

Page 1
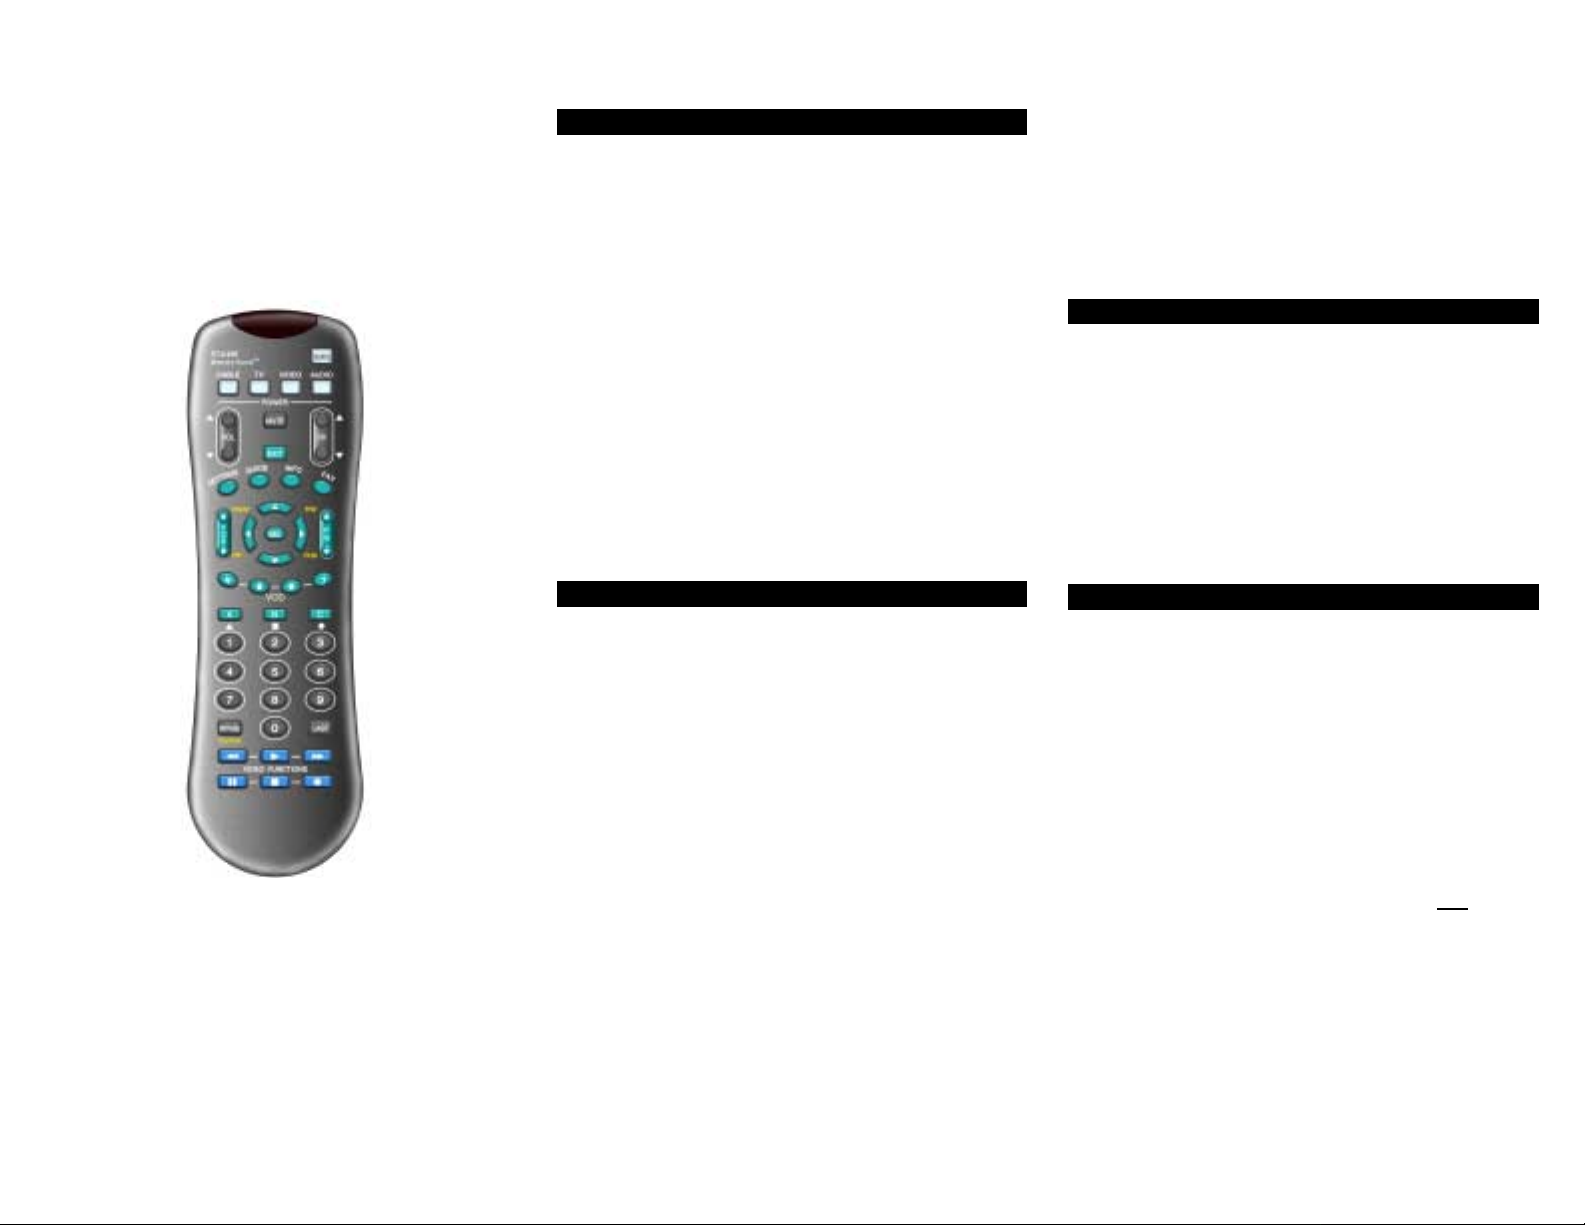
CheckMate™ IV
Model RT-U49E
Universal Remote
Control
Rev. 02/2001. © 2001, CONTEC CORPORATION
1. Introduction
Your Checkmate IV, Model RT-U49E, univers al rem ote c ontrol
is simple to program , easy to use, and can operate up to f our
(4) electronic devices, which i nclude:
CABLE Cable television converters
TV Televisions
VIDEO VCR, DVD players
AUDIO Audio-video (A/V) receivers
Your remote control is pre-programmed to operate the
Scientific-Atlantra Explorer
converters. However, it must be programmed (set-up) to
operate your TV, VCR and AUDIO devices.
Programming your remot e is a simple procedure using Point
and Press™ Programm ing, an autom atic met hod whereby the
remote self-programs to each of your devices , eliminat ing the
need to use codes. Programming your remote can also be
done by entering code numbers.
Laser Disk (LD) players
DMX & DCR Digital Music Converters
®
and Pioneer Voyager® digital
illuminate. While the c urrent mode button is illuminated,
press one of the other non-illuminated mode buttons to
operate a different device.
Memory Guard™
Eliminates reprogramm ing after battery changes provided
new batteries are installed within 4 hours of removal of ol d
batteries.
3. Installing / Replacing Batteries
Install two (2) “AAA” batteries as indicated by the diagram in
the battery compartment.
When the batteries become too weak to operate the remote
control properly, the mode keys will become dim or not
illuminate at all during use. W hen this happens, inst all 2 new
“AAA’” size batteries.
Your remote control has Memory Guard, which eliminates
reprogramming after batt ery changes provided new batteries
are installed within 4 hours of rem oval of old batteries.
Programming & Operating
Instructions
To have a clearer idea of the features and
capabilities of your remote control, take a moment
to carefully read these instructions
Save for future reference.
2. Before Getting Started
Some of the special features on your remote control are:
Cable Pre-Programmed
Your remote control is pre-programmed to operate the
Scientific-At lantra Explorer
converters. If you are operating ei ther of these converters ,
no cable programming is necessary.
Point and Press™ Programming
Lets you program your TV, VCR and Audio devices
without using codes. For m ore information, s ee sections
5, 6 and 7.
SmartKeys™
Program multiple button presses on the [CABLE], [TV],
and [BYPASS] buttons. For m ore information, see sect ion
13.
[DEVICE]
This button lets you select the operating mode of the
remote control.
Press [DEVICE] and the current mode button will
®
and Pioneer Voyager® digital
4. Programming Your Cable Converter
Your remote control is pre-programmed to operate the
Scientific-Atlantra Explorer
converters. If you are operating either of these
converters, no cable programming is necessary - proceed
to section 5.
If you need to operate another converter, l ook up the brand
and model number in the Cable Setup Code list. If you are not
sure of your brand and model, contact your cable company.
To program (setup) your cable converter...
1. Turn on your cable converter.
2. Press [DEVICE], t hen [MUTE] toget her - hold both butt ons
down until the lighted mode buttons start blinking in
sequence.
3. Press [CABLE]. The [CABLE] button will illuminate.
4. From the Cable Setup Code list, locate and enter t he 3digit code for your brand and model.
5. Press [CABLE] to lock in the code. The [CABLE] button
will blink 2 times and go out.
®
and Pioneer Voyager® digital
Page 2

Cable brand & setup code ___________________________
5. Programming Your TV
If you have a TV that’s operated by remote control, it’s
recommended that you plug i t direc tl y into a wall out let ins tead
of the cable converter.
To program (setup) your TV...
1. Turn on your TV.
2. Press [DEVICE], t hen [MUTE] toget her - hold both butt ons
down until the lighted mode buttons start blinking in
sequence.
3. Press [TV]. The [TV] button will illuminate.
4 a. Press and hold [CH π] until your TV turns of f. As
soon as your TV turns off, rel ease [CH π]!.
OR
b. From the TV Setup Code list, locate and enter the 3-
digit codes until your TV turns off.
5. Press [MUTE]. If your TV turns back on, press [TV] to
lock in the code. The [TV] but ton will blink 2 times and go
out.
If your TV doesn’t turn back on, repeat steps 4 and 5
above until you can turn your TV off and on.
TV brand & setup code _____________________________
! NOTE when using the Point and Press™ Programming
method (step 4a.). If you find a code that turns your TV of f but
not back on, you may have gone past the correct matching
code. Try pressing [CH θ] one step at a time until you find a
code that turns your TV back on.
6. Programming Your VCR or DVD Player
To program (setup) your VCR or DVD player...
1. Turn on your VCR or DVD player.
2. Press [DEVICE], t hen [MUTE] toget her - hold both butt ons
down until the lighted mode buttons start blinking in
sequence.
3. Press [VIDEO]. The [VIDEO] button will illuminate.
4. a. Press and hold [CH π] until your VCR or DVD turns
off. As soon as your V CR or DV D turns off, release
[CH π]!.
OR
b. From the VCR or DVD Set up Code l i st, locate and
enter the 3-digit codes unti l your V CR or DVD player
turns off.
5. Press [MUTE]. If your VCR or DVD player turns bac k on,
press [VIDEO] to lock in the code. The [VIDEO] button
will blink 2 times and go out.
If your VCR or DVD doesn’t turn back on, repeat steps 4
and 5 above until you can turn your VCR or DVD off and
on.
VCR / DVD brand & setup code ______________________
! NOTE when using the Point and Press™ Programming
method (step 4a.). I f you find a code that turns your VCR or
DVD off but not back on, you m ay have gone past t he correct
matching code. Try pressi ng [CH θ] one step at a time until
find a code that turns your VCR or DVD back on.
7. Programming Your Audio Device
To program (setup) your audio-video receiver, laser-disk
player, or digital music converter....
1. Turn on your audio-video receiver, laser-disk player, or
digital music converter.
2. Press [DEVICE], t hen [MUTE] toget her - hold both butt ons
down until the lighted mode buttons start blinking in
sequence.
3. Press [AUDIO]. The [AUDIO] button will illuminate.
4. a. Press and hold [CH π] until your audio device turns
off. As soon as your audio device turns off, release
[CHπ]!.
OR
b. From the Audio Setup Code l i st below, locate and
enter the 3-digit codes until your devi ce turns off.
5. Press [MUTE]. If your audio devic e turns back on, pres s
[AUDIO] to lock in the code. The [ AUDIO] but ton will blink
2 times and go out.
If your audio device doesn’t turn back on, repeat s teps 4
and 5 above until you can turn your audio / auxiliary device
off and on.
Audio brand & setup code ___________________
! NOTE when using the Point and Press™ Programming
method (step 4a.). If you find a code that turns your audio
device off but not back on, you may have gone past the
correct matching code. Try press ing [ CH θ] one-st ep at a t im e
until find a code that turns your device back on.
8. Operating Your Converter
Your remote control is designed to operate all the features
and functions of your advanced c abl e converter.
To select your remote’s CABLE mode and operate your
converter, press [DEVICE] then [CABLE]. The [CABLE]
button will blink 3 times. Then press.. .
[CABLE] CABLE on / off.
[TV] TV on / off.
[VIDEO] VCR/ DVD on / off.
[AUDIO] AUDIO on / off.
[CH π] / [CH θ] Inc reases / decreases CABLE channel.
[VOLπ] / [VOL θ] Increases / decreases CABLE
volume.
[MUTE] Mutes CABLE volume.
[EXIT] Exits on-screen menus, vi ew guide,
interactive guides
[SETTINGS] Displays programs s ettings.
[GUIDE] Displays interactive program guide.
[INFO] Displays channel, ti me information.
[FAV] View favorite channels.
[PG π] / [PGθ] Page up / down through menus, view
guide.
[VOD ττττ] / [VOD υυυυ] Rewind (ττττ) or fast-forward (υυυυ) through
a Video-on-Demand event.
[3333], [6666], [4444], [5555] Navigate on-screen menus, program
guide, PPV events and interactive
services.
[SEL] Chose menu options, int eractive
screen items.
[II] Pause a Video-on-Demand event.
[!!!!] Stop a Video-on-Demand event.
[""""] Record a Video-on-Demand event
[>] Play a Video-on-Demand event.
[A], [B], [C] On screen decision buttons .
[0] - [9] Numeric entry buttons.
[BYPASS] Switch between cable converter and
TV.
[Last] Last channel vi ewed.
In your remote’s cable mode, you can also press the blue
buttons at the bottom to operate your VCR’s basic
Page 3

functions…
[<<] VCR / DVD rewind.
[>] VCR / DVD play.
[>>] VCR / DVD fast-forward.
[II] VCR / DVD pause.
[!!!!] VCR / DVD stop.
[""""] VCR record.
9. Operating Your TV
Your remote control can operat e many functions of your TV,
including setup and picture-in-picture functions on most
leading brands. These include RCA, ProScan, GE, Hitachi,
Toshiba, JVC, Sharp, Panasonic, Zenith, SONY, Mitsubishi,
Phillips, and Magnavox.
To select your remote’s TV mode and operate your TV,
press [DEVICE] then [TV]. The [TV] button will blink 2
times. Then press...
[TV] TV on / off.
[CABLE] CABLE on / off.
[VIDEO] VCR / DVD on / off.
[AUDIO] AUDIO on / off.
[CH π] / [CH θ] Increases / decreases TV channels.
[VOL π] / [VOL θ] Increases / decreases TV vol ume.
[MUTE] Mutes TV vol u me.
[0] – [9] Numeric entry buttons.
[SETTINGS] or [SEL] Accesses TV’s on-s creen menus.
[BYPASS] / [TV/VCR] Change TV’s video inputs.
[>] View last TV channel
[INFO] Displays TV channels and t i me.
[PIP] Picture-in-picture on / off.
[POS] Picture-in-picture posi tion.
[SWAP] Picture-in-picture swap.
[FRZ] Pic ture-in-picture freeze.
[3333], [6666], [4444], [5555] Navigates TV’s menu.
[II] Press after 0-9 to change c hannels on
some TV’s
[C] Sleep / timer functions.
In your remote’s TV mode, you can also press the blue
buttons at the bottom to operate your VCR’s basic
functions…
[<<] VCR / DVD rewind.
[>] VCR / DVD play.
[>>] VCR / DVD fast-forward.
[II] VCR / DVD pause.
[!!!!] VCR / DVD stop.
[""""] VCR record.
10. Operating Your VCR or DVD Player
Your remote control can operat e many functions of your VCR
or DVD player.
To select your remote’s VIDEO mode and operate your
VCR or DVD, press [DEVICE] then [VIDE O]. The [VIDEO]
button will blink 3 times. Then press...
[VIDEO] VCR / DVD power on / off.
[CABLE] CABLE on / off.
[TV] TV on / off.
[AUDIO] Audio on / off.
[CH π] / [CH θ] Increases / decreases VCR channel s,
or DVD skip “+ / -”.
[0] – [9] Enter VCR channels.
[BYPASS] / [TV/VCR] Change VCR’s video inputs.
[EXIT] DVD clear functions.
[SETTINGS] DVD menu functions.
[GUIDE] DVD guide functions.
[INFO] DVD program information.
[3333], [6666], [4444], [5555] Navigate DVD menu.
[II] DVD enter functions.
[A] DVD subtitl e on / off.
[>] DVD return function.
In your remote’s VIDEO mode, you can also press the blue
buttons at the bottom to operate your VCR’s basic
functions…
[<<] VCR / DVD rewind.
[>] VCR / DVD play.
[>>] VCR / DVD fast-forward.
[II] VCR / DVD pause.
[!!!!] VCR / DVD stop.
[""""] VCR record.
11. Operating Your Audio Device
Your remote control can al so operate many functions of your
audio-video receiver, laser disk player, or DMX / DCR digital
music converter.
To select your remote’s AUDIO mode and operate your
video devices, press [DEVICE] then [AUDIO]. The [AUDIO]
button will blink 2 times. Then press...
For Audio / Video (A / V) Receivers, press...
[AUDIO] A/V receiver on / off.
[VOL π] / [VOL θ] Increases / decreases volume.
[MUTE] Mutes volume.
[CH π] / [CH θ] Next / l ast preset tuner channel.
[1] Select “Tuner” i nput.
[2] Select “CD” i nput.
[3] Select “Tape # 1” i nput.
[4] Select “Tape # 2” i nput.
[5] Select “P hone” i nput.
[6] Select “VCR # 1” input.
[7] Select “VCR #2” input.
[8] Select “LD” i nput.
[9] Select “AUX” input.
[0] Select “TV ” i nput .
[BYPASS] / [TV/VCR] AM / FM on tuner.
For Laser Disk players, press…
[AUDIO] LD player on / off.
[CH π] / [CH θ] LD >>| or |<<
[<<] LD rewind.
[>] LD play.
[>>] LD fast-forward.
[II] LD pause.
[!!!!] LD stop.
[""""] LD open / close.
For DCR and DMX Digital Music Converters, press...
[AUDIO] DCR / DMX on / off.
[VOL π] / [VOL θ] Increases / decreases volume.
[MUTE] Mutes volume.
[CH π] / [CH θ] Change music selections.
[0] - [9] Enter selections directly.
12. Programming Volume Control
When you first program your remote, each device cont rols its
own volume / mute.
To control volume / mute through your TV or Audio device
in the remote’s cable mode…
1. Press [DEVICE] , then [MUTE] together - hold both down
until the lighted mode buttons start blinking i n sequence.
2. Press [CABLE] to select the cable mode. The [CABLE]
button will illuminate.
3. Press [VOL π], then [TV] for TV vol ume. Or [VOL π] then
[AUDIO] for audio volume. The [CABLE ] button will blink
2 times and go out.
To return volume control back to your converter, repeat s teps
Page 4

1. and 2. above, then press [VOL π], then [CABLE] in step 3.
To control volume / mute through your TV or Audio device
in the remote’s video mode…
1. Press [DEVICE] , then [MUTE] together - hold both down
until the lighted mode buttons start blinking i n sequence.
2. Press [VIDEO] to select the video mode. The VIDEO
button will illuminate.
3. Press [VOL π], then [TV] for TV vol ume. Or [VOL π] then
[AUDIO] for audio volume. The [VI DEO] but ton will blink 2
times and go out.
13. Your Remote’s SmartKeys™
Your remote is equipped with three (3) Sm artKeys™ ([CBL],
[TV], [BYPASS]) that operate in its cable mode.
Each SmartKey™ can be programmed so whenever it’s
pressed, it can transm it up to 8 individual button presses i n
sequence.
Programming and using the [CABLE] SmartKey™
The [CABLE] button normally turns on / off your cable
converter.
You can program the [CABLE] SmartKey™ to turn on your
converter, TV, VIDEO and AUDIO devices with one button
press.
1. Press [DEVICE] , then [CABLE] to sel ect the Cable mode
of your remote.
2. Press [CABLE], then [SEL] together – hold both down
together until the [CABLE] butt on illuminates.
3. In this
order, press [TV], [VIDEO], [AUDIO]. The
[CABLE]
button will blink and remain illuminated.
4. Press [CH π] to lock in this setting. The [CABLE] button
will blink 2 times and go out.
To return the [CABLE] button to its normal default setting,
repeat steps 1 and 2 above, then press [CH θ].
Programming and using the [TV] SmartKey™
The [TV] button normally t urns on / off your TV.
You can program the [TV] SmartKey™ so whenever it is
pressed, it will turn on your TV, then tune your TV to its correct
output channel (typically 3) with one button press.
1. Press [DEVICE] , then [CABLE] to sel ect the CABLE mode
of your remote.
2. Press [TV], t hen [SEL] together – hold both down together
until the [TV] button illuminates.
3. In this
order, press [0], [3]. The [TV] button will blink and
remain illuminated.
4. Press [CH π] to lock in this setting. The [TV] button will
blink 2 times and go out.
To return the [TV] button to its normal default setting, repeat
steps 1 and 2 above, then press [ CH θ].
Programming and using the [BYPASS] SmartKey™
The [BYPASS] button (CABLE mode) normally puts your
converter in a BYPASS mode. W hile the converter is in its
BYPASS mode, you can record one program on your VCR
while watching a different program through your TV. When
exiting your converter’s BYPASS mode, your TV must be retuned to its correct output channel (typicall y 3) for proper cabl e
reception.
You can program the [BYPASS] SmartKey™ to automatically
tune your TV to its correct out put channel.
1. Press [DEVICE] , then [CABLE] to sel ect the Cable mode
of your remote.
2. Press [BYPAS S], then [SEL] together – hold both down
together until the [CABLE] button illuminates.
3. In this order, press [DEVICE], [TV], [0], [3]. The [CABLE]
button will blink and remain illuminated.
4. Press [CH π] to store the sett ing. The [ CABLE] butt on will
blink 2 times and go out.
To return the BYPASS SmartKey™ to its normal default
setting, repeat steps 1 and 2 above, then press [CH θ].
Remember: When using any SmartKey™ to transmit a series
of functions, be sure to keep your remote aimed at t he devic es
to ensure all functions are received in their entirety.
14. Programming a 2nd TV, VCR, DVD
Instead of programming an audio device, you can program
your remote to operate a 2
nd
TV, 2nd VCR, or 2nd DVD player.
Here’s an example of how you would program a second TV to
your remote’s [AUDIO ] button…
1. Turn on your 2
nd
TV.
2. Press [DEVICE], t hen [MUTE] toget her - hold both butt ons
down until the lighted mode buttons start blinking in
sequence.
3. Press [AUDIO], then [ TV]. The [AUDI O] and [TV] butt ons
will start blinking.
nd
4 a. Press and hold [CH π] until your 2
soon as your 2
nd
TV turns off, release [CH π]!.
TV turns off. As
OR
b. From the TV Setup Code list, locate and enter the 3-
digit codes until your 2
5. Press [MUTE]. If your 2
nd
TV turns off.
nd
TV turns back on, press
[AUDIO] to lock in the code. The [ AUDIO] but ton will blink
2 times and go out.
nd
If your 2
above until you can turn your 2
! NOTE when using the Point and Press™ Programming
method (step 4a.). If you find a c ode that turns your 2
TV doesn’t turn back on, repeat steps 4 and 5
nd
TV off and on.
nd
TV off
but not back on, you may have gone past the correct m atc hing
code. Try pressing [ CH θ] one s tep at a tim e until fi nd a code
that turns your 2nd TV back on.
If you want to program a 2
nd
VCR or DVD player in the above
example, you would press [AUDIO], then [VIDEO] in step 3. ,
then steps 4. and 5. referring t o the Video Setup Code list.
15. Code Number Readback
To identify a 3-digit device code s tored under the Point and
Press™ method, f ol l ow thes e steps:
1. Press [DEVICE] , then [MUTE] - hold both down until the
illuminated mode buttons s tart blinking in sequence.
2. Press [CABLE] to ident ify your cable converter code. Or
[TV], [VIDEO], [AUDIO] to identify these codes. The
selected mode button will be illuminated.
3. Press [INFO]. The illuminated button “blink back” the
code numbers, with a 1 second interval between each digit
of the code.
Example: For code “035”, the remote will blink 10 times , then
3 times, then 5 times.
Page 5

16. Helpful Tips & Troubleshooting
1. Your remote is equipped with a Point and Press™ quick programming sticker on the back of its case. This will help
you quickly program the remote without using codes.
2. The illuminated mode button will remain on while the
remote is in a programming mode. In the abs ence of an
entry, the button will go out after 20 seconds.
When locking in your devices, t he illum inated m ode but ton
will blink 2 times and go off.
3. When using the Point and Press programm ing method,
you may find a code that turns your device off but not back
on. If this happens…
a. the correct code has not been found. Cont i nue
pressing [CH π] until your devices t urn on and off.
b. you may have gone past the correct matching code.
Try pressing [CH θ] one step at a ti me until find a
code that turns your converter bac k on.
4. If you have any questions conc erni ng the operation of your
cable converter, contact your cable operator.
Cable Setup Codes
Manufacturer Model Code
PIONEER B A-V1000 / 2000 120
BA-9000 121
VOYAGER 001
SCIENTIFIC-ATLANTA EXPLORER 001
TV Setup Codes
Manufacturer Codes
A MARK 112 143
ADMIRAL 072 081 160 161
AKAI 001 146
AMPRO 073 167
ANAM 043 054 056 080 112 131 055
AOC 058 001 004 112
AUDIOVOX 076
CANDLE 001 002 003 004
CAPEHART 058
CETRONIC 043
CITIZEN 001 002 003 043 101 143 004
103
CLASSIC 043
CONCERTO 004
CONTEC 043 051
CORONADO 143
CRAIG 054 043
CROWN 143 043
CURTIS MATHES 001 004 101 143
CXC 043
DAEWOO 004 016 017 043 044 055 071
076 103 107 111 114 120 123
125 127 136 143
DAYTRON 004 143
DYNASTY 043
DYNATECH 062
ELECTROHOME 024 076 143
EMERSON 004 005 028 043 048 051 076
096 143 151 153 154 155
FISHER 007 057
FUNAI 028 043
FUTURETECH 043
GE 001 073 130 144 160 161 004
008 009 034 056 074 091 155
GOLDSTAR 004 106 119 110 112 113 127
143
HALL MARK 004
HITACHI 011 163 004 007 072 010 012
023 075 143 158
INFINITY 164
INKEL 129
JBL 164
JCP 001
JCPENNY 004 008 009 024 030 065 101
143 156 160
JENSEN 013
JVC 038 070 034 083
KENWOOD 001 070
KLOSS 002 059
KTV 001 043 143 154
LOGENET 072
LOGIK 072
LUXMAN 004
LXI 007 015 052 081 160 164
MAGNAVOX 001 003 004 022 059 060 161
063 064 094 127 160 164
MARANTZ 164 001
MATSUI 164
MEMOREX 004 007 072
METZ 088
MGA 024 001 004 042
MINERVA 088
MITSUBISHI 024 004 028 040 042 109 124
146
MTC 001 004 062 101
NAD 015 025
NEC 001 130 134 040 056 007 019
024
NIKEI 043
ONKING 043
ONWA 043
OPTONICA 019 081
PANASONIC 034 056 080 164
PHILCO 001 003 004 024 056 059 060
063 064 127 143 164
PHILIPS 164 005 038 093 127 001
003 004 059
PIONEER 023 025 135 176 001 004 018
PORTLAND 004 143
PROSCAN 144 160 161 167
PROTON 004 058 131 143 171 173 193
QUASAR 034 056
RADIO SHACK 004 019 043 127 143
RCA 161 144 160 156 065 001 004
023 024 056 074 152
REALISTIC 007 019
RUNCO 072 169 073 130 179 180 181
SAMPO 001 004 058
SAMSUNG 004 101 127 133 143 160 089
105
SANYO 007 053 057 082 020 021 033
SCOTT 004 028 043 048 143
SEARS 004 007 015 028 030 057 082
094 143 160
SELECO 189
SHARP 081 014 019 028 004 022 143
175 029 181
SIGNATURE 072
SONY 070 085 126 139
SOUNDESIGN 003 004 028 043
SPECTRON 112
SSS 004 043
SUPRE MACY 002
SYLVANIA 001 003 044 059 060 063 064
127 160 164
SYMPHONICS 052
TANDY 081
TATUNG 056 062
TETNICS 034 080
TECHWOOD 004
TEKNIKA 002 003 004 024 028 043 072
101 143
TELERNET 072
TERA 172
TMK 004
TOSHIBA 015 030 007 040 062 101
TOTEVISION 143
UNIVERSAL 008 009
VIDEO CONCEPTS 146
VIDIKRON 174 188
Page 6

WESTING HOUSE 076
VIDTECH 004
WARDS 004 064 164 008 009 019 028
060 061 063 072 074 143
YAMAHA 001 004
YORK 004
YUPITERU 043
ZENITH 072 073 095 103
ZONDA 112
VCR / DVD Player Codes
Manufacturer Codes
AIWA 034 161
AKAI 043 046 124 142 146
AMPRO 072
ANAM 031 103
AUDIO DYNAMICS 012 023 043
BROKSONIC 035 037 129
CANON 028 031
CAPEHART 108
CRAIG 001 040 135
CURTIS MATHES 031 041
DAEWOO 005 108 111 117 017 065 007
010
DAYTRON 108
DBX 012 023 043
DENON 226 240
DYNATECH 034 053
ELECTROHOME 059
EMERSON 006 029 035 037 129 153 017
025 027 031 034 036 046 101
131 138
FISHER 001 010 008 009
FUNAI 034
GE 031 072 144 147 063 107 109
243
GO VIDEO 132 155 040 136
GOLDSTAR 101 004 012 020
HARMAN KARDON 012 045
HITACHI 004 026 034 043 063 137 150
INSTANTREPLAY 031
JCL 031
JCPENNY 004 012 031 040 101
JENSEN 043
JVC 048 043 055 060 130 150 152
012 031 238 241
KENWOOD 014 034 048 150
LG 235 247
LLOYD 034
LXI 001 009 017 034 101 004 106
MAGIN 040
MAGNAVOX 067 031 034 068 041 156 170
MARANTZ 067 069 012 031
237
MARTA 101
MATSUI 027 030
MEI 031
MEMOREX 040 101 001 014 031 034 053
072 134 139
MGA 045 046 059
MINOLTA 004 020
MITSUBISHI 059 061 051 142 004 046 020
045 227
MTC 034 040
MULTITECH 024 034
NEC 012 023 043 048
NORMENDE 043
OPTONICA 053 054
PANASONIC 031 070 133 140 163 228 242
PENTAX 004 020 031 063
PHILCO 031 034 067
PHILIPS 031 034 054 067 101 150
PILOT 101
PIONEER 021 004 048 229
PORTLAND 108
PROCAN 230
PULSAR 072
QUARTZ 014
QUASAR 031 070 133 140 163 014
RADIO SHACK 101
RCA 107 109 144 041 031 004 020
034 040 140 147 158 231 243
REALISTIC 001 008 010 014 031 034 040
053 054 101
RICO 058
RUNCO 072
SALORA 014
SAMSUNG 040 017 107 109 113 115 124
122 236 248
SANSUI 043 048 135
SANYO 001 014 040 134
SCOTT 017 037 129 131
SEARS 001 004 008 010 014 017 020
081 101
SHARP 031 053 054 159
SHINTOM 024
SONY 056 057 058 001 052 053 031
009 154 171 077 232 244
SOUNDESIGN 034
STS 004
SYLVANIA 031 034 059 067
SYMPHONIC 034
TANDY 010 034
TATUNG 043
TEAC 034 043
TECHNICS 031 070
TEKNIKA 031 034 101
THOMAS 034
TMK 006
TOSHIBA 017 131 004 008 059 082 150
233 245
TOTEVISION 040 101
UNITECH 040
VECTOR RESEARCH 012
VICTOR 048
VIDEO CONCEPTS 012 034 046 141
VIDEOSONIC 040
WARDS 001 004 017 024 031 034 040
053 054 131
YAMAHA 012 034 043 234 246
ZENITH 072 034 056 058 048 080 101
153 247
AUDIO Setup Codes
Manufacturer Codes
ADC 200
ADCOM 072 082 092 161
AIWA 025 071 091 100 104 114 170
171
AKAI 093 138
AMC 125 126 127
ANGSTROM 142
ARCAM 141
AUDIO ACCESS 147
AUDIO ALCHEMY 135
AUDIO FILE 203
AUDIO MATRIX 077
AUDIO TECHNICA 134
B & K 096 097
BOSE 070 113 170
BRYSTON 015
CARVER 003 008 014 016 027 028 040
061 090 099 151 203
CASIO 204
CHIRO 140
CINEMA SOUND 001 134
CITATION 148
CLARION 026
CURTIS MATHES 204
DENON 001 056 105 119 151 155 188
199
ENLIGHTENED AUDIO 049 050
FISHER 151
FOSGATE 062 157
GOLDSTAR 006 072
HARMON KARDON 060 064 066 115 153 157 162
HITACHI 020
INKEL 005
JCPENNY 102 204
Page 7

JENSEN 058
JVC 013 163 177 178
KENWOOD 005 026 057 086 095 154 166
KOSS 102
KRELL 150
KYOCERA 200
LEXICON 120 167 171 172
LINN 124
LUXMAN 004 029 035 137 139 165
LXI 204
MAGNAVOX 043 152 164 191
MARANTZ 027 028 048 063 090 191
MCINTOSH 173
MCS 204
MERIDIAN 009 051 121
MITSUBISHI 180
MONDIAL 022 023 042 073 075
NAD 048
NAKAMICHI 079 087 111 182 183
NEC 080
ONKYO 001 012 030 041 044 046 081
103 107 108
OPTIMUS 017 026 036 138
PANASONIC 007 088 129 130 132 195
PHILIPS 063 188 189 191
PIONEER 001 039 045 054 069 078 128
158 168
PROCEED 144
RCA 010 067 117 156
REALISTIC 019 034 037 047
ROTEL 074 083 085
SAMSUNG 123
SANSUI 032 063 110 116
SANYO 151
SCOTT 019
SEARS 204
SHARP 026 057 094 175
SHERWOOD 024 038
SONY 011 018 052 053 055 084 089
112 186 187
SOUNDESIGN 036
SSI 068
TAEKWANG 138
TEAC 019 059 109 111
TECHNICS 076 080 088 098 122 193
THETA DIGITAL 065
TOSHIBA 033 131
YAMAHA 002 021 026 031 067 101 118
192
ZENITH 106 143
CALIFORNAI AUDIO 241
DAEWOO 231
DENON 237 250 251
DMX-DJ 254
FISHER 241
GOLDSTAR 234
KENWOOD 232
MAESTRO II 255
MAGNAVOX 233 247
MITSUBISHI 247
NAD 247
OPTIMUS 239
PANASONIC 228 241 243
PHILIPS 233
QUASAR 241
PIONEER 227 245 247
RCA 238
REALISTIC 239
SAMSUNG 230 236
SHARP 232 235
SONY 229
TECHNICS 228 241 243
TOSHIBA 232
YAMAHA 240 242 249
Digital Music Converter Setup Codes
Manufacturer Codes
DMX-DJ 254
MAESTRO II 255
Rev. 02/2001. © 2001, CONTEC CORPORATION
Laser Disc Player Setup Codes
Manufacturer Codes
 Loading...