

Contax M1 Instruction Manual
CONTAX
www.orphancameras.com
Nl
lnstruction
manual . Bedienungsanleitung
@

nry
EiJtilj:jij
V
greatly
We
Contax
fundamental
Automatic
setting so that the
The
photographic possibilities.
camera to ensure
features include:
A S-frame
O
the viewfinder.
focus
n nign
@
1/8000 second, with flash
Focus
@
during a sequence of exposures.
Use
@
expanding the
appreciate
Nl is
an autofocus single lens reflex
principle
or manual focus
N1 is
Contax
autofocus detection site
automatically.
speed shutter with
Auto-Bracket
of high-performance
your purchase
"building
of
can
user
equipped with many features
proper
use
The user
Control,
range
of
Read
can select a single site or have
Carl
photographic possibilities.
this
of
Contax Nl
cameras for creating
can be selected according
achieve the desired results with
instructions
these
and a long
pattern
an automatic shutter
sync
1/250
at
for
automatic
Zeiss T*
camera based
that will maximize creative
service life.
carefully before using the
is
that
speed
second.
shifting of the focusing
lenses and various
camera.
works of art".
to the subject and
Some of the notable
spread wider throughout
the sites detect
range
The
the
on
Contax'
accuracy.
of 32 seconds to
distance
accessories for
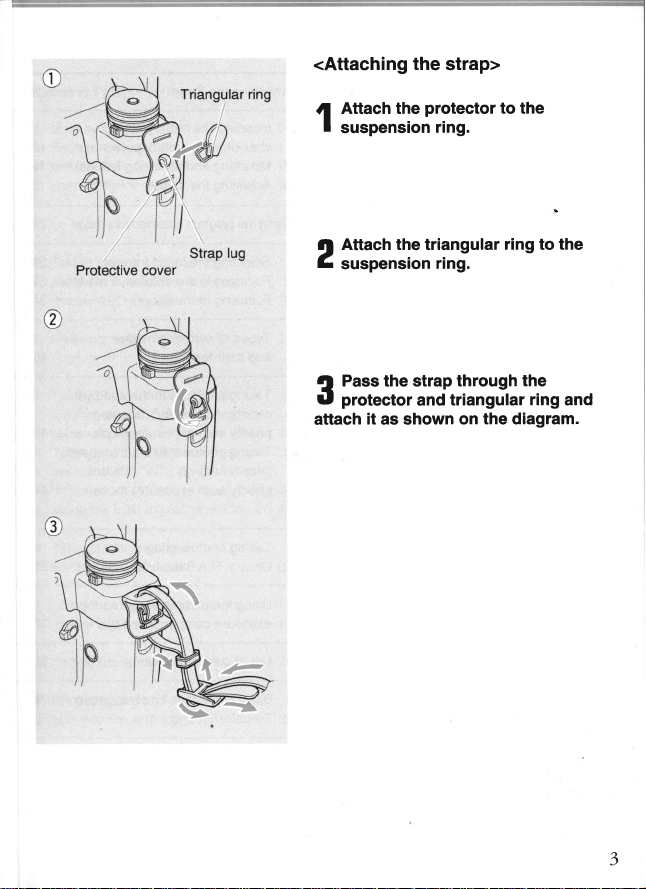
<Attaching
the
strap>
the strap
and
it
as shown
protector
flng.
flng.
Attach the
tl
I
SUSpenStOn
Attach the triangular
ll
L
SUSpenStOn
Pass
e
tU
protector
attach
to the
ring
to
through
triangular
the
ring
on the diagram.
the
and
CONTENTS
Attaching
the
Strap
1 . Inserting
2.
3.
Using
1.
2. Focusing
3.
1. Types
1 . Taking
2.
1. List of
the battery
the battery
checking
Mounting
Adjusting
Selecting
Focusing
and
priority
priority
Taking
priority
Taking
and
the diopter
program
the
the
in the autofocus
manually
metering
of
features
their
photos
mode
auto
photos
settings
priority
auto
photos
TLA
Contax
the command
Using
exposure
custom
information
Basic
Troubleshooting
and
power
removirg
autoexposure
focus
exposure)
exposure)
flash
compensation
lenses
""
frames
modes
with the aperture
"Av"
(aperture
mode
with
shutter
"Tv" (shutter
mode'
a
using
dial
dial
functions
photography
on
mode
mode
speed
the
as
"""
""
""'
""
"""
" """"'
""'78
"""
""
"
12
14
"
15
24
27
29
34
"'
40
"
43
"
44
61
72
79
LCD
1.
Contax
2.
Contax
3.
viewfinder
Data back
pack
Power
FE-1
D-10
P-8
""
85
""""'86
'
""""
89
Names of
4. Main
5. Shutter
6.
7. Loading film
Parts
switch
Holding
release button
the
camera
'
Panel
Display
16
""
17
17
18
Removing
8.
9. Setting
10.
Switching
and
film
film
the
the drive
Viewfinder
speed
Display
manually
mode
""'21
""'
""
22
23
4. Taking
2.
3.
4. Taking
5. Using
2. Taking
2.
54.
65.
96.
photos
with the
in three different
shifted
(Focus
ABC mode)
range
Metering
photos
Taking
auto
exposure)
manually
set
(manual
"M"
Contax
Using
shutter
Setting
Shutter
aperture
Contax
Contax
Focusing screens
in the
"P"
mode
mode
photos
with the exposure
exposure)
the
exposure
bulb
photos
using a
TLA360
the
command
'
dial
the custom
and
speed
value display
Cable switch
Mount adapter
(program
flash
focus
steps
program
"":"'
mode
mode
as the
dial
functions
LA type
NAM-1
FX
type
auto
"""'
""""'
"""'
""""'
""""
""
""
""'
36
45
46
47
72
91
92
93
photos
Taking
6.
compensation
7. Taking
8. Using
9. Checking
10.
Cable
Replacing the camera
1 1 .
Taking
3.
flashes with the X contact
4.
Camera
7.
Contax
with
Multiple
exposure
the self timer
the depth of
switch socket
photos
using
and
Care
Flexible
case
exposure
field
back " 59
other
Precautions
C-8
""""
"""
"""'
""'
""
ffi
ffi
48
55
57
58
59
ffi
i#
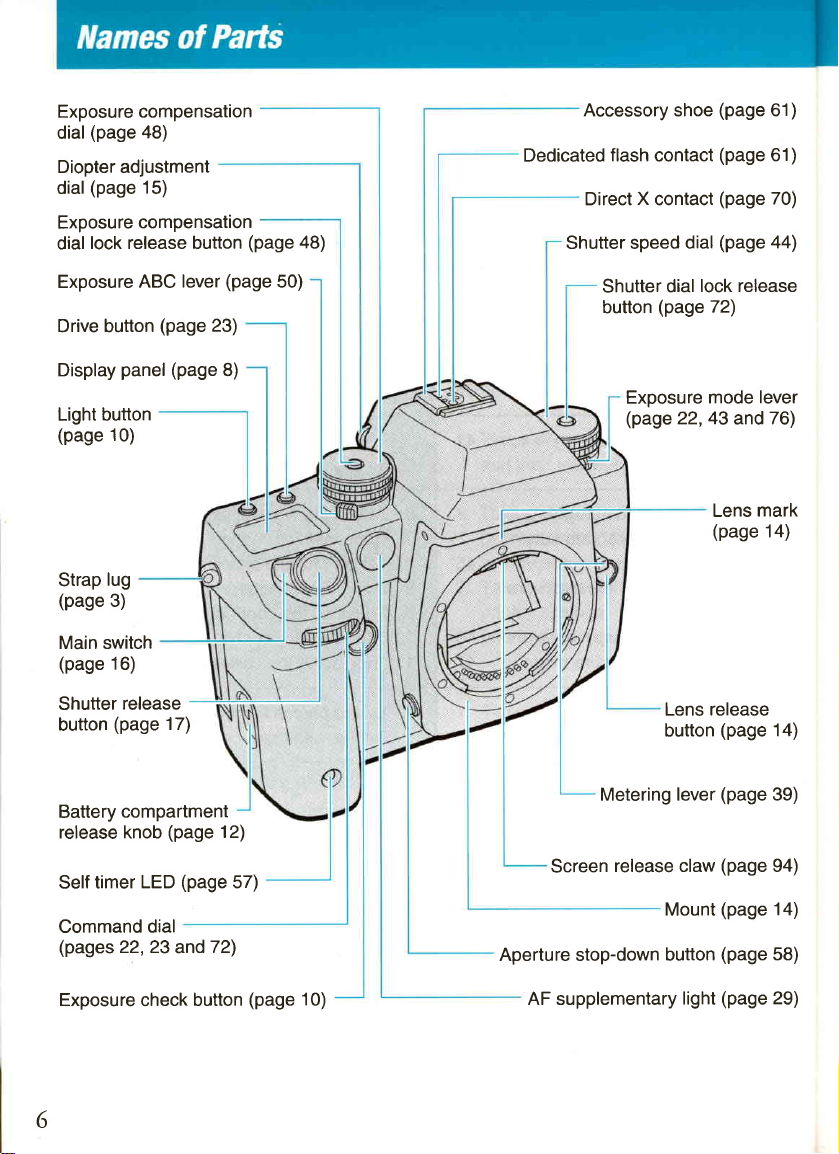
Exposure compensation
www.orphancameras.com
(page
dial
48)
Diopter adjustment
(page
dial
Exposure
dial
15)
compensation
lock release button
(page
48)
Accessory
Dedicated
Direct X contact
Shutter speed
flash
shoe
contact
dial
(page
(page
(page
(page
61)
61)
70)
44)
Exposure
ABC lever
Drive button
Display
Light button
(page
Strap
(page
Main switch
(page
Shutter
button
Battery
release knob
Self timer
Command
(pages
panel (page
10)
lug
3)
16)
release
(page
compartment
LED
dial
22,23
(page
17)
(page
(page
and72)
(page
23)
8)
12)
57)
50)
Shutter
button
Exposure
(page
Metering lever
Screen
Aperture stop-down
release claw
lock release
dial
(page
72)
mode lever
22,43
and
Lens
(page
Lens release
(page
button
(page
(page
(page
Mount
(page
button
76)
mark
14)
14)
39)
94)
14)
58)
Exposure
6
check
button
(page
10)
AF supplementary
light
(page
29)
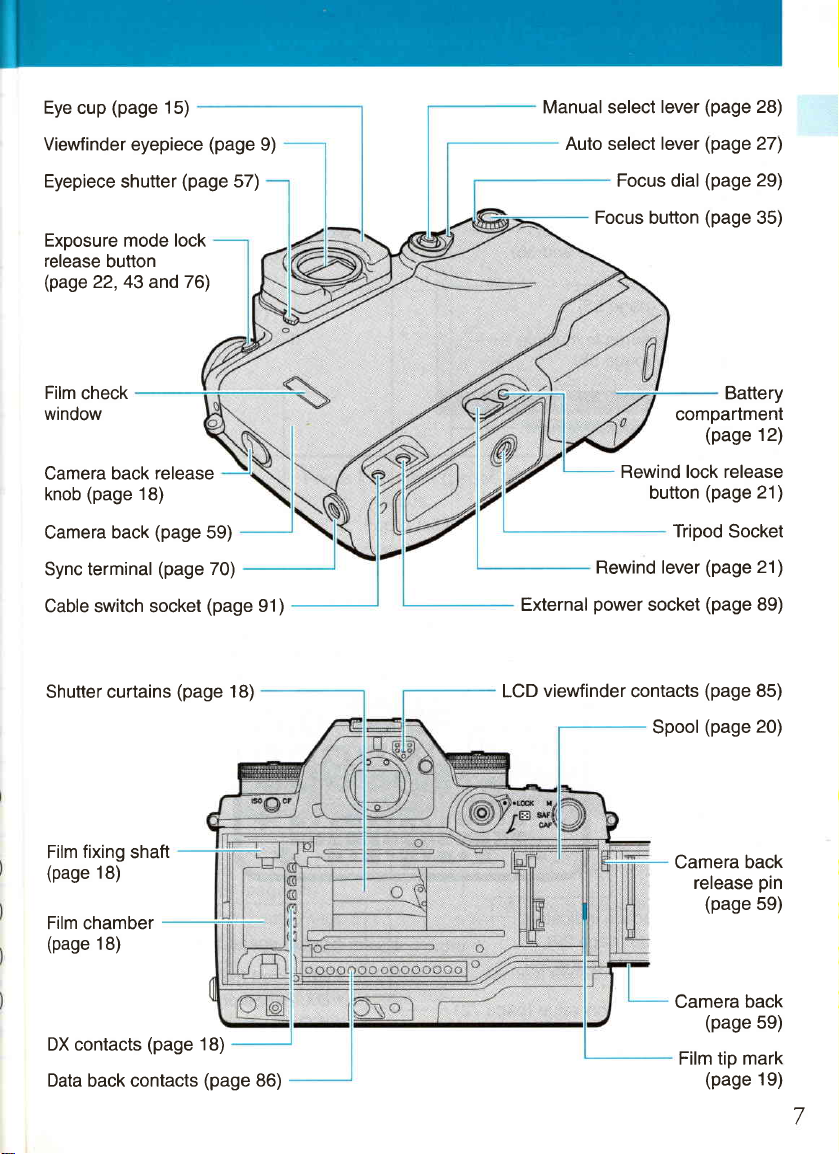
Eye cup
(page
15)
Manual select
lever
(page
28)
Viewfinder
Eyepiece
Exposure mode lock
release
(page
Film
window
Camera back
knob
Camera
Sync terminal
Cable switch socket
Shutter curtains
button
22,43
check
(page
back
eyepiece
shutter
and
release
18)
(page
(page
(page
(page
76)
(page
57)
59)
70)
(page
18)
9)
91)
External
viewfinder
LCD
Auto select
Focus button
Rewind lever
power
lever
Focus
Rewind lock release
button
socket
contacts
Spool
(page
27)
(page
(page
29)
35)
dial
Battery
compartment
(page
12)
(page
21)
Tripod
Socket
(page
21)
(page
89)
(page
85)
(page
20)
fixing
Film
(page
Film chamber
(page
DX contacts
Data
shaft
18)
18)
back contacts
(page
18)
(page
86)
Camera back
release
Camera
Film tip mark
(page
back
(page
(page
pin
59)
59)
19)
7

<Display
Exposure counter
timer
Self
Exposure
shooting
Multiple exposure
number setting
panel>
remaining
ABC and
(pages
order
(page
(page
time
Focus
55)
Remaining exposures
(page
exposure
Bulb exposure
Film
.
No film
.
Film advance
.
Film
.
Film
.
End of
.
Film
.
End of
mode
(page
time
loading indicators
(page
19)
(page
error
(page
film
rewind
normal
(display
21)
(display
(page
advance
advancing
rewinding
21)
Multiple exposure
(page
mode
55)
19)
(page
57)
ABC
50 and 36)
in multiple
55)
47)
19)
(page
19)
increments)
decrements)
mode
Drive
.
timer
Self
(10
seconds/2
.
.
frame shooting
Single
Continuous
(page
(page
mode
seconds)
shooting
23)
57)
mode
mode
Remaining
power
Aperture
(page
(page
(page
battery
(page
43)
23)
23)
13)
value
(page
mode
indicators
(page
value
frame
Focus
.
Auto select
.
Manual
selection
mode
select
Exposure compensation
.
.
1/3 EV
112 EY
increments
increments
lffi]
r
Irrlorl..looI
IIIIITITITIII-
---i.
29)
29)
(page
72)
-.
-;-.
+
--a
Shutter
Film speed
.
.
Custom
speed
For automatic
DX:
fSO: For
functions
(page
44)
(page
22)
setting
manual setting
(page
74)
(page
(page
20)
22)
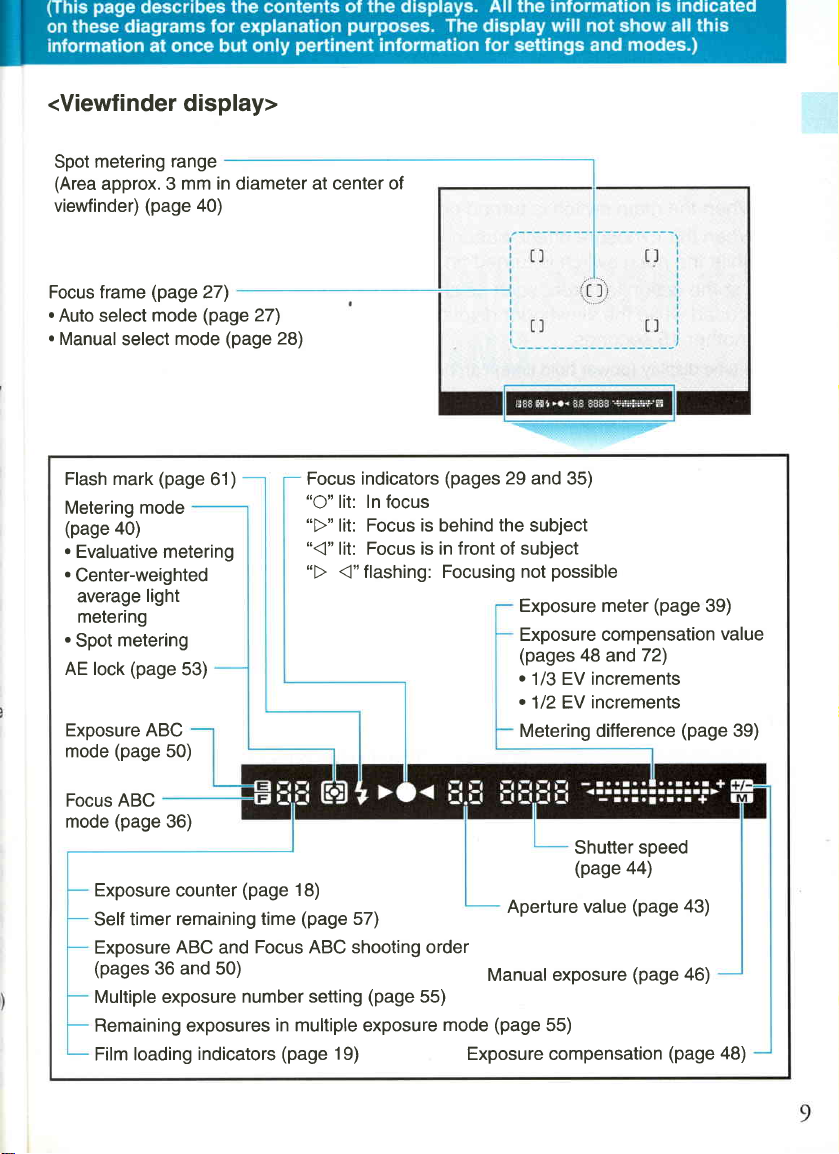
<Viewfinder display>
metering
Spot
(Area
approx. 3
select
select
mode
a0)
metering
(page
(page
(page
mode
(page
light
viewfinder)
Focus frame
.
Auto
.
Manual
Flash mark
Metering
(page
.
Evaluative metering
.
Center-weighted
average
metering
.
Spot
AE lock
Exposure ABC
(page
mode
50)
range
mm in diameter at center of
a0)
27)
(page
27)
(page
mode
61)
53)
28)
Focus indicators
"O"
lit: In focus
"D"
lit: Focus is behind
"("
lit: Focus is in front
(pages
29
and 35)
the
subject
subject
of
Exposure meter
(page
Exposure compensation
(pages
48
.
1/3 EV increments
.112EV
Metering difference
and72)
increments
(page
39)
value
39)
Focus ABC
(page
mode
Exposure
Self
Exposure
(pages
Multiple exposure
Remaining exposures
Film loading
36)
counter
remaining time
timer
ABC
36 and 50)
indicators
(page
18)
(page
57)
Focus ABC shooting order
and
number setting
in multiple
(page
(page
exposure
19)
Aperture
Manuat exposure
55)
(page
mode
Exposure compensation
55)
Shutter
(page
44)
value
speed
(page
(page
(page
43)
46)
48)
The
exposure
The
automatically
When the
e
Wnen the exposure
@
N1's viewfinder serves
Contax
film status.
and
viewfinder display
turns
main switch
while the main switch
lf some action
is
while the
used
another 1 6
.
The time display
seconds.
(power
as
turns on
off after
when the operations
16
seconds
is turned on.
is
is taken, such
turned
as changing
on.
is
button
check
viewfinder display
hold time) can be changed.
the main
information source
below
power.
to save
pressed
shutter button
or
aperture,
is lit, the display
(Page
are
shutter
time
74)
for focus,
performed,
is half-pressed
speed or any
is
extended
then
dial
The viewfinder display
.
During
shooting.
.
When the end of
.
While the film
.
When rewinding
.
ln the all imprint
.
When there
.
When the battery
.
When the exposure
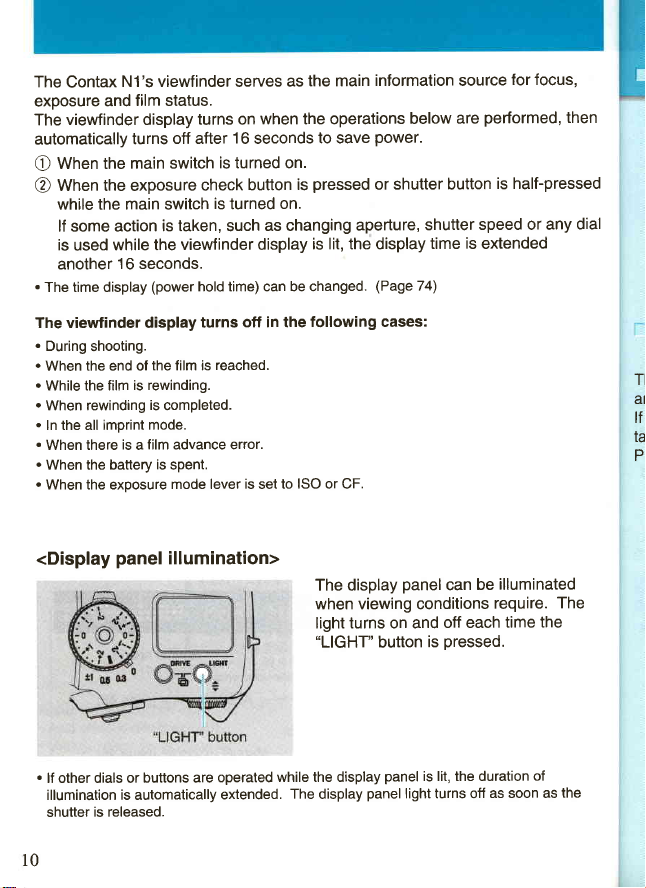
<Display
.
lf other dials or
illumination is automatically
shutter
the film is
is rewinding.
is
completed.
mode.
is a film advance error.
is
spent.
panel
illumination>
buttons are
is released.
10
turns
reached.
mode lever
operated
extended.
off in the
is
to ISO or CF.
set
while the display
The
following cases:
The display
panel
can
be
when viewing conditions
light turns on and
'LIGHT'
display
button
panel
off each
pressed.
is
panel
is lit, the duration
light turns off
illuminated
require.
time the
of
as soon as
TI
a]
tf
ta
P
The
the

I
I
I
BASIG OPERATIONS
'-..
f
This
section
includes basic operations of
and
you
lf
taking
PROCEDURE" on
Pi
i
:"
describes
have
already
photographs
SHOOTING
procedures
knowledge on
basic
immediately,
page
24.
that should be
this camera.
handling a camera and
proceed
to
taken
"SIMPLE
PRIOR TO
photographing
prior
to
wish to
SHOOTING
start
11
e
@
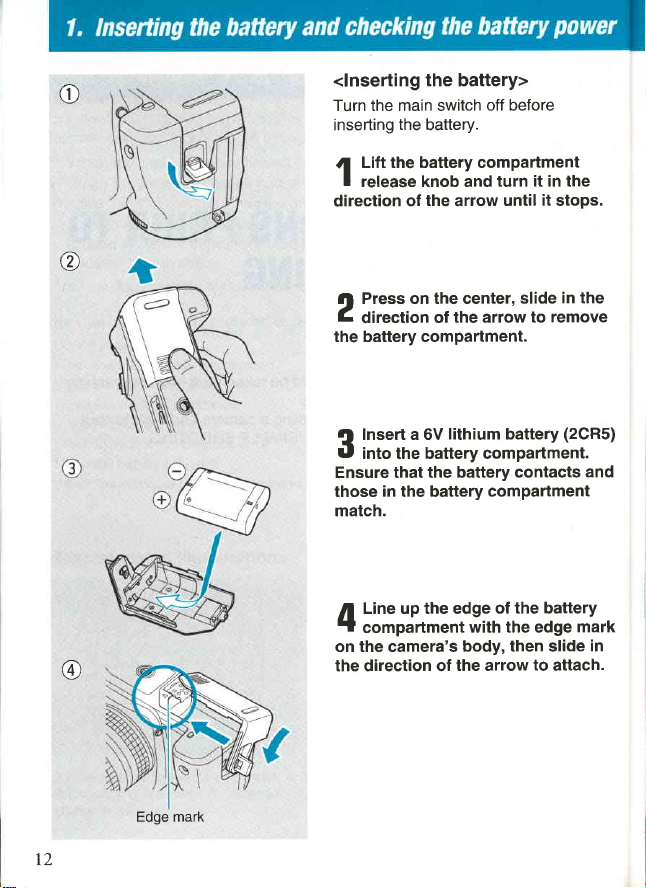
<lnserting
Turn the main switch
inserting
Lift the battery compartment
{
I
release knob and
direction
l| Press on the center,
C
direction of the arrow to
the battery compartment.
the battery>
the
battery.
the
of
arrow
off before
turn it in the
until
it
slide
stops.
in the
remove
12
@
Edge mark
Insert a 6V
Q
U
into the battery compartment.
Ensure that
in
those
match.
Line up the edge
/l
'f
compartment
on the camera's
the direction of
lithium battery
the
battery
the battery
with the edge
body, then slide
the arrow
contacts
compartment
of the battery
to
attach.
(2CR5)
and
mark
in

@
Turn the
[,
rf
release knob clockwise
battery
compartment
to fasten.
<Checking the battery
"E"
The
Check the battery
marks mean the
power
with the
EA
m
\l.z
-G,/l\
\1,/
-il,/l\
(ftashins)
(ftashing)
.
Lower the release
position.
.
The
display
.
Even
continuous
the
the
turn the
times.
enough battery
power>
following:
main
There is sufficient battery
Battery
Replace with a new battery.
Camera
switch
power
turned on.
not
will
knob into its
"E"
panel.
when
voltage may decrease
"E"
main
lf the
is low and will need
operate.
mark appears
battery
new battery, during
using a
shooting or at
mark may
"E"
light. lf
off then back on 2 or 3
switch
mark lights,
power.
power.
replacement soon.
original
in the
low temperatures
momentarily and
happens,
this
there is
r3
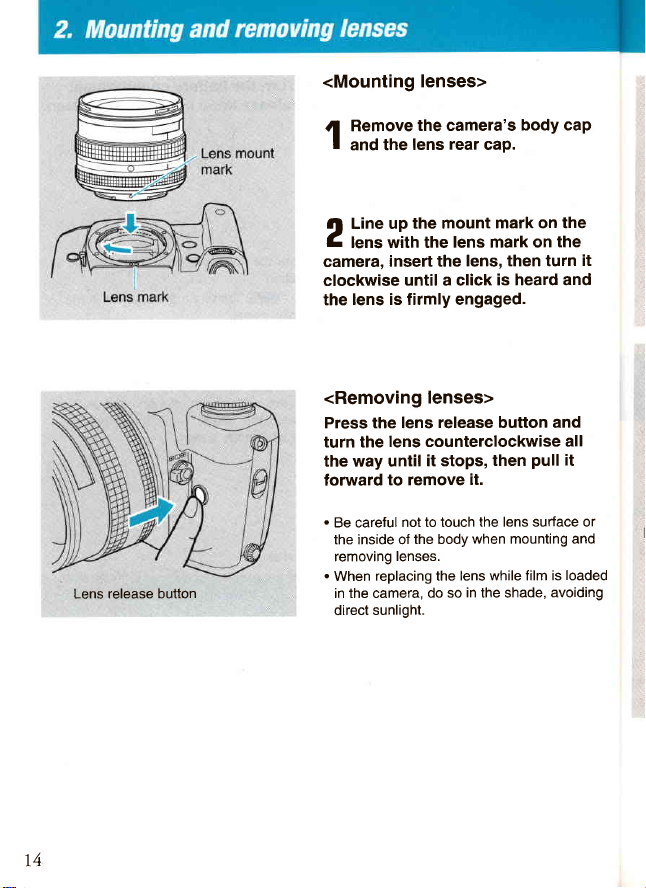
<Mounting
lenses>
Lens
release
button
Remove
,l
I
and the
Line up
!l
C
lens with the
camera,
clockwise
lens is firmly engaged.
the
<Removing
Press the lens
turn the
the way until
forward
.
Be careful
the inside of
removing
.
When
in the camera,
direct
the camera's
rear
lens
the mount
insert the
lens counterclockwise
to remove
replacing the lens
sunlight.
lens mark on
until a click
lenses>
release button and
it stops,
not to touch
the body
lenses.
do so
body cap
cap.
mark on the
lens, then turn
then
it.
the lens surface or
when mounting and
while film is
in
the shade,
the
is heard and
all
pull
it
loaded
avoiding
it
r4
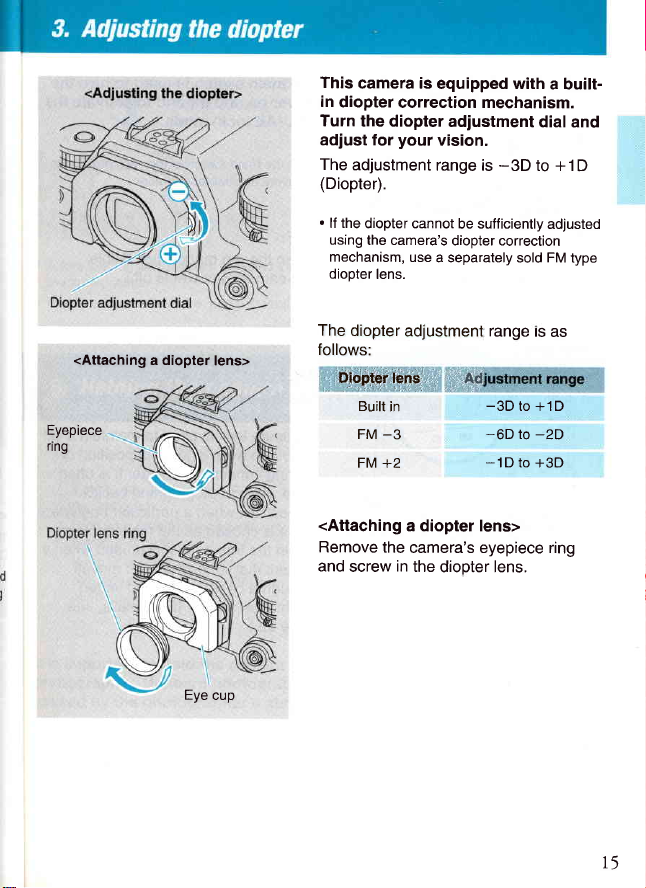
<Attaching
Eyepiece
flng
a diopter
lens>
This
camera is
in
diopter
Turn
the diopter
adjust for
The
adjustment
(Diopter).
.
lf the
diopter cannot
using
the camera's
mechanism,
diopter
lens.
The
diopter
follows:
Diopter lens
Built
in
-3
FM
FM
+2
equipped with
a built-
correction mechanism.
your
adjustment
vision.
range is
be sufficiently
-3D
dial
to + 1
adjusted
diopter correction
use
a separately
adjustment
sold
range
rs
FM
as
Ad
-3D
to +1D
-6D
-2D
to
-1D
to
+3D
and
D
type
Eye
cup
<Attaching
Remove
and
the
screw
a diopter lens>
camera's eyepiece ring
in
the
diopter lens.
L5
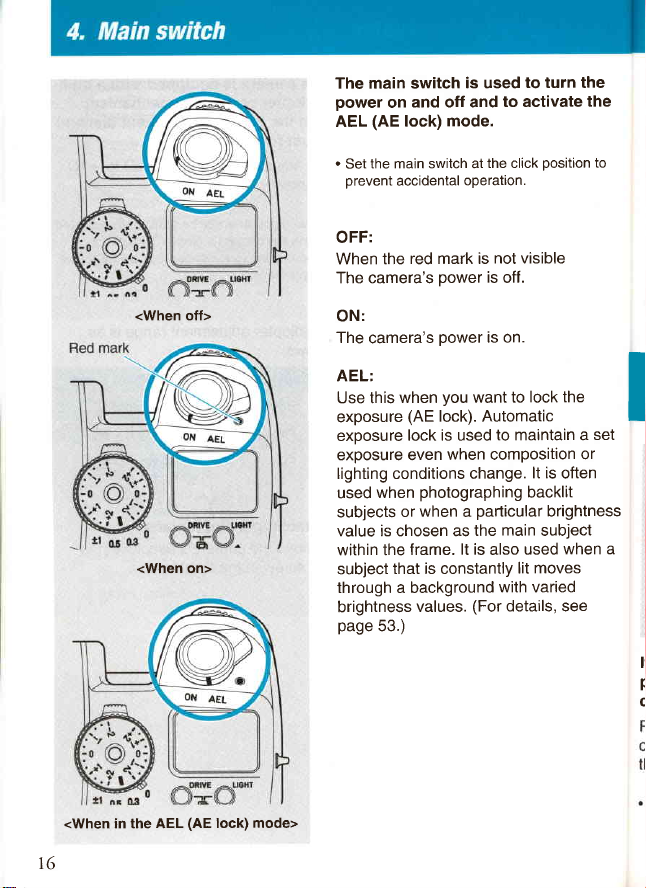
The main switch
power
AEL
on
(AE
lock)
and off and
mode.
is used
to activate
to turn the
the
<When off>
<When on>
.
the main switch at
Set
prevent
accidental
OFF:
When the
The camera's
ON:
The
AEL:
Use this
exposure
exposure
exposure even
lighting conditions change.
used
subjects
value is chosen as
within the
subject
through a background
brightness
page
red mark is
camera's
when
(AE
lock is used
photographing
when
when
or
frame.
that is constantly
values.
53.)
the click
operation.
not visible
power
is
off.
power
is on.
you
want to
lock). Automatic
to maintain a
when composition
particular
a
main
the
lt is
also
lit
with varied
(For
details, see
position
lock the
lt is
often
backlit
brightness
subject
when a
used
moves
to
set
or
lr
r
c
<When in the AEL
r6
(AE
lock) mode>

.
Before loading
pressure
prevent
To
Tuct< in
e
the camera.
ttotO
?
the
feep
@
relaxed
button
position.
camera shake,
your
shutter
your
gently.
.
Full
practice pressing
film,
your
elbows
when
breath
button.
arms and hands
press
and
the shutter
The
shutter release
in
two steps.
When
pressed,
on and the
functions
pressed
pressure
shutter is released
taken.
the
shutter release
use a smooth motion when
and
stabilize
pressing
button
the shutter
the
button
viewfinder
autofocus
are activated. When
pressure),
(full
further
and the
get
button to
pressing
the
shutter
operates
is
half-
display turns
metering
and
photo
used to
the
release
the
is
half-
button.
It is important
photographs.
caused
Practice working
to hold the
Unsharp
photographer's
by the
with the
compositions. Find
the
camera
against a building or tree
.
When
photographs
taking
slow, use a tripod to
camera firmly in
photographs
abrupt motion when
camera and making
positions
in
that
are comfortable for
places
dark
avoid camera shake.
ordef to achieve
are
often due to camera
taking a
vertical
both
you.
Propping
can often be effective.
or in
other cases where the
sharp
shake
picture.
horizontal
and
yourself
shutter speed is
or
T7
(1)
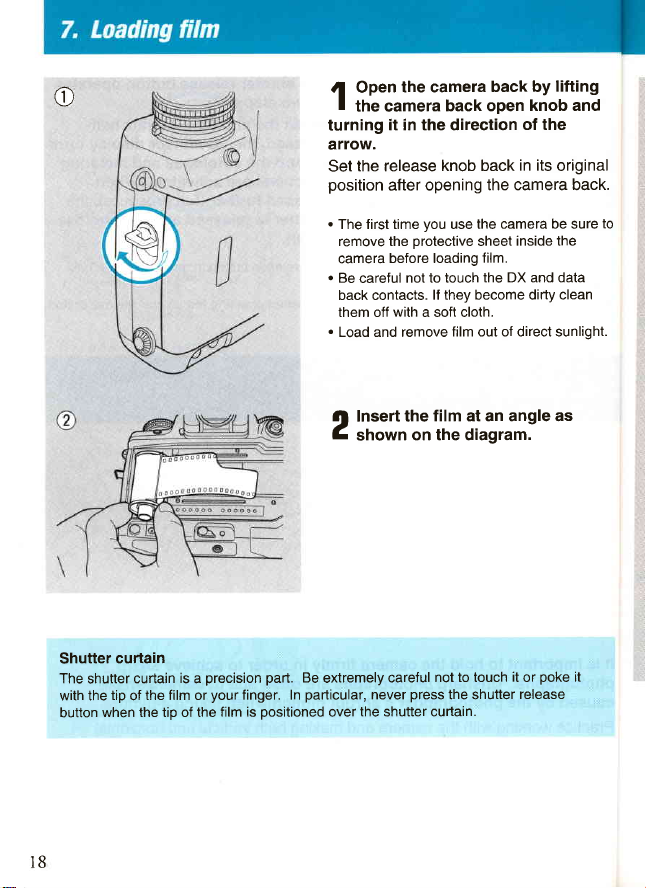
Open
{
I
the camera
turning
arrow.
the release
Set
position
the camera
back by
back open
it in the direction
knob back
after opening
the camera back.
lifting
knob and
of the
in its
original
curtain
Shutter
The
shutter
tip
with the
when the tip of the
button
curtain
the film or
of
precision pad.
is
a
your
film is
finger. In
positioned
.
The first time
remove the
camera
.
Be
careful
back contacts.
them off
.
Load and remove
Insert the
fl
C
shown
Be
extremely
particular,
over
never
the
you
the camera be sure
use
protective
before loading
not to touch
sheet
film.
the DX and data
lf they become dirty clean
with
a soft cloth.
film out of direct sunlight.
film at an angle
on the diagram.
not to touch
careful
press
the shutter
cudain.
shutter
inside the
as
poke
it
or
release
to
it
r8
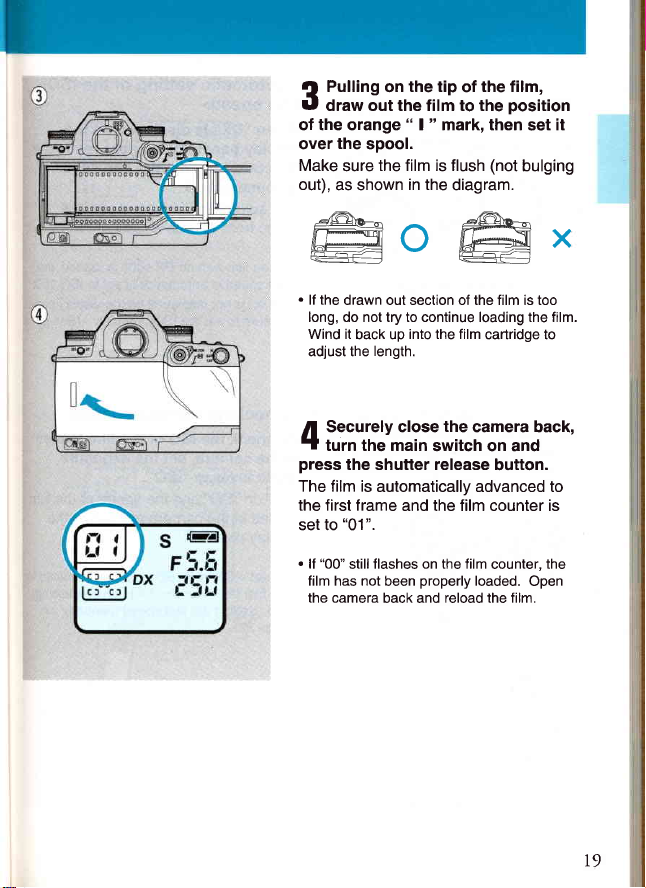
Pulling on the tip
Q
lU
draw out the film to the
of the orange " I " mark, then
the
over
Make
out),
spool.
the film is flush
sure
as shown
in the
the film,
of
(not
diagram.
position
it
set
bulging
@o
.
lf the
drawn out section of the film is too
long, do not try to continue loading the film.
Wind it
back up
adjust the
/l
-
press
The film is
the first frame
set to
.
lf
film has not
the camera
length.
Securely close
turn the main
the shutter release
automatically advanced to
"01".
"00"
flashes on the film
still
been
back and
@x
into the film
and the film counter is
properly
cafiridge to
the
camera back,
switch on and
button.
counter,
loaded.
reload the film.
the
Open
r9
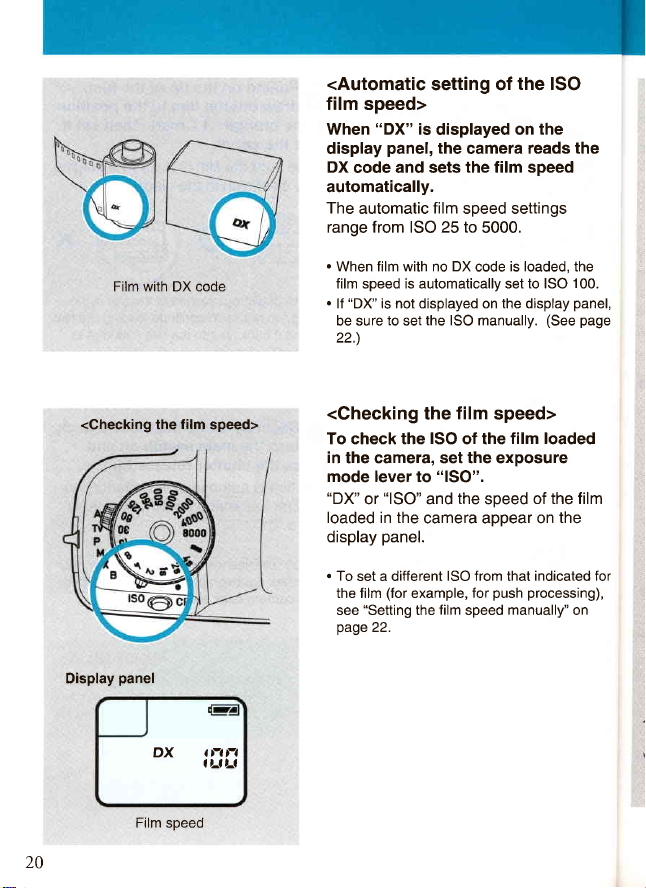
Film with DX code
<Automatic
setting of
the ISO
film speed>
"DX"
When
display
DX
code and sets
is
panel,
displayed on
the
camera
the film speed
the
reads the
automatically.
The
automatic
range from ISO 25 to
.
When film with no DX
film
speed settings
5000.
code
is loaded,
film speed is automatically set to ISO
.
"DX"
lf
is not displayed on the display
to
be sure
the ISO manually.
set
22.)
the
100.
panel,
(See page
20
<Ghecking
Display
the
panel
DX
Film speed
film
speed>
.x)-f
,^a
)-l
a
<Checking the
To check the
in
the camera, set the exposure
mode lever to
"DX"
"lSO"
or
loaded in the
panel.
display
.
To
set a different
(for
the film
"Setting
see
page
22.
film
speed>
ISO
of the
film loaded
"lSO".
the
and
speed
camera appear on
ISO from
that
push processing),
the
film
for
speed
manually"
example,
of the film
the
indicated for
on
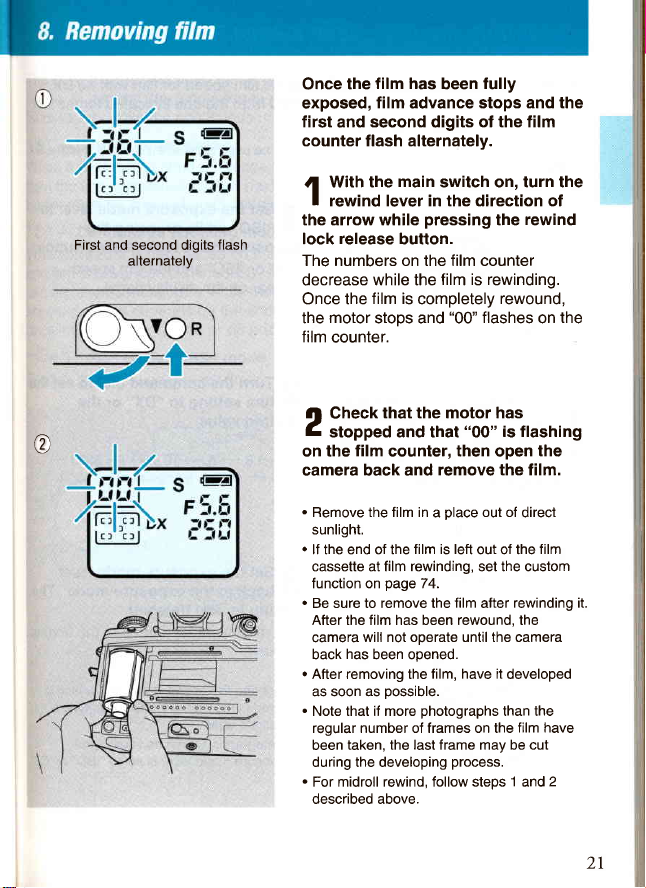
film has
the
Once
exposed,
first
counter flash alternately.
and
film
second
been
advance stops
digits
of the film
fully
and the
@
First
and second digits
alternately
flash
,l With the
I
rewind lever in the direction of
the arrow while
lock
The numbers on the film counter
decrease
Once the
motor
the
film
counter.
ll
Check
4
stopped and that
on the
camera back and
.
Remove the film in
sunlight.
.
lf the end of the
cassette at film rewinding, set the custom
function on
.
Be sure to remove the
After the film has been rewound, the
camera
back
.
After removing the
as soon as oossible.
.
Note that if more
regular number of frames on the
been
during the developing
.
For midroll rewind, follow steps 1 and2
described above.
main
switch on, turn the
release
film
will not operate until the camera
has
taken, the last frame may be cut
pressing
button.
while the
film is
completely
stops and
that the motor has
counter, then open
a olace
film is left
page
74.
been opened.
film, have it
photographs
the
film is rewinding.
rewound,
"00"
flashes
"00"
is flashing
remove the film.
out of
out of the
film
rewinding it.
after
developed
than the
film have
process.
rewind
on
the
direct
film
the
2l
the
Use
when
or
code
.
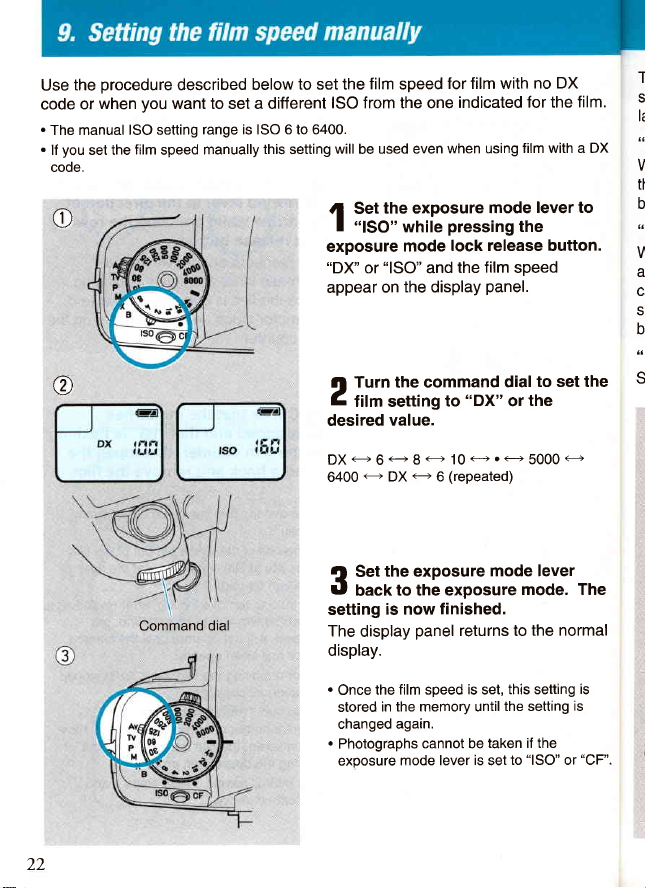
The manual
.
you
lf
set the
code.
c
@
procedure
you
ISO
setting
film
speed
to set the
described
want to set a different
below
range is ISO 6 to 6400.
this setting
manually
film
ISO from the one
will
used even
be
the exposure
Set
{
I
"lSO" while
exposure
"DX"
"lSO"
or
on the display
appear
for film with
speed
indicated
when using
pressing
lock release button.
mode
the
and
ll Turn the command
C
nmsetting
desired
value.
to
"DX"
no DX
for the film.
film with a DX
mode lever to
the
film
speed
panel.
to set the
dial
the
or
T
S
t,r,
V
tt
:
v1
a
Ci
sl
:
S
22
Command dial
€-+ 6 +-+
DX
€-->
tlt
rl
Set
back
display
DX
the exposure
to the exposure
is now
6400
setting
The
display.
.
the film speed
Once
in the memory until
stored
changed again.
.
Photographs
exoosure
mode lever
<-+
10
8
+--)
(repeated)
6
finished.
panel
cannot be
<-->
<-->.
mode lever
returns to
is
this setting
set,
the setting
taken if the
is
to
set
€--)
5000
mode. The
the normal
is
is
"lSO"
"CF".
or
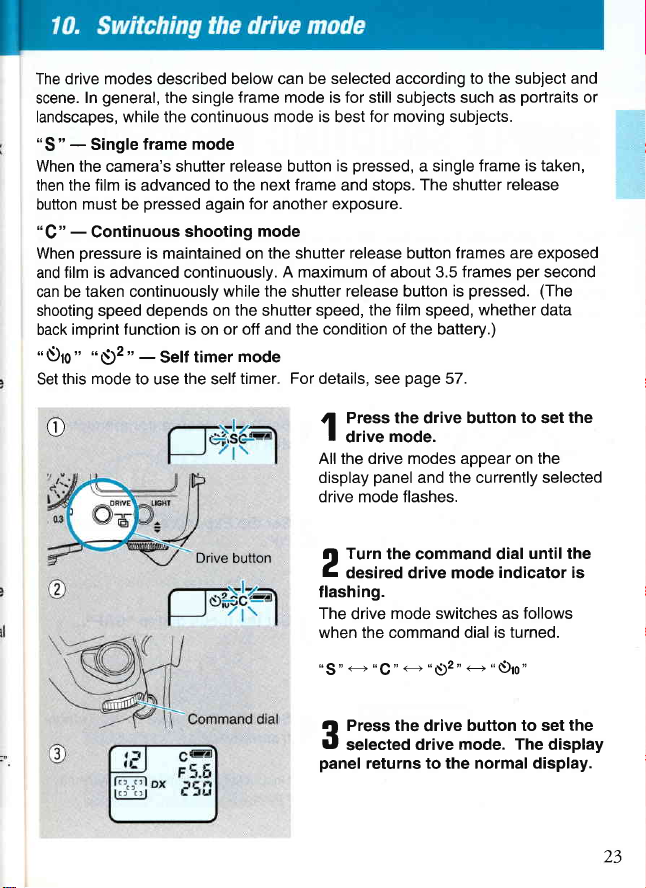
The drive modes described below can
scene.
landscapes, while the continuous
'rS"
When the
then the film is
button must be
"C"
When
and
can be
shooting speed depends on
back
"
Set this
general,
In
-
Single
-
Continuous
pressure
film is advanced continuously.
taken continuously
imprint function is
Slo
" ",{)2 "
mode
the single
frame mode
camera's shutter
advanced
pressed
is maintained on the shutter
-
Self
to use
frame mode is for
release button
to the
again
shooting
while the
the
or off and the condition of the battery.)
on
mode
timer
the
timer.
self
mode is
next frame
for
another
mode
A maximum of about 3.5 frames
shutter
shutter
For
be selected according to the subject and
still subjects such
for moving
best
pressed,
is
and stops.
exposure.
release
release button
speed, the
details, see
subjects.
a single
The
shutter
frames are exposed
button
is
film
speed,
page
57.
portraits
as
frame is taken,
release
per
pressed. (The
whether
second
data
or
c
Drive
button
Press the drive
{
I
drive mode.
All the drive modes appear on the
panel
display
drive mode flashes.
ll Turn
Z
flashing.
The
when the command dial
"S" - "G"
I
lU
panel
the command dial
desired drive mode
mode switches as
drive
-
Press the
selected
returns to the normal display.
button to set the
and the currently selected
untilthe
indicator is
follows
is turned.
<.---;
"N)2"
drive
drive
"$rc"
button to set the
mode. The
display
23
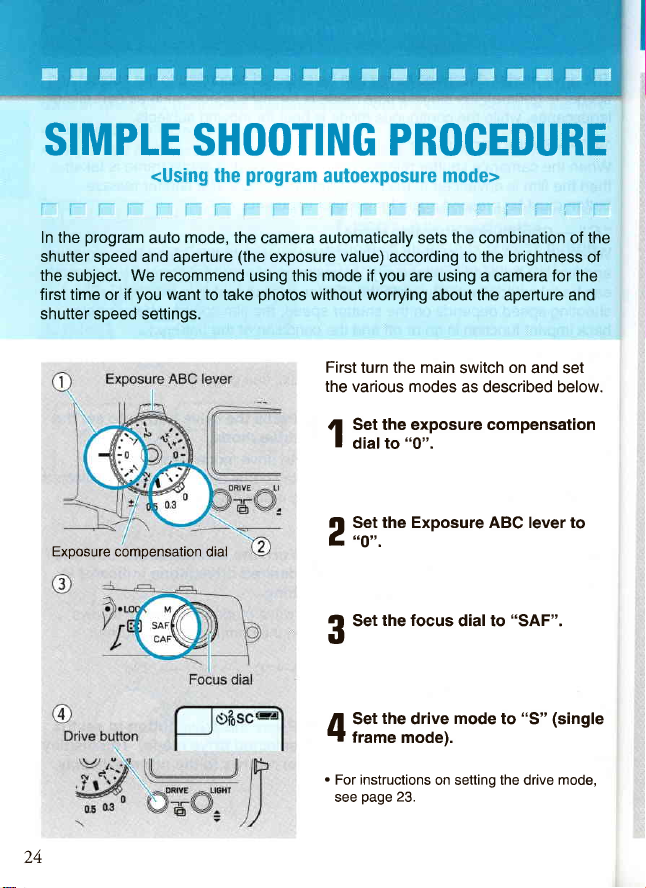
SIMPLE
SHOOTING
<Using the
program
In the
shutter speed and aperture
the
subject.
first time
shutter speed
Exposure
if
or
compensation dial
mode, the
auto
We recommend
you
want to
settings.
take
PROGEDURE
program
camera automatically sets the combination of the
(the
using this mode if
photos
autoexposure mode>
exposure value)
without
First
the various modes
,l
tl
L
according
you
worrying about the aperture and
turn the main
Set the exposure compensation
I
oialto
Set the Exposure ABC lever to
"O".
I
to the
are using a camera for the
"0".
brightness of
on
switch
as described below.
and set
24
the focus
Set
Q
U
the
Set
page
drive
mode).
23.
/l
'l
frame
.
For instructions
see
"SAF".
to
dial
mode
on setting the drive
"S" (single
to
mode,

Move the auto
[,
rf
several times in the direction
the arrow
seleCtion
move the lever upwards
to set the
indicator
select
focusing frame
,.Ii.;
to
lever
",
then
to lock.
of
Auto
Exposure mode
e
Exoosure mode
@
lever
select
lever
lock release butlon
the metering
Set
f
lf
evaluative
Turn the exposure
I
f
mode lock release button and
exposure
Q
O
focus
half-press the shutter button.
(Use
Q
rf
frame used to
and
,lll
IU
composition,
button allthe
photo.
pressing
while
mode to
Point the camera at
position
Focusing
the subject
the subject
frame in the viewfinder,
one of the
any
"O" (focus
With the shutter button
nalt-pressed, determine
mode to
metering
is
is in
focus flashes
then
way
("
mode lever
the exposure
"P".
the subject,
within the
five focus frame.)
performed.
focus, the focus
lights.
mark)
press
the shutter
in
take the
to
EE
When
").
set the
then
red
still
the
once
)5
FOCUSING
This camera offers two types of
the focus
adjusts
adjusts the focus manually.
There are
photography
AF) which
In
addition,
the AF modes. The
within a certain range in
for focusing
This
camera
according to the subject and scene.
fhe camera's
e
focus mode by turning the lens'focus ring when the focus
mode
"One
@
shot auto focus"
pressed
automatically, and
two AF modes:
comes
(page
photographing
when
in handy for taking
there are two modes for selecting the focusing frame or frames in
in the manualfocus
"auto
accurately on a selected
is also equipped with the functions described below.
"dualfocus
30).
focusing:
"SAF"
(single
select mode" is convenient for adjusting the focus
general,
while the
mechanism" allows
for focusing
(MF)
autofocus
manualfocus
AF) which is
stationary subjects, and
photos
of moving subjects.
"manual
point.
you
automatically while the
(page
mode
26
(AF),
(MF)
35).
in which the
in which the user
general
convenient
select
to switch to the manual
for
"CAF" (continuous
mode"
can be used
Use
is
in
set
focus
button is
camera
them
the SAF
Focus
Utl
tl
t]tl
<Auto select mode>
<Switching Auto
frames
Select Mode>
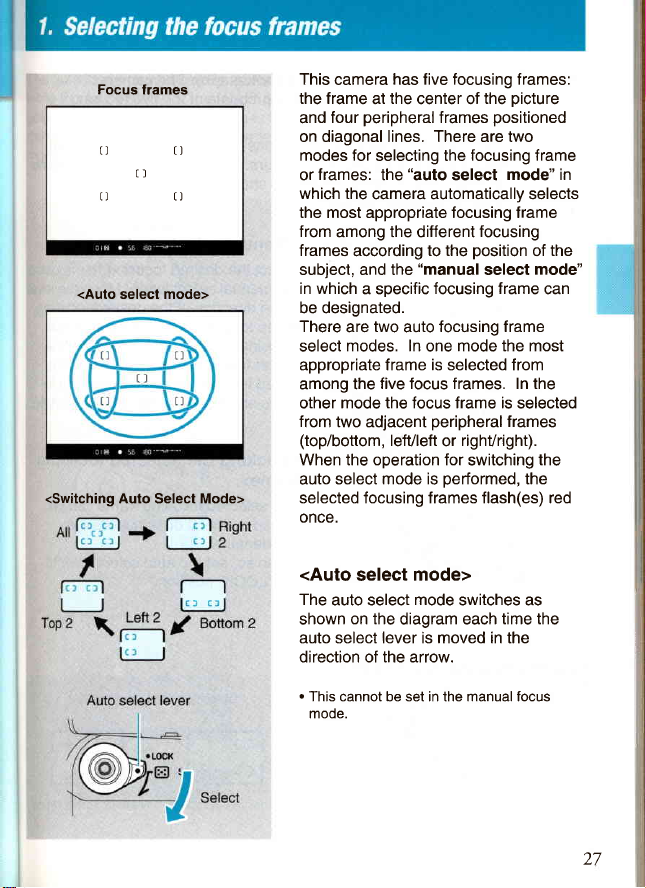
This
camera has
the frame
and
on diagonal lines. There are two
modes for
or
which the
the most appropriate focusing frame
from
frames
subject, and the
in which
be designated.
There
select
appropriate frame is selected from
among the
other
from
(top/bottom,
When the operation for
auto select
selected focusing frames flash(es) red
once.
peripheral
four
frames:
among the different
according
a specific
are
modes. In
mode the focus frame is
two adjacent
five focusing frames:
the
at
center of
frames
selecting the
"auto
the
camera automatically selects
to the
"manual
focusing frame
two
focusing frame
auto
one
five focus frames. In the
peripheral
lefVleft
or
performed,
mode is
picture
the
positioned
focusing frame
mode" in
select
focusing
position
mode the most
righVright).
switching
select
selected
frames
of
mode"
the
the
the
can
<Auto
The
auto select
on the
shown
auto select lever is moved in the
direction of the arrow.
.
This cannot be set in the manual focus
mode.
select
diagram each
mode>
mode
switches as
time the
I
I
27
"r,--Tj'l"
-r
rcr
"rr-jl"
crr
r
: This mode is suited
automatically
selects
frames.
: This mode is suited
distances
at the edges
for which the shooting
selected
focusing
frames.
general
for
most
the
for
compositions
picture.
of the
distance
photography.
appropriate
of
containing
The camera selects
is
shortest
from
The
camera
the five
subjects
among
focusing
at equal
the
two
the
frame
T
W
S(
rh
m
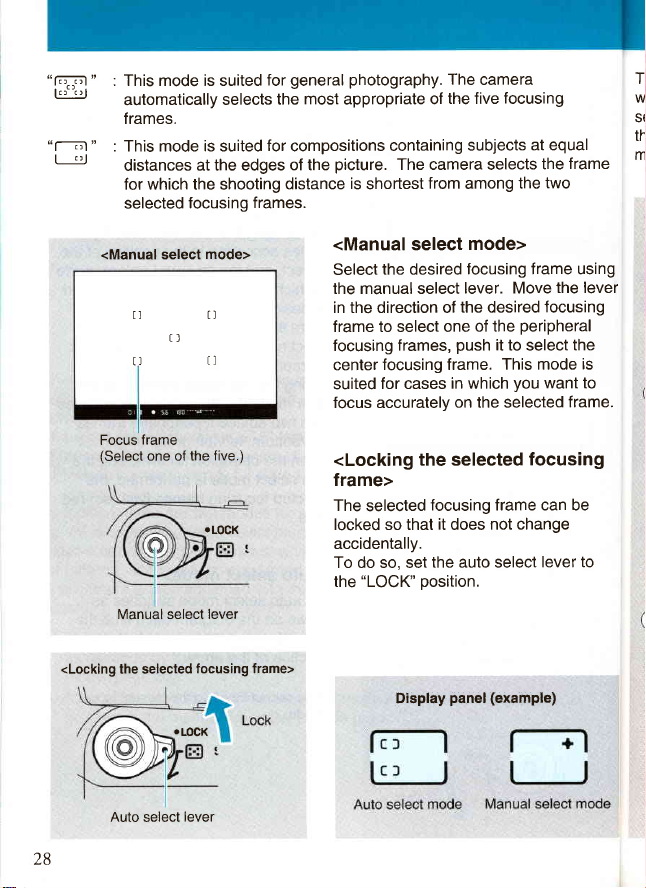
<Manual select
ntl
tl
tl
frame
Focus
(Select
one of the
selecl lever
Manual
<Locking the selected
.LOCK
Auto
select
lever
mode>
tl
five.)
rLOGK
tocusing frame>
<Manual select
the desired
Select
the manual select
in the direction of
the desired
frame to select one
push
focusing
center
suited
focus accurately
<Locking
frames,
focusing frame.
for cases
in which
on the selected
the selected
frame>
The
selected
locked so that
focusing frame can be
it
does
accidentally.
To do so, set
"LOCK" position.
the
the auto select
panel
Display
mode>
focusing frame using
lever. Move
the lever
focusing
peripheral
of the
it
to select
the
This mode is
you
want to
frame.
focusing
not change
lever to
(example)
28
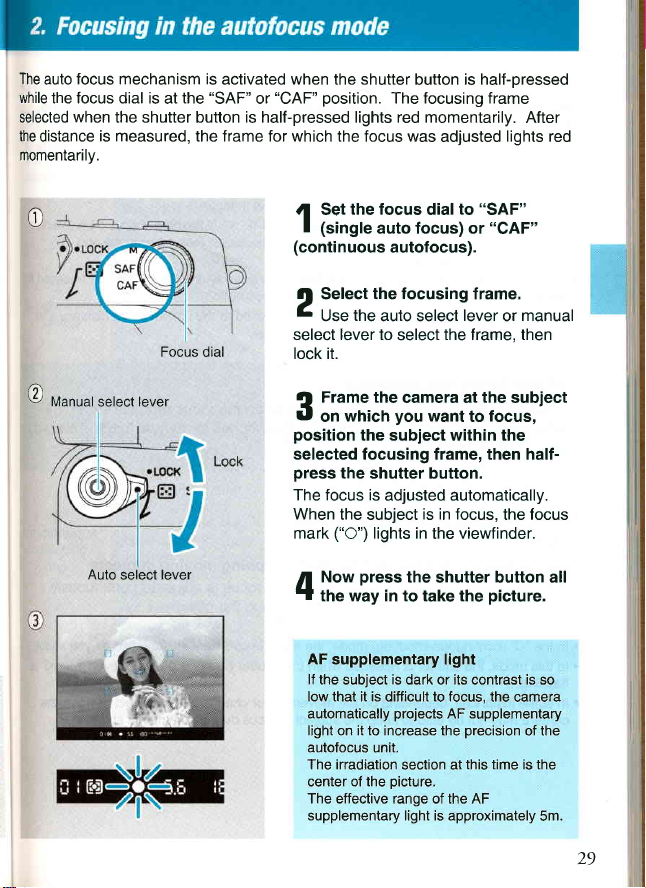
The
focus mechanism is
auto
while
the focus dial is
when
selected
the
distance
momentarily.
is measured,
activated when the shutter
"SAF"
the
at
the shutter button is half-pressed lights red momentarily.
the frame for which the focus was
"CAF' position.
or
The focusing frame
is half-pressed
button
adjusted
lights red
After
e
@
Manual
Auto
select
select lever
lever
Focus
dial
fl
the focus
Set
f
(single
(conti
!t
b
select lever to
lock it.
rl
tU
position
selected focusing frame, then half-
press
The focus is
When
mark
/L
T
AF supplementary light
lf
low that it is
automatically
light on it to increase
autofocus
The irradiation
center of
The effective range of
supplementary light is
auto focus) or
nuous
autofocus).
the focusing
Select
the
Use
on
Now
the way in to take the
the subject is dark or its contrast is so
auto select
select
Frame the
the shutter button.
the subject
("O")
camera at
you
which
the subject within the
adjusted automatically.
lights in
press
the shutter button all
difficult
projects
unit.
section at
picture.
the
"SAF"
to
dial
want
is in focus,
"CAF"
frame.
lever
the frame, then
the
to focus,
the
or
the
subiect
focus,
to
the focus
viewfinder.
picture.
the camera
AF supplementary
precision
this time is the
AF
the
approximately 5m.
manual
of the
29

<"SAF"
This mode
landscapes,
Half-press the shutter
locked at that
(single
auto
is recommended
etc.).
position.
focus)>
button
general
for
to focus. Once
photography (still
subject
is in focus,
the
life,
portraits,
the focus
<l
,r;,
is
.
The shutter cannot
.
.
.
possible
is not
lt
the same distance
object at
photograph
"tr
is flashing but
lf
{"
pressing
the shutter
When the drive
remains at
focus mechanism>
<Dual
lens'focus
lf the
the focus
and
fine tune focus.
way to
<"CAF"
mode is recommended
This
the shutter button
When
that the subject
Check
.
"C" (continuous
In the
.
In this mode, the shutter
be
focus on the desired
to
the original subject.
button
mode is set
that set distance
ring is turned by
mark
(continuous
flashing.
.
In
instances, depending
some
may not be able
camera
if the subject
released
as the subject,
(Page
you
want to take
pressing
while
"C",
the
is lit, the
focus is locked at
to
for subsequent
("O")
autofocus)>
photographing
for
half-pressed,
is
is in focus before
shooting)
mode,
released when
is
the movement
on
the subject
to keep
is not in focus.
'>
is flashing.
if
subject
lock
32)
the
the focus button.
hand when
mode switches
<"
the focus, then
photo
anyway,
photos.
the focus
the shutter
the first
to manual
moving
the focus
taking
the focus
the shutter button
is
adjusted
picture.
the
is
continuously
is
or change
in the subject
in focus during continuous
Focus on a different
recompose
focusing distance
mode
and
can be
is
set
focus.
released by
to
This is a
subiects.
continuously.
you
as
adjusted
pressed,
even
if
position,
shooting.
and
"SAF"
shoot.
"tr
{"
the
(s
(c
is
30
 Loading...