

Page 1

EMS -
Easy-Marking-System
eco
EMS - eco
Operating Instructions
Release: July 21, 2010
©
1
Page 2

EMS -
eco
Easy-Marking-System
Plotter EMS - eco
Operating Instructions
1. Introduction...................................................................................................3
2. Items supplied ..............................................................................................4
3. Product overview ..........................................................................................5
4. Set-up ...........................................................................................................6
5. Operation......................................................................................................7
6. Cleaning and product care .........................................................................10
7. Accessories.................................................................................................11
8. Troubleshooting..........................................................................................12
9.Technical information...................................................................................13
10. Instructions for packaging the plotter EMS-eco .......................................14
11. Safety instructions ....................................................................................15
2
Page 3

1. Introduction:
Thank you for purchasing the EMS-eco, a flexible plotter that helps you label marking
elements quickly and easily.
Rugged construction in stylish aluminium
Labelling area A4 size 220 mm x 305 mm
Easy to change fixtures to suit a variety of marking elements
Auto calibration no adjustment necessary
Capable of labelling marking elements up to 10.5 mm in height.
Special solutions for up to 15 mm are possible
Universal power supply of 100-240V AC
The special start-up function for the plotter pens ensures neat labelling right from
the very first marking element
PC interfaces: USB ports
Control language: HPGL
Possible to update EMS-eco software through PC connection and downloading
from the Internet
3
Page 4
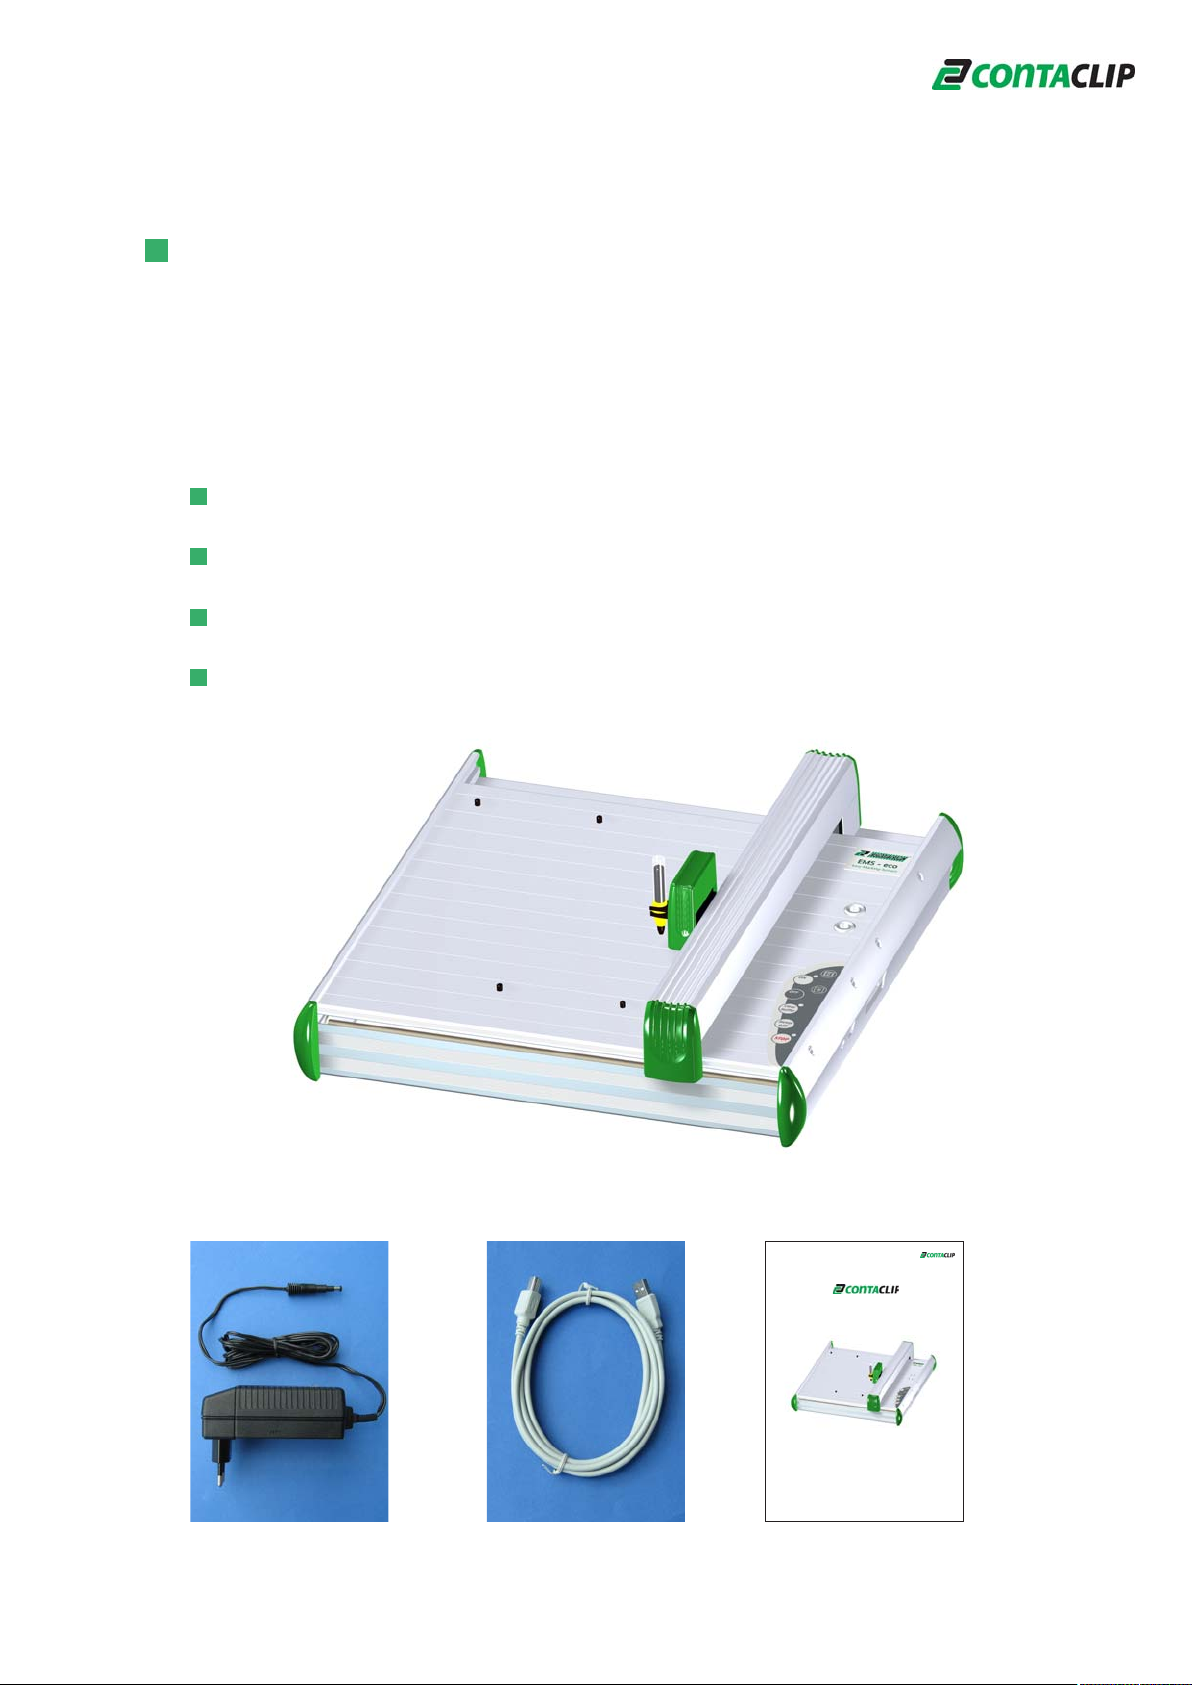
2. Items supplied
Please check you have received all the items supplied with your labelling device
(see list below).
Please retain the packaging in case you need to return the device.
The following items are supplied as standard:
1. Plotter EMS-eco
2. Power supply with corresponding mains power cord
3. USB cable
4. Operating instructions
2.
1.
3.
4.
EMS -
eco
Easy-Marking-System
EMS - eco
Operating Instructions
Release: July 21, 2010
©
1
4
Page 5
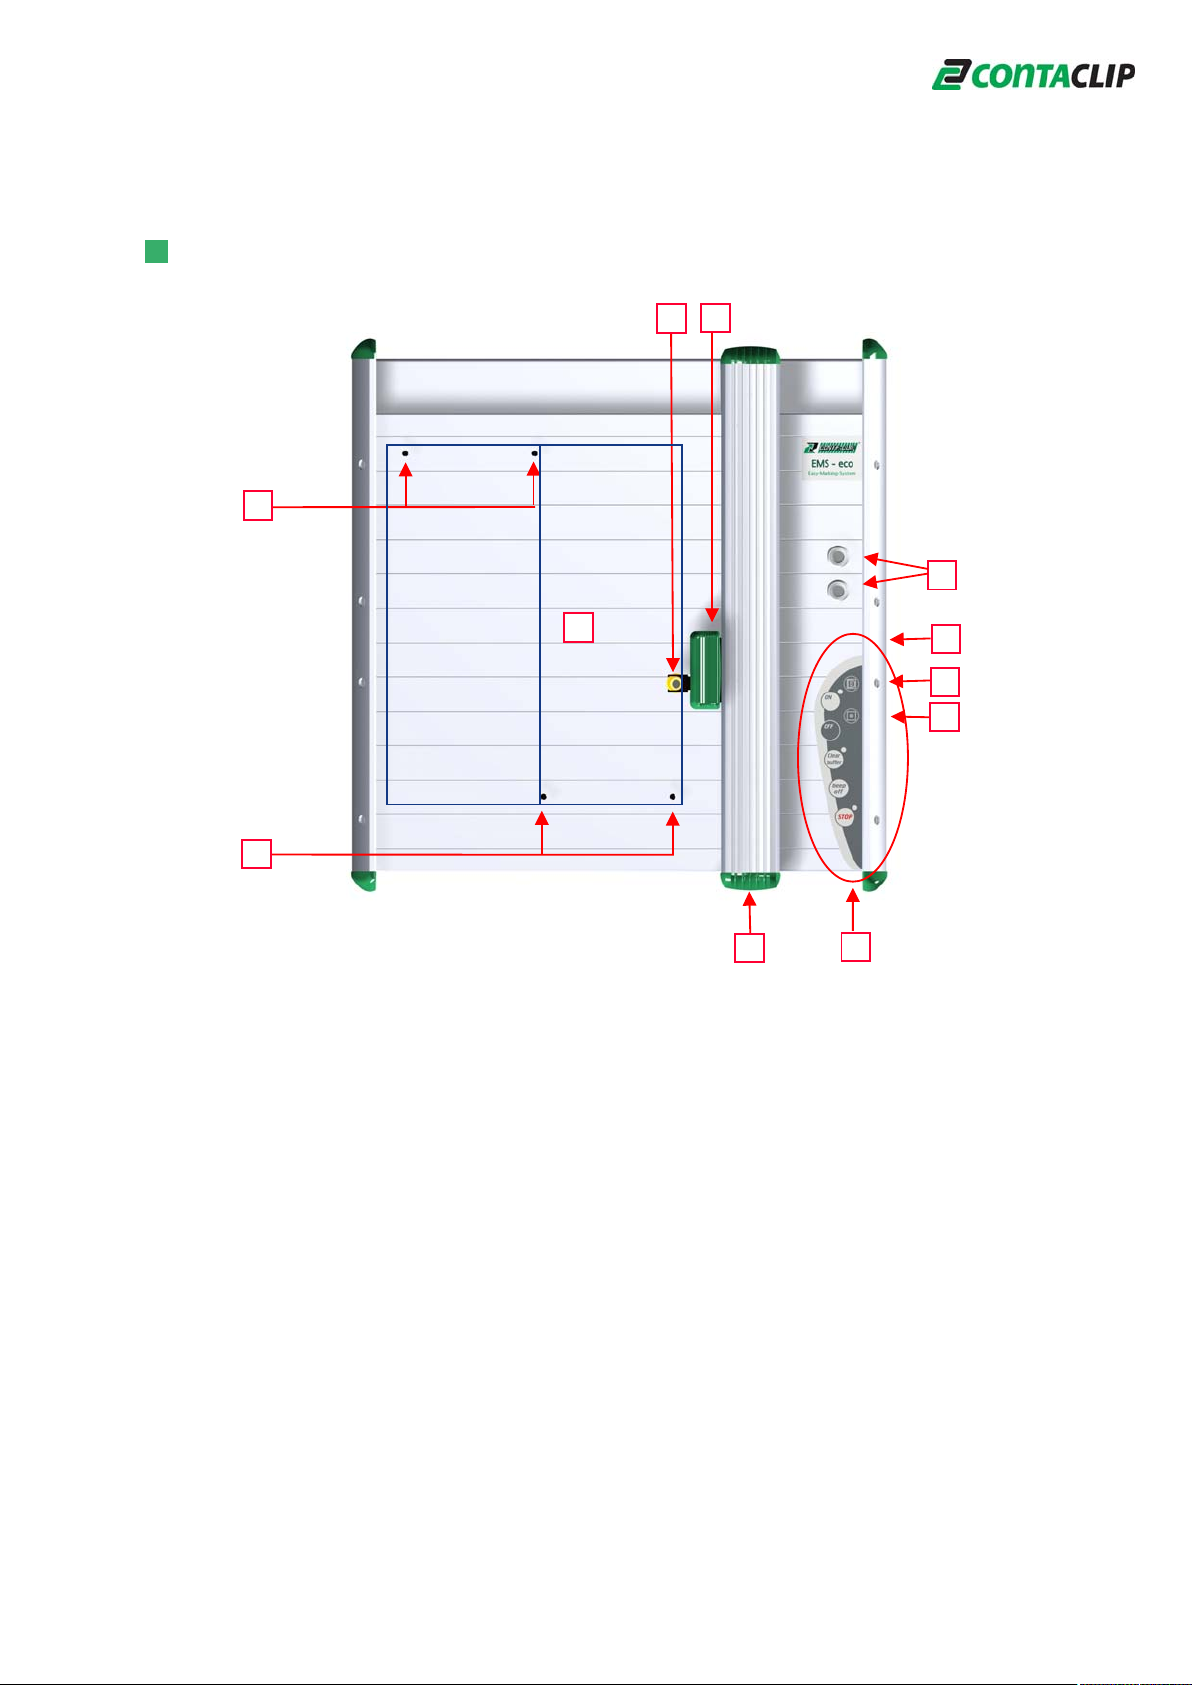
3. Product overview
2
4
3
Segment 1
Segment 2
1
2
1) Plotting area
2) Pins for holding support plates
3) Clip adapter for plotter pen
4) Penholder
5) Power supply
6) USB port
7) Control panel/control keys
8) Writing arm
9) Plotter pen storage location
10) Interface for optional external devices
9
10
6
5
8
7
5
Page 6

4. Setting up the Plotter EMS - eco
LOCATION
A dry, dust-free room is the ideal environment for the plotter. If possible, do not install
the device in damp or very dusty areas. Do not expose the system to direct sunlight.
Please ensure that the connections on the right-hand side of the device are accessible
at all times. Position the EMS-eco firmly on the work surface where it is to be used,
ensuring it is level.
Please ensure that the writing arm can move freely and is not obstructed by other
objects.
CONNECTIONS
Plug the device into a correctly installed mains socket using the power supply included
with the product.
The power supply features a variable AC input voltage of 100-240V~50-60Hz.
The power connection can be replaced by way of adapter plugs.
Plug the connector from the output cable on the power supply into the top right-hand
side of the plotter.
Then hook up the device using the provided USB cable. The respective ports are
located on the right-hand side of the EMS-eco.
6
Page 7

5. Operation
Once you have installed the EMS-eco and connected the power supply and data
cable, you can switch the plotter on.
Important:
Before switching the device on please ensure that there are no objects on the
writing/plotting area which might prevent the writing arm from moving freely.
All settings and commands are entered using the control panel.
Control Panel
Switch device on/off
Delete data
Turn off the beep
reminder signal to re-cap
and store the plotter pen
downloaded from PC
Pause or stop plotter
activity
ON/OFF buttons
The ON/OFF buttons are used to activate and deactivate the device. When the plotter
is switched on, the writing arm moves to the top right-hand corner of the labelling area
and auto calibration takes place. The green light comes on when the system is ready
for use and to receive data from the PC.
Clear buffer
If the EMS-eco contains data the yellow light will come on. You can delete this data by
pressing the 'Clear buffer' key.
To do this the system must be in stop mode (red light on).
7
Page 8

Stop/view key
If the 'stop/view' key is activated while the plotter is in action, the job will pause
immediately and the plotter pen will move into the top right-hand corner. The red light
will signal the interruption. Pressing the key again will calibrate the writing arm and the
plotter will continue with the job. The red light will go out.
Beep off key
After completion of the print job an acoustic signal (beep) will notify the user to take
the pen out of the pen holder and re-cap. The signal will be repeated continuously
after 20 seconds and can be turned off by using the 'beep off' key.
Attention:
The pen will clog and dry up if it remains un-capped in the pen holder.
Please note:
To turn off the signal in general please press 'Clear buffer' and 'beep off' together and
press 'ON' to start the plotter.
To re-activate the signal please use the same sequence.
Insert the plotter pen into the pen holder
Before using the EMS-eco, insert the plotter pen with the desired tip width into the clip
adapter of the pen holder.
Important:
Only plotter pens of the types shown with HP-adaption
may be used. Using other plotter pens and writing
instruments may damage the device.
Please note:
Prior to starting the plot, please select the pen with the desired tip width and make
sure to prime the pen on a plastic surface. Insert the pen directly into the pen holder.
The plotter always re-calibrates prior to first plotting.
8
Page 9

Placing the fixtures on the Plotter EMS-eco
There are four pin stops on the plotting area where up to two different fixtures can be
loaded. Different fixtures are available depending on the size of the marking elements.
They can occupy one or two segments on the plotting area.
Different size fixtures:
1 segment
Placing the elements in the fixtures
Choose the appropriate fixture for the elements to be labelled and insert the elements
carefully into the fixture. You can also add the elements first and then place the
fixtures on the plotter.
2 segments
9
Page 10

6. Cleaning and product care
Protect the EMS-eco from dust and other dirt. When not in use, cover the plotter.
A special dust cover is available as an accessory.
Wipe the device occasionally after use with a dry, lint-free cloth or a mild cleaning
agent.
Important:
Under no circumstances use harsh cleaning products to clean the plotter.
Never lubricate the mechanical parts of the plotter.
10
Page 11

7. Accessories
RefillPlotter Pen
Ink Cartridges
DisposablePlotter Pen
Cleaning Set
Dust Protection Cap
available in six tip-widths
Pen holder
available in six tip-widths
Pen Cleaner Cleaning Fluid
11
Page 12

8. Troubleshooting
If your plotter EMS-eco is not functioning correctly, please check the following:
Device fails to switch on Check whether the mains plug and connecting plug
are plugged in correctly.
Check whether the socket being used is functioning
properly. Is the green light of the power supply
illuminated? If not, please replace the power supply.
Plotter does not respond to
data downloaded from PC
No labelling is taking place
even though a plotter pen has
been inserted.
Poor labelling quality, uneven
line thickness, missing items
Is the interface cable connected properly?
Replace the data cable if necessary.
Is the correct interface on the PC being used?
Check whether the plotter pen has dried out or if
there is sufficient ink in the pen.
Refill or replace the pen if necessary.
The plotter pen tip may be spoiled. Clean the tip
carefully using a lint-free cloth dipped in special
cleaning fluid.
Replace the plotter pen if necessary.
12
Page 13

9. Technical Information
EMS-eco plotter specifications
Type of plotter: Flatbed plotter
Maximum plotting area: 220 mm x 305 mm
Plotting speed with pen: Max. 40 mm/s
Plotter pen: Special plotter pens with HP fixing
Ports: USB Level 1.1
Control language: Based on HP-GL 7475A
Buffer: 16 MB
Drive: Two-phase step motor
Addressable resolution: .01 mm
Repeat accuracy: .05 mm
Repeat accuracy after pen change: .05 mm with optimum pen
Power supply: Via separate power supply with exchangeable
mains power connection
Power supply input voltage: 100-240V AC 50-60Hz
Power supply input current: .7 A max.
Power supply output voltage: 24 V DC
Power supply output current: 1.25 A max.
Environmental conditions: In use: 10°C-35°C
35%-75% relative humidity
Storage: -10°C-50°C
10%-90% relative humidity
Safety certificate: EN 60950-1
Interference safety compliance: EN 55022 B
EN 61000-4-2 to 6
EN 61000-4-11
Dimensions: 440 mm x 440 mm x 125 mm
Weight: Approx. 6 kg
13
Page 14

10. Instructions for packaging the plotter EMS - eco
center piece covering
the y-arm
two corner pieces
with inlay
two corner pieces
without inlay
accessory box
inside the white
box
inside the white
box complete
14
Page 15

11. Safety instructions
Safety instructions
●Keep the operating instructions in a safe place.
●This device complies with all recognised technical standards and all relevant safety
regulations.
●The mains power supply used must correspond with that specified on the name
plate.
●Use in dry conditions only.
●Disconnect the device from the mains socket by pulling the plug, not the cord.
●All repairs, including replacement of mains power supply components, must be
performed by a qualified service technician.
Säkerhetsföreskrifte
●Förvara bruksanvisningen på säker plats.
●Denna apparat är tillverkad enligt modern teknik och i enlighet med gällande
säkerhetsföreskrifter för elektriska apparater.
●Kontrollera uppgifterna på typmärket innan anslutning till eluttag.
●Apparaten får endast användas i torra utrymmen.
●Dra inte ur kontakten ur eluttaget genom att rycka i sladden.
●Reparationer av denna apparat, inklusive utbyte av el-sladd, får endast utföras av
fackman.
Sicherheitshinweise
●Bewahren Sie die Gebrauchsanweisung sorgfältig auf.
●Dieses Gerät entspricht den anerkannten Regeln der Technik und den einschlägigen
●Sicherheitsbestimmungen für Gerätesicherheit.
●Elektrische Anschlussbedingungen und Angaben auf dem Typenschild müssen
übereinstimmen
●Gerätenutzung nur in trockenen Räumen
●Netzstecker nicht am Kabel aus der Steckdose ziehen
●Reparaturen an diesem Gerät, einschließlich der Austausch der Netzzuleitung,
dürfen nur von Fachkräften durchgeführt werden
15
Page 16

Instructions de sécurité
●Conserver ces instructions dans un endroit sûr.
●Cet appareil répond aux normes techniques et satisfait toutes les règles de sécurité.
●Le courant utilisé doit être identique à celui spécifié sur l'appareil.
●Ne pas utiliser cet appareil dans un environnement humide.
●Débrancher l'appareil en tirant sur la prise, pas sur le câble.
●Toutes les réparations y compris le remplacement des composants électriques,
doivent être effectuées par un technicien qualifié.
Instrucciones de Seguridad
●Conserve las instrucciones de seguridad en un lugar seguro.
●Este equipo cumple con todas las normas técnicas de seguridad eléctrica y
requisitos de seguridad eléctrico aplicables en el país de uso.
●La fuente de alimentación debe corresponderse con los valores de tensión y
corriente citados en la placa de identificación del producto.
●Las características de la fuente de alimentación a utilizar con el producto son las
siguientes : entrada : 100-240Vca, 50/60Hz, 700mA. Salida : 24Vcc/1,25A
●Utilice el equipo en condiciones secas únicamente.
●Desconecte el equipo de la red de alimentación por medio de la ficha, nunca tirando
del cordón.
●Todas las reparaciones, incluyendo el reemplazo del cordón de alimentación, deben
ser realizadas por personal técnico calificado.
15
 Loading...