

Construction Solutions DBX1000 Installation And Product Manual
Construction Solutions
7801 E. Gray RD Suite 110 Ph: (480)346-8240
Scottsdale, AZ 85260 Fax: (480) 346-8250
www.newconstructionsolutions.com
DBX1000 Recessed Vent Receptacle
Installation Guidelines &
Product Information
Material used in the DBX 1000 meets UL94 HB Flammability Testing and is recognized by Underwriters Laboratories Inc.
Representative samples of this component have been evaluated by UL and meet applicable UL requirements.
Snap On Trim Ring
Box made from High Impact Polystyrene (“HIPS”)
Meets UL94 HB Flammability Testing
Install in up to 24” on center location, brackets included
Easy to remove 4” oval knockouts
Top and Bottom Straw clamps for gas pipe
Snap on trim ring accommodates up to ¾” drywall
US Patented Product 6,938,640
¼”
17⅛
17⅛
13¾
1¾
13¾
1
Top Oval Clearance
Notches
¼”
17⅛
17⅛
13¾
1¾
13¾
1
¼”
17⅛
17⅛
13¾
1¾
13¾
1
¼”
17⅛
17⅛
13¾
1¾
13¾
1
Top Oval Clearance
Notches
For optimum results, install the DBX1000 ® recessed vent receptacle for 4 Inch Walls as follows:
Box Installation - 16 Inch On-Center Spacing:
1. Orient box to match desired venting direction, score & remove appropriate top or rear 4-inch oval vent pipe
knock out. Allow minimum of 4 inches of vent of pipe to extend inside box
2. If gas line is to be installed, locate 1⅝ straw clamp on top of box. Cut the webs between the 8 fins with a
utility knife. Push the gas line through the straw clamp. The fins will flex inward holding the pipe.
3. Slide box into position taking care to correctly align vent pipe and gas pipe (if present).
4. Spacing tabs will automatically position box so that bottom, inside edge is from 2¼ to 2⅝ inches above
unfinished floor to allow clearance between trim ring and finished floor covering. Tabs may be removed if a
different spacing is desired.
5. Attach box directly to both right and left studs using the six flange screw holes. Screws are recommended for
mounting.
Box Installation - 24 Inch On-Center Spacing:
1. Orient box to match desired venting direction, score & remove appropriate 4-inch oval vent pipe knock out.
Allow minimum of 4inches of vent of pipe to extend inside box.
2. If gas line is to be installed, locate 1⅝ straw clamp on top or bottom of box. Cut the webs between the 8 fins
with a utility knife. Push the gas line through the straw clamp. The fins will flex inward holding the pipe.
3. Slide box into position taking care to correctly align vent pipe and gas pipe (if present).
4. Spacing tabs will automatically position box so that bottom, inside edge is from 2¼ to 2⅝ inches above
unfinished floor to allow clearance between trim ring and finished floor covering. Tabs may be removed if a
different spacing is desired.
5. Attach one side of box directly to stud using the three flange screw holes.
6. Snap in the two mounting straps on the other side of the box and attach these to the second stud using the
strap screw holes. Screws are recommended for mounting.
Trim Instructions:
1. Snap out left or right trim ring “cut out” (see detail below).
2. Leave 1¾ inches between inside edge of box and
end of baseboard to allow for trim ring clearance.
3. Snap trim ring into opening, no caulking required.
4. Leave unfinished or paint with desired color.

Construction Solutions
7801 E. Gray RD Suite 110 Ph: (480)346-8240
Scottsdale, AZ 85260 Fax: (480) 346-8250
www.newconstructionsolutions.com
DBX1000 Recessed Vent Receptacle
Installation Guidelines &
Product Information
Material used in the DBX 1000 meets UL94 HB Flammability Testing and is recognized by Underwriters Laboratories Inc.
Representative samples of this component have been evaluated by UL and meet applicable UL requirements.
Box made from High Impact Polystyrene (“HIPS”)
Meets UL94 HB Flammability Testing
Install in up to 24” on center location, brackets
included
Easy to remove 4” knockouts
Top and Bottom Straw clamps for gas pipe
Snap on trim ring accommodates up to ¾” drywall
US Patented Product 6,938,640
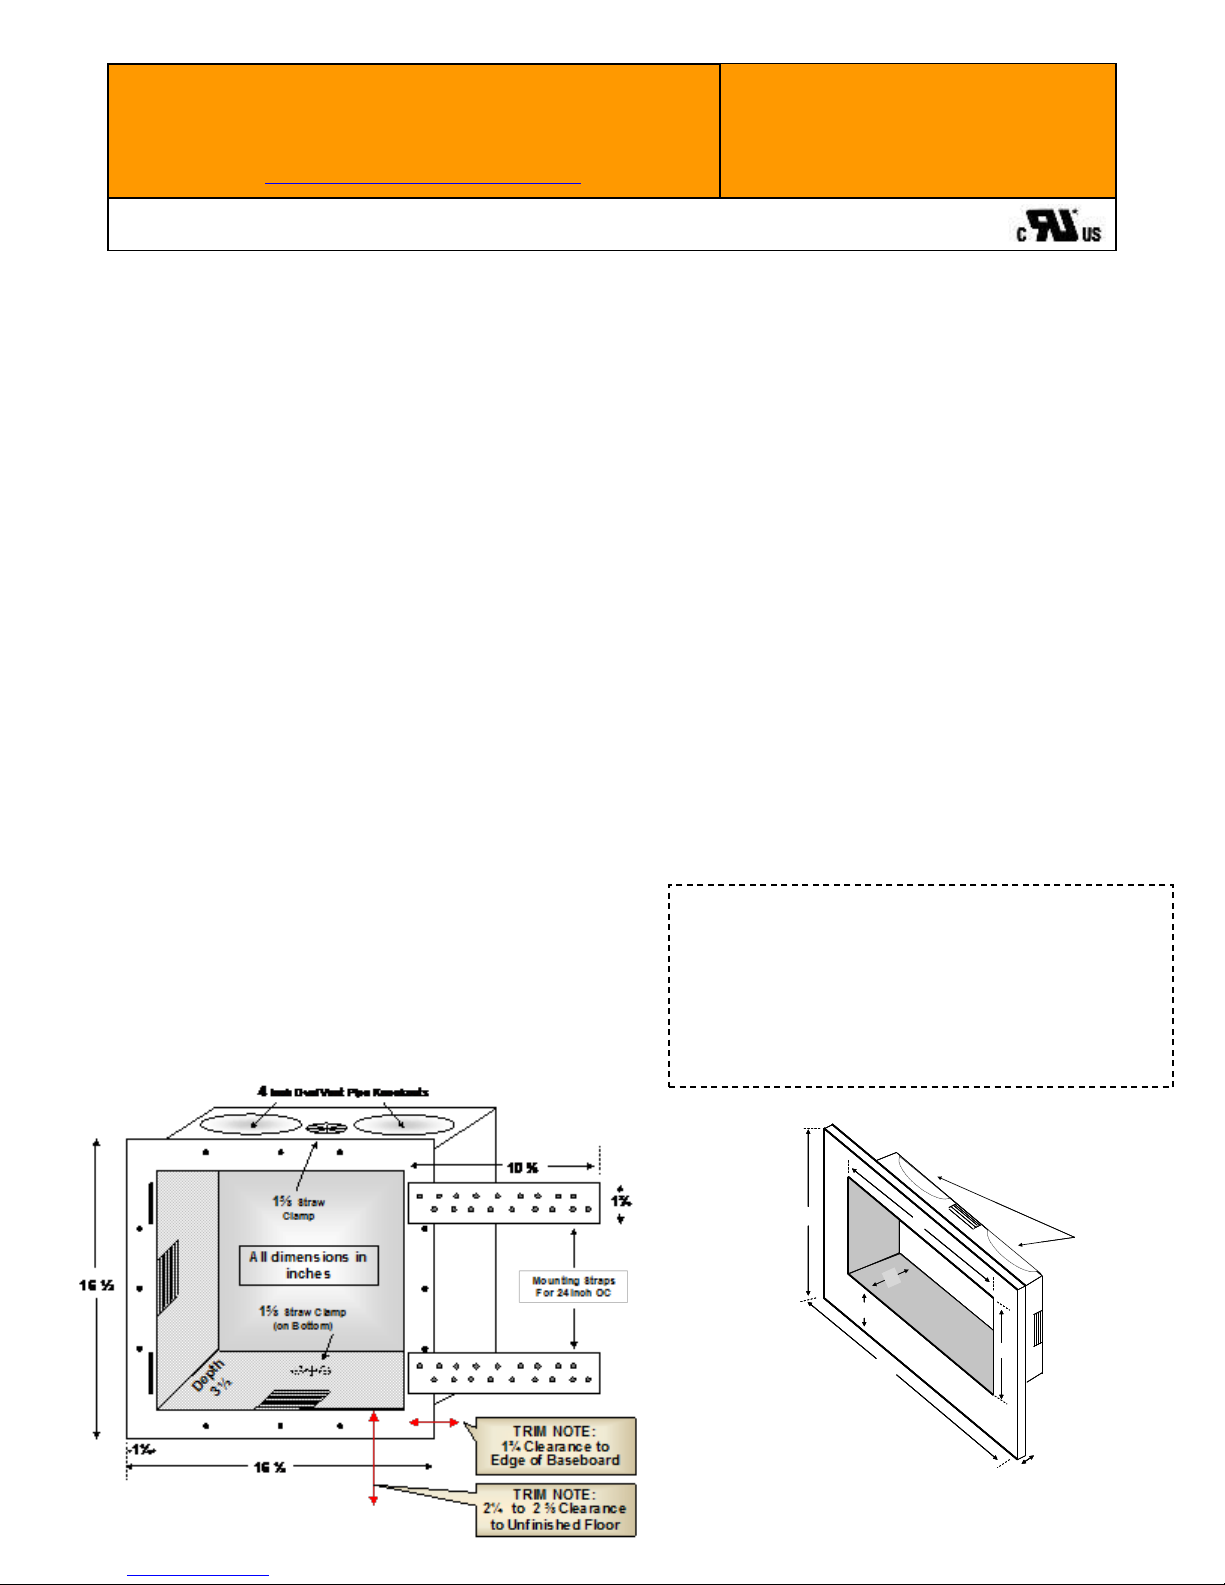
6” Wall DBX 1000
Recessed Vent Box
16 ½”
10 ⅛”
1¼
1¾”
16 ½”
Mounting Straps
For 24” OC
4” Vent Pipe Knockouts
Depth
5
½”
1⅝” Straw
Clamp
TRIM NOTE:
1¾” Clearance to
Edge of Baseboard
TRIM NOTE:
2¼” to 2 ⅝” Clearance
to Unfinished Floor
1⅝’’ Straw Clamp
(on Bottom)
4” Rear
Knockout
6” Wall DBX 1000
Recessed Vent Box
16 ½”
10 ⅛”
1¼
1¾”
16 ½”
Mounting Straps
For 24” OC
4” Vent Pipe Knockouts
Depth
5
½”
1⅝” Straw
Clamp
TRIM NOTE:
1¾” Clearance to
Edge of Baseboard
TRIM NOTE:
2¼” to 2 ⅝” Clearance
to Unfinished Floor
1⅝’’ Straw Clamp
(on Bottom)
4” Rear
Knockout
¼”
17⅛
17⅛
13¾
1¾
13¾
1
¼”
17⅛
17⅛
13¾
1¾
13¾
1
¼”
17⅛
17⅛
13¾
1¾
13¾
1
For optimum results, install the DBX1000 ® recessed vent receptacle for 6 Inch Walls as follows:
Box Installation - 16 Inch On-Center Spacing:
6. Orient box to match desired venting direction, score & remove appropriate, top or rear, 4-inch
vent pipe knock out. Allow minimum of 4 inches of vent of pipe to extend inside box
7. If gas line is to be installed, locate 1⅝ straw clamp on top of box. Cut the webs between the
8 fins with a utility knife. Push the gas line through the straw clamp. The fins will flex inward
holding the pipe.
8. Slide box into position taking care to correctly align vent pipe and gas pipe (if present).
9. Spacing tabs will automatically position box so that bottom, inside edge is from 2¼ to 2⅝
inches above unfinished floor to allow clearance between trim ring and finished floor
covering. Tabs may be removed if a different spacing is desired.
10. Attach box directly to both right and left studs using the six flange screw holes. Screws are
recommended for mounting.
Box Installation - 24 Inch On-Center Spacing:
7. Orient box to match desired venting direction, score & remove appropriate 4-inch vent pipe
knock out. Allow minimum of 4inches of vent of pipe to extend inside box.
8. If gas line is to be installed, locate 1⅝ straw clamp on top or bottom of box. Cut the webs
between the 8 fins with a utility knife. Push the gas line through the straw clamp. The fins
will flex inward holding the pipe.
9. Slide box into position taking care to correctly align vent pipe and gas pipe (if present).
10. Spacing tabs will automatically position box so that bottom, inside edge is from 2¼ to 2⅝
inches above unfinished floor to allow clearance between trim ring and finished floor
covering. Tabs may be removed if a different spacing is desired.
11. Attach one side of box directly to stud using the three flange screw holes.
12. Snap in the two mounting straps on the other side of the box and attach these to the second
stud using the strap screw holes. Screws are recommended for mounting.
Trim Instructions:
5. Leave 1¾ inches between inside edge of box and
end of baseboard to allow for trim ring clearance.
6. Snap trim ring into opening, no caulking required.
7. Leave unfinished or paint with desired color.
 Loading...