

Page 1

'
[nl] Gebruiksaanwijzing 2
[en] Instruction manual 28
Inbouwoven CF2347.3
Built-in oven CF2347.3
Page 2

2
é Inhoudsopgave
[nl]Gebruiksaanwijzing
Belangrijke veiligheidsvoorschriften ....................................... 3
Oorzaken van schade........................................................................4
Energie en milieutips................................................................ 5
Energie besparen ...............................................................................5
Milieuvriendelijk afvoeren ..................................................................5
Uw nieuwe oven......................................................................... 5
Bedieningspaneel ...............................................................................5
Functies ................................................................................................6
Binnenruimte........................................................................................6
De toebehoren............................................................................ 6
Toebehoren..........................................................................................6
Toebehoren inschuiven......................................................................6
Inschuifhoogtes ...................................................................................7
Extra toebehoren.................................................................................7
Voor het eerste gebruik............................................................. 7
Tijd instellen .........................................................................................7
Apparaat reinigen ...............................................................................7
Apparaat bedienen..................................................................... 8
Apparaat inschakelen ........................................................................8
Apparaat uitschakelen. ......................................................................8
Basisinstellingen wijzigen..................................................................8
Automatische veiligheidsuitschakeling ...........................................8
Elektronische klok ..................................................................... 9
Klokdisplay...........................................................................................9
Kookwekker .........................................................................................9
Gebruiksduur .......................................................................................9
Gebruikseinde ..................................................................................10
Voorkeuzefunctie ............................................................................ 10
Tijd instellen ...................................................................................... 10
Snelvoorverwarming........................................................................10
Instellingen controleren, corrigeren of wissen............................ 10
Kinderslot ................................................................................. 11
Blokkering .........................................................................................11
Permanente blokkering................................................................... 11
Bakken ...................................................................................... 11
Baktabel voor basisdeeg en kleingebak..................................... 11
Broodbakstand.................................................................................13
Baktabel voor gerechten en diepvries kant-en-klaar producten.
.............................................................................................................13
Tips en trucs ..................................................................................... 14
Braden ...................................................................................... 14
Open braden..................................................................................... 14
Gesloten braden ..............................................................................14
Braadtabel.........................................................................................15
Tips en trucs ..................................................................................... 16
Grillen........................................................................................ 16
Rondom-grillen ................................................................................. 16
Vlakgrillen..........................................................................................17
Hetelucht eco ........................................................................... 18
Ontdooien................................................................................. 19
Bereiden met stoom ................................................................ 19
Yoghurt ..................................................................................... 19
Inmaak....................................................................................... 20
Ovenreiniging........................................................................... 20
Belangrijke aanwijzingen ................................................................ 20
Voor de reiniging ............................................................................. 21
Reinigingsstand instellen................................................................ 21
Na afloop van de reiniging............................................................. 21
Onderhoud en reiniging .......................................................... 21
Schoonmaakmiddelen .................................................................... 21
Inhangroosters reinigen..................................................................22
Ovendeur verwijderen en inbrengen............................................22
Deurafscherming afnemen............................................................. 23
Deurruiten verwijderen en inbrengen...........................................23
Storingen en reparaties........................................................... 24
Storingstabel.....................................................................................24
Ovenlamp aan het plafond vervangen ........................................25
Glazen afscherming......................................................................... 25
Servicedienst ........................................................................... 26
Enummer en FDnummer .............................................................. 26
Testgerechten........................................................................... 26
Produktinfo
Meer informatie over producten, accessoires, onderdelen en
diensten vindt u op het internet: www.constructa.de en in de
online-shop: www.constructa-eshop.com
Page 3

3
: Belangrijke veiligheidsvoorschriften
Lees deze gebruiksaanwijzing zorgvuldig
door. Alleen dan kunt u uw apparaat goed
en veilig bedienen. Bewaar de
gebruiksaanwijzing voor later gebruik of om
door te geven aan een volgende eigenaar.
Dit apparaat is alleen bestemd voor inbouw.
Neem het speciale installatievoorschrift in
acht.
Controleer het apparaat na het uitpakken.
Niet aansluiten in geval van
transportschade.
Alleen een daartoe bevoegd vakman mag
apparaten zonder stekker aansluiten. Bij
schade door een verkeerde aansluiting
maakt u geen aanspraak op garantie.
Dit apparaat is alleen bestemd voor
huishoudelijk gebruik en de huiselijke
omgeving. Gebruik het uitsluitend voor het
bereiden van gerechten en drank. Zorg
ervoor dat het apparaat onder toezicht
gebruikt wordt. Het toestel alleen gebruiken
in gesloten ruimtes.
Dit toestel kan worden gebruikt door
kinderen vanaf 8 jaar en door personen met
beperkte fysieke, sensorische of geestelijke
vermogens of personen die gebrek aan
kennis of ervaring hebben, wanneer zij
onder toezicht staan van een persoon die
verantwoordelijk is voor hun veiligheid of
geleerd hebben het op een veilige manier
te gebruiken en zich bewust zijn van de
risico's die het gebruik van het toestel met
zich meebrengt.
Kinderen mogen niet met het apparaat
spelen. Reiniging en onderhoud van het
toestel mogen niet worden uitgevoerd door
kinderen, tenzij zij 8 jaar of ouder zijn en
onder toezicht staan.
Zorg ervoor dat kinderen die jonger zijn dan
8 jaar uit de buurt blijven van het toestel of
de aansluitkabel.
Toebehoren altijd op de juiste manier in de
binnenruimte plaatsen. Zie beschrijving
toebehoren in de gebruiksaanwijzing.
Risico van brand!
■
Brandbare voorwerpen die in de
binnenruimte worden bewaard kunnen
vlam vatten. Bewaar geen brandbare
voorwerpen in de binnenruimte. Open
nooit de deur wanneer er sprake is van
rookontwikkeling in het apparaat. Het
toestel uitschakelen en de stekker uit het
stopcontact halen of de zekering in de
meterkast uitschakelen.
Risico van brand!
■
Wanneer de apparaatdeur geopend wordt,
ontstaat er een luchtstroom. Het
bakpapier kan dan de
verwarmingselementen raken en vlam
vatten. Tijdens het voorverwarmen mag er
nooit bakpapier los op de toebehoren
liggen. Verzwaar het bakpapier altijd met
een vorm. Bakpapier alleen op het
benodigde oppervlak leggen. Het
bakpapier mag niet uitsteken over de
toebehoren.
Risico van verbranding!
■
Het toestel wordt zeer heet. Nooit de hete
vlakken in de binnenruimte of
verwarmingselementen aanraken. Het
apparaat altijd laten afkoelen. Zorg ervoor
dat er geen kinderen in de buurt zijn.
Risico van verbranding!
■
Toebehoren of vormen worden zeer heet.
Neem hete toebehoren en vormen altijd
met behulp van een pannenlap uit de
binnenruimte.
Risico van verbranding!
■
Alcoholdampen kunnen in de
binnenruimte vlam vatten. Nooit gerechten
klaarmaken die een hoog percentage
alcohol bevatten. Alleen kleine
hoeveelheden drank met een hoog
alcoholpercentage gebruiken. De deur
van het toestel voorzichtig openen.
Kans op verbranding!
■
Tijdens het gebruik worden de
toegankelijke onderdelen heet. De hete
onderdelen nooit aanraken. Zorg ervoor
dat er geen kinderen in de buurt zijn.
Risico van verbranding!
■
Bij het openen van de apparaatdeur kan
hete stoom vrijkomen. De deur van het
toestel voorzichtig openen. Zorg ervoor
dat er geen kinderen in de buurt zijn.
Kans op verbrandingen!
■
Door water in de hete binnnruimte kan
hete waterdamp ontstaan. Nooit water in
de hete binnenruimte gieten.
Risico van letsel!
Wanneer er krassen op het glas van de
apparaatdeur zitten, kan dit springen. Geen
schraper, scherpe of schurende
schoonmaakmiddelen gebruiken.
Page 4

4
Kans op een elektrische schok!
■
Ondeskundige reparaties zijn
gevaarlijk.Reparaties mogen uitsluitend
worden uitgevoerd door technici die zijn
geïnstrueerd door de klantenservice.Is het
apparaat defect, haal dan de stekker uit
het stopcontact of schakel de zekering in
de meterkast uit. Contact opnemen met
de klantenservice.
Kans op een elektrische schok!
■
De kabelisolatie van hete
toestelonderdelen kan smelten. Zorg
ervoor dat er nooit aansluitkabels van
elektrische toestellen in contact komen
met hete onderdelen van het apparaat.
Kans op een elektrische schok!
■
Binnendringend vocht kan een schok
veroorzaken. Geen hogedrukreiniger of
stoomreiniger gebruiken.
Kans op een elektrische schok!
■
Bij vervanging van de lamp in de
binnenruimte staan de contacten van de
lampfitting onder stroom. Trek voordat u
tot vervanging overgaat de netstekker uit
het stopcontact trekken of schakel de
zekering in de meterkast uit.
Kans op een elektrische schok!
■
Een defect toestel kan een schok
veroorzaken. Een defect toestel nooit
inschakelen. De netstekker uit het
stopcontact halen of de zekering in de
meterkast uitschakelen. Contact opnemen
met de klantenservice.
Risico van brand!
■
Losse voedselresten, vet en braadjus
kunnen tijdens de zelfreiniging vlam
vatten. Verwijder voor de zelfreiniging altijd
de grove verontreiniging uit de
binnenruimte en van de toebehoren.
Risico van brand!
■
De buitenkant van het apparaat wordt
tijdens de zelfreiniging zeer heet. Nooit
brandbare voorwerpen, zoals bijv.
droogdoeken, aan de deurgreep hangen.
Zorg ervoor dat de voorkant van het
toestel vrij blijft. Zorg ervoor dat er geen
kinderen in de buurt zijn.
Risico van verbranding!
■
De binnenruimte wordt tijdens de
zelfreiniging zeer heet. Nooit de
apparaatdeur openen of de
vergrendelingshaak met de hand
verschuiven. Het toestel laten afkoelen.
Zorg ervoor dat er geen kinderen in de
buurt zijn.
Risico van verbranding!
■
; De buitenkant van het apparaat wordt
tijdens de zelfreiniging zeer heet. De
apparaatdeur nooit aanraken. Het
apparaat laten afkoelen. Zorg ervoor dat
er geen kinderen in de buurt zijn.
Ernstig gezondheidsrisico!
Het toestel wordt zeer heet tijdens de
zelfreiniging. De antiaanbaklaag van
bakplaten en vormen wordt aangetast en er
ontstaan giftige gassen. Nooit platen en
vormen met een antiaanbaklaag
meereinigen bij de zelfreiniging. Alleen
geëmailleerde toebehoren meereinigen.
Oorzaken van schade
Attentie!
■ Toebehoren, folie, bakpapier of vormen op de bodem van de
binnenruimte: Geen toebehoren op de bodem van de
binnenruimte leggen. Geen bakpapier of folie, van welk type
dan ook, op de bodem van de binnenruimte leggen. Geen
vorm op de bodem van de binnenruimte plaatsen wanneer
een temperatuur van meer dan 50 °C ingesteld is. Er
ontstaat dan een opeenhoping van warmte. De bak- en
braadtijden kloppen niet meer en het email wordt
beschadigd.
■ Water in de hete binnenruimte: Nooit water in de hete
binnenruimte gieten. Er ontstaat dan waterdamp. Door de
verandering van temperatuur kan schade aan het email
ontstaan.
■ Vochtige levensmiddelen: Geen vochtige levensmiddelen
langere tijd in de afgesloten binnenruimte bewaren. Het email
raakt dan beschadigd.
■ Vruchtensap: De bakplaat bij zeer vochtig vruchtengebak niet
te overvloedig bedekken. Vruchtensap dat van de bakplaat
druppelt, laat vlekken achter die niet meer kunnen worden
verwijderd. Gebruik zo mogelijk de diepere braadslede.
■ Afkoelen met open apparaatdeur: De binnenruimte alleen
laten afkoelen wanneer deze afgesloten is. Ook wanneer de
deur slechts op een kier openstaat, kan de voorzijde van
aangrenzende meubels op den duur worden beschadigd.
■ Sterk vervuilde deurdichting: is de deurdichting sterk vervuild,
dan sluit de apparaatdeur tijdens het gebruik niet meer goed.
De voorzijde van aangrenzende meubels kan worden
beschadigd.Zorg ervoor dat de deurdichting altijd schoon is.
■ Apparaatdeur als vlak om op iets op te leggen of te plaatsen:
niets op de apparaatdeur leggen of plaatsen en er niets aan
hangen. Geen vormen of toebehoren op de apparaatdeur
plaatsen.
■ Toebehoren inschuiven: afhankelijk van het type toestel
kunnen de toebehoren krassen geven op de deur.
Toebehoren altijd tot de aanslag in de binnenruimte schuiven.
■ Apparaat transporteren: Het apparaat niet aan de deurgreep
vasthouden of dragen. De deurgreep houdt op den duur het
gewicht van het apparaat niet en kan afbreken.
Page 5
5
Energie en milieutips
Hier krijgt u tips over de manier waarop u bij het bakken en
braden kunt besparen op energie en het apparaat op de juiste
manier afvoert.
Energie besparen
■ De oven alleen voorverwarmen als dit in het recept of in de
tabellen van de gebruiksaanwijzing is opgegeven.
■ Gebruik donkere, zwart gelakte of geëmailleerde bakvormen.
Deze nemen de hitte bijzonder goed op.
■ Open de ovendeur tijdens het garen, bakken of braden zo
weinig mogelijk.
■ Meerdere taarten of cakes kunt u het beste na elkaar bakken.
De oven is dan nog warm. Daardoor is de baktijd voor het
tweede gerecht korter. U kunt ook 2 rechthoekige bakvormen
naast elkaar in de oven plaatsen.
■ Bij langere bereidingstijden kunt u de oven 10 minuten voor
het einde van de bereidingstijd uitzetten en de restwarmte
gebruiken voor het afbakken.
Milieuvriendelijk afvoeren
Voer de verpakking op een milieuvriendelijke manier af.
Uw nieuwe oven
In dit hoofdstuk vindt u informatie over
■ het bedieningspaneel
■ de functies
■ de binnenruimte
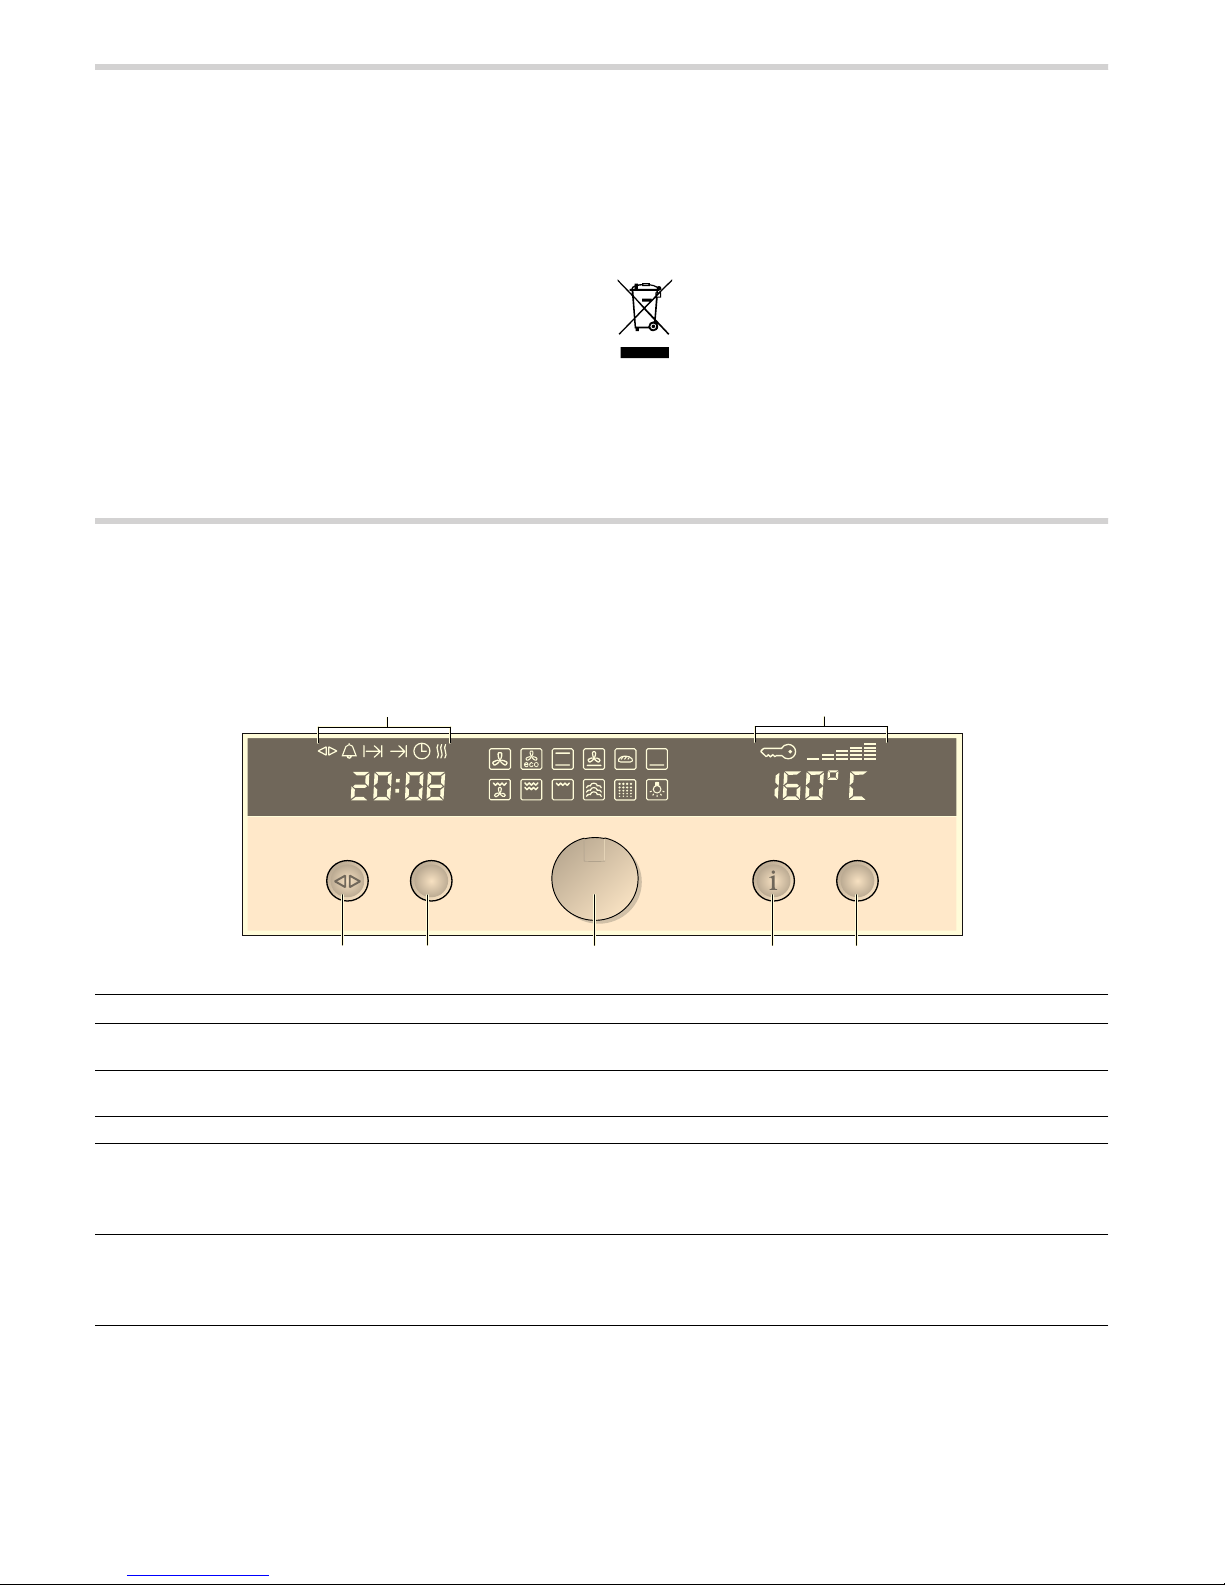
Bedieningspaneel
Indrukbare bedieningsknoppen
De draai-, temperatuur en functiekeuzeknop zijn indrukbaar.
Om in en uit te schakelen op de betreffende knop drukken.
Dit apparaat is gekenmerkt in overeenstemming met
de Europese richtlijn 2012/19/EU betreffende
afgedankte elektrische en elektronische apparatuur
(waste electrical and electronic equipment - WEEE).
De richtlijn geeft het kader aan voor de in de EU
geldige terugneming en verwerking van oude
apparaten.
Bedieningselement Gebruik
KJ Klokfunctietoets Gewenste klokfunctie of de functie Snel voorverwarmen kiezen (zie het
hoofdstuk: Elektronische klok)
Draaiknop Instellingen binnen een klokfunctie uitvoeren of de functie Snel voorverwarmen inscha-
kelen (zie het hoofdstuk: Elektronische klok)
Functiekeuzeknop Gewenste functie kiezen (zie het hoofdstuk: Apparaat inschakelen)
± Infotoets Ingeschakeld apparaat: actuele oventemperatuur tijdens het opwarmen weergeven
(zie het hoofdstuk: Apparaat inschakelen)
Uitgeschakeld apparaat: menu Basisinstellingen opvragen (zie het
hoofdstuk: Basisinstellingen wijzigen)
Temperatuurkeuzeknop Ingeschakeld apparaat: temperatuur instellen (zie het
hoofdstuk: Apparaat inschakelen)
Uitgeschakeld apparaat: Instellingen in het menu Basisinstellingen wijzigen (zie het
hoofdstuk: Basisinstellingen wijzigen)
(OHNWURQLVFKHNORN
)XQFWLHNHX]HNQRS'UDDLNQRS
,QIRWRHWV
.ORNIXQFWLHWRHWV
7
HPSHUDWXXUGLVSOD\
7HPSHUDWXXU
NHX]HNQRS
Page 6
6
Functies
Hier vindt u een overzicht van de functies van uw apparaat.
Binnenruimte
In de binnenruimte bevindt zich de ovenlamp. Een
koelventilator beschermt de oven tegen oververhitting.
Ovenlamp
Tijdens het gebruik brandt de ovenlamp in de binnenruimte.Bij
de zelfreiniging gaat de lamp uit..
Koelventilator
De koelventilator wordt zo nodig in- en uitgeschakeld. De
warme lucht ontsnapt via de deur. Let op! De ventilatiesleuven
niet afdekken. Anders raakt de oven oververhit.
De koelventilator loopt een bepaalde tijd na, zodat de
binnenruimte na gebruik sneller afkoelt.
De toebehoren
In dit hoofdstuk vindt u informatie over
■ de toebehoren
■ de manier waarop de toebehoren op de juiste manier in de
binnenruimte worden geschoven
■ de inschuifniveaus
■ de extra toebehoren
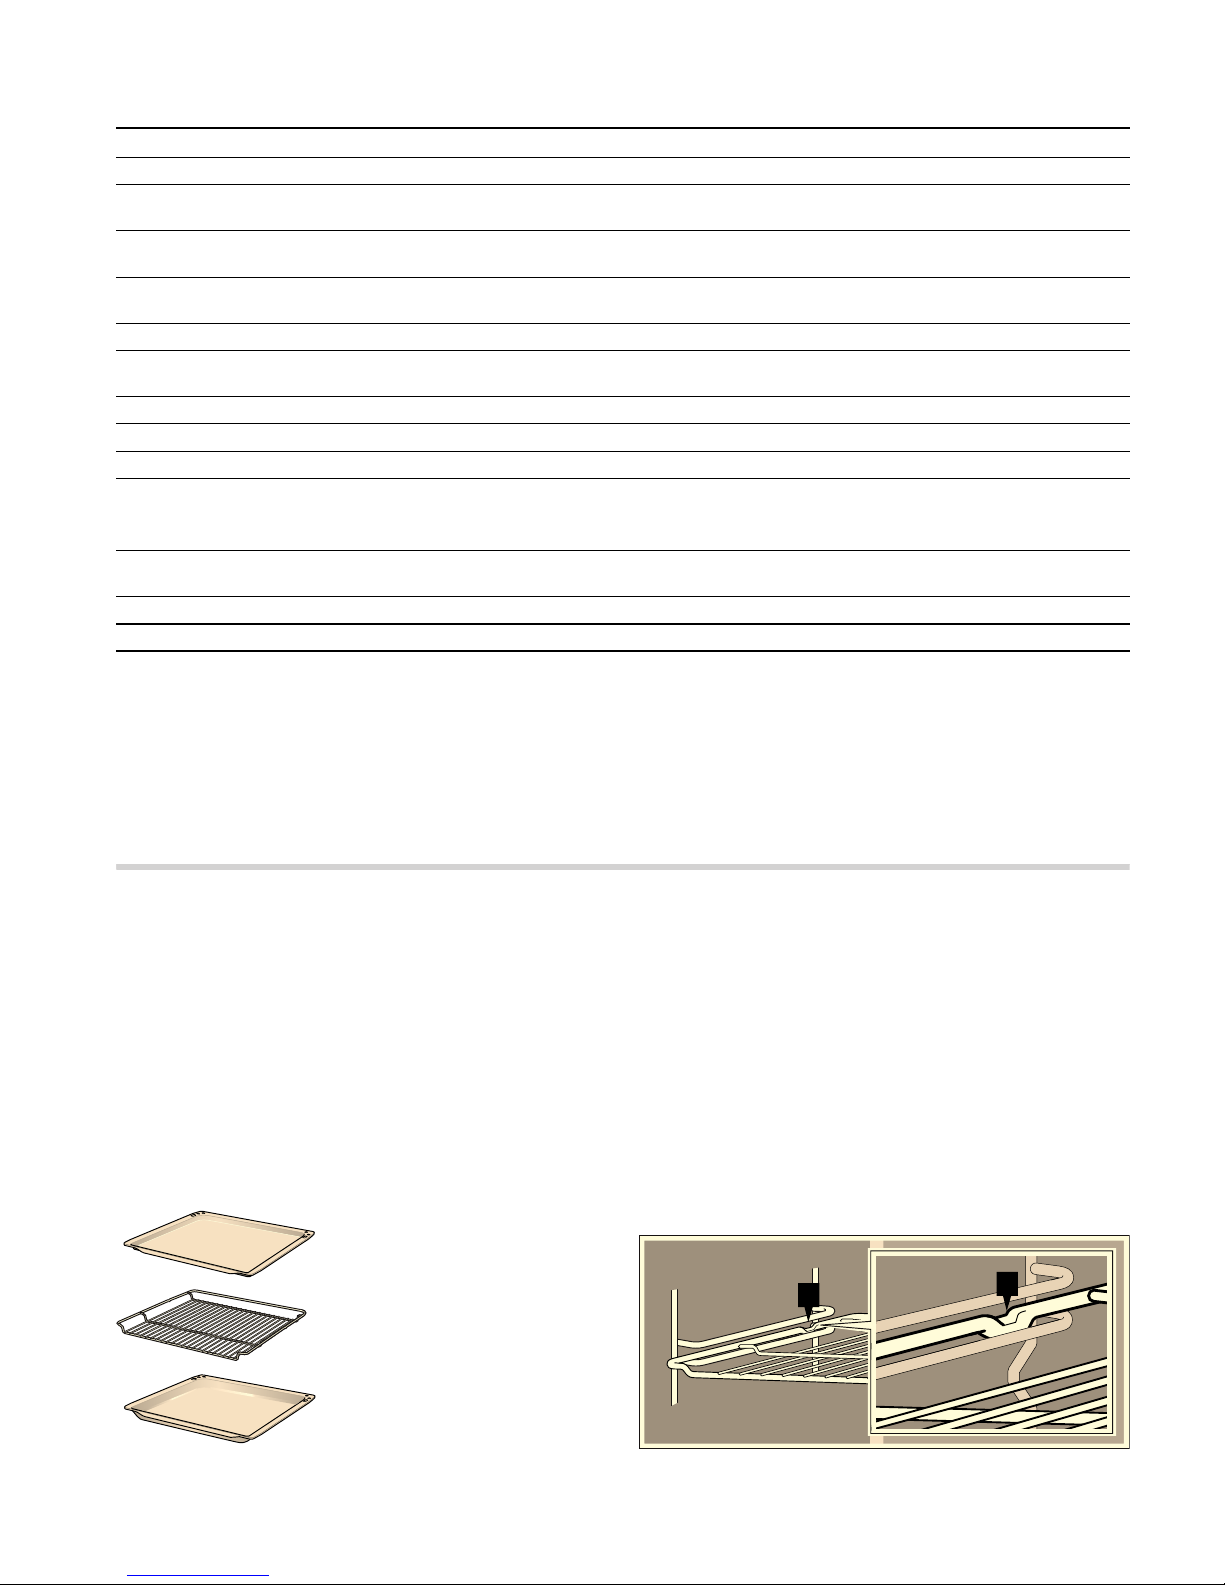
Toebehoren
Bij de levering van uw apparaat zijn de volgende toebehoren
inbegrepen:
Aanwijzing: De bakplaat en braadslede kunnen tijdens het
gebruik van het toestel iets kromtrekken. De oorzaak hiervan
zijn grote temperatuurverschillen bij de toebehoren. Deze
kunnen zich voordoen wanneer er slechts op een deel van de
toebehoren gerechten zijn geplaatst of diepvriesproducten,
zoals pizza's, op de toebehoren zijn gelegd.
Toebehoren inschuiven
De toebehoren zijn voorzien van een vergrendelingsfunctie. De
vergrendelingsfunctie voorkomt dat de toebehoren kantelen
wanneer ze worden verwijderd. De toebehoren dienen op de
juiste wijze in de binnenruimte te worden geschoven, zodat de
kantelbeveiliging goed werkt.
Let er bij het inschuiven van het rooster op
■ dat de ontgrendelnok (a) naar beneden wijst
■ dat de ontgrendelnok (a) zich achter het rooster bevindt
Let er bij het inschuiven van de bakplaat of de braadslede op
■ dat de ontgrendelnok (a) zich achter de toebehoren bevindt
Functie Toepassing
3 Hete lucht voor het bakken en braden op één of meerdere niveaus
“ Hete lucht eco* om energiegeoptimaliseerd te bakken en braden op één niveau. Het apparaat hoeft niet
te worden voorverwarmd
% Boven- en onderwarmte voor het bakken en braden op één niveau. Bijzonder geschikt voor taarten met een voch-
tige bedekking (bijv. kwarktaart)
0 Pizzastand voor diepvries kant-en-klaar producten en voor gerechten die veel warmte aan de onder-
kant nodig hebben (zie het hoofdstuk: Bakken)
ë Broodbakstand voor bakwaren die bij een hoge temperatuur gebakken moeten worden
$ Onderwarmte voor gerechten en bakwaren die aan de onderkant sterker gebruind of krokant moeten
worden. Schakel de onderwarmte aan het einde van de baktijd slechts kort in.
4 Rondomgrillen voor gevogelte en grotere stukken vlees
+ Grill, groot voor grote hoeveelheden vlakke, kleine gerechten van de grill (bijv. steaks, worstjes)
( Grill, klein voor kleine hoeveelheden platte, kleine gerechten van de grill (bijv. steaks, toast)
é Stoomstand voor het gezond bereiden van groente, vlees en vis
De stoomstand é kan alleen samen met het mega systeemstoomapparaat (als extra
accessoire in de vakhandel verkrijgbaar) worden gebruikt.
x Ovenreiniging automatische reiniging van de binnenruimte. De oven warmt op tot de verontreiniging
wordt afgebroken
\ Ovenverlichting als hulp bij het onderhoud en reinigen van de binnenruimte
* Verwarmingsmethode waarbij de energie-efficiëntieklasse overeenkomt met EN50304.
Bakplaat, geëmailleerd
voor het bakken van plaatgebak en
klein gebak
Rooster
voor het bakken in vormen, het
braden in braadservies en het
grillen
Braadslede, geëmailleerd
voor het bakken van vochtig gebak,
voor het braden, het grillen en het
opvangen van afdruipende vloeistof
D
D
Page 7
7
■ dat de schuine kant van de toebehoren tijdens het inschuiven
naar de deur van het toestel is gericht
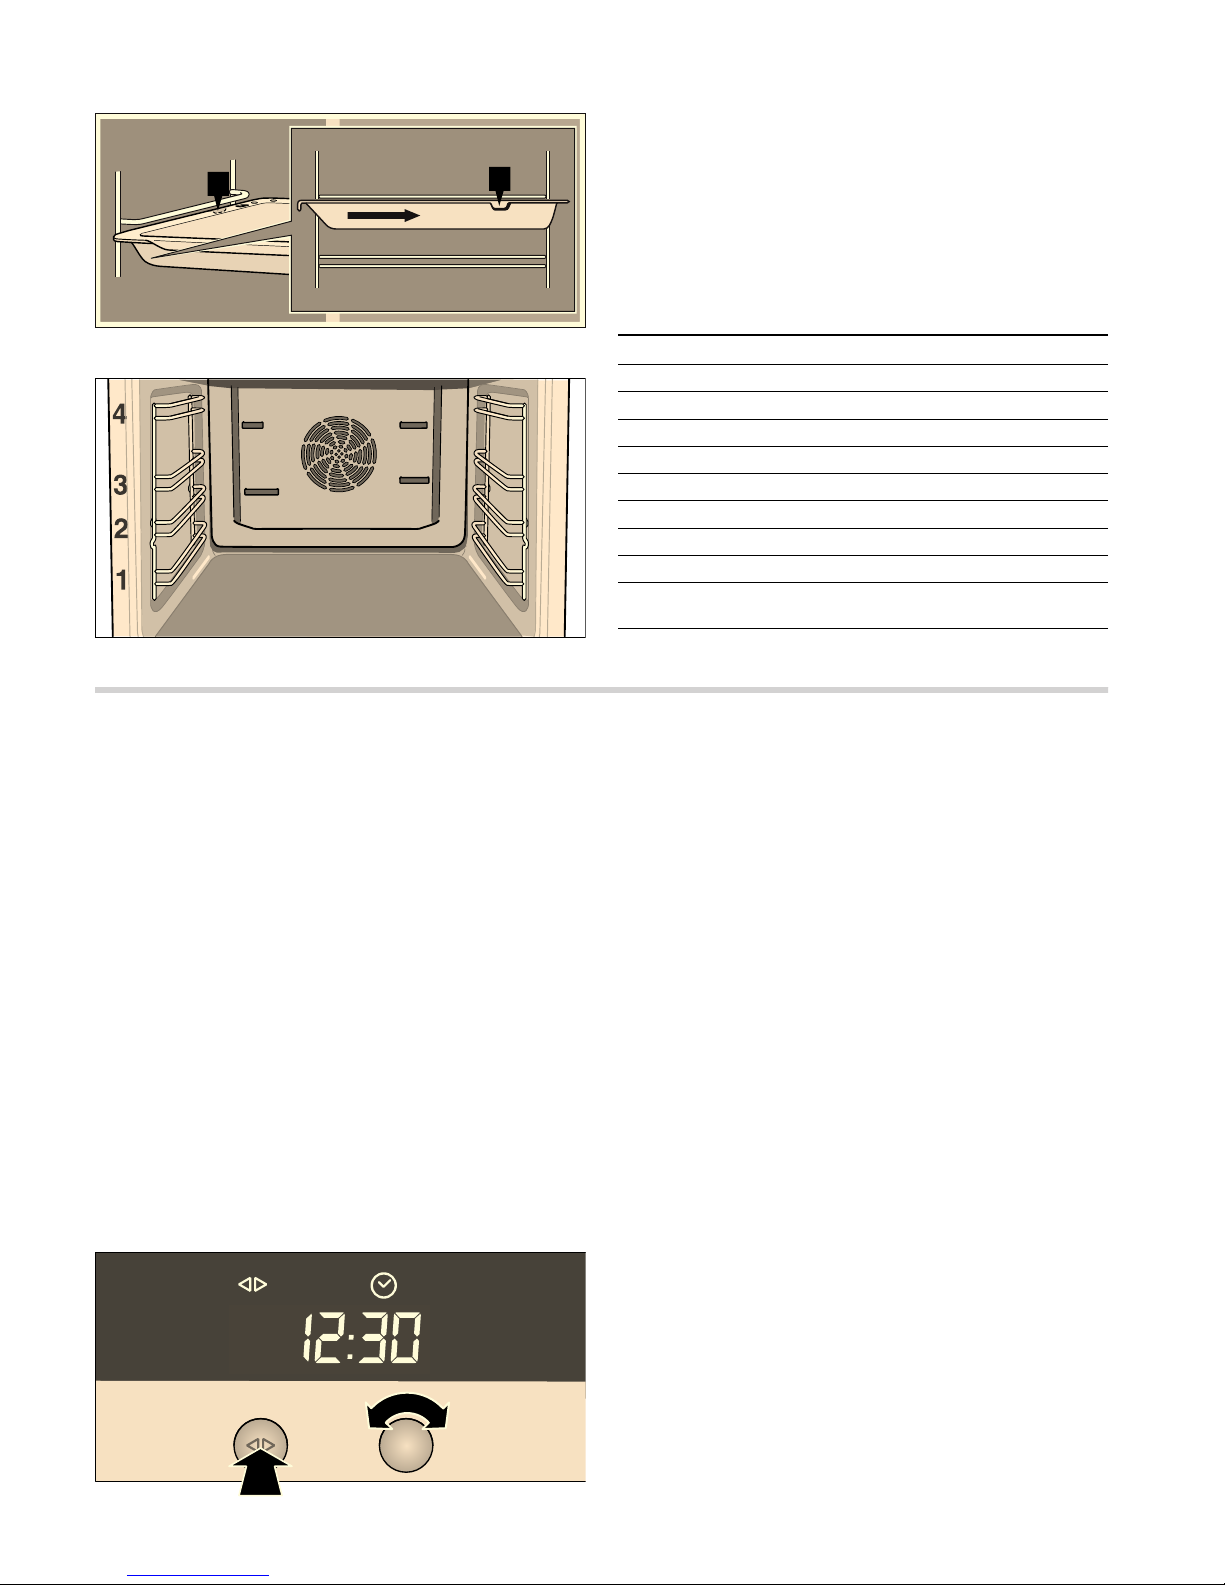
Inschuifhoogtes
De binnenruimte heeft vier inschuifhoogtes. De inschuifhoogtes
worden van beneden naar boven geteld.
Aanwijzing: Bij het bakken en braden met hete lucht 3
inschuifhoogte 2 niet gebruiken. Dit heeft invloed op de
luchtcirculatie, met als gevolg een slechter bak- en
braadresultaat.
Extra toebehoren
Extra toebehoren kunt u kopen bij de klantenservice of in
speciaalzaken. U kunt dit nakijken in de verkoopdocumenten.
Geef bij de aankoop alstublieft de precieze aanduiding (E-nr.)
van uw toestel aan.
Voor het eerste gebruik
In dit hoofdstuk leest u
■ hoe u na de elektrische aansluiting van uw apparaat de tijd
instelt
■ hoe u het apparaat voor het eerste gebruik schoonmaakt
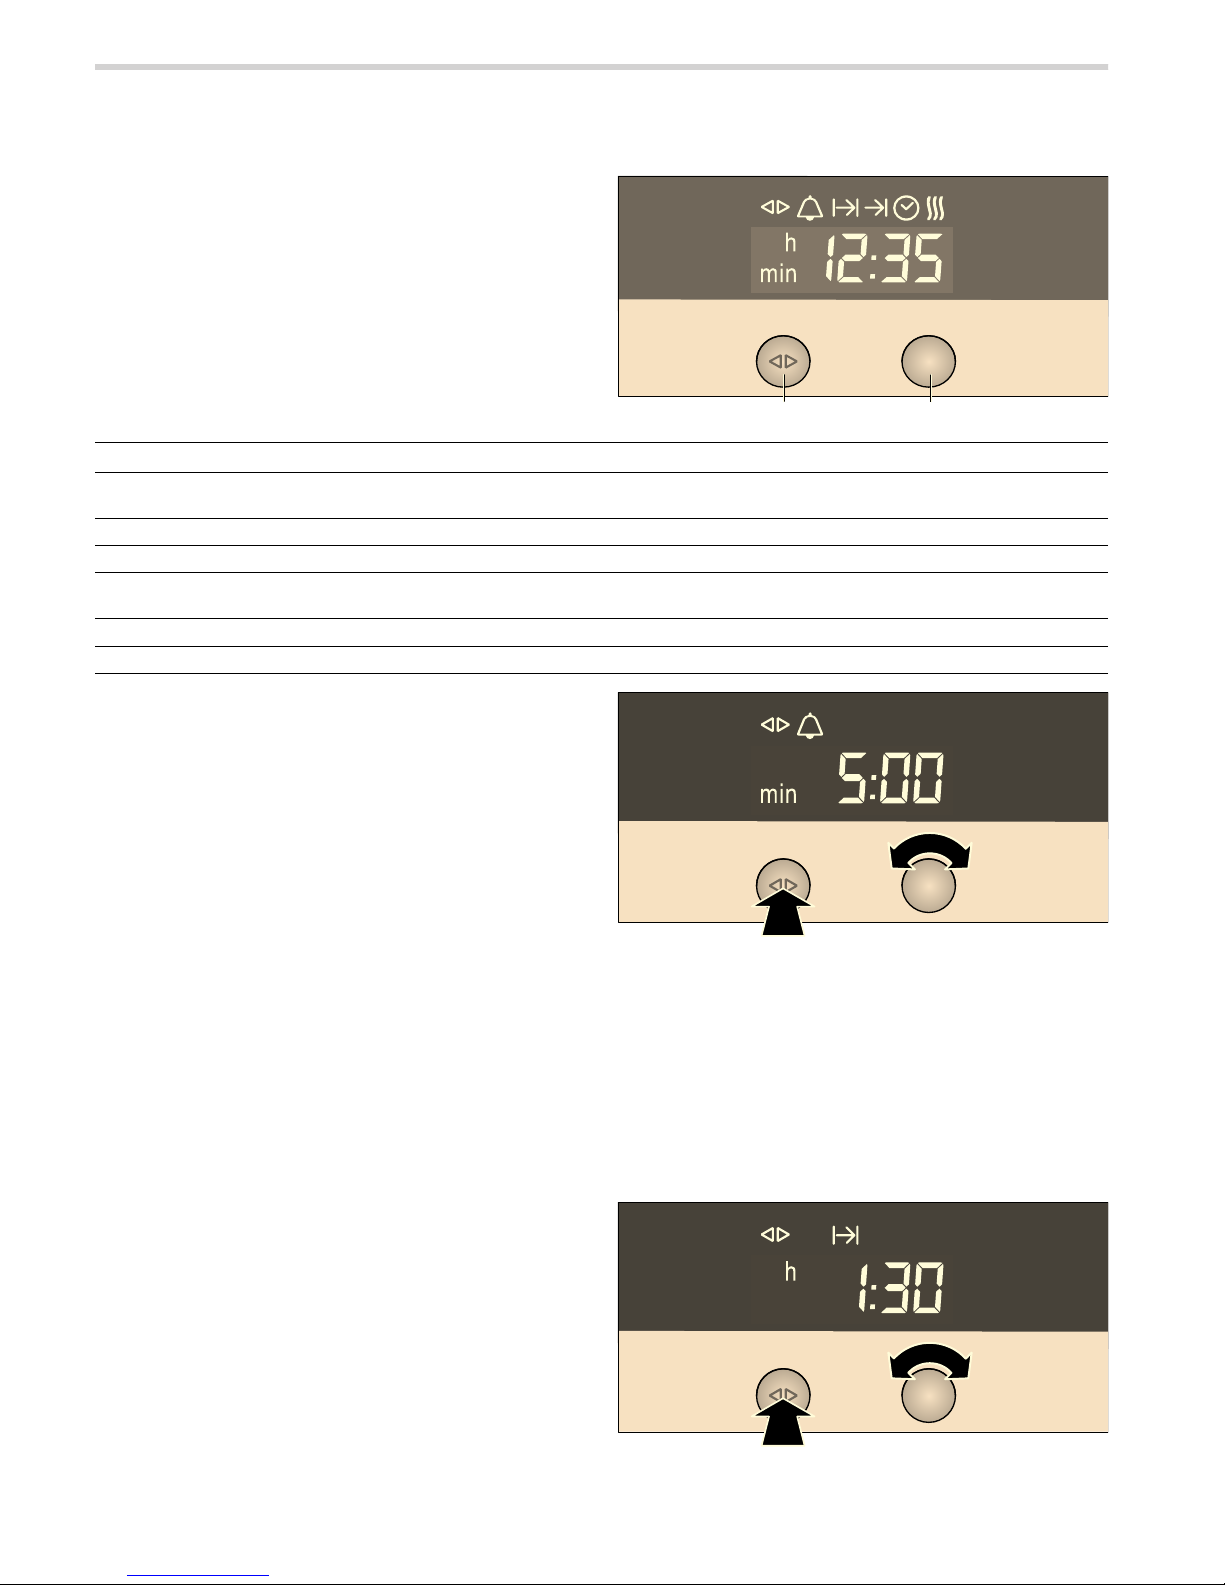
Tijd instellen
Aanwijzing: Wanneer u op de klokfunctietoets KJ drukt, heeft
u 3 seconden de tijd om de tijd met de draaiknop in te stellen.
Was dit te kort, dan kunt u de tijd later nog veranderen.
Op het klokdisplay knippert ‹:‹‹.
1. Klokfunctietoets KJ kort indrukken om naar de instelmodus
te gaan.
De symbolen KJ en 3 zijn verlicht. Op het klokdisplay
verschijnt ‚ƒ:‹‹.
2. Met de draaiknop de actuele tijd instellen.
Uw instelling wordt na 3 seconden automatisch
overgenomen.
Tijd wijzigen
Om de tijd achteraf te veranderen, drukt u zo vaak op de
klokfunctietoets KJ tot de symbolen KJ en 3 weer verlicht
zijn. Met de draaiknop de tijd wijzigen.
Apparaat reinigen
Maak het apparaat voor het eerste gebruik schoon
1. Toebehoren en verpakkingsresten uit de binnenruimte
verwijderen.
2. Toebehoren en binnenruimte schoonmaken met warm
zeepsop (zie het hoofdstuk: Reiniging en onderhoud).
3. Boven- en onderwarmte % op 240 °C 60 minuten lang
verwarmen.
4. De afgekoelde binnenruimte met warm zeepsop afnemen.
5. Reinig de buitenkant van het apparaat met een zachte,
vochtige doek en zeepsop.
D
D
Toebehoren Bestelnr.
Braadslede met inzetrooster CZ 1242 X1
Bakplaat, geëmailleerd CZ 1342 X0
Bak- en braadrooster CZ 1432 X1
Bakplaat, aluminium CZ 1332 X0
Pizzavorm CZ 1352 X0
Systeemstoomapparaat CZ 1282 X0
2voudige telescopische uitschuifvoorziening CZ 1702 X2
3voudige telescopische uitschuifvoorziening CZ 1742 X2
4voudige telescopische volledige uitschuifvoorziening
CZ 1755 X2
Page 8
8
Apparaat bedienen
In dit hoofdstuk leest u
■ hoe u het apparaat in- en uitschakelt
■ hoe u een functie en temperatuur kiest
■ hoe u de basisinstellingen kunt wijzigen.
■ wanneer u het apparaat automatisch uitschakelt
Apparaat inschakelen
1. Aan de functieschakelaar draaien, totdat het symbool voor de
gewenste functie wordt verlicht.
Op het temperatuurdisplay verschijnt een voorgestelde
temperatuur.
2. Aan de temperatuurkeuzeknop draaien om de voorgestelde
temperatuur te wijzigen.
Het apparaat begint op te warmen.
Aanwijzing: Wordt er geen voorgestelde temperatuur
weergegeven, dan is de temperatuur van de gekozen functie
een vaste instelling. U kunt deze temperatuur niet veranderen.
Actuele temperatuur
Druk op de infotoets ±. De actuele temperatuur verschijnt
gedurende 3 seconden.
Aanwijzing: De actuele temperatuur kan alleen worden
weergegeven bij functies met een temperatuurvoorstel.
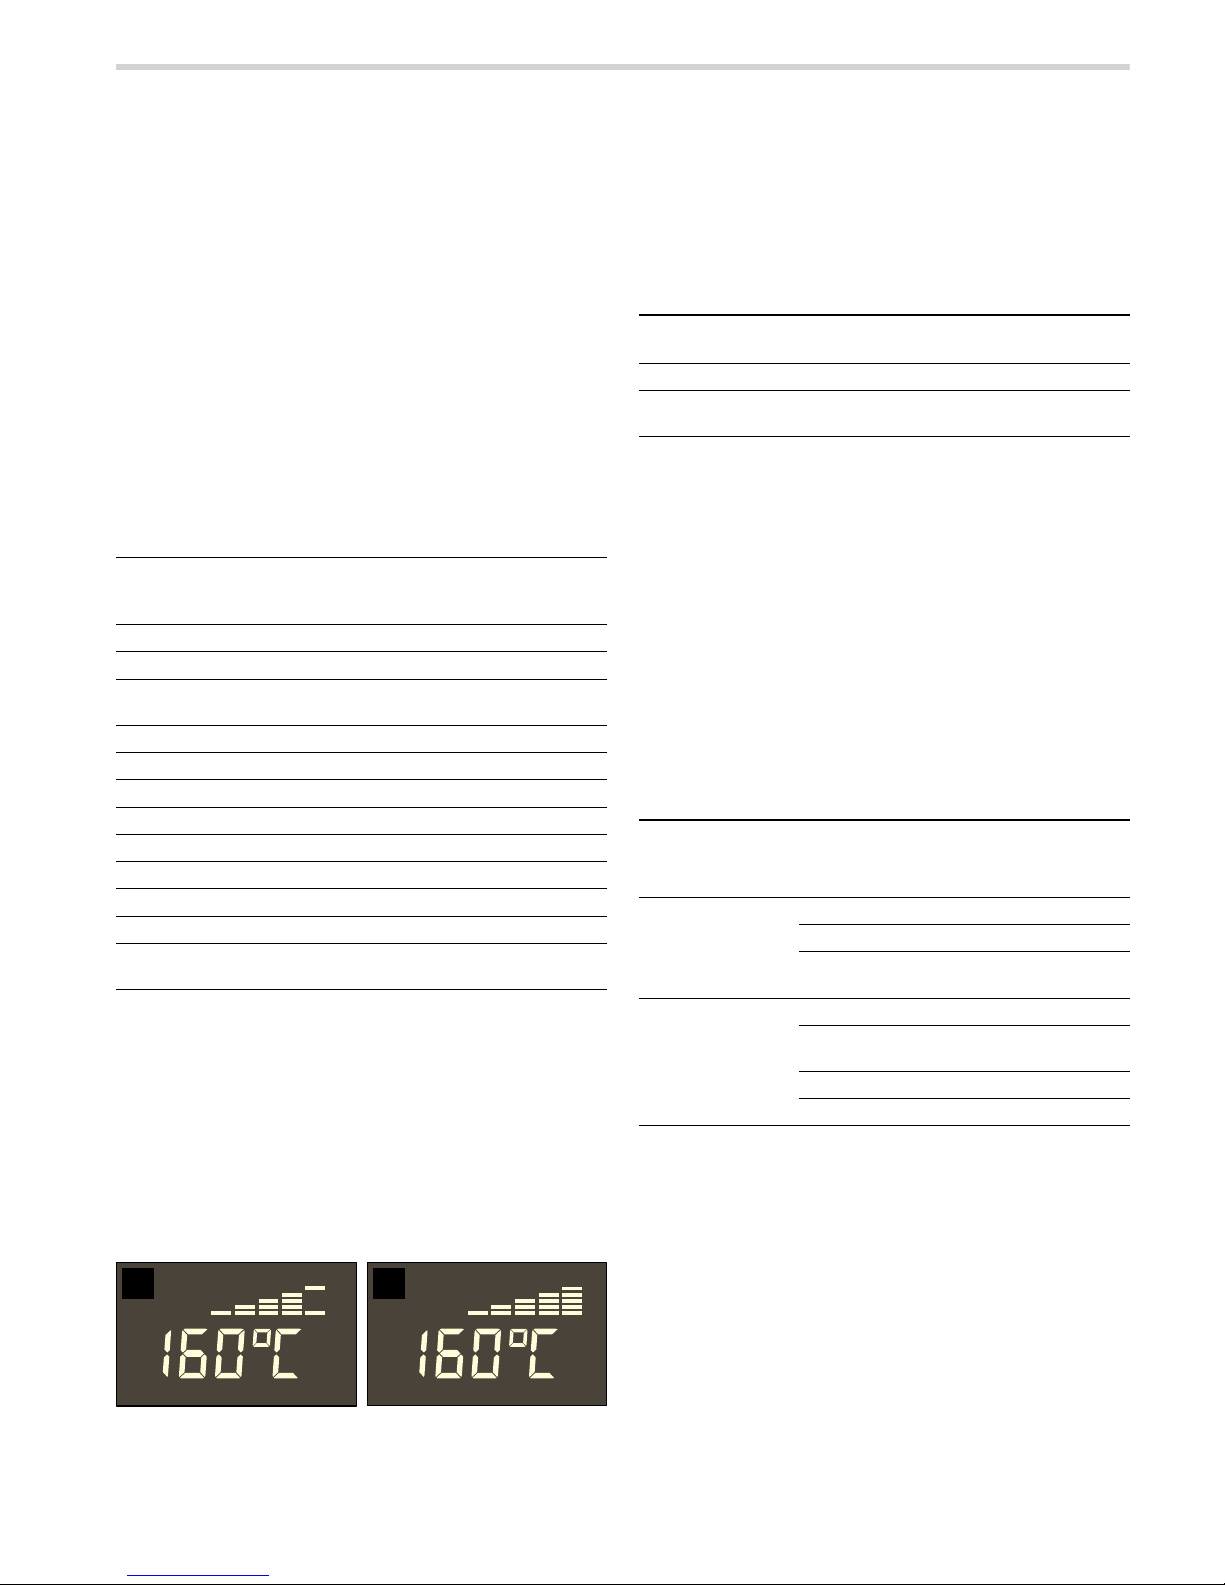
Verwarmingscontrole
De verwarmingscontrole geeft de temperatuurstijging in de
binnenruimte weer.
■ Temperatuur bereikt (Afbeelding A)
■ Apparaat warmt na (Afbeelding B)
Apparaat uitschakelen.
Draai de functiekeuzeknop naar de stand Û terug. Het apparaat
is uitgeschakeld.
Het apparaat heeft een koelventilator. Na het uitschakelen kan
de koelventilator nalopen.
Op het temperatuurdisplay ziet u of de restwarmte in de
binnenruimte hoog of laag is.
Basisinstellingen wijzigen
Uw apparaat heeft verschillende standaard basisinstellingen. U
kunt deze basisinstellingen naar wens veranderen.
Het apparaat moet uitgeschakeld en mag niet geblokkeerd zijn.
1. Infotoets ± 3 seconden lang indrukken om in het
menu Basisinstellingen te komen.
Op het temperatuurdisplay verschijnt ™‚‹.
2. Infotoets ± zo vaak kort indrukken tot het instelsymbool van
de actuele basisinstelling van een submenu op het
temperatuurdisplay wordt weergegeven (bijv. ™„ƒ).
3. Met de temperatuurkeuzeknop de gewenste basisinstelling
binnen een submenu instellen (bijv. ™„„).
4. Infotoets ± 3 seconden lang indrukken.
Uw basisinstelling wordt opgeslagen.
U kunt de volgende basisinstellingen wijzigen.
Automatische veiligheidsuitschakeling
De automatische veiligheidsuitschakeling wordt geactiveerd
wanneer u langere tijd geen instellingen op uw ingeschakelde
apparaat uitvoert.
De tijdsduur waarna uw apparaat uitgaat, is afhankelijk van uw
instellingen.
Op het temperatuurdisplay knippert ‹‹‹. De werking van het
apparaat wordt onderbroken.
Draai de functiekeuzeknop naar de stand Û terug om het te
deactiveren.
Functie Voorgestelde
temperatuur in
°C
Temperatuurbereik in °C
3 Hete lucht 160 40 - 200
“ Hete lucht eco 160 40 - 200
% Boven- en onder-
warmte
170 50 - 275
0 Pizzastand 220 50 - 275
ë Broodbakstand 200 180 - 220
$ Onderwarmte 200 50 - 225
4 Rondom-grillen 170 50 - 250
+ Grill, groot 220 50 - 275
( Grill, klein 180 50 - 275
é Stoomstand Vaste instelling -
x Ovenreiniging Stand 0 1, 2 en 3
\ Verlichting van de
binnenruimte
Vaste instelling -
$ %
Temperatuurdisplay
Betekenis
• Restwarmte hoog (boven de 120 ºC)
œ Restwarmte laag (tussen
60 °C en 120 °C)
Menu Basisinstellingen
Submenu Basisinstelling Instel-sym-
bool
Kinderslot Apparaat gedeblokkeerd ™‚‹
Apparaat geblokkeerd ™‚‚
Apparaat permanent
geblokkeerd
™ƒ‚
Geluidssignaal Geluidssignaal uit ™„‹
Geluidssignaal 30 seconden.
™„‚
Geluidssignaal 2 minuten ™„ƒ
Geluidssignaal 10 minuten ™„„
Page 9
9
Elektronische klok
In dit hoofdstuk leest u
■ hoe u de kookwekker instelt
■ hoe u het apparaat automatisch uitschakelt (gebruiksduur en
gebruikseinde)
■ hoe u het apparaat automatisch in- en uitschakelt (instelling
vooraf)
■ hoe u de tijd instelt
■ hoe u de functie Snel voorverwarmen inschakelt
Klokdisplay
Aanwijzingen
■ Tussen ƒƒ:‹‹ en †:†Š uur wordt het klokdisplay verduisterd
wanneer u in deze tijd niets instelt of als er geen klokfunctie
geactiveerd is.
■ Bij het instellen van een klokfunctie wordt het tijdsinterval
langer wanneer u hogere waarden instelt (bijv. gebruiksduur
tot‚:‹‹œ met een precisie van één minuut, hoger dan ‚:‹‹œ
met een precisie van 5 minuten in te stellen).
■ Bij de klokfuncties Kookwekker Q, Gebruiksduur x,
Gebruikseinde y en Voorkeuzefunctie klinkt na afloop van
de instellingen een signaal en het symbool Q resp. y
knippert. Wilt u het geluidssignaal voortijdig beëindigen, druk
dan op de klokfunctietoets KJ.
■ Druk steeds maar slechts kort op de klokfunctietoets KJ om
een klokfunctie te kiezen. U heeft dan 3 seconden de tijd om
de geselecteerde klokfunctie in te stellen. Hierna wordt de
instelmodus automatisch verlaten.
Klokdisplay uit- en inschakelen
1. Klokfunctietoets KJ 6 seconden lang indrukken.
Het klokdisplay gaat uit. Is er een klokfunctie actief, dan blijft
het bijbehorende symbool verlicht.
2. Klokfunctietoets KJ kort indrukken.
Het klokdisplay gaat aan.
Kookwekker
1. KLokfunctietoets KJ zo vaak indrukken tot de symbolen KJ
en Q verlicht zijn.
2. Met de draaiknop de tijdsduur instellen (bijv. †:‹‹ minuten).
De instelling wordt automatisch overgenomen. Hierna wordt
weer de tijd weergegeven en de kookwekker loopt af.
Gebruiksduur
Automatisch uitschakelen na een ingestelde tijdsduur.
1. Functie en temperatuur instellen.
Het apparaat warmt op.
2. Klokfunctietoets KJ zo vaak indrukken tot de symbolen KJ
en x verlicht zijn.
3. Met de draaiknop de gebruiksduur instellen (bijv. ‚:„‹ uur).
De instelling wordt automatisch overgenomen. Hierna wordt
weer de tijd weergegeven en de ingestelde gebruiksduur
loopt af.
.ORNIXQFWLHWRHWV 'UDDLNQRS
Klokfunctie Gebruik
Q Kookwekker U kunt de wekker gebruiken als een kook- of eierwekker. Het apparaat gaat niet automa-
tisch aan of uit.
x Gebruiksduur Het apparaat gaat na een ingestelde gebruiksduur (bijv. ‚:„‹ uur) automatisch uit
y Gebruikseinde Het apparaat gaat op een ingesteld tijdstip (bijv. ‚ƒ:„‹ uur) automatisch uit
Voorkeuzefunctie Het apparaat wordt automatisch in- en uitgeschakeld. Gebruiksduur en gebruikseinde
worden gecombineerd
3 Tijd Tijd instellen
f Snel voorverwarmen Opwarmtijd verkorten
Page 10
10
Na afloop van de gebruiksduur schakelt het apparaat
automatisch uit.
1. Functie- en temperatuurkeuzeknop weer in de stand Û
draaien.
2. Klokfunctietoets KJ indrukken om de klokfunctie te
beëindigen.
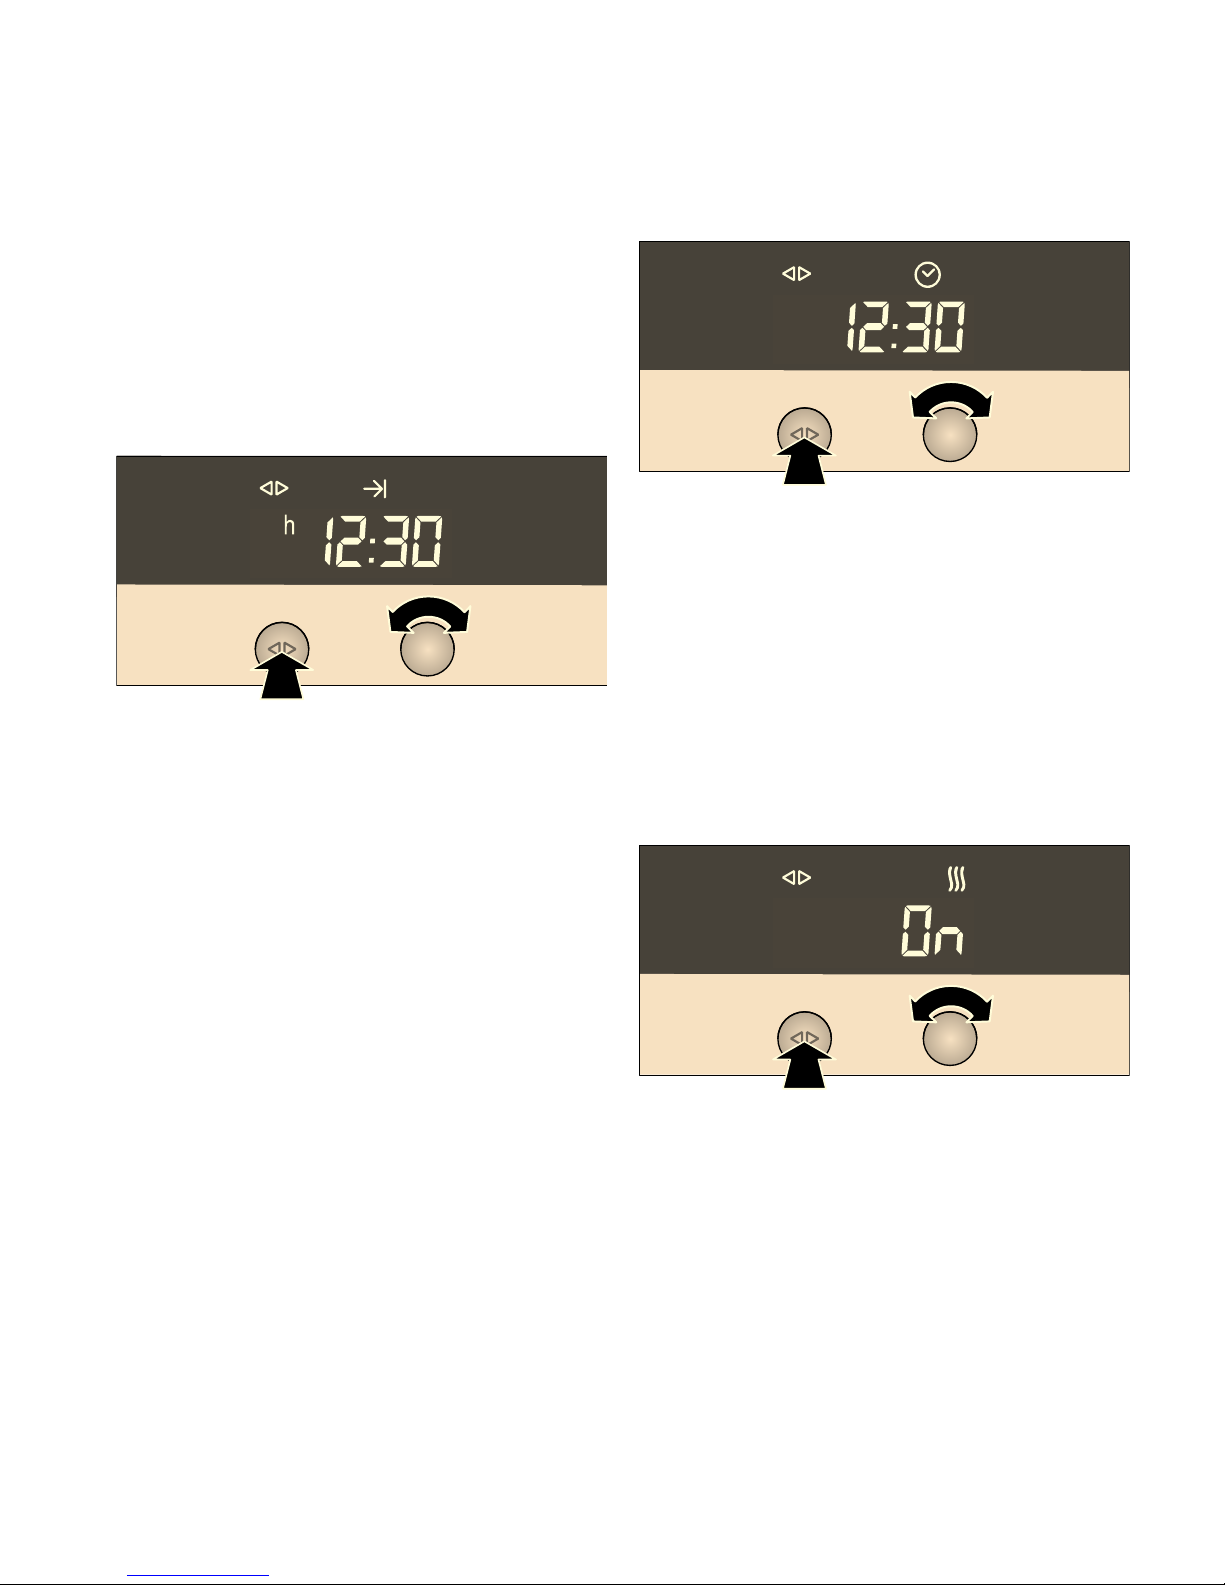
Gebruikseinde
Automatisch uitschakelen op een ingesteld tijdstip.
1. Functie en temperatuur instellen.
Het apparaat warmt op.
2. KLokfunctietoets KJ zo vaak indrukken tot de symbolen KJ
en y verlicht zijn.
3. Met de draaiknop het gebruikseinde instellen
(bijv. ‚ƒ:„‹ uur).
De instelling wordt automatisch overgenomen. Hierna wordt
weer de tijd weergegeven.
Op het tijdstip van het ingestelde gebruikseinde schakelt het
apparaat automatisch uit.
1. Functie- en temperatuurkeuzeknop weer in de stand Û
draaien.
2. Klokfunctietoets KJ indrukken om de klokfunctie te
beëindigen.
Voorkeuzefunctie
Het apparaat schakelt automatisch in en op het tijdstip van het
gekozen gebruikseinde uit. Combineer hiervoor de klokfuncties
Gebruiksduur en Gebruikseinde.
Let erop dat levensmiddelen die snel bederven niet te lang in
de binnenruimte mogen staan.
1. Functie en temperatuur instellen.
Het apparaat warmt op.
2. Klokfunctietoets KJ zo vaak indrukken tot de symbolen KJ
en x verlicht zijn.
3. Met de draaiknop de gebruiksduur instellen (bijv. ‚:„‹ uur).
De instelling wordt automatisch overgenomen.
4. KLokfunctietoets KJ zo vaak indrukken tot de symbolen KJ
en y verlicht zijn.
5. Met de draaiknop het gebruikseinde instellen
(bijv. ‚ƒ:„‹ uur).
Het apparaat schakelt uit en wacht op het juiste tijdstip om in
te schakelen (in het voorbeeld om ‚‚:‹‹ uur). Op het
ingestelde gebruikseinde schakelt het apparaat automatisch
uit (‚ƒ:„‹ uur).
6. Functie- en temperatuurkeuzeknop weer in de stand Û
draaien.
7. Klokfunctietoets KJ indrukken om de klokfunctie te
beëindigen.
Tijd instellen
U kunt de tijd alleen wijzigen wanneer er geen andere
klokfunctie actief is.
1. Klokfunctietoets KJ zo vaak indrukken tot de symbolen KJ
en 3 verlicht zijn.
2. Met de draaiknop de tijd instellen.
De instelling wordt automatisch overgenomen.
Snelvoorverwarming
Bij de functies Hete lucht 3 en Broodbakstand ë kunt u de
opwarmtijd verkorten wanneer de ingestelde temperatuur hoger
is dan 100 °C.
Aanwijzing: Plaats tijdens het snel voorverwarmen geen
producten in de binnenruimte zolang het symbool f verlicht is.
1. Functie en temperatuur instellen.
Het apparaat warmt op.
2. De klokfunctietoets KJ zo vaak indrukken tot de
symbolen KJ en f verlicht zijn en Πin het klokdisplay
verschijnt.
3. De draaiknop naar rechts draaien.
Op het klokdisplay wordt Ž weergegeven en het symbool f
is verlicht. De functie Snelvoorverwarming wordt
ingeschakeld.
Nadat de ingestelde temperatuur bereikt is, wordt het snel
voorverwarmen uitgeschakeld. Het symbool f verdwijnt.
Instellingen controleren, corrigeren of wissen
1. Om uw instellingen te controleren drukt u zo vaak op de
klokfunctietoets KJ tot het betreffende symbool verlicht is.
2. Zo nodig kunt u de instelling met de draaiknop corrigeren.
3. Wanneer u de instelling wilt wissen, draait u de draaiknop
naar links terug op de oorspronkelijke waarde.
Page 11

11
Kinderslot
In dit hoofdstuk leest u
■ hoe u het apparaat blokkeert
■ hoe u het apparaat permanent blokkeert
Blokkering
Het vergrendelde apparaat kan niet per ongelijk of door
onbevoegden (bijv. spelende kinderen) worden ingeschakeld.
Om het apparaat weer in te schakelen moet u het deblokkeren.
Na gebruik wordt het apparaat niet automatisch geblokkeerd.
Blokkeer het eventueel opnieuw of activeer de permanente
blokkering.
Apparaat blokkeren
1. Apparaat uitschakelen.
2. Infotoets ± ingedrukt houden tot ™‚‹ op het
temperatuurdisplay verschijnt.
3. Aan de temperatuurkeuzeknop draaien tot ™‚‚ op het
temperatuurdisplay verschijnt.
4. Infotoets ± ingedrukt houden tot het symbool ‚ op het
temperatuurdisplay verschijnt.
Aanwijzing: Wordt geprobeerd het geblokkeerde apparaat in
te schakelen, dan verschijnt -†- op het temperatuurdisplay.
Apparaat deblokkeren
1. Infotoets ± ingedrukt houden tot ™‚‚ op het
temperatuurdisplay verschijnt.
2. Aan de temperatuurknop draaien tot ™‚‹ op het
temperatuurdisplay verschijnt.
3. Infotoets ± ingedrukt houden tot het symbool ‚ verdwijnt.
Permanente blokkering
Het permanent geblokkeerde apparaat kan niet per ongeluk of
door onbevoegden (bijv. spelende kinderen) worden
ingeschakeld.
Om het apparaat in te schakelen moet u de permanente
blokkering tijdelijk onderbreken. Nadat u het apparaat
uitgeschakeld heeft, wordt het weer automatisch geblokkeerd.
Apparaat permanent blokkeren
1. Apparaat uitschakelen.
2. Infotoets ± ingedrukt houden tot ™‚‹ op het
temperatuurdisplay verschijnt.
3. Aan de temperatuurkeuzeknop draaien tot ™ƒ‚ op het
temperatuurdisplay verschijnt.
4. Infotoets ± 3 seconden indrukken.
Uw apparaat wordt na 30 seconden geblokkeerd. Op het
temperatuurdisplay verschijnt het symbool ‚.
Aanwijzing: Wordt geprobeerd het geblokkeerde apparaat in
te schakelen, dan verschijnt -†˜ op het temperatuurdisplay.
Permanente blokkering onderbreken .
1. Infotoets ± ingedrukt houden tot ™ƒ‚ op het
temperatuurdisplay verschijnt.
2. Aan de temperatuurkeuzeknop draaien tot ™ƒ‹ op het
temperatuurdisplay verschijnt.
3. Infotoets ± ingedrukt houden tot het symbool ‚ verdwijnt.
De permanente blokkering is onderbroken.
4. Apparaat binnen 30 seconden inschakelen.
Na het uitschakelen wordt de permanente blokkering na
30 seconden weer geactiveerd.
Apparaat permanent deblokkeren .
1. Infotoets ± ingedrukt houden tot ™ƒ‚ op het
temperatuurdisplay verschijnt.
2. Aan de temperatuurkeuzeknop draaien tot ™ƒ‹ op het
temperatuurdisplay verschijnt.
3. Infotoets ± ingedrukt houden tot het symbool ‚ verdwijnt.
4. Binnen 30 seconden de infotoets opnieuw 3 seconden lang
indrukken.
5. Aan de temperatuurknop draaien tot ™‚‹ op het
temperatuurdisplay verschijnt.
6. Infotoets ± 3 seconden indrukken.
Het apparaat is permanent gedeblokkeerd.
Bakken
Bakvormen
Gebruik donkere bakvormen van metaal. Door blank metalen of
glazen vormen wordt de baktijd verlengd en bruint het gebak
niet gelijkmatig.
Bakplaten
Wij raden u aan uitsluitend de originele bakplaten te gebruiken,
omdat deze optimaal op de binnenruimte en de functies zijn
afgestemd.
Schuif de bakplaten altijd voorzichtig tot de aanslag in de oven.
Let erop dat de schuine kant van de bakplaat altijd naar de
deur van het apparaat wijst.
Bakken op één niveau
Bakt u met hete lucht 3, let dan op het volgende:
Gebak in vormen, inschuifhoogte 2
Gebak op de plaat: inschuifhoogte 3.
Bakken op twee niveaus
Gebruik hete lucht 3.
Braadslede op inschuifhoogte 3
Bakplaat op inschuifhoogte 1.
Bakplaten die gelijktijdig in de oven worden geplaatst, hoeven
niet op hetzelfde moment klaar te zijn.
Baktabel voor basisdeeg en kleingebak
De waarden in de tabel zijn richtwaarden en gelden voor
geëmailleerde bakplaten en donkere bakvormen. De waarden
kunnen variëren, afhankelijk van de soort en hoeveelheid deeg
en de bakvorm.
Wij raden u aan om de eerste keer de laagste van de
opgegeven temperaturen in te stellen. In principe levert de
lagere temperatuur een gelijkmatigere bruining op.
Wanneer u gerechten bakt volgens eigen recept, houd dan de
waarden van gelijksoortig gebak in de tabel aan.
Houd de instructies in de tabel omtrent het voorverwarmen aan.
Page 12

12
Hete lucht 3/~ Boven- en
onderwarmte %
Basisdeeg Inschuif-
hoogte
Tempera-
tuur in °C
Baktijd in minuten Inschuif-
hoogte
Tempera-
tuur in °C
Roerdeeg
Plaatgebak met bedekking 1 160-170 30-40 3 170-180
1+3 150-170 40-50 - -
Spring/rechthoekige vorm (cake) 1 150-160 60-80 2 160-170
Vorm vruchtentaartbodem 1 160-170 25-35 2 170-180
Zandtaartdeeg
Plaatgebak met droge bedekking, bijv.strooisel 1 160-170 50-70 3 180-190
1+3 160-170 60-80 - -
Plaatgebak met vochtige bedekking, bijv.roomglazuur 1 150-170 60-90 3 170-190
Springvorm, bijv.kwarktaart 1 160-170 70-100 2 170-180
Vorm vruchtentaartbodem 1 160-170 20-30 2 180-190*
Biscuitbeslag
Biscuitrol 1 180-190* 10-15 3 190-200*
Vorm vruchtentaartbodem 1 160-170 20-30 2 170-180
Biscuit (6 eieren) 1 150-160 30-45 2 160-170
Biscuit (3 eieren) 1 150-160 25-45 2 160-170
Gistdeeg
Plaatgebak met droge bedekking, bijv.strooisel 1 160-170 50-70 3 170-180
1+3 160-170 60-80 - -
Plaatgebak met vochtige bedekking, bijv.roomglazuur 1 150-170 60-90 3 170-190
Gistkrans/-vlecht (500 g) 1 160-170 40-50 3 170-180
Springvorm 1 160-170 30-45 2 160-170
Tulbandvorm 1 160-170 40-50 2 170-180
* Oven voorverwarmen
Hete lucht 3/~ Boven- en
onderwarmte %
Klein gebak Inschuif-
hoogte
Temperatuur in °C
Baktijd in minuten Inschuif-
hoogte
Temperatuur in °C
Gistdeeg 1 160-170 20-30 3 170-180
1+3 160-170 30-40 - -
Baisermassa 1 80 100-150 3 80-90
1+3 80 150-170 - -
Bladerdeeg 1 180-200 20-30 3 200-210
1+3 180-200* 25-35 - -
Soezendeeg 1 190-200* 25-35 3 200-210*
1+3 190-200* 30-40 - -
Roerdeeg, bijv. muffins 1 150-160* 20-40 3 160-170*
1+3 160-170 25-35 - -
Zandtaartdeeg, bijv. boterkoekjes 1 140-150* 15-25 3 140-150*
1+3 130-140* 15-25 - -
1+3+4 130-140* 15-25 - -
* Oven voorverwarmen
Page 13

13
Broodbakstand
De opgaven in de tabel zijn richtwaarden. Ze kunnen al
naargelang het soort en de hoeveelheid deeg variëren.
De waarden voor brooddeeg gelden zowel voor deeg op de
bakplaat als voor deeg in een rechthoekige vorm.
Stel de eerste keer de laagste opgegeven temperatuur in. In
principe levert de laagste temperatuur de meest gelijkmatige
bruining op.
Neem de aanwijzingen voor het voorverwarmen in de tabel in
acht.
Baktabel voor gerechten en diepvries kanten-klaar producten.
De pizzastand 6 is bijzonder geschikt voor vers bereide
gerechten, die veel warmte van de onderkant nodig hebben, en
voor diepgevroren kant-en-klaar producten.
Let op de volgende punten:
■ Bedekt de bakplaat met bakpapier
■ Leg de frites niet over elkaar
■ Keer diepgevroren aardappelproducten na de helft van de
baktijd
■ Diepgevroren aardappelproducten pas na het bakken
kruiden
■ Laat bij het opbakken van broodjes wat ruimte tussen de
afzonderlijke broodjes. Leg er niet te veel op een bakplaat
■ Houd u aan de aanwijzingen van de fabrikant
De opgaven in de tabel zijn richtwaarden en gelden voor
geëmailleerde bakplaten. De waarden kunnen variëren,
afhankelijk van de soort en hoeveelheid deeg en de bakvorm.
Wij raden u aan om de eerste keer de laagste van de
opgegeven temperaturen in te stellen. In principe levert de
lagere temperatuur een gelijkmatigere bruining op.
De opgaven in de tabel gelden voor het plaatsen in een koude
oven.
Met de pizzastand 0 kunt u niet op twee niveaus bakken.
Broodbakstand ë/{ Boven- en
onderwarmte %
Brood Inschuif-
hoogte
Tempera-
tuur in °C
Baktijd in minuten Inschuif-
hoogte
Tempera-
tuur in °C
Broodjes 1 220* 10-20 2 240*
Plat rond brood 1 220* 15-20 2 240*
Empanada 1 180* 30-40 2 200*
Brooddeeg 7501000g
Afbakken 1 220* 35-40 2 220*
Brooddeeg 10001250g
Voorbakken 1 220* 10-15 2 240*
Afbakken 1 180 40-45 2 200
Brooddeeg 12501500g
Voorbakken 1 220* 10-15 2 240*
Afbakken 1 180 40-50 2 200
* Oven voorverwarmen
Broodbakstand ë/{ Pizzastand 0/}
Gerechten Inschuif-
hoogte
Tempera-
tuur in °C
Baktijd in minuten Inschuif-
hoogte
Tempera-
tuur in °C
Pizza, vers 1 190-210* 20-30 1 180-200
1+3 180-190 35-45 - -
Flammkuchen 1 190-210* 15-25 1 200-220
Quiche 1 180-200* 50-60 1 170-190
Taart 1 180-200* 30-45 1 190-210
Zwitserse vruchtentaart 1 180-190* 45-55 1 170-190
Gegratineerde aardappels van ongekookte aardappels 1 180-200 50-60 1 170-190
Pizza, diepvries
Pizza met dunne bodem 1 180-200 10-20 1 200-220
1+3 180-190 20-30 - -
Pizza met dikke bodem 1 180-200 20-30 1 180-200
1+3 180-190 25-35 - -
Aardappelproducten
Frites 1 190-210 15-25 1 210-230
1+3 180-190 25-35 - -
* Oven voorverwarmen
Page 14

14
Tips en trucs
Braden
: Kans op letsel door gebruik van niet hittebestendige
schalen!
Gebruik alleen braadvormen die speciaal voor de oven
bestemd zijn.
Open braden
Voor het open braden wordt een vorm zonder deksel gebruikt.
Keer het vlees bij het braden met boven- en onderwarmte %
om nadat ca. de helft of twee derde van de braadtijd verstreken
is.
Bakken in de braadslede
Tijdens het braden in de braadslede ontstaat braadsap. Dit
braadsap kunt u als basis voor een smakelijke saus gebruiken.
Bij het braden in de braadslede kunt u ook bijgerechten (bijv.
groenten) mee laten garen.
Bij kleinere stukken vlees kunt u in plaats van de braadslede
een kleinere braadvorm gebruiken. Plaats deze direct op het
rooster.
Braden op het rooster
Braadt u direct op het rooster, plaats de braadslede dan op
hoogte 1. Het vleessap wordt opgevangen en de binnenruimte
blijft schoner.
Gesloten braden
Voor het gesloten braden wordt een braadvorm met deksel
gebruikt. Gesloten braden is zeer geschikt voor stoofgerechten.
Kroketten 1 180-200 15-30 1 200-220
Rösti, gevulde aardappelflappen 1 180-200 15-25 1 200-220
Brood en banket, diepvries
Broodjes/baguette, voorgebakken 1 180-200 10-20 1 180-200
Afbakbroodjes/baguette 1 180-200 5-15 1 200-220
Zoute krakelingen, niet voorgebakken 1 180-190 15-20 1 170-190
Brood en banket, voorgebakken
Afbakbroodjes/baguette 1 180-200 5-15 1 180-200
Groenteballetjes, diepvries
Vissticks 1 180-200 15-20 1 190-210
Kipsticks, nuggets 1 190-210 15-25 1 200-220
Groenteburgers 1 190-210 35-45 1 200-220
Strudel, diepvries 1 190-210 35-45 1 180-200
Het gebak is te licht Inschuifhoogte en aanbevolen bakgerei controleren. De bakvorm op het rooster en niet
op de bakplaat plaatsen. Langere baktijd of hogere temperatuur aanhouden.
Het gebak is te donker Inschuifhoogte controleren. Een kortere baktijd of lagere temperatuur aanhouden.
Het gebak in de bakvorm is ongelijkmatig bruin geworden
Inschuifhoogte en temperatuur controleren. Bakvorm niet direct voor de luchtuitlaat van
de achterwand van de binnenruimte plaatsen. Controleer of de bakvorm goed op het
rooster staat.
Het gebak op de bakplaat is ongelijkmatig bruin geworden
Inschuifhoogte en temperatuur controleren. Bij het bakken van klein gebak gelijke groottes en diktes aanhouden.
Het gebak is te droog. Een kortere baktijd en een wat hogere temperatuur aanhouden.
Het gebak is van binnen te vochtig Temperatuur verlagen Let op: baktijden kunnen door hogere temperaturen niet korter
worden (van buiten gaar, van binnen niet). Baktijd verlengen en het deeg langer laten rijzen. Minder vloeistof aan het deeg of beslag toevoegen.
Het gebak zakt in nadat u het uit de
oven heeft genomen.
Minder vloeistof aan het deeg of beslag toevoegen. Baktijd verlengen of de temperatuur
verlagen.
De opgegeven baktijd is niet juist Controleer bij klein gebak de hoeveelheid op de bakplaat. Klein gebak mag elkaar niet
raken.
Diepvriesproduct is na het bakken niet
overal gelijkmatig bruin geworden
Wanneer diepvriesproducten na het voorbakken in ongelijke mate bruin zijn geworden
blijft dit zo na het bakken.
Diepvriesproduct is niet bruin, niet knapperig of de opgegeven tijd is niet juist
Verwijder voor het bakken het ijs van het diepvriesproduct. Gebruik geen sterk met ijs
bedekte diepvriesproducten.
Broodbakstand ë/{ Pizzastand 0/}
Gerechten Inschuif-
hoogte
Tempera-
tuur in °C
Baktijd in minuten Inschuif-
hoogte
Tempera-
tuur in °C
* Oven voorverwarmen
Page 15

15
Braadtabel
De braadtijd en temperatuur zijn afhankelijk van de grootte, de
hoogte, de kwaliteit en het soort vlees.
In het algemeen geldt: Hoe groter het braadstuk, des te lager
de temperatuur en des te langer de braadduur.
De opgaven in de tabel zijn richtwaarden en gelden voor het
braden zonder deksel. De waarden kunnen variëren, afhankelijk
van het soort en de hoeveelheid vlees en de braadvorm.
Stel de eerste keer de laagste opgegeven temperatuur in. In
principe levert de laagste temperatuur de meest gelijkmatige
bruining op.
Laat het vlees na afloop van de braadtijd nog ca. 10 minuten
rusten in de uitgeschakelde, gesloten binnenruimte. Bij de
opgegeven braadtijd is de aanbevolen rusttijd niet inbegrepen.
De opgaven in de tabel gelden voor het inschuiven in de
onverwarmde oven en voor vlees dat direct uit de koelkast
komt.
Hete lucht 3/~ Boven- en
onderwarmte %
Vlees Inschuif-
hoogte
Tempera-
tuur in °C
Braadtijd in minu-
ten
Inschuif-
hoogte
Tempera-
tuur in °C
Gehakt van 500 g vlees 1 170-180 60-70 1 200-210
Varkensvlees
Filet, medium (400 g) 1 170-180 30-45 3 200-230
Braadstuk met zwoerd (1,5 kg) 1 160-170 120-150 2 200-220
Braadstuk met zwoerd (2,5 kg) 1 160-170 150-180 2 190-210
Braadstuk, doorregen, zonder zwoerd, bijv. nek (1,5 kg) 1 160-170 100-130 2 190-210
Braadstuk, doorregen, zonder zwoerd, bijv. nek (2,5 kg) 1 160-170 120-150 2 180-200
Braadstuk mager (1kg) 1 170-180 70-90 2 180-200
Braadstuk mager (2kg) 1 170-180 80-100 2 180-200
Casselerrib 1 160-170 70-80 2 190-210
Rundvlees
Filet, medium (1 kg) 1 180-190 45-65 2 200-220
Rosbief, medium (1,5 kg) 1 180-190 30-45 2 200-220
Stoofvlees** (1,5 kg) 1 170-180 120-150 2 200-220
Stoofvlees** (2,5 kg) 1 170-180 150-180 2 190-210
Kalfsvlees
Kalfsvlees/borst (1,5 kg) 1 160-170 90-120 2 180-200
Kalfsvlees/borst (2,5 kg) 1 160-170 120-150 2 170-190
Schenkel 1 160-170 100-130 2 190-210
Lamsvlees
Lamsbout zonder been 1 180-190 70-110 2 200-220
Rug met been 1 180-190* 40-50 2 200-220*
Rug zonder been 1 180-190* 30-40 2 200-220*
Gevogelte (niet gevuld)
Kip, heel (1 kg) 1 170-180 60-70 2 200-220
Eend, heel (2-3 kg) 1 150-160 90-120 2 190-210
Gans, heel (3-4 kg) 1 150-160 130-180 2 180-200
Wild
Reevlees/bout zonder been (1,5kg) 1 160-170 20-30 2 190-210
Wild zwijn (1,5 kg) 1 160-170 120-140 2 190-210
Hertenvlees (1,5 kg) 1 160-170 100-120 2 190-210
Konijn 1 160-170 70-80 2 180-200
Vis
Vis, heel (300 g) 1 160-170 20-30 2 190-210
Vis, heel (700 g) 1 160-170 30-40 2 180-200
*) Oven voorverwarmen
**) Stoofvlees gesloten braden
Page 16

16
Tips en trucs
Grillen
In dit hoofdstuk vindt u informatie over
■ grillen in het algemeen
■ rondom grillen 4
■ vlakgrillen (groot grill-oppervlak + en klein grill-oppervlak ()
Attentie!
Schade door hoge temperaturen: In de binnenruimte ontstaat
een zeer hoge temperatuur. Laat de deur van het apparaat
tijdens het grillen gesloten. Nooit met een geopende
apparaatdeur grillen.
Aanwijzingen
■ Gebruik om te grillen altijd het rooster en de braadslede.
■ Leg het rooster in de braadslede en plaats beide op de
inschuifhoogte die in de tabel wordt opgegeven
■ Zet de gerechten van de grill altijd midden op het rooster.
■ Let er bij het grillen van meerdere vleesstukken op dat het
soort, de dikte en het gewicht van het vlees hetzelfde is.
Rondom-grillen
Rondom grillen 4 is bijzonder geschikt voor gevogelte of vlees
(bijv. varkensvlees met zwoerd), dat rondom knapperig gegrild
moet worden.
Keer de gerechten van de grill na ca. de helft tot twee derde
van de grilltijd om.
Steek bij eend en gans het vel onder de vleugels en bouten
vast, zodat het vet er goed uit kan braden.
Bij het rondom-grillen op het rooster kan al naargelang het te
grillen gerecht de binnenruimte sterker vervuild raken. Maak de
binnenruimte na gebruik daarom altijd schoon, zodat het vuil
niet inbrandt.
De gegevens in de tabel zijn richtwaarden, die gelden voor de
geëmailleerde braadslede met rooster. De waarden kunnen al
naargelang het soort en de hoeveelheid gerechten variëren.
Stel de eerste keer de laagste opgegeven temperatuur in. In
principe levert de laagste temperatuur de meest gelijkmatige
bruining op.
Laat de gerechten van de grill aan het einde nog ca.
10 minuten rusten in de uitgeschakelde, gesloten oven. Bij de
opgegeven grilltijd is de aanbevolen rusttijd niet inbegrepen.
De opgaven gelden voor het inschuiven in de onverwarmde
oven en voor vlees dat direct uit de koelkast komt.
Korst te dik en/of vlees te droog Inschuifhoogte controleren. Lagere temperatuur of kortere braadtijd aanhouden.
Korst te dun Temperatuur verhogen of na afloop van de braadtijd de grill even inschakelen.
Het vlees is van binnen niet gaar Neem de toebehoren die niet nodig zijn uit de binnenruimte. Braadtijd verlengen. Contro-
leer met behulp van een vleesthermometer de kerntemperatuur van het vlees.
Waterdamp in de binnenruimte slaat
neer op de apparaatdeur
Wanneer het apparaat aan is, verdwijnt de waterdamp geleidelijk. Bij zeer veel waterdamp kunt u kort en voorzichtig de apparaatdeur openen, zodat hij sneller verdwijnt.
Gerechten van de grill Inschuifhoogte Temperatuur in °C Grilltijd in minuten
Varkensvlees
Braadstuk met zwoerd 2 170-190 140-160
Schenkel 2 180-200 120-150
Rundvlees
Rosbief, medium (1,5 kg) 2 220-240 40-50
Lamsvlees
Lamsbout zonder been, medium 2 170-190 120-150
Gevogelte (niet gevuld)
Halve kippen (1-2 stuks) 2 210-230 40-50
Kip, heel (1-2 stuks) 2 200-220 60-80
Eend, heel (2-3 kg) 2 180-200 90-120
Eendenborst 3 230-250 30-45
Gans, heel (3-4 kg) 1 150-170 130-160
Ganzenborst 2 160-180 80-100
Ganzenbout 2 180-200 50-80
Page 17
17
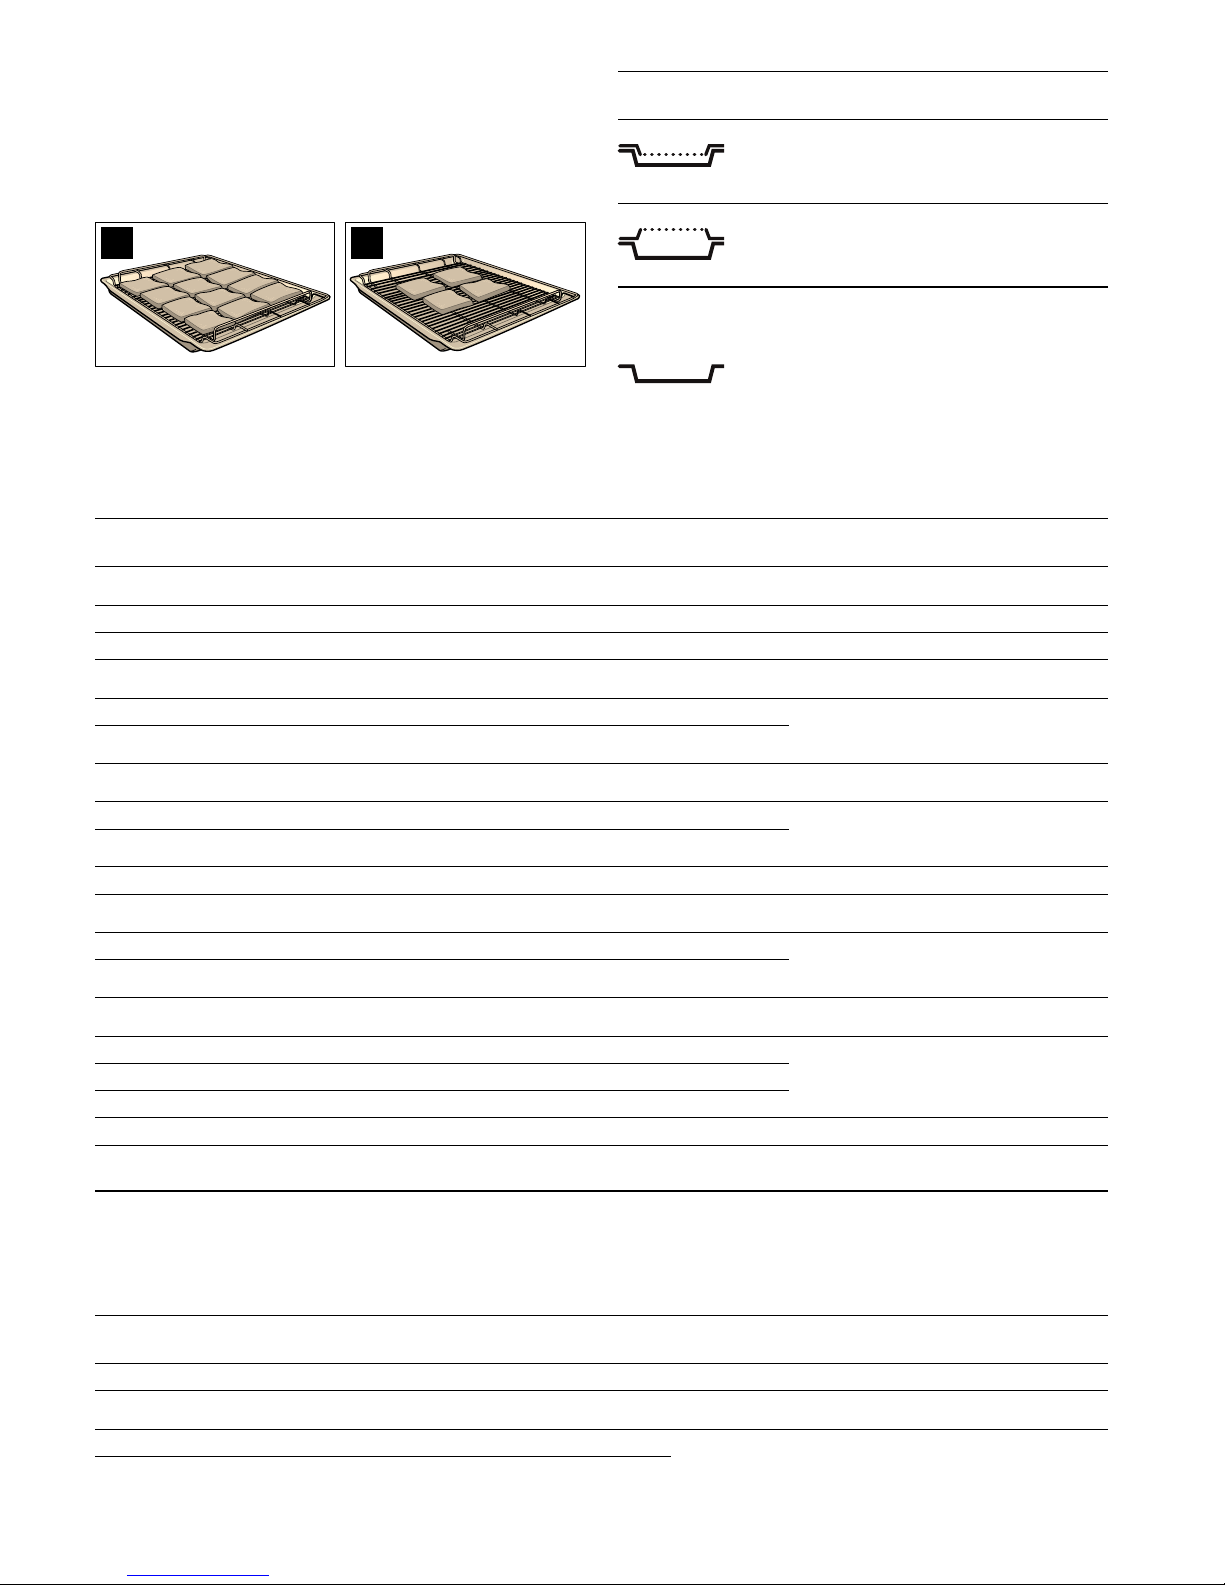
Vlakgrillen
Gebruik voor grote hoeveelheden platte gerechten de
grill groot + (Afbeelding A).
Gebruik voor kleine hoeveelheden platte gerechten de
grill klein (. Zet de gerechten midden op het rooster
(Afbeelding B). Door het gebruik van de kleine vlakgrill spaart u
energie.
Bestrijk de gerechten naar wens licht met olie.
Keer de gerechten van de grill na ca. de helft tot twee derde
van de grilltijd om.
U kunt het grillresultaat beïnvloeden door het rooster of de
positie van het rooster te veranderen:
Aanwijzing: De braadslede altijd in de normale toestand (niet
omgekeerd) gebruiken.
Tabel Grill, groot +/š
De opgaven in de tabel zijn richtwaarden. De waarden kunnen
al naargelang het soort en de hoeveelheid gerechten variëren.
Ze gelden voor het inschuiven in de onverwarmde oven en voor
vlees dat direct uit de koelkast komt.
Tabel Klein grill-oppervlak (/y
De opgaven in de tabellen zijn richtwaarden. De waarden
kunnen al naargelang het soort en de hoeveelheid van het te
grillen product variëren. Deze gelden uitsluitend voor het
plaatsen in een onverwarmde oven en voor vlees direct uit de
koelkast.
$ %
Positie van het
rooster
Gebruik
Het gebogen rooster met de verlaging naar
beneden in de braadslede leggen: geschikt
voor gegrilde gerechten die overwegend
doorbakken moeten zijn
Het gebogen rooster met de verlaging naar
boven in de braadslede leggen: geschikt
voor gegrilde gerechten die overwegend
saignant tot medium moeten zijn
Gerechten van de grill Inschuifhoogte Temperatuur in °CGrilltijd in
minuten
Opmerkingen
Varkensvlees
Filetsteaks, medium (3 cm dik) 4 275 12-15
Steaks, doorbakken (2 cm dik) 4 275 15-20
Rundvlees
Filetsteaks (3-4 cm dik) 4 275 15-20 Afhankelijk van de gewenste garing
kunnen grilltijden worden verkort of ver-
lengd.
Tournedos 4 275 12-15
Lamsvlees
Filet 4 275 8-12 Afhankelijk van de gewenste garing
kunnen grilltijden worden verkort of ver-
lengd.
Koteletten 4 275 10-15
Worsten 4 250 10-14 Licht insnijden
Gevogelte
Kippenbouten 3 250 25-30 Door het insteken van de huid kan blaas-
vorming bij het grillen worden voorko-
men.
Kleine kipdelen 3 250 25-30
Vis
Steaks 4 220 15-20 De delen moeten even dik zijn.
Koteletten 4 220 15-20
Hele vis 3 220 20-25
Groente 4 275 15-20
Toast met bedekking 3 220 10-15 De inschuifhoogte wordt bepaald door
de hoogte van de bedekking
Gerechten van de grill Inschuif-
hoogte
Tempera-
tuur in °C
Grilltijd in
minuten
Opmerkingen
Worsten 4 250 12-16 Licht insnijden
Gevogelte
Kippenbouten 3 250 35-45 Door het insteken van de huid kan blaasvorming bij het
grillen worden voorkomen
Kleine kipdelen 3 250 30-40
Page 18

18
Hetelucht eco
Met de functie Hetelucht eco “/| kunt u talrijke gerechten
energiegeoptimaliseerd klaarmaken op één niveau.
Aanwijzingen
■ Plaats de gerechten in de onverwarmde, lege binnenruimte
■ Open de apparaatdeur tijdens de bereiding alleen wanneer
dit beslist noodzakelijk is
In de tabel vindt u een keur aan gerechten die het best geschikt
zijn voor Hetelucht eco “/|.
De opgaven in de tabel zijn richtwaarden en geldig voor
geëmailleerde bakplaten, braadsledes en donkere bakvormen.
De waarden kunnen variëren, afhankelijk van de soort en
hoeveelheid van het gerecht en de bakvorm.
Wij raden u aan om de eerste keer de laagste van de
opgegeven temperaturen in te stellen. In principe levert de
laagste temperatuur de meest gelijkmatige bruining op.
Vis
Steaks 4 230 15-20 Delen moeten even dik zijn
Koteletten 4 230 15-20
Hele vis 3 230 20-25
Groente 4 275 15-20
Toast met bedekking 3 220 12-18 De inschuifhoogte wordt bepaald door de hoogte van
de bedekking
Gerechten van de grill Inschuif-
hoogte
Tempera-
tuur in °C
Grilltijd in
minuten
Opmerkingen
Gerechten met Hetelucht eco “/| Toebehoren Inschuifhoogte Tempera-
tuur in °C
Tijdsduur
in minuten
Taart, cake en gebak
Roerdeeg met droge bedekking Bakplaat 1 170 - 190 25 - 30
in vormen Spring/rechthoekige
vorm
1 160 - 170 60 - 80
in vormen Vorm vruchtentaartbo-
dem
1 160 - 170 20 - 30
Klein gebak, bijv. muffins Muffinplaat 1 170 - 180 20 - 30
Zandtaartdeeg met droge bedekking, bijv. notenpunten Bakplaat 1 180 - 200 25 - 30
Klein gebak, bijv. boterkoekjes Bakplaat 1 140 - 150 20 - 25
Biscuitbeslag Biscuitrol Bakplaat 1 180 - 190 15 - 20
in vormen (6 eieren) Springvorm 1 160 - 170 40 - 50
in vormen Vorm vruchtentaartbo-
dem
1 160 - 170 20 - 30
Gistdeeg met droge bedekking Bakplaat 1 170 - 190 30 - 45
in vormen Tulbandvorm 1 170 - 180 40 - 50
Klein gebak Bakplaat 1 180 - 190 20 - 30
Bladerdeeg Klein gebak Bakplaat 1 190 - 200 30 - 35
Soezendeeg Klein gebak Bakplaat 1 190 - 200 35 - 45
Kantenklare diepvriesproducten
Pizza, diepvries met dunne bodem Braadslede 1 180 - 200 15 - 25
met dikke bodem Braadslede 1 180 - 200 20 - 30
Frites Braadslede 1 190 - 200 20 - 30
Broodjes/Baguette voorgebakken Braadslede 1 180 - 200 10 - 20
Ovenschotels
Gegratineerde aardappels
van ongekookte aardappels Ovenschaal op het
rooster
1 180 - 200 60 - 80
Lasagne Ovenschaal op het
rooster
1 180 - 190 50 - 60
Zoete ovenschotels Ovenschaal op het
rooster
1 170 - 180 50 - 60
Page 19

19
Ontdooien
Gebruik voor het ontdooien en garen van diepvriesproducten
Hetelucht 3.
Aanwijzingen
■ Ontdooide diepvriesproducten (vooral vlees) hebben kortere
bereidingstijden nodig dan verse producten
■ De bereidingstijd van diepvriesvlees wordt verlengd met de
tijd die nodig is voor het ontdooien
■ Diepvriesgevogelte dient u voor de bereiding altijd te
ontdooien om de ingewanden te kunnen verwijderen
■ Maak diepvriesvis op dezelfde temperatuur klaar als verse vis
■ U kunt kant-en-klare diepvriesgroente in aluminiumschalen in
grotere hoeveelheden gelijktijdig in de binnenruimte plaatsen
■ Gebruik bij het ontdooien op één niveau inschuifhoogte 1 en
op twee niveaus inschuifhoogte 1 + 3
■ Houd u bij diepvrieslevensmiddelen aan de aanwijzingen van
de fabrikant
Bereiden met stoom
De stoomstand é kan alleen samen met het
systeemstoomapparaat (als extra accessoire in de vakhandel
verkrijgbaar) worden gebruikt.
Schakel de stoomstand alleen in wanneer de binnenruimte
volledig is afgekoeld (kamertemperatuur). Wanneer op het
temperatuurdisplay afwisselend • en ¨©¨verschijnt, is de
binnenruimte niet volledig afgekoeld. Wacht tot de binnenruimte
afgekoeld is en schakel de stoomstand opnieuw in. Het
stoomproces wordt automatisch geregeld.
Aanwijzingen
■ Gebruik voor de bereiding met stoom alleen de stoomstand
samen met het systeemstoomapparaat.
■ Gebruik de stoomstand niet samen met de klokvoorkeuze-
functie
■ Verdere nuttige aanwijzingen vindt u in de gebruiksaanwijzing
bij het systeemstoomapparaat
Yoghurt
Met uw apparaat kunt u ook zelf yoghurt maken.
1. Toebehoren verwijderen uit de binnenruimte.
2. 1 liter houdbare melk (3,5 % vet) of gepasteuriseerde verse
melk tot 40 °C verwarmen
of
1 liter verse melk een keer opkoken en tot 40 °C laten
afkoelen.
3. 150 g dikke yoghurt bij de warme melk doen, doorroeren en
gelijkmatig in kommen of schroefglazen doen. Niet meer dan
200 ml per kom of glas.
4. De gevulde glazen/kommen met passend deksel of
vershoudfolie afdekken.
5. Oven met hete lucht 3 5 minuten bij 50 °C voorverwarmen.
6. Glazen/kommen op gelijkmatige afstanden van elkaar over
de hele bodem van de binnenruimte verdelen en de deur van
het apparaat sluiten.
7. Na 8 uur de oven uitschakelen en de glazen/kommen
gedurende minimaal 12 uur in de koelkast plaatsen.
Vlees
Gestoofd rundvlees 1 kg Vorm gesloten op het
rooster
1 190 - 200 120 - 150
Varkensnek 1 kg Braadslede 1 180 - 190 110 - 130
Gebraden kalfsvlees 1 kg Braadslede 1 180 - 190 100 - 120
Vis
Forel ca. 400 g Braadslede 1 160 -170 25 - 30
Gerechten met Hetelucht eco “/| Toebehoren Inschuifhoogte Tempera-
tuur in °C
Tijdsduur
in minuten
Diepvriesgerecht Tempera-
tuur in °C
Ontdooitijd
in minuten
Rauwe diepvriesproducten/ diepvrieslevensmiddelen
50 30 - 90
Brood/broodjes (750 - 1500 g) 50 30 - 60
Droog diepvriesplaatgebak 60 45 - 60
Vochtig diepvriesplaatgebak 50 50 - 70
Page 20

20
Inmaak
: Risico van letsel!
Weckflessen met levensmiddelen die niet goed zijn ingekookt
kunnen barsten. Let op de volgende punten:
■ Fruit en groente moeten vers en in perfecte staat zijn.
■ Gebruik uitsluitend schone en onbeschadigde weckflessen
■ De weckflessen mogen tijdens het inkoken in de
binnenruimte niet met elkaar in contact komen
In de binnenruimte kunt u de inhoud van maximaal zes
weckflessen met ½, 1 of 1½ liter tegelijkertijd met hete lucht 3
inmaken.
Let hierbij op de volgende punten:
Aanwijzingen
■ Gebruik bij een inmaakproces alleen weckflessen van gelijke
grootte en met dezelfde levensmiddelen
■ Zorg er voor dat u bij het voorbereiden en afsluiten van de
weckflessen schoon werkt
■ Gebruik uitsluitend hittebestendige rubber afdichtringen
■ De volgende levensmiddelen kunt u niet inmaken met uw
apparaat: de inhoud van blikjes, vlees, vis of paté
Vruchten voorbereiden
1. Fruit wassen en afhankelijk van de soort schillen, ontpitten en
in stukken snijden.
2. Het fruit tot ca. 2 cm onder de rand in de weckflessen doen.
3. Weckflessen met een hete, afgeschuimde suikeroplossing
vullen (ca. Y liter voor een literglas).
Op één liter water:
■ ca. 250 g suiker bij zoet fruit
■ ca. 500 g suiker bij zuur fruit
Groenten voorbereiden
1. Groenten wassen en afhankelijk van de soort schoonmaken
en in stukken snijden.
2. De groente tot ca. 2 cm onder de rand in de weckflessen
doen.
3. Weckflessen direct vullen met heet gekookt water.
Weckflessen sluiten
1. Randen van de weckflessen met een schone, vochtige doek
afnemen.
2. Rubberen ring en deksel plaatsen en de weckflessen met
klem sluiten.
Inmaken starten
1. Braadslede op inschuifhoogte 1 plaatsen.
2. Weckflessen in een driehoek opstellen, zonder dat ze elkaar
aanraken.
3. ½ liter heet water (ca. 80 °C) in de braadslede gieten.
4. Hete lucht 3 met 160 °C instellen.
■ Weckflessen met ½ of 1 liter vormen belletjes na ca.
50 minuten
■ Weckflessen met 1½ liter vormen belletjes na ca. 60
minuten
5. Apparaat uitschakelen, zodra alle weckflessen belletjes
vormen.
6. Weckflessen nog enkele minuten in de gesloten binnenruimte
laten.
Frambozen, aardbeien, kersen of augurken:
ca. 5-10 minuten
Inmaken beëindigen
Bij fruit, augurken en tomatenpuree:
1. Apparaat uitschakelen, zodra alle weckflessen belletjes
vormen.
2. Weckflessen nog enkele minuten in de gesloten binnenruimte
laten.
■ Frambozen, aardbeien, kersen of augurken:
ca. 5-10 minuten
■ Ander fruit:
ca. 10-15 minuten
■ Tomatensaus of appelmoes:
ca. 15-20 minuten
Bij groente:
1. Temperatuur tot 100 °C reduceren, zodra alle weckflessen
belletjes vormen. Weckflessen ca. 60 minuten in de gesloten
binnenruimte laten doorkoken.
2. Apparaat uitschakelen.
3. Weckflessen nog ca.15-30 minuten in de gesloten
binnenruimte laten staan.
Weckflessen uit de oven nemen
1. Weckflessen op een schone doek plaatsen, afdekken en
beschermen tegen tocht.
2. Klemmen pas verwijderen wanneer de glazen koud zijn.
Ovenreiniging
Bij de ovenreiniging warmt de oven op tot ca. 500 °C. Op deze
manier verbranden resten van het braden, grillen of bakken en
hoeft u slechts nog de as uit de binnenruimte te verwijderen.
U kunt drie reinigingsstanden kiezen.
Hoe sterker en ouder de verontreinig is, des te hoger moet de
reinigingsstand zijn. Het is voldoende wanneer u de
binnenruimte elke twee tot drie maanden reinigt. Voor een
reiniging is slechts ca. 2,5 - 4,7 kWh nodig.
Belangrijke aanwijzingen
Voor uw veiligheid vergrendelt de ovendeur automatisch. U
kunt de ovendeur pas weer openen wanneer de binnenruimte
enigszins is afgekoeld. Probeer niet de haken met de hand te
verschuiven.
De ovendeur niet openen zolang de reiniging wordt uitgevoerd.
Daardoor kan het reinigen worden afgebroken.
De lamp in de binnenruimte is niet aan tijdens de reiniging.
: Risico van brand!
De oven wordt aan de buitenkant zeer heet. Let erop dat de
voorkant van de oven vrij blijft. Nooit brandbare voorwerpen,
bijv. theedoeken, aan de deurgreep hangen. Houd kinderen uit
de buurt.
Stand Reinigingsgraad Tijdsduur
1 licht ca. 1 uur, 15 minuten
2 gemiddeld ca. 1 uur, 30 minuten
3 intensief ca. 2 uur
Page 21

21
Voor de reiniging
De oven dient leeg te zijn. Neem de toebehoren, de vormen en
inschuifrails uit de oven. In het hoofdstuk Onderhoud en
reiniging kunt u lezen hoe de rails verwijderd worden.
Maak de ovendeur en de randvlakken van de binnenruimte bij
de deurdichting schoon. De dichting niet schuren.
Let er voordat u begint met schoonmaken op dat de ovendeur
gesloten is.
: Risico van brand!
Losse voedselresten, vet en vleessap kunnen in brand vliegen.
Neem de binnenruimte met een vochtige doek af.
Toebehoren meereinigen
De rails zijn niet geschikt voor de zelfreiniging. Neem ze uit de
binnenruimte. Wilt u toebehoren meereinigen, dan kunt u de
accessoirehouders later aanschaffen.
U kunt de accessoirehouders verkrijgen bij de klantenservice of
via internet, onder materiaalnummer 466546.
De houders worden aan de linker- en rechterkant ingebracht.
Hiermee kunt u geëmailleerde toebehoren, bijv. de braadslede,
zonder antiaanbaklaag meereinigen. Altijd slechts één
accessoire meereinigen.
Niet-geëmailleerde toebehoren, bijv. het rooster, zijn niet
geschikt voor de zelfreiniging. Neem ze uit de binnenruimte.
: Ernstig gezondheidsrisico!
Nooit platen en vormen met een antiaanbaklaag meereinigen.
Door de grote hitte wordt de antiaanbaklaag vernietigd en
ontstaan er giftige gassen.
Aanwijzing: Welke toebehoren geschikt zijn voor de
zelfreiniging kunt u ook nakijken in de tabel voor extra
toebehoren in het begin van de gebruiksaanwijzing.
Reinigingsstand instellen
1. De functieknop op x zetten. Op het temperatuurdisplay
verschijnt 0.
2. Met de temperatuurkeuzeknop de reinigingsgraad instellen.
De ovenreiniging start na enkele seconden.
Op het display voor de elektronische klok verschijnt de
tijdsduur voor de reiniging. Na enkele seconden start de oven.
De tijdsduur loopt zichtbaar af.
De ovendeur vergrendelt na de start.
Na afloop van de reiniging
Op het klokdisplay staat 0:00 en y knippert.
Functiekeuzeknop op o zetten en de toets KJ een keer
indrukken. De ovendeur kan pas worden geopend wanneer de
oven afgekoeld is.
Reiniging afbreken
Functiekeuzeknop naar Û terugdraaien. De ovendeur kan pas
worden geopend wanneer de oven afgekoeld is.
Reinigingsstand veranderen
Na de start kan de reinigingsstand niet meer veranderd
worden.
De reiniging moet 's nachts worden uitgevoerd
Om de oven overdag te kunnen gebruiken, verzet u het tijdstip
van het einde van de reiniging naar de nacht. Stel in volgens de
beschrijving bij punt 1 en 2.
1. Klokfunctietoets KJ indrukken tot het symbool yverschijnt.
2. Met de draaiknop de eindtijd op een later tijdstip zetten.
De oven gaat over in de wachtstand. Op het display staat de
tijd. Wanneer de oven start, loopt de tijdsduur zichtbaar af.
Na afloop van de reiniging
Wanneer de binnenruimte afgekoeld is, verwijdert u de
achtergebleven as met een vochtig doekje uit de binnenruimte.
Onderhoud en reiniging
Wanneer u de oven goed verzorgt en schoonmaakt, blijft hij
lang mooi en intact. Hieronder wordt uitgelegd hoe u de oven
op de juiste manier verzorgt en schoonmaakt.
Aanwijzingen
■ Geringe kleurverschillen op de voorzijde van de oven zijn het
gevolg van het gebruik van verschillende materialen, zoals
glas, kunststof en metaal.
■ Schaduwen op de ruit van de deur, die eruit zien als strepen,
zijn lichtreflexen van de ovenlamp.
■ Het email wordt ingebrand op zeer hoge temperaturen.
Hierdoor kunnen er kleine kleurverschillen ontstaan. Dit is
normaal en heeft geen nadelige invloed op de werking. De
smalle randen van de bakplaten kunnen niet volledig worden
geëmailleerd. Ze kunnen daarom ruw zijn. De bescherming
tegen corrosie blijft hierbij intact.
Schoonmaakmiddelen
Om te voorkomen dat de verschillende oppervlakken door
verkeerde schoonmaakmiddelen beschadigd worden, dient u
zich te houden aan de gegevens in de tabel. Gebruik
■ geen scherpe of schurende reinigingsmiddelen,
■ geen sterk alcoholhoudende reinigingsmiddelen,
■ geen harde schuur- of schoonmaaksponsjes,
■ geen hogedrukreinigers of stoomstraalapparaten.
Was nieuwe vaatdoekjes voor het gebruik goed uit.
Page 22

22
Inhangroosters reinigen
U kunt de inhangroosters verwijderen om ze gemakkelijker
schoon te maken.
: Risico van verbranding door hete onderdelen in de
binnenruimte!
Wacht tot de binnenruimte afgekoeld is.
1. Inhangroosters aan de voorkant naar boven drukken en naar
opzij verwijderen (Afbeelding A).
2. Inhangroosters aan de achterkant naar voren trekken en naar
opzij verwijderen (Afbeelding B).
3. Inhangroosters met afwasmiddel en spons of een borstel
reinigen.
4. De inhangroosters altijd met de welving (a) naar beneden
inbrengen, zodat de inschuifhoogtes kloppen.
5. Inhangroosters achter tot de aanslag inbrengen en naar
achteren drukken (Afbeelding C).
6. Inhangroosters voor tot de aanslag inbrengen en naar
beneden drukken (Afbeelding D).
Ovendeur verwijderen en inbrengen
Om de deurruiten schoon te maken en te demonteren, kunt u
de ovendeur verwijderen.
De scharnieren van de ovendeur zijn alle voorzien van een
blokkeerhendel. Wanneer de blokkeerhendels zijn dichtgeklapt
(Afbeelding A), is de ovendeur beveiligd. Hij kan niet worden
verwijderd. Wanneer de blokkeerhendels voor het verwijderen
van de ovendeur opengeklapt zijn (B), zijn de scharnieren
beveiligd. Ze kunnen niet dichtklappen.
: Risico van letsel!
Wanneer de scharnieren niet beveiligd zijn, klappen ze met
grote kracht dicht. Let erop dat de blokkeerhendels altijd
helemaal dichtgeklapt zijn, en bij het verwijderen van de
ovendeur helemaal opengeklapt.
Bereik Schoonmaakmiddelen
Voorkant van de
oven
Warm zeepsop:
met een schoonmaakdoekje reinigen en
met een zachte doek nadrogen. Geen
glasreiniger of schraper gebruiken.
Roestvrij staal Warm zeepsop:
met een schoonmaakdoekje reinigen en
met een zachte doek nadrogen. Kalk-,
vet-, zetmeel- en eiwitvlekken altijd
onmiddellijk verwijderen. Onder zulke
vlekken kan gemakkelijk corrosie ontstaan.
Bij de klantenservice of in de vakhandel
zijn speciale schoonmaakmiddelen voor
roestvrij staal verkrijgbaar die geschikt
zijn voor warme oppervlakken. Het
schoonmaakmiddel heel dun opbrengen
met een zachte doek.
Ruiten van de deur Glasreiniger:
met een zachte doek schoonmaken.
Geen schraper gebruiken.
Deurafscherming Schoonmaakmiddel voor roestvrij staal
(verkrijgbaar bij de klantenservice of in
de vakhandel):
Neem de gegevens van de fabrikant in
acht.
Binnenruimte Warm zeepsop of water met azijn:
met een schoonmaakdoekje reinigen.
Bij sterke vervuiling een schuursponsje
van roestvrij staal of ovenreiniger gebruiken. Alleen gebruiken in de onverwarmde oven.
U kunt het best de zelfreiniging gebruiken. Neem hierbij de aanwijzingen in het
hoofdstuk Ovenreiniging in acht!
Glazen afscherming van de ovenlamp
Warm zeepsop:
met een schoonmaakdoekje reinigen.
Inschuifrails Warm zeepsop:
laten weken en met een schoonmaakdoekje of borstel schoonmaken.
Telescooprails Warm zeepsop:
met een schoonmaakdoekje of borstel
schoonmaken.
Niet laten weken, in de vaatwasmachine
schoonmaken of bij de zelfreiniging meereinigen. De rails zouden beschadigd
raken en blokkeren.
Toebehoren Warm zeepsop:
laten weken en met een schoonmaakdoekje of borstel schoonmaken.
$ %
D
D
& '
%$
Page 23

23
Deur verwijderen
1. Ovendeur helemaal openen.
2. Beide blokkeerhendels links en rechts openklappen
(Afbeelding A).
3. Ovendeur tot de aanslag sluiten. Met beide handen links en
rechts vastpakken. Nog wat verder sluiten en uitnemen
(Afbeelding B).
Deur inbrengen
De ovendeur in de omgekeerde volgorde weer inbrengen.
1. Let er bij het inbrengen van de ovendeur op dat beide
scharnieren recht in de opening worden geleid
(Afbeelding A).
2. De keep op het scharnier dient aan beide kanten in te klikken
(Afbeelding B).
3. Beide blokkeerhendels weer dichtklappen (Afbeelding C).
Ovendeur sluiten.
: Risico van letsel!
Wanneer de ovendeur er per ongeluk uitvalt of een scharnier
dichtklapt, het scharnier niet met uw hand aanraken. Neem
contact op met de klantenservice.
Deurafscherming afnemen
De afscherming op de ovendeur kan verkleurd raken. Om de
ovendeur grondig schoon te maken kunt u de afscherming
verwijderen.
1. Ovendeur helemaal openen.
2. Afscherming van de ovendeur eraf schroeven. Hiervoor de
schroeven aan de linker- en rechterkant losdraaien
(Afbeelding A).
3. Afscherming afnemen (Afbeelding B).
Let erop dat de ovendeur niet gesloten wordt zolang de
afscherming afgenomen is. De binnenruit kan beschadigd
worden.
De afscherming schoonmaken met een reinigingsproduct
voor roestvrij staal.
4. Afscherming weer terugplaatsen en bevestigen.
5. Ovendeur sluiten.
Deurruiten verwijderen en inbrengen
Om gemakkelijker schoon te maken kunt u de ruiten van de
ovendeur uitnemen.
Let er bij het verwijderen van de binnenruiten op in welke
volgorde u de ruiten eruit neemt. U brengt de ruiten weer in de
juiste volgorde in door te letten op het nummer dat erop staat.
Verwijderen
1. Ovendeur verwijderen en met de handgreep naar beneden
op een doek leggen.
2. De afscherming bovenaan de ovendeur eraf schroeven.
Hiervoor de schroeven aan de linker- en rechterkant
losdraaien (Afbeelding A).
3. Bovenste ruit optillen en naar buiten trekken, en de beide
kleine afdichtingen afnemen (Afbeelding B).
4. De grote klemmen rechts en links losschroeven. De ruit
optillen en de klemmen van de ruit afnemen (Afbeelding C).
5. Afdichting onder aan de ruit afnemen (Afbeelding D). Hierbij
aan de afdichting trekken en naar boven uitnemen. Ruit eruit
trekken.
6. Onderste ruit er schuin naar boven uittrekken.
%$
%
$
&
%
$
%$
'
&
Page 24

24
7. De schroeven links en rechts op het plaatdeel NIET
afschroeven (Afbeelding E).
Reinig de ruiten met glasreiniger en een zachte doek.
: Risico van letsel!
Wanneer er krassen op het glas van de apparaatdeur zitten,
kan dit springen. Geen schraper, scherpe of schurende
schoonmaakmiddelen gebruiken.
Inbrengen
Let er bij het inbrengen op dat bij beide ruiten “right above“
linksonder ondersteboven staat.
1. Onderste ruit schuin naar achteren inschuiven (Afbeelding A).
2. Middelste ruit inschuiven (Afbeelding B).
3. Borgveren rechts en links op de ruit plaatsen, zo uitlijnen dat
de veren zich boven het schroefgat bevinden en
vastschroeven (Afbeelding C).
4. Afdichting onder aan de ruit weer inhaken (Afbeelding D).
5. Bovenste ruit schuin naar achteren in de beide houders
schuiven. Let erop dat u hierbij de afdichting niet naar
achteren schuift (Afbeelding E).
6. De beide kleine afdichtingen links en rechts weer aan de ruit
bevestigen (Afbeelding F).
7. De afscherming plaatsen en vastschroeven.
8. Ovendeur inbrengen.
Gebruik de oven pas weer wanneer de ruiten naar behoren
zijn ingezet.
Storingen en reparaties
Er hoeft niet altijd contact te worden opgenomen met de
klantenservice. In veel gevallen kunt u zelf voor een oplossing
zorgen. In de volgende tabel staan een paar tips om storingen
op te lossen.
: Kans op een elektrische schok!
■ Werkzaamheden aan de elektronica van het apparaat mogen
alleen door een vakman worden uitgevoerd.
■ Bij het werken aan de elektronica van het apparaat beslist de
netstekker uit het stopcontact halen. Automatische
beveiliging activeren of de zekering in de meterkast van uw
woning eruit draaien.
Storingstabel
(
%$
'
&
)
(
Storing Mogelijke oorzaak Aanwijzing/oplossing
Elektrische functie vertoont een storing
(bijv. indicatielampjes branden niet meer)
Zekering defect. Zekeringen in de meterkast controleren, eventueel
vervangen.
Vloeistof of dun vloeibaar deel loopt naar
één kant.
Apparaat niet horizontaal ingebouwd.
Inbouw van het apparaat controleren (zie het installatievoorschrift).
Apparaat functioneert niet meer, op het
klokdisplay knippert ‹:‹‹.
Stroomtoevoer is onderbroken. Tijd opnieuw instellen (zie het hoofdstuk: Elektroni-
sche klok).
Op het klokdisplay knippert ‹:‹‹, op het
temperatuurdisplay verschijnt “rrr“.
De stroomtoevoer is onderbroken
terwijl het apparaat in gebruik was
Op de klokfunctietoets drukken, de tijd opnieuw
instellen (zie het hoofdstuk: Elektronische klok).
Op het temperatuurdisplay verschijnt
EXXX, bijv. “„‹‹.
Interne fout van de apparaatelektronica.
Op de klokfunctietoets drukken. Verdwijnt de melding niet, haal de stekker dan uit het stopcontact
en steek hem er na ca. 10 seconden weer in.
Apparaat kan niet worden bediend, op het
temperatuurdisplay verschijnen D en -†-.
Apparaat is geblokkeerd. Blokkering deactiveren (zie het hoofdstuk: Kinder-
slot).
Page 25

25
Foutmeldingen met “
Wordt op het display een foutmelding met “ weergegeven,
druk dan op de toets 0. Hiermee wordt de foutmelding gewist.
Het kan voorkomen dat u aansluitend de tijd opnieuw moet
instellen. Wordt de fout opnieuw weergegeven, neem dan
contact op met de servicedienst.
Bij de volgende foutmeldingen kunt u het probleem zelf
oplossen.
Ovenlamp aan het plafond vervangen
Als de ovenlamp is uitgevallen, moet deze worden vervangen.
Temperatuurbestendige reservelampen, 40 watt, kunt u krijgen
bij de klantenservice of uw speciaalzaak. Gebruik uitsluitend
originele lampen.
: Kans op een elektrische schok!
Zekering in de meterkast uitschakelen.
1. Theedoek in de onverwarmde oven leggen, om schade te
voorkomen.
2. Glazen afscherming verwijderen. Hiervoor met de duimen de
metalen strippen naar achteren drukken (Afbeelding A).
3. De lamp eruit draaien en vervangen door een lamp van
hetzelfde type (Afbeelding B).
4. Glazen afscherming weer terugplaatsen. Hierbij met één kant
inbrengen en de andere kant vast aandrukken. Het glas zit nu
vast.
5. Theedoek eruit nemen en de zekering inschakelen.
Glazen afscherming
Als de glazen afscherming beschadigd is, dient hij te worden
vervangen. Passende glazen afschermingen zijn verkrijgbaar bij
de klantenservice. Vermeld a.u.b. het productnummer (Enr.) en
het fabricagenummer (FD-nr.) van uw apparaat.
Apparaat kan niet worden bediend, op het
temperatuurdisplay verschijnen D en -†˜.
Apparaat is permanent geblokkeerd.
Permanente blokkering deactiveren (zie het hoofdstuk: Kinderslot).
Apparaat warmt niet op, op het klokdisplay knippert de dubbele punt, op het temperatuurdisplay verschijnt bijv. ‚‡‹©.
Er is een toetscombinatie
gebruikt.
Apparaat uitschakelen, info-toets 3 seconden lang
indrukken, dan de klokfunctietoets 4 seconden
lang indrukken, vervolgens de info-toets opnieuw
3 seconden lang indrukken.
Elektronisch gestuurde functies werken
niet.
Energetische impulsen (bijv. een
blikseminslag).
De betreffende functies opnieuw instellen.
Bij het inschakelen van een functie
verschijnt •of œ op het temperatuurdisplay.
Apparaat is niet volledig afgekoeld.
Wachten tot het apparaat afgekoeld is, vervolgens
de functie opnieuw inschakelen.
Apparaat is automatisch uitgeschakeld.
op het temperatuurdisplay knippert ‹‹‹.
Het apparaat is als beveiliging
tegen oververhitting uitgeschakeld.
Functiekeuzeknop in de stand Û terugdraaien.
Bij het braden of grillen ontstaat een
walm.
Er verbrandt vet op het grillelement.
Verder grillen of braden tot het vet op het grillelement verbrand is.
Rooster of braadslede verkeerd
ingeschoven.
Rooster in de braadslede leggen en samen op een
lagere inschuifhoogte plaatsen.
In de binnenruimte treedt versterkt condensatie op.
Normaal verschijnsel (bijv. bij
gebak met zeer vochtige bedekking of een groot braadstuk)
Apparaatdeur tijdens het gebruik af en toe kort
openen.
Geëmailleerde inschuifdelen hebben
matte, heldere vlekken.
Normaal verschijnsel door afdruipend vlees- of vruchtensap.
Niet mogelijk.
Deurruiten zijn beslagen Normaal verschijnsel dat is geba-
seerd op de temperatuurverschillen die zich voordoen.
Apparaat bij 100 °C opwarmen en na 5 minuten
weer uitschakelen.
Storing Mogelijke oorzaak Aanwijzing/oplossing
Foutmelding Mogelijke oorzaak Aanwijzing/oplossing
“‹‚‚ Een toets is te lang ingedrukt of
beklemd geraakt.
Druk alle toetsen afzonderlijk in. Controleer of de
toetsen schoon zijn. Neem contact op met de klantenservice wanneer de foutmelding aanhoudt.
“‚‚† De temperatuur in de oven is te
hoog.
De ovendeur vergrendelt. Wacht tot de binnenruimte is afgekoeld. Met de toets 0 wist u de foutmelding.
%$
Page 26

26
Servicedienst
Wanneer uw apparaat gerepareerd moet worden, staat onze
servicedienst voor u klaar. Wij vinden altijd een passende
oplossing, ook om onnodig bezoek van een technicus te
voorkomen.
Enummer en FDnummer
Geef aan de klantenservice altijd het productnummer (E-nr.) en
het fabricagenummer (FD-nr.) van uw apparaat op, zodat wij u
goed van dienst kunnen zijn. Het typeplaatje met de nummers
vindt u rechts, aan de zijkant van de ovendeur. Om niet te lang
te hoeven zoeken wanneer u de klantenservice nodig heeft,
kunt u hier direct de gegevens van uw apparaat en het
telefoonnummer van de servicedienst invullen.
Let erop dat het bezoek van een technicus van de servicedienst
in het geval van een verkeerde bediening ook tijdens de
garantietijd kosten met zich meebrengt.
De contactgegevens in alle landen vindt u in de bijgesloten lijst
met Servicedienstadressen.
Verzoek om reparatie en advies bij storingen
Vertrouw op de competentie van de fabrikant. Dan bent u ervan
verzekerd dat de reparatie wordt uitgevoerd door ervaren
technici die gebruikmaken van de originele reserveonderdelen
voor uw apparaat.
Testgerechten
Deze tabellen zijn gemaakt voor onderzoeksinstituten om het
controleren en testen van verschillende apparaten te
vergemakkelijken.
Testgerechten volgens de norm EN 50304/EN 60350 (2009)
resp. IEC 60350.
Neem de aanwijzingen voor het voorverwarmen in de tabellen
in acht. De waarden in de tabel zijn van toepassing zonder
snelvoorverwarming.
Aanwijzing: Gebruik voor het bakken eerst de laagste
opgegeven temperatuur.
Enr.
FD-nr.
Servicedienst O
NL 088 424 4080
B 070 222 145
Bakken Inschuif-
hoogte
Functie Temperatuur
in °C
Baktijd in minuten
Sprits 3 % 140-150* 25-35
1 “/| 140-150 25-35
1+3 3/~ 140-150* 30-40
1+3+4 3/~ 130-140* 40-50
Small cakes (20 stuks per plaat) 3 % 160170** 25-30
1 “/| 160-180 25-35
1+3 3/~ 140150** 30-40
1+3+4 3/~ 140150** 35-50
Waterbiscuit 2 % 160-170* 25-35
1 3/~ 160-170* 25-35
Donkere appeltaart (donkere vormen naast elkaar,
afbeelding A)
1 0/} 170-180* 60-70
Bedekte appeltaart (donkere vormen naast elkaar,
afbeelding A)
1 “/| 180-190 75-85
Donkere appeltaart (donkere vormen diagonaal geplaatst,
afbeelding B)
1+3 3/~ 170-180* 65-75
* Oven voorverwarmen
** 10 minuten voorverwarmen
$ %
Page 27

27
Grillen Inschuif-
hoogte
Functie Temperatuur Grilltijd in minuten
Toast* (braadslede + rooster) 3+4 +/š 275 ^-2
Beefsteaks, 12 stuks** (braadslede + rooster) 3+4 +/š 275 2030
* Oven voorverwarmen
** Na Z van de tijd keren
Page 28

28
Ú Table of contents
[en]Instruction manual
Important safety information .................................................. 29
Causes of damage .......................................................................... 30
Energy and environment tips ................................................. 30
Saving energy................................................................................... 30
Environmentally-friendly disposal.................................................. 31
Your new oven.......................................................................... 31
Control panel .................................................................................... 31
Operating modes ............................................................................. 31
Cooking compartment .................................................................... 32
Your accessories ..................................................................... 32
Accessories ......................................................................................32
Inserting accessories ...................................................................... 32
Shelf positions .................................................................................. 33
Optional accessories ......................................................................33
Before using the appliance for the first time......................... 33
Setting the clock ..............................................................................33
Cleaning the appliance...................................................................33
Operating the appliance.......................................................... 33
Switching on the appliance............................................................ 33
Switching off the appliance............................................................34
Changing the basic settings .......................................................... 34
Automatic safety cut-out ................................................................. 34
Electronic clock ....................................................................... 35
Clock display .................................................................................... 35
Timer .................................................................................................. 35
Cooking time .................................................................................... 35
End of operation .............................................................................. 36
Preset operation...............................................................................36
Setting the clock ..............................................................................36
Rapid heat up ................................................................................... 36
Checking, correcting or deleting settings ................................... 36
Childproof lock......................................................................... 37
Lock....................................................................................................37
Permanent lock ................................................................................ 37
Baking....................................................................................... 37
Baking table for basic doughs and baked products ................ 37
Bread-baking .................................................................................... 39
Baking table for dishes and pre-prepared frozen meals ......... 39
Tips and tricks .................................................................................. 40
Roasting.................................................................................... 40
Open roasting................................................................................... 40
Roasting with a lid ........................................................................... 41
Roasting table ..................................................................................41
Tips and tricks .................................................................................. 42
Grilling ...................................................................................... 42
All-round grilling ............................................................................... 42
Radiant grilling.................................................................................. 43
Hot air eco ................................................................................ 44
Defrosting................................................................................. 45
Steam cooking ......................................................................... 45
Yoghurt ..................................................................................... 45
Preserving ................................................................................ 46
Pyrolytic cleaning .................................................................... 46
Important notes ................................................................................ 46
Before cleaning ................................................................................ 47
Setting the cleaning level ............................................................... 47
After cleaning.................................................................................... 47
Care and cleaning.................................................................... 47
Cleaning agents ............................................................................... 47
Cleaning the hook-in racks ............................................................ 48
Detaching and attaching the oven door......................................48
Removing the door cover............................................................... 49
Removing and installing the door panels ................................... 49
Faults and repairs.................................................................... 50
Malfunction table.............................................................................. 50
Replacing the bulb in the oven ceiling light ...............................51
Glass cover ....................................................................................... 51
After-sales service................................................................... 52
E number and FD number ............................................................. 52
Test dishes ............................................................................... 52
Produktinfo
Additional information on products, accessories, replacement
parts and services can be found at www.constructa.de and in
the online shop www.constructa-eshop.com
Page 29

29
: Important safety information
Read these instructions carefully. Only then
will you be able to operate your appliance
safely and correctly. Retain the instruction
manual and installation instructions for
future use or for subsequent owners.
This appliance is only intended to be fully
fitted in a kitchen. Observe the special
installation instructions.
Check the appliance for damage after
unpacking it. Do not connect the appliance
if it has been damaged in transport.
Only a licensed professional may connect
appliances without plugs. Damage caused
by incorrect connection is not covered
under warranty.
This appliance is intended for domestic use
only. The appliance must only be used for
the preparation of food and drink. The
appliance must be supervised during
operation. Only use this appliance indoors.
This appliance may be used by children
over the age of 8 years old and by persons
with reduced physical, sensory or mental
capabilities or by persons with a lack of
experience or knowledge if they are
supervised or are instructed by a person
responsible for their safety how to use the
appliance safely and have understood the
associated hazards.
Children must not play with, on, or around
the appliance. Children must not clean the
appliance or carry out general maintenance
unless they are at least 8 years old and are
being supervised.
Keep children below the age of 8 years old
at a safe distance from the appliance and
power cable.
Always slide accessories into the cooking
compartment correctly. See "Description of
accessories in the instruction manual.
Risk of fire!
■
Combustible items stored in the cooking
compartment may catch fire. Never store
combustible items in the cooking
compartment. Never open the appliance
door if there is smoke inside. Switch off
the appliance and unplug it from the
mains or switch off the circuit breaker in
the fuse box.
Risk of fire!
■
A draught is created when the appliance
door is opened. Greaseproof paper may
come into contact with the heating
element and catch fire. Do not place
greaseproof paper loosely over
accessories during preheating. Always
weight down the greaseproof paper with a
dish or a baking tin. Only cover the
surface required with greaseproof paper.
Greaseproof paper must not protrude over
the accessories.
Risk of burns!
■
The appliance becomes very hot. Never
touch the interior surfaces of the cooking
compartment or the heating elements.
Always allow the appliance to cool down.
Keep children at a safe distance.
Risk of serious burns!
■
Accessories and ovenware become very
hot. Always use oven gloves to remove
accessories or ovenware from the cooking
compartment.
Risk of burns!
■
Alcoholic vapours may catch fire in the hot
cooking compartment. Never prepare food
containing large quantities of drinks with a
high alcohol content. Only use small
quantities of drinks with a high alcohol
content. Open the appliance door with
care.
Risk of scalding!
■
The accessible parts become hot during
operation. Never touch the hot parts. Keep
children at a safe distance.
Risk of scalding!
■
When you open the appliance door, hot
steam may escape. Open the appliance
door with care. Keep children at a safe
distance.
Risk of scalding!
■
Water in a hot cooking compartment may
create hot steam. Never pour water into
the hot cooking compartment.
Risk of injury!
Scratched glass in the appliance door may
develop into a crack. Do not use a glass
scraper, sharp or abrasive cleaning aids or
detergents.
Risk of electric shock!
■
Incorrect repairs are dangerous. Repairs
may only be carried out by one of our
trained after-sales engineers. If the
appliance is faulty, unplug the mains plug
or switch off the fuse in the fuse box.
Contact the after-sales service.
Page 30

30
Risk of electric shock and serious injury!
■
The cable insulation on electrical
appliances may melt when touching hot
parts of the appliance. Never bring
electrical appliance cables into contact
with hot parts of the appliance.
Risk of electric shock!
■
Do not use any high-pressure cleaners or
steam cleaners, which can result in an
electric shock.
Risk of electric shock!
■
When replacing the cooking compartment
bulb, the bulb socket contacts are live.
Before replacing the bulb, unplug the
appliance from the mains or switch off the
circuit breaker in the fuse box.
Risk of electric shock!
■
A defective appliance may cause electric
shock. Never switch on a defective
appliance. Unplug the appliance from the
mains or switch off the circuit breaker in
the fuse box. Contact the after-sales
service.
Risk of fire!
■
Loose food residues, grease and meat
juices may catch fire during the Selfcleaning cycle. Remove coarse dirt from
the cooking compartment and from the
accessories before every Self-cleaning
cycle.
Risk of fire!
■
The appliance will become very hot on the
outside during the Self-cleaning cycle.
Never hang combustible objects, e.g. tea
towels, on the door handle. Do not place
anything against the front of the oven.
Keep children at a safe distance.
Risk of burns!
■
The cooking compartment will become
very hot during the Self-cleaning cycle.
Never open the appliance door or move
the locking latch by hand. Allow the
appliance to cool down. Keep children at
a safe distance.
Risk of burns!
■
; The appliance will become very hot on
the outside during the Self-cleaning cycle.
Never touch the appliance door. Allow the
appliance to cool down. Keep children at
a safe distance.
Risk of serious damage to health!
The appliance will become very hot during
the Self-cleaning cycle. The non-stick
coating on baking trays and tins is
destroyed and noxious gases are released.
Never let non-stick baking trays and tins go
through the Self-cleaning cycle. Only
enamelled accessories may be cleaned at
the same time.
Causes of damage
Caution!
■ Accessories, foil, greaseproof paper or ovenware on the
cooking compartment floor: do not place accessories on the
cooking compartment floor. Do not cover the cooking
compartment floor with any sort of foil or greaseproof paper.
Do not place ovenware on the cooking compartment floor if a
temperature of over 50 ºC has been set. This will cause heat
to accumulate. The baking and roasting times will no longer
be correct and the enamel will be damaged.
■ Water in a hot cooking compartment: do not pour water into
the cooking compartment when it is hot. This will cause
steam. The temperature change can cause damage to the
enamel.
■ Moist food: do not store moist food in the cooking
compartment when it is closed for prolonged periods This will
damage the enamel.
■ Fruit juice: when baking particularly juicy fruit pies, do not
pack the baking tray too generously. Fruit juice dripping from
the baking tray leaves stains that cannot be removed. If
possible, use the deeper universal pan.
■ Cooling with the appliance door open: only allow the cooking
compartment to cool when it is closed. Even if the appliance
door is only open a little, front panels of adjacent units could
be damaged over time.
■ Very dirty door seal: If the door seal is very dirty, the
appliance door will no longer close properly when the
appliance is in use. The fronts of adjacent units could be
damaged.Always keep the door seal clean.
■ Appliance door as a seat, shelf or worktop: Do not sit on the
appliance door, or place or hang anything on it. Do not place
any cookware or accessories on the appliance door.
■ Inserting accessories: depending on the appliance model,
accessories can scratch the door panel when closing the
appliance door. Always insert the accessories into the
cooking compartment as far as they will go.
■ Carrying the appliance: do not carry or hold the appliance by
the door handle. The door handle cannot support the weight
of the appliance and could break.
Energy and environment tips
Here you can find tips on how to save energy when baking and
roasting and how to dispose of your appliance properly.
Saving energy
■ Only preheat the oven if this is specified in the recipe or in
the operating instruction tables.
■ Use dark, black lacquered or enamelled baking tins. They
absorb the heat particularly well.
■ Open the oven door as infrequently as possible while you are
cooking, baking or roasting.
■ It is best to bake several cakes one after the other. The oven
is still warm. This reduces the baking time for the second
cake. You can also place two loaf tins next to each other.
■ For longer cooking times, you can switch the oven off
10 minutes before the end of the cooking time and use the
residual heat to finish cooking.
Page 31

31
Environmentally-friendly disposal
Dispose of packaging in an environmentally-friendly manner.
Your new oven
In this section, you will find information on
■ the control panel
■ the operating modes
■ the cooking compartment
Control panel
Pop-out operating knob
The rotary, temperature and operating mode selectors can all
be popped out. Push the required operating knob to pop it in or
out.
Operating modes
Here you can gain an overview of your appliance's operating
modes.
This appliance is labelled in accordance with European
Directive 2012/19/EU concerning used electrical and
electronic appliances (waste electrical and electronic
equipment - WEEE). The guideline determines the
framework for the return and recycling of used
appliances as applicable throughout the EU.
Control element Use
KJ Clock function button Selects the required clock function or Rapid heat up (see section: Electronic clock)
Rotary selector Makes settings within a clock function or activates Rapid heat up
(see section: Electronic clock)
Operating mode selector Selects the desired operating mode (see section: Switching on the appliance)
± Info button When the appliance is switched on: displays the current oven temperature during the
heating up phase (see section: Switching on the appliance)
When the appliance is switched off: calls up the basic settings menu
(see section: Changing the basic settings)
Temperature selector When the appliance is switched on: sets the temperature (see section: Switching
on the appliance)
When the appliance is switched off: changes the settings in the basic settings menu
(see section: Changing the basic settings)
(OHFWURQLFFORFN
2SHUDWLQJPRGHVHOHFWRU
,QIREXWWRQ
7
HPSHUDWXUHGLVSOD\
&ORFNIXQFWLRQ
EXWWR
Q
5RWDU\
VHOHFWR
U
7HPSHUDWXUH
VHOHFWR
U
Operating mode Application
3 Hot air For baking and roasting on one or more levels
“ Hot air eco* For energy-optimised baking and roasting on one level. The appliance does not need to
be preheated
% Top/bottom heat For baking and roasting on one level. Especially suitable for cakes with moist toppings
(e.g. cheesecake)
0 Circotherm intensive For frozen convenience products and for meals that require a lot of heat from underneath
(see section: Baking)
ë Bread-baking For items that need to be baked at a high temperature
* Operating mode used to determine the energy efficiency class in accordance with EN50304.
Page 32

32
Cooking compartment
The oven light is located in the cooking compartment. A cooling
fan protects the oven from overheating.
Oven light
During operation, the oven light in the cooking compartment is
on.The light remains switched off during self-cleaning.
Cooling fan
The cooling fan switches on and off as required. The hot air
escapes above the door. Caution: do not cover the ventilation
slots. Otherwise the oven will overheat.
So that the cooking compartment cools down more quickly
after operation, the cooling fan continues to run for a certain
period afterwards.
Your accessories
In this section, you will find information on
■ Your accessories
■ the correct way to insert the accessories into the cooking
compartment
■ the shelf positions
■ the optional accessories
Accessories
The following accessories are included with your appliance:
Note: The baking tray and universal pan may become distorted
when the appliance is in operation. This is caused by the
considerable temperature differences acting on the
accessories. These differences may occur if only a part of the
accessory is covered with food, or if frozen items such as pizza
are placed on the accessory.
Inserting accessories
The accessories are equipped with a locking function. The
locking function prevents the accessories from tilting when they
are pulled out. The accessories must be inserted into the
cooking compartment correctly for the tilt protection to work
properly.
When inserting the wire rack, check
■ that the lug (a) is pointing downwards
■ that the lug (a) is in the rear part of the wire rack
When inserting the baking tray or the universal pan, check
■ that the lug (a) is in the rear part of the of the accessory
■ that the sloping edge of the accessory faces towards the
appliance door when it is inserted
$ Bottom heat For food and baked items on which you want a crust to form, or which need more brown-
ing on the underside. Switch on bottom heat at the end of the baking time for a brief
period only.
4 All-round grilling For poultry and larger pieces of meat.
+ Full-surface grill For large amounts of flat, small items for grilling (e.g. steaks, sausages)
( Centre-area grill For small amounts of flat, small items for grilling (e.g. steaks, toast)
é Steam cooking For gentle preparation of vegetables, meat and fish
The é Steam cooking operating mode can only be used in conjunction with the
Mega System steamer (available as an optional accessory from specialist retailers).
x Pyrolytic Automatic cooking compartment cleaning. The oven heats up until the dirt is broken
down
\ Light Helps with cleaning and care of the cooking compartment
Operating mode Application
* Operating mode used to determine the energy efficiency class in accordance with EN50304.
Baking tray, enamelled
for baking tray bakes and small
items
Wire rack
for baking in baking tins, roasting in
roasting dishes and grilling
Universal pan, enamelled
for baking moist cakes, roasting,
grilling and collecting drops of
liquid during cooking
D
D
D
D
Page 33

33
Shelf positions
The cooking compartment has four shelf positions. The shelf
positions are counted from the bottom up.
Note: When baking and roasting with 3 hot air, do not use
shelf position 2. This will adversely affect air circulation and
your baking and roasting results will not be as good.
Optional accessories
You can purchase optional accessories from the after-sales
service or specialist retailers. Please see the sales brochures
for more details.
When purchasing, please always quote the exact identification
number (E-no.) of your appliance.
Before using the appliance for the first time
In this section, you can read about
■ How to set the clock after connecting up your appliance
■ How to clean your appliance before using it for the first time
Setting the clock
Note: When you press the KJ clock function button, you have
3 seconds to set the clock using the rotary selector. Should this
have been insufficient for you, you can amend the clock time
later.
‹:‹‹ flashes in the clock display.
1. Briefly press the KJ clock function button to go to the
setting mode.
The KJ and 3 symbols light up. ‚ƒ:‹‹ appears in the clock
display.
2. Set the current time using the rotary selector.
Your setting is accepted after 3 seconds.
Changing the clock
To subsequently change the time, press the KJclock function
button repeatedly until the KJ and 3 symbols light up again.
Change the time with the rotary selector.
Cleaning the appliance
Clean your appliance before using it for the first time.
1. Remove accessories and any remaining packaging from the
cooking compartment.
2. Clean the accessories and cooking compartment with hot
soapy water (see section: Cleaning and care).
3. Heat with % Top/bottom heat at 240°C for 60 minutes.
4. Afterwards, wipe the cooled cooking compartment with hot,
soapy water.
5. Clean the outside of the appliance with a soft, damp cloth
and soapy water.
Operating the appliance
In this section, you can read about
■ how to switch your appliance on and off
■ how to select an operating mode and temperature
■ how you can change the basic settings
■ when your appliance switches off automatically
Switching on the appliance
1. Turn the operating mode selector until the symbol for the
required operating mode lights up.
A default temperature appears in the temperature display.
2. Turn the temperature selector to change the default
temperature.
The appliance begins to heat up.
Note: If no default temperature is displayed, the temperature for
your selected operating mode is a fixed setting. You cannot
change this temperature.
Accessories Order no.
Universal pan with wire insert CZ 1242 X1
Baking tray, enamelled CZ 1342 X0
Baking and roasting shelf CZ 1432 X1
Baking tray, aluminium CZ 1332 X0
Pizza tray CZ 1352 X0
System steamer CZ 1282 X0
Telescopic shelf x2 CZ 1702 X2
Telescopic shelf x3 CZ 1742 X2
Telescopic shelf with full extension x4 CZ 1755 X2
Operating mode Default temper-
ature in °C
Temperature
range in °C
3 Hot air 160 40 - 200
“ Hot air eco 160 40 - 200
Page 34

34
Current temperature
Press the ± info button. The current temperature appears for
3 seconds.
Note: The current temperature can only be displayed with
operating modes with a default temperature.
Heating indicator
The heating indicator displays the rising temperature in the
cooking compartment.
■ Temperature reached (figure A)
■ Appliance reheating (figure B)
Switching off the appliance
Turn the operating mode selector to the Û position. The
appliance is switched off.
The appliance has a cooling fan. After the appliance is switched
off, the cooling fan may continue to run.
You can see in the temperature display whether there is high or
low residual heat in the cooking compartment.
Changing the basic settings
Your appliance has various basic settings, which are preset at
the factory. You can, however, change these basic settings as
required.
The appliance must be switched off and controls must not be
locked.
1. Press and hold the ± info button for 3 seconds to go to
the basic settings menu.
In the temperature display, ™‚‹ appears.
2. Press the ± info button briefly and repeatedly until the setting
symbol for the current basic setting of a submenu is
displayed in the temperature display (e.g. ™„ƒ).
3. Using the temperature selector, set the required basic setting
within a submenu (e.g. ™„„).
4. Press and hold the ± info button for 3 seconds.
Your basic setting is saved.
You can change the following basic settings:
Automatic safety cut-out
The automatic safety cut-out is activated if your appliance is
switched on and you have not made any settings for a long
time.
The length of time after which your appliance switches itself off
depends on the settings that you make.
‹‹‹ flashes in the temperature display. Appliance operation is
interrupted.
Turn the operating mode selector to the Û position to deactivate
it.
% Top/bottom heat 170 50 - 275
0 Circotherm intensive 220 50 - 275
ë Bread-baking 200 180 - 220
$ Bottom heat 200 50 - 225
4 All-round grilling 170 50 - 250
+ Full-surface grill 220 50 - 275
( Centre-area grill 180 50 - 275
é Steam cooking Fixed setting -
x Pyrolytic Level 0 1, 2 and 3
\ Interior lighting Fixed setting -
Temperature display
Meaning
• Residual heat high (above 120 °C)
œ Residual heat low (between
60 °C and 120 °C)
Operating mode Default temper-
ature in °C
Temperature
range in °C
$ %
Basic settings menu
Submenu Basic setting Setting
symbol
Childproof lock Appliance controls
unlocked
™‚‹
Appliance controls locked ™‚‚
Appliance controls permanent lock
™ƒ‚
Audible signal Audible signal off ™„‹
Audible signal 30 seconds ™„‚
Audible signal 2 minutes ™„ƒ
Audible signal 10 minutes ™„„
Page 35

35
Electronic clock
In this section, you can read about
■ how to set the timer
■ how to switch your appliance off automatically (cooking time
and end of operation)
■ how to switch your appliance on and off automatically (preset
operation)
■ how to set the time
■ find out how to activate rapid heat up
Clock display
Notes
■ Between the times ƒƒ:‹‹ and †:†Š the clock display is
dimmed if you do not make any settings in that period or no
clock function is activated.
■ When you set a clock function, the time interval increases
when you set higher values (e.g. cooking time up to‚:‹‹œ to
the minute, using ‚:‹‹œ
to the nearest 5 minutes).
■ For the Q minute minder, x cooking time, y end of
operation and preselection mode clock functions, a signal
sounds when the settings have elapsed and the Q or y
symbol flashes. To cancel the audible signal before it ends,
press the KJ clock function button.
■ Briefly press the KJ clock function button to select a clock
function. You then have 3 seconds to set the selected clock
function. After this time, the setting mode is exited
automatically.
Switching the clock display on and off
1. Press and hold the KJclock function button for 6 seconds.
The clock display switches off. If a clock function is active,
the associated symbol remains lit.
2. Press the KJclock function button briefly.
The clock display switches on.
Timer
1. Press the KJclock function button repeatedly until the KJ
and Q symbols light up.
2. Set the duration using the rotary selector (e.g. †:‹‹ minutes).
The setting is applied automatically. Then the clock is
displayed again and the minute minder starts counting down.
Cooking time
Automatic switch-off after a cooking time setting has elapsed.
1. Set the operating mode and temperature.
The appliance heats up.
2. Press the KJclock function button repeatedly until
the KJand x symbols light up.
3. Set the cooking time with the rotary selector
(e.g. ‚:„‹ hours).
The setting is applied automatically. The time is then
displayed again and the set cooking time counts down.
&ORFNIXQFWLRQEXWWRQ 5RWDU\VHOHFWRU
Clock function Use
Q Timer You can use the minute minder as an egg timer or a kitchen timer. The appliance does
not switch on or off automatically
x Cooking time The appliances switches off automatically after a cooking time setting has elapsed
(e.g. ‚:„‹ hours)
y End of operation The appliance switches off automatically at a set time (e.g. ‚ƒ:„‹ )
Preset operation The appliance switches on and off automatically. Cooking time and end of operation
have been combined.
3 Clock Setting the clock
f Rapid heat up Shortens the heat up time
Page 36

36
Once the cooking time has elapsed, the appliance switches off
automatically.
1. Turn the operating mode and temperature selector back to
the Û position.
2. Press the KJ clock function button to exit the clock function.
End of operation
Automatic switch-off at a set time.
1. Set the operating mode and temperature.
The appliance heats up.
2. Press the KJclock function button repeatedly until the KJ
and y symbols light up.
3. Set the end of operation using the rotary selector
(e.g. ‚ƒ:„‹ o'clock).
The setting is applied automatically. The clock is then
displayed again.
The appliance switches off automatically at the time set for the
end of operation.
1. Turn the operating mode and temperature selector back to
the Û position.
2. Press the KJ clock function button to exit the clock function.
Preset operation
The appliance switches on automatically, then switches off
automatically at the time preselected for the end of operation.
To set this function, combine the cooking time and end of
operation clock functions.
Bear in mind that food which spoils easily should not be left in
the cooking compartment for too long.
1. Set the operating mode and temperature.
The appliance heats up.
2. Press the KJclock function button repeatedly until
the KJand x symbols light up.
3. Set the cooking time with the rotary selector
(e.g. ‚:„‹ hours).
The setting is applied automatically.
4. Press the KJclock function button repeatedly until
the KJand y symbols light up.
5. Set the end of operation using the rotary selector
(e.g. ‚ƒ:„‹ o'clock).
The appliance switches off and waits until the appropriate
time to switch on (‚‚:‹‹ in the example). The appliance
switches off automatically at the time set for the end of
operation (‚ƒ:„‹ ).
6. Turn the operating mode and temperature selector back to
the Û position.
7. Press the KJ clock function button to exit the clock function.
Setting the clock
You can only change the clock when no other clock function is
active.
1. Press the KJ clock function button repeatedly until
the KJand 3 symbols light up.
2. Set the clock using the rotary selector.
The setting is applied automatically.
Rapid heat up
You can reduce the heating up time for the 3 Hot air and ë
Bread-baking operating modes if the set temperature is higher
than 100 °C.
Note: During Rapid heat up, do not place any food in the
cooking compartment until the f symbol goes out.
1. Set the operating mode and temperature.
The appliance heats up.
2. Press the KJ clock function button repeatedly until the KJ
and f symbols light up and Πappears in the clock display.
3. Turn the rotary selector clockwise.
Ž is displayed in the clock display and the f symbol lights
up. Rapid heat up is activated.
After reaching the set temperature, Rapid heat up switches off.
The f symbol goes out.
Checking, correcting or deleting settings
1. To check your settings, press the KJ clock function button
repeatedly until the corresponding symbol lights up.
2. If necessary, you can correct your setting using the rotary
selector.
3. If you wish to cancel your setting, turn the rotary selector anti-
clockwise to the original value.
Page 37

37
Childproof lock
In this section, you can read about
■ how to lock your appliance
■ how to lock your appliance permanently
Lock
Once it has been locked, the appliance cannot be switched on
accidentally or by unauthorised users (e.g. by children playing).
To switch the appliance on again, you must unlock it. After
appliance operation, the appliance is not automatically locked.
Lock it again if necessary or activate the permanent lock.
Lock appliance
1. Switch off the appliance.
2. Press and hold the ± info button until ™‚‹ appears in the
temperature display.
3. Turn the temperature selector until ™‚‚ appears on the
temperature display.
4. Press and hold the ± info button until the ‚ symbol appears
in the temperature display.
Note: If you try to switch the appliance on when it is locked, -†-
appears in the temperature display.
Unlocking the appliance
1. Press and hold the ± info button until ™‚‚ appears in the
temperature display.
2. Turn the temperature selector until ™‚‹ appears on the
temperature display.
3. Press and hold the ± info button until the ‚ symbol goes out.
Permanent lock
Once it has been permanently locked, the appliance cannot be
switched on accidentally or by unauthorised users (e.g. by
children playing).
To switch the appliance on, you must interrupt the permanent
lock briefly. After you have switched your appliance off, it locks
again automatically.
Locking the appliance permanently
1. Switch off the appliance.
2. Press and hold the ± info button until ™‚‹ appears in the
temperature display.
3. Turn the temperature selector until ™ƒ‚ appears on the
temperature display.
4. Press and hold the ± info button for 3 seconds.
Your appliance will be locked after 30 seconds. The ‚
symbol appears on the temperature display.
Note: If you try to switch the locked appliance on, -†˜ appears
in the temperature display.
Interrupting permanent lock
1. Press and hold the ± info button until ™ƒ‚ appears in the
temperature display.
2. Turn the temperature selector until ™ƒ‹ appears on the
temperature display.
3. Press and hold the ± info button until the ‚ symbol goes out.
The permanent lock is interrupted.
4. Switch the appliance on within 30 seconds.
After the permanent lock is switched off, it is reactivated after
30 seconds.
Unlocking the appliance permanently
1. Press and hold the ± info button until ™ƒ‚ appears in the
temperature display.
2. Turn the temperature selector until ™ƒ‹ appears on the
temperature display.
3. Press and hold the ± info button until the ‚ symbol goes
out.
4. Within 30 seconds, press and hold the info button again for
3 seconds.
5. Turn the temperature selector until ™‚‹ appears on the
temperature display.
6. Press and hold the ± info button for 3 seconds.
The appliance is permanently unlocked.
Baking
Baking tins
Use dark metal baking tins. Tinplate and glass dishes increase
the baking time required and the cake will not brown evenly.
Baking trays
We recommend that you only use original baking trays, as
these have been optimally designed for the cooking
compartment and the operating modes.
Always carefully push the baking trays in as far as they will go.
Make sure that the sloping edge of the baking tray always
faces the appliance door.
Baking on one level
When baking with 3 Hot air, note the following:
Cakes in tins, shelf position 2
Cakes on trays, shelf position 3.
Baking on two levels:
Use 3 Hot air.
Universal pan in shelf position 3
Baking tray at shelf position 1.
Baking trays that are placed in the oven at the same time will
not necessarily be ready at the same time.
Baking table for basic doughs and baked
products
The details given in the table are average values and apply to
the use of enamelled baking trays and dark-coloured baking
tins. The values may vary depending on the type and amount of
dough/mixture and on the baking tin.
We recommend that you set the lower of the specified
temperatures the first time. A lower temperature will generally
provide more even browning.
If you are baking according to your own recipe, use similar
recipes in the table as a guide.
Observe the notes in the table about preheating.
Page 38

38
3/~ Hot air % Top/bottom heat
Basic dough Shelf posi-
tion
Tempera-
ture in °C
Baking time in
minutes
Shelf posi-
tion
Tempera-
ture in °C
Sponge mixture
Tray bake with topping 1 160-170 30-40 3 170-180
1+3 150-170 40-50 - -
Springform tin/loaf tin (cake) 1 150-160 60-80 2 160-170
Flan-base cake tin 1 160-170 25-35 2 170-180
Shortcrust pastry
Tray bakes with dry topping, e.g. crumble 1 160-170 50-70 3 180-190
1+3 160-170 60-80 - -
Tray bakes with moist topping, e.g. egg custard 1 150-170 60-90 3 170-190
Springform cake tin, e.g. cheesecake 1 160-170 70-100 2 170-180
Flan-base cake tin 1 160-170 20-30 2 180-190*
Sponge mixture
Swiss roll 1 180-190* 10-15 3 190-200*
Flan-base cake tin 1 160-170 20-30 2 170-180
Sponge (6 eggs) 1 150-160 30-45 2 160-170
Sponge (3 eggs) 1 150-160 25-45 2 160-170
Yeast dough
Tray bakes with dry topping, e.g. crumble 1 160-170 50-70 3 170-180
1+3 160-170 60-80 - -
Tray bakes with moist topping, e.g. egg custard 1 150-170 60-90 3 170-190
Savarin/plaited loaf (500 g) 1 160-170 40-50 3 170-180
Springform cake tin 1 160-170 30-45 2 160-170
Ring cake tin 1 160-170 40-50 2 170-180
* Preheat oven
3/~ Hot air Top/bottom heat %
Small baked products Shelf posi-
tion
Temperature in °C
Baking time in
minutes
Shelf posi-
tion
Temperature in °C
Yeast dough 1 160-170 20-30 3 170-180
1+3 160-170 30-40 - -
Meringue mixture 1 80 100-150 3 80-90
1+3 80 150-170 - -
Puff pastry 1 180-200 20-30 3 200-210
1+3 180-200* 25-35 - -
Choux pastry 1 190-200* 25-35 3 200-210*
1+3 190-200* 30-40 - -
Sponge mixture, e.g. muffins 1 150-160* 20-40 3 160-170*
1+3 160-170 25-35 - -
Shortcrust pastry, e.g. butter biscuits 1 140-150* 15-25 3 140-150*
1+3 130-140* 15-25 - -
1+3+4 130-140* 15-25 - -
* Preheat oven
Page 39

39
Bread-baking
The information in the table contains only guide values. It may
vary depending on the type and amount of dough.
The values for bread dough apply to both dough placed on a
tray and dough placed in a loaf tin.
You should set the lower of the specified temperatures the first
time. Lower temperatures will generally allow more even
browning.
Please note the information about preheating in the table.
Baking table for dishes and pre-prepared
frozen meals
Circotherm intensive 6 is particularly suitable for freshly
prepared dishes that require a lot of heat from underneath and
for frozen convenience products.
Note the following points:
■ Line the baking tray with greaseproof paper
■ Spread chips out in a single layer
■ Turn frozen potato products half way through the baking time
■ Only season frozen potato products after they have finished
baking
■ Leave a little space between pieces of dough when baking
bread rolls. Do not place too many on one baking tray
■ Observe the manufacturer's instructions.
The values in the table are guidelines and apply to enamelled
baking trays. The values may vary depending on the type and
amount of dough/mixture and on the baking tin.
We recommend that you set the lower of the specified
temperatures the first time. A lower temperature will generally
provide more even browning.
The information in the table applies to putting food in a cold
oven.
With 0 Circotherm intensive, you cannot bake on two levels.
ë/{ Bread-baking % Top/bottom heat
Bread Shelf posi-
tion
Tempera-
ture in °C
Baking time in
minutes
Shelf posi-
tion
Tempera-
ture in °C
Bread rolls 1 220* 10-20 2 240*
Flatbread 1 220* 15-20 2 240*
Empanada 1 180* 30-40 2 200*
Bread dough 750-1000 g
Final baking 1 220* 35-40 2 220*
Bread dough 1000-1250 g
Initial baking 1 220* 10-15 2 240*
Final baking 1 180 40-45 2 200
Bread dough 1250-1500 g
Initial baking 1 220* 10-15 2 240*
Final baking 1 180 40-50 2 200
* Preheat oven
Bread-baking ë/{ 0/} Circotherm inten-
sive
Dishes Shelf posi-
tion
Tempera-
ture in °C
Baking time in
minutes
Shelf posi-
tion
Tempera-
ture in °C
Pizza, fresh 1 190-210* 20-30 1 180-200
1+3 180-190 35-45 - -
Savoury flan 1 190-210* 15-25 1 200-220
Quiche 1 180-200* 50-60 1 170-190
Tart 1 180-200* 30-45 1 190-210
Swiss flan 1 180-190* 45-55 1 170-190
Potato gratin made from raw potatoes 1 180-200 50-60 1 170-190
Pizza, frozen
Pizza with thin base 1 180-200 10-20 1 200-220
1+3 180-190 20-30 - -
Deep-pan pizza 1 180-200 20-30 1 180-200
1+3 180-190 25-35 - -
Potato products
Chips 1 190-210 15-25 1 210-230
1+3 180-190 25-35 - -
Croquettes 1 180-200 15-30 1 200-220
* Preheat oven
Page 40

40
Tips and tricks
Roasting
: There is a risk of injury if you use roasting dishes that
are not heat-resistant!
Only use roasting dishes that are marked as being suitable for
use in the oven.
Open roasting
For open roasting, a roasting dish without a lid is used.
When you are roasting with % Top/bottom heat, you should
turn the roast approximately half to two thirds of the way
through the roasting time.
Roasting in the universal pan
Juices escape from the roasting meat and are collected in the
universal pan. You can use these juices as the basis for a tasty
gravy.
You can also cook side dishes (e.g. vegetables) at the same
time as roasting meat in the universal pan.
For smaller joints, you can use a smaller roasting dish instead
of the universal pan. Place this directly on the wire rack.
Roasting on the wire rack
If you are roasting directly on the wire rack, you should also
insert the universal pan at level 1. The meat juices are collected
here and the oven is kept clean.
Rösti, stuffed potato pockets 1 180-200 15-25 1 200-220
Baked items, frozen
Bread rolls/baguette, prebaked 1 180-200 10-20 1 180-200
Crispy bread rolls/baguette 1 180-200 5-15 1 200-220
Pretzels, raw dough 1 180-190 15-20 1 170-190
Baked items, prebaked
Crispy bread rolls/baguette 1 180-200 5-15 1 180-200
Processed portions, frozen
Fish fingers 1 180-200 15-20 1 190-210
Drumsticks, nuggets 1 190-210 15-25 1 200-220
Veggie burgers 1 190-210 35-45 1 200-220
Strudel, frozen 1 190-210 35-45 1 180-200
The cake is too light in colour Check the shelf height and the recommended bakeware. Place the baking tin on the wire
rack and not on the baking tray. Increase the baking time or the temperature.
The cake is too dark Check the shelf height. Shorten the baking time or reduce the temperature.
The cake is unevenly browned in the
baking tin
Check the shelf height and the temperature. Do not place the baking tin directly in front
of the air outlets in the back wall of the cooking compartment. Check for the correct position of the baking tin on the wire rack.
The cake is unevenly browned on the
baking tray
Check the shelf height and the temperature. When baking small items, make sure that
they are the same size and thickness.
The cake is too dry Shorten the baking time and increase the temperature slightly.
The cake is too moist in the centre Reduce the temperature. Note: Higher temperatures do not mean shorter baking times
(cooked on the outside, but not on the inside). Increase the baking time and allow the
cake dough to prove longer. Add less liquid to the mixture.
The cake collapses when you take it out
of the oven
Add less liquid to the mixture. Increase the baking time or reduce the temperature.
The specified baking time is not correct For small items, check the amount on the baking tray. The items must not be touching
each other.
Frozen products are not browned evenly
after baking
If frozen products are unevenly browned when prebaked, then uneven browning is to be
expected after baking.
Frozen products are not browned, not
crispy or the specified time is not correct
Remove ice from frozen products before baking them. Do not use heavily frosted frozen
products.
Bread-baking ë/{ 0/} Circotherm inten-
sive
Dishes Shelf posi-
tion
Tempera-
ture in °C
Baking time in
minutes
Shelf posi-
tion
Tempera-
ture in °C
* Preheat oven
Page 41

41
Roasting with a lid
Roasting dishes with lids are used for this kind of roasting. This
method is particularly suitable for pot roasts.
Roasting table
The roasting time and temperature depend on the size, height,
type and quality of the item.
As a general rule: the larger the item, the lower the temperature
and the longer the roasting time.
The information in the table is a guideline, and relates to items
cooked without a lid. The values may vary depending on the
type and quantity of the meat/fish and on the roasting dish.
You should set the lower of the specified temperatures the first
time. This will generally allow more even browning.
At the end of the roasting time, switch the oven off and leave
the roast to rest for approximately 10 minutes in the cooking
compartment with the door closed. The recommended rest time
is not included in the given roasting times.
The information in the table is for food placed in a cold oven
and for meat/fish taken directly from the refrigerator.
3/~ Hot air % Top/bottom heat
Roast Shelf posi-
tion
Tempera-
ture in °C
Roasting time in
minutes
Shelf posi-
tion
Tempera-
ture in °C
Meat loaf made with 500 g meat 1 170-180 60-70 1 200-210
Pork
Fillet, medium (400 g) 1 170-180 30-45 3 200-230
Roast with rind (1.5 kg) 1 160-170 120-150 2 200-220
Roast with rind (2.5 kg) 1 160-170 150-180 2 190-210
Joint, marbled, without rind, e.g. neck (1.5 kg) 1 160-170 100-130 2 190-210
Joint, marbled, without rind, e.g. neck (2.5 kg) 1 160-170 120-150 2 180-200
Joint, lean (1 kg) 1 170-180 70-90 2 180-200
Joint, lean (2 kg) 1 170-180 80-100 2 180-200
Smoke-cured pork 1 160-170 70-80 2 190-210
Beef
Fillet, medium (1 kg) 1 180-190 45-65 2 200-220
Sirloin, medium (1.5 kg) 1 180-190 30-45 2 200-220
Pot roast** (1.5 kg) 1 170-180 120-150 2 200-220
Pot roast** (2.5 kg) 1 170-180 150-180 2 190-210
Veal
Breast/joint of veal (1.5 kg) 1 160-170 90-120 2 180-200
Breast/joint of veal (2.5 kg) 1 160-170 120-150 2 170-190
Knuckle 1 160-170 100-130 2 190-210
Lamb
Leg, boned 1 180-190 70-110 2 200-220
Saddle on the bone 1 180-190* 40-50 2 200-220*
Saddle, boned 1 180-190* 30-40 2 200-220*
Poultry (not stuffed)
Chicken, whole (1 kg) 1 170-180 60-70 2 200-220
Duck, whole (2-3 kg) 1 150-160 90-120 2 190-210
Goose, whole (34 kg) 1 150-160 130-180 2 180-200
Game
Joint/leg of roe venison, boned (1.5 kg) 1 160-170 20-30 2 190-210
Wild boar joint (1.5 kg) 1 160-170 120-140 2 190-210
Joint of venison (1.5 kg) 1 160-170 100-120 2 190-210
Rabbit 1 160-170 70-80 2 180-200
Fish
Fish, whole (300 g) 1 160-170 20-30 2 190-210
Fish, whole (700 g) 1 160-170 30-40 2 180-200
*) Preheat the oven
**) Roast pot roast with lid
Page 42

42
Tips and tricks
Grilling
In this section, you will find information on
■ Grilling in general
■ 4 All-round grilling
■ Radiant grilling (Full-surface + and Centre-area grill ()
Caution!
Material damage due to effect of heat: The temperature
generated in the cooking compartment is very high. Keep the
appliance door closed when using the grill. Never grill with the
appliance door open.
Notes
■ Always use the wire rack and the universal pan when grilling
■ Place the wire rack in the universal pan and slide them both
in at the height specified in the grilling table
■ Always place the food to be grilled in the centre of the wire
rack
■ If you are grilling more than one piece of meat, make sure
that they are the same sort of meat and that they are of
similar thickness and weight.
All-round grilling
4 All-round grilling is particularly suitable for grilling poultry and
meat so that it is crispy all round (e.g. roast pork with
crackling).
Turn the items after half to two-thirds of the grilling time.
Pierce duck and goose skin under the wings and legs to allow
the fat to escape.
Depending on the food you are cooking, the cooking
compartment may become more than usually dirty when you
cook food on the wire rack using all-round grilling. You should
therefore clean the cooking compartment after every use so
that the dirt does not burn on.
The information in the table is a guideline, and applies to the
enamelled universal pan with wire rack. The values may vary
depending on the type and amount of food to be grilled.
You should set the lower of the specified temperatures the first
time. This will generally allow more even browning.
At the end of the cooking time, switch the grill off and leave the
food to stand for approximately 10 minutes in the cooking
compartment with the door closed. The recommended rest time
is not included in the grilling times specified.
The values are for food placed in a cold oven and for meat
taken directly from the refrigerator.
Crust too thick and/or roast too dry Check the shelf height. Reduce temperature or roasting time.
Crust too thin Increase the temperature or switch on the grill briefly at the end of the roasting time.
The meat is not cooked right through Remove any accessories that are not required from the cooking compartment. Increase
the roasting time. Check the core temperature of the roast using a meat thermometer.
Steam in the cooking compartment is
condensing on the appliance door
The steam dries during the course of the cooking. If there is an excessive volume of
steam, you can carefully open the door briefly to dissipate the steam more quickly.
Grilled food Shelf position Temperature in °C Grilling time in minutes
Pork
Joint with rind 2 170-190 140-160
Knuckle 2 180-200 120-150
Beef
Sirloin, medium (1.5 kg) 2 220-240 40-50
Lamb
Leg of lamb, boned, medium 2 170-190 120-150
Poultry (not stuffed)
Chicken halves (1-2 halves) 2 210-230 40-50
Chicken, whole (1-2 chickens) 2 200-220 60-80
Duck, whole (2-3 kg) 2 180-200 90-120
Duck breast 3 230-250 30-45
Goose, whole (34 kg) 1 150-170 130-160
Goose breast 2 160-180 80-100
Goose leg 2 180-200 50-80
Page 43

43
Radiant grilling
For grilling large quantities of flat items, use the + Full-surface
grill (Fig. A).
For grilling small quantities of flat items, use the ( Centre-area
grill. Place the food to be grilled in the centre of the wire rack
(Fig. B). You will save energy by using the centre-area grill.
Brush the items to be grilled with a little oil to taste.
Turn the items after half to two-thirds of the grilling time.
You can influence the grilling result by changing the type or
position of the wire rack.
Note: Always use the universal pan in the standard position
(not the other way up).
Full-surface grill table +/š
The information in the table contains only guide values. The
values may vary depending on the type and amount of food to
be grilled. They are for food placed in a cold oven and for meat
taken directly from the refrigerator.
Centre-area grill (/y table
The details given in the table are guidelines. The values may
vary depending on the type and amount of items to be grilled.
They apply to meat placed into a cold oven straight from the
refrigerator.
$ %
Wire rack position
Use
Place the stepped wire rack in the universal
pan with the step pointing downwards: suitable for items that should be well-done
Place the stepped wire rack in the universal
pan with the step pointing upwards: suitable
for items that should be rare to medium
Grilled food Shelf position Temperature in °CGrilling time
in minutes
Comments
Pork
Fillet steaks, medium (3 cm thick) 4 275 12-15
Steak, well cooked (2 cm thick) 4 275 15-20
Beef
Fillet steaks (3-4 cm thick) 4 275 15-20 Grilling times can be increased or
reduced, depending on how well cooked
you like your food.
Tournedos 4 275 12-15
Lamb
Fillet 4 275 8-12 Grilling times can be increased or
reduced, depending on how well cooked
you like your food.
Chops 4 275 10-15
Sausages 4 250 10-14 Lightly score skins
Poultry
Chicken legs 3 250 25-30 Pricking the skin can prevent blistering
during grilling.
Small chicken portions 3 250 25-30
Fish
Steaks 4 220 15-20 The pieces should be of equal thickness.
Chops 4 220 15-20
Whole fish 3 220 20-25
Vegetables 4 275 15-20
Toast with topping 3 220 10-15 The shelf position depends on the height
of the topping
Grilled food Shelf posi-
tion
Tempera-
ture in °C
Grilling time
in minutes
Comments
Sausages 4 250 12-16 Lightly score skins
Poultry
Chicken legs 3 250 35-45 Pricking the skin can prevent blistering during grilling
Small chicken portions 3 250 30-40
Page 44

44
Hot air eco
With the “/| Hot air eco heating type, you can prepare many
dishes on one level and save energy.
Notes
■ Place your dishes in the empty cooking compartment before
it has heated up.
■ Only open the appliance door during cooking if it is
absolutely necessary.
The table contains a selection of dishes best suited to “/|
Hot air eco.
The details given in the table are guidelines and apply to the
use of enamelled baking trays and universal pans as well as
dark-coloured baking tins. The values may vary depending on
the type and amount of dishes and on the baking tin used.
We recommend that you set the lower of the specified
temperatures the first time. Lower temperatures will generally
allow more even browning.
Fish
Steaks 4 230 15-20 The pieces should be of equal thickness
Chops 4 230 15-20
Whole fish 3 230 20-25
Vegetables 4 275 15-20
Toast with topping 3 220 12-18 The shelf position depends on the height of the topping
Grilled food Shelf posi-
tion
Tempera-
ture in °C
Grilling time
in minutes
Comments
Meals with Hot air eco “/| Accessories Shelf position Tempera-
ture in °C
Cooking
time in
minutes
Cakes and pastries
Rich sponge mixture With dry topping Baking tray 1 170 - 190 25 - 30
In tins Springform cake tin/
loaf tin
1 160 - 170 60 - 80
In tins Flan-base cake tin 1 160 - 170 20 - 30
Small baked items, e.g. muffins Muffin tray 1 170 - 180 20 - 30
Shortcrust pastry With dry topping, e.g. nut triangles Baking tray 1 180 - 200 25 - 30
Small baked items, e.g. butter biscuits Baking tray 1 140 - 150 20 - 25
Sponge mixture Swiss roll Baking tray 1 180 - 190 15 - 20
In tins (6 eggs) Springform cake tin 1 160 - 170 40 - 50
In tins Flan-base cake tin 1 160 - 170 20 - 30
Yeast dough With dry topping Baking tray 1 170 - 190 30 - 45
In tins Ring cake tin 1 170 - 180 40 - 50
Small baked items Baking tray 1 180 - 190 20 - 30
Puff pastry Small baked items Baking tray 1 190 - 200 30 - 35
Choux pastry Small baked items Baking tray 1 190 - 200 35 - 45
Frozen convenience products
Pizza, frozen With thin base Universal pan 1 180 - 200 15 - 25
With thick base Universal pan 1 180 - 200 20 - 30
Chips Universal pan 1 190 - 200 20 - 30
Bread rolls/baguette Prebaked Universal pan 1 180 - 200 10 - 20
Bakes
Potato gratin Made using raw potatoes Ovenproof dish on the
wire rack
1 180 - 200 60 - 80
Lasagne Ovenproof dish on the
wire rack
1 180 - 190 50 - 60
Sweet bake Ovenproof dish on the
wire rack
1 170 - 180 50 - 60
Page 45

45
Defrosting
Use 3 Hot air to defrost and cook frozen products.
Notes
■ Frozen products that have been defrosted (meat in particular)
require shorter cooking times than fresh products
■ The cooking time for frozen meat increases by the defrosting
time
■ Always defrost frozen poultry before cooking so that you can
remove the giblets
■ Cook frozen fish at the same temperatures as fresh fish
■ You can place large quantities of ready made frozen
vegetables in aluminium dishes in the cooking compartment
at the same time
■ Use shelf height 1 when defrosting on one level, and shelf
heights 1 + 3 when using two levels
■ Observe the instructions on the packaging when using frozen
foods.
Steam cooking
The é Steam cooking setting can only be used in conjunction
with the system steam cooker (available as an accessory from
specialist retailers).
Only switch Steam cooking on when the cooking compartment
has cooled down completely (room temperature). When • and
¨©¨ appear alternately in the temperature display, the cooking
compartment has not cooled down fully. Wait until the cooking
compartment has cooled down and switch Steam cooking on
again. The steam cooking process is controlled automatically.
Notes
■ For steam cooking, use only the steam cooking setting with
the system steam cooker
■ Do not use Steam cooking together with the preselection
mode clock function
■ You will find further useful information in the instruction
manual included with the system steam cooker
Yoghurt
You can also use your appliance to make your own yoghurt.
1. Remove the accessories from the cooking compartment.
2. Heat 1 litre of long-life milk (3.5 % fat) or fresh pasteurised
milk to 40 °C
or
Bring 1 litre of fresh milk to the boil once and allow to cool
down to 40 °C.
3. Add 150 g of set yoghurt to the warm milk, stir in and fill the
cups or jars evenly. Do not pour more than 200 ml into any
single container.
4. After filling, cover the containers with a snugly fitting lid or
cling film.
5. Preheat the oven with 3 Hot air for 5 minutes at 50 °C.
6. Evenly space the containers over the cooking compartment
floor, then close the appliance door.
7. Switch off the oven after 8 hours and place the containers in
the refrigerator for at least 12 hours.
Meat
Pot-roasted beef 1 kg Covered ovenware on
the wire rack
1 190 - 200 120 - 150
Shoulder of pork 1 kg Universal pan 1 180 - 190 110 - 130
Joint of veal 1 kg Universal pan 1 180 - 190 100 - 120
Fish
Trout approx. 400 g Universal pan 1 160 -170 25 - 30
Meals with Hot air eco “/| Accessories Shelf position Tempera-
ture in °C
Cooking
time in
minutes
Frozen meals Tempera-
ture in °C
Defrosting
time in min-
utes
Raw frozen products/ foods 50 30 - 90
Bread/Bread rolls (750 - 1,500 g) 50 30 - 60
Dry, frozen tray bakes 60 45 - 60
Moist, frozen tray bakes 50 50 - 70
Page 46

46
Preserving
: Risk of injury!
Preserving jars containing incorrectly preserved food can burst.
Bear in mind the following notes:
■ Fruit and vegetables must be fresh and unblemished.
■ Use only clean and undamaged preserving jars.
■ Preserving jars must not touch one another in the cooking
compartment during the preserving process.
In the cooking compartment, you can preserve the contents of
a maximum of six ½, 1 or 1½ litre preserving jars at the same
time using 3 Hot air.
Observe the following points for preserving:
Notes
■ For each preserving process, only use preserving jars that
are the same size and contain the same food.
■ When preparing and closing the preserving jars, make sure
that they are clean.
■ Use only heat-resistant rubber rings.
■ You cannot preserve the following food in your appliance: the
contents of tin cans, meat, fish or pie filling
Preparing fruit
1. Wash fruit and, depending on the type, peel, pit and chop.
2. Fill the preserving jars with fruit up to approximately 2 cm
below the rim.
3. Fill the preserving jars with hot, skimmed sugar solution
(approx. Y l for a one litre jar).
For one litre water:
■ approx. 250 g sugar for sweet fruit
■ approx. 500 g sugar for sour fruits
Preparing vegetables
1. Wash vegetables and, depending on the type, clean and
chop.
2. Fill the preserving jars with vegetables up to approximately 2
cm below the rim.
3. Fill up the preserving jars immediately with hot, boiled water.
Closing the preserving jars
1. Wipe of the rim of the preserving jars with a clean, damp
cloth.
2. Place the rubber ring and lid on wet and close the jars with a
clamp.
Starting the preserving process
1. Slide in the universal pan at shelf position 1.
2. Set up the preserving jars in a triangle so that they do not
touch one another.
3. Pour ½ litre of hot water (approx. 80 °C) into the universal
pan.
4. Set the 3 Hot air to 160 °C.
■ Preserving jars containing ½ or 1 litre will start to bubble
after approx. 50 minutes
■ Preserving jars containing 1½ litres will start to bubble after
approx. 60 minutes
5. Switch off the appliance once all preserving jars are bubbling.
6. Leave the preserving jars in the cooking compartment while it
is still closed for a few minutes longer.
Raspberries, strawberries, cherries or gherkins:
approx. 5-10 minutes
Ending the preserving process
For fruit, gherkins and tomato purée:
1. Switch off the appliance once all preserving jars are bubbling.
2. Leave the preserving jars in the cooking compartment while it
is still closed for a few minutes longer.
■ Raspberries, strawberries, cherries or gherkins:
approx. 5-10 minutes
■ Other fruit:
approx. 10-15 minutes
■ Tomato puree or apple sauce:
approx. 15-20 minutes
For vegetables:
1. Reduce the temperature to 100 °C once all the preserving
jars are bubbling. Allow the preserving jars to bubble for
approximately 60 minutes longer in the cooking compartment
while it is still closed.
2. Switch off the appliance.
3. Leave the preserving jars in the cooking compartment while it
is still closed for approx. 15 - 30 minutes longer.
Remove the preserving jars
1. Place the preserving jars on a clean cloth, cover and protect
from draughts.
2. Only remove the clamps once the jars are cold.
Pyrolytic cleaning
With Pyrolytic cleaning, the oven heats up to
approximately 500 °C. This burns off residues from roasting,
grilling or baking and you only need to wipe the ashes from the
cooking compartment.
You can choose from three cleaning levels.
The heavier and older the dirt, the higher the cleaning level
should be. We recommend cleaning the cooking compartment
at least once very one to two months. Depending on useage
and what has been cooked more frequent cleaning may be
necessary. A cleaning cycle only requires approx. 2.5 - 4.7
kilowatt hours.
Important notes
For safety reasons, the oven door locks automatically. You can
only open the oven door again once the cooking compartment
has cooled down slightly. Do not attempt to push in the latch by
hand.
Do not attempt to open the oven door while the cleaning
programme is in operation. The cleaning process may be
cancelled.
The lamp is not lit in the cooking compartment during cleaning.
Level Degree of cleaning Cooking time
1 gentle approx. 1 hour, 15 minutes
2 medium approx. 1 hour, 30 minutes
3 intensive approx. 2 hours
Page 47

47
: Risk of fire!
The outside of the oven becomes very hot. Make sure that
nothing is placed against the front of the oven. Never hang
flammable objects, e.g. tea towels, on the door handle. Keep
children at a safe distance.
Before cleaning
The oven must be empty. Take any accessories, ovenware and
shelves out of the oven. Please see the Care and cleaning
section for how to unhook the rails.
Clean the oven door and the along the edges of the cooking
compartment in the area around the seal. Do not scrub the
seal.
Make sure that the oven door is closed before you start
cleaning.
: Risk of fire!
Loose food residues, grease and meat juices may catch fire.
Wipe out the cooking compartment with a damp cloth.
Cleaning accessories at the same time
The shelves are not suitable for the self-cleaning programme.
Take them out of the cooking compartment. If you wish to clean
accessories at the same time, you can buy accessory holders.
You can obtain the accessory holders from the after-sales
service or on the internet using the material number 466546.
The accessory holders are inserted on the left- and right-hand
sides.
You can use the holder to clean enamelled accessories without
a non-stick coating at the same time, e.g. the universal pan.
Always only clean one accessory at a time.
Non-enamelled accessories, e.g. the wire rack, are not suitable
for the self-cleaning programme. Remove them from the
cooking compartment.
: Risk of serious damage to health.!
Never clean non-stick baking trays and baking tins at the same
time using the self-cleaning programme. High temperatures
damage the non-stick coating and poisonous gases are
released.
Note: For details on which accessories are suitable for the selfcleaning programme, please see the optional accessory table
at the start of these instructions.
Setting the cleaning level
1. Set the operating mode selector to x. 0 appears in the
temperature display.
2. Use the temperature selector to set the cleaning level.
Pyrolytic cleaning starts after a few seconds.
The clock display shows the cleaning duration. The oven will
start up after a few seconds. The time starts counting down.
After the programme starts, the oven door locks.
Once cleaning has finished
0:00 appears in the clock display and y flashes. Set the
operating mode selector to o and press the KJ button once.
You can only open the oven door once the oven has cooled
down.
Cancelling cleaning
Turn the operating mode selector back to Û. You can only open
the oven door once the oven has cooled down.
Changing the cleaning level
Once the programme has started, you can no longer change
the cleaning level.
Setting cleaning to run overnight
So that you can use your oven throughout the day, delay the
end of the cleaning process to during the night. Make settings
as described in steps 1 and 2.
1. Press the KJ clock function button until they symbol
appears.
2. Set the End of operation to a later end time using the rotary
selector.
The oven switches to standby. The display shows the time of
day. When the oven starts, you can see the time counting
down.
After cleaning
Once the cooking compartment has cooled down, wipe out the
ash that has been left behind in the cooking compartment with
a damp cloth.
Care and cleaning
With good care and cleaning, your oven will remain clean and
fully-functioning for a long time to come. Here we will explain
how to maintain and clean your oven correctly.
Notes
■ Slight differences in the colours on the front of the oven are
caused by the use of different materials, such as glass,
plastic and metal.
■ Shadows on the door panel which look like streaks, are
caused by reflections made by the oven light.
■ Enamel is baked on at very high temperatures. This can
cause some slight colour variations. This is normal and does
not affect their function. The edges of thin trays cannot be
completely enamelled. As a result, these edges can be
rough. This will not impair the anti-corrosion protection.
Cleaning agents
To ensure that the different surfaces are not damaged by using
the wrong cleaning agent, observe the information in the table.
Do not use
■ aggressive or abrasive cleaning agents,
■ cleaning agents with a high concentration of alcohol,
■ hard scouring pads or sponges,
■ high-pressure cleaners or steam cleaners.
Wash new sponge cloths thoroughly before use.
Page 48

48
Cleaning the hook-in racks
You can remove the hook-in racks for easier cleaning.
: Risk of burning due to hot components in the cooking
compartment!
Wait until the cooking compartment has cooled down.
1. Push the hook-in rack upwards at the front and unhook to the
side (figure A).
2. Pull the hook-in rack forwards at the rear and unhook to the
side (figure B).
3. Clean the hook-in rack with washing-up liquid and a sponge
or brush.
4. Align the hook-in rack with the indentation (a) facing
downwards, so that the shelf heights match.
5. Insert the hook-in rack at the rear as far as it will go and push
to the rear (figure C).
6. Insert the hook-in rack at the front as far as it will go and push
downwards (figure D).
Detaching and attaching the oven door
For cleaning purposes and to remove the door panels, you can
detach the oven door.
The oven door hinges each have a locking lever. When the
locking levers are closed (figure A), the oven door is secured in
place. It cannot be detached. When the locking levers are open
in order to detach the oven door (Fig. B), the hinges are locked.
They cannot snap shut.
: Risk of injury!
Whenever the hinges are not locked, they snap shut with great
force. Ensure that the locking levers are always fully closed or,
when detaching the oven door, fully open.
Detaching the door
1. Open the oven door fully.
2. Fold up the two locking levers on the left and right (figure A).
3. Close the oven door as far as the limit stop. With both hands,
grip the door on the left and right-hand sides. Close the door
a little further and pull it out (figure B).
Area Cleaning agents
Oven front Hot soapy water:
Clean with a dish cloth and dry with a
soft cloth. Do not use glass cleaners or
glass scrapers.
Stainless steel Hot soapy water:
Clean with a dish cloth and dry with a
soft cloth. Remove flecks of limescale,
grease, starch and albumin (e.g. egg
white) immediately. Corrosion can form
under such residues.
Special stainless steel cleaning products suitable for hot surfaces are available from our after-sales service or from
specialist retailers. Apply a very thin layer
of the cleaning product with a soft cloth.
Door panels Glass cleaner:
Clean with a soft cloth. Do not use a
glass scraper.
Door cover Stainless steel cleaning agents (available
from our after-sales service or from specialist retailers):
Please observe the manufacturer's
instructions.
Cooking compartment
Hot soapy water or a vinegar solution:
Clean with a dish cloth.
If there are heavy deposits of dirt, use a
stainless steel scouring pad or oven
cleaner. Only use when the cooking
compartment is cold.
It is best to use the self-cleaning function.
Observe the instructions in the Pyrolytic
cleaning section.
Glass cover for the
oven light
Hot soapy water:
Clean with a dish cloth.
Shelves Hot soapy water:
Soak and clean with a dish cloth or
brush.
Telescopic shelves Hot soapy water:
Clean with a dish cloth or a brush.
Do not soak. Clean in the dishwasher, or
in the oven as part of the self-cleaning
programme. The rails may be damaged
causing them to jam.
Accessories Hot soapy water:
Soak and clean with a dish cloth or
brush.
$ %
D
D
& '
%$
%$
Page 49

49
Attaching the door
Reattach the oven door in the reverse sequence to removal.
1. When attaching the oven door, ensure that both hinges are
inserted straight into the opening (figure A).
2. The notch on the hinge must engage on both sides (figure B).
3. Fold back both locking levers (figure C). Close the oven
door.
: Risk of injury!
If the oven door falls out accidentally or a hinge snaps shut, do
not reach into the hinge. Call the aftersales service.
Removing the door cover
The oven door cover can become discoloured. To carry out
thorough cleaning, you can remove the cover.
1. Open the oven door fully.
2. Unscrew the oven door cover. To do this, undo the left and
right screws (figure A).
3. Remove the cover (figure B).
Make sure that the oven door is not closed while the cover is
removed. The inner panel may be damaged.
Clean the cover with a stainless-steel cleaning agent.
4. Replace the cover and secure it in position.
5. Close the oven door.
Removing and installing the door panels
To facilitate cleaning, you can remove the glass panels from the
oven door.
When removing the inner panels, pay attention to the sequence
in which the panels are removed. In order to reassemble the
panels in the correct sequence, use the numbers that appear
on each panel.
Removal
1. Detach the oven door and lay it on a cloth with the handle
facing down.
2. Unscrew the cover at the top of the oven door. To do this,
unscrew the left and right screws (fig. A).
3. Lift the top panel up and pull it out and remove the two small
seals (fig. B).
4. Unscrew the retaining clips on the right and left. Lift the panel
and remove the clips from the panel (fig. C).
5. Remove the seal from the bottom of the panel (fig. D). Pull
the seal and remove it up and out. Pull out the panel.
6. Pull the lower panel at an angle, upwards and out.
7. Do NOT unscrew the left and right-hand screws from the
sheet metal part (fig. E).
Clean the panels with glass cleaner and a soft cloth.
: Risk of injury!
Scratched glass in the appliance door may develop into a
crack. Do not use a glass scraper, sharp or abrasive cleaning
aids or detergents.
%
$
&
%
$
%$
'
&
(
Page 50

50
Installation
During installation, make sure that the lettering "top right" is
upside down at the bottom left of both panels.
1. Insert the lower panel at an angle towards the back (fig. A).
2. Slide in the middle panel (fig. B).
3. Stick the retaining clips onto the right and left-hand side of
the panel, aligning them so that the retaining carriers are over
the screw holes, and then screw into place (fig. C).
4. Hook the seal in to the bottom of the panel again (fig. D).
5. Insert the uppermost panel at an angle to the back into the
brackets. Take care not to push the seal to the back (fig. E).
6. Insert the two small seals on the left and right of the panel
again (fig. F).
7. Put the cover back in place and screw it on.
8. Attach the oven door.
Do not use the oven again until the panels have been
correctly installed.
Faults and repairs
It is not always necessary to call the after-sales service.
Sometimes, you can find a remedy yourself. You will find some
tips for troubleshooting in the following table.
: Risk of electric shock!
■ Work on the appliance electronics may only be performed by
a specialist.
■ Always disconnect the appliance from the power supply
when work is carried out on the electronics. Switch off the
circuit breaker or remove the fuse from your household fuse
box.
Malfunction table
%$
'
&
)
(
Problem Possible cause Note/remedy
Electrical operation is faulty (e.g. indicator
lamps no longer light up).
Circuit breaker faulty. Check fuses in the fuse box and replace if neces-
sary.
Liquid or thin batter runs to one side. Appliance not installed level. Check appliance installation (see the Installation
instructions).
Appliance no longer works, ‹:‹‹ flashes
in the clock display.
There was a power cut. Reset the time of day (see section: Electronic
clock).
‹:‹‹ flashes on the clock display,
“rrr”appears on the temperature display.
The power supply was interrupted while the appliance was in
operation.
Press the clock function button, reset the time of
day (see section: Electronic clock).
The temperature display shows, EXXX,
e.g. “„‹‹.
Internal fault in the appliance electronics.
Press the clock function button. If the message
does not go out, pull out the mains plug and plug it
back in again after approx. 10 seconds.
Appliance operation is not possible, D
and -†-appear in the temperature display.
The appliance controls have been
locked.
Deactivate lock (see section: Childproof lock).
Appliance operation is not possible, D
and -†˜ appear in the temperature display.
The appliance controls were
locked permanently.
Deactivate permanent lock (see section: Childproof
lock).
Page 51

51
Error messages with “
If an error message with “ is shown in the display, press the
0 button. This cancels the error message. You may then have
to reset the time of day. If the error is shown again, call the
after-sales service.
You can take remedial action yourself if the following error
messages are displayed.
Replacing the bulb in the oven ceiling light
If the bulb in the oven light fails, it must be replaced. Heatresistant, 40 watt spare bulbs can be obtained from our aftersales service or a specialist retailer. Only use these bulbs.
: Risk of electric shock!
Switch off the circuit breaker in the fuse box.
1. Place a tea towel in the oven when it is cold to prevent
damage.
2. Remove the glass cover. To do this, press back the metal
tabs with your thumb (Fig. A).
3. Unscrew the bulb and replace it with one of the same type
(Fig. B).
4. Refit the glass cover. When doing this, insert it on one side
and press firmly on the other side. The glass cover will click
into place.
5. Remove the tea towel and switch on the circuit breaker.
Glass cover
You must replace a damaged glass cover. Suitable glass
covers may be obtained from the after-sales service. Please
specify the E number and FD number of your appliance.
The appliance does not heat up, the colon
flashes on the clock display,‚‡‹©
appears in the temperature display,
for example.
A button combination was actuated.
Switch off the appliance, press and hold the info
button for 3 seconds, then press and hold the
clock function button for 4 seconds before pressing and holding the info button again for a further
3 seconds.
Electronically-controlled functions are
faulty.
Energy surges (e.g. lightning
strike).
Reset the function concerned.
When an operating mode is switched on,
•or œ appears in the temperature display.
The appliance has not cooled
down fully.
Wait until the appliance has cooled down, then
switch on the operating mode again.
The appliance has switched off automatically, ‹‹‹ flashes in the temperature display.
The appliance has switched off to
protect itself from overheating.
Turn the operating mode selector back to the
Û position.
Smoke is generated during roasting or
grilling.
Fat is burning on the grill element. Continue grilling or roasting until the fat on the grill
element is burnt away.
Wire rack or universal pan
inserted incorrectly.
Place the wire rack in the universal pan and insert
them together at a lower shelf height.
High levels of condensation are generated
in the cooking compartment.
Normal occurrence (e.g. when
baking cakes with very moist topping or cooking a large roast).
Open the appliance door briefly from time to time
during operation.
Enamelled accessories have light, matt
marks.
Normal occurrence caused by
dripping meat or fruit juices.
Not possible
Door panels are steamed up. Normal occurrence caused by
temperature differences.
Heat the appliance up to 100 °C and then switch
off again after 5 minutes.
Problem Possible cause Note/remedy
Error message Possible cause Note/remedy
“‹‚‚ A button was pressed for too long
or has jammed.
Press all buttons individually. Check that the buttons are clean. If the error message remains,
please contact the after-sales service.
“‚‚† The temperature in the cooking
compartment is too high.
The oven door locks. Wait until the cooking compartment has cooled down. Clear the error message with the 0 button.
%$
Page 52

52
After-sales service
Our after-sales service is there for you if your appliance needs
to be repaired. We will always find the right solution in order to
avoid unnecessary visits from a service technician.
E number and FD number
When calling us, please give the product number (E no.) and
the production number (FD no.) so that we can provide you with
the correct advice. The rating plate containing these numbers
can be found on the right-hand side of the oven door. You can
make a note of the numbers of your appliance and the
telephone number of the after-sales service in the space below
to save time should it be required.
Please note that there will be a fee for a visit by a service
technician in the event of a malfunction, even during the
warranty period.
Please find the contact data of all countries in the enclosed
customer service list.
Rely on the professionalism of the manufacturer. You can
therefore be sure that the repair is carried out by trained service
technicians who carry original spare parts for your appliances.
Test dishes
These tables have been produced for test institutes to facilitate
the inspection and testing of the various appliances.
Test dishes tested to standard EN 50304/EN 60350 (2009)
and IEC 60350.
Please note the information in the tables about preheating. The
table values do not include Rapid heat up.
Note: For baking, use the lower of the temperatures indicated
first.
E no.
FD no.
After-sales service O
Baking Shelf posi-
tion
Operating
mode
Temperature
in °C
Baking time in
minutes
Whirls 3 % 140-150* 25-35
1 “/| 140-150 25-35
1+3 3/~ 140-150* 30-40
1+3+4 3/~ 130-140* 40-50
Small cakes (20 per tray) 3 % 160-170** 25-30
1 “/| 160-180 25-35
1+3 3/~ 140-150** 30-40
1+3+4 3/~ 140-150** 35-50
Hot water sponge cake 2 % 160-170* 25-35
1 3/~ 160-170* 25-35
Double crust apple pie (black tins placed next to one
another, fig. A)
1 0/} 170-180* 60-70
Double crust apple pie (black tins placed next to one
another, fig. A)
1 “/| 180-190 75-85
Double crust apple pie (black tins placed diagonally across
from each other, fig. B)
1+3 3/~ 170-180* 65-75
* Preheat oven
** Preheat for 10 minutes
$ %
Page 53

53
Grilling Shelf posi-
tion
Operating
mode
Temperature Grilling time in
minutes
Toast* (universal pan + wire rack) 3+4 +/š 275 ^-2
Beef steaks x 12** (universal pan + wire rack) 3+4 +/š 275 20-30
* Preheat oven
** turn over after Z of the cooking time
Page 54

Page 55

Page 56

Constructa Vertriebs-GmbH
Carl-Wery-Straße 34
81739 München
DEUTSCHLAND
45
(931007)
*9000905534* 9000905534
 Loading...