

Page 1

[de] Gebrauchsanleitung 2
[en] Instruction manual 48
[fr] Notice d’utilisation 93
[nl] Gebruiksaanwijzing 142
CC4P86660
Microwave
Micro-ondes
Magnetron
Mikrowelle
Page 2

de
Inhaltsverzeichnis
[de]Gebr auchsanl ei t ung
8 Bestimmungsgemäßer Gebrauch . . . . . . . . . . . . 3
( Wichtige Sicherheitshinweise . . . . . . . . . . . . . . . 3
Generell . . . . . . . . . . . . . . . . . . . . . . . . . . . . . . . . . . . . 3
Mikrowelle . . . . . . . . . . . . . . . . . . . . . . . . . . . . . . . . . . 4
Dampf . . . . . . . . . . . . . . . . . . . . . . . . . . . . . . . . . . . . . 6
] Ursachen für Schäden . . . . . . . . . . . . . . . . . . . . . 6
Generell . . . . . . . . . . . . . . . . . . . . . . . . . . . . . . . . . . . . 6
Mikrowelle . . . . . . . . . . . . . . . . . . . . . . . . . . . . . . . . . . 6
Dampf . . . . . . . . . . . . . . . . . . . . . . . . . . . . . . . . . . . . . 7
7 Umweltschutz . . . . . . . . . . . . . . . . . . . . . . . . . . . . 7
Energiesparen . . . . . . . . . . . . . . . . . . . . . . . . . . . . . . . 7
Umweltgerecht entsorgen. . . . . . . . . . . . . . . . . . . . . . .7
* Gerät kennen lernen. . . . . . . . . . . . . . . . . . . . . . . 8
Bedienfeld . . . . . . . . . . . . . . . . . . . . . . . . . . . . . . . . . . 8
Funktionswähler . . . . . . . . . . . . . . . . . . . . . . . . . . . . . .8
Touch-Felder und Display . . . . . . . . . . . . . . . . . . . . . . . 9
Drehwähler . . . . . . . . . . . . . . . . . . . . . . . . . . . . . . . . . 10
Betriebsarten . . . . . . . . . . . . . . . . . . . . . . . . . . . . . . .10
Heizarten . . . . . . . . . . . . . . . . . . . . . . . . . . . . . . . . . .10
Dampf . . . . . . . . . . . . . . . . . . . . . . . . . . . . . . . . . . . .11
Mikrowelle . . . . . . . . . . . . . . . . . . . . . . . . . . . . . . . . . 11
Garraum . . . . . . . . . . . . . . . . . . . . . . . . . . . . . . . . . . . 11
Tankblende. . . . . . . . . . . . . . . . . . . . . . . . . . . . . . . . . 11
Wassertank. . . . . . . . . . . . . . . . . . . . . . . . . . . . . . . . .12
Auffangbehälter . . . . . . . . . . . . . . . . . . . . . . . . . . . . .12
_ Zubehör. . . . . . . . . . . . . . . . . . . . . . . . . . . . . . . . 13
Mitgeliefertes Zubehör . . . . . . . . . . . . . . . . . . . . . . . .13
Zusätzliches Zubehör . . . . . . . . . . . . . . . . . . . . . . . . .13
Sonderzubehör. . . . . . . . . . . . . . . . . . . . . . . . . . . . . . 13
Zubehör einschieben . . . . . . . . . . . . . . . . . . . . . . . . . 13
K Vor dem ersten Gebrauch . . . . . . . . . . . . . . . . . 14
Erste Inbetriebnahme . . . . . . . . . . . . . . . . . . . . . . . . .14
Wasserhärtebereich einstellen. . . . . . . . . . . . . . . . . . .14
Garraum und Zubehör reinigen . . . . . . . . . . . . . . . . . 14
1 Gerät bedienen . . . . . . . . . . . . . . . . . . . . . . . . . . 15
Gerät ein- und ausschalten. . . . . . . . . . . . . . . . . . . . .15
Betriebsart einstellen . . . . . . . . . . . . . . . . . . . . . . . . .15
Heizart und Temperatur einstellen . . . . . . . . . . . . . . . 15
Schnellaufheizen. . . . . . . . . . . . . . . . . . . . . . . . . . . . .16
Automatische Sicherheitsabschaltung . . . . . . . . . . . . 16
P Automatik-Programme. . . . . . . . . . . . . . . . . . . . 23
Programm einstellen . . . . . . . . . . . . . . . . . . . . . . . . . .23
Programmtabelle. . . . . . . . . . . . . . . . . . . . . . . . . . . . .24
O Zeitfunktionen einstellen . . . . . . . . . . . . . . . . . . 26
Zeiteinstellungen abfragen . . . . . . . . . . . . . . . . . . . . .26
Wecker einstellen . . . . . . . . . . . . . . . . . . . . . . . . . . . .26
Dauer einstellen . . . . . . . . . . . . . . . . . . . . . . . . . . . . .26
Erste Inbetriebnahme . . . . . . . . . . . . . . . . . . . . . . . . .27
A Kindersicherung. . . . . . . . . . . . . . . . . . . . . . . . . 27
Aktivieren und deaktivieren . . . . . . . . . . . . . . . . . . . . .27
Q Grundeinstellungen . . . . . . . . . . . . . . . . . . . . . . 28
Grundeinstellungen ändern. . . . . . . . . . . . . . . . . . . . .28
Liste der Grundeinstellungen . . . . . . . . . . . . . . . . . . .28
D Reinigen . . . . . . . . . . . . . . . . . . . . . . . . . . . . . . . 29
Geeignete Reinigungsmittel . . . . . . . . . . . . . . . . . . . .29
Selbstreinigende Flächen reinigen . . . . . . . . . . . . . . .30
Gerät sauberhalten . . . . . . . . . . . . . . . . . . . . . . . . . . .30
. Reinigungsfunktion . . . . . . . . . . . . . . . . . . . . . . 31
Entkalkung . . . . . . . . . . . . . . . . . . . . . . . . . . . . . . . . .31
Spülen . . . . . . . . . . . . . . . . . . . . . . . . . . . . . . . . . . . .31
Nachreinigen. . . . . . . . . . . . . . . . . . . . . . . . . . . . . . . .31
Auffangbehälter leeren . . . . . . . . . . . . . . . . . . . . . . . .32
3 Störungen, was tun? . . . . . . . . . . . . . . . . . . . . . 33
4 Kundendienst . . . . . . . . . . . . . . . . . . . . . . . . . . . 34
E-Nummer und FD-Nummer . . . . . . . . . . . . . . . . . . . .34
J Für Sie in unserem Kochstudio getestet . . . . . 34
Allgemeine Hinweise. . . . . . . . . . . . . . . . . . . . . . . . . .34
Auftauen . . . . . . . . . . . . . . . . . . . . . . . . . . . . . . . . . . .35
Tiefgefrorene Speisen erwärmen. . . . . . . . . . . . . . . . .37
Erwärmen . . . . . . . . . . . . . . . . . . . . . . . . . . . . . . . . . .37
Kuchen, Kleingebäck und Brot . . . . . . . . . . . . . . . . . .38
Aufläufe & Gratins. . . . . . . . . . . . . . . . . . . . . . . . . . . .41
Geflügel, Fleisch und Fisch. . . . . . . . . . . . . . . . . . . . .41
Gemüse und Beilagen . . . . . . . . . . . . . . . . . . . . . . . .44
Desserts . . . . . . . . . . . . . . . . . . . . . . . . . . . . . . . . . . .46
Acrylamid in Lebensmitteln . . . . . . . . . . . . . . . . . . . . .46
Prüfgerichte . . . . . . . . . . . . . . . . . . . . . . . . . . . . . . . .46
^ Mikrowelle. . . . . . . . . . . . . . . . . . . . . . . . . . . . . . 16
Geschirr . . . . . . . . . . . . . . . . . . . . . . . . . . . . . . . . . . .16
Mikrowellen-Stufen . . . . . . . . . . . . . . . . . . . . . . . . . . .17
Mikrowelle einstellen. . . . . . . . . . . . . . . . . . . . . . . . . .17
Mikrowellen-Kombibetrieb einstellen. . . . . . . . . . . . . . 18
` Dampf . . . . . . . . . . . . . . . . . . . . . . . . . . . . . . . . . 19
Geräusche . . . . . . . . . . . . . . . . . . . . . . . . . . . . . . . . . 19
Garen mit Dampf . . . . . . . . . . . . . . . . . . . . . . . . . . . . 19
Dampf-Kombibetrieb einstellen. . . . . . . . . . . . . . . . . . 20
Wassertank füllen . . . . . . . . . . . . . . . . . . . . . . . . . . . . 20
Wassertank nachfüllen . . . . . . . . . . . . . . . . . . . . . . . .21
Nach jedem Dampfbetrieb . . . . . . . . . . . . . . . . . . . . .21
2
Produktinfo
Weitere Informationen zu Produkten, Zubehör,
Ersatzteilen und Services finden Sie im Internet:
www.constructa.de und Online-Shop:
www.constructa-eshop.com
Mo-Fr: 8.00-18.00 Uhr
erreichbar.
Nur in Deutschland gültig!
Für Produktinformationen sowie
Anwendungs- und
Bedienungsfragen oder unter
info@constructa-energy.de
Page 3

Bestimmungsgemäßer Gebrauch de
8Bestimmungsgemäßer
Gebrauch
Bes t i mmungsgemäßer Gebr auch
Diese Anleitung sorgfältig lesen. Nur dann
können Sie Ihr Gerät sicher und richtig
bedienen. Die Gebrauchs- und
Montageanleitung für einen späteren
Gebrauch oder für Nachbesitzer aufbewahren.
Dieses Gerät ist nur für den Einbau bestimmt.
Spezielle Montageanleitung beachten.
Das Gerät nach dem Auspacken prüfen. Bei
einem Transportschaden nicht anschließen.
Nur ein konzessionierter Fachmann darf
Geräte ohne Stecker anschließen. Bei
Schäden durch falschen Anschluss besteht
kein Anspruch auf Garantie.
Dieses Gerät ist nur für den privaten Haushalt
und das häusliche Umfeld bestimmt. Das
Gerät nur zum Zubereiten von Speisen und
Getränken benutzen. Das Gerät während des
Betriebes beaufsichtigen. Das Gerät nur in
geschlossenen Räumen verwenden.
Dieses Gerät ist für eine Nutzung bis zu einer
Höhe von maximal 4000 Metern über dem
Meeresspiegel bestimmt.
Dieses Gerät kann von Kindern ab 8 Jahren
und Personen mit reduzierten physischen,
sensorischen oder mentalen Fähigkeiten oder
Mangel an Erfahrung oder Wissen benutzt
werden, wenn sie von einer Person, die für
ihre Sicherheit verantwortlich ist, beaufsichtigt
oder von ihr bezüglich des sicheren
Gebrauchs des Gerätes unterwiesen wurden
und sie die daraus resultierenden Gefahren
verstanden haben.
Kinder dürfen nicht mit dem Gerät spielen.
Reinigung und Benutzer-Wartung dürfen nicht
durch Kinder durchgeführt werden, es sei
denn, sie sind 15 Jahre und älter und werden
beaufsichtigt.
Kinder jünger als 8 Jahre vom Gerät und der
Anschlussleitung fernhalten.
(Wichtige
Sicherheitshinweise
Wichtige Sicherheitshinweise
Generell
:Warnung – Brandgefahr!
■ Im Garraum gelagerte, brennbare
Gegenstände können sich entzünden. Nie
brennbare Gegenstände im Garraum
aufbewahren. Nie die Gerätetür öffnen,
wenn Rauch im Gerät auftritt. Das Gerät
ausschalten und Netzstecker ziehen oder
Sicherung im Sicherungskasten
ausschalten.
Brandgefahr!
■ Lose Speisereste, Fett und Bratensaft
können sich entzünden. Vor dem Betrieb
grobe Verschmutzungen aus dem Garraum,
von den Heizelementen und vom Zubehör
entfernen.
Brandgefahr!
■ Beim Öffnen der Gerätetür entsteht ein
Luftzug. Backpapier kann die Heizelemente
berühren und sich entzünden. Nie
Backpapier beim Vorheizen unbefestigt auf
das Zubehör legen. Backpapier immer mit
einem Geschirr oder einer Backform
beschweren. Nur die benötigte Fläche mit
Backpapier auslegen. Backpapier darf nicht
über das Zubehör hinausstehen.
:Warnung – Verbrennungsgefahr!
■ Das Gerät wird sehr heiß. Nie die heißen
Garraum-Innenflächen oder Heizelemente
berühren. Das Gerät immer abkühlen
lassen. Kinder fernhalten.
Verbrennungsgefahr!
■ Zubehör oder Geschirr wird sehr heiß.
Heißes Zubehör oder Geschirr immer mit
Topflappen aus dem Garraum nehmen.
Verbrennungsgefahr!
■ Alkoholdämpfe können sich im heißen
Garraum entzünden. Nie Speisen mit
großen Mengen an hochprozentigen
alkoholischen Getränken zubereiten. Nur
kleine Mengen hochprozentiger Getränke
verwenden. Gerätetür vorsichtig öffnen.
3
Page 4

de Wichtige Sicherheitshinweise
:Warnung – Verbrühungsgefahr!
■ Die zugänglichen Teile werden im Betrieb
heiß. Nie die heißen Teile berühren. Kinder
fernhalten.
Verbrühungsgefahr!
■ Beim Öffnen der Gerätetür kann heißer
Dampf entweichen. Dampf ist je nach
Temperatur nicht sichtbar. Beim Öffnen
nicht zu nah am Gerät stehen. Gerätetür
vorsichtig öffnen. Kinder fernhalten.
Verbrühungsgefahr!
■ Durch Wasser im heißen Garraum kann
heißer Wasserdampf entstehen. Nie Wasser
in den heißen Garraum gießen.
:Warnung – Verletzungsgefahr!
Zerkratztes Glas der Gerätetür kann springen.
Keinen Glasschaber, scharfe oder scheuernde
Reinigungsmittel benutzen.
:Warnung – Stromschlaggefahr!
■ Unsachgemäße Reparaturen sind
gefährlich. Nur ein von uns geschulter
Kundendienst-Techniker darf Reparaturen
durchführen und beschädigte
Anschlussleitungen austauschen. Ist das
Gerät defekt, Netzstecker ziehen oder
Sicherung im Sicherungskasten
ausschalten. Kundendienst rufen.
Stromschlaggefahr!
■ An heißen Geräteteilen kann die
Kabelisolierung von Elektrogeräten
schmelzen. Nie Anschlusskabel von
Elektrogeräten mit heißen Geräteteilen in
Kontakt bringen.
Stromschlaggefahr!
■ Eindringende Feuchtigkeit kann einen
Stromschlag verursachen. Keinen
Hochdruckreiniger oder Dampfreiniger
verwenden.
Stromschlaggefahr!
■ Eindringende Feuchtigkeit kann einen
Stromschlag verursachen. Nie das Gerät
großer Hitze und Nässe aussetzen. Das
Gerät nur in geschlossenen Räumen
verwenden.
Stromschlaggefahr!
■ Ein defektes Gerät kann einen Stromschlag
verursachen. Nie ein defektes Gerät
einschalten. Netzstecker ziehen oder
Sicherung im Sicherungskasten
ausschalten. Kundendienst rufen.
:Warnung – Gefahr durch Magnetismus!
Im Bedienfeld oder den Bedienelementen sind
Permanentmagnete eingesetzt. Diese können
elektronische Implantate, z. B.
Herzschrittmacher oder Insulinpumpen,
beeinflussen. Als Träger von elektronischen
Implantaten 10 cm Mindestabstand zum
Bedienfeld einhalten.
Mikrowelle
:Warnung – Verbrennungsgefahr!
■ Die nicht bestimmungsgemäße
Verwendung des Gerätes ist gefährlich.
Nicht zulässig sind, das Trocknen von
Speisen oder Kleidung, das Erwärmen von
Pantoffeln, Körner- oder Getreidekissen,
Schwämmen, feuchten Putzlappen und
Ähnlichem.
Zum Beispiel können überhitzte Pantoffeln,
Körner- oder Getreidekissen, Schwämme,
feuchte Putzlappen und Ähnliches zu
Verbrennungen führen
Brandgefahr!
■ Lebensmittel können sich entzünden. Nie
Lebensmittel in Warmhalteverpackungen
erwärmen.
Nie Lebensmittel in Behältern aus
Kunststoff, Papier oder anderen brennbaren
Materialien unbeaufsichtigt erwärmen.
Nie eine viel zu hohe Mikrowellen-Leistung
oder -Zeit einstellen. Nach den Angaben in
dieser Gebrauchsanleitung richten.
Nie Lebensmittel mit Mikrowelle trocknen.
Nie Lebensmittel mit geringem
Wassergehalt, wie z. B. Brot, mit zu hoher
Mikrowellen-Leistung oder -Zeit auftauen
oder erwärmen.
Brandgefahr!
■ Speiseöl kann sich entzünden. Nie
ausschließlich Speiseöl mit Mikrowelle
erhitzen.
:Warnung – Explosionsgefahr!
Flüssigkeiten oder andere Nahrungsmittel in
fest verschlossenen Gefäßen können
explodieren. Nie Flüssigkeiten oder andere
Nahrungsmittel in fest verschlossenen
Gefäßen erhitzen.
:Warnung – Verbrennungsgefahr!
■ Lebensmittel mit fester Schale oder Haut
können während, aber auch noch nach
dem Erwärmen explosionsartig zerplatzen.
Nie Eier in der Schale garen oder
hartgekochte Eier erwärmen. Nie Schalenund Krustentiere garen. Bei Spiegeleiern
oder Eiern im Glas vorher den Dotter
anstechen. Bei Lebensmitteln mit fester
Schale oder Haut, wie z. B. Apfel, Tomaten,
Kartoffeln oder Würstchen, kann die Schale
platzen. Vor dem Erwärmen die Schale oder
Haut anstechen.
Verbrennungsgefahr!
4
Page 5

Wichtige Sicherheitshinweise de
■ Die Hitze in der Babynahrung verteilt sich
nicht gleichmäßig. Nie Babynahrung in
geschlossenen Gefäßen erwärmen. Immer
den Deckel oder den Sauger entfernen.
Nach dem Erwärmen gut umrühren oder
schütteln. Temperatur überprüfen, bevor Sie
dem Kind die Nahrung geben.
Verbrennungsgefahr!
■ Erhitzte Speisen geben Wärme ab. Das
Geschirr kann heiß werden. Geschirr oder
Zubehör immer mit einem Topflappen aus
dem Garraum nehmen.
Verbrennungsgefahr!
■ Bei luftdicht verschlossenen Lebensmitteln
kann die Verpackung platzen. Immer die
Angaben auf der Verpackung beachten.
Gerichte immer mit einem Topflappen aus
dem Garraum nehmen.
Verbrennungsgefahr!
■ Die zugänglichen Teile werden im Betrieb
heiß. Nie die heißen Teile berühren. Kinder
fernhalten.
Verbrennungsgefahr!
■ Die nicht bestimmungsgemäße
Verwendung des Gerätes ist gefährlich.
Nicht zulässig sind, das Trocknen von
Speisen oder Kleidung, das Erwärmen von
Pantoffeln, Körner- oder Getreidekissen,
Schwämmen, feuchten Putzlappen und
Ähnlichem.
Zum Beispiel können überhitzte Pantoffeln,
Körner- oder Getreidekissen, Schwämme,
feuchte Putzlappen und Ähnliches zu
Verbrennungen führen
:Warnung – Verbrühungsgefahr!
■ Beim Erhitzen von Flüssigkeiten kann es zu
Siedeverzug kommen. Das heißt, die
Siedetemperatur wird erreicht, ohne dass
die typischen Dampfblasen aufsteigen.
Schon bei geringer Erschütterung des
Gefäßes kann die heiße Flüssigkeit plötzlich
heftig überkochen und verspritzen. Beim
Erhitzen immer einen Löffel mit in das Gefäß
geben. So wird der Siedeverzug vermieden.
:Warnung – Verletzungsgefahr!
■ Ungeeignetes Geschirr kann bersten.
Geschirr aus Porzellan und Keramik kann
feine Löcher in Griffen und Deckel haben.
Hinter diesen Löchern verbirgt sich ein
Hohlraum. In den Hohlraum eingedrungene
Feuchtigkeit kann das Geschirr zum
Bersten bringen. Nur
mikrowellengeeignetes Geschirr
verwenden.
Verletzungsgefahr!
■ Geschirr und Behälter aus Metall oder
Geschirr mit Metallbesatz können beim
reinen Mikrowellenbetrieb zu Funkenbildung
führen. Das Gerät wird beschädigt. Beim
reinen Mikrowellenbetrieb nie Metallbehälter
verwenden. Nur mikrowellengeeignetes
Geschirr oder Mikrowelle in Kombination
mit einer Heizart verwenden.
:Warnung – Stromschlaggefahr!
Das Gerät arbeitet mit Hochspannung. Nie
das Gehäuse entfernen.
:Warnung – Gefahr schwerer
Gesundheitsschäden!
■ Bei mangelhafter Reinigung kann die
Oberfläche des Gerätes beschädigt
werden. Es kann Mikrowellen-Energie
austreten. Gerät regelmäßig reinigen und
Nahrungsmittelreste sofort entfernen.
Garraum, Türdichtung, Tür und Türanschlag
immer sauber halten. ~ "Reinigen"
auf Seite 29
Gefahr schwerer Gesundheitsschäden!
■ Durch eine beschädigte Garraumtür oder
Türdichtung kann Mikrowellen-Energie
austreten. Nie das Gerät benutzen, wenn
die Garraumtür, die Türdichtung oder der
Kunststoff-Rahmen der Tür beschädigt ist.
Kundendienst rufen.
Gefahr schwerer Gesundheitsschäden!
■ Bei Geräten ohne Gehäuseabdeckung tritt
Mikrowellen-Energie aus. Nie die
Gehäuseabdeckung entfernen. Bei
Wartungs- oder Reparaturarbeit
Kundendienst rufen.
5
Page 6

de Ursachen für Schäden
Dampf
:Warnung – Verbrühungsgefahr!
■ Das Wasser im Wassertank kann sich im
weiteren Gerätebetrieb stark erhitzen.
Wassertank nach jedem Gerätebetrieb mit
Dampf leeren.
Verbrühungsgefahr!
■ Heißer Dampf entsteht im Garraum.
Während des Gerätebetriebs mit Dampf
nicht in den Garraum fassen.
Verbrühungsgefahr!
■ Beim Herausnehmen des Zubehörs kann
heiße Flüssigkeit überschwappen. Heißes
Zubehör nur mit Ofenhandschuh vorsichtig
herausnehmen.
:Warnung – Verletzungs- und
Brandgefahr!
Brennbare Flüssigkeiten können sich im
heißen Garraum entzünden (Verpuffung).
Keine brennbaren Flüssigkeiten
(z. B. alkoholhaltige Getränke) in den
Wassertank füllen. Ausschließlich Wasser oder
die von uns empfohlene Entkalkerlösung in
den Wassertank füllen.
]Ursachen für Schäden
Ur s a c h en für Schäden
Generell
Achtung!
■ Wasser im heißen Garraum: Nie Wasser in den
heißen Garraum gießen. Es entsteht Wasserdampf.
Durch den Temperaturwechsel können Schäden
entstehen.
■ Feuchtigkeit im Garraum: Feuchtigkeit über längere
Zeit im Garraum kann zu Korrosion führen. Nach
dem Benutzen den Garraum trocknen lassen. Keine
feuchten Lebensmittel längere Zeit im
geschlossenen Garraum aufbewahren. Lagern Sie
keine Speisen im Garraum.
■ Auskühlen mit offener Gerätetür: Nach einem Betrieb
mit hohen Temperaturen den Garraum nur
geschlossen auskühlen lassen. Nichts in die
Gerätetür einklemmen. Auch wenn die Tür nur einen
Spalt breit offen ist, können benachbarte
Möbelfronten mit der Zeit beschädigt werden.
Nur nach einem Betrieb mit viel Feuchtigkeit den
Garraum geöffnet trocknen lassen.
■ Stark verschmutzte Dichtung: Wenn die Dichtung
stark verschmutzt ist, schließt die Gerätetür bei
Betrieb nicht mehr richtig. Die angrenzenden
Möbelfronten können beschädigt werden. Dichtung
immer sauber halten. ~ "Reinigen" auf Seite 29
■ Gerätetür als Sitz- oder Ablagefläche: Nicht auf die
Gerätetür stellen, setzen oder daran hängen. Kein
Geschirr oder Zubehör auf der Gerätetür abstellen.
■ Zubehör einschieben: Je nach Gerätetyp kann
Zubehör die Türscheibe beim Schließen der
Gerätetür zerkratzen. Zubehör immer bis zum
Anschlag in den Garraum schieben.
■ Gerät transportieren: Gerät nicht am Türgriff tragen
oder halten. Der Türgriff hält das Gewicht des
Gerätes nicht aus und kann abbrechen.
Mikrowelle
Achtung!
■ Aluminiumfolie: Aluminiumfolie im Garraum darf
nicht in Kontakt mit der Türscheibe kommen. Es
können dauerhafte Verfärbungen an der Türscheibe
entstehen.
■ Funkenbildung: Metall, z. B. der Löffel im Glas, muss
mindestens 2 cm von den Garraumwänden und der
Türinnenseite entfernt sein. Funken können das
innere Türglas zerstören.
■ Mikrowellen- und Mikrowellenkombinationsbetrieb:
Der Rost ist für den Mikrowellenbetrieb und für den
Mikrowellenbetrieb in Kombination mit einer Heizart
ungeeignet. Es kann zu Funkenbildung kommen und
der Garraum wird beschädigt.
■ Aluminiumschalen: Keine Aluminiumschalen im
Gerät verwenden. Das Gerät wird durch entstehende
Funkenbildung beschädigt.
6
Page 7
Umweltschutz de
■ Mikrowellenbetrieb ohne Speisen: Der Betrieb des
Gerätes ohne Speisen im Garraum führt zur
Überlastung. Nie die Mikrowelle ohne Speisen im
Garraum starten. Ausgenommen ist ein kurzzeitiger
Geschirrtest. ~ "Mikrowelle" auf Seite 16
■ Mikrowellen-Popcorn: Nie eine zu hohe
Mikrowellen-Leistung einstellen. Die Türscheibe kann
durch Überbelastung springen. Maximal 600 Watt
verwenden. Die Popcorntüte immer auf einen
Glasteller legen.
Dampf
Achtung!
■ Pflege des Gerätes: Der Garraum Ihres Gerätes
besteht aus hochwertigem Edelstahl. Durch falsche
Pflege kann Korrosion im Garraum entstehen.
Beachten Sie die Pflege- und Reinigungshinweise in
der Gebrauchsanleitung. Entfernen Sie Schmutz im
Garraum gleich nachdem das Gerät abgekühlt ist.
■ Backformen: Geschirr muss hitze- und
dampfbeständig sein. Silikonbackformen sind für
den kombinierten Betrieb mit Dampf nicht geeignet.
■ Geschirr mit Roststellen: Verwenden Sie kein
Geschirr mit Roststellen. Bereits kleinste Flecken
können zur Korrosion im Garraum führen.
■ Abtropfende Flüssigkeiten: Schieben Sie beim
Dämpfen die Glaspfanne in Einschubhöhe 3 ein und
stellen Sie den Dampfgarbehälter auf die
Glaspfanne. Abtropfende Flüssigkeit wird in der
Glaspfanne aufgefangen.
■ Heißes Wasser im Wassertank: Heißes Wasser kann
die Pumpe beschädigen. Füllen Sie kein heißes
Wasser in den Wassertank.
■ Schäden im Garraum: Starten Sie keinen Betrieb,
wenn Wasser auf dem Garraumboden steht.
Wischen Sie vor dem Betrieb das Wasser vom
Garraumboden auf.
■ Entkalkerlösung: Bringen Sie keine Entkalkerlösung
auf das Bedienfeld oder andere Oberflächen am
Gerät. Die Oberflächen werden beschädigt. Wenn es
doch passiert, entfernen Sie die Entkalkerlösung
sofort mit Wasser.
■ Wassertank reinigen: Wassertank nicht in der
Spülmaschine reinigen. Der Wassertank wird sonst
beschädigt. Reinigen Sie den Wassertank mit einem
weichen Tuch und handelsüblichem Spülmittel.
■ Frostschutz: Um Schäden durch Frosteinwirkung bei
Transport und Lagerung zu vermeiden, muss das
Gerät vorher vollständig entleert werden.
7Umweltschutz
Umwel t s c h u t z
Ihr neues Gerät ist besonders energieeffizient. Hier
erhalten Sie Tipps, wie Sie beim Umgang mit Ihrem
Gerät noch mehr Energie sparen können und wie Sie
das Gerät richtig entsorgen.
Energiesparen
■ Heizen Sie das Gerät nur dann vor, wenn es im
Rezept oder in den Tabellen der Gebrauchsanleitung
angegeben ist.
■ Verwenden Sie zum Backen dunkle, schwarz
lackierte oder emaillierte Backformen. Sie nehmen
die Hitze besonders gut auf.
■ Öffnen Sie die Gerätetür während des Betriebs
möglichst selten.
■ Mehrere Kuchen backen Sie am besten
nacheinander. Der Garraum ist noch warm. Dadurch
verkürzt sich die Backzeit für den zweiten Kuchen.
Sie können auch 2 Kastenformen nebeneinander in
den Garraum geben.
■ Bei längeren Garzeiten können Sie das Gerät
10 Minuten vor Ende der Garzeit ausschalten und
die Restwärme zum Fertiggaren nutzen.
Umweltgerecht entsorgen
Entsorgen Sie die Verpackung umweltgerecht.
Dieses Gerät ist entsprechend der
europäischen Richtlinie 2012/19/EU über
Elektro- und Elektronikaltgeräte (waste
electrical and electronic equipment - WEEE)
gekennzeichnet.
Die Richtlinie gibt den Rahmen für eine EU-weit
gültige Rücknahme und Verwertung der
Altgeräte vor.
7
Page 8
de Gerät kennen lernen
*Gerät kennen lernen
Gerät kennen lernen
In diesem Kapitel erklären wir Ihnen die Display- und
Bedienelemente. Außerdem lernen Sie die
verschiedenen Funktionen Ihres Gerätes kennen.
Hinweis: Je nach Gerätetyp sind Abweichungen in den
Farben und Einzelheiten möglich.
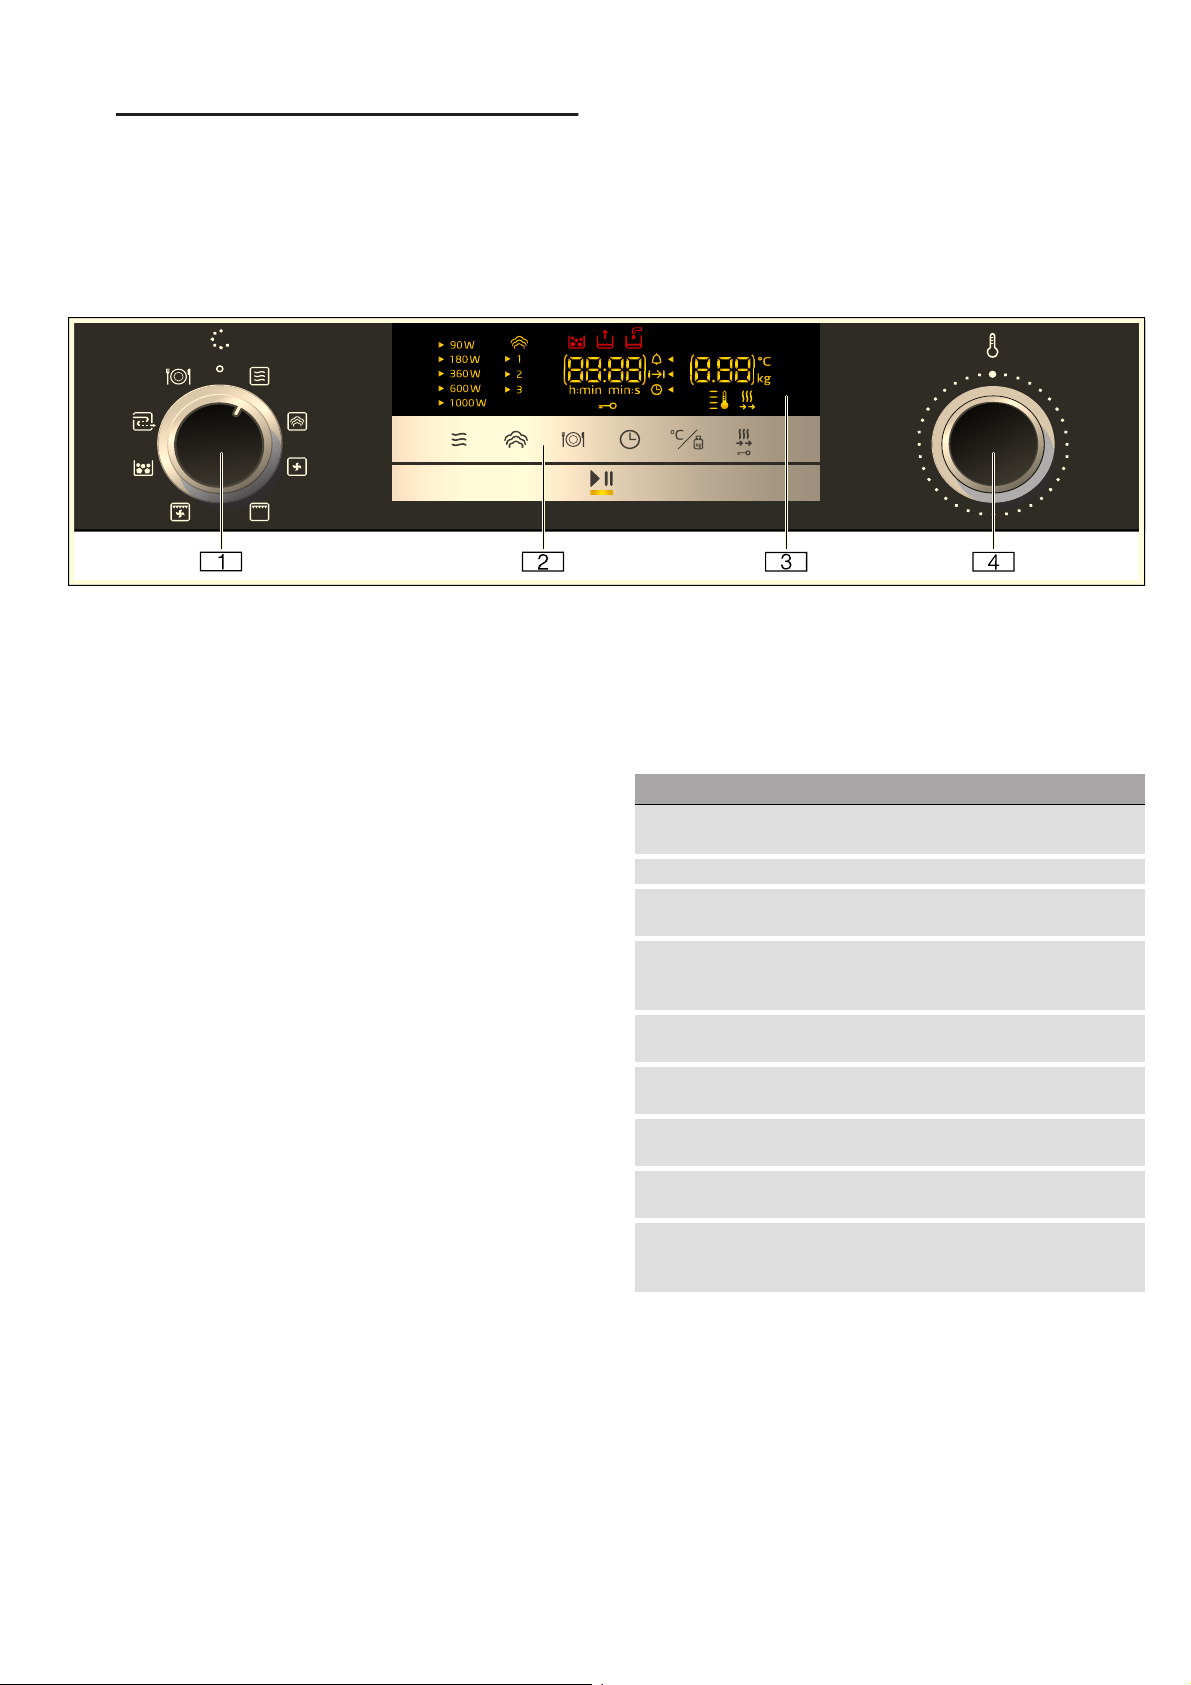
( Funktionswähler
Mit dem Funktionswähler stellen Sie die
Betriebsart oder weitere Funktionen ein.
Den Funktionswähler können Sie von der
Nullstellung aus nach links oder rechts drehen.
0 Touch-Felder
Hinter den Touch-Feldern liegen Sensoren. Tippen
Sie auf das Symbol, um die Funktion
auszuwählen.
8 Display
Das Display zeigt Symbole aktiver Funktionen und
die Zeitfunktionen an.
@ Drehwähler
Mit dem Drehwähler stellen Sie die Temperatur
zur Heizart ein oder wählen die Einstellung für
weitere Funktionen.
Den Drehwähler können Sie nach links oder
rechts drehen.
Hinweise
■ Bei manchen Geräten sind die Funktions- oder
Drehwähler versenkbar. Zum Ein- und Ausrasten
drücken Sie in der Nullstellung auf den Funktionsoder Drehwähler.
■ Befindet sich der Funktionswähler in der Nullstellung
(Energiesparmodus) und wird eine Funktion gewählt,
dauert es wenige Sekunden, bis die jeweilige
Funktion zur Verfügung steht (z. B. Mikrowelle).
Bedienfeld
Über das Bedienfeld stellen Sie mit Hilfe von Funktionsund Drehwähler sowie Touch-Feldern die
verschiedenen Funktionen Ihres Gerätes ein. Das
Display zeigt Ihnen die aktuellen Einstellungen an.
Die Übersicht zeigt das Bedienfeld bei eingeschaltetem
Gerät mit einer ausgewählten Betriebsart.
Funktionswähler
Mit dem Funktionswähler stellen Sie die Betriebsarten
und weitere Funktionen ein.
Damit Sie immer die richtige Betriebsart für Ihr Gericht
finden, erklären wir Ihnen hier die Unterschiede und
Anwendungsbereiche.
Stellung Verwendung
Û Nullstellung Das Gerät ist ausgeschaltet und befin-
det sich im Energiesparmodus.
! Mikrowelle Mikrowellenbetrieb wählen.
z Dampf Heißer Dampf wird in den Garraum
eingespeist.
~ Heißluft Der Ventilator verteilt die Hitze des
Ringheizkörpers in der Rückwand
gleichmäßig im Garraum.
$ Grill Die ganze Fläche unter den Grillheiz-
körpern wird heiß.
# Umluftgrill Der Ventilator wirbelt die heiße Luft
der Grillheizkörper um die Speise.
8 Entkalken Dient der Entkalkung des Verdamp-
fers und hält diesen funktionsfähig.
$ Spülen Spült die Rohre der Dampfeinheit mit
Wasser.
= Programme Für viele Gerichte finden Sie hier
bereits vorprogrammierte Einstellungen.
--------
8
Page 9

Gerät kennen lernen de
Touch-Felder und Display
Mit den Touch-Feldern können Sie verschiedene
Zusatzfunktionen Ihres Gerätes einstellen. Im Display
sehen Sie die Werte dazu.
Touch-Felder
Die Bedeutung der verschiedenen Touch-Felder sehen
Sie hier kurz erklärt.
Symbol Bedeutung
! Mikrowelle Leistungsstufen der Mikrowelle wäh-
len, bzw. Mikrowellenfunktion zu
einer Heizart zuschalten.
É Dampf Dampfstufe wählen, bzw. Dampffunk-
tion zu einer Heizart zuschalten.
= Programme Programmauswahl aufrufen, mit dem
Drehwähler die Programmnummer
einstellen.
0 Zeitfunktionen Zeitfunktionen auswählen und mit
dem Drehwähler einstellen.
i Schnelles Vorhei-
zen / Kindersicherung
û/A Temperatur/
Gewicht
@ Start/Stop Betrieb starten oder anhalten
--------
Display
Das Display ist so strukturiert, dass Sie die Angaben
auf einen Blick ablesen können, passend zu jeder
Situation.
Der Wert, den Sie gerade einstellen können, ist
fokussiert. Der Fokus wird durch eine Klammer um den
Einstellwert dargestellt.
Der Wert im Fokus kann direkt über den Einstellbereich
geändert werden.
Kurzes Drücken: Schnellvorheizen
aktivieren/deaktivieren.
Langes Drücken: Kindersicherung
aktivieren/deaktivieren.
Temperatur/ Gewicht auswählen und
mit dem Drehwähler einstellen.
Hinweis: Langes Drücken beendet
den laufenden Betrieb, die Einstellungen der ausgewählten Betriebsart
werden auf die Standardwerte zurückgesetzt.
Display-Elemente
Die Bedeutung der verschiedenen Display-Elemente
sehen Sie hier kurz erklärt.
Symbol Bedeutung
Q Wecker Ist das Symbol markiert, wird im Dis-
play die Weckerzeit angezeigt.
+ Dauer Ist das Symbol markiert, wird im Dis-
play die Dauer angezeigt.
0 Uhrzeit Ist das Symbol markiert, wird im Dis-
play die Uhrzeit angezeigt.
h:min Stunden/Minuten Dauer in Stunden und Minuten
min:s Minuten/Sekun-
Dauer in Minuten und Sekunden
den
@ Kindersicherung Leuchtet das Symbol, ist die Kindersi-
cherung aktiviert.
D Auffangbehälter Statusanzeige Auffangbehälter
9 Wassertank Statusanzeige Wassertank
d Schnellaufheizen Leuchtet das Symbol, ist das Schnell-
aufheizen aktiviert.
$ Entkalken Leuchtet das Symbol, muss das Gerät
entkalkt werden.
--------
Statusanzeige Auffangbehälter und Wassertank
Die Statusanzeige leuchtet nur, wenn Auffangbehälter
oder Wassertank für die ausgewählte Betriebsart
benötigt werden. Sie kann verschiedene Zustände
darstellen und informiert Sie über nötige
Handlungsschritte.
Statusanzeige Wassertank
Symbol Bedeutung
9
Symbol leuchtet,
Pfeil blinkt
Symbol ohne Pfeil
blinkt
Symbol ohne Pfeil
leuchtet
Wassertank befindet sich im Tankschacht und muss befüllt werden.
Wassertank befindet sich nicht im
Tankschacht und muss eingeschoben werden.
Wassertank befindet sich im Tankschacht. Es ist keine weitere Aktion
nötig.
Statusanzeige Auffangbehälter
Symbol Bedeutung
Symbol leuchtet,
Pfeil blinkt
Auffangbehälter befindet sich im
Tankschacht und muss geleert werden.
D
Symbol ohne Pfeil
blinkt
Auffangbehälter befindet sich nicht
im Tankschacht. Auffangbehälter in
den Tankschacht einschieben.
Symbol ohne Pfeil
leuchtet
Auffangbehälter befindet sich im
Tankschacht. Es ist keine weitere
Aktion nötig.
9
Page 10

de Gerät kennen lernen
Temperaturanzeige
Das gelbe Thermometer rechts unten im Display zeigt
an, dass das Gerät aufheizt.
Ist eine Heizart eingestellt, dann füllen sich die Balken
von unten nach oben gelb, je weiter der Garraum
aufgeheizt ist.
Bei Grill und Dampf leuchten die Balken sofort
vollständig.
Bei der Mikrowellenfunktion leuchten die Balken nicht.
Wenn Sie vorheizen, ist der optimale Zeitpunkt zum
Einschieben Ihrer Speise erreicht, sobald alle vier Linien
gelb leuchten.
Hinweis: Durch thermische Trägheit kann sich die
angezeigte Temperatur von der tatsächlichen
Temperatur im Garraum etwas unterscheiden.
Nachtmodus
Um Energie zu sparen wird von 22 Uhr bis 5.59 Uhr die
Displayhelligkeit automatisch auf einen niedrigeren Wert
reduziert.
Drehwähler
Mit dem Drehwähler ändern Sie die Einstellwerte, die im
Display angezeigt werden und im Fokus sind.
Bei Auswahllisten, z. B. Programme, beginnt nach dem
letzten Punkt wieder der erste.
Bei Werten, z. B. Gewicht, müssen Sie den Drehwähler
wieder zurückdrehen, wenn der minimale oder
maximale Wert erreicht ist.
Dampf-Kombibetrieb
~ "Dampf-Kombibetrieb
Damit können Sie zusätzlich zu einer
Heizart die Dampffunktion zuschalten.
einstellen" auf Seite 20
Reinigen
~ "Reinigungsfunktion"
auf Seite 31
Grundeinstellungen
~ "Grundeinstellungen"
auf Seite 28
--------
Für die Reinigung gibt es verschiedene Reinigungsfunktionen: Entkalken und Spülen.
Die Grundeinstellungen Ihres Gerätes
können Sie nach Ihren Wünschen
anpassen.
Heizarten
Damit Sie immer die richtige Heizart für Ihr Gericht
finden, erklären wir Ihnen hier die Unterschiede und
Anwendungsbereiche.
Die Symbole zu den einzelnen Heizarten unterstützen
bei der Wiedererkennung.
Heizart Temperatur Verwendung
Heißluft 40 °C Hefeteig gehen lassen, Sahnetor-
~
100-230 °C Zum Backen und Braten auf einer
Grill Grillstufen:
$
1 = schwach
2 = mittel
3 = stark
Umluftgrillen 100-190 °C Zum Braten von Geflügel, ganzem
#
--------
Vorschlagswerte
Zu jeder Heizart gibt das Gerät eine
Vorschlagstemperatur oder -stufe an. Diese können Sie
übernehmen oder im jeweiligen Bereich ändern.
ten auftauen.
Ebene.
Zum Grillen von flachem Grillgut
wie Steaks, Würstchen oder Toast
und zum Gratinieren.
Fisch und größeren Fleischstücken.
Betriebsarten
Ihr Gerät verfügt über verschiedene Betriebsarten, die
Ihnen den Betrieb des Gerätes erleichtern.
Genaue Beschreibungen dazu finden Sie in den
entsprechenden Kapiteln.
Betriebsart Verwendung
Heizarten
~ "Gerät bedienen"
auf Seite 15
Mikrowelle
~ "Mikrowelle" auf Seite 16
Dampf
~ "Dampf" auf Seite 19
Mikrowellen-Kombibetrieb
~ "MikrowellenKombibetrieb einstellen"
auf Seite 18
10
Für die optimale Zubereitung Ihrer
Speisen gibt es verschiedene, fein
abgestimmte Heizarten.
Mit der Mikrowelle können Sie Ihre
Gerichte schneller garen, erhitzen
oder auftauen.
Für die optimale Zubereitung Ihrer
Speisen gibt es verschiedene, fein
abgestimmte Dampfstufen.
Damit können Sie zusätzlich zu einer
Heizart die Mikrowelle zuschalten.
Page 11
Gerät kennen lernen de
Dampf
Die Dampffunktion können Sie alleine oder kombiniert
mit allen Heizarten und der Mikrowellenfunktion
einsetzen.
Um die Dampffunktion optimal zu nutzen, entfernen Sie
den Rost. Schieben Sie die Glaspfanne auf
Einschubhöhe 3 ein und stellen Sie den
Dampfgarbehälter in die Glaspfanne.
3
Dampf-Stufen
Für die Dampffunktion stehen Ihnen verschiedene
Intensitäten zur Verfügung. Die Dampf-Stufen können
über das Touch-Feld É gewählt werden. Die gewählte
Dampf-Stufe wird auf dem Display dargestellt.
Stufe Intensität Verwendung Anzeige im Display
1 gering Zum Auftauen von
Gemüse, Fleisch, Fisch
und Obst.
2 mittel Zur Zubereitung von
Desserts, Fisch und
Würstchen.
3 stark Zum Garen von Gemüse,
Fisch, Beilagen, zum
Entsaften und blanchieren.
Ausnahmen:
! Mikrowellen-Stufe 1000 Watt
~ Heißluft 40°C
Wie Sie die Mikrowelle mit Heizarten und der
Dampffunktion kombinieren, erfahren Sie hier:
~ "Mikrowellen-Kombibetrieb einstellen" auf Seite 18
Garraum
Verschiedene Funktionen im Garraum erleichtern den
Betrieb Ihres Gerätes. So wird z. B. der Garraum
großflächig ausgeleuchtet und ein Kühlgebläse schützt
das Gerät vor Überhitzung.
Gerätetür öffnen
Wenn Sie während eines laufenden Betriebs die
Gerätetür öffnen, wird der Betrieb angehalten. Türe
schließen und auf Feld @ tippen, um den Betrieb
fortzusetzen.
Garraumbeleuchtung
Die Garraumbeleuchtung leuchtet immer während des
Betriebs. Wenn der Betrieb beendet wird, schaltet sie
sich aus.
Die Garraumbeleuchtung schaltet sich ein, wenn Sie die
Gerätetür öffnen. Das hilft Ihnen z. B. bei der Reinigung
Ihres Gerätes. Nach ca. 15 Minuten schaltet sich die
Garraumbeleuchtung automatisch wieder aus.
Kühlgebläse
Ihr Gerät hat ein Kühlgebläse. Das Kühlgebläse schaltet
sich bei Betrieb ein. Die warme Luft entweicht über der
Tür.
Nach dem Betrieb läuft das Kühlgebläse eine
bestimmte Zeit lang nach.
Achtung!
Die Lüftungsschlitze nicht abdecken. Das Gerät
überhitzt sonst.
Mikrowelle
Es stehen Ihnen verschiedene Mikrowellen-Leistungen
in Stufen zur Verfügung, passend für verschiedene
Arten von Speisen und Zubereitung. Die
Mikrowellenstufen entsprechen nicht immer der
genauen Wattzahl, die das Gerät verwendet.
Folgende Mikrowellen-Stufen stehen Ihnen zur
Verfügung.
Mikrowellen-Stufe maximale Dauer
90 1 Stunde 30 Minuten
180 1 Stunde 30 Minuten
360 1 Stunde 30 Minuten
600 1 Stunde 30 Minuten
1000 30 Minuten
--------
Die Mikrowellenfunktion können Sie alleine oder
kombiniert mit allen Heizarten und der Dampffunktion
einsetzen.
Hinweise
■ Beim Mikrowellen-Betrieb bleibt das Gerät kalt.
Trotzdem schaltet sich das Kühlgebläse ein. Es kann
weiterlaufen auch wenn der Mikrowellen-Betrieb
bereits beendet ist.
■ An Türfenster, Innenwänden und Boden kann
Kondenswasser auftreten. Das ist normal, die
Funktion des Geräts wird dadurch nicht
beeinträchtigt. Wischen Sie das Kondenswasser
nach dem Garen ab.
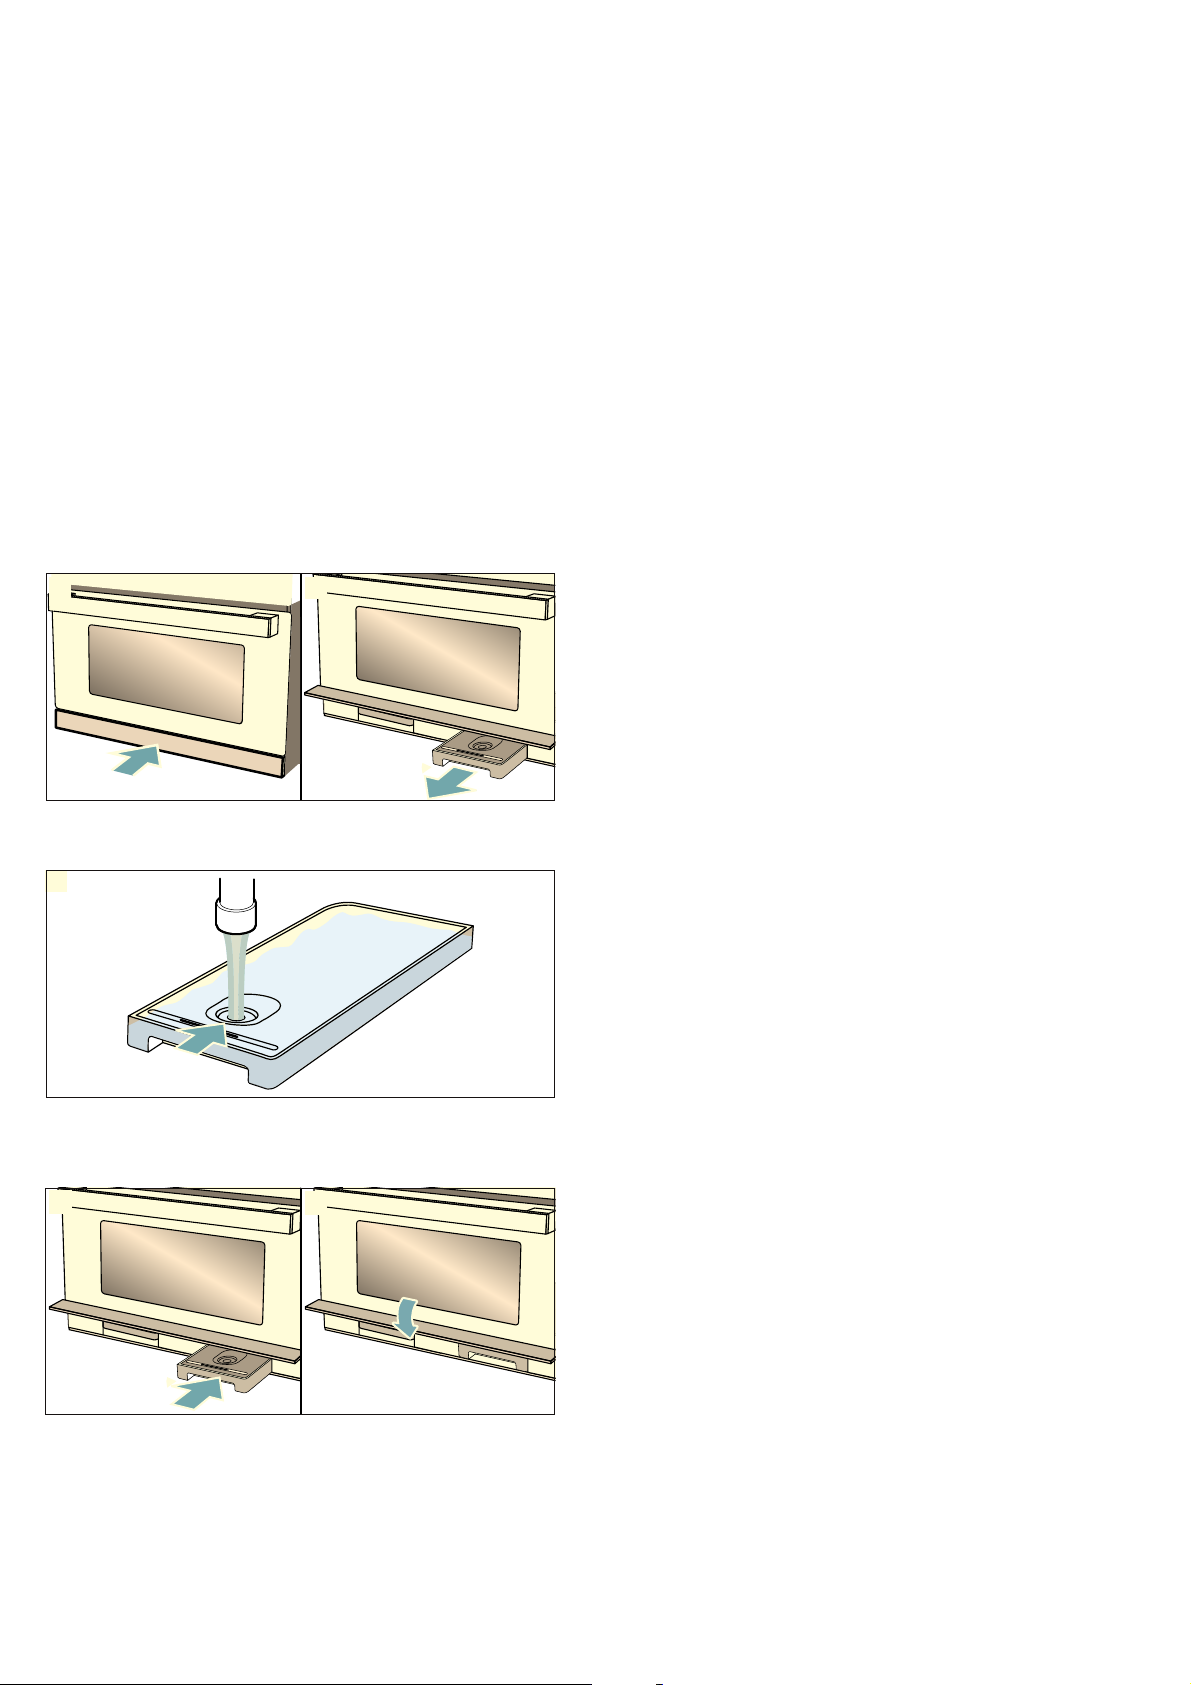
Tankblende
Die Tankblende befindet sich unter der Gerätetür und
ermöglicht Zugang zu Auffangbehälter und Wassertank.
Beide befinden sich hinter der Tankblende. Zum Öffnen
und Schließen der Tankblende gehen Sie
folgendermaßen vor:
Zum Öffnen drücken Sie kurz mittig auf die Tankblende.
Die Tankblende klappt nach oben.
11
Page 12

de Gerät kennen lernen
Zum Schließen klappen Sie die Tankblende nach unten
und drücken kurz mittig auf die Tankblende. Die
Tankblende ist verriegelt.
1
2
Wassertank
Das Gerät ist mit einem Wassertank ausgestattet. Der
Wassertank befindet sich rechts hinter der Tankblende.
Für Betriebe mit Dampf füllen Sie den Wassertank mit
Wasser. ~ "Wassertank füllen" auf Seite 20
Blinkt der Pfeil des Wassertank-Symbols 9 im Display,
muss der Wassertank mit frischem Wasser gefüllt
werden.
Auffangbehälter
Das Gerät ist mit einem Auffangbehälter ausgestattet.
Der Auffangbehälter befindet sich links hinter der
Tankblende. Leeren Sie den Auffangbehälter vor und
nach dem Ausführen der
Reinigungsfunktionen~ "Reinigungsfunktion"
auf Seite 31
Blinkt der Pfeil des Auffangbehälter-Symbols D im
Display, muss der Auffangbehälter geleert werden.
( Griff zum Entnehmen und Einschieben des
Wassertanks
0 Auffangöffnungen
8 Tankdeckel
( Griff zum Entnehmen und Einschieben des
Wassertanks
0 Öffnung zum Füllen
8 Tankdeckel
12
Page 13
Zubehör de
_Zubehör
Zubehör
Ihrem Gerät liegt diverses Zubehör bei. Hier erhalten
Sie einen Überblick über das mitgelieferte Zubehör und
dessen richtige Verwendung.
Mitgeliefertes Zubehör
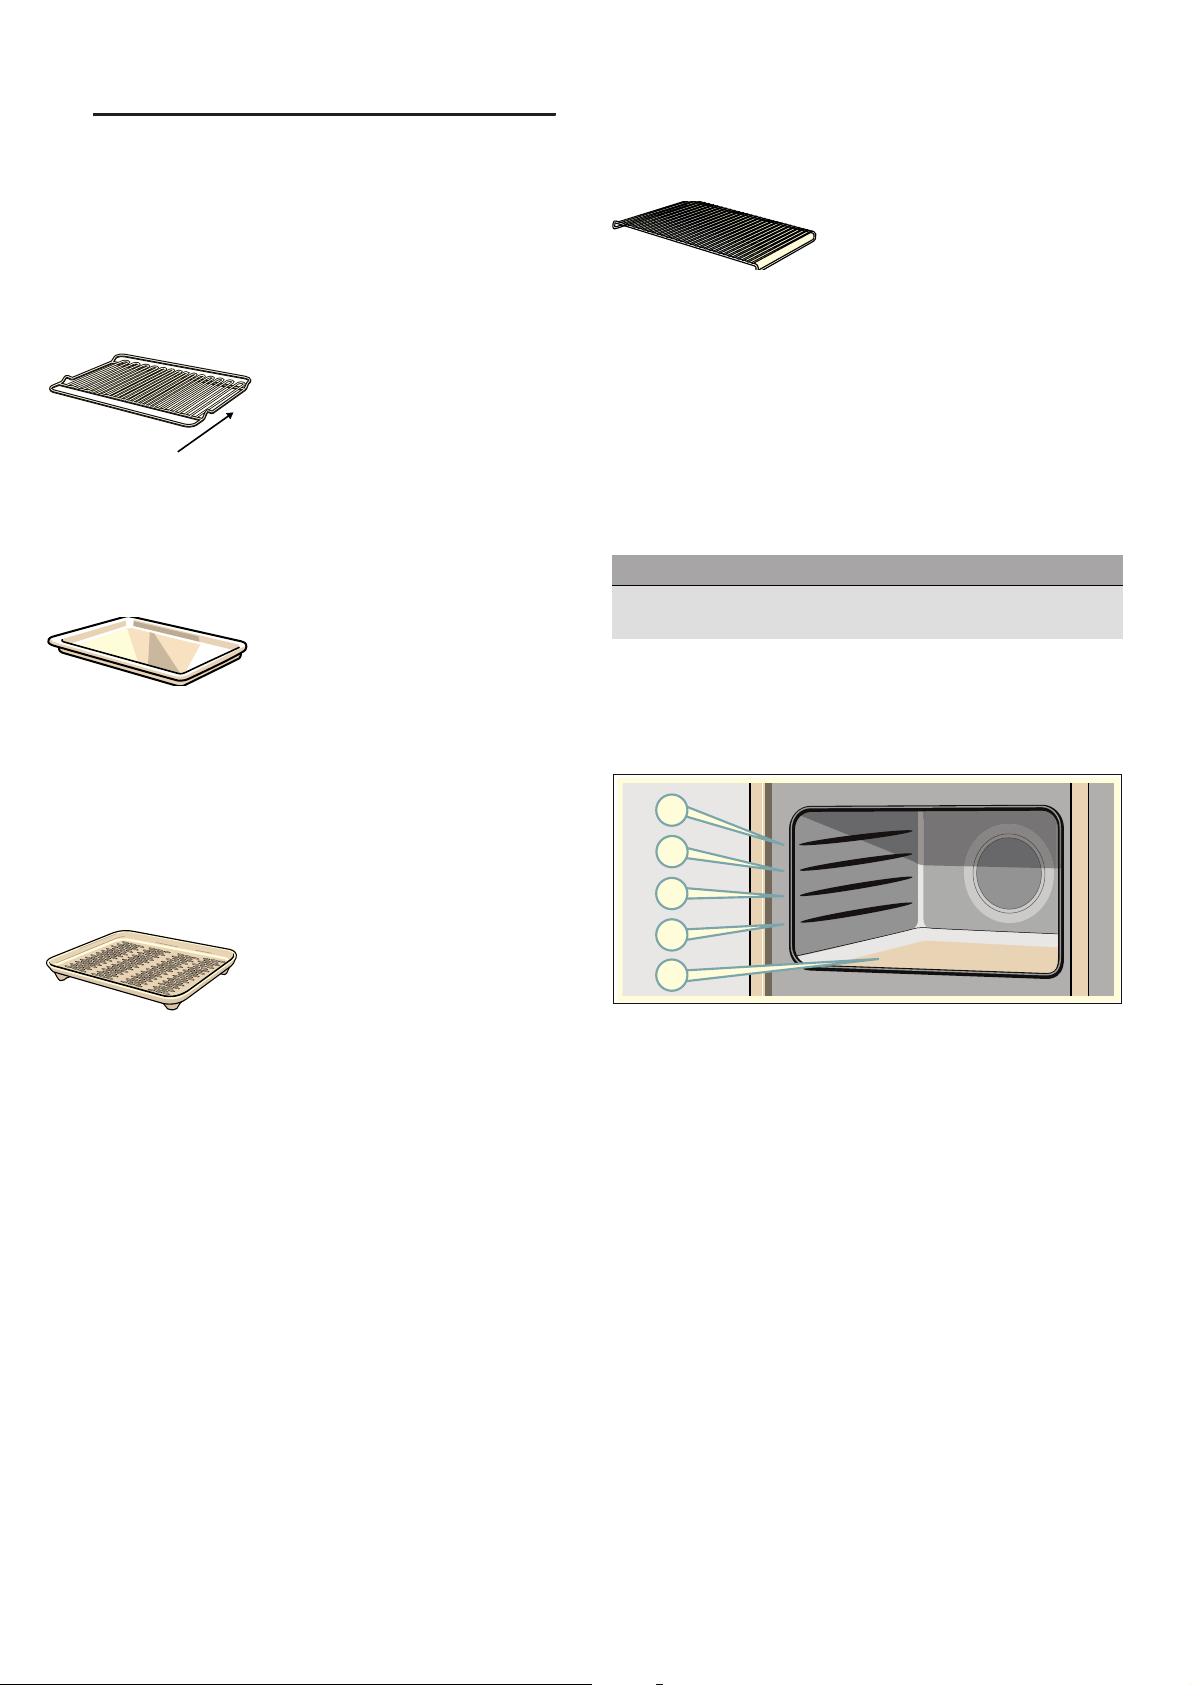
Ihr Gerät ist mit folgendem Zubehör ausgestattet:
Rost
Als Stellfläche für Backformen
oder zum Grillen und
Überbacken.
³
Verwenden Sie den Rost zum
Grillen auf den Einschubhöhen
3 und 4.
Der Rost ist nicht für den reinen
Mikrowellenbetrieb oder
Dampfbetrieb geeignet.
Beachten Sie beim Einschieben
die Einschubrichtung a.
Glaspfanne
Die Glaspfanne kann in allen
Betriebsarten und im
Kombinationsbetrieb zum Garen
verwendet werden. Außerdem
dient sie als Spritzschutz, wenn
Sie Lebensmittel direkt auf dem
Rost grillen.
Lassen Sie die Glaspfanne
abkühlen, bevor Sie sie reinigen
oder in kaltes Wasser legen, da
das Glas sonst beschädigt
werden kann.
Zusätzliches Zubehör
Je nach Gerätemodell kann zusätzliches Zubehör
beiliegen.
Einlegerost
Zum Braten. Stellen Sie den
Einlegerost mit den Füßen nach
unten in die Glaspfanne. Dies
stellt sicher, das abtropfendes
Fett und Fleischsäfte
aufgefangen werden. Der
Einlegerost ist nicht für
Mikrowellenbetrieb oder
Dampfbetrieb geeignet.
Sonderzubehör
Weiteres Zubehör erhalten Sie beim Kundendienst oder
im Fachhandel.
Sonderzubehör
Glasbräter
Für Schmorgerichte und Aufläufe, die Sie im Backofen zubereiten.
--------
Zubehör einschieben
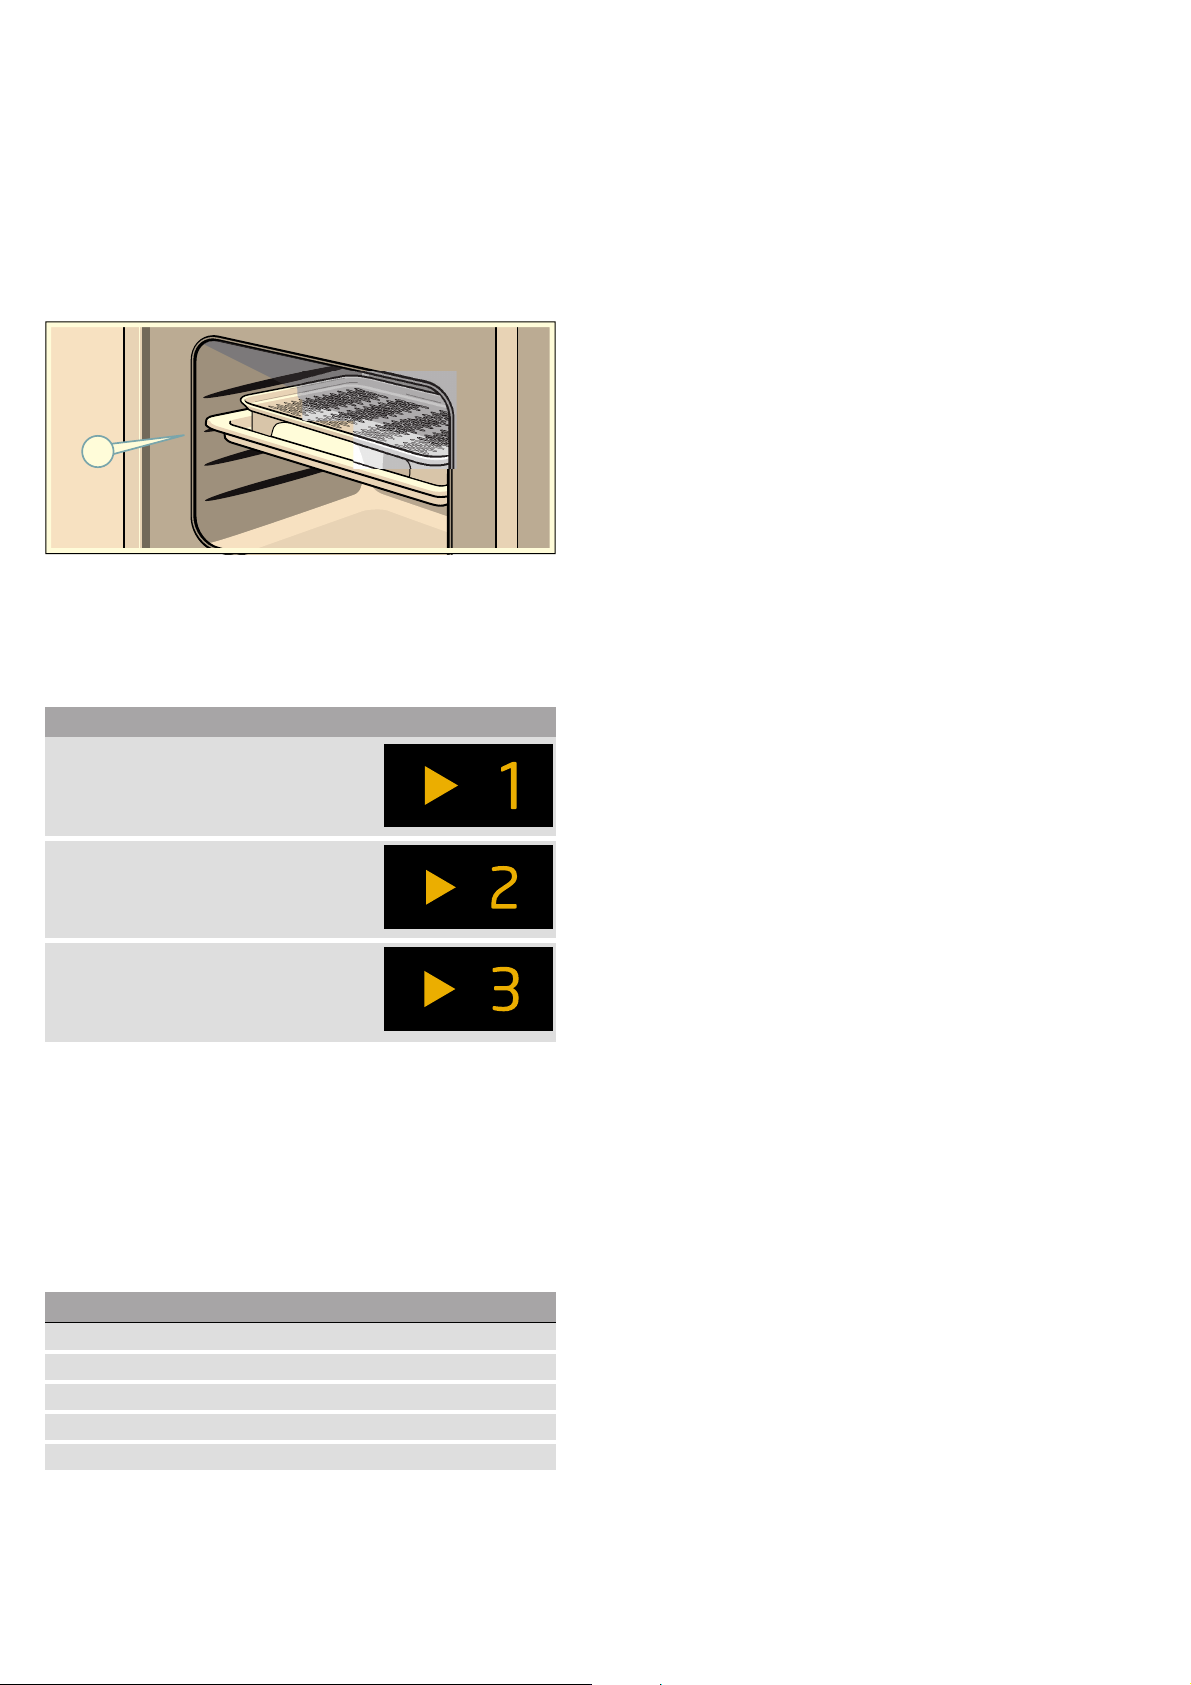
Der Garraum hat 4 Einschubhöhen. Die Einschubhöhen
werden von unten nach oben gezählt.
4
3
2
Dampfgarbehälter
Der Dampfgarbehälter wird in
die Glaspfanne gestellt, um mit
den Betriebsarten Dampf oder
Dampf mit Mikrowelle zu garen.
Dafür muss die Glaspfanne auf
Einschubhöhe 3 eingeschoben
sein. Die Nahrungsmittel
können direkt auf den
Dampfgarbehälter gelegt
werden.
Der Dampfgarbehälter ist
spülmaschinenfest.
Verwenden Sie den
Dampfgarbehälter nicht im
reinen Mikrowellenbetrieb oder
in den Heizarten Grill, Heißluft
oder Umluftgrill.
Verwenden Sie nur Originalzubehör vom Hersteller
Ihres Gerätes. Es ist speziell auf Ihr Gerät abgestimmt.
Zubehör können Sie beim Kundendienst, im
Fachhandel oder im Internet nachkaufen.
1
0
Setzen Sie das Zubehör in die Führung und schieben
Sie es vollständig ein.
Hinweis: Der Garraumboden (Höhe 0) ist insbesondere
für den Mikrowellenbetrieb geeignet, da die
Mikrowellenleistung hier am besten ist. Verwenden Sie
hierfür ausschließlich mikrowellengeeignetes Geschirr.
13
Page 14

de Vor dem ersten Gebrauch
KVor dem ersten Gebrauch
Vor dem er s t en Gebr auch
Bevor Sie Ihr neues Gerät benutzen können, müssen
Sie einige Einstellungen vornehmen. Reinigen Sie den
Garraum und das Zubehör.
Das Gerät muss fertig montiert und angeschlossen
sein.
Erste Inbetriebnahme
Nach dem Stromanschluss oder einem Stromausfall
erscheint im Display die Aufforderung für die
Einstellung der Uhrzeit. Es kann einige Sekunden
dauern, bis die Aufforderung erscheint.
Uhrzeit einstellen
Bei Inbetriebnahme ist die Zeitanzeige im Fokus. Der
Wert‚ƒ:‹‹ blinkt auf dem Display und das Symbol 0
leuchtet. Stellen Sie die Uhrzeit ein.
1. Mit dem Drehwähler die Uhrzeit einstellen.
2. Auf Feld 0 tippen.
Die Uhrzeit ist eingestellt.
Uhrzeit ändern
Hinweis: Das Gerät muss ausgeschaltet sein, um die
Uhrzeit ändern zu können.
1. Zwei Mal auf Feld 0 tippen.
Auf dem Display erscheint das Symbol 0 und die
Uhrzeit.
2. Mit dem Drehwähler die Uhrzeit einstellen.
3. Auf Feld 0 tippen.
Die Uhrzeit ist eingestellt.
Wasserhärtebereich einstellen.
Wass er här t eber ei ch ei nst el l en
Damit das Gerät Sie zuverlässig an die anstehende
Entkalkung erinnern kann, müssen Sie Ihren
Wasserhärtebereich richtig einstellen.
Ab Werk ist der Wasserhärtebereich 4 (sehr hart)
eingestellt.
Achtung!
Geräteschäden durch Verwendung nicht geeigneter
Flüssigkeiten.
Verwenden Sie kein destilliertes Wasser, kein stark
chloridhaltiges Leitungswasser (> 40 mg/l) oder andere
Flüssigkeiten.
Verwenden Sie ausschließlich frisches, kaltes
Trinkwasser ohne Kohlensäure oder enthärtetes
Wasser.
Hinweise
■ Ist Ihr Wasser stark kalkhaltig, empfehlen wir Ihnen,
enthärtetes Wasser zu verwenden.
■ Wenn Sie ausschließlich enthärtetes Wasser
verwenden, können Sie in diesem Fall den
Wasserhärtebereich “enthärtet“ einstellen.
■ Wenn Sie Mineralwasser verwenden, dann stellen
Sie den Wasserhärtebereich “4 sehr hart“ ein.
■ Wenn Sie Mineralwasser verwenden, dann nur
Mineralwasser ohne Kohlensäure.
Wasserhärtebereich Einstellung
0 0 enthärtet
1 (bis 1,3 mmol/l) 1 weich
2 (1,3 - 2,5 mmol/l) 2 mittel
3 (2,5 - 3,8 mmol/l) 3 hart
4 (über 3,8 mmol/l) 4 sehr hart
Hinweise
■ Wenn nach dem Einstellen der Uhrzeit nicht auf das
Feld 0 getippt wird, dann wird der eingestellte Wert
nach wenigen Sekunden automatisch übernommen.
■ Wurde der Funktionswähler während den
Einstellungen bewegt, muss er anschließend wieder
auf die Nullstellung gebracht werden. Erst dann kann
das Gerät benutzt werden.
■ Um den Standby-Verbrauch Ihres Gerätes zu
senken, können Sie die Uhrzeit ausblenden.
Den Wasserhärtebereich können Sie in den
Grundeinstellungen ändern.~ "Grundeinstellungen"
auf Seite 28
Garraum und Zubehör reinigen
Bevor Sie zum ersten Mal mit dem Gerät Speisen
zubereiten, reinigen Sie den Garraum und das Zubehör.
Garraum reinigen
Um den Neugeruch zu beseitigen, heizen Sie den
leeren, geschlossenen Garraum auf. Ideal dafür ist eine
Stunde bei Heißluft ~ mit 180 ºC. Achten Sie darauf,
dass keine Verpackungsreste im Garraum sind.
1. Mit dem Funktionswähler Heißluft ~ einstellen.
2. Mit dem Drehwähler 180 ºC einstellen.
3. Auf Feld @ tippen.
Das Gerät beginnt zu heizen.
Nach einer Stunde das Gerät ausschalten. Hierzu auf
das Feld @ tippen und dann den Funktionswähler auf
die Nullstellung drehen.
Zubehör reinigen
Bevor Sie das Zubehör das erste Mal benutzen,
reinigen Sie es gründlich mit heißer Spüllauge und
einem weichen Spültuch.
14
Page 15
1Gerät bedienen
Gerät bedi enen
Die Bedienelemente und ihre Funktionsweise haben
Sie bereits kennen gelernt. Nun erklären wir Ihnen, wie
Sie Ihr Gerät einstellen. Sie erfahren, was beim Ein- und
Ausschalten passiert und wie Sie die Betriebsarten
einstellen.
Gerät bedienen de
Gerät ein- und ausschalten
Bevor Sie an Ihrem Gerät etwas einstellen können,
müssen Sie es einschalten.
Hinweis: Die Kindersicherung kann nur bei
ausgeschaltetem Gerät eingestellt werden. Einige
Anzeigen bleiben auch bei ausgeschaltetem Gerät im
Display sichtbar.
Wenn Sie Ihr Gerät nicht benötigen, schalten Sie es
aus. Wenn längere Zeit nichts eingestellt ist, schaltet
sich das Gerät automatisch aus.
Gerät einschalten
Funktionswähler drehen, um das Gerät einzuschalten.
Im Display erscheint ein Standardwert im Fokus. Das
Gerät ist betriebsbereit.
Wie Sie die Betriebsarten einstellen, können Sie den
einzelnen Kapiteln entnehmen.
Gerät ausschalten
Funktionswähler auf die Nullstellung drehen.
Eine evtl. laufende Funktion wird abgebrochen.
Im Display erscheint die Uhrzeit.
Hinweis: Ob die Uhrzeit bei ausgeschaltetem Gerät
angezeigt werden soll oder nicht, können Sie in den
Grundeinstellungen festlegen.
Betriebsart einstellen
Nach dem Auswählen einer Betriebsart erscheinen
Vorschlagswerte auf dem Display. Sie können diese
Einstellung sofort starten.
Grundsätzlich gilt:
1. Mit dem Funktionswähler die Betriebsart auswählen.
2. Wenn nötig, weitere Einstellungen vornehmen.
Dazu auf das entsprechende Feld tippen und mit
dem Drehwähler den Wert ändern.
3. Auf das Feld @ tippen.
Das Gerät startet den Betrieb. Die LED @ leuchtet.
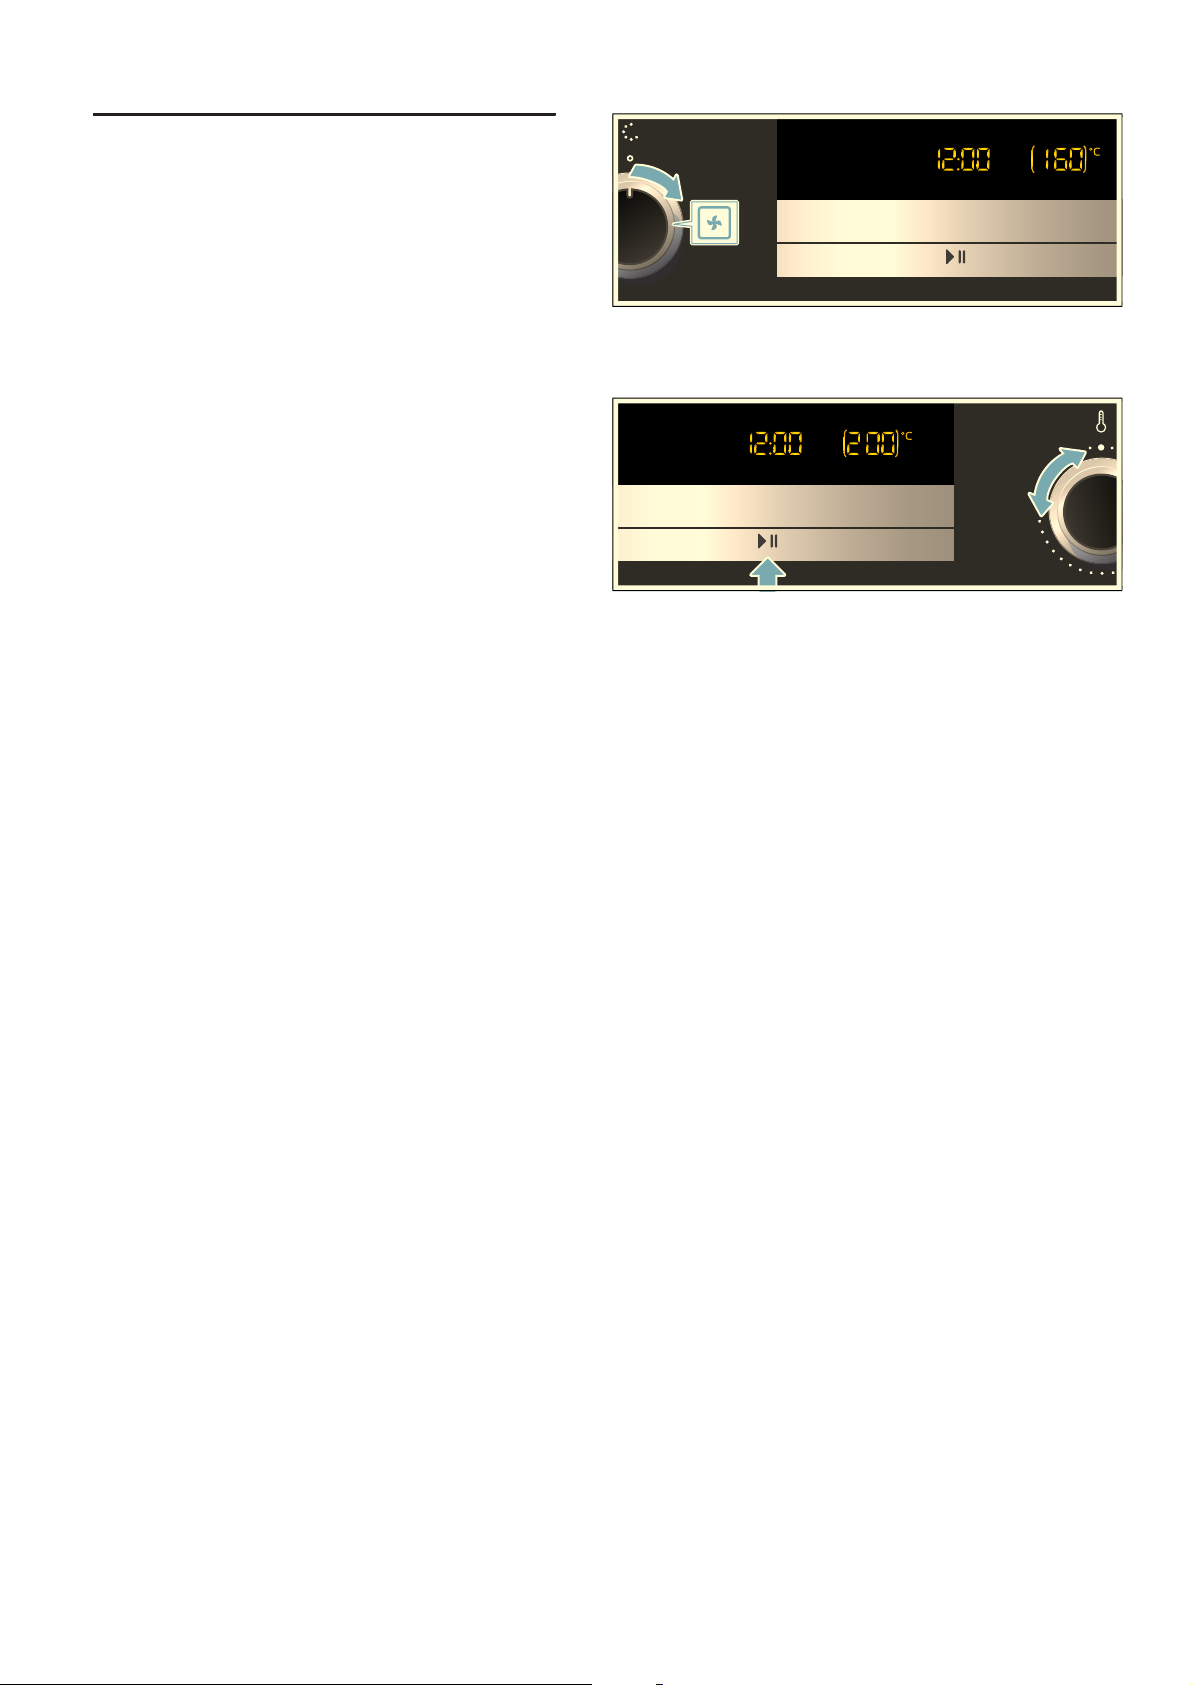
Heizart und Temperatur einstellen
2. Mit dem Drehwähler die Temperatur auf 200°C
einstellen.
3. Auf Feld @ tippen.
Das Gerät beginnt zu heizen. Die LED @ leuchtet. Die
Temperaturanzeige füllt sich.
Sie können die Temperatur im laufenden Betrieb
jederzeit mit dem Drehwähler verändern.
Hinweise
■ Nach dem Aufheizen sind je nach Heizart geringe
Temperaturschwankungen normal.
■ Im laufenden Betrieb kann die Temperatur nicht auf
40°C eingestellt werden.
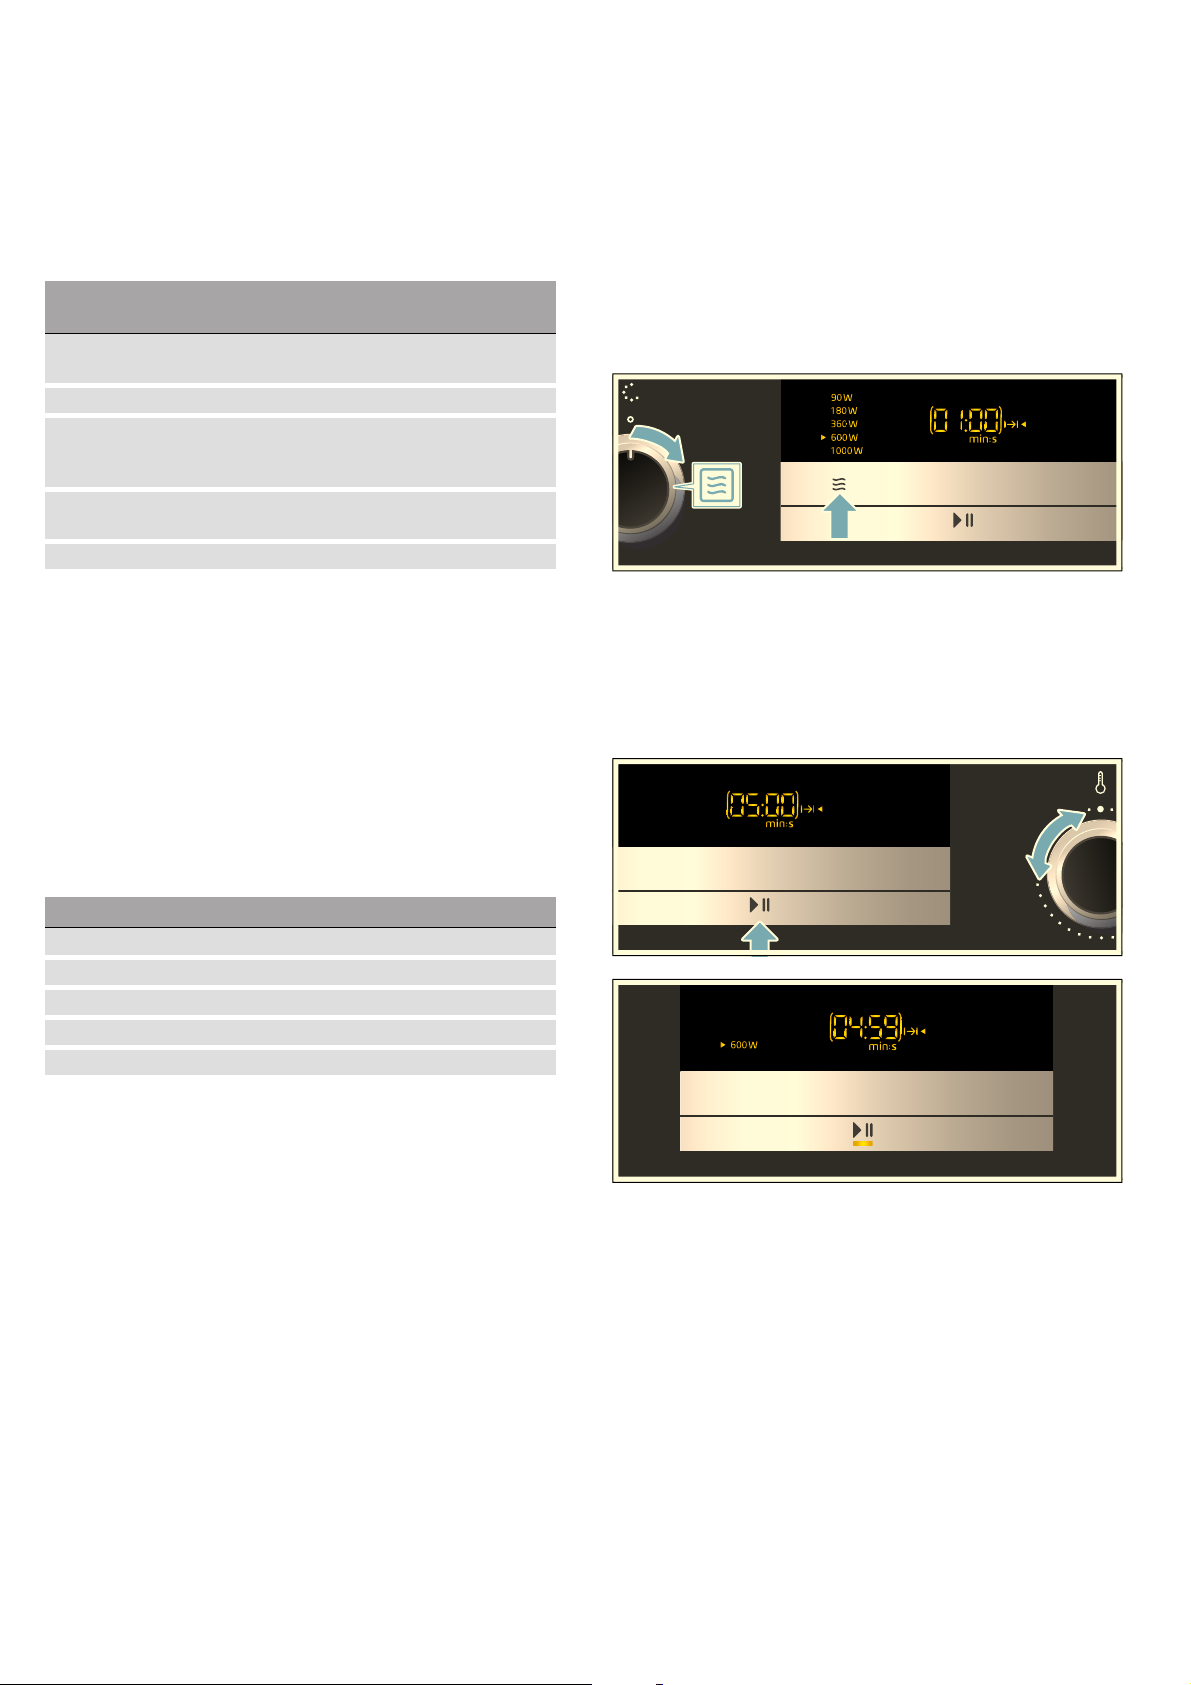
Dauer einstellen
1. Heizart und Temperatur einstellen.
2. Auf Feld 0 tippen, bis sich das Symbol + im Fokus
befindet.
3. Mit dem Drehwähler die gewünschte Dauer
einstellen.
4. Auf Feld @ tippen.
Das Gerät beginnt zu heizen. Die LED @ leuchtet.
Die Dauer läuft sichtbar ab.
Betrieb anhalten
1. Auf das Feld @ tippen oder die Gerätetür öffnen.
Der Betrieb wird angehalten, die LED @ blinkt.
2. Die Gerätetür schließen.
3. Auf das Feld @ tippen.
Der Betrieb wird fortgesetzt, die LED @ leuchtet.
Betrieb abbrechen
Den Funktionswähler auf die Nullstellung drehen.
Der Betrieb wird abgebrochen und alle Einstellungen
gelöscht.
Beispiel: Heißluft ~ bei 200°C
1. Mit dem Funktionswähler die Heizart Heißluft ~
einstellen.
Im Display erscheint die Vorschlagstemperatur
160°C.
Hinweis: Nach Unterbrechung oder Abbruch des
Betriebs kann das Kühlgebläse weiterlaufen.
15
Page 16

de Mikrowelle
Schnellaufheizen
Mit dem Schnellaufheizen erreicht Ihr Gerät die
eingestellte Temperatur besonders schnell.
Verwenden Sie Schnellaufheizen bei eingestellten
Temperaturen über 100 ºC. Für folgende Heizarten ist
Schnellaufheizen verfügbar:
■ ~ Heißluft (Ausnahme: Heißluft 40 °C)
■ # Umluftgrill
Damit Sie ein gleichmäßiges Garergebnis erhalten,
geben Sie Ihr Gericht erst in den Garraum, wenn die
Schnellaufheizung beendet ist.
1. Heizart und Temperatur einstellen.
2. Auf Feld i tippen.
Auf dem Display leuchtet das Symbol d.
3. Auf Feld @ tippen.
Das Gerät beginnt zu heizen. Die LED @ leuchtet.
Schnellaufheizung ist beendet
Ein Signal ertönt. Das Symbol d auf dem Display
erlischt. Ihr Gerät läuft mit der eingestellten Heizart und
Temperatur weiter. Geben Sie Ihr Gericht in den
Garraum.
Schnellaufheizung abbrechen
Auf Feld i tippen. Das Symbol d auf dem Display
erlischt. Ihr Gerät läuft mit der eingestellten Heizart und
Temperatur weiter.
Hinweis: Schnellaufheizen wird nach spätestens 15
Minuten automatisch deaktivert.
Automatische Sicherheitsabschaltung
Die Automatische Sicherheitsabschaltung wird aktiviert,
wenn das Gerät ohne eingestellte Dauer für längere Zeit
in Betrieb ist.
Nach 9 Stunden schaltet sich das Gerät automatisch
aus.
^Mikrowelle
Mikrowelle
Mit der Mikrowelle können Sie Ihre Speisen besonders
schnell garen, erhitzen oder auftauen. Die Mikrowelle
können Sie alleine oder kombiniert mit Heizarten
einsetzen.
Um die Mikrowelle optimal zu nutzen, beachten Sie die
Hinweise zum Geschirr und orientieren Sie sich an den
Angaben in den Anwendungstabellen am Ende der
Gebrauchsanleitung.
Um die Mikrowelle optimal zu nutzen, stellen Sie Ihr
Geschirr auf den Garraumboden. Entfernen Sie den
Rost. Beachten Sie die Hinweise zum Geschirr.
Geschirr
Nicht jedes Geschirr ist für Mikrowellen geeignet. Damit
Ihre Speisen erwärmt werden und das Gerät nicht
beschädigt wird, verwenden Sie nur für Mikrowellen
geeignetes Geschirr.
Geeignetes Geschirr
Geeignet ist hitzebeständiges Geschirr aus Glas,
Glaskeramik, Porzellan, Keramik oder temperaturfestem
Kunststoff. Diese Materialien lassen Mikrowellen durch.
Sie können auch Serviergeschirr verwenden. So sparen
Sie sich das Umfüllen. Benutzen Sie Geschirr mit Goldoder Silberdekor nur, wenn der Hersteller garantiert,
dass es für Mikrowellen geeignet ist.
Ungeeignetes Geschirr
Ungeeignet ist Metallgeschirr. Metall lässt Mikrowellen
nicht durch. Die Speisen bleiben in geschlossenen
Metallgefäßen kalt.
Achtung!
Funkenbildung: Metall, z. B. der Löffel im Glas, muss
mindestens 2 cm von den Garraumwänden und der
Türinnenseite entfernt sein. Funken können das innere
Türglas zerstören.
16
Geschirrtest
Niemals die Mikrowelle ohne Speisen einschalten.
Einzige Ausnahme ist der kurze Geschirrtest.
Wenn Sie unsicher sind, ob Ihr Geschirr
mikrowellengeeignet ist, machen Sie diesen Test.
1. Leeres Geschirr für ½ - 1 Minute bei maximaler
Leistung in den Garraum stellen.
2. Zwischendurch die Temperatur des Geschirrs
prüfen.
Das Geschirr muss kalt oder handwarm bleiben.
Wird es heiß oder entstehen Funken, ist es ungeeignet.
Brechen Sie den Test ab.
:Warnung – Verbrennungsgefahr!
Die zugänglichen Teile werden im Betrieb heiß. Nie die
heißen Teile berühren. Kinder fernhalten.
Page 17
Mikrowelle de
Mikrowellen-Stufen
Die Mikrowellen-Leistungen sind Stufen und
entsprechen nicht immer der genauen Wattzahl, die das
Gerät verwendet.
Folgende Mikrowellen-Stufen stehen Ihnen zur
Verfügung.
Mikrowellen-Stufe
90 1 Stunde 30 Minuten Zum Auftauen von empfindli-
180 1 Stunde 30 Minuten Zum Auftauen und Weitergaren.
360 1 Stunde 30 Minuten Zum Garen von Fleisch und zum
600 1 Stunde 30 Minuten Zum Erhitzen und Garen von
1000 30 Minuten Zum Erhitzen von Flüssigkeiten.
--------
Vorschlagswerte:
Zu jeder Mikrowellen-Stufe schlägt das Gerät eine
Dauer vor. Diese können Sie übernehmen oder im
jeweiligen Bereich ändern.
Die maximale Einstellung ist zum Erwärmen von
Flüssigkeiten vorgesehen. Zum Schutz des Gerätes
wird nach einiger Zeit die maximale Leistung der
Mikrowelle reduziert. Die volle Leistung steht nach einer
Abkühlzeit wieder zur Verfügung.
maximale Dauer Verwendung
chen Speisen.
Erwärmen von empfindlichen
Speisen.
Speisen.
Mikrowelle einstellen
Beispiel: Mikrowellen-Stufe 600 Watt, Dauer 5 Minuten.
1. Mit dem Funktionswähler die Funktion Mikrowelle !
auswählen.
Das Gerät ist betriebsbereit. Auf dem Display wird
als Vorschlagswert die maximale MikrowellenLeistung ! angezeigt, sie kann jederzeit geändert
werden.
2. Über das Touch-Feld Mikrowellen-Stufe die
gewünschte Leistungsstufe wählen.
Auf dem Display wird die Mikrowellen-Stufe markiert
und eine Vorschlagsdauer angezeigt.
3. Mit dem Drehwähler die gewünschte Dauer
einstellen.
Hinweis: Sie können auch zuerst die Dauer und
dann die Mikrowellen-Stufe einstellen.
4. Auf das Feld @ tippen.
Intervalle der Zeiteinstellung
Das Intervall beim Einstellen der Betriebsdauer
verändert sich mit der Länge der Betriebsdauer.
Betriebsdauer Intervall
0 - 1 Minute 5 Sekunden
1 - 3 Minuten 10 Sekunden
3 - 15 Minuten 30 Sekunden
15 Minuten - 1 Stunde 1 Minute
1 Stunde - 1 Stunde 30 Minuten 5 Minuten
Auf dem Display läuft die Dauer ab. Die LED @
leuchtet.
Die Dauer ist abgelaufen
Ein Signal ertönt. Gerätetür öffnen oder auf ein
beliebiges Feld tippen.
Dauer ändern
Mit dem Drehwähler die Dauer ändern. Nach wenigen
Sekunden wird die Änderung übernommen.
Mikrowellen-Leistung ändern
Auf Feld ! tippen, bis die gewünschte Stufe im Display
angewählt ist.
17
Page 18

de Mikrowelle
Hinweise
■ Mehrfaches Tippen schaltet die Leistungsstufen von
der höchsten zur niedrigsten Leistung durch.
■ Wird die Mikrowellenfunktion erst nach dem Start
hinzugefügt, pausiert das Gerät. Starten Sie den
Betrieb über das Feld @
Betrieb anhalten
1. Auf das Feld @ tippen oder die Gerätetür öffnen.
Der Betrieb wird angehalten, die LED @ blinkt.
2. Die Gerätetür schließen.
3. Auf das Feld @ tippen.
Der Betrieb wird fortgesetzt, die LED @ leuchtet.
Betrieb abbrechen
Den Funktionswähler auf die Nullstellung drehen.
Der Betrieb wird abgebrochen und alle Einstellungen
gelöscht.
Hinweis: Nach Unterbrechung oder Abbruch des
Betriebs kann das Kühlgebläse weiterlaufen.
Mikrowellen-Kombibetrieb einstellen
Mikrowellen-Kombi bet r i eb ei nst el l en
Sie können die Mikrowellenfunktion mit allen Heizarten
und der Dampffunktion kombinieren. Das Gerät heizt
und gleichzeitig wird die Mikrowelle zugeschaltet. So
wird Ihre Speise schneller fertig.
Kombinationsmöglichkeiten
■ É Dampf
■ ~ Heißluft
■ $ Grill
■ # Umluftgrill
Ausnahmen:
! Mikrowellen-Stufe 1000 Watt
~ Heißluft 40°C
Kombibetrieb einstellen
Beispiel: Heißluft ~ 190 ºC mit Mikrowelle 360 W, 17
Minuten.
1. Mit dem Funktionswähler die Funktion Heißluft ~
einstellen.
Ein Vorschlagswert für die Temperatur erscheint.
2. Mit dem Drehwähler die gewünschte Temperatur
einstellen.
3. Auf das Feld Mikrowellen-Leistung ! tippen, bis die
gewünschte Stufe im Display angewählt ist.
Eine Vorschlagsdauer erscheint.
4. Mit dem Drehwähler die Dauer einstellen.
5. Auf Feld @ tippen.
Der Betrieb startet, die LED @ leuchtet. Die Dauer
läuft sichtbar ab.
Die Dauer ist abgelaufen
Ein Signal ertönt, das Symbol @ hört auf zu leuchten.
Der Kombibetrieb ist beendet. Auf ein beliebiges Feld
tippen, um den Signalton zu beenden.
Mikrowellen-Leistung ändern
Auf Feld ! tippen, bis die gewünschte Stufe im Display
angewählt ist.
Hinweise
■ Mehrfaches Tippen schaltet die Leistungsstufen von
der höchsten zur niedrigsten Leistung durch.
■ Wird die Mikrowellenfunktion erst nach dem Start
hinzugefügt, pausiert das Gerät. Starten Sie den
Betrieb über das Feld @
Betrieb anhalten
1. Auf das Feld @ tippen oder die Gerätetür öffnen.
Der Betrieb wird angehalten, die LED @ blinkt.
2. Die Gerätetür schließen.
3. Auf das Feld @ tippen.
Der Betrieb wird fortgesetzt, die LED @ leuchtet.
Betrieb abbrechen
Den Funktionswähler auf die Nullstellung drehen.
Der Betrieb wird abgebrochen und alle Einstellungen
gelöscht.
Hinweis: Nach Unterbrechung oder Abbruch des
Betriebs kann das Kühlgebläse weiterlaufen.
Garraum trocknen
Trocknen Sie den Garraum nach dem Betrieb, damit
keine Feuchtigkeit zurückbleibt.
Garraum erwärmen
Zum Trocknen den Garraum erwärmen, so dass
Feuchtigkeit im Garraum verdampft. Anschließend die
Gerätetür öffnen, damit der Wasserdampf aus dem
Garraum entweicht.
1. Gerät abkühlen lassen.
2. Grobe Verschmutzungen im Garraum sofort
entfernen und Feuchtigkeit vom Garraumboden
aufwischen.
3. Mit dem Funktionswähler Umluftgrill #
4. Zwei Mal auf das Feld 0 tippen.
Das Symbol Dauer + ist im Display markiert.
5. Mit dem Drehwähler eine Dauer von 15 Minuten
einstellen.
6. Mit Feld @ den Betrieb starten.
Trocknen wird gestartet und nach 15 Minuten
automatisch beendet.
7. Gerätetür öffnen und für 1 bis 2 Minuten geöffnet
lassen, damit die Feuchtigkeit aus dem Garraum
entweichen kann.
Garraum per Hand trocknen
1. Gerät abkühlen lassen.
2. Schmutz im Garraum entfernen.
3. Garraum mit einem Schwamm trocknen.
4. Gerätetür 1 Stunde geöffnet lassen, damit der
Garraum vollständig trocknet.
18
Page 19
Dampf de
`Dampf
Dampf
Die Dampffunktion können Sie alleine oder kombiniert
mit allen Heizarten und der Mikrowellenfunktion
einsetzen.
Um die Dampffunktion optimal zu nutzen, entfernen Sie
den Rost. Schieben Sie die Glaspfanne auf
Einschubhöhe 3 ein und stellen Sie den
Dampfgarbehälter in die Glaspfanne.
3
:Warnung – Verbrühungsgefahr!
Beim Öffnen der Gerätetür kann heißer Dampf
entweichen. Dampf ist je nach Temperatur nicht
sichtbar. Beim Öffnen nicht zu nah am Gerät stehen.
Gerätetür vorsichtig öffnen. Kinder fernhalten.
Dampf einstellen
Hinweis: Wurde das Gerät längere Zeit nicht benutzt,
führen Sie zunächst einen Spülgang $ durch.
~ "Reinigungsfunktion" auf Seite 31
Beispiel: Dampf-Stufe 2: mittel, Dauer 10 Minuten.
1. Mit dem Funktionswähler die Funktion Dampf z
auswählen.
Das Gerät ist betriebsbereit. Die maximale DampfStufe und eine Dauer von 20 Minuten sind als
Standardwerte eingestellt. Der Pfeil des WassertankSymbols 9 blinkt.
2. Wassertank entnehmen, mit frischem Wasser bis zu
Markierung MAX füllen und vollständig in den
Tankschacht einschieben.~ "Wassertank füllen"
auf Seite 20
3. Auf das Feld É tippen, bis die gewünschte
Leistungsstufe erreicht ist.
Geräusche
Pumpe
Während des Betriebs hören Sie ein brummendes
Geräusch. Das Geräusch entsteht durch die Funktion
der Pumpe. Dies ist ein normales Betriebsgeräusch.
Garen mit Dampf
Dampf-Stufen
Für die Dampffunktion stehen Ihnen verschiedene
Intensitäten zur Verfügung. Die Dampf-Stufen können
über das Touch-Feld É gewählt werden. Die gewählte
Dampf-Stufe wird auf dem Display dargestellt.
Stufe Intensität Verwendung Anzeige im Display
1 gering Zum Auftauen von
Gemüse, Fleisch, Fisch
und Obst.
2 mittel Zur Zubereitung von
Desserts, Fisch und
Würstchen.
Im Display wird die gewählte Dampf-Stufe angezeigt.
4. Mit dem Drehwähler die gewünschte Dauer
einstellen.
Hinweis: Sie können auch zuerst die Dauer und
dann die Dampf-Stufe einstellen.
3 stark Zum Garen von Gemüse,
Fisch, Beilagen, zum
Entsaften und blanchieren.
19
Page 20

de Dampf
5. Auf Feld @ tippen.
Der Pfeil des Wassertank-Symbols 9 erlischt, das
Wassertank-Symbol ( leuchtet. Der Betrieb startet.
Die LED @ leuchtet. Im Display läuft die Dauer ab.
Je nach Dampfstufe kann die Füllung des
Wassertanks unterschiedlich lange ausreichen.
Sollte der Wassertank während des Betriebs leer
werden, so wird der Betrieb unterbrochen und der
Pfeil des Wassertank-Symbols 9 blinkt. Den
Wassertank mit frischem Wasser bis zur Markierung
MAX befüllen und den Betrieb über das Feld @
fortsetzen.
Hinweise
■ Die Dampf-Stufe kann im laufenden Betrieb jederzeit
über das Feld z geändert werden.
■ Nach dem Garen mit Dampf die Tropfrinne und den
Garraum auswischen. ~ "Nach jedem
Dampfbetrieb" auf Seite 21
Dampf-Kombibetrieb einstellen
Dampf - Kombi bet r i eb ei nst el l en
Bei einigen Heizarten können Sie die Dampffunktion
zuschalten.
Beim Garen mit Dampfunterstützung wird während des
Gerätebetriebes in unterschiedlichen Abständen und
Intensitäten Dampf in den Garraum gegeben. Hierdurch
erreichen Sie ein besseres Garergebnis.
Ihr Gargut
■ erhält eine knusprige Kruste
■ erhält eine glänzende Oberfläche
■ wird innen saftig und zart
■ reduziert sein Volumen nur minimal
Kombinationsmöglichkeiten
■ ! Mikrowelle
■ ~ Heißluft
■ $ Grill
■ # Umluftgrill
Ausnahmen:
! Mikrowellen-Stufe 1000 Watt
~ Heißluft 40°C
Kombinationsbetrieb einstellen
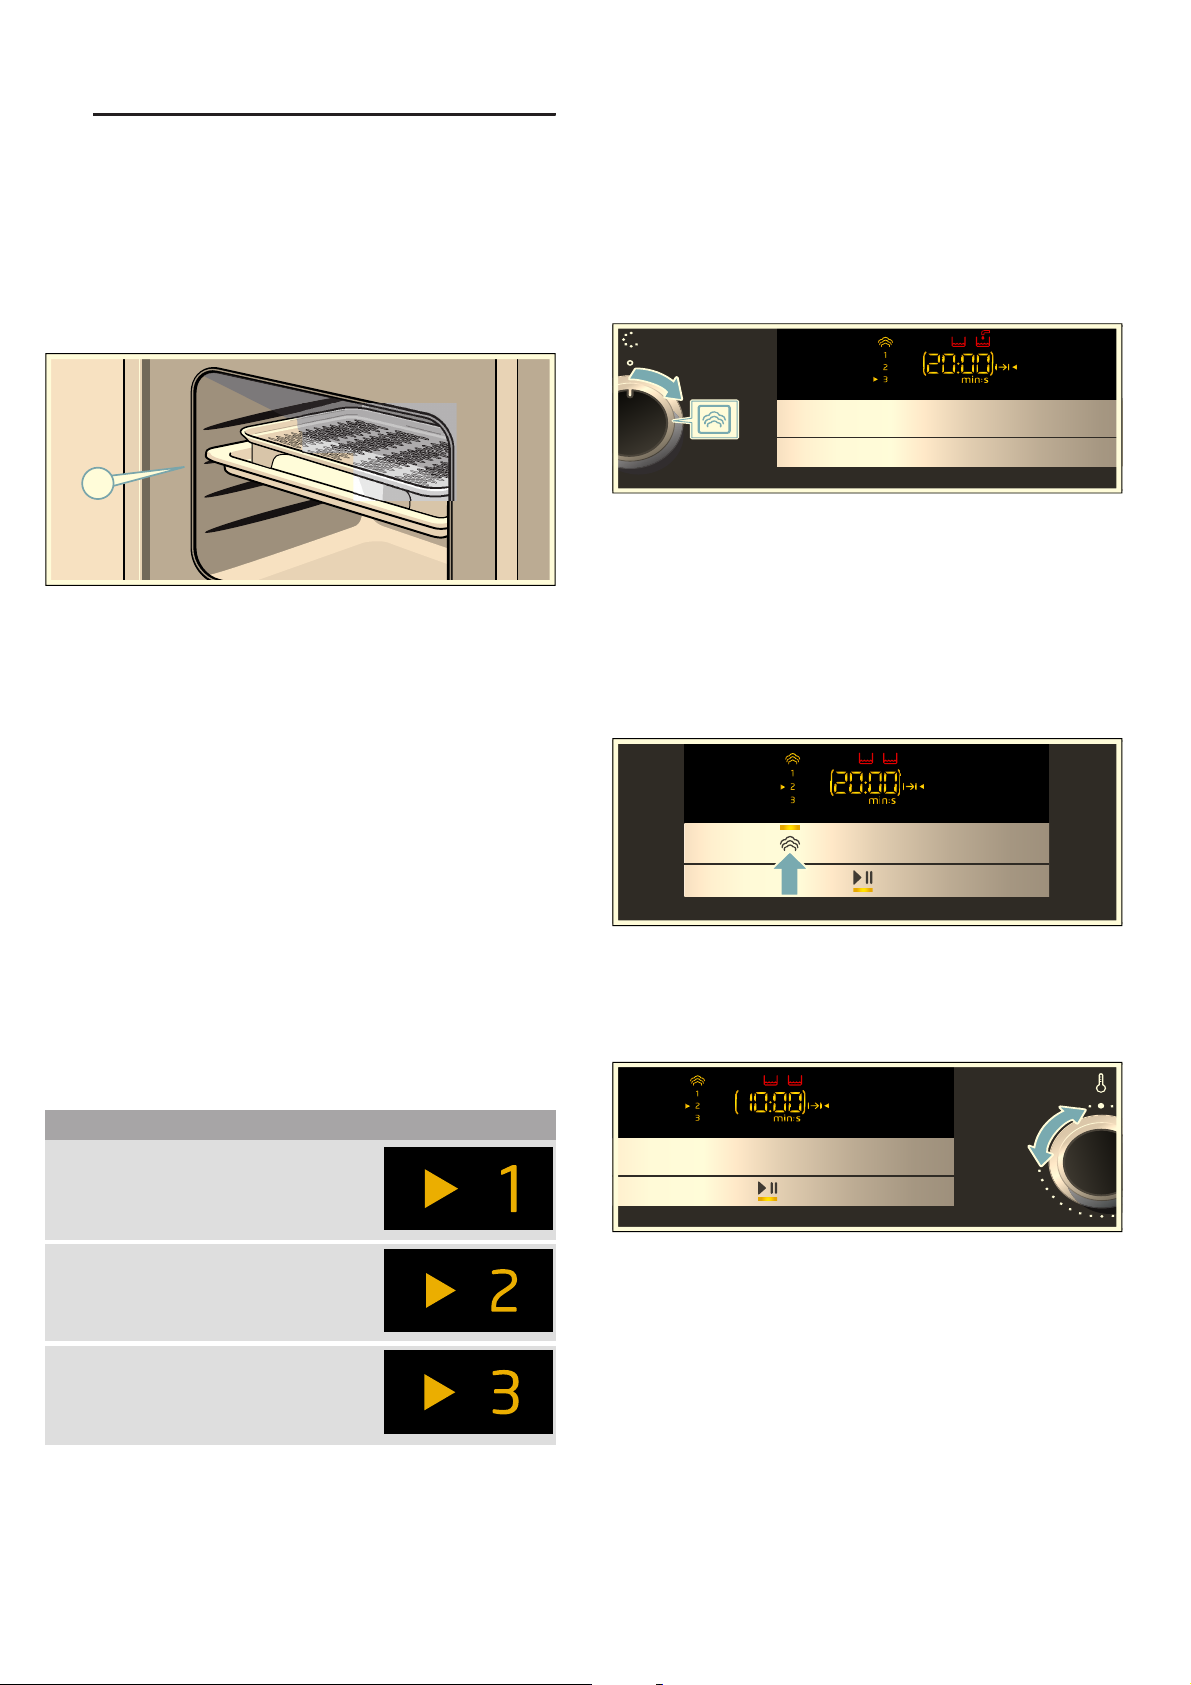
Beispiel: Heißluft ~ 190 ºC mit Dampf Stufe 2.
1. Mit dem Funktionswähler die Heizart Heißluft ~
einstellen.
Ein Vorschlagswert für die Temperatur erscheint.
2. Mit dem Drehwähler die gewünschte Temperatur
einstellen.
3. Auf das Feld Dampf É tippen, bis die gewünschte
Stufe im Display angewählt ist.
Im Display erscheint das Wassertanksymbol 9.
4. Wassertank auffüllen.
5. Auf Feld @ tippen.
Der Betrieb startet, die LED @ leuchtet. Die Dauer
läuft sichtbar ab.
Hinweis: Sollte der Wassertank während des Betriebs
leer werden, läuft der Betrieb ohne Dampfunterstützung
weiter. Es erscheint keine Anzeige im Display.
Die Dauer ist abgelaufen
Ein Signal ertönt, das Symbol @ hört auf zu leuchten.
Der Kombibetrieb ist beendet. Auf ein beliebiges Feld
tippen, um den Signalton zu beenden.
Dampf-Stufe ändern
Auf Feld É tippen bis die gewünschte Stufe im Display
angewählt ist.
Hinweis: Mehrfaches Tippen schaltet die Stufen von
der höchsten zur niedrigsten Stufe durch. Nach der
niedrigsten Stufe wird die Dampffunktion deaktivert.
Erneutes Tippen aktiviert die Dampffunktion, beginnend
bei der höchsten Stufe.
Betrieb anhalten
1. Auf das Feld @ tippen oder die Gerätetür öffnen.
Der Betrieb wird angehalten, die LED @ blinkt.
2. Die Gerätetür schließen.
3. Auf das Feld @ tippen.
Der Betrieb wird fortgesetzt, die LED @ leuchtet.
Betrieb abbrechen
Den Funktionswähler auf die Nullstellung drehen.
Der Betrieb wird abgebrochen und alle Einstellungen
gelöscht.
Hinweis: Nach Unterbrechung oder Abbruch des
Betriebs kann das Kühlgebläse weiterlaufen.
Wassertank füllen
Wass er t ank füllen
Der Wassertank befindet sich rechts hinter der
Tankblende unterhalb der Gerätetür. Bevor Sie einen
Betrieb mit Dampf starten, öffnen Sie die Tankblende
und füllen Wasser in den Wassertank.
Vergewissern Sie sich, dass Sie den
Wasserhärtebereich korrekt eingestellt haben.
~ "Grundeinstellungen" auf Seite 28
:Warnung – Verletzungs- und Brandgefahr!
Füllen Sie ausschließlich Wasser in den Wassertank.
Füllen Sie keine brennbaren Flüssigkeiten (z. B.
alkoholhaltige Getränke) in den Wassertank. Dämpfe
brennbarer Flüssigkeiten können sich im Garraum
durch heiße Oberflächen entzünden (Verpuffung). Die
Gerätetür kann aufspringen. Heiße Dämpfe und
Stichflammen können austreten.
20
Page 21
Dampf de
Achtung!
Geräteschäden durch Verwendung nicht geeigneter
Flüssigkeiten.
Verwenden Sie kein destilliertes Wasser, kein stark
chloridhaltiges Leitungswasser (> 40 mg/l) oder andere
Flüssigkeiten.
Verwenden Sie ausschließlich frisches, kaltes
Trinkwasser ohne Kohlensäure oder enthärtetes
Wasser.
Hinweise
■ Ist Ihr Wasser stark kalkhaltig, empfehlen wir Ihnen,
enthärtetes Wasser zu verwenden.
■ Wenn Sie ausschließlich enthärtetes Wasser
verwenden, können Sie in diesem Fall den
Wasserhärtebereich “enthärtet” einstellen.
1. Kurz auf die Mitte der Tankblende drücken.
Die Tankblende öffnet sich. Auffangbehälter (links)
und Wassertank (rechts) sind zugänglich.
2. Den Wassertank aus dem Tankschacht entnehmen .
1 2
Wassertank nachfüllen
Wenn der Wassertank im laufenden Betrieb leer ist,
verhält sich das Gerät je nach Betriebsart
unterschiedlich:
■ Dampfbetrieb: Der Betrieb wird unterbrochen, eine
Meldung erscheint im Display. Auf der höchsten
Dampfstufe reicht eine Tankfüllung für ca. 3040 Minuten, auf niedrigeren Dampfstufen deutlich
länger.
■ Dampf mit Mikrowelle: Der Betrieb wird
unterbrochen. Eine Tankfüllung reicht für ca.
50 Minuten.
■ Heißluft oder Grill mit Dampf: Der Betrieb wird mit
Heißluft oder Grill fortgesetzt, es erscheint keine
Meldung im Display. Eine Tankfüllung reicht auf der
höchsten Dampfstufe für ca. 3 Stunden Betrieb, auf
niedrigeren Dampfstufen deutlich länger.
■ Umluftgrill mit Dampf: Der Betrieb wird mit Umluftgrill
fortgesetzt, es erscheint keine Meldung im Display.
Eine Tankfüllung reicht für ca. 9 Stunden Betrieb.
Hinweis: Die angegebenen Zeiten können variieren.
Füllen Sie den Wassertank erneut bis zur Markierung
MAX.
3. Den Wassertank bis zur Markierung “MAX” mit
kaltem Wasser füllen.
4. Den Wassertank wieder in den Tankschacht setzen
und ihn vollständig einschieben.
5. Die Tankblende schließen.
Die Dampffunktion ist betriebsbereit.
1. Blende öffnen.
2. Wassertank entnehmen und nachfüllen.
3. Gefüllten Wassertank einsetzen und Blende
schließen.
Nach jedem Dampfbetrieb
Im Garraum bleibt Feuchtigkeit zurück. Wischen Sie die
Tropfrinne und den Garraum vorsichtig aus. Nach
jedem Betrieb mit Dampf wird empfohlen, die
Reinigungsfunktion Spülen $ durchzuführen.
Anschließend den Wassertank und den Auffangbehälter
leeren und trocknen.
Hinweis: Kalkflecken mit einem essiggetränkten Tuch
entfernen, mit klarem Wasser nachwischen und mit
einem weichen Tuch trocknen.
Spülen
Damit Ihr Gerät sauber bleibt, können Sie Wasser durch
das Rohrsystem pumpen. Das Wasser wird
anschließend in den Auffangbehälter abgelassen.
Starten
1. Mit dem Funktionswähler Spülen $ auswählen.
Die Dauer des Programms wird angezeigt. Sie kann
nicht verändert werden.
2. Tankblende öffnen.
3. Auffangbehälter entnehmen und ausleeren.
4. Leeren Auffangbehälter vollständig einschieben.
5. Wassertank entnehmen und mit frischem Wasser
füllen.
6. Wassertank vollständig einschieben.
7. Tankblende schließen.
8. Auf das Feld @ tippen.
Es wird Wasser durch die Rohre gepumpt. Auf dem
Display läuft die Dauer ab. Sobald die Dauer
abgelaufen ist, ertönt ein Signal. Auffangbehälter
leeren.
21
Page 22
de Dampf
Wassertank leeren
1. Tankblende in der Mitte kurz drücken.
Die Tankblende klappt nach oben.
2. Wassertank entnehmen.
3. Deckel des Wassertanks vorsichtig abnehmen.
4. Wassertank leeren, mit Spülmittel reinigen und mit
klarem Wasser gründlich ausspülen.
5. Alle Teile mit einem weichen Tuch trocknen.
6. Dichtung am Deckel trocken reiben.
7. Mit geöffnetem Deckel trocknen lassen.
8. Deckel auf den Wassertank setzen und andrücken.
9. Wassertank vollständig einschieben.
10. Tankblende schließen und kurz in der Mitte drücken.
Die Tankblende ist verriegelt.
Achtung!
■ Trocknen Sie den Wassertank nicht im heißen
Garraum. Der Wassertank wird beschädigt.
■ Reinigen Sie den Wassertank nicht in der
Geschirrspülmaschine. Der Wassertank wird
beschädigt.
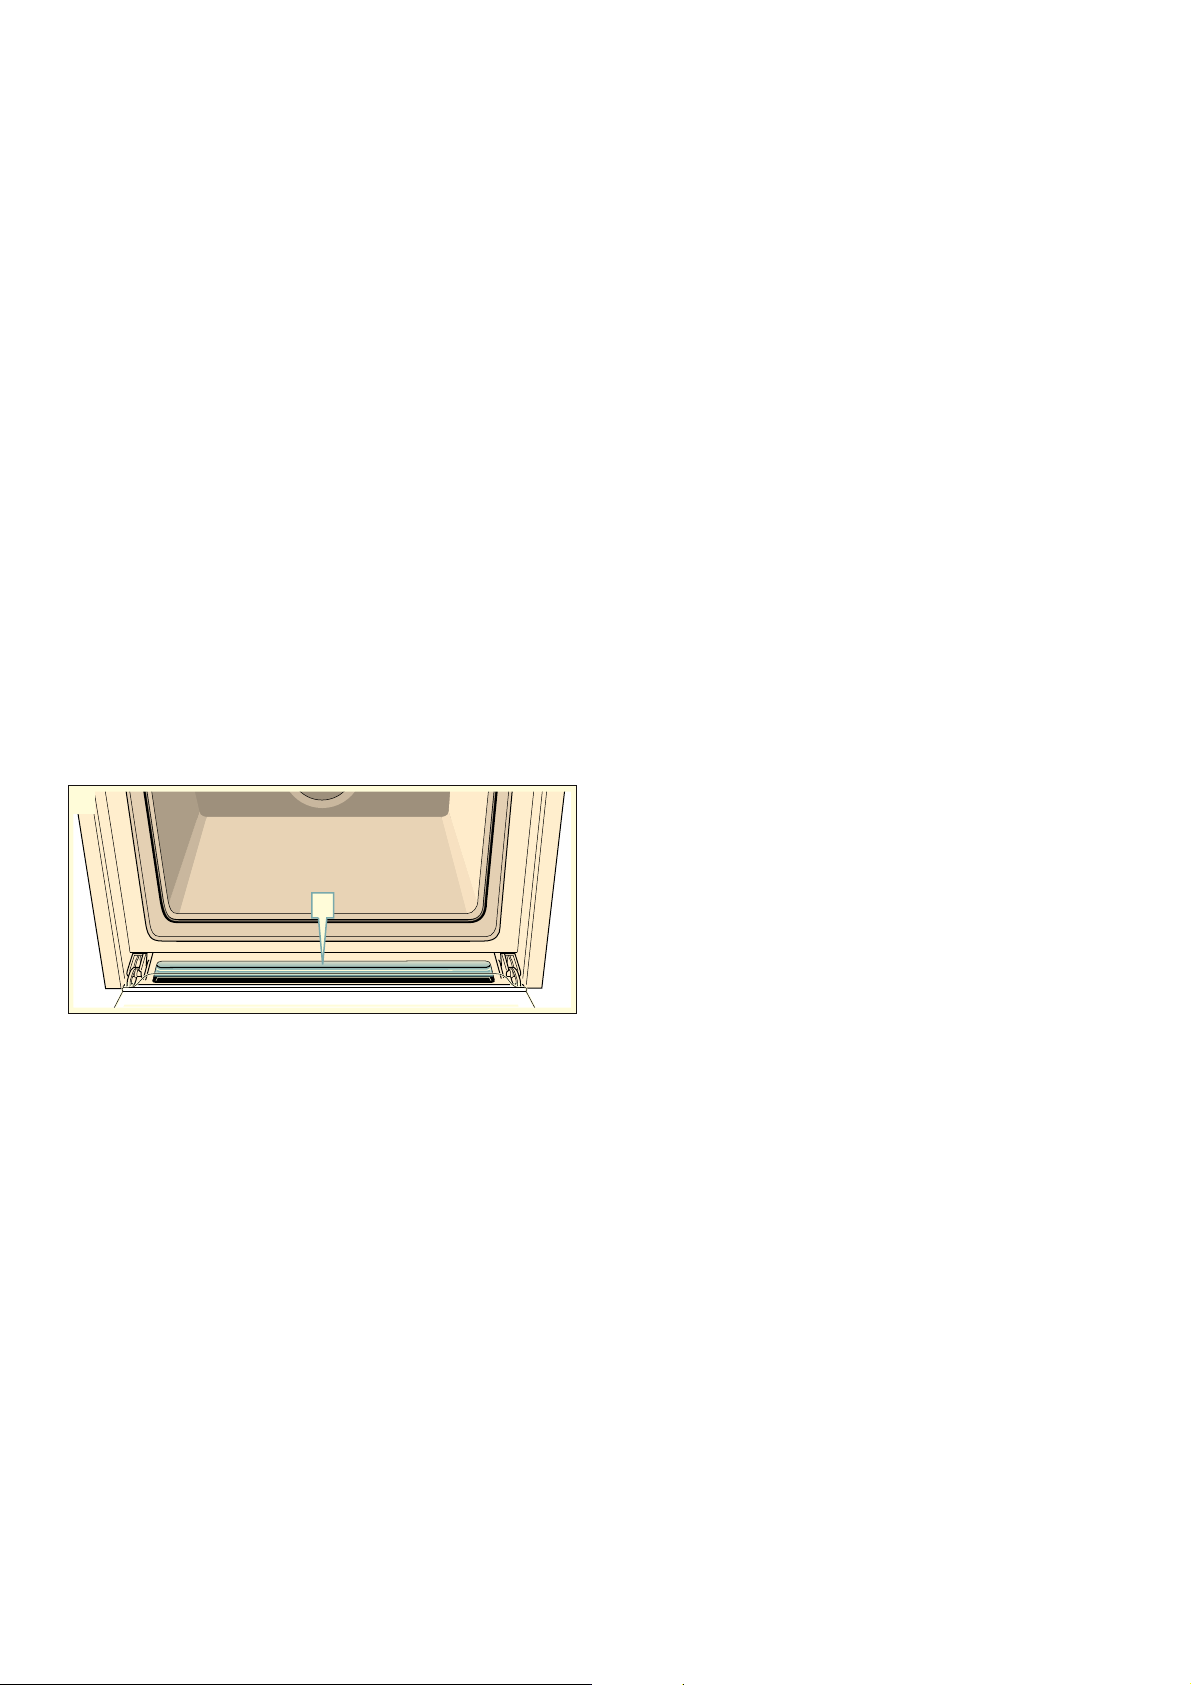
Tropfrinne trocknen
1. Gerät abkühlen lassen.
2. Gerätetür öffnen.
3. Tankblende öffnen.
4. Wassertank und Auffangbehälter entnehmen.
5. Tropfrinne ‚ unterhalb des Garraumes mit einem
Schwammtuch auswischen (Bild !).
1
Garraum trocknen
Trocknen Sie den Garraum nach dem Betrieb, damit
keine Feuchtigkeit zurückbleibt.
Garraum erwärmen
Zum Trocknen den Garraum erwärmen, so dass
Feuchtigkeit im Garraum verdampft. Anschließend die
Gerätetür öffnen, damit der Wasserdampf aus dem
Garraum entweicht.
1. Gerät abkühlen lassen.
2. Grobe Verschmutzungen im Garraum sofort
entfernen und Feuchtigkeit vom Garraumboden
aufwischen.
3. Mit dem Funktionswähler Umluftgrill #
4. Zwei Mal auf das Feld 0 tippen.
Das Symbol Dauer + ist im Display markiert.
5. Mit dem Drehwähler eine Dauer von 15 Minuten
einstellen.
6. Mit Feld @ den Betrieb starten.
Trocknen wird gestartet und nach 15 Minuten
automatisch beendet.
7. Gerätetür öffnen und für 1 bis 2 Minuten geöffnet
lassen, damit die Feuchtigkeit aus dem Garraum
entweichen kann.
Garraum per Hand trocknen
1. Gerät abkühlen lassen.
2. Schmutz im Garraum entfernen.
3. Garraum mit einem Schwamm trocknen.
4. Gerätetür 1 Stunde geöffnet lassen, damit der
Garraum vollständig trocknet.
D
22
Page 23
Automatik-Programme de
PAutomatik-Programme
Aut omat i k - Progr amme
Mit den Automatik-Programmen können Sie ganz
einfach Speisen zubereiten. Sie wählen das Programm
und geben das Gewicht Ihrer Speise ein. Die optimale
Einstellung übernimmt das Automatik-Programm. Sie
können aus 30 Programmen auswählen.
Hinweise
■ Nehmen Sie das Lebensmittel aus der Verpackung
und wiegen Sie es ab. Wenn Sie das genaue
Gewicht nicht eingeben können, runden Sie es auf
bzw. ab.
■ Stellen Sie die Lebensmittel in den kalten Garraum.
■ Verwenden Sie für die Programme immer
mikrowellengeeignetes, hitzebeständiges Geschirr,
z. B. aus Glas oder Keramik. Beachten Sie dazu die
Zubehörhinweise in der Programmtabelle.
■ Für ein optimales Garergebnis verwenden Sie nur
einwandfreie Lebensmittel und Fleisch mit
Kühlschranktemperatur. Bei Tiefkühlgerichten
verwende Sie nur Lebensmittel direkt aus dem
Gefriergerät.
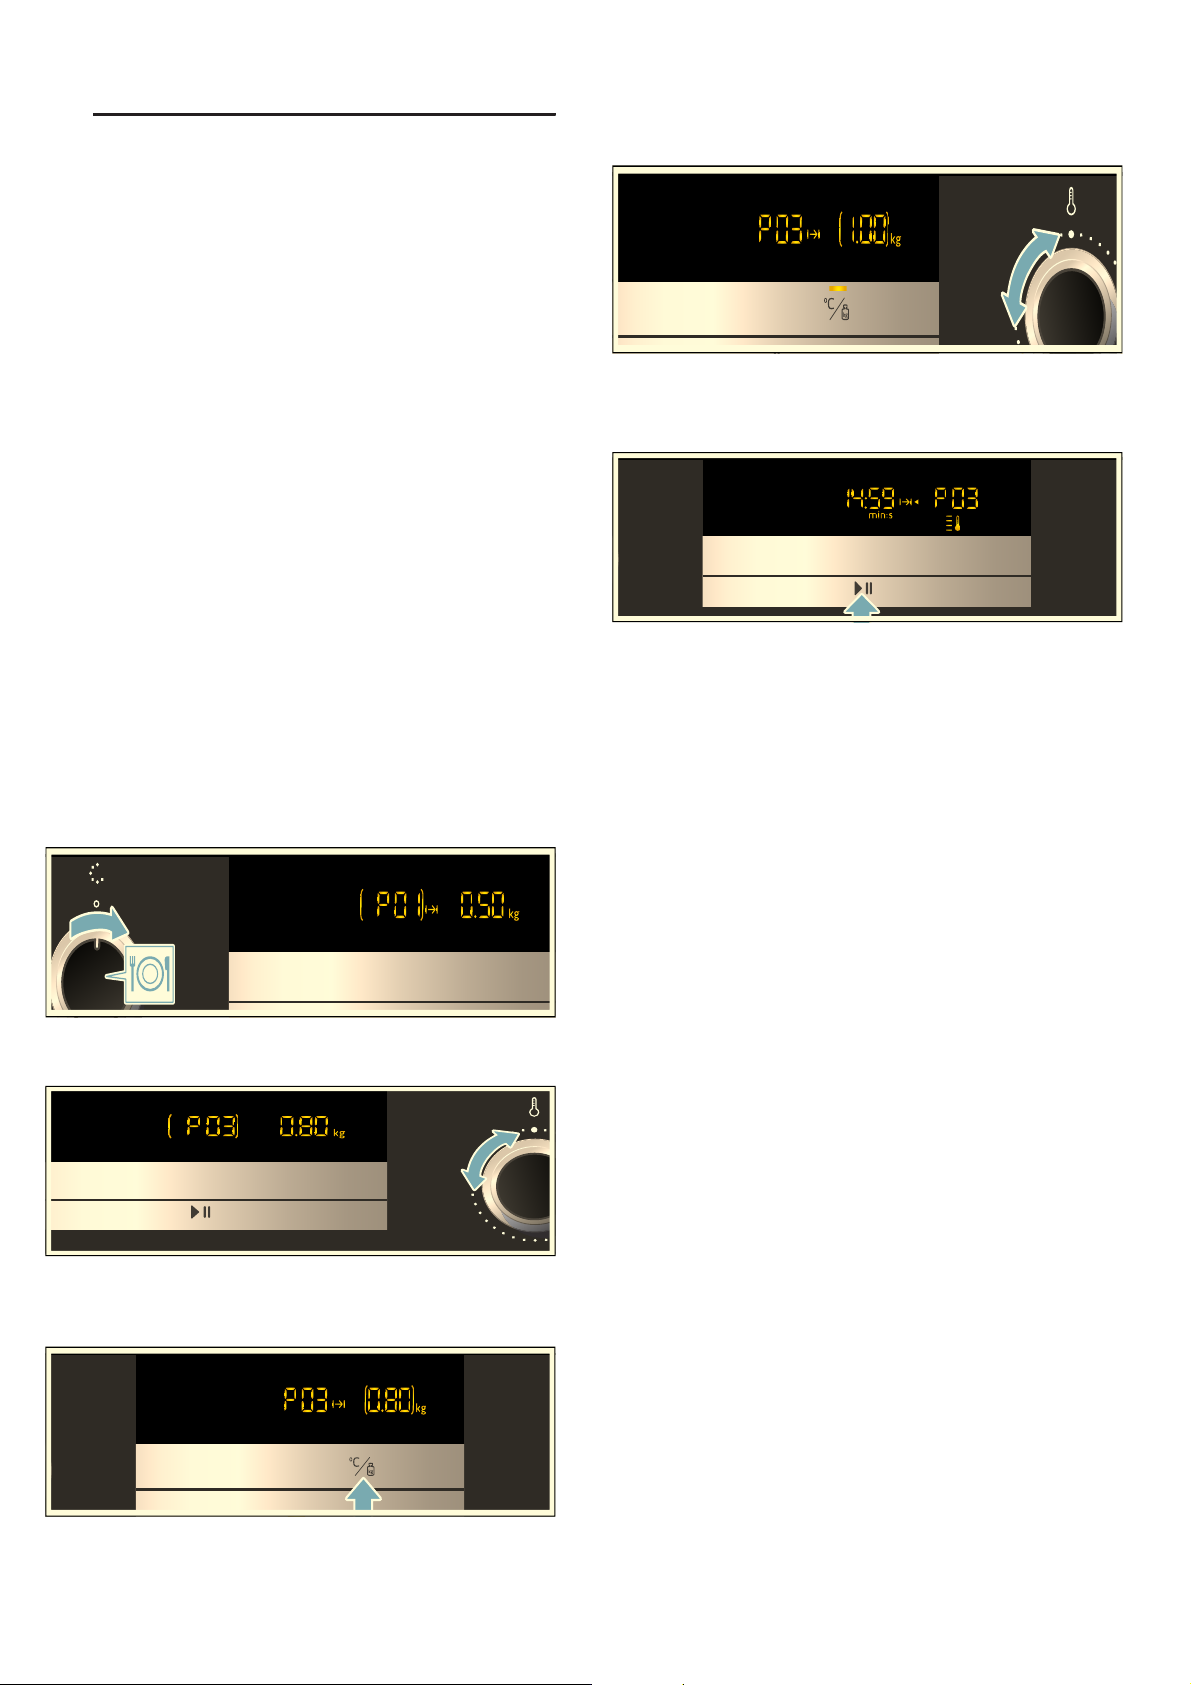
Programm einstellen
Beispiel im Bild: Programm 3 mit 1 Kilogramm Gewicht.
1. Den Funktionswähler auf Automatik-Programme =
stellen.
Auf dem Display erscheint die erste
Programmnummer und ein Gewichtsvorschlag.
Das Gerät stellt automatisch die zum Gewicht
passende Dauer ein.
5. Auf Feld @ tippen.
Das Programm startet. Die Dauer läuft sichtbar ab, der
Temperaturbalken und die LED @ leuchten.
Hinweise
■ Vor dem Start können Sie über die Felder = und
û/A zwischen den Programmen und dem Gewicht
wechseln.
■ Nach dem Start können die Programmnummer und
das Gewicht nicht mehr geändert werden. Sie
können das eingestellte Gewicht über das Feld û/A
abfragen.
Programm ist beendet
Ein Signal ertönt. Das Programm ist beendet, das Gerät
heizt nicht mehr.
Den Funktionswähler auf die Nullstellung drehen.
2. Mit dem Drehwähler die Programmnummer 3
wählen.
3. Auf Feld A tippen.
Auf dem Display befindet sich die
Gewichtseinstellung im Fokus.
4. Mit dem Drehwähler 1 Kilogramm Gewicht
einstellen.
Programm ändern
1. Ca. 4 Sekunden auf Feld @ tippen.
Das Programm wird zurückgesetzt.
2. Neues Programm auswählen.
Betrieb anhalten
1. Auf das Feld @ tippen oder die Gerätetür öffnen.
Der Betrieb wird angehalten, die LED @ blinkt.
2. Die Gerätetür schließen.
3. Auf das Feld @ tippen.
Der Betrieb wird fortgesetzt, die LED @ leuchtet.
Betrieb abbrechen
Den Funktionswähler auf die Nullstellung drehen.
Der Betrieb wird abgebrochen und alle Einstellungen
gelöscht.
Hinweis: Nach Unterbrechung oder Abbruch des
Betriebs kann das Kühlgebläse weiterlaufen.
23
Page 24

de Automatik-Programme
Programmtabelle
Programm Gericht Gewicht in kgGeschirr / Zubehör, Einschub-
höhe
Auftauen
P 01 Hackfleisch* 0,10 - 1,20 flaches, offenes Geschirr
Garraumboden
P 02 Fischfilet* 0,10 - 1,00 flaches, offenes Geschirr
Garraumboden
P 03 Hähnchenteile mit
Knochen*
P 04 Brotscheiben* 0,10 - 0,50 flaches, offenes Geschirr
Geflügel, Fleisch, Fisch
P 05 Hähnchenteile,
frisch*
P 06 Roastbeef, englisch 0,50 - 2,00 Glaspfanne
P 07 Roastbeef, rosa 0,50 - 2,00 Glaspfanne
P 08 Roastbeef, durch 0,50 - 2,00 Glaspfanne
P 09 Lammkeule mit
Knochen, rosa
P 10 Lammkeule mit
Knochen, durch
P 11 Fisch, ganz, frisch 0,20 - 1,20 Dampfgarbehälter + Glaspfanne
P 12 Fischfilet, frisch 0,20 - 0,50 Dampfgarbehälter + Glaspfanne
P 13 Fischfilet, gefroren 0,20 - 0,50 Dampfgarbehälter + Glaspfanne
P 14 Eintopf aus frischen
Zutaten**
Gemüse & Beilagen
P 15 Brokkoli, frisch 0,10 - 1,00 Dampfgarbehälter + Glaspfanne
P 16 Erbsen, gefroren 0,10 - 1,00 Dampfgarbehälter + Glaspfanne
P 17 Karottenscheiben,
frisch
P 18 Grüner Spargel,
frisch
P 19 Eier, weichgekocht 2 - 10 Stück Dampfgarbehälter + Glaspfanne
*Wendesignal beachten **Umrührsignal beachten
0,15 - 1,20 flaches, offenes Geschirr
Garraumboden
Garraumboden
0,15 - 1,00 Rost + Glaspfanne
Höhe 3 + 2
Höhe 1
Höhe 1
Höhe 1
1,00 - 2,00 Glaspfanne
Höhe 1
1,00 - 2,00 Glaspfanne
Höhe 1
Höhe 3
Höhe 3
Höhe 3
0,50 - 2,00 Geschirr mit Deckel
Garraumboden
Höhe 3
Höhe 3
0,10 - 0,75 Dampfgarbehälter + Glaspfanne
Höhe 3
0,10 - 0,70 Dampfgarbehälter + Glaspfanne
Höhe 3
Höhe 3
Hinweise Besonderheiten
Verwenden Sie nur
mikrowellengeeignetes Geschirr.
Verwenden Sie nur
mikrowellengeeignetes Geschirr.
Verwenden Sie nur
mikrowellengeeignetes Geschirr.
Verwenden Sie nur
mikrowellengeeignetes Geschirr.
Verwenden Sie nur
mikrowellengeeignetes Geschirr.
Füllen Sie den Wassertank.
Füllen Sie den Wassertank.
Verwenden Sie
gleichmäßig flache
Fischfilets. Füllen
Sie den Wassertank.
Verwenden Sie nur
mikrowellengeeignetes Geschirr.
Füllen Sie den Wassertank.
Füllen Sie den Wassertank.
Füllen Sie den Wassertank.
Füllen Sie den Wassertank.
Füllen Sie den Wassertank.
Hackfleisch vom Rind, Lamm, Schwein;
bereits aufgetautes Hackfleisch nach
dem Wenden entfernen
Filet vom Hecht, Kabeljau, Rotbarsch,
Seelachs, Zander
Hautseite nach unten
Weizenbrot, Weizenmischbrot, Vollkornbrot; Brot nur in der benötigten Menge
auftauen. Es wird schnell altbacken.
Trennen Sie die Scheiben wenn möglich.
Hähnchenschenkel, halbe Hähnchen,
Hautseite nach unten
Innenseite mit Zitronensaft beträufeln.
Verwenden Sie Fleisch, Gemüse und
Brühe zu gleichen Teilen und geben Sie
das Gesamtgewicht an.
Nicht übereinander legen
Hühnereier gekühlt
24
Page 25

Automatik-Programme de
Programm Gericht Gewicht in kgGeschirr / Zubehör, Einschub-
höhe
P 20 Reis** 0,10 - 0,50 hohes Geschirr mit Deckel
Garraumboden
P 21 Backofenkartoffeln 0,20 - 1,50 Rost
Höhe 2
P 22 Salzkartoffeln 0,20 - 0,50 Dampfgarbehälter + Glaspfanne
Höhe 3
P 23 Fruchtkompott** 0,30 - 0,80 flaches Geschirr auf Glaspfanne
Höhe 3
Convenience
P 24 Pommes frites,
gefroren*
P 25 Kroketten, gefro-
ren*
P 26 Pizza, vorgeba-
cken, gekühlt
P 27 Pizza, vorgeba-
cken, gefroren
P 28 Nudelauflauf, vorge-
kocht und gekühlt
P 29 Tellergericht erwär-
men, gekühlt
P 30 Tellergericht erwär-
men, gefroren
*Wendesignal beachten **Umrührsignal beachten
0,20 - 0,80 Glaspfanne
Höhe 2
0,25 - 0,80 Glaspfanne
Höhe 2
0,10 - 0,60 Rost
Höhe 2
0,10 - 0,50 Rost
Höhe 1
0,30 - 1,00 Geschirr auf Glaspfanne
Höhe 2
0,20 - 0,50 flaches Geschirr auf Glaspfanne
Höhe 3
0,20 - 0,50 flaches Geschirr auf Glaspfanne
Höhe 3
Hinweise Besonderheiten
Verwenden Sie nur
mikrowellengeeignetes Geschirr.
Füllen Sie den Wassertank.
Verwenden Sie nur
mikrowellengeeignetes Geschirr. Füllen Sie den
Wassertank.
Verwenden Sie nur
mikrowellengeeignetes Geschirr.
Verwenden Sie nur
mikrowellengeeignetes Geschirr. Füllen Sie den
Wassertank.
Verwenden Sie nur
mikrowellengeeignetes Geschirr. Füllen Sie den
Wassertank.
Langkornreis, keinen Kochbeutel-Reis
verwenden. Die 2-3-fache Menge Wasser zum Reis zugeben. Nach Programmende 5-10 Minuten ruhen lassen.
Mittelgroße Kartoffeln, ca. 250g,
waschen, trocknen und die Schale mehrmals mit einer Gabel einstechen.
Kartoffeln, geschält und geviertelt.
Geben Sie zu den Früchten etwas
Zucker und Zimt dazu. Bei Beerenkompott geben Sie Himbeeren und Erdbeeren erst beim Umrührsignal dazu.
Nicht übereinander legen
Nicht übereinander legen
Pizza mit dünnem Boden
Pizza mit dünnem Boden, Pizza-Baguette
Lasagne, Canelloni oder Nudelaufläufe
mit vorgegarten Nudeln
25
Page 26
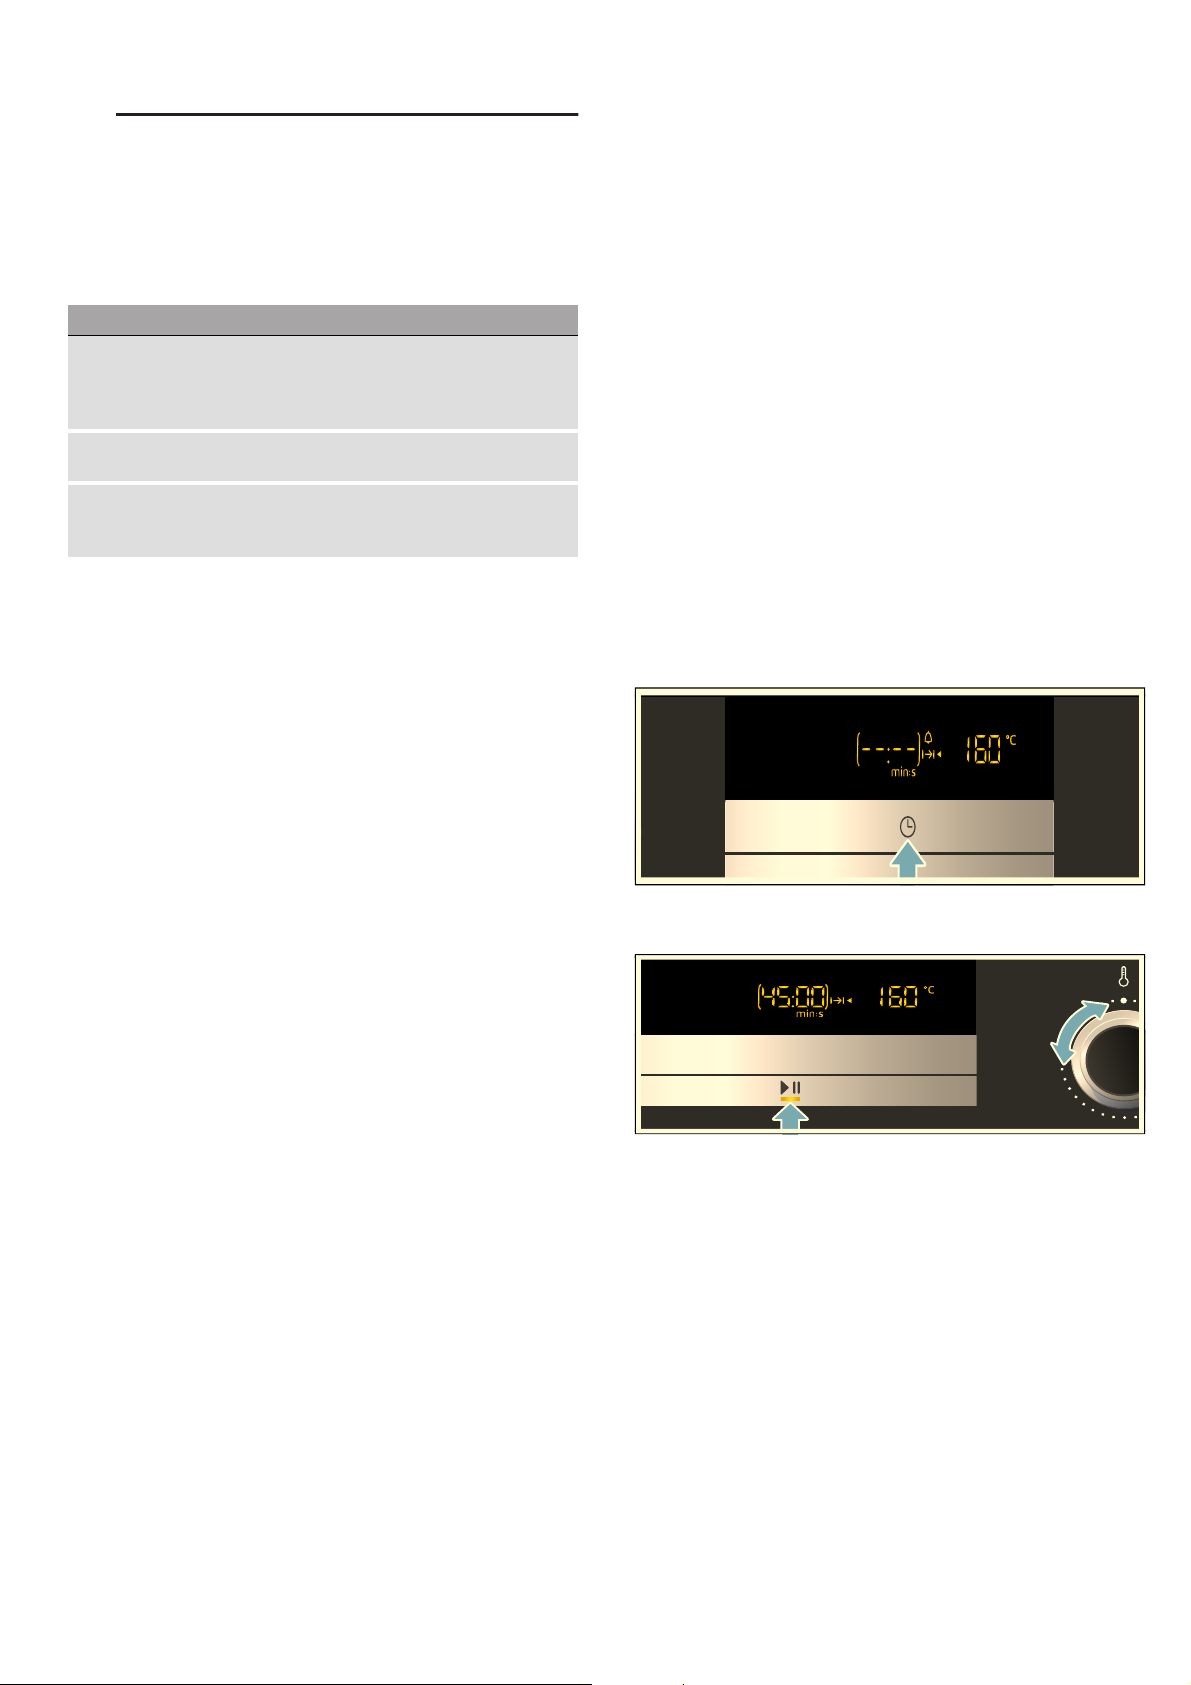
de Zeitfunktionen einstellen
OZeitfunktionen einstellen
Zei t f unk t i onen ei nst el l en
Ihr Gerät hat verschiedene Zeitfunktionen. Mit dem
Touch-Feld 0 rufen Sie das Menü auf und wechseln
zwischen den einzelnen Funktionen. Im Display
leuchten die Symbole der verfügbaren Funktionen, die
gerade angewählte Funktion ist fokussiert.
Zeitfunktion Verwendung
Q Wecker Der Wecker funktioniert wie eine Eieruhr. Er
läuft unabhängig vom Betrieb und anderen
Zeitfunktionen und beeinflusst das Gerät
nicht.
+ Dauer Nach Ablauf einer eingestellten Dauer been-
det das Gerät automatisch den Betrieb.
0 Uhrzeit Solange keine andere Funktion im Vorder-
grund läuft, zeigt Ihnen das Gerät die Uhrzeit
im Display an.
Erst nach dem Einstellen einer Heizart können Sie die
Dauer mit dem Feld 0 aufrufen. Der Wecker kann
jederzeit eingestellt werden.
Nach Ablauf einer Dauer oder Weckerzeit ertönt ein
Signal. Sie können das Signal vorzeitig beenden, indem
Sie auf das Feld 0 tippen.
Weckerzeit ändern
Mit dem Drehwähler die Weckerzeit ändern. Nach
wenigen Sekunden wird die Änderung übernommen.
Weckerzeit löschen
Mit dem Drehwähler die Weckerzeit auf ‹‹:‹‹
zurückstellen. Nach wenigen Sekunden wird die
Änderung übernommen. Der Wecker ist ausgeschaltet.
Dauer einstellen
Sie können die Gardauer Ihres Gerichts am Gerät
einstellen. Wenn die Dauer abgelaufen ist, schaltet sich
das Gerät automatisch aus. Die Garzeit wird nicht
ungewollt überschritten.
Beispiel im Bild: Heizart Heißluft, Dauer 45 Minuten.
1. Mit dem Funktionswähler die Heizart einstellen.
Auf dem Display wird eine Temperatur als
Vorschlagswert angezeigt.
2. Bei Bedarf mit dem Drehwähler die Temperatur
verstellen.
3. Zweimal auf Feld 0 tippen.
Auf dem Display steht - - : - - und die Zeitsymbole
leuchten.
Hinweis: Wie lange ein Signal ertönt, können Sie in den
Grundeinstellungen ändern. ~ "Grundeinstellungen"
auf Seite 28
Zeiteinstellungen abfragen
Wenn mehrere Zeitfunktionen eingestellt sind, leuchten
die entsprechenden Symbole auf dem Display. Die
Dauer läuft sichtbar ab.
Um Wecker Q, Dauer + oder Uhrzeit 0 abzufragen, so
oft auf Feld 0 tippen, bis das jeweilige Symbol im
Fokus steht. Im Betrieb sind nur Wecker und Dauer
verfügbar, im Standby sind nur Wecker und Uhrzeit
verfügbar. Der Wert dazu erscheint für einige Sekunden
auf dem Display.
Wecker einstellen
Den Wecker können Sie wie einen Küchenwecker
benutzen. Dieser läuft unabhängig vom Gerät. Der
Wecker hat ein eigenes Signal. So hören Sie, ob der
Wecker oder eine Dauer abgelaufen ist.
1. Auf Feld 0 tippen.
Auf dem Display leuchten das Symbol Q und die
Zeitsymbole.
2. Mit dem Drehwähler die Weckerzeit einstellen.
Nach wenigen Sekunden wird die eingestellte Zeit
übernommen. Der Wecker startet. Auf dem Display
leuchtet das Symbol Q und die Weckerzeit läuft
sichtbar ab. Die anderen Zeitsymbole erlöschen.
4. Mit dem Drehwähler eine Dauer von 45 Minuten
einstellen.
5. Auf Feld @ tippen.
Der Backofen startet. Auf dem Display läuft die Dauer
sichtbar ab und die LED @ leuchtet. Die anderen
Zeitsymbole erlöschen.
Dauer ist abgelaufen
Ein Signal ertönt. Das Gerät hört auf zu heizen. Auf dem
Display steht ‹‹:‹‹.
1. Auf Feld 0 tippen.
Das Signal erlischt.
2. Funktionswähler auf die Nullstellung drehen.
Das Gerät ist ausgeschaltet.
Weckerzeit ist abgelaufen
Ein Signal ertönt. Auf dem Display steht ‹‹:‹‹. Auf ein
beliebiges Feld tippen, um den Wecker auszuschalten.
26
Dauer ändern
Mit dem Drehwähler die Dauer ändern. Nach wenigen
Sekunden wird die Änderung übernommen.
Page 27

Kindersicherung de
Dauer löschen
Falls die Weckerfunktion eingestellt ist, tippen Sie
zunächst auf das Feld 0. Erst dann können Sie die
Dauer ändern.
Mit dem Drehwähler die Dauer bis auf ‹‹:‹‹
zurückstellen. Nach wenigen Sekunden wird die
Änderung übernommen.
Erste Inbetriebnahme
Nach dem Stromanschluss oder einem Stromausfall
erscheint im Display die Aufforderung für die
Einstellung der Uhrzeit. Es kann einige Sekunden
dauern, bis die Aufforderung erscheint.
Uhrzeit einstellen
Bei Inbetriebnahme ist die Zeitanzeige im Fokus. Der
Wert‚ƒ:‹‹ blinkt auf dem Display und das Symbol 0
leuchtet. Stellen Sie die Uhrzeit ein.
1. Mit dem Drehwähler die Uhrzeit einstellen.
2. Auf Feld 0 tippen.
Die Uhrzeit ist eingestellt.
Uhrzeit ändern
AKindersicherung
Ki nder si c her ung
Damit Kinder das Gerät nicht versehentlich einschalten,
ist Ihr Gerät mit einer Kindersicherung ausgestattet.
Aktivieren und deaktivieren
1. Funktionswähler auf die Nullstellung drehen.
2. Ca. 4 Sekunden lang auf Feld i tippen.
Im Display erscheint das Symbol @. Die
Kindersicherung ist aktiviert bzw. deaktiviert.
Hinweise
■ Wenn eine Weckerzeit Q eingestellt ist, läuft diese
weiter. Solange die Kindersicherung aktiv ist, kann
die Weckerzeit nicht geändert werden.
■ Signaltöne, z. B. nach Ablauf der Weckerzeit, können
durch das Tippen auf ein beliebiges Feld beendet
werden.
Hinweis: Das Gerät muss ausgeschaltet sein, um die
Uhrzeit ändern zu können.
1. Zwei Mal auf Feld 0 tippen.
Auf dem Display erscheint das Symbol 0 und die
Uhrzeit.
2. Mit dem Drehwähler die Uhrzeit einstellen.
3. Auf Feld 0 tippen.
Die Uhrzeit ist eingestellt.
Hinweise
■ Wenn nach dem Einstellen der Uhrzeit nicht auf das
Feld 0 getippt wird, dann wird der eingestellte Wert
nach wenigen Sekunden automatisch übernommen.
■ Wurde der Funktionswähler während den
Einstellungen bewegt, muss er anschließend wieder
auf die Nullstellung gebracht werden. Erst dann kann
das Gerät benutzt werden.
■ Um den Standby-Verbrauch Ihres Gerätes zu
senken, können Sie die Uhrzeit ausblenden.
27
Page 28

de Grundeinstellungen
QGrundeinstellungen
Grundei ns t el l ungen
Damit Sie Ihr Gerät optimal und einfach bedienen
können, stehen Ihnen verschiedene Einstellungen zur
Verfügung. Sie können diese Einstellungen nach Bedarf
ändern.
Grundeinstellungen ändern
Das Gerät muss ausgeschaltet sein.
1. Einige Sekunden lang auf Feld 0 tippen.
Auf dem Display erscheint die erste
Grundeinstellung.
2. Mit dem Drehwähler die Grundeinstellung ändern.
3. Auf Feld 0 tippen.
Auf dem Display erscheint die nächste
Grundeinstellung. Sie können mit dem Feld 0 alle
Grundeinstellungen durchgehen und mit dem
Drehwähler ändern.
4. Einige Sekunden lang auf Feld 0 tippen.
Alle Einstellungen sind übernommen.
Befindet sich das Gerät im Standby-Modus, können Sie
die Einstellungen jederzeit ändern.
Abbrechen
Wenn Sie die Änderungen nicht speichern wollen,
drehen Sie den Funktionswähler. Die
Grundeinstellungen werden ohne zu speichern beendet.
Liste der Grundeinstellungen
Grundeinstellung Möglichkeiten Erklärung
™‹‚ Signalton-Dauer
ƒ = mittel = 30
Sekunden
™‹ƒ Tastenton*
‚ = an
™‹„ Display-Helligkeit*
ƒ = mittel
™‹… Zeitanzeige
‚ = an
™‹† Garraumbeleuch-
tung
‚ = an
™‹‡ Wasserhärte
… = sehr hart
™‹ˆ Werkseinstellung
‹ = aus
™‹‰ Demomodus
‹ = aus
‚ = kurz = 10
Sekunden
„ = lang = 2
Minuten
‹ = aus Ton beim Tippen auf
‚ = niedrig
„ = hoch
‹ = aus Uhrzeit im Display
‹ = aus Garraumbeleuch-
‹ = enthärtet
‚ = weich
ƒ = mittel
„ = hart
‚ = an Gerät auf Werksein-
‚ = an Demomodus an- und
Signal nach Ablauf
einer Dauer oder des
Weckers
Touch-Felder
Helligkeit des Dis-
plays einstellen
anzeigen
tung im Betrieb anund ausschalten
Die Wasserhärte
beeinflusst die Reinigungszyklen des
Geräts
stellungen zurücksetzen
ausschalten
Hinweis: Der Demo-
modus ist nur innerhalb der ersten
5 Minuten nach Anschluss des Geräts
sichtbar.
*Änderung wird direkt übernommen.
28
Page 29

Reinigen de
DReinigen
Rei ni g e n
Bei sorgfältiger Pflege und Reinigung bleibt Ihr Gerät
lange schön und funktionsfähig. Wie Sie Ihr Gerät
richtig pflegen und reinigen, erklären wir Ihnen hier.
:Warnung – Verbrennungsgefahr!
Das Gerät wird sehr heiß. Nie die heißen GarraumInnenflächen oder Heizelemente berühren. Das Gerät
immer abkühlen lassen. Kinder fernhalten.
:Warnung – Stromschlaggefahr!
Eindringende Feuchtigkeit kann einen Stromschlag
verursachen. Keinen Hochdruckreiniger oder
Dampfreiniger verwenden.
:Warnung – Verletzungsgefahr!
Zerkratztes Glas der Gerätetür kann springen. Keinen
Glasschaber, scharfe oder scheuernde
Reinigungsmittel benutzen.
Hinweis: Unangenehme Gerüche, z. B. nach der
Zubereitung von Fisch können Sie ganz einfach
beseitigen. Geben Sie ein paar Tropfen Zitronensaft in
eine Tasse Wasser. Immer einen Löffel in das Gefäß
geben, um Siedeverzug zu vermeiden. Erhitzen Sie das
Wasser für 1 bis 2 Minuten mit maximaler MikrowellenLeistung.
Geeignete Reinigungsmittel
Damit die unterschiedlichen Oberflächen nicht durch
falsche Reinigungsmittel beschädigt werden, beachten
Sie die Angaben in der Tabelle. Je nach Gerätetyp sind
nicht alle Bereiche bei Ihrem Gerät vorhanden.
Für Ihr Gerät können Sie beim Kundendienst sonstiges
Zubehör nachkaufen. Geben Sie dazu die jeweilige
Artikel-Nummer an.
Waschen Sie neue Schwammtücher vor Gebrauch
gründlich aus.
Mikrofasertuch
Das Mikrofasertuch ist besonders geeignet für die
Reinigung von empfindlichen Oberflächen wie Glas,
Glaskeramik, Edelstahl oder Aluminium. Es entfernt in
einem Arbeitsgang wässrigen und fetthaltigen Schmutz.
Bestellnr. 466 148
Pflegetuch für Edelstahloberflächen
Sie können die Oberflächen mit einem geprüften und
empfohlenen ölimprägnierten Pflegetuch (bei uns zu
bestellen) behandeln, um ihre Widerstandsfähigkeit
gegen Fingerabdrücke und Kratzer zu erhöhen.
Bestellnr. 311 134
Pflegeöl für moderne Edelstahloberflächen
Dasselbe Pflegöl wie in den Tüchern kann als Flasche
bei uns bestellt werden.
Bestellnr. 311 567
Fettlöser
Für die intensive Oberflächenreinigung von
hartnäckigem Fettschmutz.
Bestellnr. 311 781
Entkalkungsmittel
Damit Ihr Gerät funktionsfähig bleibt, müssen Sie es
regelmäßig entkalken. Verwenden Sie nur die hier
empfohlenen Entkalkungsmittel. Andere
Entkalkungsmittel können Schäden am Gerät
verursachen.
Entkalkungsmittel, flüssig: Bestellnr. 311 680
Entkalkungstabletten: Bestellnr. 311 864
Achtung!
Oberflächenschäden
Verwenden Sie keine
■ scharfen oder scheuernden Reinigungsmittel,
■ stark alkoholhaltigen Reinigungsmittel,
■ harten Scheuerkissen oder Putzschwämme,
■ Hochdruckreiniger oder Dampfreiniger,
■ speziellen Reiniger zur Warmreinigung.
Bereich Reinigung
Gerät außen
Edelstahlfront Heiße Spüllauge:
Mit einem Spültuch reinigen und einem weichen Tuch nachtrocknen.
Kalk-, Fett-, Stärke- und Eiweißflecken sofort
entfernen. Unter solchen Flecken kann sich
Korrosion bilden.
Beim Kundendienst oder im Fachhandel sind
spezielle Edelstahl-Pflegemittel erhältlich, die
sich für warme Oberflächen eignen. Das Pflegemittel mit einem weichen Tuch hauchdünn
auftragen.
Bedienfeld Heiße Spüllauge:
Mit einem Spültuch reinigen und einem weichen Tuch nachtrocknen.
Keinen Glasreiniger oder Glasschaber verwenden.
Türscheiben Heiße Spüllauge:
Mit einem Spültuch reinigen und einem weichen Tuch nachtrocknen.
Keinen Glasschaber oder Scheuerspiralen
aus Edelstahl verwenden.
Türgriff Heiße Spüllauge:
Mit einem Spültuch reinigen und einem weichen Tuch nachtrocknen.
Wenn Entkalkungsmittel auf den Türgriff
gelangt, sofort abwischen. Diese Flecken lassen sich sonst nicht mehr entfernen.
Gerät innen
Selbstreinigende Flächen
Türinnenseite
und Türdichtung
Beachten Sie die Hinweise zu den Garraumflächen im Anschluss an die Tabelle.
Heiße Spüllauge:
Mit einem Spültuch reinigen.
Türdichtung nicht abnehmen.
Nicht scheuern.
Prüfen Sie nach der Reinigung die Position
der Türdichtung.
29
Page 30

de Reinigen
Edelstahlflächen Heiße Spüllauge:
Mit einem Spültuch reinigen.
Nicht scheuern.
Prüfen Sie nach der Reinigung die Position
der Türdichtung.
Zubehör Heiße Spüllauge:
Einweichen und mit einem Spültuch oder
einer Bürste reinigen.
Auffangbehälter und
Wassertank
Heiße Spüllauge:
Mit einem Spültuch reinigen und mit klarem
Wasser gründlich ausspülen, um Spülmittelreste zu entfernen.
Mit einem weichen Tuch nachtrocknen. Mit
geöffnetem Deckel trocknen lassen. Dichtung
am Deckel trocken reiben.
Nicht im Geschirrspüler reinigen.
Tankschacht Nach jedem Betrieb trockenreiben.
Dampfauslass im Gar-
raum
--------
Heiße Spüllauge: einen Reinigungsschwamm
oder eine weiche Spülbürste verwenden.
Hinweise
■ Kleine Farbunterschiede an der Gerätefront
entstehen durch verschiedene Materialien, wie z. B.
Glas, Kunststoff oder Metall.
■ Schatten an den Türscheiben, die wie Schlieren
wirken, sind Lichtreflexe der Garraumbeleuchtung.
Gerät sauberhalten
Damit sich keine hartnäckigen Verschmutzungen
bilden, halten Sie das Gerät immer sauber und
entfernen Verschmutzungen umgehend.
Tipps
■ Reinigen Sie den Garraum nach jedem Gebrauch.
So können sich Verschmutzungen nicht einbrennen.
■ Entfernen Sie Kalk-, Fett-, Stärke- und Eiweißflecken
immer sofort.
■ Verwenden Sie zum Backen von sehr feuchten
Kuchen die Glaspfanne.
■ Verwenden Sie zum Braten geeignetes Geschirr,
z. B. einen Bräter.
■ Verwenden Sie nach Möglichkeit Heißluft. Die
Verschmutzung ist bei dieser Heizart geringer.
Selbstreinigende Flächen reinigen
Die Rückseite des Garraums verfügt über eine
selbstreinigende katalytische Beschichtung. Spritzer
vom Backen und Braten werden von dieser Schicht
aufgesaugt und abgebaut, während das Gerät in
Betrieb ist. Es ist daher nicht erforderlich, diesen
Bereich zu reinigen.
Achtung!
Verwenden Sie keinen Backofenreiniger auf den
selbstreinigenden Flächen. Die Oberflächen werden
beschädigt. Wenn doch Backofenreiniger auf diese
Flächen kommt, sofort mit Wasser und einem
Schwammtuch abtupfen. Bitte nicht reiben und keine
scheuernden Reinigungshilfen verwenden.
Wenn der Garraum abgekühlt ist, entfernen Sie
bräunliche oder weißliche Rückstände mit Wasser und
einem weichen Schwamm.
Hinweis: Während des Betriebs können sich rötliche
Flecken auf den Flächen bilden. Das ist kein Rost,
sondern Rückstände von Lebensmitteln. Diese Flecken
sind nicht gesundheitsgefährdend und schränken die
Reinigungsfähigkeit der selbstreinigenden Flächen nicht
ein.
30
Page 31

Reinigungsfunktion de
.Reinigungsfunktion
Reini gungsf unkt i on
Entkalkung
Damit Ihr Gerät funktionsfähig bleibt, müssen Sie es
regelmäßig entkalken.
Achtung!
■ Geräteschäden: Verwenden Sie zum Entkalken nur
das von uns empfohlene Entkalkungsmittel, flüssig
oder in Tablettenform. Die Einwirkzeiten während
des Entkalkens sind auf das Entkalkungsmittel
abgestimmt. Andere Entkalkungsmittel können
Schaden am Gerät verursachen. Entkalkungsmittel
erhalten Sie beim Kundendienst.
Entkalkungsmittel, flüssig: Bestellnr.311 680
Entkalkungstabletten: Bestellnr. 311 846
■ Entkalkerlösung: Bringen Sie keine Entkalkerlösung
oder Entkalkungsmittel auf das Bedienfeld oder
andere Oberflächen am Gerät. Die Oberflächen
werden beschädigt. Wenn es doch passiert,
entfernen Sie die Entkalkerlösung sofort mit Wasser.
Die Entkalkung besteht aus zwei Schritten. Aus
hygienischen Gründen muss die Entkalkung vollständig
abgelaufen sein, damit das Gerät wieder betriebsbereit
ist. Insgesamt dauert die Entkalkung ca. 30 Minuten.
■ Entkalkung (29 Minuten), anschließend den
Auffangbehälter leeren und den Wassertank mit
frischem Wasser auffüllen.
■ Spülgang nach Entkalkung (ca. 1 Minute),
anschließend den Auffangbehälter leeren.
Wird das Entkalken unterbrochen (z. B. durch
Stromausfall, Ausschalten des Geräts oder Abbruch
des Entkalkungsprozesses), werden Sie nach dem
Wiedereinschalten des Gerätes aufgefordert, den
Spülgang durchzuführen. Das Gerät bleibt bis zum
Ende des Spülgangs für andere Betriebe gesperrt.
Wie häufig das Gerät entkalkt werden muss, hängt von
der Wasserhärte des verwendeten Wassers ab. Sobald
noch 5 oder weniger Betriebe mit Dampf möglich sind,
erinnert Sie das Gerät über das Symbol $ im Display
an das Entkalken. So haben Sie Zeit das Entkalken
rechtzeitig vorzubereiten.
Danach ist der Dampfbetrieb erst nach erfolgter
Entkalkung möglich.
Starten
1. Mit dem Funktionswähler Entkalkung 8 auswählen.
Die Dauer des Entkalkens wird angezeigt. Sie kann
nicht verändert werden.
2. Tankblende öffnen.
3. Auffangbehälter entnehmen und ausleeren.
4. Leeren Auffangbehälter vollständig einschieben.
5. Wassertank entnehmen.
6. Wasser und Entkalkungsmittel nach
Packungsangabe zu einer Entkalkerlösung mischen.
7. Entkalkerlösung in den Wassertank füllen und
Wassertank vollständig einschieben.
8. Tankblende schließen.
9. Auf das Feld @ tippen.
Das Gerät wird entkalkt. Im Display läuft die
Restdauer ab. Sobald das Entkalken abgelaufen ist,
ertönt ein Signal. Der Betrieb wird angehalten.
Spülgang nach Entkalkung
1. Tankblende öffnen.
2. Auffangbehälter entnehmen, ausleeren und wieder
einschieben.
3. Wassertank entnehmen, gründlich ausspülen, mit
frischem Wasser füllen und wieder einschieben.
4. Tankblende schließen.
5. Auf Feld @ tippen.
Das Gerät spült. Sobald der Spülgang abgelaufen
ist, ertönt ein Signal. Auffangbehälter leeren.
Hinweis:
Bei Verwendung der Entkalkungstabletten (Bestell Nr.
311 846) müssen Sie zusätzlich die Reinigungsfunktion
Spülen zweimal dürchführen.
Spülen
Damit Ihr Gerät sauber bleibt, können Sie Wasser durch
das Rohrsystem pumpen. Das Wasser wird
anschließend in den Auffangbehälter abgelassen.
Starten
1. Mit dem Funktionswähler Spülen $ auswählen.
Die Dauer des Programms wird angezeigt. Sie kann
nicht verändert werden.
2. Tankblende öffnen.
3. Auffangbehälter entnehmen und ausleeren.
4. Leeren Auffangbehälter vollständig einschieben.
5. Wassertank entnehmen und mit frischem Wasser
füllen.
6. Wassertank vollständig einschieben.
7. Tankblende schließen.
8. Auf das Feld @ tippen.
Es wird Wasser durch die Rohre gepumpt. Auf dem
Display läuft die Dauer ab. Sobald die Dauer
abgelaufen ist, ertönt ein Signal. Auffangbehälter
leeren.
Nachreinigen
Nach jedem Entkalken oder Spülen folgende Schritte
durchführen:
1. Tankblende öffnen.
2. Auffangbehälter und Wassertank leeren, reinigen
und trocknen.
3. Funktionswähler auf die Nullstellung drehen.
Der Vorgang ist abgeschlossen und das Gerät
wieder betriebsbereit.
31
Page 32
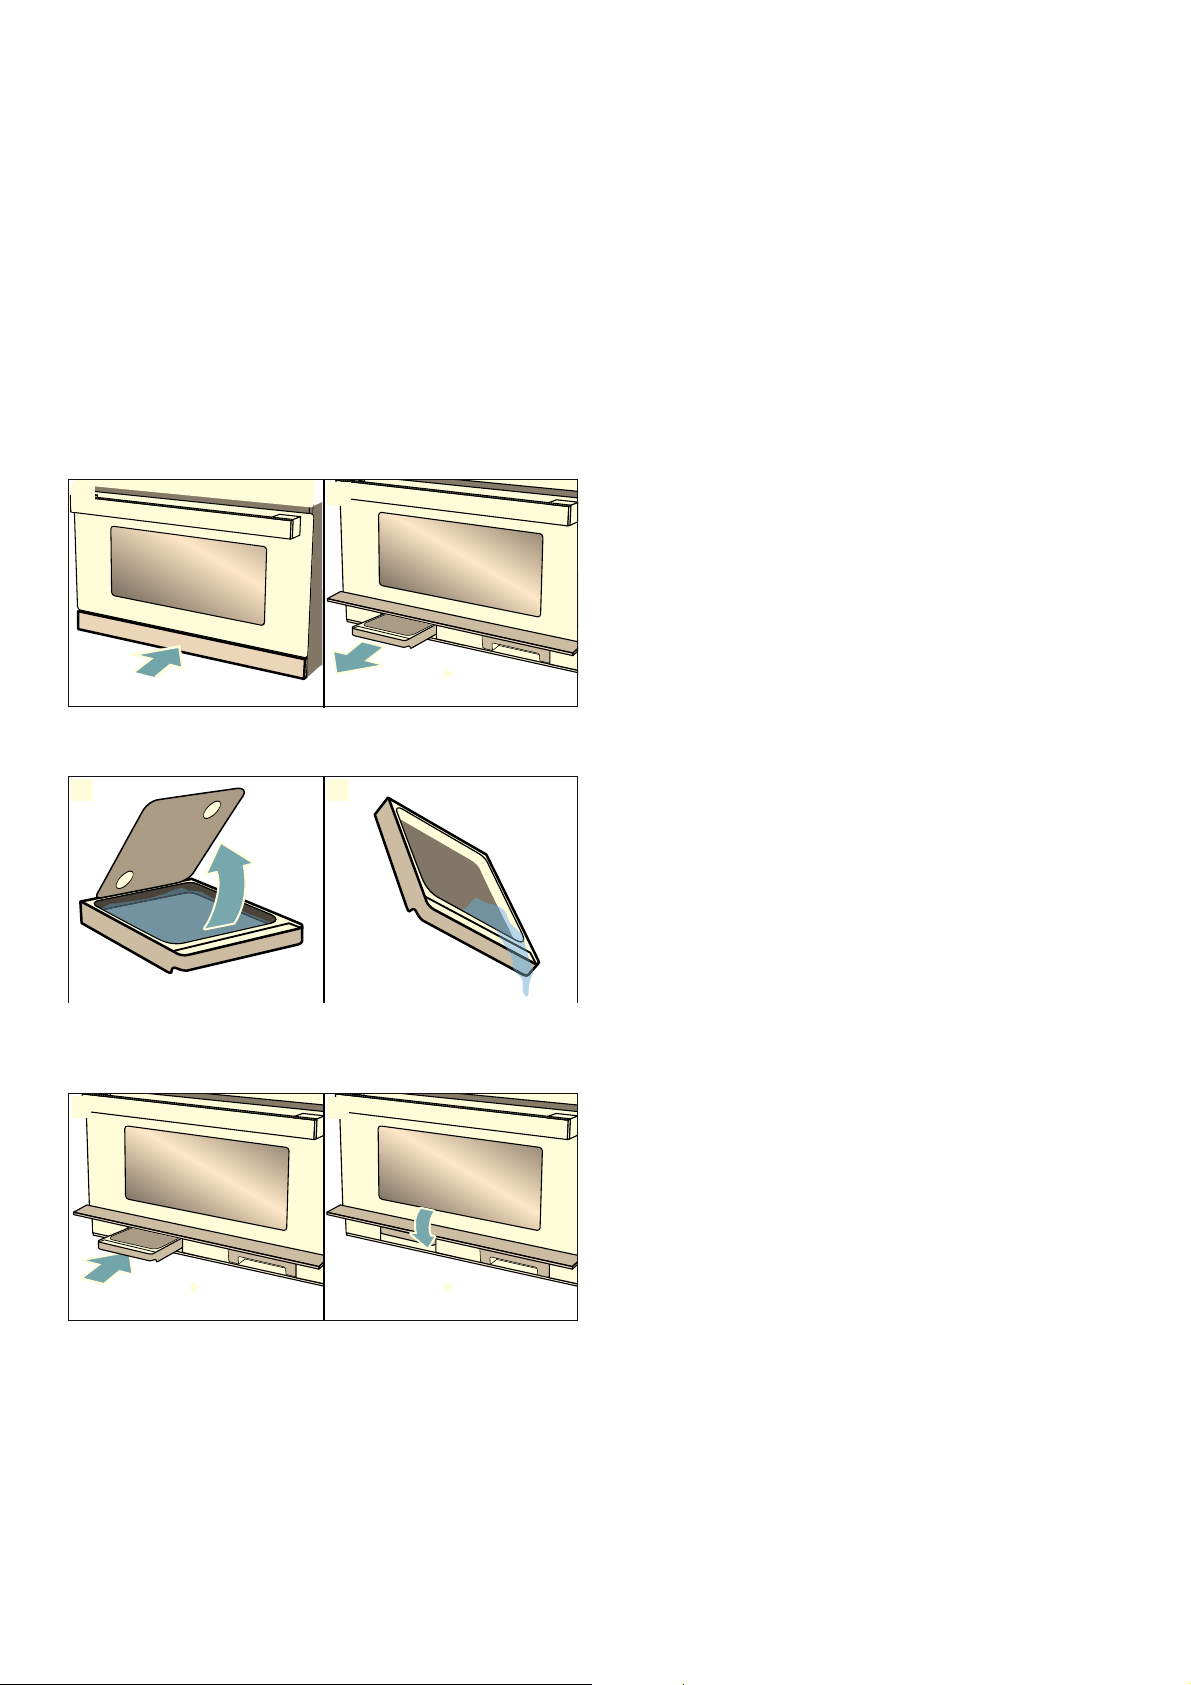
de Reinigungsfunktion
Auffangbehälter leeren
Bei den Reinigungsfunktionen wird das Restwasser im
Auffangbehälter gesammelt. Leeren und trocknen Sie
anschließend den Auffangbehälter.
Achtung!
■ Trocknen Sie den Auffangbehälter nicht im heißen
Garraum. Der Auffangbehälter wird beschädigt.
■ Reinigen Sie den Auffangbehälter nicht in der
Geschirrspülmaschine. Der Auffangbehälter wird
beschädigt.
1. Kurz auf die Mitte der Tankblende drücken.
Die Tankblende öffnet sich. Auffangbehälter und
Wassertank sind zugänglich.
2. Auffangbehälter aus dem Tankschacht entnehmen.
1 2
3. Deckel des Auffangbehälters öffnen.
4. Auffangbehälter entleeren.
I
5. Auffangbehälter wieder in den Tankschacht
einsetzen und vollständig einschieben.
6. Tankblende schließen.
I
Das Gerät ist betriebsbereit.
32
Page 33

Störungen, was tun? de
3Störungen, was tun?
Stör ungen, was tun?
Wenn eine Störung auftritt, liegt es oft nur an einer
Kleinigkeit. Bevor Sie den Kundendienst rufen,
versuchen Sie bitte, mit Hilfe der Tabelle, die Störung
selbst zu beheben.
Eine Störung, was tun?
Fehlermeldung Mögliche Ursache Abhilfe / Hinweis
Das Gerät funktioniert nicht Stecker wurde nicht eingesteckt Stecker einstecken
Stromausfall Prüfen, ob die Küchenlampe funktioniert
Sicherung defekt Im Sicherungskasten nachsehen, ob die Sicherung
Fehlbedienung Sicherung im Sicherungskasten ausschalten. Nach
Das eingeschaltete Gerät kann nicht
bedient werden, im Display wird das
Symbol @
Die Garraumbeleuchtung ist ausgefallen. LED-Lampe defekt Kundendienst rufen
Im Display blinkt‚ƒ:‹‹ und das
Symbol 0 leuchtet.
Das Gerät ist nicht in Betrieb. Auf dem Dis-
play steht eine Dauer.
Die Mikrowelle funktioniert nicht. Die Tür wurde nicht ganz geschlossen. Prüfen, ob Speisereste oder ein Fremdkörper in der
Die Speisen werden langsamer heiß als
bisher
Der Mikrowellen-Betrieb wird ohne
erkennbaren Grund abgebrochen.
Gerät lässt sich einstellen, heizt aber nicht.
Der Doppelpunkt blinkt.
Symbole für Wassertank und Auffangbehälter blinken dauerhaft.
“‹†„ƒ. Verschmutzungen auf dem Bedienfeld verursa-
“†‹‹†. Die Dampffunktion wurde bei leerem Wassertank
Kindersicherung ist aktiviert Feld @ so lange getippt halten, bis das Symbol @
Stromausfall Uhrzeit neu einstellen
Nach dem Einstellen wurde nicht auf das Feld @
getippt.
Feld @ wurde nicht angetippt. Auf Feld @ tippen
Es wurde eine zu kleine Mikrowellen-Leistung ein-
gestellt.
Es wurde eine größere Menge als sonst in das
Gerät gegeben.
Die Speisen waren kälter als sonst. Speisen zwischendurch umrühren oder wenden
Die Mikrowelle hat eine Störung. Den Kundendienst rufen, wenn dieser Fehler wieder-
Das Gerät befindet sich im Demomodus. Demomodus in den Grundeinstellungen deaktivieren.
Technisches Problem. Sicherstellen, dass Wassertank und Auffangbehälter
chen ein dauerhaft aktives Touch-Feld.
mehrfach aktiviert.
:Warnung – Stromschlaggefahr!
Unsachgemäße Reparaturen sind gefährlich. Nur ein
von uns geschulter Kundendienst-Techniker darf
Reparaturen durchführen und beschädigte
Anschlussleitungen austauschen. Ist das Gerät defekt,
Netzstecker ziehen oder Sicherung im
Sicherungskasten ausschalten. Kundendienst rufen.
Bei einigen Fehlermeldungen können Sie selbst Abhilfe
schaffen.
für das Gerät in Ordnung ist
ca. 10 Sekunden wieder einschalten
erlischt
Auf Feld @ tippen oder die Einstellung löschen,
indem Sie mit dem Funktionswähler eine andere
Funktion anwählen.
Tür klemmen
Eine höhere Mikrowellen-Leistung wählen
Doppelte Menge - doppelte Zeit
holt auftritt.
Hinweis: Der Demomodus ist nur innerhalb der ersten
5 Minuten nach Anschluss des Geräts sichtbar.
vollständig in den jeweiligen Tankschacht eingeschoben sind.
Wenn die Symbole weiterhin dauerhaft blinken, Kundendienst rufen.
Das Gerät kann weiterhin genutzt werden, mit Ausnahme der Dampffunktion.
Gerät ausschalten und das Bedienfeld reinigen. Gerät
wieder einschalten.
Wenn der Fehler unmittelbar nach dem Einschalten
wieder auftritt, Kundendienst rufen.
Vor erneutem Benutzen sicherstellen, dass der Wassertank mit kaltem Wasser gefüllt und vollständig in
den Tankschacht eingeschoben ist.
Wenn der Fehler weiterhin auftritt, Kundendienst
rufen.
33
Page 34

de Kundendienst
4Kundendienst
Kundendiens t
Wenn Ihr Gerät repariert werden muss, ist unser
Kundendienst für Sie da. Wir finden immer eine
passende Lösung, auch um unnötige Besuche des
Kundendienstpersonals zu vermeiden.
E-Nummer und FD-Nummer
Geben Sie beim Anruf bitte die Erzeugnisnummer
(E-Nr.) und die Fertigungsnummer (FD-Nr.) an, damit wir
Sie qualifiziert betreuen können. Das Typenschild mit
den Nummern finden Sie, wenn Sie die Garraumtür
öffnen, rechts. Damit Sie bei Bedarf nicht lange suchen
müssen, können Sie hier die Daten Ihres Gerätes und
die Telefonnummer des Kundendienstes eintragen.
E-Nr.
Kundendienst O
Beachten Sie, dass der Besuch des Servicetechnikers
im Falle einer Fehlbedienung auch während der
Garantiezeit nicht kostenlos ist.
Die Kontaktdaten aller Länder für den nächstgelegenen
Kundendienst finden Sie hier bzw. im beiliegenden
Kundendienst-Verzeichnis.
Reparaturauftrag und Beratung bei Störungen
A 0810 550 533
D 089 54 020 755
CH 0848 840 040
Vertrauen Sie auf die Kompetenz des Herstellers. Sie
stellen somit sicher, dass die Reparatur von geschulten
Servicetechnikern durchgeführt wird, die mit den
Original-Ersatzteilen für Ihr Gerät ausgerüstet sind.
FD-Nr.
JFür Sie in unserem
Kochstudio getestet
Für Si e in uns erem Kochstudi o get es t et
Hier finden Sie eine Auswahl an Speisen und die
optimalen Einstellungen dazu. Wir zeigen Ihnen welche
Heizart und Temperatur für Ihre Speise am besten
geeignet ist. Sie erhalten Angaben zum passenden
Zubehör und in welcher Höhe es eingeschoben werden
sollte. Sie bekommen Tipps zum Geschirr und zur
Zubereitung.
Hinweis: Beim Zubereiten von Lebensmitteln kann viel
Wasserdampf im Garraum entstehen.
Ihr Gerät ist sehr energieeffizient und gibt während des
Betriebs nur wenig Wärme nach außen ab. Aufgrund
der hohen Temperaturunterschiede zwischen dem
Geräte-Innenraum und den äußeren Teilen des Gerätes,
kann sich Kondenswasser an Tür, Bedienfeld oder
benachbarten Möbelfronten absetzen. Das ist eine
normale, physikalisch bedingte Erscheinung. Durch
Vorheizen oder vorsichtiges Türöffnen kann Kondensat
vermindert werden.
Beim Dämpfen oder einer Anwendung mit
Dampfunterstützung ist es gewünscht, dass viel
Wasserdampf im Garraum entsteht. Wischen Sie nach
dem Garen den Garraum aus, wenn er abgekühlt ist.
Allgemeine Hinweise
Empfohlene Einstellwerte
In der Tabelle finden Sie für verschiedene Speisen die
optimale Funktion. Temperatur/Stufen und Dauer sind
von der Menge, vom Geschirr, von der Qualität,
Temperatur und Beschaffenheit der Lebensmittel
abhängig. Deshalb sind Einstellbereiche angegeben.
Versuchen Sie es zuerst mit den niedrigeren Werten.
Wenn erforderlich, stellen Sie beim nächsten Mal höher
ein.
Im Mikrowellenbetrieb stellen Sie die längste
angegeben Zeit ein und prüfen Sie ihr Gericht nach der
kürzesten Zeit.
Bei Anwendungen mit Dampf stellen Sie zu Beginn
sicher, dass der Wassertank gefüllt ist.
Es kann sein, dass Sie andere Mengen haben, als in
den Tabellen angegeben. Für den MikrowellenSolobetrieb gibt es eine Faustregel: Doppelte Menge fast doppelte Zeit, halbe Menge - halbe Dauer.
Die Einstellwerte gelten für das Einschieben der Speise
in den kalten Garraum.
Für ausgewählte Speisen ist vorheizen notwendig und
in der Tabelle angegeben. Geben Sie Ihr Gericht und
Zubehör erst nach dem Vorheizen in den Garraum.
Manche Speisen gelingen am besten, wenn sie in
mehreren Schritten gebacken werden. Diese sind in der
Tabelle angegeben.
Wenn Sie nach Ihrem eigenen Rezept zubereiten
wollen, orientieren Sie sich an ähnlichen Speisen in der
Tabelle. Zusätzliche Informationen finden Sie in den
Tipps im Anschluss an die Einstelltabellen.
Entfernen Sie nicht genutztes Zubehör aus dem
Garraum.
34
Page 35

Für Sie in unserem Kochstudio getestet de
Zubehör
Verwenden Sie nur Originalzubehör Ihres Gerätes. Es
ist optimal auf den Garraum und die Betriebsarten
abgestimmt.
Achten Sie darauf, dass Sie immer geeignetes Geschirr
und Zubehör verwenden und es richtig herum
einschieben.
Beachten Sie auch die Hinweise zu geeignetem
Geschirr für den Mikrowellen und Dampfbetrieb in den
entsprechenden Kapiteln.~ "Mikrowelle"
auf Seite 16~ "Dampf" auf Seite 19
Benutzen Sie immer Topflappen, wenn Sie heißes
Zubehör oder Geschirr aus dem Garraum nehmen.
Backformen und Geschirr
Für ein optimales Garergebnis empfehlen wir Ihnen
dunkle Backformen aus Metall.
Weißblechformen, Keramikformen und Glasformen
verlängern die Backzeit und das Gebäck bräunt nicht
gleichmäßig.
Wenn Sie Silikonformen verwenden wollen, prüfen Sie
die Angaben des Herstellers auf Dampf- und
Mikrowelleneignung und orientieren Sie sich an den
Angaben und Rezepten des Herstellers.
Silikonformen sind oft kleiner als normale Formen. Die
Mengen- und Rezeptangaben können abweichen.
Prinzipiell gilt:
■ Backen mit Heißluft in der Glaspfanne,
Einschubhöhe 2
■ Backen mit Heißluft in der Form auf dem Rost,
Einschubhöhe 1
■ Braten auf dem Rost oder in der Glaspfanne,
Einschubhöhe 2. Wenn Sie den Rost verwenden,
schieben Sie die Glaspfanne darunter ein.
■ Grillen auf dem Rost auf Einschubhöhe 3 oder 4.
Schieben Sie die Glaspfanne darunter ein.
■ Mikrowellen-Solobetrieb: Geschirr auf den
Garraumboden, Einschubhöhe 0.
■ Dampf-Solobetrieb: Glaspfanne mit
Dampfgarbehälter auf Einschubhöhe 3.
Backpapier
Verwenden Sie nur Backpapier, das für die gewählte
Temperatur geeignet ist. Schneiden Sie Backpapier
immer passend zu.
Belegen Sie das Zubehör erst nach dem Vorheizen mit
Backpapier.
Auftauen
Geben Sie die gefrorenen Lebensmittel in einem
offenen Gefäß auf den Garraumboden.
Empfindliche Teile wie z. B. Unterkeulen und Flügel von
Hähnchen oder fette Randpartien von Braten können
Sie mit kleinen Stücken Alufolie abdecken. Die Folie
darf die Gerätewände nicht berühren. Nach der Hälfte
der Auftauzeit können Sie die Alufolie abnehmen.
Beim Auftauen von Fleisch und Geflügel entsteht
Flüssigkeit. Diese beim Wenden entfernen und in
keinem Fall weiterverwenden oder mit anderen
Lebensmitteln in Berührung bringen.
Die Speisen zwischendurch 1-2 Mal wenden oder
umrühren. Große Stücke sollten Sie mehrmals wenden.
Lassen Sie das Aufgetaute noch 10 - 60 Minuten bei
Raumtemperatur ruhen, damit sich die Temperatur
ausgleicht. Bei Geflügel können Sie dann die Innereien
herausnehmen.
Das Fleisch kann auch mit einem kleinen gefrorenen
Kern weiterverarbeitet werden.
Hinweise
■ Verwenden Sie offenes Geschirr und stellen Sie das
Geschirr auf den Garraumboden.
■ Beachten Sie, dass eine Einstellung aus mehreren
Schritten bestehen kann.
■ Stellen Sie immer die maximal angegebene Zeit ein,
überprüfen Sie ihr Gericht nach der kürzest
angegebenen Zeit.
Gericht Geschirr Einschub-
höhe
Fleisch im Ganzen vom
Rind, Schwein, Kalb (mit
Geschirr
offen
0 ! 800 g 1
und ohne Knochen)
Fleisch in Stücken oder
Scheiben vom Rind,
Geschirr
offen
0 ! 200 g 1
Schwein, Kalb
Heizart Gewicht Schritte Mikrowellen-
stufe
180
2
1000 g 1
2
1500 g 1
2
90
180
90
180
90
180
2
500 g 1
2
800 g 1
2
90
180
90
180
90
Dauer
in Min.
15
25
15
25 - 35
25
25 - 30
4 - 6
10
5 - 10
10
10 - 15
Hinweise
Mehrmals wenden.
5
Beim Wenden die Fleischteile
voneinander trennen.
35
Page 36

de Für Sie in unserem Kochstudio getestet
Gericht Geschirr Einschub-
höhe
Hackfleisch, gemischt Geschirr
offen
Geflügel bzw. Geflügelteile
Ente Geschirr
Gans Geschirr
Fischfilet, Fischkotelett
oder Scheiben
Fisch im Ganzen Geschirr
Gemüse, z. B. Erbsen Geschirr
Obst, z. B. Himbeeren Geschirr
Butter, antauen Geschirr
Brot, ganz Geschirr
Kuchen, trocken,
z. B. Rührkuchen
Kuchen, saftig,
z. B. Obstkuchen,
Quarkkuchen
Geschirr
offen
offen
offen
Geschirr
offen
offen
offen
offen
offen
offen
Geschirr
offen
Geschirr
offen
0 ! 200 g 1 90 15 Möglichst flach einfrieren.
0 ! 600 g 1
0 ! 2000 g 1
0 ! 4500 g 1
0 ! 400 g 1
0 ! 300 g 1
0 ! 300 g 1 180 10 - 15 Zwischendurch vorsichtig
0 ! 300 g 1 180 7 - 10 Zwischendurch vorsichtig
0 ! 125 g 1 90 6 - 8 Verpackung vollständig ent-
0 ! 500 g 1
0 ! 500 g 1 90 10 - 15 Kuchenstücke voneinander
0 ! 500 g 1
Heizart Gewicht Schritte Mikrowellen-
stufe
500 g 1
2
800 g 1
2
2
1200 g 1
2
2
2
2
2
600 g 1
2
600 g 1
2
500 g 1
2
250 g 1
2
2
1000 g 1
2
750 g 1
2
2
750 g 1
2
180
90
180
90
180
90
180
90
180
90
180
90
180
90
180
90
180
90
180
90
18
90
180
90
180
90
180
90
180
90
180
90
180
90
Dauer
in Min.
10 - 15
10
15 - 20
10 - 15
10
20 - 25
20
30 - 40
30
60 - 80
10 - 15
10 - 15
15 - 25
10
9 - 15
5 - 10
3 - 5
10 - 15
15 - 25
10 - 15
15 - 25
15 - 25
Hinweise
Zwischendurch mehrmals
5
wenden und bereits aufgetautes Fleisch entfernen.
5
Zwischendurch wenden. Auftauflüssigkeit entfernen.
Mehrmals wenden. Auftauflüssigkeit entfernen.
Alle 20 Minuten wenden. Auftauflüssigkeit entfernen.
5
Aufgetaute Teile voneinander
trennen.
3
Zwischendurch wenden.
8
umrühren.
umrühren und aufgetaute
8
Teile voneinander trennen.
fernen.
2
3
Zwischendurch wenden.
5
trennen. Nur für Kuchen ohne
3
Glasur, Sahne oder Creme.
5
Nur für Kuchen ohne Glasur,
Sahne oder Gelantine.
7
36
Page 37

Für Sie in unserem Kochstudio getestet de
Tiefgefrorene Speisen erwärmen
Nehmen Sie Fertiggerichte aus der Verpackung. Im
mikrowellengeeigneten Geschirr erwärmen sie sich
schneller und gleichmäßiger. Verschiedene
Speisenkomponenten können sich unterschiedlich
schnell erwärmen.
Flache Speisen erwärmen sich schneller als hohe.
Verteilen Sie die Speisen daher möglichst flach im
Gefäß. Lebensmittel sollten Sie nicht übereinander
schichten.
Die Speisen sollten Sie zwischendurch 2 - 3 mal
umrühren bzw. wenden.
Gericht Geschirr Einschub-
höhe
Suppe, gefroren Geschirr
0 ! 400 g 600 8- 15
geschlossen
Eintopf, gefroren Geschirr
0 ! 500 g 600 8 - 13
geschlossen
Menü, Tellergericht, Fertiggericht (2-3 Komponenten),
Geschirr
geschlossen
0 ! 300 - 400 g 600 11 - 15
gefroren
Fleischscheiben oder -stücke
in Soße, z. B. Gulasch, gefro-
Geschirr
geschlossen
0 ! 500 g 600 12 - 17 Beim Umrühren die
ren
Aufläufe, z. B. Lasagne, Can-
nelloni, gefroren
Beilagen, z. B. Reis, Nudeln,
gefroren
Geschirr
geschlossen
Geschirr
geschlossen
0 ! 450 g 600 10 - 15
0 ! 250 g 600 2 - 5 Flüssigkeit zugeben
Heizart Gewicht Mikrowellen-
Lassen Sie die Gerichte nach dem Erwärmen noch 2
bis 5 Minuten zum Temperaturausgleich ruhen.
Benutzen Sie immer Topfhandschuhe oder Topflappen,
wenn Sie das Geschirr herausnehmen.
Hinweise
■ Stellen Sie das Geschirr auf den Garraumboden.
■ Decken Sie die Speisen immer ab. Wenn Sie keinen
passenden Deckel für Ihr Gefäß haben, nehmen Sie
einen Teller oder Mikrowellen-Spezialfolie.
■ Stellen Sie immer die maximal angegebene Zeit ein,
überprüfen Sie ihr Gericht nach der kürzest
angegebenen Zeit.
stufe
Dauer
in Min.
Hinweise
1000 g 600 10 - 15
1000 g 600 25 - 30
Fleischstücke voneinander
trennen.
500 g 600 8 - 10
Gemüse, z. B. Erbsen, Brokkoli, Karotten, gefroren
Rahmspinat, gefroren Geschirr
Geschirr
geschlossen
0 ! 300 g 600 8 - 10 Bodenbedeckt Wasser
0 ! 500 g 600 11 - 16 Ohne Zugabe von Wasser
geschlossen
Erwärmen
:Warnung
Verbrühungsgefahr!
■ Beim Erhitzen von Flüssigkeiten kann es zu
Siedeverzug kommen. Das heißt, die
Siedetemperatur wird erreicht, ohne dass die
typischen Dampfblasen aufsteigen. Schon bei
geringer Erschütterung des Gefäßes kann die heiße
Flüssigkeit plötzlich heftig überkochen und
verspritzen. Beim Erhitzen immer einen Löffel mit in
das Gefäß geben. So wird der Siedeverzug
vermieden.
600 g 600 14 - 17
zugeben
garen, zwischendurch
umrühren
Achtung!
Metall - z. B. ein Löffel im Glas - muss mindestens 2 cm
von den Backofenwänden und der Türinnenseite
entfernt sein. Funken könnten das innere Türglas
zerstören.
Hinweise
■ Nehmen Sie Fertiggerichte aus der Verpackung. Im
mikrowellengeeigneten Geschirr erwärmen sie sich
schneller und gleichmäßiger. Verschiedene
Speisenkomponenten können sich unterschiedlich
schnell erwärmen.
■ Die Speisen sollten Sie zwischendurch mehrmals
umrühren bzw. wenden. Kontrollieren Sie die
Temperatur.
■ Lassen Sie die Gerichte nach dem Erhitzen noch 2
bis 5 Minuten zum Temperaturausgleich ruhen.
■ Benutzen Sie immer Topfhandschuhe bzw.
Topflappen, wenn Sie das Geschirr herausnehmen.
37
Page 38

de Für Sie in unserem Kochstudio getestet
■ Decken Sie die Speisen ab, wenn dies in der Tabelle
angegeben ist. Stellen Sie das Geschirr auf den
Garraumboden. Wollen Sie die Dampffunktion
zuschalten, dann stellen Sie ihr Geschirr auf die
Glaspfanne in der Einschubhöhe 3. Füllen Sie den
Wassertank.
Gericht Geschirr Einschub-
höhe
Babykost, z. B. Milch-
Geschirr offen 0 ! 150 ml 360 - 0,5-1,5 Ohne Sauger oder Deckel.
fläschchen
Heizart Gewicht /
Menge
Mikrowellenstufe
Dampf
-stufe
Dauer
in Min.
Hinweise
Nach dem Erhitzen immer
gut schütteln. Unbedingt die
Temperatur kontrollieren.
Getränke Geschirr offen 0 ! 200 ml 1000 - 1-2 Löffel ins Glas geben, alko-
500 ml 1000 - 4-5
holische Getränke nicht
überhitzen; zwischendurch
kontrollieren
Suppe, 2 Tassen je 175g Geschirr offen 0 ! 350 g 600 - 3-4
Suppe, 4 Tassen je 175g Geschirr offen 0 ! 700 g 600 - 6-8
Fleisch oder Fleischstü-
cke in Soße
Menü, Tellergericht, Fer-
Geschirr
0 ! 500 g 600 - 7-10 Fleischscheiben voneinan-
geschlossen
Geschirr offen 3 !+z 400 g 360 3 9-14
der trennen
tiggericht (2-3 Komponenten)
Eintopf Geschirr
geschlossen
0 ! 400 g 600 - 6-8
800 g 600 - 8-11
Gemüse Geschirr offen 3 !+z 150 g 360 3 3-5
Geschirr offen 3 !+z 300 g 360 3 4-7
Tipps zur Mikrowelle
Sie finden für die vorbereitete Speisenmenge keine Einstellangabe.
Verlängern oder verkürzen Sie die Garzeit nach folgender Faustregel: doppelte Menge = fast doppelte Zeit, halbe Menge = halbe Zeit
Die Speise ist zu trocken geworden. Stellen Sie beim nächsten Mal eine kürzere Garzeit ein oder wählen Sie eine
niedrigere Mikrowellen-Leistung. Decken Sie die Speise ab und geben Sie
mehr Flüssigkeit dazu.
Die Speise ist nach Ablauf der Zeit noch nicht aufgetaut, nicht
heiß oder nicht gar.
Nach Ablauf der Garzeit ist die Speise am Rand überhitzt, in der
Mitte aber noch nicht fertig.
Nach dem Auftauen ist das Geflügel oder Fleisch außen angegart, in der Mitte aber noch nicht aufgetaut.
Stellen Sie eine längere Zeit ein. Größere Mengen und höhere Speisen brauchen länger.
Rühren Sie zwischendurch um und wählen Sie beim nächsten Mal eine niedrigere Leistung und eine längere Dauer.
Wählen Sie beim nächsten Mal eine kleinere Mikrowellen-Leistung. Wenden
Sie das Auftaugut bei großen Mengen auch mehrmals.
Kuchen, Kleingebäck und Brot
In den Einstelltabellen finden Sie optimale Einstellungen
für viele Gebäcke.
Zum Teig gehen lassen decken Sie die Teigschüssel
mit Folie oder einem Tuch ab, stellen Sie diese auf den
Garraumboden und stellen Heißluft 40 °C ein.
Backen in Kombination mit Mikrowelle
Wenn Sie in Kombination mit Mikrowelle backen,
können Sie die Garzeit erheblich verkürzen.
Verwenden Sie immer hitzebeständiges
mikrowellengeeignetes Geschirr. Beachten Sie die
Hinweise zu mikrowellengeeignetem
Geschirr.~ "Mikrowelle" auf Seite 16
Im Kombinationsbetrieb können Sie gewöhnliche
Backformen aus Metall verwenden. Wenn sich zwischen
38
Backform und Rost Funken bilden, prüfen Sie, ob die
Form außen sauber ist. Verändern Sie die Position der
Form auf dem Rost. Wenn das nicht hilft, backen Sie
ohne Mikrowelle weiter. Die Backdauer verlängert sich.
Wenn Sie Formen aus Kunststoff, Keramik oder Glas
verwenden, verkürzt sich die in den Einstelltabellen
angegebene Backzeit.
Backen mit Dampfunterstützung
Bestimmte Gebäcke (z. B. Hefegebäck) erhalten mit
Dampfunterstützung eine knusprigere Kruste und eine
glänzendere Oberfläche. Das Gebäck trocknet weniger
aus.
Füllen Sie den Wassertank bis zur Markierung “MAX”
auf. Falls das Wasser aufgebraucht ist wird ihr Gericht
mit der eingestellten Heizart ohne Dampfzugabe
weitergegart.
Page 39

Für Sie in unserem Kochstudio getestet de
Tiefkühlprodukte
Entnehmen Sie das Gericht vollständig aus der
Verpackung. Verwenden Sie keine stark vereisten
Tiefkühlprodukte. Entfernen Sie Eis an der Speise.
Tiefkühlprodukte sind teilweise ungleichmäßig
vorgebacken. Die ungleichmäßige Bräunung bleibt
auch nach dem Backen bestehen.
Kuchen in Formen
Gericht Geschirr Einschub-
höhe
Rührkuchen, einfach* Napf- / Kranz- / Kastenform 1 ~ 160-170 - 60-80
Rührkuchen, fein (z. B. Sand-
kuchen)*
Nusskuchen Springform 1 ~+! 170-180 90 30-35
Tortenboden aus Rührteig Tortenbodenform 1 ~ 160-170 - 35-40
Biskuittorte, 3 Eier Springform 1 ~ 160-170 - 45-50
Obst- oder Quarktorte aus
Mürbeteig*
Obstkuchen, fein, aus Rührt-
eig
Pikante Kuchen (z. B. Quiche
/ Zwiebelkuchen)
*Kuchen ca. 20 Minuten im Backofen auskühlen lassen
Napf- / Kranz- / Kastenform 1 ~ 150-160 - 60-70
Springform 2 ~+! 150-160 360 40-50
Napfform / Springform 1 ~+! 170-190 90 30-45
Springform 2 ~+! 160-180 90 50-70
Brot und Brötchen
Nie Wasser in den heißen Garraum gießen oder
Geschirr mit Wasser auf den Garraumboden stellen.
Durch den Temperaturwechsel können Schäden am
Garraumboden entstehen.
Schalten Sie die Dampffunktion zur Heißluft dazu. Die
Einstellwerte für Brotteige gelten sowohl für Teige auf
dem Backblech, als auch für Teige in einer Kastenform.
Heizart Temperatur
in °C
Mikrowellenstufe
Dauer
in Min.
Kuchen auf dem Backblech
Gericht Geschirr Einschub-
höhe
Rührkuchen mit trockenem Belag Glaspfanne 2 ~ 160-170 - - 30-40
Hefekuchen mit saftigem Belag z. B.
Hefeteig mit Apfel-Streusel*
Hefezopf mit 500 g Mehl* Glaspfanne 1 ~+z 170-180 - 3 35-45
Strudel mit Obstfüllung, vorgebacken,
geforeren
Pizza Glaspfanne 2 ~ 210-230 - - 25-35
Pizza, vorgebacken, gefroren Rost 2 #+! 180-190 180 - 8-15
Pizza-Baguette, vorgebacken, gefroren Rost 2 #+! 190-210 180 - 12-15
*vorheizen
Kleingebäck und Plätzchen
Gericht Geschirr Einschubhöhe Heizart Temperatur in °C Dauer in Min.
Plätzchen Glaspfanne 2 ~ 50-170 20-35
Baiser Glaspfanne 2 ~ 100 90-120
Makronen Glaspfanne 2 ~ 110 35-45
Blätterteiggebäck Glaspfanne 2 ~ 170 -180 35-45
Glaspfanne 1 ~ 160-170 - - 30-45
Glaspfanne 1 #+z 180-200 - 2 40-50
Heizart Temperatur
in °C
Mikrowellenstufe
Dampfstufe
Dauer
in Min.
39
Page 40

de Für Sie in unserem Kochstudio getestet
Brot und Brötchen
Gericht Geschirr Einschub-
höhe
Brot, 1 kg* Glaspfanne 1 ~+z 1
Brot 1,5 kg* Kastenform 0 ~+z 1
Brötchen. z. B. Weizenmehlbrötchen*
Toastbrot, 12 Scheiben Rost 3 $ 1 - 3 - 3-6
Toastbrot, 4 Scheiben Rost 3 % 1 - 3 - 3-6 Toastbrotscheiben
Toast überbacken, 2-4
Scheiben
*vorheizen
Tipps zum Backen
Zwischen Form und Rost entstehen
Funken.
Sie möchten feststellen, ob das
Gebäck durchgebacken ist.
Das Gebäck fällt zusammen. Verwenden Sie beim nächsten Mal weniger Flüssigkeit. Oder stellen Sie die Temperatur um 10 °C niedriger
Das Gebäck ist in der Mitte hoch aufgegangen und am Rand niedriger.
Kleingebäck klebt beim Backen aneinander.
Das Gebäck ist zu trocken. Stellen Sie die Temperatur um 10 °C höher ein und verkürzen Sie die Backzeit.
Das Gebäck ist insgesamt zu hell. Ist die Einschubhöhe und das Zubehör korrekt, dann erhöhen Sie ggf. die Temperatur oder verlängern die
Das Gebäck in Form- oder Kasten
wird hinten zu dunkel.
Das Gebäck ist insgesamt zu dunkel. Wählen Siebeim nächsten Mal eine niedrigere Temperatur und verlängern Sie ggf. die Backzeit.
Das Gebäck ist ungleichmäßig
gebräunt.
Das Gebäck sieht gut aus, ist aber
innen nicht durchgebacken.
Das Gebäck löst sich nicht beim Stürzen.
Glaspfanne 1 ~+z 1 200-220 - 3 25-35
Rost + Glaspfanne
3+1 $ 1 - 3 - 8-10
Prüfen Sie, ob die Form außen sauber ist. Verändern Sie die Position der Form im Backofen. Wenn das nicht
hilft, backen Sie ohne Mikrowelle weiter oder verwenden Sie die Glaspfanne als Stellfläche. Die Backdauer
verlängert sich dann.
Stechen Sie mit einem Holzstäbchen an der höchsten Stelle in das Gebäck. Wenn kein Teig mehr am Holz
klebt, ist das Gebäck fertig.
ein und verlängern Sie die Backzeit. Beachten Sie die angegebenen Zutaten und Zubereitungshinweise im
Rezept.
Fetten Sie nur den Boden der Springform ein. Nach dem Backen lösen Sie das Gebäck vorsichtig mit einem
Messer.
Um jedes Gebäckstück sollte ein Abstand von ca. 2 cm sein. So ist genügend Platz, damit Gebäckstücke
schön aufgehen und rundherum bräunen können.
Backzeit.
Stellen Sie die Backform nicht direkt an die Rückwand, sondern mittig auf das Zubehör.
Wählen Sie die Temperatur etwas niedriger.
Auch überstehendes Backpapier kann die Luftzirkulation beeinflussen. Schneiden Sie Backpapier immer pas-
send zu.
Achten Sie darauf, dass die Backform nicht direkt vor den Öffnungen der Garraum-Rückwand steht.
Beim Backen von Kleingebäck sollten Sie möglichst gleiche Größen und Dicken verwenden.
Backen Sie mit niedrigerer Temperatur etwas länger und geben Sie ggf. weniger Flüssigkeit hinzu. Bei
Gebäck mit saftigem Belag backen Sie erst den Boden vor. Bestreuen Sie ihn mit Mandeln oder Paniermehl
und geben dann den Belag darauf.
Lassen Sie das Gebäck nach dem Backen noch 5 bis 10 Minuten auskühlen. Sollte er sich immer noch nicht
lösen, lockern Sie den Rand nochmals vorsichtig mit einem Messer. Stürzen Sie das Gebäck erneut und bedecken Sie die Form mehrmals mit einem nassen, kalten Tuch. Beim nächsten Mal die Form einfetten und mit
Paniermehl ausstreuen.
Heizart Schritte Temperatur
in °C
230
2
2
190-200
230
200-210
Grillstufe
Dampfstufe
-
-
-
-
Dauer
in Min.
3
-
3
-
10-15
30-45
10-15
40-50
Hinweise
Nie heißes Wasser
direkt in den heißen Backofen gießen.
nebeneinander in
die Mitte des Rosts
legen.
40
Page 41

Für Sie in unserem Kochstudio getestet de
Aufläufe & Gratins
In ihrem Gerät können Sie Aufläufe und Gratins
zubereiten. In den Einstelltabellen finden Sie optimale
Einstellungen für einige Speisen.
Der Garzustand eines Auflaufs ist abhängig von der
Größe des Geschirrs und von der Höhe des Auflaufs.
Verwenden Sie für Aufläufe und Gratins ein breites,
flaches Geschirr. In einem schmalen, hohen Geschirr
Gericht Geschirr Einschubhöhe Heizart Temperatur Mikrowellenstufe Dauer
Aufläufe süß, z. B. Quark-Auflauf mit
Obst, 1,5 kg
Aufläufe pikant, aus gegarten Zutaten, z. B. Nudelauflauf, 1 kg
Aufläufe pikant, aus rohen Zutaten,
z.B. Kartoffelgratin, 1,1 kg
Auflaufform 0 # 130-150 180 25-35
Auflaufform 0 # +! 180-190 600 12-17
Auflaufform 0 # +! 170-180 600 20-30
Geflügel, Fleisch und Fisch
Ihr Gerät bietet Ihnen verschiedene Möglichkeiten zur
Zubereitung von Geflügel, Fleisch und Fisch. In den
Einstelltabellen finden Sie optimale Einstellungen für
viele Speisen. Manche Speisen gelingen am besten,
wenn sie in mehreren Schritten gegart werden. Diese
sind in der Tabelle angegeben.
Garen im Geschirr
:Warnung – Verletzungsgefahr durch
zerspringendes Glas!
Heißes Glasgeschirr auf einem trockenen Untersetzer
abstellen. Wenn die Unterlage nass oder kalt ist, kann
das Glas springen.
Verwenden Sie nur Geschirr, das für Ihre Anwendung
geeignet ist. Am besten geeignet ist Geschirr aus Glas.
Prüfen Sie, ob das Geschirr in den Garraum passt.
Glänzende Bräter aus Edelstahl oder Aluminium sind für
die Anwendung mit Mikrowellen nicht geeignet. In der
konventionellen Anwendung reflektieren glänzende
Bräter die Wärme wie ein Spiegel und sind so nur
bedingt geeignet. Das Geflügel, Fleisch und Fisch gart
langsamer und bräunt weniger. Verwenden Sie zum
konventionellen Garen eine höhere Temperatur und /
oder eine längere Garzeit.
Beachten Sie die Herstellerangaben zu Ihrem
Bratgeschirr.
Offenes Geschirr
Zur Zubereitung von Geflügel, Fleisch und Fisch
verwenden Sie am besten eine hohe Bratform. Stellen
Sie die Form auf den Garraumboden. Möchten Sie die
Dampfzugabe nutzen, verwenden Sie ein offenes
Geschirr. Wenn Sie kein passendes Geschirr haben,
verwenden Sie die Glaspfanne.
Geschlossenes Geschirr
Achten Sie darauf, dass der Deckel passt und gut
schließt. Stellen Sie das Geschirr auf den Rost.
benötigen die Speisen mehr Zeit und werden an der
Oberseite dunkler. Verwenden Sie immer die
angegeben Einschubhöhen.
Beachten Sie die Hinweise zu mikrowellengeeignetem
Geschirr.~ "Mikrowelle" auf Seite 16
Verwenden Sie eine flache Auflaufform mit einer Höhe
von 4-5 cm. Aufläufe und Gratins sollten im
abgeschalteten Backofen noch 5 Minuten nachgaren.
in Min.
:Warnung – Verbrühungsgefahr!
Beim Öffnen des Deckels nach dem Garen kann sehr
heißer Dampf entweichen. Heben Sie den Deckel hinten
an, damit der heiße Dampf vom Körper weg entweichen
kann.
Garen in Kombination mit Mikrowelle
Die Garzeit wird dadurch erheblich verkürzt. Anders als
bei konventionellem Betrieb, richtet sich die Gardauer
beim Braten in Kombination mit Mikrowelle nach dem
Gesamtgewicht.
Hinweis: Wenn Sie andere Mengen haben, als in den
Einstelltabellen angegeben, hilft Ihnen eine Grundregel:
Doppelte Menge entspricht nahezu doppelter Dauer.
Verwenden Sie immer hitzebeständiges
mikrowellengeeignetes Geschirr. Bratformen aus Metall
oder Römertopf sind nur zum Braten ohne Mikrowelle
geeignet. Beachten Sie die Hinweise zu
mikrowellengeeignetem Geschirr.~ "Mikrowelle"
auf Seite 16
Garen mit Dampfunterstützung
Bestimmte Speisen werden mit Dampfunterstützung
knuspriger. Sie erhalten eine glänzendere Oberfläche
und trocknen weniger aus.
Verwenden Sie offenes Geschirr. Das Geschirr muss
hitze- und dampfbeständig sein. Schalten Sie die
Dampfunterstützung zu, wie in der Einstelltabelle
angegeben. Füllen Sie den Wassertank bis zur
Markierung “MAX”. Falls das Wasser aufgebraucht ist
wird ihr Gericht mit der eingestellten Heizart ohne
Dampfzugabe weitergegart.
Dämpfen auf dem Dampfgarbehälter
Im Gegensatz zur Dampfunterstützung wird mit der
Funktion Dämpfen das Fleisch schonender gegart,
erhält aber keine Kruste. Es bleibt besonders saftig.
Als Geschmacksvariante können Sie Fleischstücke vor
dem Dämpfen anbraten, die Gardauer verkürzt sich.
Größere Stücke brauchen eine längere Gardauer.
Fleischstücke müssen nicht gewendet werden.
Für das Dämpfen von Geflügel, Fleisch oder Fisch
legen Sie das Gargut auf den Dampfgarbehälter in der
41
Page 42

de Für Sie in unserem Kochstudio getestet
Glaspfanne und schieben diese auf Einschubhöhe 3
ein. Füllen Sie den Wassertank bis zur Markierung
“MAX”. Sollte der Wassertank während des Betriebs
leer werden, so wird der Betrieb unterbrochen. Sie
werden im Display darauf hingewiesen.
Grillen
Lassen Sie die Gerätetür während des Grillens
geschlossen. Nie bei geöffneter Gerätetür grillen.
Legen Sie das Grillgut auf den Rost. Schieben Sie
zusätzlich die Glaspfanne unter dem Rost ein.
Abtropfendes Fett wird aufgefangen.
Nehmen Sie möglichst gleiche Grillstücke mit ähnlicher
Dicke und Gewicht. So bräunen sie gleichmäßig und
bleiben schön saftig. Legen Sie die Grillstücke direkt
auf den Rost.
Wenden Sie die Grillstücke mit einer Grillzange. Wenn
Sie mit einer Gabel ins Fleisch stechen, verliert es Saft
und wird trocken.
Salzen Sie Fleisch erst nach dem Grillen. Salz entzieht
dem Fleisch Wasser.
Hinweise
■ Die Grillheizstäbe schalten sich immer wieder ein
und aus, das ist normal. Wie oft das geschieht,
richtet sich nach der eingestellten Grillstufe.
■ Beim Grillen kann Rauch entstehen.
Empfohlene Einstellwerte
Die Einstellwerte gelten für das Einschieben von
ungefülltem, bratfertigem Geflügel, Fleisch oder Fisch
mit Kühlschranktemperatur in den kalten Garraum.
In der Tabelle finden Sie Angaben für Geflügel, Fleisch
und Fisch mit Vorschlagsgewichten. Wenn Sie
schwereres Geflügel, Fleisch oder Fisch zubereiten
wollen, verwenden Sie auf jeden Fall die niedrigere
Temperatur. Bei mehreren Stücken orientieren Sie sich
am Gewicht des schwersten Stückes zur Ermittlung der
Gardauer. Die einzelnen Stücke sollten annähernd
gleich groß sein.
Je größer ein Geflügel, Fleisch oder Fisch, desto
niedriger die Temperatur und umso länger die
Gardauer.
Wenden Sie Geflügel, Fleisch und Fisch, wenn es in der
Einstelltabelle angegeben ist.
Wenn der Braten fertig ist, sollte er noch 10 Minuten im
abgeschalteten, geschlossenen Garraum ruhen. So
verteilt sich der Fleischsaft besser. Wickeln Sie den
Braten ggf. in Alufolie ein. In der angegebenen
Gardauer ist die empfohlene Ruhezeit nicht enthalten.
Das Braten und Schmoren im Geschirr ist komfortabler.
Sie können den Braten mit dem Geschirr einfacher aus
dem Garraum nehmen und die Soße direkt im Geschirr
zubereiten.
Die Menge der Flüssigkeit ist abhängig von Fleischart
und Material des Geschirrs und davon, ob Sie einen
Deckel verwenden. Wenn Sie Fleisch im emaillierten
oder dunklen Metallbräter zubereiten, ist etwas mehr
Flüssigkeit nötig, als im Glasgeschirr.
Während des Bratens verdampft die Flüssigkeit im
Geschirr. Gießen Sie bei Bedarf vorsichtig Flüssigkeit
nach.
Der Abstand zwischen Fleisch und Deckel sollte
mindestens 3 cm betragen. Das Fleisch kann aufgehen.
Zum Schmoren braten Sie das Fleisch nach Bedarf
vorher an. Geben Sie für den Schmorfond Wasser,
Wein, Essig oder Ähnliches hinzu. Der Boden des
Geschirrs sollte 1-2 cm hoch bedeckt sein.
Fisch
Ganzer Fisch muss nicht gewendet werden. Ob der
Fisch gar ist, erkennen Sie, wenn sich die Rückenflosse
leicht lösen lässt.
Wenn Sie Fisch auf dem Rost garen wollen, bestreichen
Sie den Rost vorher mit etwas Öl, dann lässt sich der
Fisch später leichter lösen.
Geflügel
Stechen Sie bei Ente oder Gans die Haut unter den
Flügeln ein. So kann das Fett ablaufen.
Schneiden Sie bei Entenbrust die Haut ein. Wenden Sie
Entenbrust nicht.
Wenn Sie Geflügel wenden, achten Sie darauf, dass
zuerst die Brustseite bzw. die Hautseite unten ist.
Fleisch
Bestreichen Sie mageres Fleisch nach Belieben mit Fett
oder belegen Sie es mit Speckstreifen.
Geben Sie zum Braten von magerem Fleisch etwas
Flüssigkeit hinzu. Im Glasgeschirr sollte der Boden des
Geschirrs knapp bedeckt sein.
Schneiden Sie eine Schwarte kreuzweise ein.
42
Page 43

Geflügel
Für Sie in unserem Kochstudio getestet de
Gericht Geschirr Ein-
schubhöhe
Hähnchen, ganz
1,3 kg (kochen)
Hähnchen, ganz
1,3 kg (braten)
Hähnchenteile, z. B.
Hähnchenviertel,
800 g
Entenbrust, 500 g Rost + Glas-
Gänsebrust, Gänsekeulen, 700900 g
Fleisch
Gericht Geschirr Einschub-
Rinderschmor-braten, 1 kg
Roastbeef, englisch, 1,5 kg
Rindersteaks 23 cm dick, 2-3
Stück, je 200 g
Schweinefleisch
ohne Schwarte,
750 g, z. B. Nacken
Shweinefleisch mit
Schwarte, 1 kg,
z. B. Schulter
Schweinelende
500-600 g
Schweinenackensteaks 2-3 cm dick,
2-3 Stück, je 120 g
Grillwürste 4-6
Stück, je 150 g
Hackbraten, 750 g Geschirr
Geschirr
geschlossen
Geschirr
offen
Geschirr
offen
pfanne
Geschirr
offen
Geschirr
geschlossen
Geschirr
offen
Rost +
Glaspfanne
Geschirr
offen
Geschirr
offen
Geschirr
offen
Rost+ Glaspfanne
Rost+ Glaspfanne
offen
0
0 #+z+! 190 - 360 3 40-45 Mit der Brustseite
0
3+2 $+!+z - 3 180 3 10-12 Mit der Hautseite
0 $+! - 2 180 - 30-40 Hohes offenes
höhe
0
0
3+1
0 #+z+! 1 170-180 - 360 3 25-35 Zum Schluss
0 #+z+! 1 170-180 - 180 3 60-80 Schwarte ein-
0
3+1
3+1
0 #+z+! 1 190 - 360 3 15-20 Zum Schluss
Heizart Temperatur Grill-
stufe
- - 600 - 25-35 Nach halber Zeit
!
190 - 180 - 20-35 Haut einstechen.
#
Heizart Schritte Temperatur Grill-
1 160-170 - 180 - 80-90
#+
!
1 180-190 - 180 - 30-40 Nach halber Zeit
#
+!
$
#+
!
$
$
1
2
1 180-190 - 180 - 35-40 Zum Schluss
1
2
1
2
- 3
- 2
- 3
Mikrowellenstufe
stufe
Mikrowellenstufe
3
2
3
Dampfstufe
-
-
-
-
-
-
Dauer
in Min.
Dampfstufe
-
-
-
-
-
-
Hinweise
wenden.
nach oben legen.
Nicht wenden.
5 min nachziehen
lassen.
Mit der Hautseite
nach oben legen.
Nicht wenden.
nach oben legen.
Nicht wenden.
Geschirr. Nicht
wenden.
Dauer
in Min.
10-15
5-10
15-20
10-15
10-15
5-10
Hinweise
wenden. Zum
Schluss
10 Minuten
ruhen lassen.
10 Minuten
ruhen lassen.
schneiden. Zum
Schluss
10 Minuten
ruhen lassen.
Nicht wenden.
10 Minuten
ruhen lassen.
10 Minuten
ruhen lassen.
43
Page 44

de Für Sie in unserem Kochstudio getestet
Fisch
Gericht Geschirr Einschub-
höhe
Fischfilet, frisch, 400 g Glaspfanne + Dampf-
garbehälter
Fischfiletstücke, gefroren,
400 g
Fischfiletstücke, gefroren,
800 g
Fischfilet, überbacken,
500 g
Fischkotelett 2-3 Stück, je
150 g
Fisch, ganz, z.B. Forellen,
2-3 Stück, je 300 g
Tipps zum Braten und Schmoren
Der Braten ist zu dunkel und die
Kruste stellenweise verbrannt und/
oder der Braten ist zu trocken.
Die Kruste ist zu dünn. Erhöhen Sie die Temperatur oder schalten Sie nach dem Ende der Bratdauer den Grill kurz ein.
Der Braten sieht gut aus, aber die
Soße ist angebrannt.
Der Braten sieht gut aus, aber die
Soße ist zu hell und wässrig.
Beim Schmoren brennt das Fleisch
an.
Geschirr geschlossen 0 ! - - 600 - 10-15
Glaspfanne + Dampfgarbehälter
Geschirr offen 0 $+! - 3 600 - 10-15
Rost + Glaspfanne 3+1 $ - 3 - - 8-12
Glaspfanne + Dampfgarbehälter
Überprüfen Sie die Einschubhöhe und die Temperatur. Wählen Sie beim nächsten Mal eine niedrigere Temperatur und verkürzen Sie ggf. die Bratdauer.
Wählen Sie beim nächsten Mal ein kleineres Bratgeschirr und geben Sie ggf. mehr Flüssigkeit hinzu.
Wählen Sie beim nächsten Mal ein größeres Bratgeschirr und geben Sie ggf. weniger Flüssigkeit hinzu.
Bratgeschirr und Deckel müssen zusammenpassen und gut schließen.
Reduzieren Sie die Temperatur und geben Sie bei Bedarf während des Schmorens noch Flüssigkeit hinzu.
3 z - - - 3 15-17
3 z - - - 3 23-25
3 z - - - 3 18-22
Heizart Temperatur
in °C
Grillstufe
Mikrowellenstufe
Dampfstufe
Dauer
in Min.
Gemüse und Beilagen
Hier finden Sie Angaben zur schnellen und schonenden
Zubereitung von vielen Gemüsesorten, Reis und
Kartoffeln, sowie tiefgekühlten Kartoffelprodukten.
Mikrowelle
Garen Sie Gemüse immer im geschlossenen
mikrowellengeeignetem Geschirr. Verwendend Sie ein
hohes Gefäß mit Deckel für das Kochen von Reis und
geben Sie wie in der Tabelle angegeben Wasser dazu.
Dämpfen
Verwenden Sie zum Dämpfen die Glaspfanne und den
Dampfgarbehälter.
Beachten Sie die in der Einstelltabelle angegebenen
Stückgrößen. Bei kleineren Stücken verkürzt sich die
Garzeit, bei größeren verlängert sie sich. Qualität und
Reifegrad haben ebenfalls Einfluss auf die Garzeit.
Daher sind die angegebenen Einstellwerte nur
Richtlinien.
Verteilen Sie die Lebensmittel immer gleichmäßig im
Geschirr. Bei unterschiedlichen Schichthöhen garen sie
ungleichmäßig. Schichten Sie druckempfindliche
Lebensmittel nicht zu hoch auf dem Dampfgarbehälter.
Füllen Sie den Wassertank bis zur Markierung “MAX”.
Sollte der Wassertank während des Betriebs leer
werden, so wird der Betrieb unterbrochen. Sie werden
im Display darauf hingewiesen.
Couscous
Geben Sie Wasser bzw. Flüssigkeit im angegebenen
Verhältnis zu. Zum Beispiel geben Sie bei einem
Verhältnis von 1:2 je 100 g Couscous 200 ml
Flüssigkeit zu.
44
Page 45

Für Sie in unserem Kochstudio getestet de
Gericht Geschirr Einschub-
höhe
Artischocken, ganz, frisch Glaspfanne + Dampfgar-
behälter
Blattspinat, frisch, 250 g Glaspfanne + Dampfgar-
behälter
Blumenkohl, ganz, frisch Glaspfanne + Dampfgar-
behälter
Brokkoli, ganz, frisch, 500 g Glaspfanne + Dampfgar-
behälter
Brokkoliröschen, gefroren,
500 g
Gemüse, frisch, 250 g* Geschirr geschlossen 0 ! 1 - 600 - 6-10
Gemüse, frisch, 500 g* Geschirr geschlossen 0 ! 1 - 600 - 10-15
Maiskolben, frisch, 2 Stück Glaspfanne + Dampfgar-
Mischgemüse, gefroren,
250 g
Karotten in Scheiben dämpfen
Lauchringe, frisch, 500 g Glaspfanne + Dampfgar-
Grüne Bohnen frisch, 500 g Glaspfanne + Dampfgar-
Rote Bete, ganz, 500 g Glaspfanne + Dampfgar-
Spargel, grün, 250 g Glaspfanne + Dampfgar-
Zucchini in Scheiben dämpfen
Kartoffeln, geviertelt, 250 g Glaspfanne + Dampfgar-
Kartoffeln, geviertelt, 500 g Glaspfanne + Dampfgar-
Kartoffeln, geviertelt,
750 g**
Pommes Frites, gefroren Glaspfanne 2 ~ 1 180-210 - - 30-40
Rösti, gefroren Glaspfanne 2 ~ 1 190-210 - - 25-35
Kroketten, gefroren Glaspfanne 2 ~ 1 190-210 - - 25-35
Reis, 125 g + 300 ml Was-
ser
Reis, 250 g + 500 ml Wasser
Couscous, 1:2 Glaspfanne 3 z 1 - - 3 3-10
*zwischendurch umrühren
**Wassertank muss zwischendurch evtl. nachgefüllt werden
Glaspfanne + Dampfgarbehälter
behälter
Glaspfanne + Dampfgar-
behälter
Glaspfanne + Dampfgar-
behälter
behälter
behälter
behälter
behälter
Glaspfanne + Dampfgar-
behälter
behälter
behälter
Glaspfanne + Dampfgar-
behälter
Geschirr geschlossen 0 ! 1
Geschirr geschlossen 0 ! 1
Heizart Schritte Temperatur Mikrowellen-
stufe
3 z 1 - - 3 36-40
3 z 1 - - 3 5-7
2 z 1 - - 3 28-35
2 z 1 - - 3 20-23
3 z 1 - - 3 14-16
3 z 1 - - 3 35-45
3 z 1 - - 3 12-15
3 z 1 - - 3 18-20
3 z 1 - - 3 10-12
3 z 1 - - 3 18-20
3 z 1 - - 3 50-60
3 z 1 - - 3 15-18
3 z 1 - - 3 12-14
3 z 1 - - 3 28-30
3 z 1 - - 3 30-32
3 z 1 - - 3 32-35
-
2
2
-
-
-
600
180
600
180
Dampfstufe
-
-
-
-
Dauer
in Min.
4-6
12-15
6-8
15-18
45
Page 46

de Für Sie in unserem Kochstudio getestet
Desserts
Mit ihrem Gerät können sie schnelle und feine Desserts
zubereiten.
Milchreis
Geben Sie Milch im angegebenen Verhältnis zu. Zum
Beispiel geben Sie bei einem Verhältnis von 1:2,5 je
100 g Milchreis 250 ml Milch zu.
Beachten Sie die Hinweise in der Einstelltabelle.
Gericht Geschirr Einschubhöhe Heizart Mikrowellen-
stufe
Dampfstufe Dauer
in Min.
Flan Caramel Glaspfanne 3 z - 3 40-50
Dampfnudeln Glaspfanne 3 z - 2 20-25
Milchreis 1:2, 5 Geschirr geschlossen 3 z - 3 30-40
Obst, Kompott, 500 g Geschirr geschlossen 3 z - 3 9-12
Popcorn für die Mikrowelle,
Geschirr geschlossen 0 ! 600 - 3-5
1 Tüte á 100 g
Süßspeisen, z. B. Pudding
Geschirr geschlossen 0 ! 600 - 6-8
(instant) 500 ml*
*zwischendurch umrühren
Acrylamid in Lebensmitteln
zubereiteten Getreide- und Kartoffelprodukten wie z. B.
Kartoffelchips, Pommes frites, Toast, Brötchen, Brot,
Welche Speisen sind betroffen?
feinen Backwaren (Kekse, Lebkuchen, Spekulatius).
Acrylamid entsteht vor allem bei hocherhitzt
Tipps zur acrylamidarmen Zubereitung von Speisen
Allgemein Garzeiten möglichst kurz halten. Speisen goldgelb, nicht zu dunkel bräunen. Großes, dickes Gargut enthält weniger
Acrylamid.
Backen Mit Heißluft max. 180 °C Ei oder Eigelb verringert die Bildung von Acrylamid.
Plätzchen Mit Heißluft max. 180 °C Ei oder Eigelb verringert die Bildung von Acrylamid.
Backofen-Pommes-frites Gleichmäßig und einlagig auf dem Zubehör verteilen. Mindestens 400 g pro Backvorgang backen, damit die Pommes
nicht austrocknen.
Prüfgerichte
■ Beachten Sie die Hinweise zum Vorheizen in den
Tabellen. Die Einstellwerte gelten ohne
Diese Tabellen wurden für Prüfinstitute erstellt, um das
Prüfen des Gerätes zu erleichtern.
Nach IEC 60350-1 bzw. IEC 60705.
Backen
Schnellaufheizen.
■ Verwenden Sie zum Backen zunächst die niedrigere
der angegebenen Temperaturen.
■ Die Tabellenwerte gelten für das Einschieben in den
kalten Backofen.
■ Backformen auf den Rost stellen.
Hinweise
■ Die Einstellwerte gelten für das Einschieben in den
kalten Garraum.
Gericht Geschirr Einschub-
höhe
Heizart Temperatur
in °C
Dauer
in Min.
Spritzgebäck Glaspfanne 2 ~ 160-170 30-35
Small Cakes* Glaspfanne 2 ~ 160-170 20-25
Wasserbiskuit Springform Ø 26 cm 1 ~ 160-170 40-50
Gedeckter Apfelkuchen Springform Ø 20 cm 2 ~ 170-190 80-100
*Backofen 5 Minuten vorheizen
46
Page 47

Für Sie in unserem Kochstudio getestet de
Zubereitung mit Mikrowelle
Für die Zubereitung mit Mikrowelle verwenden Sie
immer hitzebeständiges, mikrowellengeeignetes
Auftauen mit Mikrowelle
Gericht Geschirr Einschub-
höhe
Auftauen von Fleisch Geschirr offen 0 ! 500 g 1
Garen mit Mikrowelle
Gericht Geschirr Einschubhöhe Heizart Gewicht Schritte Mikrowellenstufe Dauer
Eiercreme Geschirr offen 0 ! 1000 g 1
Sponge Cake Geschirr offen 0 ! 475 g 1 600 8-10
Fleischklops Geschirr offen 0 ! 900 g 1 600 20-25
Garen mit Mikrowelle kombiniert
Gericht Geschirr Einschub-
höhe
Kartoffelgratin Geschirr offen 0 $+! - 1 360 25-32
Kuchen, 700 g Geschirr offen 1 ~+! 190-200 - 180 20-27
Hähnchen Geschirr offen 0 #+! 190 - 360 30-45 Brustseite nach unten. Hohes
Heizart Temperatur
Heizart Gewicht Schritte Mikrowellenstufe Dauer
in °C
Geschirr. Beachten Sie die Hinweise zu
mikrowellengeeignetem Geschirr.~ "Mikrowelle"
auf Seite 16
in Min.
180
Grillstufe Mikrowellen-
stufe
2
2
Dauer
in Min.
90
in Min.
360
180
Hinweise
Geschirr ohne Deckel. Nach
der Hälfte der Zeit wenden.
7
8-12
18-20
18-22
Dämpfen
Stellen Sie die Glaspfanne mit dem Dampfgarbehälter
auf Einschubhöhe 3.
Gericht Geschirr Einschub-
höhe
Erbsen, gefroren Glaspfanne + Dampf-
garbehälter
Brokkoli, frisch, 300 g Glaspfanne + Dampf-
garbehälter
Brokkoli, frisch, ein Behälter
Grillen
Schieben Sie die Glaspfanne unter den Rost ein. Die
Flüssigkeit wird aufgefangen und der Garraum bleibt
sauberer.
Gericht Geschirr Einschub-
Toast bräunen Rost 3 $ 3 4-5
Beefburger, 12 Stück Rost+Glaspfanne 3+1 $ 3 35-45 Nach halber Zeit wenden
Glaspfanne + Dampfgarbehälter
3 z 3 - Der Test ist beendet, sobald die kälteste
3 z 3 11-13
3 z 3 18-20
höhe
Heizart Dampf-stu-feDauer
in Min.
Die Tabellenwerte gelten für das Einschieben in den
kalten Backofen.
Heizart Grillstufe Dauer
in Min.
Hinweise
Stelle 85 °C errreicht hat.
Hinweise
47
Page 48

en
Table of contents
[en]Instruction manual
8 Intended use . . . . . . . . . . . . . . . . . . . . . . . . . . . . 49
( Important safety information. . . . . . . . . . . . . . . 49
General information . . . . . . . . . . . . . . . . . . . . . . . . . . 49
Microwave . . . . . . . . . . . . . . . . . . . . . . . . . . . . . . . . .50
Steam. . . . . . . . . . . . . . . . . . . . . . . . . . . . . . . . . . . . . 51
] Causes of damage . . . . . . . . . . . . . . . . . . . . . . . 52
General information . . . . . . . . . . . . . . . . . . . . . . . . . . 52
Microwave . . . . . . . . . . . . . . . . . . . . . . . . . . . . . . . . .52
Steam. . . . . . . . . . . . . . . . . . . . . . . . . . . . . . . . . . . . . 53
7 Environmental protection . . . . . . . . . . . . . . . . . 53
Saving energy. . . . . . . . . . . . . . . . . . . . . . . . . . . . . . .53
Environmentally-friendly disposal . . . . . . . . . . . . . . . . 53
* Getting to know your appliance . . . . . . . . . . . . 54
Control panel . . . . . . . . . . . . . . . . . . . . . . . . . . . . . . . 54
Function selector . . . . . . . . . . . . . . . . . . . . . . . . . . . . 54
Touch fields and display. . . . . . . . . . . . . . . . . . . . . . .55
Rotary selector . . . . . . . . . . . . . . . . . . . . . . . . . . . . . .56
Operating modes . . . . . . . . . . . . . . . . . . . . . . . . . . . .56
Types of heating. . . . . . . . . . . . . . . . . . . . . . . . . . . . . 56
Steam. . . . . . . . . . . . . . . . . . . . . . . . . . . . . . . . . . . . . 57
Microwave . . . . . . . . . . . . . . . . . . . . . . . . . . . . . . . . .57
Cooking compartment . . . . . . . . . . . . . . . . . . . . . . . . 57
Tank cover . . . . . . . . . . . . . . . . . . . . . . . . . . . . . . . . .58
Water tank . . . . . . . . . . . . . . . . . . . . . . . . . . . . . . . . . 58
Drip tray . . . . . . . . . . . . . . . . . . . . . . . . . . . . . . . . . . .58
_ Accessories . . . . . . . . . . . . . . . . . . . . . . . . . . . . 59
Accessories included . . . . . . . . . . . . . . . . . . . . . . . . .59
Additional accessories . . . . . . . . . . . . . . . . . . . . . . . .59
Special accessories . . . . . . . . . . . . . . . . . . . . . . . . . .59
Inserting accessories . . . . . . . . . . . . . . . . . . . . . . . . . 59
K Before using for the first time . . . . . . . . . . . . . . 60
Initial use . . . . . . . . . . . . . . . . . . . . . . . . . . . . . . . . . . 60
Set the water hardness range. . . . . . . . . . . . . . . . . . . 60
Cleaning the cooking compartment and accessories .60
1 Operating the appliance. . . . . . . . . . . . . . . . . . . 61
Switching the appliance on and off. . . . . . . . . . . . . . . 61
Selecting an operating mode . . . . . . . . . . . . . . . . . . .61
Setting the heating function and temperature . . . . . . .61
Rapid heating . . . . . . . . . . . . . . . . . . . . . . . . . . . . . . .62
Automatic safety switch-off function . . . . . . . . . . . . . . 62
P Automatic programmes . . . . . . . . . . . . . . . . . . . 69
Setting a programme . . . . . . . . . . . . . . . . . . . . . . . . .69
Programme table . . . . . . . . . . . . . . . . . . . . . . . . . . . .70
O Setting the time-setting options . . . . . . . . . . . . 72
Checking the time settings . . . . . . . . . . . . . . . . . . . . .72
Setting the timer . . . . . . . . . . . . . . . . . . . . . . . . . . . . .72
Setting a cooking time . . . . . . . . . . . . . . . . . . . . . . . .72
Initial use. . . . . . . . . . . . . . . . . . . . . . . . . . . . . . . . . . .73
A Childproof lock. . . . . . . . . . . . . . . . . . . . . . . . . . 73
Activating and deactivating . . . . . . . . . . . . . . . . . . . . .73
Q Basic settings. . . . . . . . . . . . . . . . . . . . . . . . . . . 74
Changing the basic settings . . . . . . . . . . . . . . . . . . . .74
List of basic settings . . . . . . . . . . . . . . . . . . . . . . . . . .74
D Cleaning . . . . . . . . . . . . . . . . . . . . . . . . . . . . . . . 75
Suitable cleaning agents. . . . . . . . . . . . . . . . . . . . . . .75
Cleaning self-cleaning surfaces. . . . . . . . . . . . . . . . . .76
Keeping the appliance clean. . . . . . . . . . . . . . . . . . . .76
. Cleaning function . . . . . . . . . . . . . . . . . . . . . . . . 76
Descaling . . . . . . . . . . . . . . . . . . . . . . . . . . . . . . . . . .76
Rinsing . . . . . . . . . . . . . . . . . . . . . . . . . . . . . . . . . . . .77
Subsequent cleaning . . . . . . . . . . . . . . . . . . . . . . . . .77
Emptying the drip tray. . . . . . . . . . . . . . . . . . . . . . . . .77
3 Trouble shooting . . . . . . . . . . . . . . . . . . . . . . . . 78
4 Customer service . . . . . . . . . . . . . . . . . . . . . . . . 79
E number and FD number . . . . . . . . . . . . . . . . . . . . .79
J Tested for you in our cooking studio . . . . . . . . 79
General information. . . . . . . . . . . . . . . . . . . . . . . . . . .79
Defrosting . . . . . . . . . . . . . . . . . . . . . . . . . . . . . . . . . .80
Heating frozen food . . . . . . . . . . . . . . . . . . . . . . . . . .82
Warming . . . . . . . . . . . . . . . . . . . . . . . . . . . . . . . . . . .82
Cakes, small baked items and bread . . . . . . . . . . . . .83
Bakes and gratins. . . . . . . . . . . . . . . . . . . . . . . . . . . .86
Poultry, meat and fish . . . . . . . . . . . . . . . . . . . . . . . . .86
Vegetables and side dishes . . . . . . . . . . . . . . . . . . . .89
Desserts . . . . . . . . . . . . . . . . . . . . . . . . . . . . . . . . . . .91
Acrylamide in foodstuffs . . . . . . . . . . . . . . . . . . . . . . .91
Test dishes . . . . . . . . . . . . . . . . . . . . . . . . . . . . . . . . .91
^ Microwave. . . . . . . . . . . . . . . . . . . . . . . . . . . . . . 62
Cookware . . . . . . . . . . . . . . . . . . . . . . . . . . . . . . . . . .62
Microwave power settings . . . . . . . . . . . . . . . . . . . . . 63
Setting the microwave . . . . . . . . . . . . . . . . . . . . . . . . 63
Setting the microwave to combined operation . . . . . . 64
` Steam . . . . . . . . . . . . . . . . . . . . . . . . . . . . . . . . . 65
Noise . . . . . . . . . . . . . . . . . . . . . . . . . . . . . . . . . . . . . 65
Cooking with steam . . . . . . . . . . . . . . . . . . . . . . . . . .65
Setting the steam combination . . . . . . . . . . . . . . . . . .66
Filling the water tank. . . . . . . . . . . . . . . . . . . . . . . . . . 67
Refilling the water tank . . . . . . . . . . . . . . . . . . . . . . . .67
After every steam operation . . . . . . . . . . . . . . . . . . . .68
48
Produktinfo
Additional information on products, accessories,
replacement parts and services can be found at
www.constructa.de and in the online shop
www.constructa-eshop.com
Page 49

Intended use en
8Intended use
Intended use
Read these instructions carefully. Only then
will you be able to operate your appliance
safely and correctly. Retain the instruction
manual and installation instructions for future
use or for subsequent owners.
This appliance is only intended to be fully fitted
in a kitchen. Observe the special installation
instructions.
Check the appliance for damage after
unpacking it. Do not connect the appliance if it
has been damaged in transport.
Only a licensed professional may connect
appliances without plugs. Damage caused by
incorrect connection is not covered under
warranty.
This appliance is intended for domestic use
only. The appliance must only be used for the
preparation of food and drink. The appliance
must be supervised during operation. Only
use this appliance indoors.
This appliance is intended for use up to a
maximum height of 4000 metres above sea
level.
This appliance may be used by children over
the age of 8 years old and by persons with
reduced physical, sensory or mental
capabilities or by persons with a lack of
experience or knowledge if they are
supervised or are instructed by a person
responsible for their safety how to use the
appliance safely and have understood the
associated hazards.
Children must not play with, on, or around the
appliance. Children must not clean the
appliance or carry out general maintenance
unless they are at least 15 years old and are
being supervised.
Keep children below the age of 8 years old at
a safe distance from the appliance and power
cable.
(Important safety
information
Impor t ant saf ety informat i on
General information
:Warning – Risk of fire!
■ Combustible items stored in the cooking
compartment may catch fire. Never store
combustible items in the cooking
compartment. Never open the appliance
door if there is smoke inside. Switch off the
appliance and unplug it from the mains or
switch off the circuit breaker in the fuse box.
Risk of fire!
■ Loose food remnants, fat and meat juices
may catch fire. Before using the appliance,
remove the worst of the food remnants from
the cooking compartment, heating elements
and accessories.
Risk of fire!
■ A draught is created when the appliance
door is opened. Greaseproof paper may
come into contact with the heating element
and catch fire. Do not place greaseproof
paper loosely over accessories during
preheating. Always weight down the
greaseproof paper with a dish or a baking
tin. Only cover the surface required with
greaseproof paper. Greaseproof paper
must not protrude over the accessories.
:Warning – Risk of burns!
■ The appliance becomes very hot. Never
touch the interior surfaces of the cooking
compartment or the heating elements.
Always allow the appliance to cool down.
Keep children at a safe distance.
Risk of serious burns!
■ Accessories and ovenware become very
hot. Always use oven gloves to remove
accessories or ovenware from the cooking
compartment.
Risk of burns!
■ Alcoholic vapours may catch fire in the hot
cooking compartment. Never prepare food
containing large quantities of drinks with a
high alcohol content. Only use small
quantities of drinks with a high alcohol
content. Open the appliance door with care.
:Warning – Risk of scalding!
■ The accessible parts become hot during
operation. Never touch the hot parts. Keep
children at a safe distance.
Risk of scalding!
■ When you open the appliance door, hot
steam can escape. Steam may not be
visible, depending on its temperature. When
opening, do not stand too close to the
appliance. Open the appliance door
carefully. Keep children away.
49
Page 50

en Important safety information
Risk of scalding! ■ Water in a hot cooking compartment may
create hot steam. Never pour water into the
hot cooking compartment.
:Warning – Risk of injury!
Scratched glass in the appliance door may
develop into a crack. Do not use a glass
scraper, sharp or abrasive cleaning aids or
detergents.
:Warning – Risk of electric shock!
■ Incorrect repairs are dangerous. Repairs
may only be carried out and damaged
power cables replaced by one of our
trained after-sales technicians. If the
appliance is defective, unplug the appliance
from the mains or switch off the circuit
breaker in the fuse box. Contact the aftersales service.
Risk of electric shock and serious injury!
■ The cable insulation on electrical
appliances may melt when touching hot
parts of the appliance. Never bring
electrical appliance cables into contact with
hot parts of the appliance.
Risk of electric shock!
■ Do not use any high-pressure cleaners or
steam cleaners, which can result in an
electric shock.
Risk of electric shock!
■ Penetrating moisture may cause electric
shock. Never subject the appliance to
intense heat or humidity. Only use this
appliance indoors.
Risk of electric shock!
■ A defective appliance may cause electric
shock. Never switch on a defective
appliance. Unplug the appliance from the
mains or switch off the circuit breaker in the
fuse box. Contact the after-sales service.
:Warning – Hazard due to magnetism!
Permanent magnets are used in the control
panel or in the control elements. They may
affect electronic implants, e.g. heart
pacemakers or insulin pumps. Wearers of
electronic implants must stay at least 10 cm
away from the control panel.
Microwave
:Warning – Risk of burns!
■ Using the appliance for anything other than
its intended purpose is dangerous.
You are not permitted to use it to dry food
or clothing or to warm slippers, grain or
cereal pillows, sponges, damp cleaning
cloths or the like.
This is because, for instance, overheated
slippers, grain or cereal pillows, sponges
and damp cleaning cloths, etc., may cause
burns to the skin.
Risk of fire!
■ Food may catch fire. Never heat food in
heat-retaining packages.
Do not leave food heating unattended in
containers made of plastic, paper or other
combustible materials.
Do not select a microwave power or time
setting that is higher than necessary. Follow
the information provided in this instruction
manual.
Never use the microwave to dry food.
Never defrost or heat food with a low water
content, e.g. bread, at too high a microwave
power or for too long.
Risk of fire!
■ Cooking oil may catch fire. Never use the
microwave to heat cooking oil on its own.
:Warning – Risk of explosion!
Liquids and other food may explode when in
containers that have been tightly sealed.
Never heat liquids or other food in containers
that have been tightly sealed.
:Warning – Risk of burns!
■ Foods with peel or skin may burst or
explode during, or even after, heating.
Never cook eggs in their shells or reheat
hard-boiled eggs. Never cook shellfish or
crustaceans. Always prick the yolk when
baking or poaching eggs. The skin of foods
that have a peel or skin, such as apples,
tomatoes, potatoes and sausages, may
burst. Before heating, prick the peel or skin.
Risk of burns!
■ Heat is not distributed evenly through baby
food. Never heat baby food in closed
containers. Always remove the lid or teat.
Stir or shake well after the food has been
heated. Check the temperature of the food
before it is given to the child.
Risk of burns!
■ Heated food gives off heat. The ovenware
may become hot. Always use oven gloves
to remove ovenware or accessories from
the cooking compartment.
Risk of burns!
50
Page 51
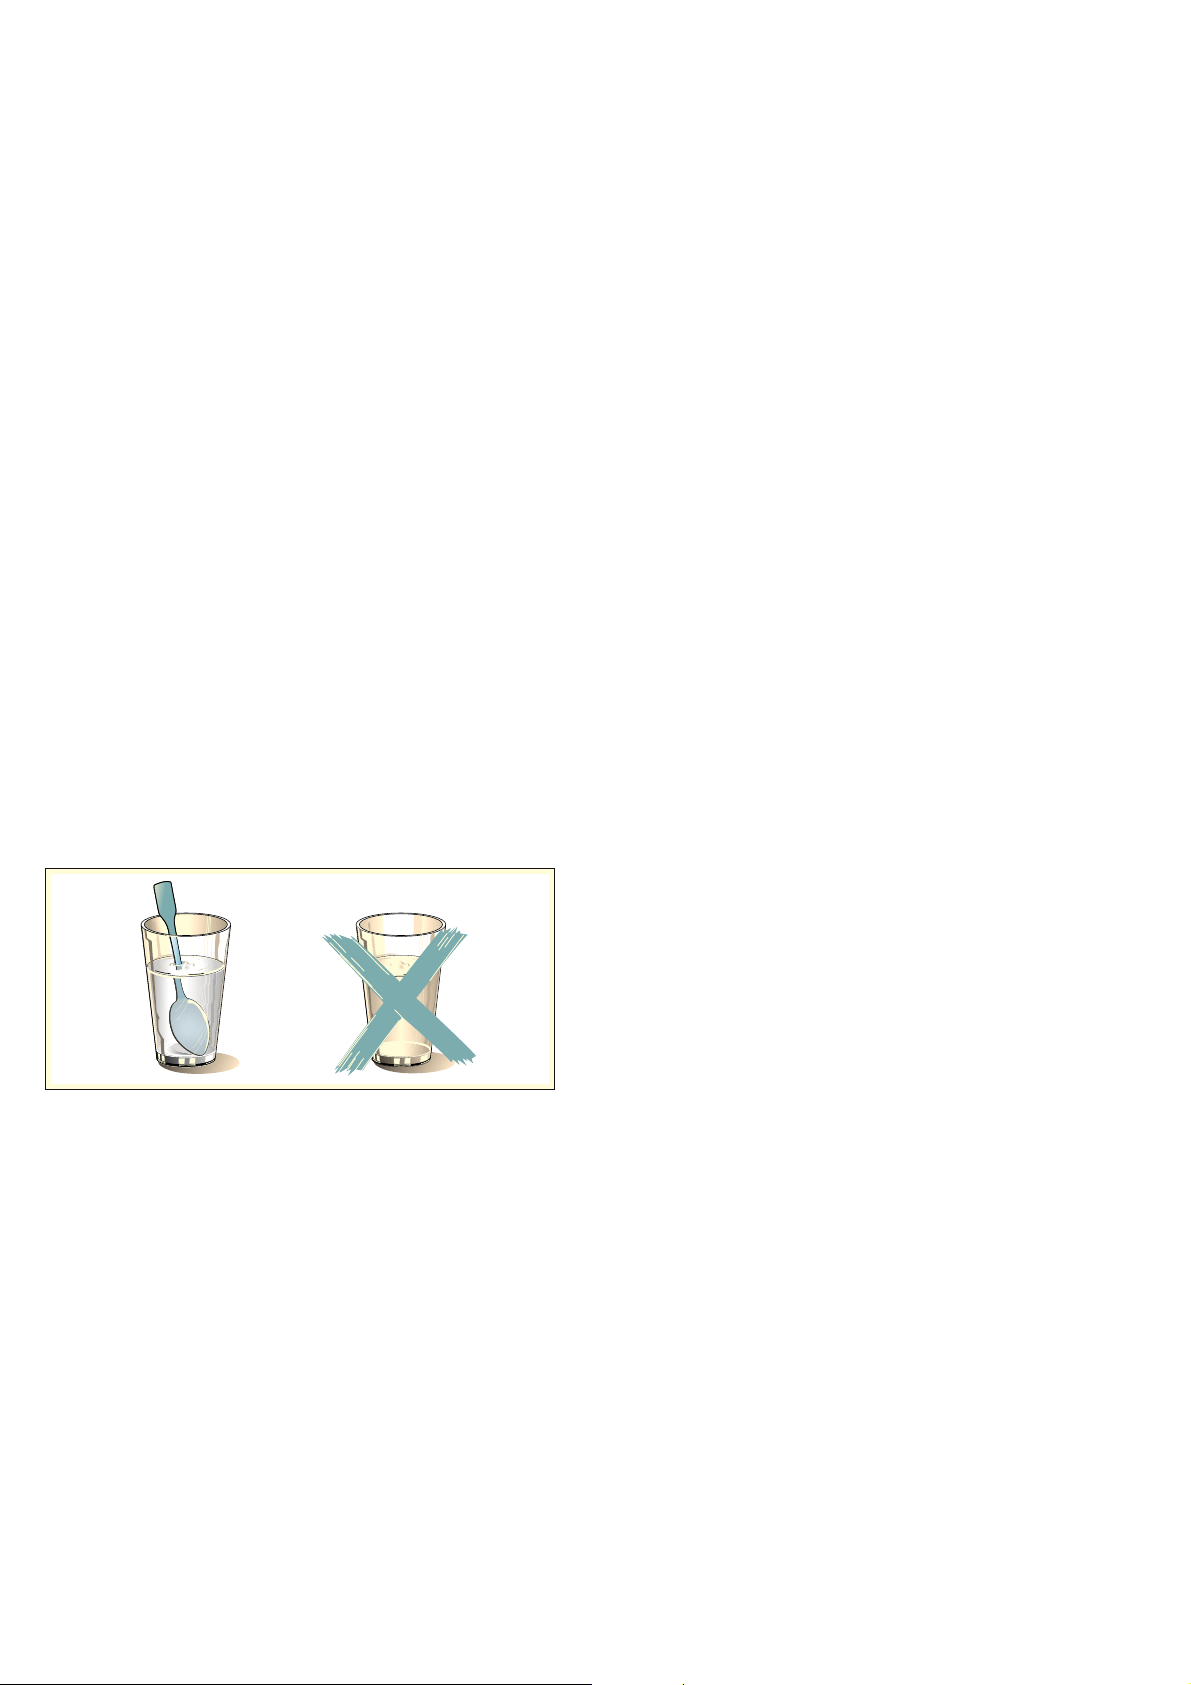
Important safety information en
■ Airtight packaging may burst when food is
heated. Always observe the instructions on
the packaging. Always use oven gloves to
remove dishes from the cooking
compartment.
Risk of burns!
■ The accessible parts become very hot when
in operation. Never touch hot parts. Keep
children at a safe distance.
Risk of burns!
■ Using the appliance for anything other than
its intended purpose is dangerous.
You are not permitted to use it to dry food
or clothing or to warm slippers, grain or
cereal pillows, sponges, damp cleaning
cloths or the like.
This is because, for instance, overheated
slippers, grain or cereal pillows, sponges
and damp cleaning cloths, etc., may cause
burns to the skin.
:Warning – Risk of scalding!
■ There is a possibility of delayed boiling
when a liquid is heated. This means that the
liquid reaches boiling temperature without
the usual steam bubbles rising to the
surface. Even if the container only vibrates a
little, the hot liquid may suddenly boil over
and spatter. When heating, always place a
spoon in the container. This will prevent
delayed boiling.
:Warning – Risk of injury!
■ Unsuitable ovenware may crack. Porcelain
or ceramic ovenware can have small
perforations in the handles or lids. These
perforations conceal a cavity below. Any
moisture that penetrates this cavity could
cause the ovenware to crack. Only use
microwave-safe ovenware.
Risk of injury!
■ If using the appliance in microwave mode
only, placing cookware and containers
made of metal or featuring metal detailing
inside the appliance may cause sparks
when the appliance is operating. This may
damage the appliance. Never use metal
containers when using the appliance in
microwave mode only.
:Warning – Risk of electric shock!
The appliance is a high-voltage appliance.
Never remove the casing.
:Warning – Risk of serious damage to
health!
■ The surface of the appliance may become
damaged if it is not cleaned properly.
Microwave energy may escape. Clean the
appliance on a regular basis, and remove
any food residue immediately. Always keep
the cooking compartment, door seal, door
and door stop clean. ~ "Cleaning"
on page 75
Risk of serious damage to health!
■ Microwave energy may escape if the
cooking compartment door or the door seal
is damaged. Never use the appliance if the
cooking compartment door, the door seal
or the plastic door frame is damaged. Call
the after-sales service.
Risk of serious damage to health!
■ Microwave energy will escape from
appliances that do not have any casing.
Never remove the casing. For any
maintenance or repair work, contact the
after-sales service.
Steam
:Warning – Risk of scalding!
■ The water in the water tank may become
very hot if you continue to operate the
appliance. Empty the water tank after every
operation with steam.
Risk of scalding!
■ Hot steam is generated in the cooking
compartment. Do not reach into the
cooking compartment during any operation
with steam.
Risk of scalding!
■ Hot liquid may spill over the sides of the
accessory when it is removed from the
cooking compartment. Remove hot
accessories with care and always wear
oven gloves.
:Warning – Risk of injury and risk of fire!
Flammable liquids can catch fire in the
cooking compartment when it is hot
(explosion). Do not fill the water tank with any
flammable fluids (e.g. alcoholic drinks). Only
fill the water tank with water or with the
descaling solution that is recommended by us.
51
Page 52

en Causes of damage
]Causes of damage
Cau s e s of damage
General information
Caution!
■ Water in the hot cooking compartment: Never pour
water into the hot cooking compartment. This will
cause steam. The temperature change can cause
damage.
■ Moisture in the cooking compartment: Over an
extended period of time, moisture in the cooking
compartment may lead to corrosion. Allow the
cooking compartment to dry after use. Do not keep
moist food in the closed cooking compartment for
extended periods of time. Do not store food in the
cooking compartment.
■ Cooling with the appliance door open: Following
operation at high temperatures, only allow the
cooking compartment to cool down with the door
closed. Do not trap anything in the appliance door.
Even if the door is only left open a crack, the front of
nearby furniture may become damaged over time.
Only leave the cooking compartment to dry with the
door open if a lot of moisture was produced whilst
the oven was operating.
■ Extremely dirty seal: If the seal is very dirty, the
appliance door will no longer close properly during
operation. The fronts of adjacent units could be
damaged. Always keep the seal clean.
~ "Cleaning" on page 75
■ Appliance door as a seat, shelf or worktop: Do not
sit on the appliance door, or place or hang anything
on it. Do not place any cookware or accessories on
the appliance door.
■ Inserting accessories: depending on the appliance
model, accessories can scratch the door panel
when closing the appliance door. Always insert the
accessories into the cooking compartment as far as
they will go.
■ Carrying the appliance: do not carry or hold the
appliance by the door handle. The door handle
cannot support the weight of the appliance and
could break.
Microwave
Caution!
■ Aluminium foil: Aluminium foil in the cooking
compartment must not come into contact with the
door glass. This could cause permanent
discolouration of the door glass.
■ Creation of sparks: Metal – e.g. a spoon in a glass –
must be kept at least 2 cm from the cooking
compartment walls and the inside of the door.
Sparks can irreparably damage the glass on the
inside of the door.
■ Microwave and microwave combination mode: The
wire rack is not suitable for use in microwave mode
or microwave mode combined with a type of
heating. If you use either of these, this may create
sparks, which may damage the cooking
compartment.
■ Foil containers: Do not use foil containers in the
appliance. They damage the appliance by producing
sparks.
■ Operating the microwave without food: Operating the
appliance without food in the cooking compartment
may lead to overloading. Never switch on the
microwave unless there is food inside. The short
crockery test is the exception to this rule.
~ "Microwave" on page 62
■ Microwave popcorn: Never set the microwave
power too high.The door panel may crack if
overloaded. Use a power setting no higher than 600
watts. Always place the popcorn bag on a glass
plate.
52
Page 53

Environmental protection en
Steam
Caution!
■ Appliance care: Your appliance's cooking
compartment is made from high-quality stainless
steel. Improper care may lead to corrosion in the
cooking compartment. Follow the care and cleaning
instructions in the instruction manual. Remove food
remnants from the cooking compartment surfaces
as soon as the appliance has cooled down.
■ Baking tins: Ovenware must be heat and steam
resistant. Silicone baking tins are not suitable for
combined operation with steam.
■ Ovenware with areas of rust: Do not use any
ovenware which displays areas of rust. Even the
smallest spots of rust can lead to corrosion in the
cooking compartment.
■ Dripping liquids: During steaming, insert the glass
tray into shelf position 3 and place the steam
container onto the glass tray. Any dripping liquid is
caught in the glass tray.
■ Hot water in the water tank: Hot water can damage
the pump. Do not pour hot water into the water tank.
■ Risk of damage to the cooking compartment: Do not
use the appliance if there is water on the cooking
compartment floor. Before using the appliance, wipe
away the water from the cooking compartment floor.
■ Descaling solution: Do not allow any descaling
solution to come into contact with the control panel
or other surfaces on the appliance. This damages
the surfaces. If this does happen, remove the
descaling solution immediately with water.
■ Cleaning the water tank: Do not clean the water tank
in the dishwasher. Otherwise, the water tank will be
damaged. Clean the water tank with a soft cloth and
standard washing-up liquid.
■ Frost protection: To prevent frost damage during
transportation and storage, the appliance must be
completely emptied beforehand.
7Environmental protection
Env i r o nment al pr ot ec t i on
Your new appliance is particularly energy-efficient.
Here you can find tips on how to save even more
energy when using the appliance, and how to dispose
of your appliance properly.
Saving energy
■ Only preheat the appliance if this is specified in the
recipe or in the tables in the operating instructions.
■ Use dark, black lacquered or enamelled baking tins
for baking. These absorb the heat particularly well.
■ Open the appliance door as infrequently as possible
when the appliance is in use.
■ It is best to bake several cakes one after the other.
The cooking compartment is still warm. This reduces
the baking time for the second cake. You can place
two cake tins next to each other in the cooking
compartment.
■ For longer cooking times, you can switch the
appliance off 10 minutes before the end of the
cooking time and use the residual heat to finish
cooking.
Environmentally-friendly disposal
Dispose of packaging in an environmentally-friendly
manner.
This appliance is labelled in accordance with
European Directive 2012/19/EU concerning
used electrical and electronic appliances
(waste electrical and electronic equipment WEEE). The guideline determines the
framework for the return and recycling of used
appliances as applicable throughout the EU.
53
Page 54
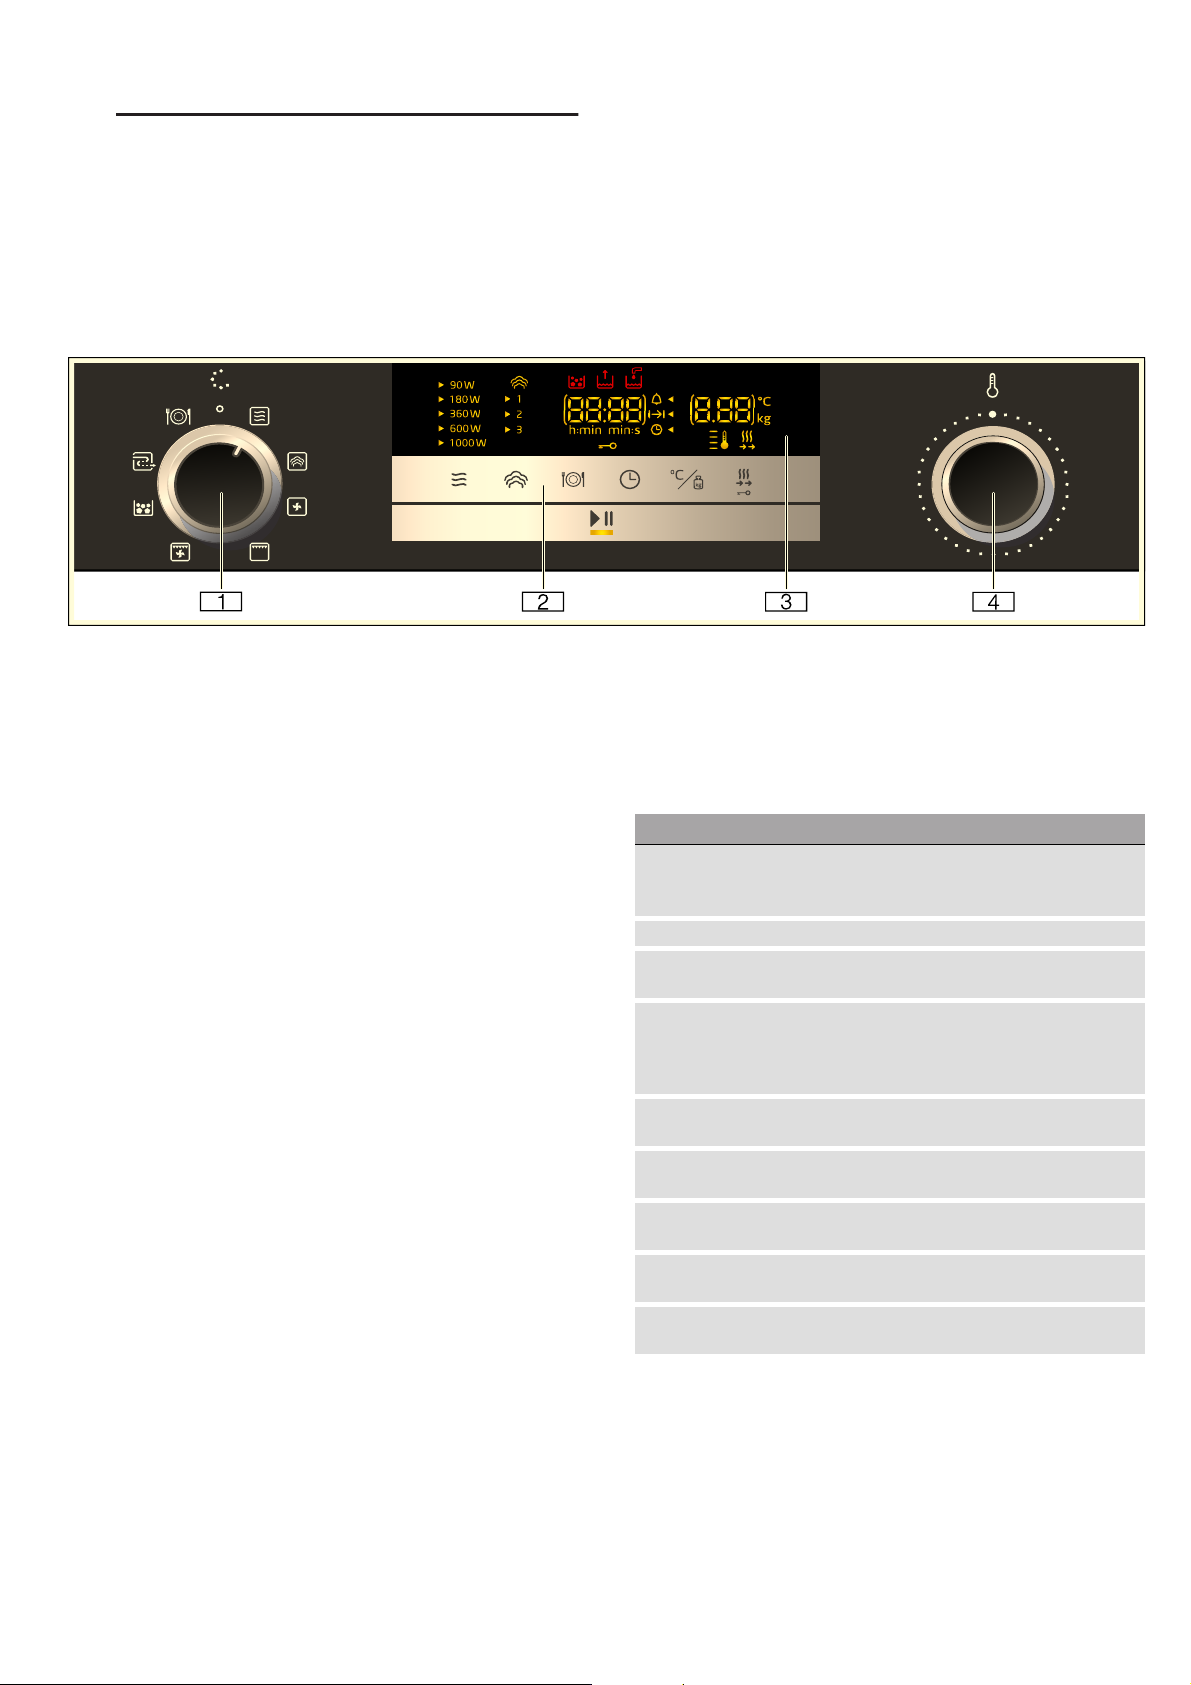
en Getting to know your appliance
*Getting to know your
appliance
Gett i ng to know your appl i ance
In this section, we explain the display and controls.
You will also find out about the various functions of your
appliance.
Note: Depending on the appliance model, individual
details and colours may differ.
( Function selector
Use the function selector to set the type of heating
or other functions.
You can turn the function selector clockwise or
anti-clockwise from the "Off" position.
0 Touch fields
There are sensors behind the touch fields. Simply
touch a symbol to select the function.
8 Display
The display shows symbols for active functions
and the time-setting options.
@ Rotary selector
Use the rotary selector to set the temperature for
the heating type or select the setting for other
functions.
You can turn the rotary selector clockwise and
anti-clockwise.
Notes
■ On some appliances, the function or rotary selector
can be retracted. To pop the function or rotary
selector in or out, push it in in the "Off" position.
■ If the function selector is in the "Off" position (energy-
saving mode) and a function is selected, it will take a
few seconds before the function becomes available
(e.g. the microwave).
Control panel
Use the function and rotary selector, as well as the
touch fields, to set the various functions for your
appliance via the control unit. The current settings are
shown in the display.
The overview shows the control panel when the
appliance is switched on with a selected operating
mode.
Function selector
Use the function selector to set the operating modes
and other functions.
To make sure you always use the right operating mode
to cook your food, we have explained the differences
and applications below.
Position Use
Û "Off" position In this position, the appliance is
switched off and is in energy-saving
mode.
! Microwave Select microwave mode.
z Steam Hot steam is fed into the cooking
compartment.
~ Convection The fan distributes the heat from the
ring heating element in the back
panel evenly around the cooking compartment.
$ Grill The whole area below the grill ele-
ments becomes hot.
# Hot air grill The fan circulates the hot air from the
grill elements around the food.
8 Descaling Used to descale the evaporator and
keep it operational.
$ Rinse This function rinses the pipes in the
steam unit with water.
= Programmes This gives you access to prepro-
grammed settings for many dishes.
--------
54
Page 55
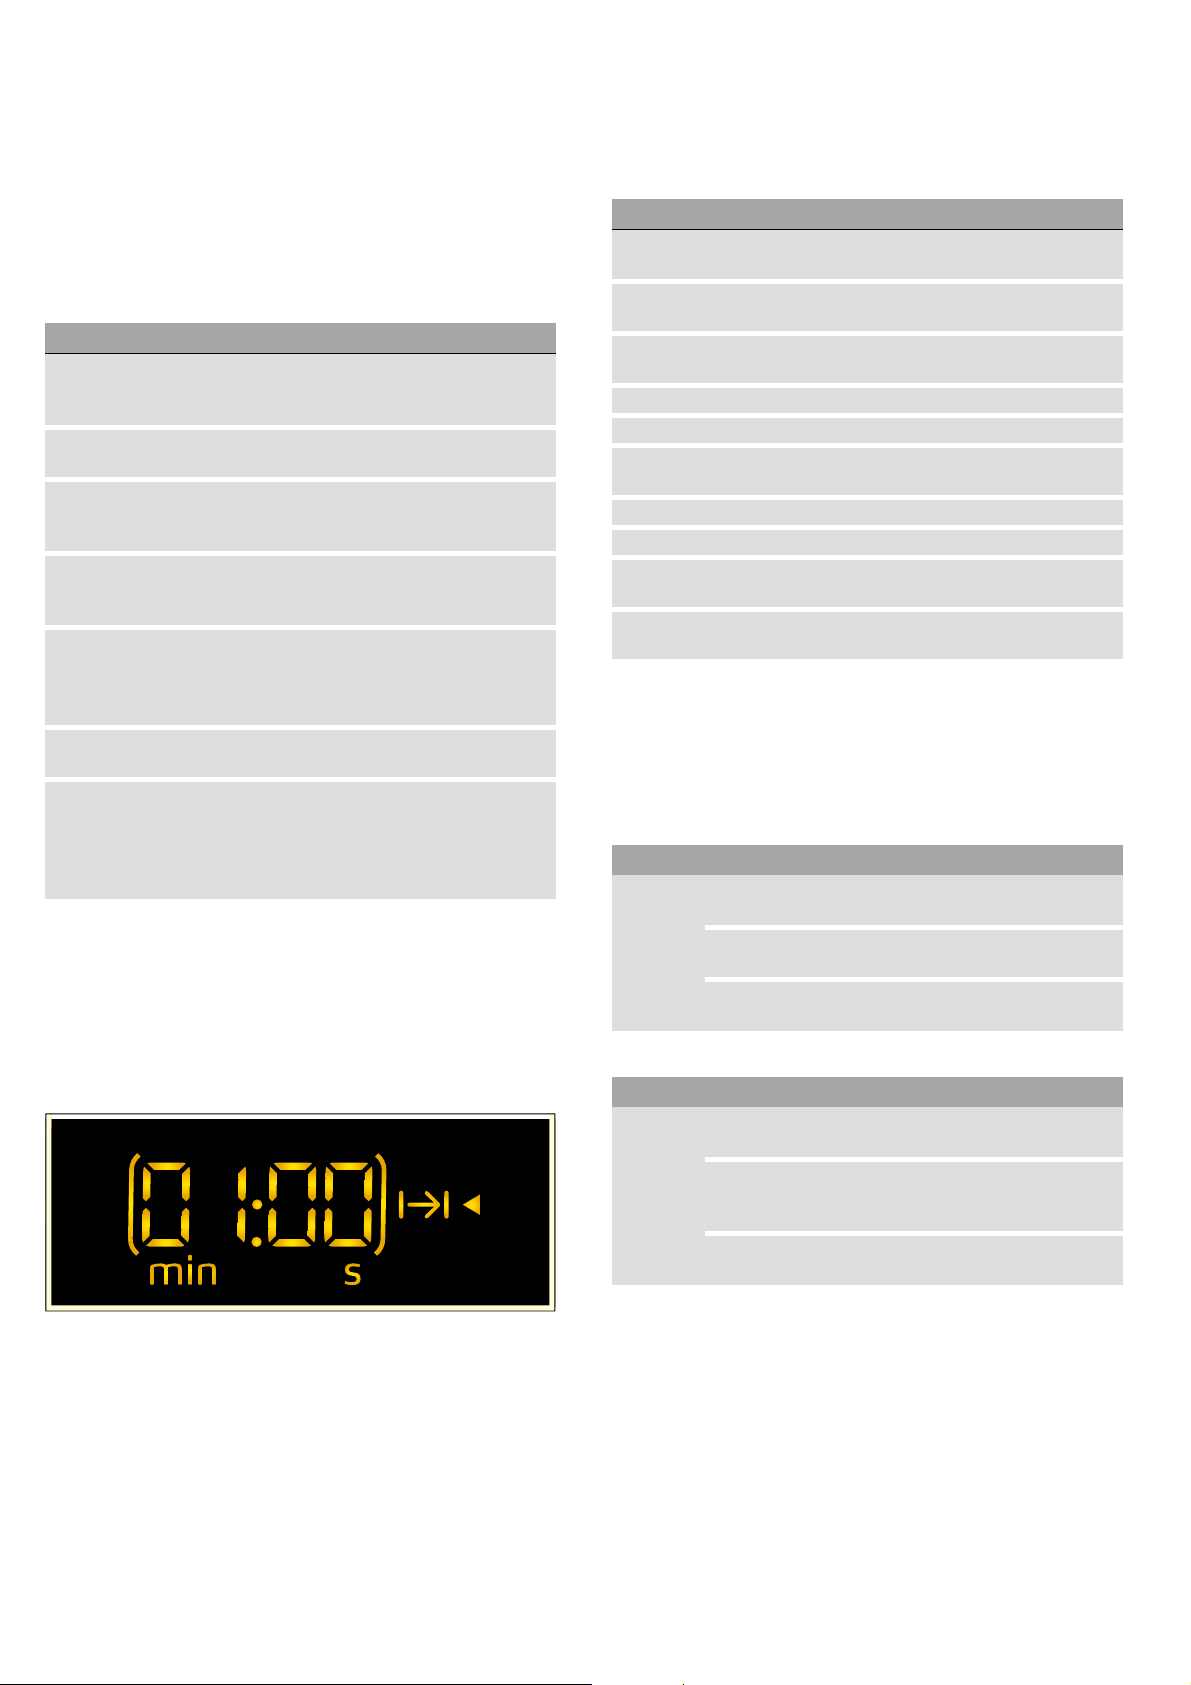
Getting to know your appliance en
Touch fields and display
You can use the touch fields to set various additional
functions for your appliance. You can see the values for
these in the display.
Touch fields
Here you can find a short explanation of the various
buttons and touch fields.
Symbol Meaning
! Microwave Select the microwave power levels or
switch on the microwave function for
a type of heating.
É Steam Select a steam level or switch on the
steam function for a type of heating.
= Programmes Call up the programme selection, use
the rotary selector to select the programme number.
0 Time-setting
options
i Rapid preheat-
ing/childproof
lock
û/A Temperature/
weight
@ Start/stop Starts or pauses the operation
--------
Display
The display is structured so that the information can be
read at a glance in any situation.
The value that you can currently set is highlighted. It is
highlighted by brackets around the set value.
The value that is highlighted can be changed directly
using the settings area.
Select the "Time-setting options" symbol and use the rotary selector to set
the time-setting options you require.
Press briefly: Activate/deactivate
rapid preheating.
Press and hold: Activate/deactivate
the childproof lock.
Select and set the temperature/
weight using the rotary selector.
Note: Pressing and holding ends the
current operation and the settings for
the operating mode selected are reset
to the default values.
Display elements
Here you can find a short explanation of the various
display elements.
Symbol Meaning
Q Timer If the symbol is highlighted, the timer
will appear on the display.
+ Cooking time If the symbol is highlighted, the cook-
ing time will appear on the display.
0 Clock If the symbol is highlighted, the clock
will appear on the display.
h:min Hours/minutes Cooking time in hours and minutes
min:s Minutes/seconds Cooking time in minutes and seconds
@ Childproof lock If this symbol lights up, the childproof
lock is activated.
D Drip tray Drip tray status display
9 Water tank Water tank status display
d Rapid heating If this symbol lights up, rapid heating
is activated.
$ Descaling If the symbol lights up, the appliance
must be descaled.
--------
Drip tray and water tank status display
The status display only lights up when the rip tray or
water tank is required for the selected operating mode.
It can display various statuses and informs the user
when action is required.
Water tank status display
Symbol Meaning
9
Symbol lights up,
arrow flashes
Symbol without
arrow flashes
Symbol without
arrow lights up
Water tank is in the tank recess and
needs filling.
Water tank is not in the tank recess
and needs fitting in place.
Water tank is in the tank recess. No
further action necessary.
Drip tray status display
Symbol Meaning
D
Symbol lights up,
arrow flashes
Symbol without
arrow flashes
Drip tray is in the tank recess and
needs emptying.
Drip tray is not in the tank recess.
Insert the drip tray into the tank
recess.
Symbol without
arrow lights up
Drip tray is in the tank recess. No further action necessary.
55
Page 56
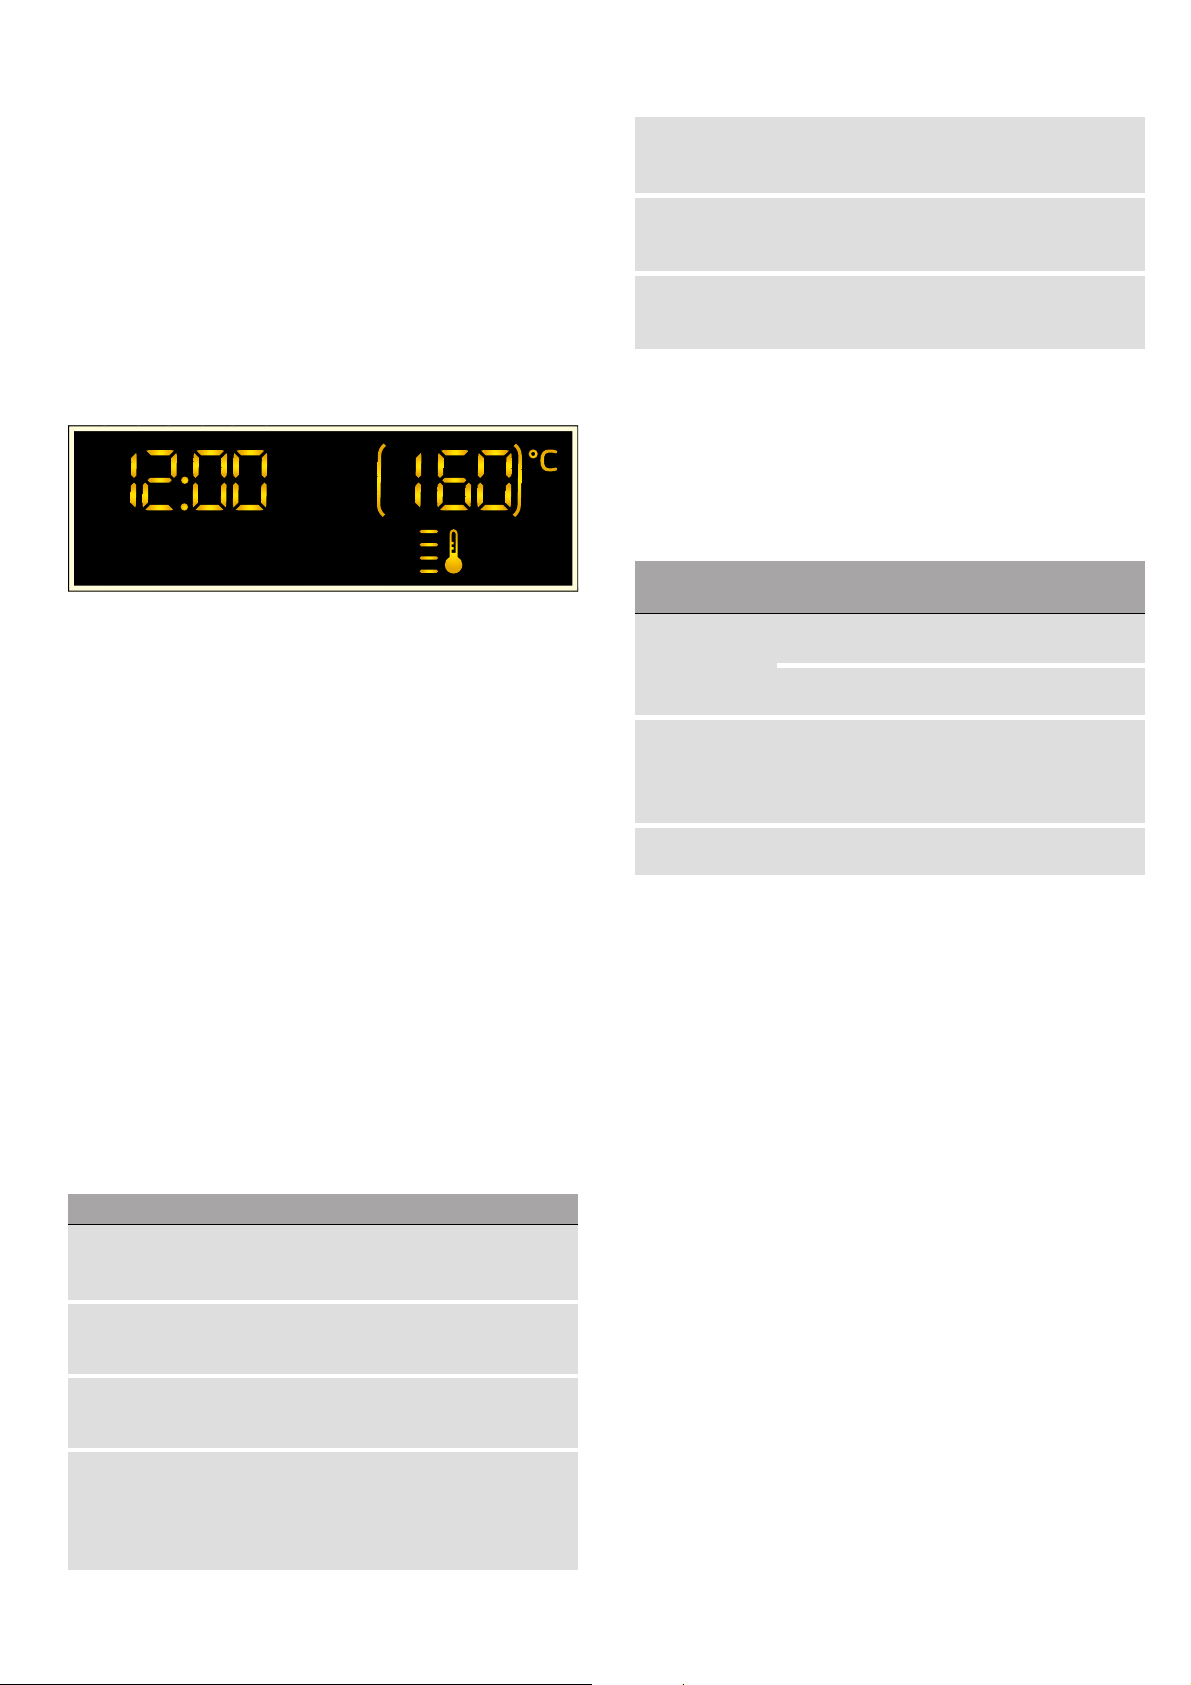
en Getting to know your appliance
Temperature indicator
The yellow thermometer at the bottom right of the
display indicates that the appliance is heating up.
If a heating function is in use, the bars turn yellow from
bottom to top as the cooking compartment heats up.
If you are using the grill or steam mode, all the bars will
be lit at the beginning.
The bars do not light up when the microwave function is
in use.
When you are preheating the appliance, the optimal
time to place your food in the cooking compartment is
as soon as all four bars have turned yellow.
Note: Due to thermal inertia, the actual temperature
inside the cooking compartment may be slightly
different to the temperature that is displayed.
Night mode
To save energy, the display brightness is automatically
reduced to a lower level between 10 p.m. and 5.59 a.m.
Rotary selector
Use the rotary selector to change the adjustment values
that are shown in the display and highlighted.
In most selection lists, e.g. programmes, the first
selection follows the last.
For values, e.g. weight, you have to turn the rotary
selector back the other way when you reach the
minimum or maximum value.
Steam combination
~ "Setting the steam
combination" on page 66
Cleaning
~ "Cleaning function"
In addition to a type of heating, you
can switch the steam function on for
this.
Different cleaning functions are available: Descaling and rinsing.
on page 76
Basic settings
~ "Basic settings"
You can change your appliance's
basic settings to suit your needs.
on page 74
--------
Types of heating
To make sure you always use the right type of heating
to cook your food, we have explained the differences
and applications below.
The symbols for each type of heating help you to
remember them.
Type of heating Tempera-
ture
Hot air 40 °C Let yeast dough rise, defrost
~
100-230 °C For baking and roasting on one
Grill Grill settings:
$
1 = low
2 = medium
3 = high
#
Hot air grill-
100-190 °C For roasting poultry, whole fish
ing
--------
Default values
For each type of heating, the appliance specifies a
default temperature or level. You can accept this value
or change it in the appropriate area.
Use
cream cakes.
level.
For grilling flat items, such as
steaks or sausages, for making
toast, and for au gratin dishes.
and larger pieces of meat.
Operating modes
Your appliance has various operating modes which
make your appliance easier to use.
You can find more precise descriptions of these in the
corresponding sections.
Operating mode Use
Types of heating
~ "Operating the appliance"
on page 61
Microwave
~ "Microwave" on page 62
Steam
~ "Steam" on page 65
Microwave combined operation
~ "Setting the microwave to
combined operation"
on page 64
56
There are various finely tuned heating
types for the optimal preparation of
your food.
You can use the microwave to cook,
heat up or defrost your dishes more
quickly.
There are various finely tuned steam
levels for the optimal preparation of
your food.
In addition to a type of heating, you
can switch the microwave on for this.
Page 57

Getting to know your appliance en
Steam
You can use the steam function on its own or in
combination with all types of heating and the microwave
function.
To ensure optimum use of the steam function, remove
the wire rack. Insert the glass tray at shelf position 3
and insert the steam container into the glass tray.
3
Steam levels
Different intensity levels are available when using the
steam function. The steam levels can be selected by
touching É. The selected steam level is shown in the
display.
Level Intensity Use Display indicator
1 low For defrosting vegeta-
bles, meat, fish and fruit.
Exceptions:
! Microwave setting, 1000 watts
~ Hot air 40 °C
Find out how to combine the microwave function with all
types of heating and the steam function here:
~ "Setting the microwave to combined operation"
on page 64
Cooking compartment
Various functions in the cooking compartment make
your appliance easier to use. For example, the cooking
compartment is well lit and a cooling fan prevents the
appliance from overheating.
Opening the appliance door
If you open the appliance door during an operation, the
operation is paused. Close the door and touch the
@ field to continue the operation.
Interior lighting
The interior lighting lights up while the appliance is
operating. Once the oven has finished cooking the
food, the lighting goes out.
The interior lighting switches on when the appliance
door is opened. This makes it easier to clean your
appliance, for example. After approximately 15 minutes,
the interior lighting automatically switches itself off.
2 medium For preparing desserts,
fish and sausages.
3 high For cooking vegetables,
fish, side dishes, for
extracting juice from
fruit and for blanching.
Microwave
A variety of microwave power settings that are suitable
for different types of food and food preparation are
available. The microwave settings do not always
correspond exactly to the wattage used by the
appliance.
The following microwave settings are available.
Microwave setting Maximum cooking time
90 1 hour 30 mins
180 1 hour 30 mins
360 1 hour 30 mins
600 1 hour 30 mins
1000 30 minutes
--------
You can use the microwave function on its own or in
combination with all types of heating and the steam
function.
Cooling fan
Your appliance has a cooling fan. The cooling fan
switches on during operation. The hot air escapes
above the door.
The cooling fan continues to run for a certain time after
operation.
Caution!
Do not cover the ventilation slots. Otherwise, the
appliance may overheat.
Notes
■ The appliance remains cool during microwave
operation. Despite this, the cooling fan will still
switch on. The fan may run on even when microwave
operation has ended.
■ Condensation may form on the door window, interior
walls and floor. This is normal and does not
adversely affect appliance operation. Wipe away the
condensation after cooking.
57
Page 58

en Getting to know your appliance
Tank cover
The tank cover is located below the appliance door and
allows for access to the drip tray and water tank. Both
of these are located behind the tank cover. Proceed as
follows to open and close the tank cover:
Briefly press on the centre of the tank cover to open it.
The tank cover folds upwards.
To close the tank cover, fold it downwards and briefly
press the centre of the tank cover. The tank cover is
locked.
1
2
Water tank
The appliance is equipped with a water tank. The water
tank is located to the right behind the tank cover. Fill the
water tank with water to operate the appliance using
steam modes. ~ "Filling the water tank" on page 67
If the arrow of the water tank symbol 9 flashes on the
display, the water in the water tank needs replacing.
Drip tray
The appliance is equipped with a drip tray. The drip tray
is located to the left behind the tank cover. Empty the
drip tray before and after carrying out the cleaning
functions~ "Cleaning function" on page 76
If the arrow of the drip tray symbol D flashes on the
display, the drip tray needs emptying.
( Handle for removing and inserting the water tank
0 Collection opening
8 Tank cover
( Handle for removing and inserting the water tank
0 Opening for filling
8 Tank cover
58
Page 59
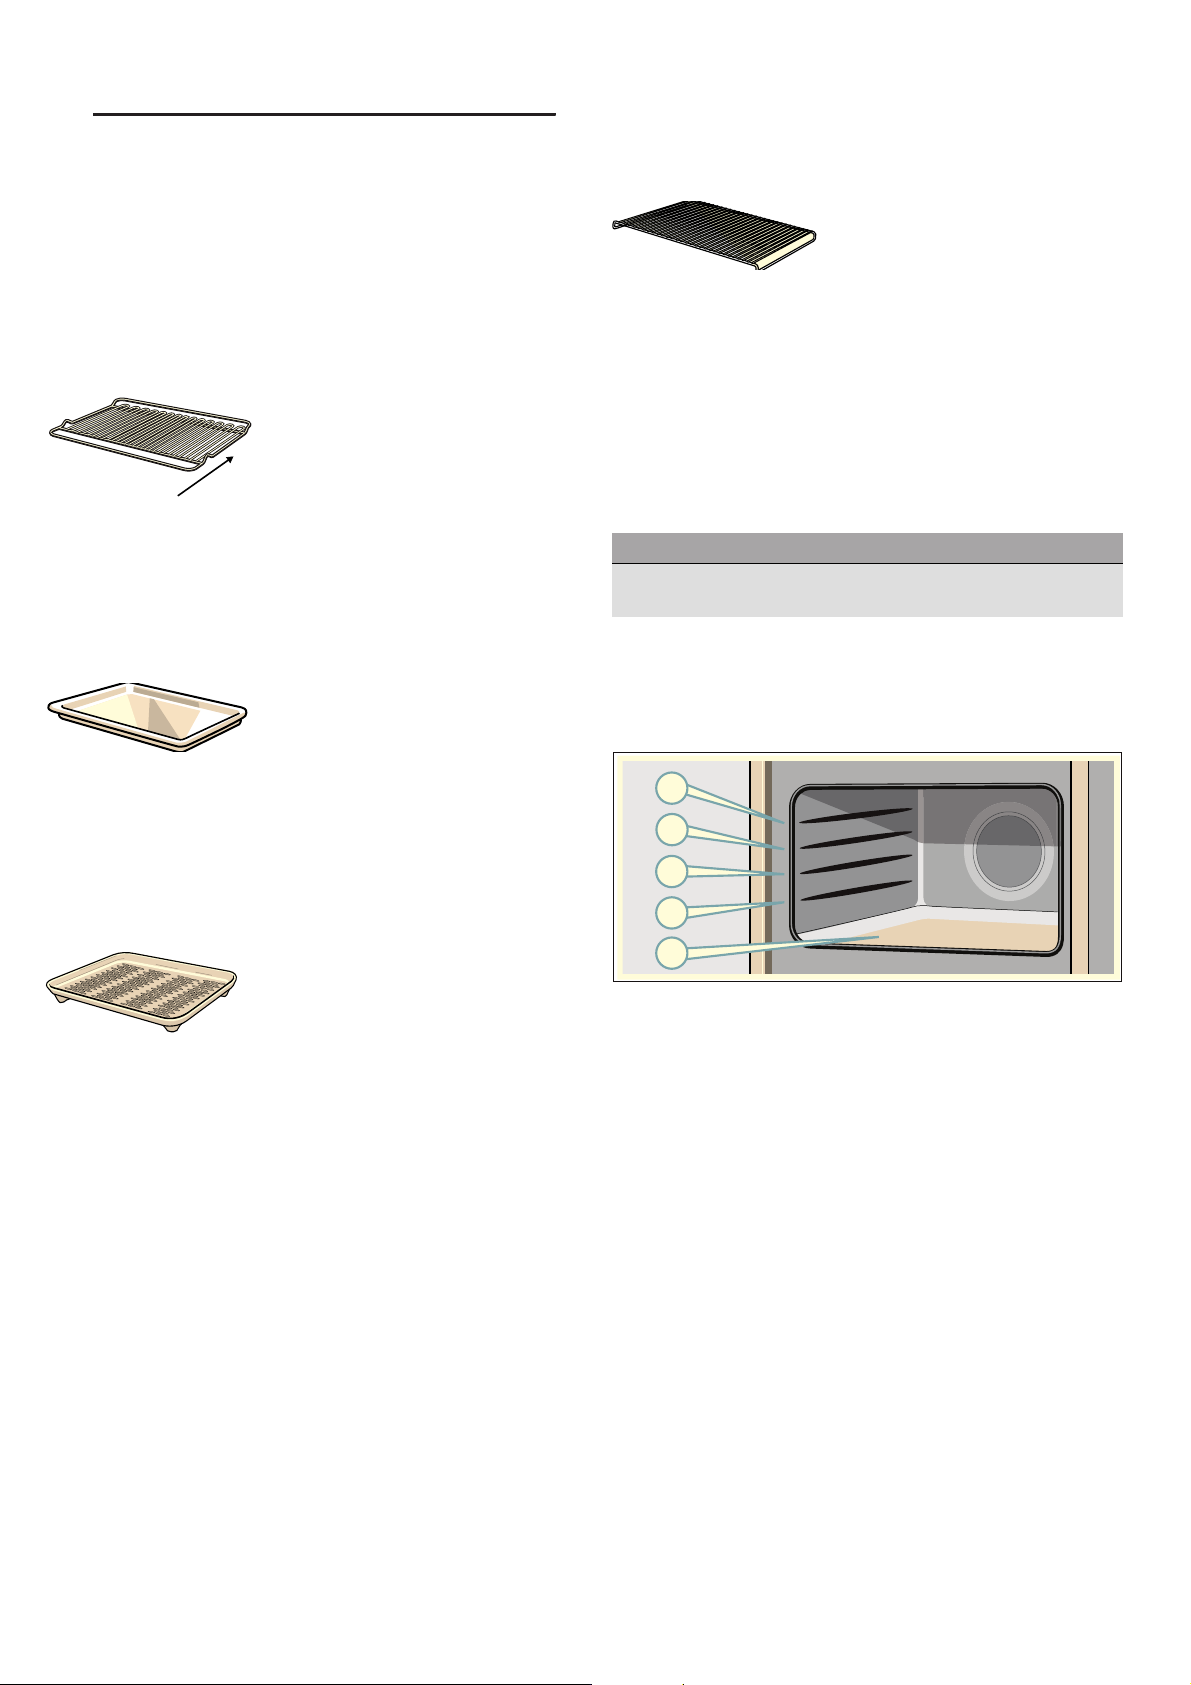
Accessories en
_Accessories
Accessori es
Your appliance is accompanied by a range of
accessories. Here, you can find an overview of the
accessories included and information on how to use
them correctly.
Accessories included
Your appliance is equipped with the following
accessories:
Wire rack
Use as a surface for setting
down baking tins or for grilling
and browning.
³
Use the wire rack for grilling at
shelf positions 3 and 4.
The wire rack is not suitable for
use when the appliance is
operating purely in microwave
mode or when you are cooking
using steam.
Make sure that you insert the
wire rack in direction a.
Glass tray
The glass tray can be used for
cooking in all operating modes,
including combination mode. In
addition, it acts as a splash
guard if you are grilling food
directly on the wire rack.
Allow the glass tray to cool
before you clean it or place it in
cold water as this may damage
the glass.
Additional accessories
Additional accessories may be enclosed depending on
the appliance model.
Wire insert
For frying. Insert the wire insert
into the glass tray with its feet to
the bottom. This ensures that
dripping grease and meat juices
can be collected. The wire insert
is not suitable for use in
microwave operation or steam
mode.
Special accessories
You can obtain further accessories from the after-sales
service or from specialist retailers.
Special accessories
Glass roasting dish
For pot roasts and bakes that you prepare in the oven.
--------
Inserting accessories
The cooking compartment has four shelf positions. The
shelf positions are counted from the bottom up.
4
3
2
1
Steam container
The steam container is placed
into the glass tray in order to
cook with the "Steam" or "Steam
with microwave" operating
modes. The glass tray must be
inserted in shelf position 3 for
this. The food can be placed
directly onto the steam
container.
The steam container is
dishwasher-safe.
Do not use the steam container
in standard microwave
operation or during "Grill", "Hot
air" or "Hot air grill" heating
modes.
Only use original accessories provided by your
appliance manufacturer. They are specially adapted for
your appliance.
You can buy accessories from our customer service,
from specialist retailers or online.
0
Insert the accessory into the guide and slide it in fully.
Note: The cooking compartment (position 0) is
particularly suitable for microwave operation, as this is
where the microwave power is optimum. Only use
cookware that is suitable for use in microwaves.
59
Page 60

en Before using for the first time
KBefore using for the first
time
Bef or e usi ng for the first time
Before you can use your new appliance, you must
make some settings. You must also clean the cooking
compartment and accessories.
The appliance must be fully installed and connected to
the mains.
Initial use
After connecting the electricity supply or after a power
cut, the display prompts you to set the time. It may take
a few seconds for the instruction to appear.
Setting the time
During initial use, the time display is highlighted.
The‚ƒ:‹‹ value flashes in the display and the 0
symbol lights up. Set the time.
1. Use the rotary selector to set the time.
2. Touch 0.
The time has now been set.
Changing the time on the clock
Note: To change the time on the clock, you will need to
switch off the appliance.
1. Touch the 0 button twice.
The 0 symbol and the clock time will appear on the
display.
2. Set the clock using the rotary selector.
3. Touch the 0 button.
The time has now been set.
Set the water hardness range.
Set t i ng the wa t e r har dness r ange
So that the appliance can reliably remind you to
descale it when required, you must set your water
hardness range correctly.
The water hardness range is set to 4 (very hard) ex
works.
Caution!
The appliance may become damaged due to the use of
unsuitable liquids.
Do not use distilled water, highly chlorinated tap water
(>40 mg/l) or other liquids.
Only use fresh, cold, non-carbonated tap water or
softened water.
Notes
■ If your water is very hard, we recommend that you
use softened water.
■ If you only use softened water, you can set the water
hardness range to "softened" in this case.
■ If you use mineral water, set the water hardness
range to "4 very hard".
■ If you use mineral water, you must only use non-
carbonated mineral water.
Water hardness range Setting
0 0 softened
1 (up to 1.3 mmol/l) 1 soft
2 (1.3 - 2.5 mmol/l) 2 medium
3 (2.5 - 3.8 mmol/l) 3 hard
4 (above 3.8 mmol/l) 4 very hard
You can change the water hardness in the basic
settings.~ "Basic settings" on page 74
Notes
■ If you do not touch the 0 button after setting the
time, the set value is automatically adopted after a
few seconds.
■ If the function selector has been moved to configure
the settings, it must be returned to the "Off" position
once you have finished. Only then can the appliance
be used.
■ In order to reduce the energy consumption of your
appliance in standby, you can hide the clock.
Cleaning the cooking compartment and
accessories
Before using the appliance to prepare food for the first
time, you must clean the cooking compartment and
accessories.
Cleaning the cooking compartment
To eliminate the new-appliance smell, heat up the
cooking compartment when it is empty and with the
oven door closed. One hour with Hot air ~ at 180 °C
is ideal for this. Ensure that no packaging remnants
have been left in the cooking compartment.
1. Use the function selector to set Hot air ~.
2. Use the rotary selector to set to 180 ºC.
3. Touch @.
The appliance begins to heat up.
Switch off the appliance after one hour. To do so, touch
@ and then turn the function selector to the off position.
Cleaning the accessories
Before you use the accessories for the first time, clean
them thoroughly with hot soapy water and a soft dish
cloth.
60
Page 61

Operating the appliance en
1Operating the appliance
Operat i ng the appl i ance
You have already learnt about the controls and how
they work. Now we will explain how to set your
appliance. You will learn about what happens when you
switch the appliance on and off, and how to select the
operating mode.
Switching the appliance on and off
Before you are able to set the appliance, you must
switch it on.
Note: The childproof lock can only be set if the
appliance is switched off. Some displays also remain
visible in the display when the appliance has been
switched off.
Switch off your appliance when it is not being used. If
no settings are applied for a long time, the appliance
switches itself off automatically.
Switching on the appliance
Turn the function selector to switch on the appliance.
A standard value is highlighted in the display. The
appliance is ready to use.
You can find out how to select the operating modes in
the individual chapters.
Switching off the appliance
Turn the function selector to the off position.
Any functions that may be running are cancelled.
The time appears in the display.
Note: You can set whether the clock should be
displayed when the device is switched off in the basic
settings.
Selecting an operating mode
Setting the heating function and temperature
Example: Hot air ~ at 200 °C
1. Use the function selector to set the Hot air ~
heating function.
A default temperature of 160 °C will appear on the
display.
2. Use the rotary selector to set the temperature to
200 °C.
3. Touch the @ button.
The appliance will start heating. The @ LED will be lit.
The length of the bar on the temperature indicator
gradually increases.
You can change the temperature at any time when the
appliance is heating using the rotary selector.
Notes
■ Once the appliance has heated up, slight
fluctuations in temperature are normal, depending
on the heating function.
■ When the appliance is heating, the temperature
cannot be set to 40 °C.
After selecting an operating mode, default values are
shown in the display. You can start this setting
immediately.
The following always applies:
1. Use the function selector to select the operating
mode.
2. If necessary, apply other settings.
To do this, touch the appropriate field and use the
rotary selector to change the value.
3. Touch @.
The appliance starts the operation. The @ LED lights
up.
Setting the cooking time
1. Set the type of heating and temperature.
2. Touch 0 until the + symbol is highlighted.
3. Use the rotary selector to set the required cooking
time.
4. Touch @.
The appliance begins to heat up. The @ LED lights
up. The cooking time starts counting down.
Pausing the operation
1. Touch the @ field or open the appliance door.
The operation is suspended and the @ LED flashes.
2. Close the appliance door.
3. Touch the @ field.
The operation is continued and the @ LED lights up.
61
Page 62

en Microwave
Stopping the appliance from heating
Turn the function selector to the "Off" position.
The appliance will stop heating and all the settings will
be cleared.
Note: The fan may continue to run after the appliance
has been paused or stopped.
Rapid heating
With rapid heating, your appliance reaches the set
temperature particularly quickly.
Only use rapid heating when a temperature of over
100 °C has been selected. Rapid heating is available
for the following types of heating:
■ ~ Hot air (Exception: Hot air 40 °C)
■ # Hot air grill
To ensure an even cooking result, do not place your
food in the cooking compartment until rapid heating is
complete.
1. Set the type of heating and temperature.
2. Touch i.
The d symbol lights up on the display.
3. Touch @.
The appliance begins to heat up. The @ LED lights
up.
Rapid heating has finished
An audible signal sounds. The d symbol disappears
from the display. Your appliance continues to run with
the set type of heating and temperature. Place your
food in the cooking compartment.
Cancelling rapid heating
Touch i. The d symbol disappears from the display.
Your appliance continues to run with the set type of
heating and temperature.
Note: Rapid heating is automatically deactivated within
15 minutes maximum.
^Microwave
Microwave
You can use the microwave to cook, heat up or defrost
food quickly. You can use the microwave on its own or
in combination with other types of heating.
To ensure optimum use of the microwave, please
observe the notes on cookware and familiarise yourself
with the data in the application tables at the end of the
instruction manual.
To ensure optimum use of the microwave, place your
cookware on the cooking compartment floor. Remove
the wire rack. Observe the instructions on the
cookware.
Cookware
Not all cookware is microwavable. So that your food is
heated and the appliance is not damaged, only use
microwavable cookware.
Suitable cookware
Heat-resistant cookware made of glass, glass ceramic,
porcelain, ceramic or heat-resistant plastic are suitable.
These materials allow microwaves to pass through.
You can also use serving dishes. This saves you having
to transfer food from one dish to another. You should
only use cookware with decorative gold or silver trim if
the manufacturer guarantees that they are suitable for
use in microwaves.
Unsuitable cookware
Metal cookware is unsuitable. Metal does not allow
microwaves to pass through. Food in covered metal
containers will remain cold.
Caution!
Creation of sparks: Metal – e.g. a spoon in a glass –
must be kept at least 2 cm from the cooking
compartment walls and the inside of the door. Sparks
can irreparably damage the glass on the inside of the
door.
Automatic safety switch-off function
The automatic safety switch-off function is activated if
your appliance is operating for a long time with no
cooking time having been set.
The appliance automatically switches off after nine
hours.
62
Cookware test
Never switch on the microwave unless there is food
inside. The short cookware test is the only exception to
this rule.
Perform the following test if you are unsure whether
your cookware is suitable for use in the microwave.
1. Heat the empty cookware at maximum power for ½
to 1 minute.
2. Check the temperature of the cookware during this
time.
The cookware should remain cold or warm to the touch.
The cookware is unsuitable if it becomes hot or sparks
are generated.
In this case, stop the test.
:Warning – Risk of burns!
The accessible parts become very hot when in
operation. Never touch hot parts. Keep children at a
safe distance.
Page 63

Microwave en
Microwave power settings
The microwave power settings are levels and do not
always correspond to the exact wattage that the
appliance uses.
The following microwave power settings are available.
Microwave setting
90 1 hour 30 mins For defrosting food that deterio-
180 1 hour 30 mins For defrosting and continued
360 1 hour 30 mins For cooking meat and for heat-
600 1 hour 30 mins For heating and cooking food.
1000 30 minutes For heating liquids.
--------
Default values:
The appliance provides a default cooking time for each
microwave setting. You can accept this value or change
it in the appropriate area.
The maximum setting is for heating liquids. After a
certain period, the microwave's power output is reduced
to below maximum to protect the appliance. The
microwave's full power is available again after a cooling
period.
Maximum cooking
time
Use
rates easily in terms of quality.
cooking.
ing food that deteriorates easily
in terms of quality.
Setting the microwave
Example: Microwave setting 600 W, cooking time
5 minutes.
1. Use the function selector to select the microwave
function !.
The appliance is now ready to use. The maximum
microwave power output ! will be displayed as the
default value on the display. You can change this at
any time.
2. Touch the microwave setting field to select the
power setting you require.
The microwave setting will be highlighted and a
default cooking time will be shown on the display.
3. Use the rotary selector to set the required cooking
time.
Note: You can also set the cooking time first and
then the microwave setting.
4. Touch the @ button.
Time setting intervals
The interval for setting the cooking time changes with
the length of the cooking time.
Cooking time Interval
0 - 1 minute 5 seconds
1 - 3 minutes 10 seconds
3 - 15 minutes 30 seconds
15 minutes - 1 hour 1 minute
1 hour - 1 hour 30 minutes 5 minutes
The time remaining will count down on the display.
The @ LED will be lit.
The cooking time has elapsed
An audible signal sounds. Open the appliance door or
touch any field.
Changing the cooking time
Use the rotary selector to change the cooking time.
After a few seconds, the change is applied.
Changing the microwave power output
Touch ! until the required level is selected in the
display.
63
Page 64

en Microwave
Notes
■ Touching it several times switches the power levels
from the highest to the lowest level.
■ If the microwave function is only added after the
start, the appliance pauses. Press @ to start
operation
Pausing the operation
1. Touch the @ field or open the appliance door.
The operation is suspended and the @ LED flashes.
2. Close the appliance door.
3. Touch the @ field.
The operation is continued and the @ LED lights up.
Stopping the appliance from heating
Turn the function selector to the "Off" position.
The appliance will stop heating and all the settings will
be cleared.
Note: The fan may continue to run after the appliance
has been paused or stopped.
Setting the microwave to combined
operation
Set t i ng the microwave to combi ned oper at i on
You can combine the microwave function with all types
of heating and the steam function. The appliance heats
up and the microwave is switched on at the same time.
As a result, the food is ready in a much shorter time.
Changing the microwave power output
Touch ! until the required level is selected in the
display.
Notes
■ Touching it several times switches the power levels
from the highest to the lowest level.
■ If the microwave function is only added after the
start, the appliance pauses. Press @ to start
operation
Pausing the operation
1. Touch the @ field or open the appliance door.
The operation is suspended and the @ LED flashes.
2. Close the appliance door.
3. Touch the @ field.
The operation is continued and the @ LED lights up.
Stopping the appliance from heating
Turn the function selector to the "Off" position.
The appliance will stop heating and all the settings will
be cleared.
Note: The fan may continue to run after the appliance
has been paused or stopped.
Drying the cooking compartment
Dry the cooking compartment after operation to ensure
that no moisture remains.
Combination options
■ É Steam
■ ~ Hot air
■ $ Grill
■ # Hot air grill
Exceptions:
! Microwave setting, 1000 watts
~ Hot air 40 °C
Setting combined operation
Example: Hot air ~ 190 ºC with microwave at 360 W,
17 minutes.
1. Use the function selector to set the Hot air ~
function.
A default value for the temperature is displayed.
2. Turn the rotary selector to set the desired
temperature.
3. Touch the microwave power output field ! until the
required level is selected in the display.
A default cooking time appears.
4. Set the cooking time using the rotary selector.
5. Touch @.
The operation starts and the @ LED lights up. The
cooking time starts counting down.
The cooking time has elapsed
A signal sounds and the @ symbol stops lighting up.
Combination mode has finished. Touch any field to end
the acoustic signal.
Heating up the cooking compartment
To dry, heat up the cooking compartment so that the
moisture in the cooking compartment evaporates. Then
open the appliance door to allow the steam to escape
from the cooking compartment.
1. Allow the appliance to cool down.
2. Remove the worst dirt from the cooking
compartment immediately and wipe away moisture
from the cooking compartment floor.
3. Use the function selector to select Hot air grill #
4. Touch 0 twice.
The cooking time symbol + is highlighted in the
display.
5. Use the rotary selector to set a cooking time of 15
minutes.
6. Press @ to start the operation.
The drying function starts and ends automatically
after 15 minutes.
7. Open the appliance door and leave it open for 1 to 2
minutes so that the moisture in the cooking
compartment can escape.
Drying the cooking compartment by hand
1. Allow the appliance to cool down.
2. Remove any food remnants from the walls of the
cooking compartment.
3. Dry the cooking compartment with a sponge.
4. Leave the appliance door open for 1 hour so that the
cooking compartment dries completely.
64
Page 65

Steam en
`Steam
St e a m
You can use the steam function on its own or in
combination with all types of heating and the microwave
function.
To ensure optimum use of the steam function, remove
the wire rack. Insert the glass tray at shelf position 3
and insert the steam container into the glass tray.
3
:Warning – Risk of scalding!
When you open the appliance door, hot steam can
escape. Steam may not be visible, depending on its
temperature. When opening, do not stand too close to
the appliance. Open the appliance door carefully. Keep
children away.
Setting the steam
Note: If the appliance has not been used for an
extended period, start by running a rinse cycle $.
~ "Cleaning function" on page 76
Example: Steam setting 2: Medium, cooking time
10 minutes.
1. Use the function selector to select the steam
function z.
The appliance is ready to use. The maximum steam
setting and a cooking time of 20 minutes are set as
the default values. The arrow of the water tank
symbol 9 flashes.
2. Remove the water tank, fill with fresh water up to the
"max." mark and insert fully in the tank
recess.~ "Filling the water tank" on page 67
3. Touch and hold the É button until you reach the
required setting.
Noise
Pump
You will hear a humming noise during operation. This
noise is caused by the pump. It is a normal operating
noise.
Cooking with steam
Steam levels
Different intensity levels are available when using the
steam function. The steam levels can be selected by
touching É. The selected steam level is shown in the
display.
Level Intensity Use Display indicator
1 low For defrosting vegeta-
bles, meat, fish and fruit.
2 medium For preparing desserts,
fish and sausages.
The selected steam setting will be shown on the
display.
4. Use the rotary selector to set the required cooking
time.
Note: You can also adjust the cooking time first and
then the steam setting.
3 high For cooking vegetables,
fish, side dishes, for
extracting juice from
fruit and for blanching.
65
Page 66

en Steam
5. Touch the @ button.
The arrow of the water tank symbol 9 will go out
and the water tank symbol ( will be lit. The
appliance will start. The @ LED will be lit. The
cooking time will count down on the display. The
amount of time a tankful of water will last varies
depending on the steam setting. If the water tank
runs out of water while the appliance is in operation,
the appliance is paused and the arrow of the water
tank symbol 9 flashes. Fill the water tank with fresh
water up to the "max." mark and touch the @ button
to resume operation.
Notes
■ The steam setting can be changed at any time when
the appliance is in operation by pressing the
z button.
■ After cooking with steam, wipe out the drip channel
and the cooking compartment. ~ "After every
steam operation" on page 68
Setting the steam combination
Set t i ng the st eam combi nat i on
With some types of heating, you can switch on the
steam function.
When you cook with steam assistance, steam is
introduced into the cooking compartment at various
intervals and with varying degrees of intensity. This
gives you a better cooking result.
Your food
■ Becomes crispy on the outside
■ Achieves a glossy surface
■ Is succulent and tender on the inside
■ Only undergoes a minimum reduction in volume
Combination options
■ ! Microwave
■ ~ Hot air
■ $ Grill
■ # Hot air grill
Exceptions:
! Microwave setting, 1000 watts
~ Hot air 40 °C
Setting combination mode
Example: Hot air ~ 190 ºC with steam setting 2.
1. Use the function selector to set the Hot air ~
heating function.
A default value for the temperature will be displayed.
2. Turn the rotary selector to set the desired
temperature.
3. Touch the Steam button É until the required setting
has been selected on the display.
The water tank symbol 9 will appear on the display.
4. Refill water tank.
5. Touch the @ button.
The appliance will start and the @ LED will be lit.The
cooking time will start counting down.
Note: If the water tank runs out of water during cooking,
the appliance will continue cooking, but without steam
assistance. No indicator will appear on the display.
The cooking time has elapsed
A signal sounds and the @ symbol stops lighting up.
Combination mode has finished. Touch any field to end
the acoustic signal.
Changing the steam level
Touch the É field until the required level is selected in
the display.
Note: Touch the field multiple times switches through
the levels from the highest to the lowest level. After the
lowest level, the steam function is deactivated.
Touching again activates the steam function, starting
with the highest level.
Pausing the operation
1. Touch the @ field or open the appliance door.
The operation is suspended and the @ LED flashes.
2. Close the appliance door.
3. Touch the @ field.
The operation is continued and the @ LED lights up.
Stopping the appliance from heating
Turn the function selector to the "Off" position.
The appliance will stop heating and all the settings will
be cleared.
Note: The fan may continue to run after the appliance
has been paused or stopped.
66
Page 67
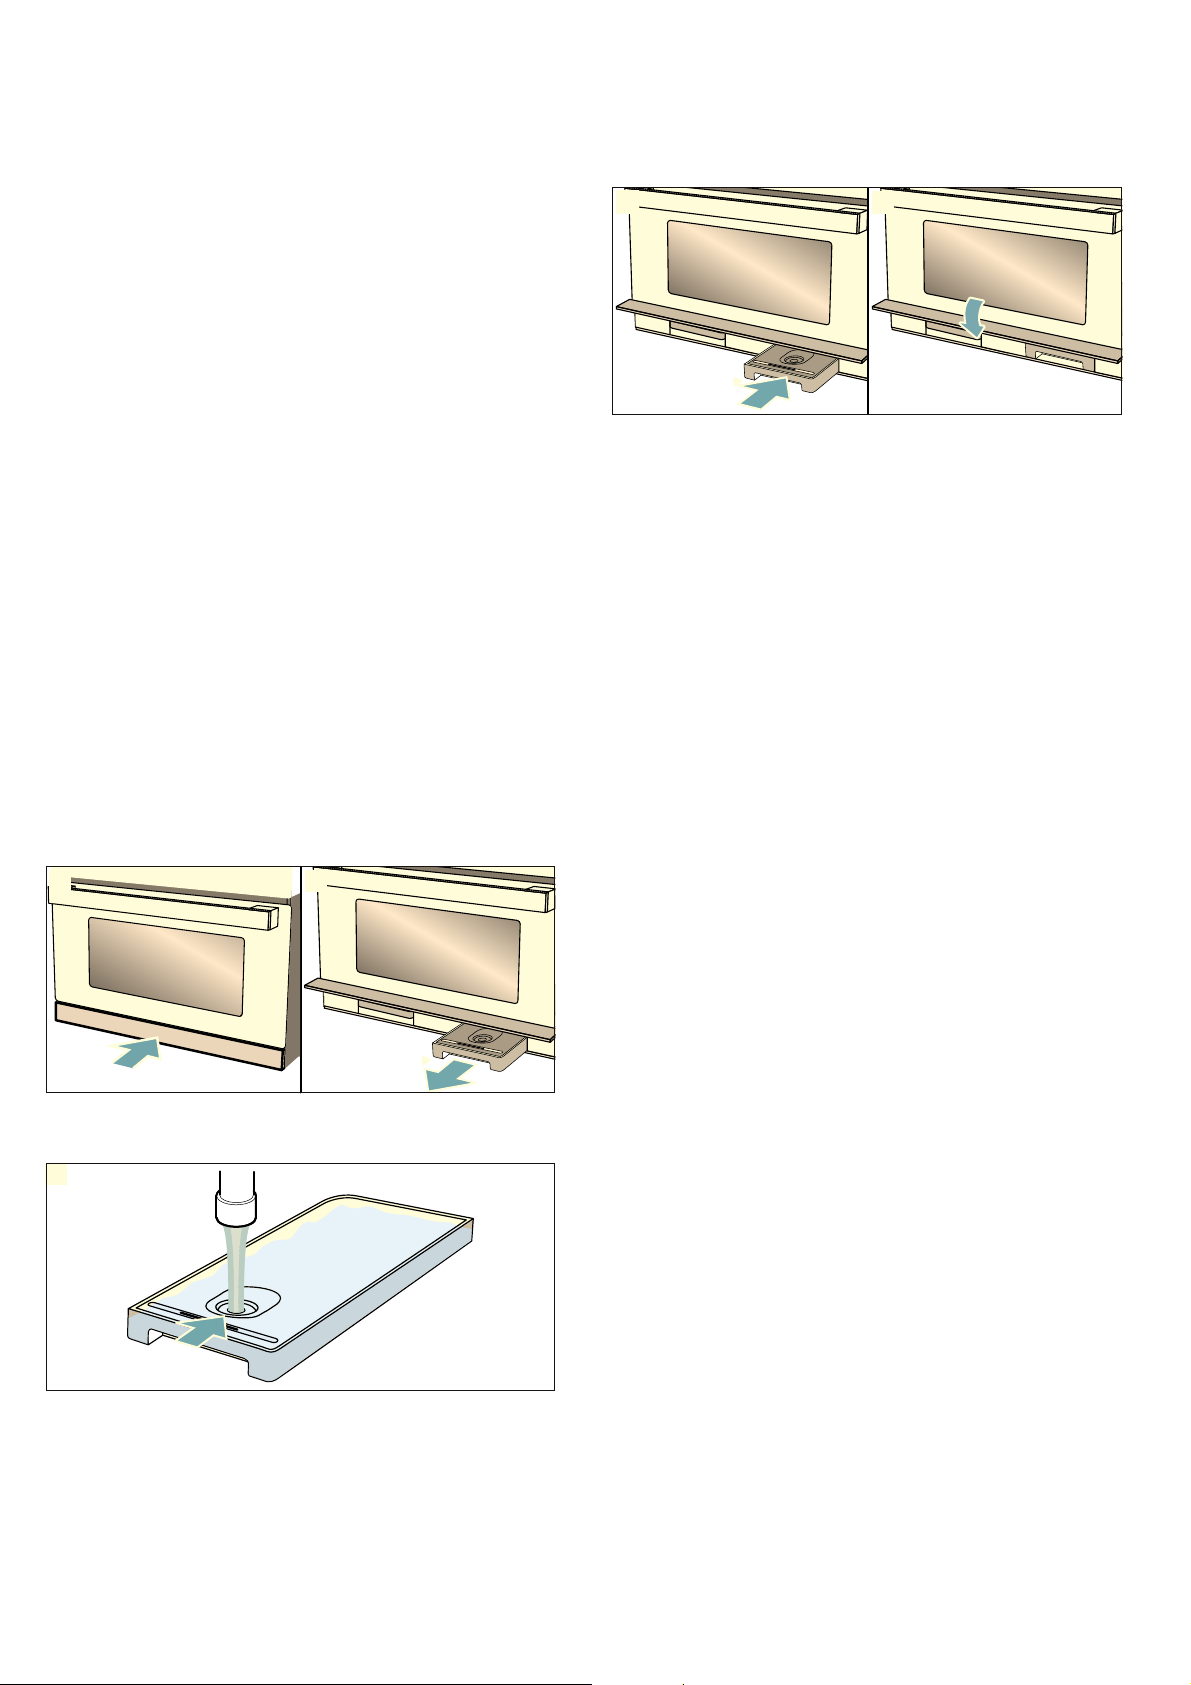
Steam en
Filling the water tank
Filling the wa t e r tank
The water tank is located to the right behind the tank
cover, below the appliance door. Before starting an
operation with steam, open the tank cover and fill the
water tank with water.
Ensure that the water hardness range has been set
correctly. ~ "Basic settings" on page 74
:Warning – Risk of injury and fire!
Only fill the water tank with water. Do not pour any
flammable liquids (e.g. alcoholic drinks) into the water
tank. Due to hot surfaces, vapours from flammable
liquids may catch fire in the cooking compartment
(explosion). The appliance door may spring open. Hot
steam and jets of flame may escape.
Caution!
The appliance may become damaged due to the use of
unsuitable liquids.
Do not use distilled water, highly chlorinated tap water
(>40 mg/l) or other liquids.
Only use fresh, cold, non-carbonated tap water or
softened water.
Notes
■ If your water is very hard; we recommend that you
use softened water.
■ If you use only softened water, you can set your
appliance to the "softened" water hardness range.
1. Briefly press on the centre of the tank cover.
The tank cover will open. The drip tray (left) and
water tank (right) can now be accessed.
2. Remove the water tank from the tank recess.
1 2
4. Place the water tank back into the tank recess and
slide it in fully.
5. Close the tank cover.
The steam function is ready to use.
Refilling the water tank
The way the appliance responds if the water tank runs
dry when the appliance is in operation depends on what
operating mode it is in:
■ Steam-assistance mode: The appliance is stopped
and a message appears on the display.At the
highest steam setting, a tankful of water will last
approx. 30-40 minutes; at the lower steam settings,
it will last much longer.
■ Steam-assistance with microwave: The appliance is
stopped. A tankful of water will last approx.
50 minutes.
■ Steam-assisted hot-air or grill mode: The appliance
continues to run in hot-air or grill mode; no message
appears on the display. At the highest steam setting,
a tankful of water will last approx. 3 hours; at the
lower steam settings, it will last much longer.
■ Steam-assisted air recirculation grill mode: The
appliance continues to run in air recirculation grill
mode; no message appears on the display. A tankful
of water will last approx. 9 hours.
3. Fill the water tank with cold water up to the "max."
mark.
Note: Actual times may vary from those specified.
Refill the water tank up to the "MAX" mark.
1. Open the control panel.
2. Remove and refill the water tank.
3. Insert the filled water tank and close the control
panel.
67
Page 68

en Steam
After every steam operation
Moisture remains in the cooking compartment. Carefully
wipe out the drip channel and the cooking
compartment. Each time you cook using steam, we
recommend that you run the Rinse cleaning function $
afterwards. Then empty and dry the water tank and drip
tray.
Note: Remove limescale marks with a cloth soaked in
vinegar, then wipe with clean water and dry with a soft
cloth.
Rinsing
To ensure that your appliance stays clean, you can
pump water through the pipe system. The water is then
drained to the drip tray.
Starting
1. Use the function selector to select the rinse cycle $.
The duration of the programme will be displayed.It
cannot be changed.
2. Open the tank cover.
3. Remove and empty the drip tray.
4. Slide the empty drip tray in fully.
5. Remove the water tank and fill it with fresh water.
6. Slide the water tank in fully.
7. Close the tank cover.
8. Touch the @ button.
Water is pumped through the pipes.The time
remaining will count down on the display. An audible
signal will sound once this time has elapsed. Empty
the drip tray.
Emptying the water tank
1. Briefly press on the centre of the tank cover.
The tank cover folds upwards.
2. Remove the water tank.
3. Carefully remove the lid for the water tank.
4. Empty the water tank, clean it with detergent and
then rinse it thoroughly with clean water.
5. Dry all parts with a soft cloth.
6. Rub the seal on the lid until dry.
7. Allow the water tank to dry with the lid open.
8. Place the lid on the water tank and push down on it.
9. Slide the water tank in fully.
10. Close the tank cover and briefly press on the centre
of it.
The tank cover is locked.
Caution!
■ Do not dry the water tank in the hot cooking
compartment. This will damage the water tank.
■ Do not clean the water tank in the dishwasher. This
will damage the water tank.
Cleaning the drip trough
1. Allow the appliance to cool down.
2. Open the appliance door.
3. Open the tank cover.
4. Remove the water tank and drip tray.
5. Wipe around the drip trough ‚ underneath the
cooking compartment with a sponge cloth (fig. !).
1
D
Drying the cooking compartment
Dry the cooking compartment after operation to ensure
that no moisture remains.
Heating up the cooking compartment
To dry, heat up the cooking compartment so that the
moisture in the cooking compartment evaporates. Then
open the appliance door to allow the steam to escape
from the cooking compartment.
1. Allow the appliance to cool down.
2. Remove the worst dirt from the cooking
compartment immediately and wipe away moisture
from the cooking compartment floor.
3. Use the function selector to select Hot air grill #
4. Touch 0 twice.
The cooking time symbol + is highlighted in the
display.
5. Use the rotary selector to set a cooking time of 15
minutes.
6. Press @ to start the operation.
The drying function starts and ends automatically
after 15 minutes.
7. Open the appliance door and leave it open for 1 to 2
minutes so that the moisture in the cooking
compartment can escape.
Drying the cooking compartment by hand
1. Allow the appliance to cool down.
2. Remove any food remnants from the walls of the
cooking compartment.
3. Dry the cooking compartment with a sponge.
4. Leave the appliance door open for 1 hour so that the
cooking compartment dries completely.
68
Page 69
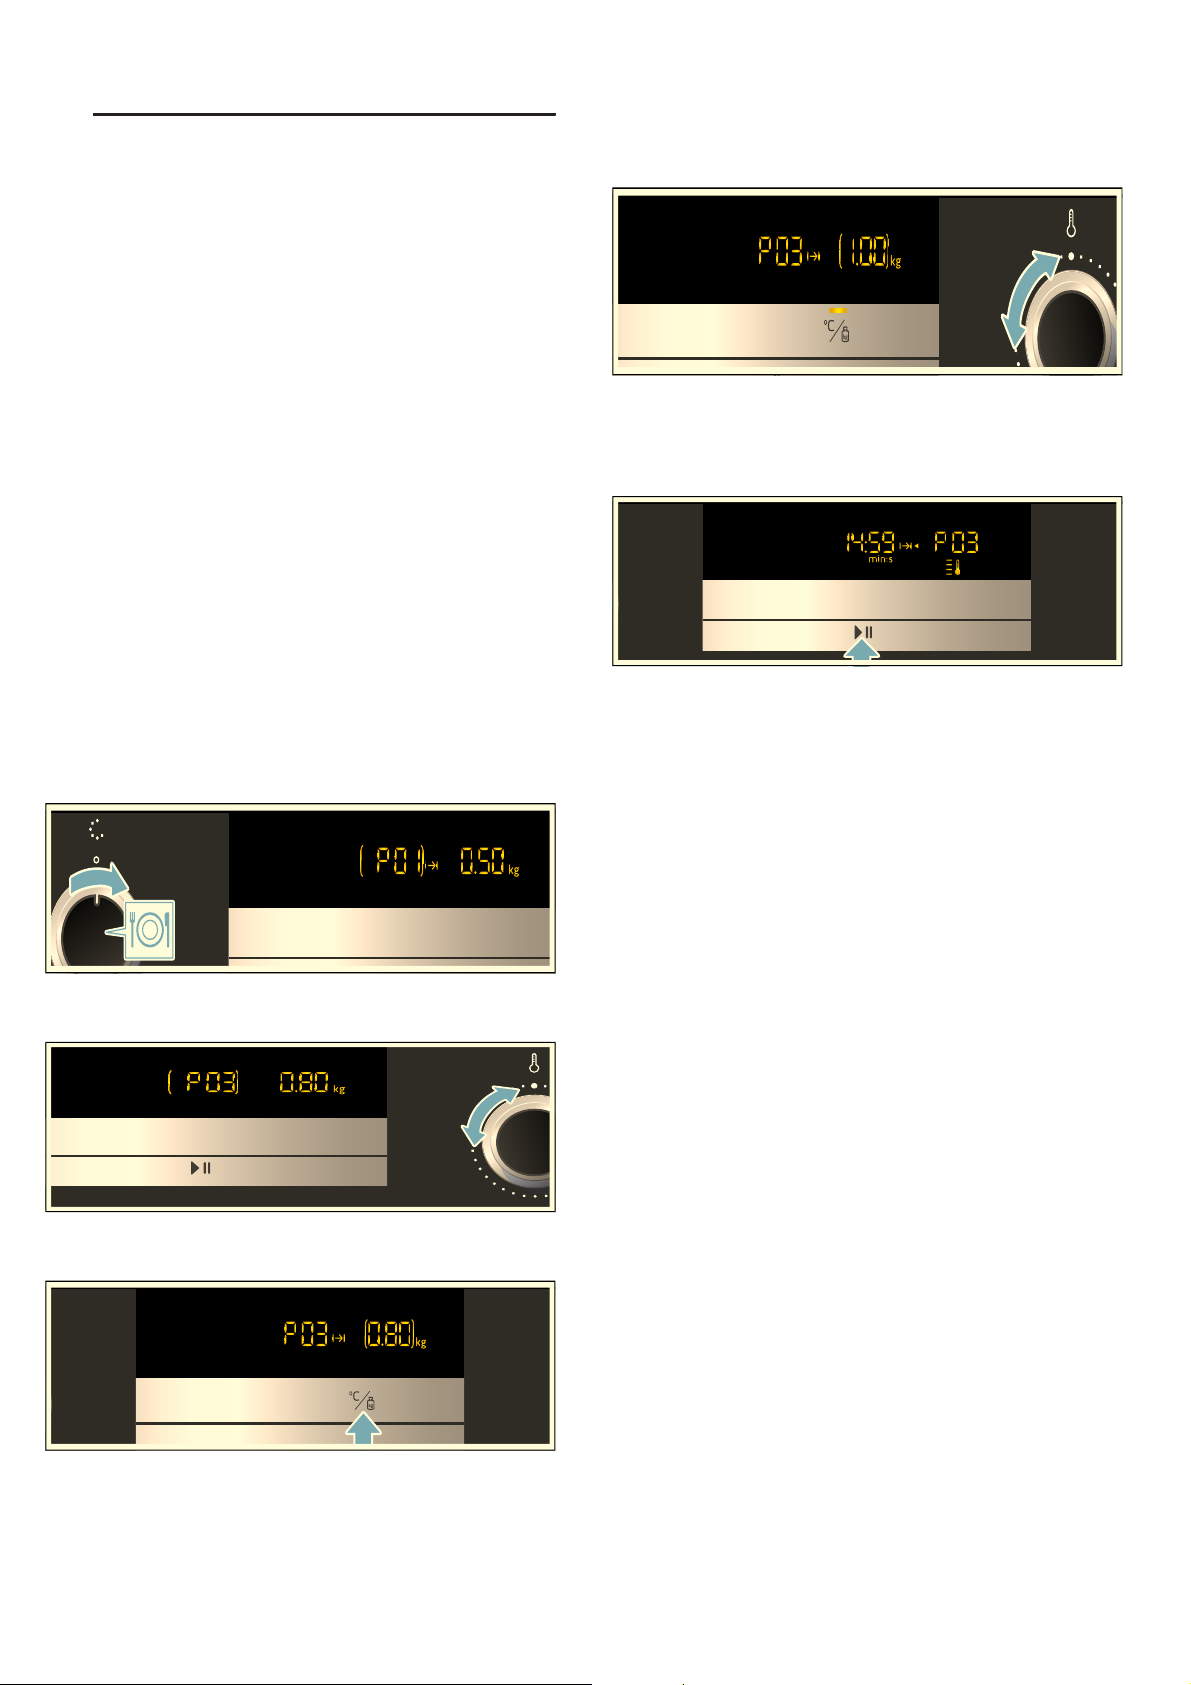
Automatic programmes en
PAutomatic programmes
Aut omat i c pr ogr ammes
You can prepare food really easily using the automatic
programmes. You select the programme and enter the
weight of your food. The automatic programme then
applies the most suitable settings. You can select from
30 programmes.
Notes
■ Take the food out of its packaging and weigh it. If it
is not possible to enter the exact weight, you should
round it up or down.
■ Place the food in the cold cooking compartment.
■ For the programmes, always use microwaveable,
heat-resistant cookware, for example made of glass
or ceramic. Observe the accessories tips in the
programme table.
■ For an optimal cooking result, use food that is in
good condition and chilled meat only. For frozen
food, use food straight out of the freezer only.
Setting a programme
Example in diagram: Programme 3 with a weight of 1
kg.
1. Set the function selector to = automatic
programmes.
The first programme number and weight suggestion
are shown in the display.
4. Use the rotary selector to set the weight to 1 kg.
The appliance automatically sets the right cooking
time for that weight.
5. Touch @.
The programme will start. The cooking time visibly
counts down and the temperature bar and the @ LED
light up.
Notes
■ Before starting you can use = and û/A to switch
between programmes and weight.
■ Once you have started the programme, the
programme number and weight cannot be changed.
You can check the set weight by touching û/A.
2. Use the rotary selector to select programme number
3.
3. Touch A.
The weight setting is highlighted in the display.
The programme has ended
An audible signal sounds. The programme has finished;
the appliance stops heating.
Turn the function selector to the off position.
Changing the programme
1. Touch the @ field for approx. four seconds.
The programme is reset.
2. Select a new programme.
Pausing the operation
1. Touch the @ field or open the appliance door.
The operation is suspended and the @ LED flashes.
2. Close the appliance door.
3. Touch the @ field.
The operation is continued and the @ LED lights up.
Stopping the appliance from heating
Turn the function selector to the "Off" position.
The appliance will stop heating and all the settings will
be cleared.
Note: The fan may continue to run after the appliance
has been paused or stopped.
69
Page 70

en Automatic programmes
Programme table
Programme
Defrosting
P 01 Minced meat* 0.10 - 1.20 Shallow cookware without lid
P 02 Fish fillet* 0.10 - 1.00 Shallow cookware without lid
P 03 Chicken pieces on
P 04 Bread slices* 0.10 - 0.50 Shallow cookware without lid
Poultry, meat, fish
P 05 Chicken pieces,
P 06 Sirloin, rare 0.50 - 2.00 Glass tray
P 07 Sirloin, medium 0.50 - 2.00 Glass tray
P 08 Sirloin, well done 0.50 - 2.00 Glass tray
P 09 Leg of lamb on the
P 10 Leg of lamb on the
P 11 Fish, whole, fresh 0.20 - 1.20 Steaming tray + glass tray
P 12 Fish fillet, fresh 0.20 - 0.50 Steaming tray + glass tray
P 13 Fish fillet, frozen 0.20 - 0.50 Steaming tray + glass tray
P 14 Stew made with
Vegetables and side dishes
P 15 Broccoli, fresh 0.10 - 1.00 Steaming tray + glass tray
P 16 Peas, frozen 0.10 - 1.00 Steaming tray + glass tray
P 17 Sliced carrots, fresh 0.10 - 0.75 Steaming tray + glass tray
P 18 Green asparagus,
P 19 Eggs, soft-boiled x 2 - 10 Steaming tray + glass tray
*Turn when the turn signal prompts you **Stir when the stir signal prompts you
Dish Weight in kg Cookware/accessories, shelf
position
Cooking compartment floor
Cooking compartment floor
0.15 - 1.20 Shallow cookware without lid
the bone*
0.15 - 1.00 Wire rack + glass tray
fresh*
1.00 - 2.00 Glass tray
bone, medium rare
1.00 - 2.00 Glass tray
bone, well done
0.50 - 2.00 Cookware with lid
fresh ingredients**
0.10 - 0.70 Steaming tray + glass tray
fresh
Cooking compartment floor
Cooking compartment floor
Positions 3 + 2
Position 1
Position 1
Position 1
Position 1
Position 1
Position 3
Position 3
Position 3
Cooking compartment floor
Position 3
Position 3
Position 3
Position 3
Position 3
Notes Specific details
Use microwave-safe
cookware only.
Use microwave-safe
cookware only.
Use microwave-safe
cookware only.
Use microwave-safe
cookware only.
Use microwave-safe
cookware only.
Fill the water tank. Drizzle the inside with lemon juice.
Fill the water tank.
Use fish fillets of
equal thickness. Fill
the water tank.
Use microwave-safe
cookware only.
Fill the water tank.
Fill the water tank.
Fill the water tank.
Fill the water tank. Spread out flat
Fill the water tank. Hen's eggs, chilled
Minced beef, lamb, pork; after turning,
remove any minced meat that has
already defrosted
Fillet of pike, cod, ocean perch, pollock,
pike-perch
Skin side down
Wheat bread, wheat-rye bread, wholemeal bread; bread should only be
defrosted in the required amounts, as it
quickly becomes stale. If possible, separate the slices.
Chicken thigh, half chicken, skin side
down
Use equal quantities of meat, vegetables
and stock and enter the total weight.
70
Page 71

Automatic programmes en
Programme
P 20 Rice** 0.10 - 0.50 Deep cookware with lid
P 21 Jacket potatoes 0.20 - 1.50 Wire rack
P 22 Boiled potatoes 0.20 - 0.50 Steaming tray + glass tray
P 23 Fruit compote** 0.30 - 0.80 Shallow cookware on glass tray
Convenience
P 24 Fries, frozen* 0.20 - 0.80 Glass tray
P 25 Croquettes, frozen* 0.25 - 0.80 Glass tray
P 26 Pizza, pre-baked,
P 27 Pizza, pre-baked,
P 28 Pasta bake, pre-
P 29 Reheat plated meal,
P 30 Reheat plated meal,
*Turn when the turn signal prompts you **Stir when the stir signal prompts you
Dish Weight in kg Cookware/accessories, shelf
position
Cooking compartment floor
Position 2
Position 3
Position 3
Position 2
Position 2
0.10 - 0.60 Wire rack
chilled
0.10 - 0.50 Wire rack
frozen
0.30 - 1.00 Cookware on glass tray
cooked and chilled
0.20 - 0.50 Shallow cookware on glass tray
chilled
0.20 - 0.50 Shallow cookware on glass tray
frozen
Position 2
Position 1
Position 2
Position 3
Position 3
Notes Specific details
Use microwave-safe
cookware only.
Fill the water tank. Potatoes, peeled and quartered.
Use microwave-safe
cookware only. Fill
the water tank.
Use microwave-safe
cookware only.
Use microwave-safe
cookware only. Fill
the water tank.
Use microwave-safe
cookware only. Fill
the water tank.
Long-grain rice; do not use boil-in-thebag rice. Add two-three parts water to
one part rice. Allow to stand for 5-10
minutes after the programme has ended.
Medium-sized potatoes, approx. 250 g,
wash, dry and pierce the skins several
times with a fork.
Add some sugar and cinnamon to the
fruit. For berry compotes, do not add
raspberries and strawberries until you
are prompted to stir the fruit.
Spread out flat
Spread out flat
Thin-crust pizza
Thin-crust pizza, pizza baguette
Lasagne, cannelloni or pasta bakes
using precooked pasta
71
Page 72
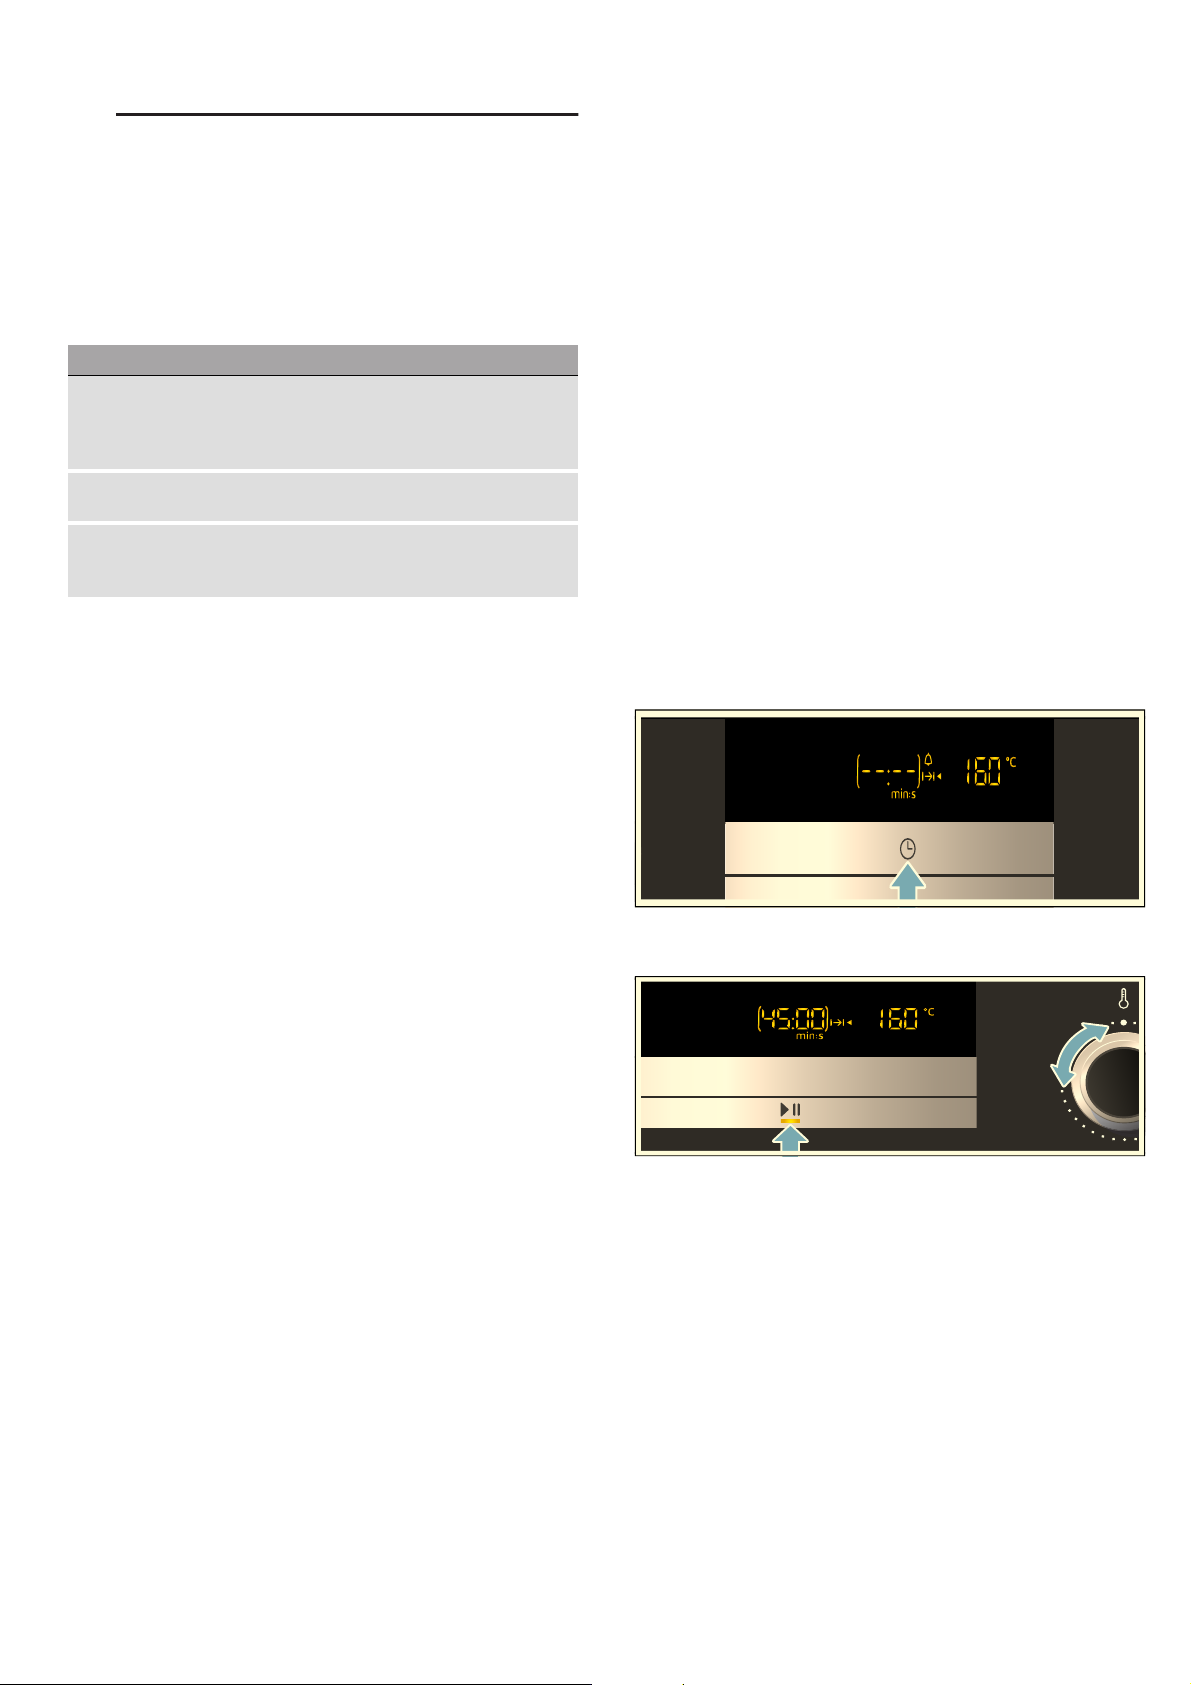
en Setting the time-setting options
OSetting the time-setting
options
Set t i ng the time- set t i ng opt i ons
Your appliance has various time-setting options. You
can use the 0 touch field to call up the menu and
switch between the individual functions. The symbols for
the available functions light up in the display and the
function that you just selected is highlighted.
Time-setting option Use
Q Timer The timer functions like an egg timer. It runs
independently of the appliance when it is
heating and of other time-setting options and
does not affect the appliance.
+ Cooking time Once the set cooking time has elapsed, the
appliance automatically stops heating.
0 Time When no other function is running in the fore-
ground, the appliance shows you the time of
day in the display.
You can only call up the cooking time using the 0 field
after setting a type of heating. The timer can be set at
any time.
An audible signal sounds once the cooking time or
timer duration has elapsed. You can cancel the signal
early by touching the 0 field.
Changing the timer duration
Use the rotary selector to change the timer duration.
The change is applied after a few seconds.
Cancelling the timer duration
Use the rotary selector to reset the timer duration
to ‹‹:‹‹. The change is applied after a few seconds.
The timer is now switched off.
Setting a cooking time
You can set the cooking time for your food on the
appliance. Once the cooking time has elapsed, the
appliance will automatically switch itself off. The
cooking time cannot be accidentally exceeded.
Example in the picture: Hot air heating function, cooking
time of 45 minutes.
1. Use the function selector to set the heating function.
A default value for the temperature is shown on the
display.
2. Use the rotary selector to adjust the temperature if
necessary.
3. Touch the 0 button twice.
- - : - - will be shown on the display and the time
symbols will be lit.
Note: You can change how long the audible signal
sounds for in the basic settings. ~ "Basic settings"
on page 74
Checking the time settings
If several time-setting options are set, the
corresponding symbols light up in the display. The
cooking time starts counting down.
To check the timer Q, cooking time + or time 0, touch
0 repeatedly until the relevant symbol is highlighted.
During operation, only the timer and cooking time are
available. In standby, only the timer and time are
available. The value for this appears in the display for a
few seconds.
Setting the timer
You can use the timer as a kitchen timer. It runs
independently of the appliance. The timer has its own
audible signal. In this way, you can tell whether it is the
timer or a cooking time which has elapsed.
1. Touch the 0 field.
The Q symbol and the time symbols light up again.
2. Use the rotary selector to set the timer duration.
After a few seconds, the time setting is adopted. The
timer starts. The Q symbol lights up in the display and
the timer counts down. The other time symbols go out.
The timer duration has elapsed
An audible signal sounds. ‹‹:‹‹ is shown in the
display. Touch any field to switch off the timer.
4. Use the rotary selector to set a cooking time of 45
minutes.
5. Touch the @ button.
The oven will start. The cooking time will count down on
the display and the @ LED will be lit.The other time
symbols will go out.
The cooking time has elapsed
An audible signal sounds. The appliance stops heating.
‹‹:‹‹ is shown in the display.
1. Touch the 0 field.
The audible signal stops.
2. Turn the function selector to the off position.
The appliance is switched off.
Changing the cooking time
Use the rotary selector to change the cooking time.
After a few seconds, the change is applied.
72
Page 73

Childproof lock en
Cancelling the cooking time
If the timer function has been set, first touch the
0 button. You will now be able to adjust the cooking
time.
Use the rotary selector to reset the cooking time to
‹‹:‹‹.After a few seconds, the change will be applied.
Initial use
After connecting the electricity supply or after a power
cut, the display prompts you to set the time. It may take
a few seconds for the instruction to appear.
Setting the time
During initial use, the time display is highlighted.
The‚ƒ:‹‹ value flashes in the display and the 0
symbol lights up. Set the time.
1. Use the rotary selector to set the time.
2. Touch 0.
The time has now been set.
Changing the time on the clock
Note: To change the time on the clock, you will need to
switch off the appliance.
AChildproof lock
Chi l dp r o of lock
Your appliance is equipped with a childproof lock so
that children cannot switch it on accidentally or change
any settings.
Activating and deactivating
1. Turn the function selector to the off position.
2. Touch i for approx. 4 seconds.
The @ symbol will appear on the display. The
childproof lock is activated or deactivated.
Notes
■ If a timer duration Q has been set, this will continue
to count down. While the childproof lock is active,
the timer duration cannot be changed.
■ Acoustic signals, e.g. once the timer duration has
elapsed, can be ended by touching any field.
1. Touch the 0 button twice.
The 0 symbol and the clock time will appear on the
display.
2. Set the clock using the rotary selector.
3. Touch the 0 button.
The time has now been set.
Notes
■ If you do not touch the 0 button after setting the
time, the set value is automatically adopted after a
few seconds.
■ If the function selector has been moved to configure
the settings, it must be returned to the "Off" position
once you have finished. Only then can the appliance
be used.
■ In order to reduce the energy consumption of your
appliance in standby, you can hide the clock.
73
Page 74

en Basic settings
QBasic settings
Bas i c set t i ngs
There are various settings available to you in order to
help use your appliance effectively and simply. You can
change these settings as required.
Changing the basic settings
The appliance must be switched off.
1. Touch the 0 button for a few seconds.
The first basic setting will appear on the display.
2. Use the rotary selector to change the basic setting.
3. Touch the 0 button.
The next basic setting will appear on the display.You
can go through all of the basic settings using the
0 button and make changes using the rotary
selector.
4. Touch the 0 button for a few seconds.
This applies all the settings.
If the appliance is in standby mode, you can change the
settings at any time.
Cancelling
If you do not want to save the changes, turn the function
selector. The basic settings are ended without being
saved.
List of basic settings
Basic setting Options Explanation
™‹‚ Audible signal
duration
ƒ = medium = 30
seconds
™‹ƒ Button tone*
‚ = On
™‹„ Display bright-
ness*
ƒ = medium
™‹… Time display
‚ = On
™‹† Interior lighting
‚ = On
™‹‡ Water hardness
… = very hard
™‹ˆ Factory setting
‹ = Off
™‹‰ Demo mode
‹ = Off
‚ = short = 10
seconds
„ = long = 2 minutes
‹ = Off Tone when touching
‚ = low
„ = high
‹ = Off Allows you to display
‹ = Off Allows you to switch
‹ = softened
‚ = soft
ƒ = medium
„ = hard
‚ = On Allows you to reset
‚ = On Allows you to switch
Audible signal
sounds after a set
cooking time or duration elapses or when
the timer reaches
zero
touch fields
Allows you to set the
display brightness
the clock time
the interior lighting
on or off
The water hardness
affects the appliance's cleaning
cycles
appliance factory settings
demo mode on and
off
Note: Demo mode is
only visible in the first
5 minutes after connecting the appliance
to the mains.
*The change is applied immediately.
74
Page 75

Cleaning en
DCleaning
Cleani ng
With good care and cleaning, your appliance will retain
its appearance and remain fully functioning for a long
time to come. We will explain here how you should
correctly care for and clean your appliance.
:Warning – Risk of burns!
The appliance becomes very hot. Never touch the
interior surfaces of the cooking compartment or the
heating elements. Always allow the appliance to cool
down. Keep children at a safe distance.
:Warning – Risk of electric shock!
Do not use any high-pressure cleaners or steam
cleaners, which can result in an electric shock.
:Warning – Risk of injury!
Scratched glass in the appliance door may develop into
a crack. Do not use a glass scraper, sharp or abrasive
cleaning aids or detergents.
Note: Unpleasant odours, for example after fish has
been prepared, can be removed very easily. Add a few
drops of lemon juice to a cup of water. Always place a
spoon in the container to prevent delayed boiling. Heat
the water for 1 to 2 minutes at maximum microwave
output.
Suitable cleaning agents
To ensure that the different surfaces are not damaged
by using the wrong cleaning agent, observe the
information in the table. Depending on the appliance
model, not all of the areas listed may be on/in your
appliance.
You can buy other accessories for your appliance from
our customer service. Please specify the relevant
product number.
Wash new sponge cloths thoroughly before use.
Microfibre cloth
The microfibre cloth is especially suitable for cleaning
easily damaged surfaces, such as glass, glass ceramic,
stainless steel or aluminium. It removes liquid and
greasy deposits in one go.
Order no. 466 148
Conditioning cloth for stainless steel surfaces
You can treat surfaces with a tested, recommended oilimpregnated conditioning cloth (available from us),
which will make the surface more resistant to
fingerprints and scratches.
Order no. 311 134
Conditioning oil for modern stainless steel surfaces
This is the same conditioning oil that is used in the
cloths, and can be ordered from us in a bottle.
Order no. 311 567
Degreaser
For intensive removal of stubborn grease deposits from
surfaces.
Order no. 311 781
Descaling agent
To ensure that your appliance continues to operate
correctly, it must be descaled regularly. Only use a
recommended descaling agent to do this. Other
descaling agents may damage the appliance.
Liquid descaling agent: Order no. 311 680
Descaling tablets: Order no. 311 846
Caution!
Surface damage
Do not use any
■ harsh or abrasive cleaning agents,
■ cleaning agents with a high alcohol content,
■ hard scouring pads or cleaning sponges,
■ high-pressure cleaners or steam cleaners,
■ special cleaners for cleaning the appliance while it is
hot.
Area Cleaning
Appliance exterior
Stainless steel
front
Hot soapy water:
Clean with a dish cloth and then dry with a soft
cloth.
Remove flecks of limescale, grease, starch and
albumin (e.g. egg white) immediately. Corrosion
can form under such flecks.
Special stainless steel cleaning products suitable
for hot surfaces are available from our after-sales
service or from specialist retailers. Apply a very
thin layer of the cleaning product with a soft cloth.
Control panel Hot soapy water:
Clean with a dish cloth and then dry with a soft
cloth.
Do not use glass cleaner or a glass scraper.
Door panels Hot soapy water:
Clean with a dish cloth and then dry with a soft
cloth.
Do not use a glass scraper or a stainless steel
scouring pad.
Door handle Hot soapy water:
Clean with a dish cloth and then dry with a soft
cloth.
If descaler comes into contact with the door handle, wipe it off immediately. Otherwise, any stains
will not be able to be removed.
Appliance interior
Self-cleaning surfaces
Inside of the door
and door seal
Observe the instructions for the surfaces of the
cooking compartment that follow the table.
Hot soapy water:
Clean with a dishcloth.
Do not remove the door seal.
Do not scour.
Check the position of the door seal after cleaning
it.
Stainless-steel
surfaces
Hot soapy water:
Clean with a dishcloth.
Do not scour.
Check the position of the door seal after cleaning
it.
75
Page 76

en Cleaning function
Accessories Hot soapy water:
Soak and clean with a dish cloth or brush.
Drip tray and
water tank
Hot soapy water:
Clean with a dish cloth and rinse thoroughly with
clean water to remove residual detergent.
Dry with a soft cloth. Leave to dry with the lid
open. Rub the seal on the lid until dry.
Do not clean in the dishwasher.
Tank recess Rub dry after every use.
Steam outlet in
cooking compart-
Hot, soapy water: Use a cleaning sponge or a soft
washing-up brush.
ment
--------
Notes
■ Slight differences in colour on the front of the
appliance are caused by the use of different
materials, such as glass, plastic and metal.
■ Shadows on the door panels, which look like
streaks, are caused by reflections made by the
interior lighting.
Cleaning self-cleaning surfaces
The rear panel of the cooking compartment has a selfcleaning, catalytic coating. This coating absorbs and
dispels splashes from baking and roasting while the
appliance is in operation. It is therefore not necessary to
clean this area.
Caution!
Do not use oven cleaner on the self-cleaning surfaces.
This damages the surfaces. If oven cleaner does get
onto these surfaces, dab it off immediately using water
and a sponge cloth. Do not rub the surface and do not
use abrasive cleaning aids.
When the cooking compartment has cooled down,
remove the brown or white residue with water and a soft
sponge.
Note: During operation, reddish spots form on the
surfaces. This is not rust, but residue from food. These
spots are not harmful and do not restrict the cleaning
ability of the self-cleaning surfaces.
.Cleaning function
Cl e a n i n g function
Descaling
To ensure that your appliance continues to operate
correctly, it must be descaled regularly.
Caution!
■ Risk of damage to the appliance: Only use the
descaler recommended by us for descaling, either in
liquid or tablet form.The time the descaler needs to
be left to work depends on the product used.Other
descalers may damage the appliance. You can
order descaler from our after-sales service.
Liquid descaler: Order no. 311 680 Descaling
tablets: Order no. 311 846
■ Descaling solution: Do not allow any descaling
solution or descaler to come into contact with the
control panel or other surfaces on the appliance.
This may damage the surfaces. If this does happen,
remove the descaling solution immediately with
water.
Descaling consists of two steps.For hygiene reasons,
the descaling program must be run through completely
before the appliance is ready for operation again.
Descaling will take around 30 minutes in total.
■ Descale the appliance (29 minutes), then empty the
drip tray and fill the water tank with fresh water.
■ Run a rinse cycle after descaling the appliance
(approx. 1 minute), then empty the drip tray.
If descaling is interrupted (e.g. due to a power failure,
because the appliance is switched off or because the
descaling process is cancelled), you will be prompted
to run a rinse cycle once the appliance is switched back
on.The appliance cannot be used until the rinse cycle
comes to an end.
The frequency with which the appliance must be
descaled depends on the hardness of the water used.
When only five more steam-assisted operations are
possible (or fewer), the $ symbol appears on the
appliance display, reminding you to descale it. You can
therefore prepare for the descaling in good time.
The steam mode is then only possible after the
descaling process has been completed.
Keeping the appliance clean
Always keep the appliance clean and remove dirt
immediately so that stubborn deposits of dirt do not
build up.
Tips
■ Clean the cooking compartment after each use. This
ensures that dirt cannot be baked on.
■ Always remove flecks of limescale, grease, starch
and albumin (e.g. egg white) immediately.
■ Use the glass tray for baking very moist cakes.
■ Use suitable ovenware for roasting, e.g. a roasting
dish.
■ Where possible, use hot air. This type of heating
creates less dirt.
76
Starting
1. Use the function selector to select Descale 8.
The duration of the descaling process will be
displayed.It cannot be changed.
2. Open the tank cover.
3. Remove and empty the drip tray.
4. Slide the empty drip tray in fully.
5. Remove the water tank.
6. Mix water and descaler in accordance with the
instructions on the packaging to create a descaling
solution.
Page 77

Cleaning function en
7. Pour the descaling solution into the water tank and
slide the water tank in fully.
8. Close the tank cover.
9. Touch the @ button.
The appliance will now be descaled. The remaining
time counts down on the display. An audible signal
will sound once descaling has finished.The
appliance will be stopped.
Rinse cycle after descaling
1. Open the tank cover.
2. Remove the drip tray, empty it and slide it back in.
3. Remove the water tank, rinse it thoroughly, fill it with
fresh water and slide it back in.
4. Close the tank cover.
5. Touch the @ button.
The appliance will now be rinsed. An audible signal
will sound once the rinse cycle has finished. Empty
the drip tray.
Note:
When using descaling tablets (order no. 311 846), you
must also run the Rinse cleaning function twice.
Rinsing
Emptying the drip tray
With the cleaning functions, the residual water is
collected in the drip tray. Then empty and dry the drip
tray.
Caution!
■ Do not dry the drip tray in the hot cooking
compartment. This will damage the drip tray.
■ Do not clean the drip tray in the dishwasher. This will
damage the drip tray.
1. Briefly press on the centre of the tank cover.
The tank cover opens. The drip tray and water tank
can now be accessed.
2. Remove the drip tray from the tank recess.
1 2
To ensure that your appliance stays clean, you can
pump water through the pipe system. The water is then
drained to the drip tray.
Starting
1. Use the function selector to select the rinse cycle $.
The duration of the programme will be displayed.It
cannot be changed.
2. Open the tank cover.
3. Remove and empty the drip tray.
4. Slide the empty drip tray in fully.
5. Remove the water tank and fill it with fresh water.
6. Slide the water tank in fully.
7. Close the tank cover.
8. Touch the @ button.
Water is pumped through the pipes.The time
remaining will count down on the display. An audible
signal will sound once this time has elapsed. Empty
the drip tray.
Subsequent cleaning
Carry out the following steps after every descaling
programme or rinse cycle:
1. Open the tank cover.
2. Empty, clean and dry the drip tray and water tank.
3. Turn the function selector to the off position.
The process is complete and the appliance is ready
for use again.
3. Open the lid for the drip tray.
4. Empty the drip tray.
I
5. Insert the drip tray back into the tank recess and
slide it in fully.
6. Close the tank cover.
I
The appliance is ready to use.
77
Page 78

en Trouble shooting
3Trouble shooting
Troubl e shoot i ng
If a fault occurs, there is often a simple explanation.
Before calling the after-sales service, please refer to the
fault table and attempt to correct the fault yourself.
Troubleshooting
Error message Possible cause Remedy/Note
The appliance does not work The plug is not plugged into the mains Plug the plug in
Power failure Check whether the kitchen light works
The fuse is faulty Check in the fuse box to make sure that the fuse for
Faulty operation Switch off the fuse in the fuse box. Switch it back on
Although the appliance is switched on, it
cannot be operated; the @ symbol is in
the display
The interior lighting has failed. The LED bulb is defective Call our customer service
‚ƒ:‹‹ flashes in the display and the
0 symbol lights up.
The appliance is not operating. A cooking
time is shown in the display.
The microwave is not working. The door has not been properly closed. Check whether food residue or debris is trapped in
It is taking longer than usual for food to
heat up
Microwave operation has been cancelled
for no apparent reason.
The appliance can be set, but does not
heat up. The colon flashes.
The water tank and drip tray symbols are
flashing continuously.
“‹†„ƒ. Dirt on the control panel is creating a touch field
“†‹‹†. The steam function has been activated multiple
The childproof lock is activated Press and hold @ until the @ symbol goes out
Power failure Reset the clock
@ was not touched after the setting was made. Touch @ or delete the setting by using the function
@ was not touched. Touch @
The microwave power output has been set too
low.
A larger amount of food than usual has been
placed in the appliance.
The food was colder than usual. Stir or turn the food during cooking
The microwave has a fault. If this fault recurs, call our customer service.
The appliance is in demo mode. Deactivate demo mode in the basic settings.
Technical problem. Make sure that the water tank and drip tray are fully
that is permanently active.
times with an empty water tank.
:Warning – Risk of electric shock!
Incorrect repairs are dangerous. Repairs may only be
carried out and damaged power cables replaced by
one of our trained after-sales technicians. If the
appliance is defective, unplug the appliance from the
mains or switch off the circuit breaker in the fuse box.
Contact the after-sales service.
You can take remedial action yourself for some error
messages.
the appliance is OK
after approx. 10 seconds
selector to select another function.
the door
Select a higher microwave power output
Double the amount – double the time
Note: Demo mode is only visible in the first 5 minutes
after connecting the appliance to the mains.
inserted in the relevant tank recess.
If the symbols continue to flash, call our customer ser-
vice.
You may continue to use the appliance, except for the
steam function.
Switch off the appliance and clean the control panel.
Switch the appliance on again.
If this fault recurs immediately after switching back
on, call our customer service.
Before next use, make sure that the water tank is filled
with cold water and fully inserted in the tank recess.
If this fault recurs, call our customer service.
78
Page 79

Customer service en
4Customer service
Cus t o mer servi ce
Our after-sales service is there for you if your appliance
needs to be repaired. We will always find an
appropriate solution, also in order to avoid after-sales
personnel having to make unnecessary visits.
E number and FD number
When calling us, please give the product number (E
no.) and the production number (FD no.) so that we can
provide you with the correct advice. The rating plate
bearing these numbers can be found on the right-hand
side when you open the appliance door. To save time,
you can make a note of the number of your appliance
and the telephone number of the after-sales service in
the space below, should it be required.
E no.
After-sales service O
Please note that there will be a fee for a visit by a
service technician in the event of a malfunction, even
during the warranty period.
Please find the contact data of all countries in the
enclosed customer service list.
Rely on the professionalism of the manufacturer. You
can therefore be sure that the repair is carried out by
trained service technicians who carry original spare
parts for your appliances.
FD no.
JTested for you in our
cooking studio
Test ed for you in our cooki ng st udio
Here, you can find a selection of dishes and the ideal
settings for them. We will show you which type of
heating and temperature are best suited to your dish.
You will get information on suitable cooking
accessories and the height at which they should be
placed in the oven. You will also get tips about
cookware and preparation methods.
Note: A lot of steam can build up in the cooking
compartment when cooking food.
Your appliance is very energy-efficient and radiates very
little heat to its surroundings during operation. Due to
the high difference in temperature between the
appliance interior and the external parts of the
appliance, condensation may build up on the door,
control panel or adjacent kitchen cabinet panels. This is
a normal physical phenomenon. Condensation can be
reduced by preheating the oven or opening the door
carefully.
When steaming or during operation with steam
assistance, it is desirable that there is a significant
build-up of steam in the cooking compartment. Wipe the
cooking compartment clean after cooking, once it has
cooled off.
General information
Recommended setting values
The table lists the optimum function for various types of
food. The temperature/settings and duration depend on
the cookware used and the quantity, quality,
temperature and consistency of the food. Settings
ranges are indicated for this reason. Try using the lower
values to start with. You can use a higher setting next
time if necessary.
When using the microwave, always set the longest
specified time but check your meal after the shortest
specified time.
Before cooking with steam, ensure that the water tank is
full.
It may be that you have different quantities from those
specified in the tables. There is a rule of thumb for
operating the microwave on its own: Double the amount
= almost double the time, half the amount = half the
time.
The setting values apply to food that is placed into a
cold cooking compartment.
Preheating is necessary for selected food, and this is
indicated in the table. Do not place your food and
accessory into the cooking compartment until it has
finished preheating.
Some dishes turn out best if they are cooked in multiple
stages. These are indicated in the table.
If you wish to follow one of your own recipes, you
should use the settings listed in the table for similar
food as reference. Additional information can be found
in the baking tips listed after the settings tables.
79
Page 80

en Tested for you in our cooking studio
Remove any accessories that are not being used from
the cooking compartment.
Accessories
Only use genuine accessories for your appliance.
These have been tailored to the cooking compartment
and the operating modes of your appliance.
Ensure that you always use suitable cookware and
accessories, and that they are placed in the oven the
right way around.
Also observe the notes on using cookware suitable for
microwave cooking and cooking with steam in the
relevant sections.~ "Microwave"
on page 62~ "Steam" on page 65
Always use an oven cloth or oven gloves when taking
hot accessories or cookware out of the cooking
compartment.
Bakeware and cookware
For best results, we recommend using dark-coloured
metal bakeware.
Tinplate baking tins, ceramic dishes and glass dishes
extend the baking time and prevent the bake from
browning evenly.
If you would like to use silicone moulds, check the
manufacturer's instructions to see whether they are
suitable for use with microwaves or steam-assisted
cooking. Use the manufacturer's instructions and
recipes as a guide.
Silicone moulds are often smaller than normal baking
tins. The given quantities and recipes may vary.
As a general rule:
■ Bake on the glass tray with hot air, shelf position 2
■ Bake in a tin on the wire rack with hot air, shelf
position 1
■ Roasts on the wire rack or the glass tray, shelf
position 2. If you use the wire rack, place the glass
tray underneath.
■ Grill on the wire rack on shelf position 3 or 4. Place
the glass tray underneath.
■ Microwave-only operation: Cookware on the bottom
of the cooking compartment, shelf position 0.
■ Steam-only operation: Glass tray with steamer
basket on shelf position 3.
Greaseproof paper
Only use greaseproof paper that is suitable for the
selected temperature. Always cut greaseproof paper to
size.
Do not line accessories with greaseproof paper until
after they have been preheated.
Defrosting
Place the frozen food in an uncovered container on the
bottom of the cooking compartment.
Delicate parts such as the drumsticks and wings of
chicken or fatty outer layers of roasts can be covered
with small pieces of aluminium foil. The foil must not
touch the walls of the appliance. You can remove the
foil half way through the defrosting time.
Liquid will be produced when defrosting meat or
poultry. Drain off this liquid when turning meat and
poultry and under no circumstances use it for other
purposes or allow it to come into contact with other
foods.
Turn or stir the food once or twice during the process.
Large pieces of food should be turned several times.
Leave defrosted items to stand at room temperature for
a further 10 to 60 minutes so that the temperature can
stabilise. You can remove the giblets from poultry at this
point.
The meat can also be processed further when a small
part of the core is frozen.
Notes
■ Use an uncovered item of cookware and place it on
the bottom of the cooking compartment.
■ Please note that a setting can comprise several
steps.
■ Always set the maximum specified time but check
your meal after the minimum specified time.
Dish Cookware Shelf posi-
tion
Whole pieces of beef,
pork or veal (on the
Cookware,
uncovered
0 ! 800 g 1
bone or boned)
Meat in pieces or slices
of beef, veal or pork
Cookware,
uncovered
0 ! 200 g 1
80
Heating
function
Weight Steps Microwave
setting
180
2
1000 g 1
2
1500 g 1
2
90
180
90
180
90
180
2
500 g 1
2
800 g 1
2
90
180
90
180
90
Cooking
time
in min
15
25
15
25 - 35
25
25 - 30
5
4 - 6
10
5 - 10
10
10 - 15
Notes
Turn frequently.
Turn during cooking. Separate any defrosted parts.
Page 81

Tested for you in our cooking studio en
Dish Cookware Shelf posi-
tion
Minced meat, mixed Cookware,
uncovered
Poultry or poultry pieces Cookware,
uncovered
Duck Cookware,
uncovered
Goose Cookware,
uncovered
Fish fillet, fish steak or
slices
Whole fish Cookware,
Vegetables, e.g. peas Cookware,
Fruit, e.g. raspberries Cookware,
Butter, defrosting Cookware,
Bread, loaf Cookware,
Cakes, plain, e.g.
sponge cake
Cakes, moist, e.g. fruit
flan, cheesecake
Cookware,
uncovered
uncovered
uncovered
uncovered
uncovered
uncovered
Cookware,
uncovered
Cookware,
uncovered
0 ! 200 g 1 90 15 Freeze food flat if possible.
0 ! 600 g 1
0 ! 2000 g 1
0 ! 4500 g 1
0 ! 400 g 1
0 ! 300 g 1
0 ! 300 g 1 180 10 - 15 Stir during cooking.
0 ! 300 g 1 180 7 - 10 Stir several times. Seperate
0 ! 125 g 1 90 6 - 8 Remove all packaging.
0 ! 500 g 1
0 ! 500 g 1 90 10 - 15 Only for cakes without icing,
0 ! 500 g 1
Heating
function
Weight Steps Microwave
setting
500 g 1
2
800 g 1
2
2
1200 g 1
2
2
2
2
2
600 g 1
2
600 g 1
2
500 g 1
2
250 g 1
2
2
1000 g 1
2
750 g 1
2
2
750 g 1
2
180
90
180
90
180
90
180
90
180
90
180
90
180
90
180
90
180
90
180
90
18
90
180
90
180
90
180
90
180
90
180
90
180
90
Cooking
time
in min
5
10 - 15
10
15 - 20
5
10 - 15
10
20 - 25
20
30 - 40
30
60 - 80
5
10 - 15
3
10 - 15
8
15 - 25
10
9 - 15
8
5 - 10
2
3 - 5
3
10 - 15
5
15 - 25
3
10 - 15
5
15 - 25
7
15 - 25
Notes
Turn frequently during
defrosting and remove any
minced meat that has already
defrosted.
Turn during cooking.
Turn several times.
Turn every 20 minutes.
Remove any liquid that results
from defrosting.
Turn during cooking. Separate any defrosted parts.
Turn several times.
any defrosted parts.
Turn during cooking.
whipped cream or crème
pâtissière, seperate the
pieces of cake.
Only for cakes without icing,
whipped cream or gelatine.
81
Page 82

en Tested for you in our cooking studio
Heating frozen food
Take ready meals out of the packaging. They will heat
up more quickly and evenly in microwaveable
cookware. The speed at which different components of
the meal heat up may vary.
Food which lies flat will cook more quickly than food
which is piled high. You should therefore distribute the
food so that it is as flat as possible in the cookware.
Food should not be placed in layers on top of one
another.
Stir or turn the food 2 or 3 times during the process.
Dish Cookware Shelf posi-
tion
Soup, frozen Cookware, cov-
0 ! 400 g 600 8 - 15
ered
Stew, frozen Cookware, cov-
0 ! 500 g 600 8 - 13
ered
Menu, plated meal, ready
meal (2-3 components), fro-
Cookware, covered
0 ! 300 - 400 g 600 11 - 15
zen
Slices or pieces of meat in
sauce, e.g. goulash, frozen
Bakes, e.g. lasagne, cannelloni, frozen
Side dishes, e.g. rice, pasta,
frozen
Cookware, covered
Cookware, covered
Cookware, covered
0 ! 500 g 600 12 - 17 Separate the pieces of
0 ! 450 g 600 10 - 15
0 ! 250 g 600 2 - 5 Add liquid
Heating
function
After heating, leave the food to stand for a further 2 to
5 minutes to allow the temperature to stabilise.
Always wear oven gloves or use a pot holder when
removing cookware from the appliance.
Notes
■ Place the cookware on the bottom of the cooking
compartment.
■ Always cover the food. If you do not have a
dedicated lid for your cookware, use a plate or
special microwave film.
■ Always set the maximum specified time but check
your meal after the minimum specified time.
Weight Microwave
setting
Cooking
time
Notes
in min
1000 g 600 10 - 15
1000 g 600 25 - 30
meat when stirring.
500 g 600 8 - 10
Vegetables, e.g. peas, broccoli, carrots, frozen
Creamed spinach, frozen Cookware, cov-
Cookware, covered
0 ! 300 g 600 8 - 10 Add enough water to cover
0 ! 500 g 600 11 - 16 Cook without adding water,
ered
Warming
:Warning
Risk of scalding!
■ There is a possibility of delayed boiling when a liquid
is heated. This means that the liquid reaches boiling
temperature without the usual steam bubbles rising
to the surface. Even if the container only vibrates a
little, the hot liquid may suddenly boil over and
spatter. When heating, always place a spoon in the
container. This will prevent delayed boiling.
600 g 600 14 - 17
the base
stir occasionally
Caution!
Metal, e.g. a spoon in a glass, must be kept at least
2 cm from the oven walls and the inside of the door.
Sparks could irreparably damage the glass on the
inside of the door.
Notes
■ Take ready meals out of the packaging. They will
heat up more quickly and evenly in microwaveable
cookware. The speed at which different components
of the meal heat up may vary.
■ Stir or turn the food frequently during the process.
Check the temperature.
■ After heating, leave the food to stand for a further 2
to 5 minutes to allow the temperature to stabilise.
■ Always wear oven gloves or use a pot holder when
removing cookware from the appliance.
■ Cover the food if this is specified in the table. Place
the cookware on the bottom of the cooking
compartment. If you would like to activate the steam
function, place your cookware on the glass tray in
shelf position 3. Fill the water tank.
82
Page 83

Tested for you in our cooking studio en
Dish Cookware Shelf po-
sition
Baby food, e.g. baby bottles
Beverages Cookware,
Soup, 2 cups, 175 g
each
Soup, 4 cups, 175 g
each
Meat or pieces of meat in
sauce
Menu, plated meal, ready
meal (2-3 components)
Stew Cookware, cov-
Vegetables Cookware,
Cookware,
uncovered
uncovered
Cookware,
uncovered
Cookware,
uncovered
Cookware, covered
Cookware,
uncovered
ered
uncovered
Cookware,
uncovered
0 ! 150 ml 360 - 0.5-1.5 No teats or lids. Always
0 ! 200 ml 1000 - 1-2 Place a spoon in the glass;
0 ! 350 g 600 - 3-4
0 ! 700 g 600 - 6-8
0 ! 500 g 600 - 7-10 Separate the slices of meat
3 !+z 400 g 360 3 9-14
0 ! 400 g 600 - 6-8
3 !+z 150 g 360 3 3-5
3 !+z 300 g 360 3 4-7
Heating
function
Weight/
quantity
500 ml 1000 - 4-5
800 g 600 - 8-11
Microwave
setting
Steam
setting
Cooking
time
in min
Notes
shake well after heating.
Always check the temperature.
do not overheat alcoholic
drinks; check occasionally
Microwave tips
You cannot find any information about the settings for the quantity of food you have prepared.
The food has become too dry. Next time set a shorter cooking time or select a lower microwave power set-
The time has elapsed but the food is not defrosted, not hot or
not cooked.
Time has elapsed and the food is overheated at the edge but not
done in the middle.
After defrosting, the poultry or meat is cooked on the outside
but not defrosted in the middle.
Cakes, small baked items and bread
The settings tables list the optimum settings for many
bakes.
To prove dough, place the dough in a bowl and cover it
with film or a tea towel. Place this on the bottom of the
cooking compartment and then set 40 °C hot air.
Baking in combination with a microwave
Baking in combination with a microwave considerably
reduces the cooking time.
Always use heat-resistant cookware that is suitable for
microwave use. Observe the notes on cookware
suitable for microwaves.~ "Microwave" on page 62
In combined operation, you can use conventional metal
baking tins. If sparks are produced between the baking
tin and the wire rack, check whether the tin is clean on
the outside. Change the position of the tin on the wire
rack. If this does not help, continue baking without the
microwave. The baking time will be longer. If you use
baking tins made of plastic, ceramic or glass, the
Lengthen or shorten the cooking time according to the following rule of
thumb: Double the amount = double the time, half the amount = half the time
ting. Cover the food and add more liquid.
Set a longer time. Large quantities and food which is piled high require longer
times.
Stir it occasionally and next time select a lower microwave power setting and
a longer cooking time.
Next time select a lower microwave power setting. If you are defrosting a large
quantity of food, turn it frequently.
baking time indicated in the settings tables will be
shorter.
Steam-assisted baking
Using steam-assisted baking gives certain baked items
(e.g. yeast-risen pastries) a crispier crust and glossier
surface. The baked item does not dry out as much.
Fill the water tank up to the "max." mark. If the
appliance runs out of water, it will continue to cook your
meal with the selected heating function but without
adding steam.
Frozen products
Carefully take the food out of the packaging. Do not use
frozen products that are covered with a thick layer of
ice. Remove any ice on the food.
Some frozen products may be unevenly pre-baked.
Uneven browning may remain even after baking.
83
Page 84

en Tested for you in our cooking studio
Bread and rolls
Never pour water into the hot cooking compartment or
place cookware containing water onto the bottom of the
cooking compartment. The change in temperature
could damage the bottom of the cooking compartment.
Cakes in tins
Dish Cookware Shelf posi-
tion
Sponge cake, simple* Ring-shaped cake tin/
Vienna ring tin/loaf tin
Sponge cake, delicate (e.g.
sand cake)*
Nut cake Springform tin 1 ~+! 170-180 90 30-35
Sponge flan base Flan tin 1 ~ 160-170 - 35-40
3-egg fatless sponge cake Springform tin 1 ~ 160-170 - 45-50
Fruit tart or cheesecake with
shortcrust pastry*
Fruit cake, delicate, made of
sponge
Savoury bakes (e.g. quiche/
onion tart)
*Allow cakes to cool in the oven for approx. 20 minutes
Ring-shaped cake tin/
Vienna ring tin/loaf tin
Springform tin 2 ~+! 150-160 360 40-50
Ring-shaped cake tin/
springform tin
Springform tin 2 ~+! 160-180 90 50-70
1 ~ 160-170 - 60-80
1 ~ 150-160 - 60-70
1 ~+! 170-190 90 30-45
Switch on the steam function for hot air. The settings for
bread dough apply to both dough placed on a baking
tray and dough placed in a loaf tin.
Heating
function
Temperature
in °C
Microwave
setting
Cooking time
in min
Cakes on baking trays
Dish Cookware Shelf posi-
tion
Sponge cake with dry topping Glass tray 2 ~ 160-170 - - 30-40
Yeast cake with moist topping, e.g.
yeast dough with apple crumble*
Plaited loaf with 500 g flour* Glass tray 1 ~+z 170-180 - 3 35-45
Strudel filled with fruit, pre-baked, fro-
zen
Pizza Glass tray 2 ~ 210-230 - - 25-35
Pizza, pre-baked, frozen Wire rack 2 #+! 180-190 180 - 8-15
Pizza baguette, pre-baked, frozen Wire rack 2 #+! 190-210 180 - 12-15
*Preheat
Small baked products and biscuits
Meal Cookware Shelf position Heating
Biscuits Glass tray 2 ~ 50 -170 20-35
Meringue Glass tray 2 ~ 100 90-120
Macaroons Glass tray 2 ~ 110 35-45
Puff pastry Glass tray 2 ~ 170 -180 35-45
Glass tray 1 ~ 160-170 - - 30-45
Glass tray 1 #+z 180-200 - 2 40-50
Heating
function
function
Temperature
in °C
Temperature in °C Duration in min.
Microwave
setting
Steam
setting
Cooking time
in min
84
Page 85

Bread and rolls
Tested for you in our cooking studio en
Meal Cookware Shelf po-
sition
Bread, 1 kg* Glass tray 1 ~+z 1
Bread 1.5 kg* Cake tin 0 ~+z 1
Bread rolls, e.g. wheat
rolls*
Bread for toasting, 12
slices
Bread for toasting, 4
slices
Toast with topping, 2-4
slices
*preheat
Baking tips
Sparks are generated between the tin
and the wire rack.
You want to find out whether the
baked item is completely cooked in
the middle.
The baked item collapses. Next time use less liquid. Alternatively, set the temperature to be 10 °C lower and extend the baking time. Use
The baked item has risen in the middle but is lower around the edges.
Small baked items stick to one
another during baking.
The baked item is too dry. Set the temperature 10 °C higher and shorten the baking time.
The baked item is too light in colour
overall.
The back of an item baked in a tin or
loaf tin is too dark.
The baked item is too dark in colour
overall.
The cake is unevenly browned. Select a slightly lower temperature.
The baked item looks good but it is
not cooked properly in the middle.
The baked item will not come out of
the tin when turned upside down.
Glass tray 1 ~+z 1 200-220 - 3 25-35
Wire rack 3 $ 1 - 3 - 3-6
Wire rack 3 % 1 - 3 - 3-6 Place the slices of
Wire rack +
glass tray
3+1 $ 1 - 3 - 8-10
Check that the tin is clean on the outside. Change the position of the tin in the oven. If this does not help, continue baking without microwaves or place the tin on the glass tray. The baking time will then be longer.
Push a cocktail stick into the highest part of the baked item. If the cocktail stick comes out clean with no
dough residue, the baked item is ready.
the ingredients and preparation instructions given in the recipe.
Only grease the base of the springform cake tin. After baking, loosen the baked item carefully with a knife.
There should be a gap of approx. 2 cm around each item. This gives enough space for the baked items to
expand well and brown on all sides.
If the shelf position and the cookware are correct, then you should increase the temperature if necessary or
extend the baking time.
Place the baking tray in the middle of the accessory, not directly against the back wall of the oven.
Select a lower temperature next time and extend the baking time if necessary.
Protruding greaseproof paper can affect the air circulation. Always cut greaseproof paper to size.
Ensure that the baking tin does not stand directly in front of the openings in the cooking compartment back
wall.
When baking small items, you should use similar sizes and thicknesses wherever possible.
Bake for longer at a lower temperature and add less liquid if necessary. For baked items with a moist topping,
bake the base first. Sprinkle it with almonds or breadcrumbs and then place the topping on top.
Allow the baked item to cool down for 5 to 10 minutes after baking. If it still sticks, carefully loosen the cake
around the edges again using a knife. Turn the baked item upside down again and cover the tin several times
with a cold, wet cloth. Next time grease the tin and sprinkle with breadcrumbs.
Heating
function
Steps Temperature
in °C
230
2
2
190-200
230
200-210
Grill
setting
-
-
-
-
Steam
level
3
-
3
-
Duration
in min.
10-15
30-45
10-15
40-50
Notes
Never pour hot
water directly into a
hot oven.
bread next to each
other in the centre
of the wire rack.
85
Page 86

en Tested for you in our cooking studio
Bakes and gratins
You can use your appliance to cook bakes and gratins.
The settings tables list the optimum settings for certain
meals.
How well cooked a bake is will depend on the size of
the cookware and the depth of the bake. Use wide,
shallow cookware for bakes and gratins. Food takes
Dish Cookware Shelf position Heating
Bakes, sweet, e.g. quark and fruit
soufflé, 1.5 kg
Savoury bakes made from cooked
ingredients, e.g. pasta bake, 1 kg
Savoury bakes made from raw
ingredients, e.g. potato gratin, 1.1
kg
Ovenproof dish 0 # 130-150 180 25-35
Ovenproof dish 0 # +! 180-190 600 12-17
Ovenproof dish 0 # +! 170-180 600 20-30
Poultry, meat and fish
Your appliance offers different methods of cooking
poultry, meat and fish. The settings tables list the
optimum settings for numerous meals. Some dishes
turn out best if they are cooked in multiple stages.
These are indicated in the table.
Cooking with cookware
:Warning – Risk of injury from shattering glass!
Place hot glass cookware on a dry mat after cooking.
The glass may crack if placed on a cold or wet surface.
Only use cookware that is suitable for what you intend
to use it for. Glass cookware is best. Check whether the
cookware fits in the cooking compartment.
Stainless steel and aluminium roasting trays that have a
shiny surface are not suitable for microwave use.
During conventional cooking, shiny roasting trays reflect
heat like a mirror, meaning that they are not entirely
suitable. The poultry, meat and fish cooks slower and
does not brown so well. Use a higher temperature and/
or a longer cooking time for conventional cooking.
Observe the manufacturer's instructions for your
roasting trays.
Uncovered cookware
To cook poultry, meat and fish, it is best to use a deep
roasting tin. Place the tin on the bottom of the cooking
compartment. If you would like to use steam-assisted
cooking, use an uncovered item of cookware. If you do
not have any suitable cookware, use the glass tray.
Covered cookware
Ensure that the lid fits well and closes properly. Place
the cookware onto the wire rack.
:Warning – Risk of scalding!
Very hot steam may escape when opening the lid after
cooking. Lift the lid at the rear so that the hot steam can
escape away from you.
Cooking in combination with a microwave
This considerably reduces the cooking time. Unlike in
conventional operation, when roasting in combination
longer to cook in deep, narrow cookware and it browns
more on top. Always use the indicated shelf positions.
Observe the notes on cookware suitable for
microwaves.~ "Microwave" on page 62
Use a shallow ovenproof dish that is 4-5 cm deep.
Bakes and gratins should be left to cook in the oven for
a further 5 minutes after the oven has been switched
off.
function
with a microwave the cooking time is based on the total
weight.
Note: If you have different quantities to those indicated
in the settings tables, the following basic rule applies:
double the quantity equates to roughly double the
cooking time. Always use heat-resistant cookware that
is suitable for microwave use. Metal roasting dishes or
earthenware pots are only suitable for roasting without
using the microwave. Observe the notes on cookware
suitable for microwaves.~ "Microwave" on page 62
Steam-assisted cooking
Certain foodstuffs will become crispier during steamassisted cooking.Their surface becomes glossier and
they dry out less.
Use cookware without a lid. Cookware must be heatand steam-resistant. Use steam-assisted cooking if it is
indicated in the settings table. Fill the water tank up to
"max." mark. If the appliance runs out of water, it will
continue to cook your meal with the selected heating
function but without adding steam.
Steaming using the steaming tray
In contrast to steam-assisted cooking, the steaming
function cooks the meat particularly gently but it does
not become crispy on the outside. It remains very
succulent.
You can also sear pieces of meat before steaming,
which will reduce their cooking time and give them a
slightly different flavour. Larger pieces require a longer
cooking time. Pieces of meat do not need to be turned.
To steam poultry, meat or fish, place the item to be
cooked in the steaming tray in the glass tray and then
place this in the cooking compartment at shelf position
3. Fill the water tank up to "max." mark. If the water tank
runs out of water while the appliance is in operation, the
appliance is paused. You will be alerted to this by a
message on the display.
Grilling
Keep the appliance door closed when using the grill.
Never grill with the appliance door open.
Temperature Microwave setting Cooking
time in min
86
Page 87

Tested for you in our cooking studio en
Place the food to be grilled on the wire rack. Place the
glass tray underneath the wire rack to collect any
dripping fat.
Try to use pieces of food of a similar thickness and
weight. This will allow them to brown evenly and remain
succulent and juicy. Place the food to be grilled directly
onto the wire rack.
Use tongs to turn the pieces of food you are grilling. If
you pierce the meat with a fork, the juices will run out
and it will become dry.
Do not add salt to the meat until it has been grilled. Salt
draws water from the meat.
Notes
■ The grill elements continuously switch on and off;
this is normal. The grill setting determines how
frequently this occurs.
■ Smoke may be produced when grilling.
Recommended settings
The settings are based on the assumption that
unstuffed, chilled, ready-to-roast poultry, meat or fish is
placed into a cold cooking compartment.
The table lists specifications for poultry, meat and fish
with default values for the weight. If you wish to prepare
heavier poultry, meat or fish, always use the lower
temperature. If cooking more than one piece, use the
weight of the heaviest piece as a basis for determining
the cooking time. The individual pieces should be
approximately the same size.
The larger the poultry, meat or fish, the lower the
cooking temperature and the longer the cooking time.
Turn poultry, meat and fish if specified in the settings
table.
When you turn poultry, ensure that the breast side or
the skin side is underneath at first.
Meat
Baste lean meat with fat as required or cover it with
strips of bacon.
When roasting, add a little liquid if the meat is lean. This
liquid should just about cover the bottom of the glass
cookware.
Score the rind crosswise.
When the joint is ready, turn off the oven and allow it to
rest for a further 10 minutes in the cooking
compartment, keeping the door closed. This helps
distribute the meat juices more evenly. Wrap the joint in
aluminium foil if necessary. The recommended resting
time is not included in the indicated cooking time.
It is more convenient to roast and braise meat in
cookware. You can take the joint out of the cooking
compartment more easily in the cookware, and prepare
the sauce in the cookware itself.
The quantity of liquid depends on the type of meat, the
material the cookware is made from and on whether or
not a lid is used. If preparing meat in an enamelled or
dark metal roasting dish, it will need a little more liquid
than if cooked in glass cookware.
The liquid in the cookware evaporates when roasting.
Carefully pour in more liquid if required.
The distance between the meat and the lid should be at
least 3 cm. The meat may rise.
If necessary, braise the meat first by searing it. Add
water, wine, vinegar or a similar liquid to the braising
liquid. Cover the bottom of the cookware with approx. 12 cm of liquid.
Poultry
When cooking duck or goose, pierce the skin on the
underside of the wings. This allows the fat to run out.
If using duck breast, score the skin. Do not turn duck
breasts.
Poultry
Dish Cookware Shelf po-
sition
Chicken, whole,
1.3 kg (boil)
Chicken, whole,
1.3 kg (roast)
Chicken portions,
e.g. chicken quar-
Cookware,
covered
Cookware,
uncovered
Cookware,
uncovered
Heating
function
Temperature
0
!
0 #+z+! 190 - 360 3 40-45 Place with the
0
#
ters, 800 g
Fish
Whole fish does not need to be turned. You can tell
when the fish is cooked because the dorsal fin can be
removed easily.
If you would like to cook fish on the wire rack, coat the
wire rack with a little oil beforehand as this will make it
easier to remove the fish later.
Grill setting
Microwave
setting
Steam
setting
Cooking
time
Notes
in min
- - 600 - 25-35 Turn halfway
through.
breast side up. Do
not turn. Leave to
stand for
5 minutes.
190 - 180 - 20-35 Pierce the skin.
Place with the skin
side up. Do not
turn.
87
Page 88

en Tested for you in our cooking studio
Dish Cookware Shelf po-
sition
Duck breast, 500 g Wire rack +
glass tray
Goose breast,
goose legs, 700900 g
Meat
Dish Cookware Shelf posi-
Pot-roasted beef,
1 kg
Sirloin, rare,
1.5 kg
Beef steaks x 2-323 cm thick, 200 g
each
Pork without
rind, 750 g, e.g.
neck
Pork with rind,
1 kg, e.g. shoulder
Pork loin
500-600 g
Pork neck steaks x
2-3, 2-3 cm thick,
120 g each
Grilling sausages x
4-6, 150 g each
Meat loaf, 750 g Cookware,
Cookware,
uncovered
Cookware,
covered
Cookware,
uncovered
Wire rack +
glass tray
Cookware,
uncovered
Cookware,
uncovered
Cookware,
uncovered
Wire rack +
glass tray
Wire rack +
glass tray
uncovered
3+2 $+!+z - 3 180 3 10-12 Place with the skin
0 $+! - 2 180 - 30-40 Deep cookware
tion
0
0
3+1
0 #+z+! 1 170-180 - 360 3 25-35 Leave to stand
0 #+z+! 1 170-180 - 180 3 60-80 Score the rind.
0
3+1
3+1
0 #+z+! 1 190 - 360 3 15-20 Leave to stand
Heating
function
Heating
function
#+
!
#
+!
$
#+
!
$
$
Temperature
Steps Tempera-
1 160-170 - 180 - 80-90
1 180-190 - 180 - 30-40 Turn halfway
1
2
1 180-190 - 180 - 35-40 Leave to stand
1
2
1
2
Grill setting
ture
Microwave
setting
Grill
setting
- 3
- 2
- 3
3
2
3
Steam
setting
Microwave
setting
-
-
-
-
-
-
Steam
setting
-
-
-
-
-
-
Cooking
time
in min
Cooking
time
in min
10-15
5-10
15-20
10-15
10-15
5-10
Notes
side up. Do not
turn.
without a lid.Do not
turn.
Notes
through.Leave to
stand for 10 minutes afterwards.
for 10 minutes afterwards.
Leave to stand
for 10 minutes
afterwards. Do
not turn.
for 10 minutes
afterwards.
for 10 minutes
afterwards.
88
Page 89

Fish
Tested for you in our cooking studio en
Dish Cookware Shelf posi-
tion
Fish fillet, fresh, 400 g Glass tray + steaming
tray
Fish fillet pieces, frozen,
400 g
Fish fillet pieces, frozen,
800 g
Fish fillet, au gratin, 500 g Cookware, uncovered 0 $+! - 3 600 - 10-15
Fish steaks x 2-3, 150 g
each
Fish, whole, e.g. trout, x 2-
3, 300 g each
Tips for roasting and braising
The roast is too dark and the crackling is burned in places, and/or the
roast is too dry.
The crackling is too thin. Increase the temperature or switch the grill on briefly at the end of the roasting time.
The roast looks good but the juices
have caught.
The roast looks good but the juices
are too clear and watery.
The meat catches during braising. The roasting dish and lid must fit together well and close properly.
Cookware, covered 0 ! - - 600 - 10-15
Glass tray + steaming
tray
Wire rack + glass tray 3+1 $ - 3 - - 8-12
Glass tray + steaming
tray
Check the shelf position and temperature. Select a lower temperature the next time and reduce the roasting
time if necessary.
Next time use a smaller roasting dish and add more liquid if necessary.
Next time use a larger roasting dish and add less liquid if necessary.
Reduce the temperature and add more liquid when braising if necessary.
3 z - - - 3 15-17
3 z - - - 3 23-25
3 z - - - 3 18-22
Heating
function
Temperature
in °C
Grill setting
Microwave
setting
Steam
setting
Cooking
time
in min
Vegetables and side dishes
Here you can find information about how best to cook
different types of vegetables, rice, potatoes and frozen
potato products quickly.
Microwave
Always cook vegetables in a suitable item of cookware
and keep them covered. Cook rice in a deep pot with a
lid and add the quantity of liquid indicated in the table.
Steaming
Use the glass tray and the steaming tray to steam food.
Use the portion sizes listed in the settings table. Larger
pieces will take longer to cook and smaller ones will
cook more quickly. The cooking time also depends on
the quality and the ripeness of the food. The settings
indicated are therefore intended as a guide only.
Always distribute the food evenly in the cookware. It will
not cook evenly if the food is piled up to varying
heights.Do not stack pressure-sensitive food too high in
the steaming tray.
Fill the water tank up to the "max." mark. If the water
tank runs out of water while the appliance is in
operation, the appliance is paused. You will be alerted
to this by a message on the display.
Couscous
Add water or liquid in the indicated ratio. For example,
with a ratio of 1:2, use 200 ml of liquid for every 100 ml
of liquid.
89
Page 90

en Tested for you in our cooking studio
Dish Cookware Shelf posi-
tion
Artichokes, whole, fresh Glass tray + steaming
tray
Spinach leaves, fresh,
250 g
Cauliflower, whole, fresh Glass tray + steaming
Broccoli, whole, fresh,
500 g
Broccoli florets, frozen,
500 g
Vegetables, fresh, 250 g* Cookware, covered 0 ! 1 - 600 - 6-10
Vegetables, fresh, 500 g* Cookware, covered 0 ! 1 - 600 - 10-15
Corn on the cob, fresh, x 2 Glass tray + steaming
Mixed vegetables, frozen,
250 g
Steaming sliced carrots Glass tray + steaming
Sliced leeks, fresh, 500 g Glass tray + steaming
Green beans, fresh, 500 g Glass tray + steaming
Beetroot, whole, 500 g Glass tray + steaming
Asparagus, green, 250 g Glass tray + steaming
Steaming sliced courgettes Glass tray + steaming
Potatoes, quartered, 250 g Glass tray + steaming
Potatoes, quartered, 500 g Glass tray + steaming
Potatoes, quartered,
750 g**
Chips, frozen Glass tray 2 ~ 1 180-210 - - 30-40
Rösti, frozen Glass tray 2 ~ 1 190-210 - - 25-35
Croquettes, frozen Glass tray 2 ~ 1 190-210 - - 25-35
125 g rice + 300 ml water Cookware, covered 0 ! 1
250 g rice + 500 ml water Cookware, covered 0 ! 1
Couscous, 1:2 Glass tray 3 z 1 - - 3 3-10
*Stir occasionally
**Water tank may need to be refilled during cooking
Glass tray + steaming
tray
tray
Glass tray + steaming
tray
Glass tray + steaming
tray
tray
Glass tray + steaming
tray
tray
tray
tray
tray
tray
tray
tray
tray
Glass tray + steaming
tray
Heating
function
3 z 1 - - 3 36-40
3 z 1 - - 3 5-7
2 z 1 - - 3 28-35
2 z 1 - - 3 20-23
3 z 1 - - 3 14-16
3 z 1 - - 3 35-45
3 z 1 - - 3 12-15
3 z 1 - - 3 18-20
3 z 1 - - 3 10-12
3 z 1 - - 3 18-20
3 z 1 - - 3 50-60
3 z 1 - - 3 15-18
3 z 1 - - 3 12-14
3 z 1 - - 3 28-30
3 z 1 - - 3 30-32
3 z 1 - - 3 32-35
Steps Tempera-
ture
-
2
2
-
-
-
Microwave
setting
600
180
600
180
Steam
setting
-
-
-
-
Cooking
time
in min
4-6
12-15
6-8
15-18
90
Page 91

Tested for you in our cooking studio en
Desserts
You can use your appliance to quickly prepare
delicious desserts.
Rice pudding
Add milk in the indicated ratio. For example, with a ratio
of 1:2.5, use 250 ml of milk for every 100 ml of
pudding rice.
Observe the notes in the settings table.
Dish Cookware Shelf position Heating
function
Microwave
setting
Steam setting Cooking time
in min
Crème caramel Glass tray 3 z - 3 40-50
Dampfnudeln (yeast dump-
Glass tray 3 z - 2 20-25
lings)
Rice pudding 1:2.5 Cookware, covered 3 z - 3 30-40
Fruit, compote, 500 g Cookware, covered 3 z - 3 9-12
Microwave popcorn, 1 x 100 g
Cookware, covered 0 ! 600 - 3-5
bag
Desserts, e.g. blancmange
Cookware, covered 0 ! 600 - 6-8
(instant) 500 ml*
*Stir occasionally
Acrylamide in foodstuffs
products that are heated to high temperatures, such as
crisps, chips, toast, bread rolls, bread, fine baked
Which foods are affected?
goods (biscuits, gingerbread, cookies).
Acrylamide is mainly produced in grain and potato
Tips for keeping acrylamide to a minimum when preparing food
General Keep cooking times as short as possible. Cook food until it is golden brown, but not too dark. Large, thick pieces of food
contain less acrylamide.
Baking Use hot air at no higher than 180 °C; egg or egg yolk reduces the production of acrylamide.
Biscuits Use hot air at no higher than 180 °C; egg or egg yolk reduces the production of acrylamide.
Oven chips Spread out a single layer evenly on the accessory. Cook at least 400 g each time so that the chips do not dry out.
Test dishes
■ Observe the notes about preheating in the tables.
The settings apply without rapid heating.
These tables have been produced for test institutes to
facilitate inspection of the appliance.
In accordance with IEC 60350-1 and IEC 60705.
■ When baking, use the lower of the listed
temperatures to begin with.
■ The values in the table apply to food placed in a cold
oven.
Baking
■ Place baking tins on the wire rack.
Notes
■ The settings apply to food that is placed into a cold
cooking compartment.
Dish Cookware Shelf position Heating
function
Temperature
in °C
Cooking time
in min
Viennese whirls Glass tray 2 ~ 160-170 30-35
Small cakes* Glass tray 2 ~ 160-170 20-25
Hot water sponge cake 26 cm springform cake tin 1 ~ 160-170 40-50
Double-crusted apple pie 20 cm springform cake tin 2 ~ 170-190 80-100
*Preheat the oven for 5 minutes
91
Page 92

en Tested for you in our cooking studio
Preparing food with a microwave
When preparing food in a microwave, always use heatresistant cookware that is suitable for microwave use.
Microwave defrosting
Dish Cookware Shelf po-
sition
Defrosting meat Cookware, uncovered 0 ! 500 g 1
Microwave cooking
Dish Cookware Shelf position Heating
Custard Cookware, uncov-
ered
Sponge cake Cookware, uncov-
ered
Meatballs Cookware, uncov-
ered
Combined microwave cooking
Dish Cookware Shelf posi-
tion
Potato gratin Cookware,
uncovered
Cake, 700 g Cookware,
uncovered
Chicken Cookware,
uncovered
0 $+! - 1 360 25-32
1 ~+! 190-200 - 180 20-27
0 #+! 190 - 360 30-45 Breast side down.Deep cook-
Heating
function
Heating
function
0 ! 1000 g 1
0 ! 475 g 1 600 8-10
0 ! 900 g 1 600 20-25
Temperature
in °C
Observe the notes on cookware suitable for
microwaves.~ "Microwave" on page 62
Weight Steps Microwave set-
Weight Steps Microwave set-
function
Grill setting
Microwave
setting
2
2
Cooking
time
in min
ting
180
90
ting
360
180
Notes
ware without a lid. Turn halfway through the cooking time.
Cooking time
in min
7
8-12
Cooking time
in min
18-20
18-22
Steaming
Place the glass tray with steamer basket on shelf
position 3.
Dish Cookware Shelf posi-
tion
Peas, frozen Glass tray + steaming
tray
Broccoli, fresh, 300 g Glass tray + steaming
tray
Broccoli, fresh, one container
Grilling
Place the glass tray underneath the wire rack to catch
the liquid and keep the cooking compartment cleaner.
Dish Cookware Shelf posi-
Toasting bread Wire rack 3 $ 3 4-5
Beefburgers, x 12 Wire rack + glass tray 3+1 $ 3 35-45 Turn halfway through
Glass tray + steaming
tray
3 z 3 - The test is complete once the coldest
3 z 3 11 - 13
3 z 3 18 - 20
tion
Heating
function
Heating
function
Steam setting
The values in the table apply to food placed in a cold
oven.
Grill setting Cooking time
Cooking
time
in min
in min
Notes
area has reached 85 °C.
Notes
92
Page 93

Table des matières
[fr]Notice d’ ut i l i sat i on
8 Utilisation conforme. . . . . . . . . . . . . . . . . . . . . . 94
( Précautions de sécurité importantes . . . . . . . . 94
Généralités . . . . . . . . . . . . . . . . . . . . . . . . . . . . . . . . . 94
Micro-ondes . . . . . . . . . . . . . . . . . . . . . . . . . . . . . . . .95
Vapeur . . . . . . . . . . . . . . . . . . . . . . . . . . . . . . . . . . . .97
] Causes de dommages . . . . . . . . . . . . . . . . . . . . 97
Généralités . . . . . . . . . . . . . . . . . . . . . . . . . . . . . . . . . 97
Micro-ondes . . . . . . . . . . . . . . . . . . . . . . . . . . . . . . . .98
Vapeur . . . . . . . . . . . . . . . . . . . . . . . . . . . . . . . . . . . .98
7 Protection de l'environnement . . . . . . . . . . . . . 99
Économie d'énergie . . . . . . . . . . . . . . . . . . . . . . . . . . 99
Elimination écologique . . . . . . . . . . . . . . . . . . . . . . . .99
* Présentation de l'appareil . . . . . . . . . . . . . . . . 100
Bandeau de commande. . . . . . . . . . . . . . . . . . . . . . 100
Sélecteur de fonction . . . . . . . . . . . . . . . . . . . . . . . .100
Champs tactile et écran . . . . . . . . . . . . . . . . . . . . . .101
Sélecteur rotatif . . . . . . . . . . . . . . . . . . . . . . . . . . . . 102
Modes de fonctionnement . . . . . . . . . . . . . . . . . . . .102
Modes de cuisson . . . . . . . . . . . . . . . . . . . . . . . . . .102
Vapeur . . . . . . . . . . . . . . . . . . . . . . . . . . . . . . . . . . .103
Micro-ondes . . . . . . . . . . . . . . . . . . . . . . . . . . . . . . .103
Compartiment de cuisson . . . . . . . . . . . . . . . . . . . .103
Bandeau du réservoir . . . . . . . . . . . . . . . . . . . . . . . .104
Réservoir d'eau . . . . . . . . . . . . . . . . . . . . . . . . . . . .104
Bac collecteur . . . . . . . . . . . . . . . . . . . . . . . . . . . . . 104
_ Accessoires . . . . . . . . . . . . . . . . . . . . . . . . . . . 105
Accessoires fournis . . . . . . . . . . . . . . . . . . . . . . . . . 105
Accessoires supplémentaires. . . . . . . . . . . . . . . . . .105
Accessoire spécial . . . . . . . . . . . . . . . . . . . . . . . . . .105
Insertion de l'accessoire. . . . . . . . . . . . . . . . . . . . . . 105
K Avant la première utilisation . . . . . . . . . . . . . . 106
Première mise en service . . . . . . . . . . . . . . . . . . . . .106
Réglez la classe de dureté de l'eau.. . . . . . . . . . . . .106
Nettoyer le compartiment de cuisson et les accessoires
106
1 Utilisation de l’appareil . . . . . . . . . . . . . . . . . . 107
Allumer et éteindre l'appareil . . . . . . . . . . . . . . . . . . 107
Régler un mode de fonctionnement . . . . . . . . . . . . .107
Réglage du mode de cuisson et de la température .107
Chauffage rapide . . . . . . . . . . . . . . . . . . . . . . . . . . . 108
Coupure de sécurité automatique . . . . . . . . . . . . . .108
fr
P Programmes automatiques . . . . . . . . . . . . . . . 115
Régler un programme. . . . . . . . . . . . . . . . . . . . . . . .115
Tableau des programmes. . . . . . . . . . . . . . . . . . . . .116
O Réglage des fonctions de temps. . . . . . . . . . . 118
Interroger les réglages de temps . . . . . . . . . . . . . . .118
Réglage de la minuterie . . . . . . . . . . . . . . . . . . . . . .118
Réglage de la durée . . . . . . . . . . . . . . . . . . . . . . . . .118
Première mise en service . . . . . . . . . . . . . . . . . . . . .119
A Sécurité-enfants . . . . . . . . . . . . . . . . . . . . . . . . 119
Activation et désactivation. . . . . . . . . . . . . . . . . . . . .119
Q Réglages de base . . . . . . . . . . . . . . . . . . . . . . . 120
Modifier les réglages de base. . . . . . . . . . . . . . . . . .120
Liste des réglages de base. . . . . . . . . . . . . . . . . . . .120
D Nettoyage . . . . . . . . . . . . . . . . . . . . . . . . . . . . . 121
Nettoyants appropriés. . . . . . . . . . . . . . . . . . . . . . . .121
Nettoyage des surfaces autonettoyantes . . . . . . . . .122
Maintenir l'appareil propre . . . . . . . . . . . . . . . . . . . .122
. Fonction nettoyage . . . . . . . . . . . . . . . . . . . . . 123
Détartrage. . . . . . . . . . . . . . . . . . . . . . . . . . . . . . . . .123
Rinçage . . . . . . . . . . . . . . . . . . . . . . . . . . . . . . . . . .123
Nettoyage de finition . . . . . . . . . . . . . . . . . . . . . . . . .123
Vider le bac collecteur . . . . . . . . . . . . . . . . . . . . . . .124
3 Anomalies, que faire ? . . . . . . . . . . . . . . . . . . . 125
4 Service après-vente . . . . . . . . . . . . . . . . . . . . . 126
Numéro E et numéro FD. . . . . . . . . . . . . . . . . . . . . .126
J Testés pour vous dans notre laboratoire . . . . 127
Indications générales . . . . . . . . . . . . . . . . . . . . . . . .127
Décongeler . . . . . . . . . . . . . . . . . . . . . . . . . . . . . . . .128
Réchauffer des plats surgelés . . . . . . . . . . . . . . . . .129
Réchauffer . . . . . . . . . . . . . . . . . . . . . . . . . . . . . . . .130
Gâteaux, petites pâtisseries et pain . . . . . . . . . . . . .131
Soufflés et gratins . . . . . . . . . . . . . . . . . . . . . . . . . . .134
Volaille, viande et poisson . . . . . . . . . . . . . . . . . . . .134
Légumes et garnitures . . . . . . . . . . . . . . . . . . . . . . .138
Desserts . . . . . . . . . . . . . . . . . . . . . . . . . . . . . . . . . .139
L'acrylamide dans les aliments . . . . . . . . . . . . . . . . .140
Plats tests . . . . . . . . . . . . . . . . . . . . . . . . . . . . . . . . .140
^ Les micro-ondes. . . . . . . . . . . . . . . . . . . . . . . . 108
Récipient . . . . . . . . . . . . . . . . . . . . . . . . . . . . . . . . .108
Niveaux de puissance de micro-ondes. . . . . . . . . . .109
Réglage des micro-ondes . . . . . . . . . . . . . . . . . . . .109
Régler le mode combiné du micro-ondes. . . . . . . . .110
` Vapeur . . . . . . . . . . . . . . . . . . . . . . . . . . . . . . . . 111
Bruits . . . . . . . . . . . . . . . . . . . . . . . . . . . . . . . . . . . . 111
Cuisson à la vapeur . . . . . . . . . . . . . . . . . . . . . . . . .111
Régler le mode combiné vapeur . . . . . . . . . . . . . . . 112
Remplir le réservoir d’eau . . . . . . . . . . . . . . . . . . . .112
Remplir le réservoir d'eau. . . . . . . . . . . . . . . . . . . . . 113
Après chaque fonctionnement à la vapeur . . . . . . . . 113
Produktinfo
Vous trouverez des informations supplementaires
concernant les produits, accessoires, pièces de
rechange et services sur Internet sous :
www.constructa.de et la boutique en ligne :
www.constructa-eshop.com
93
Page 94

fr Utilisation conforme
8Utilisation conforme
Utilisation conforme
Lire attentivement ce manuel. Ce n'est
qu'alors que vous pourrez utiliser votre
appareil correctement et en toute sécurité.
Conserver la notice d'utilisation et de montage
pour un usage ultérieur ou pour le propriétaire
suivant.
Cet appareil est conçu pour être encastré
uniquement. Respecter la notice spéciale de
montage.
Contrôler l'état de l'appareil après l'avoir
déballé. Ne pas le raccorder s'il présente des
avaries de transport.
Seul un expert agréé peut raccorder l'appareil
sans fiche. La garantie ne couvre pas les
dommages résultant d'un mauvais
raccordement.
Cet appareil est conçu uniquement pour un
usage ménager privé et un environnement
domestique. Utiliser l'appareil uniquement
pour préparer des aliments et des boissons.
Surveiller l'appareil lorsqu'il fonctionne. Utiliser
l'appareil uniquement dans des pièces
fermées.
Cet appareil est conçu pour une utilisation
jusqu'à une altitude maximale de 4 000 m.
Cet appareil peut être utilisé par des enfants
de 8 ans ou plus et par des personnes dotées
de capacités physiques, sensorielles ou
mentales réduites ou disposant de
connaissances ou d’expérience insuffisantes,
sous la surveillance d'un tiers responsable de
leur sécurité ou bien lorsqu'ils ont reçu des
instructions liées à l'utilisation de l'appareil en
toute sécurité et qu'ils ont intégré les risques
qui en résultent.
Les enfants ne doivent pas jouer avec
l'appareil. Le nettoyage et l'entretien effectué
par l'utilisateur ne doivent pas être accomplis
par des enfants, sauf s'ils sont âgés de 15 ans
et plus et qu'un adulte les surveille.
Les enfants de moins de 8 ans doivent être
tenus à distance de l'appareil et du cordon
d'alimentation.
(Précautions de sécurité
importantes
Précaut i ons de sécuri t é impor t ant es
Généralités
:Mise en garde – Risque d'incendie !
■ Tout objet inflammable entreposé dans le
compartiment de cuisson peut s'enflammer.
Ne jamais entreposer d'objets inflammables
dans le compartiment de cuisson. Ne
jamais ouvrir la porte de l'appareil lorsqu'il
s'en dégage de la fumée. Éteindre l'appareil
et débrancher la fiche secteur ou enlever le
fusible dans le boîtier à fusibles.
Risque d’incendie !
■ Les résidus alimentaires épars, la graisse et
le jus de rôti peuvent s'enflammer. Avant
utilisation, retirez les grosses salissures
présentes dans le compartiment de
cuisson, sur les résistances de chauffe et
sur les accessoires.
Risque d'incendie !
■ Il se produit un courant d'air lors de
l'ouverture de la porte de l'appareil. Le
papier sulfurisé peut toucher les
résistances chauffantes et s'enflammer. Ne
jamais poser de papier sulfurisé non
attaché sur un accessoire lors du
préchauffage. Toujours déposer un plat ou
un moule de cuisson sur le papier sulfurisé
pour le lester. Recouvrir uniquement la
surface nécessaire de papier sulfurisé. Le
papier sulfurisé ne doit pas dépasser des
accessoires.
:Mise en garde – Risque de brûlure !
■ L'appareil devient très chaud. Ne jamais
toucher les surfaces intérieures chaudes du
compartiment de cuisson ni les résistances
chauffantes. Toujours laisser l'appareil
refroidir. Tenir les enfants éloignés.
Cet appareil et ses parties accessibles
deviennent chauds pendant leur utilisation.
Il convient de veiller à ne pas toucher les
éléments chauffants. Il convient de
maintenir à distance les enfants de moins
de 8 ans à moins qu’ils ne soient sous une
surveillance continue.
Risque de brûlure !
■ Les récipients ou les accessoires
deviennent très chaud. Toujours utiliser des
maniques pour retirer le récipient ou les
accessoires du compartiment de cuisson.
Risque de brûlure !
94
Page 95

Précautions de sécurité importantes fr
■ Les vapeurs d'alcool peuvent s'enflammer
dans un compartiment de cuisson chaud.
Ne jamais préparer de plats contenant de
grandes quantités de boissons fortement
alcoolisées. Utiliser uniquement de petites
quantités de boissons fortement
alcoolisées. Ouvrir la porte de l'appareil
avec précaution.
:Mise en garde – Risque de brûlures !
■ Les éléments accessibles deviennent
chauds pendant le fonctionnement. Ne
jamais toucher les éléments chauds.
Eloigner les enfants.
Risque de brûlures !
■ De la vapeur chaude peut s'échapper
lorsque vous ouvrez la porte de l'appareil.
La vapeur n'est pas visible selon sa
température. Ne pas se placer trop près de
l'appareil lors de l'ouverture. Ouvrir
prudemment la porte de l'appareil. Eloigner
les enfants.
Risque de brûlure !
■ La présence d'eau dans un compartiment
de cuisson chaud peut générer de la
vapeur d'eau chaude. Ne jamais verser
d'eau dans le compartiment de cuisson
chaud.
:Mise en garde – Risque de blessure !
Un verre de porte d'appareil rayé peut se
fendre. Ne pas utiliser de racloir à verre, ni de
produit de nettoyage agressif ou abrasif.
:Mise en garde – Risque de choc
électrique !
■ Tenter de réparer vous-même l'appareil est
dangereux. Seul un technicien du service
après-vente formé par nos soins est habilité
à effectuer des réparations et à remplacer
des câbles d'alimentation défectueux. Si
l'appareil est défectueux, débrancher la
fiche secteur ou enlever le fusible dans le
boîtier à fusibles. Appeler le service aprèsvente.
Risque de choc électrique !
■ L'isolation des câbles des appareils
électroménagers peut fondre au contact
des pièces chaudes de l'appareil. Ne
jamais mettre le câble de raccordement
des appareils électroménagers en contact
avec des pièces chaudes de l'appareil.
Risque de choc électrique !
■ De l'humidité qui pénètre peut occasionner
un choc électrique. Ne pas utiliser de
nettoyeur haute pression ou de nettoyeur à
vapeur.
Risque de choc électrique !
■ Une infiltration d'humidité peut provoquer
un choc électrique. Ne jamais exposer
l'appareil à une forte chaleur ou humidité.
Utiliser l'appareil uniquement dans des
pièces fermées.
Risque de choc électrique !
■ Un appareil défectueux peut provoquer un
choc électrique. Ne jamais mettre en
service un appareil défectueux. Débrancher
la fiche secteur ou enlever le fusible dans le
boîtier à fusibles. Appeler le service aprèsvente.
:Mise en garde – Danger par magnétisme !
Le bandeau de commande ou les éléments de
commande contiennent des aimants
permanents. Ceux-ci peuvent influer sur des
implants électroniques, par ex. stimulateurs
cardiaques ou pompes à insuline. En tant que
porteur d'un implant électronique, respecter
une distance minimum de 10 cm du bandeau
de commande.
Micro-ondes
:Mise en garde – Risque de brûlure !
■ Toute utilisation non conventionnelle de
l'appareil est dangereuse.
Ne sont pas autorisés le séchage
d'aliments ou de vêtements, le
réchauffement de pantoufles, de coussins
de céréales ou de graines, d'éponges, de
chiffons humides et autres articles
similaires.
Par exemple, des pantoufles, coussins de
céréales ou de graines, éponges, chiffons
humides ou autres articles surchauffés
peuvent entraîner des brûlures
Risque d'incendie !
■ Les aliments peuvent s'enflammer. Ne
jamais réchauffer les aliments dans des
emballages qui conservent la chaleur.
Ne jamais réchauffer des aliments dans des
récipients en plastique, en papier ou autres
matériaux inflammables, sans les surveiller.
Ne jamais régler une puissance ou une
durée de micro-ondes trop élevée. Suivre
les indications de cette notice d'utilisation.
Ne jamais déshydrater des aliments aux
micro-ondes.
Ne jamais décongeler ni réchauffer au
micro-ondes à une puissance trop élevée
ou trop longtemps des aliments dont la
teneur en eau est faible, comme du pain.
Risque d'incendie !
■ L'huile alimentaire peut s'enflammer. Ne
jamais chauffer de l'huile alimentaire seule
aux micro-ondes.
95
Page 96
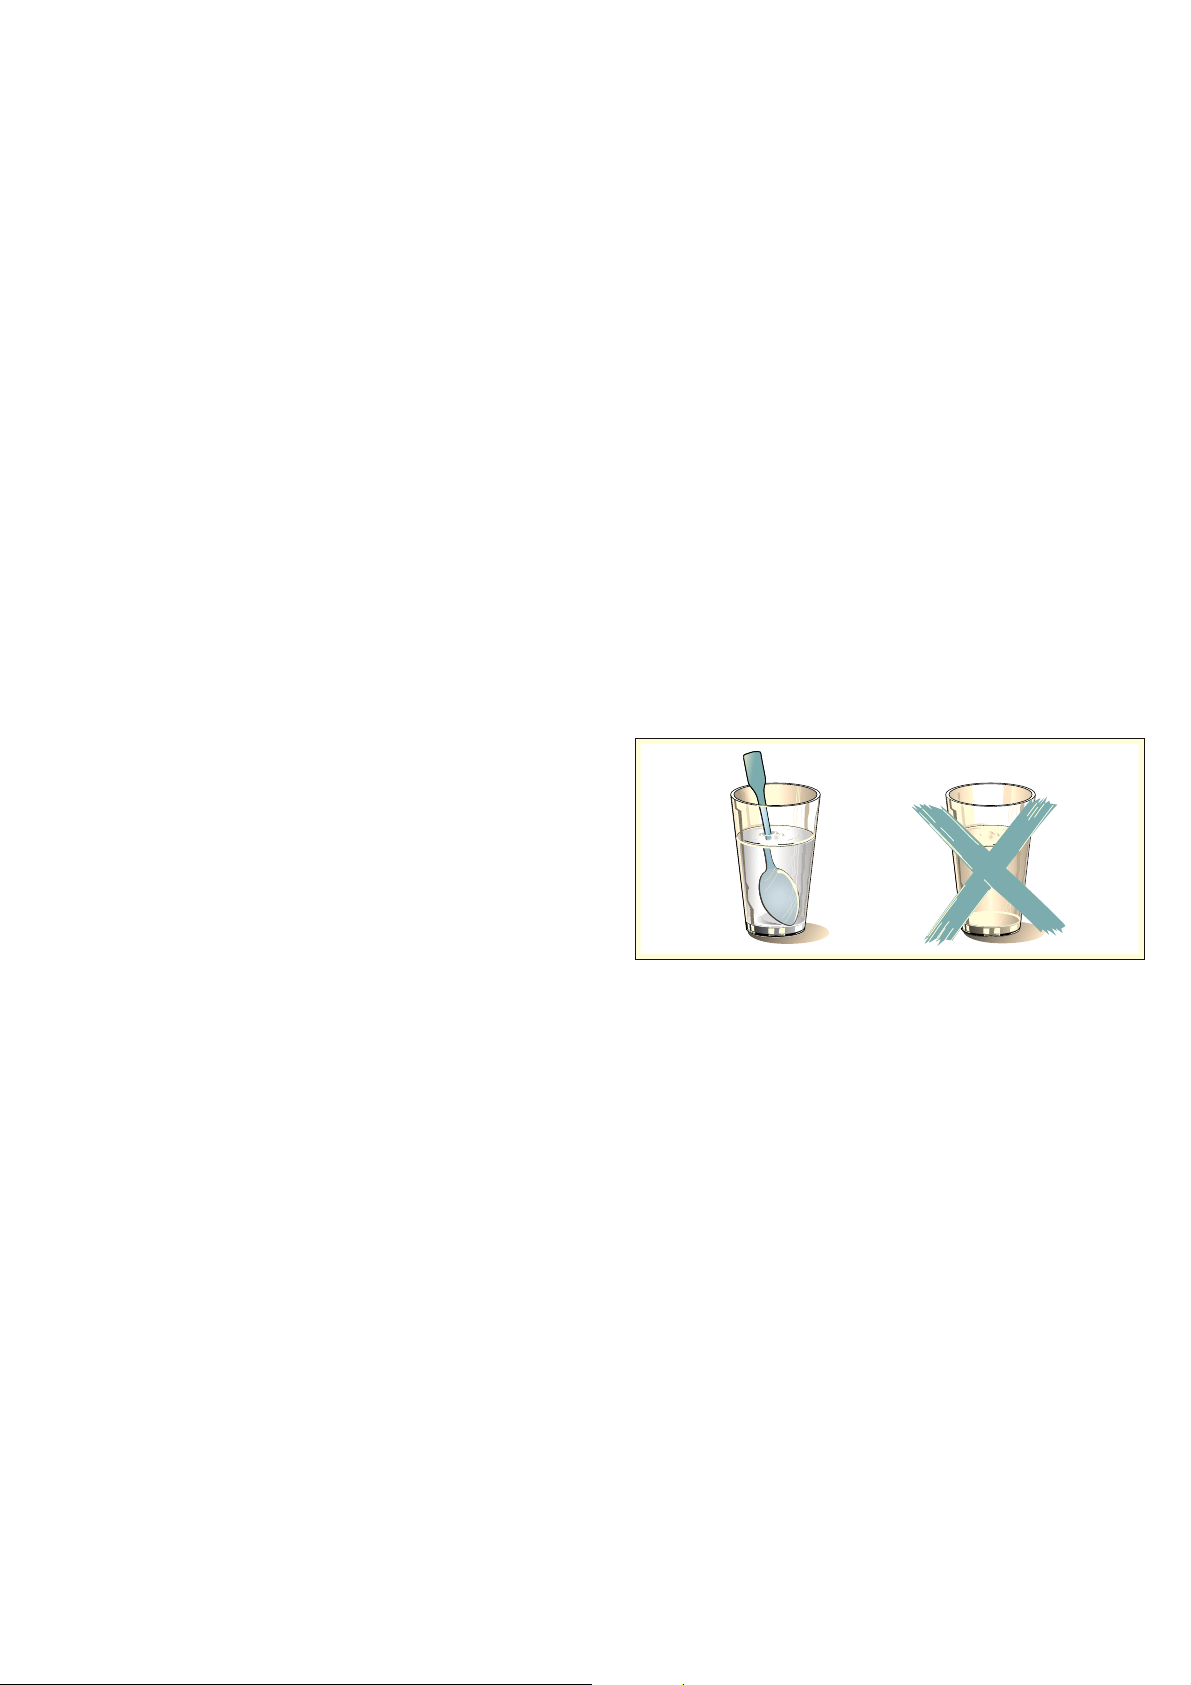
fr Précautions de sécurité importantes
:Mise en garde – Risque d'explosion !
Les liquides ou autres aliments dans des
récipients hermétiquement fermés peuvent
exploser. Ne jamais chauffer de liquides ou
d'autres aliments dans des récipients
hermétiquement fermés.
:Mise en garde – Risque de brûlure !
■ Les aliments comportant une enveloppe ou
une peau dure peuvent éclater, à la
manière d'une explosion, au moment de les
réchauffer, mais également après. Ne
jamais faire cuire d'oeufs dans leur coquille
ni réchauffer des oeufs durs. Ne jamais
faire cuire d'animaux à coquilles ni de
crustacés. Avant de faire des œufs sur le
plat ou des œufs pochés, percer leur
jaune.En cas d'utilisation d'aliments
comportant une enveloppe ou une peau
dure, comme des pommes, tomates,
pommes de terre ou saucisses, l'enveloppe
peut éclater. Percer l'enveloppe ou la peau
avant de les réchauffer.
Risque de brûlure !
■ La chaleur ne se répartit pas uniformément
dans l'alimentation pour bébé. Ne jamais
réchauffer des aliments pour bébé dans
des récipients fermés. Toujours retirer le
couvercle et la tétine. Après réchauffage,
remuer ou secouer énergiquement. Vérifier
la température des aliments avant de
donner les aliments à l'enfant.
Risque de brûlure !
■ Les aliments chauffés dégagent de la
chaleur. Le plat peut devenir chaud.
Toujours utiliser des maniques pour retirer
le récipient ou les accessoires du
compartiment de cuisson.
Risque de brûlure !
■ Si les aliments sont hermétiquement
emballés, leur emballage peut éclater.
Toujours respecter les consignes figurant
sur l'emballage. Toujours utiliser des
maniques pour retirer des plats du
compartiment de cuisson.
Risque de brûlure !
■ Les éléments accessibles deviennent
chauds pendant le fonctionnement. Ne
jamais toucher les éléments chauds.
Eloigner les enfants.
Risque de brûlure !
■ Toute utilisation non conventionnelle de
l'appareil est dangereuse.
Ne sont pas autorisés le séchage
d'aliments ou de vêtements, le
réchauffement de pantoufles, de coussins
de céréales ou de graines, d'éponges, de
chiffons humides et autres articles
similaires.
Par exemple, des pantoufles, coussins de
céréales ou de graines, éponges, chiffons
humides ou autres articles surchauffés
peuvent entraîner des brûlures
:Mise en garde – Risque de brûlure !
■ Un retard d'ébullition peut se produire
lorsque vous chauffez des liquides. Cela
signifie que la température d'ébullition est
atteinte sans que les bulles de vapeur
typiques remontent. À la moindre secousse
ou vibration, le liquide chaud peut alors
subitement déborder et jaillir. Toujours
placer une cuillère dans le récipient que
vous faites chauffer. Cela permet d'éviter ce
retard d'ébullition.
:Mise en garde – Risque de blessure !
■ Toute vaisselle inappropriée peut éclater.
La vaisselle en porcelaine ou en céramique
peut présenter des microporosités dans les
poignées et les couvercles. Derrière ces
microporosités se dissimulent des cavités.
De l'humidité peut s'y introduire et faire
éclater le récipient. Utiliser uniquement de
la vaisselle conçue pour aller au microondes.
Risque de blessures !
■ La vaisselle et les récipients métalliques ou
la vaisselle dotée d'applications en métal
peuvent produire des étincelles en mode
micro-ondes pur. L'appareil est
endommagé. En mode micro-ondes pur,
n'utilisez jamais de récipients métalliques.
96
:Mise en garde – Risque de choc
électrique !
L'appareil fonctionne avec une tension élevée.
Ne jamais retirer le boîtier.
Page 97

Causes de dommages fr
:Mise en garde – Risque de préjudice
sérieux pour la santé !
■ En cas de nettoyage insuffisant, la surface
de l'appareil peut être endommagée. De
l'énergie de micro-ondes risque de
s'échapper. Nettoyez l'appareil
régulièrement et enlevez immédiatement
tous les résidus d'aliments. Veillez à ce que
le compartiment de cuisson, le joint de
porte, la porte et la butée de porte restent
toujours propres. ~ "Nettoyage"
à la page 121
Risque de préjudice sérieux pour la santé !
■ L'énergie micro-ondes peut s'échapper par
une porte de compartiment de cuisson
défectueuse ou un joint de porte
endommagé. Ne jamais utiliser l'appareil si
la porte du compartiment de cuisson, le
joint de porte ou le cadre en plastique est
endommagé. Prévenez le service aprèsvente.
Risque de préjudice sérieux pour la santé !
■ L'énergie du micro-ondes s'échappe dans
le cas d'appareils sans habillage. Ne jamais
enlever l'habillage du corps de l'appareil.
Appeler le service après-vente en cas
d'intervention de maintenance ou de
réparation.
Vapeur
:Mise en garde – Risque de brûlure ! !
■ L'eau dans le réservoir d'eau peut devenir
très chaude lorsque l'appareil continue de
fonctionner. Vider le réservoir d'eau après
chaque utilisation de l'appareil avec de la
vapeur.
Risque de brûlure ! !
■ De la vapeur chaude est produite dans le
compartiment de cuisson. Ne pas mettre la
main dans le compartiment de cuisson lors
du fonctionnement de l'appareil avec de la
vapeur.
Risque de brûlure !
■ Du liquide chaud peut déborder lors de
l'enlèvement de l'accessoire. Retirer
l'accessoire chaud prudemment avec des
gants isolants.
]Causes de dommages
Cau s e s de dommages
Généralités
Attention !
■ Eau dans le compartiment de cuisson chaud : Ne
versez jamais d'eau dans le compartiment de
cuisson chaud. Cela produit de la vapeur d'eau. Le
changement de température peut endommager.
■ Humidité dans le compartiment de cuisson : si de
l'humidité subsiste longtemps dans le compartiment
de cuisson, cela peut entraîner une corrosion.
Laissez sécher le compartiment de cuisson après
utilisation. Ne conservez pas d'aliments humides
dans le compartiment de cuisson pendant une
longue durée. Ne stockez pas d'aliments dans le
compartiment de cuisson.
■ Refroidissement avec la porte de l'appareil ouverte :
lorsque vous avez utilisé l'appareil à haute
température, laissez refroidir le compartiment de
cuisson uniquement la porte fermée. Ne coincez rien
dans la porte de l'appareil. Même si la porte n'est
qu'en partie ouverte, les façades des meubles
voisins peuvent s'endommager avec le temps.
Laissez refroidir le compartiment de cuisson porte
ouverte uniquement lorsque la cuisson a créé
beaucoup d'humidité.
■ Joint de porte fortement encrassé : si le joint est
fortement encrassé, la porte de l'appareil ne ferme
plus correctement lors du fonctionnement. La façade
des meubles voisins peut être endommagée. Veillez
à ce que le joint soit toujours propre. ~ "Nettoyage"
à la page 121
■ Porte de l'appareil utilisée comme surface d'assise
ou support : il est interdit de grimper, de s'asseoir et
de s'accrocher à la porte de l'appareil. Ne pas
déposer de récipients ou des accessoires sur la
porte de l'appareil.
■ Introduire l'accessoire : Selon le modèle d'appareil,
les accessoires peuvent rayer la vitre en fermant la
porte. Introduire les accessoires toujours jusqu'en
butée dans le compartiment de cuisson.
■ Transporter l'appareil : Ne transportez ou ne portez
pas l'appareil par la poignée de la porte. La poignée
ne supportera pas le poids de l'appareil et risque de
se casser.
:Mise en garde – Risque de blessures et
d'incendie !
Les liquides inflammables peuvent
s'enflammer dans le compartiment de cuisson
chaud (déflagration). Ne pas remplir le
réservoir d'eau de liquides inflammables (p.ex.
boissons alcoolisées). Remplir le réservoir
d'eau exclusivement d'eau ou de solution
détartrante que nous recommandons.
97
Page 98
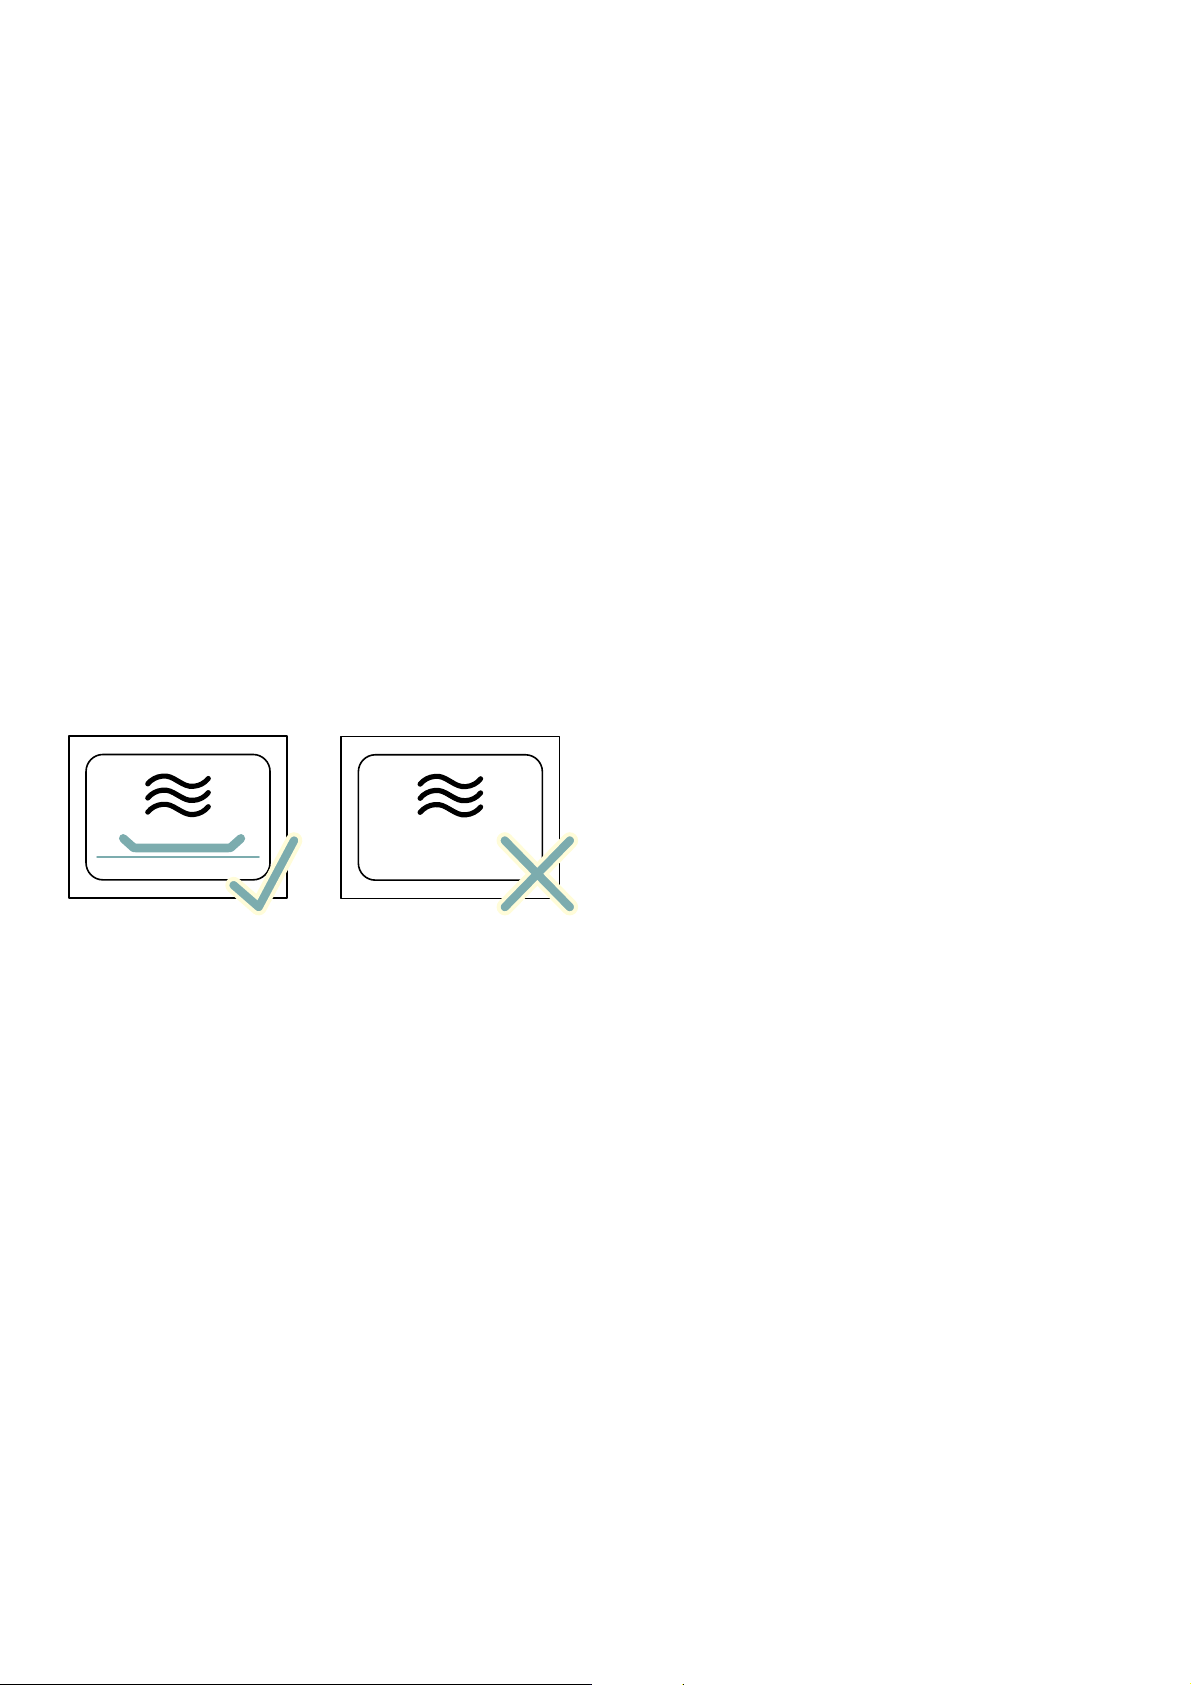
fr Causes de dommages
Micro-ondes
Attention !
■ Feuille d'aluminium : Une feuille d'aluminium placée
dans le compartiment de cuisson ne doit pas entrer
en contact avec la vitre de la porte. Cela peut
conduire à des décolorations définitives sur la vitre
de la porte
■ Formation d'étincelles : le métal p. ex. une cuillère
dans un verre, doit se trouver à une distance d'au
moins 2 cm des parois du compartiment de cuisson
et de l'intérieur de la porte. Des étincelles pourraient
détériorer la vitre de la porte.
■ Mode micro-ondes et micro-ondes combiné : la grille
n'est pas adaptée au mode micro-ondes ni au mode
micro-ondes combiné à un autre mode de cuisson.
Des étincelles peuvent se produire, ce qui
endommagerait le compartiment de cuisson.
■ Barquettes en aluminium : n'utilisez aucune
barquette en aluminium dans l'appareil. La formation
d'étincelles endommage l'appareil.
■ Utilisation du micro-ondes sans aliments : faire
fonctionner l'appareil sans aliments dans le
compartiment de cuisson entraîne une surchauffe.
Ne démarrez jamais le micro-ondes sans aliments
dans le compartiment de cuisson. Sauf pour tester
rapidement un récipient. ~ "Les micro-ondes"
à la page 108
■ Pop corn au micro-ondes : Ne sélectionnez jamais
une puissance de micro-ondes trop élevée. La vitre
de la porte peut éclater en cas de surcharge. Réglez
au maximum sur 600 W. Veillez à toujours placer le
sachet de pop corn sur une assiette en verre.
Vapeur
Attention !
■ Entretien de l'appareil : le compartiment de cuisson
de votre appareil est en acier inoxydable de qualité
supérieure. Si le compartiment de cuisson est mal
entretenu, de la corrosion peut y apparaître.
Respectez les indications d'entretien et de nettoyage
figurant dans la notice d'utilisation. Éliminez les
salissures présentes dans le compartiment de
cuisson dès que l'appareil a refroidi.
■ Moules : la vaisselle doit résister à la chaleur et à la
vapeur. Les moules en silicone ne sont pas adaptés
pour la cuisson à la vapeur.
■ Vaisselle avec taches de rouille : N'utilisez pas de
vaisselle présentant des taches de rouille. Même
des taches infimes peuvent occasionner de la rouille
dans le compartiment de cuisson.
■ Liquides qui s'écoulent : pour le mode vapeur,
insérez la lèchefrite en verre au niveau 3 et placez le
récipient de cuisson à la vapeur sur la lèchefrite en
verre. Le liquide qui s'égoutte est récupéré dans la
lèchefrite en verre.
■ Eau chaude dans le réservoir d'eau : l'eau chaude
peut endommager la pompe. Ne versez pas d'eau
chaude dans le réservoir d'eau.
■ Dommages dans le compartiment de cuisson : ne
faites jamais fonctionner votre appareil lorsque de
l'eau se trouve sur le fond du compartiment de
cuisson. Essuyez l'eau qui se trouve sur le fond du
compartiment de cuisson avant toute utilisation.
■ Solution détartrante : veillez à ce qu'aucune solution
détartrante n'entre en contact avec le bandeau de
commande ou toute autre surface de l'appareil.
Vous risquez d’endommager les surfaces. Si
toutefois cela se produisait, éliminez immédiatement
la solution détartrante avec de l'eau.
■ Nettoyage du réservoir d'eau : Ne pas nettoyer le
réservoir d'eau au lave-vaisselle. Cela
endommagerait le réservoir d'eau. Nettoyez le
réservoir d'eau avec un chiffon doux et un produit à
vaisselle usuel du commerce.
■ Protection antigel : pour éviter les dommages dus à
l’effet du gel pendant le transport et le stockage, il
faut vider entièrement l’appareil.
98
Page 99

7Protection de
l'environnement
Prot ec t i on de l ' envi r onnement
Votre nouvel appareil est d'une très grande efficacité
énergétique. Vous trouverez ici des conseils comment
vous pouvez économiser encore plus d'énergie lors de
l'utilisation de l'appareil et comment correctement
éliminer l'appareil.
Économie d'énergie
■ Préchauffez l'appareil uniquement si cela est indiqué
dans la recette ou dans les tableaux de la notice
d'utilisation.
■ Pour cuire des pâtisseries, utilisez des moules de
couleur foncée, laqués noirs ou émaillés. Ces types
de moules absorbent bien la chaleur.
■ Ouvrez le moins possible la porte de l'appareil
pendant le fonctionnement.
■ Si vous souhaitez faire cuire plusieurs gâteaux,
faites-les cuire les uns après les autres. Le
compartiment de cuisson est encore chaud. Le
temps de cuisson diminue au deuxième gâteau.
Vous pouvez aussi placer 2 moules à cake côte à
côte dans le compartiment de cuisson.
■ Si les temps de cuisson sont assez longs, vous
pouvez éteindre l'appareil 10 minutes avant la fin du
temps de cuisson, puis terminer la cuisson grâce à
la chaleur résiduelle.
Protection de l'environnement fr
Elimination écologique
Eliminez l'emballage en respectant
l'environnement.
Cet appareil est marqué selon la directive
européenne 2012/19/UE relative aux appareils
électriques et électroniques usagés (waste
electrical and electronic equipment - WEEE).
La directive définit le cadre pour une reprise et
une récupération des appareils usagés
applicables dans les pays de la CE.
99
Page 100

fr Présentation de l'appareil
*Présentation de l'appareil
Présent at i on de l ' appar ei l
Dans ce chapitre, nous vous expliquons les éléments
d'affichage et de commande. De plus, vous allez
découvrir les différentes fonctions de votre appareil.
Remarque : Des variations de détails ou de couleurs
sont possibles selon le modèle d'appareil.
( Sélecteur de fonctions
Le sélecteur de fonction vous permet de régler le
mode de fonctionnement ou d'autres fonctions.
Vous pouvez tourner le sélecteur de fonction vers
la gauche ou la droite à partir de la position zéro.
0 Champs tactiles
Sous les champs tactiles se trouvent des sondes.
Effleurez le symbole pour sélectionner la fonction.
8 Affichage
L'affichage indique le symbole des fonctions
actives et les fonctions de temps.
@ Sélecteur rotatif
Réglez la température pour le mode de cuisson
avec le sélecteur rotatif ou sélectionnez le réglage
pour d'autres fonctions.
Vous pouvez tourner le sélecteur rotatif vers la
gauche ou la droite.
Remarques
■ Sur certains appareils, le sélecteur de fonction ou le
sélecteur rotatif sont escamotables. Pour les
enclencher et les désenclencher, appuyez le
sélecteur pour le placer en position zéro.
■ Si le sélecteur de fonction se trouve en position zéro
(mode économie d'énergie) et qu'une fonction est
sélectionnée, quelques secondes s'écoulent avant
que la fonction concernée soit disponible (par ex.
micro-ondes).
Bandeau de commande
Via le bandeau de commande, vous réglez les
différentes fonctions de votre appareil à l'aide du
sélecteur de fonction et du sélecteur rotatif. L'écran
affiche les réglages actuels.
L'aperçu montre le bandeau de commande, l'appareil
allumé, avec un mode de fonctionnement sélectionné.
Sélecteur de fonction
Le sélecteur de fonction vous permet de régler les
modes de fonctionnement ou d'autres fonctions.
Afin que vous trouviez toujours le mode de
fonctionnement approprié pour votre plat, nous vous
expliquons ci-après les différences et les utilisations.
Position Utilisation
Û Position zéro L'appareil est éteint et se trouve en
mode d'économie d'énergie.
! Micro-ondes Sélectionnez le mode micro-ondes.
z Vapeur De la vapeur chaude est injectée dans
le compartiment de cuisson.
~ Chaleur tournante Le ventilateur répartit uniformément
dans le compartiment de cuisson la
chaleur de la résistance située dans la
paroi arrière.
$ Gril Toute la surface située sous la résis-
tance chauffante du gril est chauffée.
# Gril air pulsé Le ventilateur répartit l'air chaud de la
résistance chauffante du gril autour
du mets.
8 Détartrage Sert au détartrage de l'évaporateur et
le maintient opérationnel.
$ Rinçage Nettoie les tuyaux de l'unité de vapeur
avec de l'eau.
= Programmes Vous trouverez ici des réglages déjà
préprogrammés pour de nombreux
plats.
--------
100
 Loading...