

Constellation audio Cygnus Owner's Manual
2
CAUTION
To reduce risk of electric shock, do not remove any of the cover plates or screws on the digital file
player/DAC. There are no user serviceable parts inside. Contact qualified service personnel.
WARNING
To reduce risk of fire or electric shock, do not expose this digital file player/DAC to moisture, rain, or
excessive humidity.
The lightning flash with arrowhead, within an equilateral triangle, is intended to alert the
user to the presence of uninsulated “dangerous voltage” within the product’s enclosure that
may be of sufficient magnitude to constitute a risk of electrical shock to persons.
The exclamation point within an equilateral triangle is intended to alert the user to the
presence of important operating maintenance (servicing) instructions in the literature
accompanying the appliance.
3
Thank you for purchasing the Constellation Audio Cygnus digital file player/DAC. You’re
about to experience musicality, realism and detail you probably didn’t think was possible
with digital audio.
We designed it the Cygnus to deliver the ultimate in digital sound quality and to offer
simple operation. These seemingly conflicting goals required us to rethink the
configuration of the unit, separating it into a main chassis containing the audio and digitalto-analog conversion circuits, and a separate chassis containing the power supply, the WiFi
transmitter/receiver and the USB interface. Because of the Cygnus’ unique configuration,
you may find its installation and controls somewhat different from what you’re used to. But
we think you’ll agree that our design eliminates many of the frustrating complexities of
digital audio—and in the process, achieves a level of fidelity no other digital audio source
device can match.
Please read this manual in full before you operate the Cygnus, so you can be assured of
getting maximum performance.
Contents
Page Topic
4 Before you install the Cygnus
Unpacking
Connecting the power supply and Link cables and the WiFi antenna
Installation notes
In the event of malfunction
7 Source device and amplifier connections
XLR, RCA/coax and Toslink inputs
USB connectors
9 Other connections on the Cygnus (main chassis)
RS-232, Link, trigger, USB/control and hub connections
11 Other connections on the Cygnus (power supply)
Antenna, LAN and AC input
12 Controls / displays / indicators
Front panel touchscreen and buttons
13 Control screens
15 Setting up for WiFi control
15 Step-by-step operating procedure
16 Using the web interface to control the Media Player
18 Creating and managing playlists
19 Maintenance
19 Troubleshooting
21 For more information
4
Before you install the Cygnus
Unpacking
Take care when you remove the Cygnus main chassis and power supply from their packaging. Because of its
machined aluminum top chassis, it is heavier than the average preamp. Have an extra person nearby to help
if you need it. You may wish to use gloves to protect your fingers.
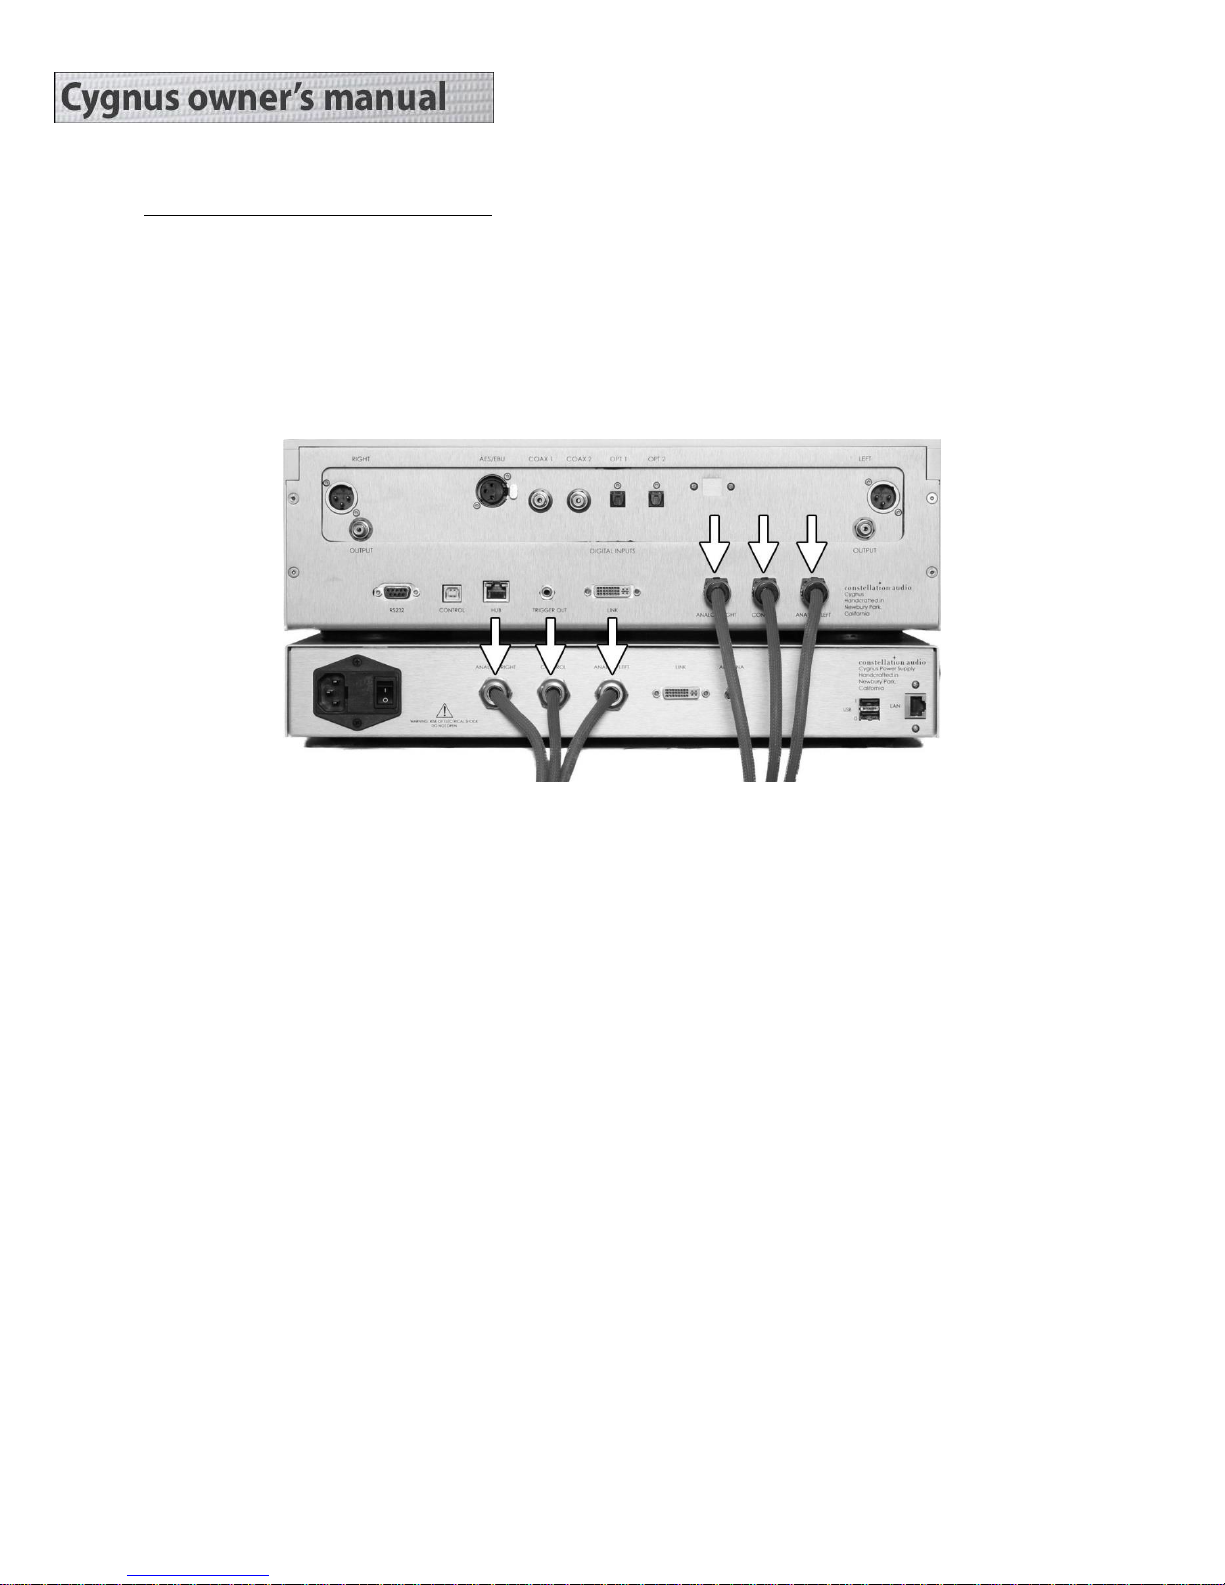
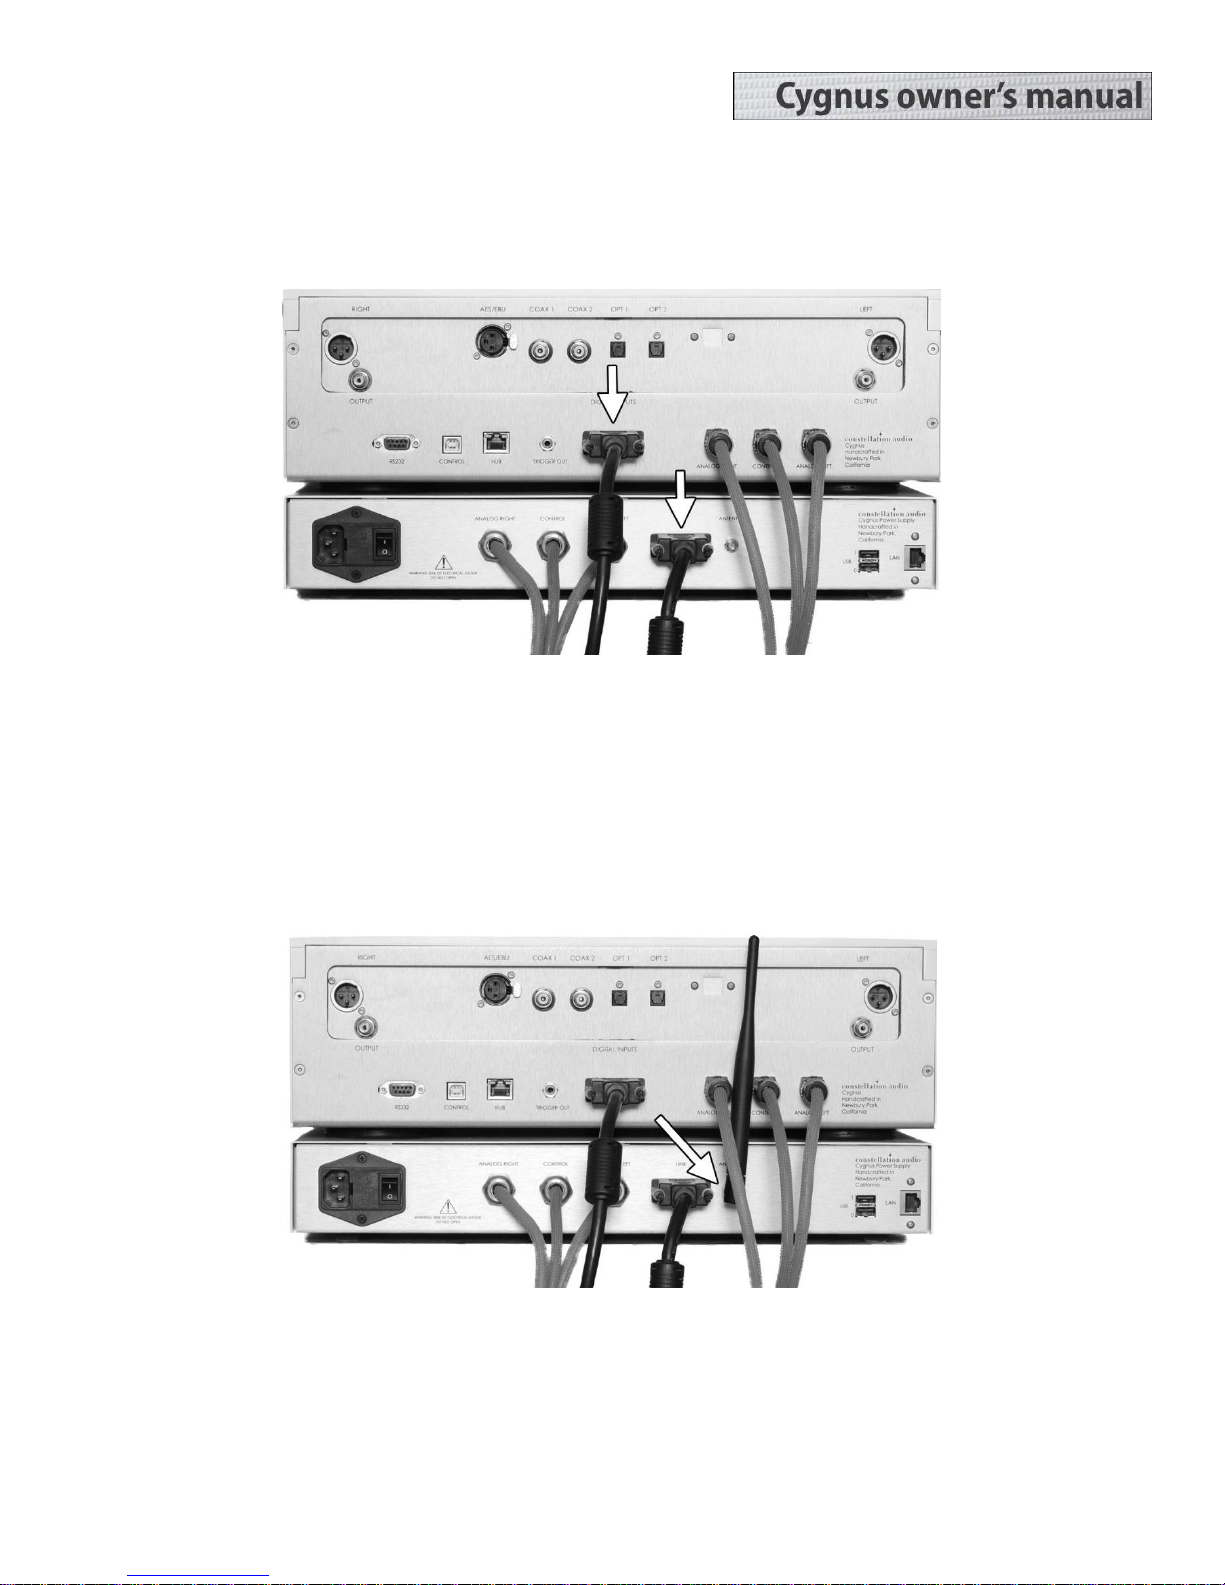
Connecting the power supply cables
The Cygnus's separate power supply (bottom component in the picture above) must be connected to the
Cygnus main chassis (top component in the picture above) as shown above before you plug the unit into a
wall. Make sure the power switch on the power supply is in the off (O) position.
The supplied cables are spiral-wrapped, gold-plated copper designed for aerospace use, and can handle up to
30 amps. These cables are permanently attached to the back of the power supply. Do not attempt to replace
them. The cables are long enough to allow separation of the two components, so you can, for example, place
the power supply at the bottom of your equipment rack with the Cygnus main chassis up nearer the top.
Connect the power supply’s Left Analog cable into the Analog Left power input of the Cygnus main chassis.
Repeat with the Analog Right and Control power cables. The connector on the Control cable is different from
the analog power cables to assure the proper connection is made.
Do not connect the AC power cord yet. Wait until you have connected the Link cable between the power
supply and the main chassis.
DO NOT remove the power cables while the unit is powered on. If you do happen to accidently pull one of
them out, DO NOT plug it back in. Turn off the power supply using the hard switch on the rear panel, unplug
the unit, then replace the cable. Failure to power down the unit before replacing a power cable can result in
substantial damage to your Cygnus.
5
Connecting the Link cable
The Link cable is a DVI-type digital cable that connects the Cygnus main chassis to the power supply section.
It carries digital audio and control signals from the power supply’s WiFi transceiver and USB interface to the
main chassis. Before you connect the Link cable, make sure the AC cord to the power supply is not plugged
in, and that the power switch on the power supply is in the off (O) position.
Connect the Link cable by gently pushing the plug onto the connector on the Cygnus main chassis Make sure
the plug is oriented correctly with the connector. Then tighten the two mounting screws on the plug. Repeat
with the other plug and the connector on the power supply.
Connecting the WiFi antenna
The included antenna transmits and receives WiFi network signals. To install it, carefully thread it onto the
antenna connector on the back of the power supply. Point the antenna upward or to the side.
You can now plug the AC power cord into the power supply and into the wall socket, and turn the power
supply’s master power switch on.

6
If you will be using the Constellation Audio Centaur or Hercules amplifiers (or any other high-powered
amplifier), do not plug the Cygnus into the same AC socket or into any other outlet connected on that circuit.
Constellation Audio amplifiers draw a great deal of power and could affect the Cygnus’s performance if the
amplifier(s) and preamp are plugged into the same electrical circuit or AC outlet.
When you connect or disconnect the AC cord, always grasp it by the plug, not by the cord itself. Pulling the
plug out by the cord can damage the cord, the AC socket, and/or the Cygnus.
Installation notes
The Cygnus preamplifier uses passive cooling; there are no internal fans. While the Cygnus does not generate
as much heat as an amplifier, it should still be located in an area with adequate ventilation.
There should be at least 6 in/15 cm of clearance between the sides and top of the preamp and the nearest
wall or cabinet. If the Cygnus is installed in a cabinet or an equipment closet, ensure the cabinet/closet has
adequate ventilation. The same rule applies to the power supply. Installation in an unventilated cabinet or
closet may cause the Cygnus main chassis or power supply to overheat, significantly reducing its lifespan.
The Cygnus requires a room-temperature environment to operate properly. Ambient temperature should be
about 70°F/21°C, plus or minus 10°F/5°C. Never install the Cygnus in a place where it may be exposed to
direct sunlight, and do not install it next to a room heater, radiator, air conditioner, etc.
Do not install the Cygnus inside an all-metal cabinet. This will interfere with WiFi reception needed to control
the unit.
Make sure that the Cygnus will not be exposed to moisture. Do not locate it in an area where it might be
spilled on, and do not place it in a humid location (such as an unfinished basement).
Installing the Cygnus in a place where it will be exposed to direct sunlight or moisture, or where it will not
have adequate ventilation, will void your warranty.
Associated equipment
The Cygnus is designed to be paired with any high-quality audio preamp and amplifier or integrated amp. We
recommend you use it with Constellation's own Centaur or Hercules II amps and Altair II or Virgo preamps,
but you can use the brands of your choice. We strongly recommend you use a balanced (XLR) connection
from the Cygnus to the preamp and the preamp to the amp, but RCA outputs are provided on the Cygnus in
case your system does not have XLR inputs.
The Cygnus has only analog outputs and cannot be connected to another DAC. It can, however, be connected
to a multiroom audio system. We recommend using the XLR outputs to feed your main system, and the RCA
outputs to feed your multiroom audio system.
Before making or changing any connection to the Cygnus, first turn off the master power switch on the power
supply and also turn off the preamp and power amplifier.

7
Source components
The Cygnus DAC section has five digital audio inputs (AES/EBU, two coax, two Toslink optical). We
recommend you use the highest quality connection that your digital source device provides. In order of
preference, we recommend AES/EBU, then coax, then Toslink.
In the event of malfunction
Do not under any circumstances open the chassis of the Cygnus. There are no user-serviceable parts inside.
Opening the chassis can present a shock hazard even if the AC power is disconnected. Any alteration or
modification of the Cygnus’s internal parts or circuit will immediately void your warranty.
If your Cygnus does not function correctly, refer to the Troubleshooting section at the end of this manual. If
you are still unable to resolve the problem, contact your Constellation Audio dealer.
If any liquid is spilled on the digital file player/DAC, or if any metal object (such as a staple or a paper clip) is
inadvertently forced inside, immediately disconnect the AC power and contact your Constellation Audio
dealer.
Source device and output connections
1. AES/EBU digital input
Use this connection if your digital source device has an AES/EBU output, because it delivers the best possible
sound quality. This connection accepts PCM digital audio signals in resolution up to 32 bits/192 kilohertz.
This jack accommodates a standard XLR plug. To remove the XLR plug, push on the tab on the right side of
the jack (viewed from the rear) and pull the plug out.
 Loading...