

Constellation Pictor Owner's Manual


Thank you for purchasing the Constellation Pictor Line Stage.
Using the same revolutionary Line Stage Gain Module circuit pioneered in our Altair and Viego
preamps, and a fully separate, physically isolated power supply, the Pictor delivers truly extraordinary sound quality. However, as with our other preamps, the Pictor’s advanced design
necessarily demands a somewhat different setup process compared with typical stereo preamps.
By reading this manual before you operate the Pictor, you assure maximum performance from
your system.
Contents
Page Topic
3 Warranty information
4 Before you install the Pictor
Unpacking
Installation notes
In the event of malfunction
5 Power supply connections
6 Input and output connections
XLR and RCA inputs
XLR and RCA outputs
RS 232 / control
USB / control
Trigger output
AC power input
9 Controls / displays / indicators
Front panel knobs and buttons
Rear panel controls
11 Remote control
12 Control screens
14 Step-by-step operating procedure
15 Maintenance
15 Troubleshooting
17 Specifications
17 For more information
2
Limited warranty
New Constellation Audio products are warranted to be free from manufacturing defects for ninety (90) days
from date of purchase from an authorized dealer or distributor. If the product is registered on our website:
https://www.constellationaudio.com/warranty/register within this period, the warranty shall be extended to
three (3) years from the original date of sale. The warranty includes parts and labor. Complete warranty details
are on the included warranty card.
CAUTION: NO USER SERVICEABLE PARTS INSIDE. Do not open the amplifier chassis or remove any of its
screws. Contact Constellation or your dealer if you have service needs.
WARNING: Do not expose this amplifier to moisture or excessive humidity, and do not use it outdoors. Fire
hazard may result.
The lightning flash with arrowhead, within an
equilateral triangle, is intended to alert the user to the presence of uninsulated dangerous
voltage within the product enclosure that may
be of sufficient magnitude to constitute a risk
of electrical shock to persons.
The exclamation point within an equilateral
triangle is intended to alert the user to the
presence of important operating maintenance
(servicing) instructions in the literature accompanying the appliance.
3

Before you install the Pictor
Unpacking
Take care when you remove the Pictor and its power supply from their packaging. Because of their machined
aluminum chassis components, they may be heavier than you expect. Have an extra person nearby to help if
you need it. You may wish to use gloves to protect your fingers and avoid leaving fingerprints on the surface.
Installation notes
The Pictor must be located in an area with adequate ventilation so that heat does not build up. There should be
at least 6 in/15 cm of clearance between the sides and top of the preamp and the nearest wall or cabinet. If the
Pictor is installed in a cabinet or an equipment closet, ensure adequate ventilation. If you install the power supply on a different shelf or compartment, make sure it, too, is adequately ventilated. Installation of the preamp
or power supply in an unventilated cabinet or closet may cause the Pictor to overheat, reducing its lifespan.
The Pictor requires a room-temperature environment to operation properly. Ambient temperature should be
about 70°F/21°C, plus or minus 10°F/5°C. Never install the Pictor in a place where it may be exposed to direct
sunlight, and do not install it next to a heater, radiator, air conditioner, etc.
Make sure the Pictor will not be exposed to moisture. Do not locate it in an area where it might be spilled on,
and do not place it in a humid location (such as an unfinished basement).
When you connect or disconnect the AC cord, always grasp it by the plug, not by the cord itself. Pulling the
plug out by the cord can damage the cord, the AC socket, and/or the Pictor.
Installing the Pictor in a place where it will be exposed to direct sunlight or moisture, or where it will not have
adequate ventilation, will void your warranty.
Source components
The Pictor has six analog audio inputs—three balanced (XLR) and three unbalanced (RCA)—and can be used
with any audio source component with line-level analog outputs. An XLR connection will provide the highest
quality signal, and should be used when possible. If you are using a record turntable, you will need to connect
a high-quality phono preamp, such as the Constellation Perseus or Andromeda, between the turntable and the
Pictor.
Before making or changing any connections to the Pictor, turn off the master power switch on the back of the
power supply, and turn off the power amplifier(s).
In the event of malfunction
Do not under any circumstances open the chassis of the Pictor. There are no user-serviceable parts inside.
Opening the chassis can present a shock hazard even if the AC power is disconnected. Any alteration or modification of the Pictor’s internal parts or circuit will void your warranty.
If your Pictor does not function correctly, refer to the Troubleshooting section at the end of this manual. If you
are still unable to resolve the problem, contact your Constellation dealer.
If liquid is spilled on the Pictor, or if any metal object (such as a staple or a paper clip) is inadvertently forced
inside, immediately disconnect the AC power and contact your Constellation dealer.
4
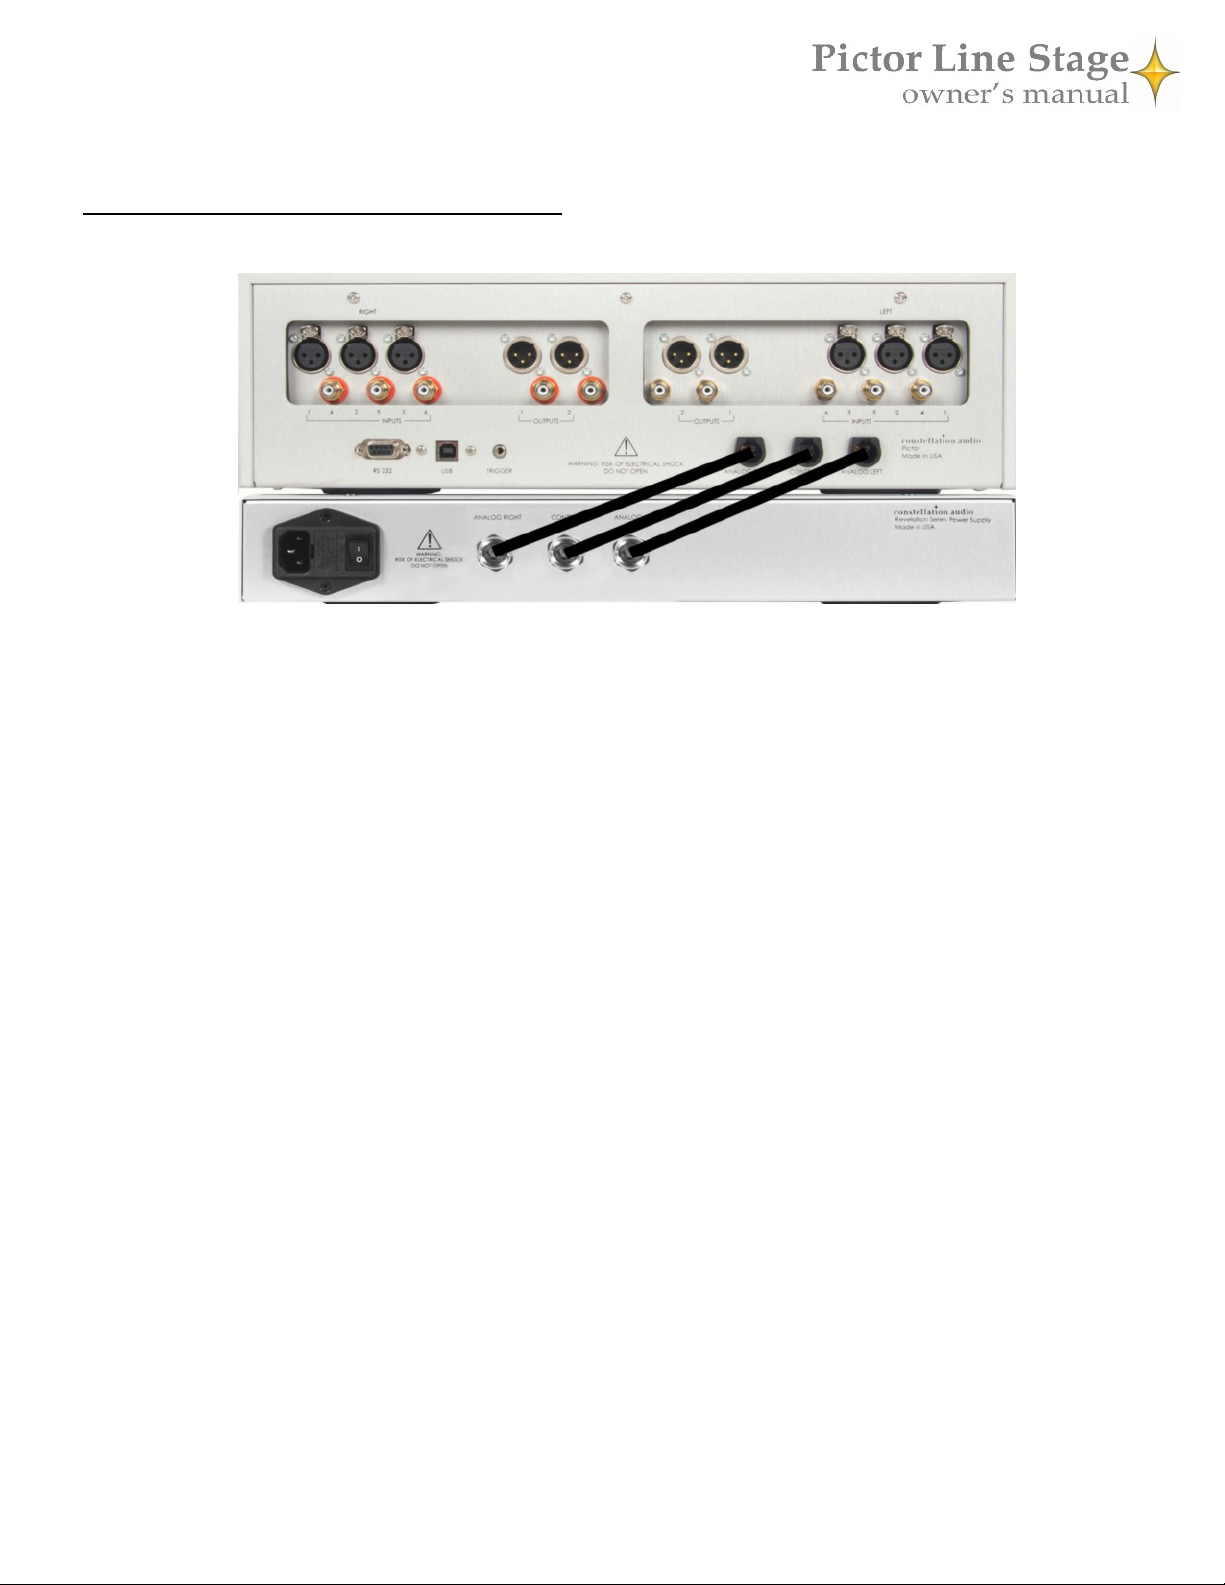
Power supply connections
The Pictor's separate power supply (bottom component in the picture above) must be connected to the Pictor main chassis
(top component in the picture above) as shown above before you plug the unit into a wall. Make sure the power switch
on the power supply is in the off (O) position. The supplied cables are spiral-wrapped, gold-plated copper designed for
aerospace use, and can handle up to 30 amps. Only these cables should be used between the power supply and the Pictor.
Connect the Analog Right power cable from the supply to the Analog Right jack on the preamp, the Analog Left power
cable from the supply to the Analog Left jack on the preamp, and the Control power cable from the supply to the Control
power jack on the preamp. At this point you can plug the Pictor power supply into the wall socket. Leave the master
power switch off until you connect your other equipment to the Pictor.
DO NOT remove the power cables while the unit is powered on. If you do happen to accidentally pull one of them
out, DO NOT plug it back in. Turn off the power supply using the hard switch on the rear panel, unplug the unit,
then replace the cable. Failure to power down the unit before replacing a power cable can result in substantial damage
to your Pictor.
If you will be using a Constellation Audio amplifier (or any other high-powered amplifier), do not plug the Pictor into the
same AC socket or into any other outlet connected on that circuit. Constellation Audio amplifiers draw a great deal of
power and could affect the Pictor’s performance if the amplifier(s) and preamp are plugged into the same electrical circuit
or AC outlet.
When you connect or disconnect the AC cord, always grasp it by the plug, not by the cord itself. Pulling the plug out by
the cord can damage the cord, the AC socket, and/or the Pictor.
5

Input and output connections
1. XLR inputs
On the rear of the Pictor are six XLR inputs, two on each side. As you are looking at the rear panel, the left three XLR inputs are for the right channel, the right three inputs are for the left channel. Underneath each jack is the corresponding
input number. Use of XLR connections is recommended for the best possible audio quality. To remove an XLR plug, push
on the tab above the jack and pull the plug out.
IMPORTANT NOTE: To preserve true dual-mono operation, the Pictor uses a symmetrical circuit layout. This configuration requires that the amplifier’s back panel connections be laid out a little differently from those on most preamps. For
example, the left-channel connection for Input 1 is on the right side of the back panel, and the right-channel connection is
at the left side. Connecting the cables in the usual side-by-side fashion will result in an incorrect installation and the mixing of sounds from different source devices.
2. RCA inputs
These unbalanced inputs are provided as a convenience for use with unbalanced signal sources. Whenever possible, we
recommend using XLR connections instead. Connecting to an unbalanced source is handled in the same way an XLR balanced source. To remove an RCA plug, grasp the plug and pull it out. Do not pull on the cable.
IMPORTANT NOTE: To preserve true dual-mono operation, the Pictor uses a symmetrical circuit layout. This configuration requires that the amplifier’s back panel connections be laid out a little differently from those on most preamps. For
example, the left-channel connection for Input 1 is on the right side of the back panel, and the right-channel connection is
at the left side. Connecting the cables in the usual side-by-side fashion will result in an incorrect installation and the mixing of sounds from different source devices.
6
 Loading...