

Page 1
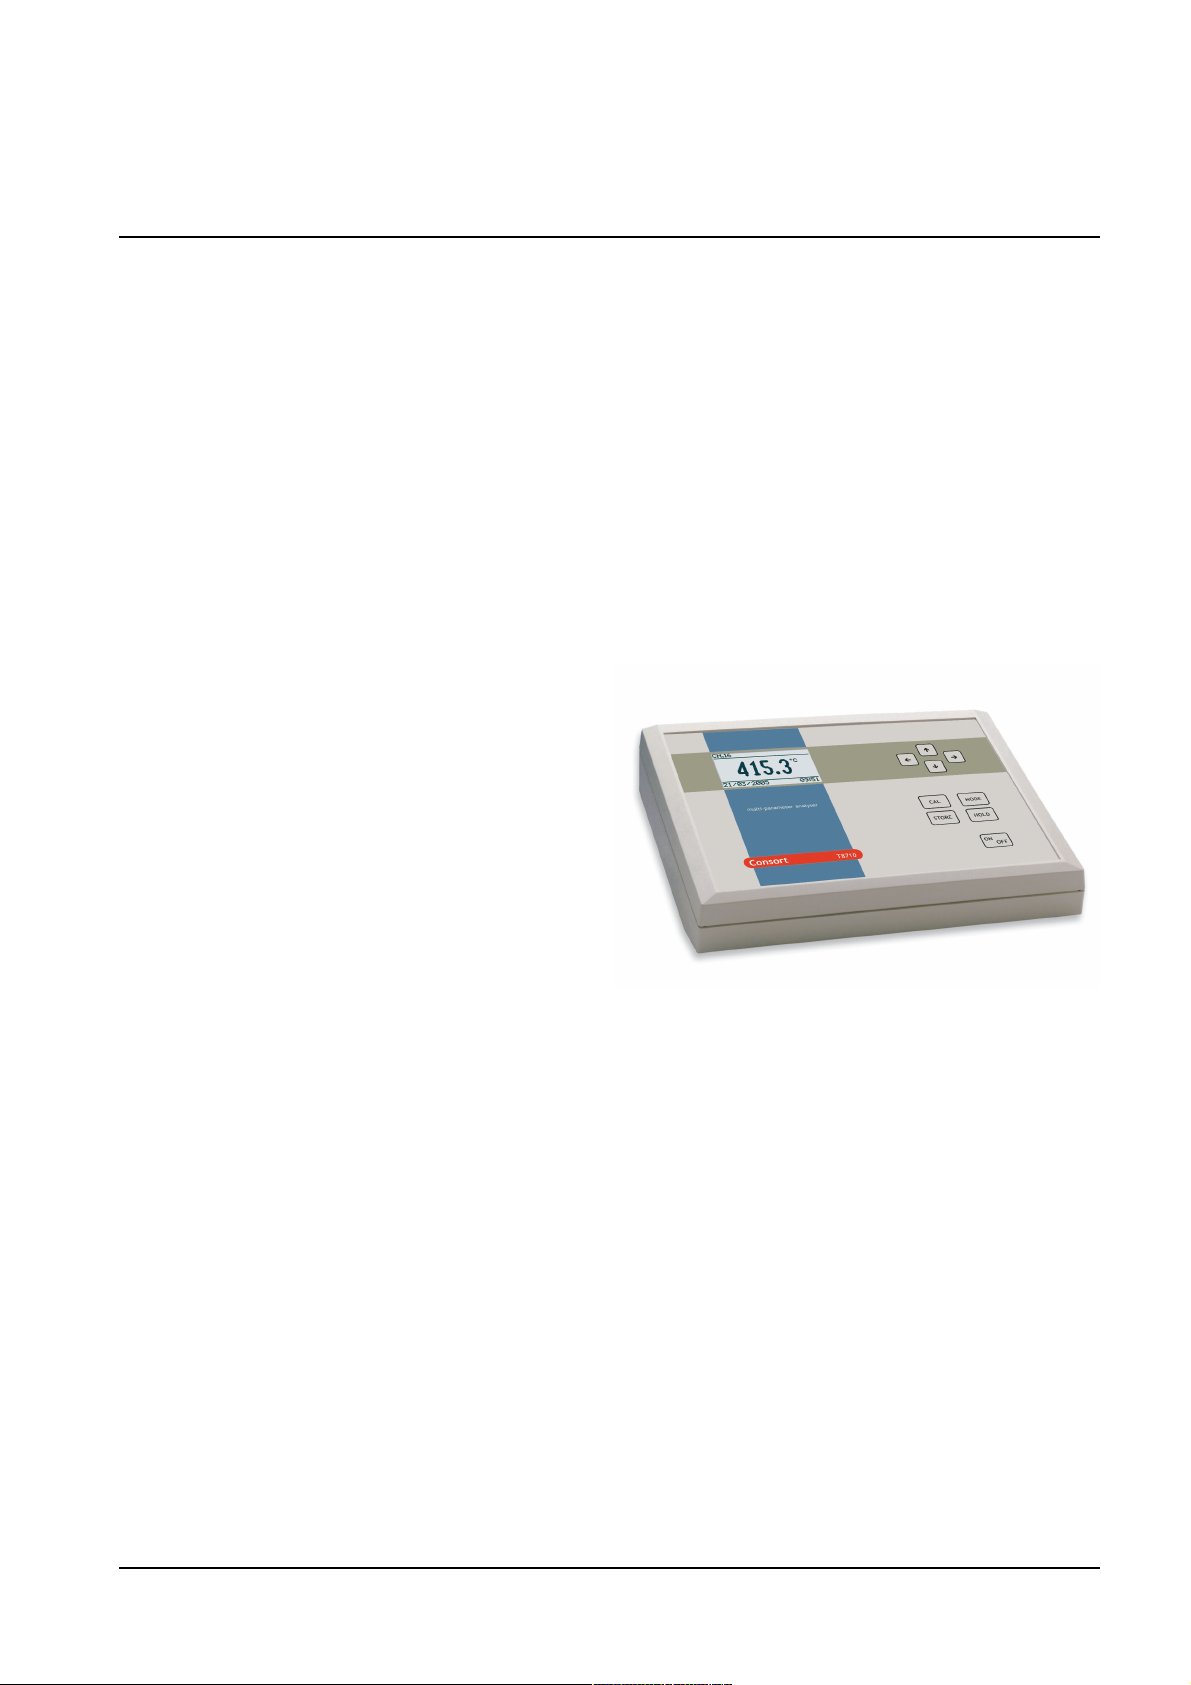
Consort
MANUAL
HANDLEIDING
MODE D’EMPLOI
ANLEITUNG
T8710
T8720
April 2013
Page 2
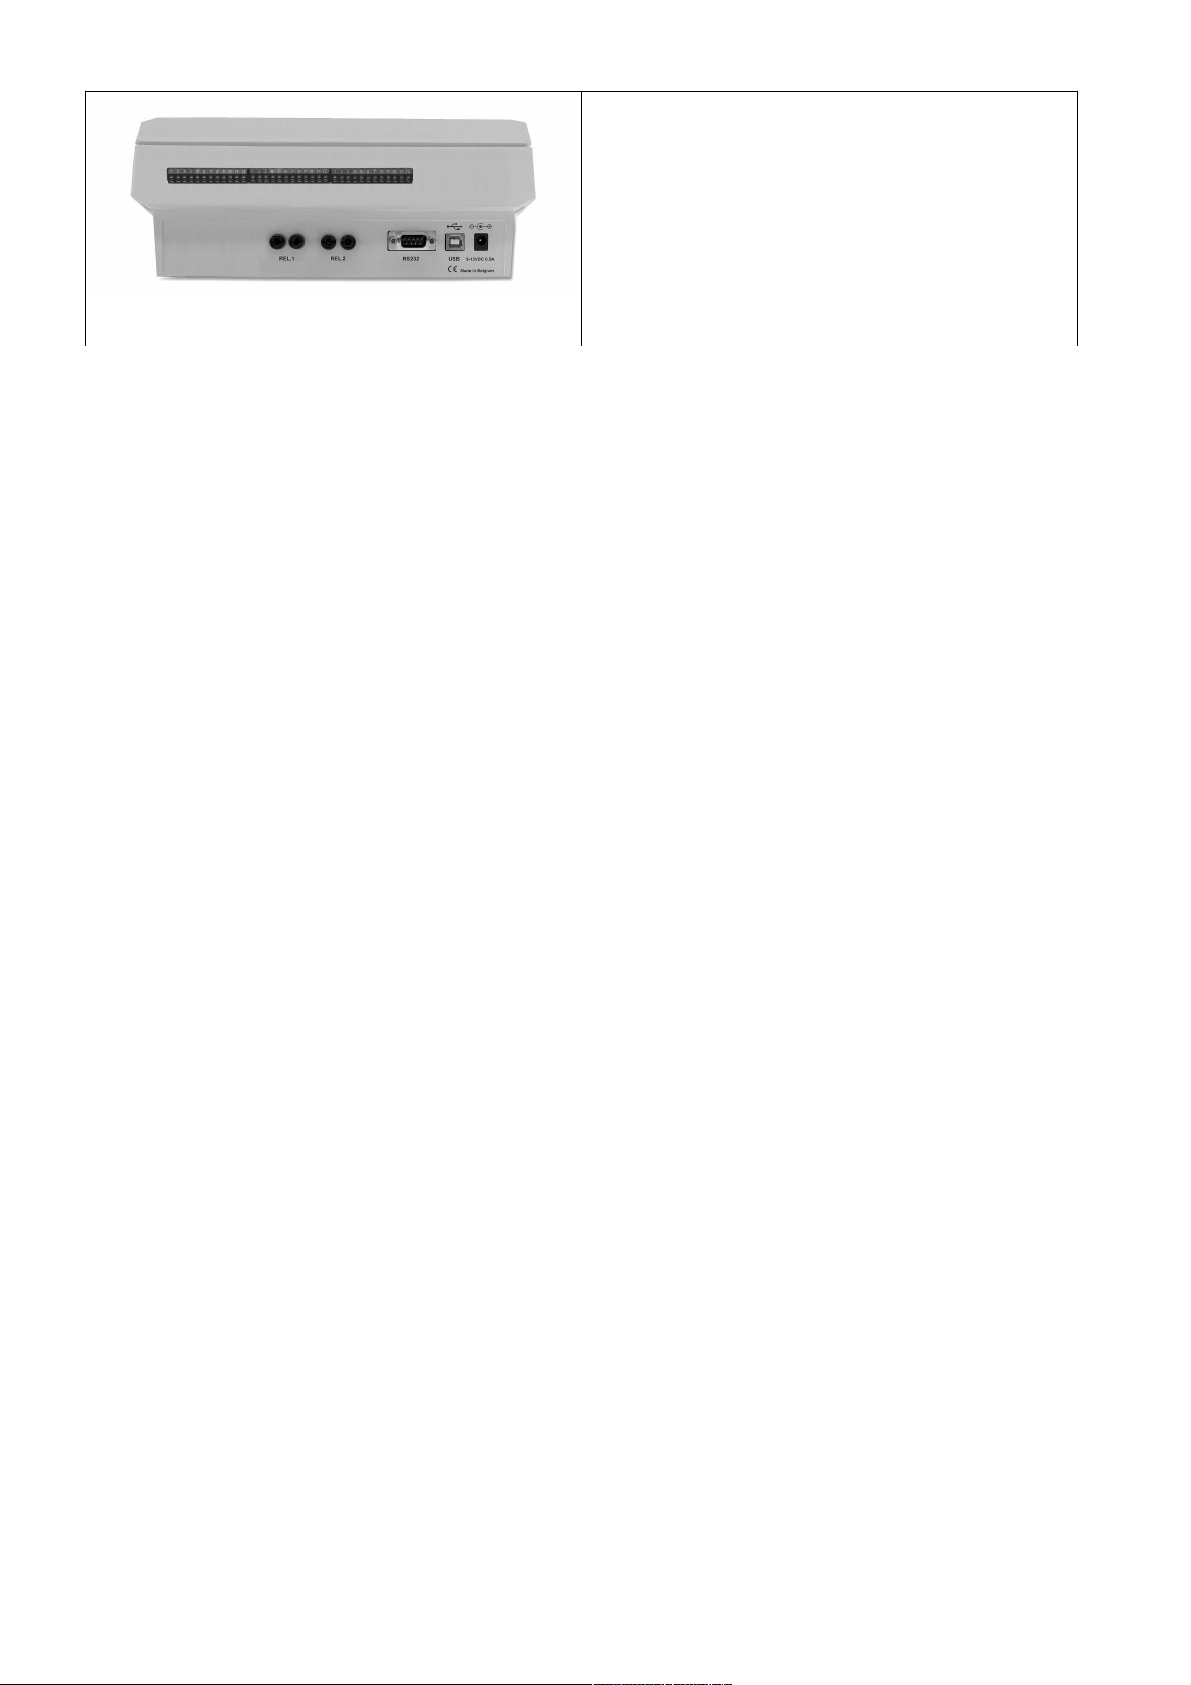
T8710
16 channels for thermocouples type J, K, T or E
T8720
12 channels for Pt100
Page 3

Index
General informations.....................................................................................1
Installation of the instrument...........................................................................2
Calibration.................................................................................................3
Measurement...............................................................................................3
Alternating measurements...............................................................................4
Good Laboratory Practice................................................................................4
Data Storage in the internal memory..................................................................4
External storage in a computer using USB or RS232.................................................4
Algemene informatie.....................................................................................5
Instelling van het toestel................................................................................6
IJken........................................................................................................7
Meting.......................................................................................................7
Alternerende metingen..................................................................................8
Goede Laboratorium Praktijk...........................................................................8
Data-opslag in het intern geheugen....................................................................8
Externe opslag in een computer via USB of RS232...................................................8
Informations générales...................................................................................9
Installation de l'appareil................................................................................10
Etalonnage................................................................................................11
Mesure de Conductivité/TDS/Salinité/Résistivité..................................................11
Mesures alternées.......................................................................................12
Bonnes Pratiques de Laboratoire......................................................................12
Collection de données dans la mémoire interne....................................................12
Collection externe dans un ordinateur par USB/RS232............................................12
Allgemeine Informationen..............................................................................13
Installation des Gerätes................................................................................14
Kalibrierung...............................................................................................15
Messung...................................................................................................15
Alternierende Messungen...............................................................................16
Gute Laborpraxis.........................................................................................16
Datenspeicherung im internen Speicher.............................................................16
Externe Datenspeicherung in einen Computer über USB/RS232.................................16
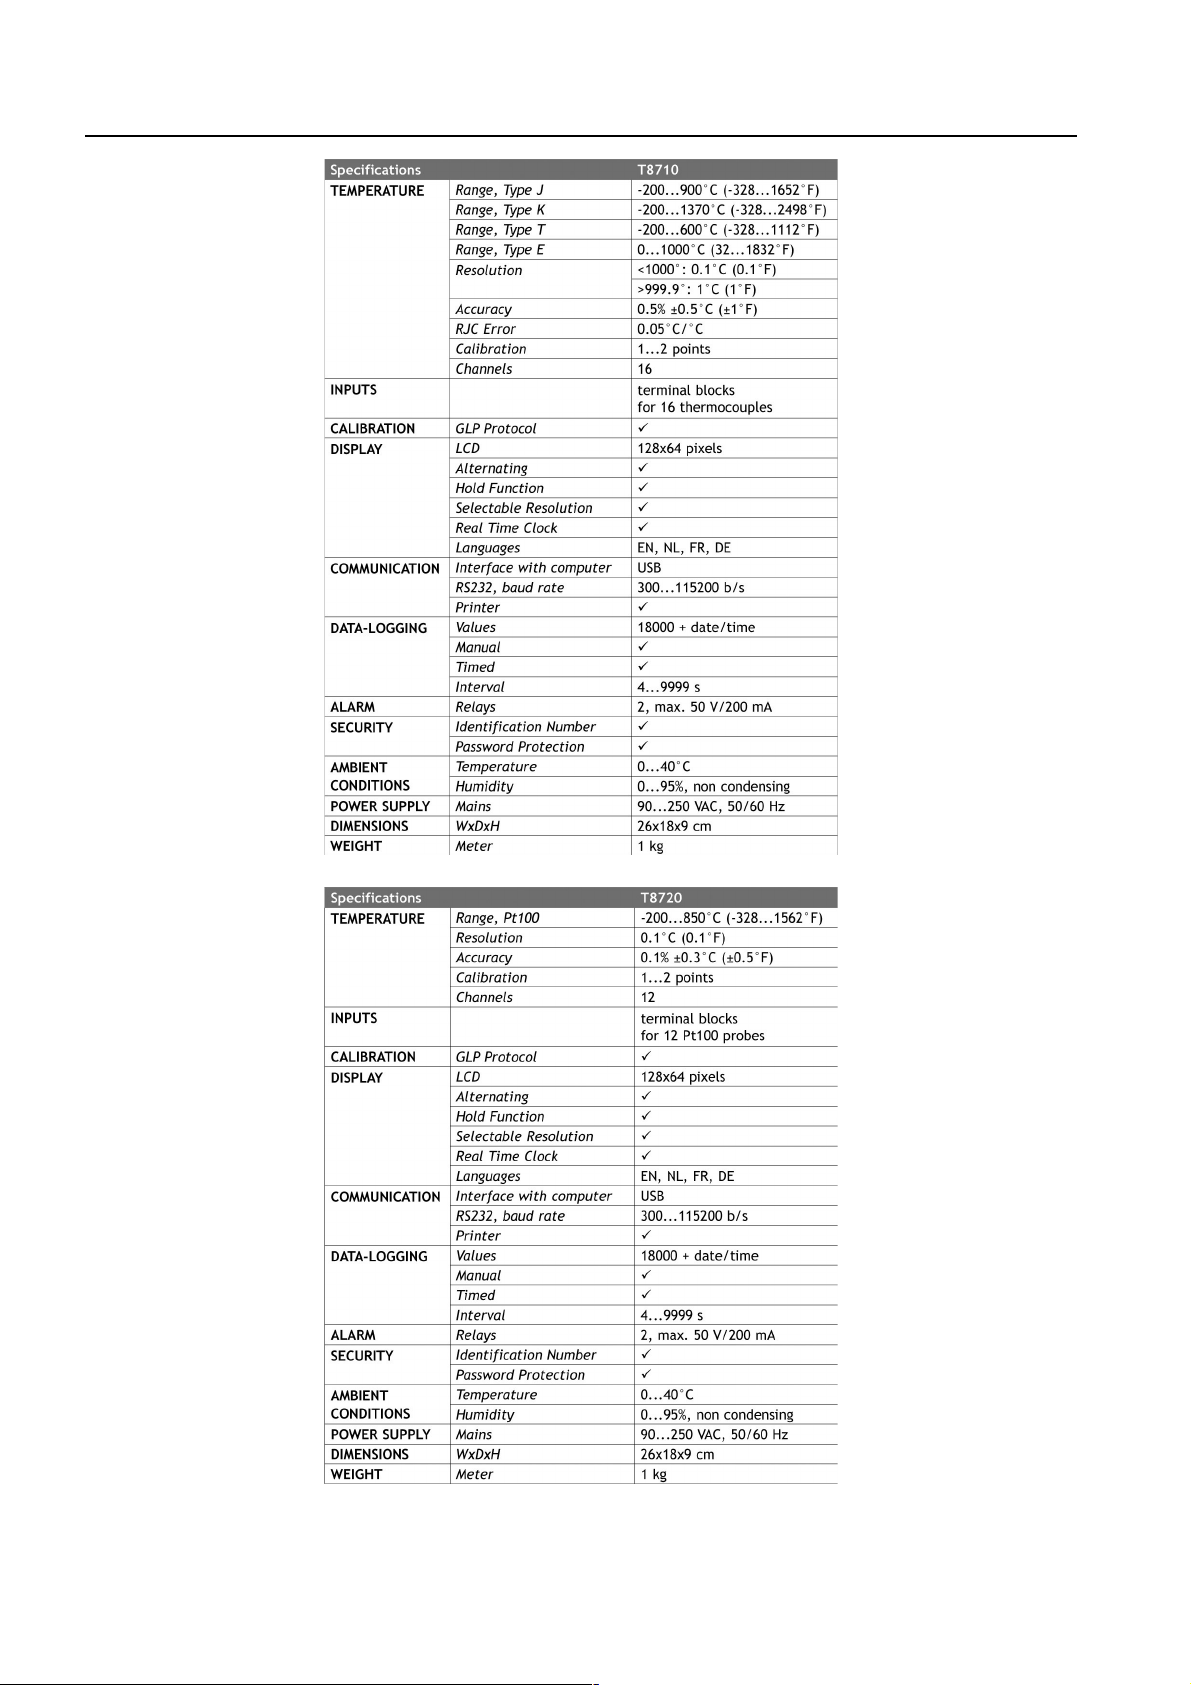
Specifications............................................................................................17
Page 4

General informations
Introduction
This instrument is manufactured with the latest technology and needs no
particular maintenance. Consort certifies that this instrument was thoroughly
inspected and tested at the factory prior to shipment and found to meet all
requirements defined by contract under which it is furnished. However,
dimensions and other physical characteristics may differ.
The normal operating temperature should be between 0° and 40°C. Never use the
instrument in a room with high humidity (>95 %) or at very low temperatures
(condensation water!).
Manufacturer
Consort bvba
Parklaan 36 Tel (+32)(14)41 12 79
B2300 Turnhout Fax (+32)(14)42 91 79
Belgium E-mail: [email protected]
Warranty
This instrument (excluding all accessories) is warranted against defective material
and workmanship for a period of thirty-six (36) months from the date of shipment
ex factory. Consort will repair all defective equipment returned to it during the
warranty period without charge, provided the equipment has been used under
normal laboratory conditions and in accordance with the operating limitations and
maintenance procedures in this instruction manual and when not having been
subject to accident, alteration, misuse or abuse. A return authorisation must be
obtained from Consort before returning any product for warranty repair on a
freight prepaid basis!
Consort is not liable for consequential damages arising out of the use or handling
of its products.
Servicing
In the event of this instrument being returned for servicing, the owner is
requested NOT to send the following items unless they are suspect:
Manual
Cables
Accessories
If serious malfunctioning occurs, stop using the unit immediately and consult your
local Consort dealer.
AC adaptor
Connect the mains adapter to the DC socket. Do not hold the adapter by wet
hand.
Keyboard
MODE = Selects the settings or escapes from error traps, calibration
procedures, etc..by returning to the original mode.
çè
é
ê
= Button for entering a value, for selecting a function or a channel.
CAL = Starts or proceeds a calibration or a function.
STORE = Stores the displayed value or send it to a computer.
HOLD = Holds display when measuring.
ON/OFF = Switches the instrument on or off.
1
Page 5

Installation of the instrument
Inputs
T8710
Connect the temperature probes with the terminal blocks and insert them in the
instrument. The channel numbers start from the left to the right (backview). The
even numbers are the negative poles. The uneven numbers are the positive poles.
T8720
Connect the temperature probes with the terminal blocks
and insert them in the instrument. The channel numbers
start from the left to the right (backview).
2-wire Pt100: connect to clamps 1 and 3, etc.
3-wire Pt100: connect to clamps 1+2 and 3, etc.
4-wire Pt100: connect to clamps 1+2 and 3+3, etc.
Outputs
A standard USB or Ethernet port is provided for interfacing the instrument with a
computer or network.
A standard RS232 port is provided for interfacing the instrument with a printer.
Data is sent in the ASCII code at a BAUD rate of 300...19200 bps (8 bit, no parity,
1 stopbit).
• The RS232 port is automatically switched off when a USB cable is connected.
Language
1. Press MODE.
2. Select [SYSTEM] and press CAL.
3. Select [LANGUAGE] and press CAL.
4. Select the desired language and press CAL.
Contrast
1. Press MODE.
2. Select [SYSTEM] and press CAL.
3. Select [CONTRAST] and press CAL.
4. Adjust the contrast and press CAL.
Date and time
1. Press MODE.
2. Select [SYSTEM] and press CAL.
3. Select [DATE/TIME] and press CAL.
4. Select date or time and press CAL to adjust.
Password
1. Press MODE.
2. Select [PASSWORD] and press CAL.
3. A private code can be programmed to avoid undesired access to the
instrument. Select [YES] and press CAL to enter your secret sequence of 5
keys.
Channels
1. Press MODE.
2. Select [CHANNELS] and press CAL.
3. Select [ACTIVATE] and press CAL.
4. Select the desired channel and press CAL to activate or deactivate.
5. Select [THERMOCOUPLE] and press CAL. (T8710 only)
6. Select the desired channel and press CAL. (T8710 only)
7. Select the type of thermocouple and press CAL. (T8710 only)
8. Select [UNIT] and press CAL.
9. Select the desired unit and press CAL.
10. Select [RESOLUTION] and press CAL.
11. Select the desired measurement resolution and press CAL.
2
Page 6

Stand-by
1. Press MODE.
2. Select [SYSTEM] and press CAL.
3. Select [STAND-BY] and press CAL.
4. Select [YES] and press CAL to restart automatically after a power failure.
Relays
1. Press MODE.
2. Select [RELAYS] and press CAL.
3. Select [ACTION] for relay-1 and press CAL.
4. Select [OPEN] [CLOSE] or [NONE] and press CAL.
5. Select [WHEN] for relay-1 and press CAL.
6. Select when the relay should be closed and press CAL.:
[ALARM] maximum or minimum level is exceeded.
[ALARM>] maximum level is exceeded.
[ALARM<] minimum level is exceeded.
[STAND-BY] instrument is in stand-by.
[ACTIVE] instrument is measuring.
[INACTIVE] instrument is not measuring.
7. Proceed for relay-2 accordingly.
• Specifications of the relays: max. 50 V, 200 mA, AC/DC
Alarm
1. Select the menu by pressing MODE.
2. Select [ALARM] and press CAL.
3. Select [BEEPER] and press CAL to activate or deactivate.
4. Select the desired channel and press CAL.
5. Select [ACTIVATE] and press CAL to activate or deactivate.
6. Select [TEMP.>] and press CAL.
7. Select the desired maximum level and press CAL. Each time the
measurements are above this level, the beeper will sound an alarm.
8. Select [TEMP.<] and press CAL.
9. Select the desired minimum level and press CAL. Each time the
measurements are below this level, the beeper will sound an alarm.
• Alarm hysteresis = 1°C
Calibration
1. Verify that the instrument is switched on in a stable temperature
environment.
2. Press CAL while measuring.
3. Select [CHANNEL] and press CAL.
4. Select the desired channel and press CAL.
5. Select [METHOD] and press CAL.
6. Select the desired calibration method and press CAL.
7. Select [TYPE] and press CAL.
8. Select the 1- or 2-point calibration and press CAL.
9. Select [CALIBRATE] and press CAL. Follow the instructions on the screen.
Measurement
1. Verify that the instrument is switched on in a stable temperature
environment. The display immediately shows the measured value according to
the last calibration.
• Press çè to change between the channels.
• Press é to display the maximum temperature ever measured by the selected channel
(after switching on). Press é again to return to the normal measurements. Press CAL
to reset the minimum/maximum memory.
• Press ê to display the minimum temperature ever measured by the selected channel
(after switching on). Press ê again to return to the normal measurements. Press CAL
to reset the minimum/maximum memory.
• Any alarm will sound an alert and close a relay when programmed for alarm. Press
MODE to stop the beeper.
3
Page 7

Alternating measurements
1. Select the menu by pressing MODE.
2. Select [ALTERNATE] and press CAL to activate or deactivate. The display
alternates between the selected modes with an interval of ca. 5 s.
3. Press MODE to return to the measurements.
Good Laboratory Practice
1. Press CAL while measuring.
2. Select [GLP] and press CAL.
3. Browse with çè
é
ê
to show a complete calibration report. Press STORE to
print the report.
Data Storage in the internal memory
1. Select the menu by pressing MODE.
2. Select [DATALOGGER] and press CAL.
Start the data-logging
1. Select [STORE] and press CAL.
2. Select [ACTIVATE] and press CAL.
3. Select [YES] or [NO] and press CAL.
4. Select [INTERVAL] and press CAL.
5. Select the desired time interval between the data-logging (or MANUAL) and
press CAL.
6. Select [ALARM] and press CAL.
7. Select the desired time interval between the data-logging (or MANUAL), when
the alarm is activated, and press CAL.
8. Select [NUMBER] and press CAL.
9. Select the desired number of values to be data-logged and press CAL.
10. Press MODE to return to the measurements and to start the data-logging
according to the previous settings. When manual data-logging has been
selected, press STORE to put a next measurement into memory. In the
meantime the display shows the logging-number e.g. [#00027].
View the stored values on the display
1. Select [RECALL] and press CAL.
2. Select [TABLE] or [PRINT] to display or print the stored data and press CAL to
continue. Follow the intructions on the screen.
3. In case [TABLE] have been selected press CAL to show the options.
4. Select [LOG#] and press CAL. Select the number of the first line to be shown
on the display and press CAL.
5. Select [SHOW] and press CAL. Select [Log#] (line numbers) or [Date] to be
shown on the display and press CAL.
Erase the stored values
1. Select [ERASE] and press CAL. Follow the intructions on the screen.
External storage in a computer using USB or RS232
1. Select the menu by pressing MODE.
2. Select [USB/RS232] and press CAL.
3. Select [BAUDRATE] and press CAL.
4. Select the desired baudrate and press CAL.
5. Select [INTERVAL] and press CAL.
6. Select the desired interval between the transmitted data and press CAL. Pre-
set to zero if no automatic transmitting is required.
7. Select [ALARM] and press CAL.
8. Select the desired interval between the transmitted data, when the alarm is
activated, and press CAL. Pre-set to zero if no automatic transmitting is
required.
9. Select [IDENTIF. No.] and press CAL.
10. Enter an identification number for the transmitted data and press CAL.
• You can download free software and a suitable USB driver from www.consort.be.
4
Page 8

Algemene informatie
Inleiding
Dit toestel is gebouwd volgens de modernste technologie en hoeft niet speciaal te
worden onderhouden. Consort bevestigt dat dit toestel grondig werd nagekeken
en getest alvorens te worden verstuurd, en beantwoordt aan alle vereisten van
het aankoopkontrakt. Er kunnen echter wel afwijkingen optreden in de afmetingen en andere fysische eigenschappen. De normale werktemperatuur moet tussen
0° en 40°C liggen. Gebruik het toestel nooit in een ruimte met hoge vochtigheidsgraad (>95 %) of bij zeer lage temperaturen (condenswater!).
Fabrikant
Consort bvba
Parklaan 36 Tel (+32)(14)41 12 79
B2300 Turnhout Fax (+32)(14)42 91 79
Belgium E-mail: [email protected]
Waarborg
Dit toestel (uitgezonderd alle toebehoren) is gewaarborgd tegen defect materiaal
of constructiefouten voor een periode van zesendertig (36) maanden vanaf de
verzenddatum af fabriek. Consort zal elk toestel gratis herstellen, binnen de
waarborgperiode, voor zover het werd gebruikt onder normale laboratorium omstandigheden volgens de werkvoorschriften en onderhoudsprocedures uit deze gebruiksaanwijzing en wanneer de oorzaak van het defect niet een ongeluk, een
aanpassing, verkeerd gebruik of misbruik is. Er moet eerst een toelating van Con-
sort verkregen worden vooraleer eender welk toestel franco terug te sturen voor
herstelling onder waarborg!
Consort kan niet aansprakelijk worden gesteld voor eventuele schadelijke gevolgen van het gebruik of behandeling van zijn producten.
Onderhoud
Mocht dit toestel worden teruggestuurd voor onderhoud, gelieve volgende toebehoren NIET mee te sturen, tenzij ze verdacht zijn:
Handleiding
Kabels
Toebehoren
In geval van ernstige storing, stop onmiddellijk het gebruik van het toestel en
raadpleeg uw plaatselijke Consort verdeler.
Netadapter
Verbind de netadapter met de DC-bus. Zorg er steeds voor met droge handen te
werken.
Toetsenbord
MODE = Kiest de instellingen of ontsnapt uit foutmeldingen, ijkprocedures,
enz.. door terug te keren naar de oorspronkelijk gekozen functie.
çèéê
= Toetsen voor het instellen van een waarde of voor het kiezen van een
functie of een kanaal.
CAL = Vervolgt een ijking of een functie.
STORE = De getoonde waarde wordt opgeslagen of verzonden naar een
computer.
HOLD = Houdt de aflezing vast tijdens het meten.
ON/OFF = Schakelt het toestel aan of uit.
5
Page 9

Instelling van het toestel
Ingangen
T8710
Bevestig de temperatuurvoelers aan de afneembare aansluitklemmen op de achterzijde van het toestel. Begin hierbij met de kanalen van links naar rechts (gezien van de achterzijde). De even nummers zijn de negatieve polen. De oneven
nummers zijn de positieve polen.
T8720
Bevestig de temperatuurvoelers aan de afneembare
aansluitklemmen op de achterzijde van het toestel. Begin
hierbij met de kanalen van links naar rechts (gezien van
de achterzijde).
2-draads Pt100: verbind aan klemmen 1 en 3, enz.
3-draads Pt100: verbind aan klemmen 1+2 en 3, enz.
4-draads Pt100: verbind aan klemmen 1+2 en 3+3, enz.
Uitgangen
Dit model heeft een USB-poort waardoor het met een computer kan verbonden
worden.
Dit model heeft ook een RS232-poort waardoor het met een printer kan verbonden worden. De gegevens worden doorgestuurd volgens de ASCII code met een
snelheid (BAUD) van 300...19200 bps (8 bit, geen pariteit, 1 stopbit).
• De RS232-poort wordt automatisch uitgeschakeld wanneer een USB-kabel is
aangesloten.
Taal
1. Druk op MODE.
2. Kies [SYSTEEM] en druk op CAL.
3. Kies [TAAL] en druk op CAL.
4. Kies de gewenste taal en druk op CAL.
Contrast
1. Druk op MODE.
2. Kies [SYSTEEM] en druk op CAL.
3. Kies [CONTRAST] en druk op CAL.
4. Pas het contrast aan en druk op CAL.
Datum en tijd
1. Druk op MODE.
2. Kies [SYSTEEM] en druk op CAL.
3. Kies [DATUM/TIJD] en druk op CAL.
4. Kies de datum en tijd in en druk op CAL.
Wachtwoord
1. Druk op MODE.
2. Kies [WACHTWOORD] en druk op CAL.
3. Om ongewenste toegang tot het toestel te vrijwaren, kan men een
wachtwoord programmeren. Kies [JA] en druk op CAL om uw geheime
volgorde van 5 toetsen in te geven.
Kanalen
1. Kies het menu met MODE.
2. Kies [KANALEN] en druk op CAL.
3. Kies [ACTIVEREN] en druk op CAL.
4. Kies het gewenste kanaal en druk op CAL om het al of niet te activeren.
5. Kies [THERMOKOPPEL] en druk op CAL. (enkel T8710)
6. Kies het gewenste kanaal en druk op CAL. (enkel T8710)
7. Kies het gewenste type thermokoppel en druk op CAL. (enkel T8710)
8. Kies [EENHEID] en druk op CAL.
9. Kies het gewenste eenheid en druk op CAL.
10. Kies [RESOLUTIE] en druk op CAL.
11. Kies de gewenste meetresolutie en druk op CAL.
6
Page 10

Stand-by
1. Druk op MODE.
2. Kies [SYSTEEM] en druk op CAL.
3. Kies [STAND-BY] en druk op CAL.
4. Kies [JA] (= automatisch verder gaan na een stroomuitval) of [NEE] (= het
toestel kan uitgeschakeld worden) en druk op CAL.
Relais
1. Druk op MODE.
2. Kies [RELAIS] en druk op CAL.
3. Kies [ACTIVEREN] voor relais-1 en druk op CAL.
4. Kies [OPEN] [SLUITEN] of [GEEN] en druk op CAL.
5. Kies [ALS] voor relais-1 en druk op CAL.
6. Kies wanneer het relais moet sluiten en druk op CAL.:
[ALARM] maximum of minimum niveau is overschreden.
[ALARM>] maximum niveau is overschreden.
[ALARM<] minimum niveau is overschreden.
[STAND-BY] instrument is in stand-by.
[ACTIEF] instrument is aan het meten.
[INACTIEF] instrument is niet aan het meten.
7. Ga dienovereenkomstig verder voor relais-2.
• Specificaties van de relais: max. 50 V, 200 mA, AC/DC
Alarm
1. Kies het menu met MODE.
2. Kies [ALARM] en druk op CAL.
3. Kies [BEEPER] en druk op CAL om het al of niet te activeren.
4. Kies het gewenste kanaal en druk op CAL.
5. Kies [ACTIVEREN] en druk op CAL om het al of niet te activeren.
6. Kies [TEMP. >] en druk op CAL.
7. Kies het gewenste maximum en druk op CAL. Telkens wanneer de metingen
dit maximum overschrijden, zal de zoemer een alarmsignaal laten horen.
8. Kies [TEMP. <] en druk op CAL.
9. Kies het gewenste minimum en druk op CAL. Telkens wanneer de metingen dit
minimum overschrijden, zal de zoemer een alarmsignaal laten horen.
• Alarm hysteresis = 1°C.
IJken
1. Zorg er voor dat het toestel aan staat in een stabiele temperatuuromgeving.
2. Druk op CAL tijdens het meten.
3. Kies [KANAAL] en druk op CAL.
4. Kies het gewenste kanaal en druk op CAL.
5. Kies [METHODE] en druk op CAL.
6. Kies de gewenste ijkmethode en druk op CAL.
7. Kies [TYPE] en druk op CAL.
8. Kies 1- of 2-puntsijking en druk op CAL.
9. Kies [IJKEN] en druk op CAL. Volg de instructies op het scherm.
Meting
1. Zorg er voor dat het toestel aan staat in een stabiele temperatuuromgeving.
• Druk op çè om tussen de kanalen om te schakelen.
• Druk op é om de hoogst gemeten temperatuur, vanaf het inschakelen van het
toestel, te zien. Druk opnieuw op é om terug te keren naar de normale metingen.
Druk op CAL om het minimum/maximum geheugen te wissen.
• Druk op ê om de laagst gemeten temperatuur vanaf het inschakelen van het toestel,
te zien. Druk opnieuw op ê om terug te keren naar de normale metingen. Druk op
CAL om het minimum/maximum geheugen te wissen.
• Bij een alarm-situatie zal het relais sluiten en een signaal weerklinken. Druk op
MODE om het alarmsignaal te stoppen.
7
Page 11

Alternerende metingen
1. Kies het menu met MODE.
2. Kies [ALTERNEREN] en druk op CAL om het al of niet te activeren. De aflezing
toont dan alternerend de ingestelde kanalen met een interval van ca. 5 s.
3. Druk op MODE om terug te keren naar de metingen.
Goede Laboratorium Praktijk
1. Druk op CAL tijdens het meten.
2. Kies [GLP] en druk op CAL.
3. Blader met çè
é
ê
om een volledig calibratierapport te tonen. Druk op STORE om het rapport af te
drukken.
Data-opslag in het intern geheugen
1. Kies het menu met MODE.
2. Kies [DATA-OPSLAG] en druk op CAL.
De gegevensverwerking te beginnen
1. Kies [OPSLAAN] en druk op CAL.
2. Kies [ACTIVEREN] en druk op CAL.
3. Kies [JA] of [NEE] en druk op CAL.
4. Kies [INTERVAL] en druk op CAL.
5. Kies het gewenste tijdinterval tussen elke data-opslag (of MANUEEL) en druk
op CAL.
6. Kies [ALARM] end druk op CAL.
7. Kies het gewenste tijdinterval tussen elke data-opslag (of MANUEEL), in geval
van alarm, en druk op CAL.
8. Kies [AANTAL] end druk op CAL.
9. Kies het gewenste aantal op te slagen waarden en druk op CAL.
10. Druk op MODE om terug te keren naar de metingen het opslaan te beginnen
volgens de voorafgaande instellingen. Bij manuele gegevensverwerking drukt
men telkens op STORE om een volgende meting in het geheugen op te slaan.
Ondertussen verschijnt op de aflezing het opslagnummer b.v. [#00027].
De verwerkte gegevens in het uitleesvenster tonen
1. Kies [UITLEZEN] en druk op CAL.
2. Kies [TABEL] of [AFDRUKKEN] om de opgeslagen data te tonen of af te
drukken en druk op CAL om verder te gaan. Volg de instructies op het scherm.
3. In geval van [TABEL] druk op CAL om de opties te zien.
4. Kies [LOG#] en druk op CAL. Kies het nummer van de eerste lijn, die op de
aflezing moet verschijnen, en druk op CAL.
5. Kies [SHOW] en druk op CAL. Kies [Log#] (lijnnummers) of [Datum], die op de
aflezing moeten verschijnen, en druk op CAL.
De verwerkte gegevens wissen
1. Kies [WISSEN] en druk op CAL. Volg de instructies op het scherm.
Externe opslag in een computer via USB of RS232
1. Kies het menu met MODE.
2. Kies [USB/RS232] en druk op CAL.
3. Kies [BAUDRATE] en druk op CAL.
4. Kies de gewenste baudwaarde en druk op CAL.
5. Kies [INTERVAL] en druk op CAL.
6. Kies het gewenste tijdinterval tussen de verstuurde gegevens en druk op CAL.
Stel in op manueel indien er geen automatisch versturen gewenst is.
7. Kies [ALARM] en druk op CAL.
8. Kies het gewenste tijdinterval tussen elke data-opslag, in geval van alarm, en
druk op CAL. Stel op indien er geen automatisch versturen gewenst is.
9. Kies [IDENTIF. Nr.] en druk op CAL.
10. Kies een identificatienummer voor de verstuurde gegevens en druk op CAL.
• Gratis software en een aangepaste USB driver kan via www.consort.be worden
afgehaald.
8
Page 12

Informations générales
Préface
Cet appareil est construit selon les dernières technologies et ne nécessite aucun
entretien particulier. Consort certifie que cet appareil a été contrôlé et vérifié
sévèrement à l'usine avant livraison afin de convenir aux exigences définies par le
contrat d'achat. Néanmoins, il peut y avoir des différences dans les dimensions ou
autres caractéristiques physiques.
La température d'utilisation normale doit être entre 0° et 40°C. N'utilisez jamais
l'appareil dans un lieu humide (>95 %) ou à une température très basse (condensation d'eau!).
Fabricant
Consort bvba
Parklaan 36 Tel (+32)(14)41 12 79
B2300 Turnhout Fax (+32)(14)42 91 79
Belgium E-mail: [email protected]
Garantie
Cet appareil (sauf tous les accessoires) est garanti pendant trente-six (36) mois, à
partir de la date d'expédition départ usine, contre toute faute du matériel et
main d’œuvre. Consort réparera gratuitement chaque appareil défectueux, qui
lui est retourné, à condition que l'appareil a été utilisé dans des conditions nor males de laboratoire selon les limitations opérationnelles et les procédés d'entre tien de ce mode d'emploi et que le défaut n'est pas dû à un accident, une adaptation, un mal-traitement ou un abus. Avant de retourner, aux frais de l'utilisateur,
tout appareil pour réparation sous garantie, il faut d'abord obtenir l'approbation
de Consort!
Consort décline toute responsabilité pour des dommages éventuels causés par
l'usage ou la manipulation de ses produits.
Service
En cas de retour de cet appareil pour service après vente, NE PAS renvoyer les accessoires suivants, sauf s'ils sont suspects:
Mode d'emploi
Câbles
Accessoires
En cas de mauvais fonctionnement sérieux, arrêtez d'utiliser l'appareil immédiatement et consultez votre agent Consort local.
Adaptateur secteur
Raccordez l’adaptateur secteur à l’entrée DC. Ne saisissez jamais l'adaptateur
avec des mains mouillées.
Le clavier
MODE = Choisit tous les modes ou permet de sortir des affichages erreur,
procédures d'étalonnages, etc en retournant au mode choisis.
çè
é
ê
= Boutons pour rentrer manuellement une valeur ou pour choisir un
canal ou une fonction.
CAL = Commence ou continue un étalonnage ou une fonction.
STORE = Mémorise la valeur affichée ou l'envoie à un ordinateur.
HOLD = Arrête l'affichage pendant une mesure.
ON/OFF = Allumer ou éteindre l’appareil.
9
Page 13

Installation de l'appareil
Entrées
T8710
Brancher les sondes de température aux borniers à l’arrière de l’appareil. On
commence de gauche à droite (vu par derrière) avec les canaux. Les numéros
pairs sont les pôles négatifs. Les numéros impairs sont les pôles positifs.
T8720
Brancher les sondes de température aux borniers à l’arrière de l’appareil. On commence de gauche à droite (vu
par derrière) avec les canaux.
Pt100 à 2-fil: connectez aux bornes 1 et 3, etc.
Pt100 à 3-fil: connectez aux bornes 1+2 et 3, etc.
Pt100 à 4-fil: connectez aux bornes 1+2 et 3+3, etc.
Sorties
Ce modèle est équipé en standard d'une sortie USB pour communiquer avec un ordinateur. Ce modèle est aussi équipé en standard d'une sortie RS232 pour commu niquer avec une imprimante. L'instrument envoie les valeurs en code ASCII avec
une vitesse (BAUD) de 300...19200 bps (8 bit, pas de parité, 1 bit de stop).
• La sortie RS232 est automatiquement désactivée lorsque le câble USB est branché.
Langage
1. Appuyez sur MODE.
2. Sélectionnez [SYSTEME] et appuyez sur CAL.
3. Sélectionnez [LANGAGE] et appuyez sur CAL.
4. Choisissez le langage désiré et appuyez sur CAL.
Contraste
1. Appuyez sur MODE.
2. Sélectionnez [SYSTEME] et appuyez sur CAL.
3. Sélectionnez [CONTRASTE] et appuyez sur CAL.
4. Ajustez le contraste et appuyez sur CAL.
Date et heure
1. Appuyez sur MODE.
2. Sélectionnez [SYSTEME] et appuyez sur CAL.
3. Sélectionnez [DATE/HEURE] et appuyez sur CAL.
4. Ajustez le la date et l'heure et appuyez sur CAL.
Mot de passe
1. Appuyez sur MODE.
2. Sélectionnez [MOT DE PASSE] et appuyez sur CAL.
3. Afin de protéger l'accès à l'appareil, un code personnel peut être programmé.
Choisissez [OUI] et appuyez sur CAL pour entrer votre séquence secrète de 5
touches.
Canaux
1. Sélectionnez le menu en appuyant sur MODE.
2. Sélectionnez [CANAUX] et appuyez sur CAL.
3. Sélectionnez [ACTIVER] et appuyez sur CAL.
4. Choisissez le canal désiré et appuyez sur CAL pour activer ou désactiver.
5. Sélectionnez [THERMOCOUPLE] et appuyez sur CAL. (T8710 uniquement)
6. Choisissez le canal désiré et appuyez sur CAL. (T8710 uniquement)
7. Choisissez le thermocouple désirée et appuyez sur CAL. (T8710 uniquement)
8. Sélectionnez [UNITE] et appuyez sur CAL.
9. Choisissez l'unité désirée et appuyez sur CAL.
10. Sélectionnez [RESOLUTION] et appuyez sur CAL.
11. Choisissez la résolution désirée et appuyez sur CAL.
10
Page 14

Stand by
1. Appuyez sur MODE.
2. Sélectionnez [SYSTEME] et appuyez sur CAL.
3. Sélectionnez [STAND BY] et appuyez sur CAL.
4. Choisissez [OUI] (= continue automatiquement après une panne de courant)
ou [NON] (= l'appareil peut être éteint) et appuyez sur CAL.
Canaux
1. Sélectionnez le menu en appuyant sur MODE.
2. Sélectionnez [CANAUX] et appuyez sur CAL.
3. Sélectionnez [ACTIVER] pour le relais-1 et appuyez sur CAL.
4. Sélectionnez [OUVRIR] [FERMER] ou [AUCUN] et appuyez sur CAL.
5. Sélectionnez [QUAND] pour relais-1 et appuyez sur CAL.
6. Sélectionnez quand le relais doit être fermée et appuyez sur CAL.
[ALARME] le niveau maximum ou minimum est dépassé.
[ALARME>] le niveau maximum est dépassé.
[ALARME<] le niveau minimum est dépassé.
[STAND-BY] l'instrument est en stand-by.
[ACTIF] l'instrument est entrain de mesurer.
[INACTIF] l'instrument n'est pas entrain de mesurer.
7. Procédez de la même façon pour le relais-2.
Alarme
1. Sélectionnez le menu en appuyant sur MODE.
2. Sélectionnez [ALARME] et appuyez sur CAL.
3. Sélectionnez [BEEPER] et appuyez sur CAL pour activer ou désactiver.
4. Choisissez le canal désiré et appuyez sur CAL.
5. Sélectionnez [ACTIVER] et appuyez sur CAL pour activer ou désactiver.
6. Sélectionnez [TEMP. >] et appuyez sur CAL.
7. Choisissez la valeur maximale et appuyer sur CAL. Chaque fois que les
mesures sont au-dessous de ce seuil, un signal d'alarme sonnera.
8. Choisissez le thermocouple désirée et appuyez sur CAL.
9. Sélectionnez [TEMP. <] et appuyez sur CAL.
10. Choisissez la valeur minimale et appuyer sur CAL. Chaque fois que les
mesures sont en-dessous de ce seuil, un signal d'alarme sonnera.
• Hystérèse de l'alarme = 1°C.
Etalonnage
1. Vérifier que l'appareil est allumé dans un environnement à température
stable.
2. Appuyez sur MODE pendant les mesures.
3. Sélectionnez [CANAL] et appuyez sur CAL.
4. Choisissez le canal désiré et appuyez sur CAL.
5. Sélectionnez [METHODE] et appuyez sur CAL.
6. Choisissez la méthode désirée et appuyez sur CAL.
7. Sélectionnez [TYPE] et appuyez sur CAL.
8. Choisissez étalonnage à 1 ou 2 points et appuyez sur CAL.
9. Sélectionnez [ETALONNER] et appuyez sur CAL. Suivez les instructions sur
l'écran.
Mesure
1. Vérifier que l'appareil est allumé dans un environnement à température
stable.
• Appuyer sur çè pour changer entre les canaux.
• Appuyer sur é pour voir la température maximale à partir de la mise en marche de
l’appareil. Appuyer à nouveau sur é pour revenir dans les mesures normales. Appuyer
sur CAL pour effacer la mémoire minimum/maximum.
• Appuyer sur ê pour voir la température minimale à partir de la mise en marche de
l’appareil. Appuyer à nouveau sur ê pour revenir dans les mesures normales. Appuyer
sur CAL pour effacer la mémoire minimum/maximum.
• En cas d’alarme le relais se ferme et un signal acoustique retentit. Appuyer sur MODE
pour arrêter le signal acoustique.
11
Page 15

Mesures alternées
1. Sélectionnez le menu en appuyant sur MODE.
2. Sélectionnez [ALTERNER] et appuyez sur CAL pour activer ou désactiver.
L’affichage montre alternativement les modes choisies avec un intervalle
d'environ 5 s.
3. Appuyez sur MODE pour retourner dans les mesures.
Bonnes Pratiques de Laboratoire
1. Appuyez sur CAL pendant les mesures.
2. Sélectionnez [BPL] et appuyez sur CAL.
3. Feuilletez avec çè
é
ê
pour voir un rapport d’étalonnage. Appuyez sur
STORE pour imprimer le rapport.
Collection de données dans la mémoire interne
1. Sélectionnez le menu en appuyant sur MODE.
2. Sélectionnez [COLLECTEUR] et appuyez sur CAL.
Démarrage de la collection
1. Sélectionnez [COLLECTER] et appuyez sur CAL.
2. Sélectionnez [ACTIVATER] et appuyez sur CAL.
3. Sélectionnez [OUI] ou [NON] et appuyez sur CAL.
4. Sélectionnez [INTERVALLE] et appuyez sur CAL.
5. Choisissez l'intervalle de temps désiré entre les collections de données (ou
MANUELLE) et appuyez sur CAL.
6. Sélectionnez [ALARME] et appuyez sur CAL.
7. Choisissez l'intervalle de temps désiré entre les collections de données (ou
MANUELLE), en cas d'alarme, et appuyez sur CAL.
8. Sélectionnez [NOMBRE] et appuyez sur CAL.
9. Choisissez le nombre désiré de mesures à mémoriser et appuyez sur CAL.
10. Appuyez sur MODE pour retourner aux mesures et démarrer la collection de
données selon les installations précédentes. En cas de collection manuelle,
appuyez chaque fois sur STORE pour mémoriser une mesure suivante. L'affichage
montre alors le numéro d'ordre, p.e [#00027].
Afficher les données du collecteur
1. Sélectionnez [AFFICHER] et appuyez sur CAL.
2. Choisissez [TABLE] ou [IMPRIMER] pour afficher ou imprimer les données en
mémoire et puis appuyez sur CAL pour continuer. Suivez les instructions sur
l'écran.
3. En cas où [TABLE] a été sélectionnée, appuyez sur CAL pour voir les options.
4. Sélectionnez [LOG#] et appuyez sur CAL. Choisissez le numéro de la première
ligne à montrer et appuyez sur CAL.
5. Sélectionnez [MONTRER] et appuyez sur CAL. Choisissez [Log#] (numéros) ou
[Date] à montrer et appuyez sur CAL.
Effacer les données du collecteur
1. Sélectionnez [EFFACER] et appuyez sur CAL. Suivez les instructions sur l'écran.
Collection externe dans un ordinateur par USB/RS232
1. Sélectionnez le menu en appuyant sur MODE.
2. Sélectionnez [USB/RS232] et appuyez sur CAL.
3. Sélectionnez [BAUDRATE] et appuyez sur CAL.
4. Choisissez la vitesse de transmission et appuyez sur CAL.
5. Sélectionnez [INTERVALLE] et appuyez sur CAL.
6. Choisissez l'intervalle de temps désiré entre les transmissions de données et
appuyez sur CAL. Programmez cette valeur à zéro pour transmettre les mesures
manuellement.
7. Sélectionnez [ALARME] et appuyez sur CAL.
8. Choisissez l'intervalle de temps désiré entre les transmissions de données, en cas
d'alarme, et appuyez sur CAL. Programmez cette valeur à zéro pour transmettre
les mesures manuellement.
9. Sélectionnez [No D'IDENT.] et appuyez sur CAL.
10. Choisissez un numéro d'identification pour les transmissions de données et
appuyez sur CAL.
12
Page 16

Allgemeine Informationen
Einführung
Dieses Gerät wurde mit der neuesten Technologie hergestellt und benötigt keine
besondere Wartung. Consort bescheinigt, dass dieses Gerät vor dem Versand
gründlich geprüft wurde und allen Anforderungen des Kaufvertrags entspricht.
Dennoch können bezüglich der Abmessungen und anderer physikalischer Eigenschaften geringwertige Abweichungen auftreten. Die normale Arbeitstemperatur
soll zwischen 0° und 40°C liegen. Das Gerät nie bei hoher Luftfeuchtigkeit (>95 %)
oder bei sehr niedrige Temperaturen (Kondensation!) betreiben.
Hersteller
Consort bvba
Parklaan 36 Tel (+32)(14)41 12 79
B2300 Turnhout Fax (+32)(14)42 91 79
Belgium E-mail: [email protected]
Garantie
Dieses Gerät (Zubehör ausgenommen) besitzt eine Garantie gegen fehlerhaftes
Material und Konstruktionsfehler von sechsunddreißig (36) Monaten ab dem Lieferdatum bei Versand ab Werk. Consort verpflichtet sich zu kostenloser Reparatur aller fehlerhaften Geräte, die in der Garantiezeit beanstandet wurden, unter der
Bedingung, dass das Gerät unter normalen Laboratoriumskonditionen und der Gebrauchsanleitung gemäß verwendet wurde, nicht jedoch bei einem Unfall,
falscher Behandlung und Handhabung oder Modifikation des Gerätes. Bevor ein
Gerät während der Garantiezeit zur Reparatur frei Haus an Consort zurückgeschickt wird, ist eine Genehmigung einzuholen. Consort haftet nicht für Schäden,
die aus dem Gebrauch oder der Handhabung seiner Produkte entstehen.
Service
Sollte dieses Gerät zur Reparatur eingeschickt werden, so wird der Kunde gebeten
folgende Artikel NICHT mitzuschicken, außer bei vermuteten Defekten:
Bedienungsanleitung
Kabel
Zubehör
Bei auftretenden ernsthaften Fehlfunktionen das Gerät sofort abschalten, und
einen Consort Fachhändler aufsuchen.
Netzadapter
Verbinden Sie den Netzadapter an der DC-Buchse. Dabei sollte darauf geachtet
werden, mit trockenen Händen zu arbeiten.
Bedienungsfeld
MODE = Wählt alle Funktionen, Kalibrierungsprozeduren, usw. durch
zurückzugehen nach die gewählte Funktion.
çè
é
ê
= Taste, um einen bestimmten Wert einzustellen oder um einen
Funktion zu wählen.
CAL = Beginnt oder setzt Kalibrierung fort oder eine Funktion.
STORE = Die Werte auf der Anzeige werden gespeichert oder versendet an
einen Computer.
HOLD = Hält die Anzeige während der Messung konstant.
ON/OFF = Gerät einschalten oder ausschalten.
13
Page 17

Installation des Gerätes
Eingänge
T8710
Verbinden Sie die Temperaturfühler mit den steckbare Anschlussklemmen am
Rückseite des Gerätes. Fangen Sie an mit den Kanäle von links bis rechts ab (gesehen von der Rückseite). Die gerade Nummer sind die negative Buchsen. Die ungerade Nummer sind die positive Buchsen. Wichtig: die Erdungsbuchse immer mit
der Erdung verbinden!
T8720
Verbinden Sie die Temperaturfühler mit den steckbare Anschlusskemmen am Rückseite des Gerätes. Fangen Sie an
mit den Kanäle von links bis rechts ab (gesehen von der
Rückseite).
2-Draht Pt100: verbinden an die Klemmen 1 und 3, usw.
3-Draht Pt100: verbinden an die Klemmen 1+2 und 3, usw.
4-Draht Pt100: verbinden an die Klemmen 1+2 und 3+3, usw.
Ausgänge
Dieses Modell ist mit einer USB-Schnittstelle zum Anschluss an einen Computer
ausgestattet. Dieses Modell ist auch mit einer RS232-Schnittstelle zum Anschluss
an einen Drucker ausgestattet. Daten werden im ASCII-Kode mit einer BAUD-Rate
von 300...19200 b/s übertragen (8 bit, keine Parität, 1 Stopbit).
• Die RS232-Schnittstelle wird automatisch ausgeschaltet, wenn ein USB-Kabel
angeschlossen ist.
Sprache
1. Drücken Sie MODE.
2. Wählen Sie [SYSTEM] und drücken Sie CAL.
3. Wählen Sie [SPRACHE] und drücken Sie CAL.
4. Wählen Sie die erwünschte Sprache und drücken Sie CAL.
Kontrast
1. Drücken Sie MODE.
2. Wählen Sie [SYSTEM] und drücken Sie CAL.
3. Wählen Sie [KONTRAST] und drücken Sie CAL.
4. Stellen Sie den Kontrast ein und drücken Sie CAL.
Datum und Zeit
1. Drücken Sie MODE.
2. Wählen Sie [SYSTEM] und drücken Sie CAL.
3. Wählen Sie [DATUM/ZEIT] und drücken Sie CAL.
4. Wählen Sie das Datum oder die Zeit und drücken Sie CAL.
Kennwort
1. Drücken Sie MODE.
2. Wählen Sie [KENNWORT] und drücken Sie CAL.
3. Damit unbefugten Personen der Zugang zum Gerät verwehrt wird, wählen Sie
[JA] und drücken Sie CAL um Ihren Geheimcode von 5 Tastenlängen ein zu
geben.
Kanäle
1. Wählen Sie das Menü mit MODE.
2. Wählen Sie [KANÄLE] und drücken Sie CAL.
3. Wählen Sie [AKTIVIEREN] und drücken Sie CAL.
4. Wählen Sie den erwünschten Kanal und drücken Sie CAL zum aktivieren.
5. Wählen Sie [THERMOELEMENT] und drücken Sie CAL. (nur T8710)
6. Wählen Sie den erwünschten Kanal und drücken Sie CAL. (nur T8710)
7. Wählen Sie den erwünschten Thermoelement-Typ und drücken Sie CAL. (nur T8710)
8. Wählen Sie [EINHEIT] und drücken Sie CAL.
9. Wählen Sie die erwünschte Einheit und drücken Sie CAL.
10. Wählen Sie [AUFLÖSUNG] und drücken Sie CAL.
11. Wählen Sie die erwünschte Auflösung und drücken Sie CAL.
14
Page 18

Stand-by
1. Drücken Sie MODE.
2. Wählen Sie [SYSTEM] und drücken Sie CAL.
3. Wählen Sie [STAND-BY] und drücken Sie CAL.
4. Wählen Sie [JA] (= automatisch weitergehen nach einem Stromausfall) oder
[NEE] (= das Gerät kann ausgeschaltet werden) und drücken Sie CAL.
Relais
1. Drücken Sie MODE.
2. Wählen Sie [RELAIS] und drücken Sie CAL.
3. Wählen Sie [ACTIEVEREN] für relais-1 und drücken Sie CAL.
4. Wählen Sie [ÖFFNEN] [SCHLIESSEN] oder [KEINER] und drücken Sie CAL.
5. Wählen Sie [WENN] für relais-1 und drücken Sie CAL.
6. Wählen Sie wenn das Relais geschlossen werden sollte und drücken Sie CAL.:
[ALARM] Maximum oder Minimum überschritten.
[ALARM>] Maximum überschritten.
[ALARM<] Minimum überschritten.
[STAND-BY] Gerät is in Stand-by.
[AKTIV] das Gerät misst.
[INAKTIV] das Gerät misst nicht.
7. Dementsprechend gehen Sie weiter für Relais-2.
• Technische Daten des Relais: max. 50 V, 200 mA, AC/DC
Alarm
1. Wählen Sie das Menü mit MODE.
2. Wählen Sie [ALARM] und drücken Sie CAL.
3. Wählen Sie [BEEPER] und drücken Sie CAL zum aktivieren oder nicht.
4. Wählen Sie den erwünschten Kanal und drücken Sie CAL.
5. Wählen Sie [AKTIVIEREN] und drücken Sie CAL zum aktivieren oder nicht.
6. Wählen Sie [TEMP. >] und drücken Sie CAL.
7. Wählen Sie das erwünschte Maximalniveau und drücken Sie CAL. Jedes mal,
wenn die Messungen dieses Niveau überschreiten, wird der Summer einen
Alarmton erklingen lassen.
8. Wählen Sie [TEMP. <] und drücken Sie CAL.
9. Wählen Sie das erwünschte Minimalniveau und drücken Sie CAL. Jedes mal,
wenn die Messungen dieses Niveau unterschreiten, wird der Summer einen
Alarmton erklingen lassen.
• Alarm-Hysterese = 1°C.
Kalibrierung
1. Vor die Messung das Gerät in eine Temperaturstabile Umgebung an stehen
lassen.
2. Drücken Sie CAL während die Messungen.
3. Wählen Sie [KANAL] und drücken Sie CAL.
4. Wählen Sie den erwünschten Kanal und drücken Sie CAL.
5. Wählen Sie [METHODE] und drücken Sie CAL.
6. Wählen Sie die erwünschte Kalibriermethode und drücken Sie CAL.
7. Wählen Sie [TYPE] und drücken Sie CAL.
8. Wählen Sie 1- oder 2-Punkt-Kalibrierung und drücken Sie CAL.
9. Wählen Sie [KALIBRIEREN] und drücken Sie CAL. Verfolgen Sie die
Anweisungen auf dem Schirm.
Messung
1. Vor die Messung das Gerät in eine Temperaturstabile Umgebung an stehen
lassen.
• Drücken Sie çè um zwischen die Kanäle umzuschalten.
• Drücken Sie é um die höchste gemessene Temperatur zu zeigen. Drücken Sie wieder é um mit
die Messungen weiterzugehen. Drücken Sie CAL um den Minimum/Maximum Speicher zu löschen.
• Drücken Sie ê um die niedrigste gemessene Temperatur zu zeigen. Drücken Sie wieder ê um mit
die Messungen weiterzugehen. Drücken Sie CAL um den Minimum/Maximum Speicher zu löschen.
• Jedes mal, während einer Alarm, wird die Relais schließen und der Summer einen Alarmton
erklingen lassen. Drücken Sie MODE zum annullieren.
15
Page 19

Alternierende Messungen
1. Wählen Sie das Menü mit MODE.
2. Wählen Sie [ALTERNIEREN] und drücken Sie CAL. Das Gerät zeigt die
eingestellte Messwerte mit einem Intervall von ungefähr 5 s.
3. Drücken Sie MODE um mit die Messungen weiterzugehen.
Gute Laborpraxis
1. Wählen Sie den gewünschten Bereich mit MODE.
2. Wählen Sie [GLP] und drücken Sie CAL.
3. Blättern Sie mit çè
é
ê
um einen kompletten Bericht der
Kalibrierergebnissen vorzuzeigen. Drücken Sie STORE, um den Bericht zum
Drucker zu senden.
Datenspeicherung im internen Speicher
1. Wählen Sie das Menü mit MODE.
2. Wählen Sie [SPEICHER] und drücken Sie CAL.
Daten speichern
1. Wählen Sie [SPEICHERN] und drücken Sie CAL.
2. Wählen Sie [ACTIVIEREN] und drücken Sie CAL.
3. Wählen Sie [JA] oder [NEIN] und drücken Sie CAL.
4. Wählen Sie [INTERVALL] und drücken Sie CAL.
5. Wählen Sie das erwünschte Zeitintervall zwischen den Speicherungen (oder MANUELL)
und drücken Sie CAL.
6. Wählen Sie [ALARM] und drücken Sie CAL.
7. Wählen Sie das erwünschte Zeitintervall zwischen den Speicherungen (oder MANUELL),
während einer Alarm, und drücken Sie CAL.
8. Wählen Sie [ANZAHL] und drücken Sie CAL.
9. Wählen Sie die erwünschte Anzahl zu speichern Daten und drücken Sie CAL.
10. Drücken Sie MODE um mit die Messungen weiterzugehen. Im Fall einer manuellen
Datenverarbeitung drücken Sie die STORE-Taste, um jede folgende Messung zu
speichern. Inzwischen wird die Speichernummer angezeigt, z.B. [#00027].
Die gespeicherten Werte anzeigen
1. Wählen Sie [AUSLESEN] und drücken Sie CAL.
2. Wählen Sie [TABELLE] oder [DRUCKEN] um die gespeicherten Daten vorzuzeigen
oder auszudrucken, und drücken Sie CAL. Verfolgen Sie die Anweisungen auf dem
Schirm.
3. Wenn Sie [TABELLE] gewählt haben, drücken Sie CAL um die Optionen zu zeigen.
4. Wählen Sie [LOG#] und drücken Sie CAL. Wählen Sie die nummer der erste zu
zeigen Linie und drücken Sie CAL.
5. Wählen Sie [ZEIGEN] und drücken Sie CAL. Wählen Sie [Log#] (Nummern) oder
[Datum] um zu zeigen und drücken Sie CAL.
Daten löschen
1. Wählen Sie [LÖSCHEN] und drücken Sie CAL. Verfolgen Sie die Anweisungen auf
dem Schirm.
Externe Datenspeicherung in einen Computer über USB/RS232
Wählen Sie das Menü mit MODE.
2. Wählen Sie [USB/RS232] und drücken Sie CAL.
3. Wählen Sie [BAUDRATE] und drücken Sie CAL.
4. Wählen Sie die erwünschte Baud-rate und drücken Sie CAL.
5. Wählen Sie [INTERVALL] und drücken Sie CAL.
6. Wählen Sie das erwünschte Zeitintervall zwischen den gesendeten Daten und
drücken Sie CAL. Auf Null einstellen, wenn das automatische Ausdrucken nicht
erwünscht.
7. Wählen Sie [ALARM] und drücken Sie CAL.
8. Wählen Sie das erwünschte Zeitintervall, während einer Alarm, zwischen den
gesendeten Daten und drücken Sie CAL. Auf Null einstellen, wenn das
automatische Ausdrucken nicht erwünscht.
9. Wählen Sie [IDENTIF. Nr.] und drücken Sie CAL.
10. Wählen Sie eine Identikationsnummer für den gesendeten Daten und drücken Sie
CAL.
16
Page 20
Specifications
17
Page 21

DECLARATION OF CONFORMITY
We declare under our sole responsibility that the product
Multi-channel analysers
content of the type numbers
T8710, T8720
to which this declaration relates is in conformity
with the following standards
LOW VOLTAGE DIRECTIVE 2006/95/EC
EN61010-1
EMC DIRECTIVE 2004/108/EC
EN61326-1
Consort bvba
Parklaan 36, B-2300 Turnhout, Belgium
Tel: (+32) (0)14 41 12 79
Fax: (+32) (0)14 42 91 79
Sales: [email protected]
The electro-magnetic susceptibility has been chosen at a level that gains proper operation in
residential areas, on business and light industrial premises and on small-scale enterprises, inside as
well as outside of buildings. All places of operation are characterised by their connection to the
public low voltage power supply system.
18
Page 22

WARRANTY CERTIFICATE
This instrument (excluding all accessories) is warranted against defective material
and workmanship for a period of thirty-six (36) months from the date of shipment ex
factory.
Accessories and breakable items such as electrodes are not warranted unless proven
to be defective before shipment.
The original purchase order numbers, Consort invoice numbers and serial numbers of
the products must be provided.
CONSORT will repair all defective equipment returned to it during the warranty
period without charge (CIF Turnhout prepaid by sender), provided the equipment has
been used under normal laboratory conditions and in accordance with the operating
limitations and maintenance procedures described in the instruction manual and when
not having been subject to accident, alteration, misuse or abuse.
If the products have been used with or have come into contact with fluids, an MSDS
(material safety data sheet) must be supplied prior to issuing a return authorisation.
A return authorisation must be obtained from CONSORT before returning any product
for warranty repair on a freight prepaid basis!
19
Page 23

20
Page 24

Consort bvba
Parklaan 36 • B-2300 Turnhout • Belgium
Tel: (+32) (0)14 41 12 79
Fax: (+32) (0)14 42 91 79
Sales: [email protected]
Support: [email protected]
Information: [email protected]
 Loading...