

Page 1
62001097 Iss 02
IF YOUR HEATER DOES NOT WORK
Check that power is available to the heater. The neon in the control switch should
be illuminated.
Check that the thermal cut-out has not operated. Follow the reset instructions
given under the section headed ‘Thermal Oper ated Cut-out’.
Check tha t the fu se in th e spur unit ha s not blo wn. Thi s can be don e by rep la cing
the fuse with another suita ble fuse.
Should neither of the above remedies work, then telephone the helpline number
shown in these instructions. (UK ONLY).
Do not attempt to repair the heater.
CLEANING
Always disconnect the heater from the main s befor e cleanin g.
The heater should not require any maintenance, but it is strongly advised that it is kept
clean. An occasional wi p e over with a soft cl ot h is all that should be necessa ry.
Do NOT use metal or furniture polish on any part of the h eater
Do NOT touch the heater with wet hands or in any way bring water into contact
with it.
If the supply cord on this appliance is damaged, it must be replaced by a special cord
which is only available from an Authorised Service Agent, or your supplier.
GUARANTEE
This guarantee i s offered to you as an extr a benefit and does not affect your legal
rights.
All electrical a pp liances prod u ced for th e C ompany are guarant eed for one year against
faulty material or workmanship. This applies only if the appliance has been used for
purposes i n accord ance with the instruct ions provi ded and has not been conn ected to a n
unsuitable electricity supply, or subject to misuse, neglect, damage or modified or repaired
by any person not authorised by us.
The correct electricity supply voltage is shown on the rating label attached to the
appliance.
CUSTOMER HELPLINE
Shoul d you n eed an y advice on th e use of yo ur n ew Cons ort pr oduct , or sh ould you
require service or repair, please contact our Helpline:
Operating hours: Monday to Thursday 8.30am to 4.30pm | Friday 8.30 to 3.30pm
Consort Equipment Products Limited
Thornton Industr ial Es tate, M ilford Have n , P embrokeshi re, SA 73 2RT
Tel: 01646 692172 Fax: 01646 695195
Email: [email protected] Web: www.consortepl .com
Quality Space Heaters
Using and looking after your
CN2F 2 kW Wall Mounted Fan Heater
Page 2
62001097 Iss 02
CONTROLS
The heater is fitted with a built-in thermostat to control the temperature level to which
the room is heated. The thermostat adjustment knob is located on the right hand end and
is numbered. Rotate the knob clockwise to a higher number to raise the room temperature.
Once set it is unlikely to require being touched again.
To set the heater to the Frost Watch mode, turn the thermostat control
knob fully anti-clockwise until the frost symbol aligns with mark.
The switches on the side panel of the heater operate to give:
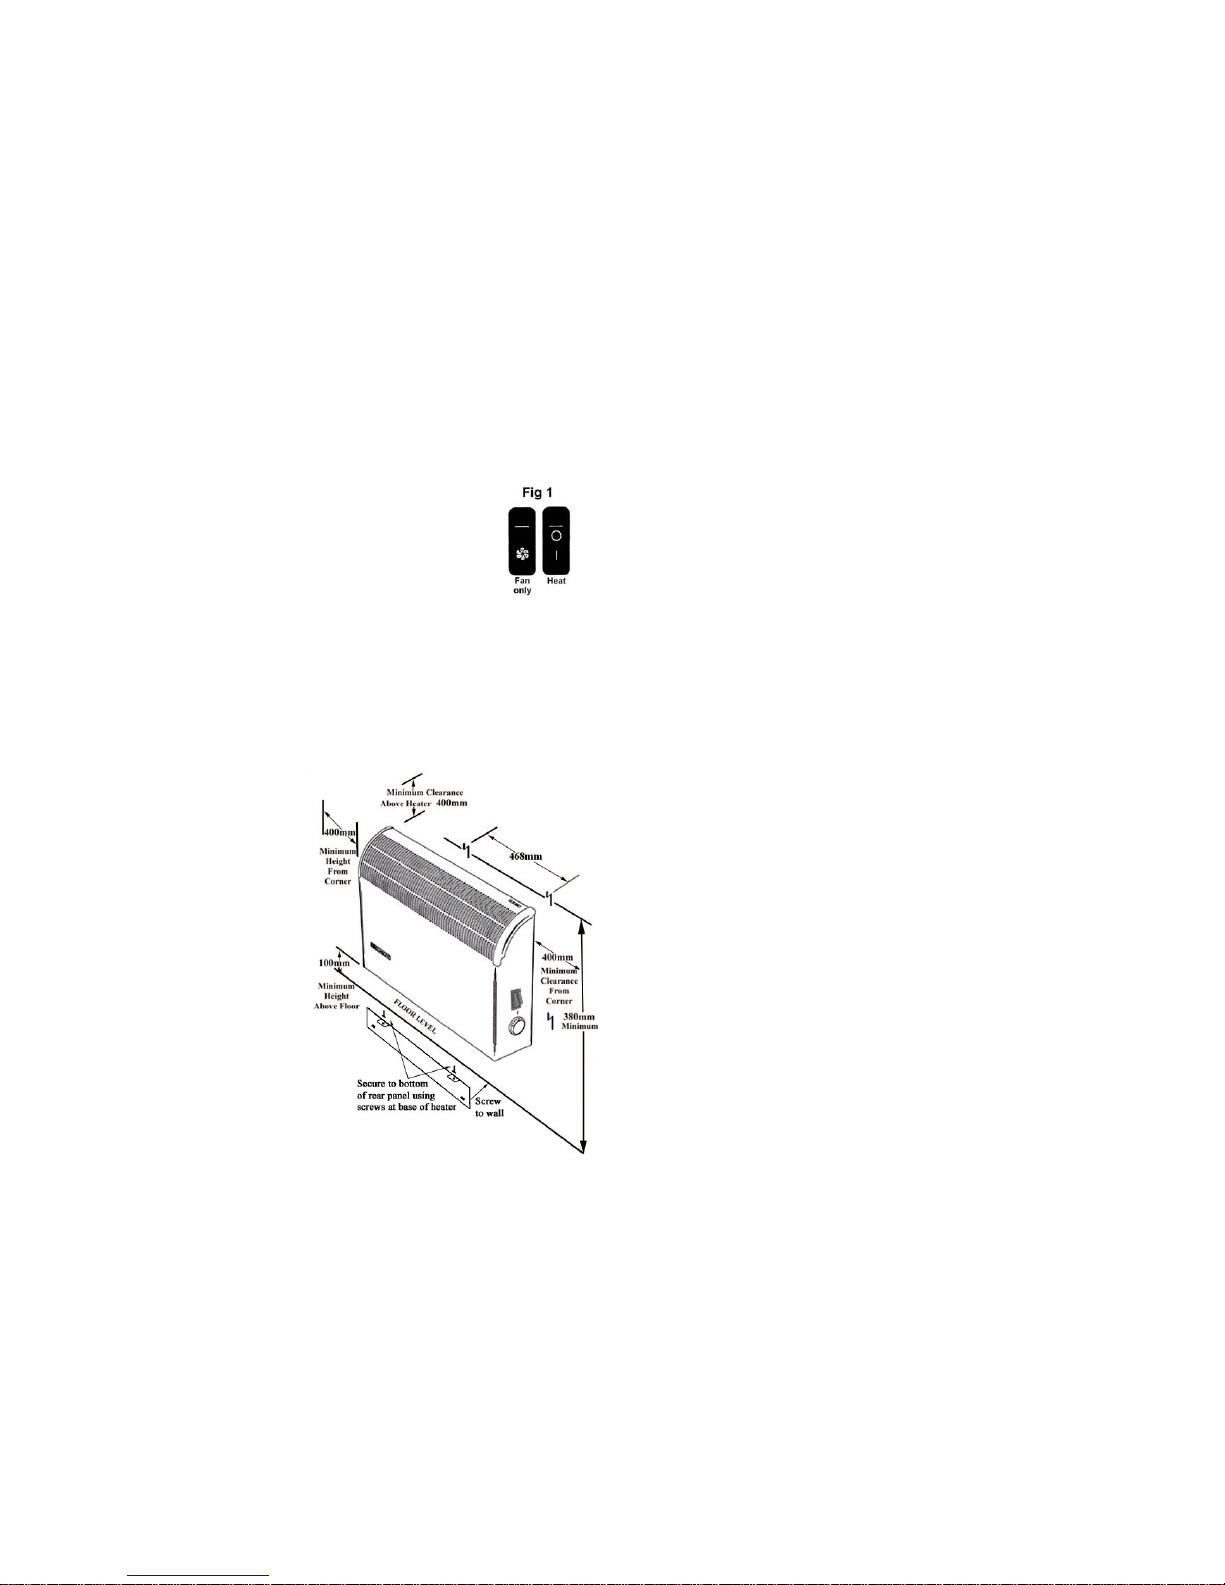
fan only or 2 k W. S e e F ig 1.
CONNECTION TO THE MAIN SUPPLY
Electrical installation should be carried out by a competent installer, preferably
registered with NICEIC (National Inspection Council for Electrical Installation
Contracting) in accordance with the 16 edition of the IEE Wiring Regulations, (BS.7671:
1992), and any relevant Local Authority Bye-Laws.
This heater is fitted with a 3-core mains supply cable and should be permanently
connected to the electricity supply via a double pole switch having 3mm gap on each pole.
A switched Fused Connection unit to BS.1363. Part 4 is a recommended mains supply
connect ion accessor y to ensure com pliance wit h safety req uirement s applicabl e to fixedwiring installation.
THERMAL OPERATED CUT-OUT
The appliance is fitted with an
Electronic Safety Control (ES). This is
a safety device which switches the
heater off if, for any reason, the
appliance overheats. The ES control
must be re-set manually. This must be
done by a competent el ectrician. Th e
re-set button is on the ES control
located in the center of the heating
element inside the heater. For
assistance with this, please ring our
helpline (see back pag e of docu ment).
Th e hea t er car ri es a ‘D o Not Cov er ’
label to warn the user that if the
appliance is covered, there is a risk of
overheating.
WALL MOUNTING
The heater must not be located immediately below a fixed socket outlet.
Th e Wa ll M ount in g bra cket s ar e pa ck ed sep ara tel y in the car ton . F it th e top moun t ing
bracket s to the wal l at the h eight and centres sh own in th e diagram. Wi thdraw th e two
feet-secur in g scr ews from th e base of t he h eater and u se thes e scr ews to s ecur e th e righ tangled bracket s to th e bas e of th e rear pan el of th e heat er in the corr ect holes. These a re
the holes in the two protruding lug s .
Mou n t you r a p pl iance on t o th e t op br a c ket s vi a th e t wo slots i n th e r ear pan el . Sec ure
the bottom bracket to the wall as shown.
WARNING – THIS APPLIANCE MUST BE EARTHED
IMPORTANT – ALWAYS RETAIN YOUR USER INSTRUCTIONS FOR FUTURE REFERENCE.
SAFETY
This equipment has been designed and manufactured to the highest international
standar ds, but, like all electrical applian ces which are oper ated by mains volta ge, care
must be taken if you are to obtain the best results and safety is to be assured.
NOTE: The appliance is not intended for use by persons (including children) with
reduced physical, sensory or mental capabilities, or lack of experience and knowledge
unless they have been given supervision or instruction concerning use of the appliance by
a person responsible for their safety.
Children should be supervised to ensure that they do not play with the appliance
Do NOT site the appliance into a corner when in use.
Do NOT u se th is h eat er in th e im media te su rroun din gs of a bath , a sh ower or a
swimming pool.
Do NOT handle the appliance with wet hands.
Do NOT use the appliance in workshops or rooms where excessive dust is
generate d or prese nt.
Ensure that nothing is pushed into any aperture of this appliance.
Do NOT touch outlet grille when the appliance is in use.
Do NOT cover or restrict any aperture of the appl iance when in u s e.
Do NOT use th e appliance if d amaged.
Do NOT leave the appliance unatten d ed where young children are present.
This appliance meets the requirements of EU Directive 89/336 for EMC.
 Loading...