

Page 1
Reference Tuner-1.0
AERIAL REQUIREMENTS
The tuner aerial should be mounted on the roof, clear of obstructions and also as high as possible. Horizontally
polarised aerials will respond to almost all commercial broadcasts whilst partially rejecting police and taxi
transmissions, and are therefore recommended. Use of an aerial preamplifier will disturb the muting operation of
the tuner and may cause cross modulation problems. Such preamplifiers should only be used as a last resort.
In most commercial radio broadcasts are usually radiated from different sites even though the target areas of the
services may be similar. This means that unless the transmitters are in almost the same direction looking from
your house, an aerial aligned on one transmitter will give less than optimum performance on the other. In these
circumstances you should fit an aerial rotator, or a less directional aerial if appropriate. The more sensitive and
directional the aerial you use, the less good will be the reception in directions other than the one towards which
the aerial is pointing. If you are particularly interested in receiving a wide range of VHF transmissions an aerial
rotator is a necessity. Your dealer will be familiar with local conditions and will be able to advise you on which
stations are capable of being received satisfactorily.
CONNETIONS
The FM aerial input socket could be connected via 75ohm low-loss coaxial cable to a suitable roof-mounted
directional aerial. The tuner’s audio output is set to 700mV at 100% modulation and should match almost any
preamplifier without difficulty.
GENERAL USE
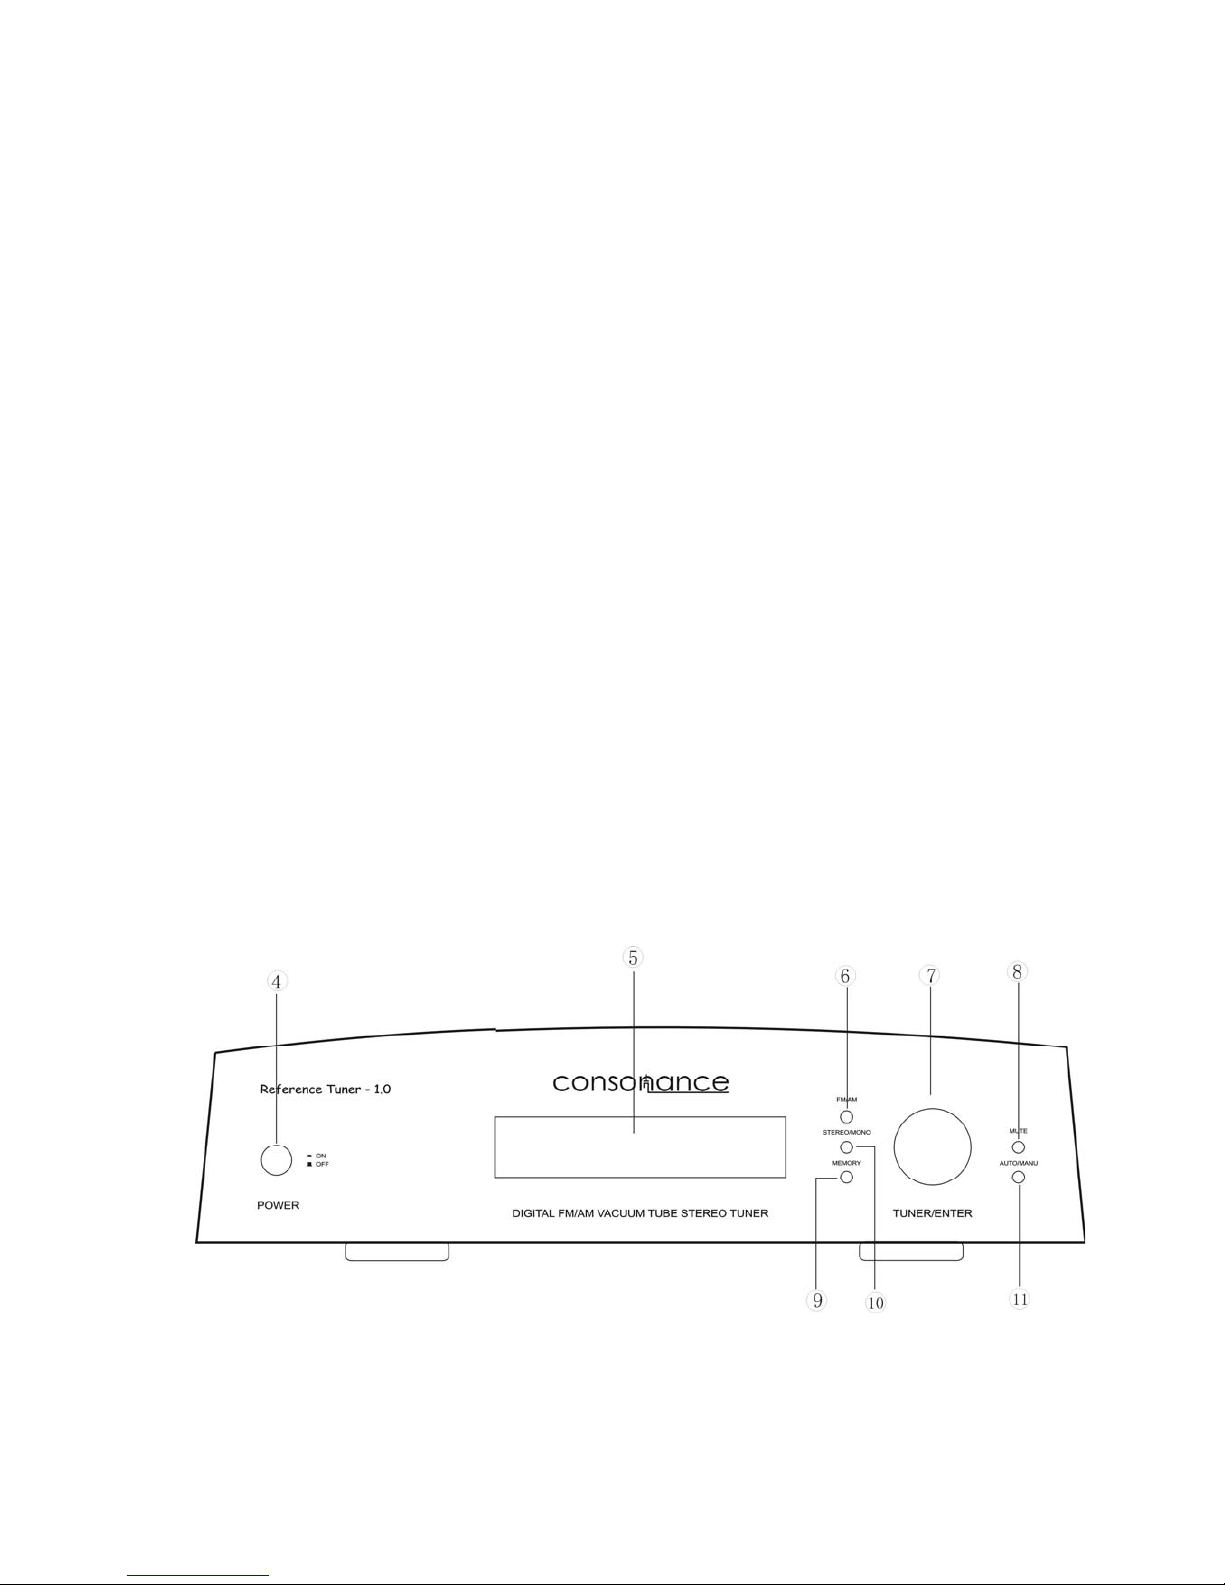
FRONT PANEL OF TUNER
The Tuner has only seven buttons. The buttons on the front panel have 7 functions.
POWER ON OFF
Page 2

2
The Tuner is switched on by pushing the power button q on the left hand side of the front panel. A flashing "
TUNER TU-902" blue light in the display indicates that power has been switched on. And then goes to factory set
“FM 87.5MHz” and stand-by for modulation.
By pushing the same button one more time the power is switched off and stay at the final choose station till the
next turn on. To cancel all the memory v and get back the factory set, push the memory clear key on the remote
5 seconds.
FM / AM
Pushing the FM/AM button s on the front panel or on the remote will switch the tuner sequentially through “FM”
and “AM ” modulation modes.
STEREO / MONO
Pushing the STEREO/MONO button w on the front panel or st. /mono key on the remote will switch the tuner
sequentially through “stereo” and “mono ” modes.
FM programmes which are broadcast in stereo recommended stereo mode except those which are extremely
weak or in circumstances of very weak reception, when mono operation will be enforced because stereo
reproduction would be too noisy. Mono mode combines the left and right channels to produce a mono output
signal. Switching to mono can reduce background noise with weak stereo signals.
AUTO / MAN
Pushing the AUTO/MANU button (11) on the front panel or auto/man key on the remote will switch the tuner
sequentially through “auto-scan” and “manual ” modulation modes.
In manual modulation mode, the tuning knob on the front panel or up and down navigator keys on the remote
could adjust the tuning frequency step by step. In auto-scan modulation mode, the tuning knob on the front panel
or the up and down navigator keys will cause the tuner to search for stations automatically.
TUNING
In manual modulation mode, adjusts the tuning knob clockwise or counter-clockwise or push the up or down
navigator keys on the remote continually searching for signals and stations. Rock the tuning knob tslightly
backwards and forwards to check that the tuning is set to the center of the range over which the station can be
heard, or the station may slip off tune.
In auto-scan mode, causes the tuner to “scan” down the FM/AM band searching for signals above a preset level.
The tuner will stop searching at each tuned station and, using the remote, the option to store the station as a
preset will be available. During tuning automatically, the tuned frequency display on the screen r until a station is
received and tuned with sufficient accuracy.
MEMORY
The stations memory key enables specific FM station frequencies to be assigned to preset memory. To assign a
station to a preset first tune manually by inputting the station frequency directly from the numeric keypad or by
using the up or down navigator keys (or auto-scan ). Press the stations memory key on the remote, the tuner is
now in station memory mode-the “MEM” indicator will flash and the display will show “- -” or numbers of station.
Press the desired preset number (00-39) from the numeric keypad or choose the desired preset number (00-39)
by using the tuning knob on the front panel or the up or down navigator keys on the remote, then press one more
time the stations memory key simply.
Page 3

3
MUTE
Push the MUTE button, a flashing" MUTE" blue light in the display indicates ureducing the tuner output volume
to zero. A second press restores the volume.
ADDITIONAL FUNCTION AVAILABLE ON THE REMOTE CONTROL
CLOCK / TUNER
Switch the tuner sequentially through “clock display or time reset ” and “tuner ” modes.
NUMERIC KEYPAD
In tuner mode the numeric keys will select tuner presets or can be used directly to input station frequencies.
AUTO SCAN-SAVE
Press the scan-save key on the remote, the tuner is now in auto scan-save stations mode. Turn slightly the tuning
knob a bit clockwise/counter-clockwise or push once the up or down navigator keys on the remote, the tuner to
“scan” down the whole FM band searching for signals/stations and store them automatically.
FREQUENCY INPUT AND PRESET
Press the freq.input key once on the remote, the tuner is now in frequency input preset mode-the display will
show “- - -”. Then input the station frequency directly from the numeric keypad to tune manually.
TIME SET
Toggles the tuner through three time set modes – turn on time, clock time and turn off time.
BRIGHTNESS OF DIGITAL INDICATOR
Toggles the tuner display through three brightness modes – bright, light and dim.
MEMORY CLEAR
To clear the memory of preset stations press the memory clear key, the Indicator shows “clear” and with flash of
the preset stations number you want to clear, then followed by the enter key on the remote.
Page 4

4
REAR PANEL OF TUNER
From left to right the connectors are :
75ohm FM coaxial aerial input
FM&AM aerial inputs right/left n
Stereo signal outputs (RCA) right/left p
AC Power connection 230V / 115V / 100V AC dependent on country. o
REMOTE CONTROL
The Tuner-1.0 can be controlled by remote control. The remote control uses two 1.5-volt LR03 AAA batteries.
12.CLOCK / TUNER MODE SWITCH KEY
13.NUMERIC KEYPAD
14.FM/AM MODE SWITCH KEY
15.UPWARDS NAVIGATOR KEY
16.BACKWARDS NAVIGATOR KEY
17.DOWNWARDS NAVIGATOR KEY
18.AUTO/MANUAL MODE SWITCH KEY
19.STEREO/MONO MODE SWITCH KEY
20.TURN ON TIME SET KEY
21.BRIGHT MODE KEY OF DIGITAL INDICATOR
22.MEMORY CLEAR KEY
23.ENTER OR CONFIRM KEY
24.FORWARDS NAVIGATOR KEY
25.STATIONS MEMORY KEY
26.AUTO SCAN AND SAVE STATIONS KEY
27.FREQUENCY INPUT PRESET KEY
28.CLOCK TIME RESET KEY
29.TURN OFF TIME SET KEY
30.DIM MODE KEY OF DIGITAL INDICATOR
31.LIGHT MODE KEY OF DIGITAL INDICATOR
Page 5

5
32.MUTE MODE KEY
USE, PLACEMENT & CLEANING
Note: It takes about 1 minute for the 6H30 vacuum tube to reach its normal operating point, and only slight sonic
improvement will be noticed after 5 minutes. The Ref.Tuner-1.0 performs best after being switched on for about
30-60 minutes for heating. The top cover are made of cherry wood, while the front panel and side panels are
made of brushed / blasted and anodized aluminum. Fingerprints or stains on the front panel, knobs or top cover
can be removed with a cloth moistened with warm water. We wish you good luck in setting up and connecting
your new Tuner and hope that it will give you many years of joyful natural sounding music experiences !
TECHNICAL SPECIFICATIONS
Vacuum tube: Sovtek 6H30 x 1
Mains Supply: 100V/115V/230V 50 or 60 Hz.
Preset Memory: 40 stations
Dimensions / Weight : 21cm x 43cm x 33cm (HxWxD) / 18kg (wood top panel)
Page 6

6
FM: 22.5KV dev, 1KHz
MW: 30% mod 1KHz
FM: I/P imped: 50ohm
MW: single loop attenna
1. FM:
Item Content Condition Standard Terminal Unit
1 IF freq. 10.7 +/-0.3 MHz
Low extrenity 87.5 MHz
2 freq. range
High extrenity 108.5 MHz
90MHz 10 20 uV
98MHz 10 20 uV
3 (26dB S/N)
106MHz 10 20 uV
4 image rejection 106MHz 25 20 dB
5 IF rejection 90MHz 50 40 dB
6 overall distortion 75KHz dev,1mV i/p 1 2 %
7 large signal handing Distortion<10% 1260 711 mV/M
8 FM limiting sense (-3dB) KHz dev 10 14 uV
9 selective S300 +/-300K,2signal method 20 15 dB
10 strong i/p S/N A-weighted 1mV i/p 67.5KHz dev 60 55 dB
low 60 100 Hz
11 AF(overall) frequency response
50us
high 10K 8K Hz
12 mod.hum 22.5KHz dev 1mV i/p 55 50 dB
13 stereo on/off point 67.5KHz dev 15 20 uV
14 channal separation 45 40 dB
15 AMsuppression 100uV- 5mV i/p, 22.5KHz dev 30 25 dB
16 Max output 67.5KHz dev 1mV i/p 700 mV
17 Scan Auto Stop Sensitivity 26 32 dB
2. MW
Item Content Condition Standard Terminal Unit
1 IF freq. 450 +/-3 KHz
Low extrenity 522 KHz
2 freq. range
High extrenity 1620 KHz
600KHz/603KHz 85 90 dbuV/m
1000KHz/999KHz 85 90 dbuV/m
3 (26dB S/N)
1400KHz/1404KHz 85 90 dbuV/m
4 image rejection 1400KHz 40 30 dB
5 IF rejection 600KHz 40 30 dB
6 overall distortion 50mV/m i/p, 80%mod 1 2 %
7 large signal handing Distortion<10% 1000 500 mV/M
8 AGC merit 100mV/m i/p, 30%mod 30 25 dB
9 selectivity S9 +/-9KHz 20 16 dB
10 strong i/p S/N 50mV/m i/p, 30%mod 45 40 dB
low 60 100 Hz
11
AF(overall) frequency response
1 KHz ref.
high 2.2K 2K Hz
12 mod.hum 5mV/m i/p, 30%mod 40 35 dB
13 Max output 50mV/m i/p, 30%mod 700 mV
14 Scan Auto Stop Sensitivity 98 104 dB
FM :
Tuning range: VHF/FM 87.5 - 108.5 MHz
Page 7

7
Sensitivity: (INF)10dB uV/m
Signal/Noise Ratio: 55dB
Output level: 700mV per channel at 100% modulation
AM :
Tuning range: VHF/AM 522 - 1620 kHz
Sensitivity: (INF) 60dB uV/m
Signal/Noise Ratio: 45 dB
Output level: 700mV per channel at 100% modulation
SPECIFICATIONS SUBJECT TO CHANGE WITHOUT NOTICE.
NOTE & WARNING
Consonance products should only be opened and/or serviced by certified Consonance technicians. The device
contains electronic components that can cause severe electric shock. Work performed on Consonance products
by unqualified personnel can cause serious damage and personal injury.
Opening of the product by non-authorized personnel will void the guarantee.
The products must not be exposed to rain or moisture.
GUARANTEE
All Consonance products come with a 1-year guarantee against defective materials and workmanship.
In case you should need assistance with your Consonance product please find your nearest dealer or distributor
by looking at our webpage : http://www.operaudio.com
In case you have problems locating your dealer or distributor please e-mail to klep@public.bta.net.cn
The Opera Audio Co.,Ltd
Beijing, China
 Loading...