

Page 1
1
Digital music player
SAFETY INSTRUCTION
To avoid personal injury or damage to equipment, please ensure that you read this
manual in its entirety before attempting to operate the equipment. Please retain this
manual for future reference.
TO PREVENT THE RISK OF ELECTRIC SHOCK, DO NOT UNDER ANY CIRCUMSTANCES
REMOVE ANY PARTS OF THE EQUIPMENT COVER. THERE ARE NO USER
SERVICEABLE PARTS INSIDE. ALL SERVICING MUST BE CARRIED OUT BY QUALIFIED
SERVICE PERSONNEL.
This icon marks a presence of un-insulated “dangerous voltage” within the product's
enclosure that may be of sufficient magnitude to constitute a risk of electric shock to persons.
This icon marks important operating, maintenance and service information that should
be read to prevent possible personal injury
WARNINGS
Do Not Disassemble
Do not attempt to service the equipment beyond that described in this manual. Touching
the equipment’s internal parts could result in severe personal injury. All other servicing or
problems as listed below should be referred to qualified Consonance service technicians:
• The power supply cord or plug has been damaged
• Objects have fallen or liquid has been spilled into the equipment
• The equipment does not appear to function normally or exhibits a marked change in
performance
• The equipment has been dropped or the enclosure damaged
Do not under any circumstances allow anyone to modify your Consonance equipment
without first checking with Opera Audio, your dealer, or your distributor. Unauthorized
modifications will invalidate your guarantee.
Page 2

2
Cleaning
Never clean with furniture polish, benzene, or volatile liquids. Dust periodically with a
clean, soft paint brush. Fingerprints can be removed with a moist polishing cloth.
Power Lines
In case of connecting a tuner, an outdoor antenna should be located away from power
lines. If an outside antenna is connected to the system, be sure the antenna is grounded
so as to
p
rovide some protection against voltage surges and built up of static charges.
Power Source
The equipment should be connected to a power supply only of the type described in this
manual or as marked on the equipment.
Lighting
Consonance hi-fi system can be damaged by lightning. Power amplifiers are particularly
at risk and therefore should be turned off when there is risk of lightning strike. For
com
p
lete protection all mains plugs and any aerial cables should be disconnected when
Ventilation
The equipment should be situated so that its location or position does not interfere with
its proper ventilation.
1. The equipment must not be placed on bed, sofa, or similar surfaces, that may block
the ventilation openings,
2. The equipment must not be placed in a built-in installation, such as a bookcase or
cabinet that may impede the flow of air.
3. The equipment should be situated away from heat sources such as radiators, heat
register, stoves, or other electronic appliances that produce heat. This equipment is
not intended for commercial use.
Water and Moisture
The equipment should not be used near water, e.g., near a bathtub, washbowl, kitchen
sink, laundry tub, in a wet basement, or near a swimming pool etc. Similarly, do not
placed objects filled with liquid, such as vases on top of the equipment.
Grounding or Polarization
Power supply cords should be routed so that they are not likely to be walked on or
pinched by items placed upon or against them, paying particular attention to cords and
plugs, convenience receptacles, and the point where they exit from the amplifier.
Page 3

3
Table of Contents
Introduction 4--- 6
Fast operating guide 7---17
Appendix 1 18
Appendix 2 19---22
Appendix 3 23---24
Reference7 Specification 25
D-Linear7MK2 Specification 26
Warranty 27
Page 4
4
Please check the following Appendix ments are complete:
n Remote control
Reference7 D-Linear7MK2
o Power Cable
p Instructions for use
q Card reader(For SD card transform)
r USB extended wire.
(For the USB wireless adaptor and USB storage device both in USB port.)
s 802.11N 150M high speed wireless adaptor.
Page 5
5
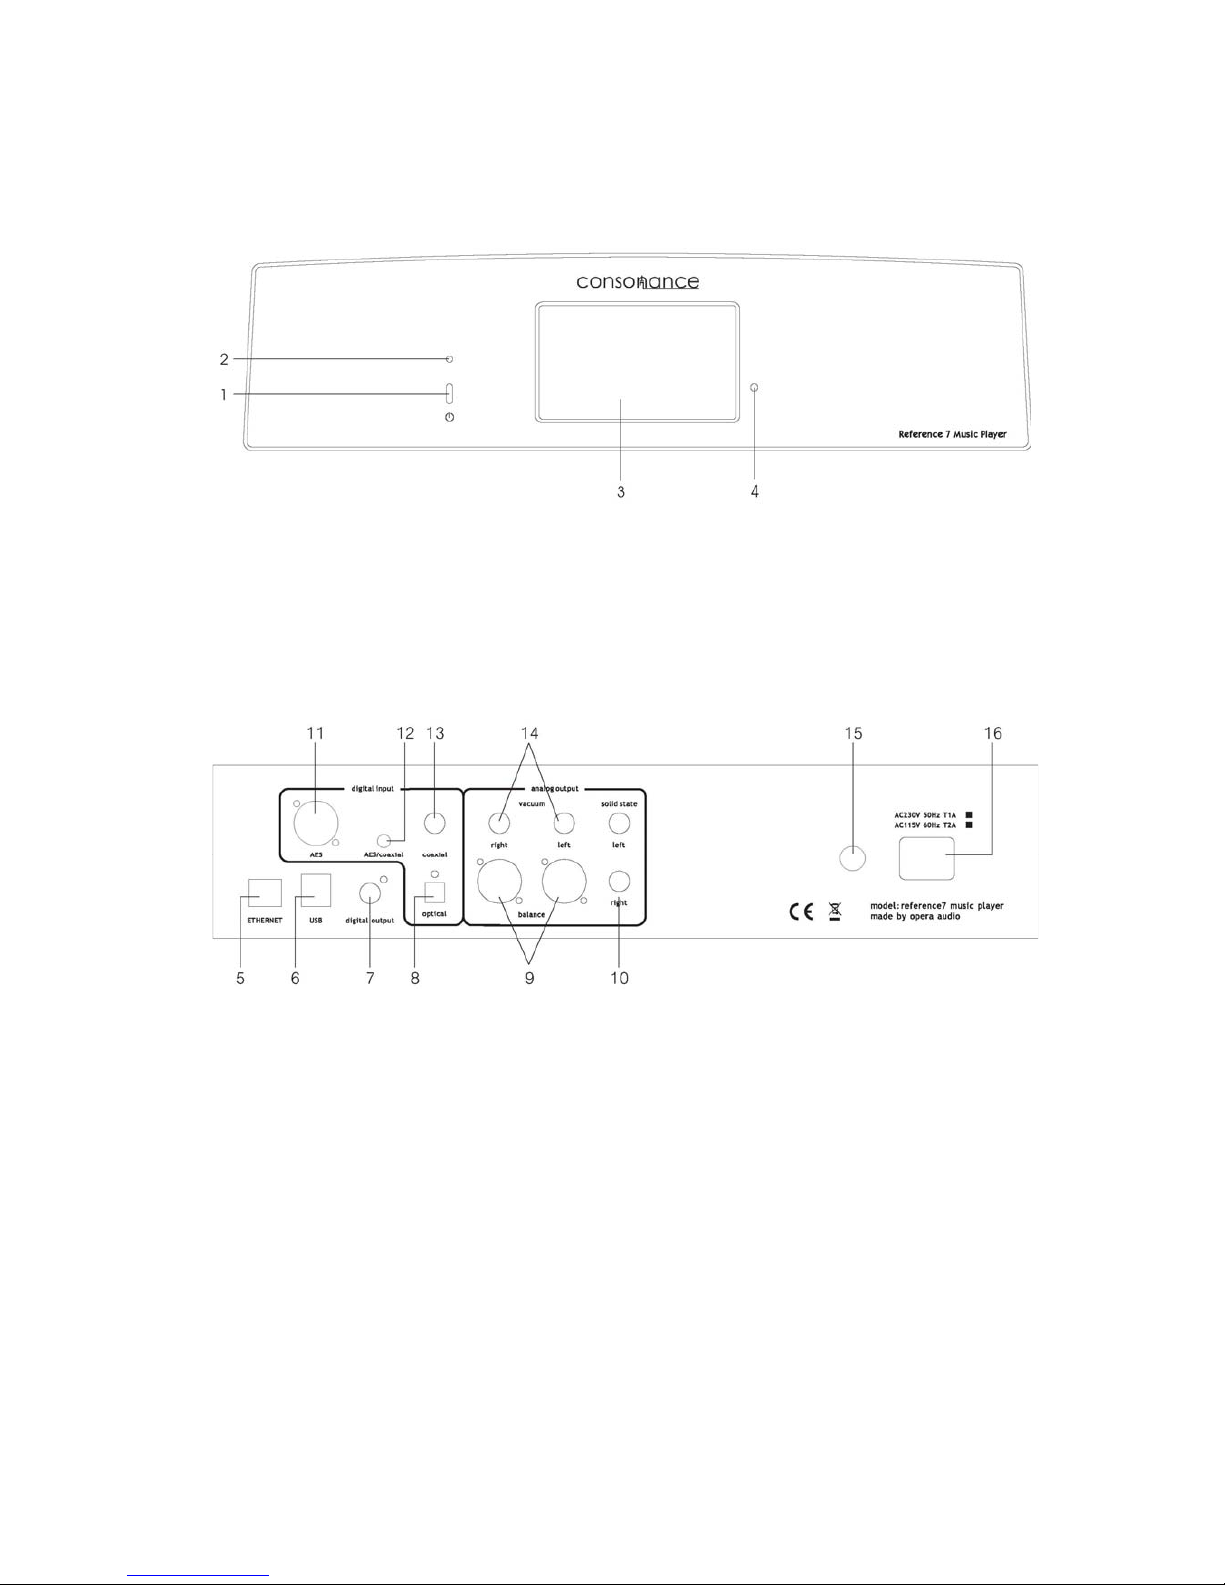
Refenrence7
OPERATING TIPS
1. Power switch
2. LED indicator
3. Display touch screen
4. Remote sensor
5. RJ-45 LAN interface
6. USB HOST ports
7. Coaxial Digital output
8. OPTICAL Digital input
9. Balanced Analog outputs
10. RCA Analog outputs
11. AES Digital input
12. Digital inputs select switch
13. Coaxial Digital input
14. RCA vacuum tube stage outputs
15. Fuse
16. AC Power connection
Page 6
6
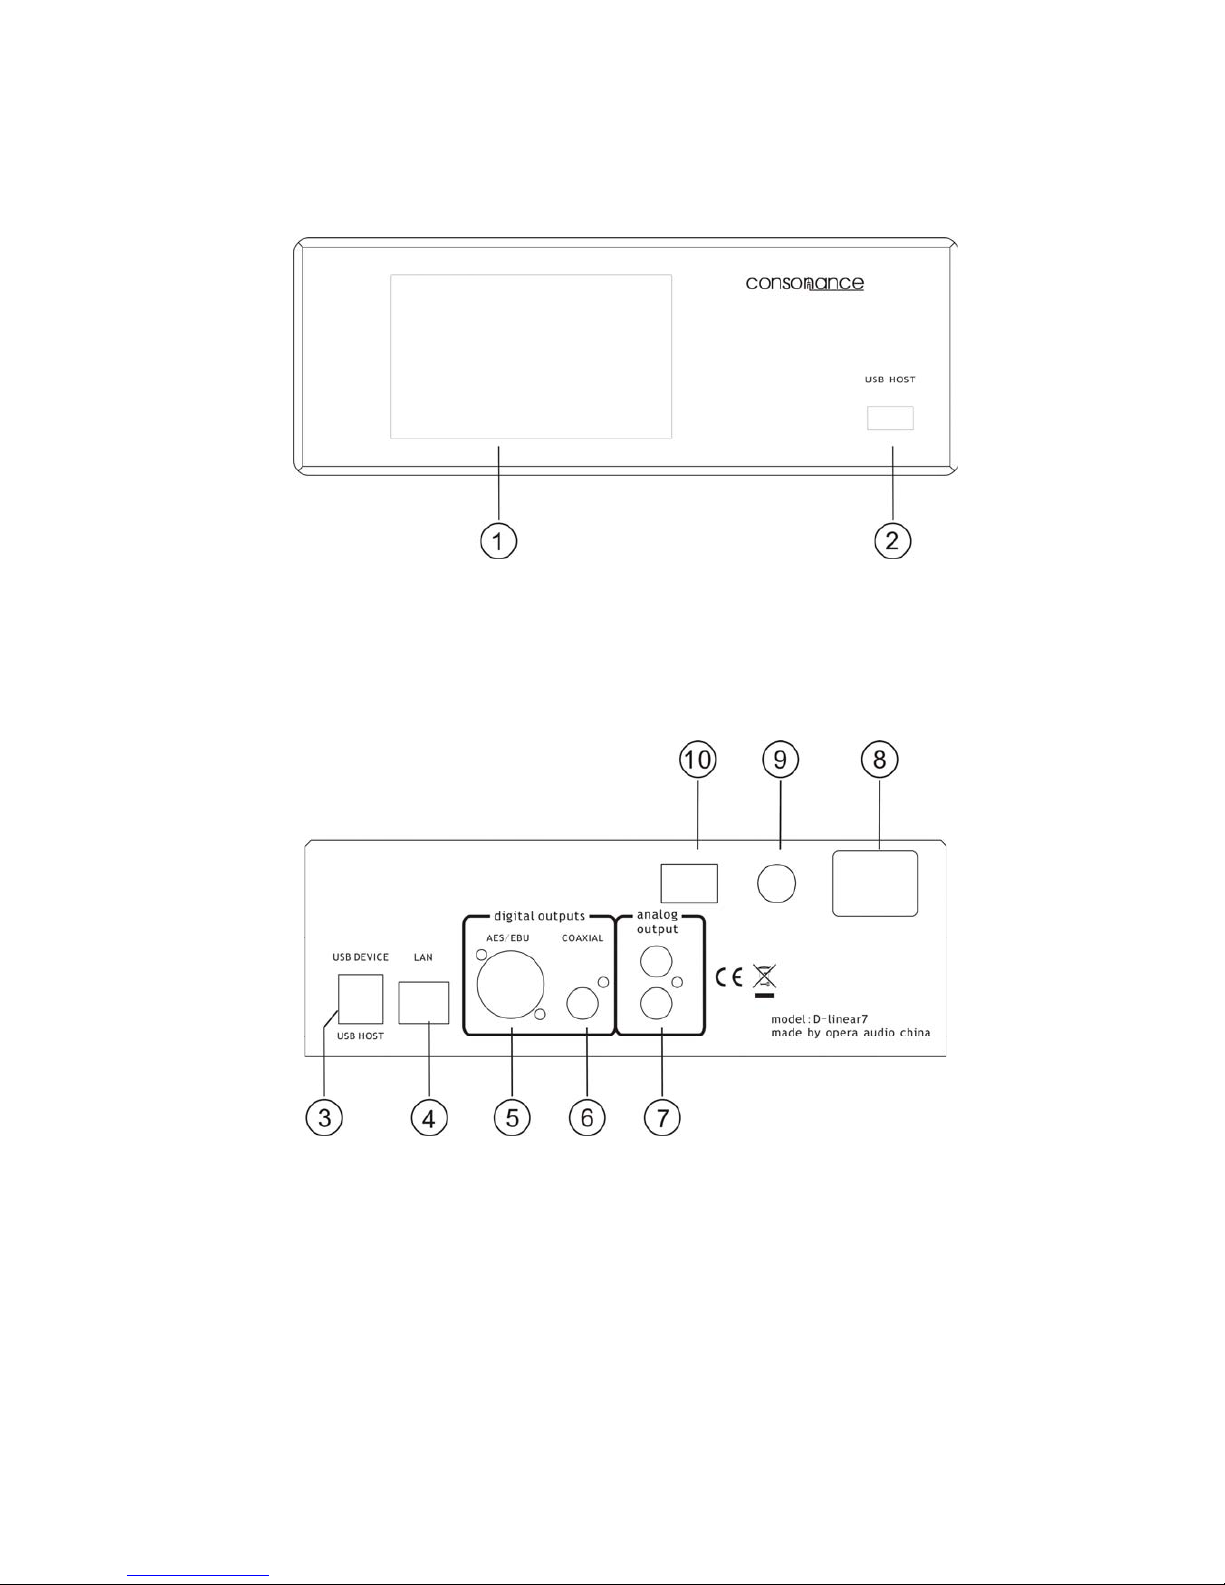
D-Linear7MK2
GENERAL TIPS
1. Display touch screen
2. USB HOST Port
3. USB HOST jack
4. RJ-45 LAN interface
5. AES digital output
6. Coaxial Digital output
7. RCA analog outputs
8. AC Power connection
9. Fuse
10. Power switch
Page 7
7
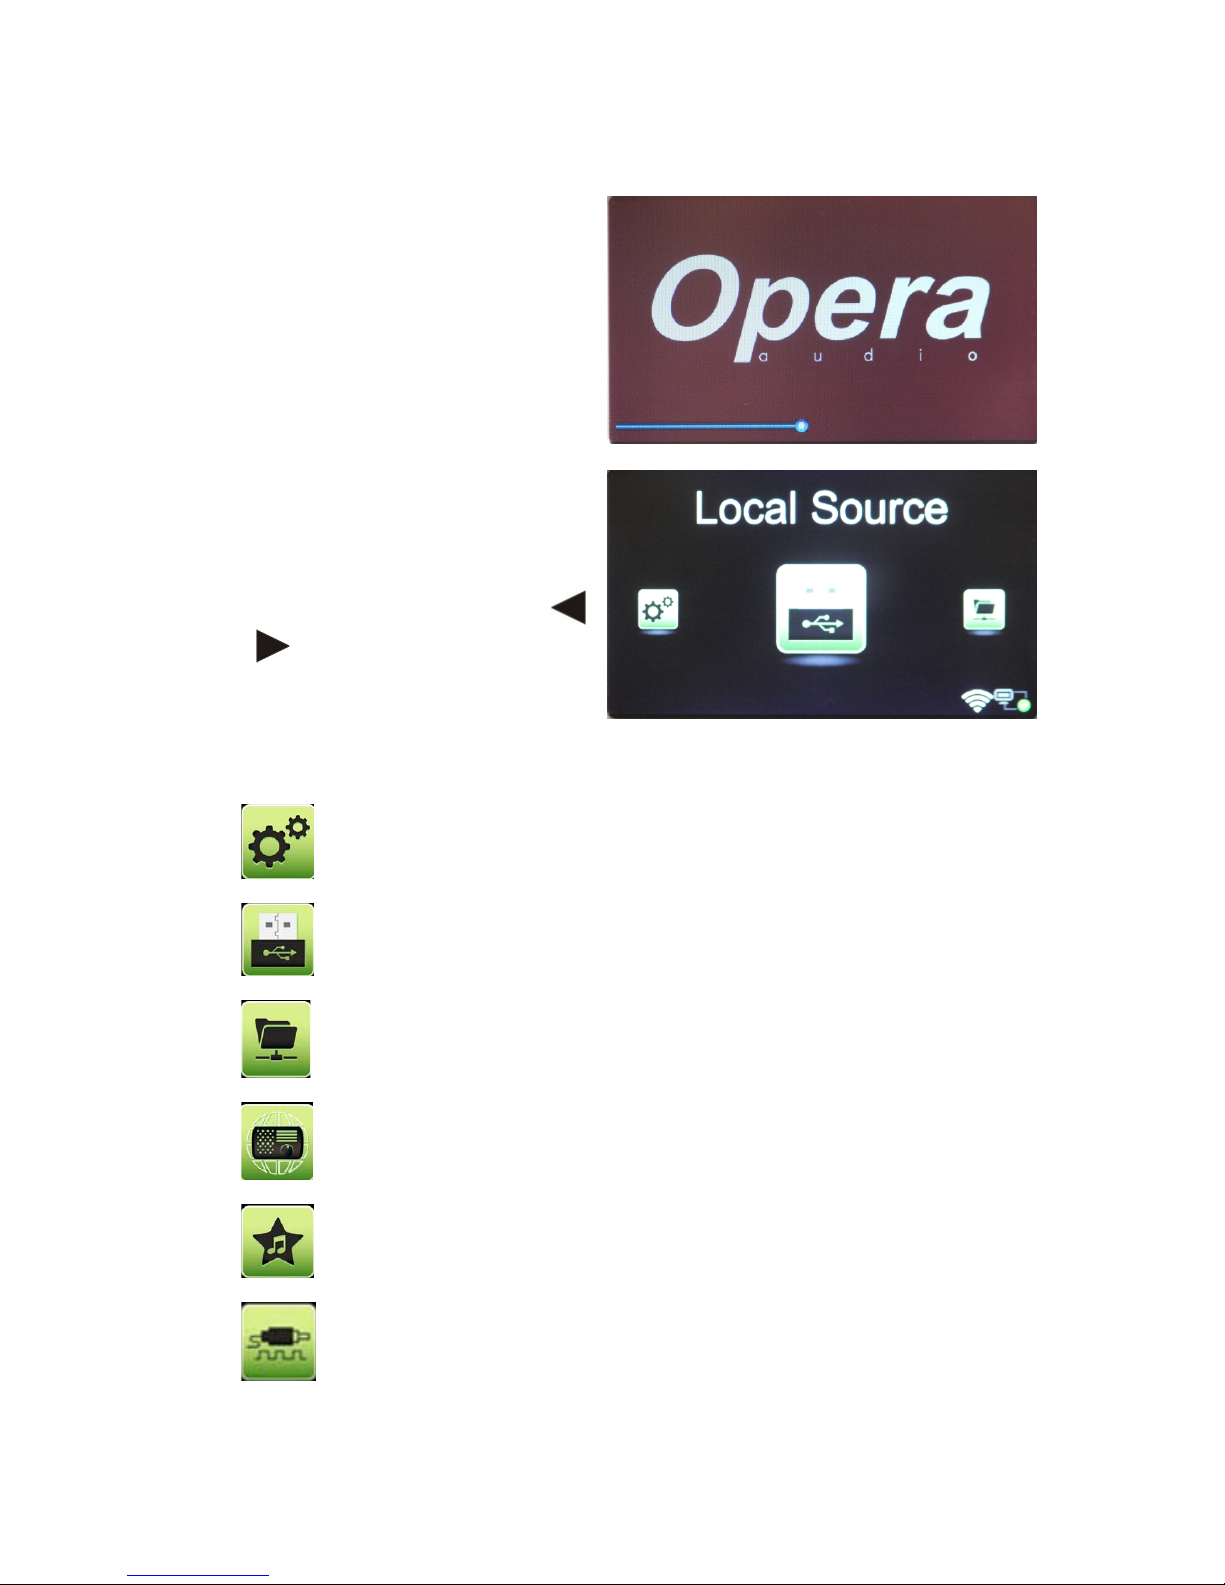
Fast operating guide
After turning the player on wait about
30 seconds.
The icon interface will show up as per
the above picture, with 6 icons in total.
Only three icons can be seen each
time, they can be switched (moved)
simply by touch or remote control
and .
The icons of this interface indicate the following functions:
1. System settings list or view system properties
2. Play the USB storage device
3. Play the network sharing
4. Internet broadcast
5. My favorites
6. DAC stage, through the optical fiber, coaxial /AES input for receiving
external PCM source.
Page 8
8
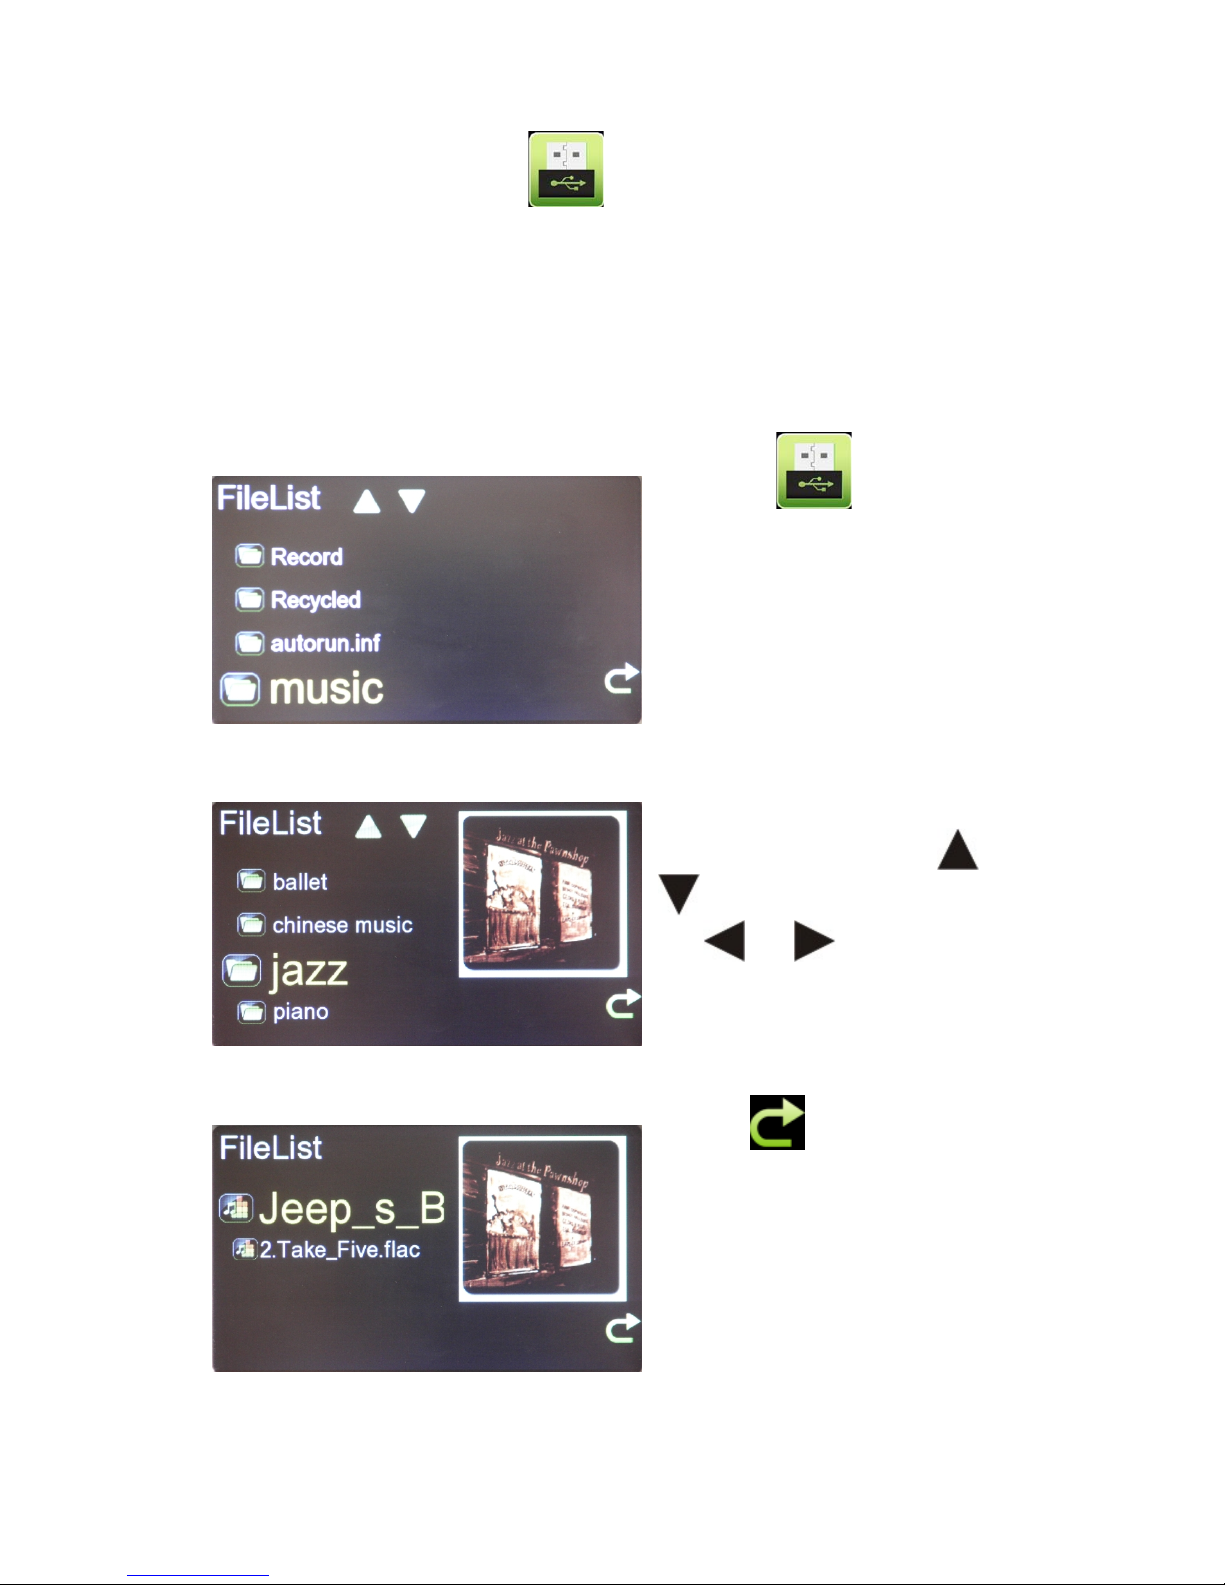
Play USB storage device
Descriptions for each USB port
The machine also has USB HOST and the USB DEVICE Interface ports on the
rear panel.
WARNING NOTE: Do not run both two USB ports at the same time, this
can cause a USB failure.
Position the on the interface in
the middle, then touch it or press the
OK button on the remote control to
enter the USB mobile storage device
file list.
If external hard drives disk has files
then it will display the file list. Please
choose a file.
Search folders by touching or
pressing the remote control
and
button to browse the music folder.
The and . The picture shown
on the right side of the screen is the
album cover of the folder (the JPG file
needs to be stored in the folder.)
Click the
on the menu or press
the
EXIT button to go back to
previous menu.
Page 9
9
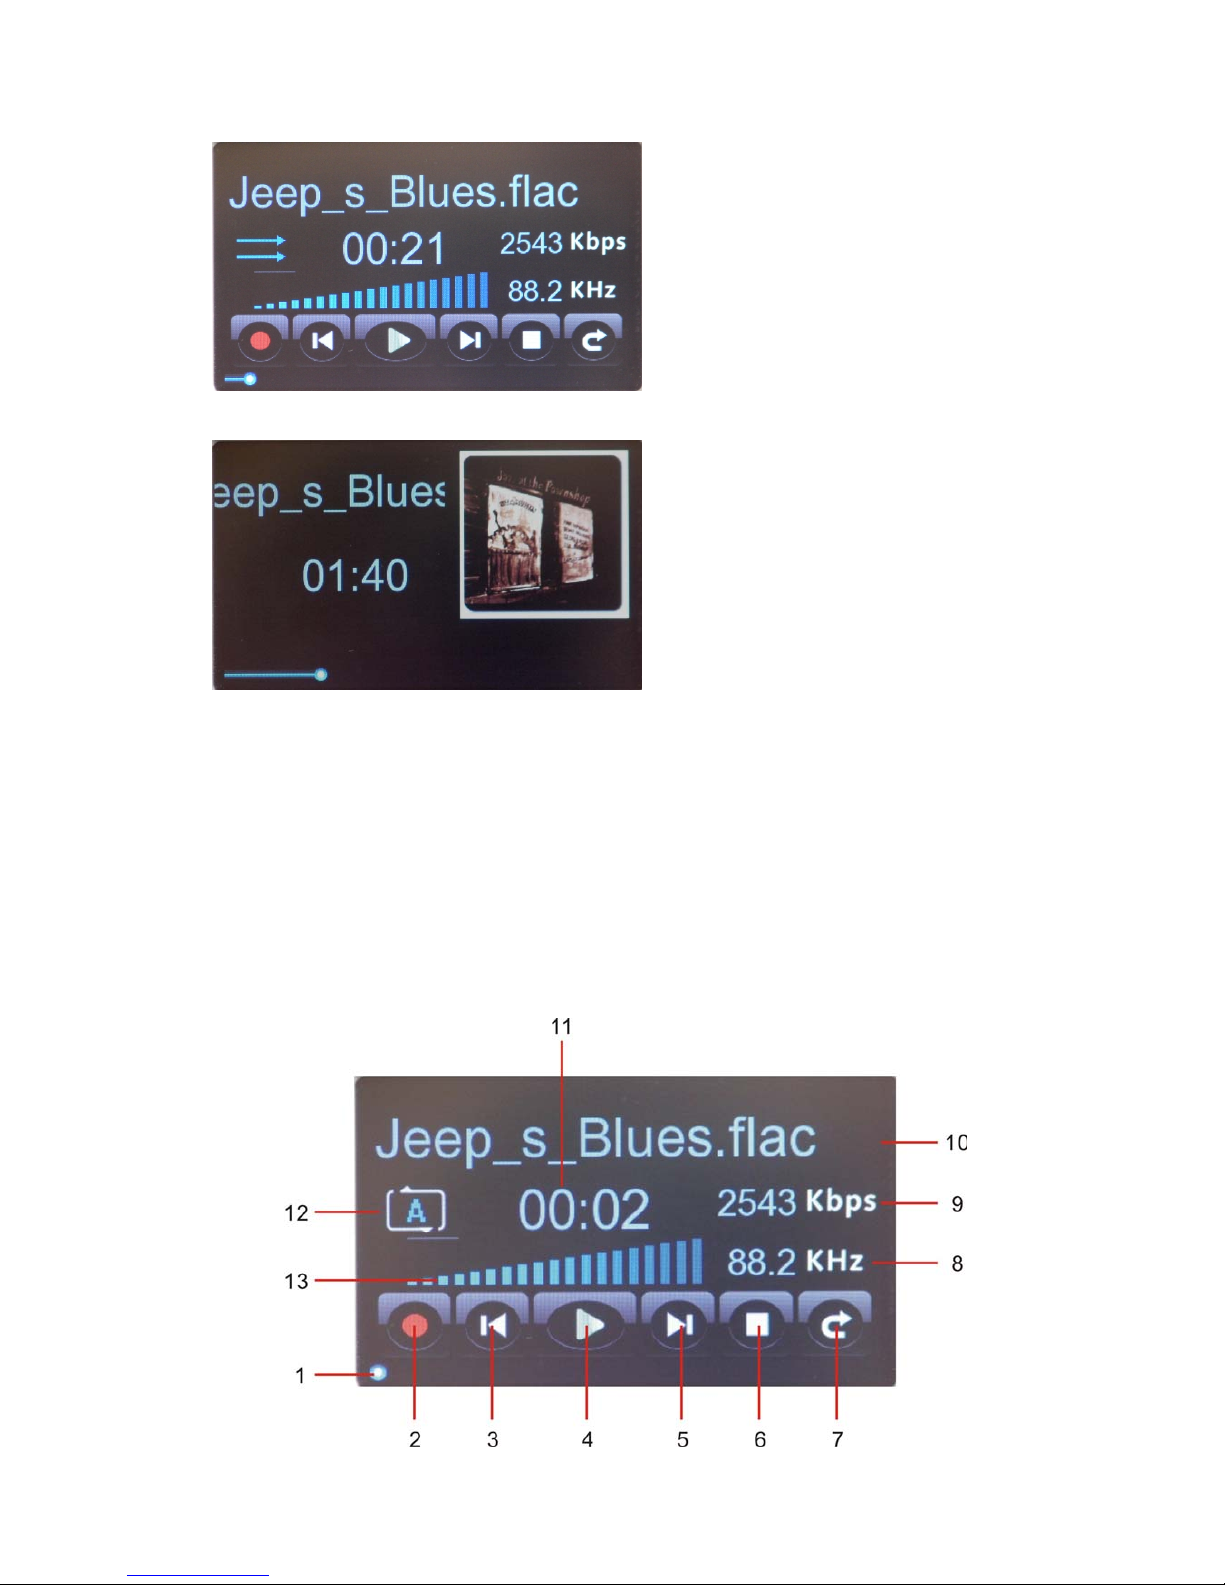
Click the current selected file name
on the screen or OK button on the
remote control to play music.
The screensaver will be active when
music played for 10 seconds.
In playing mode, press the RCLL LIST button to recall the file list to select other
file to play.
WARNING: When the USB storage device is working do not remove the USB
storage device or turn off the player.
Playing interface icon and button describe:
Page 10

10
1. Playing timeline.
2. Recording button: Click this button or press button on the remote
control to record the current playing file to the USB storage device (24 bit/96kHz
WAV).
NOTE: The USB storage device should be FAT32 file system. The FAT32 format
operation detail in Appendix 1.
3. Previous button: Click this button or press the button on the
remote control, the playing timeline will return to the beginning of the currently
playing file. Double click or double press, the previous file will be played.
4. Play/Pause: Click this button or on the remote
control to play music. In playing click and press this button to pause.
5. Next,Click this button or press the button on the remote control
to play the next file.
6. Stop: In playing click this button or press the button on the remote
control to stop playing and back to main menu.
7. Stop and return: When playing click this button or press the EXIT
button to stop. Click and press again to go back to the previous menu.
8. Current sampling rate.
9. Bit rate.
10. File or Internet Broadcast name.
11. Current play time: Press the TIME button on the remote control to switch the
time mode. In the internet broadcast mode to display the current Beijing time.
12.Play mode:
Page 11

11
Single file repeat
Folder files repeat;
No repeat;
Random play;
Sequence.
NOTE:
The DL7 has an internal volume
control with screen display, however the Ref 7 does not have a internal
volume control but does display the volume bar, please disregard this
display if you own the Ref 7.
Favorite
Favorite type: Playlist, Classical, Popular, Jazz, symphony, Voice, Folk POP, Test
Disk, Rock, Country, Dace, Pure music, Soundtrack, Others, General type radio,
Recent played radio.
Select the favorite in file list or
internet broadcast list and press
button on the remote control to save
into Favorite menu.
In the main menu press the
button or click into
Favorite folder.
NOTE: Press the FUN button to delete the file name in favorites.
Page 12

12
Internet Broadcast
To play the internet broadcast you need to setup the network correctly. The
Appendix 2 is the network setup guide.
This icon means
Reference 7 network is
connected.
Click or press the @
button on the remote control to enter
the broadcast list: Region, Type.
Press the number button on the
remote control to fast select the
broadcast in the list. Press the
selected name or press the OK
button on the remote control to play.
The internet broadcast supply clock
calibration.
The clock time is the current network
time.
Page 13

13
Click the or the button on the remote control to record the current
playing internet broadcast to USB storage device.
Please check the Appendix 1 recording detail.
NOTE :The USB storage device should be FAT32 format.
Net Source
To play the network the source needs to be setup correctly. The Appendix 2 is the
network setup guide.
Setup network share
Please check the Appendix 2 network share guide.
This icon means
Reference 7 network connected well.
Finished the network setup correct, back to main menu click
or OK button
on the remote control into, the share visit type will be displayed .
Page 14

14
Click the roll bar or press the OK
button on the remote control to into
the samba share, the shared folder
computer IP address will be
displayed.
The Input IP support input the IP
address by press the number button
on the remote control to visit the
shared folder computer.
Click ENTER or press OK button on
the remote control to connect the
computer.
After connected the computer
shared folder will be displayed.
To play the network shared same as
the USB storage device.
Page 15

15
DAC MODE (Only for Reference 7)
The Reference 7 supply working as a DAC support external input from 44.1 KHz to
96 KHz PCM digital signal.
Select the in the center of
main menu click it or press OK
button on the remote control to DAC
mode.
Press the DAC button on the remote
control will into DAC mode also.
The coaxial input is the default input. To select the AES input, switch the
AES/Coaxial selector on the rear panel.
Press the SWITCH button on the remote control or click to switch
optical and coaxial input.
In DAC mode click
or press the button on the remote control the
current playing will be record to USB storage device.
Please check the Appendix 1 recording detail.
NOTE
:
The USB storage device should be FAT32 format.
The DAC button for D-Linear7MK2 was switch the R0~R5 digital filter mode.
Page 16

16
SETUP
Select the in the center of main menu click it or press button on the
remote control to SETUP menu.
SETUP menu support 7 option, click
the option name or press
and to select setup option.
SETUP OPTION: Network, Brightness, Language, Screen Time, Update,
Calibrate, About.
Network: Please check the network setup detail in Appendix 2.
Brightness:
Support 4 levels bright adjustment.
Language:
Simplified/ Traditional Chinese,
English, Deutsch, Japanese, Italy,
Russian.
Page 17

17
Screen Time:
Screen time is the lighting time of the background light,4 options:5 sec, 10 sec,
30 sec and always.
Update:
The system support firmware upgrade.
Please visit http://www.opera-consoncance.com to download the upgrade
firmware.
How to update: Copy the update_firmware.bin to USB stick root folder. Plug the
USB stick to USB HOST port, into the UPDATE menu, the system will upgrade the
firmware automatic. DO NOT remove the USB stick or power off the system in the
upgrade progress. The system will restart automatic to finished the update. Please
check the Appendix 4.
Calibration:
The Calibration function is for touch screen.
Into the Calibration function: Click the
“+” displayed to calibration. To finished
the needs click the “+” 5 times – in
center of the screen and all of 4
corners.
Finish 5 times clicks the screen display
success.
About:
Check the system information.
Page 18

18
Appendix 1
Recording
In playing internet broadcast or DAC mode, touch this icon for 2 seconds or long
press button on the remote control to record music. The recorded file will be
auto named and save into USB storage device.
The USB storage device must in
FAT32 format, select storage
location to record the music.
The recorded file will named by date
and auto save to Record folder. In
the recording progress the screen
display font color will been to yellow
and the red dot will blink.
Click the or press the button on the remote control to stop recording.
Page 19

19
Appendix 2
Network setting in detail:
DHCP opened / closed and input by hand specifications:
Find the icon in the main interface,and “ network selection ” menu after
entering. Find “ DHCP ” through touching screen or pressing the buttons
and of remote control.
Enter next menu through touching
scrolling or pressing OK button and
select ON.
DHCP has been activated in the factory, and can obtain an IP address
automatically. Please check it if the unit is unable to connect to the internet.
If the router dosen’t open the function of DHCP, you are required to enter the IP
address manually. Specific setting are as follows:
1. Return to the “network selection”
menu and touch up and down arrow
or remote control to enter the IP
setting.
Page 20

20
2. Access to “IP Addr” after entering
IP setting menu.(as left picture).Set
up IP address through the
and of remote control.
3. Return to the previous menu after
setting this up and select “Route
Addr ”.
4. Set up operation method the same
as above after entering “Route
Addr”(see right ).
5. Return to the previous menu to
select the setting of “Dns Addr”(see
left)
6. Enter the setting menu of “Dns
Addr” and the operated method same
as above.(see right)
Page 21

21
WI-FI and LAN connection:
Plug the wifi module into the USB interface, insert the networking cable into the
“LAN” port directly and set up relevant network configuration , then you can use
the network functions.
To select the “Lan” mode after
networking cable of computor insert
the “LAN” port directly.
If you choose Wi-Fi mode, the
wireless network card should be
inserted into the rear USB port,
restart, and choose the
“Wireless”mode in the nettype.
Enter into the wireless setting.Search the wireless network device.
Page 22

22
Selected the right device.
Set up the connected code using the remote control button of , and ,
.
Note: To select the number 0~9 and English words with the button
,
of remote control and letters with the button
,
by moving last code or
insert next code.
Network state
The icon of the main interface right lower corner indicates the network state,
including wireless , wired, DHCP, connected,disconnected and so on.
Flashing alternately shows retrieving IP address;
Connected to the LAN successfully;
Disconnect with the LAN;
Connected with the WAN successfully ;
No link to the WIFI net;
Indicates the WIFI signal strength gradually increase.
Page 23

23
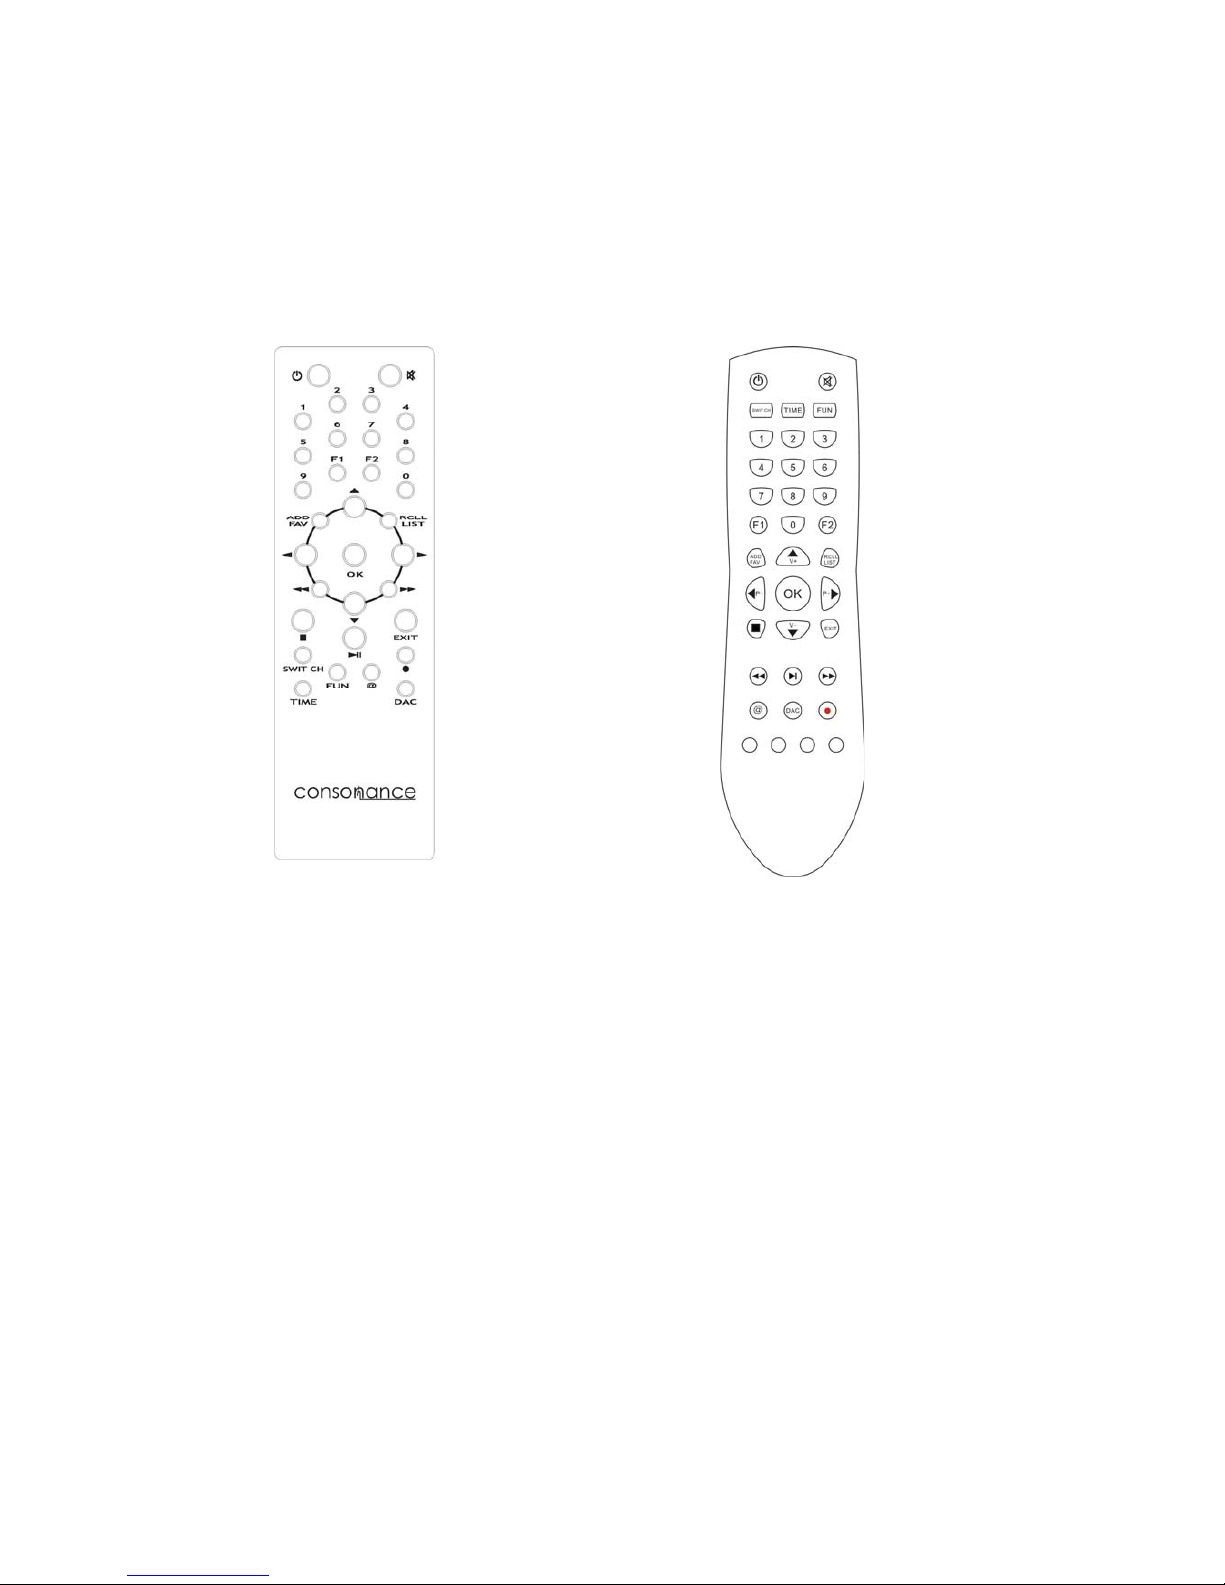
Appendix 3:
The remote control must be pointed towards to the receiver window and operated
within the range of 30 degrees and 7 meters. Please do not place any visual
obstruction between them. Please avoid allowing direct sunlight or florescent
lighting to fall directly in the receiver sensor of the unit.
Do not mix old and new batteries-two are required, size AAA,LR03 or SUM-
4.Please take out the batteries if the unit will not be used for a long time.
The remote control manual shown below:
1. Standby(no function at this time)
2. Mute(no function at this time)
3. Numerical
4. F1 (no function at this time)
5. F2(no function at this time)
6. Navigate up
Press the key to select last file or hold
down to continue to choose.
Under network setting, it indicates the
letters and numbers moving up .
7. Navigate down
Press the key to select next file and
hold down to continue to choose.
Under network setting, it indicates the
letters and numbers moving down .
8. Add to or open the favorites
Press this key adds currently playing
music or station to the favourites list.
9. RCLL LIST
Press the key to check other pieces
in current folder when playing music.
Press OK to play.
10. Previous
While music is playing, pressing the key once, will allow it to be re-enter.
Pressing twice, will allow you to play the last file. Under searching files and too
many files are displayed, please use the key to page up. Move up the cursor under
the network settings and input the password of the wireless network.
Page 24

24
11. Next
While music is playing, press the key once and it will jump to the next file for
broadcasting. Under searching files, to many files displayed, please use the key
to page down. Move down the cursor under the network settings and input the
password of the wireless network.
12. OK
Confirm button
13. Rewind
Back one track.
14. Fast Forward
Forward one track.
15. Stop
Stop playing current files and return to the main menu.
16. Exit
Return to the previous page and list operation.
17. Play/pause
Pressing the key first pauses the current playing music, pressing second plays
sequentially.
18. Switching
While playing music, pressing this key allows user to switch such as single,
order, circulation, and random mode. When using the DAC,switch the coaxial
and optical .
19. Delete
It can be used to edit or delete the previous track.
20. Timekeeping
Selection ways of timing under playback: sequence or reverse order .
21. Record
Press this button to start high quality recording to the current playing network
radio, the recording is named and stored automatically on the mobile storage
device.
22. Network radio
Press this button in main menu will transfer the operation directly to the network
radio.
23. DAC
Press this button in the main menu to transfer decoding operated interface of
external digital signal.
Page 25

25
Reference7 Specification
1.24Bit/192kHz digital stream music player.
2.Built-in 24Bit/96kHz recording for digital input and internet broadcast.
(needs FAT32 storage device)
3.Built-in over 10,000 global Internet Broadcast stations.
4.Upgradeable firmware through USB memory device.
5.Support play WAV/FLAC/ALAC/ACC etc, digital music format.
6.RJ-45 10/100Mbps LAN, support TCP/IP, UpnP, UDP, RTSP, HDCP, PPPoE,
HTTP etc, network protocol, support NAS and PC sharing, support MMS, RTSP,
HTTP etc, stream media protocol.
7. WLAN: IEEE 802.11 b/G/n,150Mbps.
8. 5 inch TFT touch screen and IR remote control.
9. USB2.0 port *2, support large volume external removeable hard disk.
Analog output:2.3V RMS (RCA, XLR)
Distortion: <0.0025% (XLR output)
<0.003% (solid-state output)
<0.03 (tube output)
SNR: >110dB (solid-state output) >100dB (tube output).
Tube: 6H30EH *1 golden plated.
Digital input: USB2.0 *2, LAN *1, Coaxial RCA(75 ohm) *1, AES(110ohm) *1,
Optical *1.
Digital output: RCA *1 (0.5Vpp).
Analog output: RCA *2 groups (1 group for solid-state, 1 group for tube ).
XLR *1 group for solid-state
Size: 11cm x 43cm x 33cm (HxWxD)
Weight:10kg(wooden top cover) / 14kg(aluminium top cover)
Page 26

26
D-Linear7MK2 Specification
1.24Bit/192kHz digital stream music player
2.Built-in 24Bit/96kHz recording for internet broadcast.
(needs FAT32 storage device)
3.Built-in over 10,000 globe Internet Broadcast
4.Upgradeable firmware
5.Support play WAV/FLAC/ALAC/ACC etc, digital music format.
6.RJ-45 10/100Mbps LAN, support TCP/IP, UpnP, UDP, RTSP, HDCP, PPPoE,
HTTP etc, network protocol, support NAS and PC sharing, support MMS,
RTSP, HTTP etc, stream media protocol.
7. WLAN: IEEE 802.11 b/G/n,150Mbps
8. 4.3 inch TFT touch screen and IR remote control
9. 3 pieces USB2.0 port, support large volume external removeable hard disk.
Analog output:2.3V RMS
Distortion: 0.003%
SNR: >110dB
Digital input:USB2.0 *3, LAN *1
Digital output:RCA coaxial *1(0.5Vpp,75ohm)
AES *1(3Vpp。110ohm)
Analog output: RCA *1
Size:10cm x 22.5cm x 32cm (HxWxD)
Weight:3kg
Page 27

27
Warranty
Opera audio guarantees each product manufactured by us to be free from defects
in materials and workmanship under normal use. Our obligation under this
warranty is limited to making good at our factory any part or parts thereof which
shall, within 1 year after delivery to the original purchaser, be returned to us with
transportation charges prepaid, and which an examination shall disclose to have
been thus defective; this warranty being expressly in lieu of all other warranties
expressed or implied and of all other obligations or liabilities on our part. This
warranty shall not apply to any Opera audio product which shall have been
repaired or altered outside of our factory in any way so as to affect its stability, nor
which has been subject to misuse, negligence or accident. Warranties of the
vacuum tubes are by the respective manufacturers, usually 90 days.
Please mail or e-mail the Registration Card to the address as follows:
Registration Card
Name
Address
City
State
Zip
Email
Telephone
Model
Serial Number
Purchase Date
Dealer
The Opera Audio Co., Ltd.
No.2 JiuXianQiaoLu
ChaoYang District
Beijing, China
Tel: 86 10 59789215
Fax: 86 10 59789265
support@opera-consonance.com
www.opera-consonance.com
 Loading...