

Page 1
11
THE
INSTALUERUNG
GUIDE
GUiA
INSTALLATION
DER
D'INSTALLATION
DE
INSTALACION
GUIDE
BOOK
EINZUGSVORRICHTUNG
DES
DE
MECANISMES
LOS
MECANISMOS
D'ENTRAINEMENT
1
~~ru
.
~fi¥fffll~m~•~~8>Gilf.li
I
PLEASE
READ
INSTRUCTIONS
I
VORAUFSTELLUNG
ZEICHNUNGEN
I
VEUILLEZ
AVANT
I
POR
LIRE
LES
DE
PROCEDER A L'INSTALLATION
FAVOR
LEA
LAS
LESEN
DIRECTIVEES
INSTRUCCIONES
&ASSOCIATED
SIE
BITTE
DIEANLEITUNGEN
ET
LES
SCHEMAS
DE
LOS
DRAWINGS
ESQUEMAS
BEFORE
UNO
D'ASSEMBLAGE
ANTES
INSTALLATION
DIE
DAZUGEHORIGEN
ATTENTIVEMENT
DE
INSTALARLO
Page 2
~Uff.I-1-11-
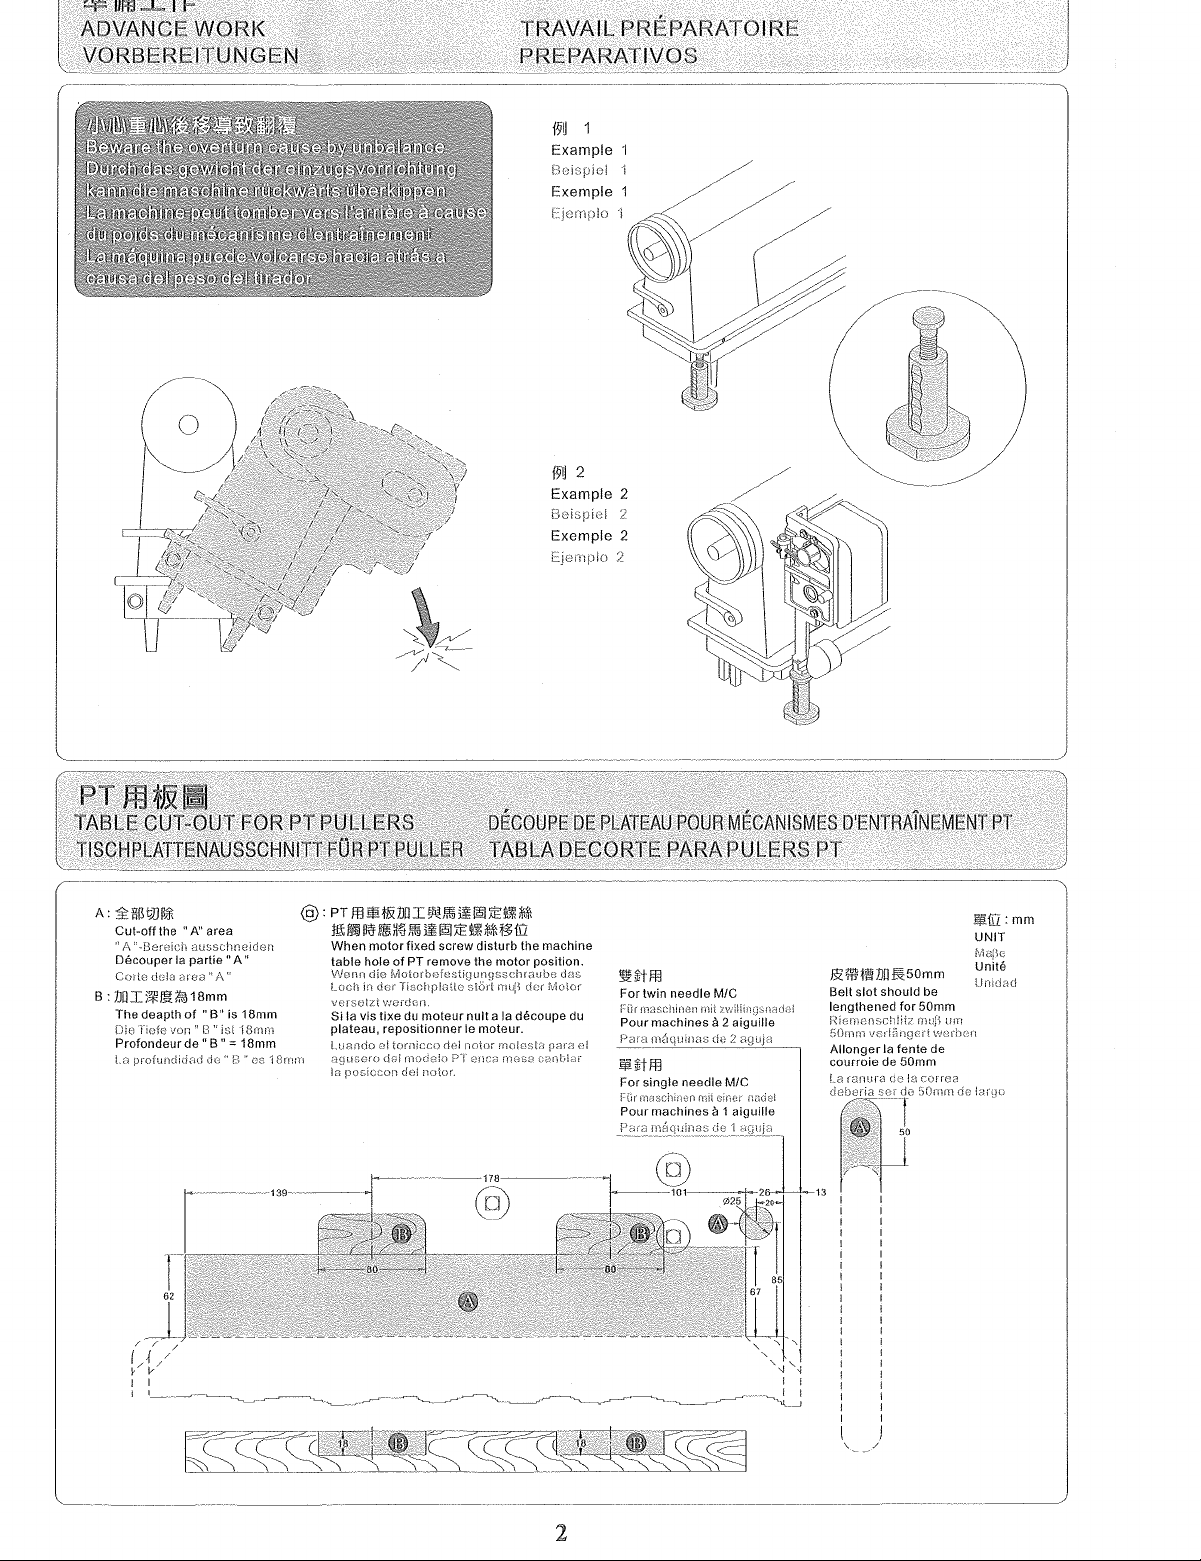
ADVANCE WORK
_VOF{~EREITUNG~~~-
l
TRAVAIL PREPARATOIRE
PREPARATIVOS
wu
i
Example
Bcispio!
Exemple
EjcrY1p!o
f9U
Example
1
1
·1
2
2
PTfflf&lll
TABLE
TISCHPLATTENAUSSCHNITT
CUFOUT
Cut-off
the
"A"
per
de!a
Ia
area"
vor~
area
aussclmulder:
partie"
A"
of
"B"
" f3" ist 18rnrn
de"
B" = 18mm
1\
,.
-Bereich
Decou
Corte
B:
1JOI)'fjff~18mm
The
deapth
Die Tiofe
Profondeur
FORPT
A"
is
18mm
PULLERS
FOR
@:
PT
Jl;l;
When
table
VVenn
Loch
Si Ia
plateau,
Lunndo
!a
Exemple
Ejernplo
DECOUPE
PTPULLER
------·-
--~~~~~~~~---------------
fflillt&JJOIWI®Jiigj)AEl~iM1
jj
IRi
!!Ill
M~
,lffi
il
motor
fixed
hole
of
PT
remove
dle
r!lotorbefest!uunqsschraube
ln
dcr
Tlschp!attc
V-Jerdcn.
vis
tixe
du
moteur
repositionner
o!
torn
icc~)
d0d
rnofisk)
posiccon
de!
notot.
igjj
AE
screw
On!
TABLA
l~
iM1
t~
disturb
the
motor
sl.Ort r!!Uj1
null
a Ia
le
moteur.
notor
rrw!osta
DECORTE
ill
the
machine
position.
llns
der
fv1uior
decoupe
parn
DE
PLATEAU
~J\tffl
du
~~tffl
2
POUR
PARAPULERS
For
twin
needle
For
single
needle
MECANISMES
PT
M/C
M/C
D'ENTRATNEMENT
EZI'IH!!i1J0~5omm
Belt
slot
should
lengthened
50!nm
Allonger
courroie
be
for
50mm
vcdnn~1('-f!
Ia
fente
de
de
50mm
urn
\Nurbnr;
PT
~ill:
mm
UNIT
i';ia;)(';
unite
---------------
~~~~~------~----
2
Page 3
8~
cmHlil'i1¥~
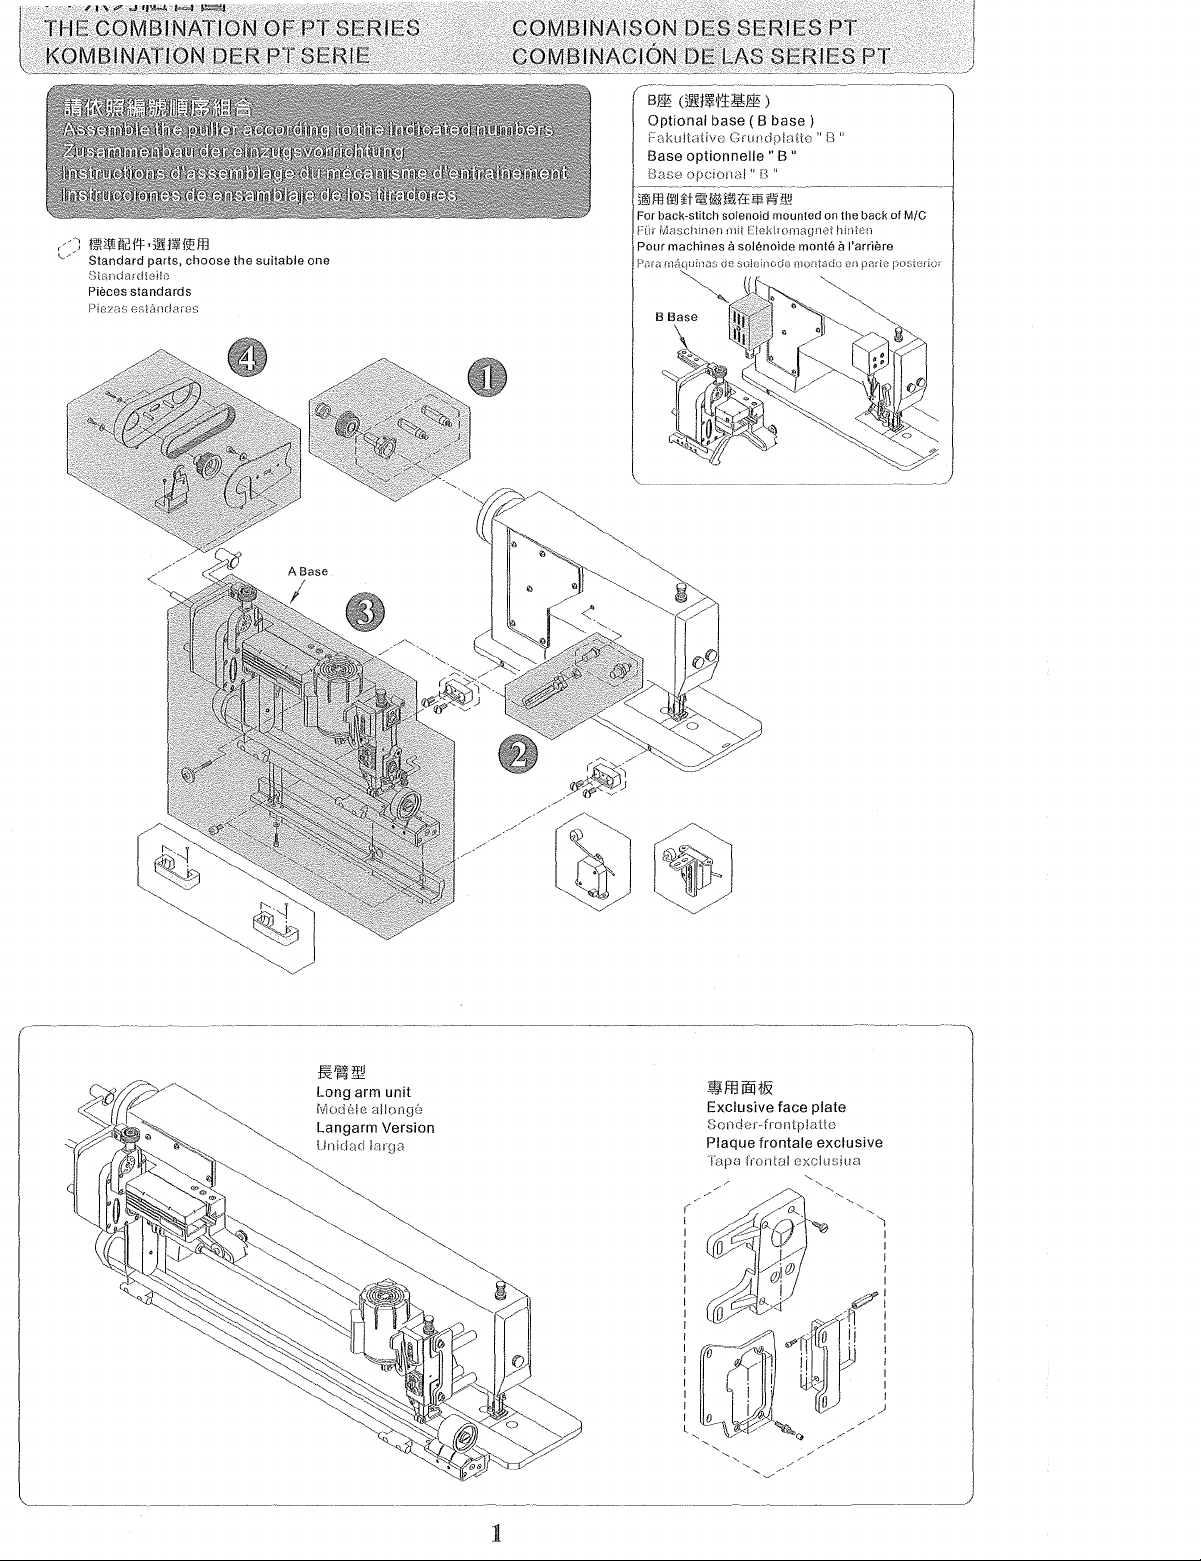
Optional
Faku!tatlvo
Base
optionnelle
Base
opcional u t3
base
( 8
Grundplaitt;
)
base
"B"
"
)
,,
B p
!il'iil§llUH1H~Jl!'ffl
Pieces
standards
csi2mdnms
choose
the
suitable
one
For back-stitch solenoid mounted
on
the back of M/C
:R:~l:1\!
Long
arm
Modi,le
Langarm
Unidad
unit
allongi'
Version
larga
1
~fflfillH&
Exclusive
Sonder~fro11tplatte
Plaque
Tapa
--------------
face
frontale
frontal
plate
exclusive
exclusiua
Page 4
1=1
!l!}]l:
CONTENTS
INHALTSVERZEICHNIS
*El
a-
~
Combination
Kombination
Advance
work
Vorbereitungen
~~7]7~~~
Installation
---
-
instruction
lnstallierung
~c
*~
~-
Wiring
diagram
Schaltplan
14
~
Parts
list
Auflistung
mm~ilU;5m~
Roller
Auflistung
~r~~ci4*i5m~-
Electric
Elektrische
i53(
~~
Solution for
der
list
der
components
teile
tJF
~*
----- -
error
teile
-----
rollen
----
function
Problemlosung
-----
DES
TABLE
MATIERES
CONTENIDO
Combinaison
Combinaci6n
Travail
de
preparation
Preparatives
Instructions
lnstrucciones
d'installation
de instalaci6n
Schema de montage
Diadrama de
instalaci6n
Liste des pieces
Lista de piezas
Liste des rouleaux
Lista de
rodillos
Composantes Electriques
Componentes
electricos
Detection des problemes
Localizaci6n de los problemas
~
Page
Seite
13-14
~~
1
2
3-7
8-9
10
11
12
J:f.U.El
ilf
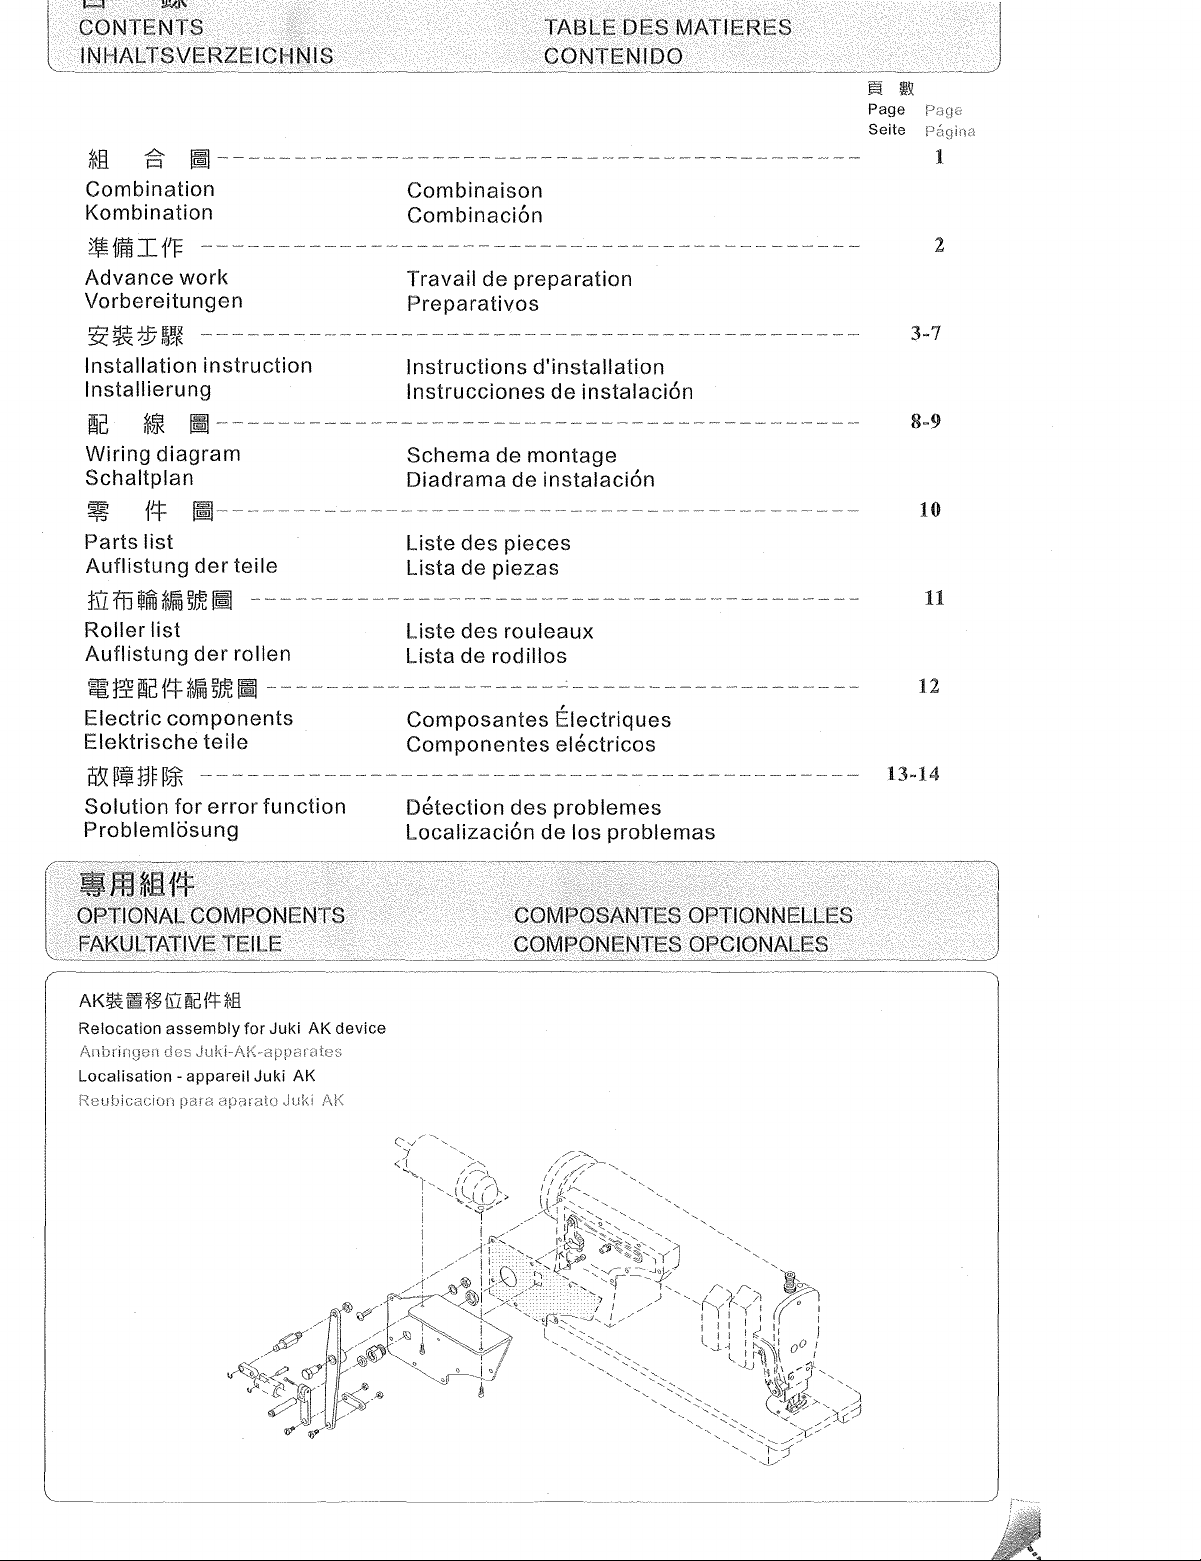
OPTIONAL COMPONENTS
FAKULTATIVE TEILE
AK~
iii
HHIZ
~214
~fl
Relocation
Localisation-
Heublcacior1
assembly
appareil
for
Juki
Juki
AK
AK
Juki
COMPOSANTES OPTIONNELLES
COMPONENTES OPCIONALES
device
--------~-
Page 5
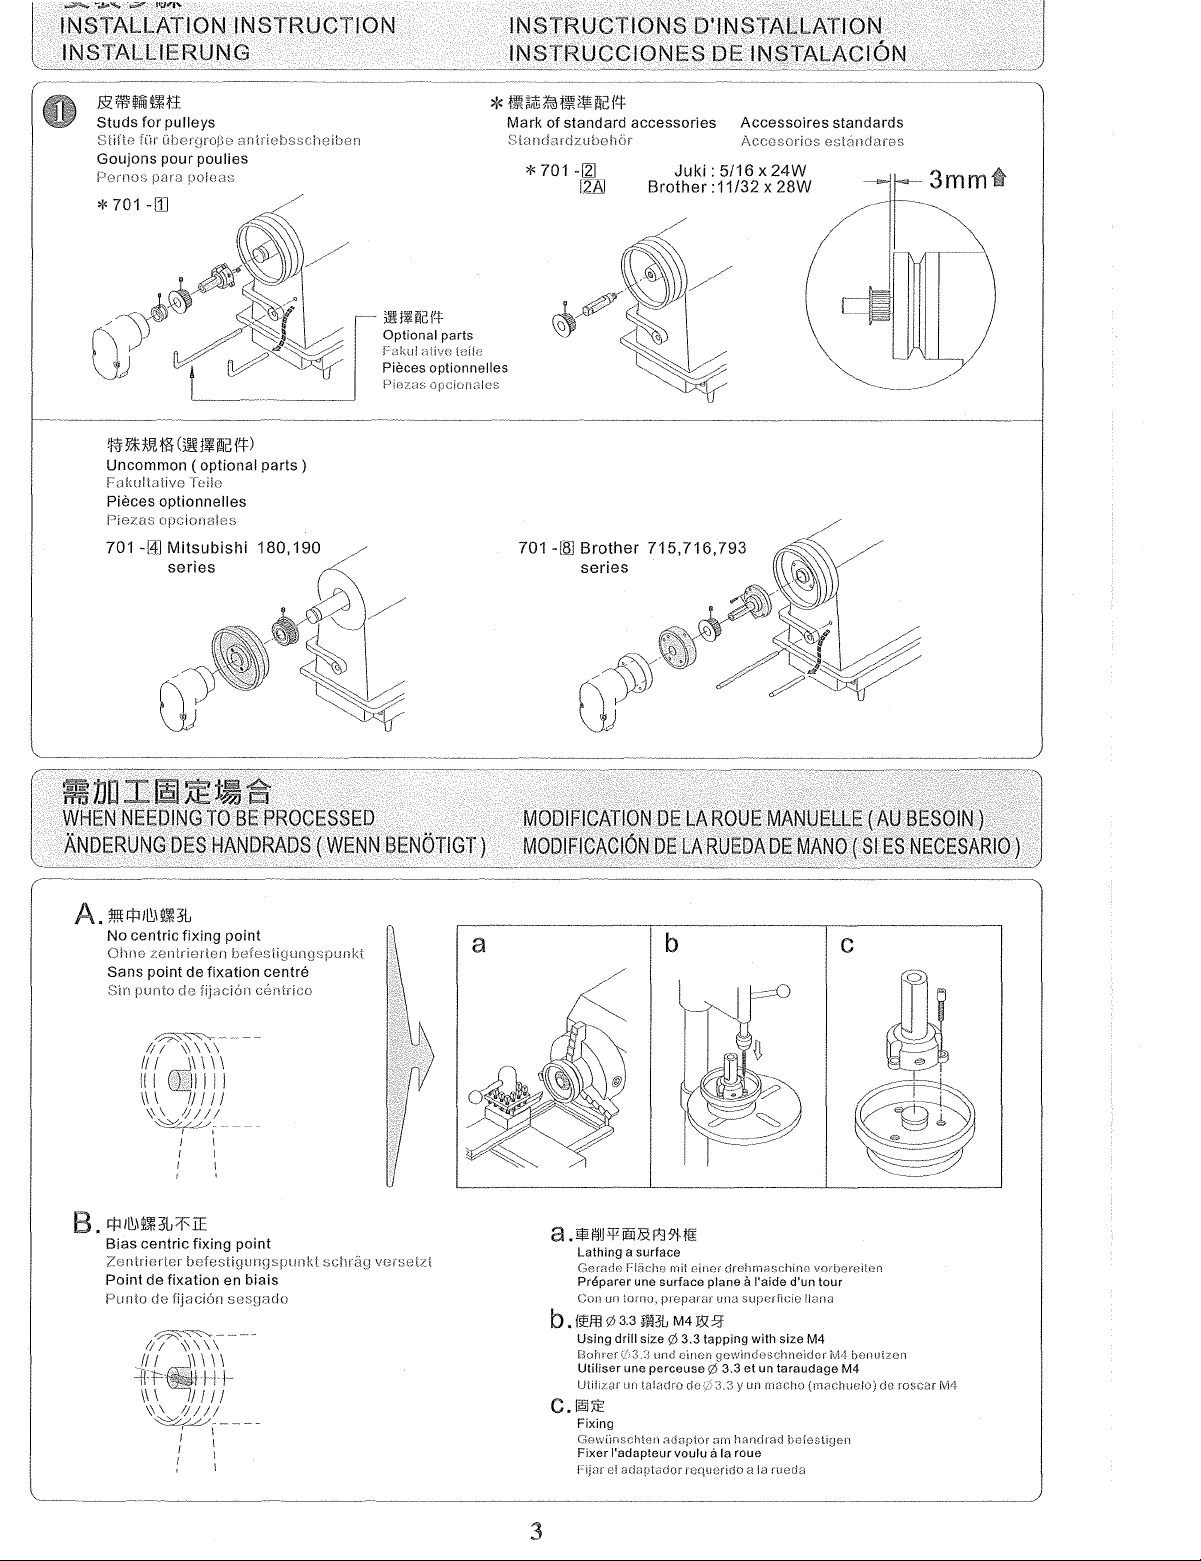
INSTALLATION INSTRUCTION
INSTALLIERUNG
Studs
for
pulleys
fllr
Goujons
Pernos
* 701
t:lberoro[3o
pour
para polo
-ITI
'ffl7t~JHiH~tnci!fl
Uncommon
Fakultative
Pieces
optionnelles
Piezas
opcionales
701
-ltl:J
Mitsubishi
series
antriebsscheibHn
poulies
as
(optional
Tt::ilr:;
parts)
180,190/
(Y\
\
l!HUcl':t:
Optional
F:Jku!
Pieces
INSTRUCTIONS D'INSTALLATION
INSTRUCCIONES
*
fWi
Mark
Standardzubei16r
parts
optionnelles
opcionr~lcs
701
~]]
f.Z\ltJili
1l
of
standard
* 701 -[2]
[2AJ
-[ffi
Brother
series
~i:H!f
accessories
Juki:
Brother
715,716,793
DE INSTALACION
Accessoires
Accesorios
5116 X 24W
:11/32 x
standards
est8ndarcG
28W
3mmt
o~·~
A.
m\t:PI~\l!,~}L
No
centric
fixing
Ohno
zentrir:Jrten
Sans
point
Sin pun to
~~
/;;
II!
Ill lL_IIIII
II I //I I I
\\\
~_.,(_/___/-
8.
t:PI~\t~JL/l'IE
Bias
centric
Zentrierter
Point
de
Pun
to cie
point
bofesu~--.1unnspunkt
de
fixation
de
fijaci6n
c8ntrico
\\\\\
,.J\ \ \ \
/jjjj
' '
I
I
I
fixing
point
befestigunnspunkt
fixation
en
fijaci6n
biais
sesuacJo
centre
schrfi9
versetzt
a
b
Lathing a surface
Gerado
F!Rc!w rn!t
Preparer une surface plane a I' aide d'un
Con
un
tornu,
b.
{\!'ffl
¢3.3
Using drill
Bohrcr:(3.3
Utiliser une perceuse ¢ 3.3
Utiliz;;n
un
oiner
drehmHschino
preparnr
una
~11.,
M4
JJZ:!j'
size¢
3.3 tapping with size M4
unci
einen
gewlndoschneidor
taLJdro
supetficie
et
y un
c
vorbereiten
tour
ilano
un taraudage M4
macho
M4
(rnachuu!o)
bonutzen
do
roscar
M4
Fixing
Gewilnschtt-m <1dnptor am !1andrad
Fixer l'adapteur voulu a
Fijnr
el
adaptador
____ , _______
,
______
_
3
Ia
requorido
roue
bcfestigen
Ia rue dEl
Page 6

-1
li?ll..t~~iM\iil!E£Ul!f.l
Do not
tighten
Diese
Schraube
Attendre a plus
Debe
esperarse a mas
the
screw
erst
lard
C)
-3
'fill!~
unit
spiiter
anziehen
pour
serrer
tarde
no. C)
cette
para
-3
apretar
-3
vis C) -3
este
I
i
crJ=
I
nwj)
gonau
~§11f!Wim8H'/lifB~M
Adjust
tension
of
timing
Spnnnung
einstellen
La
tension
Henlaie
dc!a
des
de
cor
belt
Obertrngungsriemens
Ia
courro
d'ajustement
rea de
trans
A
1.J
'm
~
-3
Adjust
Position
Regier
Ajustar
CD
-~ffitij[:\Efi1!Wi,ij[ffitffll1t$lr..~!ll~
General type, needle to the toppest
Standardnwdell : Nadel
Stellung bring
Sur un modele n\gulier,
a sa position
Sabre
Ia
aguja
un
sobre
en
Ia
modelo
plus haute
su
m
input
shaft
position
der
antriebswelle
Ia
position
Ia
posicion
in
ihre
placer
general,
alta posic16n
•
CAUTION
WARNUNG
ATTENTION
ADVERTENCIA
positi~n
hOchste
l'aiguille
colocar
de
del
l'arbre
d'entree
eje
de
entrada
ffit
i2§
H
iji
:\E
liT!Wi.
iji
H
H4
of
~
~~
injury
$Jr..
in
ihre
~
without
Needle feed type, needle to the lowest
position
Modell
mit
Nadelantrleb · Nadel
tiefste
Stellung
Sur
un
l'aiguille a sa position Ia plus basse
Sabre
colocar
bringen
modele entraine par aiguille.
un
modelo
que
Ia
aguja
en
su
i*
~
~
~
Danger
Es
ist
geHihrlich die
Risque
d'accident
Peligro de lesion sin
f!£
placer
~
sans protection
!llli
1§
~u
if~
safety
maschine
dispositivo
~il!lmll'!l*I~l!M~/\/Jflll*U'Ri~._t~aiH.!l.®ilffiit'-il*
Meet
the
both
red
line
on
the
timing
\f'.Jenn
sich
Quand
les 2 !ignes
l'engrenage
Cuando
!as
del
engrane
X
fiX
1~
gear
die
de
~
screw
rouges
distribution
0
transmission
se
input
rencontrent,
tocan,
apretar
shaft,
serrer
el
tighten
Ia
vis
tornillo
de
device
ohne
sicherheitseinrichtung
zu
de seguridad
-5
6
Release
Einstellen
~Suseci6n
Suieci6n
Page 7

trr
ffi
~ffii
The
puller's
either
sewn
Stollen
kann
den
Reglez
peut
endommager
Ajustar
y \o
causar
tG
111
1'1=
~lffl\tt
feeding
material
sie
die
Geschwindigkeit
Stoff
beschadigen
le
regime
d'alimentation
el regimen de
un
desgaste
~
eiit~
amount
or
roller
le
tissu
et\ou
alimentaci6n
premature
-A.
1E!
~~::t
should
be
will
be
torn
der
Einzugsvorrichtung
oder
frUhzeitige
du
mecanisme
causer
del
de
los rodillos.
~a~
properly
easily.
Abnutzung
l'usure
tirador
m
ffi
'ffii
&
larger
than
so ein, daB sich
der
d'entralnement
prematuree
para
que
Ia
du
tela
ffi
*-'~
~u ~ mt~
feed
dog's
to
Rollen
verursachen.
pour
que
rouleau.
no so frunza. una
procure
der
Stoff
le
tissu
even
effect
nicht
krause
ne
fasse pas
velocidad
on sewn
it.
eine
de
faux
demasiada
material.
zu
hohe
plis. un
alta
puede
But
if
it
is
overmust,
Geschwindigkeit
regime
trop
eleve
estropear
Ia
tela
P-1
~~mm
c~t~ill!J
For heavy material (optional type)
FUr
schweres Material (fakultatives model!)
Pour tissu epa is (type optionnel)
5
0
(mm)
~
1--
0
\
---.....
30
!\
60
Para tela gruesa
~
1\
\
I'-....
v
90
120
150
180
ilitt~...tl'Jtll~~
Needle
Nadel
Aiguille
AguJa 15
~
l.l!H~
il3
Pullerspeed
Gescl1windigkeit
Einzugsvorrichtung
Veloci
~tt&
Needle
Stictlplatte
Plaque
Placa de
~!!!
dad
del
plate
a aiguille
aguja
~~
der
rodillo
__/
~
,,
10
~
~
<:i_./
10 10
15
(tipo opcional)
1/
./
/
I
210 240 270
v
~
I
300 330 0 30
\
1\
~
60
\
90
120 150 180
I\
I'-
P-2 -~m
(mm)
15
"
10
\
c~~illl>
General use (standard type)
FUr
den Allgemeingebrauch (Standardmodell)
general (type regulier)
Usage
Uso general (tipo estandar)
1\
:---
\
\
1'-....
15
0
30
60
90
~
120
150
180
r---
1/
/
210 240 270
1/
f
300 330 0 30
~
/
1\
\
(--..1--
\
1\
'-....
60
90
120 150
180
7
Page 8

SCHEMADE
CABLAGE
DIAGRAMA DE CABLEADO
Auto-reverse
Selbstumkehrender
Solenoide
Solenoide de
(atacado)
solenoid
auto-inverseur
inversion
Elektromagnet
l§lmll®~Jll\\llr:fllllJfli
N.P.
Motor
N.P. Motorsteuen:mg
Commande
Man do
controller
de
motor
de
moteur
NP
NP
• l.!li!l!i'iO§i!1J!IHt;:[l!lll\lliit'l.!ll(DC24-48V) • l<ll!l@@
To
solenoid
power
cords
of
auto·llfler
{DC24-48V},
see
(l)O
AC 380 - 440V, 1
wu
1
Example 1
Beispiel
Exemple 1
Ejemplo 1
OOW
~if.!~~~
Voltage
regulator
Regulateur
Regulador de voltaje ( piezas opcionales )
1
(~}l1)l~cf-1=)
(optional
de tension
parts)
(pieces
optionnelles)
wu
2
Example 2
Beispi<;;l
Exemple 2
Ejemplo 2
2
~
8
e
l.!lli!l@:
Earth terminal
Terrnmnl de
eel
bias a
tierra
.
aQ
"
~
~
Page 9

~m~
Solenoid
E!Gktronlaut;et
Solenoide
Eloctroinla!l
J@littflili!IJ2-
Microswitch
Microcontact pour levier inverseur
for
reverse
lever
fliUJJOOI!IJ
Microswitch
fvl!!uoschalter
Microcontact
t~Jli:§l!illJliiJ~!ItJ:l:lf¥tlilltffliil!JiU~j}jj\_t
Finding
Suchan
Pourtrouver
Pata
for
knee
presser
fur
KniofFuBhebei
pour
reliwe-pied ( genou
and
connecting
und
Verbindcn
et
raccorder
!ocn!izaf y conectar
the
les
!os
foot
lifter
)
(DC
power
cordons
cablos
24-
cords
of
d'alimentation
H!Octricos doi .:;olenoide
48V)
auto-reverse
pour
solenoid ( DC24-
le
solimoide
auto-inverseur ( C.C.24-
cio
invorsi6n
48V)
autornilt!ca ( CD24
!'1!\Rli\00~~
Suspension
Ha!t(IC!JdC;t
Microcontact
ivltcroinierruptnf
48V)
~,
48\f)
microswitch
suspendu
lrnRIHI~~
Pin
alignment
Ein::;;te!!un9
Alignment
Alinearniento
des
du
Strrts
goujon
dn!
pin
litl:l:l~Jl'!f
Machine
brand
Marke
Marque
JUKI
BROTHER
SINGER
TOYOTA
MITSUBISHI
ffil!!!iiifl§l!IJIJ!l:ftiil!IU~~i}jj\~
To
solenoid
power
cords
of
Stromkabel
Cordons
Cah!os de n!irncntc!ci6n do
des
E!uktromagnnis
d'alimentation
@
auto-lifter
solano
ide
so!cnoido
Fu:Jhcbel
de
® ©
pour
para
elevateur
alzador
de pied
do pie
JUKI
BROTHER
SINGER
~
iil!)J!UR&lill~
Power
Strornkabe!
Les
cordons
Cabk:s y terminal
(
cords
iil!i}jj\
and
earth
uncl Erdunn::::;<.iernrnu (
et
Ia
borne
de
\1]
:
AC100V-220V)
terminal
(AC100V-240V
mise
a Ia
Stromversorgunn
de
conexion a tierra
TOYOTA
power
terre
(source
(
~~urninis!ro
d'alimentation
source)
A.
C.!
OOV~2,:H)V)
dn
enorgi;:1 G!t:.}ctrica
CA
100V-240V)
®ffl~l!!l
Applicable
Ver\"-:cndbarn
Modeles
Mockdos
Models
mode!io
applicables
ap!lcablss
fQ:iffllism
Auto-reverse cord no.
No de
DDL-555-4
DDL-555-5
DDL-5550-7
BROTHER
BROTHER
SINGER
LS2-AD158
DA-1200
LS2-180
DDL-5550-6
DDL-9000
SERIES
S-7200
SERIES
SERIES
DB 189 LS2-190
®
© ®
®
© ®
®
®
®
®
8l~~
t
t,~
DDL-5550-7 DDL-9000
DDL-555-5
BROTHER
SINGER
SERIES
SERIES
DA-1200 SERIES
C/\
iOOV~·240V)
®
©
®
© ®
®
cordon a degagement
do
!itwrac!hn
®
®
(j)
@
@
®
@
(j)
@
@
®
auto
automfJtiCG-
9
Page 10

I I
m:Y!J~lTR!
PARTS LIST FOR PT SERIES
AUFUSTUNG
~a5m~llfl:
Mark description :
Beschreil;ung:
Description :
Descripci6n:
PT-P-2AND-··~
DER TEILE
!lll~llcl'i=·~!l!lnelf.l
Pieces
Pir:zas estfi:nda! es
0 l!li!l!ltUcl'i=
Optional
Fakultativo
Pieces
Piezas
DERSERIE
choose
standards
parts
Toile
optionnelles
opclonales
the
suitable
PT
one
LISTE DES PIECES DES SERIES PT
LIST A
f2l
~ll!li'ncl'i=·
Optional
Faku!tative
Pieces
Piezas
DE
RECAMBIOS
~l!l%9ill~tl!!~lil'IMlii!l
parts, please
Toi!e-b\ttn
optionnelles,
opcionalos.
indicate
rnodollnwnrner
veuillez
indiquer
ind!quo
por
sewing
fo.vor e!
DE
machine
elm
N8hrnaschine
le
no
de
nunwro
LAS SERIES PT
model
no.
modele
de Ia
de
moclc!o
angebcn
machine a coudre
de
!a mt1quina dE
coser
r·,.
i
i
i
i
i
"·,,
"·
·b.
10
Page 11

:r.u
TIJ
!Jlftl-
ROLLER LIST
AUFLISTUNG
_t
~iHi
"5/Je
Upper
nmJ
DER ROLLEN
~~~--~--~--,-,-
roller
LISTE DES ROULEAUX
LISTA
Rouleau
DE
RODILLOS
susperieur
'I
II
'"'""'
r,;w
':Jilt
P2510
P2515
l---~-~···--·--~-t---~Do,
P5515
P5535
P5550
85515
, .
Item J\rid<el
Art1cle
10
@ffi~lli/Suitable
Mode!o
~,
f(;y
"J..f!J!
(8
CiiJ
();
(55T)
G
Vnr\-vondbar
~~.=;-1
~
r;:::;-;:::J
L':.:::IJ
§_]
.il!Htll!~m
Single
needle
'Ji"-.Jade!
Une aiguille
Una
'!Htll!~m
Twinneedle
zv,illingsnndel
Deux aiguilles
__
s agujas
PT
~B
PL
PT
PL
~S~
PL PT PF
flir
Convient
§]
T5550
P7015
P5515K
P5535K
P5550K
s1o1s
® PL PF
@
(I}
CJJ
~r
PL
~~
PK
py
~
PY
PK
IPil
PL PF
PT
85535
85550
1'
~iHi
Lower
P2580
P2560
T2560
P3022
--,
•
[
__j
ml~lli~i4
·
Standard
Standardteile
roller
f§2
~
0
~
(15T)
0
~
~
parts
PL
PT
PL
PT
Rouleau
[E]
PL-S2
[pL-S~
[~
Pieces
Piozas
standards
estandares
S5535K
inferieur(du
P2580K
····-
-·
bas)
~
(25T)
PK
~
py
py
S2580K
P2560K
~·
~
(25T)
§s]
PK
S2560K
---~~
PUJm
Polyurethane
•
P
•
Polyuretilan
~
•
Steel
S
• Stahl
Polyurethane
Poliuretano
Acier
Acero
11
I~~lm
• Engineering
T
•
Tectlnischer
D!E~Im
C :
~ngineering
roctlmscher
plastics
f<unststoff
plastics
KunststoH
,
Plastiques
Plasticos
Plastiques
Plasticos
d'ingenierie
de
d'ingenierie
de
Page 12

I
J£tmC1:.rifl/miSJJi!m!
COMPOSANTES ELECTRIQUES
llt~~;~:~~~~~g::~~~NTEN
COMPONENTES ELECTRICOS
E3
I¥!Jilltmll!ll21
For reverse lever
Urnkehrt1obe!
Pour levier inverseur
Pnra
pn!anca
de inver:>i6n
AIR
COMPONENtS
LUFTZUFHRTEILE
-~~--------
E4f¥Ulitml~~22
For
reverse
Fiir Umke!HhGbf-:!
Pour levier inverseur
--~-------------
lever
E5
11\H!Iiml~~
For
knee
lifter
Pour modele
suspendu
COMPOSANTES PNEUMATIQUES
Modell
12
Page 13

!JX
t'=i!
:f1F
P.-J\
SOULTION
PROBLEMLOSUNG
l
FOR
ERROR
FUNCTION
-
--~-
SOLUTION
DES
LOCALIZACION
PROBLEMES
DE
PROBLEMAS
I
DE
FUNCIONAMIENT~
- -·
I~
tiH5
~
~:%
tTI
ffi
fRli
!liHiUJJ
~Fc!l:Jt
tTiffi.~:%fH~
tnffi~~'t:~1il!~t'a~9.Xf~
lt~f'F
~~~jlffi)lt!
~~ID!Uffi:ft~:%
(IE ;%80°CW.l')
~~~P:fffitl$12;%9.X;lm5:tdfilft
f!iH~lm~N:
1~
1
.tn
ffi
~
!liH,iUJJ
~
:IIUJJ
~ItS
i8U1J
~:EJ:·
B W3:9D;Jm5ti]HJ?l'Bi3W.t±JJiij8Jmltfl18flilJFlff.;l$
1.~https://manualmachine.com/\1Jili!ll~m\UJJ~IElli~IElii
f'F
2•~~•a&~mmm•••••5ttl
3.Bi3mmmf£5ttl
1.tTiffi'lffi~NJHJJ~MJ;fl.l
2-tuffi'oo'~~~~:t:·I:R:
OTiffi,ffijff,;)PU
1.§-fi;!J~S~ffrt~*Ui§ttl
2.Bi3~J~.m~f£5ttl
3.~{!j:j~~
1.~~~t±J)\1Jiji!ll*Jfll~~~~!'ll
2.51tltnt~J~
3.5~51±!3Lt~r.U£5ttl
1.f~~
~t§.X!lil~
1.P:fffitl;'fd1JtW\~~
2.m.JmJ$12;%
1~mH1~
fij,\1~'
5
~~~~tfilftm.l
~
t~
r,%¥1
\iilllmBi3~~1t;'
mJ@
-~~~~--~-~~~..t-·lliffi
Situation
Vibration 1.Fixed
Un-syncom between 1.Wrong position
pulling & feeding
Un-normal worn out for 1
roller
Stop pulling
unsteadable pulling 2.Timing belt loosen
Transmission oil leaking 1.Thread wrapped in transmission
Solenoid's
too high
Solenoid out
Warranty:
or
temperature
(Normal
offunction
One
yaer,
*
As
transmission
is
80°C)
or
screw
lossen
2.Screw
3.Timing
2.Roller's
1.Screw loosen
3.Parts
2.0il
3.Bottom oil hole's screw loosen
1.The
1.Eiectric control system
2.Switch out
18
for
.Roller
hit
(Roller
is made by PU, will
damage
seal worn
operate
months
care,
for
stud & timing belt
belt
loosen
by sewing machine
RPM too
please
fast
out
distance
of
order
after
manufactured
follow
Reason
transmission & sewing machine
gear
naturely
for
back stitch switch
error
instruction
~
§ttl
~~?ZJ:'A.ff)
~
F~
~J¥-J&!iJI~i\1:~
(~~Bi3mmm&tnffi'ffii~fil,\!~)
f'FJtfi~§.X@;
:R
~
f'F
Bi¥
Fs~
M5~n5n
1.
~P.?i!
Q-
1.
~~.?i!
e-
2._t~fl5ttlBM
3.
~P.?i!
8-
~~fil~ 7 ~m!Yf~l!l1f
1._t~
2.~~.?{!
3j!~t~t~J~~{!j:
1.~1l.*~~!'ll
2.f!!t~51tl'En
3._t~f£5ttlt~•
~M.?i!~ 9 ~m!Yf~l!l1f
1.
f!!t~P:fffiU~
2.
]!!j~I#J
Solution
1. See
fig.0-8-5
loosen
worn out, do not
input
or
output shaft
or
date
(Roller & timing
sticked
shaft
stock
knee
lifter
on
transmission
for
long time)
switch is too short
belt
not
under
1. See
fig.C)
2. Tightem the screw
3.
See
fig.C)
See page 7
1. Re-tightin
2.
See
fig.C)
3. Replace parts
1.
Get
rid
2. Replace seal
3. Re-tighten
See page 9
1. Replace the control box
2. Replace switch
warranty)
t)-
5
m!M'I®!E
3 m!Yf!'Elli
2
m!M'~l!l1f
§ttlt~•
2
m!Yf~l!l1f
mJ
-3
-2
-2
of
thread
Problem
Vibrieren 1.Lockere Schrauben anziehen
Einzug und
in Einklang
Ungewtihnlicher
VerschleiB
Kein Einzug bzw.
UngleichmaBiger Einzug
Auslaufen von
Obertragungstil 2.01dichtung
Temperatur des Electromagnets zu hoch
Der
funktioniert
Garantie: 1 jahr
Zufuhr
der
Rolle 2.R.P.M.
(Normal=
Elektromagnet
nicht
bzw. 18
*
Zur
Wartung
nicht 1.Falsche Stellung
2.Schraube
3.0bertragungsriemen
1.Rolle sttiBt sich an
(Die
1.Die Schraube ist
2.0bertragungsriemen
3.Beschadigte Teile 3. Teile austauschen
1.~.aden
3.Schraube des unteren
1.Der Abstand zur Betatigung des Ruckstichschalters oder Kniehebels ist
80"C)
der
1.Systemfehler in
monate
des
Obertragungsgetriebes
fi.lr
Stift
der
Rolle zu hoch
Rolle nutzt nach und nach ab. austauschen wenn notwendig)
in
der Antriebsoder Abtriebswelle des Obertragungsgetriebes eingeklemmt
defekt
Mikroschalter-Freiraum ist fUr den Umkehrhebel
nach
dem
der
und Obertragungsriemen locker 2. Schraube anziehen
der
locker
der
Fabrikationsdatum.
Ursache
Welle von Ubertragungsgetriebe und Nahmaschine
locker
Nahmaschine Siehe seite 7
locker 2.
Ollochs
elektrischen
locker
Steuerung
Rollen
den
entsprechenden
oder
Kniehebel zu kurz
und
Ubertragungsriemen
Anweisungen
13
zu
kurz.
fallen
folgen.
Losung
1.Siehe0-8-5
SieheC)-3
1.
3.
SieheC)-2
1.Anziehen
SieheC)-2
1. Faden
2. Dichtung austauschen
3.Anziehen
Siehe
1.
nicht
ltisen
seite
9
Steuerungskasten
auswechseln
unter
diese
Garantie.
Page 14

Probleme
Vibration
Entrafnement et 1.Mauvaise position
alimentation
desynchronises
Usure anormale du rouleau
Pas d'entralnement ou
entralnement inegal
Fuite d'huile de 1.Fil
transmission
Temperature du
trop haute
(temperature normale
Solenoide detectueux 1.Erreur du systeme de contr61e
-
solenoide
1.Serrer
2.Vis du goujon
3.Courroie de distribution
1.Rouleau frappe par
2.RPM
1.Vis desserree
2.Courroie
3.Pieces
2.Joint
3.Vis du trou d'huile du bas
1.L'espace libre du
80"C)
les
vis
desserrees
et
d'engrenage
du rouleau trop rapide
(Le rouleau s'usera
de
distribution
endommagees
emprisonne
d'etancheite a l'huile
l'actionneur
sur
au genou
microcontact
Raison
d'arbre
de
Iache
Ia
machine Voir Ia page 7
naturellement.
Iache
l'arbre
d'entree
desserree
machine
de
use
a coudre
courroie de distribution
le
changer
ou de sortie de transmission
est trop
electrique
prtit
au
pour le
et
transmission
desserrees
besoin)
levier
inverseur
ou
Solution
1.
Voir
Ia
fig.Q-
1.
Voir
Ia
2.
3.
1.
2. Voir
3.
1. Degager le fil
2. Rem
3.
Voir Ia page 9
1 .
fig. e -3
Serrer
les vis
voirlafig.e-2
Resserrer
Ia
fig. e -2
Remplacer
placer
Resserrer
Remplacer
de contr61e
{i)-5
les pieces
le
joint
Ia
bolte
-
'
Garantie: Un an , ou 18 mois a pres
* Pour
entretenir
Ia transmission, suivre les
Ia
date de fabrication ( le rouleau
Problema Raz6n
Vibraci6n
Tracci6n y avance
fuera de sincronizaci6n
Desgaste abnormal del
rodillo
Ausencia de tracci6n o 1.Tornillo flojo
avance
desigual
Perdida
transmisi6n
Temperatura demasiada 1.Distancia para
alta
(Normal=
Solenoide
Garantfa:
de aceite de 1.Hilo
del
solenoide
80"C) El
defectuoso 1.Error
Un
afio o 18 meses
1.Apretar
1.Mala posicion de
2.Aflojamiento
3.Correa
1.Rodillo
2.RPM
(EI rodillo tiene un
2.Correa
3.Piezas
2.Junta de estanquidad del
3.Perdida
demasiado
de inversion o para
(no hay garantfa sobre
* Para el
cuidado
los
tornillos
de
los tornillos del perno y
de sincronizaci6n flojo.
presionado
del
rodillo demasiado rapid a
de sincronizaci6n flojo.
daf\adas
enganchado
del tornillo del
activar
espacio
corta.
libre del
del
sistema de mando
despues
de
el rodillo y
de
Ia
transmisi6n, hag a el
flojos.
Ia
transmisi6n y del
porIa
desgaste
sobre el eje de entrada
el
microinterruptor
el
accionamiento
Ia
fecha de fabricaci6n
Ia
correa de sincronizaci6n).
instructions
maquioa de
natural.
aceite
orificio
interior
interruptor
electrico
favor
et
Ia
qui
Ia
concernant.
eic
de
Ia
del
cambiar
gastada.
de pespunte o del alzador
es
del
de
maguina.
engrane
coser
segun
ode
salida de
del aceite.
demasiado
alzador
seguir
de
Ia
correa
Ia
pequef\o para
angular.
Ia instrucciones
courroie de
de
sincronizacion.
necesidad)
Ia
transmisi6n.
angular
distribution
Ia
palanca
sobre
ne
1.
Vease
1.
Vease dibujo e -3
2.
Apretar
3.
Ver dibujo e -2
Vease pagina 7
1.
Apretarlo
2.
Vease
3.
Cambiar
1.
Liberar
2.
Cambiar
3.
Apretar
Vease pagina 9
1.
Substituir
mando
Ia
transmisi6n.
sont
pas
garantis)
Soluci6n
dibujoQ-
los
tornillos
dibujoe
las piezas
el hilo
Ia
junta
Ia
caja de
electrico
{i)-5
-2
14
Page 15

Page 16

RACING
SEWING
MACHINE
CO.,
LTD.
 Loading...