

Page 1
INDUSTRIAL
ELECTRIC
STEAM
IRON
MODELS·
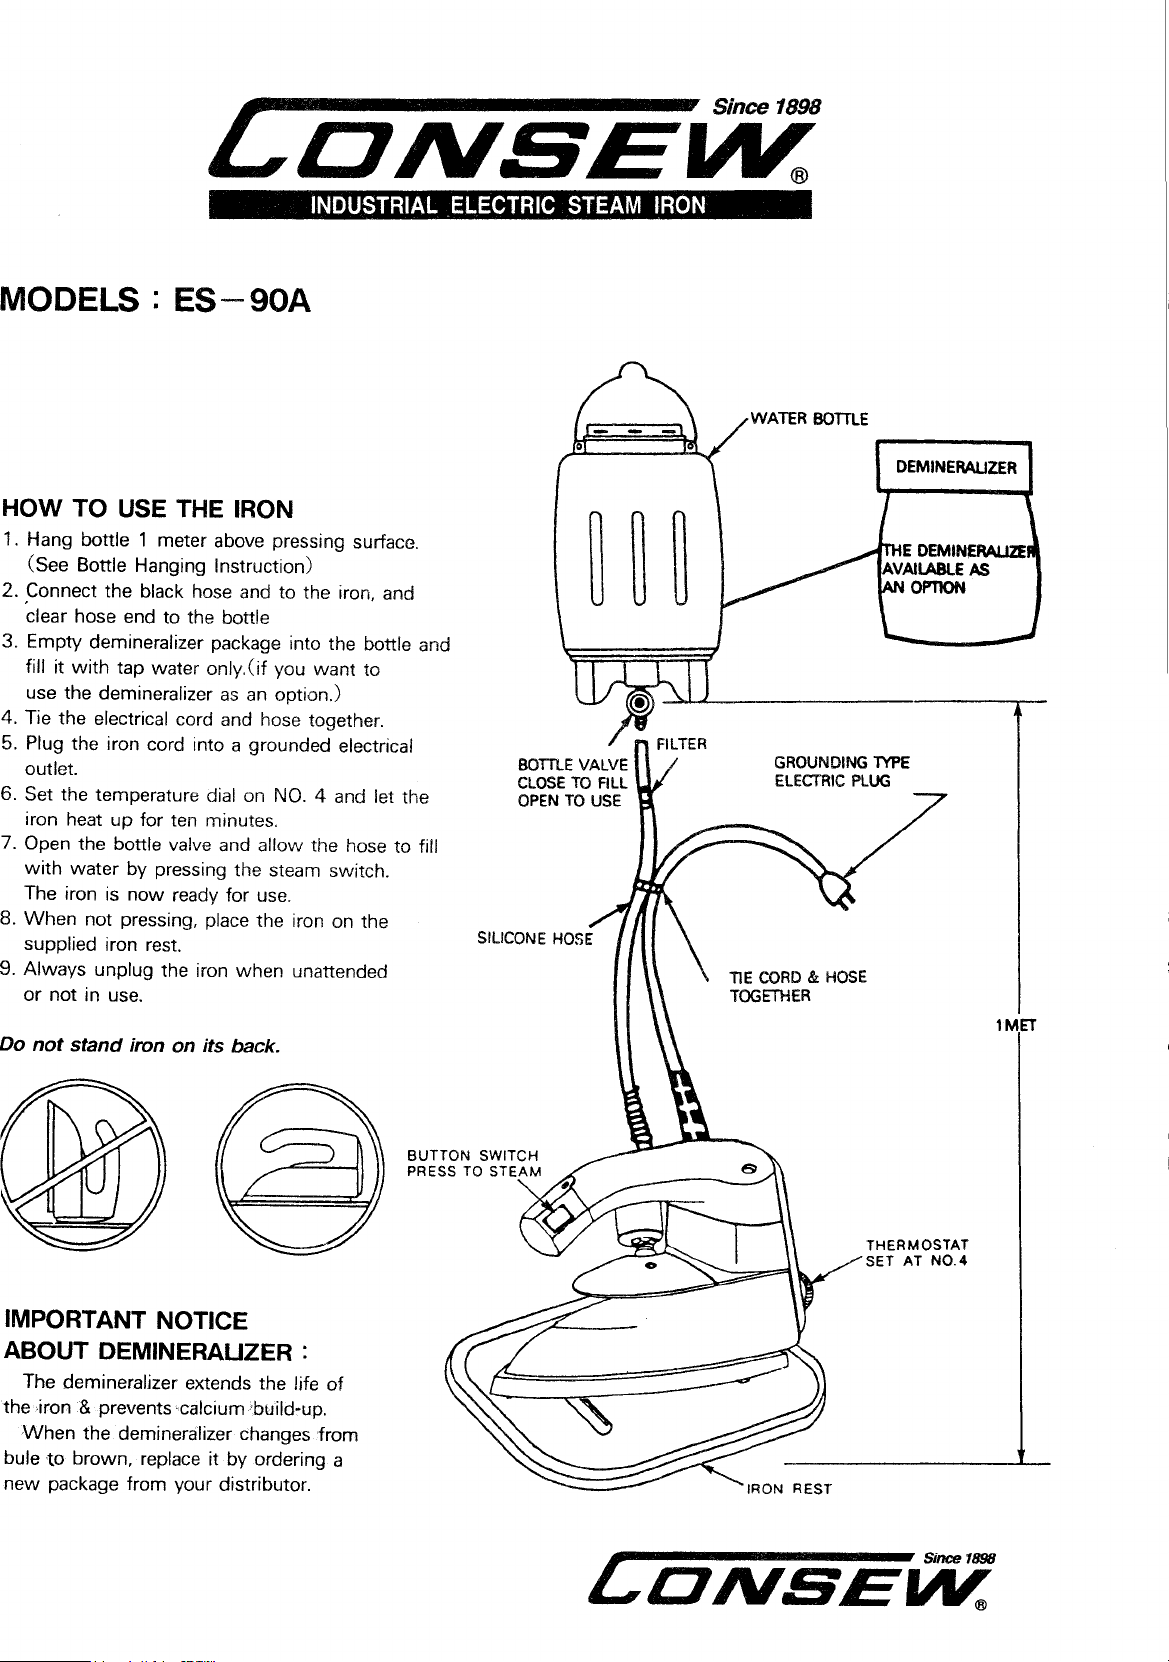
HOW
1. Hang bottle 1 meter above pressing surface.
2. Connect the black hose and to the iron, and
3. Empty demineralizer package into the bottle and
4. Tie the electrical cord and hose together.
5.
6.
7.
8. When not pressing, place the iron
9. Always unplug the iron when unattended
Do not stand
TO
(See Bottle Hanging Instruction)
clear hose end to the bottle
fill it
with
use the demineralizer
Plug the iron cord into a grounded electrical
outlet.
Set the temperature dial
iron heat up for ten minutes.
Open the bottle valve
with
water by pressing the steam switch.
not in
is
use.
The iron
supplied iron
or
ES-90A
USE THE IRON
tap water only.(if you want to
as
an
option.)
on
NO.
4 and let the
and
allow the hose to fill
now ready for
rest.
iron
on its back.
use.
on
the
WATER
GROUNDING
ELECTRIC
TIE
CORD & HOSE
TOGETHER
BOffiE
DEMINERAUZER
1YPE
PLUG
1MET
IMPORTANT NOTICE
ABOUT DEMINERAUZER
The demineralizer extends the life
the iron & prevents ·calcium
When
bule
new package from your distributor.
the demineralizer changes from
to
brown, replace it by ordering a
:
of
'btJild~up.
LIDNSEMl
Page 2
PRESSING WITH CONSEW IRON
Now
that your iron
professional results. :
-Initially,
This may take a
-Begin
--For
It
-There
follows:
-A
starch build-up
--When
to
allow water
to press.
best results, it
is
not necessary to activate the steam switch continuously.
are
several settings on your temperature dial. Recommended temperature settings
# 1 , 2 - Preheat
# 3
# 4
# 5
teflon shoe
unattended or not in
-Silk
-Cotton
- Linen(high temperature)
is
recommended and
is
properly set-up, please read the following tips for pressing
to
enter into the hose and iron, press the steam switch.
few
seconds, then you will see steam.
is
only necessary to press the steam switch for a
and delicate fabrics
and
wool(medium
use,
(low
temperature)
temperature)
is
available from your distributor to prevent garment shine and
always turn off and unplug your iron.
few
with
seconds at a time.
are
as
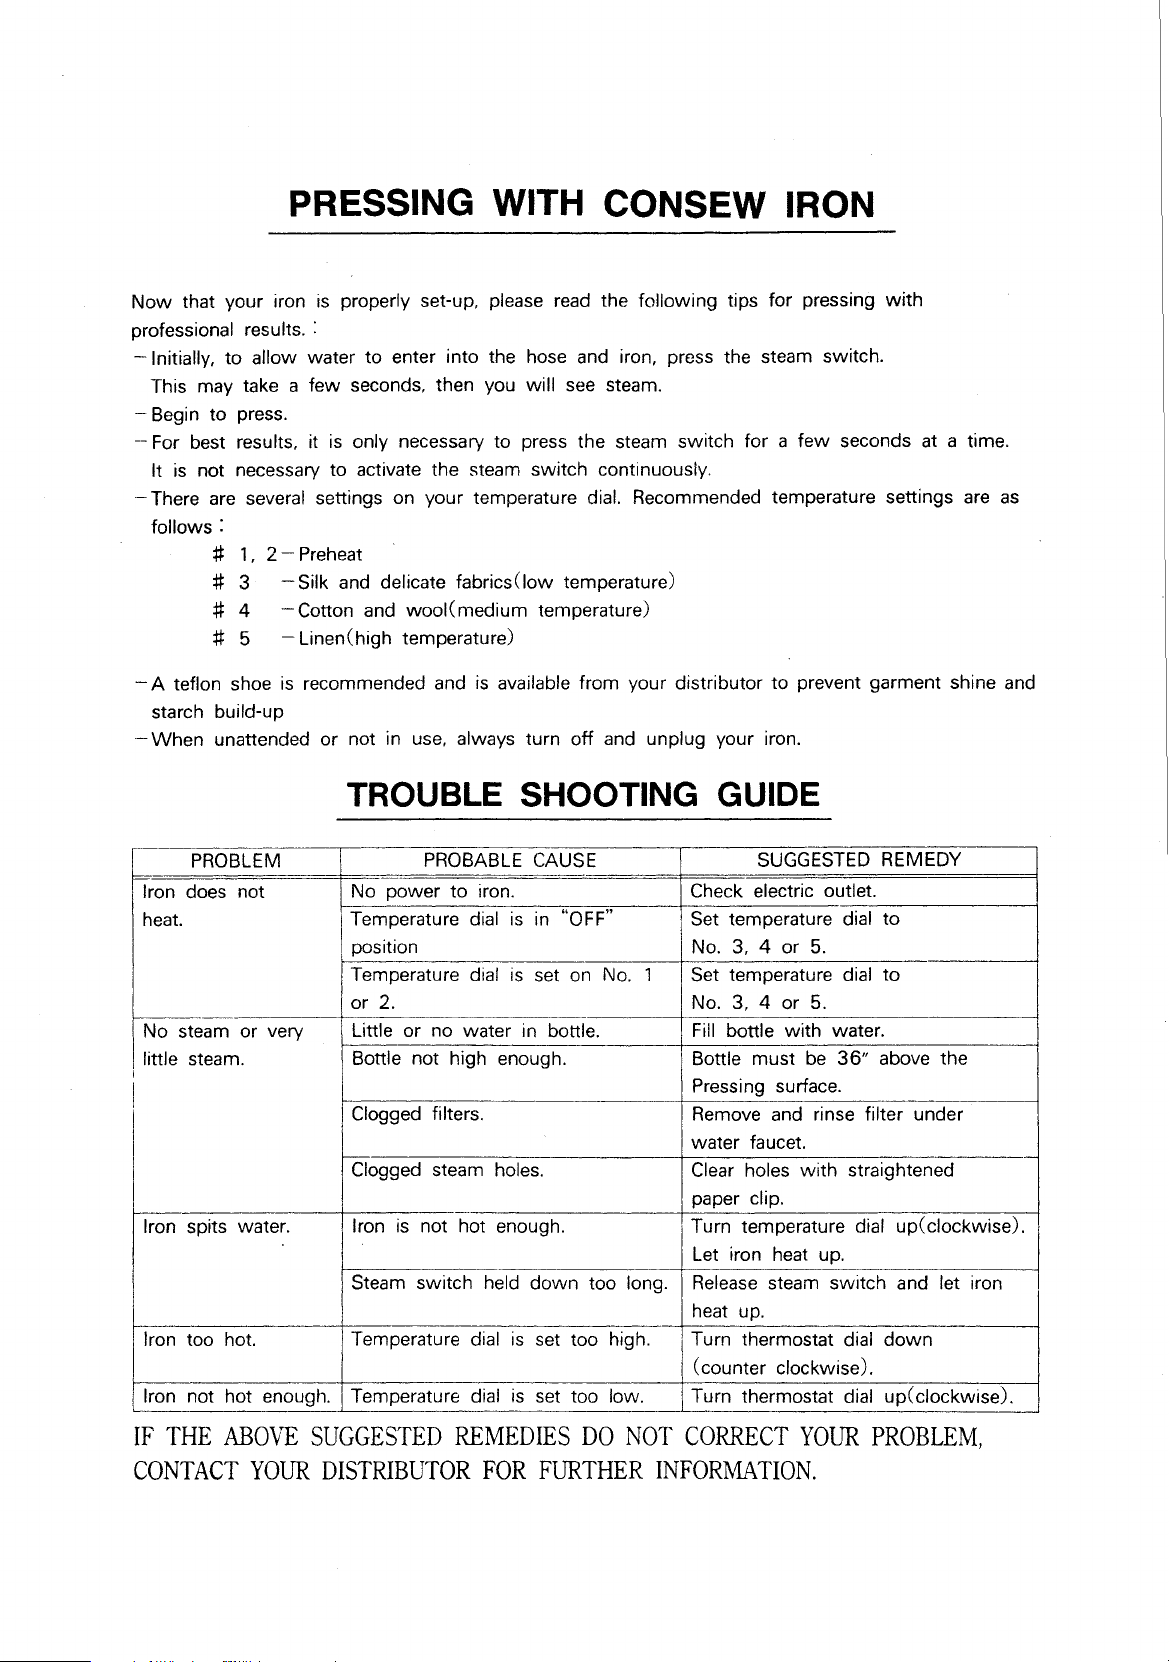
TROUBLE SHOOTING GUIDE
PROBLEM
ron does not
~
eat.
I
==c=
~~wer
I Temperature dial
,
pos1t1on
!Temperature dial IS set on No. 1 Set temperature dial
PROBABLE CAUSE I SUGGESTED REMEDY
to
1ro_n-:-.
-,-----,
~=;-----4-
7
is
in
"OFF" . Set temperature dial
~heck
No. 3, 4 or
electric outlet.
5.
h I or 2. No. 3, 4 or 5.
No steam- or very
I
, little steam. 1 Bottle not high enough. Bottle must
' I Pressing surface.
Iron spits water.
Iron too hot. Temperature dial
Iron not hot enough. Temperature dial
L-------~-L-~--------
IF
THE
ABOVE
~Little
~ogged
SUGGESTED
or no water in bottle. I Fill bottle with water.
be
Clogged filters. Remove and rinse filter under
water faucet.
steam holes.
Iron
is
not hot enough. Turn temperature dial up(clockwise).
Steam switch held down too long. Release steam switch and let
is
set too high. Turn thermostat dial
is
set too low. Turn thermostat dial up(clockwise).
REMEDIES
-
DO
NOT
Clear holes
paper clip.
Let iron heat up.
heat up.
(counter clockwise).
--
·-------------;-----~--1
CORRECT
with
YOUR
to
to
36"
above the
straightened
down
PROBLEM,
--
1ron
CONTACT
YOlJR
DISTRIBUTOR
FOR
FURTHER
INFORMATION.
Page 3

.-----·-
-----
---
---
• I
' 0 i '
-------;
~
~?-_
j_
______
- -
: -- I
---
----f?1:;
'f
I
~1
..
c~.
!£=
<~-~~::;~~-~-
I :
:~~
"J
'tl ' I
-·---
_ - - l I
;·-
:
t-
'-="-
, I
I · I
i
\:2_1>
~-
.
L._
-·-
' I
:®""'
-
---(?_~
i L - -
--@
~Xi
~-,_'Y9;,n:
I • •
'!"!'
'~
: .
:----
.
I \
. I
'
...
I
--~
---"
~iJ
~:_
~
'-
'--.
9-"):
<NO);
"-----
""'-:
~:
--·-
~
\~ff
. . -- !
(_-
itt)
i~
,'!)
: j
' ! 1 I
~I
~!)
/ ®
\_._-~,-
. . . .
9
/-~_
--;,3
---
0)
·-~--------
·-
.
I o
0-~-
-·--r
- '
j
Exploded View
~t----(;_0)
'
-----~)
-----<~
i I
---
I
i1
-~
~~
~
I.
~-
---1
0
----
I .
I
j
~
\\
~
l
~~-
t
-~
----\_ij)
__....o
___
./~
---
-·-
-tf\~~
- - - -OfJ
Ci_l)
----
J;~!-
~-----(ijl
®
,·/~.~~
I \ \
I
i
f'•./
(}-:;--·-c?J
·,:J----
'
·.
\ n
\\\
\
f
~-<_§),
__
../_-~
.(;.'-
\.._
__
I
~):
NO
PART
NO
19047
! 1
531100/531300
I 2
59010
3
4
51003
5
511102
5
511101
7
52001
21059
8
551200
18~1
541100/541200
9·1
14005
9-2
14002
14004
9·3
14007
9·4
14101
9·5
14011
9·5
9-7
14102
54001
9·8
9·9
14039
9-10
14501/14502
14038
9·11
14019
9·12
51009
10
11
511100
12
52103
13
58901158902
13·1
21070
14
161000
14·1
16009
16102
14-2
14·3
16010
14-4
16107
15
16108
15·1
16018
15·2
16031
15·3
16003
---·---
SILICONE
IRON
BASE
ASSY(
12CN/22fN)
COVER
THERMO
SHIELD
HANDLE
BASE
HANDLE
BACK
CCNER
THERMOSTAT
THERMOSTAT
SOLENOID
HOSE
HOSE
VALVE
RUBBER
VALVE
VALVE
VALVE
VALVE
VALVE
VALVE
COIL
LOCKING
SOCKET
HANDLE
LAMPASSY
LINE
CORD
WATER
HANGER
FILTER
WATER
WATER
SILICONE
FILTER
SILICONE
SiliCONE
'-
KNOB
VALVE
BARB
NUT
BARS
SOLENOID
D-RING
PACKING
PIN
SPRING
BODY
NAME
PLATE
COIL
CCNER
COIL(
12fN/22fN)
COVER
WASHER
NUT
HEAD
CAP
SET
CORD(
12fNI22M
PROTECTOR
BOmE
BOmE
BOTTLE
VALVE
HOSE
HOSE
HOSE
DESCRIPTION
REST
ASSY
ASSY(
12fN/22CN)
BOLT(M5X65)
ASSY
ASSY
SET
SPRING
'i/E!
90A~tl
90A1Jtll
ii'!I,;IE!
mt~SET
;J;I-'f.SET
~1Jtll
A90~~PI
UPil:-SET
'II"!SET
~~?,jLig
l"!if,;l
lit:<£~
~~PIIit.:il!f
'II!:!E!
~~~
'II!:!~
'II!:!~E!
i!~~llj
~~~~
~llj2jAI
'iJLig
\!JI!fg
Al-'f.l!SET
IESET
~f!.l!E.tlSET
fl
HSET
H.:ili!l
tiEl
H
~35fT
~i!I~~ET
IIEI
~i!li!!!t:
~i!lf!!!AAilfj
Page 4

CEILING HOOK INSTALLATION INSTRUCTIONS
IMPORTANT:
OVER
CAUTION
hardware is
that
HOOK.
are
SLIDE CHAIN LINK ONLY
-Injury
pulled from the ceiling. To avoid such injury,
structurally sound.
CAUTION-DO
to persons or damage to the ceiling may result if the bottle or mounting
NOT SLIDE ELECTRICAL WIRE
OVER
HOOK.
mount
only to ceiling members
OH
WATER
FOR HOLLOW CEILINGS :
1)
Drill
5/8"'
diameter hole in the ceiling at desired hook loca-
tion.
2\
Assemble toggle bolt by screw1ng bolt
3 I Insert flaps and bolt assembly(
with
the
bolt(A)
turning hook(C1 clockwise until firmly seated.
protruding through ceiling. Lock assembly
A/B)
(AI
into toggle
hinge up into ceding hole
HOSE
..
B;
by
FOR
Screw hook clockwise into ceiling until! firmly seated.
WOOD
BEAM
CEILINGS
FOR EITHER METHOD
Hang the bottle assembly by a chain from the hook so that the bot-
is
tom of the bottle
the iron.
1 METER( 1 Yardstick) from the water inlet on
LDNSEJiil
 Loading...