

Page 1

°°°°°°
UPGRADE
Stand: 05/06
UPGRADE
Stand: 05/06
FUNKWETTERSTATION WS1600
Best.-Nr. 64 61 88
Manuelle Zeiteinstellung
- Drücken und halten Sie die Taste „set/ch“ für etwa 2 Sekunden. Die
Zeitanzeige beginnt daraufhin zu blinken.
Hinweis: Erfolgt innerhalb der nächsten 8 Sekunden keine Eingabe,
kehrt das Gerät automatisch in den normalen Anzeigebetrieb
zurück!
- Durch Betätigen der Taste „min/max/+“ können Sie jetzt zwischen
den Anzeigeformaten 12h/°F und 24h/°C auswählen.
- Drücken Sie anschließend erneut die Taste „set/ch“. Die
Stundenanzeige beginnt zu blinken.
- Durch Betätigen der Taste „min/max/+“ können Sie nun die Stunden
einstellen.
- Verfahren Sie analog dazu bei der Minuteneinstellung.
- Drücken Sie zum Beenden des Einstellvorganges noch einmal die
Taste „set/ch“.
Min-Max-Werte
- Zum Abfragen der Min-Max-Werte betätigen Sie jeweils die Taste
„min/max/+“
- Zum Zurücksetzen der Min-Max-Werte drücken und halten Sie die
Taste „min/max/+“ für etwa 2 Sekunden.
KURZANLEITUNG
Z U M
ZUSATZEMPFÄNGER
FUNKWETTERSTATION WS1600
Best.-Nr. 64 61 88
Manuelle Zeiteinstellung
- Drücken und halten Sie die Taste „set/ch“ für etwa 2 Sekunden. Die
Zeitanzeige beginnt daraufhin zu blinken.
Hinweis: Erfolgt innerhalb der nächsten 8 Sekunden keine Eingabe,
kehrt das Gerät automatisch in den normalen Anzeigebetrieb
zurück!
- Durch Betätigen der Taste „min/max/+“ können Sie jetzt zwischen
den Anzeigeformaten 12h/°F und 24h/°C auswählen.
- Drücken Sie anschließend erneut die Taste „set/ch“. Die
Stundenanzeige beginnt zu blinken.
- Durch Betätigen der Taste „min/max/+“ können Sie nun die Stunden
einstellen.
- Verfahren Sie analog dazu bei der Minuteneinstellung.
- Drücken Sie zum Beenden des Einstellvorganges noch einmal die
Taste „set/ch“.
Min-Max-Werte
- Zum Abfragen der Min-Max-Werte betätigen Sie jeweils die Taste
„min/max/+“
- Zum Zurücksetzen der Min-Max-Werte drücken und halten Sie die
Taste „min/max/+“ für etwa 2 Sekunden.
Page 2

Version 06/06
Funkwetterstation
WS 1600
Seite 3 - 37
Radio Weather Station
WS 1600
Page 38 - 70
Station météo sans fil
WS 1600
Page 71 - 105
Radioweerstation
WS 1600
Pagina 106 - 139
Best.-Nr. / Item-No. / N
o
de commande / Bestnr.: 64 61 88
BEDIENUNGSANLEITUNG
OPERATING INSTRUCTIONS
NOTICE D’EMPLOI
GEBRUIKSAANWIJZING
Page 3

Impressum
Diese Bedienungsanleitung ist eine Publikation der Conrad Electronic GmbH. KlausConrad-Straße 1, D-92240 Hirschau.
Alle Rechte einschließlich Übersetzung vorbehalten. Reproduktionen jeder Art, z. B.
Fotokopie, Mikroverfilmung, oder die Erfassung in elektronischen Datenverarbeitungsanlagen, bedürfen der schriftlichen Genehmigung des Herausgebers.
Nachdruck, auch auszugsweise, verboten.
Diese Bedienungsanleitung entspricht dem technischen Stand bei Drucklegung.
Änderung in Technik und Ausstattung vorbehalten.
©
Copyright 2006 by Conrad Electronic GmbH. Printed in Germany.
Imprint
These operating instructions are published by Conrad Electronic GmbH, KlausConrad-Str. 1, 92240 Hirschau/Germany
No reproduction (including translation) is permitted in whole or part e.g. photocopy, microfilming or storage in electronic data processing equipment, without the
express written consent of the publisher.
The operating instructions reflect the current technical specifications at time of
print. We reserve the right to change the technical or physical specifications.
©
Copyright 2006 by Conrad Electronic GmbH. Printed in Germany.
Note de l´éditeur
Cette notice est une publication de la société Conrad Electronic GmbH, Klaus-Conrad-Str. 1, 92240 Hirschau/Allemagne.
Tous droits réservés, y compris traduction.Toute reproduction, quel que soit le type,
par exemple photocopies, microfilms ou saisie dans des traitements de texte electronique est soumise à une autorisation préalable écrite de l`éditeur.
Impression, même partielle, interdite.
Cette notice est conforme à la règlementation en vigueur lors de l´impression.
Données techniques et conditionnement soumis à modifications sans aucun préalable.
©
Copyright 2006 par Conrad Electronic GmbH. Imprimé en Allemagne.
Impressum
Deze gebruiksaanwijzing is een publikatie van Conrad Electronic Benelux BV.
Alle rechten, inclusief de vertaling, voorbehouden. Reprodukties van welke aard
dan ook, fotokopie, microfilm of opgeslagen in een geautomatiseerd gegevensbestand, alleen met schriftelijke toestemming van de uitgever.
Nadruk, ook in uittreksel, verboden.
Deze gebruiksaanwijzing voldoet aan de technische eisen bij het ter perse gaan.
Wijzigingen in techniek en uitrusting voorbehouden.
©
Copyright 2006 by Conrad Electronic Benelux B.V. Printed in Germany.
*06-06/AH
CONRAD IM INTERNET http://www.conrad.com
100%
recycling
paper.
Bleached
without
chlorine.
100%
Recyclingpapier.
Chloorvrij
gebleekt.
100%
RecyclingPapier.
Chlorfrei
gebleicht.
100%
papier
recyclé.
Blanchi
sans
chlore.
Page 4

2
Diese Bedienungsanleitung gehört zu diesem Produkt. Sie enthält wichtige Hinweise zur Inbetriebnahme und Handhabung. Achten Sie hierauf,
auch wenn Sie dieses Produkt an Dritte weitergeben.
Heben Sie deshalb diese Bedienungsanleitung zum Nachlesen auf!
These operating instructions belong with this product. They contain
important information for putting it into service and operating it. This
should be noted also when this product is passed on to a third party.
Therefore look after these operating instructions for future reference!
Ce mode d'emploi appartient à ce produit. Il contient des recommandations en ce qui concerne sa mise en service et sa manutention. Veuillez
en tenir compte et ceci également lorsque vous remettez le produit à des
tiers.
Conservez ce mode d'emploi afin de pouvoir vous documenter en temps utile!
Deze gebruiksaanwijzing hoort bij dit product. Er staan belangrijke aanwijzingen in betreffende de ingebruikname en gebruik, ook als u dit product doorgeeft aan derden.
Bewaar deze handleiding zorgvuldig, zodat u deze later nog eens kunt nalezen!
Page 5

3
Einführung
Sehr geehrter Kunde, wir bedanken uns für den Kauf der Funkwetterstation!
Sie haben damit ein Produkt erworben, welches nach dem heutigen Stand der
Technik gebaut wurde.
Dieses Produkt erfüllt die Anforderungen der geltenden europäischen und
nationalen Richtlinien. Die Konformität wurde nachgewiesen, die entsprechenden Erklärungen und Unterlagen sind beim Hersteller hinterlegt.
Um diesen Zustand zu erhalten und einen gefahrlosen Betrieb sicherzustellen müssen Sie als Anwender diese Bedienungsanleitung beachten!
Bei Fragen wenden Sie sich an unsere Technische Beratung
Deutschland: Tel.-Nr.: 0180/5 31 21 11
Fax-Nr.: 09604/40 88 48
e-mail: tkb@conrad.de
Mo. - Fr. 8.00 bis 18.00 Uhr
Österreich: Tel.-Nr.: 0 72 42/20 30 60
Fax-Nr.: 0 72 42/20 30 66
e-mail: support@conrad.at
Mo. - Do. 8.00 bis 17.00 Uhr, Fr. 8.00 bis 14.00 Uhr
Schweiz: Tel.-Nr.: 0848/80 12 88
Fax-Nr.: 0848/80 12 89
e-mail: support@conrad.ch
Mo. - Fr. 8.00 bis 12.00 Uhr, 13.00 bis 17.00 Uhr
Bestimmungsgemäße Verwendung
Bei diesem Produkt handelt es sich um eine funkgesteuerte Wetterstation mit der
Anzeige von Zeit, Tagesdatum, Kalender, Wettervorhersage, Windrichtung und Windgeschwindigkeit, Regenmenge, Außentemperatur, Außenluftfeuchtigkeit, Luftdruck mit
verschiedenen Alarmfunktionen für eine Vielzahl von Wetterkonditionen. Die Wetterstation bietet ihnen dadurch umfassende Wetterinformationen und Wettervorhersagen.
Die Basisgeräte der Wetterstation sind nur für den Einsatz im Innenbereich konzipiert
und dürfen nicht im Freien und nicht in Feuchtenräumen, z.B. Badezimmer betrieben
werden! Der Regensensor und der Windsensor werden durch Kabel mit dem Thermo-Hygro-Außen-Sender verbunden, der dann die Daten an die Basisgeräte der
Page 6

4
Wetterstation per 868 MHz-Signal sendet. Die Montage der Sensoren und Sender
erfolgt natürlich im Freien. Die Spannungsversorgung der Basisgeräte und des Senders erfolgt mittels Batterien vom Typ Mignon á 1,5 Volt.
Diese Wetterstation liefert keine 100%-ige Genauigkeit, sie ist daher nur für den
Heimgebrauch gedacht. Für medizinische Zwecke oder öffentliche Informationen ist
die Wetterstation nicht zugelassen.
Eine andere Verwendung als zuvor beschrieben, führt zur Beschädigung dieses Produktes, darüber hinaus ist dies mit Gefahren, wie z. B. Brand, etc., verbunden. Die
Sicherheitshinweise sind unbedingt zu beachten!
Sicherheitshinweise
Bei Schäden, die durch Nichtbeachten dieser Bedienungsanleitung verursacht werden, erlischt der Garantieanspruch! Für Folgeschäden übernehmen wir keine Haftung!
Bei Sach- oder Personenschäden, die durch unsachgemäße
Handhabung oder Nichtbeachten der Sicherheitshinweise verursacht werden, übernehmen wir keine Haftung! In solchen Fällen
erlischt jeglicher Garantieanspruch!
Aus Sicherheits- und Zulassungsgründen (CE) ist das eigenmächtige Umbauen
und/oder Verändern des Produktes nicht gestattet ist!
Für eine korrekte und sichere Bedienung ist es für Installateure, Endverbraucher und
Service-Techniker zwingend notwendig, allen Sicherheitsvorschriften, die in dieser
Bedienungsanleitung gelistet sind, Folge zu leisten!
Die Spannungsversorgung erfolgt über sieben Mignonzellen á 1,5 Volt
Die Wetterstation für Kinder unzugänglich aufbewahren, denn es handelt sich hierbei
nicht um ein Kinderspielzeug! (Auch nicht in der Nähe von Kinderbetten oder Laufställen montieren!)
Betreiben Sie die Basisgeräte der Wetterstation niemals in der Nähe von Wasser,
bzw. Wasserdampf oder feuchten Umgebungsbedingungen, wie z.B. Badewanne,
Waschmaschine, Spülbecken, Swimmingpool oder feuchten Kellergeschossen!
Achten Sie beim Aufstellen der Basisgeräte auf ausreichende Belüftung! Die Gehäuse dürfen weder blockiert noch abgedeckt werden! Setzen Sie die Basisgeräte niemals direkter Sonneneinstrahlung aus!
Page 7

5
Heizungen, Öfen, sowie andere Wärmequellen sollten ebenfalls in großzügigem
Abstand zu den Basisgeräten verbleiben!
Verwenden Sie nur das beiliegende Original-Zubehör, da sonst irreparable Schäden
die Folge sein könnten! In diesen Fällen erlischt der Garantieanspruch! Benutzen Sie
auch keine Verlängerungskabel!
Achten Sie darauf, dass alle Kabel so verlegt sein müssen, dass niemand darüber
stolpern kann, bzw. für Kinder und Haustiere unzugänglich sind!
Entfernen Sie die Batterien aus den Basisgeräten und des Senders, wenn die Wetterstation längere Zeit nicht in Betrieb ist!
Schließen Sie auf keinen Fall zusätzliches Equipment oder andere Geräte an! Die Folge
könnte fehlerhafte Bedienung, bzw. irreparabler Schaden an den Geräten sein! Garantieverlust!
Achten Sie darauf, dass nichts auf die Gehäuse der Basisstationen fällt und keine
Flüssigkeiten durch die Öffnungen ins Gehäuseinnere eindringen können!
In gewerblichen Einrichtungen sind die Unfallverhütungsvorschriften des Verbandes
der gewerblichen Berufsgenossenschaften für elektrische Anlagen und Betriebsmittel zu beachten!
Page 8

6
Bedienungselemente
Page 9
7
Page 10

8
Inbetriebnahme
Vor endgültiger Inbetriebnahme der Wetterstation ist es wichtig, vorab in räumlicher
Nähe (z.B. auf einem Tisch) versuchsweise eine komplette Verschaltung und Grundeinstellung des Systems in dessen später gewünschter Konfiguration der voraussichtlichen Anwendung vorzunehmen. Diese Maßnahme dient auch dem Test der
einzelnen Geräteteile auf korrekte Funktion vor deren endgültiger Platzierung und
Montage am Bestimmungsort.
1. Erstellen Sie zunächst die Verbindung zwischen dem
Regen- und Windsensor und dem Thermo-HygroAußen-Sender, indem Sie die Stecker der beiden Sensoren in die entsprechende Buchse des Thermo-HygroAußen-Senders stecken!
- Buchse RAIN für den Regensensor
- Buchse WIND für den Windsensor
2. Legen Sie zuerst die Batterien in den Thermo-Hygro-Außen-Sender! Siehe hierzu
das Kapitel „Batteriewechsel“!
3. Legen Sie dann erst die Batterien in die Basisgeräte. Siehe hierzu das Kapitel
„Batteriewechsel“!
Sobald die Batterien eingelegt sind, leuchten alle Segmente auf dem LCD-Display
kurz auf und ein Signalton (nicht bei der Temperaturstation) ertönt. Danach werden die Uhrzeit 0:00, das Datum 1.1.05, die Wettersymbole und der Luftdruck
angezeigt.
4. Danach beginnt die Wetterstation, Daten von den Außensensoren zu empfangen
und auf dem LCD-Display anzuzeigen. Sollten Außentemperatur, Außenluftfeuchtigkeit, Windtemperatur (Wind Chill) und Windgeschwindigkeit nicht nach ca. 30
Sekunden angezeigt werden, müssen Sie die Batterien nochmals aus allen Einheiten entnehmen und den Vorgang nochmals ab Punkt 1 wiederholen.
5. Sie sollten die Kabel auf korrekte Verbindung überprüfen und durch manuelles
Drehen des Windrades, Bewegen der Wetterfahne, Kippen des Regensensors mit
hörbarem Anschlag der Schaltwippe, etc. die einzelnen Funktionen überprüfen!
6. Die Uhrzeit und das Datum müssen manuell eingestellt werden! Siehe hierzu Kapitel
„Uhrzeit- und Datumseinstellung“!
7. Nachdem die Wetterstation entsprechend der obigen Punkte auf korrekte Funktion
geprüft und für gut befunden wurde, kann die Montage der Einzelbausteine vorgenommen werden. Hierbei ist jedoch darauf zu achten, dass die Geräteteile an den
Page 11

9
gewünschten Montage- bzw. Aufstellungsorten korrekt zusammenarbeiten! Sollten
z. B. bei der 868 MHz-Funkverbindung Übertragungsprobleme auftreten, so reicht
zu deren Lösung meist eine leichte Verschiebung der Montageorte aus.
Im Normalfall erreicht die Funkverbindung zwischen Empfänger und
Sender im freien Feld eine Reichweite von mindestens 100 Meter,
sofern sie nicht durch Hindernisse wie Gebäude, Bäume, Fahrzeuge,
Hochspannungsleitungen, usw. beeinflusst wird.
Störstrahlungen, wie sie z. B. von Computerbildschirmen, Radios oder
Fernsehgeräten erzeugt werden, können eine Funkverbindung gar
unmöglich machen. Beachten Sie dies bitte bei der Wahl der Aufstellungs- und Montageorte!
8. Nachdem die Batterien in den Außensensor eingesetzt wurden, sollten die Batterien auch in die Basisgeräte eingelegt werden, damit ein möglichst schneller Signalempfang zustande kommt. Werden die Batterien erst 5 Stunden nachdem sie
in den Außensensor gesetzt wurden in die Basisstation eingesetzt, ist ein erfolgreicher Signalempfang des Außensensors nicht mehr möglich. In diesem Fall
müssen die Batterien nochmals entfernt und neu eingesetzt werden. (Vorgang
nochmals ab Punkt 1 wiederholen.)
Nachdem also die Batterien in
der richtigen Reihenfolge eingesetzt wurden, beginnt zwischen der Basisstation und
dem Senderr die Synchronisationsphase. Während dieser
Zeit blinkt das Sensorenempfangssignal.
Wird das Signal korrekt empfangen wird das Symbol dauerhaft angezeigt. Wird das
Signal nicht angezeigt ist die Funkverbindung gestört. In diesem Fall muss ein neuer
Standort des Senders oder der Basisstation gesucht werden!
Batteriewechsel
Die Basisstation arbeitet mit
drei Mignonzellen à 1,5 Volt.
Ein Batteriewechsel wird
erforderlich, wenn im Display
die Batterietiefstandsanzeige
(links oben im Display)
erscheint.
Page 12

10
Der Thermo-Hygro-AußenSender arbeitet mit 2 Mignonzellen á 1,5 Volt.
Ein Batteriewechsel wird
erforderlich, wenn im Display
die Batterietiefstandsanzeige
(rechts unten im Display)
erscheint.
Bei einem Batteriewechsel gehen die gespeicherten Daten verloren. Es müssen daher alle Einstellungen / Programmierungen neu
vorgenommen werden.
Batterien gehören nicht in Kinderhände!
Achten Sie beim Einlegen der Batterien auf die richtige Polung!
Achten Sie darauf, dass die Batterien nicht kurzgeschlossen, ins
Feuer geworfen und aufgeladen werden! In diesen Fällen besteht
Explosionsgefahr!
Funktionstasten
Die Basisstation verfügt über 5
Tasten welche folgende Funktionen
ausweisen:
SET-Taste
Betätigen Sie diese Taste zum Eintritt in den manuellen Einstellmodus für folgende
Funktionen:
LCD-Kontrast, manuelle Zeiteinstellung, 12-/24-Stunden-Zeitanzeigeformat, Kalendereinstellung, Temperaturanzeigeeinheiten °C/°F, Einheiten der Windgeschwindigkeit, Einheiten Regenmenge, Einheiten Luftdruck, Referenzeinstellung des relativen
Luftdrucks, Einstellung der Schaltschwelle für die Wettervorhersageanzeige, Einstellung der Schaltschwelle für die Sturmwarnung und Alarmeinstellung EIN / AUS
(ON/OFF).
Drücken und halten Sie im normalen Anzeigemodus die Taste zur Schaltung Summer
EIN / AUS (ON/OFF)!
Page 13

11
Drücken und halten Sie im Wetteralarm-Einstellmodus die Taste für die Einstellung
der verschiedenen Alarmwerte und zur Schaltung Alarm EIN / AUS (ON/OFF)!
Drücken Sie die Taste zur Aktivierung des Rückstellmodus während der Anzeige der
gespeicherten Maximal- oder Minimalwerte!
Beenden des Alarmsignals während des Ertönens eines Weck- oder Wetteralarms.
+ - Taste
Drücken zur Umschaltung der Kalenderanzeige auf die voreingestellte Alarmzeit, das
Tagesdatum, Wochentag und Tagesdatum oder Sekunden in der Zeitanzeigesektion.
Drücken zur Einstellung (Erhöhung) der verschiedenen Einstellwerte.
Beenden des Alarmsignals während des Ertönens eines Weck- oder Wetteralarms.
Drücken zur Bestätigung der Rückstellung eines gespeicherten Maximal- oder Minimalwertes.
HISTORY-Taste
Drücken zur Anzeige der gespeicherten Wetterdaten-Historie.
Beenden des Alarmsignals während des Ertönens eines Weck- oder Wetteralarms.
Drücken zum Verlassen des manuellen Einstellmodus und des Alarmeinstellmodus.
ALARM-Taste
Drücken zum Eintritt in den Einstellmodus für den Weck- und Wetteralarm.
Bestätigung der einzelnen Alarmeinstellungen.
Drücken zum Verlassen des manuellen Einstellmodus.
Beenden des Alarmsignals während des Ertönens eines Weck- oder Wetteralarms.
Drücken zum Verlassen des Anzeigemodus für die gespeicherten Maximals- und
Minimalwerte.
MIN/MAX-Taste
Drücken zur Anzeige der gespeicherten Minimal- und Maximalwerte der verschiedenen Wetterdaten.
Page 14

12
Drücken zur Einstellung (Verminderung) der verschiedenen Einstellwerte.
Beenden des Alarmsignals während des Ertönens eines Weck- oder Wetteralarms.
LCD-Bildschirm
Der LCD-Bildschirm ist zur Anzeige der folgenden Informationen in fünf Sektionen
eingeteilt:
1. Zeit und Datum
2. Winddaten
3. Außentemperatur und Außenluftfeuchtigkeit
4. Luftdruck- und Regenmengendaten
5. Luftdruck-Historie und Wettervorhersage
Manuelle Einstellungen
Die folgenden Einstellungen können nach Drücken der SET-Taste manuell geändert
werden:
- LCD-Kontrast
- Zeiteinstellung
- 12-/24-Stunden-zeitanzeigeformat
- Kalendereinstellung
- Temperatureinheiten °C/ °F
- Windgeschwindigkeitseinheiten
- Regenmengeneinheiten
- Luftdruckeinheiten
- Referenzwert Relativer Luftdruck
- Schaltempfindlichkeitswert der Wettervorhersageanzeige
- Schaltempfindlichkeitswert für Sturmwarnung
- Einstellung Alarm EIN / AUS (ON/OFF)
Einstellung des LCD-Kontrasts
Der LCD-Kontrast kann in 8 Stufen von „LCD 1“ bis „LCD 8“ eingestellt werden.
(Voreinstellung: LCD 5):
Drücken Sie die SET-Taste! Die Anzeige der Kontraststufe beginnt zu blinken.
Benützen Sie die + - Taste oder die MIN/MAX-Taste zur Einstellung der Kontraststufe!
Drücken Sie zur Bestätigung die SET-Taste!
Page 15

13
Manuelle Zeiteinstellung
Der Anwender kann nun in folgenden Schritten manuell die Uhrzeit einstellen:
Die Stundenstellen beginnen zu blinken
Stellen Sie mir der + - Taste oder der MIN/MAX-Taste die Stunden ein!
Drücken Sie die SET-Taste zur Umschaltung in den Einstellmodus für die Minuten!
Die Minutenstellen beginnen zu blinken.
Stellen Sie mit der + - Taste oder der MIN/MAX-Taste die Minuten ein!
Drücken Sie zur Bestätigung die SET-Taste!
Einstellung 12-/24-Stunden-Zeitanzeigeformat
Die Zeit kann so eingestellt werden, dass sie im 12- oder 24-Stundenformat dargestellt wird. (Voreinstellung: 24h) Einstellung der 24-Stundenanzeige wie folgt:
Benützen Sie zur Umschaltung der Einheiten die + - Taste oder die MIN/MAX-Taste!
Drücken Sie zur Bestätigung die SET-Taste!
Kalendereinstellung
Die Kalendervoreinstellung der Wetterstation ist der 1.1. des Jahres 2005. Das
Datum kann wie folgt manuell eingestellt werden:
Die Jahresstellen beginnen zu blinken.
Stellen Sie mit der + - Taste oder MIN/MAX-Taste das Jahr ein!
Die Einstellung reicht von „00“ (2000) bis „99“ (2099).
Drücken Sie zur Bestätigung der Wahl und zum Eintritt in den Monatsmodus die SETTaste! Die Monatsstellen beginnen zu blinken.
Stellen Sie mit der + - Taste oder der MIN/MAX-Taste den Monat ein!
Drücken Sie zur Bestätigung der Wahl und zum Eintritt in den Modus „Tagesdatum“
die SET-Taste! Die Stellen des Tagesdatums beginnen zu blinken.
Page 16

14
Stellen Sie mit der + - Taste oder MIN/MAX-Taste das Tagesdatum ein!
Drücken Sie zur Bestätigung aller Kalendereinstellungen die SET-Taste!
Einstellung Temperatureinheiten °C/ °F
Die Temperaturanzeige kann so eingestellt werden, dass die Temperatureinheiten in
„°C“ oder in „°F“ dargestellt werden. (Voreinstellung: °C).
Die Temperatureinheit beginnt zu blinken
Benützen Sie die + - Taste oder die MIN/Max-Taste zur Umschaltung zwischen den
Einheiten „°C“ oder „°F“!
Drücken Sie zur Bestätigung die SET-Taste!
Einstellung der Windgeschwindigkeitseinheiten
Die Windgeschwindigkeit kann in den Einheiten „km/h“ (Kilometer pro Stunde),
„mph“ (Meilen pro Stunde) oder „m/s“ (Meter pro Sekunde) dargestellt werden. (Voreinstellung: km/h).
Benützen Sie die + - Taste oder die MIN/MAX-Taste zur Umschaltung zwischen den
Einheiten „km/h“, „mp/h“ oder „m/s“!
Drücken Sie zur Bestätigung die SET-Taste!
Einstellung der Regenmengeneinheiten
Die Einheiten für die Gesamtregenmenge können in „mm“ oder „inch“ dargestellt
werden. (Voreinstellung: „mm“)
Benützen Sie die + - Taste oder die MIN/MAX-Taste zur Umschaltung zwischen den
Einheiten „mm“ oder „inch“!
Drücken Sie zur Bestätigung die SET-Taste!
Page 17

15
Einstellung der Einheiten des Relativen Luftdrucks
Die Einheiten für den relativen Luftdruck können in „hPa“ (hektopascal) oder „inHg“
(Inch Quecksilbersäule) dargestellt werden. (Voreinstellung: hPa)
Benützen Sie die + - Taste oder die MIN/MAX-Taste zur Umschaltung zwischen den
Einheiten „hPa“ oder „inHg“!
Drücken Sie zur Bestätigung die SET-Taste!
Einstellung des Relativen Referenzluftdrucks
Der Wert des relativen Referenzluftdrucks des Barometers Ihrer Wetterstation beträgt
nach dem Einlegen der Batterien in der Voreinstellung 1013hPa.
Für eine genaue Messung ist es erforderlich, das Barometer Ihrer Wetterstation
zunächst auf ihren lokalen relativen Luftdruck zu kalibrieren (in Abhängigkeit Ihrer
lokalen Höhe über dem Meeresspiegel). Erkundigen Sie sich nach dem aktuellen
Luftdruck Ihres näheren Umfeldes (lokaler Wetterservice, Internet, optisches Fachgeschäft, kalibrierte Anzeigegeräte in öffentlichen Gebäuden oder am Flughafen, etc.)
Der relative Luftdruck kann für bessere Referenz innerhalb eines Bereiches von 919 bis
1080 hPa (27.17 bis 31,90 inHg) manuell auf einen anderen Wert eingestellt werden.
Der aktuelle relative Referenzluftdruckwert beginnt zu blinken.
Benützen Sie die + - Taste oder die MIN/MAX-Taste zur Erhöhung oder Verminderung des Wertes! Stetes Drücken der Tasten bewirkt eine schnellere Weiterschaltung.
Drücken Sie zur Bestätigung des eingestellten Wertes die SET-Taste!
Hinweis:
Diese Kalibrierungsmöglichkeit ist für jene Anwender von besonderem Nutzen, die
sich auf verschiedenen Höhen über dem Meeresspiegel befinden - ihre Luftdruckanzeigen jedoch basierend auf Meereshöhe zur Anzeige bringen wollen.
Einstellung des Schaltempfindlichkeitswertes für die Wettervorhersagesymbole
Page 18

16
Der Anwender kann als Schaltschwelle für die Änderung der Wettersymbolanzeigen
im Bereich von 2hPa bis 4hPa einen ganz bestimmten Wert auswählen. Dieser repräsentiert die „Empfindlichkeit“ der Wettervorhersage, d.h. je geringer der Wert, desto
empfindlicher die Wettervorhersage (Voreinstellung: 3hPa).
Der aktuelle Schaltwert beginnt zu blinken.
Benützen Sie die + - Taste oder die MIN/MAX-Taste zur Einstellung des Schaltwertes!
Drücken Sie zur Bestätigung des eingestellten Wertes die SET-Taste!
Einstellung des Schaltempfindlichkeitswertes für den Sturmwarnalarm
Der Anwender kann weiterhin als Schaltschwelle für eine Sturmwarnungsanzeige im
Bereich von 3 hPa bis 9 hPa einen ganz bestimmten Wert für einen, über einen Zeitraum
von 6 Stunden eintretenden Abfall des Luftdrucks auswählen (Voreinstellung: 5 hPa).
Der aktuelle Schaltwert beginnt zu blinken.
Benützen Sie die + - Taste oder die MIN/MAX-Taste zur Einstellung des Schaltwertes!
Drücken Sie zur Bestätigung des eingestellten Wertes die SET-Taste!
Einstellung des Sturmwarnungsalarm EIN / AUS (ON/OFF):
Der Anwender kann weiter den akustischen Sturmwarnungsalarm EIN oder AUS
(0N/OFF) schalten. (Voreinstellung: AUS).
Die Anzeige „AOF“ beginnt zu blinken.
Benützen Sie die + - Taste um den Alarm EIN (ON) oder AUS (OFF) zu schalten!
(„AOF“ = AUS, „AON“ = EIN).
Drücken Sie zur Bestätigung des eingestellten Wertes und zur Rückkehr in den normalen Anzeigemodus die SET-Taste!
Hinweis:
Ist ein Sturmwarnungsalarm aktiviert, so wird der nach unten gerichtete Wettertendenzpfeil blinken. (siehe auch Abschnitt: „WETTERTENDENZANZEIGE“!)
Verlassen des manuellen Einstellmodus
Zum Verlassen des manuellen Einstellmodus kann während der manuellen Einstellungen zu jeder Zeit die ALARM-Taste oder die HISTOY-Taste gedrückt werden oder
auf die automatische Rückschaltung (Automatic Timeout) gewartet werden. In beiden Fällen kehrt das Gerät zum normalen Zeitanzeigemodus zurück.
Page 19

17
Einstellen des Weckzeitalarms
Der Alarm kann mithilfe der ALARM- und SET-Tasten eingestellt werden.
Drücken Sie ein Mal die ALARM-Taste! Das „ALARM“-Symbol und die Alarmzeitanzeige erscheinen im oberen rechten Teil des LCD-Bildschirms.
Drücken und halten Sie die SET-Taste für etwa 2 Sekunden! Die Stundenstelle der
Alarmzeit wird anfangen zu blinken. Stellen Sie mit der + - Taste oder MIN/MAXTaste die Stunden der Alarmzeit ein!
Drücken Sie zur Bestätigung der Wahl und zum Eintritt in den Minutenmodus die
SET-Taste. Die Minutenstelle wird beginnen zu blinken.
Stellen Sie mit der + - Taste oder MIN/MAX-Taste die Minuten der Alarmzeit ein!
Drücken Sie zur Bestätigung der Wahl die ALARM-Taste! Warten Sie etwa 30 Sekunden, bis die Anzeige automatisch zum normalen Anzeigemodus zurückkehrt!
Drücken Sie im normalen Anzeigemodus die ALARM-Taste ein Mal, um erneut in den
Alarmeinstellmodus zu gelangen! Betätigen Sie dann kurz die SET-Taste, um den
Weckalarm EIN (ON) oder AUS (OFF) zu schalten! (Die Anzeige des Symbols ((( • )))
bedeutet, dass der Weckalarm eingeschaltet ist.)
Drücken Sie die HISTORY-Taste oder warten Sie etwa 30 Sekunden für die automatische Rückkehr der Anzeigen in den normalen Anzeigemodus!
Hinweis:
Die Signaldauer des Weckalarms beträgt 2 Minuten. Zur Beendigung des Weckalarms kann während des Ertönens jede beliebige Taste gedrückt werden!
Wetteralarmbetrieb
Die Wetteralarme können in Bereitschaft gesetzt werden, um bei bestimmten Wetterkonditionen Warnsignale zu liefern. So kann der Anwender z.B. die Alarmschwelle für
die Außentemperatur auf +40°C (HI = HOCH) und -10°C (LO = NIEDRIG) setzen,
wobei nur der Alarm HOCH aktiviert wird und der Alarm NIEDRIG aktiviert bleibt (d.h.
dass Temperaturen >+40°C einen Alarm verursachen, während solche <-10°C dies
nicht tun).
Page 20
18
Die Wetterstation kann somit so eingestellt werden, dass sie bei Eintritt bestimmter
Wetterbedingungen einen Alarm liefert:
Die folgenden Wetteralarm-Einstellungen können im Wetteralarm-Einstellmodus vorgenommen werden:
- Außentemperaturalarm HOCH (HI)
- Außentemperaturalarm NIEDRIG (LO)
- Außenluftfeuchtigkeitsalarm HOCH (HI)
- Außenluftfeuchtigkeitsalarm NIEDRIG (LO)
- Windgeschwindigkeitsalarm HOCH (HI)
Voreinstellung der Alarmwerte
Temperatur Niedrig LO 0°C
Hoch HI 40°C
Relative Niedrig LO 45%
Luftfeuchtigkeit Hoch HI 70%
Windgeschwindigkeit Hoch HI 100 km/h
Einstellung des HOHEN und NIEDRIGEN Aussentemperaturalarms
Der hohe und niedrige Außentemperaturalarm kann nach Wunsch des Anwenders
unabhängig voneinander EIN oder AUS geschaltet werden!
Page 21

19
Einstellung des Außentemperatur-Alarmwertes (Alarmwert HOCH oder NIEDRIG)
Drücken Sie im normalen Anzeigemodus zwei Mal die Alarm-Taste! Die Anzeige des
Außentemperaturalarms wird erscheinen:
Drücken und halten Sie die SET-Taste für etwa 2 Sekunden! Die Temperaturanzeige
wird nun blinken. Drücken Sie zur Einstellung des Außentemperatur HOCH-Alarmwertes die + - Taste oder die MIN/MAX-Taste! (Halten der Taste führt zu schnellem
Weiterschalten der Werte).
Drücken Sie zur Bestätigung der Wahl die ALARM-Taste! Das Blinken der Anzeige
wird beendet. Drücken Sie nun die SET-Taste, um den Alarm EIN oder AUS zu schalten! (Die Anzeige des Symbols (*) lässt erkennen, dass der Alarm eingeschaltet ist).
Drücken Sie ein Mal die ALARM-Taste! Die Außentemperatur NIEDRIG-Alarmanzeige
wird erscheinen.
Drücken und halten Sie die SET-Taste für etwa 2 Sekunden! Die Temperaturanzeige
beginnt zu blinken. Drücken Sie zur Einstellung des Außentemperatur NIEDRIGAlarmwertes die + - Taste oder die MIN/MAX-Taste! (Halten der Taste führt zu
schnellem Weiterschalten der Werte).
Drücken Sie zur Bestätigung der Wahl die ALARM-Taste! Das Blinken der Anzeige
wird beendet. Drücken Sie die SET-Taste, um den Alarm EIN oder AUS zu schalten!
(Die Anzeige des Symbols (*) lässt erkennen, dass der Alarm eingeschaltet ist.
Drücken Sie die HISTORY-Taste oder warten Sie etwa 30 Sekunden für die automatische Rückkehr der Anzeigen in den normalen Anzeigemodus!
Für den Fall, dass die Temperatur einen Wert erreicht, der die Alarmbedingungen für
einen HOCH oder NIEDRIG-Alarm erfüllt, dann wird sowohl der Anzeigewert, als
auch das entsprechende Symbol („HI AL“/LO AL“) blinken. Der Summer wird für
etwa 2 Minuten ertönen. Durch Drücken einer beliebigen Taste kann der Anwender
das Summersignal beenden.
Einstellung des HOHEN und NIEDRIGEN Aussenluftfeuchtigkeitsalarms
Der hohe und niedrige Außenluftfeuchtigkeitsalarm kann nach Wunsch des Anwenders unabhängig
voneinander EIN oder AUS geschaltet werden.
Einstellung des Außenluftfeuchtigkeits-Alarmwertes (Alarmwert HOCH oder
NIEDRIG)
Drücken Sie im normalen Anzeigemodus vier Mal die ALARM-Taste! Die Anzeige des
Außenluftfeuchtigkeitsalarms wird erscheinen.
Page 22

20
Drücken und halten Sie die SET-Taste für etwa 2 Sekunden! Die Luftfeuchtigkeitsanzeige beginnt zu blinken. Drücken Sie nun zur Einstellung des Außenluftfeuchtigkeit
HOCH-Alarmwertes die + - Taste oder die MIN/MAX-Taste!
Drücken Sie zur Bestätigung der Wahl die ALARM-Taste! Das Blinken der Anzeige
wird beendet. Drücken Sie die SET-Taste, um den Alarm EIN oder AUS zu schalten!
(Die Anzeige des Symbols (*) lässt erkennen, dass der Alarm eingeschaltet ist.
Drücken Sie ein Mal die ALARM-Taste! Die Außenluftfeuchtigkeit NIEDRIG-Alarmanzeige erscheint.
Drücken und halten Sie die SET-Taste für etwa 2 Sekunden! Die Luftfeuchtigkeitsanzeige beginnt zu blinken. Drücken Sie zur Einstellung des Außenluftfeuchtigkeit
NIEDRIG-Alarmwertes die + - Taste oder MIN/MAX-Taste!
Drücken Sie zur Bestätigung der Wahl die ALARM-Taste! Das Blinken der Anzeige
wird beendet. Drücken Sie die SET-Taste, um den Alarm EIN oder AUS zu schalten!
(Die Anzeige des Symbols (*) lässt erkennen, dass der Alarm eingeschaltet ist.
Drücken Sie die HISTORY-Taste oder warten Sie etwa 30 Sekunden für die automatische Rückkehr der Anzeigen in den normalen Anzeigemodus!
Für den Fall, dass die Luftfeuchtigkeit einen Wert erreicht, der die Alarmbedingungen
für einen HOCH oder NIEDRIG-Alarm erfüllt, dann wird sowohl der Anzeigewert als
auch das entsprechende Symbol („HI AL“/“LO AL“) blinken.
Einstellung des Windgeschwindikeitsalarms
Der Windgeschwindigkeitsalarm HOCH kann durch folgende Schritte eingestellt
werden:
Drücken Sie im normalen Anzeigemodus sechs Mal die ALARM-Taste! Die Anzeige
des Windgeschwindkeitsalarms erscheint.
Drücken und halten Sie die SET-Taste für etwa 2 Sekunden! Die Windgeschwindigkeitsanzeige beginnt zu blinken. Drücken Sie zur Einstellung des Windgeschwindkeit
HOCH-Alarmwertes die + - Taste oder die MIN/MAX-Taste!
Drücken Sie zur Bestätigung der Wahl die ALARM-Taste! Das Blinken der Anzeige
wird beendet. Drücken Sie die SET-Taste, um den Alarm EIN oder AUS zu schalten!
(Die Anzeige des Symbols (*) lässt erkennen, dass der Alarm eingeschaltet ist).
Drücken Sie zur Rückkehr in den normalen Anzeigenmodus ein Mal die ALARM-Taste!
Für den Fall, dass die Windgeschwindigkeit einen Wert erreicht, der die Alarmbedingungen für einen HOCH-Alarm erfüllt, dann wird sowohl der Anzeigewert als auch das entsprechende Symbol („HI AL“) blinken. Der Summer wird für etwa 2 Minuten ertönen.
Durch Drücken einer beliebigen Taste kann der Anwender das Summersignal beenden.
Page 23

21
Hysterese
Um kleine Schwankungen der Messdaten auszugleichen, die einen dauernd ertönenden Wetteralarm verursachen könnten, wenn der Messwert sehr nahe bei dem
vom Anwender eingestellten Alarmwert liegt, wurde für jeden Wetteralarm eine
Hysterese-Funktion eingeführt.
Wenn z.B. der Hochtemperaturalarm auf +25°C eingestellt ist und der aktuelle Wert
erreicht diese +25°C, so wird der Alarm aktiviert, sofern er eingeschaltet ist. Sinkt die
Temperatur nun auf +24,9°C oder darunter und steigt dann wieder auf +25°C an, so
wird der angezeigte Messwert blinken; es ertönt jedoch kein Alarm mehr. Der Wert
muss erst unter +24°C sinken (bei einer voreingestellten Hysterese von 1°C), damit
ein neuer Alarm produziert werden kann.
Folgende Tabelle zeigt die Hysteresewerte für die verschiedenen Wetterdaten:
Wetterdaten Hysterese
Temperatur 1°C
Luftfeuchtigkeit 3% RH
Windgeschwindigkeit 5 km/h
Hinweis:
Um erkennen zu lassen, dass die aktuellen Wetterbedingungen außerhalb der voreingestellten Grenze liegen, werden die Temperatur- und Luftfeuchtigkeitsdaten auch
dann weiter blinken, wenn eine Taste gedrückt wurde, um den Alarm zu beenden
oder den Summer abzuschalten.
Wettervorhersage und Wettertendenzanzeige
W
ettervorhersagesymbole
Die drei Wettervorhersagesymbole im unteren rechten Teil des LCD-Bildschirms werden in einer der folgenden Kombinationen angezeigt:
Bei plötzlichen oder größeren Schwankungen des Luftdrucks werden die Anzeigesymbole aktualisiert, um die Wetterveränderung anzuzeigen.
Jedes Mal, nachdem ein neuer durchschnittlicher Luftdruckwert gewonnen wurde ein Mal pro Minute - wird dieser Wert mit einem internen Referenzwert verglichen. Ist
die Differenz dieser Werte größer als der gewählte Schaltwert für die Wettertendenz,
Page 24

22
so ändert sich das Wettersymbol entweder zum Besseren oder Schlechteren. Für
einen solchen Fall wird der aktuelle Luftdruckwert als neuer Referenzwert für die
Wettertendenz übernommen,
Ändern sich die Anzeigesymbole nicht, dann hat sich entweder der Luftdruck nicht
verändert oder die Veränderung ist so langsam eingetreten, dass sie von der Wetterstation nicht registriert werden konnte. Der Anwender kann somit im manuellen Einstellmodus die Empfindlichkeit gegenüber einer Luftdruckänderung entsprechend
einstellen - siehe hierzu Abschnitt EINSTELLUNG DES SCHALTEMPFINDLICH-
KEITSWERTES FÜR DIE WETTERVORHERSAGESYMBOLE!
Wenn die Symbole allerdings Sonne oder Regen anzeigen, verändert sich die Anzeige auch dann nicht, wenn sich das Wetter bessert (Anzeige: SONNIG) oder verschlechtert (Anzeige: REGNERISCH), da die Anzeigesymbole bereits die beiden
Extremsituationen darstellen.
Die Anzeigesymbole zeigen eine Wetterbesserung oder -verschlechterung an, was
aber nicht unbedingt, wie durch die Symbole angegeben, Sonne oder Regen bedeutet. Ist z.B. das aktuelle Wetter wolkig und es wird Regen angezeigt, so deutet dies
nicht auf eine Fehlfunktion des Gerätes hin, sondern gibt an, dass der Luftdruck
gesunken und eine Wetterverschlechterung zu erwarten ist, wobei es sich aber nicht
unbedingt um Regen handeln muss.
Hinweis:
Nach der Grundeinstellung sollten die Messwerte und Wettervorhersagen für die
ersten 12 - 24 Stunden nicht beachtet werden, da die Station erst über diesen Zeitraum auf konstante Höhe über dem Meeresspiegel Luftdruckdaten sammeln muss,
um eine genauere Vorhersage treffen zu können.
Wie mit jeder Wettervorhersage kann auch hier keine absolute Genauigkeit garantiert
werden. Auf Grund der unterschiedlichen Klimazonen für die das Gerät entwickelt
wurde, hat die Wetterstation eine durchschnittliche Treffergenauigkeit von 75%. In
Gegenden mit plötzlichen Wetterveränderungen, z.B. von Sonne zu Regen, wird die
Wetterstation genauer sein als in Gebieten mit konstanten Wetterbedingungen, beispielsweise meist sonnig.
Wird die Wetterstation an einen Ort gebracht, der deutlich höher oder tiefer als der
ursprüngliche Standort liegt, z.B. vom Erdgeschoss in die oberen Stockwerke eines
Hauses, so ignorieren Sie bitte für die nächsten 12 - 24 Stunden die Anzeigen der
Wettervorhersage! Durch diese Maßnahme hat das Gerät die Möglichkeit, größere
Messreihen zu verarbeiten und wird dadurch die neue Örtlichkeit nicht fälschlich als
Luftdruckänderung interpretieren, wenn es sich tatsächlich nur um eine geringfügige
Änderung der Höhe über dem Meeresspiegel handelt.
Page 25

23
Wettertendenzanzeige
Mit den Wettervorhersagesymbolen arbeiten die Wettertendenzanzeigen zusammen.
Es sind dies die links und rechts neben den Wettersymbolen befindlichen Pfeile.
Zeigt dieser Pfeil nach oben, so heißt dies, dass der Luftdruck steigt und eine Wetterbesserung in Aussicht ist. Zeigt der Pfeil nach unten, so bedeutet dies fallenden
Luftdruck und damit eine zu erwartende Wetterverschlechterung.
Aufgrund dieser Überlegung kann das Gerät also auch erkennen lassen, sie sich das
Wetter verändert hat oder wie es sich ändern könnte. Wird z.B. der nach unten
gerichtete Pfeil gleichzeitig mit den Symbolen der bewölkten Sonne angezeigt, so
fand die letzte erkennbare Wetteränderung während einer sonnigen Periode statt,
d.h. es wurde nur das Sonnensymbol angezeigt. Da der Tendenzpfeil nach unten
zeigt, heißt dies weiter, dass die nächste Wetteränderung das Regensymbol zur
Anzeige bringen wird.
Hinweis:
Hat die Wettertendenzanzeige erstmals eine Änderung des Luftdrucks registriert, so
bleibt sie permanent auf dem LCD-Bildschirm sichtbar.
Luftdruckhistorie (Elektronisches Barometer mit Luftdrucktrend
Im unteren Teil des LCD-Bildschirms kommen die relativen Luftdruckwerte und eine
Luftdruck-Historie zur Anzeige.
Abhängig von der Art der Programmierung wird eine Luftdruck-Historie in Form einer
aus vertikalen Balken bestehenden Grafik dargestellt.
Diese Balkengrafik des elektronischen Barometers zeigt die Luftdruck-Historie der
letzten 12 Stunden in fünf 3-Stunden-Schritten:
Die Horizontalachse repräsentiert die Luftdruckmesswerte der letzten 12 Stunden
(-12, -9, -6, -3 und 0 Stunden). Die für jeden der 5 Schritte ausgegebenen Balken zeigen den Trend über den gemessenen Zeitraum. Die Skala an der rechten Seite vergleicht das Ergebnis. Die „O“ in der Mitte der Skala kennzeichnet den aktuellen Luftdruck.
Die Vertikalachse repräsentiert die Luftdruckänderungen in hPa (+4, +2, 0, -2, -4.
„O“ kennzeichnet den aktuellen Luftdruck). Jede Abweichung +/- 2 hPa oder 0,05
inHg) zeigt in Hekto-Pascal (hPa), wie hoch oder niedrig der zurück liegende Wert im
Page 26

24
Vergleich zum aktuellen Luftdruck war.
Steigen die Balken an, so bedeutet dies eine durch steigenden Luftdruck verursachte Wetterbesserung. Fallende Balken bedeuten sinkenden Luftdruck und damit eine
vom aktuellen Zeitpunkt „O“ zu erwartende Wetterverschlechterung.
Zu jeder vollen Stunde wird der aktuelle Luftdruck als Basis für die Anzeige eines
neuen Grafikbalkens benützt. Die bestehende Gesamtgrafik wird dabei um einen
Balken nach links verschoben.
Hinweis:
Für eine genaue barometrische Luftdrucktrendanzeige sollte die Wetterstation auf
konstante Höhe über dem Meer betrieben werden. Das bedeutet, dass die Station
z.B. nicht vom Erdgeschoss in die oberen Stockwerke eines Hauses verlegt werden
sollte. Ist dies trotzdem einmal erforderlich, so ist die Anzeige für die nächsten 12 24 Stunden zu ignorieren!
Windrichtungs- und Windgeschwindigkeitsmessung
Im normalen Anzeigenmodus zeigt die zweite Sektion des LCD-Bildschirms die folgenden Winddaten:
Windrichtung (gezeigt auf einer Kompassrose mit 16 Unterteilungen) und Windgeschwindigkeit auf einer Beaufort-Scale
Windkühle (Wind Chill) in °C oder °F
Windgeschwindigkeit in km/h, mph oder m/s
Regenmengenmessung
Die gemessene Gesamtregenmenge wird in der vierten Sektion des LCD-Bildschirms in den Einheiten „mm“ oder „inch“ angezeigt.
(Siehe auch „ANSICHT DER MAXIMALEN / MINIMALEN WETTERDATEN“!)
Page 27

25
Ansicht der Historie-Daten
Die Wetterstation kann bis zu 200 Sätze von Wetterdaten speichern. Diese Daten
werden automatisch nach Inbetriebnahme der Wetterstation in 3-Stunden-Intervallen
zum nächsten Zeitpunkt zu den Uhrzeiten 0:00, 03:00, 06:00, 09:00, 12:00, 15:00,
18:00 und 21:00 gespeichert. Hat z.B. der Anwender nach der Installation der Batterien manuell die Uhrzeit auf 14:52 gestellt, so wird der erste Historien-Datensatz
automatisch 15:00 Uhr gespeichert. Die Speicherung des zweiten Satzes findet dann
um 18:00 Uhr statt, usw.
Jeder gespeicherte Datensatz enthält die Windrichtung, die Windgeschwindigkeit
auf Beaufort-Skale, die Windkühletemperatur (Wind Chill), die Windgeschwindigkeit,
die Außentemperatur und -luftfeuchtigkeit, den relativen Luftdruck und die Gesamtmenge, die Luftdruckhistorie und die Wettertendenz. Ferner werden die Zeit und das
Datum der Speicherung angezeigt.
Hinweis:
Um die korrekte Zeit der Speicherung der Historien-Aufzeichnung zu erhalten, sollte
der Anwender sofort nach dem Einsetzen der Batterien in die Wetterstation manuell
die aktuelle Zeit einstellen,
Danach sollte eine Änderung der voreingestellten Zeit vermieden werden, da dies
auch die aufgezeichnete Zeit der Speicherung jeder weiteren Historien-Speicherung
ändern würde und dadurch zu einer Verwirrung des Anwenders führen könnte.
Betrachtung der Wetterhistorie
Drücken Sie die HISTORY-Taste! Die neueste Wetteraufzeichnung mit Zeit und
Datum der Speicherung erscheint in der Anzeige. Ferner wird im untersten Teil des
LCD-Bildschirms das „HISTORY“-Symbol dargestellt.
Drücken Sie zur Ansicht älterer Aufzeichnungen die MIN/MAX-Taste!
(Drücken Sie die MIN/MAX-Taste und die + - Taste um entweder die vorherige (previous) oder die folgende (next) Aufzeichnung zu betrachten!
Page 28

26
Die Speicherungen finden in 3-Stunden-Intervallen statt.)
Hinweis:
Die gespeicherten Historien-Aufzeichnungen bleiben bei einem Batteriewechsel oder
bei sonstiger Entnahme der Batterien nicht im Speicher erhalten!
Der Wert der Gesamtregenmenge wird in der Historien-Aufzeichnung in ganzen Zahlen (ohne Dezimalstellen) dargestellt.
Ansicht der Maximalen/Minimalen Wetterdaten
Die Wetterstation zeichnet die maximalen und minimalen Werte der verschiedenen
Wetterdaten automatisch mit dem Zeitpunkt ihrer Speicherung auf. Die folgenden
gespeicherten maximalen und minimalen Wetterdaten können durch Drücken der
MIN/MAX-Taste im normalen Anzeigemodus betrachtet werden!
- Minimale Außentemperatur mit Zeit und Datum der Speicherung
Page 29

27
- Maximale Außentemperatur mit Zeit und Datum der Speicherung
- Minimale Außenluftfeuchtigkeit mit Zeit und Datum der Speicherung
- Maximale Außenluftfeuchtigkeit mit Zeit und Datum der Speicherung
- Minimale Windkühletemperatur (Wind Chill) mit Zeit und Datum der Speicherung
Page 30

28
- Maximale Windkühletemperatur (Wind Chill) mit Zeit und Datum der Speicherung
- Minimaler relativer Luftdruck mit Zeit und Datum der Speicherung
- Maximale Windgeschwindigkeit
Rückstellung der maximalen und minimalen Wetterdaten
Zur Rückstellung der zuvor beschriebenen maximalen und minimalen Wetterdaten
1 bis 9 muss der Anwender jede einzelne Anzeige separat zurückstellen!
Betätigen Sie die MIN/MAX-Taste zur Anzeige der gewünschten Wetterdaten! Möch-
Page 31

29
te der Anwender z.B. die minimale Luftfeuchtigkeit zurückstellen, so muss er im normalen Anzeigemodus zur Anzeige des minimalen Luftfeuchtigkeitswerts die
MIN/MAX-Taste drei Mal drücken!
Drücken und halten Sie die SET-Taste für etwa 2 Sekunden, bis das „RESET“-Symbol im unteren Teil des LCD-Bildschirms erscheint!
Drücken Sie ein Mal die + - Taste, um den gespeicherten Wert auf dessen aktuellen
Wert und Zeitpunkt zurück zu stellen!
Drücken Sie zur Rückkehr in den normalen Anzeigemodus die ALARM-Taste!
Gesamtregenmenge
Die Gesamtregenmenge wird in der vierten Sektion des LCD-Bildschirms in den Einheiten „mm“ oder „inch“ angezeigt. Die Anzeige zeigt die Regenmenge, die seit der
letzten Rückstellung der Wetterstation gesammelt wurde.
Drücken Sie im normalen Anzeigemodus zur Anzeige der Gesamtregenmenge die
MIN/MAX-Taste zehn Mal! Das „RESET“-Symbol erscheint im Display.
Um die Anzeige der Gesamtregenmenge zurückzustellen, drücken Sie während der
Anzeigen des Werts der Gesamtregenmenge und des „RESET“-Symbols die + Taste ein Mal. Die Gesamtregenmenge wird auf 0 und die gespeicherte Zeit auf den
aktuellen Zeitpunkt zurückgestellt.
Hinweis:
Nach der Inbetriebnahme werden Zeit, Datum und Gesamtregenmenge als „-„ dargestellt. Nach der manuellen Einstellung der Uhrzeit wird die Zeit angezeigt.
Page 32

30
Ein-/ Ausschalten des Summers (ON/=FF)
Der Anwender hat die Möglichkeit, den Summer auszuschalten, so dass er im Fall
der Aktivierung eines Weckalarms nicht ertönt. Als Alarmanzeige erscheint dann nur
noch das entsprechende Alarmsymbol (*) auf dem LCD-Bildschirm.
Wenn der Summer ausgeschaltet ist und der Fall eines Wetteralarms eintritt, so wird
auch hier kein Summer ertönen. Zur Anzeige, dass sich eine Wetterbedingung außerhalb des eingestellten Schaltwerts und somit im Alarmzustand befindet, blinkt die
Anzeige des entsprechenden Wetterwertes.
Ausschalten des Summers
Drücken und halten Sie im normalen Anzeigemodus die SET-Taste, bis das Symbol
„BUZZER OFF“ (Summer AUS) an der rechten Seite über der Windrichtungsanzeige
erscheint! Das LCD wechselt in den Einstellmodus.
Drücken Sie zur Rückkehr in den normalen Anzeigemodus ein Mal die ALARM-Taste!
Das Symbol „BUZZER OFF“ wird weiterhin sichtbar bleiben.
Wiedereinschalten des Summers
Wenn das Symbol „BUZZER OFF“ auf dem LCD-Bildschirm sichtbar ist, drücken Sie
kurz die SET-Taste! Das Symbol „BUZZER OFF“ verschwindet.
Drücken Sie zur Rückkehr in den normalen Anzeigemodus ein Mal die ALARMTaste1 Das Symbol „BUZZER OFF“ wird nicht mehr angezeigt und das Alarmsignal
im Alarmfall normal ertönen.
Batterietiefstandsanzeige
Die Batterietiefstandsanzeige für die Wetterstation und den Thermo-Hygro-Außensender erscheint in der obersten, bzw. untersten Sektion des LCD-Bildschirms,
wenn eine der Batterien schwach wird und ersetzt werden muss.
Es wird allerdings empfohlen, sämtliche Batterien aller Geräteeinheiten zur Sicherstellung einer optimalen Genauigkeit der Wetterstation einmal jährlich zu erneuern!
Hinweis:
Nach einem Batteriewechsel müssen sowohl die Wetterstation, als auch der Außensender neu eingestellt werden!
(Siehe hierzu auch Abschnitt „Grundeinstellung“!)
Der Datenspeicher für die Historien-Daten wird im Falle eines Batteriewechsels
gelöscht.
Page 33

31
Thermo-Hygro-Außen-Sensor
Außentemperatur, Außenluftfeuchtigkeit, Wind- und Regendaten werden alle 4,5
Sekunden gemessen und übertragen. Die Wetterstation (Basisstation / Empfänger)
wird dabei für den korrekten Empfang der gesendeten Daten auf den Thermo-HygroAußen-Sensor (Sender) synchronisiert. Der Sendebereich des Senders beträgt im
Normalfall bis zu 100 m und kann jedoch durch die Umgebungstemperatur beeinflusst werden. Bei niedrigen Temperaturen kann sich die Sendeleistung vermindern.
Werden die Außenbereichsdaten nicht innerhalb von 30 Sekunden nach der Inbetriebnahme empfangen und angezeigt, so prüfen Sie bitte folgende Punkte:
1. Der Abstand von Empfänger und Sender zu nStörquellen wie z.B. Computermoni-
toren oder Fernsehgeräten sollte mind. 1,5 m bis 2 m betragen.
2. Vermeiden Sie, den Empfänger direkt an oder die Nähe von metallischen Türen
oder Fensterrahmen zu platzieren.
3. Die Benutzung anderer Geräte, auf der selben Frequenz (868MHz) können die
korrekte Signalübertragung verhindern.
4. Störungen des Empfangs können auch von Nachbarn verursacht werden, die auf
der selben Frequenz (868MHz) Geräte betreiben.
5. Sichtverbindung zwischen Wetterstation uns Thermo-Hygro-Außen-Sensor z.B.
durch ein Fenster erweitert den Empfangsbereich.
Hinweis
Erfolgt eine korrekte Übertragung des 868MHz-Signals, so sollten die Batteriefächer
der Komponenten nicht mehr geöffnet werden. Es könnten sich sonst die Batterien
aus den Kontakten lösen und damit eine unerwünschte Rückstellung der gespeicherten Daten ergeben. Sollte dies trotzdem versehentlich vorkommen, so müssen
zur Vermeidung von Übertragungsproblemen alle Einheiten neu eingestellt werden.
Zeigt die Außenbereichsanzeige im normalen Betriebsmdus „---„, so wird die Wetterstation die Intervalle für den Außenbereichsempfang so lange 15 Minuten, bis die
gesendeten Daten gelesen werden können. Ist dies der Fall, so stellen Sie die Empfangsintervalle wieder auf 4,5 Sekunden zurück.
Ist trotz Beobachtung dieser Faktoren kein Empfang möglich, so müssen alle Komponenten neu eingestellt werden.
Page 34

32
Vor der Montage
Stellen Sie vor der endgültigen Montage der einzelnen Geräte sicher, dass
- die Kabellängen von Wind- und Regenmesser zum Thermo-Hygro-Außen-Sensor
ausreichen
- das das Sendesignal des Thermo-Hygro-Außen-Sensors von der Basisstation
empfangen wird
Die Basisstation
Die Basisstation kann an eine Wand gehängt oder durch zwei verschiedene Klappständer frei aufgestellt werden.
Wandmontage
Wählen Sie eine geschützte Montagestelle aus. Vermeiden Sie den Einfluss von
Regen oder Sonneneinstrahlung. Stellen Sie sicher, dass die Werte des Senders an
der Montagestelle empfangen werden können.
• Schraube (nicht im Lieferumfang enthalten) an der gewünschten Stelle in die Wand drehen. Dabei den Schraubenkopf etwa
5 mm von der Wand abstehen lassen.
• Hängen Sie nun die Wetterstation an die Schraube. Achten
Sie dabei darauf, dass die Wetterstation vor dem Loslassen
sicher an der Schraube hängt.
Der Thermo-Hygro-Außen-Sensor
Ein idealer Montageort für den Thermo-Hygro-Außen-Sensor ist eine Außenwand
unter einem Dachüberstand, da hier der Thermo-Hygro-Außen-Sensor vor direkter
Page 35

33
Sonneneinstrahlung und anderen externen Wetterbedingungen am besten geschützt
ist. Verwenden Sie zur Befestigung des Wandhalters die mitgelieferten Schrauben.
Stecken Sie anschließend den Thermo-Hygro-Außen-Sensor in den Halter und sichern
Sie beide Teile mit der mitgelieferten Schraube. Stellen Sie sicher, dass die Anschlusskabel von Wind- und Regensensor richtig und korrekt in die entsprechenden Buchsen
des Thermo-Hygro-Außen-Sensors gesteckt sind. Dadurch vermeiden Sie Übertragungsfehler. Anschließend schieben Sie den Regenschutz über den Sensor.
Der Regensensor
Für beste Ergebnisse sollte der Regensensor sicher auf einer ebenen Fläche ca. 1 m
über dem Erdboden montiert werden. Der Montageort muß sich in freiem Gelände
ohne Abdeckung durch Bäume oder andere Hindernisse befinden, damit der fallende Regen nicht beeinflusst wird und dadurch ungenaue Messwerte entstehen. Stellen Sie sicher, dass sich der Regen nicht im Gehäuse sammeln kann und ungehindert
abfließen kann. (Test durch vorsichtiges Eingießen von sauberen Wasser.)
Wenn der Regensensor fest montiert ist, dann verbinden Sie dessen Anschlusskabel,
mit der richtigen Buchse des Thermo-Hygro-Außen-Senders.
Der Regensensor ist somit betriebsbereit. Gießen Sie zu Testzwecken sehr langsam
und vorsichtig und eine geringe sauberes Wasser in den Trichter des Regensensors.
Diese Wassermenge wird nun wie normaler Regen gemessen. Das Messergebnis
sollte nach ca. 2 Minuten im Display der Basisstation angezeigt werden.
Page 36

34
Der Windsensor
Führen Sie zunächst das Anschlusskabel durch die Halterung des Windsensors. Prüfen Sie vorab, ob sich Windfahne und Windrad frei drehen und leicht bewegen lassen. Für korrekte und genaue Messergebnisse ist es wichtig, den Windsensor so zu
montieren, dass dessen Frontseite (Markierung E) in Richtung Ost-West-Richtung
zeigt. Der Windsensor kann mit den beiliegenden Schrauben oder Kabelbinder an
einen soliden Wand- oder Holzmast mit einem Durchmesser von 16 bis 33 mm befestigt werden. In jedem Fall ist es wichtig, dass der Wind ungehindert von allen Seiten
auf den Windsensor einwirken kann. Anschließend verbinden Sie dessen Anschlusskabel, mit der richtigen Buchse des Thermo-Hygro-Außen-Senders.
Pflege und Instandhaltung
Extreme Temperatureinwirkungen, Vibrationen, und Stossbelastungen sollten vermieden werden, da dies zu Beschädigungen des Gerätes und falschen Vorhersagen
und Angaben führen könnte.
Verwenden Sie zur Reinigung von Display und Gehäusen ein weiches, leicht feuchtes
Tuch! Keine lösenden oder scheuernden Reinigungsmittel verwenden, da diese das
Display und Gehäuse beschädigen können.
Tauchen Sie die Basisstation nicht ins Wasser!
Entfernen Sie sofort leistungsschwache Batterien, um ein Auslaufen der Batteriesäure
zu verhindern!
Ersetzen Sie verbrauchte Batterien immer komplett und gleichen Typs!
Öffnen der Gehäuse, sowie eigene Reparaturversuche führen zu Garantieverlußt!
Page 37

35
Fehlerbeseitigung
Die 868MHz-Technik ermöglicht es, auf kurze bis mittlere Distanzen Daten drahtlos per
Funk zu überetragen. Dabei wird vom Sender eine Trägerwelle mit einer Frequenz von
868MHz benutzt, mit der die zu übertragenden Informationen übermittelt werden. Der
Empfänger filtert die Informationen aus diesem Signal heraus und wertet diese aus.
Bei dieser Frequenz handelt es sich um eine allgemein freigegebene Frequenz, d.h.
jeder darf zugelassene Geräte in diesem Frequenzbereich benutzen, es ist keine
Anmeldung des Gerätes bzw. keine Amateurfunkprüfung zum Betrieb notwendig.
Durch diese neue Technik wurden bisher z.B. viele innovative Produkte wie Babyfone, LPD-Funkgeräte, Audio-Übertragungssysteme oder auch diese Wetterstation
hergestellt. Es sind dafür keine Kabelverbindungen notwendig, die die Übertragung
per Funk erfolgt. Bedingt durch die gesetzlichen Vorschriften ist die Sendeleistung
und die Bandbreite sehr gering. Dadurch ergeben sich im Gebrauch dieser Geräte
manchmal Probleme:
1. Empfangsprobleme:
- Keine Anzeige der gesendeten Daten auf der Empfängereinheit.
- Häufiger Ausfall derDatenübertragung.
2. Empfangsstörungen:
- Sender sind an Metallrahmen oder ähnlichem angebracht.
- Wände und Decken bestehen aus Stahlbeton. Auch eine hohe Luftfeuchtigkeit
kann die Reichweite ebenfalls stark einschränken.
- Fensterscheiben sind bedampft oder bestehen aus einer Wärmeschutzvergla-
sung.
- Spiegel, Bäume, Gebäude oder ähnliches sind in unmittelbarer Nähe.
3. Störeinflüsse:
- Andere 868MHz-Produkte befinden sich im Umkreis von 20 m zu Ihrer Wettersta-
tion. Produkte Ihres Nachbarn z.B. wie Funkkopfhörer, Babyfone oder auch andere
Wetterstation, welche auf der gleichen Frequenz arbeiten.
- Mehrere Sender sind nebeneinander angebracht (Mindestabstand ca. 0,5 m).
- Mikrowellen, Heizungssteuerungen, Fernsher, Computer oder andere Haushalts-
geräte befinden sich in unmittelbarer Nähe (Mindestabstand ca.. 2- 3 m).
4. Fehleranalyse:
- Sind Sie genau nach der Bedienungsanleitung vorgegangen? Legen Sie zuerst die
Batterien in den Sender und dann erst in den Empfänger!
- Prüfen Sie die Wetterstation vor der Rücksendung erst 2 - 3 Tage in einem
gemeinsamen Raum, mit möglichst wenig Störquellen um die grundsätzliche
Funktionsbereitschaft festzustellen - kontrollieren Sie auch die Batterien Ihres
Produkts, ob diese noch Voll sind!
Page 38

36
- Versuchen Sie anschließend (nach positiver Prüfung) die Ursache des Problems
zu ergründen z.B. durch Nachfrage bei unserer Horline!
- Verändern Sie durch mehrere Versuche zuerst den Standort des Senders oder der
des Empfängers um die günstigste Sende-Empfangsverbindung zu ermitteln!
Entsorgung
Entsorgen Sie das Produkt am Ende seiner Lebensdauer gemäß den
geltenden gesetzlichen Bestimmungen!
Entsorgung von gebrauchten Batterien/Akkus!
Sie als Endverbraucher sind gesetzlich (Batterieverordnung) zur Rückgabe aller
gebrauchten Batterien und Akkus verpflichtet; eine Entsorgung über den Hausüll
ist untersagt!
Schadstoffhaltige Batterien/Akkus sind mit nebenstehenden Symbolen gekennzeichnet, die auf das Verbot der Entsorgung über den
Hausmüll hinweisen.
Die Bezeichnungen für das ausschlaggebende Schwermetall sind: Cd
= Cadmium, Hg = Quecksilber, Pb = Blei. Ihre verbrauchten Batterien/Akkus können Sie unentgeltlich bei den Sammelstellen Ihrer
Gemeinde, unseren Filialen oder überall dort abgeben, wo
Batterien/Akkus verkauft werden!
Sie erfüllen damit die gesetzlichen Verpflichtungen und leisten Ihren Beitrag zum
Umweltschutz!
Technische Daten
Spannungsversorgung
Basisgerät : 3 x 1,5 Volt Mignon-Batterie (Alkali)
Thermo-Hygro-Außen-Sender : 2 x 1,5 Volt Mignon-Batterie (Alkali)
Batterielebensdauer : ca. 24 Monate
Frequenz : 868MHz
Sendereichweite : ca. 100 m im Freienfeld
Page 39

37
Temperaturmessbereich
Außenfühler : -40,0°C bis +59,9°C mit 0,1°C Auflösung
(Anzeige „OF.L“ Messwert außerhalb diese
Bereichs)
Rel. Luftfeuchte : 1% bis 99“ mit 1% Auflösung
(Anzeige „--„ bei < 1% / „99“ > 99%)
Windgeschwindigkeit : 0 bis 50 m/s
(Anzeige „OF.L“ bei > 50m/s
Windtemperatur : -40°C bis +59,9°C
(Anzeige „OF.L“ Messwert außerhalb diese
Bereichs)
Einstellbereich des rel. Luftdrucks : 919 bis 1080 hPa
(27,17 bis 31,90 inHg)
Regenmenge : 0 bis 9999 mm oder 0 bis 393,6 inch
Anzeige „OF.L“ bei >9999 mm)
Wetterhistorie : Datensätze alle 4,5 Sekunden
Luftdruck-Prüfintervalle : jede 15 Sekunden
Abmessungen (LxBxH)
Basisstation : 165,4 x 30,8 x 141,9 mm
Thermo-Hygro-Außen-Sender : 57,3 x 62 x 157 mm
Windsensor : 250 x 164 x 192,7 mm
Regensensor : 144 x 54,6 x 88 mm
Konformitätserklärung
Hiermit erklären wir, Conrad Electronic, Klaus-Conrad-Straße 2, 92240 Hirschau,
dass sich dieses Produkt in Übereinstimmung mit den grundlegenden Anforderungen und den anderen relevanten Vorschriften der Richtlinie 1999/5/EG befindet. Die
Konformitätserklärung zu diesem Produkt finden Sie unter www.conrad.com
Page 40

38
Introduction
Dear customer, thank you for buying the Radio Weather Station.
You have purchased a product which has been designed according to state-ofthe-art technology.
This product meets the requirements of all applicable European and national
guidelines. Its conformity has been certified and the corresponding declarations and documents can be obtained from the manufacturer.
To maintain this status and to ensure risk-free operation, you, as the user, must comply with these operating instructions.
For a fast response of your technical enquiries please use the email
address listed below.
Germany: Fon. + 49 9604/40 88 80
Fax + 49 9604/40 88 48
e-mail: tkb@conrad.de
Mon to Thurs 8.00am to 4.30pm
Fri 8.00am to 2.00pm
Page 41

39
Intended use
This product is a radio-controlled weather station, which displays the time, the date,
the calendar, weather forecast, wind direction and speed, rain quantity, outdoor temperature, outdoor humidity and the air pressure and has different alarm functions for a
large number of weather conditions. The weather station provides comprehensive
weather information and forecasts.
The basis of the weather station is for indoor use only and may not be operated outdoors or in damp rooms, e.g. bathrooms. The rain sensor and the wind sensor are
connected to the thermal hygro outdoor sensor with cables and the sensor then
sends the data to the basis of the weather station via a 868 MHz signal. The sensors
and the transmitter are installed outdoors. The basis and the transmitter are supplied
with power via batteries type mignon at 1.5 Volts each.
This weather station is not 100% accurate and therefore designed for home use only.
The weather station is not approved for medical purposes or public information.
Use other than that described above will lead to damage to the product and will
expose you to additional risks, such as fire etc. The safety instructions must be
observed.
Safety instructions
The warranty lapses in case of damage resulting from failure to
observe these operating instructions. We will not assume any
responsibility for consequential damage!
We will also not assume any responsibility for damage to assets
or persons caused by improper handling or failure to observe the
safety instructions. The claim to warranty will lapse in such cases.
For safety and licensing (CE) reasons, unauthorised conversion and/or modification
to the product are not permitted!
For correct and safe operation, technicians, end consumers and service technicians
need to observe all of the safety instructions listed with these operating instructions.
Power is supplied by seven 1.5 volt mignon batteries.
Keep the weather station out of the reach of children, since it is not a toy. (Do not
install near children’s beds or playpens either.)
Page 42

40
Never operate the basis of the weather station in the vicinity of water or steam, or in
humid ambient conditions such as near a bathtub, washing machine, sink, swimming
pool or in damp cellars.
Ensure sufficient ventilation when installing the basis! The housings must neither be
blocked nor covered. Never expose the basis to direct sunlight!
Also keep a sufficient distance to heaters, ovens and other heat sources.
Only use the enclosed OEM accessories to prevent irreparable damage. In such cases you will lose the claim to warranty. Do not use extension cables.
Make sure all the cables are laid so that nobody will trip over them and that they are
not accessible for children or pets.
Remove the batteries from the basis of the weather station and the transmitter if they
are not going to be used for longer periods.
Never connect additional equipment or other devices. This could cause faulty operation
or irreparable damage to the device. Loss of warranty!
Please ensure that no objects fall onto the housing of the basis and that no liquid enters
the housing.
On commercial premises, the relevant accident prevention regulations for electrical
equipment must be complied with.
Page 43

41
Operating Elements
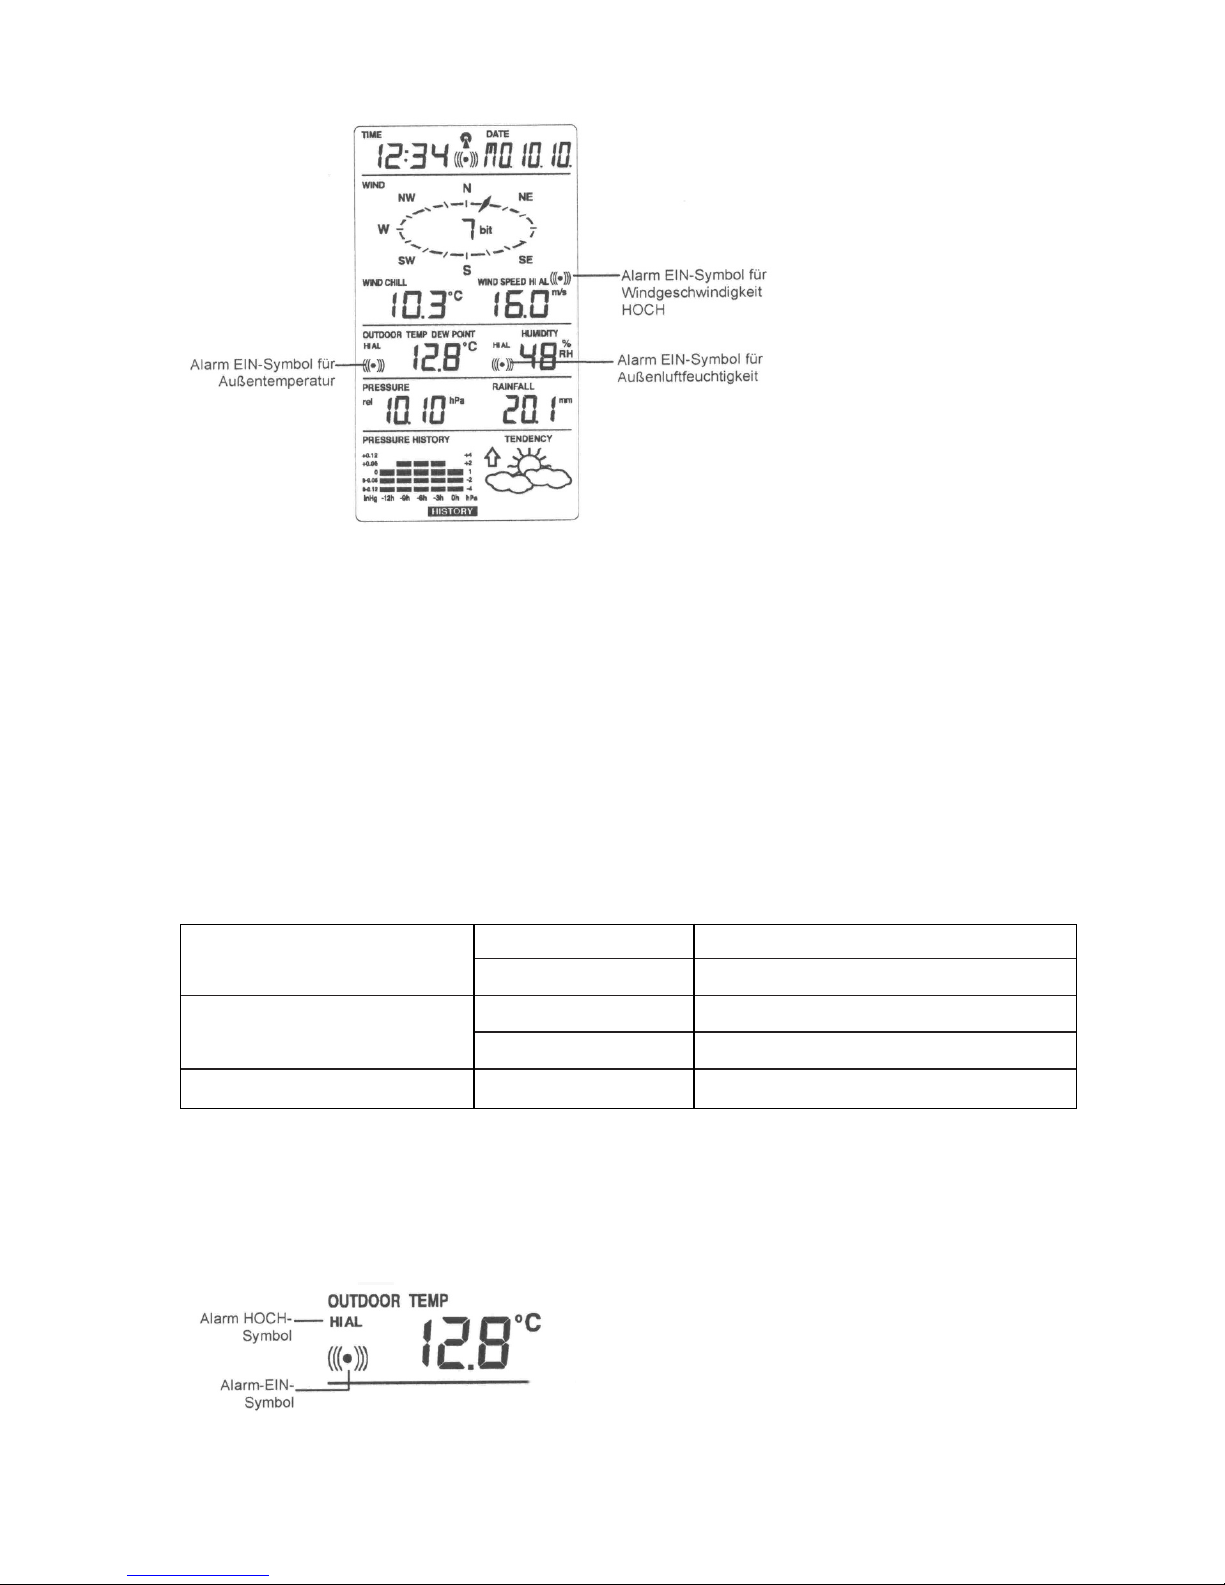
Low-battery
indicator
Outdoor transmitter
battery low indicator
Wakeup alarm symbol
History diagram of air
pressure history
Relative air pressure in
hPa or inHg
Symbol for outdoor
temperature
Outdoor temperature in
°C or °F
Wind chill in °C or °F
Time display
Calendar display
Display for buzzer
(ON/OFF)
Wind direction display and
wind speed on Beauford
scale
Symbol for wind speed
HI/LO alarm
Wind speed in km/h, mph or m/s
Relative outdoor humidity in % RH
Symbol for outdoor humidity alarm
Total rain quantity in mm or inches
Weather trend display
Weather forecast display
Outdoor signal reception symbol
Fold-out stand I
Attachment opening
Fold-out stand II
Battery compartment cover
Page 44

42
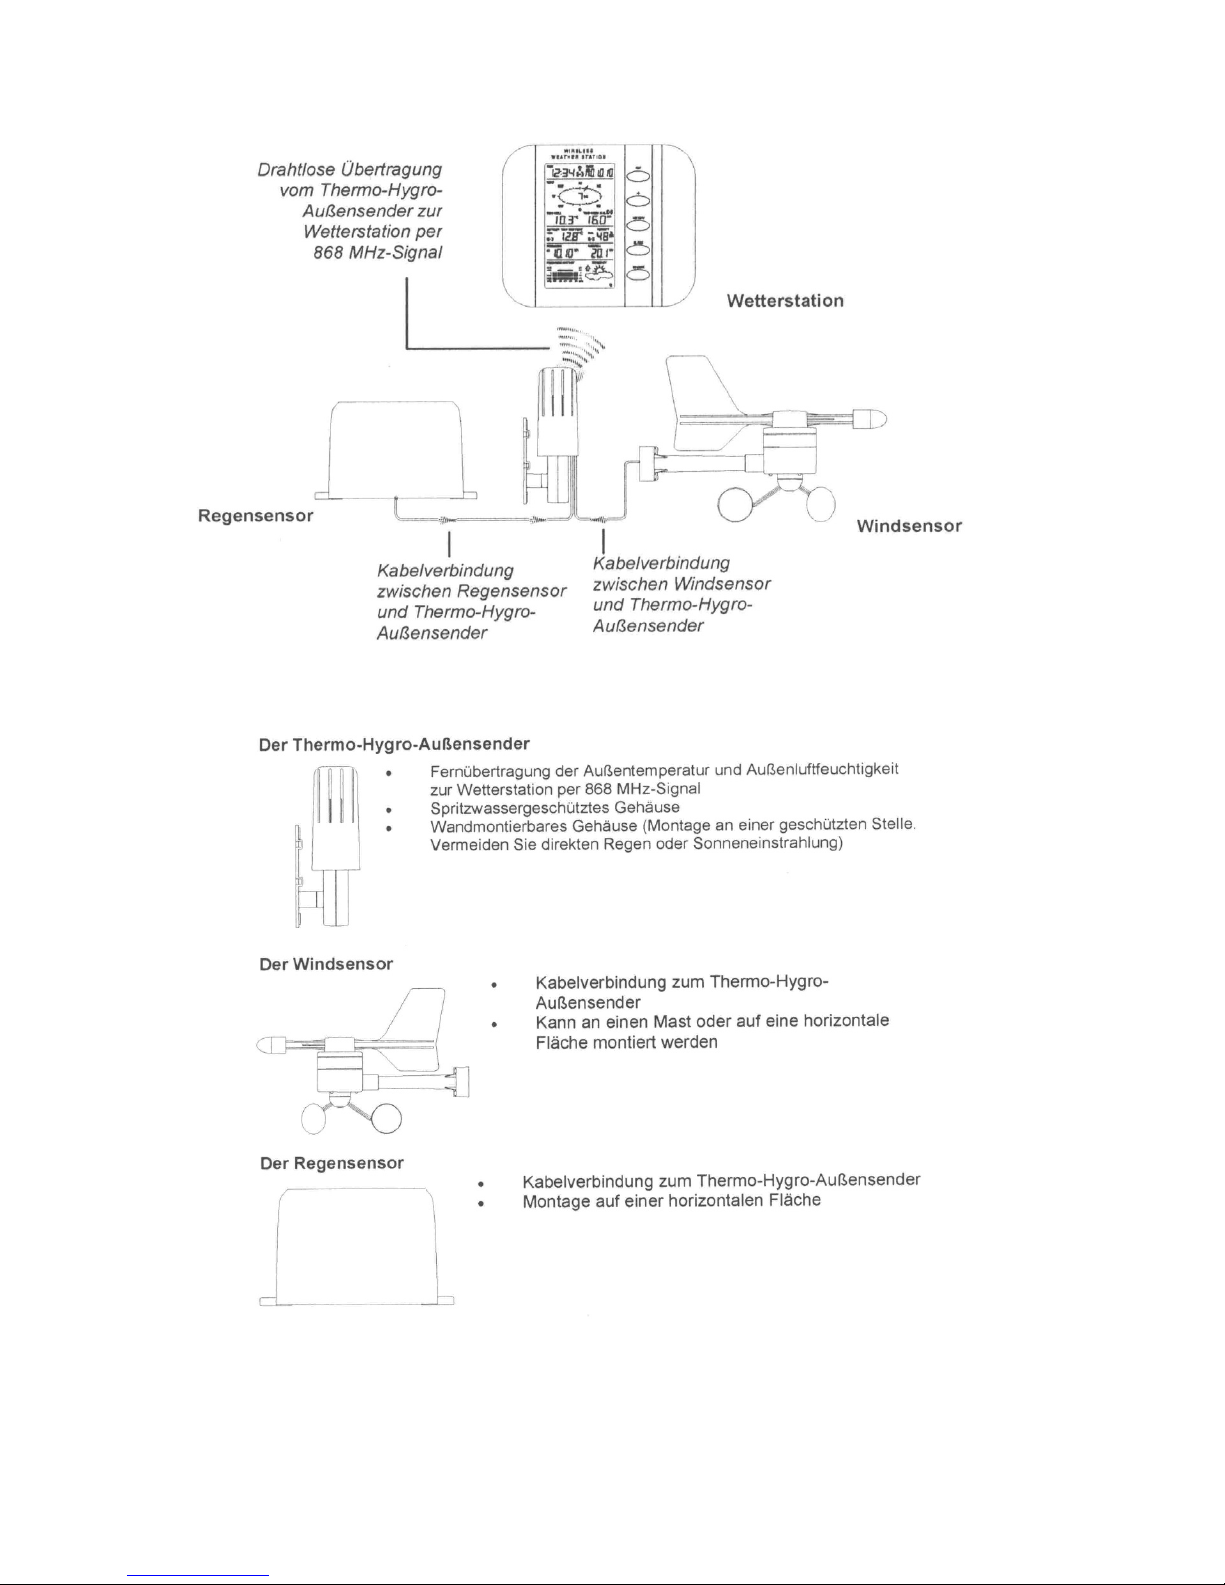
Wireless transmission from
the thermal hygro outdoor
transmitter to the weather
station per 868 MHz signal
Wireless transmission from
the thermal hygro outdoor
transmitter to the weather
station per 868 MHz signal
Rain sensor
Weather station
Wind sensor
Cable connection between wind sensor and
thermal hygro outdoor
transmitter
The thermal hygro outdoor sensor
• Remote transmission of the outdoor ttemperature and the outdoor
air humidity to the weather station via 868 MHz signal
• Spray water protected casing
• Wall-mountable casing. (Installation in a protected place. Avoid
direct rain or solar radiation)
The wind sensor
• Cable conneection to the thermal hygro outdoor sensor
• Can be mounted on a pole or a horizontal surface
The rain sensor
• Cable conneection to the thermal hygro outdoor sensor
• Can be mounted on a horizontal surface
Page 45

43
Initial operation
Prior to final commissioning, wire and set the entire system in its later configuration
on a table indoors, for example. This measure also serves to test individual appliance
parts for their correct function prior to final installation and placement at the installation site.
1. First establish the connection between the rain and wind
sensor and the thermal hygro outdoor transmitter by
plugging the plugs of both sensors into the corresponding socket of the thermal hygro outdoor sensor.
- Socket RAIN for the rain sensor
- Socket WIND for the wind sensor
2. First, insert the batteries into the thermal hygro outdoor transmitter! See the chapter „Battery exchange“.
3. Then insert the batteries in the basis appliances. See the chapter „Battery
exchange“.
As soon as the batteries are inserted, all segments on the LC display light up
briefly and a signal sounds (not with the temperature station). The the time (0:00),
the date (1.1.05), the weather symbols and the air pressure are displayed.
4. Afterwards, the weather station starts to receive data from the outdoor sensors
and display them on the LC display. If the outdoor temperature, the outdoor
humidity, the wind chill and wind speed are not displayed after approx. 30 seconds, you once again have to remove all batteries from the units and repeat the
process starting at point 1.
5. Check the cables for proper connection and the individual functions by manually
turning the wind wheel, moving the weather flag, tilting the rain sensor until the
contact controller audibly snaps into place, etc.
6. The time and the date must be set manually! See the chapter „Setting the time and
the date“
7. After you checked the correct function of the weather station in accordance with
the above points and everything works correctly, you can start assembling the individual components. Make sure that the components interact correctly at the installation site! Should there be transmission problems with the 868 MHz radio connection, for example, shifting the installation site easily solves this problem in most
cases.
Base for the wind
and rain sensor
Page 46

44
In normal cases, the radio connection between the receiver and the
transmitter has a range of at least 100 meters in free field, inasmuch as
it is not obstructed by obstacles like buildings, trees, power lines, etc.
Interference signals emitted by PC monitors, radios or TVs, for example, may prevent the establishment of the radio connection alltogether.
Observe this when selecting the installation sites!
8. After inserting the batteries into the outdoor sensor, you should also insert the
batteries in the basis devices to ensure a quick signal reception. If the batteries
are first inserted in the basis 5 hours after inserting them in the outdoor sensor, a
successful signal reception for the outdoor sensor is no longer possible. In this
case, the batteries have to be removed and reinserted again. (Repeat the procedure starting at point 1).
After the batteries were inserted in the correct sequence,
the synchronisation phase between the basis station and the
transmitter starts. The sensor
reception signal blinks during
this time.
If the signal is received correctly, the symbol is permanently displayed. If the signal is
not displayed, the radio connection is impaired. In this case, you have to look for a
new installation site for the transmitter or the basis.
Replacing the batteries
The basis works with three
1.5 V mignon cells.
A battery change is necessary when the display shows
the low battery symbol on
the top left.
Sensor reception signal
1. Remove the battery compartment
cover.
2. Insert the batteries observing the
correct polarity (see marking in
the battery compartment).
3. Replace the cover.
Page 47

45
The thermal hygro outdoor
sensor works with 2 mignon
cells of 1.5 V each.
A battery change is necessary when the display shows
the low battery symbol on
the bottom right.
Saved data is
lost when changing the batteries. Therefore you have to make all
settings / programming operations again.
Batteries do not belong in the hands of children.
Make sure that the polarity is correct when inserting the batteries.
The batteries must not be short-circuited nor thrown into the fire
nor reloaded. In these cases, there is a risk of explosion.
Function buttons
The basis has 5 buttons, which have
the following functions:
SET button
Press this button for accessing the manual setup mode for the following functions:
LCD contrast, manual time setting, 12/24 hr format, calendar setting, temperature
display units °C/°F, wind speed, rain quantity, air pressure, reference setting for the
relative air pressure, setting the switching threshold for the weather forecast display,
setting the switching threshold for the storm warning and alarm setting ON/OFF.
In normal display mode, press and hold the button for switching the buzzer ON/OFF.
In weather alarm setup mode, press and hold the button for setting the different
alarm values and for switching the alarm ON/OFF.
Press the button for activating reset mode during the display of the saved maximum
or minimum values.
Stopping the alarm signal when the wakeup or weather alarm sounds.
SET button
+ button
ALARM button
MIN/MAX button
HISTORY button
1. Remove the rain protection from the thermal
hygro oputdoor sensor.
2. Remove the battery compartment cover
3. Insert the batteries observing the correct
polarity (see marking in the battery
compartment).
4. Close the battery compartment cover and
replace the rain protection.
Page 48

46
+ - button
Press this button to switch the calendar display to the set alarm time, the date, the
weekday and the day’s date or the display of seconds in the time display section.
Press to set (increase) the different setup values.
Stopping the alarm signal when the wakeup or weather alarm sounds.
Press to confirm the reset of a saved maximum or minimum value.
HISTORY button
Press this button to display the saved weather data history.
Stopping the alarm signal when the wakeup or weather alarm sounds.
Press to leave the manual setup mode and the alarm setup mode.
ALARM button
Press to access the setup mode for the wakeup and weather alarm.
Confirmation of the individual alarm settings.
Press to leave the manual setup mode.
Stopping the alarm signal when the wakeup or weather alarm sounds.
Press to leave the display mode for the saved minimum and maximum values.
MIN/MAX button
Press to display the saved minimum and maximum values of the different weather
data.
Press to set (decrease) the different setup values.
Stopping the alarm signal when the wakeup or weather alarm sounds.
LCD monitor
The LCD monitor serves to display the following information in five sections:
1. Time and date
2. Wind data
3. Outdoor temperature and air humidity
4. Air pressure and rain quantity data
5. Air pressure history and weather forecast
Page 49

47
Manual settings
The following settings can be changed manually when pressing the SET button:
- LCD contrast
- Time setting
- 12/24 hr time format
- Calendar setting
- Temperature units (°C/°F)
- Wind speed units
- Rain quantity units
- Air pressure units
- Reference value relative air pressure
- Switching sensitivity of the weather forecast display
- Switching sensitivity for storm warnings
- Setting ALARM ON/OFF
Setting the LCD contrast
You can set the LCD contrast in 8 steps from LCD 1 to LCD 8.
(Factory setting: LCD 5):
Press the SET button. The display of the contrast level starts to flash.
Use the + - button or the MIN/MAX button to set the contrast level.
Manual Time Setting
Now you can set the time manually in the following steps:
The hours start to flash.
Set the hours with the buttons + - or MIN/MAX
Press SET to switch to the setup mode for the minutes The minutes start to flash.
Set the minutes with the buttons + - or MIN/MAX
Press SET for confirmation.
Blinking display
Blinking
hours display
Blinking minutes display
Page 50

48
Setting the 12/24 hr time format
You can display the time in 12 or 24 hr format. (Factory setting: 24h) Set the 24 hr format as follows:
Use the + - button or the MIN/MAX button to set the unit.
Press SET for confirmation.
Calendar setting
The calendar preset of the weather station is 1.1.2005. You can set the date manually as follows:
The years start to flash.
Set the years with the buttons + - or MIN/MAX
The range is from „00“ (2000) to „99“ (2099).
Press SET to confirm your selection and to access the months. The months start to
flash.
Set the month with the buttons + - or MIN/MAX
Press SET to confirm your selection and to access the date mode. The day settings
start to flash.
Set the date with the buttons + - or MIN/MAX
Press SET for confirmation of all calendar settings.
Setting the temperature units (°C/°F)
You can display the temperature in °C and in °F. (Factory setting: °C).
The temperature unit begins to flash.
Use the + - or the MIN/MAX button to switch between the units °C or °F.
Press SET for confirmation.
Blinking display
Year
blinking
„Date and month“ (24 hr time format)
„Month and date“ (12-hr time format)
Page 51

49
Setting the wind speed units
You can display the wind speed in km/h (kilometers per hour) or mph (miles per hour)
or m/s (meters per second). (Factory setting: km/h).
Use the + - or the MIN/MAX button to switch between the units km/h, mp/h or m/s.
Press SET for confirmation.
Setting the rain quantity units
You can display the total rain quantity in mm or inches. (Factory setting: „mm“)
Use the + - or the MIN/MAX button to switch between the units mm or inches.
Press SET for confirmation.
Setting the relative air pressure units
You can display the relative air pressure units in hPa (hektopascal) or inHg (Inch mercury column). (Factory setting: hPa)
Use the + - or the MIN/MAX button to switch between the units hPA or inHG.
Press SET for confirmation.
Setting the relative reference air pressure
After inserting the batteries, the relative reference air pressure of the barometer of
your weather station is 1013PA.
For exact measuring, it is necessary to initially calibrate the barometer to the local
relative air pressure (depends on the local height above sea level). Find out the current air pressure in your region (local weather service, Internet, optical shop, calibrated displays in public buildings or at the airport, etc.).
For better reference, the relative air pressure can be set to a manual value in a range
from 919 to 1080 hPa (27.17 to 31.90 inHg).
blinking
blinking
blinking
blinking
Page 52

50
The current relative reference air pressure value starts to blink.
Use the + - button or the MIN/MAX button to increase or decrease the value. Constant pressing of the button switches forwards faster.
Press SET for confirmation of the set value.
Note:
This calibration option is especially useful for applicants residing at different heights
above sea level but want to display the air pressure based on sea level.
Setting the switching sensitivity for the weather forecast symbols
The user can select a specific value as switching threshold for the change of the
weather symbol display in a range from 2hPa to 4hPa. This represents the sensitivity
of the weather forecast, meaning the lower the value, the more sensitive the weather
forecast (factory setting: 3hPa).
The current switching value starts to blink.
Use the + - button or the MIN/MAX button to set the switching value.
Press SET for confirmation of the set value.
Setting the switching sensitivity value for the storm warning alarm
The user can also set a specific value as switching threshold in a range from 3 hPa to 9
hPa for a drop of the air pressure within 6 hours (factory setting: 5 hPa).
The current switching value starts to blink.
Use the + - button or the MIN/MAX button to set the switching value.
Press SET for confirmation of the set value.
Setting the storm warning alarm ON/OFF
You can set the acoustic storm warning alarm to ON or OFF. (Factory setting: OFF).
The display AOF starts to flash.
blinking
blinking
Page 53

51
Use the + - button to set the alarm to ON or OFF. („AOF“ = OFF, „AON“ = ON).
To confirm the set value and return to the normal display mode, press the SET button.
Note:
If a storm warning alarm is active, the downward weather trend arrow blinks. (Also
see the section „WEATHER TREND DISPLAY“)
Leaving the manual setup mode
To leave the manual setup mode, you can press the ALARM or the HISTORY button
at any time during manual setup or wait for the automatic timeout. In both cases, the
device returns to the normal time display mode.
Setting the wakeup alarm
You can set the alarm with the ALARM and the SET buttons.
Press the ALARM button once. The ALARM symbol and the alarm time display
appear on the top right part of the LCD monitor.
Press and hold the SET button for approx. 2 seconds. The hours of the alarm time
start blinking Set the hours of the alarm time with the buttons + - or MIN/MAX
Press SET to confirm your selection and to access the minutes. The minutes start to
flash.
Set the minutes of the alarm time with the buttons + - or MIN/MAX
Press ALARM for confirmation. Wait approx. 30 seconds until the display automatically returns to the normal display mode.
In normal display mode, press the ALARM button once to return to the alarm setup
mode. Briefly press the SET button to set the alarm to ON or OFF. (The symbol ((( • )))
means that the wakeup alarm was set.)
Press the HISTORY button or wait approx. 30 seconds for the automatic return to
normal display mode.
blinking
Alarm time display
Alarm ON symbol
Page 54

52
Note:
The signal duration of the wakeup alarm is 2 minutes. To terminate the wakeup
alarm, press any key while the alarm sounds.
Weather alarm operation
You can put the weather alarms in standby to activate alarm signals in case of certain
weather conditions. For example, you can set the alarm threshold for the outside
temperature to +40°C (HIGH) and -10°C (LOW), whereby only the alarm HIGH is activated and the alarm LOW stays activated (meaning temperatures of >+40°C cause
an alarm, while temperatures <-10°C do not).
This lets you set the weather station in such a way that it sounds an alarm when certain weather conditions occur.
You can make the following weather alarm settings in the weather alarm setup mode:
- Outdoor temperature alarm HIGH (HI)
- Outdoor temperature alarm LOW (LO)
- Outdoor air humidity alarm HIGH (HI)
- Outdoor air humidity alarm LOW (LO)
- Wind speed alarm HIGH (HI)
Presetting the alarm values
Temperature Low LO 0°C
High HI 40°C
Relative Low LO 45%
Humidity High HI 70%
Wind speed High HI 100 km/h
Alarm ON symbol for
wind speed HIGH
Alarm ON symbol
for outdoor air
humidity
Alarm ON symbol for
outdoor air humidity
Page 55

53
Setting the HIGH and the LOW outdoor temperature alarm
The high and low outdoor temperature alarm can be set independently of one another to ON or OFF.
Setting the outdoor temperature alarm value (alarm value HIGH or LOW)
In normal display mode, press the alarm button twice. The display of the outdoor
temperature alarm will appear.
Press and hold the SET button for approx. 2 seconds. The temperature display starts
blinking. To set the outdoor temperature alarm value HIGH, press the + - or the
MIN/MAX button. (Keeping the button depressed advances the values faster).
Press ALARM for confirmation. The display stops blinking. Now press SET to turn
the alarm ON or OFF. (The symbol (*) means that the alarm was set.)
Press the ALARM button once. The outdoor temperature LOW display will appear.
Press and hold the SET button for approx. 2 seconds. The temperature display
begins to flash. To set the outdoor temperature alarm value LOW, press the + - or the
MIN/MAX button. (Keeping the button depressed advances the values faster).
Press ALARM for confirmation. The display stops blinking. Now press SET to turn
the alarm ON or OFF. (The symbol (*) means that the alarm was set.)
Press the HISTORY button or wait approx. 30 seconds for the automatic return to
normal display mode.
In case the temperature reaches a value that fulfills the alarm conditions for a HIGH
or LOW alarm, both the display value as well as the corresponding symbol (HI AL/LO
AL) start to blink. The buzzer will sound for approx. 2 minutes. By pressing any key,
the user can stop the buzzing sound.
Setting the HIGH and the LOW outdoor air humidity alarm
The high and low outdoor air humidity alarm can be set independently to ON or OFF
.
Setting the outdoor air humidity alarm value (alarm value HIGH or LOW)
In normal display mode, press the alarm button four times. The display of the outdoor air humidity alarm will appear.
Alarm HIGH
symbol
Alarm ON
symbol
Page 56

54
Press and hold the SET button for approx. 2 seconds. The air humidity display
begins to flash. To set the outdoor air humidity alarm value HIGH, press the + - or the
MIN/MAX button.
Press ALARM for confirmation. The display stops blinking. Now press SET to turn
the alarm ON or OFF. (The symbol (*) means that the alarm was set.)
Press the ALARM button once. The outdoor air humidity LOW alarm display appears.
Press and hold the SET button for approx. 2 seconds. The air humidity display
begins to flash. To set the outdoor air humidity alarm value LOW, press the + - or the
MIN/MAX button.
Press ALARM for confirmation. The display stops blinking. Now press SET to turn
the alarm ON or OFF. (The symbol (*) means that the alarm was set.)
Press the HISTORY button or wait approx. 30 seconds for the automatic return to
normal display mode.
In case the air humidity reaches a value that fulfills the alarm conditions for a HIGH or
LOW alarm, both the display value as well as the corresponding symbol (HI AL/LO
AL) start to blink.
Setting the wind speed alarm
You can set the wind speed alarm HIGH the following way:
In normal display mode, press the alarm button six times. The display of the wind
speed alarm appears.
Press and hold the SET button for approx. 2 seconds. The wind speed display
begins to flash. To set the wind speed alarm value HIGH, press the + - or the
MIN/MAX button.
Press ALARM for confirmation. The display stops blinking. Now press SET to turn
the alarm ON or OFF. (The symbol (*) means that the alarm was set.)
To return to normal display mode, press the ALARM button once.
In case the wind speed reaches a value that fulfills the alarm condition for a HIGH alarm,
both the display value as well as the corresponding symbol (HI AL) start to blink. The
buzzer will sound for approx. 2 minutes. By pressing any key, the user can stop the
buzzing sound.
Hysteresis
In order to compensate slight fluctuations of the measuring data, which may cause a
constant weather alarm signal if the measuring value is very close to the value set by
the user, a hysteresis function is available for each weather alarm.
Page 57

55
For example, if the high temperature alarm is set to +25°C and the current value
reaches these +25°C, the alarm is activated if it is turned on. If the temperature now
falls to +24.9°C or below and then rises again to +25°C, the displayed measuring value blinks but the alarm no longer sounds. Now the value has to drop below +24°C
(with a preset hysteresis of 1°C) to activate another alarm.
The following table shows the hysteresis values for the different weather data:
Weather data Hysteresis
Temperature 1°C
Humidity 3% RH
Wind speed 5 km/h
Note:
To indicate that the current weather conditions are outside of the preset limits, the
temperature and air humidity will continue blinking when a button was pressed to
turn the alarm or the buzzer off.
Weather forecast and weather trend display
W
eather forecast symbols
The three weather forecast symbols on the bottom right of the LCD monitor are displayed in the following combinations:
In case of sudden or larger air pressure fluctuations, the display symbols are updated to indicate the weather change.
Each time a new average air pressure value is obtained - once per minute - this value is compared with an internal reference value. If the difference of these values is
larger than the selected switching value for the weather trend, the weather icon either
changes to worse or better. In this case, the current air pressure value is taken over
as new reference value for the weather trend.
If the display symbols do not change, either the air pressure did not change or the
change occurred so gradually that it cannot be registered by the weather station.
This way, the user can adjust the sensitivity in case of an air pressure change accordingly in the manual setup mode - see section SETTING THE SWITCHING SENSI-
TIVITY VALUE FOR THE WEATHER FORECAST SYMBOLS.
Sonny
Cloudy, partly sunny Rainy
Page 58

56
However, when the symbols show sun or rain, the display does not change when the
weather gets better (display: SUNNY) or worse (display: RAINY) because the display
symbols already represent the two extreme situations.
The display symbols indicate a weather change for the better or worse, which does
not have to mean sun or rain, however, as indicated by the symbols. For example, if
the current weather is cloudy and rain is displayed, this does not mean that the
device malfunctions, but rather that the air pressure has dropped and that a worse
weather condition is to be expected, which does not necessarily have to mean rain,
however.
Note:
After making the basic settings, you should not pay attention to the measuring values and weather forecasts for the first 12 to 24 hours, because the station first has to
collect air pressure data in this period on a constant height above sea level to make
a more exact forecast.
Just like with any other weather forecast, absolute accuracy cannot be guaranteed
here. Due to the different climatic zones for which the device was designed, the
weather station has an average accuracy of 75%. In regions with sudden weather
changes, e.g. from sun to rain, the weather station will be more accurate than in
regions with constant weather conditions, e.g. mostly sunny.
If the weather station is taken to a place that is significantly higher or lower than the
original location, e.g. from the ground floor to the top stories of a house, please
ignore the display of the weather forecast for the next 12 to 24 hours. With this measure, the device has the chance to process larger measuring series and will therefore
not wrongly interpret the new location as a change in air pressure if this actually only
concerns a slight change of the height above sea level.
Weather trend display
The weather trend displays work together with the weather forecast symbols.
These are the arrows to the right and the left of the weather symbols. If this arrow
points upwards, this means that the air pressure is rising and that the weather is getting better. If the arrow points downwards, this means that the air pressure is dropping and that the weather will get worse.
Due to this, the device is also able to indicate how the weather has changed or how
it may change. If the downwards arrow is displayed with the cloudy sun symbol, for
example, the last weather change took place during a sunny period, meaning only
the sun symbol was displayed. Due to the fact that the trend arrow points downwards, this also means that the next weather change will result in the display of the
rain symbol.
Page 59

57
Note:
Once the weather trend display has registered a change of the air pressure for the
first time, it will remain permanently visible on the LCD monitor.
Air pressure history (electronic barometer with air pressure trend)
The relative air pressure values and an air pressure history are displayed on the bottom of the LCD monitor.
Depending on the type of programming, the air pressure history is displayed in the
shape of a graphic consisting of vertical bars.
The bar graphic of the electronic barometer shows the air pressure history of the last
12 hours in five 3-hour steps:
The horizontal axis represents the air pressure measuring values of the last 12 hours
(-12, -9, -6, -3 and 0 hours). The bar for each of the 5 steps shows the trend over the
measured time period. The scale on the right side compares the result. The 0 in the
middle of the scale denotes the current air pressure.
The vertical axis represents the air pressure changes in hPa (+4, +2, 0, -2, -4. 0 indicates the current air pressure). Each deviation of +/- 2 hPa or 0.05 inHg) shows in
hectopascal (hPa) how high or low the past value was compared to the current air
pressure.
If the bars rise, this indicates a weather change for the better due to the increasing air
pressure. Dropping bars indicate a declining air pressure and therefore a weather
change for the worse as of the current time 0.
At each full hour, the current air pressure is used as basis for the display of a new
graphic bar. The existing graphic is then moved to the left by one bar.
Note:
For an exact barometer air pressure tendency display, the weather station should be
operated at a constant height above sea level. This means that the station should not
be moved from the ground floor to the top floors of a house. If this becomes necessary, the display has to be ignored for the next 12 to 24 hours.
Wind direction and wind speed measuring
In normal display mode, the second section of the LCD monitor shows the following
wind data:
Air pressure change
in inHg
Air pressure
change in
hPa
Page 60

58
Wind direction (displayed on a compass grid with 16 steps) and wind speed on a
Beauford scale
Wind chill in °C or °F
Wind speed in km/h, mph or m/s
Rain quantity measuring
The measured total rain quantity is displayed on the fourth section of the LCD monitor in the units „mm“ or „inches“.
(Also see „DISPLAY OF THE MAXIMUM / MINIMUM WEATHER DATA“.)
Display of the history data
The weather station can save up to 200 weather data records. This data is saved
automatically after commissioning the weather station in 3-hour intervals at the
times 0:00, 03:00, 06:00, 09:00, 12:00, 15:00, 18:00 and 21:00. E.g. if the user set
the time to 14:52 manually after inserting the batteries, the first history data record
is automatically saved at 15:00 hrs. The second data record is saved at 18:00 hrs
and so
on.
Each saved data record contains the wind direction, the wind speed on the Beauford
scale, the wind chill factor, the wind speed, the outdoor temperature and air humidity, the relative air pressure and the total quantity, the air pressure history and the
weather trend. The time and date of saving are also displayed.
Text shows wind speed on
Beaufort scale
Arrow shows last wind
direction measured
Alarm symbol
shows that the
alarm is ON
Wind speed
Wind chill
Page 61

59
Note:
To maintain the correct time of saving of the history record, the user should manually set the time immediately after inserting the batteries in the weather station.
Afterwards, you should avoid changing the set time, as this would also change the
recorded saving time of each additional history record, which may lead to confusion.
Viewing the weather history
Press the HISTORY button. The latest weather record with the time and date of saving appears on the display. In addition, the HISTORY symbol is displayed on the bottom of the LCD monitor.
To view older records, press the MIN/MAX button.
(Press the MIN/MAX and the + - button to see the previous or the next record.
(Saved in 3-hour intervals.)
Note:
The saved history records are not preserved in case of a battery change or when otherwise removing the batteries.
The value of the total rain quantity is displayed in the history record in integer numbers (without decimal points).
Viewing the minimum/maximum weather data
The weather station records the maximum and minimum values of the different
weather data automatically with the time of saving. You can view the following
saved maximum/minimum weather data by pressing MIN/MAX in normal display
mode:
Page 62

60
- Minimum outdoor temperature with time and date of saving
- Maximum outdoor temperature with time and date of saving
- Minimum outdoor air humidity with time and date of saving
- Maximum outdoor air humidity with time and date of saving
Time and date
of saving
Minimum outdo-
or temperature
value
MIN symbol
Time and date of
saving
Maximum outdoor air humidity
value
MAX symbol
Page 63

61
- Minimum wind chill temperature with time and date of saving
- Maximum wind chill temperature with time and date of saving
- Minimum relative air pressure with time and date of saving
Time and date
of saving
Maximum out-
door air humi-
dity value
MAX symbol
Time and date
of saving
Maximum rela-
tive air humidi-
ty value
MAX symbol
Page 64

62
- Maximum wind speed
Resetting the maximum and minimum weather data
To reset the previously described maximum and minimum weather data
1 to 9, you have to reset each individual display manually.
Press MIN/MAX to display the desired weather data. E.g. if you want to reset the
minimum weather data, you have to press the MIN/MAX button three times in normal
display mode to display the minimum air humidity value.
Press and hold the SET button for approx. 2 seconds until the RESET symbol
appears on the bottom of the LCD monitor.
Press the button + - once to reset the saved value to its current value and time.
To return to normal display mode, press the ALARM button once.
MAX symbol
Time and date of
saving
Maximum wind
speed value
Page 65

63
Total rain quantity
The total rain quantity is displayed on the fourth section of the LCD monitor in the
units „mm“ or „inches“. The display shows the rain quantity collected since the last
reset of the weather station.
In normal display mode, press the MIN/MAX button ten times to display the total rain
quantity. The RESET symbol appears on the display.
To reset the display of the total rain quantity, press the + - button once during the display of the total rain quantity and the RESET symbol. The total rain quantity is reset
to 0 and the saved time to the current time.
Note:
After commissioning, the time, date and total rain quantity are displayed as „-“. After
manual setting of the time, the time is displayed.
Turning the buzzer ON/OFF
You can turn off the buzzer so that it does not sound in case a wakeup alarm is activated. Then only the corresponding alarm symbol (*) appears on the LCD monitor.
When the buzzer is off and a weather alarm occurs, no buzzer sounds. To indicate
that a weather condition is outside of the set switching value and therefore in alarm
status, the display of the corresponding weather value blinks.
The total rain quantity is measured
as of this time and date.
Total rain quantity
Page 66

64
Turning off the buzzer
Press and hold the SET button in normal display mode until the symbol BUZZER
OFF appears on the right above the wind direction display. The LCD switches to setup mode.
To return to normal display mode, press the ALARM button once. The symbol
BUZZER OFF will remain visible.
Reactivating the buzzer
Briefly press the SET button when the symbol BUZZER OFF is visible on the display.
The symbol BUZZER OFF disappears.
To return to normal display mode, press the ALARM button once. The symbol
BUZZER OFF is no longer displayed and the alarm signal sounds in case of an alarm.
Low battery indicator
The low battery indicator for the weather station and the thermal hygro outdoor sensor appears on the top or bottom part of the LCD monitor when a battery is weak
and has to be replaced.
We do however recommend to exchange the batteries of all device components
once a year to ensure optimum accuracy.
Note:
After a battery change, you have to reset the weather station as well as the outdoor
sensor.
(Also see the section „Basic setting“.)
The data memory for the history data is deleted in case of a battery change.
Thermal hygro outdoor sensor
Outdoor temperature, outdoor air humidity, wind and rain data is measured every 4.5
seconds and transmitted. The weather station (basis and receiver) is synchronised to
the thermal hygro sensor (transmitter) for correct data reception. In normal cases, the
transmission range of the transmitter is up to 100 m but may be influenced by the
ambient temperature. In case of low temperatures, the transmission power may be
reduced. If the outdoor data is not received and displayed within 30 seconds after
commissioning, please check the following points:
Symbol for buzzer OFF
Page 67

65
1. The distance of the receiver and transmitter to interference sources, e.g. PC monitors or TVs, should be at least 1.5 m to 2 m.
2. Avoid placing the receiver directly or close to metal doors or window frames.
3. Using other devices on the same signal frequency (868MHz) could prevent correct signal transmission.
4. Neighbours operating devices on the same frequency (868 MHz) could also cause
interference.
5. Visual connection between the weather station and the thermal hygro outdoor
sensor, e.g. through a window, also expands the reception range.
Note
If the 868MHz signal is transmitted correctly, you should no longer open the battery
compartments of the components. Otherwise the batteries may become detached
and trigger an accidental reset of the saved data. If this happens nonetheless, you
have to reset all units to prevent transmission problems.
If the outdoor display shows „—-“ in normal operating mode, the weather station will
set the intervals for outdoor reception to 15 minutes until the sent data can be read.
If this is the case, reset the reception intervals to 4.5 seconds.
If no reception is possible despite observing all these facts, all components must be
reset.
Prior to installation
Prior to final installation of all components, make sure that
- the cable length from the wind and rain measuring device to the thermal hygro
outdoor sensor is sufficient
- the transmission signal of the thermal hygro outdoor sensor is received by the
basis
The base station
The base station can be wall-mounted or set up on a table or similar.
Wall-mounting
Select a protected installation site. Avoid rain or direct sunlight. Make sure that the
values of the transmitter can be received at the installation site.
Page 68

66
• Turn a screw (not part of the delivery) into the desired spot on
the wall. Let the screw head protrude approx. 5 mm out of the
wall.
• Hang the weather station on the wall. Make sure it hangs
securely before letting go.
Thermal hygro outdoor sensor
An ideal installation site for the thermal hygro outdoor sensor is an exterior wall below
a roof protrusion, which protects it from direct sunlight and other external weather conditions. Use the provided screws to attach the wall mount. Then insert the thermal
hygro outdoor sensor into the holder and secure both components with the provided
screw. Make sure that the connection cables of the wind and rain sensor are correctly
plugged into the corresponding sockets of the thermal hygro outdoor sensor. This prevents transmission errors. Then slide the rain protection over the sensor.
The rain sensor
For best results, the rain sensor should be installed on a level surface approx. 1 m
above the ground. The installation site must be located in free terrain without
obstruction by trees or other obstacles so that the rain can fall freely and result in
accurate measuring values. Make sure that the rain does not collect in the casing
and flow off. (Test this by carefully pouring in clean water).
Rain guard
Thermal hygro
transmitter
Wall mount
Page 69

67
When the rain sensor is securely mounted, connect its cable with the right socket of
the thermal hygro outdoor sensor.
Now the rain sensor is ready for operation. For test purposes, carefully and very
slowly pour in a slight amount of clean water into the funnel of the rain sensor. This
water quantity is now measured like normal rain. The measuring result should be displayed on the basis after approx. 2 minutes.
The wind sensor
First, guide the connection cable through the mount of the wind sensor. Check
whether the wind flag and the wind wheel can turn free and easily. For correct and
accurate measuring, it is important to mount the wind sensor in such a way that its
front side (marking E) points towards East-West. You can attach the wind sensor with
the enclosed screws or cable clams to a solid wall or wooden post with a diameter of
16 to 33 mm. In any case, make sure that the wind can access the wind sensor on all
sides without restriction. Then connect the connection cable with the correct socket
of the thermal hygro outdoor sensor.
Care and maintenance
Avoid extreme temperatures, vibrations and blows, which may damage the device
and lead to false measuring results.
Use a slightly damp, soft cloth to clean the display and the casing. Do not use any
solvents or abrasive cleaners, which may damage the display and the casing.
Do not immerse the basis in water!
Weather flag
Horizontal installation surface
Wind wheel
Vertical post
Page 70

68
Remove weak batteries immediately to prevent battery acid leaks!
Always replace spent batteries completely with the same type.
Opening the casing and repair attempts lead to the loss of the warranty.
Error remedy
The 868MHz technology makes it possible to transmit data over a short to medium
distance wireless. The transmitter uses a carrier frequency of 868 MHz for transmitting
the information. The receiver filters this information out of the signal and analyses it.
This frequency is a general frequency, meaning anyone can use devices in this frequency range without having to register them or passing an amateur radio technician
exam. This new technology enabled the production of many innovative products like
babyphones, LPD walkie-talkies, audio transmission system or this weather station.
Due to radio transmission, no cables are required. Due to the statutory regulations,
the transmission power and bandwidth is very low. Therefore, problems may sometimes occur when using these devices:
1. Reception problems:
- No display of the transmitted data on the receiver unit.
- Frequent loss of data transmission.
2. Reception Disturbances
- Transmitters are attached to metal frames or similar.
- Reinforced concrete walls and ceilings. High air humidity may also restrict the
reception.
- Vapourised windows or thermally insulated vitrification.
- Mirrors, trees, buildings or similar close-by.
3. Interference:
- Other 868MHz devices are located in a range of 20 m to your weather station. Your
neighbour’s devices, e.g. headphones, babyfones or other weather stations work
on the same frequency.
-
Several transmitters installed next to each other (minimum distance approx. 0.5 m).
- Microwaves, heater controls, TVs, PCs or other household devices are located in
direct proximity (minimum distance approx. 2- 3 m).
4. Error analysis:
- Did you exactly follow the operating instructions?
First insert the batteries in the transmitter and THEN in the receiver!
Page 71

69
- Check the weather station 2-3 days in a joint room before sending it back, ensure
that there are no interference sources to check the general function. Also check
whether the batteries in your product are still charged!
- Then try to find out the cause of the problem, e.g. by contacting our hotline.
- Change the location of the transmitter or the receiver to determine the best transmission/receiver connection!
Disposal
When the product has become unusable, you should dispose of it in
accordance with the current statutory regulations.
Disposal of spent batteries/rechargeable batteries
You, as the end user, are legally obliged (Ordinance on the Return and Disposal of
Used Batteries) to return all used batteries. Disposal in the household waste is
prohibited!
Batteries containing hazardous substances are labelled with the symbols shown to the left. These symbols also indicate that disposal of
these batteries in the household waste is prohibited.
The designations for the critical heavy metals are as follows: Cd =
cadmium, Hg = mercury, Pb = lead. You can hand in your used batteries at no cost at official collection points in your community, at our
stores or anywhere batteries are sold.
You will thus carry out your legal obligations and contribute to the protection of our
environment.
Technical data
Voltage supply
Basis : 3 x 1.5 Volt mignon battery (Alkaline)
Thermal hygro outdoor sensor : 2 x 1.5 Volt mignon battery (Alkaline)
Battery service life : approx. 24 months
Frequency : 868MHz
Range of transmission : ca. 100 m in free field
Page 72

70
Temperature measuring range
Outdoor sensor : -40.0°C to +59.9°C with 0.1°C resolution
(Display „OF.L“ measuring value outside of
this range)
Rel. air humidity : 1% to 99% with 1% resolution
(Display „—„ at < 1% / „99“ > 99%)
Wind speed : 0 to 50 m/s
(Display „OF.L“ at > 50m/s
Wind chill : -40°C to +59.9°C
(Display „OF.L“ measuring value outside of
this range)
Setting range rel. air humidity : 919 to 1080 hPa
(27.17 to 31.90 inHg)
Rain quantity : 0 to 9999 mm or 0 to 393.6 inch
(Display „OF.L“ at > 9999 mm)
Weather history : Data records every 4.5 seconds
Air pressure test intervals : each 15 seconds
Dimensions (LxWxH)
Base station : 165.4 x 30.8 x 141.9 mm
Thermal hygro outdoor sensor : 57.3 x 62 x 157 mm
Wind-sensor : 250 x 164 x 192.7 mm
Rain sensor : 144 x 54.6 x 88 mm
Declaration of conformity
We, Conrad Electronic, Klaus-Conrad-Straße 2, 92240 Hirschau, hereby declare that
this product adheres to the fundamental requirements and the other relevant regulations of Directive 1999/5/EC. You can find the conformity declaration for this product
under www.conrad.com.
Page 73

71
Introduction
Cher client, nous vous remercions d´avoir acheté cette station météo sans fil !
Avec ce produit, vous avez acquis un système à la pointe du développement
technique.
Ce produit répond aux exigences des directives européennes et nationales en
vigueur. Sa conformité a été vérifiée et les déclarations et documents afférents
ont été déposés chez le fabricant.
Afin de maintenir le produit dans son état actuel et d’assurer un fonctionnement sans
risques, les utilisateurs sont tenus de suivre les instructions contenues dans le présent mode d’emploi !
Pour toutes questions, adressez vous à notre service conseil technique
France: Tél. 0 892 897 777
Fax 0 892 896 002
e-mail: support@conrad.fr
du lundi au vendredi de 8h00 à 18h00
le samedi de 8h00 à 12h00
Suisse: Tél. 0848/80 12 88
Fax 0848/80 12 89
e-mail: support@conrad.ch
du lundi au vendredi de 8h00 à 12h00, 13h00 à 17h00
Utilisation conforme
Ce produit est une station météo sans fil à commande radio avec affichage des éléments suivants : heure, date, calendrier, prévisions météo, direction et vitesse du vent,
pluviométrie, température extérieure, humidité de l’air extérieur, pression atmosphérique, avec différentes fonctions d’alarme pour un grand nombre de conditions météorologiques. La station météo vous offre ainsi des informations et des prévisions météorologiques complètes.
Les appareils de base de la station météo sont uniquement conçus pour une utilisation en intérieur et ne doivent pas être utilisés en plein air ou dans des locaux
humides, p. ex. dans des salles de bains ! Le capteur de pluie et le capteur de vent
sont reliés par un câble à l’émetteur thermo-hygro extérieur qui émet les données
aux appareils de base de la station météo par le biais d’un signal sur la fréquence
Page 74

72
868 MHz. Le montage des capteurs et de l’émetteur s’effectue naturellement en
plein air. L’alimentation électrique des appareils de base et de l’émetteur est assurée
par des piles Mignon de 1,5 Volt.
Cette station météo ne garantit pas une précision de 100 % et n’est donc conçue
que pour un usage privé. La station météo ne doit pas être utilisée à des fins médicales ou pour l’information du public.
Toute utilisation autre que celle décrite précédemment peut détériorer le produit et
entraîner par exemple l’apparition de risques d’incendie, etc. Observez impérativement les consignes de sécurité !
Consignes de sécurité
Tout dommage résultant d’un non-respect du présent mode d’emploi entraîne l’annulation de la garantie ! Nous déclinons toute
responsabilité pour les dommages consécutifs !
De même, nous n’assumons aucune responsabilité en cas de
dommages matériels ou corporels résultant d’une utilisation de
l’appareil non conforme aux spécifications ou d’un non-respect
des présentes consignes de sécurité ! Dans ces cas, la garantie
est annulée !
Pour des raisons de sécurité et d’homologation (CE), les transformations et/ou modifications du produit, réalisées à titre individuel, sont interdites !
Pour assurer la commande correcte en toute sécurité de l’appareil, il est absolument
indispensable que les électriciens, consommateurs finaux et techniciens d’entretien
respectent toutes les consignes de sécurité énumérées dans ce mode d’emploi !
L’alimentation électrique s’effectue avec sept piles Mignon de 1,5 volts chacune
Conservez la station météo hors de portée des enfants car il ne s’agit pas d’un jouet
pour les enfants ! (Ne montez pas non plus ce produit à proximité de lits d’enfant ou
de parcs pour enfants !)
N’utilisez jamais les appareils de base de la station météo à proximité d’eau ou de
vapeurs d’eau, ou dans un environnement humide comme dans une baignoire, un
lave-linge, un évier, une piscine ou dans des entresols humides !
Lors de la mise en place des appareils de base, garantir une ventilation suffisante !
Les boîtiers ne doivent être ni bloqués, ni recouverts ! Ne jamais exposer les appa-
Page 75

73
reils de base à un ensoleillement direct !
Les appareils de base doivent également être installés à bonne distance de chauffages, fours ou autres sources de chaleur !
Utiliser exclusivement les accessoires d’origine fournis sous peine de provoquer
éventuellement des dommages irréparables ! Ceci entraîne l’annulation de la garantie ! N’utilisez pas non plus de rallonge !
Veillez à poser tous les câbles de façon à ce que personne ne puisse trébucher dessus, et qu’ils soient hors de portée des enfants et animaux domestiques !
Retirer les piles des appareils de base et de l’émetteur si la station météo n’est pas
utilisée pendant un laps de temps prolongé !
Ne branchez en aucun cas des équipements supplémentaires ou d’autres appareils !
Cela pourrait entraîner des erreurs de commande ou endommager les appareils de
façon irréparable ! Perte de la garantie !
Veillez à ce qu’aucun objet ne tombe sur les boîtiers des stations de base ou qu’aucun liquide ne pénètre à l’intérieur par les orifices !
Dans les installations industrielles, il conviendra d’observer les consignes de prévention des accidents relatives aux installations électriques et aux moyens d’exploitation, édictées par les syndicats professionnels
Page 76

74
Eléments de commande
Symbole de piles
déchargées
Affichage de piles
déchargées de l'émetteur
extérieur
Histogramme de l'histo-
gramme de la pression
atmosphérique
Pression atmosphérique
relative en hPa ou inHg
Symbole pour tempéra-
tures extérieures
Température extérieure
en °C ou °F
Fraîcheur du vent (Wind
Chill) en °C ou °F
Affichage de l'heure
Affichage du calendrier
Affichage pour vibreur
ARRET (OFF)
Affichage de la direction
du vent et de la vitesse du
vent sur l'échelle Beaufort
Symbole pour alarme de vitesse
de vent HI/LO
Vitesse du vent en km/h, mph ou m/s
Humidité relative de l'air extérieur en %
Symbole pour alarmes d'humidité
de l'air extérieur
Quantité totale de pluie en mm ou
en pouces
Affichage de la tendance météo
Symbole de prévision météo
Symbole de réception du signal de
l'émetteur extérieur
Support rabattable I
Oeillet d'accrochage
Support rabattable II
Couvercle du logement des piles
Symbole d'alarme de réveil
Page 77

75
Transmission sans fil de
l'émetteur thermo-hygro
extérieur vers la station
météo par signal 868 MHz
Liaison par câble entre le
capteur de pluie et le capteur thermo-hygro extérieur
Capteur de pluie
Station météo
Capteur de vent
Liaison par câble entre
le capteur de vent et le
capteur thermo-hygro
extérieur
L'émetteur thermo-hygro extérieur
• Télétransmission de la température extérieure et de l'humidité de
l'air extérieur à la station météo par le biais d'un signal 868 MHz
• Boîtier protégé contre les projections d'eau
• Boîtier préparé pour un montage mural (à un endroit protégé ;
éviter une exposition directe à la pluie ou au soleil)
Le capteur
• Relié à l'émetteur thermo-hygro extérieur par
un câble
• Peut se monter sur un mât ou sur une surface
horizontale
Le capteur de pluie
• Relié à l'émetteur thermo-hygro extérieur par un câble
• Montage sur une surface horizontale
Page 78
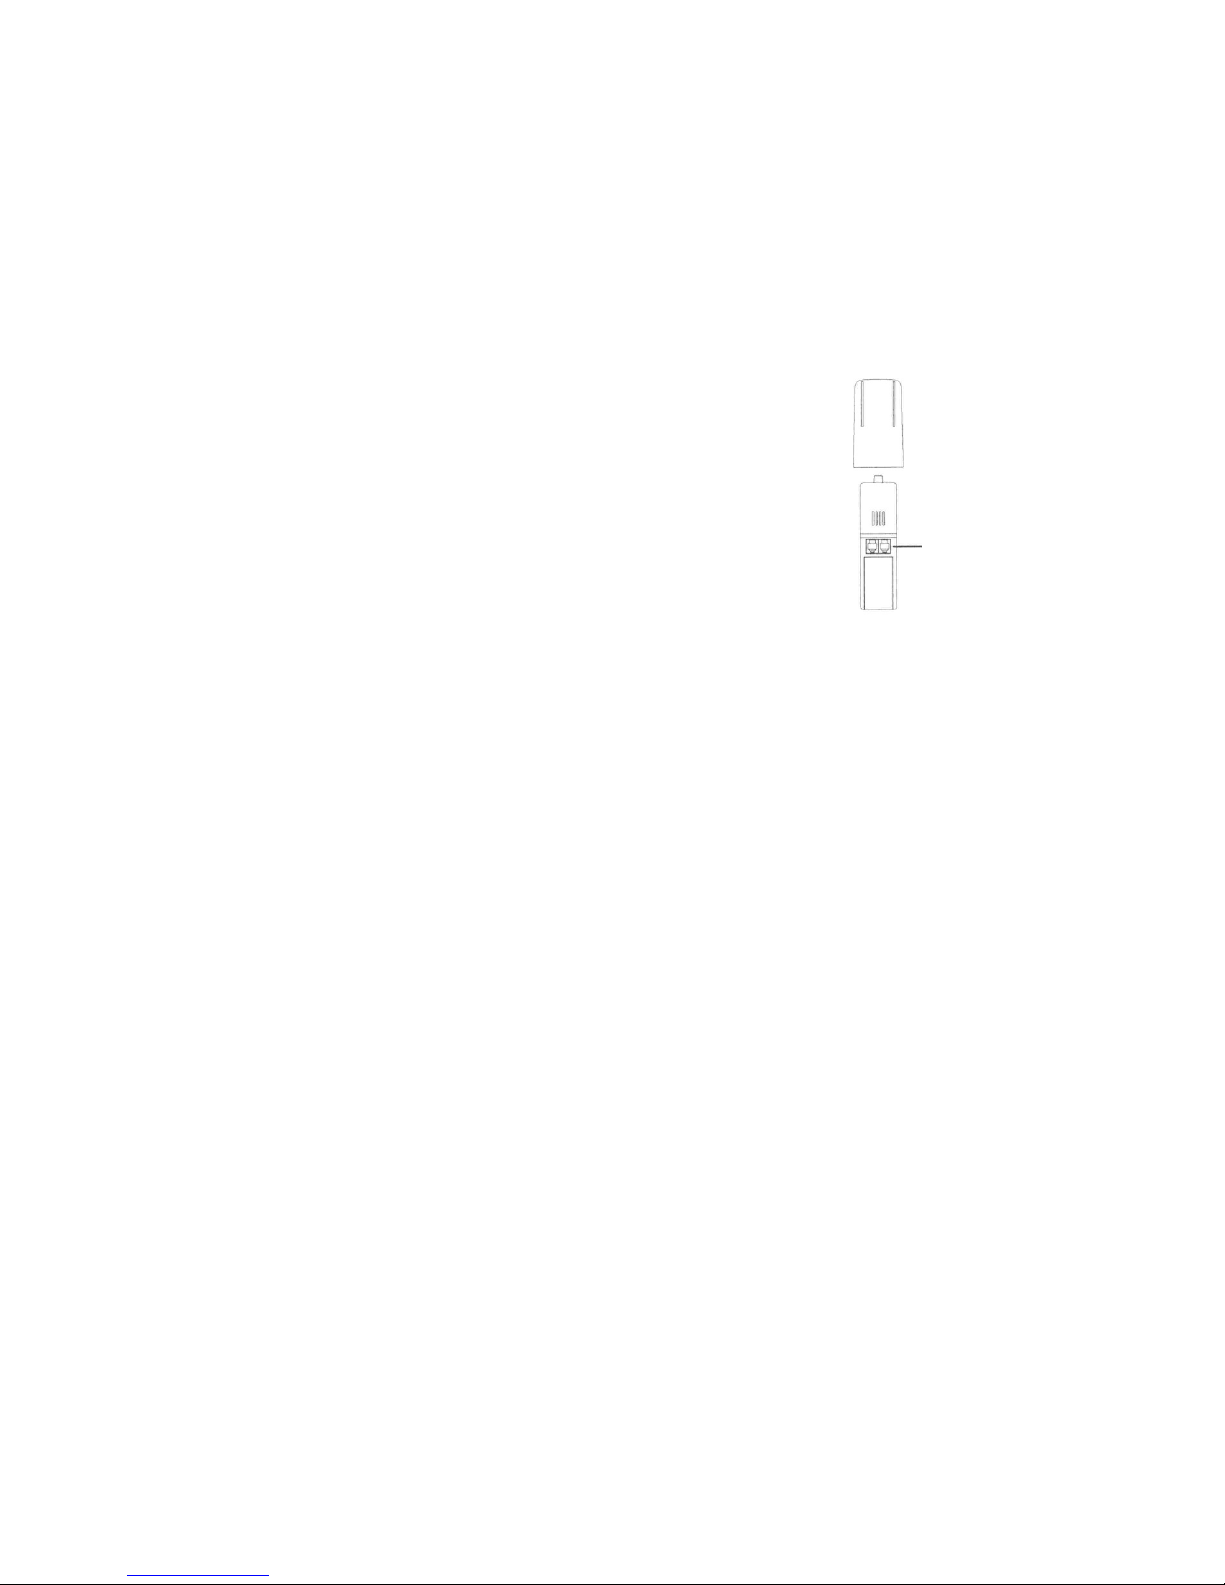
76
Mise en service
Avant la mise en service définitive de la station météo, il est important de procéder, à
titre d’essai, à un montage complet à échelle réduite (p. ex. sur une table) et à un
réglage de base du système dans la configuration ultérieure souhaitée de l’application prévue. Cette mesure sert aussi à tester le bon fonctionnement des différentes
parties de l’appareil avant le positionnement définitif et le montage à l’endroit d’utilisation.
1. Etablir tout d’abord la liaison entre le capteur de pluie et
de vent et l’émetteur thermo-hygro extérieur en branchant les connecteurs des deux capteurs dans la douille
correspondante de l’émetteur thermo-hygro extérieur !
- Douille RAIN pour le capteur de pluie
- Douille WIND pour le capteur de vent
2. Insérer tout d’abord les piles dans l’émetteur thermo-hygro extérieur ! Cf. chapitre
„Changement des piles“.
3. Mettre en premier les piles dans les appareils de base. Cf. chapitre „Changement
des piles“.
Dès que les piles sont en place, tous les segments de l’écran LCD s’allument brièvement et un signal retentit (pas pour la station de température). L’écran affiche
ensuite l’heure 0:00, la date 1.1.05, les symboles de temps et la pression atmosphérique.
4. La station météo commence ensuite à recevoir des données des capteurs extérieurs et à les afficher sur l’écran LCD. Si la température extérieure, l’humidité de
l’air extérieur, la température du vent (Wind Chill) et la vitesse du vent ne s’affichent pas au bout d’environ 30 secondes, retirer à nouveau les piles de toutes les
unités et recommencer l’opération à partir du point 1.
5. Vérifier que les câbles sont bien raccordés et contrôler les différentes fonctions en
tournant à la main l’anémomètre, en déplaçant la girouette, en basculant le capteur de pluie avec une butée audible de la bascule de commutation, etc. !
6. L’heure et la date doivent être réglés manuellement ! Voir à cet effet le chapitre
„Réglage de l’heure et de la date“ !
7. Après avoir contrôlé le bon fonctionnement de la station météo sur la base des
points précédents et si l’ensemble fonctionne bien, il est alors possible de passer
au montage des différentes unités. Il convient toutefois de veiller à ce que les éléments de l’appareil fonctionnent correctement ensemble aux emplacements de
Socle pour
capteur de vent
et de pluie
Page 79

77
montage ou d’installation souhaités ! En cas de problèmes p. ex. de la liaison radio
868 MHz, le remède consiste généralement à décaler légèrement les emplacements de montage.
Normalement, la liaison radio entre le récepteur et l’émetteur en plein
air atteint une portée minimale de 100 mètres en l’absence d’obstacles tels que des bâtiments, des arbres, des véhicules, des lignes
haute-tension, etc.
Les rayonnements perturbateurs émis p. ex. par des écrans d’ordinateurs, des radios ou des téléviseurs peuvent même rendre impossible
toute liaison radio. Veuillez en ternir compte lors du choix des emplacements de mise en place et de montage !
8. Une fois que les piles ont été montées dans les capteurs extérieurs, il faut également insérer les piles dans les appareils de base afin de permettre une réception
aussi rapide que possible des signaux. Si le délai entre la mise en place des piles
dans la station de base et dans le capteur extérieur dépasse 5 heures, la réception du signal du capteur extérieur n’est plus possible. En pareil cas, il faut à nouveau retirer les piles et les remettre en place. (Recommencer l’opération à partir
du point 1.)
Une fois que les piles ont été
mises en place dans le bon
ordre, la phase de synchronisation entre la station de base
et l’émetteur démarre. Pendant
ce temps, le signal de réception du capteur clignote.
Lorsque le signal est correctement reçu, le symbole s’affiche en continu. Si le signal
ne s’affiche pas, la liaison radio est perturbée. Dans ce cas, il est nécessaire de chercher un nouvel emplacement pour l’émetteur ou pour la station de base !
Remplacement des piles
La station de base fonctionne avec trois piles Mignon de
1,5 Volt.
Les piles doivent être remplacées lorsque le symbole
de décharge des piles (en
haut à gauche sur l’afficheur)
apparaît.
Signal de réception
du signal du capteur
1. Retirer le couvercle du logement
des piles
2. Mettre en place les piles en veillant
à respecter la polarité (voir marquage dans le logement).
3. Remonter le couvercle.
Page 80

78
L’émetteur thermo-hygro
extérieur fonctionne avec 2
piles Mignon de 1,5 Volt.
Les piles doivent être remplacées lorsque le symbole
de décharge des piles (en
bas à droite sur l’afficheur)
apparaît.
Lors du remplacement des piles, les données enregistrées sont
perdues. Il est donc nécessaire de recommencer tous les
réglages / toutes les programmations.
Les piles ne doivent pas être laissées à la portée des enfants !
Respectez la polarité lors de la mise en place des piles!
Veillez à ne pas court-circuiter les piles, à ne pas les jeter dans le
feu et à ne pas les recharger ! Risque d’explosion !
Touches de fonction
La station de base dispose de 5
touches assurant les fonctions suivantes :
Touche SET
Actionner cette touche pour accéder au mode de réglage manuel des fonctions suivantes :
contraste LCD, réglage manuel de l’heure, format d’affichage 12/24 heures, réglage
du calendrier, unités d’affichage de température °C/°F, unités de vitesse du vent, unités de pluviométrie, unités de pression atmosphérique, réglage de référence de la
pression atmosphérique relative, réglage du seuil de commutation pour la prévision
météo, réglage du seuil de commutation pour l’alarme de tempête et réglage d’alarme MARCHE/ARRET (ON/OFF).
En mode d’affichage normal, actionner et maintenir enfoncée la touche de commutation Vibreur MARCHE / ARRET (ON/OFF) !
Touche SET
Touche +- (Plus)
Touche ALARME
Touche MIN/MAX
Touche HISTORY
1. Sur l'émetteur thermo-hygro extérieur, retirer
la protection contre la pluie.
2. Retirer le couvercle du logement des piles
3. Mettre en place les piles en veillant à
respecter la polarité (voir marquage dans
le logement).
4. Refermer le couvercle du logement des piles
et remonter la protection contre la pluie.
Page 81

79
En mode de réglage d’alarme météo, actionner et maintenir enfoncée la touche de
réglage des différentes valeurs d’alarme et de commutation Alarme MARCHE /
ARRET (ON/OFF) !
Actionner la touche d’activation du mode de réinitialisation pendant l’affichage des
valeurs maxi ou mini enregistrées !
Arrêter le signal d’alarme pendant qu’un alarme de réveil ou une alarme météo retentit.
Touche + -
Actionner cette touche pour commuter l’affichage du calendrier sur l’heure d’alarme
préréglée, la date, le jour de la semaine et la date ou les secondes dans la section
d’affichage d’horodatage.
Actionner la touche pour régler (augmenter) les différents réglages.
Arrêter le signal d’alarme pendant qu’un alarme de réveil ou une alarme météo retentit.
Actionner la touche pour confirmer la réinitialisation d’une valeur maxi ou mini enregistrée.
Touche HISTORY
Actionner la touche pour afficher l’historique des données météo enregistrées.
Arrêter le signal d’alarme pendant qu’un alarme de réveil ou une alarme météo retentit.
Actionner la touche pour quitter le mode de réglage manuel et le mode de réglage de
l’alarme.
Touche REVEIL
Actionner la touche pour accéder au mode de réglage de l’alarme de réveil et l’alarme météo.
Confirmation des différents réglages d’alarme.
Actionner la touche pour quitter le mode de réglage manuel.
Arrêter le signal d’alarme pendant qu’un alarme de réveil ou une alarme météo retentit.
Actionner la touche pour quitter le mode d’affichage pour les valeurs maxi et mini
enregistrées.
Touche MIN/MAX
Actionner la touche pour afficher les valeurs mini et maxi des différentes données
météorologiques.
Page 82

80
Actionner la touche pour régler (diminuer) les différents réglages.
Arrêter le signal d’alarme pendant qu’un alarme de réveil ou une alarme météo
retentit.
Ecran LCD
L’écran LCD est subdivisé en cinq sections pour l’affichage des informations suivantes :
1. Heure et date
2. Données du vent
3. Température extérieure et humidité de l’air extérieur
4. Données de pression atmosphérique et de pluviométrie
5. Historique de la pression atmosphérique et prévisions météo
Réglages manuels
Les réglages suivants peuvent être modifiés manuellement après actionnement de la
touche SET :
- Contraste LCD
- Réglage de l’heure
- Affichage de l’heure en mode 12/24 heures
- Réglage du calendrier
- Unités de température °C/°F
- Unités de vitesse du vent
- Unités de pluviométrie
- Unités de pression atmosphérique
- Valeur de référence de la pression atmosphérique relative
- Valeur de sensibilité de commutation de l’affichage des prévisions météo
- Valeur de sensibilité de commutation d’alarme de tempête
- Réglage Alarme MARCHE / ARRET (ON/OFF)
Réglage du contraste LCD
Le contraste LCD peut être réglé en 8 paliers de „LCD 1“ à „LCD 8“.
(Préréglage : LCD 5) :
Appuyez sur la touche SET ! L’affichage du niveau de contraste commence à clignoter.
Utiliser la touche + - ou MIN/MAX pour régler le niveau de contraste !
Appuyez sur la touche SET pour valider !
Affichage clignotant
Page 83

81
Réglage manuel de l’heure
L’utilisateur peut maintenant régler manuellement l’heure selon la procédure suivante :
Les heures commencent à clignoter.
Utiliser la touche + - ou MIN/MAX pour régler les heures !
Actionner la touche SET pour passer au mode de réglage des minutes ! Les minutes
commencent à clignoter.
Utiliser la touche + - ou MIN/MAX pour régler les minutes !
Appuyez sur la touche SET pour valider !
Réglage du format d’affichage de l’heure en mode 12/24 heures
L’heure peut être réglée de sorte à s’afficher en format 12 ou 24 heures. (Préréglage
: 24 h) Réglage de l’affichage 24 heures :
Utiliser la touche + - ou MIN/MAX pour changer d’unités !
Appuyez sur la touche SET pour valider !
Réglage du calendrier
Le préréglage du calendrier de la station météo est le 1.1. de l’année 2005. La date
peut être réglée manuelle comme suit :
Les années commencent à clignoter.
Utiliser la touche + - ou MIN/MAX pour régler l’année !
Le réglage va de „00“ (2000) à „99“ (2099).
Actionner la touche SET pour valider le choix et pour passer au mode de réglage des
mois ! Les mois commencent à clignoter.
Utiliser la touche + - ou MIN/MAX pour régler le mois !
Actionner la touche SET pour valider le choix et pour passer au mode de réglage de
la date ! Les segments de la date commencent à clignoter.
Affichage clignotant des minutes
Affichage clignotant
Affichage clignot-
ant des heures
„Date et mois“ (format 24 heures)
„Mois et date" (format 12 heures)
Année
Page 84

82
Utiliser la touche + - ou MIN/MAX pour régler la date !
Appuyez sur la touche SET pour valider tous les réglages du calendrier !
Réglage des unités de température °C/°F
La température peut être affichée en „°C“ ou en „°F“. (Préréglage : °C).
L’unité de température commence à clignoter.
Utiliser la touche + - ou MIN/MAX pour sélectionner l’unité voulue („°C“ ou „°F“) !
Appuyez sur la touche SET pour valider !
Réglage des unités de vitesse du vent
La vitesse du vent peut être affichée en „km/h“ (kilomètres par heure), en „mph“
(miles par heure) ou en „m/s“ (mètres par seconde). (Préréglage : km/h).
Utiliser la touche + - ou MIN/MAX pour sélectionner l’unité voulue („km/h“, „mp/h“
ou „m/s“) !
Appuyez sur la touche SET pour valider !
Réglage des unités de quantité de pluie
La quantité totale de pluie peut être affichée en „mm“ ou en „pouces“. (Préréglage :
„mm“)
Utiliser la touche + - ou MIN/MAX pour sélectionner l’unité voulue („mm“ ou
„pouces“) !
Appuyez sur la touche SET pour valider !
clignotant
clignotant
clignotant
Page 85

83
Réglage des unités de pression atmosphérique relative
La pression atmosphérique relative peut être affichée en „hPa“ (hectopascal) ou en
„inHg“ (pouces de mercure). (Préréglage : hPa)
Utiliser la touche + - ou MIN/MAX pour sélectionner l’unité voulue („hPa“ ou „inHg“) !
Appuyez sur la touche SET pour valider !
Réglage de la pression atmosphérique relative de référence
La valeur de la pression atmosphérique de référence relative du baromètre de votre
station météo est réglée défaut à 1013hPa après la mise en place des piles.
Pour une mesure précise, il est nécessaire de calibrer tout d’abord le baromètre de
votre stations météo à la pression atmosphérique relative locale (en fonction de votre
altitude par rapport au niveau de la mer). Demandez la pression atmosphérique
actuelle de votre environnement immédiat (service météo local, Internet, opticien
spécialisé, affichages calibrés dans des bâtiments publics ou les aéroports, etc.)
La pression atmosphérique relative peut être réglée manuellement à une autre valeur
comprise entre 919 et 1080 hPa (27.17 à 31,90 inHg) afin de disposer d’une référence
plus précise.
La valeur de pression atmosphérique relative actuelle commence à clignoter.
Utiliser la touche + - ou MIN/MAX pour augmenter ou diminuer la valeur ! Un actionnement continu des touches provoque un défilement plus rapide des valeurs.
Appuyez sur la touche SET pour valider la valeur réglée !
Remar
que :
Cette possibilité de calibrage est particulièrement utile pour les utilisateurs qui se trouvent à des altitudes différentes par rapport au niveau de la mer et qui souhaitent toutefois disposer d’un affichage de pression atmosphérique par rapport au niveau de la mer.
Réglage de la valeur de sensibilité de commutation pour les symboles de prévisions météo
clignotant
clignotant
clignotant
Page 86

84
L’utilisateur peut sélectionner une valeur quelconque entre 2 hPa et 4 hPa comme
seuil de commutation pour la modification de l’affichage des symboles météo. Cette
valeur représente la „sensibilité“ de la prévision. Autrement dit, plus la valeur est
faible, plus la prévision est sensible (préréglage : 3hPa).
Le seuil de commutation actuel commence à clignoter.
Utiliser la touche + - ou MIN/MAX pour régler le seuil de commutation !
Appuyez sur la touche SET pour valider la valeur réglée !
Réglage de la valeur de sensibilité de commutation pour l’alarme de tempête
L’utilisateur peut en outre choisir une valeur quelconque entre 3 hPa et 9 hPa comme
seuil de commutation pour un affichage d’alarme de tempête en cas de chute de pression atmosphérique intervenant dans un laps de temps de 6 heures (préréglage : 5 hPa).
Le seuil de commutation actuel commence à clignoter.
Utiliser la touche + - ou MIN/MAX pour régler le seuil de commutation !
Appuyez sur la touche SET pour valider la valeur réglée !
Réglage de l’alarme de tempête MARCHE / ARRET (ON/OFF) :
L’utilisateur peut en outre commuter l’alarme acoustique de tempête sur MARCHE
ou ARRET (0N/OFF). (Préréglage : ARRET).
L’affichage „AOF“ commence à clignoter.
Utiliser la touche + - pour commuter l’alarme sur MARCHE (ON) ou ARRET (OFF) !
(„AOF“ = ARRET, „AON“ = MARCHE).
Actionner la touche SET pour valider le choix et pour retourner au mode d’affichage
normal !
Remar
que :
Si une alarme de tempête est activée, la flèche de tendance météo dirigée vers le
bas clignotera. (voir aussi le paragraphe : „AFFICHAGE DE TENDANCE METEO“ !)
Quitter le mode de réglage manuel
Pour quitter le mode de réglage manuel, vous pouvez actionner à tout moment la
touche ALARME ou la touche HISTORY pendant le réglage manuel ou attendre le
retour automatique (Automatic Timeout). Dans les deux cas, l’appareil retourne au
mode d’affichage normal de l’heure.
clignotant
clignotant
Page 87

85
Réglage de l’alarme de réveil
L’alarme peut se régler à l’aides touches ALARME et SET.
Appuyez une fois sur la touche ALARME ! Le symbole „ALARM“ et l’affichage de
l’heure d’alarme apparaissent en haut à droite de l’écran LCD.
Appuyez et maintenez la touche SET pendant env. 2 secondes ! L’heure de l’alarme
commence à clignoter. Utiliser la touche + - ou MIN/MAX pour régler l’heure de l’alarme !
Actionner la touche SET pour valider le choix et pour passer au mode de réglage des
minutes ! Les minutes commencent à clignoter.
Utiliser la touche + - ou MIN/MAX pour régler les minutes de l’alarme !
Appuyez sur la touche ALARME pour valider le choix ! Attendre environ 30 secondes
que l’affichage retourne automatiquement au mode d’affichage normal !
En mode d’affichage normal, appuyer une fois sur la touche ALARM pour retourner
au mode de réglage de l’alarme ! Actionner ensuite brièvement la touche SET pour
commuter l’alarme de réveil sur MARCHE (ON) ou ARRET (OFF) ! (L’affichage du
symbole ((( • ))) signifie que l’alarme est activée.)
Actionner la touche HISTORY ou attendre env. 30 secondes le retour automatique au
mode d’affichage normal !
Remar
que :
Le signal d’alarme de réveil dure 2 minutes. L’actionnement d’une touche quelconque permet d’arrêter l’alarme de réveil lorsqu’elle retentit.
Mode alarme météo
Les alarmes météo peuvent être activées pour délivrer des signaux d’avertissement
dans certaines conditions météorologiques. L’utilisateur peut p. ex. régler le seuil
d’alarme pour la température extérieure à + 40°C (HI = HAUTE) et -10°C (LO = BASSE) en activant uniquement l’alarme HAUT et en laissant inactivée l’alarme BAS
(autrement dit, des températures > + 40 °C déclenchent une alarme, alors que des
températures < -10 °C ne le font pas).
Affichage de l'heure de l'alarme
Symbole alarme MARCHE
Page 88

86
La station météo peut ainsi être réglée de sorte à délivrer une alarme en cas d’apparition de conditions météo données :
Les réglages d’alarme météo peuvent être effectués en mode de réglage d’alarme
météo :
- Alarme de température extérieure HAUTE (HI)
- Alarme de température extérieure BASSE (LO)
- Alarme d’humidité de l’air extérieur HAUTE (HI)
- Alarme d’humidité de l’air extérieur BASSE (LO)
- Alarme de vitesse du vent HAUTE (HI)
Préréglage des valeurs d’alarme
Température Basse LO 0 °C
Haute HI 40 °C
Humidité de l’air Basse LO 45%
relative Haute HI 70%
Vitesse du vent Haute HI 100 km/h
Réglage de l’alarme de température extérieure HAUTE et BASSE
Les alarmes de température haute et basse peuvent être commutées indépendamment l’une de l’autre sur MARCHE ou ARRET au choix de l’utilisateur !
Symbole alarme MARCHE pour vitesse du
vent HAUTE
Symbole alarme
MARCHE pour
humidité de l'air
extérieur
Symbole alarme MARCHE pour humidité de
l'air extérieur
Symbole
alarme HAUTE
Symbole
alarme
MARCHE
Page 89

87
Réglage de la valeur d’alarme de température extérieure (valeur d’alarme HAUTE ou
BASSE)
Dans le mode d’affichage normal, appuyer deux fois sur la touche d’alarme ! L’affichage de l’alarme de température extérieure apparaît :
Appuyez et maintenez la touche SET pendant env. 2 secondes ! L’affichage de température commence à clignoter. Appuyer sur la touche + - ou sur la touche MIN/MAX
pour régler la valeur d’alarme HAUTE pour la température extérieure ! (Le fait de
maintenir la touche enfoncée provoque un défilement plus rapide des valeurs).
Appuyez sur la touche ALARME pour valider le choix ! L’affichage arrête de clignoter.
Appuyer maintenant sur la touche SET pour commuter l’alarme sur MARCHE ou
ARRET ! (L’affichage du symbole (*) montre que l’alarme est activée.)
Appuyez une fois sur la touche ALARME ! L’affichage de l’alarme BASSE pour la
température extérieure apparaît.
Appuyez et maintenez la touche SET pendant env. 2 secondes ! L’affichage de la
température commence à clignoter. Appuyer sur la touche + - ou sur la touche
MIN/MAX pour régler la valeur d’alarme BASSE pour la température extérieure ! (Le
fait de maintenir la touche enfoncée provoque un défilement plus rapide des
valeurs).
Appuyez sur la touche ALARME pour valider le choix ! L’affichage arrête de clignoter.
Appuyer sur la touche SET pour commuter l’alarme sur MARCHE ou ARRET ! (L’affichage du symbole (*) montre que l’alarme est activée.)
Actionner la touche HISTORY ou attendre env. 30 secondes le retour automatique au
mode d’affichage normal !
Au cas où la température atteint une valeur qui remplit la condition d’une alarme
HAUTE ou BASSE, la valeur d’affichage ainsi que le symbole correspondant („HI
AL“/LO AL“) se mettent à clignoter. Le vibreur retentit pendant environ 2 minutes.
L’actionnement d’une touche quelconque permet à l’utilisateur d’arrêter le signal
sonore.
Réglage de l’alarme d’humidité de l’air extérieur HAUTE et BASSE
Les alarmes de valeur d’humidité de l’air extérieur haute et basse peuvent être commutées indépendamment
l’une de l’autre sur MARCHE ou ARRET au choix de l’utilisateur.
Réglage de la valeur d’alarme d’humidité de l’air extérieur (valeur d’alarme
HAUTE ou BASSE)
Dans le mode d’affichage normal, appuyer quatre fois sur la touche ALARME ! L’affichage de l’alarme d’humidité de l’air extérieur apparaît.
Page 90

88
Appuyez et maintenez la touche SET pendant env. 2 secondes ! L’affichage de l’humidité de l’air commence à clignoter. Appuyer sur la touche + - ou sur la touche
MIN/MAX pour régler la valeur d’alarme HAUTE pour l’humidité de l’air extérieur !
Appuyez sur la touche ALARME pour valider le choix ! L’affichage arrête de clignoter.
Appuyer sur la touche SET pour commuter l’alarme sur MARCHE ou ARRET ! (L’affichage du symbole (*) montre que l’alarme est activée.)
Appuyez une fois sur la touche ALARME ! L’affichage de l’alarme BASSE pour l’humidité de l’air extérieur apparaît.
Appuyez et maintenez la touche SET pendant env. 2 secondes ! L’affichage de l’humidité de l’air commence à clignoter. Appuyer sur la touche + - ou sur la touche
MIN/MAX pour régler la valeur d’alarme BASSE pour l’humidité de l’air extérieur !
Appuyez sur la touche ALARME pour valider le choix ! L’affichage arrête de clignoter.
Appuyer sur la touche SET pour commuter l’alarme sur MARCHE ou ARRET ! (L’affichage du symbole (*) montre que l’alarme est activée.)
Actionner la touche HISTORY ou attendre env. 30 secondes le retour automatique au
mode d’affichage normal !
Au cas où l’humidité de l’air atteint une valeur qui remplit la condition d’une alarme
HAUTE ou BASSE, la valeur d’affichage ainsi que le symbole correspondant („HI
AL“/“LO AL“) se mettent à clignoter.
Réglage de l’alarme de vitesse du vent
La marche à suivre pour le réglage de l’alarme HAUTE de vitesse du vent est la suivante :
Dans le mode d’affichage normal, appuyer six fois sur la touche ALARME ! L’affichage de l’alarme de vitesse du vent apparaît.
Appuyez et maintenez la touche SET pendant env. 2 secondes ! L’affichage de la
vitesse du vent commence à clignoter. Appuyer sur la touche + - ou sur la touche
MIN/MAX pour régler la valeur d’alarme HAUTE pour la vitesse du vent !
Appuyez sur la touche ALARME pour valider le choix ! L’affichage arrête de clignoter.
Appuyer sur la touche SET pour commuter l’alarme sur MARCHE ou ARRET ! (L’affichage du symbole (*) montre que l’alarme est activée.)
Pour retourner au mode d’affichage normal, appuyer une fois sur la touche ALARME !
Au cas où la vitesse du vent atteint une valeur qui remplit la condition d’une alarme
HAUTE, la valeur d’affichage ainsi que le symbole correspondant („HI AL“) se mettent à
clignoter. Le vibreur retentit pendant environ 2 minutes. L’actionnement d’une touche
quelconque permet à l’utilisateur d’arrêter le signal sonore.
Page 91

89
Hystérésis
Afin de compenser les petites variations des données de mesure qui risqueraient de
provoquer en permanence le déclenchement sonore d’une alarme météo lorsque la
valeur est très proche de la valeur d’alarme réglée par l’utilisateur, chaque alarme
météo est dotée d’une fonction d’hystérésis.
Si p. ex. l’alarme de température haute est réglée à + 25 °C et que la valeur actuelle
atteint ces + 25 °C, l’alarme est activée, sous réserve qu’elle soit en marche. Si la
température retombe à + 24,9 °C ou moins et remonte ensuite à + 25 °C, la mesure
affichée clignote alors, mais l’alarme ne retentit plus. La valeur doit déjà retomber à
une valeur inférieure à + 24 °C (pour un réglage d’hystérésis de 1 °C) pour qu’une
nouvelle alarme soit générée.
Le tableau suivant montre les valeurs d’hystéréris pour les différentes données
météorologiques :
Données météo Hystérésis
Température 1°C
Humidité de l’air 3 % rel.
Vitesse du vent 5 km/h
Remar
que :
Pour bien montrer que les conditions météo actuelles se situent hors de la limite préréglée, les données de température et d’humidité continuent à clignoter même si une
touche est actionnée pour arrêter l’alarme ou pour désactiver le signal sonore.
Prévisions météo et affichage des tendances
Symboles de prévisions météo
Les trois symboles de prévision météo à la partie inférieure droite de l’écran LCD
s’affichent dans l’une des combinaisons suivantes :
En cas de variations soudaines ou importantes de la pression atmosphérique, les
symboles sont actualisés pour afficher le changement de temps.
A chaque nouvelle mesure de pression atmosphérique moyenne, c’est-à-dire une
fois par minute, cette valeur est comparée à une valeur de référence interne. Si la dif-
Ensoleillé
Nuageux avec éclaircies Pluvieux
Page 92

90
férence de ces valeurs est supérieure au seuil de commutation sélectionné pour la
tendance météo, le symbole change vers une amélioration ou une détérioration des
conditions météo. En pareil cas, la valeur de pression atmosphérique actuelle est
reprise comme nouvelle valeur de référence pour la tendance météo,
L’absence de changement des symboles peut s’expliquer par le fait que la pression
atmosphérique est restée inchangée ou que la modification est intervenue si lentement qu’elle n’a pas pu être enregistrée par la station météo. L’utilisateur peut régler
en mode manuel la sensibilité par rapport à une modification de la pression atmosphérique - voir paragraphe REGLAGE DU SEUIL DE SENSIBILITE POUR LES
SYMBOLES DE PREVISION METEO !
Par contre, si les symboles indiquent soleil ou pluie, l’affichage ne change pas
lorsque le temps s’améliore (affichage : SOLEIL) ou se détériore (affichage : PLUIE)
car les symboles représentent déjà les deux situations extrêmes.
Les symboles d’affichage indiquent une amélioration ou une détérioration du temps,
ce qui ne signifie par forcément la présence de soleil ou de pluie comme l’indiquent
les symboles. Par exemple, lorsque le temps actuel est nuageux, l’affichage du symbole de la pluie n’est pas dû à un dysfonctionnement de l’appareil, mais indique simplement que la pression atmosphérique a chuté et qu’il faut donc s’attendre à une
dégradation du temps, mais qu’il ne s’agit pas forcément de pluie.
Remarque :
Après le réglage de base, il convient de ne pas prendre à la lettre les mesures et les
prévisions météo pendant les premières 12 à 24 heures, car la station doit déjà collecter des valeurs de pression atmosphérique à altitude constante pendant cette
période afin de pouvoir donner une prévision plus précise.
Il n’est toutefois pas possible de garantir la précision absolue des prévisions météo.
Du fait des différentes zones climatiques pour lesquelles l’appareil a été développé,
la station météo présente une précision moyenne de prévisions de 75 %. La station
météo sera plus précise dans les régions avec des changements de temps subits, p.
ex. du soleil à la pluie, que dans des régions avec des conditions météo constantes,
par exemple majoritairement ensoleillées.
Si la station météo est amenée dans un endroit nettement plus haut ou bas que l’emplacement initial, par exemple du rez-de-chaussée aux étages supérieurs d’une maison, veuillez ne pas tenir compte des affichages des prévisions pour les prochaines
12 à 24 heures ! De ce fait, l’appareil a la possibilité de traiter de plus grandes séries
de mesures et n’interprétera donc pas faussement le déplacement au nouvel endroit
comme une modification de la pression atmosphérique s’il ne s’agit effectivement
que d’une variation infime de l’altitude par rapport au niveau de la mer.
Page 93

91
Affichage de la tendance météo
Les affichages de tendance météo travaillent en liaison avec les symboles de prévisions météo.
Ce sont les flèches qui se trouvent à gauche et à droite à côté des symboles du
temps. Si cette flèche est dirigée vers le haut, cela signifie que la pression atmosphérique augmente et qu’une amélioration du temps est en vue. Si la flèche est dirigée vers le bas, cela signifie une chute de la pression atmosphérique et donc une
dégradation prévisible du temps.
De ce fait, l’appareil peut aussi monter que le temps a changé ou comment il a changé. Par exemple, si la flèche dirigée vers le bas apparaît en même temps que les symboles du soleil avec des nuages, le dernier changement de temps détectable est
donc intervenu pendant une période ensoleillée, c’est-à-dire que seul le symbole du
soleil était affiché. La flèche de tendance étant dirigée vers le bas, cela veut aussi dire
que le prochain changement de temps entraînera l’affichage du symbole de la pluie.
Remarque :
Une fois que l’affichage de la tendance météo a enregistré pour la première fois une
fois une modification de la pression atmosphérique, il reste alors en permanence
visible sur l’écran LCD.
Historique de la pression atmosphérique (baromètre électronique avec tendance de pression atmosphérique)
Les valeurs de pression atmosphérique relative et un historique de la pression atmosphérique s’affichent à la partie inférieure de l’écran LCD.
Selon le type de programmation, un historique de la pression atmosphérique est
représenté sous forme d’un bargraphe.
Ce bargraphe du baromètre électronique indique l’historique de la pression atmosphérique des 12 dernières heures en cinq blocs de 3 heures :
L’axe horizontal représente les pressions atmosphériques mesurées au cours des
12 dernières heures (-12, -9, -6, -3 et 0 heure). Les barres affichées pour chacun
des 5 blocs indiquent la tendance pendant la période mesurée. L’échelle du côté
droit compare le résultat. Le „O“ au milieu de l’échelle représente la pression atmosphérique actuelle.
L’axe vertical représente les modifications de pression atmosphérique en hPa (+4,
+2, 0, -2, -4. „O“ représente la pression atmosphérique actuelle). Chaque écart (+/2 hPa ou 0,05 inHg) indique en hectopascal (hPa) la différence en plus ou en moins
de la valeur précédente par rapport à la pression atmosphérique actuelle.
Variation de la pression
atmosphérique en inHg
Variation de la pression
atmosphérique en hPa
Page 94

92
Des barres ascendantes signifient une amélioration du temps du fait d’une augmentation de la pression atmosphérique. Des barres descendantes signifient une chute
de la pression atmosphérique et donc une dégradation prévisible du temps par rapport au moment actuel „O“.
A chaque heure pleine, la pression atmosphérique actuelle est utilisée comme base
pour l’affichage d’un nouveau bargraphe. Le graphique global existant est alors
décalé d’un barre vers la gauche.
Remar
que :
Pour un affichage barométrique précis de la tendance de la pression atmosphérique, la
station météo doit être utilisée à une altitude constante au-dessus du niveau de la mer.
Autrement dit, une station ne doit pas être déplacée p. ex. du rez-de-chaussée jusque
dans les étages supérieurs d’une maison. Si un tel déplacement devait être nécessaire,
il convient alors d’ignorer l’affichage pendant les prochaines 12 à 24 heures !
Mesure de la direction et de la vitesse du vent
En mode d’affichage normal, la deuxième section de l’écran LCD affiche les données
suivantes du vent :
Sens du vent (affiché sur une rose des vents à 16 subdivisions) et vitesse du vent sur
l’échelle Beaufort
Fraîcheur du vent (Wind Chill) en °C ou °F
Vitesse du vent en km/h, mph ou m/s
Mesure de pluviométrie
La quantité totale de pluie mesurée est affichée en „mm“ ou en „pouces“ dans la
quatrième section de l’écran LCD.
(voir aussi „VISUALISATION DES DONNEES METEO MAXIMALES / MINI-
MALES“!)
Le texte indique la vitesse
du vent sur l'échelle
Beaufort
La flèche indique la dernière direction reconnue
du vent
Le symbole
d'alarme montre
que l'alarme est
en MARCHE
Vitesse du vent
Fraîcheur du vent
(Wind Chill)
Page 95

93
Visualisation des données historiques
La station météo peut enregistrer jusqu’à 200 jeux de données météo. Après la mise
en service de la station météo, ces données sont enregistrées automatiquement
toutes les 3 heures à compter du point de démarrage suivant à 0 h 00, 03 h 00, 06 h
00, 09 h 00, 12 h 00, 15 h 00, 18 h 00 und 21h 00. Par exemple, si l’utilisateur a réglé
manuellement l’heure à 14 h 52 après l’installation des piles, le premier jeu de données historique sera enregistré automatiquement à 15 h 00. L’enregistrement du
deuxième jeu de données aura ensuite lieu à 18 h 00, et ainsi de suite.
Chaque jeu de données enregistré contient la direction du vent, la vitesse du vent sur
l’échelle Beaufort, la fraîcheur du vent (Wind Chill), la vitesse du vent, la température
et l’humidité de l’air extérieur, la pression atmosphérique relative et la pluviométrie
totale, l’historique de la pression atmosphérique et la tendance météo. L’heure et la
date de l’enregistrement sont en outre affichées.
Remar
que :
Afin de garantir que l’heure d’enregistrement des données historiques est correcte,
l’utilisateur doit régler l’heure manuellement après la mise en place des piles dans la
station météo.
Il convient ensuite d’éviter de modifier l’heure préréglée, car cela modifierait aussi
l’heure de tous les enregistrements historiques suivants et risquerait ainsi de perturber l’utilisateur.
Observation de l’historique du temps
Appuyez sur la touche HISTORY ! Le dernier enregistrement du temps avec indication de l’heure et de la date d’enregistrement s’affiche. De plus, le symbole „HISTORY“ apparaît à la partie inférieure de l’écran LCD.
Appuyer sur la touche MIN/MAX pour visualiser des enregistrements plus anciens !
(Appuyer sur la touche MIN/MAX et sur la touche + - pour visualiser l’enregistrement
précédent (previous) ou suivant (next) !
Page 96

94
L’enregistrement s’effectue avec une périodicité de 3 heures.)
Remar
que :
Les données historiques enregistrées ne sont pas sauvegardées dans la mémoire en
cas de changement de pile ou de retrait des piles !
La valeur de la pluviométrie totale apparaît sous forme d’un nombre entier (sans
décimales) dans les données historiques.
Visualisation des données météo maximales / minimales
La station météo enregistre automatiquement les valeurs maximales et minimales
des différentes données météo avec indication de l’heure et de la date d’enregistrement. Les valeurs maximales et minimales suivantes enregistrées pour les données
météo peuvent être visualisées par actionnement de la touche MIN/MAX en mode
d’affichage normal !
- Température extérieure minimale avec heure et date d’enregistrement
Heure et date
de l'enregist-
rement
Valeur mini de
température
extérieure
Symbole MIN
Page 97

95
- Température extérieure maximale avec heure et date d’enregistrement
- Humidité de l’air extérieur minimale avec heure et date d’enregistrement
- Humidité de l’air extérieur maximale avec heure et date d’enregistrement
- Fraîcheur du vent minimale (Wind Chill) avec heure et date d’enregistrement
Heure et date de
l'enregistrement
Humidité de l'air
extérieur maximale
Symbole MAX
Heure et date
de l'enregistre-
ment
Fraîcheur du
vent minimale
Symbole MIN
Page 98

96
- Fraîcheur du vent maximale (Wind Chill) avec heure et date d’enregistrement
- Pression atmosphérique relative minimale avec heure et date d’enregistrement
- Vitesse du vent maximale
Réinitialisation des données météo maximales et minimales
Pour la remise à zéro des données météo maximales et minimales précédemment
décrites 1 à 9, l’utilisateur doit réinitialiser chaque affichage séparément !
Appuyer sur la touche MIN/MAX pour afficher les données météo voulues ! Si l’utilisateur souhaite p. ex. réinitialiser la valeur d’humidité de l’air minimale, il doit alors
Heure et date
de l'enregistre-
ment
Pression atmos-
phérique relative
maximale
Symbole MAX
Symbole MAX
Heure et date de
l'enregistrement
Vitesse du vent maximale
Page 99

97
appuyer trois fois sur la touche MIN/MAX pour afficher la valeur d’humidité de l’air
minimale en mode d’affichage normal !
Appuyez et maintenez la touche SET pendant env. 2 secondes jusqu’à ce que le
symbole „RESET“ apparaisse dans la partie inférieure de l’écran LCD !
Appuyez une fois sur la touche + - pour ramener la valeur enregistrée à sa valeur et à
sa date actuelle !
Pour retourner au mode d’affichage normal, appuyer sur la touche ALARME !
Pluviométrie totale
La quantité totale de pluie est affichée en „mm“ ou en „pouces“ dans la quatrième
section de l’écran LCD. L’affichage indique la quantité de pluie accumulée depuis la
dernière réinitialisation de la station météo.
En mode d’affichage normal, appuyer dix fois sur la touche MIN/MAX pour afficher la
pluviométrie totale ! Le symbole „RESET“ apparaît sur l’afficheur.
Pour réinitialiser la pluviométrie totale, appuyer une fois sur la touche + - lorsque la
valeur de pluviométrie totale et le symbole „RESET“ sont affichés. La quantité de
pluie totale est remise à 0, et la date et heure enregistrée est réinitialisée à la date et
heure actuelle.
Remar
que :
Après la mise en service, l’heure, la date et la quantité de pluie totale sont représentées par le symbole „-„. L’heure et la date s’affichent après le réglage manuel de
l’heure.
La quantité de pluie totale est
mesurée à partir de cette heure et
de cette date
Pluviométrie totale
Page 100
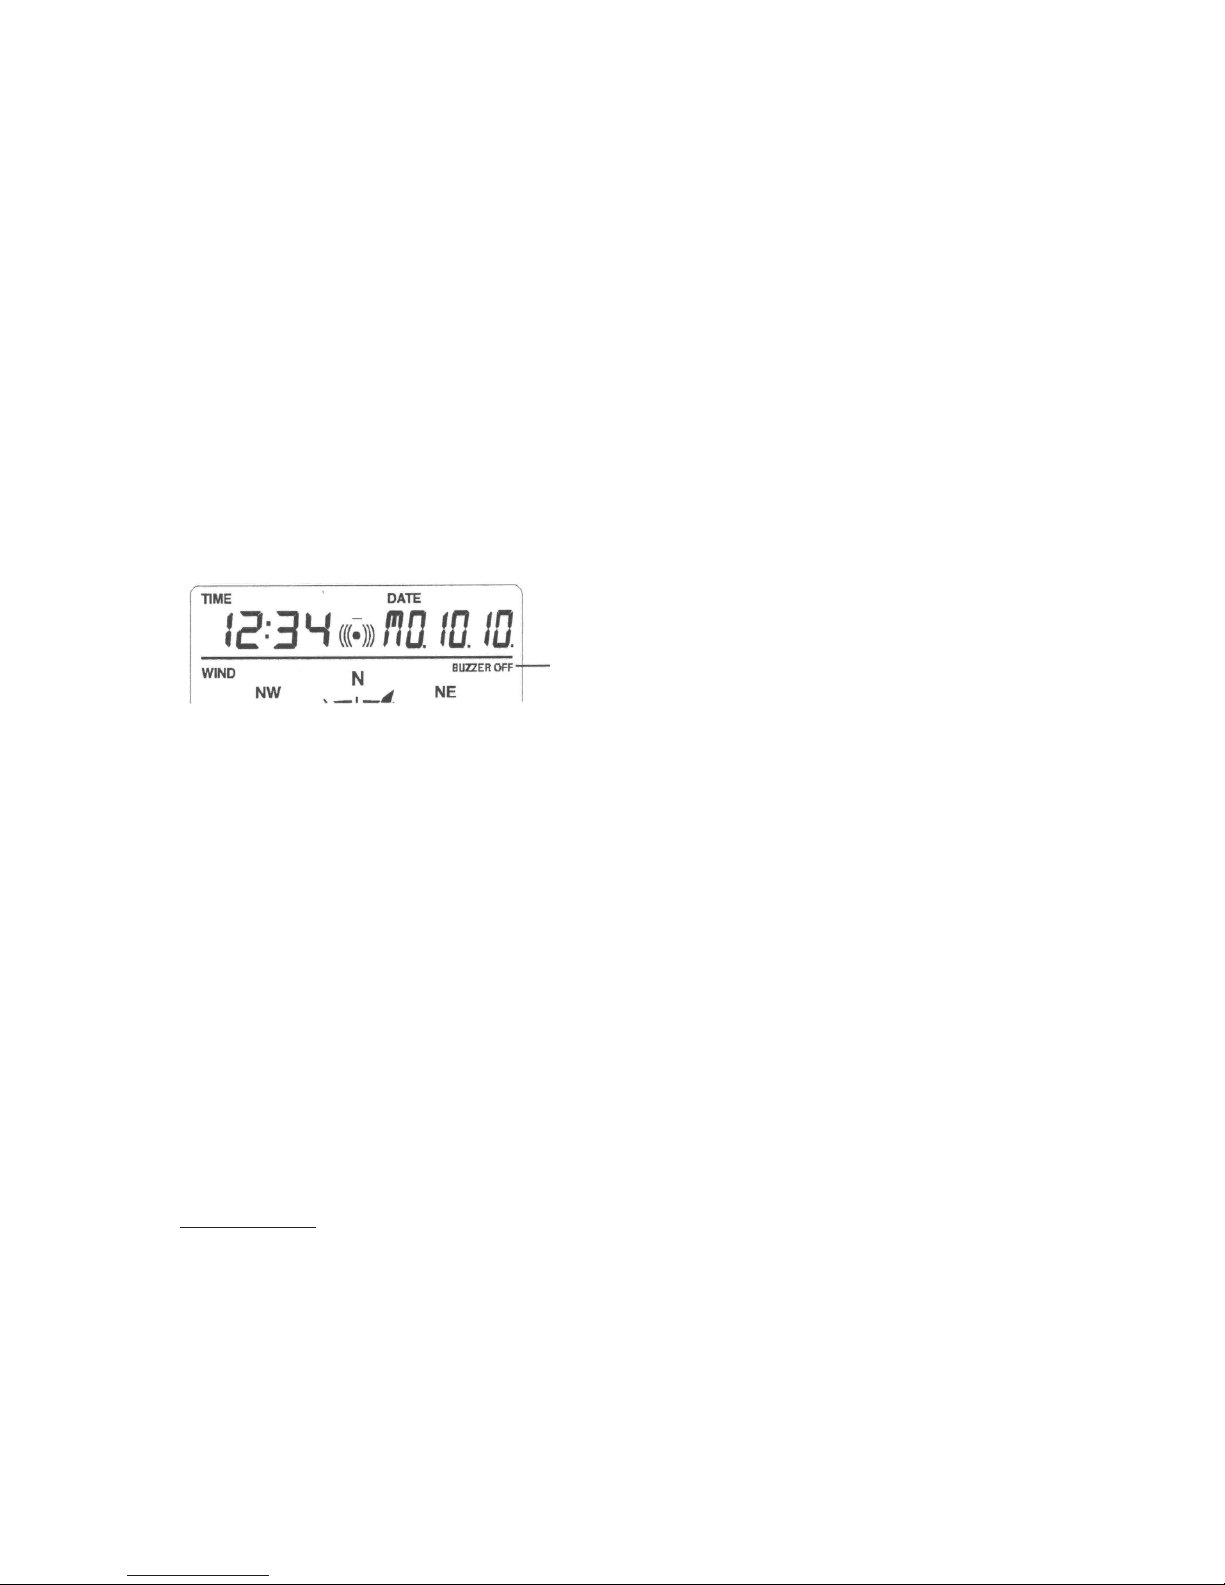
98
Mise en marche/arrêt du vibreur (ON/=FF)
L’utilisateur a la possibilité de désactiver le vibreur de sorte que le signal sonore ne
retentisse pas en cas d’activation d’une alarme de réveil. Seul le symbole d’alarme
correspondant (*) apparaît alors sur l’écran LCD.
Lorsque le vibreur est désactivé et qu’une alarme météo se produit, le signal sonore
ne retentira donc pas. Afin de signaler à l’utilisateur qu’une condition météo se situe
hors du seuil de commutation réglée et correspond donc à un état d’alarme, l’affichage de la valeur météo correspondante se met alors à clignoter.
Désactivation du vibreur
En mode d’affichage normal, actionner et maintenir la touche SET jusqu’à l’apparition du symbole „BUZZER OFF“ (vibreur ARRET) à droite au-dessus de l’affichage de
la direction du vent ! L’écran LCD passe au mode de réglage.
Pour retourner au mode d’affichage normal, appuyer une fois sur la touche ALARME
! Le symbole „BUZZER OFF“ reste visible.
Réactivation du vibreur
Lorsque le symbole „BUZZER OFF“ est visible sur l’écran LCD, appuyer brièvement
sur la touche SET ! Le symbole „BUZZER OFF“ disparaît.
Pour retourner au mode d’affichage normal, appuyer une fois sur la touche ALARM
1. Le symbole „BUZZER OFF“ n’est plus affiché et le signal d’alarme retentira à nouveau en cas d’alarme.
Affichage du symbole de décharge des piles
Le symbole de décharge des piles pour la station météo et l’émetteur thermo-hygro
extérieur apparaît tout en haut ou tout en bas de l’écran LCD lorsque l’une des piles
devient faible et doit être remplacée.
Il est toutefois recommandé de remplacer une fois par an toutes les piles de toutes
les unités de l’appareil afin de garantir une précision optimale de la station météo !
Remar
que :
Après un remplacement des piles, il est nécessaire de rerégler la station météo ainsi
que l’émetteur extérieur !
(voir aussi le paragraphe „Réglage de base“!)
La mémoire des données historiques est effacée en cas de changement des piles.
Symbole pour “Vibreur ARRET”
 Loading...