

Page 1

Conrad
Powerline Adapter PL85D
Page 2

Alle Angaben in dieser Dokumentation sind nach sorgfältiger Prüfung zusammengestellt worden, gelten jedoch nicht als
Zusicherung von Produkteigenschaften. Der Hersteller haftet ausschließlich in dem Umfang, der in den Verkaufs- und
Lieferbedingungen festgelegt ist.
Weitergabe und Vervielfältigung der zu diesem Produkt gehörenden Dokumentation und Software und die Verwendung
ihres Inhalts sind nur mit schriftlicher Erlaubnis des Herstellers gestattet. Änderungen, die dem technischen Fortschritt
dienen, bleiben vorbehalten.
Marken
Windows
HomePlug
®
und Microsoft® sind eingetragene Marken von Microsoft, Corp.
®
ist eine eingetragene Marke von HomePlug Powerline Alliance.
Der Hersteller behält sich vor, die genannten Daten ohne Ankündigung zu ändern, und übernimmt keine Gewähr für tec hnische Ungenauigkeiten und/oder Auslassungen .
Juni 2008
Page 3

Inhalt
1 Einleitung. . . . . . . . . . . . . . . . . . . . . . . . . . . . . . . . . . . . . . . . . . . . . . . . . . . . . . . . . . . . . . . 4
1.1 Was bedeutet HomePlug?. . . . . . . . . . . . . . . . . . . . . . . . . . . . . . . . . . . . . . . . . . . . .4
1.1.1 Powerline Adapter PL85D. . . . . . . . . . . . . . . . . . . . . . . . . . . . . . . . . . . . . .4
1.2 Anwendungsbeispiele . . . . . . . . . . . . . . . . . . . . . . . . . . . . . . . . . . . . . . . . . . . . . . . . 5
1.2.1 Internet-Einzelplatzlösung mit Internetanschluss über ein Modem
(Netzwerkschnittstelle) . . . . . . . . . . . . . . . . . . . . . . . . . . . . . . . . . . . . . . . .5
1.2.2 Internet-Mehrplatzlösung mit Internetanschluss über einen
Modem-Router . . . . . . . . . . . . . . . . . . . . . . . . . . . . . . . . . . . . . . . . . . . . . .5
2 Installation . . . . . . . . . . . . . . . . . . . . . . . . . . . . . . . . . . . . . . . . . . . . . . . . . . . . . . . . . . . . . . 6
2.1 Lieferumfang . . . . . . . . . . . . . . . . . . . . . . . . . . . . . . . . . . . . . . . . . . . . . . . . . . . . . . .6
2.2 Systemvoraussetzungen . . . . . . . . . . . . . . . . . . . . . . . . . . . . . . . . . . . . . . . . . . . . . .6
2.3 Anschluss- und Anzeigeelemente . . . . . . . . . . . . . . . . . . . . . . . . . . . . . . . . . . . . . . .6
2.4 Anschluss des Adapters . . . . . . . . . . . . . . . . . . . . . . . . . . . . . . . . . . . . . . . . . . . . . .7
3 Konfiguration des HomePlug-Netzwerkes . . . . . . . . . . . . . . . . . . . . . . . . . . . . . . . . . . . . 8
4 Anhang. . . . . . . . . . . . . . . . . . . . . . . . . . . . . . . . . . . . . . . . . . . . . . . . . . . . . . . . . . . . . . . . . 9
4.1 Technische Daten . . . . . . . . . . . . . . . . . . . . . . . . . . . . . . . . . . . . . . . . . . . . . . . . . . .9
4.2 Wichtige Sicherheitsanweisungen. . . . . . . . . . . . . . . . . . . . . . . . . . . . . . . . . . . . . .10
4.3 Allgemeine Garantiebedingungen . . . . . . . . . . . . . . . . . . . . . . . . . . . . . . . . . . . . . .12
Conrad Powerline Adapter PL85D
Page 4

4 Einleitung
1 Einleitung
In diesem Kapitel geben wir Ihnen einen Überblick über die HomePlug-Technologie und stellen Ihnen den Adapter kurz vor. Anwendungsbeispiele finden
Sie am Ende des Kapitels.
1.1 Was bedeutet HomePlug?
HomePlug („Inhouse-Powerline”) ist eine intelligente und sichere Technologie, mit der Sie einfach, schnell und preiswert ein Heimnetzwerk über das
Stromnetz aufbauen, ohne erst eine teure und lästige Verkabelung durchfüh
ren zu müssen. Dabei müssen sich Leistungsdaten und Installationsaufwand
nicht hinter den traditionellen Methoden verstecken. Ganz im Gegenteil: Mit
HomePlug erreichen Sie mittlerweile ähnliche Geschwindigkeiten wie mit
anderen LAN-Technologien.
-
1.1.1 Powerline Adapter PL85D
Der Adapter bietet eine Übertragungsrate von bis zu 85 Mbit/s über das hausinterne Stromnetz. Er sorgt dafür, dass zwischen den Computern Ihres
Netzwerkes auch größere Dateien über das Stromnetz getauscht werden
können.
Einfache Installation
• Adapter über das Netzwerkkabel mit dem Computer bzw. dem jeweiligen
Netzwerkgerät verbinden
• Adapter mit dem Stromnetz verbinden
• optional: Installation der Konfigurationssoftware auf Ihrem Computer zur
individuellen Kennwortvergabe
• Fertig!
Conrad Powerline Adapter PL85D
Page 5
Einleitung 5
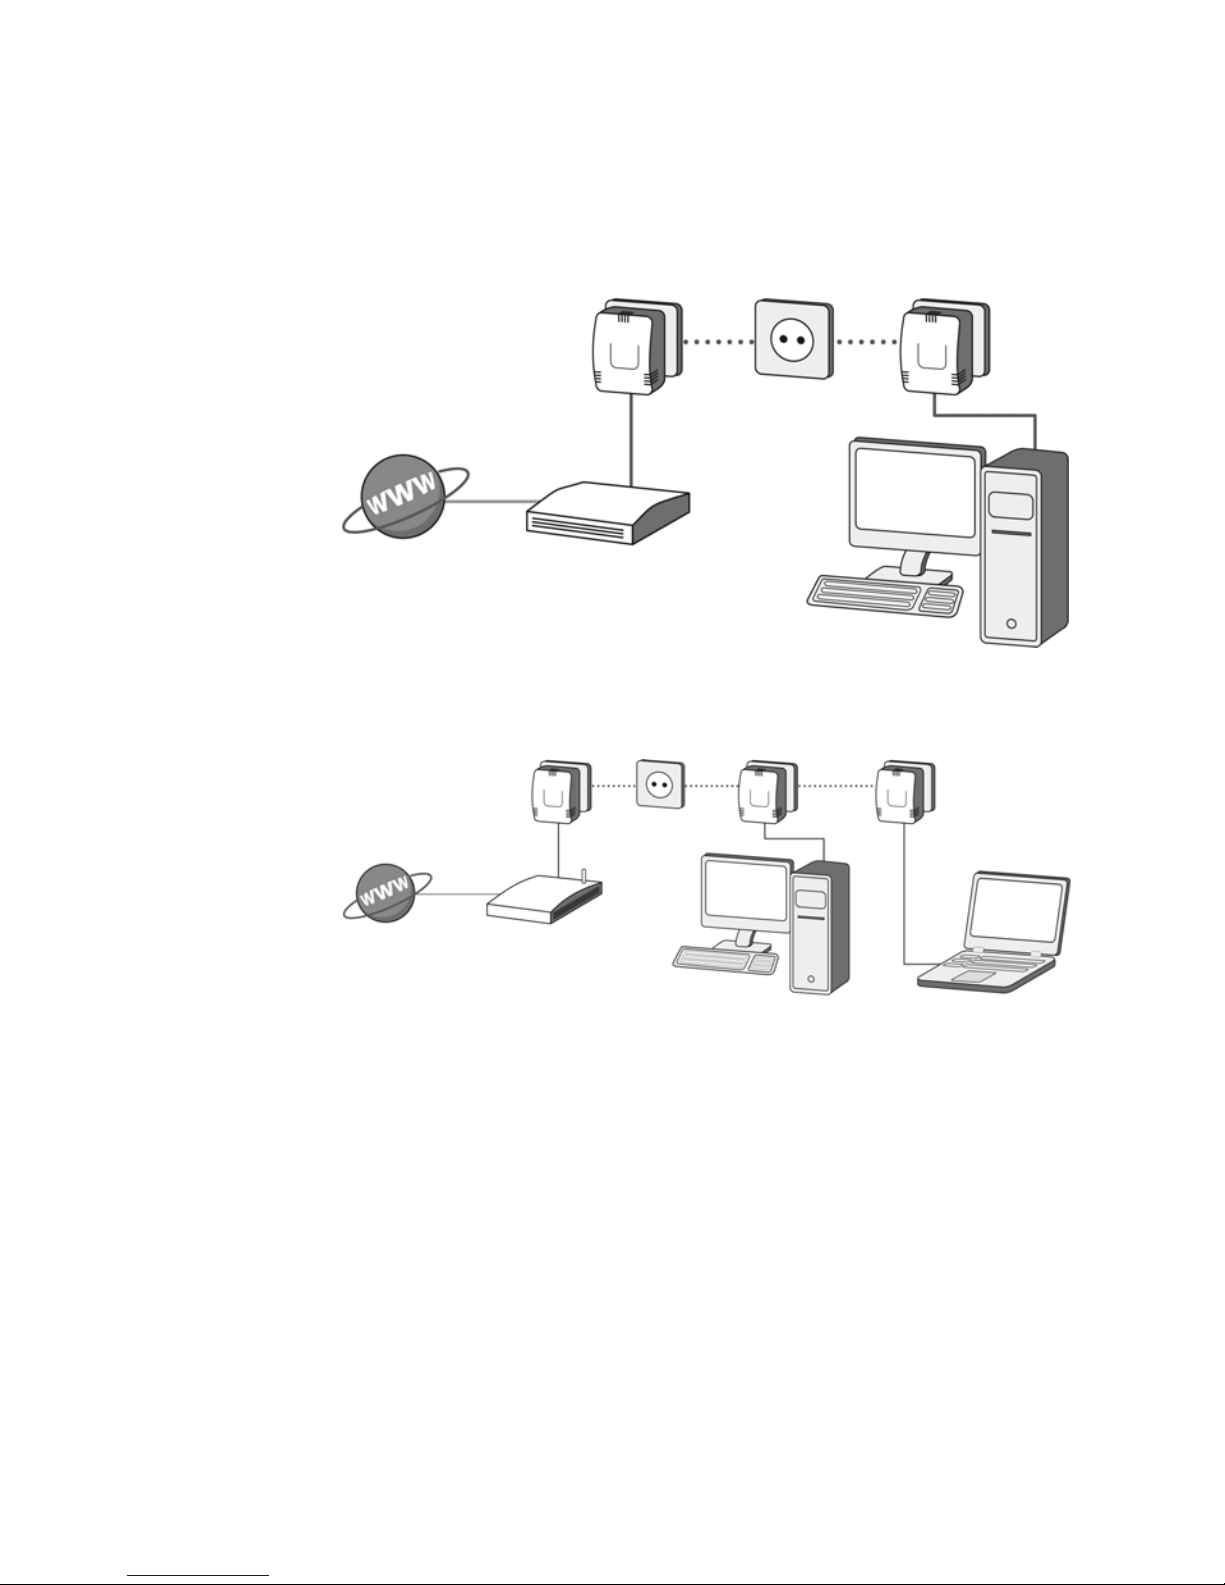
1.2 Anwendungsbeispiele
1.2.1 Internet-Einzelplatzlösung mit Internetanschluss über ein
Modem (Netzwerkschnittstelle)
Modem
1.2.2 Internet-Mehrplatzlösung mit Internetanschluss über einen
Modem-Router
Modem-Router
Conrad Powerline Adapter PL85D
Page 6

6 Installation
2Installation
In diesem Kapitel beschreiben wir die Anschluss- und Anzeigeelemente des
Adapters und zeigen Ihnen, wie Sie diesen anschließen.
2.1 Lieferumfang
• Powerline Adapter PL85D
• Netzwerkkabel
• gedrucktes Installationsfaltblatt
• CD mit Online-Dokumentation und Konfigurationssoftware
Der Hersteller behält sich das Recht vor, Änderungen im Lieferumfang ohne
Vorankündigung vorzunehmen.
2.2 Systemvoraussetzungen
• Betriebssysteme: Windows XP (32 bit), Windows Vista oder alle netzwerk-
fähigen Betriebssysteme
• Netzwerkanschluss
Beachten Sie, dass Ihr Computer bzw. das jeweilige Gerät über eine Netzwerkkarte bzw. einen Netzwerkadapter mit Ethernet-Schnittstelle verfügen
muss.
2.3 Anschluss- und Anzeigeelemente
Der Adapter besitzt 3 Kontrollleuchten (LEDs) sowie einen Netzwerkanschluss.
LEDs Powerline Adapter PL85D
Power
HP Act
Leuchtet, wenn der Adapter betriebsbereit ist.
Blinkt, wenn Daten über die Stromleitungen gesendet und empfangen
werden.
HP Link
Anschluss Powerline Adapter PL85D
ETH Netzwerkanschluss: Hier verbinden Sie den Adapter über das mitgelie-
Conrad Powerline Adapter PL85D
Leuchtet, wenn eine V erbindung zum HomePlug-Netz besteht.
ferte Netzwerkkabel mit einem Computer oder einem anderen Gerät.
Page 7

Beachten Sie, dass alle Adapter, die an das Stromnetz angeschlossen sind
nach ca. 20 Minuten in den Energiesparmodus wechseln, wenn kein einge
schaltetes Gerät an der Ethernet-Schnittstelle angeschlossen ist. Im Energiesparmodus ist der Adapter über das Stromnetz nicht erreichbar.
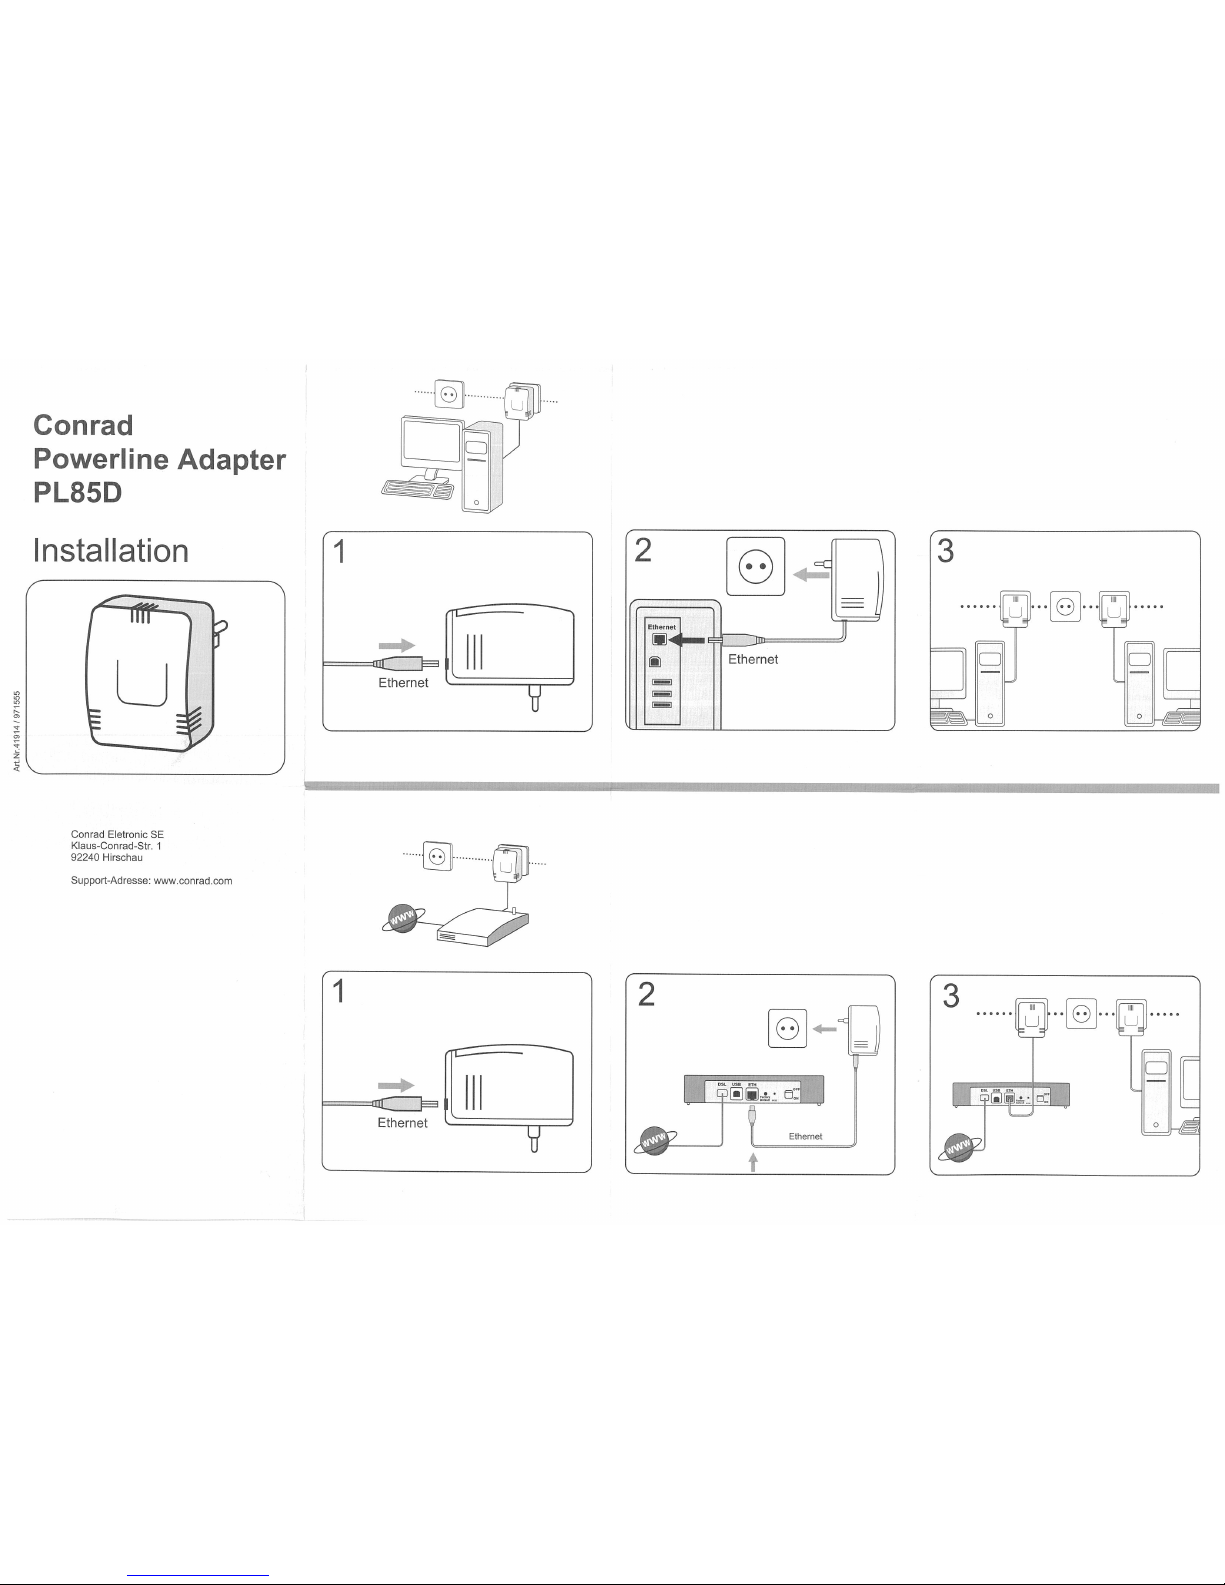
2.4 Anschluss des Adapters
Schließen Sie den Adapter über das mitgelieferte Netzwerkkabel an
einen Netzwerkanschluss Ihres eingeschalteten Computers an.
Stecken Sie den Adapter in eine verfügbare Steckdose.
Um mehrere HomePlug-Geräte miteinander zu einem abgeschlossenen und
sicheren Netzwerk zu verbinden, fahren Sie nun mit der Installation der Kon
figurationssoftware fort. Lesen Sie dazu im Kapitel 'Konfiguration des Home-
Plug-Netzwerkes weiter'.
Installation 7
-
-
Conrad Powerline Adapter PL85D
Page 8

8 Konfiguration des HomePlug-Netzwerkes
3 Konfiguration des HomePlug-Netzwerkes
Um die Konfigurationssoftware zu installieren, legen Sie die mitgelieferte CDROM in das CD-Laufwerk Ihres Computers. Falls auf Ihrem Computer Auto
play aktiviert ist, startet die Installation automatisch. Öffnen Sie ansonsten
das Verzeichnis mit dem Windows Explorer, indem Sie mit der rechten Maus
taste auf Start klicken und im Kontextmenü den Eintrag Explorer auswählen.
Starten Sie dann den Installationsassistenten manuell.
Nach einer erfolgreichen Installation finden Sie die Konfigurationssoftware
unter Start --> Alle Programme -> HomePlug -> HomePlug-Konfigurati
onsassistent.
• Lokalen Adapter suchen
Nach dem Start des Assistenten wird der lokale Adapter gesucht, der direkt
mit Ihrem Computer verbunden ist.
Beachten Sie: Jedes HomePlug-Gerät, das Sie in Ihr Netzwerk geschützt
einbinden möchten, muss zur Konfiguration direkt mit Ihrem Computer ver
bunden sein.
-
-
-
-
• Netzwerkkennwort vergeben
Wählen Sie im nächsten Schritt ein Netzwerkkennwort, das für alle Adapter
in Ihrem persönlichen Heimnetzwerk gelten soll. Es muss von allen Geräten
verwendet werden.
Das Standardkennwort im Auslieferungszustand lautet „HomePlug”. Aus
Sicherheitsgründen empfehlen wir, dieses zu überschreiben und ein individu
-
elles Kennwort zu vergeben.
• Weitere Adapter hinzufügen
Schließen Sie jeden weiteren Adapter, der Ihrem Netzwerk hinzugefügt
werden soll an Ihren Computer an und weisen, das von Ihnen gewählte
Kennwort zu.
Conrad Powerline Adapter PL85D
Page 9

4 Anhang
4.1 Technische Daten
Standards Ethernet-Spezifikation IEEE 802.3, IEEE 802.3x, IEEE
Protokolle CSMA/CD
Übertragungsgeschwindigkeit bis zu 85 Mbit/s
Übertragungsverfahren asynchron
Modulation OFDM – 84 Carrier
Anhang 9
Powerline Adapter PL85D
802.3u
Auto MDI / X
abwärts kompatibel zum HomePlug-Standard 1.0
Reichweite bis zu 200 m über Stromnetz
Sicherheit 56-Bit-DES-Verschlüsselung
LEDs Power
HomePlug Activitiy
HomePlug Link
HomePlug-Anschluss Euro-Netzstecker
Computerschnittstelle RJ45
Leistungsaufnahme max. 4,5 W
Stand-by: 3 W
Spannungsversorgung integrierte Versorgung über Steckdose
Nennspannung: 110 - 230 V AC
Nennstrom: 0,05 A
Nennfrequenz: 50 Hz
Umgebungsbedingungen Luftfeuchtigkeit (nicht kondensierend): 10-90%
Lagerung: -25°C – 70°C
Betrieb: 0°C – 40°C
Systemvoraussetzungen Ethernet-Schnittstelle
Windows XP (32 bit), Windows Vista oder alle netzwerkfä-
higen Betriebssysteme
Garantie 2 Jahre
Conrad Powerline Adapter PL85D
Page 10

10 Anhang
4.2 Wichtige Sicherheitsanweisungen
Alle Sicherheits- und Bedienungsanweisungen sollten vor Inbetriebnahme
des Gerätes gelesen und verstanden worden sein und für zukünftige Ein
sichtnahmen aufbewahrt werden.
• Das Gerät darf nicht geöffnet werden. Es befinden sich keine durch den
Anwender zu wartenden Teile im Inneren des Gerätes.
Versuchen Sie nicht, dass Produkt selbst zu warten, sondern wenden Sie
sich für jegliche Wartung aussschließlich an qualifiziertes Fachpersonal! Es
besteht Stromschlaggefahr!
• Verwenden Sie das Gerät ausschließlich an einem trockenen Standort.
• Verwenden Sie zum Anschluss des Gerätes immer das beiliegende Netz-
werkkabel.
• Stecken Sie keine Gegenstände in die Öffnungen des Gerät.
-
• Um das Gerät vom Stromnetz zu trennen, ziehen Sie den Netzstecker.
• Setzen Sie das Gerät nicht direkter Sonneneinstrahlung aus.
• Schlitze und Öffnungen am Gehäuse dienen der Belüftung und dürfen
weder verstopft noch abgedeckt werden.
• Das Gerät darf nicht in direkter Nähe eines Heizkörpers aufgestellt werden.
• Das Gerät sollte nur an Plätzen aufgestellt werden, welche gemäß der
Anweisungen des Herstellers eine ausreichende Belüftung gewähren.
• Vor der Reinigung trennen Sie das Gerät vom Stromnetz. Verwenden Sie
zur Reinigung des Gerätes niemals Wasser, Verdünner, Benzol, Alkohol
oder andere scharfe Reinigungsmittel, da dies zu Beschädigungen des
Gehäuses führen kann, sondern nur ein feuchtes Tuch.
• Das Gerät sollte ausschließlich an einem Versorgungsnetz betrieben werden, wie auf dem Typenschild beschrieben. Wenn Sie nicht sicher sind,
welche Art von Versorgungsnetz Sie zuhause haben, wenden Sie sich an
Ihren Händler oder an Ihren zuständigen Energieversorger.
• Im Schadensfall trennen Sie das Gerät vom Stromnetz und wenden sich
an Ihren Kundendienst. Ein Schadensfall liegt vor,
• wenn das Gerät mit Flüssigkeit überschüttet wurde oder Gegen-
• wenn das Gerät Regen oder Wasser ausgesetzt war.
• wenn das Gerät nicht funktioniert, obwohl alle Bedienungsanweisun-
Conrad Powerline Adapter PL85D
stände in das Gerät hinein geraten sind.
gen ordnungsgemäß befolgt wurden.
Page 11

• wenn das Gehäuse des Gerätes beschädigt ist.
• Wenn das Produkt eine Einrichtung der Klasse A ist, kann es im Wohnbe-
reich Funkstörungen verursachen.
Anhang 11
Conrad Powerline Adapter PL85D
Page 12

12 Anhang
4.3 Allgemeine Garantiebedingungen
Diese Garantie gewährt der Hersteller den Erwerbern von Produkten nach ihrer Wahl zus ätzlich
zu den ihnen zustehenden gesetzlichen Gewährleistungsansp rüchen nach Maßgabe der folgenden Bedingungen:
1 Garantieumfang
a) Die Garantie erstreckt sich auf das gelieferte Gerät mit allen Teilen. Sie wird in der Form
geleistet, dass Teile, die nachweislich trotz sachgemäßer Behandlung und Beachtung der
Gebrauchsanweisung aufgrund von Fabrikations- und/oder Materialfehlern defekt geworden sind, nach Wahl des Herstellers kostenlos ausgetauscht oder repariert werden. Alternativ hierzu behält sich der Hersteller vor, das defekte Gerät gegen ein Ersatzgerät mit
gleichem Funktionsumfang und gleichen Leistungsmerkmalen auszutauschen. Handbücher und evtl. mitgelieferte Software sind von der Garantie ausgeschlossen.
b) Die Kosten für Material und Arbeit szeit werden vom He rsteller getragen, nicht a ber die Kos-
ten für den Versand vom Erwerber zur Service-Werkstätte und/oder zum Hersteller.
c) Ersetzte Teile gehen in das Eigentum des Herstellers über.
d) Der Hersteller ist bere chtigt, über die Instandset zung und den Austausch hinaus technische
Änderungen (z. B. Firmware-Updates) vorzunehmen, um das Gerät dem aktuellen Stand
der Technik anzupassen. Hierfür entstehen dem Erwerber keine zusätzlichen Kosten. Ein
Rechtsanspruch hierauf besteht nicht.
2 Garantiezeit
Die Garantiezeit beträgt für dieses Produkt zwei Jahre. Die Garantiezeit beginn t mit dem Tag der
Lieferung des Gerätes. Vom Hersteller erbrachte Garantieleistungen bewirken weder eine Verlängerung der Garantiefrist, noch setzen sie eine neue Garantiefr ist in Lauf. Die Garantiefrist für
eingebaute Ersatzteile endet mit der Garantiefrist für das ganze Gerät.
3 Abwicklung
a) Zeigen sich innerhalb der Garantiezeit Fehler des Gerätes, so sind Garantieansprüche
unverzüglich, spätestens jedoch innerhalb von sieben Tagen geltend zu machen.
b) Transportschäden, die äußerlich erkennbar sind (z.B. Gehäuse beschädigt), sind unver-
züglich gegenüber der mit dem Transport beauftragten Person un d dem Ab sender gelte nd
zu machen. Äußerlich nicht erkennbare Schäden sind unverzüglich nach Entdeckung, spä -
testens jedoch innerhalb von drei Tagen nach Anlieferung, schriftlich gege nüber der Trans-
portperson und dem Absender zu reklamieren.
c) Der Transport zu und von der Stelle, welche die Garantieansprüche entgegennimmt und/
oder das instandgesetzte Gerät austauscht, geschieht auf eigene Gefahr und Kosten des
Erwerbers.
d) Garantieansprüche werden nur berücksichtigt, wenn mit dem Gerät eine Kopie des Rech-
nungsoriginals vorgelegt wird. Der Hersteller behält sich in Einzelfällen vor, sich das Rech-
nungsoriginal vorlegen zu lassen.
4 Ausschluss der Garantie
Jegliche Garantieansprüche sind insbesondere ausgeschlossen,
a) wenn der Aufkleber mit der Seriennummer vom Gerät entfernt worden ist,
b) wenn das Gerät durch den Einfluss höherer Gewalt oder durch Umwelteinflüsse (Feuc htig-
keit, Stromschlag, Staub u.ä.) beschädigt oder zerstört wurde,
c) wenn das Gerät unter Bedingungen gelagert oder betrieben wurde, die außerhalb der tech -
nischen Spezifikationen liegen,
Conrad Powerline Adapter PL85D
Page 13

d) wenn die Schäden durch unsachgemäße Behandlung – insbesondere durch Nichtbeach-
tung der Systembeschreibung und der Betriebsanleitung – aufgetreten sind,
e) wenn das Gerä t durch hierfür nicht vo m Hersteller beauft ragte Personen ge öffnet, repariert
oder modifiziert wurde,
f) wenn das Gerät mechanische Beschädigungen irgendwelcher Art aufweist,
g) wenn der Garantieanspruch nicht gemäß Ziffer 3a) oder 3b) gemeldet worden ist.
5 Bedienungsfehler
Stellt sich heraus, dass die gemeldete F ehlfunkt ion des Geräte s du rch fe hlerh afte F remd -Hard ware, -Software, Installation oder Bedienung verursacht wurde, behält der Hersteller sich vor,
den entstandenen Prüfaufwand dem Erwerber zu berechnen.
6 Ergänzende Regelungen
a) Die vorstehenden Bestimmungen regeln das Rechtsverhältnis zum Hersteller abschlie-
ßend.
b) Durch diese Garantie werden weitergehende Ansprüche, insbesondere solche auf Wand-
lung oder Minderung, nicht begründet. Schadensersatzansprüche, gleich aus welchem
Rechtsgrund, sind ausgeschlossen. Dies gilt nicht, soweit z.B. bei Personenschäden oder
Schäden an privat genutzten Sachen nach dem Produkthaftungsgesetz oder in Fällen des
Vorsatzes oder der groben Fahrlässigkeit zwingend gehaftet wird.
c) Ausgeschlossen sind insbesondere Ansprüche auf Ersatz von entgangenem Gewinn, mit-
telbaren oder Folgeschäden.
d) Für Datenverlust und/ode r die Wiederbeschaf fung von Daten haft et der Hersteller in Fällen
von leichter und mittlerer Fahrlässigkeit nicht.
e) In Fällen, in denen der Hersteller die Vernichtung von Daten vorsätzlich oder grob fahrläs-
sig verursacht hat, haftet der Hersteller für den typischen Wiederherstellungsaufwand, der
bei regelmäßiger und gefahrentsprechender Anfe rtigung von Sicherheitskopien eingetret en
wäre.
f) Die Garantie bezieht sich lediglich auf den Erstkäufer und ist nicht übertragbar.
g) Gerichtsstand ist Aachen, falls der Erwerber Vollkaufmann ist. Hat der Erwerber keinen all-
gemeinen Gerichtsstand in der Bundesrepublik Deutschland oder verlegt er nach V ertrags-
abschluss seinen Wohnsitz oder gewöhnlichen Aufenthaltsort aus dem Geltungsbereich
der Bundesrepublik Deutschland, ist der Geschäftssitz des Herste llers Gerichtss tand. Die s
gilt auch, falls Wohnsitz oder gewöh nlicher Aufenthalt des Käufers im Zeitpunkt der Klage-
erhebung nicht bekannt ist.
h) Es findet das Recht der Bundesrepublik Deutschland Anwendung. Das UN-Kaufrecht gilt
im Verhältnis zwischen dem Hersteller und dem Erwerber nicht.
Anhang 13
Conrad Powerline Adapter PL85D
Page 14
Page 15

Conrad
Powerline Adapter PL85D
Page 16

While the information in this manual has been compiled with great care, it may not be deemed an assurance of product
characteristics. The manufacturer shall be liable only to the degree specified in the terms of sale and delivery.
The reproduction and distribution of the documentation and software supplied wit h this product and the use of its contents
is subject to written authorization from the manufacturer. We reserve the right to make any alterations that arise as the
result of technical development.
Trademarks
Windows
HomePlug
®
and Microsoft® are registered trademarks of Microsoft, Corp.
®
is a registered trademark of Home Plug Power Alliance.
Subject to change without notice. No liability for technical errors or omissions.
June 2008
Page 17

Contents
1 Introduction . . . . . . . . . . . . . . . . . . . . . . . . . . . . . . . . . . . . . . . . . . . . . . . . . . . . . . . . . . . . . 4
1.1 What does HomePlug stand for?. . . . . . . . . . . . . . . . . . . . . . . . . . . . . . . . . . . . . . . .4
1.1.1 Powerline Adapter PL85D. . . . . . . . . . . . . . . . . . . . . . . . . . . . . . . . . . . . . .4
1.2 Practical examples. . . . . . . . . . . . . . . . . . . . . . . . . . . . . . . . . . . . . . . . . . . . . . . . . . .5
1.2.1 Internet solution for single users with Internet connection via a modem
(network port) . . . . . . . . . . . . . . . . . . . . . . . . . . . . . . . . . . . . . . . . . . . . . . .5
1.2.2 Internet solution for multi-users with Internet connection via a
modem router . . . . . . . . . . . . . . . . . . . . . . . . . . . . . . . . . . . . . . . . . . . . . . .5
2 Installation . . . . . . . . . . . . . . . . . . . . . . . . . . . . . . . . . . . . . . . . . . . . . . . . . . . . . . . . . . . . . . 6
2.1 Package contents . . . . . . . . . . . . . . . . . . . . . . . . . . . . . . . . . . . . . . . . . . . . . . . . . . .6
2.2 System requirements. . . . . . . . . . . . . . . . . . . . . . . . . . . . . . . . . . . . . . . . . . . . . . . . .6
2.3 Connection and display elements . . . . . . . . . . . . . . . . . . . . . . . . . . . . . . . . . . . . . . .6
2.4 Connecting the adapter . . . . . . . . . . . . . . . . . . . . . . . . . . . . . . . . . . . . . . . . . . . . . . .7
3 Configuring the HomePlug network . . . . . . . . . . . . . . . . . . . . . . . . . . . . . . . . . . . . . . . . . 8
4 Appendix . . . . . . . . . . . . . . . . . . . . . . . . . . . . . . . . . . . . . . . . . . . . . . . . . . . . . . . . . . . . . . . 9
4.1 Technical data . . . . . . . . . . . . . . . . . . . . . . . . . . . . . . . . . . . . . . . . . . . . . . . . . . . . . .9
4.2 Important safety instructions . . . . . . . . . . . . . . . . . . . . . . . . . . . . . . . . . . . . . . . . . .10
4.3 Warranty conditions. . . . . . . . . . . . . . . . . . . . . . . . . . . . . . . . . . . . . . . . . . . . . . . . .11
Conrad Powerline Adapter PL85D
Page 18

4 Introduction
1 Introduction
This chapter gives an overview of the HomePlug technology and briefly introduces the adapter. Practical examples are listed at the end of the chapter.
1.1 What does HomePlug stand for?
HomePlug (“Inhouse Powerline”) is an intelligent, secure technology that lets
you set up a home network easily, quickly and economically via your electri
cal wiring, without the need for complex and expensive dedicated cabling.
The available performance and effort required for the installation also com
pares favourably to traditional methods—HomePlug technology now attains
speeds you would expect from other LAN technologies.
1.1.1 Powerline Adapter PL85D
-
-
The adapter provides a transmission rate of up to 85 Mbps via the electrical
wiring in the building. It also facilitates larger data transfer between the com
puters in your network via the electrical wiring.
Simple Installation
• Connect the adapter via the network cable to the computer or the respective
network device.
• Connect the adapter to the electrical wiring
• As an option: install the configuration software on your computer for indivi-
dual password allocation
• That's it!
-
Conrad Powerline Adapter PL85D
Page 19

Introduction 5
1.2 Practical examples
1.2.1 Internet solution for single users with Internet connection
via a modem (network port)
modem
1.2.2 Internet solution for multi-users with Internet connection
via a modem router
modem router
Conrad Powerline Adapter PL85D
Page 20

6 Installation
2Installation
This chapter describes the connection and display elements of the adapter
and how to connect it.
2.1 Package contents
• Powerline Adapter PL85D
• Network cable
• Printed installation leaflet
• CD containing online documentation and configuration software
The manufacturer reserves the right to change the package contents without
prior notice.
2.2 System requirements
• Operating systems: Windows XP (32 bit), Windows Vista or any other
operating system with network support
• Network connection
Please note that your computer or other device must feature a network
adapter with an Ethernet port.
2.3 Connection and display elements
The adapter is fitted with 3 control lamps (LEDs) as well as a network connection.
LEDs HomePlug 85
Power
HP Act
HP Link
Lit steady when the adapter is operational.
Flashes when data is being sent and received via the electrical wiring.
Lit steady when a connection with the HomePlug network exists.
Connection HomePlug 85
ETH Network connection: This is the connection point on the adapter for
Conrad Powerline Adapter PL85D
connecting it to a computer or another device with the network cable
(included).
Page 21

Please note that all adapters which are connected to the electrical wiring,
switch to energy-saving mode after approx. 20 minutes, if no active network
device is connected to the Ethernet port. In energy-saving mode, the adapter
cannot be accessed via the electrical wiring.
2.4 Connecting the adapter
Use the included network cable to connect the adapter to the network
port of your running computer.
Plug the adapter into a free electrical outlet.
In order to connect multiple HomePlug devices into a self-contained, secure
network, now continue with the installation of the configuration. For more
information, refer to the chapter '
Configuring the HomePlug network'.
Installation 7
Conrad Powerline Adapter PL85D
Page 22

8 Configuring the HomePlug network
3 Configuring the HomePlug network
To install the configuration software, insert the included CD-ROM in the CD
drive of your computer. If autoplay is installed on your computer, the installa
tion will start automatically. Otherwise, open the folder with the Windows
Explorer by right-clicking on Start and selecting Explorer from the context
menu. Double-click to start the installation wizard manually.
Upon successful installation, the configuration software can be found under
Start --> All programs --> HomePlug --> HomePlug Configuration Wiz
ard.
• Scan for local adapter
After launching the wizard, it initially scans for the local adapter connected
directly to your computer.
Please note: You must connect every HomePlug device that you intend to
integrate securely in your network directly to your computer for configuration.
-
-
• Assign a network password
In this step, select a network password that will apply to all adapters in your
home network. The password must be used by all devices.
The factory default password is "HomePlug". For security reasons, we re-
commend overwriting it and assigning a password of your own.
• Add further adapters
Connect each adapter, which is to be added to your network, to your computer and assign it a password.
Conrad Powerline Adapter PL85D
Page 23

4 Appendix
4.1 Technical data
Standards Ethernet specification IEEE 802.3, IEEE 802.3x, IEEE
Protocols CSMA/CD
Transfer rate up to 85 Mbps
Transfer procedure Asynchronous
Modulation OFDM—84 carrier
Appendix 9
Powerline Adapter PL85D
802.3u
Auto MDI/X
compatible to HomePlug standard 1.0
Range up to 200 m via power supply
Security 56-bit encryption via power supply
LEDs Power
HomePlug Activity
HomePlug Link
HomePlug connection Standard power plug
Computer interface RJ45
Power consumption 4.5 VA (max.)
3 VA (stand-by)
Power supply Integrated power supply via power socket
Rated voltage: 110 - 230 VAC
Rated current: 0.05 A
Rated frequency: 50 Hz
Environment Humidity (non-condensing): 10-90%
Storage: -25°C – 70°C
Operation: 0°C – 40°C
System requirements Ethernet interface
Windows XP (32 bit), Windows Vista or any other opera-
ting system with network support
Warranty 2 years
Conrad Powerline Adapter PL85D
Page 24

10 Appendix
4.2 Important safety instructions
All safety and operating instructions should be read and understood before
using the device, and should be kept for future reference.
• Never open the device. There are no user-serviceable parts inside the
device.
Do not try to service this product yourself! Contact qualified technicians each
and every time your device needs maintenance. There is a risk of electric
shock!
• Use the device in a dry location only.
• Always use the included network cable to connect the device.
• Do not insert any objects into the openings of the device.
• To disconnect the device from the power supply grid, pull the power plug.
• Do not keep the device in direct sunlight.
• Slots and openings on the case serve as ventilation. Never block or cover
them.
• Never set up the device near a heater or radiator.
• The device should be located only where sufficient ventilation according to
the instructions of the manufacturer can be ensured.
• Disconnect the device from the power supply grid before cleaning. Use a
moist towel to clean the device. Never use water, paint thinner, benzene,
alcohol or other strong cleaning agents when cleaning the device, as these
could damage the case.
• Never use the device with a power supply that does not meet the specifications provided on the rating plate. If you do not know what type of power
supply you have at home, contact your dealer or energy supplier.
• In the event of damage, disconnect the device from the power supply grid
and contact customer service. This applies, for example, if
• the power cable or plug is damaged.
• liquid has been spilled on the device or objects have fallen into the
device.
• the device has been exposed to rain or water.
• the device does not work, even though the operating instructions
• the device’s case is damaged.
• Class A products may cause interference when used in residential environ-
ments.
Conrad Powerline Adapter PL85D
have been followed properly.
Page 25

4.3 Warranty conditions
The warranty is given to purchasers of the manufacturer's products in addition to the warranty
conditions provided by law and in accordance with the following conditions:
1 Warranty coverage
a) The warranty covers the equipment delivered and all its parts. Parts will, at the manufac tu -
rer's sole discretion, be replaced or repaired free of charge if, despite proven proper handling and adherence to the operating instructions, these parts became defective due to
fabrication and/or material defects. Alternatively, the manufacturer reserves the right to
replace the defective product with a comparable product with the same specifications and
features. Operating manuals and possibly supplied software are excluded from the warranty.
b) Material and service charges shall be covered by the manufacturer, but not shipping and
handling costs involved in transport from the buyer to the service station and/or to the
manufacturer.
c) Replaced parts become property of the manufacturer.
d) The manufacturer is authorized to ca rry out techn ical changes (e.g. firmware updates) bey-
ond repair and replacement of defective parts in order to bring th e equipment up to the cur-
rent technical state. This does not result in any additional charge for the customer. A legal
claim to this service does not exist.
Appendix 11
2 Warranty period
The warranty period for this product is two years. This period begins at the day of delivery from
the manufacturer's dealer. Warra nty serv ices carried out by the man ufact urer do no t result in an
extension of the warranty period nor do they initiate a n ew warranty period. The warra nty period
for installed replacement parts ends with the warranty period of the device as a whole.
3 Warranty procedure
a) If defects appear during the warranty period, the warranty claims must be made immedia-
tely, at the latest within a period of 7 days.
b) In the case of any ext ernally visible damage arising from transp ort (e.g. damage to the hou -
sing), the person carrying out the transportation and t he sender should be informed imme-
diately. On discovery of damage which is not externally visible, the transport company and
the sender are to be immediately informed in writing, at th e latest within 3 da ys of delive ry.
c) Transport to and from the location where the warranty claim is accep ted and/or the repaired
device is exchanged, is at the purchaser's own risk and cost.
d) Warranty claims are only valid if a copy of the original purc hase receipt is returned with the
device. The manufacturer reserves the right to require the submission of the original
purchase receipt.
4 Suspension of the warranty
All warranty claims will be deemed invalid
a) if the label with the serial number has been removed from the device,
b) if the device is damag ed or destroyed as a result of acts of nature or by environmental influ -
ences (moisture, electric shock, dust, etc.),
c) if the device was stored or operated under conditions not in compliance with the technical
specifications,
d) if the damage occurred due to incorrect handling, e specially to non-observance of t he sys-
tem description and the operating instructions,
Conrad Powerline Adapter PL85D
Page 26

12 Appendix
e) if the device was opened, repaired or modified by persons not contracted by the manufac-
turer,
f) if the device shows any kind of mechanical damage, or
g) if the warranty claim has not been reported in accordance with 3a) or 3b).
5 Operating mistakes
If it becomes apparent that the reported malfunction of the device ha s been caused by unsuitable
hardware, software, installation or operation, the manufacturer reserves the right to charge the
purchaser for the resulting testing costs.
6 Additional regulations
a) The above condition s define the complete scope of the manufacturer's legal liability.
b) The warranty gives no entitleme nt to addition al claims, such as any refund in full or in part.
Compensation claims, regardless of the legal basis, are excluded. This does not apply if
e.g. injury to persons or damage to private property are spec ifically c overed by t he product
liability law, or in cases of intentional act or culpable negligence.
c) Claims for compensation of lost profits, indirect or cons equential detriments, are excluded.
d) The manufacturer is not liable for lost data or retrieval of lost data in cases of slight and ordi -
nary negligence.
e) In the case that t he intentional or culpable negligence of the manuf acturer's employees has
caused a loss of data, the manufacturer will be liable for those costs typical to the recovery
of data where periodic security data back-ups have been made.
f) The warranty is valid only for the first purchaser and is not transferable.
g) The court of jurisdiction is located in Aachen, Germany in the case that the purchaser is a
merchant. If the purchaser does not have a court of jurisdiction in the Federal Republic of
Germany or if he moves his domicile out of Germany after conclusion of the contract, the
manufacturer's court of jurisdiction applies. This is also applicable if the purchaser's domi-
cile is not known at the time of institution of proceedings.
h) The law of the Federal Republic of Germany is applicable. The UN commercial law does
not apply to dealings between the manufacturer and the purchaser.
Conrad Powerline Adapter PL85D
Page 27

Conrad
Powerline Adapter PL85D
Page 28

While the information in this manual has been compiled with great care, it may not be deemed an assurance of product
characteristics. The manufacturer shall be liable only to the degree specified in the terms of sale and delivery.
The reproduction and distribution of the documentation and software supplied wit h this product and the use of its contents
is subject to written authorization from the manufacturer. We reserve the right to make any alterations that arise as the
result of technical development.
Trademarks
Windows
HomePlug
®
and Microsoft® are registered trademarks of Microsoft, Corp.
®
is a registered trademark of Home Plug Power Alliance.
Subject to change without notice. No liability for technical errors or omissions.
June 2008
Page 29

Contents
1 Introduction . . . . . . . . . . . . . . . . . . . . . . . . . . . . . . . . . . . . . . . . . . . . . . . . . . . . . . . . . . . . . 4
1.1 What does HomePlug stand for?. . . . . . . . . . . . . . . . . . . . . . . . . . . . . . . . . . . . . . . .4
1.1.1 Powerline Adapter PL85D. . . . . . . . . . . . . . . . . . . . . . . . . . . . . . . . . . . . . .4
1.2 Practical examples. . . . . . . . . . . . . . . . . . . . . . . . . . . . . . . . . . . . . . . . . . . . . . . . . . .5
1.2.1 Internet solution for single users with Internet connection via a modem
(network port) . . . . . . . . . . . . . . . . . . . . . . . . . . . . . . . . . . . . . . . . . . . . . . .5
1.2.2 Internet solution for multi-users with Internet connection via a
modem router . . . . . . . . . . . . . . . . . . . . . . . . . . . . . . . . . . . . . . . . . . . . . . .5
2 Installation . . . . . . . . . . . . . . . . . . . . . . . . . . . . . . . . . . . . . . . . . . . . . . . . . . . . . . . . . . . . . . 6
2.1 Package contents . . . . . . . . . . . . . . . . . . . . . . . . . . . . . . . . . . . . . . . . . . . . . . . . . . .6
2.2 System requirements. . . . . . . . . . . . . . . . . . . . . . . . . . . . . . . . . . . . . . . . . . . . . . . . .6
2.3 Connection and display elements . . . . . . . . . . . . . . . . . . . . . . . . . . . . . . . . . . . . . . .6
2.4 Connecting the adapter . . . . . . . . . . . . . . . . . . . . . . . . . . . . . . . . . . . . . . . . . . . . . . .7
3 Configuring the HomePlug network . . . . . . . . . . . . . . . . . . . . . . . . . . . . . . . . . . . . . . . . . 8
4 Appendix . . . . . . . . . . . . . . . . . . . . . . . . . . . . . . . . . . . . . . . . . . . . . . . . . . . . . . . . . . . . . . . 9
4.1 Technical data . . . . . . . . . . . . . . . . . . . . . . . . . . . . . . . . . . . . . . . . . . . . . . . . . . . . . .9
4.2 Important safety instructions . . . . . . . . . . . . . . . . . . . . . . . . . . . . . . . . . . . . . . . . . .10
4.3 Warranty conditions. . . . . . . . . . . . . . . . . . . . . . . . . . . . . . . . . . . . . . . . . . . . . . . . .11
Conrad Powerline Adapter PL85D
Page 30

4 Introduction
1 Introduction
This chapter gives an overview of the HomePlug technology and briefly introduces the adapter. Practical examples are listed at the end of the chapter.
1.1 What does HomePlug stand for?
HomePlug (“Inhouse Powerline”) is an intelligent, secure technology that lets
you set up a home network easily, quickly and economically via your electri
cal wiring, without the need for complex and expensive dedicated cabling.
The available performance and effort required for the installation also com
pares favourably to traditional methods—HomePlug technology now attains
speeds you would expect from other LAN technologies.
1.1.1 Powerline Adapter PL85D
-
-
The adapter provides a transmission rate of up to 85 Mbps via the electrical
wiring in the building. It also facilitates larger data transfer between the com
puters in your network via the electrical wiring.
Simple Installation
• Connect the adapter via the network cable to the computer or the respective
network device.
• Connect the adapter to the electrical wiring
• As an option: install the configuration software on your computer for indivi-
dual password allocation
• That's it!
-
Conrad Powerline Adapter PL85D
Page 31

Introduction 5
1.2 Practical examples
1.2.1 Internet solution for single users with Internet connection
via a modem (network port)
modem
1.2.2 Internet solution for multi-users with Internet connection
via a modem router
modem router
Conrad Powerline Adapter PL85D
Page 32

6 Installation
2Installation
This chapter describes the connection and display elements of the adapter
and how to connect it.
2.1 Package contents
• Powerline Adapter PL85D
• Network cable
• Printed installation leaflet
• CD containing online documentation and configuration software
The manufacturer reserves the right to change the package contents without
prior notice.
2.2 System requirements
• Operating systems: Windows XP (32 bit), Windows Vista or any other
operating system with network support
• Network connection
Please note that your computer or other device must feature a network
adapter with an Ethernet port.
2.3 Connection and display elements
The adapter is fitted with 3 control lamps (LEDs) as well as a network connection.
LEDs HomePlug 85
Power
HP Act
HP Link
Lit steady when the adapter is operational.
Flashes when data is being sent and received via the electrical wiring.
Lit steady when a connection with the HomePlug network exists.
Connection HomePlug 85
ETH Network connection: This is the connection point on the adapter for
Conrad Powerline Adapter PL85D
connecting it to a computer or another device with the network cable
(included).
Page 33

Please note that all adapters which are connected to the electrical wiring,
switch to energy-saving mode after approx. 20 minutes, if no active network
device is connected to the Ethernet port. In energy-saving mode, the adapter
cannot be accessed via the electrical wiring.
2.4 Connecting the adapter
Use the included network cable to connect the adapter to the network
port of your running computer.
Plug the adapter into a free electrical outlet.
In order to connect multiple HomePlug devices into a self-contained, secure
network, now continue with the installation of the configuration. For more
information, refer to the chapter '
Configuring the HomePlug network'.
Installation 7
Conrad Powerline Adapter PL85D
Page 34

8 Configuring the HomePlug network
3 Configuring the HomePlug network
To install the configuration software, insert the included CD-ROM in the CD
drive of your computer. If autoplay is installed on your computer, the installa
tion will start automatically. Otherwise, open the folder with the Windows
Explorer by right-clicking on Start and selecting Explorer from the context
menu. Double-click to start the installation wizard manually.
Upon successful installation, the configuration software can be found under
Start --> All programs --> HomePlug --> HomePlug Configuration Wiz
ard.
• Scan for local adapter
After launching the wizard, it initially scans for the local adapter connected
directly to your computer.
Please note: You must connect every HomePlug device that you intend to
integrate securely in your network directly to your computer for configuration.
-
-
• Assign a network password
In this step, select a network password that will apply to all adapters in your
home network. The password must be used by all devices.
The factory default password is "HomePlug". For security reasons, we re-
commend overwriting it and assigning a password of your own.
• Add further adapters
Connect each adapter, which is to be added to your network, to your computer and assign it a password.
Conrad Powerline Adapter PL85D
Page 35

4 Appendix
4.1 Technical data
Standards Ethernet specification IEEE 802.3, IEEE 802.3x, IEEE
Protocols CSMA/CD
Transfer rate up to 85 Mbps
Transfer procedure Asynchronous
Modulation OFDM—84 carrier
Appendix 9
Powerline Adapter PL85D
802.3u
Auto MDI/X
compatible to HomePlug standard 1.0
Range up to 200 m via power supply
Security 56-bit encryption via power supply
LEDs Power
HomePlug Activity
HomePlug Link
HomePlug connection Standard power plug
Computer interface RJ45
Power consumption 4.5 VA (max.)
3 VA (stand-by)
Power supply Integrated power supply via power socket
Rated voltage: 110 - 230 VAC
Rated current: 0.05 A
Rated frequency: 50 Hz
Environment Humidity (non-condensing): 10-90%
Storage: -25°C – 70°C
Operation: 0°C – 40°C
System requirements Ethernet interface
Windows XP (32 bit), Windows Vista or any other opera-
ting system with network support
Warranty 2 years
Conrad Powerline Adapter PL85D
Page 36

10 Appendix
4.2 Important safety instructions
All safety and operating instructions should be read and understood before
using the device, and should be kept for future reference.
• Never open the device. There are no user-serviceable parts inside the
device.
Do not try to service this product yourself! Contact qualified technicians each
and every time your device needs maintenance. There is a risk of electric
shock!
• Use the device in a dry location only.
• Always use the included network cable to connect the device.
• Do not insert any objects into the openings of the device.
• To disconnect the device from the power supply grid, pull the power plug.
• Do not keep the device in direct sunlight.
• Slots and openings on the case serve as ventilation. Never block or cover
them.
• Never set up the device near a heater or radiator.
• The device should be located only where sufficient ventilation according to
the instructions of the manufacturer can be ensured.
• Disconnect the device from the power supply grid before cleaning. Use a
moist towel to clean the device. Never use water, paint thinner, benzene,
alcohol or other strong cleaning agents when cleaning the device, as these
could damage the case.
• Never use the device with a power supply that does not meet the specifications provided on the rating plate. If you do not know what type of power
supply you have at home, contact your dealer or energy supplier.
• In the event of damage, disconnect the device from the power supply grid
and contact customer service. This applies, for example, if
• the power cable or plug is damaged.
• liquid has been spilled on the device or objects have fallen into the
device.
• the device has been exposed to rain or water.
• the device does not work, even though the operating instructions
• the device’s case is damaged.
• Class A products may cause interference when used in residential environ-
ments.
Conrad Powerline Adapter PL85D
have been followed properly.
Page 37

4.3 Warranty conditions
The warranty is given to purchasers of the manufacturer's products in addition to the warranty
conditions provided by law and in accordance with the following conditions:
1 Warranty coverage
a) The warranty covers the equipment delivered and all its parts. Parts will, at the manufac tu -
rer's sole discretion, be replaced or repaired free of charge if, despite proven proper handling and adherence to the operating instructions, these parts became defective due to
fabrication and/or material defects. Alternatively, the manufacturer reserves the right to
replace the defective product with a comparable product with the same specifications and
features. Operating manuals and possibly supplied software are excluded from the warranty.
b) Material and service charges shall be covered by the manufacturer, but not shipping and
handling costs involved in transport from the buyer to the service station and/or to the
manufacturer.
c) Replaced parts become property of the manufacturer.
d) The manufacturer is authorized to ca rry out techn ical changes (e.g. firmware updates) bey-
ond repair and replacement of defective parts in order to bring th e equipment up to the cur-
rent technical state. This does not result in any additional charge for the customer. A legal
claim to this service does not exist.
Appendix 11
2 Warranty period
The warranty period for this product is two years. This period begins at the day of delivery from
the manufacturer's dealer. Warra nty serv ices carried out by the man ufact urer do no t result in an
extension of the warranty period nor do they initiate a n ew warranty period. The warra nty period
for installed replacement parts ends with the warranty period of the device as a whole.
3 Warranty procedure
a) If defects appear during the warranty period, the warranty claims must be made immedia-
tely, at the latest within a period of 7 days.
b) In the case of any ext ernally visible damage arising from transp ort (e.g. damage to the hou -
sing), the person carrying out the transportation and t he sender should be informed imme-
diately. On discovery of damage which is not externally visible, the transport company and
the sender are to be immediately informed in writing, at th e latest within 3 da ys of delive ry.
c) Transport to and from the location where the warranty claim is accep ted and/or the repaired
device is exchanged, is at the purchaser's own risk and cost.
d) Warranty claims are only valid if a copy of the original purc hase receipt is returned with the
device. The manufacturer reserves the right to require the submission of the original
purchase receipt.
4 Suspension of the warranty
All warranty claims will be deemed invalid
a) if the label with the serial number has been removed from the device,
b) if the device is damag ed or destroyed as a result of acts of nature or by environmental influ -
ences (moisture, electric shock, dust, etc.),
c) if the device was stored or operated under conditions not in compliance with the technical
specifications,
d) if the damage occurred due to incorrect handling, e specially to non-observance of t he sys-
tem description and the operating instructions,
Conrad Powerline Adapter PL85D
Page 38

12 Appendix
e) if the device was opened, repaired or modified by persons not contracted by the manufac-
turer,
f) if the device shows any kind of mechanical damage, or
g) if the warranty claim has not been reported in accordance with 3a) or 3b).
5 Operating mistakes
If it becomes apparent that the reported malfunction of the device ha s been caused by unsuitable
hardware, software, installation or operation, the manufacturer reserves the right to charge the
purchaser for the resulting testing costs.
6 Additional regulations
a) The above condition s define the complete scope of the manufacturer's legal liability.
b) The warranty gives no entitleme nt to addition al claims, such as any refund in full or in part.
Compensation claims, regardless of the legal basis, are excluded. This does not apply if
e.g. injury to persons or damage to private property are spec ifically c overed by t he product
liability law, or in cases of intentional act or culpable negligence.
c) Claims for compensation of lost profits, indirect or cons equential detriments, are excluded.
d) The manufacturer is not liable for lost data or retrieval of lost data in cases of slight and ordi -
nary negligence.
e) In the case that t he intentional or culpable negligence of the manuf acturer's employees has
caused a loss of data, the manufacturer will be liable for those costs typical to the recovery
of data where periodic security data back-ups have been made.
f) The warranty is valid only for the first purchaser and is not transferable.
g) The court of jurisdiction is located in Aachen, Germany in the case that the purchaser is a
merchant. If the purchaser does not have a court of jurisdiction in the Federal Republic of
Germany or if he moves his domicile out of Germany after conclusion of the contract, the
manufacturer's court of jurisdiction applies. This is also applicable if the purchaser's domi-
cile is not known at the time of institution of proceedings.
h) The law of the Federal Republic of Germany is applicable. The UN commercial law does
not apply to dealings between the manufacturer and the purchaser.
Conrad Powerline Adapter PL85D
Page 39

Conrad
Powerline Adapter PL85D
Page 40

While the information in this manual has been compiled with great care, it may not be deemed an assurance of product
characteristics. The manufacturer shall be liable only to the degree specified in the terms of sale and delivery.
The reproduction and distribution of the documentation and software supplied wit h this product and the use of its contents
is subject to written authorization from the manufacturer. We reserve the right to make any alterations that arise as the
result of technical development.
Trademarks
Windows
HomePlug
®
and Microsoft® are registered trademarks of Microsoft, Corp.
®
is a registered trademark of Home Plug Power Alliance.
Subject to change without notice. No liability for technical errors or omissions.
June 2008
Page 41

Contents
1 Introduction . . . . . . . . . . . . . . . . . . . . . . . . . . . . . . . . . . . . . . . . . . . . . . . . . . . . . . . . . . . . . 4
1.1 What does HomePlug stand for?. . . . . . . . . . . . . . . . . . . . . . . . . . . . . . . . . . . . . . . .4
1.1.1 Powerline Adapter PL85D. . . . . . . . . . . . . . . . . . . . . . . . . . . . . . . . . . . . . .4
1.2 Practical examples. . . . . . . . . . . . . . . . . . . . . . . . . . . . . . . . . . . . . . . . . . . . . . . . . . .5
1.2.1 Internet solution for single users with Internet connection via a modem
(network port) . . . . . . . . . . . . . . . . . . . . . . . . . . . . . . . . . . . . . . . . . . . . . . .5
1.2.2 Internet solution for multi-users with Internet connection via a
modem router . . . . . . . . . . . . . . . . . . . . . . . . . . . . . . . . . . . . . . . . . . . . . . .5
2 Installation . . . . . . . . . . . . . . . . . . . . . . . . . . . . . . . . . . . . . . . . . . . . . . . . . . . . . . . . . . . . . . 6
2.1 Package contents . . . . . . . . . . . . . . . . . . . . . . . . . . . . . . . . . . . . . . . . . . . . . . . . . . .6
2.2 System requirements. . . . . . . . . . . . . . . . . . . . . . . . . . . . . . . . . . . . . . . . . . . . . . . . .6
2.3 Connection and display elements . . . . . . . . . . . . . . . . . . . . . . . . . . . . . . . . . . . . . . .6
2.4 Connecting the adapter . . . . . . . . . . . . . . . . . . . . . . . . . . . . . . . . . . . . . . . . . . . . . . .7
3 Configuring the HomePlug network . . . . . . . . . . . . . . . . . . . . . . . . . . . . . . . . . . . . . . . . . 8
4 Appendix . . . . . . . . . . . . . . . . . . . . . . . . . . . . . . . . . . . . . . . . . . . . . . . . . . . . . . . . . . . . . . . 9
4.1 Technical data . . . . . . . . . . . . . . . . . . . . . . . . . . . . . . . . . . . . . . . . . . . . . . . . . . . . . .9
4.2 Important safety instructions . . . . . . . . . . . . . . . . . . . . . . . . . . . . . . . . . . . . . . . . . .10
4.3 Warranty conditions. . . . . . . . . . . . . . . . . . . . . . . . . . . . . . . . . . . . . . . . . . . . . . . . .11
Conrad Powerline Adapter PL85D
Page 42

4 Introduction
1 Introduction
This chapter gives an overview of the HomePlug technology and briefly introduces the adapter. Practical examples are listed at the end of the chapter.
1.1 What does HomePlug stand for?
HomePlug (“Inhouse Powerline”) is an intelligent, secure technology that lets
you set up a home network easily, quickly and economically via your electri
cal wiring, without the need for complex and expensive dedicated cabling.
The available performance and effort required for the installation also com
pares favourably to traditional methods—HomePlug technology now attains
speeds you would expect from other LAN technologies.
1.1.1 Powerline Adapter PL85D
-
-
The adapter provides a transmission rate of up to 85 Mbps via the electrical
wiring in the building. It also facilitates larger data transfer between the com
puters in your network via the electrical wiring.
Simple Installation
• Connect the adapter via the network cable to the computer or the respective
network device.
• Connect the adapter to the electrical wiring
• As an option: install the configuration software on your computer for indivi-
dual password allocation
• That's it!
-
Conrad Powerline Adapter PL85D
Page 43

Introduction 5
1.2 Practical examples
1.2.1 Internet solution for single users with Internet connection
via a modem (network port)
modem
1.2.2 Internet solution for multi-users with Internet connection
via a modem router
modem router
Conrad Powerline Adapter PL85D
Page 44

6 Installation
2Installation
This chapter describes the connection and display elements of the adapter
and how to connect it.
2.1 Package contents
• Powerline Adapter PL85D
• Network cable
• Printed installation leaflet
• CD containing online documentation and configuration software
The manufacturer reserves the right to change the package contents without
prior notice.
2.2 System requirements
• Operating systems: Windows XP (32 bit), Windows Vista or any other
operating system with network support
• Network connection
Please note that your computer or other device must feature a network
adapter with an Ethernet port.
2.3 Connection and display elements
The adapter is fitted with 3 control lamps (LEDs) as well as a network connection.
LEDs HomePlug 85
Power
HP Act
HP Link
Lit steady when the adapter is operational.
Flashes when data is being sent and received via the electrical wiring.
Lit steady when a connection with the HomePlug network exists.
Connection HomePlug 85
ETH Network connection: This is the connection point on the adapter for
Conrad Powerline Adapter PL85D
connecting it to a computer or another device with the network cable
(included).
Page 45

Please note that all adapters which are connected to the electrical wiring,
switch to energy-saving mode after approx. 20 minutes, if no active network
device is connected to the Ethernet port. In energy-saving mode, the adapter
cannot be accessed via the electrical wiring.
2.4 Connecting the adapter
Use the included network cable to connect the adapter to the network
port of your running computer.
Plug the adapter into a free electrical outlet.
In order to connect multiple HomePlug devices into a self-contained, secure
network, now continue with the installation of the configuration. For more
information, refer to the chapter '
Configuring the HomePlug network'.
Installation 7
Conrad Powerline Adapter PL85D
Page 46

8 Configuring the HomePlug network
3 Configuring the HomePlug network
To install the configuration software, insert the included CD-ROM in the CD
drive of your computer. If autoplay is installed on your computer, the installa
tion will start automatically. Otherwise, open the folder with the Windows
Explorer by right-clicking on Start and selecting Explorer from the context
menu. Double-click to start the installation wizard manually.
Upon successful installation, the configuration software can be found under
Start --> All programs --> HomePlug --> HomePlug Configuration Wiz
ard.
• Scan for local adapter
After launching the wizard, it initially scans for the local adapter connected
directly to your computer.
Please note: You must connect every HomePlug device that you intend to
integrate securely in your network directly to your computer for configuration.
-
-
• Assign a network password
In this step, select a network password that will apply to all adapters in your
home network. The password must be used by all devices.
The factory default password is "HomePlug". For security reasons, we re-
commend overwriting it and assigning a password of your own.
• Add further adapters
Connect each adapter, which is to be added to your network, to your computer and assign it a password.
Conrad Powerline Adapter PL85D
Page 47

4 Appendix
4.1 Technical data
Standards Ethernet specification IEEE 802.3, IEEE 802.3x, IEEE
Protocols CSMA/CD
Transfer rate up to 85 Mbps
Transfer procedure Asynchronous
Modulation OFDM—84 carrier
Appendix 9
Powerline Adapter PL85D
802.3u
Auto MDI/X
compatible to HomePlug standard 1.0
Range up to 200 m via power supply
Security 56-bit encryption via power supply
LEDs Power
HomePlug Activity
HomePlug Link
HomePlug connection Standard power plug
Computer interface RJ45
Power consumption 4.5 VA (max.)
3 VA (stand-by)
Power supply Integrated power supply via power socket
Rated voltage: 110 - 230 VAC
Rated current: 0.05 A
Rated frequency: 50 Hz
Environment Humidity (non-condensing): 10-90%
Storage: -25°C – 70°C
Operation: 0°C – 40°C
System requirements Ethernet interface
Windows XP (32 bit), Windows Vista or any other opera-
ting system with network support
Warranty 2 years
Conrad Powerline Adapter PL85D
Page 48

10 Appendix
4.2 Important safety instructions
All safety and operating instructions should be read and understood before
using the device, and should be kept for future reference.
• Never open the device. There are no user-serviceable parts inside the
device.
Do not try to service this product yourself! Contact qualified technicians each
and every time your device needs maintenance. There is a risk of electric
shock!
• Use the device in a dry location only.
• Always use the included network cable to connect the device.
• Do not insert any objects into the openings of the device.
• To disconnect the device from the power supply grid, pull the power plug.
• Do not keep the device in direct sunlight.
• Slots and openings on the case serve as ventilation. Never block or cover
them.
• Never set up the device near a heater or radiator.
• The device should be located only where sufficient ventilation according to
the instructions of the manufacturer can be ensured.
• Disconnect the device from the power supply grid before cleaning. Use a
moist towel to clean the device. Never use water, paint thinner, benzene,
alcohol or other strong cleaning agents when cleaning the device, as these
could damage the case.
• Never use the device with a power supply that does not meet the specifications provided on the rating plate. If you do not know what type of power
supply you have at home, contact your dealer or energy supplier.
• In the event of damage, disconnect the device from the power supply grid
and contact customer service. This applies, for example, if
• the power cable or plug is damaged.
• liquid has been spilled on the device or objects have fallen into the
device.
• the device has been exposed to rain or water.
• the device does not work, even though the operating instructions
• the device’s case is damaged.
• Class A products may cause interference when used in residential environ-
ments.
Conrad Powerline Adapter PL85D
have been followed properly.
Page 49

4.3 Warranty conditions
The warranty is given to purchasers of the manufacturer's products in addition to the warranty
conditions provided by law and in accordance with the following conditions:
1 Warranty coverage
a) The warranty covers the equipment delivered and all its parts. Parts will, at the manufac tu -
rer's sole discretion, be replaced or repaired free of charge if, despite proven proper handling and adherence to the operating instructions, these parts became defective due to
fabrication and/or material defects. Alternatively, the manufacturer reserves the right to
replace the defective product with a comparable product with the same specifications and
features. Operating manuals and possibly supplied software are excluded from the warranty.
b) Material and service charges shall be covered by the manufacturer, but not shipping and
handling costs involved in transport from the buyer to the service station and/or to the
manufacturer.
c) Replaced parts become property of the manufacturer.
d) The manufacturer is authorized to ca rry out techn ical changes (e.g. firmware updates) bey-
ond repair and replacement of defective parts in order to bring th e equipment up to the cur-
rent technical state. This does not result in any additional charge for the customer. A legal
claim to this service does not exist.
Appendix 11
2 Warranty period
The warranty period for this product is two years. This period begins at the day of delivery from
the manufacturer's dealer. Warra nty serv ices carried out by the man ufact urer do no t result in an
extension of the warranty period nor do they initiate a n ew warranty period. The warra nty period
for installed replacement parts ends with the warranty period of the device as a whole.
3 Warranty procedure
a) If defects appear during the warranty period, the warranty claims must be made immedia-
tely, at the latest within a period of 7 days.
b) In the case of any ext ernally visible damage arising from transp ort (e.g. damage to the hou -
sing), the person carrying out the transportation and t he sender should be informed imme-
diately. On discovery of damage which is not externally visible, the transport company and
the sender are to be immediately informed in writing, at th e latest within 3 da ys of delive ry.
c) Transport to and from the location where the warranty claim is accep ted and/or the repaired
device is exchanged, is at the purchaser's own risk and cost.
d) Warranty claims are only valid if a copy of the original purc hase receipt is returned with the
device. The manufacturer reserves the right to require the submission of the original
purchase receipt.
4 Suspension of the warranty
All warranty claims will be deemed invalid
a) if the label with the serial number has been removed from the device,
b) if the device is damag ed or destroyed as a result of acts of nature or by environmental influ -
ences (moisture, electric shock, dust, etc.),
c) if the device was stored or operated under conditions not in compliance with the technical
specifications,
d) if the damage occurred due to incorrect handling, e specially to non-observance of t he sys-
tem description and the operating instructions,
Conrad Powerline Adapter PL85D
Page 50

12 Appendix
e) if the device was opened, repaired or modified by persons not contracted by the manufac-
turer,
f) if the device shows any kind of mechanical damage, or
g) if the warranty claim has not been reported in accordance with 3a) or 3b).
5 Operating mistakes
If it becomes apparent that the reported malfunction of the device ha s been caused by unsuitable
hardware, software, installation or operation, the manufacturer reserves the right to charge the
purchaser for the resulting testing costs.
6 Additional regulations
a) The above condition s define the complete scope of the manufacturer's legal liability.
b) The warranty gives no entitleme nt to addition al claims, such as any refund in full or in part.
Compensation claims, regardless of the legal basis, are excluded. This does not apply if
e.g. injury to persons or damage to private property are spec ifically c overed by t he product
liability law, or in cases of intentional act or culpable negligence.
c) Claims for compensation of lost profits, indirect or cons equential detriments, are excluded.
d) The manufacturer is not liable for lost data or retrieval of lost data in cases of slight and ordi -
nary negligence.
e) In the case that t he intentional or culpable negligence of the manuf acturer's employees has
caused a loss of data, the manufacturer will be liable for those costs typical to the recovery
of data where periodic security data back-ups have been made.
f) The warranty is valid only for the first purchaser and is not transferable.
g) The court of jurisdiction is located in Aachen, Germany in the case that the purchaser is a
merchant. If the purchaser does not have a court of jurisdiction in the Federal Republic of
Germany or if he moves his domicile out of Germany after conclusion of the contract, the
manufacturer's court of jurisdiction applies. This is also applicable if the purchaser's domi-
cile is not known at the time of institution of proceedings.
h) The law of the Federal Republic of Germany is applicable. The UN commercial law does
not apply to dealings between the manufacturer and the purchaser.
Conrad Powerline Adapter PL85D
Page 51

WLAN-Mini-Router N150
Version 11/09
Best.-Nr. 97 24 35 °
Bestimmungsgemäße Verwendung
Das Produkt verfügt über 3 verschiedene Funktionen: Es kann entweder als Router, als Accesspoint oder
als Converter betrieben werden.
Dieses Produkt erfüllt die gesetzlichen, nationalen und europäischen Anforderungen. Alle enthaltenen
Firmennamen und Produktbezeichnungen sind Warenzeichen der jeweiligen Inhaber. Alle Rechte
vorbehalten.
Lieferumfang
• WLAN-Mini-Router
• Steckernetzteil
• Netzwerkkabel
• CD mit umfangreichem englischsprachigen Handbuch des Herstellers (HTML-Format)
• Kurzanleitung
Merkmale
• Netzwerkport 10/100MBit (Anschluss „LAN“)
• WLAN nach 802.11b/g/n (max. 150MBit, N150)
• Betriebsart Router, Accesspoint, Client/Converter per Schalter wählbar
• Konfiguration über integrierten Webserver
Sicherheitshinweise
Bei Schäden, die durch Nichtbeachten dieser Bedienungsanleitung verursacht
werden, erlischt die Gewährleistung/Garantie! Für Folgeschäden übernehmen wir
keine Haftung!
Bei Sach- oder Personenschäden, die durch unsachgemäße Handhabung oder
Nichtbeachten der Sicherheitshinweise verursacht werden, übernehmen wir keine
Haftung. In solchen Fällen erlischt die Gewährleistung/Garantie.
• Aus Sicherheits- und Zulassungsgründen (CE) ist das eigenmächtige Umbauen und/oder
Verändern des Produkts nicht gestattet.
• Der Aufbau des Steckernetzteils entspricht der Schutzklasse II. Als Spannungsquelle für
das Steckernetzteil darf nur eine ordnungsgemäße Netzsteckdose des öffentlichen
Versorgungsnetzes verwendet werden (100-240V~, 50/60Hz, siehe Aufdruck auf dem
Steckernetzteil).
• Das Produkt ist kein Spielzeug. Geräte, die an Netzspannung betrieben werden, gehören
nicht in Kinderhände. Lassen Sie deshalb in Anwesenheit von Kindern besondere
Vorsicht walten.
• Lassen Sie das Verpackungsmaterial nicht achtlos liegen, dieses könnte für Kinder zu
einem gefährlichen Spielzeug werden.
• Das Produkt ist nur für geschlossene, trockene Innenräume vorgesehen, es darf nicht
feucht oder nass werden! Es besteht die Gefahr eines lebensgefährlichen elektrischen
Schlages!
• Gehen Sie vorsichtig mit dem Produkt um, durch Stöße, Schläge oder dem Fall aus
bereits geringer Höhe wird es beschädigt.
Konfiguration, Betriebsart wählen
☞
Auf der mitgelieferten CD finden Sie eine sehr ausführliche Bedienungsanleitung des
Herstellers in englischer Sprache (HTML-Format).
Für die Schnellinstallation beachten Sie bitte folgende Abschnitte.
Soll die Betriebsart mit dem seitlichen Schiebeschalter gewechselt werden, so trennen Sie
den Mini-Router zuerst von der Betriebsspannung (Steckernetzteil aus der Netzsteckdose
ziehen oder Niederspannungsstecker aus dem Mini-Router ziehen).
Erst dann darf der Schiebeschalter in eine andere Position gebracht werden. Andernfalls
wird das Umschalten auf eine andere Betriebsart nicht erkannt!
LED-Beschreibung:
1 Power-LED, leuchtet, wenn der Mini-Router über das mitgelieferte Stecker-
netzteil mit Spannung/Strom versorgt wird
2 WPS-LED
3 LED für WLAN, blinkt bzw. leuchtet bei Datenübertragung über WLAN
Betrieb als WLAN-Router
Falls noch nicht geschehen, trennen Sie den Mini-Router von der Stromversorgung. Bringen Sie dann den
seitlichen Schiebeschalter in die Position „Router“ und verbinden Sie die RJ45-Buchse „Internet“ am MiniRouter mit dem DSL-Modem. Die Buchse „LAN“ am Mini-Router steht für den Anschluss eines Computers
bzw. Netzwerkswitchs zur Verfügung.
WWW
Ꮨ
쮕
BEDIENUNGSANLEITUNG www.conrad.com
Gehen Sie für die Konfiguration des Mini-Routers wie folgt vor:
• Verbinden Sie den Mini-Router mit der Stromversorgung.
☞
Der Startvorgang des im Mini-Routers integrierten Webservers kann bis zu einer Minute
dauern. In dieser Zeit wird natürlich externen Geräten noch keine IP-Adresse zugeteilt.
• Schalten Sie den bzw. die Computer ein und starten Sie das jeweilige Betriebssystem.
☞
Für die Konfiguration des Mini-Routers sollte ein Computer verwendet werden, der über
Kabel am Mini-Router angeschlossen ist (am Anschluss „LAN“) und der so eingestellt ist,
dass er seine IP-Adresse automatisch bezieht.
• Im Mini-Router ist ein DHCP-Server integriert, der die IP-Adressen automatisch verteilt.
Der DHCP-Server im Mini-Router verteilt IP-Adressen im Bereich 192.168.1.x. Die IP-Adresse
192.168.1.1 (Subnet-Mask 255.255.255.0) ist vom Mini-Router selbst belegt.
Das Betriebssystem muss so eingerichtet sein, dass dem Netzwerkadapter des Computers eine IP-
Adresse beim Start automatisch zugewiesen wird. Dies ist bei Windows XP, Windows Vista oder
Windows 7 standardmäßig voreingestellt.
Sollten Sie eine feste IP-Adresse eingestellt haben, so müssen Sie dies in der Systemsteuerung von
Windows ändern, da andernfalls keine Kommunikation mit dem Mini-Router möglich ist.
Achten Sie darauf, dass nur ein DHCP-Server im gesamten Netzwerk existiert. Sollten Sie also beispielsweise den Mini-Router und eine Netzwerkfestplatte mit DHCP-Server betreiben, so darf nur einer
der DHCP-Server eingeschaltet sein (wir empfehlen, dass der DHCP-Server des Mini-Routers eingeschaltet ist).
• Starten Sie Ihren Internet-Browser (z.B. den Internet-Explorer) und geben Sie in der Adresszeile
„192.168.1.1“ ein (ohne Anführungszeichen).
Nun sollte der Anmeldebildschirm des Mini-Routers erscheinen. Geben Sie als Benutzernamen „admin“
und als Passwort „password“ ein (jeweils klein geschrieben).
Danach gelangen Sie zum internen Webserver, über den Sie die weitere Konfiguration vornehmen
können.
• Je nachdem, welchen Provider Sie verwenden, ist die Konfiguration des Routers unterschiedlich.
• Im einfachsten Fall klicken Sie im Webserver des Mini-Routers auf „Internet“ und dort auf „Internet
Service Setup“. Stellen Sie dort als Zugangsart („WAN Connection Type“) „PPPoE (DSL)“ ein. Dann
kann der Benutzername und das Passwort, welches Sie vom Provider erhalten haben, eingegeben
werden. Nach dem Speichern dieser Daten und dem Neustart des Mini-Routers sollte bereits ein
Internet-Zugang der Computer möglich sein.
☞
Klicken Sie auf die Schaltfläche „RADIO OFF“, diese wechselt dann auf „RADIO ON“. Dies
bedeutet, dass die WLAN-Funktion ausgeschaltet ist.
Klicken Sie auf die Schaltfläche „RADIO ON“, diese wechselt dann auf „RADIO OFF“. Dies
bedeutet, dass die WLAN-Funktion eingeschaltet ist.
Vergessen Sie nicht, für WLAN die Verschlüsselung zu aktivieren („WPA2“ empfohlen).
Als zusätzliche Sicherheit könnten Sie nur die MAC-Adressen (nicht mit den IP-Adressen
verwechseln!) der Computer eintragen, die Zugang zum Router bzw. Internet bekommen
dürfen (die Einstellung ist im Menü „Firewall“ und dort unter „MAC Filtering“ zu finden).
Die MAC-Adressen sind in der Regel auf den Netzwerkkarten oder WLAN-Sticks aufgedruckt; unter Windows in der Eingabeaufforderung kann die MAC-Adresse der
Netzwerkkarten auch per Befehl „ipconfig/all“ angezeigt werden.
Da jeder Netzwerkadapter eine andere MAC-Adresse hat, ergibt sich so eine zusätzliche
Sicherheit des drahtlosen Netzwerks, da nur Computer mit der im Router gespeicherten
MAC-Adresse Zugriff erhalten.
Betrieb als Accesspoint
Falls noch nicht geschehen, trennen Sie den Mini-Router von der Stromversorgung. Bringen Sie den
seitlichen Schiebeschalter in die Position „AP“ (= Accesspoint).
Für den Anschluss des Mini-Routers an Ihr Netzwerk verwenden Sie die Buchse „Internet“ des MiniRouters. An der Buchse „LAN“ des Mini-Routers kann später ein weiterer Computer (oder ein zusätzlicher
Switch) über ein herkömmliches Netzwerkkabel angeschlossen werden.
Gehen Sie für die Konfiguration des Mini-Routers wie folgt vor:
• Verbinden Sie den Mini-Router mit der Stromversorgung.
☞
Der Startvorgang des im Mini-Routers integrierten Webservers kann bis zu einer Minute
dauern. In dieser Zeit ist kein Zugriff auf den Webserver im Mini-Router möglich.
• Schalten Sie den bzw. die Computer ein und starten Sie das jeweilige Betriebssystem.
Für die Konfiguration des Mini-Routers muss ein Computer verwendet werden, der über
Kabel am Mini-Router angeschlossen ist (am Anschluss „LAN“ oder „Internet“) und der eine
IP-Adresse 192.168.1.x hat (x = 1....249).
Der Mini-Router hat in der Betriebsart „Accesspoint“ in der Grundeinstellung ab Werk die
feste IP-Adresse 192.168.1.250, Subnet 255.255.255.0.
Diese Voreinstellung lässt sich später im Webserver des Mini-Routers selbstverständlich
ändern - damit jedoch für die Erst-Konfiguration eine Verbindung von Ihrem Computer zum
Mini-Router hergestellt werden kann, gehen Sie wie gerade beschrieben vor.
Die IP-Adresse 192.168.1.250 darf natürlich von einem anderen Gerät in Ihrem Netzwerk
noch nicht verwendet werden!
Bei Problemen mit der Konfiguration trennen Sie einfach den Mini-Router und Ihren
Computer vom restlichen Netzwerk und schließen Sie den für die Konfiguration verwendeten
Computer direkt über ein 1:1-verbundenes Netzwerkkabel am Mini-Router an (Anschluss
„LAN“ oder „Internet“). Stellen Sie den Computer wie oben beschrieben auf eine feste IPAdresse (z.B. 192.168.1.50) ein, stellen Sie die Subnet-Maske auf 255.255.255.0 ein.
• Starten Sie Ihren Internet-Browser (z.B. den Internet-Explorer) und geben Sie in der Adresszeile
„192.168.1.250“ ein (ohne Anführungszeichen).
Modem
Page 52

• Nun sollte der Anmeldebildschirm des Mini-Routers erscheinen. Geben Sie als Benutzernamen „admin“
und als Passwort „password“ ein.
• Erstellen Sie nun unter dem Menü „Wireless“ eine WLAN-Verbindung und stellen Sie die
Verschlüsselungsart ein (wie bei einem normalen Router).
☞
Klicken Sie auf die Schaltfläche „RADIO OFF“, diese wechselt dann auf „RADIO ON“. Dies
bedeutet, dass die WLAN-Funktion ausgeschaltet ist.
Klicken Sie auf die Schaltfläche „RADIO ON“, diese wechselt dann auf „RADIO OFF“. Dies
bedeutet, dass die WLAN-Funktion eingeschaltet ist.
Betrieb als Converter
Bei Betrieb als „Converter“ kann der Mini-Router als WLAN-Adapter für ein Gerät ohne WLAN dienen.
Dies kann nicht nur ein Computer, sondern auch ein anderes Gerät mit RJ45-Netzwerkanschluss (z.B.
Internet-Radio, Spielkonsole, Fernseher, Satellitenreceiver o.ä.) sein.
☞
Beachten Sie, dass Sie den Mini-Router zuerst an einem Computer konfigurieren müssen,
erst danach kann der Mini-Router als Converter betrieben werden. Die Konfiguration kann
nur erfolgen, wenn ein Computer über ein Netzwerkkabel mit dem Mini-Router verbunden ist.
Die Einstellungen im Mini-Router lassen sich nicht z.B. mit einer Spielkonsole vornehmen!
Falls noch nicht geschehen, trennen Sie den Mini-Router von der Stromversorgung. Bringen Sie den
seitlichen Schiebeschalter in die Position „Converter“.
Gehen Sie wie folgt vor:
• Verbinden Sie den Mini-Router mit der Stromversorgung.
☞
Der Startvorgang des im Mini-Routers integrierten Webservers kann bis zu einer Minute
dauern. In dieser Zeit ist kein Zugriff auf den Webserver im Mini-Router möglich.
• Schalten Sie den zur Konfiguration verwendeten Computer ein und starten Sie das jeweilige
Betriebssystem.
Für die Konfiguration des Mini-Routers muss ein Computer verwendet werden, der über
Kabel am Mini-Router angeschlossen ist (am Anschluss „LAN“ oder „Internet“) und der eine
IP-Adresse 192.168.1.x hat (x = 1....249).
Der Mini-Router hat in der Betriebsart „Converter“ in der Grundeinstellung ab Werk die feste
IP-Adresse 192.168.1.250, Subnet 255.255.255.0.
Diese Voreinstellung lässt sich später im Webserver des Mini-Routers selbstverständlich
ändern - damit jedoch für die Erst-Konfiguration eine Verbindung von Ihrem Computer zum
Mini-Router hergestellt werden kann, gehen Sie wie gerade beschrieben vor.
Die IP-Adresse 192.168.1.250 darf natürlich von einem anderen Gerät in Ihrem Netzwerk
noch nicht verwendet werden!
Bei Problemen mit der Konfiguration trennen Sie einfach den Mini-Router und Ihren
Computer vom restlichen Netzwerk und schließen Sie den für die Konfiguration verwendeten
Computer direkt über ein 1:1-verbundenes Netzwerkkabel am Mini-Router an (Anschluss
„LAN“ oder „Internet“). Stellen Sie den Computer wie oben beschrieben auf eine feste IPAdresse (z.B. 192.168.1.50) ein, stellen Sie die Subnet-Maske auf 255.255.255.0 ein.
• Starten Sie Ihren Internet-Browser (z.B. den Internet-Explorer) und geben Sie in der Adresszeile
„192.168.1.250“ ein (ohne Anführungszeichen).
Nun sollte der Anmeldebildschirm des Mini-Routers erscheinen. Geben Sie als Benutzernamen „admin“
und als Passwort „password“ ein.
Danach gelangen Sie zum internen Webserver, über den Sie die weitere Konfiguration vornehmen
können.
• Im Menu „Wireless“ des Mini-Routers klicken sie auf „Site Survey“. Nach ein paar Sekunden erscheinen
dort die verfügbaren WLAN-Netze. Wählen Sie die gewünschte Verbindung aus und klicken Sie auf
„Connect“. Im darauf folgenden Fenster können Sie die Sicherheitseinstellungen anpassen.
Anschließend geben Sie ihr WLAN-Passwort im Feld „Pass Phrase“ ein und bestätigen mit „Apply“.
Nach ein paar Sekunden können Sie die Verbindung im Menu „Site Survey“ bzw. „Link Status“ überprüfen.
Schließen Sie anschließend die Konfigurationsseite und entfernen Sie die feste IP Adresse wieder aus
ihren Windows-Netzwerkeinstellungen. Im Normalfall wird nun der LAN-Verbindung Ihres PCs eine
neue IP-Adresse zugewiesen. Gegebenenfalls ist hierzu ein Neustart nötig.
Zum nachträglichen Ändern der Konfiguration muss nur wieder eine feste IP-Adresse eingestellt
werden. Hierbei ist es egal, ob der PC an der „LAN“-Buchse oder an der „Internet“-Buchse des MiniRouters angeschlossen ist.
Alternativ können Sie natürlich die Konfiguration manuell vornehmen. Im Menü „Wireless“ klicken Sie
auf „Add“, dort lassen sich alle Zugangsdaten eingeben.
• Nach der Konfiguration an einem Computer kann der Mini-Router auch an anderen Geräten mit
Netzwerkanschluss betrieben werden, z.B. Internet-Radio, Spielkonsole, Fernseher, Satellitenreceiver o.ä.
Reset
Halten Sie die Taste „RESET“ des Mini-Routers-Adapters für mehr als 3 Sekunden gedrückt, so werden
alle Einstellungen auf die Werkseinstellung zurückgesetzt.
Anschließend führt der Mini-Router einen Neustart durch (kann bis zu 1 Minute dauern).
In der Grundeinstellung ist der Benutzername „admin“ und das Passwort „password“. Der DHCP-Server
ist eingeschaltet, im Router-Modus werden den angeschlossenen Computern im Netzwerk die IPAdressen aus dem Bereich 192.168.1.x zugeteilt. Die Subnet-Mask ist 255.255.255.0, die IP-Adresse des
Mini-Routers ist 192.168.1.1.
Im Accesspoint- und Client-/Converter-Modus hat der Mini-Router die feste IP-Adresse 192.168.1.250 (in
den Einstellungen des Webservers des Mini-Routers veränderbar).
Anleitung des Herstellers auf der mitgelieferten CD
Auf der CD befindet sich eine umfangreiche Anleitung des Herstellers (in englischer Sprache). Zum
Betrachten benötigen Sie einen Internet-Browser.
Legen Sie die CD in das entsprechende Laufwerk Ihres Computers ein, worauf nach kurzer Zeit das Menü
der CD erscheint (Installation des Netzwerkmanagers oder Bedienungsanleitung ansehen). Wenn der CDAutorun bei Ihrem Computer abgeschaltet ist, so starten Sie das Programm „Autoloader.exe“ im
Hauptverzeichnis der CD.
Zum Zeitpunkt der Erstellung dieser Bedienungsanleitung befand sich außerdem ein Verzeichnis „QIG“
auf der CD mit einer englischsprachigen Kurzanleitung im PDF-Format (zum Betrachten einer PDF-Datei
ist eine entsprechende Software erforderlich, z.B. der „Acrobat Reader“, den Sie kostenlos bei
www.adobe.com herunterladen können).
Handhabung
Der Betrieb ist nur in trockenen Innenräumen zulässig, das Produkt darf nicht feucht oder
nass werden, Gefahr durch elektrischen Schlag!
Verwenden Sie das Produkt niemals gleich dann, wenn es von einem kalten in einen
warmen Raum gebracht wird. Das dabei entstehende Kondenswasser kann unter
Umständen das Produkt zerstören.
Lassen Sie das Produkt zuerst auf Zimmertemperatur kommen. Dies kann u.U. mehrere
Stunden dauern. Erst danach darf das Steckernetzteil mit der Netzspannung verbunden und
der Router in Betrieb genommen werden.
Achten Sie darauf, dass die Isolierung des gesamten Produkts weder beschädigt noch zerstört wird. Das Gehäuse darf nicht geöffnet werden! Eine Wartung oder Reparatur darf nur
duch eine Fachwerkstatt durchgeführt werden.
Überprüfen Sie vor jedem Gebrauch das Produkt auf Beschädigungen!
Falls Sie Beschädigungen feststellen, so darf das Produkt NICHT an die Netzspannung
angeschlossen werden! Es besteht Lebensgefahr!
Es ist anzunehmen, dass ein gefahrloser Betrieb nicht mehr möglich ist, wenn
- das Gerät sichtbare Beschädigungen aufweist,
- das Gerät nicht mehr funktioniert und
- nach längerer Lagerung unter ungünstigen Verhältnissen oder
- nach schweren Transportbeanspruchungen.
Wenn das Produkt längere Zeit nicht in Betrieb genommen wird, so ziehen Sie das
Steckernetzteil aus der Netzsteckdose. Beachten Sie, dass dann ein Internet-Zugang nicht
mehr möglich ist, auch die Netzwerkverbindung zwischen den Computern untereinander
funktioniert nicht!
Vermeiden Sie folgende widrige Umgebungsbedingungen am Aufstellungsort oder beim
Transport:
- Nässe oder zu hohe Luftfeuchtigkeit
- Extreme Kälte oder Hitze
- Staub oder brennbare Gase, Dämpfe oder Lösungsmittel
- starke Vibrationen
- starke Magnetfelder, wie in der Nähe von Maschinen oder Lautsprechern
Achten Sie beim Aufstellen/Betrieb des Produkts darauf, dass die Kabel nicht geknickt oder
gequetscht werden.
Tipps & Hinweise
• Bei der Benutzung eines Kabelmodems (z.B. Internet über TV-Kabel) sollte nach der Konfiguration das
Modem, der Router und der PC neu gestartet werden.
Dies ist vor allem sinnvoll, wenn das Modem und der PC schon vorher verbunden waren und der MiniRouter nachträglich installiert wird.
• Nach dem Verbinden des Mini-Routers mit der Betriebsspannung (oder einem Reset) dauert es bis zu
einer Minute, bis der Mini-Router von einem Computer verwendet werden kann (z.B. um das
Konfigurationsmenü aufzurufen). Wenn Sie keine Verbindung herstellen können (trotz richtiger
Konfiguration der angeschlossenen Geräte), so warten Sie diese Zeit zuerst ab.
• Bei der Verwendung von WLAN ist unbedingt eine Verschlüsselung zu aktivieren. Wir empfehlen Ihnen
dazu WPA2.
Eine zusätzliche Sicherheit gegen unberechtigten Zugriff auf das WLAN (oder auch per Netzwerkkabel
angeschlossene Geräte) wäre, nur die MAC-Adressen der von Ihnen genutzten Netzwerkkarten oder
WLAN-Adapter zuzulassen.
• Für die Konfiguration mit T-Online ist der Benutzername wie folgt einzugeben:
Anschlusskennung + T-Online-Nr. + „#“ + Mitbenutzernr. + „@t-online.de“
Beispiel: Daten Ihrer Auftragsbestätigung von T-Online:
11111111111 „Anschlusskennung“
222222222222 „Zugehörige T-Online-Nummer“
0001 „Mitbenutzernummer/Suffix“
Beispiel für einen Benutzernamen: 111111111111222222222222#0001@t-online.de
Das Raute-Symbol ist u.U. nicht erforderlich.
Entsorgung
Elektrische und elektronische Produkte dürfen nicht in den Hausmüll!
Entsorgen Sie das Produkt am Ende seiner Lebensdauer gemäß den geltenden gesetz-
lichen Bestimmungen.
Konformitätserklärung (DOC)
Hiermit erklären wir, Conrad Electronic, Klaus-Conrad-Straße 1, D-92240 Hirschau, dass sich dieses
Produkt in Übereinstimmung mit den grundlegenden Anforderungen und den anderen relevanten
Vorschriften der Richtlinie 1999/5/EG befindet.
☞
Die Konformitätserklärung zu diesem Produkt finden Sie unter www.conrad.com.
Ꮨ
Diese Bedienungsanleitung ist eine Publikation der Conrad Electronic SE, Klaus-Conrad-Str. 1,
D-92240 Hirschau (www.conrad.com).
Alle Rechte einschließlich Übersetzung vorbehalten. Reproduktionen jeder Art, z. B. Fotokopie,
Mikroverfilmung, oder die Erfassung in elektronischen Datenverarbeitungsanlagen, bedürfen der
schriftlichen Genehmigung des Herausgebers. Nachdruck, auch auszugsweise, verboten.
Diese Bedienungsanleitung entspricht dem technischen Stand bei Drucklegung. Änderung in Technik
und Ausstattung vorbehalten.
© Copyright 2009 by Conrad Electronic SE.
Page 53

WLAN Mini Router N150
Version 11/09
Item-No. 97 24 35 °
Intended Use
The product is intended to provide 3 different functions: It can be operated either as a router or as an
access point or as a converter.
This product complies with the applicable National and European requirements. All names of companies
and products are the trademarks of the respective owner. All rights reserved.
Package Contents
• WLAN Mini Router
• Wall plug transformer
• Network cable
• CD with detailed manufacturer’s manual in English (HTML format)
• Quick guide
Features
• Network port 10/100MBit (Connection „LAN“)
• WLAN using 802.11b/g/n (max. 54 MBit, N150)
• The operational modes: router, access point, client/converter, are selected by a switch
• Configuration via integrated web server
Safety Instructions
The warranty will be void in the event of damage caused by failure to observe these
safety instructions! We do not assume any liability for any consequential damage!
We do not assume any liability for material and personal damage caused by improper use or non-compliance with the safety instructions. The warranty will be void in
such cases.
• The unauthorised conversion and/or modification of the product is inadmissible because
of safety and approval reasons (CE).
• The design of the wall plug transformer complies with protection class II. Only connect the
wall plug transformer to a standard mains socket connected to the public supply. (100240V~, 50/60Hz, see imprint on the wall plug transformer).
• The device is not a toy. Keep devices that operate on the mains voltage out of the reach
of children! Therefore, be especially careful when children are around.
• Do not leave packing materials unattended. They may become dangerous playthings for
children.
• The product should only be used in dry indoor areas, it must not be exposed to damp or
wet! There is a risk of a lethal electric shock!
• Handle the product with care, it can be damaged by impacts, blows, or accidental drops,
even from a low height.
Configuration, Selecting the Operating Mode
☞
There is a detailed manufacturer’s operating manual in English (HTML format) on the CD
provided.
For quick installation, please pay attention to the following sections.
If the operating mode is to be changed, which is done using the slide switch on the side, first
disconnect the mini router from the mains voltage (unplug the wall plug transformer from the
mains socket or unplug the low-voltage plug from the mini router).
Only then may the slide switch be set to another position. Otherwise, the switch to another
operating mode will not be recognised!
LED Description:
1 Power-LED, this is lit when the mini router is powered via the enclosed wall
plug transformer
2 WPS LED
3 LED for WLAN, this flashes or is lit during data transfer via WLAN
Operation as a WLAN Router
If this has not yet been done, disconnect the mini router from the power supply. Move the slide switch on
the side to the position „Router“ and connect the RJ45 connector „Internet“ on the mini router to the DSL
modem. The jack „LAN“ on the mini router is available for connecting a computer or network switch.
WWW
Ꮨ
OPERATING INSTRUCTIONS www.conrad.com
To configure the mini router, proceed as follows:
• Connect the mini router to the power supply.
☞
It can take up to one minute to start the web server integrated in the mini router. During this
time, IP addresses are not allocated to any external devices.
• Switch the computer(s) on and start the operating system.
☞
A computer that is connected to the mini router via a cable (on the „LAN“ connection) and
which is set up so it is allocated an IP address automatically, should be used for configuring
the mini router.
• There is a DHCP server integrated in the mini router that automatically allocates the IP addresses.
The DHCP server in the mini router allocates IP addresses in the range 192.168.1.x. The IP address
192.168.1.1 (Subnet-Mask 255.255.255.0) is allocated to the mini router.
The operating system must be set up so that the computer’s network adapter is allocated an IP address
automatically allocated during start up. In Windows XP, Windows Vista or Windows 7 this function is the
default setting.
If you have set a fixed IP address, you will have to change this in Windows control panel, otherwise communication with the mini router is not possible.
Further, it is important that there is only one DHCP server in the network. If you ate using the mini router
and a network hard disk, for example, only one DHCP server can be switched on (we recommend the
mini router’s DHCP server is switched on).
• Start your Internet browser (e.g. Internet Explorer) and enter „192.168.1.1“ into the address line (without quotation marks).
The login screen of the mini router should now appear. Enter „admin“ as the user name and „password“
as the password (in lower-case letters).
You then come to the internal web server used for further configuration.
• Depending on which provider you use, the configuration of the router is different.
• In the simplest case, click on „Internet“ under the web server of the mini router and from there on
„Internet Service Setup“. Set the access type („WAN Connection Type“) to „PPPoE (DSL)“. Then the
user name and the password supplied by your provider can be entered. After saving this data and
restarting the router, the computers should have access to the Internet.
☞
Click on the button „RADIO OFF”, which then changes to „RADIO ON”. This means that the
WLAN function is turned off.
Click on the button „RADIO ON”, which then changes to „RADIO OFF”. This means that the
WLAN function is turned on.
Do not forget to activate the WLAN encryption („WPA2“ is recommended).
As additional security, you could enter the MAC addresses of the computers (not to be con-
fused with the IP addresses!) that are to be allowed access to the router or the Internet (this
setting can be found in the menu „Firewall“ and from there under „MAC Filtering“).
Normally the MAC addresses are printed on the network cards or WLAN-sticks; entering the
command „ipconfig/all“ at the Windows prompt will also display the MAC address.
Because every network adapter has an individual MAC address, this increases additionally
the security of the wireless network, since only computers that have their MAC address
saved in the router are granted access.
Operation as Access Point
If this has not yet been done, disconnect the mini router from the power supply. Set the sliding switch on
the side to the „AP“ position (= Access Point).
To connect the mini router to your network, use the jack „Internet“ on the mini router. Later, an additional
computer (or switch) can be connected to the „LAN“ connector on the mini router, via a conventional network cable.
To configure the mini router, proceed as follows:
• Connect the mini router to the power supply.
☞
It can take up to one minute to start the web server integrated in the mini router. During this
time an access to the mini router’s web server is not possible.
• Switch the computer(s) on and start the operating system.
To configure the mini router, a computer must be used that is connected to the mini router
via a cable (to the connector „LAN“ or „Internet“) and which has an IP address in the range
192.168.1.x (x = 1....249).
In the operating mode „Access point“, the mini router has the fixed IP address
192.168.1.250, Subnet 255.255.255.0 as the default setting.
Of course, this default setting can be changed later, in the web server of the mini router -
however, to establish a connection from your computer to the mini router for the initial configuration, proceed as described above.
Naturally, the IP address 192.168.1.250 must not be used by any other device in your network!
If you have problems with the configuration, just disconnect the mini router and your computer from the network and then connect the computer you are using for the configuration
directly to the mini router, using a 1:1-connected network cable (connector „LAN“ or
„Internet“). Allocate the computer a fixed IP address as described above (e.g. 192.168.1.50),
set the subnet mask to 255.255.255.0.
• Start your Internet browser (e.g. Internet Explorer) and enter „192.168.1.250“ into the address line (without quotation marks).
Modem
Page 54

• The login screen of the mini router should now appear. Enter „admin“ as the user name and „password“
as the password.
• Now, in menu „Wireless“ create a WLAN connection and set the encryption type (in the same way as for
a normal router).
☞
Click on the button „RADIO OFF”, which then changes to „RADIO ON”. This means that the
WLAN function is turned off.
Click on the button „RADIO ON”, which then changes to „RADIO OFF”. This means that the
WLAN function is turned on.
Operation as converter
When used as a „Converter“, the mini router can be used as WLAN adapter for a device without WLAN.
This does not have to be a computer, it can also be another device with RJ45 network connection (e.g.
Internet radio, games console, TV set, satellite receiver or the like).
☞
Please note, you have to set up the mini router on a computer first, only after this can the mini
router be operated as converter. It can only be configured when it is connected to a computer via a network cable.
The settings in the mini router cannot be done using a games console, for example!
If this has not yet been done, disconnect the mini router from the power supply. Set the sliding switch on
the side to the „Converter“ position.
Proceed as follows:
• Connect the mini router to the power supply.
☞
It can take up to one minute to start the web server integrated in the mini router. During this
time an access to the mini router’s web server is not possible.
• Switch on the computer, which you will use for the configuration, and start its operating system.
To configure the mini router, a computer must be used that is connected to the mini router
via a cable (to the connector „LAN“ or „Internet“) and which has an IP address in the range
192.168.1.x (x = 1....249).
In the operating mode „Converter“ the mini router has the fixed IP address 192.168.1.250,
Subnet 255.255.255.0 as the default setting.
Of course, this default setting can be changed later, in the web server of the mini router however, to establish a connection from your computer to the mini router for the initial configuration, proceed as described above.
Naturally, the IP address 192.168.1.250 must not be used by any other device in your network!
If you have problems with the configuration, just disconnect the mini router and your computer from the network and then connect the computer you are using for the configuration
directly to the mini router, using a 1:1-connected network cable (connector „LAN“ or
„Internet“). Allocate the computer a fixed IP address as described above (e.g. 192.168.1.50),
set the subnet mask to 255.255.255.0.
• Start your Internet browser (e.g. Internet Explorer) and enter „192.168.1.250“ in the address line (without quotation marks).
The login screen of the mini router should now appear. Enter „admin“ as the user name and „password“
as the password.
You then come to the internal web server used for further configuration.
• From the mini router’s „Wireless“ menu, click on „Site Survey“. After a few seconds the available WLAN
networks will be displayed. Select the desired connection and click on „Connect“. In the following window you can adjust the security settings. Following this, enter your WLAN password in the field „Pass
Phrase“ and confirm with „Apply“. After a few seconds, you can review the connection from the menu
„Site Survey“ or „Link Status“.
When finished, close the configuration site and remove the fixed IP address from your Windows network
settings. Normally, a new IP address is now allocated to the LAN connection for your PC. This might
need the computer to be restarted.
To make changes to the configuration at a later date, a fixed IP address must be set again. For this, it is
not important whether the PC is connected to the „LAN“ connector or to the „Internet“ connector of the
mini router.
Alternatively, the configuration can be performed manually. In the „Wireless“ menu click on „Add“; here
all of the access data can be entered.
• After it has been configured from a computer, the mini router can also be used for other devices with
a network connection, e.g. Internet radio, games console, TV set, satellite receivers or similar.
Reset
Hold the „RESET“ button on the mini router pressed down for more than 3 seconds to reset all the settings
to the default values.
After this, the mini router reboots (this can take up to 1 minute).
The default setting for the user name is „admin“ and for the password „password“. The DHCP server is
activated, in the router mode the computers connected to the network are allocated IP addresses in the
range 192.168.1.x. The subnet mask is 255.255.255.0, the IP address for the mini router is 192.168.1.1.
In the access point mode and the client/converter mode, the mini router has the fixed IP address
192.168.1.250 (this can be changed in the mini router’s settings from the web server).
Manufacturer’s instructions on the CD enclosed
On the CD, there are extensive manufacturer’s instructions (in English). To view these, you need an
Internet browser.
Insert the CD in a suitable drive on your computer, after a short while the menu of the CD will appear
(installation of the network manager or for viewing the operating instructions). If the CD auto-run is disabled on your computer, start the program „Autoloader.exe“, which you will find in the main directory of
the CD.
At time of writing this operating manual, a directory named „QIG“, with a quick guide in English in PDF format, was also on the CD (to view a PDF file suitable software is required, e.g. „Acrobat Reader“, which you
can download free of charge from www.adobe.com).
Handling
Only to be used in dry, enclosed rooms. The product must not get damp or wet, lethal danger of an electric shock!
Never use the product immediately after it has been taken from a cold room to a warm one.
The condensation that forms might destroy your unit.
Allow the product to reach room temperature. This may take several hours. Only then can
the transformer be plugged into the mains and the router put into operation.
Ensure the insulation of the entire product is neither damaged nor destroyed. The housing
must not be opened! Any maintenance or repair work must only be carried out by authorised
personnel.
Check the product for damage before each use!
If you detect any damage, DO NOT connect the product to the mains supply! This presents
a danger to life!
It can be assumed that safe operation is no longer possible if
- the device is visibly damaged,
- the device does not operate any longer and
- the unit was stored under unfavourable conditions for a long period of time or
- it has been subjected to considerable stress in transit.
If the product is not to be used for a longer period, unplug the wall plug transformer. Bear in
mind that when Internet access is not possible, neither does the network connection
between the computers function!
Avoid the following unfavourable environmental conditions at the installation location and
during transportation:
- Damp or excess air humidity
- Extreme cold or heat
- Dust or flammable gases, fumes or solvents
- Strong vibrations
- Strong magnetic fields such as those found close to machinery or loudspeakers
When setting up the product, ensure that the cables are neither bent nor squeezed.
Tips & Notes
• When using a cable modem (e.g. Internet via cable TV), the modem, the router and the PC should be
restarted after configuring.
This makes sense, where the modem and the PC were connected previously and the is mini router
installed later.
• After connecting the mini router to the mains (or after a reset), it takes up to one minute before the mini
router can be used by a computer (e.g. to access the configuration menu). If you cannot establish connection (despite the correct configuration of the connected devices) wait for this length of time.
• When you are using WLAN, it is necessary to activate the encryption. We recommend WPA2.
Additional security against unauthorised access to the WLAN (or to devices that are connected via a net-
work cable) is to only allow access for the MAC addresses on the network cards or WLAN adapters that
you are using.
• For configuration with T-Online, the user name must be entered as follows:
Connection recognition + T-Online no. + „#“ + joint user no. + „@t-online.de“
Example: Data for your T-Online order confirmation:
11111111111 „Connection recognition“
222222222222 „Associated T-Online number“
0001 „Joint user number/suffix“
Example of a user name: 111111111111222222222222#0001@t-online.de
The hash symbol might not be necessary.
Disposal
Electrical and electronic products do not belong in the household waste!
Please dispose of the device when it is no longer of use, according to the current statutory
requirements.
Declaration of Conformity (DOC)
We, Conrad Electronic, Klaus-Conrad-Strafle 1, D-92240 Hirschau, hereby declare that this product conforms to the fundamental requirements and the other relevant regulations of the directive 1999/5/EG.
☞
You can find the declaration of conformity at www.conrad.com.
Ꮨ
These operating instructions are a publication by Conrad Electronic SE, Klaus-Conrad-Str. 1, D-92240
Hirschau (www.conrad.com).
All rights including translation reserved. Reproduction by any method, e.g. photocopy, microfilming, or
the capture in electronic data processing systems require the prior written approval by the editor.
Reprinting, also in part, is prohibited.
These operating instructions represent the technical status at the time of printing. Changes in
technology and equipment reserved.
© Copyright 2009 by Conrad Electronic SE.
Page 55

Mini router WLAN N150
Version 11/09
N° de commande 97 24 35 °
Utilisation conforme
Le produit dispose de 3 fonctions différentes : Il peut être utilisé comme routeur, comme point d’accès ou
comme convertisseur.
Cet appareil satisfait aux exigences légales nationales et européennes. Tous les noms d’entreprises et les
appellations d’appareils figurant dans ce mode d’emploi sont des marques déposées des propriétaires
correspondants. Tous droits réservés.
Étendue de la fourniture
• Mini router WLAN
• Bloc d’alimentation
• Câble de réseau
• CD avec manuel détaillé en anglais du fabricant (format HTML)
• Guide rapide
Caractéristiques
• Port de réseau 10/100MBit (raccordement „LAN“)
• WLAN 802,11 b/g/N (max. 150 Mbits, N150)
• Mode de fonctionnement routeur, Accesspoint, Client/Converter sélectionnable par interrupteur
• Configuration via serveur web intégré
Consignes de sécurité
Tout dommage résultant d’un non-respect du présent mode d’emploi entraîne l’annulation de la garantie ! Nous déclinons toute responsabilité pour les dommages causés !
De même, nous n’assumons aucune responsabilité en cas de dommages matériels
ou corporels résultant d’une manipulation de l’appareil non conforme aux spécifications ou du non-respect des présentes consignes de sécurité. Dans ces cas-là, la
garantie est annulée.
• Pour des raisons de sécurité et d’homologation (CE), il est interdit de modifier la construction ou de transformer l’appareil de son propre gré.
• La construction de l’adaptateur réseau correspond à la classe de protection II. Seule un
prise de courant appropriée du réseau publique doit être utilisée comme source d’alimentation (100-240V~, 50/60 Hz, voir impression sur le bloc d’alimentation).
• Cet produit n’est pas un jouet. Maintenir les appareils fonctionnant sous tension du réseau
hors de la portée des enfants. Une vigilance particulière s’impose en présence d’enfants.
• Ne pas laisser le matériel d’emballage sans surveillance, il pourrait constituer un jouet
dangereux pour les enfants.
• L’appareil ne convient que pour une utilisation dans des locaux fermés et secs, il ne doit
être ni humidifié, ni mouillé ! Risque de choc électrique avec danger de mort !
• Cet appareil doit être manipulé avec précaution ; les coups, les chocs ou une chute, même
d’une hauteur peu élevée, peuvent l’endommager.
Configuration, choisir le mode de fonctionnement
☞
Le CD fourni contient un manuel d’utilisation très détaillé du fabricant en langue anglaise.
Pour l’installation rapide, tenir compte des sections suivantes.
Si le mode de fonctionnement doit être changé à l’aide de l’interrupteur coulissant sur le
côté, couper d’abord l’adaptateur WLAN de la tension de service (débrancher le bloc d’alimentation de la prise de courant ou débrancher le connecteur basse tension du mini routeur).
Ensuite seulement mettre l’interrupteur coulissant dans une autre position. Sinon, la commutation sur un autre mode de fonctionnement n’est pas détectée.
Description des LED :
1 La Power-LED est allumée quand le mini routeur est alimenté en ten-
sion/courant par l’intermédiaire du bloc d’alimentation fourni
2 WPS-LED
3 LED pour WLAN, clignote ou est allumée pendant le transfert de données
via WLAN
Fonctionnement comme routeur WLAN
Si ce n’est pas encore fait, couper l’alimentation électrique du mini routeur. Ensuite mettre l’interrupteur
coulissant latéral en position „Router“ et relier la prise RJ45 „Internet“ sur le mini routeur au modem DSL.
La prise „LAN“ sur le mini routeur est prévue pour le raccordement d’un ordinateur ou d’un switch réseau.
WWW
Ꮨ
MODE D’EMPLOI www.conrad.com
Pour la configuration du mini routeur procéder comme suit :
• Relier le mini routeur à l’alimentation électrique.
☞
Le démarrage du serveur web intégré au mini routeur peut prendre jusqu’à une minute. A
ce moment, aucune adresse IP n’est encore affectée aux appareils externes.
• Démarrer le ou les ordinateur(s) et lancer le système d’exploitation correspondant.
☞
La configuration du mini routeur devrait être faite avec un ordinateur raccordé au mini routeur par câble (sur la prise „LAN“) et qui est réglé de manière à recevoir automatiquement
son adresse IP.
• Le mini routeur est équipé d’un serveur DHCP qui attribue automatiquement les adresses IP.
Le serveur DHCP dans le mini routeur distribue les adresses IP pour la gamme de 192.168.1.x (x
>=100). L’adresse IP 192.168.1.1 (Subnet-Mask 255.255.255.0) correspond au mini routeur.
Le système d’exploitation doit être configuré de manière à ce que le système affecte automatiquement
une adresse IP à l’adaptateur réseau de l’ordinateur. Windows XP, Windows Vista ou Windows 7 sont
configurés ainsi par défaut.
Si vous avez réglé une adresse IP fixe, cela doit être modifié dans le panneau de configuration de
Windows, sinon aucune communication n’est possible avec le mini routeur.
Par ailleurs, il est important qu’il n’y ait qu’un seul serveur DHCP dans l’ensemble du réseau. Si, par
exemple, vous utilisez ce routeur et un disque dur réseau, il doit n’y avoir qu’un seul serveur DHCP
(nous recommandons l’utilisation du serveur DHCP du mini routeur).
• Démarrer le navigateur Internet (par ex. Internet-Explorer) et entrer „192.168.1.1“ dans la ligne d’adresse (sans guillemets).
L’écran d’accueil du mini routeur devrait alors s’afficher. Introduisez „admin“ comme nom d’utilisateur et
„password“ comme mot de passe (respectivement en minuscules).
Cela donne accès au serveur de web interne qui permet d’effectuer d’autres configurations.
• La configuration du routeur peut varier en fonction de votre fournisseur.
• Dans le cas le plus simple, cliquer dans le serveur web du mini serveur sur „Internet“ et là sur „Internet
Service Setup“. Régler „PPPoE (DSL)“ („WAN Connection Type“) comme type d’accès. Ensuite, entrer
le nom d’utilisateur et le mot de passe reçus du fournisseur. Après l’enregistrement de ces données et
le redémarrage du mini routeur, l’accès Internet devrait déjà être possible.
☞
Cliquer sur le bouton „RADIO OFF“, qui passe ensuite à „RADIO ON“. Cela signifie que la
fonction WLAN est désactivée.
Cliquer sur le bouton „RADIO ON“, qui passe ensuite à „RADIO OFF“. Cela signifie que la
fonction WLAN est sactivée.
Ne pas oublier d’activer le code pour WLAN („WPA2“ est recommandé).
Comme sécurité complémentaire il est possible d’entrer uniquement les adresses MAC (ne
pas confondre avec les adresses IP !) des ordinateurs qui peuvent avoir accès au routeur
ou à Internet (le réglage se trouve dans le menu „Firewall“ et là sous „MAC Filtering“).
Les adresses MAC sont généralement imprimées sur les cartes de réseau ou clés WLAN ;
dans l’invite sous Windows l’adresse MAC peut également être affichée par l’invite „ipconfig/all“.
Comme chaque adaptateur de réseau à une adresse MAC différente, cela offre une sécurité complémentaire pour le réseau sans fil, car seuls les ordinateurs avec l’adresse MAC
enregistrée dans le routeur auront accès.
Fonctionnement comme Accesspoint
Si ce n’est pas encore fait, couper l’alimentation électrique du mini routeur. Mettez l’interrupteur à coulisse situé sur le côté sur la position „AP“ (= Accesspoint).
Pour le raccordement du mini routeur au réseau, utiliser la prise „Internet“ du mini routeur. Sur la prise
„LAN“ du mini routeur il est possible ultérieurement de raccorder un autre ordinateur (ou un switch supplémentaire) au moyen d’un câble réseau conventionnel.
Pour la configuration du mini routeur procéder comme suit :
• Relier le mini routeur à l’alimentation électrique.
☞
Le démarrage du serveur web intégré au mini routeur peut prendre jusqu’à une minute.
Pendant ce temps l’accès au serveur web dans le mini routeur est impossible.
• Démarrer le ou les ordinateur(s) et lancer le système d’exploitation correspondant.
La configuration du mini routeur doit être effectuée avec ordinateur raccordé par câble au
mini routeur (connexion „LAN“ ou „Internet“) et qui a une adresse IP 192.168.1.x (x =
1....249).
En mode service „Accesspoint“ le mini routeur a, dans le réglage de base d’usine l’adresse
IP fixe 192.168.1.250, Subnet 255.255.255.0.
Ce préréglage peut bien entendu être modifié plus tard dans le serveur web du mini routeur
- mais pour qu’une liaison ordinateur / mini routeur puisse être établie pour la configuration
initiale, procéder comme décrit précédemment.
L’adresse IP 192.168.1.250 ne doit pas encore être utilisée par un autre appareil dans le
réseau !
En cas de problèmes avec la configuration, couper le mini routeur et l’ordinateur du reste du
réseau et raccorder l’ordinateur utilisé pour la configuration directement par un câble réseau
raccordé 1:1 au mini routeur (connexion „LAN“ ou „Internet“). Régler l’ordinateur comme
décrit précédemment sur une adresse IP fixe (par ex. 192.168.1.50), régler le masque
Subnet sur 255.255.255.0.
• Démarrer le navigateur Internet (par ex. Internet-Explorer) et entrer „192.168.1.250“ dans la ligne
d’adresse (sans guillemets).
Modem
Page 56

• L’écran d’accueil du mini routeur devrait alors s’afficher. Introduisez „admin“ comme nom d’utilisateur et
„password“ comme mot de passe.
• Sous le menu „Wireless“ établir une liaison WLAN et régler le mode de codage (comme pour un routeur
ordinaire).
☞
Cliquer sur le bouton „RADIO OFF“ qui passe ensuite à „RADIO ON“. Cela signifie que la
fonction WLAN est désactivée.
Cliquer sur le bouton „RADIO ON“ qui passe ensuite à „RADIO OFF“. Cela signifie que la
fonction WLAN est sactivée.
Fonctionnement comme convertisseur
En mode „Converter“ le mini routeur peut servir d’adaptateur WLAN pour un appareil sans WLAN. Il peut
s’agir non seulement d’un ordinateur, mais un autre appareil avec une connexion réseau RJ45 (par ex.
radio Internet, console de jeu, téléviseur, récepteur satellite, ou analogues).
☞
Il faut que le mini routeur soit d’abord configuré sur un ordinateur, il ne pourra être utilisé comme convertisseur qu’après cette configuration. La configuration ne peut être effectuée que si
l’ordinateur est relié au mini routeur par un câble réseau.
Les réglages dans le mini routeur ne peuvent pas être effectués, par ex. avec une console
de jeu !
Si ce n’est pas encore fait, couper l’alimentation électrique du mini routeur. Mettez l’interrupteur à coulisse situé sur le côté sur la position „Converter“.
Procéder comme suit :
• Relier le mini routeur à l’alimentation électrique.
☞
Le démarrage du serveur web intégré au mini routeur peut prendre jusqu’à une minute.
Pendant ce temps l’accès au serveur web dans le mini routeur est impossible.
• Démarrer l’ordinateur utilisé pour la configuration et lancer le système d’exploitation correspondant.
La configuration du mini routeur doit être effectuée avec ordinateur raccordé par câble au
mini routeur (connexion „LAN“ ou „Internet“) et qui a une adresse IP 192.168.1.x (x =
1....249).
En mode service „Converter“ le mini routeur a, dans le réglage de base d’usine l’adresse IP
fixe 192.168.1.250, Subnet 255.255.255.0.
Ce préréglage peut bien entendu être modifié plus tard dans le serveur web du mini routeur
- mais pour qu’une liaison ordinateur / mini routeur puisse être établie pour la configuration
initiale, procéder comme décrit précédemment.
L’adresse IP 192.168.1.250 ne doit pas encore être utilisée par un autre appareil dans le
réseau !
En cas de problèmes avec la configuration, couper le mini routeur et l’ordinateur du reste du
réseau et raccorder l’ordinateur utilisé pour la configuration directement par un câble réseau
raccordé 1:1 au mini routeur (connexion „LAN“ ou „Internet“). Régler l’ordinateur comme
décrit précédemment sur une adresse IP fixe (par ex. 192.168.1.50), régler le masque
Subnet sur 255.255.255.0.
• Démarrer le navigateur Internet (par ex. Internet-Explorer) et entrer „192.168.1.250“ dans la ligne
d’adresse (sans guillemets).
L’écran d’accueil du mini routeur devrait alors s’afficher. Introduisez „admin“ comme nom d’utilisateur et
„password“ comme mot de passe.
Cela donne accès au serveur de web interne qui permet d’effectuer d’autres configurations.
• Dans le menu „Wireless“ du mini routeur, cliquer sur „Site Survey“. Après quelques secondes, les
réseaux WLAN disponibles s’y affichent. Sélectionner la liaison souhaitée et cliquer sur „Connect“. Dans
la fenêtre suivante vous pouvez adapter les réglages de sécurité. Ensuite entrer le mot de passe WLAN
dans le champ „Pass Phrase“ et confirmer avec „Apply“. Après quelques secondes il est possible de
vérifier la liaison dans le menu „Site Survey“ ou „Link Status“.
Fermer ensuite la page de configuration et enlever de nouveau l’adresse IP fixe des réglages réseau
Windows. Normalement la liaison LAN du PC reçoit une nouvelle adresse IP. Un redémarrage peut, le
cas échéant être nécessaire.
Pour la modification ultérieure de la configuration il suffit de régler de nouveau une adresse IP fixe. Le
PC peut être raccordé à la prise „LAN“ ou à la prise „Internet“ du mini routeur.
Alternativement, la configuration peut également être effectuée manuellement. Dans le menu „Wireless“
cliquer sur „Add“, là toutes les données d’accès peuvent être entrées.
• Après la configuration sur un ordinateur, le min routeur peut, le cas échéant, également fonctionner
sur d’autres appareils avec raccordement au réseau par ex. radio-Internet, console de jeu, téléviseur,
récepteur satellite ou analogueou analogue.
Reset
Maintenir la touche „RESET“ du mini routeur pendant plus de 3 secondes, tous les réglages sont remis au
réglage d’usine.
Ensuite, le mini routeur redémarre (cela peut prendre jusqu’à 1 minute).
Dans le réglage de base, le nom d’utilisateur est „admin“ et le mot de passe „password“. Le serveur DHCP
est en marche, en mode routeur les ordinateurs raccordés au réseau reçoivent des adresses IP de la plage 192.168.1.x. Le Subnet-Mask est 255.255.255.0, l’adresse IP du mini routeur est 192.168.1.1.
En mode Accesspoint et Client/Converter le mini routeur à l’adresse IP fixe 192.168.1.250 (peut être modifiée dans les réglages du serveur web du mini routeur).
Manuel du fabricant sur le CD fourni
Le CD contient un manuel détaillé du fabricant (en langue anglaise). Pour l’affichage il faut un navigateur
Internet.
Insérer le CD dans le lecteur correspondant de l’ordinateur, le menu du CD s’affiche peu de temps après
(installation du gestionnaire du réseau ou instructions d’utilisation). Si le CD-Autorun est désactivé sur l’ordinateur, démarrer le programme „Autoloader.exe“ dans le répertoire principal du CD.
Au moment de l’établissement du manuel d’utilisation, le CD contenait en plus un un répertoire „QIG“ avec
un guide rapide en langue anglaise en format PDF (pour l’affichage d’un fichier PDF il faut un logiciel correspondant, par ex. „Acrobat Reader“, qui peut être téléchargé gratuitement à www.adobe.com).
Maniement
L’appareil ne doit être utilisé que dans les locaux intérieurs secs, ne pas humidifier, ni
mouiller l’appareil, danger de choc électrique!
Ne jamais utiliser l’appareil lorsqu’il vient d’être transporté d’un local froid vers un local
chaud. L’eau de condensation risque, le cas échéant de détruire l’appareil.
Attendre que l’appareil ait atteint la température ambiante avant de le brancher. Selon les
cas, cela peut prendre plusieurs heures. C’est seulement après cette procédure que le bloc
d’alimentation peut être raccordé à la tension du réseau et que le router peut être mis en
service.
Veiller à ce que l’isolation de l’ensemble de l’appareil ne soit ni endommagée, ni détruite. Il
est interdit d’ouvrir le boîtier ! Seul un atelier spécialisé peut effectuer l’entretien et la réparation.
Contrôler l’appareil avant chaque utilisation et vérifier s’il présente d’éventuelles détériorations !
En cas d’endommagements, ne PAS brancher l’appareil à la tension du secteur ! Danger de
mort !
Un fonctionnement sans risque n’est plus assuré lorsque
- l’appareil présente des dommages visibles,
- l’appareil ne fonctionne plus,
- l’appareil a été stocké durant une période prolongée dans des conditions défavorables,
- lorsque l’appareil a été transporté dans des conditions défavorables.
Lorsque l’appareil n’a plus été utilisé durant une période prolongée, débrancher le bloc d’alimentation de la prise de courant. Notez qu’un accès Internet n’est plus possible ensuite et
que l’interconnexion au réseau entre les ordinateurs ne fonctionne plus !
Préserver l’appareil des conditions environnementales défavorables suivantes durant l’utilisation ou le transport :
- Eau ou humidité de l’air trop élevée
- Froid ou chaleur extrême
- Poussière ou gaz, vapeurs ou solvants inflammables
- Fortes vibrations
- Champs magnétiques intenses à proximité de machines ou de haut-parleurs
Lors de l’installation ou de la mise en service de l’appareil, veiller à ce que le câble ne soit
ni coudé, ni écrasé.
Conseils et indications
• En cas d’utilisation d’un modem câble (par ex. Internet par câble TV) le modem, le routeur et le PC doivent être redémarrés après la configuration.
Cela est utile quand le modem et le PC étaient déjà reliés auparavant et que le mini routeur est installé
ultérieurement.
• Après le raccordement du mini routeur à la tension de service (ou après un reset) cela peut prendre jusqu’à une minute jusqu’à ce qu’un mini routeur puisse être utilisé par un ordinateur (par ex. pour appeler
le menu de configuration). S’il est impossible d’établir une connexion (malgré la configuration correcte
des appareil raccordés), attendre tout d’abord au moins pendant une minute.
• Lors de l’utilisation de WLAN, il faut impérativement activer un codage. Pour cela, nous recommandons
WPA2.
Une protection supplémentaire contre l’accès non autorisé à WLAN (ou même à des appareils raccordés par câble réseau) consiste à autoriser exclusivement des adresses MAC des cartes réseau ou
adaptateurs WLAN utilisés.
• Pour la configuration avec T-Online le nom d’utilisateur doit être entré de la manière suivante :
Détection de connexion + T-Online-Nr. + „#“ + n° d’utilisateur. + „@t-online.de“
Exemple : Données de la confirmation de commande de T-Online :
11111111111 „détection de connexion“
222222222222 „numéro T-Online correspondant“
0001 „numéro d’utilisateur/suffix“
Exemple de programmation pour un nom d’utilisateur : 111111111111222222222222#0001@t-onli-
ne.de
Le symbole du losange n’est pas obligatoire.
Élimination
Les appareils électriques/électroniques ne doivent pas être éliminés dans les ordures ménagères.
Il convient de procéder à l’élimination de l’appareil au terme de sa durée de vie conformément aux prescriptions légalesen vigueur.
Déclaration de conformité (DOC)
Conrad Electronic, Klaus-Conrad-Strasse 1, D-92240 Hirschau, Allemagne, déclare que l’appareil est
conforme aux exigences fondamentales et aux autres réglementations importantes de la directive
1999/5/CE.
☞
Vous trouverez la déclaration de conformité de l’appareil sur le site www.conrad.com.
Ꮨ
Ce mode d'emploi est une publication de la société Conrad Electronic SE, Klaus-Conrad-Str. 1,
D-92240 Hirschau (www.conrad.com).
Tous droits réservés, y compris de traduction. Toute reproduction, quelle qu'elle soit (p. ex. photocopie,
microfilm, saisie dans des installations de traitement de données) nécessite une autorisation écrite de
l'éditeur. Il est interdit de le réimprimer, même par extraits.
Ce mode d'emploi correspond au niveau technique du moment de la mise sous presse. Sous réserve
de modifications techniques et de l'équipement.
© Copyright 2009 by Conrad Electronic SE.
Page 57

WLAN-mini-router N150
Versie 11/09
Bestnr. 97 24 35 °
Beoogd gebruik
Het product heeft 3 verschillende functies: Het kan of als router, als accesspoint of als converter worden
gebruikt.
Dit product voldoet aan de voorwaarden van de nationale en Europese wetgeving. Alle voorkomende
bedrijfsnamen en productaanduidingen zijn handelsmerken van de betreffende eigenaren. Alle rechten
voorbehouden.
Omvang van de levering
• WLAN-mini-router
• Netvoedingadapter
• Netwerkkabel
• CD met uitgebreid Engelstalig handboek van de fabrikant (HTML-formaat)
• Korte handleiding
Kenmerken
• Netwerkpoort 10/100 MBit(„LAN“-aansluiting)
• WLAN volgens 802.11b/g/n (max. 150 MBit, N150)
• Bedrijfsmodus router, accesspoint, client/converter per schakelaar selecteerbaar
• Configuratie via geïntegreerde webserver
Veiligheidsaanwijzingen
Bij schade, veroorzaakt door het niet in acht nemen van deze gebruiksaanwijzing,
vervalt het recht op garantie! Voor gevolgschade aanvaarden wij geen aansprakelijkheid!
Voor materiÎle schade of persoonlijk letsel, veroorzaakt door ondeskundig gebruik of
het niet in acht nemen van de veiligheidsinstructies, zijn wij niet aansprakelijk. In dergelijke gevallen vervalt de garantie.
• Om veiligheids- en toelatingsredenen (CE) is het eigenhandig ombouwen en/of wijzigen
van het product niet toegestaan.
• De constructie van de netvoedingadapter voldoet aan beschermingsklasse II. Voor de
netvoedingadapter mag als spanningsbron alleen een correcte contactdoos van het openbare stroomnet worden gebruikt (100-240 V~, 50/60 Hz, zie de opdruk op de netvoedingadapter).
• Het product is geen speelgoed. Apparaten die op het elektriciteitsnet worden aangesloten
dienen buiten bereik van kinderen te worden gehouden. Wees dus extra voorzichtig bij
aanwezigheid van kinderen.
• Laat het verpakkingsmateriaal niet rondslingeren. Dit kan voor kinderen gevaarlijk speelgoed zijn.
• Het product is alleen bestemd voor gebruik in gesloten, droge ruimtes binnenshuis; het
mag niet vochtig of nat worden! Er bestaat kans op een levensgevaarlijke elektrische
schok!
• Behandel het product voorzichtig, door stoten, schokken of een val - zelfs van geringe
hoogte - kan het beschadigen.
Configuratie, modus kiezen
☞
Op de meegeleverde CD treft u een zeer uitgebreide, Engelstalige bedieningshandleiding
van de fabrikant aan (HTML-formaat).
Neem voor de snelle installatie de volgende hoofdstukken in acht.
Mocht de modus met de schuifschakelaar aan de zijkant worden gewisseld, koppel dan de
mini-router eerst los van de bedrijfspanning (steker van netadapter uit het stopcontact halen
of laagspanningsteker uit de mini-router halen).
Pas dan mag de schuifschakelaar in een andere stand worden gezet. Anders zal de
omschakeling naar een andere modus niet herkend worden!
LED-beschrijving:
1 Power-LED, brandt wanneer de mini-router via de meegeleverde netvoeding-
adapter van spanning/stroom wordt voorzien
2 WPS-LED
3 LED voor WLAN knippert resp. brandt bij gegevensoverdracht via WLAN
Werking als WLAN-router
Indien dit nog niet is gedaan, de mini-router van de stroomvoorziening loskoppelen. Schuif de schakelaar
aan de zijkant in de positie „router“ en verbind de RJ45-connector „internet“ op de mini-router met het
ADSL-modem. De „LAN“ -connector op de mini-router is beschikbaar voor de aansluiting op een computer of netwerkswitch.
WWW
Ꮨ
GEBRUIKSAANWIJZING www.conrad.com
Handel als volgt voor de configuratie van de mini-router:
• Sluit de mini-router aan op de stroomvoorziening.
☞
Het opstarten van de in de mini-router geïntegreerde webserver kan tot een minuut duren.
In deze tijd wordt natuurlijk aan externe apparaten nog geen IP-adres toegekend.
• Zet de computer(s) aan en start het desbetreffende besturingssysteem.
☞
Voor de configuratie van de mini-router dient een computer te worden gebruikt, die via de
kabel op de mini-router is aangesloten (op de „LAN“-aansluiting) en die zo is ingesteld, dat
hij zijn IP-adres automatisch betrekt.
• In de mini-router is een DHCP-server geïntegreerd, die de IP-adressen automatisch verdeelt.
De DHCP-server in de mini-router verdeelt IP-adressen in het bereik 192.168.1.x. Het IP-adres
192.168.1.1 (subnet-mask 255.255.255.0) wordt door de mini-router zelf bezet.
Het besturingssysteem moet zo zijn ingesteld dat de netwerkkaart van de computer bij de start auto-
matisch een IP-adres krijgt toegewezen. Dit is bij Windows XP, Windows Vista of Windows 7 standaard
zo ingesteld.
Indien u een vast IP-adres hebt ingesteld, dan moet u dit in de systeembesturing van Windows wijzigen,
omdat er anders geen communicatie mogelijk is met de mini-router.
Bovendien is het belangrijk dat er in het hele netwerk slechts één DHCP-server bestaat. Als u bijvoorbeeld de mini-router en een netwerk-harde schijf met DHCP-server gebruikt, mag er slechts één DHCPserver zijn ingeschakeld (wij adviseren u de DHCP-server van de mini-router in te schakelen).
• Start uw internet-browser (bijv. Internet Explorer) en voer in de adresregel „192.168.1.1“ in (zonder aanhalingstekens).
Nu dient het aanmeldscherm van de mini-router te verschijnen. Voer als gebruikersnaam „admin“ en als
wachtwoord „password“ in.
Daarna komt u in de interne webserver, waar u de verdere configuratie kunt uitvoeren.
• De configuratie van de router is afhankelijk van de provider die u gebruikt.
• In het eenvoudigste geval klikt u in de webserver van de mini-router op „Internet“ en daar op „Internet
Service Setup“. Als toegangsvorm daar („WAN Connection Type“) „PPPoE (ADSL)“ instellen. Dan kunnen de gebruikersnaam en het wachtwoord, dat u van de provider heeft gekregen, worden ingevoerd.
Nadat deze gegevens zijn opgeslagen en de mini-router opnieuw is gestart, moet u via de computer
reeds toegang tot internet hebben.
☞
Klik op het schakelvlakje „RADIO OFF“, deze wisselt dan naar de stand „RADIO ON“.
Dit betekent dat de WLAN-functie is uitgeschakeld.
Klik op het schakelvlakje „RADIO ON“, deze wisselt dan naar de stand „RADIO OFF“.
Dit betekent dat de WLAN-functie is ingeschakeld.
Vergeet u niet, voor WLAN de versleuteling te activeren („WPA2“ geadviseerd).
Als extra veiligheid kunt u alleen de MAC-adressen (niet te verwisselen met de IP-adres-
sen!) van de computer invoeren, die toegang tot de router resp. internet mogen hebben (de
instelling vindt u in het menu „Firewall“ en daar onder „MAC Filtering“).
De MAC-adressen zijn normaal gesproken op de netwerkkaarten of WLAN-sticks gedrukt;
onder Windows in de prompt kan het MAC-adres van de netwerkkaarten ook via het commando „ipconfig/all“ worden aangegeven.
Omdat elke netwerkadapter een ander MAC-adres heeft biedt dit een extra beveiliging van
het draadloze netwerk, omdat alleen computers met het in de router opgeslagen MAC-adres
toegang krijgen.
Werking als accesspoint
Indien dit nog niet is gedaan, de mini-router van de stroomvoorziening loskoppelen. Zet de schuifschakelaar aan de zijkant in de stand „AP“ (=accesspoint)..
Voor het op uw netwerk aansluiten van de mini-router, de connector „Internet“ van de mini-router gebruiken. Er kan, op de „LAN“-connector van de mini-router, later nog een computer (of een extra switch) via
een conventionele netwerkkabel worden aangesloten.
Handel als volgt voor de configuratie van de mini-router:
• Sluit de mini-router aan op de stroomvoorziening.
☞
Het opstarten van de in de mini-router geïntegreerde webserver kan tot een minuut duren.
Gedurende deze tijd is geen toegang op de webserver in de mini-router mogelijk.
• Zet de computer(s) aan en start het desbetreffende besturingssysteem.
Voor de configuratie van de mini-router moet een computer worden gebruikt, die via kabel
op de mini-router is aangesloten (op de „LAN“- of „Internet“- aansluiting) en die een IP-adres
192.168.1.x heeft (x = 1....249).
De mini-router heeft in de modus „Accesspoint“ in de basisinstelling vanaf fabriek het vaste
IP-adres 192.168.1.250, subnet 255.255.255.0.
Deze voorinstelling kan later in de webserver van de mini-router vanzelfsprekend worden
veranderd - teneinde evenwel voor de eerste configuratie een verbinding van uw computer
naar de mini-router kan worden gemaakt, handel dan zoals hiervoor beschreven.
Het IP-adres 192.168.1.250 mag natuurlijk nog niet door een ander apparaat in uw netwerk
worden gebruikt!
Bij problemen met de configuratie kunt u eenvoudig de mini-router en uw computer van het
overige netwerk loskoppelen, en sluit u de voor de configuratie gebruikte computer direct via
een 1:1 verbonden netwerkkabel op de mini-router aan („LAN“- of „Netwerk“-aansluiting).
Stel de computer zoals boven beschreven in op een vast IP-adres (bijv. 192.168.1.50), stel
het subnet-mask in op 255.255.255.0.
• Start uw internet-browser (bijv. Internet Explorer) en voer in de adresregel „192.168.1.250“in (zonder
aanhalingstekens).
Modem
Page 58

• Nu dient het aanmeldscherm van de mini-router te verschijnen. Voer als gebruikersnaam „admin“ en als
wachtwoord „password“ in.
• Stel nu onder „Wireless“ een WLAN-verbinding op en stel de versleutelingmodus in (zoals bij een normale router).
☞
Klicken Sie auf die Schaltfläche „RADIO OFF“, diese wechselt dann auf „RADIO ON“. Dies
bedeutet, dass die WLAN-Funktion ausgeschaltet ist.
Klicken Sie auf die Schaltfläche „RADIO ON“, diese wechselt dann auf „RADIO OFF“. Dies
bedeutet, dass die WLAN-Funktion eingeschaltet ist.
Gebruik als converter
De mini-router kan bij gebruik als „converter“ als WLAN-adapter voor een apparaat zonder WLAN dienen.
Dit hoeft niet alleen een computer te zijn, maar kan ook een ander apparaat met RJ45-netwerkaansluiting
(bijv. internetradio, spelconsole, televisie, satellietontvanger, etc.) zijn.
☞
Let er op, dat de mini-router eerst aan een computer moet worden geconfigureerd, pas daarna kan de mini-router als converter worden gebruikt. De configuratie kan alleen plaatsvinden, als een computer via een netwerkkabel verbonden is met de mini-router.
De instellingen in de mini-router kunnen niet met bijv. een spelconsole worden uitgevoerd!
Indien dit nog niet is gedaan, de mini-router van de stroomvoorziening loskoppelen. Zet de schuifschakelaar
aan de zijkant in de stand „Converter“.
Ga als volgt te werk:
• Sluit de mini-router aan op de stroomvoorziening.
☞
Het opstarten van de in de mini-router geïntegreerde webserver kan tot een minuut duren.
Gedurende deze tijd is geen toegang op de webserver in de mini-router mogelijk.
• Zet de voor de configuratie gebruikte computers aan en start het desbetreffende besturingssysteem.
Voor de configuratie van de mini-router moet een computer worden gebruikt, die via kabel
op de mini-router is aangesloten (op de „LAN“- of „Internet“- aansluiting) en die een IP-adres
192.168.1.x heeft (x = 1....249).
De mini-router heeft in de modus „Converter“ in de basisinstelling vanaf fabriek het vaste IPadres 192.168.1.250, subnet 255.255.255.0.
Deze voorinstelling kan later in de webserver van de mini-router vanzelfsprekend worden
veranderd - teneinde evenwel voor de eerste configuratie een verbinding van uw computer
naar de mini-router kan worden gemaakt, handel dan zoals hiervoor beschreven.
Het IP-adres 192.168.1.250 mag natuurlijk nog niet door een ander apparaat in uw netwerk
worden gebruikt!
Bij problemen met de configuratie kunt u eenvoudig de mini-router en uw computer van het
overige netwerk loskoppelen, en sluit u de voor de configuratie gebruikte computer direct via
een 1:1 verbonden netwerkkabel op de mini-router aan („LAN“- of „Netwerk“-aansluiting).
Stel de computer zoals boven beschreven in op een vast IP-adres (bijv. 192.168.1.50), stel
het subnet-mask in op 255.255.255.0.
• Start uw internet-browser (bijv. Internet Explorer) en voer in de adresregel „192.168.1.250“in (zonder
aanhalingstekens).
Nu dient het aanmeldscherm van de mini-router te verschijnen. Voer als gebruikersnaam „admin“ en als
wachtwoord „password“ in.
Daarna komt u in de interne webserver, waar u de verdere configuratie kunt uitvoeren.
• Klik op „Site Survey“ in het menu „Wireless“ van de mini-router. Na een paar seconden verschijnen daar
de beschikbare WLAN-netwerken. Kies de gewenste verbinding en klik op „Connect“. In het daarop volgende scherm kunt u de veiligheidsinstellingen aanpassen. Aansluitend voert u uw WLAN-wachtwoord
in het veld „Pass Phrase“ in en met „Apply“ bevestigen. Na een paar seconden kunt u de verbinding in
het menu „Site Survey“ resp. „Link Status“ controleren.
Sluit aansluitend de configuratiepagina en verwijder het vaste IP-adres weer uit uw Windows-netwerkinstellingen. Normaal gesproken wordt nu aan de LAN-verbinding van uw pc’s een nieuw IP-adres toegekend. In voorkomend geval is nu een herstart nodig.
Voor het naderhand wijzigen van de configuratie moet nu opnieuw een vast IP-adres worden ingesteld.
Het maakt hierbij niet uit, of de pc op de „LAN“-connector of op de „Internet“-connector van de mini-router is aangesloten.
Optioneel kan natuurlijk de configuratie ook handmatig worden uitgevoerd. Klik in het menu „Wireless“
op „Add“, daar kunnen alle toegangsgegevens worden ingevoerd.
• Na de configuratie op een computer kan de mini-router nu evt. ook op andere apparaten met netwerkaansluiting worden gebruikt, bijv. internetradio, spelconsole, televisie of satellietontvanger.
Reset
Houd de toets „RESET“ van de mini-router-adapter meer dan 3 seconden ingedrukt, zo worden alle instellingen op de fabrieksinstelling teruggezet.
Vervolgens voert de mini-router een nieuwe start uit (kan tot 1 minuut duren).
In de basisinstelling is de gebruikersnaam „admin“ en het wachtwoord „password“. De DCHP-server is
ingeschakeld, in de router-modus worden aan de aangesloten computers in het netwerk de IP-adressen
uit het bereik 192.168.1.x toegekend. Het subnet-mask is 255.255.255.0, het IP-adres van de mini-router
is 192.168.1.1.
In het accesspoint- en de client-/convertermodus heeft de mini-router het vaste IP-adres 192.168.1.250
(in de instellingen van de webserver van de mini-router te wijzigen).
Handleiding van de fabrikant op de meegeleverde CD
Op de CD bevindt zich een uitgebreide handleiding van de fabrikant (in Engelse taal). U hebt, voor het
bekijken hiervan, een Internet-Browser nodig.
Plaats de CD in het desbetreffende station van uw computer, waarop na korte tijd het menu van de CD
verschijnt (installatie van de netwerkmanager of de gebruikshandleiding bekijken) Als de CD-autorun bij
uw computer is uitgeschakeld, start het programma „Autolader.exe“ in de hoofddirectory van de CD.
Op het tijdstip van opstellen van de deze gebruikshandleiding bevond zich bovendien een map „QIG“ op
de CD met een Engelstalige korte handleiding in PDF-formaat ( voor het bekijken van een PDF-bestand
is een overeenkomstige software noodzakelijk, bijv. „Acrobat Reader“, die u gratis via www.adobe.com
kunt downloaden).
Algemeen gebruik
Gebruik het product enkel in droge binnenruimtes. Het product mag niet vochtig of nat worden. Dit kan levensgevaarlijke elektrische schokken tot gevolg hebben!
Gebruik het product nooit onmiddellijk nadat het van een koude naar een warme ruimte is
gebracht. Het condenswater dat hierbij gevormd wordt kan het product in sommige gevallen onherstelbaar beschadigen.
Laat het apparaat eerst op kamertemperatuur komen. Dit kan soms een aantal uren duren.
Sluit daarna pas de netvoedingadapter aan op de netspanning en neem de router in gebruik.
Zorg dat de isolatie van het totale product niet wordt beschadigd of wordt verwijderd. Open
de behuizing niet! Laat onderhoud of reparaties alleen door een vakbedrijf uitvoeren.
Controleer het product vóór elk gebruik op beschadigingen!
Indien u beschadigingen vaststelt, sluit het product dan NIET op de netspanning aan!
Levensgevaar!
U kunt ervan uitgaan dat gebruik zonder gevaar niet meer mogelijk is, wanneer
- het apparaat zichtbare beschadigingen vertoont,
- het product niet meer werkt en
- het langdurig onder ongunstige omstandigheden werd opgeslagen, of
- na zware transportbelastingen.
Haal de adapter uit het stopcontact wanneer u het product langere tijd niet gebruikt. Let op:
er is dan geen internettoegang meer mogelijk, ook de netwerkverbinding tussen de computers functioneert niet!
Vermijd de volgende ongunstige omstandigheden op de plaats van opstelling of tijdens het
vervoer:
- Vocht of een te hoge luchtvochtigheid
- Extreme kou of hitte
- Stof of brandbare gassen, dampen of oplosmiddelen
- Sterke trillingen
- Sterke magnetische velden, bijv. in de buurt van machines of luidsprekers
Let er bij het opstellen/het gebruik van het product op dat de kabels niet geknikt of platgedrukt worden.
Tips & aanwijzingen
• Bij het gebruik van een kabelmodem (bijv. internet via tv-kabel) dient na de configuratie het modem, de
router en de pc opnieuw te worden gestart.
Dit is vooral zinvol, als het modem en de pc al eerder verbonden waren en de mini-router naderhand
wordt geïnstalleerd.
• Na het verbinden van de mini-router met de bedrijfsspanning (of een reset) duurt het tot een minuut voordat de mini-router door een computer kan worden gebruikt (bijv. om het configuratiemenu op te roepen).
Wanneer u geen verbinding kunt maken (ondanks het feit dat de aangesloten apparaten juist zijn geconfigureerd), wacht deze tijd dan eerst af.
• Als u WLAN gebruikt, moet u altijd een codering activeren. Wij adviseren u hiervoor WPA2.
U kunt een extra beveiliging tegen onbevoegde toegang via WLAN (of apparaten die via een netwerk-
kabel zijn aangesloten) instellen, door alleen de MAC-adressen toe te laten van netwerkkaarten of
WLAN-adapters die u zelf gebruikt.
• Voor de configuratie met T-Online dient de gebruikersnaam als volgt te worden ingevoerd:
Gebruikersidentificatie + T-Online-nr. + „#“ + nr. medegebruiker + „@t-online.de“
Voorbeeld: Gegevens van uw opdrachtbevestiging van T-Online:
11111111111 „Gebruikersidentificatie“
222222222222 „Bijbehorende T-Online-nummer“
0001 „nr. Medegebruiker/Suffix“
Voorbeeld voor een gebruikersnaam: 111111111111222222222222#0001@t-online.de
Het hek-symbool is eventueel niet noodzakelijk.
Verwijdering
Elektrische en elektronische producten niet via het normale huisvuil verwijderen!
Voer het onbruikbaar geworden product af volgens de geldende wettelijke voorschriften.
Verklaring van overeenstemming (DOC)
Hierbij verklaren wij, Conrad Electronic, Klaus-Conrad-Strafle 1, D-92240 Hirschau, dat dit product in overeenstemming is met de algemene eisen en andere relevante voorschriften van de richtlijn 1999/5/EG.
☞
De bij dit product behorende verklaring van overeenstemming kunt u vinden op www.conrad.com.
Ꮨ
Deze gebruiksaanwijzing is een publicatie van de firma Conrad Electronic SE, Klaus-Conrad-Str. 1,
D-92240 Hirschau (www.conrad.com).
Alle rechten, vertaling inbegrepen, voorbehouden. Reproducties van welke aard dan ook, bijvoorbeeld
fotokopie, microverfilming of de registratie in elektronische gegevensverwerkingsapparatuur, vereisen
de schriftelijke toestemming van de uitgever. Nadruk, ook van uittreksels, verboden.
Deze gebruiksaanwijzing voldoet aan de technische stand bij het in druk bezorgen. Wijziging van
techniek en uitrusting voorbehouden.
© Copyright 2009 by Conrad Electronic SE. 01_1109_02/HK
 Loading...