

Page 1

Impressum
Diese Bedienungsanleitung ist eine Publikation der Conrad Electronic GmbH, Klaus-ConradStraße 1, D-92240 Hirschau.
Alle Rechte einschließlich Übersetzung vorbehalten. Reproduktionen jeder Art, z. B. Fotokopie,
Mikroverfilmung, oder die Erfassung in EDV-Anlagen, bedürfen der schriftlichen Genehmigung
des Herausgebers.
Nachdruck, auch auszugsweise, verboten.
Diese Bedienungsanleitung entspricht dem technischen Stand bei Drucklegung. Änderung in
Technik und Ausstattung vorbehalten.
© Copyright 2002 by Conrad Electronic GmbH. Printed in Germany.
Imprint
These operating instructions are published by Conrad Electronic GmbH, Klaus-Conrad-Str. 1,
92240 Hirschau/Germany
No reproduction (including translation) is permitted in whole or part e.g. photocopy, microfilming or storage in electronic data processing equipment, without the express written consent of
the publisher.
The operating instructions reflect the current technical specifications at time of print. We reserve the right to change the technical or physical specifications.
© Copyright 2002 by Conrad Electronic GmbH. Printed in Germany.
Note de l´éditeur
Cette notice est une publication de la société Conrad Electronic GmbH, Klaus-Conrad-Str. 1,
92240 Hirschau/Allemagne.
Tous droits réservés, y compris traduction. Toute reproduction, quel que soit le type, par exemple photocopies, microfilms ou saisie dans des traitements de texte electronique est soumise à
une autorisation préalable écrite de l`éditeur.
Impression, même partielle, interdite.
Cette notice est conforme à la règlementation en vigueur lors de l´impression. Données techni-
ques et conditionnement soumis à modifications sans aucun préalable.
© Copyright 2002 par Conrad Electronic GmbH. Imprimé en Allemagne.*866-06-02/01-WM
100% Recyclingpapier.
Chlorfrei
gebleicht.
CONRAD IM INTERNET http://www.conrad.de
100%
recycling
paper.
Bleached
without
chlorine.
100%
papier
recyclé.
Blanchi
sans
chlore.
Version 06/02
DJ- Plattenspieler
Mc Crypt DJ 2600B
Seite 4 - 14
DJ- Record Player
Mc Crypt DJ 2600B
Page 15 - 25
Platine tourne-disque
spécial DJ
Mc Crypt DJ 2600B
Page 26 - 36
Best.-Nr. / Item-No. / Node commande:
30 09 74
BEDIENUNGSANLEITUNG
OPERATING INSTRUCTIONS
MODE D’EMPLOI
2
Diese Bedienungsanleitung gehört zu diesem Produkt. Sie enthält wichtige Hinweise zur Inbetriebnahme und Handhabung. Achten Sie hierauf, auch wenn Sie dieses Produkt an Dritte weitergeben.
Heben Sie deshalb diese Bedienungsanleitung zum Nachlesen auf!
Eine Auflistung der Inhalte finden Sie in dem Inhaltsverzeichnis mit Angabe der entsprechenden Seitenzahlen auf Seite 5.
The present operating manual forms part of this product. It contains important information on
how to put the product into operation and assemble it. Please note it duly even if you pass it on to
third parties.
Keep this operating manual for your future reference!
A list of content together with the corresponding page number can be found in the table of contents on
page 16.
Le mode d’emploi suivant correspond au produit ci-dessus mentionné. Il comporte des instructions importantes relatives à sa mise en service et à son maniement ! Il faut respecter ces instructions, même si ce produit est transmis à tierce personne !
Gardez ce mode d’emploi pour toute consultation ultérieure !
Vous trouverez une table des matières dans l’index page 27 avec indication des pages correspondantes à
consulter.
Page 2

3
/ Back / Face arrière
4
Einführung
Sehr geehrter Kunde, wir bedanken uns für den Kauf des "DJ-Plattenspieler Mc Crypt DJ-2600B". Mit diesem Gerät haben Sie ein Produkt erworben, welches nach dem heutigen Stand der Technik gebaut wurde.
Dieses Produkt erfüllt die Anforderungen der geltenden europäischen und nationalen Richtlinien. Die Konformität wurde nachgewiesen, die entsprechenden Erklärungen und Unterlagen sind beim Hersteller hinterlegt.
Um diesen Zustand zu erhalten und einen gefahrlosen Betrieb sicherzustellen, müssen Sie als Anwender
diese Bedienungsanleitung beachten!
Bei Fragen wenden Sie sich an unsere Technische Beratung
Deutschland: Tel. 0180/5 31 21 18 oder 09604/40 88 46
Fax 09604/40 88 44
e-mail: tkb@conrad.de
Mo. - Fr. 8.00 bis 18.00 Uhr
Österreich: Tel. 0 72 42/20 30 60 · Fax 0 72 42/20 30 66
e-mail: support@conrad.at
Mo. - Do. 8.00 bis 17.00 Uhr
Fr. 8.00 bis 14.00 Uhr
Schweiz: Tel. 0848/80 12 88 · Fax 0848/80 12 89
e-mail: support@conrad.ch
Mo. - Fr. 8.00 bis 12.00 Uhr, 13.00 bis 17.00 Uhr
Bestimmungsgemäße Verwendung
Der Verwendungsbereich des Plattenspielers umfasst den Einsatz in Heim und semiprofessionellen Musikanlagen. Das Gerät dient dazu, Standard LP- und Single-Schallplatten mit 33 oder 45 U/min abzuspielen.
Das Gerät ist für den Anschluss an einen Audioverstärker oder ein Mischpult mit entsprechendem Phonoeingang vorgesehen.
Die Aufstellung, Bedienung, Wartung und Instandhaltung darf nur durch entsprechend qualifizierte Personen durchgeführt werden.
Eine Verwendung ist nur in geschlossenen Räumen und nicht im Freien erlaubt. Der Kontakt mit Feuchtigkeit, z.B. im Badezimmer u.ä. ist unbedingt zu vermeiden.
Eine andere Verwendung als zuvor beschrieben führt zur Beschädigung dieses Produktes, darüber hinaus
ist dies mit Gefahren, wie z.B. Kurzschluss, Brand, elektrischer Schlag etc. verbunden. Das gesamte Produkt darf nicht geändert bzw. umgebaut und das Gehäuse nicht geöffnet werden!
Die Sicherheitshinweise sind unbedingt zu befolgen!
37
Page 3

36
Défaut : Cause possible :
Apparition de bruits parasitaires Disque ou tête de lecture sales
Force d’appui mal réglée
Connexion défectueuse du câble de mise à la masse
Aucune reproduction sur les deux canaux Volume sur minimum sur l’ampli / la console de mixage
Connexion défectueuse du câble Cinch
Reproduction sur un seul canal Régleur de la balance de l’ampli / de la console de
mixage mal réglé
Commande Start/Stop (27) actionnée
Le plateau tourne disque tourne dans le Commande inversion du sens de la marche (26)
mauvais sens actionnée
Données techniques & caractéristiques
Conditions environnementales
Température de fonctionnement : de +5 à +35 °C
Humidité relative de l’air : < 90 % (non condensante)
Données techniques
Moteur: moteur DC EG
Tension de service: 230 V AC / 50 Hz
Puissance absorbée 15 W
Vitesses du plateau
tourne-disque: 33 1/3 et 45 tr/min
Scintillement et
pleurage: < 0,15 %
Pitch: +/-10%
Dimensions (lxhxp): 450 mm x 152 mm x
352 mm
Poids: 7,7kg
Tête du bras de lecture:force d’appui 3 g
Câble blanc = là gauche +
Câble bleu =là gauche –
Câble vert =à droite +
Câble rouge =à droite –
Entrées de commande: commande par touche
externe sans potentiel
Caractéristiques
•Platine tourne-disque spécial DJ, manuelle, entraînée par courroie
•Douilles jack 3,5mm pour la commande des fonctions inversion du sens de la marche &
Start/Stop
•Vitesse réglable à +/- 10% (Pitch)
•Grande touche Start/Pause
•Accélération et freinage rapides du plateau tourne-disque
•Eclairage du saphir escamotable
•Lampe stroboscope pour un réglage exact de la
vitesse
•Antipatinage
•Tête du bras de lecture adaptée à la « marche
arrière » du plateau tourne-disque
5
Inhaltsverzeichnis
Einführung . . . . . . . . . . . . . . . . . . . . . . . . . . . . . . . . . . . . . . . . . . . . . . . . . . . . . . . . . . . . . . . . . . . . . . . . . . . 4
Bestimmungsgemäße Verwendung . . . . . . . . . . . . . . . . . . . . . . . . . . . . . . . . . . . . . . . . . . . . . . . . . . . . . . . . 4
Inhaltsverzeichnis . . . . . . . . . . . . . . . . . . . . . . . . . . . . . . . . . . . . . . . . . . . . . . . . . . . . . . . . . . . . . . . . . . . . . 5
Sicherheits- und Gefahrenhinweise . . . . . . . . . . . . . . . . . . . . . . . . . . . . . . . . . . . . . . . . . . . . . . . . . . . . . . . . 5
Anschluß- und Bedienelemente . . . . . . . . . . . . . . . . . . . . . . . . . . . . . . . . . . . . . . . . . . . . . . . . . . . . . . . . . . 7
Montage . . . . . . . . . . . . . . . . . . . . . . . . . . . . . . . . . . . . . . . . . . . . . . . . . . . . . . . . . . . . . . . . . . . . . . . . . . . . . 7
Plattenteller & Riemen . . . . . . . . . . . . . . . . . . . . . . . . . . . . . . . . . . . . . . . . . . . . . . . . . . . . . . . . . . . . . . . . 7
Abdeckhaube . . . . . . . . . . . . . . . . . . . . . . . . . . . . . . . . . . . . . . . . . . . . . . . . . . . . . . . . . . . . . . . . . . . . . . 8
Gegengewicht . . . . . . . . . . . . . . . . . . . . . . . . . . . . . . . . . . . . . . . . . . . . . . . . . . . . . . . . . . . . . . . . . . . . . . 8
Tonabnehmersystem . . . . . . . . . . . . . . . . . . . . . . . . . . . . . . . . . . . . . . . . . . . . . . . . . . . . . . . . . . . . . . . . . 8
Aufstellen des Gerätes . . . . . . . . . . . . . . . . . . . . . . . . . . . . . . . . . . . . . . . . . . . . . . . . . . . . . . . . . . . . . . . . . 8
Anschluß . . . . . . . . . . . . . . . . . . . . . . . . . . . . . . . . . . . . . . . . . . . . . . . . . . . . . . . . . . . . . . . . . . . . . . . . . . . . 9
Cinch- und Masseanschluss . . . . . . . . . . . . . . . . . . . . . . . . . . . . . . . . . . . . . . . . . . . . . . . . . . . . . . . . . . . 9
Steuereingänge . . . . . . . . . . . . . . . . . . . . . . . . . . . . . . . . . . . . . . . . . . . . . . . . . . . . . . . . . . . . . . . . . . . . 10
Netzleitung . . . . . . . . . . . . . . . . . . . . . . . . . . . . . . . . . . . . . . . . . . . . . . . . . . . . . . . . . . . . . . . . . . . . . . . . 10
Einstellungen . . . . . . . . . . . . . . . . . . . . . . . . . . . . . . . . . . . . . . . . . . . . . . . . . . . . . . . . . . . . . . . . . . . . . . . . 10
Einstellen des Gegengewichts . . . . . . . . . . . . . . . . . . . . . . . . . . . . . . . . . . . . . . . . . . . . . . . . . . . . . . . . 10
Einstellen des Antiskating . . . . . . . . . . . . . . . . . . . . . . . . . . . . . . . . . . . . . . . . . . . . . . . . . . . . . . . . . . . . 11
Abgleichen der Abspielgeschwindigkeit . . . . . . . . . . . . . . . . . . . . . . . . . . . . . . . . . . . . . . . . . . . . . . . . . 11
Inbetriebnahme . . . . . . . . . . . . . . . . . . . . . . . . . . . . . . . . . . . . . . . . . . . . . . . . . . . . . . . . . . . . . . . . . . . . . . 11
Transport des Gerätes . . . . . . . . . . . . . . . . . . . . . . . . . . . . . . . . . . . . . . . . . . . . . . . . . . . . . . . . . . . . . . . . . 12
Handhabung . . . . . . . . . . . . . . . . . . . . . . . . . . . . . . . . . . . . . . . . . . . . . . . . . . . . . . . . . . . . . . . . . . . . . . . . 12
Einstellen des Überhangs . . . . . . . . . . . . . . . . . . . . . . . . . . . . . . . . . . . . . . . . . . . . . . . . . . . . . . . . . . . . . . 12
Wartung, Pflege & Entsorgung . . . . . . . . . . . . . . . . . . . . . . . . . . . . . . . . . . . . . . . . . . . . . . . . . . . . . . . . . . 13
Wartung & Pflege . . . . . . . . . . . . . . . . . . . . . . . . . . . . . . . . . . . . . . . . . . . . . . . . . . . . . . . . . . . . . . . . . . . 13
Entsorgung . . . . . . . . . . . . . . . . . . . . . . . . . . . . . . . . . . . . . . . . . . . . . . . . . . . . . . . . . . . . . . . . . . . . . . . 13
Behebung von Störungen . . . . . . . . . . . . . . . . . . . . . . . . . . . . . . . . . . . . . . . . . . . . . . . . . . . . . . . . . . . . . . 13
Technische Daten und Merkmale . . . . . . . . . . . . . . . . . . . . . . . . . . . . . . . . . . . . . . . . . . . . . . . . . . . . . . . . 14
Technische Daten . . . . . . . . . . . . . . . . . . . . . . . . . . . . . . . . . . . . . . . . . . . . . . . . . . . . . . . . . . . . . . . . . . 14
Merkmale . . . . . . . . . . . . . . . . . . . . . . . . . . . . . . . . . . . . . . . . . . . . . . . . . . . . . . . . . . . . . . . . . . . . . . . . . 14
Umgebungsbedingungen . . . . . . . . . . . . . . . . . . . . . . . . . . . . . . . . . . . . . . . . . . . . . . . . . . . . . . . . . . . . . . 14
Sicherheits- und Gefahrenhinweise
Ein in einem Dreieck befindliches Ausrufezeichen weist auf wichtige Hinweise in
der Bedienungsanleitung hin. Lesen Sie bitte vor Inbetriebnahme die komplette
Anleitung durch, sie enthält wichtige Hinweise zum korrekten Betrieb.
Bei Schäden, die durch Nichtbeachten dieser Bedienungsanleitung verursacht
werden, erlischt der Garantieanspruch! Für Folgeschäden übernehmen wir keine
Haftung!
Bei Sach- oder Personenschäden, die durch unsachgemäße Handhabung oder
Nichtbeachten der Sicherheitshinweise verursacht werden, übernehmen wir keine
Haftung! In solchen Fällen erlischt jeder Garantieanspruch.
°
Aus Sicherheits- und Zulassungsgründen (CE) ist das eigenmächtige Umbauen
und/oder Verändern des Gerätes nicht gestattet.
Achten Sie auf eine sachgerechte Inbetriebnahme des Gerätes. Beachten Sie hierbei
diese Bedienungsanleitung.
Bedienungsanleitung
Page 4

34
• Abaissez-le à l’aide du lève-bras, baissez pour ce faire le levier du lève-bras vers l’avant. Le bras de lecture s’abaisse et la reproduction commence.
• Montez le son sur l’ampli dans une mesure vous étant agréable.
• Grace au régleur Pitch, il est possible d’accélérer ou de ralentir la vitesse de lecture pour produire des
effets. En position au milieu, le régleur s’enclenche légèrement et le voyant à côté du régleur s’allume. La
reproduction reprend à la vitesse d’origine.
• Au cas où vous voudriez interrompre la reproduction sans remonter le bras de lecture, appuyez simplement sur la touche Start/pause.
• Pour terminer la reproduction ou à la fin du disque, remontez le bras par le levier lève-bras (position vers
le haut) et remettez le bras sur son support puis rabaissez-le pour qu’il puisse revenir en position repos.
• Appuyez sur la touche marche/arrêt ou sur la touche marche/arrêt de télécommande (touche externe). Le
plateau est éteint.
• Après utilisation, éteignez d’abord l’ampli puis la platine tourne-disque avec l’interrupteur secteur.
☞
Quand vous n’utilisez pas l’appareil, mettez toujours le bras de lecture sur son support et bloquez-le
avec le crochet afin qu’il ne soit pas endommagé en cas de toucher involontaire. N’oubliez pas de baisser le bras avant de le bloquer.
Pour protéger l’appareil contre la poussière, fermez prudemment le couvercle après ou même pendant l’utilisation de manière à ne pas provoquer de secousses.
Transport de l’appareil
• Débranchez le cordon d’alimentation, le câble Cinch et dévissez le câble de mise à la masse.
• Fixez le bras de lecture au moyen du crochet de blocage du support du bras
• Mettez le capuchon sur la tête de lecture (protection du saphir)
• Retirez la tête de lecture du bras
• Enlevez le contre-poids
• Retirez le plateau tourne-disque
• Retirez le couvercle et enlevez les charnières
• Remballez l’appareil dans l’emballage d’origine
Maniement
N’allumez jamais l’appareil tout de suite quand il vient d’être mis d’une pièce froide dans une pièce chaude.
L’eau de condensation qui en résulte pourrait, dans des conditions défavorables, détruire l’appareil.
Laissez donc l’appareil éteint prendre la température ambiante avant de le mettre en marche. Attendez que l’eau de condensation se soit évaporée.
Evitez d’utiliser l’appareil dans des conditions d’environnement contraires à son bon fonctionnement. Des
conditions d’environnement contraires sont que l’appareil fonctionne :
• dans une humidité relative de l’air trop élevée (> 90 % hum. rel.), mouillé, dans la poussière ou des gaz,
vapeurs ou solutions inflammables
• à des températures trop élevées (> +35°C), à des températures trop basses (< +5°C)
N’écoutez pas de la musique pendant longtemps à un volume exagéré, cela pourrait pro-
voquer des séquelles auditives.
Réglage du porte à faux
Le porte à faux est l’intervalle entre le saphir et l’axe de centrage du plateau tourne disque. Le porte à faux a déjà été
ajusté en usine. Au cas où vous changeriez la tête du bras de
lecture, vous pouvez réajuster le porte à faux en procédant
comme suit :
Pour une reproduction optimale, le réglage du porte à faux du
bras de lecture doit être de 15 mm. Dévissez à cet effet les
deux vis de la tête (Headshell) et coulissez celle-ci dans la
position correcte. Revissez ensuite les deux vis.
ligne du
saphir
tête du bras de lecture
(support du saphir)
7
Sollten Sie sich über den korrekten Anschluß nicht im Klaren sein oder sollten sich
Fragen ergeben, die nicht im Laufe der Bedienungsanleitung abgeklärt werden, so
setzen Sie sich bitte mit unserer technischen Auskunft oder einem anderen Fachmann in Verbindung. Wenden Sie sich an eine Fachkraft, wenn Sie Zweifel über die
Arbeitsweise oder die Sicherheit des Produktes haben.
Anschluss- und Bedienelemente
siehe Ausklappseite
(1) Start/Pause-Taste
(2) Stroboskopleuchte zur Kontrolle der Plattentellerdrehzahl
(3) Auflagematte
(4) Netzschalter
(5) Scharnierhalterungen für die Abdeckhaube
(6) Plattenteller Zentrierstift
(7) Aufbewahrungsmöglichkeit für ein weiteres Tonabnehmersystem
(8) Tonarmgegengewicht
(9) Single-Adapter (Puck)
(10) Einstellskala für die Auflagekraft des Tonarms
(11) Einstellrad für die Antiskating-Kompensation
(12) Tonarmlift
(13) Tonarmstütze mit Stützenklemme
(14) Drehzahlregler für 33 oder 45 U/min
(15) Tonarm
(16) Pitch-Schieberegler
(17) Feststellschraube für das Tonabnehmersystem
(18) Tonabnehmersystem (bestehend aus Nadel, System, Systemträger (Headshell))
(19) Verriegelungstaste für Nadelleuchte
(20) Nadelleuchte
(21) Drehzahlwahlschalter 33 bzw. 45 U/min
(22) Plattenteller mit Stroboskop-Punkten
(23) Scharniere
(24) Cinch-Ausgang (links/rechts)
(25) Masseklemme
(26) Steuereingang Vorwärts-/Rückwärtsumschaltung (REMOTE Forw/Backw)
(27) Steuereingang Start/Stop (REMOTE Start/Stop)
(28) Netzkabel
(29) Abdeckhaube
Montage
Plattenteller & Riemen
Entnehmen Sie den Plattenspieler mit seinen Zubehör- und Montageteilen,
diese befinden sich zum Teil seitlich in den Styroporschutzecken, der Verpackung.
Stellen Sie Ihren Plattenspieler auf einer stabilen und waagerechten Fläche
auf. Stecken Sie den Plattenteller auf den Plattenteller-Zentrierstift. Drehen
Sie den Plattenteller solange, bis unter einem der beiden äußeren Löcher
des Plattentellers die Motorantriebsachse zu sehen ist.
Legen Sie den Antriebsriemen, der sich auf der Unterseite des Plattentellers
befindet, über die Motorantriebsachse.
☞
Achten Sie darauf, dass der Riemen nicht verdreht ist.
Legen Sie die mitgelieferte Auflagematte auf den Plattenteller.
Page 5

32
Entrées de commande
L’appareil dispose de deux entrées de commande (douilles jack 3,5mm). Il est possible de télécommander
les fonctions marche/arrêt et commutation du sens de la marche (marche avant/marche arrière) souvent utilisées sur les consoles de mixage par l’intermédiaire de ces entrées. Au cas où votre console de mixage
serait équipée des sorties de commande correspondantes, il est possible de connecter celles-ci aux
entrées de commande de la platine tourne-disque. A condition bien sûr que le câblage de sortie de la
console convienne à ces fonctions :
Entrée de commande marche/arrêt (REMOTE START/STOP)
La platine peut être mise en route ou arrêtée par l’intermédiaire de cette douille jack 3,5mm. Connectez
l’entrée (si vous le désirez) avec la sortie de commande marche/arrêt de la console de mixage, cette fonction peut également être commandée par une pédale.
L’interrupteur marche/arrêt est sans fonction quand la sortie de commande est utilisée.
Entrée de commande commutation du sens de la marche (REMOTE FORW/BACKW)
Le sens de la marche (marche avant/marche arrière) de la platine peut être inversé par l’intermédiaire de
cette douille jack 3,5mm. Connectez l’entrée (si vous le désirez) avec la sortie de commande commutation
du sens de la marche de la console de mixage, cette fonction peut également être commandée par une
pédale.
Cordon d’alimentation en courant
Enfoncez la fiche du cordon d’alimentation dans une prise de courant
usuelle de 230V AC / 50 Hz.
Réglages
Réglage du contre-poids
☞
Attention : prenez soin à ne pas abîmer le saphir de la pointe de lecture pendant ce réglage.
• Tournez le régleur antipatinage sur "0".
• Enlevez prudemment le capuchon de protection de la tête de lecture en le tirant vers le bas.
• Ouvrez le crochet de blocage du bras et faites pivoter le bras dans l’espace libre entre son support et le
plateau.
• Abaissez le lève-bras en appuyant sur le levier du lève-bras vers l’avant. Tenez prudemment le bras en
glissant un doigt dessous pour qu’il ne tombe pas par inadvertance.
• Tournez le contre-poids du bras de lecture jusqu’à ce que celui-ci tienne tout seul horizontalement à hauteur du plateau tourne-disque. Le bras ne doit ni se poser ni cogner contre quoi que ce soit. Le bras ne
doit pas non plus basculer ni en direction du saphir ni en direction du contre-poids.
• Remettez le bras sur son support et fixez-le au moyen du crochet.
• Tournez maintenant l’échelle de réglage du contre-poids sur "0" sans pour autant dérégler le contre-poids
(tenir fermement le contre-poids et ne tourner que l’échelle).
• Réglez la force d’appui du bras de lecture au moyen de l’échelle sur la valeur conseillée par le fabricant du
saphir. A cet effet, tournez le contre-poids avec l’échelle dans le sens contraire des aiguilles d’une montre vu de devant, jusqu’à ce que la valeur souhaitée soit atteinte. La ligne rouge sur le bras de lecture sert
ici de marque. Le réglage conseillé pour le saphir joint est de 3 3g (2,5 ~ 3,5g).
9
Rückstände auf den Möbeln hinterlassen könnten. Das Gerät sollte deshalb nicht ohne
geeigneten Schutz auf wertvolle Möbeloberflächen gestellt werden.
Bohren oder schrauben Sie zur Befestigung des Gerätes keine zusätzlichen Schrauben
in das Gehäuse, dadurch wird das Gerät beschädigt.
Anschluss
Stellen Sie sicher, dass vor dem Anschluss des Plattenspielers an die Audioanlage das Netzkabel nicht eingesteckt ist. Schalten Sie alle anzuschließenden Geräte aus und trennen Sie diese vom Stromnetz indem
Sie die Netzstecker ziehen.
Beachten Sie beim Anschluss und bei der Inbetriebnahme der Audioanlage auch die Vorschriften und
Sicherheitsbestimmungen der Hersteller der anderen Anlagenkomponenten.
Anschluss an ein Mischpult (Beispiel):
Cinch- und Masseanschluss
Der Plattenspieler kann wahlweise an den Phonoeingang eines Verstärkers oder auch eines Mischpultes
angeschlossen werden.
Das Gerät an das der Plattenspieler angeschlossen wird, muss über einen Cinch-Phonoeingang für
Magnetsysteme (MM) verfügen. Vergewissern Sie sich in der betreffenden Bedienungsanleitung, wo dieser
Anschluss zu finden ist und ob dieser bezüglich der Eingangsbeschaltung geeignet ist. Andere Eingänge,
z.B. AUX oder der Mikrofoneingang, sind für den Anschluss des Plattenspielers nicht geeignet. Bei Nichtbeachtung dieser Hinweise können der Plattenspieler oder die angeschlossenen Geräte beschädigt werden.
☞
Verwenden Sie zur Verkabelung nur das mitgelieferte oder andere, geeignete Cinchkabel. Wenden Sie
sich im Zweifelsfall an einen Fachmann.
Verbinden Sie die Plattenspieler-Cinchbuchsen (rot = rechter Kanal / weiß = linker Kanal) mit den PhonoCincheingangsbuchsen ihres Verstärkers, bzw. Mischpultes. Verbinden Sie die Masseklemme des Plattenspielers mit der Masseklemme Ihres Verstärkers, bzw. Mischpults, um Brummstörungen zu vermeiden.
Page 6

30
Couvercle
Fixez les deux charnières au couvercle. Enfoncez ensuite les charnières avec couvercle dans les supports
de charnières de la platine tourne-disque.
Contre-poids
Enfoncez le contre-poids presque jusqu’à la marque rouge sur le bras de
lecture de la platine. L’échelle du contre-poids doit être orientée en direction
de la vis de fixation du saphir. Tournez le contre-poids jusqu’à la moitié de la
ligne rouge du bras de lecture. Vous trouverez une plus ample description du
réglage du contre-poids au point "Réglage du contre-poids".
Tête de lecture
Faites attention avant de monter la tête de lecture que le bras
de lecture soit bien fixé par le crochet de blocage. Enfoncez
prudemment la tête de lecture sur le bras. Fixez-la au moyen
de la vis de fixation en tournant celle-ci dans le sens contraire
des aiguilles d’une montre.
Mise en place de l’appareil
Tenez compte pour choisir où placer l’appareil des caractéristiques des locaux, comme par ex. de la proximité d’une prise de courant, etc. Prenez également en compte qu’il faut absolument éviter un rayonnement
direct du soleil, les vibrations, la poussière, trop de chaleur, de froid ou d’humidité. De puissants transformateurs ou moteurs ne doivent pas se trouver à proximité immédiate. Placez l’appareil suffisamment loin
des haut-parleurs pour éviter un rétro-couplage acoustique.
Placez l’appareil à un endroit stable et plan. La non-observation de cet avertissement
peut avoir pour conséquence que l’appareil ou le disque écouté soient endommagés. Ne
faites fonctionner l’appareil que quand celui-ci est dans la position requise car sinon un
fonctionnement correct n’est pas possible.
bras de lecture
contre-poids
11
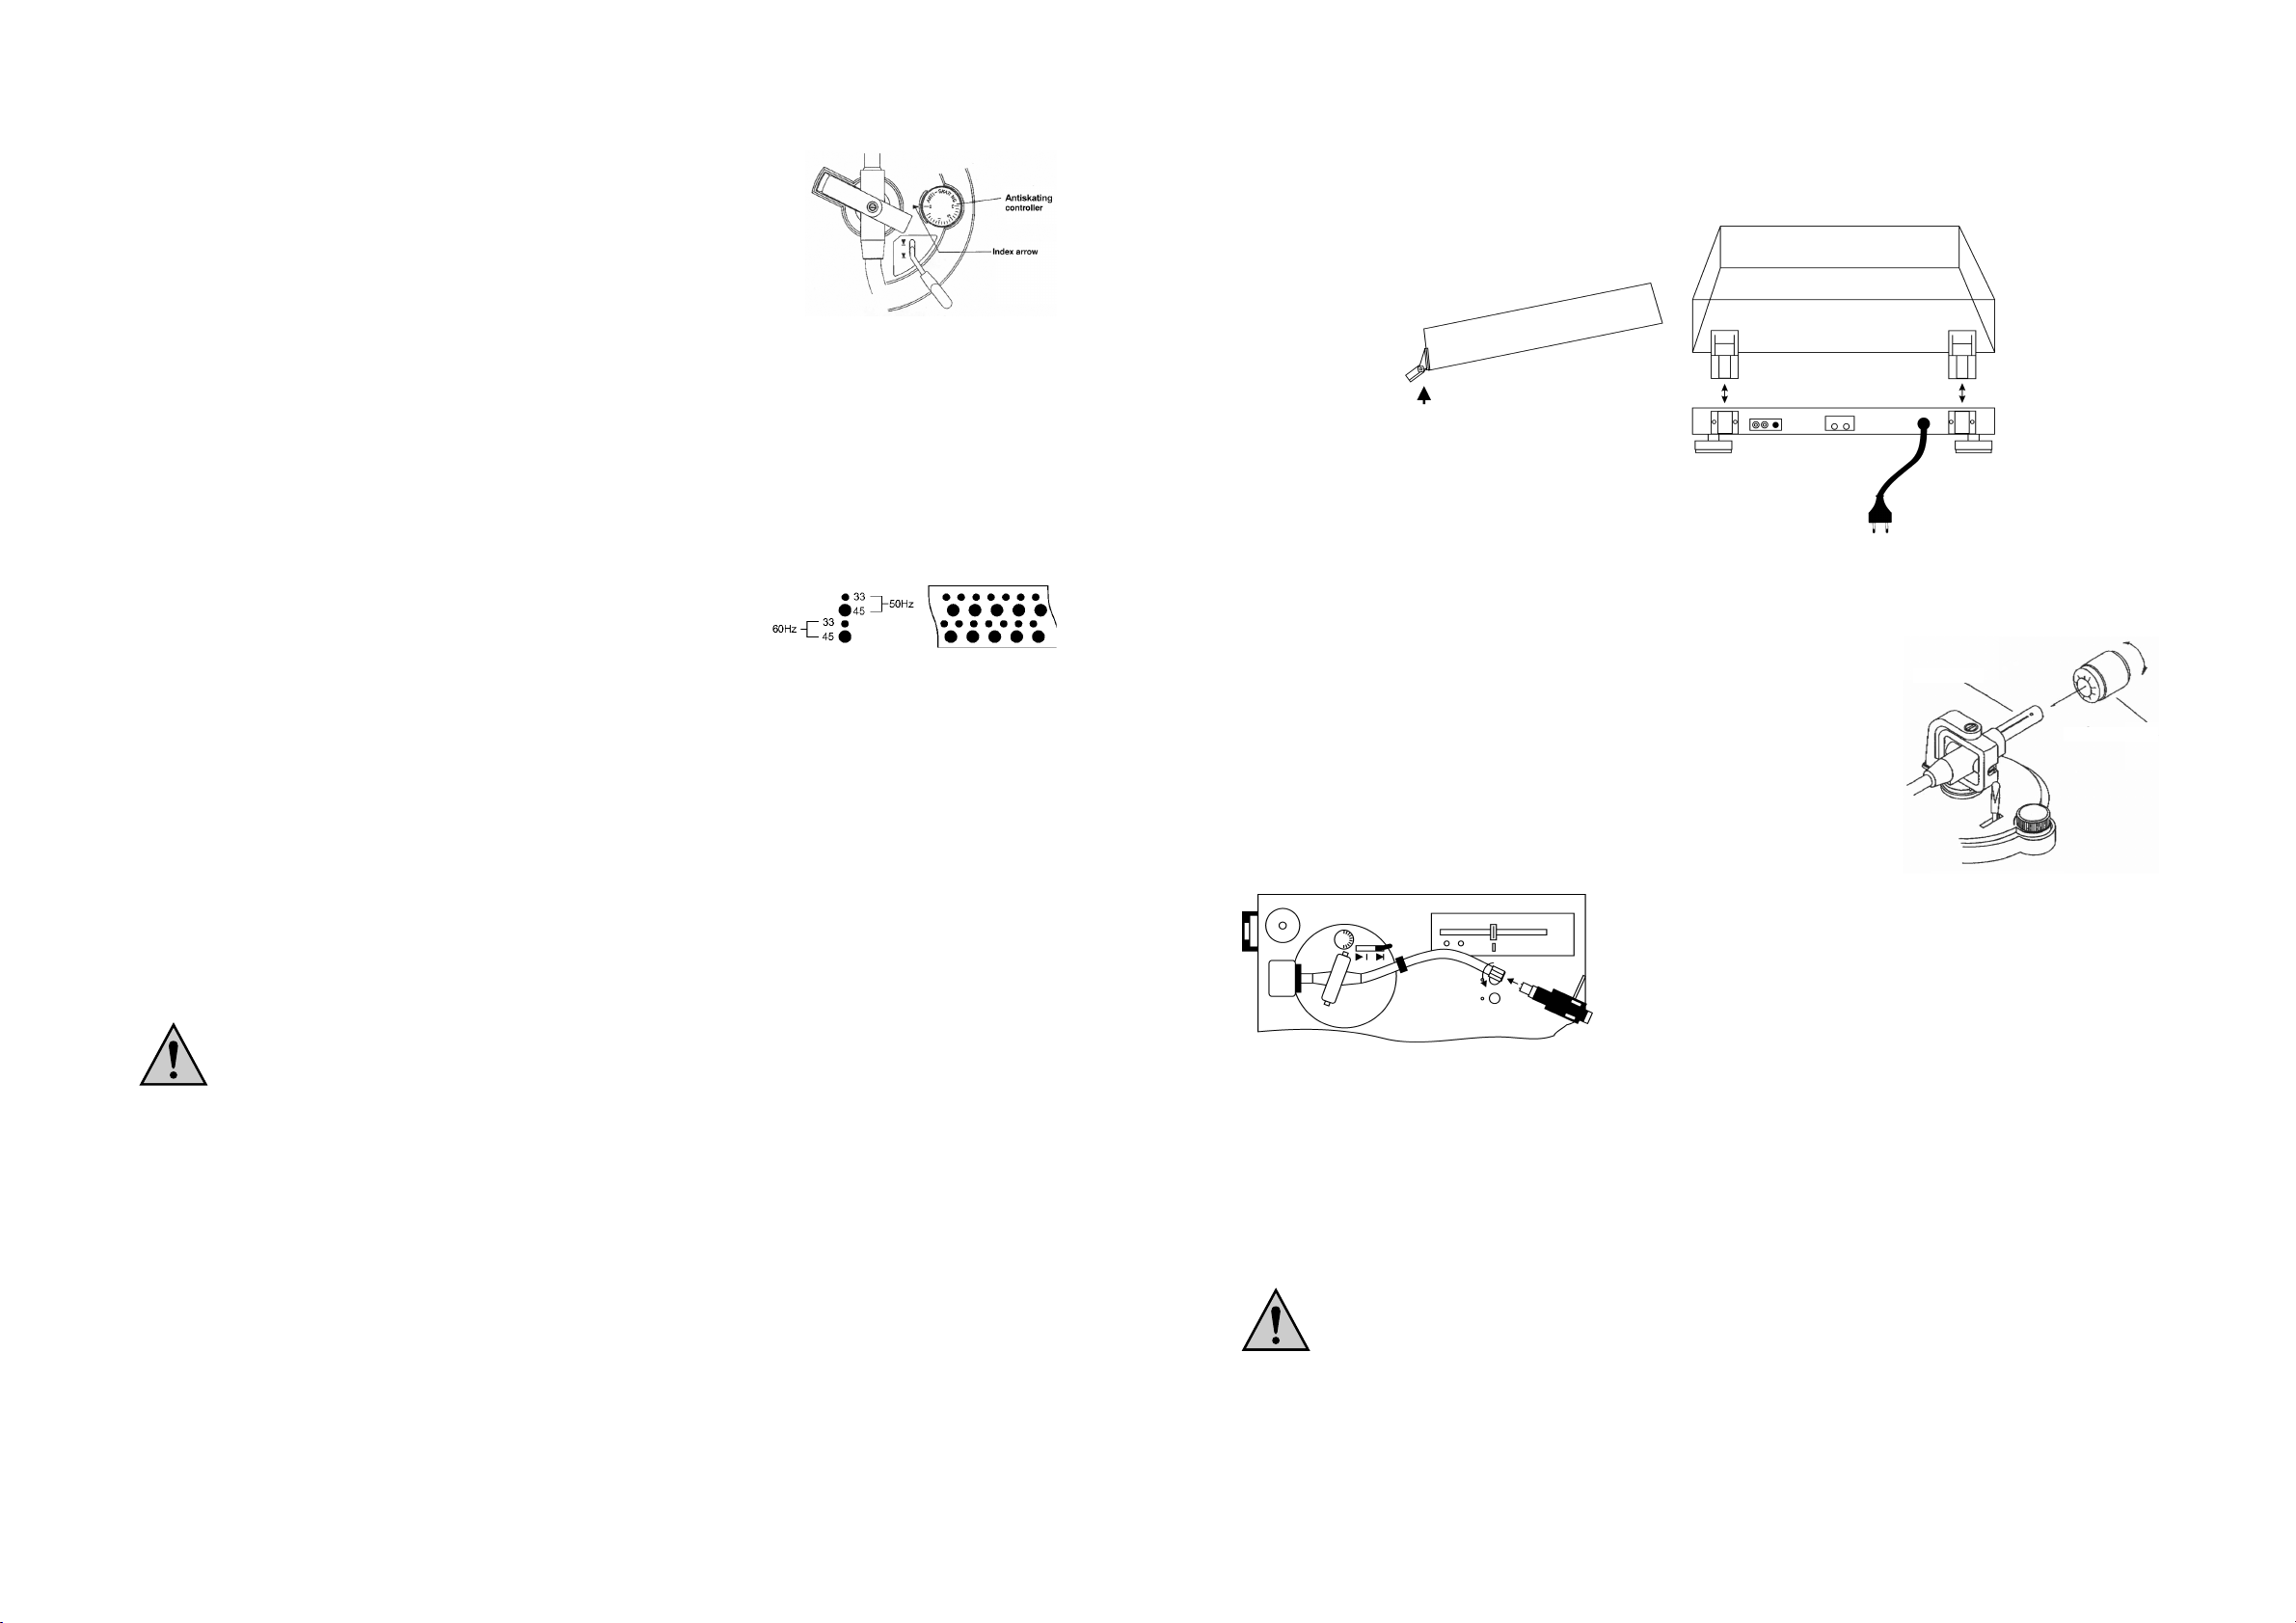
Einstellen des Antiskating
Stellen Sie den Antiskating-Regler so ein, das der Wert dem der Nadelauflagekraft des jeweilig verwendeten Tonabnehmersystems entspricht. Ist z.B.
die Nadelauflagekraft 2 Gramm, so stellen Sie den Antiskatingregler auf 2 ein.
Die empfohlene Einstellung für das mitgelieferte System ist der Wert 3.
Abgleichen der Abspielgeschwindigkeit
• Schalten Sie den Plattenspieler ein.
• Lösen Sie die Stützenklemme.
• Stellen Sie den Tonarmlift auf "AUF" Position (Tonarm anheben).
• Stellen Sie den Pitch-Schieberegler auf Mittenstellung.
• Wählen Sie die Geschwindigkeit "33".
• Drücken Sie die START/PAUSE Taste um den Plattenspieler zu starten (Plattenteller dreht sich).
• Bewegen Sie den Tonarm in Richtung Plattenteller, den Tonarm jedoch nicht absenken.
• Beachten Sie die Punkte am Plattentellerrand. Mit Hilfe der Stroboskopleuchte kann die Geschwindigkeitseinstellung überprüft werden.
• Es befinden sich 4 Punktereihen auf dem Plattentellerrand. Welche
Punktereihe zu beachten ist, ist von der eingestellten Abspielgeschwindigkeit (33/45) und der Betriebsspannungsfrequenz (50/60Hz)
abhängig. In Deutschland ist die maßgebende Betriebsspannungsfrequenz 50 Hz, es sind in diesem Falle die beiden oberen Punktereihen zu beachten.
• Mit den Drehzahlreglern (14) kann die Geschwindigkeit korrekt eingestellt werden.
Regler mit 33 beschriftet = Einstellregler für Geschwindigkeit 33 U/min.
Regler mit 45 beschriftet = Einstellregler für Geschwindigkeit 45 U/min.
• Einstellvorgang: Wenn sich die Punktereihe unter der Ansicht der Stroboskopleuchte scheinbar nach
rechts oder links dreht ist die Plattentellergeschwindigkeit zu langsam, bzw. zu hoch. Benutzen Sie einen
kleinen Schraubendreher und drehen Sie den Drehzahlregler (14) mit der Beschriftung "33" in Richtung
"+", bzw. "-" bis die Punktereihe scheinbar stillsteht.
• Wählen Sie nun die Abspielgeschwindigkeit "45" und führen Sie die Einstellung auch hier durch. Hier ist
jedoch der Einstellregler mit der Beschriftung "45" zu verstellen.
• Bringen Sie den Tonarm wieder in die Ruheposition, senken Sie ihn ab und sichern Sie ihn mit der Stützenklemme.
Inbetriebnahme
Um eine sachgemäße Inbetriebnahme zu gewährleisten, lesen Sie vor Gebrauch unbedingt diese Bedienungsanleitung mit den Sicherheitshinweisen vollständig und aufmerksam durch!
• Überprüfen Sie nochmals alle Anschluss- und Justagearbeiten.
• Öffnen Sie die Abdeckhaube
• Legen Sie eine Schallplatte auf den Plattenteller. Stecken Sie ( falls benötigt ) den Single-Adapter (Puck)
auf die Plattentellerachse, um eine Single-Schallplatte abzuspielen,
• Stellen Sie den Pitch-Schieberegler in Mittenstellung. Der Regler rastet in dieser Stellung leicht ein.
• Schalten Sie den Netzschalter des Plattenspielers ein.
• Wählen Sie mit dem Drehzahlwahlschalter die auf der Schallplatte angegebene Geschwindigkeit (33 bzw.
45 U/min). Die gewählte Geschwindigkeit wird durch eine Leuchte (LED) angezeigt.
• Schalten Sie das Mischpult, bzw. den Verstärker ein. Wählen Sie den Eingang, an dem der Plattenspieler
angeschlossen ist.
• Betätigen Sie den Start/Pause-Schalter, bzw. die angeschlossene Start/Stop-Fernbedienfunktion (externer Taster). Der Plattenteller dreht sich.
• Lösen Sie die Stützenklemme am Tonarm.
• Stellen Sie den Tonarmlifthebel auf Position "AUF" und schwenken Sie den Tonarm von der Tonarmstütze über die Schallplatte.
• Bei schlechten Lichtverhältnissen drücken Sie die Verriegelungstaste für die Nadelleuchte, die Nadelleuchte fährt aus und schaltet sich automatisch ein. Zum Ausschalten einfach die Nadelleuchte mit leichtem Druck wieder einschieben.
• Richten Sie den Tonarm über der ersten Plattenrille aus.
Page 7

28
Le système ne doit jamais être soumis à des températures extrêmes, à de fortes vibrations, à une humidité très élevée ou à de fortes sollicitations mécaniques.
L’appareil a été construit conformément à la classe II.
Pour l’alimentation en courant, seule l’utilisation d’une prise de courant du secteur
public de 230 V/50 Hz (10/16 A) est autorisée. N’essayez jamais de brancher l’appareil
sur un autre voltage.
Le système n’est homologué que pour une utilisation en intérieur.
Ne laissez jamais l’appareil fonctionner sans surveillance.
Assurez-vous que tous les raccordements électriques, câbles de raccordement entre
l’appareil et d’éventuelles rallonges sont conformes aux prescriptions correspondantes
et à ce mode d’emploi.
Un câble de raccordement défectueux ne peut être remplacé que par un spécialiste.
Il faut maintenir les appareils électriques hors de la portée des enfants. Soyez particulièrement vigilant en leur présence ! Les enfants pourraient essayer d’introduire des
objets dans les appareils, ce qui représente un risque d’électrocution très dangereux.
Ne mettez jamais de récipient, comme par ex. un pot de fleurs, sur l’appareil. Ne versez
jamais des liquides sur les appareils. Ne posez jamais de petits objets comme par ex.
des pièces de monnaie ou des trombones, etc. sur l’appareil, ils pourraient tomber à
l’intérieur de celui-ci. Ceci représente de gros risques d’incendie ou un danger de mort
par électrocution. Si toutefois ceci arrivait, débranchez tout de suite l’appareil de la prise de courant et adressez-vous à du personnel qualifié.
Il ne faut pas brancher ou débrancher les cordons d’alimentation secteur avec des
mains mouillées.
Ne débranchez jamais l’appareil en tirant sur le fil mais en le tenant par les surfaces
prévues à cet effet de la fiche.
Ne laissez pas traîner le matériel d’emballage, les feuilles ou poches plastiques, les morceaux de polystyrène expansé etc. Ils pourraient devenir des jouets dangereux pour les enfants.
Faites attention en mettant l’appareil en place à ne pas endommager les fils électriques en les coinçant ou
en les abîmant sur une arête vive.
Débranchez toujours l’appareil de la prise de courant
- avant de nettoyer l’appareil,
- par temps orageux
- quand vous n’utilisez pas l’appareil pendant une longue période.
Pour garantir un fonctionnement en toute sécurité de l’appareil, la mise en service doit impérativement être
effectuée par du personnel qualifié.
13
Wartung, Pflege & Entsorgung
Wartung & Pflege
Überprüfen Sie regelmäßig die technische Sicherheit des Gerätes, z.B. auf Beschädigung des Gehäuses,
des Netzanschlußkabels, etc.. Wenn anzunehmen ist, dass ein gefahrloser Betrieb nicht mehr möglich ist,
so ist das Gerät außer Betrieb zu setzen und gegen unbeabsichtigten Betrieb zu sichern.
Es ist anzunehmen, daß ein gefahrloser Betrieb nicht mehr möglich ist, wenn:
• das Gerät sichtbare Beschädigungen aufweist
• das Gerät nicht mehr arbeitet
• nach längerer Lagerung unter ungünstigen Verhältnissen, oder
• nach schweren Transportbeanspruchungen
Bevor Sie das Gerät reinigen oder warten beachten Sie unbedingt folgende Sicherheitshinweise:
Ziehen Sie den Netzstecker aus der Steckdose .
Eine Reparatur/ein Öffnen des Gerätes darf nur durch eine Fachkraft erfolgen, die mit
den damit verbundenen Gefahren bzw. einschlägigen Vorschriften vertraut ist.
Das Gerät ist wartungsfrei, öffnen Sie es deshalb niemals. Durch Öffnen des Gerätes erlischt der Garantieanspruch.
Äußerlich sollte das Gerät nur mit einem weichen, trockenen Tuch oder Pinsel gereinigt werden. Verwenden
Sie auf keinen Fall aggressive Reinigungsmittel oder chemische Lösungen, da dadurch das Gehäuse angegriffen oder die Funktion beeinträchtigt werden könnte. Achten Sie beim Säubern darauf, daß Sie nicht
unbeabsichtigt die Einstellungen für Auflagekraft und Antiskatingfunktion verstellen.
☞
Beim Reinigen sollte immer der Nadelschutz aufgesteckt werden, damit die Tonabnehmernadel
nicht beschädigt werden kann.
Entsorgung
Entsorgen Sie das unbrauchbar gewordene Gerät gemäß den geltenden gesetzlichen Vorschriften.
Behebung von Störungen
Mit diesem Gerät haben Sie ein Produkt erworben, welches nach dem Stand der Technik gebaut wurde und
betriebssicher ist. Dennoch kann es zu Problemen oder Störungen kommen.
Deshalb möchten wir Ihnen hier beschreiben, wie Sie mögliche Störungen beheben können:
Beachten Sie unbedingt die Sicherheitshinweise!
Fehlfunktion: Mögliche Ursache:
kein Antrieb, keine Geschwindigkeitsanzeige Netzverbindung unterbrochen, Netzschalter nicht einge-
schaltet
kein Antrieb, Anzeige vorhanden Antriebsriemen überprüfen
zu tiefe bzw. zu hohe Tonwiedergabe Drehzahl falsch eingestellt
verzerrte Tonwiedergabe Auflagekraft falsch eingestellt
Verstärker/Mischpult ist übersteuert
am Verstärker/Mischpult wurde nicht der Phonoeingang
angeschlossen
Tonabnehmersystem defekt, bzw. verschlissen
Tonarm läßt sich nicht absenken Auflagekraft falsch eingestellt
Störgeräusche treten auf Schallplatte oder Tonabnehmernadel verschmutzt
Auflagekraft falsch eingestellt
Anschluß des Massekabels fehlerhaft
Page 8

26
Introduction
Cher client, nous vous remercions de l’achat de cette platine tourne-disque "spécial DJ Mc Crypt DJ2600B". En achetant cet appareil, vous avez fait l’acquisition d’un produit construit d’après les derniers progrès de la technique.
Ce produit est conforme aux exigences des directives européennes et nationales en vigueur. La conformité
a été contrôlée, les certificats de conformité ont été consignés auprès du fabricant.
Afin de maintenir l’appareil en bon état et d’en assurer une utilisation sans risques, l’utilisateur doit absolument tenir compte de et respecter ce mode d’emploi !
Pour toutes questions, adressez vous à notre service
conseil technique
France: Tél. 0 826 827 000 · Fax 0 826 826 002
e-mail: technique@conrad.fr
du lundi au vendredi de 9h00 à 19h00
samedi de 9h00 à 18h00
Suisse: Tél. 0848/80 12 88 · Fax 0848/80 12 89
e-mail: support@conrad.ch
du lundi au vendredi de 8h00 à 12h00, 13h00 à 17h00
Restrictions d’utilisation
Cette platine tourne-disque est prévue pour l’emploi en privé ou semi-professionnel. L’appareil permet la
reproduction de disques vinyles, que ce soit des albums standards ou des singles en 33 ou en 45 tours.
L’appareil est prévu pour être branché à un ampli audio ou à une console de mixage disposant des entrées
phono correspondantes.
La mise en place, le maniement, l’entretien et la maintenance ne doivent être exécutés que par des personnes qualifiées en conséquence.
L’appareil ne doit être utilisé qu’en intérieur, jamais en extérieur à l’air libre. Tout contact avec l’humidité,
par ex. dans une salle de bains, est absolument à éviter !
Toute utilisation autre que stipulée ci-dessus provoque l’endommagement de ce produit et peut en outre
avoir des dangers pour conséquence, risques de courts-circuits, d’incendie, d’électrocution, etc. Il n’est
permis ni de modifier le produit, ni de le transformer, ni d’en ouvrir le boîtier !
Il faut absolument tenir compte des avertissements concernant la sécurité !
15
Introduction
Dear Customer, thank you for purchasing the "DJ Record Player Mc Crypt DJ-2600B". With this device you
have bought a state of the art product.
This product meets the standards of the established European and national guidelines. CE-conformity has
been proven, the relevant documents are in the manufacturer's possession.
We kindly request the user to respect this operating manual to preserve this condition and to ensure safe
operation.
In case of questions, consult our technical information service
Germany: Tel. 0180/5 31 21 18 or 09604/40 88 46
Fax 09604/40 88 44
e-mail: tkb@conrad.de
Mon - Fri 8.00 to 18.00
Austria: Tel. 0 72 42/20 30 60 · Fax 0 72 42/20 30 66
e-mail: support@conrad.at
Mon - Thu 8.00 to 17.00
Fri. 8.00 to 14.00
Switzerland: Tel. 0848/80 12 88 · Fax 0848/80 12 89
e-mail: support@conrad.ch
Mon - Fri 8.00 to 12.00, 13.00 to 17.00
Prescribed Use
The range of application for the record player includes the use in home and semi-professional stereo equipment. The device is designed to play standard LPs and singles at 33 or 45 rpm. The device is designed for
the connection to an audio amplifier or a mixing desk with suitable phone input.
Set up, operation, maintenance and repairs may only be carried out by correspondingly trained personnel.
It is only allowed to be used in closed rooms and not outdoors. Contact with dampness e.g., bathroom or
similar, needs to be absolutely avoided.
Any use other than the one previously described can lead to damages on the product. Moreover, this
involves dangers, such as e.g., short-circuit, fire, electric shock, etc. No part of the product may be modified or rebuilt.
Always observe the safety instructions and technical data.
Page 9

24
Maintenance, Care & Disposal
Maintenance & Care
Check the technical safety of the device regularly e.g., for damages on the system unit’s cover, the mains
power cord, etc. If there is reason to believe that safe operation has become impossible put the [product]
out of operation and secure it against any unintended operation.
Safe operation must be presumed to be no longer possible, if
• the device exhibits visible damage
• the device does not operate any longer
• the device was stored under unfavourable conditions for a long period of time.
or
• the device was exposed to extraordinary stress caused by transport.
Before cleaning or servicing the device, please observe the following safety instructions:
Pull the mains plug from the socket.
Repairs/opening the device may only be carried out by qualified personnel who are familiar with the hazards involved and the relevant regulations.
The device is maintenance-free, never open it. On opening the device, your right to claim under guarantee
expires.
Clean the exterior of the system only with a soft, dry cloth or brush. Never use aggressive cleaning agents
or solvents since this might damage the system unit’s cover or impair operation. When cleaning make sure
not to accidentally re-adjust the settings for the stylus force and the antiskating function.
☞
During cleaning the stylus protection should always be in place, so that the pickup stylus does
not get damaged.
Disposal
When the device can no longer be used dispose of it in accordance with current legal regulations.
Troubleshooting
With this device you have bought a state of the art product which is safe to operate. However, problems or
disturbances can arise.
This why we would like to inform you can, how to avoid such occurrences:
Always observe the safety instructions.
Malfunction Possible Cause
No drive, no speed display System connection interrupted, mains switch not
switched on
No speed, no display Check drive belt
Too deep or too high sound reproduction Wrong speed setting
Interfering noises Wrong setting of stylus force
Amplifier or mixing desk is in overdrive
The phono input was not connected to the amplifier/mix-
ing desk
Phono system defect or worn out
Pick-up arm can not be lowered Wrong setting of stylus force
Interfering noises Record or stylus dirty
Wrong setting of stylus force
Connection of earth cable faulty
17
The device must not be exposed to extreme temperatures, high humidity or strong
mechanical use.
The product is designed to safety class II.
Only a current source of 230 V/50 Hz (10/16 A) can be used as a mains socket.
Never try to operate the device with a different voltage.
The unit is only authorized for the use in closed rooms.
Do not operate the device unattended.
Make sure that all electrical connections, connecting cables between the device and possible extension leads are as instructed and in accordance with the operating manual.
A faulty mains power cord may only be replaced by a specialist.
Electrical devices should be kept out of reach of children. Pay special attention when
children are around. Children might try to insert objects into the device. There is the risk
of a fatal electrical shock.
Do not place containers e.g., flower pots onto the device. Never pour fluids over the
device. Do not place small objects e.g., coins, paper clips, etc. onto the device, they
might fall inside the device. There is a high risk of a fire or a fatal electrical shock.
However, should fluids or an object get inside the device, switch the device off straight
away, pull the mains power line and contact a specialist.
Do not touch the mains plug when your hands are wet.
Do not pull out the plug by tugging the cord. Always pull the power cord off the mains
socket with the provided grip area on the plug.
Do not leave packing material unattended. Plastic foils or bags, polystyrene parts, etc. may become dangerous playing material for children.
When setting up the device, make sure not to crush the mains power cord or to damage it with sharp edges.
Always remove the mains plug from the socket outlet
- before cleaning the device
- during thunderstorms
- if you are not using the device for a prolonged period of time
To ensure safe operation of the device, the commissioning should be carried out by suitably qualified personnel.
Page 10
22
Setting the Antiskating
Set the antiskating controller so that the level complies with stylus force of
the respective cartridge system. For example, if the stylus force is 2 grams,
set the antiskating controller to 2.
The recommended setting for the enclosed system is level 3.
Tuning of Playing Speed
• Switch on the record player.
• Loosen the support clamp.
• Set the pick-up arm lift to position "AUF" (lift pick-up arm).
• Set the pitch sliding controller to middle position.
• Select speed "33".
• Press the START/PAUSE button to start the record player (turntable is turning).
• Move the pick-up arm towards the turntable but do not lower the pick-up arm.
• Note the dots on the edge of the turntable. With the help of the stroboscopic light, the speed setting can
be controlled.
• There are 4 rows of dots on the turntable edge. The row of dots needed to be observed depends on the set playing speed (33/45) and
the operating voltage frequency (50/60Hz). In Germany the decisive
operating voltage frequency is 50 Hz, in which case the two top rows
of dots need to be observed.
• With the speed controllers (14) the speed can be set correctly.
Controller lettered 33 = setting controller for speed 33 rpm.
Controller lettered 45 = setting controller for speed 45rpm.
• Setting process: when the row of dots is observed under the stroboscopic light and it seems like they are
turning towards the right or left, then the turntable speed is too slow or too high. Use a small screwdriver
and turn the speed controller (14) lettered "33" towards "+", or "-" until it seems that the row of dots stand
still.
• Now select playing speed "45" and also carry out the setting. But here the setting controller lettered "45"
needs to be set.
• Bring the pick-up arm to rest position again, lower it and secure it with the support clamp.
Getting Started
To ensure proper operation, please read this manual carefully and thoroughly with the
safety warnings.
• Recheck all connections and adjustments.
• Open the lid
• Put a record onto the turntable. If necessary put the single adapter (puck) on the turntable axis to play a
single.
• Set the pitch slide switch to middle position. In this position the controller easily clicks in.
• Switch on the power switch of the record player.
• Select the speed indicated on the record with the speed selection switch (33 or 45 rpm). The selected
speed is indicated by the LED.
• Switch on the mixing desk or the amplifier. Select the input to which the record player is connected.
• Activate the Start/Pause button or the connected Start/Stop remote control function (external button). The
turntable will turn.
• Loosen the support clamp on the pick-up arm.
• Set the pick-up arm lift to "AUF" position and swing the pick-up arm from the pick-up rest over the record.
• if the lighting conditions are bad, press the interlocking key for the stylus light, the stylus light comes out
and switches itself on automatically. To switch it off, simply push the stylus light back in with slight pressure.
• Line up the pick-up arm above the first record groove.
19
Lid
Put the two hinges onto the lid. Then put the hinges with the lid into the provided mount of the record player.
Counterbalance
Put the counterbalance onto the pick-up arm, up to just before the red marking line. The scale of the counterbalance will point towards the lock screw for
the cartridge system. Turn the counterbalance up to half of the length of the
red marking line on the pick-up arm. Instructions for the exact setting can be
found under "Setting of Counterbalance”.
Cartridge System
Before installing the cartridge system, ensure that the pick-up
arm is secured in the support clamp. Put the cartridge system
carefully onto the record player’s pick-up arm.
Fasten the cartridge system by turning the lock screw
anticlockwise.
Placement of Device
When selecting a set-up place, consider the room conditions e.g., the location of the next electrical outlet.
When choosing a location, make sure that the device is not exposed to direct sunlight, vibration, dust, hot and
cold temperatures or dampness. Furthermore, no powerful transformers or motors must be set up in the vicinity of the device. Keep a sufficient distance between the device and the speakers, to avoid acoustic feedback.
Only place the device onto a stable, horizontal surface. Failure to observe this note could
cause damage to the device or the record. Only operate the device correctly set up, otherwise it will not work properly.
In view of the variety of different varnishes and polishes on furniture, it is possible that
the feet of the device leave visible marks on the furniture due to a chemical reaction. This
is why the device should not be put on valuable furniture surfaces without suitable protection.
Do not drill or screw additional screws into the system-unit’s cover to fasten the device,
since this will damage the device.
Pick-up arm
Counterbalance
Page 11

6
Das Gerät darf keinen extremen Temperaturen, starken Vibrationen, hoher Feuchtigkeit
oder starken mechanischen Beanspruchungen ausgesetzt werden.
Das Gerät ist in Schutzklasse II aufgebaut.
Als Stromquelle darf nur eine 230 V/50 Hz (10/16 A) Netzsteckdose verwendet werden.
Versuchen Sie nie, das Gerät an einer anderen Spannung zu betreiben.
Das System ist nur für den Betrieb in geschlossenen Räumen zugelassen.
Betreiben Sie das Gerät nicht unbeaufsichtigt.
Versichern Sie sich, dass alle elektrischen Verbindungen, Verbindungsleitungen zwischen dem Gerät und evtl. Verlängerungsleitungen vorschriftsmäßig und in Übereinstimmung mit der Bedienungsanleitung sind.
Eine schadhafte Netzanschlußleitung darf nur vom Fachmann ersetzt werden.
Elektrische Geräte gehören nicht in Kinderhände. Lassen Sie in Anwesenheit von Kindern besondere Vorsicht walten. Kinder könnten versuchen Gegenstände ins Gerät zu
stecken. Es besteht die Gefahr eines lebensgefährlichen elektrischen Schlages.
Stellen Sie keine Behälter , z.B. Blumentöpfe, auf das Gerät. Gießen Sie nie Flüssigkeiten über dem Gerät aus. Legen Sie keine kleinen Gegenstände, z.B. Geldstücke, Büroklammern, etc. auf das Gerät, diese könnten in das Geräteinnere fallen. Es besteht höchste Gefahr eines Brandes oder lebensgefährlichen elektrischen Schlages. Sollte
dennoch Flüssigkeit oder ein Gegenstand ins Geräteinnere gelangt sein, schalten Sie
das Gerät sofort spannungsfrei ziehen Sie den Netzstecker und wenden Sie sich an eine
Fachkraft.
Die Netzleitung darf nie mit nassen Händen ein- oder ausgesteckt werden.
Ziehen Sie die Netzleitung nie an der Leitung aus der Steckdose, ziehen Sie diese immer
nur an den dafür vorgesehenen Griffflächen des Steckers aus der Netzsteckdose.
Lassen Sie das Verpackungsmaterial nicht achtlos liegen, Kunststofffolien bzw. –tüten, Styroporteile, etc.,
könnten für Kinder zu einem gefährlichen Spielzeug werden.
Beachten Sie beim Aufstellen des Gerätes, daß das Netzanschlusskabel nicht gequetscht oder durch
scharfe Kanten beschädigt wird.
Ziehen Sie immer den Netzstecker aus der Netzsteckdose
- bevor Sie das Gerät reinigen
- bei Gewitter
- wenn Sie das Gerät für längere Zeit nicht benutzen
Um den sicheren Betrieb des Gerätes zu gewährleisten, ist die Inbetriebnahme durch entsprechend qualifiziertes Personal durchzuführen.
35
Entretien, nettoyage & élimination des déchets
Entretien & nettoyage
Vérifiez régulièrement le bon état technique de l’appareil au point de vue sécurité, par ex. endommagement
du boîtier, du cordon d’alimentation, etc.
S’il est probable qu'une utilisation sans danger n'est plus possible, l'appareil doit être mis hors service et
protégé contre toute utilisation involontaire.
Une utilisation sans danger n'est plus possible si
• l'appareil présente des dommages visibles,
• l'appareil ne fonctionne plus
• après un long stockage dans des conditions défavorables ou
• après des conditions de transport défavorables.
Avant de nettoyer l’appareil ou d’effectuer un entretien, veuillez prendre les consignes de sécurité suivantes
en considération :
Débranchez l’appareil du secteur. Toute réparation/ouverture de l’appareil doivent impérativement être effectuées par un spécialiste connaissant les dangers liés à de tels travaux et les prescriptions correspondantes.
L’appareil ne nécessite pas d’entretien, il n’est donc jamais nécessaire de l’ouvrir. Ouvrir l’appareil a pour
conséquence l’annulation de la garantie.
Nettoyez l’extérieur du système avec un chiffon doux et sec ou un pinceau. N’utilisez en aucun cas un
détergent agressif ou une solution chimique, ils pourraient détériorer la surface du boîtier ou perturber le
bon fonctionnement. Faites bien attention lors du nettoyage de ne pas dérégler involontairement la force
d’appui du bras de lecture ni la fonction antipatinage.
☞
Protégez toujours la tête de lecture par son capuchon pour éviter un endommagement du saphir
lors du nettoyage.
Elimination des déchets
Jetez l’appareil devenu inutilisable suivant les lois en vigueur.
Guide de dépannage
Vous avez acquis ici un appareil fiable et sûr, construit d’après les derniers progrès de la technique.
D’éventuels problèmes ou anomalies pourraient cependant subvenir. C’est pourquoi nous décrivons cidessous comment parer vous-même à ces dérangements :
Prenez absolument compte des avertissements concernant la sécurité !
Défaut : Cause possible :
Pas d’entraînement du plateau, Connexion au secteur interrompue, interrupteur secteur
pas d’indication de la vitesse n’est pas allumé
Pas d’entraînement du plateau, Contrôler la courroie d’entraînement
pas d’indication de la vitesse
Reproduction des sons trop aigus ou trop bas Vitesse mal réglée
Reproduction des sons déformée Force d’appui mal réglée
Ampli/console de mixage surchargés
L’entrée phono de l’ampli/de la console de mixage n’est
pas connecté
Tête de lecture défectueuse ou usée
Le bras ne se laisse pas abaisser Force d’appui mal réglée
Page 12

8
Abdeckhaube
Stecken Sie die zwei Scharniere auf die Abdeckhaube. Stecken Sie anschließend die Scharniere mit der
Abdeckhaube in die vorgesehenen Halterungen des Plattenspielers.
Gegengewicht
Stecken Sie das Gegengewicht bis kurz vor der roten Markierungslinie auf
den Tonarm des Plattenspielers. Die Skala des Gegengewichts zeigt dabei in
Richtung Feststellschraube für das Tonabnehmersystem. Drehen Sie das
Gegengewicht bis zur halben Länge des roten Markierungsstrichs auf den
Tonarm. Die Beschreibung der exakten Einstellung erfolgt unter dem Punkt
"Einstellen des Gegengewichts".
Tonabnehmersystem
Achten Sie vor der Montage des Tonabnehmersystems darauf,
dass der Tonarm in der Stützenklemme gesichert ist. Stecken
Sie das Tonabnehmersystem vorsichtig auf den Plattenspielertonarm.
Befestigen Sie das Tonabnehmersystem durch Drehen der
Feststellschraube entgegen dem Uhrzeigersinn.
Aufstellen des Gerätes
Berücksichtigen Sie bei der Wahl des Aufstellortes die Raumgegebenheiten, wie z.B. die Lage der nächsten
Steckdose. Achten Sie bei der Auswahl des Aufstellortes auch darauf, dass das Gerät nicht direktem Sonnenlicht, Vibrationen, Staub, Hitze, Kälte oder Feuchtigkeit ausgesetzt wird. Es dürfen sich keine starken
Transformatoren oder Motoren in der Nähe des Gerätes befinden. Stellen Sie das Gerät in einem ausreichend großen Abstand zu den Lautsprechern auf, um akustische Rückkopplungen zu vermeiden.
Stellen Sie das Gerät nur auf einen stabilen, waagerechten Untergrund. Ein Nichtbeachten dieses Hinweises könnte eine Beschädigung des Gerätes oder der Schallplatte nach
sich ziehen. Betreiben Sie das Gerät nur korrekt aufgestellt, da ansonsten keine richtige
Funktion gegeben ist.
Angesichts der Vielfalt der verwendeten Lacke und Polituren bei Möbeln ist nicht auszuschließen, dass die Gerätefüße, hervorgerufen durch eine chemische Reaktion, sichtbare
33
Réglage de l’antipatinage
Ajustez le régleur antipatinage de manière à ce qu’il soit sur la valeur correspondant à la force d’appui de la tête de lecture utilisée. Si par exemple la force d’appui de la tête de lecture est de 2 grammes, mettez le régleur antipatinage sur 2. Le réglage conseillé pour la tête de lecture livrée est la valeur à
prendre.
Equilibrage de la vitesse de lecture
• Allumez la platine tourne-disque.
• Débloquez le crochet de fixation du bras. .
• Mettez le lève-bras sur la position "vers le haut" (levez le bras de lecture).
• Mettez le régleur coulissant Pitch sur le milieu.
• Sélectionnez la vitesse "33".
• Appuyez sur la touche START/PAUSE pour démarrer la platine (le plateau se met à tourner).
• Poussez le bras en direction du plateau mais sans l’abaisser.
• Observez les points sur le bord du plateau. Il est possible de vérifier la vitesse de rotation à l’aide de la
lampe stroboscope.
• 4 rangées de points se trouvent sur le bord du plateau. Pour savoir
de quelle rangée de points il faut tenir compte, il faut connaître la
vitesse de lecture (33/45) et la fréquence de la tension de service
(50/60Hz). En Allemagne par exemple, la tension de fréquence courante est de 50 Hz, dans ce cas, les deux rangées de points du haut
sont à observer.
• Il est alors possible de régler correctement la vitesse au moyen du régleur de vitesse (14).
Régleur avec indication 33 = réglage fin de la vitesse 33 tr/min
Régleur avec indication 45 = réglage fin de la vitesse 45 tr/min
• Réglage fin : Si les rangées de points paraissent tourner vers la droite ou la gauche sous la lampe stroboscope, c’est que la vitesse de rotation est trop rapide ou trop lente. Utilisez un petit tournevis pour tourner la vis de réglage (14) marquée "33" en direction du "+" ou du "-" jusqu’à ce que les rangées de point
paraissent rester immobiles.
• Sélectionnez maintenant la vitesse de lecture "45" et procédez ici aussi au réglage fin. Bien entendu c’est
ici la vis de réglage marquée "45" qu’il faudra alors tourner.
• Remettez le bras de lecture dans la position de repos, rabaissez-le et fixez-le à l’aide du crochet.
Mise en service
Afin de garantir une mise en service correcte, il faut absolument lire attentivement et
complètement ce mode d’emploi ainsi que les consignes de sécurité avant la mise en
service !
• Contrôlez encore une fois tous les réglages et ajustages.
• Ouvrez le couvercle.
• Posez un disque sur le plateau. Mettez (si nécessaire) l’adaptateur 45 tours (Puck) sur l’axe central du plateau pour jouer un petit 45 tours.
• Mettez le régleur Pitch sur la position du milieu. Le régleur s’y enclenche légèrement.
• Allumez l’interrupteur secteur de la platine.
• Sélectionnez la vitesse de lecture indiquée sur le disque (33 ou 45 tours) au moyen du commutateur de
vitesse. La vitesse sélectionnée est indiquée par un voyant (LED).
• Allumez la console de mixage ou l’ampli. Sélectionnez l’entrée connectée à la platine.
• Appuyez sur la touche Start/Pause ou sur la télécommande Start/Stop connectée (touche externe). Le
plateau tourne.
• Débloquez le crochet de fixation du bras.
• Mettez le levier du lèvre-bras sur la position "vers le haut" et pivotez le bras pour l’enlever de son support
et mettez-le au-dessus du disque.
• S’il fait trop sombre, vous pouvez appuyer sur la touche de déblocage de la lampe du saphir, la lampe
sort et s’allume automatiquement. Pour éteindre la lampe, la remettre en place en appuyant légèrement
dessus.
• Placez le bras de lecture à l’aplomb du premier sillon du disque.
Page 13

10
Steuereingänge
Das Gerät verfügt über zwei Steuereingänge (3,5mm Klinkenbuchsen). Über diese Eingänge können die
Funktionen Start/Stop und Laufrichtungsumschaltung (vorwärts / rückwärts) über externe Taster, wie sie
häufig in Mischpulten verwendet werden, ferngesteuert werden. Wenn Ihr Mischpult über entsprechende
Steuerausgänge verfügt, können die Steuerbuchsen des Plattenspielers angeschlossen werden. Voraussetzung hierfür ist eine passende Beschaltung des Mischpultausgangs:
Steuereingang Start/Stop (REMOTE START/STOP)
Über die 3,5mm-Klinkenbuchse kann der Plattenspieler gestartet, bzw. angehalten werden.
Verbinden Sie diesen Eingang ( falls gewünscht ) mit dem Start/Stop-Steuerausgang des Mischpultes, die
Funktion kann aber auch mit einem Fußschalter betätigt werden.
Der Start/Stop-Schalter ist bei Nutzung des Steuerausgangs außer Betrieb.
Steuereingang Laufrichtungsumschaltung (REMOTE FORW/BACKW)
Über die 3,5mm-Klinkenbuchse kann die Laufrichtung (vorwärts / rückwärts) des Plattenspielers umgeschaltet werden.
Verbinden Sie diesen Eingang ( falls gewünscht ) mit dem Laufrichtungsumschalter-Steuerausgang des
Mischpultes, die Funktion kann aber auch mit einem Fußschalter betätigt werden.
Netzleitung
Stecken Sie den Netzstecker des Netzkabels in eine 230V AC / 50 Hz
Haushalts-Netzsteckdose.
Einstellungen
Einstellen des Gegengewichts
☞
Vorsicht: Beschädigen Sie bei der folgenden Einstellung die Nadel des Tonabnehmers nicht.
• Drehen Sie den Antiskatingregler auf die Einstellung "0".
• Nehmen Sie den Nadelschutz vorsichtig vom Tonabnehmersystem indem Sie ihn nach unten abziehen.
• Öffnen Sie die Stützenklemme der Tonarmstütze und schwenken Sie den Tonarm in den Freiraum zwischen Tonarmstütze und Plattenteller.
• Senken Sie den Tonarmlift ab, indem Sie den Tonarmlifthebel nach vorn bewegen. Stützen Sie den Tonarm dabei vorsichtig mit einem Finger ab, damit er nicht unbeabsichtigt nach unten fällt.
• Verdrehen Sie das Tonarmgegengewicht, bis der Tonarm waagerecht in Höhe des Plattentellers schwebt.
Hierbei darf der Tonarm nirgends aufliegen oder anstoßen. Der Tonarm darf nicht Richtung Tonabnehmer
oder Gegengewicht kippen.
• Bringen Sie den Tonarm zurück auf die Tonarmstütze und rasten Sie die Stützenklemme ein.
• Drehen Sie nun die Einstellskala vor dem Tonarmgegengewicht auf Stellung "0", ohne dabei das Gegengewicht selbst zu verstellen (Gegengewicht festhalten / nur Skala drehen).
• Stellen Sie die Auflagekraft des Tonarms anhand der Skala auf den vom Tonabnehmerhersteller empfohlenen Wert für die Nadelauflagekraft ein. Drehen Sie hierzu das Gegengewicht mit der Einstellskala von
vorne gesehen entgegen dem Uhrzeigersinn, bis der benötigte Wert erreicht ist. Die rote Linie auf dem
Tonarm dient hierbei als Markierung. Die empfohlene Einstellung für das mitgelieferte System ist der
Wert 3 3g (2,5 ~ 3,5g).
31
Vu la diversité des laques et vernis utilisés pour entretenir les meubles, il n’est pas exclu
que les pieds de l’appareil, par une réaction chimique, laissent des traces visibles sur la
surface du meuble où il est posé. Placez quelque chose d’approprié sous les pieds pour
protéger vos meubles précieux.
Ne perforez pas le boîtier ni n’y vissez pas de vis supplémentaires pour fixer l’appareil,
vous pourriez endommager le boîtier.
Branchement
Vérifiez avant de connecter la platine tourne-disque à l’installation audio que le cordon d’alimentation en
courant n’est pas branché à la prise de courant. Eteignez tous les appareils qui doivent lui être branché et
enlevez toutes les fiches des prises de courant pour les mettre hors tension.
Prenez également en compte les prescriptions et les consignes de sécurité des fabricants des autres composants de l’installation audio lors du branchement et de la mise en service du tourne-disque.
Branchement à une console de mixage (exemple) :
Branchement Cinch et de la prise de masse
Cette platine tourne-disque peut être connectée à l’entrée phono soit d’un ampli soit d’une console de
mixage.
L’appareil auquel est connecté la platine doit disposer d’une entrée phono Cinch pour systèmes magnétiques (MM). Vérifiez dans la notice d’emploi correspondante où se trouve ce connecteur et s’il est approprié en ce qui concerne le câblage d’entrée. D’autres entrées comme par ex. l’entrée AUX ou la prise micro
ne sont pas appropriées à la connexion de la platine tourne-disque. La non-observation de cet avertissement peut avoir pour conséquence que la platine ou les appareils lui étant connectés soient endommagés.
☞
N’utilisez pour le raccordement que le câble Cinch joint ou d’autres du même type. En cas de doutes,
veuillez consulter un spécialiste.
Effectuez le raccordement entre les douilles Cinch de la platine (rouge = canal de droite / blanc = canal de
gauche) et les douilles Cinch d’entrée phono de votre ampli ou de votre console de mixage. Connectez la
borne de mise à la masse de la platine avec la borne de mise à la masse de votre ampli / console pour éviter les ronflements dérangeants.
Page 14

12
• Senken diesen mit dem Tonarmlift ab, indem sie den Betätigungshebel hierfür nach vorne schwenken.
Der Tonarm senkt sich ab und die Wiedergabe beginnt.
• Erhöhen Sie nun die Lautstärke am Verstärker auf ein für Sie angenehmes Maß.
• Mit dem Pitchregler kann die Abspielgeschwindigkeit zur Erzielung von Effekten, erhöht oder verringert
werden. In Mittenstellung rastet der Regler leicht ein und die Anzeigeleuchte neben dem Regler leuchtet.
Die Wiedergabe erfolgt wieder in der Originalgeschwindigkeit.
• Falls Sie die Wiedergabe unterbrechen wollen, ohne den Tonarm anzuheben, drücken Sie einfach auf die
Start/Pause-Taste.
• Zum Beenden der Wiedergabe bzw. am Ende der Schallplatte heben Sie den Tonarm von der Platte ab,
indem Sie den Tonarm mit dem Tonarmlift anheben (Auf-Position) und den Tonarm wieder auf der Tonarmstütze ablegen. Senken Sie den Tonarm ab, damit der Tonarm auf der Tonarmstütze seine Ruhelage
einnehmen kann.
• Betätigen Sie den Start/Stop-Schalter bzw. die Start/Stop-Fernbedienfunktion (externer Taster). Der Plattentellerantrieb schaltet ab.
• Schalten Sie nach Gebrauch zuerst den Verstärker und dann den Plattenspieler mit dem Netzschalter aus.
☞
Bei Nichtbenutzung sollte der Tonarm immer auf der Tonarmstütze mit der Stützenklemme verriegelt
werden, damit er nicht durch unbeabsichtigte Berührungen beschädigt werden kann. Beachten Sie,
dass vor Verriegelung des Tonarms der Tonarmlift abgesenkt werden muß.
Um das Gerät vor Staub zu schützen schließen Sie nach Gebrauch oder auch während der Wiedergabe vorsichtig und ohne Erschütterungen die Abdeckhaube.
Transport des Gerätes
• Stecken Sie das Netzkabel aus, das Cinchkabel ab und schrauben Sie das Massekabel ab.
• Sichern Sie den Tonarm mit der Stützenklemme
• Bringen Sie über der Systemnadel den Plastikschutz an
• Entfernen Sie das Tonabnehmersystem
• Entfernen Sie das Gegengewicht
• Nehmen Sie den Plattenteller ab
• Nehmen Sie die Abdeckhaube ab und entfernen Sie die Scharniere
• Verpacken Sie das Gerät wieder in der Originalverpackung
Handhabung
Nehmen Sie das Gerät niemals gleich dann in Betrieb, wenn es von einem kalten Raum in einen warmen
Raum gebracht wurde. Das dabei entstehende Kondenswasser kann unter Umständen das Gerät zerstören.
Lassen Sie das Gerät ausgeschaltet auf Zimmertemperatur kommen. Warten Sie bis, das Kondenswasser verdunstet ist.
Vermeiden Sie den Betrieb unter widrigen Umgebungsbedingungen. Widrige Umgebungsbedingungen sind:
• zu hohe Luftfeuchtigkeit (> 90 % rel. Luftfeuchtigkeit) Nässe, Staub und brennbare Gase, Dämpfe oder
Lösungsmittel
• zu hohe Umgebungstemperaturen (> +35 °C), zu niedrige Umgebungstemperaturen (< +5 °C)
Musik sollte nicht über einen längeren Zeitraum mit übermäßiger Lautstärke gehört wer-
den, da dadurch das Gehör geschädigt werden kann.
Einstellen des Überhangs
Der Überhang ist der Abstand zwischen der Nadel und dem
Plattentellerzentrierstift. Der Überhang ist werkseitig bereits
eingestellt. Sollte jedoch das Plattenspielersystem einmal getauscht werden, können Sie den Überhang wie folgt einstellen:
Der Überhang des Tonarms sollte für ein optimales Abspielen
auf 15mm eingestellt werden. Lösen Sie hierzu die beiden
Schrauben am Systemträger (Headshell) und schieben Sie das
Plattenspielersystem in die korrekte Position. Ziehen Sie die
beiden Schrauben wieder an.
29
Si vous n’êtes pas sûr de vous quant au branchement correct de l’appareil ou si
vous avez des questions auxquelles ce mode d’emploi n’a su répondre, veuillez s’il
vous plaît vous adresser à notre service technique ou toute autre personne qualifiée. Veuillez consulter un spécialiste si vous avez des doutes sur la manière dont
fonctionne le produit ou sur des questions de sécurité.
Eléments de branchement et de réglage
(voir rabat)
(1) Touche Start/Pause
(2) Lampe stroboscope pour le contrôle de la vitesse du plateau tourne-disque
(3) Tapis en caoutchouc
(4) Interrupteur secteur
(5) Support pour charnière du couvercle
(6) Axe de centrage du plateau tourne-disque
(7) Rangement pour une tête de lecture de rechange
(8) Contre-poids du bras de lecture
(9) Adaptateur pour disque 45 tours (Puck)
(10) Échelle de réglage de la force d’appui du bras de lecture
(11) Échelle de réglage de la compensation antipatinage
(12) Lève-bras
(13) Support de bras avec crochet de blocage du bras
(14) Réglage fin des vitesse 33 ou 45 tours
(15) Bras de lecture
(16) Régleur Pitch
(17) Vis de fixation du saphir
(18) Tête du bras de lecture (comprenant le saphir et son système de support (Headshell))
(19) Touche de déblocage de la lampe du saphir
(20) Lampe d’éclairage du saphir
(21) Commutateur 33 ou 45 tours
(22) Plateau tourne-disque avec points stroboscopiques
(23) Charnières
(24) Sortie Cinch (gauche / droite)
(25) Borne de mise à la masse
(26) Entrée de commande commutation marche avant/marche arrière (REMOTE Forw/Backw)
(27) Entrée de commande marche/arrêt (REMOTE Start/Stop)
(28) Cordon d’alimentation en courant
(29) Couvercle
Montage
Plateau tourne-disque & courroie
Retirez la platine tourne-disque et ses accessoires ainsi que les éléments de
montage de l’emballage, certaines pièces se trouvent sur le côté dans les
coins de protection en polystyrène expansé. Placez la platine sur une surface plane et stable. Mettez le plateau tourne-disque en place sur l’axe de
centrage. Faites tourner le plateau jusqu’à ce que vous puissiez voir l’axe
d’entraînement du moteur par un des deux trous extérieurs du plateau.
Faites passer la courroie qui se trouve sur la face inférieure du plateau autour
de l’axe d’entraînement du moteur.
☞
Prenez soin à ce que la courroie ne soit pas entortillée sur elle-même.
Posez le tapis en caoutchouc sur le plateau.
Page 15

14
Fehlfunktion: Mögliche Ursache:
keine Wiedergabe auf beiden Kanälen Lautstärke am Verstärker/Mischpult auf Minimum einge-
stellt
Anschluß der Cinchleitungen fehlerhaft
Wiedergabe nur über einen Kanal Balanceregler am Verstärker/Mischpult falsch eingestellt
Anschluss einer Cinchleitung fehlerhaft
Start/Pause Taste ohne Funktion Steuerausgang für Start/Stop (27) wurde betätigt.
Plattenteller dreht sich in die falsche Richtung Steuerausgang für die Vorwärts/Rückwärtsumschaltung
(26) wurde betätigt.
Technische Daten und Merkmale
Umgebungsbedingungen
Arbeitstemperaturbereich: +5 bis +35 °C
Relative Luftfeuchtigkeit: < 90 % (nicht kondensierend)
Technische Daten
Motor: DC EG Motor
Betriebsspannung: 230 VAC / 50 Hz
Leistungsaufnahme: 15 W
Plattentellerdrehzahl: 33 1/3 und 45 U/min
Gleichlaufschwankungen: < 0,15 %
Pitch: +/-10%
Abmessungen (BxHxT): 450 mm x 152 mm x
352 mm
Masse: 7,7kg
Tonabnehmersystem: Auflagekraft 3 g
weißes Kabel = links +
blaues Kabel = links –
grünes Kabel = rechts +
rotes Kabel = rechts –
Steuereingänge: Steuerung über exter-
ne, potentialfreie
Tasterfunktion
Merkmale
•Riemengetriebener manueller DJ-Plattenspieler
•3,5mm-Klinkenbuchsen zur Steuerung der Funktionen Laufrichtung & Start/Stop
•+/- 10% regelbare Geschwindigkeit (Pitch)
•Große Start/Pause-Taste
•Schnelle Hochlauf- und Bremszeit des Plattentelllers
•Versenkbare Nadelbeleuchtung
•Strobe-Beleuchtung zur exakten Geschwindigkeitseinstellung
•Antiskating
•Tonabnehmersystem "für Rückwärtslauf des
Plattentellers" geeignet
27
Index
Introduction . . . . . . . . . . . . . . . . . . . . . . . . . . . . . . . . . . . . . . . . . . . . . . . . . . . . . . . . . . . . . . . . . . . . . . . . . 26
Restrictions d’utilisation . . . . . . . . . . . . . . . . . . . . . . . . . . . . . . . . . . . . . . . . . . . . . . . . . . . . . . . . . . . . . . . . 26
Index. . . . . . . . . . . . . . . . . . . . . . . . . . . . . . . . . . . . . . . . . . . . . . . . . . . . . . . . . . . . . . . . . . . . . . . . . . . . . . . 27
Consignes de sécurité . . . . . . . . . . . . . . . . . . . . . . . . . . . . . . . . . . . . . . . . . . . . . . . . . . . . . . . . . . . . . . . . . 27
Eléments de branchement et de réglage . . . . . . . . . . . . . . . . . . . . . . . . . . . . . . . . . . . . . . . . . . . . . . . . . . . 29
Branchement et montage. . . . . . . . . . . . . . . . . . . . . . . . . . . . . . . . . . . . . . . . . . . . . . . . . . . . . . . . . . . . . . . 29
Plateau tourne-disque & courroie . . . . . . . . . . . . . . . . . . . . . . . . . . . . . . . . . . . . . . . . . . . . . . . . . . . . . . . 29
Couvercle . . . . . . . . . . . . . . . . . . . . . . . . . . . . . . . . . . . . . . . . . . . . . . . . . . . . . . . . . . . . . . . . . . . . . . . . . 30
Contre-poids . . . . . . . . . . . . . . . . . . . . . . . . . . . . . . . . . . . . . . . . . . . . . . . . . . . . . . . . . . . . . . . . . . . . . . . 30
Tête de lecture. . . . . . . . . . . . . . . . . . . . . . . . . . . . . . . . . . . . . . . . . . . . . . . . . . . . . . . . . . . . . . . . . . . . . . 30
Mise en place de l’appareil. . . . . . . . . . . . . . . . . . . . . . . . . . . . . . . . . . . . . . . . . . . . . . . . . . . . . . . . . . . . . . 30
Branchement . . . . . . . . . . . . . . . . . . . . . . . . . . . . . . . . . . . . . . . . . . . . . . . . . . . . . . . . . . . . . . . . . . . . . . . . 31
Connecteurs Cinch et de mise à la masse . . . . . . . . . . . . . . . . . . . . . . . . . . . . . . . . . . . . . . . . . . . . . . . . 31
Entrées de commande . . . . . . . . . . . . . . . . . . . . . . . . . . . . . . . . . . . . . . . . . . . . . . . . . . . . . . . . . . . . . . . 32
Cordon d’alimentation courant . . . . . . . . . . . . . . . . . . . . . . . . . . . . . . . . . . . . . . . . . . . . . . . . . . . . . . . . . 32
Réglages. . . . . . . . . . . . . . . . . . . . . . . . . . . . . . . . . . . . . . . . . . . . . . . . . . . . . . . . . . . . . . . . . . . . . . . . . . . . 32
Réglage du contre-poids. . . . . . . . . . . . . . . . . . . . . . . . . . . . . . . . . . . . . . . . . . . . . . . . . . . . . . . . . . . . . . 32
Réglage de l’antipatinage . . . . . . . . . . . . . . . . . . . . . . . . . . . . . . . . . . . . . . . . . . . . . . . . . . . . . . . . . . . . . 33
Equilibrage de la vitesse de lecture. . . . . . . . . . . . . . . . . . . . . . . . . . . . . . . . . . . . . . . . . . . . . . . . . . . . . . 33
Mise en service. . . . . . . . . . . . . . . . . . . . . . . . . . . . . . . . . . . . . . . . . . . . . . . . . . . . . . . . . . . . . . . . . . . . . . . 33
Transport de l’appareil . . . . . . . . . . . . . . . . . . . . . . . . . . . . . . . . . . . . . . . . . . . . . . . . . . . . . . . . . . . . . . . . . 34
Maniement . . . . . . . . . . . . . . . . . . . . . . . . . . . . . . . . . . . . . . . . . . . . . . . . . . . . . . . . . . . . . . . . . . . . . . . . . . 34
Réglage du porte à faux . . . . . . . . . . . . . . . . . . . . . . . . . . . . . . . . . . . . . . . . . . . . . . . . . . . . . . . . . . . . . . . . 34
Entretien, nettoyage & élimination des déchets . . . . . . . . . . . . . . . . . . . . . . . . . . . . . . . . . . . . . . . . . . . . . . 35
Entretien & nettoyage . . . . . . . . . . . . . . . . . . . . . . . . . . . . . . . . . . . . . . . . . . . . . . . . . . . . . . . . . . . . . . . . 35
Elimination des déchets . . . . . . . . . . . . . . . . . . . . . . . . . . . . . . . . . . . . . . . . . . . . . . . . . . . . . . . . . . . . . . 35
Guide de dépannage . . . . . . . . . . . . . . . . . . . . . . . . . . . . . . . . . . . . . . . . . . . . . . . . . . . . . . . . . . . . . . . . . . 35
Données techniques et caractéristiques . . . . . . . . . . . . . . . . . . . . . . . . . . . . . . . . . . . . . . . . . . . . . . . . . . . 36
Données techniques . . . . . . . . . . . . . . . . . . . . . . . . . . . . . . . . . . . . . . . . . . . . . . . . . . . . . . . . . . . . . . . . . 36
Caractéristiques . . . . . . . . . . . . . . . . . . . . . . . . . . . . . . . . . . . . . . . . . . . . . . . . . . . . . . . . . . . . . . . . . . . . 36
Conditions environnementales . . . . . . . . . . . . . . . . . . . . . . . . . . . . . . . . . . . . . . . . . . . . . . . . . . . . . . . . . . . 36
Consignes de sécurité
Un point d’exclamation dans un triangle signale les avertissements importants de
cette notice d’emploi. Lisez complètement le mode d’emploi avant la mise en service, il contient des indications importantes pour le fonctionnement correct de
l’appareil.
En cas de dommages dus à la non observation de ce mode d’emploi, la validité de
la garantie est annulée !
Nous déclinons toute responsabilité pour d’éventuels dommages consécutifs!
Nous déclinons toute responsabilité pour d’éventuels dommages matériels ou corporels dus à un maniement incorrect ou à la non observation des précautions
d’emploi ! De tels cas entraînent l’annulation de toute garantie !
°
Pour des raisons de sécurité et d’homologation (CE), il est interdit de modifier la construction ou de transformer l’appareil soi-même !
Prenez soin à ce que l’appareil soit correctement mis en service. Prenez compte à cet
effet du présent mode d’emploi.
Bedienungsanleitung
Page 16

16
Table of Contents
Introduction . . . . . . . . . . . . . . . . . . . . . . . . . . . . . . . . . . . . . . . . . . . . . . . . . . . . . . . . . . . . . . . . . . . . . . . . . 15
Prescribed Use . . . . . . . . . . . . . . . . . . . . . . . . . . . . . . . . . . . . . . . . . . . . . . . . . . . . . . . . . . . . . . . . . . . . . . . 15
Table of Contents . . . . . . . . . . . . . . . . . . . . . . . . . . . . . . . . . . . . . . . . . . . . . . . . . . . . . . . . . . . . . . . . . . . . . 16
Safety Instructions and Caution . . . . . . . . . . . . . . . . . . . . . . . . . . . . . . . . . . . . . . . . . . . . . . . . . . . . . . . . . . 17
Connection Elements and Controls . . . . . . . . . . . . . . . . . . . . . . . . . . . . . . . . . . . . . . . . . . . . . . . . . . . . . . . 18
Set up . . . . . . . . . . . . . . . . . . . . . . . . . . . . . . . . . . . . . . . . . . . . . . . . . . . . . . . . . . . . . . . . . . . . . . . . . . . . . . 18
Turntable & Belt. . . . . . . . . . . . . . . . . . . . . . . . . . . . . . . . . . . . . . . . . . . . . . . . . . . . . . . . . . . . . . . . . . . . . 18
Lid . . . . . . . . . . . . . . . . . . . . . . . . . . . . . . . . . . . . . . . . . . . . . . . . . . . . . . . . . . . . . . . . . . . . . . . . . . . . . . . 19
Counterbalance . . . . . . . . . . . . . . . . . . . . . . . . . . . . . . . . . . . . . . . . . . . . . . . . . . . . . . . . . . . . . . . . . . . . . 19
Cartridge System. . . . . . . . . . . . . . . . . . . . . . . . . . . . . . . . . . . . . . . . . . . . . . . . . . . . . . . . . . . . . . . . . . . . 19
Setting up the Device . . . . . . . . . . . . . . . . . . . . . . . . . . . . . . . . . . . . . . . . . . . . . . . . . . . . . . . . . . . . . . . . . . 19
Connection . . . . . . . . . . . . . . . . . . . . . . . . . . . . . . . . . . . . . . . . . . . . . . . . . . . . . . . . . . . . . . . . . . . . . . . . . . 20
Cinch- and Earth Connection . . . . . . . . . . . . . . . . . . . . . . . . . . . . . . . . . . . . . . . . . . . . . . . . . . . . . . . . . . 20
Control Inputs . . . . . . . . . . . . . . . . . . . . . . . . . . . . . . . . . . . . . . . . . . . . . . . . . . . . . . . . . . . . . . . . . . . . . . 20
Mains Power Line . . . . . . . . . . . . . . . . . . . . . . . . . . . . . . . . . . . . . . . . . . . . . . . . . . . . . . . . . . . . . . . . . . . 21
Setting . . . . . . . . . . . . . . . . . . . . . . . . . . . . . . . . . . . . . . . . . . . . . . . . . . . . . . . . . . . . . . . . . . . . . . . . . . . . . 21
Setting of Counterbalance. . . . . . . . . . . . . . . . . . . . . . . . . . . . . . . . . . . . . . . . . . . . . . . . . . . . . . . . . . . . . 21
Setting of Antiskating . . . . . . . . . . . . . . . . . . . . . . . . . . . . . . . . . . . . . . . . . . . . . . . . . . . . . . . . . . . . . . . . 22
Tuning of Playing Speed . . . . . . . . . . . . . . . . . . . . . . . . . . . . . . . . . . . . . . . . . . . . . . . . . . . . . . . . . . . . . . 22
Getting Started . . . . . . . . . . . . . . . . . . . . . . . . . . . . . . . . . . . . . . . . . . . . . . . . . . . . . . . . . . . . . . . . . . . . . . . 22
Transporting the Device . . . . . . . . . . . . . . . . . . . . . . . . . . . . . . . . . . . . . . . . . . . . . . . . . . . . . . . . . . . . . . . . 23
Handling . . . . . . . . . . . . . . . . . . . . . . . . . . . . . . . . . . . . . . . . . . . . . . . . . . . . . . . . . . . . . . . . . . . . . . . . . . . . 23
Setting of Overhang . . . . . . . . . . . . . . . . . . . . . . . . . . . . . . . . . . . . . . . . . . . . . . . . . . . . . . . . . . . . . . . . . . . 23
Maintenance, Care & Disposal . . . . . . . . . . . . . . . . . . . . . . . . . . . . . . . . . . . . . . . . . . . . . . . . . . . . . . . . . . . 24
Maintenance & Care . . . . . . . . . . . . . . . . . . . . . . . . . . . . . . . . . . . . . . . . . . . . . . . . . . . . . . . . . . . . . . . . . 24
Disposal. . . . . . . . . . . . . . . . . . . . . . . . . . . . . . . . . . . . . . . . . . . . . . . . . . . . . . . . . . . . . . . . . . . . . . . . . . . 24
Troubleshooting . . . . . . . . . . . . . . . . . . . . . . . . . . . . . . . . . . . . . . . . . . . . . . . . . . . . . . . . . . . . . . . . . . . . . . 24
Technical Specifications and Characteristics. . . . . . . . . . . . . . . . . . . . . . . . . . . . . . . . . . . . . . . . . . . . . . . . 25
Technical Specifications . . . . . . . . . . . . . . . . . . . . . . . . . . . . . . . . . . . . . . . . . . . . . . . . . . . . . . . . . . . . . . 25
Characteristics. . . . . . . . . . . . . . . . . . . . . . . . . . . . . . . . . . . . . . . . . . . . . . . . . . . . . . . . . . . . . . . . . . . . . . 25
Surrounding Conditions . . . . . . . . . . . . . . . . . . . . . . . . . . . . . . . . . . . . . . . . . . . . . . . . . . . . . . . . . . . . . . . . 25
Safety Instructions and Cautions
An exclamation mark inside a triangle points to important notes in the operating
manual. Please read through the entire manual before getting started, it contains
important notes on the correct operation.
Any claims for guarantee will become invalid in the event of damage that results
from the non-observance of the operating manual. We do not accept responsibility
for such damage.
Nor do we accept responsibility for damage to property or for personal injuries
caused by improper use or non-observance of safety instructions. Guarantees will
not be accepted in any such case.
°
The unauthorised conversion and/or modification of the product is inadmissible because
of safety and approval reasons (CE).
Make sure you put the device correctly into operation. To do this, note the operating
manual.
Bedienungsanleitung
25
Malfunction Possible Cause
No playback on both channels Volume on amplifier/mixing desk set to minimum
Connection of cinch line faulty
Playback only through one channel Wrong setting of balance control on amplifier/mixing desk
Connection of a cinch line faulty
Start/Pause button without function Control output for Start/Stop (27) was actuated
Turntable turns in the wrong direction Control output for forward/backward selector (26) was
activated
Technical Specifications and Characteristics
Surrounding Conditions
Range of operating temperature: +5 to +35 °C
Relative air humidity: < 90 % (not condensing)
Technical Specifications
Motor: DC EG Motor
Operating voltage: 230 VAC / 50 Hz
Power consumption: 15 W
Turntable’s revolutions: 33 1/3 and 45 rpm
Flutter < 0,15 %
Pitch: +/-10%
Dimensions (WxHxD): 450 mm x 152 mm x
352 mm
Weight: 7.7kg
Cartridge system: stylus force 3 g
white cable = left +
blue cable = left –
green cable = right +
red cable = right –
Control inputs: control via external
potential-free key func-
tion
Characteristics
•Belt driven manual DJ record player
•3.5mm jack connectors to control direction of
rotation & Start/Stop functions
•+/- 10% adjustable speed (pitch
•Large Start/Pause button
•Fast run-up and stopping time of turntable
•Fold-away stylus illumination
•Strobe illumination for exact speed setting
•Antiskating
•Phono system suitable "for backward operation
of turntable "
Page 17

18
When in doubt about how to connect it correctly or should there be questions that
are not replied to in these operating instructions contact our Technical Advisory
Service or another expert. Consult an expert when in doubt about the way of operation or the safety of the product.
Connection Elements and Controls
see fold-out page
(1) Start/Pause button
(2) Stroboscopic light for controlling turntable speed
(3) Slip mat
(4) Power switch
(5) Hinge mount for lid
(6) Turntable centring pin
(7) Storage possibility for a further cartridge system
(8) Pick-up arm counterbalance
(9) Single adapter (Puck)
(10) Setting scale for stylus force of pick-up arm
(11) Adjusting wheel for antiskating compensation
(12) Pick-up arm lift
(13) Pick-up arm rest with support clamp
(14) Speed controller for 33 or 45 rpm
(15) Pick-up arm
(16) Pitch slide controller
(17) Lock screw for cartridge system
(18) Cartridge system (consisting of stylus, system, system carrier (Headshell))
(19) Interlocking key for stylus light
(20) Stylus light
(21) Speed selector 33 or 45 rpm
(22) Turntable with stroboscopic dots
(23) Hinges
(24) Cinch output (left/right)
(25) Earth clamp
(26) Control input forward /backward switchover (REMOTE Forw/Backw)
(27) Control input Start/Stop (REMOTE Start/Stop)
(28) Power cord
(29) Lid
Installation
Turntable & Belt
Take out the record player with its accessories and installation parts, they
are partly located in the side of the Styrofoam protection corners of the
packaging.
Place the record player onto a stable and horizontal surface. Insert the
turntable into the turntable centring pin. Turn the turntable until the motor
drive axis can be seen underneath one of two outer holes of the turntable.
Place the driving belt, which is located at the bottom of the turntable over the
motor drive axis.
☞
Make sure not to twist the belt.
Put the enclosed slip mat onto the turntable.
23
• Lower it with the pick-up lift by swinging the control lever forward. The pick-up arm lowers and playback
starts.
• Now increase the volume on the amplifier to suit your taste.
• To achieve effects, the playing speed can be increased or lower with the pitch controller. In middle position the controller clicks in easily and the display light next to the controller lights up. Playback is back to
original speed.
• When you want to interrupt playback without lifting the pick-up arm, just press the Start/Pause button.
• To end playback or when the record ends, lift the pick-up arm from the record by lifting the pick-up arm
with the pick-up arm lift (Auf position) and replacing the pick-up arm onto the pick-up arm rest. Lower the
pick-up arm so that the pick-up arm can take its resting position again.
• Activate the Start/Stop button or the Start/Stop remote control function (external key). The turntable drive
will switch off.
• After use, first switch off the amplifier and then the record player with the power switch.
☞
When not in use the pick-up arm should always be locked with the support clamp on the pick-up rest,
so that it does not get damaged by accidental contact. Note that before locking the pick-up arm, the
pick-up lift needs to be lowered.
To protect the device from dust, carefully close the lid avoiding excessive jolting after use or also during
playback.
Transport of Device
• Unplug the mains cord, the cinch cable and unscrew the earth cable.
• Secure the pick-up arm with the support clamp.
• Cover the system’s stylus with the plastic protection
• Remove the cartridge system.
• Remove the counterbalance
• Remove the turntable
• Take off the lid and remove the hinges
• Repack the device in its original packaging
Handling
Never turn on the device immediately after it has been brought from a cold into a warm room. Condensation
water that forms might destroy your device.
Leave the device switched off and wait until it has reached room temperature. Wait till the condensation water has evaporated.
Avoid operation under adverse surrounding conditions. Adverse surrounding conditions are:
• too high humidity (> 90 % relative air humidity) dampness, dust and flammable gases, vapours or solvents
• too high surrounding temperatures (> +35 °C), too low surrounding temperatures (< +5 °C)
Music should not be listened to at excessive volume over a longer period of time, since
this can damage the device.
Setting the Overhang
The overhang is the distance between the stylus and the turntable centring pin. The overhang has been already been set by
the factory. If the record player system is to be changed at
some point, the overhang can be set as follows: For optimal
playback the overhang of the pick-up arm should be set to
15mm. For this loosen the two headshells on the system carrier and slide the record player system into the correct position.
Screw back the two screws.
stylus
line
system carrier
Page 18

20
Connection
Before connecting the record player to the audio system, make sure that the power cord is not plugged in.
Switch off all devices to be connected and disconnect them from the power supply system by pulling out
the power cords.
Please also note the instructions and safety regulations of the manufacture’s of other stereo components
when connecting and commissioning the audio system.
Connecting to a mixing desk (Example):
Cinch and Earth Connection
Alternatively, the record player can be connected to the phono input of an amplifier or also to that of a mixing desk.
The device to which the record player is connected, has to have a cinch phono input for magnetic systems
(MM). Look in the operating manual in question where this connection is located and whether it is suitable
for input circuit. Other inputs e.g., AUX or the microphone input are not suitable for connecting the record
player. Failure to observe these notes can lead to damage on the record player or the connected devices.
☞
Only use the enclosed or other suitable cinch cables for wiring. When in doubt consult an expert.
Connect the record player’s cinch jacks (red = right channel / white = left channel) with the phono cinch
input jacks of your amplifier or mixing desk. Connect the earth clamp of the record player with the earth
clamp of your amplifier or mixing desk to avoid hum disturbances.
Control Inputs
The device has two control inputs (3.5mm jack sockets). Via these inputs the functions Start/Stop and the
rotating direction change-over (forward / backward ) can be remote controlled through an external pushbutton, as they are often used in mixing desks. If your mixing desk has the corresponding control outputs,
the control jacks of the record player can be connected. A prerequisite is a suitable circuit of the mixing
desk output.
21
Control Input Start/Stop (REMOTE START/STOP)
Via the 3.5mm jack socket the record player can be started or stopped. Connect this input (if so desired)
with the Start/Stop control output of the mixing desk, but the function can also be activated with the foot
switch.
The Start/Stop button is disabled when using the control output.
Control Input Rotating Direction Selector (REMOTE FORW/BACKW)
Via the 3.5mm jack socket the rotating direction (forward/backward) of the record player can be selected.
Connect this input (if so desired) with the input of the rotating direction selector of the mixing desk, howev-
er, this function can also be activated with the foot switch.
Mains Power Line
Insert the mains plug of the power cord to a 230V AC / 50 Hz household
mains socket.
Settings
Setting of Counterbalance
☞
Caution: do not damage the stylus of the pick-up arm during the following setting.
• Turn the antiskating controller to setting "0".
• Carefully take the stylus protection from the cartridge system by pulling it downward.
• Open the support clamp of the pick-up arm rest and swing the pick-up arm to the free space between
pick-up arm rest and turntable.
• Lower the pick-up arm lift by moving the pick-up arm lever forward. Carefully support the pick-up arm
with a finger, to prevent it accidentally falling.
• Turn the pick-up arm counterbalance until the pick-up arm is suspended horizontally at the height of the
turntable. Doing this, the pick-up arm must not be put down or get pushed against anything. The pick-up
arm must not tilt towards cartridge or counterbalance.
• Put the pick-up arm back to the pick-up arm rest and click in the support clamp.
• Now turn the setting scale in front of the pick-up arm counterbalance to setting "0", without actually
changing the counterbalance itself (hold the counterbalance – only turn the scale).
• Set the stylus force of the pick-up arm with scale on the recommended level by the cartridge manufacturer for the stylus force. For this, turn the counterbalance with the setting scale (if looking at it from the
front) anticlockwise, until the necessary level has been reached. The red marking line on the pick-up arm
serves as marking. The recommended setting for the enclosed system is level 3 3g (2,5 ~ 3,5g).
 Loading...