

Page 1
Impressum
Diese Bedienungsanleitung ist eine Publikation der Conrad Electronic GmbH, Klaus-ConradStraße 1, D-92240 Hirschau.
Alle Rechte einschließlich Übersetzung vorbehalten. Reproduktionen jeder Art, z. B. Fotokopie,
Mikroverfilmung, oder die Erfassung in EDV-Anlagen, bedürfen der schriftlichen Genehmigung
des Herausgebers.
Nachdruck, auch auszugsweise, verboten.
Diese Bedienungsanleitung entspricht dem technischen Stand bei Drucklegung. Änderung in
Technik und Ausstattung vorbehalten.
© Copyright 2002 by Conrad Electronic GmbH. Printed in Germany.
Imprint
These operating instructions are published by Conrad Electronic GmbH, Klaus-Conrad-Str. 1,
92240 Hirschau/Germany
No reproduction (including translation) is permitted in whole or part e.g. photocopy, microfilming or storage in electronic data processing equipment, without the express written consent of
the publisher.
The operating instructions reflect the current technical specifications at time of print. We reserve the right to change the technical or physical specifications.
© Copyright 2002 by Conrad Electronic GmbH. Printed in Germany.
Note de l´éditeur
Cette notice est une publication de la société Conrad Electronic GmbH, Klaus-Conrad-Str. 1,
92240 Hirschau/Allemagne.
Tous droits réservés, y compris traduction. Toute reproduction, quel que soit le type, par exemple photocopies, microfilms ou saisie dans des traitements de texte electronique est soumise à
une autorisation préalable écrite de l`éditeur.
Impression, même partielle, interdite.
Cette notice est conforme à la règlementation en vigueur lors de l´impression. Données techni-
ques et conditionnement soumis à modifications sans aucun préalable.
© Copyright 2002 par Conrad Electronic GmbH. Imprimé en Allemagne.
*878-08-02/36-MG
100% Recyclingpapier.
Chlorfrei
gebleicht.
CONRAD IM INTERNET http://www.conrad.de
100%
recycling
paper.
Bleached
without
chlorine.
100%
papier
recyclé.
Blanchi
sans
chlore.
Version 08/02
Electronic Keyboard
„MC-110“
Seite 4 - 26
Electronic Keyboard
„MC-110“
Page 27 - 50
Clavier multimédia
"MC-110"
Page 51 - 74
Best.-Nr. / Item-No. / Node commande:
30 05 76
BEDIENUNGSANLEITUNG
OPERATING INSTRUCTIONS
MODE D’EMPLOI
Page 2

2
Diese Bedienungsanleitung gehört zu diesem Produkt. Sie enthält wichtige Hinweise zur Inbetriebnahme und Handhabung. Achten Sie hierauf, auch wenn Sie dieses Produkt an Dritte weitergeben.
Heben Sie deshalb diese Bedienungsanleitung zum Nachlesen auf!
Eine Auflistung der Inhalte finden Sie in dem Inhaltsverzeichnis mit Angabe der entsprechenden Seitenzahlen auf Seite 4.
The present operating manual forms part of this product. It contains important information on
how to put the product into operation and assemble it. Please note it duly even if you pass it on to
third parties.
Keep this operating manual for your future reference!
You will find a table of contents on page 28.
Le mode d'emploi suivant correspond au produit mentionné ci-dessus. Il comporte des instructions importantes relatives à sa mise en service et à son maniement. Il faut respecter ces instructions, même si ce produit est transmis à une tierce personne.
Gardez donc ce mode d'emploi pour toute consultation ultérieure!
Vous trouverez une liste du contenu avec le numéro de la page correspondante dans l'index à la page 52.
75
Page 3
74
23. Annexe "C", Liste des chansons de démons-
tration
3
Einführung
Sehr geehrter Kunde,
wir bedanken uns für den Kauf dieses Produkts.
Das Produkt ist EMV-geprüft und erfüllt die Anforderungen der geltenden europäischen und nationalen Richtlinien. Die CE-Konformität wurde nachgewiesen, die entsprechenden Erklärungen sind beim
Hersteller hinterlegt.
Um diesen Zustand zu erhalten und einen gefahrlosen Betrieb sicherzustellen, müssen Sie als Anwender
diese Bedienungsanleitung beachten!
Alle enthaltenen Firmennamen und Produktbezeichnungen sind Warenzeichen der jeweiligen Inhaber. Alle Rechte vorbehalten.
Bei Fragen wenden Sie sich an unsere Technische Beratung
Deutschland: Tel. 0180/5 31 21 18 oder 09604/40 88 46
Fax 09604/40 88 44
e-mail: tkb@conrad.de
Mo. - Fr. 8.00 bis 18.00 Uhr
Österreich: Tel. 0 72 42/20 30 60 · Fax 0 72 42/20 30 66
e-mail: support@conrad.at
Mo. - Do. 8.00 bis 17.00 Uhr
Fr. 8.00 bis 14.00 Uhr
Schweiz: Tel. 0848/80 12 88 · Fax 0848/80 12 89
e-mail: support@conrad.ch
Mo. - Fr. 8.00 bis 12.00 Uhr, 13.00 bis 17.00 Uhr
Bestimmungsgemäße Verwendung
Das Produkt dient zur Erzeugung von Tönen, die Sie über die Tasten spielen können. Diese werden über die
eingebauten Lautsprecher wiedergegeben. Der Anschluss eines Kopfhörers oder eines externen Verstärkers ist möglich. Für externe Midi-Geräte stehen drei Buchsen (Midi-In, Midi-Out, Midi-Thru) zur Verfügung.
Eine andere Verwendung als zuvor beschrieben führt zu Beschädigungen dieses Produkts, ausserdem ist
dies mit Gefahren wie z.B. Kurzschluss, Brand, elektrischer Schlag etc. verbunden. Das gesamte Produkt
darf nicht geändert bzw. umgebaut werden. Das Gehäuse darf nicht geöffnet werden. Die auf dem Produkt
befindlichen Aufkleber dürfen nicht beschädigt oder entfernt werden.
Page 4
4
Inhaltsverzeichnis
Seite
1 Merkmale & technische Daten...................................................................................................................5
2. Lieferumfang..............................................................................................................................................5
3. Symbol-Erklärung......................................................................................................................................5
4. Sicherheitshinweise...................................................................................................................................5
5. Batterien einsetzen, Batteriewechsel ........................................................................................................6
6. Entsorgung von gebrauchten Batterien, Umwelthinweis ..........................................................................7
7. Bedienelemente.........................................................................................................................................8
8. Anschluss eines Kopfhörers......................................................................................................................9
9. Anschluss eines Fußpedals.......................................................................................................................9
10. Anschluss eines externen Verstärkers.......................................................................................................9
11. Anschluss von MIDI-Geräten...................................................................................................................10
12. Demo-Songs abspielen ...........................................................................................................................10
13. Grundfunktionen......................................................................................................................................11
"Voice"-Modus wählen, Instrumente ("Voices") auswählen/spielen .......................................................11
Instrumente mit den Tasten "-/OFF" und "+/ON" (unten im Zahlenblock) auswählen............................12
Instrumente mit den Zahlentasten des Zahlenblocks auswählen ...........................................................12
Zweiklang-Effektfunktion ("Dual Voice", Taste "DUAL") .........................................................................12
Schnellauswahl des "Piano"-Instruments (Taste "PIANO").....................................................................13
Sostenuto-Effekt (Taste "SUSTAIN").......................................................................................................13
Tonhöhen-Kurve einstellen (Tasten "PITCH BEND")...............................................................................13
Digital Signal Processor (Taste "DSP") ...................................................................................................13
14. Automatische Begleitung ........................................................................................................................14
"Style"-Modus wählen, Auswahl der Begleitrhythmen ("Styles")............................................................14
Begleitrhythmen mit den Tasten "-/OFF" und "+/ON" (unten im Zahlenblock) auswählen ....................14
Begleitrhythmen mit den Zahlentasten des Zahlenblocks auswählen ....................................................14
Gewählten Begleitrhythmus ("Style") abspielen, Taste "START/STOP" .................................................14
Geschwindigkeit einstellen, Taste "TEMPO +/-".....................................................................................15
Verwenden der automatischen Begleitung (Begleitrhythmen) ................................................................15
Start des Begleitrhythmus synchronisieren, Taste "SYNC"....................................................................16
Begleitrhythmus mit einem Intro-Sound starten, Taste "INTRO/ENDING".............................................16
Metronom ein/aus, Taste "METRONOME" .............................................................................................16
Tastatur-Aufteilung für die Begleitung verändern ("SELECT"/"SPLIT.PT").............................................17
Lautstärkeeinstellung der einzelnen Spuren des Begleitrhythmus verändern, Mixer .............................17
"One-Touch-Setting", Taste "OTS".........................................................................................................17
15. Allgemeine Bedienung & Einstellung.......................................................................................................18
Verändern der eingestellten Oktave, Taste "OCTAVE +/-" .....................................................................18
Aktivieren und Spielen der Drumpads ("SELECT"/"PERCUS")...............................................................18
Einstellung der Tonhöhe des Keyboards ("SELECT"/"X´SPOSER")........................................................18
Feineinstellung der Tonhöhe ("SELECT"/"TUNE") ..................................................................................18
Stereoposition einstellen ("SELECT"/"PAN") ..........................................................................................19
MIDI-Kanal einstellen ("SELECT"/"MIDI") ...............................................................................................19
Beat-Level einstellen ("SELECT"/"BEAT")...............................................................................................19
Tastatur des Keyboards aufteilen ("SELECT"/"SPLIT.PT").....................................................................19
Sicherung der Einstellungen, Speichern .................................................................................................20
Anschlag-Sensor ein/aus, Taste "TOUCH".............................................................................................20
Aufnahme/Wiedergabe, Tasten "RECORD" & "PLAY"............................................................................20
16. Notenständer einsetzen...........................................................................................................................21
17. Handhabung............................................................................................................................................21
18. Wartung und Reinigung...........................................................................................................................22
19. Entsorgung ..............................................................................................................................................23
20. Behebung von Störungen........................................................................................................................23
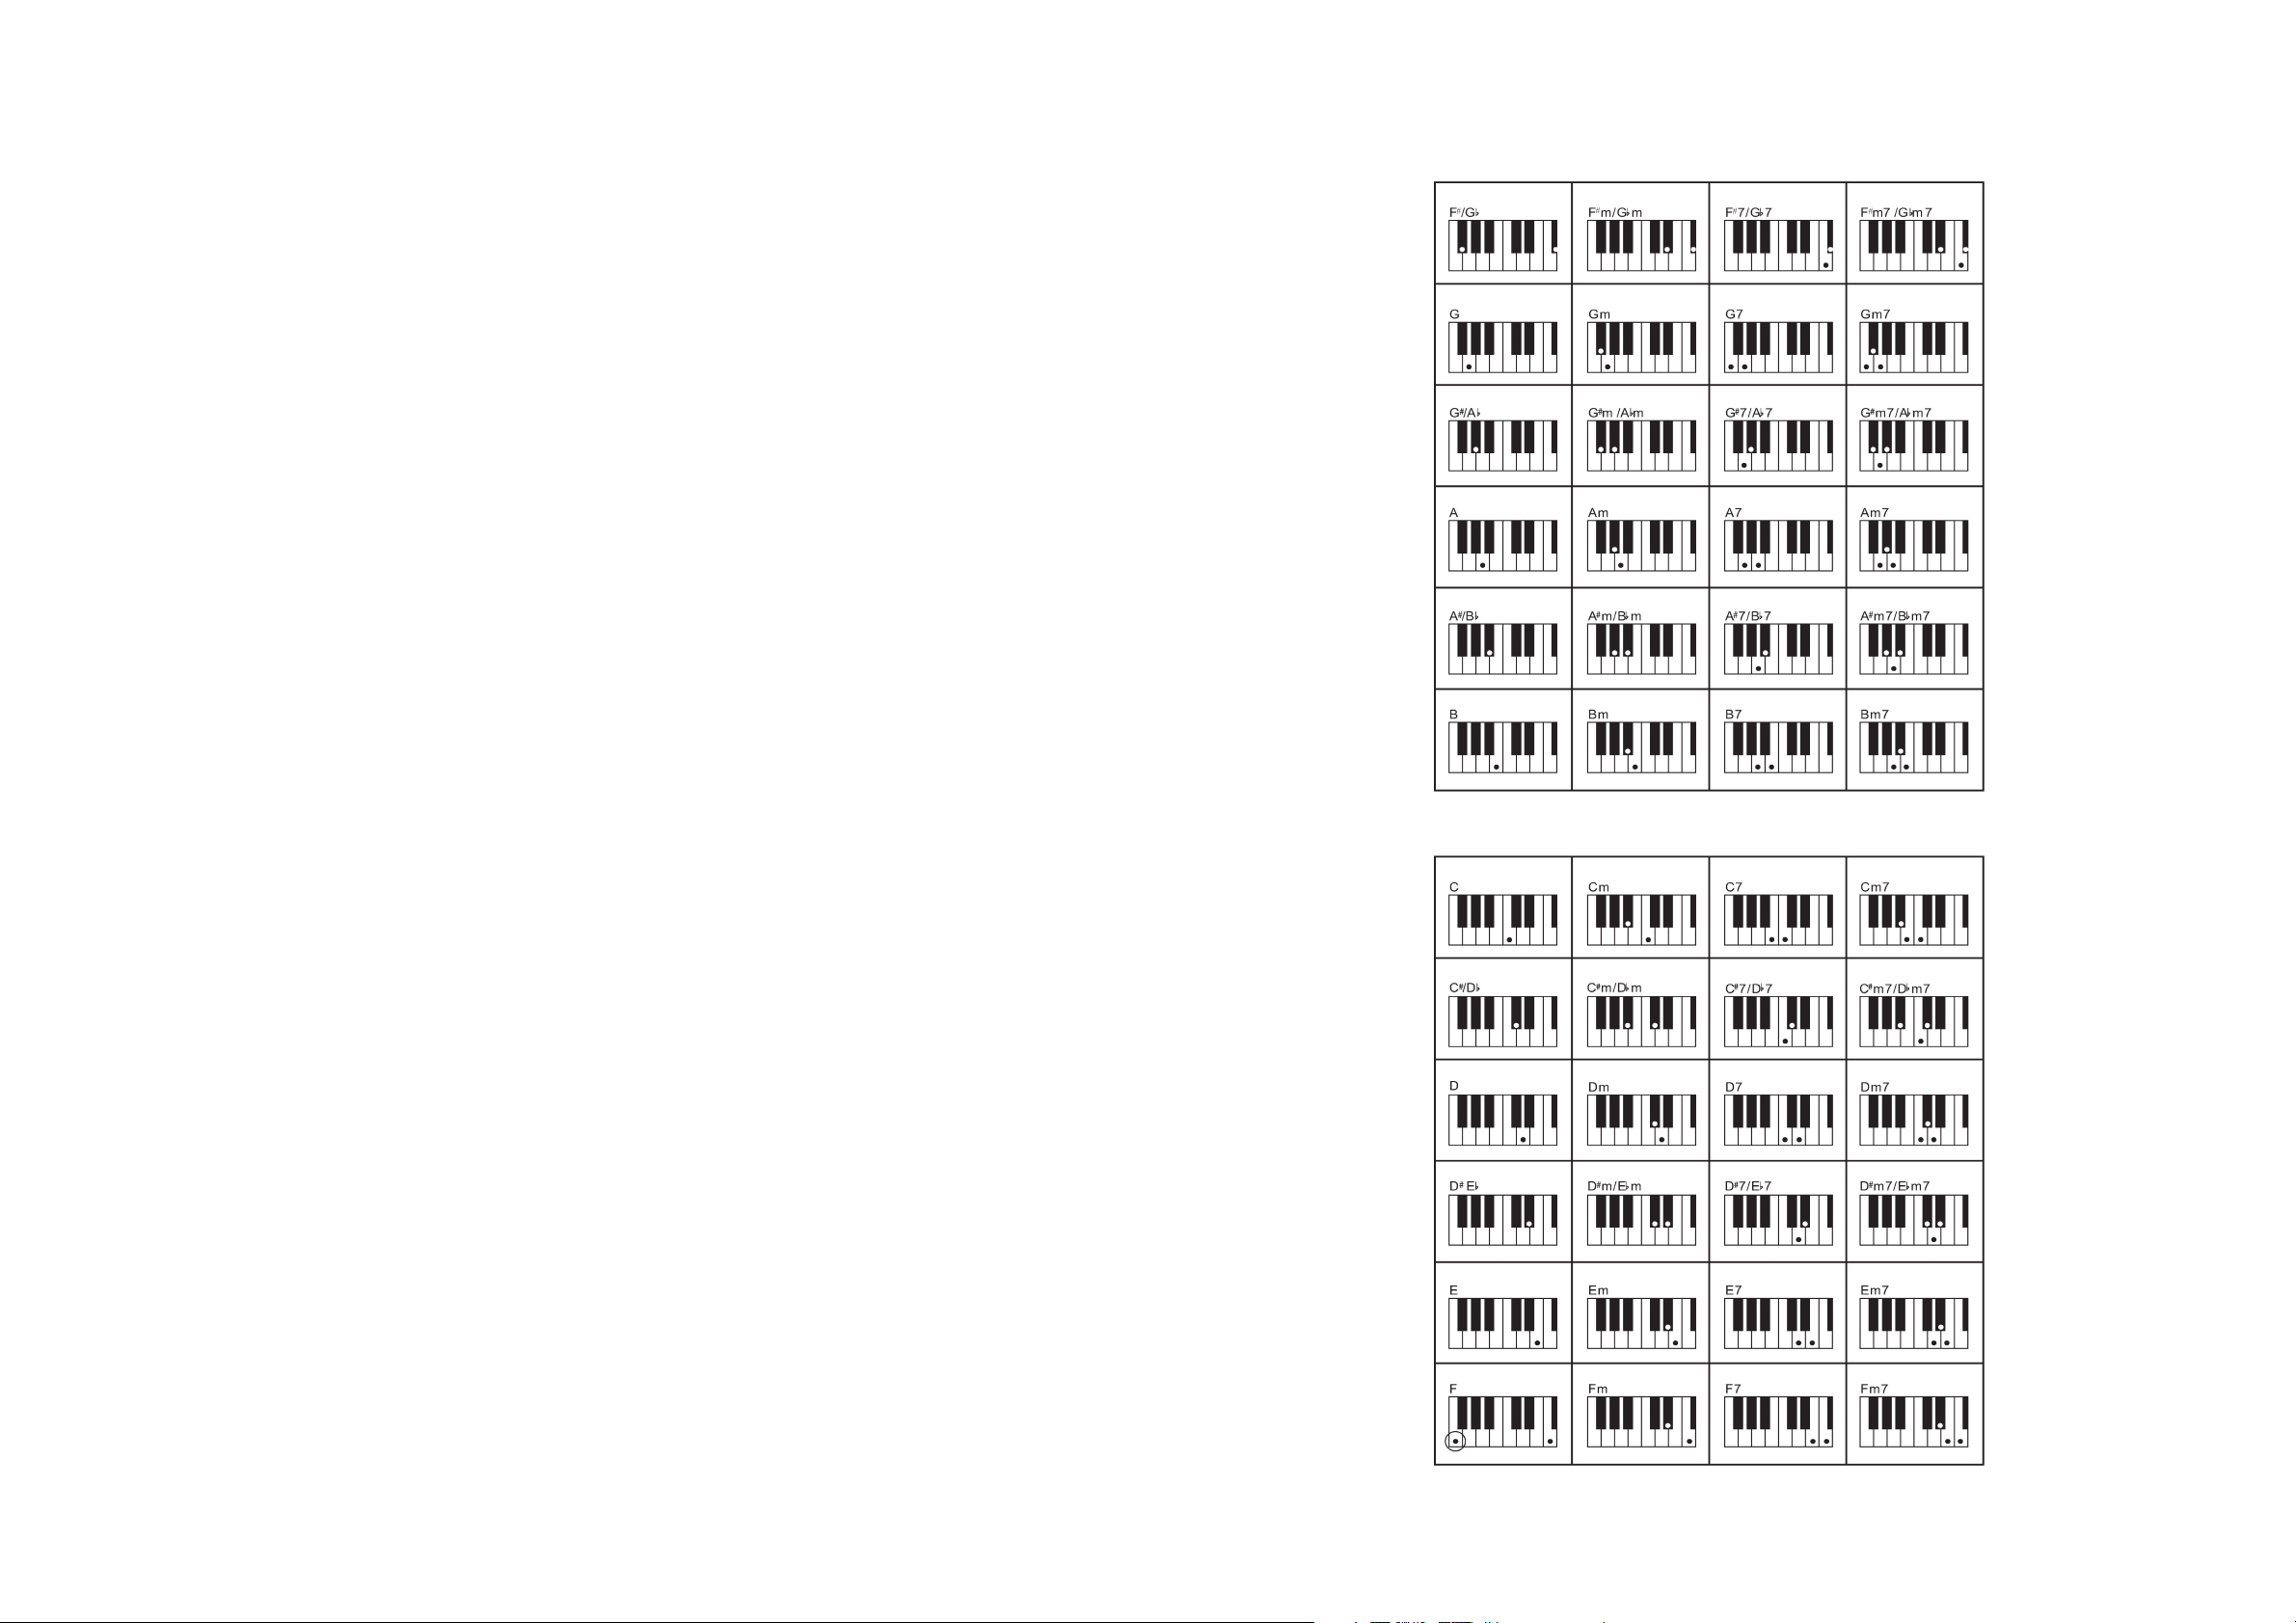
21. Anhang A: Akkorde..................................................................................................................................24
22. Anhang B: Einzelne Akkorde ...................................................................................................................25
23. Anhang C: Demo-Song-Liste ..................................................................................................................26
73
22. Annexe "B", Accords individuels.
Page 5

72
21. Annexe "A", Accords.
5
1. Merkmale
• 136 PCM-Instrumente ("Voices") und Schlagzeug-Sounds ("Drum/Percussion")
• 100 Begleitrhythmen ("Styles")
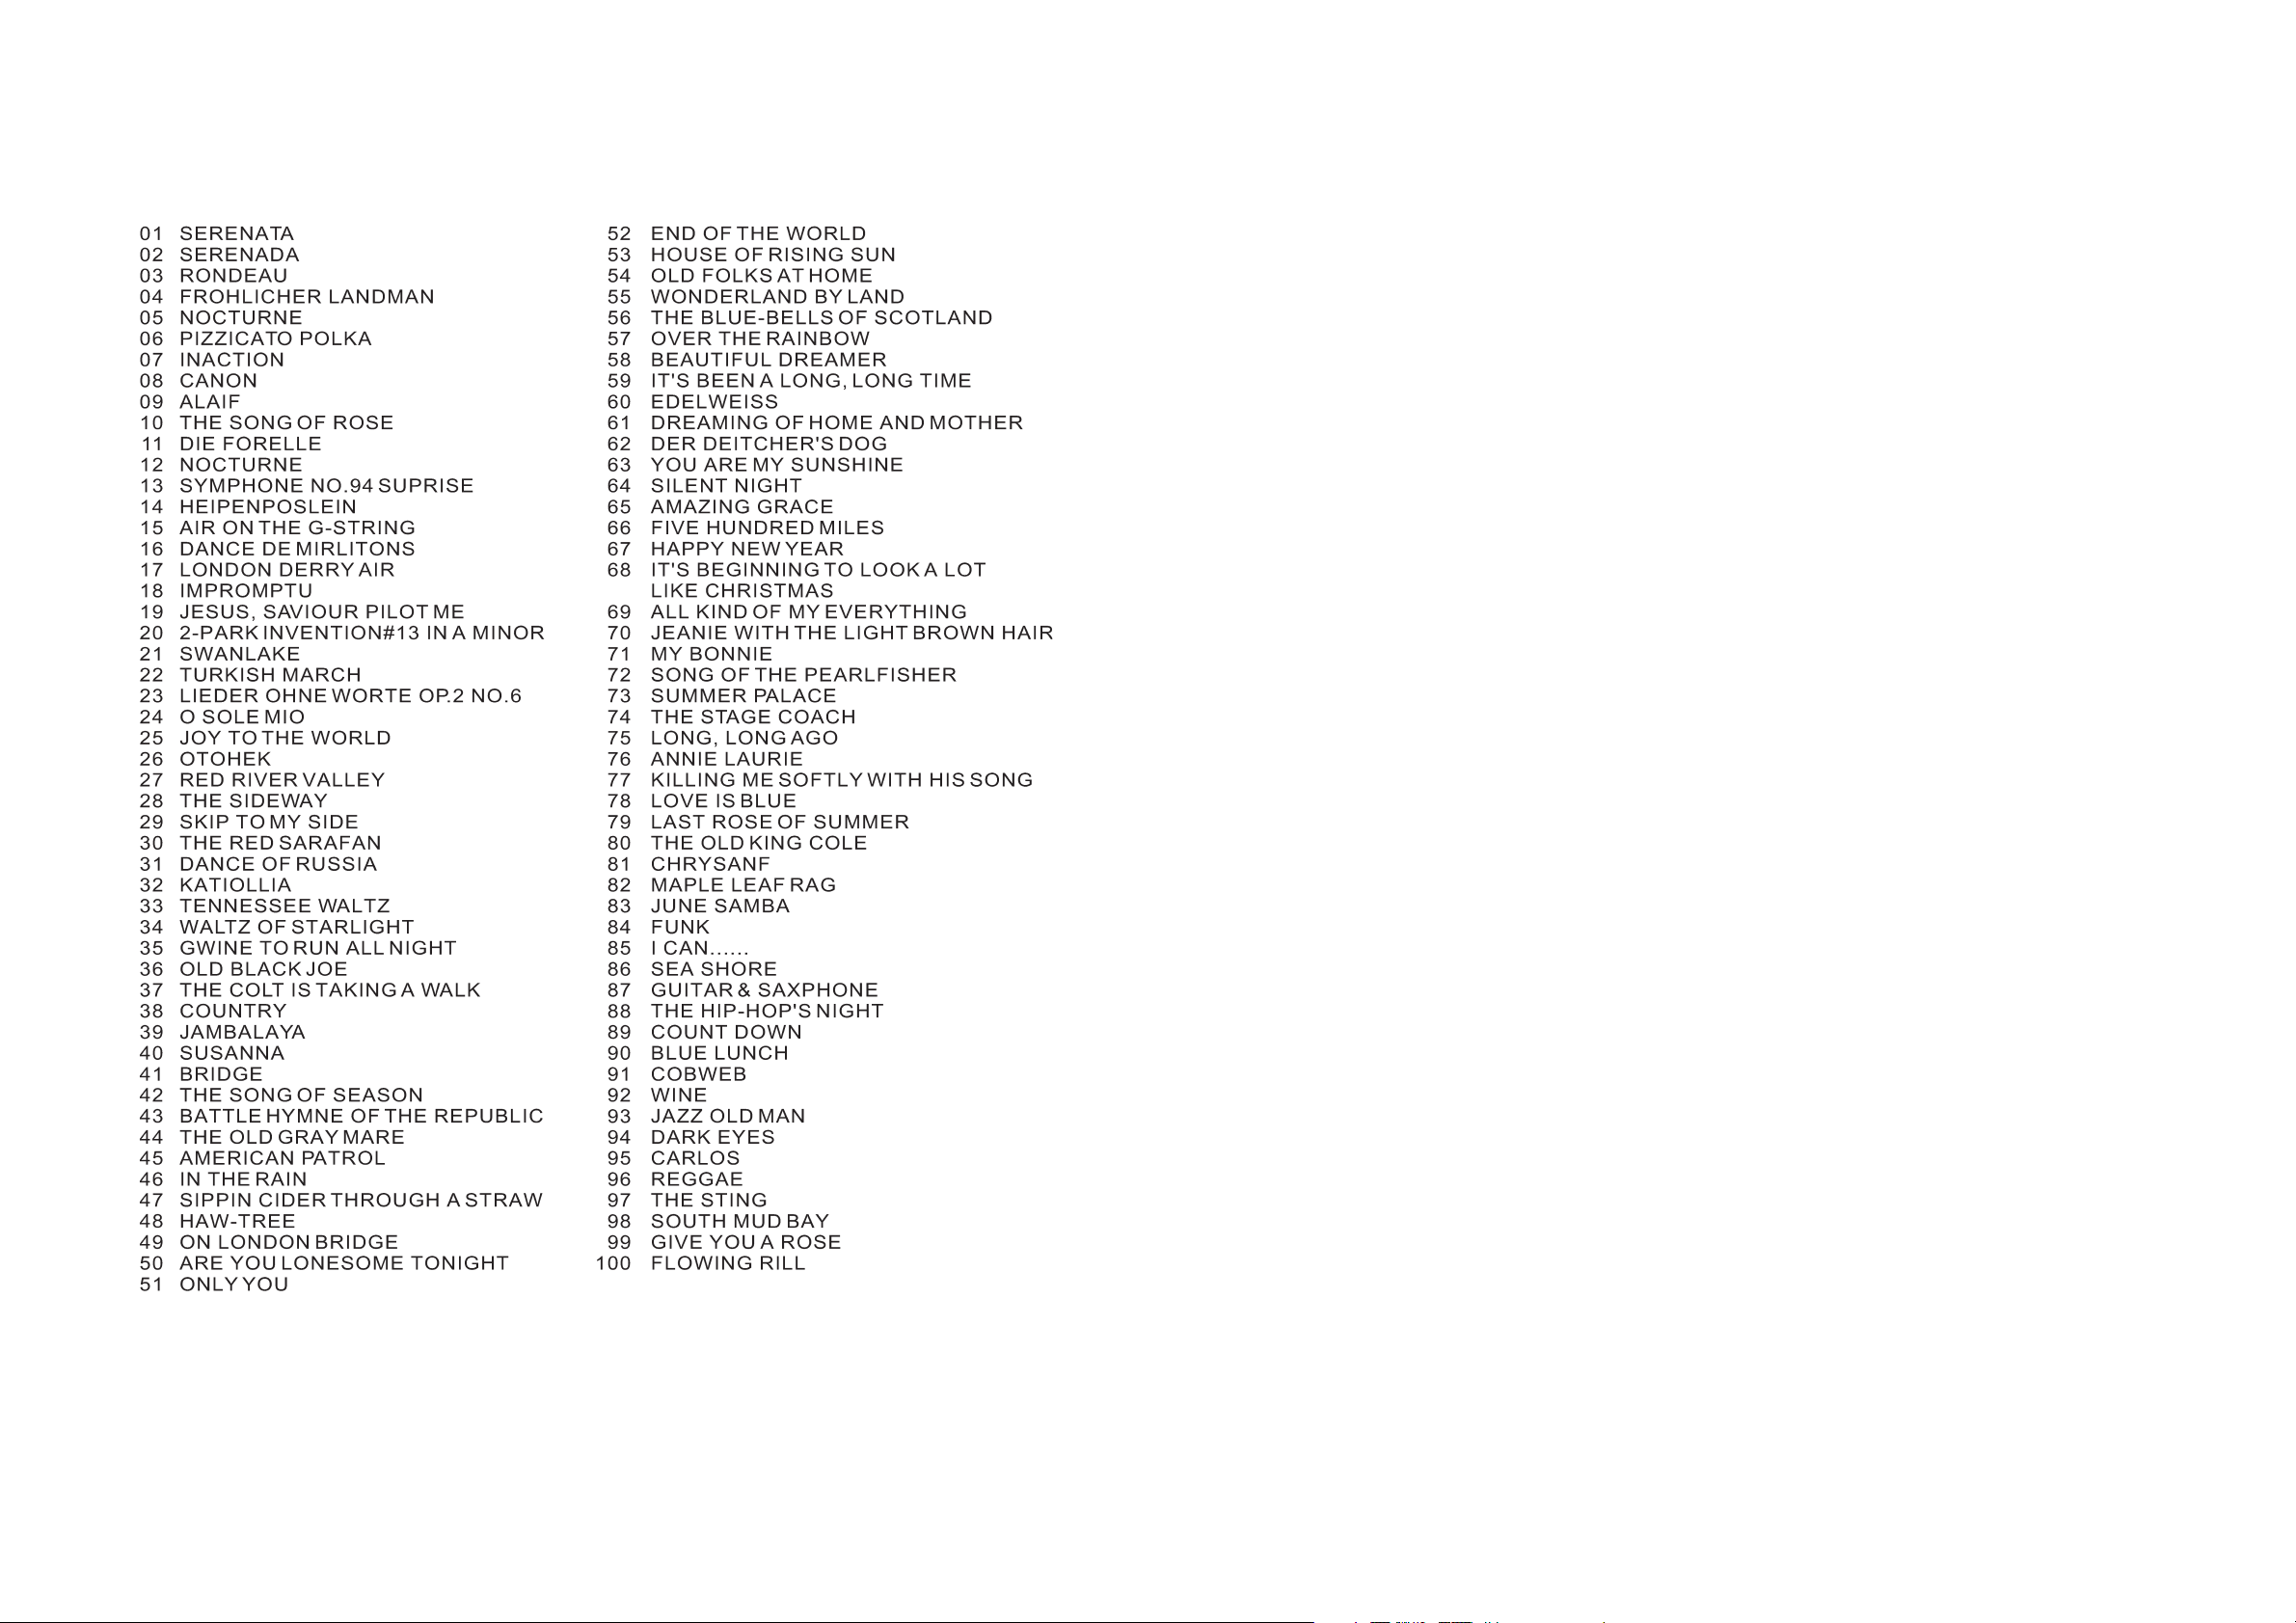
• 100 Demo-Songs
•Aufnahme/Wiedergabe
•MIDI-kompatibel
• LC-Display, beleuchtet
• 61 Tasten
• 64stimmig (max.)
• Stereo-Lautsprecher eingebaut (2-Wege-System)
• Kopfhörer-Buchse (Buchse "PHONES", 6.35mm-Klinkenbuchse)
• Anschluss für Fußpedal (Buchse "SUSTAIN", 6.35mm-Klinkenbuchse)
• Ausgang "AUX" zum Anschluss an externen Verstärker (Buchse "AUX.OUT", 6.35mm-Klinkenbuchse)
• Batteriebetrieb (6*Mono-Batterie); Anschluss eines externen Netzteils (nicht im Lieferumfang) möglich
Netzteil muss eine Spannung von 9-12V= und einen Strom von mindestens 1.6A liefern, der Innenkontakt
muss "Plus" / "+" liefern).
Der Hersteller empfiehlt ein Netzteil mit 12V= und 2.2A, um bei höheren Lautstärken genügend Reserven für die verzerrungsfreie Wiedergabe zu haben.
2. Lieferumfang
• Electronic Keyboard "MC-110"
• Notenhalter
• Bedienungsanleitung
3. Symbol-Erklärung
Das Ausrufezeichen im Dreieck weist Sie auf besondere Gefahren bei Handhabung, Betrieb
oder Bedienung hin.
Das Symbol mit dem Blitz im Ausrufezeichen wird verwendet, wenn Gefahr für Ihre Gesundheit
besteht, z.B. durch elektrischen Schlag.
Das "Hand"-Symbol steht für spezielle Tipps und Bedienhinweise.
4. Sicherheitshinweise
Bei Schäden, die durch Nichtbeachtung dieser Bedienungsanleitung verursacht werden,
erlischt der Garantieanspruch.
Für Folgeschäden übernehmen wir keine Haftung!
Bei Sach- oder Personenschäden, die durch unsachgemäße Handhabung oder Nichtbeachten der Sicherheitshinweise verursacht werden, übernehmen wir keine Haftung! In
solchen Fällen erlischt jeder Garantieanspruch.
Lesen Sie die Bedienungsanleitung vor Inbetriebnahme vollständig durch.
Page 6
6
• Aus Sicherheits- und Zulassungsgründen (CE) ist das eigenmächtige Umbauen und/oder Verändern des
Gerätes nicht gestattet.
• Wenden Sie sich an eine Fachkraft, wenn Sie Zweifel über die Arbeitsweise, die Sicherheit oder den
Anschluss des Gerätes haben.
• In Schulen, Ausbildungseinrichtungen, Hobby- und Selbsthilfewerkstätten ist das Betreiben des Produkts
durch geschultes Personal verantwortlich zu überwachen.
• Lassen Sie das Verpackungsmaterial nicht achtlos liegen, Plastikfolien/-tüten, Styroporteile, etc., könnten
für Kinder zu einem gefährlichen Spielzeug werden.
• Das Gerät gehört nicht in Kinderhände. Es ist kein Spielzeug.
• Das Gerät ist nur für trockene Innenräume geeignet (keine Badezimmer o.ä. Feuchträume). Vermeiden Sie
das Feucht- oder Nasswerden des Geräts.
Sollten Sie sich über den korrekten Anschluss nicht im Klaren sein oder sollten sich Fragen ergeben,
die nicht im Laufe der Bedienungsanleitung abgeklärt werden, so setzen Sie sich bitte mit unserer
technischen Auskunft oder einem anderen Fachmann in Verbindung.
5. Batterien einsetzen, Batteriewechsel
a) Batteriebetrieb; Batterien einlegen und wechseln
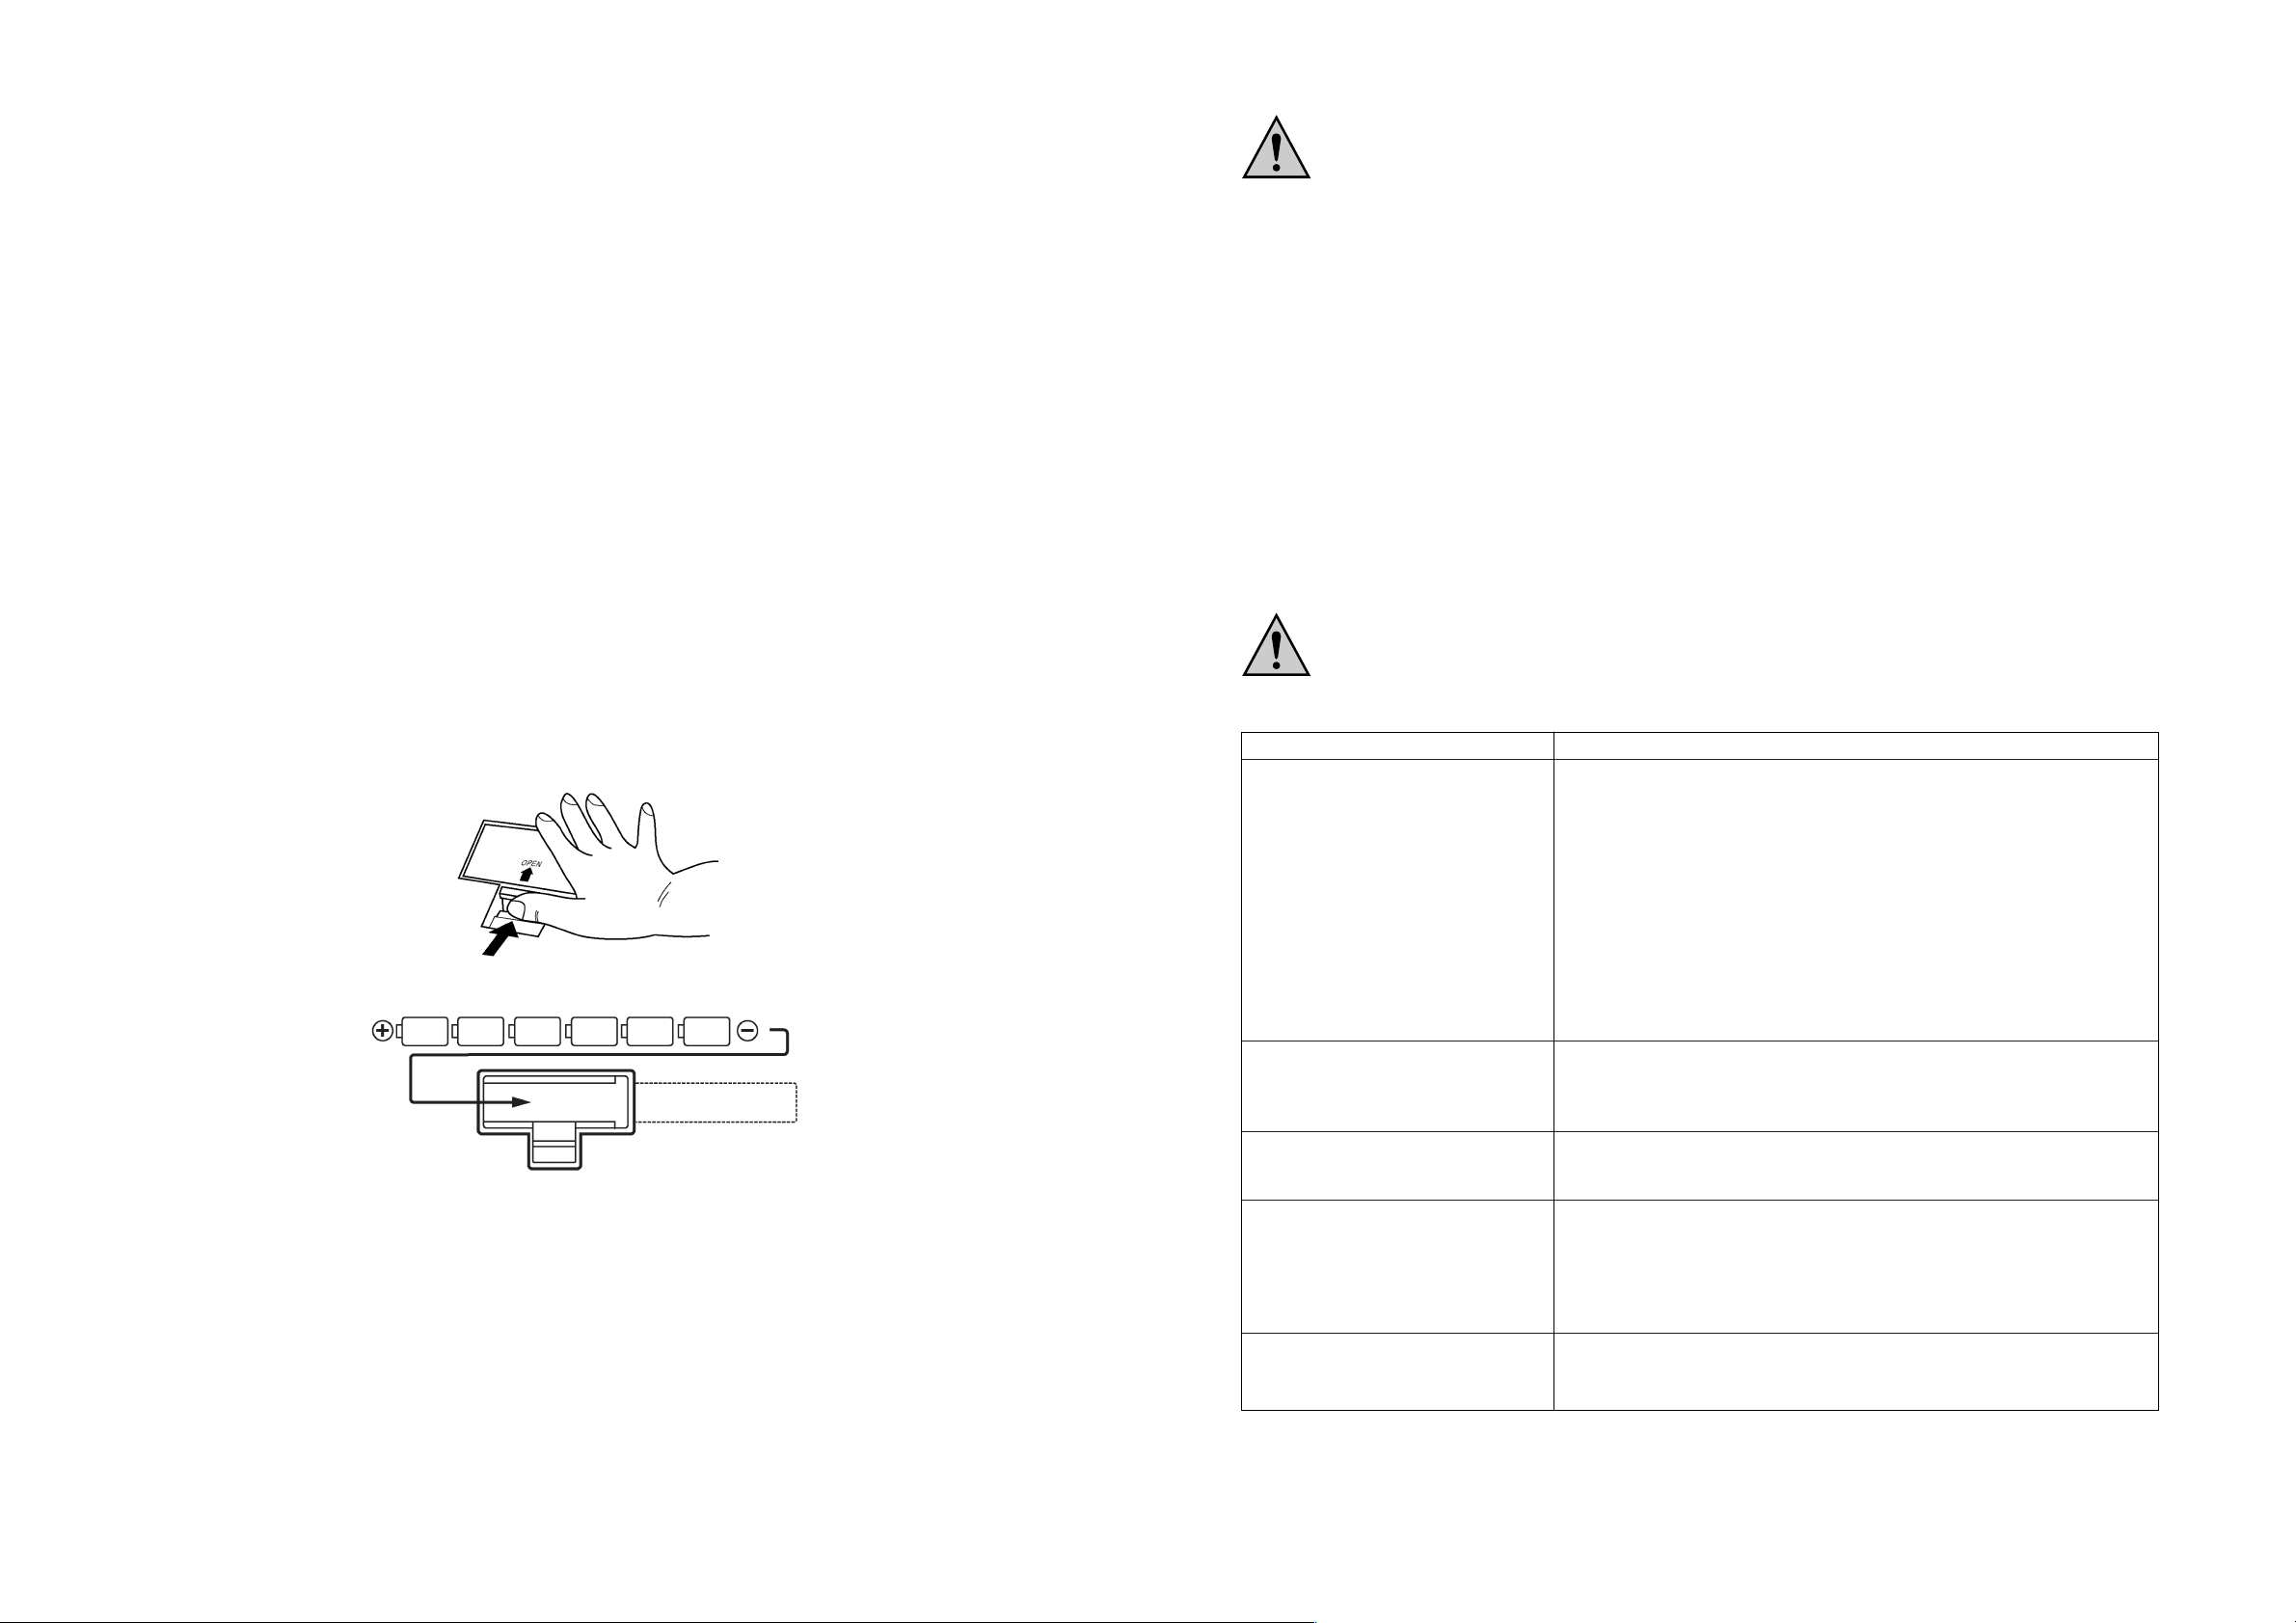
Auf der Unterseite des Keyboards befindet sich das Batteriefach. Öffnen Sie die Klappe.
Legen Sie 6 Stück Monozellen polungsrichtig ein. Neben dem Batteriefach finden Sie eine Abbildung, die
Ihnen die korrekte Orientierung zeigt.
Schließen Sie dann das Batteriefach wieder.
Wenn Sie feststellen, dass die Batterien leer sind, so sind die Batterien gegen neue auszutauschen.
Die Batterien können leer sein, wenn sie folgende Dinge feststellen:
• Nach dem Einschalten erscheint keine Displayanzeige
• Nur noch geringe Lautstärke über Lautsprecher/Kopfhörer (bei korrekt eingestelltem Lautstärkeregler)
• Störgeräusche oder verzerrte Wiedergabe
• Automatisches Ausschalten des Keyboards bei höheren Lautstärken
• Große Helligkeitsschwankungen der Displaybeleuchtung bei höheren Lautstärken
Bild 1
Bild 2
71
Toute réparation ne doit être effectuée que par du personnel qualifié connaissant les dangers
éventuels et les prescriptions correspondantes.
Nettoyez le produit au moyen d'un chiffon sec, doux et non-pelucheux.
Pour enlever les salissures plus importantes, il est conseillé d'utiliser un chiffon humidifié d'eau
tiède. Si nécessaire, ajoutez un peu de détergent faible.
Pour être sûr que le détergent n'attaque pas la surface de l'appareil, commencez le nettoyage à un
endroit invisible de la surface!
Avant de brancher à nouveau le clavier multimédia, d'insérer les piles ou de le connecter à un bloc d'alimentation externe, attendez qu'il ait complètement séché!
19. Elimination des déchets
Jetez l'appareil devenu inutilisable conformément aux lois en vigueur.
20. Guide de dépannage
Pour cela, tenez compte de toutes les consignes de sécurité du présent mode d'emploi!
Problème Solution
L'écran n'est pas illuminé bien • Les piles ont-elles été insérées correctement (en respectant la
que l'appareil soit allumé polarité)?
• Les piles sont-elles vides?
• Au cas où vous utiliseriez un bloc d'alimentation externe, est-il
connecté correctement au clavier multimédia et à la tension du
secteur, est-il peut-être mis hors service?
• Tenez compte de la bonne polarité de la fiche de contact, le
contact intérieur doit être positif (9-12V=), le contact extérieur est
la masse!
• Le bloc d'alimentation externe fournit-il assez de courant (au
moins 1.6A)?
• La fiche du bloc d'alimentation externe n'entre-t-elle pas dans la
douille du clavier multimédia?
Aucun son n'est audible • L'appareil est-il mis en service et le volume est-il réglé correcte-
ment?
• Y a-t-il un casque qui est raccordé? Celui-ci met hors service les
haut-parleurs intégrés.
Le clavier multimédia se met hors • Remplacez les piles par des piles neuves; essayez si le clavier
service automatiquement lors de la fonctionne pendant quelque temps encore avec des piles
lecture presque usagées en baissant le volume.
L'affichage à l'écran scintille • Remplacez les piles par des piles neuves; essayez si le clavier
fonctionne pendant quelque temps encore avec des piles
presque usagées en baissant le volume.
• De faibles variations de la luminosité de l'éclairage de fond de
l'écran sont normales lorsqu'un volume fort est réglé et lors de la
reproduction de graves.
Pas de réponse via la • Raccordez toujours le connecteur "MIDI-IN" d'un côté au
connexion MIDI connecteur "MIDI-OUT" de l'autre côté d'une connexion.
• Tenez compte du mode d'emploi des appareils MIDI.
Page 7
70
Veillez à ce que l'isolation de l'ensemble du produit ne soit ni endommagée ni détruite.
Ouvrir des couvercles ou ôter des pièces (par ex. le couvercle du boîtier) peut avoir pour
conséquence que des éléments sous tension ne soient plus protégés. Il est également possible que des points de raccordement sous tension ne soient plus protégés. Avant le raccordement de l'appareil, avant un entretien, une remise en état ou avant le remplacement de
pièces ou de modules, il faut déconnecter l'appareil de toute source de tension et de tous les
autres raccordements, n'oubliez pas de retirer les piles!
Tout entretien ou toute réparation du clavier multimédia ne doit être effectué(e) que par du
PERSONNEL QUALIFIE connaissant les dangers éventuels et les prescriptions correspondantes.
Avant chaque mise en service, vérifiez que le produit ne présente pas de dommages!
En cas d'endommagements, retirez les piles insérées, ne branchez PAS le produit à la
tension du secteur via un bloc d'alimentation externe!
Quand vous n'utilisez pas le clavier multimédia durant une longue période, déconnectez-le de tout bloc
d'alimentation externe, débranchez également le bloc d'alimentation externe de la tension du secteur.
Retirez les piles insérées.
N'introduisez jamais des objets pointus (par ex. des stylos à bille, des épingles ou
aiguilles, des trombones, etc.) dans les orifices et fentes d'aération de l'appareil, il y a
risque d'une décharge électrique mortelle et de destruction de l'appareil!
Ne posez jamais des objets ou réservoirs contenant des liquides sur le clavier.
Lors de la pose du clavier multimédia, veillez à ne pas plier ni de coincer les câbles de raccordement.
18. Entretien et nettoyage
Contrôlez périodiquement la sûreté technique de l'appareil, par ex. si le boîtier (et le bloc d'alimentation
externe) sont endommagés.
Si une utilisation sans danger n'est plus possible, l'appareil doit être mis hors service et protégé contre toute utilisation involontaire. Eteignez le clavier multimédia, déconnectez-le du bloc d'alimentation externe et
déconnectez également le bloc d'alimentation de la tension du secteur. Retirez également les piles insérées!
Une utilisation sans danger n'est plus possible si:
- l'appareil présente des dommages visibles,
- l'appareil ne fonctionne plus et
- l'appareil a été stocké pendant longtemps dans des conditions défavorables ou
- l'appareil a été transporté dans des conditions défavorables.
Avant de procéder au nettoyage ou à l'entretien de l'appareil, tenez impérativement compte des précautions d'emploi suivantes:
Avant un nettoyage, un entretien ou une remise en état, il faut déconnecter l'appareil de toute
source de tension. Eteignez le clavier multimédia, déconnectez-le du bloc d'alimentation externe et retirez les piles insérées dans le clavier multimédia.
Aucune pièce nécessitant un entretien ne se trouve à l'intérieur du produit.
Ouvrir des couvercles ou ôter des pièces peut avoir pour conséquence que des éléments sous
tension ne soient plus protégés.
Les condensateurs dans l'appareil peuvent conserver des charges, même si l'appareil a été
déconnecté de toute source de tension.
7
Lassen Sie Batterien nicht offen herumliegen, es besteht die Gefahr, dass diese von Kindern
oder Haustieren verschluckt werden. Suchen Sie in einem solchen Fall sofort einen Arzt auf!
Lassen Sie keine leeren Batterien im Batteriefach, da selbst auslaufgeschützte Batterien korrodieren können und dadurch Chemikalien freigesetzt werden können, welche Ihrer Gesundheit
schaden bzw. die das Batteriefach beschädigen können.
Wenn Sie das Produkt längere Zeit nicht benutzen, so nehmen Sie die Batterien aus dem Batteriefach.
Ausgelaufene oder beschädigte Batterien können bei Berührung mit der Haut Verätzungen verursachen, benutzen Sie in diesem Fall bitte geeignete Schutzhandschuhe.
Versuchen Sie nie, Batterien wieder aufzuladen. Es besteht Explosionsgefahr!
Werfen Sie keine Batterien ins Feuer. Es besteht Explosionsgefahr!
Achten Sie darauf, dass Batterien nicht kurzgeschlossen werden. Es besteht Explosionsgefahr!
Mischen Sie keine alten und neuen Batterien, sondern tauschen Sie immer den ganzen Batteriesatz aus.
Verwenden Sie immer 6 Batterien des gleichen Typs & Herstellers.
Lassen Sie Batterien und Akkus nicht in der Nähe von Kindern oder Tieren herumliegen,
bewahren Sie sie an einem für Kinder oder Tiere unzugänglichen Ort auf. Durch Verschlucken von Batterien, Akkus oder Knopfzellen besteht LEBENSGEFAHR! Suchen Sie
in einem solchen Fall sofort einen Arzt oder ein Krankenhaus auf!U
b) Betrieb über externes Netzteil (nicht im Lieferumfang)
Schalten Sie das Keyboard aus, bevor Sie das externe Netzteil mit dem Keyboard und der Netzspannung
verbinden.
Verwenden Sie ein Netzteil, das eine Ausgangsspannung von 9-12V= und einen Strom von mindestens 1.6A liefert. (Empfehlung des Herstellers: 12V= bei 2.2A, um bei größeren Lautstärken genügend Reserven für die verzerrungsfreie Wiedergabe zu haben).Der Innenkontakt muss dabei "Plus"
/ "+" liefern.
Wird das Gerät über ein externes Netzteil betrieben, so werden die internen Batterien abgeschaltet. Sie sollten sie jedoch trotzdem entnehmen, um ein Auslaufen der Batterien zu vermeiden. Sie verhindern so die
Beschädigung des Batteriefachs.
Wenn das Keyboard längere Zeit nicht benutzt wird, so trennen Sie das externe Netzteil von der Netzspannung!
6. Entsorgung von gebrauchten Batterien
Umwelthinweis
Sie als Endverbraucher sind gesetzlich (Batterieverordnung) zur Rückgabe aller gebrauchten Batterien
und Akkus verpflichtet; eine Entsorgung über den Hausmüll ist untersagt!
Schadstoffhaltige Batterien/Akkus sind mit den links stehenden
Mülltonnen-Symbolen gekennzeichnet, die auf das Verbot der Entsorgung über den Hausmüll hinweisen.
Die Bezeichnungen für das ausschlaggebende Schwermetall sind:
Cd=Cadmium, Hg=Quecksilber, Pb=Blei.
Rechts sehen Sie ein Beispiel, wie der Aufdruck auf der von Ihnen verwendeten Batterie
aussehen könnte.
Ihre verbrauchten Batterien/Akkus können Sie unentgeltlich bei den Sammelstellen Ihrer
Gemeinde, unseren Filialen oder überall dort abgeben, wo Batterien/Akkus verkauft werden!
Sie erfüllen damit die gesetzlichen Verpflichtungen und leisten Ihren Beitrag zum Umweltschutz.
Beispiel
Page 8
8
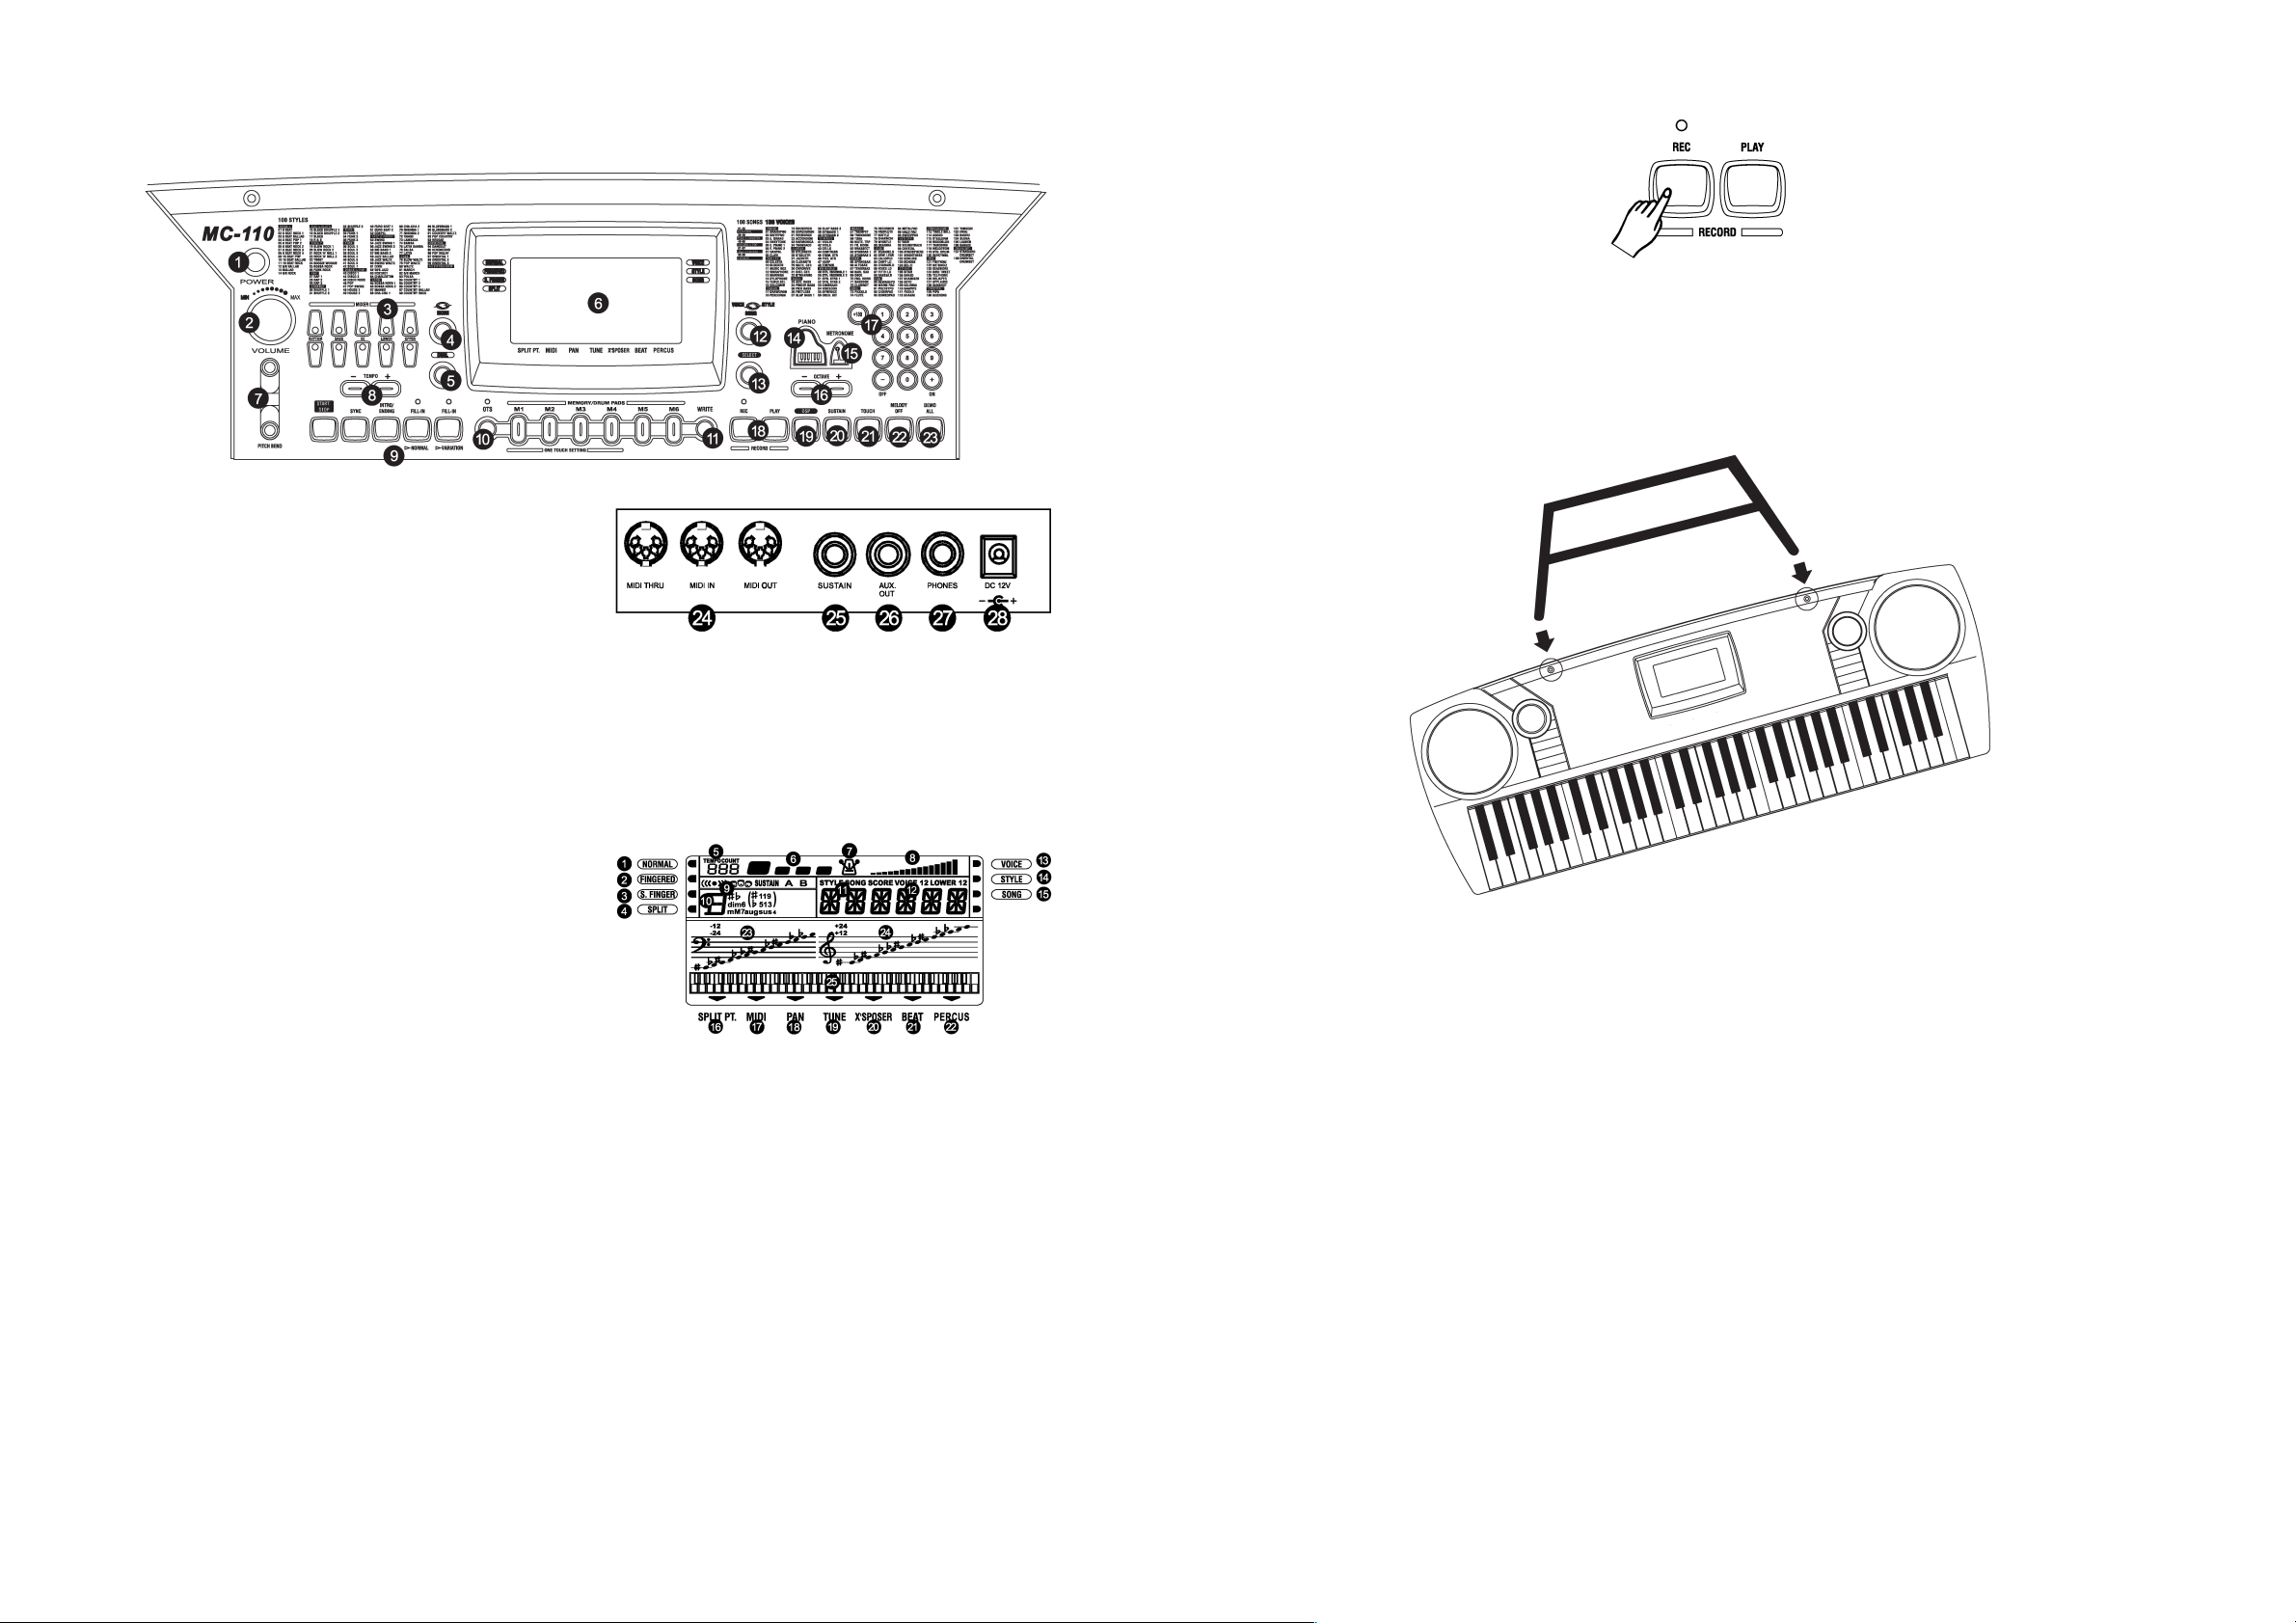
7. Bedienelemente
a) Oberseite
1 POWER: Ein-/Ausschalter
2 VOLUME: Haupt-Lautstärkeregler
3 MIXER: Lautstärke der Begleitspuren +/-
- RHYTHM: Begleitrhythmus
- BASS: Basslautstärke
- OC: Orchestration, Begleitung
- LOWER: Lower-Voice
- UPPER: Upper-Voice
4 MODE: Modus-Taste
5 DUAL: Zweiklangfunktion ein/aus
6 LC-Display
7 PITCH BEND: Pitch-Funktion
8 TEMPO +/-: Geschwindigkeitseinstellung +/9 Kontrolle für Begleitung
- START/STOP
- SYNC
- INTRO/ENDING
-FILL IN > NORMAL
-FILL IN > VARIATION
10 OTS: One-Touch-Setting
11 WRITE: Einstellungen speichern
12 VOICE/STYLE/
SONG: Funktion auswählen
13 SELECT: Funktionen wählen
14 PIANO: Sofortauswahl des Piano-
Instruments
15 METRONOME:Metronom-Funktion
16 OCTAVE +/-: Oktaven verstellen
17 Zahlenblock 0-9
18 REC/PLAY: Spiel aufnehmen/wiedergeben
19 DSP: Digital-Signal-Processor, ein/aus
20 SUSTAIN: Sostenuto-Effekt ein/aus
21 TOUCH: Anschlagart einstellen
22 MELODY OFF: Melodie aus (z.B. bei Demosong)
23 DEMO ALL: Abspielen aller Demo-Songs
Bild 3
b) Rückseite
24 MIDI-Buchsen MIDI-IN/-OUT/-THRU
25 Buchse "SUSTAIN" für Fußpedal
26 Buchse "AUX.OUT" für externen Verstärker
27 Buchse "PHONES" für Kopfhörer
28 Buchse für externes Netzteil
c) LC-Display
1 NORMAL
2 FINGERED
3 S.FINGER
4 SPLIT
5 TEMPO
6 BEAT
7 METRONOME
8 VOLUME
9 DSP
10 CHORD
11 STYLE
12 LOWER/VOICE1/
VOICE2
13 VOICE
14 STYLE
15 SONG
16 SPLIT PT.
17 MIDI CHAN.
18 PAN
19 TUNE
20 X´SPOSER
21 BEAT
22 PERCUS
23 BASS
24 TREBLE
25 KEYBOARD
Bild 5
Bild 4
69
16. Utilisation d'un pupitre de musicien
Un pupitre de musicien simple pouvant être fixé en haut du clavier multimédia fait partie de la livraison. Pour
cela, deux trous sont prévus dans le clavier, insérez-y le pupitre de musicien.
17. Maniement
L'utilisation n'est permise que dans des locaux secs à l'intérieur.
Placez l'appareil sur une surface suffisamment grande, plane et solide. Il est conseillé de ne pas placer l'appareil sur des meubles précieux, car des réactions chimiques provoquées par les pieds en caoutchouc
pourraient causer des altérations de la couleur, il y a également le risque que les pieds ne produisent des
empreintes.
Conditions environnantes défavorables à éviter sur le lieu d'emplacement ou lors du transport:
- un rayonnement intense du soleil
- l'humidité ou un taux d'hygrométrie trop élevé
- des températures extrêmes (chaleur et froid extrêmes)
- de la poussière ou des gaz, vapeurs ou solutions inflammables
- de fortes vibrations
- de forts champs électromagnétiques, comme il en existe près de machines ou de haut-parleurs.
N'allumez jamais le clavier multimédia juste après l'avoir transféré d'une pièce froide dans une pièce chaude. L'eau de condensation qui en résulte pourrait dans des conditions défavorables détruire l'appareil.
Laissez donc le produit éteint prendre la température ambiante. Cela peut durer plusieurs heures.
Figure 46
Page 9
68
Modifier l'affectation des touches du clavier multimédia ("SELECT"/"SPLIT.PT")
Appuyez sur la touche "SELECT" jusqu'à ce que la petite flèche s'affiche à côté de "SPLIT PT." à l'écran.
Puis, appuyez sur la touche où vous souhaitez modifier l'affectation.
Mémorisation des réglages
Le clavier multimédia dispose de six mémoires qui servent à mémoriser les réglages.
Les six touches "M1" à "M6" peuvent être appuyées à tout moment pour restaurer et charger les réglages
effectués.
Evidemment, la fonction "PERCUS" doit être désactivée ("PERCUS OFF").
Mémoriser
Après avoir terminé les réglages, maintenez appuyée la touche "WRITE". Appuyez brièvement sur une des
touches "M1" à "M6". Des données existantes seront écrasées!
Avec l'extinction du clavier multimédia, tous les réglages seront perdus.
Capteur de frappe marche/arrêt, touche "TOUCH"
Deux types de frappe sont réglables:
• La frappe sera transmise soit comme "Touche appuyée" ou "Touche non appuyée". Le volume du son
reproduit reste toujours au même niveau.
• La frappe est transmise en fonction de son intensité. Une légère frappe ne produit qu'un son à bas volu-
me, une forte frappe produit un son à volume fort.
Appuyez sur la touche "TOUCH" pour permuter entre les deux types de frappe.
Enregistrement/reproduction, touches "RECORD" & "PLAY"
Vous avez la possibilité d'enregistrer ce que vous jouez en appuyant sur la touche "RECORD". Pour arrêter
l'enregistrement, appuyez simplement encore une fois sur la touche "RECORD".
Pour écouter l'enregistrement, appuyez sur la touche "PLAY", pour arrêter la reproduction, appuyez encore une fois sur la touche "PLAY".
Si vous lancez un nouvel enregistrement, l'ancien sera écrasé!
Figure 43
Figure 44
Figure 45
9
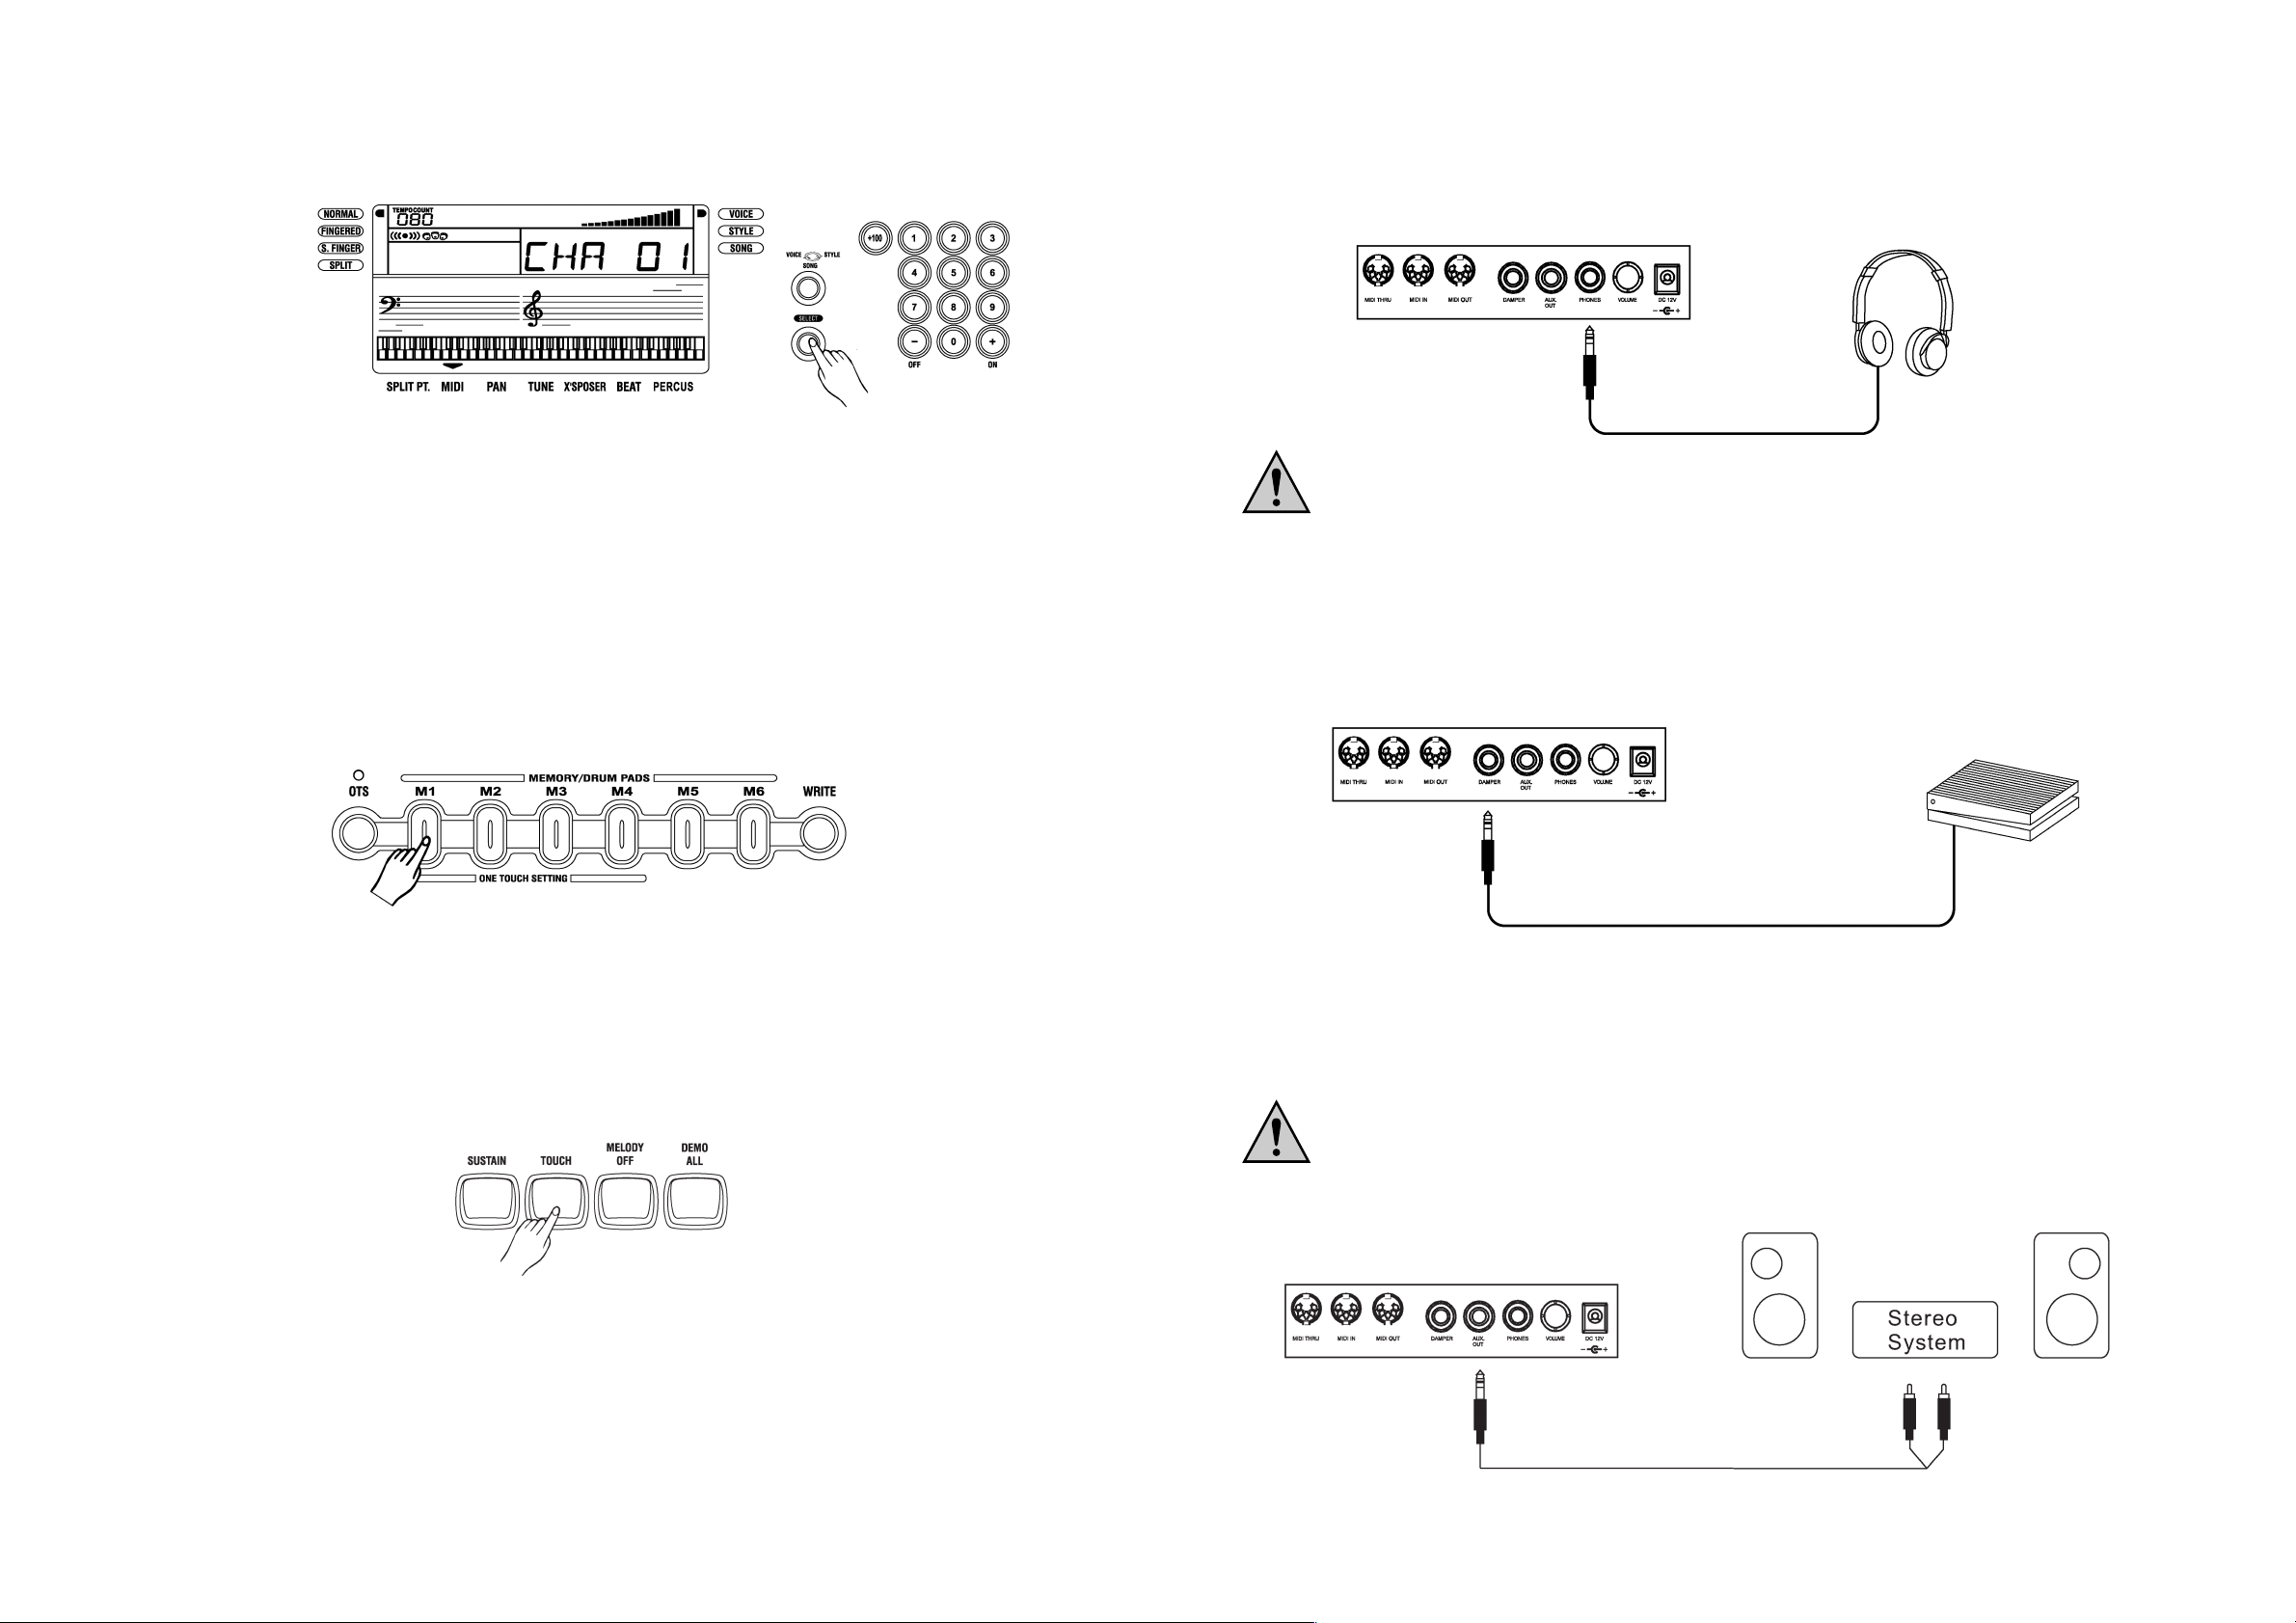
8. Anschluss eines Kopfhörers
An der 6.35mm-Klinkenbuchse "PHONES" auf der Rückseite des Keyboards können Sie einen handelsüblichen Kopfhörer einstecken, wenn Sie z.B. Ihre Nachbarn nicht in der Nacht stören wollen. Die Wiedergabe
über die eingebauten Lautsprecher wird beim Einstecken des Kopfhörers automatisch ausgeschaltet.
Drehen Sie zuerst die Lautstärke des Keyboards auf Null zurück. Stecken Sie den Kopfhörer
ein und setzen Sie ihn erst danach auf. Drehen Sie nun die Lautstärke vorsichtig höher.
Bei zu hoch aufgedrehter Lautstärke besteht die Gefahr der Beeinträchtigung Ihres Gehörs!
Stellen Sie deshalb die Lautstärke so ein, dass sie als angenehm empfunden wird und nicht zu
laut ist!
9. Anschluss eines Fußpedals
Ein Fußpedal (nicht im Lieferumfang) kann an der 6.35mm-Klinkenbuchse "SUSTAIN" angeschlossen werden. Es dient zur Dämpfung (Fußpedal gedrückt) der gerade gespielten Note, wie bei einem herkömmlichen
Klavier.
10. Anschluss eines externen Verstärkers
An die 6.35mm-Klinkenbuchse "AUX.OUT" auf der Rückseite des Keyboards lässt sich ein externer Verstärker mit Line-Eingangspegel anschließen.
Drehen Sie die Lautstärke am Keyboard auf Null, schalten Sie das Keyboard aus.
Schließen Sie den externen Verstärker an. Verwenden Sie z.B. den AUX-IN- oder TAPE-INAnschluss des Verstärkers. Es muss ein Eingang mit Line-Pegel sein.
Drehen Sie die Lautstärke des Verstärkers zurück.
Schalten Sie den Verstärker und danach das Keyboard ein.
Drehen Sie anschließend die Lautstärke von Keyboard und Verstärker vorsichtig hoch.
Bild 6
Bild 7
Bild 8
Page 10
10
11. Anschluss von MIDI-Geräten
Drei unterschiedliche MIDI-Buchsen stehen auf der Rückseite des Keyboards zur Verfügung:
MIDI-IN Empfängt Daten eines externen MIDI-Geräts
MIDI-OUT Sendet die im Keyboard erzeugten MIDI-Daten an ein extern angeschlossenes Gerät.
MIDI-THRU Ein externes MIDI-Gerät schickt Daten an ein anderes MIDI-Gerät.
12. Demo-Songs abspielen
Eine Auswahl von 100 Demo-Songs ist im Keyboard gespeichert, um Ihnen zu zeigen, was das Keyboard
alles leisten kann.
• Schalten Sie das Keyboard ein.
• Stellen Sie die Lautstärke nach Wunsch ein.
• Drücken Sie die Taste "DEMO ALL". Das Keyboard beginnt, die 100 Demo-Songs abzuspielen. Mit den
Tasten "+/ON" und "-/OFF" beim Zahlenblock kann das nächste bzw. vorherige Stück ausgewählt werden.
Drücken Sie die Taste "DEMO ALL" nochmals, um die Wiedergabe zu beenden.
Bild 9
Bild 10
Bild 11
Bild 12
67
Réglage précis de la hauteur des sons ("SELECT"/"TUNE")
Appuyez sur la touche "SELECT" jusqu'à ce que la petite flèche s'affiche à côté de "TUNE" à l'écran. Modifiez ensuite la hauteur des sons à l'aide des touches "+/ON" ou "-/OFF".
Réglage de l'équilibreur des voies ("SELECT"/"PAN")
Appuyez sur la touche "SELECT" jusqu'à ce que la petite flèche s'affiche à côté de "PAN" à l'écran. Modifiez ensuite l'équilibre des voies stéréo à l'aide des touches "+/ON" ou "-/OFF". Cela pourrait s'avérer
nécessaire quand vous êtes assis à l'extrémité droite ou gauche du clavier multimédia et que le volume du
haut-parleur de droite ou de gauche soit trop fort ou trop faible.
Réglage du canal Midi ("SELECT"/"MIDI")
Appuyez sur la touche "SELECT" jusqu'à ce que la petite flèche s'affiche à côté de "MIDI" à l'écran. Modifiez ensuite le canal MIDI à l'aide des touches "+/ON" ou "-/OFF".
Réglage du niveau d'interférence Beat ("SELECT"/"BEAT")
Appuyez sur la touche "SELECT" jusqu'à ce que la petite flèche s'affiche à côté de "BEAT" à l'écran. Modifiez ensuite le niveau Beat à l'aide des touches "+/ON" ou "-/OFF".
Figure 39
Figure 40
Figure 41
Figure 42
Page 11
66
"One-Touch-Setting" (sélection raccourcie)
Pour chacun des 100 rythmes d'accompagnement, cette fonction dispose de quatre préréglages à variations différentes.
De cette manière, 400 réglages au total sont à votre disposition!
• Appuyez sur la touche "OTS".
• Appuyez sur la touche "START/STOP" pour lancer le rythme d'accompagnement réglé.
• Pendant la reproduction, appuyez sur une des quatre touches OTS: "M1", "M2", "M3", "M4".
• Pour désactiver la fonction de sélection raccourcie OTS, vous n'avez qu'à appuyer encore une fois sur la
touche "OTS".
15. Maniement général & Réglage
Modification de l'octave sélectionnée, touche "OCTAVE +/-"
Vous pouvez augmenter ou baisser le registre d'une ou deux octaves à l'aide des touches "OCTAVE".
Activation et lecture des touches de batterie ("SELECT"/"PERCUS")
Appuyez sur la touche "SELECT" jusqu'à ce que la petite flèche s'affiche à côté de "PERCUS" à l'écran.
Puis, appuyez sur la touche "+/ON" en bas du pavé numérique. Les six touches "M1" à "M6" situées en
bas de l'écran à cristaux liquides permettent la sélection des fonctions de batterie.
Pour désactiver de nouveau cette fonction, appuyez sur la touche "SELECT" jusqu'à ce que la petite flèche
s'affiche à côté de "PERCUS" à l'écran. Puis, appuyez sur la touche "-/OFF" en bas du pavé numérique.
Réglage de la hauteur des sons du clavier multimédia ("SELECT"/"X´SPOSER")
Appuyez sur la touche "SELECT" jusqu'à ce que la petite flèche s'affiche à côté de "X´SPOSER" à l'écran.
Réglez la hauteur des sons en pas de demi-tons à l'aide des touches "+/ON" ou "-/OFF" selon vos désirs.
Figure 35
Figure 36
Figure 37
Figure 38
11
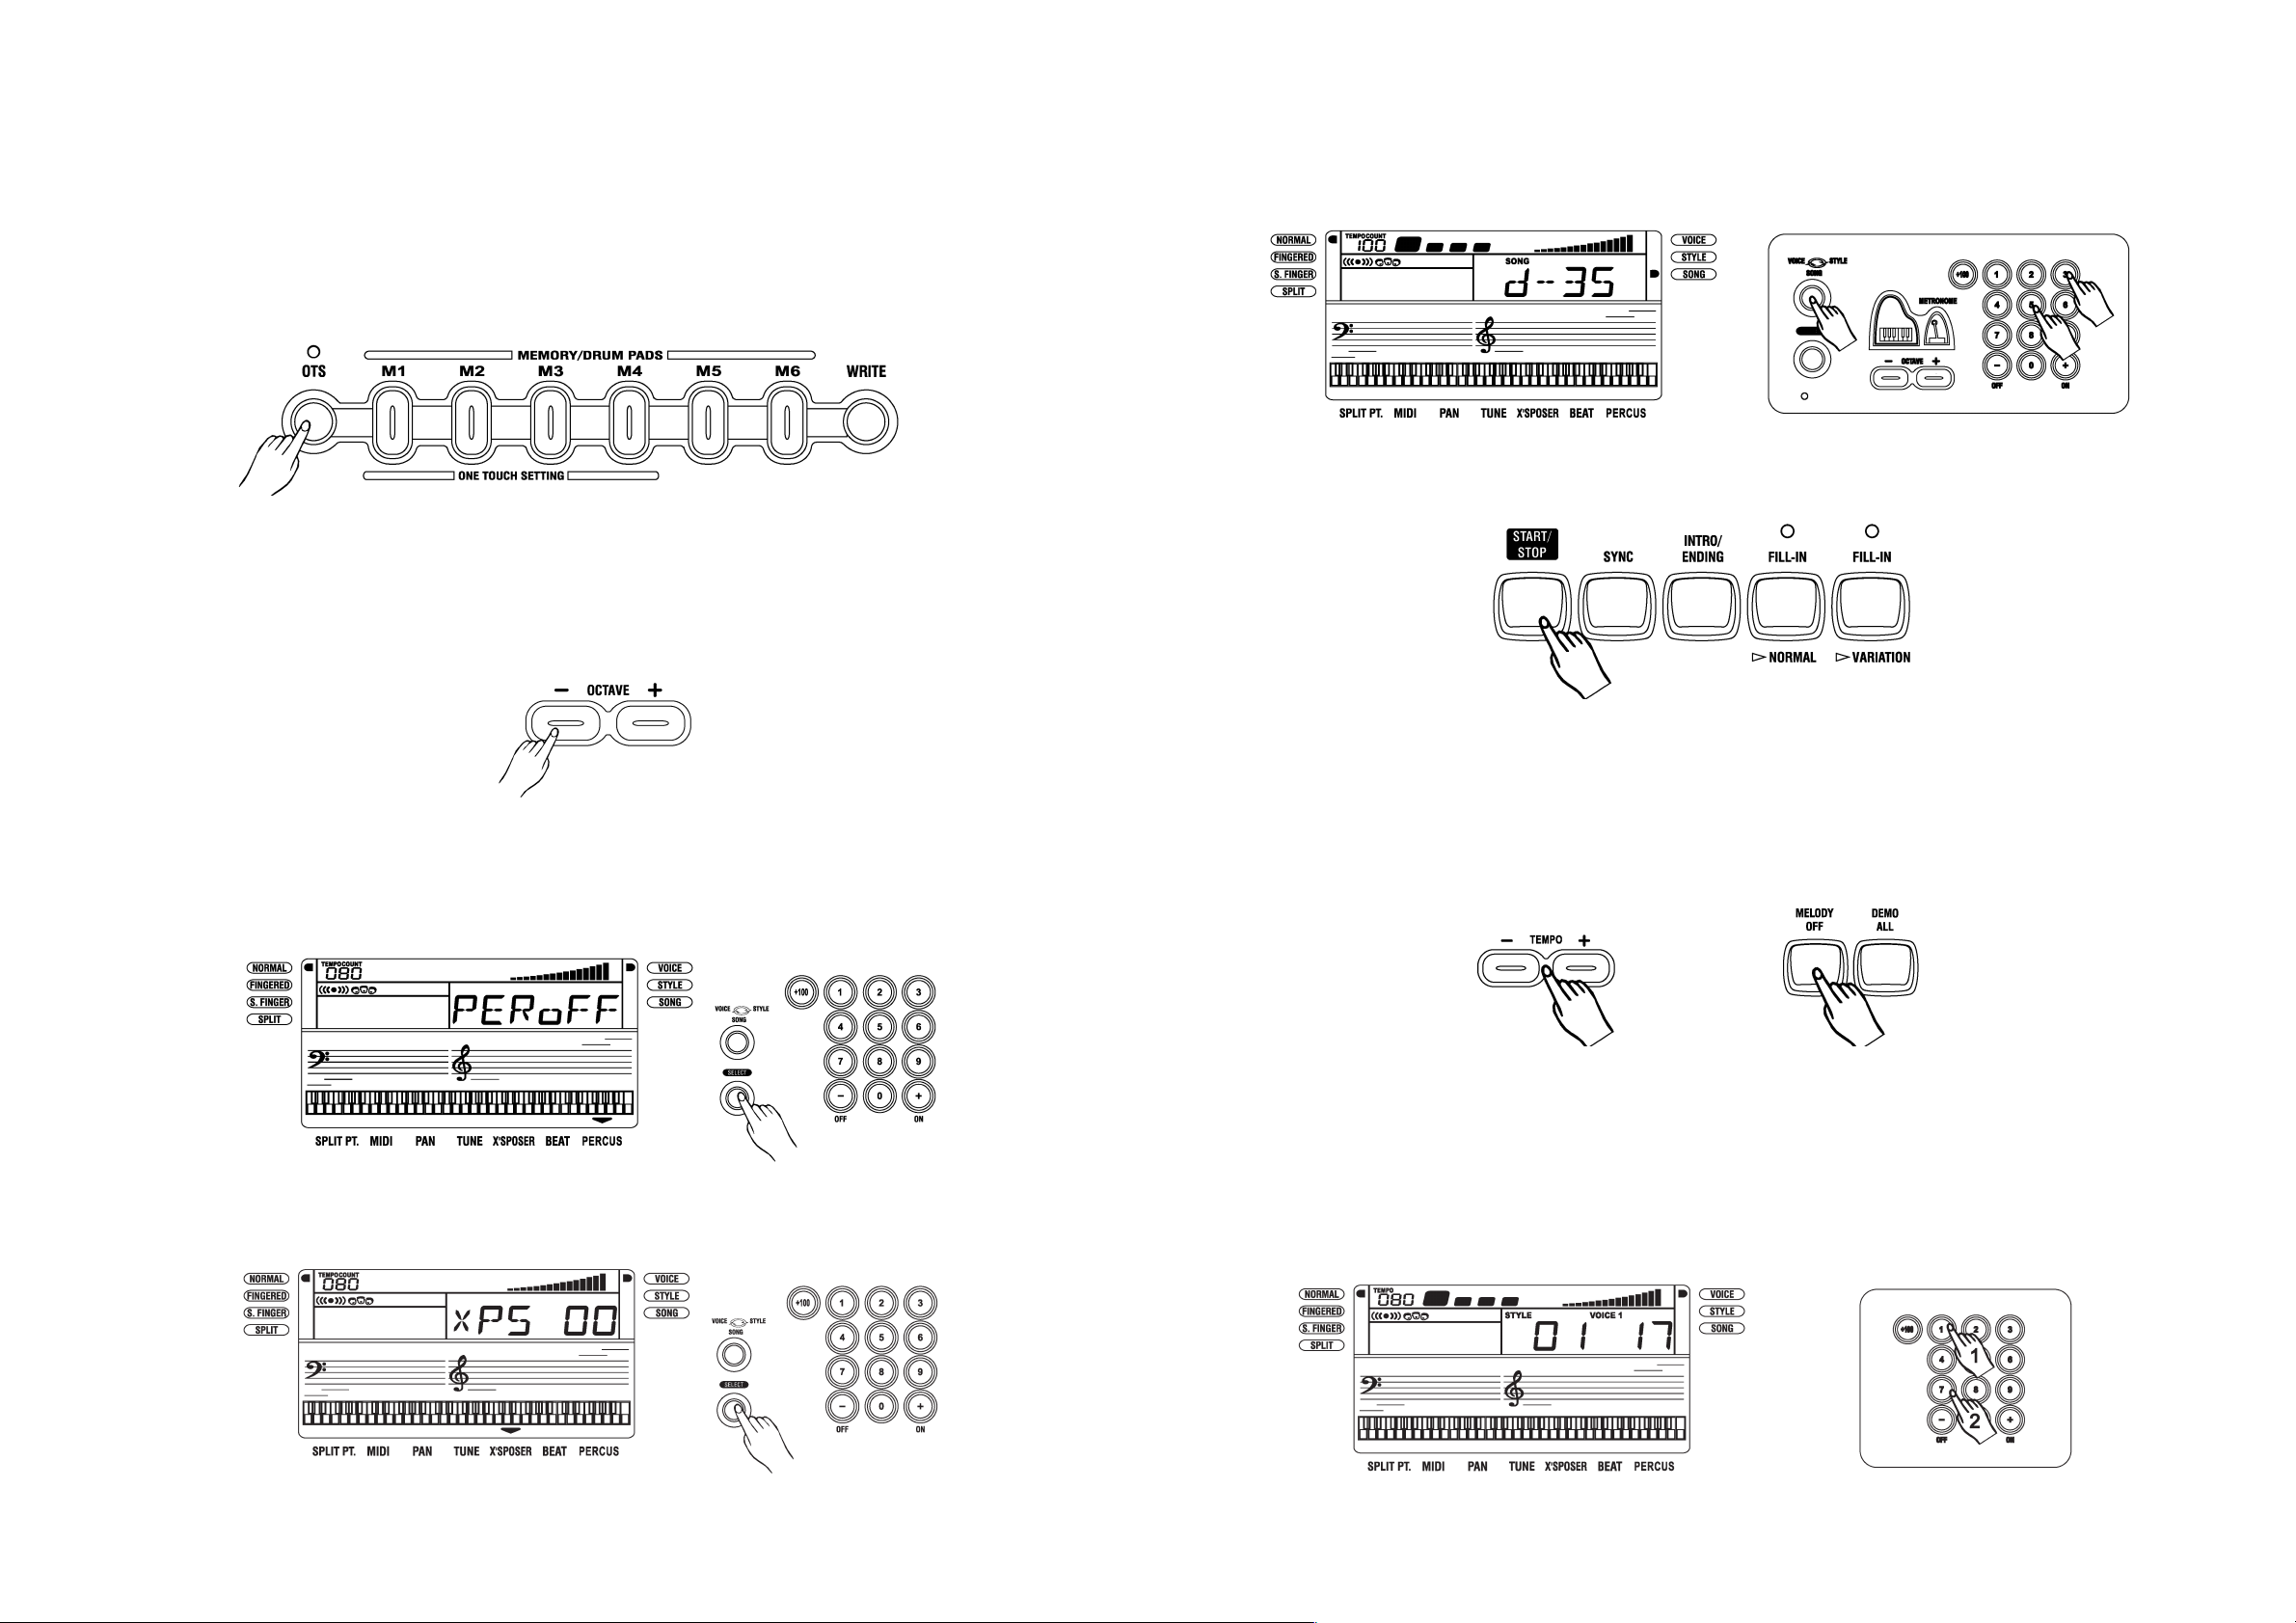
Abspielen eines einzelnen Demo-Songs
• Drücken Sie die Taste "VOICE/STYLE/SONG".
• Geben Sie die gewünschte Nummer des Demo-Songs mit der Zahlentastatur ein. Drücken Sie beispiels-
weise die Taste "3" und danach die Taste "5".
• Drücken Sie die Taste "START/STOP", um den gerade ausgewählten Demo-Song zu starten. Der Song
spielt dann in einer Endlosschleife, nach dem Ende startet er erneut. Drücken Sie die Taste
"START/STOP", um den Abspielvorgang zu beenden.
Mit dem Demo-Song "mitspielen"
Es ist möglich, bei dem gerade laufenden Demo-Song mitzuspielen.
• Während das Keyboard den Demo-Song spielt, drücken Sie die Taste "MELODY OFF". Der Melodie-Teil
des gerade laufenden Demo-Songs wird abgeschaltet.
•Mit den beiden "TEMPO"-Tasten (+/-) können Sie nun die Geschwindigkeit des Songs einstellen.
•Drücken Sie erneut die "MELODY OFF"-Taste, dann wird der Melodie-Teil wieder eingeschaltet.
13. Grundfunktionen
"VOICE"-Modus wählen, Instrumente ("Voices") auswählen/spielen
Das Keyboard verfügt über 136 PCM-Instrumente und -Schlagzeugtöne. Bevor man diese auswählen kann,
sollten Sie sicherstellen, dass der "VOICE"-Modus aktiv ist (im LC-Display ist eine Markierung neben "VOICE").
Drücken Sie die Taste "VOICE/STYLE/SONG", um den Modus umzuschalten.
Bild 13
Bild 14
Bild 15
Bild 16
Page 12
12
Instrumente mit den Tasten "-/OFF" und "+/ON" (unten im Zahlenblock) auswählen
Wenn der "VOICE"-Modus aktiviert ist, können Sie mit diesen beiden Tasten die Instrumente/Voices auswählen. Drücken Sie die Tasten einfach mehrmals, bis das gewünschte Instrument aktiv ist. Oder Sie
drücken und halten die Taste "-/OFF" bzw. "+/ON", dann werden die Instrumente schnell weitergeschaltet.
Die Nummer des ausgewählten Instruments wird im LC-Display angezeigt.
Instrumente mit den Zahlentasten des Zahlenblocks auswählen
Die Zahlentasten dienen zum direkten Auswählen der gewünschten Instrumente ("Voices"). So müssen Sie
sie nicht umständlich und langsam per "-/OFF"- bzw. "+/ON"-Taste durchschalten.
Zweistellige Nummern der Instrumente können eingegeben werden, indem man nacheinander die entsprechende Zahlentaste drückt. Drücken Sie für das Instrument 17 zuerst kurz die Taste "1" und lassen Sie sie
wieder los, drücken Sie dann die Taste "7".
Dreistellige Zahlen werden eingegeben, indem Sie zuerst die Taste "+100" drücken und danach die letzten
beiden Stellen eingeben, wie oben beschrieben. Für Instrument 117 also die Taste "+100", dann "1", dann
"7".
Zweiklang-Effektfunktion ("Dual voice")
Um einen Zweiklang-Effekt zu aktivieren, wählen Sie zuerst ein Instrument ("Voice") mit den Zahlentasten
aus. Drücken Sie dann die Taste "DUAL". Im LC-Display erscheint VOICE 2. Geben Sie danach die Nummer des zweiten Instruments ein.
Um die Funktion wieder auszuschalten, drücken Sie einfach die Taste "DUAL" nochmals, im Display
erscheint VOICE 1.
Bild 17
Bild 18
Bild 19
65
Lorsque le clavier joue à la cadence du métronome, vous pouvez à tout moment régler un autre
rythme d'accompagnement ("Style") à l'aide des touches du pavé numérique (le clavier multimédia
doit être en mode "Style" qui est à régler par la touche "VOICE/STYLE/SONG").
Modifier l'affectation des touches pour l'accompagnement
Appuyez sur la touche "SELECT" jusqu'à ce que la petite flèche à côté de "SPLIT PT."s'affiche à l'écran.
Puis, appuyez sur cette touche du clavier où vous souhaitez effectuer la modification de l'affectation. La
note correspondante s'affiche à l'écran.
Réglage du volume des différentes pistes du rythme d'accompagnement, mixer
Le clavier multimédia dispose de 5 pistes d'accompagnement différentes:
RHYTHM, BASS, ORCHESTRATION, LOWER VOICE, UPPER VOICE.
Les touches correspondantes du mixer permettent de régler le volume de chaque piste.
Les touches supérieures permettent d'augmenter le volume, les touches inférieures de baisser le volume.
Si vous appuyez simultanément sur les deux touches d'une piste (par ex. "BASS"), la piste concernée est
désactivée.
Pour réactiver la piste, appuyez encore une fois simultanément sur les deux touches.
Figure 32
Figure 33
Figure 34
Page 13

64
Mode "FINGERED" (à plusieurs voix): Annexe A:
Mode "SINGLE FINGER" (à une seule voix): Annexe B:
• Pour terminer la lecture, appuyez encore une fois sur la touche "START/STOP".
Variations
Pendant la lecture:
Chaque rythme d'accompagnement possède deux variations: "NORMAL" et "VARIATIONS".
Pendant la lecture, il est à tout moment possible de permuter entre les deux variations à l'aide des touches
"FILL-IN NORMAL" ou "FILL-IN VARIATIONS". Le clavier multimédia produit automatiquement le passage doux entre les deux variations!
Synchronisation du début du rythme d'accompagnement, touche "SYNC"
Cela signifie que la reproduction du rythme d'accompagnement réglé ne démarre que si vous commencer
à jouer.
• Appuyez sur la touche "SYNC". En haut de l'écran, l'affichage se met à clignoter.
• Jouez un son et l'accompagnement démarre.
Lancer le rythme d'accompagnement avec un son d'introduction, touche "INTRO/ENDING"
Au lieu de démarrer immédiatement, la lecture du rythme d'accompagnement ne commence qu'après la
lecture d'un court son d'introduction.
• Appuyez sur la touche "INTRO/ENDING".
• Appuyez sur la touche "START/STOP" et jouez ensuite un accord (en mode "FINGERED" ou "SINGLE
FINGER"). En fonction de l'accord joué, le clavier multimédia joue un son intro et après le rythme d'accompagnement sélectionné.
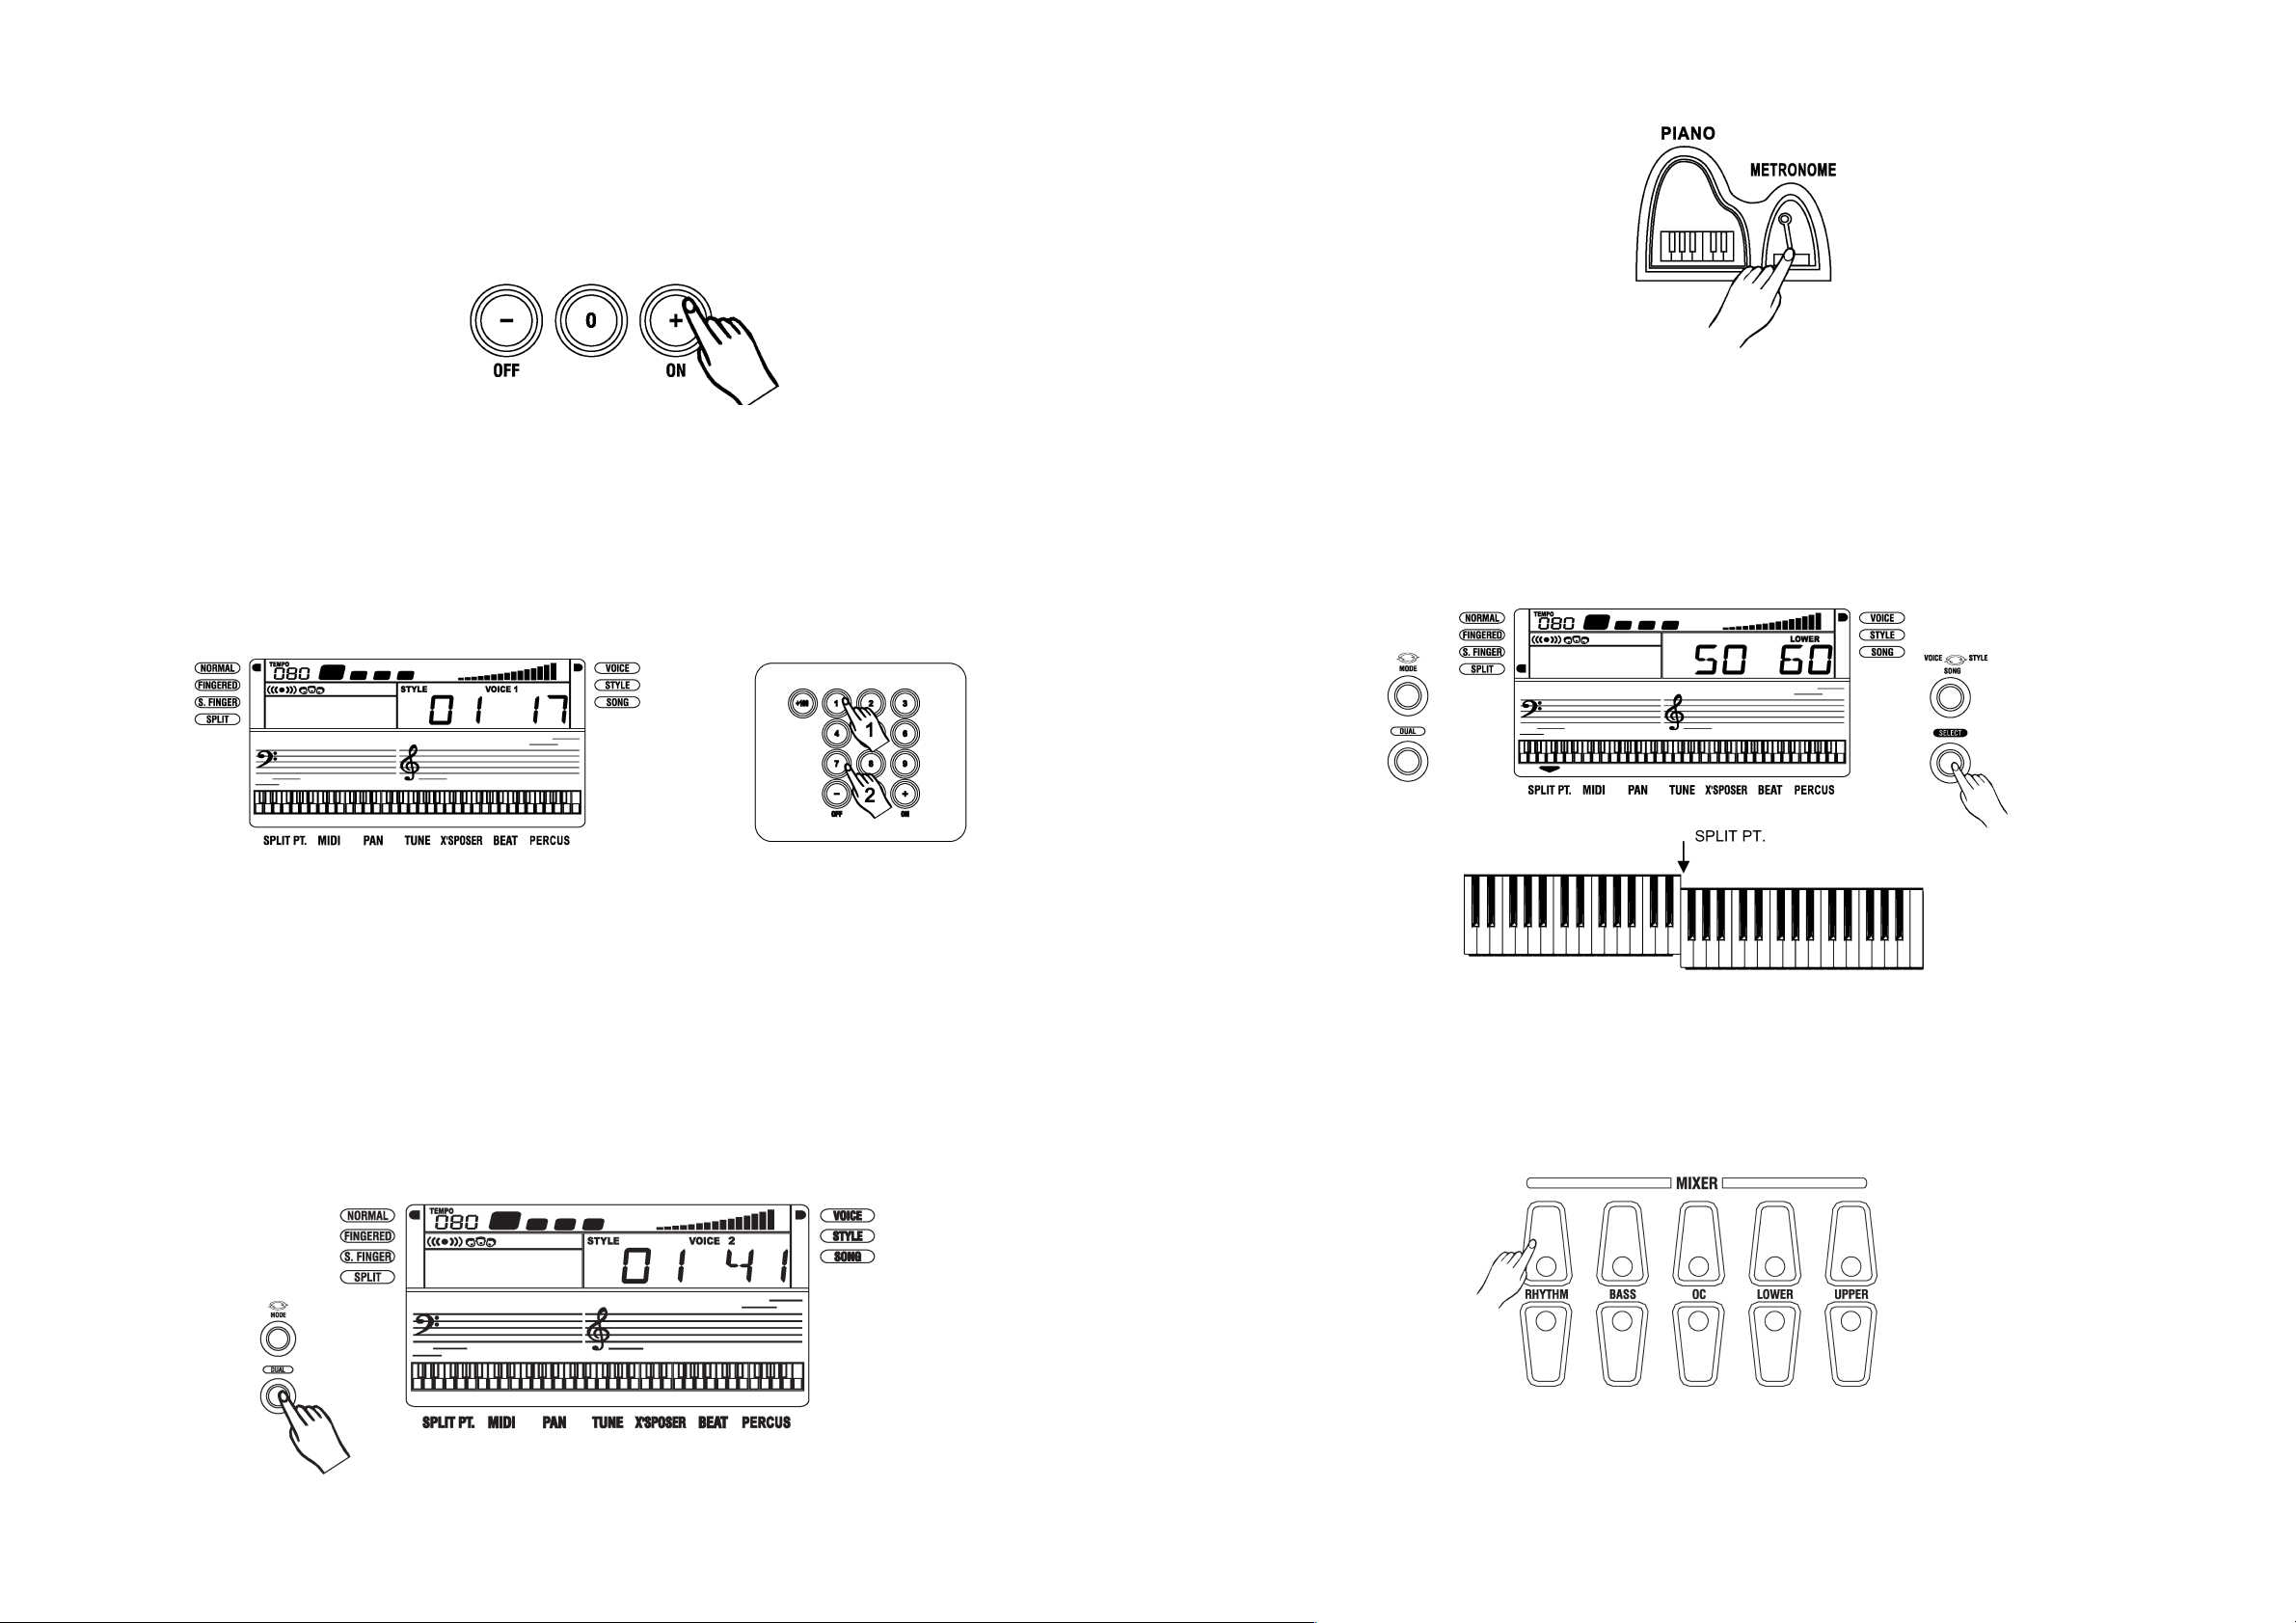
Allumer/éteindre le métronome, touche "METRONOME"
Lancez la reproduction du métronome en appuyant sur la touche "METRONOME". Pour désactiver le
métronome, vous n'avez qu'à appuyer encore une fois sur la touche "METRONOME".
Figure 29
à plusieurs voix à une seule voix
Figure 30
Figure 31
13
Schnellauswahl des "Piano"-Instruments (Taste "PIANO")
Um schnell auf das meistverwendete "Piano"-Instrument umzuschalten, drücken Sie die Taste "PIANO".
Ein nochmaliger Druck auf die Taste "PIANO" aktiviert das zuletzt eingestellte Instrument.
Sostenuto-Effekt (Taste "SUSTAIN")
Drücken Sie die Taste "SUSTAIN", um den Effekt ein- oder auszuschalten. Im LC-Display erscheint entweder SUST OFF (ausgeschaltet) oder SUST ON (eingeschaltet).
Die Töne werden beim Spielen länger angehalten und erhalten dadurch mehr Volumen.
Tonhöhen-Kurve einstellen (Tasten "PITCH BEND")
Die beiden Tasten "PITCH BEND" erlauben es, die gerade auf dem Keyboard gespielten Noten in der Tonhöhe nach oben oder unten zu verändern. Drücken Sie die oben liegende Taste, um die Tonhöhe nach oben
zu verändern oder die untere Taste, um die Tonhöhe nach unten zu verschieben.
Digital Signal Processor (Taste "DSP")
Der eingebaute DSP besteht aus zwei Einheiten: "Reverb" und "Chorus". Diese ergänzen die gespielten
Töne um "Reverb"- und "Chorus"-Effekte.
Um den DSP ein- oder auszuschalten, drücken Sie einfach die "DSP"-Taste. Bei eingeschaltetem DSP
erscheint das rechts abgebildete Symbol im LC-Display.
Bild 20
Bild 21
Bild 22
Bild 23
Page 14

14
14. Automatische Begleitung
"Style"-Modus wählen, Auswahl der Begleitrhythmen ("Styles")
Das Keyboard verfügt über 100 verschiedene Begleitrhythmen. Schalten Sie mit der
"VOICE/STYLE/SONG"-Taste in den "Style"-Modus um (im LC-Display erscheint neben "STYLE" eine
Markierung).
Begleitrhythmen mit Tasten "-/OFF" und "+/ON" (unten im Zahlenblock) wählen
Im "STYLE"-Modus werden mit diesen beiden Tasten die Begleitrhythmen ausgewählt. Drücken Sie die
Tasten einfach mehrmals, bis der gewünschte Begleitrhythmus aktiv ist. Oder Sie drücken und halten die
Taste "-/OFF" bzw. "+/ON", dann werden die Begleitrhythmen schnell weitergeschaltet.
Die Nummer des ausgewählten Begleitrhythmus wird im LC-Display angezeigt.
Begleitrhythmen mit den Zahlentasten des Zahlenblocks auswählen
Die Zahlentasten dienen zum direkten Auswählen des gewünschten Begleitrhythmus ("Styles"). So müssen
Sie sie nicht umständlich und langsam per "-/OFF"- bzw. "+/ON"-Taste durchschalten.
Zweistellige Nummern der Begleitrhythmen können eingegeben werden, indem man nacheinander die entsprechende Zahlentaste drückt. Drücken Sie für den Begleitrhythmus 15 zuerst kurz die Taste "1" und lassen Sie sie wieder los, drücken Sie dann die Taste "5".
Gewählten Begleitrhythmus ("Style") abspielen, Taste "START/STOP"
• Drücken Sie die Taste "START/STOP", um den Abspielvorgang zu starten.
• Drücken Sie die Taste "START/STOP" erneut, um den Abspielvorgang anzuhalten.
Eine Zahleneingabe während des Abspielvorgangs ist ebenfalls möglich. Wählen Sie per Taste
"VOICE/STYLE/SONG" entweder den Modus "Voice" oder den Modus "Style" aus und geben Sie
dann per Zahlentaste das gewünschte Instrument ("Voice") oder den gewünschten Begleitrhythmus
("Style") ein.
Bild 24
Bild 25
Bild 26
63
Sélection des rythmes d'accompagnement à l'aide des touches du pavé numérique
Les touches du pavé numérique permettent la sélection directe des rythmes d'accompagnement souhaités
("Styles"). Cela évite de devoir commuter de façon embarrassante et lente par la touche "-/OFF" ou
"+/ON".
Il est possible d'introduire un nombre à deux caractères d'un rythme d'accompagnement en appuyant à
tour de rôle les touches correspondantes du pavé numérique. Pour le rythme d'accompagnement 15, par
exemple, appuyez d'abord sur la touche "1", relâchez-la et appuyez ensuite sur la touche "5".
Lecture du rythme d'accompagnement sélectionné ("Style"), touche "Marche/arrêt"
• Appuyez sur la touche "START/STOP" pour lancer la lecture.
• Appuyez sur la touche "START/STOP" pour arrêter la lecture.
Il est également possible d'introduire un nombre pendant la lecture. A l'aide de la touche "VOICE/STYLE/SONG" sélectionnez soit le mode "Voice" soit le mode "Style" et introduisez l'instrument ("Voice") ou le rythme d'accompagnement ("Style") souhaité via le pavé numérique.
Réglage de la vitesse, touche "TEMPO +/-"
Réglez maintenant la vitesse du rythme d'accompagnement à l'aide des deux touches "TEMPO" (+/-). A
l'écran s'affiche la vitesse.
Quand vous appuyez simultanément sur les deux touches, la vitesse d'origine est réglée.
Utilisation de l'accompagnement automatique
• Réglez correctement le mode par la touche "MODE" ("FINGERED" (à plusieurs voix), "SINGLE FINGER" (à
une seule voix)).
• Sélectionnez le type de variation à l'aide des touches "FILL-IN NORMAL" ou "FILL-IN VARIATION".
• Appuyez sur la touche "START/STOP" pour lancer la lecture du rythme d'accompagnement sélectionné.
• Jouez un accord. La procédure dépend du mode réglé. Tenez également compte des annexes comprenant les détails pour jouer un accord.
Figure 26
Figure 27
Figure 28
Page 15

62
Processeur de signaux numériques (touche "DSP")
Le DSP incorporé se compose de deux éléments: "Reverb" et "Chorus". Ceux-ci complètent les sons joués
des effets "Reverb" et "Chorus".
Pour activer ou désactiver le DSP, vous n'avez qu'à appuyer sur la touche "DSP". Lorsque la fonction DSP
est activée, le symbole figurant à droite s'affiche à l'écran.
14. Accompagnement automatique
Sélection du mode "Style", sélection des rythmes d'accompagnement ("Styles")
Le clavier multimédia dispose de 100 rythmes d'accompagnement différents. Permutez en mode "Style" à
l'aide de la touche "VOICE/STYLE/SONG" (un repère s'affiche à côté de "STYLE" à l'écran).
Sélection des rythmes d'accompagnement à l'aide des touches "-/OFF" et "+/ON" (situées en bas du
pavé numérique)
Si vous êtes en mode "STYLE", ces deux touches permettent de sélectionner les rythmes d'accompagnement. Appuyez plusieurs fois sur ces touches jusqu'à ce que le rythme d'accompagnement souhaité soit
sélectionné. Ou maintenez appuyée la touche "-/OFF" ou "+/ON" pour faire défiler rapidement les rythmes
d'accompagnement.
Le numéro du rythme d'accompagnement sélectionné s'affiche à l'écran à cristaux liquides.
Figure 22
Figure 23
Figure 24
Figure 25
15
Geschwindigkeit einstellen, Tasten "TEMPO +/-"
Mit den beiden Tasten "TEMPO +/-" können Sie die Geschwindigkeit des Begleitrhythmus verändern. Im
Display wird die Geschwindigkeit angezeigt.
Wenn Sie beide Tasten gleichzeitig drücken, wird die Geschwindigkeit wieder auf die Grundeinstellung
zurückgestellt.
Verwenden der automatischen Begleitung
• Stellen Sie den Modus über die "MODE"-Taste korrekt ein ("FINGERED", "SINGLE FINGER").
• Wählen Sie die Variationsart mit den Tasten "FILL-IN NORMAL" oder "FILL-IN VARIATION".
• Drücken Sie die Taste "START/STOP", um den Abspielvorgang des eingestellten Begleitrhythmus zu
beginnen.
• Spielen Sie einen Akkord. Die Vorgehensweise ist abhängig vom eingestellten Modus. Beachten Sie den
Anhang für Details für das Spielen eines Akkords.
Modus "FINGERED": Anhang A
Modus "SINGLE FINGER": Anhang B
• Um den Abspielvorgang zu beenden, drücken Sie die "START/STOP"-Taste erneut.
Variationen
Während dem Abspielvorgang:
Jeder Begleitrhythmus hat zwei verschiedene Variationen: "NORMAL" und "VARIATIONS".
Sie können jederzeit während des Abspielvorgangs zwischen den beiden Variationen umschalten, und zwar
mit den Tasten "FILL-IN NORMAL" und "FILL-IN VARIATIONS". Das Keyboard erzeugt automatisch einen
passenden sanften Übergang zwischen den beiden Variationen!
Bild 27
Bild 28
Bild 29
Page 16

16
Start des Begleitrhythmus synchronisieren, Taste "SYNC"
Dies hat den Sinn, die Wiedergabe des eingestellten Begleitrhythmus erst dann zu starten, wenn Sie mit
dem Spielen beginnen.
•Drücken Sie die "SYNC"-Taste. Oben im LC-Display beginnt die Anzeige zu blinken.
• Spielen Sie einen Ton, die Begleitung startet.
Begleitrhythmus mit einem Intro-Sound starten, Taste "INTRO/ENDING"
Anstatt dass der Begleitrhythmus sofort startet, wird am Anfang ein kurzer Intro-Sound gespielt.
•Drücken Sie die "INTRO/ENDING"-Taste.
•Drücken Sie die "START/STOP"-Taste und spielen Sie dann einen Akkord (im Modus "FINGERED" oder
"SINGLE FINGER"). Das Keyboard spielt nun abhängig vom gespielten Akkord einen Intro-Sound und
danach den gewählten Begleitrhythmus.
Metronom ein/aus, Taste "METRONOME"
Starten Sie die Wiedergabe des Metronoms durch Drücken der "METRONOME"-Taste. Um das Metronom
auszuschalten, drücken Sie einfach erneut die "METRONOME"-Taste.
Während das Keyboard den Metronom-Takt spielt, können Sie jederzeit einen anderen Begleitrhythmus ("Style") mit den Zahlentasten einstellen (Keyboard muss im "Style"-Modus sein, mit Taste
"VOICE/STYLE/SONG" einstellen).
Bild 30
Bild 31
Bild 32
61
Des nombres à trois caractères doivent être introduits en appuyant d'abord sur la touche "+100" et en
entrant ensuite les deux autres caractères, comme décrit ci-dessus. Pour l'instrument 117 par exemple,
appuyez sur la touche "+100", puis sur "1", puis sur "7".
Fonction d'effet bitonal ("Dual Voice", touche "DUAL")
Pour activer l'effet bitonal, sélectionnez d'abord un instrument ("Voice") à l'aide du pavé numérique. Puis,
appuyez sur la touche "DUAL". A l'écran LCD s'affiche VOICE 2. Entrez ensuite le numéro du deuxième
instrument.
Pour désactiver cette fonction, appuyez simplement encore une fois sur la touche "DUAL", à l'écran s'affiche VOICE 1.
Sélection rapide de l'instrument de piano (touche "PIANO")
Pour sélectionner rapidement le piano, l'instrument le plus souvent utilisé, appuyez sur la touche "PIANO".
Une deuxième pression sur la touche "PIANO" active l'instrument sélectionné précédemment.
Effet de soutien de son Sostenuto (touche "SUSTAIN")
Appuyez sur la touche "SUSTAIN" pour activer ou désactiver cet effet. A l'écran s'affiche soit
SUST OFF (effet désactivé) soit SUST ON (effet activé).
Les sons seront maintenus plus longtemps lors de la lecture et semblent être de cette manière plus volumineux.
Réglage de la courbe de tonalité (touches "PITCH BEND")
Les deux touches "PITCH BEND" permettent de baisser ou d'augmenter la hauteur des sons joués sur le
clavier multimédia. Appuyez sur la touche supérieure pour augmenter la hauteur des sons ou la touche inférieure pour baisser la hauteur.
Figure 19
Figure 20
Figure 21
Page 17

60
• Pendant que le clavier multimédia joue la chanson de démonstration, appuyez sur la touche "MELODY
OFF". La mélodie accompagnant la chanson de démonstration en cours de lecture est éteinte.
• Réglez maintenant la vitesse de la chanson à l'aide des deux touches "TEMPO" (+/-).
• Appuyez encore une fois sur la touche "MELODY OFF" pour relancer la lecture de la mélodie.
13. Fonctions de base
Sélectionner le mode de voix "Voice", sélection/lecture des instruments ("Voices")
Le clavier multimédia offre le choix entre 136 instruments PCM et sons de batterie. Avant de les choisir,
assurez-vous que le mode "VOICE" est activé (l'écran LCD affiche un repère à côté de "VOICE").
Appuyez sur la touche "VOICE/STYLE/SONG"pour permuter entre les modes réglables.
Sélection des instruments à l'aide des touches "-/OFF" et "+/ON" (situées en bas du pavé numérique)
Lorsque le mode "VOICE" est activé, ces deux touches permettent la sélection des instruments/voix.
Appuyez plusieurs fois sur ces touches jusqu'à ce que l'instrument souhaité soit sélectionné. Ou maintenez
appuyée la touche "-/OFF" ou "+/ON" pour faire défiler rapidement les instruments.
Le numéro de l'instrument sélectionné s'affiche à l'écran à cristaux liquides.
Sélection des instruments à l'aide des touches du pavé numérique
Les touches du pavé numérique permettent la sélection directe des instruments souhaités ("Voices"). Cela
évite de devoir commuter de façon embarrassante et lente par la touche "-/OFF" ou "+/ON".
Il est possible d'introduire un nombre à deux caractères d'un instrument en appuyant à tour de rôle les
touches correspondantes du pavé numérique. Pour l'instrument 17, par exemple, appuyez d'abord sur la
touche "1", relâchez-la et appuyez ensuite sur la touche "7".
Figure 15
Figure 16
Figure 17
Figure 18
17
Tastatur-Aufteilung für die Begleitung verändern
Drücken Sie die "SELECT"-Taste so oft, bis der kleine Pfeil unten im LC-Display bei "SPLIT PT." steht.
Drücken Sie dann die Taste der Klaviatur, an der Sie die Teilung vornehmen wollen. Die entsprechende Note
wird im Display angezeigt.
Lautstärkeeinstellung der einzelnen Spuren des Begleitrhythmus verändern, Mixer
Das Keyboard hat 5 verschiedene Begleitspuren:
RHYTHM, BASS, ORCHESTRATION, LOWER VOICE, UPPER VOICE.
Mit den jeweiligen Tasten der Mixer-Einstellung können Sie die Lautstärke der jeweiligen Spur einstellen.
Die oberen Tasten erhöhen die Lautstärke, die unteren verringern sie.
Werden beide Tasten einer Spur (z.B. "BASS") gleichzeitig gedrückt, wird die jeweilige Spur ausgeschaltet.
Um die Spur wieder einzuschalten, drücken Sie einfach die beiden Tasten nochmals gleichzeitig.
"One-Touch-Setting"
Diese Funktion hat für jede der 100 Begleitrhythmen je 4 Voreinstellungen mit unterschiedlichen Variationen.
So haben Sie insgesamt 400 vordefinierte Einstellungen!
• Drücken Sie die Taste "OTS".
• Drücken Sie die Taste "START/STOP", um den eingestellten Begleitrhythmus abzuspielen.
• Während der Wiedergabe drücken Sie eine der vier OTS-Tasten: "M1", "M2", "M3", "M4".
• Um die OTS-Funktion wieder abzuschalten, drücken Sie einfach erneut die "OTS"-Taste.
Bild 33
Bild 34
Bild 35
Page 18

18
15. Allgemeine Bedienung & Einstellung
Verändern der eingestellten Oktave, Taste "OCTAVE +/-"
Verändern Sie die gesamte Tonlage ein oder zwei Oktaven nach oben oder unten mit den "OCTAVE"Tasten.
Aktivieren und Spielen der Drumpads ("SELECT"/"PERCUS")
Drücken Sie die "SELECT"-Taste so oft, bis unten im LC-Display der Pfeil bei "PERCUS" steht. Drücken Sie
danach die Taste "+/ON" unten im Zahlenfeld. Die sechs Tasten "M1" bis "M6" unter dem LC-Display
arbeiten nun als Drumpads.
Um diese Funktion wieder auszuschalten, drücken Sie die "SELECT"-Taste sooft, bis unten im LC-Display
der Pfeil bei "PERCUS" steht. Drücken Sie dann die Taste "-/OFF" unten im Zahlenfeld.
Einstellung der Tonhöhe des Keyboards ("SELECT"/"X´SPOSER")
Drücken Sie die "SELECT"-Taste so oft, bis unten im LC-Display der Pfeil bei "X´SPOSER" steht. Stellen
Sie die Tonhöhe in Halbtonschritten mit den Tasten "+/ON" bzw. "-/OFF" nach Wunsch ein.
Feineinstellung der Tonhöhe ("SELECT"/"TUNE")
Drücken Sie die "SELECT"-Taste so oft, bis unten im LC-Display der Pfeil bei "TUNE" steht. Verändern sie
dann die Tonhöhe mit den Tasten "+/ON" bzw. "-/OFF".
Bild 37
Bild 38
Bild 39
Bild 36
59
• Réglez le volume souhaité.
• Appuyez sur la touche "DEMO ALL". Le clavier multimédia commence à jouer les 100 chansons de
démonstration. Les touches "+/ON" et "-/OFF" du pavé numérique permettent de sélectionner la chanson suivante ou précédente.
• Appuyez encore une fois sur la touche "DEMO ALL" pour arrêter la reproduction.
Lecture d'une chanson de démonstration sélectionnée
• Appuyez sur la touche "VOICE/STYLE/SONG".
• Introduisez le numéro de la chanson souhaitée à l'aide du pavé numérique. Appuyez par exemple sur la
touche "3" et ensuite sur la touche "5".
• Appuyez sur la touche "START/STOP" pour lancer la reproduction de la chanson de démonstration
sélectionnée. La chanson est ainsi jouée dans une boucle infinie. Ayant fini, elle démarre à nouveau.
Appuyez encore une fois sur la touche "START/STOP" pour arrêter la reproduction.
"Accompagner" la chanson de démonstration
Il est possible d'accompagner la chanson de démonstration en cours de lecture.
Figure 11
Figure 12
Figure 13
Figure 14
Page 19

58
10. Raccordement d'un amplificateur externe
Il est possible de raccorder un amplificateur externe avec niveau d'entrée Line à la prise femelle jack de
6.35mm "AUX.OUT" située sur la face arrière du clavier multimédia.
Baissez le volume du clavier multimédia à zéro et éteignez-le.
Raccordez l'amplificateur externe. Raccordez-le par ex. à la douille de raccordement AUX-IN
ou TAPE-IN de l'amplificateur. Il faut utiliser une entrée à niveau Line.
Baissez le volume de l'amplificateur.
Allumez l'amplificateur et ensuite le clavier multimédia.
Puis, augmentez soigneusement le volume du clavier multimédia et de l'amplificateur.
11. Raccordement d'appareils Midi
Sur la face arrière du clavier multimédia sont disposées trois connecteurs femelles MIDI différents:
MIDI-IN pour la réception de données d'un appareil MIDI externe
MIDI-OUT pour l'émission des données MIDI produites sur le clavier multimédia vers un appareil exter-
ne raccordé.
MIDI-THRU pour la transmission de données par un appareil MIDI externe à un autre appareil MIDI.
12. Lecture de chansons de démonstration
100 chansons de démonstration sont mémorisées dans le clavier multimédia pour démontrer la performance du clavier multimédia.
• Allumez le clavier multimédia.
Figure 8
Figure 9
Figure 10
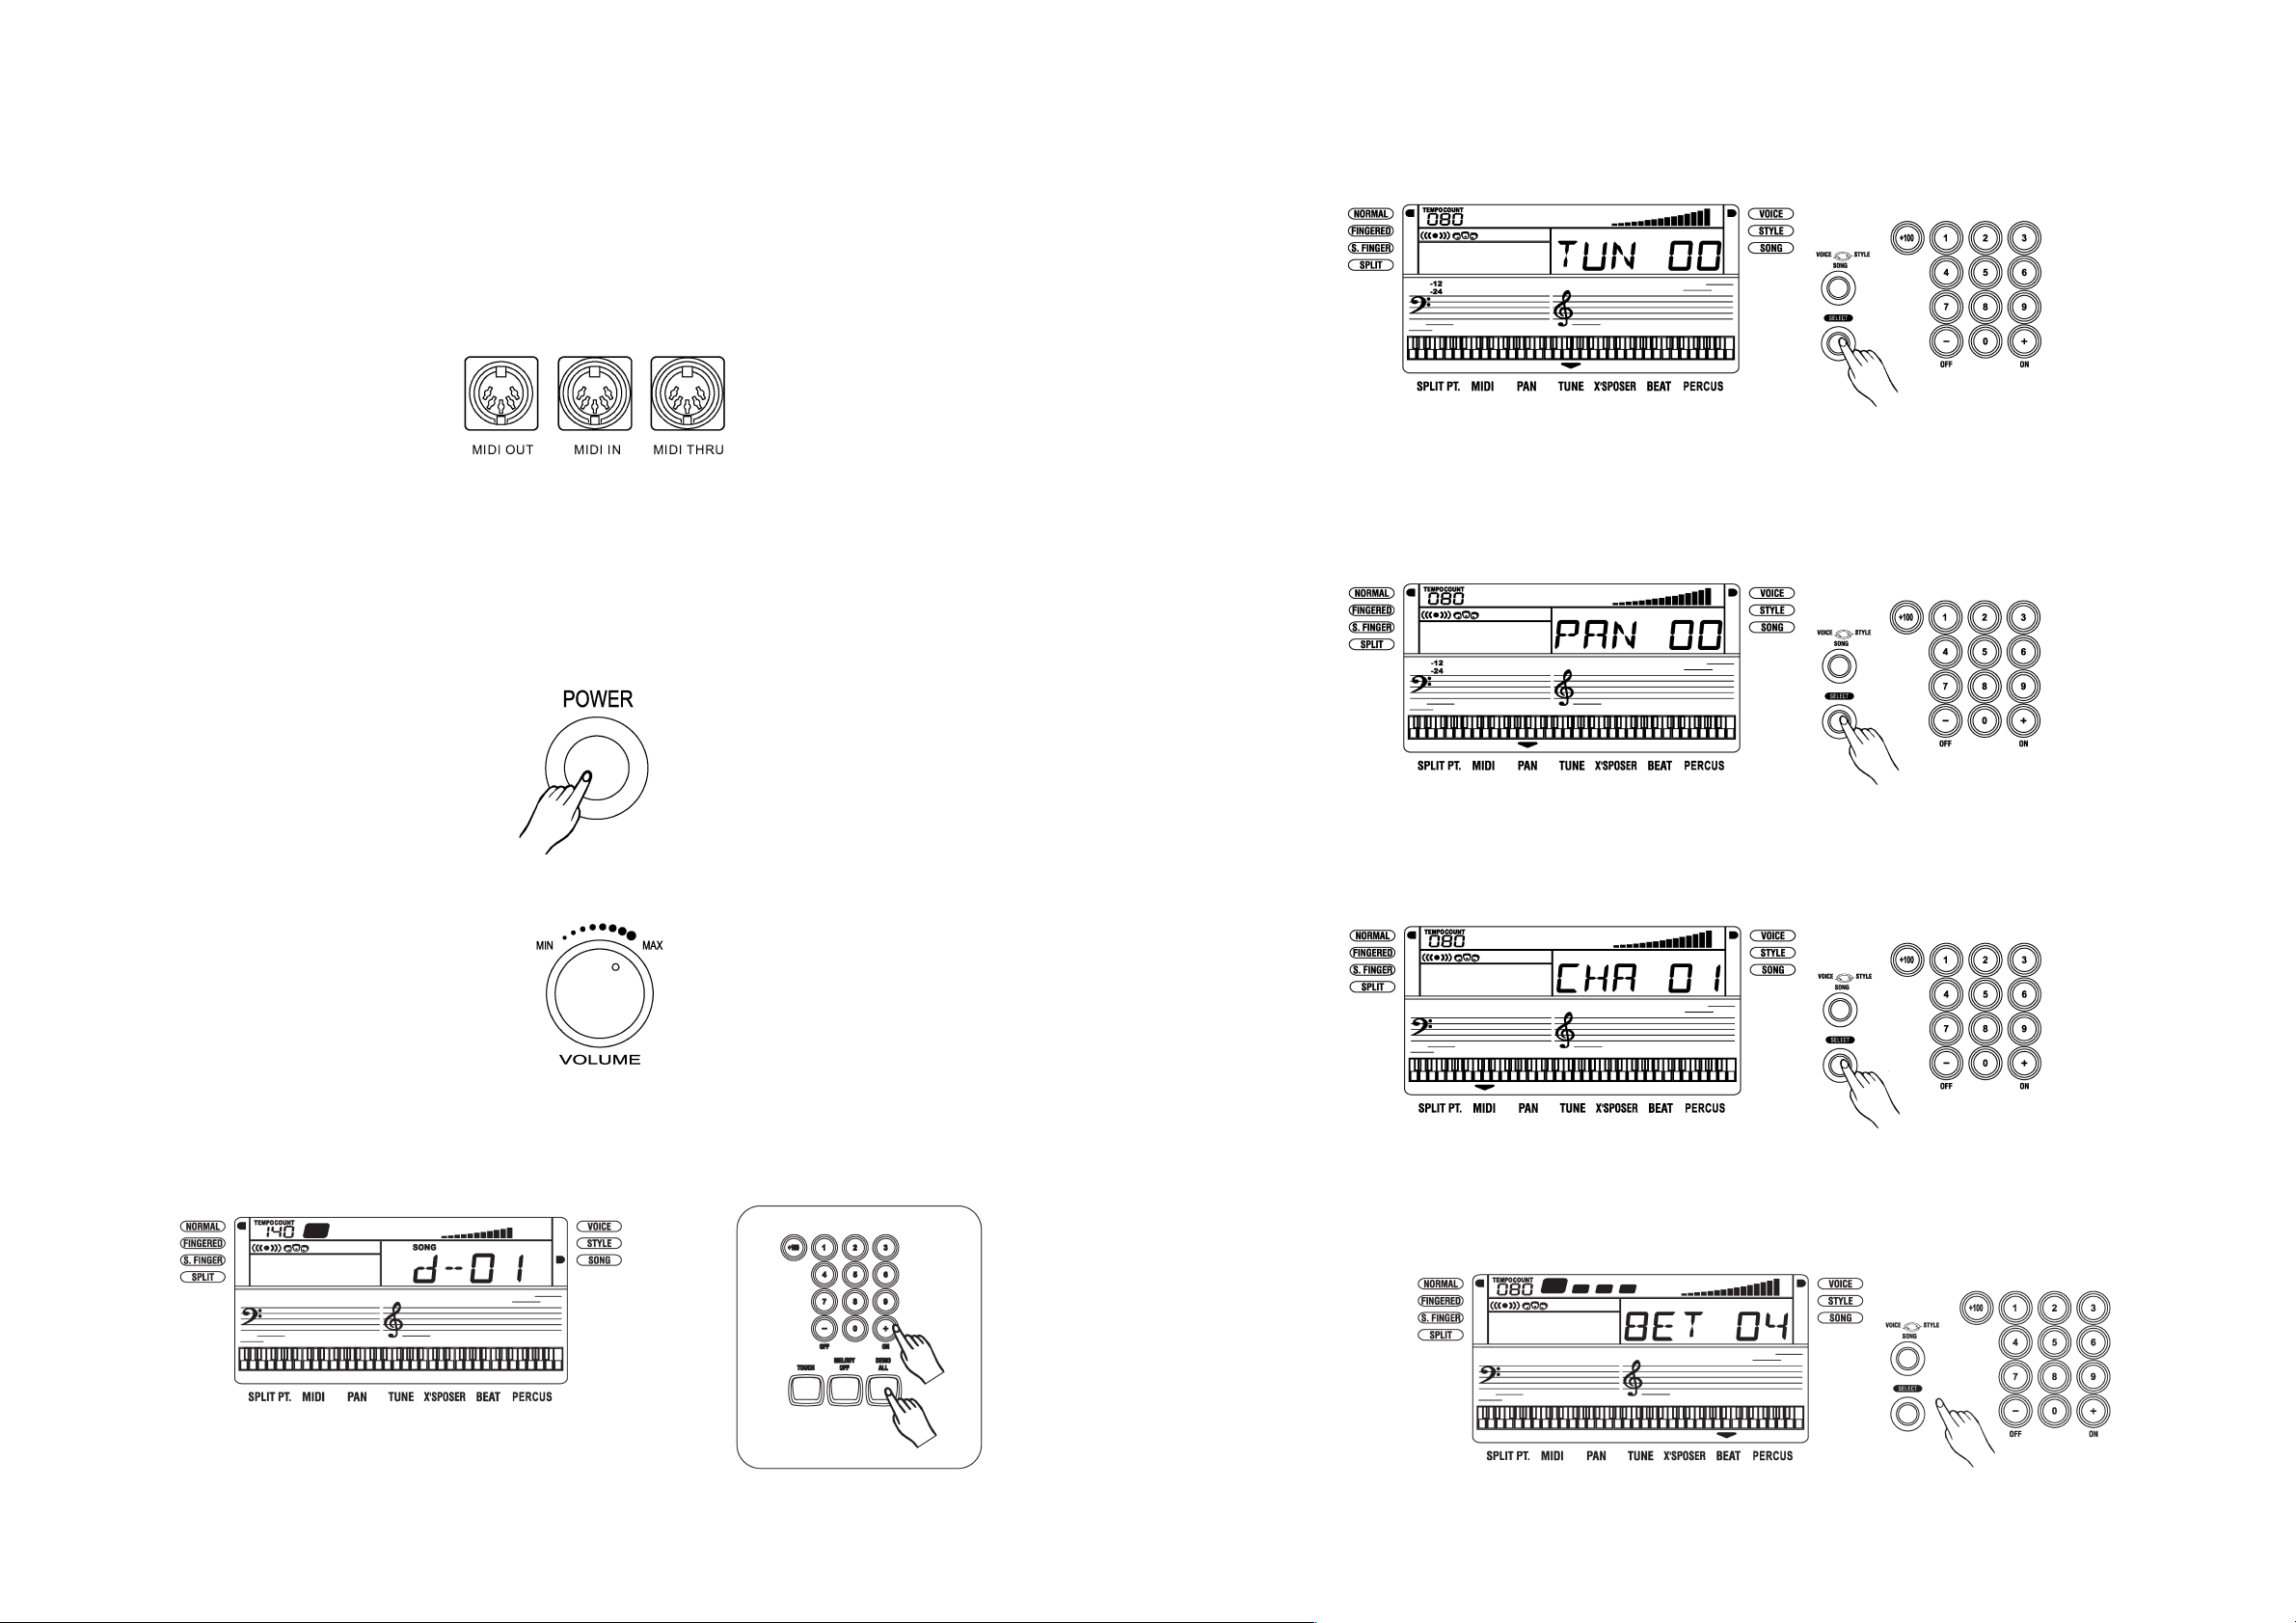
19
Stereo-Position einstellen ("SELECT"/"PAN")
Drücken Sie die "SELECT"-Taste so oft, bis unten im LC-Display der Pfeil bei "PAN" steht. Verändern sie
dann die Stereo-Position mit den Tasten "+/ON" bzw. "-/OFF". Dies kann erforderlich sein, wenn Sie am linken oder rechten Ende des Keyboards sitzen und die Lautstärke des linken/rechten Lautsprechers zu laut
oder zu leise ist.
MIDI-Kanal einstellen ("SELECT"/"MIDI")
Drücken Sie die "SELECT"-Taste so oft, bis unten im LC-Display der Pfeil bei "MIDI" steht. Verändern sie
dann den MIDI-Kanal mit den Tasten "+/ON" bzw. "-/OFF".
Beat-Level einstellen ("SELECT"/"BEAT")
Drücken Sie die "SELECT"-Taste so oft, bis unten im LC-Display der Pfeil bei "BEAT" steht. Verändern sie
dann den Beat-Level mit den Tasten "+/ON" bzw. "-/OFF".
Tastatur des Keyboards aufteilen ("SELECT"/"SPLIT.PT")
Drücken Sie die "SELECT"-Taste so oft, bis unten im LC-Display der Pfeil bei "SPLIT PT." steht. Drücken
Sie dann die Taste, an der Sie das Keyboard teilen wollen.
Bild 40
Bild 41
Bild 42
Bild 43
Page 20

20
Sicherung der Einstellungen
Das Keyboard hat 6 Speicher, welche dazu benutzt werden können, die Einstellungen zu speichern.
Sie können die 6 Tasten "M1" bis "M6" zu beliebiger Zeit drücken, um die Einstellungen wiederherzustellen
und zu laden.
Die "PERCUS"-Funktion muss natürlich ausgeschaltet sein ("PERCUS OFF").
Speichern
Wenn Sie die Einstellungen abgeschlossen haben, drücken und halten
Sie die Taste "WRITE". Drücken Sie
dann kurz eine der 6 Tasten "M1" bis "M6". Bereits vorhandene Daten werden überschrieben!
Beim Ausschalten des Keyboards gehen alle Einstellungen verloren.
Anschlag-Sensor ein/aus, Taste "TOUCH"
Zwei Anschlag-Arten sind einstellbar:
• Der Anschlag wird nur als "Taste gedrückt" oder "Taste nicht gedrückt" weitergemeldet. Der Ton ist
immer gleich laut.
• Der Anschlag wird abhängig von der Stärke des Anschlags weitergemeldet. Ein leichter Anschlag erzeugt
nur einen leisten Ton, ein starker Anschlag erzeugt einen lauten Ton.
Drücken Sie die Taste "TOUCH", um zwischen den beiden Anschlag-Arten umzuschalten.
Aufnahme/Wiedergabe, Tasten "RECORD" & "PLAY"
Sie können Ihr Spiel aufnehmen, wenn Sie die "RECORD"-Taste drücken. Zum Aufnahmeende drücken Sie
einfach die Taste "RECORD" erneut.
Um sich die Aufnahme anzuhören, drücken Sie die "PLAY"-Taste; um die Wiedergabe abzubrechen,
drücken Sie einfach nochmals die "PLAY"-Taste.
Wenn Sie eine neue Aufnahme starten, wird die bestehende überschrieben!
Bild 46
Bild 45
Bild 44
57
c) Ecran à cristaux liquides
1 NORMAL 10 CHORD 19 TUNE
2 FINGERED 11 STYLE 20 X´SPOSER
3 S.FINGER 12 LOWER/VOICE1/VOICE2 21 BEAT
4 SPLIT 13 VOICE 22 PERCUS
5 TEMPO +/-: 14 STYLE 23 BASS
6 BEAT 15 SONG 24 TREBLE
7 METRONOME 16 SPLIT PT. 25 KEYBOARD
8 VOLUME: 17 MIDI CHAN.
9 DSP 18 PAN
8. Raccordement d'un casque
Il est possible de raccorder à la douille jack de 6.35mm "PHONES" située sur la face arrière du clavier multimédia un casque en vente dans le commerce, si vous souhaitez par ex. écouter les sons joués sans déranger vos voisins pendant la nuit. La reproduction via les haut-parleurs intégrés s'arrête automatiquement
avec le raccordement du casque.
Baissez d'abord le volume du clavier multimédia à zéro. Branchez le casque et ne le mettez
qu'après. Puis, augmentez prudemment le volume.
N'écoutez pas la musique trop fort, des problèmes auditifs pourraient en résulter!
Réglez le volume de manière à ce que le volume soit agréable et ne soit pas trop fort!
9. Raccordement d'une pédale
Il est possible de raccorder une pédale (non fourni) à la prise femelle jack de 6.35mm "SUSTAIN".
Elle permet l'affaiblissement d'un son joué (pédale appuyée), comme pour un piano normal.
Figure 5
Figure 6
Figure 7
Page 21

56
Les désignations des métaux lourds sont les suivants:
Cd=Cadmium, Hg=Mercure, Pb=Plomb.
A droite, vous voyez un exemple de l'inscription qui pourrait figurer sur la pile utilisée.
Vous pouvez restituer gratuitement vos piles/accus usagés soit auprès de nos succursales soit auprès des déchetteries communales (centres de tri de matériaux recyclables)
qui sont dans l'obligation de les récupérer.
De cette manière, vous respectez les dispositions légales et participez à la protection de l'environnement!
7. Eléments de commande
a) Face supérieure
1 POWER: Interrupteur marche/arrêt
2 VOLUME: Bouton principal de réglage du
volume
3 MIXER: Volume des pistes d'accompa-
gnement +/-
- RHYTHM: Rythme d'accompagnement
- BASS: Volume des graves
- OC: Orchestration, accompagnement
- LOWER: Baisser la voix
- UPPER: Augmenter la voix
4 MODE: Touche de sélection du mode
5 DUAL: Effet de son bitonal
marche/arrêt
6 Ecran à cristaux liquides
7 PITCH BEND: Fonction de réglage de la hau-
teur des sons (fonction pitch)
8 TEMPO +/-: Réglage de la vitesse +/
9 Contrôle de l'accompagnement
- START/STOP (marche/arrêt)
- SYNC
- INTRO/ENDING
-FILL IN > NORMAL
-FILL IN > NORMAL
10 OTS: "One-Touch-Setting", touche
"OTS"
11 WRITE: Mémoriser les sélections
12 VOICE/STYLE/
SONG: Sélectionner une fonction
13 SELECT: Sélectionner des fonctions
Exemple
14 PIANO: Sélection rapide de l'instrument
de piano
15 METRONOME:Fonction de métronome
16 OCTAVE +/-: Modifier l'octave
17 Pavé numérique 0-9
18 REC/PLAY: Enregistrer/reproduire un jeu
19 DSP: Processeur de signaux numé-
riques marche/arrêt
20 SUSTAIN: Effet de soutien de son
marche/arrêt
21 TOUCH: Régler le mode de frappe
22 MELODY OFF:Eteigner la mélodie (par ex.
d'une chanson de démonstra-
tion)
23 DEMO ALL: Lecture de toutes les chansons
de démonstration
b) Face arrière
24 Prises femelles MIDI MIDI-IN/-OUT/-THRU
25 Douille "SUSTAIN" pour pédale
26 Douille "AUX.OUT" pour amplificateur externe
27 Douille " PHONES " pour casque
28 Douille de raccordement d'un bloc
d'alimentation externe
Figure 4
Figure 3
21
16. Notenständer einsetzen
Im Lieferumfang ist ein einfacher Notenständer, der oben am Keyboard befestigt werden kann. Zwei Löcher
sind dazu oben im Keyboard, stecken Sie den Notenständer hier ein.
17. Handhabung
Der Betrieb ist nur in trockenen Innenräumen zulässig.
Stellen Sie das Gerät auf eine ebene, feste, ausreichend große Fläche. Stellen Sie das Gerät nicht auf wertvolle Möbeloberflächen; durch chemische Reaktionen könnte es sonst zu Verfärbungen durch die Gummifüße kommen, ausserdem sind Druckstellen möglich.
Vermeiden Sie folgende widrige Umgebungsbedingungen am Aufstellungsort oder beim Transport:
- Starke Sonneneinstrahlung
- Nässe oder zu hohe Luftfeuchtigkeit
- Extreme Kälte oder Hitze
- Staub oder brennbare Gase, Dämpfe oder Lösungsmittel
- starke Vibrationen
- starke Magnetfelder, wie in der Nähe von Maschinen oder Lautsprechern
Schalten Sie das Keyboard niemals gleich dann ein, wenn es von einem kalten in einen warmen Raum
gebracht wird. Das dabei entstehende Kondenswasser kann unter Umständen das Gerät zerstören.
Lassen Sie das Produkt zuerst uneingeschaltet auf Zimmertemperatur kommen. Dies kann u.U. mehrere Stunden dauern.
Achten Sie darauf, dass die Isolierung des gesamten Produkts weder beschädigt noch zerstört wird.
Beim Öffnen von Abdeckungen und/oder Entfernen von Teilen (z.B. Gehäusedeckel) können
spannungsführende Teile freigelegt werden. Es können auch Anschlussstellen spannungsführend sein. Vor dem Anschluss des Produkts, einer Wartung, Instandsetzung oder dem Austausch von Teilen oder Baugruppen muss das Produkt von externen Spannungsquellen und
allen anderen Anschlüssen getrennt werden, entfernen Sie die Batterien!
Eine Wartung oder eine Reparatur an der Digital-Drum darf nur durch eine FACHKRAFT erfolgen, die mit den damit verbundenen Gefahren bzw. den einschlägigen Vorschriften vertraut ist.
Page 22

22
Überprüfen Sie vor jedem Gebrauch das Produkt auf Beschädigungen!
Falls Sie Beschädigungen feststellen, so entfernen Sie die eingesetzen Batterien, verbinden Sie das Produkt NICHT
über ein externes Netzteil mit der Netzspannung!
Wenn das Keyboard längere Zeit nicht in Betrieb genommen wird, so trennen Sie es von einem evtl. extern
angeschlossenem Netzteil; stecken Sie auch das externe Netzteil von der Netzspannung ab.
Entnehmen Sie die in dem Keyboard eingelegten Batterien.
Fassen Sie niemals mit spitzen Gegenständen (z.B. Kugelschreiber, Steck- und Stricknadeln, Büroklammern etc.) in die Lüftungsschlitze und Geräteöffnungen des Geräts, es
besteht die Gefahr eines lebensgefährlichen elektrischen Schlages und der Zerstörung
des Geräts!
Stellen Sie keine Gegenstände oder Behälter mit Flüssigkeiten auf das Keyboard.
Achten Sie beim Aufstellen des Keyboards darauf, dass keines der Verbindungskabel geknickt oder
gequetscht wird.
18. Wartung und Reinigung
Überprüfen Sie regelmässig die technische Sicherheit des Produkts, z.B. Beschädigung des Gehäuses (und
eines externen Netzteils, falls vorhanden).
Wenn anzunehmen ist, dass ein gefahrloser Betrieb nicht mehr möglich ist, so ist das Produkt außer Betrieb
zu setzen und gegen unbeabsichtigten Betrieb zu sichern. Schalten Sie das Keyboard aus, trennen Sie es
von einem externen Netzteil, trennen Sie das externe Netzteil von der Netzspannung. Entnehmen Sie auch
evtl. eingesetzte Batterien!
Es ist anzunehmen, dass ein gefahrloser Betrieb nicht mehr möglich ist, wenn
- das Gerät sichtbare Beschädigungen aufweist,
- das Gerät nicht mehr funktioniert und
- nach längerer Lagerung unter ungünstigen Verhältnissen oder
- nach schweren Transportbeanspruchungen.
Bevor Sie das Gerät reinigen oder warten, beachten Sie unbedingt folgende Sicherheitshinweise:
Vor einer Reinigung, Wartung oder Instandsetzung muss das Gerät von allen Spannungsquellen getrennt werden. Schalten Sie das Keyboard aus, trennen Sie es von einem externen Netzteil, entnehmen Sie die in dem Keyboard eingelegten Batterien.
Es sind keinerlei vom Anwender zu wartende Teile im Inneren des Produkts.
Beim Öffnen von Abdeckungen oder Entfernen von Teilen können spannungsführende Teile
freigelegt werden.
Kondensatoren im Gerät können noch geladen sein, selbst wenn das Gerät von allen Spannungsquellen getrennt wurde.
Eine Reparatur darf nur durch eine Fachkraft erfolgen, die mit den damit verbundenen Gefahren bzw. einschlägigen Vorschriften vertraut ist.
Zur Reinigung des Produkts reicht ein trockenes, weiches, fusselfreies Tuch.
Für stärkere Verschmutzungen können Sie das Tuch zusätzlich leicht mit lauwarmen Wasser
anfeuchten und evtl. auch einen Spritzer schwaches Reinigungsmittel hinzugeben.
Probieren Sie sicherheitshalber an einer nicht sichtbaren Stelle aus, ob das schwache Reinigungsmittel die Oberfläche angreift!
55
Ne laissez pas traîner les piles, elles pourraient être avalées par un enfant ou par un animal
domestique! Au cas où cela serait arrivé, consultez immédiatement un médecin!
Ne tardez pas à retirer les piles usagées du compartiment à piles, car même les piles antiécoulement pourraient corroder et par là-même dégager des substances chimiques pouvant
nuire à votre santé ou endommager le compartiment à pile.
Retirez les piles du compartiment quand vous n'utilisez pas l'appareil pendant longtemps.
Des piles corrodées ou endommagées peuvent, au toucher, causer des brûlures de la peau;
pour cette raison, mettez impérativement des gants de protection adaptés pour retirer de telles
piles!
N'essayez jamais de recharger des piles. Risque d'explosion!
Ne les jetez jamais dans le feu. Risque d'explosion!
Faites attention à ne pas court-circuiter les piles. Risque d'explosion!
Veillez à ne pas utiliser des piles usagées et neuves ensembles. Echangez toujours le lot complet de piles.
N'utilisez que 6 piles du même type et du même fabricant.
Ne laissez pas traîner les piles et les accus à la portée des enfants et des animaux,
conservez-les à un endroit qui leur est inaccessible. Il y a risque qu'elles soient avalées
par des enfants ou des animaux domestiques. Danger de mort! Si cela devait arriver malgré tout, consultez immédiatement un médecin ou un hôpital!
b Alimentation par bloc d'alimentation externe (non compris dans la livraison)
Eteignez le clavier multimédia avant d'y raccorder le bloc d'alimentation externe et de le brancher sur secteur.
Utilisez un bloc d'alimentation qui fournit une tension de sortie de 9-12V= (en tension continue) et
un courant d'au moins 1,6A. (Recommandation du constructeur: 12V= pour 2.2A pour pouvoir
garantir une reproduction sans distorsion d'un volume assez fort). Le contact intérieur doit être
"positif" / "+".
Si l'appareil est alimenté par un bloc d'alimentation externe, les piles insérées sont mises hors service. Il est
quand même préférable de les retirer pour éviter qu'elles ne corrodent et endommagent ainsi le compartiment à piles.
Si vous n'utilisez pas le clavier multimédia durant une longue période, débranchez le bloc d'alimentation
externe du secteur!
6. Elimination des piles usagées
Précision relative à la protection de l'environnement!
Le consommateur est tenu de par la loi à recycler toutes les piles et tous les accus usagé(e)s; il est interdit
de les jeter dans la poubelle ordinaire!
Des piles/accus contenant des substances nocives sont repérés des symboles figurant ci-contre
qui renvoient à l'interdiction de les jeter dans la poubelle ordinaire.
Page 23

54
• Pour des raisons de sécurité et d'homologation (CE), il est interdit de modifier la construction et/ou de
transformer l'appareil soi-même!
• Contactez un spécialiste au cas où vous ne seriez pas complètement sûr du fonctionnement, de la sûreté
technique ou du raccordement de l'appareil.
• Dans les écoles, les centres de formation professionnelle, les ateliers pour handicapés ou dans les ateliers
d'amateurs, l'utilisation du produit doit être responsabilisée par du personnel qualifié.
• Ne laissez pas traîner négligemment le matériel d'emballage. Les feuilles plastiques d'emballage ou
poches plastiques, les morceaux de polystyrène etc. pourraient devenir des jouets dangereux pour les
enfants.
• Le présent appareil doit être maintenu hors de la portée des enfants. Ce n'est pas un jouet.
• L'appareil est préconisé pour l'utilisation dans des locaux secs à l'intérieur (et non dans des pièces
humides ou des salles de bains). Ne pas mouiller l'appareil.
En cas de doute sur le branchement correct de l'appareil ou si vous aviez des questions auxquelles
le mode d'emploi n'a pu répondre, prenez contact avec notre service technique ou demandez l'avis
d'un autre spécialiste.
5. Mise en place et changement des piles
a) Alimentation par piles; mise en place et remplacement des piles
Le compartiment à pile se trouve sur la face inférieure du clavier multimédia. Ouvrez le couvercle.
Insérez 6 piles mono en respectant les pôles. Des repères à côté du compartiment à piles vous indiquent la
bonne orientation.
Puis, refermez le compartiment à piles.
Dès que vous constatez que les piles sont usagées, ne tardez pas à les remplacer par des piles neuves.
Les piles sont vides si les symptômes suivants se font remarquer:
• pas d'affichage à l'écran après avoir allumé l'appareil
• faible volume par les haut-parleurs/casque (le bouton de réglage du volume étant réglé correctement)
• brouillage ou reproduction affectée de distorsion
• extinction automatique du clavier multimédia en cas de volumes assez forts
• variations importantes de la luminosité de l'éclairage de l'écran en cas de volumes assez forts
Figure 1
Figure 2
23
Bevor Sie das Keyboard wieder anschließen, Batterien einlegen bzw. mit einem externen Netzteil verbinden,
warten Sie, bis das Gerät vollständig trocken ist!
19. Entsorgung
Entsorgen Sie das unbrauchbar gewordene Produkt gemäß den geltenden gesetzlichen Vorschriften.
20. Behebung von Störungen
Beachten Sie alle Sicherheitshinweise dieser Bedienungsanleitung!
Problem Lösungshilfe
Display leuchtet • Sind Batterien polungsrichtig eingelegt?
beim Einschalten • Sind die Batterien leer?
nicht auf • Falls Sie ein externes Netzteil einsetzen, ist es korrekt mit dem Keybo-
ard und der Netzspannung verbunden; ist es evtl. ausgeschaltet?
• Beachten Sie die korrekte Polung des Stromsteckers, der Innenkontakt
muss "Plus" führen (9-12V=), der Aussenkontakt "Masse"!
• Liefert das externe Netzteil genügend Strom (mindestens 1.6A)?
• Passt der Stecker des externen Netzteils vielleicht nicht korrekt in die
Buchse des Keyboards?
Kein Ton hörbar • Ist das Gerät eingeschaltet und der Lautstärkeregler korrekt einge-
stellt?
• Ist evtl. ein Kopfhörer angeschlossen? Dieser schaltet die eingebauten
Lautsprecher ab.
Das Keyboard • Ersetzen Sie die Batterien gegen neue; ggf. kann das Keyboard noch
schaltet sich beim einige Zeit mit schwachen Batterien betrieben werden, wenn die
Spielen selbst aus Lautstärke reduziert wird.
Das Display • Ersetzen Sie die Batterien gegen neue; ggf. kann das Keyboard noch
flackert einige Zeit mit den schwachen Batterien betrieben werden, wenn die
Lautstärke reduziert wird.
• Geringe Helligkeitsänderungen der Beleuchtung des Displays bei
hoher Lautstärkeeinstellung und Bass-Wiedergabe sind normal.
Keine Reaktion • Verbinden Sie immer den Anschluss "MIDI-IN" des einen Geräts mit
über den dem "MIDI-OUT"-Anschluss des anderen Geräts.
MIDI-Anschluss • Beachten Sie die Anleitung zu dem anderen MIDI-fähigen Gerät.
Page 24

24
21. Anhang "A", Akkorde
53
1. Caractéristiques
• 136 instruments PCM ("Voices") et sons de batterie ("Drum/Percussion")
• 100 rythmes d'accompagnement ("Styles")
• 100 chansons de démonstration
• Enregistrement/reproduction
•Compatible MIDI
• Ecran à cristaux liquides, illuminé
• 61 touches
• 64 voix (max.):
• Haut-parleurs stéréo intégrés (système deux voies)
• Connecteur femelle pour casque (prise "PHONES", douille jack de 6.35mm)
• Connecteur femelle pour pédale (prise "SUSTAIN", douille jack de 6.35mm)
• Sortie auxiliaire pour la connexion d'un amplificateur externe (douille "AUX OUT", douille jack de 6.35mm)
• Alimentation par piles (6*piles mono); branchement d'un bloc d'alimentation externe (non compris dans le
contenu de l'emballage) possible; le bloc d'alimentation doit fournir une tension de 9-12V= et un courant
d'au moins 1.6A, le contact intérieur doit conduire "positif" / "+".
Le constructeur recommande l'utilisation d'un bloc d'alimentation de 12V= et de 2.2A pour
pouvoir garantir une reproduction sans aucune distorsion en cas de volumes assez forts.
2. Contenu de l'emballage
• Clavier multimédia "MC-110"
• Pupitre de musicien
•Mode d'emploi
3. Explication des symboles
Un point d'exclamation placé dans un triangle attire l'attention sur des dangers particuliers lors
du maniement, du service et de l'utilisation.
Le symbole de foudre placé dans un triangle est utilisé pour indiquer un danger pour votre
santé, par ex. pour cause d'une décharge électrique.
Le symbole de la main renvoie à des astuces et conseils d'utilisation spécifiques.
4. Consignes de sécurité
En cas de dommages dus à la non-observation de ce mode d'emploi, la validité de la
garantie est annulée!
Nous déclinons toute responsabilité pour les éventuels dommages consécutifs!
Nous déclinons toute responsabilité pour d'éventuels dommages matériels ou corporels
dus à un maniement incorrect ou à la non-observation des consignes de sécurité. Dans
de tels cas, la garantie est annulée.
Lisez complètement le présent mode d'emploi avant de mettre en service l'appareil.
Page 25

52
Index
Page
1. Caractéristiques et données techniques . . . . . . . . . . . . . . . . . . . . . . . . . . . . . . . . . . . . . . . . . . . . . . . 53
2. Contenu de l'emballage . . . . . . . . . . . . . . . . . . . . . . . . . . . . . . . . . . . . . . . . . . . . . . . . . . . . . . . . . . . . 53
3. Explication des symboles . . . . . . . . . . . . . . . . . . . . . . . . . . . . . . . . . . . . . . . . . . . . . . . . . . . . . . . . . . 53
4. Consignes de sécurité . . . . . . . . . . . . . . . . . . . . . . . . . . . . . . . . . . . . . . . . . . . . . . . . . . . . . . . . . . . . . 53
5. Mise en place et changement des piles . . . . . . . . . . . . . . . . . . . . . . . . . . . . . . . . . . . . . . . . . . . . . . . 54
6. Elimination des piles usagées, précision relative à la protection de l'environnement . . . . . . . . . . . . . 55
7. Eléments de commande . . . . . . . . . . . . . . . . . . . . . . . . . . . . . . . . . . . . . . . . . . . . . . . . . . . . . . . . . . . 56
8. Raccordement d'un casque . . . . . . . . . . . . . . . . . . . . . . . . . . . . . . . . . . . . . . . . . . . . . . . . . . . . . . . . . 57
9. Raccordement d'une pédale . . . . . . . . . . . . . . . . . . . . . . . . . . . . . . . . . . . . . . . . . . . . . . . . . . . . . . . . . 57
10. Raccordement d'un amplificateur externe . . . . . . . . . . . . . . . . . . . . . . . . . . . . . . . . . . . . . . . . . . . . . . 58
11. Raccordement d'appareils Midi . . . . . . . . . . . . . . . . . . . . . . . . . . . . . . . . . . . . . . . . . . . . . . . . . . . . . . 58
12. Lecture de chansons de démonstration . . . . . . . . . . . . . . . . . . . . . . . . . . . . . . . . . . . . . . . . . . . . . . . 58
13. Fonctions de base . . . . . . . . . . . . . . . . . . . . . . . . . . . . . . . . . . . . . . . . . . . . . . . . . . . . . . . . . . . . . . . . 60
Sélectionner le mode de voix "Voice", sélection/lecture des instruments ("Voices") . . . . . . . . . . . . . 60
Sélection des instruments à l'aide des touches "-/OFF" et "+/ON" (situées en bas du pavé numérique) 60
Sélection des instruments à l'aide des touches du pavé numérique . . . . . . . . . . . . . . . . . . . . . . . . . 60
Fonction d'effet bitonal ("Dual Voice", touche "DUAL") . . . . . . . . . . . . . . . . . . . . . . . . . . . . . . . . . . . 61
Sélection rapide de l'instrument de piano (touche "PIANO") . . . . . . . . . . . . . . . . . . . . . . . . . . . . . . . 61
Effet de soutien Sostenuto (touche "SUSTAIN") . . . . . . . . . . . . . . . . . . . . . . . . . . . . . . . . . . . . . . . . .61
Réglage de la courbe de tonalité (touches "PITCH BEND") . . . . . . . . . . . . . . . . . . . . . . . . . . . . . . . . 61
Processeur de signaux numériques (touche "DSP") . . . . . . . . . . . . . . . . . . . . . . . . . . . . . . . . . . . . . . 62
14. Accompagnement automatique . . . . . . . . . . . . . . . . . . . . . . . . . . . . . . . . . . . . . . . . . . . . . . . . . . . . . . 62
Sélection du mode "Style", sélection des rythmes d'accompagnement ("Styles") . . . . . . . . . . . . . . . 62
Sélection des rythmes d'accompagnement à l'aide des touches "-/OFF" et "+/ON"
(situées en bas du pavé numérique) . . . . . . . . . . . . . . . . . . . . . . . . . . . . . . . . . . . . . . . . . . . . . . . . . . 62
Sélection des rythmes d'accompagnement à l'aide des touches du pavé numérique . . . . . . . . . . . . 63
Lecture du rythme d'accompagnement sélectionné ("Style"), touche "Marche/arrêt" . . . . . . . . . . . . 63
Réglage de la vitesse, touche "TEMPO +/-" . . . . . . . . . . . . . . . . . . . . . . . . . . . . . . . . . . . . . . . . . . . . 63
Utilisation de l'accompagnement automatique (rythmes d'accompagnement) . . . . . . . . . . . . . . . . . 63
Synchronisation du début du rythme d'accompagnement, touche "SYNC" . . . . . . . . . . . . . . . . . . . 64
Lancer le rythme d'accompagnement avec un son d'introduction, touche "INTRO/ENDING" . . . . . 64
Allumer/éteindre le métronome, touche "METRONOME" . . . . . . . . . . . . . . . . . . . . . . . . . . . . . . . . . . 64
Modifier l'affectation des touches pour l'accompagnement ("SELECT"/"SPLIT.PT") . . . . . . . . . . . . . 65
Réglage du volume des différentes pistes du rythme d'accompagnement, mixer . . . . . . . . . . . . . . . 65
"One-Touch-Setting", touche "OTS" . . . . . . . . . . . . . . . . . . . . . . . . . . . . . . . . . . . . . . . . . . . . . . . . . . 66
15. Maniement général & Réglage . . . . . . . . . . . . . . . . . . . . . . . . . . . . . . . . . . . . . . . . . . . . . . . . . . . . . . . 66
Modification de l'octave sélectionnée, touche "OCTAVE +/-" . . . . . . . . . . . . . . . . . . . . . . . . . . . . . . 66
Activation et lecture des touches de batterie ("SELECT"/"PERCUS") . . . . . . . . . . . . . . . . . . . . . . . . 66
Réglage de la hauteur des sons du clavier multimédia ("SELECT"/"X´SPOSER") . . . . . . . . . . . . . . . 66
Réglage précis de la hauteur des sons ("SELECT"/"TUNE") . . . . . . . . . . . . . . . . . . . . . . . . . . . . . . . . 67
Réglage du son stéréo ("SELECT"/"PAN") . . . . . . . . . . . . . . . . . . . . . . . . . . . . . . . . . . . . . . . . . . . . .67
Réglage du canal Midi ("SELECT"/"MIDI") . . . . . . . . . . . . . . . . . . . . . . . . . . . . . . . . . . . . . . . . . . . . . 67
Réglage du niveau Beat ("SELECT"/"BEAT") . . . . . . . . . . . . . . . . . . . . . . . . . . . . . . . . . . . . . . . . . . . 67
Modifier l'affectation des touches du clavier multimédia ("SELECT"/"SPLIT.PT") . . . . . . . . . . . . . . . 68
Mémorisation des réglages, stockage . . . . . . . . . . . . . . . . . . . . . . . . . . . . . . . . . . . . . . . . . . . . . . . . . 68
Capteur de frappe marche/arrêt, touche "TOUCH" . . . . . . . . . . . . . . . . . . . . . . . . . . . . . . . . . . . . . . 68
Enregistrement/reproduction, touches "RECORD" & "PLAY" . . . . . . . . . . . . . . . . . . . . . . . . . . . . . . . 68
16. Utilisation d'un pupitre de musicien . . . . . . . . . . . . . . . . . . . . . . . . . . . . . . . . . . . . . . . . . . . . . . . . . . 69
17. Maniement . . . . . . . . . . . . . . . . . . . . . . . . . . . . . . . . . . . . . . . . . . . . . . . . . . . . . . . . . . . . . . . . . . . . . . 69
18. Entretien et nettoyage . . . . . . . . . . . . . . . . . . . . . . . . . . . . . . . . . . . . . . . . . . . . . . . . . . . . . . . . . . . . . 70
19. Elimination des déchets . . . . . . . . . . . . . . . . . . . . . . . . . . . . . . . . . . . . . . . . . . . . . . . . . . . . . . . . . . . . 71
20. Guide de dépannage . . . . . . . . . . . . . . . . . . . . . . . . . . . . . . . . . . . . . . . . . . . . . . . . . . . . . . . . . . . . . . 71
21. Annexe A: Accords . . . . . . . . . . . . . . . . . . . . . . . . . . . . . . . . . . . . . . . . . . . . . . . . . . . . . . . . . . . . . . . 72
22. Annexe B: Accords individuels . . . . . . . . . . . . . . . . . . . . . . . . . . . . . . . . . . . . . . . . . . . . . . . . . . . . . . 73
23. Annexe C: Liste des chansons de démonstration . . . . . . . . . . . . . . . . . . . . . . . . . . . . . . . . . . . . . . . . 74
25
22. Anhang "B", einzelne Akkorde
Page 26

26
23. Anhang "C", Demo-Song-Liste
51
Introduction
Cher client,
Nous vous remercions d'avoir choisi ce produit.
La compatibilité électronique du présent produit a été contrôlée. Il est conforme aux exigences des
directives européennes et nationales en vigueur. La conformité a été établie, les actes déclaratifs
ont été consignés auprès du fabricant.
Afin de maintenir le produit en bon état et d'en assurer une exploitation sans risques, l'utilisateur doit absolument tenir compte de ce mode d'emploi et le respecter!
Tous les noms d'entreprises et appellations de produits contenus dans cette notice sont des
marques déposées des propriétaires correspondants.
Pour toutes questions, adressez vous à notre service
conseil technique
France: Tél. 0 826 827 000 · Fax 0 826 826 002
e-mail: technique@conrad.fr
du lundi au vendredi de 9h00 à 19h00
samedi de 9h00 à 18h00
Suisse: Tél. 0848/80 12 88 · Fax 0848/80 12 89
e-mail: support@conrad.ch
du lundi au vendredi de 8h00 à 12h00, 13h00 à 17h00
Utilisation prévue
Le produit est prévu pour la production de sons électroniques qui se jouent au moyen de touches. Les sons
seront reproduits au moyen des haut-parleurs intégrés. Il est possible d'y raccorder un casque ou un amplificateur externe. Trois connecteurs femelles pour des appareils midi (Midi-In, Midi-Out, Midi-Thru) sont mis
à disposition.
Toute utilisation autre que celle stipulée ci-dessus provoque l'endommagement du présent produit, ainsi
que des risques de courts-circuits, d'incendie, de décharge électrique, etc. Le produit ne doit être ni modifié ni transformé! Il est interdit d'ouvrir le boîtier. Ne pas endommager ou retirer les étiquettes se trouvant
sur le produit.
Page 27

50
23. Annex "C", list of demo songs.
27
Introduction
Dear customer,
we thank you for your acquiring this product.
This product is EMC-tested and meets the requirements requirements of all applicable national and
European directives. CE-conformity has been proved; the relevant documents are in the manufacturer's possession.
We kindly request the user to respect this operating manual to preserve this condition and to ensure safe
operation.
The company names and product names contained are trademarks of the respective proprietor. All
rights reserved.
In case of questions, consult our technical information service
Germany: Tel. 0180/5 31 21 16 or 09604/40 88 47
Fax 09604/40 88 44
e-mail: tkb@conrad.de
Mon - Fri 8.00 to 18.00
Austria: Tel. 0 72 42/20 30 60 · Fax 0 72 42/20 30 66
e-mail: support@conrad.at
Mon - Thu 8.00 to 17.00
Fri. 8.00 to 14.00
Switzerland: Tel. 0848/80 12 88 · Fax 0848/80 12 89
e-mail: support@conrad.ch
Mon - Fri 8.00 to 12.00, 13.00 to 17.00
Prescribed use
The product generates sounds you can play on the keyboard. Audio output is over the integrated loudspeakers. It is also possible to connect headphones or an external amplifier. There are three sockets for
external MIDI devices (MIDI in, MIDI out, MIDI thru).
Any other use than the one described above damages the product. Moreover, this involves dangers, such
as short-circuit, fire, electric shock, etc. No part of the product may be modified or rebuilt. The housing
must not be opened.
The stickers on the product must not be removed or damaged.
Page 28

28
Table of contents
page
1. Features and technical data ....................................................................................................................29
2. Scope of delivery.....................................................................................................................................29
3. Symbol explanations ...............................................................................................................................29
4. Safety instructions ..................................................................................................................................29
5. Inserting and replacing batteries.............................................................................................................30
6. Disposing of used batteries.....................................................................................................................31
7. Operating elements .................................................................................................................................32
8. Connecting headphones .........................................................................................................................33
9. Connecting a pedal .................................................................................................................................33
10. Connecting an external amplifier.............................................................................................................33
11. Connecting MIDI devices ........................................................................................................................34
12. Playing demo songs ................................................................................................................................34
13. Basic functions ........................................................................................................................................35
Selecting "voice mode”, selecting/playing instruments ("voices”)..........................................................35
Selecting instruments with the keys "-/OFF” and "+/ON” (at the bottom of the number block) ............36
Selecting instruments with the numeral keys in the number block.........................................................36
Dual voice effect (key "DUAL”) ...............................................................................................................36
Quick select piano (key "PIANO”) ...........................................................................................................37
Sostenuto effect (key "SUSTAIN”) ..........................................................................................................37
Setting the pitch bend (keys "PITCH BEND”) .........................................................................................37
Digital Signal Processor (key "DSP").......................................................................................................37
14. Automatic accompaniment ....................................................................................................................38
Selecting "style” mode, choosing the accompanying rhythms ("styles”) ...............................................38
Selecting styles with the keys "-/OFF” and "+/ON” (at the bottom of the number block) ......................38
Selecting styles with the numeral keys in the number block ..................................................................38
Playing the selected style, key "START/STOP” ......................................................................................38
Setting the speed, keys "TEMPO +/-".....................................................................................................39
Using automatic accompaniment ("styles”) ............................................................................................39
Synchronising the start of the accompanying styles, key "SYNCH” ......................................................40
Starting the style with an intro-sound, key "INTRO/ENDING" ................................................................40
Metronome on/off, key "METRONOME".................................................................................................40
Changing the splitting of the keyboard for the accompaniment ("SELECT"/"SPLIT.PT") ......................41
Setting the volume for individual tracks, mixer .......................................................................................41
"One-Touch-Setting", key "OTS"............................................................................................................41
15. General operating & setting.....................................................................................................................42
Changing the set octave, key "OCTAVE +/-"..........................................................................................42
Activating and playing the drumpads ("SELECT"/"PERCUS")................................................................42
Setting the pitch of the keyboard ("SELECT"/"X´SPOSER")...................................................................42
Precise adjustment of the tune ("SELECT"/"TUNE")...............................................................................42
Selecting stereo position ("SELECT"/"PAN") ..........................................................................................43
Selecting MIDI channel ("SELECT"/"MIDI").............................................................................................43
Selecting beat level ("SELECT"/"BEAT").................................................................................................43
Splitting the keyboad ("SELECT"/"SPLIT.PT")........................................................................................43
Saving the adjustments...........................................................................................................................44
Touch sensor on/off, key "TOUCH" ........................................................................................................44
Record/playback, keys "RECORD" & "PLAY" ........................................................................................44
16. Putting up the music stand .....................................................................................................................45
17. Handling ..................................................................................................................................................45
18. Maintenance and cleaning ......................................................................................................................46
19. Disposal...................................................................................................................................................47
20. Trouble-shooting .....................................................................................................................................47
21. Annex A: Chords .....................................................................................................................................48
22. Annex B: Individual chords......................................................................................................................49
23. Annex C: List of demo songs ..................................................................................................................50
49
22. Annex "B", individual chords.
Page 29

48
21. Annex "A", chords.
29
1. Features
• 136 PCM instruments("voices") and percussion sounds ("drum/percussion")
• 100 Accompanying rhythms ("styles")
• 100 demo songs
• Record/playback
•MIDI compatible
• LCD, illuminated
• 61 keys
• 64-part (max.)
• Integrated stereo loudspeaker (two-way-system)
• Phones socket (socket "PHONES", 6.35 mm jack socket)
• Terminal for pedal (socket "SUSTAIN", 6.35 mm jack socket)
• Output "AUX" for connecting an external amplifier (socket "AUX.OUT", 6.35 mm jack socket)
• Battery operation (6* mono battery); connection of an external adapter (not included) possible. Adapter
must generate a voltage 9-12V= and a current of at least 1.6A, the inner contact must supply "plus" / "+" ).
The manufacturer recommends an adapter with 12V= and 2.2 A, to have enough reserves for
distortion-free playback at a higher volume.
2. Scope of delivery
• Electronic keyboard "MC-110"
• Music stand
• Operating instructions
3. Symbol explanations
An exclamation mark in a triangle points out special risk during handling or operation.
The symbol with a flash in the triangle is used for health risks, e.g. by an electric shock.
The symbol "hand" points out important tips and notes for the operation.
4. Safety instructions
Any claims for guarantee will become invalid in the event of damage that results from the
non-observance of the operating manual. We do not accept responsibility for such damage nor for any indirect losses.
Read these operation instructions carefully and completely. before you put the keyboard
into operation.
Page 30

30
• The unauthorised conversion and/or modification of the product is inadmissible because of safety and
approval reasons (CE).
• Consult an expert when in doubt about the way of operation or the safety of the product.
• In schools, training facilities, do-it-yourself and hobby workshops, the operation of the product should be
supervised by well-instructed trained personnel.
• Do not leave packing material littered, plastic films or bags, polystyrene parts etc. could be a dangerous
toy for children.
• Keep the product away from children. It is not a toy!
• The product is only suitable for dry rooms (no bathrooms or similar wet rooms). Protect the keyboard from
moisture or wetness.
When in doubt about how to connect it correctly or should there be questions that are not answered
in these operating instructions contact our Technical Advisory Service or another expert.
5. Inserting and replacing batteries
a) Battery operation; inserting and replacing batteries
The battery compartment is at the bottom of the keyboard.
Open the lid of the battery compartment and insert 6 monocells in the right way (correct polarity!). Next to
the battery compartment you can see an illustration showing the correct polarity.
Close the battery compartment again.
If you notice that the batteries are low, replace them.
The batteries may be low if you notice the following:
• When you switch on the keyboard, there is no display
• Only a very low volume over the speakers or phones (with the volume control set correctly)
• Disturbances, noises or distorted playback
• The keyboard switches off automatically at a high volume
• Considerable fluctuations of the lightness of the display illumination at a higher volume
Fig. 1
Fig. 2
47
Before you connect the keyboard, insert the batteries or connect the external adapter. Wait until the keyboard is completely dry!
19. Disposal
If the product cannot be used any more it has to disposed of according to the applicable legal requirements.
20. Trouble-shooting
Please observe all the safety instructions in this operating manual!
Problem Remedy
The display does not • Have the batteries been inserted with the correct polarity?
light up when you • Are the batteries empty?
switch on the keyboard. • If you use an external adapter, is it connected correctly to the key-
board and to the mains? Is it switched on?
• Make sure the polarity of the plug is correct, the interior contact must
be "plus” (9-12V=), the outer contact "ground”!
• Does your external adapter supply enough power? (at least 1.6 A)
• Does the plug of your external adapter fit correctly into the socket of
the keyboard?
No sound. • Is the keyboard witched on; is the volume control set correctly?
• Are headphones connected? They automatically switch of the integrated loudspeaker.
The keyboard switches • Replace the batteries; the keyboard might be operated even with low
off while you are playing. batteries if you reduce the volume.
The display flickers. • Replace the batteries; the keyboard might be operated even with low
batteries if you reduce the volume.
•A little fluctuation in the lightness of the illumination of the display is
normal with a high volume and bass playback.
No reaction over the • Always connect "MIDI-IN” of one device to "MIDI-OUT” of the other.
MIDI terminal. • Please observe the instructions for the other MIDI device.
Page 31

46
Check the keyboard for any damages before every use!
Should you notice any damage, remove the batteries, and do NOT
connect the product to
the mains via an external adapter.
If you want to use the keyboard for a longer period of time, disconnect it from the adapter, unplug the
adapter.
Remove the batteries from the keyboard.
Never stick pointed objects (such as pens, pins, needles, paper clips etc.) into the ventilation apertures or the openings of the device, you risk a dangerous electric shock and
the destruction of the keyboard.
Never put objects or containers filled with liquids onto the keyboard.
When mounting the product make sure that the power cord is neither jammed nor damaged by sharp
edges.
18. Maintenance and cleaning
Check the technical safety of the product regularly for example for damages in the housing (and of the
external adapter, if applicable).
If there is room to believe that safe operation has become impossible, put the keyboard out of operation and
secure it against any unintended operation. Switch the keyboard off, disconnect it from an external adapter,
unplug the adapter, and remove any batteries!
Safe operation must be presumed to be no longer possible, if
- the keyboard exhibits visible damage
- the keyboard does not operate any longer
- the keyboard was stored under unfavourable conditions for a long period of time.
or
- the keyboard was exposed to extraordinary stress caused by transport.
Before cleaning or maintenance, please note the following safety instructions:
Before cleaning or maintenance, the keyboard must be disconnected from every power supply. Switch the keyboard off, disconnect it from an external adapter, remove the batteries you
have inserted.
In the interior of the keyboard there are no parts to be maintained by the user.
When you open covers and/or remove parts, live parts may be exposed. Even terminals may
be live.
Capacitors inside the device may still carry voltage even though you have disconnected all
voltage sources.
Repair may only be carried out by qualified personnel, who are familiar with the hazards
involved and the relevant regulations.
For cleaning the keyboard, use a soft, dry, non-fluff cloth.
For heavier dirt you can slightly wet the cloth with lukewarm water and you can add a splash of
a light cleansing agent.
To be on the safe side, try at a hidden place whether your liquid attacks the surface!
31
Do not leave batteries littered because children or pets might swallow them. In case of batteries being swallowed call for immediate medical care.
Do not leave used batteries in the keyboard since even leakage-protected batteries can corrode releasing chemical agents that might harm your health or destroy the battery compartment.
If you do not use the product for a longer period of time, remove the batteries.
Leaky or damaged batteries might cause cauterization when in contact with the skin; therefore,
use suitable protective gloves.
Never try to recharge the batteries! Danger of explosion!
Do not throw the batteries into fire! Danger of explosion!
Make sure the batteries are not short-circuited. Danger of explosion!
Do not mix old and new batteries! Always replace the complete set of batteries.
Always use 6 batteries of the same type and brand.
Do not leave batteries lying around openly when children or pets are present, keep batteries away from children. In case of batteries, rechargeable or round cell batteries being
swallowed, there is DANGER TO LIFE, call for immediate medical care.
b) Operation with an external adapter (not included)
Switch the keyboard off before you connect the external adapter to the keyboard and the mains voltage.
Use an adapter with an output voltage of 9-12V= and a current of at least 1.6 A. (Recommendation
of the manufacturer: 12V= at 2.2 A, to have enough reserves for distortion-free playback at a higher
volume. The inner contact must supply "plus" / "+" ).
When you operate the keyboard with an external adapter, the internal batteries are switched off. You should
remove them nevertheless to avoid leakage that could damage the battery compartment.
If you do not use the product for a longer period of time, disconnect the adapter.
6. Disposing of used batteries
Environmental notes
In Germany the consumer is legally bound (by the used battery decree "Altbatterienverordnung”) to return
any used battery or rechargeable battery; it is forbidden to dispose of batteries with the household
garbage.
Batteries and rechargeable batteries containing pollutants are labelled with these symbols
that indicate the interdiction to dispose of these products in the garbage.
The denominations of the relevant heavy metals are: Cd=cadmium, Hg=mercury, Pb=lead.
These abbreviations are under the garbage symbol on the left, for example.
On the right side you see an example what the print on the batteries you use might look like.
You can return your used batteries free of charge to the local disposal institutions, to all our
subsidiaries and wherever batteries are being sold.
Fulfil the legal requirements and participate in environmental protection!
Example
Page 32

32
7. Operating elements
a) Top
1 POWER: on/off switch
2 VOLUME: main volume control
3 MIXER: vol. of the accompanying tracks +/-
-RHYTHM: accompanying rhythm
-BASS: bass volume
-OC: orchestration, accompaniment
-LOWER: lower voice
-UPPER: upper voice
4 MODE: mode key
5 DUAL: dual voice effect on/off
6 LCD
7 PITCH BEND: pitch function
8 TEMPO +/-: speed selectio +/9 Control for the accompaniment
-START/STOP
-SYNC
-INTRO/ENDING
-FILL IN > NORMAL
-FILL IN > VARIATION
10 OTS: one touch setting
11 WRITE: saving the adjustments
12 VOICE/STYLE/
SONG: select function
13 SELECT: select functions
14 PIANO: quick select piano
15 METRONOME: metronome function
16 OCTAVE +/-: changing the octave
17 Number block 0-9
18 REC/PLAY: record / playback
19 DSP: digital signal processor, on/off
20 SUSTAIN: sostenuto effect on/off
21 TOUCH: set type of touch
22 MELODY OFF: melody on (e.g. for demo song)
23 DEMO ALL: play all the demo songs
b) Back
24 MIDI sockets MIDI-IN/-OUT/-THRU
25 Socket "SUSTAIN" for pedal
26 Socket "AUX.OUT" for external amplifier
27 Socket "PHONES" for headphones
28 Socket for external adapter
c) LCD
1 NORMAL
2 FINGERED
3 S.FINGER
4 SPLIT
5 TEMPO
6 BEAT
7 METRONOME
8 VOLUME
9 DSP
10 CHORD
11 STYLE
12 LOWER/VOICE1/
VOICE2
13 VOICE
14 STYLE
15 SONG
16 SPLIT PT.
17 MIDI CHAN.
18 PAN
19 TUNE
20 X´SPOSER
21 BEAT
22 PERCUS
23 BASS
24 TREBLE
25 KEYBOARD
Fig. 3
Fig. 5
Fig. 4
45
16. Putting up the music stand
A simple music stand is included in the scope of delivery. It can be fastened at the top of the keyboard. Put
the music stand into the two holes at the top of the keyboard.
17. Handling
The product should be used in dry rooms, not outdoors.
Place the keyboard on an underground that is sufficiently big, solid, flat and clean. Do not place the keyboard on precious furniture, chemical reactions with the rubber stands could cause discolouring in the surface or the stands may leave marks.
Avoid the following adverse ambient conditions at the place of installation and during transport:
- strong sunlight
- dampness or high humidity
- extreme heat or cold
- dust or inflammable gases, vapours or solvants
- strong vibrations
- strong magnetic fields like near machines or loudspeakers
Never turn on the keyboard immediately after it has been brought from a cold into a warm room. Condensation water that forms might destroy your keyboard.
Leave the device switched off and wait until it has reached room temperature. This may take several
hours.
Make sure that no part of the insulating of the product is damaged or destroyed.
When you open covers and/or remove parts (e.g. the lid of the housing), live parts may be
exposed. Even terminals may be live. So disconnect the product from external power supplies
and any other connections before you carry out a connecting, maintenance, overhauling works
on the product or before you replace parts or modules. Remove the batteries!
Maintenance or repair of the digital drum may only be carried out by qualified personnel, who
are familiar with the hazards involved and the relevant regulations.
Page 33

44
Saving the adjustments
The keyboard has six memories you can use for saving the adjustments.
You can press the six keys "M1" to "M6" at any time to restore and to load the adjustments.
Of course, the "PERCUS" function must be turned off ("PERCUS OFF").
Saving
When you have finished the adjustments, press and hold
the key "WRITE". Then shortly press one of the six
keys "M1" to "M6". Already existing data will be rewritten!
When you switch off the keyboards all the adjustments will be lost.
Touch sensor on/off, key "TOUCH"
You can select two types of touch:
• The touch will only be recognised and passed on as "key pressed" or "key not pressed". The sound has
always the same volume.
• The touch will be recognised and passed on according to the intensity of the touch. A light touch will only
generate a soft sound, a hard touch will generate a loud sound.
Press the key "TOUCH", to change between the two types of touch.
Record/playback; key "RECORD" & "PLAY"
You can record your playing by pressing the "RECORD" key. At the end of the recording press the
"RECORD" key again.
To listen to the recording, press the play "PLAY" key; to interrupt the playback, simply press the "PLAY"
key again.
When you start a new recording, the old one will be rewritten!
Fig. 46
Fig. 45
Fig. 44
33
8. Connecting headphones
You can connect a pair of customary headphones to the 6.35 mm jack socket "PHONES" at the back of the
keyboard, for example if you do not want to disturb your neighbours at night. Playback over the integrated
loudspeakers will automatically be deactivated when you plug the headphones.
First turn down the volume of the keyboard to zero. Plug in the headphones and then put them
on. Now carefully turn the volume up. If the volume is too high, you risk damaging your hearing!
So set the volume to a level you can enjoy and that is not too loud!
9. Connecting a pedal
You can connect a pedal (not included) to the 6.35 mm jack plug "SUSTAIN". It serves for damping the note
you just played (pedal pressed down) as in a usual piano.
10. Connecting an external amplifier
You can connect an external amplifier with a line input level to the 6.35 mm jack socket "AUX.OUT" at the
back of the keyboard.
Turn the volume of the keyboard down to zero. Switch the keyboard off. Connect the external
amplifier. Use the AUX-IN or the TAPE-IN terminal of the amplifier. It has to be an input with line
level.
Turn down the volume of the amplifier.
Switch on the amplifier and then the keyboard.
Then carefully turn up the volume of the keyboard and of the amplifier.
Fig. 6
Fig. 7
Fig. 8
Page 34

34
11. Connecting MIDI devices
There are three different MIDI sockets at the back of the keyboard:
MIDI-IN Receives data from an external MIDI device.
MIDI-OUT Sends the MIDI data generated in the keyboard to an external device.
MIDI-THRU An external MIDI device sends data to another MIDI device.
12. Playing demo songs
The keyboard has a selection of 100 demo songs in its memory to show you, what the keyboard is able to
do.
• Switch the keyboard on.
• Set the volume as you like.
• Press the key "DEMO ALL". The keyboard will begin to play the 100 demo songs. With the keys "+/ON"
and "-/OFF" in the number block you can select the next or previous piece.
Press the key "DEMO ALL" again to stop the playback.
Fig. 9
Fig. 10
Fig. 11
Fig. 12
43
Selecting stereo position ("SELECT"/"PAN")
Press the key "SELECT" several times until the little arrow at the bottom of the LCD points to "PAN". then
change the stereo position with the keys "+/ON" or "-/OFF". This may be necessary it you sit in front of the
right or left side of the keyboard and the volume of the left/right loudspeaker is too high or too low.
Selecting MIDI channel ("SELECT"/"MIDI")
Press the key "SELECT" several times until the little arrow at the bottom of the LCD points to "MIDI". Then
change the MIDI channel with the keys "+/ON" or "-/OFF".
Selecting beat level ("SELECT"/"BEAT")
Press the key "SELECT" several times until the little arrow at the bottom of the LCD points to "BEAT". Then
select the beat level with the keys "+/ON" or "-/OFF".
Splitting the keyboard ("SELECT"/"SPLIT.PT")
Press the key "SELECT" several times until the little arrow at the bottom of the LCD points to "SPLIT PT.".
Then press the key where you want to split the keyboard.
Fig. 40
Fig. 41
Fig. 42
Fig. 43
Page 35

42
15. General operating & setting
Changing the set octave, key "OCTAVE +/-"
Change the complete pitch level by one or two octaves up or down using the "OCTAVE” keys.
Activating and playing the drumpads ("SELECT"/"PERCUS")
Press the "SELECT" key several times until the little arrow at the bottom of the LCD points to "PERCUS",
then press the key "+/ON" at the bottom of the number block. The six keys "M1" to "M6" below the LCD
now work as drumpads.
To de-activate this function, press the key "SELECT" several times until the little arrow at the bottom of the
LCD points to "PERCUS". Then press the key "-/OFF" at the bottom of the number block.
Setting the pitch of the keyboard ("SELECT"/"X´SPOSER")
Press the key "SELECT" several times until the little arrow at the bottom of the LCD points to "X´SPOSER".
Set the pitch level semitone-wise with the keys "+/ON" or "-/OFF" as required.
Precise adjustment of the pitch level ("SELECT"/"TUNE")
Press the key "SELECT" several times until the little arrow at the bottom of the LCD point to "TUNE". Then
change the pitch with the keys "+/ON" or "-/OFF".
Fig. 37
Fig. 38
Fig. 39
Fig. 36
35
Playing a single demo song
• Press the key "VOICE/STYLE/SONG".
• Enter the number of the desired demo song with the numeral keys. For example, press the key "3” and
then the key "5”.
• Press the key "START/STOP", to start the selected demo song. The song will then be played continuously. When it is finished, it starts again. Press the key "START/STOP", to stop the playback.
"Playing along” with the demo song
You can play along with the demo song you are hearing.
• While the keyboard is playing the demo song, press the key "MELODY OFF". The melody part of the
song will be switched off.
• With the two "TEMPO"-keys (+/-) you can now adjust the speed of the song.
• Press the key "MELODY OFF" again to reactivate the melody.
13. Basic functions
Selecting "VOICE" mode, selecting/playing instruments ("voices")
The keyboard has 136 PCM instrument and percussion sounds. Before you can select them, make sure that
the "VOICE" mode is activated (there is a sign next to "VOICE" in the LCD).
Press the key "VOICE/STYLE/SONG", to switch the mode.
Fig. 13
Fig. 14
Fig. 15
Fig. 16
Page 36

36
Selecting instruments with the keys "-/OFF" and "+/ON" (at the bottom of the number block).
When the "VOICE" mode is activated, you can also select instruments/voices with these two keys.
Simply press the keys several times until the desired instrument is active. Or you press and hold the key "-
/OFF" or "+/ON", then the instruments will be scanned quickly. The number of the selected instrument will
be displayed in the LCD.
Selecting instruments with the numeral keys in the number block.
With the numeral keys you can directly select the desired instruments ("voices"). So you do not have to click
slowly trough all the possibilities with the "-/OFF" or "+/ON" key.
You can enter two-digit numbers by simply pressing one number after the other. For instrument 17, shortly
press the key "1" and release it, then press the key "7".
For entering three-digit numbers, first press the key "+100" and then the last two digits as described above.
For instrument 117 this would be: key "+100", then "1", then "7".
Dual voice effect (key "dual voice")
To activate a dual-voice effect, first select an instrument ("voice") over the number block. Then press the
key "DUAL". The LCD will show VOICE 2. Then enter the number of the second instrument.
To deactivate this function, simply press the key "DUAL" again, the display shows VOICE 1.
Fig. 17
Fig. 18
Fig. 19
41
Changing the splitting of the keyboard for the accompaniment
Press the "SELECT" key several times until the little arrow at the bottom of the LCD points to "SPLIT PT.".
Then press the key of the piano keyboard where you want to split it. The corresponding note will be displayed in the LCD.
Setting the volume for individual tracks, mixer
The keyboard has 5 different accompanying tracks:
RHYTHM, BASS, ORCHESTRATION, LOWER VOICE, UPPER VOICE.
With the respective keys in the mixer mode you can set the volume of each individual track.
The upper keys increase the volume, the lower keys reduce it.
If you press both keys of one track (e.g. "BASS") simultaneously, the respective track will be switched off.
To switch it on again, simply press the two keys again.
"One-Touch-Setting"
This function has 4 pre-settings with different variations for each of the 100 styles.
So you have 400 pre-defined setting altogether!
• Press the key "OTS".
• Press the key "START/STOP", to play the selected accompanying rhythm.
• During playback, press one of the four OTS keys: "M1", "M2", "M3", "M4".
• To switch off the OTS function, simply press the "OTS" key again.
Fig. 33
Fig. 34
Fig. 35
Page 37

40
Synchronising the start of the accompanying styles, key "SYNC"
This is for making sure that the playback of the selected accompanying rhythm only starts when you begin
to play.
• Press the key "SYNC". The icon at the top of the LCD starts flashing.
• Play a note, the accompaniment starts.
Starting the style with an intro-sound, key "INTRO/ENDING"
Instead of the accompanying rhythms starting immediately, a short intro sound is played at the beginning.
• Press the key "INTRO/ENDING".
• Press the key "START/STOP" and play a chord (in the mode "FINGERED" or "SINGLE FINGER"). The
keyboard will now play an intro-sound depending on the chord you played, and then the selected accompanying rhythm.
Metronome on/off, key "METRONOME"
Start metronome playback by pressing the key "METRONOME". To switch off the metronome, simply
press the key "METRONOME" again.
While the keyboard is playing the metronome time, you can select another accompanying rhythm
("style”) at any time with the numeral keys (keyboard must be in the "style" mode, set with the key
"VOICE/STYLE/SONG").
Fig. 30
Fig.31
Fig. 32
37
Quick select "piano" (key "PIANO")
In order to switch to the most common instrument "piano", press the key "PIANO".
If you press "PIANO" again, the last instrument that was set will be activated again.
Sostenuto effect (key "SUSTAIN")
Press the key "SUSTAIN" to switch the effect on or off. The LCD will either display SUST OFF (switched off)
or SUST ON (switched on).
The sounds will last longer while playing, thus gaining more volume.
Setting the pitch bend (keys "PITCH BEND")
The two keys "PITCH BEND" make it possible to increase or decrease alter the pitch of the notes that have
just been played on the keyboard. Press the upper button to increase the pitch, and the lower button to
decrease it.
Digital Signal Processor (key "DSP")
The integrated DSP consists of two units: "Reverb" and "chorus". They add "reverb" and "chorus" effects
to the sounds played.
To switch the DSP on or off, simply press the "DSP" key. When the DSP is switched on, the symbol you can
see on the right side will be displayed in the LCD.
Fig. 20
Fig. 21
Fig. 22
Fig. 23
Page 38

38
14. Automatic accompaniment
Selecting "style" mode, choosing the accompanying rhythms ("styles”)
The keyboard has 100 different accompanying rhythms. Switch to the "style” mode by pressing the key
"VOICE/STYLE/SONG" (in the LCD a sign will light up next to "STYLE").
Selecting styles with the keys "-/OFF" and "+/ON" (at the bottom of the number block)
In the "STYLE" mode you can select the styles with these two keys. Simply press the keys several times
until the desired style is activated. Or press and hold the key "-/OFF" or "+/ON", then the styles will be
scanned quickly.
The number of the selected style will be displayed in the LCD.
Selecting styles with the numeral keys in the number block
With the numeral keys you can directly select the desired accompanying rhythms ("styles”). So you do not
have to click slowly trough all the possibilities with the "-/OFF" or "+/ON" key.
You can enter a two-digit number of a style by simply pressing one number after the other. For style 15,
shortly press the key "1" and release it, then press the key "5".
Playing the selected accompanying rhythm ("style"), key "START/STOP"
• Press the key "START/STOP", to start playback.
• Press the key "START/STOP" again to stop playback.
You can also enter numbers during playback. With the key "VOICE/STYLE/SONG" either select the
mode "voice" or the mode "style" and then enter the desired instrument ("voice”) or the desired
accompanying rhythm ("style”) with the numeral keys.
Fig. 24
Fig. 25
Fig. 26
39
Setting the speed, keys "TEMPO +/-"
With the two keys "TEMPO +/-" you can change the style speed. The display will show the speed.
When you hold both keys pressed down, the speed will go back to the standard setting.
Using automatic accompaniment
• Select the correct mode with the "MODE" key ("FINGERED", "SINGLE FINGER").
• Select the variation with the keys "FILL-IN NORMAL" or "FILL-IN VARIATION".
• Press the key "START/STOP" to start playback of the selected accompanying style.
• Play a chord. The procedure depends on the selected mode. Please note the annex for details on playing
chords.
Mode "FINGERED": Annex A
Mode "SINGLE FINGER": Annex B
• To stop playback, press the "START/STOP" key again.
Variations
During playback:
Every accompanying rhythm has two variations: "NORMAL" and "VARIATIONS".
You can switch from one to the other at any time during playback. Use the keys "FILL-IN NORMAL" and
"FILL-IN VARIATIONS". The keyboard will automatically generate a soft transition between the two variations!
Fig. 27
Fig. 28
Fig. 29
 Loading...