

Page 1

Manual FP260 PC-Application
Table of contents:
- Short description of the FP260 PC application
- Overview of the control panel
- Installation of the FP260 PC application
- Getting started
- Importing (enrolling) new fingerprints
- Special characteristics of the "master"
- Administration of persons with access authorisation
- Changing the master
- Renaming saved fingerprints
- Deleting individual users
- Deleting all users
- The relay mode (door opener mode)Manual switching of the relay
- Special functions:
- Identify user
- Scanning fingerprint
- Data protection with the "PIN function"
- The LOG -
- Language selection
-
FAQ (frequently asked questions)
file
Page 2
Short description of the FP260 PC application
In addition to the standalone mode of the FP260 module, this software provides a
range of additional functions for easier administration of the users imported. It also
allows recording a log file and saving fingerprints as image files. The door can
furthermore be conveniently opened from the computer at the click of the mouse.
Overview of the control panel
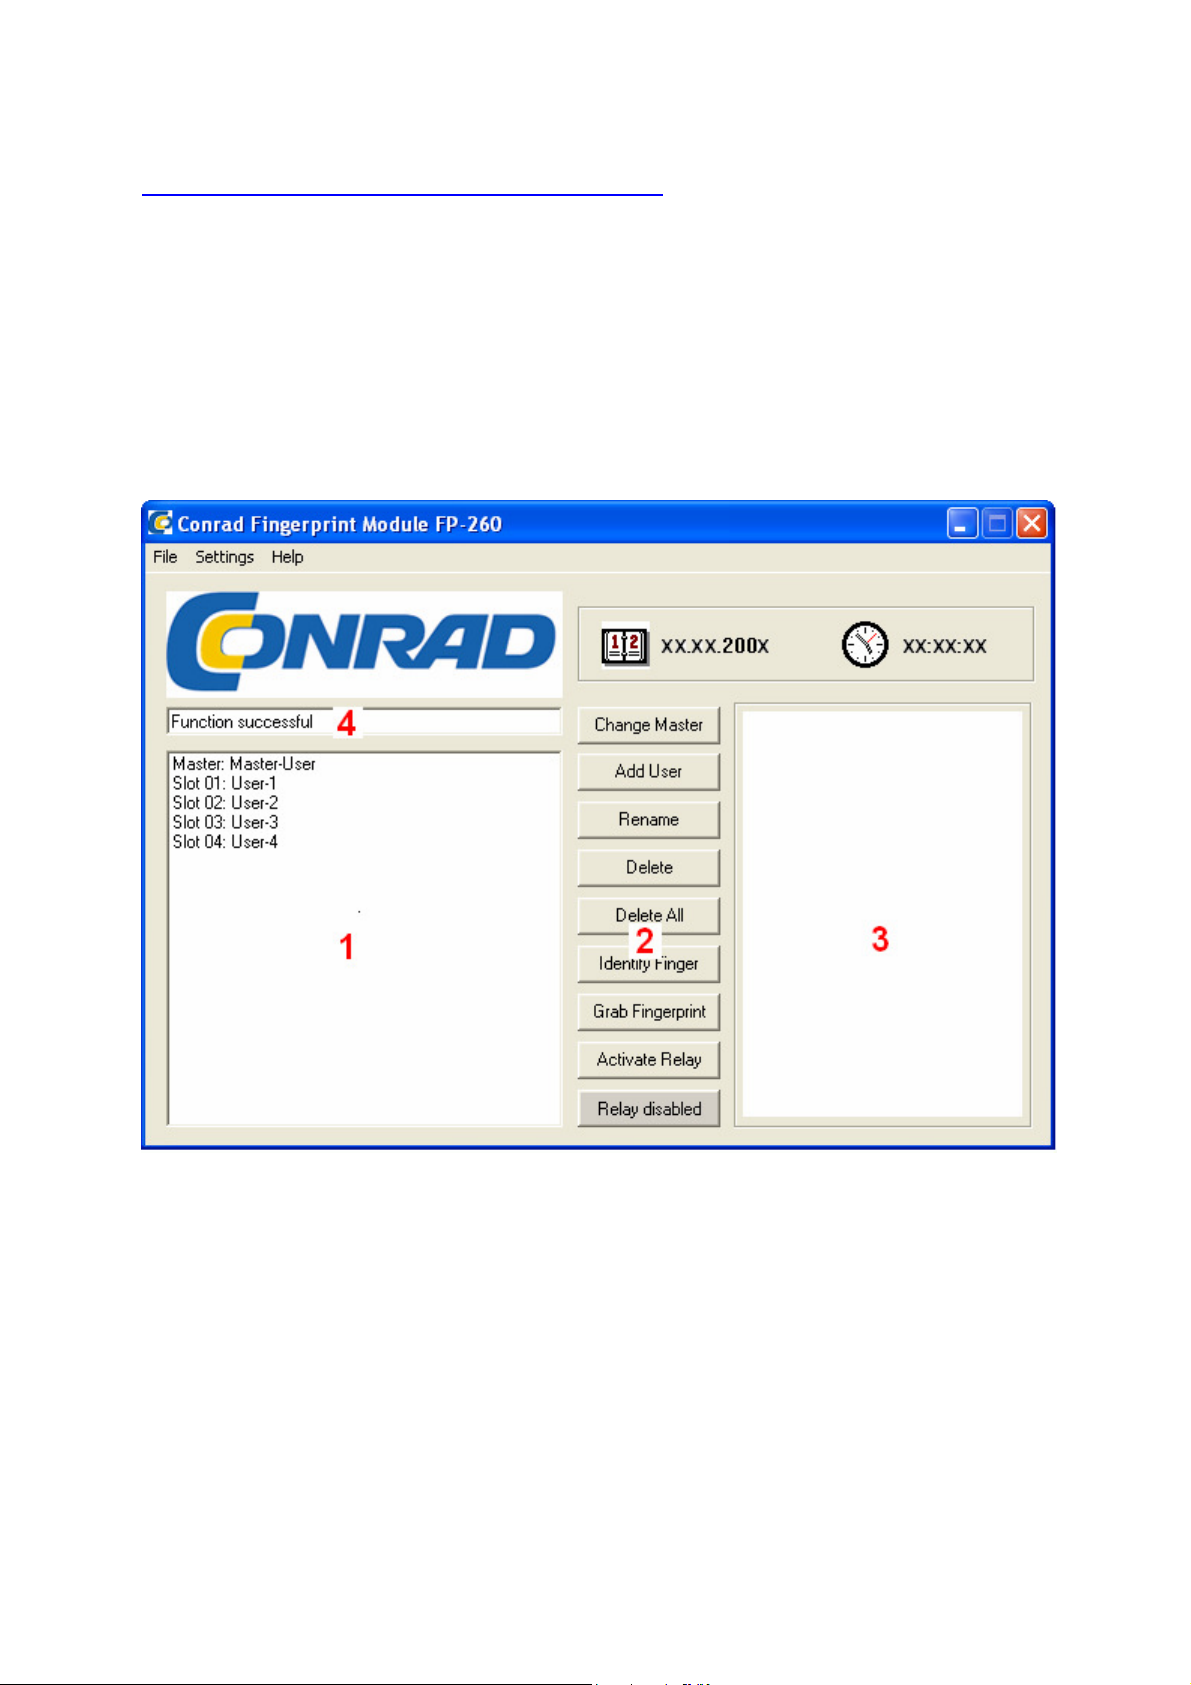
The following illustration shows the control panel of the FP260 PC software if several
persons with access authorisation have already been imported
1: List of persons with access authorisation who have been imported (enrolled).
2: Control panel for fingerprints administration, finger identification, fingerprint
scanning, manual relay switching and relay operation can be activated here.
3: Display of the fingerprint recorded last.
4: Status display of the command displayed last.
Page 3

Installation of the FP260 PC application
To install the FP260 WINDOWS software, insert the SETUP CD into the CD drive
and close it. If the installation does not start automatically, the SETUP.EXE file on the
CD must be run. Follow the instructions of the software.
The software suggests the FP260 directory for installation and copies the necessary
files to the directory selected and into WINDOW's SYSTEM directory. The installation
program allows creates a FP260 program group under PROGRAMS.
Before starting the software, you must prepare the FP260 hardware as
specified in Section "Getting starting".
Page 4
Getting started
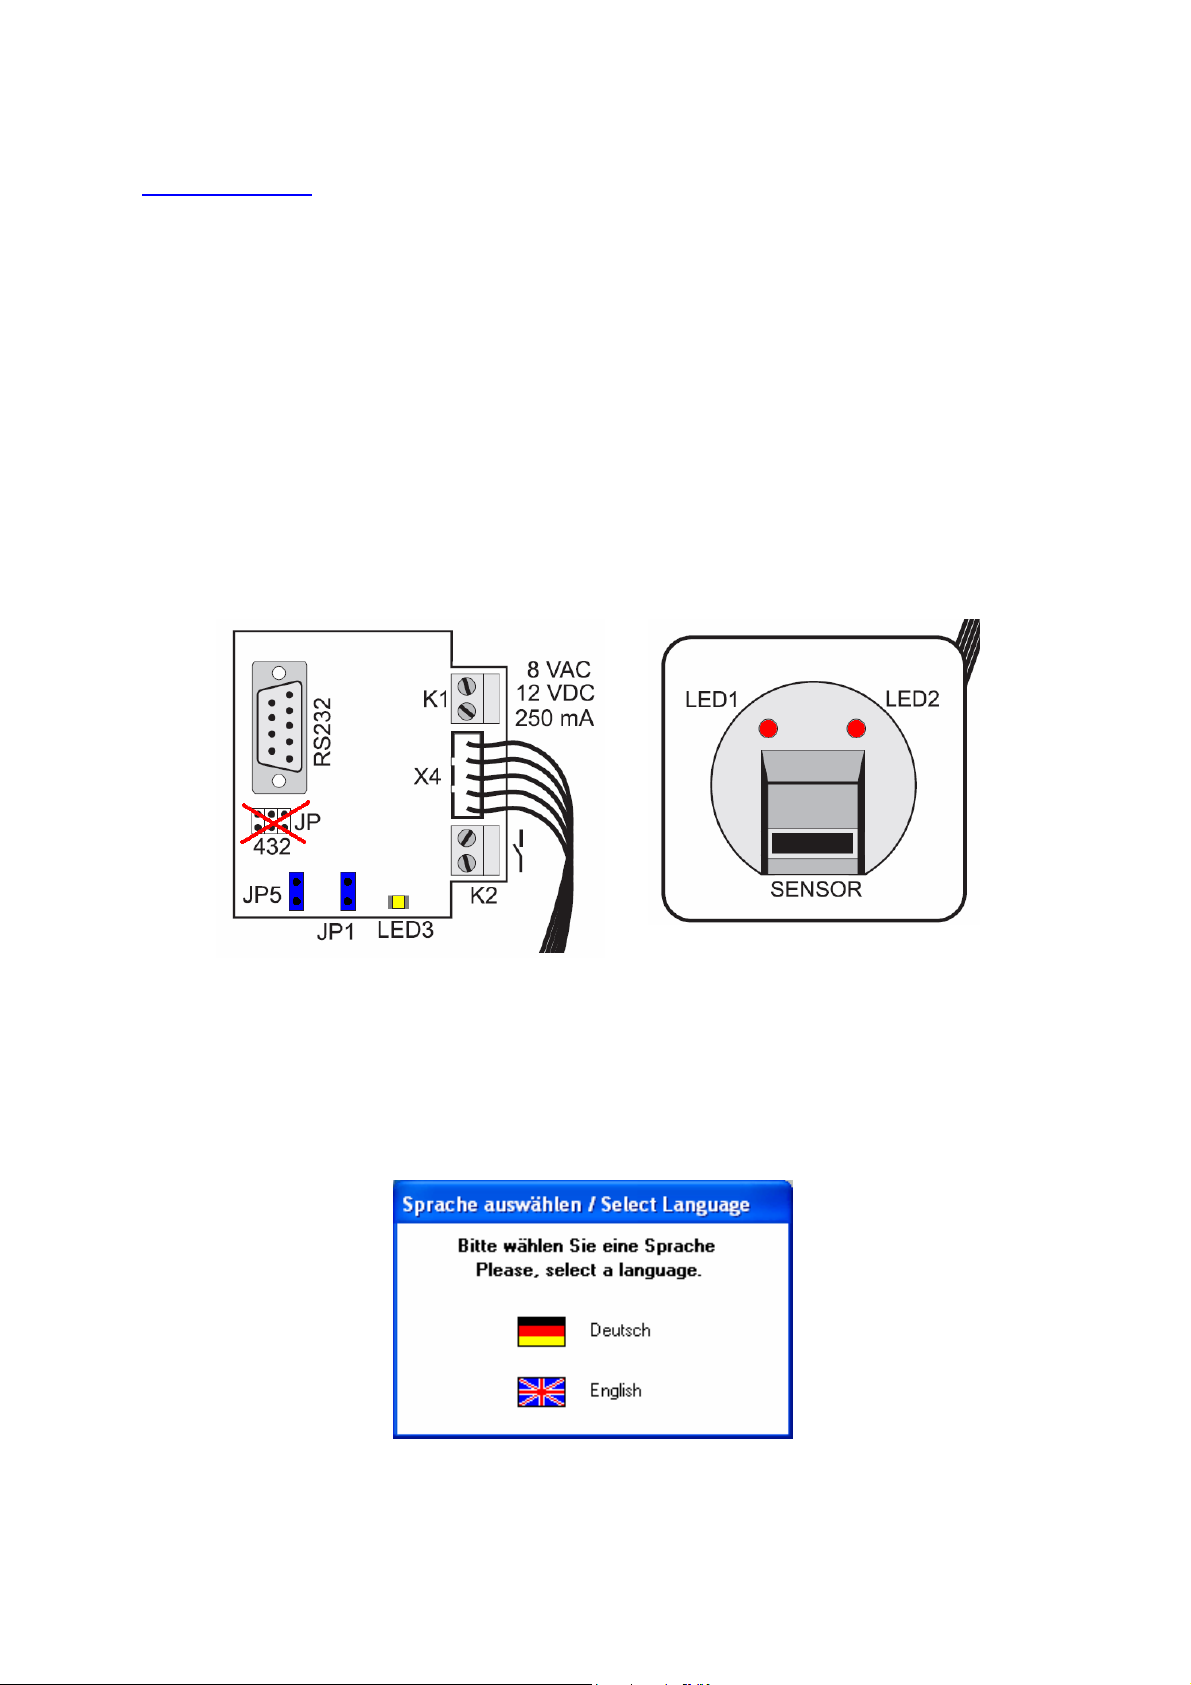
First the PC mode must be set by setting the two "JP1" and "JP5" jumpers on the
FP260 control module. The fingerprint module has a serial (RS232) interface (9-pin
SUB-D socket on the control module) to create a connection to the PC. Nothing has
to be switched or bridged on the "JP2, JP3 and JP4" jumpers (production
connections).
Now connect the FP260 control module (evaluation unit) using the 9-pin RS232 cable
(pin assignment 1:1, plug – socket, e.g. Conrad Item no.: 981281 - 62) with a free
COM connection on your PC. The COM port must be in the range between COM1
and COM8. (see Device Manager/Connections (COM and LPT))
The module must be supplied with power in accordance with the hardware
instructions.
The FP260 fingerprint access system is now ready for PC mode.
If it should be reverted to standalone mode, JP1 and JP5 have to be disconnected
again.
FP260 control-module diagram FP260 sensor diagram
Now start the application under "START/PROGRAMS/FP260" by double clicking on
the FP260 icon.
You are then requested to select the desired language on the first start of the
program.
To select the language, you must click on the respective flag.
The program then connects to the fingerprint module. This can take up to 20
seconds.
Page 5
After a successful start, the flashing LED3 on the FP260 control module shows the
correct function of the interface to the application software. LED1 and LED2 on the
sensor are permanently alight.
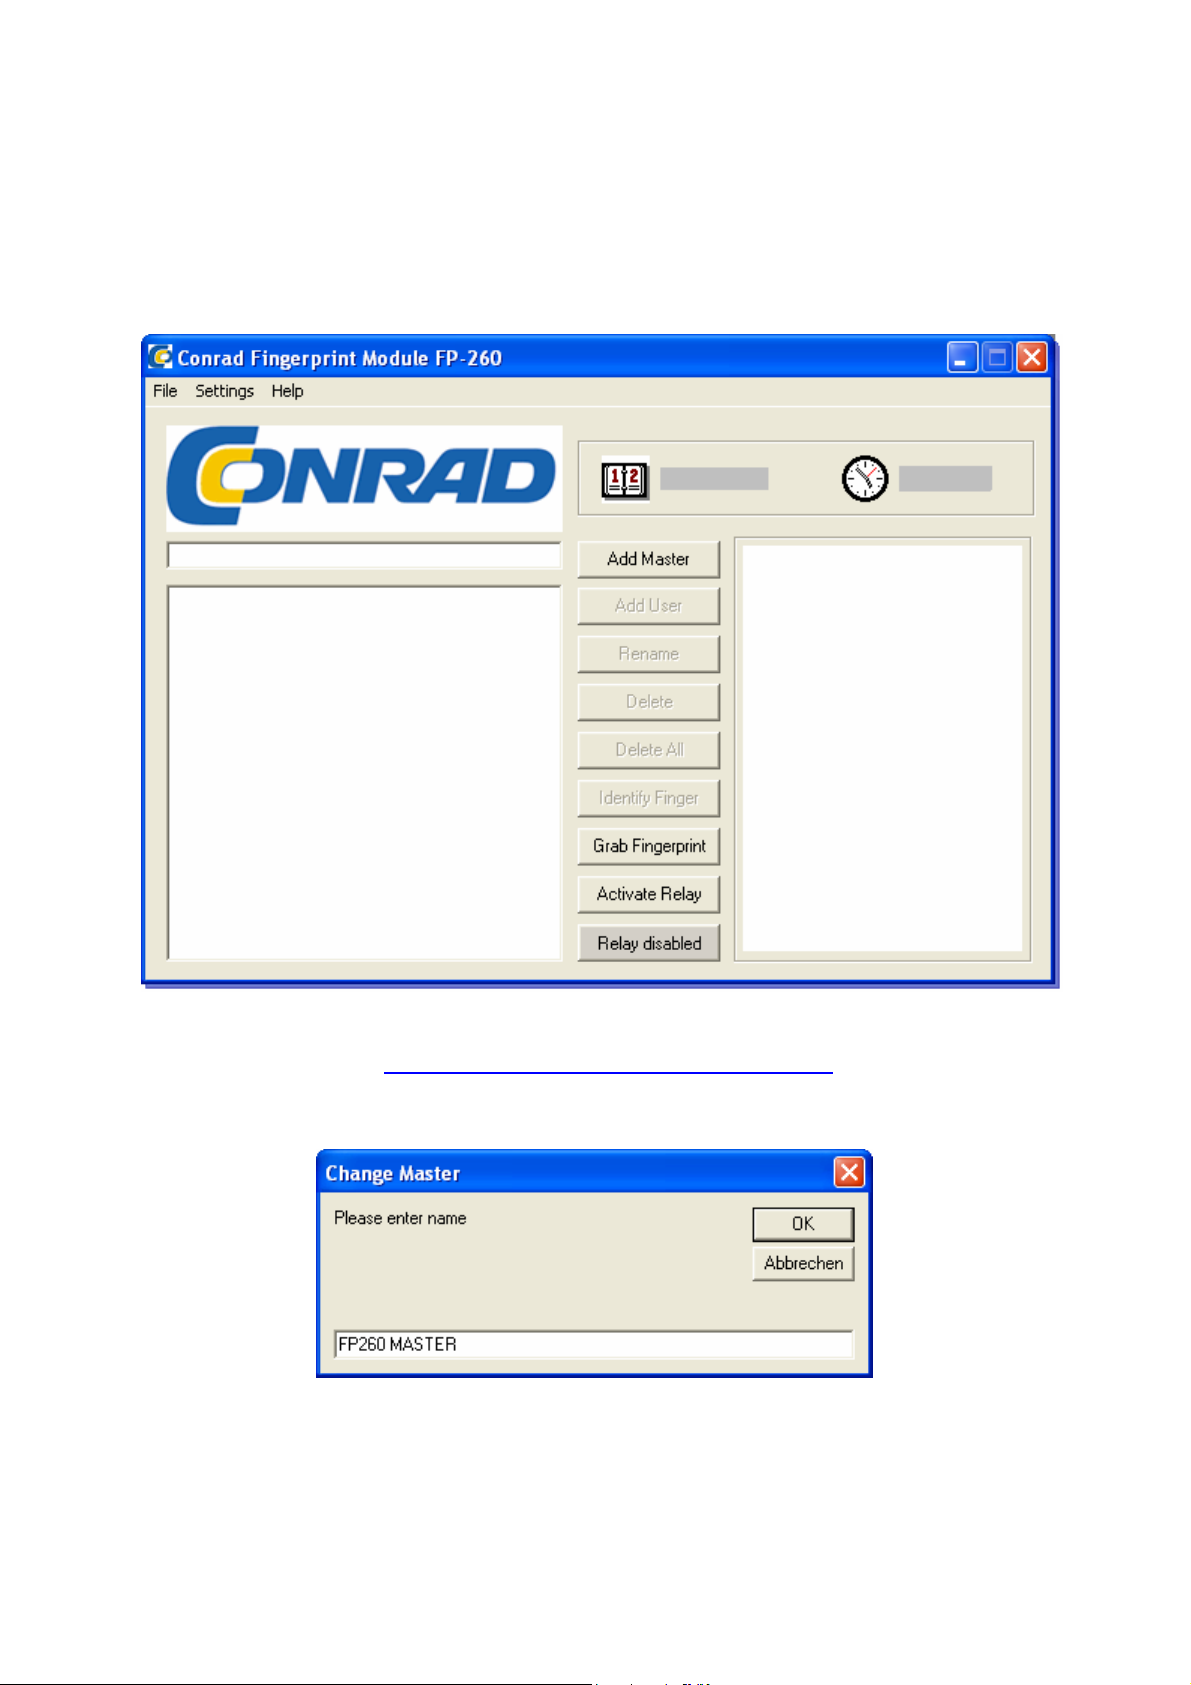
Subsequently, the following program window is displayed, if the FP260 system is still
in delivery condition, i.e. no users have been imported yet.
Now a master fingerprint must be created first (first user with special authorisation in
standalone mode, see Special characteristics of the "master")
This is performed by clicking "Add master".
Now you are asked to enter the name for the master.
After entering the name (in this example "FP260 MASTER“), confirm it by pressing
the "OK" button at the top right.
Page 6

A window is displayed which guides you through graphical and written instructions
through the import process.
In order to import the fingerprint successfully, you have the swipe your finger within
the next 15 seconds over the sensor while applying a little pressure, preferably in the
middle and evenly. To this end, use your index finger. This procedure has to be
repeated twice with the same finger in order to ensure sufficient quality of the
imported fingerprint.
It is also important that the finger is swiped over the sensor flatly so that
it touches the metal stripes at the top and lower ends of the sensor
while scanning.
(See figure).
You can find further details on importing fingerprints "Importing (enrolling) new
fingerprints".
Page 7

After successfully importing the master, it is displayed under the item "Master" in the
list of users saved.
Furthermore, a range of additional functions in the control panel are now released.
Via the "Add user" button, additional users with access authorisations can be
imported in the same way as with the master, after entering the respective name.
Page 8

Please read the respective sections below for a detailed description of
the individual functions.
Page 9

LED2
Importing (enrolling) new fingerprints
New users are imported via the "Add user" button. This requires that the "master"
user has been imported.
First you are asked to enter the name. Click OK after entering it. A window is
subsequently displayed which guides you through graphical help and text instructions
through the import process.
It must be observed that the finger is swiped over the sensor within the
LED1
next 15 seconds with slight pressure, centrally and at a low speed.
(The index finger is best suited for these purposes.) It is
also important that the finger is swiped over the sensor
flatly so that it touches the metal stripes at the top and
lower ends of the sensor while scanning. (See figure on
the right).
The software provides feedback as to whether the recording was successful or what
deviation resulted in the error (for instance, "finger moved too fast"). This procedure
has to be repeated three times in total.
If the import process is not continued for longer than 20 seconds, it is automatically
cancelled.
Always use the same finger for the learning process, as the import with
otherwise not be accepted.
Subsequently the newly imported user appears under the assigned slot number of
the list. The system can save up to 25 fingerprints (depending on size). The same
name can be assigned to several fingerprints. This allows the respective user to use
various fingers.
Please note: The same finger can be imported several times. The
program would accept this, but it is not advisable and may result in
errors.
The "master – user” is a special matter, which will be discussed in the following
section.
Page 10

Special characteristics of the "master"
Before you import the persons with authorised access, you have to program the
"master fingerprint" with special authorisation first. Later learning procedures in the
"standalone mode" can only be started after confirmation. It therefore serves to
protect against importing unwanted users.
In PC mode the master cannot be deleted, but only replaced!
Deleting the master is only possible by resetting the FP260 system to the factory
settings via the reset jumper on the FP260 evaluation unit. To this end, the FP260
application software must be closed. First, the JP1 and JP5 jumpers must be
removed in order to switch the system to standalone mode. Then the "JP5“ jumper
must be switched for approx. 20 seconds until the "LED1" display on the sensor goes
out (LED2 remains alight). Switching JP1 now allows reactivating PC mode.
Figure: Jumper settings when resetting to factory settings
When resetting to factory settings, all saved fingerprints are deleted!
Page 11

Administration of persons with access authorisation
A range of additional functions are available in the PC application to administrate
persons with access authorisation. Deleting individual users and assigning names is
possible.
Changing the master
With the "Change master" function, the "master-user” can be created after entering
the name, if no master has been imported yet. If a master is already available, it can
only be replaced with a new master.
Renaming saved fingerprints
In order to change a fingerprint, it must first be highlighted in the list of saved users. It
can then be renamed via the "Rename" button.
Deleting individual users
An individual saved fingerprint is deleted by highlighting it in the list and then clicking
the "Delete" button. After confirming by clicking "Yes", it is deleted and thus a
memory slot free for a new user.
Deleting all users
Via the "Delete all" function, all saved fingerprints can be deleted after confirmation.
The "master" fingerprint is not affected by this action. It can only be replaced with a
new "master".
Page 12

The relay mode (door opener mode)
The relay/door opener mode is activated by clicking the "Relay disabled/enabled"
button. If it is activated, it is highlighted in colour and the remaining buttons are
blocked.
Means that the relay/door opener function is deactivated.
Displays that the relay mode is active. When identifying a enrolled
user, the switch contact of relay 4 is closed for 4 seconds. This user is
displayed on the desktop's the bottom right corner.
Successful identification is additionally displayed by LED1 and LED2 on the sensor
which go out while the relay is switched. If the identification is not successful, i.e. the
user not imported, the two light emitting diodes flash three times in quick succession.
This can be caused by too fast or too slow movement over the sensor, a
unauthorised or a badly scanned fingerprint. A soiled sensor surface can also cause
this. Where necessary, clean
the sensor surface with a soft, antistatic cloth, without aggressive liquids.
If the software is not in relay operation, the door opener mode is inactive again. This
means that smooth operation of the PC must be ensured for this.
During relay operation, a LOG file with details regarding date, time and associated
names is recorded in the list when using the access system. (see Section "The LOG
- file")
Manual switching of the relay
When clicking on the "Activate relay" button, the relay is activated for four seconds.
This means that the door can be conveniently opened from the computer, for
instance. This is also displayed with the two light emitting diodes going out.
Page 13

Special functions:
Identify user
Via the “Identify Finger” button, it can be established what entry in the list is
assigned to the respective finger. After successfully scanning the finger, the assigned
entry is displayed in the status display.
Scanning fingerprint
Via the “Grab Fingerprint" function, an image of the fingerprint can be saved as an
image file. First, the import process is started as normal. Then the image of the
fingerprint appears in the display window. It is now possible to save it with the
"File/Save fingerprint"-function as bitmap (.bmp).
Fingerprint data are sensitive and strictly confidential data.
Thus:
If a user's fingerprint should be saved as a .bmp image file, his consent must
first be obtained in writing. Disclosing and passing on to third parties is only
allowed with the user's written consent. It must be ensured that all documents
involved are protected accordingly from third parties.
Data protection with the "PIN function"
In order to protect the software from unauthorised access, an 8-digit PIN code is to
be used. It can be activated via the "Settings/Enable PIN”menu item.
Is set when delivered to PIN "00000000".
If the PIN is activated, it is queried when the program is started. The user then has
unlimited access to all program functions after entering the correct pin.
For security reasons it is recommended to change the PIN after installation. To this
end select "Settings/ change PIN". Then the old PIN must first be entered as a
confirmation. The new PIN can then be entered and has to be confirmed again. The
PIN must be eight digits long and may consist of letters and numbers.
The PIN is saved within the FP260 module. This means that it is also queried after
reinstallation of the FP260 user software, if it was activated originally.
Page 14

The LOG - file
During the relay/door opener mode, all attempts at switching the relay by fingerprint
are recorded in a LOG - file along with date and time (as per Windows system time)
(file format .txt). The user belonging to the fingerprint is also saved if he is in the list
of associated fingerprints. If a non-authorised person tries to gain access, this event
is also logged (displayed as "user unknown").
xx.xx.200x; 09:21:56; master: master user
xx.xx.200x; 09:45:14; slot 02: user 2
xx.xx.200x; 09:53:33; user unknown
xx.xx.200x; 10:16:46; master: master user
Every day a new LOG file is created with the respective date as the name. (e.g.
"1/1/2008.txt“)
The current LOG file can be displayed via "File\Open last LOG file". The folder
where the FP260 software saves the log files can be directly accessed via
"File\Open LOG folder".
Language selection
The program language can be switched via "Settings\Language" from German to
English and vice versa.
Page 15

FAQ (frequently asked questions)
If the FP260 module is not identified by the software:
Observe correct jumper settings (JP1 & JP5 set)
Use suitable RS-232 cable (1:1, plug - socket, RS-232 cable 9-pin.)
The COM port must be in the 1-8 range (see Device Manager)
The assignment of the RS232 connection on the FP260 fingerprint module:
Pin 2: RX
Pin 3: TX
Pin 5: GND
Pin 7: RTS
Pin 8: CTS
LED1 and LED2 occasionally flare:
This is due to the system and therefore normal.
System requirements:
Operating system Windows XP, Windows Vista.
CD-drive
1 free COM port
Min. 25Mb free HDD space
 Loading...