

Page 1

DYON RAPTOR
1
EN
Index
Index ............................................................................................... 1
1 Important Safety Instructions ........................................................... 3
2 Front and Rear Panel Illustration...................................................... 5
3 Remote Control................................................................................ 6
3.1 Key introduce .............................................................................................. 6
3.2 Installing the Batteries ................................................................................ 7
3.3 Using the Remote Control .......................................................................... 7
4 Connections ..................................................................................... 8
4.1 Connecting to TV ........................................................................................8
4.2 Connecting the Cable .................................................................................9
5 First Time Installation......................................................................10
6 Channel Settings............................................................................ 11
6.1 Edit channel .............................................................................................. 11
6.1.1 Favorites ....................................................................................................... 11
6.1.2 Lock / unlock channels ................................................................................12
6.1.3 Skip channels ...............................................................................................12
6.1.4 Move channels ............................................................................................. 12
6.1.5 Delete channels ........................................................................................... 12
6.1.6 Rename channels........................................................................................ 12
6.1.7 Sort channels (A-Z; Z-A, u.s.w.) .................................................................12
7 Installation.......................................................................................13
7.1 Quick Search ............................................................................................ 13
7.2 Auto Search .............................................................................................. 13
8 System Setup..................................................................................14
8.1 Language .................................................................................................. 14
8.2 TV System ................................................................................................ 14
8.3 Display Setting .......................................................................................... 15
8.4 Local Time Setting .................................................................................... 15
8.5 Timer Setting............................................................................................. 15
8.6 Parental Lock ............................................................................................ 16
8.7 OSD Setting .............................................................................................. 16
8.8 Favorite ..................................................................................................... 17
8.9 Other ......................................................................................................... 17
9 Tools ..............................................................................................18
9.1 Information ................................................................................................ 18
9.2 Factory Setting.......................................................................................... 18
9.3 Common Interface .................................................................................... 18
9.3.1 CAM Modul...................................................................................................18
9.4 Firmware upgrade..................................................................................... 19
9.5 USB Media Player .................................................................................... 19
Page 2

DYON RAPTOR
2
EN
9.6 Remove USB device safely ...................................................................... 19
10 Game ............................................................................................. 19
11 Record Setting ................................................................................20
11.1 PVR Speicher Einstellungen .................................................................... 20
11.2 PVR Setting .............................................................................................. 20
12 Record & MediaPlayer ....................................................................21
12.1 Record & Timeshift ................................................................................... 21
12.1.1 Record........................................................................................................... 21
12.1.2 Timeshift ....................................................................................................... 21
12.1.3 Recording List ..............................................................................................22
12.2 MedienPlayer ............................................................................................ 22
12.2.1 Record........................................................................................................... 22
12.2.2 Music ............................................................................................................. 22
12.2.3 Bilder .............................................................................................................23
12.2.4 Video .............................................................................................................23
13 General functions............................................................................24
13.1 OK List ...................................................................................................... 24
13.2 Favorite List .............................................................................................. 24
13.3 EPG (Eletronic Program Guide) ............................................................... 25
13.4 Teletext ..................................................................................................... 25
13.5 Program Information ................................................................................. 26
13.6 Audio ......................................................................................................... 26
13.7 Subtitle ...................................................................................................... 26
13.8 Zoom In ..................................................................................................... 26
14 Glossary..........................................................................................27
15 Troubleshooting ..............................................................................28
16 Technical Specification ...................................................................29
17 Warranty condition ..........................................................................31
Page 3

DYON RAPTOR
3
EN
1 Important Safety Instructions
1) Read these instructions.
2) Keep these instructions.
3) Heed all warnings.
4) Follow all instructions.
5) Do not use this apparatus near water.
6) Clean only with dry cloth.
7) Do not block any ventilation openings, install in accordance with the instructions.
8) Do not install near any heat sources such as radiations, heat registers, stoves, or other apparatus
(including amplifiers) that produce heat.
9) Do not defeat the safety purpose of the polarized plug. If the provided plug does not fit into your
outlet, consult an electrician for replacement of the obsolete outlet.
10) Protected the power cord from being walked on or pinched particularly at plugs, convenience
receptacles, and the point where they exit from the apparatus.
11) Only use attachments/accessories specified by the manufacturer.
12) Unplug this apparatus during lighting storms or when unused for long periods of time.
13) Refer all servicing to qualified service personnel. Servicing is required when the apparatus has been
damaged in any way, such as power-supply cord or plug is damaged, liquid has been spilled or
objects have fallen into the apparatus, the apparatus has been exposed to rain or moisture, does not
operate normally, or has been dropped.
14) Mains plug is used as the disconnect device, the disconnect device shall remain readily operable.
15) The ventilation should not be impeded by covering the ventilation openings with items, such as
newspapers, table-cloth, curtains, etc.
16) No naked flame sources, such as lighted candles, should be placed on the apparatus.
17) Attention should be drawn to the environmental aspects of battery disposal.
18) The use of apparatus in moderate climate.
WARNING: To reduce the risk of fire or electric shock, do not expose this apparatus to rain or moisture.
WARNING: The batteries shall not be exposed to excessive heat such as sunshine, fire or the like.
The symbol indicates that dangerous voltages constituting a risk of electric shock are present within
this unit.
The symbol indicates that there are important operating and maintenance instructions in the
literature accompanying this unit.
The symbol indicates that this product incorporates double insulation between hazardous mains
voltage and user accessible parts. When servicing use only identical replacement parts.
Page 4

DYON RAPTOR
4
EN
CAUTION:
When the apparatus was in electrostatic circumstance, it may be malfunction and need to reset by user.If.
Tips regarding environmental protection
At the end of its operating life, this product may not be disposed of by way of your normal
household waste. Instead it must be delivered to a collection point for recycling electrical and
electronic equipment. The icon on the product, in the operating instructions or on the
packaging, indicates this.
The materials used in manufacturing this product are recyclable, depending on their
identifying markings. By recycling this equipment, by recycling its components, or through
other procedures of re-using outdated equipment, you are making an important contribution
to protection our environment. Please ask you local municipal administration for the location
of the corresponding recycling point.
Battery Recycling
In order to ensure the environmentally friendly disposal of batteries, please do NOT dispose of
used batteries through normal household waste. Please take the batteries to your local retail
or community collection point for recycling.
The following may be an indication of a discharged battery: The device cannot be switched
on. The device switches off automatically and "Battery Empty" is shown in the display. The
device and or battery do not function properly.
Support
URL: http://www.dyon.eu
See our website for the latest information on this product, on other products by our company and on our
company itself. If you have questions or problems, please read the FAQs on our website or contact our
customer support service support@dyon.eu
.
Appropriate use
The receiver is designed for receiving encrypted and unencrypted digital SD and HD cabel channels for
private use. It is exclusively meant for this purpose and must only be used for the same. This also includes
paying attention to all information contained in this operating manual, especially in the safety instructions.
Any other usage is considered to be improper and may lead to material damages and even personal
injuries. Moreover, it will result in the immediate loss of guarantee. The manufacturer does not bear any
liability for damages caused due to improper use.
Page 5
DYON RAPTOR
5
EN
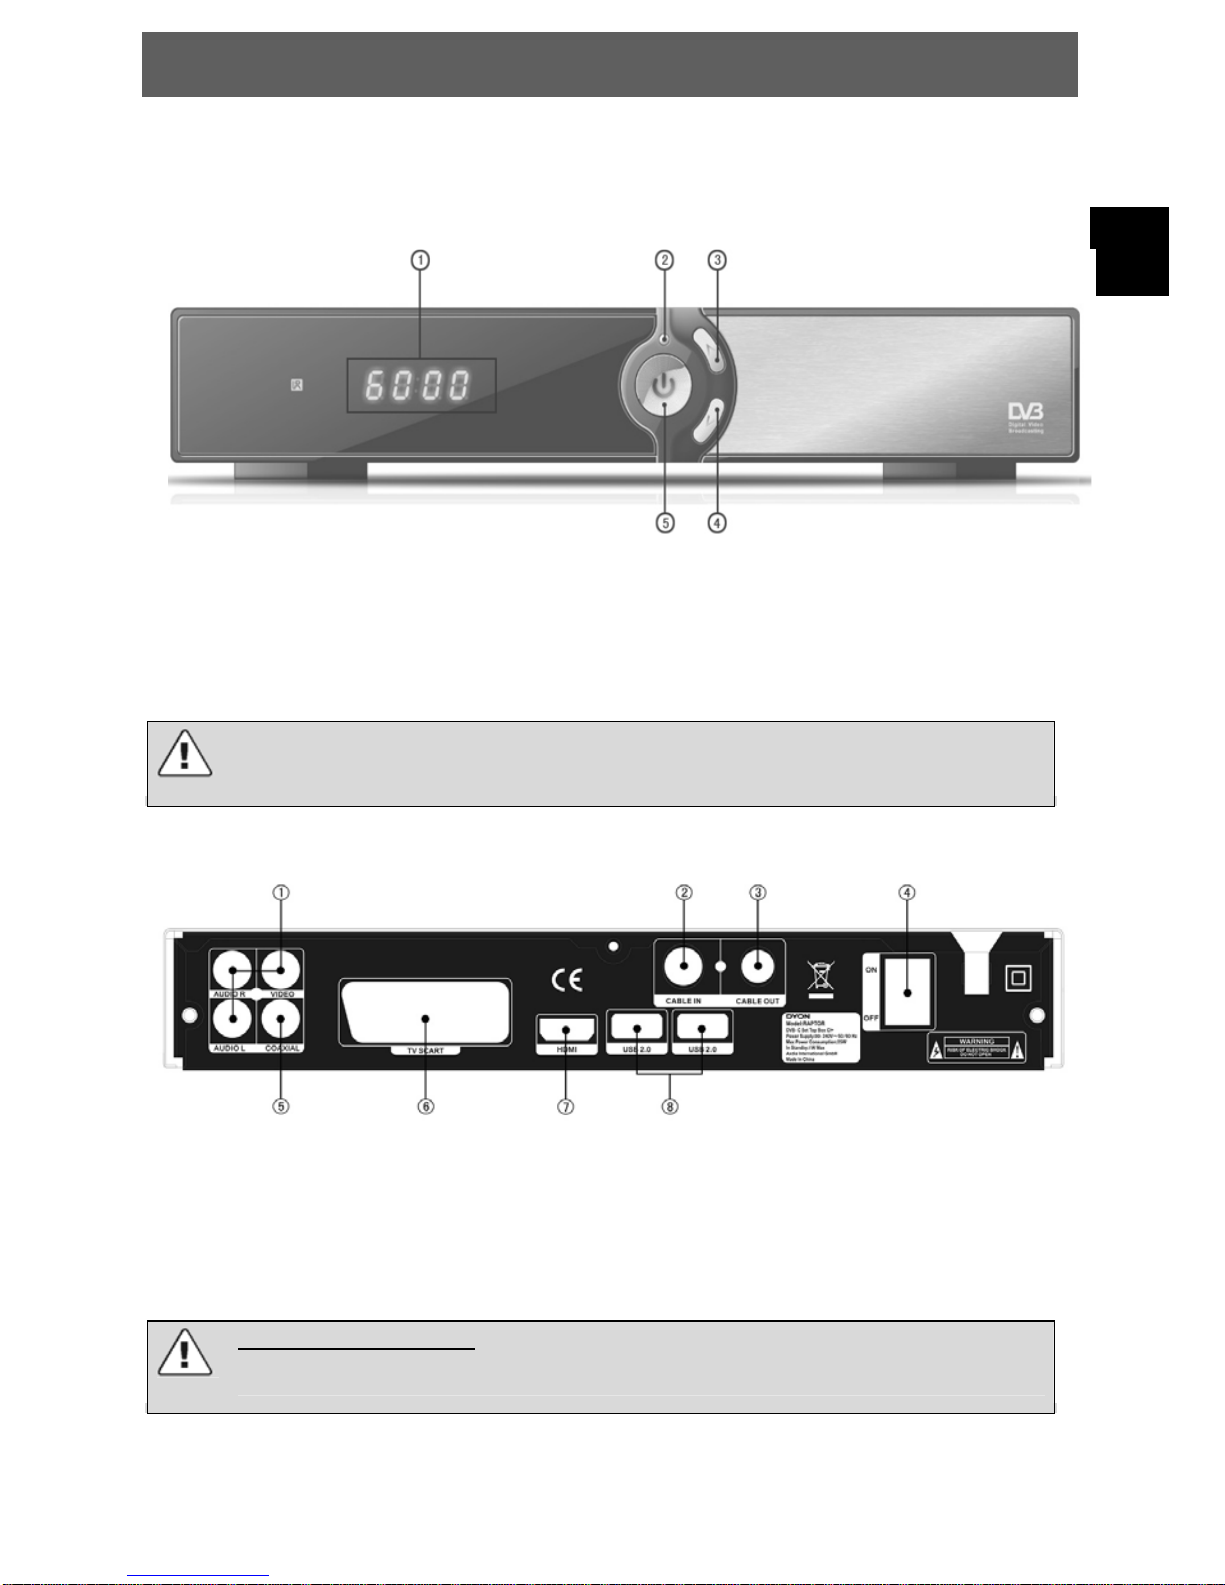
2 Front and Rear Panel Illustration
1. Front panel
1. LED Display: Used to display information.
2. DVB-C Signal indicator (green if signal)
3. CH+ (Navigates through the Menus. Selects the next Channel)
4. CH- (Navigates through the Menus. Selects the previous Channel)
5. Standby (Used to switch the set top box to on or standby)
Stand-by-indicator ()
Caution:
If possible, please connect USB devices directly to the DYON Harrier's USB interface.
If this is not possible, use only USB extension cables not exceeding 25 cm.
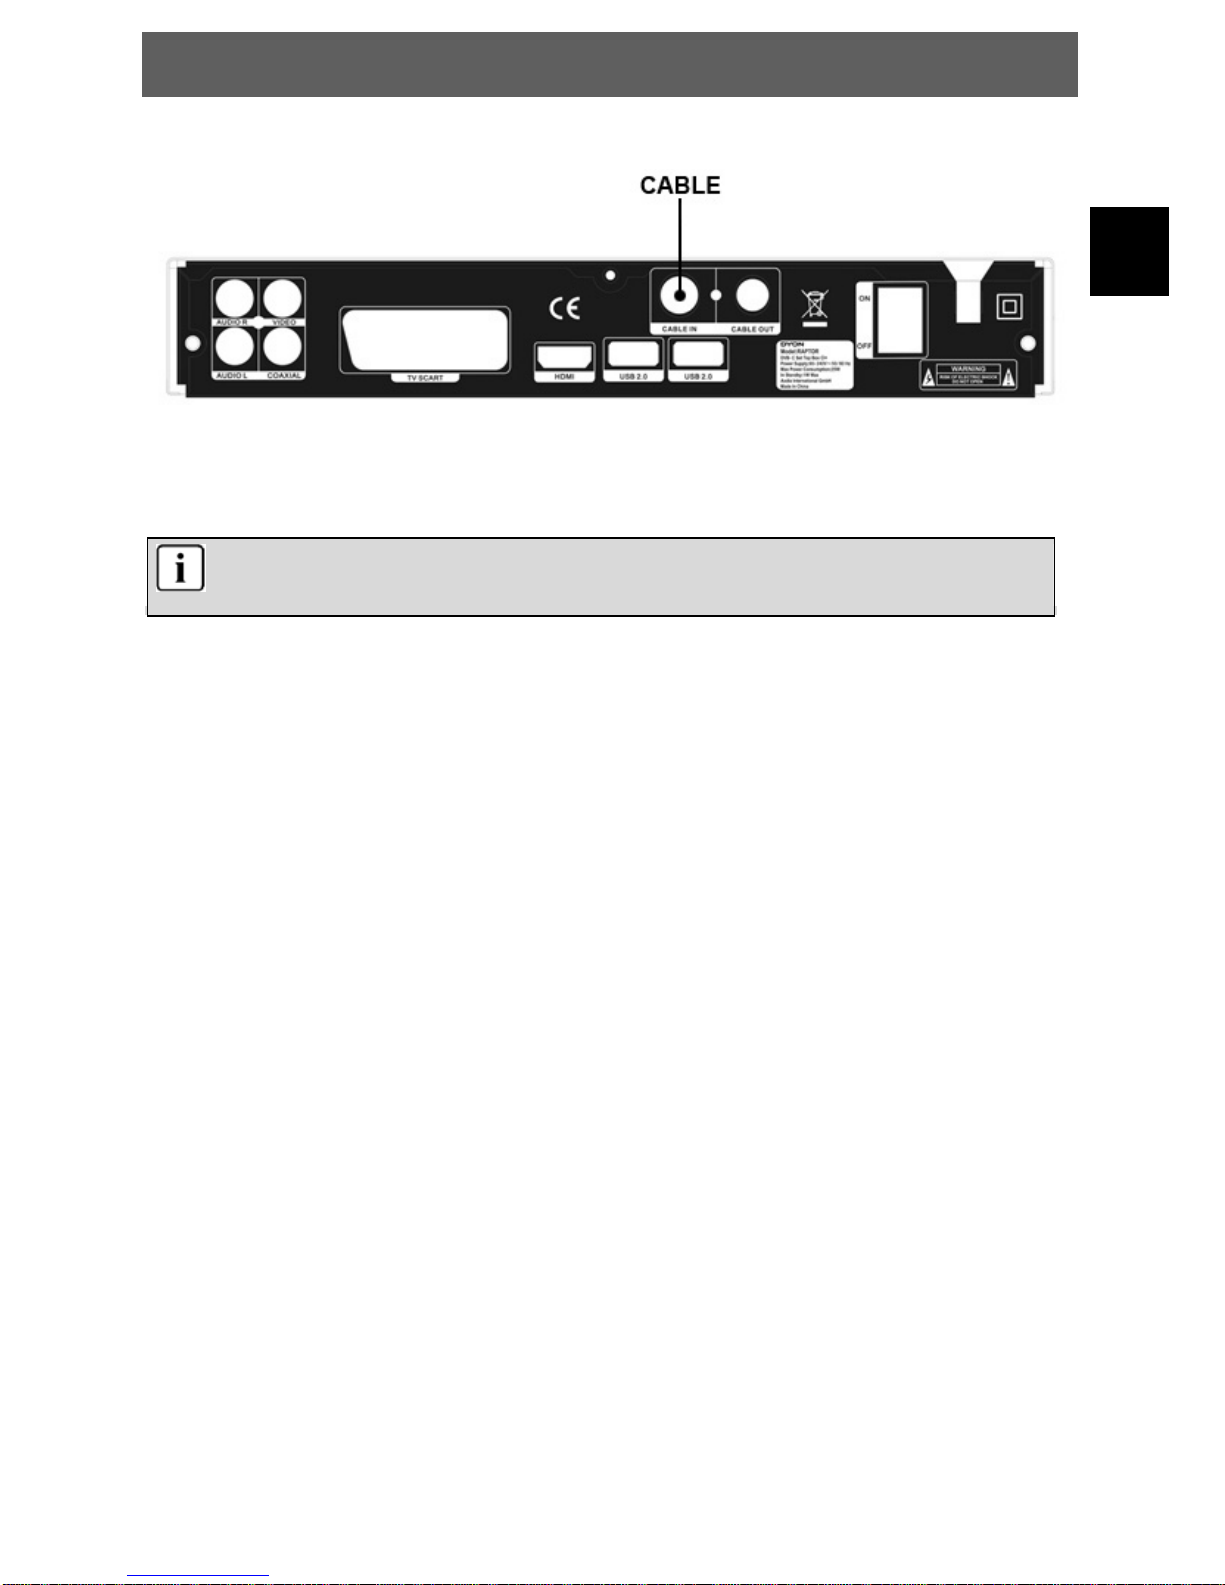
2. Rear panel
1. AV Video Output: This socket outputs analog audio L/R / video signal.
2. R F-Input:
Used to connect the cable to receive the signal.
3. R F-Reloop :
This socket will bypass the RF signal to another STB.
4. Powe rswitc h: Turn on / off the engine.
5. Coaxial:
This socket connects to a coaxial socket on your surround sound system.
6. T V S c ar t : This socket connects to your TV.
7. H D M I OU T : This socket connects to HDMI in device.
8. USB-Po rt:
Data input from USB storage devices.
!!!!!ATTENTION!!!!!
THE DEVICE HAS A POWER SWITCH. IN THE CASE THE POWER SWITCH IS IN OFF
POSITION, THE DEVICE CANNOT WORK!!!
Page 6
DYON RAPTOR
6
EN
3 Remote Control
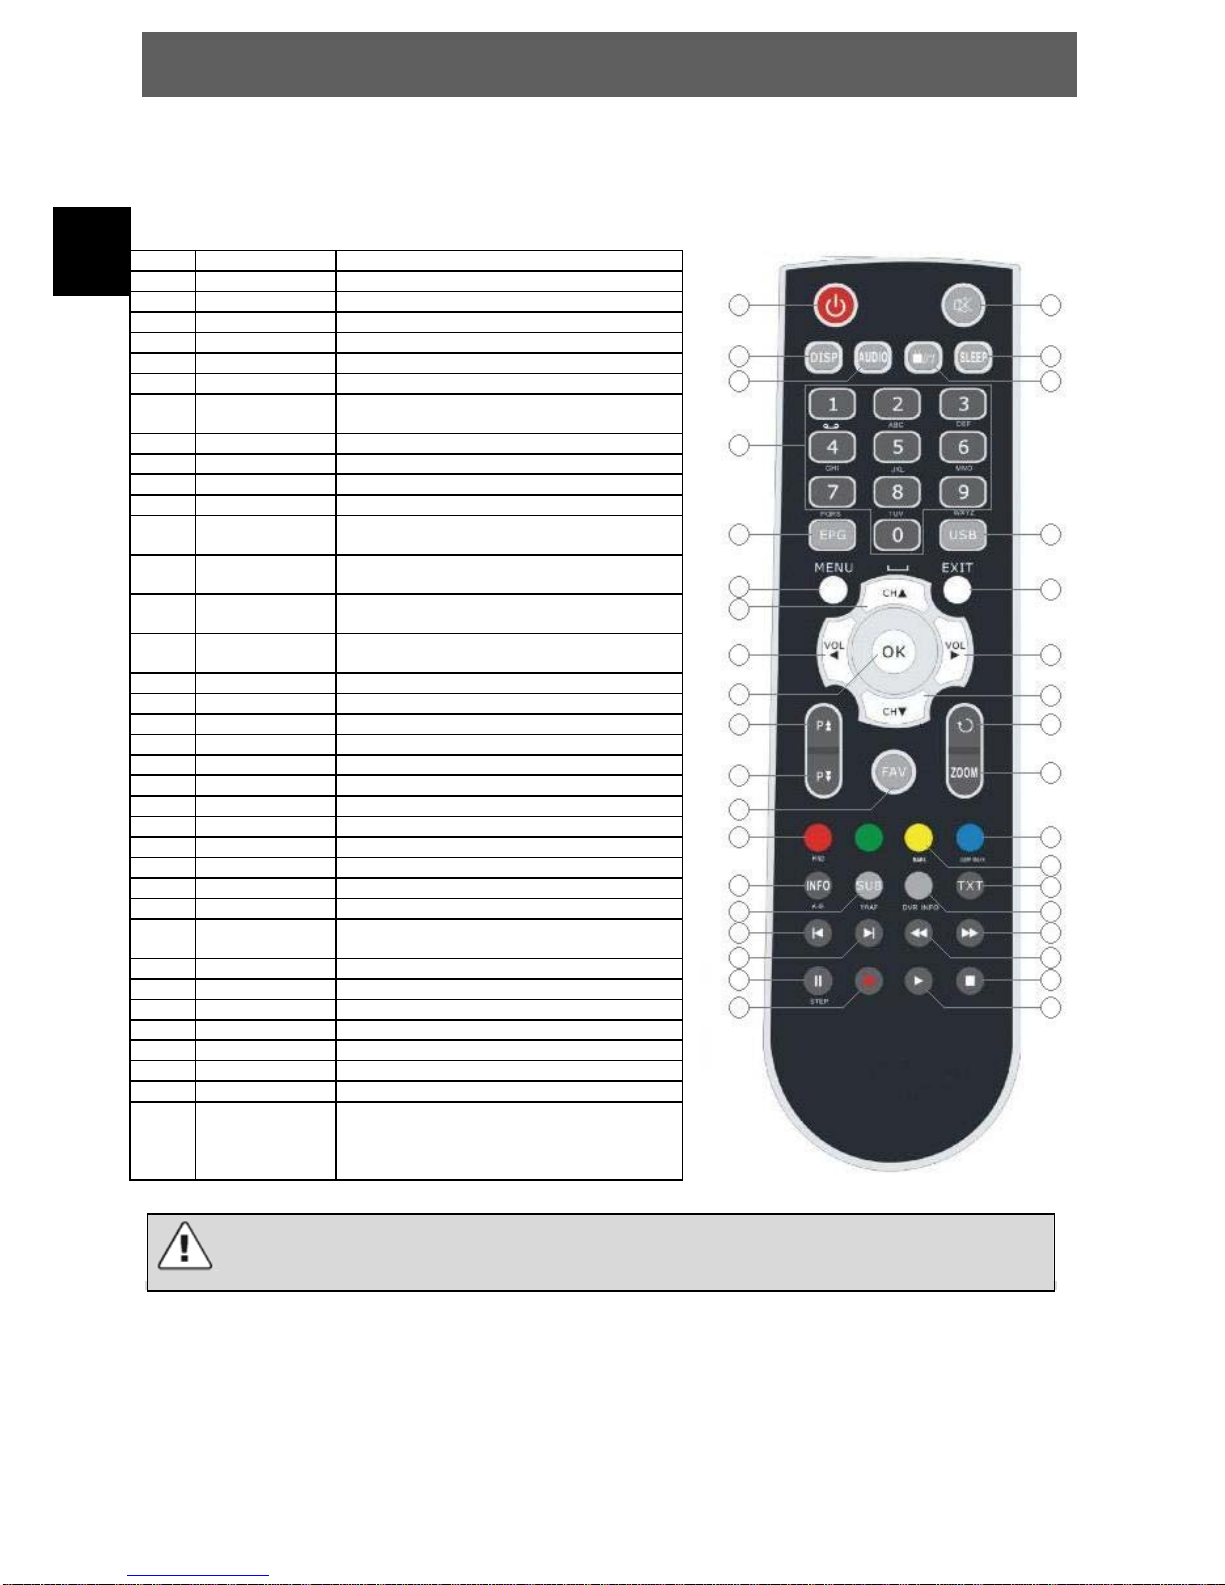
3.1 Key introduce
No. Key Function
1 STANDBY Switch the product to on or standby
2 MUTE Mute or restore audio output
3 DISP Set the HDMI mode
4 AUDIO Display the audio list
5 SLEEP Set the sleep time
6 TV/RADIO Switch beteween TV and RADIO
7 0-9 (No.Keys) Enter a TV/radio channel number or menu
option number
8 EPG Display the program guide
9 USB Enter USB menu
10 MENU Activate main menu
11 EXIT Exit current menu Stepp by step
12 CH Navigates through the Menus. Selects the
next Channel.
13 VOL Navigates through the Menus. Decreases
volume.
14 VOL Navigates through the Menus. Increases
volume.
15 CH Navigates through the Menus. Selects the
previous Channel.
16 OK Confirm
17 P Page up
18 P Page down
19 RECALL Switch to the previous viewed channel
20 ZOOM Picture zooming function
21 FAVOURITE Display favorite channel list
22 FIND Quickly find channels which you want
23 JUMP MARK Jump to the marked position
24 MARK Mark a position when play the video
25 INFO Display the program information
26 SUB Display the subtitle language list
27 TXT Display the teletext
28 DVR Info Display the information of the video and
the recording
29 (PREV) Previous
30 (NEXT) Next
31 (FWD) Fast forward
32 (REV) Fast rewind
33 (PAUSE) Pause/Step
34 (RECORD) Record
35 (STOP) Stop
36 (PLAY) Play
Note:
SUB / TEXT / AUDIO may not be available for all channels.
1
2
3
4
5
7
12
17
14
20
11
6
18
23
21
22
16
24
25
13
15
19
26
10
9
8
27
28
29
30
31
32
33
34
35
36
Page 7
DYON RAPTOR
7
EN
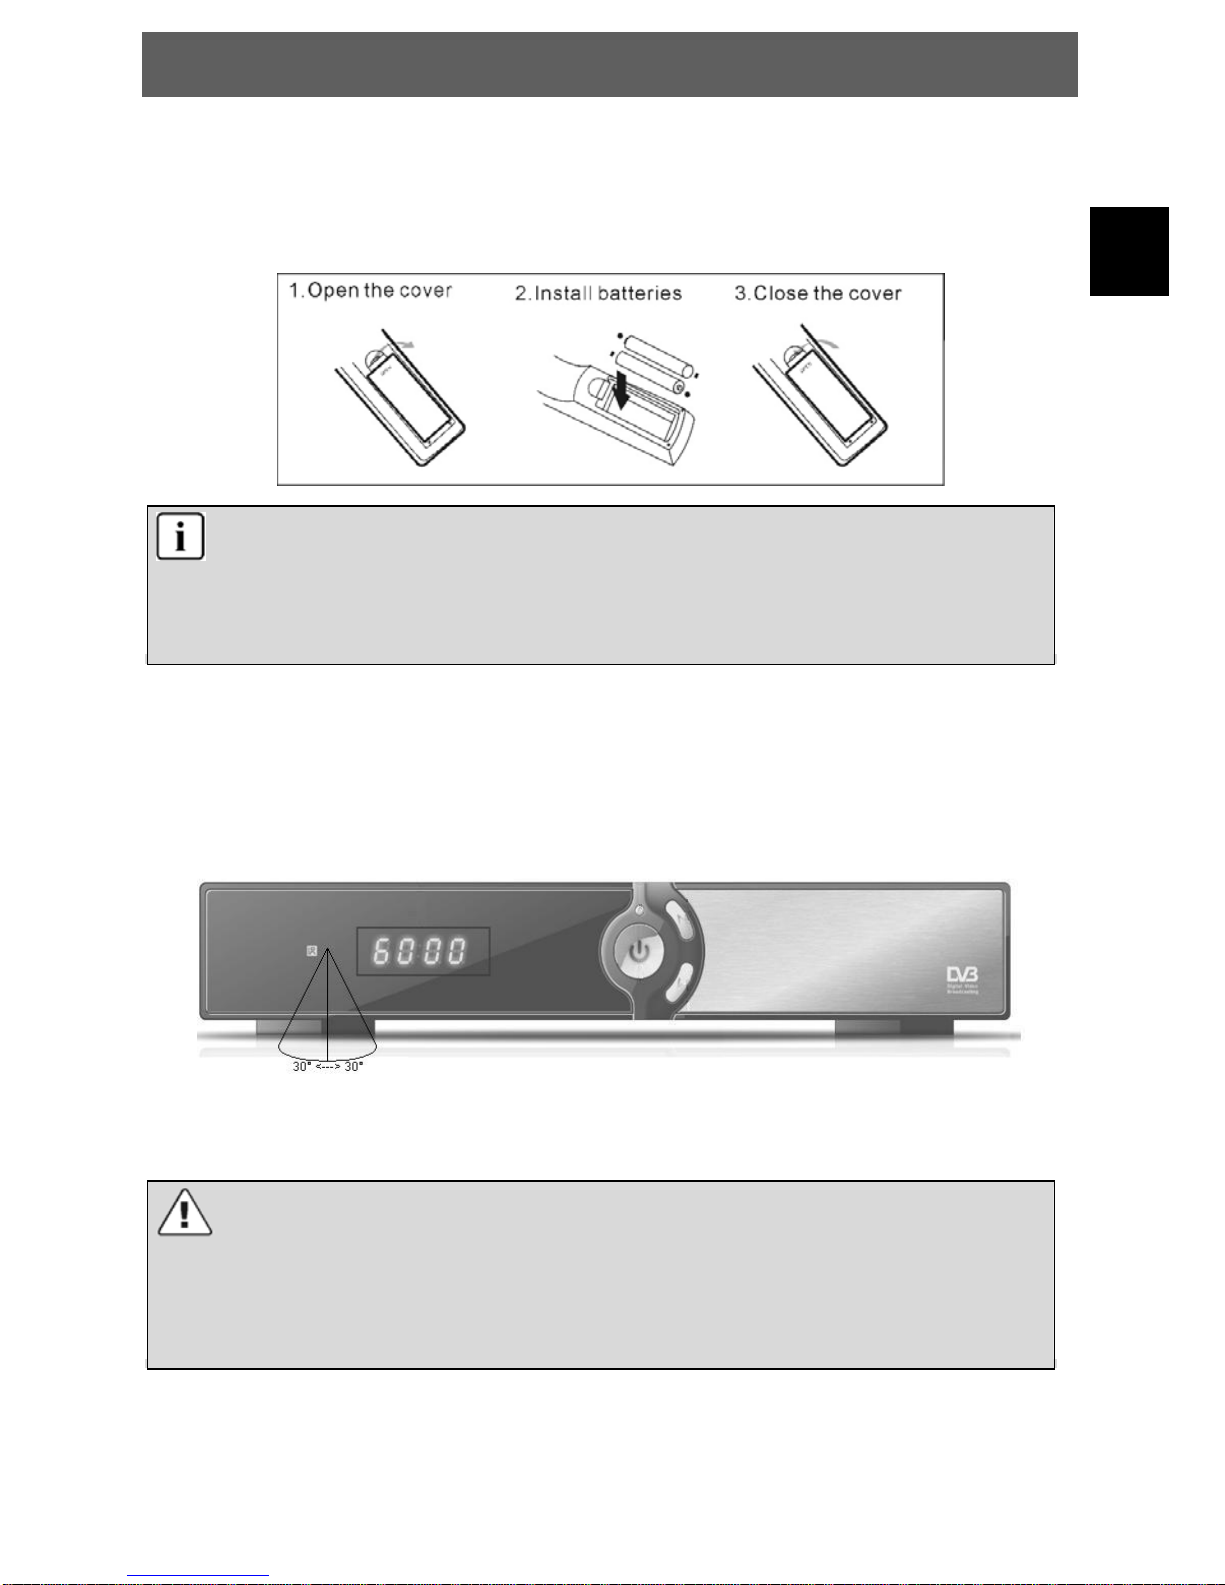
3.2 Installing the Batteries
Remove the battery cover from the remote control and put 2xAAA size batteries inside the compartment.
The diagram inside the battery compartment shows the correct way to install the batteries.
Notes on batteries
If the remote control is not used for a long period of time, please remove the battery from the
compartment.
Do not heat batteries or dispose of them in fires.
Do not dismantle, deform or modify batteries.
3.3 Using the Remote Control
To use the remote control, point it towards the front of the digital set top box The remote control has a
range of up to 7 metres from the set top box at an angle of up to 60 degrees.
The remote control will not operate if its path is blocked.
Note:
Sunlight or very bright light will decrease the sensitivity of the remote control.
Please do not plug out the storage media directly when it is being used, such as the
following functions or menus: music/album/ movie/, PVR timeshift/recording/playback. If you
want to plug out it, please close or stop the functions and menus above firstly.
Page 8
DYON RAPTOR
8
EN
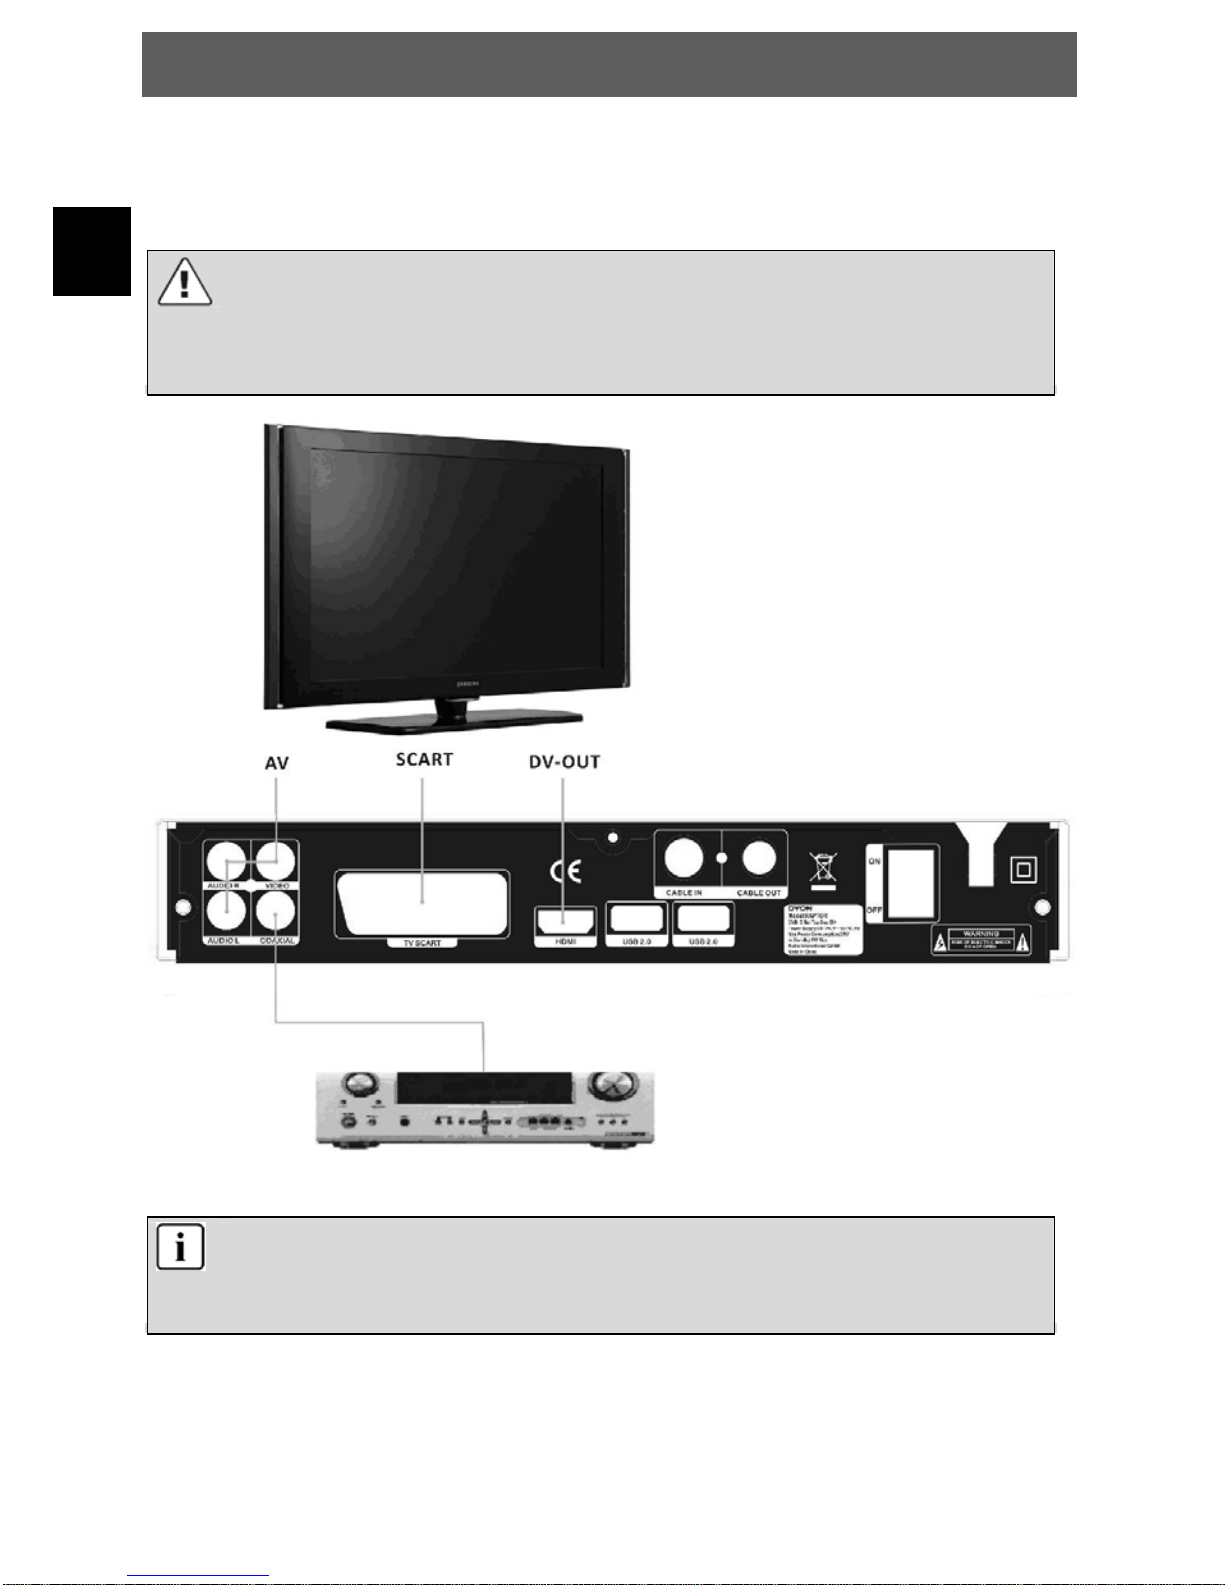
4 Connections
4.1 Connecting to TV
Caution:
Ma ke su re to chec k the volta ge sp ecifica tio n of th e wal l outlet
is the same rating with
the receiver. To prevent the risk of electric shock, do not open the cover or the back
of the receiver.
Note:
When connecting the receiver to other equipment, e.g., TV, VCR and amplifier, make sure to
refer to relevant user manual for instruction. Also, make sure you disconnect all the
equipments from the mains supply before the connection.
Page 9
DYON RAPTOR
9
EN
4.2 Connecting the Cable
Connect the antenna cable as shown above.
Note:
You can only use a DVB-C cable connection to receive.
Page 10
DYON RAPTOR
10
EN
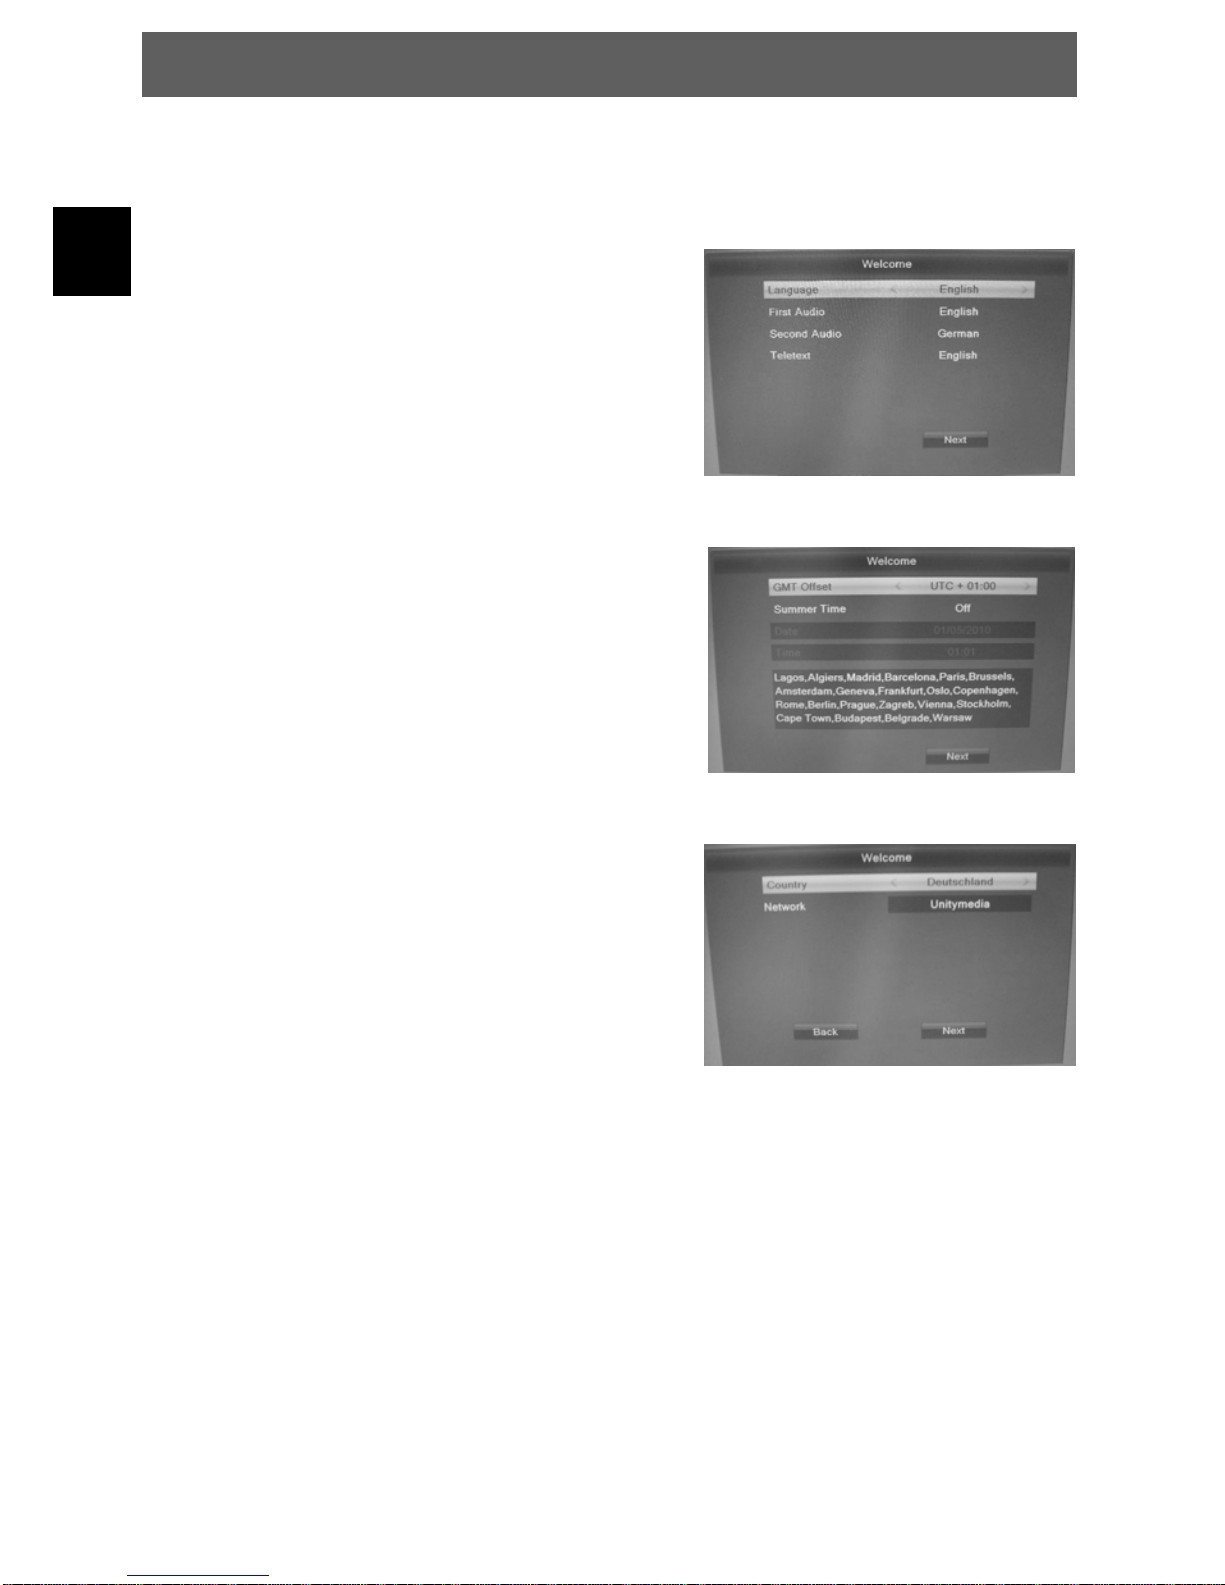
5 First Time Installation
After all connections have been made properly, switch on
TV and make sure the receiver is connected to the Main
Power. Press Power button to switch receiver on. If you
are using the receiver for the first time or restored to
Factory Default, the Main Menu will appear on your TV
screen.
(1) Select [OSD-Language] and press / to switch
your choice.
(2) Select first audio language.
(3) Select second audio language.
(4) Select teletext language.
(5) Select your timezone.
(6) Switch summer time on or off.
(7) Select your country.
(8) Select your cable provider.
Do you want to load default channels?
- Yes: the preinstalled channel list will be load. You can watch tv directly.
- No: the auto search will be started.
Page 11

DYON RAPTOR
11
EN
6 Channel Settings
Press the Menu Key to open the main settings and select
„Programm Edit“.
You can set the following options:
TV Channel List: Edit TV Channel
Radio Channel List: Edit Radio Channel List
Delete all: Delete all programs
Select one of three options and press „Ok“ to confirm.
6.1 Edit channel
To edit channels (Lock, skip, favourite, move, or
delete) open TV Channel List or Radio Channel List
menu.
As shown on the right side:
Press „Vol/“ to switch between the program lists.
6.1.1 Favorites
Use the CH+/CH- keys to select the channel then press the FAV button and use the CH+/CH- keys to
select a FAV group, then press OK button to confirm. And the channel added to the FAV group which you
selected.
Open favorites
If you have set several favorite lists, press the FAV button to enter the favorite list.
Press the CH+/CH- button to change different favorite list and press the OK button to select a fav-group.
Page 12

DYON RAPTOR
12
EN
6.1.2 Lock / unlock channels
Use the CH+/CH- keys to the channels and press the RED button.
6.1.3 Skip channels
Use the CH+/CH- keys to the channels and press the GREEN button.
6.1.4 Move channels
Use the CH+/CH- keys to the channels and press the YELLOW button. Then you can using the CH+/CH-
keys to move the channel to the new location or using the numeric keys input the number of the position
that you want to move to, and press the OK button.
6.1.5 Delete channels
Press the BLUE to edit the channels.
You can mark multiple channels with BLUE button. Then exit the edit window, you will get a security
message asking whether you want to save the operation or not.
6.1.6 Rename channels
Press the BLUE to edit the channels.
Use the CH+/CH- keys to the channel and press the GREEN button.
6.1.7 Sort channels (A-Z; Z- A, etc.)
Press the BLUE to edit the channels.
Press the RED button and the sort menu is showed up. Then you can sort channels by (Z-A, A-Z,
FTA/Scramble and lock).
Page 13

DYON RAPTOR
13
EN
7 Installation
7.1 Quick Search
Scan mode
Select how you want to find the channels:
Frequence: Input directly the frequence of the data packet.
Channel: Name of the single frequence.
Symbol rate
Input the symbal rate value.
QAM
Input the QAM value.
Network Search
Select Networkscan to add transponder from program providers to your transponderpool.
7.2 Auto Search
Auto Search allows you to configure the cable setting parameters.
Before search, you must select the correct network option which you want to search. And then
move highlight to Search, and press OK button to search.
Page 14

DYON RAPTOR
14
EN
8 System Setup
8.1 Language
Enter Language menu, you can set the OSD Language, First Audio Language, Second Audio Language
and Teletext Language.
8.2 TV System
1. Video Resoulution
Here you define the resolution, which is output via the HDMI. The options are 480i / 480p, 576i /
576p,720p_50 / 720p_60,1080i_25 / 1080i_30,1080p_50 / 1080p_60 / 1080p_25 / 1080p_30 / 1080p_24.
Note: Please use the native resolution of your TV. To do this, follow the specifications of your TV
equipment. E.g. 720p for HD-Ready TV sets or 1080i/1080p for FULL-HD TV sets.
2. Aspect Mode
With this menu you can change the aspect ratio to your TV television, AUTO, 4:3 PS, 4:3 LB,16:9.
Note: In general, allows to 16:9 optimal output. This shows in the correct 4:3 aspect ratio display.
3. Digital Audio Out
With this option you can define the nature of the digital audio output via coaxial audio output.
BS Out Sound is in RAW mode to the coaxial audio output unchanged issued
LPCM Out Output is in PCM format
Page 15

DYON RAPTOR
15
EN
8.3 Display Setting
The display settings can set Brightness, Contrast, Saturation, Hue, Sharpness and Led Brightness. You
can press the VOL+/ VOL- button to adjust the value.
8.4 Local Time Setting
The Local Time Setting contains option for GMT Offset, Summer Time, Date, Time.
8.5 Timer Setting
You can setup a View or Record Timer here. Select a timer and press OK button.
Timer Mod e
Once: only one time.
Daily: Repeat every day.
Off: Close this timer.
Timer Service
Channel: Will switch to the channel when the timer is
started.
Record: Only if there is a USB device, it will be
recorded automatically when the timer is started. And
the recorded PVR will be saved in USB device.
Wakeup Channel
Select the Channel from Channel List.
Wakeup Date
Input start date of the timer.
On Time
Set Start time of the timer.
Duration
Set the timer duration.
Page 16

DYON RAPTOR
16
EN
8.6 Parental Lock
1. Menu Lock
Menu Lock determines that when users wish to enter “Edit Channel/Installation/Tools” menu, whether
have to input Password or not.
2. Channel Lock
Channel Lock determines that when users wish to play the lock channels, whether have to input the
password or not.
3. New Password
New Password is used for change the password. You can input the new password in this item by using
numeric keys directly.
4. Confirm Password
After you finished the New Password, the highlight will auto skip to Confirm Password and ask you to input
the new password again. If the password is correct, the screen will show up a message of “Saving Data,
Please wait…”. After finish saving and back to “system Setup” menu, the password is changed.
Please note:
Default password: „0000“ Master password „2580“
8.7 OSD Setting
1. OSD Timeout
OSD Timeout can set the duration time of the information bar show up on the screen. The range of the
duration is “1 second~10 seconds”.
2. OSD Transparency
Press the VOL+/ VOL- button to change the OSD Transparency. There are 5 levels of transparency, 10%,
20%, 30%, 40% and “Off”.
3. OSD Aniamation
Press the VOL+/ VOL- button to switch the OSD Aniamation status.
Page 17

DYON RAPTOR
17
EN
8.8 Favourite
You can rename the favourite group’s name in this
menu.
Press Ok to input the name over the software
keyboard.
Press Red to delete
Press Yellow for capslock
Press Blue to save
8.9 Other
Channel Play Type
Beeper
Auto Standby
Page 18

DYON RAPTOR
18
EN
9 Tools
9.1 Information
Display version information such as software or hardware.
9.2 Factory Setting
You have the opportunity to make undo all the settings and changes by load the default settings.
9.3 Common Interface
This option allows you to view, change the
settings and information of a Common Access
Module.
9.3.1 CAM Modul
You can press the DVR INFO button to enter the recording list directly. Press the CH+/CH- to highlight the
PVR file you want to play, press the OK button to play. And you can watch the PVR file while recording.
CI+ module authenticate
If you insert the CI+ module, it will appear the prompt
box such as the right picture. Waiting few minutes, it
will appear the other prompt box. The information is
“Your Module is operational”. Then the prompt box
will disappear automatically.
And you can watch the Pay-TV.
Note: If you inset the module first time or switch to
another module, the module will authenticate for a
long time. Please wait patiently.
Page 19

DYON RAPTOR
19
EN
9.4 Firmware upgrade
Let you install a new software version on the device. This of course must be connected to a USB HDD or
memory stick with the update file in the root directory.
You can select “Upgrade” or “Save “.
Upgrade Upgrading a new software version
Save Saving the data of current software version or the program list.
9.5 USB Media Player
Open the USB media player.
9.6 Remove USB device safely
You can use this item to remove USB device safely.
10 Game
You can play 2 games here, Othello and Sudoku.
Page 20

DYON RAPTOR
20
EN
11 Record Setting
11.1 PVR Setting
You can press VOL+/ VOL- button to see the selected partition information of USB HDD or memory stick.
If you are connecting 2 USB device, then press CH+/CH- to change USB device.
DVR Set
Press BLUE button to set the DVR type.
There are three options of DVR Type, REC
& TMS, REC and TMS.
REC & TMS: Both for recording and
Timeshift in current partition
REC: Only for recording in current partition
TMS: Only for timeshift in current partition.
Note:
There are two icons display under the partition. The red icon means recording, the green
icon means timeshift.
11.2 PVR Setting
The PVR settings contain relevant options for the inclusion or time-shift function. These are Timeshift,
Jump, Timeshift to Record and display REC icon.
1. Timeshift
With this function you can turn off Time
shifting or activate.
Note:If you select “On” , it will remain
maximum size of 20G for timeshift.
2. Jump
You can set the jump time.
3. Time-shift to Record
It allows you to whether add the content of
auto timeshifted into recorded file or not.
4. Display REC Icon
You can set the display time of REC icon
when recording.
Page 21

DYON RAPTOR
21
EN
12 Record & MediaPlayer
12.1 Record & Timeshift
12.1.1 Record
You can watch another channel from the same TP while recording. You can also record two FTA channels
in the same transponder at the same time. You can also do many operations while recording.
1. Start Recording
1) You can press the ● button to start recording while watching program.
2) If you have set the timer, and set the Time Record on, it will start recording automatically according to
the start time of the timer.
2. Stop Recording
1) You can press the ■ button to stop recording. If you don`t press the ■ button, it will stop recording
according to the record duration.
2) If you have set the timer, it will stop recording automatically according to the stop time of the timer.
3) If the free space on the USB HDD or USB disk is insufficient, recording will stop.
3. Watch the Other Program while Recording
At the same time, you can only watch the program from the same TP.
4. Other Operations while Recording
While the recording channel is current channel, press the INFO button can display the channel
information. And press the DVR INFO button can display the recording time. And press the DVR INFO
button twice can display all the previous recording files. Press the ● button can set the record duration.
Press the || button to pause the program and press the X button to play the program. Press the WW/XX
button can fast rewind or fast forward in playback mode.
12.1.2 Timeshift
Timeshifte allows you to pause a live broadcast and return to it later and continue where you left off.
In order to use the Time Shift function, you must navigate to Menu -> REC Setting -> PVR Setting->
Timeshift with the option “ON”. And the timeshift will start automatically while play the program. While it is
in timeshift mode, press the DVR INFO button can display the timeshift information, press the || button can
pause the program and press the X button to play the program, press the WW/XX button can fast rewind
or fast forward. Press YELLOW button to mark on current time when info bar display. And press the BLUE
button to jump to mark.
Page 22

DYON RAPTOR
22
EN
12.1.3 Recording List
You can press the DVR INFO button to enter the recording list directly. Press the CH+/CH- to highlight the
PVR file you want to play, press the OK button to play. And you can watch the PVR file while recording.
12.2 MedienPlayer
Press „USB“ on remote control to open the Media Player. It can play many kinds of media files, you also
can record channels and playback them and you can do various operations when using USB HDD or USB
disk. You can press VOL+/VOL- button to change media type in Image/Video/Record/Music.
12.2.1 Record
CH+/Ok
Red
Green
Yellow
Exit
Move to the previous or next recording or folder
Starts playback of the file or open the folder
Rename the selected file
Lock the selected file
Delete the selected file
Return to previous directory
12.2.2 Music
CH+/Ok
Red
Green
Yellow
Blue
SWAP
DVR
A-B
Exit
Move to the previous or next music or folder
Play the selected music file
Display the Play List of the music files
Add the highlighted music to the Play List
Add all music files in current directory to the Play
List
Edit (Rename/Delete/Copy/Add Folder)
Switch to the other USB device
Sort the files by Name/Time/Size/Favourite
Set the Repeat mode (Single, Folder, Folder
Random)
Return to previous directory
Page 23

DYON RAPTOR
23
EN
12.2.3 Bilder
CH+/Ok
Red
Green
Yellow
Blue
SWAP
DVR
A-B
TXT
Exit
Move to the previous or next image or folder
Start the slide show of all images in this folder
Display the Play List of pictures
Add the highlighted image to the Play List
Add all images in current directory to the Play List
Edit (Rename/Delete/Copy/Add Folder)
Switch to the other USB device
Sort the files by Name/Time/Size/Favourite
Set menu with the options for the slide show time
and slide show repeat
Display all images as small thumbnails
Return to previous directory
12.2.4 Video
CH+/Ok
Blue
SWAP
DVR
Exit
Move to the previous or next video or folder
Play the selected video file
Edit (Rename/Delete/Copy/Add Folder)
Switch to the other USB device
Sort the files by Name/Time/Size/Favourite
Return to previous directory
Page 24

DYON RAPTOR
24
EN
13 General Functions
13.1 OK List
Press the OK button to enter the channel list
while watching a program.
Press the VOL+/VOL- button to switch the
satellite and FAV group.
Press the CH+/CH- button to move the
highlighting, and press OK button to watch the
highlighting channel.
RED: Program find function
YELLOW: Shows only a type of programms
HD, Crypte, FTA…
GREEN: Sort function
Multifeed channels
If a program have multifeed channels, press “Green” Key to open the select menu.
Press “Up/Down” to select the multifeed channel and confirm with “Ok”.
13.2 Favourite List
If you have set several favorite lists, press the FAV button can enter the favorite list.
Press the CH+/CH- button to change different
favorite list and press the OK button can select
a favorite group.
Press CH+/CH- button to select the channel in
the current favorite list.
Note:
If you selected a favorite list, press the CH+/CH- button can only change the channels in this
favorite list and press the OK button can only display the channels in this favorite list.
Page 25

DYON RAPTOR
25
EN
13.3 EPG (Eletronic Program Guide)
You can view the EPG information of all channels in time
and date order.
1. Press the EPG button.
2. Press the CH+/CH- button to change channel.
3. Press the VOL+/VOL- button to change EPG event
of the highlighted channel.
4. Press the OK button to display the detail
information of the highlighted EPG event.
Q Go to the EPG of current time
Go to the EPG of previous hour
Go to the EPG of next hour
Go to the EPG of previous 2 hours
Go to the EPG of next 2 hours
Go to the EPG of previous day
Go to the EPG of previous day
Press the GREEN button to enter Timer Setup menu.
After setup, press the OK button can add the highlighted
EPG event to the Timer.
13.4 Teletext
Teletext is an information system broadcast by certain channels which can be
consulted like a newspaper. It also offers access to subtitles for viewers with hearing
problems or who are not familiar with the transmission language(cable networks,
satellite channels, etc.)
1. Press the TXT button.
2. Press the CH+/CH- button to page up or page
down.
3. Press the NUMERIC(0-9) buttons can go to the
designated page directly.
Page 26

DYON RAPTOR
26
EN
13.5 Program Information
You can press the INFO button to display the general information of the current channel. And the info bar
will disappear automatically after few seconds or you can press the EXIT button to exit the info bar.
You can press the INFO button twice to display the detail information of the current channel. It can display
the channel name, satellite, transponder, PID and signal information. And you can press the EXIT button
or INFO button to exit the info frame.
13.6 Audio
You can select the language you prefer in Audio if the current program is available in multiple audio
languages.
1. Press the AUDIO button.
2. Press the OK button to select the audio language you prefer.
3. Select audio direction (Left, Right, Stereo) using the VOL+/VOL- button.
4. Press the EXIT button to close.
13.7 Subtitle
You can select the language for the subtitle if the program provides subtitle information.
1. Press the SUB button.
2. Select the required subtitle language and press the OK button. The subtitle of the selected language will
be displayed at the bottom of the screen.
13.8 Zoom In
You can zoom in the current video picture.
1. Press the ZOOM button.
2. Press the CH+/CH-/VOL+/VOL- button to move the icon to the position you want to zoom in.
3. Press the OK button to display.
4. Press the EXIT button to close.
Page 27

DYON RAPTOR
27
EN
14 Glossary
DVB The Digital Video Broadcast group was created to establish a technical
framework for the introduction of digital video broadcasting systems.
EPG Electronic Programme Guide
RF connector Coaxial connector for antenna cable.
FTA Free to air services Free of charge services that can be received without a special
decoder.
S/PDIF Sony/Philips Digital Interface Format. Digital audio output.
Mute Key of the remote control for turning off sound
OSD On screen display Menu control displayed on the screen.
Symbol rate Speed of the digital transmission
Receiver Receiver unit, which converts signals from the antenna into video and audio
signals.
SCART A21 pole connector for connecting the TV set to the receiver.
Transponder Satellite frequency. Several digital channels can be broadcasted simultaneously
on a transponder.
VCR Abbreviation for Video Cassette Recorder or DVD Player.
HDMI High Definition Multimedia Interface. A connector for connecting the TV set to the
receiver and transmit picture and sound in HD quality.
Coaxial Electrical digital audio output for connecting an audio amplifier.
Page 28

DYON RAPTOR
28
EN
15 T roubleshooting
If you experience problems with this receiver or its installation, in the first instance
please read carefully the relevant sections of this User Manual and this Troubleshooting
section.
Problem Possible cause What to do
Power isn't connected Connect the power No picture
The power switch is not on Switch on the power
Not connect DVB-C cable Plug in the DVB-C cable Screen shows
No Signal
Incorrect setting Set up correct parameter
No or incorrect connection
with audio cable
Connect the audio cable
correctly
Mute the sound Switch on the correct
volume control
No sound from
Speaker
Incorrect sound track Try another sound track
No or incorrect connection
with AV cable
Connect the audio cable
correctly
Only sound,
no image on the
screen
The program is a radio
program
Press <TV/RADIO> key to
shift into TV mode
Select an alternative channel Scrambled channel
message
Channel is scrambled
Input Cam module
Forgotten channel lock
code
Re-install channels to cancel
channel lock
Receiver off Plug in and turn on receiver
Handset not aimed correctly Aim handset at front panel
Front panel obstructed Check for obstructions
Remote control batteries are
inserted incorrectly
Check batteries direction
No response to remote
control
Handset batteries exhausted Replace remote control
The signal is too weak Strengthen the signal The image stop
suddenly or mosaic
Not shielded TV cable Use a shielded TV cable
Missing Channels in the preinstalled list
Sometimes the cable provider
changes the frequencies. We try
to keep the list updated
Please do a auto scan (or
manual scan if the new
frequencies are known)."
Manufacturer
Axdia International GmbH
Formerweg 9
D-47877 Willich (Germany)
Tel: +49(0) 2154 / 8826-0
Fax: +49(0) 2154 / 8826-100
Web: www.dyon.eu
Support hotline: +49 (0)2154 / 8826-101
E-Mail: info@axdia.de
Page 29

DYON RAPTOR
29
EN
16 T echnical Specification
Tuner & Channel
No. of Tuners QPSK ,8PSK
Frequency Range 950 MHz to 2150 MHz
Signal Level -25 to -65 dBm
LNB Power 13V/18V/14V/19VOFF, Imax = 400mA
LNB Tone Switch 22KHz+/-2KHz, 0.6Vpp+/-0.2V
DiSEqC Control Version DiSEq C 1.0/1.1/1.2/1.3(USALS)Compatible, Tone burst A/B
MPEG
Transport Stream MPEG-2 ISO/IEC 13818Transport stream specification
Profile Level MPEG1,MPEG-2 MP@ML,H.264, VC1, DV, DivX, and MPEG4
Input Rate 80 Mbps for MPEG Transport Stream and 25 Mbps for DV streams
Aspect Ratio 4:3, 16:9
Video Resolution 576i, 576p, 480i, 480p, 720p50, 720p60, 1080i.1080p
Audio Decoding MPEG-2 layer I and II (Music cam),MPEG4 AAC and MPEG4 AAC-HE (AAC+),Dolby
Digital (AC-3) with bit rates up to 640 K bits /s, LPCM up to 48 KHz,MP3.
Audio Mode Single channel/Dual channel/Joint stereo/Stereo
Sampling 32, 44.1 and 48 KHz
Power Supply
Input Voltage AC 90 ~240V, 50/60Hz
Power Consumption Max. 18 W
Protection Separate internal fuse. Input shall have lightening Protection
Physical Specification
Weight (Net) About 2.5kg
Operating Temp 0C° to + 40C°
Storage Temp -40C° to + 65C°
* Specifications are subject to change without further notice.
Page 30

DYON RAPTOR
30
EN
Declaration of conformity
We declare that the product is in conformity with the requirements of the following directives and
standards:
Europea n Directive 20 04/108/EC
EN 55013: 2001 +A1:2003 +A2:2006, EN 55020 :2007
(EN61000-3-2:2006, EN61000-3-3:1995+A1+A2)
European Directive 2006/95/EC
EN 60065:2002 +A1:2006 +A11:2008
European Directive 2009/125/EC + Commission Regulation 107/2009
Willich, 17.09.2010 Axdia International GmbH
Page 31

DYON RAPTOR
31
EN
17 Warranty condition
The following conditions comprise the requirements and scope of our warranty
conditions and do not affect our legal and contractual warranty obligations.
We offer a warranty on our products in accordance with the following conditions:
1. DYON products are covered by a 24 month warranty. We will resolve damages or
defects on DYON products free of charge within 12 months of the purchase date
under the following warranty conditions. For any damage or defect determined later
than 12 months after the purchase date, proof of a manufacturing fault must be
submitted for repair under warranty.
The warranty does not cover batteries and other parts, which are considered
consumables, parts that break easily such as glass or plastic or defects based on
normal wear and tear. There is no warranty obligation in the event of marginal
differences compared to the target appearance and workmanship provided these
have a negligible effect on the product's fitness for use, in the event of damage
caused by chemical or electrochemical effects, by water or generally from abnormal
conditions.
2. The warranty will be performed in such a way that we shall decide whether to repair
the defective parts or to replace them with working parts free of charge. AXDIA
reserves the right to exchange the product for a replacement product of equal value
if the product that is sent in cannot be repaired within a reasonable time or at
reasonable cost. The product can also be exchanged for a different model of the
same value. Requests cannot be made for repairs to be carried out on site. Parts
that have been replaced or exchanged become our property.
3. The warranty claim does not apply if repairs or other work is carried out by
unauthorized persons or if our products are equipped with additional parts or
accessories that are not approved for our products.
4. Warranties that have been activated do not cause the warranty period to be
extended, nor do they trigger a new warranty period. The warranty period for any
replacement parts installed ends with the warranty period for the entire product.
5. Any other or further claims are excluded, especially those for replacement due to
damage caused outside of the product, provided there is no obligatory legal liability.
We therefore accept no liability for accidental, indirect or other consequential
damage of any kind, which leads to usage restrictions, data loss, loss of earnings or
interruption to business.
Asserting a warran ty claim
1. To make use of the warranty service, you must contact the AXDIA Service Center by e-mail, fax or phone (see below
for contact details). You can also use the service form on our website or on the back of the warranty conditions.
2. AXDIA Service Center will try to diagnose and solve your problem. If it is determined that a warranty claim exists, you
will be given an RMA number (Return Material Authorization) and you will be asked to send the product to AXDIA.
Page 32

DYON RAPTOR
32
EN
IMPORTANT: AXDIA will only accept parcels that have an RMA number.
Please observe the following when sending the product:
1. Send the product suitably packaged with carriage and insurance paid. Do not enclose any accessories with the
products (no cables, CD's, memory cards, manuals, etc.), unless the AXDIA Service Centre specifies otherwise.
2. Mark the RMA number on the outside of the package in such a way that it is visible and clearly legible.
3. You must enclose a copy of the sales slip as proof of purchase.
4. Once AXDIA has received the product, it will meet its warranty obligations in accordance with the warranty conditions
and will return the product to the sender with carriage and insurance paid.
Service outside of warranty
AXDIA can refuse any service claim made that is not covered by the warranty. If AXDIA agrees to provide
a service outside the warranty, the customer will be invoiced for all repair and transport costs.
AXDIA will not accept any packages that have not first been approved by AXDIA by means of an RMA
(Return Material Authorization).
 Loading...