

Page 1

E R G Ä N Z U N G www.conrad.com
Land Displayanzeige Stadt Region
Country Display City Region
Pays Affichage sur l'écran Ville Région
Land Aanduiding Stad Regio
ANDORRA AND.LA.VELL* ANDORRA LA VELLA* 70
AU/AUSTRIA ST.PÖLTEN ST PÖLTEN 50
AU/AUSTRIA BISCHOFSHO BISCHOFSHOFEN 48
AU/AUSTRIA BREGENZ BREGENZ 48
AU/AUSTRIA EISENSTADT EISENSTADT 49
AU/AUSTRIA GRAZ GRAZ 46
AU/AUSTRIA INNSBRUCK INNSBRUCK 47
AU/AUSTRIA KITZBÜHEL KITZBÜHEL 48
AU/AUSTRIA KLAGENFURT KLAGENFURT 46
AU/AUSTRIA LANDECK LANDECK 47
AU/AUSTRIA LIENZ LIENZ 46
AU/AUSTRIA LINZ LINZ 26
AU/AUSTRIA SALZBURG SALZBURG 48
AU/AUSTRIA SCHLADMING SCHLADMING 48
AU/AUSTRIA VILLACH VILLACH 46
AU/AUSTRIA WELS WELS 26
AU/AUSTRIA WIEN WIEN 49
AU/AUSTRIA ZELTWEG ZELTWEG 46
AU/AUSTRIA ZWETTL ZWETTL 50
B/BELGIUM ANTWERPEN ANTWERPEN 6
B/BELGIUM BRUGGE BRUGGE 6
B/BELGIUM BRUSSEL BRUSSEL 6
B/BELGIUM CHARLEROI CHARLEROI 6
B/BELGIUM GENT GENT 6
B/BELGIUM LIEGE LIEGE 6
B/BELGIUM NAMUR NAMUR 6
B/BELGIUM VERVIERS VERVIERS 13
CH/SUISSE ST.GALLEN ST.GALLEN 35
CH/SUISSE AARAU AARAU 32
CH/SUISSE ADELBODEN ADELBODEN 33
CH/SUISSE ALTDORF ALTDORF 35
CH/SUISSE BASEL BASEL 45
CH/SUISSE BELLINZONA BELLINZONA 38
CH/SUISSE BERN BERN 32
CH/SUISSE BIENNE BIENNE 32
CH/SUISSE BRIG BRIG 34
CH/SUISSE CHUR CHUR 36
CH/SUISSE DAVOS DAVOS 36
CH/SUISSE DELEMONT DELEMONT 11
CH/SUISSE FRAUENFELD FRAUENFELD 32
CH/SUISSE FRIBOURG FRIBOURG 31
CH/SUISSE GENEVE GENEVE 31
CH/SUISSE GLARUS GLARUS 35
CH/SUISSE GRINDELWLD GRINDELWALD 33
CH/SUISSE INTERLAKEN INTERLAKEN 33
CH/SUISSE LACHAUX-D.F LA CHAUX-DE-FONDS 11
CH/SUISSE LAUSANNE LAUSANNE 31
CH/SUISSE LIESTAL LIESTAL 45
CH/SUISSE LOCARNO LOCARNO 38
CH/SUISSE LUGANO LUGANO 38
CH/SUISSE LUZERN LUZERN 32
CH/SUISSE MARTIGNY MARTIGNY 34
CH/SUISSE MONTREUX MONTREUX 31
CH/SUISSE NEUCHATEL NEUCHATEL 31
CH/SUISSE SAMEDAN* SAMEDAN* 86
CH/SUISSE SARNEN SARNEN 35
CH/SUISSE SCHAFFHAUS. SCHAFFHAUSEN 32
CH/SUISSE SCHWYZ SCHWYZ 35
CH/SUISSE SION SION 34
CH/SUISSE SOLOTHURN SOLOTHURN 32
CH/SUISSE STANS STANS 35
CH/SUISSE ZERMATT* ZERMATT* 88
CH/SUISSE ZUG ZUG 32
CH/SUISSE ZÜRICH ZÜRICH 32
CZ/CZ REP BRNO BRNO 50
CZ/CZ REP BUDEJOVICE BUDEJOVICE 50
CZ/CZ REP CHEB CHEB 50
CZ/CZ REP DECIN DECIN 51
CZ/CZ REP HAVL_BROD HAVLICKAV BROD 50
CZ/CZ REP HRADEC/KRA HRADEC/KRA 50
CZ/CZ REP OLOMOUC OLOMOUC 50
CZ/CZ REP OSTRAVA OSTRAVA 50
CZ/CZ REP PLZEN PLZEN 50
CZ/CZ REP PRAHA PRAHA 50
CZ/CZ REP TEPLICE TEPLICE 51
D / GER AACHEN AACHEN 14
D / GER AALEN AALEN 59
D / GER ANSBACH ANSBACH 28
D / GER AUGSBURG AUGSBURG 25
D / GER BAD_TÖLZ BAD_TÖLZ 48
D / GER BAYREUTH BAYREUTH 28
D / GER BERCHTESGA BERCHTESGADEN 48
D / GER BERLIN BERLIN 52
D / GER BIELEFELD BIELEFELD 14
D / GER BITBURG BITBURG 13
D / GER BORKUM BORKUM 19
D / GER BREMEN BREMEN 22
D / GER BREMERHAVN BREMERHAVEN 19
D / GER BURGHAUSEN BURGHAUSEN 26
D / GER COTTBUS COTTBUS 29
D / GER CUXHAVEN CUXHAVEN 19
D / GER DONAUESCH. DONAUESCHINGEN 57
D / GER DORTMUND DORTMUND 14
D / GER DRESDEN DRESDEN 29
D / GER DUISBURG DUISBURG 14
D / GER DÜSSELDORF DÜSSELDORF 14
D / GER EISENACH EISENACH 30
D / GER EMDEN EMDEN 19
D / GER ERFURT ERFURT 30
D / GER ESSEN ESSEN 14
D / GER FEHMARN FEHMARN 24
D / GER FLENSBURG FLENSBURG 24
D / GER FRANKFURT.M FRANKFURT AM MAIN 12
D / GER FRANKFURT.O FRANKFURT AN DER ODER 52
Funk-Wetterstation „DV928“
Best.-Nr. 64 63 30
Sehr geehrte Kundin, sehr geehrter Kunde!
Anbei finden Sie die neueste Version der Funk-Wetterstation „DV216NL“. Diese zeigt nun Daten
von 470 Städten an (voher 272). Für die mit einem Stern (*) gekennzeichneten Städte ist nur eine
2-Tages Wettervorhersage möglich (heute und morgen).
Wir bitten um Beachtung.
Ihr Conrad-Team.
S U P P L E M E N T www.conrad.com
Wireless Weather Station “DV928”
Item No. 64 63 30
Dear customer!
Enclosed you will find the latest version of the Wireless Weather Station “DV216NL”. It now displays
data from 470 cities (previously 272). For all cities marked with an asterisk (*), only a 2-day weather
forecast is possible (today and tomorrow).
Please pay attention to that fact.
Your Conrad Team.
C O M P L É M E N T www.conrad.com
Station météorologique sans fil
« DV928 »
N° de commande 64 63 30
Chère cliente, cher client !
Veuillez trouver ci-joint la version la plus récente de la station météorologique sans fil « DV216NL ».
Elle indique désormais les données 470 villes (précédemment 272). Pour les villes marquées d’un
(*) il n’est possible d’obtenir qu’une prévision pour 2 jours (aujourd’hui et demain).
Veuillez en tenir compte
Votre équipe Conrad.
A A N V U L L I N G www.conrad.com
Draadloos Weerstation “DV928”
Bestelnr. 64 63 30
Beste klanten,
Bijgevoegd vindt u de nieuwste versie van het draadloze weerstation “DV216NL”. Het verschaft u
informatie over 470 steden (voorheen 272). Voor de steden met een sterretje (*) wordt het weer
maar voor 2 dagen voorspeld (vandaag en morgen).
Mogen wij u vragen hierop te letten.
Uw Conrad-Team.
Version 07/10
Version 07/10
Version 07/10
Versie 07/10
Page 2

Land Displayanzeige Stadt Region
Country Display City Region
Pays Affichage sur l'écran Ville Région
Land Aanduiding Stad Regio
D / GER FREIBURG FREIBURG 45
D / GER FREUDENST. FREUDENSTADT 57
D / GER FRIEDRI.HFN FRIEDRICHSHAFEN 26
D / GER FULDA FULDA 37
D / GER GARMISCH_P GARMISCH_PATENKIRCHEN 48
D / GER GIESSEN GIESSEN 37
D / GER GÖRLITZ GÖRLITZ 29
D / GER GOSLAR GOSLAR 22
D / GER GÖTTINGEN GÖTTINGEN 37
D / GER GREIFSWALD GREIFSWALD 24
D / GER HAGEN HAGEN 13
D / GER HALLE HALLE 29
D / GER HAMBURG HAMBURG 19
D / GER HANNOVER HANNOVER 22
D / GER HEILBRONN HEILBRONN 59
D / GER HILDESHEIM HILDESHEIM 22
D / GER HOF HOF 30
D / GER INGOLSTADT INGOLSTADT 25
D / GER JENA JENA 30
D / GER KAISERSLAU KAISERSLAUTERN 12
D / GER KARLSRUHE KARLSRUHE 12
D / GER KASSEL KASSEL 37
D / GER KEMPTEN KEMPTEN 26
D / GER KIEL KIEL 24
D / GER KOBLENZ KOBLENZ 13
D / GER KÖLN KÖLN 14
D / GER KONSTANZ KONSTANZ 32
D / GER LANDSHUT LANDSHUT 25
D / GER LEIPZIG LEIPZIG 29
D / GER LINDAU LINDAU 48
D / GER LINGEN LINGEN 14
D / GER LÖRRACH LÖRRACH 45
D / GER LÜBECK LÜBECK 24
D / GER LÜNEBURG LÜNEBURG 22
D / GER MAGDEBURG MAGDEBURG 22
D / GER MAINZ MAINZ 12
D / GER MANNHEIM MANNHEIM 12
D / GER MÜNCHEN MÜNCHEN 26
D / GER MÜNSTER MÜNSTER 14
D / GER NEUBR.BURG NEUBRANDENBURG 52
D / GER NÜRNBERG NÜRNBERG 28
D / GER OFFENBURG OFFENBURG 45
D / GER OLDENBURG OLDENBURG 22
D / GER OSNABRÜCK OSNABRÜCK 14
D / GER PASSAU PASSAU 25
D / GER PFORZHEIM PFORZHEIM 59
D / GER PLAUEN PLAUEN 30
D / GER POTSDAM POTSDAM 52
D / GER REGENSBURG REGENSBURG 25
D / GER ROSENHEIM ROSENHEIM 26
D / GER ROSTOCK ROSTOCK 24
D / GER RÜGEN RÜGEN 24
D / GER SAARBRÜCKE SAARBRÜCKEN 13
D / GER SIEGEN SIEGEN 13
D / GER SIGMARINGE SIGMARINGEN 26
D / GER SPIEKEROOG SPIEKEROOG 19
D / GER ST_PETER_O ST_PETER_ORDING 19
D / GER STUTTGART STUTTGART 59
D / GER SYLT SYLT 19
D / GER TRIER TRIER 13
D / GER TÜBINGEN TÜBINGEN 59
D / GER ULM ULM 25
D / GER VILL.-SCHWE. VILLINGEN-SCHWENNINGEN 57
D / GER WEIDEN WEIDEN 28
D / GER WERTHEIM WERTHEIM 28
D / GER WILHELMSHA WILHELMSHAVEN 19
D / GER WUPPERTAL WUPPERTAL 14
D / GER WÜRZBURG WÜRZBURG 28
D / GER ZWICKAU ZWICKAU 30
DK/DENMARK ALBORG ALBORG 20
DK/DENMARK ARHUS ARHUS 21
DK/DENMARK BORNHOLM BORNHOLM 55
DK/DENMARK ESBJERG ESBJERG 20
DK/DENMARK HERNING HERNING 20
DK/DENMARK KØBENHAVN KØBENHAVN 23
DK/DENMARK NYKOPING NYKOPING 54
DK/DENMARK ODENSE ODENSE 21
DK/DENMARK RONNE RONNE 55
DK/DENMARK SKAGEN SKAGEN 20
DK/DENMARK THYBORØN THYBORØN 20
ES / SPAIN BARCELONA* BARCELONA* 69
ES / SPAIN BILBAO* BILBAO* 65
ES / SPAIN FIGUERES* FIGUERES* 69
ES / SPAIN GIJON* GIJON* 74
ES / SPAIN GIRONA* GIRONA* 69
ES / SPAIN IBIZA* IBIZA* 67
ES / SPAIN LLORET.D.MA* LLORET DE MAR* 69
ES / SPAIN MADRID* MADRID* 64
ES / SPAIN MAHON* MAHON* 67
ES / SPAIN PALMA-D.MA* PALMA DE MALLORCA* 67
ES / SPAIN SEVILLA* SEVILLA* 71
ES / SPAIN VALENCIA* VALENCIA* 68
FL/LICHTEN VADUZ VADUZ 48
FRANCE AGEN AGEN 0
FRANCE AJACCIO* AJACCIO* 73
FRANCE ALBI ALBI 5
FRANCE ALENCON ALENCON 2
FRANCE ALES ALES 8
FRANCE AMIENS AMIENS 17
FRANCE ANGERS ANGERS 3
FRANCE ANGOULEME ANGOULEME 1
FRANCE ANNECY ANNECY 11
FRANCE AUCH AUCH 0
FRANCE AURILLAC AURILLAC 4
Land Displayanzeige Stadt Region
Country Display City Region
Pays Affichage sur l'écran Ville Région
Land Aanduiding Stad Regio
FRANCE AUXERRE AUXERRE 2
FRANCE AVIGNON AVIGNON 8
FRANCE BAR_LE_DUC BAR_LE_DUC 2
FRANCE BASTIA* BASTIA* 73
FRANCE BEAUVAIS BEAUVAIS 17
FRANCE BELFORT BELFORT 45
FRANCE BESANCON BESANCON 11
FRANCE BEZIERS BEZIERS 5
FRANCE BLOIS BLOIS 2
FRANCE BOBIGNY BOBIGNY 2
FRANCE BORDEAUX BORDEAUX 0
FRANCE BOULOGNE BOULOGNE 6
FRANCE BOURG_EN_B BOURG_EN_B 9
FRANCE BOURGES BOURGES 2
FRANCE BREST BREST 3
FRANCE BRIANCON BRIANCON 10
FRANCE BRIVE-L-GA BRIVE LA GAILLARDE 0
FRANCE CAEN CAEN 17
FRANCE CAHORS CAHORS 0
FRANCE CANNES CANNES 43
FRANCE CARCASSONN CARCASSONN 5
FRANCE CERGY_PONT CERGY_PONT 2
FRANCE CHAMBERY CHAMBERY 10
FRANCE CHARTRES CHARTRES 2
FRANCE CHAUMONT CHAUMONT 7
FRANCE CHERBOURG CHERBOURG 3
FRANCE CLERMON-FE CLERMON FERRAND 4
FRANCE COLMAR COLMAR 45
FRANCE CRETEIL CRETEIL 2
FRANCE DIGNE DIGNE 10
FRANCE DIJON DIJON 7
FRANCE EPINAL EPINAL 7
FRANCE EVIAN EVIAN 31
FRANCE EVREUX EVREUX 17
FRANCE EVRY EVRY 2
FRANCE FLORAC FLORAC 4
FRANCE FOIX FOIX 5
FRANCE GAP GAP 10
FRANCE GRENOBLE GRENOBLE 10
FRANCE GUERET GUERET 4
FRANCE LA ROCHELL LA ROCHELL 1
FRANCE LA_ROCHE_S LA_ROCHE_S 1
FRANCE LAON LAON 17
FRANCE LAVAL LAVAL 3
FRANCE LE HAVRE LE HAVRE 17
FRANCE LE MANS LE MANS 2
FRANCE LILLE LILLE 6
FRANCE LIMOGES LIMOGES 1
FRANCE LONS_LE_S LONS_LE_S 7
FRANCE LORIENT LORIENT 3
FRANCE LYON LYON 9
FRANCE MACON MACON 9
FRANCE MARSEILLE MARSEILLE 8
FRANCE MELUN MELUN 2
FRANCE MENDE MENDE 4
FRANCE METZ METZ 7
FRANCE MILLAU MILLAU 4
FRANCE MONT_DE_MA MONT_MARSAN 0
FRANCE MONTAUBAN MONTAUBAN 0
FRANCE MONTELIMAR MONTELIMAR 8
FRANCE MONTLUCON MONTLUCON 4
FRANCE MONTPELLIE MONTPELLIER 5
FRANCE MULHOUSE MULHOUSE 45
FRANCE NANCY NANCY 7
FRANCE NANTERRE NANTERRE 2
FRANCE NANTES NANTES 3
FRANCE NEVERS NEVERS 2
FRANCE NICE NICE 43
FRANCE NIMES NIMES 8
FRANCE NIORT NIORT 1
FRANCE ORLEANS ORLEANS 2
FRANCE PARIS PARIS 2
FRANCE PAU PAU 0
FRANCE PERIGUEUX PERIGUEUX 0
FRANCE PERPIGNAN PERPIGNAN 5
FRANCE POITIERS POITIERS 1
FRANCE PRIVAS PRIVAS 8
FRANCE PUY_EN_VEL PUY_VELAY 4
FRANCE REIMS REIMS 2
FRANCE RENNES RENNES 3
FRANCE RODEZ RODEZ 4
FRANCE ROUEN ROUEN 17
FRANCE SEDAN SEDAN 13
FRANCE ST_BRIEUC ST_BRIEUC 3
FRANCE ST_FLOUR ST_FLOUR 4
FRANCE ST_TROPEZ ST_TROPEZ 8
FRANCE ST-ETIENNE ST-ETIENNE 4
FRANCE STRASBOURG STRASBOURG 45
FRANCE TARBES TARBES 0
FRANCE TOULON TOULON 8
FRANCE TOULOUSE TOULOUSE 0
FRANCE TOURS TOURS 2
FRANCE TROYES TROYES 2
FRANCE VALENCE VALENCE 9
FRANCE VERSAILLES VERSAILLES 2
FRANCE VESOUL VESOUL 7
H/HUNGARY BUDAPEST* BUDAPEST* 63
H/HUNGARY DEBRECEN* DEBRECEN* 63
H/HUNGARY GYÖR GYÖR 49
H/HUNGARY MISKOLC* MISKOLC* 63
H/HUNGARY PECS* PECS* 63
H/HUNGARY SIOFOK* SIOFOK* 63
H/HUNGARY SZEGED* SZEGED* 63
H/HUNGARY SZOLNOK* SZOLNOK* 63
Page 3

Land Displayanzeige Stadt Region
Country Display City Region
Pays Affichage sur l'écran Ville Région
Land Aanduiding Stad Regio
H/HUNGARY TATABANYA* TATABANYA* 63
HR/CROATIA OSIJEK* OSIJEK* 87
HR/CROATIA RIJEKA RIJEKA 44
HR/CROATIA SPLIT* SPLIT* 89
HR/CROATIA ZAGREB* ZAGREB* 87
I / ITALY ALESSANDRI ALESSANDRIA 40
I / ITALY ANCONA* ANCONA* 61
I / ITALY AOSTA AOSTA 39
I / ITALY BARI* BARI* 62
I / ITALY BERGAMO BERGAMO 40
I / ITALY BOLOGNA BOLOGNA 44
I / ITALY BOLZANO BOLZANO 27
I / ITALY BRESCIA BRESCIA 40
I / ITALY CAGLIARI* CAGLIARI* 73
I / ITALY CATANIA* CATANIA* 66
I / ITALY COSENZA* COSENZA* 66
I / ITALY EDOLO EDOLO 38
I / ITALY FIRENZE FIRENZE 41
I / ITALY FOGGIA* FOGGIA* 62
I / ITALY GENOVA GENOVA 43
I / ITALY LA SPEZIA LA SPEZIA 43
I / ITALY LECCE* LECCE* 62
I / ITALY MERANO MERANO 27
I / ITALY MESSINA* MESSINA* 66
I / ITALY MILANO MILANO 40
I / ITALY NAPOLI* NAPOLI* 60
I / ITALY PALERMO* PALERMO* 66
I / ITALY PARMA PARMA 40
I / ITALY PERUGIA PERUGIA 41
I / ITALY PESCARA* PESCARA* 61
I / ITALY PIACENZA PIACENZA 40
I / ITALY PISA PISA 41
I / ITALY R.CALABRIA* REGGIO CALABRIA* 66
I / ITALY RIMINI RIMINI 44
I / ITALY ROMA ROMA 41
I / ITALY SAN_MARIN* SAN_MARINO* 61
I / ITALY SAN_REMO SAN_REMO 43
I / ITALY SASSARI* SASSARI* 73
I / ITALY SESTRIERE SESTRIERE 39
I / ITALY SIENA SIENA 41
I / ITALY TORINO TORINO 40
I / ITALY TRENTO TRENTO 27
I / ITALY TRIESTE TRIESTE 44
I / ITALY UDINE UDINE 44
I / ITALY VENEZIA VENEZIA 44
I / ITALY VERONA VERONA 40
IRELAND CORK* CORK* 75
IRELAND DUBLIN* DUBLIN* 76
IRELAND GALWAY* GALWAY* 75
IRELAND LIMERICK* LIMERICK* 75
LUX LUXEMBOURG LUXEMBOURG 13
MONACO MONACO MONACO 43
N / NORWAY BERGEN* BERGEN* 78
N / NORWAY DRAMMEN DRAMMEN 58
N / NORWAY FREDRIKST. FREDRIKSTADEN 58
N / NORWAY OSLO OSLO 58
N / NORWAY STAVANGER* STAVANGER* 78
N / NORWAY TØNSBERG TØNSBERG 58
N / NORWAY TRONDHEIM* TRONDHEIM* 79
NL/NETHERL AMSTERDAM AMSTERDAM 42
NL/NETHERL ARNHEM ARNHEM 42
NL/NETHERL ASSEN ASSEN 42
NL/NETHERL DEN HAAG DEN HAAG 42
NL/NETHERL DEN HELDER DEN HELDER 19
NL/NETHERL EINDHOVEN EINDHOVEN 42
NL/NETHERL GRONINGEN GRONINGEN 19
NL/NETHERL HAARLEM HAARLEM 42
NL/NETHERL LEEUWARDEN LEEUWARDEN 19
NL/NETHERL LELYSTAD LELYSTAD 42
NL/NETHERL MAASTRICHT MAASTRICHT 6
NL/NETHERL MIDDELBURG MIDDELBURG 6
NL/NETHERL ROTTERDAM ROTTERDAM 42
NL/NETHERL S.HERTOGENB S.HERTOGENBOSCH 42
NL/NETHERL TERNEUZEN TERNEUZEN 6
NL/NETHERL TEXEL TEXEL 19
NL/NETHERL UTRECHT UTRECHT 42
NL/NETHERL ZWOLLE ZWOLLE 42
P/PORTUGAL LISBOA* LISBOA* 72
PL/POLAND BIALYSTOK* BIALYSTOK* 82
PL/POLAND BIELSKO* BIELSKO* 83
PL/POLAND GDANSK* GDANSK* 81
PL/POLAND KATOWICE* KATOWICE* 83
PL/POLAND KIELCE* KIELCE* 83
PL/POLAND KRAKOW* KRAKOW* 83
PL/POLAND LODZ* LODZ* 82
PL/POLAND LUBLIN* LUBLIN* 82
PL/POLAND OLSZTYN* OLSZTYN* 81
PL/POLAND POZNAN POZNAN 52
PL/POLAND RZESZOW* RZESZOW* 83
PL/POLAND SZCZECIN* SZCZECIN* 63
PL/POLAND TORUN* TORUN* 82
PL/POLAND WALBRZYCH WALBRZYCH 51
PL/POLAND WARSZAWA* WARSZAWA* 82
PL/POLAND WROCLAW WROCLAW 29
PL/POLAND ZAKOPANE* ZAKOPANE* 83
S/SWEDEN BORAS BORAS 56
S/SWEDEN BORGHOLM BORGHOLM 55
S/SWEDEN FALUN* FALUN* 85
S/SWEDEN GÄVLE GÄVLE 54
S/SWEDEN GÖTEBORG GÖTEBORG 53
S/SWEDEN HALMSTAD HALMSTAD 53
S/SWEDEN JÖNKÖPING JÖNKÖPING 56
S/SWEDEN KALMAR KALMAR 55
S/SWEDEN KARLSTAD KARLSTAD 56
Land Displayanzeige Stadt Region
Country Display City Region
Pays Affichage sur l'écran Ville Région
Land Aanduiding Stad Regio
S/SWEDEN LINKÖPING LINKÖPING 55
S/SWEDEN MALMÖ MALMÖ 23
S/SWEDEN ÖREBRO ÖREBRO 56
S/SWEDEN ÖSTERSUND* ÖSTERSUND* 85
S/SWEDEN STOCKHOLM STOCKHOLM 54
S/SWEDEN SUNDSVALL* SUNDSVALL* 80
S/SWEDEN UMEA* UMEA* 84
S/SWEDEN UPPSALA UPPSALA 54
S/SWEDEN VÄSTERAS VÄSTERAS 54
S/SWEDEN VISBY VISBY 55
SK/SLOVAKI BRANSKA* BRANSKA* 63
SK/SLOVAKI BRATISLAVA BRATISLAVA 49
SK/SLOVAKI KOSICE* KOSICE* 63
SK/SLOVAKI TRENCIN TRENCIN 49
SLOVENIA LJUBLJANA LJUBLJANA 46
SLOVENIA MARIBOR MARIBOR 46
SLOVENIA NOVA GORIC NOVA GORIC 44
UK ABERDEEN* ABERDEEN* 77
UK BELFAST* BELFAST* 76
UK BIRMINGHAM BIRMINGHAM 16
UK BLACKPOOL BLACKPOOL 16
UK BOURNEMOUT BOURNEMOUT 18
UK BRIGHTON BRIGHTON 18
UK BRISTOL BRISTOL 15
UK CAMBRIDGE CAMBRIDGE 18
UK CARDIFF CARDIFF 15
UK DOVER DOVER 18
UK EDINBURGH* EDINBURGH* 77
UK EXETER EXETER 15
UK GLASGOW* GLASGOW* 77
UK HOLYHEAD HOLYHEAD 15
UK IPSWICH IPSWICH 18
UK ISLE_O_MA* ISLE_OF_MAN* 77
UK JERSEY JERSEY 3
UK KINGSTON KINGSTON 18
UK LEEDS LEEDS 16
UK LEICESTER LEICESTER 16
UK LIVERPOOL LIVERPOOL 16
UK LONDON LONDON 18
UK MANCHESTER MANCHESTER 16
UK MIDDLESBRO MIDDLESBROUGH 16
UK NEWCASTLE NEWCASTLE 16
UK NORTHAMPTO NORTHAMPTON 18
UK NORWICH NORWICH 18
UK NOTTINGHAM NOTTINGHAM 16
UK OXFORD OXFORD 18
UK PLYMOUTH PLYMOUTH 15
UK PORTSMOUTH PORTSMOUTH 18
UK READING READING 18
UK SHEFFIELD SHEFFIELD 16
UK SOUTHAMPTO SOUTHAMPTON 18
UK ST_DAVIDS ST_DAVIDS 15
UK SWANSEA SWANSEA 15
V/VATICANO VATICANO VATICANO 41
Impressum
Diese Bedienungsanleitung ist eine Publikation der Conrad Electronic SE, Klaus-Conrad-Str. 1, D-92240 Hirschau (www.conrad.com).
Alle Rechte einschließlich Übersetzung vorbehalten. Reproduktionen jeder Art, z. B. Fotokopie, Mikroverfilmung, oder die Erfassung in
elektronischen Datenverarbeitungsanlagen, bedürfen der schriftlichen Genehmigung des Herausgebers. Nachdruck, auch auszugsweise,
verboten.
Diese Bedienungsanleitung entspricht dem technischen Stand bei Drucklegung. Änderung in Technik und Ausstattung vorbehalten.
© Copyright 2010 by Conrad Electronic SE.
Legal Notice
These operating instructions are a publication by Conrad Electronic SE, Klaus-Conrad-Str. 1, D-92240 Hirschau (www.conrad.com).
All rights including translation reserved. Reproduction by any method, e.g. photocopy, microfilming, or the capture in electronic data processing
systems require the prior written approval by the editor. Reprinting, also in part, is prohibited.
These operating instructions represent the technical status at the time of printing. Changes in technology and equipment reserved.
© Copyright 2010 by Conrad Electronic SE.
Information légales
Ce mode d'emploi est une publication de la société Conrad Electronic SE, Klaus-Conrad-Str. 1, D-92240 Hirschau (www.conrad.com).
Tous droits réservés, y compris de traduction. Toute reproduction, quelle qu'elle soit (p. ex. photocopie, microfilm, saisie dans des installations de
traitement de données) nécessite une autorisation écrite de l'éditeur. Il est interdit de le réimprimer, même par extraits.
Ce mode d'emploi correspond au niveau technique du moment de la mise sous presse. Sous réserve de modifications techniques et de
l'équipement.
© Copyright 2010 by Conrad Electronic SE.
Colofon
Deze gebruiksaanwijzing is een publicatie van de firma Conrad Electronic SE, Klaus-Conrad-Str. 1, D-92240 Hirschau (www.conrad.com).
Alle rechten, vertaling inbegrepen, voorbehouden. Reproducties van welke aard dan ook, bijvoorbeeld fotokopie, microverfilming of de registratie
in elektronische gegevensverwerkingsapparatuur, vereisen de schriftelijke toestemming van de uitgever. Nadruk, ook van uittreksels, verboden.
Deze gebruiksaanwijzing voldoet aan de technische stand bij het in druk bezorgen. Wijziging van techniek en uitrusting voorbehouden.
© Copyright 2010 by Conrad Electronic SE.
V1_0710_01
Page 4

Version 06/08
Funk-Wetterstation
"DV928"
Seite 2 - 54
Radio Weather Station
"DV928"
Page 55 - 107
Station météo sans fil
« DV928 »
Page 108 - 160
Draadloos weerstation
"DV928"
Pagina 161 - 213
Best.-Nr. / Item No. / N° de commande / Bestnr.: 64 63 30
BEDIENUNGSANLEITUNG
OPERATING INSTRUCTIONS
NOTICE D´EMPLOI
GEBRUIKSAANWIJZING
Page 5

2
Inhaltsverzeichnis
Seite
1. Einführung .......................................................................................................................................................... 5
2. Lieferumfang ...................................................................................................................................................... 5
3. Bestimmungsgemäße Verwendung.................................................................................................................. 6
4. Symbol-Erklärung .............................................................................................................................................. 6
5. Merkmale und Funktionen ................................................................................................................................. 7
a) Wetterstation ................................................................................................................................................ 7
b) Temperatur-/Luftfeuchte-Sensor ................................................................................................................. 8
c) Windsensor .................................................................................................................................................. 8
d) Regensensor ............................................................................................................................................... 8
6. Sicherheitshinweise ........................................................................................................................................... 9
7. Batterie- und Akkuhinweise............................................................................................................................. 10
8. Bedienelemente ............................................................................................................................................... 11
a) Wetterstation .............................................................................................................................................. 11
b) Temperatur-/Luftfeuchtesensor................................................................................................................. 13
c) Windsensor ................................................................................................................................................ 14
d) Regensensor ............................................................................................................................................. 15
9. Inbetriebnahme ................................................................................................................................................ 16
a) Temperatur-/Luftfeuchtesensor................................................................................................................. 16
b) Windsensor ................................................................................................................................................ 17
c) Regensensor ............................................................................................................................................. 18
d) Wetterstation .............................................................................................................................................. 18
10. DCF- und METEOTIME-Empfang .................................................................................................................. 21
11. Bedienung der METEOTIME-Funktionen ...................................................................................................... 24
a) Zeitzone, Sprache und Kontrast einstellen .............................................................................................. 24
b) Empfangstest für das "METEOTIME"-Signal .......................................................................................... 24
c) Umschalten der Anzeige für Zeit/Datum, Städteliste und Sonnenaufgangs-/Sonnenuntergangszeit.. 24
d) Land/Stadt für Wetteranzeige auswählen ................................................................................................ 25
e) Stadt aus der Anzeigeliste löschen .......................................................................................................... 25
f) Wohnort eingeben ..................................................................................................................................... 26
g) Wetterinformation umschalten für Tag/Nacht........................................................................................... 26
h) Unwetter-Meldungen ................................................................................................................................. 26
i) Beschreibung der Wettersymbole ............................................................................................................ 27
12. Bedienung der Innen-/Außensensoren .......................................................................................................... 28
a) Nach Sensoren suchen ............................................................................................................................. 28
b) Hintergrundbeleuchtung............................................................................................................................ 28
c) Funktion auswählen .................................................................................................................................. 29
Page 6

3
Seite
13. Beschreibung der Funktionen ......................................................................................................................... 30
a) Anzeigefeld "PRESSURE"........................................................................................................................ 30
Anzeige umschalten .................................................................................................................................. 30
Luftdruck auf Meereshöhe einstellen/korrigieren .................................................................................... 30
Einheiten für den Luftdruck wählen ("mmHg", "hPa/mBar" oder "InHg" ................................................ 30
Höhenlage einstellen/korrigieren .............................................................................................................. 31
Einheiten für die Höhenlage wählen ("meter" oder "feet") ...................................................................... 31
Mondphase für die letzten 39 Tage bzw. der nächsten 39 Tage ansehen ............................................. 31
Verlauf von Temperatur, Luftfeuchte oder Luftdruck der letzten 24 Stunden ansehen ......................... 31
Luftdruckwerte der letzten 24 Stunden ansehen ..................................................................................... 32
Luftdruck-Alarm aktivieren ........................................................................................................................ 32
b) Anzeigefeld für "Temperatur/Luftfeuchte" ................................................................................................ 33
Anzeigeeinheit umschalten °C/°F ............................................................................................................ 33
Taupunkt-Anzeige...................................................................................................................................... 33
Anzeige der Minimum-/Maximumwerte für Temperatur/Luftfeuchte ....................................................... 33
Minimum-/Maximumwerte löschen ........................................................................................................... 34
Mehrere Temperatur-/Luftfeuchtesensoren umschalten ......................................................................... 34
Automatisches Umschalten bei mehreren Temperatur-/Luftfeuchtesensoren ....................................... 34
Temperatur-Alarm auswählen, ein-/ausschalten ..................................................................................... 34
Temperaturwert für den Temperatur-Alarm einstellen ............................................................................. 34
Tendenzanzeige für Temperatur und Luftfeuchte .................................................................................... 35
Komfort-Indikator für Innenluftfeuchte ...................................................................................................... 35
c) Anzeigefeld "WIND" .................................................................................................................................. 36
Anzeigedaten umschalten......................................................................................................................... 36
Einheiten für die Anzeige der Windgeschwindigkeit umschalten ........................................................... 36
Wertespeicher für Windgeschwindigkeit ansehen................................................................................... 36
Wertespeicher für Windgeschwindigkeit löschen .................................................................................... 37
Windgeschwindigkeits-Alarm ein-/ausschalten ....................................................................................... 37
Windgeschwindigkeits-Alarm einstellen ................................................................................................... 37
d) Anzeigefeld "RAIN" ................................................................................................................................... 38
Anzeigedaten umschalten......................................................................................................................... 38
Wertespeicher für Regenmenge löschen................................................................................................. 38
Regenmengen-Alarm ein-/ausschalten.................................................................................................... 38
Regenmengen-Alarm einstellen ............................................................................................................... 38
13. Software-Installation, Anschluss an den PC .................................................................................................. 39
a) Software-Installation .................................................................................................................................. 39
b) Anschluss an den PC ................................................................................................................................39
c) Kurzbeschreibung der Software ............................................................................................................... 39
14. Batteriewechsel................................................................................................................................................ 40
a) Wetterstation .............................................................................................................................................. 40
b) Sensoren .................................................................................................................................................... 40
15. Behebung von Störungen ............................................................................................................................... 41
16. Reichweite ........................................................................................................................................................ 42
17. Wartung und Reinigung................................................................................................................................... 43
Page 7

4
Seite
18. Entsorgung ....................................................................................................................................................... 44
a) Allgemein ................................................................................................................................................... 44
b) Batterien und Akkus .................................................................................................................................. 44
19. Konformitätserklärung (DOC) ......................................................................................................................... 44
20. Technische Daten ............................................................................................................................................ 45
a) Wetterstation .............................................................................................................................................. 45
b) Steckernetzteil für Wetterstation............................................................................................................... 45
c) Temperatur-/Luftfeuchtesensor................................................................................................................. 46
d) Regensensor ............................................................................................................................................. 46
e) Windsensor ................................................................................................................................................ 46
21. Städte für die Wettervorhersage ..................................................................................................................... 47
22. Wettermeldungen ............................................................................................................................................ 52
23. Displayanzeigen............................................................................................................................................... 54
Page 8
5
1. Einführung
Sehr geehrte Kundin, sehr geehrter Kunde,
wir bedanken uns für den Kauf dieses Produkts.
Dieses Produkt entspricht den gesetzlichen nationalen und europäischen Anforderungen. Um diesen Zustand zu
erhalten und einen gefahrlosen Betrieb sicherzustellen, müssen Sie als Anwender diese Bedienungsanleitung
beachten!
Lesen Sie sich vor Inbetriebnahme des Produkts die komplette Bedienungsanleitung durch,
beachten Sie alle Bedienungs- und Sicherheitshinweise.
Alle enthaltenen Firmennamen und Produktbezeichnungen sind Warenzeichen der jeweiligen Inhaber. Alle Rechte
vorbehalten.
Bei technischen Fragen wenden Sie sich bitte an:
Deutschland: Tel.-Nr.: 0180/5 31 21 11
Fax: 0180/5 31 21 10
E-Mail: Bitte verwenden Sie unser Formular im Internet www.conrad.de,
unter der Rubrik "Kontakt".
Mo. - Fr. 8.00 bis 18.00 Uhr
Österreich: www.conrad.at
www.conrad.business.at
Schweiz: Tel.-Nr.: 0848/80 12 88
Fax-Nr.: 0848/80 12 89
e-mail: support@conrad.ch
Mo. - Fr. 8.00 bis 12.00 Uhr, 13.00 bis 17.00 Uhr
2. Lieferumfang
• Wetterstation
• Steckernetzteil für Wetterstation
• Temperatur-/Luftfeuchte-Sensor mit integriertem LC-Display
• Regensensor
• Windsensor mit Solarzelle
• USB-Anschlusskabel
• Montagematerial
•CD
• Bedienungsanleitung
Page 9
6
3. Bestimmungsgemäße Verwendung
Die Wetterstation dient zur Anzeige verschiedener Messwerte, z.B. der Innen-/Außentemperatur, der Innen-/
Außenluftfeuchte, der Regenmenge, der Windgeschwindigkeit und der Windrichtung.
Die im Lieferumfang enthaltenen Sensoren senden die Messwerte drahtlos per Funk zur Wetterstation.
Integriert in der Wetterstation ist eine Funkuhr, die über das DCF-Zeitzeichensignal nicht nur die genaue Uhrzeit,
sondern auch das Datum erhält. Die Umschaltung von Sommer- und Winterzeit geschieht dadurch ebenfalls
automatisch.
Weiterhin empfängt die Wetterstation die über das DCF-Signal übertragenen Wetterinformationen für zahlreiche
verschiedene Regionen Europas.
Eine Aufstellung mit allen Merkmalen und Eigenschaften des Produkts finden Sie in Kapitel 5.
Die Wettervorhersagen der Wetterstation sind nur als Orientierungswerte zu sehen. Sie stellen keine absolut genaue
Voraussage dar. Der Hersteller übernimmt keine Verantwortung für inkorrekte Anzeigen, Messwerte oder Wettervorhersagen und die Folgen, die sich daraus ergeben können.
Das Produkt ist für den Privatgebrauch vorgesehen; es ist nicht für medizinische Zwecke oder für die Information der
Öffentlichkeit geeignet.
Die Bestandteile dieses Produkts sind kein Spielzeug, sie enthalten zerbrechliche bzw. verschluckbare Glas- und
Kleinteile, außerdem Batterien. Das Produkt gehört nicht in Kinderhände!
Betreiben Sie alle Komponenten so, dass sie von Kindern nicht erreicht werden können.
Der Betrieb des Produkts erfolgt über Batterien. Die Wetterstation selbst lässt sich auch über das mitgelieferte
Steckernetzteil betreiben.
Eine andere Verwendung als oben beschrieben kann zur Beschädigung des Produkts führen, außerdem bestehen
weitere Gefahren.
Lesen Sie sich diese Bedienungsanleitung vollständig und aufmerksam durch, sie enthält viele wichtige Informatio-
nen für Aufstellung, Betrieb und Bedienung. Beachten Sie alle Sicherheitshinweise!
4. Symbol-Erklärung
Das Symbol mit dem Blitz im Dreieck wird verwendet, wenn Gefahr für Ihre Gesundheit besteht, z.B.
durch elektrischen Schlag.
Das Symbol mit dem Ausrufezeichen im Dreieck weist auf wichtige Hinweise in dieser Bedienungsanleitung hin, die unbedingt zu beachten sind.
Das "Hand"-Symbol ist zu finden, wenn Ihnen besondere Tipps und Hinweise zur Bedienung gegeben
werden sollen.
Page 10

7
5. Merkmale und Funktionen
a) Wetterstation
Die Wetterstation unterscheidet sich auf den ersten Blick nicht von anderen herkömmlichen Wetterstationen.
Sie kann jedoch Wetter-Informationen auswerten und anzeigen, die zusätzlich zu dem DCF-Signal (bzw. dem HBG-
Signal der Schweiz) per Funk empfangen werden, das sog. "METEOTIME"-Signal.
Die Wetter-Informationen werden durch professionelle Meteorologen und modernsten Instrumenten erstellt - sie
basieren also auf ähnlichen Daten, wie Sie sie von der Wettervorhersage aus TV und Radio kennen.
Folgende Vorhersagen werden angezeigt:
• Wetterdatenanzeige (Wettervorhersage über Symbole, Tag-Temperatur, Nacht-Temperatur) für den aktuellen
Tag und die folgenden 3 Tage; für 60 Regionen Europas
• Zusätzliche Wetterdatenanzeige für 30 weitere Regionen Europas (für den aktuellen Tag und den darauf
folgenden Tag)
• Wahrscheinlichkeitsanzeige für Niederschlag (Heute)
• Windgeschwindigkeit und Windrichtung (Heute)
• Wettermeldung (z.B. bei Sturm)
• Anzeige der Sonnenaufgangs- und Sonnenuntergangs-Zeiten für 272 Großstädte Europas
Weiterhin verfügt die Wetterstation über folgende Anzeigen und Funktionen:
• Funkgesteuerte DCF-Uhrzeit-/Datumsanzeige
• Anzeige der Innentemperatur/Innenluftfeuchte (über Sensor gemessen)
• Anzeige der Außentemperatur/Außenluftfeuchte (über Sensor gemessen)
• Anzeige der Windgeschwindigkeit und Windrichtung (über Sensor gemessen)
• Anzeige der Regenmenge (über Sensor gemessen)
• Anzeige des Luftdruckwerts und des Luftdruckverlaufs (über Sensor gemessen)
• Temperaturanzeige der Innen-/Außensensoren in Grad Celsius (°C) oder Grad Fahrenheit (°F) wählbar
• Luftdruckanzeige in verschiedenen Einheiten darstellbar ("hPa", "inHg", "mmHg")
• Windgeschwindigkeitsanzeige wählbar in Kilometer pro Stunde ("km/h"), Meilen pro Stunde ("mph"), Meter pro
Sekunde ("m/s")
• MIN-/MAX-Speicher für Innen-/Außentemperatur, Innen-/Außenluftfeuchte, Windgeschwindigkeit, Regenmenge
• Tischaufstellung oder Wandmontage möglich
• Betrieb über vier Batterien vom Typ AA/Mignon oder externes Steckernetzteil
• USB-Anschluss, zum Auslesen von Daten über PC
• Betrieb im trockenen Innenbereich (Wetterstation/Steckernetzteil dürfen nicht feucht oder nass werden!)
• Hintergrundbeleuchtung für LC-Display
Page 11

8
b) Temperatur-/Luftfeuchte-Sensor
• Drahtlose Funkübertragung
• Messung der Temperatur und Luftfeuchte
• Betrieb über 2 Batterien vom Typ AA/Mignon
• Wandmontage
• Betrieb im geschützten Außenbereich (z.B. unter einem Dachvorsprung)
c) Windsensor
• Drahtlose Funkübertragung
• Messung der Windgeschwindigkeit und der Windrichtung
• Betrieb über fest eingebauten NiMH-Akkupack und Solarzelle
• Stützbatterien einsetzbar (2 Batterien vom Typ AA/Mignon)
• Montage an einer Wand möglich (alternativ auch Mastbefestigung)
• Betrieb im Außenbereich
d) Regensensor
• Drahtlose Funkübertragung
• Messung der Regenmenge
• Betrieb über 2 Batterien vom Typ AA/Mignon
• Montage auf einer ebenen Fläche
• Betrieb im Außenbereich
Page 12
9
6. Sicherheitshinweise
Bei Schäden, die durch Nichtbeachten dieser Bedienungsanleitung verursacht werden, erlischt der Garantieanspruch. Für Folgeschäden übernehmen wir keine Haftung!
Bei Sach- oder Personenschäden, die durch unsachgemäße Handhabung oder Nichtbeachten
der Sicherheitshinweise verursacht werden, übernehmen wir keine Haftung. In solchen Fällen
erlischt jeder Garantieanspruch!
Sehr geehrte Kundin, sehr geehrter Kunde, die folgenden Sicherheits- und Gefahrenhinweise dienen nicht nur zum
Schutz Ihrer Gesundheit, sondern auch zum Schutz des Geräts. Lesen Sie sich bitte die folgenden Punkte
aufmerksam durch:
• Aus Sicherheits- und Zulassungsgründen (CE) ist das eigenmächtige Umbauen und/oder Verändern des Produkts nicht gestattet. Öffnen/Zerlegen Sie es nicht (bis auf die in dieser Anleitung
beschriebenen Arbeiten zum Einlegen/Wechseln der Batterien bzw. Reinigung)!
Wartungs-, Einstellungs- oder Reparaturarbeiten dürfen nur von einem Fachmann/Fachwerkstatt
durchgeführt werden.
• Verwenden Sie dieses Produkt nicht in Krankenhäusern oder medizinischen Einrichtungen. Obwohl
die Außensensoren nur relativ schwache Funksignale aussenden, könnten diese dort zu Funktionsstörungen von lebenserhaltenden Systemen führen. Gleiches gilt möglicherweise in anderen
Bereichen.
• Die Wetterstation und das Steckernetzteil ist nur für trockene Innenräume geeignet. Setzen Sie sie
keiner direkten Sonneneinstrahlung, starker Hitze, Kälte, Feuchtigkeit oder Nässe aus, andernfalls
besteht Lebensgefahr durch einen elektrischen Schlag!
• Die Außensensoren sind für den Betrieb im Außenbereich geeignet. Sie dürfen aber nicht in oder
unter Wasser betrieben werden.
• Das Produkt ist kein Spielzeug, es gehört nicht in Kinderhände. Das Produkt enthält Kleinteile, Glas
(Display) und Batterien. Platzieren Sie das Produkt so, dass es von Kindern nicht erreicht werden
kann.
• Lassen Sie das Verpackungsmaterial nicht achtlos liegen, dieses könnte für Kinder zu einem
gefährlichen Spielzeug werden.
• Betreiben Sie das Produkt nur in gemäßigtem Klima, nicht in tropischem Klima.
• Wenn das Produkt von einem kalten in einen warmen Raum gebracht wird (z.B. bei Transport), kann
Kondenswasser entstehen. Dadurch könnte das Produkt beschädigt werden, außerdem besteht
beim Steckernetzteil Lebensgefahr durch einen elektrischen Schlag!
Lassen Sie deshalb das Produkt zuerst auf Zimmertemperatur kommen, bevor Sie es verwenden.
Dies kann u.U. mehrere Stunden dauern.
• In Schulen, Ausbildungseinrichtungen, Hobby- und Selbsthilfewerkstätten ist das Betreiben des
Produkts durch geschultes Personal verantwortlich zu überwachen.
• Gehen Sie vorsichtig mit dem Produkt um, durch Stöße, Schläge oder dem Fall aus bereits geringer
Höhe wird es beschädigt.
Page 13

10
7. Batterie- und Akkuhinweise
Der Betrieb der Wetterstation und der Außensensoren mit Akkus ist grundsätzlich möglich.
Durch die geringere Spannung von Akkus (Akku = 1.2V, Batterie = 1.5V) und die geringere Kapazität
kommt es jedoch zu einer kürzeren Betriebsdauer, auch ist eine Verringerung der Funkreichweite
möglich. Weiterhin sind Akkus temperaturempfindlicher als Batterien.
Wir empfehlen Ihnen deshalb, vorzugsweise hochwertige Alkaline-Batterien zu verwenden, um einen
langen und sicheren Betrieb zu ermöglichen.
Benötigte Batterien:
Wetterstation: 4 Batterien vom Typ AA/Mignon
Außentemperatur-/Außenluftfeuchtesensor: 2 Batterien vom Typ AA/Mignon
Windsensor: 2 Batterien vom Typ AA/Mignon
Regensensor: 2 Batterien vom Typ AA/Mignon
Bitte beachten Sie:
• Batterien/Akkus gehören nicht in Kinderhände.
• Achten Sie beim Einlegen der Batterien/Akkus auf die richtige Polung (Plus/+ und Minus/- beachten).
• Lassen Sie Batterien/Akkus nicht offen herumliegen, es besteht die Gefahr, dass diese von Kindern oder
Haustieren verschluckt werden. Suchen Sie im Falle eines Verschluckens sofort einen Arzt auf.
• Ausgelaufene oder beschädigte Batterien/Akkus können bei Berührung mit der Haut Verätzungen verursachen,
benutzen Sie deshalb in diesem Fall geeignete Schutzhandschuhe.
• Achten Sie darauf, dass Batterien/Akkus nicht kurzgeschlossen, zerlegt oder ins Feuer geworfen werden. Es
besteht Explosionsgefahr!
• Herkömmliche Batterien dürfen nicht aufgeladen werden. Es besteht Explosionsgefahr! Laden Sie ausschließlich
dafür vorgesehene wiederaufladbare Akkus, verwenden Sie ein geeignetes Ladegerät.
• Bei längerem Nichtgebrauch (z.B. bei Lagerung) entnehmen Sie die eingelegten Batterien/Akkus. Bei Überalterung besteht andernfalls die Gefahr, dass Batterien/Akkus auslaufen, was Schäden am Produkt verursacht,
Verlust von Garantie/Gewährleistung!
• Wechseln Sie immer den ganzen Satz Batterien/Akkus aus, verwenden Sie nur Batterien/Akkus des gleichen
Typs/Herstellers und des gleichen Ladezustands (keine vollen mit halbvollen oder leeren Batterien/Akkus
mischen).
• Mischen Sie niemals Batterien mit Akkus. Verwenden Sie entweder Batterien oder Akkus.
• Für die umweltgerechte Entsorgung von Batterien und Akkus lesen Sie bitte das Kapitel "Entsorgung".
Page 14
11
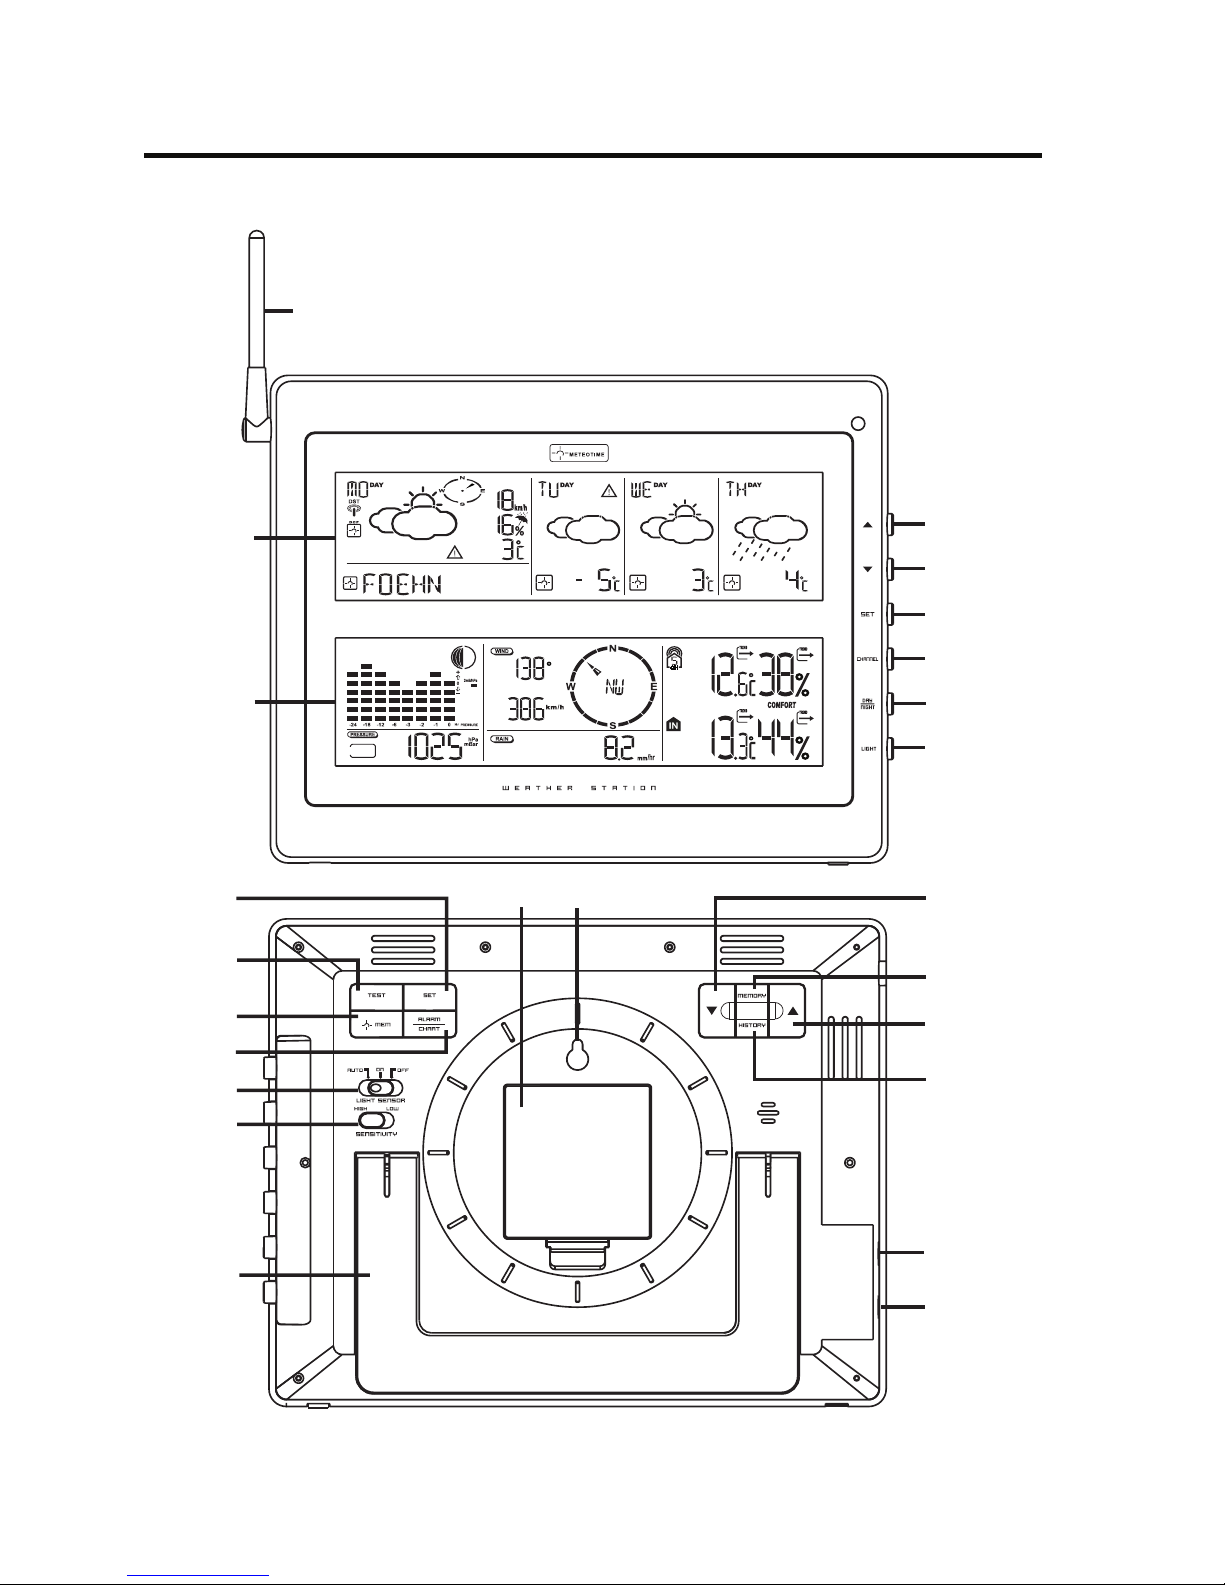
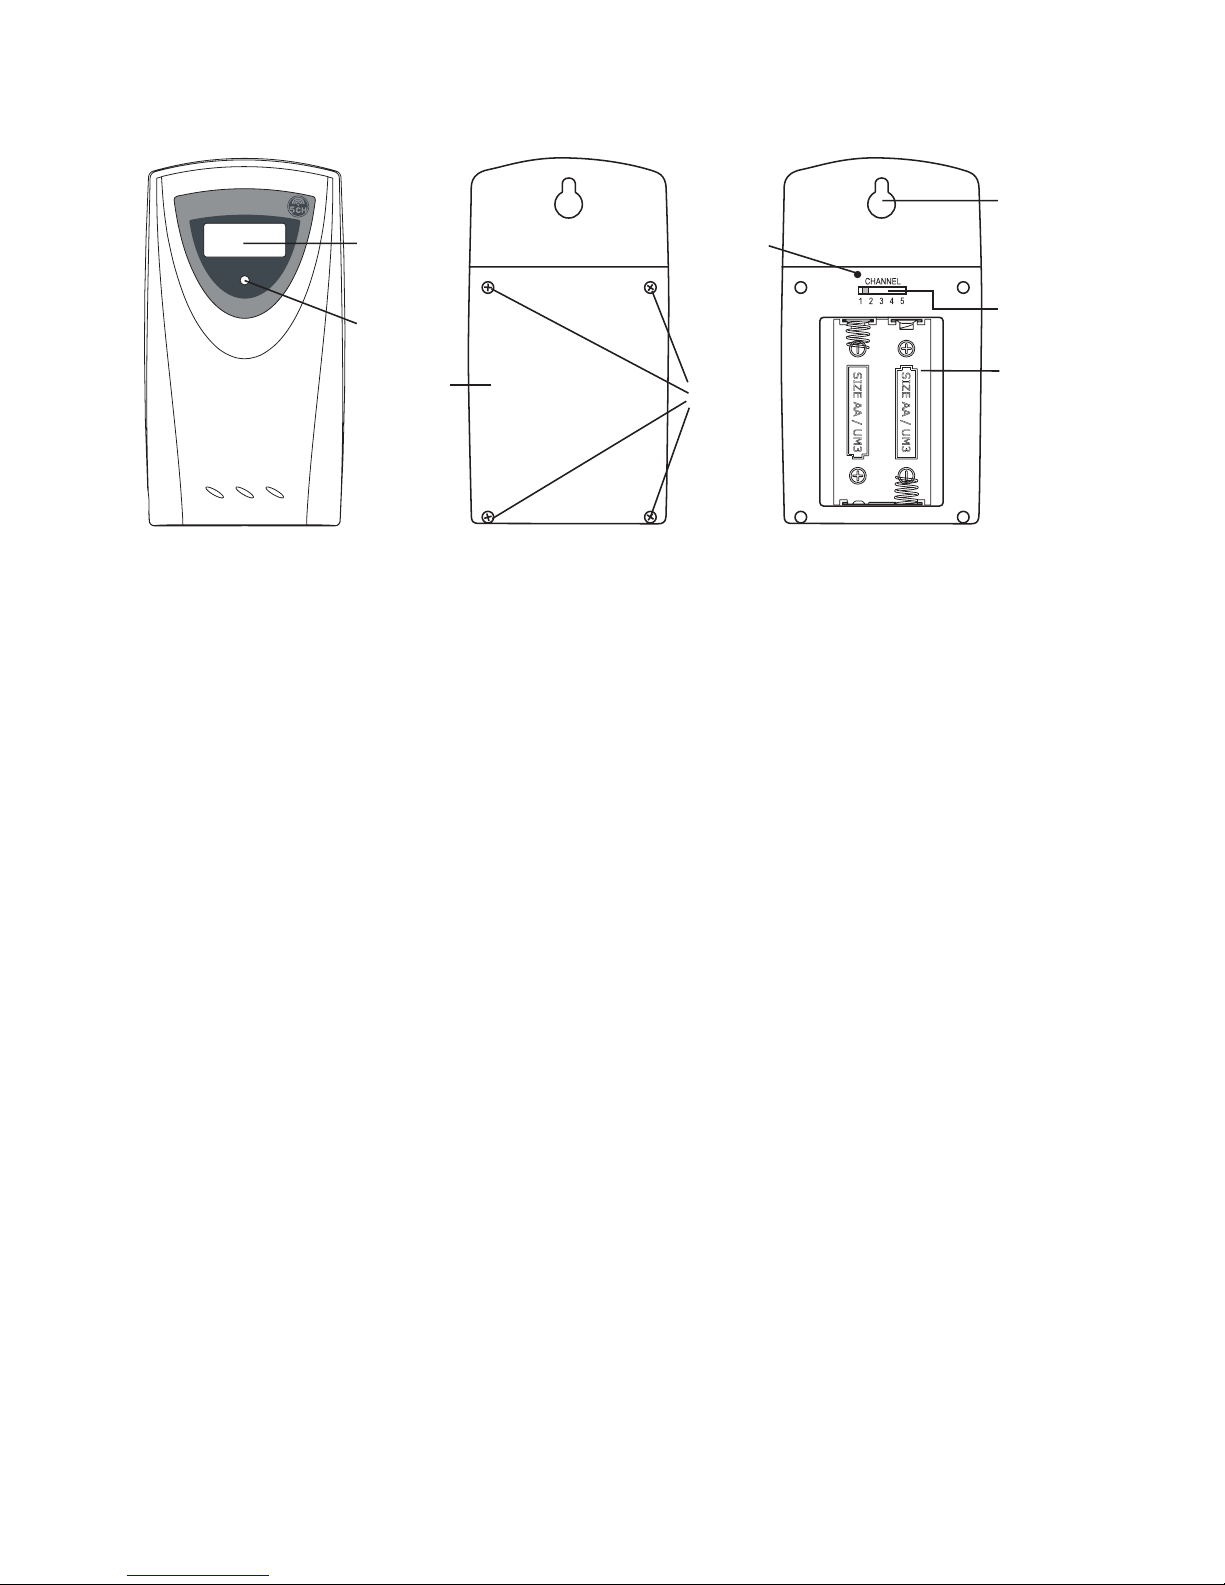
8. Bedienelemente
a) Wetterstation
1
2
3
5
7
4
6
16
8
9
10
11
12
13
14
15
17
18
22
A
B
20
21
19
Page 15

12
A Oberes Display für Anzeige der METEOTIME-Daten (Wetterdaten, die über das DCF-Signal empfangen
wurden), der DCF-Uhrzeit/-Datum, sowie der Sonnenaufgangs- und Sonnenuntergangszeit
B Unteres Display für Anzeige der Messdaten der Innensensoren (Innentemperatur, Innenluftfeuchte, Luftdruck)
und Außensensoren (z.B. Außentemperatur, Außenluftfeuchte, Windrichtung, Windgeschwindigkeit, Regenmenge
Auf der Rückseite und der rechten Seite der Wetterstation gibt es Pfeiltasten und je eine Taste "SET",
die jedoch völlig unterschiedliche Funktionen haben.
Die auf der rechten Seite befindlichen Tasten "a" (1), "b" (2) und "SET" (3) dienen für den
METEOTIME-Teil der Wetterstation (oberes Display). Die auf der Rückseite liegenden Tasten "T"
(16), "S" (18) und "SET" (7) sind für die Bedienung des Sensoren-Teils (unteres Display) vorgesehen.
Die Taste "SET" (7) auf der Rückseite dient für die Bedienung der restlichen Funktionen.
1 Taste "a" für Einstellungen im METEOTIME-Display (z.B. Land/Stadt auswählen)
2 Taste "b" für Einstellungen im METEOTIME-Display (z.B. Land/Stadt auswählen)
3 Taste "SET" für Einstellungen im METEOTIME-Display bzw. zum Umschalten der Anzeige (Stadt, Uhrzeit/
Datum, Sonnenaufgangs-/Sonnenuntergangszeit und zum Aktivieren des Einstellmodus für Land, Stadt,
Zeitzone, Sprache und Displaykontrast
4 Taste "CHANNEL" für die Auswahl der Temperatur-/Luftfeuchtesensoren (wenn mehr als ein Temperatur-/
Luftfeuchtesensor betrieben wird; einer ist im Lieferumfang)
5 Taste "DAY/NIGHT" zum Umschalten der METEOTIME-Vorhersage für Tag/Nacht
6 Taste "LIGHT" für Aktivierung der Hintergrundbeleuchtung
7 Taste "SET" für Auswahl der Funktionen bzw. für die Aktivierung des Einstellmodus für die Sensoren
8 Taste "TEST" für den Start eines Empfangstests des METEOTIME-Signals
9 Taste "MEM"
10 Taste "ALARM/CHART" für Einstellung eines Grenzwert-Alarms für Temperatur/Luftfeuchte, Wind, Regen),
sowie für Umschaltung der Bargraph-Anzeige für Luftdruck, Außenluftfeuchte (Kanal 1) und Außentemperatur
(Kanal 1)
11 Schiebeschalter "LIGHT SENSOR" (Betriebsart für Hintergrundbeleuchtung wählen)
12 Schiebeschalter "SENSITIVITY" (Empfindlichkeit für den Helligkeitssensor einstellen)
13 Ausklappbarer Standfuß
14 Batteriefachdeckel/Batteriefach für 4 Batterien vom Typ AA/Mignon
15 Öffnung für Wandbefestigung
16 Taste "T" für Auswahl der Sensoren/Anzeigebereiche (Temperatur/Luftfeuchte, Wind, Regen, Luftdruck) bzw.
für Einstellungen im Messdaten-Display
17 Taste "MEMORY" z.B. für die Anzeige von MIN-/MAX-Daten für Temperatur, Luftfeuchte, Wind und Regen
18 Taste "S" für Auswahl der Sensoren/Anzeigebereiche (Temperatur/Luftfeuchte, Wind, Regen, Luftdruck) bzw.
für Einstellungen im Messdaten-Display
19 Taste "HISTORY" für Anzeige der Luftdruckwerte der vergangenen 24 Stunden
20 Buchse für externes Steckernetzteil (für Dauerbetrieb der Hintergrundbeleuchtung ist der Anschluss des
mitgelieferten externen Netzteils erforderlich)
21 USB-Buchse für Anschluss der Wetterstation an einen Computer
22 Empfangsantenne für die Sensoren
Page 16
13
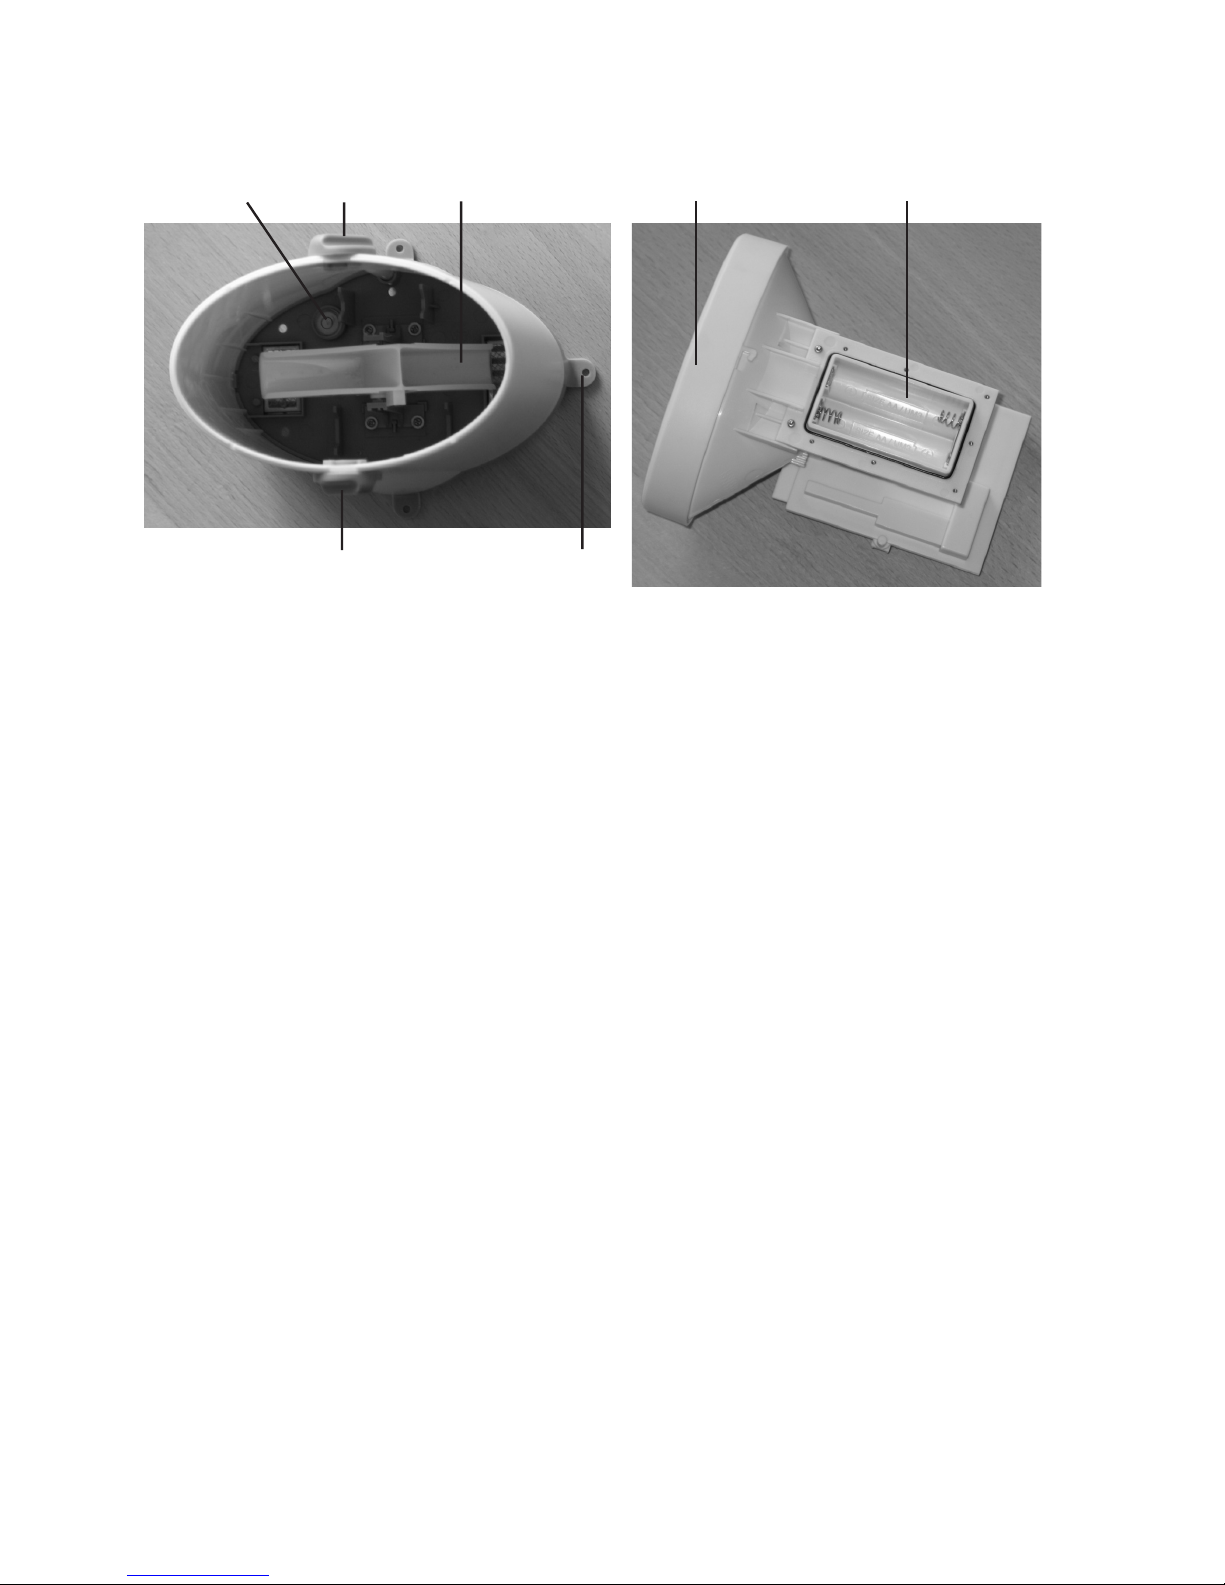
b) Temperatur-/Luftfeuchtesensor
23 Display für Anzeige der Temperatur und Luftfeuchte
24 LED (blinkt kurz auf bei Datenübertragung)
25 Batteriefachdeckel
26 Vier Schrauben für Batteriefachdeckel
27 Reset-Taste
28 Öffnung für Wandmontage
29 Schalter für Kanalwahl (Kanal 1 bis 5)
30 Batteriefach für 2 Batterien vom Typ AA/Mignon
24
WIRELESS THERMO HYGRO
1
23
27
30
29
28
RESET
25
26
Page 17

14
c) Windsensor
31 Windfahne für Messung der Windrichtung
32 Schalenkreuz für Messung der Windgeschwindigkeit
33 Solarzelle für Aufladen des internen Akkupacks
34 Vier Schrauben für Batteriefachdeckel
35 Batteriefachdeckel
36 Vier Löcher für Wandbefestigung
37 Versenkt angeordnete Taste zum Speichern der Richtung "NORD" für die Windrichtungsanzeige der Wettersta-
tion
38 Batteriefach für 2 Batterien vom Typ AA/Mignon (für Stützfunktion bei leerem Akkupack)
Im Windsensor ist ein Akkupack fest eingebaut (NiMH-Akkus). Dieser wird über die im Windsensor
integrierte Solarzelle (33) geladen.
Bei nicht ausreichender Akkuspannung erfolgt die Stromversorgung über die zwei Stützbatterien, die
im Batteriefach (35) eingelegt sind.
34
35
36
36
36
31
32
33
SET
37
38
Page 18
15
d) Regensensor
39 Integrierte Wasserwaage
40 Zwei Drehknöpfe für Verriegelung des Auffangbehälters
41 Wippe für Zählvorgang
42 Insgesamt vier Standfüße mit Befestigungsloch
43 Auffangbehälter
44 Batteriefach für 2 Batterien vom Typ AA/Mignon
40
40
39 41
42
43 44
Page 19

16
9. Inbetriebnahme
Nehmen Sie zuerst den Außensensor für Temperatur/Luftfeuchte in Betrieb, anschließend den
Regen- und Windsensor. Erst danach dürfen Batterien in die Wetterstation eingelegt werden.
Nur so ist eine einwandfreie Funktion der Geräte gewährleistet.
Bei der Erstinstallation benötigen Sie für die Wetterstation die Höhenlage Ihres Wohnorts. Aus dieser
wird später der Korrekturwert für den Luftdruck errechnet. Die Höhenlage Ihres Wohnorts (es ist nur
ein ungefährer Wert erforderlich) erfahren Sie z.B. auf Landkarten oder auf der Webseite Ihrer Stand/
Gemeinde.
Bevor Sie Regen- und Windsensor fest montieren, empfehlen wir Ihnen einen Funktionstest aller
Geräte.
Die Funkreichweite von 30m (Regensensor und Windsensor) sowie 100m (Außensensor für Temperatur/Luftfeuchte) ist die sog. "Freifeld-Reichweite", also die maximale Reichweite bei direkter Sichtverbindung zwischen Sender (Sensoren) und Empfänger (Wetterstation).
Diese Idealkonfiguration ist aber natürlich praxisfremd, da sich zwischen Sensoren und Wetterstation
Möbel, Wände, Fenster oder Pflanzen befinden.
Ein weiterer Störeinfluss, der die Reichweite stark verringert, ist die Nähe zu Metallteilen, elektrischen/
elektronischen Geräten oder Kabeln. Problematisch sind auch Stahlbeton-Decken, metallbedampfte
Isolierglasfenster oder andere Geräte auf der gleichen Sendefrequenz.
Legen Sie die Geräte für den Funktionstest nicht direkt nebeneinander, halten Sie einen Abstand von
mindestens 50cm ein; da sich sonst die Sender gegenseitig beeinflussen könnten.
a) Temperatur-/Luftfeuchtesensor
• Öffnen Sie das Batteriefach auf der Rückseite, indem Sie vorher die vier Schrauben (26) des Batteriefachdeckels
(25) herausdrehen. Sollte die Gummidichtung am Batteriefachdeckel hängen bleiben, so setzen Sie sie wieder in
den zugehörigen Schlitz ein.
• Mit dem Schiebeschalter (29) können Sie den Übertragungskanal einstellen, wenn Sie mehr als einen Temperatur-
/Luftfeuchtesensor betreiben.
Wird nur ein einziger Temperatur-/Luftfeuchtesensor betrieben (einer ist im Lieferumfang enthalten), so
stellen Sie unbedingt Kanal 1 ein (wird für die Aufzeichnungsfunktion benötigt)!
• Legen Sie zwei Batterien vom Typ AA/Mignon polungsrichtig in das Batteriefach (30) ein (Plus/+ und Minus/-
beachten). Im Display erscheinen kurz alle Displaysegmente, anschließend der erste Messwert für die Temperatur
und Luftfeuchte.
Wenn keine Anzeige erscheint, prüfen Sie, ob die Batterien voll sind bzw. richtig eingelegt wurden.
Drücken Sie ggf. kurz die versenkt angeordnete Reset-Taste mit einer aufgebogenen Büroklammer
(keine Gewalt beim Drücken anwenden) oder entnehmen Sie beide Batterien und legen Sie sie erneut
ein.
• Setzen Sie den Batteriefachdeckel (25) richtig auf und schrauben Sie ihn fest.
• Der Anbringungsort des Temperatur-/Luftfeuchtesensors sollte so gewählt werden, dass er an einem vor
Niederschlag geschützten Ort liegt (z.B. unter einem Dachvorsprung), da der Sensor sonst nicht mehr die
Lufttemperatur messen würde.
Der Sensor darf auch nicht direkter Sonneneinstrahlung ausgesetzt werden (Messwertverfälschung durch
Sonneneinwirkung).
Mittels der Öffnung für die Wandmontage (28) kann der Temperatur-/Luftfeuchtesensor z.B. an einer Schraube
aufgehängt werden.
Page 20
17
b) Windsensor
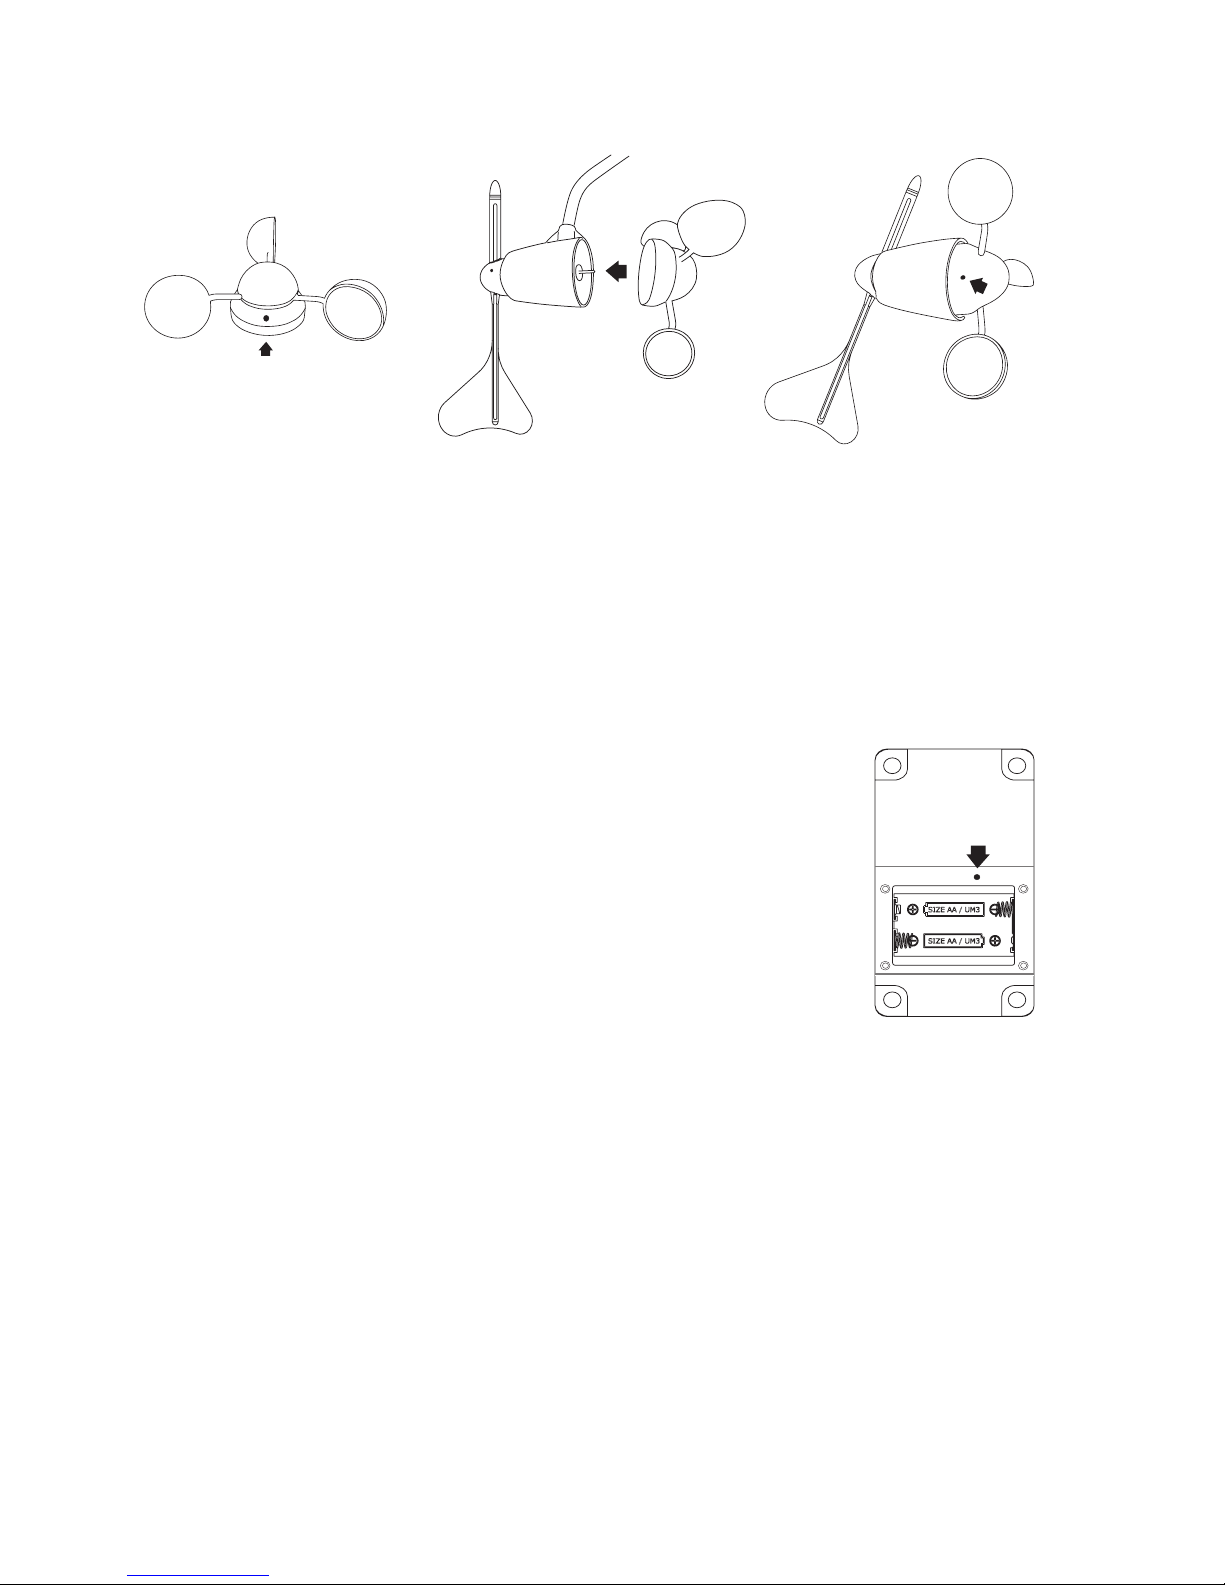
• Lösen Sie die Innensechskantschraube im Schalenkreuz (siehe "A"), drehen Sie sie ein paar Umdrehungen
entgegen dem Uhrzeigersinn.
• Stecken Sie das Schalenkreuz auf die Metallachse auf (siehe "B").
Achten Sie dabei darauf, dass die 3 halbkugelförmigen Elemente nicht beschädigt oder gar abgebrochen werden - Verlust von Garantie/Gewährleistung!
• Sichern Sie das Schalenkreuz an der Achse, indem die kleine Innensechskantschraube am Schalenkreuz
festgedreht wird (siehe "C").
• Entfernen Sie den Batteriefachdeckel (35), indem dessen 4 Schrauben (34) entfernt werden.
• Legen Sie zwei Batterien vom Typ AA/Mignon polungsrichtig in das Batteriefach (38) ein (Plus/+ und Minus/beachten).
Damit die Hauptstation die korrekte Windrichtung anzeigen kann, die die Windfahne (31) misst, muss die Windfahnenspitze genau nach Norden ausgerichtet
werden Anschließend ist die Taste (37) zu drücken, die oben im Batteriefach des
Windsensors zu sehen ist (siehe Pfeil im Bild rechts).
Diese Ausrichtung muss bei jedem Batteriewechsel am Windsensor erneut
vorgenommen werden.
• Setzen Sie den Batteriefachdeckel (35) richtig auf und schrauben Sie ihn fest.
• Der Anbringungsort des Windsensors sollte so gewählt werden, dass er nicht zu nahe an Wänden oder Gebäuden
liegt, da es sonst zu Fehlmessungen kommt. Der Wind in der Nähe von Gebäuden ist in der Regel schneller als
auf einer freien Fläche, außerdem stimmt natürlich die Windrichtung nicht.
Wir empfehlen Ihnen, einen Mindestabstand von 3-5m zu Gebäuden oder Bäumen einzuhalten.
Mittels 4 Befestigungslöchern (36) kann der Windsensor z.B. an einer senkrechten Wand festgeschraubt werden.
Mittels einer geeigneten Halterung wäre auch die Montage an einem Mast möglich (abgerundete Gehäuserückseite).
A
B
C
SET
Page 21

18
c) Regensensor
• Nehmen Sie den oberen Auffangbehälter (43) ab, indem Sie zuerst die beiden seitlichen Drehknöpfe (40)
entriegeln. Diese sind etwa 45° nach links gegen den Uhrzeigersinn zu drehen. Wenden Sie keine Gewalt an!
Anschließend kann der Auffangbehälter (43) nach oben herausgezogen werden. Merken Sie sich die richtige
Orientierung.
• Auf der Seite mit dem kleineren senkrechten Gehäuseteil liegt das Batteriefach (44, halbrunde Batterieform auf
der Rückseite). Der Batteriefachdeckel ist mit 7 kleinen Schrauben gesichert, drehen Sie diese heraus.
• Legen Sie zwei Batterien vom Typ AA/Mignon polungsrichtig in das Batteriefach (44) ein (Plus/+ und Minus/beachten).
• Setzen Sie den Batteriefachdeckel richtig auf und schrauben Sie ihn fest.
• Wenn Sie in das Unterteil hineinsehen, so finden Sie dort eine kleine eingebaute Wasserwaage (39), die später
für die richtige waagrechte Montage dient.
• Stecken Sie den Auffangbehälter in das Unterteil ein. Achten Sie dabei auf die richtige Orientierung, nur eine ist
möglich!
• Verriegeln Sie die beiden seitlichen Drehknöpfe (40), indem diese wieder um 45° nach rechts im Uhrzeigersinn
gedreht werden. Wenden Sie keine Gewalt an!
• Der Anbringungsort des Regensensors sollte so gewählt werden, dass er direkt dem Niederschlag ausgesetzt ist,
z.B. auf einem Carport o.ä.
Schützen Sie ihn vor Laub o.ä., da dies die Ablauföffnung im Auffangbehälter verstopft. Aus diesem Grund sollte
die Ablauföffnung auch gelegentlich kontrolliert werden.
Mittels vier Standfüßen (42) kann der Regensensor befestigt werden.
d) Wetterstation
Nehmen Sie zuerst alle Sensoren in Betrieb, falls noch nicht geschehen.
• Öffnen Sie den Batteriefachdeckel (14) auf der Rückseite der Wetterstation und legen Sie vier Batterien vom Typ
AA/Mignon polungsrichtig in das Batteriefach ein (Plus/+ und Minus/- beachten).
Für die Nutzung der automatischen Hintergrundbeleuchtung bei Dunkelheit ist die Verwendung des
mitgelieferten Steckernetzteils erforderlich.
Verbinden Sie den runden Niederspannungsstecker mit der entsprechenden Buchse (20) der Wetterstation, stecken Sie das Steckernetzteil in eine Netzsteckdose (230V~/50Hz).
Bei Verwendung des Steckernetzteils dienen die Batterien als Stützbatterien bei Stromausfall.
• Im Display erscheinen nach Einlegen der Batterien kurz alle Displaysegmente, danach blinkt im Display oben links
das Empfangssymbol für das DCF-Signal und die Wettersymbole der verschiedenen Anzeigebereiche, im Display
steht "SUCHE SIG." = Suche nach Signal.
Die Displaysprache kann später von der Grundeinstellung (Deutsch) auf andere Sprachen umgeschaltet werden, siehe Kapitel 11. a).
• Anschließend blinkt das Funkturm-Symbol für den DCF-Empfang links oben im Display.
Empfang Sehr gut Gut Schlecht Kein Empfang
Symbol
• Setzen Sie den Batteriefachdeckel wieder auf.
Page 22
19
Die Erkennung des DCF-Signals und dessen Auswertung kann einige Minuten dauern.
Stellen Sie die Wetterstation nicht neben elektrische/elektronische Geräte und nicht in die Nähe von
Kabeln, Steckdosen oder Metallteilen.
Ein schlechter Empfang ist auch zu erwarten z.B. bei metallbedampften Isolierglasfenstern, Stahlbeton-
bauweise, beschichteten Spezialtapeten oder in Kellerräumen.
Beachten Sie für weitere Informationen zum DCF-Empfang das Kapitel 10.
• Im unteren Display im linken Bereich blinkt jetzt die Anzeige für die Einheiten der Luftdruckmessung.
• Wählen Sie die Einheiten der Luftdruckmessung ("mmHg", "hPa/mBar" oder "InHg") mit den Tasten "T" (16) bzw.
"S" (18) auf der Rückseite der Wetterstation aus und drücken Sie kurz die Taste "SET" (7) auf der Rückseite zum
Speichern. In der Regel sollten Sie "hPa/mBar" wählen (Hektopascal/Millibar).
• Anschließend blinkt die Anzeige für die Einheiten der Höhenlage ("meter" bzw. "feet"). Wählen Sie die gewünschte
Einheit mit den Tasten "T" (16) bzw. "S" (18) auf der Rückseite der Wetterstation und drücken Sie kurz die Taste
"SET" (7) zum Speichern.
• Nun blinkt der Wert für die Höhenlage. Stellen Sie hier mit den Tasten "T" (16) bzw. "S" (18) auf der Rückseite
der Wetterstation die ungefähre Höhenlage Ihres Wohnorts ein. Halten Sie die jeweilige Taste für eine Schnellverstellung länger gedrückt.
Speichern Sie den Wert, drücken Sie kurz die Taste "SET" (7) auf der Rückseite.
• Die Wetterstation misst nun den Luftdruck und zeigt diesen im Display an (z.B. "1016.4 hPa/mBar").
• Im unteren Display blinkt rechts das Empfangssymbol für die Außensensoren.
• Wenn im oberen Display "LAND EINST." (Land einstellen) erscheint, stellen Sie Ihr Heimatland mit den Tasten
"a" (1) und "b" (2) an der rechten Seite der Wetterstation ein (z.B. "D/GER" für Deutschland) und bestätigen die
Einstellung mit kurzem Druck auf die seitliche Taste "SET" (3).
Darauf zeigt das Display "STADT EINST." (Stadt einstellen) an. Mit den Tasten "a" (1) und "b" (2) an der rechten
Seite können Sie eine Stadt auswählen, die in der Nähe Ihres Wohnorts liegt.
Bestätigen Sie die Einstellung mit kurzem Druck auf die Taste "TEST" (8), dann wird die Stadt gespeichert und es
erscheint ein kleines Häkchen über dem Städtenamen:
Insgesamt 5 verschiedene Städte sind auswählbar, diese Einstellung ist selbstverständlich auch
später durchführbar. Ebenso ist es möglich, eine für die Anzeige bereits ausgewählte Stadt zu löschen
und eine andere zu speichern, siehe Kapitel 11. d) und 11. e).
Falls Sie das Land und die Stadt nicht wie oben beschrieben einstellen, so wird von der Wetterstation
als Land automatisch "Deutschland" und als Stadt "Frankfurt am Main" ausgewählt.
• Mit den Tasten "a" (1) und "b" (2) an der rechten Seite können Sie weitere Städte auswählen und mit der Taste
"TEST" (8) speichern.
• Drücken Sie die Taste "SET" (3) an der rechten Seite der Wetterstation, so werden die Einstellungen gespeichert,
im Display erscheint "EINST. VORG." (= Einstellungen vorgenommen).
Die Grundeinstellungen bzw. die Erstinbetriebnahme ist damit beendet. Stellen Sie nun z.B. die
Display-Sprache wie in Kapitel 11. a) beschrieben ein.
Page 23

20
Mit kurzem Druck auf die Taste "SET" (3) an der rechten Seite sollte sich jetzt umschalten lassen
zwischen der Stadt, die Sie ausgewählt haben, der Anzeige der Sonnenaufgangs-/Sonnenuntergangszeit
für diese Stadt und der Anzeige von Uhrzeit und Datum.
Mit der Taste "CHANNEL" (4) an der rechten Seite kann der Kanal für den Temperatur-/Luftfeuchtesensor ausgewählt werden, je nachdem, welchen Sie eingestellt haben (wenn nur ein Temperatur-/
Luftfeuchte-Sensor vorhanden ist, muss dieser auf Kanal 1 eingestellt sein!).
Eine erneute Suche nach den Außensensoren kann gestartet werden, indem Sie die Taste "T" (16)
auf der Rückseite ca. 3 Sekunden drücken, bis das Empfangssymbol für die Außensensoren zu blinken
beginnt. Der Empfangsversuch dauert ca. 2 Minuten, drücken Sie in dieser Zeit keine Taste, bewegen
Sie die Wetterstation und die Sensoren nicht.
Alle Einstellungen, z.B. das Land und die Stadt für die METEOTIME-Wetteranzeige, die Einheitenauswahl für den Luftdruck, die Höhenlage usw. können selbstverständlich auch nachträglich eingestellt
bzw. verändert werden. Sie brauchen also nicht die gesamte Einstellung wiederholen.
• Mit dem Standfuß auf der Rückseite der Wetterstation kann diese an einer geeigneten Stelle aufgestellt werden.
Für eine Wandmontage (Öffnung an der Rückseite der Wetterstation) kann der Standfuß einfach nach unten
abgezogen werden.
Wählen Sie als Aufstell- bzw. Montageort eine Stelle, die nicht direktem Sonnenlicht ausgesetzt ist
(Messwertverfälschung der Temperatur-/Luftfeuchtemessung). Halten Sie auch ausreichend Abstand zu Heizkörpern ein.
Um einen guten Funkempfang zu bekommen, sollte die Wetterstation so weit weg wie möglich von elektrischen/
elektronischen Geräten, Metallteilen, Kabeln o.ä. aufgestellt werden.
Schützen Sie wertvolle Möbeloberflächen mit einer geeigneten Unterlage, sonst sind Kratzspuren möglich.
Page 24

21
10. DCF- und METEOTIME-Empfang
Die Wetterstation ist in der Lage, das sog. DCF-Signal zu empfangen und
auszuwerten.
Dabei handelt es sich um ein Funksignal, das von einem Sender in
Mainflingen (nahe Frankfurt am Main) stammt. Dessen Reichweite beträgt bis zu 1500km, bei idealen Empfangsbedingungen sogar bis zu
2000km.
Das DCF-Signal enthält die genaue Uhrzeit (Abweichung theoretisch 1
Sekunde in einer Million Jahre!) und das Datum.
Selbstverständlich entfällt auch das umständliche manuelle Einstellen
der Sommer- und Winterzeit.
Die DCF-Uhrzeit wird jeden Tag automatisch um 2, 3, 4, 6, 10, 14 und 18
Uhr synchronisiert.
Die Wetterstation erkennt weiterhin das zum DCF-Signal kompatible Signal des Zeitzeichensenders "HBG" in der
Schweiz.
Als Besonderheit wertet die Wetterstation das sog. "METEOTIME"-Signal aus, das im DCF-/HBG-Signal
enthalten ist.
Das "METEOTIME"-Signal enthält die Daten der Wettervorhersage für 90 verschiedene Regionen
Europas.
Für 60 Regionen werden Daten für den aktuellen Tag und die folgenden drei Tage übertragen, für 30
Regionen Daten für den aktuellen Tag und den folgenden Tag.
Die METEOTIME-Daten werden im DCF-Signal mitgesendet.
Die Übertragung der Daten für die Wettervorhersage über das Funksignal des DCF- bzw. HBG-Senders ist
aufgrund der verwendeten Technik relativ langsam, deshalb dauert es bis zu 24 Stunden, bis die Wetterstation alle Wetterdaten empfangen hat.
Das Symbol " " im jeweiligen Anzeigebereich bedeutet, dass die "METEOTIME"-Daten empfangen wurden, das
Symbol " " steht für noch fehlende Daten.
Die richtige Wahl des Aufstellungsorts ist für den Empfang der Funkdaten entscheidend, da der
Empfang der Wetterdaten rund um die Uhr stattfindet.
Stellen Sie die Wetterstation nicht neben elektrische/elektronische Geräte und nicht in die Nähe von
Kabeln, Steckdosen oder Metallteilen. Halten Sie ausreichend Abstand, mindestens 1 Meter!
Ein schlechter Empfang ist auch zu erwarten z.B. bei metallbedampften Isolierglasfenstern, Stahlbetonbauweise, beschichteten Spezialtapeten oder in Kellerräumen.
Für die 30 Regionen, in denen nur die Wetterdaten von heute und morgen übertragen werden, werden bei den
beiden darauf folgenden Tagen im Anzeigebereich für die Tagestemperatur nur zwei Striche "--" angezeigt.
Sie können nach der Inbetriebnahme (Kapitel 9) über die Taste "TEST" einen Empfangstest für das
"METEOTIME"-Signal starten, siehe Kapitel 11. b).
Übertragungszeiten/Informationen des "METEOTIME"-Signals:
22.00 Uhr - 03.59 Uhr: Vorhersage für den aktuellen Tag
04.00 Uhr - 09.59 Uhr: Vorhersage für den nächsten Tag
10.00 Uhr - 15.59 Uhr: Vorhersage für den übernächsten Tag
16.00 Uhr - 18.59 Uhr: Vorhersage für den letzten (dritten)Tag
1500 km
2000 km
Page 25
22
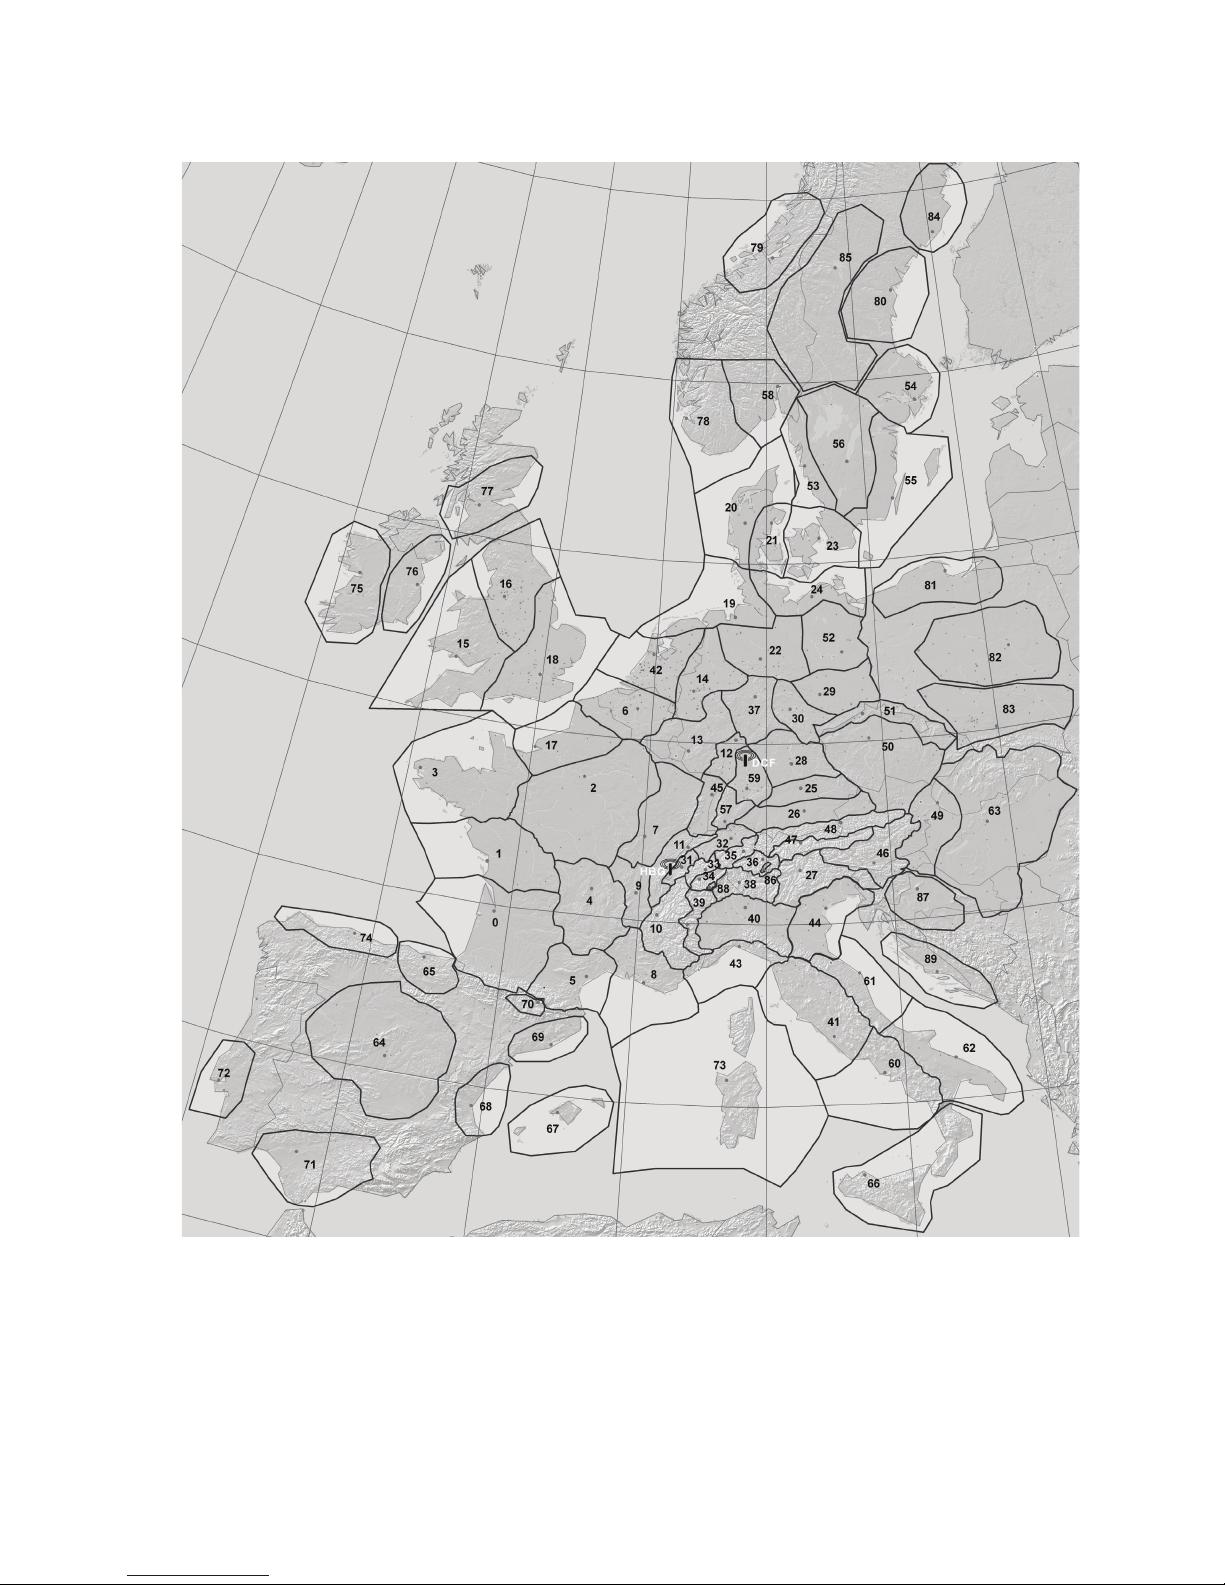
Position der 90 Wetterbereiche (Ausschnittsvergrößerung von Mitteleuropa siehe nächste Seite):
Page 26
23
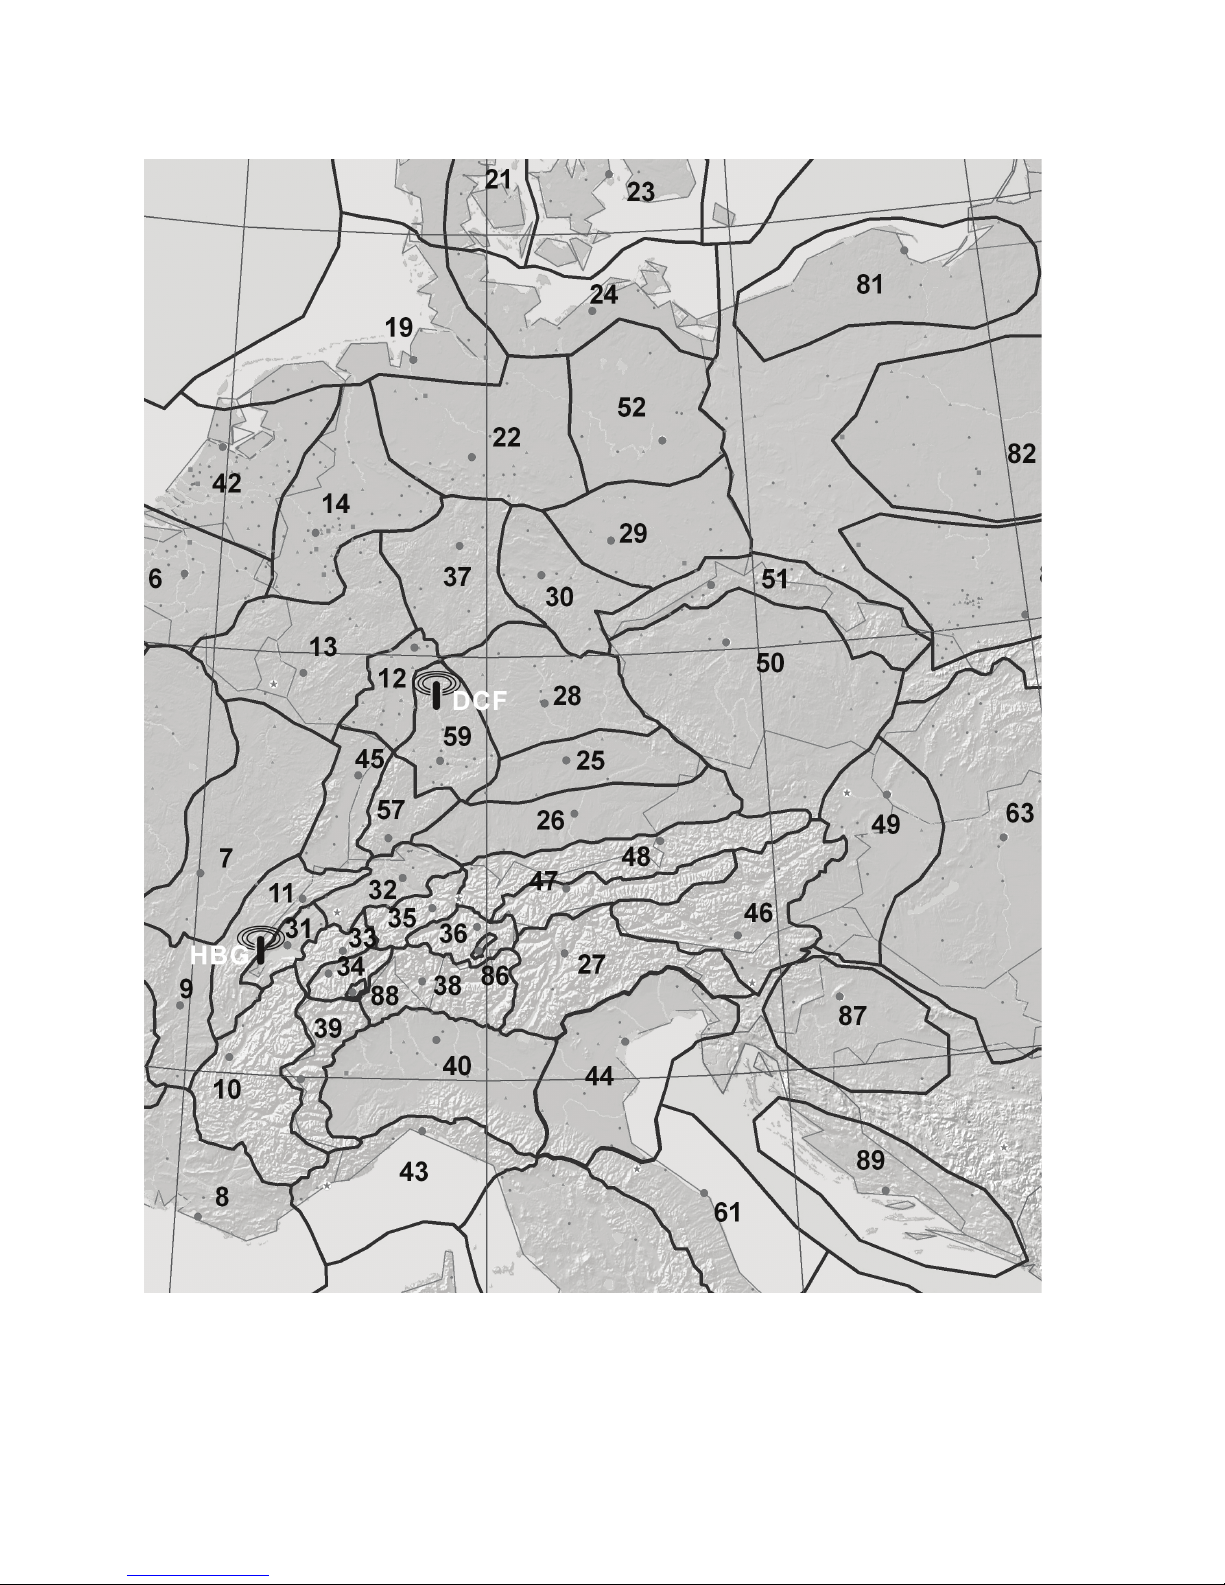
Ausschnittvergrößerung der Wetterbereiche in Mitteleuropa:
Page 27

24
11. Bedienung der METEOTIME-Funktionen
a) Zeitzone, Sprache und Kontrast einstellen
• Halten Sie die Taste "SET" (3) an der rechten Seite so lange gedrückt (ca. 3 Sekunden), bis im oberen Display
"LAND EINST." (Land einstellen) erscheint.
• Drücken Sie kurz die Taste "SET" (3) an der rechten Seite, im Display unten erscheint "ZONE +00HR".
• Mit den Tasten "a" (1) und "b" (2) an der rechten Seite kann die gewünschte Zeitzone eingestellt werden
(Einstellbereich +12h.....-11h).
• Drücken Sie kurz die Taste "SET" (3), im Display unten erscheint die momentan eingestellte Sprache für die
Textanzeigen im Display.
• Wählen Sie die gewünschte Sprache mit den Tasten "a" (1) und "b" (2) aus.
DEUTSCH = Deutsch
DUTCH = Niederländisch
ENGLISH = Englisch
ESPANOL = Spanisch
FRANCAIS = Französisch
ITALIANO = Italienisch
SWEDISH = Schwedisch
• Drücken Sie kurz die Taste "SET" (3), im Display erscheint der aktuell eingestellte Kontrastwert.
• Wählen Sie den Kontrastwert für das LC-Display mit den Tasten "a" (1) und "b" (2) aus (Einstellwerte 0....9).
• Drücken Sie kurz die Taste "SET" (3) an der rechten Seite der Wetterstation, so werden die Einstellungen
gespeichert, im Display erscheint "EINST. VORG." (= Einstellungen vorgenommen), der Einstellmodus wird
beendet.
b) Empfangstest für das "METEOTIME"-Signal
Da in jedem DCF-Signal pro Sekunde einige Informationen für das Wetter enthalten sind (das sog. "METEOTIME"Signal), ist ein Empfangstest im Gegensatz zu herkömmlichen DCF-Uhren sehr leicht möglich.
Drücken Sie kurz die Taste "TEST" (8) auf der Rückseite.
Im Display wird "EMPF. TEST" (Empfangstest) angezeigt. Anschließend dient das "METEOTIME"-Empfangs-
symbol links der Städteanzeige zur Kontrolle des Empfangs des DCF-/METEOTIME-Signals:
= einwandfreier Empfang
= kein Empfang
Verändern Sie ggf. den Aufstellungsort der Wetterstation, bis " " angezeigt wird.
Nach einer Minute wird der Empfangstest automatisch beendet (oder vorher Taste "TEST" nochmals drücken).
Selbstverständlich können Sie den Empfangstest erneut starten, gehen Sie wie oben beschrieben vor.
c) Umschalten der Anzeige für Zeit/Datum, Städteliste und Sonnenaufgangs-/
Sonnenuntergangszeit
Durch kurzen Druck auf die Taste "SET" (3) an der rechten Seite der Wetterstation können Sie umschalten zwischen
der Auswahlliste für die gespeicherten Städte, der Sonnenaufgangs- und Sonnenuntergangszeit sowie der Anzeige
von Uhrzeit und Datum.
Page 28

25
d) Land/Stadt für Wetteranzeige auswählen
Sie können bis zu 5 Städte auswählen, deren Wettervorhersage sich später mit den Tasten "a" (1) und "b" (2)
anzeigen lässt.
Im Kapitel 21 finden Sie eine Auflistung aller verfügbaren Städte.
Gehen Sie zur Auswahl wie folgt vor:
• Halten Sie die Taste "SET" (3) so lange gedrückt (ca. 3 Sekunden), bis im Display "LAND EINST." (Land einstellen)
erscheint.
• Wählen Sie das Land mit den Tasten "a" (1) und "b" (2) aus (z.B. "D/GER" für Deutschland) und bestätigen die
Auswahl mit kurzem Druck auf die Taste "SET" (3).
Darauf zeigt das Display "STADT EINST." (Stadt einstellen) an.
• Mit den Tasten "a" (1) und "b" (2) lässt sich eine Stadt auswählen.
• Bestätigen Sie die Einstellung mit kurzem Druck auf die Taste "TEST" (8). Über dem Namen der Stadt erscheint
ein kleines Häkchen.
Drücken Sie die Taste "TEST" (8) nochmals, um die Stadt aus der Liste zu löschen, das Häkchen verschwindet
wieder.
Erscheint "SPEICHER_V" (Speicher voll), so sind alle 5 Speicher belegt.
Es können insgesamt 5 Städte gespeichert werden, um deren Wetterdaten anzuzeigen. Um eine
andere Stadt zu speichern, ist vorher eine vorhandene Stadt aus der Anzeigeliste zu löschen, siehe
nächstes Kapitel.
• Durch Drücken der Taste "SET" (3) an der rechten Seite der Wetterstation wird der Einstellmodus verlassen.
e) Stadt aus der Anzeigeliste löschen
Wie im Kapitel 11. d) beschrieben, können insgesamt bis zu 5 Städte unterschiedlicher Länder gespeichert werden,
deren Wettervorhersage sich mit den Tasten "a" (1) und "b" (2) anzeigen lässt.
Um eine Stadt aus der Anzeigeliste zu löschen, gehen Sie wie folgt vor:
• Wählen Sie mit den Tasten "a" (1) und "b" (2) die Stadt aus der Anzeigeliste, die Sie löschen wollen.
• Halten Sie die Taste "SET" (3) an der rechten Seite der Wetterstation so lange gedrückt (ca. 3 Sekunden), bis im
Display "LAND EINST." (Land einstellen) erscheint.
• Drücken Sie einmal kurz die Taste "a" (1). Daraufhin wird das Land, in dem die zum Löschen ausgewählte Stadt
liegt, angezeigt.
• Drücken Sie kurz die Taste "SET" (3).
• Das Display zeigt "STADT EINST." (Stadt einstellen) an.
• Drücken Sie einmal kurz die Taste "a" (1). Nun wird die Stadt angezeigt (beachten Sie das kleine HäkchenSymbol "√" über der Stadt).
• Drücken Sie kurz die Taste "TEST" (8). Das Häkchen-Symbol "√" verschwindet, die Stadt ist aus der Anzeigeliste
gelöscht.
• Durch Drücken der Taste "SET" (3) wird der Löschmodus verlassen.
Page 29

26
f) Wohnort eingeben
Mit dieser Funktion können Sie den Namen Ihres Wohnorts eingeben.
Gehen Sie dazu wie folgt vor:
• Halten Sie die Taste "SET" (3) auf der rechten Seite so lange gedrückt (ca. 3 Sekunden), bis im Display die Anzeige
"LAND EINST." (Land einstellen) erscheint.
• Wählen Sie das Land mit den Tasten "a" (1) und "b" (2) aus (z.B. "D/GER" für Deutschland) und bestätigen die
Auswahl mit kurzem Druck auf die Taste "SET" (3).
Darauf zeigt das Display "STADT EINST." (Stadt einstellen) an.
• Mit den Tasten "a" (1) und "b" (2) lässt sich jetzt eine Stadt auswählen, die in der Nähe Ihres Wohnorts liegen
muss, damit auch die richtigen Wettervorhersage-Daten angezeigt werden.
• Drücken Sie kurz die Taste "MEM" (9). Daraufhin verschwindet der vorher angezeigte Stadtname und an der ersten
Stelle der Zeile erscheint ein blinkender Strich "_" für das Eingabefeld.
Folgende Tasten werden zur Eingabe verwendet (jeweils kurz drücken):
- Tasten "a" (1) und "b" (2): Buchstabe/Zeichen auswählen
- Taste "SET" (3): Buchstabe/Zeichen speichern und zur nächsten Stelle springen
- Taste "TEST" (8): Eine Stelle zurückspringen (Korrektur)
• Die Eingabe wird automatisch beendet, wenn Sie die den letzten Buchstaben am rechten Ende der Eingabezeile
mit kurzem Druck auf die Taste "SET" (3) speichern.
Alternativ wird die Eingabe vorher beendet, wenn an einer Eingabeposition kein Zeichen ausgewählt wird (nur der
Strich "_" blinkt) und dann die Taste "SET" (3) gedrückt wird.
g) Wetterinformation umschalten für Tag/Nacht
Die Wetterstation schaltet die Anzeige für die Wetterinformationen für Tag und Nacht abhängig von der Sonnenaufgangs- bzw. Sonnenuntergangszeit automatisch um. Dazu erscheint im Display neben der Anzeige des Wochentags
ein kleines "DAY" (Tag) bzw. "NIGHT" (Nacht).
Sie können die jeweils andere Anzeige durch kurzen Druck auf die Taste "DAY/NIGHT" (5) für 10 Sekunden
anzeigen lassen.
h) Unwetter-Meldungen
Das "METEOTIME"-Signal beinhaltet zusätzlich Informationen zu besonderen Wetterzuständen (z.B. starke
Windböen, gefrorener Regen, starker Schneefall, Gewitter, dichter Nebel, Föhn usw.).
Im Display erscheint ein Symbol "", wenn solche Daten empfangen wurden.
Durch ggf. mehrfachen kurzen Druck auf die Taste "DAY/NIGHT" können diese Meldungen im Display als
Textmeldung angezeigt werden.
Falls mehrere Meldungen existieren, blinkt das jeweils zum entsprechenden Tag gehörige Symbol, dessen Meldung
angezeigt wird.
Die Wetterstation zeigt die aktuelle Meldung außerdem automatisch im Wechsel mit der normalen Anzeige im
Display an.
Page 30
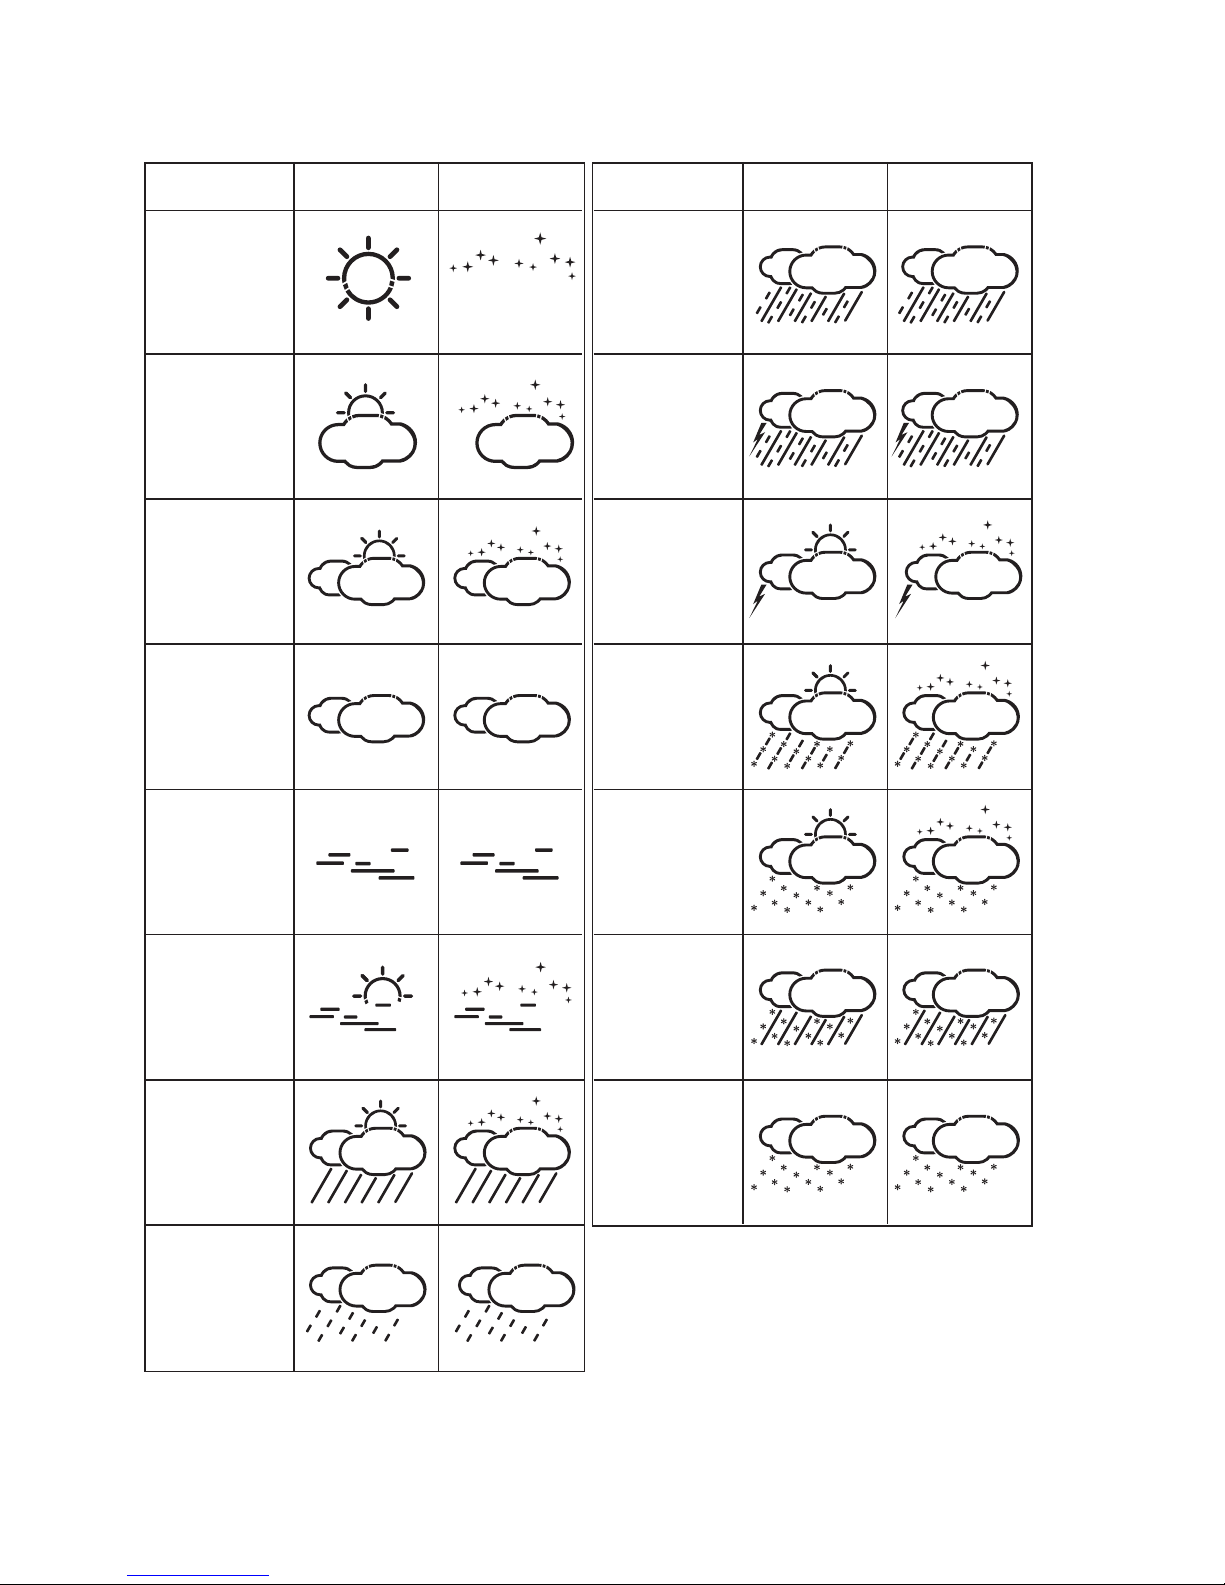
27
i) Beschreibung der Wettersymbole
Bedeutung Tag Nacht Bedeutung Tag Nacht
Sonnig
(sternenklare
Nacht)
Leicht bewölkt
Stark bewölkt
Bedeckt
Hochnebel
Nebel
Regenschauer
Leichter Regen
Starker Regen
Frontengewitter
Wärmegewitter
Graupelschauer,
Schneeregenschauer
Schneeschauer
Schneeregen
Schneefall
Page 31

28
12. Bedienung der Innen-/Außensensoren
a) Nach Sensoren suchen
Wenn in einem Anzeigefeld nur Striche erscheinen (z.B. für den Regensensor "- - - . -"), so können Sie eine manuelle
Suche nach allen Außensensoren starten.
Halten Sie die Taste "T" (16) auf der Rückseite so lange gedrückt, bis oben im Display das Symbol für den
Funkempfang der Außensensoren blinkt.
Die Sensorsuche kann einige Minuten dauern.
Falls einer der Sensoren nicht gefunden wird, so kontrollieren Sie dessen Batterien; stellen Sie den Sensor an einer
anderen Stelle auf, verringern Sie den Abstand zwischen Wetterstation und Sensor.
b) Hintergrundbeleuchtung
Bei Verwendung des mitgelieferten Steckernetzteils kann die Hintergrundbeleuchtung dauerhaft aktiviert werden
(bzw. sie schaltet sich selbst bei Dunkelheit ein und am Tag aus).
Bei Batteriebetrieb ist nur ein kurzes Aktivieren der Hintergrundbeleuchtung möglich, um Strom zu
sparen und die Batterien zu schonen.
Mit dem Schalter "LIGHT SENSOR" (11) kann die gewünschte Funktion ausgewählt werden:
ON Die Hintergrundbeleuchtung ist immer eingeschaltet (nur wenn das mitgelieferte Steckernetzteil
verwendet wird).
OFF Die Hintergrundbeleuchtung ist ausgeschaltet, sie wird nur für ein paar Sekunden aktiviert, wenn die
Taste "LIGHT" kurz gedrückt wird.
AUTO Die Hintergrundbeleuchtung wird bei Dunkelheit eingeschaltet und am Tag ausgeschaltet.
Die Empfindlichkeit für die Helligkeitserkennung (und damit für das automatische Ein-/Ausschalten der Hintergrundbeleuchtung) wird mit dem Schalter "SENSITIVITY" (12) ausgewählt, zwei Stellungen ("HIGH" und "LOW") sind
möglich.
Page 32

29
c) Funktion auswählen
Wenn sich die Wetterstation im Normalbetrieb befindet (also nicht z.B. während einer Sensorsuche o.ä.), so können
Sie die einzelnen Funktionen durch kurzes Drücken der Taste "T" (16) bzw. "S" (18) auf der Rückseite auswählen.
Die jeweils ausgewählte Funktion blinkt im unteren Display kurz auf. Bei jeder Funktion sind weitere Einstellungen
und Anzeigen möglich, die im nächsten Kapitel erklärt werden. Unten in der Displayabbildung sehen Sie die Lage
der Symbole und der jeweiligen Anzeigebereiche des Displays.
A Aktueller Luftdruck, Luftdruck bei Meereshöhe, Luftdruckwerte der vergangenen 24 Stunden, Balkendiagramm
für Luftdruckverlauf, Temperatur- und Luftfeuchteverlauf am Außensensor Kanal 1, Mondphase der letzten/
nächsten 39 Tage
B Windrichtungsanzeige, Windgeschwindigkeit, Windchill-Temperatur
C Innen-/Außentemperatur, Innen-/Außenluftfeuchte, Tendenzanzeige, Minimum-/Maximum-Wert, °C/°F-Um-
schaltung
D Regen-Messdaten, Wertespeicher, Mess-Einheit umschalten
A
B
C
D
Page 33

30
13. Beschreibung der Funktionen
a) Anzeigefeld "PRESSURE"
Drücken Sie so oft kurz die Taste "T" (16) bzw. "S" (18) auf der Rückseite, bis im Display
"PRESSURE" blinkt (siehe Pfeil im Bild unten).
Folgende Einstellmöglichkeiten und Anzeigen gibt es jetzt:
Anzeige umschalten
Mit kurzem Druck auf die Taste "SET" (7) auf der Rückseite können Sie umschalten zwischen:
• Anzeige des Luftdrucks auf Meereshöhe (im Display "SEA LEVEL")
• Anzeige des Luftdrucks auf der von Ihnen eingestellten Höhenlage ("LOCAL")
• Anzeige der Höhenlage
Luftdruck auf Meereshöhe einstellen/korrigieren
Wenn der Luftdruck auf Meereshöhe angezeigt wird (im Display "SEA LEVEL"), so können Sie diesen korrigieren,
z.B. wenn der aktuelle Luftdruck an Ihrem Wohnort bekannt ist (aus Radio, TV oder Internet).
• Drücken Sie so oft kurz die Taste "SET" (7) auf der Rückseite, bis der Luftdruck auf Meereshöhe angezeigt wird
(zusätzlich zum Luftdruckwert erscheint die Anzeige "SEA LEVEL").
• Halten Sie die Taste "SET" (7) auf der Rückseite so lange gedrückt, bis der Luftdruckwert zu blinken beginnt.
• Mit der Taste "T" (16) bzw. "S" (18) auf der Rückseite kann der Wert korrigiert werden.
• Drücken Sie kurz die Taste "SET" (7) auf der Rückseite, um die Einstellung zu speichern.
Einheiten für den Luftdruck wählen ("mmHg", "hPa/mBar" oder "InHg")
Wenn der Luftdruck auf Meereshöhe angezeigt wird (im Display "SEA LEVEL"), so können Sie die Einheiten für die
Anzeige auswählen.
• Drücken Sie so oft kurz die Taste "SET" (7) auf der Rückseite, bis der Luftdruck auf Meereshöhe angezeigt wird
(zusätzlich zum Luftdruckwert erscheint die Anzeige "SEA LEVEL").
• Halten Sie die Taste "MEMORY" (17) so lange gedrückt, bis die aktuellen Einheiten (z.B. "hPa/mBar") zu blinken
beginnen.
• Mit der Taste "T" (16) bzw. "S" (18) kann die Einheit des Luftdruckwerts (mmHg, hPa/mBar, InHg) ausgewählt
werden.
• Drücken Sie kurz die Taste "MEMORY" (17), um die Einstellung zu speichern.
¨
Page 34

31
Höhenlage einstellen/korrigieren
Wenn die Höhenlage angezeigt wird, so können Sie diese korrigieren, z.B. wenn Sie dies bei der Erstinstallation nicht
vorgenommen haben bzw. wenn Sie einen genaueren Wert für Ihren Wohnort haben.
• Drücken Sie so oft kurz die Taste "SET" (7) auf der Rückseite, bis die Höhenlage angezeigt wird.
• Halten Sie die Taste "SET" (7) so lange gedrückt, bis die Höhenlage zu blinken beginnt.
• Mit der Taste "T" (16) bzw. "S" (18) auf der Rückseite kann der Wert korrigiert werden.
• Drücken Sie kurz die Taste "SET" (7), um die Einstellung zu speichern.
Einheiten für die Höhenlage wählen ("meter" oder "feet")
Wenn die Höhenlage angezeigt wird, so können Sie die Einheiten für die Anzeige auswählen.
• Drücken Sie so oft kurz die Taste "SET" (7) auf der Rückseite, bis die Höhenlage angezeigt wird.
• Halten Sie die Taste "MEMORY" (17) so lange gedrückt, bis die aktuellen Einheiten (z.B. "meter") zu blinken
beginnen.
• Mit der Taste "T" (16) bzw. "S" (18) auf der Rückseite kann die Einheit der Höhenlage ("meter" oder "feet")
ausgewählt werden.
• Drücken Sie kurz die Taste "MEMORY" (17), um die Einstellung zu speichern.
Mondphase der letzten 39 Tage bzw. der nächsten 39 Tage ansehen
• Drücken Sie kurz die Taste "MEMORY" (17), im Anzeigefenster links neben dem Luftdruckwert erscheint
"+0 days".
• Mit der Taste "T" (16) bzw. "S" (18) auf der Rückseite können Sie nun die Mondphase der nächsten bzw. letzten
39 Tage ansehen, im Display finden Sie das entsprechende Mondsymbol (Taste "T" (16) bzw. "S" (18) länger
gedrückt halten für Schnellverstellung).
• Drücken Sie die Taste "MEMORY" (17), um den Anzeigemodus zu verlassen (oder drücken Sie für ca. 5 Sekunden
keine Taste).
Vollmond Neumond
Verlauf von Temperatur, Luftfeuchte oder Luftdruck der letzten 24 Stunden ansehen
• Halten Sie die Taste "ALARM/CHART" (10) so lange gedrückt, bis im Display rechts neben der Verlaufsanzeige
ein kleines Thermometersymbol und ein kleines Haussymbol mit "CH1" erscheint. Die Verlaufsanzeige dient jetzt
für die Anzeige des Temperaturverlaufs, der vom Temperatur-/Luftfeuchtesensor auf Kanal 1 in den letzten 24
Stunden gemessen wurden.
• Halten Sie die Taste "ALARM/CHART" (10) erneut so lange gedrückt, bis im Display rechts neben der
Verlaufsanzeige ein kleines Luftfeuchtesymbol und ein kleines Haussymbol mit "CH1" erscheint. Die Verlaufsanzeige dient jetzt für die Anzeige des Luftfeuchteverlaufs, der vom Temperatur-/Luftfeuchtesensor auf Kanal 1 in
den letzten 24 Stunden gemessen wurden.
• Wird die Taste "ALARM/CHART" (10) nochmals länger gedrückt, wechselt die Anzeige zurück auf den Luftdruckverlauf.
Nach der Erstinbetriebnahme sind noch keine Daten vorhanden.
Page 35

32
Luftdruckwerte der letzten 24 Stunden ansehen
• Drücken Sie so oft kurz die Taste "SET" (7) auf der Rückseite, bis der Luftdruck auf Meereshöhe angezeigt wird
(zusätzlich zum Luftdruckwert erscheint die Anzeige "SEA LEVEL").
• Drücken Sie mehrfach kurz die Taste "HISTORY" (19); im Display erscheint für jede der letzten 24 Stunden der
durchschnittliche Luftdruck (fehlen Werte, z.B. wegen einem Batteriewechsel oder bei Erstinbetriebnahme,
erscheinen Striche ("- - - - . -") anstatt einem Wert.
• Wenn für einige Sekunden keine Taste gedrückt wird, wechselt die Anzeige wieder zurück zum aktuellen
Luftdruckwert.
Luftdruck-Alarm aktivieren
• Drücken Sie die Taste "ALARM/CHART" (10). Im Feld der Luftdruck-Anzeige unten links erscheint "ON" bzw.
"OFF".
• Durch nochmaliges Drücken der Taste "ALARM/CHART" (10) wechselt die Anzeige von "ON" nach "OFF" bzw.
umgekehrt.
Bei aktiviertem Alarm wird ein Tonsignal ausgegeben (beenden durch Druck auf die Taste "ALARM/
CHART"), wenn der Luftdruck innerhalb kurzer Zeit mehr als 6 hPa/mBar fällt.
Page 36

33
b) Anzeigefeld für "Temperatur/Luftfeuchte"
Drücken Sie so oft kurz die Taste "T" (16) bzw. "S" (18) auf der Rückseite, bis im Display im Bereich
der Anzeige der Temperatur/Luftfeuchte das Symbol "IN" blinkt (siehe Pfeil im Bild unten).
Folgende Einstellmöglichkeiten und Anzeigen gibt es jetzt:
Anzeigeeinheit umschalten °C/°F
• Halten Sie die Taste "SET" (7) auf der Rückseite so lange gedrückt, bis die Anzeigeeinheit (°C/°F) für die Innen/Außentemperatur umgeschaltet wird.
• Lassen Sie die Taste jetzt wieder los.
Taupunkt-Anzeige
• Drücken Sie kurz die Taste "SET" (7) auf der Rückseite, im Anzeigefenster oben rechts zwischen dem Werten wird
"DEW" angezeigt (= Taupunkt) und die Temperaturanzeige wird umgeschaltet.
• Wird die Taste "SET" (7) nochmals kurz gedrückt, wird wieder die aktuelle Temperatur angezeigt.
Beim sog. Taupunkt handelt es sich um einen Temperaturpunkt, der abhängig ist vom Zusammentreffen eines bestimmten Luftdrucks, einer bestimmten Temperatur und einer bestimmten Luftfeuchte.
An diesem Temperaturpunkt beginnt die Kondensation der Luftfeuchte, die sog. Betauung, die
Luftfeuchtigkeit kondensiert aus und schlägt sich als Flüssigkeit (Nebel, Dampf) nieder.
Liegt der Taupunkt für Wasserdampf unter 0°C, so erfolgt die Kondensation als Schnee oder Reif.
Anzeige der Minimum-/Maximumwerte für Temperatur/Luftfeuchte
• Wählen Sie zuerst mit der Taste "CHANNEL" (4) den gewünschten Temperatur-/Luftfeuchtesensor.
• Drücken Sie kurz die Taste "MEMORY" (17), zwischen den Temperatur-/Luftfeuchtewerten erscheint "MIN", es
werden die Minimumwerte angezeigt.
• Drücken Sie nochmals kurz die Taste "MEMORY" (17), es erscheint "MAX" und die Maximumwerte werden
angezeigt.
• Mit nochmaligem kurzen Druck auf die Taste "MEMORY" (17) wechselt die Anzeige auf die momentanen
Messwerte.
¨
Page 37

34
Minimum-/Maximumwerte löschen
• Drücken Sie zuerst kurz die Taste "MEMORY" (17), um die Minimum- oder Maximumwerte anzuzeigen.
• Halten Sie jetzt die Taste "MEMORY" (17) etwa 3 Sekunden gedrückt. Danach sind sowohl die Minimum- als auch
die Maximumwerte gelöscht.
Bis sich wieder eine Veränderung der Werte ergibt, sind die aktuellen Messwerte der Temperatur und
Luftfeuchte als Minimal- bzw. Maximalwerte gespeichert.
Mehrere Temperatur-/Luftfeuchtesensoren umschalten
• Drücken Sie kurz die Taste "CHANNEL" (4), um den gewünschten Außensensor für Temperatur/Luftfeuchte
auszuwählen. Die zugehörige Kanalnummer wird angezeigt.
Wird nur ein Temperatur-/Luftfeuchtesensor verwendet, so sollte dieser unbedingt auf "Kanal 1"
eingestellt sein (Schalter im Batteriefach des Sensors), andernfalls funktioniert die Verlaufsanzeige
nicht (siehe Kapitel 13 a), Abschnitt "Verlauf von Temperatur, Luftfeuchte oder Luftdruck der letzten 24
Stunden ansehen").
Automatisches Umschalten bei mehreren Temperatur-/Luftfeuchtesensoren
Wenn Sie mehr als einen Temperatur-/Luftfeuchtesensor betreiben, kann die Wetterstation die bis zu 5 Kanäle auch
automatisch wechseln.
• Halten Sie die Taste "CHANNEL" (4) so lange gedrückt, bis das Symbol " " erscheint.
Dies ist nur dann möglich, wenn mehr als ein Temperatur-/Luftfeuchtesensor an der Wetterstation
angemeldet ist, andernfalls erscheint kein Symbol.
• Um das automatische Umschalten wieder zu deaktivieren, halten Sie die Taste "CHANNEL" (4) so lange gedrückt,
bis das Symbol " " verschwindet.
Temperatur-Alarm auswählen, ein-/ausschalten
Für jeden der 5 Kanäle kann eine obere und untere Temperaturgrenze eingestellt werden, bei deren Über- bzw.
Unterschreiten ein Alarmton ausgegeben wird (Beenden durch Druck auf die Taste "ALARM/CHART" (10)).
• Wählen Sie zuerst mit der Taste "CHANNEL" (4) den gewünschten Kanal für den zugehörigen Temperatur-/
Luftfeuchtesensor, für den Sie den Temperaturalarm auswählen bzw. ein-/ausschalten wollen.
• Drücken Sie mehrfach kurz die Taste "ALARM/CHART" (10), um zwischen oberer Temperaturgrenze (Symbol
" "), unterer Temperaturgrenze (Symbol " ") und der Normalanzeige umzuschalten.
• Wenn das Symbol " " oder " " angezeigt wird, kann der entsprechende Temperaturalarm ein- oder
ausgeschaltet werden, indem die Taste "T" (16) bzw. "S" (18) auf der Rückseite kurz gedrückt wird
Bei ausgeschaltetem Temperaturalarm wird "OFF" angezeigt, bei eingeschaltetem Temperaturalarm
der jeweilige Wert.
Temperaturwert für den Temperatur-Alarm einstellen
• Drücken Sie zuerst ein- bzw. zweimal die Taste "ALARM/CHART" (10), um den oberen (Symbol " ") bzw.
unteren (Symbol " ") Temperaturalarm anzuzeigen. Drücken Sie dann kurz die Taste "T" (16) bzw. "S" (18)
auf der Rückseite, um den Temperaturalarm einzuschalten (anstatt "OFF" wird ein Temperaturwert angezeigt).
• Halten Sie jetzt die Taste "ALARM/CHART" (10) so lange gedrückt, bis der Temperaturwert blinkt.
• Mit den Tasten "T" (16) bzw. "S" (18) auf der Rückseite kann der Temperaturwert verändert werden (jeweilige
Taste länger drücken für Schnellverstellung).
• Speichern Sie die Einstellung, indem Sie die Taste "ALARM/CHART" (10) kurz drücken.
Page 38

35
Tendenzanzeige für Temperatur und Luftfeuchte
Bei der Innen-/Außentemperatur und bei der Innen-/Außenluftfeuchte finden Sie eine Tendenzanzeige, die Ihnen
die jeweilige Entwicklung der Messwerte anzeigen soll:
Steigend Gleichbleibend Fallend
Komfort-Indikator für Innenluftfeuchte
Zwischen den Werten der Innen-/Außentemperatur und Innen-/Außenluftfeuchte wird entweder "WET", "COMFORT"
oder "DRY" angezeigt.
Dabei handelt es sich um den sog. Komfort-Indikator, der anhand der Innentemperatur und der Innenluftfeuchte
errechnet wird.
Anzeige Temperatur Luftfeuchte
DRY -5°C bis +50°C (+23°F bis +122°F) Unter 40% RH
COMFORT +20°C bis +25°C (+68°F bis +77°F) 40-70% RH
WET -5°C bis +50°C (+23°F bis +122°F) Über 70% RH
(keine Anzeige) Unter +20°C (+68°F), über +25°C (+77°F) 40-70% RH
Durch den Komfort-Indikator erhalten Sie eine schnelle Einschätzung der vorhandenen Umgebungsbedingungen am Aufstellort der Wetterstation ("DRY" = zu trocken, "COMFORT" = ideal,
"WET" = zu feucht).
Page 39

36
c) Anzeigefeld "WIND"
Drücken Sie so oft kurz die Taste "T" (16) bzw. "S" (18) auf der Rückseite, bis im Display "WIND"
blinkt (siehe Pfeil im Bild unten).
Folgende Einstellmöglichkeiten und Anzeigen gibt es jetzt:
Anzeigedaten umschalten
Drücken Sie mehrfach kurz die Taste "SET" (7) auf der Rückseite, um zwischen folgenden Anzeigen umzuschalten:
• Gefühlte Temperatur (Anzeige "WIND CHILL"), Windrichtungsanzeige in Abkürzungen der Himmelsrichtung (z.B.
"NNE" für "NORTH-NORTH-EAST" = Nordnordost)
• Gefühlte Temperatur (Anzeige "WIND CHILL"), Windrichtungsanzeige in Grad (z.B. 22.5°)
• Temperatur am Windsensor, Windrichtungsanzeige in Abkürzungen der Himmelsrichtung (z.B. "NNE" für "NORTHNORTH-EAST" = Nordnordost)
• Temperatur am Windsensor, Windrichtungsanzeige in Grad (z.B. 22.5°)
Der Mensch empfindet Temperaturen unter bestimmten Umständen ganz anders als ein Thermometer
anzeigen kann. Besonders bei niedrigen Außentemperaturen empfindet man die Temperatur auf
unbekleideter Haut viel niedriger, je schneller ein zusätzlicher Wind weht.
Der „Windchill“ ist als Abkühlungseffekt definiert für eine unbekleidete Haut mit einer theoretischen
Oberflächentemperatur von 33°C und einer Windgeschwindigkeit von über 2,6m/s.
Je höher die Windgeschwindigkeit ist und je niedriger die tatsächliche Umgebungstemperatur, desto
spürbarer ist der Windchill-Effekt.
Einheiten für die Anzeige der Windgeschwindigkeit umschalten
Halten Sie die Taste "SET" (7) auf der Rückseite so lange gedrückt, bis die Einheit für die Anzeige der
Windgeschwindigkeit wechselt. Lassen Sie die Taste wieder los. Beginnen Sie von vorn, wenn die Einheit nochmals
gewechselt werden soll.
Einstellbar ist "km/h", "mph", "m/s" und "knots".
Wertespeicher für Windgeschwindigkeit ansehen
Drücken Sie mehrfach kurz die Taste "MEMORY" (17), um zwischen folgenden Anzeigen umzuschalten:
• Aktuelle Windgeschwindigkeit
• Maximale Windgeschwindigkeit, die heute auftrat (Anzeige "DAILY MAX")
• Böen-Geschwindigkeit (Anzeige "GUST")
• Maximale Böen-Geschwindigkeit, die heute auftrat (Anzeige "GUST" und "DAILY MAX")
¨
Page 40

37
Wertespeicher für Windgeschwindigkeit löschen
Halten Sie die Taste "MEMORY" (17) ca. 3 Sekunden gedrückt, damit die Wertespeicher gelöscht werden.
Windgeschwindigkeits-Alarm ein-/ausschalten
Es kann ein Alarm für die Windgeschwindigkeit und ein Alarm für Windböen aktiviert werden. Beim Überschreiten
der eingestellten Windgeschwindigkeit wird ein Alarmton ausgegeben (Beenden durch Druck auf die Taste "ALARM/
CHART").
• Drücken Sie kurz die Taste "ALARM/CHART" (10), um zwischen dem Alarm für die Windgeschwindigkeit (Anzeige
"ALARM HI"), dem Alarm für Windböen (Anzeige "GUST" + "ALARM HI") und der Normalanzeige umzuschalten.
Wenn "ALARM HI" bzw. "GUST" + "ALARM HI" angezeigt wird, kann der entsprechende WindgeschwindigkeitsAlarm ein- oder ausgeschaltet werden, indem die Taste "T" (16) bzw. "S" (18) auf der Rückseite kurz gedrückt
wird.
Bei ausgeschaltetem Alarm wird "OFF" angezeigt, bei eingeschaltetem Alarm der jeweilige Wert.
Windgeschwindigkeits-Alarm einstellen
• Drücken Sie zuerst ein- bzw. zweimal die Taste "ALARM/CHART" (10), um den normalen WindgeschwindigkeitsAlarm (Anzeige "ALARM HI") oder den Windböen-Alarm (Anzeige "GUST" + "ALARM HI") auszuwählen. Drücken
Sie dann ggf. kurz die Taste "T" (16) bzw. "S" (18) auf der Rückseite, um den Alarm einzuschalten.
• Halten Sie jetzt die Taste "ALARM/CHART" (10) so lange gedrückt, bis der Windgeschwindigkeitswert blinkt.
• Mit den Tasten "T" (16) bzw. "S" (18) auf der Rückseite kann nun der Windgeschwindigkeitswert verändert
werden (jeweilige Taste länger drücken für Schnellverstellung).
• Speichern Sie die Einstellung, indem Sie die Taste "ALARM/CHART" (10) kurz drücken.
Page 41

38
d) Anzeigefeld "RAIN"
Drücken Sie so oft kurz die Taste "T" (16) bzw. "S" (18) auf der Rückseite, bis im Display "RAIN" blinkt
(siehe Pfeil im Bild unten).
Folgende Einstellmöglichkeiten und Anzeigen gibt es jetzt:
Anzeigedaten umschalten
Drücken Sie mehrfach kurz die Taste "SET" (7) oder "MEMORY" (17), um zwischen folgenden Anzeigen
umzuschalten:
• Aktuelle Regenmenge (Anzeige z.B. "1.0mm/hr")
• Regenmenge in der letzten Stunde (Anzeige "LAST HOUR")
• Regenmenge in den letzten 24 Stunden (Anzeige "LAST 24Hr")
• Regenmenge gestern (Anzeige "YESTERDAY")
• Regenmenge in der letzten Woche (Anzeige "LAST WEEK")
• Regenmenge im letzten Monat (Anzeige "LAST MONTH")
Wertespeicher für Regenmenge löschen
Halten Sie die Taste "MEMORY" (17) ca. 3 Sekunden gedrückt, damit die Wertespeicher gelöscht werden.
Regenmengen-Alarm ein-/ausschalten
Es kann ein Alarm für die Regenmenge aktiviert werden. Beim Überschreiten der eingestellten Regenmenge wird
ein Alarmton ausgegeben (Beenden durch Druck auf die Taste "ALARM/CHART").
• Drücken Sie kurz die Taste "ALARM/CHART" (10), um in den Alarmmodus zu gelangen ("ALARM HI" unten rechts
im Display), drücken Sie dann kurz die Taste "T" (16) bzw. "S" (18) auf der Rückseite, um den Alarm ein- oder
auszuschalten.
Bei ausgeschaltetem Alarm wird "OFF" angezeigt, bei eingeschaltetem Alarm der jeweilige Wert.
Regenmengen-Alarm einstellen
• Drücken Sie zuerst kurz die Taste "ALARM/CHART" (10), um in den Alarmmodus zu gelangen (Anzeige "ALARM
HI"). Falls der Alarm ausgeschaltet ist, so drücken Sie kurz die Taste "T" (16) bzw. "S" (18) auf der Rückseite,
um den Alarm einzuschalten.
• Halten Sie jetzt die Taste "ALARM/CHART" (10) so lange gedrückt, bis der Regenwert blinkt.
• Mit den Tasten "T" (16) bzw. "S" (18) auf der Rückseite kann der Regenwert verändert werden (jeweilige Taste
länger drücken für Schnellverstellung).
• Speichern Sie die Einstellung, indem Sie die Taste "ALARM/CHART" (10) kurz drücken.
¨
Page 42

39
13. Software-Installation, Anschluss an den PC
a) Software-Installation
Legen Sie die mitgelieferte CD in das entsprechende Laufwerk Ihres Computers ein (Windows-Betriebssystem
erforderlich, Windows XP empfohlen).
Falls das Installationsprogramm nicht automatisch startet, so öffnen Sie den Dateimanager und starten Sie das
Installationsprogramm der CD (z.B. "Setup.exe").
Falls die erforderliche aktuelle Java-Runtime-Version nicht erkannt wird, so bietet das Installationsprogramm an, die
passende Version zu installieren (mit auf der CD enthalten). Java ist zum Betrieb der Software unbedingt erforderlich.
Anschließend wird die Software "WeatherCapture" installiert.
b) Anschluss an den PC
Verbinden Sie die USB-Buchse (21) der Wetterstation über das mitgelieferte USB-Kabel mit einem freien USB2.0Port Ihres Computers.
Starten Sie die Software, indem Sie z.B. unter Windows XP auf die "Start"-Schaltfläche klicken und dort unter
"Programme" im Ordner "WeatherCapture" das Programm "WeatherCapture starten. Sie können das Symbol
selbstverständlich für einen einfacheren Start auch auf dem Desktop ablegen.
Anschließend erscheint "Data is loading" und die Daten aus der Wetterstation werden zum PC übertragen.
c) Kurzbeschreibung der Software
Die Software bietet eine umfangreiche Hilfe-Datei, die Sie oben über die Menüleiste starten können.
Nach dem Start der Software werden alle Messwerte in verschiedenen Fenstern dargestellt. Diese Fenster können
Sie mit der Maus verschieben und in beliebiger Weise in der Oberfläche der Software anordnen.
Über die Menüleiste sind verschiedene Funktionen wählbar, z.B. die Einstellung der Sprache der Software.
Bei den Anzeigefenstern "Temperatur", "Wind", "Luftfeuchtigkeit", "Luftdruck" und "Regen" können durch Anklicken
des kleinen viereckigen Feldes in der oberen linken Ecke des Anzeigefensters die zugehörigen Verlaufsanzeigen
der Werte-Veränderung aktiviert werden (diese sind natürlich bei Erstinbetriebnahme leer).
Sollte in der Software die Anzeige des UV-Index erscheinen, so können Sie sie über die DisplayEinstellungen der Software ausschalten (die Software wird auch für andere Wetterstationen verwendet, deshalb ist die Anzeige des UV-Index vorhanden).
Page 43

40
14. Batteriewechsel
a) Wetterstation
Ein Batteriewechsel ist erforderlich, wenn der Displaykontrast nur noch sehr schwach ist bzw. das Symbol " "
im Anzeigefeld der Uhrzeit erscheint.
Damit alle Einstellungen erhalten bleiben, empfehlen wir Ihnen, die Wetterstation während dem
Batteriewechsel über das mitgelieferte Steckernetzteil zu betreiben.
b) Sensoren
Für jeden Sensor (Temperatur-/Luftfeuchtesensor, Regensensor, Windsensor) erscheint im jeweiligen Anzeigebereich ebenfalls das Symbol " ", wenn die Batterien des Sensors erschöpft sind.
Tauschen Sie die Batterien des Sensors gegen neue aus, gehen Sie zum Austausch bzw. zum Einlegen der
Batterien wie bei der Erstinbetriebnahme beschrieben vor.
Sollte die Wetterstation den Sensor nicht mehr finden (z.B. auch eine Stunde nach dem Batteriewechsel nur Striche im Display, etwa "- - - -" für den Windsensor), so führen Sie eine manuelle Suche nach
den Sensoren durch.
Halten Sie dazu die Taste "T" (16) auf der Rückseite so lange gedrückt, bis das Symbol für den
Funkempfang der Außensensoren blinkt, siehe Kapitel 12. a). Die Sensorsuche kann einige Minuten
dauern.
Beim Batteriewechsel des Windsensors ist zu beachten, dass nach dem Einlegen der neuen Batterien die
Windfahnenspitze genau nach Norden ausgerichtet wird. Anschließend ist die Taste (37) im Batteriefach des
Windsensors zu drücken.
Andernfalls zeigt die Wetterstation falsche Windrichtungen an!
Page 44

41
15. Behebung von Störungen
Mit der Wetterstation haben Sie ein Produkt erworben, welches nach dem Stand der Technik gebaut wurde und
betriebssicher ist. Dennoch kann es zu Problemen und Störungen kommen. Deshalb möchten wir Ihnen hier
beschreiben, wie Sie mögliche Störungen beheben können.
Beachten Sie alle Sicherheitshinweise dieser Bedienungsanleitung!
Problem
Kein Empfang des Signals der
Außensensoren
Kein DCF-Empfang
Lösungshilfe
• Der Abstand zwischen Wetterstation und Außensensoren ist zu groß.
Verändern Sie den Aufstellungsort der Außensensoren.
• Führen Sie eine manuelle Sensorsuche durch (Taste "T" (16) auf der
Rückseite länger gedrückt halten, bis das Sensor-Empfangssymbol
blinkt).
• Gegenstände bzw. abschirmende Materialien behindern den Funkempfang. Gleiches gilt für andere elektronische Geräte, z.B. Fernseher oder
Computer. Verändern Sie den Aufstellungsort von Außensensoren und
Wetterstation.
• Die Batterien der Außensensoren sind schwach oder leer. Setzen Sie
versuchsweise neue Batterien in die Außensensoren ein.
• Ein anderer Sender auf der gleichen oder benachbarten Frequenz stört
das Funksignal der Außensensoren. Dies können z.B. Funkkopfhörer,
Funklautsprecher o.ä. Geräte sein.
Solche Produkte werden meist nicht dauernd betrieben; der Funkempfang kann z.B. am nächsten Tag einwandfrei sein, was eine Suche nach
der Ursache erschwert.
• Verändern Sie den Aufstellort der Wetterstation. Halten Sie ausreichend
Abstand zu elektrischen Geräten, Metallteilen und Kabeln ein. Betreiben
Sie die Wetterstation nicht in einem Keller.
Page 45

42
16. Reichweite
Die Reichweite der Übertragung der Funksignale zwischen Temperatur-/Luftfeuchtesensor und Wetterstation
beträgt unter optimalen Bedingungen bis zu 100m, die Reichweite von Regensensor bzw. Windsensor zur
Wetterstation bis zu 30m.
Bei den Reichweiten-Angaben handelt es sich jedoch um die sog. "Freifeld-Reichweite".
Diese ideale Anordnung (z.B. Wetterstation und Außensensoren auf einer glatten, ebenen Wiese ohne
Bäume, Häuser usw.) ist jedoch in der Praxis nie anzutreffen.
Normalerweise wird die Wetterstation im Haus aufgestellt, der Temperatur-/Luftfeuchtesensor neben
einem Fenster und der Regen- bzw. Windsensor auf bzw. an einem Carport.
Aufgrund der unterschiedlichen Einflüsse auf die Funkübertragung kann leider keine bestimmte
Reichweite garantiert werden.
Normalerweise ist jedoch der Betrieb in einem Einfamilienhaus ohne Probleme möglich.
Wenn die Wetterstation keine Daten von den Außensensoren erhält (trotz neuer Batterien), so
verringern Sie die Entfernung zwischen Außensensoren und Wetterstation, wechseln Sie den Aufstellungsort.
Die Reichweite kann teils beträchtlich verringert werden durch:
• Wände, Stahlbetondecken
• Beschichtete/bedampfte Isolierglasscheiben
• Fahrzeuge
• Bäume, Sträucher, Erde, Felsen
• Nähe zu metallischen & leitenden Gegenständen (z.B. Heizkörper)
• Nähe zum menschlichen Körper
• Breitbandstörungen, z.B. in Wohngebieten (DECT-Telefone, Mobiltelefone, Funkkopfhörer, Funklautsprecher,
andere Funk-Wetterstationen, Baby-Überwachungssysteme usw.)
• Nähe zu elektrischen Motoren, Trafos, Netzteilen, Computern
• Nähe zu schlecht abgeschirmten oder offen betriebenen Computern oder anderen elektrischen Geräten
Page 46

43
17. Wartung und Reinigung
Eine Wartung oder Reparatur ist nur durch eine Fachkraft oder Fachwerkstatt zulässig. Es sind keinerlei für Sie zu
wartende Bestandteile im Inneren der Bestandteile des Produkts, öffnen Sie es deshalb niemals (bis auf die in dieser
Bedienungsanleitung beschriebene Vorgehensweise beim Einlegen oder Wechseln der Batterien).
Zur Reinigung der Außenseite der Wetterstation genügt ein trockenes, weiches und sauberes Tuch.
Drücken Sie nicht zu stark auf das Display, dies kann zu Kratzspuren führen oder zu Fehlfunktionen
der Anzeige.
Staub auf der Wetterstation kann mit Hilfe eines langhaarigen, weichen und sauberen Pinsels und einem
Staubsauger leicht entfernt werden.
Zur Entfernung von Verschmutzungen an den Außensensoren kann ein leicht mit lauwarmen Wasser angefeuchtetes weiches Tuch verwendet werden.
Verwenden Sie auf keinen Fall aggressive Reinigungsmittel, Reinigungsalkohol oder andere chemische Lösungen, da dadurch das Gehäuse angegriffen oder gar die Funktion beeinträchtigt werden
kann.
Kontrollieren Sie gelegentlich den Auffangbehälter des Regensensors. Trotz des Schutzgitters könnten kleine Lauboder Schmutzteilchen die Öffnung unten im Auffangbehälter verstopfen.
Page 47

44
18. Entsorgung
a) Allgemein
Elektronische und elektrische Produkte dürfen nicht in den Hausmüll.
Entsorgen Sie das unbrauchbar gewordene Produkt gemäß den geltenden gesetzlichen Bestimmun-
gen.
b) Batterien und Akkus
Sie als Endverbraucher sind gesetzlich (Batterieverordnung) zur Rückgabe aller gebrauchten Batterien und Akkus verpflichtet; eine Entsorgung über den Hausmüll ist untersagt!
Schadstoffhaltige Batterien/Akkus sind mit nebenstehenden Symbolen gekennzeichnet, die auf das
Verbot der Entsorgung über den Hausmüll hinweisen.
Die Bezeichnungen für das ausschlaggebende Schwermetall sind: Cd=Cadmium, Hg=Quecksilber,
Pb=Blei (Bezeichnung steht auf Batterie/Akku z.B. unter den links abgebildeten Mülltonnen-Symbolen).
Ihre verbrauchten Batterien/Akkus können Sie unentgeltlich bei den Sammelstellen Ihrer Gemeinde,
unseren Filialen oder überall dort abgeben, wo Batterien/Akkus verkauft werden!
Sie erfüllen damit die gesetzlichen Verpflichtungen und leisten Ihren Beitrag zum Umweltschutz.
19. Konformitätserklärung (DOC)
Hiermit erklären wir, Conrad Electronic, Klaus-Conrad-Straße 1, D-92240 Hirschau, dass sich dieses Produkt in
Übereinstimmung mit den grundlegenden Anforderungen und den anderen relevanten Vorschriften der Richtlinie
1999/5/EG befindet.
Die Konformitätserklärung zu diesem Produkt finden Sie unter www.conrad.com.
Page 48

45
20. Technische Daten
a) Wetterstation
Luftdruck:
Messbereich ....................................................................... 500 hPa bis 1100 hPa (14.75 inHg bis 32.44 inHg)
Auflösung ........................................................................... 0,1 hPa (0,003 inHg,0,08 mmHg)
Genauigkeit ........................................................................ +/- 5 hPa (0,015 inHg, 0,38 mmHg)
Höhenbereich einstellbar .................................................. -200 m bis +5000 m (-657 ft bis 16404 ft)
Temperatur:
Innentemperatur-Messbereich .......................................... -9,9°C bis +59,9°C (14.2°F bis 140°F)
Auflösung ........................................................................... 0,1°C (0,2°F)
Genauigkeit ........................................................................ +/- 1°C (+/- 2°F)
Luftfeuchte:
Anzeigebereich .................................................................. 0% to 99% relative Luftfeuchte
Auflösung ........................................................................... 1%
Genauigkeit ........................................................................ +/- 5% (im Bereich von 25-80% relative Luftfeuchte)
Allgemein:
Messintervall ...................................................................... 10 Sekunden
Abmessungen .................................................................... Ca. 260 x 195 x 40mm
PC-Anschluss .................................................................... USB
Datenauswertung .............................................................. Nur über PC
Stromversorgung ............................................................... 4 Batterien vom Typ AA/Mignon
Batterielebensdauer .......................................................... Ca. 1 Jahr (ohne Hintergrundbeleuchtung)
Wir empfehlen Ihnen bei häufiger Nutzung der Hintergrundbeleuchtung die Verwendung des mitgelieferten Steckernetzteils.
b) Steckernetzteil für Wetterstation
Eingang .............................................................................. 230V~/50Hz
Ausgang ............................................................................. 7,5V=, 200mA
Page 49

46
c) Temperatur-/Luftfeuchtesensor
Temperatur:
Messbereich ....................................................................... -40°C bis +59,9°C
Auflösung ........................................................................... 0,1°C
Genauigkeit ........................................................................ +/- 1°C (+/- 2°F)
Luftfeuchte:
Messbereich ....................................................................... 1% to 99% relative Luftfeuchte
Auflösung ........................................................................... 1%
Genauigkeit ........................................................................ +/- 5% (im Bereich von 25-80% relative Luftfeuchte)
Allgemein:
Sendefrequenz .................................................................. 433MHz
Messintervall ...................................................................... 47 Sekunden
Stromversorgung ............................................................... 2 Batterien vom Typ AA/Mignon
Batterielebensdauer .......................................................... Ca. 1 Jahr (ohne Hintergrundbeleuchtung)
d) Regensensor
Niederschlagsmessbereich ............................................... 0 bis 1999,9 mm (1h, 24h)
Niederschlagsmessbereich ............................................... 0 bis 19999 mm (letzte Woche, letzter Monat)
Auflösung ........................................................................... 0,1mm
Sendefrequenz .................................................................. 433MHz
Übertragungszyklus ........................................................... Alle 183 Sekunden
Stromversorgung ............................................................... 2 Batterien vom Typ AA/Mignon
Batterielebensdauer .......................................................... Ca. 1 Jahr
e) Windsensor
Windgeschwindigkeit:
Messbereich ....................................................................... 0 bis 199,9 km/h (0 bis 89.3m/s)
Auflösung ........................................................................... 0,1km/h oder 0,1m/s
Genauigkeit ........................................................................ +/- (2mph +5%)
Allgemein:
Sendefrequenz .................................................................. 433MHz
Übertragungszyklus ........................................................... Alle 33 Sekunden
Stromversorgung ............................................................... Solarzelle und NiMH-Akkupack
Stützbatterien ..................................................................... 2 Batterien vom Typ AA/Mignon, werden nur bei geringem
Ladezustand des Akkupacks verwendet)
Page 50

47
21. Städte für die Wettervorhersage
In der Wetterstation sind für die 90 Gebiete der Wettervorhersage insgesamt 272 Städte gespeichert. Für die mit
einem Stern (*) gekennzeichneten Städte ist nur eine 2-Tages Wettervorhersage möglich (heute und morgen):
Land Displayanzeige Stadt Displayanzeige Region
ANDORRA ANDORRA ANDORRA LA VELLA* AND.LA.VELLA* 70
BELGIQUE / BELGIË B / BELGIUM ANTWERPEN ANTWERPEN 6
BELGIQUE / BELGIË B / BELGIUM BRUXELLES/BRUSSEL BRUSSEL 6
BELGIQUE / BELGIË B / BELGIUM CHARLEROI CHARLEROI 6
BELGIQUE / BELGIË B / BELGIUM LIEGE LIEGE 6
BELGIQUE / BELGIË B / BELGIUM VERVIERS VERVIERS 13
CESKO / CZECH REPUBLIC CZ / CZ REP BRNO BRNO 50
CESKO / CZECH REPUBLIC CZ / CZ REP PLZEN PLZEN 50
CESKO / CZECH REPUBLIC CZ / CZ REP PRAHA PRAHA 50
CESKO / CZECH REPUBLIC CZ / CZ REP DECIN DECIN 51
DANMARK / DENMARK DK / DENMARK ALBORG ALBORG 20
DANMARK / DENMARK DK / DENMARK HERNING HERNING 20
DANMARK / DENMARK DK / DENMARK ARHUS ARHUS 21
DANMARK / DENMARK DK / DENMARK ODENSE ODENSE 21
DANMARK / DENMARK DK / DENMARK KØBENHAVN KØBENHAVN 23
DEUTSCHLAND / GERMANY D / GER FRANKFURT AM MAIN FRANKFURT.M 12
DEUTSCHLAND / GERMANY D / GER KAISERSLAUTERN KAISERSLAU 12
DEUTSCHLAND / GERMANY D / GER KARLSRUHE KARLSRUHE 12
DEUTSCHLAND / GERMANY D / GER MANNHEIM MANNHEIM 12
DEUTSCHLAND / GERMANY D / GER HAGEN HAGEN 13
DEUTSCHLAND / GERMANY D / GER KOBLENZ KOBLENZ 13
DEUTSCHLAND / GERMANY D / GER SIEGEN SIEGEN 13
DEUTSCHLAND / GERMANY D / GER TRIER TRIER 13
DEUTSCHLAND / GERMANY D / GER DORTMUND DORTMUND 14
DEUTSCHLAND / GERMANY D / GER DUISBURG DUISBURG 14
DEUTSCHLAND / GERMANY D / GER DÜSSELDORF DÜSSELDORF 14
DEUTSCHLAND / GERMANY D / GER KÖLN KÖLN 14
DEUTSCHLAND / GERMANY D / GER MÜNSTER MÜNSTER 14
DEUTSCHLAND / GERMANY D / GER BREMERHAVEN BREMERHAVEN 19
DEUTSCHLAND / GERMANY D / GER HAMBURG HAMBURG 19
DEUTSCHLAND / GERMANY D / GER BREMEN BREMEN 22
DEUTSCHLAND / GERMANY D / GER HANNOVER HANNOVER 22
DEUTSCHLAND / GERMANY D / GER MAGDEBURG MAGDEBURG 22
DEUTSCHLAND / GERMANY D / GER KIEL KIEL 24
DEUTSCHLAND / GERMANY D / GER LÜBECK LÜBECK 24
DEUTSCHLAND / GERMANY D / GER ROSTOCK ROSTOCK 24
DEUTSCHLAND / GERMANY D / GER AUGSBURG AUGSBURG 25
DEUTSCHLAND / GERMANY D / GER INGOLSTADT INGOLSTADT 25
DEUTSCHLAND / GERMANY D / GER REGENSBURG REGENSBURG 25
DEUTSCHLAND / GERMANY D / GER ULM ULM 25
DEUTSCHLAND / GERMANY D / GER FRIEDRICHSHAFEN FRIEDRI.HFN 26
DEUTSCHLAND / GERMANY D / GER KEMPTEN KEMPTEN 26
DEUTSCHLAND / GERMANY D / GER MÜNCHEN MÜNCHEN 26
DEUTSCHLAND / GERMANY D / GER BAYREUTH BAYREUTH 28
DEUTSCHLAND / GERMANY D / GER NÜRNBERG NÜRNBERG 28
DEUTSCHLAND / GERMANY D / GER WÜRZBURG WÜRZBURG 28
DEUTSCHLAND / GERMANY D / GER COTTBUS COTTBUS 29
DEUTSCHLAND / GERMANY D / GER DRESDEN DRESDEN 29
DEUTSCHLAND / GERMANY D / GER HALLE HALLE 29
DEUTSCHLAND / GERMANY D / GER LEIPZIG LEIPZIG 29
DEUTSCHLAND / GERMANY D / GER EISENACH EISENACH 30
DEUTSCHLAND / GERMANY D / GER ERFURT ERFURT 30
DEUTSCHLAND / GERMANY D / GER HOF HOF 30
DEUTSCHLAND / GERMANY D / GER JENA JENA 30
DEUTSCHLAND / GERMANY D / GER PLAUEN PLAUEN 30
DEUTSCHLAND / GERMANY D / GER ZWICKAU ZWICKAU 30
Page 51

48
Land Displayanzeige Stadt Displayanzeige Region
DEUTSCHLAND / GERMANY D / GER KONSTANZ KONSTANZ 32
DEUTSCHLAND / GERMANY D / GER FULDA FULDA 37
DEUTSCHLAND / GERMANY D / GER GIESSEN GIESSEN 37
DEUTSCHLAND / GERMANY D / GER GÖTTINGEN GÖTTINGEN 37
DEUTSCHLAND / GERMANY D / GER KASSEL KASSEL 37
DEUTSCHLAND / GERMANY D / GER FREIBURG FREIBURG 45
DEUTSCHLAND / GERMANY D / GER BERLIN BERLIN 52
DEUTSCHLAND / GERMANY D / GER FRANKFURT AN DER ODER FRANKFURT.O 52
DEUTSCHLAND / GERMANY D / GER NEUBRANDENBURG NEUBR.BURG 52
DEUTSCHLAND / GERMANY D / GER POTSDAM POTSDAM 52
DEUTSCHLAND / GERMANY D / GER DONAUESCHINGEN DONAUESCH. 57
DEUTSCHLAND / GERMANY D / GER FREUDENSTADT FREUDENST. 57
DEUTSCHLAND / GERMANY D / GER VILLINGEN-SCHWENNINGEN VILL.-SCHWE. 57
DEUTSCHLAND / GERMANY D / GER HEILBRONN HEILBRONN 59
DEUTSCHLAND / GERMANY D / GER PFORZHEIM PFORZHEIM 59
DEUTSCHLAND / GERMANY D / GER STUTTGART STUTTGART 59
DEUTSCHLAND / GERMANY D / GER TÜBINGEN TÜBINGEN 59
EIRE / IRELAND IRELAND GALWAY* GALWAY* 75
EIRE / IRELAND IRELAND DUBLIN* DUBLIN* 76
ESPANA / SPAIN ES / SPAIN MADRID* MADRID* 64
ESPANA / SPAIN ES / SPAIN BILBAO* BILBAO* 65
ESPANA / SPAIN ES / SPAIN PALMA DE MALLORCA* PALMA-D.MAL* 67
ESPANA / SPAIN ES / SPAIN VALENCIA* VALENCIA* 68
ESPANA / SPAIN ES / SPAIN BARCELONA* BARCELONA* 69
ESPANA / SPAIN ES / SPAIN SEVILLA* SEVILLA* 71
ESPANA / SPAIN ES / SPAIN GIJON* GIJON* 74
FRANCE FRANCE BORDEAUX BORDEAUX 0
FRANCE FRANCE BRIVE-LA-GAILLARDE BRIVE-L-GA 0
FRANCE FRANCE PAU PAU 0
FRANCE FRANCE TOULOUSE TOULOUSE 0
FRANCE FRANCE LA ROCHELLE LA_ROCHELL 1
FRANCE FRANCE LIMOGES LIMOGES 1
FRANCE FRANCE POITIERS POITIERS 1
FRANCE FRANCE LE MANS LE MANS 2
FRANCE FRANCE PARIS PARIS 2
FRANCE FRANCE REIMS REIMS 2
FRANCE FRANCE TOURS TOURS 2
FRANCE FRANCE TROYES TROYES 2
FRANCE FRANCE BREST BREST 3
FRANCE FRANCE NANTES NANTES 3
FRANCE FRANCE RENNES RENNES 3
FRANCE FRANCE CLERMONT-FERRAND CLERMON-FE 4
FRANCE FRANCE MONTLUCON MONTLUCON 4
FRANCE FRANCE SAINT-ETIENNE ST-ETIENNE 4
FRANCE FRANCE BEZIERS BEZIERS 5
FRANCE FRANCE MONTPELLIER MONTPELLIE 5
FRANCE FRANCE PERPIGNAN PERPIGNAN 5
FRANCE FRANCE LILLE LILLE 6
FRANCE FRANCE DIJON DIJON 7
FRANCE FRANCE METZ METZ 7
FRANCE FRANCE NANCY NANCY 7
FRANCE FRANCE AVIGNON AVIGNON 8
FRANCE FRANCE MARSEILLE MARSEILLE 8
FRANCE FRANCE NIMES NIMES 8
FRANCE FRANCE TOULON TOULON 8
FRANCE FRANCE LYON LYON 9
FRANCE FRANCE VALENCE VALENCE 9
FRANCE FRANCE CHAMBERY CHAMBERY 10
FRANCE FRANCE GRENOBLE GRENOBLE 10
FRANCE FRANCE ANNECY ANNECY 11
FRANCE FRANCE BESANCON BESANCON 11
FRANCE FRANCE AMIENS AMIENS 17
FRANCE FRANCE CAEN CAEN 17
FRANCE FRANCE LE HAVRE LE HAVRE 17
Page 52

49
Land Displayanzeige Stadt Displayanzeige Region
FRANCE FRANCE ROUEN ROUEN 17
FRANCE FRANCE EVIAN EVIAN 31
FRANCE FRANCE CANNES CANNES 43
FRANCE FRANCE NICE NICE 43
FRANCE FRANCE BELFORT BELFORT 45
FRANCE FRANCE COLMAR COLMAR 45
FRANCE FRANCE MULHOUSE MULHOUSE 45
FRANCE FRANCE STRASBOURG STRASBOURG 45
FRANCE FRANCE BASTIA* BASTIA* 73
HRVATSKA / CROATIA HR/CROATIA ZAGREB* ZAGREB* 87
HRVATSKA / CROATIA HR/CROATIA SPLIT* SPLIT* 89
ITALIA / ITALY I / ITALY BOLZANO BOLZANO 27
ITALIA / ITALY I / ITALY TRENTO TRENTO 27
ITALIA / ITALY I / ITALY AOSTA AOSTA 39
ITALIA / ITALY I / ITALY SESTRIERE SESTRIERE 39
ITALIA / ITALY I / ITALY MILANO MILANO 40
ITALIA / ITALY I / ITALY PARMA PARMA 40
ITALIA / ITALY I / ITALY TORINO TORINO 40
ITALIA / ITALY I / ITALY VERONA VERONA 40
ITALIA / ITALY I / ITALY FIRENZE FIRENZE 41
ITALIA / ITALY I / ITALY PISA PISA 41
ITALIA / ITALY I / ITALY ROMA ROMA 41
ITALIA / ITALY I / ITALY SIENA SIENA 41
ITALIA / ITALY I / ITALY GENOVA GENOVA 43
ITALIA / ITALY I / ITALY LA SPEZIA LA SPEZIA 43
ITALIA / ITALY I / ITALY BOLOGNA BOLOGNA 44
ITALIA / ITALY I / ITALY RIMINI RIMINI 44
ITALIA / ITALY I / ITALY TRIESTE TRIESTE 44
ITALIA / ITALY I / ITALY UDINE UDINE 44
ITALIA / ITALY I / ITALY VENEZIA VENEZIA 44
ITALIA / ITALY I / ITALY NAPOLI* NAPOLI* 60
ITALIA / ITALY I / ITALY ANCONA* ANCONA* 61
ITALIA / ITALY I / ITALY BARI* BARI* 62
ITALIA / ITALY I / ITALY PALERMO* PALERMO* 66
ITALIA / ITALY I / ITALY SASSARI* SASSARI* 73
LIECHTENSTEIN LI / LICHTEN VADUZ VADUZ 48
LUXEMBOURG LUX LUXEMBOURG LUXEMBOURG 13
MAGYAR / HUNGARY H / HUNGARY GYÖR GYÖR 49
MAGYAR / HUNGARY H / HUNGARY BUDAPEST* BUDAPEST* 63
MONACO MONACO MONACO MONACO 43
NEDERLAND / NETHERLANDS NL / NETHERL MAASTRICHT MAASTRICHT 6
NEDERLAND / NETHERLANDS NL / NETHERL MIDDELBURG MIDDELBURG 6
NEDERLAND / NETHERLANDS NL / NETHERL TERNEUZEN TERNEUZEN 6
NEDERLAND / NETHERLANDS NL / NETHERL DEN HELDER DEN HELDER 19
NEDERLAND / NETHERLANDS NL / NETHERL GRONINGEN GRONINGEN 19
NEDERLAND / NETHERLANDS NL / NETHERL LEEUWARDEN LEEUWARDEN 19
NEDERLAND / NETHERLANDS NL / NETHERL TEXEL TEXEL 19
NEDERLAND / NETHERLANDS NL / NETHERL AMSTERDAM AMSTERDAM 42
NEDERLAND / NETHERLANDS NL / NETHERL ARNHEM ARNHEM 42
NEDERLAND / NETHERLANDS NL / NETHERL ASSEN ASSEN 42
NEDERLAND / NETHERLANDS NL / NETHERL DEN HAAG DEN HAAG 42
NEDERLAND / NETHERLANDS NL / NETHERL EINDHOVEN EINDHOVEN 42
NEDERLAND / NETHERLANDS NL / NETHERL HAARLEM HAARLEM 42
NEDERLAND / NETHERLANDS NL / NETHERL LELYSTAD LELYSTAD 42
NEDERLAND / NETHERLANDS NL / NETHERL ROTTERDAM ROTTERDAM 42
NEDERLAND / NETHERLANDS NL / NETHERL S-HERTOGENBOSCH S.HERTOGENB 42
NEDERLAND / NETHERLANDS NL / NETHERL UTRECHT UTRECHT 42
NEDERLAND / NETHERLANDS NL / NETHERL ZWOLLE ZWOLLE 42
NORGE / NORWAY N / NORWAY DRAMMEN DRAMMEN 58
NORGE / NORWAY N / NORWAY FREDRIKSTAD FREDRIKST. 58
NORGE / NORWAY N / NORWAY OSLO OSLO 58
NORGE / NORWAY N / NORWAY TØNSBERG TØNSBERG 58
NORGE / NORWAY N / NORWAY STAVANGER* STAVANGER* 78
NORGE / NORWAY N / NORWAY TRONDHEIM* TRONDHEIM* 79
Page 53

50
Land Displayanzeige Stadt Displayanzeige Region
ÖSTERREICH / AUSTRIA AU/AUSTRIA LINZ LINZ 26
ÖSTERREICH / AUSTRIA AU/AUSTRIA GRAZ GRAZ 46
ÖSTERREICH / AUSTRIA AU/AUSTRIA KLAGENFURT KLAGENFURT 46
ÖSTERREICH / AUSTRIA AU/AUSTRIA INNSBRUCK INNSBRUCK 47
ÖSTERREICH / AUSTRIA AU/AUSTRIA BREGENZ BREGENZ 48
ÖSTERREICH / AUSTRIA AU/AUSTRIA SALZBURG SALZBURG 48
ÖSTERREICH / AUSTRIA AU/AUSTRIA EISENSTADT EISENSTADT 49
ÖSTERREICH / AUSTRIA AU/AUSTRIA WIEN WIEN 49
ÖSTERREICH / AUSTRIA AU/AUSTRIA SANKT PÖLTEN ST.PÖLTEN 50
POLSKA / POLAND PL/POLAND WALBRZYCH WALBRZYCH 51
POLSKA / POLAND P/POLAND GDANSK* GDANSK* 81
POLSKA / POLAND P/POLAND WARSZAWA* WARSZAWA* 82
POLSKA / POLAND P/POLAND KRAKOW* KRAKOW* 83
PORTUGAL P/PORTUGAL LISBOA* LISBOA* 72
SCHWEIZ/SUISSE/SVIZZERA CH/SUISSE DELEMONT DELEMONT 11
SCHWEIZ/SUISSE/SVIZZERA CH/SUISSE LA CHAUX-DE-FONDS LA.CHAUX-D.F 11
SCHWEIZ/SUISSE/SVIZZERA CH/SUISSE FRIBOURG FRIBOURG 31
SCHWEIZ/SUISSE/SVIZZERA CH/SUISSE GENEVE GENEVE 31
SCHWEIZ/SUISSE/SVIZZERA CH/SUISSE LAUSANNE LAUSANNE 31
SCHWEIZ/SUISSE/SVIZZERA CH/SUISSE MONTREUX MONTREUX 31
SCHWEIZ/SUISSE/SVIZZERA CH/SUISSE NEUCHATEL NEUCHATEL 31
SCHWEIZ/SUISSE/SVIZZERA CH/SUISSE AARAU AARAU 32
SCHWEIZ/SUISSE/SVIZZERA CH/SUISSE BERN BERN 32
SCHWEIZ/SUISSE/SVIZZERA CH/SUISSE BIEL/BIENNE BIENNE 32
SCHWEIZ/SUISSE/SVIZZERA CH/SUISSE FRAUENFELD FRAUENFELD 32
SCHWEIZ/SUISSE/SVIZZERA CH/SUISSE LUZERN LUZERN 32
SCHWEIZ/SUISSE/SVIZZERA CH/SUISSE SCHAFFHAUSEN SCHAFFHAUS 32
SCHWEIZ/SUISSE/SVIZZERA CH/SUISSE SOLOTHURN SOLOTHURN 32
SCHWEIZ/SUISSE/SVIZZERA CH/SUISSE ZUG ZUG 32
SCHWEIZ/SUISSE/SVIZZERA CH/SUISSE ZÜRICH ZÜRICH 32
SCHWEIZ/SUISSE/SVIZZERA CH/SUISSE ADELBODEN ADELBODEN 33
SCHWEIZ/SUISSE/SVIZZERA CH/SUISSE GRINDELWALD GRINDELWALD 33
SCHWEIZ/SUISSE/SVIZZERA CH/SUISSE INTERLAKEN INTERLAKEN 33
SCHWEIZ/SUISSE/SVIZZERA CH/SUISSE BRIG BRIG 34
SCHWEIZ/SUISSE/SVIZZERA CH/SUISSE MARTIGNY MARTIGNY 34
SCHWEIZ/SUISSE/SVIZZERA CH/SUISSE SION SION 34
SCHWEIZ/SUISSE/SVIZZERA CH/SUISSE ALTDORF ALTDORF 35
SCHWEIZ/SUISSE/SVIZZERA CH/SUISSE GLARUS GLARUS 35
SCHWEIZ/SUISSE/SVIZZERA CH/SUISSE SARNEN SARNEN 35
SCHWEIZ/SUISSE/SVIZZERA CH/SUISSE SCHWYZ SCHWYZ 35
SCHWEIZ/SUISSE/SVIZZERA CH/SUISSE ST. GALLEN ST. GALLEN 35
SCHWEIZ/SUISSE/SVIZZERA CH/SUISSE STANS STANS 35
SCHWEIZ/SUISSE/SVIZZERA CH/SUISSE CHUR CHUR 36
SCHWEIZ/SUISSE/SVIZZERA CH/SUISSE DAVOS DAVOS 36
SCHWEIZ/SUISSE/SVIZZERA CH/SUISSE BELLINZONA BELLINZONA 38
SCHWEIZ/SUISSE/SVIZZERA CH/SUISSE LOCARNO LOCARNO 38
SCHWEIZ/SUISSE/SVIZZERA CH/SUISSE LUGANO LUGANO 38
SCHWEIZ/SUISSE/SVIZZERA CH/SUISSE BASEL BASEL 45
SCHWEIZ/SUISSE/SVIZZERA CH/SUISSE LIESTAL LIESTAL 45
SCHWEIZ/SUISSE/SVIZZERA CH/SUISSE SAMEDAN* SAMEDAN* 86
SCHWEIZ/SUISSE/SVIZZERA CH/SUISSE ZERMATT* ZERMATT* 88
SLOVENIJA / SLOVENIA SLOVENIA NOVA GORICA NOVA GORICA 44
SLOVENIJA / SLOVENIA SLOVENIA LJUBLJANA LJUBLJANA 46
SLOVENIJA / SLOVENIA SLOVENIA MARIBOR MARIBOR 46
SLOVENSKO / SLOVAKIA SLOVENIA BRATISLAVA BRATISLAVA 49
SVERIGE / SWEDEN S/SWEDEN MALMÖ MALMÖ 23
SVERIGE / SWEDEN S/SWEDEN GÖTEBORG GÖTEBORG 53
SVERIGE / SWEDEN S/SWEDEN HALMSTAD HALMSTAD 53
SVERIGE / SWEDEN S/SWEDEN GÄVLE GÄVLE 54
SVERIGE / SWEDEN S/SWEDEN STOCKHOLM STOCKHOLM 54
SVERIGE / SWEDEN S/SWEDEN UPPSALA UPPSALA 54
SVERIGE / SWEDEN S/SWEDEN VÄSTERAS VÄSTERAS 54
SVERIGE / SWEDEN S/SWEDEN KALMAR KALMAR 55
SVERIGE / SWEDEN S/SWEDEN LINKÖPING LINKÖPING 55
Page 54

51
Land Displayanzeige Stadt Displayanzeige Region
SVERIGE / SWEDEN S / SWEDEN VISBY VISBY 55
SVERIGE / SWEDEN S / SWEDEN BORAS BORAS 56
SVERIGE / SWEDEN S / SWEDEN JÖNKÖPING JÖNKÖPING 56
SVERIGE / SWEDEN S / SWEDEN KARLSTAD KARLSTAD 56
SVERIGE / SWEDEN S / SWEDEN ÖREBRO ÖREBRO 56
SVERIGE / SWEDEN S / SWEDEN SUNDSVALL* SUNDSVALL* 80
SVERIGE / SWEDEN S / SWEDEN UMEA* UMEA* 84
SVERIGE / SWEDEN S / SWEDEN ÖSTERSUND* ÖSTERSUND* 85
UNITED KINGDOM UK BRISTOL BRISTOL 15
UNITED KINGDOM UK PLYMOUTH PLYMOUTH 15
UNITED KINGDOM UK SWANSEA SWANSEA 15
UNITED KINGDOM UK BIRMINGHAM BIRMINGHAM 16
UNITED KINGDOM UK LIVERPOOL LIVERPOOL 16
UNITED KINGDOM UK MANCHESTER MANCHESTER 16
UNITED KINGDOM UK NEWCASTLE UPON TYNE NEWCASTLE 16
UNITED KINGDOM UK SHEFFIELD SHEFFIELD 16
UNITED KINGDOM UK BRIGHTON BRIGHTON 18
UNITED KINGDOM UK CAMBRIDGE CAMBRIDGE 18
UNITED KINGDOM UK KINGSTON UPON HULL KINGSTON 18
UNITED KINGDOM UK LONDON LONDON 18
UNITED KINGDOM UK OXFORD OXFORD 18
UNITED KINGDOM UK BELFAST* BELFAST* 76
UNITED KINGDOM UK GLASGOW* GLASGOW* 77
VATICANO / VATICAN CITY V/VATICANO CITTA DEL VATICANO VATICANO 41
Page 55

52
22. Wettermeldungen
In der unteren Displayzeile werden für kritische Wetterlagen bestimmte Textmeldungen angezeigt. Beachten Sie
dazu bitte das Kapitel 11. h).
Englisch Displayanzeige Deutsch Displayanzeige
HEAVY WEATHER HEAVY.WEATH. SCHWERES WETTER UNWETTER
HEAVY WEATHER day HEAVY.WEATH. SCHWERES WETTER TAG UNWETTER T
HEAVY WEATHER night HEAVY.WEATH. SCHWERES WETTER NACHT UNWETTER N
STORM STORM STURM STURM
STORM DAYTIME DAY.STORM STURM AM TAGE STURM.TAG
STORM NIGHTTIME NIGHT.STORM STURM NACHTS STURM.NACHT
STRONG GUST DAYTIME DAY.GUST AM TAG BÖIGER WIND WINDBÖE.T
STRONG GUST NIGHTTIME NIGHT.GUST NACHTS BÖIGER WIND WINDBÖE.N
FREEZING RAIN A.M. FROZEN.RAIN EISREGEN VORMITTAGS EISREGEN
FREEZING RAIN P.M. FROZEN.RAIN EISREGEN NACHMITTAGS EISREGEN
FREEZING RAIN NIGHTTIME FROZEN.RAIN EISREGEN NACHTS EISREGEN
FINE PARTICLES PM10 PARTICLES FEINSTAUB PM10 FEINSTAUB
OZONE OZONE OZON OZON
IRRADIATION IRRATE RADIOAKTIVE STRAHLUNG RA. STRAHL.
FLOOD FLOOD HOCHWASSER HOCHWASSER
DENSE FOG DENSE FOG DICHTER NEBEL NEBEL
HEAVY RAIN HEAVY RAIN STARKE REGENFÄLLE ST. REGEN
HEAVY RAIN HEAVY RAIN STARKE NIEDERSCHLÄGE ST. NIEDERS.
HEAVY SNOWFALL HEAVY SNOW STARKE SCHNEEFÄLLE ST. SCHNEE
HEAVY THUNDERSTORM THUNDER STARKE GEWITTER ST.GEWITTER
STRONG UV STRONG UV STARKE UV-STRAHLUNG ST. UV-STR.
DENSE FOG DAYTIME DENSE FOG TAGS DICHTER NEBEL NEBEL_T
HEAVY RAIN DAYTIME RAIN TAGS STARKER REGEN REGEN_T
HEAVY RAIN DAYTIME RAIN TAGS STARKER NIEDERSCHL. NIEDERS_T
HEAVY SNOWFALL DAYTIME HEAVY SNOW TAGS STARKE SCHNEEFÄLLE ST.SCHNEE_T
THUNDERSTORM DAYTIME THUNDER TAGS STARKE GEWITTER GEWITTER_T
DENSE FOG NIGHTTIME DENSE FOG NACHTS DICHTER NEBEL NEBEL_N
HEAVY RAIN NIGHTTIME HEAVY RAIN NACHTS STARKER REGEN REGEN_N
HEAVY RAIN NIGHTTIME HEAVY RAIN NACHTS STARK.NIEDERSCHL. NIEDERS_N
HEAVY SNOWFALL NIGHT HEAVY SNOW NACHTS STARK.SCHNEEFALL ST.SCHNEE_N
THUNDERSTORM NIGHTTIME THUNDER NACHTS STARKE GEWITTER GEWITTER_N
FOEHN FOEHN FÖHN FÖHN
BISE BISE BISE BISE
MISTRAL MISTRAL MISTRAL MISTRAL
SCIROCCO SCIROCCO SCIROCCO SCIROCCO
TRAMONTANA TRAMONTANA TRAMONTANA TRAMONTANA
Page 56

53
Niederländisch Displayanzeige Französisch Displayanzeige
ZWAAR WEER ZWAAR WEER TEMPS LOURD TEMPS.LOURD
ZWAAR WEER OVERDAG ZW WEER_D TEMPS LOURD JOUR TEMPS.LOURD
ZWAAR WEER'S NACHTS ZW WEER_N TEMPS LOURD NUIT TEMPS.LOURD
STORM STORM TEMPETE TEMPETE
STORM OVERDAG STORM_D TEMPETE JOUR TEMPETE
STORM'S NACHTS STORM_N TEMPETE NUIT TEMPETE
WINDSTOTEN OVERDAG WINDST_D RAFALES VIOLENTES JOUR VIOLENTES
WINDSTOTEN'S NACHTS WINDST_N RAFALES VIOLENTES NUIT VIOLENTES
IJZEL IN DE OCHTEND IJZEL_O PLUIE VERGLACANTE MATIN PLUIE_VER
IJZEL IN DE MIDDAG IJZEL_M PLUIE VERGLA.APRES-MIDI PLUIE_VER
IJZEL IN DE NACHT IJZEL_N PLUIE VERGLACANTE NUIT PLUIE_VER
FIJNE DEELTJES PM10 FIJNSTOF POUSSIERE FINE PM10 FINE_PM10
OZON OZON OZONE OZONE
RADIOACTIEVE STRALING RAD ACT ST IRRADIATION IRRATE
HOOGWATER HOOGWATER INONDATION INONDATION
DICHTE MIST D MIST BROUILLARD EPAIS BROUILLARD
ZWARE REGEN ZW REGEN FORTE PLUIE FORTE.PLUIE
ZWARE NEERSLAG ZW REGEN FORTE PLUIE FORTE.PLUIE
ZWARE SNEEUWVAL ZW SNEEUW FORTE CHUTE NEIGE FORTE.PLUIE
ZWARE ONWEERSBUIEN ZW ONWEER ORAGE VIOLENT ORAGE VOIL.
STERKE UV STRALING ST UV STR FORTE IRRADIATION UV FORTE UV
DICHTE MIST OVERDAG D MIST_O BROUILLARD EPAIS JOUR BROUILL_J
ZWARE REGEN OVERDAG ZW REGEN_O FORTE PLUIE JOUR FORTE.PLU_J
ZWARE NEERSLAG OVERDAG ZW REGEN_O FORTE PRECIPIT. JOUR FORTE.PRE_J
ZWARE SNEEUWVAL OVERDAG ZW SNEEUW FORTE CHUTE NEIGE JOUR FORTE.NEIGE
ZWAAR ONWEER OVERDAG ZW ONWEER ORAGE VIOLENT JOUR ORAGE
DICHTE MIST'S NACHTS D MIST_N BROUILLARD EPAIS NUIT BROUILL_N
ZWARE REGEN'S NACHTS ZW REGEN_N FORTE PLUIE NUIT FORTE.PLU_N
ZWARE NEERSLAG'S NACHTS ZW REGEN_N FORTE PLUIE NUIT FORTE.PLU_N
ZWARE SNEEUW‘S NACHTS ZW SNEEUW FORTE CHUTE NEIGE NUIT FORTE.NEI_N
ZWAAR ONWEER'S NACHTS ZW ONWEER ORAGE VIOLENT NUIT ORAGE_N
FÖHN FÖHN FOEHN FOEHN
BISE BISE BISE BISE
MISTRAL MISTRAL MISTRAL MISTRAL
SCIROCCO SCIROCCO SCIROCCO SCIROCCO
TRAMONTANA TRAMONTANA TRAMONTAGNE TRAMONTAGN
Page 57

54
23. Displayanzeigen
Englisch Displayanzeige Deutsch Displayanzeige
SEARCH SIGNAL SEARCH SIG. SUCHE SIGNAL SUCHE SIG.
SELECT CITY CITY STADT EINSTELLEN STADT.EINST.
SELECT COUNTRY COUNTRY LAND EINSTELLEN LAND EINST.
TIME ZONE ZONE ZEITZONE ZONE
HOURS HR STUNDEN H
RECEPTION TEST SCAN EMPFANGSTEST EMPF. TEST
CONTRAST. CONTRAST. KONTRAST. KONTRAST.
MEMORY FULL MEM.FULL SPEICHER VOLL SPEICHER_V
EXIT SETMODE EXIT EINSTELLUNG VORGENOMMEN EINST. VORG.
Niederländisch Displayanzeige Französisch Displayanzeige
SIGNAAL ZOEKEN SIGN ZKN CHERCHE SIG CHERCHE.SIG
STAD INSTELLEN STAD INST CHOIX DE LA VILLE CHOIX_VILL
LAND INSTELLEN LAND INST CHOIX DU PAYS CHOIX_PAYS
TIJD ZONE ZONE FUSEAU HORAIRE FUSEAU
UREN HR HRS H
SIGNAAL TEST SIGN TEST TEST DE RECEPTION TEST_REC
DISPLAY CONTRAST. CONTRAST. CONTRASTE. CONTRASTE.
GEHEUGEN VOL GEH VOL MEMOIRE PLEINE MEM PLEIN
INSTELLEN VERLATEN INST VERL REGLAGE EFFECTUE REGLAGE.EFF
Page 58

55
Table of Contents
Page
1. Introduction ...................................................................................................................................................... 58
2. Contents ........................................................................................................................................................... 58
3. Intended Use .................................................................................................................................................... 59
4. Symbol explanation ......................................................................................................................................... 59
5. Features and functions .................................................................................................................................... 60
a) Weather station.......................................................................................................................................... 60
b) Temperature/air humidity sensor .............................................................................................................. 61
c) Wind sensor ............................................................................................................................................... 61
d) Rain sensor ................................................................................................................................................ 61
6. Safety instructions ........................................................................................................................................... 62
7. Notes on batteries and rechargeable batteries .............................................................................................. 63
8. Operating elements ......................................................................................................................................... 64
a) Weather station.......................................................................................................................................... 64
b) Temperature/air humidity sensor .............................................................................................................. 66
c) Wind sensor ............................................................................................................................................... 67
d) Rain sensor ................................................................................................................................................ 68
9. Initial operation ................................................................................................................................................ 69
a) Temperature/air humidity sensor .............................................................................................................. 69
b) Wind sensor ............................................................................................................................................... 70
c) Rain sensor ................................................................................................................................................ 71
d) Weather station.......................................................................................................................................... 71
10. DCF and METEOTIME reception ................................................................................................................... 74
11. Operation of the METEOTIME functions ........................................................................................................ 77
a) Setting the time zone, language and contrast ......................................................................................... 77
b) Reception test for the "METEOTIME" signal ........................................................................................... 77
c) Switching the display for time/date, city list and sunrise/sunset times ................................................... 77
d) Selecting the country/city for the weather display ................................................................................... 78
e) Deleting a city from the display list ........................................................................................................... 78
f) Entering the place of residence ................................................................................................................ 79
g) Switching the weather information for day/night...................................................................................... 79
h) Storm alarms.............................................................................................................................................. 79
i) Description of the weather symbols ......................................................................................................... 80
12. Operating the indoor/outdoor sensors ............................................................................................................ 81
a) Searching for sensors ............................................................................................................................... 81
b) Background illumination ............................................................................................................................ 81
c) Selecting the function ................................................................................................................................82
Page 59

56
Page
13. Description of the functions ............................................................................................................................. 83
a) Display field "PRESSURE" ....................................................................................................................... 83
Switching the display................................................................................................................................. 83
Setting/adjusting the air pressure to sea level height ............................................................................. 83
Selecting the units for air pressure ("mmHg", "hPa/mBar", "InHg") ....................................................... 83
Setting/adjusting the altitude .................................................................................................................... 84
Selecting the altitude unit ("meters", "feet") ............................................................................................. 84
Viewing the moon phase of the past or next 39 days ............................................................................. 84
Viewing the temperature, air humidity or air pressure values of the past 24 hours .............................. 84
Viewing the air pressure values of the past 24 hours ............................................................................. 85
Activating the air pressure alarm .............................................................................................................. 85
b) Display field for "Temperature/humidity" .................................................................................................. 86
Switching the display unit °C/°F ............................................................................................................... 86
Dew point display ...................................................................................................................................... 86
Display of the minimum/maximum values for temperature/air humidity ................................................. 86
Deleting minimum/maximum values......................................................................................................... 87
Switching between several temperature/air humidity sensors................................................................ 87
Automatic switching in case of several temperature/air humidity sensors ............................................. 87
Selecting or turning the temperature alarm on/off ................................................................................... 87
Setting the temperature values for the temperature alarm ..................................................................... 87
Trend display for temperature/air humidity .............................................................................................. 88
Comfort indicator for interior air humidity ................................................................................................. 88
c) Display field "WIND" .................................................................................................................................. 89
Switching the display data ........................................................................................................................ 89
Switching the units for the display of the wind speed ............................................................................. 89
Viewing the value memory for the wind speed ........................................................................................ 89
Deleting the value memory for the wind speed ....................................................................................... 90
Turning the wind speed alarm on/off ........................................................................................................ 90
Setting the wind speed alarm ................................................................................................................... 90
d) Display field "RAIN" ................................................................................................................................... 91
Switching the display data ........................................................................................................................ 91
Deleting the value memory for the rain quantity ...................................................................................... 91
Turning the rain quantity alarm on/off ...................................................................................................... 91
Setting the rain quantity alarm .................................................................................................................. 91
13. Software installation, connection to the PC ................................................................................................... 92
a) Software installation .................................................................................................................................. 92
b) PC connection ........................................................................................................................................... 92
c) Short description of the software .............................................................................................................. 92
14. Battery replacement ........................................................................................................................................ 93
a) Weather station.......................................................................................................................................... 93
b) Sensors ...................................................................................................................................................... 93
15. Troubleshooting ............................................................................................................................................... 94
16. Transmission range ......................................................................................................................................... 95
17. Maintenance and cleaning .............................................................................................................................. 96
Page 60

57
Page
18. Disposal ............................................................................................................................................................ 97
a) General information ................................................................................................................................... 97
b) Batteries and rechargeable batteries ....................................................................................................... 97
19. Declaration of Conformity (DOC) .................................................................................................................... 97
20. Technical data .................................................................................................................................................. 98
a) Weather station.......................................................................................................................................... 98
b) Power pack unit for the weather station ................................................................................................... 98
c) Temperature/air humidity sensor .............................................................................................................. 99
d) Rain sensor ................................................................................................................................................ 99
e) Wind sensor ............................................................................................................................................... 99
21. Cities for the weather forecast ...................................................................................................................... 100
22. Weather reports ............................................................................................................................................. 105
23. Displays .......................................................................................................................................................... 107
Page 61

58
1. Introduction
Dear Customer,
Thank you for purchasing this product.
This product meets the requirements of current European and national guidelines. We kindly request the user to
follow the operating instructions, to preserve this condition and to ensure safe operation!
Please read the operating instructions completely and observe the safety and operating
notices before using the product.
All names of companies and products are trademarks of the respective owner. All rights reserved.
In case of any technical inquiries, contact or consult:
Germany: Tel. no.: +49 9604 / 40 88 80
Fax. no.: +49 9604 / 40 88 48
e-mail: tkb@conrad.de
Mon. to Thur. 8.00am to 4.30pm
Fri. 8.00am to 2.00pm
2. Contents
• Weather station
• Power pack unit for the weather station
• Temperature/air humidity sensor with integrated LC display
• Rain sensor
• Wind sensor with solar cell
• USB connecting cable
• Installation material
•CD
• Operating instructions
Page 62

59
3. Intended Use
The weather station serves to display different measuring values, e.g. the indoor/outdoor temperature, the indoor/
outdoor air humidity, the rain quantity, the wind speed and the wind direction.
The sensors contained in the delivery send the measuring values to the weather station (wireless via radio).
The weather station also features a radio clock that receives the exact time and the date via the DCF time signal.
Switching from DST (daylight savings time) to normal time also takes place automatically.
The weather station also receives the weather information for numerous European regions transmitted via the DCF
signal.
A list of all features and characteristics of the product is presented in chapter 5.
The weather forecasts of the weather station are only meant as orientation values. They do not represent an
absolutely exact forecast. The manufacturer does not accept any responsibility for incorrect displays, measurements
or weather forecasts or the consequences which might arise from this.
The product is intended for private use only and not suited for medical purposes or informing the public.
The contents of this product are not a toy, it contains fragile and swallowable glass parts, small parts and also
batteries. It should be kept out of the reach of children!
Keep all components out of the reach of children.
The product is battery-operated. The weather station can also be operated via the provided power pack unit.
Any use other than the one described above may damage the product and involves other possible risks.
Read these operating instructions thoroughly and carefully, they contain a lot of important information for installation,
operation and handling. Observe all safety instructions!
4. Symbol explanation
The lightening bolt icon in a triangle is used to alert you to potential personal injury hazards such as
electric shock.
An exclamation mark in a triangle indicates important instructions in this operating manual which must
be observed.
The "hand" icon indicates special tips and notes on the operation of the device.
Page 63

60
5. Features and functions
a) Weather station
At first glance, the weather station does not differ from other standard weather stations.
However, it can analyse and display weather information received in addition to the DCF signal (or the HBG signal
in Switzerland) via radio, the so-called "METEOTIME" signal.
The weather information is compiled by professional meteorologists with the most modern instrument and is
therefore based on similar data as the one in weather forecasts on the TV or radio.
The following forecasts displayed:
• Weather data display (weather forecast via symbols, day temperature, night temperature) for the current day and
the following 3 days for 60 regions in Europe
• Additional weather data display for 30 more regions in Europe (for the current and the next day)
• Precipitation forecast (today)
• Wind speed and direction (today)
• Weather warnings (e.g. storm)
• Display of the sunrise/sunset times for 272 metropolises in Europe
In addition, the weather station features the following displays and functions:
• Radio-controlled DCF time/date display
• Display of the indoor temperature/air humidity (measured via sensor)
• Display of the outdoor temperature/air humidity (measured via sensor)
• Display of the wind speed and wind direction (measured via sensor)
• Display of the rain quantity (measured via sensor)
• Display of the air pressure value and progression (measured via sensor)
• Temperature display (indoor/outdoor sensors) in degrees Celsius (°C) or Fahrenheit (°F, selectable)
• Air pressure display in different units ("hPa", "inHg", "mmHg")
• Wind speed display in kilometers per hour ("km/h"), miles per hour ("mph"), meters per second ("m/s")
• MIN/MAX memory for indoor/outdoor temperature, indoor/outdoor humidity, wind speed and rain quantity
• Installation on a table or mounting on a wall
• Operation with four batteries type AA/mignon or external power pack unit
• USB connection for data evaluation via PC
• Operation in dry indoor locations (weather station/power pack unit must not get damp or wet!)
• Background illumination of LC display
Page 64

61
b) Temperature/air humidity sensor
• Wireless radio transmission
• Measuring of temperature and air humidity
• Operation with 2 batteries type AA/mignon
• Wall-mounting
• Operation in protected outdoor locations (e.g. underneath eaves)
c) Wind sensor
• Wireless radio transmission
• Measuring of the wind speed and the wind direction
• Operation via integrated NiMH rechargeable battery pack and solar cell
• Auxiliary battery operation with 2 batteries type AA/mignon
• Wall mounting possible (alternative: attachment to a pole)
• Outdoor operation
d) Rain sensor
• Wireless radio transmission
• Measuring of the rain quantity
• Operation with 2 batteries type AA/mignon
• Installation on a level surface
• Outdoor operation
Page 65

62
6. Safety instructions
The warranty will lapse for damage due to non-compliance with these operating instructions.
Liability for any and all consequential damage is excluded!
Nor do we assume liability for damage to property or personal injury, caused by improper use
or failure to observe the safety instructions. Any claim to warranty will lapse in such cases!
Dear customer, the following safety instructions and danger warnings are not only to protect your well-being but also
to protect the device. Please read carefully through the following points:
• The unauthorized conversion and/or modification of the product is inadmissible because of safety
and approval reasons (CE). Do not open or disassemble the product (apart from the necessary steps
for inserting/changing the batteries or cleaning)!
Maintenance, setting and repair work may only be carried out by a specialist/specialised workshop.
• Do not use this product in hospitals or medical institutions. Although the outdoor sensor emits only
relatively weak radio signals, these may lead to malfunction of life-support systems. The same may
possibly apply to other areas.
• The weather station and the power pack unit are only suitable for dry indoor areas. Do not expose
it to direct sunlight, severe heat, cold or dampness, otherwise you may face the risk of a fatal electric
shock!
• The outdoor sensors are suitable for operation in protected outdoor areas. However, they may not
be operated under water.
• The product is not a toy and should be kept out of the reach of children. It contains small parts, glass
(display) and batteries. Place the product in a way that it is out of reach of children.
• Do not leave packaging material unattended. It may become a dangerous toy for children!
• Use the device only in moderate climate regions and not in tropical climate.
• When the product is brought from a cold into a warm room (e.g. during transport), condensation
water may form. This may damage the product and also poses the risk of a fatal electric shock when
the power pack unit is connected!
Wait until the product has reached room temperature before using it. This may take several hours.
• If the product is used at schools, training facilities, do-it-yourself and hobby workshops, it should not
be handled unless supervised by trained, responsible personnel.
• Handle the product carefully, it can be damaged by impacts, strikes or by falling from a low height.
Page 66

63
7. Notes on batteries and rechargeable batteries
In principle, it is possible to operate the weather station and the outdoor sensors with rechargeable
batteries.
However, the lower voltage of rechargeable batteries (rechargeable battery = 1.2V, battery = 1.5V) and
their lesser capacity reduces the operating time and the radio range. Rechargeable batteries are also
more sensitive to temperature than normal batteries
Therefore, we recommend that you use high-quality alkaline batteries to ensure long and safe
operation.
Required batteries:
Weather station: 4 batteries type AA/mignon
Outdoor temperature/air humidity sensor: 2 batteries type AA/mignon
Wind sensor: 2 batteries type AA/mignon
Rain sensor: 2 batteries type AA/mignon
Please note:
• Batteries must be kept out of the reach of children.
• Please observe the correct polarity (positive/+ and negative/-) when inserting the batteries.
• Do not let batteries/rechargeable batteries lie around openly. There is a risk of batteries being swallowed by
children or pets. If swallowed, consult a doctor immediately.
• Leaking or damaged batteries/rechargeable batteries may cause acid burns when coming into contact with skin,
therefore use suitable protective gloves.
• Make sure that batteries/rechargeable batteries are not short-circuited, dismantled or thrown into fire. There is a
risk of explosion!
• Do not recharge normal batteries. There is a risk of explosion! Only charge rechargeable batteries which are
intended for this purpose; use a suitable battery charger.
• In the case of disuse for a longer period of time (e.g. storage), remove the inserted batteries/rechargeable batteries.
Old batteries/rechargeable batteries can leak and cause damages on the product; loss of guarantee/warranty!
• Always exchange the entire set of batteries/accumulators, only use batteries/accumulators of the same type and
by the same manufacturer with the same charge status (do not mix full with semi-full or empty batteries/
accumulators).
• Never mix batteries with accumulators! Use either batteries or accumulators.
• For the environmentally friendly disposal of batteries and rechargeable batteries, please read the chapter
"Disposal".
Page 67

64
8. Operating elements
a) Weather station
1
2
3
5
7
4
6
16
8
9
10
11
12
13
14
15
17
18
22
A
B
20
21
19
Page 68

65
A Top display for the METEOTIME data (weather data received via the DCF signal), DCF time/date as well as the
sunrise/sunset times
B Bottom display for the measuring data of the indoor sensors (indoor temperature, air humidity and air pressure)
and outdoor sensors (e.g. outdoor temperature, air humidity, wind speed, wind direction, rain quantity)
There are arrow buttons on the rear and the right side of the weather station an a "SET" button each,
which have completely different functions, however.
The buttons on the right "a" (1), "b" (2) and "SET" (3) serve for the METEOTIME part of the weather
station (top display). The buttons on the rear "T" (16), "S" (18) and "SET" (7) serve for operation of
the sensor part (bottom display).
The button "SET" (7) on the rear serves for operation of the remaining functions.
1 Button "a" for settings in the METEOTIME display (e.g. select country/city)
2 Button "b" for settings in the METEOTIME display (e.g. select country/city)
3 Button "SET" for settings on the METEOTIME display or switching the display (city, time/date, sunrise/sunset
time and activation of the setup mode for country, city time zone, language and display contrast)
4 Button "CHANNEL" for selecting the temperature/air humidity sensors (if more than one temperature/air humidity
sensor is used; one is contained in the delivery)
5 Button "DAY/NIGHT" for switching the METEOTIME forecast from day to night and vice-versa
6 Button "LIGHT" for activating the background illumination
7 Button "SET" for selection of the functions or activation of the setup mode for the sensors
8 Button "TEST" to start the reception test for the METEOTIME signal
9 Button "MEM":
10 Button "ALARM/CHART" for setting a limit alarm for temperature/air humidity, wind, rain as well as for switching
the bar graph display for air pressure, outdoor air humidity (channel 1) and outdoor temperature (channel 1)
11 Slide switch "LIGHT SENSOR" (to select operating mode for background illumination)
12 Slide switch "SENSITIVITY" (to set the sensitivity for the brightness sensor)
13 Unfoldable base
14 Battery compartment cover (battery compartment for 4*AA size batteries)
15 Opening for wall fastening
16 Button "T" for selection of the sensors/display ranges (temperature/air humidity, wind, rain, air pressure) or
settings on the measuring data display
17 Button "MEMORY", e.g. for the display of minimum/maximum data for temperature, air humidity, wind and rain
18 Button "S" for selection of the sensors/display ranges (temperature/air humidity, wind, rain, air pressure) or
settings on the measuring data display
19 Button "HISTORY" to display the air pressure values of the past 24 hours
20 Socket for external power pack unit (permanent operation of the background illumination requires connection of
the supplied external power pack unit)
21 USB port (for connection of the weather station to a computer)
22 Reception antenna for the sensors
Page 69

66
b) Temperature/air humidity sensor
23 Display of the temperature and air humidity
24 LED (flashes briefly upon data transmission)
25 Battery compartment cover
26 Four screws for the battery compartment cover
27 RESET button
28 Opening for wall-mounting
29 Switch for channel selection (channel 1 to 5)
30 Battery compartment lid (battery compartment for 2*AA size batteries)
24
WIRELESS THERMO HYGRO
1
23
27
30
29
28
RESET
25
26
Page 70

67
c) Wind sensor
31 Weathercock for determination of the wind direction
32 Cup anemometer for measuring the wind speed
33 Solar cell for charging the internal rechargeable battery pack
34 Four screws for the battery compartment cover
35 Battery compartment cover
36 Four holes for wall mounting
37 Flush button for saving the direction "NORTH" for the wind direction display of the weather station
38 Battery compartment for 2 batteries type AA/Mignon (for backup function in case of empty rechargeable battery
pack)
A rechargeable battery pack is integrated in the wind sensor (NiMH batteries). This is loaded via the
solar cell (33) integrated in the wind sensor.
In case of insufficient battery power, the two backup batteries inserted in the battery compartment (35)
take care of the power supply.
34
35
36
36
36
31
32
33
SET
37
38
Page 71

68
d) Rain sensor
39 Integrated spirit level
40 Two rotary knobs for locking the receptacle
41 Tilter for counting
42 Altogether four feet with attachment hole
43 Receptacle
44 Battery compartment lid (battery compartment for 2*AA size batteries)
40
40
39 41
42
43 44
Page 72

69
9. Initial operation
First commission the outdoor sensor for the temperature/air humidity and then the rain and
wind sensor. Then insert the batteries into the weather station!
This is the only way to ensure the correct function of the devices.
When performing the initial installation, you need the altitude coordinates of your region. This is used
later on to calculate the correction value for the air pressure. To obtain the altitude of your region (an
approximate value is sufficient), consult a map or refer to the website of your city/region.
Prior to installing the rain and wind sensors in a permanent location, we recommend performing a
function test with all devices.
The radio range of 30m (rain sensor and wind sensor) as well as of 100m (outdoor sensor for
temperature/air humidity) is the so-called "free field range", meaning the maximum range in case of
direct sight connection between the transmitter (sensors) and the receiver (weather station).
However, this ideal configuration may not work in practice, as furniture, walls, windows or plants may
be located between the sensors and the weather station.
Another source of interference which significantly reduces the range, is the proximity to metal parts,
electric/electronic devices or cables. Reinforced concrete ceilings, vacuum metallised insulated glass
windows or other devices operating on the same transmission frequency.
Do not place the devices directly next to each other when performing the function test. Keep a distance
of at least 50 cm, otherwise the transmitters may interfere with each other.
a) Temperature/air humidity sensor
• Open the battery compartment on the back by unscrewing the four screws (26) of the battery compartment cover
(25) beforehand. If the rubber seal gets stuck on the battery compartment cover, replace it in the provided slot.
• With the slide switch (29), you can set the transmission channel if your want to operate more than one temperature/
air humidity sensor.
If only one single temperature/air humidity sensor is operated (one is included in the delivery), you must
select channel 1 (required for the recording function)!
• Insert two batteries of type AA/mignon with correct polarity into the battery compartment (30, observe positive/+
and negative/-). All display segments appear briefly on the display, afterwards the first measuring value for the
temperature and the air humidity.
If there is no display, check whether the batteries are charged and were inserted correctly. If required,
briefly press the countersunk reset button with an open paper clip (do not exert any force when
pressing!) or remove both batteries and insert them again.
• Replace the cover of the battery compartment (25) again and screw it down firmly.
• When selecting the installation site for the temperature/air humidity sensor, make sure that it is protected from
precipitation (e.g. beneath an eave). Otherwise, the sensor would no longer measure the air temperature.
The sensor may also not be exposed to direct sunlight, as this would falsify the measuring values.
The opening for wall mounting (28) serves to hang the temperature/air humidity sensor on a screw or similar.
Page 73

70
b) Wind sensor
• Loosen the Allen screw in the cup anemometer (see "A"), turn the screw a few turns counter-clockwise.
• Attach the cup anemometer on the metal axis (see "B").
Make sure that the 3 hemispherical elements are not damaged or even broken off - loss of warranty/
guarantee!
• Secure the cup anemometer on the axis by tightening the small Allen screw on the cup anemometer (see "C").
• Remove the battery compartment cover (35) by removing its 4 screws (34).
• Insert two batteries of type AA/mignon with correct polarity into the battery compartment (38, observe positive/+
and negative/-).
The tip of the weathercock must be aligned exactly north so that the main station
can display the correct wind direction. Then press the button (37) located on the
side inside the wind sensor's battery compartment (see arrow in the image on the
right).
This alignment must be repeated at each battery change on the wind sensor.
• Replace the cover of the battery compartment (35) again and screw it down firmly.
• The installation site for the wind sensor should not be located too close to walls or buildings to prevent wrong
measuring values. Wind close to buildings is generally faster than on a free space, and the wind direction is also
not correct, of course.
We recommend keeping a minimum distance of 3 to 5 m to buildings or trees.
The wind sensor can be screwed onto e.g. a vertical wall. Four attachment holes (36) are provided for this purpose.
It is also possible to mount it on a pole using a suitable attachment (rounded back of the housing).
A
B
C
SET
Page 74

71
c) Rain sensor
• Remove the top receptacle (43) by unlocking the two rotary knobs on the side (40) first. Turn them approx. 45°
counter-clockwise to the left. Do not exert any force.
Afterwards the receptacle (43) can be lifted off towards the top. Remember the right orientation.
• The battery compartment is located on the side with the smaller vertical housing part (44, hemispheric battery
shape on the back). The battery compartment cover is secured with 7 small screws. Please unscrew these.
• Insert two batteries of type AA/mignon with correct polarity into the battery compartment (44, observe positive/+
and negative/-).
• Replace the cover of the battery compartment again and screw it down firmly.
• If you look into the bottom part, you will see a small integrated spirit level (39) there. This serves for correct horizontal
installation.
• Insert the receptacle into the bottom part. Observe the correct orientation. Only one is possible!
• Lock the two rotary knobs on the side (40) by turning them once again clockwise to the right by 45°. Do not exert
any force.
• The rain sensor should be directly exposed to precipitation. Please remember this when selecting the installation
site (e.g. on a carport or similar).
Protect it from leaves and similar, as these may clog the drainage opening in the receptacle. Check the drainage
opening from time to time for this reason.
You can also attach the rain sensor using the four feet (42).
d) Weather station
Commission all sensors first if you have not already done so.
• Open the battery compartment cover (14) on the back of the weather station and insert two AA batteries (mignon)
paying attention to the correct polarity (observe plus/+ and minus/-).
The enclosed power pack unit is required to use the automatic background illumination at darkness.
Connect the round low-voltage plug to the corresponding socket (20) of the weather station and plug
the power pack unit into a mains outlet (230V~/50Hz).
When using the power pack unit, the batteries serve as backup in case of a power failure.
• After inserting the batteries, all display segments appear briefly; afterwards the reception signal for the DCF signal
blinks on the top left together with the weather symbols of the various display ranges. The display shows "SUCHE
SIG." = search for signal.
You can later on change the display language from the default setting (German) to other languages
(see chapter 11.a).
• Afterwards, the radio tower symbol for DCF reception blinks on the top left of the display.
Reception Very good Good Bad No reception
Symbol
• Replace the lid of the battery compartment.
Page 75

72
The detection of the DCF signal and its evaluation can last a few minutes.
Do not place the weather station next to electric/electronic devices; do not place it near cables, wall
outlets or metal parts.
A bad reception can also be caused by, e.g. metallised insulated glass windows, reinforced concrete
constructions, coated special wallpaper or installation in basements.
For more information about DCF reception, see chapter 10.
• Now the display for the air pressure units blinks on the bottom display.
• Select the air pressure units ("mmHg", "hPa/mBar" or "InHg") with the buttons "T" (16) or "S" (18) on the back
of the weather station and briefly press the button "SET" (7) on the rear to save the settings. In general, you should
select "hPa/mBar" (hectopascal/millibar).
• Afterwards, the display for the altitude units blinks ("meters" or "feet"). Select the desired unit with the buttons "T"
(16) or "S" (18) on the back of the weather station and briefly press the button "SET" (7) on the rear to save the
settings.
• The value for the altitude blinks now. Set the approximate altitude of your region with the buttons "T" (16) or "S"
(18) on the rear of the weather station. For quick adjustment, keep the corresponding button depressed for a longer
period of time.
Save the value; briefly press the button "SET" (7) on the rear.
• Now the weather station measures the air pressure and indicates this on the display (e.g. "1016.4 hPa/mBar").
• The reception symbol for the outdoor sensors blinks on the bottom right of the display.
• If "LAND EINST." (set country) appears on the top display, set your home country with the buttons "a" (1) and "b"
(2) on the right side of the weather station (e.g. "D/GER" for Germany) and confirm the setting by briefly pressing
the button "SET" (3) on the side.
Now the display shows "STADT EINST." (set city). With the buttons "a" (1) and "b" (2), you can select a city near
to your place of residence.
Briefly confirm the setting by pressing "TEST" (8). The city is saved afterwards and a small tick mark appears above
the city name:
You can select altogether 5 cities; of course, you can also make this setting later on. It is also possible
to delete a city already selected for display and save another one (see chapter 11.de and 11.e).
If you do not set the country and the city as described above, the weather station automatically sets
"Germany" for the country and "Frankfurt/Main" for the city.
• With the buttons "a" (1) and "b" (2) on the right side, you can select a additional cities and saver them with the
button "TEST" (8).
• Press the button "SET" (3) on the right side of the weather station. The settings are saved and the display shows
"EINST. VORG." (=settings performed).
This completes the basic settings and initial setup of the weather station. Now set e.g. the
display language as described in chapter 11. a).
Page 76

73
With a brief press of the button "SET" (3) on the right side, you should now be able to switch between
the city you have selected, the display of the sunrise/sunset times for this city and the display of the time
and date.
With the button "CHANNEL" (4) on the right side you can select the channel for the temperature/outdoor
humidity sensor, depending on the one you have set. (If you only use one temperature/outdoor humidity
sensor, this must be set to channel 1!)
You can start another search for the outdoor sensor by pressing the button "T" (16) on the back for
approx. 3 seconds until the reception symbol for the outdoor sensors starts to blink. The reception
attempt takes approx. 2 minutes. Do not press a button during this time and do not move the weather
station and the sensors.
Of course, you can make or change all settings, e.g. the country and the city, for the METEOTIME
weather display, the unit selection for the air pressure, altitude, etc. retrospectively. You do not have
to repeat the entire setting.
• Use the support base on the back of the weather station to install it in a suitable place.
For wall mounting (opening on the back of the weather station), simply pull off the base downwards.
Select an installation site that is not exposed to direct sunlight, otherwise you may receive wrong measuring values
for the temperature/air humidity. Also keep a sufficient distance to radiators.
To obtain a good radio reception, install the weather station as far away as possible from electric/electronic devices,
metal parts, cables or similar.
Protect valuable furniture surfaces with a suitable pad or similar to avoid scratches.
Page 77

74
10. DCF and METEOTIME reception
The weather station can receive and evaluate the so-called DCF signal.
This is a radio signal which is sent by a transmitter in Mainflingen (near
Frankfurt/Main). Its range is up to 1500km and if transmission conditions
are ideal even up to 2000km.
Among other things, the DCF signal includes the precise time (theoretical
deviation of 1 second in a million years!) and the date.
This means you do not have to switch manually between daylight savings
time and normal time.
The DCF time is synchronized automatically at 2, 3, 4, 6, 10, 14 and 18
hrs each day.
The weather station also detects the Swiss "HBG" signal, which is
compatible to the DCF signal.
As a special feature, the weather station analyses the so-called "METEOTIME" signal, which is contained
in the DCF-/HBG signal.
The "METEOTIME" signal contains the weather forecast data for 90 different regions in Europe.
The data for the current day and the following three days is transmitted for 60 regions, for 30 regions
the data for the current day and the following day.
The METEOTIME data is sent along with the DCF signal.
Due to the applied technology, the transmission of the data for the weather forecast via the radio signal of
the DCF or HBG transmitter is relatively slow, which is why it may take up to 24 hours until the weather station
has received all weather data.
The symbol " " in the respective display field means that the "METEOTIME" data was received. The symbol " "
indicates that data is still missing.
The right selection of the installation site is decisive for the reception of the radio data, because weather
data is received around the clock.
Do not place the weather station next to electric/electronic devices; do not place it near cables, wall
outlets or metal parts. Keep a sufficient distance, at least 1 m!
A bad reception can also be caused by, e.g. metallised insulated glass windows, reinforced concrete
constructions, coated special wallpaper or installation in basements.
For the 30 regions, for which only today's and tomorrow's weather data is transmitted, only two lines appear for the
two consecutive days on the display for the day temperature ("--").
After commissioning (chapter 9), you can perform a reception test for the "METEOTIME" signal via the
button "TEST" (see chapter 11. b).
Transmission times/information of the "METEOTIME" signal:
22.00 hrs - 03.59 hrs: Forecast for the current day
04.00 hrs - 09.59 hrs: Forecast for the next day
10.00 hrs - 15.59 hrs: Forecast for the day after the next
16.00 hrs - 18.59 hrs: Forecast for the last (third) day
1500 km
2000 km
Page 78

75
Position of the 90 weather regions (enlargement of Central Europe, see next page):
Page 79

76
Section enlargement of the weather areas in Central Europe:
Page 80

77
11. Operation of the METEOTIME functions
a) Setting the time zone, language and contrast
• Keep the button "SET" (3) on the right side depressed (approx. 3 seconds) until "LAND EINST." (= set country,
= "COUNTRY") appears on the top of the display.
• Briefly press the button "SET" (3) on the right side, "ZONE +00HR" appears on the bottom of the display.
• With the buttons "a" (1) and "b" (2) on the right side, you can set the desired time zone (setting range
+12h.....-11h).
• Briefly press the button "SET" (3); the currently set language for the text display appears on the bottom of the
display.
• Select the desired language with the buttons "a" (1) and "b" (2).
DEUTSCH = German
DUTCH = Dutch
ENGLISH = English
ESPANOL = Spanish
FRANCAIS = French
ITALIANO = Italian
SWEDISH = Swedish
• Briefly press the button "SET" (3); the currently set contrast value appears on the display.
• Select the contrast value for the LC display with the buttons "a" (1) and "b" (2) (setting values 0....9).
• Briefly press the button "SET" (3) on the right side of the weather station. The settings are saved and the display
shows "EINST. VORG." (=settings performed, "EXIT"). Setup mode is terminated.
b) Reception test for the "METEOTIME" signal
Because some weather information is contained in each DCF signal per second (the so-called "METEOTIME"
signal), it is very easy to perform a function test contrary to standard DCF clocks.
Briefly press the "TEST” button (8) on the rear of the weather station.
The display shows "EMPF. TEST" (reception test, "SCAN"). Afterwards, the "METEOTIME" reception symbol to the
left of the city display serves to control the reception of the DCF/METEOTIME signal:
= perfect reception
= no reception
If necessary, change the installation site until " " is displayed.
The reception test is terminated automatically after one minute (or press the button "TEST" again before). Of course,
you can restart the reception test again. Proceed as described above.
c) Switching the display for time/date, city list and sunrise/sunset times
By briefly pressing the button "SET" (3) on the right side of the weather station, you can switch between the selection
list for the saved cities, the sunrise and sunset times as well as the time and date display.
Page 81

78
d) Selecting the country/city for the weather display
You can select up to 5 cities whose weather forecast can be displayed later with the buttons "a" (1) and "b" (2).
Chapter 21 includes a list of all available cities.
Proceed as follows for selecting:
• Keep the button "SET" (3) depressed (approx. 3 seconds) until "LAND EINST." (set country, "COUNTRY") appears
on the display.
• With the buttons "a" (1) and "b" (2), select the country (e.g. "D/GER" for Germany) and confirm your selection
by briefly pressing the button "SET" (3).
Now the display shows "STADT EINST." (set city, "CITY").
• Select a city with the buttons "a" (1) and "b" (2).
• Confirm the setting by briefly pressing the "TEST" button (8). A small tick appears above the name of the city.
Press the button "TEST" (8) again to delete the city from the list; the tick disappears.
If "SPEICHER_V" (= "MEM FULL") appears, all 5 slots are assigned.
You can save up to 5 cities to display their weather data. To save another city, you first have to delete
an available city from the list (see next chapter).
• By pressing the button "SET" (3) on the right side of the weather station, you leave setup mode.
e) Deleting a city from the display list
As described in chapter 11. d), you can save up to 5 cities in different countries and display their weather forecast
with the buttons "a" (1) and "b" (2).
To delete a city from the display list, proceed as follows:
• Select the city you want to delete from the display list with the buttons "a" (1) and "b" (2).
• Keep the button "SET" (3) on the right side of the weather station depressed (approx. 3 seconds) until "LAND
EINST." (= set country, "COUNTRY") appears on the display.
• Briefly press the button"a" (1). Now the country in which the city to be deleted is located is displayed.
• Then briefly press the "SET" button (3).
• Now the display shows "STADT EINST." (set city, "CITY").
• Briefly press the button"a" (1). The city is displayed now (observe the small tick mark "√" above the city).
• Then press the button "TEST" (8). The hook icon "√" disappears and the city is deleted from the display list.
• Leave delete mode by pressing "SET" (3).
Page 82

79
f) Entering the place of residence
With this function, you can enter the name of your place of residence.
For this purpose, proceed as follows:
• Keep the button "SET" (3) on the right side depressed (approx. 3 seconds) until "LAND EINST." (=set country,
"COUNTRY") appears on the display.
• With the buttons "a" (1) and "b" (2), select the country (e.g. "D/GER" for Germany) and confirm your selection
by briefly pressing the button "SET" (3).
Now the display shows "STADT EINST." (set city, "CITY").
• With the buttons "a" (1) and "b" (2), you can now select a city close to your place of residence to display the correct
weather forecast data.
• Press the button "MEM" (9) briefly. Now the previously displayed city name disappears and a blinking line "_"
appears in its place for the input field.
Use the following buttons for your entry (press briefly):
- Buttons "a" (1) and "b" (2): select character/numeral
- "SET" button (3): save character/numeral and jump to the next position
- "TEST" button (8): jump back one spot (correction)
• The entry is finished automatically when you case the last letter at the right end of the input line by briefly pressing
"SET" (3).
Alternatively, the entry is terminated beforehand if no character is selected at an input position (only the line "_"
blinks) and then pressing the button "SET" (3).
g) Switching the weather information for day/night
The weather station switches the display for day/night weather information automatically depending on the sunrise/
sunset time. A small "DAY" or "NIGHT" indicator appears for this purpose on the display next to the weekday.
You can display the respective other value for 10 seconds by briefly pressing the button "DAY/NIGHT" (5).
h) Storm alarms
The "METEOTIME" signal contains additional information about special weather conditions (e.g. strong gusts of
wind, ice rain, heavy snowfall, thunderstorms, dense fog, foehn, etc.).
The display shows the symbol "" if such data is received.
By pressing the button "DAY/NIGHT" repeatedly, you can display these messages as text messages on the display.
In case of several messages, the symbol belonging to the respective day blinks, and the warning is displayed.
The weather station additionally displays the current message alternating with the normal display.
Page 83

80
i) Description of the weather symbols
Meaning Day Night Meaning Day Night
Sunny
(starry
night)
Slightly overcast
Very overcast
Overcast
High fog
Fog
Rain
Slight rain
Heavy rain
Thunderstorm
Heat storm
sleet,
snow and rain
showers
Snow showers
Snowy rain
Snowfall
Page 84

81
12. Operating the indoor/outdoor sensors
a) Searching for sensors
If only lines appear in a display field (e.g. for the rain sensor: "- - - . -"), you can start a manual search for all outdoor
sensors.
For this purpose, keep the button "T" (16) on the rear depressed until the symbol for the radio reception of the
outdoor sensors blinks on the top of the display.
The sensor search may take a few minutes.
If one of the sensors is not found, check its batteries, place the sensor in a different location and reduce the distance
between the weather station and the sensor.
b) Background illumination
When using the provided power pack unit, the background illumination can be activated permanently (or it is activated
automatically at darkness and deactivated during the day).
With battery operation, the background illumination can only be activated briefly to save energy and
battery power.
You can select the desired function with the switch "LIGHT SENSOR" (11):
ON The background illumination is always on (only when using the provided power pack unit).
OFF The background illumination is off and only activated for a few seconds when briefly pressing the button
"LIGHT".
AUTO The background illumination is activated at darkness and deactivated during the day.
The sensitivity for the brightness detection (and therefore the automatic activation/deactivation of the background
illumination) is selected with the switch "SENSITIVITY" (12). Two positions are possible ("HIGH" and "LOW").
Page 85

82
c) Selecting the function
If the weather station is in normal mode (e.g. not during sensor search or similar), you can select the individual
functions by briefly pressing the button "T" (16) or "S" (18) on the rear.
The selected function blinks on the bottom of the display. Additional settings and displays are possible for each
function. These are explained in the next chapter. Below in the display illustration you can see the position of the
symbols and the respective display section.
A Current air pressure, air pressure at sea level, air pressure values of the past 24 hours, bar diagram for the air
pressure, temperature and air humidity progression on outdoor sensor channel 1, moon phases of the last/next
39 days
B Wind direction, wind speed, wind-chill factor
C Indoor/outdoor temperature, indoor/outdoor humidity, trend display, minimum/maximum value, °C/°F switching
D Rain data, value memory, switching measuring units
A
B
C
D
Page 86

83
13. Description of the functions
a) Display field "PRESSURE"
Briefly press the button "T" (16) or "S" (18) on the rear until "PRESSURE" blinks on the display (see
arrow in the image below).
The following setting options and displays are available now:
Switching the display
By briefly pressing the button "SET" (7) on the rear, you can switch between:
• Display of the air pressure on sea level ("SEA LEVEL" appears on the display)
• Display of the air pressure at the altitude you have set ("LOCAL")
• Display of the altitude
Setting/adjusting the air pressure to sea level height
If the air pressure at sea level is displayed (the display indicates "SEA LEVEL"), you can correct this if you know the
current air pressure in your region (obtained from radio, TV or Internet).
• Briefly press the button "SET" (7) on the rear until the air pressure at sea level is displayed (the display "SEA LEVEL"
appear in addition to the air pressure value).
• Keep the button "SET" (7) on the rear depressed until the air pressure value starts to blink.
• You can correct the value with the button "T" (16) or "S" (18) on the rear.
• Briefly press the "SET" button (7) on the rear to save the setting.
Selecting the units for air pressure ("mmHg", "hPa/mBar", "InHg")
If the air pressure at sea level is displayed (the display shows "SEA LEVEL"), you can select the units for the display.
• Briefly press the button "SET" (7) on the rear until the air pressure at sea level is displayed (the display "SEA LEVEL"
appear in addition to the air pressure value).
• Keep the button "MEMORY" (17) depressed until the current units (e.g. "hPa/mBar") start to blink.
• With the button "T" (16) or "S" (18), you can select the unit of air pressure (mmHg, hPa/mBar, InHg).
• Briefly press the "MEMORY" button (17) to save the setting.
¨
Page 87

84
Setting/adjusting the altitude
If the altitude is displayed, you can correct it, e.g. if you did not do so during the initial installation or if you have a more
exact value for your region.
• Briefly press the "SET" button (7) on the rear until the altitude is displayed.
• Keep the button "SET" (7) depressed until the altitude starts to blink.
• You can correct the value with the button "T" (16) or "S" (18) on the rear.
• Briefly press the "SET" button (7) to save the setting.
Selecting the altitude unit ("meters", "feet")
If the altitude is displayed, you can select the display units.
• Briefly press the "SET" button (7) on the rear until the altitude is displayed.
• Keep the button "MEMORY" (17) depressed until the current units (e.g. "meters") start to blink.
• With the button "T" (16) or "S" (18), you can select the altitude unit ("meters" or "feet").
• Briefly press the "MEMORY" button (17) to save the setting.
Viewing the moon phase of the past or next 39 days
• Briefly press the button "MEMORY" (17). The display window shows "+0 days" on the left of the air pressure value.
• With the button "T" (16) or "S" (18) on the rear, you can now view the moon phase for the next resp. last 39 days.
The corresponding moon symbol is indicated on the display. Keep the button "T" (16) or "S" (18) depressed
longer for quick adjustment.
• Press the button "MEMORY" (17) to leave display mode (or do not press any button for approx. 5 seconds).
Full moon New moon
Viewing the temperature, air humidity or air pressure value progression of the past 24 hours
• Keep the button "ALARM/CHART" (10) depressed until a small thermometer symbol and a small house symbol with
"CH1" appear on the display on the right next to the progression display. The progression display now serves to
display the temperature progression measured by the temperature/air humidity sensor on channel 1 in the past 24
hours.
• Keep the button "ALARM/CHART" (10) depressed again until a small air humidity symbol and a small house symbol
with "CH1" appear on the display on the right next to the progression display. The progression display now serves
to display the air humidity progression measured by the temperature/air humidity sensor on channel 1 in the past
24 hours.
• If you press the button "ALARM/CHART" (10) once again for longer, the display switches back to the air pressure
progression.
No data is available after commissioning.
Page 88

85
Viewing the air pressure values of the past 24 hours
• Briefly press the button "SET" (7) on the rear until the air pressure at sea level is displayed (the display "SEA LEVEL"
appear in addition to the air pressure value).
• Briefly press the button "HISTORY" (19) repeatedly. The display now shows the average air pressure for each hour
in the past 24 hours (in case of missing values, e.g. because of a battery change or upon commissioning, line
appear ("- - - - . -") instead of a value.
• If you do not press a button for a few seconds, the display returns to the current air pressure value.
Activating the air pressure alarm
• Press the button "ALARM/CHART" (10). "ON" resp, "OFF" appears in the air pressure display field.
• By pressing the button "ALARM/CHART" (10) once again, the display switches from "ON" to "OFF" and vice-versa.
An acoustic signal is emitted when the alarm is activated (stop this by pressing the button "ALARM/
CHART") if the air pressure drops by more than 6 hPa/mBar within a short time.
Page 89

86
b) Display field for "Temperature/humidity"
Briefly press the button "T" (16) or "S" (18) on the rear until the symbol "IN" blinks on the display in
the range of the temperature/air humidity display (see arrow in the image below).
The following setting options and displays are available now:
Switching the display unit °C/°F
• Keep the button "SET" (7) on the rear depressed until the display unit (°C/°F) for the indoor/outdoor temperature
is switched.
• Release the button again.
Dew point display
• Briefly press the button "SET" (7) on the rear; "DEW" (= dew point) is displayed on the top right between the values,
and the temperature display is switched.
• If you briefly press the button "SET" (7) once again, the current temperature is displayed again.
The so-called dew point is a temperature point that depends on the concurrence of a certain air
pressure, a certain temperature and a certain air humidity.
Condensation of the air humidity starts at this point and condensation turns into liquid (fog, mist).
If the dew point for water vapour is below 0 °C, the water will condense as snow or hoarfrost.
Display of the minimum/maximum values for temperature/air humidity
• First select the desired temperature/air humidity sensor with the button "CHANNEL" (4).
• Briefly press the button "MEMORY" (17). "MIN" appears between the temperature/air humidity values and the
minimum values are displayed.
• Briefly press the button "MEMORY" (17) again; "MAX" appears and the maximum values are displayed.
• With another brief press of the button "MEMORY" (17), the display changes to the current measuring values.
¨
Page 90

87
Deleting minimum/maximum values
• First, briefly press the button "MEMORY" (17) to display the minimum and maximum values.
• Now keep the button "MEMORY" (17) depressed for approx. 3 seconds. This deletes the minimum and maximum
values.
Until the next value change, the current values for temperature and air humidity are saved as minimum
resp. maximum values.
Switching between several temperature/air humidity sensors
• Briefly press the button "CHANNEL" (4) to select the desired outdoor sensor for the temperature/air humidity. The
corresponding channel number is displayed.
If you only use one temperature/air humidity sensor, you must set this to "Channel 1" (switch in the
sensor's battery compartment), otherwise the progression display does not work (see chapter 13 a,
section "View progression of the temperature or air humidity in the past 24 hours").
Automatic switching in case of several temperature/air humidity sensors
If you operate more than one temperature/air humidity sensor, the weather station can also change the up to 5
channels automatically.
• Keep the button "CHANNEL" (4) depressed until the symbol " " appears.
This is only possible if more than one temperature/air humidity sensor is registered with the weather
station; otherwise no symbol appears.
• To deactivate the automatic switchover again, keep the button "CHANNEL" (4) depressed until the symbol " "
disappears.
Selecting or turning the temperature alarm on/off
For each of the 5 channels, you can select a top and bottom temperature. When this is exceeded or undercut, an
alarm sounds (stop this by pressing the button "ALARM/CHART" (10)).
• First select the desired channel for the corresponding temperature/air humidity sensor with the button "CHANNEL"
(4), for which you want to select resp. deactivate the temperature alarm.
• Briefly press the button "ALARM/CHART" (10) repeatedly to switch between the top temperature limit (symbol
" "), bottom temperature limit (symbol " ") and the normal display.
• If the symbol " " or " " is displayed, you can activate or deactivate the corresponding temperature alarm by
briefly pressing the button "T" (16) or "S" (18) on the rear.
When the temperature alarm is deactivated, the display shows "OFF"; when it is activated, the
respective value.
Setting the temperature values for the temperature alarm
• First press the button "ALARM/CHART" (10) once or twice to display the top (symbol " ") or bottom (symbol " ")
temperature alarm. Then briefly press the button "T" (16) or "S" (18) on the rear to activate the temperature alarm
(a temperature value is displayed instead of "OFF").
• Now keep the button "ALARM/CHART" (10) depressed until the temperature value changes.
• You can change the temperature value with the buttons "T" (16) or "S" (18) on the rear (keep the respective button
depressed longer for quick adjustment).
• Save the setting by briefly pressing the button "ALARM/CHART" (10).
Page 91

88
Trend display for temperature/air humidity
As with the air pressure, the indoor/outdoor temperature and the indoor/outdoor humidity also features a trend display
to show you the respective development of the measuring values:
Rising Constant Falling
Comfort indicator for interior air humidity
Either "WET", "COMFORT" or "DRY" is displayed between the values for the indoor/outdoor temperature/air
humidity.
This is the so-called comfort indicator, which is calculated using the indoor temperature and indoor air humidity.
Display Temperature Air humidity
DRY -5°C to +50°C (+23°F to +122°F) Below 40% RH
COMFORT +20°C to +25°C (+68°F to +77°F) 40-70% RH
WET -5°C to +50°C (+23°F to +122°F) Above 70% RH
(no display) Below +20°C (+68°F), above +25°C (+77°F) 40-70% RH
The comfort indicator provides a fast estimate of the prevailing ambient conditions at the installation
site of the weather station ("DRY" = too dry, "COMFORT" = ideal, "WET" = too damp).
Page 92

89
c) Display field "WIND"
Briefly press the button "T" (16) or "T" (18) on the rear until "WIND" blinks on the display (see arrow
in the image below).
The following setting options and displays are available now:
Switching the display data
Briefly press the button "SET" (7) on the rear repeatedly to switch between the following displays:
• Wind-chill factor (display "WIND CHILL"), wind direction display using the abbreviations of the points of the
compass (e.g. "NNE" for "NORTH-NORTH-EAST")
• Wind-chill factor (display "WIND CHILL"), wind direction indication in degrees (e.g. 22.5°)
• Temperature on the wind sensor, wind direction display using the abbreviations of the points of the compass (e.g.
"NNE" for "NORTH-NORTH-EAST")
• Temperature on the wind sensor, wind direction indication in degrees (e.g. 22.5°)
People sometimes perceive temperatures completely differently under certain circumstances than that
displayed by a thermometer. Especially in case of low outdoor temperatures, the temperature on naked
skin fells a lot colder the more the wind blows.
The "wind-chill" is a cooling effect defined for naked skin with a theoretical surface temperature of 33°C
and a wind speed of over 2.6m/s.
The higher the wind speed and the lower the actual ambient temperature, the more perceivable the
wind-chill effect.
Switching the units for the display of the wind speed
Keep the button "SET" (7) on the rear depressed until the unit for the display of the wind speed changes. Release
the button again. Start again if you want to change the unit once again.
You can select between "km/h", "mph", "m/s" and "knots".
Viewing the value memory for the wind speed
Briefly press the button "MEMORY" (17) repeatedly to switch between the following displays:
• Current wind speed
• Maximum wind speed today (display "DAILY MAX")
• Gust wind speed (display "GUST")
• Maximum gust wind speed today (display "GUST" and "DAILY MAX")
¨
Page 93

90
Deleting the value memory for the wind speed
Keep the button "MEMORY" (17) depressed approx. 3 seconds to delete the value memories.
Turning the wind speed alarm on/off
You can activate an alarm for the wind speed and an alarm for wind gusts. When the set wind speed is exceeded,
an alarm is issued (stop this by pressing the button "ALARM/CHART").
• Briefly press the button "ALARM/CHART" (10) to switch between the alarm for the wind speed (display "ALARM
HI"), the alarm for wind gusts (display "GUST" + "ALARM HI") and the normal display.
If "ALARM HI" or "GUST" + "ALARM HI" is displayed, you can activate or deactivate the corresponding wind speed
alarm by briefly pressing the button "T" (16) or "S" (18) on the rear.
When the alarm is deactivated, the display shows "OFF"; when it is activated, the respective value.
Setting the wind speed alarm
• First press the button "ALARM/CHART" (10) once or twice to select the normal wind speed alarm (display "ALARM
HI") or the wind gust alarm (display "GUST" + "ALARM HI"). Then briefly press the button "T" (16) or "S" (18)
on the rear to activate the alarm (if applicable).
• Now keep the button "ALARM/CHART" (10) depressed until the wind speed value blinks.
• You can change the wind speed value with the buttons "T" (16) or "S" (18) on the rear (keep the respective button
depressed longer for quick adjustment).
• Save the setting by briefly pressing the button "ALARM/CHART" (10).
Page 94

91
d) Display field "RAIN"
Briefly press the button "T" (16) or "S" (18) on the rear until "RAIN" blinks on the display (see arrow
in the image below).
The following setting options and displays are available now:
Switching the display data
Briefly press the button "SET" (7) or "MEMORY" (17) to switch between the following displays:
• Current rain quantity (display e.g. "1.0mm/hr")
• Rain quantity in the past hour (display "LAST HOUR")
• Rain quantity in the past 24 hours (display "LAST 24Hr")
• Yesterday's rain quantity (display "YESTERDAY")
• Rain quantity in the past week (display "LAST WEEK")
• Rain quantity in the past month (display "LAST MONTH")
Deleting the value memory for the rain quantity
Keep the button "MEMORY" (17) depressed approx. 3 seconds to delete the value memories.
Turning the rain quantity alarm on/off
You can activate an alarm for the rain quantity. When the set rain quantity is exceeded, an alarm is issued (stop this
by pressing the button "ALARM/CHART").
• Briefly press the button "ALARM/CHART" (10) to access alarm mode ("ALARM HI", bottom right of the display),
then briefly press the button "T" (16) or "S" (18) on the rear to activate/deactivate the alarm.
When the alarm is deactivated, the display shows "OFF"; when it is activated, the respective value.
Setting the rain quantity alarm
• First, briefly press the button "ALARM/CHART" (10) to access alarm mode (display "ALARM HI"). If the alarm is
deactivated, briefly press the button "T" (16) or "S" (18) on the rear to activate the alarm (if applicable).
• Now keep the button "ALARM/CHART" (10) depressed until the rain value blinks.
• You can change the rain value with the buttons "T" (16) or "S" (18) on the rear (keep the respective button
depressed longer for quick adjustment).
• Save the setting by briefly pressing the button "ALARM/CHART" (10).
¨
Page 95

92
13. Software installation, connection to the PC
a) Software installation
Insert the enclosed CD into the corresponding drive of your computer (Windows operating system required, Windows
XP recommended).
If the installation program does not start automatically, open the file manager and start the installation program on
the CD (e.g. "setup.exe").
If the required current Java runtime version is not detected, the installation program offers you to install the right
version (contained on the CD). Java is mandatory to operate the software.
The software "WeatherCapture" is installed afterwards.
b) PC connection
Connect the USB connector (21) of the weather station to a free USB 2.0 port of your PC using the USB cable
provided.
Start the software by e.g. clicking on the start button under Windows XP. Then start the program "WeatherCapture"
in the folder "WeatherCapture" in "Programs". Of course, you can also create a shortcut on your desktop for an easier
start.
Now the message "Data is loading" appears and the data from the weather station is transferred to the PC.
c) Short description of the software
The software offers an extensive help file, which you can start via the menu bar on top.
After starting the software, all measuring values are displayed in different windows. You can move these windows
with the mouse and align them at wish on the software's surface.
You can also select different functions via the menu bar, e.g. to set the language of the software.
For the display windows "Temperature", "Wind", "Air humidity", "Air pressure" and "Rain", you can activate the
corresponding progression displays of the value changes by clicking on the small square field in the top left edge of
the display window (of course, these are empty at first start).
If the UV index indicator should appear in the software, you can deactivate this via the software's display
settings. (The software is also used for other weather stations, which is why it includes the UV index
display).
Page 96

93
14. Battery replacement
a) Weather station
A battery exchange is required once the display contrast becomes very weak or if the symbol " " appears in the
display field for the time.
To save all settings, we recommend operating the weather station with the enclosed power pack unit
during the battery change.
b) Sensors
The symbol " " also appears for each sensor (temperature/air humidity sensor, rain sensor, wind sensor) in the
respective display section if the sensor's batteries are spent.
Exchange the batteries of the sensor for new ones. Proceed as described in the chapter "Commissioning" to
exchange and insert the batteries.
If the weather station can no longer identify the sensor (e.g. if the display still shows "- - - - -" for the wind
sensor one hour after changing the batteries), perform a manual search for the sensors.
For this purpose, keep the button "T" (16) on the rear depressed until the symbol for the radio reception
of the outdoor sensors blinks (see chapter 12.a). The sensor search may take a few minutes.
When exchanging the batteries of the wind sensor, please note that the tip of the weathercock is aligned directly north
when inserting the new batteries. Then press the button (37) in the battery compartment of the wind sensor.
Otherwise the weather station will indicate the wrong wind directions!
Page 97

94
15. Troubleshooting
In purchasing the weather station, you have acquired a product which has been designed to the state of the art and
is operationally reliable. Nevertheless, problems and faults might occur. Therefore, we would like to describe here
how to eliminate possible faults:
Observe all safety instructions in these operating instructions!
Problem
No reception of the outdoor
sensor's signal
No DCF reception
Solution
• The distance between weather station and outdoor sensors is too large.
Change the installation site of the outdoor sensors.
• Perform a manual sensor search (keep the button "T" (16) on the rear
depressed until the sensor reception signal blinks).
• Objects or shielding materials interfere with radio reception. The same
applies to other electronic devices, e.g. televisions or computers. Change
the installation site of the outdoor sensors and the weather station.
• The batteries of the outdoor sensors are weak or empty. Insert new
batteries into the outdoor sensors.
• A different transmitter on the same or an adjacent frequency interferes
with the radio signal of the outdoor sensors. This might be e.g. radiocontrolled headphones, radio-controlled speakers or similar devices.
Such products are usually not in use all the time; the radio reception may
be faultless the next day, for example, which makes a search for the
cause more difficult.
• Change the installation site of the weather station. Keep a sufficient
distance to electronic devices, metal parts and cables. Do not operate the
weather station in a basement.
Page 98

95
16. Transmission range
Under optimum conditions, the transmission range of the radio signals between the temperature/air sensor and the
weather station is up to 100m, the transmission range between the rain sensor and the wind sensor to the weather
station up to 30m.
However, the range values refer to the so-called "free field range".
This ideal arrangement (e.g. weather station and outdoor sensor on a plain, even meadow without
trees, houses etc.) never exists in practice.
Normally, the weather station is installed inside the house, the temperature/air humidity sensor next to
a window, and the rain and/or wind sensor on a carport, for example.
Due to the different influences on radio transmission, it is not possible to guarantee a specific range.
However, trouble-free operation is usually possible in a detached house.
If the weather station does not receive any data from the outdoor sensors (despite new batteries),
reduce the distance between the outdoor sensors and the weather station, change the installation site.
The range can sometimes be considerably reduced by:
• walls, reinforced concrete ceilings
• coated/metallised insulated glass
• vehicles
• trees, brushes, earth, rocks
• the proximity to metallic & conductive objects (e.g. heating elements)
• proximity to human body
• Broadband interferences, e.g. in residential areas (DECT telephones, mobiles, radio-controlled headphones,
radio-controlled speakers, other radio-controlled weather stations, baby phones etc.)
• Proximity to electric motors, transformers, power-supply units, computers
• proximity to badly shielded or openly operated computers or other electric devices
Page 99

96
17. Maintenance and cleaning
Servicing or repair may only be carried out by a specialist/specialist workshop. There are no components on the inside
of the product that need maintenance by you, this is why you should never open it (apart from the described approach
to insert or change the batteries, in these instructions).
To clean the exterior of the weather station, a dry, soft and clean cloth is sufficient.
Do not press too hard on the display, as this may cause scratch marks or lead to faulty displays.
Dust on the weather station can be easily removed with the help of a long-haired, soft and clean brush and a vacuum
cleaner.
Use a slightly damp soft cloth (moistened with lukewarm water) to remove dirt from the outdoor sensors.
Never use aggressive cleansing agents or other chemical solvents since this may damage the surface
of the housing or even impair operation.
Check the receptacle of the rain sensor sporadically. Despite the protective grid, small leave or dirt particles may clog
the opening on the bottom of the receptacle.
Page 100

97
18. Disposal
a) General information
Electric and electronic devices must not be disposed of in the household waste.
Please dispose of the inoperative product in accordance with the current legal regulations.
b) Batteries and rechargeable batteries
You as the end user are required by law (Battery Ordinance) to return all used batteries/rechargeable
batteries. Disposing of them in the household waste is prohibited!
Contaminated batteries/rechargeable batteries are labelled with these symbols to indicate that
disposal in domestic waste is forbidden.
The symbols for dangerous heavy metal constituents are: Cd=cadmium, Hg=mercury, Pb=lead (name
on battery/rechargeable battery, e.g. under the trash icons on the left).
You can return your used batteries/rechargeable batteries free of charge at the official collection points
of your community, in our stores, or everywhere else where batteries or rechargeable batteries are sold.
You thus fulfil your statutory obligations and contribute to the protection of the environment.
19. Declaration of Conformity (DOC)
We, Conrad Electronic, Klaus-Conrad-Straße 1, -92240 Hirschau, hereby declare that this product adheres to the
fundamental requirements and the other relevant regulations of Directive 1999/5/EC.
The declaration of conformity of this product can be found at www.conrad.com.
 Loading...