

Page 1

Version 05/09
Funk-Wetterstation
„DV206NL“
Seite 2 - 45
Radio-Controlled Weather Station
„DV206NL“
Page 46 - 89
Station météo radio-pilotée
« DV206NL »
Page 90 - 133
Draadloos weerstation
„DV206NL“
Pagina 134 - 177
Best.-Nr. / Item No. / N° de commande / Bestnr.: 64 64 60
BEDIENUNGSANLEITUNG
OPERATING INSTRUCTIONS
NOTICE D´EMPLOI
GEBRUIKSAANWIJZING
Page 2

2
Inhaltsverzeichnis
Seite
1. Einführung ................................................................................................................... 4
2. Lieferumfang ............................................................................................................... 5
3. Bestimmungsgemäße Verwendung ......................................................................... 5
4. Symbol-Erklärung ....................................................................................................... 6
5. Merkmale und Funktionen ......................................................................................... 7
6. Sicherheitshinweise ................................................................................................... 8
7. Batterie- und Akkuhinweise .................................................................................... 10
8. Anzeigen und Bedienelemente ............................................................................... 12
9. DCF- und METEOTIME-Empfang ............................................................................ 13
10. Inbetriebnahme ......................................................................................................... 17
a) Allgemein ............................................................................................................... 17
b) Inbetriebnahme des Außensensors...................................................................... 17
c) Inbetriebnahme der Wetterstation ........................................................................ 18
11. Aufstellen & Montage ............................................................................................... 20
a) Wetterstation .......................................................................................................... 20
b) Außensensor ......................................................................................................... 20
12. Bedienung .................................................................................................................. 21
a) Anzeige der Temperatur ........................................................................................ 21
b) Min-/Max-Werte für Temperatur ............................................................................ 21
c) Suche nach dem Außensensor durchführen........................................................21
d) Empfangstest für das "METEOTIME"-Signal ....................................................... 22
e) Land/Stadt für Wetteranzeige auswählen ............................................................ 22
f) Stadt aus der Anzeigeliste löschen ...................................................................... 23
g) Wohnort eingeben ................................................................................................. 24
h) Umschalten der Anzeige für Zeit/Datum, Städteliste und Sonnenaufgangs-/
untergangszeit ....................................................................................................... 24
i) Zeitzone, Sprache und Kontrast einstellen .......................................................... 24
j) Wetterinformationen umschalten für Tag/Nacht ................................................... 25
k) Unwettermeldungen .............................................................................................. 26
l) Beschreibung der Wettersymbole ........................................................................ 27
Page 3

3
Seite
13. Behebung von Störungen ....................................................................................... 28
14. Reichweite.................................................................................................................. 30
15. Wartung und Reinigung ........................................................................................... 31
16. Batteriewechsel......................................................................................................... 32
17. Handhabung .............................................................................................................. 32
a) Allgemein ............................................................................................................... 32
b) Wetterstation .......................................................................................................... 33
c) Außensensor ......................................................................................................... 33
18. Entsorgung ................................................................................................................ 34
a) Allgemein ............................................................................................................... 34
b) Batterien und Akkus .............................................................................................. 34
19. Technische Daten ..................................................................................................... 35
a) Wetterstation .......................................................................................................... 35
b) Außensensor ......................................................................................................... 35
20. Konformitätserklärung (DOC) ................................................................................. 35
21. Städte für die Wettervorhersage ............................................................................ 36
22. Wettermeldungen ..................................................................................................... 43
23. Displayanzeigen ........................................................................................................ 45
Page 4
4
1. Einführung
Sehr geehrte Kundin, sehr geehrter Kunde,
wir bedanken uns für den Kauf dieses Produkts.
Dieses Produkt entspricht den gesetzlichen nationalen und europäischen Anforderungen. Um
diesen Zustand zu erhalten und einen gefahrlosen Betrieb sicherzustellen, müssen Sie als
Anwender diese Bedienungsanleitung beachten!
Lesen Sie sich vor Inbetriebnahme des Produkts die komplette Bedienungsanleitung durch, beachten Sie alle Bedienungs- und Sicherheitshinweise.
Alle enthaltenen Firmennamen und Produktbezeichnungen sind Warenzeichen der jeweiligen Inhaber. Alle Rechte vorbehalten.
Bei technischen Fragen wenden Sie sich bitte an:
Deutschland: Tel.-Nr.: 0180/5 31 21 11
Fax: 0180/5 31 21 10
E-Mail: Bitte verwenden Sie unser Formular im Internet
www.conrad.de, unter der Rubrik "Kontakt".
Mo. - Fr. 8.00 bis 18.00 Uhr
Österreich: www.conrad.at
www.business.conrad.at
Schweiz: Tel.-Nr.: 0848/80 12 88
Fax-Nr.: 0848/80 12 89
e-mail: support@conrad.ch
Mo. - Fr. 8.00 bis 12.00 Uhr, 13.00 bis 17.00 Uhr
Page 5

5
2. Lieferumfang
• Wetterstation
• Außensensor
• Bedienungsanleitung
3. Bestimmungsgemäße Verwendung
Die "Funk-Wetterstation DV206NL" stellt ein hochwertiges Universal-Wetter-Messsystem
dar, das eine große Anzahl von Wetterdaten und Zusatzinformationen verarbeiten und sowohl
aktuelle Werte als auch Vorhersagen anzeigen kann.
Alle relevanten Daten werden gleichzeitig auf dem LC-Display dargestellt, bei Bedarf sind
weitere Daten per Tastendruck abrufbar.
Eine Aufstellung mit allen Merkmalen und Eigenschaften des Produkts finden
Sie in Kapitel 5.
Die Wettervorhersagen der Wetterstation sind nur als Orientierungswerte zu sehen. Sie
stellen keine absolut genaue Voraussage dar. Der Hersteller übernimmt keine Verantwortung
für inkorrekte Anzeigen, Messwerte oder Wettervorhersagen und die Folgen, die sich daraus
ergeben können.
Das Produkt ist für den Privatgebrauch vorgesehen; es ist nicht für medizinische Zwecke oder
für die Information der Öffentlichkeit geeignet.
Die Bestandteile dieses Produkts sind kein Spielzeug, sie enthalten zerbrechliche bzw.
verschluckbare Glas- und Kleinteile, außerdem Batterien. Das Produkt gehört nicht in
Kinderhände!
Betreiben Sie alle Komponenten so, dass sie von Kindern nicht erreicht werden können.
Der Betrieb des Produkts erfolgt über Batterien. Der Außensensor übermittelt seine Daten
über Funk im 433MHz-Band an die Wetterstation (Reichweite des externen Sensors bis zu
30m im Freifeld, siehe Kapitel "Reichweite").
Eine andere Verwendung als oben beschrieben kann zur Beschädigung des Produkts führen,
außerdem bestehen weitere Gefahren.
Lesen Sie sich diese Bedienungsanleitung vollständig und aufmerksam durch, sie enthält
viele wichtige Informationen für Aufstellung, Betrieb und Bedienung.
Page 6
6
4. Symbol-Erklärung
Das Symbol mit dem Blitz im Dreieck wird verwendet, wenn Gefahr für Ihre
Gesundheit besteht, z.B. durch elektrischen Schlag.
Das Symbol mit dem Ausrufezeichen im Dreieck weist auf wichtige Hinweise
in dieser Bedienungsanleitung hin, die unbedingt zu beachten sind.
Das "Hand"-Symbol ist zu finden, wenn Ihnen besondere Tipps und Hinweise
zur Bedienung gegeben werden sollen.
Page 7

7
5. Merkmale und Funktionen
Die Wetterstation unterscheidet sich auf den ersten Blick nicht von anderen herkömmlichen
Wetterstationen.
Sie kann jedoch Wetter-Informationen auswerten und anzeigen, die zusätzlich zu dem DCFSignal (bzw. dem HBG-Signal der Schweiz) per Funk empfangen werden, das sog.
"METEOTIME"-Signal.
Die Wetter-Informationen werden durch professionelle Meteorologen und modernsten Instrumenten erstellt - sie basieren also auf ähnlichen Daten, wie Sie sie von der Wettervorhersage
aus TV und Radio kennen.
Folgende Vorhersagen werden angezeigt:
• Wetterdatenanzeige (Wettervorhersage über Symbole, Tag-Temperatur, Nacht-Temperatur) für den aktuellen Tag und den nächsten Tag; für 90 Regionen Europas
• Wahrscheinlichkeitsanzeige für Niederschlag (Heute)
• Windgeschwindigkeit und Windrichtung (Heute)
• Wettermeldung (z.B. bei Sturm)
• Anzeige der Sonnenaufgangs- und Sonnenuntergangs-Zeiten für 272 Großstädte Europas
Weiterhin sind folgende Funktionen vorhanden:
• Anzeige der funkgenauen Uhrzeit, des Datums und Wochentags (Zeitzone einstellbar)
• Integrierter Sensor für die Innentemperatur
• Außensensor im Lieferumfang, für Messung der Außentemperatur; Funkübertragung
(433MHz) an die Wetterstation
• Wandmontage oder Tischaufstellung möglich
Page 8
8
6. Sicherheitshinweise
Bei Schäden, die durch Nichtbeachten dieser Bedienungsanleitung verursacht werden, erlischt der Garantieanspruch. Für Folgeschäden übernehmen wir keine Haftung!
Bei Sach- oder Personenschäden, die durch unsachgemäße Handhabung oder Nichtbeachten der Sicherheitshinweise verursacht werden,
übernehmen wir keine Haftung. In solchen Fällen erlischt jeder Garantieanspruch!
Sehr geehrte Kundin, sehr geehrter Kunde, die folgenden Sicherheits- und Gefahrenhinweise
dienen nicht nur zum Schutz Ihrer Gesundheit, sondern auch zum Schutz des Geräts. Lesen
Sie sich bitte die folgenden Punkte aufmerksam durch:
• Aus Sicherheits- und Zulassungsgründen (CE) ist das eigenmächtige
Umbauen und/oder Verändern des Produkts nicht gestattet. Öffnen/Zerlegen Sie es nicht! Es sind keinerlei von Ihnen einzustellende oder zu
wartende Teile im Inneren.
Wartungs-, Einstellungs- oder Reparaturarbeiten dürfen nur von einem
Fachmann/Fachwerkstatt durchgeführt werden.
• Verwenden Sie dieses Produkt nicht in Krankenhäusern oder medizinischen Einrichtungen. Obwohl der Außensensor nur relativ schwache Funksignale aussendet, könnte dieser dort zu Funktionsstörungen von lebenserhaltenden Systemen führen. Gleiches gilt möglicherweise in anderen
Bereichen.
• Die Wetterstation ist nur für trockene Innenräume geeignet. Setzen Sie sie
keiner direkten Sonneneinstrahlung, starker Hitze, Kälte, Feuchtigkeit oder
Nässe aus.
Der Außensensor ist für den geschützten Außenbereich geeignet (z.B.
unter einem Dachvorsprung).
• Das Produkt ist kein Spielzeug, es gehört nicht in Kinderhände. Das
Produkt enthält Kleinteile, Glas (Display) und Batterien. Platzieren Sie das
Produkt so, dass es von Kindern nicht erreicht werden kann.
• Lassen Sie das Verpackungsmaterial nicht achtlos liegen, dieses könnte
für Kinder zu einem gefährlichen Spielzeug werden.
• Betreiben Sie das Produkt nur in gemäßigtem Klima, nicht in tropischem
Klima.
Page 9
9
• Wenn das Produkt von einem kalten in einen warmen Raum gebracht wird
(z.B. bei Transport), kann Kondenswasser entstehen. Dadurch könnte das
Produkt beschädigt werden.
Lassen Sie deshalb das Produkt zuerst auf Zimmertemperatur kommen,
bevor Sie es verwenden. Dies kann u.U. mehrere Stunden dauern.
• In gewerblichen Einrichtungen sind die Unfallverhütungsvorschriften des
Verbandes der gewerblichen Berufsgenossenschaft für elektrische Anlagen und Betriebsmittel zu beachten.
• In Schulen, Ausbildungseinrichtungen, Hobby- und Selbsthilfewerkstätten
ist das Betreiben des Produkts durch geschultes Personal verantwortlich
zu überwachen.
• Gehen Sie vorsichtig mit dem Produkt um, durch Stöße, Schläge oder dem
Fall aus bereits geringer Höhe wird es beschädigt.
Page 10

10
7. Batterie- und Akkuhinweise
• Batterien/Akkus gehören nicht in Kinderhände.
• Achten Sie beim Einlegen der Batterien/Akkus auf die richtige Polung
(Plus/+ und Minus/- beachten).
• Lassen Sie Batterien/Akkus nicht offen herumliegen, es besteht die Gefahr,
dass diese von Kindern oder Haustieren verschluckt werden. Suchen Sie
im Falle eines Verschluckens sofort einen Arzt auf.
• Ausgelaufene oder beschädigte Batterien/Akkus können bei Berührung mit
der Haut Verätzungen verursachen, benutzen Sie deshalb in diesem Fall
geeignete Schutzhandschuhe.
• Achten Sie darauf, dass Batterien/Akkus nicht kurzgeschlossen, zerlegt
oder ins Feuer geworfen werden. Es besteht Explosionsgefahr!
• Herkömmliche Batterien dürfen nicht aufgeladen werden. Es besteht Explosionsgefahr!
Laden Sie ausschließlich dafür vorgesehene wiederaufladbare Akkus,
verwenden Sie ein geeignetes Ladegerät.
• Bei längerem Nichtgebrauch (z.B. bei Lagerung) entnehmen Sie die eingelegten Batterien/Akkus.
Bei Überalterung besteht andernfalls die Gefahr, dass Batterien/Akkus
auslaufen, was Schäden am Produkt verursacht, Verlust von Garantie/
Gewährleistung!
• Wechseln Sie immer den ganzen Satz Batterien/Akkus aus.
Verwenden Sie nur Batterien/Akkus des gleichen Typs/Herstellers und des
gleichen Ladezustands (keine vollen mit halbvollen oder leeren Batterien/
Akkus mischen).
• Mischen Sie niemals Batterien mit Akkus. Verwenden Sie entweder Batterien oder Akkus.
• Für die umweltgerechte Entsorgung von Batterien und Akkus lesen Sie bitte
das Kapitel "Entsorgung".
Page 11

11
Bitte beachten Sie:
Der Betrieb der Wetterstation und des Außensensors mit Akkus ist grundsätzlich möglich.
Durch die geringere Spannung von Akkus (Akku = 1.2V, Batterie = 1.5V) und die geringere
Kapazität kommt es jedoch zu einer geringeren Betriebsdauer; ebenso kann sich die Funkreichweite verringern.
Bei niedrigen Außentemperaturen sind Akkus empfindlicher als Batterien.
Wir empfehlen Ihnen deshalb, vorzugsweise hochwertige Alkaline-Batterien zu verwenden,
um einen langen und sicheren Betrieb zu ermöglichen.
Für die Wetterstation sind zwei Batterien vom Typ AA/Mignon erforderlich (z.B. Conrad-Best.-
Nr. 652502, 2x bestellen).
Der Außensensor benötigt ebenfalls zwei Batterien vom Typ AA/Mignon erforderlich (z.B.
Conrad-Best.-Nr. 652502, 2x bestellen).
Page 12
12
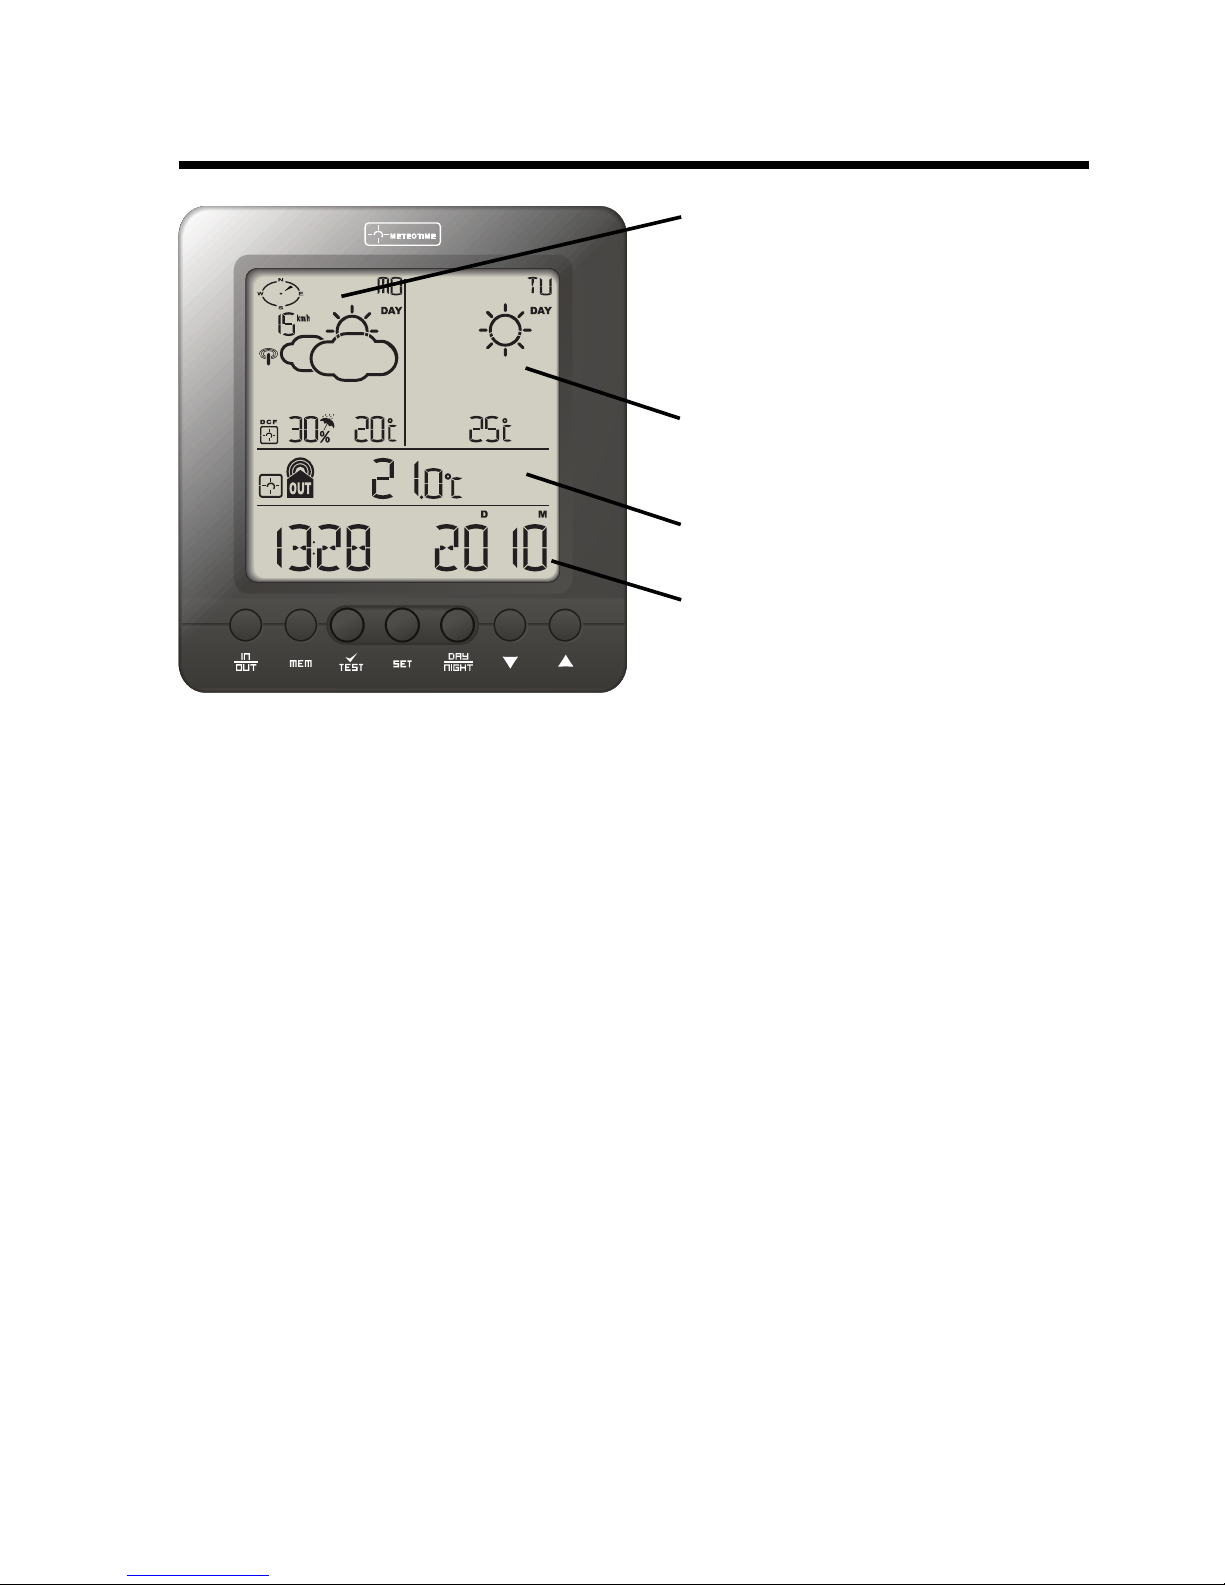
8. Anzeigen und Bedienelemente
• Anzeigebereich für Wettervorhersage für
Heute, mit Windgeschwindigkeit, Windrichtung und der Wahrscheinlichkeit von
Niederschlag (Regen/Schnee/Hagel);
Anzeige von Tag-/Nacht-Temperatur,
Tag-/Nacht-Wetter
• Wettervorhersage für den nächsten Tag,
mit Tag-/Nacht-Temperatur, Tag-/NachtWetter
• Anzeigebereich für Innen-/Außentemperatur
• Anzeigebereich für verschiedene Werte, z.B. für DCF-Uhrzeit/Datum, Städteauswahl usw.
Bedientasten:
Taste "IN/OUT": Kurz drücken für Umschalten der Anzeige für Innen-/Außentemperatur; 3
Sekunden drücken für Aktivierung der Suche nach dem Außensensor
Taste "MEM": Kurz drücken für Anzeige der MIN-/MAX-Werte bzw. 3 Sekunden drücken zum
Löschen der MIN-/MAX-Werte
Taste "TEST": Empfangstest für Außensensor aktiveren
Taste "SET": Kurz drücken für Umschalten zwischen Stadt, DCF-Zeit/Datum, Sonnenauf-/
untergangszeit bzw. 3 Sekunden drücken für Aktivierung des Einstellmodus (z.B. Auswahl der
Stadt, der Zeitzone, Sprache für die Anzeige im Display)
Tasten "" und "": Werte verändern
Taste "DAY/NIGHT": Wetterdaten anzeigen für Tag/Nacht
Page 13
13
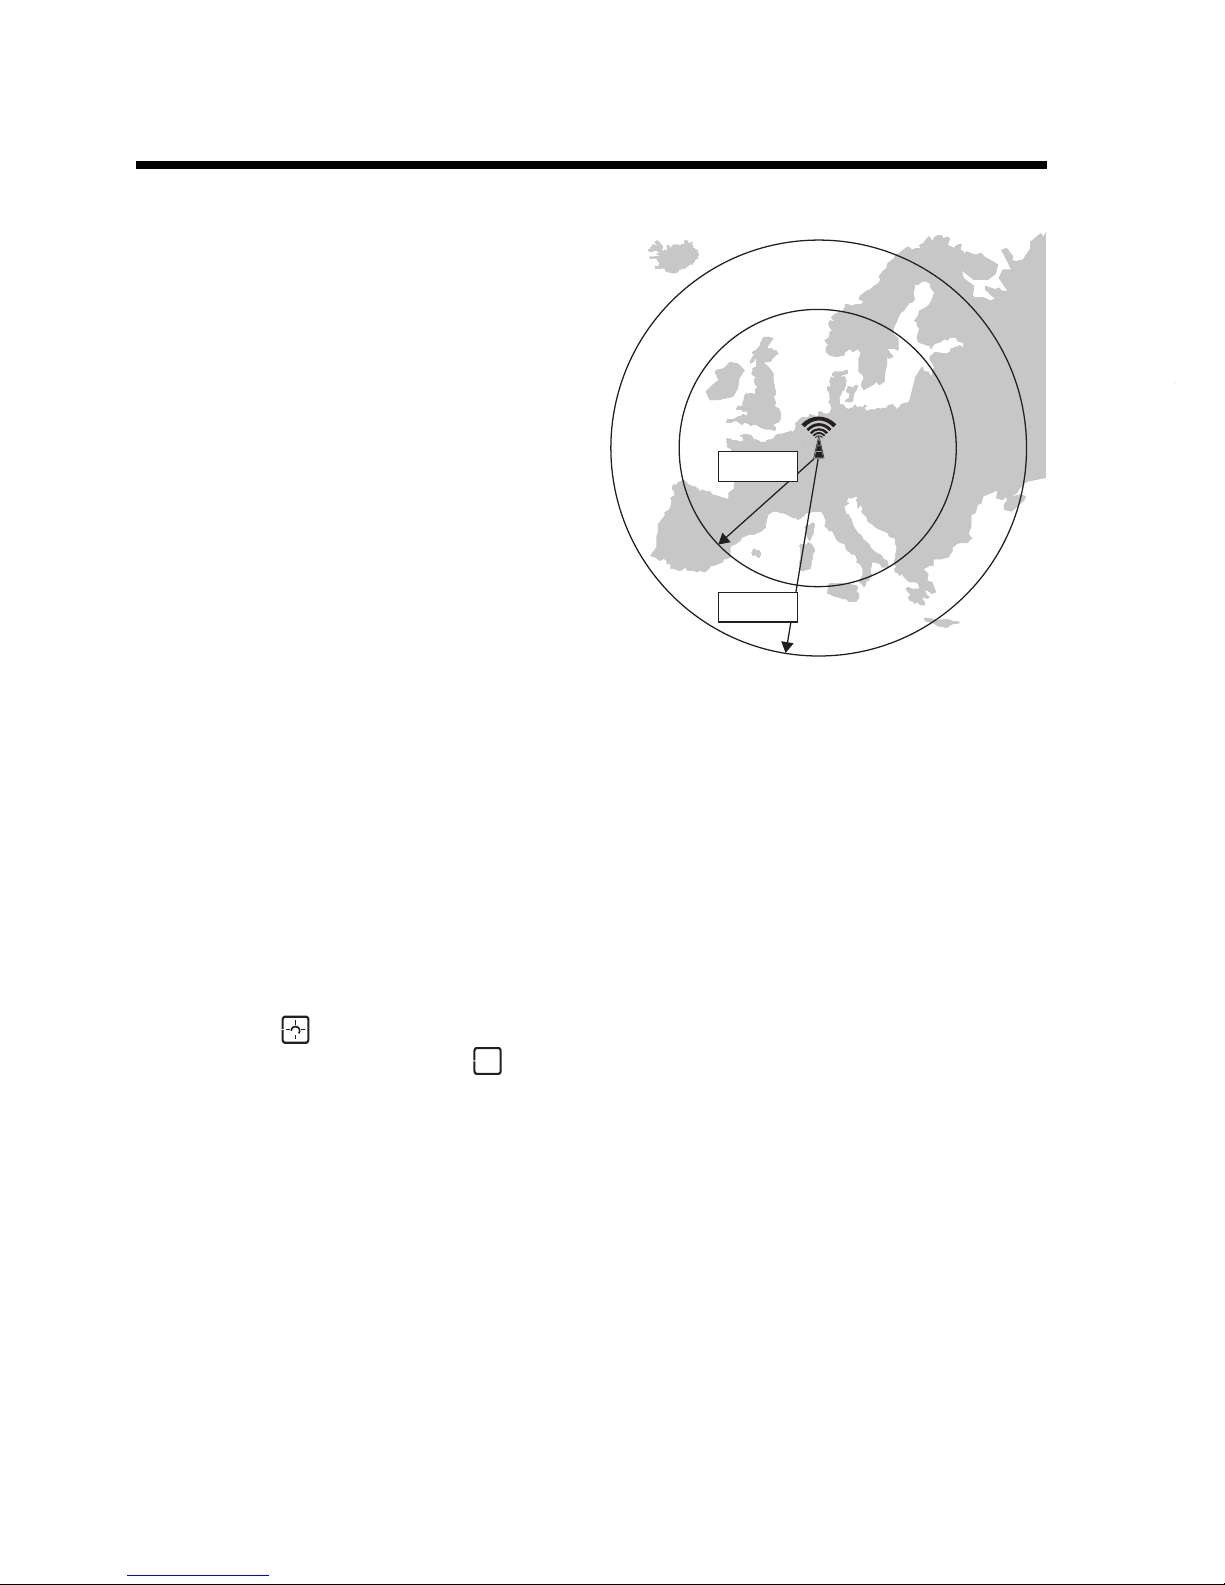
9. DCF- und METEOTIME-Empfang
Die Wetterstation ist in der Lage, das sog.
DCF-Signal zu empfangen und auszuwerten.
Dabei handelt es sich um ein Funksignal,
das von einem Sender in Mainflingen (nahe
Frankfurt am Main) stammt. Dessen Reichweite beträgt bis zu 1500km, bei idealen
Empfangsbedingungen sogar bis zu 2000km.
Das DCF-Signal enthält die genaue Uhrzeit
(Abweichung theoretisch 1 Sekunde in einer
Million Jahre!) und das Datum.
Selbstverständlich entfällt auch das umständliche manuelle Einstellen der Sommer- und
Winterzeit.
Die Wetterstation erkennt weiterhin das zum DCF-Signal kompatible Signal des Zeitzeichensenders "HBG" in der Schweiz.
Als Besonderheit wertet die Wetterstation das sog. "METEOTIME"-Signal aus, das im
DCF-/HBG-Signal enthalten ist.
Das "METEOTIME"-Signal enthält die Daten der Wettervorhersage für 90
verschiedene Regionen Europas.
Die Übertragung der Daten für die Wettervorhersage über das Funksignal des DCF- bzw.
HBG-Senders ist aufgrund der verwendeten Technik relativ langsam, deshalb dauert es bis
zu 24 Stunden, bis die Wetterstation alle Wetterdaten empfangen hat.
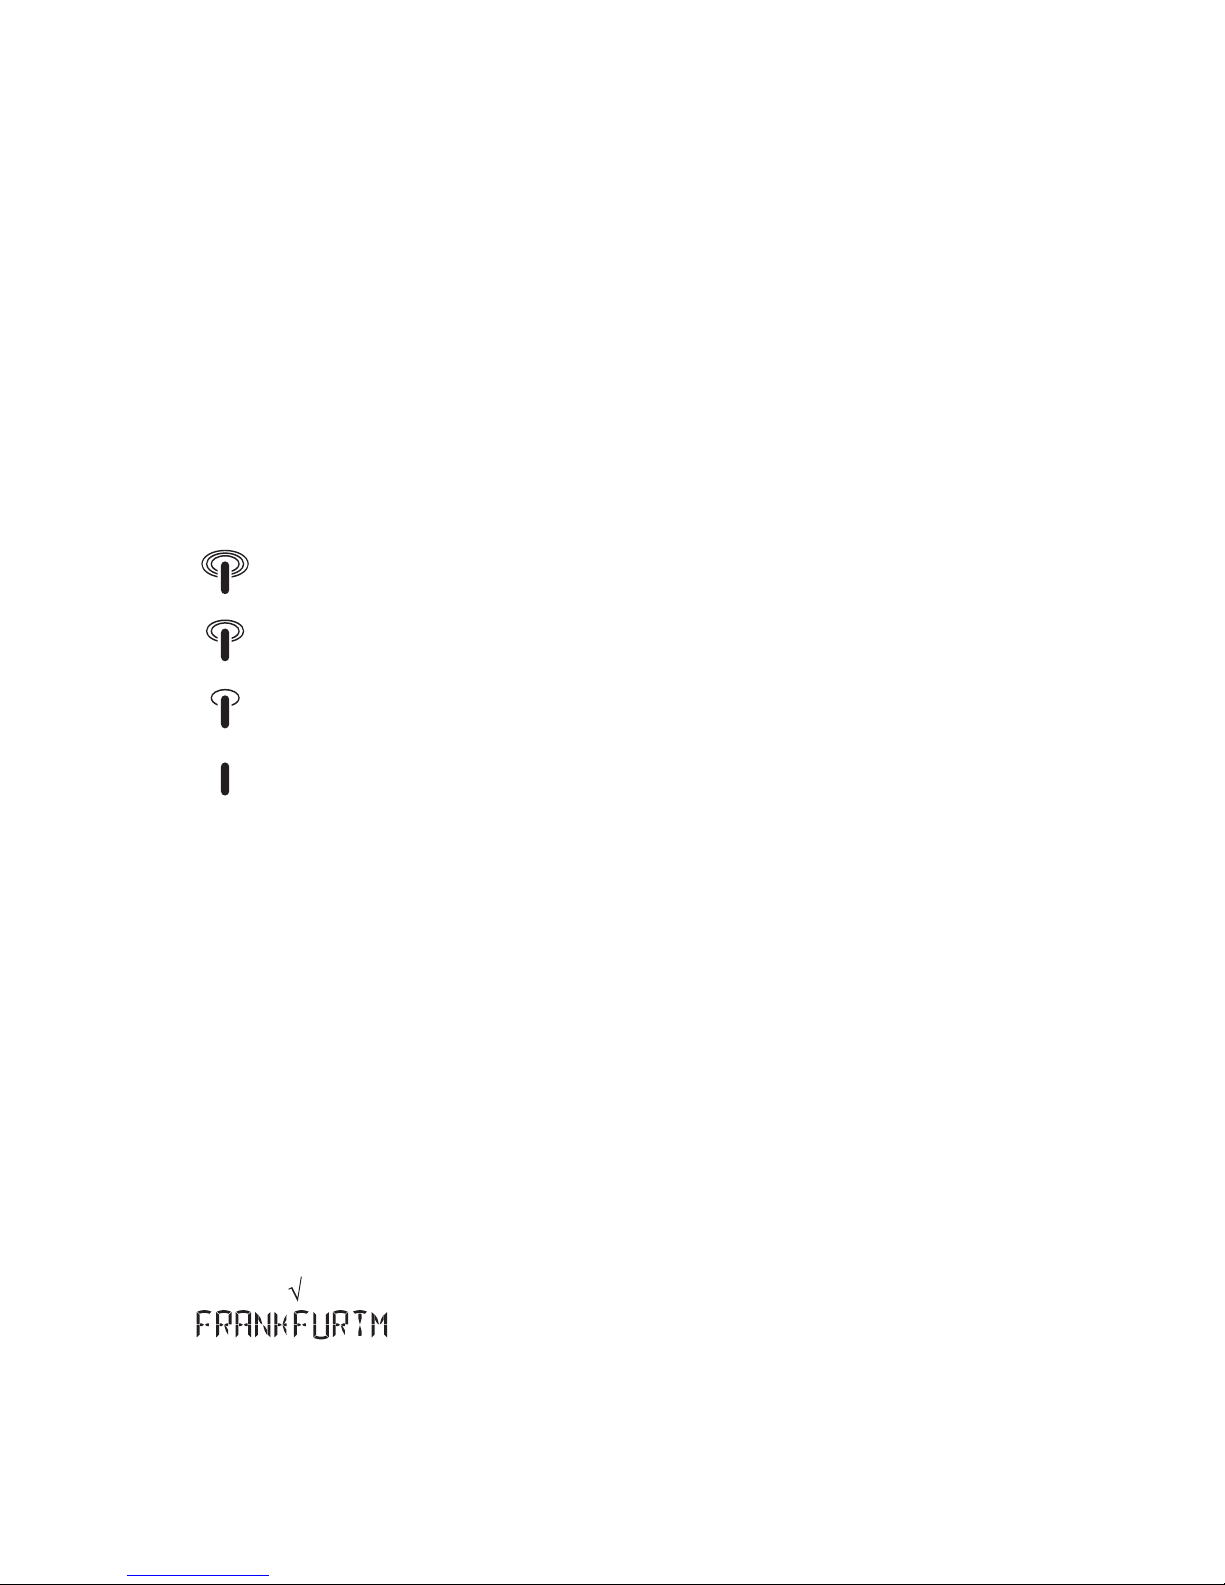
Das Symbol "
" im jeweiligen Anzeigebereich bedeutet, dass die METEOTIME-Daten
empfangen wurden, das Symbol " " steht für noch fehlende Daten.
Die richtige Wahl des Aufstellungsorts ist für den Empfang der Funkdaten
entscheidend, da der Empfang der Wetterdaten rund um die Uhr stattfindet.
Stellen Sie die Wetterstation nicht neben elektrische/elektronische Geräte und
nicht in die Nähe von Kabeln, Steckdosen oder Metallteilen. Halten Sie
ausreichend Abstand, mindestens 1 Meter!
Ein schlechter Empfang ist auch zu erwarten z.B. bei metallbedampften
Isolierglasfenstern, Stahlbetonbauweise, beschichteten Spezialtapeten oder
in Kellerräumen.
1500 km
2000 km
Page 14

14
Sie können nach der Inbetriebnahme (Kapitel 10) und der Wahl des Aufstellungs/Montageorts (Kapitel 11) über die Taste "TEST" einen Empfangstest für das
"METEOTIME"-Signal starten, siehe Kapitel 12. d).
Page 15
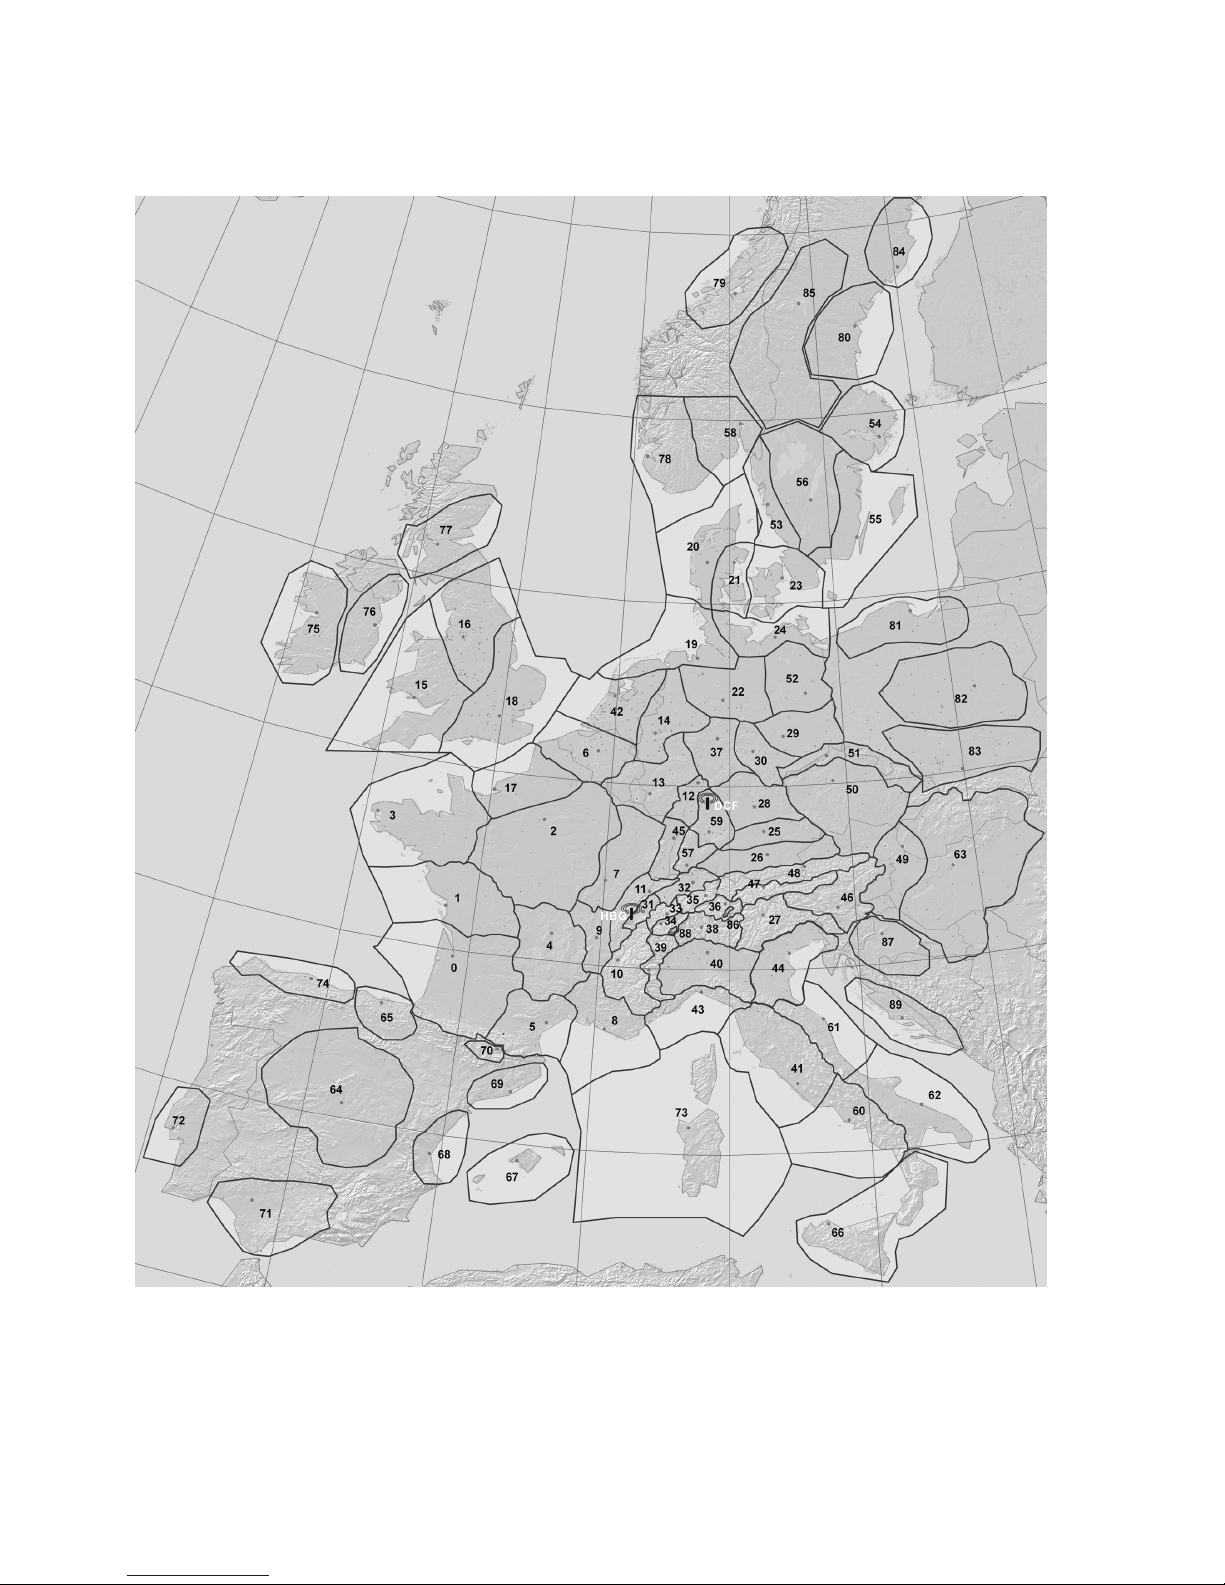
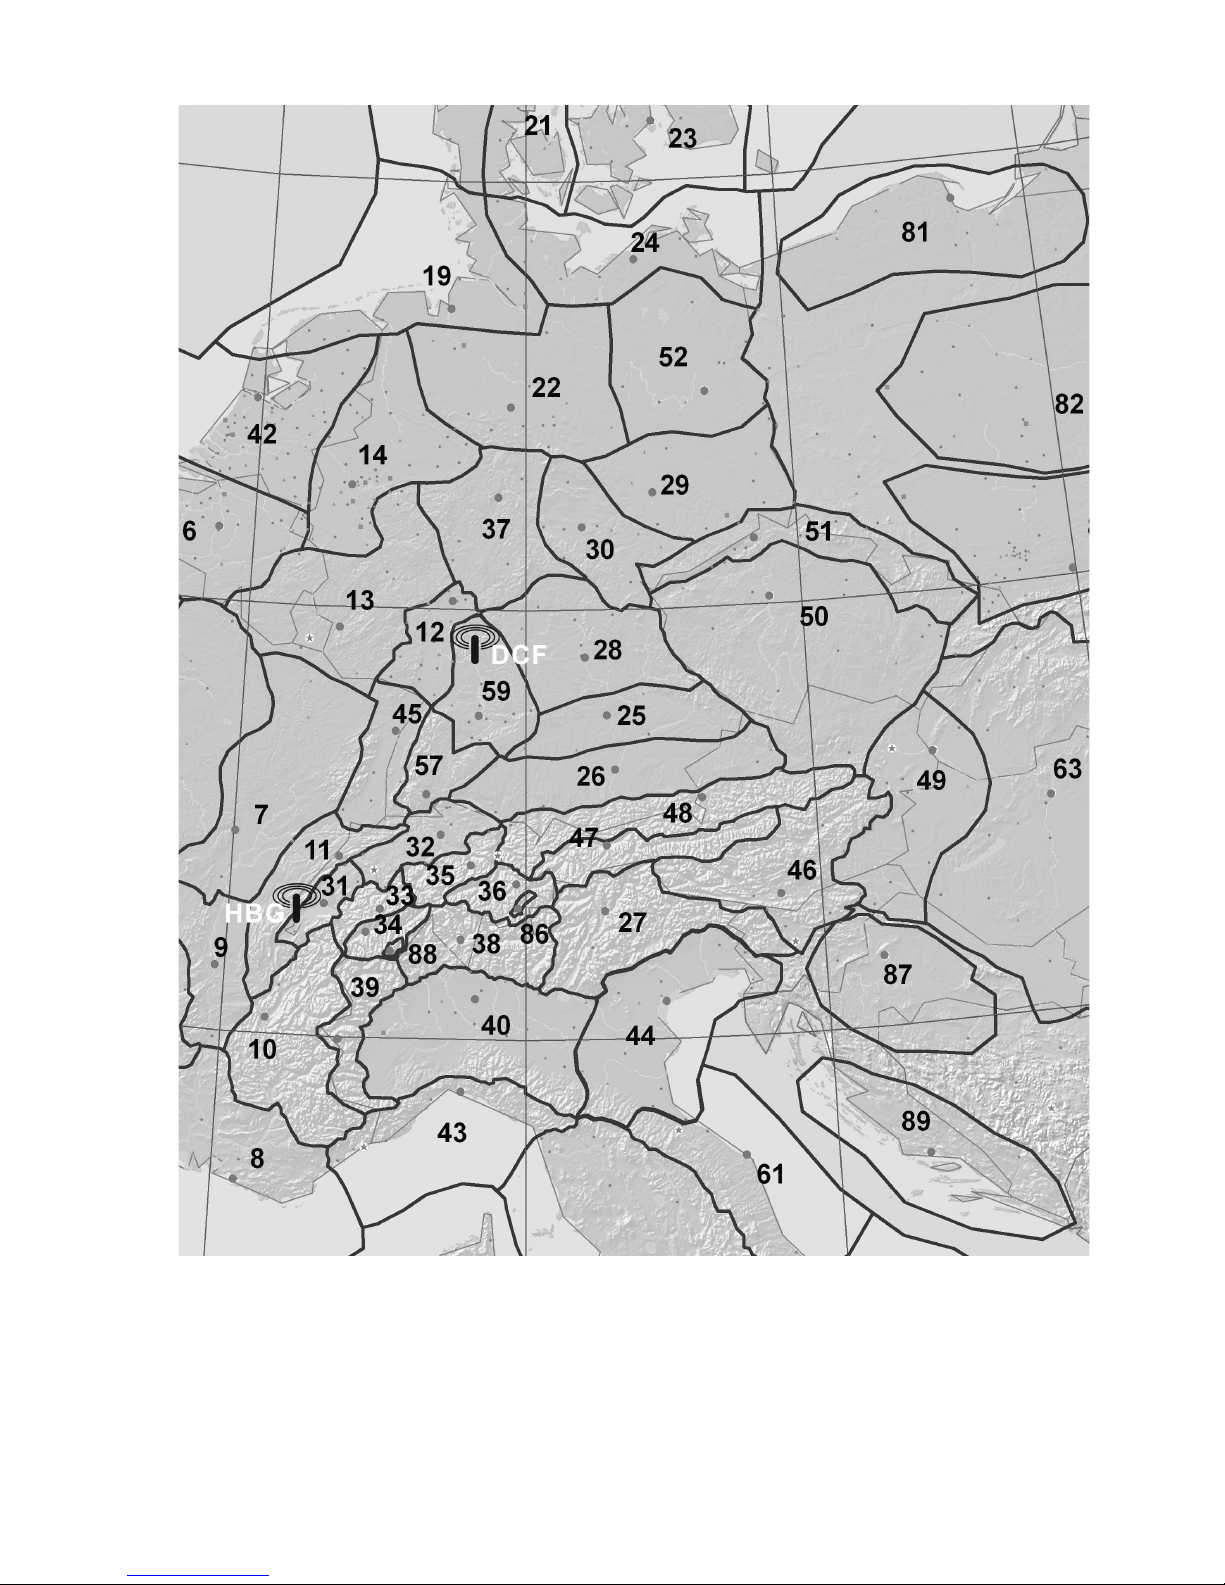
15
Position der 90 Wetterbereiche (Ausschnittsvergrößerung von Mitteleuropa siehe
nächste Seite):
Page 16
16
Page 17

17
10. Inbetriebnahme
a) Allgemein
Bitte beachten Sie:
Legen Sie zuerst in den Außensensor Batterien ein, erst danach in die
Wetterstation.
Wenn Sie in anderer Reihenfolge vorgehen, kann es vorkommen, dass die
Wetterstation den Außensensor nicht erkennt. In diesem Fall kann später eine
manuelle Suche nach dem Außensensor durchgeführt werden.
Wenn Sie Wetterstation und Außensensor bei der Erstinbetriebnahme z.B. in einem Zimmer
ausprobieren wollen, so sollten Sie den Außensensor nicht direkt neben die Wetterstation
legen. Andernfalls kann es durch Funkinterferenzen zu Empfangsproblemen kommen. Halten
Sie einen Abstand von mindestens 1m zwischen Wetterstation und Außensensor ein.
Durch diesen Funktionstest stellen Sie sicher, dass spätere Empfangsprobleme auf die
Anordnung von Wetterstation und Außensensor zurückzuführen ist.
Die Reichweite im Freifeld beträgt bis zu 30m (ohne Störeinflüsse, direkte Sicht zwischen
Außensensor und Wetterstation). Die effektiv erzielbare Reichweite in Gebäuden ist natürlich
geringer und beträgt etwa 10-20m, je nach Bauweise und Aufstellort.
Bitte beachten Sie dazu das Kapitel "Reichweite".
b) Inbetriebnahme des Außensensors
• Öffnen Sie das Batteriefach des Außensensors, indem Sie die vier Schrauben des Batteriefachdeckels auf der Rückseite mit einem dazu geeigneten Schraubendreher herausdrehen.
• Anschließend sind zwei Batterien vom Typ AA/Mignon polungsrichtig einzulegen (Plus/+
und Minus/- beachten).
• Setzen Sie den Batteriefachdeckel wieder auf und schrauben Sie ihn fest.
Page 18
18
c) Inbetriebnahme der Wetterstation
• Öffnen Sie das Batteriefach auf der Rückseite der Wetterstation.
• Legen Sie zwei Batterien vom Typ AA/Mignon polungsrichtig in das Batteriefach ein
(Plus/+ und Minus/- beachten). Im Batteriefach finden Sie eine entsprechende Abbildung.
Nach dem Einlegen der Batterien erscheinen kurz alle verfügbaren Display-Elemente.
• Verschließen Sie das Batteriefach.
• Im Display blinkt oben links das Empfangssymbol für das DCF-Signal und die Wettersymbole der verschiedenen Anzeigebereiche, unten im Display steht "SUCHE SIG." =
Suche nach Signal.
Die Displaysprache kann später von der Grundeinstellung (Deutsch) auf
andere Sprachen umgeschaltet werden. Beachten Sie dazu das Kapitel 12. i).
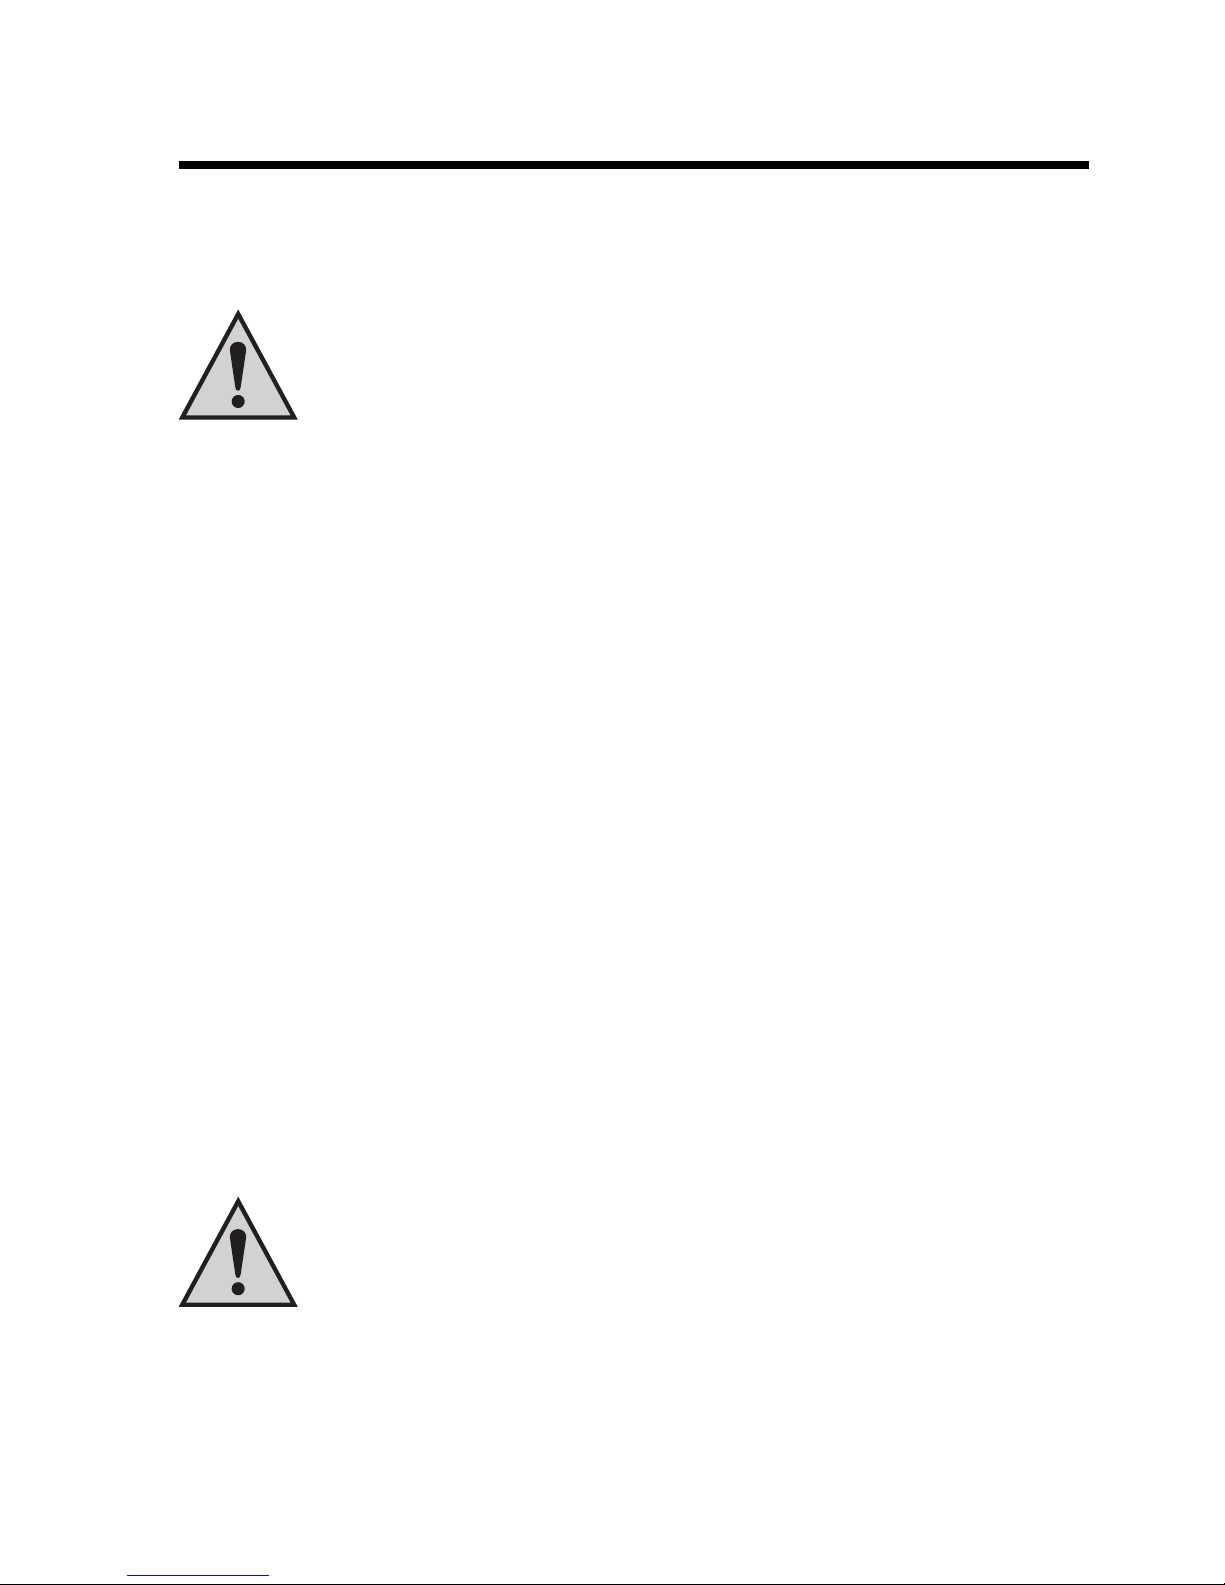
Sehr guter Empfang
Guter Empfang
Schlechter Empfang
Kein Empfang
Wie bereits in Kapitel 9 erwähnt, ist ein ausreichender Abstand zu elektrischen/
elektronischen Geräten, Metallteilen, Kabeln usw. einzuhalten.
Bewegen Sie die Wetterstation während dem ersten Empfangsversuch nicht.
Es kann 3-10 Minuten dauern, bis der DCF-Empfang für die Uhrzeit, das Datum
und erste METEOTIME-Daten abgeschlossen ist.
• Wenn im Display unten "LAND EINST." (Land einstellen) erscheint, stellen Sie Ihr Heimatland mit den Tasten "" und "" ein (z.B. "D/GER" für Deutschland) und bestätigen die
Einstellung mit kurzem Druck auf die Taste "SET".
Darauf zeigt das Display "STADT EINST." (Stadt einstellen) an. Mit den Tasten "" und
"" können Sie eine Stadt auswählen, die in der Nähe Ihres Wohnorts liegt.
Bestätigen Sie die Einstellung mit kurzem Druck auf die Taste "TEST", dann wird die Stadt
gespeichert und es erscheint ein kleines Häkchen über dem Städtenamen:
Page 19

19
Insgesamt 5 verschiedene Städte sind auswählbar, diese Einstellung ist
selbstverständlich auch später durchführbar. Ebenso ist es möglich, eine für
die Anzeige bereits ausgewählte Stadt zu löschen und eine andere zu speichern, siehe Kapitel 12. e) und 12. f).
Falls Sie das Land und die Stadt nicht wie oben beschrieben einstellen, so wird
von der Wetterstation als Land automatisch "Deutschland" und als Stadt
"Frankfurt am Main" ausgewählt.
• Mit den Tasten "" und "" können Sie weitere Städte auswählen und mit der Taste
"TEST" speichern.
• Drücken Sie die Taste "SET", die Einstellungen werden gespeichert, in der unteren
Displayzeile erscheint "EINST. VORG." (= Einstellungen vorgenommen).
• Das Display zeigt jetzt evtl. bereits diverse Wetterdaten an.
• Danach sucht die Wetterstation nach dem Außensensor; im Anzeigebereich für die Temperatur blinkt das Symbol "OUT". Dies dauert ca. 2-3 Minuten. Warten Sie diesen Zeitraum ab,
drücken Sie keine Taste.
Wenn nach 2-3 Minuten immer noch keine Anzeige der Außentemperatur
erscheint, platzieren Sie den Außensensor an einer anderen Stelle (nicht
direkt neben die Wetterstation legen, halten Sie einen Abstand von mind.
einem Meter ein.
Drücken Sie anschließend die Taste "IN/OUT" für ca. 3 Sekunden, um die
Suche nach dem Außensensor erneut zu starten.
Das Symbol "OUT" blinkt wieder, der Außensensor wird gesucht.
Page 20
20
11. Aufstellen & Montage
Nachdem Sie wie in Kapitel 10 beschrieben die Bestandteile des Systems in Betrieb
genommen haben, können Sie den Außensensor an einer dazu geeigneten Stelle platzieren
bzw. montieren. Gleiches gilt natürlich für die Wetterstation.
Achten Sie beim Bohren/Festschrauben darauf, dass keine Strom-, Gas- oder
Wasserleitungen beschädigt werden, Lebensgefahr!
Bevor Sie eine Schraube oder einen Haken für die Wandmontage eindrehen
bzw. ein Loch für einen Dübel bohren, sollten Sie feststellen, ob am Montageort
ein einwandfreier Empfang der Funkdaten möglich ist (DCF-Daten bzw.
Messdaten des Außensensors).
a) Wetterstation
Die Wetterstation kann über den Standfuß an einer passenden Stelle aufgestellt werden.
Diese muss waagrecht, ausreichend groß, stabil und eben sein, außerdem außerhalb der
Reichweite von Kindern liegen.
Zur Wandmontage steht eine entsprechende Öffnung an der Rückseite der Wetterstation zur
Verfügung. Der Standfuß ist dabei einzuklappen.
Der Aufstell- oder Montageort sollte so gewählt werden, dass die Wetterstation nicht in der
Nähe von Heizkörpern o.ä. liegt. Auch direkte Sonneneinstrahlung ist zu vermeiden (die
Wetterstation erwärmt sich, somit wird nicht mehr die Lufttemperatur im Raum gemessen).
b) Außensensor
Bringen Sie den Außensensor im geschützten Außenbereich an einer Stelle an, die ganztägig
im Schatten liegt. Andernfalls wird durch die Sonneneinstrahlung der Temperaturmesswert
verfälscht.
Gleiches gilt, wenn längere Zeit Regen oder Schnee auf den Sensor gelangen (der Temperatursensor würde in diesem Fall nicht mehr die Lufttemperatur messen).
Setzen Sie den Außensensor nicht direktem Niederschlag aus, betreiben Sie
den Außensensor niemals in oder unter Wasser, dadurch wird er zerstört!
Page 21

21
12. Bedienung
a) Anzeige der Temperatur
Etwa im mittleren Bereich des LC-Displays befindet sich der Anzeigebereich für die Temperatur.
Mit der Taste "IN/OUT" wird umgeschaltet zwischen der Anzeige der Innentemperatur
(Symbol "IN" im Display) und der Außentemperatur (Symbol "OUT" im Display).
b) Min-/Max-Werte für Temperatur
Durch kurzes Drücken der "MEM"-Taste (siehe Kapitel 8) wird umgeschaltet zwischen der
"MIN"- und "MAX"-Anzeige und der Momentan-Werte.
Löschen Sie die gespeicherten Daten, indem Sie die "MEM"-Taste ca. 3 Sekunden lang
drücken.
Als Min-/Max-Wert wird bis zum nächsten Datenempfang jeweils nur "- - . -" angezeigt, bis
wieder ein Datenpaket vom Außensensor empfangen wird bzw. eine Veränderung der Werte
erfolgt.
c) Suche nach dem Außensensor durchführen
Nach einem Batteriewechsel im Außensensor oder bei Empfangsstörungen lässt sich eine
manuelle Suche nach dem Funksignal des Außensensors durchführen.
Drücken Sie dazu die Taste "IN/OUT" so lange (ca. 3 Sekunden), bis das Symbol "OUT" im
Anzeigebereich der Temperatur blinkt, die Wetterstation sucht nach dem Außensensor. Dies
kann 2-3 Minuten dauern.
Bewegen Sie in dieser Zeit die Wetterstation und den Außensensor nicht.
Drücken Sie keine Taste an der Wetterstation.
d) Empfangstest für das "METEOTIME"-Signal
Da in jedem DCF-Signal pro Sekunde einige Informationen für das Wetter enthalten sind (das
sog. "METEOTIME"-Signal), ist ein Empfangstest im Gegensatz zu herkömmlichen DCFUhren sehr leicht möglich.
Drücken Sie kurz die Taste "TEST".
Page 22

22
Unten im Display wird "EMPF. TEST" (Empfangstest) angezeigt und das "METEOTIME"Empfangssymbol links der Temperaturanzeige (links neben dem IN/OUT-Symbol) beginnt zu
blinken.
= einwandfreier Empfang
= kein Empfang
Verändern Sie ggf. den Aufstellungsort der Wetterstation, bis "
" angezeigt wird.
Nach einer Minute wird der Empfangstest automatisch beendet (oder vorher Taste "TEST"
nochmals drücken). Selbstverständlich können Sie den Empfangstest erneut starten, gehen
Sie wie oben beschrieben vor.
e) Land/Stadt für Wetteranzeige auswählen
Sie können bis zu 5 Städte auswählen, deren Wettervorhersage sich später mit den Tasten
"" und "" angezeigen lässt.
Im Kapitel 21 finden Sie eine Auflistung aller verfügbaren Städte.
Gehen Sie zur Auswahl wie folgt vor:
• Halten Sie die Taste "SET" so lange gedrückt (ca. 3 Sekunden), bis unten im Display "LAND
EINST." (Land einstellen) erscheint.
• Wählen Sie das Land mit den Tasten "" und "" aus (z.B. "D/GER" für Deutschland) und
bestätigen die Auswahl mit kurzem Druck auf die Taste "SET".
Darauf zeigt das Display "STADT EINST." (Stadt einstellen) an.
• Mit den Tasten "" und "" lässt sich eine Stadt auswählen.
Bestätigen Sie die Einstellung mit kurzem Druck auf die Taste "TEST". Über dem Namen der
Stadt erscheint ein kleines Häkchen.
Drücken Sie die Taste "TEST" nochmals, um die Stadt aus der Liste zu löschen, das
Häkchen verschwindet wieder.
Erscheint "SPEICHER_V" (Speicher voll), so sind alle 5 Speicher belegt.
Es können insgesamt 5 Städte gespeichert werden, um deren Wetterdaten
anzuzeigen. Um eine andere Stadt zu speichern, ist vorher eine vorhandene
Stadt aus der Anzeigeliste zu löschen, siehe nächstes Kapitel.
• Durch Drücken der Taste "SET" wird der Einstellmodus verlassen.
Page 23

23
f) Stadt aus der Anzeigeliste löschen
Wie im Kapitel 12. e) beschrieben, können insgesamt bis zu 5 Städte unterschiedlicher Länder
gespeichert werden, deren Wettervorhersage sich mit den Tasten "" und "" anzeigen
lässt.
Um eine Stadt aus der Anzeigeliste zu löschen, gehen Sie wie folgt vor:
• Wählen Sie mit den Tasten "" bzw. "" die Stadt aus der Anzeigeliste, die Sie löschen
wollen.
• Halten Sie die Taste "SET" so lange gedrückt (ca. 3 Sekunden), bis unten im Display
"LAND EINST." (Land einstellen) erscheint.
• Drücken Sie einmal kurz die Taste "". Daraufhin wird das Land, in dem die zum Löschen
ausgewählte Stadt liegt, angezeigt.
• Drücken Sie kurz die Taste "SET".
• Das Display zeigt "STADT EINST." (Stadt einstellen) an.
• Drücken Sie einmal kurz die Taste "". Nun wird die Stadt angezeigt (beachten Sie das
kleine Häkchen-Symbol "√" über der Stadt).
• Drücken Sie kurz die Taste "TEST". Das Häkchen-Symbol "√" verschwindet.
• Durch Drücken der Taste "SET" wird der Löschmodus verlassen.
g) Wohnort eingeben
Mit dieser Funktion können Sie den Namen Ihres Wohnorts eingeben.
Gehen Sie dazu wie folgt vor:
• Halten Sie die Taste "SET" so lange gedrückt (ca. 3 Sekunden), bis unten im Display "LAND
EINST." (Land einstellen) erscheint.
• Wählen Sie das Land mit den Tasten "" und "" aus (z.B. "D/GER" für Deutschland) und
bestätigen die Auswahl mit kurzem Druck auf die Taste "SET".
Darauf zeigt das Display "STADT EINST." (Stadt einstellen) an.
• Mit den Tasten "" und "" lässt sich jetzt eine Stadt auswählen, die in der Nähe Ihres
Wohnorts liegen muss.
• Drücken Sie kurz die Taste "MEM". Daraufhin verschwindet der vorher angezeigte Stadtname und an der ersten Stelle der Zeile erscheint ein blinkender Strich "_" für das
Eingabefeld.
Page 24

24
Folgende Tasten werden zur Eingabe verwendet (jeweils kurz drücken):
- Tasten "" und "": Buchstabe/Zeichen auswählen
- Taste "SET": Buchstabe/Zeichen speichern und zur nächsten Stelle springen
- Taste "TEST": Eine Stelle zurückspringen (Korrektur)
• Die Eingabe wird automatisch beendet, wenn Sie die den letzten Buchstaben am rechten
Ende der Eingabezeile mit kurzem Druck auf die Taste "SET" speichern.
Alternativ wird die Eingabe vorher beendet, wenn an einer Eingabeposition kein Zeichen
ausgewählt wird (nur der Strich "_" blinkt) und dann die Taste "SET" gedrückt wird.
h) Umschalten der Anzeige für Zeit/Datum, Städteliste und
Sonnenaufgangs-/untergangszeit
Durch kurzen Druck auf die Taste "SET" können Sie umschalten zwischen der Auswahlliste
für die gespeicherten Städte, der Sonnenaufgangs- und Sonnenuntergangszeit sowie der
Anzeige von Uhrzeit und Datum.
i) Zeitzone, Sprache und Kontrast einstellen
• Halten Sie die Taste "SET" so lange gedrückt (ca. 3 Sekunden), bis unten im Display "LAND
EINST." (Land einstellen) erscheint.
• Drücken Sie kurz die Taste "SET", im Display unten erscheint "ZONE +00HR".
• Mit den Tasten "" und "" kann die gewünschte Zeitzone eingestellt werden.
• Drücken Sie kurz die Taste "SET", im Display unten erscheint die momentan eingestellte
Sprache für die Textanzeigen der unteren Zeile.
• Wählen Sie die gewünschte Sprache mit den Tasten "" und "" aus.
• Drücken Sie kurz die Taste "SET", im Display unten erscheint der aktuell eingestellte
Kontrastwert.
• Wählen Sie den Kontrastwert für das LC-Display mit den Tasten "" und "" aus.
• Beenden Sie den Einstellmodus durch einen kurzen Druck auf die Taste "SET".
Page 25
25
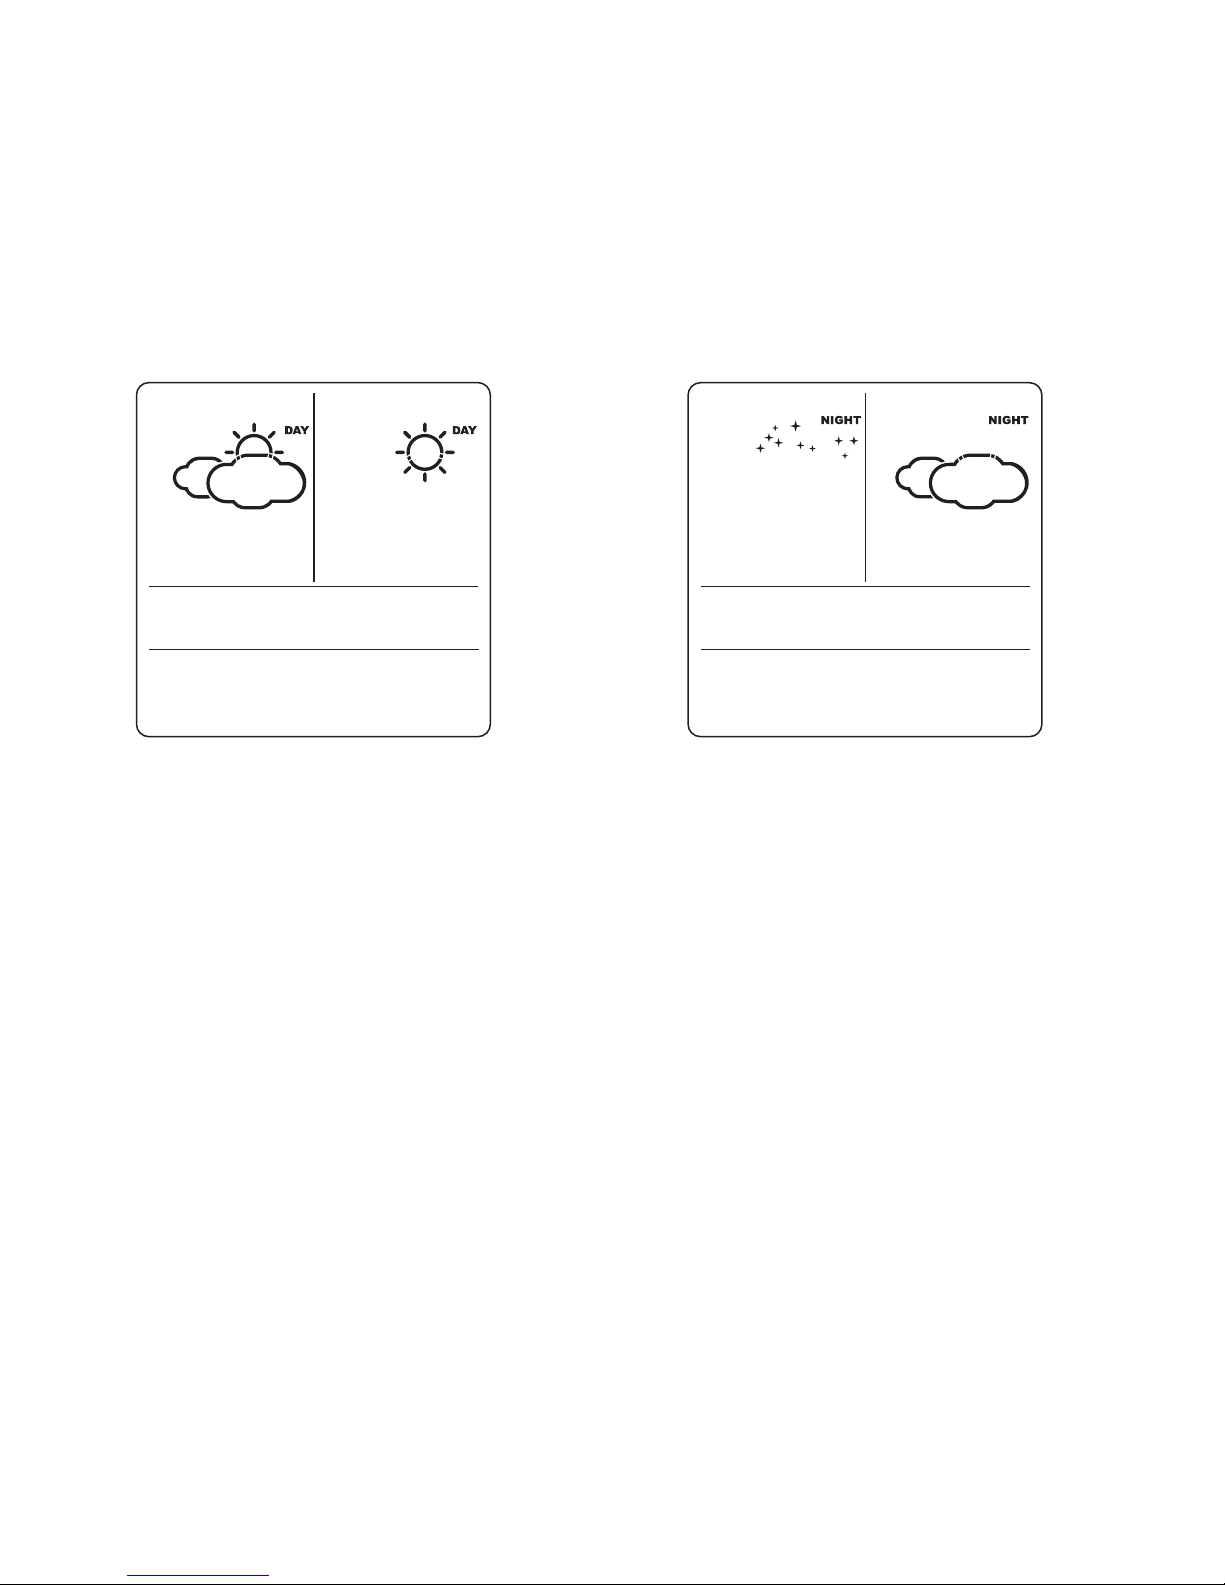
j) Wetterinformation umschalten für Tag/Nacht
Die Wetterstation schaltet die Anzeige für die Wetterinformationen für Tag und Nacht
abhängig von der Sonnenaufgangs- bzw. Sonnenuntergangszeit automatisch um. Dazu
erscheint im Display neben der Anzeige des Wochentags ein kleines "DAY" (Tag) bzw.
"NIGHT" (Nacht).
Sie können die jeweils andere Anzeige durch kurzen Druck auf die Taste "DAY/NIGHT" für 10
Sekunden anzeigen lassen.
< DAY/NIGHT >
Page 26
26
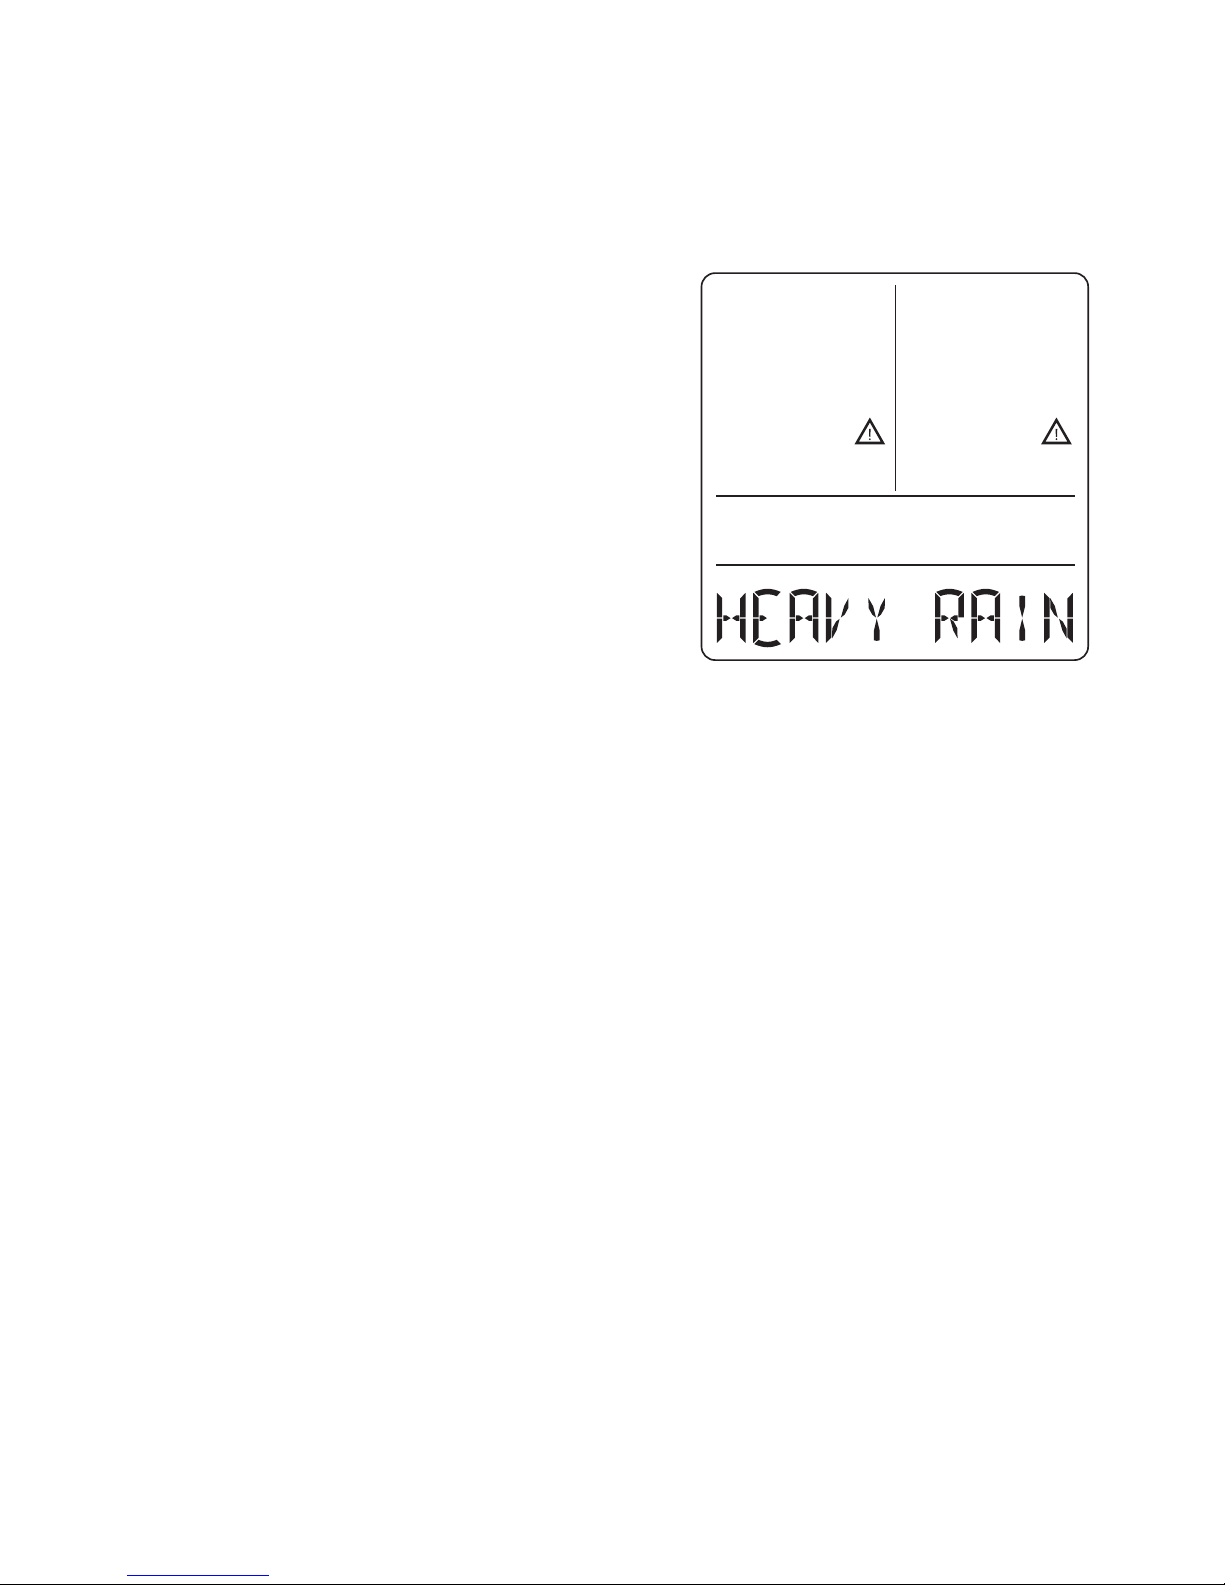
k) Unwetter-Meldungen
Das "METEOTIME"-Signal beinhaltet zusätzlich Informationen zu besonderen Wetterzuständen (z.B. starke Windböen, gefrorener Regen, starker Schneefall, Gewitter, dichter Nebel
usw.).
Im Display erscheint ein Symbol, wenn solche
Daten empfangen wurden (Position der Symbole
siehe rechts im Bild).
Durch ggf. mehrfachen kurzen Druck auf die Taste "DAY/NIGHT" können diese Meldungen unten
im Display als Textmeldung angezeigt werden.
Falls mehrere Meldungen existieren, blinkt das
jeweils zum entsprechenden Tag gehörige Symbol, dessen Meldung unten angezeigt wird.
Die Wetterstation zeigt die aktuelle Meldung außerdem automatisch im Wechsel mit der normalen Anzeige unten im Display an.
Page 27
27
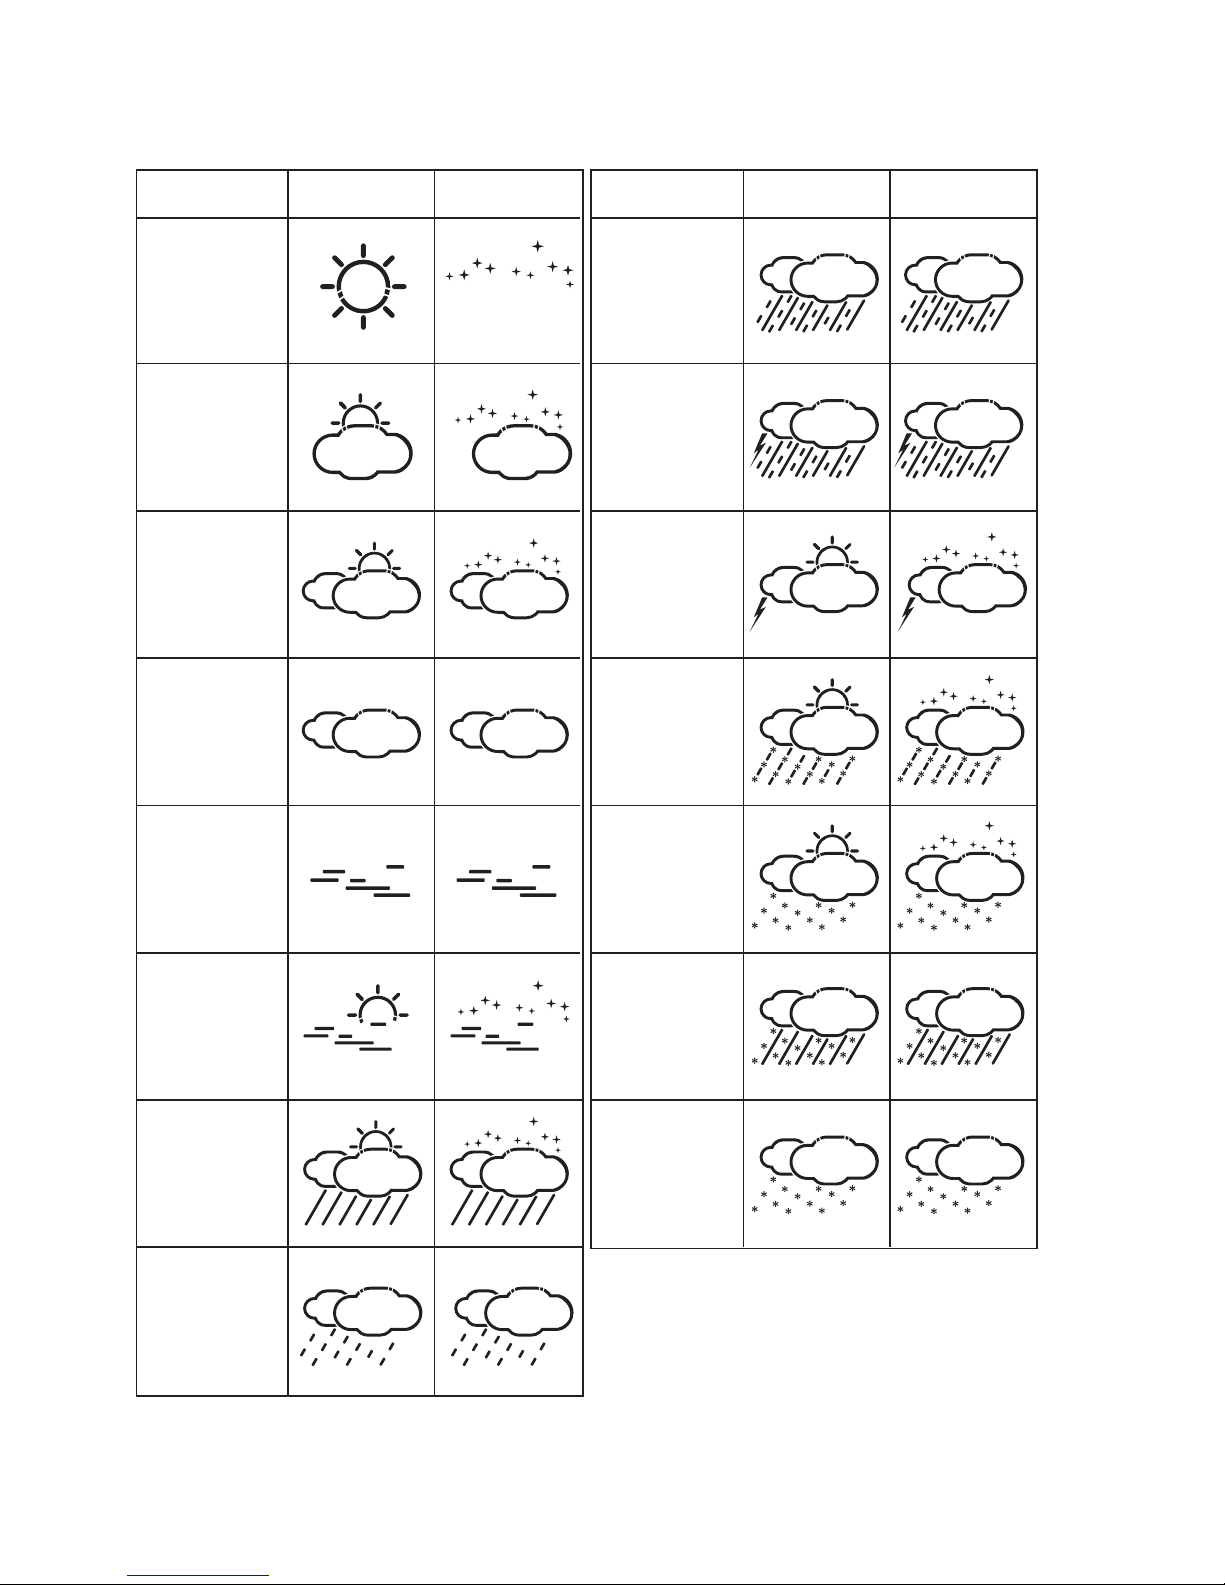
l) Beschreibung der Wettersymbole
Bedeutung Tag Nacht Bedeutung Tag Nacht
Sonnig
(sternenklare
Nacht)
Leicht bewölkt
Stark bewölkt
Bedeckt
Hochnebel
Nebel
Regenschauer
Leichter
Regen
Starker Regen
Frontengewitter
Wärmegewitter
Graupelschauer,
Schneeregenschauer
Schneeschauer
Schneeregen
Schneefall
Page 28
28
13. Behebung von Störungen
Mit der Wetterstation haben Sie ein Produkt erworben, welches nach dem Stand der Technik
gebaut wurde und betriebssicher ist. Dennoch kann es zu Problemen und Störungen kommen.
Deshalb möchten wir Ihnen hier beschreiben, wie Sie mögliche Störungen beheben können.
Beachten Sie alle Sicherheitshinweise dieser Bedienungsanleitung!
Kein Empfang des Signals des Außensensors
• Der Abstand zwischen Wetterstation und Außensensor ist zu groß. Verändern Sie den
Aufstellungsort des Außensensors.
• Gegenstände bzw. abschirmende Materialien behindern den Funkempfang. Gleiches gilt
für andere elektronische Geräte, z.B. Fernseher oder Computer. Verändern Sie den
Aufstellungsort von Außensensor und Wetterstation.
• Die Batterien des Außensensors sind schwach oder leer. Setzen Sie versuchsweise neue
Batterien in den Außensensor ein.
• Ein anderer Sender auf der gleichen oder benachbarten Frequenz stört das Funksignal des
Außensensors. Dies können z.B. Funkkopfhörer, Funklautsprecher o.ä. Geräte sein.
Solche Produkte werden meist nicht dauernd betrieben; der Funkempfang kann z.B. am
nächsten Tag einwandfrei sein, was eine Suche nach der Ursache erschwert.
• Starten Sie die manuelle Suche nach dem Außensensor, indem Sie die Taste "IN/OUT" für
etwa 3 Sekunden gedrückt halten und loslassen, wenn das Symbol "OUT" im Display blinkt.
Störungen beim Empfang der Wettervorhersagen
• Durch kurzzeitige Störungen der Funkübertragung (verursacht z.B. durch den Betrieb eines
nicht ausreichend entstörten Geräts, dem Einschalten oder Ausschalten von elektrischen
Geräten usw.) ist es möglich, dass Wetterinformationen nicht korrekt von der Wetterstation
empfangen werden. Die Wetterstation zeigt z.B. für den morgigen Tag kein Empfangssymbol an.
Verändern Sie ggf. den Aufstellungsort der Wetterstation.
Page 29

29
Wettervorhersagen fehlen in der Anzeige
• Aufgrund der geringen Datenmenge, die per DCF-Signal übertragbar ist, dauert der
Empfang aller Wettervorhersagen bis zu 24 Stunden (sofern keine Empfangsprobleme
aufgetreten sind).
Page 30

30
14. Reichweite
Die Reichweite der Übertragung der Funksignale zwischen Außensensor und Wetterstation
beträgt unter optimalen Bedingungen bis zu 30m. Dies wird oft auch als "Freifeld-Reichweite"
bezeichnet.
Diese ideale Anordnung (z.B. Wetterstation und Außensensor auf einer glatten, ebenen Wiese ohne Bäume, Häuser usw.) ist jedoch in der Praxis nie
anzutreffen.
Normalerweise wird die Wetterstation im Haus aufgestellt und der Außensensor z.B. außen
neben dem Fenster montiert.
Die Reichweite kann teils beträchtlich verringert werden durch:
• Wände, Stahlbetondecken
• Beschichtete/bedampfte Isolierglasscheiben
• Fahrzeuge
• Bäume, Sträucher, Erde, Felsen
• Nähe zu metallischen & leitenden Gegenständen (z.B. Heizkörper)
• Nähe zum menschlichen Körper
• Breitbandstörungen, z.B. in Wohngebieten (DECT-Telefone, Mobiltelefone, Funkkopfhörer,
Funklautsprecher, andere Funk-Wetterstationen, Baby-Überwachungsgeräte usw.)
• Nähe zu Kabeln, elektrischen Motoren, Trafos, Netzteilen, Computer
• Nähe zu schlecht abgeschirmten oder offen betriebenen Computern oder anderen elektrischen Geräten
Da die örtlichen Gegebenheiten an jedem Aufstellungsort anders sind, kann
eine bestimmte Reichweite nicht garantiert werden.
Normalerweise ist jedoch der Betrieb in einem Einfamilienhaus ohne Probleme möglich. Wenn die Wetterstation keine Daten vom Außensensor erhält
(trotz neuer Batterien), so verringern Sie die Entfernung zwischen Außensensor und Wetterstation, wechseln Sie den Aufstellungsort.
Page 31

31
15. Wartung und Reinigung
Eine Wartung oder Reparatur ist nur durch eine Fachkraft oder Fachwerkstatt zulässig. Es sind
keinerlei für Sie zu wartende Bestandteile im Inneren der Bestandteile des Produkts, öffnen
Sie es deshalb niemals (bis auf die in dieser Bedienungsanleitung beschriebene Vorgehensweise beim Einlegen oder Wechseln der Batterien).
Zur Reinigung der Außenseite der Wetterstation genügt ein trockenes, weiches und sauberes
Tuch.
Staub auf der Wetterstation kann mit Hilfe eines langhaarigen, weichen und sauberen Pinsels
und einem Staubsauger leicht entfernt werden.
Drücken Sie nicht zu stark auf das Display, dies kann zu Kratzspuren führen
oder zu Fehlfunktionen der Anzeige.
Zur Entfernung von Verschmutzungen am Außensensor kann ein leicht mit lauwarmen
Wasser angefeuchtetes sauberes, weiches Tuch verwendet werden.
Verwenden Sie auf keinen Fall aggressive Reinigungsmittel, Reinigungsalkohol oder andere chemische Lösungen, dadurch wird das Gehäuse angegriffen (Verfärbungen).
Page 32

32
16. Batteriewechsel
Die Wetterstation zeigt sowohl für die Batterien der Wetterstation selbst als auch für den
Außensensor ein kleines Symbol im Display an, wenn die Batterien schwach werden.
• Batterien der Wetterstation schwach: Batteriesymbol oben links im Display, neben dem
Funkturmsymbol
• Batterien des Außensensors schwach: Batteriesymbol im Anzeigebereich der Temperatur
Wenn die Batterien des Außensensors gewechselt werden, so drücken Sie danach auf der
Wetterstation die Taste "IN/OUT" für etwa 3 Sekunden, um eine manuelle Suche nach dem
Außensensor durchzuführen.
Beim Wechsel der Batterien der Wetterstation gehen Sie wie bei der Erstinbetriebnahme vor.
Die von Ihnen ausgewählten Städte für die Anzeige bleiben jedoch erhalten, ebenso wie ein
von Ihnen programmierter Städtename.
17. Handhabung
Beachten Sie sämtliche Sicherheitshinweise dieser Bedienungsanleitung!
a) Allgemein
Das Produkt ist kein Spielzeug, es gehört nicht in Kinderhände. Es enthält verschluckbare
Kleinteile, Glas (Display), sowie Batterien.
Das Produkt darf nicht geöffnet oder zerlegt werden (bis auf den in dieser Bedienungsanleitung beschriebenen Batteriewechsel).
Es sind keine für Sie zu wartenden Teile im Inneren des Produkts. Außerdem erlischt durch
das Öffnen/Zerlegen die Zulassung (CE) und die Garantie/Gewährleistung.
Durch den Fall aus bereits geringer Höhe wird das Produkt beschädigt.
Page 33

33
b) Wetterstation
Vermeiden Sie folgende widrige Umgebungsbedingungen bei Betrieb der Wetterstation:
- Nässe oder zu hohe Luftfeuchtigkeit
- Extreme Kälte oder Hitze
- Direkte Sonneneinstrahlung
- Staub oder brennbare Gase, Dämpfe oder Lösungsmittel
- starke Vibrationen
- starke Magnetfelder, wie in der Nähe von Maschinen oder Lautsprechern
Verwenden Sie das Produkt niemals gleich dann, wenn es von einem kalten in einen warmen
Raum gebracht wird. Das dabei entstehende Kondenswasser kann unter Umständen das
Produkt zerstören. Warten Sie, bis das Produkt auf Zimmertemperatur gekommen ist. Dies
kann mehrere Stunden dauern!
Der Aufstellungsort muss so gewählt werden, dass die Wetterstation sicher steht und nicht
herunterfallen kann. Durch das hohe Gewicht besteht sonst Verletzungsgefahr.
Wertvolle oder kratzempfindliche Möbeloberflächen sollten Sie mittels geeigneter Unterlagen
vor Beschädigung schützen, bevor Sie die Wetterstation aufstellen.
c) Außensensor
Der Außensensor ist geeignet zum Betrieb im geschützten Außenbereich (z.B. unter einem
Dachvorsprung). Betreiben Sie ihn niemals in oder unter Wasser.
Montieren Sie den Außensensor so, dass er senkrecht/aufrecht steht (Display liegt oben,
Standfuß zeigt nach unten). Andernfalls kann Wasser in das Gerät gelangen.
Page 34

34
18. Entsorgung
a) Allgemein
Elektronische und elektrische Produkte dürfen nicht in den Hausmüll.
Entsorgen Sie das unbrauchbar gewordene Produkt gemäß den geltenden
gesetzlichen Bestimmungen.
b) Batterien und Akkus
Sie als Endverbraucher sind gesetzlich (Batterieverordnung) zur Rückgabe aller gebrauchten
Batterien und Akkus verpflichtet; eine Entsorgung über den Hausmüll ist untersagt!
Schadstoffhaltige Batterien/Akkus sind mit nebenstehenden Symbolen gekennzeichnet, die auf das Verbot der Entsorgung über den Hausmüll hinweisen.
Die Bezeichnungen für das ausschlaggebende Schwermetall sind:
Cd=Cadmium, Hg=Quecksilber, Pb=Blei (Bezeichnung steht auf Batterie/
Akku z.B. unter den links abgebildeten Mülltonnen-Symbolen).
Ihre verbrauchten Batterien/Akkus können Sie unentgeltlich bei den Sammelstellen Ihrer Gemeinde, unseren Filialen oder überall dort abgeben, wo
Batterien/Akkus verkauft werden!
Sie erfüllen damit die gesetzlichen Verpflichtungen und leisten Ihren Beitrag zum Umweltschutz.
Page 35

35
19. Technische Daten
a) Wetterstation
Temperaturbereich: ................... -5,0°C bis +50,0°C
Genauigkeit: ............................... +/- 1°C
Batterien: .................................... 2 * AA/Mignon (Alkaline empfohlen)
Abmessungen: ........................... Ca. 127 x 117 x 28mm (H x B x T)
Gewicht: ..................................... Ca. 185g (ohne Batterien)
b) Außensensor
Temperaturbereich: ................... -20,0°C bis +50,0°C
Genauigkeit: ............................... +/- 1°C
Sendefrequenz: ......................... 433MHz
Reichweite: ................................. Bis 30m (im Freifeld, bitte Kapitel "Reichweite" beachten)
Batterien: .................................... 2 * AA/Mignon (Alkaline empfohlen)
Abmessungen: ........................... Ca. 110 x 61 x 32mm (H x B x T)
Gewicht: ..................................... Ca. 67g (ohne Batterien)
20. Konformitätserklärung (DOC)
Hiermit erklären wir, Conrad Electronic, Klaus-Conrad-Straße 1, D-92240 Hirschau, dass sich
dieses Produkt in Übereinstimmung mit den grundlegenden Anforderungen und den anderen
relevanten Vorschriften der Richtlinie 1999/5/EG befindet.
Die Konformitätserklärung zu diesem Produkt finden Sie unter www.conrad.com.
Page 36

36
21. Städte für die Wettervorhersage
In der Wetterstation sind für die 90 Gebiete der Wettervorhersage insgesamt 272 Städte
gespeichert.
Land Displayanzeige Stadt Displayanzeige Region
ANDORRA ANDORRA ANDORRA LA VELLA AND.LA.VELLA 70
BELGIQUE / BELGIË B/BELGIUM ANTWERPEN ANTWERPEN 6
BELGIQUE / BELGIË B/BELGIUM BRUXELLES/BRUSSEL BRUSSEL 6
BELGIQUE / BELGIË B/BELGIUM CHARLEROI CHARLEROI 6
BELGIQUE / BELGIË B/BELGIUM LIEGE LIEGE 6
BELGIQUE / BELGIË B/BELGIUM VERVIERS VERVIERS 13
CESKO / CZECH REPUBLIC CZ/CZ REP BRNO BRNO 50
CESKO / CZECH REPUBLIC CZ/CZ REP PLZEN PLZEN 50
CESKO / CZECH REPUBLIC CZ/CZ REP PRAHA PRAHA 50
CESKO / CZECH REPUBLIC CZ/CZ REP DECIN DECIN 51
DANMARK / DENMARK DK/DENMARK ALBORG ALBORG 20
DANMARK / DENMARK DK/DENMARK HERNING HERNING 20
DANMARK / DENMARK DK/DENMARK ARHUS ARHUS 21
DANMARK / DENMARK DK/DENMARK ODENSE ODENSE 21
DANMARK / DENMARK DK/DENMARK KØBENHAVN KØBENHAVN 23
DEUTSCHLAND / GERMANY D / GER FRANKFURT AM MAIN FRANKFURT.M 12
DEUTSCHLAND / GERMANY D / GER KAISERSLAUTERN KAISERSLAU 12
DEUTSCHLAND / GERMANY D / GER KARLSRUHE KARLSRUHE 12
DEUTSCHLAND / GERMANY D / GER MANNHEIM MANNHEIM 12
DEUTSCHLAND / GERMANY D / GER HAGEN HAGEN 13
DEUTSCHLAND / GERMANY D / GER KOBLENZ KOBLENZ 13
DEUTSCHLAND / GERMANY D / GER SIEGEN SIEGEN 13
DEUTSCHLAND / GERMANY D / GER TRIER TRIER 13
DEUTSCHLAND / GERMANY D / GER DORTMUND DORTMUND 14
DEUTSCHLAND / GERMANY D / GER DUISBURG DUISBURG 14
DEUTSCHLAND / GERMANY D / GER DÜSSELDORF DÜSSELDORF 14
DEUTSCHLAND / GERMANY D / GER KÖLN KÖLN 14
DEUTSCHLAND / GERMANY D / GER MÜNSTER MÜNSTER 14
DEUTSCHLAND / GERMANY D / GER BREMERHAVEN BREMERHAVEN 19
DEUTSCHLAND / GERMANY D / GER HAMBURG HAMBURG 19
DEUTSCHLAND / GERMANY D / GER BREMEN BREMEN 22
DEUTSCHLAND / GERMANY D / GER HANNOVER HANNOVER 22
DEUTSCHLAND / GERMANY D / GER MAGDEBURG MAGDEBURG 22
DEUTSCHLAND / GERMANY D / GER KIEL KIEL 24
DEUTSCHLAND / GERMANY D / GER LÜBECK LÜBECK 24
DEUTSCHLAND / GERMANY D / GER ROSTOCK ROSTOCK 24
Page 37

37
Land Displayanzeige Stadt Displayanzeige Region
DEUTSCHLAND / GERMANY D / GER AUGSBURG AUGSBURG 25
DEUTSCHLAND / GERMANY D / GER INGOLSTADT INGOLSTADT 25
DEUTSCHLAND / GERMANY D / GER REGENSBURG REGENSBURG 25
DEUTSCHLAND / GERMANY D / GER ULM ULM 25
DEUTSCHLAND / GERMANY D / GER FRIEDRICHSHAFEN FRIEDRI.HFN 26
DEUTSCHLAND / GERMANY D / GER KEMPTEN KEMPTEN 26
DEUTSCHLAND / GERMANY D / GER MÜNCHEN MÜNCHEN 26
DEUTSCHLAND / GERMANY D / GER BAYREUTH BAYREUTH 28
DEUTSCHLAND / GERMANY D / GER NÜRNBERG NÜRNBERG 28
DEUTSCHLAND / GERMANY D / GER WÜRZBURG WÜRZBURG 28
DEUTSCHLAND / GERMANY D / GER COTTBUS COTTBUS 29
DEUTSCHLAND / GERMANY D / GER DRESDEN DRESDEN 29
DEUTSCHLAND / GERMANY D / GER HALLE HALLE 29
DEUTSCHLAND / GERMANY D / GER LEIPZIG LEIPZIG 29
DEUTSCHLAND / GERMANY D / GER EISENACH EISENACH 30
DEUTSCHLAND / GERMANY D / GER ERFURT ERFURT 30
DEUTSCHLAND / GERMANY D / GER HOF HOF 30
DEUTSCHLAND / GERMANY D / GER JENA JENA 30
DEUTSCHLAND / GERMANY D / GER PLAUEN PLAUEN 30
DEUTSCHLAND / GERMANY D / GER ZWICKAU ZWICKAU 30
DEUTSCHLAND / GERMANY D / GER KONSTANZ KONSTANZ 32
DEUTSCHLAND / GERMANY D / GER FULDA FULDA 37
DEUTSCHLAND / GERMANY D / GER GIESSEN GIESSEN 37
DEUTSCHLAND / GERMANY D / GER GÖTTINGEN GÖTTINGEN 37
DEUTSCHLAND / GERMANY D / GER KASSEL KASSEL 37
DEUTSCHLAND / GERMANY D / GER FREIBURG FREIBURG 45
DEUTSCHLAND / GERMANY D / GER BERLIN BERLIN 52
DEUTSCHLAND / GERMANY D / GER FRANKFURT AN DER ODER FRANKFURT.O 52
DEUTSCHLAND / GERMANY D / GER NEUBRANDENBURG NEUBR.BURG 52
DEUTSCHLAND / GERMANY D / GER POTSDAM POTSDAM 52
DEUTSCHLAND / GERMANY D / GER DONAUESCHINGEN DONAUESCH. 57
DEUTSCHLAND / GERMANY D / GER FREUDENSTADT FREUDENST. 57
DEUTSCHLAND / GERMANY D / GER VILLINGEN-SCHWENNINGEN VILL.-SCHWE. 57
DEUTSCHLAND / GERMANY D / GER HEILBRONN HEILBRONN 59
DEUTSCHLAND / GERMANY D / GER PFORZHEIM PFORZHEIM 59
DEUTSCHLAND / GERMANY D / GER STUTTGART STUTTGART 59
DEUTSCHLAND / GERMANY D / GER TÜBINGEN TÜBINGEN 59
EIRE / IRELAND IRELAND GALWAY GALWAY 75
EIRE / IRELAND IRELAND DUBLIN DUBLIN 76
ESPANA / SPAIN ES / SPAIN MADRID MADRID 64
ESPANA / SPAIN ES / SPAIN BILBAO BILBAO 65
ESPANA / SPAIN ES / SPAIN PALMA DE MALLORCA PALMA-D.MAL 67
ESPANA / SPAIN ES / SPAIN VALENCIA VALENCIA 68
ESPANA / SPAIN ES / SPAIN BARCELONA BARCELONA 69
Page 38

38
Land Displayanzeige Stadt Displayanzeige Region
ESPANA / SPAIN ES / SPAIN SEVILLA SEVILLA 71
ESPANA / SPAIN ES / SPAIN GIJON GIJON 74
FRANCE FRANCE BORDEAUX BORDEAUX 0
FRANCE FRANCE BRIVE-LA-GAILLARDE BRIVE-L-GA 0
FRANCE FRANCE PAU PAU 0
FRANCE FRANCE TOULOUSE TOULOUSE 0
FRANCE FRANCE LA ROCHELLE LA_ROCHELL 1
FRANCE FRANCE LIMOGES LIMOGES 1
FRANCE FRANCE POITIERS POITIERS 1
FRANCE FRANCE LE MANS LE MANS 2
FRANCE FRANCE PARIS PARIS 2
FRANCE FRANCE REIMS REIMS 2
FRANCE FRANCE TOURS TOURS 2
FRANCE FRANCE TROYES TROYES 2
FRANCE FRANCE BREST BREST 3
FRANCE FRANCE NANTES NANTES 3
FRANCE FRANCE RENNES RENNES 3
FRANCE FRANCE CLERMONT-FERRAND CLERMON-FE 4
FRANCE FRANCE MONTLUCON MONTLUCON 4
FRANCE FRANCE SAINT-ETIENNE ST-ETIENNE 4
FRANCE FRANCE BEZIERS BEZIERS 5
FRANCE FRANCE MONTPELLIER MONTPELLIE 5
FRANCE FRANCE PERPIGNAN PERPIGNAN 5
FRANCE FRANCE LILLE LILLE 6
FRANCE FRANCE DIJON DIJON 7
FRANCE FRANCE METZ METZ 7
FRANCE FRANCE NANCY NANCY 7
FRANCE FRANCE AVIGNON AVIGNON 8
FRANCE FRANCE MARSEILLE MARSEILLE 8
FRANCE FRANCE NIMES NIMES 8
FRANCE FRANCE TOULON TOULON 8
FRANCE FRANCE LYON LYON 9
FRANCE FRANCE VALENCE VALENCE 9
FRANCE FRANCE CHAMBERY CHAMBERY 10
FRANCE FRANCE GRENOBLE GRENOBLE 10
FRANCE FRANCE ANNECY ANNECY 11
FRANCE FRANCE BESANCON BESANCON 11
FRANCE FRANCE AMIENS AMIENS 17
FRANCE FRANCE CAEN CAEN 17
FRANCE FRANCE LE HAVRE LE HAVRE 17
FRANCE FRANCE ROUEN ROUEN 17
FRANCE FRANCE EVIAN EVIAN 31
FRANCE FRANCE CANNES CANNES 43
FRANCE FRANCE NICE NICE 43
Page 39

39
Land Displayanzeige Stadt Displayanzeige Region
FRANCE FRANCE BELFORT BELFORT 45
FRANCE FRANCE COLMAR COLMAR 45
FRANCE FRANCE MULHOUSE MULHOUSE 45
FRANCE FRANCE STRASBOURG STRASBOURG 45
FRANCE FRANCE BASTIA BASTIA 73
HRVATSKA / CROATIA HR/CROATIA ZAGREB ZAGREB 87
HRVATSKA / CROATIA HR/CROATIA SPLIT SPLIT 89
ITALIA / ITALY I / ITALY BOLZANO BOLZANO 27
ITALIA / ITALY I / ITALY TRENTO TRENTO 27
ITALIA / ITALY I / ITALY AOSTA AOSTA 39
ITALIA / ITALY I / ITALY SESTRIERE SESTRIERE 39
ITALIA / ITALY I / ITALY MILANO MILANO 40
ITALIA / ITALY I / ITALY PARMA PARMA 40
ITALIA / ITALY I / ITALY TORINO TORINO 40
ITALIA / ITALY I / ITALY VERONA VERONA 40
ITALIA / ITALY I / ITALY FIRENZE FIRENZE 41
ITALIA / ITALY I / ITALY PISA PISA 41
ITALIA / ITALY I / ITALY ROMA ROMA 41
ITALIA / ITALY I / ITALY SIENA SIENA 41
ITALIA / ITALY I / ITALY GENOVA GENOVA 43
ITALIA / ITALY I / ITALY LA SPEZIA LA SPEZIA 43
ITALIA / ITALY I / ITALY BOLOGNA BOLOGNA 44
ITALIA / ITALY I / ITALY RIMINI RIMINI 44
ITALIA / ITALY I / ITALY TRIESTE TRIESTE 44
ITALIA / ITALY I / ITALY UDINE UDINE 44
ITALIA / ITALY I / ITALY VENEZIA VENEZIA 44
ITALIA / ITALY I / ITALY NAPOLI NAPOLI 60
ITALIA / ITALY I / ITALY ANCONA ANCONA 61
ITALIA / ITALY I / ITALY BARI BARI 62
ITALIA / ITALY I / ITALY PALERMO PALERMO 66
ITALIA / ITALY I / ITALY SASSARI SASSARI 73
LIECHTENSTEIN LI/LICHTEN VADUZ VADUZ 48
LUXEMBOURG LUX LUXEMBOURG LUXEMBOURG 13
MAGYAR / HUNGARY H/HUNGARY GYÖR GYÖR 49
MAGYAR / HUNGARY H/HUNGARY BUDAPEST BUDAPEST 63
MONACO MONACO MONACO MONACO 43
NEDERLAND / NETHERLANDS NL/NETHERL MAASTRICHT MAASTRICHT 6
NEDERLAND / NETHERLANDS NL/NETHERL MIDDELBURG MIDDELBURG 6
NEDERLAND / NETHERLANDS NL/NETHERL TERNEUZEN TERNEUZEN 6
NEDERLAND / NETHERLANDS NL/NETHERL DEN HELDER DEN HELDER 19
NEDERLAND / NETHERLANDS NL/NETHERL GRONINGEN GRONINGEN 19
NEDERLAND / NETHERLANDS NL/NETHERL LEEUWARDEN LEEUWARDEN 19
NEDERLAND / NETHERLANDS NL/NETHERL TEXEL TEXEL 19
NEDERLAND / NETHERLANDS NL/NETHERL AMSTERDAM AMSTERDAM 42
Page 40

40
Land Displayanzeige Stadt Displayanzeige Region
NEDERLAND / NETHERLANDS NL/NETHERL ARNHEM ARNHEM 42
NEDERLAND / NETHERLANDS NL/NETHERL ASSEN ASSEN 42
NEDERLAND / NETHERLANDS NL/NETHERL DEN HAAG DEN HAAG 42
NEDERLAND / NETHERLANDS NL/NETHERL EINDHOVEN EINDHOVEN 42
NEDERLAND / NETHERLANDS NL/NETHERL HAARLEM HAARLEM 42
NEDERLAND / NETHERLANDS NL/NETHERL LELYSTAD LELYSTAD 42
NEDERLAND / NETHERLANDS NL/NETHERL ROTTERDAM ROTTERDAM 42
NEDERLAND / NETHERLANDS NL/NETHERL S-HERTOGENBOSCH S.HERTOGENB 42
NEDERLAND / NETHERLANDS NL/NETHERL UTRECHT UTRECHT 42
NEDERLAND / NETHERLANDS NL/NETHERL ZWOLLE ZWOLLE 42
NORGE / NORWAY N / NORWAY DRAMMEN DRAMMEN 58
NORGE / NORWAY N / NORWAY FREDRIKSTAD FREDRIKST. 58
NORGE / NORWAY N / NORWAY OSLO OSLO 58
NORGE / NORWAY N / NORWAY TØNSBERG TØNSBERG 58
NORGE / NORWAY N / NORWAY STAVANGER STAVANGER 78
NORGE / NORWAY N / NORWAY TRONDHEIM TRONDHEIM 79
ÖSTERREICH / AUSTRIA AU/AUSTRIA LINZ LINZ 26
ÖSTERREICH / AUSTRIA AU/AUSTRIA GRAZ GRAZ 46
ÖSTERREICH / AUSTRIA AU/AUSTRIA KLAGENFURT KLAGENFURT 46
ÖSTERREICH / AUSTRIA AU/AUSTRIA INNSBRUCK INNSBRUCK 47
ÖSTERREICH / AUSTRIA AU/AUSTRIA BREGENZ BREGENZ 48
ÖSTERREICH / AUSTRIA AU/AUSTRIA SALZBURG SALZBURG 48
ÖSTERREICH / AUSTRIA AU/AUSTRIA EISENSTADT EISENSTADT 49
ÖSTERREICH / AUSTRIA AU/AUSTRIA WIEN WIEN 49
ÖSTERREICH / AUSTRIA AU/AUSTRIA SANKT PÖLTEN ST.PÖLTEN 50
POLSKA / POLAND PL/POLAND WALBRZYCH WALBRZYCH 51
POLSKA / POLAND P/POLAND GDANSK GDANSK 81
POLSKA / POLAND P/POLAND WARSZAWA WARSZAWA 82
POLSKA / POLAND P/POLAND KRAKOW KRAKOW 83
PORTUGAL P/PORTUGAL LISBOA LISBOA 72
SCHWEIZ/SUISSE/SVIZZERA CH/SUISSE DELEMONT DELEMONT 11
SCHWEIZ/SUISSE/SVIZZERA CH/SUISSE LA CHAUX-DE-FONDS LA.CHAUX-D.F 11
SCHWEIZ/SUISSE/SVIZZERA CH/SUISSE FRIBOURG FRIBOURG 31
SCHWEIZ/SUISSE/SVIZZERA CH/SUISSE GENEVE GENEVE 31
SCHWEIZ/SUISSE/SVIZZERA CH/SUISSE LAUSANNE LAUSANNE 31
SCHWEIZ/SUISSE/SVIZZERA CH/SUISSE MONTREUX MONTREUX 31
SCHWEIZ/SUISSE/SVIZZERA CH/SUISSE NEUCHATEL NEUCHATEL 31
SCHWEIZ/SUISSE/SVIZZERA CH/SUISSE AARAU AARAU 32
SCHWEIZ/SUISSE/SVIZZERA CH/SUISSE BERN BERN 32
SCHWEIZ/SUISSE/SVIZZERA CH/SUISSE BIEL/BIENNE BIENNE 32
SCHWEIZ/SUISSE/SVIZZERA CH/SUISSE FRAUENFELD FRAUENFELD 32
SCHWEIZ/SUISSE/SVIZZERA CH/SUISSE LUZERN LUZERN 32
SCHWEIZ/SUISSE/SVIZZERA CH/SUISSE SCHAFFHAUSEN SCHAFFHAUS 32
SCHWEIZ/SUISSE/SVIZZERA CH/SUISSE SOLOTHURN SOLOTHURN 32
Page 41

41
Land Displayanzeige Stadt Displayanzeige Region
SCHWEIZ/SUISSE/SVIZZERA CH/SUISSE ZUG ZUG 32
SCHWEIZ/SUISSE/SVIZZERA CH/SUISSE ZÜRICH ZÜRICH 32
SCHWEIZ/SUISSE/SVIZZERA CH/SUISSE ADELBODEN ADELBODEN 33
SCHWEIZ/SUISSE/SVIZZERA CH/SUISSE GRINDELWALD GRINDELWALD 33
SCHWEIZ/SUISSE/SVIZZERA CH/SUISSE INTERLAKEN INTERLAKEN 33
SCHWEIZ/SUISSE/SVIZZERA CH/SUISSE BRIG BRIG 34
SCHWEIZ/SUISSE/SVIZZERA CH/SUISSE MARTIGNY MARTIGNY 34
SCHWEIZ/SUISSE/SVIZZERA CH/SUISSE SION SION 34
SCHWEIZ/SUISSE/SVIZZERA CH/SUISSE ALTDORF ALTDORF 35
SCHWEIZ/SUISSE/SVIZZERA CH/SUISSE GLARUS GLARUS 35
SCHWEIZ/SUISSE/SVIZZERA CH/SUISSE SARNEN SARNEN 35
SCHWEIZ/SUISSE/SVIZZERA CH/SUISSE SCHWYZ SCHWYZ 35
SCHWEIZ/SUISSE/SVIZZERA CH/SUISSE ST. GALLEN ST. GALLEN 35
SCHWEIZ/SUISSE/SVIZZERA CH/SUISSE STANS STANS 35
SCHWEIZ/SUISSE/SVIZZERA CH/SUISSE CHUR CHUR 36
SCHWEIZ/SUISSE/SVIZZERA CH/SUISSE DAVOS DAVOS 36
SCHWEIZ/SUISSE/SVIZZERA CH/SUISSE BELLINZONA BELLINZONA 38
SCHWEIZ/SUISSE/SVIZZERA CH/SUISSE LOCARNO LOCARNO 38
SCHWEIZ/SUISSE/SVIZZERA CH/SUISSE LUGANO LUGANO 38
SCHWEIZ/SUISSE/SVIZZERA CH/SUISSE BASEL BASEL 45
SCHWEIZ/SUISSE/SVIZZERA CH/SUISSE LIESTAL LIESTAL 45
SCHWEIZ/SUISSE/SVIZZERA CH/SUISSE SAMEDAN SAMEDAN 86
SCHWEIZ/SUISSE/SVIZZERA CH/SUISSE ZERMATT ZERMATT 88
SLOVENIJA / SLOVENIA SLOVENIA NOVA GORICA NOVA GORICA 44
SLOVENIJA / SLOVENIA SLOVENIA LJUBLJANA LJUBLJANA 46
SLOVENIJA / SLOVENIA SLOVENIA MARIBOR MARIBOR 46
SLOVENSKO / SLOVAKIA SLOVENIA BRATISLAVA BRATISLAVA 49
SVERIGE / SWEDEN S/SWEDEN MALMÖ MALMÖ 23
SVERIGE / SWEDEN S/SWEDEN GÖTEBORG GÖTEBORG 53
SVERIGE / SWEDEN S/SWEDEN HALMSTAD HALMSTAD 53
SVERIGE / SWEDEN S/SWEDEN GÄVLE GÄVLE 54
SVERIGE / SWEDEN S/SWEDEN STOCKHOLM STOCKHOLM 54
SVERIGE / SWEDEN S/SWEDEN UPPSALA UPPSALA 54
SVERIGE / SWEDEN S/SWEDEN VÄSTERAS VÄSTERAS 54
SVERIGE / SWEDEN S/SWEDEN KALMAR KALMAR 55
SVERIGE / SWEDEN S/SWEDEN LINKÖPING LINKÖPING 55
SVERIGE / SWEDEN S/SWEDEN VISBY VISBY 55
SVERIGE / SWEDEN S/SWEDEN BORAS BORAS 56
SVERIGE / SWEDEN S/SWEDEN JÖNKÖPING JÖNKÖPING 56
SVERIGE / SWEDEN S/SWEDEN KARLSTAD KARLSTAD 56
SVERIGE / SWEDEN S/SWEDEN ÖREBRO ÖREBRO 56
SVERIGE / SWEDEN S / SWEDEN SUNDSVALL SUNDSVALL 80
SVERIGE / SWEDEN S / SWEDEN UMEA UMEA 84
SVERIGE / SWEDEN S / SWEDEN ÖSTERSUND ÖSTERSUND 85
Page 42

42
Land Displayanzeige Stadt Displayanzeige Region
UNITED KINGDOM UK BRISTOL BRISTOL 15
UNITED KINGDOM UK PLYMOUTH PLYMOUTH 15
UNITED KINGDOM UK SWANSEA SWANSEA 15
UNITED KINGDOM UK BIRMINGHAM BIRMINGHAM 16
UNITED KINGDOM UK LIVERPOOL LIVERPOOL 16
UNITED KINGDOM UK MANCHESTER MANCHESTER 16
UNITED KINGDOM UK NEWCASTLE UPON TYNE NEWCASTLE 16
UNITED KINGDOM UK SHEFFIELD SHEFFIELD 16
UNITED KINGDOM UK BRIGHTON BRIGHTON 18
UNITED KINGDOM UK CAMBRIDGE CAMBRIDGE 18
UNITED KINGDOM UK KINGSTON UPON HULL KINGSTON 18
UNITED KINGDOM UK LONDON LONDON 18
UNITED KINGDOM UK OXFORD OXFORD 18
UNITED KINGDOM UK BELFAST BELFAST 76
UNITED KINGDOM UK GLASGOW GLASGOW 77
VATICANO / VATICAN CITY V/VATICANO CITTA DEL VATICANO VATICANO 41
Page 43

43
22. Wettermeldungen
In der unteren Displayzeile werden für kritische Wetterlagen bestimmte Textmeldungen
angezeigt. Beachten Sie dazu bitte das Kapitel 12. k).
Englisch Displayanzeige Deutsch Displayanzeige
HEAVY WEATHER HEAVY.WEATH. SCHWERES WETTER UNWETTER
HEAVY WEATHER day HEAVY.WEATH. SCHWERES WETTER TAG UNWETTER T
HEAVY WEATHER night HEAVY.WEATH. SCHWERES WETTER NACHT UNWETTER N
STORM STORM STURM STURM
STORM DAYTIME DAY.STORM STURM AM TAGE STURM.TAG
STORM NIGHTTIME NIGHT.STORM STURM NACHTS STURM.NACHT
STRONG GUST DAYTIME DAY.GUST AM TAG BÖIGER WIND WINDBÖE.T
STRONG GUST NIGHTTIME NIGHT.GUST NACHTS BÖIGER WIND WINDBÖE.N
FREEZING RAIN A.M. FROZEN.RAIN EISREGEN VORMITTAGS EISREGEN
FREEZING RAIN P.M. FROZEN.RAIN EISREGEN NACHMITTAGS EISREGEN
FREEZING RAIN NIGHTTIME FROZEN.RAIN EISREGEN NACHTS EISREGEN
FINE PARTICLES PM10 PARTICLES FEINSTAUB PM10 FEINSTAUB
OZONE OZONE OZON OZON
IRRADIATION IRRATE RADIOAKTIVE STRAHLUNG RA. STRAHL.
FLOOD FLOOD HOCHWASSER HOCHWASSER
DENSE FOG DENSE FOG DICHTER NEBEL NEBEL
HEAVY RAIN HEAVY RAIN STARKE REGENFÄLLE ST. REGEN
HEAVY RAIN HEAVY RAIN STARKE NIEDERSCHLÄGE ST. NIEDERS.
HEAVY SNOWFALL HEAVY SNOW STARKE SCHNEEFÄLLE ST. SCHNEE
HEAVY THUNDERSTORM THUNDER STARKE GEWITTER ST.GEWITTER
STRONG UV STRONG UV STARKE UV-STRAHLUNG ST. UV-STR.
DENSE FOG DAYTIME DENSE FOG TAGS DICHTER NEBEL NEBEL_T
HEAVY RAIN DAYTIME RAIN TAGS STARKER REGEN REGEN_T
HEAVY RAIN DAYTIME RAIN TAGS STARKER NIEDERSCHL. NIEDERS_T
HEAVY SNOWFALL DAYTIME HEAVY SNOW TAGS STARKE SCHNEEFÄLLE ST.SCHNEE_T
THUNDERSTORM DAYTIME THUNDER TAGS STARKE GEWITTER GEWITTER_T
DENSE FOG NIGHTTIME DENSE FOG NACHTS DICHTER NEBEL NEBEL_N
HEAVY RAIN NIGHTTIME HEAVY RAIN NACHTS STARKER REGEN REGEN_N
HEAVY RAIN NIGHTTIME HEAVY RAIN NACHTS STARK.NIEDERSCHL. NIEDERS_N
HEAVY SNOWFALL NIGHT HEAVY SNOW NACHTS STARK.SCHNEEFALL ST.SCHNEE_N
THUNDERSTORM NIGHTTIME THUNDER NACHTS STARKE GEWITTER GEWITTER_N
FOEHN FOEHN FÖHN FÖHN
BISE BISE BISE BISE
MISTRAL MISTRAL MISTRAL MISTRAL
SCIROCCO SCIROCCO SCIROCCO SCIROCCO
TRAMONTANA TRAMONTANA TRAMONTANA TRAMONTANA
Page 44

44
Niederländisch Displayanzeige Französisch Displayanzeige
ZWAAR WEER ZWAAR WEER TEMPS LOURD TEMPS.LOURD
ZWAAR WEER OVERDAG ZW WEER_D TEMPS LOURD JOUR TEMPS.LOURD
ZWAAR WEER'S NACHTS ZW WEER_N TEMPS LOURD NUIT TEMPS.LOURD
STORM STORM TEMPETE TEMPETE
STORM OVERDAG STORM_D TEMPETE JOUR TEMPETE
STORM'S NACHTS STORM_N TEMPETE NUIT TEMPETE
WINDSTOTEN OVERDAG WINDST_D RAFALES VIOLENTES JOUR VIOLENTES
WINDSTOTEN'S NACHTS WINDST_N RAFALES VIOLENTES NUIT VIOLENTES
IJZEL IN DE OCHTEND IJZEL_O PLUIE VERGLACANTE MATIN PLUIE_VER
IJZEL IN DE MIDDAG IJZEL_M PLUIE VERGLA.APRES-MIDI PLUIE_VER
IJZEL IN DE NACHT IJZEL_N PLUIE VERGLACANTE NUIT PLUIE_VER
FIJNE DEELTJES PM10 FIJNSTOF POUSSIERE FINE PM10 FINE_PM10
OZON OZON OZONE OZONE
RADIOACTIEVE STRALING RAD ACT ST IRRADIATION IRRATE
HOOGWATER HOOGWATER INONDATION INONDATION
DICHTE MIST D MIST BROUILLARD EPAIS BROUILLARD
ZWARE REGEN ZW REGEN FORTE PLUIE FORTE.PLUIE
ZWARE NEERSLAG ZW REGEN FORTE PLUIE FORTE.PLUIE
ZWARE SNEEUWVAL ZW SNEEUW FORTE CHUTE NEIGE FORTE.PLUIE
ZWARE ONWEERSBUIEN ZW ONWEER ORAGE VIOLENT ORAGE VOIL.
STERKE UV STRALING ST UV STR FORTE IRRADIATION UV FORTE UV
DICHTE MIST OVERDAG D MIST_O BROUILLARD EPAIS JOUR BROUILL_J
ZWARE REGEN OVERDAG ZW REGEN_O FORTE PLUIE JOUR FORTE.PLU_J
ZWARE NEERSLAG OVERDAG ZW REGEN_O FORTE PRECIPIT. JOUR FORTE.PRE_J
ZWARE SNEEUWVAL OVERDAG ZW SNEEUW FORTE CHUTE NEIGE JOUR FORTE.NEIGE
ZWAAR ONWEER OVERDAG ZW ONWEER ORAGE VIOLENT JOUR ORAGE
DICHTE MIST'S NACHTS D MIST_N BROUILLARD EPAIS NUIT BROUILL_N
ZWARE REGEN'S NACHTS ZW REGEN_N FORTE PLUIE NUIT FORTE.PLU_N
ZWARE NEERSLAG'S NACHTS ZW REGEN_N FORTE PLUIE NUIT FORTE.PLU_N
ZWARE SNEEUW‘S NACHTS ZW SNEEUW FORTE CHUTE NEIGE NUIT FORTE.NEI_N
ZWAAR ONWEER'S NACHTS ZW ONWEER ORAGE VIOLENT NUIT ORAGE_N
FÖHN FÖHN FOEHN FOEHN
BISE BISE BISE BISE
MISTRAL MISTRAL MISTRAL MISTRAL
SCIROCCO SCIROCCO SCIROCCO SCIROCCO
TRAMONTANA TRAMONTANA TRAMONTAGNE TRAMONTAGN
Page 45

45
23. Displayanzeigen
Englisch Displayanzeige Deutsch Displayanzeige
SEARCH SIGNAL SEARCH SIG. SUCHE SIGNAL SUCHE SIG.
SELECT CITY CITY STADT EINSTELLEN STADT.EINST.
SELECT COUNTRY COUNTRY LAND EINSTELLEN LAND EINST.
TIME ZONE ZONE ZEITZONE ZONE
HOURS HR STUNDEN H
RECEPTION TEST SCAN EMPFANGSTEST EMPF. TEST
CONTRAST. CONTRAST. KONTRAST. KONTRAST.
MEMORY FULL MEM.FULL SPEICHER VOLL SPEICHER_V
EXIT SETMODE EXIT EINSTELLUNG VORGENOMMEN EINST. VORG.
Niederländisch Displayanzeige Französisch Displayanzeige
SIGNAAL ZOEKEN SIGN ZKN CHERCHE SIG CHERCHE.SIG
STAD INSTELLEN STAD INST CHOIX DE LA VILLE CHOIX_VILL
LAND INSTELLEN LAND INST CHOIX DU PAYS CHOIX_PAYS
TIJD ZONE ZONE FUSEAU HORAIRE FUSEAU
UREN HR HRS H
SIGNAAL TEST SIGN TEST TEST DE RECEPTION TEST_REC
DISPLAY CONTRAST. CONTRAST. CONTRASTE. CONTRASTE.
GEHEUGEN VOL GEH VOL MEMOIRE PLEINE MEM PLEIN
INSTELLEN VERLATEN INST VERL REGLAGE EFFECTUE REGLAGE.EFF
Page 46

46
Table of Contents
Page
1. Introduction ............................................................................................................... 48
2. Contents .....................................................................................................................49
3. Intended Use .............................................................................................................. 49
4. Symbol explanation .................................................................................................. 50
5. Features and functions ............................................................................................ 51
6. Safety instructions ...................................................................................................52
7. Notes on Batteries and Rechargeable Batteries ................................................. 54
8. Indicators and controls ........................................................................................... 56
9. DCF and METEOTIME reception ............................................................................. 57
10. Initial operation ......................................................................................................... 61
a) General information ............................................................................................... 61
b) Getting started with the outdoor sensor ............................................................... 61
c) Getting started with the weather station ...............................................................62
11. Set-up & installation ................................................................................................. 64
a) Weather station ...................................................................................................... 64
b) Outdoor sensor ...................................................................................................... 64
12. Operation ................................................................................................................... 65
a) Displaying temperature ......................................................................................... 65
b) Min/max values for temperature ........................................................................... 65
c) Searching for the outdoor sensor ......................................................................... 65
d) Reception test for the "METEOTIME" signal ........................................................ 65
e) Selecting the country/city for the weather display ...............................................66
f) Deleting a city from the display list ....................................................................... 67
g) Entering the place of residence ............................................................................ 68
h) Switching the display for time/date, city list and sunrise/
sunset times ........................................................................................................... 68
i) Setting the time zone, language and contrast ..................................................... 68
j) Switching the weather information for day/night .................................................. 69
k) Storm alerts ............................................................................................................ 70
l) Description of the weather symbols ...................................................................... 71
Page 47

47
Page
13. Troubleshooting ....................................................................................................... 72
14. Transmission range ................................................................................................. 74
15. Maintenance and cleaning ...................................................................................... 75
16. Battery replacement ................................................................................................. 76
17. Handling ..................................................................................................................... 76
a) General information ............................................................................................... 76
b) Weather station ...................................................................................................... 77
c) Outdoor sensor ...................................................................................................... 77
18. Disposal ..................................................................................................................... 78
a) General information ............................................................................................... 78
b) Batteries and rechargeable batteries ................................................................... 78
19. Technical data ........................................................................................................... 79
a) Weather station ...................................................................................................... 79
b) Outdoor sensor ...................................................................................................... 79
20. Declaration of Conformity (DOC) ........................................................................... 79
21. City display for the weather forecast .................................................................... 80
22. Weather alert ............................................................................................................. 87
23. Display messages ..................................................................................................... 89
Page 48

48
1. Introduction
Dear Customer,
Thank you for purchasing this product.
This product meets the requirements of current European and national guidelines. We kindly
request the user to follow the operating instructions, to preserve this condition and to ensure
safe operation!
Please read the operating instructions completely and observe the
safety and operating instructions before using the product.
All company names and product designations contained herein are trademarks of the
respective owners. All rights reserved.
In case of any technical inquiries, contact or consult:
Germany: Tel. no.: +49 9604 / 40 88 80
Fax. no.: +49 9604 / 40 88 48
e-mail: tkb@conrad.de
Mon. to Thur. 8.00am to 4.30pm
Page 49

49
2. Contents
• Weather station
• Outdoor sensor
• Operating instructions
3. Intended Use
The "Radio-controlled weather station DV206NL" is a high-quality universal weather recording
system which processes a large amount of weather data and additional information and which
can display current values as well as forecasts.
All relevant data is shown on the LC display at the same time. If required, additional data can
be called up at the push of a button.
A list of all features and characteristics of the product is presented in
chapter 5.
The weather forecasts of the weather station are only meant as orientation values. They do not
represent an absolutely exact forecast. The manufacturer does not accept any responsibility
for incorrect displays, measurements or weather forecasts or the consequences which might
arise from this.
The product is intended for private use any not suited for medical purposes or informing the
public.
The contents of this product are not a toy, it contains fragile and swallowable glass parts, small
parts and also batteries. It should be kept out of the reach of children!
Keep all components out of the reach of children.
The product is battery-operated. The external sensor transmits its data via radio at 433MHz
bandwidth (range of the external sensor up to 30m in free field, see Chapter 14 "Range") to
the weather station.
Any use other than the one described above may damage the product and there are also other
possible dangers.
Read these operating instructions thoroughly and carefully, they contain a lot of important
information for installation, operation and handling.
Page 50

50
4. Symbol explanation
The flash icon in a triangle is used to alert you to potential personal injury
hazards such as electric shock.
An exclamation mark in a triangle indicates important instructions in this
operating manual which absolutely have to be observed.
The "hand" icon gives you tips and notes on the operation.
Page 51

51
5. Features and functions
At first glance, the weather station does not differ from other standard weather stations.
However, it can analyse and display weather information received in addition to the DCF signal
(or the HBG signal in Switzerland) via radio, the so-called "METEOTIME" signal.
The weather information is compiled by professional meteorologists with the most modern
instrument and is therefore based on similar data as the one in weather forecasts on the TV
or radio.
The following forecasts displayed::
• Weather data display (weather forecast via symbols, day temperature, night temperature)
for the current day and the following day for 90 regions in Europe
• Precipitation forecast (today)
• Wind speed and direction (today)
• Weather alerts (e.g. storm)
• Display of the sunrise/sunset times for 272 metropolises in Europe
The weather station also offers the following functions:
• Display of the accurate time, date and weekday (adjustable time zone)
• Integrated sensor for indoor temperature
• Outdoor sensor contained in the delivery for measuring the outdoor temperature; radio
transmission (433 MHz) on the weather station
• Installation on a table or mounting on a wall
Page 52

52
6. Safety instructions
The warranty will lapse for damage due to non-compliance with these
operating instructions. We do not assume any liability for any damage
arising as a consequence!
Nor do we assume liability for damage to property or personal injury,
caused by improper use or failure to observe the safety instructions. Any
claim to warranty will lapse in such cases!
Dear customer, the following safety instructions and danger warnings are not only to protect
your well-being but also to protect the device. Please read carefully through the following
points:
• The unauthorized conversion and/or modification of the product is
inadmissible because of safety and approval reasons (CE). Do not open/
disassemble it! There are no parts on the inside that need to be adjusted or
maintained by you.
Maintenance, setting jobs or repairs may only be carried out by a specialist/
specialised workshop.
• Do not use this product in hospitals or medical institutions. Although the
outdoor sensor emits only relatively weak radio signals, these may lead to
malfunction of life-supporting systems. The same may possibly apply to
other areas.
• The weather station is only suitable for dry indoor areas. Do not expose it
to direct sunlight, heavy heat, cold, dampness or wetness.
The outdoor sensor is suitable for sheltered outdoor areas (e.g. under a roof
projection).
• The product is not a toy and should be kept out of the reach of children. The
product contains small parts, glass (display) and batteries. Place the
product in a way that it is out of reach of children.
• Do not leave packaging material unattended. It may become a dangerous
toy for children!
• Use the device only in moderate climate regions and not in tropical climate.
• When the product is brought from a cold into a warm room (e.g. during
transport), condensation water may form. This could damage the product.
Wait until the product has reached room temperature before using it. This
process may take several hours.
Page 53

53
• In industrial facilities, the regulations for the prevention of accidents laid
down by the professional trade associations for electrical equipment and
facilities must be adhered to.
• If the product is used at schools, training facilities, do-it-yourself and hobby
workshops, it should not be handled unless supervised by trained,
responsible personnel.
• Handle the product with care. It can be damaged through impact, blows or
by being dropped even from a low height.
Page 54

54
7. Notes on Batteries and Rechargeable Batteries
• Batteries must be kept out of the reach of children.
• Please observe the correct polarity (positive/+ and negative/-) when inserting
the batteries.
• Do not let batteries/rechargeable batteries lie around openly. There is a risk
of batteries being swallowed by children or pets. If swallowed, consult a
doctor immediately.
• Leaking or damaged batteries/rechargeable batteries may cause acid
burns when coming into contact with skin, therefore use suitable protective
gloves.
• Make sure that batteries/rechargeable batteries are not short-circuited,
dismantled or thrown into fire. There is a risk of explosion!
• Do not recharge normal batteries. There is a risk of explosion!
Only charge rechargeable batteries which are intended for this purpose;
use a suitable battery charger.
• In the case of disuse for a longer period of time (e.g. storage), remove the
inserted batteries/rechargeable batteries.
Old batteries/rechargeable batteries can leak and cause damages on the
product; loss of guarantee/warranty!
• Always replace the whole set of batteries/accumulators.
Only use batteries/accumulators of the same type/manufacturer with the
same charge status (do not mix full with semi-charged or empty batteries/
accumulators)
• Never mix batteries with accumulators! Use either batteries or accumulators.
• For the environmentally friendly disposal of batteries and rechargeable
batteries, please read the chapter "Disposal".
Page 55

55
Please note:
In principle, it is possible to operate the weather station and the outdoor sensor
with rechargeable batteries.
However, due to the lower voltage of rechargeable batteries (rechargeable battery = 1.2V,
battery = 1.5V) and the lower capacity there is a shorter operating time and the radio range
might be reduced.
When the outdoor temperatures are lower, rechargeable batteries are more sensitive than
normal batteries.
Therefore, we recommend that you use high-quality alkaline batteries in order to allow for longlasting and reliable operation.
The weather station needs two batteries of type AA/Mignon (e.g. Conrad item number 652502,
to be ordered twice).
The outdoor sensor also requires two batteries of type AA/Mignon (e.g. Conrad item number
652502, to be ordered twice).
Page 56

56
8. Indicators and controls
• Display section for weather forecasts for
today with wind speed, direction and the
probability of precipitation (rain, snow,
hail); display of day/night temperature,
day/night weather
• Weather forecast for the next day with
day/night temperature, day/night weather
• Display section for the indoor/outdoor
temperature
• Display section for different values, e.g.
DCF time/date, city selection, etc.
Operating buttons:
Button "IN/OUT": Briefly press this to switch the display for the indoor/outdoor temperature;
press 3 seconds to activate the search for the outdoor sensor
Button "MEM": Briefly press to display the MIN/MAX values or keep depressed for 3 seconds
to delete the MIN/MAX values
Button "TEST": Activates the reception test for the external sensor
Button "SET": Briefly press to switch between city, DCF time, date, sunrise/sunset time or keep
depressed to activate setup mode (e.g. selection of the city, the time zone and the display
language)
Buttons "" and "": Changing values
Button "DAY/NIGHT": Weather data for day/night
Page 57

57
9. DCF and METEOTIME reception
The weather station can receive and evaluate
the so-called DCF signal.
This is a radio signal which is sent by a
transmitter in Mainflingen (near Frankfurt/
Main). Its range is up to 1500km and if
transmission conditions are ideal even up to
2000km.
Among other things, the DCF signal includes
the precise time (theoretical deviation of 1
second in a million years!) and the date.
This means there is no manual setting of
summer and winter time.
The weather station also detects the Swiss
"HBG" signal, which is compatible to the DCF
signal.
As a special feature, the weather station analyses the so-called "METEOTIME" signal,
which is contained in the DCF-/HBG-signal.
The "METEOTIME" signal contains the weather forecast data for 90 different
regions in Europe.
Due to the applied technology, the transmission of the data for the weather forecast via the
radio signal of the DCF or HBG transmitter is relatively slow, which is why it may take up to 24
hours until the weather station has received all weather data.
The symbol "
" in the respective display field means that the METEOTIME data was
received. The symbol "
" indicates that data is still missing.
The right selection of the installation site is decisive for the reception of the
radio data, because weather data is received around the clock.
Do not place the weather station next to electric/electronic devices; do not
place it near cables, plugs or metallic parts. Keep a sufficient distance, at least
1 m!
A bad reception can also be caused by, e.g. metallized insulated glass,
reinforced concrete construction design, coated special wallpaper or an
installation in cellars.
1500 km
2000 km
Page 58

58
After commissioning (chapter 10) and selection of the setup/installation site
(chapter 11), you can start a reception test for the "METEOTIME" signal via the
button "TEST" (see chapter 12 d).
Page 59

59
Position of the 90 weather regions (enlargement of Central Europe, see next page):
Page 60

60
Page 61

61
10. Initial operation
a) General Information
Please note:
Insert the batteries in the outdoor sensor first and only then into the weather
station.
If you proceed in a different sequence it may happen that the weather station
does not recognize the outdoor sensor! In this case, you can perform a manual
search for the outdoor sensor later on.
If you want to try the weather station and the outdoor sensor out e.g. in a room when you first
use it, you should not place the outdoor sensor directly next to the weather station. Otherwise,
there might be reception problems due to radio interference. Maintain a distance of at least 1
m between the weather station and the outdoor sensor.
This function test makes sure that later reception problems can be attributed to the arrangement
of weather station and outdoor sensor(s).
The range in free field is up to 30m (without any sources of interference, direct view between
outdoor sensor and weather station). The effectively achievable range in buildings is, of
course, smaller and is approx. 10-20m, depending on the design and installation location.
Please note the chapter "Range".
b) Initial operation of the outdoor sensor
• Open the battery compartment of the outdoor sensor by unscrewing the four screws of the
battery compartment on the back with a suitable screwdriver.
• Insert 2 size batteries type AA/mignon observing the correct polarity (observe plus/+ and
minus/-).
• Replace the cover of the battery compartment again and screw it down firmly.
Page 62

62
c) Getting started with the weather station
• Open the battery compartment on the back of the weather station.
• Insert two batteries type mignon/AA batteries observing the correct polarity into the battery
compartment (observe +/plus and -/minus). You will find the corresponding illustration in the
battery compartment.
Once the batteries have been inserted, all available display elements appear briefly.
• Close the battery compartment.
• The reception symbol for the DCF signal blinks on the top left of the display together with the
weather symbols of the different display sections. The bottom of the display shows
"SEARCH SIG." .
You can later on change the display language from the default setting (German)
to other languages. For this purpose, see chapter 12. i).
Very good reception
Good reception
Bad reception
No reception
As already mentioned in chapter 9, you have to keep a sufficient distance to
electric/electronic devices, metal parts, cables, etc.
Do not move the weather station during the first reception attempt.
It may take between 3-10 minutes until the DCF reception for the time and the
date is finished.
• If "COUNTRY" appears on the bottom of the display, set your home country with the buttons
"" and "" (e.g. "D/GER" for Germany) and confirm this setting by briefly pressing the
button "SET".
Now the display shows "CITY" (select city). With the buttons "" and "", you can select
a city near to your place of residence.
Briefly confirm the setting by pressing "TEST". The city is saved afterwards and a small tick
mark appears above the city name:
Page 63

63
You can select altogether 5 cities; of course, you can also make this setting
later on. It is also possible to delete a city already selected for display and save
another one (see chapter 12.e) and 12.f).
If you do not set the country and the city as described above, the weather
station automatically sets "Germany" for the country and "Frankfurt/Main" for
the city.
• With the buttons "" and "", you can select additional cities and save them by pressing
the button "TEST".
• Press the button "SET". The settings are saved now.
• Now the display shows various already available weather data for today and tomorrow.
• Then the weather station searches for the outdoor sensor and the symbol "OUT" blinks in
the display section for the temperature. This takes approx. 2-3 minutes. Wait for that period,
do not press any buttons.
If there is still no display of the outdoor temperature after 2 to 3 minutes, place
the outdoor sensor in a different location (not directly next to the weather
station, keep a distance of at least 1 m).
Then press the button "IN/OUT" for approx. 3 seconds to start the search for
the outdoor sensor again.
The symbol "OUT" blinks again, the outdoor sensor is searched.
Page 64

64
11. Set-up & installation
Once you have started to use the components of the system as described in Chapter 10, you
can now put/install the outdoor sensor in a suitable place. Of course, the same applies to the
weather station.
When drilling/tightening, be careful not to damage any power supply lines, gas
or water pipes, as there may be life-threatening danger involved!
Before screwing in a screw or hook for wall mounting or before you drill a hole
for a dowel, you should check if there is a faultless reception of radio data
possible at the mounting location (DCF data or readings of the outdoor
sensor(s)).
a) Weather station
The weather station can be installed in a suitable place via the foot. This must be horizontal,
sufficiently large, stable and even, and should also lie out of the reach of children.
For wall mounting, there is a corresponding opening on the back of the weather station. The
base is to be folded in for this.
The set-up or installation site should be selected in a way that the weather station is not in the
proximity of heaters or similar. Direct sunlight should also be avoided (the weather station
heats up and therefore the air temperature in the room is no longer measured).
b) Outdoor sensor
Mount the outdoor sensor in a protected outdoor area which is in the shade all day long.
Otherwise the temperature reading will be useless because of the solar radiation.
The same applies if the sensor is exposed to rain or snow for a relatively long period of time
(the temperature sensor wouldn't measure the air temperature anymore in this case).
Do not expose the outdoor sensor directly to rain, do not use the outdoor sensor
in or under water - it might be destroyed!
Page 65

65
12. Operation
a) Display of the temperature
The display section for the temperature is located approx. in the center of the LC display.
With the button "IN/OUT", you switch between the display of the indoor temperature (symbol
"IN" on the display) and the outdoor temperature (symbol "OUT" on the display).
b) Min/max values for temperature
By briefly pressing the "MEM" button (see chapter 8), you switch between the "MIN" and "MAX"
display and the present values.
Delete the saved data by pressing the button "MEM" for approx. 3 seconds.
For the min/max values, the device only shows "- - . -" until another data package is received
by the external sensor or if the values change.
c) Searching for the outdoor sensor
After changing the battery in the outdoor sensor or in case of reception disturbance, you can
search manually for the radio signal of the outdoor sensor.
For this purpose, press the button "IN/OUT" until a short signal sounds (approx. 3 seconds).
The symbol "OUT" blinks in the display section for the temperature, the weather station
searches the outdoor sensor. This can take 2-3 minutes.
Do not move the weather station and the outdoor sensor during that time. Do
not press a button on the weather station.
d) Reception test for the "METEOTIME" signal
Because some weather information is contained in each DCF signal per second (the so-called
"METEOTIME" signal), it is very easy to perform a function test contrary to standard DCF
clocks.
Briefly press the button "TEST".
Page 66

66
"SCAN" (reception test) is displayed on the bottom, and the "METEOTIME" reception symbol
to the left of the temperature display (on the left next to the IN/OUT symbol) starts to blink.
= perfect reception
= no reception
If necessary, change the installation site until "
" is displayed.
The reception test is terminated automatically after one minute (or press the button "TEST"
again before). Of course, you can restart the reception test again. Proceed as described
above.
e) Selecting the country/city for the weather display
You can select up to 5 cities whose weather forecast can be displayed later with the buttons
"" and "".
Chapter 21 includes a list of all available cities.
Proceed as follows for selecting:
• Keep the button "SET" depressed (approx. 3 seconds) until "COUNTRY" appears on the
bottom of the display.
• With the buttons "" and "" select the country (e.g. "D/GER" for Germany) and confirm
your selection by briefly pressing the button "SET".
Now the display shows "CITY".
• Select a city with the buttons "" and "".
Confirm the setting by briefly pressing the "TEST" button. A small tick appears above the
name of the city.
Press the button "TEST" again to delete the city from the list; the tick disappears.
If "MEM. FULL" appears, all 5 slots are assigned.
You can save up to 5 cities to display their weather data. To save another city,
you first have to delete an available city from the list (see next chapter).
• Leave setup mode by pressing "SET".
Page 67

67
f) Deleting a city from the display list
As described in chapter 12. e), you can save up to 5 cities in different countries and display
their weather forecast with the buttons "" and "".
To delete a city from the display list, proceed as follows:
• Select the city you want to delete from the display list with the buttons "" or "".
• Keep the button "SET" depressed (approx. 3 seconds) until "COUNTRY" appears on the
bottom of the display.
• Briefly press the button "". Now the country in which the city to be deleted is located is
displayed.
• Then briefly press the "SET" button.
• Now the display shows "CITY".
• Briefly press the button "". The city is displayed now (observe the small tick mark "√" above
the city).
• Briefly press the button "TEST". The tick mark "√" disappears.
• Leave delete mode by pressing "SET".
g) Entering your place of residence
With this function, you can enter the name of your place of residence.
For this purpose, proceed as follows:
• Keep the button "SET" depressed (approx. 3 seconds) until "COUNTRY" appears on the
bottom of the display.
• With the buttons "" and "" select the country (e.g. "D/GER" for Germany) and confirm
your selection by briefly pressing the button "SET".
Now the display shows "CITY".
• With the buttons "" and "", you can select a city near to your place of residence.
• Briefly press the "MEM" button. Now the previously displayed city name disappears and a
blinking line "_" appears in its place for the input field.
Use the following buttons for your entry (press briefly):
- Buttons "" and "": select character/numeral
- "SET" button Save character/numeral and jump to the next position
- "TEST" button Jump back one spot (correction)
Page 68

68
The entry is finished automatically when you case the last letter at the right end of the input
line by briefly pressing "SET".
Alternatively, the entry is terminated beforehand if no character is selected at an input
position (only the line "_" blinks) and then pressing the button "SET".
h) Switching the display for time/date, city list and sunrise/
sunset times
By briefly pressing the button "SET", you can switch between the selection list for the saved
cities, the sunrise and sunset times as well as the time and date display.
i) Setting the time zone, language and contrast
• Keep the button "SET" depressed (approx. 3 seconds) until "COUNTRY" appears on the
bottom of the display.
• Briefly press the button "SET", "ZONE +00HR" appears on the bottom of the display.
• You can set the desired time zone with the buttons "" and "".
• Briefly press the button "SET"; the currently set language for the text display appears on the
bottom of the display.
• Select the desired language with the buttons "" and "".
• Briefly press the button "SET", the currently set contrast value appears on the bottom of the
display.
• Select the contrast value for the LC display with the buttons "" and "".
• Terminate setup mode by briefly pressing the button "SET".
Page 69

69
j) Switching the weather information for day/night
The weather station switches the display for day/night weather information automatically
depending on the sunrise/sunset time. A small "DAY" or "NIGHT" indicator appears for this
purpose on the display next to the weekday.
You can display the respective other value for 10 seconds by briefly pressing the button
"DAY/NIGHT".
< DAY/NIGHT >
Page 70

70
k) Storm alerts
The "METEOTIME" signal contains additional information about special weather conditions
(e.g. strong gusts of wind, ice rain, heavy snowfall, thunderstorms, dense fog, etc.).
A symbol appears on the display if such data was
received (see on the right of the illustration for the
position of the symbols).
By pressing the button "DAY/NIGHT" repeatedly,
you can display these alerts as text messages on
the bottom of the display.
In case of several alerts, the symbol belonging to
the respective day blinks, whose alert is displayed
below.
The weather station additionally displays the
current alert alternating with the normal display.
Page 71

71
l) Description of the weather symbols
Meaning Day Night Meaning Day Night
Sunny
(starry night)
Slightly
overcast
Very overcast
Overrcast
High fog
Fog
Rain
Slight rain
Heavy rain
Thunderstorm
Heat storm
Sleet ,Sleet
showers
Snow showers
Snowy rain
Snowfall
Page 72

72
13. Troubleshooting
In purchasing the weather station, you have acquired a product which has been designed to
the state of the art and is operationally reliable. Nevertheless, problems and faults might occur.
Therefore, we would like to describe here how to eliminate possible faults:
Take note of all the safety instructions in these operating instructions!
No reception of the signal of the outdoor sensor
• The distance between weather station and outdoor sensor is too large. Change the
installation site of the outdoor sensor.
• Objects or shielding materials interfere with radio reception. The same applies to other
electronic devices, e.g. televisions or computers. Change the installation site of outdoor
sensor and weather station.
• The batteries of the outdoor sensor are weak or empty. Try to insert new batteries into the
outdoor sensor.
• A different transmitter on the same or an adjacent frequency interferes with the radio signal
of the outdoor sensor. This might be e.g. radio-controlled headphones, radio-controlled
speakers or similar devices.
Such products are usually not in use all the time; the radio reception may be faultless the next
day, for example, which makes a search for the cause more difficult.
• Start the manual search for the outdoor sensor by pressing the button "IN/OUT" for approx.
3 seconds and letting go once the symbol "OUT" blinks on the display.
Faulty reception of weather forecasts
• In case of brief disruptions of the radio transmission (e.g. caused by the operation of a device
that is not sufficiently screened, turning electric devices on/off, etc.), it may happen that the
weather information is not correctly received by the weather station. E.g. the weather station
does not show a reception symbol for tomorrow.
Change the location site of the weather station.
Page 73

73
Weather forecasts are missing on the display
• Due to the low data quantity transmitted via DCF signal, the reception of all weather forecasts
takes up to 24 hours (if there are no reception problems).
Page 74

74
14. Transmission range
The transmission range of the radio signals between outdoor sensor and weather station is up
to 30m under optimum conditions. This is also often designated as "free-field coverage".
However, this ideal arrangement (e.g. weather station and outdoor sensor on
a plain, even meadow without trees, houses etc.) never exists in practice.
Normally the weather station is installed in the house and the outdoor sensor is mounted, e.g.
outdoor next to the window.
The range can sometimes be considerably reduced due to:
• walls, reinforced concrete ceilings
• coated/metallised insulated glass
• vehicles
• trees, brushes, earth, rocks
• the proximity to metallic & conductive objects (e.g. heating elements)
• proximity to human body
• Broadband interferences, e.g. in residential areas (DECT telephones, mobiles, radiocontrolled headphones, radio-controlled speakers, other radio-controlled weather stations,
babyphones etc.)
• Proximity to electric motors, transformers, power supply units, computers
• proximity to badly shielded or openly operated computers or other electric devices
Since local conditions vary from site to site, a definite range cannot be
guaranteed.
However, trouble-free operation is usually possible in a detached house. When
the weather station doesn’t receive any data from the outdoor sensor (despite
new batteries), reduce the distance between outdoor sensor and weather
station, change the installation site.
Page 75

75
15. Maintenance and cleaning
Servicing or repair may only be carried out by a specialist/specialist workshop. There are no
components on the inside of the product that need maintenance by you, this is why you should
never open it (apart from the described approach to insert or change the batteries, in these
instructions).
To clean the exterior of the weather station, a dry, soft and clean cloth is sufficient.
Dust on the weather station can be easily removed with the help of a long-haired, soft and clean
brush and a vacuum cleaner.
Don’t press too hard on the display, this may cause scratch marks or lead to
failure of the display.
Use a slightly damp, clean and soft cloth to remove dirt from the outdoor sensor.
Never use aggressive cleaning agents, alcohol or other chemical solutions as
the surface of the housing could be damaged (discolouration).
Page 76

76
16. Battery replacement
In case the batteries in the weather station or the outdoor sensor become weak, a small symbol
appears on the display.
• Batteries of the weather station weak: Battery symbol on the top left of the display
• Batteries of the outdoor sensor weak: Battery symbol in the display section for the
temperature
If you change the batteries in the outdoor sensor, press the button "IN/OUT" on the weather
station afterwards for approx. 3 seconds to perform a manual search for the outdoor sensor.
Proceed as you did on commissioning to change the batteries in the weather station. The cities
you have selected for display remain just like the city names you have programmed.
17. Handling
Take note of all the safety instructions in these operating instructions!
a) General Information
The product is not a toy and should be kept out of the reach of children. It contains small
swallowable small parts, glass (display), as well as batteries.
The product may not be opened or disassembled (apart from the battery replacement
described in these operating instructions).
None of the components inside the product is to be maintained by the user. If you open/take
apart the device, the license (CE) and the guarantee/warrantee expires as well.
Do not drop the product even from a low height as this might damage it.
Page 77

77
b) Weather station
Avoid the following adverse environmental condition when operating the weather station:
- Excessive humidity or dampness
- extreme cold or heat
- direct sunlight
- Dust or combustible gases, vapours or solvents
- Strong vibrations
- strong magnetic fields such as those found in the vicinity of machinery or loudspeakers
Never use the product immediately after it has been brought from a cold into a warm room.
Condensation that forms might destroy your device. Wait until the product has reached room
temperature. This may take several hours!
The installation site should be chosen in a way that the weather station has a firm position and
cannot fall down. There is risk of injury through its weight.
Valuable or scratch sensitive furniture surfaces should be protected from damage with suitable
covers, before you put the weather station on them.
c) Outdoor sensor
The outdoor sensor is suitable to be used in a sheltered outdoor area (for example under a roof
projection). Never operate it in or below water.
Install the outdoor sensor in a way so that it is positioned vertically/upright and the LC display
points upward, the stand downward). Otherwise, water may penetrate the device.
Page 78

78
18. Disposal
a) General Information
Electric and electronic devices must not be disposed of in the domestic waste.
Please dispose of the inoperative product in accordance with the current legal
regulations.
b) Batteries and Rechargeable Batteries
You, as the end user, are required by law (Battery Ordinance) to return all used batteries/
rechargeable batteries. Disposal of them in the household waste is prohibited!
Contaminated batteries/rechargeable batteries are labelled with these symbols
to indicate that disposal in domestic waste is forbidden.
The description of dangerous heavy metal constituents are: Cd=cadmium,
Hg=mercury, Pb=lead (name on battery/rechargeable battery, e.g. under the
trash icons on the left).
You can return your exhausted batteries/rechargeable batteries free of charge
to any authorized disposal station in your local authority, to our stores or to any
other store where batteries/rechargeable batteries are sold.
You thus fulfil your statutory obligations and contribute to the protection of the environment.
Page 79

79
19. Technical data
a) Weather station
Temperature range: ................... -5.0°C to +50.0°C
Accuracy:.................................... +/- 1°C
Batteries: .................................... 2 * AA/Mignon (alkaline recommended)
Dimensions: ............................... Approx. 127 x 117 x 28mm (H x W x D)
Weight: ....................................... Approx. 185g (without batteries)
b) Outdoor sensor
Temperature range: ................... -20.0°C to +50.0°C
Accuracy:.................................... +/- 1°C
Transmission frequency: ........... 433MHz
Range: ........................................ Up to 30m
(in the free field, see Chapter "transmission range")
Batteries: .................................... 2 * AA/Mignon (alkaline recommended)
Dimensions: ............................... Approx. 110 x 61 x 32mm (H x W x D)
Weight: ....................................... Approx. 67g (without batteries)
20. Declaration of Conformity (DOC)
We, Conrad Electronic, Klaus-Conrad-Straße 1, D-92240 Hirschau, hereby declare that this
product adheres to the fundamental requirements and the other relevant regulations of
Directive 1999/5/EC.
The declaration of conformity of this product can be found at www.conrad.com.
Page 80

80
21. Cities for the weather forecast
Altogether 272 cities are saved in the weather station for the 90 regions.
Country Display City Display Region
ANDORRA ANDORRA ANDORRA LA VELLA AND.LA.VELLA 70
BELGIQUE / BELGIË B/BELGIUM ANTWERPEN ANTWERPEN 6
BELGIQUE / BELGIË B/BELGIUM BRUXELLES/BRUSSEL BRUSSEL 6
BELGIQUE / BELGIË B/BELGIUM CHARLEROI CHARLEROI 6
BELGIQUE / BELGIË B/BELGIUM LIEGE LIEGE 6
BELGIQUE / BELGIË B/BELGIUM VERVIERS VERVIERS 13
CESKO / CZECH REPUBLIC CZ/CZ REP BRNO BRNO 50
CESKO / CZECH REPUBLIC CZ/CZ REP PLZEN PLZEN 50
CESKO / CZECH REPUBLIC CZ/CZ REP PRAHA PRAHA 50
CESKO / CZECH REPUBLIC CZ/CZ REP DECIN DECIN 51
DANMARK / DENMARK DK/DENMARK ALBORG ALBORG 20
DANMARK / DENMARK DK/DENMARK HERNING HERNING 20
DANMARK / DENMARK DK/DENMARK ARHUS ARHUS 21
DANMARK / DENMARK DK/DENMARK ODENSE ODENSE 21
DANMARK / DENMARK DK/DENMARK KØBENHAVN KØBENHAVN 23
DEUTSCHLAND / GERMANY D / GER FRANKFURT AM MAIN FRANKFURT.M 12
DEUTSCHLAND / GERMANY D / GER KAISERSLAUTERN KAISERSLAU 12
DEUTSCHLAND / GERMANY D / GER KARLSRUHE KARLSRUHE 12
DEUTSCHLAND / GERMANY D / GER MANNHEIM MANNHEIM 12
DEUTSCHLAND / GERMANY D / GER HAGEN HAGEN 13
DEUTSCHLAND / GERMANY D / GER KOBLENZ KOBLENZ 13
DEUTSCHLAND / GERMANY D / GER SIEGEN SIEGEN 13
DEUTSCHLAND / GERMANY D / GER TRIER TRIER 13
DEUTSCHLAND / GERMANY D / GER DORTMUND DORTMUND 14
DEUTSCHLAND / GERMANY D / GER DUISBURG DUISBURG 14
DEUTSCHLAND / GERMANY D / GER DÜSSELDORF DÜSSELDORF 14
DEUTSCHLAND / GERMANY D / GER KÖLN KÖLN 14
DEUTSCHLAND / GERMANY D / GER MÜNSTER MÜNSTER 14
DEUTSCHLAND / GERMANY D / GER BREMERHAVEN BREMERHAVEN 19
DEUTSCHLAND / GERMANY D / GER HAMBURG HAMBURG 19
DEUTSCHLAND / GERMANY D / GER BREMEN BREMEN 22
DEUTSCHLAND / GERMANY D / GER HANNOVER HANNOVER 22
DEUTSCHLAND / GERMANY D / GER MAGDEBURG MAGDEBURG 22
DEUTSCHLAND / GERMANY D / GER KIEL KIEL 24
DEUTSCHLAND / GERMANY D / GER LÜBECK LÜBECK 24
DEUTSCHLAND / GERMANY D / GER ROSTOCK ROSTOCK 24
Page 81

81
Country Display City Display Region
DEUTSCHLAND / GERMANY D / GER AUGSBURG AUGSBURG 25
DEUTSCHLAND / GERMANY D / GER INGOLSTADT INGOLSTADT 25
DEUTSCHLAND / GERMANY D / GER REGENSBURG REGENSBURG 25
DEUTSCHLAND / GERMANY D / GER ULM ULM 25
DEUTSCHLAND / GERMANY D / GER FRIEDRICHSHAFEN FRIEDRI.HFN 26
DEUTSCHLAND / GERMANY D / GER KEMPTEN KEMPTEN 26
DEUTSCHLAND / GERMANY D / GER MÜNCHEN MÜNCHEN 26
DEUTSCHLAND / GERMANY D / GER BAYREUTH BAYREUTH 28
DEUTSCHLAND / GERMANY D / GER NÜRNBERG NÜRNBERG 28
DEUTSCHLAND / GERMANY D / GER WÜRZBURG WÜRZBURG 28
DEUTSCHLAND / GERMANY D / GER COTTBUS COTTBUS 29
DEUTSCHLAND / GERMANY D / GER DRESDEN DRESDEN 29
DEUTSCHLAND / GERMANY D / GER HALLE HALLE 29
DEUTSCHLAND / GERMANY D / GER LEIPZIG LEIPZIG 29
DEUTSCHLAND / GERMANY D / GER EISENACH EISENACH 30
DEUTSCHLAND / GERMANY D / GER ERFURT ERFURT 30
DEUTSCHLAND / GERMANY D / GER HOF HOF 30
DEUTSCHLAND / GERMANY D / GER JENA JENA 30
DEUTSCHLAND / GERMANY D / GER PLAUEN PLAUEN 30
DEUTSCHLAND / GERMANY D / GER ZWICKAU ZWICKAU 30
DEUTSCHLAND / GERMANY D / GER KONSTANZ KONSTANZ 32
DEUTSCHLAND / GERMANY D / GER FULDA FULDA 37
DEUTSCHLAND / GERMANY D / GER GIESSEN GIESSEN 37
DEUTSCHLAND / GERMANY D / GER GÖTTINGEN GÖTTINGEN 37
DEUTSCHLAND / GERMANY D / GER KASSEL KASSEL 37
DEUTSCHLAND / GERMANY D / GER FREIBURG FREIBURG 45
DEUTSCHLAND / GERMANY D / GER BERLIN BERLIN 52
DEUTSCHLAND / GERMANY D / GER FRANKFURT AN DER ODER FRANKFURT.O 52
DEUTSCHLAND / GERMANY D / GER NEUBRANDENBURG NEUBR.BURG 52
DEUTSCHLAND / GERMANY D / GER POTSDAM POTSDAM 52
DEUTSCHLAND / GERMANY D / GER DONAUESCHINGEN DONAUESCH. 57
DEUTSCHLAND / GERMANY D / GER FREUDENSTADT FREUDENST. 57
DEUTSCHLAND / GERMANY D / GER VILLINGEN-SCHWENNINGEN VILL.-SCHWE. 57
DEUTSCHLAND / GERMANY D / GER HEILBRONN HEILBRONN 59
DEUTSCHLAND / GERMANY D / GER PFORZHEIM PFORZHEIM 59
DEUTSCHLAND / GERMANY D / GER STUTTGART STUTTGART 59
DEUTSCHLAND / GERMANY D / GER TÜBINGEN TÜBINGEN 59
EIRE / IRELAND IRELAND GALWAY GALWAY 75
EIRE / IRELAND IRELAND DUBLIN DUBLIN 76
ESPANA / SPAIN ES / SPAIN MADRID MADRID 64
ESPANA / SPAIN ES / SPAIN BILBAO BILBAO 65
ESPANA / SPAIN ES / SPAIN PALMA DE MALLORCA PALMA-D.MAL 67
ESPANA / SPAIN ES / SPAIN VALENCIA VALENCIA 68
ESPANA / SPAIN ES / SPAIN BARCELONA BARCELONA 69
Page 82

82
Country Display City Display Region
ESPANA / SPAIN ES / SPAIN SEVILLA SEVILLA 71
ESPANA / SPAIN ES / SPAIN GIJON GIJON 74
FRANCE FRANCE BORDEAUX BORDEAUX 0
FRANCE FRANCE BRIVE-LA-GAILLARDE BRIVE-L-GA 0
FRANCE FRANCE PAU PAU 0
FRANCE FRANCE TOULOUSE TOULOUSE 0
FRANCE FRANCE LA ROCHELLE LA_ROCHELL 1
FRANCE FRANCE LIMOGES LIMOGES 1
FRANCE FRANCE POITIERS POITIERS 1
FRANCE FRANCE LE MANS LE MANS 2
FRANCE FRANCE PARIS PARIS 2
FRANCE FRANCE REIMS REIMS 2
FRANCE FRANCE TOURS TOURS 2
FRANCE FRANCE TROYES TROYES 2
FRANCE FRANCE BREST BREST 3
FRANCE FRANCE NANTES NANTES 3
FRANCE FRANCE RENNES RENNES 3
FRANCE FRANCE CLERMONT-FERRAND CLERMON-FE 4
FRANCE FRANCE MONTLUCON MONTLUCON 4
FRANCE FRANCE SAINT-ETIENNE ST-ETIENNE 4
FRANCE FRANCE BEZIERS BEZIERS 5
FRANCE FRANCE MONTPELLIER MONTPELLIE 5
FRANCE FRANCE PERPIGNAN PERPIGNAN 5
FRANCE FRANCE LILLE LILLE 6
FRANCE FRANCE DIJON DIJON 7
FRANCE FRANCE METZ METZ 7
FRANCE FRANCE NANCY NANCY 7
FRANCE FRANCE AVIGNON AVIGNON 8
FRANCE FRANCE MARSEILLE MARSEILLE 8
FRANCE FRANCE NIMES NIMES 8
FRANCE FRANCE TOULON TOULON 8
FRANCE FRANCE LYON LYON 9
FRANCE FRANCE VALENCE VALENCE 9
FRANCE FRANCE CHAMBERY CHAMBERY 10
FRANCE FRANCE GRENOBLE GRENOBLE 10
FRANCE FRANCE ANNECY ANNECY 11
FRANCE FRANCE BESANCON BESANCON 11
FRANCE FRANCE AMIENS AMIENS 17
FRANCE FRANCE CAEN CAEN 17
FRANCE FRANCE LE HAVRE LE HAVRE 17
FRANCE FRANCE ROUEN ROUEN 17
FRANCE FRANCE EVIAN EVIAN 31
FRANCE FRANCE CANNES CANNES 43
FRANCE FRANCE NICE NICE 43
Page 83

83
Country Display City Display Region
FRANCE FRANCE BELFORT BELFORT 45
FRANCE FRANCE COLMAR COLMAR 45
FRANCE FRANCE MULHOUSE MULHOUSE 45
FRANCE FRANCE STRASBOURG STRASBOURG 45
FRANCE FRANCE BASTIA BASTIA 73
HRVATSKA / CROATIA HR/CROATIA ZAGREB ZAGREB 87
HRVATSKA / CROATIA HR/CROATIA SPLIT SPLIT 89
ITALIA / ITALY I / ITALY BOLZANO BOLZANO 27
ITALIA / ITALY I / ITALY TRENTO TRENTO 27
ITALIA / ITALY I / ITALY AOSTA AOSTA 39
ITALIA / ITALY I / ITALY SESTRIERE SESTRIERE 39
ITALIA / ITALY I / ITALY MILANO MILANO 40
ITALIA / ITALY I / ITALY PARMA PARMA 40
ITALIA / ITALY I / ITALY TORINO TORINO 40
ITALIA / ITALY I / ITALY VERONA VERONA 40
ITALIA / ITALY I / ITALY FIRENZE FIRENZE 41
ITALIA / ITALY I / ITALY PISA PISA 41
ITALIA / ITALY I / ITALY ROMA ROMA 41
ITALIA / ITALY I / ITALY SIENA SIENA 41
ITALIA / ITALY I / ITALY GENOVA GENOVA 43
ITALIA / ITALY I / ITALY LA SPEZIA LA SPEZIA 43
ITALIA / ITALY I / ITALY BOLOGNA BOLOGNA 44
ITALIA / ITALY I / ITALY RIMINI RIMINI 44
ITALIA / ITALY I / ITALY TRIESTE TRIESTE 44
ITALIA / ITALY I / ITALY UDINE UDINE 44
ITALIA / ITALY I / ITALY VENEZIA VENEZIA 44
ITALIA / ITALY I / ITALY NAPOLI NAPOLI 60
ITALIA / ITALY I / ITALY ANCONA ANCONA 61
ITALIA / ITALY I / ITALY BARI BARI 62
ITALIA / ITALY I / ITALY PALERMO PALERMO 66
ITALIA / ITALY I / ITALY SASSARI SASSARI 73
LIECHTENSTEIN LI/LICHTEN VADUZ VADUZ 48
LUXEMBOURG LUX LUXEMBOURG LUXEMBOURG 13
MAGYAR / HUNGARY H/HUNGARY GYÖR GYÖR 49
MAGYAR / HUNGARY H/HUNGARY BUDAPEST BUDAPEST 63
MONACO MONACO MONACO MONACO 43
NEDERLAND / NETHERLANDS NL/NETHERL MAASTRICHT MAASTRICHT 6
NEDERLAND / NETHERLANDS NL/NETHERL MIDDELBURG MIDDELBURG 6
NEDERLAND / NETHERLANDS NL/NETHERL TERNEUZEN TERNEUZEN 6
NEDERLAND / NETHERLANDS NL/NETHERL DEN HELDER DEN HELDER 19
NEDERLAND / NETHERLANDS NL/NETHERL GRONINGEN GRONINGEN 19
NEDERLAND / NETHERLANDS NL/NETHERL LEEUWARDEN LEEUWARDEN 19
NEDERLAND / NETHERLANDS NL/NETHERL TEXEL TEXEL 19
NEDERLAND / NETHERLANDS NL/NETHERL AMSTERDAM AMSTERDAM 42
Page 84

84
Country Display City Display Region
NEDERLAND / NETHERLANDS NL/NETHERL ARNHEM ARNHEM 42
NEDERLAND / NETHERLANDS NL/NETHERL ASSEN ASSEN 42
NEDERLAND / NETHERLANDS NL/NETHERL DEN HAAG DEN HAAG 42
NEDERLAND / NETHERLANDS NL/NETHERL EINDHOVEN EINDHOVEN 42
NEDERLAND / NETHERLANDS NL/NETHERL HAARLEM HAARLEM 42
NEDERLAND / NETHERLANDS NL/NETHERL LELYSTAD LELYSTAD 42
NEDERLAND / NETHERLANDS NL/NETHERL ROTTERDAM ROTTERDAM 42
NEDERLAND / NETHERLANDS NL/NETHERL S-HERTOGENBOSCH S.HERTOGENB 42
NEDERLAND / NETHERLANDS NL/NETHERL UTRECHT UTRECHT 42
NEDERLAND / NETHERLANDS NL/NETHERL ZWOLLE ZWOLLE 42
NORGE / NORWAY N / NORWAY DRAMMEN DRAMMEN 58
NORGE / NORWAY N / NORWAY FREDRIKSTAD FREDRIKST. 58
NORGE / NORWAY N / NORWAY OSLO OSLO 58
NORGE / NORWAY N / NORWAY TØNSBERG TØNSBERG 58
NORGE / NORWAY N / NORWAY STAVANGER STAVANGER 78
NORGE / NORWAY N / NORWAY TRONDHEIM TRONDHEIM 79
ÖSTERREICH / AUSTRIA AU/AUSTRIA LINZ LINZ 26
ÖSTERREICH / AUSTRIA AU/AUSTRIA GRAZ GRAZ 46
ÖSTERREICH / AUSTRIA AU/AUSTRIA KLAGENFURT KLAGENFURT 46
ÖSTERREICH / AUSTRIA AU/AUSTRIA INNSBRUCK INNSBRUCK 47
ÖSTERREICH / AUSTRIA AU/AUSTRIA BREGENZ BREGENZ 48
ÖSTERREICH / AUSTRIA AU/AUSTRIA SALZBURG SALZBURG 48
ÖSTERREICH / AUSTRIA AU/AUSTRIA EISENSTADT EISENSTADT 49
ÖSTERREICH / AUSTRIA AU/AUSTRIA WIEN WIEN 49
ÖSTERREICH / AUSTRIA AU/AUSTRIA SANKT PÖLTEN ST.PÖLTEN 50
POLSKA / POLAND PL/POLAND WALBRZYCH WALBRZYCH 51
POLSKA / POLAND P/POLAND GDANSK GDANSK 81
POLSKA / POLAND P/POLAND WARSZAWA WARSZAWA 82
POLSKA / POLAND P/POLAND KRAKOW KRAKOW 83
PORTUGAL P/PORTUGAL LISBOA LISBOA 72
SCHWEIZ/SUISSE/SVIZZERA CH/SUISSE DELEMONT DELEMONT 11
SCHWEIZ/SUISSE/SVIZZERA CH/SUISSE LA CHAUX-DE-FONDS LA.CHAUX-D.F 11
SCHWEIZ/SUISSE/SVIZZERA CH/SUISSE FRIBOURG FRIBOURG 31
SCHWEIZ/SUISSE/SVIZZERA CH/SUISSE GENEVE GENEVE 31
SCHWEIZ/SUISSE/SVIZZERA CH/SUISSE LAUSANNE LAUSANNE 31
SCHWEIZ/SUISSE/SVIZZERA CH/SUISSE MONTREUX MONTREUX 31
SCHWEIZ/SUISSE/SVIZZERA CH/SUISSE NEUCHATEL NEUCHATEL 31
SCHWEIZ/SUISSE/SVIZZERA CH/SUISSE AARAU AARAU 32
SCHWEIZ/SUISSE/SVIZZERA CH/SUISSE BERN BERN 32
SCHWEIZ/SUISSE/SVIZZERA CH/SUISSE BIEL/BIENNE BIENNE 32
SCHWEIZ/SUISSE/SVIZZERA CH/SUISSE FRAUENFELD FRAUENFELD 32
SCHWEIZ/SUISSE/SVIZZERA CH/SUISSE LUZERN LUZERN 32
SCHWEIZ/SUISSE/SVIZZERA CH/SUISSE SCHAFFHAUSEN SCHAFFHAUS 32
SCHWEIZ/SUISSE/SVIZZERA CH/SUISSE SOLOTHURN SOLOTHURN 32
Page 85

85
Country Display City Display Region
SCHWEIZ/SUISSE/SVIZZERA CH/SUISSE ZUG ZUG 32
SCHWEIZ/SUISSE/SVIZZERA CH/SUISSE ZÜRICH ZÜRICH 32
SCHWEIZ/SUISSE/SVIZZERA CH/SUISSE ADELBODEN ADELBODEN 33
SCHWEIZ/SUISSE/SVIZZERA CH/SUISSE GRINDELWALD GRINDELWALD 33
SCHWEIZ/SUISSE/SVIZZERA CH/SUISSE INTERLAKEN INTERLAKEN 33
SCHWEIZ/SUISSE/SVIZZERA CH/SUISSE BRIG BRIG 34
SCHWEIZ/SUISSE/SVIZZERA CH/SUISSE MARTIGNY MARTIGNY 34
SCHWEIZ/SUISSE/SVIZZERA CH/SUISSE SION SION 34
SCHWEIZ/SUISSE/SVIZZERA CH/SUISSE ALTDORF ALTDORF 35
SCHWEIZ/SUISSE/SVIZZERA CH/SUISSE GLARUS GLARUS 35
SCHWEIZ/SUISSE/SVIZZERA CH/SUISSE SARNEN SARNEN 35
SCHWEIZ/SUISSE/SVIZZERA CH/SUISSE SCHWYZ SCHWYZ 35
SCHWEIZ/SUISSE/SVIZZERA CH/SUISSE ST. GALLEN ST. GALLEN 35
SCHWEIZ/SUISSE/SVIZZERA CH/SUISSE STANS STANS 35
SCHWEIZ/SUISSE/SVIZZERA CH/SUISSE CHUR CHUR 36
SCHWEIZ/SUISSE/SVIZZERA CH/SUISSE DAVOS DAVOS 36
SCHWEIZ/SUISSE/SVIZZERA CH/SUISSE BELLINZONA BELLINZONA 38
SCHWEIZ/SUISSE/SVIZZERA CH/SUISSE LOCARNO LOCARNO 38
SCHWEIZ/SUISSE/SVIZZERA CH/SUISSE LUGANO LUGANO 38
SCHWEIZ/SUISSE/SVIZZERA CH/SUISSE BASEL BASEL 45
SCHWEIZ/SUISSE/SVIZZERA CH/SUISSE LIESTAL LIESTAL 45
SCHWEIZ/SUISSE/SVIZZERA CH/SUISSE SAMEDAN SAMEDAN 86
SCHWEIZ/SUISSE/SVIZZERA CH/SUISSE ZERMATT ZERMATT 88
SLOVENIJA / SLOVENIA SLOVENIA NOVA GORICA NOVA GORICA 44
SLOVENIJA / SLOVENIA SLOVENIA LJUBLJANA LJUBLJANA 46
SLOVENIJA / SLOVENIA SLOVENIA MARIBOR MARIBOR 46
SLOVENSKO / SLOVAKIA SLOVENIA BRATISLAVA BRATISLAVA 49
SVERIGE / SWEDEN S/SWEDEN MALMÖ MALMÖ 23
SVERIGE / SWEDEN S/SWEDEN GÖTEBORG GÖTEBORG 53
SVERIGE / SWEDEN S/SWEDEN HALMSTAD HALMSTAD 53
SVERIGE / SWEDEN S/SWEDEN GÄVLE GÄVLE 54
SVERIGE / SWEDEN S/SWEDEN STOCKHOLM STOCKHOLM 54
SVERIGE / SWEDEN S/SWEDEN UPPSALA UPPSALA 54
SVERIGE / SWEDEN S/SWEDEN VÄSTERAS VÄSTERAS 54
SVERIGE / SWEDEN S/SWEDEN KALMAR KALMAR 55
SVERIGE / SWEDEN S/SWEDEN LINKÖPING LINKÖPING 55
SVERIGE / SWEDEN S/SWEDEN VISBY VISBY 55
SVERIGE / SWEDEN S/SWEDEN BORAS BORAS 56
SVERIGE / SWEDEN S/SWEDEN JÖNKÖPING JÖNKÖPING 56
SVERIGE / SWEDEN S/SWEDEN KARLSTAD KARLSTAD 56
SVERIGE / SWEDEN S/SWEDEN ÖREBRO ÖREBRO 56
SVERIGE / SWEDEN S / SWEDEN SUNDSVALL SUNDSVALL 80
SVERIGE / SWEDEN S / SWEDEN UMEA UMEA 84
SVERIGE / SWEDEN S / SWEDEN ÖSTERSUND ÖSTERSUND 85
Page 86

86
Country Display City Display Region
UNITED KINGDOM UK BRISTOL BRISTOL 15
UNITED KINGDOM UK PLYMOUTH PLYMOUTH 15
UNITED KINGDOM UK SWANSEA SWANSEA 15
UNITED KINGDOM UK BIRMINGHAM BIRMINGHAM 16
UNITED KINGDOM UK LIVERPOOL LIVERPOOL 16
UNITED KINGDOM UK MANCHESTER MANCHESTER 16
UNITED KINGDOM UK NEWCASTLE UPON TYNE NEWCASTLE 16
UNITED KINGDOM UK SHEFFIELD SHEFFIELD 16
UNITED KINGDOM UK BRIGHTON BRIGHTON 18
UNITED KINGDOM UK CAMBRIDGE CAMBRIDGE 18
UNITED KINGDOM UK KINGSTON UPON HULL KINGSTON 18
UNITED KINGDOM UK LONDON LONDON 18
UNITED KINGDOM UK OXFORD OXFORD 18
UNITED KINGDOM UK BELFAST BELFAST 76
UNITED KINGDOM UK GLASGOW GLASGOW 77
VATICANO / VATICAN CITY V/VATICANO CITTA DEL VATICANO VATICANO 41
Page 87

87
22. Weather alerts
Certain text messages are displayed for critical weather conditions in the bottom display line.
For this purpose, see chapter 12 k).
English Display German Display
HEAVY WEATHER HEAVY.WEATH. SCHWERES WETTER UNWETTER
HEAVY WEATHER day HEAVY.WEATH. SCHWERES WETTER TAG UNWETTER T
HEAVY WEATHER night HEAVY.WEATH. SCHWERES WETTER NACHT UNWETTER N
STORM STORM STURM STURM
STORM DAYTIME DAY.STORM STURM AM TAGE STURM.TAG
STORM NIGHTTIME NIGHT.STORM STURM NACHTS STURM.NACHT
STRONG GUST DAYTIME DAY.GUST AM TAG BÖIGER WIND WINDBÖE.T
STRONG GUST NIGHTTIME NIGHT.GUST NACHTS BÖIGER WIND WINDBÖE.N
FREEZING RAIN A.M. FROZEN.RAIN EISREGEN VORMITTAGS EISREGEN
FREEZING RAIN P.M. FROZEN.RAIN EISREGEN NACHMITTAGS EISREGEN
FREEZING RAIN NIGHTTIME FROZEN.RAIN EISREGEN NACHTS EISREGEN
FINE PARTICLES PM10 PARTICLES FEINSTAUB PM10 FEINSTAUB
OZONE OZONE OZON OZON
IRRADIATION IRRATE RADIOAKTIVE STRAHLUNG RA. STRAHL.
FLOOD FLOOD HOCHWASSER HOCHWASSER
DENSE FOG DENSE FOG DICHTER NEBEL NEBEL
HEAVY RAIN HEAVY RAIN STARKE REGENFÄLLE ST. REGEN
HEAVY RAIN HEAVY RAIN STARKE NIEDERSCHLÄGE ST. NIEDERS.
HEAVY SNOWFALL HEAVY SNOW STARKE SCHNEEFÄLLE ST. SCHNEE
HEAVY THUNDERSTORM THUNDER STARKE GEWITTER ST.GEWITTER
STRONG UV STRONG UV STARKE UV-STRAHLUNG ST. UV-STR.
DENSE FOG DAYTIME DENSE FOG TAGS DICHTER NEBEL NEBEL_T
HEAVY RAIN DAYTIME RAIN TAGS STARKER REGEN REGEN_T
HEAVY RAIN DAYTIME RAIN TAGS STARKER NIEDERSCHL. NIEDERS_T
HEAVY SNOWFALL DAYTIME HEAVY SNOW TAGS STARKE SCHNEEFÄLLE ST.SCHNEE_T
THUNDERSTORM DAYTIME THUNDER TAGS STARKE GEWITTER GEWITTER_T
DENSE FOG NIGHTTIME DENSE FOG NACHTS DICHTER NEBEL NEBEL_N
HEAVY RAIN NIGHTTIME HEAVY RAIN NACHTS STARKER REGEN REGEN_N
HEAVY RAIN NIGHTTIME HEAVY RAIN NACHTS STARK.NIEDERSCHL. NIEDERS_N
HEAVY SNOWFALL NIGHT HEAVY SNOW NACHTS STARK.SCHNEEFALL ST.SCHNEE_N
THUNDERSTORM NIGHTTIME THUNDER NACHTS STARKE GEWITTER GEWITTER_N
FOEHN FOEHN FÖHN FÖHN
BISE BISE BISE BISE
MISTRAL MISTRAL MISTRAL MISTRAL
SCIROCCO SCIROCCO SCIROCCO SCIROCCO
TRAMONTANA TRAMONTANA TRAMONTANA TRAMONTANA
Page 88

88
Netherlands Display French Display
ZWAAR WEER ZWAAR WEER TEMPS LOURD TEMPS.LOURD
ZWAAR WEER OVERDAG ZW WEER_D TEMPS LOURD JOUR TEMPS.LOURD
ZWAAR WEER'S NACHTS ZW WEER_N TEMPS LOURD NUIT TEMPS.LOURD
STORM STORM TEMPETE TEMPETE
STORM OVERDAG STORM_D TEMPETE JOUR TEMPETE
STORM'S NACHTS STORM_N TEMPETE NUIT TEMPETE
WINDSTOTEN OVERDAG WINDST_D RAFALES VIOLENTES JOUR VIOLENTES
WINDSTOTEN'S NACHTS WINDST_N RAFALES VIOLENTES NUIT VIOLENTES
IJZEL IN DE OCHTEND IJZEL_O PLUIE VERGLACANTE MATIN PLUIE_VER
IJZEL IN DE MIDDAG IJZEL_M PLUIE VERGLA.APRES-MIDI PLUIE_VER
IJZEL IN DE NACHT IJZEL_N PLUIE VERGLACANTE NUIT PLUIE_VER
FIJNE DEELTJES PM10 FIJNSTOF POUSSIERE FINE PM10 FINE_PM10
OZON OZON OZONE OZONE
RADIOACTIEVE STRALING RAD ACT ST IRRADIATION IRRATE
HOOGWATER HOOGWATER INONDATION INONDATION
DICHTE MIST D MIST BROUILLARD EPAIS BROUILLARD
ZWARE REGEN ZW REGEN FORTE PLUIE FORTE.PLUIE
ZWARE NEERSLAG ZW REGEN FORTE PLUIE FORTE.PLUIE
ZWARE SNEEUWVAL ZW SNEEUW FORTE CHUTE NEIGE FORTE.PLUIE
ZWARE ONWEERSBUIEN ZW ONWEER ORAGE VIOLENT ORAGE VOIL.
STERKE UV STRALING ST UV STR FORTE IRRADIATION UV FORTE UV
DICHTE MIST OVERDAG D MIST_O BROUILLARD EPAIS JOUR BROUILL_J
ZWARE REGEN OVERDAG ZW REGEN_O FORTE PLUIE JOUR FORTE.PLU_J
ZWARE NEERSLAG OVERDAG ZW REGEN_O FORTE PRECIPIT. JOUR FORTE.PRE_J
ZWARE SNEEUWVAL OVERDAG ZW SNEEUW FORTE CHUTE NEIGE JOUR FORTE.NEIGE
ZWAAR ONWEER OVERDAG ZW ONWEER ORAGE VIOLENT JOUR ORAGE
DICHTE MIST'S NACHTS D MIST_N BROUILLARD EPAIS NUIT BROUILL_N
ZWARE REGEN'S NACHTS ZW REGEN_N FORTE PLUIE NUIT FORTE.PLU_N
ZWARE NEERSLAG'S NACHTS ZW REGEN_N FORTE PLUIE NUIT FORTE.PLU_N
ZWARE SNEEUW‘S NACHTS ZW SNEEUW FORTE CHUTE NEIGE NUIT FORTE.NEI_N
ZWAAR ONWEER'S NACHTS ZW ONWEER ORAGE VIOLENT NUIT ORAGE_N
FÖHN FÖHN FOEHN FOEHN
BISE BISE BISE BISE
MISTRAL MISTRAL MISTRAL MISTRAL
SCIROCCO SCIROCCO SCIROCCO SCIROCCO
TRAMONTANA TRAMONTANA TRAMONTAGNE TRAMONTAGN
Page 89

89
23. Display messages
English Display German Display
SEARCH SIGNAL SEARCH SIG. SUCHE SIGNAL SUCHE SIG.
SELECT CITY CITY STADT EINSTELLEN STADT.EINST.
SELECT COUNTRY COUNTRY LAND EINSTELLEN LAND EINST.
TIME ZONE ZONE ZEITZONE ZONE
HOURS HR STUNDEN H
RECEPTION TEST SCAN EMPFANGSTEST EMPF. TEST
CONTRAST. CONTRAST. KONTRAST. KONTRAST.
MEMORY FULL MEM.FULL SPEICHER VOLL SPEICHER_V
EXIT SETMODE EXIT EINSTELLUNG VORGENOMMEN EINST. VORG.
Netherlands Display French Display
SIGNAAL ZOEKEN SIGN ZKN CHERCHE SIG CHERCHE.SIG
STAD INSTELLEN STAD INST CHOIX DE LA VILLE CHOIX_VILL
LAND INSTELLEN LAND INST CHOIX DU PAYS CHOIX_PAYS
TIJD ZONE ZONE FUSEAU HORAIRE FUSEAU
UREN HR HRS H
SIGNAAL TEST SIGN TEST TEST DE RECEPTION TEST_REC
DISPLAY CONTRAST. CONTRAST. CONTRASTE. CONTRASTE.
GEHEUGEN VOL GEH VOL MEMOIRE PLEINE MEM PLEIN
INSTELLEN VERLATEN INST VERL REGLAGE EFFECTUE REGLAGE.EFF
Page 90

90
Table des matières
Page
1. Introduction ............................................................................................................... 92
2. Contenu de la livraison ............................................................................................ 93
3. Utilisation conforme ................................................................................................. 93
4. Explication des symboles ....................................................................................... 94
5. Caractéristiques et fonctions ................................................................................. 95
6. Consignes de sécurité ............................................................................................. 96
7. Indications afférentes aux piles et accumulateurs ............................................. 98
8. Eléments d'affichage et de commande ............................................................... 100
9. Réception DCF et METEOTIME ............................................................................. 101
10. Mise en service .......................................................................................................105
a) Généralités........................................................................................................... 105
b) Mise en service du capteur extérieur ................................................................. 105
c) Mise en service de la station météo ................................................................... 106
11. Installation/montage ............................................................................................... 108
a) Station météo ....................................................................................................... 108
b) Capteur extérieur ................................................................................................. 108
12. Utilisation ................................................................................................................. 109
a) Affichage de la température ................................................................................109
b) Valeurs Min/Maxi de température ....................................................................... 109
c) Recherche du capteur extérieur ......................................................................... 109
d) Essai de réception du signal « METEOTIME » ................................................. 109
e) Sélectionner le pays/ la ville pour l'indication météo ......................................... 110
f) Effacer une ville de la liste d'affichage ............................................................... 111
g) Entrer un lieu de résidence ................................................................................. 111
h) Commuter entre l'affichage de l'heure/la date,
la liste des villes et l'heure du lever/coucher du soleil ...................................... 112
i) Ajuster le fuseau horaire, la langue et le contraste ........................................... 112
j) Commuter entre les informations météo jour/nuit .............................................. 113
k) Annonces d’intempéries ...................................................................................... 114
l) Description des symboles météo ........................................................................ 115
Page 91

91
Page
13. Dépannage ............................................................................................................... 116
14. Portée ....................................................................................................................... 118
15. Entretien et nettoyage ............................................................................................ 119
16. Remplacement des piles ....................................................................................... 120
17. Manipulation ............................................................................................................ 120
a) Généralités........................................................................................................... 120
b) Station météo ....................................................................................................... 121
c) Capteur extérieur .................................................................................................121
18. Elimination ............................................................................................................... 122
a) Généralités........................................................................................................... 122
b) Piles et accumulateurs .......................................................................................122
19. Caractéristiques techniques ................................................................................. 123
a) Station météo ....................................................................................................... 123
b) Capteur extérieur ................................................................................................. 123
20. Déclaration de conformité (DOC) ......................................................................... 123
21. Villes pour les prévisions météorologiques ....................................................... 124
22. Bulletins météo ....................................................................................................... 131
23. Affichages sur l'écran ............................................................................................ 133
Page 92

92
1. Introduction
Chère cliente, cher client,
Nous vous remercions de l’achat du présent produit.
Ce produit est conforme aux exigences des directives nationales et européennes en vigueur.
Afin de maintenir le produit dans son état actuel et d'assurer un fonctionnement sans risques,
les utilisateurs sont tenus de suivre les instructions contenues dans le présent mode d'emploi !
Avant l'utilisation de ce produit, lisez attentivement le mode d'emploi
entier et respectez toutes les instructions d'utilisation et consignes de
sécurité.
Tous les noms de société et toutes les désignations de produit sont des marques déposées
de leurs propriétaires respectifs. Tous droits réservés.
Pour toutes vos questions techniques, veuillez vous adresser au numéro suivant :
France : Tél. : 0892 897 777
Fax : 0892 896 002
e-mail : support@conrad.fr
Du lundi au vendredi de 8h00 à 18h00
le samedi de 8h00 à 12h00
Suisse : Tél. : 0848/80 12 88
Fax : 0848/80 12 89
e-mail : support@conrad.ch
Du lundi au vendredi de 8h00 à 12h00 et de 13h00 à 17h00
Page 93

93
2. Contenu de la livraison
• Station météo
• Capteur extérieur
• Mode d’emploi
3. Utilisation conforme
La « station météo radiopilotée DV206NL » est un système universel de mesure de données
météorologiques de haute gamme. Elle peut analyser un grand nombre de données
météorologiques ainsi que des informations additionnelles, de même qu'afficher les valeurs
actuelles et les prévisions météo.
Toutes les données essentielles sont affichées simultanément sur l'écran à cristaux liquides.
Si nécessaire, des données supplémentaires peuvent être appelées par une pression sur la
touche correspondante.
Vous trouverez un relevé comprenant toutes les caractéristiques et propriétés
du produit au chapître 5.
Les prévisions météorologiques de la station météo ne sont affichées qu'en tant que valeurs
d'orientation. Ces valeurs ne représentent pas de prévisions absolues. Le constructeur
décline toute responsabilité pour l'affichage incorrect, des valeurs de mesure ou des prévisions
météorologiques erronées ainsi que pour les conséquences qui en découlent.
Le produit est conçu pour un usage personnel ; il ne convient pas à des fins médicales ou à
l´information destinée au public.
Les composants de ce produit ne sont pas un jouet. Ils comprennent des pièces fragiles, des
pièces en verre et celles de petite taille qui pourraient être avaléeset, en outre des piles. Ne
laissez pas le produit à la portée des enfants !
Utilisez les composants de sorte à ce qu'ils ne soient pas à la portée des enfants.
Le produit fonctionne sur piles. Le capteur extérieur transmet ses données via radio dans la
bande de 433MHz (portée du capteur extérieur de jusqu'à 30m en champ libre, voir chapitre
« 14. Portée ») à la station météo.
Toute utilisation autre que celle décrite ci-dessus occasionne l'endommagement de ce
produit ; d´autres risques sont en outre encourus.
Lisez attentivement l'intégralité du présent mode d'emploi. Il contient des informations
importantes relatives à son emplacement, sa mise en service et son fonctionnement.
Page 94

94
4. Explication des symboles
Le symbole de l’éclair dans le triangle est utilisé pour signaler un danger pour
votre santé, par ex. un choc électrique.
Le symbole du point d'exclamation signale les informations importantes dans
le présent mode d'emploi.
Le symbole de la « main » précède les recommandations et indications
d'utilisation particulières.
Page 95

95
5. Caractéristiques et fonctions
Au premier regard, la station météo ne se distingue pas d'une station météo classique.
Elle présente cependant l'atout de pouvoir exploiter et afficher des informations météorologiques
reçues par radio en plus du signal DCF (ou du signal HBG en Suisse) sous forme du signal
appelé « METEOTIME ».
Les informations météo sont établies par des météorologues professionnels à l'aide des
instruments les plus modernes - elles se basent donc à des données semblables à celles que
vous connaîssez des prévisions météorologiques dans la télévision et la radio.
Les prévisions suivantes s'affichent :
• Affichage des données météo (prévisions météo par symboles, température de jour,
température de nuit) pour la journée actuelle et le jour suivant ; pour 90 régions européennes
• Affichage de la probabilité de précipitations (aujourd'hui)
• Vitesse et direction du vent (aujourd'hui)
• Bulletin météo (par ex. en cas de tempête)
• Affichage de l'heure du lever et du coucher du soleil pour 272 métropoles européennes
La station météo vous offre en plus les fonctions suivantes :
• Affichage de l'heure exacte radiopilotée, de la date et du jour de la semaine (fuseau horaire
réglable)
• Capteur intégré pour la température intérieure
• Capteur extérieur compris dans la livraison, servant à des mesures de la température
extérieure ; transmission des données par radio (433MHz) à la station météo
• Montage mural ou installation sur une table
Page 96

96
6. Consignes de sécurité
En cas de dommages dus à la non-observation de ce mode d'emploi, la
validité de la garantie est annulée. Nous déclinons toute responsabilité
pour les dommages consécutifs !
De même, le constructeur n'assume aucune responsabilité en cas de
dommages matériels ou corporels résultant d'une utilisation non
conforme de l'appareil ou du non-respect des présentes consignes de
sécurité. Dans ces cas, tout droit à la garantie est annulé !
Chère Cliente, cher Client. Les consignes de sécurité et les indications de danger sont
destinées non seulement à préserver votre santé, mais aussi à préserver le bon fonctionnement
de l’appareil. Veuillez lire attentivement les points suivants :
• Pour des raisons de sécurité et d'homologation (CE), les transformations et/
ou modifications arbitraires du produit sont interdites. Ne l’ouvrez ni le
démontez pas ! L'intérieur de l'appareil ne comporte aucune pièce
nécessitant un réglage ou une maintenance de votre part.
Les travaux d'entretien, de réglage ou de réparation ne doivent être
effectués que par du personnel qualifié ou par un atelier spécialisé.
• N’utilisez pas ce produit dans les hôpitaux ou les établissements médicaux.
Bien que le capteur extérieur envoie des signaux radio relativement faibles,
l'utilisation de tels appareils pourrait intervenir avec l'usage d'équipement
de survie. Il en est probablement de même dans d'autres domaines.
• La station météo ne doit être utilisée que dans des locaux intérieurs secs.
Ne l'exposez pas à un rayonnement solaire direct, à une forte chaleur, au
froid, à l'humidité ni à l'eau.
Le capteur extérieur est approprié à l'utilisation en extérieur dans un endroit
abrité (par ex. sous un rebord de toit).
• Ce produit n'est pas un jouet, tenez-le hors de portée des enfants. Le
produit contient de petites pièces, du verre (écran) et des piles. Placez le
produit de sorte à ce qu'il se trouve hors de la portée des enfants.
• Ne laissez jamais le matériel d'emballage sans surveillance ; il pourrait
devenir un jouet dangereux pour les enfants.
• N'utilisez le produit que dans des régions climatiques modérées et non
tropicales.
Page 97

97
• Après avoir transféré l’appareil d’une pièce froide à une pièce chaude (par
ex. lors du transport), de l’eau de condensation pourrait se former. Cela
pourrait endommager le produit.
Laissez donc le produit éteint prendre la température ambiante avant de le
mettre en service. Selon le cas, cela peut durer plusieurs heures.
• Dans les installations industrielles, il convient d'observer les consignes de
prévention des accidents relatives aux installations et moyens d'exploitation
électriques, édictées par les syndicats professionnels.
• Dans les écoles, les centres de formation, les ateliers de loisirs et de
réinsertion, la manipulation d'appareils alimentés par le secteur doit être
surveillée par un personnel responsable, spécialement formé à cet effet.
• Ce produit doit être manipulé avec précaution – les coups, les chocs, ou une
chute, même d'une faible hauteur, peuvent l'endommager.
Page 98

98
7. Indications afférentes aux piles et
accumulateurs
• Les piles et les accumulateurs ne doivent pas être laissés à portée des
enfants.
• Lors de la mise en place des piles/accumulateurs, veillez à la polarité
correcte (respectez plus/+ et moins/-).
• Ne laissez pas les piles/accumulateurs à la portée de tous, les enfants ou
les animaux domestiques pourraient les avaler. En pareil cas, consultez
immédiatement un médecin.
• Les accumulateurs ou les piles endommagés ou qui fuient peuvent entraîner
des brûlures en cas de contact avec la peau. Veuillez donc utiliser des gants
de protection appropriés.
• Veillez à ne pas court-circuiter, démonter ni jeter les piles ou les
accumulateurs dans le feu. Risque d'explosion !
• Les piles ne sont pas rechargeables. Risque d'explosion !
Ne rechargez que les accumulateurs rechargeables prévus à cet effet et
n'utilisez que des chargeurs appropriés.
• En cas d'une inutilisation prolongée (par ex. pendant le stockage), retirez
les piles/accumulateurs mis en place.
Les piles/accumulateurs vétustes peuvent corroder et endommager ainsi
le produit ; il en résulte une perte de la garantie !
• Remplacez toujours le jeu entier de piles/d´accumulateurs.
Utilisez exclusivement des piles/accumulateurs du même type, du même
constructeur et du même état de charge (ne pas mélanger piles/
accumulateurs pleins avec des piles/accumulateurs à demi ou entièrement
déchargés).
• Ne combinez jamais piles et accumulateurs. Utilisez soit des piles soit des
accumulateurs.
• Pour une élimination des piles et accumulateurs respectant l'environnement,
veuillez lire le chapitre « Elimination ».
Page 99

99
Important :
La mise en service de la station météo et du capteur extérieur avec
accumulateurs est en principe possible.
La faible tension des accumulateurs (accumulateur = 1.2V, pile = 1.5V) et la faible capacité
diminuent la durée de service de même que la portée radio.
A basses températures extérieures, les accumulateurs sont plus sensibles que les piles.
Nous vous recommandons pour cette raison d'utiliser des piles alcalines de qualité supérieure
pour assurer un fonctionnement long et sûr.
Trois piles de type AA/Mignon sont nécessaires pour le fonctionnement de la station météo
(par ex. Conrad n° de commande 652502, commander 2x).
Le capteur extérieur nécessite également deux piles de type AAA/mignon (par ex. référence
Conrad 652502, commander 2x).
Page 100

100
8. Affichages et éléments de commande
• Partie d'affichage pour les prévisions
météo d'aujourd'hui, avec indication de
la vitesse du vent, de la direction du vent
et de la probabilité de précipitations
(pluie/neige/grêle) ; affichage de la
température jour/nui, météo jour/nui
• Prévisions météorologiques pour le jour
suivant avec température diurne/
nocturne, météo jour/nuit
• Partie d'affichage de la température
intérieure/extérieure
• Partie d'affichage des valeurs diverses
telles que l'heure ou la date DCF, la
sélection de villes etc.
Touches de commande :
Touche « IN/OUT » : Appuyer brièvement pour commuter entre l’affichage de la température
intérieure ou extérieure ; maintenir enfoncé pour 3 secondes pour activer la recherche du
capteur extérieur
Touche « MEM » : Appuyer brièvement pour afficher les valeurs MIN/MAX ou maintenir
enfoncé pour 3 secondes pour effacer les valeurs MIN/MAX
Touche « TEST » : Activer l’essai de réception pour le capteur extérieur
Touche « SET » : Appyuer brièvement pour commuter entre ville, heure/date DCF, heure du
lever/coucher du solei ou maintenir enfoncé pour 3 secondes pour activer le mode de réglage
(par ex. sélection de la ville, du fuseau horaire, de la langue d’affichage de l’écran)
Touches « » et « » : Modifier les valeurs
Touche « DAY/NIGHT » : Afficher les données météorologiques pour le jour/la nuit
 Loading...