

Page 1

UPGRADE
Version 11/09
DJ TECH USB-PLATTENSPIELER
Best.-Nr. 30 49 62
Sehr geehrter Kunde,
bei der Aufnahme einer externen Audioquelle auf USB über den AUX-Eingang wird
das Audiosignal nicht über den angeschlossenen Verstärker wiedergegeben.
Um eine Kontrolle der Aufnahme zu ermöglichen, muss der Ausgang der externen
Audioquelle zusätzlich parallel an den Verstärker angeschlossen werden.
Hierzu kann der Audioausgang der Quelle z.B. über einen sogenannten Y-Adapter
sowohl an den AUX-Eingang des Plattenspielers, als auch an einen freien
Verstärkereingang angeschlossen werden.
Wir bitten um Beachtung.
Ihr Conrad-Team
MISE A NIVEAU
Version 11/09
PHONO DJ TECH USB
N° de commande 30 49 62
Chère cliente, cher client,
lors de l’enregistrement d’une source audio externe sur USB via l’entrée AUX, le
signal audio n’est par reproduit par l’amplificateur raccordé.
Pour permettre de contrôler l’enregistrement, la sortie de la source audio externe doit
être en plus être raccordé en parallèle à l’amplificateur.
Pour cela, la sortie audio de la source peut par ex. être raccordée par un adaptateur
Y aussi bien à l’entrée AUX du phono qu’à une entrée libre de l’amplificateur.
Veuillez en tenir compte.
Votre équipe Conrad
REMARQUE IMPORTANTE!!!
WICHTIGER HINWEIS!!!
UPGRADE
Version 1109
DJ TECH USB-RECORD PLAYER
Item-No. 30 49 62
Dear customer,
when recording from an external audio source to USB using the AUX input the audio
signal is not played back via the connected amplifier.
In order to allow control of the recording the output of the external audio source, in
addition, has to be connected to the amplifier in parallel.
To do so, the audio source output can be connected to the AUX input of the record
player as well as to a free amplifier input, using e.g. a so-called Y-adapter.
We kindly ask for your observance.
Your Conrad team
ACTUALISERING
Versie 11/09
DJ TECH USB-PLATENSPELER
Bestnr. 30 49 62
Geachte klant,
bij het opnemen vanaf een externe audiobron naar USB via de AUX-ingang wordt het
audiosginaal niet via de aangesloten versterker weergegeven.
Sluit - om de opname te kunnen regelen -de uitgang van de externe audiobron additioneel in parallel op de versterker aan.
Sluit daartoe de audiouitgang van de bron via een zogenaamde Y-adapter aan op
zowel de AUX-ingang van de platenspeler als op een vrije ingang van de versterker.
Wij danken u voor uw oplettendheid.
Uw Conradteam
BELANGRIJKE AANWIJZING!!!
IMPORTANT NOTE!!!
Page 2
Full Automatic USB Turntable with Direct Encoding
Vi ny l E n c o d e r 5
USER MANUAL (ENGLISH) P01-08
MANUEL D’UTILISATION(FRANÇAIS) P09-15
BEDIENUNGSANLEITUNG (DEUTSCH) P16-22
GEBRUIKERSHANDLEIDING (NEDERLANDS) P23-29
MANUAL DE INSTRUCCIONES (ESPAÑOL) P30-36
MANUALE DI ISTRUZIONI (ITALIANO) P37-43
Page 3
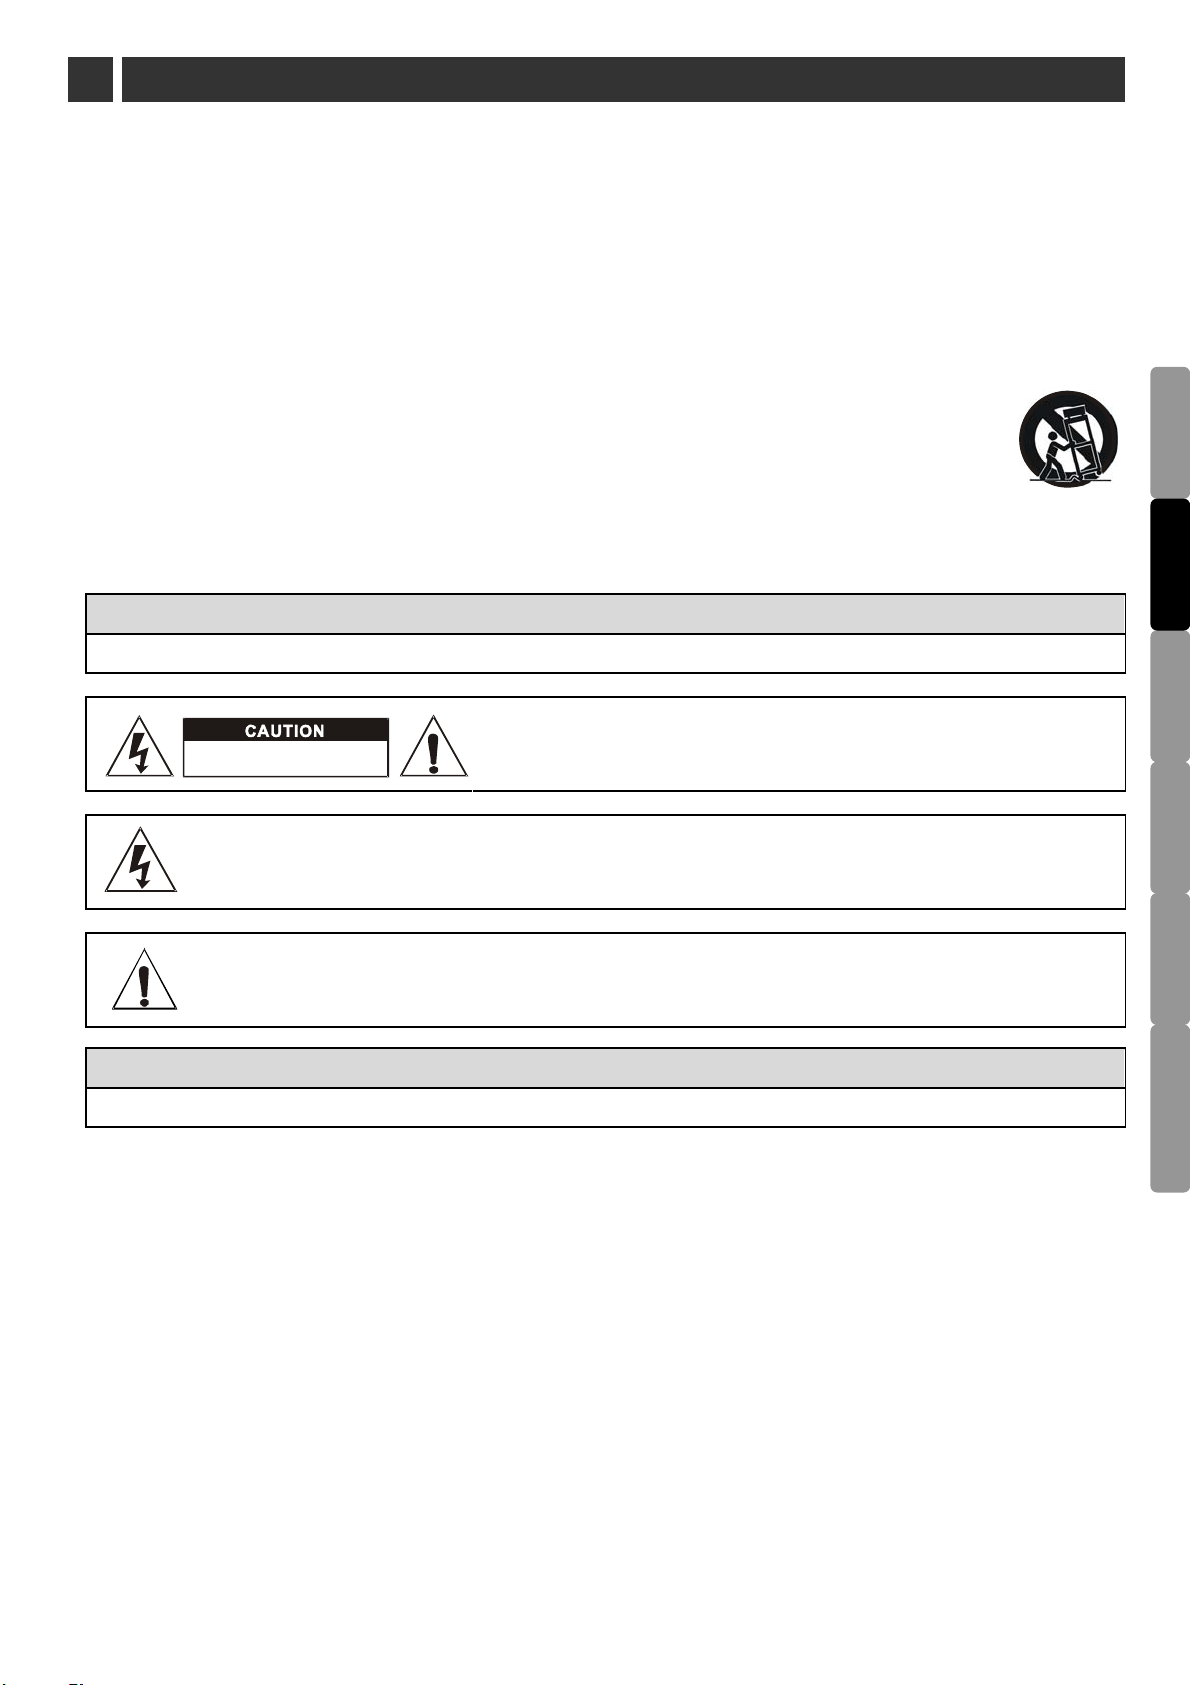
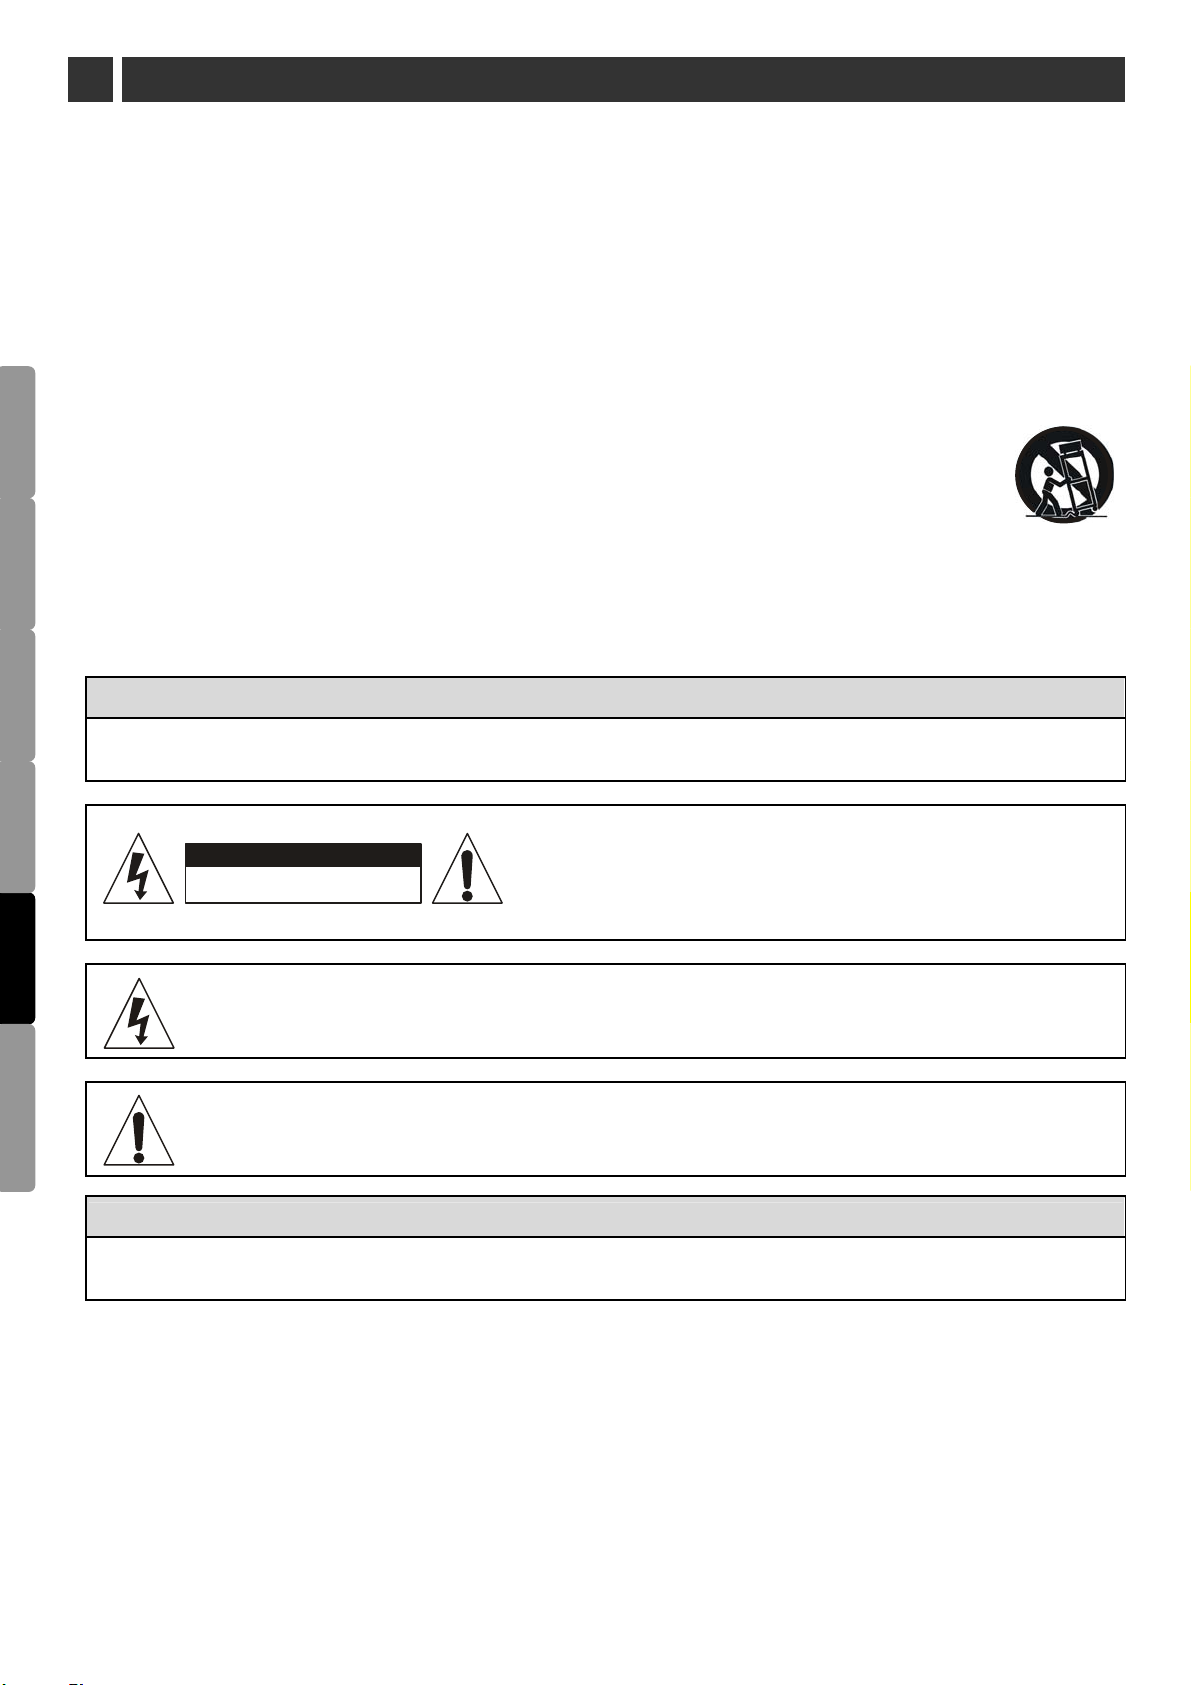
Use only with a cart, stand, tripod, bracket, or table specified by the manufacturer, or sold with the
use caution when moving the cart/apparatus combination to avoid
1 SAFETY INSTRUCTIONS
DO NO T OPEN
RISK OF ELECTRIC SHOCK
CAUTION
1. Read these Instructions.
Keep these Instructions.
2.
3. Heed all Warnings.
4. Follow all Instructions.
5. Do not use this apparatus near water.
6. Clean only with a dry cloth.
7. Do not block any of the ventilation openings. Install in accordance with the manufacture’s instructions.
8. Do not install near any heat sources such as radiators, heat registers, stoves, or other apparatus (including
amplifiers) that produce heat.
9. Do not defeat the safety purpose of the polarized plug. The wide blade is provided for your safety. If the provided
plug does not fit into your outlet, consult an electrician for replacement of the obsolete outlet.
10. Protect the power cord from being walked on or pinched particularly at plug, convenience receptacles, and point
where they exit from the apparatus.
11. Only use attachments/accessories specified by the manufacturer.
12.
ENGLISH
apparatus. When a cart is used,
injury from tip-over.
13. Unplug this apparatus during lighting storms or when unused for long periods of time.
14. Refer all servicing to qualified service personnel. Serving is required when the apparatus has been damaged in
any way, such as power-supply cord or plug is damaged, liquid has been spilled or objects have fallen into the
apparatus, the apparatus has been exposed to rain or moisture, does not operate normally, or has been dropped.
WARNING
DEUTSCH FRANÇAIS
To reduce the risk of the fire or electric shock, do not expose this apparatus to rain or moisture. The apparatus shall
not be exposed to dripping or splashing and that no objects filled with liquids, such as vases, shall be placed on the
apparatus.
DUTCH
CAUTION: To reduce the risk of electric shock, do not remove any
cover. No user-serviceable parts inside. Refer servicing to qualified
service personnel only.
The lightning flash with arrowhead symbol within the equilateral triangle is intended to alert the use to
the presence of un-insulated “dangerous voltage” within the product’s enclosure that may be of
ESPAÑOL
sufficient magnitude to constitute a risk of electric shock.
The exclamation point within the equilateral triangle is intended to alert the user to the presence of
important operation and maintenance (servicing) instructions in the literature accompanying this
appliance.
ITALIANO
CAUTION
To prevent electric shock, do not use this polarized plug with an extension cord, receptacle or other outlet unless the
blades can be fully inserted to prevent blade exposure.
2
Page 4
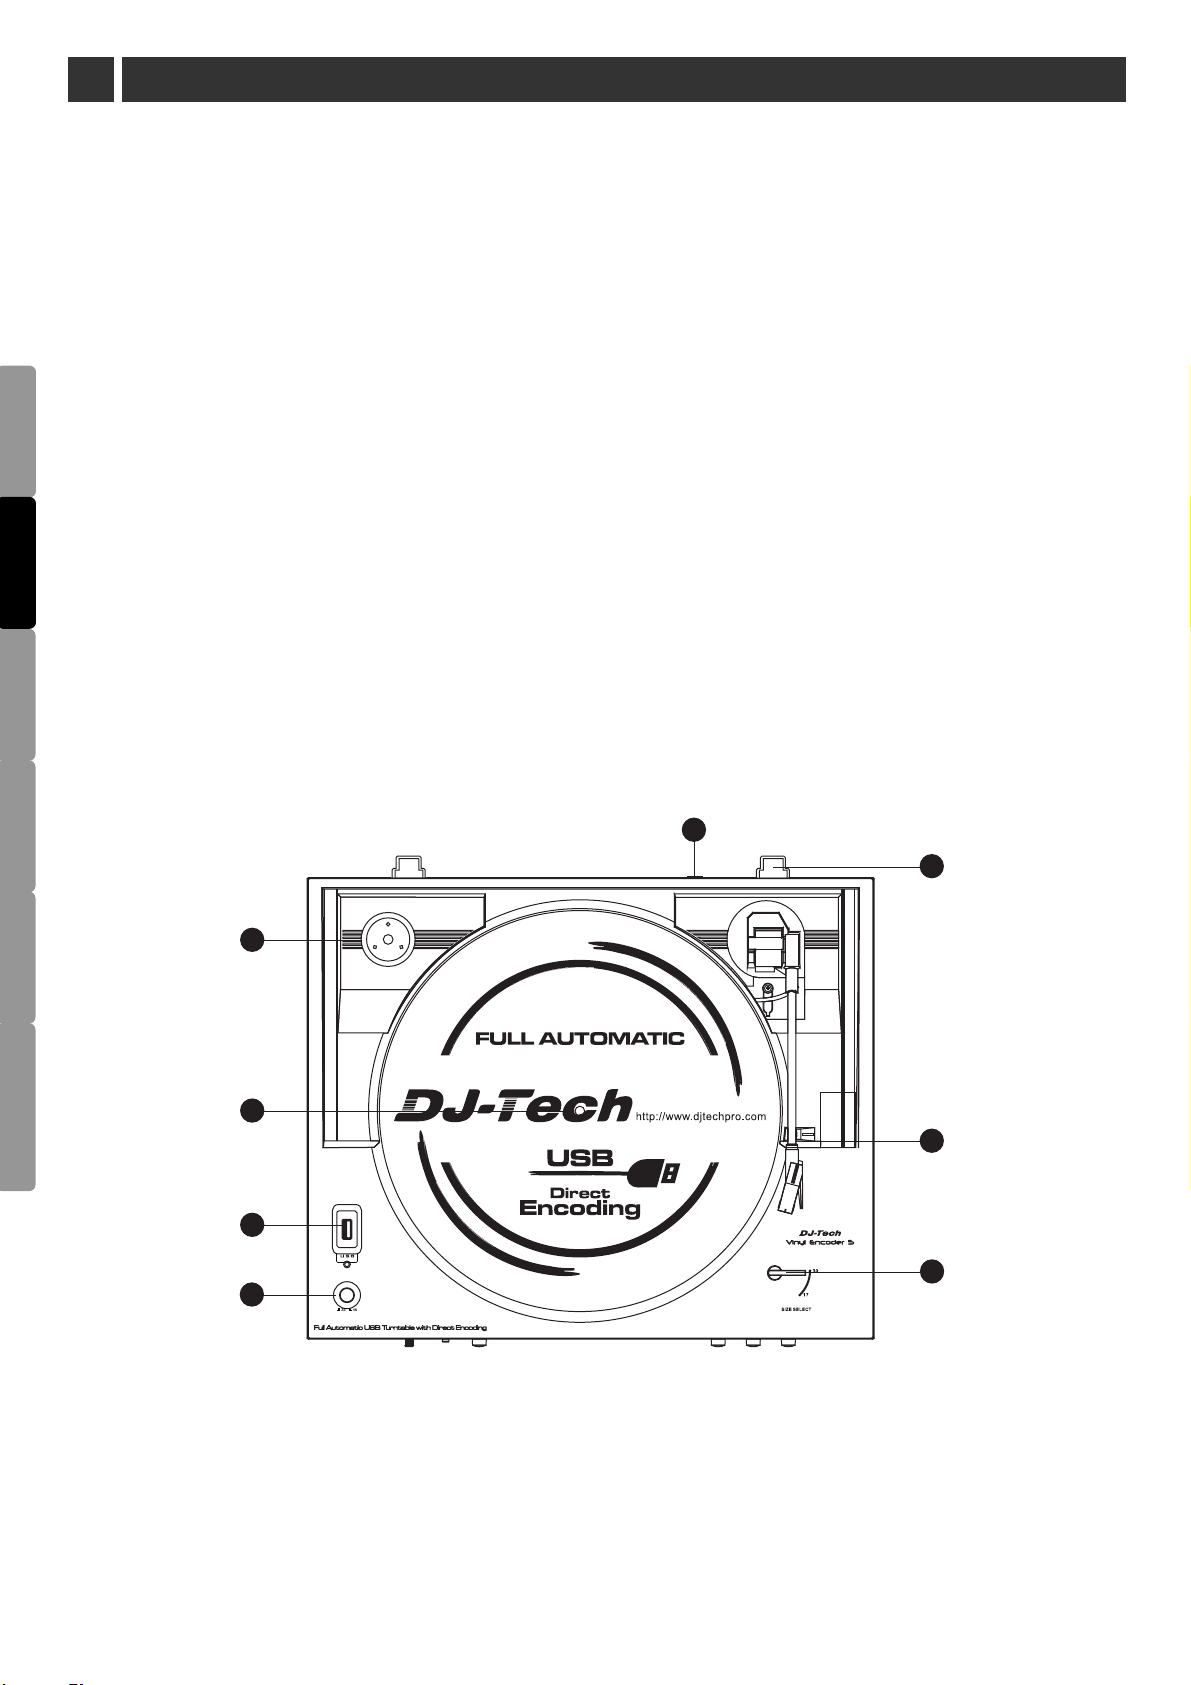
2 PART NAME AND FUNCTIONS
FEATURES
•
Built-in switchable stereo phono/line level pre-amplifier. Permits use of turntable with stereo systems
having either magnetic-phono inputs or “AUX” (line-level) inputs; also allows convenient use of
turntable with most powered speakers
•
Full automatic operation
•
2 speeds: 331/3 rpm and 45 rpm
•
Professional turntable platter
•
Replaceable diamond stylus
•
Damped lift/cueing mechanism with front-panel control
•
Removable dust cover
Accessory:
ENGLISH
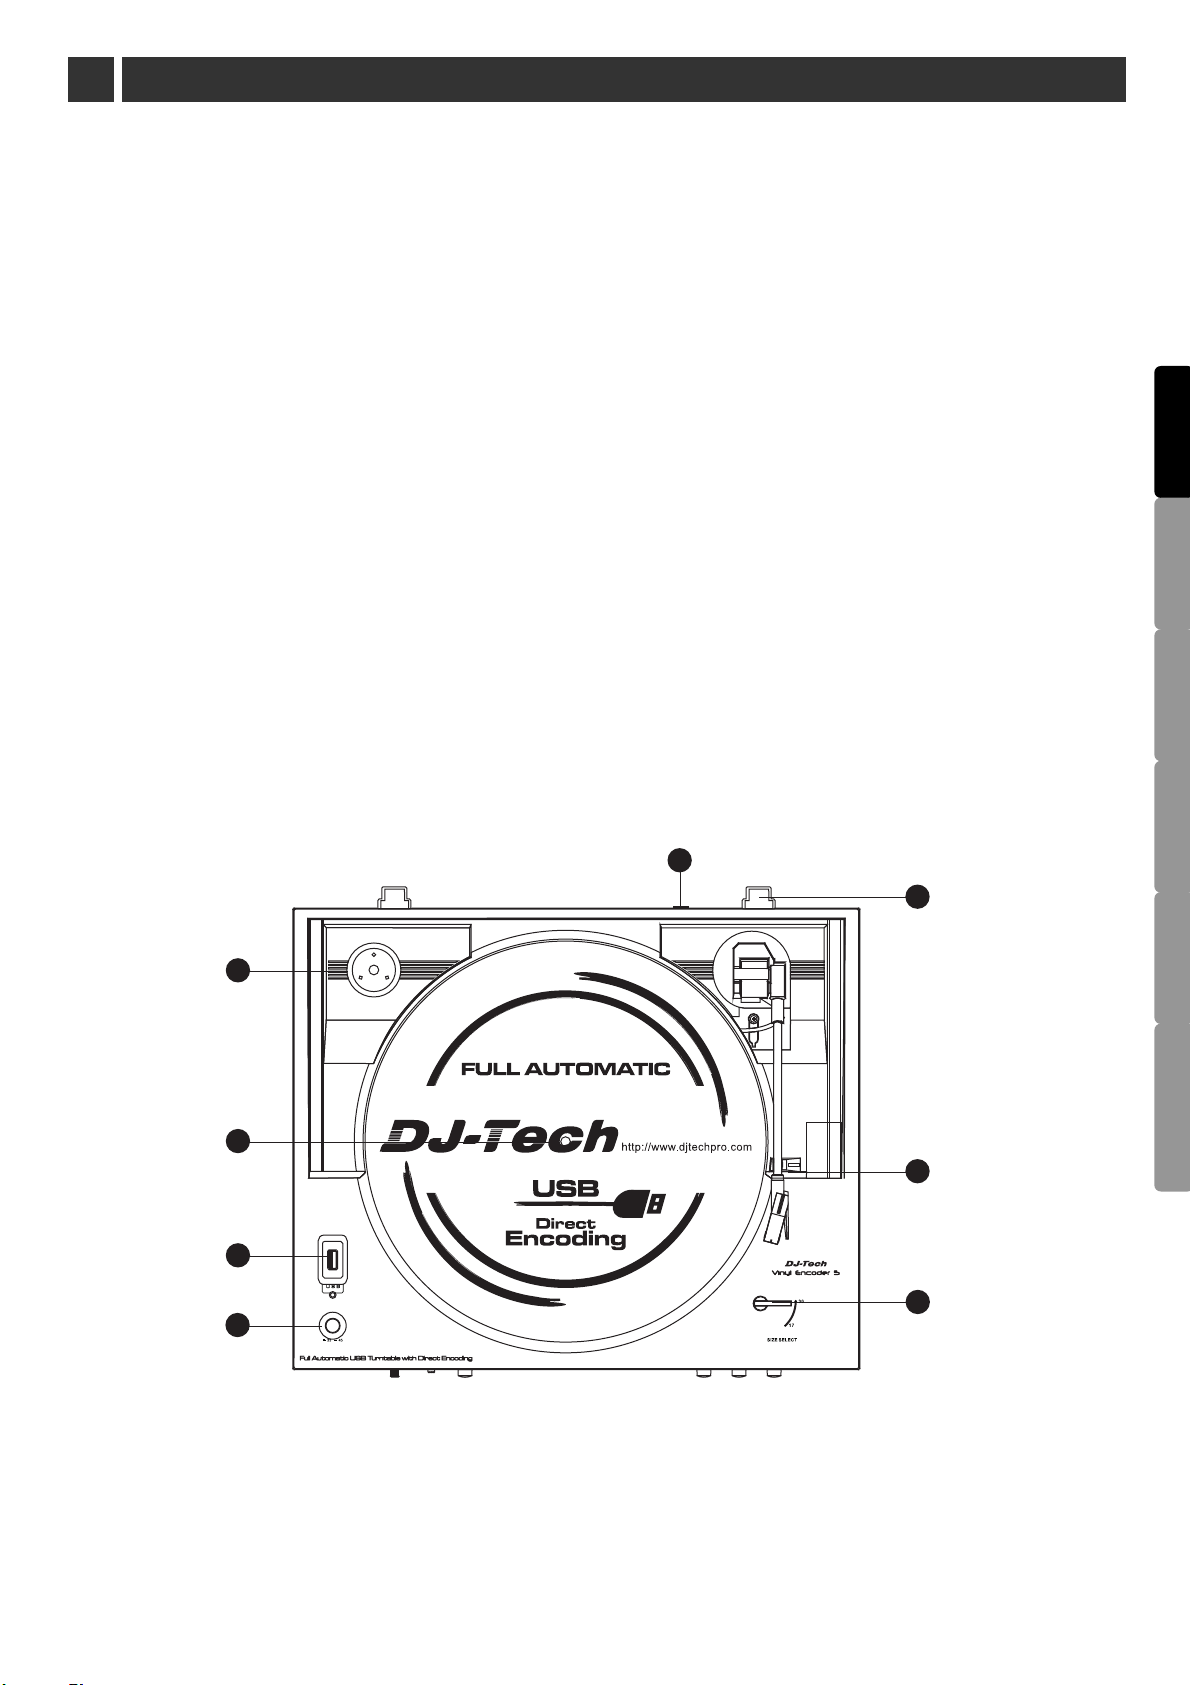
Check for the following parts included in the package with the main unit
•
Instruction manual
•
45 rpm adaptor
•
Platter
9
10
11
12
•
Slipmat
•
Dust cover
8
DEUTSCH FRANÇAIS
DUTCH
15
ESPAÑOL
ITALIANO
14
13
3
Page 5
1 2 3
4
5
6
7
CUESTOP
PLAY
RECORDAUX IN
T.T
AUX
REC. SELECT
UP
DOWN
AUX LEVEL
CLIP
SIGNAL
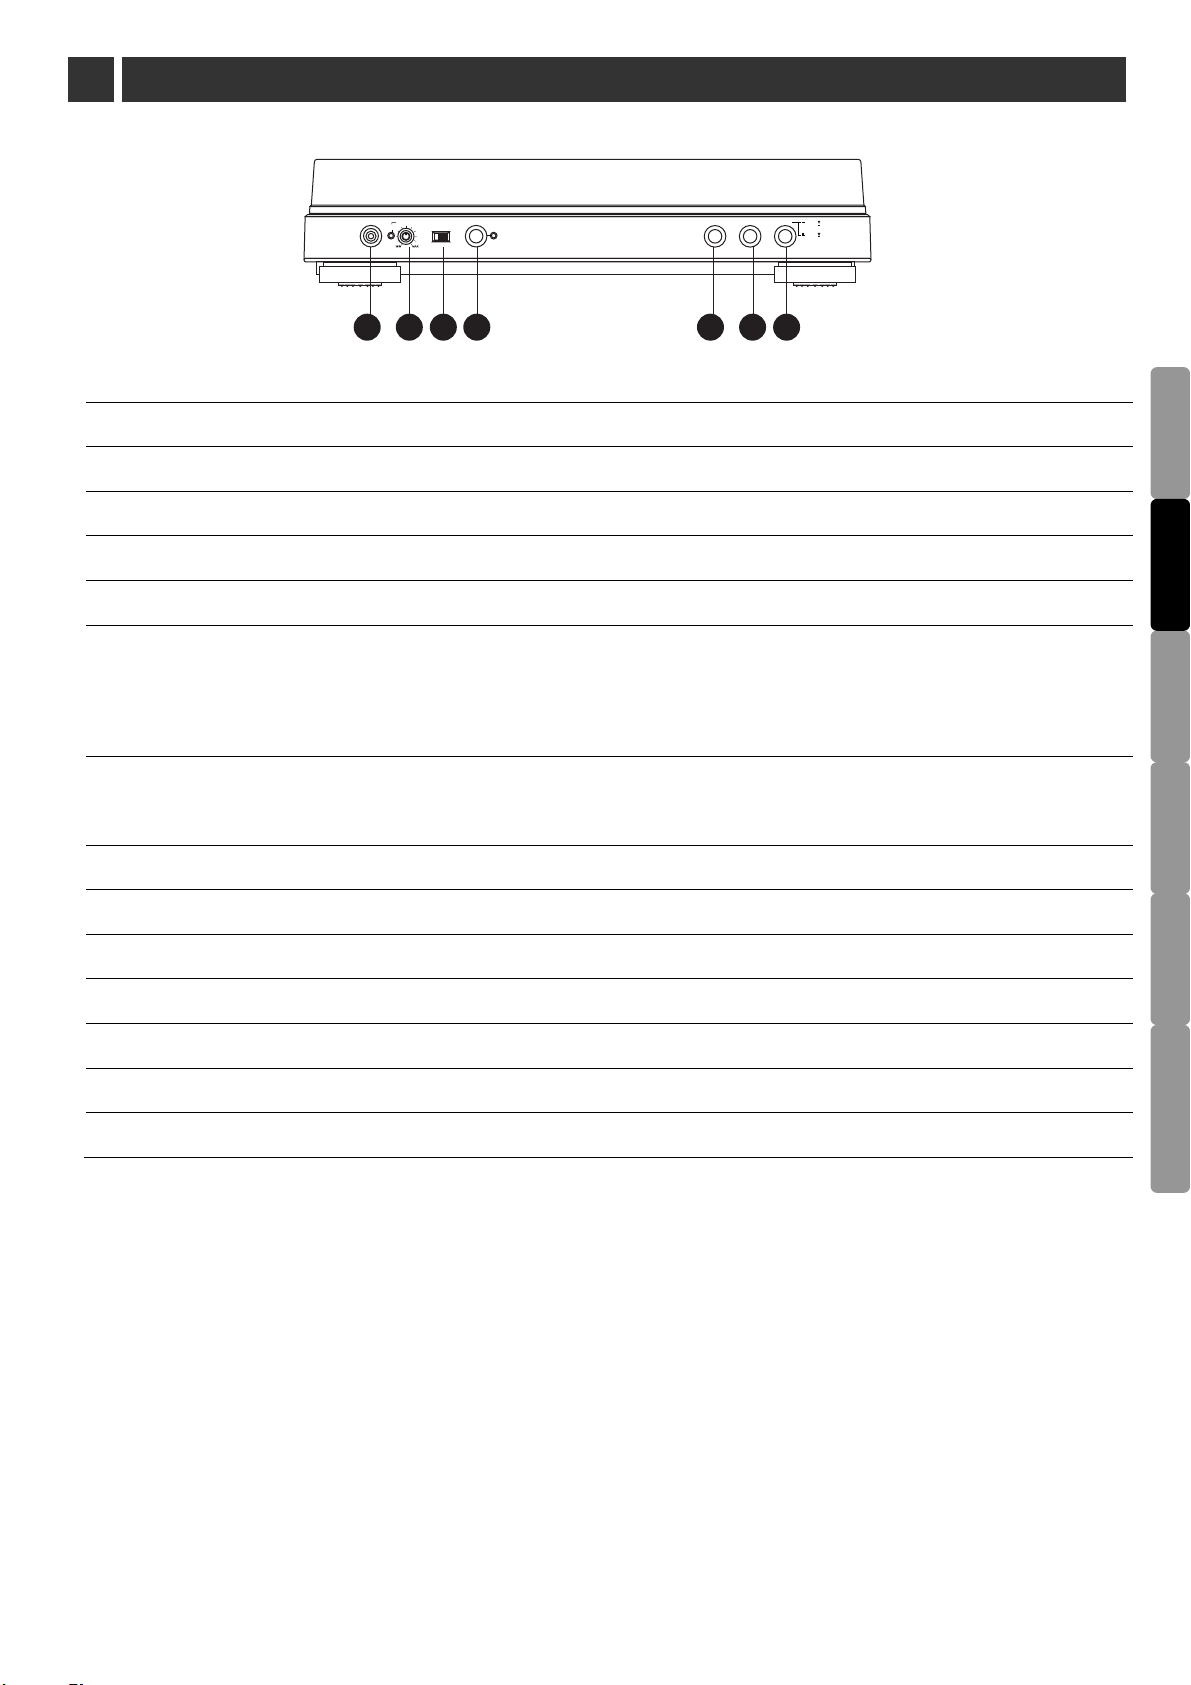
2 PART NAME AND FUNCTIONS
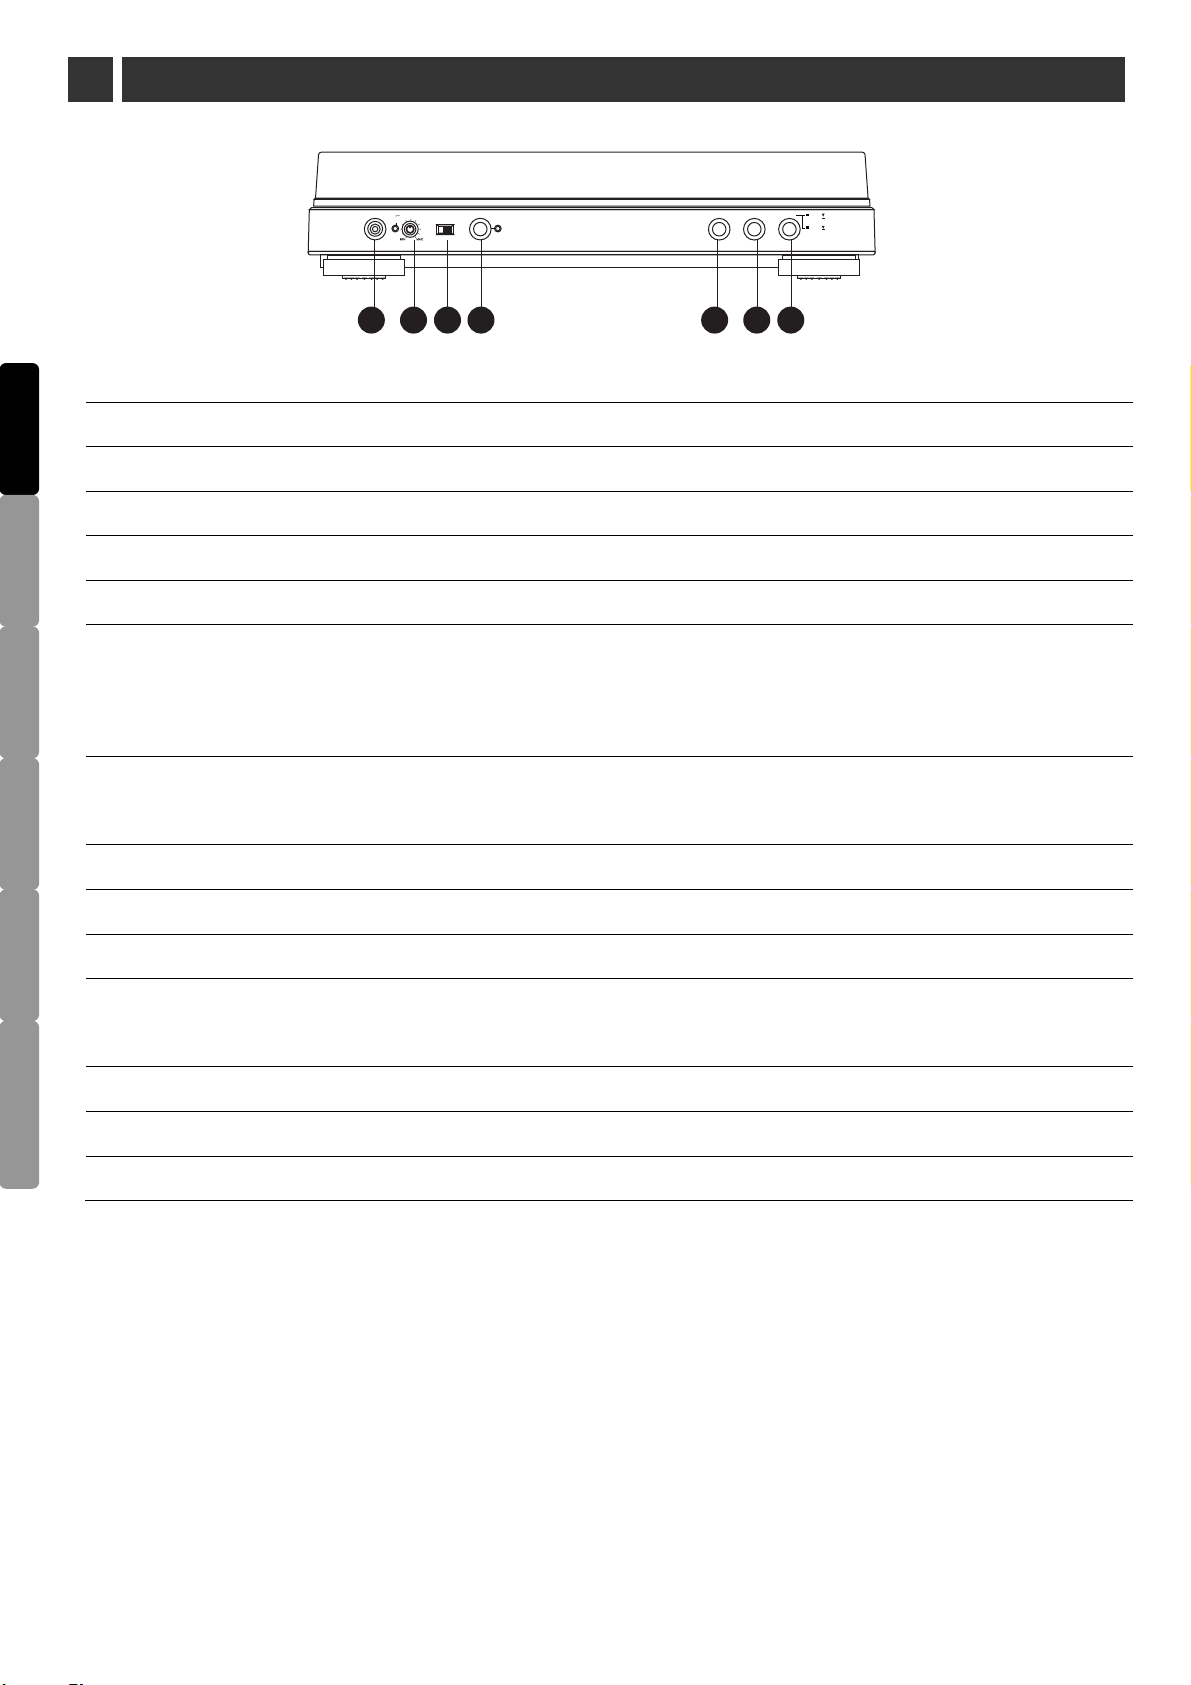
1. Play button - Engages the motor/platter and begins automatic operation.
ENGLISH
DEUTSCH FRANÇAIS
DUTCH
ESPAÑOL
2. Stop button - Disengages the motor/platter and returns tonearm to rest.
3. Cue up/down - Lifts and lowers tonearm for manual selection.
4. Aux in - Contect tape players, reel to reel or any other audio source to record.
5. Aux level - Adjust the audio source level, when the record level is over, the LED is grown red.
6. Rec. Select - To switch the record is from turntable or Aux in.
7. Record button - Press the “record” button and wait until the LED will flash (this may take several
seconds depending on the contents on the flash disk); press the “record” button again to stop the
recording process.
8. Phono/Line switch - Select Phono setting when you connect to the phono input on your home stereo.
Select the LINE when you connect to CD/AUX inputs of your home stereo.
9. 45rpm adaptor - Adapts 7" records with large center holes to fit center spindle.
10. Center spindle
11. USB slot - Insert a flash-disk to record.
12. Platter speed button - Select 33 rpm (button in high position) or 45 rpm (button in low position)
platter speed.
13. Size selector - Select the size of the record 30 or 17 cm.
ITALIANO
14. Tonearm / headshell ass’y - Tonearm is permanently attached to the headshell assembly.
15. Dust cover hinge holders - Attachment points for removable hinged dust cover.
4
Page 6
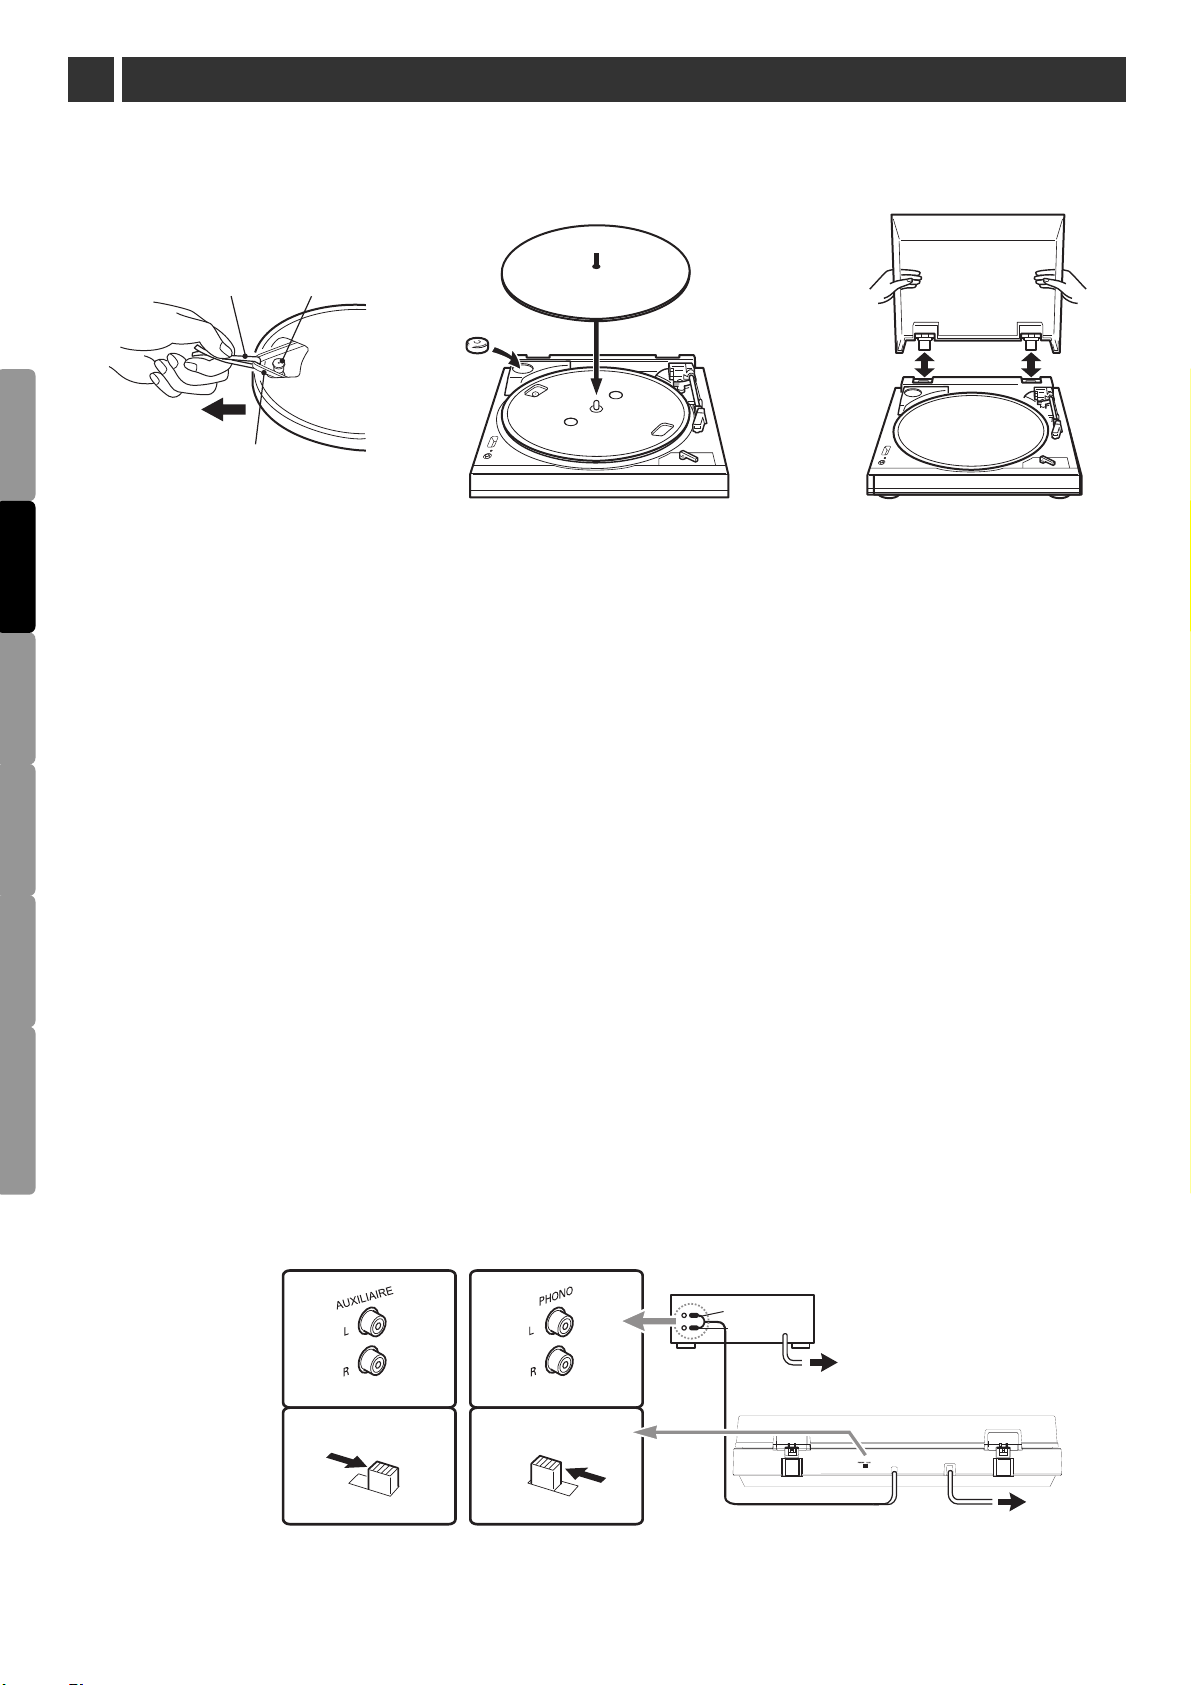
3 SETUP AND OPERATION
LINE
PHONO
AUX
PHONO
Input
Jacks
Pre-amp
Selector
Switch
Stereo System
White
Red
AC
AC
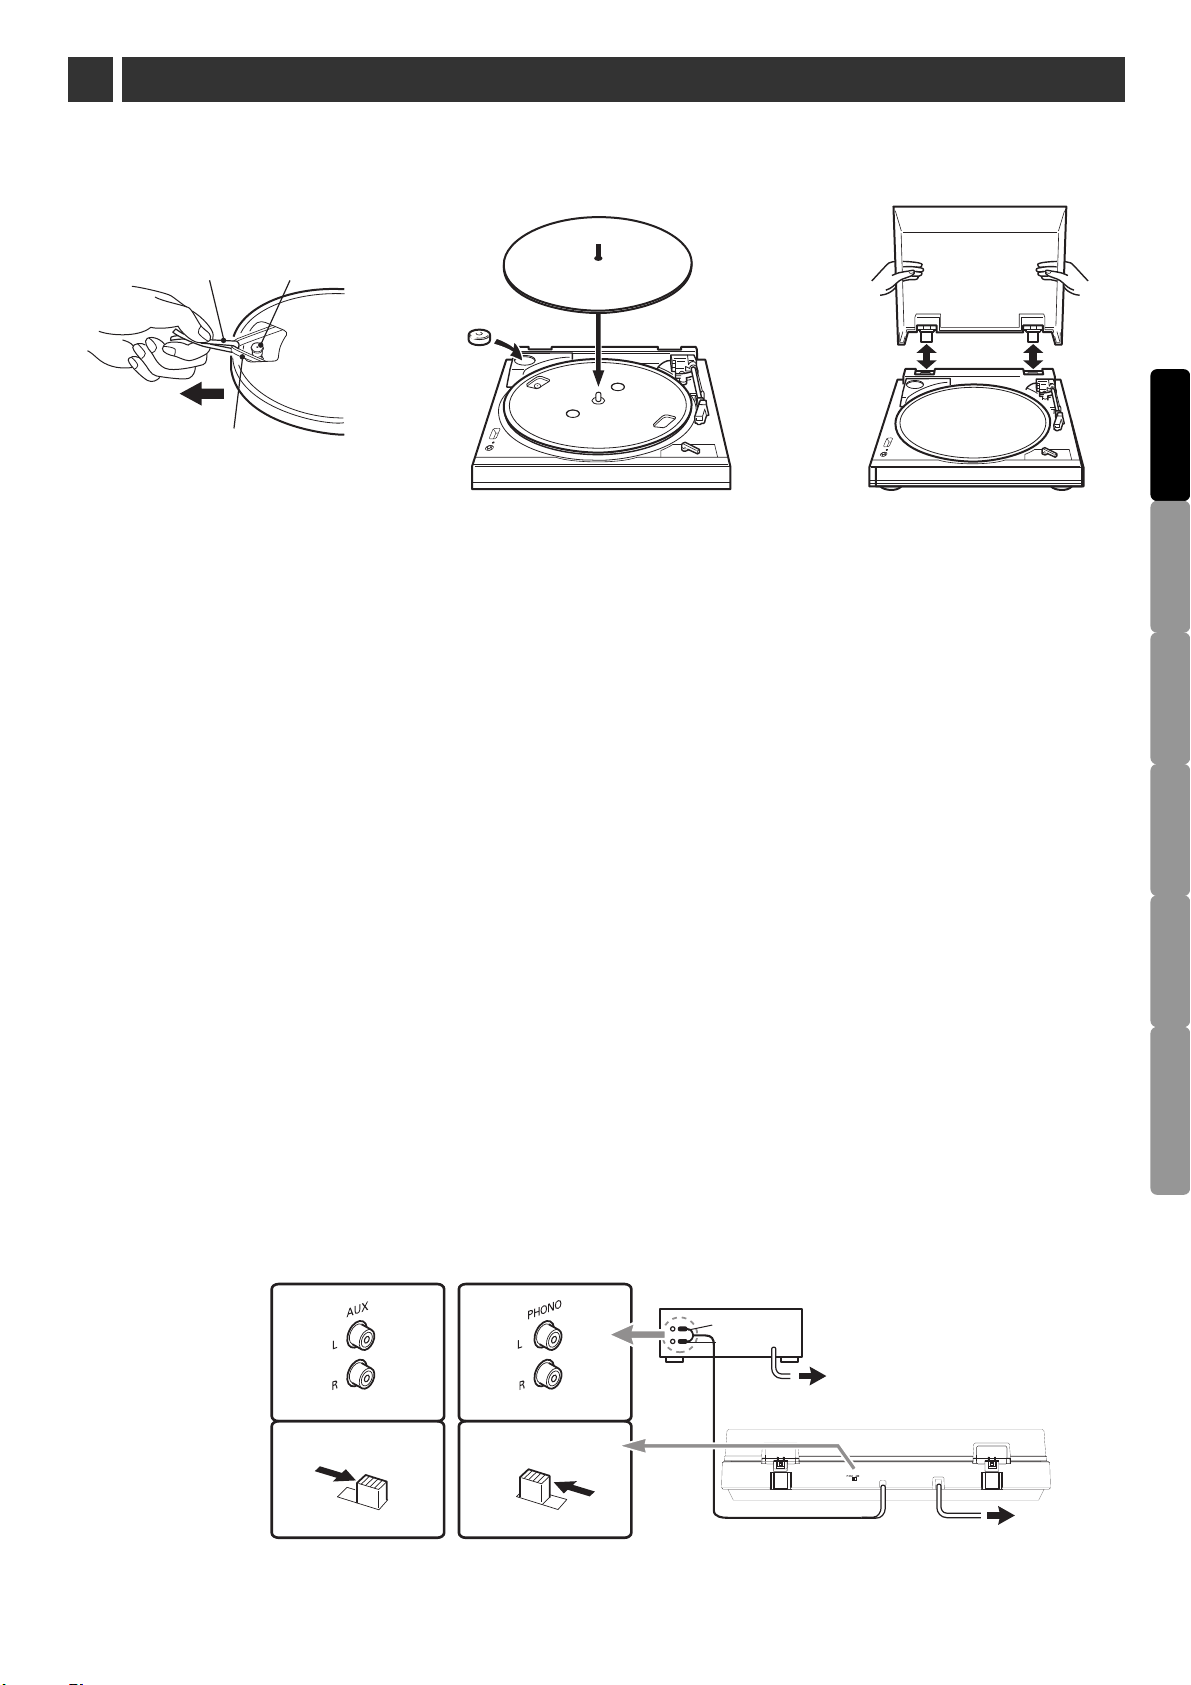
Accessory the turntable
Fig. a Fig. b Fig. c
Red ribbon
Motor spindle
Drive belt
1. Carefully place the turntable platter on the cent
er spindle, making certain the platter is fully seated
on the spindle.
2. While holding both ends of the red tape ribbon on the turntable belt, carefully pull the belt over the
motor pulley (Fig. a).
3. Once the belt is seated in the pulley's groove, carefully remove the ribbon. Make certain the belt is
not twisted
4. Place the slipmat on top of the turntable platter (Fig. b).
5. If desired, the hinged dust cover may be removed. Hold both sides of the dust cover and pull upward
gently and evenly to detach the cover from the turntable (Fig. c).
6. To re-install the dust cover, guide the dust cover hinges into the two hinge receptacles located at the
back of the turntable housing.
Setting the Pre-amp (Phono/Line) switch
c The Phono/Line switch is located on the back of the turntable. (Fig. d)
• If the stereo system you are using has a PHONO input, set the pre-amp selector switch to the
“PHONO” position.
ENGLISH
DEUTSCH FRANÇAIS
DUTCH
ESPAÑOL
• If your stereo system does not have a PHONO input, set the pre-amp selector switch to the “LINE”
position and connect the turntable's output cables to the AUX or other high-level input on your stereo
system.
d Connect the cable with the white plug to the (L) jack and red plug to the (R) jack.
e Connect the power cord plug to an AC outlet.
Fig. d
5
ITALIANO
Page 7

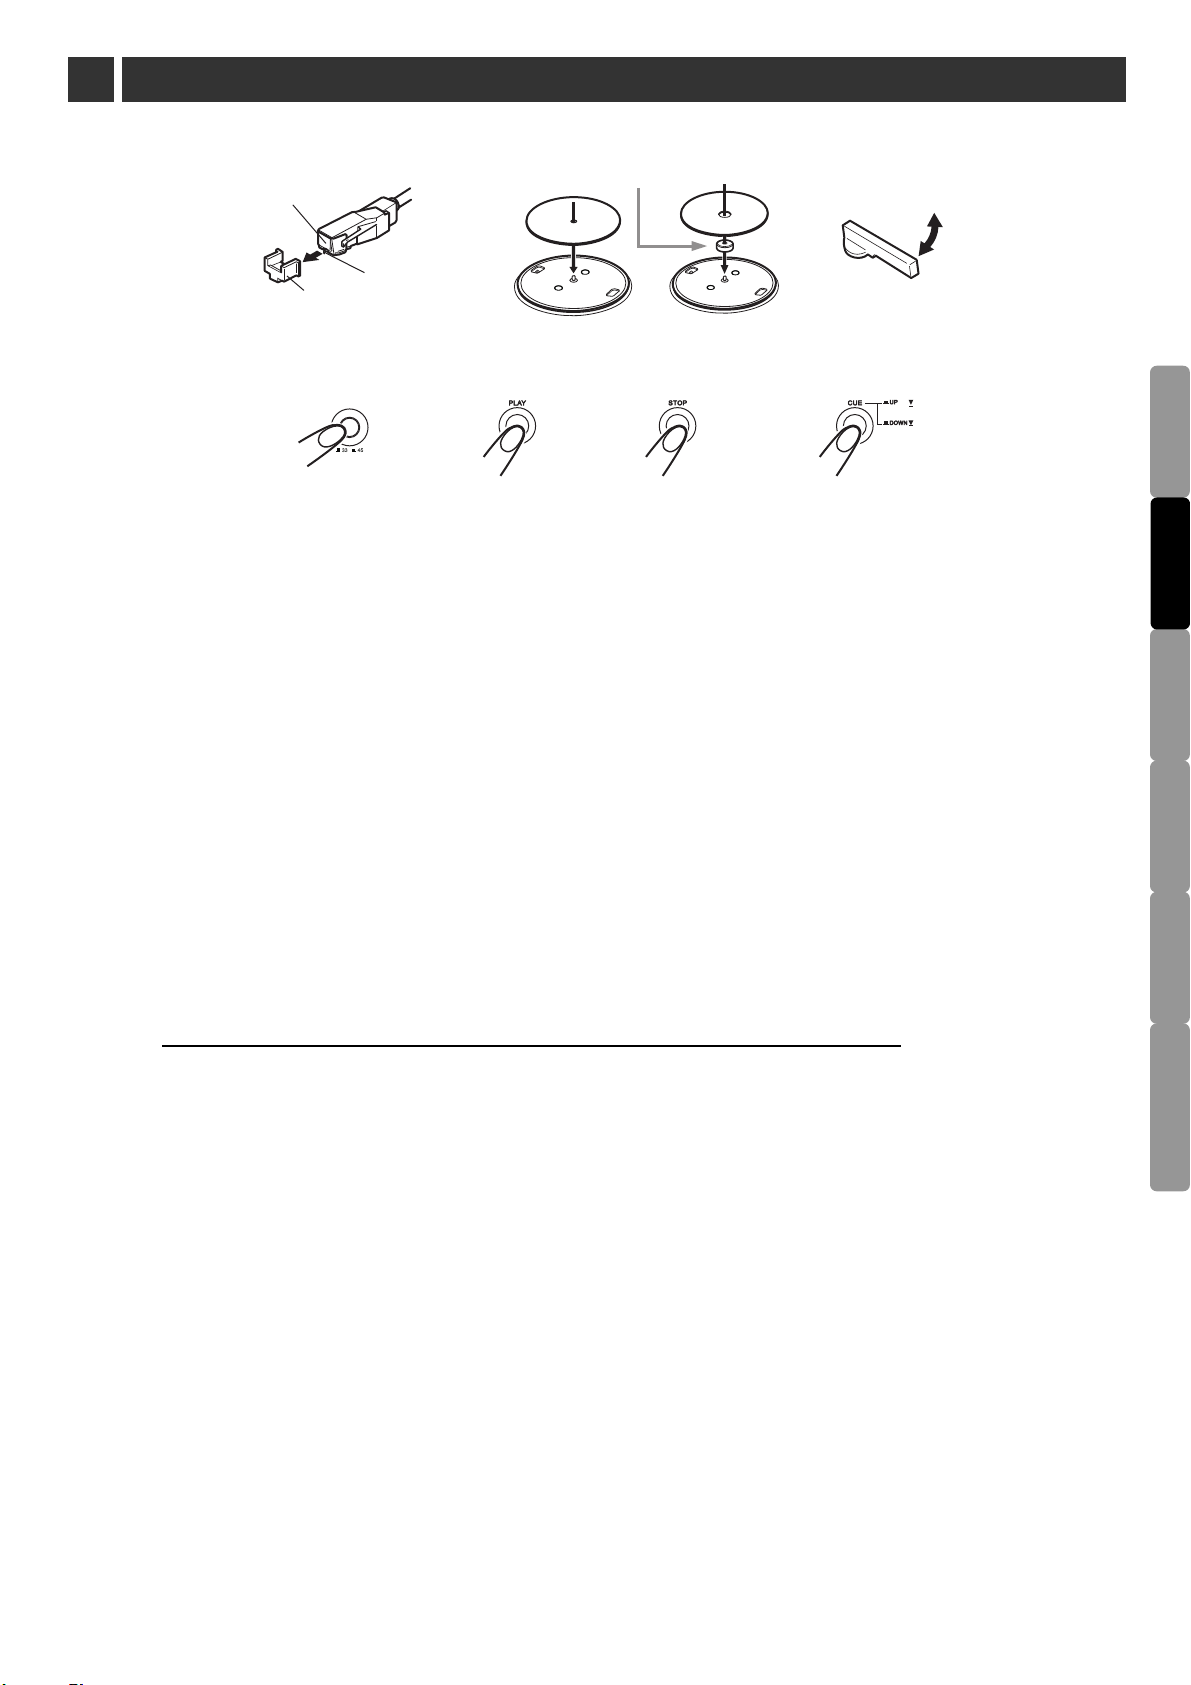
3 OPERATION
ENGLISH
Fig.1
Stylus ass’y
Stylus (”needle”)
Stylus guard
Fig.2
Fig.5Fig.4
45rpm adaptor
Fig.6 Fig.7
Fig.3
30
7
Automatic Operation
• Remove the stylus guard from the stylus assembly (Fig.1)
• Put a slipmat on the turntable. If needed, use the 45rpm adaptor (Fig.2)
• Select the size selector to 30 or 17 cm (Fig.3)
1
• Select the speed button to 33
/3 or 45 rpm (Fig.4)
DEUTSCH FRANÇAIS
DUTCH
ESPAÑOL
ITALIANO
•
Start: Gently push the PLAY button (Fig.5). The turntable will start and the tonearm automatically will
move to the lead-in groove. When the record has finished playing, the tonearm will automatically
return to the tonearm rest and the turntable will shut off
•
Stop: To stop playing the record before it reaches the end, press the STOP button (Fig.6). The
tonearm will lift and return to the tonearm rest, and the turntable will shut off
•
Cue up/down: To pause the record before it has completed playing, press the cue up button to
pause playing. Press the cue down button to continue playing the record (Fig. 7)
•
Record:
Rec. select to AUX
Recording to your USB stick
a. Insert a flash-disk (e.g.memory stick, MP3 player) into the USB slot
b. Connect any audio source
c. Adjust the Aux level
d. Press the “RECORD” button and wait until the LED will flash (this may take several seconds
depending on the contents on the flash-disk)
e. Press the “RECORD” button again to stop the recording process
f. The track is now stored on the flash disk as an 192kbps MP3 file, tracks will be numbered in
sequence and placed into a folder called “audio”
6
Page 8
3 OPERATION
Automatic Operation
•
Record:
Rec. select to TT
Recording to your USB stick
a. Insert a flash-disk (e.g.memory stick, MP3 player) into the USB slot
b. Position the stylus at the track you want to record
c. Press the “CUE UP” button to pause the record player
d. Press the “RECORD” button and wait until the LED will flash (this may take several seconds
depending on the contents on the flash-disk)
e. Press the “CUE DOWN” button and resume playing the track
f. Press the “RECORD” button again to stop the recording process
g. The track is now stored on the flash disk as an 192kbps MP3 file, tracks will be numbered in
ENGLISH
sequence and placed into a folder called “audio”
Manual Operation
• Remove the stylus guard from the stylus assembly (Fig.1)
• Put a slipmat on the turntable. If needed, use the 45rpm adaptor (Fig.2)
• Select the size selector to 30 or 17 cm (Fig.3)
1
• Select the speed button to 33
/3 or 45 rpm (Fig.4)
• Press cue up to raise the tonearm (Fig.7)
• Gently move the tonearm so the stylus is over the point on the record where play is desired to begin
• Press cue down button again to gently lower the tonearm and play record (Fig.7)
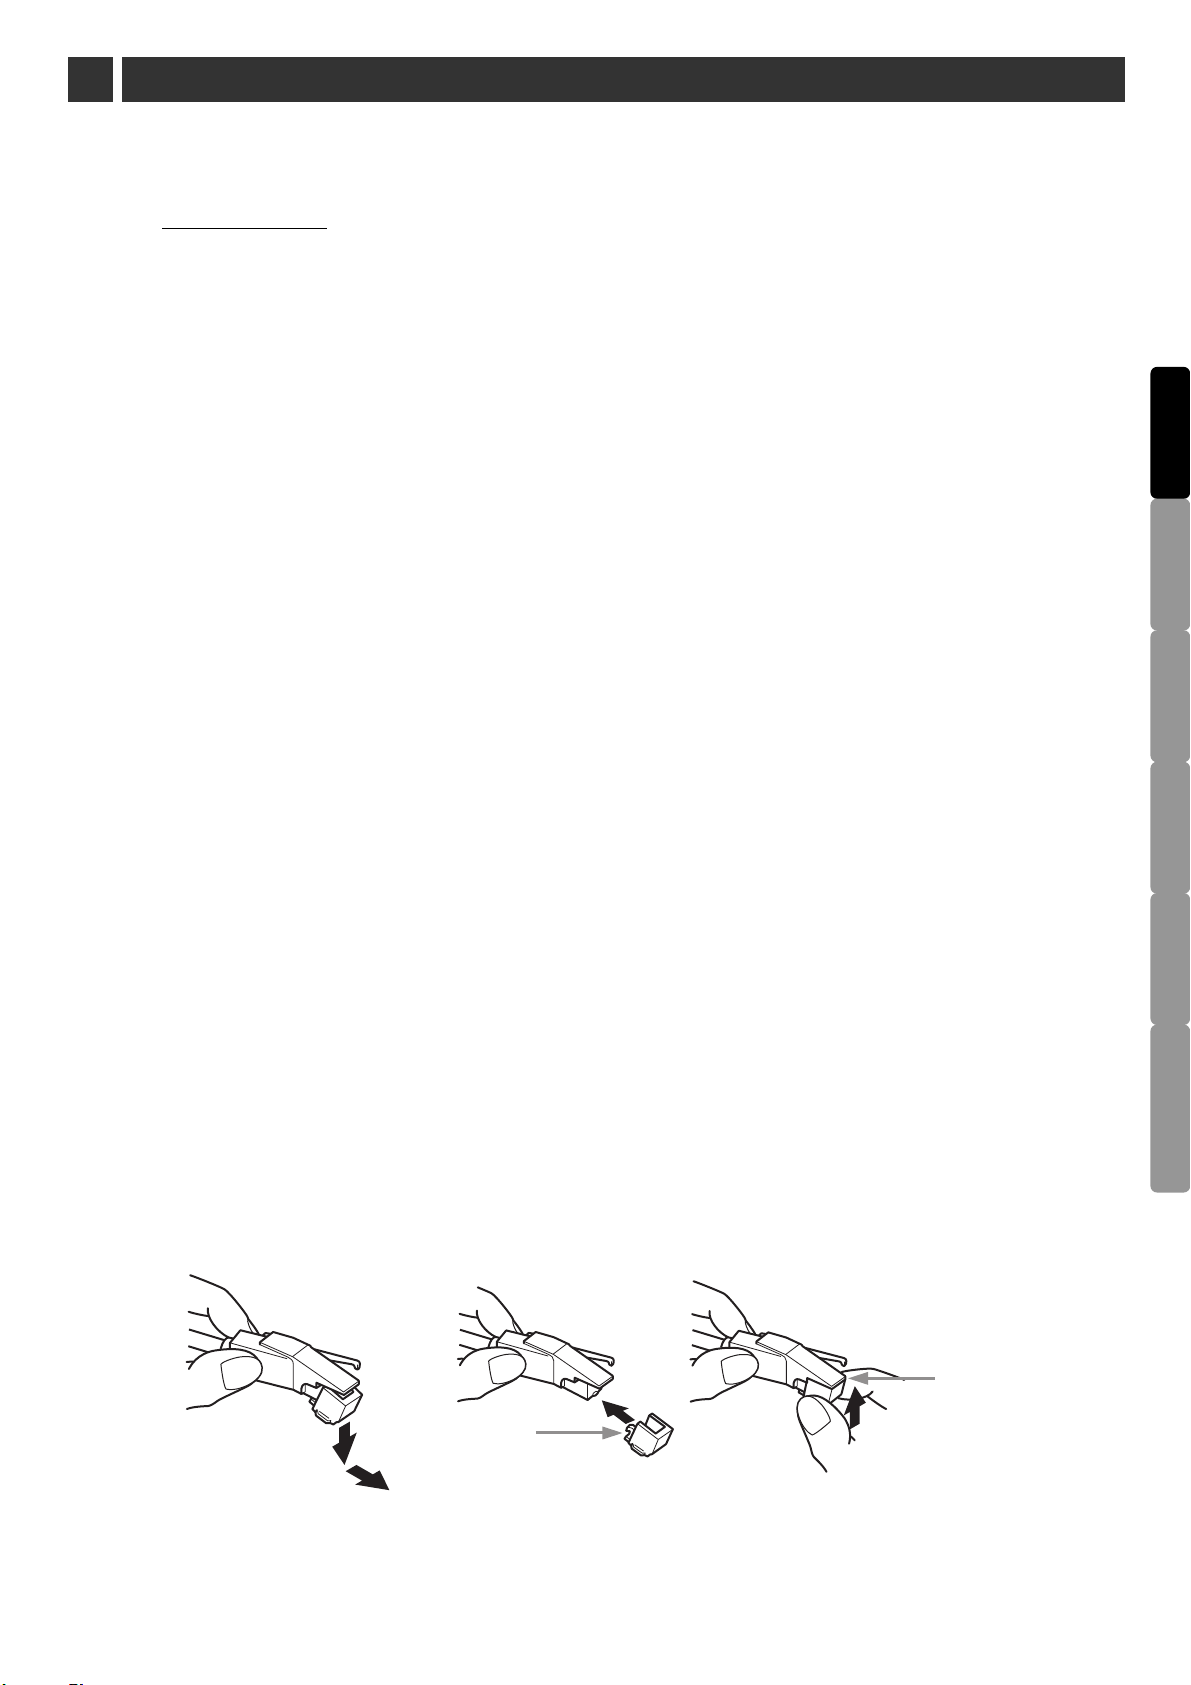
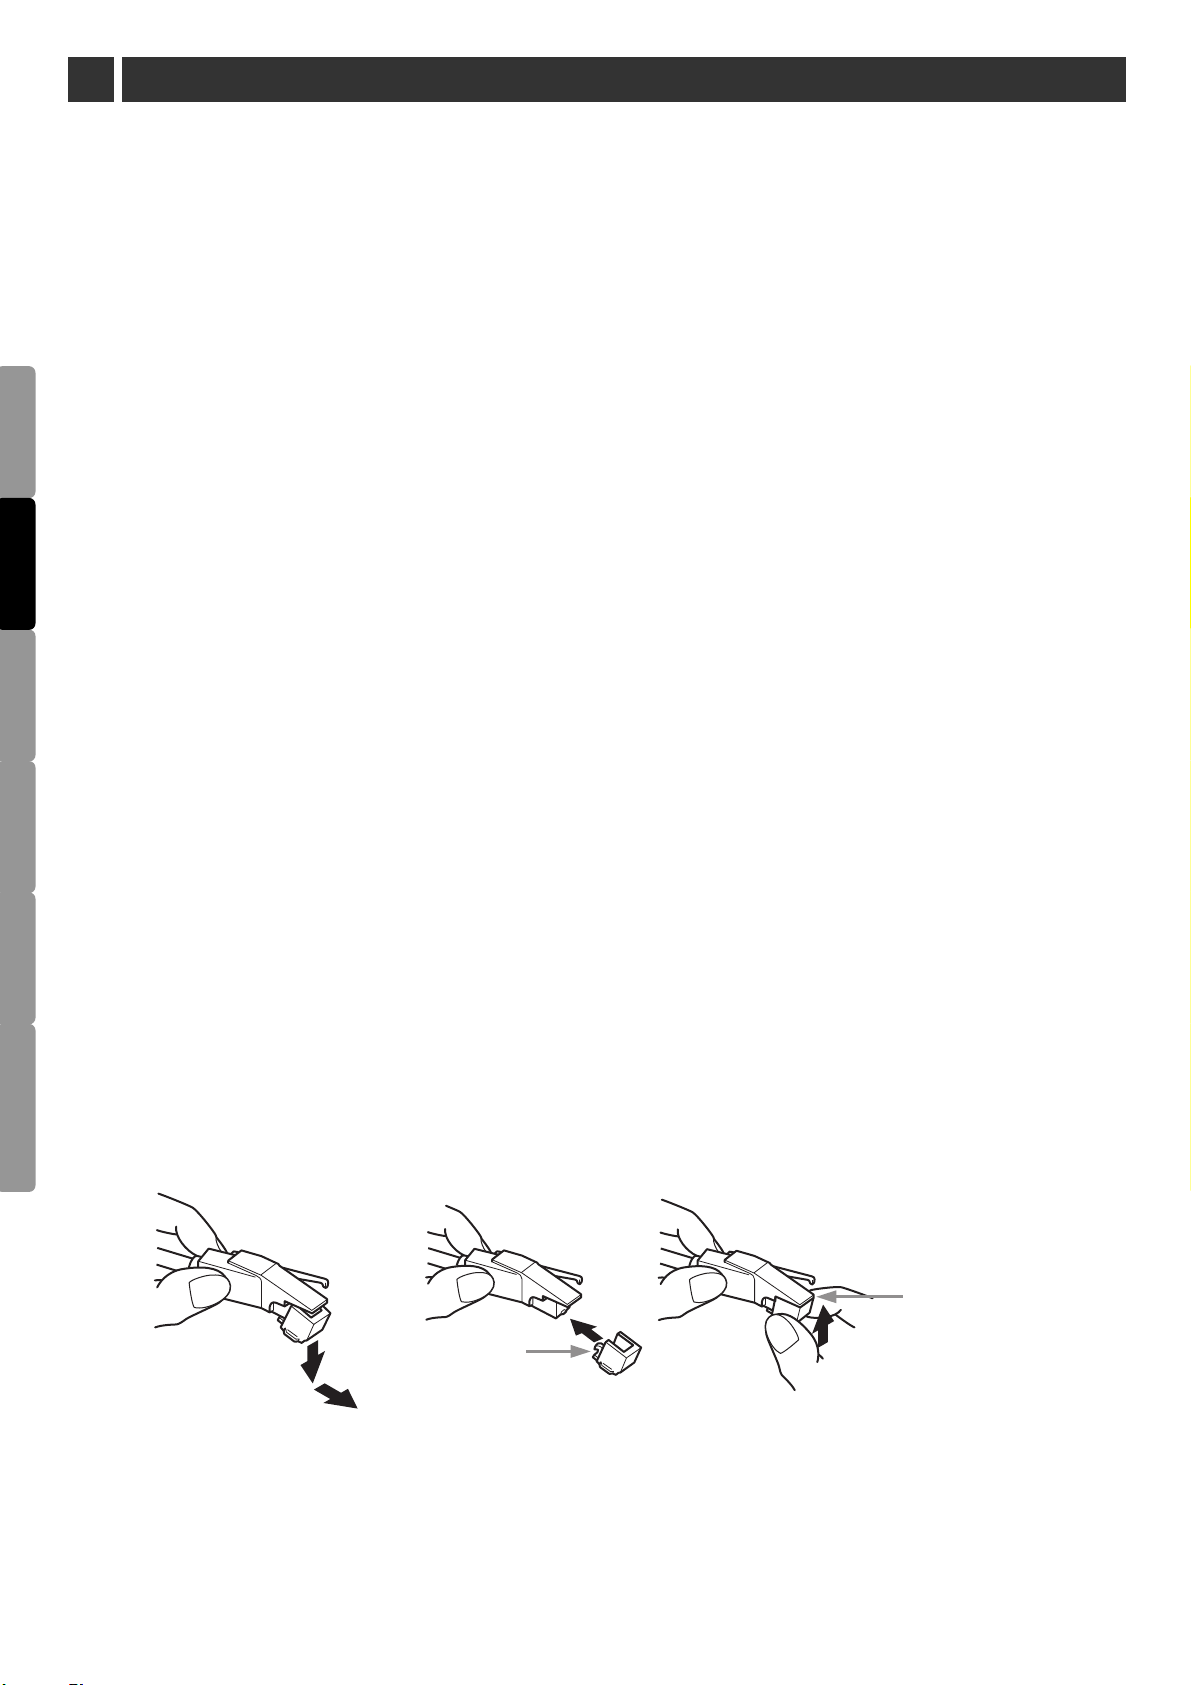
Replacing the Stylus
While holding the head of the tone arm, rotate the front of the stylus assembly in a forward and down
motion to remove it.
Make certain that the projection at the back of the assembly is fully seated in the cartridge body first,and
that the assembly “clicks” up into place, with no gap between its top edge and the front of the black
plastic tonearm head.
DEUTSCH FRANÇAIS
DUTCH
ESPAÑOL
ITALIANO
No gap here
Engage in
body first
7
Page 9
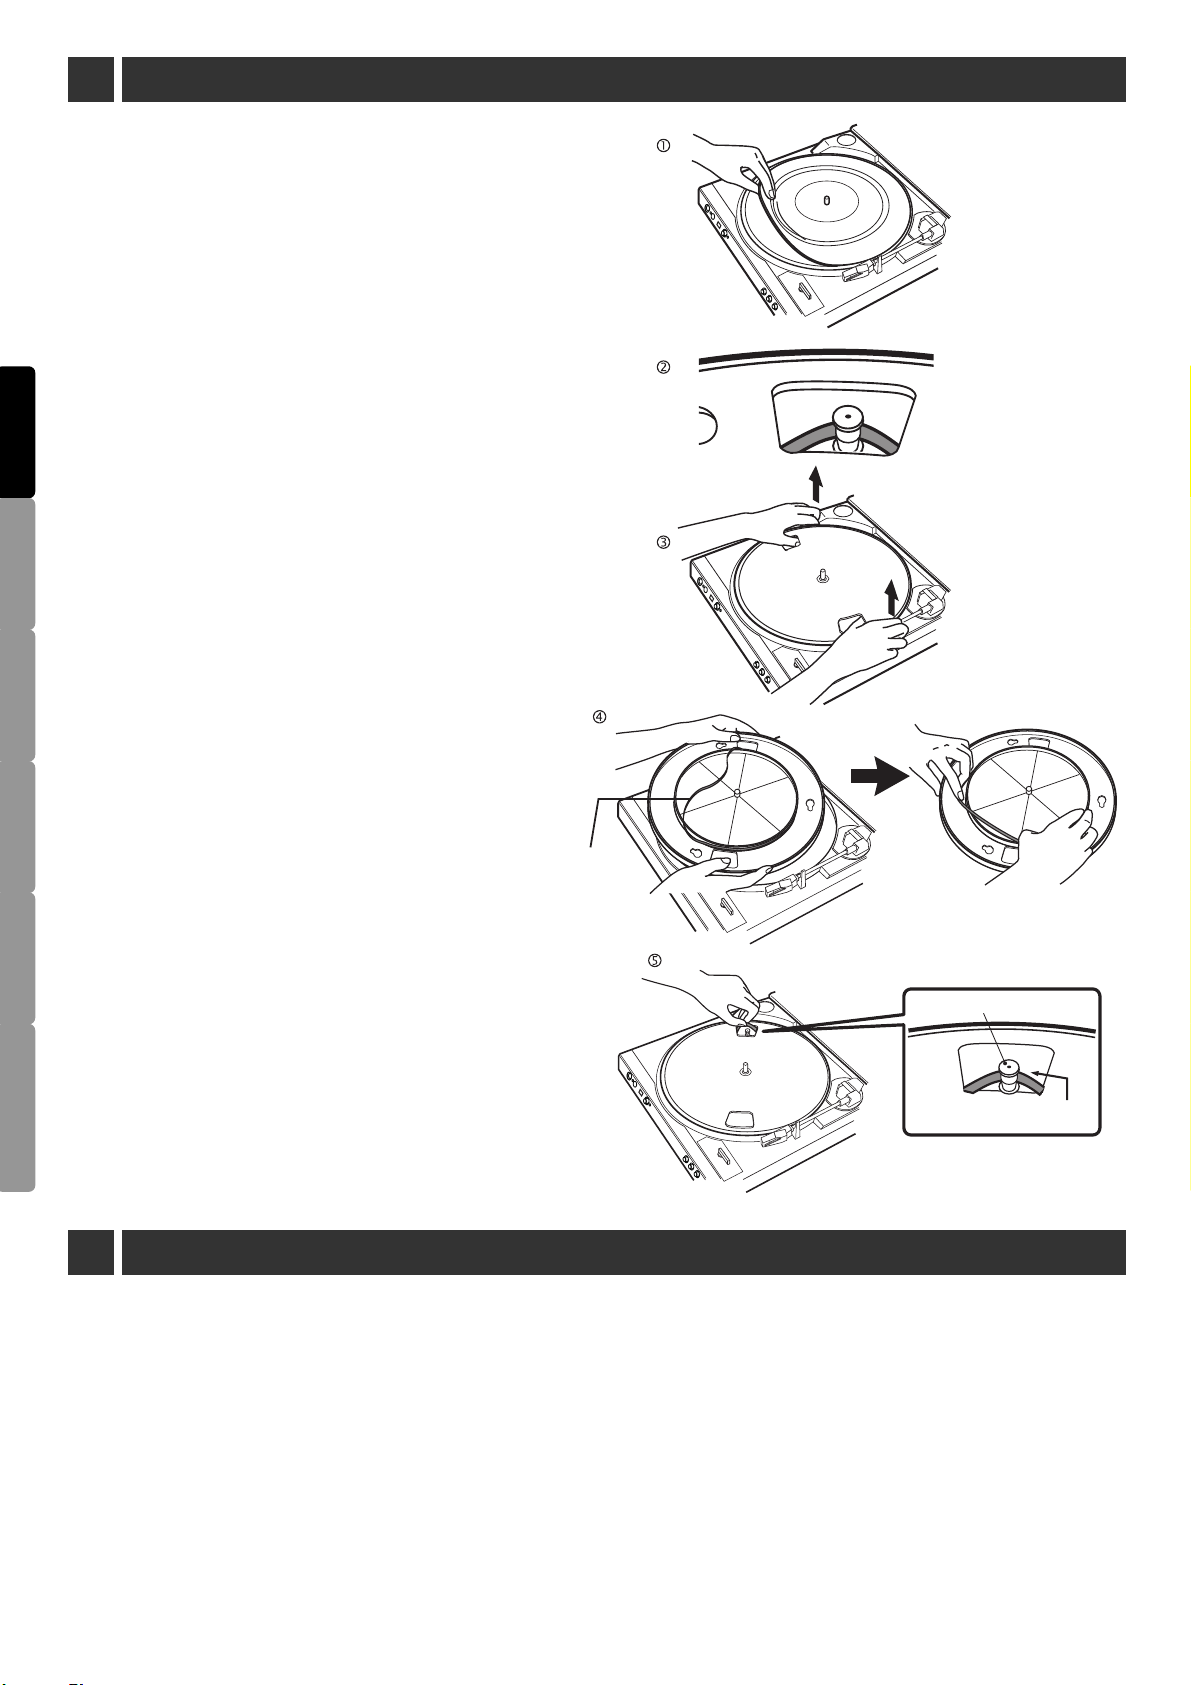
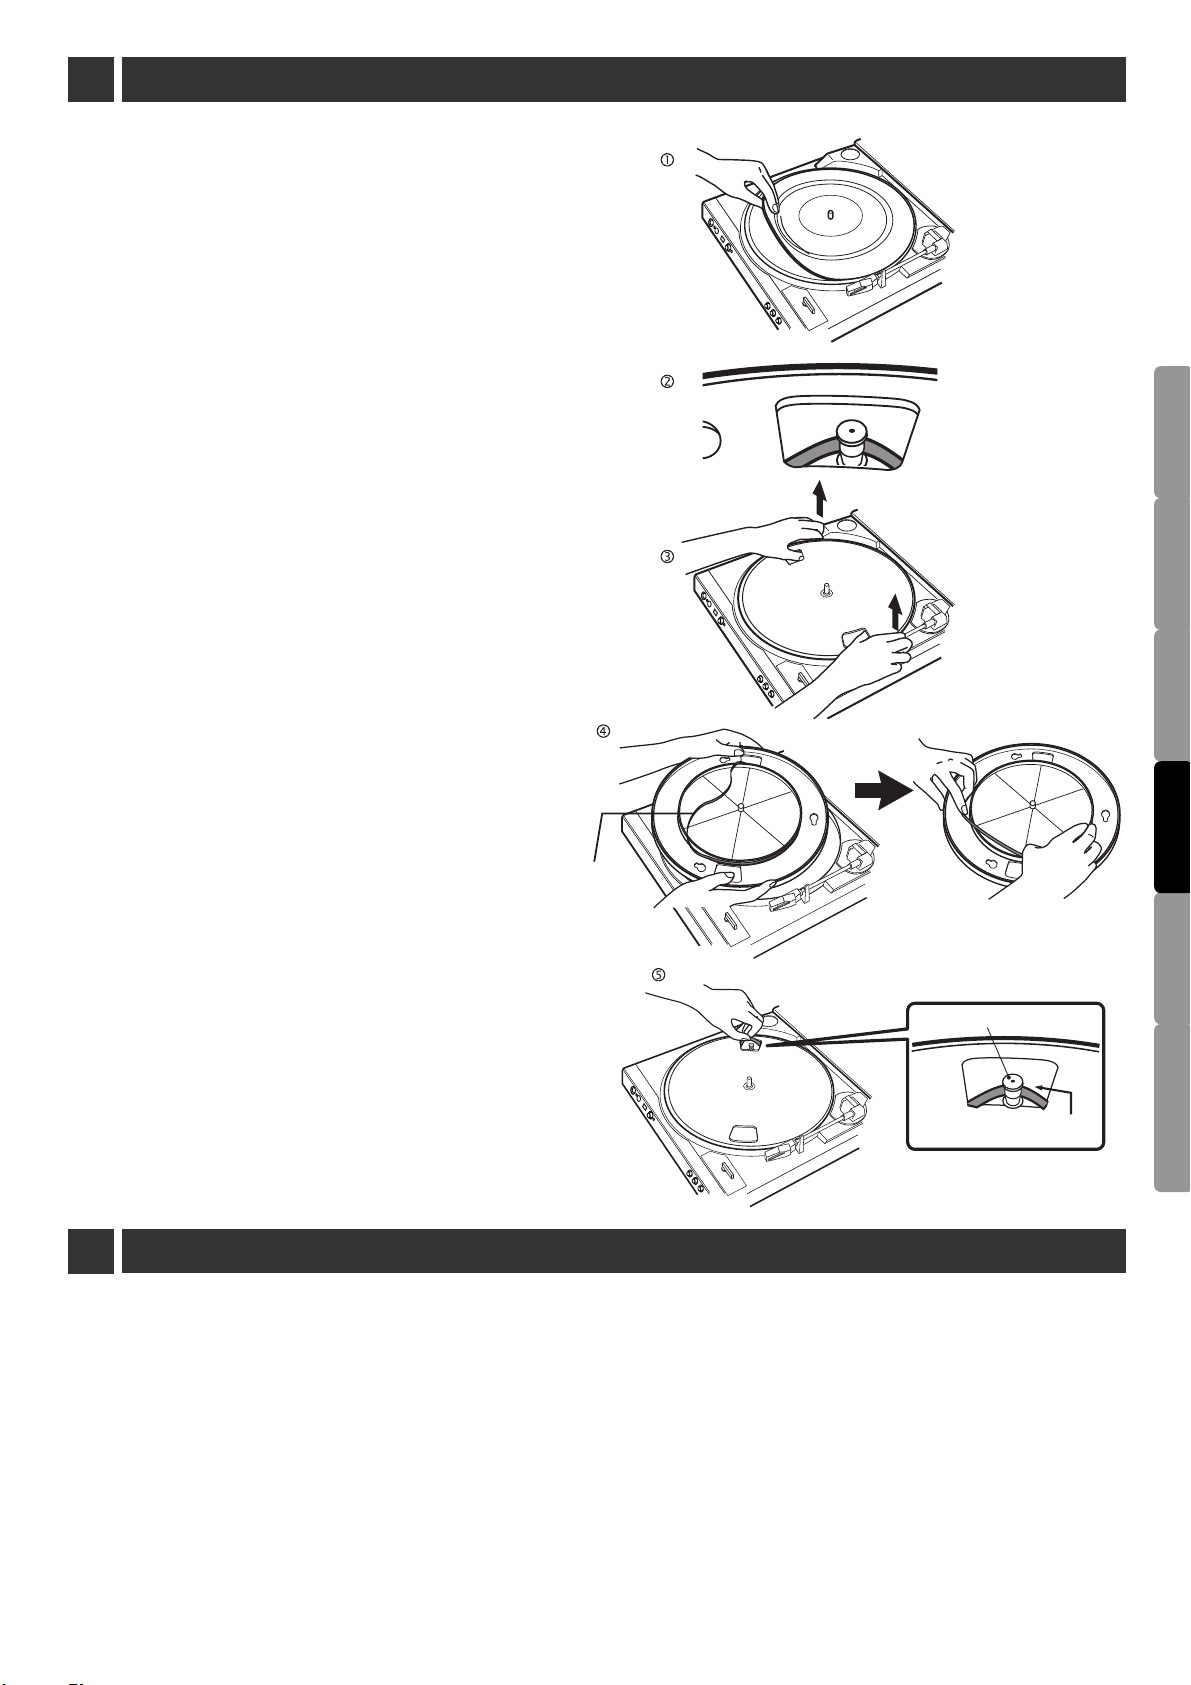
4 TROUBLESHOOTING
5 SPECIFICATIONS
Drive belt
Motor pulley
ntable does not operate
Tur
1. Make certain the turntable’s AC cord is plugged into an AC outlet,
and that the AC outlet is “live”
2. A) Remove the slipmat from the turntable (Fig. 1)
Through an opening in the turntable platter, visually inspect to see if the
drive belt is around the motor pulley (Fig. 2)
B) if the drive belt is not around the motor pulley: Lift and remove the
turntable. Place a thumb into each of the left and right openings on the
turntable platter; and, using the fingers to press down on the turntable
housing’s surface, pull the platter straight up (Fig. 3)
Avoid pressing on the tone arm
C) With the turntable platter bottom side up, place the belt along the
ENGLISH
DEUTSCH FRANÇAIS
DUTCH
ESPAÑOL
ITALIANO
outside wall of the turntable platter's drive rim, making certain that the
belt is smooth and flat all the way around (Fig. 4)
D) Put the turntable back on the center spindle, make certain it is fully
seated, and align one of its openings over the motor pulley position
E) While holding both ends of the ribbon on the turntable belt, carefully
pull the belt over the motor pulley (Fig. 5) Make certain it does not
twisted
Turntable operates, but no sound at all
1. The stylus guard is still in place.
2. The tone arm Lift button is pressed in.
3. Amplifier controls set incorrectly.
4. Check the stylus on phono cartridge for correct placement.
Turntable operates, but no sound or sound not loud enough
1. If the turntable is connected to an AUX input. The Pre-amp
selector switch may be set to the “PHONO” position.
2. The input gain of the amplified speaker or similar device may be
too low.
3. The stylus assembly may not be fully seated in the cartridge body.
Sound is very distorted
Turntable connected to an amplifier’s PHONO input. If the pre-amp
switch is set to the “LINE” position, a phono input will be overloaded
Power supply AC230V, 50Hz
er consumption 10W
Pow
Dimensions 420 x 363.4 x 94mm
Load Impedance 47K ohm
Output Voltage A. Connect with Equalizer
90-216mV at 1KHz 5cm/sec (HP-4005)
B. Connect without Equalizer
1.5-3.6mV at 1KHz 5cm/sec (HP-4005)
Weight 3.6kg
8
Page 10
1 INFORMATIONS DE SECURITE
1. Lisez les instructions.
Gardez le manuel d’utilisation.
2.
Tenez compte de tous les avertissements.
3.
Suivez toutes les instructions.
4.
N’utilisez pas l’appareil près de l’eau.
5.
Nettoyez uniquement avec un chiffon sec.
6.
Ne bloquez pas les ouvertures de ventilation. Installez selon les instructions du fabricant.
7.
N’installez pas près de source de chaleur, tels que les radiateurs, poêle ou tout autre appareil produisant de la chaleur.
8.
Ne démontez pas la prise d’alimentation pour votre sécurité. Si la prise d’alimentation n’entre pas dans la prise secteur,
9.
consultez un électricien pour le remplacement de la prise défectueuse.
Protégez votre cordon d’alimentation, ne marchez pas dessus ou ne l’écrasez pas en particulier lorsque l’appareil est
10.
branché
Utilisez uniquement les accessoires spécifiés par le fabriquant.
11.
Utilisez uniquement un chariot, stand, trépied, support ou table spécifié par le fabricant ou livré avec
12.
l’appareil.
13.
Débranchez l’appareil lors des orages ou si vous ne l’utilisez pas pendant une longue période.
Référez vous à un personnel qualifié. Ce service est requis lorsque l’appareil est endommagé en aucune façon tels que
14.
.
le cordon d’alimentation ou la prise est endommagé, liquide déversé ou objets tombés sur l’appareil, l’appareil exposé à
la pluie ou à la moisissure ou ne fonctionne pas normalement
.
AVERTISSEMENT
ENGLISH
Pour réduire les risques électriques, n’exposez pas l’appareil à la pluie ou à la moisissure.
ATTENTION: Pour réduire les chocs électriques, n’ouvrez pas le
DO N OT OPEN
RISK OF ELECTRIC SHOCK
Ce symbole alerte l’utilisateur de risqué de choc électrique.
Ce symbole alerte l’utilisateur des instructions de maintenance.
couvercle. Ne remplacez pas les pieces. Référez vous à un personnel
qualifié.
ATTENTION
Pour prévenir des chocs électriques, n’utilisez pas cette prise polarisée avec une rallonge électrique.
9
DEUTSCH FRANÇAIS
DUTCH
ESPAÑOL
ITALIANO
Page 11
2 FONCTIONS
Caractéristiques
•
Le pré-ampli possède un commutateur phono/line intégré permettant l’utilisation de la platine avec
un système équipé d’une entré AUX ou d’une entrée PHONO
•
Fonctionnement entièrement automatique
•
2 vitesses : 33 tours et 45 tours
•
Tourne disque professionnel
•
Diamant remplaçable
•
ENGLISH
Mécanisme amortisseur de montée/descente du bras contrôlé depuis le panneau avant
•
Couvercle de protection amovible
Accessoires:
FRANÇAIS ESPAÑOL
Les pieces suivantes sont fournies
•
Manuel d’utilisateur
•
Adaptateur 45 tours
DEUTSCH
DUTCH
ITALIANO
•
Plateau
9
10
11
12
•
Feutrine
•
Couvercle de protection
8
15
14
13
10
Page 12
2 FONCTIONS
AUX LEVEL
CLIP
SIGNAL
5
4
REC. SELECT
AUX
6
RECORDAUX IN
T.T
7
PLAY
1 2 3
UP
CUESTOP
DOWN
1. Bouton Play - Engage le moteur/plateau et commence à fonctionner automatiquement.
2. Bouton Stop - Désengage le moteur/plateau et retourne le bras au repos.
3. Cue up/down - Monte et descend le bras manuellement
4. Aux in - Entrée auxiliaire pour l’encodage d’une source audio extérieure.
5. Aux level - Ajuste le niveau de la source extérieure. La LED devient rouge si le niveau est trop élevé.
6. Rec. Select - Sélectionne la source à encoder, tourne disque ou source audio extérieure.
7. Bouton Record - Appuyez sur le bouton “record” et patientez jusqu’à ce que la LED clignote (cela
peut prendre plusieurs secondes selon le contenu de la clé USB), appuyez une seconde fois sur le
bouton « record » pour stopper le processus d’enregistrement.
8. Commutateur Phono/Line - Sélectionnez phono si vous vous connectez à l’entrée PHONO de votre
amplificateur, sélectionnez LINE si vous vous connectez à l’entrée CD/AUX de votre amplificateur.
9. Adaptateur 45 tours - Adaptateur pour les disques 7”.
10. Axe de rotation
11. Port pour périphérique USB (encodage direct)
12. Bouton de vitesse du plateau - Sélectionnez 33 tours ou 45 tours.
ENGLISH
DEUTSCH FRANÇAIS
DUTCH
ESPAÑOL
13. Sélecteur de taille - Sélectionnez la taille du disque 30 ou 17 cm.
14. Bras/cellule - Verrouillage du bras.
15. Couvercle de protection - Emplacements des charnières du couvercle de protection anti-poussière.
11
ITALIANO
Page 13
LINIE
PHONO
AUXILIAIRE
PHONO
Entrées
Commutateur
Système stéréo
Blanc
Rouge
AC
AC
du pré-ampli
3 INSTALLATION ET FONCTIONNEMENT
Montage
Fig. a Fig
. b Fig. c
Ruban rouge
ENGLISH
Courroie
Axe
ENGLISH
1. Placez soigneusement le plateau du tourne disque sur l’axe de rotation, vérifiez que le plateau soit
bien centré sur l’axe.
2. Tout en maintenant les deux extrémités du ruban rouge, tirez la courroie de la poulie du moteur
(Fig. a).
3. Une fois que la courroie est bien installée dans la rainure, enlevez soigneusement le ruban. Assurez
vous que la courroie n’est pas pliée.
4. Place la feutrine au-dessus du plateau du tourne disque (Fig. b).
5. Si vous le souhaitez le couvercle de protection anti-poussière peut-être retiré. Pour cela saisissez
DEUTSCH FRANÇAIS
les 2 côtés du couvercle et tirez doucement vers le hautde manière à détacher le couvercle de la
DEUTSCH FRANÇAIS
platine disque (Fig c).
6. Pour réinstaller le couvercle, guidez les deux charnières dans leurs logements situés à l’arrière de la
platine disque.
DUTCH
DUTCH
Réglage du pré ampli (Phono/Line)
Le commutateur PHONO/LINE est situé à l’arrière de la platine disque. (Fig. d)
ESPAÑOL
• Si la chaîne stéréo que vous utilisez dispose d’une entrée phono, réglez le pré ampli sur la position
Phono.
• Si votre amplificateur ne dispose pas d’une entrée PHONO, placez le commutateur sur la position
LINE et connectez la platine disque à l’entrée CD/AUX de votre amplificateur.
ITALIANO
Connectez le câble avec un câble RCA blanc (L) et un câble RCA rouge (R).
Connectez le câble d’alimentation au secteur.
Fig. d
ESPAÑOL
ITALIANO
12
Page 14
3 UTILISATION
Retirez le cache de la cellule (Fig.1)
•
Fig.1
Cellule
Cache
Pointe
Fig.2
Fig.5Fig.4
Adaptateur 45 tours
Fig.6 Fig.7
Fig.3
30
7
(ha ut)
(ba s)
ENGLISH
• Mettez la feutrine sur le tourne disque. Si nécessaire, utilisez l’adaptateur 45 tours (Fig.2)
• Sélectionnez la dimension 30 ou 17 cm (Fig.3)
• Sélectionnez la vitesse 33 ou 45 tours (Fig.4)
•
Démarrage : Appuyez doucement sur le bouton PLAY (Fig.5). Le tourne disque commencera à
tourner et le bras se placera automatiquement dans le sillon. Lorsque le disque a fini sa lecture, le
bras retournera automatiquement à sa position initiale et le tourne disque s’éteindra.
•
Stop: Pour arrêter le disque avant la fin, appuyez sur le bouton STOP (Fig.6). le bras retournera en
position initiale, et le tourne disque s’arrête
•
Cue up/down: Pour faire une pause avant la fin de la lecture appuyez sur le bouton CUE pour
mettre en pause. Appuyez sur la touche CUE afin de continuer l’enregistrement (Fig. 7)
•
Enregistrement:
Enregistrement d’une source audio extérieure (encodage sur votre clé USB)
a. Insérez une clef USB ou un lecteur MP3 dans le port USB
b. Connectez une source audio
c. Ajustez le niveau Aux
FRANÇAIS
DEUTSCH
DUTCH
ESPAÑOL
ITALIANO
d. Appuyez sur le bouton “RECORD” et patientez jusqu’à ce que la LED clignote
e. Appuyez sur le bouton “RECORD” encore une fois pour arrêter le processus d’enregistrement
f. La piste est maintenant stockée sur la clé USB comme un fichier MP3 encodé au débit de
192kbps. Un répertoire « AUDIO » est crée automatiquement, et les fichiers sont nommés de
manière consécutive
13
Page 15
3 UTILISATION
•
gistrement:
Enre
Enregistrement de la platine disque (encodage sur votre clé USB)
a. Insérez une clé USB ou un lecteur MP3 dans le port USB
b. Positionnez la cellule sur la piste que vous voulez enregistrer
c. Appuyez sur « CUE UP » pour relever le bras de la platine disque
d. Appuyez sur le bouton “RECORD” et patientez jusqu’à ce que la LED clignote
e. Appuyez sur « CUE DOWN » pour abaisser le bras de la platine disque et reprendre la lecture
ENGLISH
g. La piste est maintenant stockée sur la clé USB comme un fichier MP3 encodé au débit de
192kbps. Un répertoire « AUDIO » est crée automatiquement, et les fichiers sont nommés de
manière consécutive
f. Appuyez sur le bouton “RECORD” encore une fois pour arrêter le processus d’enregistrement
DEUTSCH FRANÇAIS
Operation manuelle
• Retirez le cache de la cellule (Fig.1)
• Mettez la feutrine sur le tourne disque. Si besoin, utiisez l’adaptateur de 45 tours (Fig.2)
• Sélectionnez la dimension du disque 30cm ou 17cm (Fig.3)
DUTCH
• Sélectionnez la vitesse 33 ou 45 tours (Fig.4)
• Appuyez sur cue up pour élever le bras (Fig.7)
Positionnez doucement le bras sur le disque où vous désirez que la lecture commence
•
ESPAÑOL
• Appuyez sur le bouton cue down encore pour la lecture (Fig.7)
Remplacez la cellule
Pour retirer la tête du bras, tirez la tête du bas vers l’avant
ITALIANO
Vérifiez que la nouvelle cellule soit bien remise en place
Il ne peut pas y
avoir d'espace ici
Insérez d'abord
dans le corps
14
Page 16

4 DEPANNAGE
5 CARACTERISTIQUES TECHNIQUES
Courroie
Poulie de moteur
urne disque ne fonctionne pas
Le to
1. Soyez sûr que l’appareil est bien branché à une prise d’alimentation,
Et que cette prise fonctionne
2. A) Retirez la feutrine du tourne disque (Fig. 1)
Au travers l’ouverture du plateau du tourne disque, vous pouvez
visualiser la courroie autour de la poulie du moteur (Fig. 2)
B) Si la courroie d’entrainement n’est pas dans la poulie,
replacez la: la remplacer Placez vos pouces à gauche et
à droite du plateau du tourne disque et utilisez vos index
pour presser la surface de logement et tirez le plateau (Fig. 3)
Évitez d’appuyer sur le bras
C) retournez le plateau, placez la courroie dans la rainure en dessous
de plateau, assurez vous que la courroie n’est pas tendue (Fig. 4)
D) Remettez le plateau en place sur l’axe de rotation, assurez vous qu’il
est correctement place et aligné l’une de ses ouvertures au dessus de la
poulie du moteur
E) Pendant que vous tenez les deux bouts du ruban qui tient la courroie,
tirez la courroie sur la poulie du moteur (Fig. 5) Assurez vous que la courroie
n’est pas tordue
Le tourne disque tourne, mais pas de son l
cache de la cellule est en place.
1. Le
2. quelque chose presse le bras.
3. L’amplificateur n’est pas bien réglé.
4. Contrôlez que la cellule est bien placée.
Le tourne disque fonctionne, mais il n’y a pas de son ou pas assez
de son
1. Si le tourne disque est connecté sur l’entrée AUX. Le sélecteur Pré
amp est peut être réglé sur la position PHONO.
2. L’entrée gain des enceintes amplifiées ou appareil similaire est peut
Etre trop faible.
3. Vérifiez l’assemblage.
Le son est très déformé
Le tourne disque est connecté à l’entrée PHONO de l’ampli
Mettez sur la position LINE, une entrée PHONO sera chargée.
ficateur
Alimentation AC230V, 50Hz
Consommation 10W
Dimensions 420 x 363.4 x 94mm
Impédance 47K ohm
Tension de sortie A. Commutateur PHONO/LINE sur LINE
90-216mV à 1KHz 5cm/sec (HP-4005)
B. Commutateur PHONO/LINE sur PHONO
1.5-3.6mV à 1KHz 5cm/sec (HP-4005)
Poids 3.6kg
ENGLISH
ENGLISH
DEUTSCH FRANÇAIS
DEUTSCH FRANÇAIS
DUTCH
DUTCH
ESPAÑOL
ESPAÑOL
ITALIANO
ITALIANO
15
Page 17

1 WICHTIGE SICHERHEITSHINWEISE
1. Bitte lesen Sie diese Bedienungsanweisung sorgfältig.
Bewahren Sie diese Bedienungsanleitung auf.
2.
Beachten Sie alle Warnhinweise.
3.
Befolgen Sie alle Instruktionen.
4.
Betreiben Sie das Gerät nicht in der Nähe von Wasser.
5.
Reinigen Sie das Gerät nur mit einem trockenen Lappen falls nötig.
6.
Blockieren Sie keinesfalls die Lüftungsschlitze. Bauen Sie das Gerät unter Beachtung der Herstellerhinweise auf.
7.
Betreiben Sie das Gerät nicht in Nähe einer Wärmequelle (Heizung, Ofen, Kerzen) oder neben Geräten, die Wärme absondern
8.
können (z.B. Verstärker)
Verändern Sie nichts am Stecker für die Stromzuführung! Andernfalls gefährden Sie die Betriebssicherheit und damit sich
9.
.
selbst! Falls der Stromstecker des Geräts sich nicht in die Steckdose stecken lässt oder nicht richtig steckt, kontaktieren Sie
einen Elektriker für die Reparatur der Steckdose.
Sorgen Sie dafür, dass niemand über das Kabel laufen kann. Quetschen und verdrehen Sie das Kabel nicht, schützen Sie
10.
ebenfalls Stecker, Anschlüsse und Ausgänge
Benutzen Sie nur vom Hersteller zugelassenes Zubehör (Originalzubehör).
11.
ENGLISH
Benutzen Sie das Gerät nur mit rollbaren Untersätzen, Stativen und Aufhängungen, die vom Hersteller
12.
.
zugelassen o der im Lieferumfang enthalten sind. Seien Sie vorsichtig bei Benu tzung eines rollbaren
Untersatzes, um Verletzungen durch ein Umkippen zu vermeiden.
13. Trennen Sie das Gerät bei Gewitter oder längerer Nichtbenutzung vom Stromnetz.
Lassen Sie Reparaturarbeiten (bei Beschädigungen jeglicher Art, z.B. Kabelbruch, kaputter Stecker, Flüssigkeitseintritt,
14.
Wasser- und Sturzschäden oder Funktionsstörungen ohne sichtbare Ursache) nur von qualifiziertem Fachpersonal
durchführen.
WARNUNG
DEUTSCH FRANÇAIS
DUTCH
ESPAÑOL
ITALIANO
Um das Risiko eines Stromschlags oder eines Feuers zu verhindern, setzen Sie dieses Gerät niemals Niederschlag oder
Feuchtigkeit aus. Stellen Sie keine flüssigkeitsgefüllten Gegenstände wie z.B. Vasen auf das Gerät.
ACHTUNG: Um das Risiko eines Stromschlags zu verhindern, öffnen Sie
CAUTION
DO NO T OPEN
RISK OF ELECTRIC SHOCK
Das Dreieckszeichen mit dem Blitz warnt vor gefährlicher Spannung, die bei unsachgemäßen Umgang
mit dem Gerät einen Stromschlag zur Folge haben kann.
Das Dreieck mit dem Ausrufezeichen dient dazu, den Benutzer auf die Wichtigkeit des betreffenden
Bedienungshinweises/Servicehinweises in der Begleitliteratur aufmerksam zu machen.
keinesfalls das Gehäuse. Es befinden sich keine vom Benutzer zu wartenden
Teile im Inneren des Gerätes. Überlassen Sie Reparaturarbeiten nur
qualifiziertem Fach- Personal!
ACHTUNG
Um einen elektrischen Schlag zu vermeiden, benutzen Sie den Gerätestecker nur mit Verlängerungskabeln oder
Steckerleisten, die den Stecker vollständig aufnehmen. Die Kontakte des Steckers dürfen im angeschlossenen
Zustand nicht freiliegen oder sichtbar sein!
16
Page 18

2 KOMPONENTEN UND FUNKTIONEN
Ausstattung
•
Eingebauter, umschaltbarer Stereo-Phono/Line-Vorverstärker. Zwei Funktionsarten des Geräts
nutzbar: Als reiner Plattenspieler (PHONO) oder zur Wiedergabe anderer Signalquellen (AUX); zum
Anschluss an jede beliebige Hifi-Anlage, sofern Anschlüsse vorhanden
•
Vollautomatisch
•
2 Geschwindigkeiten: 33 1/3 U/min und 45 U/min
•
Professioneller Plattenteller
•
Austauschbare Diamantnadel
•
Gedämpfter Lift/Cue-Mechanismus mit Frontplattensteuerung
•
Abnehmbare Schutz-Haube
Zubehör:
Überprüfen Sie, ob sich die folgenden Artikel im Lieferumfang befinden
•
Bedienungsanleitung
•
45-rpm-Adapter
•
Plattenteller
9
10
11
12
•
Slipmat
•
Schutz-Haube
8
15
14
13
ENGLISH
DEUTSCH FRANÇAIS
DUTCH
ESPAÑOL
ITALIANO
17
Page 19

1 2 3
4
5
6
7
CUESTOP
PLAY
RECORDAUX IN
T.T
AUX
REC. SELECT
UP
DOWN
AUX LEVEL
CLIP
SIGNAL
2 KOMPONENTEN UND FUNKTIONEN
1. Play - Schaltet den Motor ein und startet den Automatik-Modus.
ENGLISH
DEUTSCH FRANÇAIS
DUTCH
ESPAÑOL
2. Stop - Schaltet den Motor aus, der Tonarm geht in die Ruheposition zurück.
3. Cue up/down - Senkt oder hebt den Tonarm im manuellen Betrieb.
4. Aux-Eingang - Schließen Sie Kassettenspieler oder beliebige andere Signalquellen, um diese
aufzunehmen.
5. Aux-Pegel - Stellen Sie den Pegel der Audi-Quelle anhand der LED ein (wenn der PEgel zu hoch ist,
leuchtet die LED rot).
6. Rec. Select - Wählen Sie aus, ob vom Plattenspieler oder vom Aux-Eingang aufgenommen warden
soll.
7. Record - Drücken Sie “record” und warten Sie, bis die LED blinkt – je nachdem wieviel Platz sich auf
dem Speicher befindet, dauert dies einige Sekunden; drücken Sie nochmals “record”, um die
Aufnahme zu stoppen.
8. Phono/Line Umschalter - Wählen Sie Phono aus, wenn Sie den Plattenspieler an den
Phono-Eingang Ihres Hifi-Systems anschließen.
Wählen Sie LINE, wenn Sie das Gerät an den CD/AUX-Eingang Ihres Hifi-Systems anschließen.
ENGLISH
DEUTSCH FRANÇAIS
DUTCH
ESPAÑOL
9. 45rpm Adapter - Adapter für 7"-Vinyls.
10. Center spindle - Zentrierungspunkt
ITALIANO
11. USB-Eingang- Stecken Sie hier Ihren USB-Stick ein.
ITALIANO
12. Platter Speed - Wählen Sie die Geschwindigkeit des Plattentellers aus, entweder 33 rpm (Knopf in
normaler Position) oder 45 rpm (Knopf in gedrückter Position).
13. Size selector - Wählen Sie die Größe der Schalplatte aus, 30 oder 17 cm.
14. Tonearm / headshell - Der Tonarm ist mit dem System/der Nadel verbunden.
15. Aufnahmepunkte für die Staubschutzhaube.
18
Page 20

3 AUFBAU & BEDIENUNGSHINWEISE
LINE
PHONO
AUX
PHONO
Eingangsbuchsen
Umschalter
Stereoanlage
Weiß
Rot
AC
AC
Phono/Line
Zusammenbau
Fig. a Fig. b Fig. c
Rotes Kunststoffband
Antriebsriemen
Antriebsmotor
1. Platzieren
Sie den Plattenteller vorsichtig auf den Mittelpunkt.
2. Ziehen Sie den Riemen vorsichtig auf den Motor, indem Sie beide Enden des rotten
Kunststoffbands festhalten (Fig. a).
3. Wenn der Riemen richtig sitzt, entfernen Sie das Kunststoffband vorsichtig. Überprüfen Sie, ob sich
der Riemen verdreht hat
4. Legen Sie die Slipmat auf den Plattenteller (Fig. b).
5. Falls gewünscht, entfernen Sie die Staubschutzhaube. Öffnen Sie sie dazu, halten Sie sie an beiden
Seiten fest und ziehen Sie die Haube ab (Fig. c).
6. Um die Schutzhaube wieder aufzusetzen, lassen Sie die Aufnahmescharniere vorsichtig in die
Fassungen auf der Rückseite des Plattenspielers gleiten.
Einstellen des Pre-amp (Phono/Line)-Schalters
ENGLISH
DEUTSCH FRANÇAIS
DUTCH
c Der Phono/Line-Schalter befindet sich auf der Rückseite des Plattenspielers (Fig. d)
• Benutzen Sie den PHONO-Eingang Ihres Stereo-Systems, stellen Sie den Schalter entsprechend auf
“PHONO”.
• Benutzen Sie den AUX/LINE-Eingang Ihres Stereo-Systems, stellen Sie den Schalter entsprechend
auf “AUX/LINE” und verbinden Sie die Ausgangskabel des Plattenspielers mit den
AUX-Eingangsbuchsen Ihrer HiFi-Anlage.
d Verbinden Sie das Kabel (weißer Stecker auf Links, roter Stecker auf Rechts).
e Verbinden Sie das Stromkabel mit der Steckdose.
Fig. d
ESPAÑOL
ITALIANO
19
Page 21

3 BEDIENUNGSHINWEISE
ENGLISH
Fig.1
Nadel-Ein-/Aufbau
Automatik-Modus
Entfernen Sie den Nadelschutz von der Nadel (Fig.1)
•
• Legen Sie die Slipmat auf den Plattenteller. Falls benötigt, verwenden Sie den 45rpm-Adapter (Fig.2)
• Wählen Sie die Größe der Vinyl aus: 30 oder 17 cm (Fig.3)
Nadel-Schutzhaube
Tonabnehmer-Nadel
Fig.2
Fig.5Fig.4
45rpm-Adapter
Fig.6 Fig.7
Fig.3
30
7
ENGLISH
DEUTSCH FRANÇAIS
DUTCH
ESPAÑOL
ITALIANO
• Wählen Sie die Geschwindigkeit aus: 331/3 oder 45 rpm (Fig.4)
•
Start: Drücken Sie vorsichtig auf den PLAY-Schalter. (Fig.5). Der Plattenspieler startet, der Tonarm
bewegt sich automatisch zum Anfang der Schallplatte. Nach Abspielende bewegt sich der Tonarm
automatisch zurück in seine Ruheposition. Der Plattenspieler schaltet sich ab
•
Stop: Um die Wiedergabe vor Ende der Schallplatte zu stoppen, drücken Sie STOP (Fig.6). Der
Tonarm bewegt sich automatisch zurück in seine Ruheposition, der Plattenspieler schaltet sich ab.
•
Cue hoch/runter: Um die Wiedergabe vor Ende der Schallplatte anzuhalten, drücken Sie CUE UP.
Zum Fortsetzen der Wiedergabe drücken Sie CUE DOWN (Fig 7).
•
Record (Aufnahme):
Aufnahme über AUX
Aufnahme auf Ihren USB-Stick
a. Verbinden Sie ein Speichermedium (USB-Stick, MP3-Player etc.) mit dem USB-Eingang
b. Verbinden Sie das Gerät mit einer Signal-Quelle
c. Justieren Sie den Lautstärke-Pegel
DEUTSCH FRANÇAIS
DUTCH
ESPAÑOL
ITALIANO
d. Drücken Sie “RECORD” bis die LED aufblinkt (abhängig von dem freien Speicher auf dem
Medium kann dies ein paar Sekunden dauern)
e. Drücken Sie “RECORD” um die Aufnahme zu stoppen
f. Der Track ist nun auf dem Speichermedium gespeichert (192kbps MP3), die Tracks warden der
Reihe nach nummeriert und im dafür angelegten Ordner “Audio” gespeichert
20
Page 22

3 BEDIENUNGSHINWEISE
Automatik-Modus
•
Record:
Aufnahme über Plattenspieler
Aufnahme auf Ihren USB-Stick
a. Verbinden Sie ein Speichermedium (USB-Stick, MP3-Player etc.) mit dem USB-Eingang
b. Positionieren Sie die Nadel an dem Track, den Sie aufnehmen wollen
c. Drücken Sie “CUE UP” um die Aufnahme in den Pausenmodus zu versetzen
d. Drücken Sie “RECORD” bis die LED aufblinkt (abhängig von dem freien Speicher auf dem
Medium kann dies ein paar Sekunden dauern)
e. Drücken Sie “CUE DOWN” um die Aufnahme zu starten
f. Drücken Sie “RECORD” um die Aufnahme zu stoppen
g. Der Track ist nun auf dem Speichermedium gespeichert (192kbps MP3), die Tracks warden
ENGLISH
der Reihe nach nummeriert und im dafür angelegten Ordner “Audio” gespeichert
Manueller Modus
• Entfernen Sie den Nadelschutz von der Nadel (Fig.1)
• Legen Sie die Slipmat auf den Plattenteller. Falls benötigt, verwenden Sie den 45rpm-Adapter (Fig.2)
• Wählen Sie die Größe der Vinyl aus: 30 oder 17 cm (Fig.3)
1
• Wählen Sie die Geschwindigkeit aus: 33
/3 oder 45 rpm (Fig.4)
• Drücken Sie CUE UP um den Tonarm anzuheben (Fig.7)
• Führen Sie den Tonarm vorsichtig an den Punkt der Schallplatten, wo die Wiedergabe beginnen soll
• Drücken Sie CUE DOWN um den Tonarm abzusenken und drücken Sie RECORD (Fig.7)
Austausch der Nadel
Ziehen Sie die Nadel nach vorne und nach unten um sie abzuziehen, während Sie den Kopf des
Tonarms festhalten.
Stellen Sie sicher, dass die Nadel im System mit einem hörbaren “Click” einrastet, Zwischen der Nadel
und dem System darf kein Spielraum sein
DEUTSCH FRANÇAIS
DUTCH
ESPAÑOL
ITALIANO
Hier darf kein
Spalt bleiben
Zuerst an
Trägerkörper einschieben
21
Page 23

Antriebsriemen
Motor (Riemenrad)
5 TECHNISCHE EIGENSCHAFTEN
4 TROUBLESHOOTING
enspieler funktioniert nicht
Platt
1. Überprüfen Sie die Stromversorgung/Verkabelung, Überprüfen Sie
auch die Sicherung der Steckdose.
2. A) Nehmen Sie die Slipmat ab (Fig. 1)
Inspizieren Sie den Antriebsriemen durch die Öffnung im Plattenteller,
um zu überprüfen, ob der Riemen evtl. Abgesprungen
ist (Fig. 2)
B) Falls der Riemen abgesprungen ist, nehmen Sie den Plattenteller
ab, drehen Sie ihn um und spannen Sie den Riemen erneut. Achten Sie
darauf, dass Sie nicht am Tonarm anfassen (Fig. 3)
Vermeiden Sie es, auf den Tonarm zu drücken.
C) Setzen Sie den Plattenteller wieder auf und legen durch die
ENGLISH
DEUTSCH FRANÇAIS
DUTCH
ESPAÑOL
Öffnung im Teller den Riemen um den Motor . Achten Sie auf einen
sauberen Verlauf des Riemens! (Fig. 4)
D) Setzen Sie den Plattenteller zurück auf die Spindel in der Mitte und
achten Sie darauf, dass er ganz aufsitzt. Richten Sie eine seiner
Öffnungen so aus, dass sich diese überhalb des Motors (Riemenrad)
befindet.
E) Ziehen Sie den Riemen vorsichtig über den Motor (Riemenrad), während
Sie beide Enden des roten Kunststoffbandes anpacken (Fig. 5).
Achten Sie darauf, dass der Riemen nicht verdreht ist.
Plattenspieler funktioniert, aber kein Sound
Nadelschutz ist nicht entfernt worden.
1. Der
2. Der Tonarm-Lift ist aktiviert.
3. Verstärker ist heruntergedreht.
4. Überprüfen Sie die Nadel auf richtigen Sitz
Plattenspieler funktioniert, aber kein Sound oder sehr leise
1. Falls der Plattenspieler über AUX angeschlossen ist, stellen Sie
den Vorverstärker auf “PHONO”.
2. Die Kanallautstärke der Anlage ist zu gering
3. Überprüfen Sie die Nadel auf richtigen Sitz.
Sound ist knacksend, rauschend
Plattenspieler ist an den PHONO-Eingang des Verstärkers
angeschlossen, der Vorverstärker des Plattenspielers steht jedoch
X, dadurch übersteuert das Signal. Stellen Sie den Schalter
auf AU
auf PHONO.
ITALIANO
Stromversorgung AC230V, 50Hz
Leistungsaufnahme 10W
Abmessungen 420 x 363.4 x 94mm
Last-Impedanz 47K ohm
Ausgangsspannung A. angeschlossen an Verstärker
90-216mV bei 1KHz 5cm/sek (HP-4005)
B. nicht an Verstärker angeschlossen
1.5-3.6mV bei 1KHz 5cm/sek (HP-4005)
Gewicht 3.6kg
ENGLISH
DEUTSCH FRANÇAIS
DUTCH
ESPAÑOL
ITALIANO
22
Page 24

1 BELANGRIJKE VEILIGHEIDSVOORSCHRIFTEN
1. Lees deze voorschriften.
2. Bewaa r deze voorschriften.
3. Houd rekening met alle waarschuwingen.
4. Volg alle voorschriften.
5. Gebruik het toestel niet in de nabijheid van water.
6. Reinig enkel met een droge doek.
7. Blokkeer de ventilatie-openingen niet. Installeer volgens de instructies van de fabrikant.
8. Niet installeren in de nabijheid van warmtebronnen zoals radiatoren, warmteroosters, ovens of andere toestellen
(inclusief versterkers) die warmte produceren.
9. Houd rekening met de veiligheidsdoelstelling van de gepolariseerde stekker of de aardingstekker. De brede pin
zijn voorzien voor uw veiligheid. Als de meegeleverde stekker niet in uw stopcontact past, raadpleeg dan een
elektricien voor vervanging van het verouderde stopcontact.
10. Bescherm de stroomkabels tegen vertrappelen of belemmeren, vooral aan de stekkers, stopcontacten en het punt
waar ze uit het toestel komen.
11. Gebruik enkel hulpstukken/toebehoren die door de fabrikant gespecificeerd worden.
12. Enkel g ebruiken met een door de fabrikant gespecificeerde of met het toestel meegeleverde
kar, steun, drievoet, plank of tafel. Als er een kar w ordt gebruikt, wees dan voorzichtig als u
het toestel verplaatst in een kar/toestel-combinatie om letsels door omkantelen te vermijden.
13. Trek het toestel uit tijdens onweersbuien of als het toestel gedurende lange tijd niet wordt gebruikt.
14. Laat alle onderhoud over aan bevoegd onderhoudspersoneel. Onderhoud is nodig wanneer het toestel op een of
andere manier beschadigd is, bijvoorbeeld door een beschadigde voedingskabel of stekker, als er vloeistof op het
toestel gemorst is of er voorwerpen ingevallen zijn, als het toestel werd blootgesteld aan regen of vocht, niet
normaal werkt of gevallen is.
ENGLISH
WAARSCHUWING
Stel het toestel niet bloot aan regen of vocht om het risico op brand of elektrische schok te vermijden. Het toestel
mag niet blootgesteld worden aan druppels of spatten en er mogen geen voorwerpen met vloeistof, zoals vazen, op
het toestel geplaatst worden.
CAUTION
DO NO T OPEN
RISK OF ELECTRIC SHOCK
Het symbool van een driehoek met een bliksemschicht die eindigt op een pijl is bedoeld om de
gebruiker te waarschuwen voor de aanwezigheid van ongeïsoleerde “gevaarlijke spanning” in het
product die van zulke omvang kan zijn dat het een risico op elektrische schok vormt.
De gelijkzijdige driehoek met het uitroepteken is bedoeld om de gebruiker te waarschuwen voor de
aanwezigheid van belangrijke bedienings- en onderhoudsvoorschriften in de documentatie die bij dit
toestel hoort.
WAARSCHUWING: Geen beschermingen verwijderen om het risico op
elektrische schok te verminderen. Geen door de gebruiker te repareren
onderdelen. Laat onderhoud enkel over aan bevoegd personeel.
WAARSCHUWING
Om elektrische schok te vermijden, de gepolariseerde stekker niet gebruiken met een verlengkabel, stopcontact of
andere ontvanger, tenzij de pinnen er helemaal kunnen ingestoken worden zodat er geen blootstelling van de
pinnen is.
DEUTSCH FRANÇAIS
DUTCH
ESPAÑOL
ITALIANO
23
Page 25

2 ONDERDELEN EN FUNCTIES
Kenmerken
•
Ingebouwde schakelbare voorversterker voor de signaalsterkte van de phono/lijn-ingang. Zo kunt u
een draaitafel gebruiken met een stereosysteem als u magnetische phono-ingang hebt of
ENGLISH
DEUTSCH FRANÇAIS
DUTCH
ESPAÑOL
ITALIANO
“AUX”-invoer (lijn); waardoor u de draaitafel ook makkelijk kunt gebruiken
•
Volautomatische bediening
•
2 snelheden: 331/3 tpm en 45 tpm
•
Professionele draaitafel
•
Vervangbare diamanten naald
•
Automatisch ophef-/richtmechanisme met controle op het voorpaneel
•
Afneembare stofkap
Accessoires:
Controleer of de volgende onderdelen bij het hoofdonderdeel werden geleverd
•
Gebruikershandleiding
•
45 tpm-adapter
•
Plaat
9
10
11
12
•
Slipmat
•
Stofkap
8
15
14
13
24
Page 26

2 ONDERDELEN EN FUNCTIES
AUX LEVEL
CLIP
SIGNAL
5
4
REC. SELECT
AUX
6
RECORDAUX IN
T.T
7
1 2 3
1. Afspeelknop - Start de motor/plaat en begint automatisch met afspelen.
2. Stopknop - Stopt de motor/plaat en zet de arm opnieuw in rustpositie.
UP
PLAY
CUESTOP
DOWN
3. Richt op/neer - Tilt de arm op en brengt hem naar beneden om handmatig een passage te selecteren.
4. Aux in - Om bandspelers, magneetbanden of een andere geluidsbron om mee op te nemen aan te
sluiten.
5. Aux sterkte - Pas de sterkte van de geluidsbron aan. Wanneer het te hoog is voor een opname, wordt
de LED rood.
6. Rec. Select - Om het opnemen te verwisselen tussen de draaitafel en de Aux in.
7. Record button (Opneemknop) - Duw op de knop “record” (opnemen) en wacht tot de LED knippert
(dit kan enkele seconden duren, naargelang de inhoud van de flash disk); duw opnieuw op de knop
“record” om te stoppen met opnemen.
8. Phono/Line-schakelaar - Kies de instelling Phono wanneer u wilt aansluiten op de phono-ingang van
je thuisstereo. Selecteer LINE om aan te sluiten op CD/AUX invoer van uw thuisstereo.
9. 45 tpm adapter - Past platen van 17 cm met grote middengaten aan zodat ze op de middenpin
passen.
ENGLISH
DEUTSCH FRANÇAIS
DUTCH
ESPAÑOL
10. Middenpin
11. USB-poort - Voer een flash-disk in om op te nemen.
12. Plaatsnelheidsknop - Selecteer 33 tpm (knop in bovenstand) of 45 tpm (knop in lage positie) voor de
snelheid van de plaat.
13. Grootte kiezen - Selecteer de grootte van de plaat: 30 cm of 17 cm.
14. Arm / headshell - De arm is bevestigd aan de headshell.
15. Scharnierhouders stofkap - Aanhechtpunten voor de afneembare stofkap die met scharnieren vastzit.
25
ITALIANO
Page 27

3 INSTELLING & BEDIENING
De draaitafel monteren
Fig. a Fig. b Fig. c
Rood lint
Motorpin
ENGLISH
DEUTSCH FRANÇAIS
DUTCH
ESPAÑOL
Aandrijfriem
1. Plaats de draaitafelplaat voorzichtig op de middenpin, waarbij u goed oplet dat de plaat helemaal
over de pin komt.
2. Trek terwijl u beide kanten van het rode lint op de riem van de draaitafel houdt, de riem voorzichtig
over de riemschijf van de motor (Fig. a).
3. Haal zodra de riem in de groef van de riemschijf ligt, voorzichtig het lint weg. Let er goed op dat de
riem niet gedraaid is.
4. Leg de slipmat bovenop de draaitafelplaat (Fig. b).
5. Indien u wil kan u de stofkap verwijderen door de schroeven los te draaien. Hou beide kanten van de
stofkap vast en trek de kap zachtjes en gelijkmatig naar boven om de kap los te maken van de
draaitafel (Fig. c).
6. Om de stofkap opnieuw te monteren: breng de scharnieren van de stofkap in de twee
scharnieropeningen aan de achterkant van de draaitafel.
De voorversterkerschakelaar instellen (Phono/Line)
De schakelaar Phono/Line zit aan de achterkant van de draaitafel (Fig. d).
• Als het stereosysteem dat u gebruikt een PHONO-ingang heeft, zet de schakelaar voor
voorversterking dan in de stand "PHONO".
ENGLISH
DEUTSCH FRANÇAIS
DUTCH
ESPAÑOL
• Als uw stereosysteem geen PHONO-ingang heeft, zet de voorversterkerschakelaar dan op “LINE” en
sluit de uitgangkabels van de draaitafel dan aan op AUX of een andere sterke ingang op het
ITALIANO
stereosysteem.
Sluit de kabel met de witte stekker aan op het (L) contact en de rode stekker op het (R) contact.
Sluit de netvoedingskabel aan op een stopcontact.
Fig. d
Ingangen
Voorversterkerschakelaar
AUX
LINE
ITALIANO
PHONO
Stereosysteem
White
Red
AC
PHONO
AC
26
Page 28

3 BEDIENING
Fig.1
Grammofoonnaald
Naaldbescherming
Grammofoonnaald
(naald)
Fig.2
Fig.5Fig.4
45 tpm-adapter
Fig.6 Fig.7
Fig.3
Automatische bediening
• Haal de bescherming van de naald weg (Fig.1)
• Leg een slipmat op de draaitafel. Gebruik indien nodig de 45 tpm-adapter (Fig.2)
• Selecteer de grootte: 30 cm of 17 cm (Fig.3)
1
• Selecteer de snelheid: 33
/3 of 45 tpm (Fig.4)
30
7
ENGLISH
•
Start: Druk zachtjes op de PLAY-knop (Fig. 5) De draaitafel zal beginnen draaien en de arm zal
automatisch naar de eerste groef bewegen. Wanneer de plaat helemaal gespeeld is, zal de toonarm
automatisch terugkeren naar rustpositie en zal de draaitafel zich uitschakelen
•
Stop: Om op te houden met spelen voor de plaat het einde heeft bereikt, druk op de knop STOP
(Fig. 6). De toonarm zal zich optillen en terugkeren naar de rustpositie en de draaitafel zal
zichuitschakelen
•
Gericht op/neer: Om de plaat op pauze te zetten voor ze helemaal is afgespeeld, druk op de knop
“cue up” om het afspelen te pauzeren. Druk op de knop “cue down” om door te gaan met afspelen
van de plaat
•
Opnemen:
Opnemen naar AUX
Opnemen naar uw USB-sleutel
a. Stop een flash-disk (bijv. een USB-sleutel, een MP3-speler) in de USB-poort
b. Sluit aan op een audiobron
DEUTSCH FRANÇAIS
DUTCH
ESPAÑOL
ITALIANO
c. Pas het volume van Aux aan
d. Duw op de knop “RECORD” (opnemen) en wacht tot de LED knippert (dit kan enkele
seconden duren, naargelang de inhoud van de flash disk)
e. Druk opnieuw op de knop "RECORD" om te stoppen met opnemen
f. De track is nu opgeslagen op de flash-disk als een 192kbps MP3-document, tracks worden in
volgorde genummerd en in een map worden gezet met de naam "audio"
27
Page 29

3 BEDIENING
Automatische bediening
•
Opnemen:
Opnemen naar DT
Opnemen naar uw USB-sleutel
a. Stop een flash-disk (bijv. een USB-sleutel, een MP3-speler) in de USB-poort
b. Zet de naald op de track die u wil opnemen
c. Druk op de knop “CUE UP” om de platenspeler op pauze te zetten
d. Duw op de knop “RECORD” (opnemen) en wacht tot de LED knippert (dit kan enkele
ENGLISH
seconden duren, naargelang de inhoud van de flash disk)
e. Druk op de knop “CUE DOWN” en ga verder met het afspelen van de track
f. Druk opnieuw op de knop "RECORD" om te stoppen met opnemen
g. De track is nu opgeslagen op de flash-disk als een 192kbps MP3-document, tracks worden in
DEUTSCH FRANÇAIS
DUTCH
ESPAÑOL
ITALIANO
volgorde genummerd en in een map worden gezet met de naam "audio"
Handmatig bedienen
• Haal de bescherming van de naald weg (Fig.1)
• Leg een slipmat op de draaitafel. Gebruik indien nodig de 45 tpm-adapter (Fig.2)
• Selecteer de grootte: 30 cm of 17 cm (Fig.3)
1
• Selecteer de snelheid: 33
/3 of 45 tpm (Fig.4)
• Druk op “cue up” om de arm op te tillen (Fig.7)
• Beweeg de arm voorzichtig zodat de naald boven het punt hangt waar de plaat opnieuw moet
beginnen spelen
• Druk opnieuw op de knop “cue down” om de toonarm zachtjes naar beneden te brengen en de plaat
af te spelen (Fig.7)
De naald vervangen
Houd de kop van de arm vast en draai de voorkant van de naaldeenheid naar voren en naar beneden
om ze los te maken.
Let er goed op dat het uitstekende deel aan de achterkant van het onderdeel eerst helemaal in de
patroonhouder zit en dat de eenheid op haar plaats ‘klikt’, zonder opening tussen de bovenste rand en
de voorkant van de zwarte plastic armkop.
Eerst in
patroonhouder steken
Geen opening hier
28
Page 30
Motor riemschijf
4 PROBLEMEN OPLOSSEN
5 SPECIFICATIES
Aandrijfriem
De draaitafel draait niet
1. Let er goed op dat de netvoedingskabel is aangesloten op een
opcontact en dat het stopcontact aan staat.
st
2. A) Haal de slipmat van de draaitafel (Fig. 1)
Kijk door een opening in de plaat van de draaitafel of de aandrijfriem
rond de riemschijf van de motor ligt (Fig. 2)
B) als de aandrijfriem niet rond de riemschijf zit: til de plaat op en haal
hem van het toestel. Zet een duim in de linker en rechteropening op de
plaat van de draaitafel en gebruik uw vingers om het oppervlak van de
behuizing van de draaitafel naar beneden te drukken en de plaat recht
naar boven te trekken (Fig. 3)
Probeer geen druk uit te oefenen op de arm
C) Met de plaat van de draaitafel naar boven toe: leg de riem ro
buitenste rand van de aandrijfrand van de draaitafel, waarbij u erop let
dat de riem glad en plat ligt rondom rond (Fig. 4)
D) Leg de draaitafel terug op de centrale pin en zorg er goed voor dat
ze helemaal ligt en breng een van de openingen op gelijke hoogte met
de positie van de riemschijf van de motor
E) Trek terwijl u beide kanten van het lint op de riem van de draaitafel
houdt, de riem voorzichtig over de riemschijf van de motor (Fig.. 5) Let
er goed op dat het niet gedraaid zit
nd de
De draaitafel werkt, maar er is geen geluid
1. De bescherming voor de naald zit nog steeds over de naald heen
2. De knop om de arm op te tillen is ingedrukt
3. De knoppen voor de versterker zijn niet correct ingesteld
4. Controleer of de naaldhouder juist geplaatst is
De draaitafel werkt, maar er is geen geluid of het geluid is niet
sterk genoeg
1. Als de draaitafel is aangesloten op een AUX-ingang. Het kan dat
de schakelaar om de voorversterker te selecteren op "PHONO" staat.
2. Het kan dat de versterking van de input van de versterkte lui
of een gelijkaardig toestel niet sterk genoeg is.
3. Het kan dat de naald niet goed in het houder zit.
dspreker
Geluid is erg verstoord
De draaitafel is aangesloten op de PHONO-ingang van de versterker
Als de schakelaar voor de voorversterker in stand “LINE” staat, is de
phono-ingang overbelast.
Netvoeding AC230V, 50Hz
Verbruik 10W
Afmetingen 420 x 363.4 x 94mm
Ladingsimpedantie 47K ohm
Uitgangsspanning A. Aangesloten met Equalizer
90-216mV aan 1KHz 5cm/sec (HP-4005)
B. Aangesloten zonder Equalizer
1.5-3.6mV aan 1KHz 5cm/sec (HP-4005)
Gewicht 3.6kg
ENGLISH
DEUTSCH FRANÇAIS
DUTCH
ESPAÑOL
ITALIANO
29
Page 31
RIESGO DE DESCARGA ELÉCTRICA
NO ABRIR.
1 INSTRUCCIONES DE SEGURIDAD
1. Lea estas instrucciones.
2. Conserve estas instrucciones.
3. Respete todas las advertencias.
4. Siga todas las instrucciones.
5. No use este aparato cerca de fuentes de agua.
6. Límpielo únicamente con un paño seco.
7. No bloquee las rejillas de ventilación. Instale el aparato siguiendo las instrucciones del fabricante.
8. No coloque el aparato cerca de fuentes de calor, como radiadores, calefactores, amplificadores u otros aparatos
que despidan calor.
9. No trate de evitar la función de seguridad del enchufe polarizado. La clavija más ancha le permite garantizar su
seguridad. Si el enchufe suministrado no es compatible con su toma de corriente, acuda a un electricista para que
reemplace dicha toma.
10. El cable de alimentación debe protegerse para evitar que se doble o se pise. Preste especial atención al enchufe
y al punto de conexión del cable con el aparato.
11. Utilice únicamente los accesorios recomendados por el fabricante.
ENGLISH
12. Colo que el aparato sobre una su perficie e stable. Si usa un carro p ara transportar el a parato, tenga
cuidado al desplazarlo para evitar que se caiga y se produzcan daños.
13. Desenchufe el aparato durante las tormentas o si no va a utilizarlo durante un periodo de tiempo prolongado.
14. Para las operaciones de mantenimiento, póngase en contacto con personal técnico cualificado. El aparato ha de
repararse siempre que haya sufrido daños: deterioro del cable de alimentación o del enchufe, caída de líquido u
objetos sobre el aparato, exposición a la lluvia o la humedad, funcionamiento defectuoso o caída del propio
aparato.
DEUTSCH FRANÇAIS
DUTCH
ESPAÑOL
ITALIANO
ATENCIÓN
Para reducir el riesgo de incendio o de descarga eléctrica, no exponga este aparato a la lluvia o la humedad. No
coloque objetos llenos de líquido, como jarrones, cerca del aparato.
ATENCIÓN: Para reducir el riesgo de descarga eléctrica, no
ATENCIÓN
RIESGO DE DESCARGA ELÉCTRICA
NO ABRIR.
desmonte el aparato. En su interior no hay ninguna pieza que pueda
ser reparada por el usuario. Para las operaciones de
mantenimiento, póngase en contacto con personal técnico
cualificado.
El símbolo del rayo terminado en forma de flecha dentro de un triángulo equilátero advierte al usuario
de la presencia de voltaje peligroso no aislado en el interior del aparato de magnitud suficiente para
constituir un riesgo de descarga eléctrica para las personas.
El signo de exclamación dentro de un triángulo equilátero es una señal de aviso que alerta al usuario
de la existencia de instrucciones importantes de funcionamiento y mantenimiento en la documentación
que acompaña al producto.
ATENCIÓN
Para evitar el riesgo de descarga eléctrica, introduzca completamente las clavijas del enchufe en la toma de
corriente.
30
Page 32

2 DESCRIPCIÓN DEL APARATO Y FUNCIONE
Características
•
Preamplificador estéreo conmutable (selección entre PHONO o LINE) integrado. Permite el uso de
sistemas estéreo que dispongan de tomas PHONO magnéticas o AUX (de línea) y de la mayoría de
altavoces
•
Mecanismo totalmente automático
•
2 velocidades: 331/3 rpm y 45 rpm
•
Tocadiscos profesional
•
Aguja de diamante reemplazable
•
Mecanismo elevador/de entrada amortiguado con mando de control en el panel frontal
•
Cubierta antipolvo desmontable
Contenido de la caja:
ENGLISH
Compruebe que los siguientes accesorios están incluidos en el paquete del aparato
•
Manual de instrucciones
•
Adaptador de 45 rpm
•
Plato giradiscos
9
10
11
12
•
Alfombrilla de fieltro para vinilos
•
Cubierta antipolvo
8
15
14
13
DEUTSCH FRANÇAIS
DUTCH
ESPAÑOL
ITALIANO
31
Page 33

2 DESCRIPCIÓN DEL APARATO Y FUNCIONE
AUX LEVEL
CLIP
SIGNAL
5
4
REC. SELECT
AUX
RECORDAUX IN
T.T
7
6
PLAY
1 2 3
UP
CUESTOP
DOWN
1. Botón PLAY - Activa el plato giradiscos e inicia el mecanismo de funcionamiento automático.
2. Botón STOP - Detiene el plato y devuelve el brazo de lectura a su posición inicial.
ENGLISH
DEUTSCH FRANÇAIS
DUTCH
ESPAÑOL
3. CUE UP/DOWN - Sube y baja, respectivamente, el brazo para la selección manual.
4. AUX IN - Conecte una pletina, magnetófono o cualquier otra fuente de audio que desee grabar.
5. REC. VOL. - Ajuste el nivel de la fuente de audio; cuando se supere el nivel máximo para la
grabación, se encenderá el piloto rojo.
6. REC. SELECT - Use este botón para seleccionar una fuente de audio (el propio tocadiscos o un
equipo externo conectado a la entrada AUX IN) para la grabación.
7. Botón RECORD - Para iniciar la grabación, pulse este botón y espere hasta que el piloto parpadee
(esta operación puede durar varios segundos dependiendo del contenido del dispositivo USB). A
continuación, vuelva a pulsar el botón para detener el proceso de grabación.
8. Conmutador PHONO/LINE - Seleccione PHONO cuando conecte el aparato a la toma PHONO de un
equipo externo estéreo.
Seleccione LINE cuando conecte el aparato a las tomas CD/AUX de un equipo externo estéreo.
9. Adaptador de 45 rpm - Permite adaptar vinilos de 17 cm con agujeros centrales grandes para que se
acoplen correctamente en el eje central del giradiscos.
10. Eje central.
ITALIANO
11. Puerto USB - Inserte el dispositivo USB para efectuar la grabación
12. Conmutador de velocidad - Utilice este conmutador para seleccionar 33 rpm (botón hacia arriba) o 45
rpm (botón hacia abajo).
13. SIZE SELECT - Seleccione el diámetro del vinilo: 30 cm o 17 cm.
14. Brazo de lectura/Cabezal de la aguja - Este brazo esta fijado permanentemente al cabezal.
15. Soportes de las bisagras de la cubierta - Puntos de sujeción para la cubierta antipolvo desmontable.
32
Page 34

3 CONFIGURACIÓN Y OPERACIÓN
LINE
PHONO
Conmutador del
Equipo estéreo externo
Blanco
Rojo
AC
AC
Tomas de conexión
preamplificador
AUX PHONO
Instalación del plato giradiscos
c .giF b .giF a .giF
Cinta roja
Correa de transmisión
Polea del motor
1. Coloque con suavidad el plato en el eje central. Asegúrese de que quede completamente encajado.
2. Sujete ambos extremos de la cinta roja y tire de la correa para colocarla en torno a la polea del
motor (Fig. a).
3. Cuando la correa esté encajada en la ranura de la polea, retire con cuidado la cinta. Asegúrese de
que la correa no queda doblada.
4. Coloque la alfombrilla en la parte superior del plato (Fig. b).
5. Si lo desea, puede retirar la cubierta antipolvo. Sujétela por ambos lados y tire de ella hacia arriba,
con suavidad y sin ladearla, para separarla del tocadiscos (Fig. c).
6. Si desea volver a colocar la cubierta antipolvo, introduzca las bisagras en los dos soportes situados
en la parte trasera del aparato.
Configuración del preamplificador (PHONO/LINE)
ENGLISH
DEUTSCH FRANÇAIS
DUTCH
El conmutador PHONO/LINE está situado en la parte trasera del aparato (Fig. d).
• Si su equipo estéreo dispone de una toma PHONO, coloque el conmutador del preamplificador en la
posición «PHONO».
• Si su equipo estéreo no dispone de una toma PHONO, coloque el conmutador en la posición «LINE»
y conecte los cables del tocadiscos a la toma AUX o a otra toma de alto nivel del equipo estéreo.
Conecte el cable del conector blanco a la toma L y el rojo a la R.
Conecte el cable de alimentación a una toma de corriente.
Fig. d
ESPAÑOL
ITALIANO
33
Page 35

3 OPERACIÓN
ENGLISH
Fig.1
Cabezal de la aguja
Aguja
Protector de la aguja
Fig.2
Fig.5Fig.4
Adaptador de 45 rpm
Fig.6 Fig.7
Fig.3
30
7
Modo automático
• Retire el protector de la aguja del cabezal (Fig.1)
• Coloque la alfombrilla sobre el plato. Si fuera necesario, use el adaptador de 45 rpm (Fig.2)
• Seleccione el diámetro del vinilo: 30 cm o 17 cm (Fig.3)
1
• Seleccione la velocidad: 33
/3 o 45 rpm (Fig.4)
DEUTSCH FRANÇAIS
DUTCH
ESPAÑOL
ITALIANO
•
Inicio: Pulse el botón PLAY (fig.5). El plato comenzará a girar y el brazo se desplazará
automáticamente al surco inicial. Cuando finalice la reproducción del vinilo, el brazo volverá
automáticamente a su soporte y el plato se detendrá
•
Parada: Para detener la reproducción de un vinilo antes de que termine, pulse el botón STOP (fig.
6). El brazo se elevará y volverá a su soporte y el plato se detendrá
•
Pausa: Para interrumpir la reproducción momentáneamente, pulse el botón CUE UP. Pulse el botón
CUE DOWN para reanudar la reproducción (Fig. 7)
•
Grabación:
REC. SELECT: AUX (a partir de un equipo externo)
Grabación en un dispositivo USB
a. Introduzca un dispositivo USB en el puerto USB
b. Conecte cualquier fuente de audio
c. Ajuste el nivel de la fuente de audio mediante el botón REC.VOL
d. Pulse el botón RECORD y espere hasta que el piloto parpadee (esta operación puede durar
varios segundos dependiendo del contenido del dispositivo USB)
e. Para detener el proceso de grabación, vuelva a pulsar el botón RECORD
f. El fragmento se habrá guardado en su dispositivo USB como un archivo MP3 de 192kbps; los
archivos se enumerarán en el orden de grabación y se situarán en una carpeta llamada
«audio»
34
Page 36

3 OPERACIÓN
Modo automático
•
Grabación:
Modo manual
REC. SELECT: T.T. (a partir del tocadiscos)
Grabación en un dispositivo USB
a. Introduzca un dispositivo USB en el puerto USB
b. Coloque la aguja en el punto que desea reproducir
c. Pulse el botón «CUE UP» para interrumpir momentáneamente (pausa) la reproducción
d. Pulse el botón RECORD y espere hasta que el piloto parpadee (esta operación puede durar
varios segundos dependiendo del contenido del dispositivo USB)
e. Pulse el botón «CUE DOWN» para reanudar la reproducción
f. Para detener el proceso de grabación, vuelva a pulsar el botón RECORD
g. El fragmento se habrá guardado en su dispositivo USB como un archivo MP3 de 192kbps; los
archivos se enumerarán en el orden de grabación y se situarán en una carpeta llamada
«audio»
ENGLISH
DEUTSCH FRANÇAIS
• Reti
re el protector de la aguja del cabezal (Fig.1)
• Coloque la alfombrilla sobre el plato. Si fuera necesario, use el adaptador de 45 rpm (Fig.2)
• Seleccione el diámetro del vinilo: 30 cm o 17 cm (Fig.3)
Seleccione la velocidad: 331/3 o 45 rpm (Fig.4)
•
• Pulse el botón CUE UP para elevar el brazo de lectura (Fig.7)
•
Mueva el brazo con suavidad hasta que la aguja esté encima del punto del disco donde desea iniciar
la reproducción
• Vuelva a pulsar el botón CUE DOWN para bajar el brazo e iniciar así la reproducción (Fig.7)
Sustitución de la aguja
Sujete el cabezal del brazo, baje la punta del cabezal y retírela.
Al introducir una nueva aguja, asegúrese de que el saliente de la parte posterior del cabezal está
totalmente acoplado al cartucho y de que el cabezal encaja perfectamente (oirá un chasquido) sin que
quede ningún espacio entre el borde superior y la parte frontal del cabezal negro de plástico del brazo.
Eerst in
patroonhouder steken
Geen opening hier
DUTCH
ESPAÑOL
ITALIANO
35
Page 37

5 ESPECIFICACIONES TÉCNICAS
4 GUÍA DE RESOLUCIÓN DE PROBLEMAS
El aparato no funciona
egúrese de que el aparato está conectado a una toma de corriente
1. As
y de que dicha toma suministra corriente.
2. A) Retire la alfombrilla del plato (Fig. 1).
Mire a través de los orificios y compruebe que la correa está encajada
en la ranura de la polea del motor (Fig. 2).
B) Si la correa no está colocada correctamente, levante y retire el
plato.
Para ello, con un pulgar en cada uno de los orificios del plato,
presione con los otros dedos la superficie del plato y tire del plato
hacia arriba (fig. 3)
Asegúrese de NO hacer presión sobre el brazo de lectura.
ENGLISH
DEUTSCH FRANÇAIS
DUTCH
ESPAÑOL
ITALIANO
C) Dé la vuelta al plato y coloque la correa a lo largo de
exterior del borde del plato y asegúrese de que no está tensa ni
doblada en todo su recorrido (Fig. 4).
D) Vuelva a colocar el plato en el eje central, de forma que quede bien
encajado, y haga coincidir los orificios de modo que pueda ver la polea
del motor.
E) A través de uno de los orificios, sujete el extremo de la correa con
la cinta roja y con suavidad pase la correa por la polea del motor (Fig. 5).
Asegúrese de que no quede doblada.
El aparato funciona pero no se escucha ningún sonido
1. No se ha retirado el protector de la aguja.
2. El botón para elevar el brazo (CUE UP) está pulsado.
3. No se ha configurado correctamente el amplificador.
4. Compruebe que la aguja se ha colocado correctamente en
el cartucho.
El aparato funciona pero no se escucha ningún sonido o
el sonido se oye muy bajo
1. Si el aparato está conectado a una toma AUX, compruebe
que el selector del preamplificador está en posición PHONO.
ganancia de entrada del altavoz o de un dispositivo similar
2. La
está demasiado baja
3. La aguja no se ha instalado correctamente en el cartucho.
El sonido está distorsionado
El aparato está conectado a una toma PHONO de un amplificador.
Si el conmutador del preamplificador está en posición LINE, la toma
PHONO se sobrecargará.
transmisión por correa
la pared
Alimentación AC230V, 50Hz
Consumo 10W
Dimensiones 420 x 363.4 x 94mm
Impedancia de carga 47Kohmios
Voltaje de salida A. Conexión con ecualizador
90-216mV a 1KHz 5cm/seg (HP-4005)
B. Conexión sin ecualizador
1.5-3.6mV a 1KHz 5cm/seg (HP-4005)
Peso 3.6kg
polea del motor
36
Page 38

1 AVVERTENZE DI SICUREZZA
1. Leggete attentamente le istruzioni.
Conservate le istruzioni.
2.
Rispettate tutte le avvertenze.
3.
Seguite tutte le istruzioni.
4.
Non utilizzate l’apparecchio in presenza d’acqua.
5.
Pulite sempre l’apparecchio con un panno asciutto.
6.
Non ostruite le bocchette di ventilazione. Installate l’apparecchio seguendo le istruzioni del produttore.
7.
Non collocate l’apparecchio vicino a fonti di calore quali radiatori, bocchette d’aria calda, amplificatori o qualsiasi altro
8.
apparecchio che emette calore
Non cercate di disabilitare la funzione di sicurezza della spina polarizzata. Il connettore più lungo serve per garantire la
9.
.
vostra sicurezza. Se la spina in questione non corrisponde alla presa a muro, rivolgetevi ad un elettricista per sostituire
la presa inadeguata.
Assicuratevi che il cavo di alimentazione non venga calpestato o schiacciato. Prestate particolare attenzione alla spina,
10.
alla presa di rete e al punto d’uscita del cavo di alimentazione dall'apparecchio
Utilizzate esclusivamente gli attacchi/accessori raccomandati dal produttore.
11.
È import ante collocar e l'app arecchio su un sup porto st abile. Se utiliz zate un carrello come supporto,
12.
muovetelo con prudenza per evitare che il lettore cada e possa ferire qualcuno.
.
13. Scollegate l’apparecchio dalla presa di corrente in caso di temporale o di un prolungato periodo di non utilizzo.
Affidate ogni eventuale riparazione ad un tecnico qualificato. Un intervento di manutenzione si rivela necessario quando
14.
l’apparecchio è in qualche modo danneggiato: presa o cavo di alimentazione danneggiati, presenza di liquidi o oggetti
nell'apparecchio, esposizione alla pioggia o all'umidità, malfunzionamento, caduta
.
ENGLISH
ATTENZIONE
Per evitare ogni rischio d’incendio o scossa elettrica, non esponete l'apparecchio alla pioggia o all'umidità. Non
collocate nessun recipiente contenente liquidi, ad esempio un vaso, nelle vicinanze dell’apparecchio.
ATTENZIONE: Per evitare il rischio di scossa elettrica, non smontate
ATTENZIONE
NON APRIRE
RISCHIO DI SCOSSA ELETTRICA
Il fulmine stilizzato con punta di freccia inscritto nel triangolo equilatero indica all'utente la presenza
all'interno dell'apparecchio di una tensione pericolosa non isolata, di valore sufficiente a costituire un
rischio di scossa elettrica per le persone.
Il punto esclamativo inscritto nel triangolo equilatero indica all’utilizzatore la presenza, nella
documentazione che accompagna l’apparecchio, di istruzioni importanti per il funzionamento, la
manutenzione e la riparazione) dell’apparecchio stesso.
l’apparecchio. All'interno non ci sono parti su cui l'utente può effettuare
operazioni di manutenzione. Affidate ogni eventuale riparazione ad un
tecnico qualificato.
ATTENZIONE
Per prevenire ogni rischio di scossa elettrica, accertatevi che i terminali della spina di alimentazione siano
completamente inseriti, in modo che non siano esposti.
DEUTSCH FRANÇAIS
DUTCH
ESPAÑOL
ITALIANO
37
Page 39

2 NOME DEI COMPONENTI E LORO FUNZIONE
Caratteristiche
•
Preamplificatore stereo integrato con presa linea/phono. Consente l’impiego del giradischi con un
impianto stereo dotato di prese phono magnetiche o prese linea ("AUX"). È inoltre possibile
ENGLISH
DEUTSCH FRANÇAIS
DUTCH
ESPAÑOL
ITALIANO
collegare il giradischi ad altoparlanti più potenti
•
Funzionamento completamente automatico
•
2 velocità: 331/3 e 45 giri
•
Piatto giradischi professionale
•
Puntina sostituibile in diamante
•
Meccanismo sollevatore/di entrata ammortizzato con tasto di controllo sul pannello frontale
•
Coperchio antipolvere amovibile
Accessori:
Assicuratevi che i pezzi seguenti siano inclusi nella confezione
•
Manuale di istruzioni
•
Adattatore 45 giri
•
Piatto
10
11
12
9
•
Tappetino
•
Coperchio antipolvere
8
15
14
13
38
Page 40

2 NOME DEI COMPONENTI E LORO FUNZIONE
AUX LEVEL
CLIP
SIGNAL
5
4
REC. SELECT
AUX
6
RECORDAUX IN
T.T
7
PLAY
1 2 3
1. Tasto PLAY - Avvia il motore/piatto e il funzionamento automatico.
2. Tasto STOP - Arresta il motore/piatto e riporta il braccio in posizione di riposo.
UP
CUESTOP
DOWN
3. Tasto CUE UP/DOWN - Solleva e abbassa il braccio in modalità manuale.
4. Presa “AUX IN” - Permette la connessione di mangiacassette, bobine aperte o altre sorgenti audio
per la registrazione.
5. Livello AUX - Regola il livello della sorgente audio. Quando viene superato il livello per la
registrazione, la spia LED si illumina di rosso.
6. Selettore “Rec. Select" - Permette di selezionare la sorgente di registrazione: piatto del giradischi o
ingresso ausiliario ("AUX").
7. Tasto RECORD - Premete il tasto “RECORD” e attendente che la spia LED lampeggi (ciò può
richiedere alcuni secondi in funzione del contenuto del dispositivo USB). Premete nuovamente il tasto
RECORD per interrompere la registrazione.
8. Selettore Phone/Line - Permette di selezionare la presa adeguata. Selezionate "PHONO" quando
collegate la presa phono del vostro impianto stereo.
Selezionate “LINE” quando si tratta della presa CD/AUX del vostro impianto stereo.
9. Adattatore 45 giri - Adattatore per il foro largo dei dischi 45 giri da inserire sul perno centrale del
ENGLISH
DEUTSCH FRANÇAIS
DUTCH
ESPAÑOL
piatto.
10. Perno centrale
11. Porta USB - Inserite una periferica USB per la registrazione.
12. Tasto 33 /45 - Selezione della velocità del piatto: 33 giri o 45 giri.
13. S Selettore SIZE SELECT - Consente di selezionare le dimensioni del disco: 30 o 17 cm.
14. Insieme braccio/testina - Il braccio deve sempre essere attaccato alla testina.
15. Attacchi del coperchio antipolvere - Punti di attacco per il coperchio antipolvere.
39
ITALIANO
Page 41

LINE
PHONO
SELETTORE PREAMPLIFICATORE
IMPIANTO STEREO
BIANCO
ROSSO
AC
AC
PRESE di INGRESSO
AUX PHONO
3 IMPOSTAZIONI E FUNZIONAMENTO
Montare il giradischi
Fig. a Fig. b Fig. c
ENGLISH
DEUTSCH FRANÇAIS
DUTCH
Nastro rosso
Puleggia del motore
Cinghia di trazione
1. Posizionate delicatamente il piatto del giradischi intorno al perno centr
ale. Il piatto deve essere
sistemato correttamente sull’asse.
2. Servendovi del nastro rosso attaccato alla cinghia di trazione, fate passare la cinghia sopra la
puleggia (Fig. a).
3. Rimuovete il nastro una volta che la cinghia è correttamente posizionata nel solco della puleggia del
motore. Fate in modo che la cinghia non si attorcigli
4. Sistemate il tappetino sul piatto del giradischi (Fig. b).
5. È possibile rimuovere il coperchio antipolvere. A questo scopo, prendete il coperchio da entrambi i
lati e tirate delicatamente e in modo uniforme per staccare il coperchio dal giradischi (Fig. c).
6. Per riposizionare il coperchio antipolvere, inserite con cura i cardini del coperchio nei rispettivi
attacchi situati sul retro della base del giradischi.
Impostare il preamplificatore (selettore Phono/Line)
ENGLISH
DEUTSCH FRANÇAIS
DUTCH
c Il selettore Phono/Line si trova sul retro del giradischi. (Fig. d)
• Se l’impianto stereo in uso possiede una presa PHONO, spostate il selettore in posizione "PHONO".
ESPAÑOL
• Se l’impianto stereo non è dotato di una presa PHONO, impostate il selettore in posizione “LINE” e
collegate i cavi del giradischi alla presa AUX o ad un’altra presa high-level.
d Collegate lo spinotto bianco alla presa aux di sinistra (L) e lo spinotto rosso alla presa di destra (R).
ITALIANO
e Collegate il cavo di alimentazione ad una presa elettrica a muro AC.
Fig. d
ESPAÑOL
ITALIANO
40
Page 42

3 IMPOSTAZIONI E FUNZIONAMENTO
Fig.1
BLOCCO TESTINA
PUNTINA
PROTEZIONE DELLA PUNTINA
Fig.5Fig.4
Funzionamento automatico
Rimuovete la protezione della puntina dal blocco testina (Fig.1)
•
Posizionate un tappetino sulla piastra del giradischi. Se necessario, utilizzate l'adattatore 45 giri
•
(Fig.2)
Fig.2
ADATTATORE 45 GIRI
Fig.3
30
7
Fig.6 Fig.7
ENGLISH
• Selezionate la dimensione del disco (30 o 17 cm) usando l’apposito selettore (Fig.3)
• Selezionate la velocità del giradischi: 331/3 o 45 giri (Fig.4)
•
Avvio: Premete il tasto PLAY (Fig. 5). La riproduzione del giradischi si avvia e il braccio si sposta
automaticamente verso il primo solco. Alla fine della riproduzione, il braccio torna automaticamente
in posizione di riposo e il giradischi si spegne
•
Stop: Per arrestare il disco prima della sua fine, premete il tasto STOP (Fig. 6). Il braccio si alza e
torna in posizione di riposo. Il giradischi si spegne
•
Tasto Cue up/down: Per mettere in pausa il disco prima della fine della riproduzione, premete il
tasto cue. Premete il tasto cue di nuovo per continuare la riproduzione (Fig. 7)
•
Registrazione:
Selettore “Rec. select” in posizione AUX
Registrazione verso una periferica USB
a. Inserite una periferica di memoria flash (chiave USB, lettore MP3) nella porta USB
b. Collegate una sorgente audio
DEUTSCH FRANÇAIS
DUTCH
ESPAÑOL
ITALIANO
c. Regolate il livello Aux
d. Premete il tasto “RECORD” e attendete fino a che la spia LED non lampeggia. Ciò può
richiedere alcuni secondi in funzione del contenuto del dispositivo USB
e. Premete nuovamente il tasto “RECORD” per interrompere la registrazione
f. Il brano è memorizzato sul dispositivo USB come file MP3 (192kbps). I brani saranno numerati
in sequenza e contenuti in una cartella chiamata "audio"
41
Page 43

3 IMPOSTAZIONI E FUNZIONAMENTO
Funzionamento automatico
•
Registrazione:
Selettore “Rec. select” in posizione TT
Registrazione verso una periferica USB
a. Inserite una periferica di memoria flash (chiave USB, lettore MP3) nella porta USB
b. Posizionate la testina in corrispondenza della traccia che desiderate registrare
c. Premete il tasto “CUE UP" per mettere in pausa
d. Premete il tasto “RECORD” e attendete fino a che la spia LED non lampeggia. Ciò può
ENGLISH
richiedere alcuni secondi in funzione del contenuto del dispositivo USB
e. Premete il tasto “CUE DOWN" per riprendere la riproduzione
f. Premete nuovamente il tasto “RECORD” per interrompere la registrazione
g. Il brano è memorizzato sul dispositivo USB come file MP3 (192kbps). I brani saranno numerati
DEUTSCH FRANÇAIS
DUTCH
ESPAÑOL
ITALIANO
in sequenza e contenuti in una cartella chiamata "audio"
Funzionamento manuale
• Rimuovete la protezione della puntina dal blocco testina (Fig.1)
• Posizionate un tappetino sulla piastra del giradischi. Se necessario, utilizzate l'adattatore 45 giri
(Fig.2)
• Selezionate la dimensione (30 o 17 cm) usando l’apposito selettore (Fig.3)
1
• Selezionate la velocità del giradischi: 33
/3 o 45 giri (Fig.4)
• Premete il tasto CUE per alzare il braccio (Fig.7)
• Spostate il braccio in modo che la testina si trovi sopra il punto del disco da cui volete far partire la
riproduzione
• Premete nuovamente il tasto cue per abbassare il braccio e avviare la riproduzione (Fig.7)
Sostituire la puntina
Tenendo la testina del braccio, prendete la parte anteriore del blocco testina e tirate delicatamente verso
l'esterno e verso il basso per estrarla.
Accertatevi innanzitutto che la parte sporgente del blocco sia correttamente inserita e che il blocco
della puntina si incastri producendo un ‘clic’. Non deve esserci spazio tra il blocco della testina e la parte
in plastica nera del braccio.
Inserire prima
nel corpo
Non deve esserci
spazio
42
Page 44

4 RICERCA E RIPARAZIONE GUASTI
Il giradischi non funziona
1. Accertatevi che il cavo di alimentazione AC sia corretta
inserito in una presa AC funzionante.
2. A) Rimuovete il tappetino dal giradischi (Fig. 1)
Attraverso il foro presente sul piatto del giradischi, assicuratevi
che la cinghia di trazione si trovi intorno alla puleggia del motore
(Fig. 2)
B) Se così non fosse, sollevate il piatto per rimuoverlo.
Posizionate i pollici rispettivamente sulle aperture di destra e di
sinistra del piatto del giradischi e, usando le dita per spingere la
superficie della base del giradischi, sollevate il piatto (Fig. 3).
Non esercitate nessuna pressione sul braccio
C) Quando il piatto è sollevato, posizionate la cinghia di
lungo la parete esterna del bordo del piatto del giradischi, accertandovi
che la cinghia sia morbida e piatta in ogni punto (Fig. 4).
D) Riposizionate correttamente il piatto sul perno centrale. Fate
coincidere la posizione di almeno una delle aperture con la puleggia
del motore.
E) Tenete entrambi gli estremi del nastro rosso attaccato alla
cinghia del piatto e fate passare la cinghia sopra la puleggia (Fig. 5)
Accertatevi che non si attorcigli
mente
trazione
Il giradischi funziona ma non emette alcun suono
1. La protezione della puntina non è stata rimossa.
2. Il tasto che permette di alzare il braccio è giù.
3. Le impostazioni dell’amplificatore non sono corrette.
4. Controllate che la puntina sia correttamente posizionata.
Il giradischi funziona ma non emette alcun suono
oppure il suono non è sufficientemente forte.
1. Se il giradischi è collegato ad un ingresso AUX, anche il selettore
del preamplificatore deve essere impostato in posizione
2. È possibile che il guadagno di ingresso dell'amplificatore (o di un
apparecchio simile) sia troppo basso.
3. Il blocco testina non è correttamente inserito.
Cinghia di
trazione
“AUX".
Il suono è molto distorto
Il giradischi è collegato ad un amplificatore via l’ingresso PHONO.
Se il preamplificatore è impostato in posizione “LINE”, l’ingresso
PHONO è sovraccarico.
5 SPECIFICHE TECNICHE
Alimentazione AC230V, 50Hz
Consumo 10W
Dimensioni 420 x 363.4 x 94mm
Impedenza di carico 47K ohm
Potenza in uscita A. Connessione con equalizzatore
90-216mV a 1KHz 5cm/sec (HP-4005)
B. Connessione con equalizzatore
1.5-3.6mV at 1KHz 5cm/sec (HP-4005)
Peso 3.6kg
ENGLISH
DEUTSCH FRANÇAIS
DUTCH
ESPAÑOL
Puleggia del motore
ITALIANO
43
Page 45

 Loading...