

Page 1

UMTS/3G WLAN-Router mit
SIM-Karten-Slot
Seite 2 - 33
UMTS/3G WLAN-Router with
SIM-card slot
Page 34 - 65
Routeur Wi-Fi UMTS/3G avec
slot pour cartes SIM
Page 66 - 97
UMTS/3G WLAN-router met
SIM-kaartenslot
Pagina 98 - 132
Version 01/13
BEDIENUNGSANLEITUNG
NOTICE D‘EMPLOI
OPERATING INSTRUCTIONS
GEBRUIKSAANWIJZING
Best.-Nr. / Item No. / N° de commande / Bestelnr. 98 91 96
Page 2

2
Inhaltsverzeichnis
1. Einführung ........................................................................................................................... 3
2. Bestimmungsgemäße Verwendung .................................................................................... 4
3. Lieferumfang ....................................................................................................................... 4
4. Symbol-Erklärung ................................................................................................................4
5. Sicherheitshinweise ............................................................................................................. 5
6. Produktübersicht ................................................................................................................. 7
a) LEDs .............................................................................................................................. 7
b) Anschlüsse und Bedienelemente ................................................................................... 8
c) Betriebsarten .................................................................................................................. 8
d) Allgemeine Informationen .............................................................................................. 9
7. Inbetriebnahme ................................................................................................................. 10
8. Zugriff auf das Webinterface ..............................................................................................11
9. Konfi guration der Betriebsart „Gateway“ ........................................................................... 15
10. Konfi guration der Betriebsart „Bridge“ ............................................................................... 19
11. Konfi guration der Betriebsart „Wireless ISP“ .....................................................................22
12. Erweiterte Konfi guration ....................................................................................................26
a) Ändern der IP-Adresse................................................................................................. 26
b) Ändern des Administrator-Kennworts ........................................................................... 27
c) Ändern der Zeitzone..................................................................................................... 28
d) Speichern der Einstellungen ........................................................................................ 28
e) Benutzung von WPS .................................................................................................... 29
13. Zurücksetzen auf die Werkseinstellung ............................................................................. 29
a) Mit Hilfe der Taste „Reset“ am Gerät ............................................................................ 29
b) Im Webinterface ........................................................................................................... 30
14. Wartung und Reinigung ..................................................................................................... 31
15. Handhabung ...................................................................................................................... 31
16. Entsorgung ........................................................................................................................ 32
17. Technische Daten .............................................................................................................. 33
a) UMTS WLAN-Router .................................................................................................... 33
b) Steckernetzteil.............................................................................................................. 33
18. Konformitätserklärung (DOC) ............................................................................................ 33
Page 3

3
1. Einführung
Sehr geehrte Kundin, sehr geehrter Kunde,
wir bedanken uns für den Kauf dieses Produkts.
Dieses Produkt entspricht den gesetzlichen, nationalen und europäischen Anforderungen. Um
diesen Zustand zu erhalten und einen gefahrlosen Betrieb sicherzustellen, müssen Sie als AnwenderIn diese Bedienungsanleitung beachten!
Lesen Sie sich vor Inbetriebnahme des Produkts die komplette Bedienungsan-
leitung durch, beachten Sie alle Bedienungs- und Sicherheitshinweise.
Alle enthaltenen Firmennamen und Produktbezeichnungen sind Warenzeichen der jeweiligen
Inhaber. Alle Rechte vorbehalten.
Bei technischen Fragen wenden Sie sich bitte an:
Deutschland:
Tel.-Nr.: 0180/5 31 21 11
Fax: 0180/5 31 21 10
E-Mail: Bitte verwenden Sie unser Formular im Internet
www.conrad.de, unter der Rubrik „Kontakt“.
Mo. - Fr. 8.00 bis 18.00 Uhr
Österreich: www.conrad.at
www.business.conrad.at
Schweiz: Tel.-Nr.: 0848/80 12 88
Fax-Nr.: 0848/80 12 89
E-mail: support@conrad.ch
Mo. - Fr. 8.00 bis 12.00 Uhr, 13.00 bis 17.00 Uhr
Page 4
4
2. Bestimmungsgemäße Verwendung
Der Router dient dazu, mehrere Computer an das Internet bzw. an ein vorhandenes Netzwerk
anzubinden. Der Zugang zum Internet kann dabei über ein externes DSL- bzw. Kabelmodem mit
LAN-Anschluss oder über das interne UMTS-Modem erfolgen.
Die Stromversorgung erfolgt ausschließlich über das beiliegende Steckernetzteil.
3. Lieferumfang
• UMTS WLAN-Router
• 2 Antennen
• Steckernetzteil
• Standfuß
• Netzwerkkabel
• Herstelleranleitung auf CD
• Bedienungsanleitung
4. Symbol-Erklärung
Das Symbol mit dem Blitz im Dreieck wird verwendet, wenn Gefahr für Ihre Ge-
sundheit besteht, z.B. durch elektrischen Schlag.
Das Symbol mit dem Ausrufezeichen im Dreieck weist auf wichtige Hinweise in
dieser Bedienungsanleitung hin, die unbedingt zu beachten sind.
Das „Hand“-Symbol ist zu fi nden, wenn Ihnen besondere Tipps und Hinweise zur
Bedienung gegeben werden.
Page 5

5
5. Sicherheitshinweise
Lesen Sie bitte vor Inbetriebnahme die komplette Anleitung durch, sie ent-
hält wichtige Hinweise zum korrekten Betrieb.
Bei Schäden, die durch Nichtbeachten dieser Bedienungsanleitung verur-
sacht werden, erlischt die Gewährleistung/Garantie! Für Folgeschäden über-
nehmen wir keine Haftung!
Bei Sach- oder Personenschäden, die durch unsachgemäße Handhabung
oder Nichtbeachten der Sicherheitshinweise verursacht werden, übernehmen
wir keine Haftung! In solchen Fällen erlischt die Gewährleistung/Garantie!
Sehr geehrte Kundin, sehr geehrter Kunde,
diese Sicherheitshinweise dienen nicht nur zum Schutz des Produkts, sondern auch
zu Ihrer eigenen Sicherheit und der anderer Personen. Lesen Sie sich deshalb die-
ses Kapitel sehr aufmerksam durch, bevor Sie das Produkt in Betrieb nehmen!
• Aus Sicherheits- und Zulassungsgründen (CE) ist das eigenmächtige Umbauen
und/oder Verändern des Produkts nicht gestattet. Öffnen/Zerlegen Sie es nicht!
Es sind keinerlei von Ihnen einzustellende oder zu wartende Teile im Inneren
enthalten.
Wartungs- oder Reparaturarbeiten dürfen nur von einem Fachmann/Fachwerk-
statt durchgeführt werden.
• Das Produkt ist nur für den Betrieb in trockenen, geschlossenen Innenräumen
geeignet. Das gesamte Produkt darf nicht feucht oder nass werden, fassen Sie
es niemals mit nassen Händen an!
Es besteht Lebensgefahr durch einen elektrischen Schlag!
• Der Aufbau des Steckernetzteils entspricht der Schutzklasse II. Als Spannungs-
quelle für das Steckernetzteil darf nur eine ordnungsgemäße Netzsteckdose
des öffentlichen Versorgungsnetzes verwendet werden.
• Die Netzsteckdose muss sich in der Nähe des Geräts befi nden und leicht zu-
gänglich sein.
• Achten Sie darauf, dass die Isolierung des gesamten Produkts weder beschä-
digt noch zerstört wird.
• Überprüfen Sie vor jedem Gebrauch das Produkt auf Beschädigungen!
• Falls Sie Beschädigungen feststellen, so darf das Produkt NICHT an die Netz-
spannung angeschlossen werden! Es besteht Lebensgefahr!
Page 6

6
• Schützen Sie das Produkt vor direkter Sonneneinstrahlung, starker Hitze
(>60°C), Kälte (<0°C), Staub und Schmutz, Tropf- oder Spritzwasser, Vibrationen oder mechanischen Beanspruchungen.
• Wenn das Produkt von einem kalten in einen warmen Raum gebracht wird (z.B.
bei Transport), kann Kondenswasser entstehen. Dadurch könnte das Produkt
beschädigt werden. Außerdem besteht beim Steckernetzteil Lebensgefahr
durch einen elektrischen Schlag!
Lassen Sie deshalb das Produkt zuerst auf Zimmertemperatur kommen, bevor
Sie es verwenden bzw. an die Netzspannung anschließen. Dies kann u.U. mehrere Stunden dauern.
• Das Produkt ist kein Spielzeug. Geräte, die an Netzspannung betrieben werden,
gehören nicht in Kinderhände. Lassen Sie deshalb in Anwesenheit von Kindern
besondere Vorsicht walten.
• Lassen Sie das Verpackungsmaterial nicht achtlos liegen, dieses könnte für
Kinder zu einem gefährlichen Spielzeug werden.
• Betreiben Sie das Produkt nur in gemäßigtem, nicht in tropischem Klima.
• Stellen Sie keine Gefäße mit Flüssigkeiten, z.B. Eimer, Vasen oder Pfl anzen, in
die unmittelbare Nähe des Produkts. Flüssigkeiten könnten ins Gehäuseinnere
gelangen und dabei die elektrische Sicherheit beeinträchtigen. Außerdem besteht Brandgefahr, sowie Lebensgefahr durch einen elektrischen Schlag.
• Stellen Sie keine offenen Brandquellen, wie z.B. brennende Kerzen, auf dem
Gerät oder in dessen Nähe ab.
• Knicken Sie die Kabel nicht, stellen Sie keine Gegenstände darauf ab.
• Gehen Sie vorsichtig mit dem Produkt um, durch Stöße, Schläge oder dem Fall
aus bereits geringer Höhe wird es beschädigt.
• Sollte das Gerät Beschädigungen aufweisen, so verwenden Sie es nicht mehr.
Bringen Sie das Gerät in diesem Fall in eine Fachwerkstatt.
• In gewerblichen Einrichtungen sind die Unfallverhütungsvorschriften des Verbandes der gewerblichen Berufsgenossenschaft für elektrische Anlagen und
Betriebsmittel zu beachten.
• In Schulen, Ausbildungseinrichtungen, Hobby- und Selbsthilfewerkstätten ist
das Betreiben des Produkts durch geschultes Personal zu überwachen.
• Sollten sich Fragen ergeben, die nicht im Laufe der Bedienungsanleitung abgeklärt werden, so setzen Sie sich bitte mit unserer technischen Auskunft oder
einem anderen Fachmann in Verbindung.
Page 7
7
6. Produktübersicht
a) LEDs
POWER leuchtet, wenn der Router mit dem Stromnetz verbunden ist
WLAN leuchtet bei aktivem WLAN; blinkt schnell bei Datenübertragung
WAN
leuchtet bei einer aktiven Netzwerkverbindung; blinkt schnell bei Datenübertragung
LAN1/LAN2
leuchtet bei einer aktiven Netzwerkverbindung; blinkt schnell bei Datenübertragung
WPS blinkt bei aktiven WPS
3.5G blinkt bei aktiver UMTS-Verbindung
Page 8
8
b) Anschlüsse und Bedienelemente
SIM-Karten-Slot Karten-Slot für eine aktivierte SIM-Karte
2.4G ANT Anschluss für die WLAN-Antenne
RESET Taster um den Router auf die Werkseinstellung zurückzusetzen
WPS Taster um die WPS-Funktion zu aktivieren
LAN1/LAN2 RJ45 Netzwerk-Port; hier können Geräte, wie PCs oder Netzwerkfestplatten
angeschlossen werden
WAN RJ45 WAN-Port; es handelt sich dabei um den Internet-Port; hier wird z.B.
ein DSL- oder Kabelmodem angeschlossen
DC PWR Anschluss für das Steckernetzteil aus dem Lieferumfang
3.5G ANT Anschluss für die UMTS-Antenne
c) Betriebsarten
Das Gerät unterstützt die Betriebsarten „Gateway“, „Bridge“ und „Wireless ISP“.
Je nachdem, welche Betriebsart gewählt ist, sind verschiedene Möglichkeiten vorhanden, wie
der Zugang zum Internet möglich ist bzw. wie die Verbindung vom PC zum Router zustande
kommt.
• Betriebsart „Gateway“
In dieser Betriebsart arbeitet das Produkt als normaler WLAN-Router. Die Internetverbindung
wird entweder über das eingebaute UMTS-Modem, oder über ein externen DSL- bzw. Kabelmodem (mit LAN-Anschluss) hergestellt. Es wird dabei über ein Netzwerkkabel am WAN-Port
des Routers angeschlossen. Nach der Konfi guration können sich PCs über WLAN und den
beiden LAN-Ports mit dem Router verbinden. Die beiden LAN-Anschlüsse können hier mit
einem Netzwerk-Switch erweitert werden. Der DHCP-Server ist dauerhaft aktiv.
Page 9

9
• Betriebsart „Bridge“
Im „Bridge“ Modus fungiert das Gerät im Prinzip als Access-Point. Er dient dazu, ein vorhan-
denes Netzwerk mit einem WLAN-Access-Point zu erweitern. Es muss bereits ein Router (mit
oder ohne WLAN) vorhanden sein, der bereits mit dem Internet verbunden ist. Die beiden
LAN-Anschlüsse, der WAN-Port und das WLAN sind hier überbrückt. Die Verbindung zum
Router wird mit Hilfe eines Netzwerkkabels hergestellt. Es wird nach der Konfi guration, an
einem der drei Netzwerkanschlüsse des Geräts, angeschlossen. Die PCs können später im
Betrieb kabellos über WLAN oder über einen der zwei verbleibenden LAN-Ports mit dem
Access-Point verbunden werden. Ebenso ist es in diesem Modus möglich, einen oder zwei
LAN-Anschlüsse mit einem Netzwerk-Switch zu erweitern. Der DHCP-Server ist auf Automatik eingestellt. Sobald ein weiterer DHCP-Server im Netzwerk auftaucht, wird er automatisch
deaktiviert.
• Betriebsart „Wireless ISP“
Dieser Modus dient dazu, einen oder mehrere Computer an ein öffentliches oder privates
Drahtlosnetzwerk (z.B. Hotspot) anzubinden. Der Zugang zum Internet wird hier über WLAN
hergestellt. Trotzdem bietet das Gerät parallel dazu einen WLAN-Access-Point an. Die Computer können somit über die beiden LAN-Ports, den WAN-Port und über WLAN an den Router
angebunden werden. In dieser Betriebsart sind beide LAN-Ports und der WAN-Port ganz
normale Netzwerk-Anschlüsse. Es ist deshalb egal, an welchem Netzwerk-Port Sie nach der
Konfi guration Ihren Computer anschließen. Ebenfalls ist möglich, die Ports vom Router mit
einem Netzwerk-Switch zu erweitern. Der DHCP-Server ist dauerhaft aktiv.
d) Allgemeine Informationen
• Die voreingestellte IP-Adresse des Produkts lautet für alle Betriebsarten 192.168.1.254.
• Der Benutzername, sowie das Passwort für das Webinterface, lauten in den Standardeinstel-
lungen beide „admin“.
• Die Standard Betriebsart bei Auslieferung und nach einem Reset ist „Gateway“.
• Falls Sie das Produkt schon anderweitig konfi guriert haben, führen Sie am Besten zuerst
einen Reset durch, bevor Sie das Gerät neu konfi gurieren. Die Vorgehensweise ist im Kapitel
13 dieser Anleitung beschrieben.
• Auf der beliebenden CD ist das englischsprachige Handbuch des Herstellers enthalten. Falls
Sie Einstellungen ändern möchten, die in dieser Anleitung nicht beschrieben sind, beachten
Sie bitte dann das Handbuch des Herstellers.
Page 10

10
7. Inbetriebnahme
• Packen Sie als erstes das Gerät und das Zubehör aus.
• Als nächstes montieren Sie die beiden Antennen an den entsprechenden Antennen-Buchsen
am Gerät.
• Die Konfi guration sollte immer über die LAN-Schnittstelle des Routers erfolgen. Verbinden Sie
deshalb den Anschluss „LAN1“ am Router mit Hilfe eines 1:1-verbundenen Netwerkkabels mit
einem freien Netzwerk-Anschluss Ihres Computers. Wir empfehlen Ihnen das Kabel aus dem
Lieferumfang zu verwenden.
• Falls Sie das Gerät als Router für UMTS konfi gurieren wollen, setzen Sie Ihre aktivierte SIM-
Karte in den SIM-Karten-Slot ein.
Diesen fi nden Sie an der Rückseite des Geräts. Beachten Sie hierzu auch die Abbildung in
Kapitel 6 b).
Die Karte wird mit den Kontakten nach oben und mit der abgeschrägten Seite nach
rechts in den Slot eingeführt, bis sie einrastet.
Zum Entfernen drücken Sie einfach auf die Karte und ziehen diese anschließend
aus dem Slot heraus.
• Falls Sie das Gerät als Router für DSL oder Kabel konfi gurieren wollen, schließen Sie jetzt Ihr
DSL- bzw. Kabelmodem am Anschluss „WAN“ des Routers an. Verwenden Sie dazu ebenfalls
ein 1:1-verbundenes Netzwerkkabel oder am Besten das originale Kabel des Modems.
Schalten Sie das Modem ein.
• Für die Betriebsarten „Bridge“ und „Wireless ISP“ ist bis auf die nachfolgenden Punkte nichts
weiter nötig um die Konfi guration durchzuführen.
• Schließen Sie das Steckernetzteil an der dafür vorgesehenen Buchse „DC PWR“ an und
stecken Sie es in eine Netzsteckdose ein.
• Schalten Sie zum Schluss, falls noch nicht geschehen, Ihren PC ein und warten Sie bis das
Betriebssystem vollständig geladen ist.
Page 11
11
8. Zugriff auf das Webinterface
Falls noch nicht geschehen, bereiten Sie den Router und Ihren Computer vor, wie unter Kapitel
7 beschrieben.
Diese Konfi guration bezieht sich auf das Betriebssystem Windows® 7. Bei Windows® 8 läuft
diese allerdings nahezu identisch ab.
• Wenn Sie das Gerät das erste Mal anschließen, erscheint normalerweise eine Abfrage, um
den Ort des Netzwerks festzulegen. Wählen Sie hier „Heimnetzwerk“ oder „Arbeitsplatznetzwerk“ aus.
• Die Netzwerkschnittstelle muss dabei so konfi guriert sein, dass die IP-Adresse automatisch
bezogen wird.
• Um zu überprüfen, ob bei Ihrem PC die IP-Adresse automatisch zugewiesen wird, bzw. um
dies umzustellen, öffnen Sie als erstes das „Netzwerk und Freigebecenter“ von Windows® 7.
Page 12

12
• Sie erreichen dies, indem Sie mit der linken Maustaste
auf das Netzwerksymbol in der Taskleiste klicken.
• Anschließend klicken Sie auf „Netzwerk- und
Freigabecenter öffnen“.
• Klicken Sie nun hinter dem neuen Netzwerk auf den Punkt „LAN-Verbindung“.
• Klicken Sie hier, unten links, auf die
Schaltfl äche „Eigenschaften“.
Page 13
13
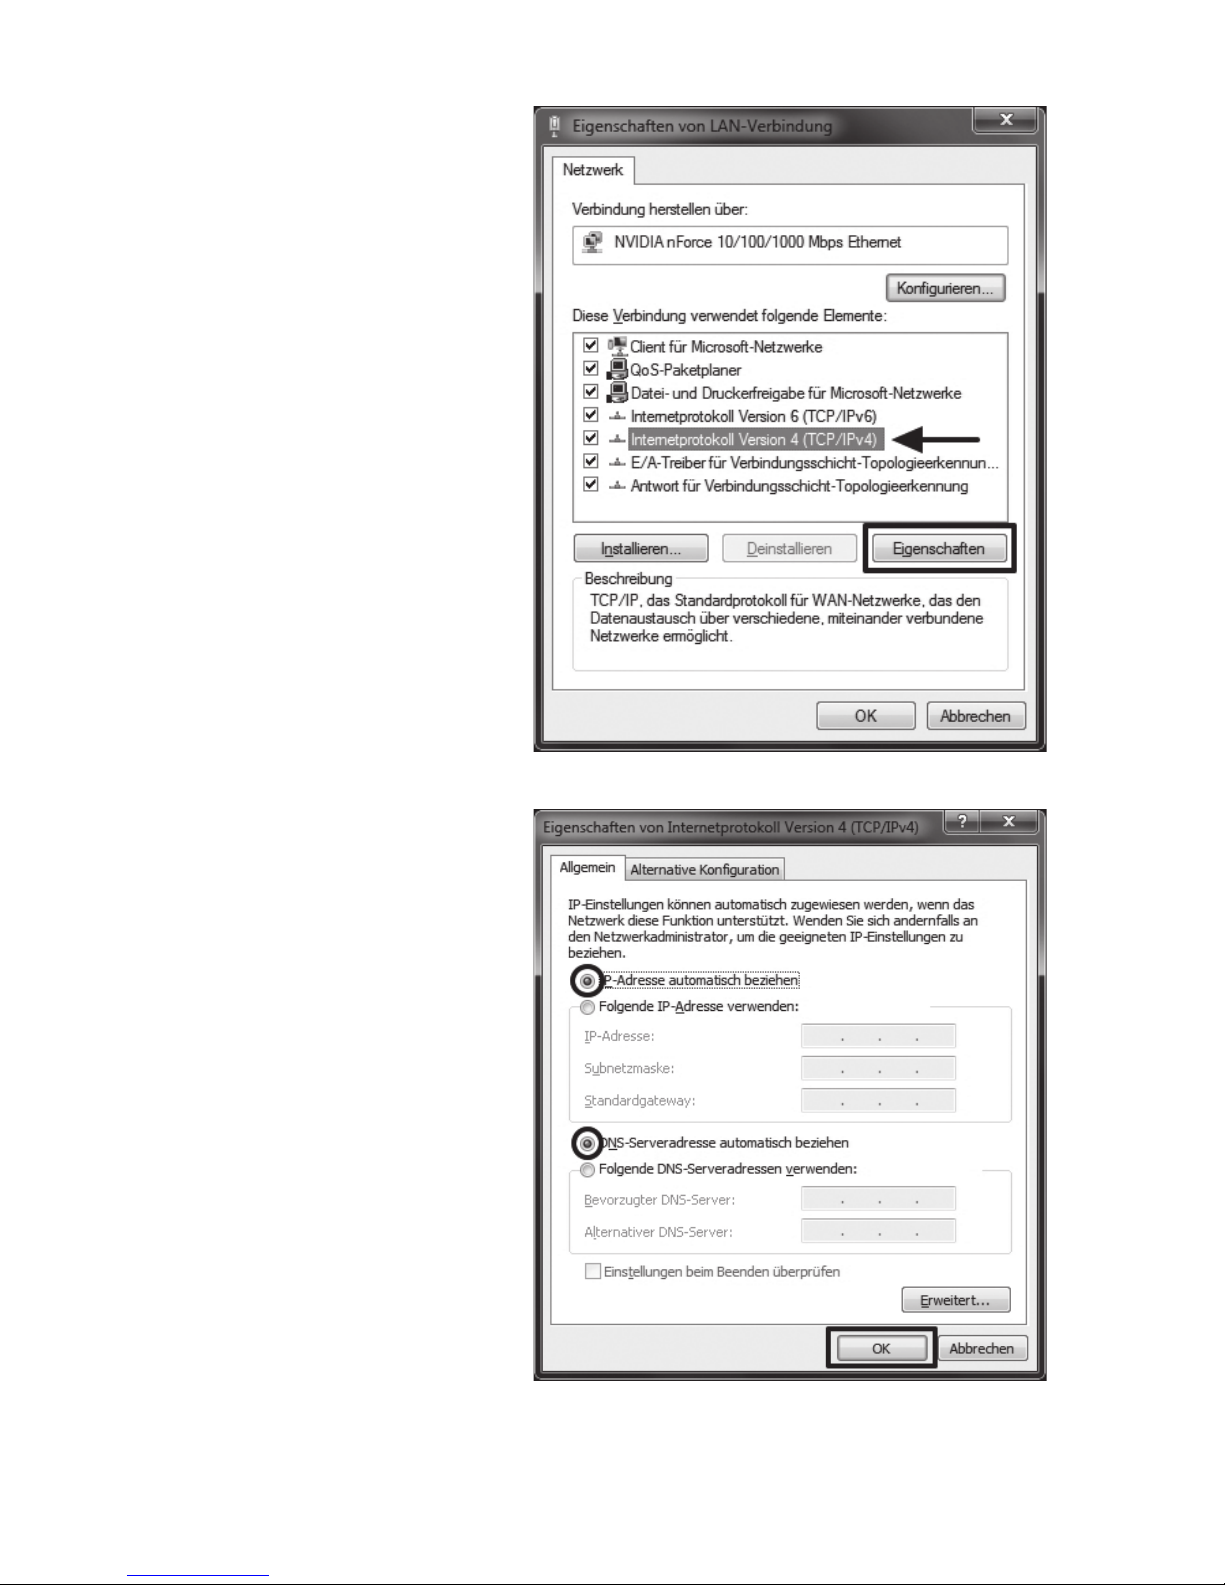
•
Es öffnet sich ein Konfi gurationsfenster.
Markieren Sie dort den Punkt „Inter-
netprotokoll Version 4 (TCP/IPv4)“
und klicken Sie wieder auf „Eigenschaften“.
•
Hier müssen beide Punkte auf „automatisch beziehen“ eingestellt sein.
Sollte dies nicht der Fall sein, no-
tieren Sie sich zuerst die aktuellen
Einstellungen, damit Sie diese nach
der Konfi guration wieder auf den
Ursprungszustand zurücksetzen
können.
Anschließend ändern Sie diese wie
im Bild angezeigt ab.
Bestätigen Sie mit „OK“ und schlie-
ßen Sie die beiden anderen Fenster
wieder.
Page 14

14
• Öffnen Sie nun Ihren Webbrowser und tippen Sie in
die Adresszeile die IP-Adresse http://192.168.1.254/
des Routers ein.
Bestätigen Sie mit Enter.
• Als Benutzername und
Passwort tippen Sie jeweils
„admin“ (ohne Anführungszeichen) in das entsprechende Feld ein.
Klicken Sie auf „OK“.
Page 15
15
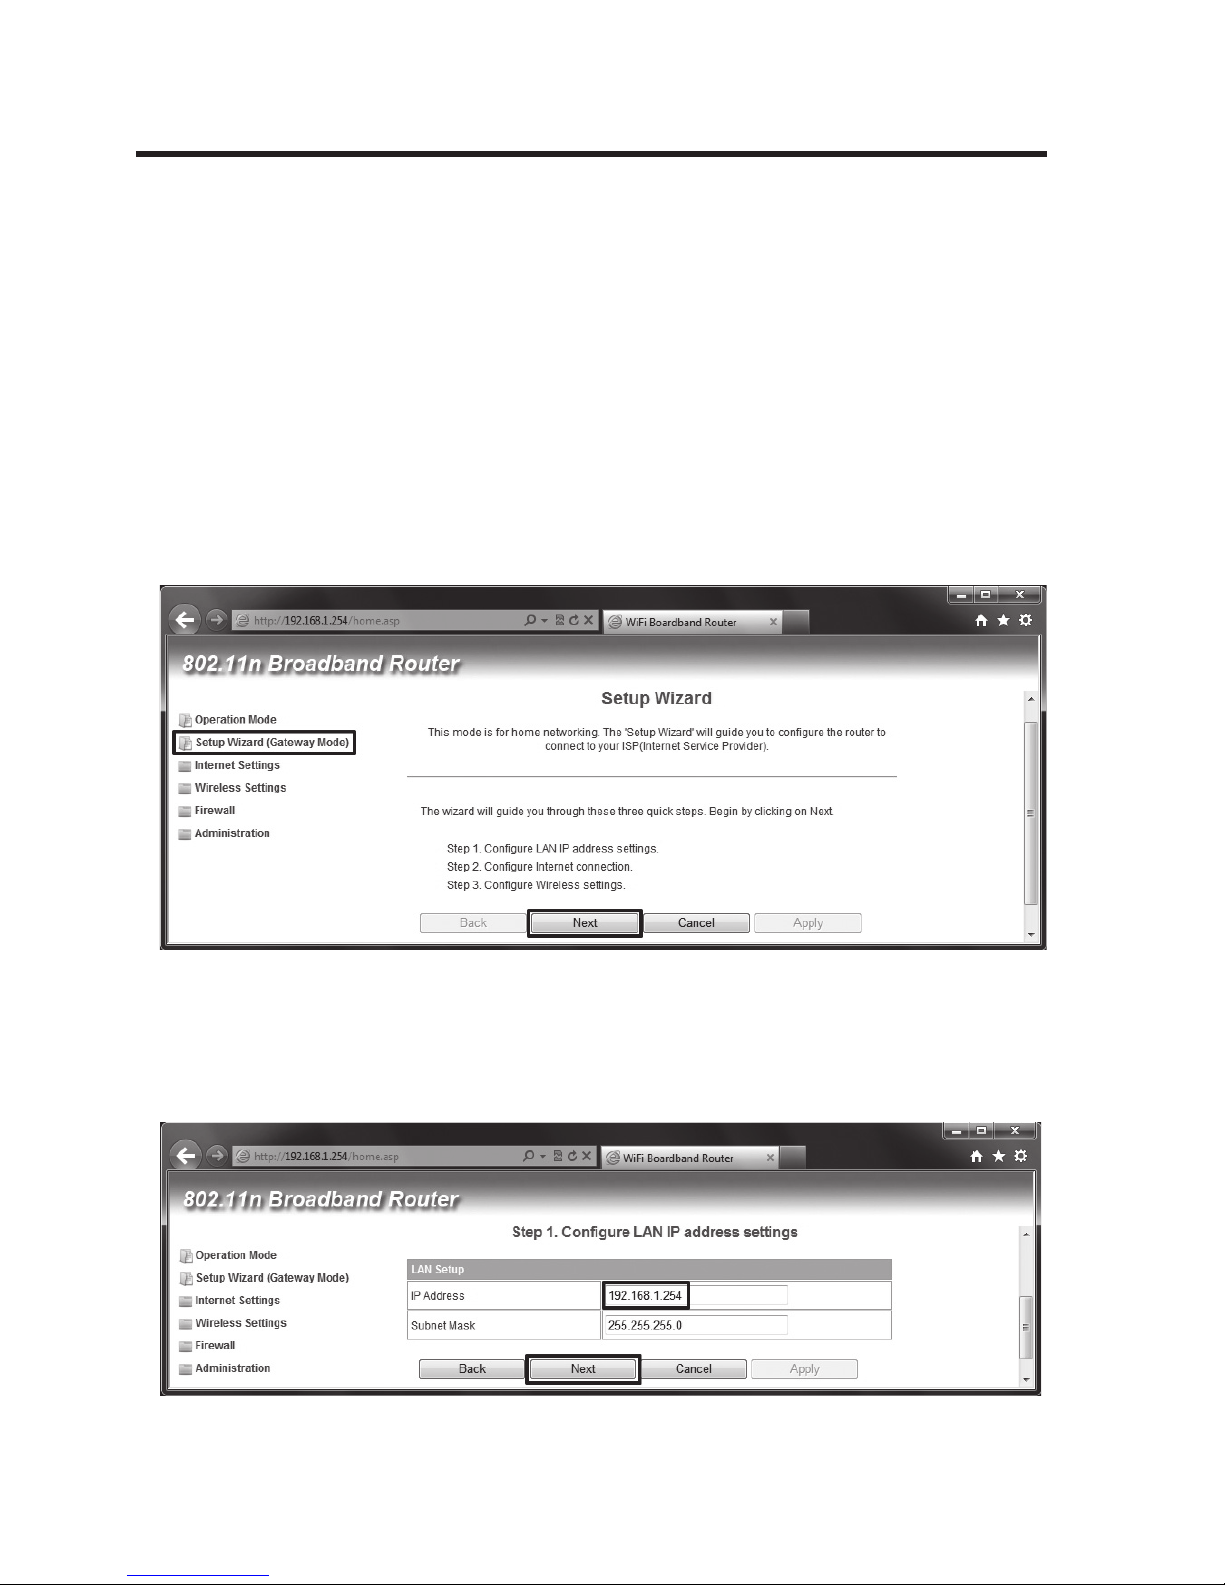
9. Konfi guration der Betriebsart „Gateway“
Dieses Kapitel beschreibt die Grundkonfi guration der Betriebsart „Gateway“. Dieser Modus
dient dazu, das Produkt als Router zu betreiben. Der Zugang zum Internet kommt entweder
über das eingebaute UMTS-Modem oder Ihrem externen DSL- bzw. Kabelmodem zu Stande.
Im Auslieferungszustand oder nach einem Reset ist das Gerät auf die Betriebsart „Gateway“
voreingestellt.
Haben Sie den Anschluss für den von Ihnen gewählten Internetzugang, wie unter Kapitel 7
beschrieben durchgeführt, können Sie sofort mit der Konfi guration beginnen.
• Klicken Sie, nachdem Sie sich am Webinterface angemeldet haben, als erstes auf den Menüpunkt „Setup Wizard (Gateway Mode)“.
Um das Konfi gurationsprogramm zu starten, klicken Sie auf „Next“.
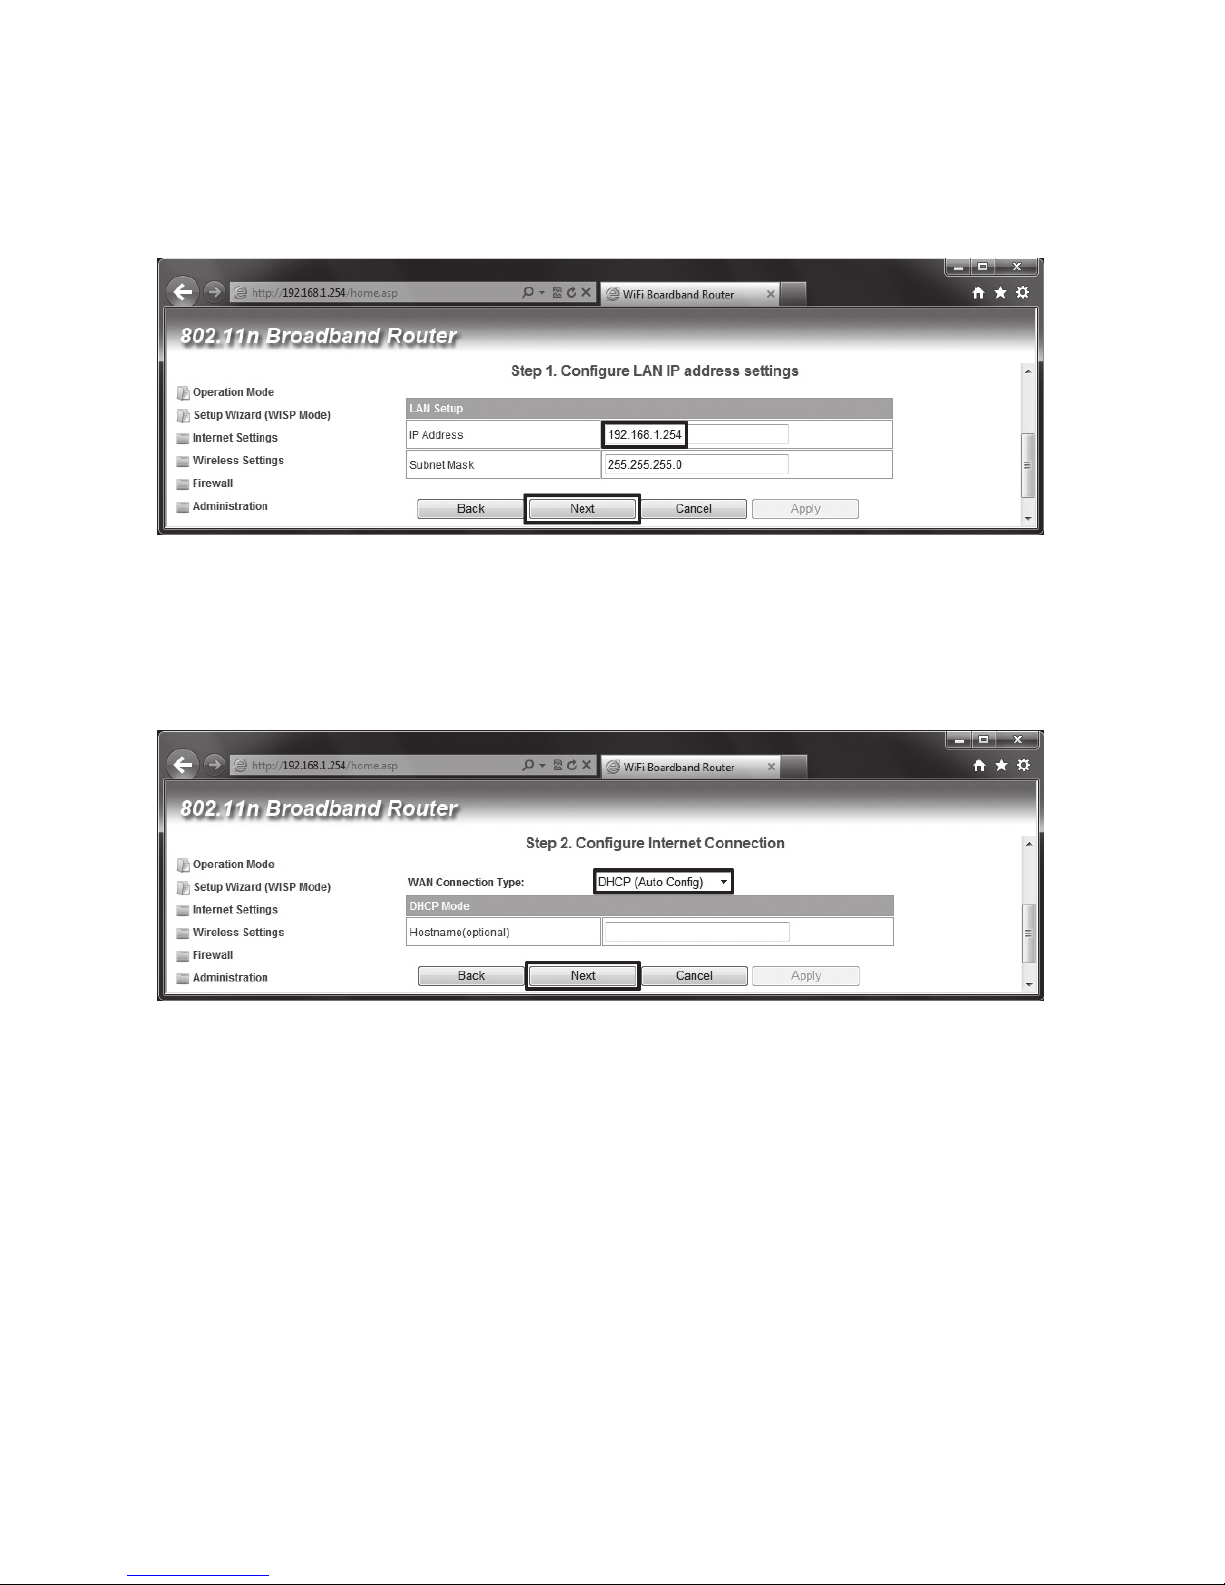
•
Im ersten Konfi gurationsfenster können Sie die IP-Adresse des Geräts bearbeiten. Ändern Sie
die Adresse nach Ihren Wünschen ab. Den „Subnet Mask“ lassen Sie am Besten unverändert.
Klicken Sie jetzt auf „Next“.
Page 16
16
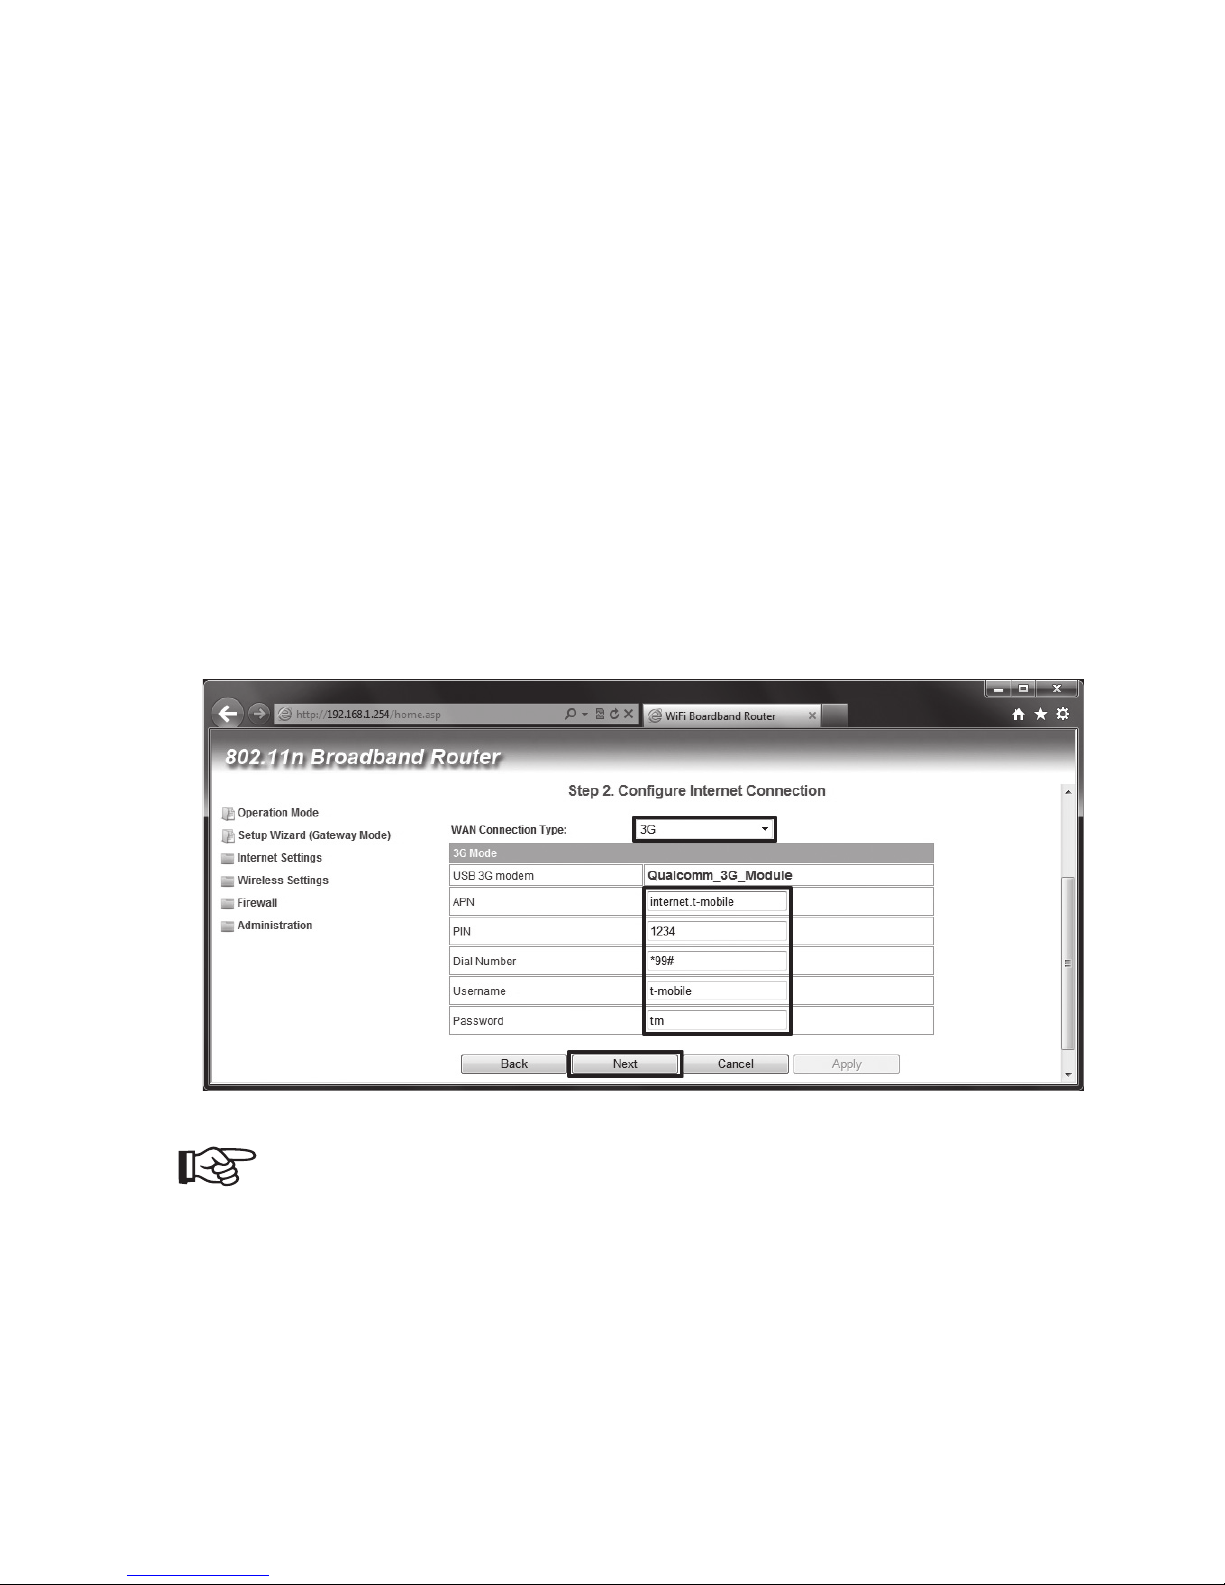
• Auf der nächsten Konfi gurationsseite müssen Sie die Art der Internetverbindung auswählen.
Die drei wichtigsten Arten sind hier nacheinander erklärt. Der Rest der Konfi guration ist für
alle Arten gleich. Denken Sie bitte daran, dass Sie die Konfi guration für die Internetverbindung
durchführen, die Sie zuvor unter Kapitel 7 ausgewählt haben.
• Wenn Sie den Router mit UMTS betreiben wollen, belassen Sie die Einstellung auf „3G“ wie
im Bild dargestellt.
Geben Sie in das Feld „APN“ die Zugangsadresse Ihres Providers ein.
Im Feld „PIN“ tragen Sie, falls aktiviert, den PIN Ihrer SIM-Karte ein. Andernfalls lassen Sie
das Feld leer.
Die Einwahlnummer im Feld „Dial Number“ sollte für die meisten Provider korrekt sein. Im
Zweifelsfall ändern Sie diese dementsprechend ab.
Falls Ihr Provider für den Zugang einen Benutzernamen und ein Passwort benötigt, tragen Sie
dies in das Feld „Username“ bzw. „Password“ ein.
Klicken Sie auf die Schaltfl äche „Next“.
Beachten Sie für die Eingabe Ihrer Zugangsdaten auch das separat beiliegende
Informationsblatt.
Page 17
17
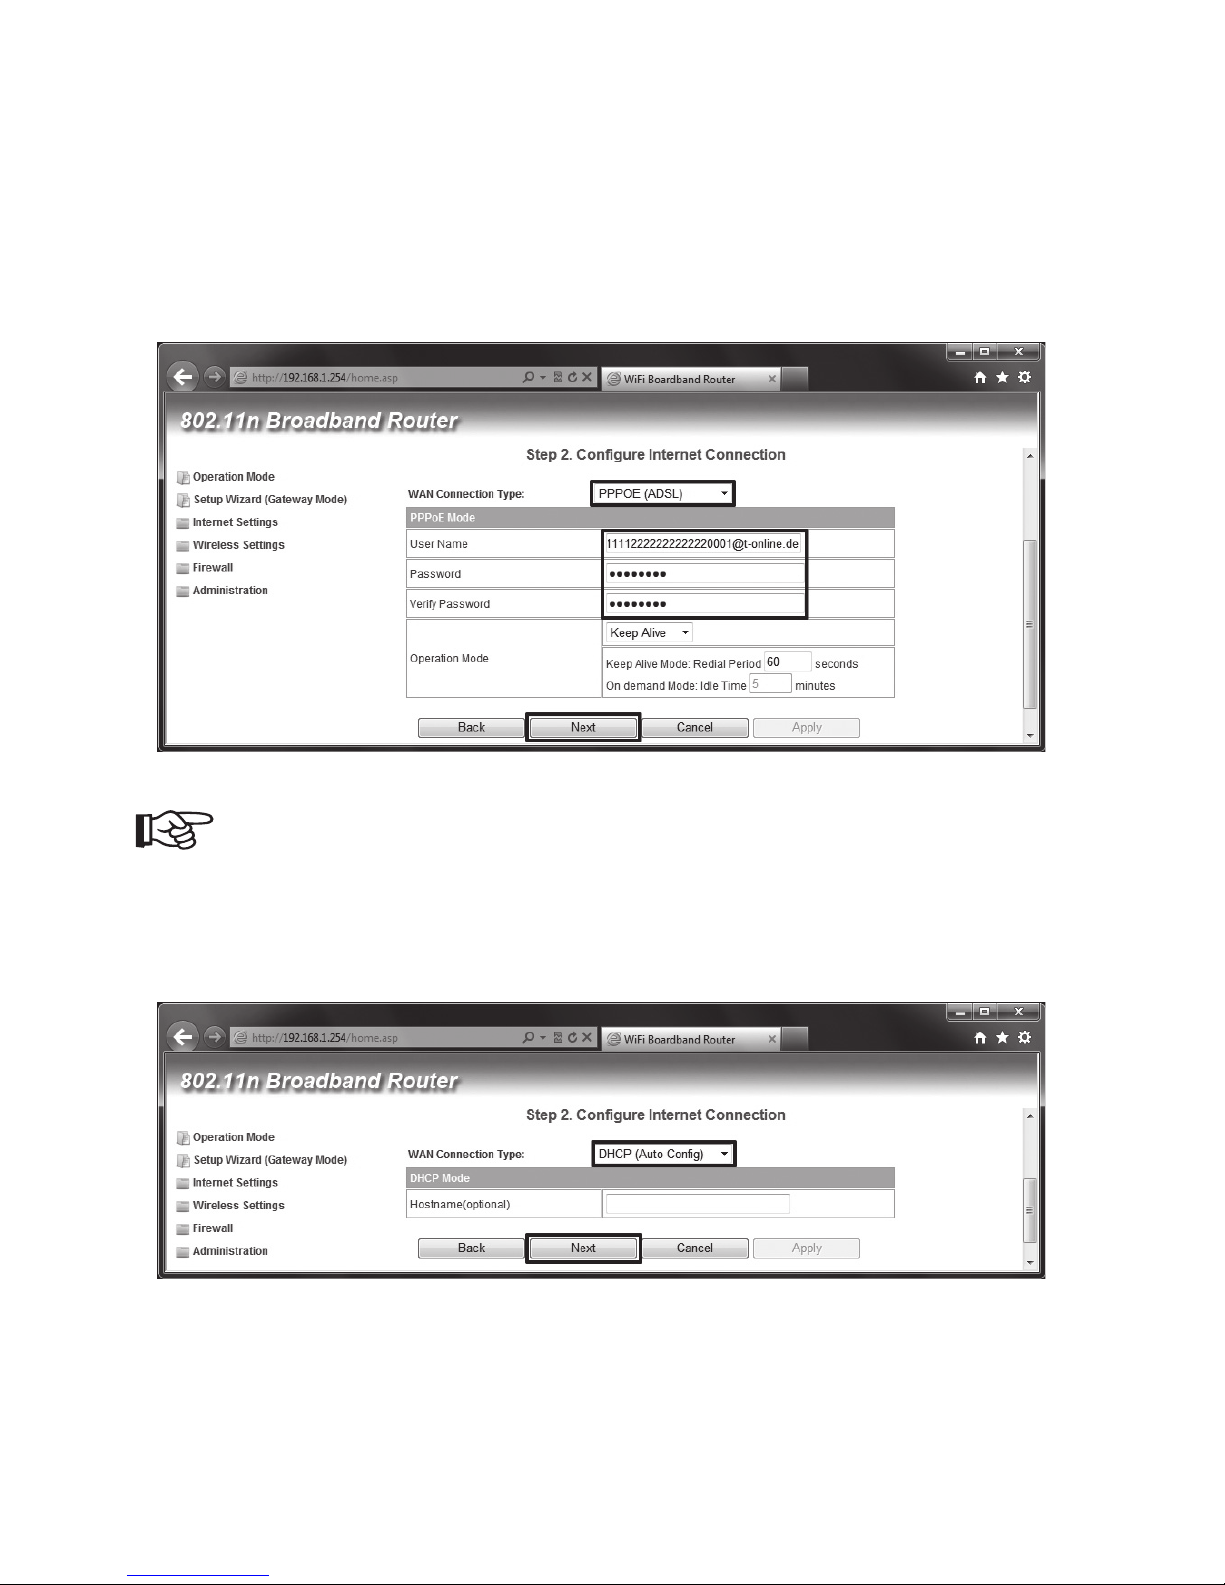
• Wollen Sie allerdings den Router mit einem DSL-Modem betreiben, wählen Sie im Menü
„PPPOE (ADSL)“ aus.
Geben Sie in das Feld „User Name“ Ihren Benutzernamen und in die Felder „Password“
und „Verfi y Password“ jeweils Ihr Kennwort ein. Diese Daten erhalten Sie normalerweise von
Ihrem Provider.
Klicken Sie danach wieder auf „Next“.
Beachten Sie für die Eingabe Ihrer Zugangsdaten auch das separat beiliegende
Informationsblatt.
• Wenn Sie den Router in Verbindung mit einem Kabelmodem betreiben wollen, ändern Sie die
Einstellung im Menü auf „DHCP (Auto Confi g)“, wie im Bild dargestellt.
Klicken Sie für den nächsten Schritt auf „Next“.
Page 18
18
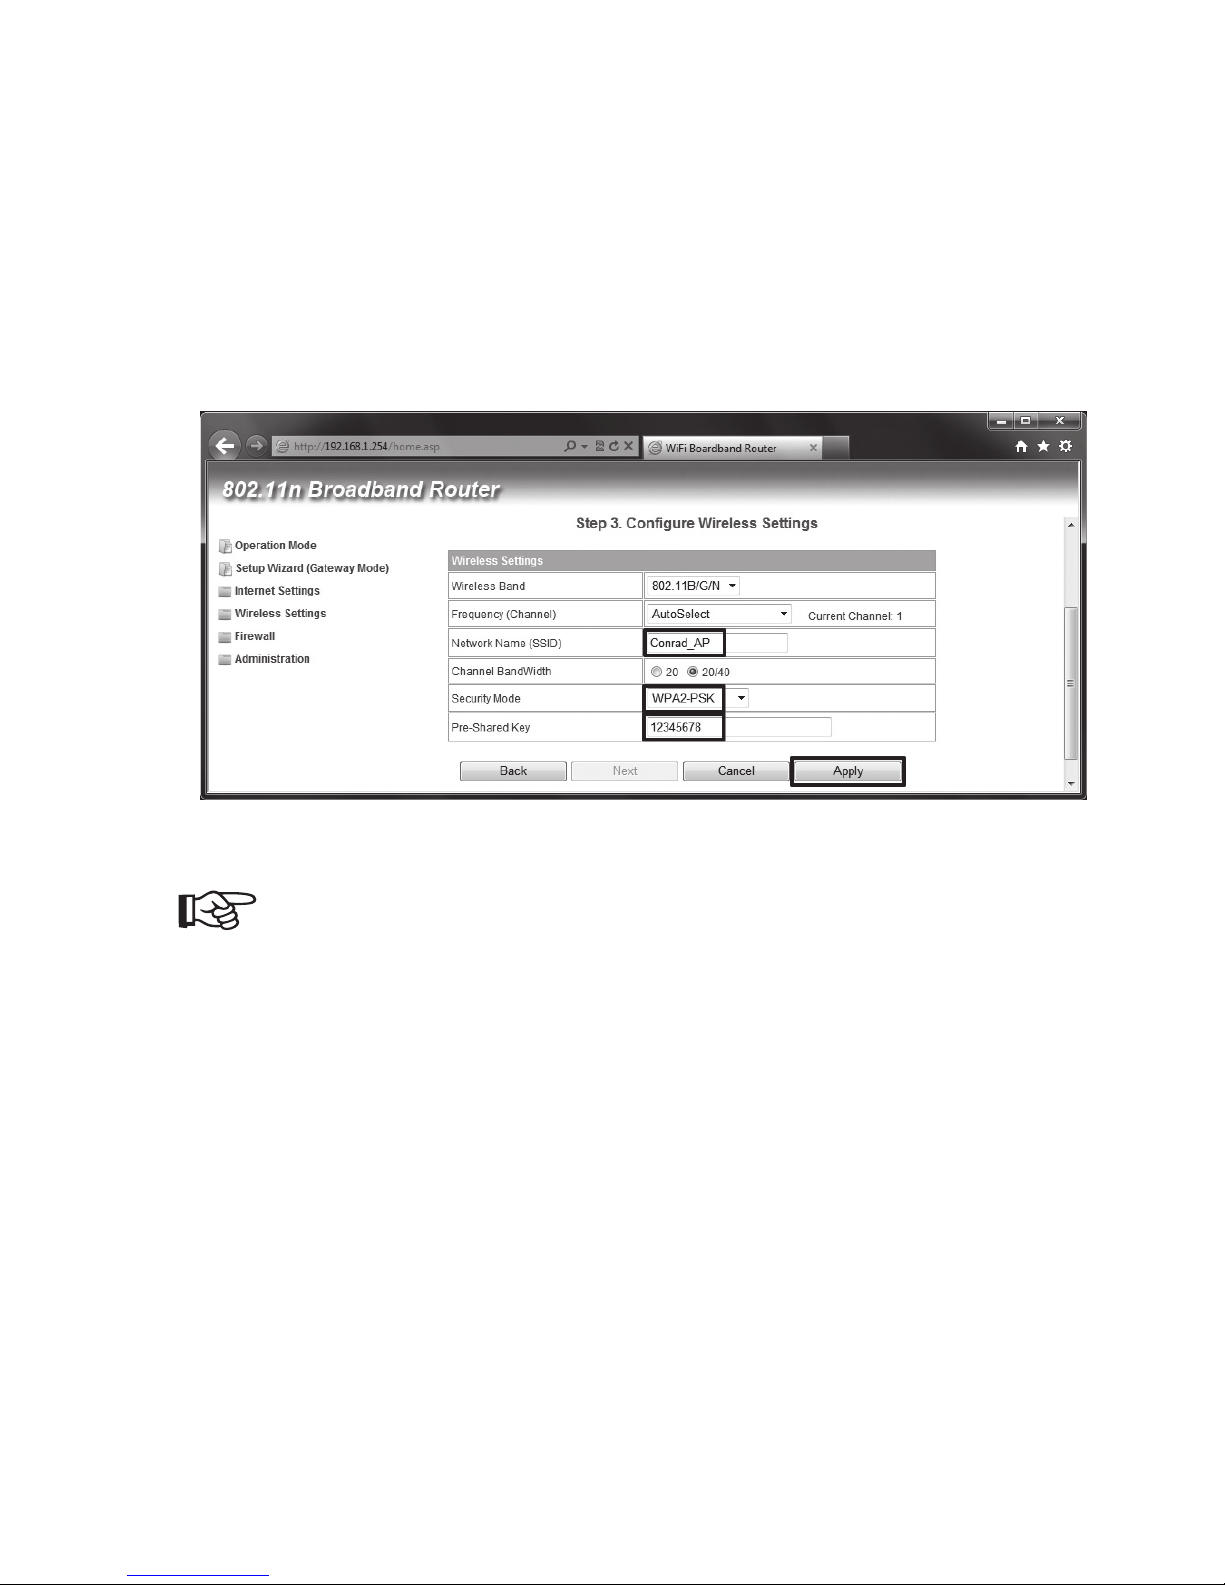
• Auf dieser Seite wird das WLAN konfi guriert. Falls erwünscht, ändern Sie zuerst den Namen
des WLANs. Geben Sie dazu hinter „Network Name (SSID)“ einen beliebigen Namen aus
Buchstaben und Zahlen ein. Unterstriche und Bindestriche sind ebenfalls erlaubt.
Um die Verschlüsselung einzuschalten, öffnen Sie das Menü hinter „Security Mode“ und wäh-
len am Besten „WPA2-PSK“ aus. Geben Sie in das Feld „Pre-Shared Key“ ein möglichst
sicheres Kennwort ein. Erlaubt sind hier die gleichen Zeichen wie beim Namen. Das Kennwort
muss mindestens 8 Zeichen lang sein.
Klicken Sie zum Speichern und Abschließen des Setups auf die Schaltfl äche „Apply“.
• Das Gerät führt nun einen Neustart durch und die Konfi guration wird übernommen.
Bitte beachten Sie:
Sollten Sie die IP-Adresse verändert haben, müssen Sie sich nach dem Neustart
erneut am Webinterface anmelden. Geben Sie dazu die geänderte IP-Adresse
in der Adresszeile des Browsers ein. Evtl. ist es vorher nötig, Ihren PC kurz vom
Netzwerk zu trennen, damit ihm eine neue IP-Adresse zugewiesen wird. Alternativ
starten Sie Ihren PC neu.
Beachten Sie zum Thema IP-Adresse ändern auch das Kapitel 12 a).
• Falls erwünscht, können Sie jetzt noch andere Einstellungen ändern. Beachten Sie hierzu
auch das Kapitel 12 dieser Bedienungsanleitung.
• Die Konfi guration ist damit abgeschlossen. Ihre Computer können nun wie gewohnt über die
Ports „LAN1“ und „LAN2“ bzw. über WLAN auf den Router und das Internet zugreifen.
Page 19
19
10. Konfi guration der Betriebsart „Bridge“
Dieses Kapitel beschreibt die Grundkonfi guration der Betriebsart „Bridge“. Dieser Modus dient
dazu, das Produkt als Access-Point, an einem vorhandenen Router zu betreiben.
Haben Sie den Anschluss wie unter Kapitel 7 beschrieben durchgeführt, können Sie sofort mit
der Konfi guration beginnen.
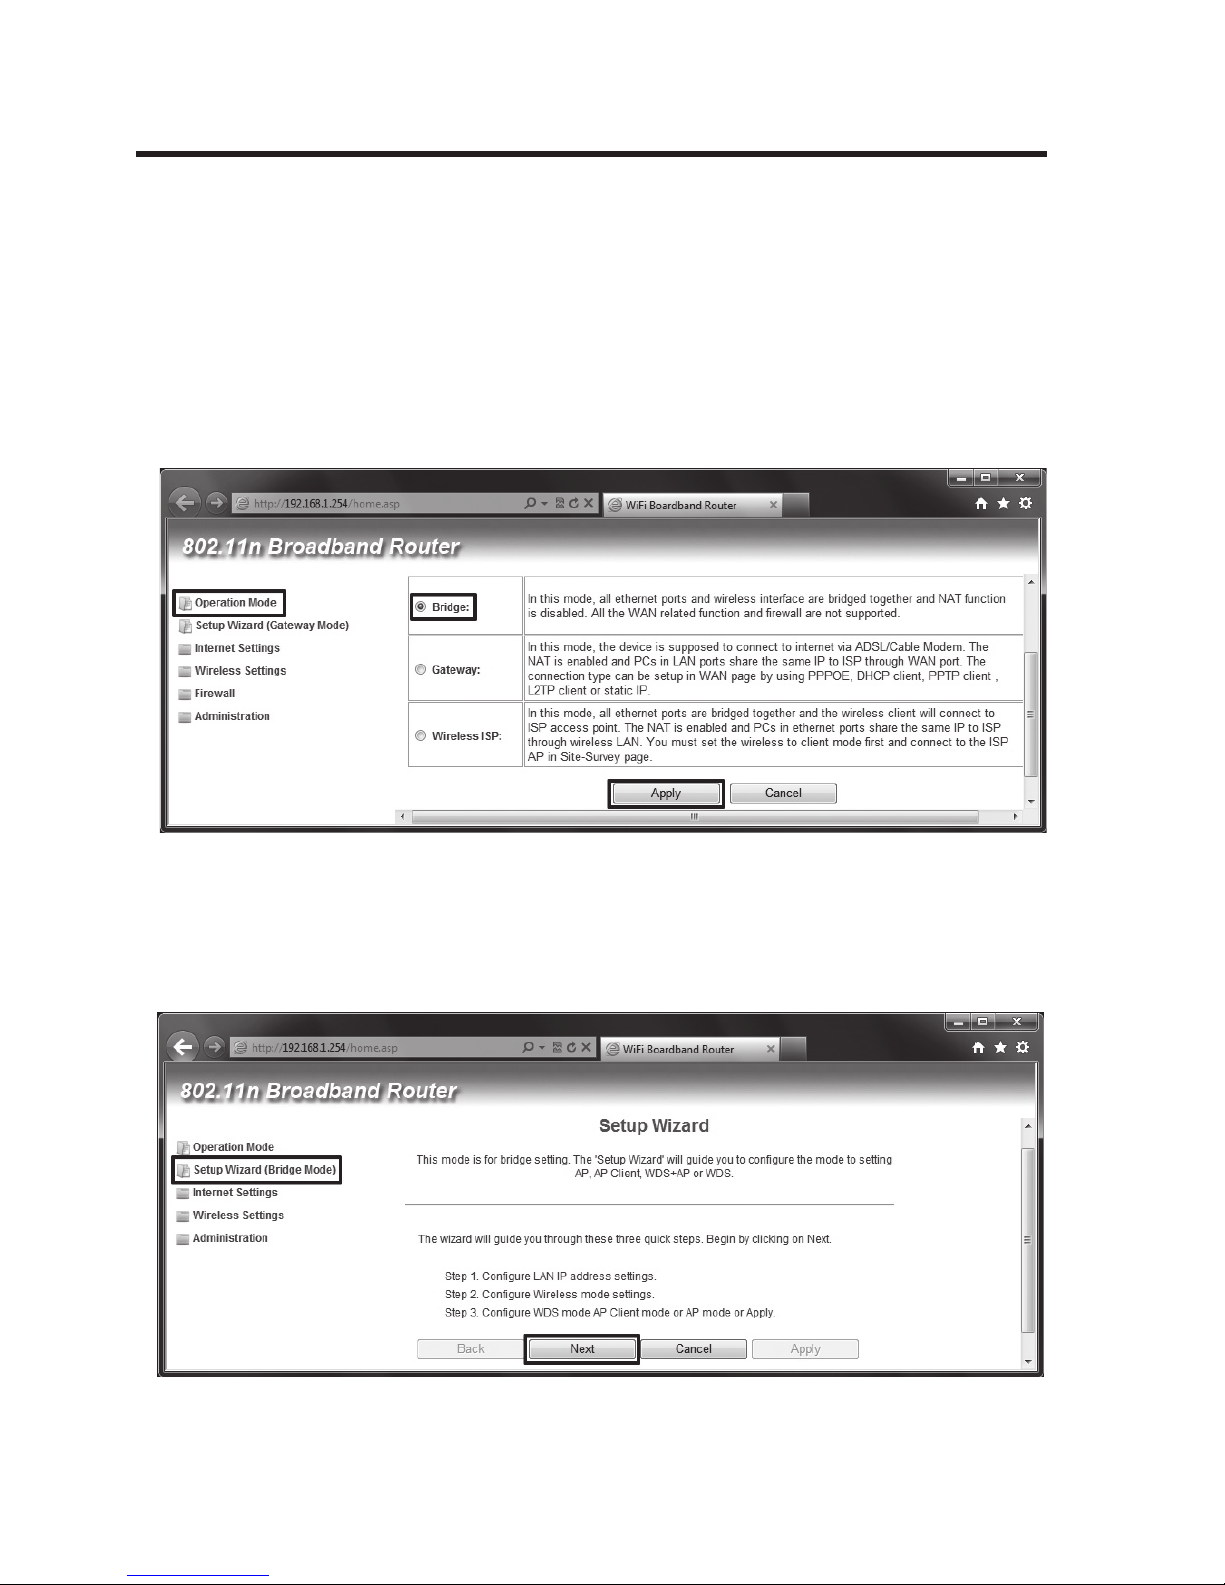
• Klicken Sie, nachdem Sie sich am Webinterface angemeldet haben, als erstes auf den Menüpunkt „Operation Mode“ und wählen Sie die Betriebsart „Bridge“ aus.
Speichern Sie die Einstellung mit „Apply“.
• Die Einstellungen werden übernommen. Dies kann einige Sekunden dauern.
• Als nächstes klicken Sie auf den Menüpunkt „Setup Wizard (Bridge Mode)“.
Das Setup starten Sie mit einem Klick auf „Next“.
Page 20
20
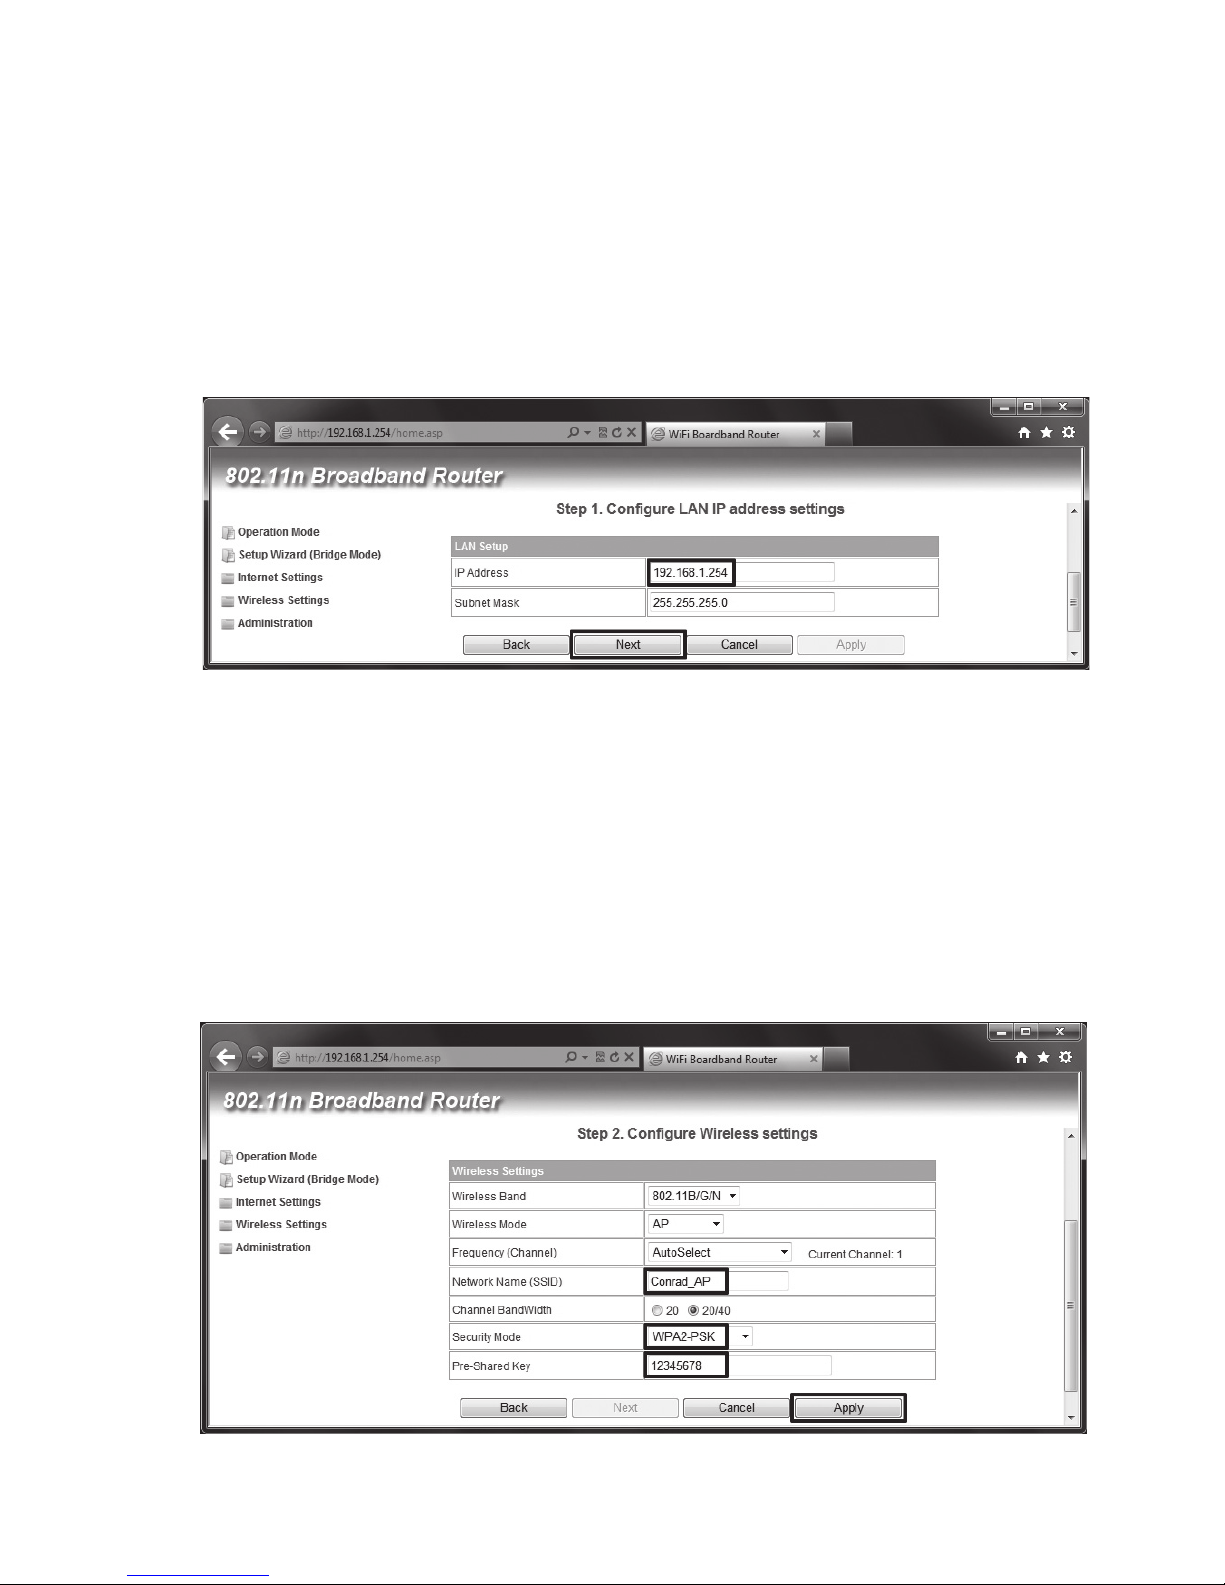
• Im ersten Konfi gurationsfenster können Sie die IP-Adresse des Access-Points ändern. Sinn-
voll wäre z.B., wenn Sie ihm eine IP-Adresse im Bereich Ihres Routers geben, um später ohne
Aufwand wieder auf den Access-Point zugreifen zu können. Hat Ihr Router z.B. die Adresse
192.168.178.1, dann weisen Sie dem AP beispielsweise die Adresse 192.168.178.250 zu.
Sie müssen hier lediglich beachten, dass die ersten drei Blöcke gleich bleiben und der letzte
Block noch nicht in Ihrem Netzwerk vorkommt. Den „Subnet Mask“ lassen Sie am Besten
unverändert.
Klicken Sie jetzt auf „Next“.
• Auf dieser Seite wird das WLAN konfi guriert. Falls erwünscht, ändern Sie zuerst den Namen
das WLANs. Geben Sie dazu hinter „Network Name (SSID)“ einen beliebigen Namen aus
Buchstaben und Zahlen ein. Unterstriche und Bindestriche sind ebenfalls erlaubt.
Um die Verschlüsselung einzuschalten, öffnen Sie das Menü hinter „Security Mode“ und wäh-
len am Besten „WPA2-PSK“ aus. Geben Sie in das Feld „Pre-Shared Key“ ein möglichst
sicheres Kennwort ein. Erlaubt sind hier die gleichen Zeichen wie beim Namen. Das Kennwort
muss mindestens 8 Zeichen lang sein.
Klicken Sie zum Speichern und Abschließen des Setups auf die Schaltfl äche „Apply“
Page 21

21
• Das Gerät führt nun einen Neustart durch und die Konfi guration wird übernommen.
Bitte beachten Sie:
Sollten Sie die IP-Adresse verändert haben, müssen Sie sich nach dem Neustart
erneut am Webinterface anmelden. Geben Sie dazu die geänderte IP-Adresse
in der Adresszeile des Browsers ein. Evtl. ist es vorher nötig, Ihren PC kurz vom
Netzwerk zu trennen, damit ihm eine neue IP-Adresse zugewiesen wird. Alternativ
starten Sie Ihren PC neu.
Beachten Sie zum Thema IP-Adresse ändern auch das Kapitel 12 a).
• Falls erwünscht, können Sie jetzt noch andere Einstellungen ändern. Beachten Sie hierzu
auch das Kapitel 12 dieser Bedienungsanleitung.
• Um das Gerät als Access-Point in Betrieb zu nehmen, verbinden Sie einen LAN-Port mit
einem 1:1-verbundenen Netzwerkkabel mit einem freien LAN-Port Ihres Routers. Es ist dabei
egal ob Sie „LAN1“, „LAN2“ oder den Anschluss „WAN“ vom Gerät benutzen, da die drei
Ports, sowie das WLAN-Interface zusammengeschaltet sind. Zum Schluss starten Sie den
AP neu, indem Sie ihn kurz von der Stromversorgung trennen.
Der Aufstellort ist prinzipiell nur durch Länge des Netzwerkkabels begrenzt. Die max. zulässi-
ge Kabellänge bei 10/100 MBit Netzwerken beträgt ca. 100 m.
• Die Konfi guration ist damit abgeschlossen.
Bitte beachten Sie:
Falls Sie die IP-Adresse nicht in den DHCP-Bereich Ihres Routers gelegt haben,
und Sie später an der Konfi guration etwas ändern wollen, gehen Sie wie folgt
vor. Entfernen Sie das Verbindungskabel zu Ihrem Router. Starten Sie dann den
Access-Point neu oder trennen Sie ihn kurz von der Stromversorgung. Verbinden
Sie Ihren PC direkt mit dem Access-Point und starten Sie ihn neu. Danach können
Sie wie bei der Grundkonfi guration auf das Webinterface zugreifen.
Page 22
22
11. Konfi guration der Betriebsart „Wireless ISP“
Dieses Kapitel beschreibt die Grundkonfi guration der Betriebsart „Wireless ISP“. Dieser Modus
dient dazu, das Produkt als Router mit eigenem DHCP-Server, zu betreiben. Die Internetverbindung wird dabei über WLAN hergestellt.
Haben Sie den Anschluss wie unter Kapitel 7 beschrieben durchgeführt, können Sie sofort mit
der Konfi guration beginnen.
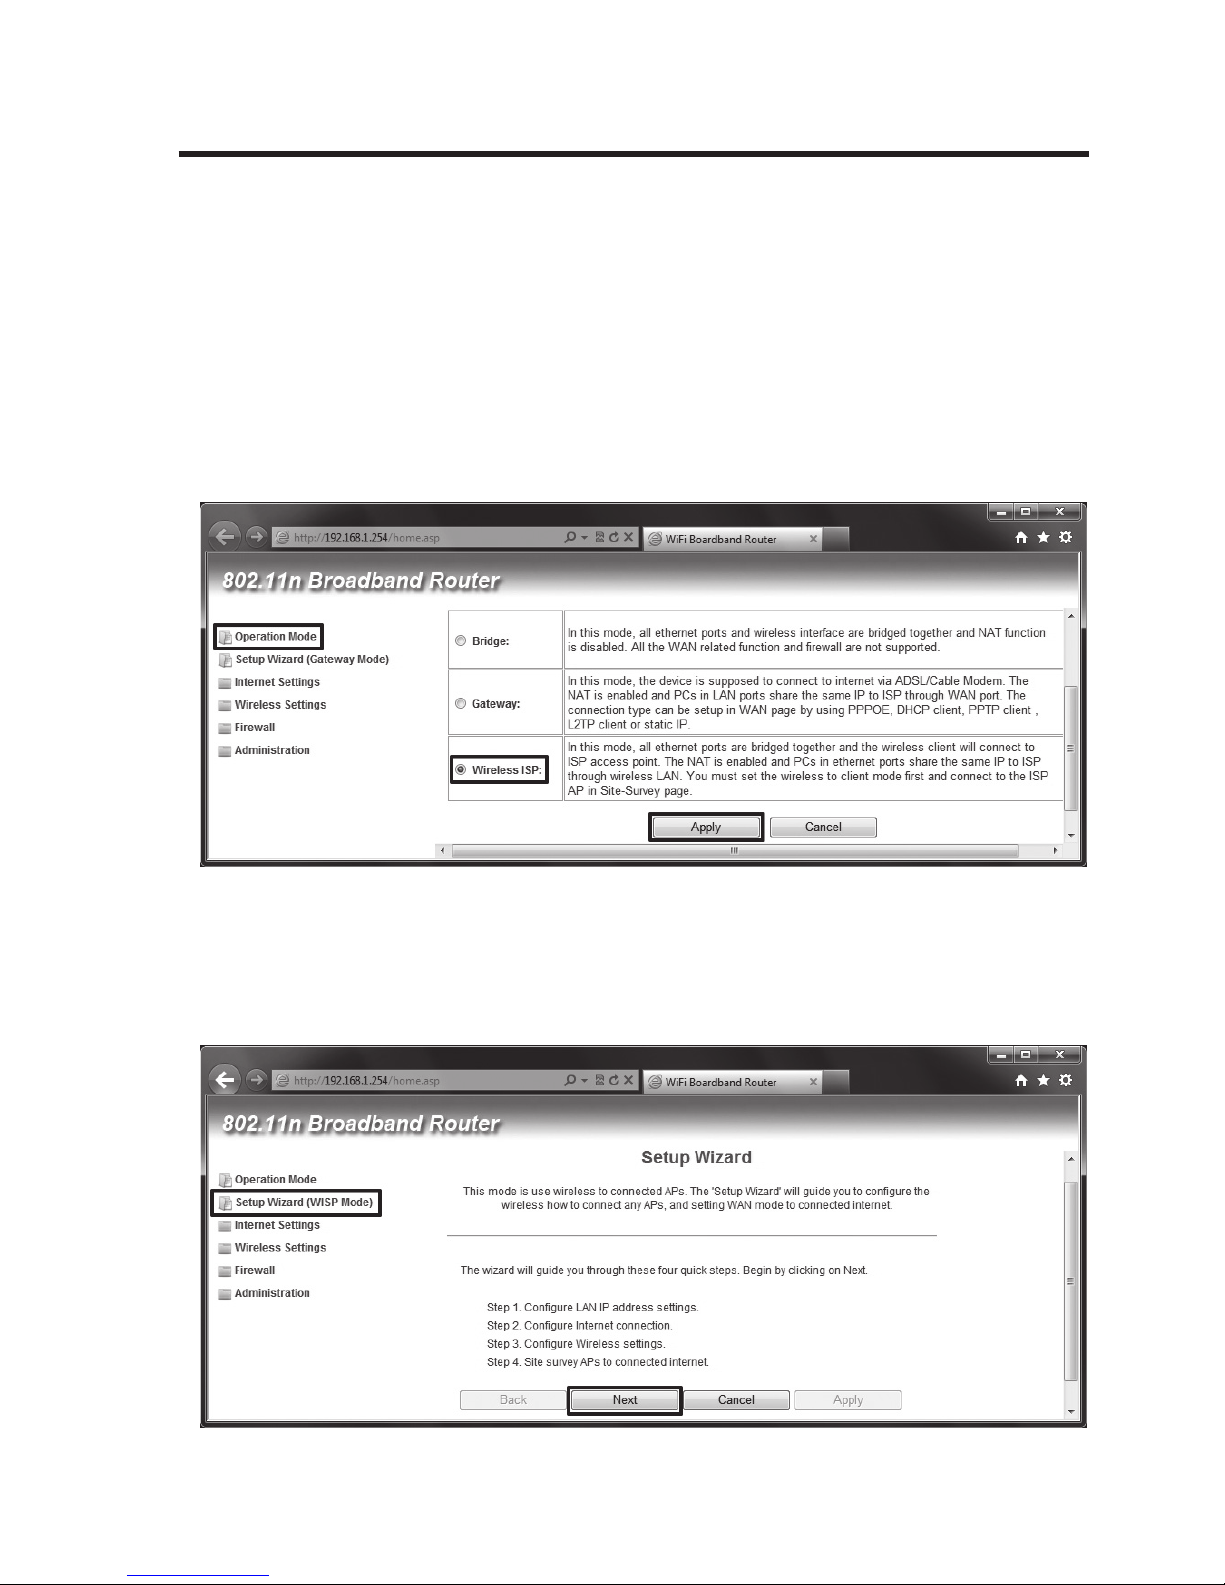
• Klicken Sie, nachdem Sie sich am Webinterface angemeldet haben, als erstes auf den Menüpunkt „Operation Mode“.
Markieren Sie dann den Punkt „Wireless ISP“ und bestätigen Sie mit „Apply“.
• Die Einstellungen werden übernommen. Dies kann einige Sekunden dauern.
• Als nächstes klicken Sie auf den Menüpunkt „Setup Wizard (WISP Mode)“.
Um das Konfi gurationsprogramm zu starten, klicken Sie auf „Next“.
Page 23
23
• Im ersten Konfi gurationsfenster können Sie die IP-Adresse des Geräts bearbeiten. Ändern
Sie die Adresse nach Ihren Wünschen ab. Den „Subnet Mask“ lassen Sie am Besten unverändert.
Klicken Sie jetzt auf „Next“.
• Hier müssen Sie die Art der Internetverbindung auswählen. In den meisten Fällen wird „DHCP
(Auto Confi g)“ die richtige Einstellung sein, z.B. wenn Sie den Router an einem vorhandenen
WLAN anmelden wollen.
Klicken Sie für den nächsten Schritt auf „Next“.
Page 24
24
• Auf dieser Seite wird das WLAN konfi guriert, auf welches Sie später mit Ihren Geräten zu-
greifen können. Falls erwünscht, ändern Sie zuerst den Namen das WLANs. Geben Sie dazu
hinter „Network Name (SSID)“ einen beliebigen Namen aus Buchstaben und Zahlen ein. Unterstriche und Bindestriche sind ebenfalls erlaubt.
Um die Verschlüsselung einzuschalten, öffnen Sie das Menü hinter „Security Mode“ und wäh-
len am Besten „WPA2-PSK“ aus. Geben Sie in das Feld „Pre-Shared Key“ ein möglichst
sicheres Kennwort ein. Erlaubt sind hier die gleichen Zeichen wie beim Namen. Das Kennwort
muss mindestens 8 Zeichen lang sein.
Klicken Sie noch auf die Schaltfl äche „Apply“.
• Jetzt muss das WLAN konfi guriert werden, mit dem Sie das Gerät verbinden wollen. Sie
können die Einstellungen manuell treffen. Einfacher ist jedoch das automatische Suchen.
Klicken Sie dazu auf die Schaltfl äche „Scan APs“
Page 25

25
• Es öffnet sich ein neues Fenster.
Hier wählen Sie das gewünschte WLAN aus, in dem Sie auf den entsprechenden Kreis klicken.
Das Fenster schließt sich automatisch wieder.
• Im Hauptfenster kontrollieren Sie die übernommenen Einstellungen und geben unten im Feld
„Pass Phrase“ noch das Kennwort für das gewählte WLAN ein.
Mit einem Klick auf die Schaltfl äche „Apply“ werden die Einstellungen gespeichert und es wird
ein Neustart durchgeführt.
Bitte beachten Sie:
Sollten Sie die IP-Adresse verändert haben, müssen Sie sich nach dem Neustart
erneut am Webinterface anmelden. Geben Sie dazu die geänderte IP-Adresse
in der Adresszeile des Browsers ein. Evtl. ist es vorher nötig, Ihren PC kurz vom
Netzwerk zu trennen, damit ihm eine neue IP-Adresse zugewiesen wird. Alternativ
starten Sie Ihren PC neu.
Beachten Sie zum Thema IP-Adresse ändern auch das Kapitel 12 a).
• Falls erwünscht, können Sie jetzt noch andere Einstellungen ändern. Beachten Sie hierzu
auch das Kapitel 12 dieser Bedienungsanleitung.
• Die Konfi guration ist damit abgeschlossen. Sie können nun an allen drei Netzwerkanschlüs-
sen Ihre Geräte anschließen. Außerdem ist natürlich ein Zugriff über das WLAN möglich.
Page 26
26
12. Erweiterte Konfi guration
a) Ändern der IP-Adresse
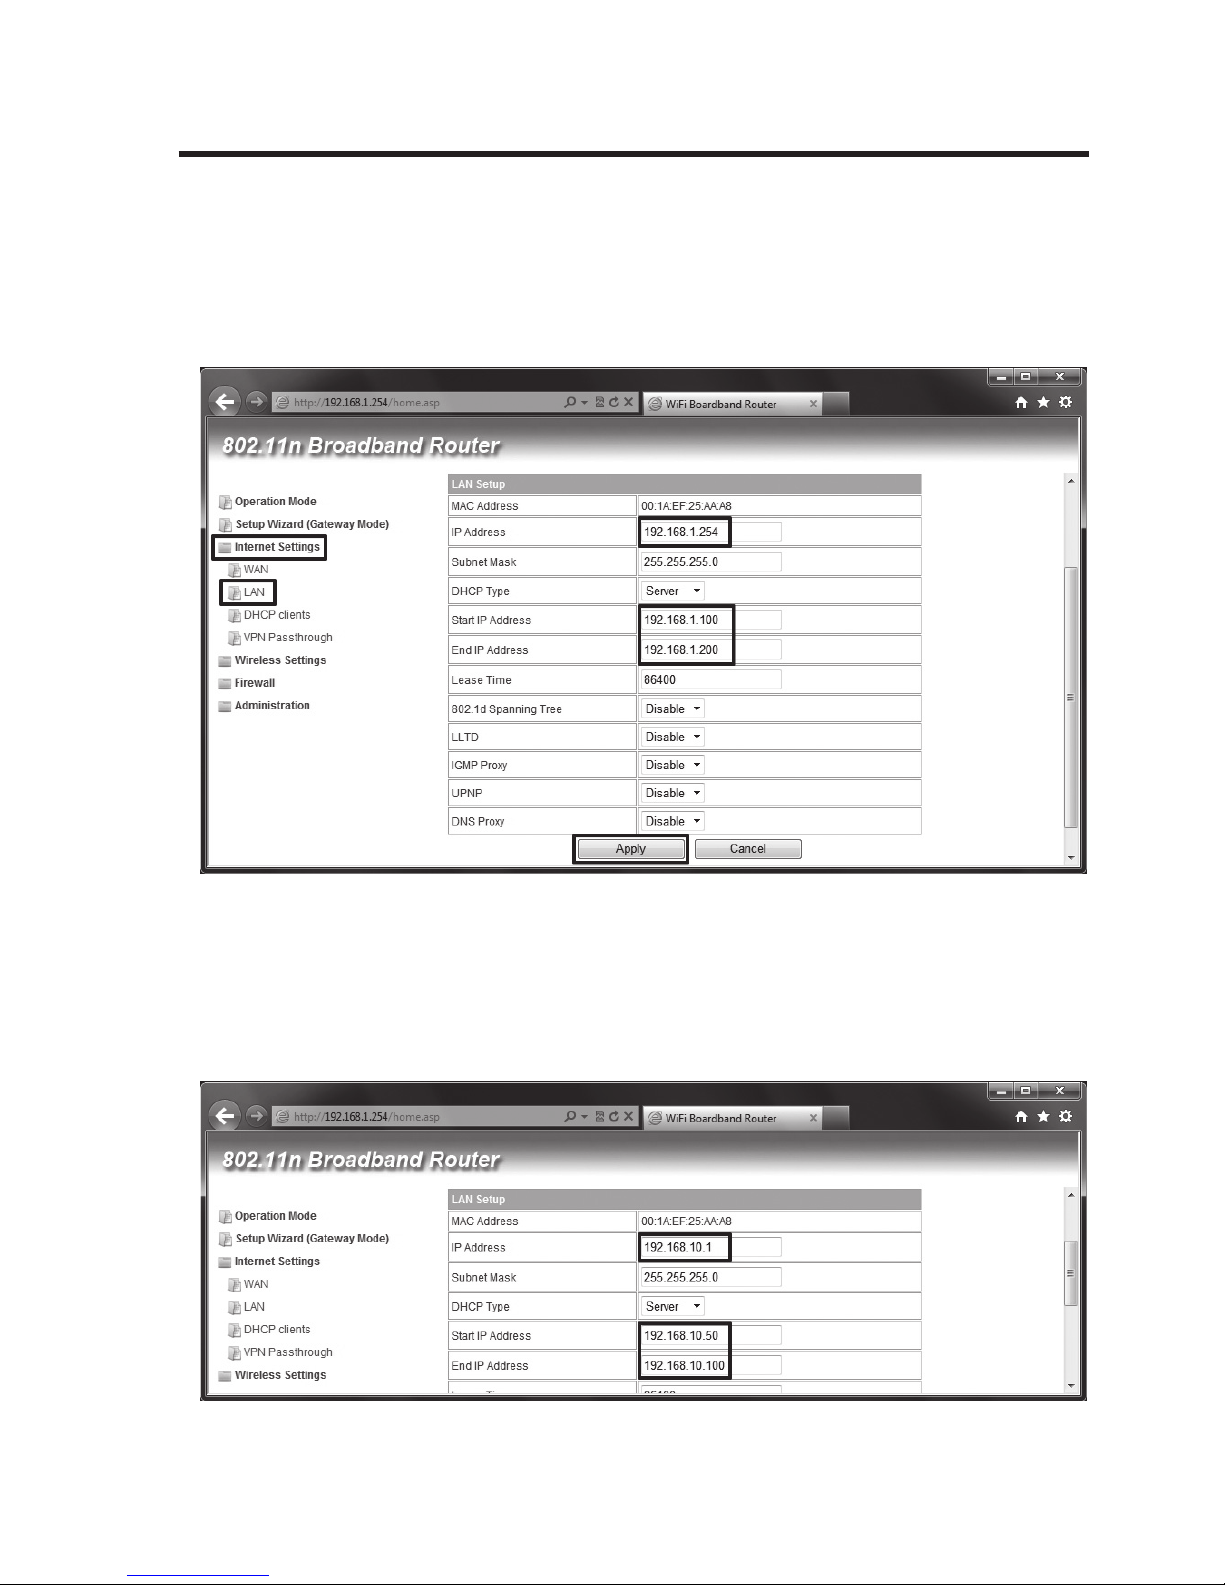
• Klicken Sie im Webinterface auf den Punkt „Internet Settings“ und anschließend auf „LAN“.
• Ändern Sie die IP-Adresse, sowie den DHCP-Bereich nach Ihren Wünschen ab.
• Speichern Sie die Einstellungen mit einem Klick auf „Apply“.
• Anhand des folgendem Beispiels wollen wir Ihnen die Konfi guration erleichtern.
Angenommen, der Router soll die IP-Adresse 192.168.10.1 haben und der DHCP-Bereich soll
auf 192.168.10.50 bis 192.168.10.100 geändert werden.
Ändern Sie dann die Adresse, wie auf dem nächsten Bild zu sehen ist, ab.
Page 27
27
Jeder Block der IP-Adresse muss im Bereich zwischen 1 und 254 liegen.
• Wenn Sie nun auf das Webinterface zugreifen wollen, müssen
Sie dementsprechend die geänderte IP-Adresse in die Adresszeile Ihres Browsers eintragen.
Bitte beachten Sie:
Sobald das Produkt einen DHCP-Server im Netzwerk erkennt, wird der Integrierte
deaktiviert. Dies gilt allerdings nur für die Betriebsart „Bridge“. In den anderen
beiden Betriebsarten ist der DHCP-Server immer aktiv.
Hier können Sie die IP-Adresse und den DHCP-Bereich beliebig anpassen.
b) Ändern des Administrator-Kennworts
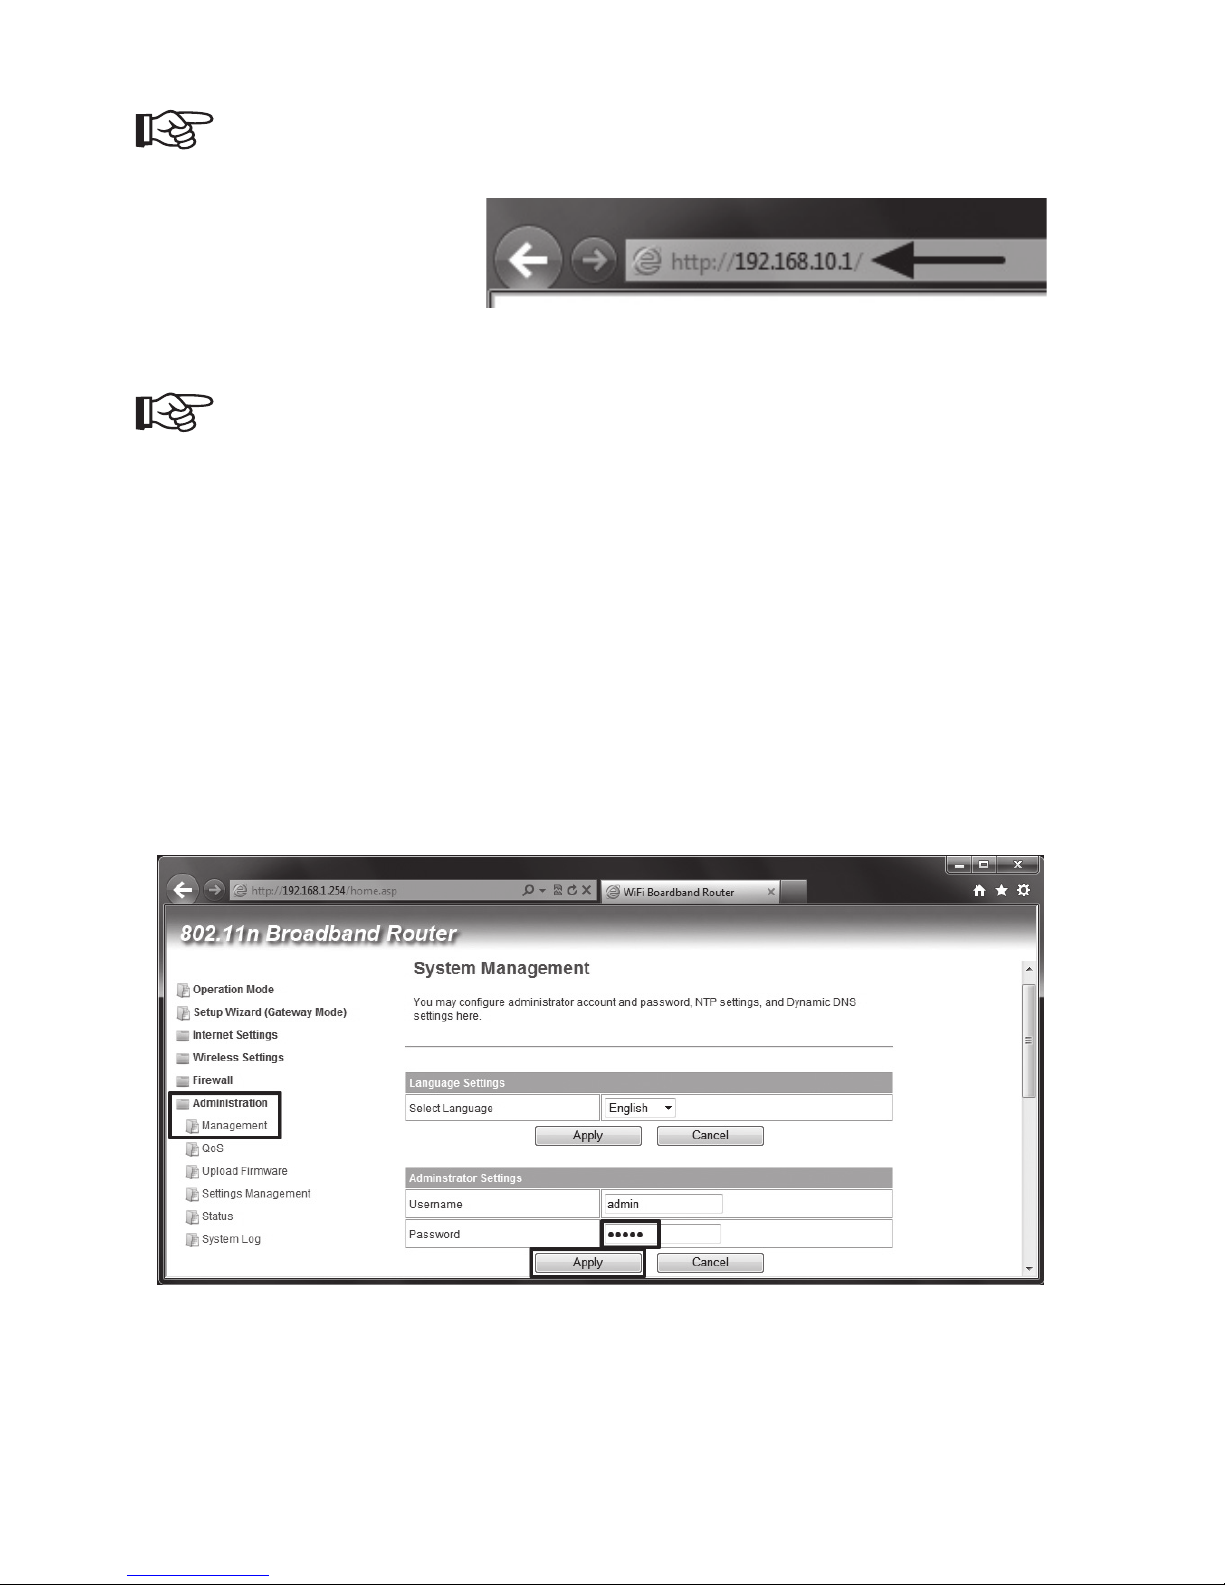
• Um das Administrator-Kennwort zu ändern, klicken Sie im Menüpunkt „Administration“ auf
den Unterpunkt „Management“.
• Tragen Sie in das Feld „Password“ ein beliebiges Passwort ein.
Speichern Sie die Einstellung mit einem Klick auf „Apply“.
• Das Webinterface wird automatisch aktualisiert und Sie müssen das Kennwort noch mal zur
Anmeldung eingeben.
Page 28
28
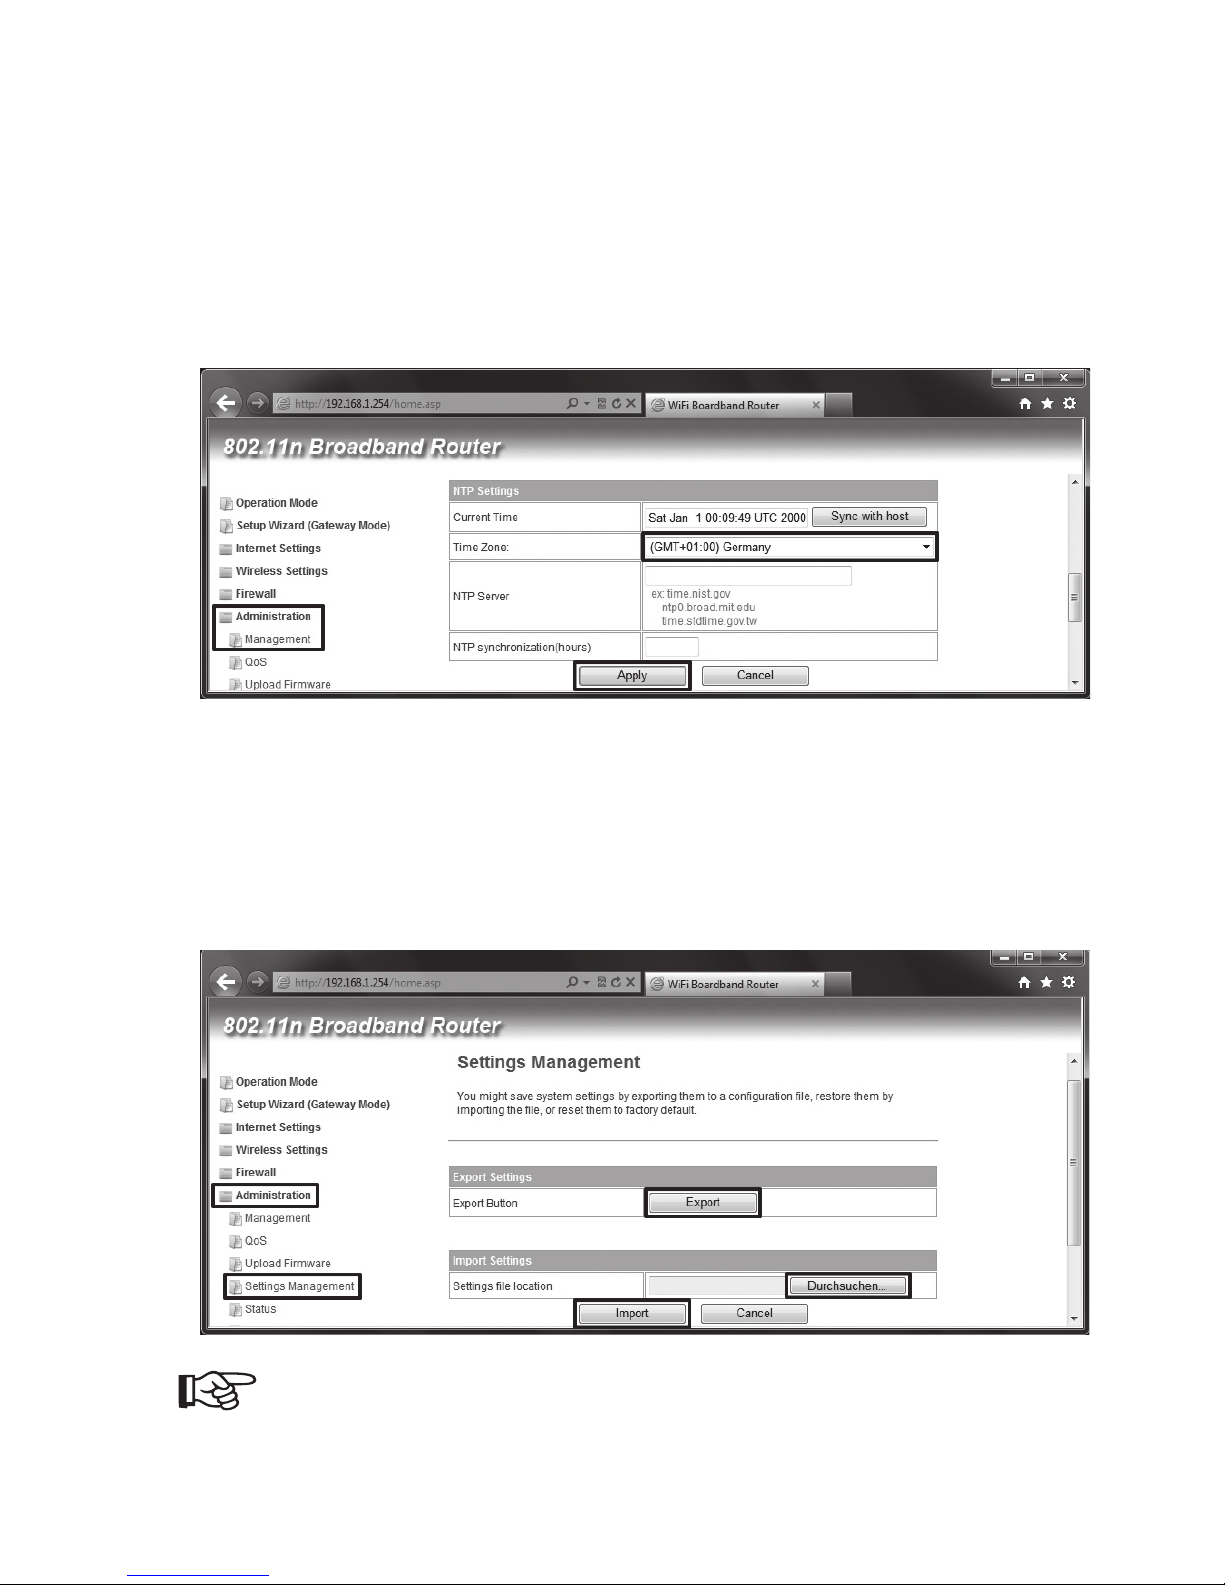
c) Ändern der Zeitzone
• Um die Zeitzone abzuändern, klicken Sie wieder im Menüpunkt „Administration“ auf den Unterpunkt „Management“.
• Scrollen Sie etwas nach unten, bis zum Punkt „NTP Settings“.
•
Öffnen Sie dort das Auswahlmenü hinter „Time Zone“ und wählen Sie die gewünschte Zeitzone aus.
• Speichern Sie die Einstellung mit einem Klick auf „Apply“.
d) Speichern der Einstellungen
• Um die Einstellung des Produkts in einer Datei zu speichern, klicken Sie im Menüpunkt „Administration“ auf den Unterpunkt „Settings Management“.
• Klicken Sie anschließend rechts auf den Button „Export“, um die Konfi gurationsdatei herunter
zu laden.
Wenn Sie die gespeicherte Konfi guration später wieder herstellen wollen, können
Sie dies im selben Menü mit dem Punkt „Import“ durchführen.
Page 29

29
e) Benutzung von WPS
• Um die WPS-Funktion zu benutzen, gehen Sie wie folgt vor.
• Falls der Router nicht in Betrieb ist, schalten Sie diesen zuerst ein und warten Sie ca. 1 Minute
bis der Startvorgang abgeschlossen ist.
• Halten Sie dann die Taste „WPS“ an der Rückseite des Gerät für ca. 3 Sekunden gedrückt
und lassen Sie sie anschließend wieder los. Die WPS-LED am Gerät beginnt daraufhin an zu
blinken.
• Der Router ist jetzt im WPS Empfangsmodus. Um ein Gerät mit dem Router zu verbinden,
drücken Sie ebenfalls die WPS-Taste an dem jeweiligen Gerät.
Beachten Sie hierzu auch die Bedienungsanleitung des Geräts, dass Sie mit dem Router
verbinden wollen.
• Warten Sie bis die Verbindung hergestellt ist.
13. Zurücksetzen auf die Werkseinstellung
a) Mit Hilfe der Taste „Reset“ am Gerät
• Um den Router ohne Webinterface auf die Werkseinstellung zurückzusetzen, verbinden Sie
ihn mit dem Steckernetzteil und stecken es in eine Netzsteckdose ein. Warten Sie ca. 1 Minute bis der Startvorgang abgeschlossen ist.
• Drücken Sie dann die am Gerät versenkt angeordnete Taste „Reset“ für ca. 5 bis 10 Sekunden
und lassen Sie sie anschließend wieder los. Ob der Reset angenommen wurde, erkennen Sie
daran, das alle LEDs mit Ausnahme der Power-LED nach einigen Sekunden für eine gewisse
Zeit ausgehen.
• Das Gerät führt einen Neustart durch. Dieser dauert etwa 1 Minute. Danach ist es wieder auf
die Werkseinstellung zurückgesetzt.
Page 30
30
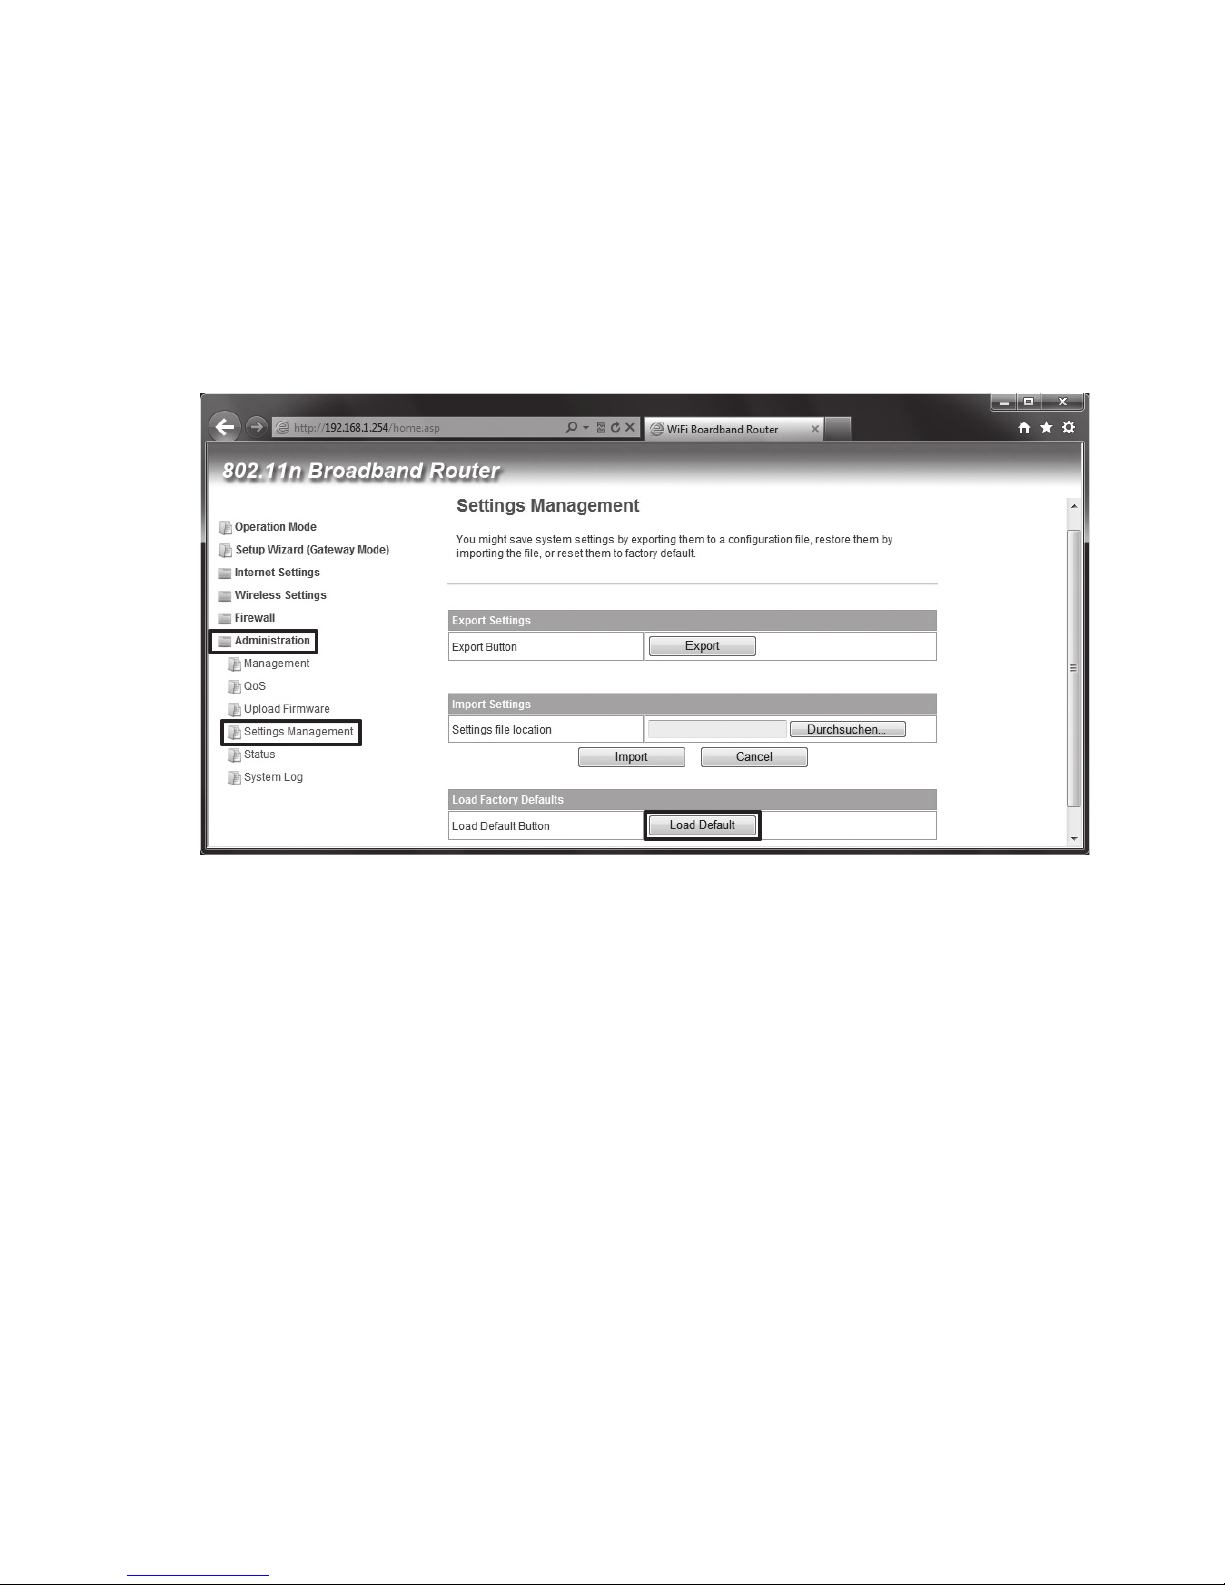
b) Im Webinterface
• Um den WLAN-Router mit Hilfe des Webinterfaces auf die Werkseinstellung zurückzusetzen,
verbinden Sie ihn mit dem Steckernetzteil und stecken es in eine Netzsteckdose ein. Warten
Sie ca. 1 Minute bis der Startvorgang abgeschlossen ist. Loggen Sie sich anschließend, wie
unter Kapitel 8 beschrieben, in das Webinterface ein.
• Klicken Sie zuerst auf „Administration“ und anschließend auf „Settings Management“.
Mit einem Klick auf die Schaltfl äche „Load Default“ starten Sie den Reset-Vorgang.
• Ob der Reset angenommen wurde, erkennen Sie daran, das alle LEDs mit Ausnahme der
Power-LED nach einigen Sekunden für eine gewisse Zeit ausgehen.
• Das Gerät führt einen Neustart durch. Dieser dauert etwa 1 Minute. Danach ist es wieder auf
die Werkseinstellung zurückgesetzt.
Page 31

31
14. Wartung und Reinigung
Eine Wartung oder Reparatur ist nur durch eine Fachkraft oder Fachwerkstatt zulässig. Es sind
keinerlei für Sie zu wartende Bestandteile im Inneren des Produkts, öffnen Sie es deshalb niemals.
Zur Reinigung der Außenseite genügt ein trockenes, weiches und sauberes Tuch.
Verwenden Sie auf keinen Fall aggressive Reinigungsmittel, Reinigungsalkohol
oder andere chemische Lösungen, dadurch wird das Gehäuse angegriffen (Verfärbungen).
15. Handhabung
Beachten Sie sämtliche Sicherheitshinweise dieser Bedienungsanleitung!
• Achten Sie beim Aufstellen des Produkts darauf, dass die Kabel nicht geknickt
oder gequetscht werden.
• Vermeiden Sie folgende widrige Umgebungsbedingungen am Aufstellungsort
oder beim Transport:
- Nässe oder zu hohe Luftfeuchtigkeit
- Extreme Kälte (<0°C) oder Hitze (>60°C), direkte Sonneneinstrahlung
- Staub oder brennbare Gase, Dämpfe oder Lösungsmittel
- starke Vibrationen, Stöße, Schläge
- starke Magnetfelder, wie in der Nähe von Maschinen oder Lautsprechern
• Es ist anzunehmen, dass ein gefahrloser Betrieb nicht mehr möglich ist, wenn
- das Gerät sichtbare Beschädigungen aufweist,
- das Gerät nicht mehr funktioniert und
- nach längerer Lagerung unter ungünstigen Verhältnissen oder
- nach schweren Transportbeanspruchungen.
Page 32

32
• Die maximal mögliche Datenübertragungsrate (z.B. 150 MBit bei 802.11b/g/n,
also etwa 17,5 MByte/s) wird im praktischen Betrieb niemals erreicht. Das ist
zurückzuführen auf die verwendete Übertragungstechnik, auf Übertragungsfehler, den Abstand zwischen den WLAN-Geräten usw.
• WLAN-Netzwerkverbindungen sollten Sie unbedingt verschlüsseln, um unberechtigte Zugriffe z.B. auf Ihren WLAN-Router zu verhindern. Sie sollten vorrangig die Verschlüsselungsart „WPA2“ anstelle „WPA“ oder „WEP“ nutzen, da
„WPA“ und „WEP“ nicht mehr ausreichend sicher gegen Angriffe geschützt ist.
• Die Reichweite ist abhängig von den Umgebungsbedingungen; eine Verringerung der Funkreichweite ist möglich durch:
- Hochfrequenzstörungen aller Art (Computer, Monitore, Handys)
- Bebauung jeglicher Art und Vegetation
- Leitende Metallteile, die sich im Nahbereich der Geräte bzw. innerhalb oder
nahe der Funkstrecke befi nden, z.B. Kabel, Heizkörper, metallisierte Isolier-
glasfenster, Stahlbetondecken usw.
- Beeinfl ussung der Strahlungscharakteristik der Antennen durch den Abstand
von Sender oder Empfänger zu leitenden Flächen oder Gegenständen (auch
zum menschlichen Körper oder Boden)
- Breitbandstörungen in städtischen Gebieten, die den Signal-Rauschabstand
verkleinern; das Signal wird in diesem „Rauschen“ nicht mehr erkannt
- Einstrahlung von mangelhaft abgeschirmten elektronischen Geräten, z.B. of-
fen betriebene Computer o.ä.
- Zu geringer Abstand von Empfänger/Sender
16. Entsorgung
Elektronische und elektrische Produkte dürfen nicht in den Hausmüll.
Entsorgen Sie das unbrauchbar gewordene Produkt gemäß den geltenden ge-
setzlichen Bestimmungen.
Page 33

33
17. Technische Daten
a) UMTS WLAN-Router
Betriebspannung ..................................12 V/DC
WLAN ...................................................802.11b/g/n (max. 150 MBit)
Netzwerk-Anschluss .............................2x LAN, RJ45, 10/100 MBit;
1x WAN, RJ45, 10/100 MBit;
Antennen ..............................................1x WLAN-Antenne, 1x UMTS/3G-Antenne
Modem ..................................................eingebaut, Betrieb mit normaler SIM-Karte
Modem Standards ................................UMTS, HSDPA, HSUPA, WCDMA
Betriebsarten ........................................Gateway, Bridge, Wireless ISP
Abmessungen (B x H x T) ....................ca. 150 x 27,5 x 105 mm (ohne Antennen)
Gewicht .................................................ca. 196 g (ohne Antennen)
Umgebungstemperatur bei Betrieb .......0 °C bis 60 °C
Luftfeuchte bei Lagerung ...................... 10% bis 90% relative Luftfeuchte, nicht kondensierend
b) Steckernetzteil
Betriebspannung ..................................100 - 240 V/AC, 50/60 Hz, 0,75 A
Ausgang ...............................................12 V/DC, 1,5 A
18. Konformitätserklärung (DOC)
Hiermit erklären wir, Conrad Electronic, Klaus-Conrad-Straße 1, D-92240 Hirschau, dass sich
dieses Produkt in Übereinstimmung mit den grundlegenden Anforderungen und den anderen
relevanten Vorschriften der Richtlinie 1999/5/EG befi ndet.
Die Konformitätserklärung (DOC) zu diesem Produkt fi nden Sie unter
www.conrad.com.
Page 34

34
Table of Contents
1. Introduction ........................................................................................................................ 35
2. Intended Use ..................................................................................................................... 36
3. Scope of Delivery .............................................................................................................. 36
4. Explanation of Symbols ..................................................................................................... 36
5. Safety Information ............................................................................................................. 37
6. Product Overview .............................................................................................................. 39
a) LEDs ............................................................................................................................ 39
b) Connections and Control Elements.............................................................................. 40
c) Operating modes.......................................................................................................... 40
d) General Information ..................................................................................................... 41
7. Commissioning .................................................................................................................. 42
8. Access to the Web Interface.............................................................................................. 43
9. Confi guration of the Operating Mode “Gateway” ............................................................... 47
10. Confi guration of the Operating Mode “Bridge” .................................................................. 51
11. Confi guration of the Operating Mode “Wireless ISP” ........................................................ 54
12. Expanded Confi guration .................................................................................................... 58
a) Changing the IP-Address ............................................................................................. 58
b) Changing the Administrator Password ......................................................................... 59
c) Changing the Time Zone .............................................................................................. 60
d) Saving the Settings ...................................................................................................... 60
e) Use of WPS..................................................................................................................61
13. Resetting to the factory settings ........................................................................................ 61
a) With the “Reset” Button on the Device ......................................................................... 61
b) In the Web Interface ..................................................................................................... 62
14. Maintenance and Cleaning ................................................................................................ 63
15. Handling ............................................................................................................................ 63
16. Disposal .............................................................................................................................64
17. Technical Data ................................................................................................................... 65
a) UMTS WLAN-Router .................................................................................................... 65
b) Mains adapter ..............................................................................................................65
18. Declaration of Conformity (DOC)....................................................................................... 65
Page 35

35
1. Introduction
Dear Customer,
Thank you for purchasing this product.
This product complies with the statutory national and European requirements. To maintain this
status and to ensure risk-free operation, the user must comply with these operating instructions!
Before taking the product in to operation, read the complete operating
instructions and observe all operating and safety notes.
All company names and product names are trademarks of their respective owners. All rights
reserved.
If there are any technical questions, contact:
Germany: Tel. + 49 9604 / 40 88 80
Fax + 49 9604 / 40 88 48
E-mail: tkb@conrad.de
Mon to Thurs 8.00am to 4.30pm
Fri 8.00am to 2.00pm
Page 36

36
2. Intended Use
The router is used to connect several computers to the internet or any present network. Internet
access can be achieved via an external DSL or cable modem with LAN-connection or an internal
UMTS modem.
Power is supplied exclusively by the included mains adapter.
3. Scope of Delivery
• UMTS WLAN-Router
• 2 aerials
• Mains adapter
• Support
• Network cable
• Operating instructions on CD
• Operating instructions
4. Explanation of Symbols
The symbol with a lightning bolt in a triangle is used where there is a health hazard,
e.g. from electric shock.
An exclamation mark in a triangle indicates important notes in these operating
instructions that must be strictly observed.
The „hand“ symbol indicates special advice and operating information.
Page 37

37
5. Safety Information
Please read the operating instructions completely before commissioning the
device. They contain important information for correct operation.
The guarantee/warranty will expire if damage is incurred resulting from non-
compliance with the operating instructions! We do not assume any liability
for consequential damage!
We do not assume any liability for property damage and personal injury
caused by improper use or non-compliance with the safety instructions! The
warranty/guarantee will expire in such cases!
Dear Customer,
this safety information serves not only to protect the product, but also your own
safety and the safety of other persons. Therefore, read this chapter very carefully
before taking the product into operation!
• For safety and licensing (CE) reasons, unauthorised conversion and/or modi-
fi cations to the product are not permitted. Never open/dismantle this product!
There are no interior components to be set or serviced by you.
Maintenance and repair work must only be carried out by a specialist/specialised
workshop.
• The product is only suitable for operation in dry, closed rooms. No part of the
product must become damp or wet; do not touch it with damp or wet hands!
There is danger to life from electric shock!
• The mains adapter is constructed pursuant to protection category II. Only a
regular mains socket connected to the public mains supply must be used as a
voltage supply for the mains adapter.
• The mains socket must be close to the device and easily accessible.
• Ensure that the entire product insulation is not damaged or destroyed.
• Check the product for damage before each use!
• If any damage is found, the appliance must NOT be connected to the mains
voltage! Danger to life!
Page 38

38
• Protect the product from direct solar radiation, strong heat (>60°C), cold (<0°C),
dust and dirt, dripping or splashing water, vibrations or mechanic load.
• If the product is brought from a cold into a warm room (e.g. in transport), it is
possible that condensation develops. This may damage the product. The mains
adapter also involves the risk of a fatal electric shock!
Therefore, you should allow the product to warm up to room temperature before
using it or connecting it to the mains voltage. This may take several hours.
• The product is not a toy. Devices that are operated with mains voltage have no
place in the hands of children. Therefore, be particularly careful when children
are present.
• Do not leave packaging material unattended. It may become a dangerous toy for
children.
• The product is only suitable for use in temperate, not tropical, climates.
• Do not place any containers with liquids, e.g. buckets, vases or plants, in direct
proximity of the product. Liquids may get into the housing and impair electrical
safety. There also is a danger of fi re and danger to life from electric shock.
• Do not place any open sources of fi re, such as burning candles, on the device or
in its proximity.
• Do not bend the cables and do not place objects on them.
• Handle the product with care. It can be damaged by impact, blows or when
dropped even from a low height.
• If the device shows any damage, do not use it anymore. In this case, take the
device to a specialist workshop.
• In commercial institutions, the accident prevention regulations of the Employer’s
Liability Insurance Association for Electrical Systems and Operating Materials
are to be observed.
• In schools, training centres, hobby and self-help workshops, the use of the product must be supervised by trained personnel.
• If there are any questions that are not answered in this operating manual, contact our technical support or another expert.
Page 39

39
6. Product Overview
a) LEDs
POWER lights up when the router is connected to the mains
WLAN lights up when the WLAN is active, fl ashes quickly at data transfer
WAN
lights up when the network connection is active; fl ashes quickly at data transfer
LAN1/LAN2
lights up when a network connection is active; fl ashes quickly at data transfer
WPS fl ashes when the WPS is active
3.5G fl ashes at active UMTS connection
Page 40

40
b) Connections and Control Elements
SIM-card slot Card slot for an activated SIM card
2.4G ANT Connection for the WLAN-aerial
RESET Button to reset the router to factory settings
WPS Button to activate the WPS function
LAN1/LAN2 RJ45 network port. Devices like PCs or network drives can be connected
here
WAN RJ45 WAN-port. This is the internet port. E.g. a DSL or cable modem is con-
nected here
DC PWR Connection for the plug-in mains adapter from the scope of delivery
3.5G ANT Connection for the UMTS-aerial
c) Operating Modes
The device supports the operating modes “Gateway”, “Bridge” and “Wireless ISP”.
Depending on the operating mode selected, there are different options for how access to internet
can be performed or how the connection from the computer to the router is established.
• Operating mode “Gateway”
In this operating mode, the product works as a regular WLAN router. The internet connection
is created via the installed UMTS modem or an external DSL or cable modem (with LAN connection). It is connected to the WAN port of the router via a network cable. After confi guration,
PCs can connect to the router via WLAN and two LAN ports. The two LAN connections can be
extended with a network switch. The DHCP-server is permanently active.
Page 41

41
• Operating Mode “Bridge”
In the „Bridge“ mode, the device generally acts as an access point. It serves to expand a
present network with a WLAN access point. There must already be a router (with or without
WLAN) that is already connected to the internet. The two LAN connections and the WLAN are
bridged here. The connection to the router is established with a network cable. It is connected
to one of the three network connections of the device after the confi rmation. The PCs can be
wirelessly connected to the access point via WLAN or via one of the two other LAN ports in
operation later. This mode also permits expanding one or two LAN ports with a network switch.
The DHCP server is set to automatic operation. It is automatically deactivated once another
DHCP server appears in the network.
• Operating mode “Wireless ISP”
This mode is used to connect one or several computers in a public or private wireless network
(e.g. hotspot). Access to the internet is created via WLAN. Nevertheless, the device offers a
WLAN access point in parallel. The computers can thus be connected to the router with the
two LAN ports, the WAN port and the WLAN. In this operating mode, both LAN ports and the
WAN port are perfectly normal network connections. Therefore, it doesn‘t matter at which
network port you connect your computer after the confi guration. It is also possible to expand
the ports of the router with a network switch. The DHCP-server is permanently active.
d) General Information
• The product’s pre-set IP address for all operating modes is 192.168.1.254.
• The user name and the password for the web interface both are “admin”.
• The standard operating mode at delivery and after reset is “Gateway”.
• If you have already confi gured the product differently, perform a reset before reconfi guring the
device. The procedure is described in chapter 13 of these instructions.
• The enclosed CD contains the English manual of the manufacturer. If you want to change
settings that are not described in these instructions, observe the manual of the manufacturer.
Page 42

42
7. Commissioning
• Unpack the device and accessories fi rst.
• Next, install the two aerials to the corresponding aerial sockets of the device.
• The confi guration should be performed via the LAN interface of the router at all times. There-
fore, connect the “LAN1“ connection of the router with a 1:1-connected network cable with a
free network connection of your computer. We recommend that you use the cable from the
delivery scope.
• If you want to confi gure the device as a router for UMTS, insert your activated SIM card into
the SIM card slot.
It is located at the back of the device. For this, observe the fi gure in chapter 6. b).
The card is inserted into the slot with the contacts up and the slanted side to the
right until it latches.
To remove it, push the card and pull it from the slot.
• If you want to confi gure the device as a router for DSL or cable, connect your DSL or cable
modem to the “WAN“ connection of the router again. Use a 1:1-connected network cable or
the original cable of the modem.
Switch on the modem.
• Nothing but performing the confi guration is required for the operating modes “Bridge“ and
“Wireless ISP“.
• Connect the plug-in mains adapter to the intended socket “DC PWR“ and connect it to a
mains outlet.
• If you have not done so yet, start your PC and wait until your operating system has booted
completely.
Page 43

43
8. Access to the Web Interface
If you have not done so yet, prepare the router and your computer as described in chapter 7.
This confi guration refers to the operating system Windows® 7. It is, however, nearly identical
for Windows® 8.
• If you connect the device for the fi rst time, a query usually appears to determine the site of the
network. Select “Home network“ or “Work network“ here.
• The network interface has to be confi gured so that the IP address is procured automatically.
• To review whether your PC is automatically assigned the IP address or to convert it, open the
„Network and Sharing Center“ of Windows® 7 fi rst.
• For this, left-click the network icon in the task bar.
Page 44

44
• Then click “Open Network and Sharing Center“.
• Now click the item “LAN connection” behind the new network.
• Click here, at the bottom left, on the
button “Properties“.
Page 45

45
• A confi guration window opens.
Mark the item “Internet Protocol
Version 4 (TCP/IPc4)“ there and click
“Properties“ again.
• Both items must be set to “Obtain
automatically“.
If this is not the case, fi rst write down
the current settings so that you can
reset to them to the original condition
after confi guration.
Then change them as shown in the
picture.
Confi rm with “OK“ and close the two
other windows again.
Page 46

46
• Now open your web
browser and type
the IP ad-
dress http://192.168.1.254/
of the router into the address line.
Confi rm with Enter.
• Enter “admin” (without
quotes) as user name and
password each in the corresponding fi elds.
Click “OK”.
Page 47

47
9. Confi guration of the Operating Mode “Gateway”
This chapter describes the basic confi guration of the operating mode “Gateway”. This mode
is used to operate the product as a router. Access to the Internet is established either via the
installed UMTS model or your external DSL or cable modem.
At delivery or after reset, the device is pre-set to the operating mode “Gateway”.
Once you have performed the connection for the internet connection selected by you as described in chapter 7, you can start confi guration immediately.
• After you have signed on at the web interface, fi rst click the menu item “Setup Wizard (Gate-
way Mode)“.
To start the confi guration programme, click “Next”.
•
You can change the IP address of the device in the fi rst confi guration window. Change the
address according to your wishes. Best leave the
“
Subnet Mask“ unchanged.
Now click “Next”.
Page 48

48
• You need to select the type of internet connection here on the next confi guration page. The
three most important types are explained herein sequence. The remaining confi guration is the
same for all types. Remember that the internet connection that you selected above in chapter
7 must be confi gured.
• If you want to operate the router with UMTS, leave the setting set to “3G“ as shown in the
image.
Enter the access address of your provider in the fi eld “APN”.
Enter the PIN of your SIM card in the fi eld “PIN“. Otherwise, leave the fi eld empty.
The dial-up number in the fi eld “Dial Number“ should be correct for most providers. Change it
accordingly in doubt.
If your provider needs a user named and password for the access, enter it in the fi eld “User-
name“ and “Password“.
Click the button “Next”.
Observe the separately enclosed information sheet for the input of your access
data as well.
Page 49

49
• If you want to operate the router with a DSL modem, select “PPPOE (ADSL)“ in the menu.
Enter your user name in the fi eld “User Name“ and your password in both fi elds “Password“
and “Verify Password“. These data are usually provided by your provider.
Then click “Next” again.
Observe the separately enclosed information sheet for the input of your access
data as well.
• If you want to operate the router in connection with a cable modem, change the settings in the
menu to “DHCP (Auto Confi g)“, as shown in the image.
For the next step, click “Next”.
Page 50

50
• The WLAN is confi gured on this page. If desired, change the WLAN name fi rst. For this, enter
any name of letters and fi gures behind “Network Name (SSID)“. Underscore and dashes are
also permitted.
To activate encryption, open the menu behind “Security Mode“ and best select “WPA2-PSK“.
Enter the safest password possible in the fi eld “Pre-Shared Key“. The same characters as in
the name are permitted here. The password must consist of at least 8 characters.
Click the button “Apply” to save and complete setup.
• The device now restarts and confi guration is assumed.
Please note:
If the IP-address has changed, you need to log on to the web interface again after
the restart. For this, enter the changed IP address into the address line of the
browser. It may also be necessary to disconnect your PC from the network briefl y
fi rst to have a new IP address assigned to it. You may also restart your PC.
Also observe chapter 12 a) on how to change the IP address.
• If desired, you may also change other settings now. Alsoo observe chapter 12 of these operating instructions on this.
• Confi guration is now complete. Your computers now can access the router and the internet as
usual via the ports „LAN1 and “LAN2“ or WLAN.
Page 51

51
10. Confi guration of the Operating Mode “Bridge”
This chapter describes the basic confi guration of the operating mode “Bridge”. This mode is
used to operate the product as an access point at a present router.
Once you have performed the connection as described in chapter 7, you can start confi guration
immediately.
• After you have signed on at the web interface, fi rst click the menu item “Operation Mode“ and
select the operating mode “Bridge“.
Save the setting with “Apply”.
• The settings are accepted. This may take several seconds.
• Next, click the menu item “Setup Wizard (Bridge Mode)”.
Start the setup by clicking “Next”.
Page 52

52
• You can change the IP address of the access point in the fi rst confi guration window. It would
be sensible, e.g., when you assign it an IP address in the range of your router to later access
the access point again easily without effort. If your router has, e.g., the address 192.168.178.1,
you will assign the AP, e.g., the address 192.168.178.250. You only need to observe that the
fi rst three blocks remain the same and the last block is not yet present in your network. Best
leave the “Subnet Mask” unchanged.
Now click “Next”.
• The WLAN is confi gured on this page. If desired, change the WLAN name fi rst. For this, enter
any name of letters and fi gures behind “Network Name (SSID)“. Underscore and dashes are
also permitted.
To activate encryption, open the menu behind “Security Mode“ and best select “WPA2-PSK“.
Enter the safest password possible in the fi eld “Pre-Shared Key“. The same characters as in
the name are permitted here. The password must consist of at least 8 characters.
Click the button “Apply” to save and complete setup.
Page 53

53
• The device now restarts and confi guration is assumed.
Please note:
If the IP-address has changed, you need to log on to the web interface again after
the restart. For this, enter the changed IP address into the address line of the
browser. It may also be necessary to disconnect your PC from the network briefl y
fi rst to have a new IP address assigned to it. You may also restart your PC.
Also observe chapter 12 a) on how to change the IP address.
• If desired, you may also change other settings now. Also observe chapter 12 of these operating instructions on this.
• To take the device into operation as an access point, connect the LAN port to a free LAN port
of your router with a 1:1-linked network cable. It doesn‘t matter if you use “LAN1“, “LAN2“ or
the connection “WAN“ of the device, since the three ports and the WLAN interface are connected. Finally, restart the AP by disconnecting it from the power supply briefl y.
The site of setup is generally only limited by the length of the network cable. The max. permis-
sible cable length at 10/100 MBit networks is about. 100 m.
• Confi guration is now complete.
Please note:
Proceed as follows if you have not put the IP-address in the DHCP-area of your
router and later want to change the confi guration. Disconnect the connection cable
from your router. Then restart the access point or disconnect it from the power
supply briefl y. Connect your PC directly to the access point and restart it. Then you
can access the web interface as in the basic confi guration.
Page 54

54
11.
Confi guration of the Operating Mode “Wireless ISP”
This chapter describes the basic confi guration of the operating mode “Wireless ISP”. This mode
is used to operate the product as a router with a dedicated DHCP server. The internet connection is created via WLAN.
Once you have performed the connection as described in chapter 7, you can start confi guration
immediately.
• After you have signed on at the web interface, fi rst click the menu item „Operation Mode“.
Then highlight the item “Wireless ISP” and confi rm with “Apply”.
• The settings are accepted. This may take several seconds.
• Next, click the menu item “Setup Wizard (WISP Mode)”.
To start the confi guration programme, click “Next”.
Page 55

55
• You can change the IP address of the device in the fi rst confi guration window. Change the
address according to your wishes. Best leave the “Subnet Mask“ unchanged.
Now click “Next”.
• You need to select the type of internet connection here. Usually, “DHCP (Auto Confi g)“ is the
right setting, e.g. when you want to sign up your router to a present WLAN.
For the next step, click “Next”.
Page 56

56
• The WLAN is confi gured on this page. You can access it later. If desired, change the WLAN
name fi rst. For this, enter any name of letters and fi gures behind “Network Name (SSID)“.
Underscore and dashes are also permitted.
To activate encryption, open the menu behind “Security Mode“ and best select “WPA2-PSK“.
Enter the safest password possible in the fi eld “Pre-Shared Key“. The same characters as in
the name are permitted here. The password must consist of at least 8 characters.
For this, click the button “Apply”.
• Now the WLAN you want to connect the device to must be confi gured. You can manually make
the setting. However, automatic searching is simpler.
For this, click the button “Scan APs“
Page 57

57
• A new window opens.
Select the desired WLAN here by clicking the corresponding circle.
The window automatically closes again.
• Check the assumed settings in the main window and enter the password for the selected
WLAN in the fi eld “Pass Phrase“ at the bottom.
Click the button “Apply“ to save the settings. A restart is performed.
Please note:
If the IP-address has changed, you need to log on to the web interface again after
the restart. For this, enter the changed IP address into the address line of the
browser. It may also be necessary to disconnect your PC from the network briefl y
fi rst to have a new IP address assigned to it. You may also restart your PC.
Also observe chapter 12 a) on how to change the IP address.
• If desired, you may also change other settings now. Also observe chapter 12 of these operating instructions on this.
• Confi guration is now complete. You can now connect all three network connections to your
devices. Access via the WLAN is possible as well, of course.
Page 58

58
12. Expanded Confi guration
a) Changing the IP-Address
• For this, click “Internet Settings” and then “LAN”.
• Change the IP address and the DHCP area according to your wishes.
• Save the settings by clicking “Apply”.
• The following examples are to make confi guration easier for you.
Assume that the router has the IP address 192.168.10.1 and the DHCP range is to be limited
to 192.168.10.50 to 192.168.10.100.
Then change the address as shown on the next image.
Page 59

59
Each block of the IP address must be in the range between 1 and 254.
• If you want to access to web
interface, you need to enter the
changed IP address into your
browsers address line accordingly.
Please note:
Once the product recognises a DHCP server in the network, the integrated one
is deactivated. However, this only applies for the operating mode „Bridge“. The
DHCP server is always active in the two other operating modes.
You can adjust the IP address and the DHCP area as you wish here.
b) Changing the Administrator Password
• To change the administrator password, click the sub-item “Management“ in the menu item
„Administration“.
• Enter any password in the fi eld “Password”.
Save the settings by clicking “Apply”.
• The web interface is automatically updated and you need to enter the password again for
logging on.
Page 60

60
c) Changing the Time Zone
• To change the time zone, click the sub-item „Management“ in the menu item „Administration“.
• Scroll a little down to the point “NTP Settings”.
•
Open the selection menu behind “Time Zone“ there and select the desired time zone.
• Save the settings by clicking “Apply”.
d) Saving the Settings
• To save the settings of the product in a fi le, click the sub item “Settings Management“ in the
menu item “Administration“.
• Then click the button “Export“ on the right to download the confi guration fi le.
if you want to restore the saved confi guration later, you can do that in the same
menu using the item “Import“.
Page 61

61
e) Use of WPS
• Proceed as follows to use the WPS function.
• If the router is not in operation, activate it fi rst and then wait for approx. 1 minute until the
starting process has been completed.
• Then push the button “WPS“ at the back of the device for about 3 seconds and release it
again. The WPS-LED at the device starts to fl ash.
• The router is now in WPS reception mode. To connect a device to the router, push the WPS
button at the respective device as well.
Observe the operating instruction of the device that you want to connect to the router as well.
• Wait until the connection has been established.
13. Resetting to the factory settings
a) With the “Reset” Button on the Device
• To reset the router to the factory settings without web interface, connect it to the plug-in mains
adapter and plug it into a mains socket. Wait for approx. 1 minute until start-up has been
completed.
• Then push the recessed button “Reset“ at the device for about 5 to 10 seconds and release
it again. Whether or not the reset was accepted by be seen by all LEDs except for the Power
LED going out for a certain time after a few seconds.
• The device now restarts. This will table take about 1 minutes. Then it is reset to factory settings.
Page 62

62
b) In the Web Interface
• To reset the WLAN router to the factory settings with the web interface, connect it to the plugin mains adapter and plug it into a mains socket. Wait for approx. 1 minute until start-up has
been completed. Log into the web interface as described in chapter 8.
• First click “Administration” and then “Settings Management”.
Click the button “Load Default” to start the reset process.
• Whether or not the reset was accepted by be seen by all LEDs except for the Power LED
going out for a certain time after a few seconds.
• The device now restarts. This will table take about 1 minutes. Then it is reset to factory settings.
Page 63

63
14. Maintenance and Cleaning
Servicing or repair must only be carried out by a specialist or specialist workshop. The product
contains no parts that require servicing by you. Therefore, do not open it.
A dry, soft and clean cloth is suffi cient for cleaning the outside.
Never use any aggressive cleaning agents, alcohol or other chemical solutions that
would damage the casing (discolouration).
15. Handling
Observe all safety information in these operating instructions!
• When setting up the product, make sure that the cables are neither bent nor
pinched.
• The following unfavourable conditions are to be avoided at the place of installation or during transport:
- Dampness or high humidity
- extreme cold (< 0°C) or heat (> 60°C), direct sunlight
- Dust or fl ammable gases, fumes or solvents
- Strong vibration, impact or blows
- strong magnetic fi elds as present near machines or speakers
• It can be assumed that safe operation is no longer possible if
- the device shows any visible damage,
- the device no longer functions and
- the device was stored under unfavourable conditions for an extended period
of time or
- after it was exposed to extraordinary stress caused by transport.
•
The maximum possible data transfer rate (e.g. 150 MBit at 802.11b/g/n, i.e. about 17.5
MByte/s) is never reached in practical operation. This is due to the used transmission
technology, transmission errors, the distance between the WLAN devices, etc.
• WLAN network connections should always be encrypted to prevent unauthorised access, e.g. to your WLAN router. You should mainly use the encryption
type “WPA2“ instead of “WPA“ or “WEP“, since “WPA“ and “WEP“ are no longer
suffi ciently safe against attacks.
Page 64

64
• The range depends on the ambience conditions; reduction of the radio range
may be caused by:
-
High-frequency interferences of all types (computers, screens, mobile phones)
- Buildings of all types and vegetation
- Conducting metal parts that are in the proximity of the devices or within or
close to radio routes, e.g. cables, radiators, metallised insulating glass windows, reinforced concrete ceilings, etc.
- Infl uencing of the radiation characteristics of the aerials by the distance be-
tween transmitter or receiver to conducting surfaces and objects (also to the
human body or ground)
- Broadband interferences in rural areas that reduce signal to noise ration; the
signal is no longer recognised within the „noise“
- Irradiation from defectively shielded electronic devices, e.g. openly operated
computers, etc.
- Too low distance between receiver/transmitter
16. Disposal
Electrical and electronic products must not be disposed of in domestic waste.
Dispose of the product according to the relevant statutory regulations at the end of
its service life.
Page 65

65
17. Technical Data
a) UMTS WLAN-Router
Operating Voltage .................................12 V/DC
WLAN ...................................................802.11b/g/n (max. 150 MBit)
Network connection ..............................2x LAN, RJ45, 10/100 MBit;
1x WAN, RJ45, 10/100 MBit;
Aerials ...................................................1x WLAN-aerial, 1x UMTS/3G-aerial
Modem ..................................................installed, operation with regular SIM card
Modem standards .................................UMTS, HSDPA, HSUPA, WCDMA
Operating modes ..................................Gateway, Bridge, Wireless ISP
Dimensions (W x H x D) .......................approx. 150 x 27.5 x 105 mm (without aerials)
Weight ..................................................Approx. 196 g (without aerials)
Ambient temperature/operation ............0 °C to 60 °C
Humidity at storage ............................... 10% to 90% rel. humidity, non-condensing
b) Mains Adapter
Operating Voltage .................................100 - 240 V/AC, 50/60 Hz, 0.75 A
Output ...................................................12 V/DC, 1.5 A
18. Declaration of Conformity (DOC)
We, Conrad Electronic, Klaus-Conrad-Straße 1, D-92240 Hirschau, hereby declare that this
product complies with the fundamental requirements and the other relevant regulations of the
directive 1999/5/EC.
The compliance statement for this product is available at
www.conrad.com.
Page 66

66
Table des matières
1. Introduction ........................................................................................................................ 67
2. Utilisation conforme ........................................................................................................... 68
3. Étendue de la livraison ...................................................................................................... 68
4. Explication des symboles .................................................................................................. 68
5. Consignes de sécurité .......................................................................................................69
6. Vue d’ensemble du produit ................................................................................................ 71
a) DEL .............................................................................................................................. 71
b) Raccords et éléments de commande........................................................................... 72
c) Modes de fonctionnement ............................................................................................ 72
d) Informations générales................................................................................................. 73
7. Mise en service ................................................................................................................. 74
8. Accès à l’interface web ...................................................................................................... 75
9. Confi guration du mode de fonctionnement « Gateway » ..................................................79
10. Confi guration du mode de fonctionnement « Bridge » ...................................................... 83
11. Confi guration du mode de fonctionnement « Wireless ISP » ............................................ 86
12. Confi guration étendue ....................................................................................................... 90
a) Modifi cation de l’adresse IP ......................................................................................... 90
b) Modifi cation du mot de passe de l’administrateur ........................................................ 91
c) Modifi cation du fuseau horaire ..................................................................................... 92
d) Enregistrement des paramètres ................................................................................... 92
e) Utilisation de la fonction WPS ...................................................................................... 93
13. Réinitialisation avec les réglages d’usine .......................................................................... 93
a) À l’aide de la touche « Reset » sur l’appareil ............................................................... 93
b) Via l’interface web ........................................................................................................94
14. Entretien et nettoyage .......................................................................................................95
15. Manipulation ...................................................................................................................... 95
16. Élimination ......................................................................................................................... 96
17. Caractéristiques techniques .............................................................................................. 97
a) UMTS routeur Wi-Fi ..................................................................................................... 97
b) Bloc d’alimentation ....................................................................................................... 97
18. Déclaration de conformité (DOC) ...................................................................................... 97
Page 67

67
1. Introduction
Chère cliente, cher client,
Nous vous remercions pour l’achat de ce produit.
Ce produit est conforme aux exigences légales des directives européennes et nationales en
vigueur. Afi n de le maintenir en bon état et d’en assurer un fonctionnement sans danger, l’utili-
sateur doit impérativement respecter le présent mode d’emploi !
Avant l’utilisation de ce produit, lisez attentivement le mode
d’emploi dans
son intégralité et observez toutes les instructions d’utilisation et consignes de
sécurité.
Tous les noms d’entreprises et appellations de produits contenus dans ce mode d’emploi sont
des marques déposées des propriétaires respectifs. Tous droits réservés.
Pour toute question technique, veuillez vous adresser à :
France: Tél. 0892 897 777
Fax 0892 896 002
du lundi au vendredi de 8h00 à 18h00
le samedi de 8h00 à 12h00
Suisse: Tél 0848 / 80 12 88
Fax 0848 / 80 12 89
e-mail:support@conrad.ch
du lundi à vendredi de 8h00 à 12h00, 13h00 à 17h00
Page 68

68
2. Utilisation conforme
Le routeur permet à plusieurs ordinateurs de connecter à internet ou à un réseau existant. L’accès à internet peut alors être réalisé à partir d’un modem DSL ou Câble externe équipé d’une
connexion LAN ou à partir du modem UMTS interne.
L’alimentation électrique s’effectue uniquement à l’aide du bloc d’alimentation fourni.
3. Étendue de la livraison
• UMTS routeur Wi-Fi
• 2 antennes
• Bloc d’alimentation
• Pied
• Câble Ethernet
• Manuel du fabricant sur CD
• Mode d’emploi
4. Explication des symboles
Le symbole de l’éclair dans le triangle est utilisé pour signaler un danger pour votre
santé, par ex. un danger d’électrocution.
Le symbole avec le point d’exclamation placé dans un triangle signale les informations importantes du présent mode d’emploi qui doivent impérativement être
respectées.
Le symbole de la « main » précède les conseils et indications spécifi ques à l’utili-
sation.
Page 69

69
5. Consignes de sécurité
Veuillez lire intégralement le mode d’emploi avant la mise en service de
l’appareil ; il contient des consignes importantes pour son fonctionnement
correct.
Tout dommage résultant d’un non-respect du présent mode d’emploi en-
traîne l’annulation de la garantie ! Nous déclinons toute responsabilité pour
les dommages consécutifs !
De même, nous n’assumons aucune responsabilité en cas de dommages
matériels ou corporels résultant d’une utilisation non conforme aux spécifi -
cations ou du non-respect des présentes consignes de sécurité ! De tels cas
entraînent l’annulation de la garantie ou garantie légale !
Chère cliente, cher client,
Les présentes consignes de sécurité servent non seulement à la protection du produit, mais permettent également de garantir votre propre sécurité ainsi que celle des
autres personnes. Veuillez donc très attentivement lire ce chapitre avant la mise en
service du produit !
• Pour des raisons de sécurité et d’homologation (CE), il est interdit de transformer et / ou de modifi er soi-même le produit. Ne l’ouvrez et ne le démontez pas !
Le produit ne contient aucune pièce nécessitant un entretien.
Toute intervention de maintenance ou de réparation ne doit être effectuée que
par un spécialiste ou un atelier spécialisé.
• Ce produit est uniquement homologué pour une utilisation en intérieur dans des
locaux secs. Le produit ne doit pas prendre l’humidité ou être mouillé, ne le
touchez jamais avec les mains mouillées !
Il y a danger de mort par électrocution !
• La construction du bloc d’alimentation correspond à la classe de protection II. En
tant que source de tension pour le bloc d’alimentation, uniquement utiliser une
prise de courant en état de marche connectée au réseau d’alimentation public.
• La prise de courant doit se trouver à proximité du l’appareil et être facilement
accessible.
• Veillez à ne pas endommager ni détruire l’isolation de l’ensemble du produit.
• Avant chaque utilisation, assurez-vous que l’appareil ne soit pas endommagé !
• Si l’appareil est endommagé, il est INTERDIT de le raccorder à la tension du
secteur ! Il y a danger de mort !
Page 70

70
• Protégez le produit contre le rayonnement solaire direct, les températures élevées (> 60°C) et basses (< 0 °C), la poussière et la saleté, les gouttes et projections d’eau, les vibrations et les contraintes mécaniques.
• De l’eau de condensation peut se former au cours du déplacement du produit
d’une pièce froide dans une pièce chaude (par ex. durant le transport). Cela peut
endommager le produit. Un danger de mort par électrocution émane également
du bloc d’alimentation !
Attendez donc que le produit ait atteint la température ambiante avant de l’utili-
ser ou de le raccorder à la tension du secteur. Dans certains cas, cela peut durer
plusieurs heures.
• Le produit n’est pas un jouet. Tenir les appareils alimentés par secteur hors de
portée des enfants. Soyez donc particulièrement vigilant en cas d’utilisation en
présence d’enfants.
• Ne laissez pas traîner le matériel d’emballage sans surveillance, il pourrait
constituer un jouet dangereux pour les enfants.
• Utilisez uniquement le produit dans les régions à climat modéré, pas dans les
régions à climat tropical.
• Ne placez aucun récipient contenant des liquides, par ex. seaux, vases ou
plantes, à proximité immédiate du produit. Les liquides pourraient pénétrer à
l’intérieur du boîtier et compromettre la sécurité électrique. Par ailleurs, il y a
danger d’incendie et danger de mort par électrocution.
• Ne placez aucune source de chaleur susceptible de provoquer un incendie,
comme par ex. des bougies allumées, sur ou à proximité de l’appareil.
• Veillez à ne pas plier le câble et à n’y déposer aucun objet.
• Ce produit doit être manipulé avec précaution. Les coups, les chocs ou une
chute, même d’une faible hauteur, pourraient l’endommager.
• Si l’appareil est endommagé, ne l’utilisez plus. En tel cas, confi ez l’appareil à un
atelier spécialisé.
• Dans les installations industrielles, il convient d’observer les consignes de prévention des accidents relatives aux installations et moyens d’exploitation électriques, édictées par le syndicat professionnel.
• Dans les écoles, les centres de formation, les ateliers de loisirs et de réinsertion,
l’utilisation du produit doit être surveillée par le personnel formé à cet effet.
• Si vous avez des questions auxquelles vous ne trouvez aucune réponse dans le
présent mode d’emploi, contactez notre service technique ou un spécialiste.
Page 71

71
6. Vue d’ensemble du produit
a) DEL
POWER allumée lorsque le routeur est relié au réseau électrique
WLAN allumée lorsque le réseau Wi-Fi est activé ; clignote rapidement durant la
transmission de données
WAN
allumée lorsque qu’une connexion réseau est activée ; clignote rapidement
durant la transmission de données
LAN1/LAN2
allumée lorsque qu’une connexion réseau est activée ; clignote rapidement
durant la transmission de données
WPS clignote lorsque la fonction WPS est activée
3.5G clignote lorsque la connexion UMTS est activée
Page 72

72
b) Raccords et éléments de commande
Slot pour cartes SIM Slot pour une carte SIM activée
2.4G ANT Prise pour l’antenne Wi-Fi
RESET Bouton-poussoir pour la réinitialisation du routeur avec les réglages
d’usine
WPS Bouton-poussoir pour l’activation de la fonction WPS
LAN1/LAN2 Port réseau RJ45 ; pour le raccordement d’appareils tels qu’ordina-
teurs ou disques durs réseau
WAN Port WAN RJ45 ; il s’agit ici du port internet ; par ex. pour le raccorde-
ment d’un modem DSL ou Câble
DC PWR Prise pour le bloc d’alimentation fourni
3.4G ANT Prise pour l’antenne UMTS
c) Modes de fonctionnement
L’appareil prend en charge les modes de fonctionnement « Gateway », « Bridge » et « Wireless
ISP ».
Selon le mode de fonctionnement sélectionné, l’accès à internet et la connexion du PC au
routeur s’effectuent de différentes manières.
• Mode de fonctionnement « Gateway »
Avec ce mode de fonctionnement, le produit fonctionne comme un routeur Wi-Fi normal.
La connexion internet doit être établie soit à l’aide du modem UMTS intégré soit à l’aide
d’un modem DSL ou Câble externe (avec connexion LAN). Le modem se branche alors à
l’aide d’un câble Ethernet au port WAN du routeur. Après la confi guration, les ordinateurs
peuvent se connecter au routeur via Wi-Fi et via les deux ports LAN. Les deux connexions
LAN peuvent ici être étendues à l’aide d’un commutateur réseau. Le serveur DHCP est activé
en permanence.
Page 73

73
• Mode de fonctionnement « Bridge »
En mode « Bridge », l’appareil fonctionne en principe comme un point d’accès. Il permet
d’ajouter un point d’accès Wi-Fi au réseau existant. Un routeur (avec ou sans Wi-Fi) doit déjà
être installé et connecté à internet. Les deux connexions LAN, le port WAN et le WLAN sont ici
shuntés. La connexion au routeur est établie à l’aide d’un câble Ethernet. Ce dernier doit être
branché sur l’unes des trois prise Ethernet après la confi guration de l’appareil. Les ordinateurs
peuvent, par la suite, se connecter au point d’accès soit sans fi l via Wi-Fi soit via l’un des deux
ports LAN libres. Ce mode permet également d’ajouter un commutateur réseau à une ou aux
deux connexions LAN. Le serveur DHCP est confi guré en mode automatique. Dès qu’un autre
serveur DHCP est détecté au sein du réseau, il est automatiquement désactivé.
• Mode de fonctionnement « Wireless ISP »
Ce mode permet de connecter un ou plusieurs ordinateurs à un réseau sans fi l public ou privé
(par ex. borne Wi-Fi). L’accès à internet est ici établi via Wi-Fi. L’appareil offre toutefois parallèlement un point d’accès Wi-Fi. Les ordinateurs peuvent ainsi être raccordés au routeur via
les deux ports LAN, via le port WAN et via Wi-Fi. Avec ce mode de fonctionnement, les deux
ports LAN et le port LAN sont des connexions réseau normales. Vous pouvez raccorder votre
ordinateur à n’importe quel port Ethernet après la confi guration. Il est également possible
d’étendre les ports du routeur à l’aide d’un commutateur réseau. Le serveur DHCP est activé
en permanence.
d) Informations générales
• Avec tous les modes de fonctionnement, l’adresse IP prédéfi nie pour le produit est
192.168.1.254.
• Par défaut, le nom d’utilisateur et le mot de passe pour l’interface web sont tous les deux
« admin ».
• Lors de la livraison et après une réinitialisation, le mode de fonctionnement par défaut est le
mode « Gateway ».
• Si vous avez déjà confi guré le produit différemment, réinitialisez de préférence l’appareil
avant d’effectuer une nouvelle confi guration. La procédure est décrite dans le chapitre 13 du
présent mode d’emploi.
• Le CD fourni contient la version anglais du manuel du fabricant. Si vous souhaitez modifi er
des réglages qui ne sont pas décrits dans le présent mode d’emploi, veuillez consulter le
manuel du fabricant.
Page 74

74
7. Mise en service
• Déballez d’abord l’appareil et les accessoires.
• Montez ensuite les deux antennes sur les prises correspondantes de l’appareil.
• Le routeur doit toujours être confi guré via l’interface LAN. Raccordez donc la prise « LAN1 »
du routeur à l’aide d’un câble Ethernet 1:1 à une prise Ethernet libre de votre ordinateur. Nous
vous recommandons d’utiliser le câble fourni.
• Si vous souhaitez confi gurer l’appareil pour UMTS, insérez la carte SIM activée dans le slot
pour cartes SIM.
Il se trouve au dos de l’appareil. À ce propos, observez également le illustration dans le
chapitre 6. b).
La carte doit être insérée dans le slot en veillant à ce que les contacts soient tour-
nés vers le haut, que le coin découpé se trouve à droite et que la carte s’enclenche
correctement.
Pour la retirer, il suffi t d’exercer une pression sur la carte puis la sortir ensuite du
slot.
• Si vous souhaitez confi gurer l’appareil comme routeur DSL ou Câble, raccordez maintenant
votre modem DSL ou Câble à la prise « WAN » du routeur. À cet effet, employez également
un câble Ethernet 1:1 ou, de préférence, les câbles d’origine fournis avec le modem.
Allumez le modem.
• Pour les modes de fonctionnement « Bridge » et « Wireless ISP », la confi guration nécessite
uniquement l’observation des points suivants.
• Raccordez le bloc d’alimentation à la prise femelle « DC PWR » puis branchez-le sur une
prise de courant.
• S’il n’est pas déjà allumé, allumez, pour fi nir, votre ordinateur et attendez que le système
d’exploitation soit complètement chargé.
Page 75

75
8. Accès à l’interface web
Le cas échéant, préparez le routeur et votre ordinateur en suivant les instructions dans le chapitre 7.
Cette confi guration s’applique au système d’exploitation Windows® 7. La procédure est quasi-
ment identique sous Windows® 8.
• Lors de la première connexion de l’appareil, vous devez normalement défi nir l’emplacement
du réseau. Sélectionnez ici « Heimnetzwerk » (Réseau domestique) ou « Arbeitsplatznetzwerk » (Réseau de bureau).
• L’interface réseau doit alors être confi gurée de manière à obtenir automatiquement l’adresse
IP.
• Pour vérifi er si l’adresse IP est automatiquement affectée à votre ordinateur ou pour modifi er
votre adresse IP, ouvrez d’abord le « Netzwerk und Freigabecenter » (Centre Réseau et
partage) de Windows® 7.
Page 76

76
• À cet effet, cliquez avec la touche gauche de la souris
sur le symbole du réseau dans la barre des tâches.
• Cliquez ensuite sur « Netzwerk- und
Freigabecenter öffnen » (Ouvrir le Centre Réseau et partage).
• Cliquez maintenant sur l’option « LAN-Verbindung » (Connexion LAN) derrière le nouveau
réseau.
• Cliquez maintenant en bas à gauche
sur le bouton « Eigenschaften » (Propriétés).
Page 77

77
•
Une fenêtre de confi guration s’ouvre
sur l’écran.
Dans cette fenêtre, marquez le point
« Internetprotokoll Version 4 (TCP/
IPc4) » (Protocole Internet version 4
(TCP/IPc4)) puis cliquez encore une
fois sur le bouton « Eigenschaften »
(Propriétés).
•
Les deux options « auto
matisch beziehen » (Obtenir automatiquement)
doivent ici être sélectionnées.
Le cas contraire, notez d’abord les
paramètres actuels afi n que vous
puissiez rétablir ces paramètres
après la confi guration.
Modifi ez ensuite les paramètres de la
manière indiquée sur l’illustration.
Validez en cliquant sur le bouton
« OK » puis refermez les deux autres
fenêtres.
Page 78

78
• Ouvrez maintenant votre
navigateur web et saisissez
l’adresse IP
http://192.168.1.254/
du
routeur dans la barre
d’adresse.
Validez en appuyant sur Entrée.
• Saisissez respectivement
« admin » (sans guillemets)
comme nom d’utilisation et
comme mot de passe dans
les champs correspondants.
Cliquez sur « OK ».
Page 79

79
9. Confi guration du mode de fonctionnement
« Gateway »
Ce chapitre décrit la confi guration de base du mode de fonctionnement « Gateway ». Ce mode
permet d’utiliser le produit comme routeur. L’accès à internet est établi soit via le modem UMTS
intégré soit via votre modem DSL ou Câble externe.
Lors de la livraison et après une réinitialisation, le mode de fonctionnement « Gateway » est
présélectionné sur l’appareil.
Si vous avez effectué le raccordement de la manière décrite dans le chapitre 7 pour la connexion
internet souhaitée, vous pouvez immédiatement lancer la confi guration.
• Après votre connexion à l’interface web, cliquez d’abord sur la rubrique « Setup Wizard (Ga-
teway Mode) » du menu.
Pour lancer le programme de confi guration, cliquez sur « Next ».
•
Vous pouvez modifi er l’adresse IP de l’appareil dans la première fenêtre de confi guration. Modifi ez
l’adresse comme vous le souhaitez. Ne modifi ez pas, de préférence, le champ « Subnet Mask ».
Cliquez maintenant sur « Next ».
Page 80

80
• Sur la page suivante de la confi guration, vous devez sélectionner le type de connexion inter-
net. Les trois principaux types sont expliqués ici séparément. Le reste de la confi guration est
identique pour tous les types. N’oubliez pas que vous devez confi gurer la connexion internet
que vous précédemment sélectionnée dans le chapitre 7.
• Si vous souhaitez utiliser le routeur via UMTS, ne modifi ez pas le réglage « 3G » représenté
sur la fi gure.
Saisissez l’adresse d’accès de votre fournisseur d’accès à internet dans le champ « APN ».
Le cas échéant, saisissez le code PIN dans le champ « PIN ». N’inscrivez sinon rien dans ce
champ.
Le numéro de connexion dans le champ « Dial Number » devrait être correct pour la plupart
des fournisseurs d’accès à internet. En cas de doute, modifi ez-le conformément aux instruc-
tions fournies.
Si votre fournisseur d’accès à internet requiert un nom d’utilisateur et un mot de passe pour
l’accès, saisissez-les dans le champ « Username » et « Password ».
Cliquez sur le bouton « Next ».
Pour la saisie de vos identifi ants, observez également la fi che d’information jointe.
Page 81

81
• Si vous souhaitez par contre utiliser le routeur avec un modem DSL, sélectionnez l’option
« PPPOE (ADSL) » dans le menu.
Saisissez votre nom d’utilisateur dans le champ « User Name » et votre mot de passe dans
les champs « Password » et « Verify Password ». Ces identifi ants vous sont normalement
fournis par votre fournisseur d’accès à internet.
Cliquez ensuite à nouveau sur « Next ».
Pour la saisie de vos identifi ants, observez également la fi che d’information jointe.
• Si vous souhaitez utiliser le routeur en liaison avec un modem Câble, modifi ez le réglage dans
le menu en sélectionnant « DHCP (Auto Confi g) » comme sur la fi gure.
Pour passer à l’étape suivante, cliquez sur « Next ».
Page 82

82
• Cette page permet de confi gurer le réseau Wi-Fi. Le cas échéant, modifi ez d’abord le nom du
réseau Wi-Fi. Pour ce faire, saisissez un nom quelconque, composé de lettres et de chiffres,
dans le champ « Network Name (SSID) ». Les tirets et tirets bas sont également autorisés.
Pour activer le chiffrement, ouvrez la liste du champ « Security Mode » et sélectionnez, de
préférence, l’option « WPA2-PSK ». Saisissez un mot de passe sûr dans le champ « PreShared Key ». Les caractères autorisés sont identiques aux caractères autorisés pour le nom.
Le mot de passe doit comporter au moins 8 caractères.
Pour enregistrer et terminer la confi guration, cliquez sur le bouton « Apply ».
• L’appareil redémarre maintenant et charge la confi guration.
Veuillez observer les points suivants :
Si vous avez modifi é l’adresse IP, vous devrez à nouveau vous connecter à l’inter-
face web. Pour ce faire, saisissez la nouvelle adresse IP dans la barre d’adresse
du navigateur. Le cas échéant, il peut s’avérer nécessaire de d’abord brièvement
débrancher l’ordinateur du réseau afi n qu’une nouvelle adresse IP lui soit affectée.
Vous pouvez sinon également redémarrer votre ordinateur.
Pour de plus amples informations à propos de la modifi cation de l’adresse IP,
observez également le chapitre 12 a).
• Si vous le souhaitez, vous pouvez maintenant encore modifi er d’autres réglages. À cet effet,
observez également le chapitre 12 du présent mode d’emploi.
• La confi guration est maintenant terminée. Vos ordinateurs peuvent maintenant accéder au
routeur et à internet comme d’habitude via les ports « LAN1 » et « LAN1 » ou via Wi-Fi.
Page 83

83
10. Confi guration du mode de fonctionnement
« Bridge »
Ce chapitre décrit la confi guration de base du mode de fonctionnement « Bridge ». Ce mode
permet d’utiliser le produit comme point d’accès avec un routeur existant.
Si vous avez effectué le raccordement de la manière décrite dans le chapitre 7, vous pouvez
immédiatement lancer la confi guration.
• Après votre connexion à l’interface web, cliquez d’abord sur la rubrique « Operation Mode »
du menu puis sélectionnez le mode de fonctionnement « Bridge ».
Enregistrez le paramètre en cliquant sur « Apply ».
• Les réglages sont enregistrés. Cela peut durer quelques secondes.
• Cliquez ensuite sur la rubrique « Setup Wizard (Bridge Mode) » du menu.
Cliquez sur « Next » pour démarrer la confi guration.
Page 84

84
• Vous pouvez modifi er l’adresse IP du point d’accès dans la première fenêtre de confi -
guration. Il est ici par ex. utile de défi nir une adresse IP comprise dans la plage de votre
routeur afi n de pouvoir, par la suite, à nouveau facilement accéder au point d’accès. Si
l’adresse 192.168.178.1 est par ex. affectée à votre routeur, affectez par exemple l’adresse
192.168.178.250 au point d’accès. Vous devez ici uniquement veiller à ce que les trois premiers blocs soient identiques et à ce que le dernier bloc ne soit pas déjà employé dans votre
réseau. Ne modifi ez pas, de préférence, le champ « Subnet Mask ».
Cliquez maintenant sur « Next ».
• Cette page permet de confi gurer le réseau Wi-Fi. Le cas échéant, modifi ez d’abord le nom du
réseau Wi-Fi. Pour ce faire, saisissez un nom quelconque, composé de lettres et de chiffres,
dans le champ « Network Name (SSID) ». Les tirets et tirets bas sont également autorisés.
Pour activer le chiffrement, ouvrez la liste du champ « Security Mode » et sélectionnez, de
préférence, l’option « WPA2-PSK ». Saisissez un mot de passe sûr dans le champ « PreShared Key ». Les caractères autorisés sont identiques aux caractères autorisés pour le nom.
Le mot de passe doit comporter au moins 8 caractères.
Pour enregistrer et terminer la confi guration, cliquez sur le bouton « Apply »
Page 85

85
• L’appareil redémarre maintenant et charge la confi guration.
Veuillez observer les points suivants :
Si vous avez modifi é l’adresse IP, vous devrez à nouveau vous connecter à l’inter-
face web. Pour ce faire, saisissez la nouvelle adresse IP dans la barre d’adresse
du navigateur. Le cas échéant, il peut s’avérer nécessaire de d’abord brièvement
débrancher l’ordinateur du réseau afi n qu’une nouvelle adresse IP lui soit affectée.
Vous pouvez sinon également redémarrer votre ordinateur.
Pour de plus amples informations à propos de la modifi cation de l’adresse IP,
observez également le chapitre 12 a).
• Si vous le souhaitez, vous pouvez maintenant encore modifi er d’autres réglages. À cet effet,
observez également le chapitre 12 du présent mode d’emploi.
• Pour confi gurer l’appareil comme point d’accès, raccordez un port LAN à un port LAN libre de
votre routeur à l’aide d’un câble Ethernet 1:1. Vous pouvez, au choix, utiliser le port « LAN1 »,
« LAN2 » ou le port « WAN » de l’appareil étant donné que les trois et l’interface WLAN sont
reliés entre eux. Pour fi nir, redémarrez le point d’accès en le débranchant brièvement de
l’alimentation électrique.
En principe, le lieu de montage dépend uniquement de la longueur du câble Ethernet. Pour
les réseaux 10/100 MBit, la longueur de câble max. autorisée s’élève à env. 100 m.
• La confi guration est maintenant terminée.
Veuillez observer les points suivants :
Si l’adresse IP n’est pas comprise dans la plage d’adresses DHCP de votre routeur
et que vous souhaitez modifi er la confi guration par la suite, procédez de la ma-
nière suivante. Débranchez le câble de raccordement à votre routeur. Redémarrez
ensuite le point d’accès ou débranchez-le brièvement de l’alimentation électrique.
Reliez directement votre ordinateur au point d’accès puis redémarrez-le. Vous
pouvez ensuite accéder à l’interface web en procédant de la même manière que
pour la confi guration de base.
Page 86

86
11. Confi guration du mode de fonctionnement
« Wireless ISP »
Ce chapitre décrit la confi guration de base du mode de fonctionnement « Wireless ISP ». Ce
mode permet d’utiliser le produit comme routeur avec un serveur DHCP distinct. La connexion
internet est ici établie via Wi-Fi.
Si vous avez effectué le raccordement de la manière décrite dans le chapitre 7, vous pouvez
immédiatement lancer la confi guration.
• Après votre connexion à l’interface web, cliquez d’abord sur la rubrique « Operation Mode »
du menu.
Sélectionnez ensuite l’option « Wireless ISP » puis validez en cliquant sur « Apply ».
• Les réglages sont enregistrés. Cela peut durer quelques secondes.
• Cliquez ensuite sur la rubrique « Setup Wizard (WISP Mode) » du menu.
Pour lancer le programme de confi guration, cliquez sur « Next ».
Page 87

87
• Vous pouvez modifi er l’adresse IP de l’appareil dans la première fenêtre de confi guration. Mo-
difi ez l’adresse comme vous le souhaitez. Ne modifi ez pas, de préférence, le champ « Subnet
Mask ».
Cliquez maintenant sur « Next ».
• Vous devez ici sélectionner le type de connexion internet. Dans la plupart des cas, le réglage
correct sera « DHCP (Auto Confi g) », par ex. si vous souhaitez connecter le routeur à un
réseau Wi-Fi existant.
Pour passer à l’étape suivante, cliquez sur « Next ».
Page 88

88
• Cette page permet de confi gurer le réseau Wi-Fi auquel vous vous connecterez par la suite
avec vos appareils. Le cas échéant, modifi ez d’abord le nom du réseau Wi-Fi. Pour ce faire,
saisissez un nom quelconque, composé de lettres et de chiffres, dans le champ « Network
Name (SSID) ». Les tirets et tirets bas sont également autorisés.
Pour activer le chiffrement, ouvrez la liste du champ « Security Mode » et sélectionnez, de
préférence, l’option « WPA2-PSK ». Saisissez un mot de passe sûr dans le champ « PreShared Key ». Les caractères autorisés sont identiques aux caractères autorisés pour le nom.
Le mot de passe doit comporter au moins 8 caractères.
Cliquez encore sur le bouton « Apply ».
• Vous devez maintenant confi gurer le réseau Wi-Fi auquel vous souhaitez connecter l’appareil.
Vous pouvez modifi er les réglages manuellement. La recherche automatique est toutefois
plus simple.
Cliquez pour cela sur la surface de commande « Scan APs »
Page 89

89
• Une nouvelle fenêtre s’affi che.
Sélectionnez ici le réseau Wi-Fi souhaité en cliquant sur la puce correspondante.
La fenêtre se referme automatiquement.
• Vous pouvez contrôler les réglages dans la fenêtre principale puis saisir en bas le mot de
passe pour le réseau Wi-Fi sélectionné dans le champ « Pass Phrase ».
Un clic sur le bouton « Apply » permet d’enregistrer les réglages et l’appareil redémarre.
Veuillez observer les points suivants :
Si vous avez modifi é l’adresse IP, vous devrez à nouveau vous connecter à l’inter-
face web. Pour ce faire, saisissez la nouvelle adresse IP dans la barre d’adresse
du navigateur. Le cas échéant, il peut s’avérer nécessaire de d’abord brièvement
débrancher l’ordinateur du réseau afi n qu’une nouvelle adresse IP lui soit affectée.
Vous pouvez sinon également redémarrer votre ordinateur.
Pour de plus amples informations à propos de la modifi cation de l’adresse IP,
observez également le chapitre 12 a).
• Si vous le souhaitez, vous pouvez maintenant encore modifi er d’autres réglages. À cet effet,
observez également le chapitre 12 du présent mode d’emploi.
• La confi guration est maintenant terminée. Vous pouvez maintenant brancher vos appareils
aux trois prises Ethernet. Il est bien sûr également possible de se connecter via Wi-Fi.
Page 90

90
12. Confi guration étendue
a) Modifi cation de l’adresse IP
• Cliquez dans l’interface web sur la rubrique « Internet Settings » puis sur « LAN ».
• Modifi ez l’adresse IP ainsi que la plage d’adresses DHCP comme vous le souhaitez.
• Enregistrez les réglages en cliquant sur « Apply ».
• L’exemple ci-après a pour objectif de vous aider à réaliser la confi guration.
Supposons que votre routeur ait l’adresse IP 192.168.10.1 et que la plage d’adresses DHCP
doive être modifi ée avec les adresses 192.168.10.50 à 192.168.10.100.
Modifi ez alors l’adresse de la manière indiquée sur la fi gure suivante.
Page 91

91
Chaque bloc de l’adresse IP doit être compris entre 1 et 254.
• Si vous souhaitez maintenant
accéder à l’interface web, vous
devez saisir la nouvelle adresse
IP dans la barre d’adresse de
votre navigateur.
Veuillez observer les points suivants :
Dès que le produit détecte un serveur DHCP dans le réseau, le serveur intégré est
désactivé. Cela est toutefois uniquement valable pour le mode de fonctionnement
« Bridge ». Avec les deux autres modes de fonctionnement, le serveur DHCP est
toujours actif.
Vous pouvez ici librement modifi er l’adresse IP et le serveur DHCP.
b) Modifi cation du mot de passe de l’administrateur
• Pour modifi er le mot de passe de l’administrateur, cliquez sur l’option « Management » dans
la rubrique « Administration » du menu.
• Saisissez un mot de passe quelconque dans le champ « Password ».
Enregistrez le réglage en cliquant sur « Apply ».
• L’interface web est automatiquement actualisée et vous devez encore une fois saisir le mot de
passe pour la connexion.
Page 92

92
c) Modifi cation du fuseau horaire
• Pour modifi er le fuseau horaire, cliquez encore une fois sur la sous-rubrique « Management »
dans la rubrique « Administration » du menu.
• Faites défi ler l’écran vers le bas jusqu’à l’option « NTP Settings ».
•
Ouvrez ici le menu de sélection « Time Zone » puis sélectionnez le fuseau horaire souhaité.
• Enregistrez le réglage en cliquant sur « Apply ».
d) Enregistrement des paramètres
• Pour enregistrer les paramètres du produit dans un fi chier, cliquez sur la sous-rubrique « Set-
tings Management » dans la rubrique « Administration » du menu.
• Cliquez ensuite sur le bouton « Export » pour télécharger le fi chier de confi guration.
Si vous souhaitez restaurer par la suite la confi guration enregistrée, vous pouvez
effectuer cette procédure dans ce menu à partir de la rubrique « Import ».
Page 93

93
e) Utilisation de la fonction WPS
• Pour activer la fonction WPS, procédez de la manière suivante.
• Si le routeur est éteint, allumez-le d’abord puis attendez env. 1 minute jusqu’à ce que la
procédure de démarrage soit terminée.
• Maintenez ensuite sur la touche « WPS » enfoncée au dos de l’appareil pendant env. 3 secondes puis relâchez-la. La DEL WPS sur l’appareil commence ensuite à clignoter.
• Le routeur bascule maintenant en mode de réception WPS. Pour connecter un appareil au
routeur, appuyez également sur la touche WPS de l’appareil correspondant.
À cet effet, observez le mode d’emploi de l’appareil que vous souhaitez connecter au routeur.
• Attendez que la connexion soit établie.
13. Réinitialisation avec les réglages d’usine
a) À l’aide de la touche « Reset » sur l’appareil
• Pour réinitialiser l’appareil aux réglages d’usine sans passer par l’interface web, raccordezle au bloc d’alimentation puis branchez ce dernier sur une prise de courant. Attendez env.
1 minute jusqu’à ce que la procédure de démarrage soit terminée.
• Appuyez ensuite sur la touche « Reset » noyée de l’appareil pendant env. 5 à 10 secondes
puis relâchez-la. La réinitialisation est correctement initialisée lorsque toutes les DEL, exception faite de la DEL Power, s’éteignent un court instant.
• L’appareil redémarre. Cette procédure dure environ 1 minute. L’appareil est ensuite réinitialisé
avec les réglages d’usine.
Page 94

94
b) Via l’interface web
• Pour réinitialiser le routeur Wi-Fi avec les réglages d’usine à partir de l’interface web, raccordez-le au bloc d’alimentation puis branchez ce dernier sur une prise de courant. Attendez env.
1 minute jusqu’à ce que la procédure de démarrage soit terminée. Connectez-vous ensuite à
l’interface web en suivant les instructions dans le chapitre°8.
• Cliquez d’abord sur « Administration » puis sur « Settings Management ».
Un clic sur le bouton « Load Default » permet de lancer la procédure de réinitialisation.
• La réinitialisation est correctement initialisée lorsque toutes les DEL, exception faite de la DEL
Power, s’éteignent un court instant.
• L’appareil redémarre. Cette procédure dure environ 1 minute. L’appareil est ensuite réinitialisé
avec les réglages d’usine.
Page 95

95
14. Entretien et nettoyage
L’entretien et les réparations ne sont admis que s’ils sont effectués par un technicien ou un atelier
spécialisé. N’ouvrez jamais l’appareil, il ne contient aucun composant nécessitant un entretien.
Pour nettoyer l’extérieur, un chiffon propre, sec et doux suffi t.
N’utilisez en aucun cas des détergents agressifs, de l’alcool de nettoyage ou des
solutions chimiques. Ceux-ci risqueraient d’endommager le boîtier (décolorations).
15. Manipulation
Respectez toutes les consignes de sécurité du présent mode d’emploi !
• Durant l’installation du produit, veillez à ne pas plier ni écraser les câbles.
• Sur le site d’installation et durant le transport, évitez les conditions ambiantes
défavorables suivantes :
- présence de liquides ou d’humidité de l’air trop élevée,
- froid (< 0 °C) ou chaleur (> 60°C) extrêmes, rayonnement solaire direct
- poussière ou gaz, vapeurs et solvants infl ammables,
- vibrations, coups et chocs importants,
- champs magnétiques intenses comme ceux à proximité de machines ou de
haut-parleurs
• Une utilisation sans danger n’est plus garantie lorsque :
- l’appareil est visiblement endommagé,
- l’appareil ne fonctionne plus et
- après un stockage prolongé dans des conditions défavorables ou
- l’appareil a été fortement sollicité pendant le transport.
Page 96

96
• Dans la pratique, le débit binaire maximal (par ex. 150 Mbps avec les normes
802.11b/g/n, c.-à-d. environ 17,5 Mo/s) n’est jamais atteint. Cela est lié à la
technologie employée pour la transmission, aux erreurs de transmission, à la
distance entre les appareils Wi-Fi, etc.
• Nous vous recommandons impérativement de chiffrer les connexions réseau
Wi-Fi afi n d’empêcher tout accès non autorisé, par ex. à votre routeur Wi-Fi.
Vous devriez, de préférence, employer le type de chiffrement « WPA2 » plutôt
que « WPA » ou « WEP » car « WPA » et « WEP » n’offrent plus une protection
suffi sante contre les cyberattaques.
• La portée dépend des conditions ambiantes. Les facteurs suivants peuvent réduire la portée :
- perturbations à haute fréquence en tous genres (ordinateurs, moniteurs, télé-
phones portables)
- constructions et végétation en tous genres
- pièces métalliques conductrices à proximité des appareils ou dans ou à proxi-
mité des voies de transmission sans fi l, par ex. câbles, radiateurs, fenêtres
isolantes métallisées, plafonds en béton armé, etc.
- perturbation du diagramme de rayonnement des antennes sous l’effet de la
distance de l’émetteur ou du récepteur par rapport aux surfaces ou objets
conducteurs (également par rapport au corps humain ou au sol)
- perturbations à large bande dans les zones urbaines qui réduisent le rapport
signal / bruit ; le signal n’est plus détecté dans ces « grésillements »
- rayonnement d’appareils électroniques insuffi samment isolés, par ex. ordina-
teurs exploités sans chiffrement ou autres
- distance insuffi sante entre le récepteur et l’émetteur
16. Élimination
Les appareils électriques et électroniques ne doivent pas être jetés dans les or-
dures ménagères.
Si le produit est devenu inutilisable, il convient alors de procéder à son élimination
conformément aux dispositions légales en vigueur.
Page 97

97
17. Caractéristiques techniques
a) Routeur Wi-Fi UMTS
Tension de service ................................................. 12 V/CC
Wi-Fi ...................................................................... 802.11b/g/n (max. 150 MBit)
Connexion réseau ................................................. 2 LAN, RJ45, 10/100 MBit ;
1 WAN, RJ45, 10/100 MBit ;
Antennes ............................................................... 1 antenne Wi-Fi, 1 antenne UMTS/3G
Modem ................................................................... intégré, utilisation avec carte SIM normale
Standards du modem ............................................ UMTS, HSDPA, HSUPA, WCDMA
Modes de fonctionnement ..................................... Gateway, Bridge, Wireless ISP
Dimensions (l x h x p) ............................................ env. 150 x 27,5 x 105 mm (sans antennes)
Poids ...................................................................... env. 196 g (sans antennes)
Température ambiante lors du fonctionnement ..... 0 °C à 60 °C
Humidité de l’air en cas de stockage ..................... humidité relative de l’air de 10 % à 90 %,
sans condensation
b) Bloc d’alimentation
Tension de service ................................................. 100 à 240 V / CA, 50 / 60 Hz, 0,75 A
Sortie ..................................................................... 12 V / CC, 1,5 A
18. Déclaration de conformité (DOC)
Par la présente, Conrad Electronic, Klaus-Conrad-Straße 1, 92240 Hirschau (Allemagne), déclare que le présent produit est conforme aux exigences fondamentales et aux autres consignes
pertinentes de la directive 1999/5/CE.
La déclaration de conformité (DOC) de ce produit est disponible sur le site
www.conrad.com.
Page 98

98
Inhoudsopgave
1. Inleiding ............................................................................................................................. 99
2. Voorgeschreven gebruik .................................................................................................. 100
3. Leveringsomvang ............................................................................................................ 100
4. Verklaring van symbolen ................................................................................................. 100
5. Veiligheidsvoorschriften ................................................................................................... 101
6. Productoverzicht .............................................................................................................. 103
a) LED’s .......................................................................................................................... 103
b) Aansluitingen en bedieningselementen ..................................................................... 104
c) Bedrijfsmodi ............................................................................................................... 104
d) Algemene informatie .................................................................................................. 105
7. Ingebruikname ................................................................................................................. 106
8. Toegang tot de webinterface ........................................................................................... 107
9. Confi guratie van de bedrijfsmodus “Gateway” .................................................................111
10. Confi guratie van de bedrijfsmodus “Bridge” .....................................................................115
11. Confi guratie van de bedrijfsmodus “Wireless ISP” ...........................................................118
12. Uitgebreide confi guratie .................................................................................................. 122
a) IP-adres wijzigen ........................................................................................................ 122
b) Administrator wachtwoord wijzigen ............................................................................123
c) Tijdzone wijzigen ........................................................................................................ 124
d) Instellingen opslaan ................................................................................................... 124
e) WPS gebruiken .......................................................................................................... 125
13. Herstellen van de fabrieksinstellingen ............................................................................. 125
a) Met behulp van de toets “Reset” op het apparaat ...................................................... 125
b) In de webinterface ...................................................................................................... 126
14. Onderhoud en reiniging ................................................................................................... 127
15. Gebruik ............................................................................................................................ 127
16. Afvoer .............................................................................................................................. 128
17. Technische gegevens ...................................................................................................... 129
a) UMTS WLAN-router ................................................................................................... 129
b) Netadapter ................................................................................................................. 129
18. Verklaring van overeenstemming (DOC) ......................................................................... 129
Page 99

99
1. Inleiding
Geachte klant,
Hartelijk dank voor de aanschaf van dit product.
Dit product voldoet aan de wettelijke nationale en Europese voorschriften. Volg de instructies
van de gebruiksaanwijzing op om deze status van het apparaat te handhaven en een ongevaarlijke werking te garanderen!
Lees voor de ingebruikneming van dit product de volledige gebruiksaan
wijzing door en neem alle bedienings- en veiligheidsvoorschriften in
acht.
Alle vermelde bedrijfs- en productnamen zijn handelsmerken van de respectievelijke eigenaren.
Alle rechten voorbehouden.
Voor meer informatie kunt u kijken op www.conrad.nl of www.conrad.be
Page 100

100
2. Voorgeschreven gebruik
De router dient om meerdere computers met het internet of een beschikbaar netwerk te verbinden. De toegang tot het internet kan daarbij via een externe DSL- of kabelmodem met een
LAN-aansluiting of de interne UMTS-modem gebeuren.
De stroomvoorziening geschiedt via de meegeleverde netadapter.
3. Leveringsomvang
• UMTS WLAN-router
• 2 Antenne
• Netadapter
• Standaard
• Netwerkkabel
• Fabrikantenhandleiding op cd
• Gebruiksaanwijzing
4. Verklaring van symbolen
Het symbool met de bliksemschicht in een driehoek geeft aan wanneer er gevaar
bestaat voor uw gezondheid, bijv. door een elektrische schok.
Het symbool met het uitroepteken in een driehoek wijst op belangrijke aanwijzingen in deze gebruiksaanwijzing die in ieder geval moeten worden opgevolgd.
Het „hand“-symbool vindt u bij bijzondere tips of instructies voor de bediening.
 Loading...