

Page 1
CONRAD IM INTERNET http://www.conrad.de
Impressum
Diese Bedienungsanleitung ist eine Publikation der Conrad Electronic GmbH.
Alle Rechte einschließlich Übersetzung vorbehalten. Reproduktionen jeder Art, z. B. Fotokopie, Mikroverfilmung, oder die Erfassung in elektronischen Datenverarbeitungsanlagen,
bedürfen der schriftlichen Genehmigung des Herausgebers.
Nachdruck, auch auszugsweise, verboten.
Diese Bedienungsanleitung entspricht dem technischen Stand bei Drucklegung. Änderung
in Technik und Ausstattung vorbehalten.
©
Copyright 2002 by Conrad Electronic GmbH. Printed in Germany.
Imprint
These operating instructions are published by Conrad Electronic GmbH, Klaus-ConradStraße 1, 92240 Hirschau/Germany
No reproduction (including translation) is permitted in whole or part e.g. photocopy,
microfilming or storage in electronic data processing equipment, without the express written consent of the publisher.
The operating instructions reflect the current technical specifications at time of print. We
reserve the right to change the technical or physical specifications.
©
Copyright 2002 by Conrad Electronic GmbH. Printed in Germany.
Note de l´éditeur
Cette notice est une publication de la société Conrad Electronic GmbH, Klaus-ConradStraße 1, 92240 Hirschau/Allemagne.
Tous droits réservés, y compris traduction. Toute reproduction, quel que soit le type, par
exemple photocopies, microfilms ou saisie dans des traitements de texte electronique est
soumise à une autorisation préalable écrite de l`éditeur.
Impression, même partielle, interdite.
Cette notice est conforme à la règlementation en vigueur lors de l´impression. Données
techniques et conditionnement soumis à modifications sans aucun préalable.
©
Copyright 2002 par Conrad Electronic GmbH. Imprimé en Allemagne.
*857-06-02/01-MG
100 %
RecyclingPapier.
Chlorfrei
gebleicht.
100 %
recycling
paper.
Bleached
without
chlorine.
100%
papier
recyclé.
Blanchi
sans
chlore.
Stoppuhr
„Professional“ Seite 4 - 18
Stop watch
„Professional“ Page 19 - 33
Chronomètre
«Professionnel» Page 34 - 49
Best.-Nr. / Item-No. / Node commande:
84 02 58
BEDIENUNGSANLEITUNGOPERATING INSTRUCTIONS
MODE D’EMPLOI
Version 06/02
2
Diese Bedienungsanleitung gehört zu diesem Produkt. Sie enthält wichtige Hinweise zur Inbetriebnahme und Handhabung. Achten Sie hierauf, auch wenn Sie dieses Produkt an Dritte weitergeben.
Heben Sie deshalb diese Bedienungsanleitung zum Nachlesen auf!
Eine Auflistung der Inhalte finden Sie in dem Inhaltsverzeichnis mit An-
gabe der entsprechenden Seitenzahlen auf Seite 5.
The present operating manual forms part of this product. It contains important information on how to put the product into operation and assemble it. Please note it duly even if you pass it on to third
people.
So keep this operating manual for your future reference.
You will find the contents listed up in the table of contents indicating the
respective page numbers on page 20.
Le mode d’emploi suivant correspond au produit ci-dessus
mentionné. Il comporte des instructions importantes relatives à sa
mise en service et à son maniement ! Il faut respecter ces instructions, même si ce produit est transmis à tierce personne !
Gardez ce mode d’emploi pour toute consultation ultérieure !
Vous trouverez une table des matières dans l’index page 35 avec indica-
tion des pages correspondantes à consulter.
Page 2

12. Maniement
N’utilisez jamais le chronomètre tout de suite quand il vient d’être mis
d’une pièce froide dans une pièce chaude. L’eau de condensation qui
en résulte pourrait, dans des conditions défavorables, le détruire.
Laissez donc le chronomètre prendre la température ambiante
avant de le mettre en marche.
Evitez d’utiliser ou de transporter le chronomètre dans des conditions contraires à son bon fonctionnement :
- mouillé ou dans une humidité relative de l’air très élevée
- des températures extrêmement élevées ou extrêmement basses
- en présence de poussière ou de gaz, vapeurs ou solutions inflammables
- de fortes vibrations
- des champs électromagnétiques puissants comme à proximité
de moteurs ou de haut-parleurs
13. Entretien et nettoyage
Enlevez la pile quand vous constatez un endommagement du chronomètre car un court-circuit pourrait provoquer un dégagement
important de chaleur (risque d’incendie ou de fuite de la pile).
Une utilisation sans danger n'est plus possible si
- l'appareil présente des dommages visibles,
- l'appareil ne fonctionne plus et
- après un long stockage dans des conditions défavorables ou
- après des conditions de transport défavorables.
Avant de nettoyer le chronomètre ou de procéder à un entretien, prenez compte des consignes de sécurité suivantes :
48
Bestimmungsgemäße Verwendung
Die Stoppuhr dient zur Zeit- bzw. Zwischenzeitmessung, wie sie
etwa im Sport-Bereich benötigt wird. Weiterhin verfügt sie über
diverse Zusatzfunktionen, z.B. 128 Zwischenzeitspeicher, Uhrzeit/Datumsanzeige und Alarmfunktion.
Eine andere Verwendung als zuvor beschrieben führt zu Beschädigungen dieses Produkts. Das gesamte Produkt darf nicht geändert
bzw. umgebaut werden.
Inhaltsverzeichnis
Seite
1. Merkmale ..................................................................................6
2. Lieferumfang .............................................................................6
3. Sicherheitshinweise ..................................................................6
4. Batterie wechseln, Umwelthinweise .........................................7
5. Bedienelemente und LC-Display ..............................................9
6. Modus wählen.........................................................................10
7. Einstellung von Uhrzeit/Datum ...............................................11
8. Alarmfunktion..........................................................................12
9. Stoppuhr-Modus.....................................................................13
10. Countdown-Timer (Dual-Timer) ..............................................14
11. Frequenz-Hochrechnung ........................................................16
12. Handhabung ...........................................................................17
13. Wartung und Reinigung ..........................................................17
14. Entsorgung..............................................................................18
15. Behebung von Störungen .......................................................18
5
Page 3

Appuyez sur la touche "START/STOP" (A), l’affichage des secondes
se met à clignoter.
Les secondes peuvent être réglées au moyen de la touche
"LAP/SPLIT/RESET" (B).
Appuyer encore une fois sur la touche "START/STOP" (A) a pour
effet que l’affichage des heures du compteur du haut (Timer 2) se
met à clignoter.
Si vous voulez utiliser la fonction "Single-Timer", mettez le Timer 2
sur "00:00:00", si c’est nécessaire. Procédez comme décrit plus
haut.
Si vous souhaitez utiliser la fonction "Dual-Timer", entrez le laps de
temps désiré en procédant de la même manière que pour le premier
compteur, voir plus haut.
Terminez les entrées en appuyant une fois brièvement sur la touche
"RECALL".
Démarrez le compte à rebours en appuyant sur la touche
"START/STOP" (A).
Le compte à rebours continue sans fin tant que vous ne rappuyez
pas sur la touche "START/STOP".
46
4. Batterie wechseln, Umwelthinweise
Wenn Sie feststellen, dass die Tasten auf dem Gerät nicht mehr reagieren oder auf dem Display nichts mehr angezeigt wird (beachten
Sie, dass die Stoppuhr nach ca. 9 Stunden automatisch den PowerSave-Modus aktiviert und das Display abschaltet), so ist die Batterie
gegen eine neue auszutauschen.
Entfernen Sie die 6 kleinen Schrauben auf der Rückseite der Stoppuhr mit einem geeigneten Schraubendreher.
Nehmen Sie die Rückseite ab.
Die Batterie kann nach Lösen der Batteriehalterung entnommen
werden, merken Sie sich die Polung der Batterie.
Legen Sie eine neue Batterie (Typ CR2032) polungsrichtig ein
(Minus liegt unten zur Stoppuhr hin).
Setzen Sie die Rückseite wieder korrekt auf und schrauben Sie sie
fest.
Achten Sie darauf, dass die Gummidichtung und die Trageschlaufe
in den Schlitzen der Stoppuhr bleibt!
Lassen Sie Batterien nicht offen herumliegen, es
besteht die Gefahr, dass diese von Kindern oder Haustieren verschluckt werden. Suchen Sie in einem solchen Fall sofort einen Arzt auf!
Lassen Sie keine leeren Batterien im Batteriefach, da
selbst auslaufgeschützte Batterien korrodieren können
und dadurch Chemikalien freigesetzt werden können,
welche Ihrer Gesundheit schaden bzw. die das Batteriefach beschädigen können.
7
Page 4
Vous pouvez terminer le chronométrage en appuyant sur la touche
"START/STOP" (A) (le cas échéant, elle vous permet de démarrer à
nouveau et de re-stopper, etc.).
Que ce soit pendant
ou après le chronométrage, appuyer une fois
sur la touche "RECALL" (C) vous permet d’afficher le temps intermédiaire le plus court ("FAST").
" " est affiché sur le Display.
En appuyant sur les touches "START/STOP" (A) et
"LAP/SPLIT/RESET" (B), il est possible d’afficher tous les temps
intermédiaires mémorisés.
Au moyen de la touche "START/STOP" vous avancez d’une place
de mémorisation, avec "LAP/SPLIT/RESET" vous revenez sur celle
d’avant.
Appuyez à nouveau sur la touche "RECALL" pour revenir sur le
chronométrage, l’indication " " disparaît.
A l’arrêt
du chronomètre, appuyer une fois sur la touche
"LAP/SPLIT/RESET" (B) permet d’effacer tous les temps, tous les
temps intermédiaires mémorisés sont également effacés !
10. Compte à rebours double (Dual-Timer)
Le compteur à rebours dispose de deux modes de fonctionnement :
• Compteur individuel ("Single Timer")
Effectuer un réglage seulement pour le compteur 1 (Timer 1).
Timer 2 doit rester sur "00:00:00".
Le compte à rebours réglé et activé est répété sans fin.
44
5. Bedienelemente & LC-Display
Im Bild auf der Ausklappseite sehen Sie alle Anzeigen und Symbole
des LC-Displays. Diese sind bei normalem Betrieb nicht alle gleichzeitig sichtbar.
Abbildung siehe Ausklappseite
1 Nummer des Speichers (1-128)
2 Speicherfeld
3 "SPLIT"-Zeitanzeige
4 "STOP"-Anzeige
5 "FULL"-Anzeige (alle Speicher sind belegt)
6 "RECALL"-Anzeige
7 Anzeige, ob die Alarmfunktion ein- oder ausgeschaltet ist
8 Funktionsanzeige
Vier Tasten:
A "START/STOP"
B "LAP/SPLIT/RESET"
C "RECALL"
D "MODE"
9
Page 5
Pour quitter le mode de réglage, appuyez
brièvement sur la touche "RECALL" (C), ce
qui est possible à tout moment où que ce
soit au cours des réglages.
8. Fonction alarme
a) Régler l’heure de déclenchement de l’alarme
Appuyez plusieurs fois de suite sur la touche "MODE" (D) jusqu’à ce
que l’heure à laquelle l’alarme devra se déclencher apparaisse (voir
6.).
Maintenez la touche "RECALL" (C) appuyée
jusqu’à ce que l’affichage des heures se
mette à clignoter.
Les heures peuvent être réglées au moyen
de la touche "LAP/SPLIT/RESET" (B),
appuyez plusieurs fois sur la touche, jusqu’à
ce que les heures soient sur le chiffre désiré
(au lieu d’appuyer 20 fois de suite sur la
touche, vous pouvez aussi maintenir la
touche appuyée, les chiffres défilent alors
automatiquement).
Appuyez sur la touche "START/STOP" (A),
les minutes se mettent à clignoter. Les
minutes peuvent être réglées au moyen de la
touche "LAP/SPLIT/RESET" (B).
Appuyez sur la touche "RECALL" (C) pour quitter le mode de réglage (ce qui est aussi possible à tout moment au cours du réglage).
42
7. Einstellung von Uhrzeit/Datum
Drücken Sie die "MODE"-Taste (D) sooft, bis
die Uhrzeit-/Datumsanzeige erscheint
(siehe 6.).Drücken und halten Sie die Taste
"RECALL" (C) solange, bis die Sekundenanzeige zu blinken beginnt.
Mit der "LAP/SPLIT/RESET"-Taste (B) werden
die Sekunden auf "00" gestellt.
Drücken Sie die "START/STOP"-Taste (A),
dann blinkt die Minutenanzeige.
Mit der "LAP/SPLIT/RESET"-Taste (B) lassen
sich die Minuten einstellen. Drücken Sie sie
sooft, bis die gewünschte Minutenzahl eingestellt ist (anstatt 20mal die Taste kurz zu
drücken, können Sie sie auch drücken und halten, dann läuft die Zahl automatisch weiter).
Durch Drücken der Taste "START/STOP" (A)
können Sie nun die Stundenanzeige auswählen, dann den Tag, den Monat und das
Jahr.
Jeweils mit der "LAP/SPLIT/RESET"-Taste (B)
lässt sich die Einstellung verändern.
Anschließend kann die Anzeige vom 12hModus (Anzeige "12H") auf den 24h-Modus
(Anzeige "24H") umgeschaltet werden,
drücken Sie kurz die "LAP/ SPLIT/ RESET"Taste (B) .
Um den Einstellmodus zu verlassen, drücken
Sie kurz die Taste "RECALL" (C). Dies ist auch
an beliebiger Stelle während der Einstellung
möglich.
11
Page 6
6. Choisir le mode de fonctionnement
Appuyez sur la touche "MODE" (D) autant de fois que nécessaire
jusqu’à ce que l’affichage du mode de fonctionnement désiré apparaisse sur le Display.
Heure /date
Régler l’heure de déclenchement de l’alarme, activer / désactiver
l’alarme
Mode chronomètre
Mode compte à rebours
Extrapolation des fréquences
40
9. Stoppuhr-Modus
Drücken Sie die "MODE"-Taste (D) sooft, bis die Stoppuhr-Anzeige
erscheint (siehe 6.).
Mit der "START/STOP"-Taste (A) starten Sie die Zeitnahme.
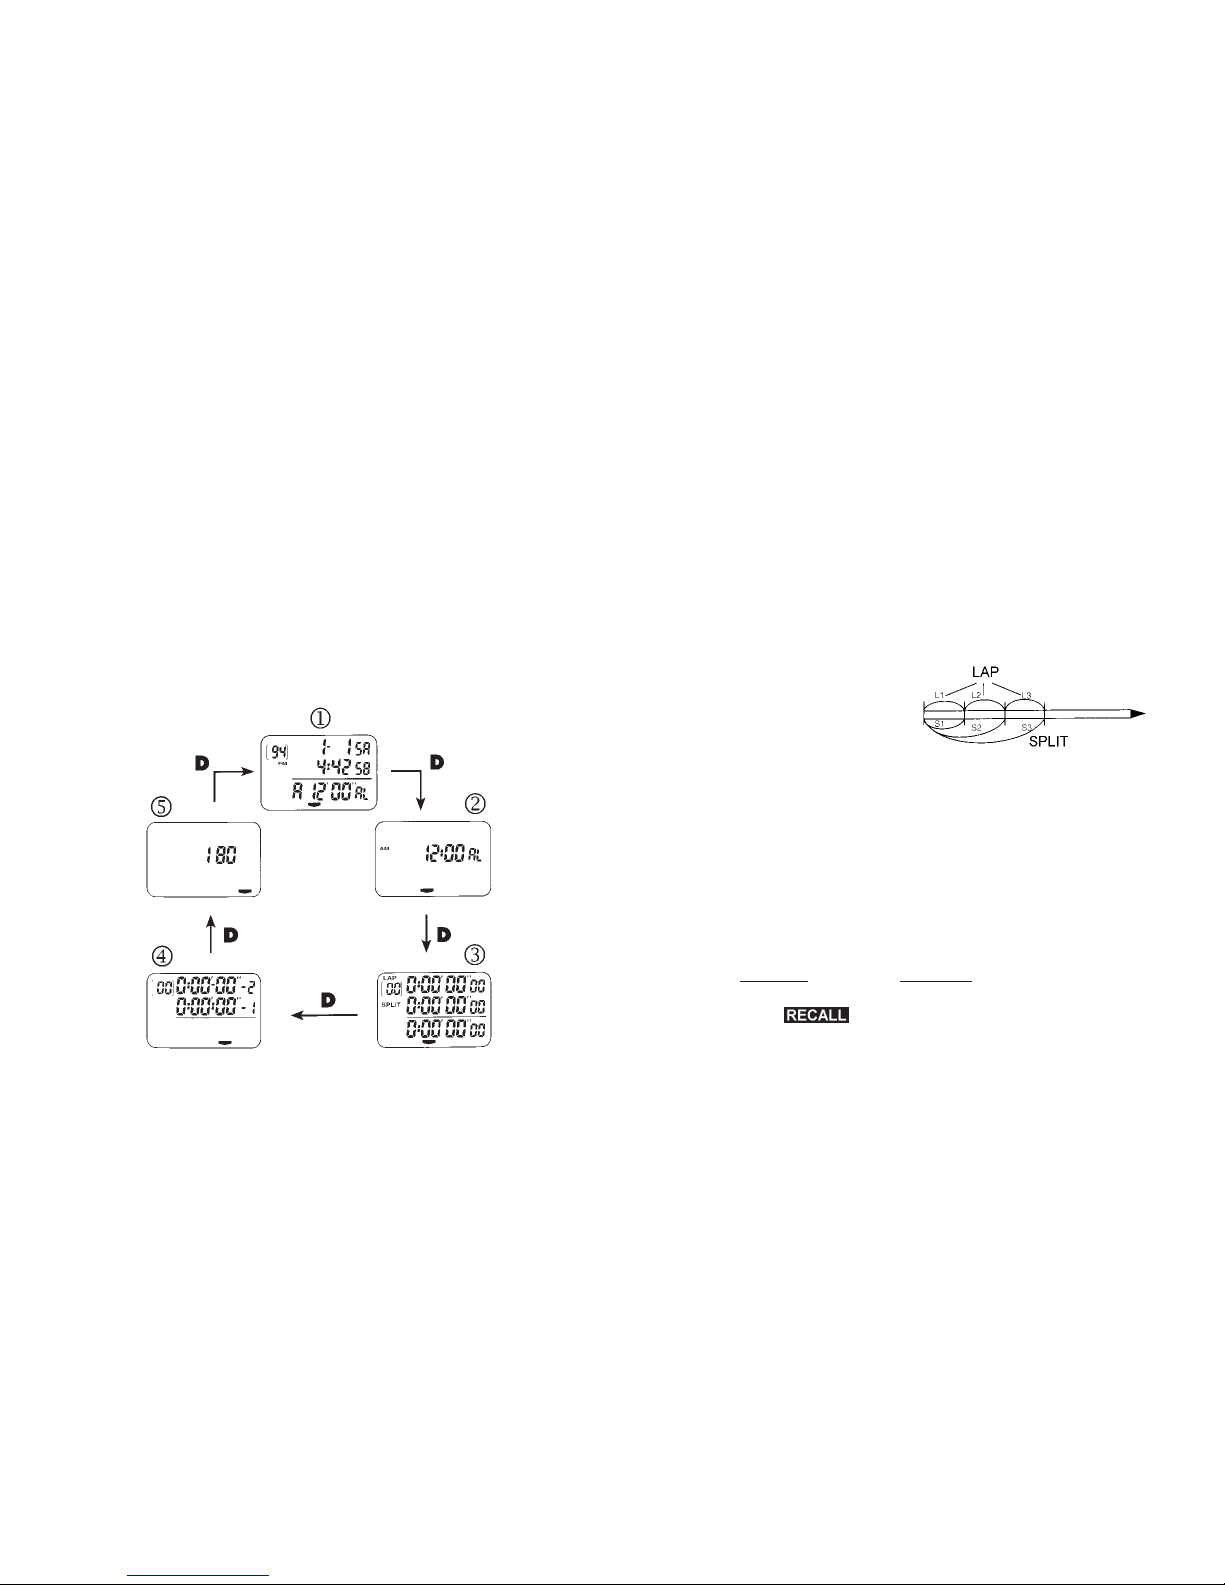
Drücken Sie die "LAP/SPLIT/RESET"-Taste (B), um eine Zwischenzeit zu nehmen. Insgesamt 128 Zwischenzeiten sind möglich,
die Nummer der Zwischenzeit wird oben links im Display angezeigt.
Die obere Zahlenreihe zeigt Ihnen
die "LAP"-Zeit an (Zeit seit der
letzten Zwischenzeitnahme).
Die mittlere Zahlenreihe zeigt die
"SPLIT"-Zeit an (Zeit zwischen
Startzeit und Zwischenzeitnahme).
In der unteren Zahlenreihe läuft die Stoppuhr.
Mit der Taste "START/STOP" (A) beenden Sie die Zeitnahme (ggf.
erneut starten und beenden usw.).
Sowohl bei laufender
als auch bei stehender Stoppuhr zeigt ein Druck
auf die Taste "RECALL" (C) die schnellste Zwischenzeit an ("FAST").
Im Display wird " " eingeblendet.
Mit den Tasten "START/STOP" (A) und "LAP/SPLIT/RESET" (B)
kann man die bereits genommenen Zwischenzeiten ansehen.
Mit der Taste "START/STOP" wird ein Speicher weitergeschaltet,
mit "LAP/SPLIT/RESET" ein Speicher zurück.
13
Page 7
Ne laissez pas des piles usagées dans le compartiment
à piles car même les piles protégées contre les fuites
peuvent corroder et ainsi libérer des produits chimiques
nocifs à votre santé et qui peuvent détruire le compartiment à piles.
Les piles corrodées ou endommagées peuvent au toucher causer des brûlures sur la peau. Mettez impérativement des gants de protection appropriés pour retirer
de telles piles.
N’essayez jamais de recharger des piles. Il y a risque
d’explosion !
Ne pas les jeter dans le feu. Il y a risque d’explosion !
Veillez à ne pas court-circuiter les piles. Il y a risque
d’explosion !
Précision relative à la protection de l’environnement !
Le consommateur est tenu de recycler les piles usagées et les accus. Il est interdit de les jeter dans les
ordures ménagères !
Vous pouvez rendre vos piles usagées et les accus,
sans avoir à assumer de frais supplémentaires,
dans nos filiales, de même que dans les centres de
recyclage municipaux /les déchetteries (centres de
tri de matériaux recyclables) qui sont tenus de les
reprendre.
Participez vous aussi à la protection de l’environnement !
38
Drücken und halten Sie die "RECALL"-Taste
(C) solange, bis die Stundenanzeige des
unteren Timers (Timer 1) blinkt.
Mit der "LAP/SPLIT/RESET"-Taste (B) werden die Stunden eingestellt.
Drücken Sie sie sooft, bis die gewünschte Stundenzahl eingestellt
ist (anstatt 5mal die Taste kurz zu drücken, können Sie sie auch
drücken und halten, dann läuft die Zahl automatisch weiter).
Drücken Sie die "START/STOP"-Taste (A), dann blinkt die Minutenanzeige.
Mit der "LAP/SPLIT/RESET"-Taste (B) lassen sich die Minuten einstellen.
Drücken Sie die "START/STOP"-Taste (A), dann blinkt die Sekunden- anzeige.
Mit der "LAP/SPLIT/RESET"-Taste (B) lassen sich die Sekunden
einstellen.
Beim nächsten Druck auf die "START/STOP"-Taste (A) blinkt die
Stundenanzeige des oberen Timers (Timer 2).
Wenn Sie die "Single-Timer"-Funktion nutzen wollen, so stellen Sie
ggf. den Timer 2 auf "00:00:00" ein, verfahren Sie dazu wie oben
beim ersten Timer beschrieben.
Wenn Sie die "Dual-Timer"-Funktion nutzen wollen, so stellen Sie
die gewünschte Zeit ein, verfahren Sie dazu wie oben beim ersten
Timer beschrieben.
Beenden Sie die Eingabe durch kurzes Drücken der "RECALL"Taste.
15
Page 8
1. Caractéristiques
• Affichage LCD (Display) sur trois lignes
• Fonctions heure/date et alarme
• Temps max. mesuré : 9 heures, 59 minutes, 59.99 secondes (pro-
gression par 1/100 de seconde)
• Nombre de mémorisations temporaires possibles : au max. 128
(affichage des temps LAP-/SPLIT)
• Compteur à rebours double
• Dragonne pratique
• Piles déjà mises en place (type : CR2032)
• Extrapolation de fréquences
• Mode économie d’énergie (s’éteint automatiquement au bout
d’env. 9h)
2. Contenu de l’emballage
• Chronomètre
• Mode d’emploi
3. Consignes de sécurité
En cas de dommages dus à la non observation de ce
mode d’emploi, la validité de la garantie est annulée !
Nous déclinons toute responsabilité pour d’éventuels dommages consécutifs !
Maintenez le chronomètre hors de portée des enfants !
N’exposez pas l’appareil à un rayonnement direct du soleil ni à la
chaleur ou au froid.
36
12. Handhabung
Setzen Sie die Stoppuhr niemals gleich dann ein, wenn sie von einem
kalten in einen warmen Raum gebracht wird. Das dabei entstehende
Kondenswasser kann unter Umständen das Produkt zerstören.
Lassen Sie die Stoppuhr zuerst auf Zimmertemperatur kommen, bevor Sie das Produkt verwenden.
Vermeiden Sie folgende widrige Umgebungsbedingungen bei der
Verwendung der Stoppuhr bzw. beim Transport:
- Nässe oder zu hohe Luftfeuchtigkeit
- Extreme Kälte oder Hitze
- Staub oder brennbare Gase, Dämpfe oder Lösungsmittel
- starke Vibrationen
- starke Magnetfelder, wie in der Nähe von Maschinen oder Lautsprechern
13. Wartung und Reinigung
Entnehmen Sie bei Beschädigungen des Geräts die Batterie, da es
durch einen Kurzschluss zu starker Erwärmung kommen kann
(Brandgefahr, Auslaufen der Batterie).
Es ist anzunehmen, dass ein gefahrloser Betrieb nicht mehr möglich
ist, wenn
- das Gerät sichtbare Beschädigungen aufweist,
- das Gerät nicht mehr funktioniert und
- nach längerer Lagerung unter ungünstigen Verhältnissen oder
- nach schweren Transportbeanspruchungen.
Bevor Sie die Stoppuhr reinigen oder warten, beachten Sie
unbedingt folgende Sicherheitshinweise:
17
Page 9

Introduction
Cher client,
nous vous remercions pour l’achat de ce chronomètre.
Ce chronomètre a été contrôlé d’après les directives de CEM et
est ainsi conforme aux normes européennes et nationales en
vigueur. La conformité CE a été contrôlée, les actes déclaratifs
et les documents correspondants ont été consignés auprès du
fabricant.
Afin de maintenir l’appareil en bon état et d’en assurer l’exploitation
sans risques, l’utilisateur doit absolument tenir compte de et respecter ce mode d’emploi !
Tous les noms d’entreprise et appellations de produits contenus dans cette notice sont des marques déposées des propriétaires correspondants. Tous droits réservés.
Pour toutes questions, adressez vous à notre service
conseil technique
France: Tél. 0 826 827 000 · Fax 0 826 826 002
e-mail: technique@conrad.fr
du lundi au vendredi de 9h00 à 19h00
samedi de 9h00 à 18h00
Suisse: Tél. 0848/80 12 88 · Fax 0848/80 12 89
e-mail: support@conrad.ch
du lundi au vendredi de 8h00 à 12h00, 13h00 à 17h00
34
Introduction
Dear customer,
thank you for your acquiring this stop watch.
This product is EMC-tested and satisfies the standards of the
established European and national guidelines. CE-conformity
has been proved; the relevant documents are in the manufacturer's possession.
We kindly request the user to respect this operating manual to preserve this condition and to ensure safe operation.
All company names and product designations contained are
trademarks of the respective owners. All rights are reserved.
In case of questions, consult our technical
information service
Germany: Tel. 0180/5 31 21 16 or 09604/40 88 47
Fax 09604/40 88 44
e-mail: tkb@conrad.de
Mon - Fri 8.00 to 18.00
Austria: Tel. 0 72 42/20 30 60 · Fax 0 72 42/20 30 66
e-mail: support@conrad.at
Mon - Thu 8.00 to 17.00
Fri. 8.00 to 14.00
Switzerland: Tel. 0848/80 12 88 · Fax 0848/80 12 89
e-mail: support@conrad.ch
Mon - Fri 8.00 to 12.00, 13.00 to 17.00
19
Page 10

First allow the stop watch to reach a room temperature before
using the product.
Avoid the adverse ambient conditions below in using or transporting
the stop watch:
- Moisture or too high an air humidity
- Extreme cold or heat
- Dust or inflammable gases, vapours or solvents
- Heavy vibrations
- Strong magnetic fields as are found in the vicinity of machinery or
loudspeakers
13. Maintenance and cleaning
Remove the battery if the watch is damaged because there could be
a short-circuit causing excessive heat (danger of fire, battery leakage).
Safe operation must be presumed to be no longer possible, if
- the watch exhibits visible damage
- the watch does not operate any longer
- the watch was stored under unfavourable conditions for a long
period of time or
- the watch was exposed to extraordinary stress caused by transport.
Before cleaning or maintaining the stop watch do not fail to
observe the safety instructions which follow:
32
1. Features
• Thee-line LC display
• Hour/Date and alarm function
• Max. measurable time : 9 hours, 59 minutes, 59.99 seconds
(Graduation 1/100 second)
• Maximum of 128 intermediate memories (displaying LAP/SPLIT
times)
• Dual countdown timer
• Practical wrist strap
• With battery inserted (Type: CR2032)
• Frequency extrapolation
• Power-save mode (automatic stop after abt. 9 hours)
2. Scope of delivery
• Stop watch
• Instructions for use
3. Safety instructions
Any claims for guarantee will become invalid in the
event of damage that results from the non-observance of the operating manual.
We do not accept responsibility for such damage.
Keep the product out of the reach of children,
Do not expose the watch to direct solar radiation, intense heat or cold.
Handle the product carefully because it will be damaged already by
shocks, bumps or a fall from a low height.
21
Page 11

How to set the timers:
Press the "MODE" key (D) as many times until the countdown display appears (see 6.).
Press and keep depressed the "RECALL"
key (C) until the hour display of the lower
timer (Timer 1) flashes.
Use the "LAP/SPLIT/RESET" key (B) to set
the hours.
Press as many times until the desired number of hours is set (instead
of briefly pressing the key 5 times you may press it and keep it
depressed, which causes the number to run on automatically).
Press the "START/STOP" key (A) to make the minute display flash.
The "LAP/SPLIT/RESET" key (B) allows to set the minutes.
Press the "START/STOP" key (A) to make the second display flash.
The "LAP/SPLIT/RESET" key (B) allows to set the seconds.
When you press the "START/STOP" key (A) next time the hour display of the upper timer (Timer 2) will flash.
If you wish to use the "Single timer" function set timer 2 to
"00:00:00", proceeding as described above for the first timer.
If you wish to use the "Dual timer" function set the time you desire,
proceeding as described above for the first timer.
To terminate the input, briefly press the "RECALL" key.
To start the countdown, press the "START/STOP" key (A).
The countdown will be repeated until you press the "START/STOP"
key.
30
Never try to recharge batteries because they might
explode.
Do not throw them into fire because they might explode.
Take care not to short-circuit batteries because they
might explode.
Instruction for environmental protection:
The law (the provision on exhausted batteries)
obliges the end user to return all used batteries and
accumulators (from button cells to lead accumulators); any disposal thereof via the domestic waste is
prohibited.
You may return your exhausted batteries and accumulators on a free-of-charge basis to both our
branch companies and our central company based
at Hirschau and the municipal disposal facilities
(waste collection yards) which are also obliged to
accept them as before.
Do make your contribution to environmental protection.
23
Page 12

9. Stop watch mode
Press the "MODE" key (D) as many times until the stop watch display appears (see 6.).
Press the "START/STOP" key (A) to start watch timing.
Press the "LAP/SPLIT/RESET" key (B) to take an intermediate time.
A total of 128 intermediate times can be taken with the number of
the intermediate time being shown at top left in the display.
The upper line of numbers shows
you the "LAP" time (the time
since the intermediate time was
taken last time).
The middle line of numbers
shows you the "SPLIT" time (the
time between the time of start
and the point the intermediate
time which was taken).
The stop watch runs in the lower
line of numbers.
Stop taking time by pressing the "START/STOP" time (A). (Start and
stop anew, if desired).
Pressing the "RECALL" key (C) will show you the fastest intermediate time ("FAST") with the stop watch both running
and stopped.
The message inserted into the display is " ".
The START/STOP" (A) and "LAP/SPLIT/RESET" (B) keys allow to
view the intermediate times which were taken already.
28
6. Mode selection
Simply press the "MODE" key (D) as many times until you see the
desired mode in the LC display.
Hour/Date display
Set the alarm time and turn the alarm on/off.
Stop watch mode
Countdown mode
Frequency extrapolation
25
Page 13

1. Merkmale
• Dreizeiliges LC-Display
• Uhr-/Datum- und Alarmfunktion
• Max. messbare Zeit: 9 Stunden, 59 Minuten, 59.99 Sekunden
(Schrittweite 1/100 Sekunde)
• Maximal 128 Zwischenspeicher (Anzeige von LAP-/SPLIT-Zeit)
• Dual-Countdown-Timer
• Praktische Trageschlaufe
• Batterie bereits eingesetzt (Typ: CR2032)
• Frequenz-Hochrechnung
• Stromsparmodus (automatische Abschaltung nach ca. 9h)
2. Lieferumfang
• Stoppuhr
• Bedienungsanleitung
3. Sicherheitshinweise
Bei Schäden, die durch Nichtbeachtung dieser
Bedienungsanleitung verursacht werden, erlischt
der Garantieanspruch.
Für Folgeschäden übernehmen wir keine Haftung!
Das Produkt gehört nicht in Kinderhände!
Setzen Sie das Gerät keiner direkten Sonneneinstrahlung, starker
Hitze oder Kälte aus.
Gehen Sie vorsichtig mit dem Produkt um - durch Stöße, Schläge
oder dem Fall aus bereits geringer Höhe wird es beschädigt.
6
11. Extrapolation des fréquences
Il s’agit ici d’une méthode très simple permettant de calculer le
nombre d’évènements ayant lieu au cours d’une minute.
Appuyez plusieurs fois de suite sur la touche
"MODE" (D) jusqu’à ce que le mode extrapola-
tion de fréquences apparaisse.
Au moyen de la touche "START/STOP" (A), pour
démarrer puis arrêter le chronométrage.
Entre "START" et "STOP", trois évènements ont
eu lieu, par ex. trois gouttes d’eau sont tombées
du robinet. Sur le Display est affiché combien
d’évènements auraient lieu en une minute, calculé automatiquement par extrapolation.
Si ce nombre est plus grand que 180 ou plus
petit que 10, "Err" (erreur) apparaît sur le Display.
Pour plus de clarté : entre "START" et "STOP" ont lieu trois évènements , et .
47
Page 14

Ausgelaufene oder beschädigte Batterien können bei
Berührung mit der Haut Verätzungen verursachen,
benutzen Sie in diesem Fall bitte geeignete Schutzhandschuhe.
Versuchen Sie nie, Batterien wieder aufzuladen. Es
besteht Explosionsgefahr!
Werfen Sie keine Batterien ins Feuer. Es besteht Explosionsgefahr!
Achten Sie darauf, dass Batterien nicht kurzgeschlossen werden. Es besteht Explosionsgefahr!
Umwelt-Hinweis!
Der Endverbraucher ist gesetzlich (Altbatterie-Verordnung) zur Rückgabe aller gebrauchten Batterien
und Akkus verpflichtet, eine Entsorgung über den
Hausmüll ist untersagt!
Ihre verbrauchten Batterien und Akkus können Sie
sowohl in unseren Niederlassungen bzw. an unsere
Zentrale in Hirschau zurückgeben, als wie bisher
auch zu kommunalen Entsorgern (Wertstoffhöfe),
die zur Rücknahme verpflichtet sind.
Leisten auch Sie Ihren Beitrag zum Umweltschutz!
8
Les trois dernières secondes sont indiquées par un bip chacune,
un signal sonore se déclenche quand le compte à rebours arrive à
00:00:00.
• Compteur double ("Dual Timer")
Effectuez un réglage des deux compteurs (Timer 1 et Timer 2).
Exemple : dans un match de boxe, le round dure 3 minutes
et la
pause entre deux rounds 1 minute. Réglez Timer 1 sur "00:03:00"
(3 minutes) et Timer 2 sur "00:01:00" (1 minute).
Après l’activation, Timer 1 démarre. Après avoir atteint les 3
minutes, un signal sonore se déclenche (fin du round) et Timer 2
démarre (début de la pause). Après une minute, un signal sonore
se déclenche, Timer 2 s’arrête (fin de la pause), Timer 1 démarre
à nouveau.
Réglage du compteur à rebours Timer :
Appuyez plusieurs fois de suite sur la touche "MODE" (D) jusqu’à ce
que l’affichage du compte à rebours apparaisse (voir 6.).
Maintenez la touche "RECALL" (C) appuyée
jusqu’à ce que l’affichage du compteur du
bas (Timer 1) se mette à clignoter.
Les heures peuvent être réglées au moyen
de la touche "LAP/SPLIT/RESET" (B).
Appuyez plusieurs fois jusqu’à ce que l’heure désirée soit affichée
(au lieu d’appuyer 5 fois de suite sur la touche, vous pouvez aussi
maintenir la touche appuyée, les chiffres défilent alors automatiquement).
Appuyez sur la touche "START/STOP" (A), l’affichage des minutes
se met à clignoter.
Les minutes peuvent être réglées au moyen de la touche
"LAP/SPLIT/RESET" (B).
45
Page 15

6. Modus wählen
Drücken Sie die Taste "MODE" (D) einfach sooft, bis Sie den
gewünschten Modus im LC-Display sehen.
Uhrzeit/Datumsanzeige
Alarmzeit einstellen und Alarm ein-/ausschalten
Stoppuhr-Modus
Countdown-Modus
Frequenz-Hochrechnung
10
b) Activer ou désactiver l’alarme
Appuyez sur la touche "MODE" (D) jusqu’à ce que l’heure de
déclenchement de l’alarme apparaisse (voir 6.).
Appuyez sur la touche "START/STOP" (A) pour activer l’alarme (un
symbole alarme apparaît en bas à gauche du Display) ou pour la
désactiver (le symbole alarme disparaît).
9. Mode chronomètre
Appuyez sur la touche "MODE" (D) jusqu’à ce que l’affichage chronomètre apparaisse (voir 6.).
Démarrez la mesure du temps écoulé au moyen de la touche
"START/STOP" (A).
Appuyez sur la touche "LAP/SPLIT/RESET" (B) pour stopper un
temps intermédiaire. Il est possible de stopper jusqu’à 128 temps
intermédiaires qui sont mémorisés chacun sous un numéro apparaissant en haut à gauche du Display.
La rangée de chiffres du haut
vous indique le temps "LAP"
(temps écoulé depuis la dernière
entrée de temps intermédiaire).
La rangée de chiffres du milieu
vous indique le temps "SPLIT"
(temps écoulé depuis le début de
la mesure et l’entrée du temps
intermédiaire).
Le chronométrage est indiqué par
la rangée de chiffres du bas.
43
Page 16

8. Alarmfunktion
a) Alarmzeit einstellen
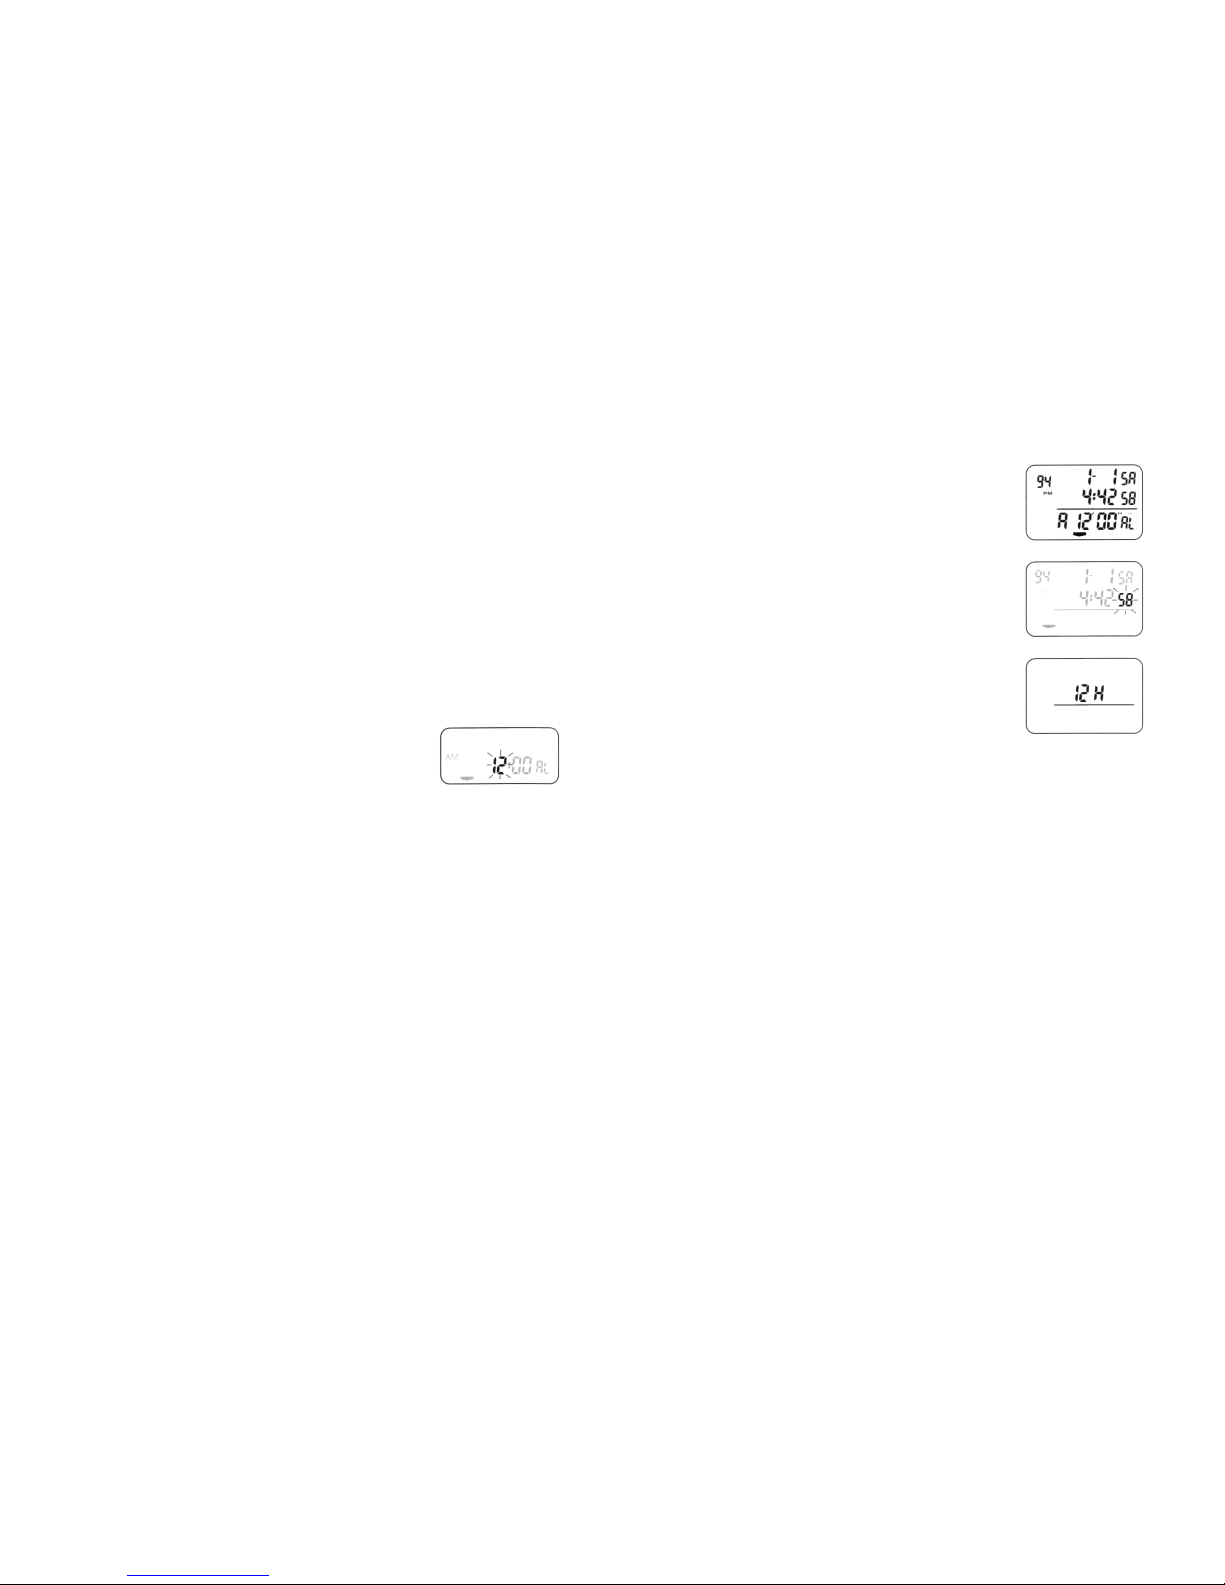
Drücken Sie die "MODE"-Taste (D) sooft, bis die Alarmzeit-Anzeige
erscheint (siehe 6.).
Drücken und halten Sie die Taste "RECALL"
(C) solange, bis die Stundenanzeige zu blinken beginnt.
Mit der "LAP/SPLIT/RESET"-Taste (B) werden die Stunden eingestellt, drücken Sie sie
sooft, bis die gewünschte Stundenzahl eingestellt ist (anstatt 20mal die Taste kurz zu
drücken, können Sie sie auch drücken und
halten, dann läuft die Zahl automatisch weiter).
Drücken Sie die "START/STOP"-Taste (A),
dann blinkt die Minutenanzeige.
Mit der "LAP/SPLIT/RESET"-Taste (B) lassen sich die Minuten einstellen.
Drücken Sie die Taste "RECALL" (C), um den Einstellmodus zu verlassen (auch an beliebiger Stelle während der Einstellung möglich).
b) Alarm ein- oder ausschalten
Drücken Sie die "MODE"-Taste (D) sooft, bis die Alarmzeit-Anzeige
erscheint (siehe 6.).
Drücken Sie die Taste "START/STOP" (A), um den Alarm einzuschalten (im Display erscheint unten links ein Alarmsymbol) oder
auszuschalten (das Alarmsymbol verschwindet).
12
7. Régler l’heure / la date
Appuyez plusieurs fois de suite sur la touche
"MODE" (D) jusqu’à ce que l’affichage de
l’heure/de la date apparaisse (voir 6). Maintenez la touche "RECALL" (C) appuyée jusqu’à ce que l’affichage des secondes se
mette à clignoter.
Les secondes sont remises à zéro ("00") au
moyen de la touche "LAP/SPLIT/RESET"
(B). Appuyez sur la touche "START/STOP"
(A), l’affichage des minutes se met à cligno-
ter. Les minutes peuvent être maintenant
réglées au moyen de la touche
"LAP/SPLIT/RESET" (B). Appuyez plusieurs
fois de suite sur la touche jusqu’à ce que les
minutes soient sur le chiffre désiré (au lieu
d’appuyer 20 fois de suite sur la touche,
vous pouvez aussi maintenir la touche
appuyée, les chiffres défilent alors automatiquement).
En appuyant à nouveau sur la touche
"START/STOP" (A), vous pouvez passer au
réglage des heures, puis du jour, du mois et
de l’année. Le réglage s’effectue à chaque fois
au moyen de la touche "LAP/SPLIT/RESET"
(B).
Ensuite, il est possible de faire passer l’affichage du mode 12h (affichage "12H") au
mode 24h (affichage "24H"). A cet effet,
appuyez brièvement sur la touche "LAP/
SPLIT/ RESET" (B) pour passer de l’un à
l’autre.
41
Page 17

Drücken Sie die Taste "RECALL" erneut, um zur Zeitnahme zurückzukehren, die Einblendung " " verschwindet.
Bei stehender
Stoppuhr löscht ein Druck auf die Taste
"LAP/SPLIT/RESET" (B) alle Zeiten, die Zwischenzeiten werden
ebenfalls alle gelöscht!
10. Countdown-Timer (Dual-Timer)
Der Countdown-Timer verfügt über zwei verschiedene CountdownModi:
• Einzelner Timer ("Single Timer")
Stellen Sie nur Timer 1 ein. Timer 2 muss auf "00:00:00" stehen.
Der eingestellte und gestartete Countdown wird laufend wieder-
holt. Bei den letzten 3 Sekunden ertönt ein kurzer Ton, bei
00:00:00 ein längerer Alarmton.
• Zwei Timer ("Dual Timer")
Stellen Sie beide Timer (Timer 1 und Timer 2) ein.
Beispiel: Bei einem Boxkampf dauert die Runde 3 Minuten
und
die Pause 1 Minute
.
Stellen Sie Timer 1 auf "00:03:00" ein (3 Minuten) und Timer 2 auf
"00:01:00" (1 Minute).
Nach dem Start läuft Timer 1. Nach Erreichen der 3 Minuten ertönt
der Alarmton, Timer 1 bleibt stehen (Runde zu Ende), Timer 2 startet (Pause beginnt). Nach Erreichen der 1 Minute ertönt der Alarmton, Timer 2 bleibt stehen (Pause zu Ende), Timer 1 startet erneut.
Einstellung der Timer:
Drücken Sie die "MODE"-Taste (D) sooft, bis die Countdown-Anzeige erscheint (siehe 6.).
14
5. Eléments de maniement & affichage
LCD (Display)
Sur l’illustration sur le rabat, vous pouvez voir tous les affichages et
symboles du Display. Ils ne sont cependant pas tous visibles en
même temps pendant le fonctionnement normal.
Illustration voir rabat
1 Numéro de mémoire (1-128)
2 Case d’affichage mémoire
3 Affichage temps "SPLIT"
4 Affichage "STOP"
5 Affichage "FULL" (toutes les mémoires sont occupées)
6 Affichage "RECALL"
7 Affichage indiquant si l’alarme est allumée ou éteinte
8 Affichage de la fonction
Quatre touches :
A "START/STOP"
B "LAP/SPLIT/RESET"
C "RECALL"
D "MODE"
39
Page 18

Starten Sie den Countdown durch Drücken der "START/STOP"Taste (A).
Der Countdown wird sooft wiederholt, bis Sie die "START/STOP"Taste drücken.
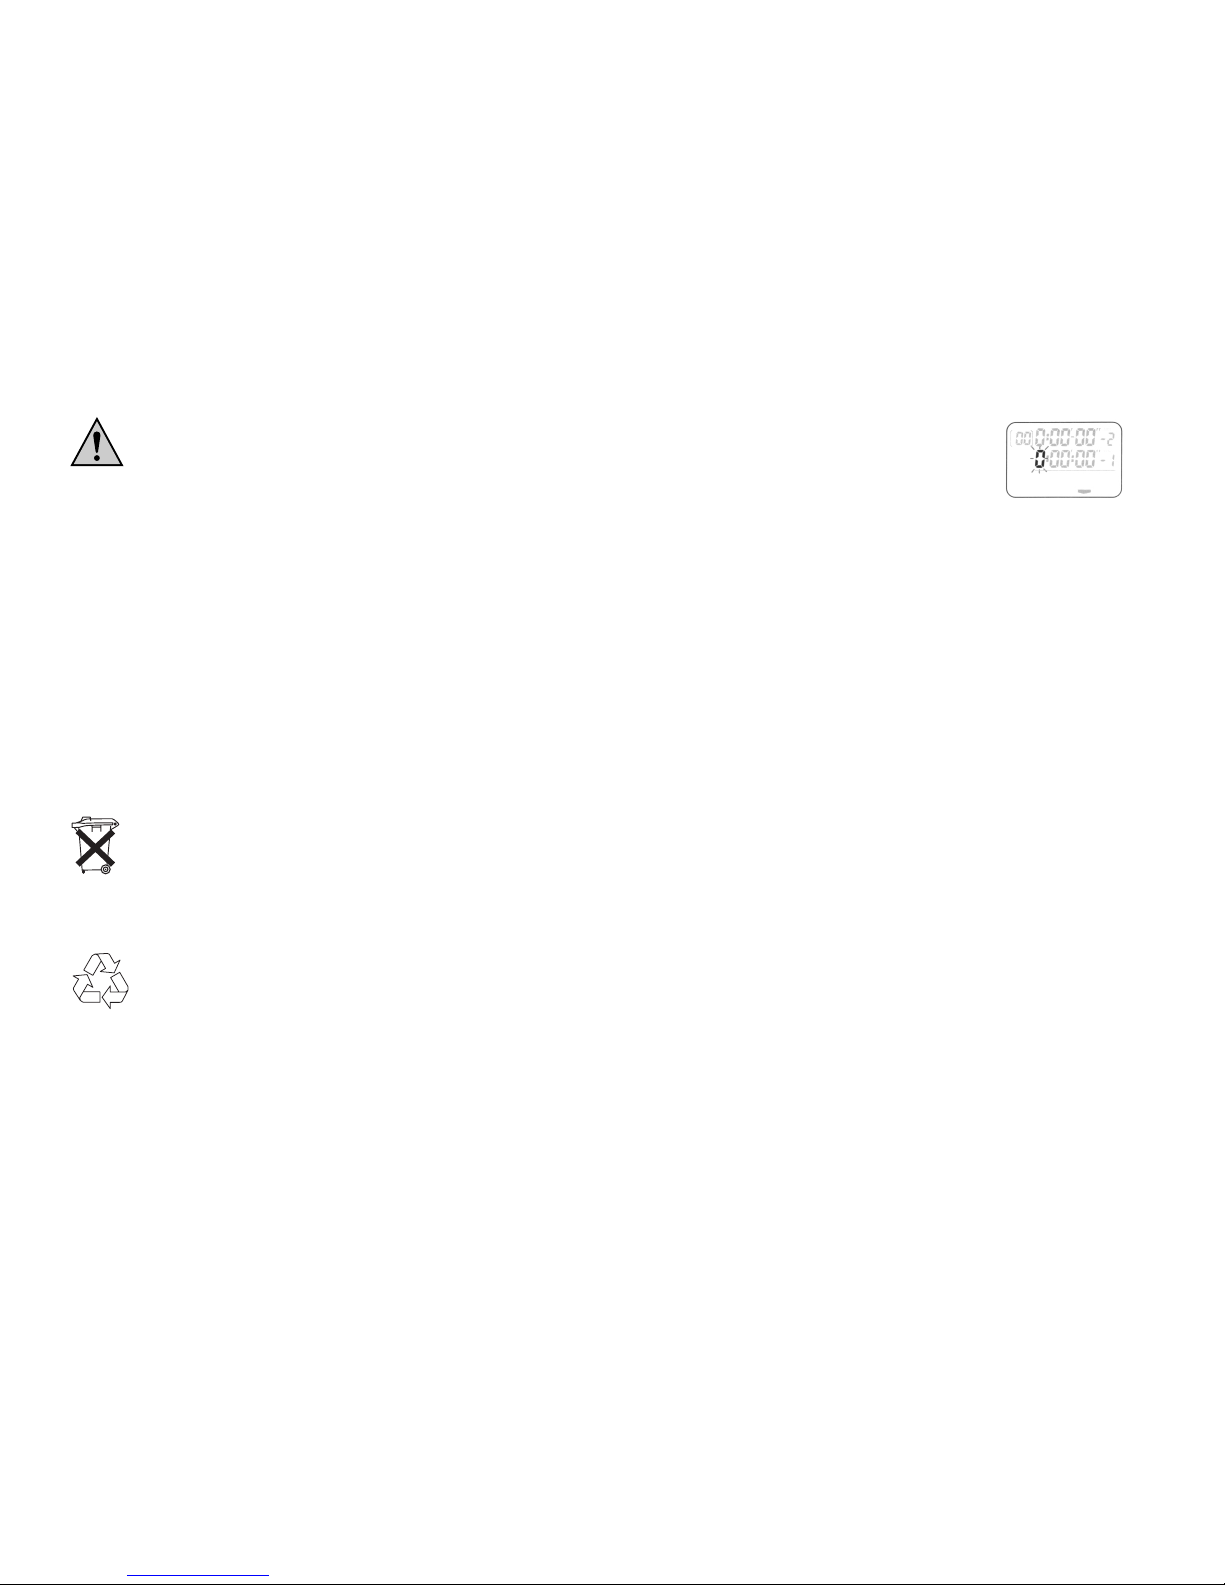
11. Frequenz-Hochrechnung
Es handelt sich hier um eine sehr einfache Methode zum Errechnen
der Anzahl von Ereignissen pro Minute.
Drücken Sie die "MODE"-Taste (D) sooft, bis der
Frequenz-Hochrechnungs-Modus erscheint.
Mit der "START/STOP"-Taste (A) starten und
beenden Sie die Zeitnahme.
Zwischen "START" und "STOP" liegen drei
Ereignisse, z.B. es fallen drei Wassertropfen aus
einem Wasserhahn. Im Display wird dann die
Anzahl der Ereignisse pro Minute hochgerechnet.
Wenn die Zahl größer als 180 oder kleiner als 10
ist, wird im Display "Err" angezeigt (Error, Fehler).
Zur Verdeutlichung: Zwischen "START" und "STOP" liegen die drei
Ereignisse , und
16
Soyez prudent lors du maniement du produit – chocs, coups et
chutes même d’une faible hauteur provoquent un endommagement.
4. Changement de piles, remarque
concernant la protection de l’environnement
Quand vous constatez que les touches de l’appareil ne réagissent
plus ou que plus rien n’est affiché sur le display (tout en tenant
compte du fait que le chronomètre se met automatiquement en
veilleuse après 9 heures env. et éteint alors l’affichage), c’est qu’il
est temps de changer les piles.
Dévissez les 6 petites vis se trouvant sur le dos du chronomètre au
moyen d’un tournevis approprié.
Retirez le dos du chronomètre.
Il est possible de retirer la pile après l’avoir décrochée de son support,
notez bien dans quel sens de la polarité elle doit être placée.
Mettez une pile neuve (de type CR2032) dans le bon sens de la polarité (le côté négatif se trouve vers le fond, en direction du chronomètre).
Remettez le dos du chronomètre correctement en place et revissezle fermement.
Faites bien attention à ce que le joint en caoutchouc et la dragonne
restent bien dans les fentes du chronomètre !
Ne laissez pas traîner les piles, elles pourraient être avalées par un enfant ou par un animal domestique. Si cela
arrivait, consultez immédiatement un médecin !
37
Page 19

Es sind keinerlei vom Anwender zu wartende Teile im
Inneren des Produkts.
Eine Reparatur darf nur durch eine Fachkraft erfolgen,
die mit den damit verbundenen Gefahren bzw. einschlägigen Vorschriften vertraut ist.
Zur Reinigung des Produkts reicht ein trockenes, fusselfreies Tuch.
Für stärkere Verschmutzungen können Sie das Tuch leicht mit lauwarmen Wasser anfeuchten.
14. Entsorgung
Entsorgen Sie das unbrauchbar gewordene Produkt entsprechend den geltenden gesetzlichen Vorschriften.
15. Behebung von Störungen
Beachten Sie alle Sicherheitshinweise dieser Bedienungsanleitung!
Problem Lösungshilfe
Keine Funktion • Die Stoppuhr schaltet sich nach etwa
9 Stunden automatisch aus (Stromsparfunktion). Drücken Sie eine der Tasten,
dann wird die Stoppuhr wieder aktiviert.
• Kontrollieren Sie die korrekte Polung der
eingesetzten Batterie.
• Tauschen Sie die Batterie gegen eine
Neue aus (Typ "CR2032").
18
Utilisation prévue
Ce chronomètre sert à stopper des temps et à chronométrer comme c’est l’usage dans beaucoup de sports. Il dispose en sus de
diverses fonctions supplémentaires, par ex. 128 mémoires pour
temps intermédiaires chronométrés, l’affichage de l’heure, de la
date et une alarme.
Toute utilisation autre que stipulée ci-dessus est strictement interdite. Il n’est permis ni de modifier le produit, ni de le transformer !
Index
page
1. Caractéristiques. . . . . . . . . . . . . . . . . . . . . . . . . . . . . . . . . . . 36
2. Contenu de l’emballage . . . . . . . . . . . . . . . . . . . . . . . . . . . . 36
3. Consignes de sécurité . . . . . . . . . . . . . . . . . . . . . . . . . . . . . 36
4. Changement de piles, remarque concernant
la protection de l’environnement . . . . . . . . . . . . . . . . . . . . . . 37
5. Eléments de maniement et affichage LCD (Display) . . . . . . . 39
6. Choisir un mode de fonctionnement . . . . . . . . . . . . . . . . . . . 40
7. Régler l’heure / la date. . . . . . . . . . . . . . . . . . . . . . . . . . . . . . 41
8. Fonction alarme . . . . . . . . . . . . . . . . . . . . . . . . . . . . . . . . . . . 42
9. Mode chronomètre . . . . . . . . . . . . . . . . . . . . . . . . . . . . . . . . 43
10. Compte à rebours (Dual-Timer) . . . . . . . . . . . . . . . . . . . . . . . 44
11. Extrapolation de fréquences . . . . . . . . . . . . . . . . . . . . . . . . . 47
12. Maniement . . . . . . . . . . . . . . . . . . . . . . . . . . . . . . . . . . . . . . . 48
13. Entretien et nettoyage . . . . . . . . . . . . . . . . . . . . . . . . . . . . . . 48
14. Elimination des déchets. . . . . . . . . . . . . . . . . . . . . . . . . . . . . 49
15. Guide de dépannage . . . . . . . . . . . . . . . . . . . . . . . . . . . . . . . 49
35
Page 20

Prescribed use
The stop watch is used in measuring times or intermediate times as
is required in the field of sports, for instance. It also has extra functions, e.g. 128 intermediate time memories, a hour/date display, and
an alarm function.
Any use other than the one described above damages this product.
No part of the product may be modified or rebuilt.
Table of contents
Page
1. Features . . . . . . . . . . . . . . . . . . . . . . . . . . . . . . . . . . . . . . . . . 21
2. Scope of delivery . . . . . . . . . . . . . . . . . . . . . . . . . . . . . . . . . . 21
3. Safety instructions . . . . . . . . . . . . . . . . . . . . . . . . . . . . . . . . . 21
4. Battery change and instructions
for environmental protection . . . . . . . . . . . . . . . . . . . . . . . . . 22
5. Controls and LC display . . . . . . . . . . . . . . . . . . . . . . . . . . . . 24
6. Mode selection . . . . . . . . . . . . . . . . . . . . . . . . . . . . . . . . . . . 25
7. Setting the hour/date . . . . . . . . . . . . . . . . . . . . . . . . . . . . . . . 26
8. Alarm function . . . . . . . . . . . . . . . . . . . . . . . . . . . . . . . . . . . . 27
9. Stop watch mode. . . . . . . . . . . . . . . . . . . . . . . . . . . . . . . . . . 28
10. Countdown timer (Dual timer) . . . . . . . . . . . . . . . . . . . . . . . . 29
11. Frequency extrapolation . . . . . . . . . . . . . . . . . . . . . . . . . . . . 31
12. Handling. . . . . . . . . . . . . . . . . . . . . . . . . . . . . . . . . . . . . . . . . 31
13. Maintenance and cleaning . . . . . . . . . . . . . . . . . . . . . . . . . . . 32
14. Disposal . . . . . . . . . . . . . . . . . . . . . . . . . . . . . . . . . . . . . . . . . 33
15. Troubleshooting . . . . . . . . . . . . . . . . . . . . . . . . . . . . . . . . . . . 33
20
The interior of the watch does not contain any components that require maintenance by the user.
A repair should solely be made by an expert conversant
with the hazards involved and the relevant regulations.
To clean the product, it will do to use a dry, non-fluffy cloth.
You may slightly wet the cloth with luke-warm water for hard-toremove impurities.
14. Disposal
Dispose of the product, which has become unusable, while
observing the effective legal provisions.
15. Troubleshooting
Observe all safety instructions of this manual.
Problem Remedy
No operation • The stop watch will be turned off auto-
matically after about 9 hours (save-power
function). Press one of the keys to reactive the stop watch.
• Check the inserted battery for its correct
polarity.
• Replace the battery with a new one (Type
"CR2032").
33
Page 21

4. Battery change and instructions for
environmental protection
If you find out that the keys do not react any longer on the watch or
the display no longer visualizes anything (noting that the stop watch
automatically activates the power-save mode after abt. 9 hours and
turns the display off) exchange the battery against a new one.
Remove the 6 small screws at the back of the stop watch, using a
suitable screw-driver.
Detach the rear panel.
The battery may be taken out once the battery mounting is
removed, keep the battery polarity in mind.
Insert a new battery (type CR2032) at the right polarity (with the negative pole at bottom pointing to the stop watch).
Replace the rear panel correctly and fix it using the screws.
Make sure the rubber sealing and the wrist strap remain in the slots
of the stop watch.
Do not leave batteries littered because children or pets
might swallow them. In case of batteries being swallowed call for immediate medical care.
Do not leave exhausted batteries in the battery compartment because even leak-protected batteries might
corrode, thus releasing chemicals which can be harmful
to your health or damage the battery compartment.
Leaky or damaged batteries might cause cauterization
when in contact with the skin; therefore, wear suitable
protective gloves.
22
11. Frequency extrapolation
This is a very simple method to calculate the number of events per
minute.
Press the "MODE" key (D) as many times until
the frequency extrapolation mode appears.
Start and stop time-taking by pressing the
"START/STOP" key (A) .
There are three events between "START" and
"STOP", e.g. three water droplets fall down from
a water tap. The display will then forecast the
number of events per minute.
If the number exceeds 180 or is less than 10
"Err" (Error) will be shown in the display.
To put it more clearly: there are three events , , and between
"START" and "STOP".
12. Handling
Never use the stop watch immediately after it has been brought
from a cold into a warm room. Condensation water that forms might
destroy your product.
31
Page 22

5. Controls and LC display
You will see all visualizations and symbols of the LC display in the
photo on the fold-out page. These are not all visible at a time during
normal operation.
See the fold-out page for the photo
1 Number of the memory (1-128)
2 Field indicating the storage
3 "SPLIT" time display
4 "STOP" display
5 "FULL" display (indicating that all memories are occupied)
6 "RECALL" display
7 Display indicating whether the alarm function is on or off
8 Function display
Four keys:
A "START/STOP"
B "LAP/SPLIT/RESET"
C "RECALL"
D "MODE"
24
The START/STOP" key allows to switch on by one memory, the
LAP/SPLIT/RESET" (B) key to switch back by one memory
Return to time-taking by pressing the " " key anew, which
causes the inserted "RECALL" to disappear.
When the stop watch is stopped
pressing the "LAP/SPLIT/RESET"
(B) key deletes all times and all of the intermediate times are deleted as well.
10. Countdown timer (Dual timer)
The countdown timer uses two different countdown modes:
• Single Timer
Only set Timer 1. Timer 2 has to be at "00:00:00" .
The countdown which is set and started is continuously repeated.
A short sound will be heard during the last 3 seconds, a longer
alarm sound will be heard at 00:00:00.
• Dual Timer
Set the two timers (Timer 1 and Timer 2).
Example: A round lasts 3 minutes
in a boxing match and the
break lasts 1 minute.
Set timer 1 to "00:03:00" (3 minutes) and timer 2 to"00:01:00"
(1 Minute).
Timer 1 will be running after the beginning. Once 3 minutes are
reached the alarm sound will be heard and timer 1 will stop (the
round is finished). Timer 2 will start (the break begins). Once 1
minutes is reached the alarm sound will be heard (the break is finished) and timer 1 will start anew.
29
Page 23

7. Setting the hour and date
Press the "MODE" key (D) as many times until
the hour/date display appears (see 6.). Press
and keep depressed the "RECALL" key (C)
until the second display begins to flash.
Set the seconds to "00" using the
"LAP/SPLIT/RESET" key (B).
Press the "START/STOP" key (A), which causes the minute display to flash.
The "LAP/SPLIT/RESET" key (B) allows to set
the minutes. Press it as many times until the
desired number of minutes is adjusted (instead
of briefly pressing the key 20 times you may
press it and keep it depressed, which causes
time to run on automatically).
Press the "START/STOP" key (A) to choose
the hour display and, then, the day, month, and
year displays.
The respective settings made can be changed
by means of the "LAP/SPLIT/RESET" key (B).
Subsequently, the display may be changed
from the 12-hour mode (with "12H" displayed)
over to the 24-hour mode (with "24H" displayed). Briefly press the "LAP/SPLIT/RESET"
key (B).
To leave the setting mode, briefly press the
"RECALL" key (C). This may also be done at
any point while making settings.
26
8. Alarm function
a) Set the time for alarm
Press the "MODE" key (D) as many times until the alarm time display
appears (see 6.).
Press and keep depressed the "RECALL"
key (C) until the hour display begins to flash.
The "LAP/SPLIT/RESET" key (B) allows to
set the hours. Press it as many times until
the desired number of hours is set (instead
of briefly pressing the key 20 times you may
press it and keep it depressed, which causes
time to run on automatically).
Press the "START/STOP" key (A) to make
the minute display flash.
The "LAP/SPLIT/RESET" key (B) allows to
set the minutes.
To leave the setting mode, press the "RECALL" key (C), (which may
also be done at any point while making settings).
b) Turn alarm on and off
Press the "MODE" key (D) as many times until the alarm time display appears (see 6.).
Press the "START/STOP" key (A) to turn the alarm on (causing an
alarm symbol to appear at bottom left) or off (causing the alarm
symbol to disappear).
27
Page 24

3
Einführung
Sehr geehrter Kunde,
wir bedanken uns für den Kauf dieser Stoppuhr.
Die Stoppuhr ist EMV-geprüft und erfüllt die Anforderungen der
geltenden europäischen und nationalen Richtlinien. Die CEKonformität wurde nachgewiesen, die entsprechenden
Erklärungen sind beim Hersteller hinterlegt.
Um diesen Zustand zu erhalten und einen gefahrlosen Betrieb
sicherzustellen, müssen Sie als Anwender diese Bedienungsanleitung beachten!
Alle enthaltenen Firmennamen und Produktbezeichnungen sind
Warenzeichen der jeweiligen Inhaber. Alle Rechte vorbehalten.
Bei Fragen wenden Sie sich an unsere
Technische Beratung
Deutschland: Tel. 0180/5 31 21 16 oder 09604/40 88 47
Fax 09604/40 88 44
e-mail: tkb@conrad.de
Mo. - Fr. 8.00 bis 18.00 Uhr
Österreich: Tel. 0 72 42/20 30 60 · Fax 0 72 42/20 30 66
e-mail: support@conrad.at
Mo. - Do. 8.00 bis 17.00 Uhr
Fr. 8.00 bis 14.00 Uhr
Schweiz: Tel. 0848/80 12 88 · Fax 0848/80 12 89
e-mail: support@conrad.ch
Mo. - Fr. 8.00 bis 12.00 Uhr, 13.00 bis 17.00 Uhr
4
Il ne se trouve aucune pièce devant faire l’objet d’une
quelconque maintenance dans le chronomètre.
Tout entretien et toute réparation du chronomètre doivent impérativement être effectués par un SPECIALISTE
connaissant les dangers liés à de tels travaux et les
prescriptions correspondantes
Pour le nettoyage de l’appareil, un chiffon sec et non pelucheux est
suffisant.
En cas de salissures plus importantes, vous pouvez utiliser un chiffon humidifié d’eau tiède.
14. Elimination des déchets
Jetez l’appareil devenu inutilisable suivant les lois en vigueur.
15. Guide de dépannage
Prenez impérativement en compte toutes les
consignes de sécurité de ce mode d’emploi !
Problème Dépannage
Pas de fonctionnement • Le chronomètre s’éteint automa-
tiquement après 9 heures (économie d’énergie). Appuyez sur l’une
des touches, le chronomètre est
réactivé.
• Contrôlez la bonne polarité de la
pile insérée.
• Remplacez la pile par une neuve
( de type "CR2032").
49
 Loading...