

Page 1
CONRAD IM INTERNET http://www.conrad.de
Countdown Timer
Page 2 - 10
Countdown Timer-Uhr
Seite 11 - 21
Item-No./ Best.-Nr.: 61 81 95
D
GB
Imprint
These operating instructions are published by Conrad Electronic GmbH, Klaus-ConradStraße 1,92240 Hirschau/Germany
No reproduction (including translation) is permitted in whole or part e.g.photocopy,microfilming or storage in electronic data processing equipment, without the express written
consent of the publisher.
The operating instructions reflect the current technical specifications at time of print. We
reserve the right to change the technical or physical specifications.
©
Copyright 1999 by Conrad Electronic GmbH. Printed in Germany.
Impressum
Diese Bedienungsanleitung ist eine Publikation der Conrad Electronic GmbH.
Alle Rechte einschließlich Übersetzung vorbehalten. Reproduktionen jeder Art, z. B. Foto-
kopie, Mikroverfilmung, oder die Erfassung in elektronischen Da tenverarbeitungsanlagen,
bedürfen der schriftlichen Genehmigung des Herausgebers.
Nachdruck,auch auszugsweise,verboten.
Diese Bedienungsanleitung entspricht dem technischen Stand bei Drucklegung. Änderung
in Technik und Ausstattung vorbehalten.
©
Copyright 1999 by Conrad Electronic GmbH. Printed in Germany.
*04-99/MZ
D
GB
100 %
RecyclingPapier.
Chlorfrei
gebleicht.
100 %
recycling
paper.
Bleached
without
chlorine.
OPERATING INSTRUCTIONS
GB
BEDIENUNGSANLEITUNG
D
Version 04/99
Page 2

Table of Contents:
Page
Introduction ......................................................................................2
Regulation use of the device............................................................3
Notes on Safety................................................................................4
Product description /Scope of supply..............................................5
Description of components..............................................................6
Operation..........................................................................................7
Fitting/replacing the battery.......................................................7
Setting up and attachment options............................................8
How to set the time....................................................................8
How to set countdown time.......................................................9
Stop-watch function...................................................................9
Handling and maintenance.............................................................10
Disposal of the device....................................................................10
Technical data.................................................................................10
Regulation use of the device:
The Countdown Timer is counter suitable for events lasting up to
99 minutes and 59 seconds, and is also includes a 12-hour digital
clock. Operation is only allowed in splash-proof locations and all
contact with water must be avoided at all times. The power supply
is via a 1.5 V type AAA microbattery.
Use of the device other than previously described will result in damage to the device, and also implies risks, such as short circuits,
fire or electric shocks, etc. No part of the product must be changed
or modified in any way.
Observance of the Notes on Safety and technical data is mandatory!
3
Introduction
Dear Customer,
Thank you for purchasing the Countdown Timer. You have acquired
a state-of-the-art product.
The product meets European and national requirements in relation to electromagnetic compatibility. Conformity has been
demonstrated and the relevant documentation (declaration)
are on file with the manufacturer.
To maintain this condition and ensure safe operation, you should,
as user, carefully read these operating instructions!
Important!
Please read carefully!
In case of damage caused by non-observance of
these operating instructions, any possible claims
under the warranty are null and void and we can
thus assume no liability for consequent damage!
Before operating the device, you must carefully
read these operating instructions.
GB
2
Page 3
When fitting batteries, make sure that they are the
right way round (polarity)!
Never leave batteries lying around. There is a risk
that of swallowing by children or pets. If swallowed,
immediately call for medical assistance!
If touched, used or damaged batteries can attack
the skin. Make sure to use protective gloves.
Make sure that the batteries are not shorted. This
constitutes an explosion risk.
Before setting up the device, a general check should be made
as to whether the device or module is thoroughly adapted to
the application you are planning.
Product description / Scope of supply:
The Countdown Timer is ideally suited to many everyday applications, such as jobs in the kitchen, intake of medication, etc. The device can be used as a countdown timer for events up to 99 minutes
and 59 seconds. Operation of the Countdown Timer is simple and
fast, only requiring rotation of the round adjustment knob. When
the time set is reached, the Countdown Timer emits an acoustic
signal which is almost impossible not to hear. There is a range of
set-up and attachment options. The Countdown Timer also includes a stop-watch function and a digital 12-hour clock.
The Countdown Timer comes complete with a microbattery and
operating instructions.
5
Notes on Safety:
If there are reasons for supposing that risk-free operation is no longer possible, the Countdown Timer must be deactivated and safetied against accidental operation. Risk-free operation can no longer
be supposed, when the Countdown Timer
• no longer functions
• is visibly damaged
• has been stored long-term under adverse conditions, or
• has been exposed to stress during transport.
Before operating the Countdown Timer, make sure
that it is not damaged!
When cleaning the exterior of the device, use only a
soft, lint-free rag. Never use solvents or similar for
cleaning.
Avoid any exposure of the device to extreme mechanical stress.
Never expose the device to either high temperatures or strong vibration. Never immerse the device in
water.
The device may only be operated with batteries (1 x
microcell, type AAA). Never attempt to operate with
device with another voltage or other batteries.
Never throw batteries into naked flames. This constitutes an explosion risk.
4
Page 4
Operation
Important:
Before starting to operate, please read carefully the section relating to regulation use of the device, and also the Notes on
Safety and technical data.
Fitting / replacing the battery:
After some time, the acoustic signal becomes weaker or the time
display is difficult to read: time to replace the battery.
This is what you do:
Using a suitable cross-head screwdriver, loosen the three screws
of the housing (7) and carefully remove the housing cover. Replace
the used microcell with a new one of the same type.
When fitting the battery, make sure it is the right way round
(polarity). See figure showing components!
Important:
If after fitting the battery, a continuous beep is audible, and all
display elements light, you need to remove the battery, refitting
it after a waiting period of approx. 10 seconds. Replacing the
battery deletes all settings. In this way, you are able to complete a RESET!
Replace the cover of the housing and re-attach the cover using the
three housing screws (7).
Make sure not to tighten the screws too much (you should feel
when the screws are tight enough).
7
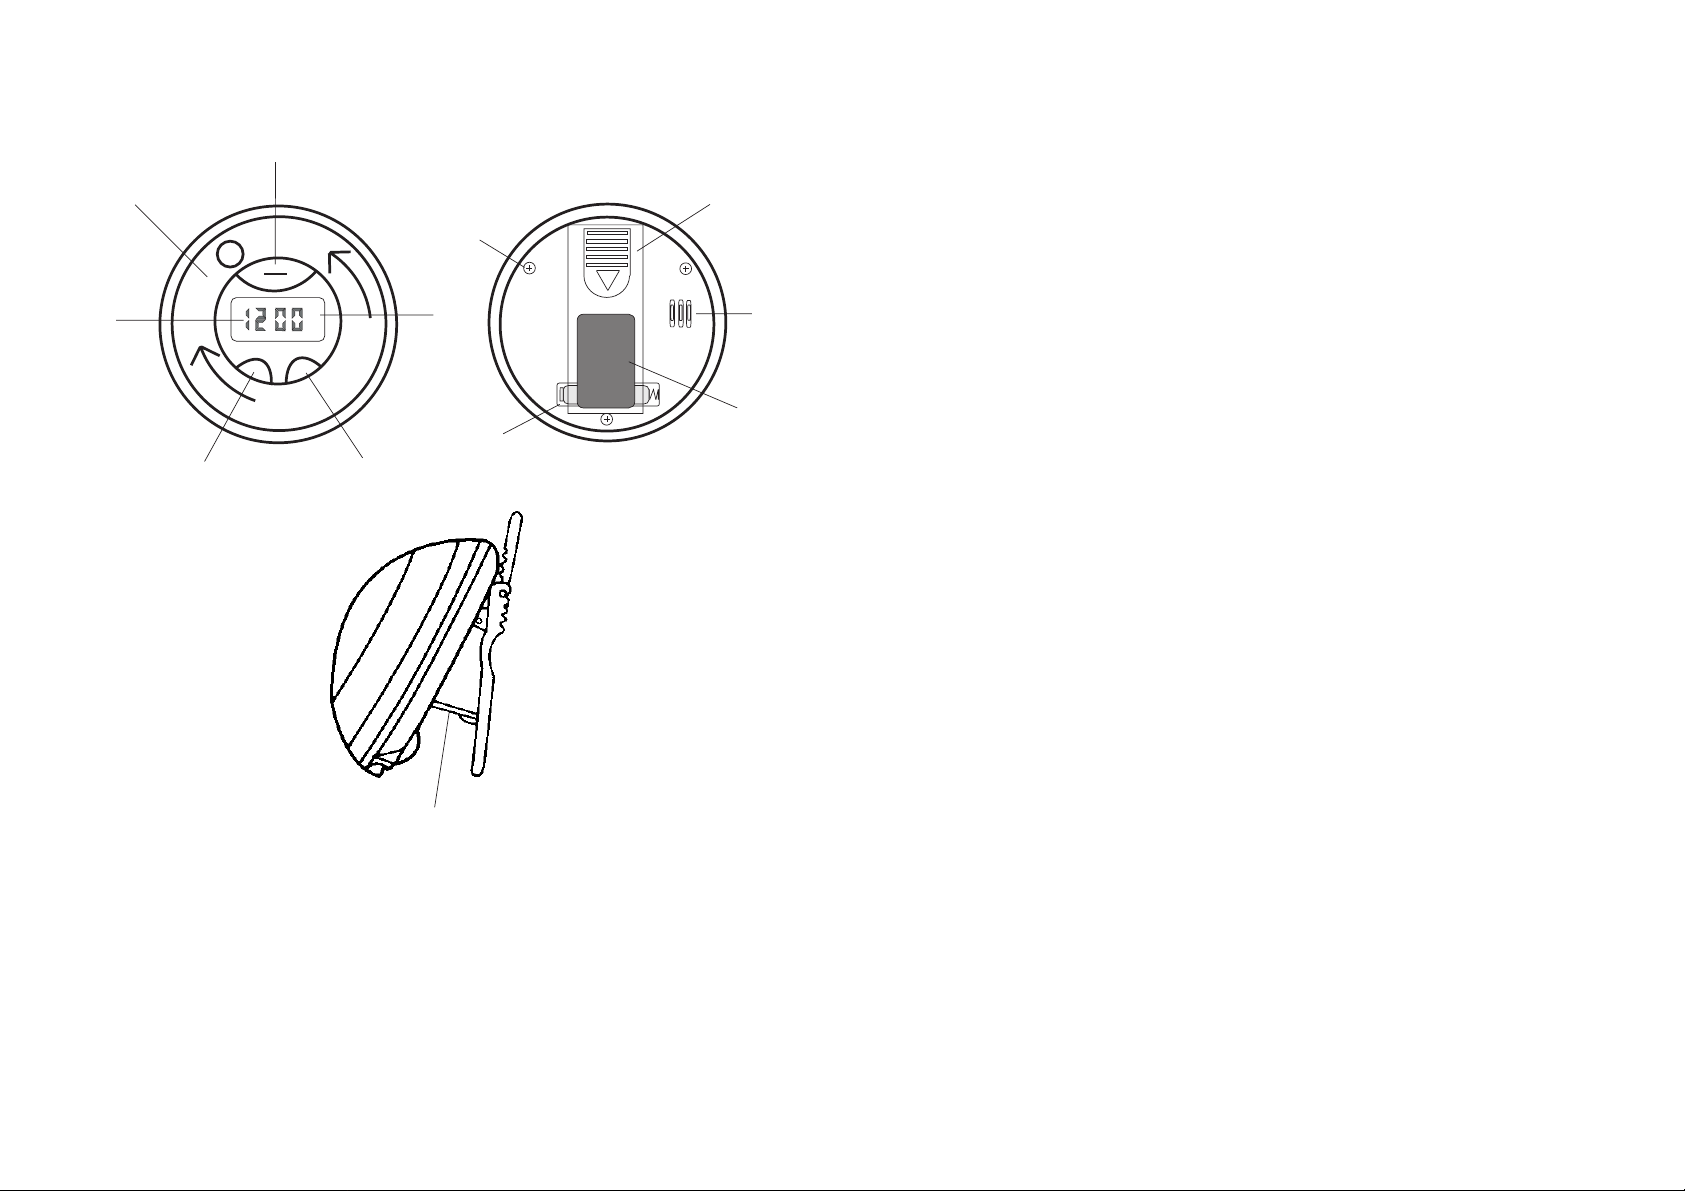
Description of components
1. Start/Stop button 7. Housing screw
2. Round adjustment knob 8. Battery compartment
3. Time display 9. Attachment magnet
4. Clock button 10. Acoustic signal opening
5. Timer button 11. Attachment clip
6. AM-PM display 12. Stand
12
+
_
7
8
9
1
11
:
PM
TIMER
CLOCK
START
STOP
1
2
3
4
5
6
6
Page 5

❏ Use the round adjustment knob (2) to set current time. The
knob can be turned in both directions. The AM/PM display (6)
indicates whether the time set is AM or PM.
❏ To save the time you have set, press the clock button (4) once.
How to set countdown time:
❏ Press the timer button (5) once.
❏ Use the round adjustment knob (2) to set the desired countdo-
wn time.
To start the countdown time, press the button Start/Stop (1)
once. The countdown time can be interrupted by pressing the
Start/Stop button and then continued.
❏ When the countdown time is over (00:00), an acoustic signal is
audible for 1 minute. The display also shows the time after the
acoustic signal.
❏ To interrupt the acoustic signal, you must press the Start/Stop
button (1). The display then shows again the countdown time
set.
Stop-watch function:
❏ Press the timer button (5).
❏ Use the round adjustment knob (2) to set the countdown time
to 00:00.
❏ To start/stop the stop-watch function, press the Start/Stop but-
ton (1).
❏ Countdown time can be set at 1 minute intervals.
9
Never leave unconsumed batteries in the Countdown Timer. Even leak-proof batteries can corrode
and may thus release chemicals which are a health
hazard and may irreparably damage the battery
compartment. Fitting batteries the wrong way round (incorrect polarity) will irreparably damage the
Countdown Timer!
Environmentally important!
As consgggumer of the product, you are legally required (regulation relating to used batteries) to return all used batteries and rechargeable batteries
(from button cell to lead battery). Disposal in domestic waste is illegal.
You can dispose of your used batteries and rechargeable batteries by returning them free of charge to
our facility in Hirschau, or, as previously, to local
disposal centers (recycling centers), which are obliged to accept them.
Act to protect the environment!
Setting up and attachment options:
❏ The Countdown Timer can be attached by the clip provided,
suspended, rested on its stand (12) and magnetically attached.
Make sure that the Countdown Timer is firmly secured, because it may be irreparably damaged if it is dropped.
How to set the time:
❏ Press the clock button (4) for approx. 3 seconds until a short
acknowledgment signal becomes audible and the time display
(3) starts to flash.
8
Page 6

Einführung
Sehr geehrter Kunde,
wir bedanken uns für den Kauf der Countdown Timer-Uhr. Mit diesem Produkt haben Sie ein Gerät erworben, welches nach dem
heutigen Stand der Technik gebaut wurde.
Der Aufbau entspricht den europäischen und nationalen Anforderungen zur Elektromagnetischen Verträglichkeit. Die Konformität wurde nachgewiesen, die entsprechenden Erklärungen
und Unterlagen sind beim Hersteller hinterlegt.
Um diesen Zustand zu erhalten und einen gefahrlosen Betrieb sicherzustellen müssen Sie als Anwender diese Bedienungsanleitung
beachten!
Achtung!
Unbedingt lesen!
Bei Schäden, die durch Nichtbeachten der Anleitung verursacht werden, erlischt der Garantieanspruch! Für Folgeschäden, die daraus resultieren,
übernehmen wir keine Haftung! Diese Bedienungsanleitung ist vor Inbetriebnahme genau durchzulesen.
D
11
Handling and maintenance
Apart from battery replacement, the Countdown Timer is maintenance-free.
For cleaning the exterior of the device only use a soft, lint-free cleaning rag. The device must be kept away from water at all times.
Never use abrasive agents or solvents for cleaning the device. Direct exposure to light may make the display difficult to read.
Disposal of the device
If your Countdown Timer has become irreparably defective, please
dispose of it according to current legal regulations.
Technical data:
Operating voltage..................................: 1.5V DC
Battery type ...........................................: 1 x microcell, type AAA
Current consumption, timer operation...: approx. 10µA
Current consumption, alarm..................: approx. 10mA
Countdown time....................................: up to 99 min. 59 sec.
Overall dimensions (x x H).....................: approx. 75 x 40mm
10
Page 7

Eine andere Verwendung als zuvor beschrieben führt zur Beschädigung dieses Produkts. Darüberhinaus ist dies mit Gefahren, wie
z.B. Kurzschluß, Brand, elektrischer Schlag, etc. verbunden. Das
gesamte Produkt darf, abgesehen vom Batteriewechsel, nicht
geöffnet, geändert bzw. umgebaut werden!
Die Sicherheitshinweise und technischen Daten sind unbedingt zu
beachten!
Sicherheitshinweise:
Wenn anzunehmen ist, daß ein gefahrloser Betrieb nicht mehr
möglich ist, so ist die Countdown Timer-Uhr außer Betrieb zu setzen und gegen unbeabsichtigten Gebrauch zu sichern! Es ist anzunehmen, daß ein gefahrloser Betrieb nicht mehr möglich ist, wenn
• die Countdown Timer-Uhr nicht mehr funktioniert
• die Countdown Timer-Uhr sichtbare Beschädigungen aufweist
• eine längere Lagerung unter ungünstigen Verhältnissen stattge-
funden hat oder
• schwere Transportbeanspruchungen nicht auszuschließen sind.
Überprüfen Sie, vor der Inbetriebnahme den Countdown Timer-Uhr auf Beschädigung(en)!
Zur äußerlichen Reinigung des Gerätes benutzen
Sie lediglich ein weiches, fusselfreies Tuch. Verwenden Sie auf keinen Fall Lösungsmittel o.ä. zur Reinigung.
Vermeiden Sie eine starke mechanische Belastung
des Gerätes.
13
Inhaltsverzeichnis:
Seite
Einführung ......................................................................................11
Bestimmungsgemäße Verwendung................................................12
Sicherheitshinweise........................................................................13
Produktbeschreibung /Lieferumfang..............................................15
Einzelteilebezeichnung...................................................................16
Inbetriebnahme...............................................................................17
Batterieeinbau-/wechsel ..........................................................17
Aufstell- und Befestigungsmöglichkeiten.................................18
Einstellen der Uhrzeit ...............................................................19
Einstellen der Countdown-Zeit.................................................19
Stopuhr-Funktion .....................................................................20
Handhabung und Wartung.............................................................20
Entsorgung.....................................................................................20
Technische Daten ...........................................................................21
Bestimmungsgemäße Verwendung:
Die Countdown Timer-Uhr ist ein Zähler für Abläufe bis zu 99 Minuten und 59 Sekunden geeignet und zusätzlich mit einer 12 Stunden
Digitaluhr ausgestattet. Der Betrieb ist ausschließlich an spritzwassergeschützten Stellen erlaubt, der Kontakt mit Wasser ist unbedingt zu vermeiden. Die Spannungsversorgung erfolgt über eine
Mikrobatterie 1,5V, Typ AAA.
12
Page 8

Produktbeschreibung / Lieferumfang:
Die Countdown Timer-Uhr ist ein ideales Gerät für viele Dinge des
täglichen Lebens, wie Arbeiten in der Küche, Einnahme von Medikamenten usw. Das Gerät kann als Countdown-Timer für Abläufe
bis 99 Minuten und 59 Sekunden eingesetzt werden. Die Bedienung der Countdown Timer-Uhr ist durch das drehbare Einstellrad
sehr einfach und schnell. Nach Erreichen der eingestellten Zeit gibt
die Countdown Timer-Uhr einen fast unüberhörbaren Signalton von
sich. Es kann zwischen vier verschiedenen Aufstell- bzw. Befestigungsmöglichkeiten gewählt werden. Ebenfalls verfügt die Countdown Timer-Uhr über eine Stopuhr-Funktion und eine digitale 12Stunden-Uhr.
Die Countdown Timer-Uhr wird mit einer Mikrobatterie und Bedienungsanleitung geliefert.
15
Setzen Sie das Gerät keinen hohen Temperaturen,
zu hohen Vibrationen oder Feuchtigkeit aus. Das
Gerät darf niemals unter Wasser getaucht werden.
Das Gerät darf ausschließlich über Batterien (1 x
Mikrozelle Typ AAA) betrieben werden. Versuchen
Sie nie das Gerät an einer anderen Spannung oder
mit anderen Batterien zu betreiben.
Werfen Sie keine Batterien ins Feuer. Es besteht Explosionsgefahr.
Achten Sie beim Einlegen der Batterien auf die richtige Polung!
Lassen Sie Batterien nicht offen herumliegen, es
besteht die Gefahr, daß diese von Kindern oder
Haustieren verschluckt werden. Suchen Sie im Falle
eines Verschluckens sofort einen Arzt auf!
Ausgelaufene oder beschädigte Batterien können
bei Berührung mit der Haut Verätzungen verursachen, benutzen Sie in diesem Falle geeignete
Schutzhandschuhe.
Achten Sie darauf, daß die Batterien nicht kurzgeschlossen werden. Es besteht Explosionsgefahr.
Es ist vor der Inbetriebnahme eines Gerätes generell zu prüfen,
ob dieses Gerät oder Modul grundsätzlich für den Anwendungsfall, für den es vorgesehen werden soll, geeignet ist.
14
Page 9

Inbetriebnahme
Achtung:
Vor Inbetriebnahme sind sowohl der bestimmungsgemäße Verwendungszweck, als auch die Sicherheitshinweise und technischen Daten zu beachten.
Batterie Einbau - Wechsel:
Wird nach einiger Zeit der Signalton schwächer, oder ist die Zeitanzeige schlecht ablesbar, ist ein Batteriewechsel vorzunehmen.
Hierzu gehen Sie wie folgt vor:
Schrauben Sie die drei Gehäuseschrauben (7) mit einem geeigneten Kreuzschlitzschraubendreher auf und nehmen Sie den
Gehäusedeckel vorsichtig ab. Erneuern Sie die verbrauchte Mikrozelle gegen eine unverbrauchte des gleichen Typs.
Beachten Sie beim Einlegen die Polung der Batterie (siehe Abbildung Einzelteilebezeichnung)!
Hinweis:
Sollte nach dem Einlegen der Batterie ein Dauerpiepston zu
hören sein, und alle Display Elemente leuchten auf, müssen
Sie die Batterie entfernen und nach einer Wartezeit von ca. 10
Sekunden erneut einlegen. Nach einem durchgeführten Batteriewechsel werden sämtliche Einstellungen gelöscht. Auf diese
Weise kann auch ein „RESET“ durchgeführt werden!
Setzen Sie den Gehäusedeckel wieder auf und verschrauben Sie
den Gehäusedeckel mit den drei Gehäuseschrauben (7).
Gehäuseschrauben mit Gefühl und nicht zu fest anziehen.
17
Einzelteilebezeichnung
1. Start/Stop Taste 7 Gehäuseschraube
2. Einstellrad 8. Batteriefach
3. Zeitanzeige 9. Befestigungsmagnet
4. Clock-Taste 10.Signaltonöffnung
5. Timer-Taste 11.Befestigungsclip
6. AM-PM Anzeige 12.Aufstellbügel
12
+
_
7
8
9
1
11
:
PM
TIMER
CLOCK
START
STOP
1
2
3
4
5
6
16
Page 10

Einstellen der Uhrzeit:
❏ Clock-Taste (4) ca. drei Sekunden drücken bis ein kurzer Quit-
tierton zu hören ist und die Zeitanzeige (3) blinkt.
❏ Mit dem Einstellrad (2) kann nun die aktuelle Uhrzeit eingestellt
werden. Hierzu kann das Einstellrad in beide Richtungen gedreht werden. Die AM/PM Anzeige (6) gibt an, ob die Zeit vor
12Uhr mittag (AM) oder nach 12 Uhr mittag (PM) eingestellt ist.
❏ Zum Speichern der eingestellten Uhrzeit, einmal die Clock-Ta-
ste (4) kurz drücken.
Einstellen der Countdown-Zeit:
❏ Timer-Taste (5) einmal drücken.
❏ Mit dem Einstellrad (2) die gewünschte Countdown-Zeit ein-
stellen.
Zum Start der Countdown-Zeit Taste Start/Stop (1) drücken.
Die Countdown-Zeit kann mit der Start/Stop-Taste unterbrochen und wieder fortgeführt werden.
❏ Ist die eingestellte Countdown-Zeit abgelaufen (00:00), ertönt
für 1 Minute der Signalton. Ebenfalls wird im Display die Zeit ab
ertönen des Signaltones angezeigt.
❏ Soll der Signalton unterbrochen werden, muß die Start/Stop-
Taste (1) gedrückt werden. Im Display wird wieder die vorher
eingestellte Countdown-Zeit angezeigt.
19
Lassen Sie keine unverbrauchten Batterien in der
Countdown Timer-Uhr, da selbst auslaufgeschützte
Batterien korrodieren können und dadurch Chemikalien freigesetzt werden können, welche Ihrer Gesundheit schaden bzw. das Batteriefach zerstören.
Eine Falschpolung der Batterie führt unweigerlich
zur Zerstörung der Countdown Timer-Uhr!
Umwelt-Hinweis!
Der Endverbraucher ist gesetzlich (Altbatterieverordnung) zur Rückgabe aller gebrauchten Batterien
und Akkus (Knopfzelle bis Bleiakku) verpflichtet; eine Entsorgung über den Hausmüll ist untersagt.
Ihre verbrauchten Batterien und Akkus können Sie
sowohl in unseren Niederlassungen bzw. an die
Zentrale in Hirschau unentgeltlich zurückgeben, als
wie bisher auch zu kommunalen Entsorgern (Wertstoffhöfe), die zur Rücknahme verpflichtet sind.
Leisten Sie einen Beitrag zum Umweltschutz!
Aufstell- und Befestigungsmöglichkeiten:
❏ Die Countdown Timer-Uhr kann entweder angeclipt, aufge-
hängt, durch den Aufstellbügel (12) aufgestellt und magnetisch
befestigt werden. Achten Sie auf eine ausreichende Befesti-
gung der Countdown Timer-Uhr, damit sie nicht durch Her-
abfallen beschädigt oder zerstört wird.
18
Page 11

Technische Daten:
Betriebsspannung..........................: 1,5V DC
Batterietyp......................................: 1 x Mikrozellen Typ AAA
Stromverbrauch Timerbetrieb........: ca. 10µA
Stromverbrauch Alarm...................: ca. 10mA
Countdown-Zeit .............................: bis 99min. 59sek.
Abmessungen (x x H)....................: ca. 75 x 40mm
21
Stoppuhr-Funktion:
❏ Timer-Taste (5) drücken.
❏ Mit dem Einstellrad (2) die Countdown-Zeit auf „00:00“ ein-
stellen.
❏ Zum Starten oder Anhalten der Stoppuhr-Funktion die
Start/Stop-Taste (1) drücken.
❏ Die Countdown-Zeit kann in 1 Minuten-Schritte eingestellt wer-
den.
Handhabung und Pflege
Die Countdown Timer-Uhr ist, abgesehen vom Batteriewechsel,
absolut wartungsfrei.
Zur äußerlichen Reinigung des Gerätes verwenden Sie lediglich ein
weiches, fusselfreies Reinigungstuch. Der Kontakt mit Wasser ist
unbedingt zu vermeiden. Verwenden Sie auf keinen Fall Scheueroder Lösungsmittel zur Reinigung des Gerätes. Durch direkten
Lichteinfall kann die Wahrnehmbarkeit des Displays beeinträchtigt
werden.
Entsorgung
Entsorgen Sie nach einem Defekt die unbrauchbar gewordene
Countdown Timer-Uhr nach den gesetzlichen Vorgaben.
20
 Loading...