

Page 1
IR Swift+ Soundfield Quick Guide
Connevans
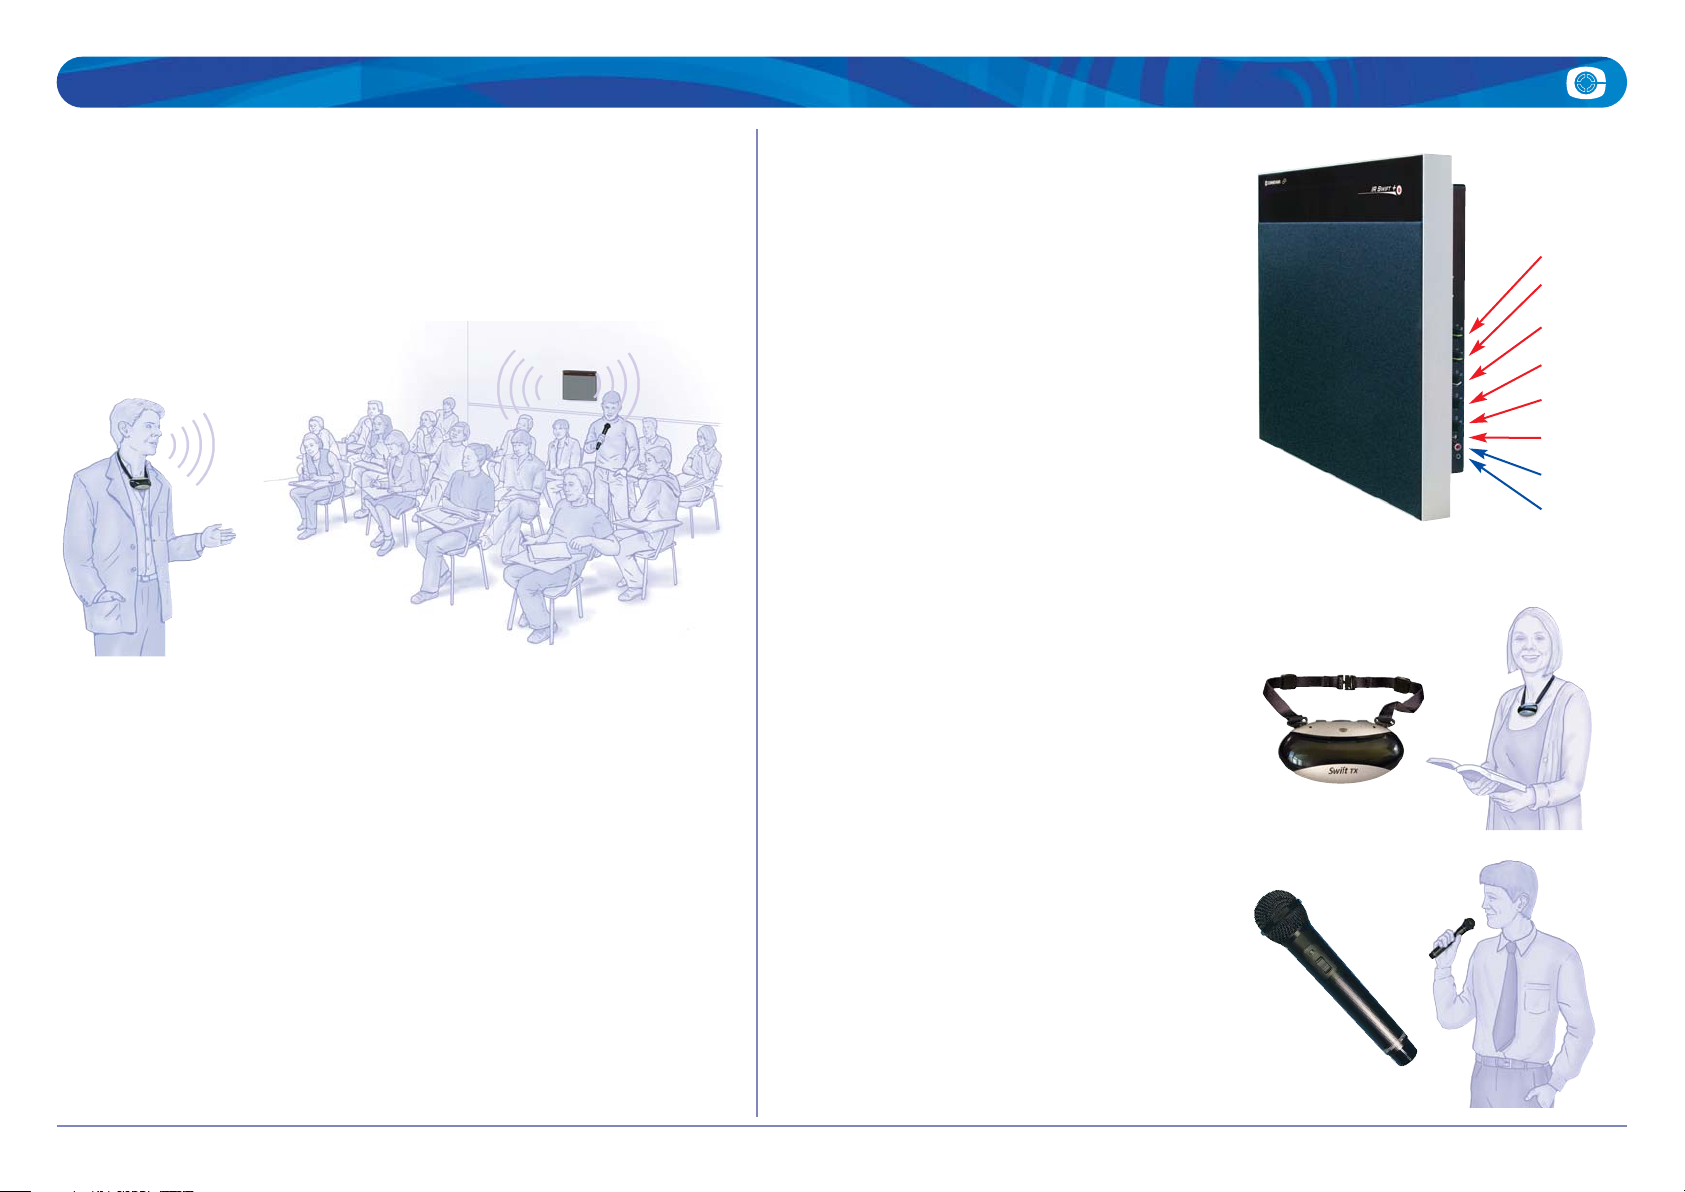
The speaker amplifier
There are six controls on the IR Swift+ amplifier.
Once set, these controls are normally left alone
and should rarely need adjusting.
As the IR Swift
+ operates from an external power
supply, the IR Swift
+ automatically enters a low
power standby state when not in use. However,
on environmental grounds, it is still best to switch
it off at the power socket when not in use.
Please refer to the IR Swift+user guide for help
with connecting external equipment such as
whiteboards, TV etc.
Treble
Bass
Aux in volume
Mic B volume
Mic A volume
Aux Out socket
Aux In socket
Aux Out adjust
The IR Swift+ wall unit has two channels and can
have two transmitters in use simultaneously.
The
IR Swift +
is a wireless infra-red soundfield system which benefits
both students and tutor ‒ a few minutes of your time will help you
understand how and why the system works so well.
Try the system out with a colleague before using it in class. When setting the volume,
if you can hear your own voice clearly from the IR Swift
+ unit from across the
classroom then the volume is too loud! Make sure you experience the system by
listening to somebody else. Listening for yourself is the best way to understand why
the IIR Swift
+ system does not need to be set very loud to achieve an enhanced
and relaxing listening experience.
benefits the tutor
offering greatly reduced vocal
fatigue, improved class
discipline and attentiveness.
Less repetition is required and
there is a generally less
stressed teaching day.
A soundfield system...
benefits the student
offering improved speech clarity and verbal
recognition for all class members including
those with permanent or temporary
hearing loss. Academic performance has
been shown to improve with the
introduction of a soundfield system.
Siting the IR
Swift
+
The IR Swift+ unit is usually best positioned at the opposite end of the classroom to
the tutor, above seated head height. Although the IR Swift
+ is a single hyper-wide
dispersion speaker unit, when in use the system actually has two ‘speakers’ ‒ one is
the IR Swift
+ and the other is yourself i.e. a sound source at both ends of the room.
When set up properly, a soundfield system will actually reduce the overall noise level
in a classroom and because there is no need to ‘talk loudly’ it gives a clearer more
natural sound to your voice.
IR
Swift
+
remote volume adjust
The IR Swift+ has a remote volume adjust feature for use with a SwiftTXtransmitter.
System components
Aux in is for connecting an iPod, MP3 player,
laptop, PC etc. 3.5mm lead also included.
SwiftTX transmitter
B45SWIFTQG4 V4.0
IR
Swift
+
transmitter
The lecturer uses the Swift TX IR transmitter to pick
up their voice. It is exceptionally light and easy to
wear and has excellent sound pick up.
A useful feature of the Swift
TX is that you can
remotely adjust the soundfield volume level to
respond to changes in classroom activity.
Handheld transmitter
Ideal as a second transmitter for guest use,
perhaps for a visitor coming in to the classroom.
Also often used for passing around the children
during ‘show & tell’, ‘carpet time’ etc, saving the
teacher from repeating what a quietly spoken
child has said.
Handheld
microphone
transmitter
Page 2
IR Swift+ Soundfield Quick Guide – Transmitters
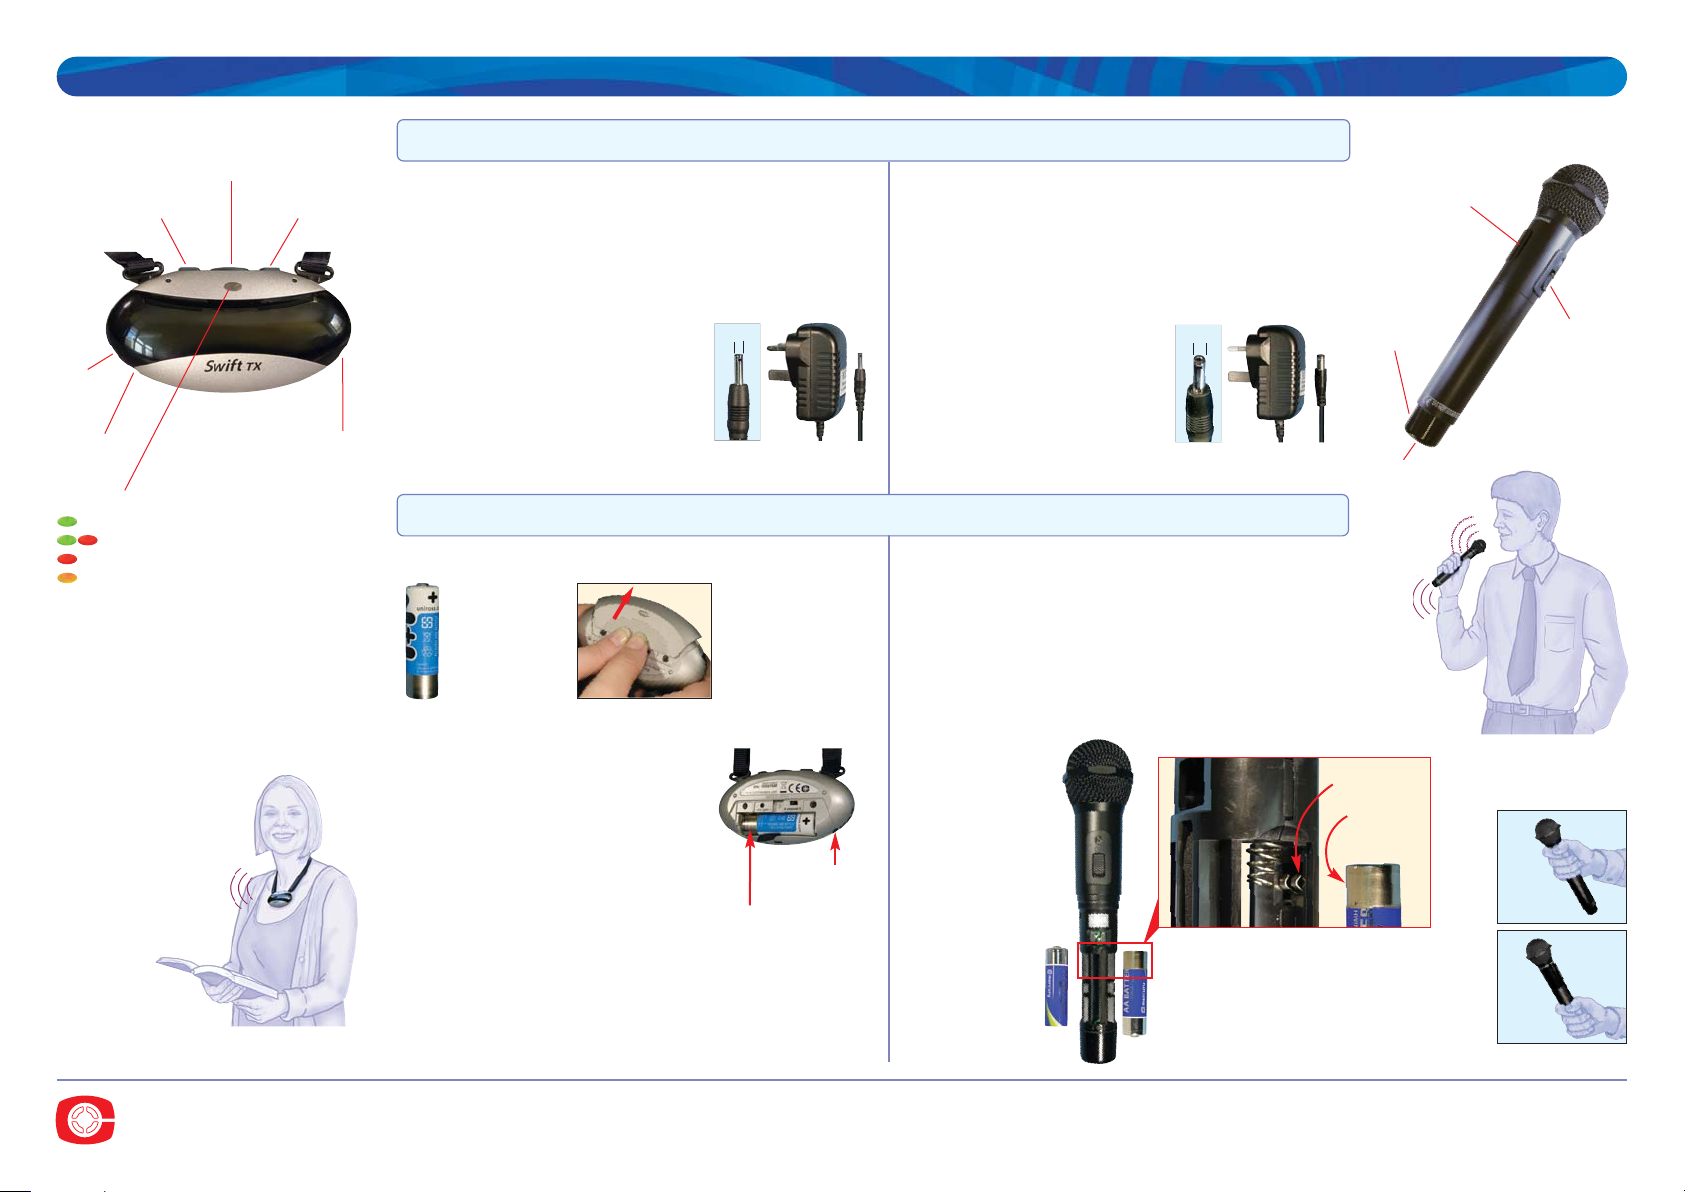
Pull out the old batteries. Replace with two new rechargeable
batteries, taking care to place the battery with the exposed end
in the side with the spring at the mic head end and the contacts
beside the spring. This is essential for correct charging.
When replacing
batteries, the
initial charge
will take approx.
10-15 hours.
To open the battery compartment, unscrew the metal
sleeve below the switch and slide the cover off.
Left battery:
High capacity
rechargeable
AA battery
MBRAAHX4VA
(sold in packs of 4)
Right battery:
High capacity rechargeable AA
battery ‒ fit the exposed end against
the spring and the side contact.
MBRAAHX1VAM
Swift
TX
pendant transmitter ‒ battery
Handheld transmitter
‒ battery
The battery is fitted with the exposed
metal end against the spring. Position
the battery on top of the ribbon tab
for easy removal next time.
Use
only
with the exposed metal end
battery as supplied with the Swift
TX.
Other types of battery will not charge.
When replacing batteries, the initial
charge will take approx. 10-15 hours.
To open battery
compartment,
press in the centre
of the battery door
with both thumbs
and slide off.
Charge socket
Technical Note - when a rechargeable battery is first inserted, the Swift
TX
will test the battery to make sure it has enough charge. The indicator will
show orange for 5 secs while it is testing, followed by green (enough
charge) or red (needs charging) for 1 sec.
A flickering indicator or no
indicator ‒ the battery has no charge
and needs to be recharged or
replaced.
Charging the IR Swift+ pendant transmitter
Charge the Swift TX pendant every evening.
Switch off the transmitter before charging.
Use the external charger 45IRTXCHG2
plugged into a mains socket. Turn on
power and the red charge indicator
will light.
Charge time from flat for the
Swift
TX transmitter is 12 hours.
It is safe to leave on charge for
up to 5 days.
45IRTXCHG2
Connevans Limited
Helpline: 01737 247571 [email protected]
Bridge House, 1 Nutfield Road, Merstham, Surrey RH1 3EB www.SchoolSoundfield.co.uk
SwiftTX Pendant
Charge
socket
Aux
socket
Microphone
socket
On/Off/Mute
Using the microphone
The microphone should be worn
approximately 15cm
(the length of a biro)
away from the mouth.
It is important when
using IR Swift
microphones not to
cover the infra red
emitter. The front
of the emitter
must face
forwards.
SwiftTXpendant mic
On/Off
IR emitter
IR emitter
Charge Socket
MBRAAHX1VAM
7
7
Handheld transmitter
Volume + Volume ‒
Status indicator:
Green = on
A
lternating red/green = recharge soon
Red = charging
Orange = charged
Battery charging
Replacing rechargeable batteries
Charging the handheld transmitter
Depending on use, the handheld mic may only need
charging every 1-2 weeks (approx. 8 hours use).
Switch off the handheld mic before charging.
Use the external charger 45IRTXHCHG2
plugged into a mains socket.
Charge time is 16-20 hours
from flat (i.e. overnight).
The batteries in all of these transmitters will last approximately 2 years.
45IRTXHCHG2
To conserve power always remember to switch the transmitter off when not in use.
Exposed end
rechargeable
battery
B45SWIFTQG4 V4.0
Side contact
Exposed
metal end
Handheld microphone
Hold in middle to avoid
blocking IR emitters
2.1mm
1.3mm
Exposed
metal end
 Loading...