

Page 1

Blue Heat/Net
Ethernet-to-Serial Communications
User Manual
Connect Tech Inc
42 Arrow Road
Guelph, Ontario
N1K 1S6
Tel: 519-836-1291
Toll: 800-426-8979 (North America only)
Fax: 519-836-4878
Email: sales@connecttech.com
support@connecttech.com
Web: www.connecttech.com
CTIM-00016 Revision 0.13, July 2006
Page 2

Limited Lifetime Warranty
Connect Tech Inc. provides a Lifetime Warranty for all Connect Tech Inc. products. Should this
product, in Connect Tech Inc.'s opinion, fail to be in good working order during the warranty
period, Connect Tech Inc. will, at its option, repair or replace this product at no charge, provided
that the product has not been subjected to abuse, misuse, accident, disaster or non Connect Tech
Inc. authorized modification or repair.
You may obtain warranty service by delivering this product to an authorized Connect Tech Inc.
business partner or to Connect Tech Inc. along with proof of purchase. Product returned to
Connect Tech Inc. must be pre-authorized by Connect Tech Inc. with an RMA (Return Material
Authorization) number marked on the outside of the package and sent prepaid, insured and
packaged for safe shipment. Connect Tech Inc. will return this product by prepaid ground
shipment service.
The Connect Tech Inc. Lifetime Warranty is defined as the serviceable life of the product. This
is defined as the period during which all components are available. Should the product prove to
be irreparable, Connect Tech Inc. reserves the right to substitute an equivalent product if
available or to retract Life Time Warranty if no replacement is available.
The above warranty is the only warranty authorized by Connect Tech Inc. Under no
circumstances will Connect Tech Inc. be liable in any way for any damages, including any lost
profits, lost savings or other incidental or consequential damages arising out of the use of, or
inability to use, such product.
Connect Tech Blue Heat/Net User’s Manual
Copyright Notice
The information contained in this document is subject to change without notice. Connect Tech
Inc. shall not be liable for errors contained herein or for incidental consequential damages in
connection with the furnishing, performance, or use of this material. This document contains
proprietary information that is protected by copyright. All rights are reserved. No part of this
document may be photocopied, reproduced, or translated to another language without the prior
written consent of Connect Tech, Inc.
Copyright 1997 - 2006 by Connect Tech, Inc.
Trademark Acknowledgment
Connect Tech, Inc. acknowledges all trademarks, registered trademarks and/or copyrights
referred to in this document as the property of their respective owners.
Not listing all possible trademarks or copyright acknowledgments does not constitute a lack of
acknowledgment to the rightful owners of the trademarks and copyrights mentioned in this
document.
Revision 0.13 9
Page 3

Connect Tech Blue Heat/Net User’s Manual
Certification Statements
Class A Computing Device
Blue Heat/Net
Connect Tech Inc. declares that the product(s) covered by the contents of this manual have been
tested and found compliant with the below listed standards as required by the Electromagnetic
Compatibility (EMC) Directive for General Immunity Compliance.
EN 55022 Conducted and Radiated emissions
CISPR 22 Class A
EN 55024 Immunity to Disturbances
EN 61000-4-2 EN 61000-4-4 EN 61000-4-6 EN 61000-3-2 Exempt
EN 61000-4-3 EN 61000-4-5 EN 61000-4-11 EN 61000-3-3 Pass
The above satisfy the requirements of:
USA: FCC – CFR47, Part 15, part 2
Canada: ICES-003
Europe EMC Directive
Japan: VCCI
Australia/New Zealand:
AS/NZS
10 Revision 0.13
Page 4

Connect Tech Blue Heat/Net User’s Manual
Table of Contents
Limited Lifetime Warranty..............................................................................................................................9
Copyright Notice..............................................................................................................................................9
Trademark Acknowledgment...........................................................................................................................9
Certification Statements.................................................................................................................................10
Table of Contents...........................................................................................................................................10
Table of Contents...........................................................................................................................................11
Introduction....................................................................................................................................................14
Features...............................................................................................................14
Understanding virtual COM ports.........................................................................15
Customer Support Overview................................................................................16
Contact Information..............................................................................................16
Blue Heat/Net Installation Overview.............................................................................................................17
Hardware Installation.....................................................................................................................................17
Connecting the Blue Heat/Net to your Network:...................................................17
Direct Connect .........................................................................................................17
Connecting to the Network.......................................................................................17
Ethernet LEDs..........................................................................................................18
Serial Port LEDs......................................................................................................19
Connecting Serial Devices...................................................................................19
RS-232 Connections: ...............................................................................................19
Connecting Power................................................................................................21
Activating the Special Operations Mode and Default Settings .............................21
Using the Reset Button to activate the Special Operations Mode............................21
Selecting a Special Operation..................................................................................22
Power On Diagnostics:.........................................................................................23
LED Error Codes .....................................................................................................23
Mounting Bracket .................................................................................................26
SCM and TCM Cabling requirements...................................................................27
SCM: Serial Configuration Manager.......................................................................27
TCM: Telnet Configuration Manager......................................................................27
Setting a Static or Dynamic IP Address................................................................28
Set the IP Address using the Web Configuration Manager......................................28
Set the IP Address using the Serial Configuration Manager....................................28
Blue Heat/Net Configuration ......................................................................................................................... 29
CDS (Configuration Data Space) .........................................................................30
Description...............................................................................................................30
Access to CDS Parameters.......................................................................................30
SCM (Serial Configuration Manager) ...................................................................31
Description...............................................................................................................31
Getting Access to the SCM.......................................................................................31
SCM Command Reference.......................................................................................31
TCM (Telnet Configuration Manager)...................................................................40
Description...............................................................................................................40
Getting Access to TCM............................................................................................40
TCM Command Reference.......................................................................................41
WCM (Web Configuration Manager).................................................................... 43
Signing In to the Web Configuration Manager........................................................43
Configuring Your Blue Heat/Net..............................................................................44
Monitoring Your Blue Heat/Net...............................................................................59
Field Server Protocols.............................................................................................62
Software Installation for Windows ................................................................................................................69
Installing the Blue Heat/Net Configuration Manager.............................................69
Running the Configuration Manager.....................................................................73
Device Installation................................................................................................73
Configure Default Blue Heat/Net.............................................................................73
Add New Blue Heat/Net...........................................................................................74
Auto Discover Blue Heat/Net...................................................................................74
Configuring the Blue Heat/Net..............................................................................75
Port Mapping...........................................................................................................76
Unmap Port(s):........................................................................................................82
Remapping Ports......................................................................................................83
Revision 0.13 11
Page 5

Connect Tech Blue Heat/Net User’s Manual
Port Properties ........................................................................................................83
Advanced Settings ............................................................................................85
Special Options........................................................................................................85
RS-232......................................................................................................................86
RS-485 Options (on RS-422/485 ports)....................................................................86
Baud Rate Mapping .................................................................................................86
COM Port Number...................................................................................................86
Scan .........................................................................................................................87
Defaults Button........................................................................................................ 87
Export Settings .........................................................................................................87
Import Settings.........................................................................................................87
Replacing your Blue Heat/Net:................................................................................87
Removing your Blue Heat/Net:................................................................................88
Blue Heat/Net Properties:........................................................................................ 88
Driver Removal........................................................................................................88
Software Installation for Linux......................................................................................................................89
Installing the Linux host driver.............................................................................. 89
Linux host driver setup using auto discovery...........................................................89
Firmware Upgrades........................................................................................................................................90
Upgrade using WCM (Web Configuration Manager)..............................................90
Upgrade using TCM (Telnet Configuration Manager)............................................90
Upgrade using SCM (Serial Configuration Manager).............................................90
Appendix .......................................................................................................................................................91
Blue Heat/Net Specifications................................................................................91
Products...................................................................................................................92
Options.....................................................................................................................92
Protocol Descriptions ...........................................................................................93
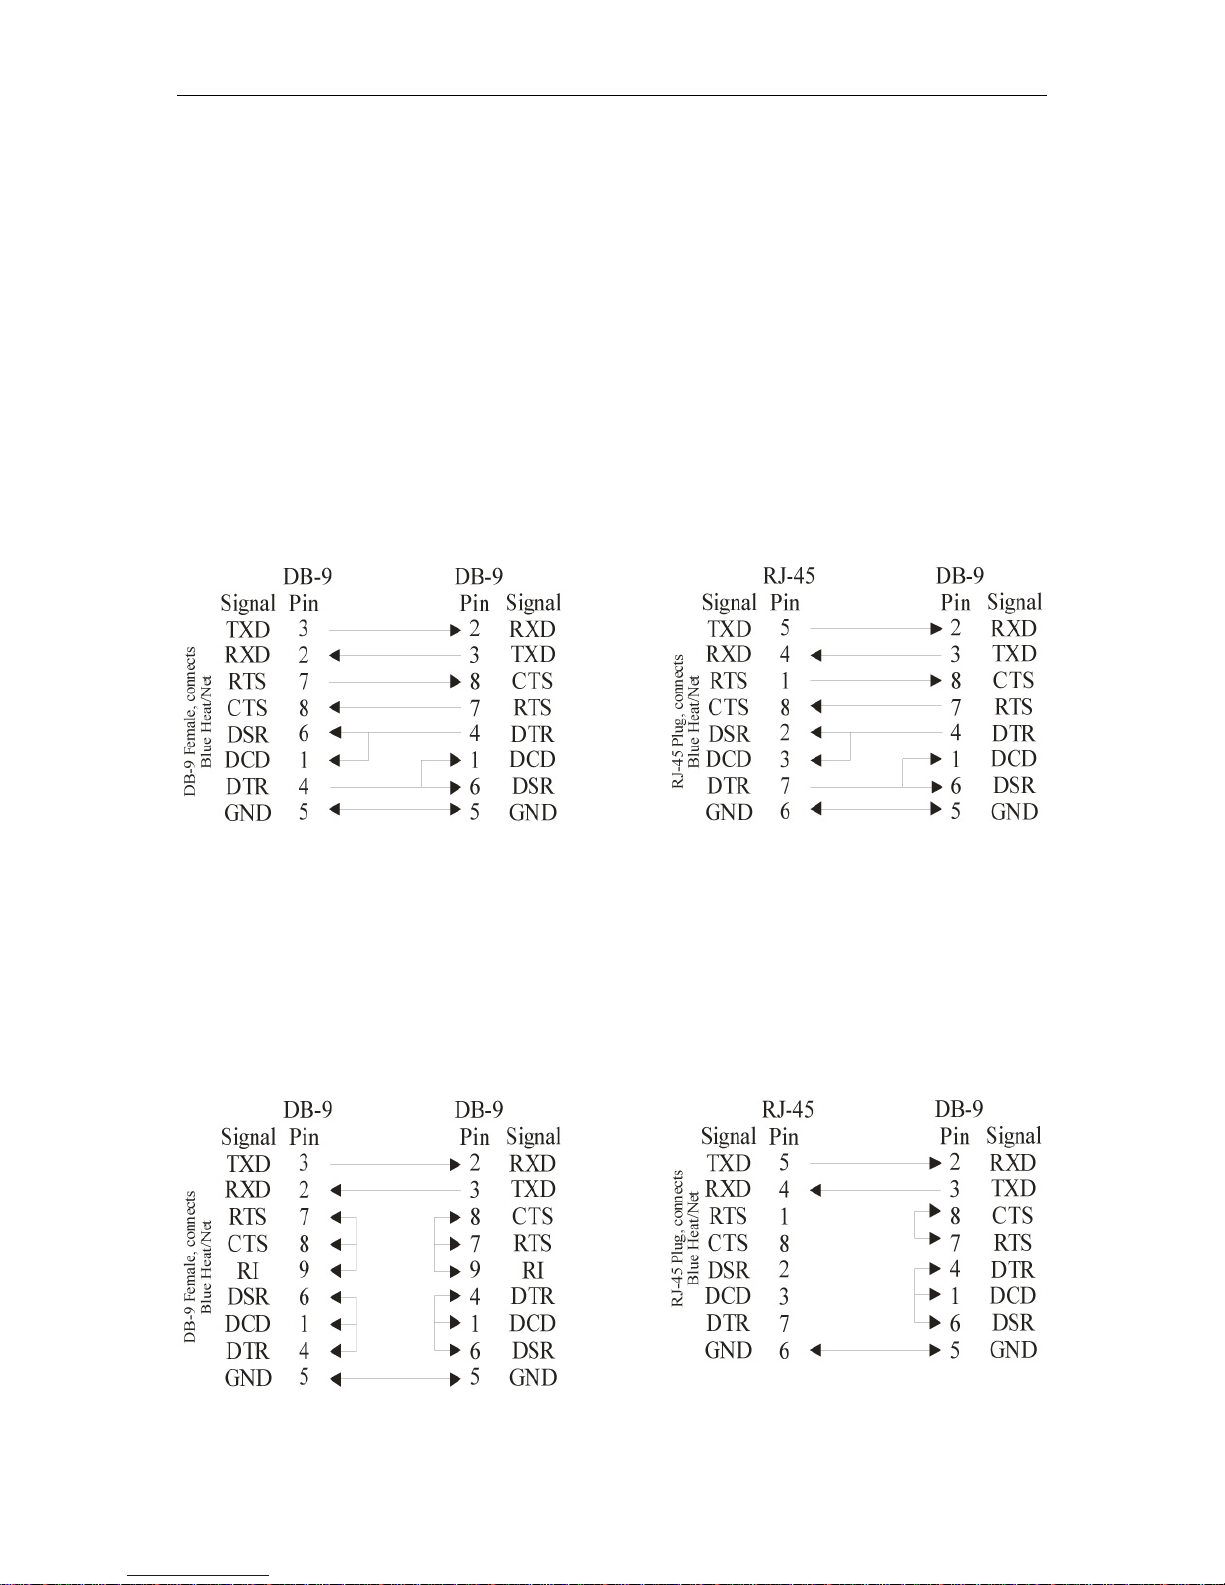
Pinouts.................................................................................................................94
RS-232 and RS-485..................................................................................................94
Cabling Examples: ...............................................................................................94
Typical RS-232 null modem connection:..................................................................94
Basic “3 wire” RS-232 null modem connection:.....................................................95
Connecting to DCE type devices:.............................................................................95
Loopback Connectors:.............................................................................................96
RS-422/485 Examples: ........................................................................................96
RS-422/485 Wiring Tips: .........................................................................................96
4-wire (full duplex, “RS-422 mode”) Wiring hardware flow control......................96
Four-wire (full duplex, “RS-422 mode”) Wiring without hardware flow control....97
Four-wire (full duplex multi-drop, “RS-485 mode”)...............................................97
Two-wire (1/2 duplex, “RS-485 mode”) Wiring ......................................................98
RS-485 Multi-drop Topology, Two-Wire and Four-Wire.........................................98
Default Settings....................................................................................................99
Network Settings......................................................................................................99
Boot Settings............................................................................................................99
SCM Operation Settings...........................................................................................99
CDS (Configuration Data Space) .........................................................................99
Common Configuration Setups..........................................................................100
Static IP Setup........................................................................................................100
DHCP Setup...........................................................................................................101
DIN Rail Mounting Option:..................................................................................102
How the Blue Heat/Net Boots Up.......................................................................104
Bootup Sequence....................................................................................................105
Flowchart of Special Operations Mode using the reset button..............................106
Asynchronous communications Tutorial................................................................106
Serial Line Interface Tutorial ..............................................................................107
RS-232 Line Interface:...........................................................................................107
RS-485 Line Interface:...........................................................................................107
Bus contention on RS-485 multi-drop networks:....................................................110
Bias and Termination Resistors in RS-485 networks:............................................111
12 Revision 0.13
Page 6

Connect Tech Blue Heat/Net User’s Manual
List of Figures
Figure 1: LED locations on 2, 4 and 8 port Blue Heat/Net models ............................................................. 18
Figure 2: Typical RS-232 null modem connection....................................................................................... 19
Figure 3: Basic 3-wire RS-232 null modem connection............................................................................... 19
Figure 4: Recommended pinouts for loopback connectors. ......................................................................... 20
Figure 5: Power connector illustration........................................................................................................ 21
Figure 6: LED error code example.............................................................................................................. 23
Figure 7: Web Configuration Manager Sign In........................................................................................... 43
Figure 8: Configuring Basic Serial Port Settings (RJ-45 Models)............................................................... 44
Figure 9: Configuring Basic Serial Port Settings (DB-9 Models)................................................................ 45
Figure 10: PPP Call configuration.............................................................................................................. 47
Figure 11: PPP Answer Configuration........................................................................................................ 49
Figure 12: Raw TCP Server configuration .................................................................................................. 50
Figure 13: Raw TCP Client configuration................................................................................................... 51
Figure 14: Configuring Advanced Serial Port Properties ........................................................................... 54
Figure 15: Configuring Security Settings..................................................................................................... 55
Figure 16: Configuring Blue Heat/Net Settings........................................................................................... 56
Figure 17: Firmware Upgrades/Downloads................................................................................................ 57
Figure 18: Restore Default Settings............................................................................................................. 57
Figure 19: Saving To Flash.......................................................................................................................... 58
Figure 20: Monitoring Serial Port Activity.................................................................................................. 59
Figure 21: Monitoring Network Traffic ....................................................................................................... 60
Figure 22: Monitoring TCP/IP Statistics..................................................................................................... 60
Figure 23: My Blue Heat/Net Hardware Details......................................................................................... 61
Figure 24: My Blue Heat/Net Software Details............................................................................................ 61
Figure 25: WCM Basic Serial Screen.......................................................................................................... 62
Figure 26: WCM Protocol Map................................................................................................................... 67
Figure 27: Blue Heat/Net Driver/Software Installation CD......................................................................... 69
Figure 28: Blue Heat/Net Software Installation Screen............................................................................... 70
Figure 29: Blue Heat/Net Configuration Manager, Installation complete screen....................................... 72
Figure 30: My Blue Heat/Net Places screen................................................................................................ 73
Figure 31: Add or Auto Discover Blue Heat/Net menu screen .................................................................... 73
Figure 32: Add Blue Heat/Net screen.......................................................................................................... 74
Figure 33: Auto Discover Blue Heat/Net screen.......................................................................................... 75
Figure 34: Installed Blue Heat/Net screen................................................................................................... 75
Figure 35: Map Port(s) menu....................................................................................................................... 76
Figure 36: Map Port(s) Express method screen........................................................................................... 77
Figure 37: Found New Hardware Wizard.................................................................................................... 78
Figure 38: Configuration Manager Window after successfully mapping ports........................................... 79
Figure 39: Basic Port Mapping option........................................................................................................ 80
Figure 40: Advanced port mapping interface .............................................................................................. 81
Figure 41: Port action menu........................................................................................................................ 82
Figure 42: Unmap Port window................................................................................................................... 83
Figure 43: Remap Port window................................................................................................................... 83
Figure 44: Port Properties window.............................................................................................................. 84
Figure 45: Advanced settings window.......................................................................................................... 85
Figure 46: Baud Rate Mapping options....................................................................................................... 86
Figure 47: Replace Blue Heat/Net window .................................................................................................. 87
Figure 48: Blue Heat/Net properties............................................................................................................ 88
Figure 49: Remove Drivers window............................................................................................................. 88
Figure 50: DIN Rail mount option for Blue Heat/Net 2............................................................................. 102
Figure 51: DIN rail mount option for four and eight port DB-9 models.................................................... 103
Figure 52: Bootup sequence....................................................................................................................... 105
Figure 53: Bootup sequence via Reset Button............................................................................................ 106
Figure 54: Typical Asynchronous Date frame........................................................................................... 106
Figure 55: RS-232 signals.......................................................................................................................... 107
Revision 0.13 13
Page 7

Connect Tech Blue Heat/Net User’s Manual
Introduction
Connect Tech’s Blue Heat/Net enables you to remotely access your RS-232 and RS-422/485
serial devices via your Ethernet LAN or the Internet. Once installed, you can network-enable any
device that is designed to be connected to a serial port. Your industrial serial communication
devices will no longer be tied to a single computer. The Blue Heat/Net hardware is easy to
install, involving little more than plugging the unit into the appropriate locations and performing
some simple configuration steps, as outlined in this manual.
Driver setup is made easy by the Blue Heat/Net’s auto-detection feature. The software does the
work of locating the units, and the Configuration Manager leads you through the rest of the setup
process.
The Blue Heat/Net’s firmware is easily configured with a choice of methods: web browser,
Telnet, or direct serial connection with a terminal and/or terminal software. Once you’ve
configured the Blue Heat/Net to your specifications, you’ll be able to start remotely accessing
your devices immediately.
Features
●
Includes an auto-sensing 10Base-T, 100Base-TX LAN interface
●
Programmable uClinux embedded operating system running on a ColdFire embedded
processor
●
Power over Ethernet (PoE) option for 2 port models
●
Free Software Development Kit available
●
Serial ports on the unit can be linked to one or more remote computers via an Ethernet LAN
and accessed using standard serial applications
●
MDI/MDI-X
model (enables use of cross-over or straight through cable)
●
Serial ports can be run at speeds up to 460.8 Kbps on RS-422/485 ports (and RS-232 ports
on 2 port models) and 230.4 Kbps on RS-232 ports (4 and 8 port models)
●
Full modem control and hardware flow control pins on all ports
●
Supports IP, TCP, UDP, ARP, RARP, TFTP, DHCP, BOOTP, HTTP, PPP, Telnet and DNS
●
Use of TCP/IP means communications can be routed to support WANs as well as LANs.
The Blue Heat/Net does not have to be located in the same site as the controlling computer
●
Point-to-Point Protocol (PPP) client and server
●
Raw TCP client and server
●
Several levels of security are built into the Blue Heat/Net that can limit connections and
help ensure the privacy of data flow
●
Network boot or booting from built-in Flash Memory
●
Firmware upgrades are downloadable
●
Configuration of Blue Heat/Net units can be done via Web Browser, Telnet or direct serial
connection
●
Software switchable RS-232/422/485 with bias/termination models are available
●
Front mounted diagnostic LEDs
●
Wall mount bracket included
●
DIN Rail mount available on DB-9 models
●
1U rack mount available for BNG models
autodetect cabling feature prevents improper cabling connections on 2 port
14 Revision 0.13
Page 8

Understanding virtual COM ports
In a typical serial port setup, the application communicates directly with the connected serial
port hardware.
Virtual COM ports differ in that the application communicates with a network protocol layer that
transfers the necessary information to and from the remote serial ports. The virtual ports appear
as standard serial ports to the application, but in reality, the data is translated into a series of
Ethernet messages between the Blue Heat/Net unit and the host computer. The serial port is not
physically connected to the host computer, but this is transparent to the application trying to
access it.
There are several advantages to using virtual COM ports, which include:
Distance – The serial ports can be a very long distance away from the host computer. They
are not limited by the standard electrical characteristics of the RS-232 or RS-422 interface
because the primary data transfer is being done via Ethernet. Depending on the set up, these
serial ports can be at a different location and the Internet can act as the carrier of the serial
port traffic.
Speed – Short RS-232/422 cable lengths can be used with the primary distance relying on
the network connection. The capacitance of long lengths of serial cable does not limit data
speeds in these cases.
Cabling – Cost effective Ethernet cabling can be used for the transfer of information to the
Blue Heat/Net and often this is part of the existing networking infrastructure. Putting some
serial ports in a remote location can be as easy as plugging in a Blue Heat/Net to the
Ethernet Network. This provides a simple, clean cabling arrangement.
Port Sharing – In some applications, it is desirable to have a serial resource that is accessed
and shared by more than one host computer. Connect Tech’s Virtual Serial Port technology
allows this to be done easily.
Routing – Different ports on a Blue Heat/Net can be connected to multiple host computers.
Monitoring – The Virtual Serial Ports can easily be monitored to ensure everything is
working correctly because they are on the network.
Connect Tech Blue Heat/Net User’s Manual
Revision 0.13 15
Page 9

Connect Tech Blue Heat/Net User’s Manual
Customer Support Overview
If you experience difficulties after reading the manual and/or using the product, contact the
Connect Tech reseller from which you purchased the product. In most cases the reseller can help
you with product installation and difficulties.
In the event that the reseller is unable to resolve your problem, our highly qualified support staff
can assist you. Our support section is available 24 hours a day, seven days a week on our
website at:
www.connecttech.com/sub/support/support.asp
more information on how to contact us directly. Our technical support is always free.
Contact Information
We offer three ways for you to contact us:
Telephone/Facsimile
Technical Support representatives are ready to answer your call Monday through Friday, from
8:30 a.m. to 5:00 p.m. Eastern Standard Time. Our numbers for calls are:
Telephone: 800-426-8979 (North America only)
Telephone: 519-836-1291 (Live assistance available 8:30 a.m. to 5:00 p.m. EST, Monday to
Friday)
Facsimile: 519-836-4878 (on-line 24 hours)
Email/Internet
You may contact us through the Internet. Our email and URL addresses are:
sales@connecttech.com
support@connecttech.com
www.connecttech.com
Mail/Courier
You may contact us by letter and our mailing address for correspondence is:
Connect Tech Inc.
Technical Support
42 Arrow Road
Guelph, Ontario
Canada N1K 1S6
. See the contact information section below for
Note:
Please go to the
Support Center
manuals, installation guides, device driver software and
technical tips.
Submit your technical support questions to our customer
support engineers via the
website.
16 Revision 0.13
Download Zone
on the Connect Tech website for product
or the
Support Center
Knowledge Database
on the Connect Tech
in the
Page 10

Blue Heat/Net Installation Overview
There are three main stages in the installation process for your Blue Heat/Net.
1. Hardware Installation
This involves the physical connection of the Blue Heat/Net hardware to your network,
and addresses issues such as cabling and power requirements.
2. Blue Heat/Net Configuration
The first step in the configuration process is to set the IP Address. Then use one of three
available methods to configure the Blue Heat/Net firmware settings for your application.
This can be done through the Serial Configuration Manager, Telnet Configuration
Manager, or the Web Configuration Manager, depending on circumstances and personal
preference.
3. Software Installation and Configuration of Blue Heat/Net drivers
This step installs and configures the Blue Heat/Net drivers and ports for your host
Operating System, and allows you to set parameters specific to your serial requirements.
This is done via the Blue Heat/Net Configuration Manager.
Hardware Installation
Connect Tech Blue Heat/Net User’s Manual
Connecting the Blue Heat/Net to your Network
Before you begin, take a minute to ensure that your package includes the required components
that should have shipped with your Blue Heat/Net.
One Blue Heat/Net unit
•
One power supply
•
One CD containing software and documentation
•
One Quick Start Guide
•
One Pheonix contact screw terminal plug (2-port PoE models)
•
One RJ-45 cable (optional)
•
One DB-9 female to DB-9 female null modem cable (optional)
•
If any of these components is missing, contact Connect Tech
reseller.
NOTE: The Blue Heat/Net 2 port model features an MDI/MDI-X
Autodetect feature. The pinouts will adjust automatically to
accommodate the use of a null Ethernet cable or a straight
through cable.
Direct Connect
Direct connect is an Ethernet connection made directly from Blue Heat/Net to the Ethernet jack
on your computer.
This connection is achieved using a cross-wired Ethernet cable, also known as a null
Ethernet cable. These cables can be assembled yourself (see appendix
from any electronics or computer store.
:
(See Contact Details) or your
for pinouts) or purchased
Connecting to the Network
The most common method involves connecting your Blue Heat/Net to network hardware at the
facility where you are installing the Blue Heat/Net device. The hub or switch could be in a
network closet in your building, or locally on your desk or workbench. This connection is
achieved using a straight through Ethernet cable; a standard Ethernet cable readily available
from any electronics or computer store. (See appendix
Revision 0.13 17
for pinouts.)
Page 11

Connect Tech Blue Heat/Net User’s Manual
Note:
Connect Tech recommends you use quality Category 5 cables
or better when connecting to the Blue Heat/Net Ethernet jack.
Ethernet LEDs
On 4 and 8 port Blue Heat/Net models, the front panel features Ethernet and Serial Port LEDs to
monitor activity. The left front side of the box features five LEDs. (Two port models feature the
CPU LED on the face of the device between the two serial port LEDs. The 10/100 and
Link/Activity (L/A) indicators are located on the top). Their usage is as follows:
Power: When this LED is on, the Blue Heat/Net is receiving line power. (Some models
do not have this LED)
CPU: Once the uClinux firmware is booted and running correctly, this LED appears as
a continuous light.
10/100: This LED represents the speed at which the Blue Heat is connected to your
Network.
LED on = a 100 megabit connection.
LED off = a 10 megabit connection.
(The Blue Heat/Net automatically senses the speed.)
L/A: (2 port models only). This light is on when a link or connection to a network or
computer is achieved. A blinking light indicates that Transmit (Tx) or Receive
(Rx) activity is detected on the Ethernet cable.
Link: (4 and 8 port models) The Link light is on when a connection to a network or
computer is achieved.
Act. (4 and 8 port models) This LED indicates that Transmit (TX) or Receive (RX)
activity is detected on the Ethernet cable.
Figure 1: LED locations on 2, 4 and 8 port Blue Heat/Net models
18 Revision 0.13
Page 12
Serial Port LEDs
The serial ports LEDs (two, four or eight, depending on your model) indicate serial activity for
each port.
A flashing LED indicates that the port in question is receiving or transmitting data.
•
BN001-004 models: If the LED is on, there is an RS-232 connection detected on the
•
RS-232 serial port.
Connecting Serial Devices
RS-232 Connections:
Typical RS-232 null modem connection
This is the typical way to connect to DTE type devices, such as the Blue Heat/Net. It is used
when hardware RTS-to-CTS flow control is required. The cable required is called a cross-over
Connect Tech Blue Heat/Net User’s Manual
or null modem cable, and is readily available at any electronics retailer/distributor.
Figure 2: Typical RS-232 null modem connection
Basic 3 wire RS-232 null modem connection:
Used to connect to DTE type devices like the Blue Heat/Net, this connection is used when
hardware RTS-to-CTS flow control is NOT required. The cable is called a cross-over cable, and
is readily available at any electronics retailer/distributor.
Figure 3: Basic 3-wire RS-232 null modem connection.
Revision 0.13 19
Page 13
Connect Tech Blue Heat/Net User’s Manual
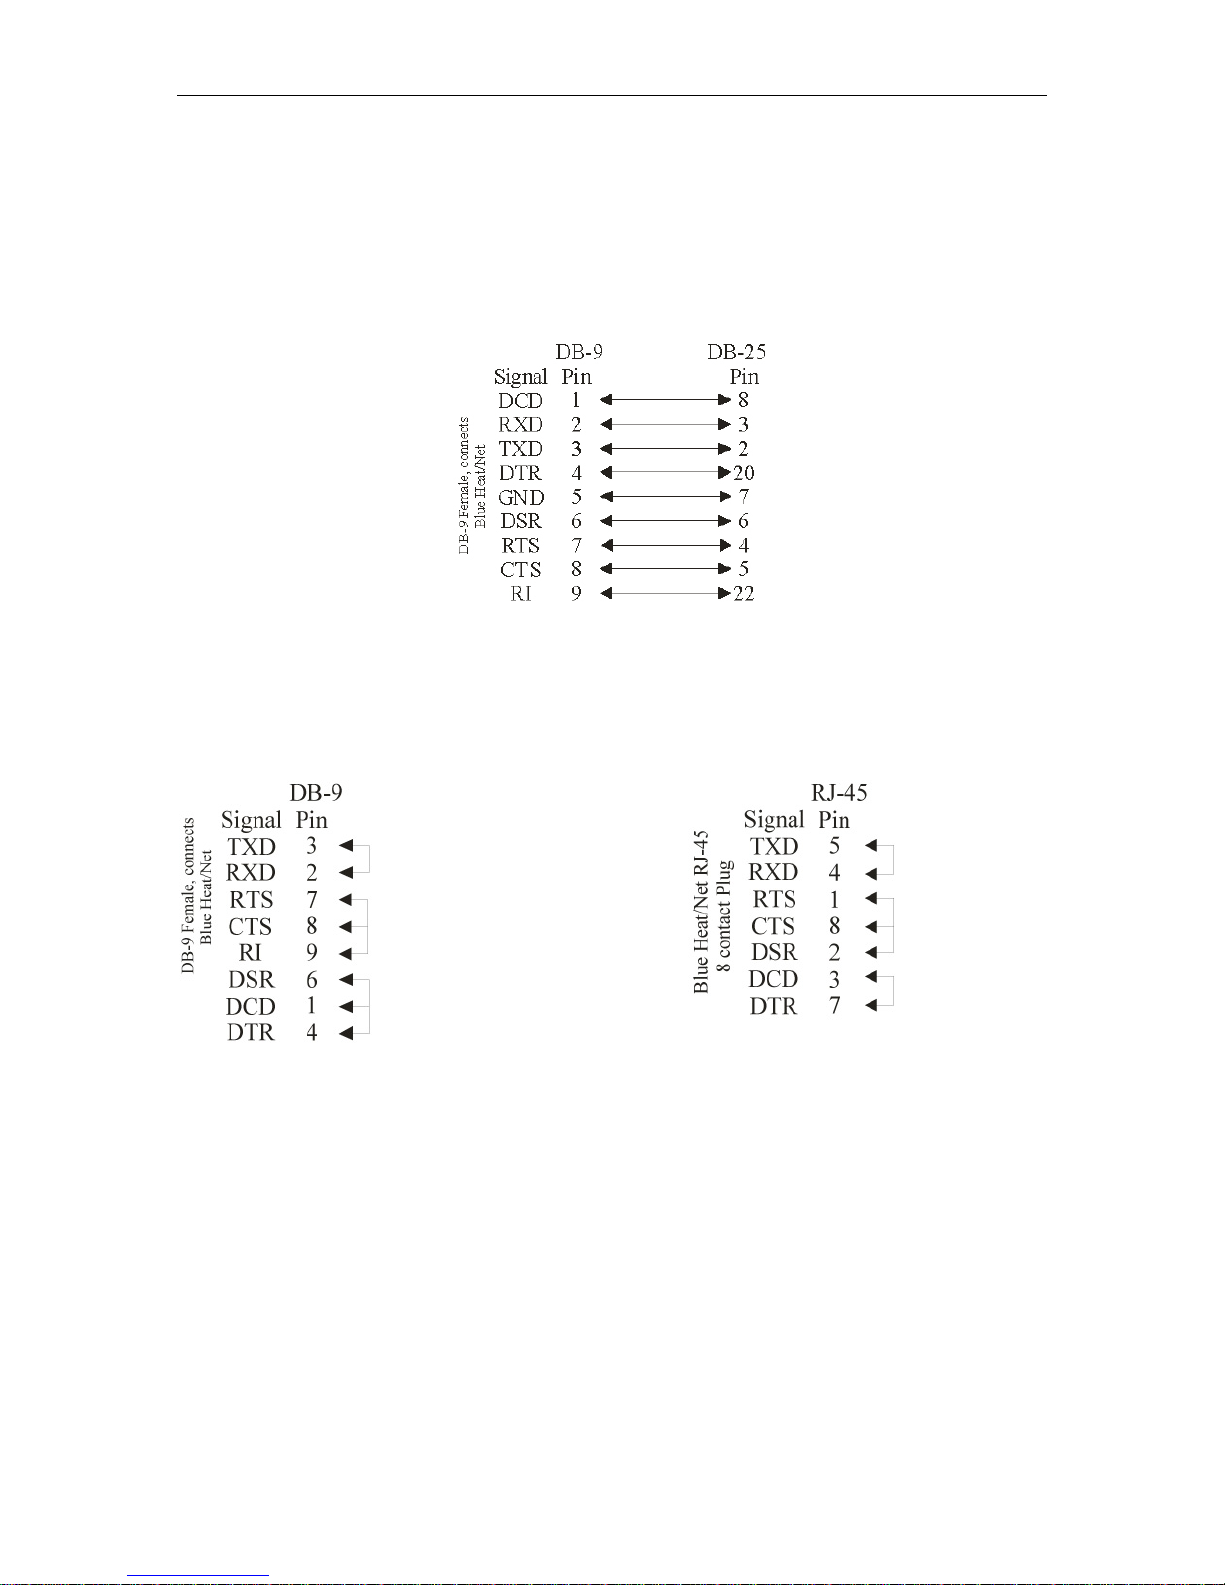
Connecting to DCE type devices:
DCE type devices do not require a null modem cable; instead, they require a straight through
cable. Straight through cables, both DB-9 to DB-9 and DB-9 to DB-25, are commonly available.
The following is an example of a DB-9 female cable to a DB-25 male cable to connect to a
modem.
Figure 4: DB-9 female to DB-25 male for modem connection.
Loopback Connectors:
Loopback connectors are useful for performing diagnostics. The following are the recommended
pinouts for creating loopback connectors for your Blue Heat/Net products.
Figure 4: Recommended pinouts for loopback connectors.
DB-9: For DB-9 female loopback connectors we recommend solder cup DB-9 connectors and
28 AWG solid core wire.
RJ-45: For RJ-45 loopback connectors, we recommend 8 pin RJ-45 connectors and about 2
inches of CAT 5 cable. You will have to crimp the wires from the CAT 5 cable into the RJ-45
plug, then strip and solder the wires to match the above loopback pinout.
20 Revision 0.13
Page 14

Connecting Power
The Blue Heat/Net uses a standard DC power jack for power input. The Blue Heat/Net can be
safely connected or disconnected at any time. New BNG (RoHS compliant) models include the
additional option for 9 to 30V DC power input using a Phoenix locking screw terminal
connector. The standard power supply requirements are as follows:
Two port models
Models BN009, BN010, BN018
0.75A DC, 5 to 30 Volts unregulated.
Model BN009/10 with Power over Ethernet (PoE) and Screw terminal power
PoE: To use Power over Ethernet, the Blue Heat/Net must be connected to an IEEE 802.3af
compliant “PSE” Power Sourcing Equipment, such as a PSE Hub or PSE Switch
Screw Terminal Power: Use the provided Phoenix screw terminal connector Phoenix SMSTB
2,5/2-ST-5.08 to power 36-56V DC. The power input is polarity independent. The acceptable
wire size is 14-24 AWG, 2.08-0.20 mm².
Four and Eight port models
Models BN001 to BN004
1A DC, 5 to 6 Volts unregulated.
Models BN005 to BN008
2A DC, 5 Volts regulated.
Model BNG008
2A DC, 5 Volts regulated.
Screw Terminal Power: Use the provided Phoenix screw terminal connector Phoenix MC
1,5/2-STF-3,5 to power 9-30V DC. The power input is polarity independent.
Connect Tech Blue Heat/Net User’s Manual
Power Connector:
Figure 5: Power connector illustration.
Note:
The center is positive, outside is ground (0V).
Activating the Special Operations Mode and Default Settings
On Blue Heat/Net models with software selectable line interfaces, there is a small reset button
located on the rear surface. On two port models, it is located between the DB-9 connectors. This
push button can be used to perform special operations, such as resetting the unit to its default
settings, or to force port scanning in situations where the SCM is not accessible.
Using the Reset Button to activate the Special Operations Mode
Revision 0.13 21
Page 15

Connect Tech Blue Heat/Net User’s Manual
To activate the Special Operations Mode, hold the reset button while the unit is powering up.
Hold the button until all the port LEDs blink rapidly. Release the reset button. The port LEDs
will continue to flash rapidly after the reset button is released to indicate the Special Operations
Mode is active.
Selecting a Special Operation
After the Special Operations Mode has been activated (see instructions
as described below:
1.
Abandon the Special Operations Mode
To abandon this mode without selecting a special operation, press and hold the reset
button for at least four seconds. While the button is pressed, the rapid flashing of the
port LEDs will stop. After four seconds, the rapid flashing will resume, you can now
release the reset button. After you release the button, the port LEDs will all be off,
indicating that the Special Operations Mode has terminated.
2.
Cancel a Special Operation
If you need to cancel a special operation after it has been selected, repeatedly press the
reset button until all the port LEDs begin to flash rapidly. Then abandon the Special
Operations Mode by pressing the reset button for four seconds, as explained above.
3.
Select a Special Operation
Operations are selected by repeated short presses of the reset button. Each time the
reset button is pressed; it is counted and represented on the port LEDs as a binary
number, with the port 1 LED the least significant bit. (see Table 1.) Choose the
operation which you want to perform. If you miss the selection which you want (press
the button too many times), keep pressing the button, the count starts over again once it
reaches 7 (1111 binary).
4.
Activate a Special Operation
To activate a selection, press and hold the reset button for at least four seconds. During
this time, the rapid flashing of the port LEDs will stop. When the rapid flashing
resumes, you can release the reset button. The port LEDs will turn off, indicating that
the Special Operations Mode has been activated.
Table 1: Special Operations Available
), there are four options
Special Operation
Force port scanning to
first two ports
(Scanning runs until
current scanning delay
setting times out. Default
is 30 seconds.)
Force port scanning to all
ports.
(Scanning runs until the
SCM is entered or until
the unit is powered
down. There is no time
out.):
22 Revision 0.13
Number of presses (and binary
Usage
representation)
ONE press This forces the first two ports to
RS-232 mode, causing the SCM to
scan these ports and thereby
allowing access to the SCM. (see
note below)
TWO presses This forces all ports to RS-232
mode, therefore all ports are
scanned for SCM use. The Blue
Heat/Net will behave in the same
manner as an RS-232 only model.
(see note below)
Page 16

Connect Tech Blue Heat/Net User’s Manual
Restore factory default
settings
NOTE: Why would I need to force port scanning?
Some line interface settings are inappropriate for SCM use.
During boot up, the SCM scans only those ports set for RS-232
or RS-485 Full-Duplex mode. If all of the ports are configured for
another mode, (1/2 Duplex or Multi-drop) SCM port scanning is
bypassed, and the SCM application cannot be accessed. Use of
either of the “Force Port Scanning” operations outlined in Table 1
will force port scanning to occur so the SCM application can be
accessed.
SEVEN presses This restores the factory default
Power On Diagnostics:
LED Error Codes
If an error is detected during the bootup process, an error condition and code are displayed on
the LEDs on the face of the Blue Heat/Net.
The error condition is signaled by a rapidly flashing CPU LED (about 10 to 20 per
•
second).
The error code is displayed on Port LEDs 1 to 4 as a binary number on four and eight
•
port models, and is represented in two port models by the behavior of the Serial 1 and
Serial 2 LEDs (see chart below).
settings for ALL configuration
parameters.
In the above example, a rapidly flashing CPU LED during the boot up process signifies the Blue
Heat/Net has experienced an error. The port LEDs 1 through 4 signify which error has occurred;
in this case, LED 2 and 3 are on, so the error code is 6. The chart below defines the error details
for each error code.
Revision 0.13 23
Figure 6: LED error code example.
Page 17

Connect Tech Blue Heat/Net User’s Manual
Table 2: LED error codes for Blue Heat/Net
2 port LED key:
CPU rapid error flash Slow flash Fast flash
(50 ms on/off) (1 s on/off) (.25 s on/off)
Error Code and Event
1.
Loader code in Flash is erased.
2.
Loader code in Flash has a bad
CRC.
Details Suggested
The regions of Flash memory which hold the
Loader code are both erased. (There are 2
redundant Loaders in Flash which can be
run).
The regions of Flash memory which hold the
Loader code both have CRC errors. (There
are 2 redundant Loaders in Flash which can
be run).
Corrective
Action
This may occur in
electrically noisy
environments or if
there are ESD
disturbances. If
this error persists,
it may be a
hardware issue.
Contact Connect
Tech.
See corrective
action for error
code 1
3.
RAM copy of Loader code has a
bad CRC.
4.
Configuration Data Space (CDS)
areas have corrupted data (CRC
failure).
24 Revision 0.13
The Loader code is copied to RAM before
execution. This error is shown if the RAM
copy has a CRC error.
The CDS is copied from Flash to RAM
during the beginning of the Loader code. If a
CRC error is detected in the RAM copy, this
error is shown.
See corrective
action for error
code 1
See corrective
action for error
code 1
Page 18

Connect Tech Blue Heat/Net User’s Manual
5.
Can’t obtain an Operating System
image (uClinux) to run.
6.
Unexpected return from the
uClinux Operating System.
7
. CDS (re)programming failure.
This will occur when any of the enabled
boot sources (Flash or BOOTP/TFTP or
TFTP) fail to obtain a valid compressed
Operating System image to run.
This error occurs if the Operating System
returns back to the Loader which is NOT
supposed to occur.
Certain CDS items are updated during the
bootup. If a failure occurs during the reprogramming of this region of Flash, this
error will occur.
Check network
connections,
server
computer or your
unit's settings.
This error occurs
if TFTP booting
is enabled, and the
BH/Net can't
download the file
from the server.
Contact Connect
Tech if it persists.
See corrective
action for error
code 1
See corrective
action for error
code 1
8.
Boot Count could not be
incremented in Flash memory
Revision 0.13 25
This error is usually caused by a Flash
memory failure.
Contact
Connect Tech
Page 19

Connect Tech Blue Heat/Net User’s Manual
9
. No ports found
(NOTE: Error displays on LEDs 5-8
on 8 port models, 1-4 on 4 ports)
15.
Mismatched CDS version
number
This message usually indicates a UART
component failure.
uClinux checks the CDS version number
against its expected CDS version number, if
they are different uClinux does not continue
its operation.
Contact
Connect Tech
If you have
updated the
uClinux
code via SCM and
haven't updated
the Loader/SCM
code, this error
appears on reboot.
Update companion Loader
code and reboot.
Mounting Bracket
The 4 and 8 port Blue Heat/Nets feature a simple vertical mounting bracket. First fasten the
mounting bracket to the vertical surface, and then slide the Blue Heat/Net onto the bracket. The
bracket is designed so that the serial port connectors face down.
A DIN Rail Mount option, sold separately as part number MS009 consists of two brackets with
DIN rail mount clips. (See appendix for more information about DIN rail mounting
The 2 port Blue Heat/Net has built-in wall mount flanges that accept a number of connection
options. DIN rail mount clips are available as part number MS010.
.)
26 Revision 0.13
Page 20

SCM and TCM Cabling requirements
SCM: Serial Configuration Manager
The Serial Configuration Manager is used to configure the Blue Heat/Net via a serial port. The
Serial Configuration Manager is discussed in greater detail later in this document. To access the
Serial Configuration Manager you will need to connect an RS-232 serial cable from your
standard computer serial port to any RS-232 port on the Blue Heat/Net. The cabling required to
connect to the Blue Heat/Net is as follows:
Blue Heat/Net products with RJ-45 connectors:
These models ship with optional DB-9 female to RJ-45 Jack adapters (PN: CB005) and a
straight through Ethernet cable, 2 meters (6.5 ft) in length (PN: CB006). Follow the steps below:
1. Plug the CB005 adapter into your PC serial port.
2. Plug either end of the CB006 cable into the CB005 adapter.
3. Plug the other end of the CB006 cable into any RS-232 RJ-45 serial port on the Blue
Heat/Net.
If you don’t have a CB006 cable and CB005 adapter, you can make your own SCM cable from a
DB-9 female, some length of CAT 5 cable and a RJ-45 plug. See the “Typical Null Modem
Cabling” section in the Connecting Serial Devices Section.
Blue Heat/Net product with DB-9 male connectors
Any null modem serial cable with DB-9 female connectors will work. Simply connect your null
modem serial cable from the PC serial port to any RS-232 port on your Blue Heat/Net.
Connect Tech Blue Heat/Net User’s Manual
:
TCM: Telnet Configuration Manager
The Telnet Configuration Manager is used to configure the Blue Heat/Net in much the same way
as the Serial Configuration Manager. You will need to connect your Blue Heat/Net to your
network through a hub or switch or through a direct connection to your computer.
Network Connection
Connect the Blue Heat/Net to your network hardware using a standard straight through CAT 5
network patch cable. A patch cable is optionally available with the Blue Heat/Net, part number:
CB006.
Direct Connect
You can connect your Blue Heat/Net directly to a computer without a hub or switch. You will
need standard cross-wired CAT 5 network patch cable.
Revision 0.13 27
Page 21

Connect Tech Blue Heat/Net User’s Manual
Setting a Static or Dynamic IP Address
Prior to configuring your Blue Heat/Net, you must set a static or dynamic IP address. The default
IP address of a new Blue Heat/Net is 192.168.42.1. If there is a possibility that this has been
changed, you will need to find the current IP address setting before you begin.
The easiest way to get the IP address of your Blue Heat/Net is as follows:
Follow the steps outlined in the section Installing the Blue Heat/Net Configuration Manager
noting your Blue Heat/Net’s IP number (i.e. A.B.C.D) using the Auto Discover Blue Heat/Net
feature.
Set the IP Address using the Web Configuration Manager
Note: If you use the Windows Configuration Manager
and use Auto Discover to locate your Blue Heat/Net on
the network, you can right-click and launch the Web
Configuration Manager from there.
You only need to use the route add command if you
choose not to use the Configuration Manager found on
the CD that accompanied your Blue Heat/Net.
From the command prompt of your computer, run: route
IP of your host machine>
Open your browser and put the Blue Heat/Net’s IP in the address bar (i.e. A.B.C.D) This will
open the WCM.
Log in (default login is wcm and the default password is password) and assign the static IP or
change the IP to 0.0.0.0 if you are using a DHCP assigned IP.
Be sure to replace the .D from the Blue Heat/Net’s IP with a 0 (zero).
add A.B.C.0 mask 255.255.255.0 <current
,
Set the IP Address using the Serial Configuration Manager
Insert your CD into the computer. The Driver/Software Installation menu should appear. If it
doesn’t, double-click on ctisetup.htm.
Click View in the Blue Heat/Net Software section and then Connect in the Serial Configuration
Manager section. This will launch HyperTerminal that comes with Windows XP.
Unplug the power to the Blue Heat/Net and plug it back in. Light indicators 1 to 8 (or 1 to 4)
will blink sequentially. This sequential flashing will last for 30 seconds. You must log in during
this window.
During this sequential flashing, type the word password into the HyperTerminal window. Be
careful you don’t miss the window of opportunity to enter the password.
You now have access to the Serial Configuration Manager (SCM). An scm> prompt is ready to
accept commands. If you do not see this prompt, unplug the power and repeat the steps above.
If you wish to set a dynamic IP address enter the following:
net dhcp=yes
save
exit
If you wish to set a static IP address, enter the following, substituting xxx.xxx.xxx.xxx
static IP you wish to assign:
net mip=xxx.xxx.xxx.xxx
save
exit
Close the HyperTerminal. You may now disconnect the RJ-45 cable from your PC and connect
it to any serial device.
with the
28 Revision 0.13
Page 22

Blue Heat/Net Configuration
The Blue Heat/Net comprises several software components, each of which manages various
functions of the Blue Heat/Net. The following is a breakdown of these components.
Operating System Software
o Host Operating System Driver
o Configuration Manager
o Web browser (Host Operating System supplied)
Blue Heat/Net Software (Firmware)
o Embedded Operating System (uClinux)
Kernel
Drivers
Ethernet
Serial
Flash
Blue Heat/Net Ethernet Protocol Converter application (Ctid)
Web server (Boa)
Web pages
Telnet services
o PPP Client and PPP Server
o Bootloader
o Serial Configuration Manager (SCM) Application
o Configuration Data Space (CDS)
The following section describes in brief what each main component controls.
Host Operating System Driver
The Host Operating System driver performs the translation from a standard Serial COM port
interface to the Blue Heat/Net protocol (which is then delivered to the LAN as described above).
Configuration Manager
This software manages and configures the relationships between the Blue Heat/Net serial ports
and the COM port assignments of the Host Operating System.
Web Browser
The Host Operating System supplies a Web Browser to support the Web Configuration Manager
(WCM) used to change the configuration settings of Blue Heat/Net units.
Embedded Operating System
The embedded Operating System is uClinux.
PPP Client and PPP Server
A Blue Heat/Net port can behave as a PPP connection, enabling you to run network protocols
over a serial link. PPP connections are often used in applications that require remote monitoring.
You can set the Blue Heat/Net to behave as either the dial out or “client” side (PPP Originate) or
the answering or “server” side (PPP Answer).
Bootloader
This code first starts up the embedded processor of the Blue Heat/Net from a power-up or
software initiated reboot. It then obtains the Embedded Operating System image (file) from one
of several locations and runs the Operating System.
Serial Configuration Manager (SCM) Application
Connect Tech Blue Heat/Net User’s Manual
Revision 0.13 29
Page 23

Connect Tech Blue Heat/Net User’s Manual
This application is used to change the configuration settings of Blue Heat/Net units by
connecting to a serial port on the Blue Heat/Net from a terminal (or terminal emulation program
on a PC).
Configuration Data Space (CDS)
This is the area, in non-volatile (Flash) memory, which stores the configuration parameters.
CDS (Configuration Data Space)
Description
The Blue Heat/Net has a number of configuration parameters which are stored in a Non-Volatile
(Flash memory) area. (See appendix for list of parameters)
The CDS area is stored redundantly in the Flash memory along with a CRC-style checksum to
ensure data integrity.
Access to CDS Parameters
The parameters stored in the CDS can be changed through the use of the following configuration
tools:
SCM Serial Configuration Manager
TCM Telnet Configuration Manager
WCM Web Configuration Manager
These three methods allow the user to change Configuration Parameters by whichever method is
most convenient. In some cases several methods will be employed during different stages of the
setup of the Blue Heat/Net, for example:
The SCM may be employed in the beginning when the unit is not connected to a network and
various networking parameters need to be set up prior to connection to a network.
TCM or WCM may be employed after the unit is connected to a network, possibly to modify
other settings related to Serial Ports, Bootup settings or others.
More information about the operation of the SCM
Note:
When CDS Parameters are changed via the SCM, TCM
or WCM, some settings will not take effect until the Blue
Heat/Net is next rebooted or powered up.
, TCM and WCM follows.
30 Revision 0.13
Page 24

SCM (Serial Configuration Manager)
Description
The Serial Configuration Manager is one of the applications you can use to access the
Configuration Data Space (CDS) settings of the Blue Heat/Net. Since the CDS stores the default
serial port settings, it is important that the line mode is configured prior to first use. Otherwise,
you’ll not be able to access the ports.
Getting Access to the SCM
To access the SCM, you simply connect a serial port terminal device (or a PC running a terminal
emulator program) to any of the serial ports on the Blue Heat/Net, and enter a correct Password.
A command prompt is then sent to the terminal and CDS Parameters can be changed using a
command line style of entry.
Note:
For RJ-45 models, the Blue Heat/Net ships with the unit
configured to scan all serial ports on the unit for entry of
the Password. This behavior can be changed by
alteration of one of the CDS parameters.
If your Blue Heat/Net model has configurable line interfaces (DB-9 models), certain settings
can affect access to the SCM. The ports are scanned as follows:
The default Line mode setting of all ports is Undefined. Under these conditions, the first two
ports are set to RS-232 mode during port scanning. Access to the SCM is available through these
ports only. (You should set all ports to a known state prior to use.)
When a port is set to something other than Undefined, any port with a setting of RS-232 or RS-
485-Full Duplex will be scanned. Otherwise, scanning is not performed, and access to SCM is
not available.
Note:
To access the Blue Heat/Net via the SCM your serial line
interface settings must be at the default values of 9600
baud, 8 data bits, no parity and 1 stop bit (9600, 8, n, 1).
No flow control is recommended.
In a situation where port scanning is not performed, you can still access the SCM using the push
button reset on the back of the unit. Follow the instructions in the section Activating the Special
Operations Mode and Default Settings to access the SCM in this situation
See the section which describes How the Blue Heat/Net Boots for a complete description of the
Bootup process of the Blue Heat/Net and how to access the SCM.
Connect Tech Blue Heat/Net User’s Manual
SCM Command Reference
SCM commands are entered as strings of ASCII characters with options separated by whitespace
characters. The entire command line is terminated by a CR character or CR/LF character pair.
Command lines can be entered manually (via a terminal or a PC with terminal emulator
program) or sent from an application program. There is no character-to-character minimum
timing restriction. The command line buffer is limited to the size of the FIFO on the serial port,
which is 64 characters for the RJ-45 model and 128 for the DB-9 model of the Blue Heat/Net.
If an SCM command is entered with no options specified, the command shows the syntax of its
options and the current setting of those options.
Revision 0.13 31
Page 25

Connect Tech Blue Heat/Net User’s Manual
Brief Command List
boot Bootup settings
cfg SCM operational settings
exit Exits the SCM application (and optionally reboots the Blue Heat/Net)
help Brief list of available commands and their syntax
info Blue Heat/Net general information and Flash verification
net Network settings
port Serial port settings, line interface settings and UART information
pson Personality settings
save Save setting changes to Non-volatile (Flash) storage
update Download (via TFTP) and Flash a new Operating System
(uClinux) and Loader/SCM image.
Command Details
boot
Syntax: boot [mode=] [file=] [delay=]
Description: This command establishes the Blue Heat/Net boot-up mode. For a detailed
description of the boot-up process of the Blue Heat/Net, see How the Blue
Heat/Net Boots up in the Appendix.
Options: mode=
A comma-separated list of the following sub-options. Each sub-option is
preceded by either a + or a – to indicate if the sub-option is enabled or disabled.
±flash Enables or disables the ability to boot from the Flash memory.
±bootp Enables or disables the ability to obtain the boot-up information from a
Server.
±tftp Enables or disables the ability to download and boot from a file located on
a Server.
file=
This option specifies the default file name used for the boot-up (if TFTP boot is
enabled) and also the default file name when using the flos command.
This can be any sequence of characters up to 128 characters in length. (The
default is BHNuClinux_vvv.gz, where vvv is the current version number of the
“Operating System image”).
delay=
This sets the time duration for accessing the SCM application. It can be set from
2 to 30 seconds, the default is 30. (See the section How the Blue Heat/Net
Boots up for more information).
32 Revision 0.13
Page 26

Connect Tech Blue Heat/Net User’s Manual
cfg
Syntax: cfg [port=] [timeout=] [password=] [prompt=] [file=]
Description: Establishes the settings used by the SCM application to
modify its behavior.
Options: port=
Specifies the port number to scan for a password to gain entry in the SCM.
N = Scan just port N (N=1 to the number of ports on the unit).
255 = Scan all ports on the unit (default unless unit has programmable line
interfaces).
timeout=
Specifies the time duration allowed for a TCM (via telnet) session to be idle (no
activity) before the session is terminated.
0 to 1092 minutes
(default = 5)
Note: A setting of zero allows infinite timeout.
password=
This sets the password phrase, which is used to gain access to the SCM, TCM
and WCM modes of configuring the Blue Heat/Net. The default is “password”.
prompt=
This setting controls whether a password prompt (and other password entry
status information) is presented to the terminal. This prompting is helpful for
new users of the product but may present a problem when other devices are
connected to the serial port.
yes enables the password prompting (default)
no disables the password prompting
file=
This sets the file name used as a default when using the flldr command.
It can be any sequence of characters up to 128 characters in length. (The default
is “BHNloader_vvv.gz”, where vvv is the current version number of the
“Loader”).
exit
Syntax: exit [-nosave] [-no_reset][-login]
Description: This command is to exit the SCM and reboot the Blue Heat/Net. If CDS changes
have been made a warning message is issued and the SCM will not exit.
Options: -nosave
Exit without saving changes (abandon changes).
-no_reset
Exit SCM without rebooting, maintaining the changes to settings for this session
only. (Booting is continued after the SCM is exited.)
-login
Exit without saving changes, and restart the SCM login process.
Revision 0.13 33
Page 27

Connect Tech Blue Heat/Net User’s Manual
help
Syntax: help
Description: Displays a brief list of all the commands.
Options: There are no options for the help command. Please note that specific help for the
options of each command can be obtained by entering any command with a
single “?” argument. An example would be net ?
info
Syntax: info [-v]
Description: This command is used to show basic information about the Blue Heat/Net unit,
like Serial Number and Version Numbers, and performs a confidence (CRC and
Decompression verification) test of the contents of the Flash memory.
Options: -v
This option disables the confidence tests.
net
Syntax: net [network= | net=]
[my_ip= | mip=]
[server_ip= | sip=]
[gateway_ip= | gip=]
[subnetmask= | snm=]
[broadcast_ip= | bcip=]
[dns_ip=]
[domain=]
[host name=1 host=]
[tcp=]
[mac=]
[dhcp=]
Description: Establishes the network settings.
Options: network= | net=
Sets the “network” portion of the IP address into my_ip, server_ip and
gateway_ip. The address entered is masked by the subnet mask setting before
being applied. This command is a shortcut for quickly setting all the IP
addresses of the unit. See note below.
my_ip= | mip=
This sets the IP address of the Blue Heat/Net unit (default is 192.168.42.1). See
note below.
server_ip= | sip=
This sets the Server IP address. This address determines the address of the
Server to use when the Bootp and tftp mode is enabled (see boot command), and
also as the default Server address to use for the update commands (default is
0.0.0.0). See note below.
gateway_ip= | gip=
This sets the Gateway IP address. This address is used when the Bootp mode is
enabled, default is 0.0.0.0. See note below.
34 Revision 0.13
Page 28

Connect Tech Blue Heat/Net User’s Manual
subnetmask= | snm=
This sets the Subnet mask IP address. (The default is 255.255.255.0) See note 1.
broadcast_ip= | bcip=
This sets the Broadcast IP address. This is used when the Bootp mode is
enabled. (The default 255.255.255.255). See note below.
dns_ip=
This sets the IP of Domain Name Server. (The default is 0.0.0.0). This must be
set to update the Blue Heat/Net firmware automatically from Connect Tech’s
anonymous ftp server.
domain=
This sets the Domain name of the unit. (The default is blueheat.net)
Host name=1 host =
This sets the Host name of the Blue Heat/Net unit. (The default is BHNssssssss,
where “ssssssss” is the serial number of the unit).
tcp=
This sets the base TCP port number used for Host TCP/IP and UDP/IP
communications. The default is 49152 (0xC000)
mac=
This displays the MAC address of the unit. (The default is 00:0C:8B:SS:SS:SS,
where SS:SS:SS is the hex value of the serial number of the unit). Note: The
MAC address cannot be changed, it can only be displayed.
dhcp=
This enables or disables DHCP support.
yes enables
no disables (default)
Notes:
All IP addresses are entered in common IP address
notation: ddd.ddd.ddd.ddd where ddd is a decimal number
from 0 to 255.
IP address “my_ip, server_ip, gateway_ip and dns_ip” can
be entered right justified, meaning that the address
entered will be applied to the specified address starting
from the least significant digit, masked by the subnet
mask. For example:
If the subnet mask is set to 255.255.255.0, and the
following command is entered:
net net=12.23.34.00 mip=45 sip=56 gip=67 dns_ip=89
The following IP addresses result:
the Blue Heat/Net unit will be 12.23.34.45
the Server will be 12.23.34.56
the Gateway will be 12.23.34.67
and the DNS IP will be 12.23.34.89
port
Revision 0.13 35
Page 29

Connect Tech Blue Heat/Net User’s Manual
Syntax: port [port#]
[line_mode= | lmode=]
[baudrate= | baud=]
[data_bits= | bits=]
[parity= | par=]
[stop_bits= | stop=]
[software_flow= | sflow=]
[xoff=]
[xon=]
[hardware_flow= | hflow=]
[local_loopback= | llb=]
[special_char_mode= | scm=]
[error_char= | errch=]
[break_char= | brkch=]
[event_char= | evtch=]
[use_xoff_xon_limits= | xlim=]
[xofflim=]
[xonlim=]
[escape_char= | esc=]
[fifos=]
[txload=]
Description: This command establishes the initial settings of the serial ports when the Blue
Heat/Net is powered up.
Options: port#
This specifies the port number to change or query. If the port number is omitted,
the command returns a summary of all the ports on the Blue Heat/Net.
N where N is 1 to the number of ports on the unit.
line_mode= | lmode=
This is used to change the Line Interface Mode settings on units supporting this
feature.
232 Sets RS-232 mode
full Sets RS-422/485 Full-Duplex mode
4wire Sets RS-422/485 4-Wire Multi-drop mode
2wire Sets RS-422/485 2-wire Multi-drop mode (½ Duplex)
±tri Enables or disables line driver Tri-State at power-up. (Valid
only with RS-422/485 Full Duplex mode.)
±bt Enables or disables Line Bias and Termination on RS-485
ports
baudrate= | baud=
This sets the baud rate.
50 to 460800 (default 9600, maximum 230400 baud on RJ-45 models )
data_bits= | bits=
This sets the number of data bits in each character (byte).
5, 6, 7 or 8 (default)
parity= | par=
This sets the parity mode
n no parity (default)
e even
o odd
0 force 0 (space parity)
1 force 1 (mark parity)
36 Revision 0.13
Page 30

Connect Tech Blue Heat/Net User’s Manual
stop_bits= | stop=
This sets the number of stop bits
1 (default)
1.5
2
software_flow= | sflow=
This sets the software (xon/xoff) flow control mode.
n none (default)
r receive (xoff is transmitted when the FIFO buffer fills, xon is
transmitted when FIFO buffer is emptied)
t transmit (transmit will stop when xoff is received, and resume when
xon is received)
b both receive and transmit
xoff=
This sets the xoff character (entered as a HEX value).
0 to FF (default is 13)
xon=
This sets the xon character (entered as a HEX value).
0 to FF (default is 11)
hardware_flow= | hflow=
This sets the hardware (RTS/CTS) flow control mode, using a comma-separated
list of the following sub-options. Each sub-option is preceded by either a + or a
– to indicate if the sub-option is enabled or disabled.
±cts
When enabled, the transmission will stop when the CTS signal goes off, and will
resume when CTS goes on.
±rts
When enabled, RTS will go off when the FIFO buffer fills, and will go on again
when the receiver buffer empties.
±dsr
When enabled, the transmission will stop when the DSR signal goes off, and
will resume when DSR goes on. (Currently not supported.)
±dtr
When enabled, DTR will go off when the FIFO buffer fills, and will go on again
when the FIFO buffer empties. (Currently not supported.)
±rts_toggle | ±rtog
This establishes the toggle mode of the RTS signal. In this mode the RTS signal
goes on before a block of transmit characters and goes off at the end of the
block. (Currently not supported.)
Example: hflow=+cts,-rts
The default for hflow is all flags disabled.
fifos=
This enables or disables the use of the FIFOs on the UART channel.
yes enabled
no disabled
The default is yes.
txload=
This sets the maximum number of bytes to load into the transmitter FIFO.
Revision 0.13 37
Page 31

Connect Tech Blue Heat/Net User’s Manual
1 to the FIFO size of the UART (default is FIFO size)
The following options are not implemented
[local_loopback= | llb=]
[special_char_mode= | scm=]
[error_char= | errch=]
[break_char= | brkch=]
[event_char= | evtch=]
[use_xoff_xon_limits= | xlim=]
[xofflim=]
38 Revision 0.13
Page 32

pson
Connect Tech Blue Heat/Net User’s Manual
[xonlim=]
[escape_char= | esc=]
Syntax: pson [port#][p=][flags=][+d]
Description: This command sets the Personality or profile of a port. It establishes the
application that will use the port.
Options: port#
This specifies the port number. This number can be any valid port number
starting at 1 to the number of ports available on the particular Blue Heat/Net
unit. If the port number is omitted, the command returns the personality of all
ports on the Blue Heat/Net.
p=
This sets the personality string to the value supplied (up to 32 characters).
Default is ctid_portd.
flags=
This sets the personality flags to the value supplied (entered as a HEX value).
0 to 0xFFFF. Default is 0x0001 (RE_SPAWN)
+d
This sets the personality flags to the default values.
Note:
The [p=] and [flags=] options are only available when the
user logs into SCM using the “backdoor” password.
Contact Technical Support for this password.
save
update
Syntax: save
Description: This command saves the setting changes into the CDS in the non-volatile (Flash)
memory.
Options: (none)
Syntax: update <-os | -loader | -jffs> [server_ip= | sip=] [file=]
Description: Download and store (in Flash memory) a new uClinux Operating System image
or a new Loader/SCM image. The download is conducted by a TFTP download
from a Server. After download the image file is checked as being a valid gzip
file (file is decompressed to validate its contents), and then the file is stored in
Flash memory. The OS file is stored in Flash in its compressed form, but the
Loader is stored uncompressed.
Options: -os | -loader | -jffs
Use -os to update the uClinux OS.
Use –loader to update the loader/SCM.
Use –jffs to update the JFFS system (Journaling Flash File System).
server_ip= | sip=
Specify the Server IP address from which the file is to be downloaded.
Revision 0.13 39
Page 33

Connect Tech Blue Heat/Net User’s Manual
file=
Specify the file name to download. If the –jffs option is chosen, then the file=
option is mandatory.
Note:
After downloading, the image is checked to ensure the
file is correctly formatted. If the file is bad the command
exits. The version is checked against your current
version. If they match, you will be prompted to choose if
you wish to program the Flash. Enter “y” to continue. If
the version is different, the new version needs to be
saved with the save command when the update is
finished.
When the JFFS is updated, all previous contents are
destroyed. Only use this option when updating to a Blue
Heat/Net that supports Personality settings.
TCM (Telnet Configuration Manager)
Description
The Telnet Configuration Manager (TCM) is an application similar to the SCM. The TCM
provides the same functionality as the SCM, and offers some additional features.
Getting Access to TCM
The TCM is accessed via a telnet connection to the Blue Heat/Net unit. Any standard telnet
application program can be used, (i.e PuTTY). If you are using DHCP to dynamically assign an
IP on your network, use the Blue Heat/Net Configuration Manager
the IP assigned to your unit.
Telnet to the assigned IP address and enter the log in and password information. Once a telnet
session is established, the user is prompted for a log in. Use the log in tcm, and the same
password used to access the SCM application. Upon successful log in the user will encounter a
similar interface as the SCM application.
’s Auto Discover to determine
40 Revision 0.13
Page 34

TCM Command Reference
The TCM commands contain the SCM commands, in addition to other commands unique to the
TCM. The TCM commands have the same syntax as the SCM (see previous section). A brief
command list is provided below. Please note that the * denotes commands not available through
the SCM application. Following this brief list are command details for the TCM-unique
commands.
Brief Command List
boot Bootup settings
•
cfg TCM operational settings
•
exit Exits the TCM application
•
help Brief list of available commands and their syntax
•
info Blue Heat/Net general information and Flash verification
•
net Network settings
•
port Serial port settings, and UART information
•
save Save setting changes to Non-volatile (Flash) storage
•
update Downloads (via TFTP) and programs Flash with Loader/SCM
•
image and Operating System (uClinux) image.
Commands unique to the TCM
sec Serial Port Security Settings *
•
stats Network or port statistics *
•
Connect Tech Blue Heat/Net User’s Manual
stats
Command Details
Syntax: stats [option]
Description: This command displays the statistics for a particular network protocol or the
serial driver statistics.
Options: txrx
This displays the number of bytes transmitted or received for each port. It also
shows which port is open, and by what IP, along with a summary of serial
errors. PFO errors are the sum of parity, frame and overrun errors that have
occurred for a particular port.
error
This second serial statistic option provides a breakdown of PFO errors. In
addition the number of serial breaks encountered is shown for each port.
tcp
This displays attributes related to the network TCP protocol.
ip
This displays attributes related to the network IP protocol.
udp
This displays attributes related to the network UDP protocol.
icmp
This displays attributes related to the network ICMP protocol.
Revision 0.13 41
Page 35

Connect Tech Blue Heat/Net User’s Manual
sec
Syntax: sec [port#] [options]
Description: This command changes the permission lists for each port. Each port has an IP
address white list. The white list contains the IP addresses checked each time a
serial port is opened through the network. If the client’s IP is not in the list the
client will be denied access to that serial port. If the list is empty then any client
may open the port. If there is a lockout associated with the list then no client can
access the list. The sec command allows you to display and edit these IP security
white lists. The permission level is used to allow access to groups of commands.
Options: port#
This specifies the port number. This number can be any valid port number
starting at 1 to the number of ports available on the particular Blue Heat/Net
unit.
list
This displays the current white list for the specified port. Remember, if the list
is empty, any client (any IP) can access the port. There is no sub option for this
command.
clear
This removes all IP addresses from a list, thus allowing any client to access the
port. This command also clears the lockout if it exits. There is no sub option for
this command.
rm
This command is used in conjunction with the list command. The user typically
examines the IP white list and makes note of which entry needs to be removed.
You must note the record number that appears to the left of the IP. Use this
record number as a sub option to the sec/rm command, in order to remove a
desired IP.
add
This appends new IPs to a given list. The sub option for the sec/add command is
a valid IP in dot-number notation. You may want to execute the list command to
confirm that an IP was successfully added.
lockout
This list is used to deny access to the specified serial port. There is no sub
option for this command. The lockout can be eliminated with a clear command.
Examples: sec 1 list Display the IP white list for port number 1.
sec 5 clear Clear the IP white list for port number 5.
sec 3 add 210.98.82.99 Add IP 210.98.82.99 to the white list for port number 3.
sec 3 rm 1 Remove the 1
st
entry in the white list for port number 3.
42 Revision 0.13
Page 36
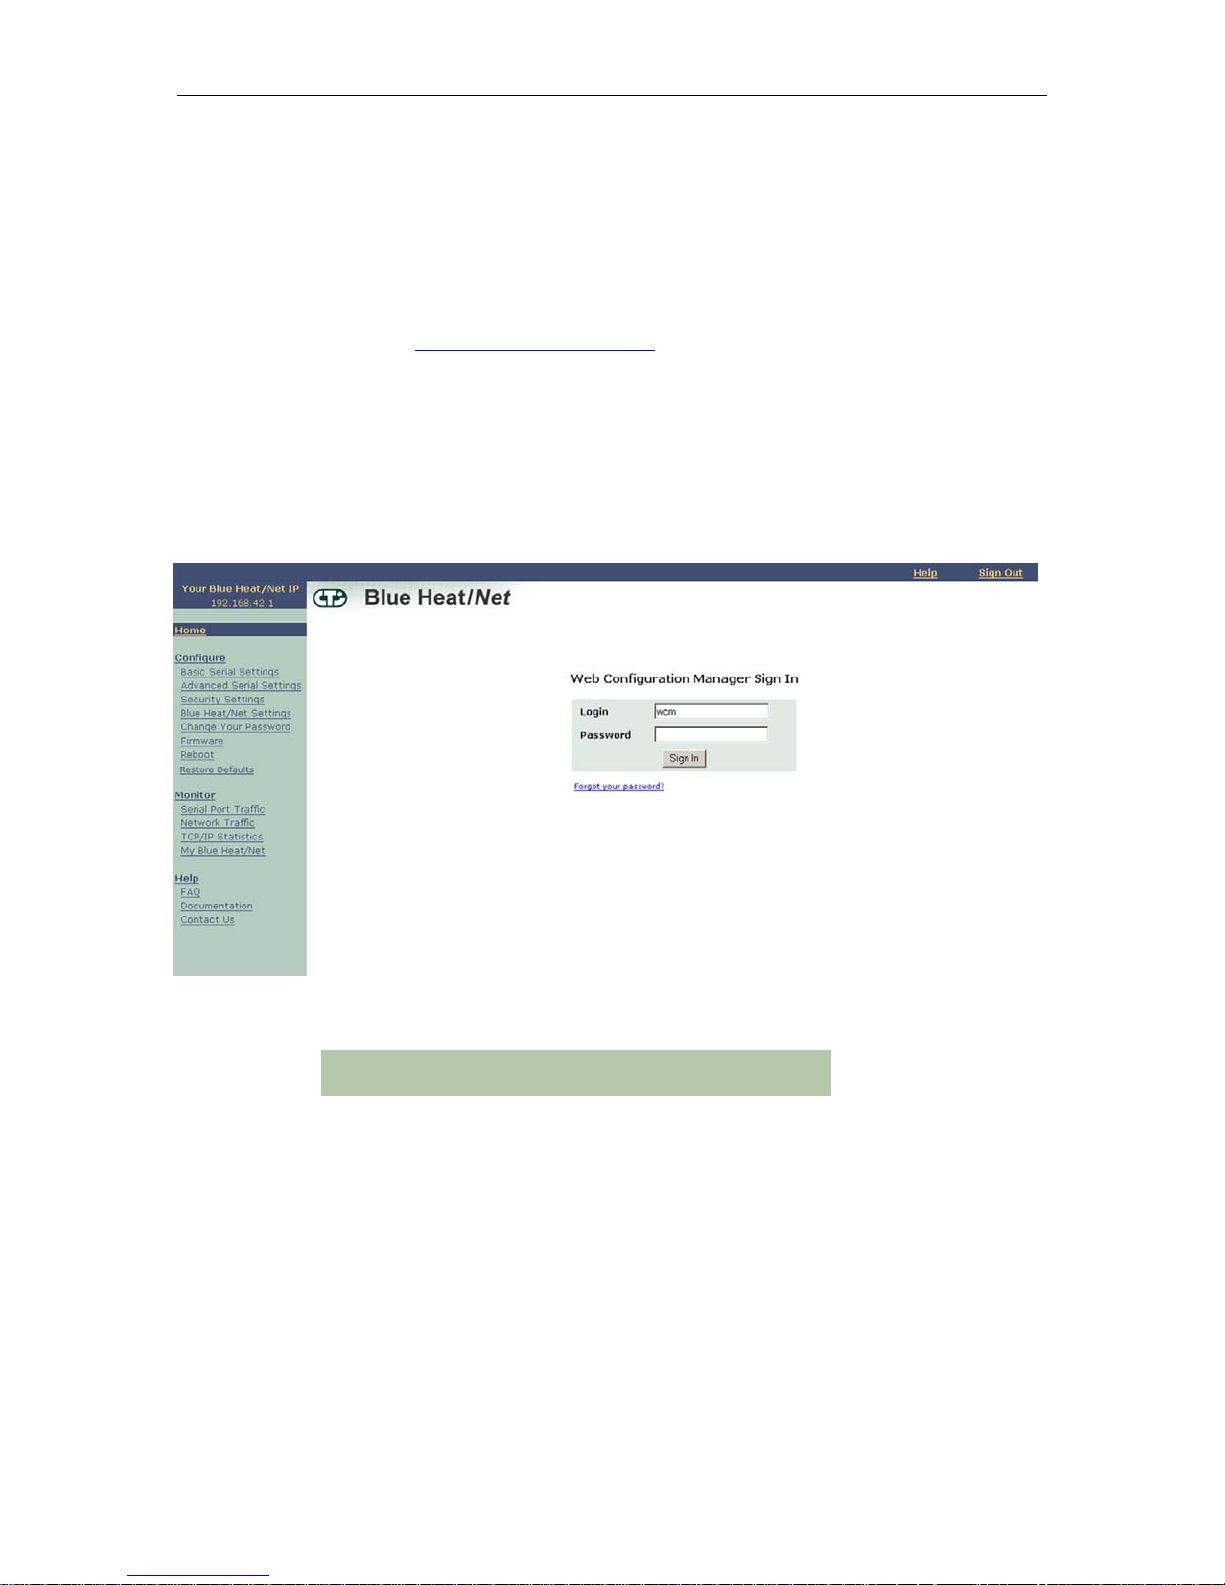
WCM (Web Configuration Manager)
Signing In to the Web Configuration Manager
You will need to know the IP address of your Blue Heat/Net unit before you use the Web
Configuration Manager. Use the Serial Configuration Manager to assign the Blue Heat/Net a
valid IP address, or tell the Blue Heat/Net to use DHCP to automatically obtain an IP address.
Please refer to the Serial Configuration Manager
this.
Once you know your IP address, open your web browser and go to: http://_your_ip_address or
http://www.hostname.com
You will arrive at the Blue Heat/Net Web Configuration Manager Sign In page. The default
username is wcm. Leave this name as-is. The default password is password. Use this
username/password combination and click the Sign In button to log on to the Web Configuration
Manager.
documentation for information on how to do
Connect Tech Blue Heat/Net User’s Manual
Once you have signed in, you should immediately
change the default password.
At this point you should be directed to the Web Configuration Manager homepage.
To sign out of the Web Configuration Manager, just click on the Sign Out link on the upper
right-hand side of the Web Configuration Manager.
Revision 0.13 43
Figure 7: Web Configuration Manager Sign In
Page 37

Connect Tech Blue Heat/Net User’s Manual
Configuring Your Blue Heat/Net
There are five main configuration options for your Blue Heat/Net. These include basic serial
settings, advanced serial settings, security settings, Blue Heat/Net settings and Firmware. The
Reboot and Change your Password options are also located here. The options for each
configuration screen are described in the following sections.
Configure Basic Serial Settings
Figure 8: Configuring Basic Serial Port Settings (RJ-45 Models)
44 Revision 0.13
Page 38

Connect Tech Blue Heat/Net User’s Manual
Figure 9: Configuring Basic Serial Port Settings (DB-9 Models)
This page contains basic or common serial settings. Here you can configure the default baud
rate, parity, start bits, stop bits and flow control for each of your Blue Heat/Net ports. DB-9
models include a Mode option to set the line interface mode. The initial values for each port are:
9600 baud
•
no parity
•
8 data bits
•
1 stop bit
•
no flow control
•
Mode: Not Set (factory default) * or port disabled
•
Personality: Blue Heat/Net
•
*DB-9 models only.
NOTE: Line modes should be changed to a specific setting.
The Windows host driver settings will override line mode
settings, so ensure the mode you choose is in agreement with
the OS advanced properties port setting.
Change the serial port settings as required, and click the Submit button at the bottom of the page.
A confirmation page will be presented to you to inform you that your changes have been saved.
(Note: These settings are usually overridden by applications you use with the Blue Heat/Net.)
Revision 0.13 45
Page 39

Connect Tech Blue Heat/Net User’s Manual
Basic settings also offers a Personality option. This enables you to set the personality or
communication protocol of your ports based on your application requirements. The personalities
include:
●
Blue Heat/Net: This is the default option and refers to the normal behavior of the Blue
Heat/Net port. In most applications, the default setting will suit the application. There is no
need to set anything beyond the regular configuration options of the Web Configuration
Manager.
●
PPP Call: This configures your Blue Heat/Net port to behave as a PPP (Point-to-Point
Protocol) connection. It configures the port to treat your PC as the client, or “dialing” side
of the connection. Choose PPP Call and click on the Configure button to set further options.
●
PPP Answer: This configures your Blue Heat/Net port to behave as a PPP connection from
as a server (answer) side of the PPP connection. Choose PPP Answer and click on the
Configure button to set additional options.
●
Ethernet to serial: Reserved for custom personalities.
●
Raw TCP Server: This configures your Blue Heat/Net port to listen for an incoming TCP
connection from a remote computer or device.
●
Raw TCP Client: This configures your Blue Heat/Net port to connect via TCP to a remote
computer or device at a specific IP address.
46 Revision 0.13
Page 40

Connect Tech Blue Heat/Net User’s Manual
Point-to-Point Protocol (PPP) Options
It is possible to configure a Blue Heat/Net port to behave as a PPP connection. This enables you
to run network protocols over a serial link. This link can be a direct serial connection using a
null modem cable, or a modem link via telephone, cell or satellite line. PPP connections are
often used in applications that require remote monitoring. You can set the Blue Heat/Net to
behave as either the dial out or “client” side (PPP Call) or the answering or “server” side (PPP
Answer). The Blue Heat/Net can act as both PPP server and client simultaneously if more than
one serial port is used.
Revision 0.13 47
Figure 10: PPP Call configuration
Page 41

Connect Tech Blue Heat/Net User’s Manual
For more detailed information about using PPP, visit
www.tldp.org/HOWTO/PPP-HOWTO/index.html
PPP Call
Choose PPP Call and click Configure. The PPP Call configuration page consists of four script
files. The Options configuration file includes system default information such as baud rate,
modem connection, flow control, peer authorization and IP addresses (local and remote)
assigned to the port. See the Linux manual page pppd (# man pppd) for a full list of options.
The Chat configuration file defines the dialog that occurs between client and server during
connection. See the Linux manual page chat (# man chat) for a full list of options.
The PAP (Password Authentication Protocol) and CHAP (Challenge Handshake Authentication
Protocol) configuration files are used to authenticate peers. Use these scripts to alter the pap-
secrets and chap-secrets files. These will only be required if you have set the options file to
authenticate connections.
Note that you must save changes and reboot before any
modifications will take effect.
PPP Answer
Choose PPP Answer and click Configure. The PPP Answer configuration page consists of four
script files. The Options configuration file includes system default information such as baud rate,
modem connection, flow control, peer authorization and IP addresses (local and remote)
assigned to the port. See the Linux manual page pppd (# man pppd) for a full list of options.
The Chat configuration file defines the dialog that occurs between client and server during
connection. See the Linux manual page chat (# man chat) for a full list of options.
The PAP (Password Authentication Protocol) and CHAP (Challenge Handshake Authentication
Protocol) configuration files are used to authenticate peers. Use these scripts to alter the pap-
secrets and chap-secrets files. These will only be required if you have set the options file to
authenticate connections.
48 Revision 0.13
Page 42
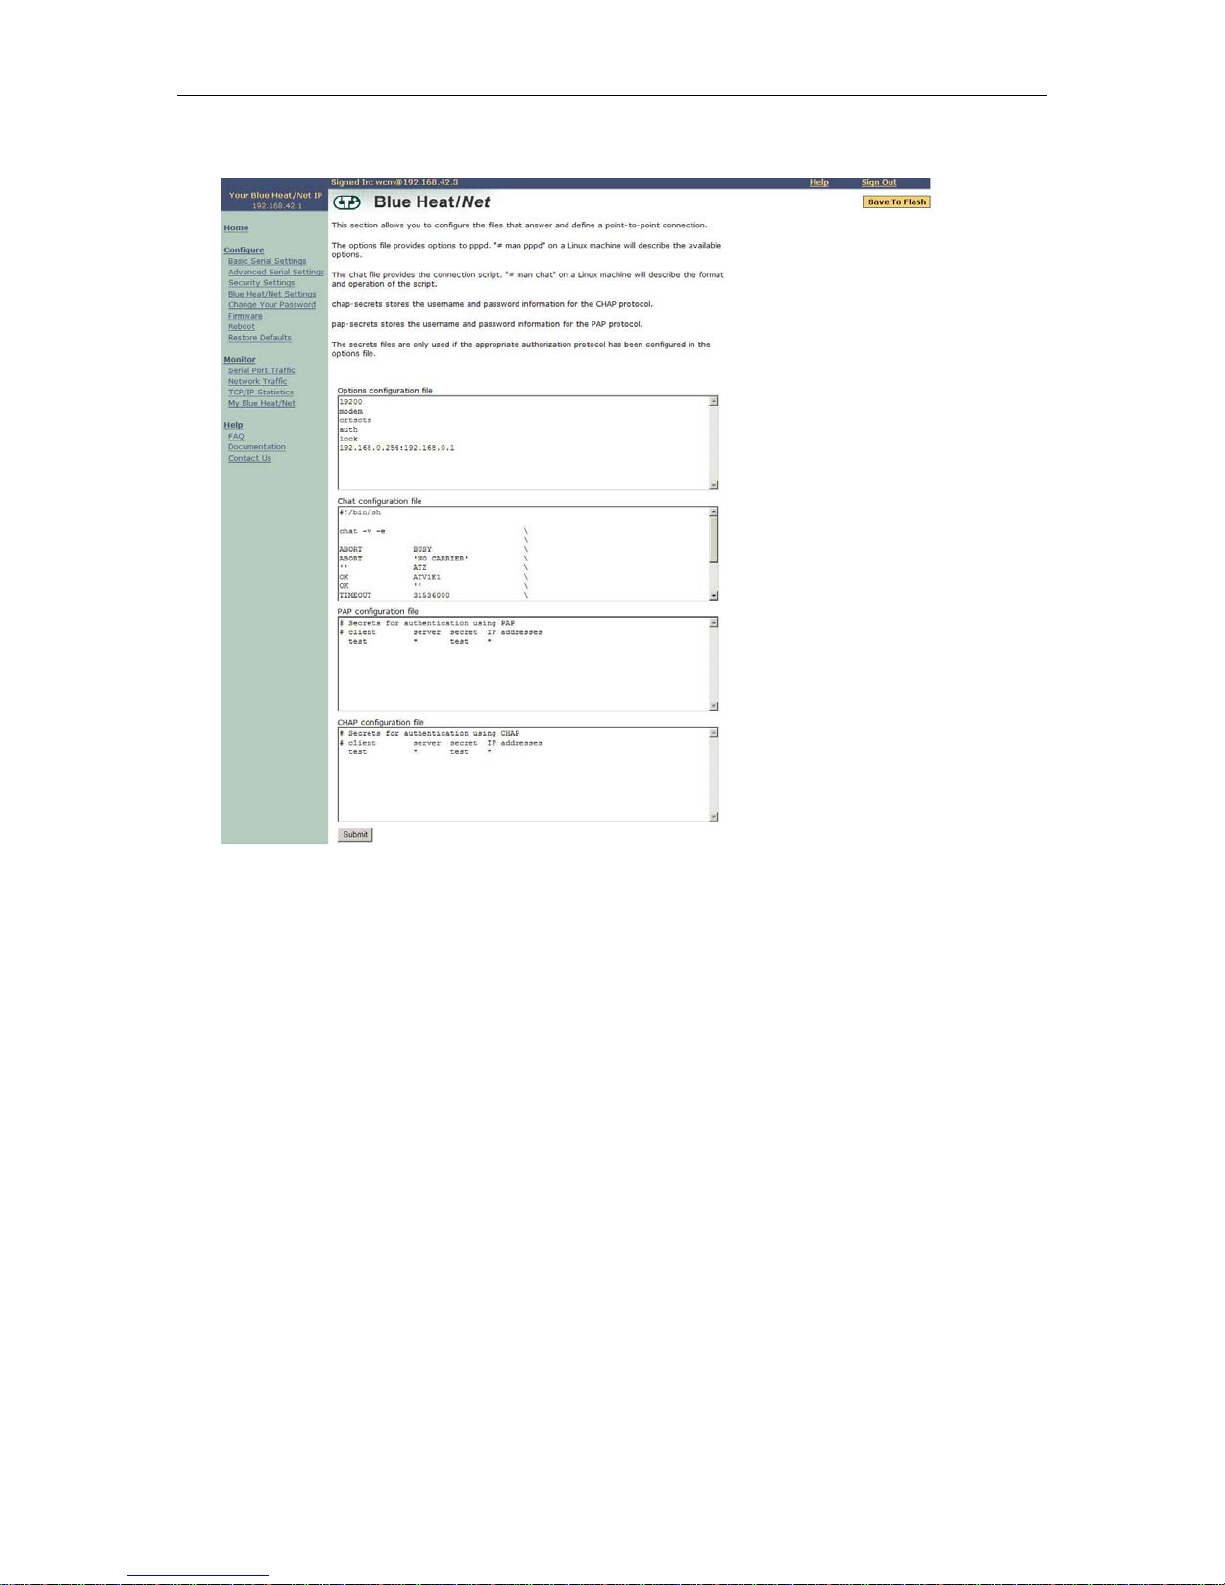
Connect Tech Blue Heat/Net User’s Manual
Figure 11: PPP Answer Configuration
Revision 0.13 49
Page 43

Connect Tech Blue Heat/Net User’s Manual
Raw TCP Server and Client Options
Blue Heat/Net serial ports can be configured to transmit/receive data using standard TCP. You
can configure the port to behave as a server, allowing a remote device to make a TCP socket
connection; or a client, enabling the Blue Heat/Net to initiate TCP-based contact with a remote
device.
Raw TCP Server
When configured to use the Raw TCP Server personality, the Blue Heat/Net will use a TCP port
to listen for an incoming connection via TCP from a remote computer or device. Once a
connection is established, any data sent to the Blue Heat/Net through the TCP/IP connection is
transmitted on the appropriate serial port. Any data received by the serial port is sent through the
TCP/IP connection to the remote computer or device.
To configure your Blue Heat/Net serial port to behave as a TCP server, choose the personality
option Raw TCP Server and click Configure. The Raw TCP Server page requires you specify the
TCP Port used for incoming connections. Specify the TCP Port number in the input box and click
Submit. (The server needs a unique TCP Port number for each serial port.) You will be
prompted to Save to Flash. Reboot the Blue Heat/Net.
Raw TCP Client
When configured to use the Raw TCP Client, the Blue Heat/Net will use the specified IP address
and TCP port to connect to a remote computer or device. The Blue Heat/Net will continue to
attempt a connection every 3 seconds until one is established. Once connected, any data sent to
the Blue Heat/Net through the TCP/IP is transmitted on the appropriate serial port. Any data
received by the appropriate serial port is sent through the TCP/IP connection to the remote
computer or device.
To configure the Blue Heat/Net serial port to behave as a TCP client, choose the personality
option Raw TCP Client and click Configure. The Raw TCP Client page requires you specify the IP
Address to which the Blue Heat/Net will try to connect. The IP address can be specified in the
input box in the format 1.2.3.4 or as a DNS name (www.connecttech.com, for example). Specify
the TCP Port number and click Submit. You will be prompted to Save to Flash. Reboot the Blue
Heat/Net.
50 Revision 0.13
Figure 12: Raw TCP Server configuration
Page 44

Connect Tech Blue Heat/Net User’s Manual
Figure 13: Raw TCP Client configuration
Checking your Raw TCP/IP settings on the Blue Heat/Net
You can check your Raw TCP Client and/or Server settings once you have completed
configuration through the WCM. To do so, open a Telnet session with your Blue Heat/Net and
type ps at the command prompt. This will display a list of programs currently running.
Raw TCP Server listing
You should see information similar to the following: <numbers> raw_pdata 2 _ 0
In this case, the 2 refers to serial port 2, the 0 refers to the fact that the server is using the Blue
Heat/Net default port for that serial port (49157 for serial port 2).
By contrast: <numbers> raw_pdata 3 _ 4000 uses serial port 3 and listening for a TCP connection
on port 4000.
Raw TCP Client listing
You should see information similar to the following:
<numbers> raw_pdata 4 www.connecttech.com 80
In this case, the 4 refers to serial port 4. It's connecting to www.connecttech.com on port 80.
Connecting Two Blue Heat/Nets together using standard TCP
You can directly connect two Blue Heat/Net devices by configuring a serial port on one to Raw
TCP Server, and a serial port on the second to Raw TCP Client. Serial data received by one Blue
Heat/Net can then be sent through a network or the internet to the second Blue Heat/Net’s serial
port. The serial ports operate independently of each other, and can be configured individually for
baud rate and electrical interface.
Configure a serial port on one Blue Heat/Net in Raw TCP Server mode (see above) and note
your TCP settings (the Blue Heat/Net’s IP address and the TCP Port you provided.)
Configure a serial port on the second Blue Heat/Net in Raw TCP Client mode (see above) and
input the settings used for the Raw TCP Server mode.
Reboot both Blue Heat/Nets. You should be able to exchange data between the two serial ports,
regardless of the serial port settings on either unit. This will extend the range of the serial
devices to anywhere that can be connected via TCP/IP, including the internet.
Revision 0.13 51
Page 45

Connect Tech Blue Heat/Net User’s Manual
If you experience connection problems:
Make sure the cables are connected properly.
•
Check the settings on your Blue Heat/Net through the WCM. Make sure you're using the
•
same port number for both the server and client.
Start a Telnet session with the Blue Heat/Net in client mode. Use the ping utility on the
•
client Blue Heat/Net to ping the server Blue Heat/Net. If ping is unsuccessful, then there
are network issues that need to be resolved (or the server Blue Heat/Net is not plugged in).
If ping is successful, recheck your client and server settings.
If you can Telnet into the Blue Heat/Net, log in and type in cat /var/log/syslog. If the TCP
•
Server is failing you'll see error log entries that may help in diagnosing the problem.
Testing Blue Heat/Net Raw TCP Client Mode with a Telnet Daemon
Testing Raw TCP Client Mode
Select Configure basic serial settings in the WCM. Choose a baud rate and serial port settings as
appropriate.
Set the personality option to Raw TCP Client and click Configure. Input the computer name or IP
Address of the computer you wish to reach. For TCP Port, choose the TCP port number to which
you will connect. For Telnet sessions this is typically port number 23. Click Submit.
Select Configure Basic serial settings on the navigation menu. Click Submit, followed by Save to
Flash. This registers the changes to the basic serial port as well as the change to the Raw TCP
Client personality.
Select Reboot from the navigation menu. This will restart the Blue Heat/Net and launch the Raw
TCP Client personality on your selected port. The Blue Heat/Net will attempt to connect and
start a Telnet session. You should see a login prompt on your serial terminal screen.
If you do not see the login prompt:
Make sure the serial cables are connected properly. For a direct serial connection to a PC,
•
you'll typically need a null modem cable.
Check the settings on your Blue Heat/Net through the WCM. Make sure everything is
•
input correctly and that you have the correct port number.
Start a Telnet session with the Blue Heat/Net. Log in and type cat /var/log/syslog. If the
•
TCP connection is failing you'll see entries such as:
Tue Nov 30 00:01:01 raw_pdata[100]: Connect failed, closing socket
Tue Nov 30 00:01:01 raw_pdata[100]: client connect failed yourIPAddress:23
If you receive these messages, the Blue Heat/Net is not able to connect to the destination.
Check to make sure that the other computer is up and running and that a Telnet daemon is
currently operating.
Testing Raw TCP Server Mode
Select Configure basic serial settings in the WCM. Choose a baud rate and serial port settings
as appropriate. Set the personality option to Raw TCP Server and click Configure.
Input the TCP Port you will use to listen for incoming connections. Do not select TCP port 23 as
it is used by the Telnet daemon on the Blue Heat/Net. Click Submit.
Select Configure basic serial settings on the navigation menu. Click Submit, followed by Save to
Flash. This registers the changes to the basic serial port as well as the change to the Raw TCP
Server personality.
52 Revision 0.13
Page 46

Connect Tech Blue Heat/Net User’s Manual
Select Reboot from the navigation menu. This will restart the Blue Heat/Net and launch the Raw
TCP Server personality on your selected port. Select the specified port with your Telnet
software to exchange data between the Telnet client and the serial port.
If you receive a login prompt, your Telnet session could be pointing to the Blue Heat/Net itself
(port 23) and you need to exit the Telnet session and try again, this time specifying the port
number you typed into the Raw TCP Server screen above.
If you experience connection problems:
Make sure the cables are connected properly.
•
Check the settings on your Blue Heat/Net through the WCM. Make sure you're using the
•
port number specified in the Server setting with your Telnet client.
Try connecting the Telnet client to port 23 on the Blue Heat/Net. If you can't get to the
•
login prompt, you need to resolve network connection issues. There is configuration
information in the Blue Heat/Net setup. Ping the IP address of the Blue Heat/Net.
If you can Telnet into the Blue Heat/Net, log in and type in "cat /var/log/syslog". If the TCP
•
Server is failing you'll see error log entries.
Revision 0.13 53
Page 47
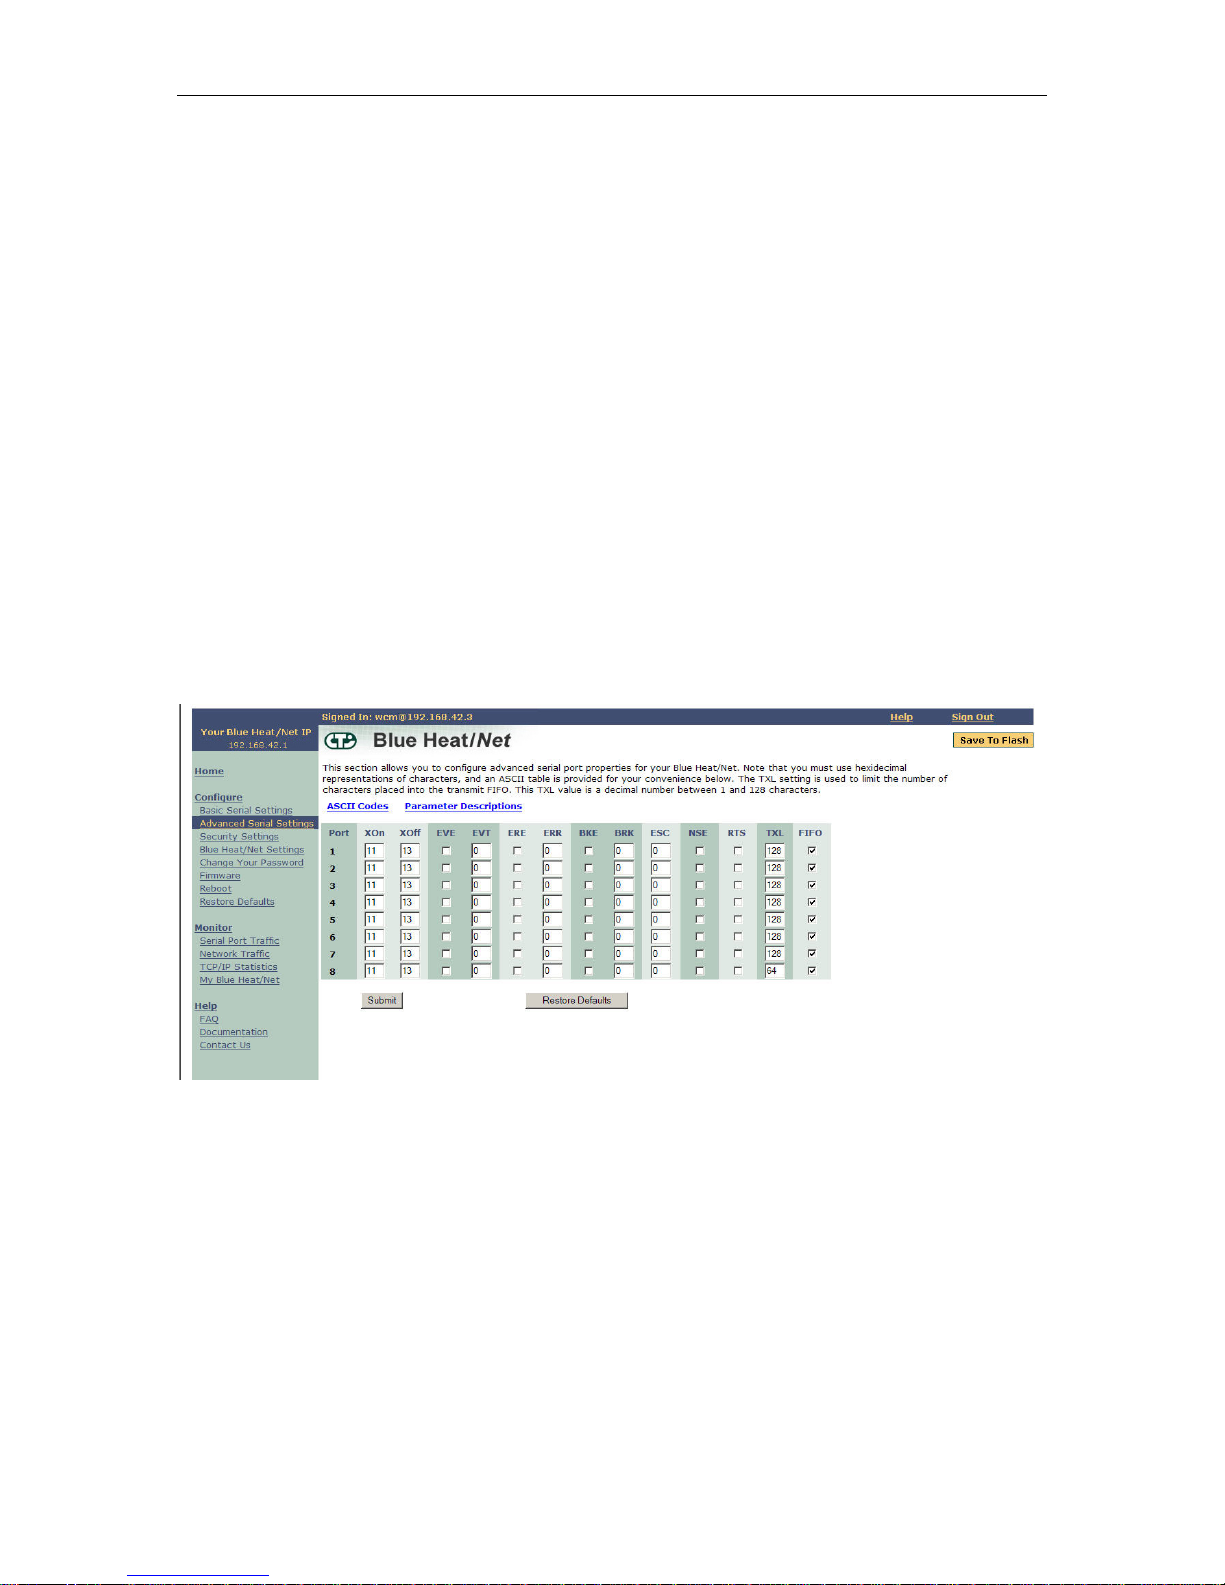
Connect Tech Blue Heat/Net User’s Manual
Configure Advanced Serial Settings
The Web Configuration Manager also allows you to configure more advanced serial port
properties. These advanced properties will allow you to configure the XOn Character, XOff
Character, Break Character, Escape Character, Error Character and Event Character, and
Transmit Load Setting for each serial port.
Further, you will be able to specify whether you want to enable Null Stripping, RTS Toggle and
FIFOs for a particular port as well as the option to enable or disable the Break, Event and Error
characters.
By default, all advanced serial properties are disabled, with the exception of FIFO, which is
enabled by default. You should only use these advanced properties if you require them.
You are required to use the ASCII representation of characters using the respective hexidecimal
values. For example, if you wanted your XOn character to be capital 'A', you would specify a
hex value of 41.
We have provided you with an ASCII table on the Advanced Serial Port Properties page for your
convenience. Click on the ASCII Table link, and an ASCII table will open in a new window.
Each serial port parameter has been abbreviated due to space constraints. We have provided
another link which describes the abbreviated parameter descriptions. Click on the Parameter
Descriptions link, and a new window will open which contains a description of each parameter.
Figure 14: Configuring Advanced Serial Port Properties
Configure Security Settings
The security configuration option will allow you to specify which IP addresses can access your
Blue Heat/Net serial ports.
For each of your Blue Heat/Net serial ports, you have three security options:
Any IP Addresses: This option will allow any IP address to access your Blue Heat/Net
•
Serial port. This is the default security setting for each Blue Heat/Net port.
No IP Addresses: This option will deny any IP address from accessing your Blue
•
Heat/Net serial port.
This list of IP Addresses: This option will allow a given set of IP addresses to access a
•
Blue Heat/Net serial port. Simply type in the list of IP addresses in the Text Field
provided. Current Blue Heat/Net models do not allow you to specify a range of IP
addresses (i.e. 113.334.334.* is not allowed), or hostnames.
54 Revision 0.13
Page 48

Connect Tech Blue Heat/Net User’s Manual
Once you have configured your Security Settings, click the Submit button at the bottom of the
page. A confirmation page will appear.
Figure 15: Configuring Security Settings
Configure Blue Heat/Net Settings
This section provides various Blue Heat/Net Configuration options, and shows you the saved
versus current settings. The details for each configuration option are provided below:
Flash Enabled: This option enables or disables the ability of the Blue Heat/Net to boot-
•
up from Flash memory.
Bootp Enabled: This option enables or disables the Blue Heat/Net’s ability to obtain
•
boot-up information from the server (see "Server IP Address" below).
TFTP Enabled: This option enables or disables the ability to download and boot from a
•
file located on a server (see "Server IP Address" below).
DHCP Enabled: This option enables or disables the use of DHCP. If DHCP is enabled,
•
the Blue Heat/Net will attempt to automatically obtain an IP address. If DHCP is
disabled, you must manually specify an IP address for the Blue Heat/Net.
Configuration Port: This option sets the port to scan for the password to gain entry into
•
the Serial Configuration Manager. You can specify a particular port, or specify the Scan
All Ports option. In this case the Blue Heat/Net will scan all ports for the password when
the Blue Heat/Net is booting. The default setting is Scan All Ports.
Session Timeout: This option specifies the time allowed between web page navigation.
•
The default session timeout is 5 minutes. This means if the Web Configuration Manager
has not received any requests for more than 5 minutes, you will be automatically logged
out. You can set the timeout from 1 minute to 2 hours, or disable the session timeout all
together by selecting the Disable Timeout option.
Boot Delay: This option specifies time allowed for gaining access to the Serial
•
Configuration Manager while the Blue Heat/Net is booting. The time ranges from 2
seconds to 30 seconds. The default setting is 30 seconds.
Server IP Address: This option sets the server IP address. This is used as the Server
•
address to use when bootp mode or TFTP mode is enabled. The default Server IP
address is 0.0.0.0
Blue Heat/Net IP Address: This option sets the IP address of your Blue Heat/Net. The
•
default IP address for your Blue Heat/Net is 192.168.42.1
Revision 0.13 55
Page 49
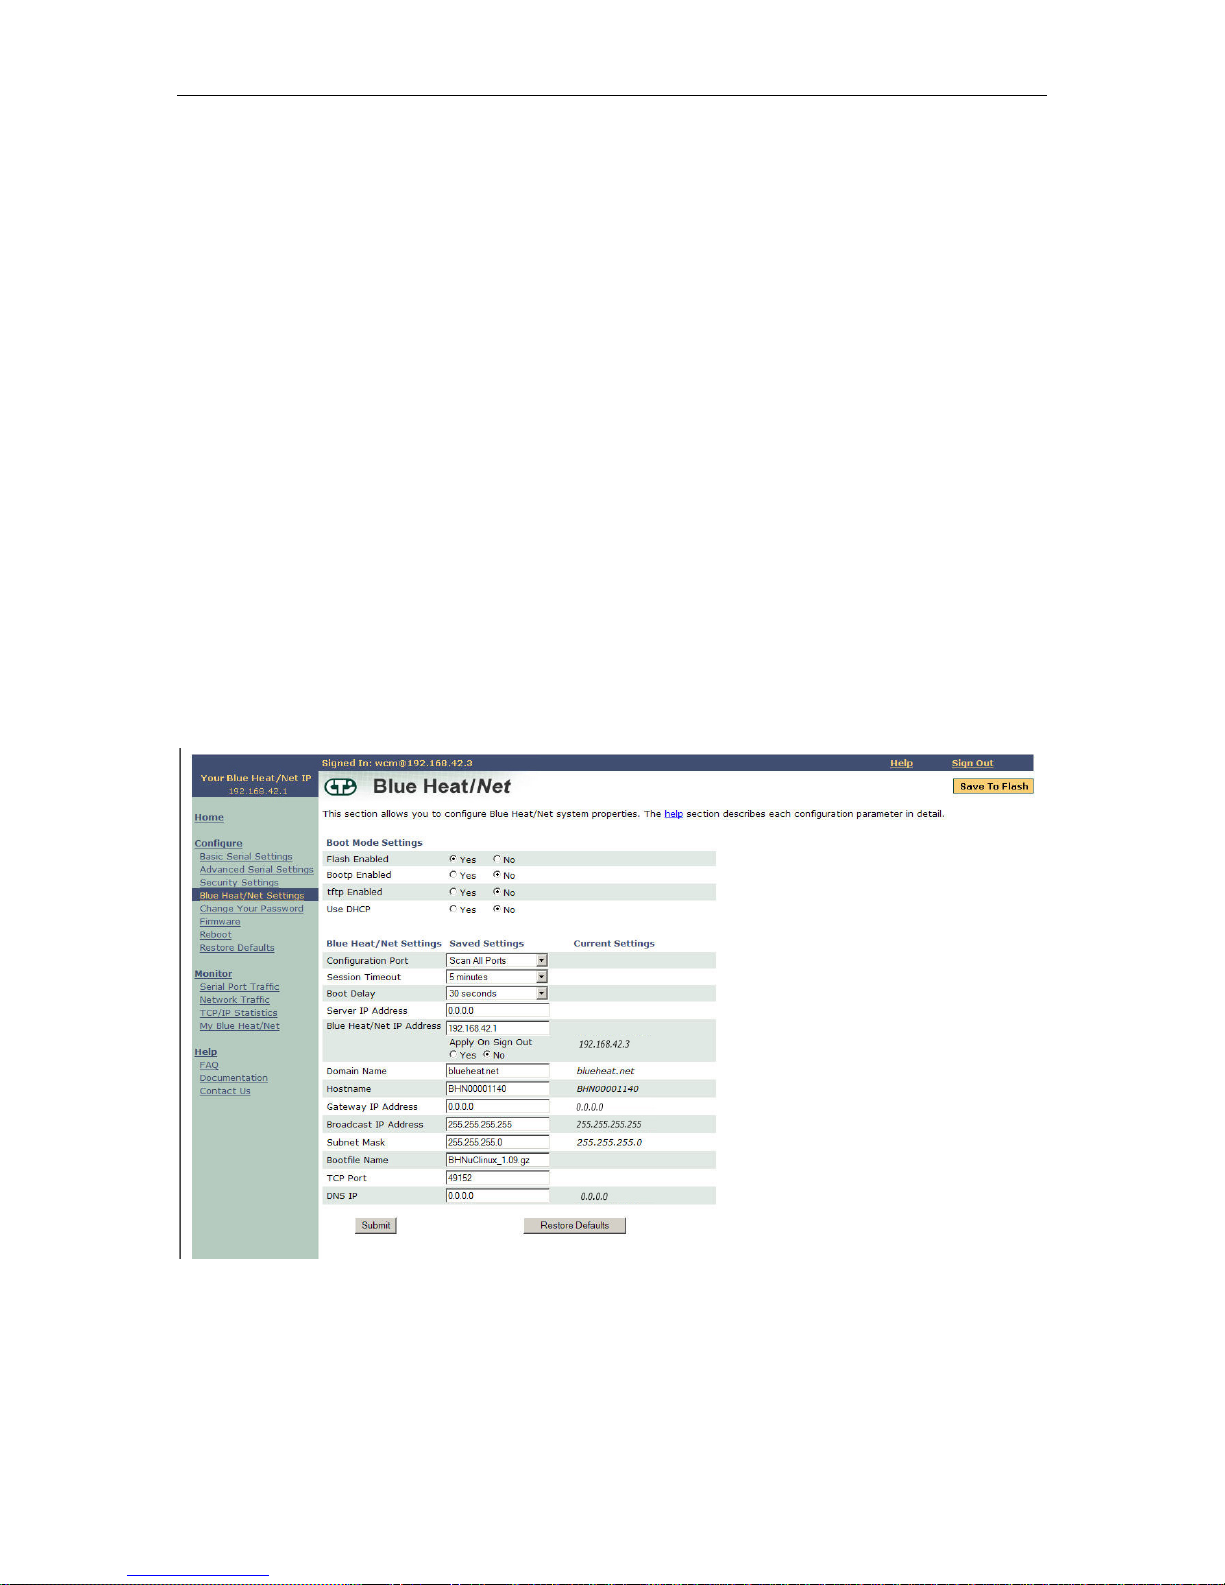
Connect Tech Blue Heat/Net User’s Manual
Domain Name: This option sets the domain name of your Blue Heat/Net. The default
•
domain name is blueheat.net.
Host Name: This option sets the hostname of your Blue Heat/Net. The default hostname
•
is BHNssssss, where ssssss is your Blue Heat/Net serial number.
Gateway IP Address: This option sets the Gateway IP address for your Blue Heat/Net.
•
The default Gateway IP address is 0.0.0.0
Broadcast IP Address: This option sets the Broadcast IP address. The default Broadcast
•
IP address is 255.255.255.255.
Subnet Mask: This option sets the Subnet mask IP address. The default Subnet mask IP
•
address is 255.255.255.0.
Bootfile Name: This option specifies the default file name which will be used for Blue
•
Heat/Net boot-up, if TFTP is enabled. If TFTP is enabled, the Blue Heat/Net will
attempt to download the bootfile you specify from a Server IP address you specify (see
"Server IP Address" above). The bootfile name should reference a valid uClinux kernel
image. If TFTP is enabled, the Blue Heat/Net unit will attempt to download this image,
and will also attempt to decompress the image and run it.
TCP Port: This option allows you to change the starting local TCP port that is used to
•
service clients connecting to the Blue Heat/Net unit. The default TCP port is 49152.
When altering the TCP port on the Blue Heat/Net unit, you must also alter it on the
user’s side.
Domain Server IP Address: This option sets the Domain Name Server IP address. The
•
default DNS IP address is 0.0.0.0.
After you've made any necessary configuration changes, click the Submit button at the bottom of
the page. A confirmation page will show up confirming the Blue Heat/Net changes.
Figure 16: Configuring Blue Heat/Net Settings
Configure Firmware
This section enables you to download new firmware to the Blue Heat/Net unit. Select a
download source and a specific firmware file path, if applicable, and then submit the download
request. This section also provides a link to reboot your Blue Heat/Net. This is standard
procedure after installing new firmware.
56 Revision 0.13
Page 50

Connect Tech Blue Heat/Net User’s Manual
Figure 17: Firmware Upgrades/Downloads
Restore Defaults
The Restore Defaults page enables you to quickly reset all or some of the default basic,
advanced, security, Blue Heat/Net or system settings of your Blue Heat/Net.
Revision 0.13 57
Figure 18: Restore Default Settings
Page 51
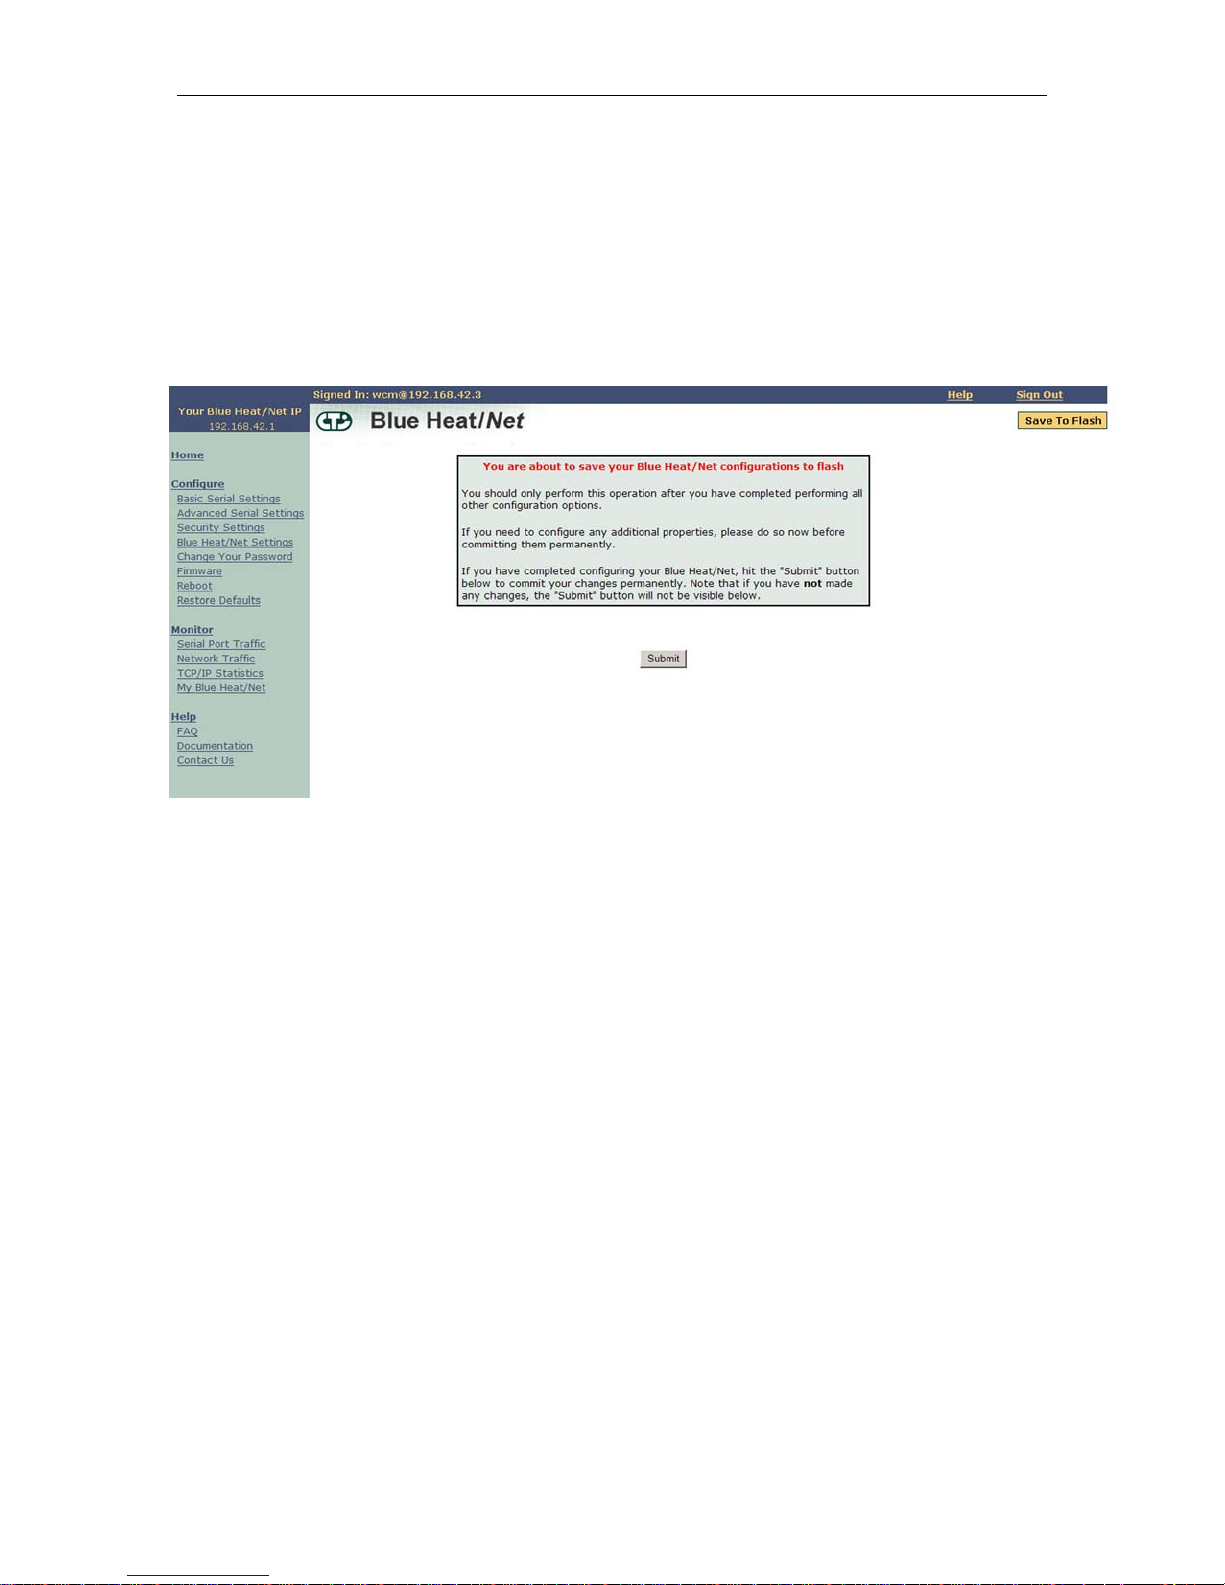
Connect Tech Blue Heat/Net User’s Manual
Saving To Flash
When you make configuration changes, the changes are stored temporarily in memory. If you
reboot your Blue Heat/Net at this point, any configuration changes you made will be lost.
To permanently save your changes, you need to save them to Flash. In order to do this, click the
Save to Flash button on the upper right-hand side of the Web Configuration Manager page.
If there are changes that need to be saved, the Save To Flash button will be yellow. Click the
Submit button to permanently save any configuration changes to the Flash Memory so they will
be present when you reboot your Blue Heat/Net.
Figure 19: Saving To Flash
If you haven't made any configuration changes, the Save To Flash button will remain grey.
58 Revision 0.13
Page 52

Monitoring Your Blue Heat/Net
The Blue Heat/Net WCM lets you monitor serial port activity, network traffic and TCP/IP
statistics as well as providing hardware and software details for your Blue Heat/Net unit.
Monitor Serial Port Traffic
This page allows you to monitor your serial port traffic. For each Blue Heat/Net port, you can
view the number of bytes transmitted, received, whether the port is using flow control, if there
are any Parity/Framing/Overrun errors, and which remote IP address is connected to your serial
port.
If ports are active (open) they are shown in green, while inactive (closed) ports are shown in
grey.
Connect Tech Blue Heat/Net User’s Manual
Figure 20: Monitoring Serial Port Activity
Monitor Network Traffic
This page allows you to view all network activity on your Blue Heat/Net. For each active
network connection, you can view the local IP address and port, the remote IP address and port,
the status of the connection, the protocol being used, as well as the number of queued transmit
and receive bytes.
Revision 0.13 59
Page 53

Connect Tech Blue Heat/Net User’s Manual
Figure 21: Monitoring Network Traffic
Monitor TCP/IP Statistics
This page allows you to view TCP, IP, UDP and ICMP statistics for your Blue Heat/Net. This
page also has a link which describes each of the network statistic parameters. Simply click on
the Parameter Descriptions link, and a new window will open up which contains a description of
each parameter.
60 Revision 0.13
Figure 22: Monitoring TCP/IP Statistics
Page 54

Connect Tech Blue Heat/Net User’s Manual
My Blue Heat/Net
This page provides you with three display options: Hardware, Software and Performance.
Use this link to find information such as device serial number, runtime software versions and
firmware versions.
Figure 23: My Blue Heat/Net Hardware Details
Revision 0.13 61
Figure 24: My Blue Heat/Net Software Details
Page 55

Connect Tech Blue Heat/Net User’s Manual
Field Server Protocols
Field Server (FST) protocols allow Blue Heat/Net to be used as an industrial protocol gateway.
This provides a connection between three network protocols (BACnet IP, Ethernet/IP, and
Modbus TCP) and four serial protocols (Modbus RTU, Modbus ASCII, DNP3, and DF1). When
configured, any serial protocol can communicate with any Ethernet protocol and vice versa.
Blue Heat/Net acts as a client on the serial side and as a server on the Ethernet side, enabling the
use of software on the Ethernet side to control or read values from devices connected on the
serial side.
Configuration
The protocols are configured as Blue Heat/Net personalities. In general, click the Configuration
button from the Basic Serial Settings page. From there, enter information in the text box and
click Submit. This will save your changes. It will also cause the field server run-time program
to reset itself and implement the changes you have made.
If you have changed Blue Heat/Net personalities, the Save To Flash image will be illuminated.
Click on it to save the changes, followed by clicking Submit on the next page.
Setting the baud rate, and other basic serial settings is done on the Basic Serial Settings page as
it is with all of the other Blue Heat/Net personalities.
Ethernet Side:
On the Basic Serial Settings page under the section marked Ethernet Protocols you'll see three
buttons. These are used to configure the BACnet IP, Ethernet/IP, and Modbus TCP settings.
Click the appropriate button to configure the desired protocol.
62 Revision 0.13
Figure 25: WCM Basic Serial Screen
Page 56

BACnet IP Configuration
When you click on the BACnet IP Configuration button, you'll see a screen containing the
following information:
Nodes
Node_Name , Node_ID
Virtual_BCU_1 , 11
The Node_Name is the name of the device and is for reference only. The Node_ID refers to
the node number on the BACnet IP network. It must be unique on the network and have a value
between 1 and 16777215. Use this number in your BACnet IP software to refer to Blue
Heat/Net.
Ethernet/IP Configuration
When you click on the Ethernet/IP Configuration button, you'll see a screen containing the
following information:
Nodes
Node_Name
EIP_0
The Node_Name is the name of the device. Use this name in your Ethernet/IP software to refer
to Blue Heat/Net.
Connect Tech Blue Heat/Net User’s Manual
Revision 0.13 63
Page 57

Connect Tech Blue Heat/Net User’s Manual
Modbus TCP Configuration
When you click on the “Modbus TCP Configuration” button, you'll see a screen containing the
following information:
Nodes
Node_Name ,Node_ID
MBP_Srv_11 ,11
The Node_Name is the name of the device and is for reference only. The Node_ID parameter
refers to the node number on the Modbus TCP network. This number must be unique on the
network and have a value between 0 and 255. Use this number in your Modbus TCP software to
refer to Blue Heat/Net, along with its IP address.
Serial Side
In the personality combo box for each serial port, you'll see the four serial protocols listed: DF1,
DNP3, Modbus ASCII, and Modbus RTU. Select the personality you wish to use and click the
“Configure” button.
The FST personalities work a little differently than the other personalities in that the serial ports
used by each protocol are determined by the configuration of the personality and not by the
personality selected in basic serial settings page. We recommend that you select the appropriate
personality for each port as this will avoid confusion.
If you have selected a port for use with an FST protocol and you then change to the Blue
Heat/Net personality, the FST protocol will continue to use the port. You will need to clear the
port information from the configuration of that personality before the port will be free for use.
DF1 Configuration
The data below refers to devices attached to the serial port.
Nodes
Node_Name, Node_ID ,PLC_Type, Port,
Device01 , 1 ,SLC5 , P4 ,
The Node_Name is used below under Map_Descriptors. The Node_ID is used by Blue
Heat/Net to find the device on the serial side (1-255). PLC_Type refers to the language
understood by that PLC. This value can be one of PLC3, PLC5, or Slc5.
Port is the Blue Heat/Net port you wish to use with this device. P1 refers to port Serial1, etc.
You can have multiple devices connected to the same port in an RS-485 configuration. You can
also have devices connected to multiple ports. Each node needs a unique ID within each port.
You can have the same value for Node_ID on different ports refer to different devices. The
Node_Name must be unique for each device.
// Client Side Map Descriptors
//
//DF1
Map_Descriptors
Node_Name, File_Type ,File_Number ,Address ,Length
,Scan_Interval
Device01 , B ,12 ,0 ,16 ,1.0s
Device01 , B ,13 ,0 ,16 ,1.0s
64 Revision 0.13
Page 58

Node_Name is created above, and refers uniquely to each device. The File_Type,
File_Number, Address, and Length are specific to the DF1 protocol. The
Scan_Interval refers to how often Blue Heat/Net should read values from the device.
DNP3 Configuration
The Node_Name is used below to get data from the device. The Node_ID refers to the device
by number (1-65535). The Port is the serial port number used to access data on the PLC, P1
refers to Serial 1 etc.
Bridge
System_Node_Id,
111 ,
//==============================================================
==================
//
// Client Side Nodes
//
Nodes
Node_Name ,Node_ID, Port,
test01 ,12 , P2 ,
Node_Name is used below to identify the device. The other parameters are DNP3 specific and
refer to the memory addresses of the device where the data is stored. The scan_interval is
the elapsed time between successive reads of the device by Blue Heat/Net.
//==============================================================
==================
//
// Client Side Map Descriptors
//
// DNP3
Map_Descriptors
Node_Name, Address ,Length ,dnpSubType ,dnpFlagBit ,dnpDataType
,dnpDataVari ,scan_interval
test01 , 0 ,4 ,value ,3 ,30
,1 ,0.5s
test01 , 0 ,4 ,value ,3 ,40
,1 ,0.5s
test01 , 0 ,14 ,value ,3 ,1
,1 ,0.5s
test01 , 0 ,14 ,value ,3 ,10
,1 ,0.5s
Connect Tech Blue Heat/Net User’s Manual
Modbus RTU Configuration
Node_Name is used below to get and set data from the device. The Node_ID is the user
assigned Modbus RTU address of the device. Port refers to the port on Blue Heat/Net. P1 is
serial 1, etc.
Note: it is possible to have more than one Node_ID on a single port. It is also possible to have
different nodes tied into different ports but have the same Node_ID.
Nodes
Node_Name , Node_ID, Port,
PLC_01 , 12 , P3 ,
Revision 0.13 65
Page 59

Connect Tech Blue Heat/Net User’s Manual
The Node_Name is the name entered below and refers to the unique combination of the
Node_ID and Port.
The Address is the starting address of the Modbus RTU device. The different address ranges
refer to different input and output types (see the Modbus protocol for details). The Length
refers to the number of data points to be read from the device. The Scan_Interval is the
speed at which we wish to read the values from the device.
//==============================================================
==================
//
// Client Side Map Descriptors
//
// MB_RTU
Map_Descriptors
Node_Name ,Address ,Length ,Scan_Interval
PLC_01 , 00001 ,20 ,0.000s
PLC_01 , 10001 ,20 ,1.000s
PLC_01 , 30001 ,20 ,0.100s
PLC_01 , 40001 ,20 ,2.000s
Modbus ASCII configuration
Node_Name is used below to get and set data from the device. The Node_ID is the user
assigned Modbus RTU address of the device. Port refers to the port on Blue Heat/Net. P1 is
serial 1, etc.
Note: It is possible to have more than one Node_ID on a single port. It is also possible to have
different nodes tied into different ports but have the same Node_ID.
//
//Client Side Nodes
//
Nodes
Node_Name , Node_ID, Port,
PLC_11 , 11 , P1 ,
The Node_Name is the name entered below and refers to the unique combination of the
Node_ID and Port.
//
//==============================================================
==================
//
// Client Side Map Descriptors
//
//
// Modbus Ascii
//
Map_Descriptors
Node_Name ,Address ,Length ,Scan_Interval
PLC_11 , 00001 ,20 ,0.000s
PLC_11 , 10001 ,20 ,1.000s
PLC_11 , 30001 ,20 ,0.100s
PLC_11 , 40001 ,20 ,2.000s
The Address is the starting address of the Modbus RTU device. The different address ranges
refer to different input and output types (see the Modbus protocol for details). The Length
66 Revision 0.13
Page 60
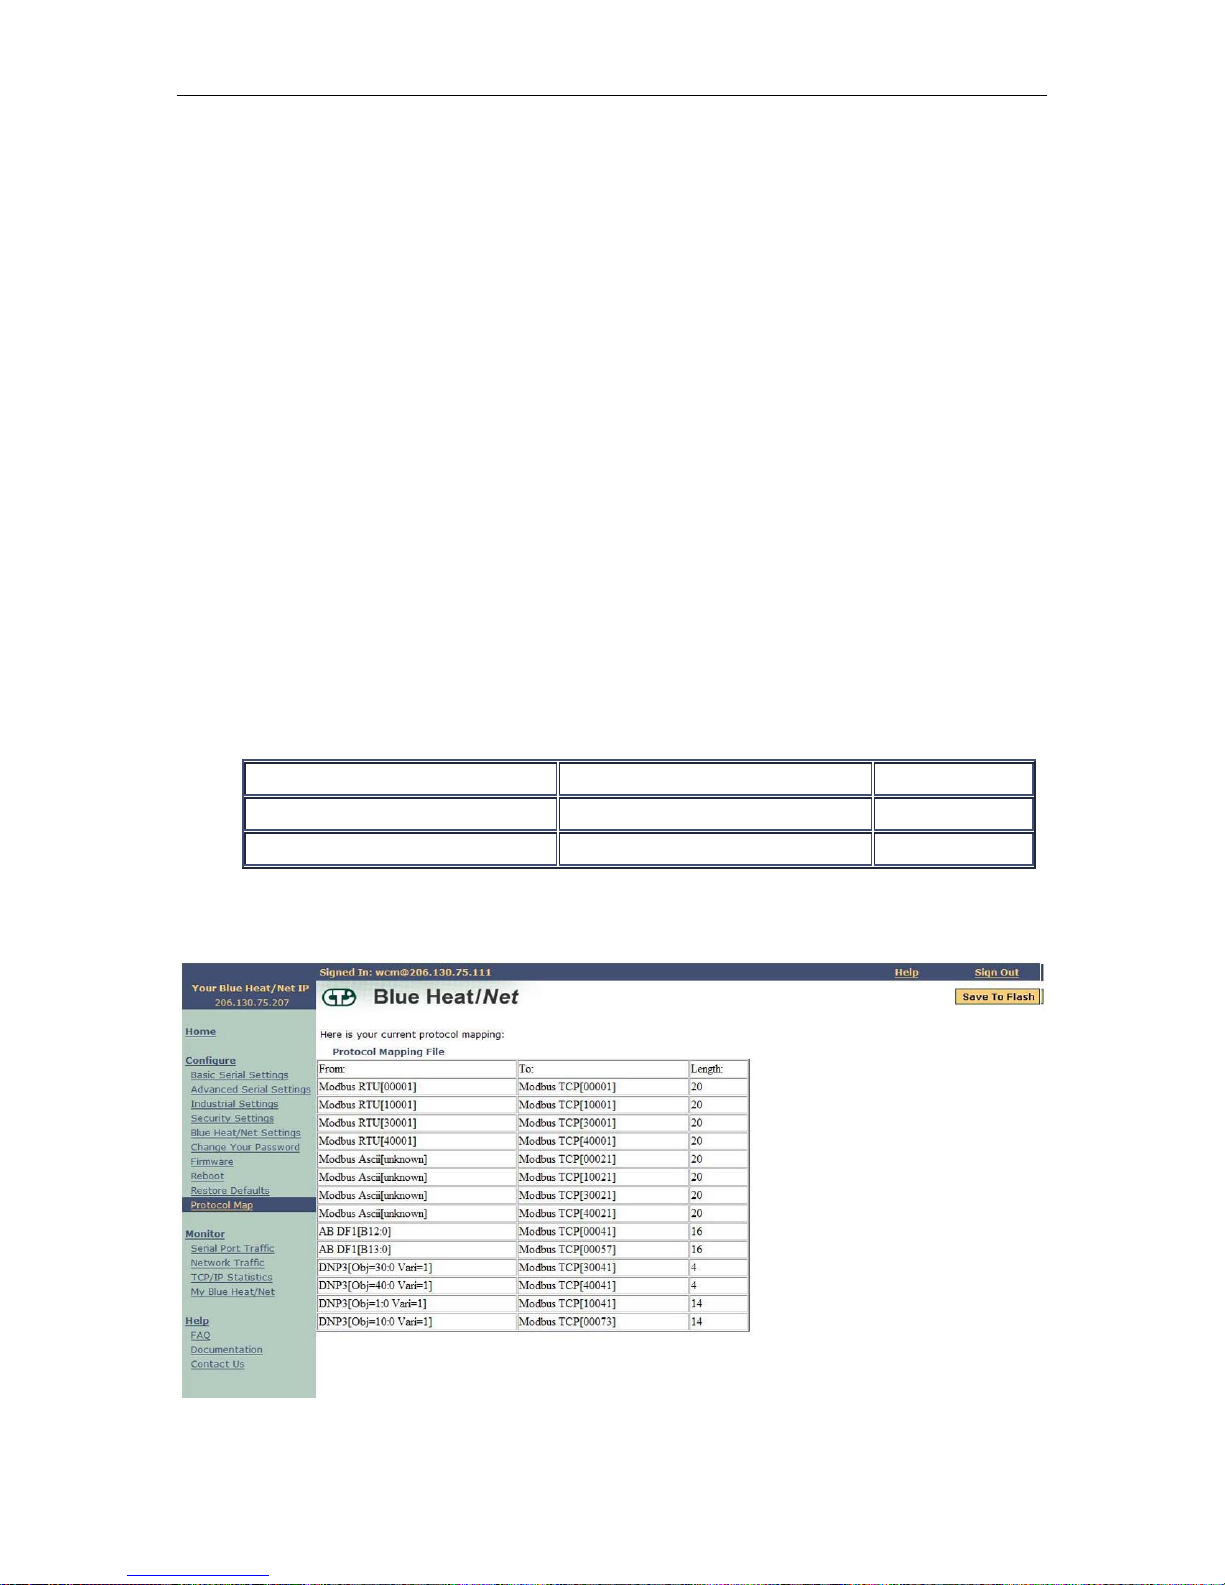
refers to the number of data points to be read from the device. The Scan_Interval is the
speed at which we wish to read the values from the device.
Restoring to Factory Configuration
All of the protocols can be returned to their original factory settings by entering the
configuration for that protocol and clicking the Restore Defaults button.
Disabling protocols
To disable a protocol, select the personality, enter the configuration screen and delete the text in
the text box. Click the Submit button to save your changes. You can restore to the factory
defaults by clicking "Restore Defaults".
Protocol Map
Selecting the Protocol Map option in the navigation menu will display a table showing the
mapping of the different protocols. This is how the Ethernet-side and serial-side protocols are
linked together. Every active serial protocol is mapped to every active Ethernet protocol and
vice versa. The map is created by the FST software and is based upon the memory addresses
and data array lengths you select in the protocol configurations. If you change the length of data
arrays in your configuration, the addresses of mapped protocols will change with it. For
example:
We have Modbus RTU and DF1 mapped to Modbus TCP. The Modbus RTU configuration has
a length of 20 it maps as shown here:
Connect Tech Blue Heat/Net User’s Manual
Protocol Mapping File
From: To: Length:
Modbus RTU[00001] Modbus TCP[00001] 20
AB DF1[B13:0] Modbus TCP[00021] 16
From the perspective of the Modbus TCP protocol, the first 20 addresses are used by Modbus
RTU (starting at address 00001, followed by DF1 at address 00021).
Revision 0.13 67
Figure 26: WCM Protocol Map
Page 61

Connect Tech Blue Heat/Net User’s Manual
If we change the length of the Modbus RTU array to 30, here's what we get:
Protocol Mapping File
From: To: Length:
Modbus RTU[00001] Modbus TCP[00001] 30
AB DF1[B13:0] Modbus TCP[00031] 16
From the perspective of the Modbus TCP protocol, now the first 30 addresses are used by
Modbus RTU (starting at address 00001, followed by DF1 at address 00031).
68 Revision 0.13
Page 62

Connect Tech Blue Heat/Net User’s Manual
Software Installation for Windows
The Blue Heat/Net is designed for easy installation and set up.
This section deals with installing and using the Blue Heat/Net software to communicate with
your Blue Heat/Net and its COM ports.
To do so, you will use the CD included with the Blue Heat/Net to install the Configuration
Manager on your computer. The Blue Heat/Net Configuration Manager will allow you install the
Blue Heat/Net on your local system, and map and configure the Blue Heat/Net’s communication
ports.
Installing the Blue Heat/Net Configuration Manager
The Blue Heat/Net Configuration Manager is a tool to control your Blue Heat/Net from your
local Windows operating system. To install the Blue Heat/Net Configuration Manager on your
computer, insert the CD provided with your Blue Heat/Net into the disk drive.
You should see this window in your browser:
Figure 27: Blue Heat/Net Driver/Software Installation CD
NOTE: Windows XP SP2 users should read the SP2 info prior
to installing the Configuration Manager
Revision 0.13 69
Page 63
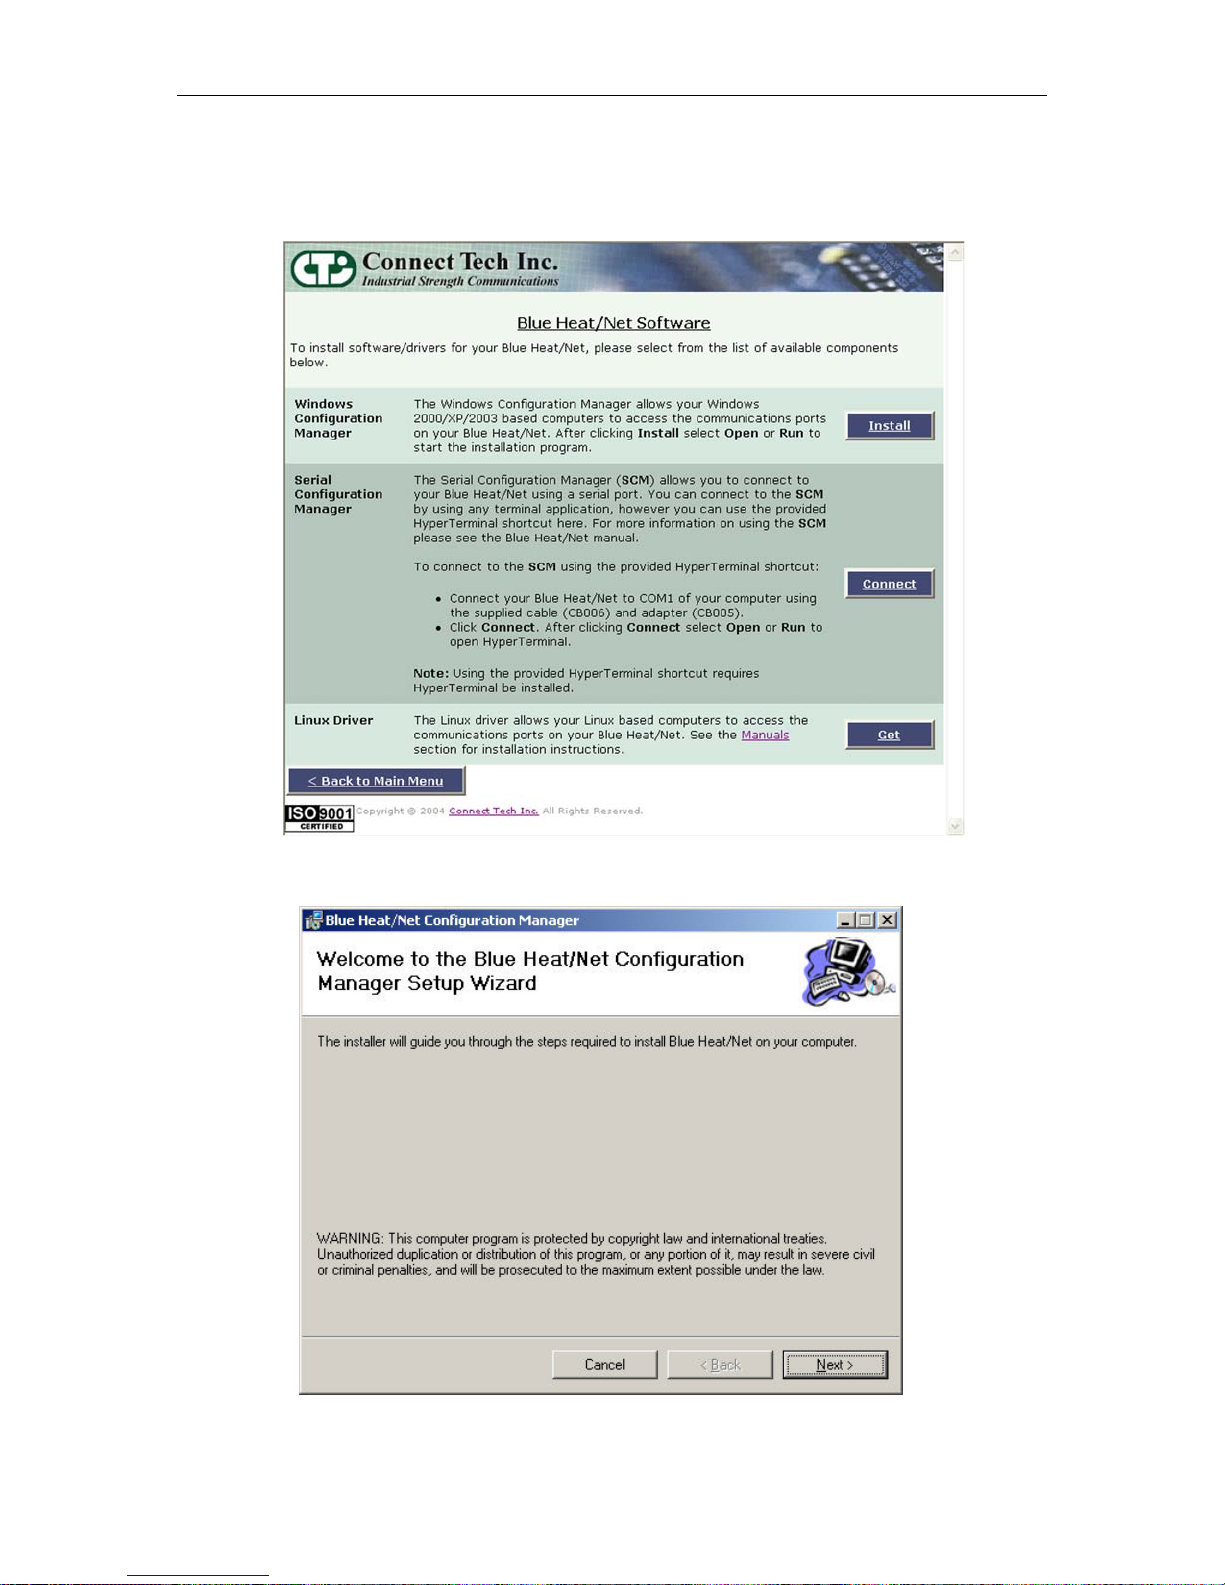
Connect Tech Blue Heat/Net User’s Manual
Select View from the Blue Heat/Net software. It will bring you to the following screen. Click Install to
begin the Configuration Manager installation. Ensure you choose Open or Run when the File Download
window appears and asks if you’d like to open the file or save it to your computer.
Figure 28: Blue Heat/Net Software Installation Screen
The Blue Heat/Net Configuration Manager Setup Wizard will begin. Click Next to start.
70 Revision 0.13
Page 64

Connect Tech Blue Heat/Net User’s Manual
Next you will have the option to launch the configuration manager after installation.
The installer will install the Configuration Manager into C:\Program Files\CTI\Blue Heat Net. If
you’d prefer an alternate location, specify in the space provided, or click Browse to locate the
new folder. Click Next.
You will then be prompted to confirm you wish to install the Configuration Manager. Select
Next to begin.
When the Installation Complete window appears, the Configuration Manager has been
successfully installed. Click Close to exit the installation wizard.
Revision 0.13 71
Page 65
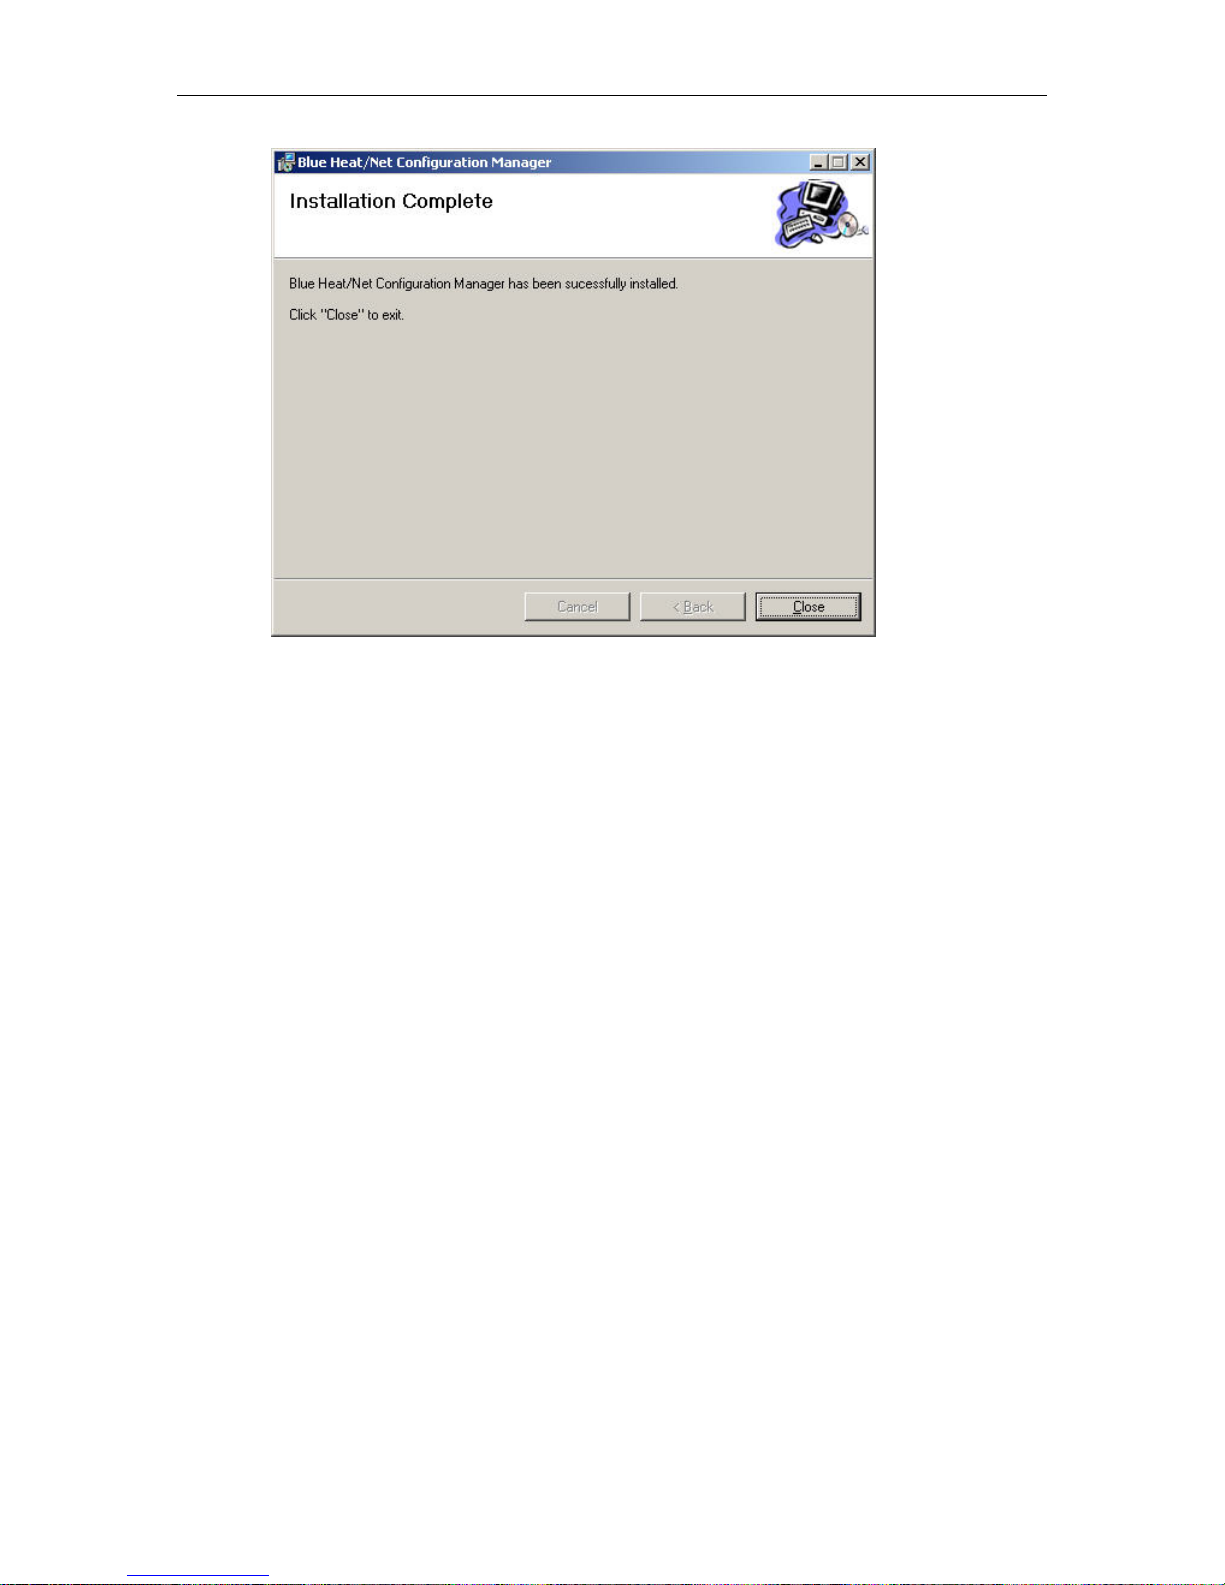
Connect Tech Blue Heat/Net User’s Manual
Figure 29: Blue Heat/Net Configuration Manager, Installation complete screen
72 Revision 0.13
Page 66

Running the Configuration Manager
If you chose the option to launch the Blue Heat/Net Configuration Manager after installation, the
main Configuration Manager window should now be open on your screen. If you did not, you
can launch it from the CTI default folder or whichever folder you chose during the installation.
Figure 30: My Blue Heat/Net Places screen
Device Installation
Select My Blue Heat/Net Places from the main Configuration window. (NOTE: If there is no Blue
Heat/Net installed, you will be prompted to auto discover a Blue Heat/Net on your network. If
Connect Tech Blue Heat/Net User’s Manual
you choose to do so, click Yes and then jump ahead to the Auto Discover Blue Heat/Net
Right-click on My Blue Heat/Net Place or click on the Action menu to pull up the sub menu
options.
There are three ways to install a Blue Heat/Net device: Configure Default Blue Heat/Net, Add
New Blue Heat/Net or Auto Discover Blue Heat/Net.
section)
Configure Default Blue Heat/Net
You can choose this option when your Blue Heat/Net still has a factory default IP address of
192.168.42.1. It will launch the Web Configuration Manager for this IP address, enabling you to
configure your Blue Heat/Net as outlined in the Web Configuration Manager
Figure 31: Add or Auto Discover Blue Heat/Net menu screen
Revision 0.13 73
section.
Page 67

Connect Tech Blue Heat/Net User’s Manual
Add New Blue Heat/Net
You can add a Blue Heat/Net by specifying the Blue Heat/Net’s IP address or MAC address.
If you specify an IP address, the Configuration Manager will connect to that specific Blue
Heat/Net and the configuration information for installation. If it cannot connect, it will not install
the unit. The Blue Heat/Net may get the IP address from DHCP server or it can be manually
fixed. The Configuration Manager will use 49152 as the default TCP port. This value is
configurable.
If you specify a MAC address (located on the underside of the device), the Configuration
Manager will use the auto-discover mechanism to retrieve the information for installation. The
auto-discover mechanism uses UDP broadcast, so the unit must be located on the local network
to install via MAC address. The Configuration Manager will use 49152 as the default UDP port.
This value is configurable.
Figure 32: Add Blue Heat/Net screen
Auto Discover Blue Heat/Net
The auto discover will broadcast a message to all the Blue Heat/Net devices on your network.
Upon receiving the broadcast packet, the Blue Heat/Net device will respond. Click the Auto
Discover button to search for Blue Heat/Net. The searching domain can be changed by checking
Use Specific Broadcast IP
broadcast packet will use the default UDP port 49152, but it can be changed in the Blue
Heat/Net configuration. The Stop button will end the search.
74 Revision 0.13
and entering an IP address domain in the IP address box. The
Page 68

Connect Tech Blue Heat/Net User’s Manual
Figure 33: Auto Discover Blue Heat/Net screen
Auto Discover will list any Blue Heat/Nets on your network, along with Blue Heat/Net's Serial
number, IP address, Host Name, Number of available ports and the MAC address. To install a
Blue Heat/Net check the appropriate box under Serial # column and then click OK. Right click
for more options, including the option to launch the Web Configuration Manager.
Configuring the Blue Heat/Net
After the unit is installed the Configuration window will look like this:
Figure 34: Installed Blue Heat/Net screen
You are now ready to map the ports of the Blue Heat/Net.
Revision 0.13 75
Page 69

Connect Tech Blue Heat/Net User’s Manual
Port Mapping
To map the available ports of the Blue Heat/Net (either eight or four, depending on your model),
right-click on Blue Heat/Net # and then select Map Port(s). You can also select Action from the
main menu, and choose Map Port(s).
Figure 35: Map Port(s) menu
76 Revision 0.13
Page 70

Connect Tech Blue Heat/Net User’s Manual
There are three modes to Map Ports: Basic, Advanced and Express.
Express
Figure 36: Map Port(s) Express method screen
This will install all the available ports of the selected Blue Heat/Net with one click. The list box
Starting COM Port enables the user to select the starting COM number. If a COM number with in
use is selected, ensure those ports are not attached to a device by going to My Computer ->
Control Panel -> System -> Hardware -> Device Manager -> Ports (COM & LPT).
During the course of port mapping, the Found New Hardware Wizard will appear as follows:
Revision 0.13 77
Page 71

Connect Tech Blue Heat/Net User’s Manual
Figure 37: Found New Hardware Wizard
Select Install the software automatically. Click Next. If you are running Windows 2000 this
wizard will not appear.
Upon successful installation, this window will appear:
At this point a Software Installation window will appear and warn that the software hasn’t
passed Windows Logo testing for Windows XP. Click Continue Anyway to proceed.
Click Finish.
78 Revision 0.13
Page 72

Connect Tech Blue Heat/Net User’s Manual
If there are more ports to map, the Found New Hardware Wizard will appear again. Repeat the
procedure above until all the ports are mapped.
The ports are now mapped, and the Configuration Manager window should appear similar to the
one below.
Figure 38: Configuration Manager Window after successfully mapping ports
Revision 0.13 79
Page 73
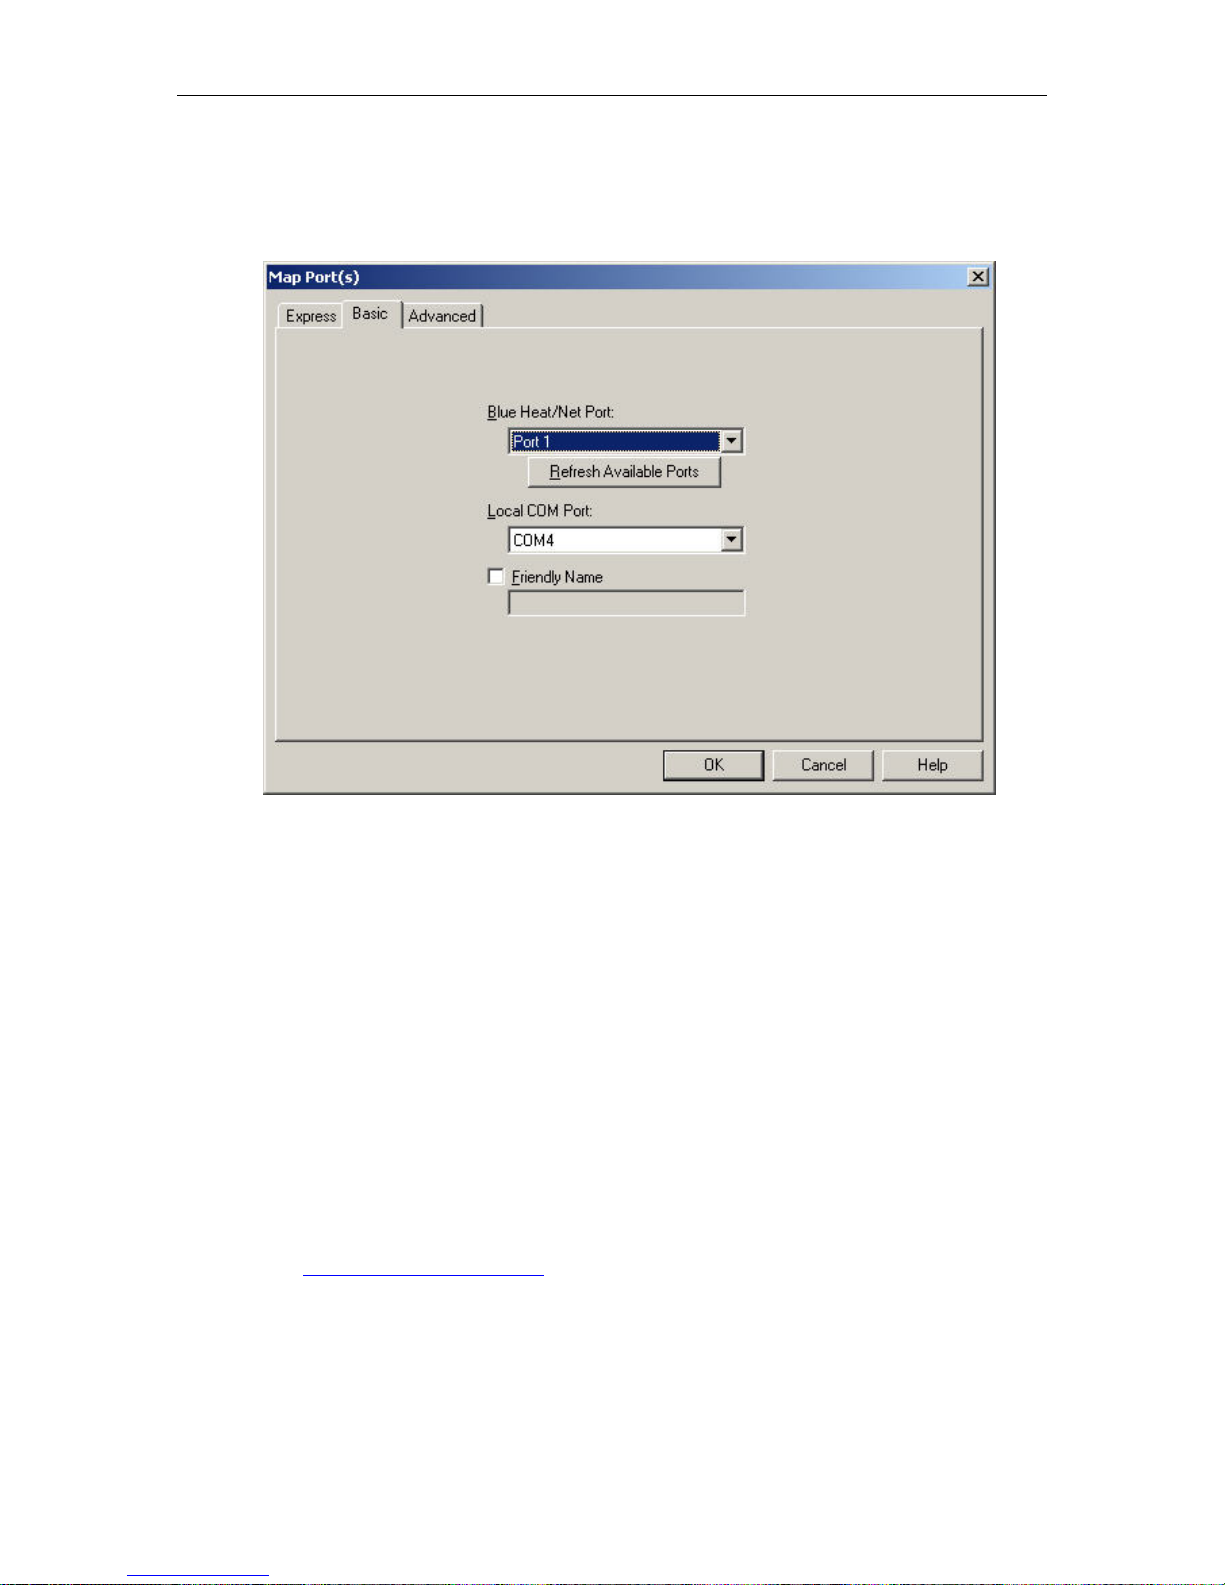
Connect Tech Blue Heat/Net User’s Manual
Basic
The Basic option installs all the available ports of the selected Blue Heat/Net, one port at a time.
It has two list boxes, Blue Heat/Net Port and Local COM Port.
Blue Heat/Net Port:
This refers to the physical COM port on the Blue Heat/Net as labelled on its enclosure. Click
Refresh Available Ports to update this list to reflect the current status.
Local COM Port:
This is local COM number that the OS application will use. It is the virtual COM port equivalent
of the remote COM port. It is also the starting COM number for the first remote port. If a COM
number with 'in use' is selected then ensure those ports are not attached to a device by going to
My Computer -> Control Panel -> System -> Hardware -> Device Manager -> Ports (COM &
LPT).
Friendly Name:
You can choose to add a name to the port description. This is an optional feature that adds a
personalized string to the description of the port in the main display window.
Choose the appropriate Blue Heat/Net port and a corresponding local COM number in the list
menus, and enter a Friendly Name, if desired, and click OK.
The Found New Hardware Wizard
process.
Figure 39: Basic Port Mapping option
will appear. See instructions above for remainder of setup
80 Revision 0.13
Page 74

Connect Tech Blue Heat/Net User’s Manual
Advanced
Figure 40: Advanced port mapping interface
This is an advanced interface for mapping ports. It will show all remote ports available for
mapping as follows:
It has three columns, Blue Heat/Net Port, Status and Local Port.
Blue Heat/Net Port refers to the physical port on Blue Heat/Net, Status refers to whether the port
is mapped or not and Local Port refers to the possible COM numbers that the Win32 application
will use. The above example shows that the selected Blue Heat/Net has two available ports to
map, and that Ports 1 and 4 are already mapped.
Click None to deselect all Blue Heat/Net Port selections and none will be mapped. An individual
Remote Port can be mapped by marking the corresponding check box. Clicking All will select all
Blue Heat/Net Ports for mapping. Refresh Available Ports will refresh this list.
The Advanced window offers the following choice under Options:
Skip in-use COM numbers
Use in-use COM numbers.
This is related to the local COM number for the mapped ports. Sometimes, COM numbers can
be occupied in the operating system's COM number database even though they are not attached
to any device. If Skip in-use COM numbers is selected during mapping, then those occupied
COM numbers will be passed over and the next free COM number will be used. If Use in-use
COM numbers is selected then those occupied COM numbers will be used, with a user warning,
during mapping. If Do not confirm in-use COM numbers is checked then no warning will be
issued. Be extra careful when selecting Use in-use COM numbers since it will conflict if any
device is attached to that occupied COM number. To find out if a device is attached to that
COM number go to My Computer -> Control Panel -> System -> Hardware -> Device Manager
-> Ports (COM & LPT).
Revision 0.13 81
Page 75

Connect Tech Blue Heat/Net User’s Manual
Starting COM port: This enables you to change the starting COM number for mapping.
If a COM number with [in use] is selected, ensure those ports are not attached to any device by
going to My Computer -> Control Panel -> System -> Hardware -> Device Manager -> Ports
(COM & LPT).
Friendly Name is an optional feature that enables the user to edit a string to be appended to the
port description of My Computer -> Control Panel -> System -> Hardware -> Device Manager -
> Ports (COM & LPT). Selecting Append Incremental Starting At: will append the number
entered for that edit box to the entered Friendly Name string, this number will be incremented for
multiple port mappings checked in the Blue Heat/Net Port list. Selecting Append Remote Port
Number will append the remote port number to the string entered in the edit box.
For each port installed, the
Unmap Port(s):
This option is located under the Action menu item when the Blue Heat/Net unit is selected, or an
individual port is selected. . It is also available by right-clicking on the selected Blue Heat/Net
unit or port.
Found New Hardware Installation Wizard will appear
Figure 41: Port action menu
.
If you choose to unmap a local COM port while selecting a port, a dialogue box will prompt you
to be sure you wish to unmap the port.
82 Revision 0.13
Page 76
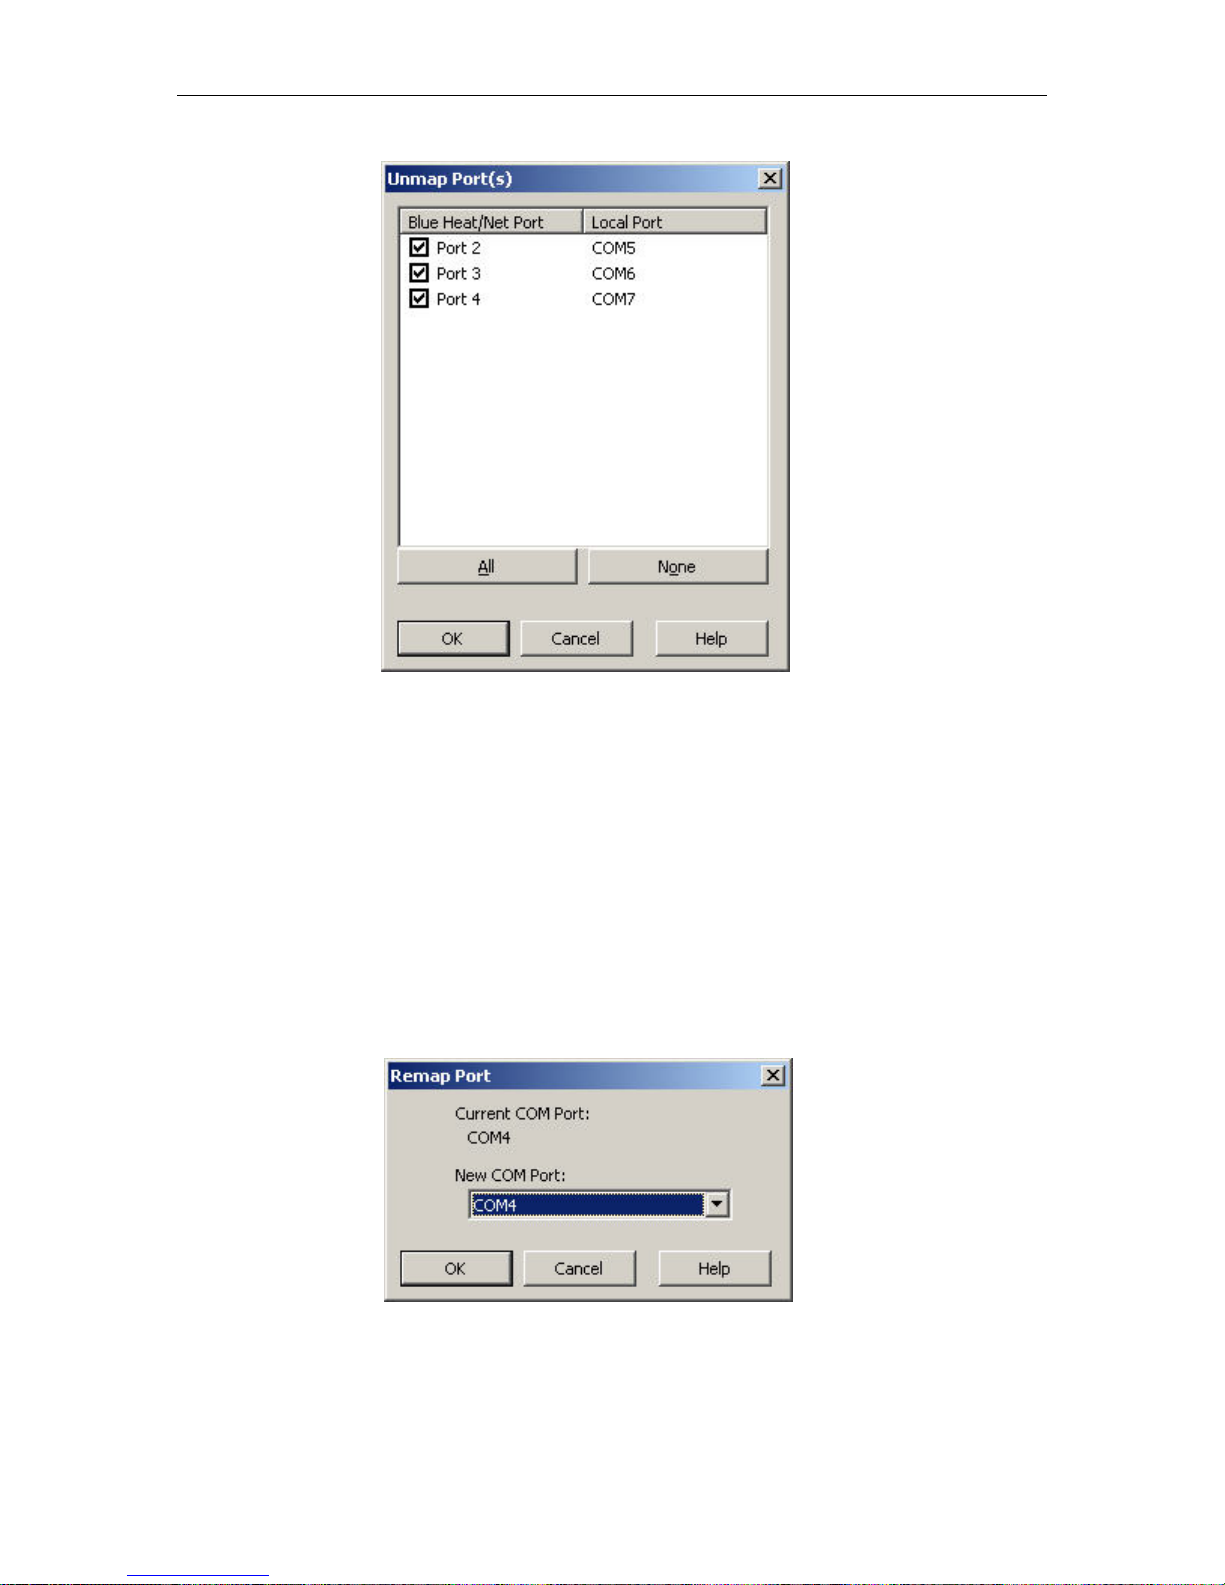
Connect Tech Blue Heat/Net User’s Manual
Figure 42: Unmap Port window
If you choose Unmap Port while the Blue Heat/Net unit is selected, you will see a list of ports.
Blue Heat/Net Port refers to the port on the Blue Heat/Net and Local Port refers to the
corresponding COM port on the computer for Win32 applications. All will select all ports of the
selected unit to be unmapped, None will deselect all ports. Individual ports can be selected by
checking the respective port under the Blue Heat/Net Port column.
Remapping Ports
Select the installed port you wish to remap, and then either go to the Action menu or right-click.
Choose Remap Port. A dialogue box will display the current COM port, and ask you to input the
new COM port from a drop down menu. Select the new COM port and click OK
Port Properties
Revision 0.13 83
Figure 43: Remap Port window
Page 77
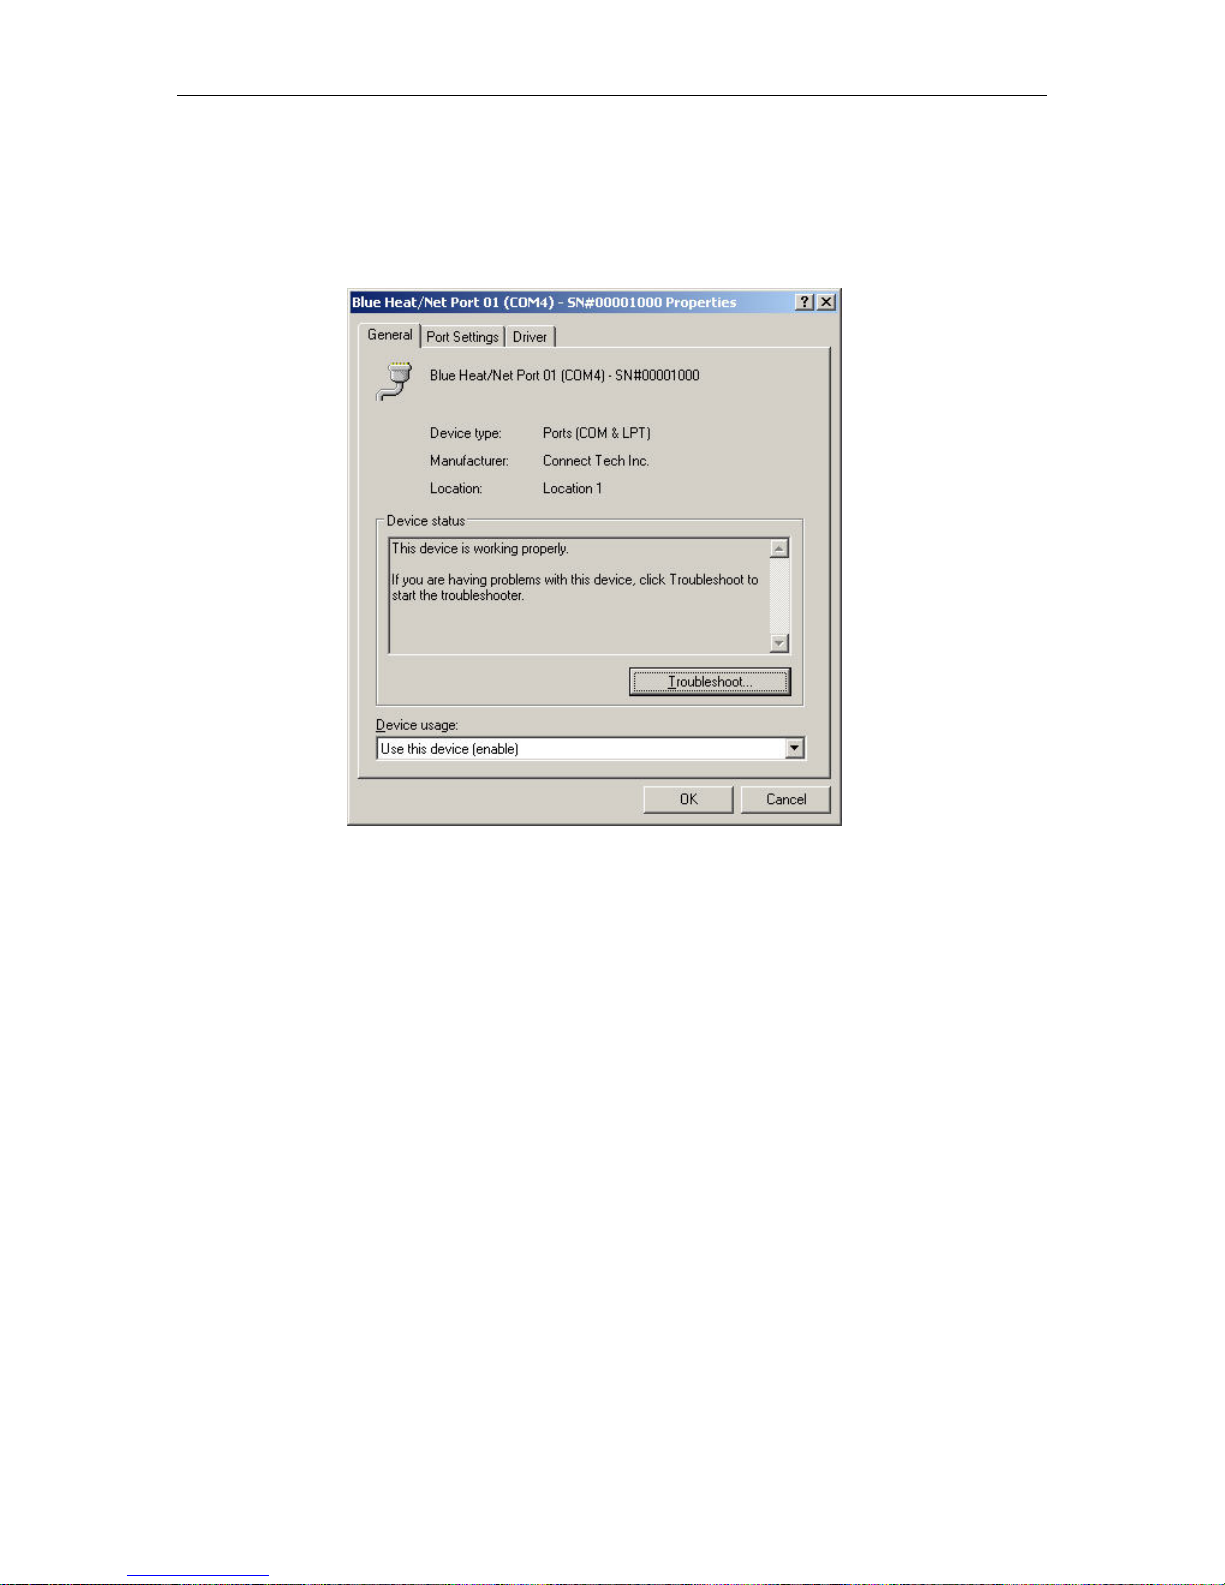
Connect Tech Blue Heat/Net User’s Manual
Right-click on the port you wish to observe, and choose Port Properties. A window will open
with three tabs: General, Port Settings and Driver.
The General properties include port and COM number, serial number, device type, manufacturer
and location.
Figure 44: Port Properties window
The Port Settings tab gives the user access to the basic port setting options: Bits per second, Data bits,
Parity, Stop bits and Flow control. There is also an option to reset all port settings to their default settings.
84 Revision 0.13
Page 78

Advanced Settings
Connect Tech Blue Heat/Net User’s Manual
Special Options
With the exception of Use FIFO Buffers, these options are typically left unselected. They are
provided to maintain compatibility with applications that require strict synchronization between
the Blue Heat/Net and the application. Some degradation of throughput will occur when these
options are selected.
Use FIFO Buffers (default is selected)
●
The Blue Heat/Net makes use of UARTs with configurable FIFOs. Selecting or deselecting this
option will enable or disable FIFO buffers of the UART respectively.
Tx Sync Mode (default is unselected)
●
In this mode data will not be marked as sent until the Blue Heat/Net has actually sent the data.
This allows for tight synchronization between the application and the data transmission.
Data is reported as soon as it is sent to the Blue Heat/Net when this mode is not turned on.
Leaving this mode unselected improves throughput.
Set Xon/Xoff Mode (default is unselected)
●
This mode must be turned on if EscapeCommFunction(SETXON\XOFF) is used by the
application connecting to the Blue Heat/Net port. This allows the Blue Heat/Net to keep the flow
control state synchronized with these IOCTLs.
It is best to leave this option unselected if this specific EscapeCommFunction(SETXON\XOFF) is
not used, because the extra work needed to maintain the flow state slows communications down.
Apply to All Ports (default is unselected)
●
This will apply the above two settings to all ports of the same Blue Heat/Net box.
Figure 45: Advanced settings window
Revision 0.13 85
Page 79

Connect Tech Blue Heat/Net User’s Manual
RS-232
This option sets the line interface mode to RS-232. In models supporting both RS-232 and RS422/485, the default setting is RS-232.
RS-485 Options (on RS-422/485 ports)
This option is checked to access the following options, available on RS-422/485 models of the
Blue Heat/Net:
Full Duplex (default)
In this mode TxD & RxD are active all the time. This mode is typically used in point-to-point
situations much like RS-232. RTS and CTS can be used along with the data signals.
Half Duplex
In this mode the TxD line driver is only enabled when data is transmitted, and RxD is disabled
when data is being transmitted. This mode is typically used in either point-to-point "two wire"
connections OR in multi-drop "two wire" bussed connections. CTS and RTS are not usually used
with this configuration.
Multi-Drop Slave
In this mode the TxD line driver is only enabled when data is transmitted and RxD is enabled all
the time. This mode is typically used in multi-drop "four wire" connections. RTS and CTS are
not usually used in this configuration.
Line Bias and Termination
This enables the line and bias termination.
Baud Rate Mapping
In some applications, high or unusual baud rates such as 230400 bps cannot be specified
directly. For such situations, two baud rates (110 bps and 300 bps) are provided which can be
mapped to different values if necessary.
Figure 46: Baud Rate Mapping options
By default 300 baud is mapped to 230400 baud. In this case, an actual baud rate of 230400 will
be set when 300 baud is specified.
If baud rate mapping is not desired, specify the same baud rate in the edit box beside each of the
selections. For example 300 would be set to 300 and 110 would be set to 110.
COM Port Number
The Blue Heat/Net driver supports the ability to change COM port names, also referred to as
COM port mapping. Use this combo box to change the COM port number to be used for the
current port. For example specifying COM5 would set the COM name for this port to COM5.
Ensure the COM name selected is not already in use or the port may not respond properly.
86 Revision 0.13
Page 80

Scan
Scan Devices (default is selected)
In this mode, the OS will scan devices attached to ports and install them during reboot or when the
driver restarts. In some situations, the OS will install a serial mouse device when data is being
received at the ports during reboot or restart of the driver. In that case, uncheck so that OS will not
install phantom devices.
Apply to All Ports
This will apply the above setting to all ports of the same Blue Heat/Net box.
Defaults Button
The defaults button resets the current settings for all options on the Advanced Settings dialogue
box to the default settings (With the exception of the COM Port Number).
Export Settings
This will save the existing settings to an XML file.
Import Settings
This will load settings from an XML file. Choose
to all ports. The new settings will take effect after clicking
Connect Tech Blue Heat/Net User’s Manual
Apply to All Ports
if the settings are to be applied
OK
.
Replacing your Blue Heat/Net:
This option is located under the Action menu when the Blue Heat/Net unit is selected. It is used
if you need to replace the selected Blue Heat/Net with another Blue Heat/Net. You must have
the new unit’s MAC address or IP address, as you will be prompted to supply one of these
parameters. The Replace Blue Heat/Net is helpful if a unit needs to be replaced with a identical
one, for whatever reason. (If the new unit's hostname is changed to be exactly the same as the
replaced unit, it will not be necessary to follow this procedure. The driver will automatically
replace the unit.)
Figure 47: Replace Blue Heat/Net window
Revision 0.13 87
Page 81

Connect Tech Blue Heat/Net User’s Manual
Removing your Blue Heat/Net:
Selecting Remove Blue Heat/Net in the Action menu will remove the Blue Heat/Net device you
have selected from your system. To remove more than one Blue Heat/Net at a time, select My
Blue Heat/Net Places, and either right-click or choose Action from the menu, and select Remove
All Blue Heat/Net. This will remove all Blue Heat/Nets located on your system.
Blue Heat/Net Properties:
This provides information about the Blue Heat/Net you have selected. It includes Host name,
MAC address, IP Address, Serial No., CDS Version, uClinux Version, Boot Loader Version,
and the Number of Ports on your Blue Heat/Net.
Figure 48: Blue Heat/Net properties
Driver Removal
Located under the Tools menu, choosing Remove Drivers while the Blue Heat/Net unit is selected
will remove the drivers for units on your system. A warning box will appear to ensure you wish
to continue. Click OK to remove all Blue Heat/Net device drivers.
Figure 49: Remove Drivers window
88 Revision 0.13
Page 82

Software Installation for Linux
Installing the Linux host driver
Configure your Blue Heat/Net prior to installing your Linux driver, as outlined in the
Configuration
the Blue Heat/Net to the network and make sure you can communicate with the unit.
If it is connected, but you can't communicate with the Blue Heat/Net, try using the SCM
Configuration Manager) to reconfigure the network settings.
Set the line modes of each port (232, 485-HD, 485-FD, etc). This step is vital if your Blue
Heat/Net is to operate correctly within the Linux Operating System. You can configure the line
modes using any of the configuration managers. Reboot your Blue Heat/Net and ping the unit.
The Linux driver is available on the CD that shipped with your Blue Heat/Net. The latest version
of the Linux driver is also available for download from the Connect Tech website.
Insert the CD provided with your Blue Heat/Net into the disk drive. Follow the steps below to
install the driver.
1. Log in as root.
2. Mount your CD drive (where XX is your CD ROM drive location).
3. Copy the driver to your home directory.
4. Change the directory to your home.
5. Unzip the given .tar.gz file into a temporary directory.
6. Navigate to the temporary directory.
7. Run the install script and follow the on-screen instructions.
section of this manual. Once you have your Blue Heat/Net configured, connect
mount /dev/hdxx/mnt/cdrom
cp /mnt/cdrom/bh-net/Linux/*.gz
cd
tar -xvzf BHN_LHD.tar.gz
cd BHN_LHD
./BHN_LHD-install.sh
Connect Tech Blue Heat/Net User’s Manual
(Serial
Linux host driver setup using auto discovery
1. Navigate to the install directory.
cd /usr/cti/BHN-Linux
2. Create a configuration file.
cat /proc/bhn/autodiscover > ./bhn.conf
3. Run bload.
./bload
This will attach the driver to /dev nodes according to ./bhn.conf
To test the installation, run a local loopback test between two ports using a standard serial
terminal program (like minicomm) and a null modem cable.
You should now have a set of Blue Heat/Net ports available as /dev/bhnS* . The file bhn.conf is
used to set the serial port mappings. For more information on serial port mapping in Linux,
please refer to the Readme.txt located on the Blue Heat/Net CD.
Revision 0.13 89
Page 83

Connect Tech Blue Heat/Net User’s Manual
Note: If you purchased a Blue Heat/Net before April 2005, you
should update your firmware using Connect Tech's FTP site.
This option is available in the Firmware section in the Web
Configuration Manager.
Should you have any problems, try updating again and then
contact Connect Tech Technical Support.
Firmware Upgrades
If you need to re-install your current firmware, it is located in the firmware directory of the CD
you received with your Blue Heat/Net.
Newer firmware versions are available from Connect Tech’s website,
http://www.connecttech.com/asp/Support/DownloadZone.asp
Ensure the following parameters are set: mip, sip, gip and dns_ip using either the SCM or TCM.
To upgrade your Blue Heat/Net firmware, you can use any of the following three methods,
depending on your preference.
. Choose Blue Heat/Net product.
Upgrade using WCM (Web Configuration Manager)
The Web Configuration Manager is the easiest way to upgrade your firmware. Simply log onto
the WCM as described in the WCM
This will bring you to the Firmware page. You will have the option to upgrade from the remote
CTI website, or to download the upgrade from a local FTP server.
If you choose to upgrade via a local FTP server, copy the firmware (*.tar) file to the anonymous
directory of a local FTP server. If you do not have a local FTP server, contact your system
administrator to set one up.
section, and click on the Firmware link on the left menu.
Upgrade using TCM (Telnet Configuration Manager)
Using the TCM application to upgrade your firmware requires you manually copy the firmware
from the CTI website to the anonymous FTP directory of you server. Then Telnet to the Blue
Heat/Net unit, log in as TCM and use the update command to complete the upgrade. The
upgrade command supports an option to upgrade from Connect Tech’s FTP directory.
Upgrade using SCM (Serial Configuration Manager)
The SCM method of upgrading is used when the Blue Heat/Net does not boot properly. You can
reinstall your original firmware from the supplied CD, or you can download any newer versions
that exist from the CTI website in the Download Zone
below.
You will need the use of a TFTP server. (Contact your system administrator to obtain access to
a TFTP server). Download the most recent firmware components from the FTP site
ftp.connecttech.com/pub/BHN/
and BHNjffs2_X.XX.gz.
These files contain all of the Blue Heat/Net firmware. Follow the update command instructions
for the SCM
to update each component.
. These files include BHNuClinux_X.XX.gz, BHNloader_VXXX.gz
or go directly to the FTP site as indicated
90 Revision 0.13
Page 84

Appendix
Blue Heat/Net Specifications
Connect Tech Blue Heat/Net User’s Manual
Revision 0.13 91
Page 85

Connect Tech Blue Heat/Net User’s Manual
Products
Model Ports
BN002 4 Y RS-232 8 circuit RJ-45 Jack
BN004 8 Y RS-232 8 circuit RJ-45 Jack
BN006 4 Y RS-232/422/485 DB-9 Male
BN008 8 Y RS-232/422/485 DB-9 Male
BN009 2 Y RS-232 DB-9 Male
BN010 (2MB Flash) 2 Y RS-232/422/485 DB-9 Male
BN018 (4MB Flash) 2 Y RS-232/422/485 DB-9 Male
BNG008 (RoHS) 2 Y RS-232/422/485 DB-9 Male
Surge Line Interface Serial Connector
Options
Part Number Description
CB004 RJ-45 to DB-25 Female adapter
CB005 RJ-45 to DB-9 Female adapter
CB006 Straight through CAT 5 Ethernet Cable 1.8 m (6 ft). Can be used with CB004 and
CB005
MS003 1A 5V unregulated power supply for North America
MS004 1A 5V unregulated power supply for United Kingdom
MS005 1A 5V unregulated power supply for European Union
MS006 1A 5V unregulated power supply for Australia/New Zealand
MS007 3.0A 5V regulated universal power supply with North American line cord
MS008 3.0A 5V regulated universal power supply, no line cord.
92 Revision 0.13
Page 86

Protocol Descriptions
The Blue Heat/Net supports a variety of protocols. The following is a brief explanation of each
and how they are implemented.
ARP
Address Resolution Protocol, a method used to find a unit’s Ethernet MAC address from its
Internet address.
BOOTP
Bootstrap Protocol, a protocol that allows a unit to boot from the network instead of using
information stored on the Blue Heat/Net (typically in Flash memory).
DHCP
Dynamic Host Configuration Protocol, a protocol that provides a means to dynamically
allocate IP addresses to computers on a local area network. The system administrator assigns
a range of IP addresses to DHCP and each client device on the Local Area Network requests
an IP address from the DHCP server. The request and grant process uses a lease concept with
a controllable time period. The Blue Heat/Net offers this as a configurable option; it can
either be turned on or the user can set a fixed IP on the unit.
HTTP
HyperText Transfer Protocol, a standardized Protocol that Web Browsers use to connect to
web pages. It is used to provide web based configuration tools on the Blue Heat/Net.
IP
Internet Protocol, a common addressing scheme for modern networks. Used in conjunction
with TCP to form TCP/IP (see below)
RARP
Reverse Address Resolution Protocol, a method to find a unit’s Internet address from a MAC
or Ethernet address.
TCP
Transmission Control Protocol, a lossless protocol, requiring a handshake to insure that data
is not lost during transmission. Used in TCP/IP to form the main data transfer pathway
between Blue Heat/Net units and the host computer.
Telnet
A terminal-protocol that can be run over TCP/IP to connect to a remote unit. It is one of the
methods used to configure the Blue Heat/Net unit.
TFTP
Trivial File Transfer Protocol, a protocol used to download firmware to the Blue Heat/Net.
UDP
User Datagram Protocol, a protocol used when handshake is not critical. It is used by TFTP
(see above) and for auto discovery of the units.
Connect Tech Blue Heat/Net User’s Manual
Revision 0.13 93
Page 87
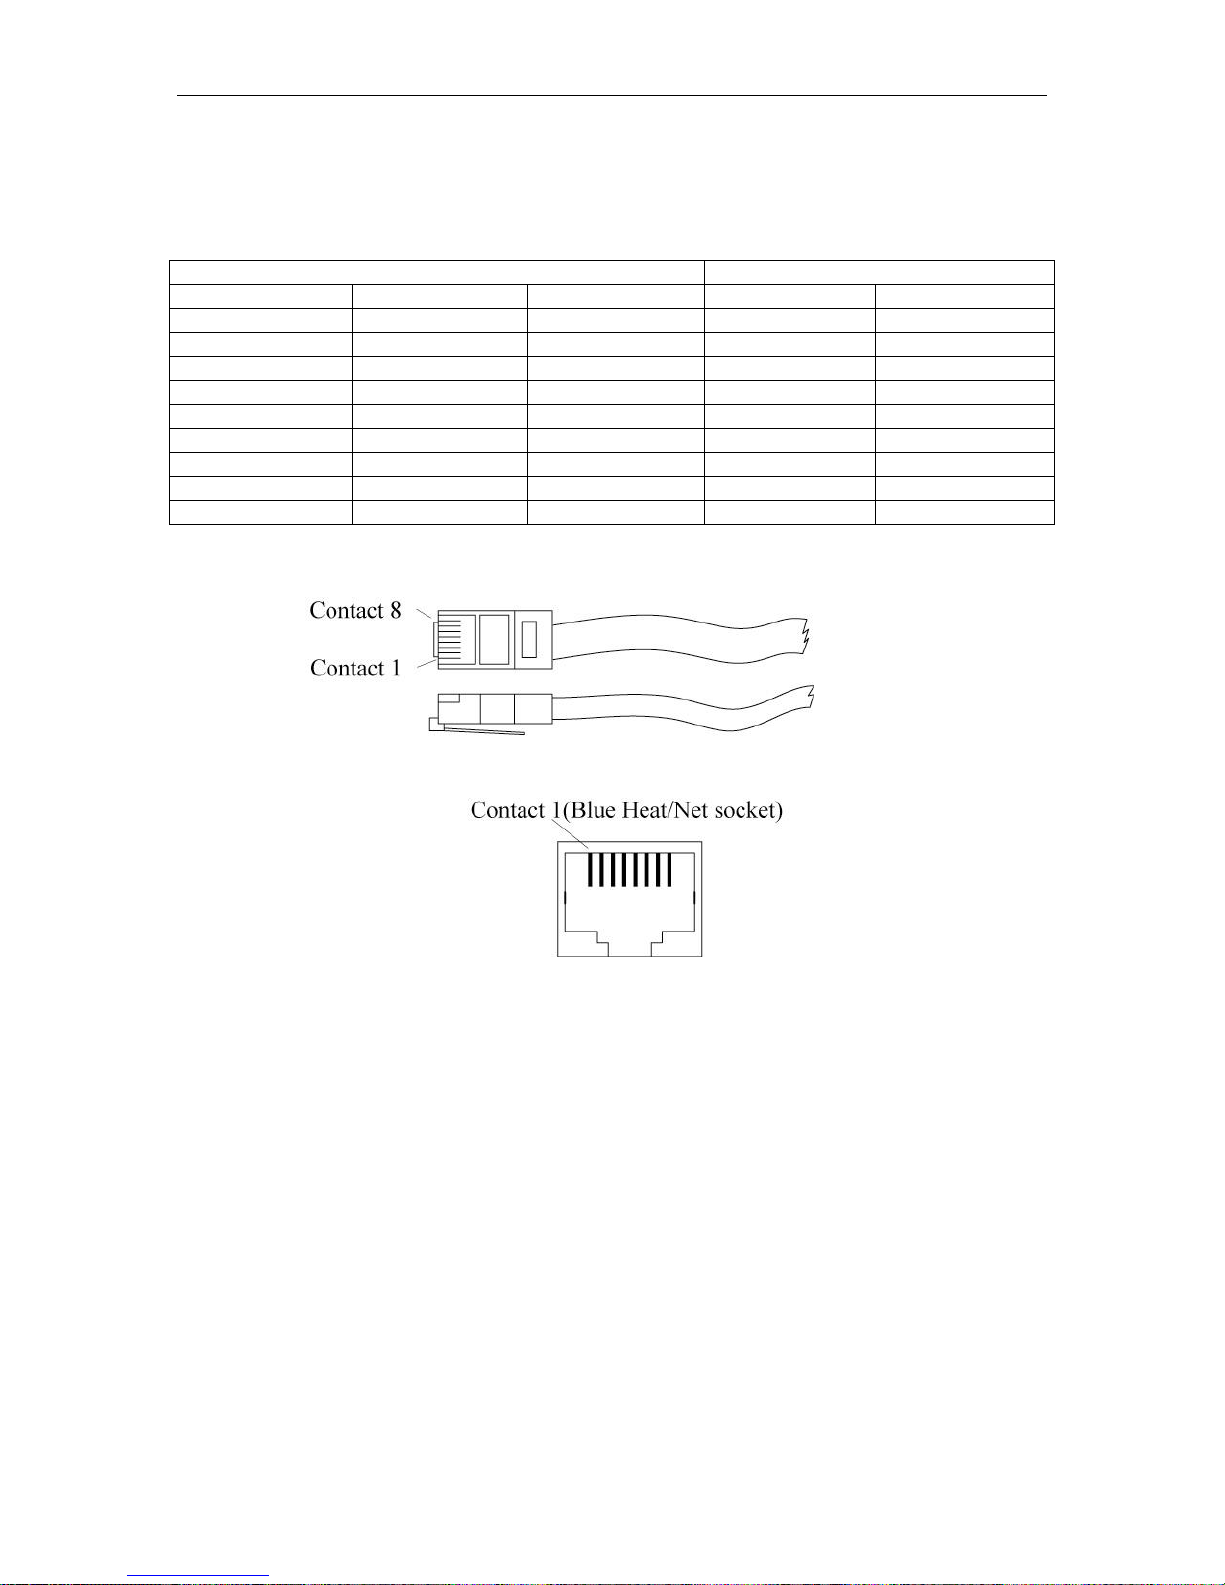
Connect Tech Blue Heat/Net User’s Manual
Pinouts
RS-232 and RS-485
RS-232 RS-485
Signal DB-9 RJ-45 Signal DB-9
DCD
RXD
TXD
DTR
GND
DSR
RTS
CTS
RI
1 3
2 4
3 5
4 7
5 6
6 2
7 1
8 8
9 N/A
Figure 50: RS-232 and RS-485 pinouts
RXD+
RXDTXD+
TXDGND
CTSRTS+
CTS+
RTS-
1
2
3
4
5
6
7
8
9
Cabling Examples:
Typical RS-232 null modem connection:
This is used to connect to DTE type devices.
The Blue Heat/Net is a DTE type device.
Used when Hardware RTS->CTS flow control is required.
This cable is also called a cross over cable and is commonly available at any Electronics
retailer/distributor.
94 Revision 0.13
Page 88
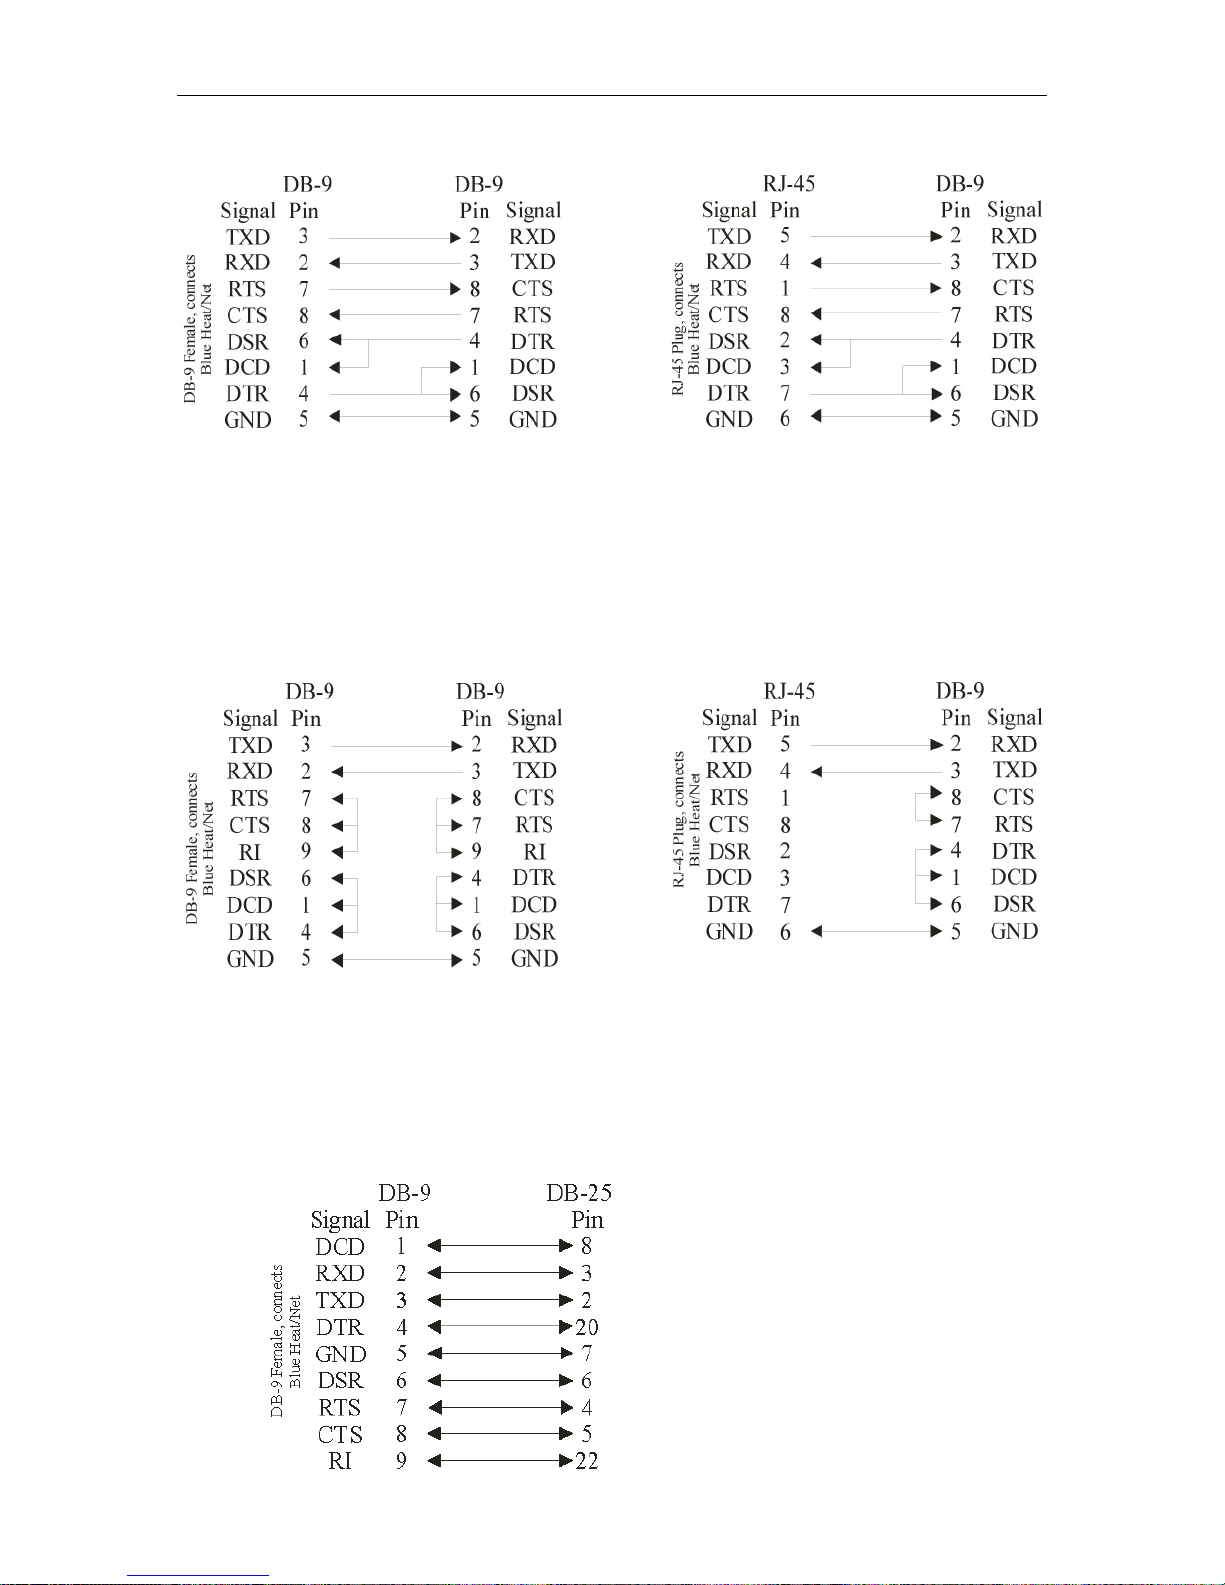
Basic “3 wire” RS-232 null modem connection:
This is used to connect to DTE type devices.
The Blue Heat/Net is a DTE type device.
Used when Hardware RTS->CTS flow control is not required.
This cable is also called a cross over cable.
Connect Tech Blue Heat/Net User’s Manual
Connecting to DCE type devices:
DCE type devices do not require a Null Modem cable, they require a straight through cable.
Straight through cables, both DB-9 to DB-9 and DB-9 to DB-25 are commonly available.
The following is an example of a DB-9 Female cable to a DB-25 Male cable to connect to a
modem.
Revision 0.13 95
Page 89

Connect Tech Blue Heat/Net User’s Manual
Loopback Connectors:
Loopback connectors are useful for performing diagnostics. The following are the recommended
pinouts for creating loopback connectors for Blue Heat/Net products.
Figure 51: Loopback connectors, DB-9 and RJ-45
DB-9: For making DB-9 Female loopback connectors we recommend using solder cup DB-9
connectors and 28 AWG solid core wire.
RJ-45: For making RJ-45 loopback connectors, we recommend using 8 pin RJ-45 connectors
and about 2 inches of CAT 5 cable. You will have to crimp the wires from the CAT 5 cable into
the RJ-45 plug, then strip and solder the wires to match the above loopback pinout.
RS-422/485 Examples:
RS-422/485 Wiring Tips:
RS-422/485 wiring must always use twisted pair cabling.
For applications which require long cable lengths (100M) and higher baud rates (115.2kbps) we
recommend using “low capacitance computer cabling”, or cabling specifically for RS-422/485
applications.
For maximum reliability in noisy environments we recommend using shielded cabling. The
drain wire of the shield should be connected at one end of the cable only. We recommend the
shield at the RS-485 device end.
4-wire (full duplex, “RS-422 mode”) Wiring hardware flow control
96 Revision 0.13
Page 90

Connect Tech Blue Heat/Net User’s Manual
Four-wire (full duplex, “RS-422 mode”) Wiring without hardware
flow control.
Four-wire (full duplex multi-drop, “RS-485 mode”)
Note: The flow control signals, RTS and CTS should be connected as per diagram when
unused to prevent loss of performance on your Blue Heat/Net
Revision 0.13 97
Page 91

Connect Tech Blue Heat/Net User’s Manual
Two-wire (1/2 duplex, “RS-485 mode”) Wiring
One device connected to Blue Heat/Net
Two devices connected to Blue Heat/Net
RS-485 Multi-drop Topology, Two-Wire and Four-Wire
When wiring multi-drop RS-485 networks, it is necessary to wire the devices in a “Daisy
Chain”, they must not be wired with a “Star” topology, see diagram.
98 Revision 0.13
Page 92

Default Settings
Network Settings
Blue Heat/Net IP address 192.168.42.1
Server IP address 0.0.0.0 (used for firmware downloads)
Gateway IP address 0.0.0.0
Subnet Mask 255.255.255.0
Broadcast IP address 255.255.255.255 (used by the bootp process)
Domain Name Server IP address: 0.0.0.0 (used for firmware downloads)
Domain Name blueheat.net
Host Name BHNssssssss (where ssssssss is the BHN serial number)
TCP Port 49152 (0xC000)
DNS IP 0.0.0.0
Boot Settings
Default enabled:
Boot from Flash
Default disabled:
use BOOTP
use TFTP
Delay: 30 (seconds)
Connect Tech Blue Heat/Net User’s Manual
SCM Operation Settings
Password: password
Password Prompting: enabled
Loader Filename: BHNloader_vvv.gz
(where vvv is the version number of the Loader, current at the time the unit was manufactured).
Line Setting: See Getting Access to SCM
section.
CDS (Configuration Data Space)
CDS Storage
This area stores the following data:
o CDS Version number
o Blue Heat/Net information
Serial Number
Software version numbers
o Network Information
MAC Address
Blue Heat/Net IP address
Server IP address
Gateway IP address
Subnet Mask IP address
Broadcast IP address
Domain Name Server IP address
Domain Name
Host Name
TCP Port number
DHCP setting
o Boot Information
Revision 0.13 99
Page 93

Connect Tech Blue Heat/Net User’s Manual
Boot Mode
Boot Filename
o SCM Parameters
Port to scan
Scan Timeout
Scan Prompt setting
Password
Password changed
Loader filename
o System Parameters
Password
Password changed
Inactivity Timeout
o Serial Port Information
Number of Ports
UART type
o Port Settings
Line mode
Baud rate
Data bits
Parity setting
Stop bits
Software flow control settings
Xoff, Xon characters
Hardware flow control settings
Local loopback
Special Error/Event handling modes and Character settings
Default personality
Common Configuration Setups
Static IP Setup
In some networking environments it is best to have the IP address set to a fixed value. The
advantage is that since it is fixed, connecting to it can be a lot simpler.
Static IP is often the best choice if you are trying to connect via WAN or through a Firewall. It
can be difficult to resolve the Blue Heat/Net’s IP address if you use DHCP in this instance.
The default configuration is a static IP of 192.168.42.1. In most cases this will not be the address
you want to use in your network. You can change it using three different methods:
Serial Configuration Manager (SCM)
A direct serial connection to on of the serial ports on the Blue Heat/Net.
Telnet Configuration Manager. (TCM)
A Telnet connection to the Blue Heat/Net
Web Configuration Manager (WCM)
Using a web browser like Internet Explorer to connect to the unit.
Refer to the manual sections for specific details on using the SCM, TCM and WCM.
Example:
You want to configure a static IP on a Blue Heat/Net of 198.182.196.15. The network’s server is
at 198.182.196.1 and the gateway is 198.182.196.2. The subnet mask is 255.255.255.0.
100 Revision
0.13
Page 94

Connect Tech Blue Heat/Net User’s Manual
Using SCM/TCM
Log onto the Blue Heat/Net. The default login for the TCM is root. (There is no login necessary
if using SCM.) The default password for both TCM and the SCM is password.
Enter net net=198.182.196.0. This will set 198.182.196.0 to the server, gateway and the unit’s IP
in one step.
Enter net my_ip=15. This will set the unit’s IP to 198.182.196.15.
Enter net server_ip=1. This will set the server IP to 198.182.196.1.
Enter net gateway_ip=2. This will set the gateway IP to 198.182.196.2.
Enter net subnetmask=255.255.255.0. This will set the subnet mask.
Enter net dns_ip=3. This will set the DNS IP to 198.182.196.3
Enter net dhcp=no. This will turn off DHCP on the unit.
Enter save. This will save the configuration set above to flash memory.
Enter exit. The unit will reboot using the new settings.
Using WCM
Connect to the Blue Heat/Net using a web browser by entering the current IP of the unit in the
address.
Log on by supplying the username and password. The default login is wcm and the default
password is password.
Select the Blue Heat/Net Settings page and fill in the server IP, Blue Heat/Net IP, Gateway IP,
DNS IP and subnet mask as defined above.
Ensure the Use DHCP option is set to no
Click on the Save to Flash button to store the changes.
DHCP Setup
In many modern networks IP numbers are not static but are automatically assigned by a DHCP
server and can change over time or on each power up.
DHCP must be enabled on the Blue Heat/Net because it is shipped to use a default static IP
(192.168.42.1)
Using SCM/TCM
Log onto the Blue Heat/Net. (If using the SCM, no login is required. For the TCM, the default
login is root.) The default password for both SCM and TCM is password.
Enter net dhcp=yes. This will turn on DHCP on the unit.
Enter net dns_ip=3. This will set the DNS IP to 198.182.196.3
Enter save. This will save the configuration we just set to flash memory.
Enter exit. The unit will reboot using the new settings.
Revision 0.13 101
Page 95

Connect Tech Blue Heat/Net User’s Manual
DIN Rail Mounting Option:
The two-port Blue Heat/Net and DB-9 models of the four and eight port Blue Heat/Net include
the option for DIN rail mounting.
The Blue Heat/Net 2 requires two DIN rail clips (part number MS010) that attach to the body of
the device.
Figure 50: DIN Rail mount option for Blue Heat/Net 2
102 Revision
0.13
Page 96
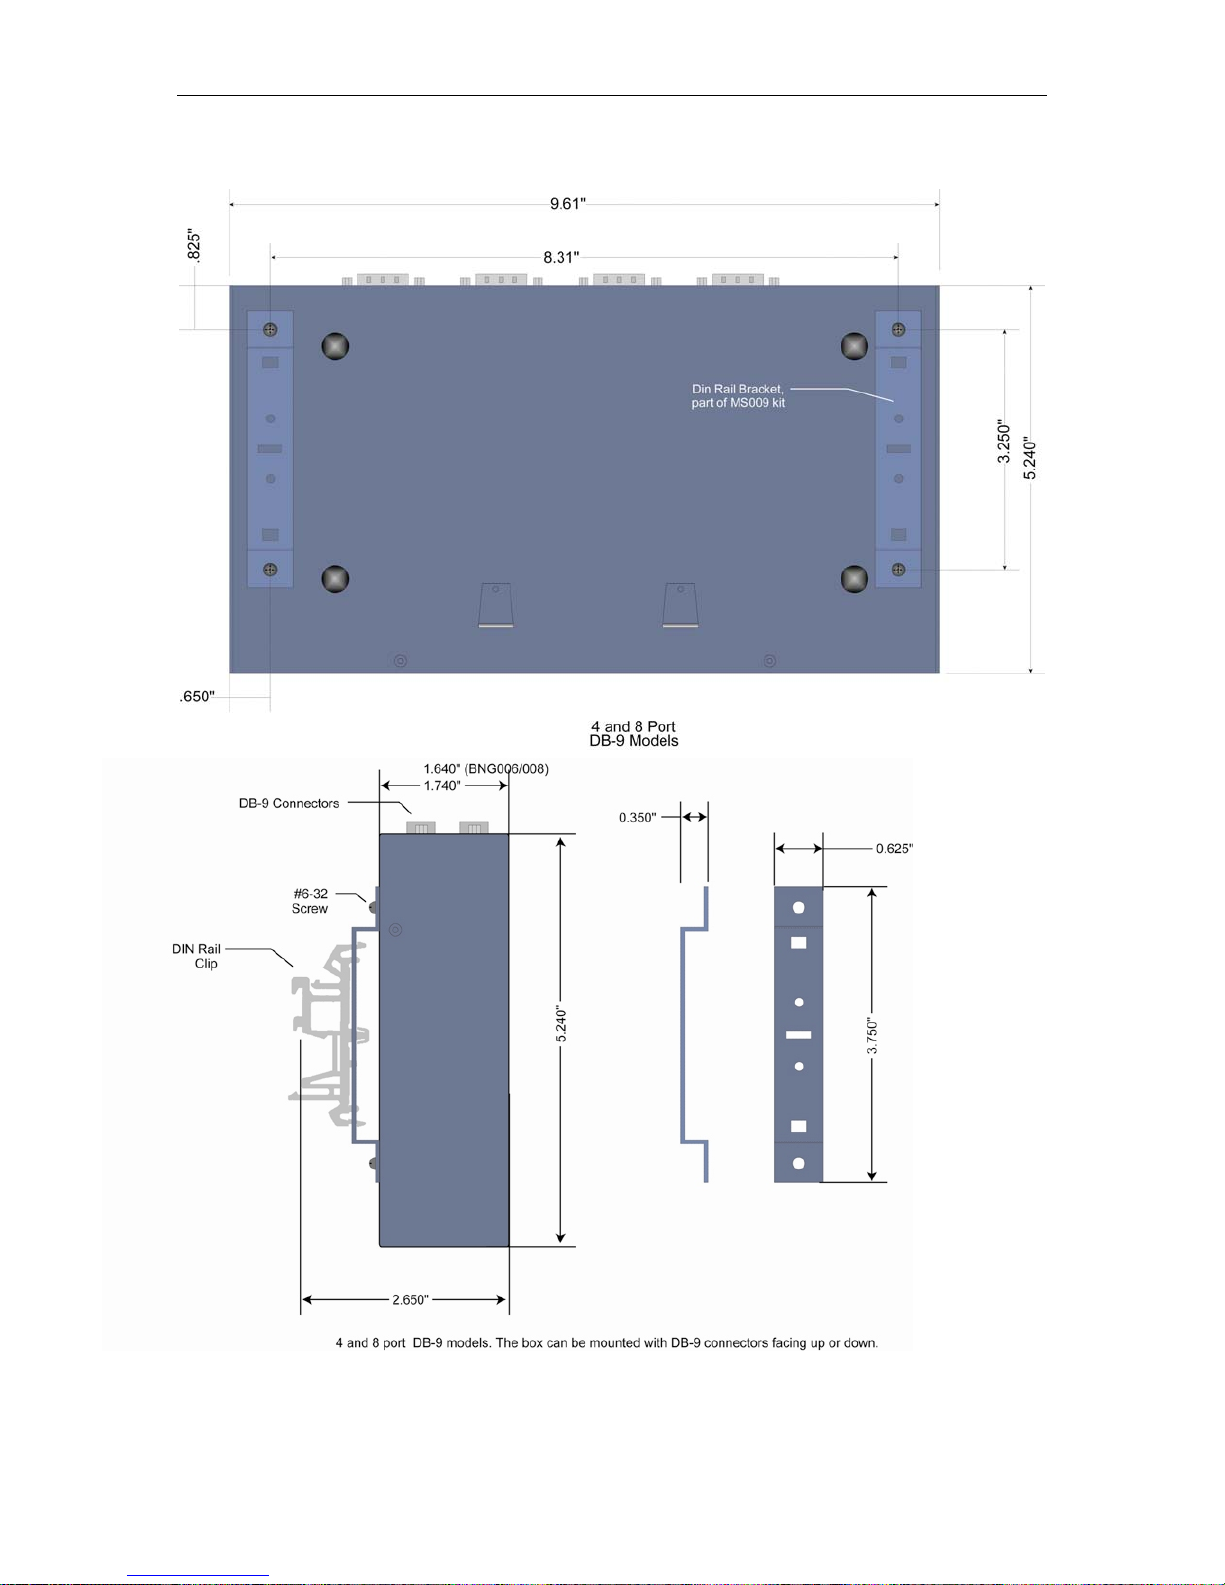
Connect Tech Blue Heat/Net User’s Manual
Four and eight-port DB-9 models can be DIN rail mounted with the addition of a DIN rail
bracket, ordered separately as part number MS009. This part number includes the clips.
Figure 51: DIN rail mount option for four and eight port DB-9 models
Revision 0.13 103
Page 97

Connect Tech Blue Heat/Net User’s Manual
How the Blue Heat/Net Boots Up
Each time the Blue Heat/Net is powered-up or rebooted with an appropriate command, a certain
sequence of software execution occurs.
The Booter runs from Flash memory first. Its job is to perform the following:
Setup the embedded processor
Validate at least one of the redundant Loaders (via a CRC check).
Load a validated Loader into RAM memory.
Run the Loader.
If the Booter discovers that both Loader programs are defective (erased or faulty CRC
calculation), an error code is displayed on the LEDs of the Blue Heat/Net.
The Loader runs from RAM memory. Its job is to perform the following:
o Update any required CDS items.
o Determine if the SCM application will be entered. This is accomplished by
scanning the designated serial ports, for a period of time, to determine if a
correct password is entered. If the password is found the SCM application will
be entered. (see the SCM/TCM, cfg
o Locate, load and run an Operating System (uClinux). (As shown in the
following boot-up flow chart).
o Run the main Operating System (uClinux).
o Operating System launches port personality default ctid
command for details of these settings).
104 Revision
0.13
Page 98
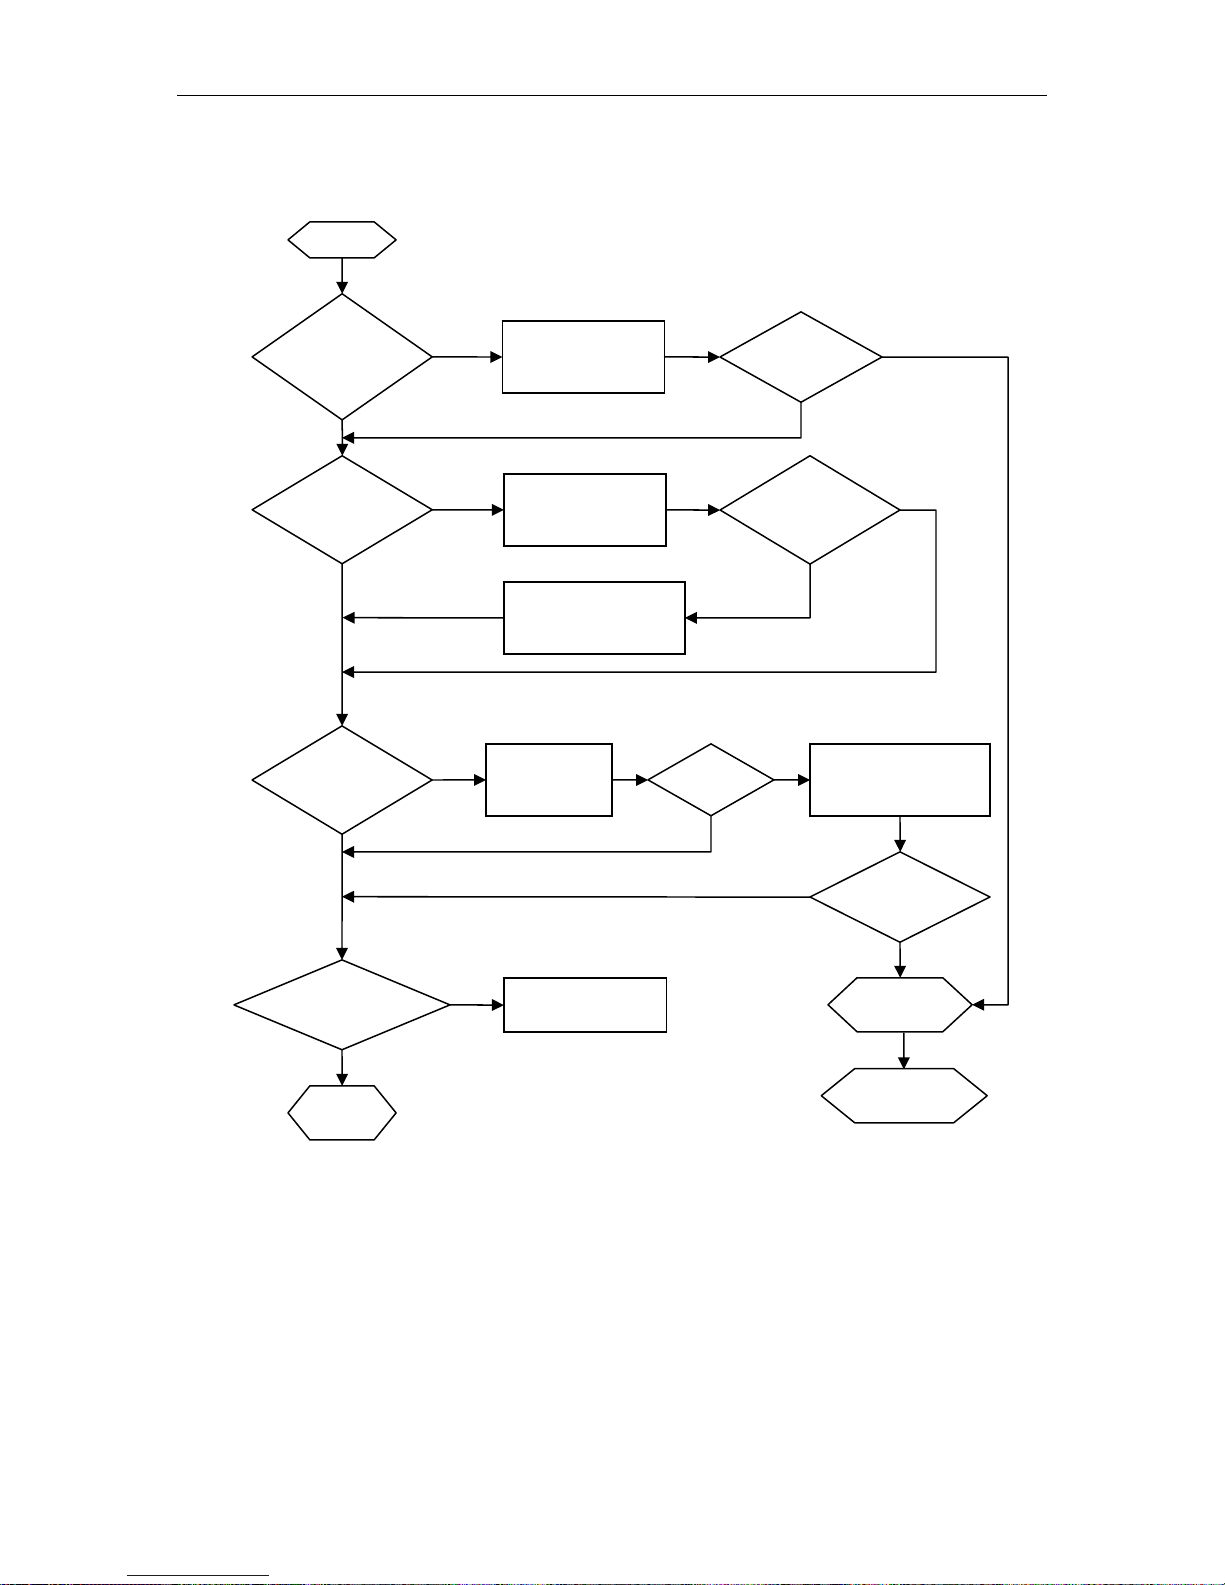
Bootup Sequence
Start
Connect Tech Blue Heat/Net User’s Manual
Boot from
Flash
Enabled?
N
Bootp
Enabled?
N
TFTP
Enabled?
N
Y
Y
Y
Decompress
uClinux from Flash
to SDRAM
Obtain boot
information from
Bootp Server
Update CDS (RAM copy)
(filename & IP address)
Attempt TFTP
Download
Information
Success
N
Decompress
OK
N
Server
Responds
Y
Y
N
Y
N
Decompress
Downloaded uClinux
into SDRAM
Decompress
OK
Y
All Boot Modes
Disabled
Y
Enter
SCM
N
Display Error on
LEDs
Run
uClinux
Y
Boot Port
Personality
Figure 52: Bootup sequence
Revision 0.13 105
Page 99

Connect Tech Blue Heat/Net User’s Manual
Flowchart of Special Operations Mode using the reset button
Power Up
Reset
Button
Held
No
Continue
Booting
Yes
Figure 53: Bootup sequence via Reset Button
Increment
Selection
Show
Selection State
On Port LEDs
Asynchronous communications Tutorial
The Blue Heat/Net features four or eight asynchronous serial communication ports.
Asynchronous communications is a simple, cost effective means of terminal serial
communication. For this reason, it is widely used for communications on personal computers,
bar codes readers, printers, terminals and much more.
In asynchronous serial communication, the electrical interface is held in the idle position
between characters, also referred to as “mark”. A change in signal level (known as space level)
indicates the start of transmission of a character. The receiver recognizes this change as a “start
bit”. Once the start bit has been sent, the transmitter sends the actual data bits. In typical
asynchronous communications there may be 5, 6, 7, or 8 data bits, depending on the application.
Both the receiver and the transmitter must be set to the same number of data bits, baud rate and
stop bits. Stop bits can be 1, 1.5, or 2 bit periods in length. When the transmitter has sent all the
data bits, it sends a stop bit. This stop bit signals to the receiver that the data has finished
transmission. The stop bit is the same state as the idle or mark state.
Pressed
Reset
Button
Held
Wait for
Button
Release
106 Revision
0.13
Figure 54: Typical Asynchronous Date frame
Page 100

Serial Line Interface Tutorial
RS-232 Line Interface:
RS-232 is the simplest, least expensive line interface standard. It is also referred to as EIA232
and TIA/EIA-232. The RS-232 specification signals levels of +3V to +15V for a logic 0 or
Space, and -3V to -15V for a logic 1 or Mark. The Blue Heat/Net has RS-232 signal levels with
a typical range of +/- 8 Volts. The maximum cable length you can use with RS-232 is dependant
on a number of factors including:
Baud rate
The faster the baud rate, the shorter the cable length must be.
Cable quality
Quality refers to the capacitance of the cable. A higher capacitance (usually specified as pF or
pico Farads per foot) dictates a lower baud rate, and a shorter maximum length. Low capacitance
computer cables for RS-232 applications are available from all wire and cable suppliers.
You can usually operate with cable lengths of up to 100 feet (30 m) at baud rates up to 115.2
Kbps using low capacitance cable. For higher baud rates such as 230.4 Kbps and up, we
recommend keeping the cable lengths to within 25 feet (7.6 m).
The TIA/EIA232 specification specifies two connectors: the DB-25 and the DB-9. Each of these
connectors has a standardized pinout. Many serial communication products offer RJ-45
connectors, including the Blue Heat/Net family. Note that there is no standard pinout for RS-232
on an RJ-45 connector. The following table specifies Connect Tech’s RJ-45 pinout.
Connect Tech Blue Heat/Net User’s Manual
RS-232 signals:
DB-9 Pin
(Standard)
1 3 DCD Data Carrier Detect
2 4 RX Receive Data
3 5 TX Transmit Data
4 7 DTR Data Terminal Ready
5 6 GND Signal Ground
6 2 DSR Data Set Ready
7 1 RTS Request to Send
8 8 CTS Clear to Send
9 N/A RI Ring Indicator
*Connect Tech Pinout.
RJ-45 Pin*
RS-485 Line Interface:
RS-485, or TIA/EIA485, is a differential line interface standard capable of high baud rates over
long cables. RS-485 is fully compatible with RS-422; which is considered a subset of RS-485.
The use of differential transmitters and receivers ensures RS-485 communications are reliable
and robust. This means two wires are used to transmit or receive a signal. One wire carries the
true or non-inverted signal; the other wire carries the inverted signal. The non-inverted signal is
labelled with a (+) and the inverted is labelled with a (-). The RS-485 specification refers to the
(+) as “TXB” and the (-) as “TXA”.
Signal Description
Figure 55: RS-232 signals
Revision 0.13 107
 Loading...