

Connects2 CAM-KIT12 User Manual

User Manual
CAM-KIT12
Digital Wireless Reversing Camera Kit
PRODUCT FEATURES
• Wireless 2.4GHz Radio Transmission
• Wide Viewing Angle (110 °)
• Night Vision Functionality
• IP68-Rated Waterproof
• User-Friendly Menu
• Variable Parking Lines (6 Sizes)
• Mirror/Original Image Display Options
BOX CONTENTS
- LCD 4.3” Monitor with Connector Cable
- Suction Cup Mount
- Car Charger with Connector Cable
- Power Box with Antenna
- Reversing Camera with Connector Cable
- Instructions
Prior to Installation
Read the manual prior to installation. Technical knowledge is necessary for installation. Please ensure you
use the correct tools to avoid damage to the vehicle or product.
Connects2 can not be held responsible for the installation of this product.
Technical Support
Connects2 want to provide a fast and suitable resolution should you encounter any technical issues. With this
in mind, when contacting Connects2, try to provide as much Information as possible. This will speed up the
process and help us to help you.
Please use our dedicated online technical support centre: support.connects2.com
CAMERA INSTALLATION
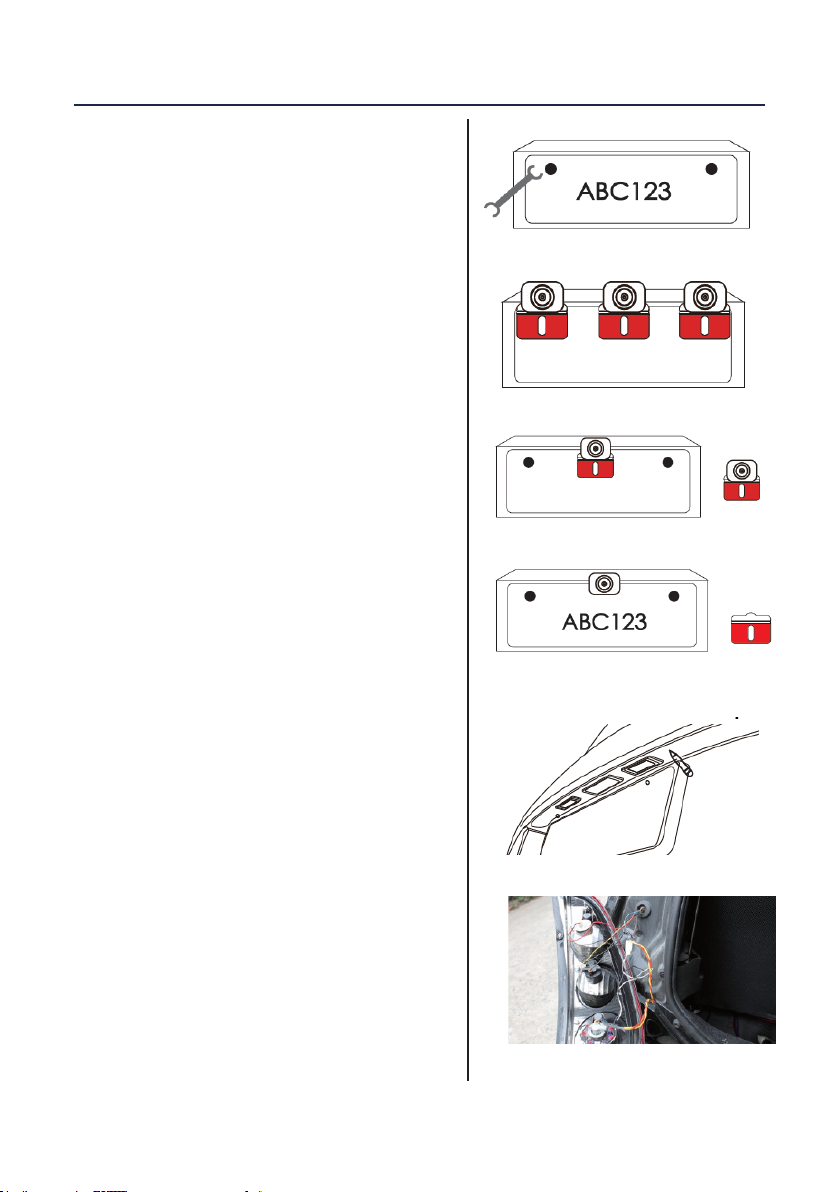
1. Remove the license plate from the vehicle
(Fig. 1)
2. Mark the location where the reversing camera
will be installed (left, middle or right). (Fig. 2)
Connects2Vision
3. Tear off the 3M tape on the back of the cam-
era bracket, and x the camera at the marked
location. (Fig. 3)
4. Tear off the 3M tape on the front of the cam-
era bracket and x it to the license plate. Then
tighten up the screws to x the license plate in
place.
(Fig. 4)
5. Find a suitable opening/drill hole near the
license plate opening into the interior of the
vehicle. For added visibility and easy installation,
remove the interior trim near the license plate.
(Fig. 5)
6. Now run the camera cable to connect to the
power box in the vehicle’s interior/cavity. Be sure
the cables
aren’t pinched or knotted. Connect the plug
of the camera cable to the 4-Pin socket of the
power box. (Fig. 6)
7. Open the inner plastic panel and remove it
from the hatch or tailgate. Test the wires with a
multimeter to nd the reverse light power wire.
Connect the red wire from the power box to the
reverse light power wire. Then connect the black
wire from the power box to a ground source
(vehicle chassis). (Fig. 7)
Fig. 1
Fig. 2
Fig. 3
Fig. 4
8. Secure the rear camera cable and power box
cable with cable ties in the rear carriage. Be sure
thereare no electrical loads or metal between
the monitor and antenna to avoid impairing the
transmission.
9. Put the car charger into the vehicle’s cigarette lighter to power on the monitor. If the
power box is correctly connected, a signal will
be transmitted to the monitor when putting the
car into reverse and the monitor will display the
camera image.
2
www.connects2.com
Fig. 5
Fig. 6
 Loading...