

Page 1

SmartPro user manual
ConnectiveTouch.com
Connective Touch
FINGERPRINT READERS
ACCESS CONTROL
SYSTEM
USER GUIDELINES
Page 2

AG|0510|DS|04|16
SMARTPRO USER MANUAL
1
Contents
GETTING STARTED ................................................................ 2
INTRODUCTION .................................................................... 2
Glossary of terms / abbreviations ................................................... 3
IMPORTANT SAFEGUARDS ....................................................... 5
INSTALLATION LOCATION ........................................................ 5
USE OF SENSOR .................................................................... 5
ENROLMENT PROCESS ........................................................... 6
TIPS FOR BEST FINGERPRINT ENROLMENT ................................... 6
Net2 Setup Considerations ........................................................... 7
New User Enrolment ................................................................. 8
New Fingerprint Enrolment (User Token Details) ............................... 13
Deleting FingerPrint templates (User Token Details) ........................... 17
Page 3

AG|0510|DS|04|16
SMARTPRO USER MANUAL
2
GETTING STARTED
INTRODUCTION
The Connective Touch SmartPro is a PC based Security system for
controlling access through multiple doors using fingerprint biometrics and
integrates with the Paxton facilities management system Net2.
This User Guide details the key functionalities for:
- Fingerprint Enrolment Software for Users on ‘Net2 Access Control’
- The management of Users within ‘Net2 Access Control’
- The management of access to SmartPro Biometric Access Control units
Page 4

AG|0510|DS|04|16
SMARTPRO USER MANUAL
3
Glossary of terms / abbreviations
CT Connective Touch
FP FingerPrint
FP Admin ‘FingerPrint Admin’ (installed as FP Enrolment
Software) is the CT software used to enrol
fingerprint templates and to control FP Enrolment
and FP Verification Units.
FP Enrolment Unit FP unit always situated by the Administrator PC.
This unit is used to register the fingerprint of a new
user.
FPR FingerPrint Reader – A unit which can be
configured as either a FP Enrolment and/or FP
Verification Unit
FPRegister Installed CT software, the FPRegister application
enables the and administration of fingerprints
within the Net2 system
FPTs FingerPrint Templates – The digital record of a
fingerprint
FP Verification Unit FP unit always situated where access is required i.e.
a door
Net2 Net2/Net2+ is a User/Facilities Management
Software from Paxton used in conjunction with the
Paxton ACU (Access Control Unit).
Net2 Pro /Plus/Lite / Client
Install versions of Net2 Access Control
Net2 Server Paxton supplied administration software
Paxton Net2 v5.03 Supplied administration software
Page 5

AG|0510|DS|04|16
SMARTPRO USER MANUAL
4
Network Subnet Any building or installation other than the Main
Building or installation.
Subnet As Network Subnet – site name
Token Within Net2 the FingerPrint Templates are referred
to as Tokens
Zone ID Within ‘Fingerprint Admin’ (installed as
FPRegister) the terms Zone and Zone ID are used
to determine a number of doors or access
points registered within a group
Page 6
AG|0510|DS|04|16
SMARTPRO USER MANUAL
5
IMPORTANT SAFEGUARDS
INSTALLATION LOCATION
Do not install terminal in areas which are exposed to direct and heavy rain,
as the fingerprint readers are not designed to work in those areas.
Fingerprint readers will work with minimum water but recommend they are
wiped off.
USE OF SENSOR
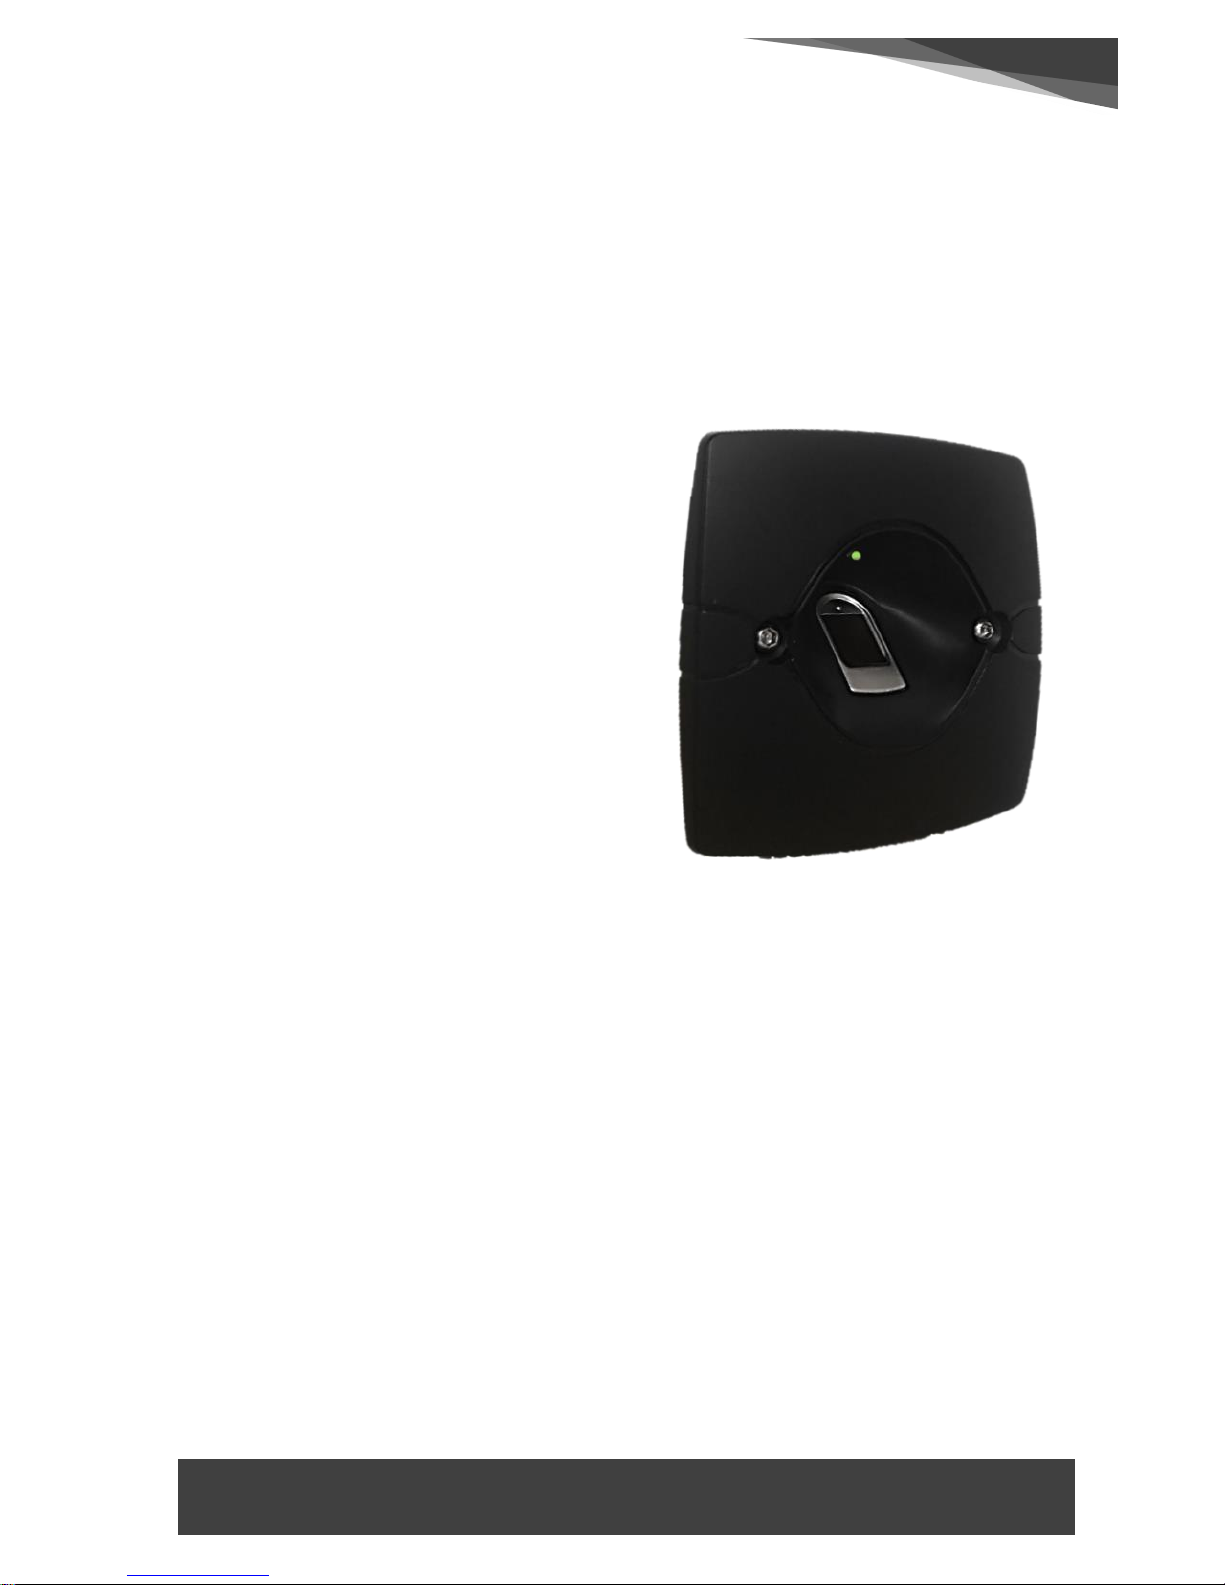
Do not abuse the fingerprint sensor by
scratching the surface, contacting the
sensor’s surface with heat, pressing
excessively hard during placement of
fingerprint for verification, or use
abrasive cleaning products or
implements. Clean the sensor
occasionally with dry or anti-bacterial
wipes to maintain the performance of
the sensor.
Figure 1. SmartPro FP Verification Unit
Page 7
AG|0510|DS|04|16
SMARTPRO USER MANUAL
6
ENROLMENT PROCESS
The Enrolment Unit is provided to enrol approved personnel into the
SmartPro system. The level permissions of each user are saved in the Main
Administrator PC.
TIPS FOR BEST FINGERPRINT ENROLMENT
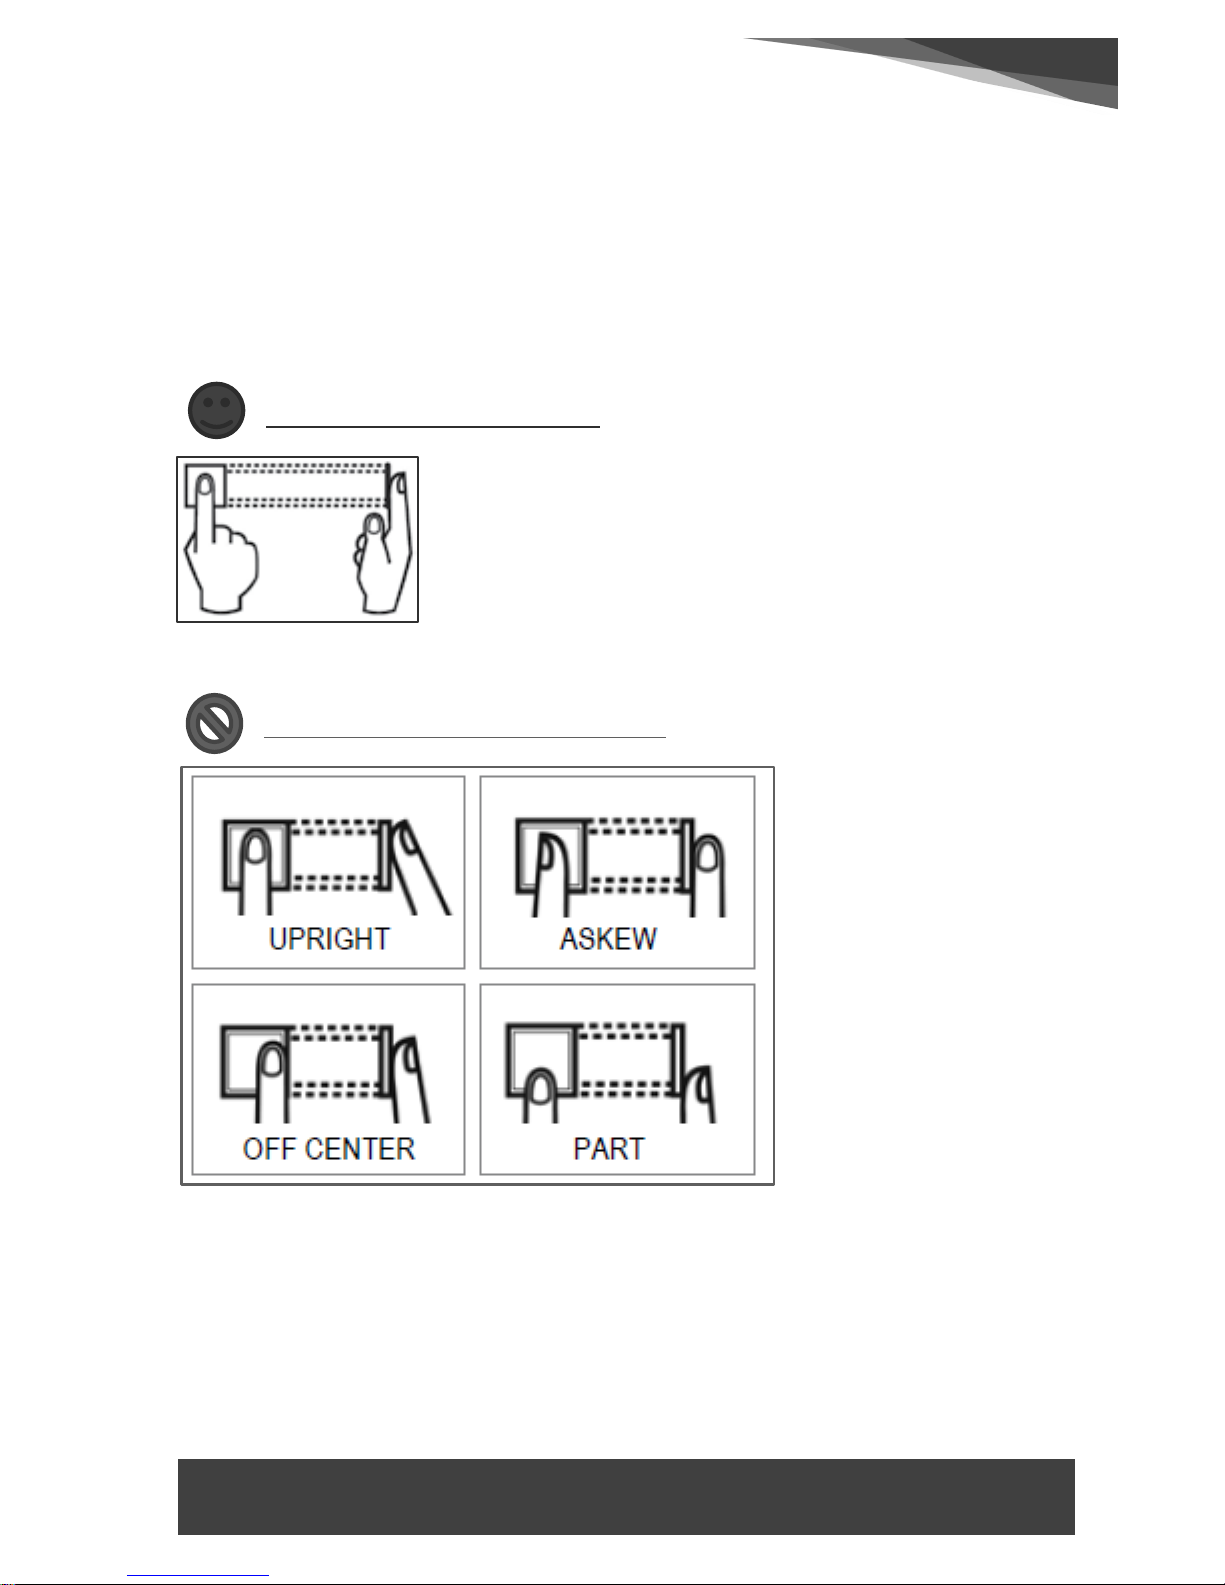
WHAT YOU SHOULD DO
Place finger flat on the fingerprint sensor. Make sure
the finger’s midpoint is placed at the centre of the
fingerprint sensor.
WHAT YOU SHOULD NOT DO
3. Plan/Side views
2. Plan/Side views
Page 8

AG|0510|DS|04|16
SMARTPRO USER MANUAL
7
Net2 Setup Considerations
With regard to all Users consideration should be given to working
parameters as follows:
‘Door groups’ – this is deciding if doors need to be grouped e.g. all
doors in one building
‘Access levels’ – types of access levels required as:
‘No access’
‘All hours, all doors’
‘Working hours’
‘Timezones’ – period to allow entry as:
‘No access
‘All hours, all doors’
‘Working hours’
‘Net2 operators’ – who has permission to access ‘Net2 Access
Control’ and the functionality they require as:
‘New operator’
‘OEM Client’
‘System engineer’
These are all covered in the ‘SmartPro Software Installation Guide’
Page 9
AG|0510|DS|04|16
SMARTPRO USER MANUAL
8
New User Enrolment
With reference to the diagram below, the first stage in enrolling a new
User is to create the User in ‘Net2 Access Control’:
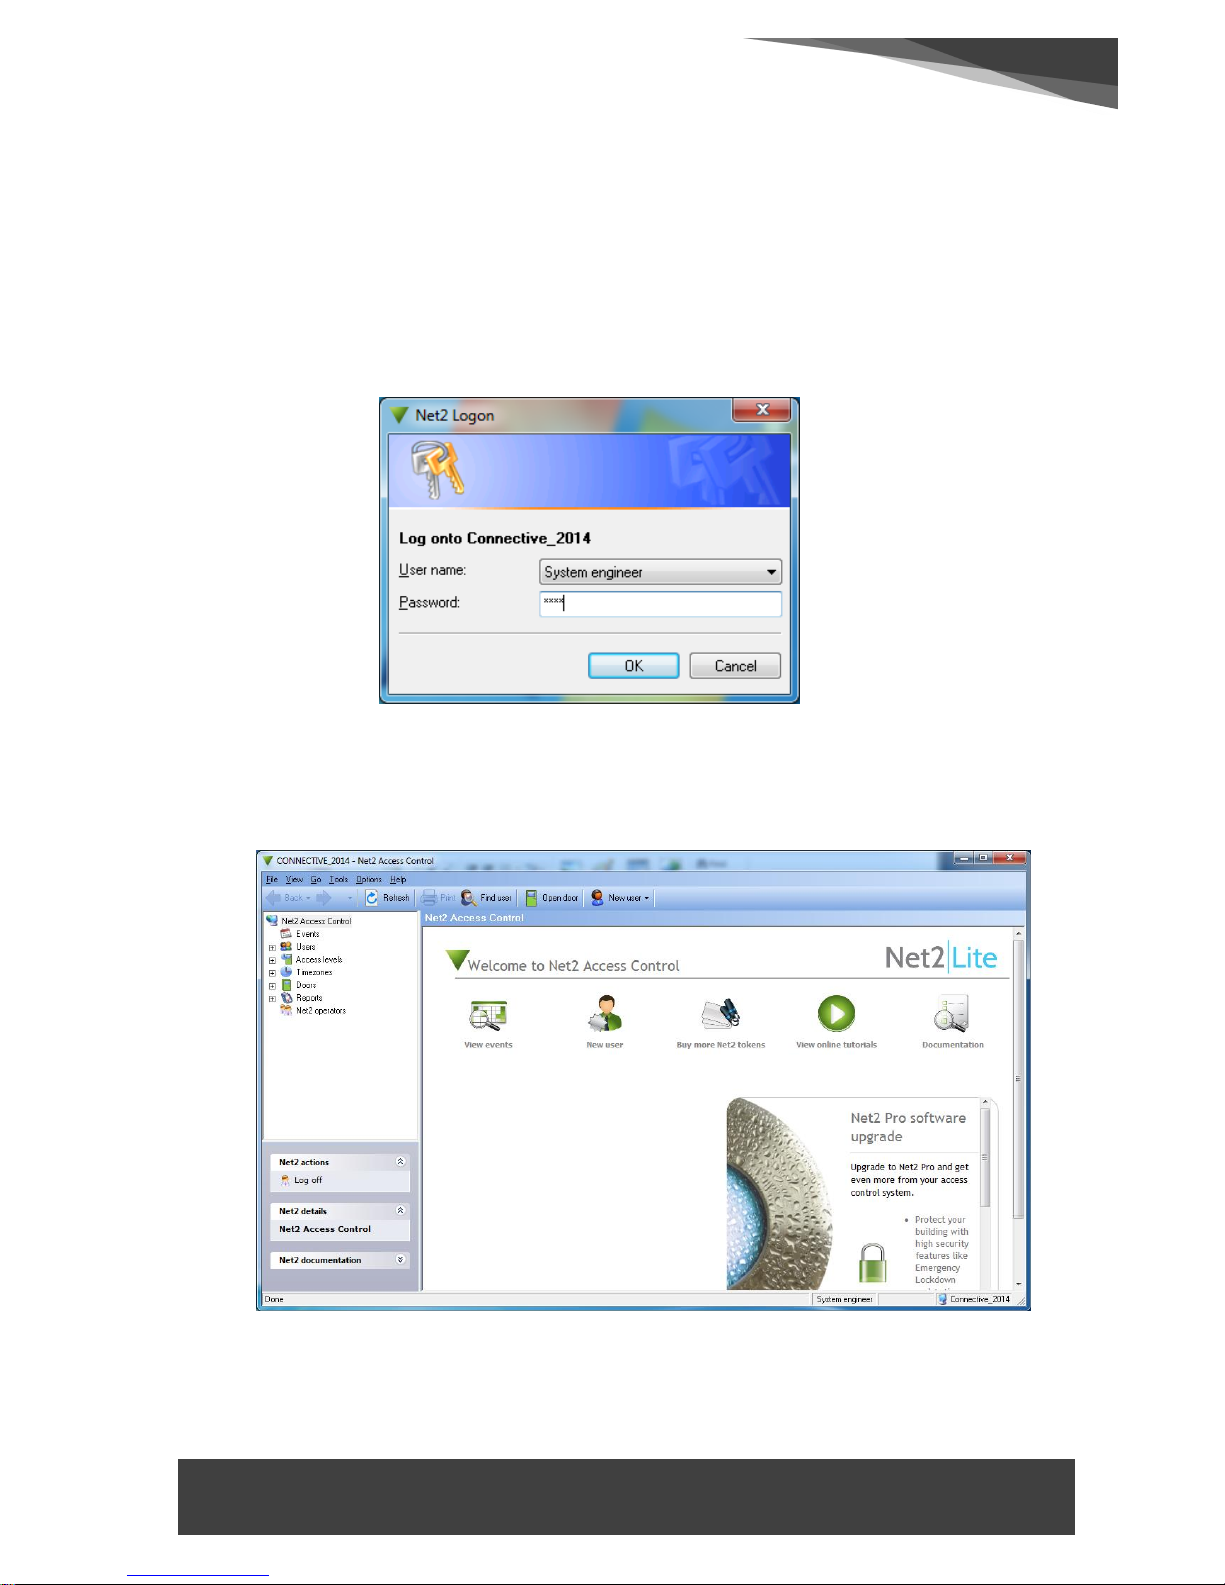
Log into ‘Net2 Access Control’ using the User name and Password
provided.
A screen similar to the one below will appear after a successful log in.
Figure 4. Net2 Software
Figure 5. Net2 Software
Page 10
AG|0510|DS|04|16
SMARTPRO USER MANUAL
9
Click on the ‘Users’ tab in the left hand pane and all the Users within
the system will appear.
Figure 6. Net2 Software - Users
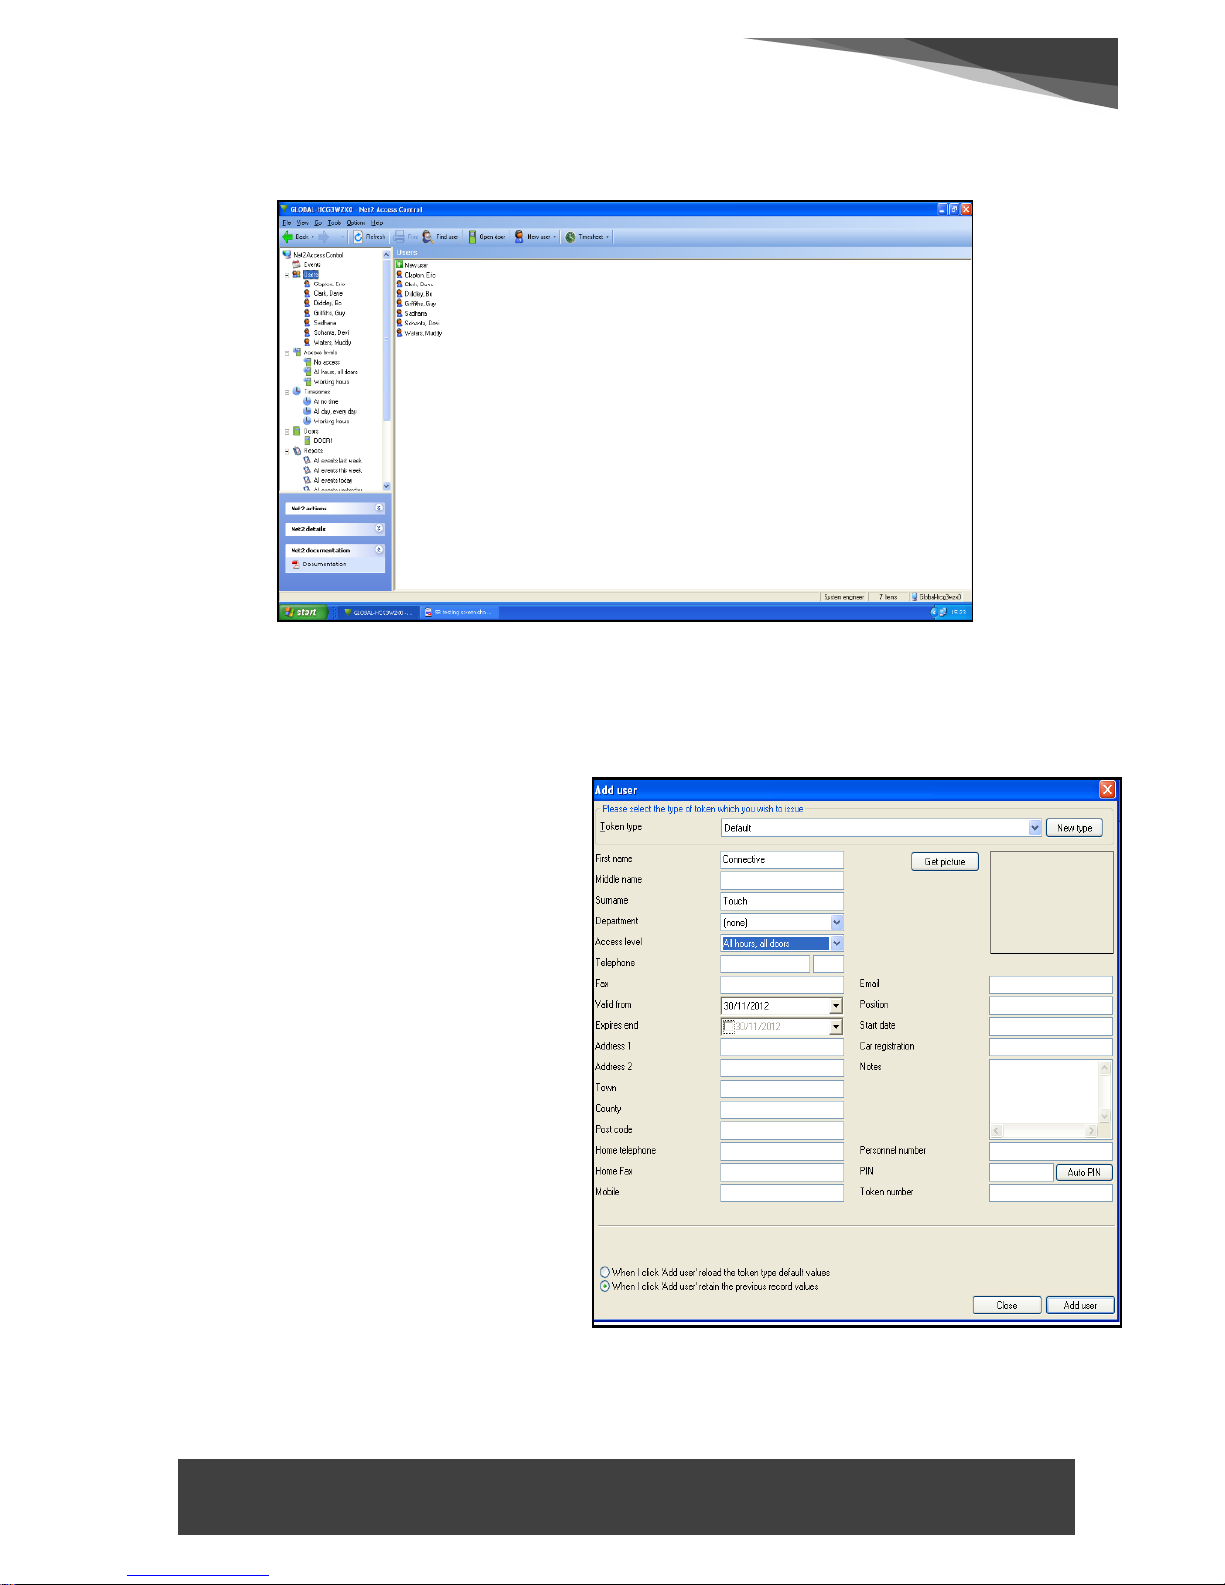
4. Click on ‘New user’ in the upper toolbar
5. the ‘Add user’ screen shown
below will appear. The
minimum details that need to
be entered are:
First name
Surname
Token type
Access level
Figure 7. Net2 - Add User
Page 11
AG|0510|DS|04|16
SMARTPRO USER MANUAL
10
Once all details are completed click ‘Add user’ in the bottom right
corner of ‘Add user’ screen
When all new Users have been added, select ‘Close’ to exit the ‘Add
user’ screen
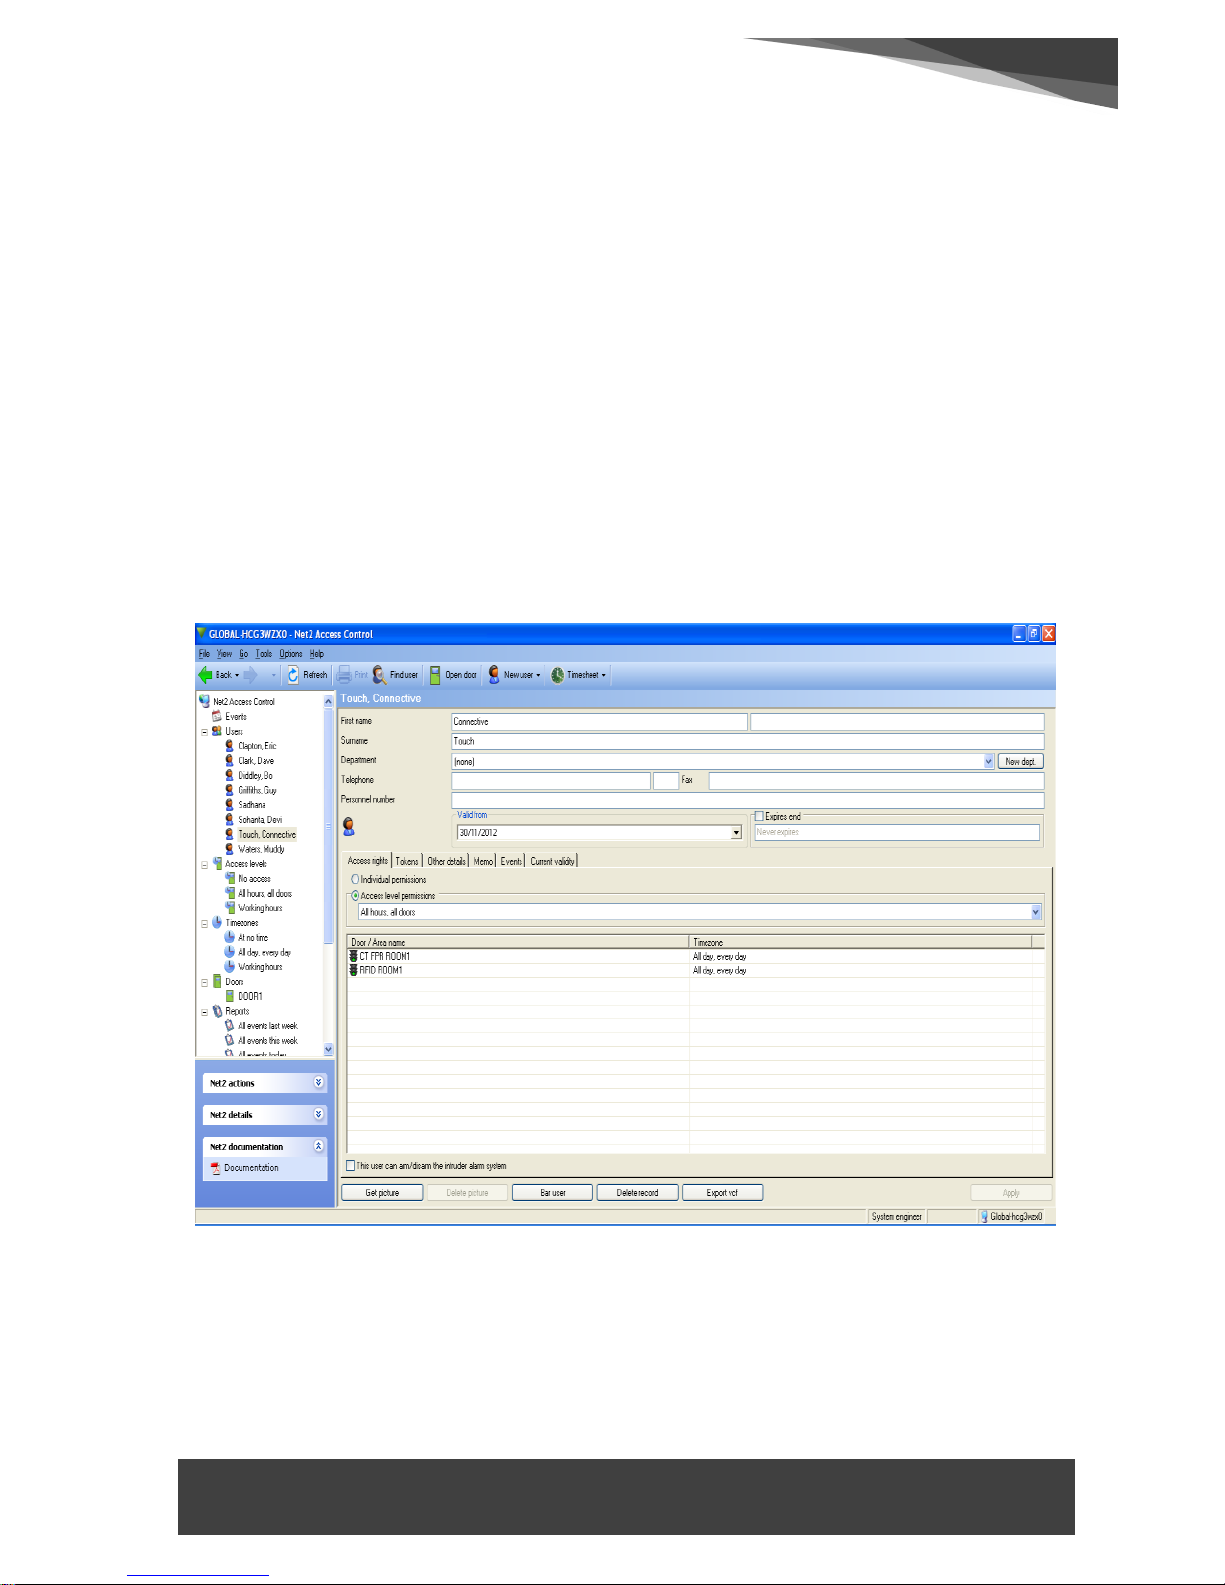
6. Once a New user has been created, the User name will appear with
any other Users in the left hand pane.
If now that User name is clicked, the below can be viewed.
The tabs; Tokens and Events will be blank.
However, as fingerprints are registered, ‘Tokens’ are created and
‘Events’ occur, all the details can be viewed
Figure 8. Net2 - User Details - Access Right
After the User has been created in ‘Net2 Access Control’ the User’s
Fingerprint has to be registered/enrolled by using the
ConnectiveTouch FP Enrolment software.
Page 12
AG|0510|DS|04|16
SMARTPRO USER MANUAL
11
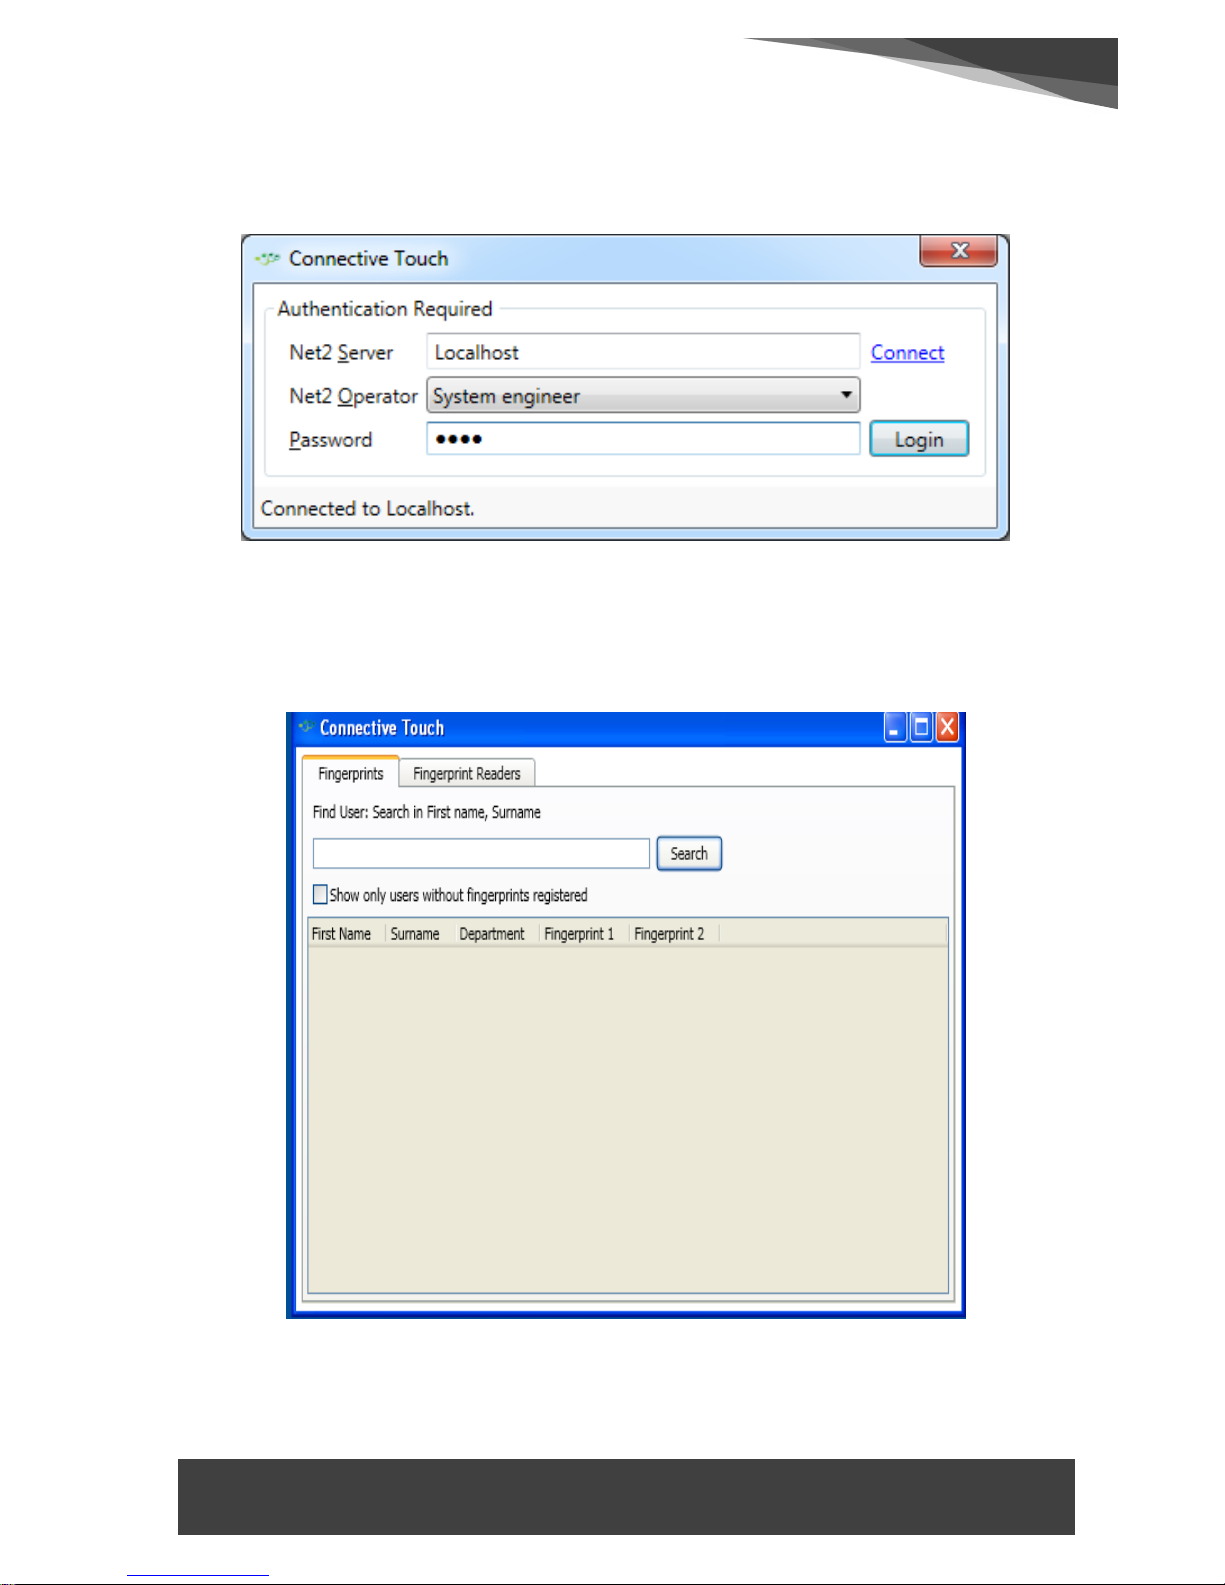
Start and Log in to the ‘Fingerprint Admin’ software using the login
and password provided.
Figure 9. CT Fingerprint Registration Software Log in
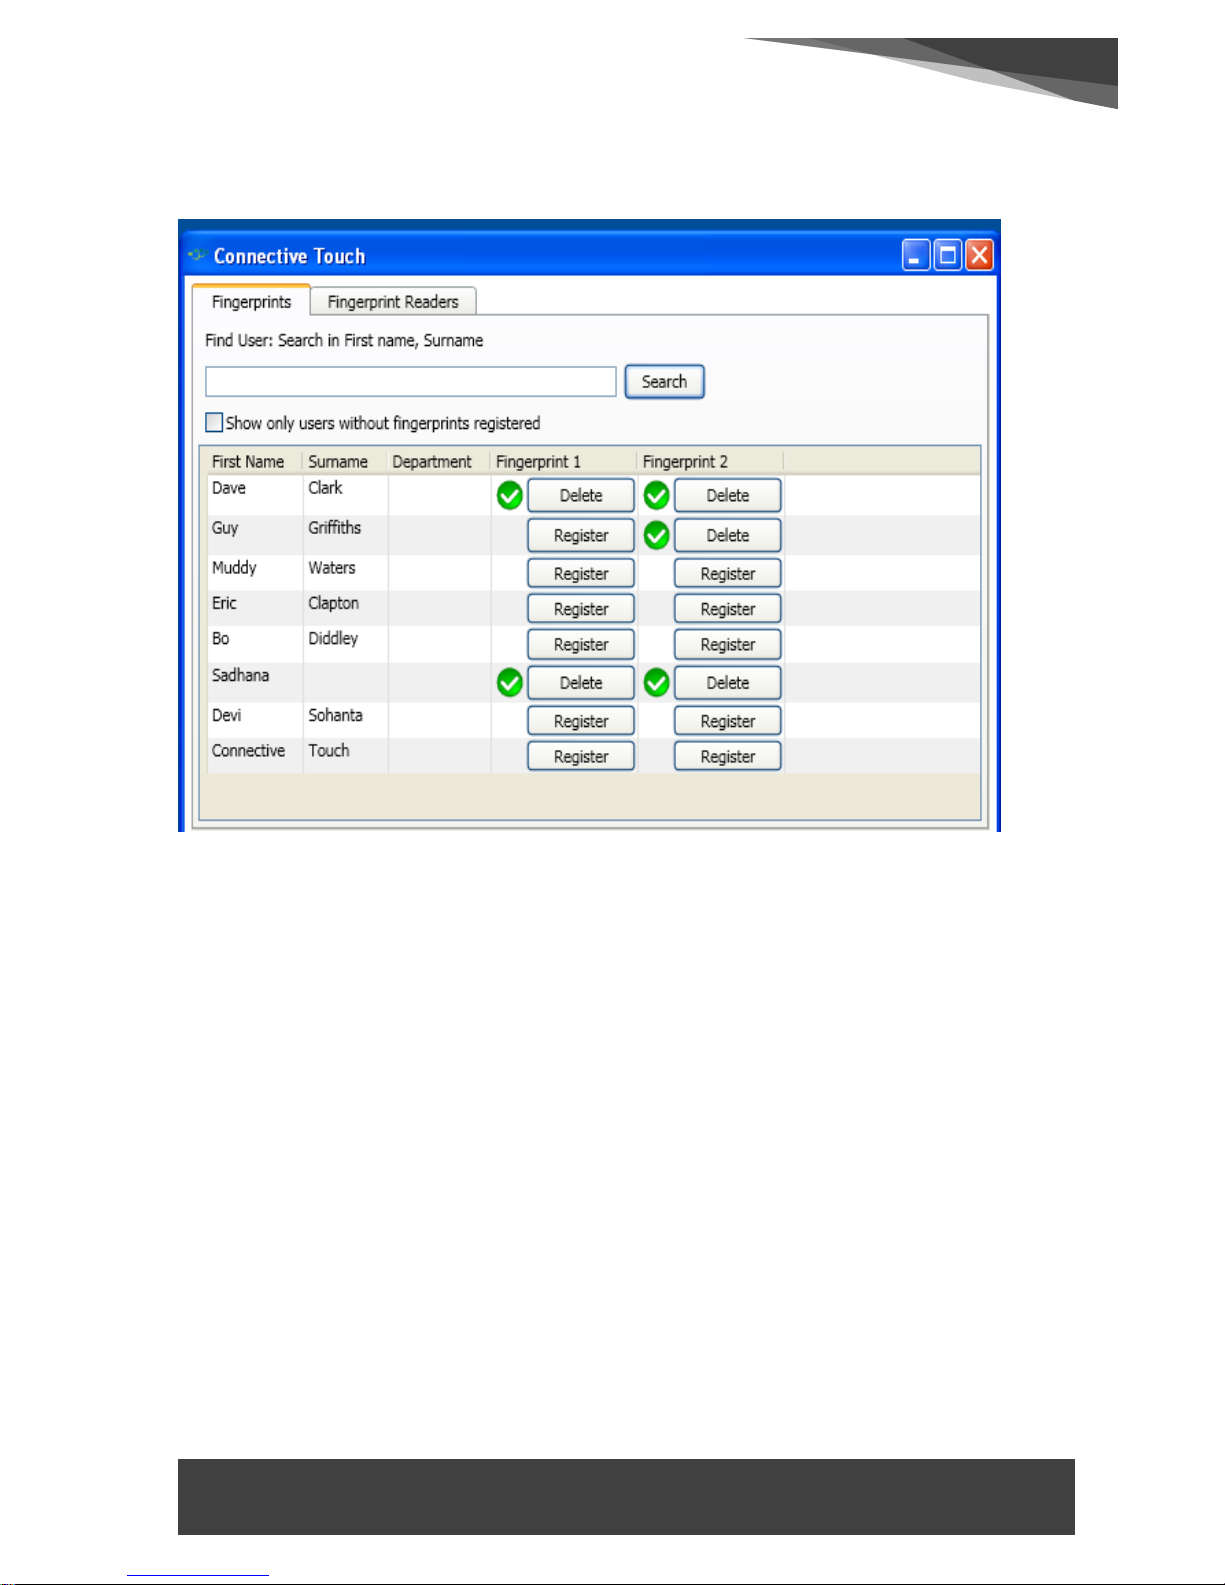
The screen shown below will appear. Ensure you are on the
‘Fingerprints’ Tab and click ‘Search’
Figure 10. CT Fingerprint Registration Software - Search
Page 13
AG|0510|DS|04|16
SMARTPRO USER MANUAL
12
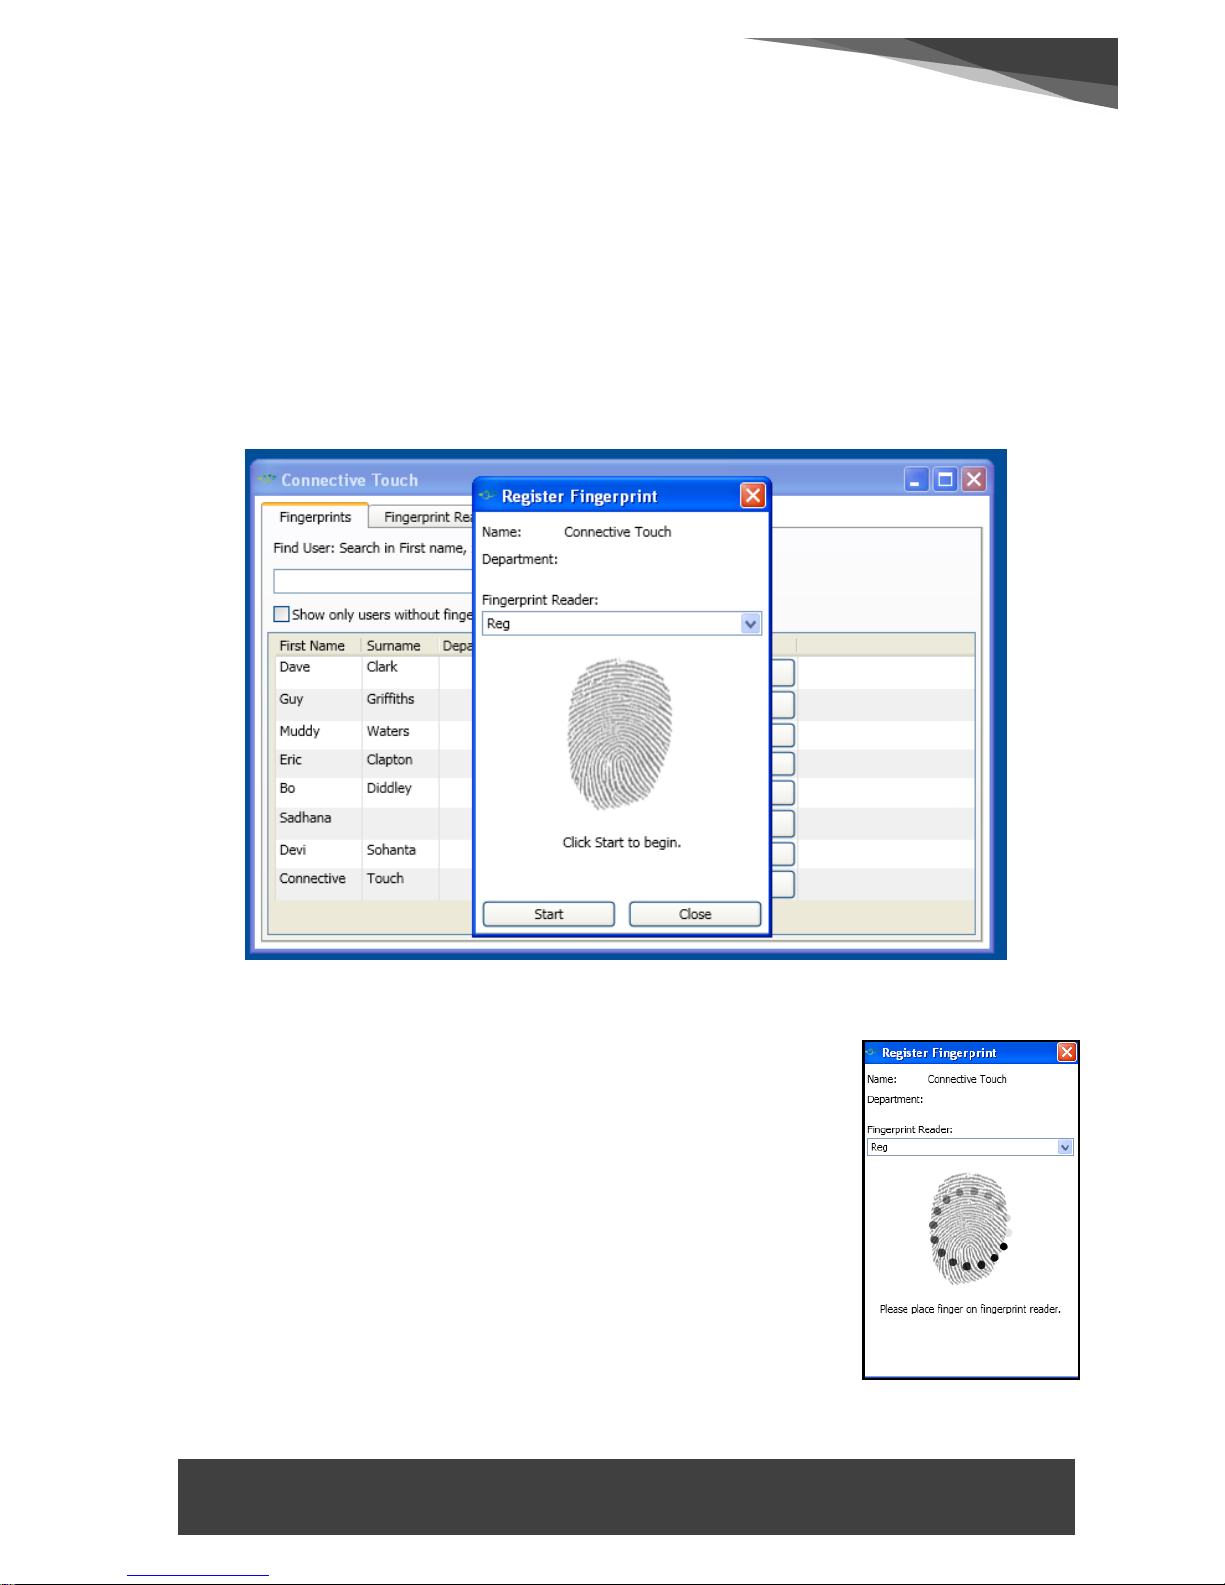
Once ‘Search’ is clicked, all the Users that are listed in ‘Net2 Access
Control’ will appear as shown below.
Figure 11.CT Fingerprint Registration Software - Users List
NOTE: If NO Users appear (and there are some on Net2) ‘Net2 Access
Control’ MUST be closed and restarted (the Administrative tools /
Services only shows the Service was started and NOT that it is now not
working!)
Page 14
AG|0510|DS|04|16
SMARTPRO USER MANUAL
13
New Fingerprint Enrolment (User Token Details)
To ‘Register’ a fingerprint, locate the User name to be enrolled and
click the ‘Register’ button for Fingerprint 1 or 2 as required,
Note that two fingerprints - Fingerprint 1 and 2 - (e.g. left & right hand
index finger) can be registered for each ‘User’.
The below screen appears.
Figure 12. CT FP Registration Software - Fingerprint Registration
Place the selected finger on the ‘Enrolment unit’ and
click ‘Start’
While registering/enrolling the dots will be circling
Good Registration of a fingerprint will take about 7
seconds.
Figure 13. FP Registration
Page 15
AG|0510|DS|04|16
SMARTPRO USER MANUAL
14
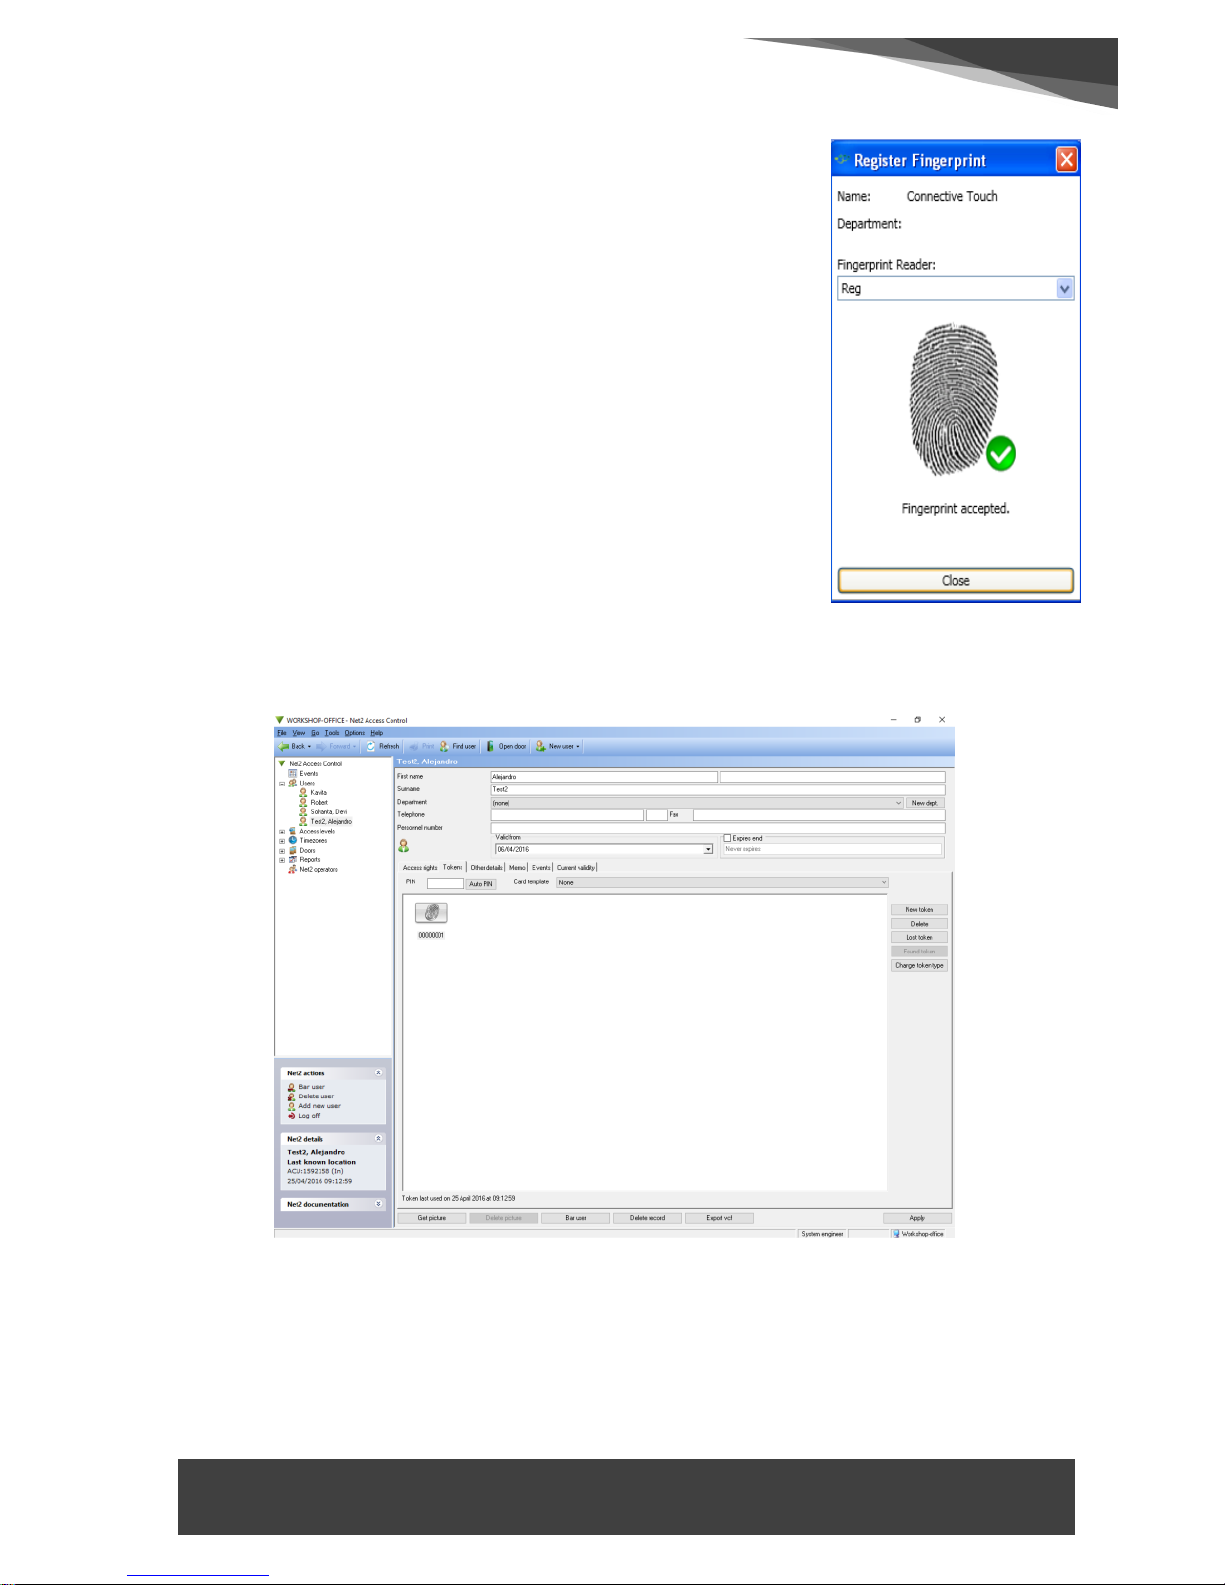
Once the Fingerprint has been accepted
accompanied by a ‘Green tick’,
Click the ‘Close’ tab
Within ‘Net2 Access Control’ under the Users
name, a ‘Token’ will appear.
Fingerprint template / token.
Figure 15. Net2 - User Details – Tokens
Only one numbered Token will appear for a User even if two fingers
have been enrolled.
Figure 14. FP Accepted
Page 16
AG|0510|DS|04|16
SMARTPRO USER MANUAL
15
Once successfully registered / enrolled, details of the FP template will
be stored in ‘NET2 Access Control’ as a ‘Token’ number and in all
SmartPro readers (as TPL/DAT files).
The ‘Token’ type can be changed from ‘Unspecified’ (the Key) to
‘Fingerprint verification card’ (a picture of a fingerprint), by right
clicking on the Key and selecting it or by clicking on ‘Change token
type’.
You will then be asked if you want to ‘Save -Yes/No’- the changes to
that User details.
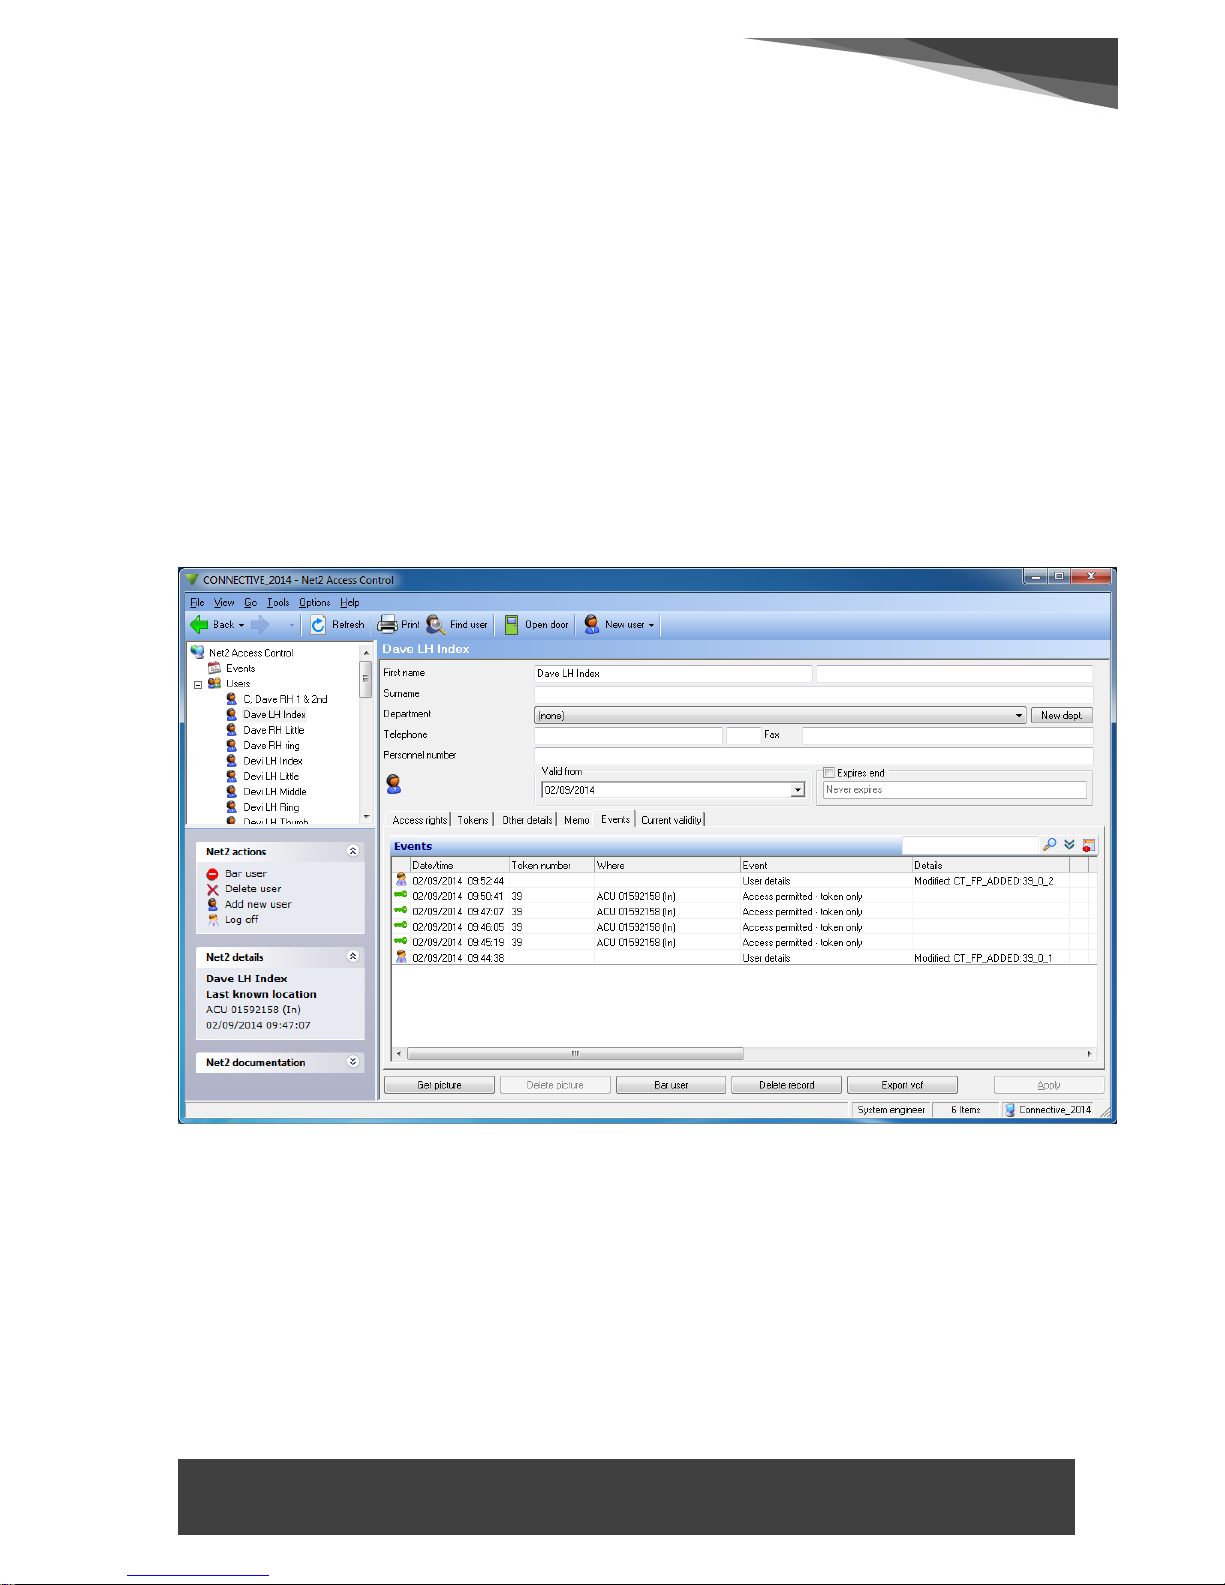
In the ‘Events’ Tab Registration and Access records.
Figure 16. Net2 - User Details - Events
CT_FP_ADDED_xx_x_x: New Fingerprint Registration
CT_FP_REMOVED_xx_x_x: Deleted Registered
Fingerprint.
Page 17
AG|0510|DS|04|16
SMARTPRO USER MANUAL
16
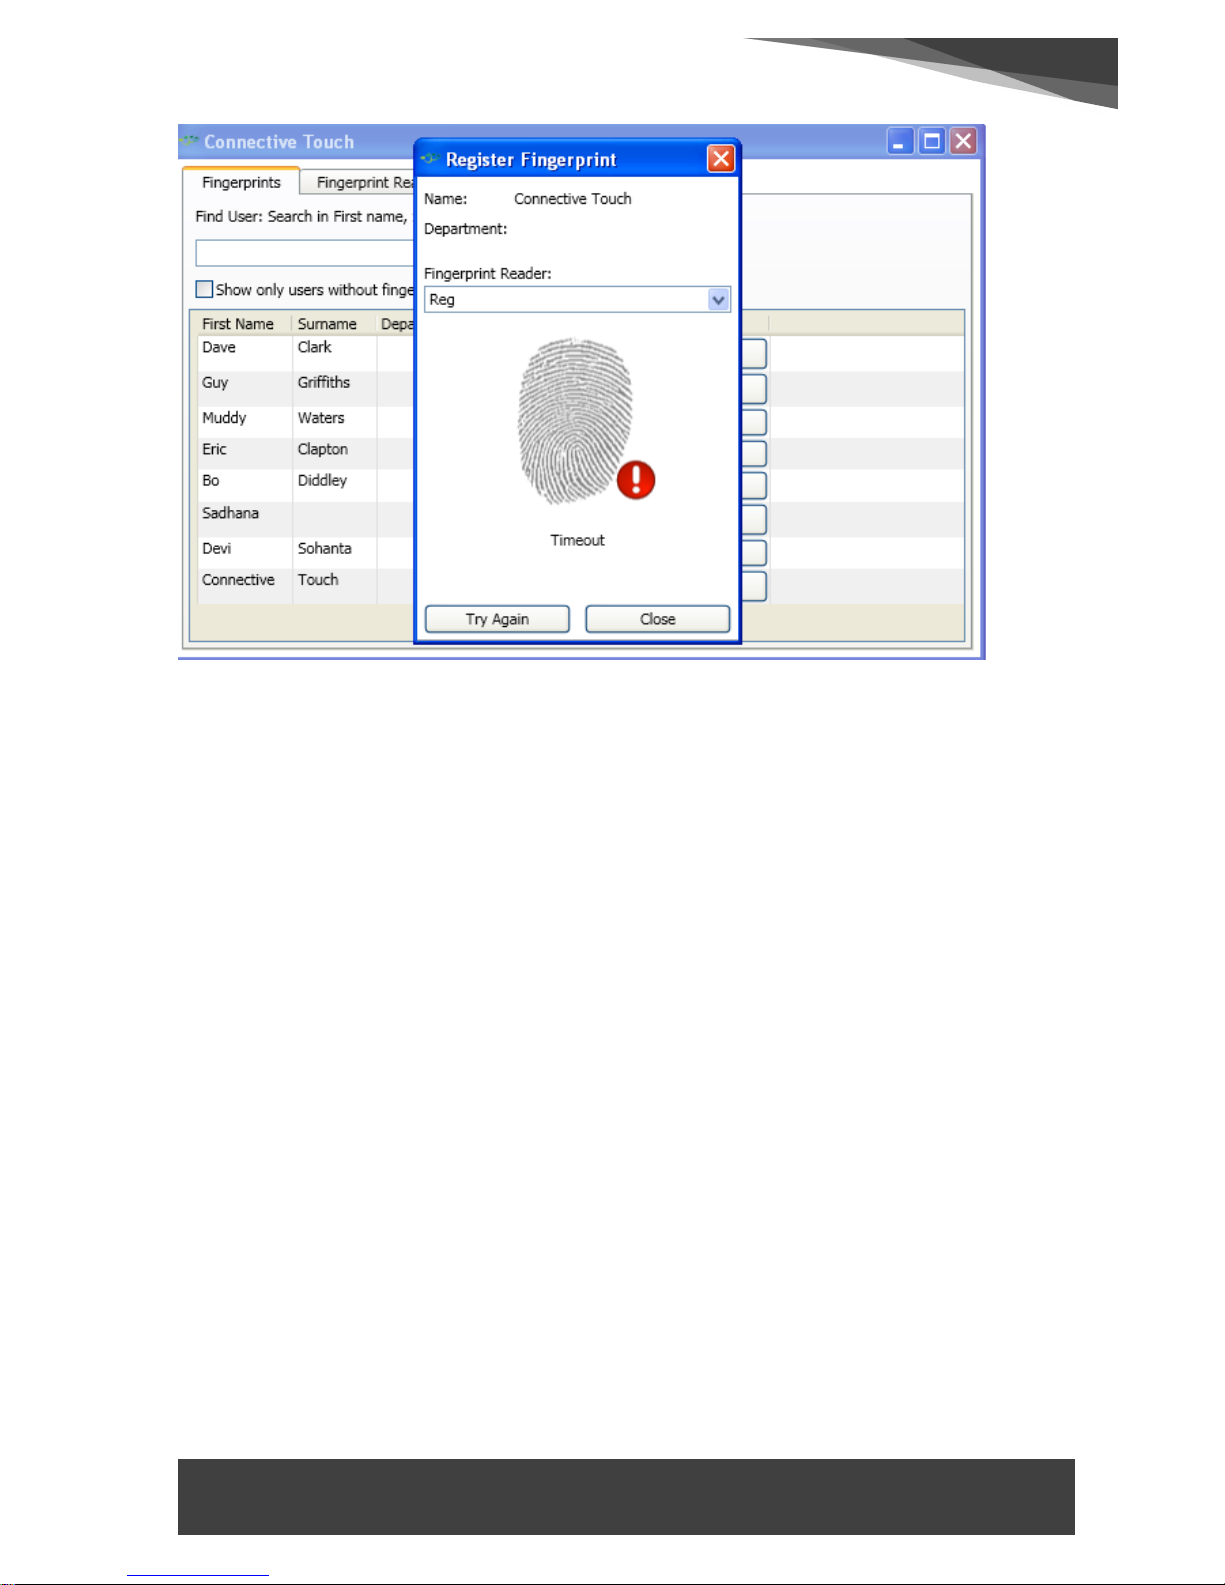
Figure 17. CT FP Registration Software - Timeout
‘Timeout’: delay in trying to register FP could be for various
reasons (e.g. finger moved while registering, delay in putting
finger on registering device) - try again
Once the FPs are registered, all User events are logged in ‘Net2 Access
Control’. This will build into a history of events for both the ‘User’ and
the ‘Doors’
Page 18
AG|0510|DS|04|16
SMARTPRO USER MANUAL
17
Deleting Fingerprint templates (User Token Details)
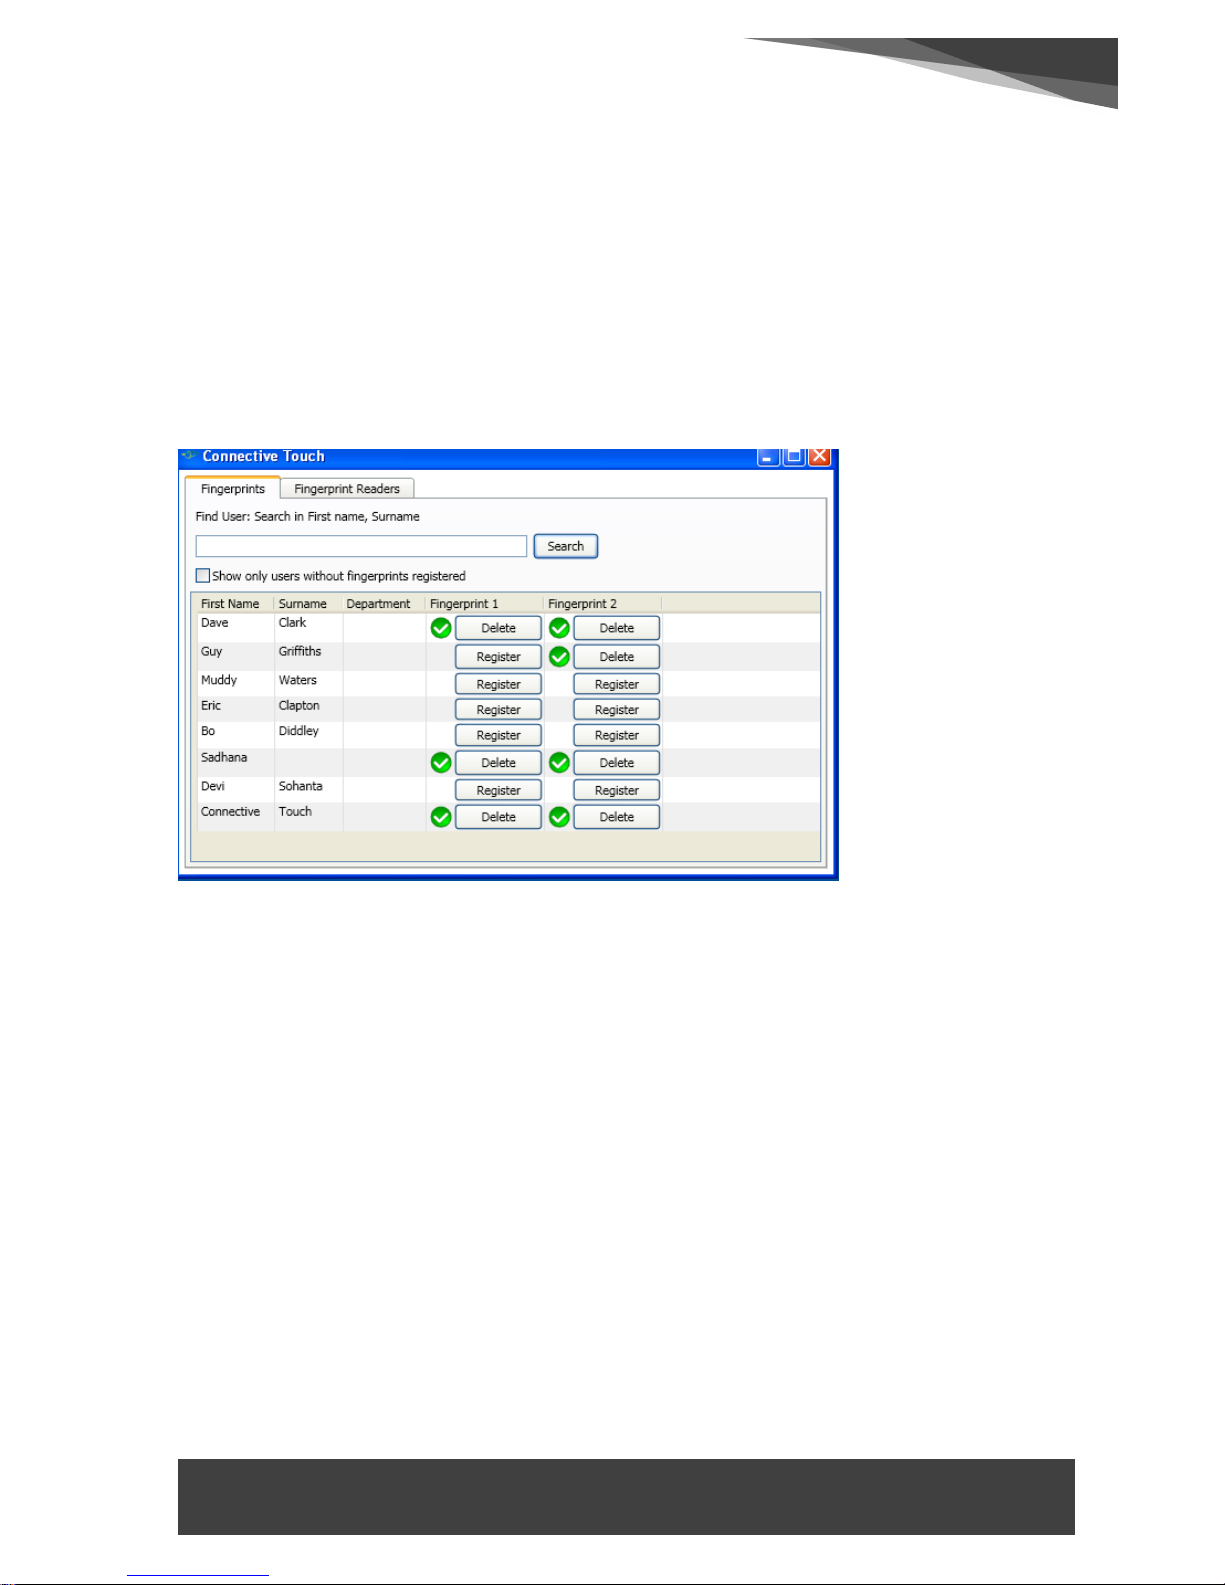
To delete a FP as shown above, log into the ‘Fingerprint Admin’
software and click the ‘Search’ button as shown below a list of all the
Users will be displayed.
Click ‘Delete’ against Fingerprint that needs to be deleted.
Figure 18. CT Fingerprint Registration Software - Users List
Page 19
AG|0510|DS|04|16
SMARTPRO USER MANUAL
18
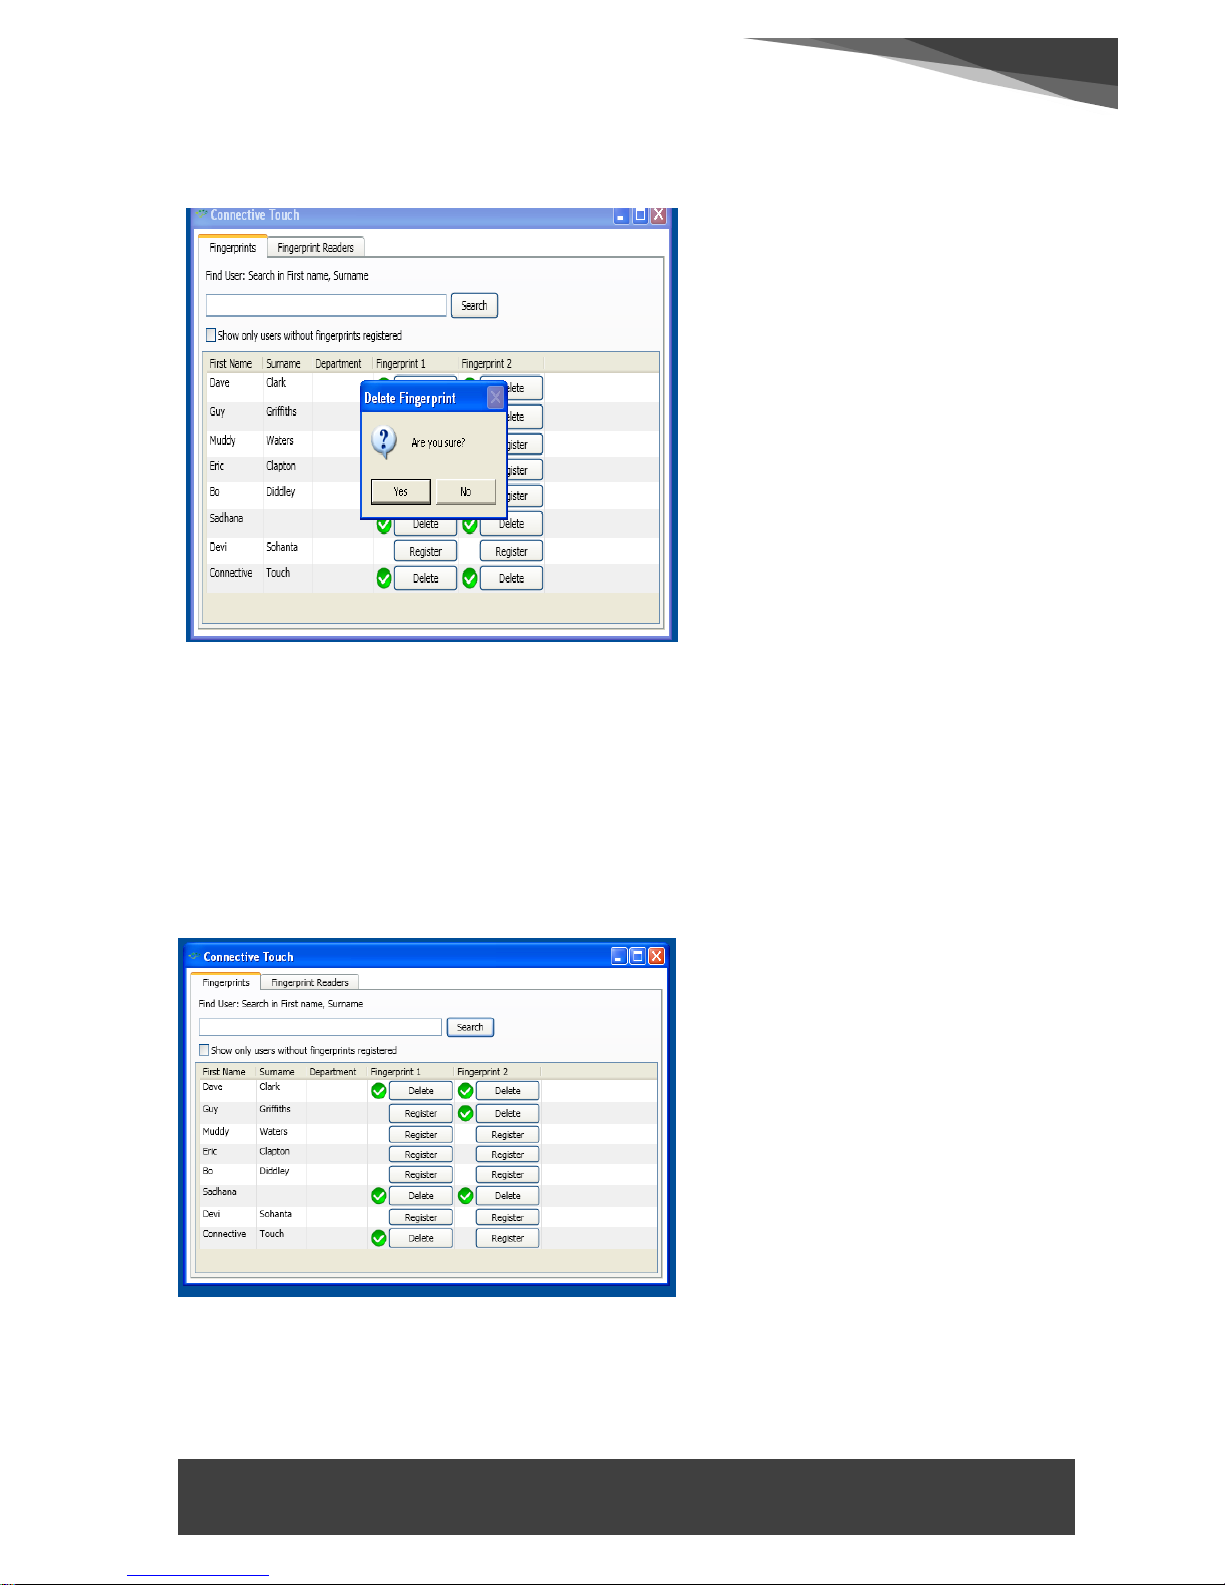
Screen shown below will appear
Figure 19CT FP Registration Software - Delete Registered Fingerprint
Confirmation
Click ‘Yes’ if you are sure you want to ‘Delete’ the fingerprint.
Once Deleted, the below screen will appear with no green tick against
the User name and Fingerprint 1 or 2 and the details will be logged in
‘Net2 Access Control’ ‘Events’ for that User.
Figure 20. CT Fingerprint Registration Software - Users List
Page 20

AG|0510|DS|04|16
SMARTPRO USER MANUAL
19
Connective Touch has a national help desk, manned by the people that
designed and developed Connective Touch, ensuring that all end users
can fully understand the potential of their product and how to maximise
the benefits, safe in the knowledge they can trust the support and advice
they receive.
The help desk provides both technical support and warranty advice,
working in conjunction with you are our approved Connective Touch
support and installation teams.
We are available from 8:30am to 6:00 pm, Monday to Friday. You can
email at any time [email protected] and a
response will be made within 24 hours.
Connective Touch
31 Loudon Avenue, Coundon, Warwickshire CV6 1JN
Tel: +44 (0) 24 7626 9035
Email: [email protected]
Web: www.connectivetouch.com
 Loading...