

Page 1
WARLORD MOUSE
USER MANUAL
Page 2
1 System Requirements
Microsoft Windows
PC with a built-in USB port
Optical drive
50 MB free disk space
2 Installation
1. Install a software from CD included in package contents or download it from http://
www.connectit.cz/wp-content/uploads/2014/12/ci-390-software.zip.
2. Open the driver folder and launch the setup.exe le.
3. Click “Next ”.
4. Click “Finish” to nish installation.
5. Plug the WARLORD MOUSE into your computer and wait for succesful nish of the
driver installation.
Note: For use with UEFI BIOS equiped motherboards is necessary to „Disable“ xHCI in USB
settings.
3 Software
Basic Settings
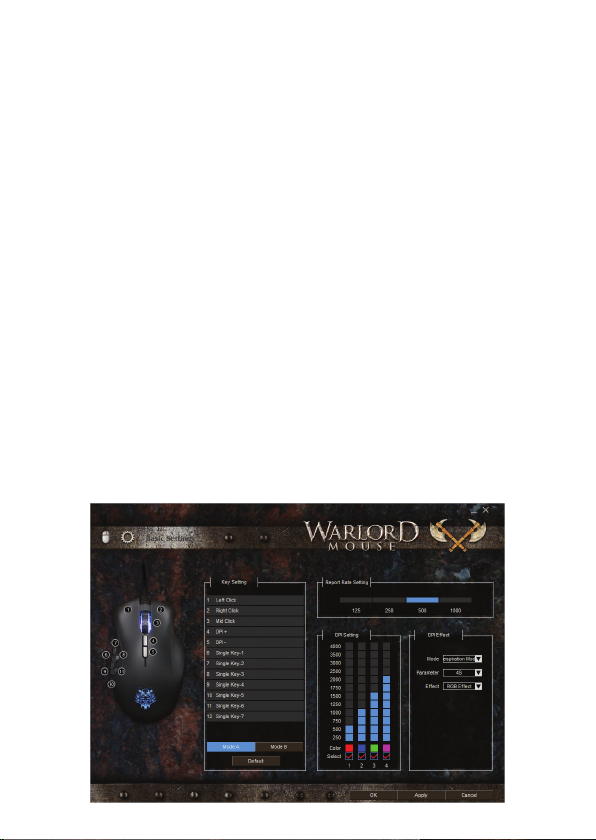
Basic Settings is the opening screen of the included software for the Warlord mouse. Here,
you can assign various functions to keys (see the Key Settings table), set DPI values in four
levels, backlight, report rate (the higher the better).
Page 3

Key Setting
Left Click Left Click
Right Click Right Click
Mid Click Mid Click
Forward Forward
Backward Backward
Triple-click Left triple click
DPI Switch (+/-/Loop) DPI switching (increase, decrease, loop)
RGB On/O Backlight on/o
Windows Launching a multimedia player, an e-mail client, calculator,
Multimedia Next/previous track, stop, play/pause, mute, volume
Fire Key Simulates repeated pressing of a key (the key has to be
Single Key Keystroke assignment
Combo Key Shortcut assignment
Macro Key Macro assignment, the macro needs to be rst recorded
Shift Switching between the settings of Mode A and B keys
Key O Switching o a key
Report Rate Setting
Sets the frequency of the mouse to sense commands. The higher the value, the shorter
response time to commands.
DPI Setting
Enables setting four levels of resolution from 250 to 4000 DPI, backlight color (Color), or
the level can be switched o/on if required (Select).
explorer etc.)
increase/decrease)
selected from a list), speed and number of repetitions can
be set
on the screen “Advanced Settings”
Page 4
DPI Eect
Standard mode Mouse continuously lit
Respiration mode Backlight slowly lights and goes out, the speed of the cycle can be
Neon mode Mouse ashing, cycle speed can be regulated using a parameter
regulated using a parameter
Advanced Settings
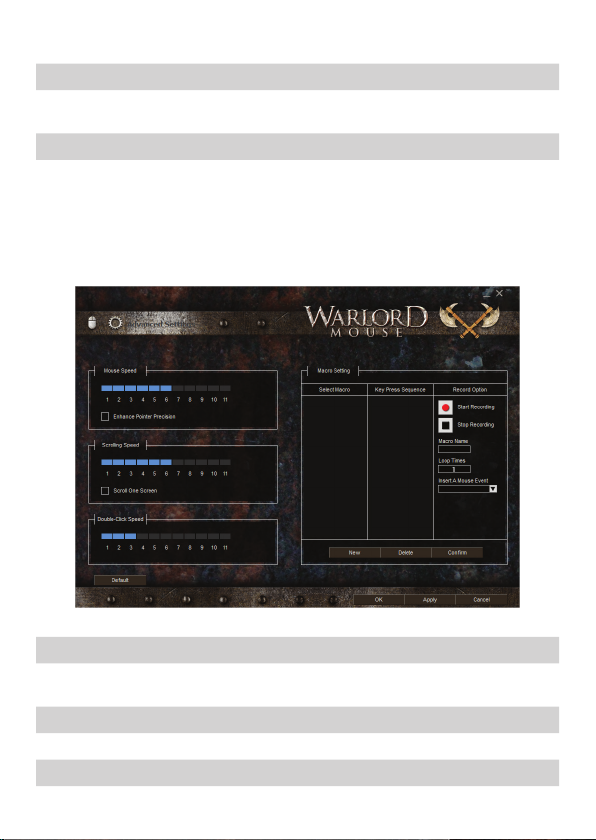
Advanced Settings can be accessed via the gear icon in the top left corner of the application. Here, you can set response, scroll wheel speed, double-click speed, and you can
record macros.
Mouse speed Response
Enhance precision of the
pointer
Scrolling speed Scroll wheel speed
Scroll one screen Move by one page
Double-click speed Double-click speed
Enhance precision of the pointer
Page 5

Macro Setting
Macro is a record of keys that are pressed on a keyboard during its recording. It is used to
facilitate simple repeated tasks (such as retrieving magic in a game etc.).
Recording
1. Enter the name of the macro in the eld below the buttons “Start recording” and “Stop
recording”
2. Set the number of repetitions
3. Click “start recording”
4. Press the keys that you want to record in the macro (use “Insert a mouse event” to
insert a mouse action)
5. Press “Stop recording”
6. Assign the macro to a selected key in “Basic Settings”
 Loading...