

Connect IO PS302SS00 Installation Instructions Manual

1
Installation Instructions
Part No. 101206
Model PS302SS00 Professional Series
Refrigerated, Internet Controlled
30” Electric Built-In Double Wall Oven
2
Before You Start
3
Electrical Requirements
3
Internet & Network
4
Product Dimensions
5
Cabinet Dimensions
6
Cabinet Requirements
7 - 14
Installation Steps & Final Checklist
15
Cleaning Your Oven
15
More Information
15
Customer Service
IMPORTANT: Read and Save These Instructions
INSTALLER: LEAVE THESE INSTRUCTIONS WITH THE HOME OWNER.
HOME OWNER: KEEP THESE INSTRUCTIONS FOR LOCAL ELECTRICAL INSPECTOR’S USE AND FUTURE REFERENCE.

2
Designed and manufactured in the USA with pride by TMIO, LLC • Chattanooga, TN • US toll-free +1.800.881.TMIO (8646) • www.tmio.com
Connect IoTM, Intelligent OvenTM, Intelligent OvensTM, Green CleanTM, and TMIO® are registered trademarks of TMIO, LLC.
BEFORE YOU START
CAUTION: Oven is heavy. Use care in handling.
Proper Installation is your responsibility. Ensure
the oven is electrically connected by a qualified
electrical installer and conforms with the National
Electrical Code, ANSI/NFPA 70 - latest edition, or in
CANADA, Canadian Electrical Code, CSA C22.11982 and C22.2 No. 01982 - latest edition.
Potential fire or burn hazard exists if cabinets above
the oven are used for storage.
Do not use this appliance for space heating.
We STRONGLY RECOMMEND running CAT5 cable to
where the back of the oven will be located.
Observe all governing codes and ordinances.
Do not remove permanently affixed labels,
warnings, or plates from the oven! These are
important for your safety.
Always disconnect the electrical supply to the
oven before servicing.
Electrical Preparation: Drill a 1” diameter hole
(or larger) in the top left rear corner of the oven
cabinet and/or sheet rock to enable the 4-wire
oven electrical cord to pass through the cabinet,
and connect to the household electrical supply.
See Cabinet Dimensions (page 5) for details.
You can be seriously
injured if you don’t follow
the instructions in this
manual before you start.
TOOLS NEEDED
•Phillips Screwdriver
•Qty. 8 Phillips Mounting Screws
PARTS SUPPLIED
This is a safety alert. Always read and obey all
safety messages. This symbol warns you of potential
hazards that can hurt or kill you and others.
This is an information symbol and indicates
additional detailed instructions in this manual.
Ensure that the oven is properly grounded. See
Electrical Requirements (page 3) and Installation Steps:
Step 3. Electrical Connections (page 9) for details.
Required cabinet cutout width is 28 5/8” (72.7 cm).
Required cabinet cutout depth is 24” (60.9 cm).
Oven support surface should be flat, level, and be
able to support a weight greater than 575 pounds
(261 kg).
Recessed installation area must provide
complete enclosure surrounding the recessed
portion of the oven.
Oven location should be away from strong draft
areas (windows/doors) and strong heating vents.
SPECIAL SYMBOLS
!
i
!
!
!
!
3
3
3
3
3
3
3
3
3
3
WARNING!
!
3
ELECTRICAL REQUIREMENTS
The Connect Io Intelligent Oven requires a
separate, grounded 4-wire, 240V (AC), 50 Amp
service with its own circuit breaker.
Wire sizes and connections must conform with the
rating of the appliance and to the requirements
of the National Electrical Code, ANSI/NFPA 70
- latest edition, or Canadian Electrical Code, CSA
C22.1-1982 and C22.2 No. 01982 - latest edition,
and all local codes and ordinances.
Oven must be connected to the proper
electrical voltage and frequency as specified
on the model/serial rating plate (located
behind the louvered refrigeration panel).
Oven must be connected to grounded metal
permanent wiring system. Check with a
qualified electrician to make sure the oven is
properly grounded.
Do not ground to a gas pipe.
Do not use an extension cord with this
appliance, because this may result in
electrical shock or other personal injury.
This unit is equipped with a No. 10 ground wire in
the conduit.
The electrical conduit must be kept to the top left
for a flush installation. Never cut the conduit.
Connect the flexible armored cable directly
to 4-wire, 240V household service. If codes
permit and separate grounding wiring is used,
we recommend that a qualified electrician
determine the grounding path and that the wire
gauge is in accordance with local codes.
Junction boxes installed on rear wall behind oven
must be recessed and located at the upper left-
hand corner of the cabinet.
A UL-Listed conduit connector must be provided
at the junction box.
Do not install a fuse in the neutral or grounding
circuit. We recommend a time-delayed fuse or
circuit breaker. Connect directly to the fused
disconnect (or circuit breaker box) through
flexible armored, or non-metallic sheathed,
copper cable (with grounding wire).
3
3
3
3
3
3
3
3
3
3
3
3
INTERNET & NETWORK
Electrical Specifications:
• Maximum Amp Usage: 46.7A
• Preheat Rating: 5300W
• Broil Element Rating: 3300W
• Baking Element Rating: 2000W
• Convection Element Rating, 1650W
IMPORTANT if location
utilizes aluminum wiring:
• Connect the aluminum
wiring to the copper wire using
special connectors designed
and UL listed for joining
aluminum to copper.
• Aluminum/copper
connection must conform
with local codes and industr y
accepted wiring practice.
A broadband (DSL or cable modem) Internet
connection is required. Dial-up Internet services
are not supported.
The oven either can be connected to a home
network or connected directly to an Internet Service
Providers’ (ISP’s) network box inside the home.
We recommend running a CAT5 cable to
the back of the oven, where a RJ45 network
connector is mounted.
NOTE: If the oven is not
connected to the Internet, it will
still cook and refrigerate, but all
connections to outside the home
will be unavailable.
The oven’s RJ45 connector enables direct hardwiring either ethernet or wireless bridge connections.
The oven will configure its settings via DHCP
automatically. If your network environment is not
configured to handle DHCP, you must manually
configure the oven Internet settings by entering:
(1) the IP address, (2) network mask, (3) the
gateway IP address, and (4) DNS ser ver address.
3
3
3
3
3
i
i
4
Designed and manufactured in the USA with pride by TMIO, LLC • Chattanooga, TN • US toll-free +1.800.881.TMIO (8646) • www.tmio.com
Connect IoTM, Intelligent OvenTM, Intelligent OvensTM, Green CleanTM, and TMIO® are registered trademarks of TMIO, LLC.
PRODUCT DIMENSIONS
APPROXIMATE SHIPPING WEIGHT:
575 lbs / 261 kg
REFRIGERATION:
Refrigeration ductwork is located at
the rear of the oven and must not be
damaged during installation.
INTERNET HOOKUPS:
RJ45 (CAT5/Ethernet) network
connection is located at the rear
of the oven. If a wireless bridge
connection is preferred, or if local
routers or adaptors are used, then
use the 2-socket 120V electrical
outlet provided.
ALIGNMENT:
Align the oven front with the
cabinet front during installation.
Make sure the vertical axis of the
oven front is parallel with the vertical
axis of the cabinet.
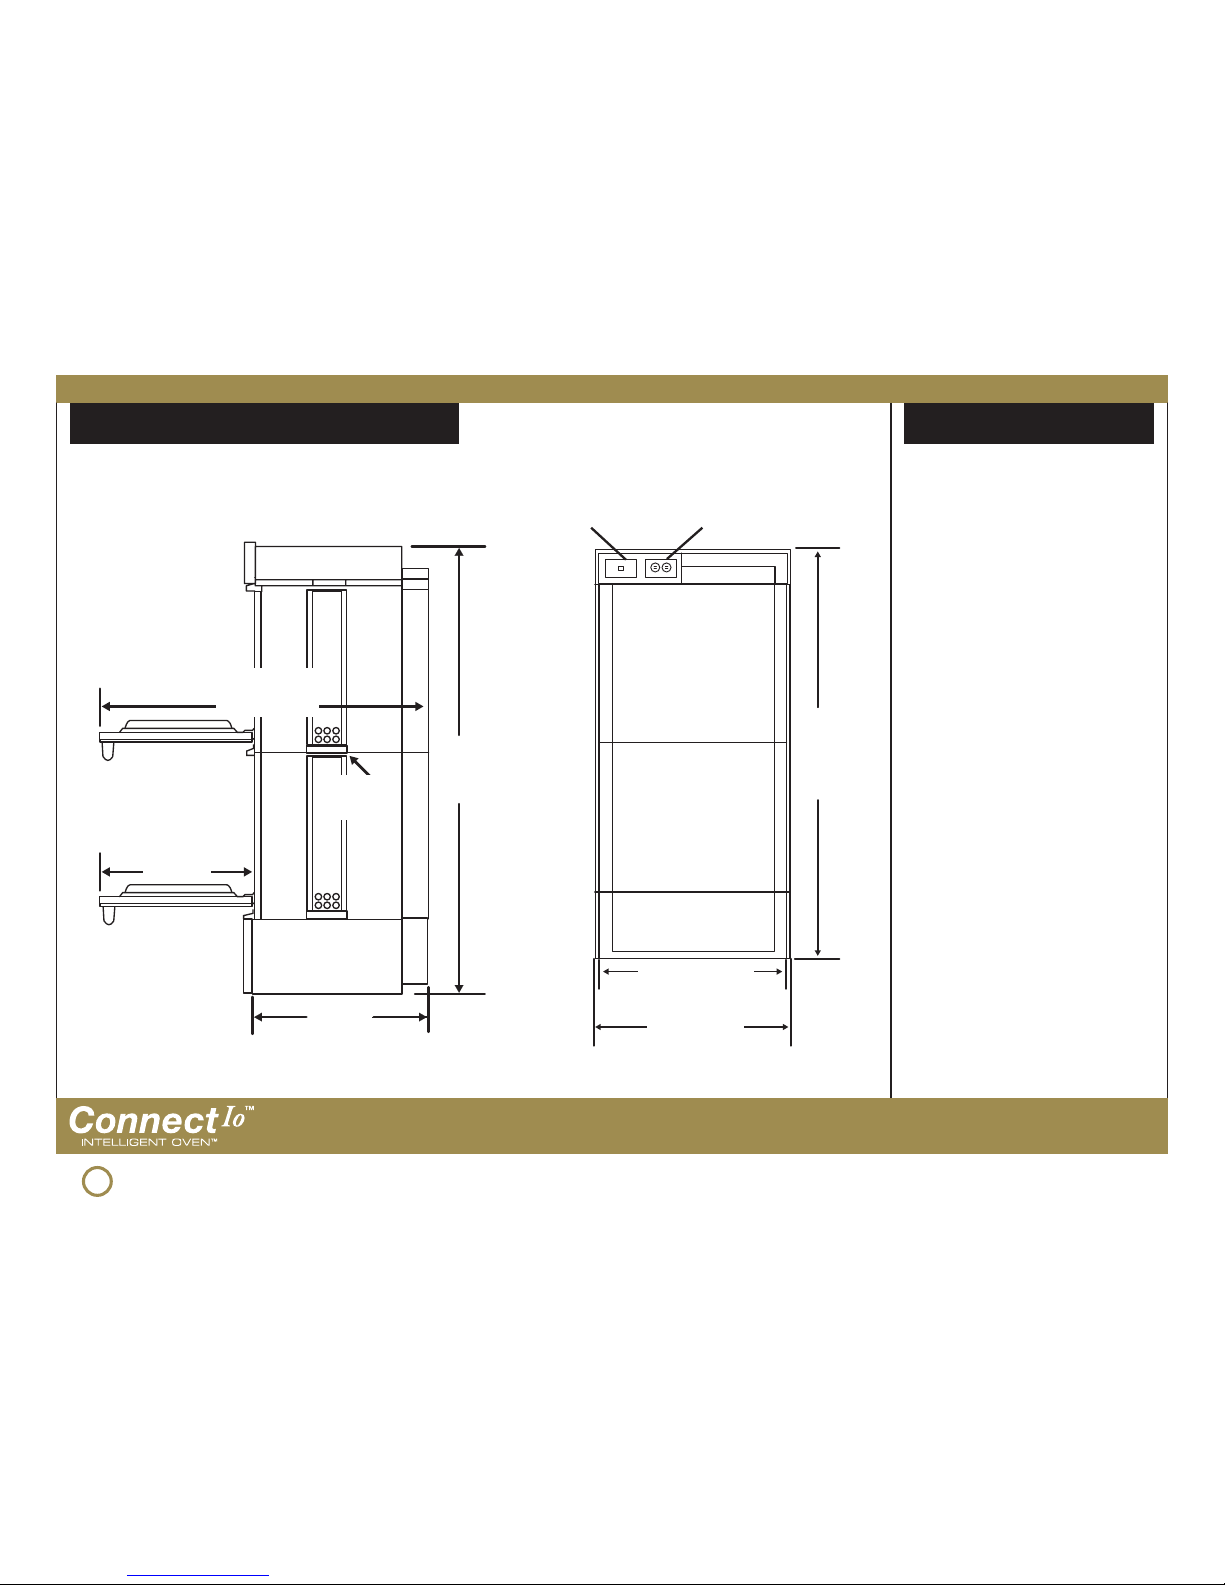
Quick Reference
Oven Right Side View
Oven Rear View
Door extends
44 1/2” (113 cm)
from oven rear
Door extends
21” (53.3 cm)
from cabinet
face
59 3/8”
(150.8 cm)
recessed
height
23 1/2”
(59.7 cm)
recessed
depth
28 1/2” (71.4 cm)
recessed width
120V outletsRJ45 network jack
61”
(154.9 cm)
overall
height
Internal
hand grip for
installation
30” (76.2 cm)
overall width
5
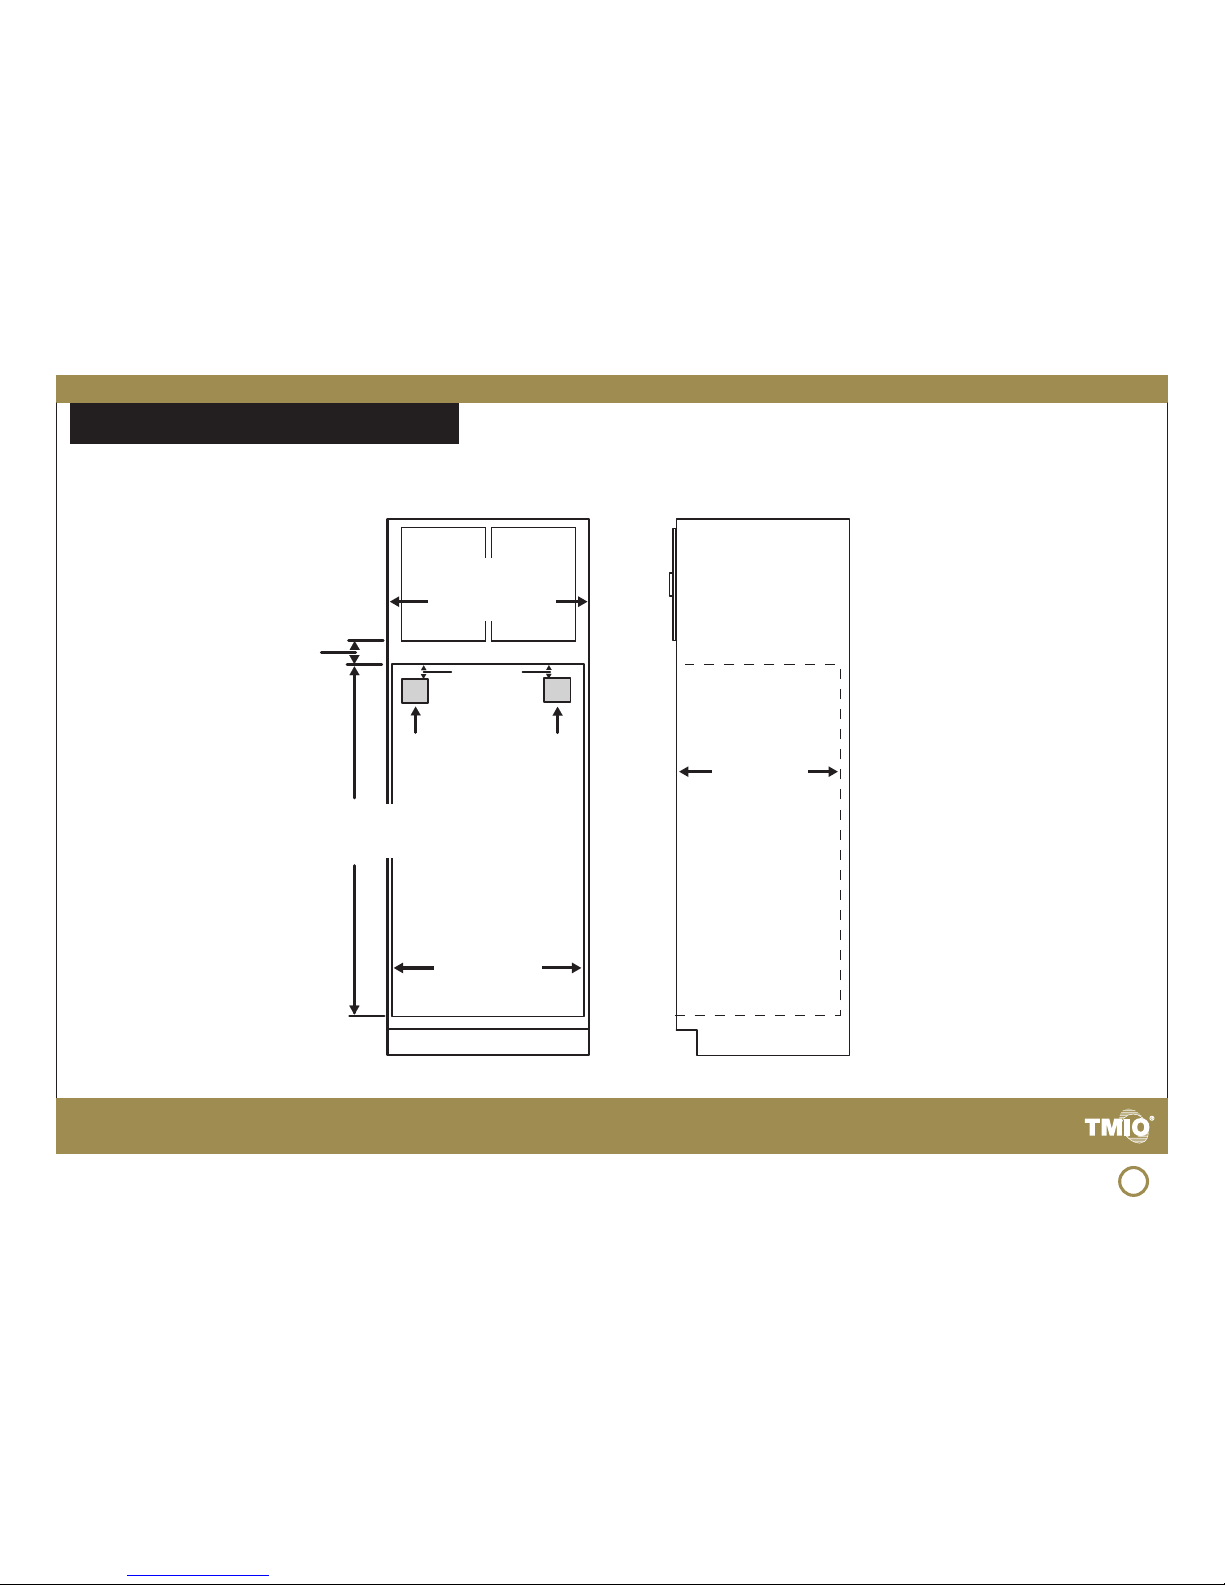
CABINET DIMENSIONS
Cabinet Front View Cabinet Side View
30” (76.2 cm) min.
cabinet width,
33” (83.8 cm)
recommended
2” (5.1 cm)
top of cutout to
bottom of upper
cabinet door
60 1/2” (153.7 cm)
cutout height
28 5/8” (72.7 cm)
cutout width
Recommended
electric cutout
2” (5.1 cm) from
cabinet top
2” (5.1 cm)
from cabinet
top
Recommended
RJ45 cutout
2” (5.1 cm) from
cabinet top
24” (60.9 cm)
cutout depth
 Loading...