

Conklin FS CDN remote control User Manual

release 5.5

XIT the Hometown Folks!
Unlimited Local Phone
Unlimited Long Distance
High Speed Internet and IPTV
Regional Directory
Bundle ‘N’ Save – come by our office to
select a service package just for you!
IPTV from XIT
High Definition TV
Digital Video Recorder (DVR)
Video on Demand (VOD)
And much more!
www.xit.net
XITv Channel 1
Local Advertising and Information
Advertise your Business, Garage Sale,
Fundraiser, Special Occasion or
Community Event. Contact XIT for
more information on how to benefit
from using our Local Advertising
Channel.

Contents
CCoonntteennttss
Remote Control Functions ............................................. iii
1. Initial Startup ............................................................. 1
PPrrooggrraamm tthhee rreemmoottee ccoonnttrrooll ...............................................
VVaalliiddaattee tthhee sseett--ttoopp bbooxx ...................................................
LLoogg iinn .......................................................................................
2. Basic TV Controls ........................................................ 4
CChhaannggee tthhee cchhaannnneell ...............................................................
VViieeww CCuurrrreenntt CChhaannnneell IInnffoorrmmaattiioonn ...................................
SSeett FFaavvoorriitteess .........................................................................
VViieeww tthhee CChhaannnneell GGuuiiddee .......................................................
AAuuttoottuunnee ...................................................................................
SSeeaarrcchh ffoorr pprrooggrraammss .............................................................
AAcccceessss mmeennuuss ...........................................................................
GGeett hheellpp ...................................................................................
LLoogg oouutt .....................................................................................
.....................................................................................................
.....................................................................................................
.....................................................................................................
.....................................................................................................
............................................................................................. 44
.....................................................................................................
.....................................................................................................
.....................................................................................................
.....................................................................................................
.....................................................................................................
.....................................................................................................
.....................................................................................................
........ 2
............................ 3
........ 4
.................... 5
.. 6
........................ 7
........ 8
.......... 110
.................... 110
...................... 111
1
1
2
3
4
5
6
7
8
0
0
1
3. Optional Menu Features ........................................... 12
WWeeaatthheerr .....................................................................................
AAlleerrttss .......................................................................................
.....................................................................................................
.....................................................................................................
.......................... 113
.................. 112
2
3
4. “My Services” Options .............................................. 14
TTeelleepphhoonnyy .................................................................................
MMeessssaaggeess ...................................................................................
CChhaatt ...........................................................................................
.....................................................................................................
.....................................................................................................
.....................................................................................................
........................ 116
................ 114
................ 115
4
5
6
5. Set Preferences ......................................................... 19
FFaavvoorriittee CChhaannnneellss .................................................................
MMeennuu LLaanngguuaaggee .........................................................................
CChhaannnneell SSeettttiinnggss ...................................................................
AAppppeeaarraannccee ...............................................................................
SSeett--ttoopp bbooxx SSeettuupp .................................................................
.....................................................................................................
.....................................................................................................
.....................................................................................................
.....................................................................................................
.....................................................................................................
........ 220
...... 220
.......... 220
.............. 221
........ 222
0
0
0
1
2
6. Paid Programming (PPV, PPB) ................................. 23
PPaayy ppeerr VViieeww ...........................................................................
PPaayy ppeerr BBlloocckk .........................................................................
.....................................................................................................
.....................................................................................................
.............. 223
.............. 224
3
4
i

Contents
7. Video on Demand (VOD) .......................................... 25
RReenntt aa VViiddeeoo oonn DDeemmaanndd mmoovviiee ...........................................
NNaavviiggaattee iinn aa VViiddeeoo oonn DDeemmaanndd mmoovviiee .............................
....................................................................................... 2255
................................................................................. 2288
8. Recorded Programs .................................................. 29
RReeccoorrdd aa pprrooggrraamm oorr sseerriieess ...............................................
VViieeww aa rreeccoorrddeedd pprrooggrraamm .....................................................
RReemmoovvee oorr ssttoopp rreeccoorrddiinnggss .................................................
MMaannaaggee MMyy DDVVRR .........................................................................
.....................................................................................................
................................................................................................. 22
...................................................................................................
................................................................................................. 33
332
.. 334
9
9
2
3
3
4
9. Account Services ...................................................... 37
AAcccceessss tthhee AAccccoouunntt mmeennuu .....................................................
CChhaannggee MMaannaaggeerr UUsseerr’’ss ppaasssswwoorrdd .......................................
AAccttiivvaattee PPIINN PPrrootteeccttiioonn .....................................................
CCrreeaattee aa uusseerr .........................................................................
SSeett ppaarreennttaall ccoonnttrroollss ((LLoocckkss)) .........................................
PPuurrcchhaassee ssuubbssccrriippttiioonn ppaacckkaaggeess .......................................
MMaannaaggee SSuubbssccrriippttiioonnss ...........................................................
MMaannaaggee uusseerr aaccttiioonnss .............................................................
SSeett AAuuttoollooggiinn .........................................................................
VViieeww ssuubbssccrriibbeerr ddeettaaiillss .....................................................
VViieeww bbiilllliinngg aaccttiivviittyy .........................................................
.....................................................................................................
.....................................................................................................
.....................................................................................................
............................................................................................... 3377
................................................................................... 3388
.....................................................................................................
.............. 440
...................................................................................................
......................................................................................... 4444
.....................................................................................................
.....................................................................................................
.............. 448
.....................................................................................................
.............. 449
.... 338
442
446
.. 447
.... 448
8
0
2
6
7
8
8
9
TV Brand Codes .............................................. .............. 50
Index ............................................................................ 54
Technical Support .................... Error! Bookmark not defined.
IInnttrroodduuccttiioonn
The set-top box is your gateway to the Full-Service Content Delivery
Network (fs|cdn
This manual is your guide to accessing these services through the
remote control unit.
Favorite Channels
Video on Demand (VOD)
Pay per View (PPV)
DVR
Parental Locks
Chat TV
Caller ID alert
®
) interactive television service including
Remote Control Functions
moottee CCoonnttrrooll FFuunnccttiioonnss
RReem
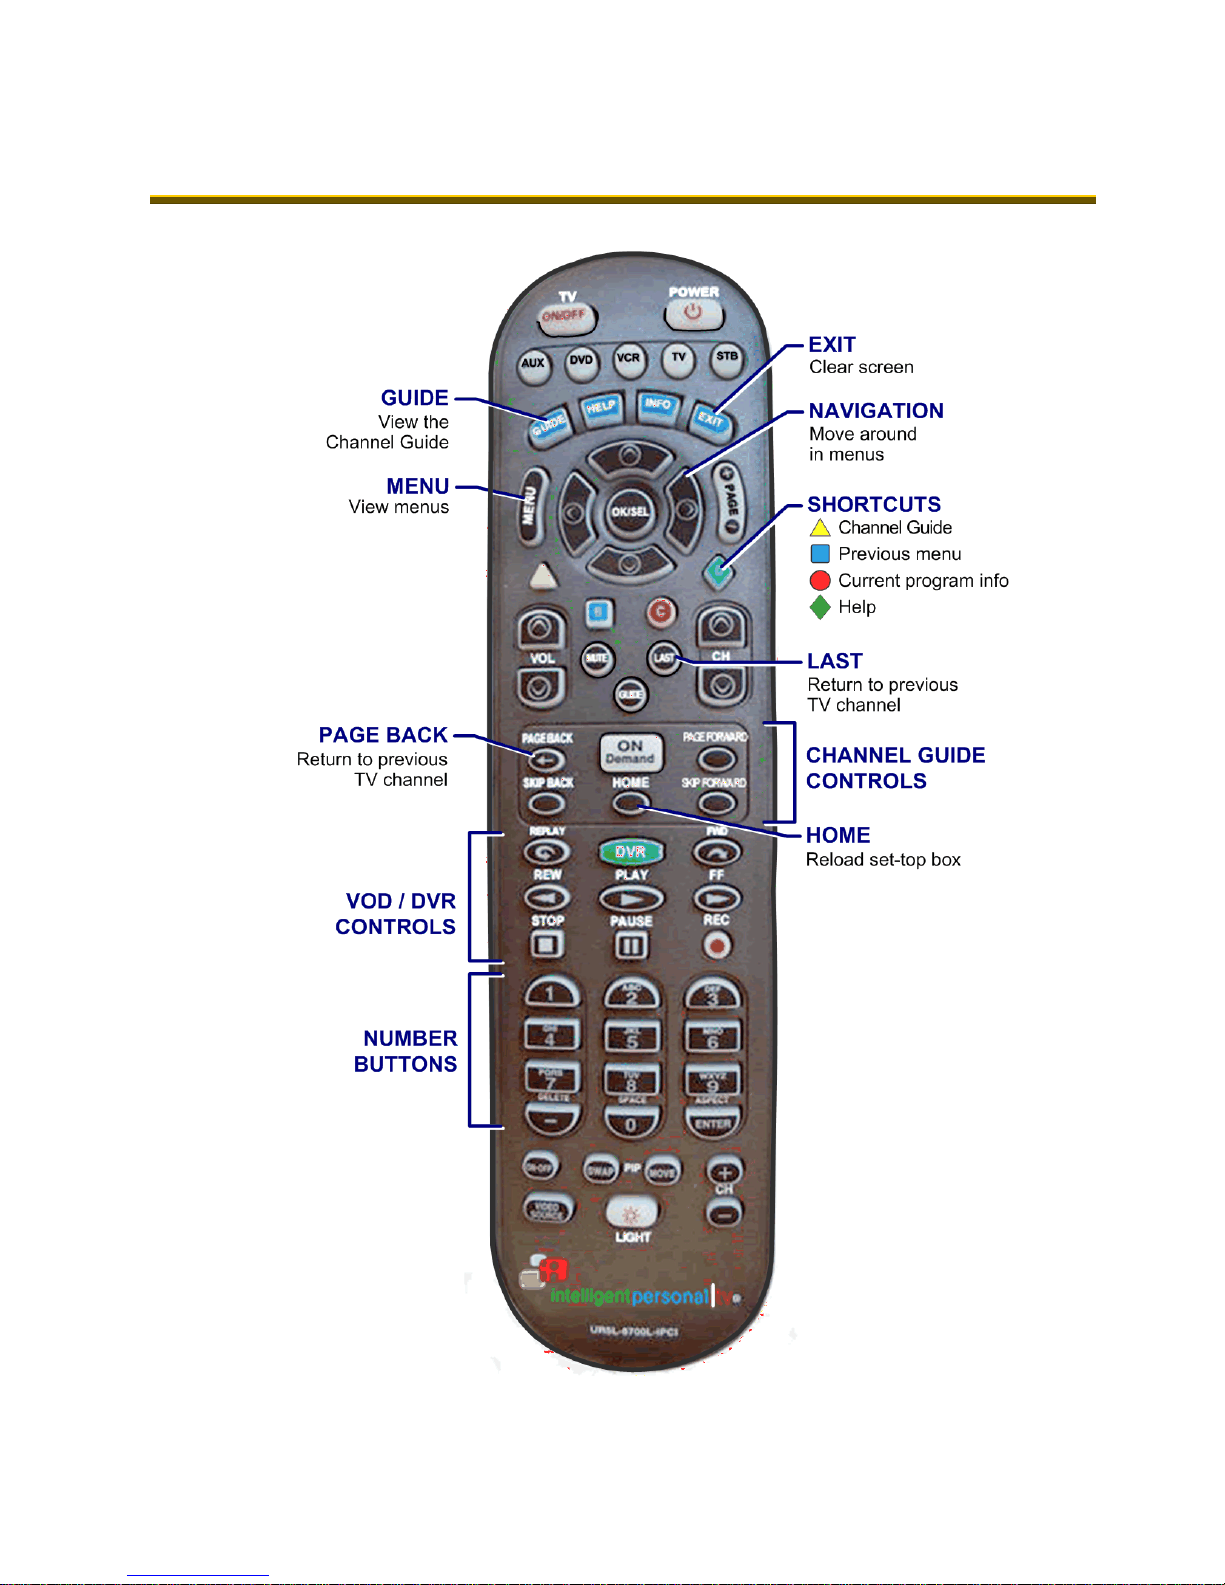
Remote Control
iii
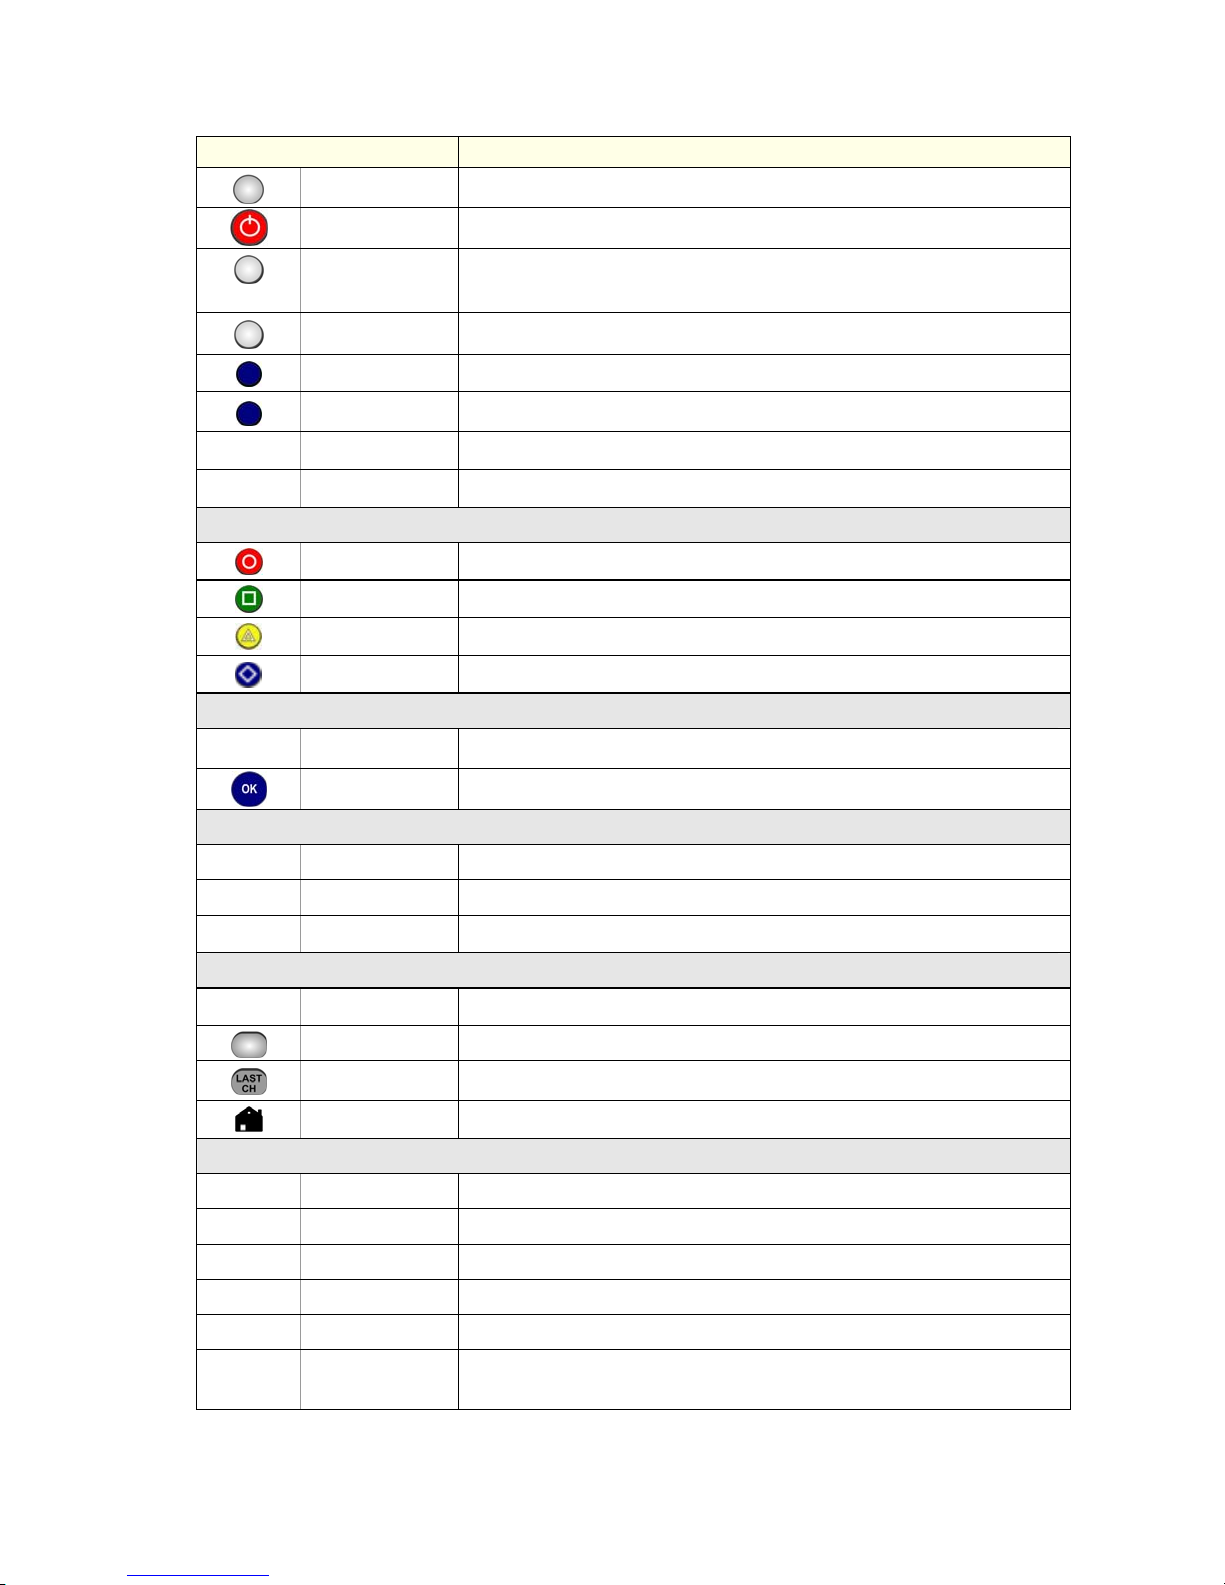
Remote Control Functions
Button Function
MUTE Mute the volume. Press again to resume previous volume setting.
POWER Put set-top box in/out of Standby mode.
AV, AUX, TV
STB Activate the set-top box (STB) mode on the remote control.
GUIDE Display the interactive Channel Guide.
MENU Display the Main Menu.
+ / – VOL Raise or lower TV volume.
+ / – CH Switch the channel number up or down.
SHORTCUTS
Program Info Display current program information.
Help Display fs|cdn Help.
Channel Guide Display the interactive Channel Guide and Favorites.
Previous Menu Display previous menu or window.
MENU NAVIGATION
Activate alternate modes on the remote control. Program these
buttons with Wegener Operating Instructions.
CHANNEL GUIDE CONTROLS
NUMBER BUTTONS
1, 2...0 number Select channel or enter login password.
VOD / RECORDED PROGRAM CONTROLS
►
Pause Pause the video. (Press ► to resume where you paused.)
arrow Navigate among selectable items on the screen.
OK Select a highlighted item. Scroll through options.
Pg Up/Down Display previous/next group of channels.
Pg Back/Fwd Display previous/next time period. Pg Back clears last channel number.
Rewind/Fast Fwd Jump to previous/next day.
Exit Clear the menu or screen.
LAST CH Return to previous TV channel.
Home Reload the set-top box.
Play Play v i deo. Resume normal play from Rewind, Fast Fwd, or Pause.
Stop Stop the video.
Record Record program to a digital video recorder.
Rewind Move video backward.
Fast Fwd Move through video quickly. Press repeatedly to increase speed. (In
Channel Guide, display next day.)

1. Initial Startup
11.. IInniittiiaall SSttaarrttuupp
When you connect power to your set-top box for the first time, you’ll
configure the set-top box and log in to fs|cdn.
IMPORTANT: Do not disconnect power to the set-top box until Startup
is complete. This will take up to 10 minutes. During this time the settop box will shut down and start up again, lights may flash or blink,
and messages will appear on your TV screen.
Startup is complete when the Welcome screen on your TV screen
prompts you for your password (see “Log in” on page 3).
Follow the instructions below to set up your system.
PPrrooggrraamm tthhee rreemmoottee ccoonnttrrooll
Before you can use the remote control, you’ll need to program it for
your TV brand.
Determine the brand of your TV (for example, Sony).
1
Find the brand in the list in “TV Brand Codes,” on page 50.
2
If you can’t find your TV brand in the list, try using the
code for a common brand (such as RCA or Samsung).
Simultaneously press and hold down the TV and OK buttons on the
3
remote until the
Use the number keys to enter the first 3-digit brand code listed for
4
the TV manufacturer.
If the TV button flashes rapidly for a second and
then stays lit, it means the remote doesn’t
recognize the brand code you entered. Enter the
next code listed for this brand, and continue down
the list until one works.
Verify that the (POWER) and VOL buttons work.
5
Continue with “Validate the set-top box” on the next page.
6
TV button stays lit.
1

1. Initial Startup
VVaalliiddaattee tthhee sseett--ttoopp bbooxx
Install the set-top box according to the installation manual.
1
Connect the AC power and wait a moment for the screen to
2
activate.
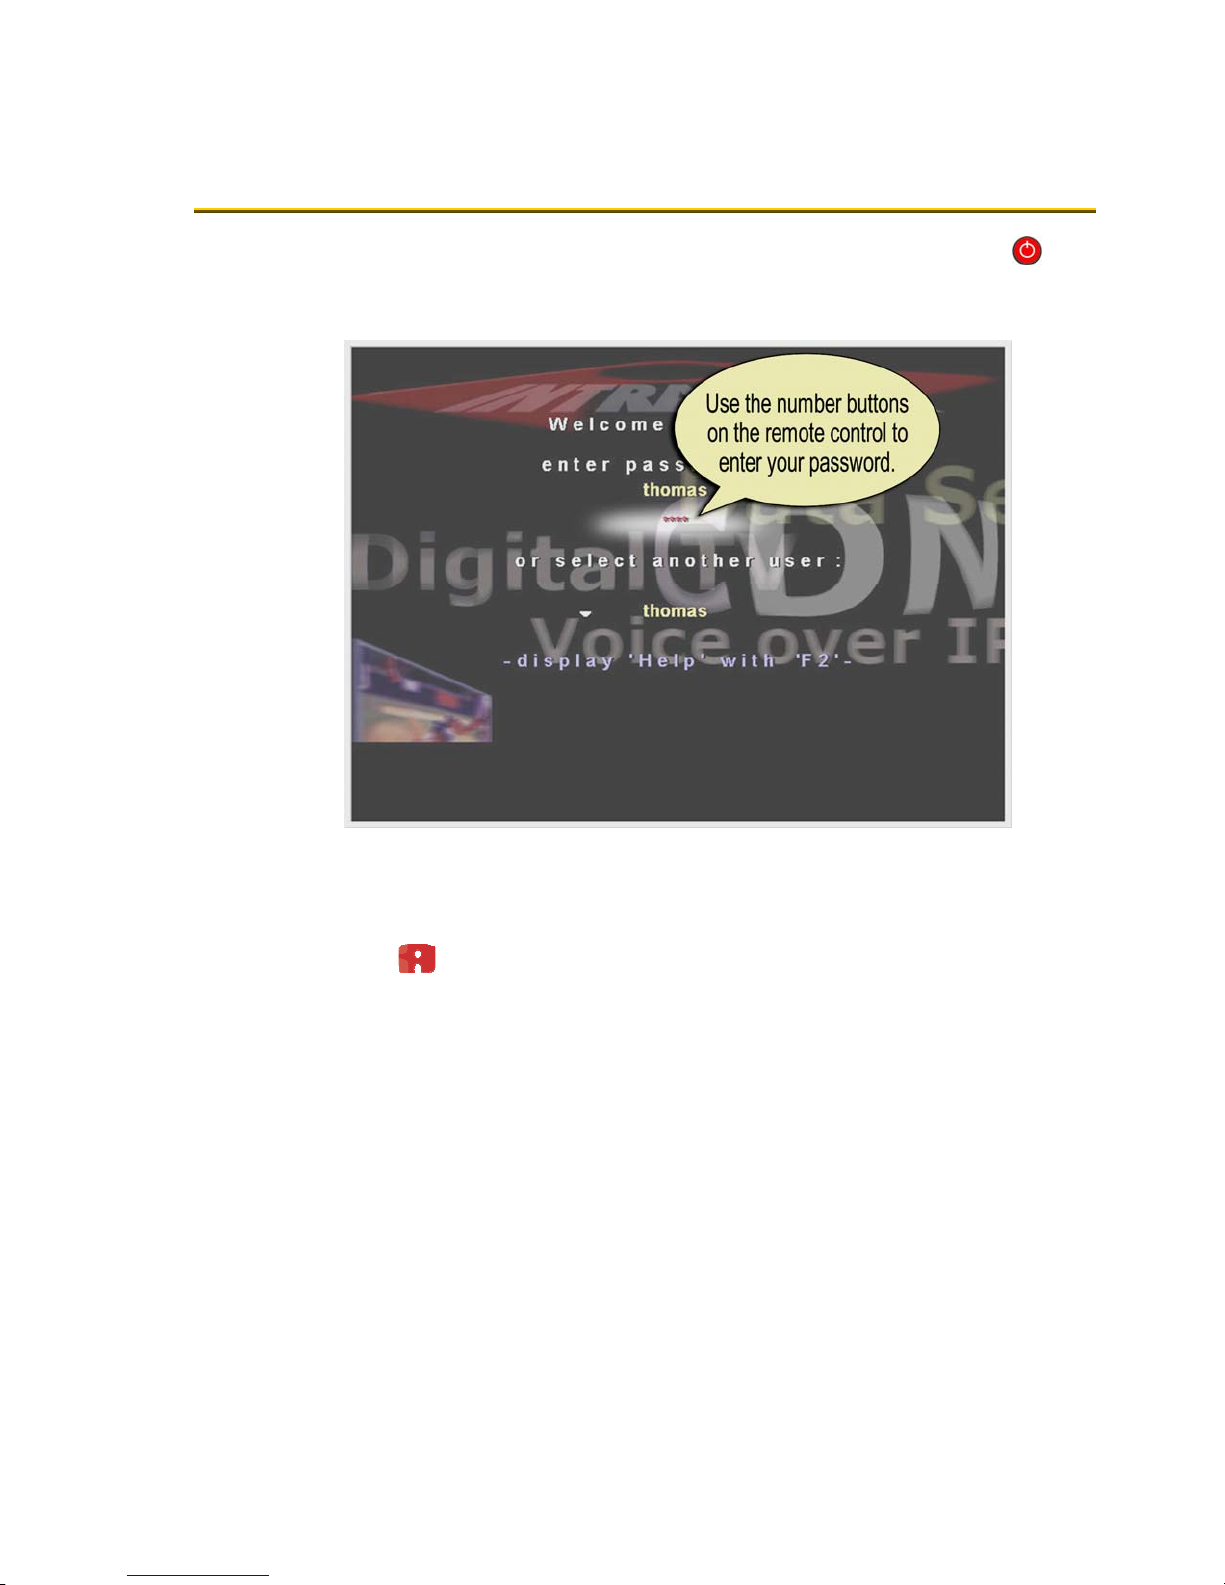
The Welcome screen will display.
Welcome screen
Note: Your welcome screen may have a different background.
On the remote control, press the STB button.
3
Use the number keys on the remote control to enter the 8-digit
4
PUK (pin unlock code) available from your fs|cdn provider.
Press
Continue with “Log in.”
5
OK.
If you make a mistake typing the PUK, press
Pg Back (
) to erase the error.
2
1. Initial Startup
LLoogg iinn
If the set-top box is off, turn it on by pressing STB and then
1
(POWER)
.
The Welcome screen will appear.
Welcome screen
To log in as a user other than the one displayed, press to
2
select a different name. Press
Be sure to use the manager user name and password
OK.
when you sign in for the first time.
Enter the numeric password for the selected user (using the
3
number keys). Press
OK.
The default password is 1 2 3 4.
3
2. Basic TV Controls
22.. BBaassiicc TTVV CCoonnttrroollss
You can control all fs|cdn services from the remote control.
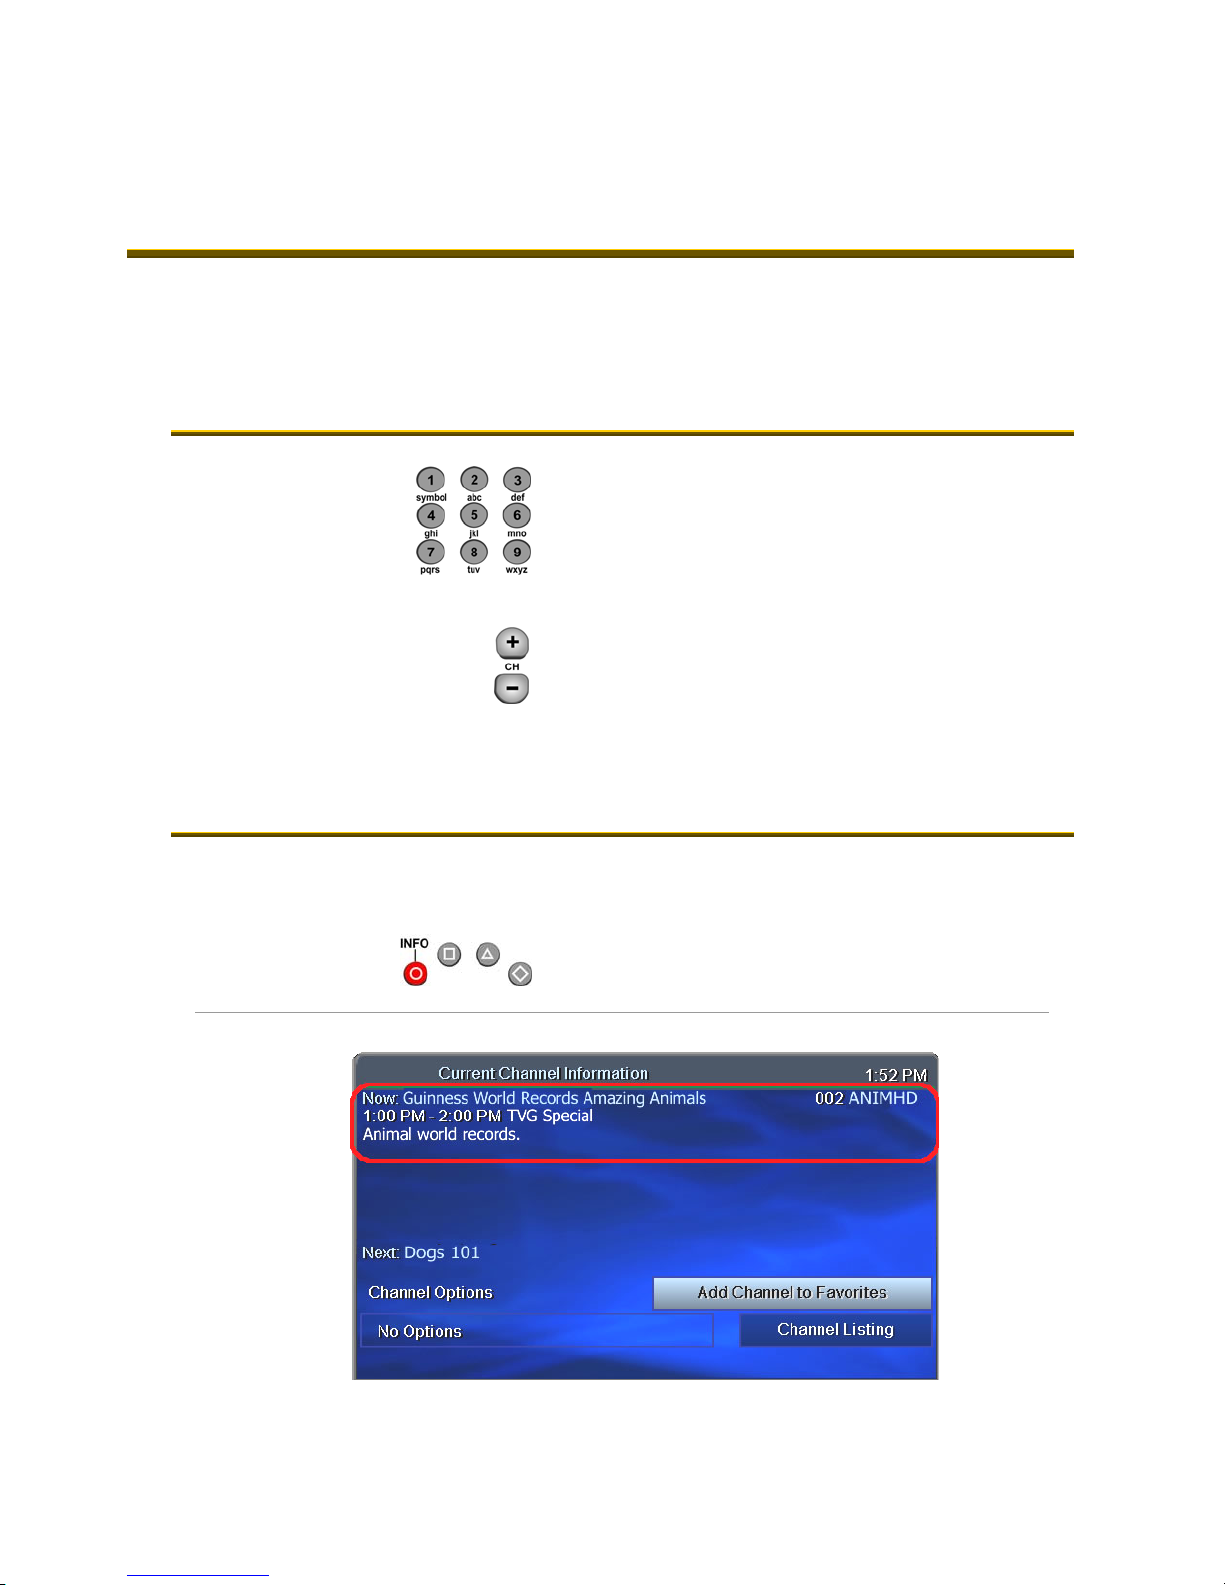
CChhaannggee tthhee cchhaannnneell
Using Number buttons, enter the channel
number.
~ OR~
On the CH (Channel) buttons, press + or –
to scroll up or down one channel at a time.
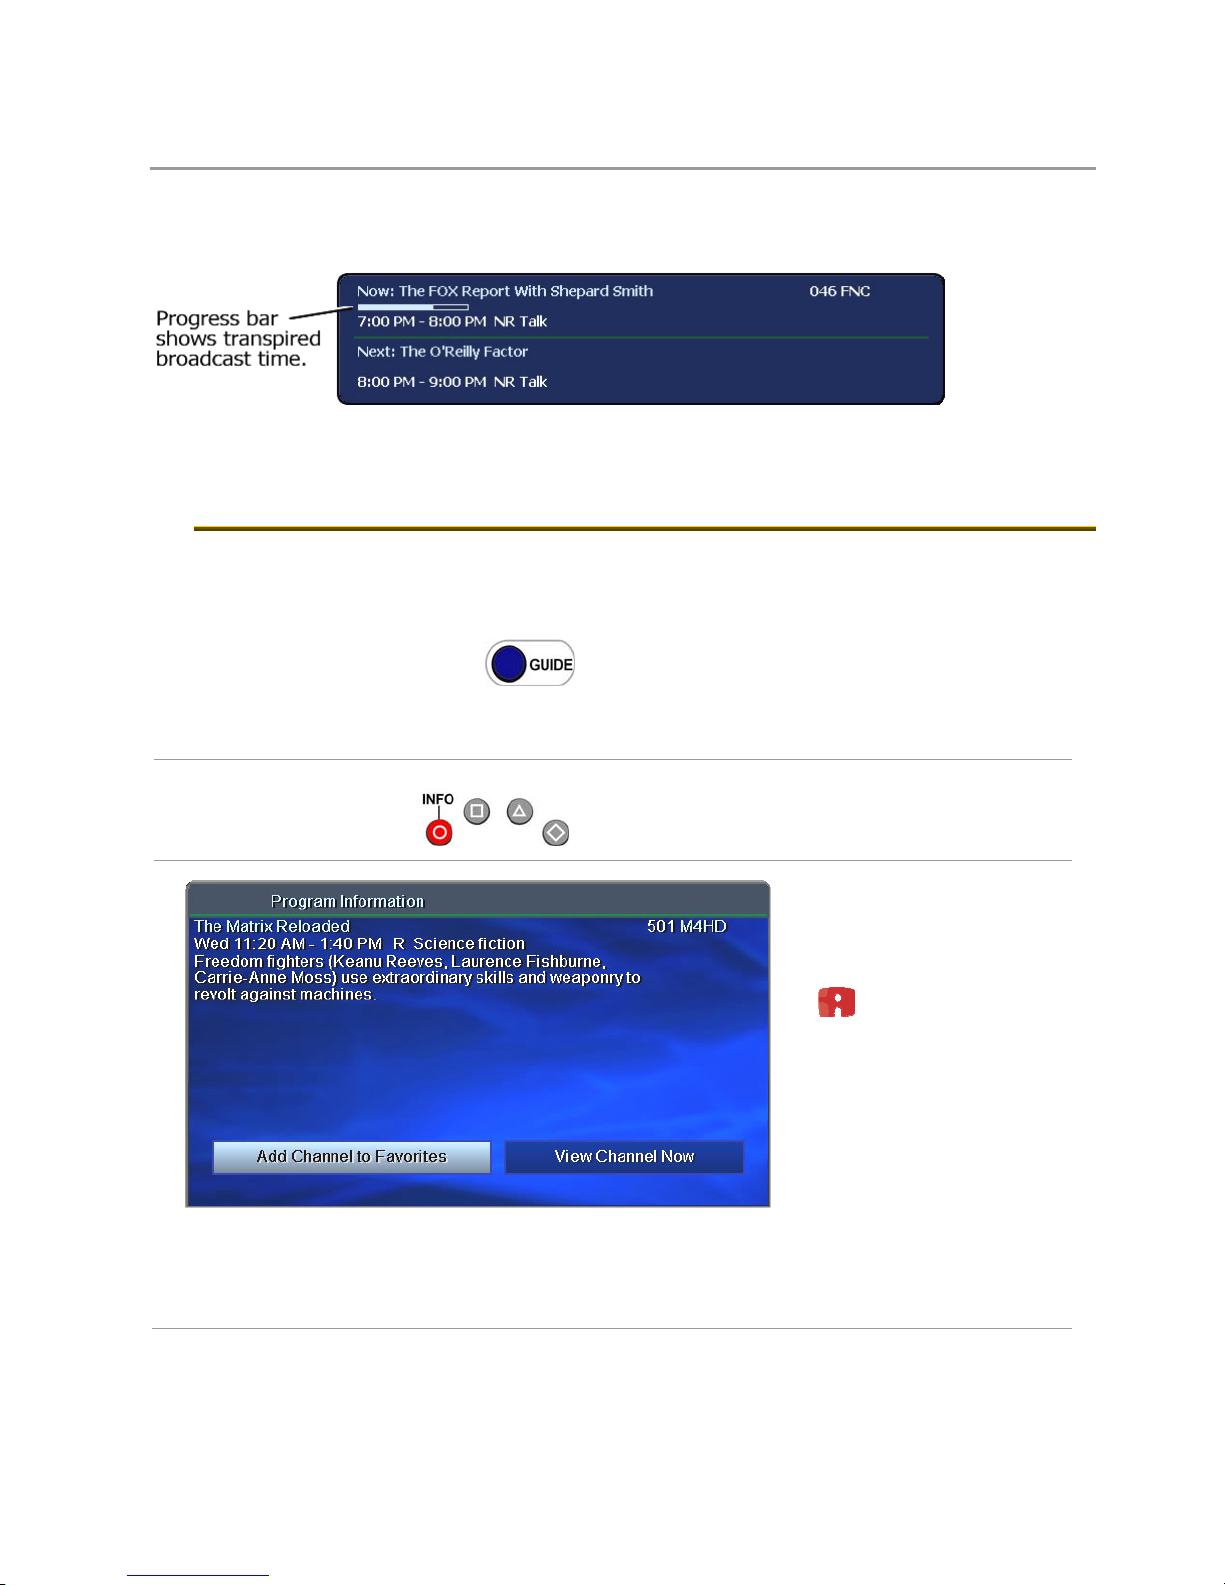
VViieeww CCuurrrreenntt CChhaannnneell IInnffoorrmmaattiioonn
See a description of the program you’re watching as well as current
channel information.
Press the red/INFO button.
info
Current Channel Information
4
2. Basic TV Controls
View Current Channel Information
In addition, every time you change the channel, a programming banner
displays channel information and a program progress bar.
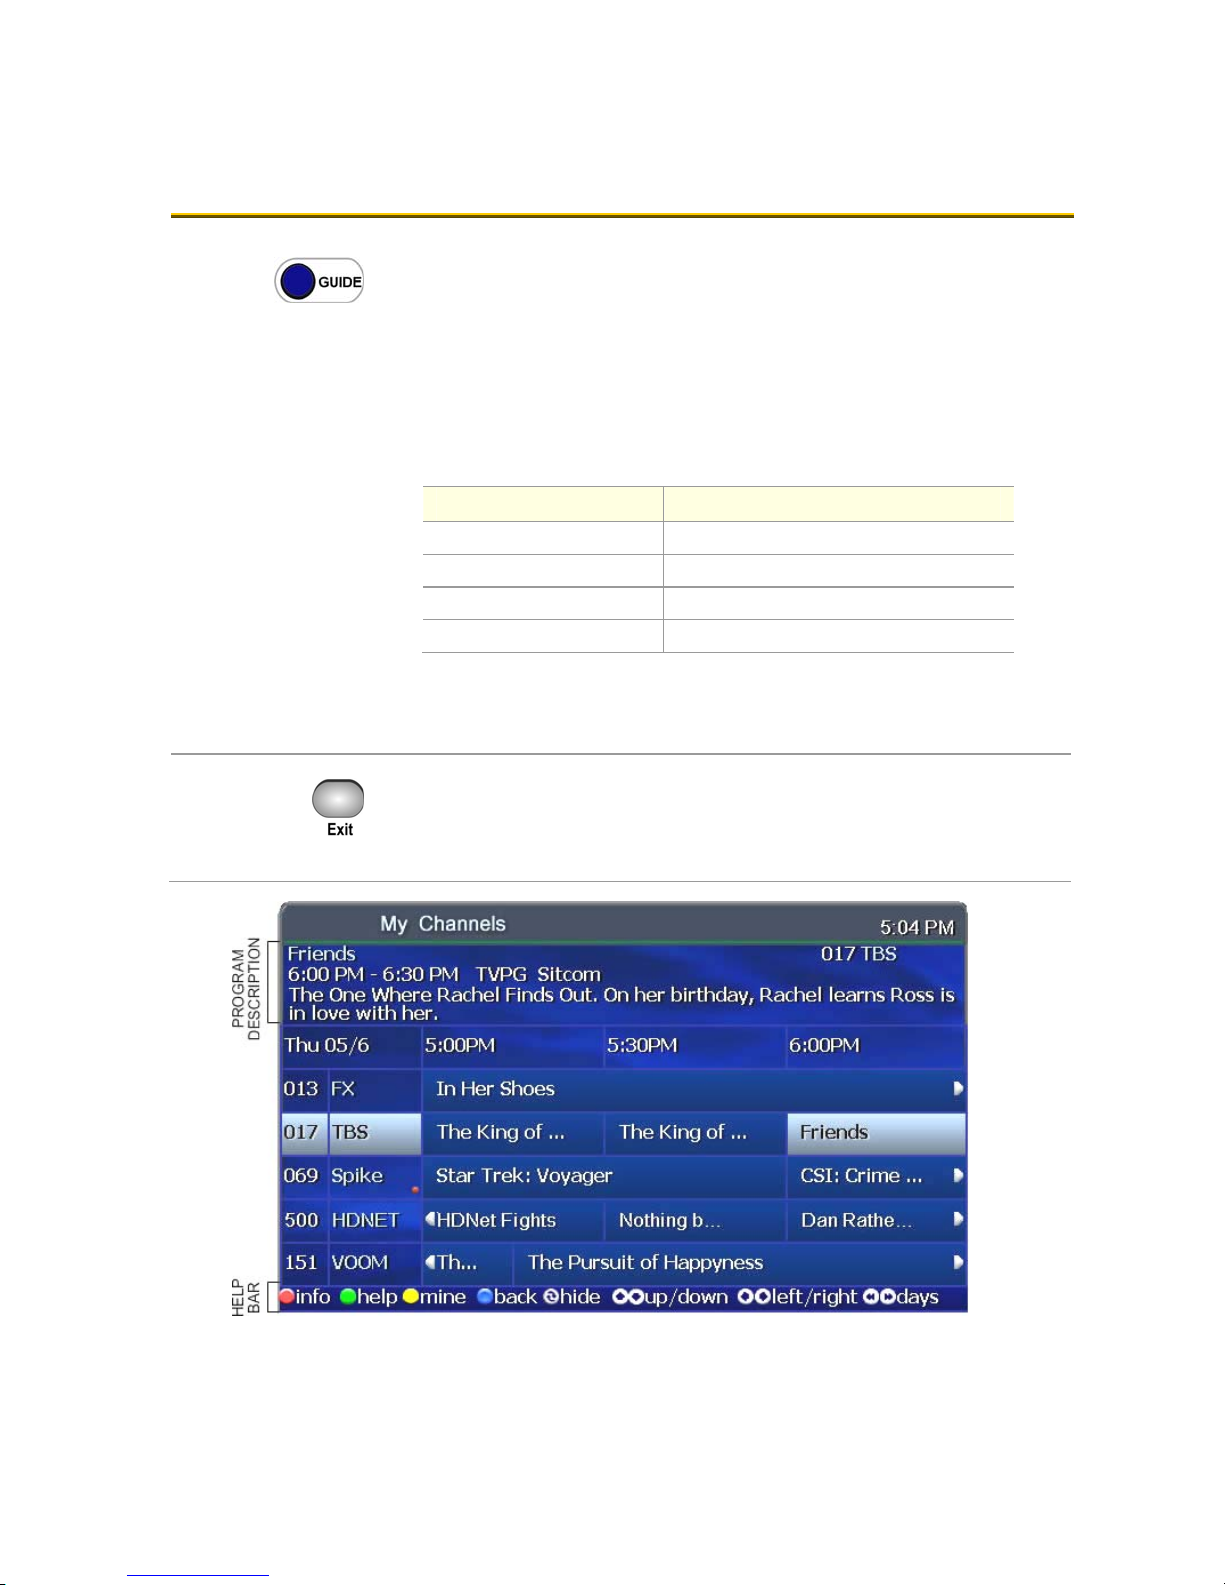
SSeett FFaavvoorriitteess
When you set Favorite channels, you create a separate program guide
just for the channels you watch the most – your Favorites!
Press the Guide button twice to see My
Channels prog ram guide.
Use and buttons to select a channel you
want to add to your Favorites program guide.
Press the red/INFO button to see program
information.
With ‘Add Channel to
Favorites’ selected, press
OK on the remote control.
After you set up
Favorite channels, you
can press the Guide
button three times to
see the Favorites
program guide.
5
2. Basic TV Controls
VViieeww tthhee CChhaannnneell GGuuiiddee
Press the Guide button to see a Channel Guide.
Press once for Offered Channels (all channels available from your
Service Provider).
Press twice for My Channels (channels you subscribe to currently).
Press three times for Favorites (channels you’ve set as favorites).
Refer to page 5 to set up Favorite channels.
The Help Bar (below the guide) provides a key to the remote control
buttons that navigate through channels and program times.*
Buttons Function
Arrows ( ) Scroll through channels and times.
Pg Up/Down (
Pg Back/Fwd (
Rewind/FastFwd ( ) Jump to previous/next day.
* Help Bar appears only if activated. Refer to “Appearance” on page 21
for more information.
In the Help Bar, “mine” denotes the Favorites guide.
) Jump to previous/next channels.
) Jump to previous/next times.
Press Exit to clear the channel guide.
Or, if you don’t exit, the Guide window will time out after a few
minutes of inactivity.
Channel Guide shows programming and a description of the selected program.
6
2. Basic TV Controls
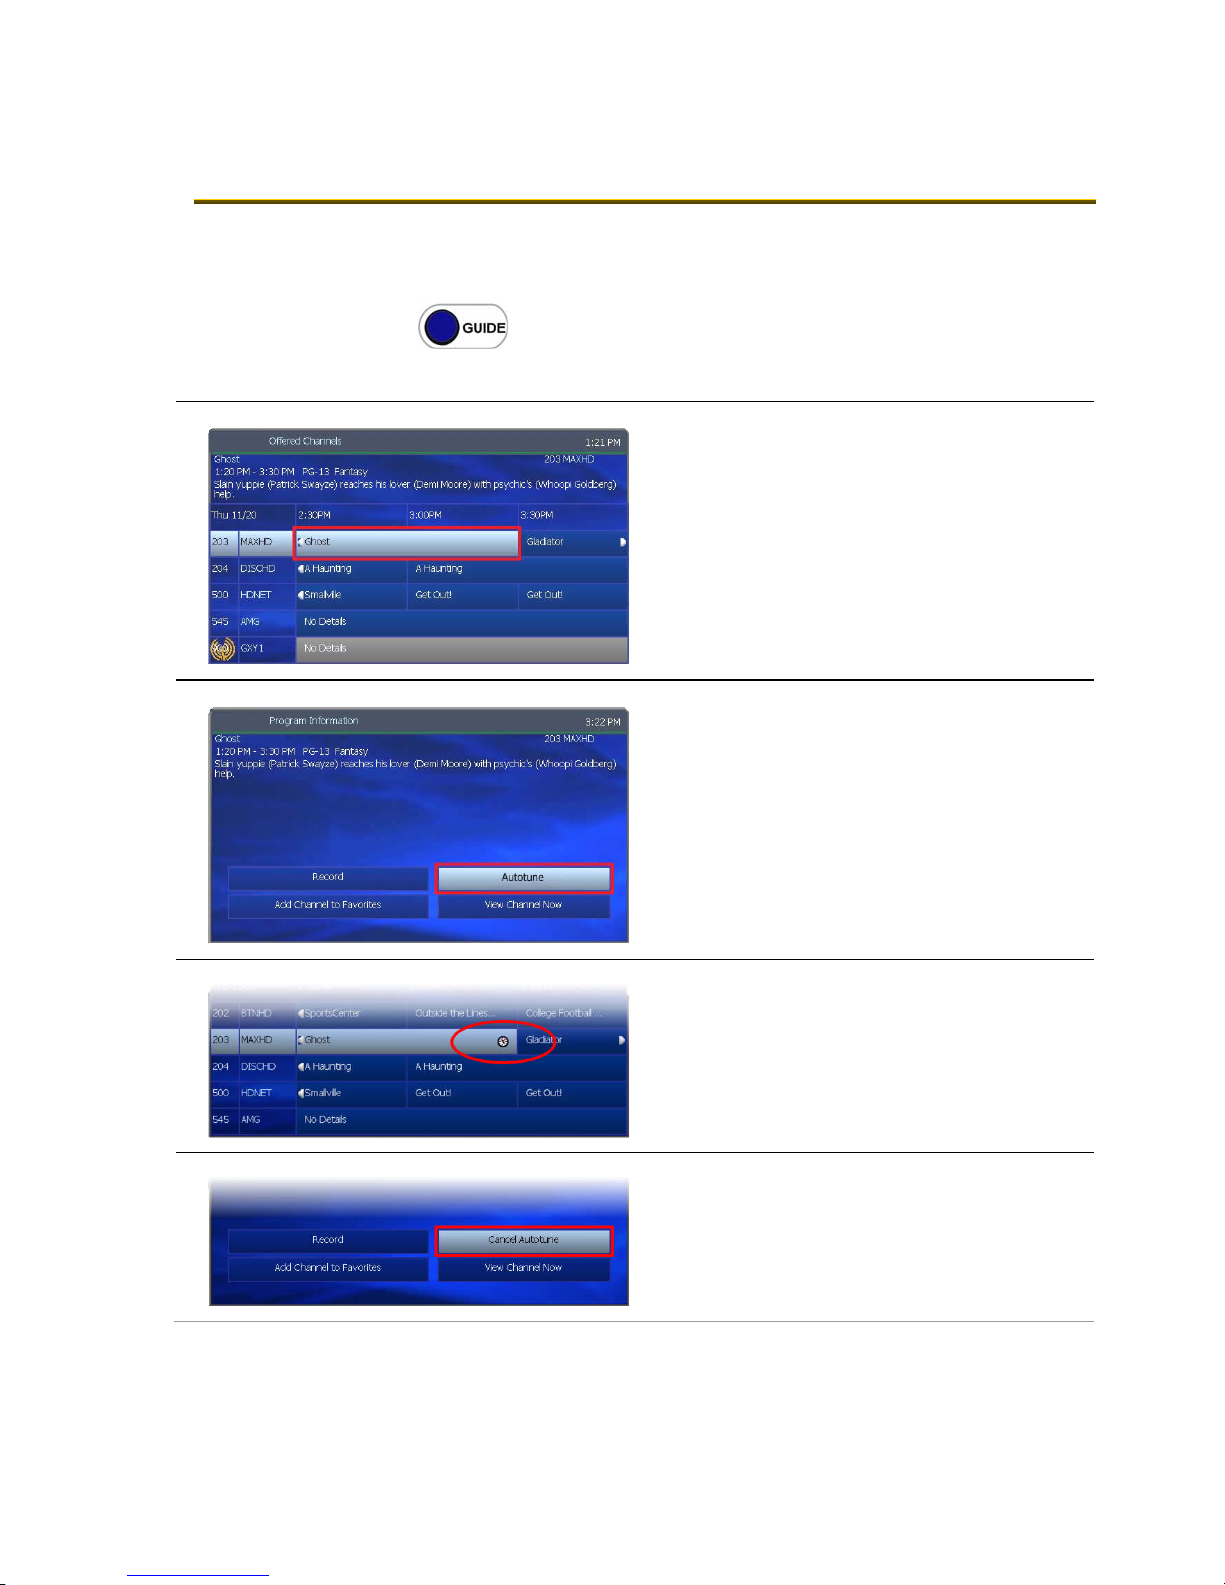
AAuuttoottuunnee
You can set your TV to tune to a later program automatically. Use your
remote control to set it up.
Press the Guide button to see the Channel Guide.
Press
programming.
guide
guide / [selected program] + ok
as many times as needed to see later
Using arrow buttons ( ), navigate
to the program you want your TV to tune to
later. Press
OK.
guide
guide / [selected program] + ok
Press to select Autotune. Press OK.
In the Channel Guide, a clock icon
indicates that the program is selected for
Autotune.
To cancel an Autotune selection,
navigate to the program, press
Cancel Autotune, and press
OK, select
OK again.
7

2. Basic TV Controls
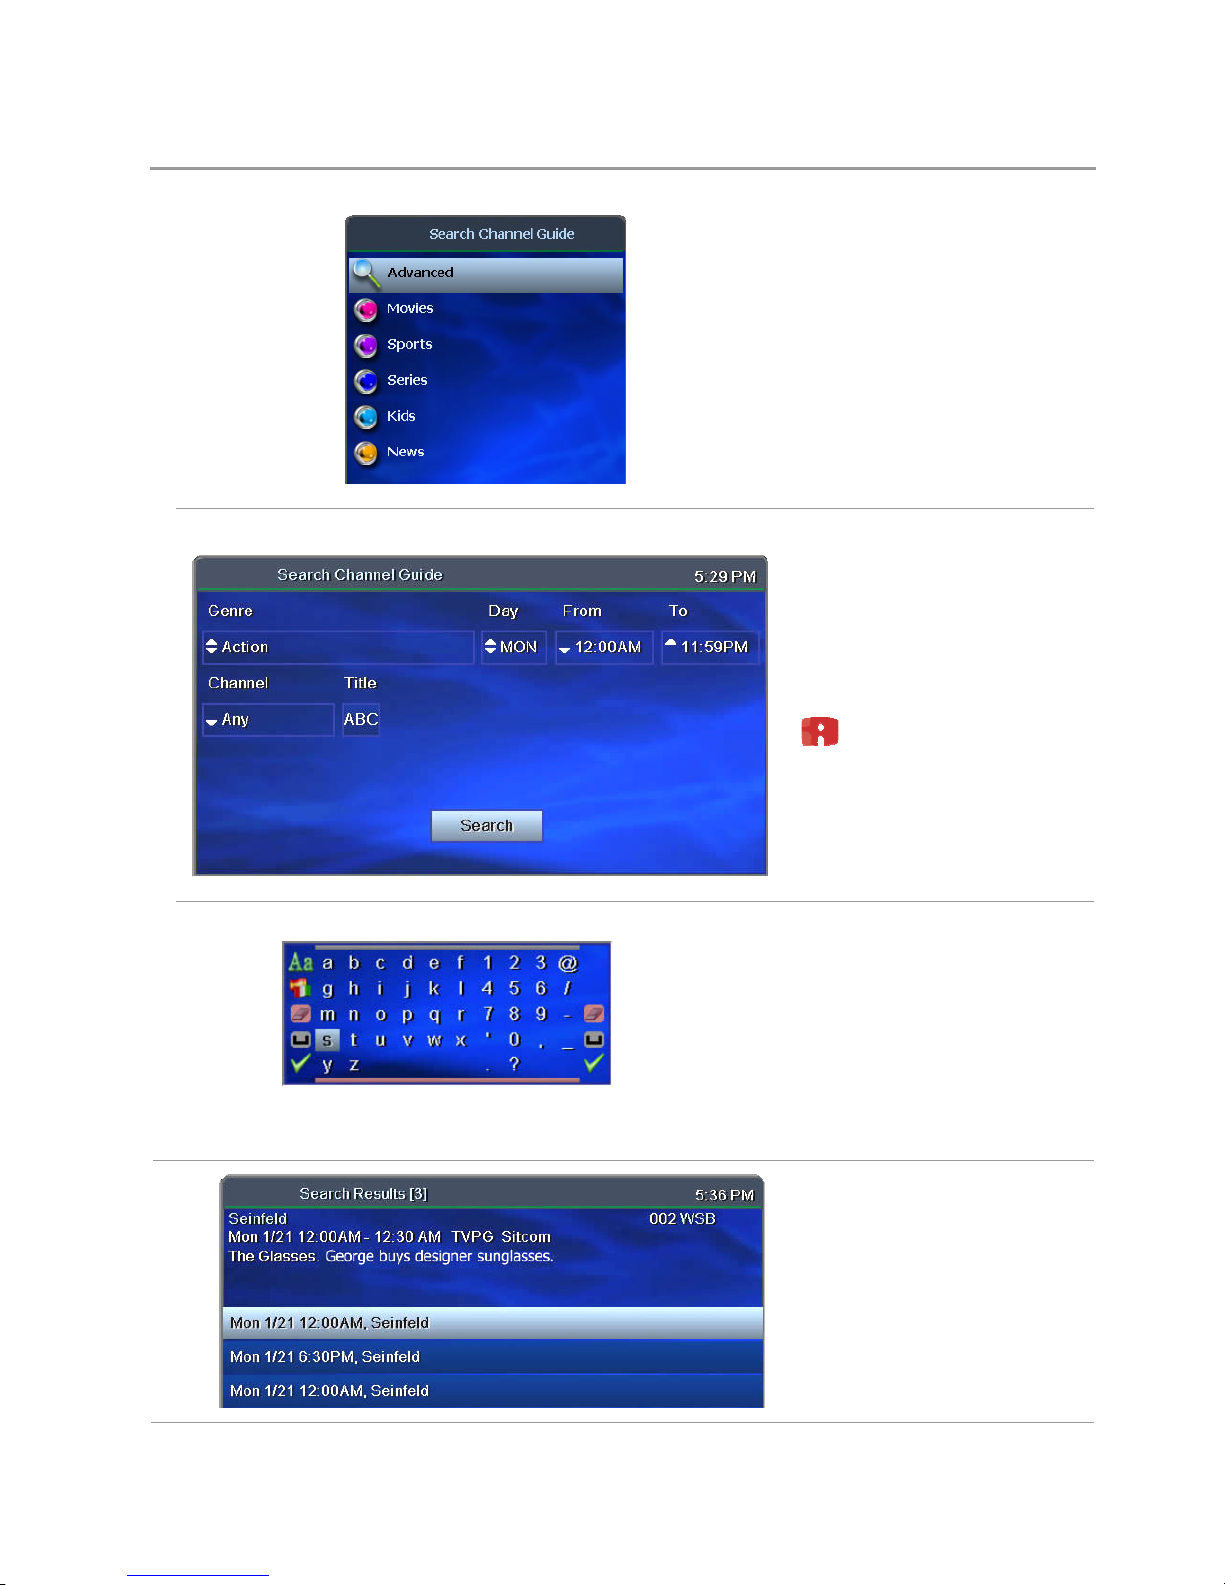
SSeeaarrcchh ffoorr pprrooggrraammss
Search for specific programming in the Channel Guide.
menu
Press MENU to access the Main Menu.
Press to select Search, and then
press
OK.
menu / search
menu / search / [movies]
Quick Search
To search for a category of programming—
such as movies, sports, series, or kids’
programs—press to make your
selection, and then press
View the Search Results of
upcoming programs for the
category you selected.
Use arrow buttons to select
an individual program and
see its description at the top
of the window.
OK.
8
2. Basic TV Controls
Search for programs
menu / search
Advanced Search
To search for specific programming using
search filters—such as program title,
channel, or day—press to make your
selection, and then press
menu / search / advanced
Press arrow buttons to
select one or more
categories: Genre, Day,
From (start time), To (end
time), Channel, Title.
OK.
Press
OK to scroll
through options in the fields
on this screen.
If you search by Title, you’ll spell the
program name in the pop-up keyboard.
(Partial spelling is okay.)
Use arrow buttons to select the letters and
OK after each. When you’re done,
press
select the check mark and press
OK.
In the Search Channel Guide window,
select Search and press
OK.
View Search Results.
Press arrow buttons
( ) to select a program
from the list and see its
description at the top of the
window.
9
2. Basic TV Controls
AAcccceessss mmeennuuss
The Main Menu is the gateway to most fs|cdn features.
On the remote control, press arrow buttons
selection, and then press
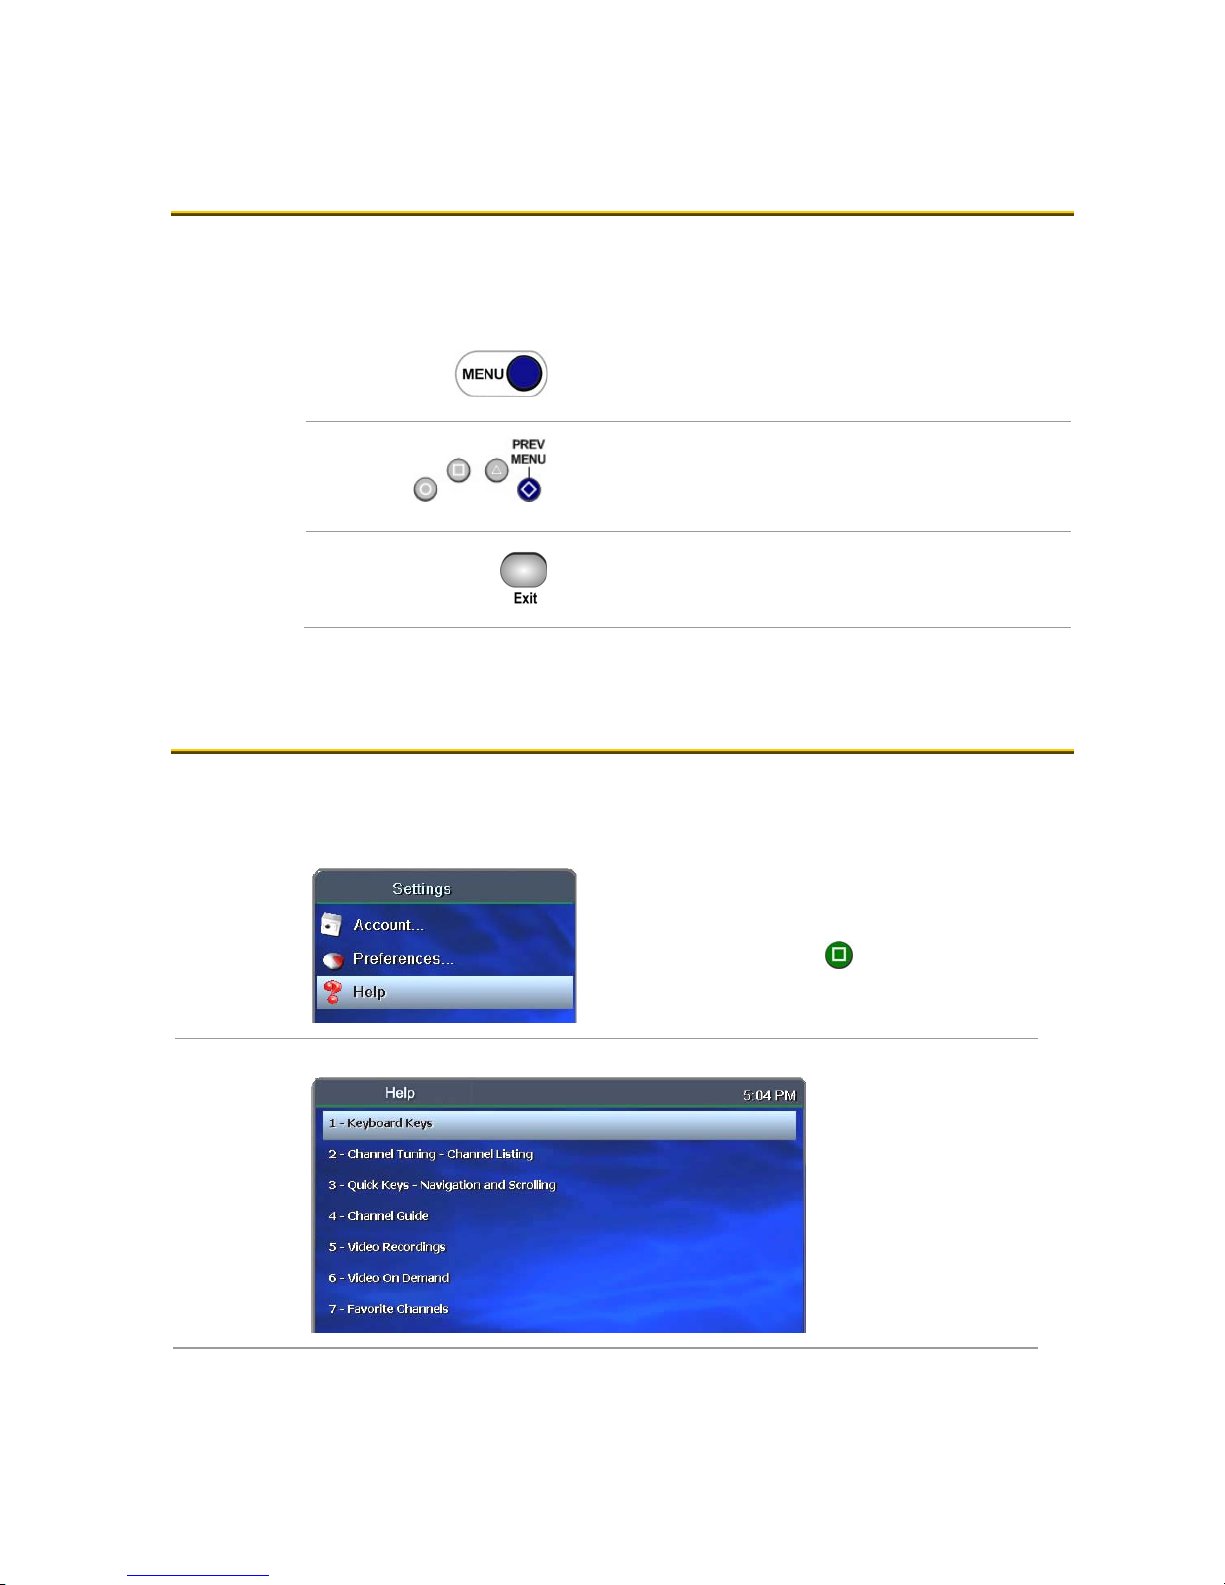
GGeett hheellpp
( ) to make your menu
OK.
Press MENU to access the Main Menu.
Press the blue diamond button to return to the
previous menu.
Press Exit to clear all menus from the screen.
Help provides instructions on your TV screen for using the remote
control and fs|cdn features.
menu / settings
Starting at the Main Menu, select
Settings [+
press the Help button.
menu / settings / help
OK] and then Help [+OK], or
Press or to
select a topic.
Press
OK.
10
2. Basic TV Controls
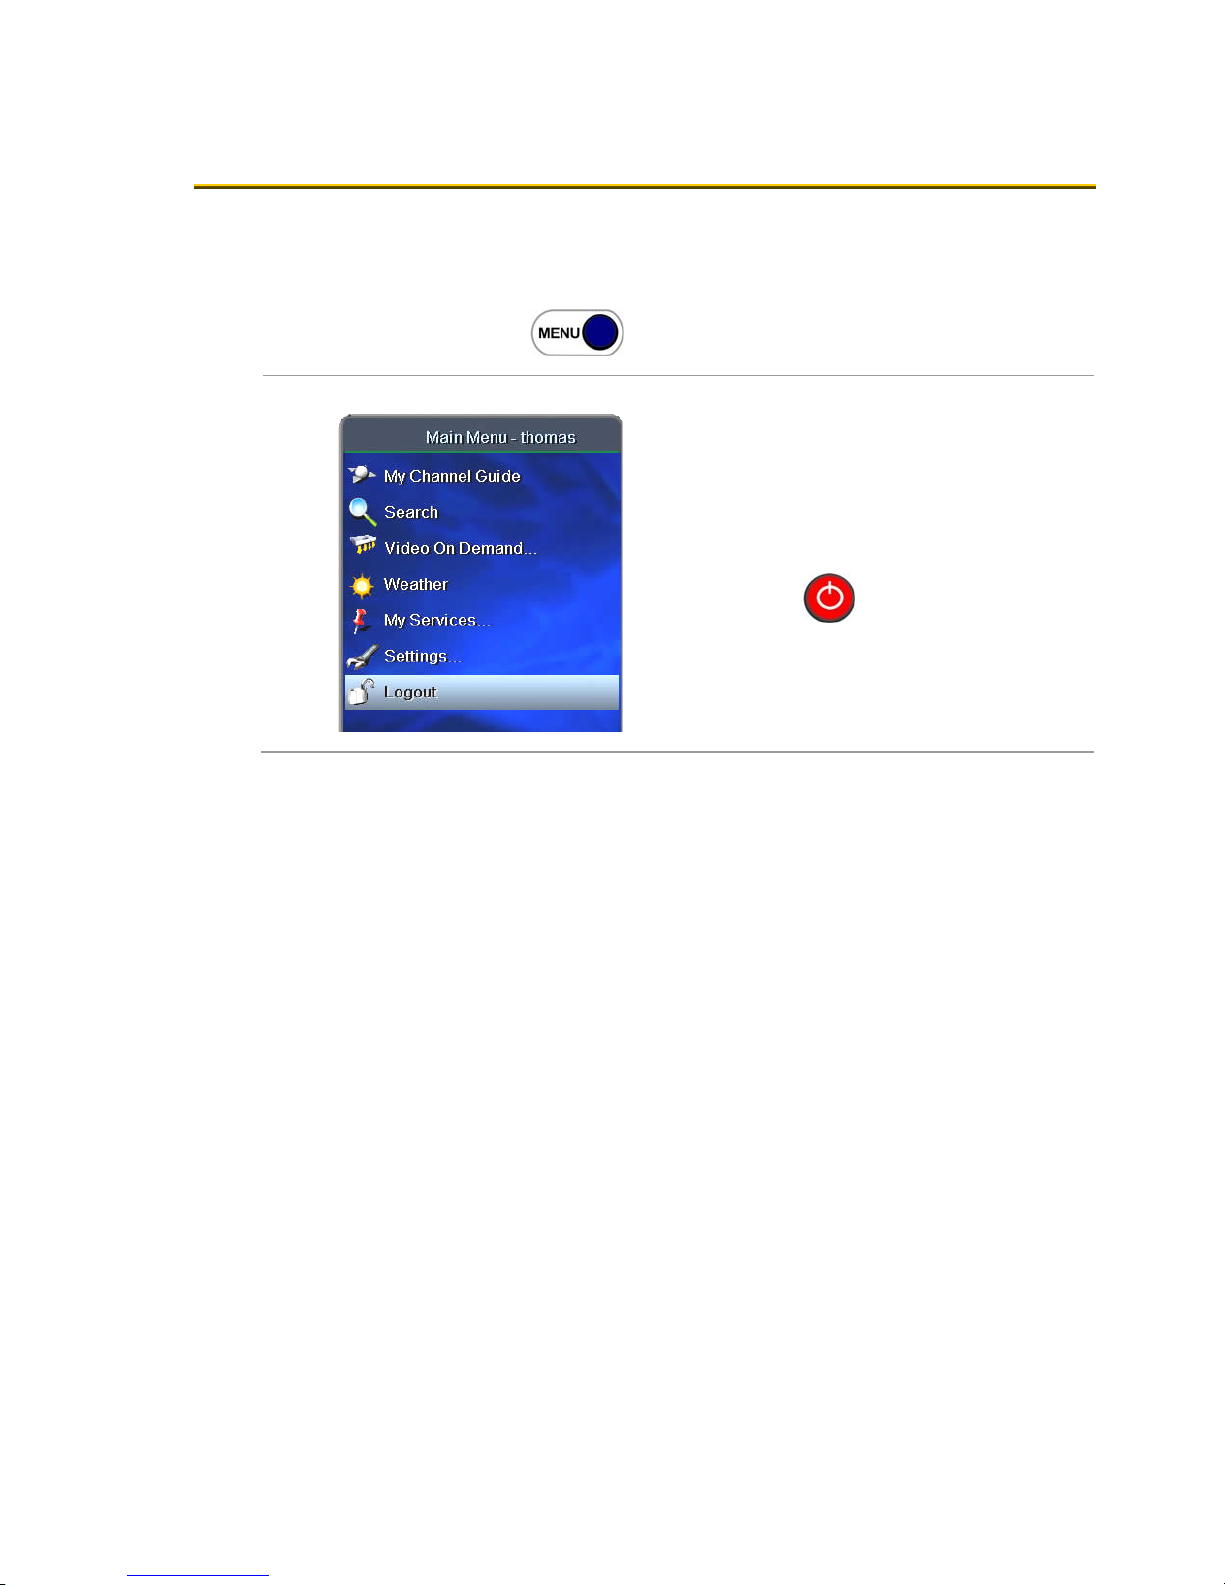
LLoogg oouutt
Normally you’ll remain logged in to the fs|cdn set-top box, and simply
turn off your TV when you’ re not watching. However, to log in as a
different user, you must first log out.
Press MENU to access the Main Menu.
menu
Press to select Logout. Press OK.
The screen will go blank as the set-top box
goes into Standby mode.
~
R
~
OOR
~~
Press Power.
11
3. Optional Menu Features
33.. OOppttiioonnaall MMeennuu FFeeaattuurreess
Along with standard features, the Main Menu list s optional features
you can purchase from your service provider.
menu
Press MENU to access the Main Menu.
Press to select the feature you want,
and then press
Features described below are:
Sample Main Menu (your menu
may look different)
Weather
Alerts
OK.
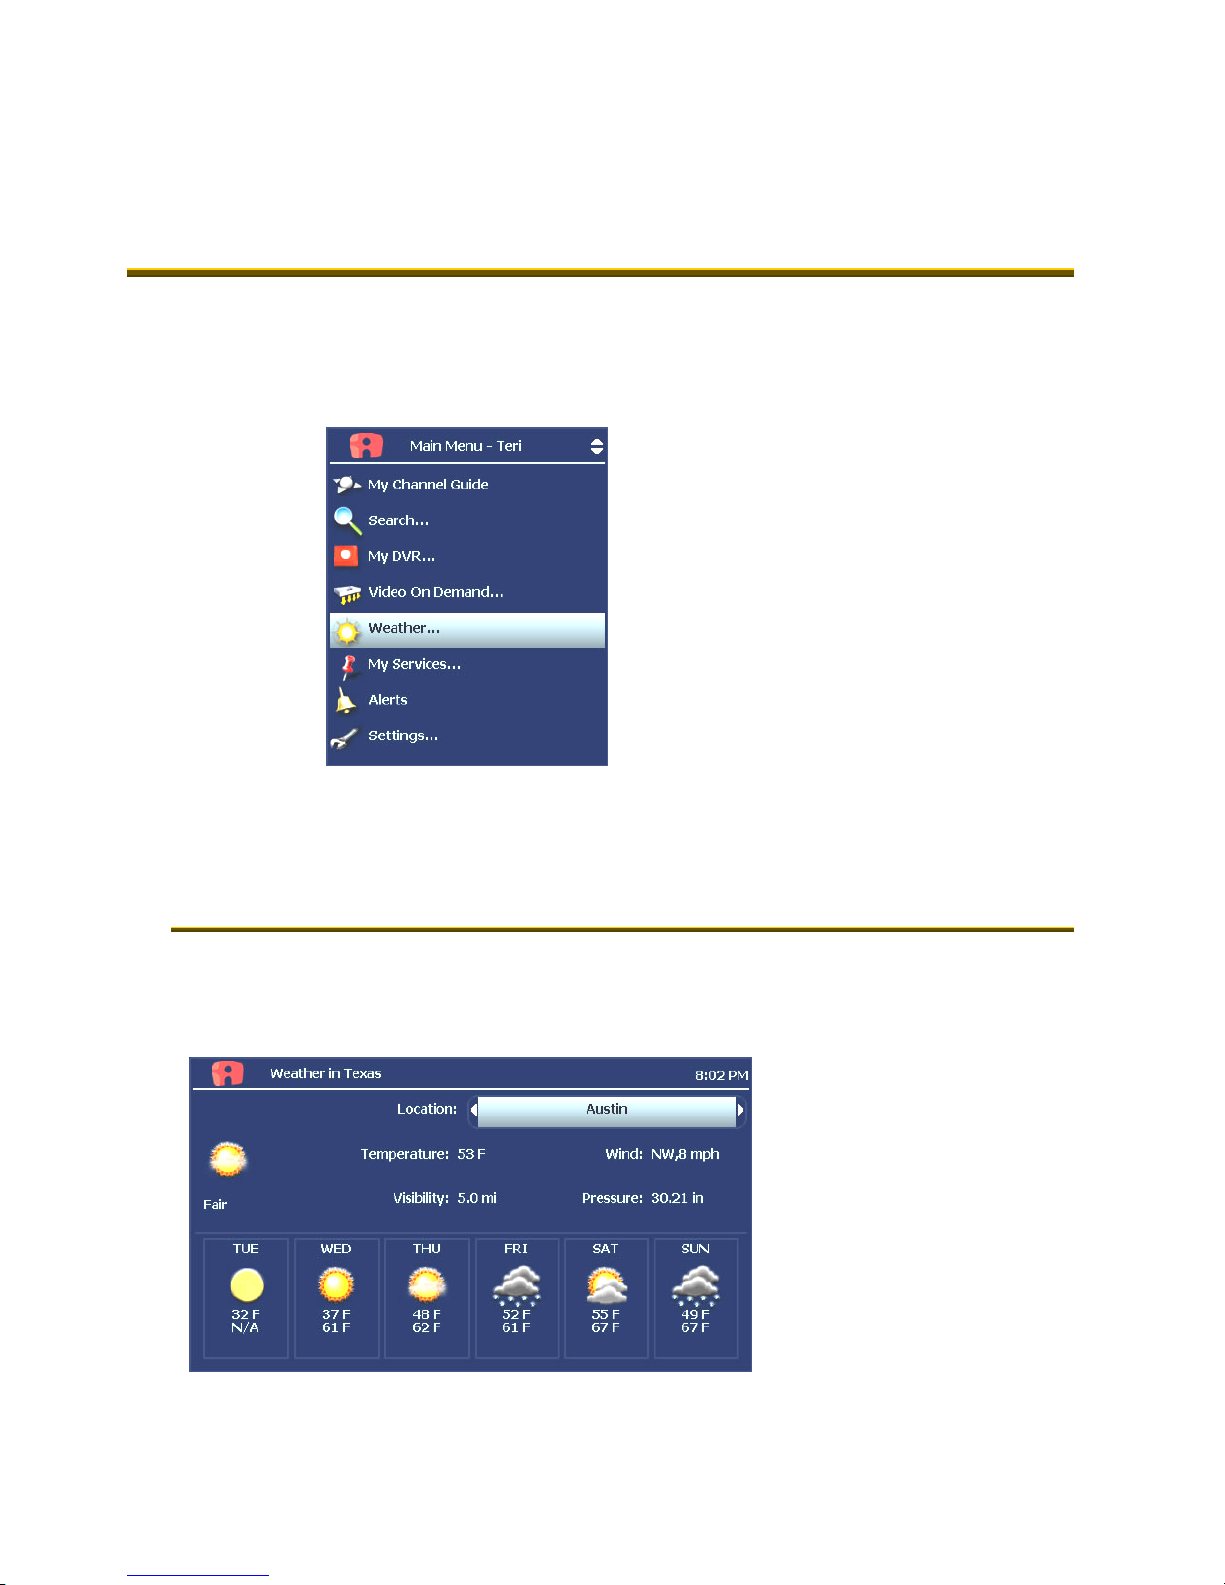
WWeeaatthheerr
Select Weather from the Main Menu to display a 6-day forecast for
available locations.
Menu / Weather
Press
locations.
12
to view alternate

3. Optional Menu Features
AAlleerrttss
menu / alerts
Alerts lets you activate or deacti vate on-screen notification for
Telephony (Caller ID), Chat, and Message services, if you are a
subscriber.
Press to select a
service. Press
deactivate/activate the
service.
A check mark indicates
service is activated.
Select OK and press
OK to
OK.
13
 Loading...