

Page 1
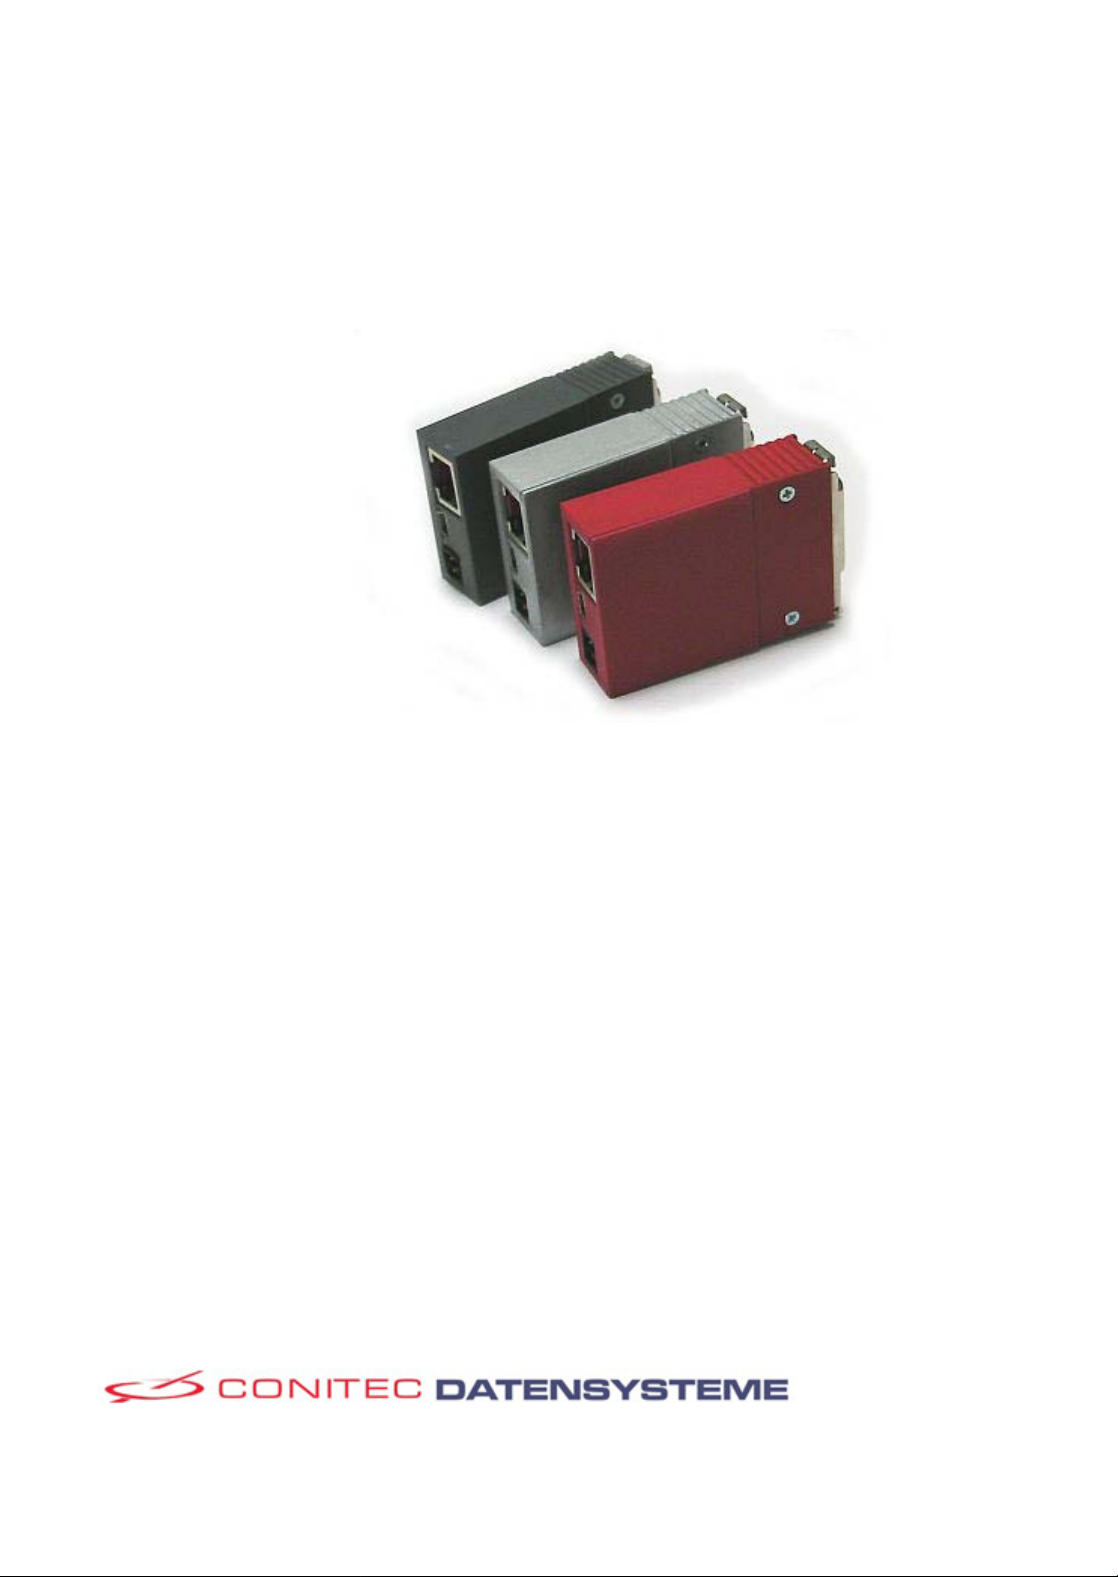
NETPORT Module
N
Conitec NETPORT module sind intelligente Ein/Ausgabe-Module im Steckergehäuse mit Ethernetund USB- Anschluss. Sie sind einsetzbar als PC-I/O-Erweiterung oder für verteilte I/OAnwendungen im Netzwerk - wie z.B. Datenerfassung, Prozessüberwachung, Ansteuerung von
Relais, Motoren, Servos oder Lampen. Alle NETPORT Module können eigenständig Skripte
ausführen. Auf diese Weise lassen sich einfache Steuer- und Überwachungsaufgaben im Netz auch
ohne Kontrolle durch einen PC durchführen.
Steuerung per Web-Interface
Um ein am Netzwerk angeschlossenes Modul zu konfigurieren, ist keine Zusatzsoftware erforderlich
- ein Browser genügt. Jedes NETPORT-Modul enthält einen HTTP-Server. Sobald das Modul mit
dem LAN oder mit einem USB-Port verbunden wurde, lässt es sich über ein Webinterface
konfigurieren, ähnlich wie ein Router. Per Webinterface können I/O-Ports direkt gesetzt oder
abgefragt oder einfache Skripte in einer C-Sprache eingegeben werden. Diese Skripte werden dann
auf dem Modul in einer Endlosschleife ausgeführt. Das Web-Interface Design kann an eigene
Anforderungen angepasst werden.
Steuerung per Befehlszeile
Skripte zur Steuerung lassen sich auch mit einem einfachen Befehlszeileninterface an ein
ETPORT-Modul übertragen und dort automatisch ausführen.
Steuerung per Software
Für komplexe Steueraufgaben steht eine DLL zur Verfügung, um NETPORT Module in eigene
Software einzubinden.
Page 2
Technische Daten NETPORT-48OCA
g
N
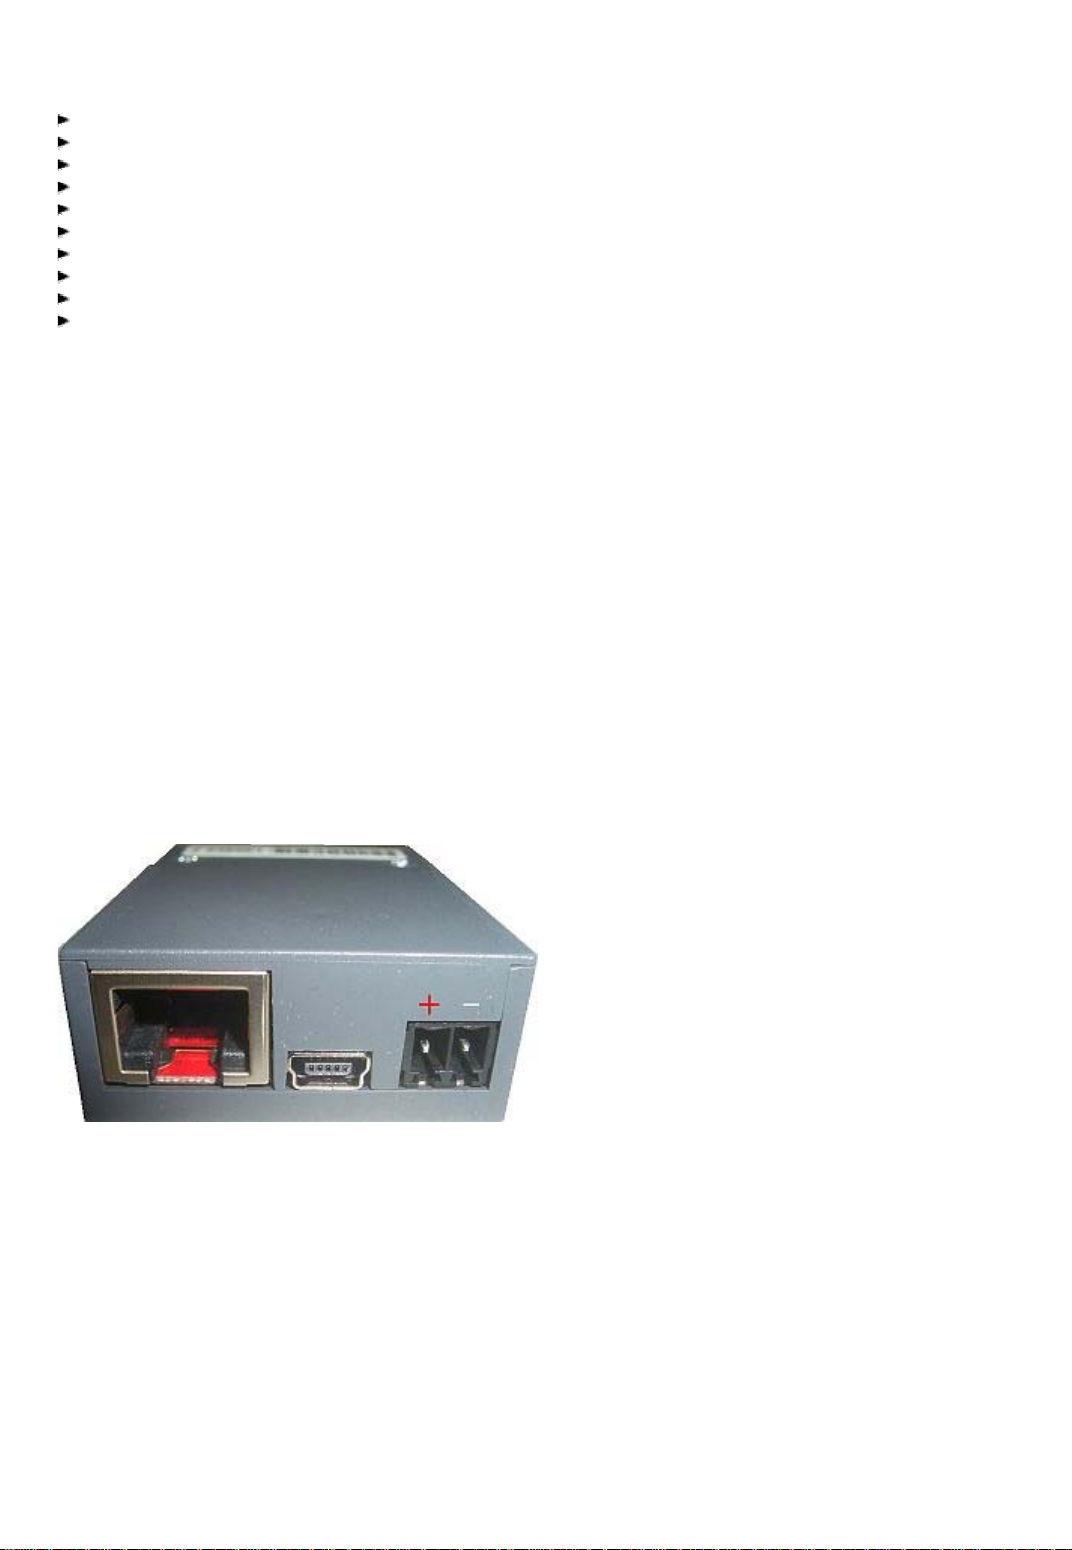
Mini USB 2.0 und Ethernet 10/100 Anschluss
Abmessungen ca. 64 x 42 x 18 mm
DSUB-15 Stecker für Ein/Ausgänge
4 Open-Collector Ausgänge, max. 100 mA
2 Analog-Eingänge, 10 Bit, Referenzspannung 1.1 / 3.3V
6 Universal-Ein/Ausgänge, umkonfigurierbar analog/digital
PWM Signalgenerator für Motoren oder Servos, Jitter < 50 us
Piezo Signalgeber, Lautstärke und Frequenz einstellbar
Interner ARM9 RISC Prozessor mit Linux Kernel
C Skriptsprache für I/O Tasks, läuft direkt auf dem Modul
Elektrische Daten und Einsatzbedingungen
Parameter Min Typ Max Einheit
Versorgungsspannung 8 12 28 V (DC)
Leistungsaufnahme 1 W
Stromaufnahme USB 20 μA
I
OX
I
IX
fPiezo 800 4000 Hz
SoftPWM Frequenz 100 10000 Hz
SoftPWM Jitter 50 μs
Zul. Betriebstemperatur 0 60 °C
Lagertemperatur -25 75 °C
Schutzart IP20
100 mA
5 20 mA
Schnittstellen
Schnittstelle Werkseinstellung Dienste
Ethernet 10/100MBPs, Auto Negotiation
00:11:ef:e0:xx:xx bis
00:11:ef:e7:xx:xx
USB Mini Fullspeed (12 MBits/s),
Ethernet Emulation,
Powered by Device
Stromversorgung 3,81 mm, 2polig, verpolungssicher 8..28V
192.168.1.12 FTP, Telnet,
Http, MADBridge
192.168.167.12 FTP, Telnet,
Http, MADBridge
DasModul kann sowohl über die Stromversorgungsbuchse, als auch über Pin 8 (VIn) und Pin 4 (GND) des
15-poligen DSUB Steckers versorgt werden.
Ein/Ausgänge
Page 3
r
Pin Signal Bemerkung
g
N
1 AGND Analog Ground
2 GPIO11 / OC3 Open Collector Ausgang
3 GPIO10 / OC2 Open Collector Ausgang
4 GND Stromversorgung GND
5 GPIO9 / OC1 Open Collector Ausgang
6 GPIO8 / OC0 Open Collector Ausgang
7 GPIO0 / AD0 Analogeingang
8 VCC Stromversorgung VCC
9 GPIO1 / ADIO1 GPIO / Analogeingang
10 GPIO2 / ADIO2 GPIO / Analogeingang
11 GPIO3 / ADIO3 GPIO / Analogeingang
12 GPIO4 / ADIO4 GPIO / Analogeingang
13 GPIO5 / ADIO5 GPIO / Analogeingang
14 GPIO6 / ADIO6 GPIO / Analogeingang
15 GPIO7 / AD7 Analogeingang
Pinfunktionen
Jedes I/O Pin kann per Web-Interface, per Skript oder per Fernsteuerung konfiguriert werden. Zu
Konfiguration gehören:
Name des Pins
Portrichtung (Ein- oder Ausgang)
Zusatzfunktionen (Analogeingang, SoftPWM)
Der Name eines I/O Pins hat rein dokumentatorischen Wert. Er wird in derWeboberfläche angezeigt und kann
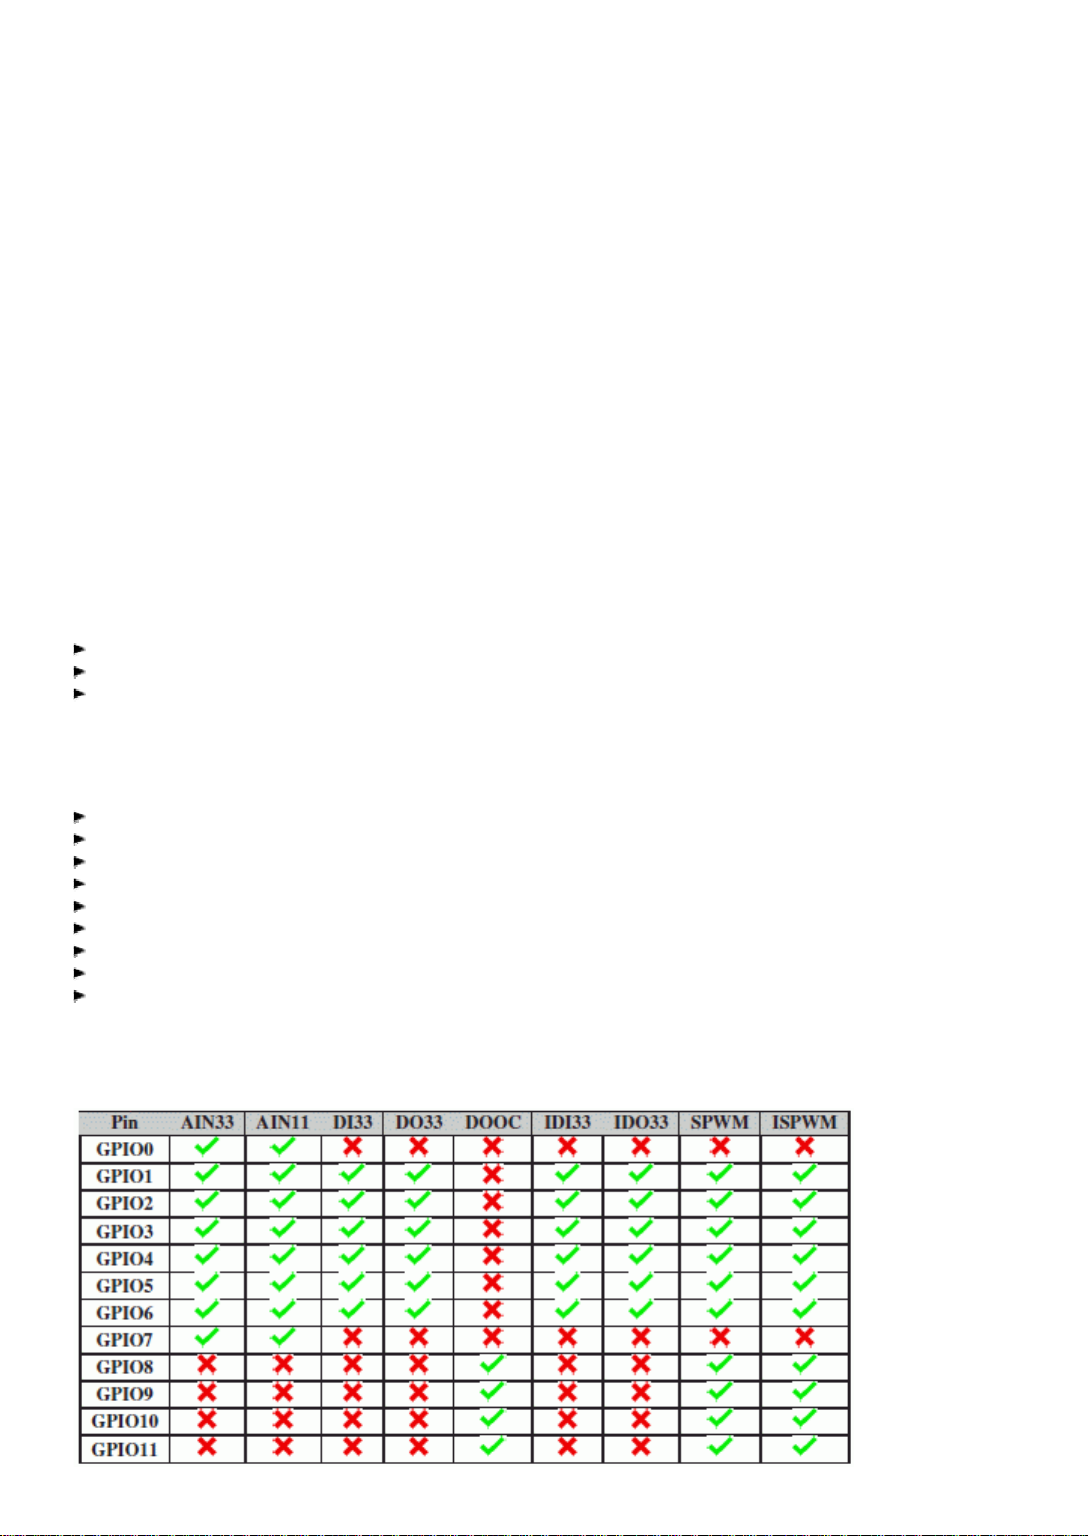
frei vergeben werden. Ein I/O Pin kann folgende Funktionen haben:
Analoger Eingang mit 3.3V Referenzspannung (AIN33)
Analoger Eingang mit 1.1V Referenzspannung (AIN11)
Digitaler Eingang 3.3V Pegel (DI33)
Digitaler Ausgang 3.3V Pegel (DO33)
Digitaler Openkollektorausgang (DOOC)
Invertierender digitaler Eingang 3.3V Pegel (IDI33)
Invertierender digitaler Ausgang 3.3V Pegel (IDO33)
Software-implementierte PWM (Pulse Width Modulation) (SPWM)
Invertierte Software-implementierte PWM (ISPWM)
Nicht alle Pins unterstützen alle Funktionen. Folgende Tabelle zeigt die verfügbaren Funktionen der einzelnen
Pins:
Page 4
Technische Daten NETPORT-84OCO
N
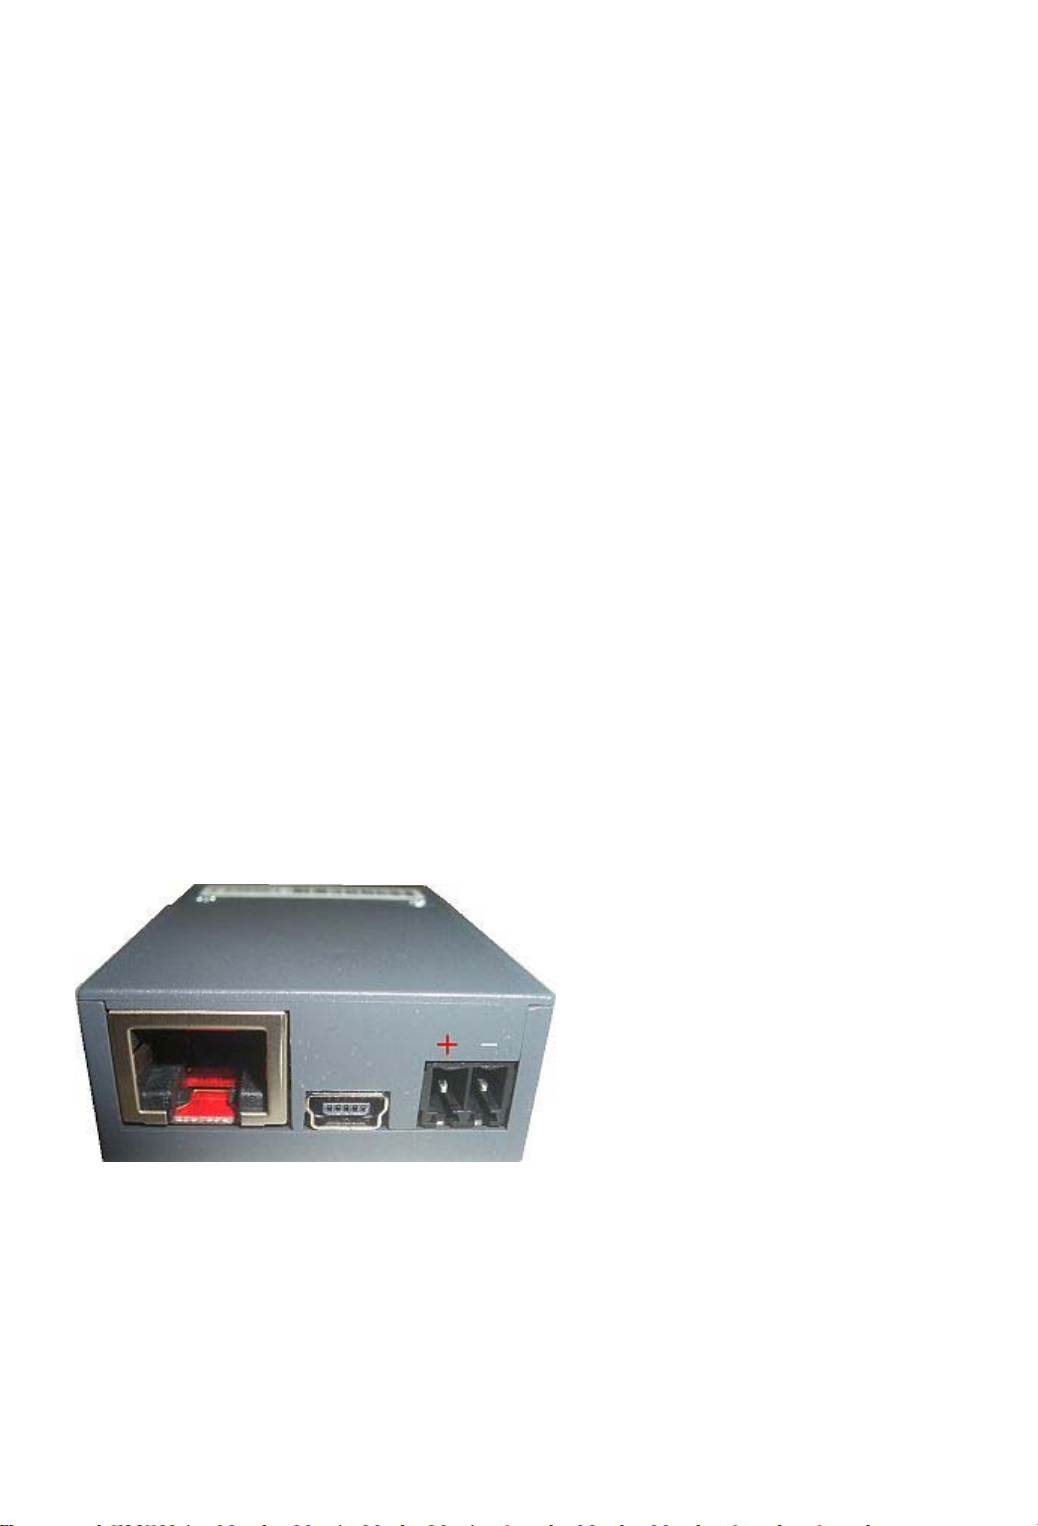
z Mini USB 2.0 und Ethernet 10/100 Anschluss
z Abmessungen ca. 64 x 42 x 18 mm
z DSUB-15 Stecker für Ein/Ausgänge
z 8 Open-Collector Ausgänge, max. 100 mA
z 4 Optokoppler-Eingänge, 20 mA
z PWM Signalgenerator für Motoren oder Servos
z Piezo Signalgeber, Lautstärke und Frequenz einstellbar
z Interner ARM9 RISC Prozessor mit Linux Kernel
z C Skriptsprache für I/O Tasks, läuft direkt auf dem Modul
Elektrische Daten und Einsatzbedingungen
Parameter Min Typ Max Einheit
Versorgungsspannung 8 12 28 V (DC)
Leistungsaufnahme 1 W
Stromaufnahme USB 20 μA
I
OX
I
IX
fPiezo 800 4000 Hz
Zul. Betriebstemperatur 0 60 °C
Lagertemperatur -25 75 °C
Schutzart IP20
100 mA
5 20mA
Schnittstellen
Schnittstelle Werkseinstellung Dienste
10/100MBPs, Auto Negotiation
Ethernet
00:11:ef:e0:xx:xx bis
192.168.1.12
00:11:ef:e7:xx:xx
Fullspeed (12 MBits/s),
USB Mini
Ethernet Emulation,
192.168.167.12
Powered by Device
Stromversorgung 3,81 mm, 2polig, verpolungssicher 8..28V
FTP, Telnet,
Http, MADBridge
FTP, Telnet,
Http, MADBridge
DasModul kann sowohl über die Stromversorgungsbuchse, als auch über Pin 8 (VIn) und Pin 4
Page 5

(GND) des 15-poligen DSUB Steckers versorgt werden.
N
Ein/Ausgänge
Pin Signal Bemerkung
1 OGND Optokoppler Ground
2 IN3 Optokoppler Eingang
3 IN2 Optokoppler Eingang
4 GND Stromversorgung GND
5 IN1 Optokoppler Eingang
6 IN0 Optokoppler Eingang
7 O7 Open Collector Ausgang
8 VCC Stromversorgung VCC
9 O6 Open Collector Ausgang
10 O5 Open Collector Ausgang
11 O4 Open Collector Ausgang
12 O3 Open Collector Ausgang
13 O2 Open Collector Ausgang
14 O1 Open Collector Ausgang
15 O0 Open Collector Ausgang
Demoboard
Das PIO84 Demoboard erlaubt den einfachen Einstieg in die Arbeit mit dem Modul. Es verfügt über
acht LEDs, welche die Ausgangszustände anzeigen und vier Taster mit denen die Eingänge
stimuliert werden können. Je nach Bestückungsoption können zusätzlich Leistungsschalter, sowie
eine schaltbare Spannungsquelle vorhanden sein.
Page 6

NETPORT Web Interface
N
Jedes NETPORT-Modul enthält einen HTTP-Server. Sobald das Modul mit dem LAN oder mit
einem USB-Port verbunden wurde, lässt es sich über ein Webinterface konfigurieren, ähnlich wie ein
Router. Sie erreichen das Modul, indem Sie dessen IP-Adresse in Ihren Browser eingeben
(Werkseinstellung):
http://192.168.1.12
Kurz darauf erscheint das Web-Interface des Moduls. Es ist unterteilt in folgende Bereiche:
Box Control
In diesem Bereich können die Ausgänge gesteuert und die Eingänge eingelesen werden. Werte
werden durch Klick auf [Update] aktualisiert. Je nach Einstellung unter Settings (s.u.) werden die
Signalrichtungen dargestellt. Die manuelle Steuerung des Moduls ist auch dann möglich, wenn ein
Skript auf dem Modul ausgeführt oder das Modul anderweitig ferngesteuert wird.
Script
In diesem Bereich der Webseite lassen sich einfache C-Skripte auf das Modul laden und ausführen
(s. Skripte). Die Skripte können einfache Abläufe realisieren oder auch komplexe
Steuerungsaufgaben erledigen. Sie werden direkt per Weboberfläche eingegeben und gespeichert, so
dass sie beim nächsten Start automatisch ausgeführt werden (s. Settings). Syntax- oder Laufzeitfehler
werden ebenfalls auf der Weboberfläche dargestellt.
Settings (Einstellungen)
Hier können die Einstellungen des Moduls verändert werden. Neue Einstellungen werden erst
wirksam durch Klick auf [Apply Settings].
[Allow remote script] ermöglicht die Fernsteuerung des Moduls per TCP Port (s. Fernsteuerung).
[Download configuration] speichert die Konfiguration des Moduls. Je nach Browser erscheint eine
Aufforderung zum Speichern der Datei. Diese Datei mit der Endung “.netbox” enthält alle
Einstellungen wie IP-Adresse, I/O Konfiguration und auch das Skript. Zusätzlich wird die
Seriennummer des Moduls gespeichert.
[Restore] lädt eine gespeicherte Konfiguration. Unter dem Menupunkt [Restore] kann angegeben
werden, welche Inhalte wiederhergestellt werden sollen:
z [Restore Script] ersetzt das aktuelle Skript durch das in der Konfigurationsdatei (.netbox)
gespeicherte Skript.
z [Restore Settings] lädt IP Adresse, I/O Konfiguration und alle weiteren Einstellungen.
z [Restore only when serial number matches] prüft zunächst, ob die Seriennummer des aktuellen
Gerätes mit der Seriennummer der Konfigurationsdatei übereinstimmt. Die Konfiguration wird
nur in diesem Fall geladen. Wenn die Seriennummern nicht übereinstimmen, wird eine
Fehlermeldung ausgegeben und nichts geändert.
z [Reboot after restoring data] startet das Modul nach Laden der Konfiguration automatisch neu.
Page 7

NETPORT Fernsteuerung
j
g
g
g
N
Jedes NETPORT Modul kann mit C-Skriptdateien oder Software-Programmen per TCP-Socket ferngesteuert
werden. Alle I/O Funktionen lassen sich durch Skriptbefehle auslösen. Diese Skriptbefehle werden von einem
Skript-Interpreter auf dem Modul ausgeführt. Rückgabewerte werden über den Socket-Kanal zurückgesendet.
Die Skript-Syntax entspricht ANSI C mit einigen Unterschieden. Pointer werden nicht unterstützt, dafür
edoch einige C++ Elemente wie z.B. Exceptions. Details zur Skriptsprache finden Sie in den folgenden
Kapiteln.
Um Skriptbefehle an das Modul zu senden, gibt ausser dem Webinterface
vielfältige weitere Möglichkeiten:
Fernsteuerung per Socket
Das Modul bedient zur Fernsteuerung den TCP Port 1233. Ein oder mehrere Socket Clients können sich zu
diesem Port verbinden, ein Skript senden und somit die Box fernsteuern. Dabei werden die gleichen Skripte
verwendet wie per Webinterface
z #include <netbox.h> ist nicht notwendig und kann weggelassen werden.
z Das Skript sollte keine Endlosschleife enthalten, damit der Befehl beendet werden kann.
Alle Skripte werden quasiparallel ausgeführt. Wenn sich mehrere Clients verbinden, können also auch mehrere
Befehle (z.B. Berechnungen) parallel zueinander ausgeführt werden. Jedes Skript hat Zugriff auf alle
Resourcen wie I/O Leitungen.
!! Die Fernsteuerung über Remote Skripte ist nur aktiv, wenn unter Settings
- mit zwei Ausnahmen:
[Allow remote script] aktiv ist.
Fernsteuerung per GalepX
Das Modul lässt sich per MAD Bridge z.B. mit Hilfe der GalepX Programmiergeräte-Software fernsteuern.
Ein Beispiel, wie eine solche Fernsteuerung aussehen kann, findet sich in der GalepX Distribution unter
skripts/pio84oco/pio84oco.gxs. Dieses Skript öffnet auf der GalepX-Oberfläche ein Fenster, welches die
Eingangszustände des PIO-Moduls darstellt und eine Steuerung der Ausgänge über Checkboxen erlaubt.
Fernsteuerung per Gamestudio
Das Multimedia-Entwicklungssystem Gamestudio (www.3dgamestudio.de) kann NETPORT-Module mit den
lite-C Befehlen socket_connect, socket_send und socket_receive steuern. Details finden Sie im GamestudioHandbuch in der Dokumentation der lite-C Befehle.
Fernsteuerung per DLL
Die remote.dll Library ist ein einfacher Weg, um eine NETPORT Fernsteuerung in eigene Software zu
implementieren. Die API enthält vier einfache Funktionen:
int RemoteConnect(char* IP,long iPort)
Öffnet eine Verbindung zum TCP Socket auf der angebenen IP-Adresse und Port. Liefert 0 zurück, wenn kein
Socket Host gefunden wurde.
void RemoteClose()
Schließt die Verbindung zum Socket; muss vor Programmende aufgerufen werden.
int RemoteSend(void *data,long size)
Sendet den Inhalt des *data Puffers zum Socket, mit Pufferlänge size in Bytes.
int RemoteReceive(void *data,long size)
Prüft, ob ein Datenpaket vom Socket empfangen wurde. In diesem Fall wird der *data Puffer mit dem Inhalt
efüllt und die Zahl der Bytes zurück
eliefert. Andernfalls wird 0 zurück
eliefert.
Page 8

Die remote.dll library befindet sich im remote\API ordner, zusammen mit einem einfachen Testprogramm
N
RemoteTest.cpp, das die Benutzung der Library demonstriert.
Fernsteuerung per Linux
Unter Linux können Befehle direkt zum Modul per Shell-Skript gesendet werden. Der Shell-Befehl connect
192.168.1.12 port 1233 öffnet den Socket auf der angegebenen IP-Adrresse; die folgenden Befehle werden
dann direkt zum Socket gesendet.
Fernsteuer-Praxis
Sobald eine Verbindung zum Modul hergestellt wurde, kann es auf zwei verschiedene Arten gesteuert werden:
z Befehlsorientiert - Hierbei wird nur ein Befehl (oder eine kurze Sequenz) an das Modul gesendet. Nach
Abarbeitung der Sequenz wird die Verbindung durch das Modul beendet.
z Interaktiv - Hierzu wird als erstes der Befehl keep gesendet. Danach können beliebig viele Befehle
oder Sequenzen gesendet werden. Die Verbindung wird durch den Client beendet.
Die folgenden Beispiele verdeutlichen das Vorgehen in einer Linux-Shell und der Modul-Adresse
192.168.1.12:
Befehlsorientiert
connect 192.168.1.12 port 1233 (öffne Verbindung - nur Linux)
print("Hallo World");\n (sende Skriptbefehl)
(warte auf Antwort)
#10 Hello World \n (empfange Antwort)
#00 \n
(Modul beendet Verbindung)
Interaktiv
connect 192.168.1.12 port 1233 (öffne Verbindung - nur Linux)
keep \n (halte Verbindung)
print("Hallo World");\n (sende Skriptbefehl)
(warte auf Antwort)
#10 Hello World \n (empfange Antwort)
#00 \n
... (sende mehr Befehle)
(Client beendet Verbindung)
►
latest version online
NETPORT Script Examples
The following example scripts can be directly copied and tested in the web interface:
Setting outputs
#include <netbox.h>
// blink output IO1 (100 ms on, 100 ms off)
// GPIO1 must be set as OUTPUT
Page 9

while(true)
N
{
io.IO1.set(true);
pause(100);
io.IO1.set(false);
pause(200);
}
Configuring inputs and outputs (48OCA only)
#include <netbox.h>
const int OUTPUT = GPIO(gpioCapDigitalOutput, gpioODTDirectLogicLevel);
const int AIN = GPIO(gpioCapAnalogInput, gpioIDTDirectLogicLevel1);
io.IO0.setFunction(AIN); // GPIO0 = analog input
io.IO1.setFunction(OUTPUT); // GPIO1..GPIO6 = digital output
io.IO2.setFunction(OUTPUT);
io.IO3.setFunction(OUTPUT);
io.IO4.setFunction(OUTPUT);
io.IO5.setFunction(OUTPUT);
io.IO6.setFunction(OUTPUT);
Reading inputs
#include <netbox.h>
// copy the value from input IO2 to output IO1
// GPIO1 must be set as OUTPUT, GPIO2 as INPUT
while(true)
{
bool boState = io.IO2.value();
io.IO1.set(boState);
}
// read the analog value from input IO2 (48OCA only)
// set output IO1 when the value is > 800
// GPIO1 must be set as OUTPUT, GPIO2 as AIN
while(true)
{
bool boState = io.IO2.value() > 800;
io.IO1.set(boState);
}
► latest version online
Variables and Arrays
Variables store numbers. For defining a variable, use a C style declaration, like this:
int name; // uninitialized variable
int name = 123; // initialized variable
This declaration creates a variable of type int with the given name. The name can contain up to 30 characters,
and must begin with A..Z, a..z, or an underscore _.
Variable types
Computers always perform their calculations with finite accuracy, so all normal variable types are limited in
precision and range:
Page 10

N
Type Size Range Precision
N
long, int 4 bytes -2147483648 to 2147483647 1
short 2 bytes 0 to 65536 1
char 1 byte 0 to 256 1
bool 4 bytes true, false 1
float 4 bytes
double 8 bytes
-3.4·1038 to 3.4·10
-1.8·10
308
to 1.8·10
38
308
> 1.2·10
> 2.2·10
-38
-308
Integer constants in the program - such as character constants ('A'), integer numeric constants (12345) or
hexadecimal constants (0xabcd) are treated as int. Constants containing a decimal point (123.456) are treated
as float.
Arrays
If you group several variables together, you have an array:
int name[n]; // uninitialized array
int name[n] = { value_1, value_2, ... value_n }; // initialized array
This creates a variable that contains n numbers, and optionally gives them default values as in the second line.
ote the winged brackets { } that must surround the set of default values. Such a multi-number variable is
called an array. The number n is called the length or the dimension of the array. If the dimension of the array
can be already determined from the definition, the number n can be omitted. Example:
int my_array[] = { 0, 10, 20, 30, 40 }; // the array gets 5 values
This creates an array of 5 numbers that can be accessed in expressions through my_array[0]...my_array[4]. In
the expression the number in the [ ] brackets - the index - tells which one of the 5 numbers of the array is
meant. Note that there is no my_array[5], as the index starts with 0. The advantage of using an array, compared
to defining single variables, is that any numeric expression also can be given as index. Example:
int i;
for (i=0; i<5; i++)
{
my_array[i] = i; // sets the array to 0,1,2,3,... etc.
}
Care must be taken that the index never exceeds its maximum value, 4 in this example. Otherwise a crash will
happen.
The number of elements of an array can be determined through its size() operator. Example:
int my_array[] = { 0, 10, 20, 30, 40 };
for (int i = 0; i < my_array.size(); i++)
...
See also:
Strings, structs, functions
►
latest version online
Strings
Page 11

Strings are a plain sequence of alphanumerical characters - letters, numbers or symbols - which are mostly
N
used for messages, or for identifiers of objects such as projects (documents), actions, buffers, programmers
(end devices), etc. They are defined this way:
string name = "characters";
Defines a global string pointer with the given name and initializes it to the content characters between double
quotation marks.
Remarks:
z Special characters in the string can be given with a backslash: \n = Line feed, \" = double quote, \\ =
back slash.
z Strings can be compared with the == operator, f.i. if (sDocument == "document0") ...
z Arrays of strings can be defined just as arrays of variables.
Example:
string device_name = "device";
string empty_str = "";
string[] lstDocs = gxGetDocumentList();
See also:
Variables, structs, functions, print, message
►
latest version online
Structs
A struct is an assembled object that contains variables, pointers, or further structs. Members of a struct are
individually accessed using the struct name, followed by a '.' and the member name. Example:
typedef struct {
int x;
int y;
string name;
} SPOT; // defines a struct type named "SPOT"
...
SPOT myspot; // creates an uninitalized SPOT struct named "myspot"
...
myspot.x = 10;
myspot.name = "test!";
sizeof(struct)
The sizeof() macro that is used in the example above gives the size of a variable or a struct in bytes.
See also:
Variables, strings, functions
►
latest version online
Expressions
Page 12

An expression is an arithmetical operation that delivers a result, which can then be assigned to a variable. The
N
arithmetic expression may be composed of any numbers, further variables, function calls, brackets, and
arithmetic operators.
The following operators are available in expressions:
= Assigns the result right of the '=' to the variable left of the '='.
+-
The usual mathematical operators. * and / have a higher priority than + and -.
*/
% Modulo operator, the integer remainder of a division.
| Bitwise OR, can be used to set certains bits in a variable.
^ Bitwise exclusive OR, can be used to toggle certain bits in a variable.
~ Bitwise invert, toggles all bits of a variable.
& Bitwise AND, can be used to reset certains bits in a variable.
>> Bitwise right shift, can be used to divide a positive integer value by 2.
<< Bitwise left shift, can be used to multiply a positive integer value by 2.
() Brackets, for defining the priority of mathematical operations. Always use brackets when priority
matters!
Examples:
x = (a + 1) * b / c;
z = 10;
x = x >> 2; // divides x by 4
x = x << 3; // multiplies x by 8
x = fraction(x) << 10; // copies the fractional part of x (10 bits) into the integer part
Assignment operators
The "="-character can be combined with the basic operators:
+= Adds the result right of the operator to the variable left of the operator.
-= Subtracts the result right of the operator from the variable left of the operator.
*= Multiplies the variable left of the operator by the result right of the operator.
/= Divides the variable left of the operator by the result right of the operator.
%= Sets the variable left of the operator to the remainder of the division by the result right of the operator.
|= Bitwise OR's the the result right of the operator and the variable left of the operator.
&= Bitwise AND's the the result right of the operator and the variable left of the operator.
^= Bitwise excöusive OR's the the result right of the operator and the variable left of the operator.
>>= Bitwise right shift the variable left of the operator by the result right of the operator.
<<= Bitwise left shift the variable left of the operator by the result right of the operator.
Increment and decrement operators
By placing a '++' at the end of a variable, 1 is added; by placing a '--', 1 is subtracted. This is a convenient
shortcut for counting a variable up or down.
Examples:
x = x + 1; // add 1 to x
z += 1; // add 1 to x
x++; // add 1 to x (lite-C only)
See also:
Page 13

Functions, Variables, Comparisons
N
►
latest version online
Comparisons
A comparison is a special type of expression that delivers either true (nonzero) or false (zero) as a result.
There are special comparison operators for comparing variables or expressions:
== True if the expressions left and right of the operator are equal.
!= True if the expressions left and right of the operator are not equal.
> True if the expression left of the operator is greater than the expression right of the operator.
>= True if the expression left of the operator is greater than or equal to the expression right of the operator.
< True if the expression right of the operator is greater than the expression left of the operator.
<= True if the expression right of the operator is greater than or equal to the expression left of the operator.
&& True if the expressions left and right of the operator are both true.
|| True if either of the expressions left and right of the operator is true.
! True if the expression right of the operator is not true.
() Brackets, for defining the priority of comparisions. Always use brackets when priority matters!
Remarks:
z !! The "equals" comparison is done with '==', to differentiate it from the assignment instruction with '='.
Wrongly using '=' instead of "==" is not noticed by the compiler because it's a valid assignment, but is
one of the most frequent bugs in scripts.
z !! Only pointers and integer variables (int, long, char etc., and var without decimals) should be
compared with '==' or '!='.
Examples:
10 < x // true if x is greater than 10
(10 <= x) && (15 => x) // true if x is between 10 and 15
!((10 <= x) && (15 => x)) // true if x is less than 10 or greater than 15 (lite-C only)
See also:
Functions
►
, Variables, Expressions
latest version online
if (comparison) { instructions... }
else { instructions... }
If the comparison between the round brackets is true (i.e. evaluates to non-zero), all instructions between the
first pair of winged brackets are executed. It it's not true (i.e. evaluates to zero), the instructions between the
second pair of winged brackets following else will be executed. The else part with the second set of
instructions can be omitted. The winged brackets can be omitted when only one instruction is to be executed
dependent on the comparison.
Page 14

Speed:
g
N
Fast
Example:
if (((x+3)<9) || (y==0)) // set z to 10 if x+3 is below 9, or if y is equal to 0
z = 10;
else
z = 5;// set z to 5 in all other cases
See also:
comparisons, while
►
latest version online
while (comparison) { instructions... }
do { instructions... } while (comparison) ;
Repeats all instructions between the winged brackets as long as the comparison between the round brackets is
true resp. evaluates to non-zero. This repetition of instructions is called a loop. The while statement evaluates
the comparison at the begin, the do..while statement at the end of each repetition.
Remarks:
z If you want the loop to run forever, simply use the value 1 for the comparison - 1 is always true.
z Loops can be prematurely terminated by break, and prematurely repeated by continue.
z The winged brackets can be omitted when the loop contains only one instruction.
Example:
int x = 0;
while(x < 100) // repeat while x is lower than 100
{
x += 1;
}
See also:
if, goto, break, continue, comparisons
►
latest version online
for (initialization; comparison; continuation) { instructions... }
Performs the initialization, then evaluates the comparison and repeats all instructions between the winged
brackets as long as the comparison is true resp. non-zero. The continuation statement will be executed after the
instructions and before the next repetition. This repetition of instructions is called a loop. Initialization and
continuation can be any expression
number of repetitions.
or function call. A for loop is often used to increment a counter for a fixed
Remarks:
z Loops can be prematurely terminated by break, and prematurely repeated by continue.
z The win
ed brackets can be omitted when the loop contains only one instruction.
Page 15

Example:
N
float x = 3;
for (int i=0; i<5; i++) // repeat 5 times
x *= x; // calculate the 5th power of x
See also:
if, while, goto, break, continue, comparisons
►
latest version online
switch (expression) { case value: instructions... default:
instructions... }
The switch statement allows for branching on multiple values of a variable or expression. The expression is evaluated
and compared with the case values. If it matches any of the case values, the instructions following th e colon are
executed. The execution continues until either the closing bracket or a break statement is encountered. If the expression
does not match any of the case statements, and if there is a default statement, the instructions following default: are
executed, otherwise the switch statement ends
Example:
int choice;
...
switch (choice)
{
case 0:
print("Zero! ");
break;
case 1:
print("One! ");
break;
case 2:
print("Two! ");
break;
default:
print("None of them! ");
}
.
See also:
if, while, goto, break, continue, comparisons ► latest version online
continue
Jumps to the begin of a while loop or the continuation part of a for loop.
Example:
int x = 0;
int y = 0;
while (x < 100)
{
x+=1;
if(x % 2) // only odd numbers
{
continue; // loop continuing from the start
}
y += x; // all odd numbers up to 100 will be sum
}
Page 16

See also:
N
while
, for, break
►
latest version online
break
The break statement terminates a loop or a switch..case statement, and continues with the first instruction after
the closing bracket.
Example:
while (x < 100)
{
x+=1;
if (x == 50) { break; } // loop will be ended prematurely
}
See also:
while
, for, switch, continue ► latest version online
message(string) : string
Returns a string with a placeholder replaced by a number.
Parameters:
string - string with a placeholder between % characters, f.i. "The value is: %value%".
Parameters:
string - formatted string.
Example:
print(message("The document ID is: \"%name%\".") << sDocument);
See also:
print, throw
►
latest version online
print(string)
Prints a string through the socket channel.
Parameters:
string - string to print.
Example:
print("Test!");
Page 17

See also:
N
message
►
latest version online
pause(int ms)
Does nothing for the given number of millicesonds.
Parameters:
ms - milliseconds to wait.
Example:
pause(200);
See also:
message
►
latest version online
throw string
Prints a string through the socket channel, and terminates the script.
Parameters:
string - string to print.
Example:
throw "Error!";
See also:
message, print
►
latest version online
Page 18

Variables and Arrays
r
A
Variables store numbers. For defining a variable, use a C style declaration, like this:
int name; // uninitialized variable
int name = 123; // initialized variable
This declaration creates a variable of type int with the given name. The name can contain up to 30
characters, and must begin with A..Z, a..z, or an underscore _.
Variable types
Computers always perform their calculations with finite accuracy, so all normal variable types are limited in
precision and range:
Type Size Range Precision
long, int 4 bytes -2147483648 to 2147483647 1
short 2 bytes 0 to 65536 1
char 1 byte 0 to 256 1
bool 4 bytes true, false 1
float 4 bytes
double 8 bytes
-3.4·1038 to 3.4·10
-1.8·10
308
to 1.8·10
38
308
> 1.2·10
> 2.2·10
-38
-308
Integer constants in the program - such as character constants ('A'), integer numeric constants (12345) o
hexadecimal constants (0xabcd) are treated as int. Constants containing a decimal point (123.456) are
treated as float.
rrays
If you group several variables together, you have an array:
int name[n]; // uninitialized array
int name[n] = { value_1, value_2, ... value_n }; // initialized array
This creates a variable that contains n numbers, and optionally gives them default values as in the second
line. Note the winged brackets { } that must surround the set of default values. Such a multi-number variable is
called an array. The number n is called the length or the dimension of the array. If the dimension of the array
can be already determined from the definition, the number n can be omitted. Example:
int my_array[] = { 0, 10, 20, 30, 40 }; // the array gets 5 values
This creates an array of 5 numbers that can be accessed in expressions through my_array[0]...my_array[4].
In the expression the number in the [ ] brackets - the index - tells which one of the 5 numbers of the array is
meant. Note that there is no my_array[5], as the index starts with 0. The advantage of using an array,
compared to defining single variables, is that any numeric expression also can be give n as index. Example:
int i;
for (i=0; i<5; i++)
{
my_array[i] = i; // sets the array to 0,1,2,3,... etc.
}
Care must be taken that the index never exceeds its maximum value, 4 in this example. Otherwise a crash
will happen.
The number of elements of an array can be determined through its size() operator. Example:
int my_array[] = { 0, 10, 20, 30, 40 };
for (int i = 0; i < my_array.size(); i++)
...
Page 19

See also:
A
A
Strings, structs, functions
latest version online
Strings
►
Strings are a plain sequence of alphanumerical characters - letters, numbers or symbols - which are mostly
used for messages, or for identif iers of objects such as projects (documents), actions, buffers, programmers
(end devices), etc. They are defined this way:
string name = "characters";
Defines a global string pointer with the given name and initializes it to the content characters between double
quotation marks.
Remarks:
Special characters in the string can be given with a backslash: \n = Line feed, \" = double quote, \\ = back
slash.
Strings can be compared with the == operator, f.i. if (sDocument == "document0") ...
Arrays of strings can be defined just as arrays of variables.
Example:
string device_name = "device";
string empty_str = "";
string[] lstDocs = gxGetDocumentList();
See also:
Variables, structs, functions, print, message
Structs
► latest version online
struct is an assembled object that contains variables, pointers, or further structs. Members of a struct are
individually accessed using the struct name, followed by a '.' and the member name. Example:
typedef struct {
int x;
int y;
string name;
} SPOT; // defines a struct type named "SPOT"
...
SPOT myspot; // creates an uninitalized SPOT struct named "myspot"
...
myspot.x = 10;
myspot.name = "test!";
sizeof(struct)
The sizeof() macro that is used in the example above gives the size of a variable or a struct in bytes.
See also:
Variables
Expressions
, strings, functions
► latest version online
n expression is an arithmetical operation that delivers a result, which can then be assigned to a variable.
The arithmetic expression may be composed of any numbers, further variables, function calls, brackets, and
Page 20

arithmetic operators.
A
The following operators are available in expressions:
= Assigns the result right of the '=' to the variable left of the '='.
+-
The usual mathematical operators. * and / have a higher priority than + and -.
*/
% Modulo operator, the integer remainder of a division.
| Bitwise OR, can be used to set certains bits in a variable.
^ Bitwise exclusive OR, can be used to toggle certain bits in a variable.
~ Bitwise invert, toggles all bits of a variable.
& Bitwise AND, can be used to reset certains bits in a variable.
>> Bitwise right shift, can be used to divide a positive integer value by 2.
<< Bitwise left shift, can be used to multiply a positive integer value by 2.
() Brackets, for defining the priority of mathematical operations. Always use brackets when priority
matters!
Examples:
x = (a + 1) * b / c;
z = 10;
x = x >> 2; // divides x by 4
x = x << 3; // multiplies x by 8
x = fraction(x) << 10; // copies the fractional part of x (10 bits) into the integer part
ssignment operators
The "="-character can be combined with the basic operators:
+= Adds the result right of the operator to the variable left of the operator.
-= Subtracts the result right of the operator from the variable left of the operator.
*= Multiplies the variable left of the operator by the result right of the operator.
/= Divides the variable left of the operator by the result right of the operator.
%= Sets the variable left of the operator to the remainder of the division by the result right of the
operator.
|= Bitwise OR's the the result right of the operator and the variable left of the operator.
&= Bitwise AND's the the result right of the operator and the variable left of the operator.
^= Bitwise excöusive OR's the the result right of the operator and the variable left of the operator.
>>= Bitwise right shift the variable left of the operator by the result right of the operator.
<<= Bitwise left shift the variable left of the operator by the result right of the operator.
Increment and decrement operators
By placing a '++' at the end of a variable, 1 is added; by placing a '--', 1 is subtracted. This is a conv enient
shortcut for counting a variable up or down.
Examples:
x = x + 1; // add 1 to x
z += 1; // add 1 to x
x++; // add 1 to x (lite-C only)
See also:
Functions, Variables, Comparisons
latest version online
►
Page 21

Comparisons
A
f
comparison is a special type of expression that delivers either true (nonzero) or false (zero) as a result.
There are special comparison operators for comparing variables or expressions:
== True if the expressions left and right of the operator are equal.
!= True if the expressions left and right of the operator are not equal.
> True if the expression left of the operator is greater than the expression right of the operator.
>= True if the expression left of the operator is greater than or equal to the expression right of the
operator.
< True if the expression right of the operator is greater than the expression left of the operator.
<= True if the expression right of the operator is greater than or equal to the expression left of the
operator.
&& True if the expressions left and right of the operator are both true.
|| True if either of the expressions left and right of the operator is true.
! True if the expression right of the operator is not true.
() Brackets, for defining the priority of comparisions. Always use brackets when priority matters!
Remarks:
!! The "equals" comparison is done with '==', to differentiate it from the assignment instruction with '='.
Wrongly using '=' instead of "==" is not noticed by the compiler because it's a valid assignment, but is one
of the most frequent bugs in scripts.
!! Only pointers and integer variables (int, long, char etc., and var without decimals) should be compared
with '==' or '!='.
Examples:
10 < x // true if x is greater than 10
(10 <= x) && (15 => x) // true if x is between 10 and 15
!((10 <= x) && (15 => x)) // true if x is less than 10 or greater than 15 (lite-C only)
See also:
Functions, Variables, Expressions
latest version online
if (comparison) { instructions... }
►
else { instructions... }
If the comparison between the round brackets is true (i.e. evaluates to non-zero), all instructions between the
first pair of winged brackets are executed. It it's not true (i.e. evaluates to zero), the instructions between the
second pair of winged brackets following else will be executed. The else part with the second set o
instructions can be omitted. The winged brackets can be omitted when only one instruction is to be executed
dependent on the comparison.
Speed:
Fast
Example:
if (((x+3)<9) || (y==0)) // set z to 10 if x+3 is below 9, or if y is equal to 0
z = 10;
else
z = 5;// set z to 5 in all other cases
See also:
Page 22

comparisons, while
r
while (comparison) { instructions... }
► latest version online
do { instructions... } while (comparison) ;
Repeats all instructions between the winged brackets as long as the comparison between the round brackets
is true resp. evaluates to non-zero. This repetition of instructions is called a loop. The while statement
evaluates the comparison at the begin, the do..while statement at the end of each repetition.
Remarks:
If you want the loop to run forever, simply use the value 1 for the comparison - 1 is always true.
Loops can be prematurely terminated by break, and prematurel y repeated by continue.
The winged brackets can be omitted when the loop contains only one instruction.
Example:
int x = 0;
while(x < 100) // repeat while x is lower than 100
{
x += 1;
}
See also:
if, goto, break, continue, comparisons
for (initialization; comparison; continuation) { instructions... }
► latest version online
Performs the initialization, then evaluates the comparison and repeats all instructions between the winged
brackets as long as the comparison is true resp. non-zero. The continuation statement will be executed afte
the instructions and before the next repetition. This repetition of instructions is called a loop. Initialization and
continuation can be any expression
or function call. A for loop is often used to increment a counter for a
fixed number of repetitions.
Remarks:
Loops can be prematurely terminated by break, and prematurel y repeated by continue.
The winged brackets can be omitted when the loop contains only one instruction.
Example:
float x = 3;
for (int i=0; i<5; i++) // repeat 5 times
x *= x; // calculate the 5th power of x
See also:
if, while, goto, break, continue, comparisons
► latest version online
switch (expression) { case value: instructions... default: instructions... }
The switch statement allows for branching on multiple values of a variable or expression. The expression is
evaluated and compared with the case values. If it matches any of the case values, the instructions following
the colon are executed. The execution continues until either the closing bracket or a break statement is
encountered. If the expression does not match any of the case statements, and if there is a default
statement, the instructions following default: are executed, otherwise the switch statement ends.
Example:
int choice;
...
Page 23

switch (choice)
{
case 0:
print("Zero! ");
break;
case 1:
print("One! ");
break;
case 2:
print("Two! ");
break;
default:
print("None of them! ");
}
See also:
, while, goto, break, continue, comparisons
if
continue
Jumps to the begin of a while loop or the continuation part of a for loop.
Example:
int x = 0;
int y = 0;
while (x < 100)
{
x+=1;
if(x % 2) // only odd numbers
{
continue; // loop continuing from the start
}
y += x; // all odd numbers up to 100 will be sum
}
latest version online
►
See also:
, for, break
while
break
► latest version online
The break statement terminates a loop or a switch..case statement, and continues with the first instruction
after the closing bracket.
Example:
while (x < 100)
{
x+=1;
if (x == 50) { break; } // loop will be ended prematurely
}
See also:
, for, switch, continue
while
► latest version online
message(string) : string
Returns a string with a placeholder replaced by a number.
Parameters:
string - string with a placeholder between % characters, f.i. "The value is: %value%".
Parameters:
string - formatted string.
Example:
Page 24

print(message("The document ID is: \"%name%\".") << sDocument);
See also:
print, throw
print(string)
Prints a string through the socket channel.
Parameters:
string - string to print.
Example:
print("Test!");
See also:
message
pause(int ms)
Does nothing for the given number of millicesonds.
Parameters:
ms - milliseconds to wait.
latest version online
►
► latest version online
Example:
pause(200);
See also:
message
throw string
Prints a string through the socket channel, and terminates the script.
Parameters:
string - string to print.
Example:
throw "Error!";
See also:
message
, print
► latest version online
► latest version online
 Loading...