

Coninvers SF-Z0025, SF-Z0026 Operating instructions
CONINVERSCONINVERS
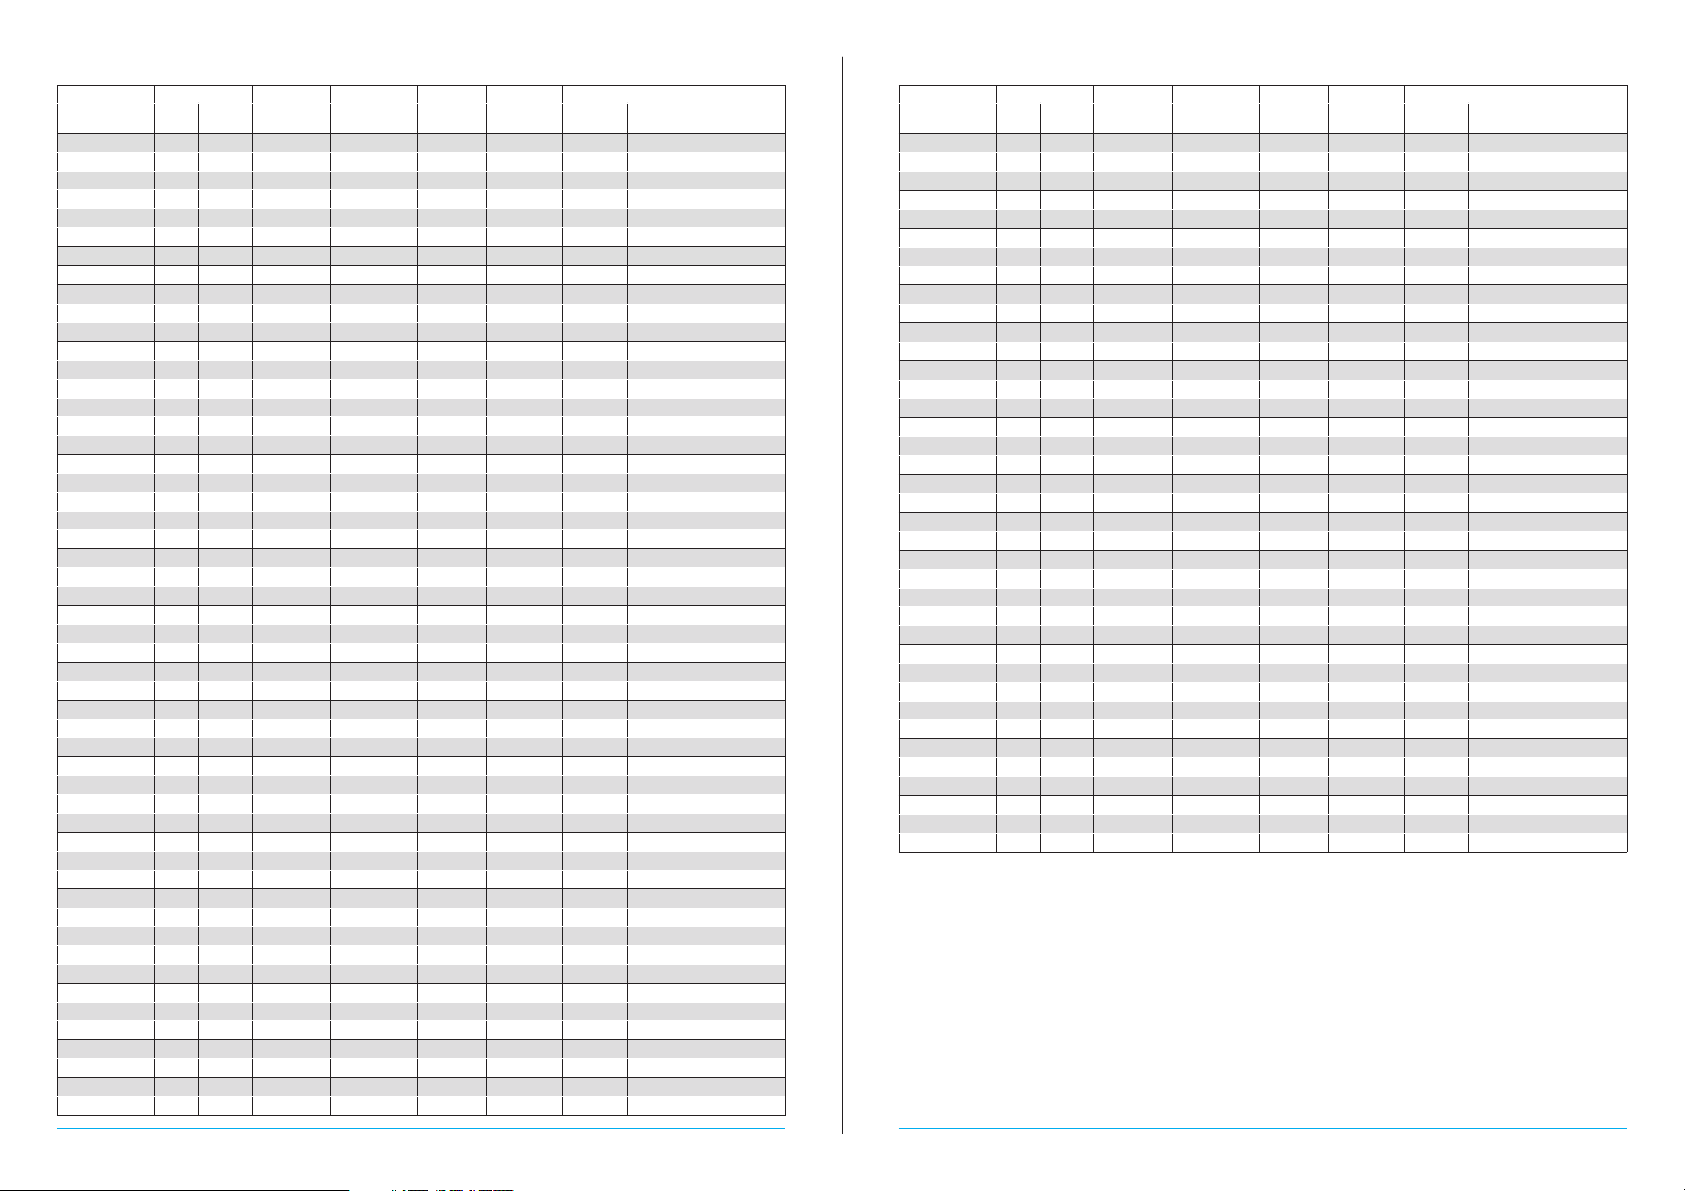
Settings chart for Coninvers crimp contacts, 4-arbor crimping pliers SF-Z0025
General information
The SF-Z0025 and SF-Z0026 4-arbor crimping pliers are for crimping the machined crimp contacts from Coninvers
as in the adjacent list. The settings for the crimping pliers have been calculated on the basis of the withdrawal forces
given in DIN EN 60352-2 and by using a reference conductor. Depending on the conductor used, the crimping
pliers settings required may differ from the values given in the settings chart.
Procedure
• To switch on: Press the "ON" button or turn the adjustment knob.
The standard display appears in mm.
• Power saving function: If after a period of 1 min. there has been
no change in the display or if no button has been pressed, the
digital display switches off automatically.
• Mode function: The "MODE" button is used to select the display
functions in mm or in inches, or the selector positions from 1-8 in
acc. with MIL 22520. Use the enclosed gauge to press the sunken
"MODE" button as often as necessary to select the desired display:
Setting the crimping parameters
• Please refer to the enclosed settings chart for the crimp arbor and
locator settings for the contact to be crimped.
• Loosen the clamping screw (manufacturing state).
• The crimping dimensions (crimping depth of the crimp arbors) are
set by turning the adjustment knob until the digital display shows
the required value. Depth settings clockwise reduce the crimping
dimensions, while counter-clockwise increases the crimping
dimensions.
• Lock the crimping dimensions using the clamping screw.
• Lift the locator at the side to set it to the position defined in the
chart. Insert the crimp contact as far as it will go into the recess
provided. The locator moves the crimp contact to the exact position.
• Insert the prepared cable as far as it will go into the crimp contact in the
pliers and close the pliers tightly.
• Remove the crimped contact from the pliers.
Changing the battery
The service life of the battery for the digital display is approximately one
year, depending on how often it is used.To change the battery (type
CR2025, 3 VOLT), the battery holder is pulled out so that the battery can be
removed. After changing the battery, it is necessary to perform a reset
and adjust the pliers accordingly.
Service and maintenance
The manual crimping pliers must be clean and in good condition before starting work. Any residue from the crimping
process must be removed from the crimping jaws and locator. The joints must be lubricated regularly with a light
machine oil and protected against dirt. Please ensure that all bolts are secured with circlips. Repairs to the 4-arbor
crimping pliers may only be carried out by the manufacturer.
Edition
December 2009
CONINVERS GmbH
Heisenbergstr. 1
D-71083 Herrenberg
Phone +49 (0) 70 32/92 74-0
Fax +49 (0) 70 32/92 74-330
www.coninvers.com
info@coninvers.com
Operating instructions for SF-Z0025 and SF-Z0026
4-arbor crimping pliers with digital display for machined contacts
Standard display
in mm
Display in
inches
Display of comparable selector
positions in acc. with MIL
Adjusting pliers/Reset
The crimping pliers may only be adjusted by authorized
trained personnel since improper adjustment can lead
to incorrect crimping.
• Using the adjustment knob, set the crimp arbors so that the
enclosed gauge can move between the crimp arbors without play.
Please note that a larger gauge dimension must always be
selected than that to be set, e.g. select 2.4 mm and adjust down to
gauge dimension 2.0 mm.
• Keep the "ON" button pressed and press the "MODE" button using
the gauge. Keep the "MODE" pressed for at least 4 seconds.
• Release the "MODE" button after 4 seconds and then the "ON"
button
• The digital display automatically jumps to the gauge value 2.0 mm.
The pliers are adjusted and ready for the crimping parameters to
be set.
Technical Product Information • December 2009 / 2009-12-08 • SF_Z0025_ENTechnical Product Information • December 2009 / 2009-12-08 • SF_Z0025_EN
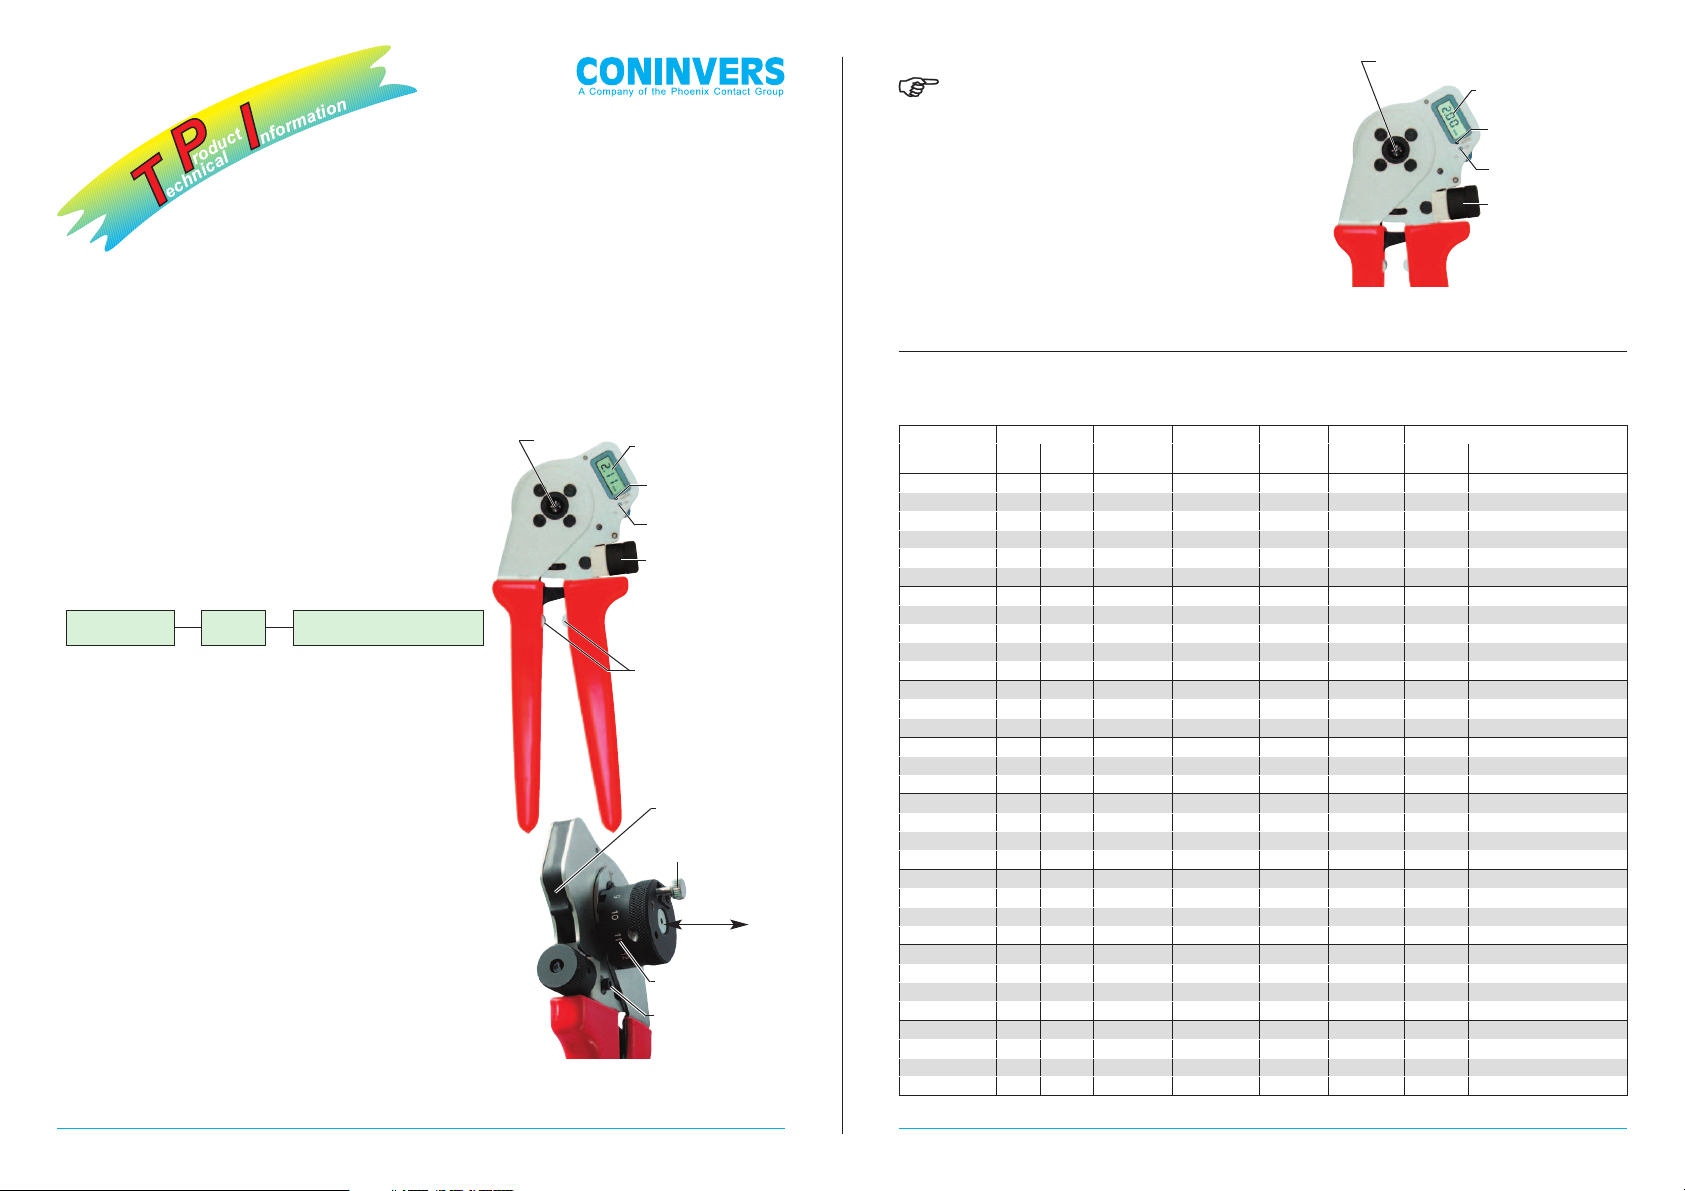
Crimping
recess
Adjustment knob for
accuracies of feed
depth of 0.01 mm
"ON" button
Digital display
Sunken
"MODE" button
End stop
5014145 (page 1 / 3)
Locator, 12-section
Battery holder
Battery type CR2025
3 VOLT
Locator screw
(no setting function)
Clamping screw for
locking the crimping
dimensions
Gauge
introduced
Adjustment knob for
setting the arbors to
the gauge dimension
"ON" button
Gauge dimensions
displayed
Sunken
"MODE" button
Continuation see next page
Contact Plug-in Ø [mm] Cross Total length Conductor Stripping Setting parameters
Type Pin Socket section
[mm
2
]
[mm] insert Ø
[mm]
length
[mm]
Locator Crimping arbor setting
[mm]
SF-6AP2000 1 0.14 20.8 2.0 4.5 8 0.73
SF-6AP2000 1 0.25 20.8 2.0 4.5 8 0.77
SF-6AP2000 1 0.35 20.8 2.0 4.5 8 0.85
SF-6AP2000 1 0.50 20.8 2.0 4.5 8 0.88
SF-6AP2000 1 0.75 20.8 2.0 4.5 8 0.97
SF-6AP2000 1 1.00 20.8 2.0 4.5 8 1.06
SF-6AS2000 1 0.25 14.2 2.0 4.5 9 0.77
SF-6AS2000 1 0.35 14.2 2.0 4.5 9 0.85
SF-6AS2000 1 0.50 14.2 2.0 4.5 9 0.92
SF-6AS2000 1 0.75 14.2 2.0 4.5 9 1.01
SF-6AS2000 1 1.00 14.2 2.0 4.5 9 1.11
SF-6CP2000 1 0.08 20.8 1.6 4.5 8 0.69
SF-6CP2000 1 0.14 20.8 1.6 4.5 8 0.76
SF-6CP2000 1 0.25 20.8 1.6 4.5 8 0.79
SF-6CS2000 1 0.08 14.2 1.6 4.5 9 0.69
SF-6CS2000 1 0.14 14.2 1.6 4.5 9 0.76
SF-6CS2000 1 0.25 14.2 1.6 4.5 9 0.79
SF-6DP2000 1 0.50 23.3 1.8 4.5 8 0.75
SF-6DP2000 1 0.75 23.3 1.8 4.5 8 0.80
SF-6DP2000 1 1.00 23.3 1.8 4.5 7 1.00
SF-6DP2000 1 1.50 23.3 1.8 4.5 7 1.10
SF-6FS2000 1 0.50 16.7 1.8 4.5 9 0.75
SF-6FS2000 1 0.75 16.7 1.8 4.5 9 0.80
SF-6FS2000 1 1.00 16.7 1.8 4.5 11 1.00
SF-6FS2000 1 1.50 16.7 1.8 4.5 11 1.10
SF-10KP004 1 0.14 20.8 1.8 4.5 8 0.90
SF-10KP004 1 0.25 20.8 1.8 4.5 8 0.93
SF-10KP004 1 0.35 20.8 1.8 4.5 8 0.95
SF-10KP004 1 0.50 20.8 1.8 4.5 8 0.98
SF-10KS004 1 0.14 14.25 1.8 4.5 9 0.73
SF-10KS004 1 0.25 14.25 1.8 4.5 9 0.76
SF-10KS004 1 0.35 14.25 1.8 4.5 9 0.80
SF-10KS004 1 0.50 14.25 1.8 4.5 9 0.84
CONINVERSCONINVERS
Settings for crimping pliers SF-Z0026 see next page.
Settings chart for Coninvers crimp contacts (Continuation), 4-arbor crimping pliers SF-Z0025 Settings chart for Coninvers crimp contacts (Continuation), 4-arbor crimping pliers SF-Z0025
Depending on the conductor used, the crimping pliers settings required may differ from the values given in
the settings chart.
Technical Product Information • December 2009 / 2009-12-08 • SF_Z0025_ENTechnical Product Information • December 2009 / 2009-12-08 • SF_Z0025_EN
Contact Plug-in Ø [mm] Cross Total length Conductor Stripping Setting parameters
Type Pin Socket section
[mm
2
]
[mm] insert Ø
[mm]
length
[mm]
Locator Crimping arbor setting
[mm]
SF-10KS010 1 0.14 14.25 2.0 4.5 9 0.73
SF-10KS010 1 0.25 14.25 2.0 4.5 9 0.76
SF-10KS010 1 0.35 14.25 2.0 4.5 9 0.80
SF-10KS010 1 0.50 14.25 2.0 4.5 9 0.83
SF-10KS010 1 0.75 14.25 2.0 4.5 9 0.90
SF-10KS010 1 1.00 14.25 2.0 4.5 9 0.98
SF-7MP2000 2 4.0 25.2 2.85 8 7 1.67
SF-7MS2000 2 4.0 25.5 4.5 8 4 1.66
SF-7NS2000 2 0.75 25.5 3.8 8 4 1.39
SF-7NS2000 2 1.00 25.5 3.8 8 4 1.42
SF-7NS2000 2 1.50 25.5 3.8 8 4 1.48
SF-7PP2000 2 0.14 25.2 1.5 8 7 0.75
SF-7PP2000 2 0.25 25.2 1.5 8 7 0.80
SF-7PP2000 2 0.35 25.2 1.5 8 7 0.97
SF-7PP2000 2 0.50 25.2 1.5 8 7 1.00
SF-7PP2000 2 0.75 25.2 1.5 8 7 1.10
SF-7PP2000 2 1.00 25.2 1.5 8 7 1.15
SF-7PS2000 2 0.25 25.5 3.3 8 4 0.92
SF-7PS2000 2 0.35 25.5 3.3 8 4 0.94
SF-7PS2000 2 0.50 25.5 3.3 8 4 0.96
SF-7PS2000 2 0.75 25.5 3.3 8 4 0.99
SF-7PS2000 2 1.00 25.5 3.3 8 4 1.21
SF-7QP2000 2 1.00 25.2 2.3 8 7 1.59
SF-7QP2000 2 1.50 25.2 2.3 8 7 1.64
SF-7QP2000 2 2.50 25.2 2.3 8 7 1.73
SF-7QS2000 2 1.00 25.5 4.3 8 4 1.59
SF-7QS2000 2 1.50 25.5 4.3 8 4 1.64
SF-7QS2000 2 2.50 25.5 4.3 8 4 1.73
SF-7RP2000 2 0.14 25.2 0.8 8 7 0.83
SF-7RP2000 2 0.25 25.2 0.8 8 7 0.87
SF-20KP004 2 0.75 25.2 2.0 8 7 1.39
SF-20KP004 2 1.00 25.2 2.0 8 7 1.42
SF-20KP004 2 1.50 25.2 2.0 8 7 1.48
SF-20KS010 2 0.75 25.5 4.3 8 4 1.20
SF-20KS010 2 1.00 25.5 4.3 8 4 1.30
SF-20KS010 2 1.50 25.5 4.3 8 4 1.45
SF-20KS010 2 2.50 25.5 4.3 8 4 1.65
SM-20KP005 2 0.75 37.4 3.8 8 6 1.34
SM-20KP005 2 1.00 37.4 3.8 8 6 1.42
SM-20KP005 2 1.50 37.4 3.8 8 6 1.48
SM-20KP006 2 0.25 37.4 3.3 8 6 0.87
SM-20KP006 2 0.35 37.4 3.3 8 6 1.09
SM-20KP006 2 0.50 37.4 3.3 8 6 1.12
SM-20KP006 2 0.75 37.4 3.3 8 6 1.16
SM-20KP006 2 1.00 37.4 3.3 8 6 1.21
SM-20KP007 2 1.00 37.4 4.3 8 6 1.59
SM-20KP007 2 1.50 37.4 4.3 8 6 1.64
SM-20KP007 2 2.50 37.4 4.3 8 6 1.73
SM-20KP008 2 2.50 37.4 4.5 8 6 1.52
SM-20KP008 2 4.00 37.4 4.5 8 6 1.66
SM-36KP001 3.6 0.75 35.8 1.8 7 5 1.26
SM-36KP001 3.6 1.00 35.8 1.8 7 5 1.29
Contact Plug-in Ø [mm] Cross Total length Conductor Stripping Setting parameters
Type Pin Socket section
[mm
2
]
[mm] insert Ø
[mm]
length
[mm]
Locator Crimping arbor setting
[mm]
SM-36KP002 3.6 1.00 35.8 2.85 7 5 1.40
SM-36KP002 3.6 1.50 35.8 2.85 7 5 1.50
SM-36KP002 3.6 2.50 35.8 2.85 7 5 1.62
SM-36KP003 3.6 4.00 35.8 3.6 12 1 2.13
SM-36KP003 3.6 6.00 35.8 3.6 12 1 2.23
SM-36KP005 3.6 1.00 49.7 4.3 10 1 1.59
SM-36KP005 3.6 1.50 49.7 4.3 10 1 1.64
SM-36KP005 3.6 2.50 49.7 4.3 10 1 1.73
SM-36KP006 3.6 2.50 49.7 4.5 10 1 1.93
SM-36KP006 3.6 4.00 49.7 4.5 10 1 2.02
SM-36KP008 3.6 4.00 49.7 5.4 10 1 2.10
SM-36KP008 3.6 6.00 49.7 5.4 10 1 2.41
SM-36KP009 3.6 1.00 35.8 2.3 12 1 1.59
SM-36KP009 3.6 1.50 35.8 2.3 12 1 1.64
SM-36KP009 3.6 2.50 35.8 2.3 12 1 1.73
SM-36KS001 3.6 1.00 36.95 4.3 10 3 1.45
SM-36KS001 3.6 1.50 36.95 4.3 10 3 1.49
SM-36KS001 3.6 2.50 36.95 4.3 10 3 1.73
SM-36KS002 3.6 2.50 36.95 4.5 10 3 1.93
SM-36KS002 3.6 4.00 36.95 4.5 10 3 2.02
SM-36KS003 3.6 4.00 36.95 5.4 10 3 2.10
SM-36KS003 3.6 6.00 36.95 5.4 10 3 2.41
ST-20KP010 2 0.25 19.8 1.5 6 10 0.90
ST-20KP010 2 0.35 19.8 1.5 6 10 1.00
ST-20KP010 2 0.50 19.8 1.5 6 10 1.10
ST-20KP010 2 0.75 19.8 1.5 6 10 1.22
ST-20KP010 2 1.00 19.8 1.5 6 10 1.35
ST-20KS010 2 0.25 15.6 1.5 6 10 0.90
ST-20KS010 2 0.35 15.6 1.5 6 10 1.00
ST-20KS010 2 0.50 15.6 1.5 6 10 1.10
ST-20KS010 2 0.75 15.6 1.5 6 10 1.22
ST-20KS010 2 1.00 15.6 1.5 6 10 1.35
ST-20KP020 2 1.00 19.8 2.3 6 10 1.59
ST-20KP020 2 1.50 19.8 2.3 6 10 1.65
ST-20KP020 2 2.50 19.8 2.3 6 10 1.73
ST-20KS020 2 1.00 15.6 2.3 6 10 1.59
ST-20KS020 2 1.50 15.6 2.3 6 10 1.65
ST-20KS020 2 2.50 15.6 2.3 6 10 1.73
5014145 (page 2 / 3)
 Loading...