

Page 1
To reduce the risk of drowning, entrapment, falls, paralysis, electrocution, or
other serious injury or death:
Dealer/Installer: Give manual to homeowner.
Installer: Read “Safe Installation” on p. 2 and all instructions before beginning. For proper assembly and
installation, instructions must be followed completely.
Homeowner: Read “Safe Use” on the back cover before using. Save these instructions.
Installation must comply with local codes and may require permits.
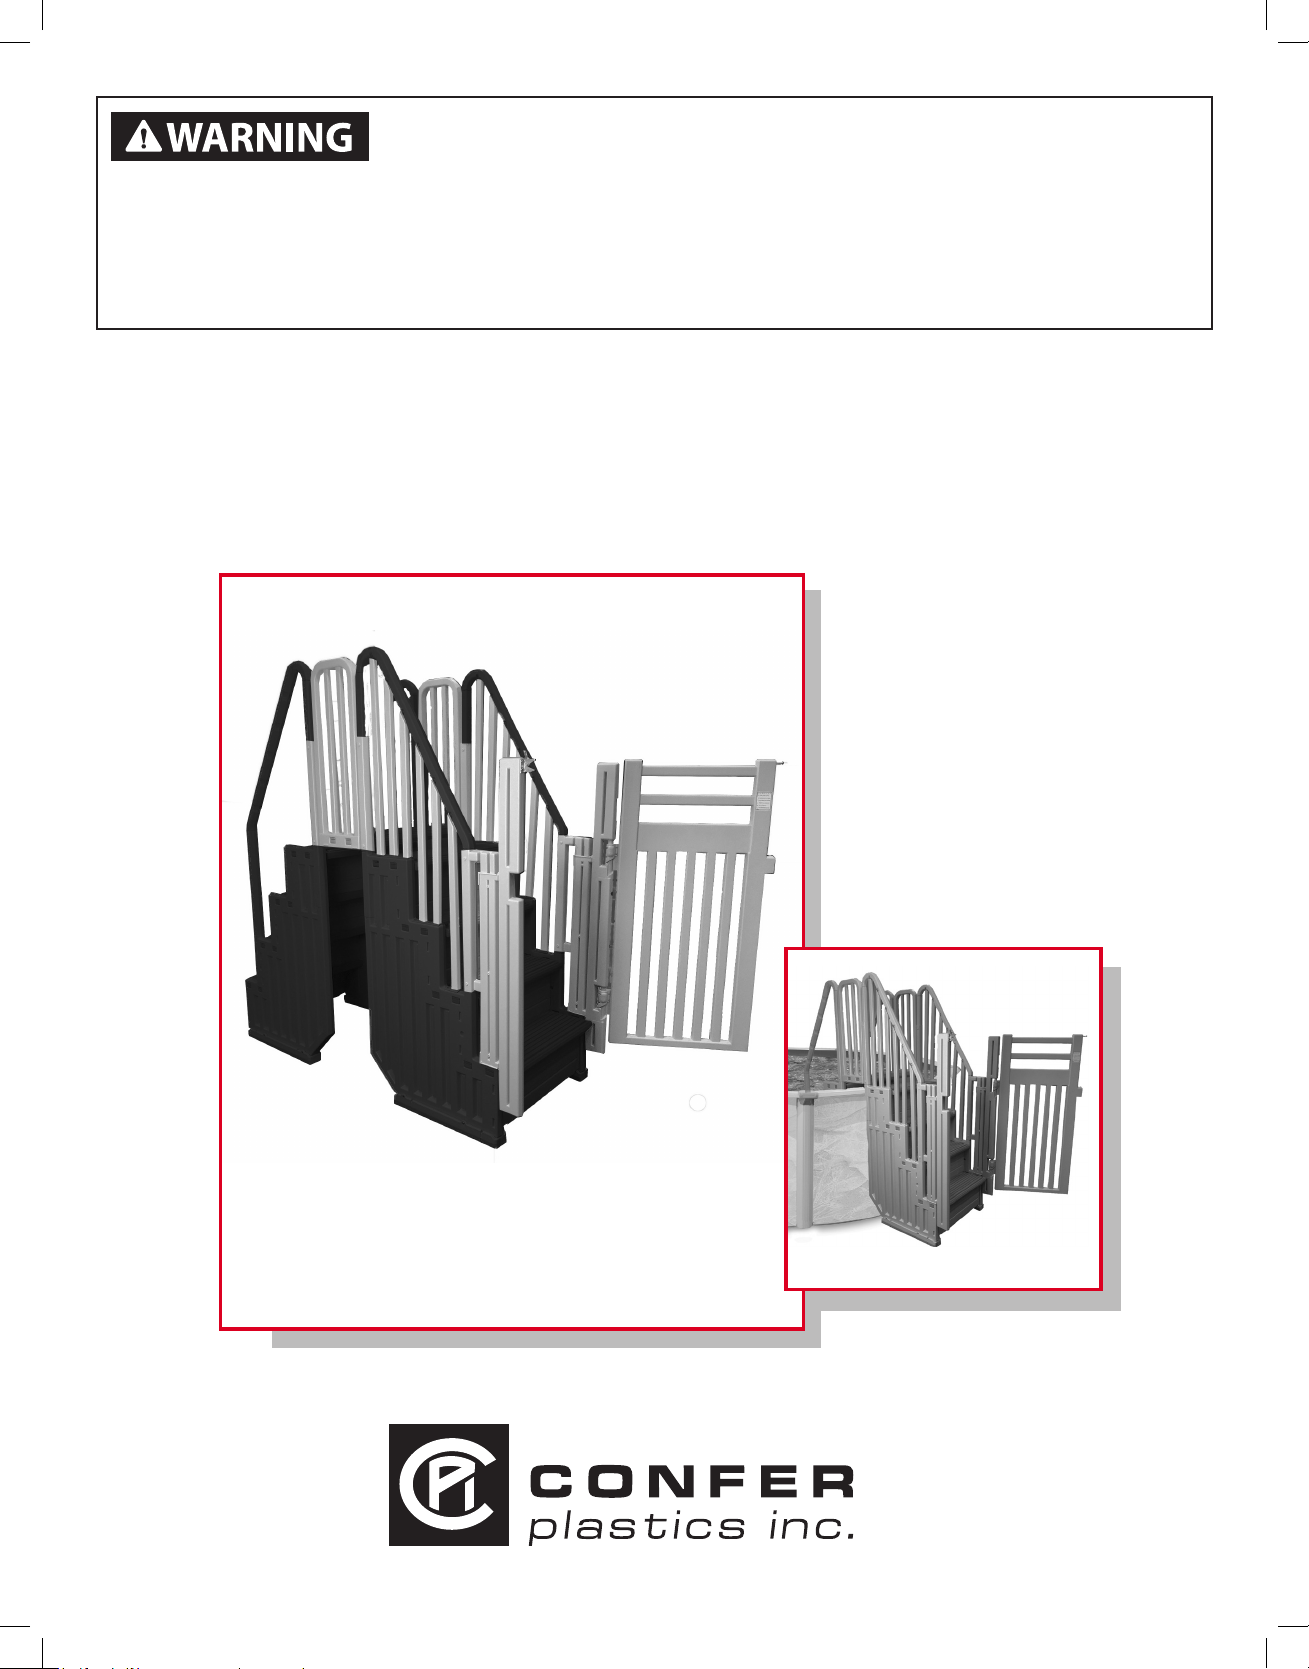
ENCLOSURE KIT
Model #STEP-ENC-X for Flat-Bottom, Above-Ground Pools
ASSEMBLY, INSTALLATION, AND USE MANUAL
MODEL
STEP-ENC-X
COMPLETE SYSTEM
REQUIRES:
• 2-STEP-1X’S
• 1-STEP-ENC-X
• 1-PES-G-X
Full Step Enclosure System
Made in the U.S.A. by
www.conferladders.com
Page 2
ASSEMBLY INSTRUCTIONS
ENCLOSURE KIT MODEL #STEP-ENC-X
PARTS LIST
Qty. Description (Carton 1 of 2)
1 Connecting Step
2 Connecting Rail
2 Gate Adapter Post
2 Set of Pickets (single, double, triple)
The following parts are supplied
in the gate carton:
1 Gate Installation Manual
2 Gate w/hardware & padlock
1 Hinge Mounting Post
1 Latch Mounting Post
(Carton 2 of 2)
HARDWARE
Qty. Description
40 #10x1-1/4” Screw
12 #10 x 3/4” Screw
12 Protective Cap
Assemble the two STEP-1X units as per their instructions, but do not attach the mounting brackets to the
posts (as described in Step 9). These parts will not be used. Also, do not attach the handrails to
the posts (as described in Step 11 of the STEP-1X instructions).
For best installation results, the outside unit should be placed on flat patio blocks on level ground.
(complete kit consists of two cartons)
NEEDED FOR ASSEMBLY
• Pliers
• Mallet (or Hammer) and block of wood
• Drill (cordless)
• Phillips Bit
• Second person to assist
Safe Installation
To reduce the risk of electrocution, drowning, entrapment, falls, or other
serious injury or death:
Check building codes/permitting. Consult your local Building Department before installation of your pool
and equipment. Pool/equipment installation must comply with the codes of the authority having jurisdiction
and may require permits (e.g., building, plumbing, electrical, zoning, etc.).
Use for intended purpose only
• Kit and assembled product must consist of two STEP-1X’s, one PES-G-X, and this enclosure kit.
• Use only as a swimming pool step system.
• This system is designed and manufactured for a specic pool wall height and/or deck of the pool check product specication and the height of your pool.
Check that you have all required parts. Check the contents of the carton with the Parts list for this
system. All parts and hardware are required. If any parts are missing, DO NOT attempt to assemble or
install the system. Instead, call Toll Free U.S. - 800-635-3213 or visit our web site at www.conferladders.
com for assistance.
Select an appropriate location - The system must be located on level, solid base and in a location that
will be in full view of competent adult supervision when in use.
Follow all instructions
• For stable, correct assembly and installation, all instructions must be followed completely and in the
sequence shown.
• Follow the manufacturer’s recommendations for the safe use of all hand tools and equipment used
during installation.
Cordless drill only - no corded drills near pool. Use a cordless drill for assembly and installation. To
reduce the risk of electrocution, NEVER use a corded drill in or around a pool.
Lift safely. When lifting awkward or heavy loads, have another person help you.
Double check after installation
• Before using the product, after assembly and installation, go over the instructions and procedures again
to make sure nothing has been overlooked.
• Make sure that safety labels are installed and legible.
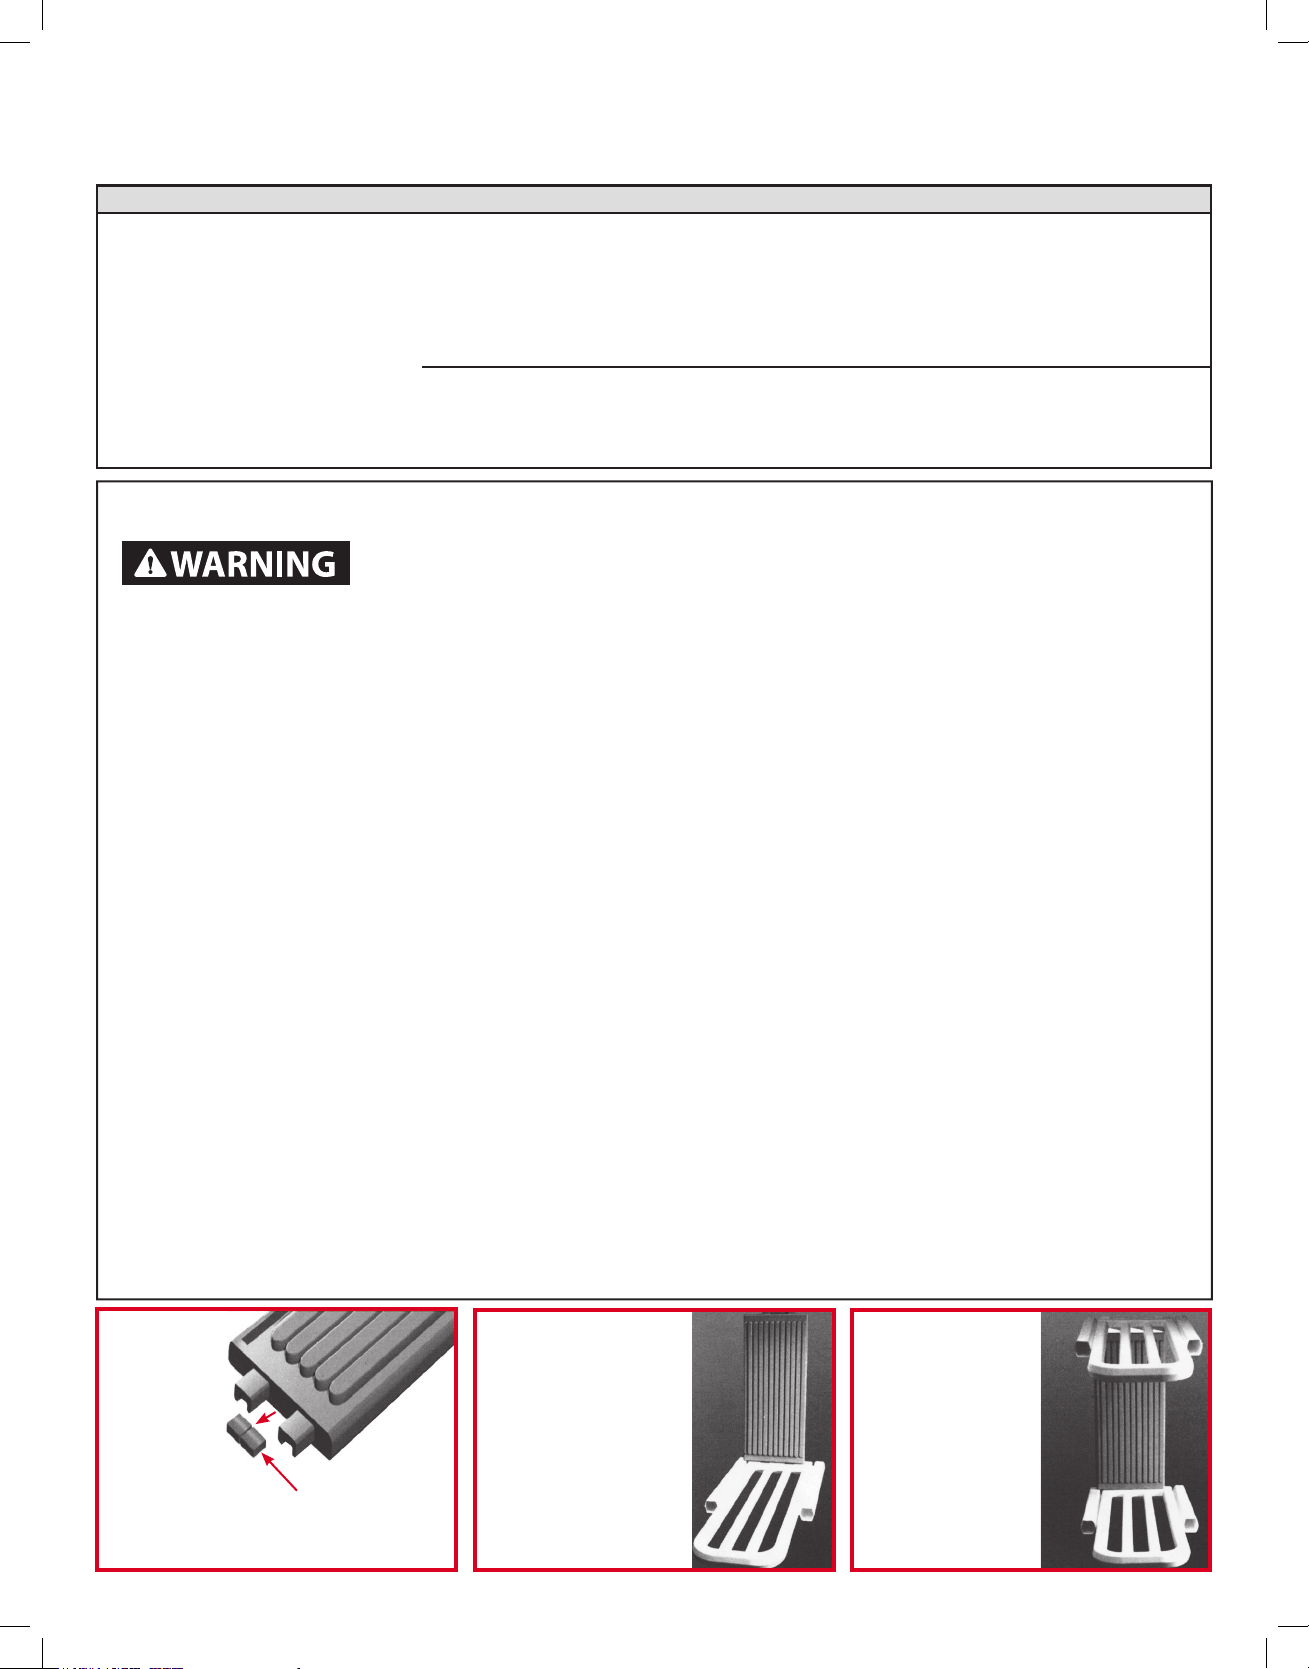
Step 1.
SAVE
Using a pair of pliers twist off the locking
wedges from both ends of the connecting
step and SAVE.
2
Step 2.
Lay one of the connecting
rails down on a clean, flat
surface. Push the end of
the connecting step into the
openings of the connecting
rail until fully seated. Make
sure the “tread” surface of
the step is facing up towards
the rails.
Step 3.
Lay the second
connecting rail down
and push the
opposite end of the
connecting step into
the openings until fully
seated.
Page 3
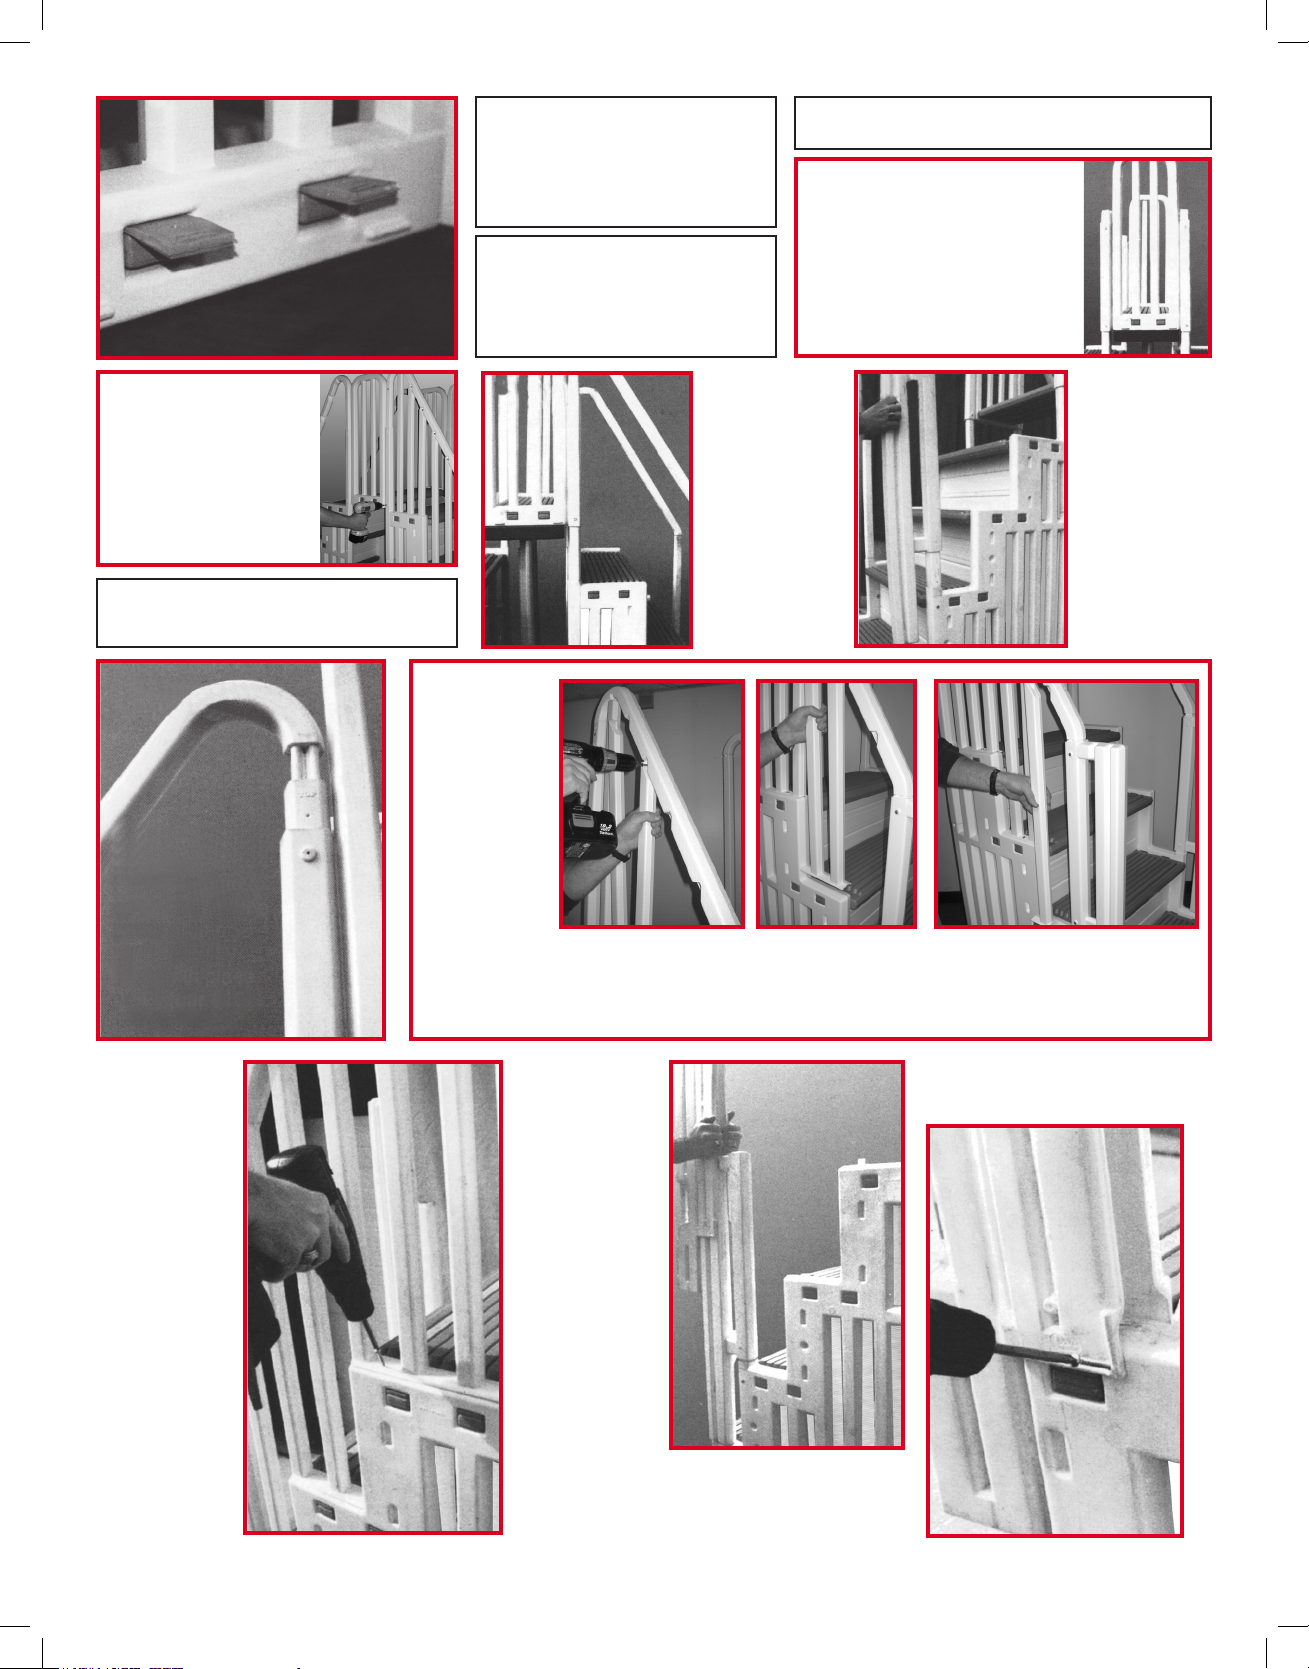
Step 4.
Step 4.
connecting step by fully
inserting the locking wedges
saved from step #1 between the
side panel and the top surface of both
ends of each step. Tap in place with a hammer.
Secure the
WARNING! Verify that your
chosen step system location
is level, has a solid base, and
will be in full view of competent
adult supervision when in use.
WARNING! Pool step will be
heavy. Have additional help. Do
not attempt to place the step by
yourself.
WARNING! Do not stand on the top steps of
the unit until fully assembled as it may tip.
Step 5.
With one of the assembled step
units at the desired location inside
the pool, and the second unit
placed outside the pool, slide the
assembled connector kit down
over the upper handrail posts until
it is resting on the pool top seat.
Step 6.
With a cordless drill fasten the
connector kit to the handrail
posts using (16) #10 x 1-1/4”
screws (eight per side) at
each of the pre-marked
locations.
WARNING! Using a corded drill near
pool may result in electrocution.
Step 9.
Step 9.
Insert the ends of
the notched
handrails into the
open ends of the
posts on the
outside unit.
Fasten in place
using four #10 x
1-1/4” screws.
Step 10.
Step 7.
Align one of the triple pickets into the notches of the handrail at the top of the unit. Fasten the
pickets in place at the top of the pickets using the #10 x 3/4” screws. Continue placing and
fastening the double pickets and then the single picket. Repeat for the opposite handrail. Cover
the ends of the screws with the protective caps.
Attach the
handrails to
the inside
unit only as
described in
step 11 of the
STEP-1X
instructions.
Step 8.
Step 8.
Slide the gate
adapter posts
down over
the short
handrail posts
of the outside
unit until they
bottom out.
Step 11.
Fasten the
pickets to the
step unit at the
pre-marked locations with
twelve #10 1-1/4”
screws.
Also, secure
the gate
adapter posts
and upper
handrail posts
in place with
#10 x 1-1/4”
screws at the
pre-marked
locations.
Step 12.
Gate
installation: see
instructions
enclosed with
gate. There are
two differences
for this
installation. For
this installation
the gate posts
slide over the
adapter posts
as shown here.
And; You must
also fasten the
lowest corner of
that flange to
the step unit as
shown (see photo at far right). NOTE: the
hinge post must be on your right-hand side
(as you are looking up the steps).
IMPORTANT: Fasten the
lowest corner of each flange to
the step as shown below.
3
Page 4
Safe Use
To reduce the risk of drowning, entrapment, falls, paralysis, electrocution, or
other serious injury or death:
Use step system properly.
• No diving or jumping from steps - shallow water; risk of paralysis or death.
• ONE PERSON ON THE LADDER/STAIR AT A TIME.
• Illuminate the steps when using the pool at night.
Weight limit - 400 lbs maximum. Exceeding maximum weight may cause the stairs to fail.
Secure stairs when not in use. When pool is not in use, make sure gate is closed and locked.
Watch children at all times when they are in or around water to help prevent drowning.
WINTERIZING / REMOVING STEP FROM POOL
PLAN AHEAD - PEOPLE WILL HAVE TO GET IN THE POOL TO MOVE OR REMOVE THE STEP.
When winterizing your pool, if you decide to leave the pool step in the pool be sure to detach the step from the pool deck and move
the step towards the center of the pool and away from the pool wall. Remove any outside steps or ladders from the pool area to
eliminate access to the pool.
If you decide to remove your pool step from the pool:
Pool step will be heavy and must be lifted from within the pool. Have additional help if you move the step or choose
to remove it from swimming pool. Do not attempt to do this by yourself - 2-3 people are required to move pool step safely. DO NOT lift
pool step by handrails or handrail posts - they may detach, possibly resulting in a fall.
Remove any outside steps or ladders from the pool area to eliminate access to the pool.
DO NOT LIFT STEP BY HANDRAILS, POSTS OR TOP TREAD. THE HANDRAILS, POSTS AND TOP TREAD WILL NOT SUPPORT
THE WEIGHT OF THE POOL STEP AND MAY DETACH OR BREAK, RESULTING IN A FALL OR INJURY.
Lift up the unit inside the pool and tilt it so that the water drains out of the steps. Once it is light enough carefully lift it over the side
of the pool, lay the unit on it’s back side and allow most of the water to drain from the side panels.
The Confer-Step can be covered, if desired, and stored outdoors.
CONFER PLASTICS INC. FIVE YEAR WARRANTY
Confer Plastics Inc. warrants their swimming pool ladders and steps to be free from defects in
workmanship for five years from date of purchase.
DO NOT RETURN DEFECTIVE PART TO DEALER
E-MAIL CONFER PLASTICS AT: [email protected]
A PICTURE [S] OF DEFECTIVE PART, A BRIEF DESCRIPTION OF PROBLEM,
PROOF OF PURCHASE AND YOUR CONTACT INFORMATION.
INFORMATION MAY ALSO BE FAXED TO CONFER PLASTICS AT: 716-694-3102
OR MAILED TO THE ADDRESS BELOW. UPON REVIEW OF THE INFORMATION YOU
WILL BE NOTIFIED IF PART IS COVERED UNDER THE WARRANTY AND
THE SHIPPING/HANDLING CHARGES.
This warranty gives you specific legal rights, and you may also have other rights which may vary from state to state.
Confer Plastics Inc.
97 Witmer Road
North Tonawanda, N.Y. 14120-2421
MADE IN THE U.S.A. by:
Printed in U.S.A.
4
97 Witmer Road
North Tonawanda, New York 14120-2421
Toll Free U.S. 800-635-3213
716-694-3100
www.conferladders.com
3-GATE-04 1M 4/19
 Loading...