

Page 1
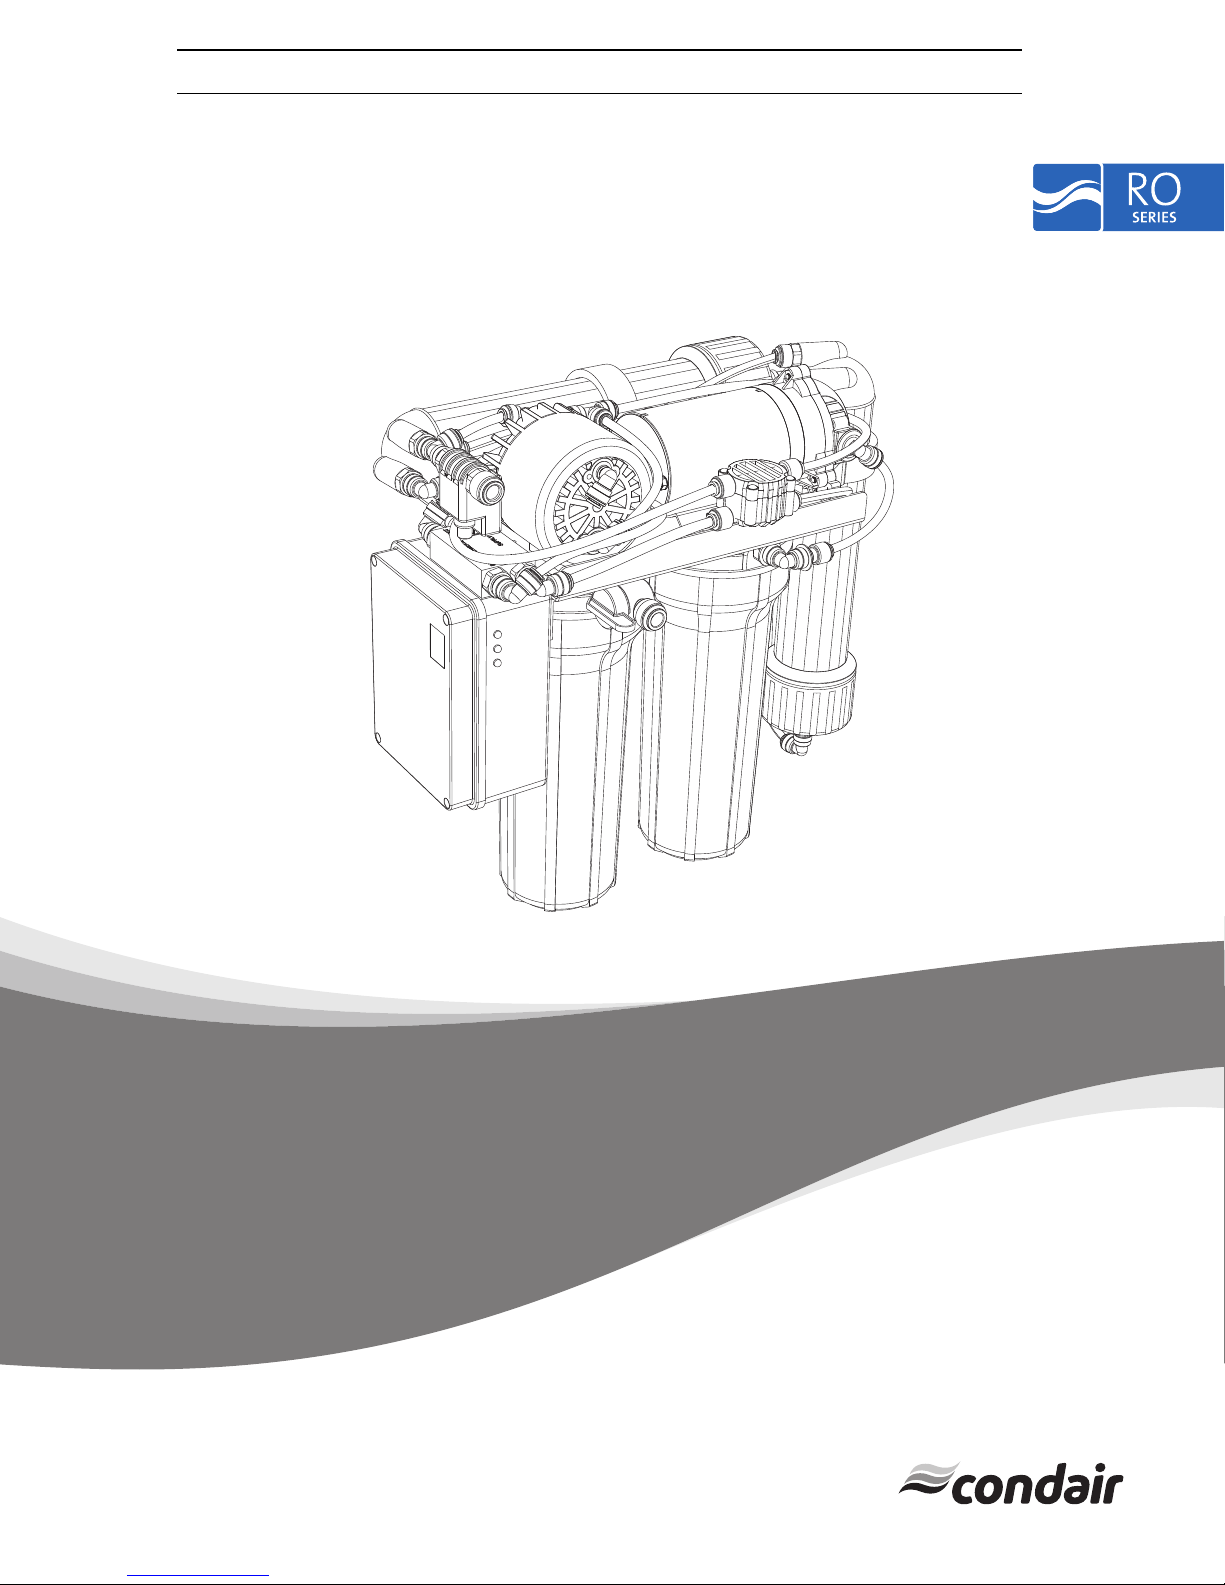
IMPORTANT! Read and save these instructions. This manual to be left with the equipment.
2594385_A_EN_1811_RO_IOM
INSTALLATION, OPERATION,
AND MAINTENANCE MANUAL
Reverse Osmosis System
RO-U
Humidification and Evaporative Cooling
Page 2

Thank you for choosing Condair
Installation date (DD/ MM / YYYY):
Commissioning date (DD / MM / YYYY):
Site:
Model:
Serial number:
Proprietary Notice
This document and the information disclosed herein are proprietary data of Condair Ltd. Neither this
document, nor the information contained herein shall be reproduced, used, or disclosed to others
without the written authorization of Condair Ltd., except to the extent required for installation, operation
or maintenance of the customer's equipment.
Liability Notice
Condair Ltd. does not accept any liability due to incorrect installation, maintenance or operation of the
equipment, or due to the use of parts/components/equipment that are not authorized by Condair Ltd..
Copyright Notice
Copyright 2018, Condair Ltd., All rights reserved.
Technical modification rights reserved.
Page 3

CONTENTS
1 Introduction 5
1.1 Before You Start 5
1.2 General 5
1.2.1 Limitations of the Manual 5
1.2.2 Symbols Used in This Manual 5
1.2.3 Storage of Manual 5
1.2.4 Available Manuals and Languages 6
1.3 Receiving and Storage 6
1.3.1 Inspection 6
1.3.2 Storage, Packaging, and Transportation 6
1.4 Safety Precautions 6
1.5 Compliance 7
2 For Your Safety 8
3 Hygiene 11
3.1 Important Notes on Hygiene 11
3.2 Hygiene Risk Management 11
3.2.1 Guidelines to Keep a Clean System and Prevent Micro-organism Growth 11
3.3 Risk Monitoring and Assessment 12
4 Product Description 13
4.1 General Description 13
4.1.1 Buffer tank, Fitting, and Wall Bracket 14
4.2 Model Designation 15
4.3 Functional Description 15
4.4 Options 17
4.5 Accessories 18
5 Product Specifications 19
5.1 Technical Data 19
5.1.1 Capacity 19
5.1.2 Weights 19
5.1.3 Dimensions 19
5.2 Operating Data 19
5.2.1 Water Quality 19
5.2.2 Temperature 19
5.2.3 Power 20
6 Installation and Planning 21
6.1 General 21
6.1.1 Installation Overview 22
6.2 Location Requirements 23
6.3 Clearance Requirements 23
6.4 Site Requirements 24
6.4.1 Water Supply Requirements 24
6.4.2 Drainage Requirements 27
6.4.3 Power Supply Requirements 27
6.5 Installation 28
RO-U
2594385_A_EN_1811_RO_IOM
Contents|3
Page 4

6.5.1 Safety 28
6.5.2 Mounting the Reverse Osmosis System 28
6.5.3 Connecting the Water Supply 28
6.5.3.1 (Optional) DI System 29
6.5.4 Connecting the Drain Line 31
6.5.5 Installing the Electrical Connections 31
7 Operation 32
7.1 General 32
7.2 Starting Up 33
7.2.1 Start Up Procedure 33
7.3 Shutting Down the Unit 34
8 Maintenance 35
8.1 General 35
8.2 Cleaning and Disinfecting 35
8.3 Maintenance List 36
8.4 Maintenance Procedures 37
8.4.1 Adjusting the Buffer Tank Pressure 37
8.4.2 Replacing the RO-U Filter 37
8.4.3 Testing the Permeate 38
8.4.4 Cleaning-RO-Membrane 38
9 Troubleshooting 39
9.1 General 39
9.2 General Troubleshooting 39
10 Spare Parts List: Reverse Osmosis System 42
11 Commissioning 44
11.1 General 44
11.2 First-time Commissioning 44
12 Decommissioning 45
12.1 General 45
12.2 Removing Unit from Service 45
12.3 Disposing or Recycling the Unit 45
A Appendix: Installation Checklist 47
Contents|4
2594385_A_EN_1811_RO_IOM
RO-U
Page 5
1 Introduction
1.1 Before You Start
Thank you for purchasing the Reverse Osmosis System.
The Reverse Osmosis System incorporates the latest technical advances and meets recognized safety
standards. Improper use of the Reverse Osmosis System may result in danger to the user or third
parties, and/or damage to property.
To ensure safe, proper, and efficient operation of the Reverse Osmosis System, please observe and
comply with all information and safety instructions contained in this manual, as well as all relevant documentation of components of the installed humidification system.
If you have additional questions, please contact your Condair representative. They will be glad to assist
you.
1.2 General
1.2.1 Limitations of the Manual
The subject of this manual is the Reverse Osmosis System. It is intended as a supplement to the installation, operation and maintenance manuals.
This manual is restricted to the installation, operation, and maintenance of the Reverse Osmosis System. This manual is intended for well trained personnel who are suitably qualified for their respective
tasks.
1.2.2 Symbols Used in This Manual
CAUTION!
The catchword "CAUTION" in conjunction with the general caution symbol is used to provide safety
instructions that, if neglected, may cause damage and/or malfunction of the unit or damage to property.
WARNING!
The catchword "WARNING" in conjunction with the general warning symbol is used to provide safety
instructions that, if neglected, may cause injury to personnel. Other specific warning symbols may also
be used in place of the general symbol.
Danger!
The catchword "DANGER" in conjunction with the general danger symbol is used to provide safety
instructions that, if neglected, may cause severe injury to personnel or even death. Other specific
danger symbols may also be used in place of the general symbol.
1.2.3 Storage of Manual
Keep this manual in a place where it is safe and readily accessible. If the equipment is moved to
another location, please ensure that it remains with the equipment.
If the manual is lost or misplaced, please contact your Condair representative for a replacement.
RO-U
2594385_A_EN_1811_RO_IOM
Introduction|5
Page 6
1.2.4 Available Manuals and Languages
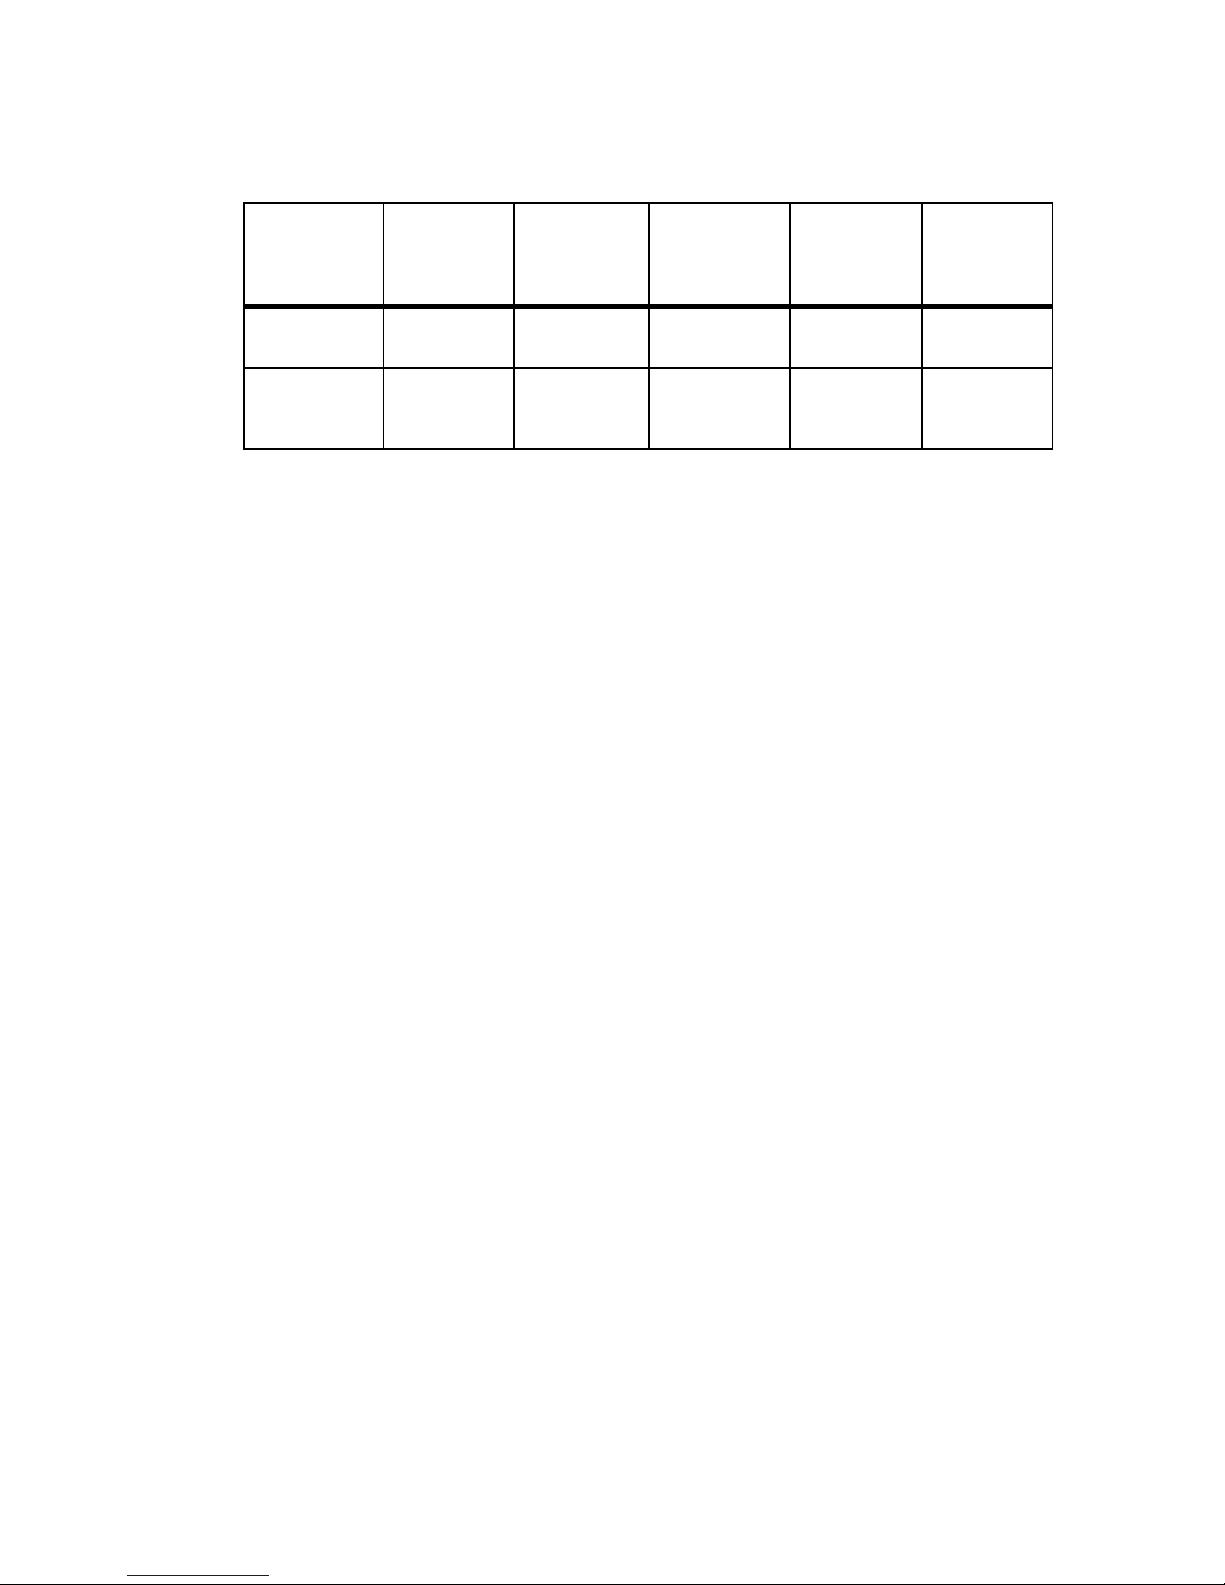
Table 1: Document (Part) Numbers and Languages of Available Manuals
Installatio n
Manual
Operation and
Maintenan ce
Manual
Installatio n,
Operation, and
Maintenan ce
Manual
Spare Parts
List
Engineering
Manual
Ultrasonic Humidifier US
Reverse
Osmosis System
RO-U
2588786_A_EN_
1811_US_IM
— —
2588787_A_EN_
1811_US_OM
1.3 Receiving and Storage
1.3.1 Inspection
After receiving the shipment, inspect the goods as follows:
l Inspect the shipping boxes for damage. Report any shipping box damages to the shipping com-
pany without delay.
l Check the goods against the packing slip to ensure that all items have been delivered. Report
any shortages to your Condair representative within 48 hours of receipt of the goods. Condair
does not assume responsibilities for any shortages beyond this period.
l Unpack the parts/components and check for any damage. If parts/components are damaged,
notify the shipping company immediately.
l Verify the model type on the specification label to ensure that it is suitable for your installation.
Refer to "Model Designation" on page15.
1.3.2 Storage, Packaging, and Transportation
—
2594385_A_EN_
1811_RO_IOM
2588788_A_EN_
1811_US_SPL
— —
—
Storage
Store the Resistive Steam Humidifier in its original packaging inside a protected area that meets the following requirements until it is installed, or if it needs to be stored for an extended period of time:
l Room temperature: 5 to 40 °C (41 to 104 °F)
l Room humidity: 10 to 95% RH (non-condensing)
Transportation
For optimum protection always transport the unit and components in their original packaging, and use
appropriate lifting/transporting devices.
Packaging
Keep the original packaging of the unit/components for later use.
If the packaging needs to be disposed, observe local regulations on waste disposal. Please recycle
packaging where possible.
1.4 Safety Precautions
Regard all safety precautions described in this manual.
6|Introduction
2594385_A_EN_1811_RO_IOM
RO-U
Page 7

For more information, refer to "For Your Safety" on page8.
1.5 Compliance
Follow all local guidelines and regulations regarding the installation and operation of the unit; this
includes (and not limited to) mounting, plumbing, water, gas, ventilation, and electrical connections.
Please consult your local Condair representative to learn more.
RO-U
2594385_A_EN_1811_RO_IOM
Introduction|7
Page 8
2 For Your Safety
General
Every person who is tasked with the installation, operation and/or maintenance of the Reverse Osmosis
System must read and understand this manual, as well as any respective installation, operation and/or
maintenance manuals before performing any work. Knowing and understanding the contents of these
manuals is a basic requirement for protecting personnel against any kind of danger, preventing faulty
operation, and operating the unit safely and correctly.
All labels, signs and markings applied to the Reverse Osmosis System must be observed and kept in a
readable state.
Personnel Qualifications
All procedures described in this document must only be performed by personnel who are adequately
qualified, familiar with the unit, well trained, and are authorized by the customer.
For safety and warranty reasons, any activity beyond the scope of this manual must only be performed
by qualified personnel authorized by Condair.
All personnel working with the Reverse Osmosis System unit must be familiar with, and comply with the
appropriate regulations on workplace safety and prevention of accidents.
Intended Use
The is intended exclusively for air humidification using a Condair-approved within specified operating
conditions. Refer to "Technical Data" on page19 for details. Any other type of application, without the
express written consent of Condair, is considered to be NOT conforming to its intended purpose, and
may lead to dangerous operation and will void the warranty.
In order to operate the equipment in the intended manner all information contained in this manual, in
particular the safety instructions, must be observed closely.
Safety Precautions that Must be Observed
DANGER!
Risk of electric shock!
The Reverse Osmosis System is 24 VAC powered. Live parts may be exposed when the access
panels or doors are removed. Touching live parts may cause severe injury or even death.
Prevention: The Reverse Osmosis System must be connected to the humidifier only after all mounting
and installation work has been completed and checked for correct workmanship, and the access panels/doors to the humidifier are closed and fastened securely.
Only qualified personnel should perform maintenance or repairs on the unit.
Follow any lockout procedures when servicing the unit.
DANGER!
Poorly maintained RO-U systems may be hazardous.
Poor maintenance of the Reverse Osmosis System poses a health risk to spaces humidified by
the Ultrasonic Humidifier. When adequately operated or poorly maintained, micro-organisms that
cause disease, such as Legionnaire's, may grow in the water system and in the humidifier which
dispel the micro-organisms into the air.
Prevention: Read, understand, and follow maintenance guidelines to ensure the humidification sys-
tem remains safe. Ensure that the unit is cleaned and disinfected, as directed in this manual, and
avoid shutting off the unit (max. 48 hours). If the unit has been off for 48 hours or more, disinfect and
flush the system thoroughly before humidifying the space with the Ultrasonic Humidifier.
For Your Safety|8
2594385_A_EN_1811_RO_IOM
RO-U
Page 9
WARNING!
Do NOT leave the unit without power. Risk of contamination.
Do NOT leave the unit unpowered for more than 48 hours, or else a total system disinfect will be
required. Without power, the system will not flush properly, resulting in standing water and conditions that may promote the growth of micro-organisms.
Prevention: Leave your unit powered on. If you do not need humidification during the 48 hours, set
the humidifier to standby or set the demand to 0.
WARNING!
Risk of contamination.
Do NOT use oil, grease, glue, Teflon, silicon, O-ring lubrication, etc. when assembling pipes or
hose connections. All of the above products can act as food for bacteria, posing health risks.
Prevention: For lubricant, use dish soap. Wash hands and wear clean gloves while assembling parts
in direct contact with water. Keep dust covers on pipes and hoses until assembly.
WARNING!
Water from RO-U systems may cause metals to corrode quickly.
Water produced from a Reverse Osmosis System is aggressive and can cause some metals to
quickly corrode. The RO-U system should always be connected to piping and equipment that is
suitable to handle RO water.
Prevention: Read, understand, and follow maintenance guidelines to ensure the humidification sys-
tem remains safe.
CAUTION!
The RO-U System contains pressurized water.
Hoses in the RO-U System contain pressurized water that may spray if the hose connections are
loose or there is a leak.
Prevention: Do not re-tighten or unscrew hoses while the system is pressurized. Test for leaks and
replace broken hoses.
CAUTION!
Do NOT fasten the RO-U System, including the tank, hoses, and pipes to vibrating surfaces.
Preventing Unsafe Operation
All personnel working with the must immediately report to the customer any alterations or changes to
the unit that may affect safety, and secure the unit against accidental power-up.
If it is suspected that the unit cannot be operated safely for any of the reasons listed below, shut it down
immediately.
Alterations and changes that may affect safe operation include:
l damage to the unit
l loose or damaged electrical connections
l improper operation
l leaks in the distribution system
RO-U
2594385_A_EN_1811_RO_IOM
For Your Safety|9
Page 10

Modifications to the Unit Prohibited
Modifications are NOT permitted on the Reverse Osmosis System without the express written consent
of Condair.
10|For Your Safety
2594385_A_EN_1811_RO_IOM
RO-U
Page 11

3 Hygiene
3.1 Important Notes on Hygiene
Observe the local health and safety executive's technical guidance on the control of Legionella in water
systems.
The user is responsible to ensure that the water system complies with local regulations, bylaws, and
guidelines (such as the HSE ACoP L8, VDI 6022, ISO 22000, HACCP, or equivalent). If inadequately
maintained, water systems, of which any humidifier is a part, can support the growth of microorganisms,
including the bacterium responsible for Legionnaires' disease.
Any risks or hazards relating to the system, including during installation and maintenance, should be
identified by a competent health and safety representative who is responsible for introducing effective
control measures.
3.2 Hygiene Risk Management
Cold water humidification presents the risk of spreading pathogenic microorganisms into the air. The
Ultrasonic Humidifier and Ultrasonic Blower Pack distribute tiny water droplets (mist) that are blown into
the space before being absorbed into the air. If the mist was contaminated before leaving the unit and
then evaporates, these contaminants are deposited onto surfaces in the space, or are otherwise
inhaled or redistributed into the ventilation system.
Pathogens include, and are not limited to, Legionella, E. coli, and viruses, and may originate from contaminated water, air, and equipment.
Regular cleaning and disinfecting is required to reduce health risks. Refer to "Hygiene Risk Man-
agement" above for more information on managing hygiene hazards.
Follow all safety precautions and local regulations. Refer to "For Your Safety" on page8.
There are multiple points in the humidification system where a contamination can occur. It is the
responsibility of the customer and of Condair to ensure that health hazards due to contamination are
reduced to acceptable levels. The use of a hygiene risk assessor is recommended.
Regularly clean and maintain the humidifier and its components, and do NOT miss or ignore the warnings in this manual and service messages displayed on the humidifier.
Supply Air and Water
Pathogens can originate from the water supply, such as a tank or water line. It is important that standing
water in the tank or in the water line is flushed frequently to prevent the buildup of contaminants, and
the water is filtered and treated.
Pathogens may also enter the humidification system through the ventilation system or from within the
humidifier space. A fan blows air out of the water reservoir into flexible tubes, and further into a blower
pack and into the atmosphere. Contaminated air can join the mist, so it is recommended to use air filters
in the ventilation system, in the humidifier, and in the Ultrasonic Blower Pack. Ensure to use the supplied air filters at all times and replace them regularly (as recommended in the Ultrasonic Humidifier
Maintenance and Operation Manual).
3.2.1 Guidelines to Keep a Clean System and Prevent Micro-organism Growth
l Perform a risk assessment of the water system using a competent person, and implement an
appropriate monitoring and control program.
l Connect a RO system to a clean, potable main water supply.
l Ensure that the system is cleaned and/or flushed regularly.
l Ensure that the buffer tank is clean and sterile before use.
l Enter a service contract that suits the needs of the company.
l Stop the system if polluted drinking water is found in the area.
RO-U
2594385_A_EN_1811_RO_IOM
Hygiene|11
Page 12

l Avoid water temperatures above 20 °C (68 °F). Temperatures between 20-60 °C (68-140 °F)
favor the growth of Legionella.
l Do not stop the system unless it is faulty or leaking (to avoid water stagnation).
l If the power to the system is interrupted (such that the unit fails to flush or drain) for more than 48
hours, complete a total system disinfection.
l Refrain from closing sections of the system, unless there is a leakage or fault (to avoid water
stagnation).
l Disinfect at least once per year, and after every maintenance or repair.
l Analyze the water and test for harmful bacteria at least once per year.
l Conduct follow-up measurements until the system is clean if bacteria has been detected in the
system.
The Condair service team can help with expert technicians who can provide:
l Bacteriological troubleshooting on-site*.
l Cleaning and disinfecting.
l Preventative maintenance.
l Repair and fault finding.
l Training and guidance.
Note: * Condair uses a quick method for measuring bacterial activity in the water with the use of
BactiQuant (BQ). Once the water sample has been taken, the bacteriological quality of the water is read
within 30 minutes, and the Condair service team will disinfect the system if necessary.
Please contact your local Condair representative for further information about our services.
3.3 Risk Monitoring and Assessment
Water hygiene assessments must be performed at the site to determine the risk and severity of hygiene
hazards that affect the health and safety of the public. Performing a risk assessment with regular monitoring will allow procedures to be adjusted.
Ensure that the person conducting the assessment is qualified.
A typical assessment inspects the following:
l Supply water quality. Refer to "Technical Data" on page19.
l Environment around the humidifier.
l Maintenance procedures. Refer to .
l Water pre-treatment options (such as using UV light, using reverse osmosis or deionized water,
etc.).
Proper maintenance procedures along with recommended site controls will help ensure compliance to
local regulations and protect the public.
It is recommended to monitor the humidification system weekly, and then monthly once satisfactory
levels are maintained.
Ensure that the results of every assessment is recorded.
IMPORTANT! Failure to make adequate provision against the outbreak of disease, such as Legionnaires' disease, may cause fatalities, illness, and liabilities.
12|Hygiene
2594385_A_EN_1811_RO_IOM
RO-U
Page 13

4 Product Description
4.1 General Description
The use of RO, de-mineralized (permeated) water is recommended for use with Nortec Ultrasonic
Humidifier systems for the following reasons:
l Prologues lifetime of transducers. Any minerals, salts, sediment, and pathogens that enter the
humidifier will pollute the water reservoir. The integrated flushing function will delay this process, but will not prevent it entirely. Depending on the quality of the added water, the water reservoir will eventually become blocked. As a result, the energy of the transducers in the humidifier
will no longer be effective, and they will wear more quickly. In addition, the float switch could
transmit the wrong information to the electronics system and cause damage to the system.
l Reduces dusts and deposits. The minerals and salts (such as calcium) present in the water will
deposit onto surfaces in spaces being humidified by the Nortec Ultrasonic Humidifier.
l Reduces bacterial growth. Bacteria, such as Legionella, could multiply in the water in the buffer
tank and would constitute a health hazard.
l Reduces maintenance.
The Nortec RO-U System is fitted with a high-grade (Dow Chemical) membrane. Working on the principle of Reverse Osmosis (R.O.), the membrane only allows water molecules to pass through. A flushing system prevents clogging, increases the service life of the membrane, and improves performance.
Flushing occurs as long as the unit is powered, and will occur every 24 hours.
Systems can be supplied with a capacity of 20 kg/h at 10 °C (44 lbs per hour at 50 °F) and the capacity
is dependent on the water pressure. Two preliminary filters are positioned ahead of the membrane; a 5
µm pre-filter and an active carbon filter.
An electric booster pump in the Nortec RO-U System increases the pressure to compensate for low
water pressure or high demand.
The water shut off valve is automatic and prevents water from being wasted when the system flushes.
A permeate pump (Water Saver) and Water Safe Guard is included with the Nortec RO-U system. The
pump increases the efficiency of the flushing and reduces water use. The water Safe Guard continuously monitors the membrane function and indicates when to replace a Nortec RO-U membrane.
RO-U
2594385_A_EN_1811_RO_IOM
Product Description|13
Page 14
1
2
3
4
5
6
7
8
9
10
11
12
13
14
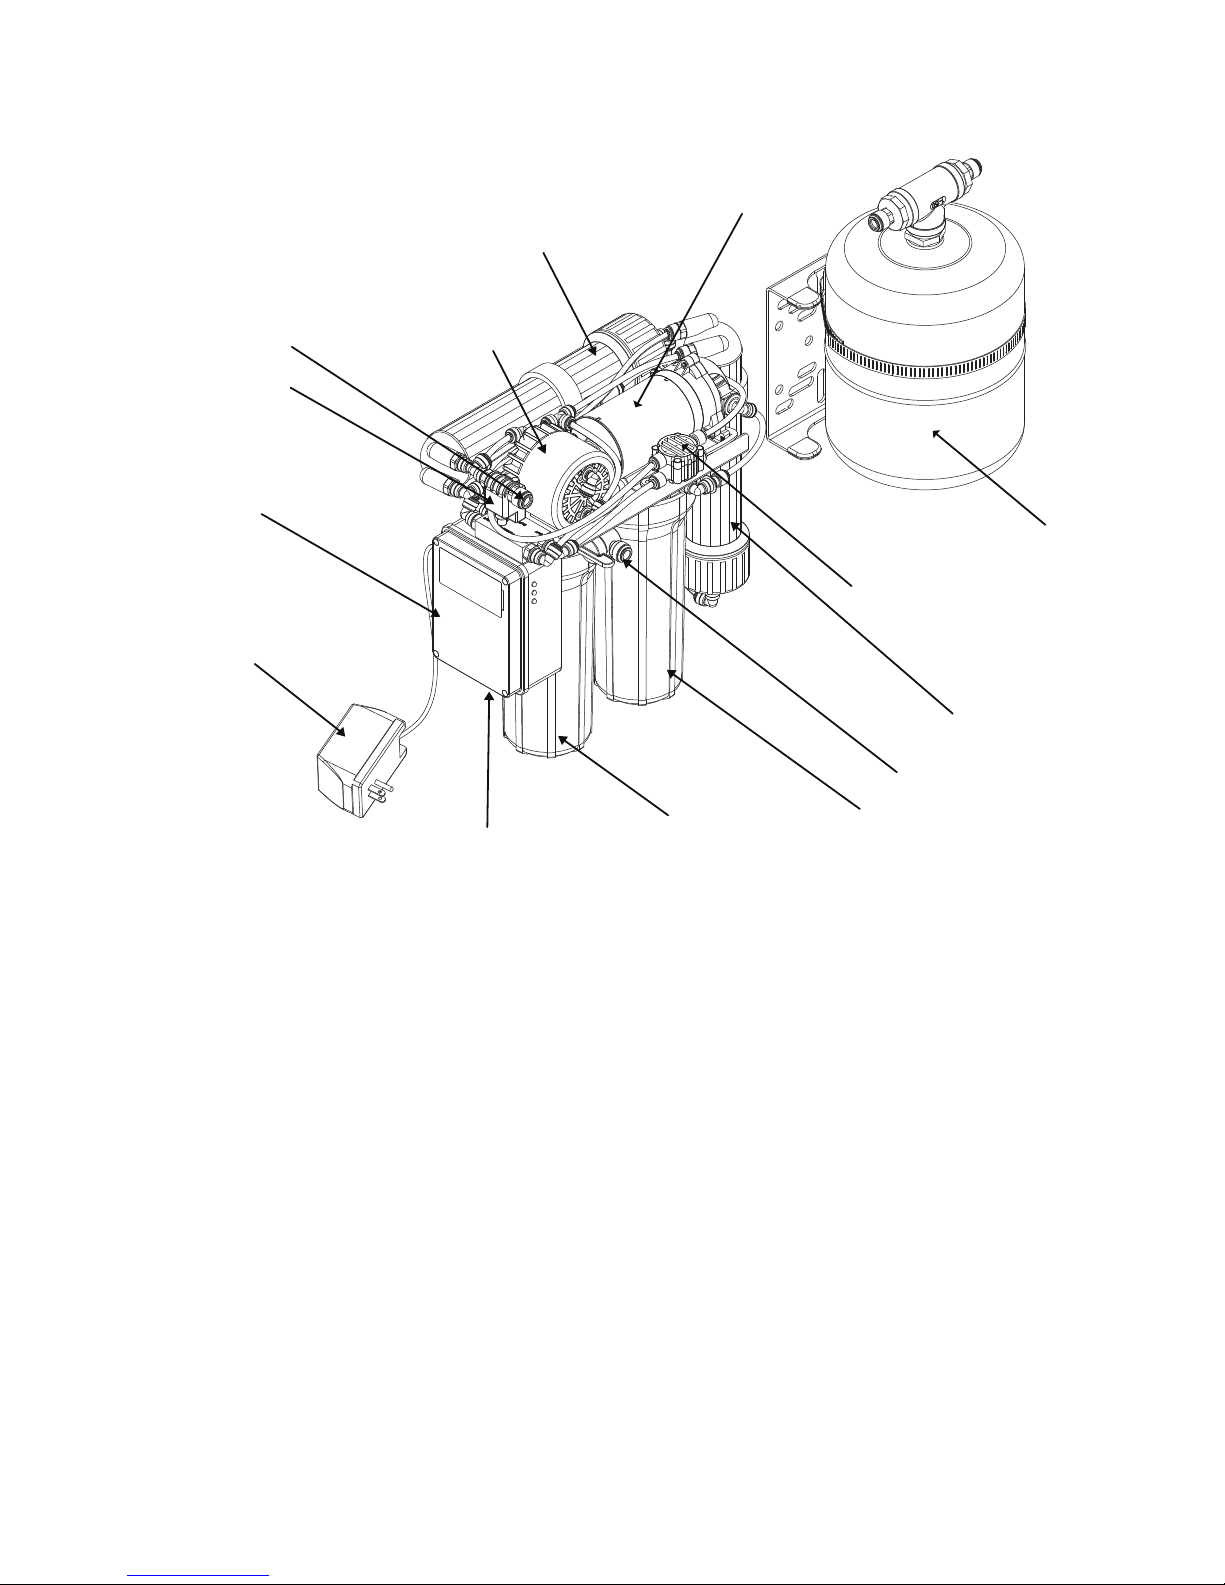
Figure 1 - Nortec RO-U Overview (with Buffer Tank)
1. RO membrane
2. Booster Pump
3. Buffer tank
4. Shut-offvalve
5. RO membrane
6. Source water inlet
7. Carbon filter
8. Sediment filter
9. Fuse (inside)
10. Wall transformer
11. Water Safe Guard
12. Pressure Switch
13. Water outlet (de-mineralized, to buffer tank)
14. Permeate pump
4.1.1 Buffer tank, Fitting, and Wall Bracket
A buffer tank and T-piece connector is included in the delivery. The buffer tank contains a polymer bag
that stores the permeated water, and will supply additional water whenever the humidifier is consuming
more water than the RO-U System is able to supply, such as during flushing and filling (at any other
time, the system supplies more than the required consumption and any excess water will be used to
refill the tank).
The buffer tank and T-piece connector should be fitted in the supply line to the humidifier.
Note: The space between the polymer bag and the tank contains pressurized air. The air pressure
between the bag and the shell of the buffer tank should greater than the RO-U water in the bag.
14|Product Description
2594385_A_EN_1811_RO_IOM
RO-U
Page 15
4.2 Model Designation
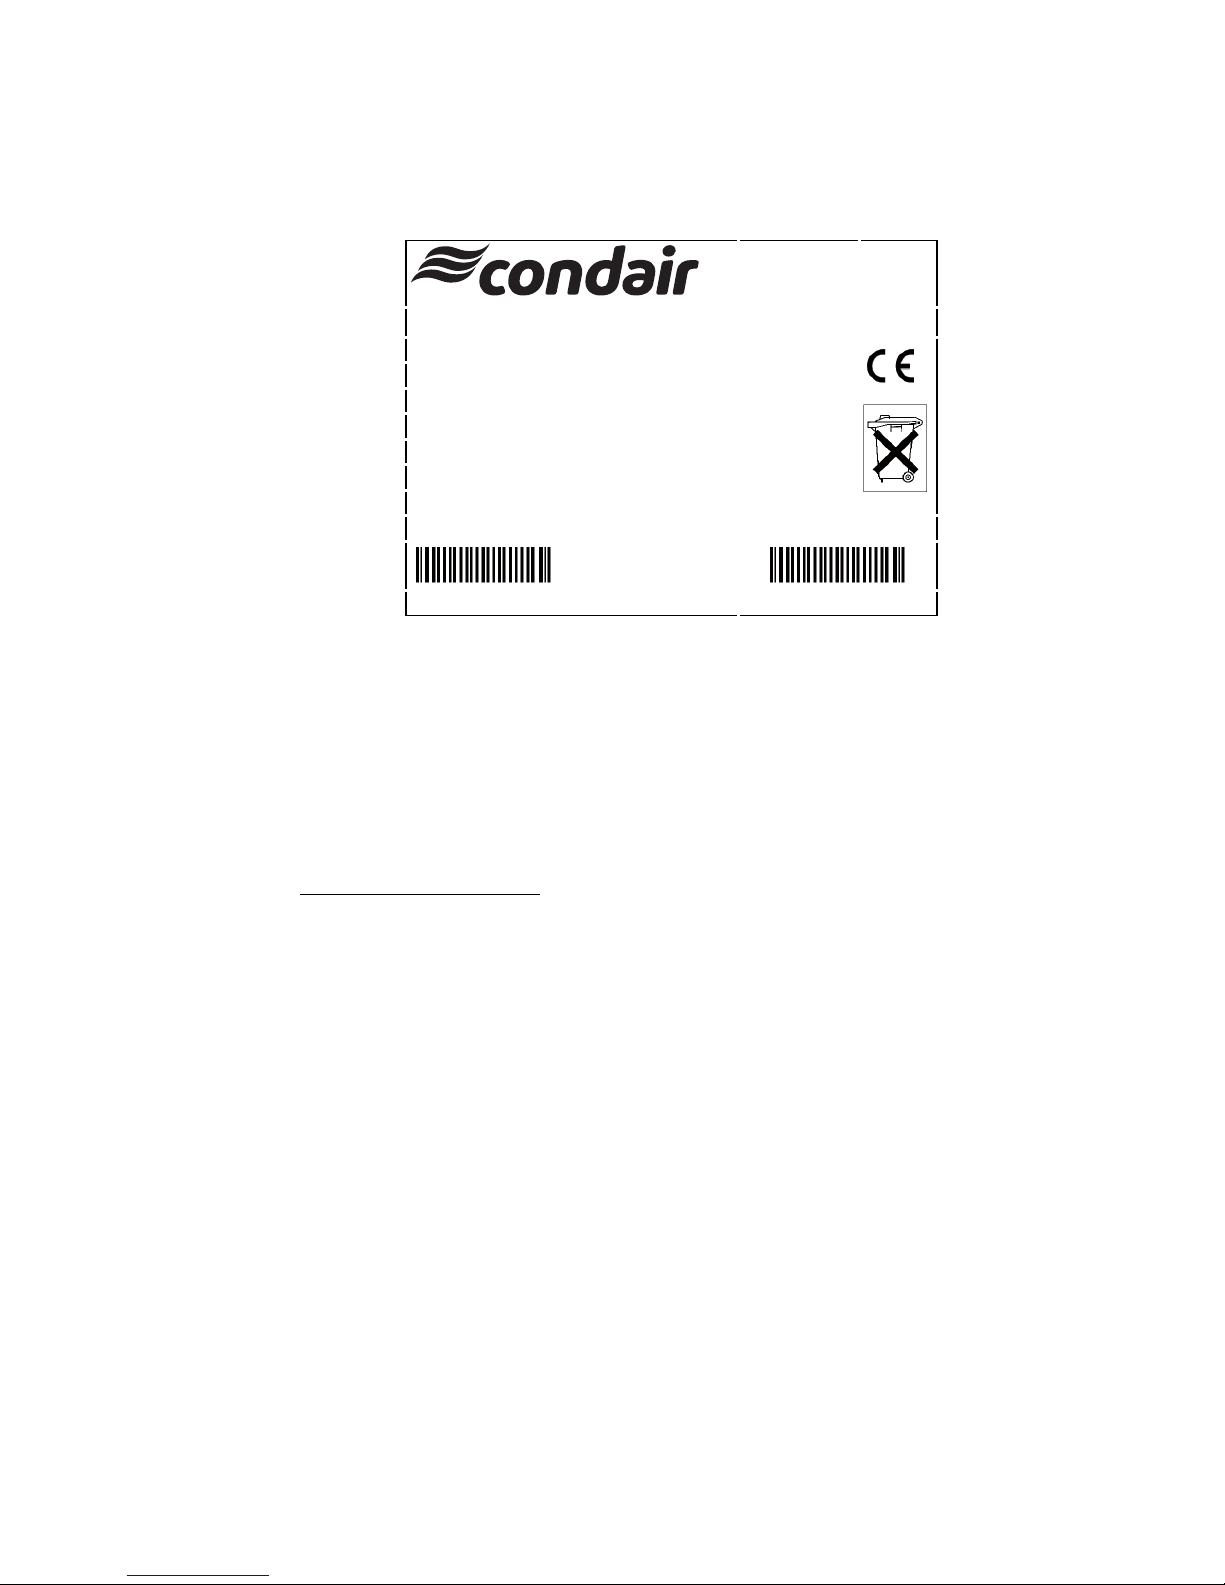
The specification label on the side of the RO-U system shows the model type, serial number, and other
ratings. Refer to the figure below. The label is located on the Water Safe Guard.
Type Designation
Serial number S/N: ?????????? EP RO-U 44 Article #
Model: RO-U 44
Production kg/lb / day at 10 °C / 50 °F 240 / 530
Production kg/lb / day at 25 °C / 77 °F 750 / 1653
Rejection salts (%) 98
Production compared to feedwater (%) 20 - 35
Max. ambient temperature (°C / °F) 45 / 112
Energy consumption (W) 25
PSI 15
4.3 Functional Description
Inlet water enters the Reverse Osmosis System and first passes through two filters. The first is the sediment filter that removes large particles from the source water before it passes through the active carbon
filter.
Filtered water then enters the booster pump and is pressurized before it passes through the Water Safe
Guard and the water shut off valve.
The Water Safe Guard measures the relative impurities between the filtered water and the permeated,
RO water from the RO membrane. This is represented by the X in the equation below.
X =
µS permeate
µS water supply (filtered)
rev.1.2 Revision #
1750 Month / Year
x 100%
RO-U
The Water Safe Guard indicates proper operation with 3 LED lights; red, yellow, and green. The display
of these lights are dependent on the value of X, above, and the duration.
l Green LED: RO membranes are working properly.
X < 10%
l Yellow LED: ROmembranes should be replaced at the next maintenance cycle.
10% ≤ X < 20% for greater than 3 minutes
l Red LED, flashing: RO membranes must be replaced within 24 hours or the unit will shut off.
l Red LED: RO membranes are not functioning and the humidifier unit is shut off. The humidifier
will resume function when the RO membranes are replaced. If the humidifier and its components
are off for more than 48 hours, a complete clean and flush of the system is required.
X ≥ 20% for greater than 24 hours
Note: During start up, the green and yellow LED will both light.
After passing the Water Safe Guard, the water passes through the water shut off valve. The water shut
off valve is dependent on the incoming water pressure and the back pressure from the tank. The valve
stops fluid flow when the permeate pressure is at a set-point greater than the inline water pressure.
2594385_A_EN_1811_RO_IOM
Product Description|15
Page 16

When the permeate pressure drops below the set-point, the shut off valve will open and allow water to
enter the tank. Without the water shut off valve, permeated water will end up being drained after the tank
has been filled (due to back pressure from the tank).
From the water shut off valves, the water enters two RO membranes. In the RO membranes, the incoming water is split into two streams; permeated water, and brine (water rejected by the membrane). The
incoming water passes through sheets that contain small pores that only allow water to pass. The 'fresh'
water moves towards the center of the membrane where they exit the other side of the ROmembrane.
The brine cannot pass through the perforated sheets and is sent to the flow restrictor (not shown), the
permeate pump, and then the drain.
Note: The flow restrictor is required for proper functioning of the RO membrane. The restrictor in the
drain line increases the pressure against the membrane and forces water to enter the sheets in the
membrane. Without the restrictor, permeate would re-enter the brine.
Permeate leaving the ROmembrane passes through a one-way, non-return valve, through the water
shut off valve, and to the permeate pump. The permeate pump uses the energy of the brine to improve
the efficiency of the RO membrane by overcoming the back pressure from the RO buffer tank.
From the permeate pump, the brine is drained and the permeate is sent to the pressure switch, and then
the buffer tank. The pressure switch shuts off the pump when a set pressure is reached in the tank, and
is designed to prevent the maximum system pressure from being reached. When the buffer tank is full,
the pressure switch will power down the system.
The buffer tank consists of a hard shell enclosing a plastic bag that is surrounded by air. The air inside
the tank is pressurized and may be altered by adding air to the bottom of the tank. The plastic bag is
filled with RO water where it is stored and used to supplement water usage of the Ultrasonic Humidifier.
16|Product Description
2594385_A_EN_1811_RO_IOM
RO-U
Page 17
V
1
2
3
4
5
6
7
8
8
9
10
11
12
13
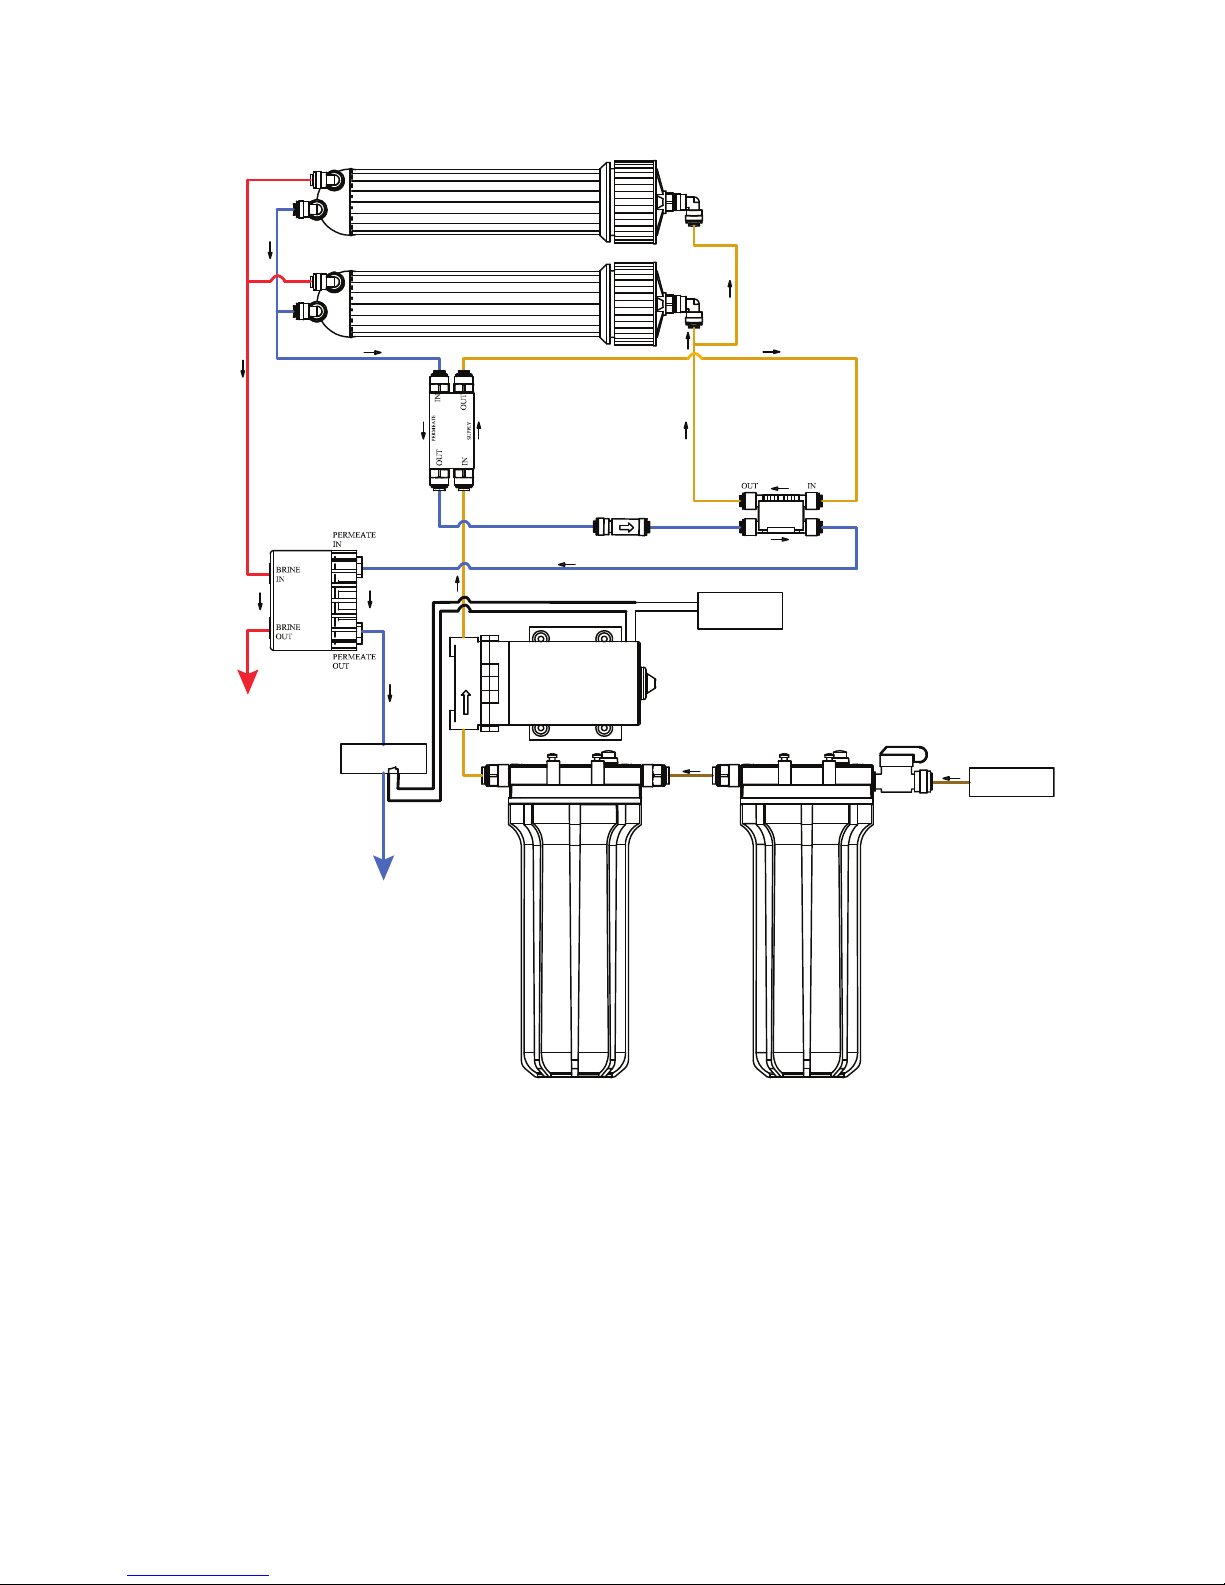
Figure 2 - Hydraulic Diagram
1. Source water
2. Sediment pre-filter
3. Carbon filter
4. Booster pump
5. Wall transformer
6. Water Safe Guard
7. Water shut-offvalve
4.4 Options
RO-U
The buffer tank (PN: 2586532) option is required for the Ultrasonic Humidifier if the RO-U is installed.
2594385_A_EN_1811_RO_IOM
8. RO membrane
9. One way valve
10. Permeate pump
11. Brine water to drain
12. Pressure switch, 2.5 bar
13. RO water (permeate) to buffer tank
Product Description|17
Page 18

4.5 Accessories
Accessories for the Reverse Osmosis System:
l Wall mounting brackets (supplied) to mount the unit and buffer tank.
l Reverse Osmosis System Installation, Operation, and Maintenance Manual (P/N:2594385_A_
EN_1811_RO_IOM) (supplied).
18|Product Description
2594385_A_EN_1811_RO_IOM
RO-U
Page 19
5 Product Specifications
5.1 Technical Data
5.1.1 Capacity
Reverse Osmosis System Capacity (with Booster Pump, Water Saver, and Water Safe Guard)
Model Capacity
water temper ature at 10°C (50 °F):
RO-U
20 kg/h / 5.3 g/h (44 lb/h / 0.19 oz/h)
5.1.2 Weights
Table 2: Reverse Osmosis System Weight
Model Weight
RO-U 9.7 kg (21 lb)
Buffer Tank 8.7 kg (19 lb)
5.1.3 Dimensions
Model Dimensions
RO-U L xW x H: 36 x 23 x 46 cm (14 x 9 x 18 in)
Buffer Tank H: 30 cm (12 in), 35 cm (14 in) with tee; diameter: 21 cm (8 in)
5.2 Operating Data
5.2.1 Water Quality
See also "Water Supply Requirements" on page24.
maximum, water temperature at 25 °C (77
°F), at 1 bar (15 psi) min.:
31.2 kg/h / 8.2 g/h (69 lb/h / 0.29 oz/h)
Water Quality:
inlet: 3/4 in, outlet: 3/8 in JG
Water supply quality Potable / Mains with CFU < 200 CFU/ml
Permeate Quantity (retention of salts and minerals) 98 %
Permeate Concentration Quality (yield compared to the supplied water) 20-35 %
Admissible Water Temperature 10-20 °C (50-68 °F).
5.2.2 Temperature
Temperature:
Ambient Temperatur e 0-25 °C (32-77 °F)
Ambient Water Temperature 0-25 °C (32-77 °F)
RO-U
2594385_A_EN_1811_RO_IOM
Product Specifications|19
Page 20
5.2.3 Power
Power (see the specification label on the unit):
Supply Voltage 24 VAC / 110 VAC transformer
Consumption 27 W
20|Product Specifications
2594385_A_EN_1811_RO_IOM
RO-U
Page 21
6 Installation and Planning
6.1 General
Strictly observe and perform all installation tasks including the mounting of the unit and connection of
the water and power supplies as described in this manual. Observe and comply with all local and
national codes dealing with water and electrical installations. Condair does not accept any liability for
installation of humidification equipment by unqualified personnel, or the use of equipment and parts
that are not authorized by Condair.
Personnel Qualifications
All installation work must be performed only by licensed personnel authorized by the customer. It is the
customer’s responsibility to verify qualifications of the personnel.
Safety
Observe the following safety precautions:
DANGER!
Risk of electric shock!
The Reverse Osmosis System is 24 VAC powered. Live parts may be exposed when the access
panels or doors are removed. Touching live parts may cause severe injury or even death.
Prevention: The Reverse Osmosis System must be connected to the humidifier only after all mounting
and installation work has been completed and checked for correct workmanship, and the access panels/doors to the humidifier are closed and fastened securely.
Only qualified personnel should perform maintenance or repairs on the unit.
Follow any lockout procedures when servicing the unit.
DANGER!
Poorly maintained RO-U systems may be hazardous.
Poor maintenance of the Reverse Osmosis System poses a health risk to spaces humidified by
the Ultrasonic Humidifier. When adequately operated or poorly maintained, micro-organisms that
cause disease, such as Legionnaire's, may grow in the water system and in the humidifier which
dispel the micro-organisms into the air.
Prevention: Read, understand, and follow maintenance guidelines to ensure the humidification sys-
tem remains safe. Ensure that the unit is cleaned and disinfected, as directed in this manual, and
avoid shutting off the unit (max. 48 hours). If the unit has been off for 48 hours or more, disinfect and
flush the system thoroughly before humidifying the space with the Ultrasonic Humidifier.
WARNING!
Do NOT leave the unit without power. Risk of contamination.
Do NOT leave the unit unpowered for more than 48 hours, or else a total system disinfect will be
required. Without power, the system will not flush properly, resulting in standing water and conditions that may promote the growth of micro-organisms.
Prevention: Leave your unit powered on. If you do not need humidification during the 48 hours, set
the humidifier to standby or set the demand to 0.
RO-U
2594385_A_EN_1811_RO_IOM
Installation and Planning|21
Page 22
WARNING!
Risk of contamination.
Do NOT use oil, grease, glue, Teflon, silicon, O-ring lubrication, etc. when assembling pipes or
hose connections. All of the above products can act as food for bacteria, posing health risks.
Prevention: For lubricant, use dish soap. Wash hands and wear clean gloves while assembling parts
in direct contact with water. Keep dust covers on pipes and hoses until assembly.
WARNING!
Water from RO-U systems may cause metals to corrode quickly.
Water produced from a Reverse Osmosis System is aggressive and can cause some metals to
quickly corrode. The RO-U system should always be connected to piping and equipment that is
suitable to handle RO water.
Prevention: Read, understand, and follow maintenance guidelines to ensure the humidification sys-
tem remains safe.
CAUTION!
The RO-U System contains pressurized water.
Hoses in the RO-U System contain pressurized water that may spray if the hose connections are
loose or there is a leak.
Prevention: Do not re-tighten or unscrew hoses while the system is pressurized. Test for leaks and
replace broken hoses.
Do NOT fasten the RO-U System, including the tank, hoses, and pipes to vibrating surfaces.
6.1.1 Installation Overview
This section covers the mounting and water connections for the RO-U System.
The RO-U System (with buffer tank) can be installed with any Ultrasonic Humidifier, and one should be
installed for each tank in the humidifier (1 in the medium and 2 in the large). The RO-U System must be
mounted on the wall, or suitable, non-vibrating mounting surface, and should have access to a drain,
water supply, and power supply, and should be placed in a location that is easy to service, with enough
room to install the buffer tank.
IMPORTANT! Do NOT commission the RO-U System until installation is complete and the unit is
flushed. The pump in the system contains preservation fluid and must be flushed out before being connected.
IMPORTANT! Once installation is complete, and the unit has been commissioned. Avoid turning the
unit off, as this creates stagnant water and health risks.
CAUTION!
22|Installation and Planning
2594385_A_EN_1811_RO_IOM
RO-U
Page 23
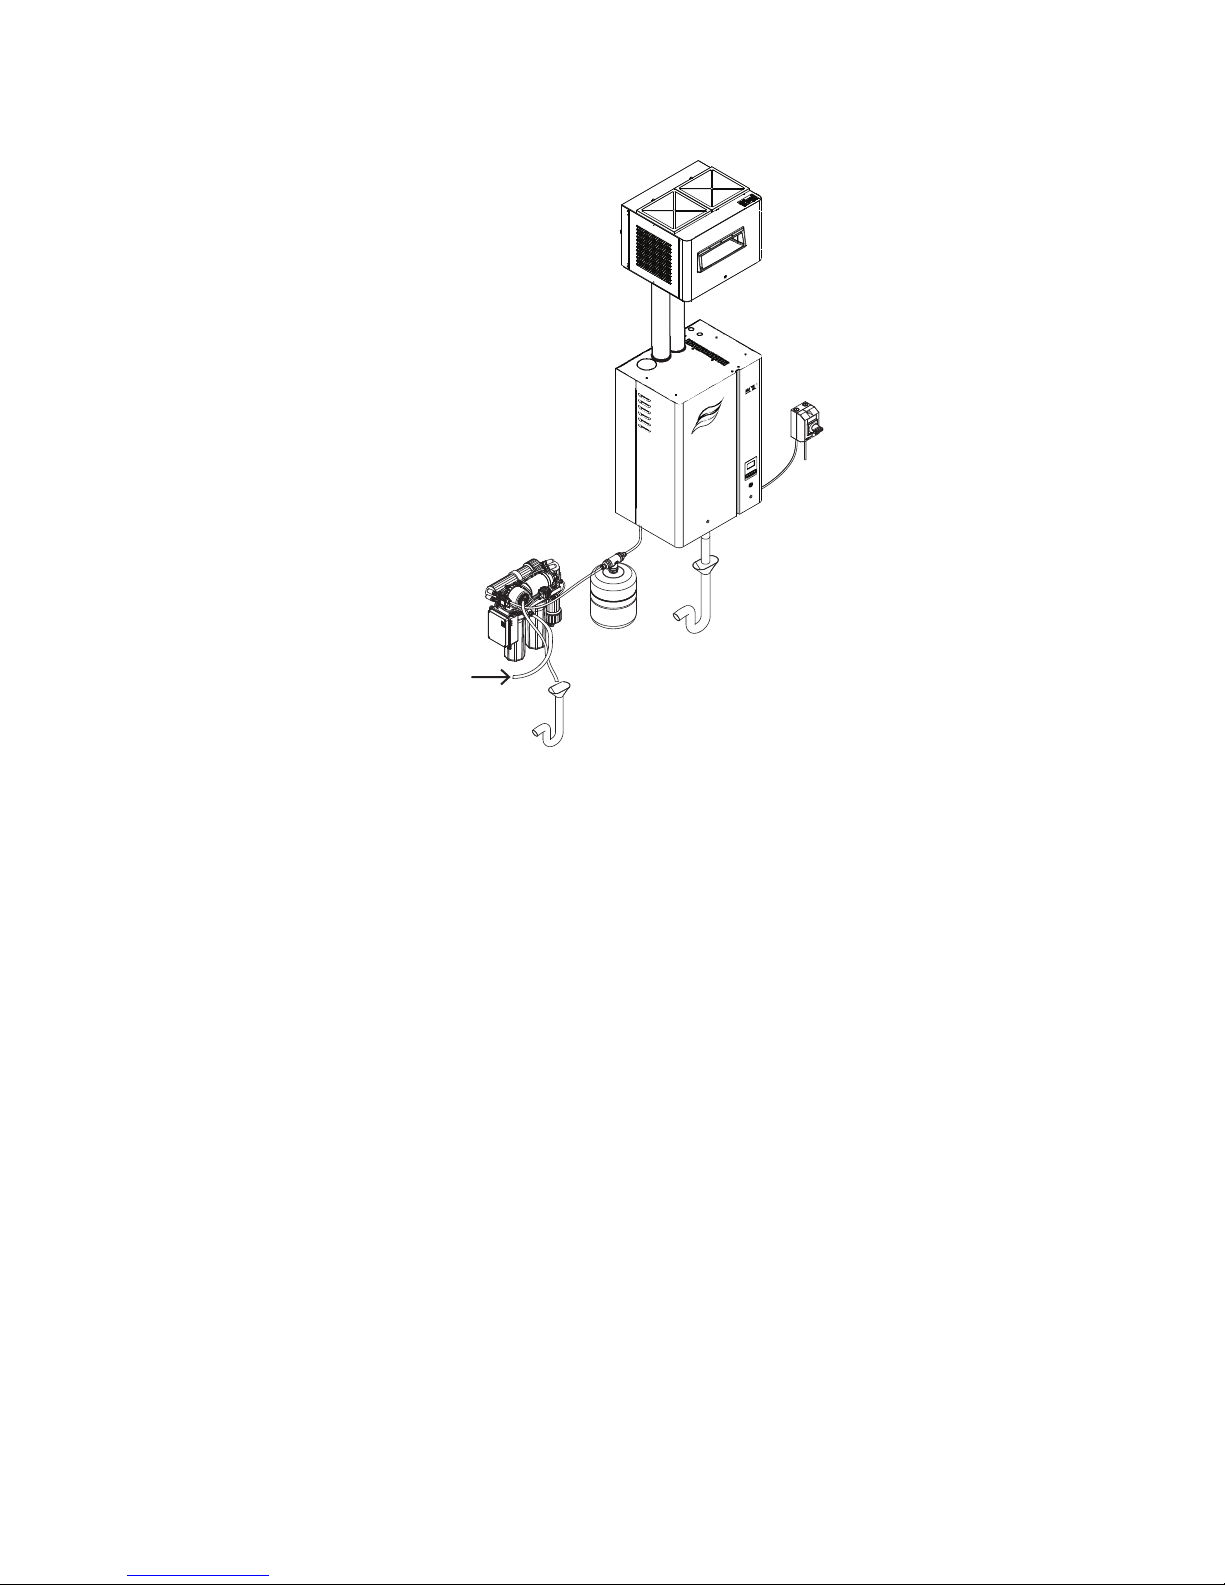
Figure 3 - Typical Configuration (medium Ultrasonic Humidifier and Ultrasonic Blower Pack
shown)
6.2 Location Requirements
The RO-U System should be installed vertically (it is possible to have the system installed horizontally,
however, air bleeding will be slower and pre-filter replacements may be more difficult), and mounted on
a non-vibrating wall or other vertical surface that is suitable for holding the RO-U with buffer tank.
It is recommended to install the buffer tank at the same elevation as the humidifier. There may be cases
where the Ultrasonic Humidifier is installed at a higher elevation than the buffer tank. Significant height
differences will result in low pressures from the buffer tank, so to compensate for this pressure drop,
note the height difference and increase the air pressure in the tank. Refer to "Adjusting the Buffer Tank
Pressure" on page37.
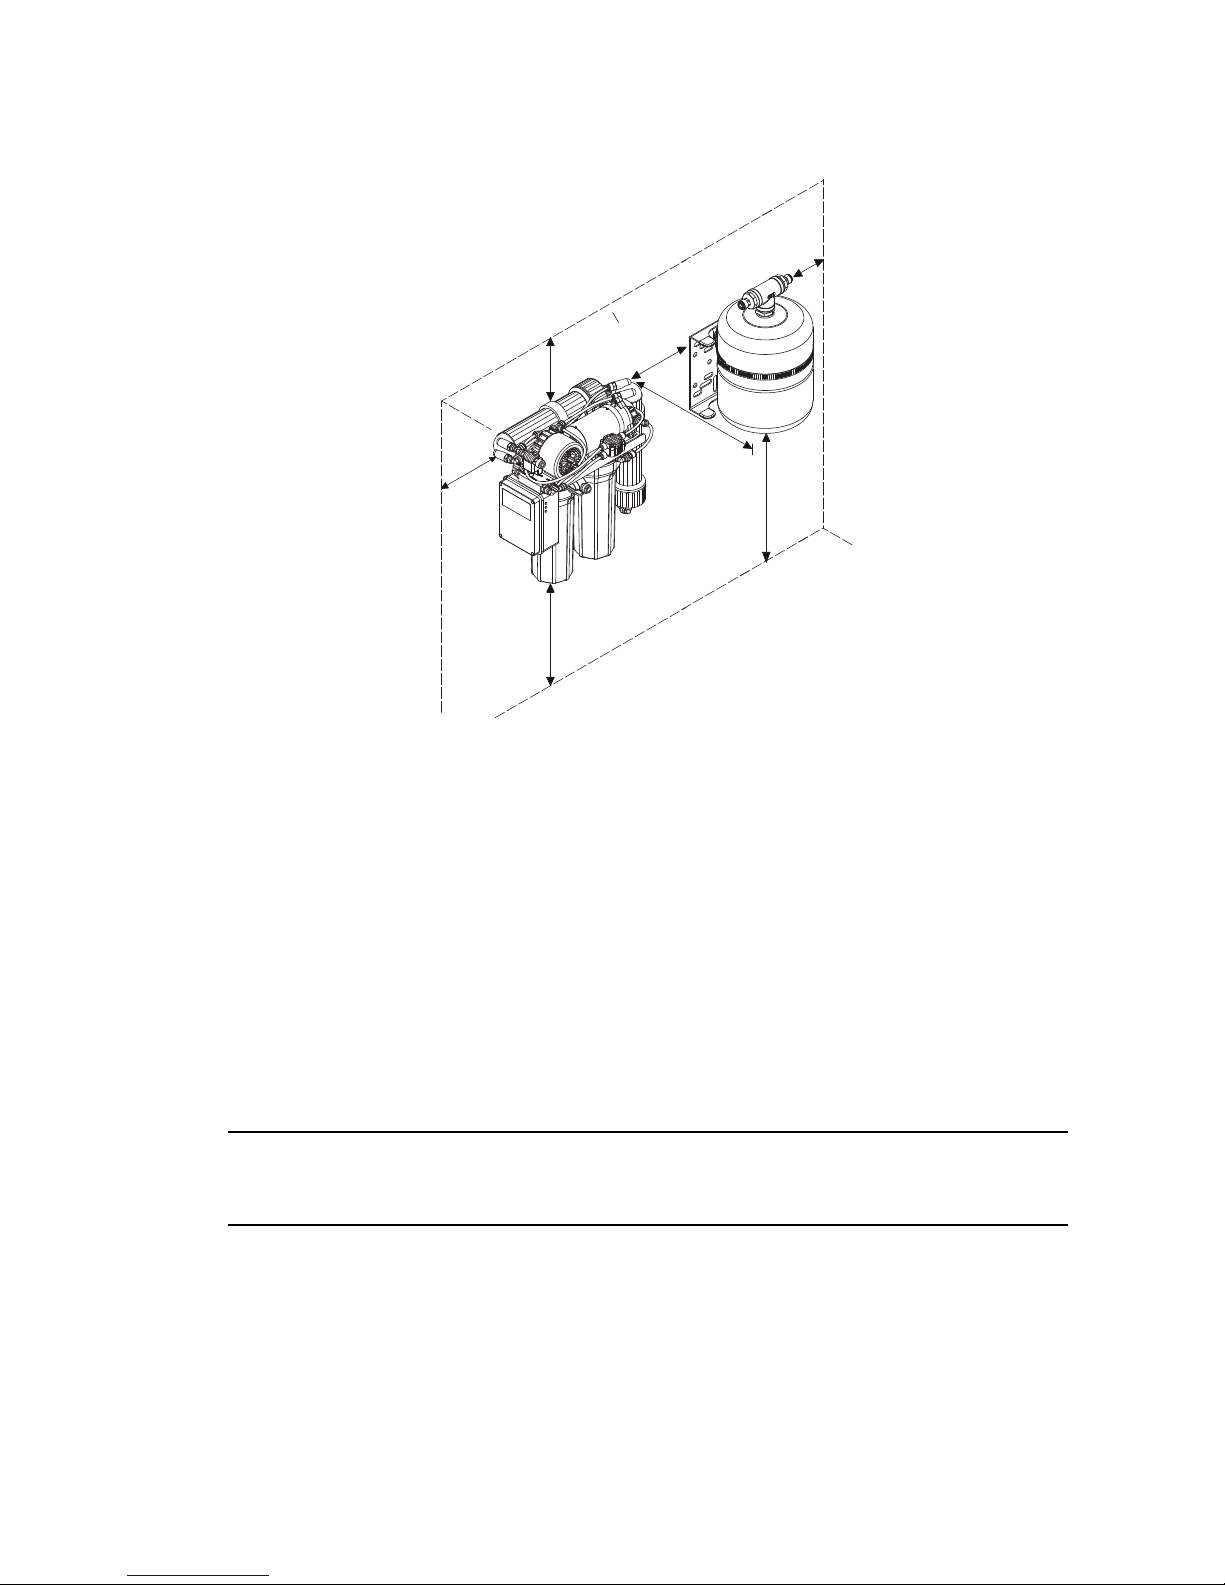
6.3 Clearance Requirements
The clearances in Figure are shown for reference only, and are suggested for ease of maintenance.
Consult local and national installation codes. Condair does not accept responsibility for violations of the
installation codes.
RO-U
2594385_A_EN_1811_RO_IOM
Installation and Planning|23
Page 24
E
A
D
B
C
F
G
Figure 4 - Minimum Clearances for the RO-U
(image not to scale)
A. min. 100 mm(3.94 in)
B. min. 250 mm(9.84 in)
C. min. 100 mm (3.94 in)
D. min. 250 mm (9.84 in)
E. min. 300 mm(11.82 in)
F.min. 150 mm(5.91 in)
G. min. 300 mm(11.82 in)
6.4 Site Requirements
6.4.1 Water Supply Requirements
IMPORTANT! Ensure that the water supply line is flushed out before it is connected.
To prevent the new humidifier from being contaminated with low-quality water, the entire supply line
must be flushed out and tested until the water supply quality and the bacteria counts are compliant with
local water quality specifications.
l Water supply connection must be installed to local plumbing codes.
l Inner diameter of the water supply line should be constant throughout the entire length.
l Water supply piping material made of stainless steel, or plastic (certified for RO or DI water sys-
tems).
l The connection material must be pressure-proof and certified for use with the R.O. system.
l The R.O system must be installed as close as possible to the humidifier.
24|Installation and Planning
2594385_A_EN_1811_RO_IOM
RO-U
Page 25
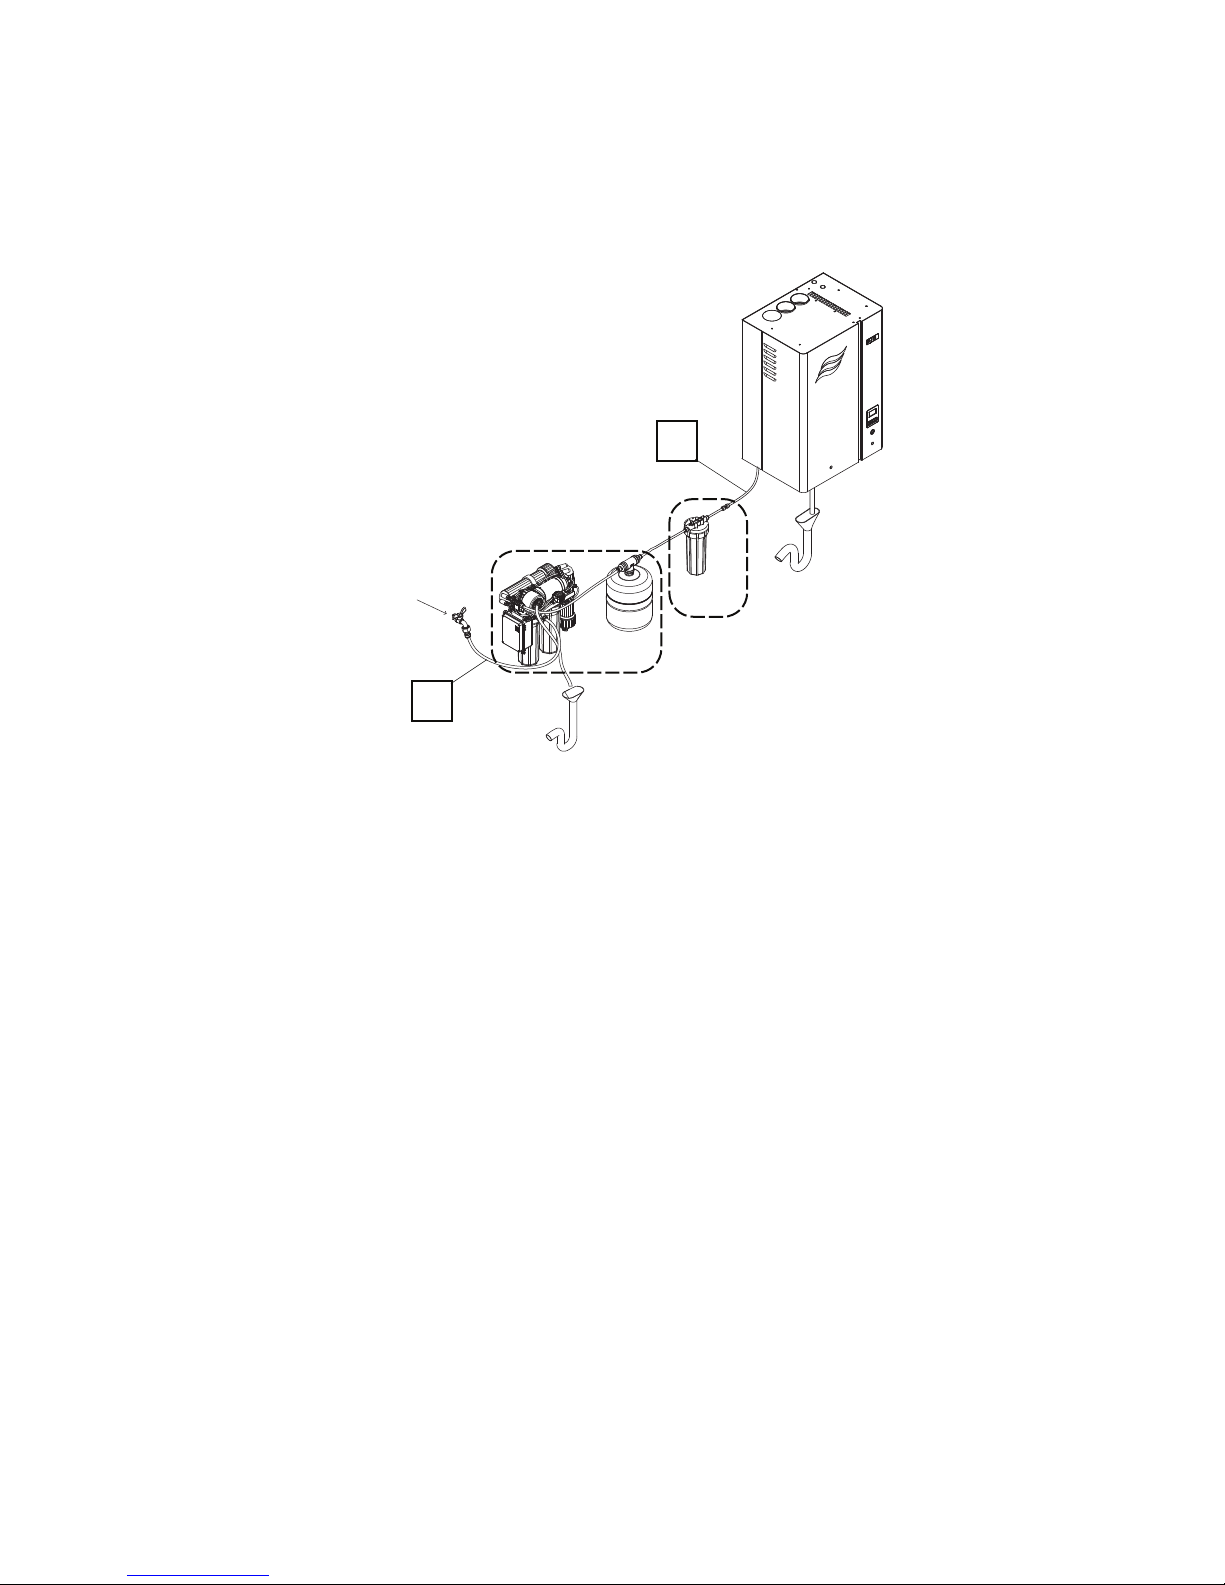
l Should a DI system be installed, contact your Condair representative.
1
2
D.I. (optional - not supplied)
R.O.
l Upon completion of installation, flush the water supply and drain lines to clear out debris in the
lines.
l Water supply should be free of additives, such as corrosion inhibitors and disinfectants.
Figure 5 - Water Supply Requirements
1. Water from the source entering the RO-U system
2. Water entering the US
RO-U
2594385_A_EN_1811_RO_IOM
Installation and Planning|25
Page 26
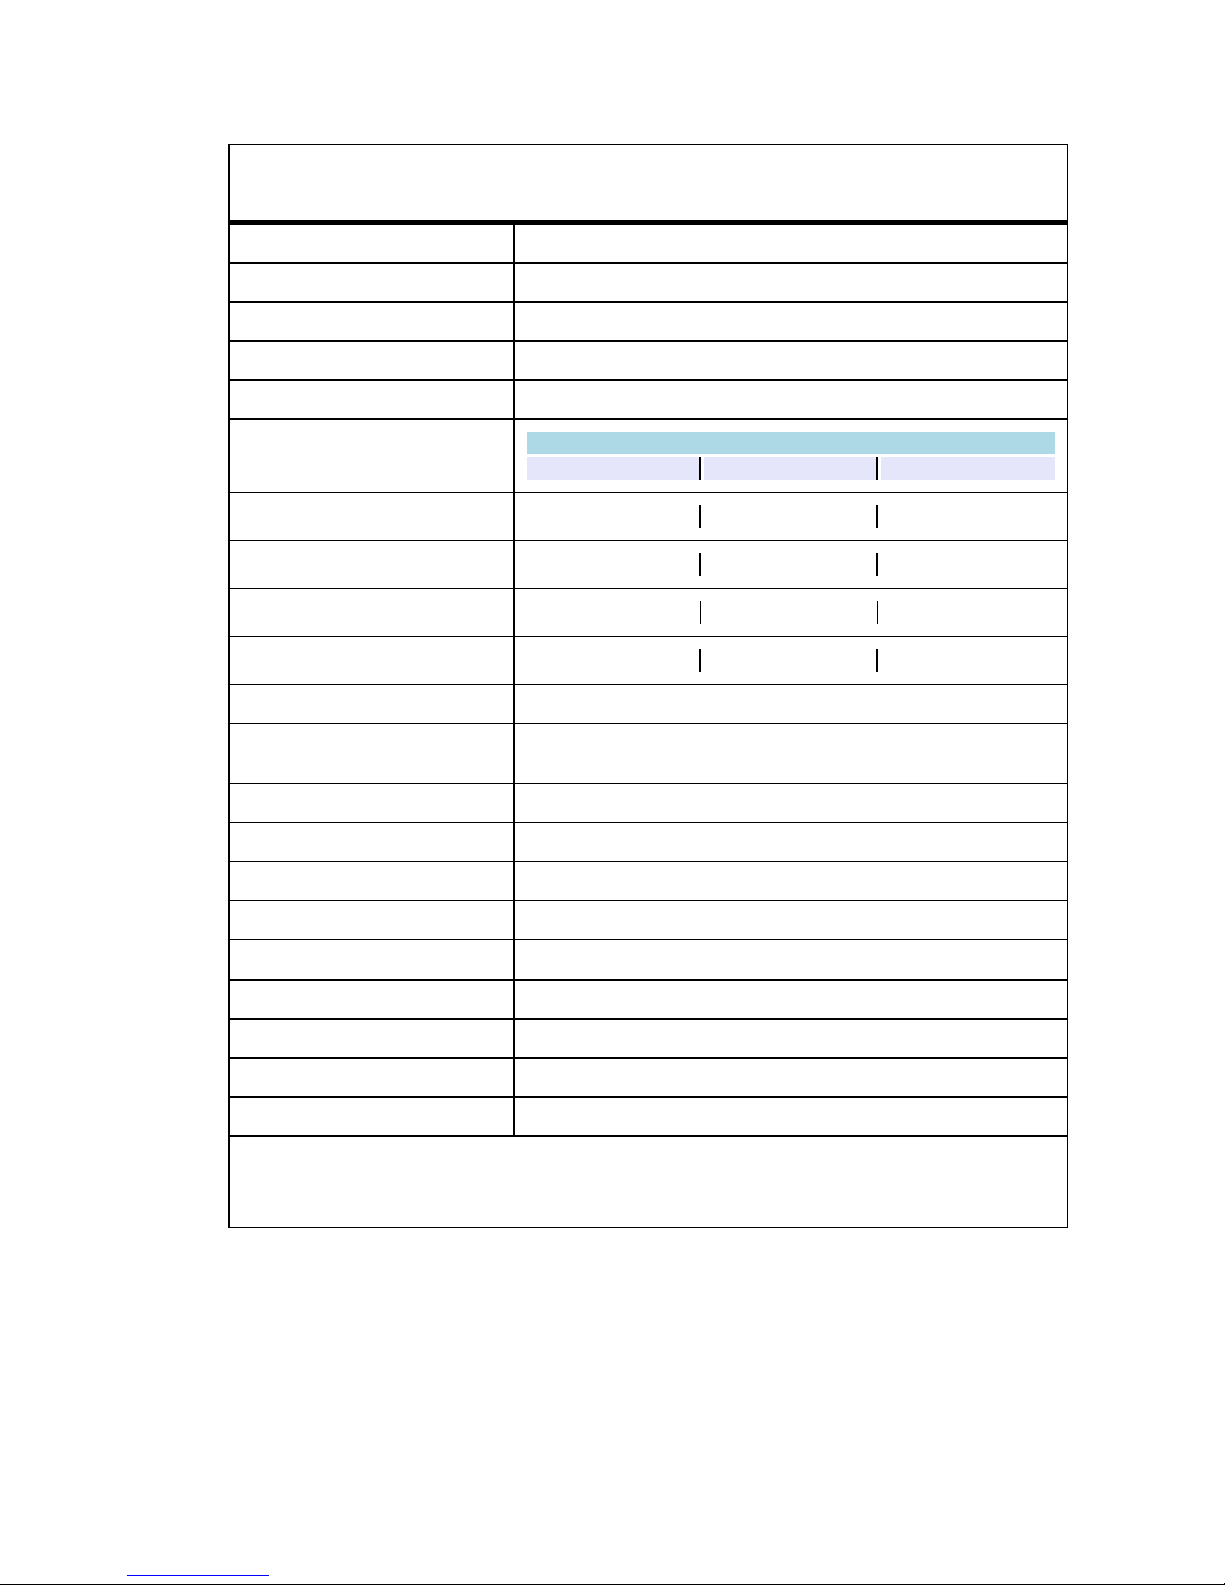
Mains Water Supply to RO-U
Conditions Value
Quality Potable, drinkable
Pressure 2.0-5.0 bar (30-75 psi)
Temper ature * 10-20°C ( 50-68°F)
Turbidity(max) 1.0 NTU
Max pH without Softener* 8.0
pH
pH 6.5-7.0 pH 7.1-7.5 pH 7.6-8.0
Max Hardness *
Max US Hardness *
Max Conductivity (at 20 °C / 68°F)*,**
Max Total Dissolved Solids (TDS) *
SiltIndex (max) 3
KMnO4Potassium permanganate
(max)
Fe Iron (max) 0.2 mg/L
Mn Manganese (max) 0.05 mg/L
Ca Calcium (max) 300 mg/L
Cu Copper (max) 1 mg/L
SiO2Silica (max) 1 mg/L
Ammonium (max) 0.5 mg/L
30 °dH 17 °dH 10 °dH
31 gpg 18 gpg 10 gpg
1300 µS/cm 750 µS/cm 600 µS/cm
800 mg/l 500 mg/l 375 mg/l
pH of water supply
10 mg/L
Chloride (max) 300 mg/L
Sulphates (max) 250 mg/L
Colony-forming Unit (CFU) (max) 200 CFU/ml ; no pathogens allowed
* If the water entering the RO-U system isgreater than the values indicated in this table, install a water softener
between the water supply and the Reverse Osmosis System.
** Contact your Condair representative ifthe conductivity of the supplywater is greater than 350 µS/cm.
26|Installation and Planning
2594385_A_EN_1811_RO_IOM
RO-U
Page 27
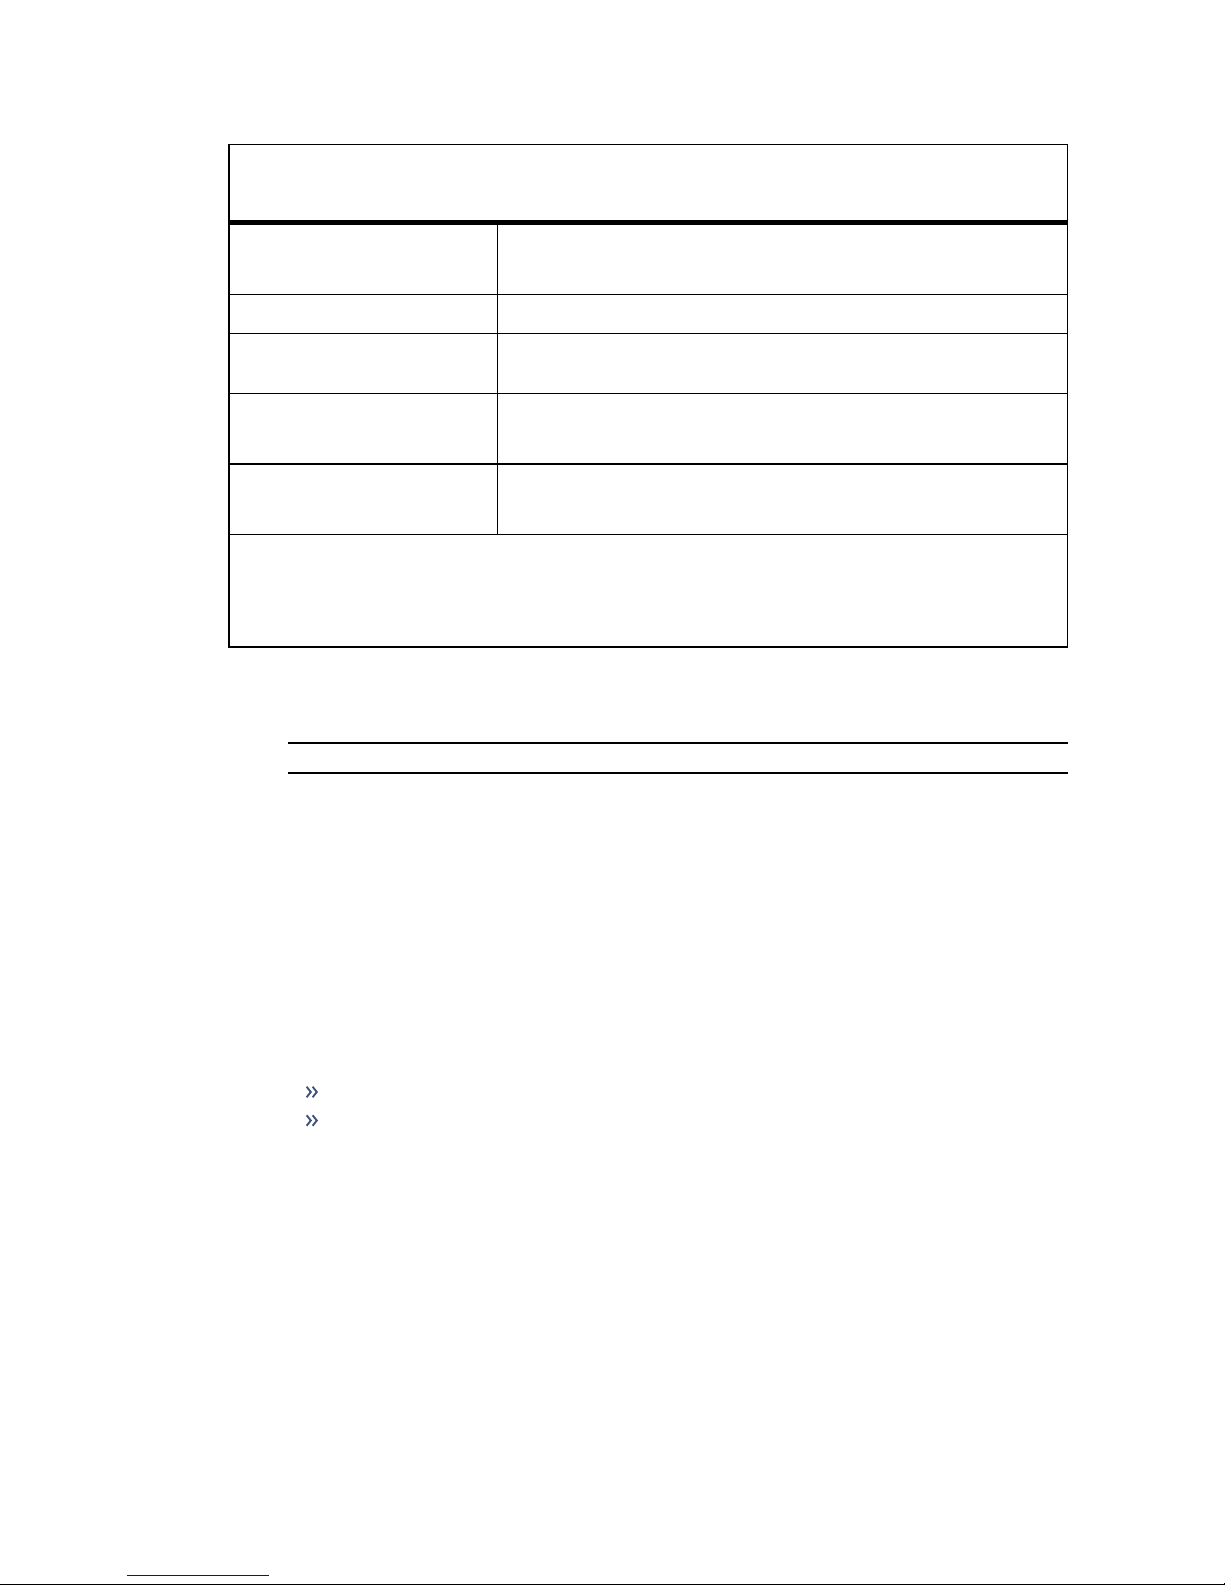
Water Supply Requirements to the US
Conditions Value
Pressure 2-5.5 bar (30-80 psi)
spike pressure limited to 8 bar (120psi)
Temper ature 1-25 °C (34-77 °F)
Min-Max Conductivity * , Max Total
Dissolved Solids (TDS)
Quality RO or DI water
Colony-forming Unit (CFU) < 200 CFU/ml for industrial applications**
* if the conductivityof the water entering the RO-U system isgreater than 350 µS/cm, contact your Condair representative .
** CFU leaving the unit via mist should be <1000 CFU/ml for industrialapplications. Keep the CF U entering the humidifier as low as possible, such that the CFU leaving the unit iswithin acceptable guidelines.
6.4.2 Drainage Requirements
l Drain piping material is suitable for RO water and DI water (if used).
IMPORTANT! Avoid copper.
l (Recommended) Floor drains present under the unit in case of leaks or overflowing water.
l Drain line connections must be installed to local plumbing codes.
l Ensure that the drain line is correctly fixed and is easily accessible for service.
l Each drain line must be installed with a constant decline (minimum 1.2°).
l The drain line should be a short as possible.
l The air gap funnel should have a minimum diameter of 64 mm (2-1/2 in).
l Ensure that the open end of each drain does NOT touch the funnel. The minimum air gap
allowed is 20mm (0.79in).
l Each drain line must lead to its own separate air gap funnel with trap, before connecting to the
drain.
l Each drain line must be secured to prevent the line from:
slipping out of the funnel
or going through, the funnel.
l Upon completion of installation, flush the drain lines to clear out any debris in the lines.
2-15 µS/cm , TDS: 9 mg/L
refer to the water supply requirements for the RO-U
follow applicable regulations
6.4.3 Power Supply Requirements
l The Reverse Osmosis System is mains powered, at 27 W with 24 VAC / 110 VAC transformer.
The power requirements are indicated on the specification label on the Water Safe Guard. Refer
to "Model Designation" on page15.
RO-U
2594385_A_EN_1811_RO_IOM
Installation and Planning|27
Page 28
6.5 Installation
6.5.1 Safety
Observe all safety precautions and comply with local installation codes. Refer to "For Your Safety" on
page8.
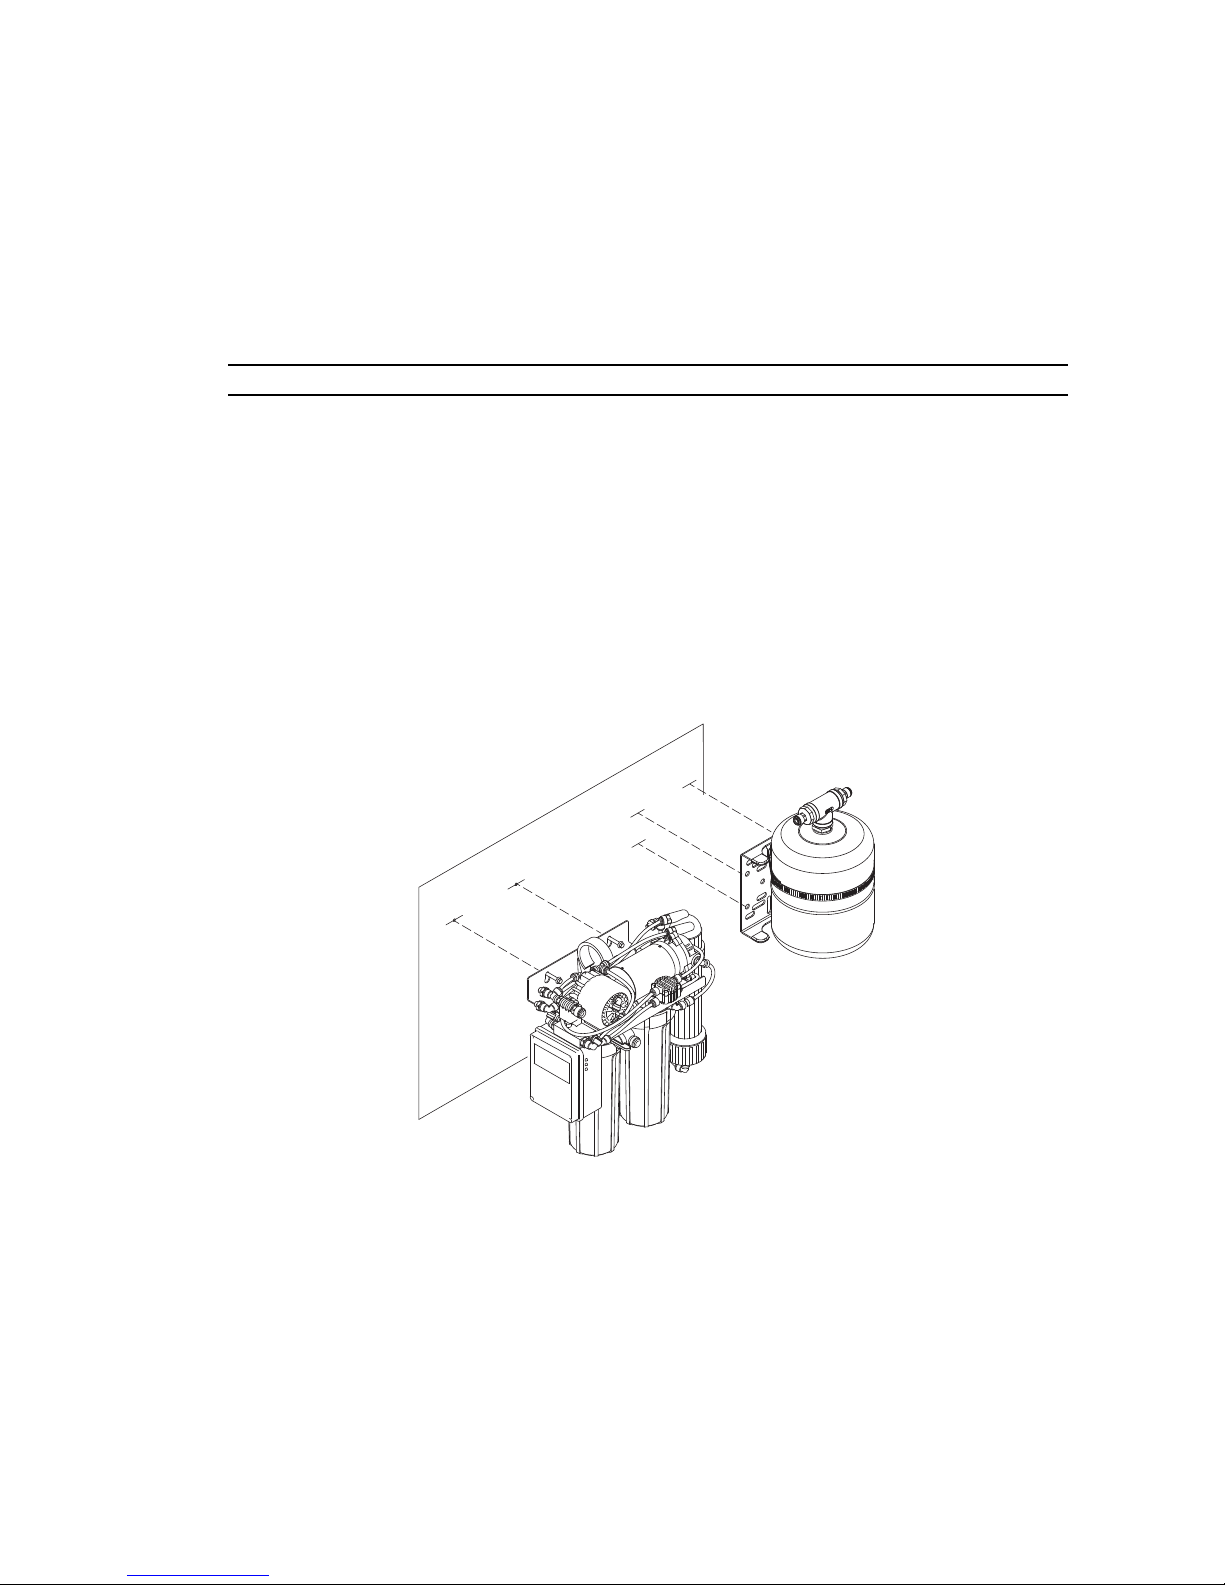
6.5.2 Mounting the Reverse Osmosis System
Refer to "Mounting Requirements" for mounting requirements.
IMPORTANT! Keep the system bacteria-free by washing your hands and wearing gloves.
1. Ensure that the location meets the clearance requirements. Refer to "Clearance Requirements"
on page23.
2. Remove the RO membrane on top of the RO-U System.
3. Locate 2x4 wooden studs, or equivalent support, on the mounting surface, and mark the attachment points at the desired position. Use a level.
4. Insert screws (capable of holding the unit) at the attachment points.
5. Remove any cellophane around the sediment and carbon filters.
6. Install the sediment pre-filter on the left (closest to the Water Safe Guard).
7. Install the carbon filter. Ensure that the O-ring on the holders are seated correctly between the
carbon filter element and the holders. The carbon filter element is fitted with flat rubber flanges.
8. Place the RO-U System over the screws, against the mounting surface.
Figure 6 - Mounting the RO-U
6.5.3 Connecting the Water Supply
Refer to "Water Supply Requirements" on page24 for water supply requirements.
RO-U and Ultrasonic Humidifier
1. Check that the supply water pressure is greater than 1 bar (15 psi).
2. Turn off the water supply.
28|Installation and Planning
2594385_A_EN_1811_RO_IOM
RO-U
Page 29

3. Connect the RO-U System to a female swivel adapter with an air bleed valve.
4. Connect the female swivel adapter to the water source.
5. Fit a 3/8 in tube from the RO water connection port to the T-piece connector.
IMPORTANT! Condair recommends using plastic or stainless steel tubing for RO water.
6. Connect the T-piece connector to the inlet valve on the buffer tank. Ensure that the orientation of
the T-piece connector allows water to flow through in one direction only. Water from the RO unit
should face the opening of the plastic attachment in the T-piece connector. Refer to Figure 7 -
on the next page.
7. Fit a 3/8 in tube from the T-piece connector to the humidifier. A 3/4 in adapter to the humidifier is
supplied.
Note: The RO-U unit has a shut-off tap for the water supply to stop fluid flow when the buffer tank is full,
and when no water is being consumed.
Note: The buffer tank should be depressurized to 0.5 bar (7 psi) before being filled with water. Refer to
"Adjusting the Buffer Tank Pressure" on page37.
6.5.3.1 (Optional) DI System
If it is found that your TDS or conductivity levels in the source water are high (>350 µS/cm), a DI system
(supplied by others) should be installed (suggested to further reduce 'white dust' from forming in the
humidified areas) after consulting with your Condair representative. Should a DI system be installed,
the location would be between the buffer tank and the humidifier.
RO-U
2594385_A_EN_1811_RO_IOM
Installation and Planning|29
Page 30
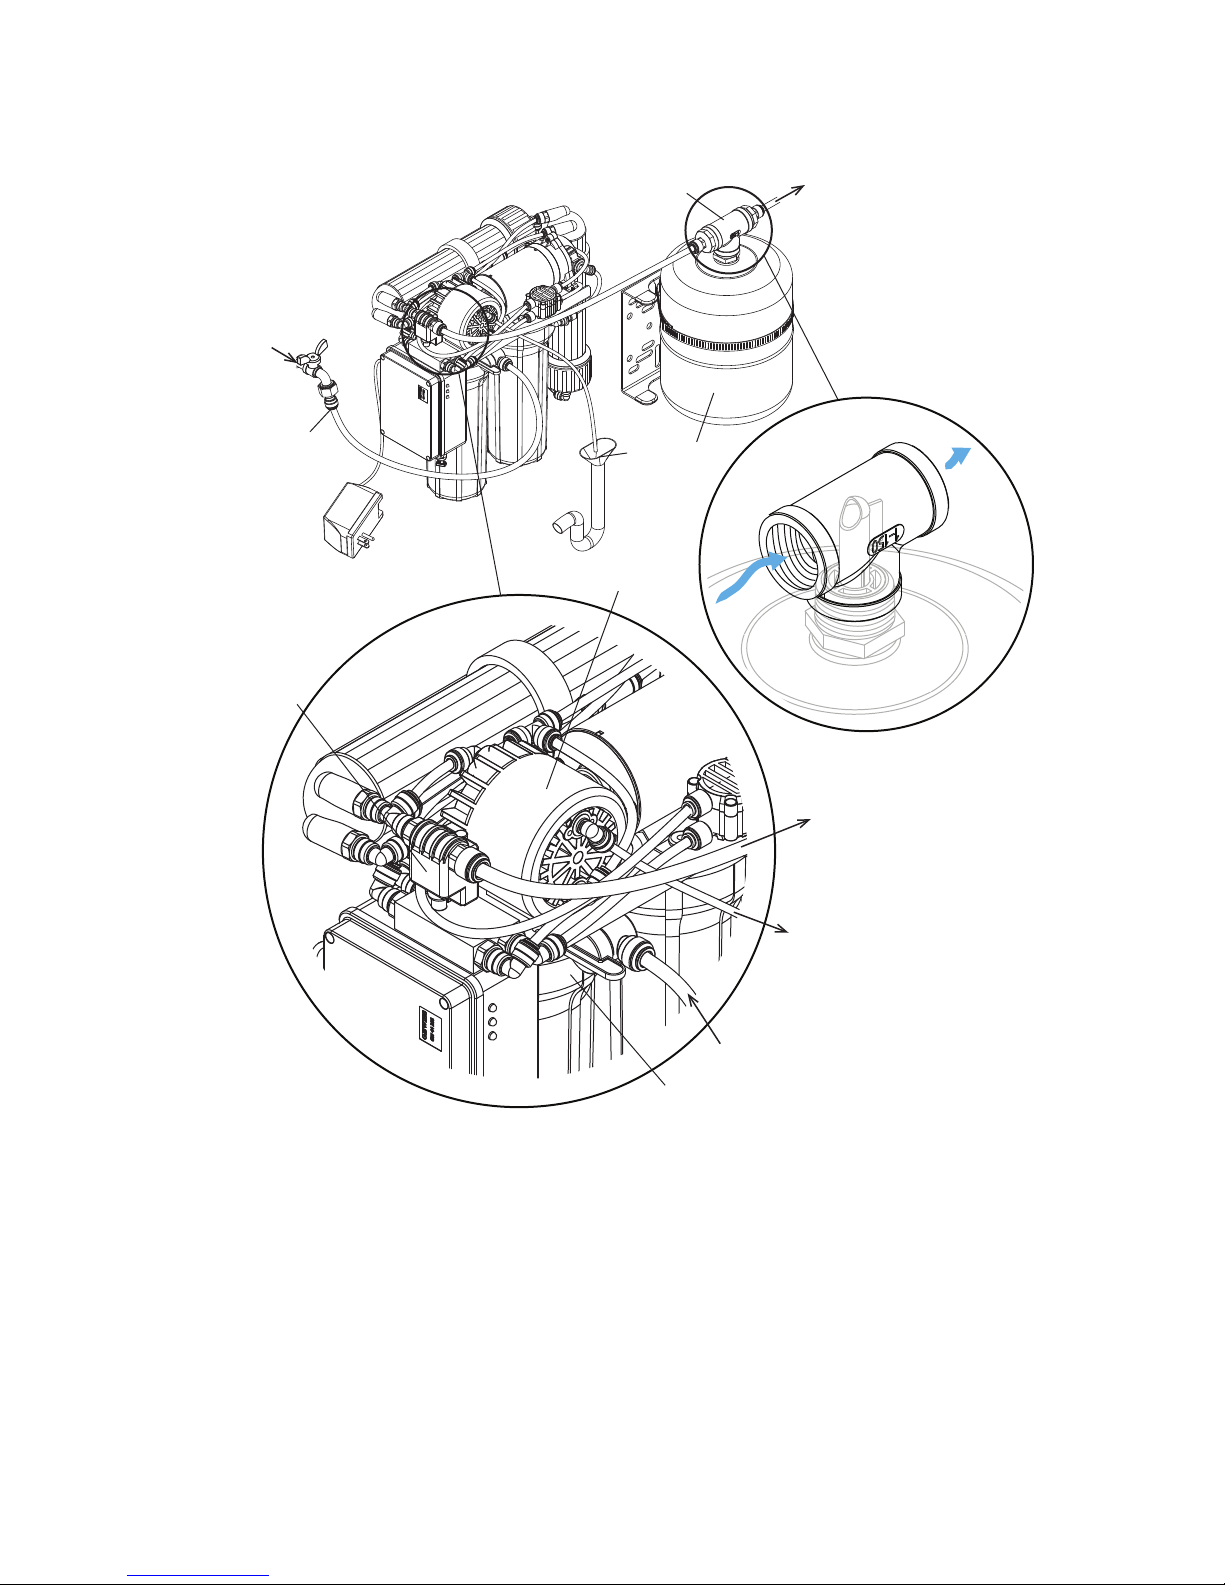
1
2
3
4
5
6
7
8
9
10
11
12
Figure 7 - Supply Water Connection
1. Hose from buffer tank to humidifier
2. Inlet source water
3. Air gap funnel to drain
4. Buffer tank
5. Hose from pressure switch to tank
6. Hose from permeate pump to drain (air gap funnel)
7. Hose from water source to sediment filter
8. Female swivel adapter
9. T-piece connector
10. Permeate pump
11. Sediment filter
12. Pressure switch
30|Installation and Planning
2594385_A_EN_1811_RO_IOM
RO-U
Page 31
6.5.4 Connecting the Drain Line
Refer to "Drainage Requirements" on page27 for drain line requirements.
1. Fit a tube, 1/4 in minimum, from the discharge port to the air gap funnel (recommended) leading
to the drain. Refer to Figure 7 - on the previous page.
Note: Leave a gap between the drain line and the drain to prevent water from flowing back into
the RO-U System.
6.5.5 Installing the Electrical Connections
Refer to "Model Designation" on page15 and "Power Supply Requirements" on page27 for the electrical requirements. All wiring must be in accordance with local electrical codes.
Safety
The electrical installation work requires removal of the door panels in the humidifier. Observe the following safety precautions:
DANGER!
Risk of electric shock!
The Reverse Osmosis System is 24 VAC powered. Live parts may be exposed when the access
panels or doors are removed. Touching live parts may cause severe injury or even death.
Prevention: The Reverse Osmosis System must be connected to the humidifier only after all mounting
and installation work has been completed and checked for correct workmanship, and the access panels/doors to the humidifier are closed and fastened securely.
Only qualified personnel should perform maintenance or repairs on the unit.
Follow any lockout procedures when servicing the unit.
CAUTION!
Electrostatic discharge (ESD)!
The electronic components inside the control cabinet in the humidifier are sensitive to electrostatic discharge (ESD).
Prevention: Take appropriate measures to protect the electronic components inside the unit against
damage caused by electrostatic discharge (ESD). Refer to ANSI/ESD-S20.20.
l All electrical installation work must be performed only by a licensed electrician authorized by the
customer. It is the customer’s responsibility to verify qualifications of the personnel.
l The electrical installation must be performed according to the wiring diagrams in this manual,
the instructions in this section, as well as applicable national and local codes.
l All cables must lead into the unit, via appropriate cable glands or grommets, and be properly
supported.
l Make sure the cables are secured, and do not rub on any components or become a tripping haz-
ard.
l Observe national and local codes for maximum cable length and required wire sizes for cables.
To power the RO-U System:
1. Insert the transformer plug into the socket. The system requires 24 VAC power.
RO-U
2594385_A_EN_1811_RO_IOM
Installation and Planning|31
Page 32
7 Operation
7.1 General
Personnel Qualifications
The Reverse Osmosis System must only be operated by personnel who are adequately qualified, welltrained, and are authorized by the customer.
Safety
Observe the following safety precautions.
DANGER!
Risk of electric shock!
The Reverse Osmosis System is 24 VAC powered. Live parts may be exposed when the access
panels or doors are removed. Touching live parts may cause severe injury or even death.
Prevention: The Reverse Osmosis System must be connected to the humidifier only after all mounting
and installation work has been completed and checked for correct workmanship, and the access panels/doors to the humidifier are closed and fastened securely.
Only qualified personnel should perform maintenance or repairs on the unit.
Follow any lockout procedures when servicing the unit.
DANGER!
Poorly maintained RO-U systems may be hazardous.
Poor maintenance of the Reverse Osmosis System poses a health risk to spaces humidified by
the Ultrasonic Humidifier. When adequately operated or poorly maintained, micro-organisms that
cause disease, such as Legionnaire's, may grow in the water system and in the humidifier which
dispel the micro-organisms into the air.
Prevention: Read, understand, and follow maintenance guidelines to ensure the humidification sys-
tem remains safe. Ensure that the unit is cleaned and disinfected, as directed in this manual, and
avoid shutting off the unit (max. 48 hours). If the unit has been off for 48 hours or more, disinfect and
flush the system thoroughly before humidifying the space with the Ultrasonic Humidifier.
WARNING!
Do NOT leave the unit without power. Risk of contamination.
Do NOT leave the unit unpowered for more than 48 hours, or else a total system disinfect will be
required. Without power, the system will not flush properly, resulting in standing water and conditions that may promote the growth of micro-organisms.
Prevention: Leave your unit powered on. If you do not need humidification during the 48 hours, set
the humidifier to standby or set the demand to 0.
WARNING!
Risk of contamination.
Do NOT use oil, grease, glue, Teflon, silicon, O-ring lubrication, etc. when assembling pipes or
hose connections. All of the above products can act as food for bacteria, posing health risks.
Prevention: For lubricant, use dish soap. Wash hands and wear clean gloves while assembling parts
in direct contact with water. Keep dust covers on pipes and hoses until assembly.
Operation|32
2594385_A_EN_1811_RO_IOM
RO-U
Page 33
WARNING!
Water from RO-U systems may cause metals to corrode quickly.
Water produced from a Reverse Osmosis System is aggressive and can cause some metals to
quickly corrode. The RO-U system should always be connected to piping and equipment that is
suitable to handle RO water.
Prevention: Read, understand, and follow maintenance guidelines to ensure the humidification sys-
tem remains safe.
CAUTION!
The RO-U System contains pressurized water.
Hoses in the RO-U System contain pressurized water that may spray if the hose connections are
loose or there is a leak.
Prevention: Do not re-tighten or unscrew hoses while the system is pressurized. Test for leaks and
replace broken hoses.
Do NOT fasten the RO-U System, including the tank, hoses, and pipes to vibrating surfaces.
7.2 Starting Up
Ensure that all connections are secure.
Before beginning:
CAUTION!
l disconnect the power source from the RO-U System.
l disconnect the tube connecting the buffer tank to the humidifier.
l close the inlet valve on the buffer tank. This will prevent water from entering the tank and to raise
the system pressure quickly, without having to wait for the tank to fill. This must also be done so
that the RO membranes can be flushed.
l relieve air pressure in the buffer tank. See instructions below for details.
IMPORTANT!
Has your unit been inactive and without power?
Inactivity of the humidifier for more than 48 hours requires you to clean and disinfect your system before
starting up. There is risk of the membrane fouling if the RO-U unit has been 'inactive' for a long period,
so it is advised to keep the RO-U system on and running to regularly flush every 24 hours.
7.2.1 Start Up Procedure
First Time Start Up
IMPORTANT! Clean and disinfect the unit if the unit has been unpowered for an extended period of
time (over 48 hours). Refer to "Cleaning and Disinfecting" on page35.
1. Open the water inlet valve and allow water to flow through the RO-U.
2. Check for leaks. If leaks are found, shut off the water and repair them.
3. Connect the power supply.
4. Allow the water to flow freely for 2 minutes to flush the RO membrane.
RO-U
2594385_A_EN_1811_RO_IOM
Operation|33
Page 34

5. While the RO membrane is being flushed, relieve the air pressure in the buffer tank from 2.76
bar to 0.5 bar (40 psi to 7 psi) by opening the black cap and valve at the bottom of the buffer
tank. Refer to "Adjusting the Buffer Tank Pressure" on page37. Lowering the pressure will allow
water to flow into the tank.
6. Reconnect the tube from the buffer tank to the humidifier.
7. Open the water valve to the buffer tank and wait until the tank is completely filled. The green and
yellow lights on the Water Safe Guard will illuminate. After 3 minutes, only the green LED will
remain illuminated (if the water is OK).
8. Turn on the humidifier.
Start Up (Restart)
IMPORTANT! Clean and disinfect the unit if the unit has been unpowered for an extended period of
time (over 48 hours). Refer to "Cleaning and Disinfecting" on page35.
1. Open the supply valve to the RO-U System and let the system flush for 5 minutes.
2. Supply voltage to the pump by plugging in the wall adapter.
3. Reconnect the tube to the buffer tank.
4. Relieve the air pressure in the buffer tank from 2.76 bar to 0.5 bar (40 psi to 7 psi) by opening the black cap and valve at the bottom of the buffer tank. Refer to "Adjusting the Buffer Tank
Pressure" on page37. Lowering the pressure will allow water to flow into the tank.
5. Open the water valve on the storage tank.
6. Wait until the system reaches the correct pressure. When this happens, the discharge water will
stop.
7. Turn on the humidifier.
7.3 Shutting Down the Unit
IMPORTANT! Clean and disinfect the unit if the unit has been unpowered for an extended period of
time (over 48 hours). Refer to "Cleaning and Disinfecting" on page35. Avoid unpowering the unit.
To shut down the unit:
1. Turn off the humidifier. Refer to the humidifier Operation and Maintenance Manual for the proper
procedure.
2. Unplug RO-U unit.
3. Close the supply water valve.
4. Close the water inlet valve on the buffer tank.
5. Disconnect the buffer tank from the humidifier. Excess water will be drain.
34|Operation
2594385_A_EN_1811_RO_IOM
RO-U
Page 35
8 Maintenance
8.1 General
Strictly observe all safety precautions, and perform only those maintenance tasks described in this
manual. Refer to "For Your Safety" on page8.
Use only original Condair replacement parts.
All maintenance work must be performed only by licensed personnel authorized by the customer. It is
the customer's responsibility to verify qualifications of the personnel.
The maintenance work may require removal of the cover on the unit.
The Ultrasonic Humidifier may need to be unplugged to safely maintain and operate on the unit. Refrain
from unpowering the unit (for more than 48 hours) unless it is deemed necessary, as unpowered units
will not flush.
8.2 Cleaning and Disinfecting
Cleaning and disinfecting should be performed by authorized persons. Contact your Condair representative for more details.
Refer to "Maintenance List" on the next page for the general procedure and frequency of maintenance.
Disinfectants are mandatory, and must NOT produce toxic residue. Observe all safety precautions
labeled on the disinfectants and cleaner.
CAUTION!
Risk of damage to the humidifier components!
Do NOT use solvents, aromatized, or halogenized hydrocarbons, or other harsh chemicals for
cleaning.
Do NOT use cleaning materials that could leave scratches on wet, plastic and metal surfaces of
the unit.
Do NOT use hard or metallic brushes to clean the unit.
Condair recommends the following:
l Avoid recontaminating the components. Use clean gloves (that are safe to use with the agents
listed below) when handling components and cleaning agents.
l For cleaning: dish washing soap
l For descaling: citric acid solution
Note: pH 2, or 20g citric acid in 1 L water, or 0.18 lbs for every 1 gallon
l For disinfecting: 0.1% hydrogen peroxide, H
l At the end of each cleaning, allow the humidifier to fill and create mist for 2-3 minutes, then per-
2O2
form a full drain cycle. This should be performed manually or through changing the demand signal (full demand to mist; zero stop mist and allow to drain).
Condair provides a cleaning and disinfecting kit for the Ultrasonic Humidifier (P/N: 2594996)
IMPORTANT! Avoid cleaning with hard or rough materials, such as steel wool, or metal brushes. Abrasions on the surface of any components may prevent micro-organisms from being cleaned easily.
Instead use a clean cloth or soft brush.
Avoid materials that will leave particles behind.
Avoid using a hard, or metal (or otherwise abrasive) brush.
RO-U
2594385_A_EN_1811_RO_IOM
Maintenance|35
Page 36
To disinfect a component:
1. Review the maintenance instructions for the component that will be cleaned and disinfected.
Specific considerations must be taken into account for some components.
2. Ensure UV assembly is shut down before disinfection.
3. Clean the component with hot water and soap, and rinse with water. Remove biofilms and any
surface impurities. Avoid using hard or metallic brushes (to avoid surface abrasions) to clean
and disinfect.
4. Descale components using citric acid* (pH 2), then rinse with water.
l *Let the component soak for 20 minutes and avoid scrubbing. Do NOT agitate the piezo-
electric transducers because they are very fragile.
5. Apply disinfecting agent (hydrogen peroxide) to the component and allow to air dry (this allows
the agent to penetrate and kill pathogens).
6. Rinse thoroughly with clean water (RO or DI water) to remove residue.
To disinfect hoses:
1. Clean and disinfect hose connections, as described above.
2. Remove any residue or particles from the hoses.
3. Flush the hoses with hot water.
4. Flush the hoses with disinfecting liquid and allow to air dry.
5. Rinse the hoses with clean water (RO or DI water) to remove residue from disinfectant.
IMPORTANT! A new RO membrane arrives with disinfecting agent inside. The disinfecting agent is
flushed upon first start-up, and should remain moist for optimum performance (i.e. Do NOT let the RO
membrane dry out). It is NOT suggested to further clean the RO membrane. To ensure proper functioning of the RO membrane, avoid disassembling the component, and replace the RO membrane as
necessary.
IMPORTANT! If the RO system must be disinfected, contact your Condair representative.
8.3 Maintenance List
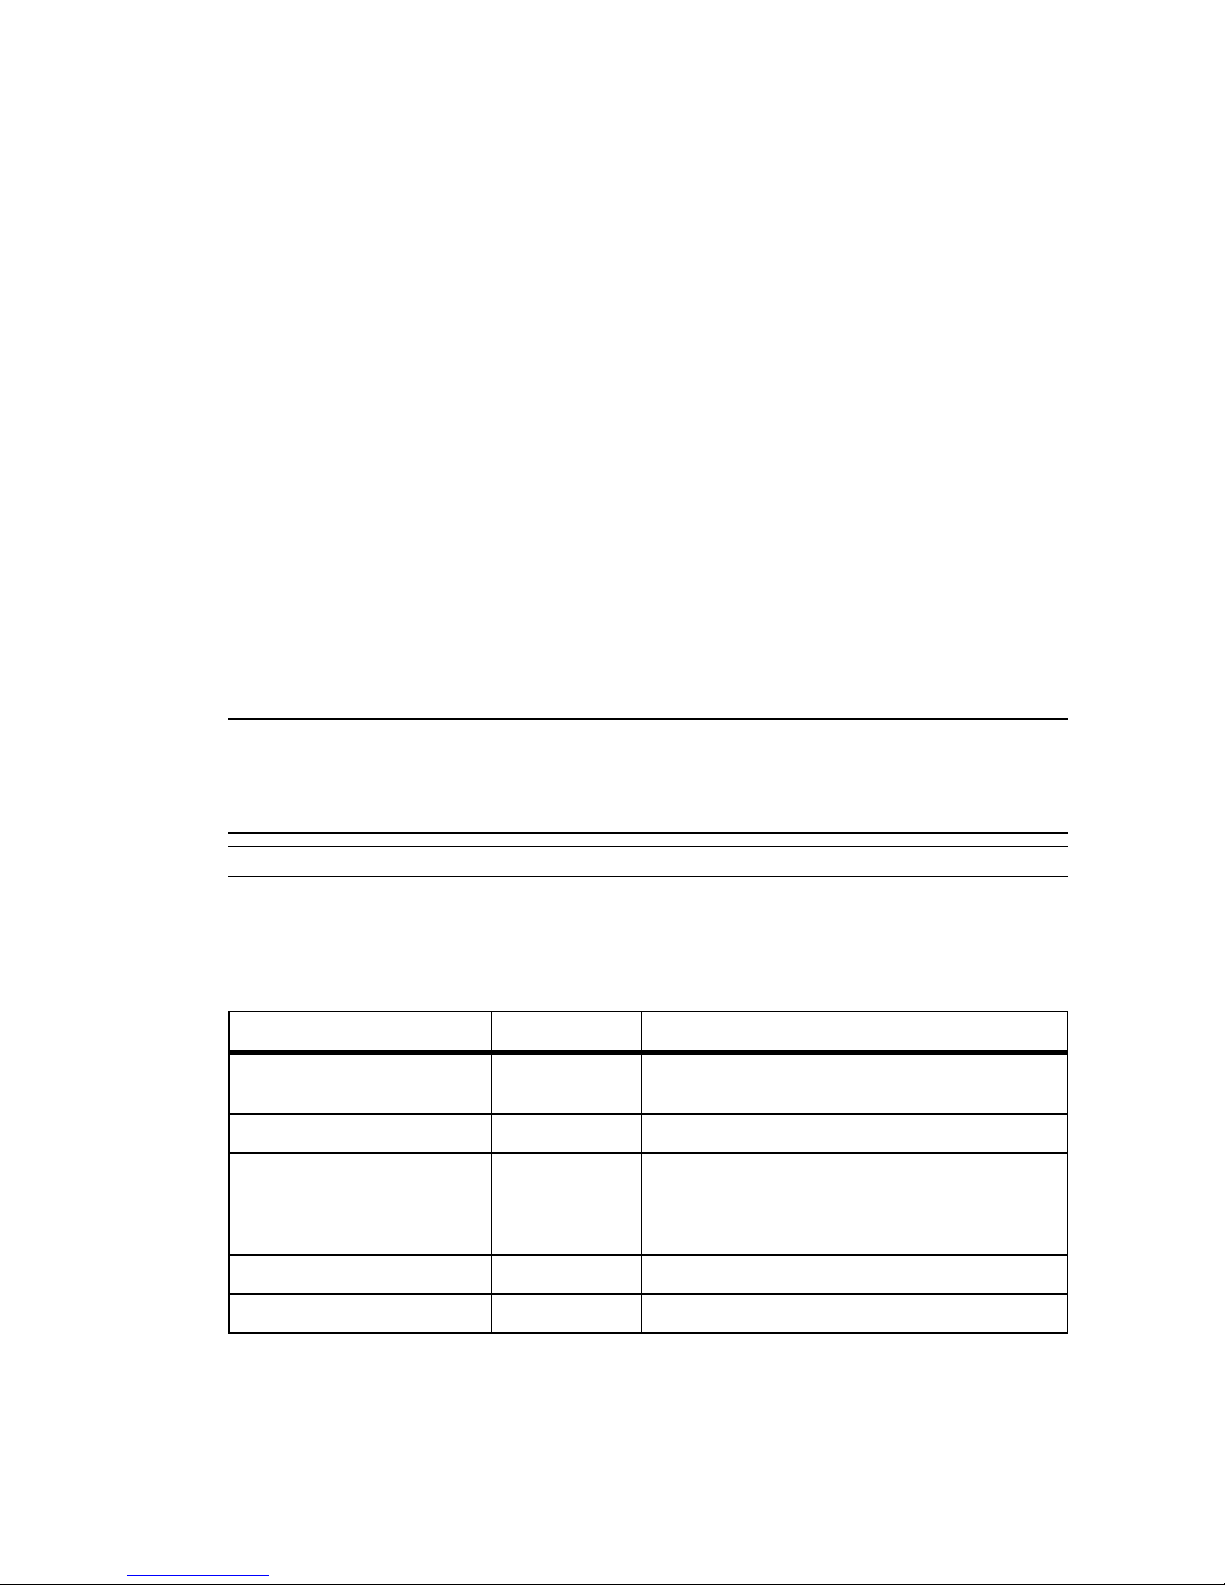
Perform the following maintenance tasks at the intervals specified in Table 3 below.
Table 3: Maintenance List
Task/Component Frequency Description
Replace sediment filter Yearly If the supply water is heavilypolluted with minerals, it is
Replace carbon filter Yearly
Replace RO membr ane 2-5 Years Typicalreplacements range between 24-60 months.
Assess permeate water Yearly -
Inspect the buffer tank Yearly -
recommended to do thismore often.
-
Replacement isnecessary when the Water Safe Guard displaysa red light, or when the capacity has dropped more
than 10%.
36|Maintenance
2594385_A_EN_1811_RO_IOM
RO-U
Page 37

8.4 Maintenance Procedures
Ensure that the humidifier is shut down properly and observe all safety precautions described in this
manual . Refer to "Shutting Down the Unit" on page34 and "For Your Safety" on page8.
8.4.1 Adjusting the Buffer Tank Pressure
The air pressure pushes against the water-filled bag inside the buffer tank. Air pressure that is much
greater than the pressure of the supply water pressure will prevent the tank from being completely filled.
Air pressure that is too low will reduce the water pressure being sourced to the humidifier.
Adjusting the air pressure in the tank will require a pressure gauge and an air compressor; or any other
device that can supply air to the buffer tank, such as a bicycle pump. For accurate pressure readings,
ensure that the buffer tank is drained of water.
To adjust the air pressure in the buffer tank:
1. Turn off the RO-U System and turn off the humidifier.
2. Close the valve for the water source.
3. Close the water valve at the buffer tank.
4. Disconnect the buffer tank from the humidifier. Water will drain from the tube, so direct excess
water into a drain.
5. Open the water valve at the buffer tank, and continue to let the water drain until the tank is
empty.
6. Close the water valve at the buffer tank.
7. Locate and open the black cap and valve at the bottom of the buffer tank.
8. Insert compressed air until the desired pressure is attained, then close the valve and cap.
Adjust the air to 0.5 bar (7 psi) + 0.1 bar for every meter (or 0.44 psi/ft) below the humidifier.
9. Open the valve for the water source.
10. Turn on the RO-U System.
11. Open the water valve at the buffer tank. The buffer tank should fill with water.
l If the tank does not fill completely, carefully open the valve at the bottom of the tank and
release small amounts of air until the tank is full.
l If the pressure in the buffer tank is too low, carefully open the valve at the bottom of the
tank and add more compressed air.
12. Once the desired pressure is attained, turn on the humidifier.
8.4.2 Replacing the RO-U Filter
The buffer tank in the RO-U System must be depressurized before the filters can be replaced.
To replace the filters:
1. Empty water from the buffer tank. Refer to "Adjusting the Buffer Tank Pressure" above.
2. Shut down the unit, as described in "Shutting Down the Unit" on page34.
3. Twist the filter holders (these encase the filters) to remove the filters from the unit.
Note: The filter holders will contain water. Beware of spilling.
4. Empty the filter holders and clean them with soap, water, and chlorine (optional, but recommended). Rinse thoroughly.
5. Place the new filters in their filter holders.
l For the carbon filter, ensure that the O-ring is centered on top.
RO-U
2594385_A_EN_1811_RO_IOM
Maintenance|37
Page 38

6. Re-install the filter holders into the unit and hand-tighten.
7. Restart the unit and check for leaks.
8.4.3 Testing the Permeate
To test the permeate (de-ionized water from the RO membrane):
1. Take a sample of the water supply and measure the conductivity of the water with a conductivity
meter. Wipe off the conductivity meter after the reading.
Note: If the micro-seimens value (µS) of the source water supply is greater than 500 µS, install
a descaling system ahead of the RO-U System (recommended).
2. Take a sample of the permeate and measure the conductivity with a conductivity meter.
3. Perform the following calculation:
a. Divide the (value found in step 2) by the (value found in step 1).
b. Multiply this ratio by 100%.
4. The results indicate the following:
l <10 %: the permeate is good.
l Between 10% and 20%: the permeate is acceptable.
l >20 %: the permeate is poor. Replace the membrane.
8.4.4 Cleaning-RO-Membrane
Do not clean the RO membrane. The RO-U system, as long as it is powered, will flush every 24 hours.
Should cleaning be performed, please contact your Condair representative first. It is advised that RO
membranes be replaced for RO-U systems that have been unpowered for over 24 hours.
Note: A new RO membrane should come packaged with disinfectant. This disinfectant is flushed out of
the system upon first time use.
38|Maintenance
2594385_A_EN_1811_RO_IOM
RO-U
Page 39

9 Troubleshooting
9.1 General
Troubleshooting of the Reverse Osmosis System must only be performed by well qualified and well
trained personnel. Electrical repairs must only be performed by a licensed electrician authorized by the
customer, or by Condair service technicians.
Troubleshooting the Reverse Osmosis System may require the user to access the inside of the humidifier to the control and plumbing cabinets, which may expose the user and equipment to hazards
described in "For Your Safety" on page8.
9.2 General Troubleshooting
No or little water being produced
Probable Cause Corrective Action
Poor water connection
T connector improperly installed
Incorrect or no voltage
Buffer tank air pressure is too high
n Check the inlet for the water pressure and ensure that the
valve isopen. Also ensure that the valves from the buffer tank
are open.
n The T connector on the buffer tank isa 1-way valve. The
change the direction of the valve.
n Check the voltage supplyand ensure the unit is plugged in.
n Carefullyopen the air valve at the bottom of the buffer tank
and slowly release air until the tank isfull. Refer to "Adjusting
the Buffer Tank Pressure" on page37.
RO membrane is not producing enough permeate
Probable Cause Corrective Action
Blocked discharge hose
Defective or broken membrane
n Check the flow restrictor (from the waste-end of the RO mem-
brane) and the drain hose for blockages. Clean the drain
hoses or restrictor if there isa blockage, or replace if neces-
sary. The ratio of drain to permeate water should be 3:1.
n Replace the RO membrane. A proper membrane will have a
good rejection rate; the minerals in the permeate should be
lessthan 10% of the minerals in the supplywater.
RO-U
2594385_A_EN_1811_RO_IOM
Troubleshooting|39
Page 40

RO membrane is not producing enough discharge water
Probable Cause Corrective Action
Blocked discharge hose
n Check the flow restrictor (from the waste-end of the RO mem-
brane) and the drain hose for blockages. Clean the drain
hoses or restrictor if there isa blockage, or replace if neces-
sary. The ratio of drain to permeate water should be 3:1.
Red LED is flashing or illuminated
Probable Cause Corrective Action
RO membrane is losing effectiveness
Leaks in the system
n RO membrane should be replaced within 24 hours of when
the red LED began flashing. The RO-U willshut off after 24
hours and the r ed LED willremain solid red.
n Fix any leaks in the system and reset the RO-U unit (turn off
and turn on).
Calcium deposits from humidification
Probable Cause Corrective Action
Ineffective RO membrane
n Test the RO membrane. Refer to "Testing the Permeate" on
page38. Replace membr ane as necessary.
Water supply is too hard
n If the inlet water is too hard (based on testing), and is over 500
µS, install a de-scaling system ahead of the RO-U system.
Ensure that the ratio of discharge water to permeate is3:1.
40|Troubleshooting
2594385_A_EN_1811_RO_IOM
RO-U
Page 41

Booster pump is not working or is too hot
Probable Cause Corrective Action
Broken or defective pump
Pump is short cycling (frequent on and
off)
n Replace the booster pump. Ensure the pump iscool before
handling.
n The pump should turn off if there isnot enough water being
drawn into the system to offset what the pump outputs. Check
the valves and check for blockages. Ensure enough water is
being drawn into the pump. If this issue is frequent, replace the
pump.
Filters are not working or are leaking
Probable Cause Corrective Action
Blockage in the filter
Leak in the filter cover
Broken O-ring
n Clear the blockage or replace the filter.
n Switch the housing containers for the filters to check if the cov-
ers are faulty. If the original, leaking filter is stillleaking, inspect
the O-ring with the filter. If the switched housing is leaking (and
the original stopped), the cover is defective. Contact a Condair
representative for a replacement.
n Open the filter housing and check the O-r ing for damage or
improper installation. Replace the O-ring if necessary.
RO-U
2594385_A_EN_1811_RO_IOM
Troubleshooting|41
Page 42
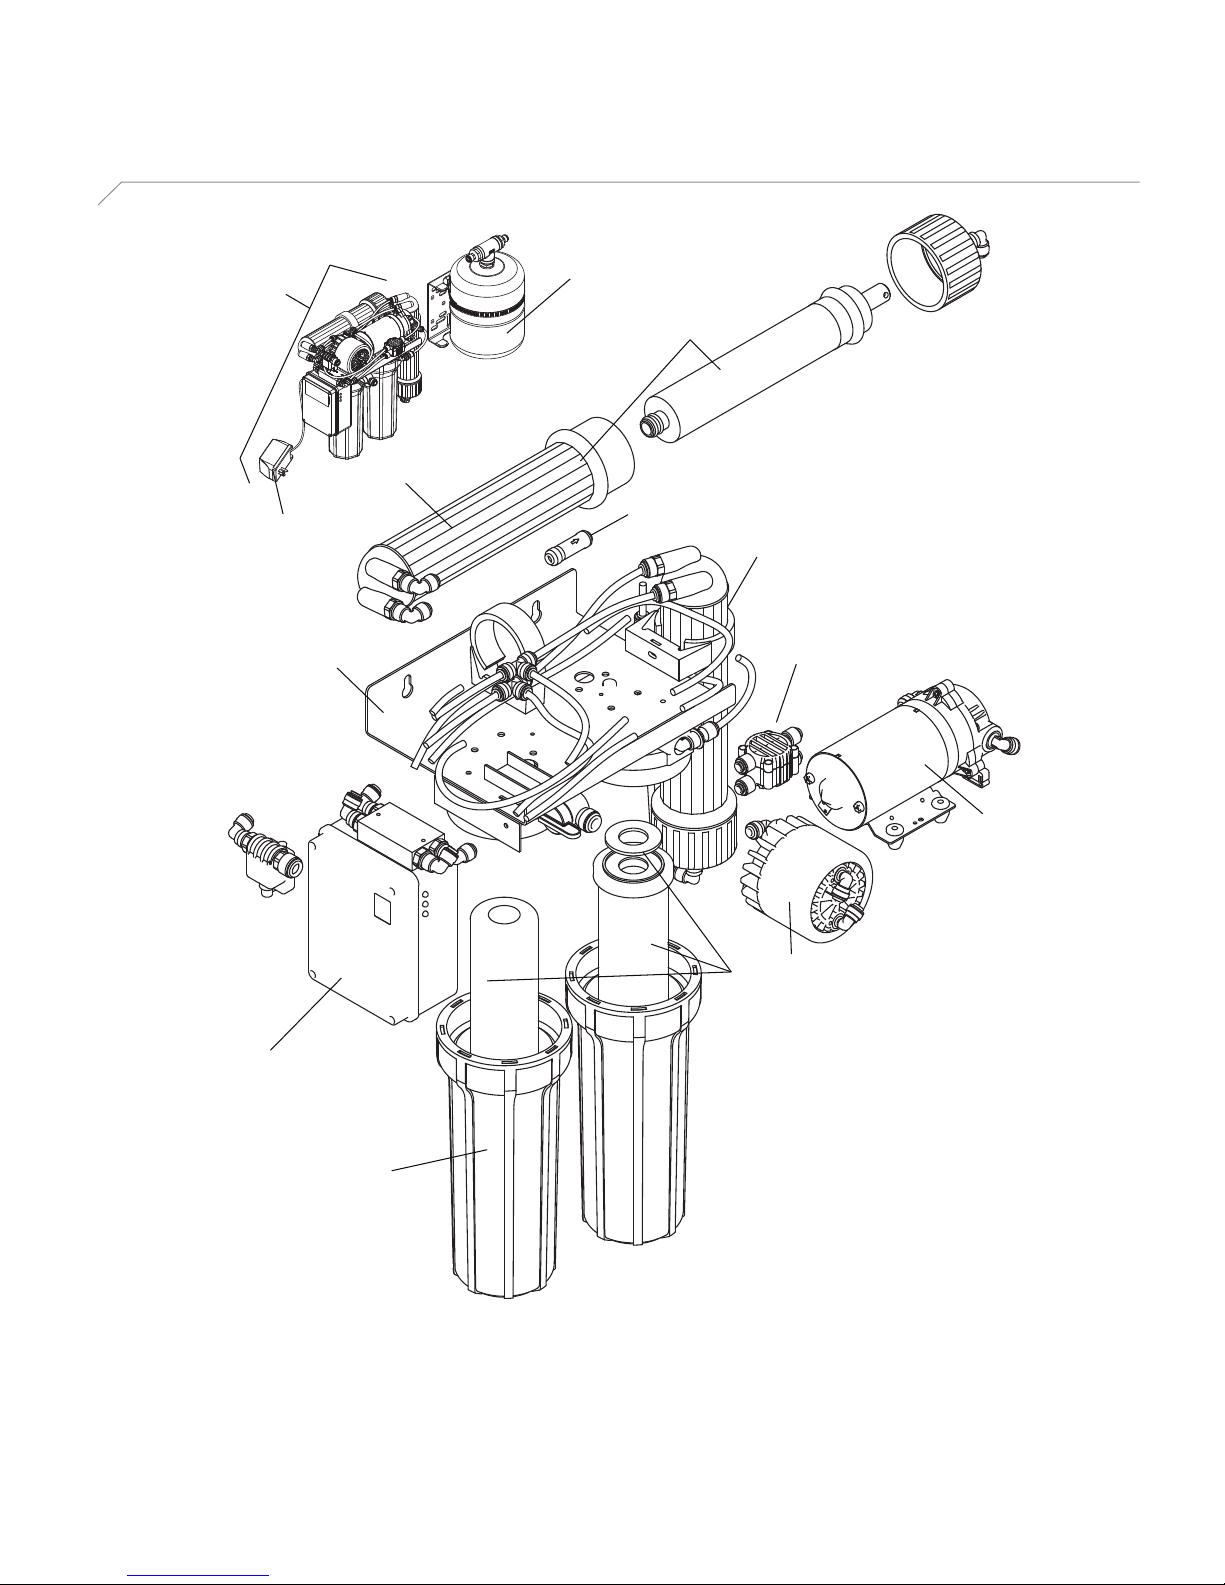
10 Spare Parts List: Reverse Osmosis System
010
005
015
020
025
030
035
040
050
060
005
065
070
080
Figure 8 - RO-U Spare Parts. Refer to Table 4 on the next page.
RO-U 2594385_A_EN_1811_RO_IOM Spare Parts List: Reverse Osmosis Sys-
tem|42
Page 43
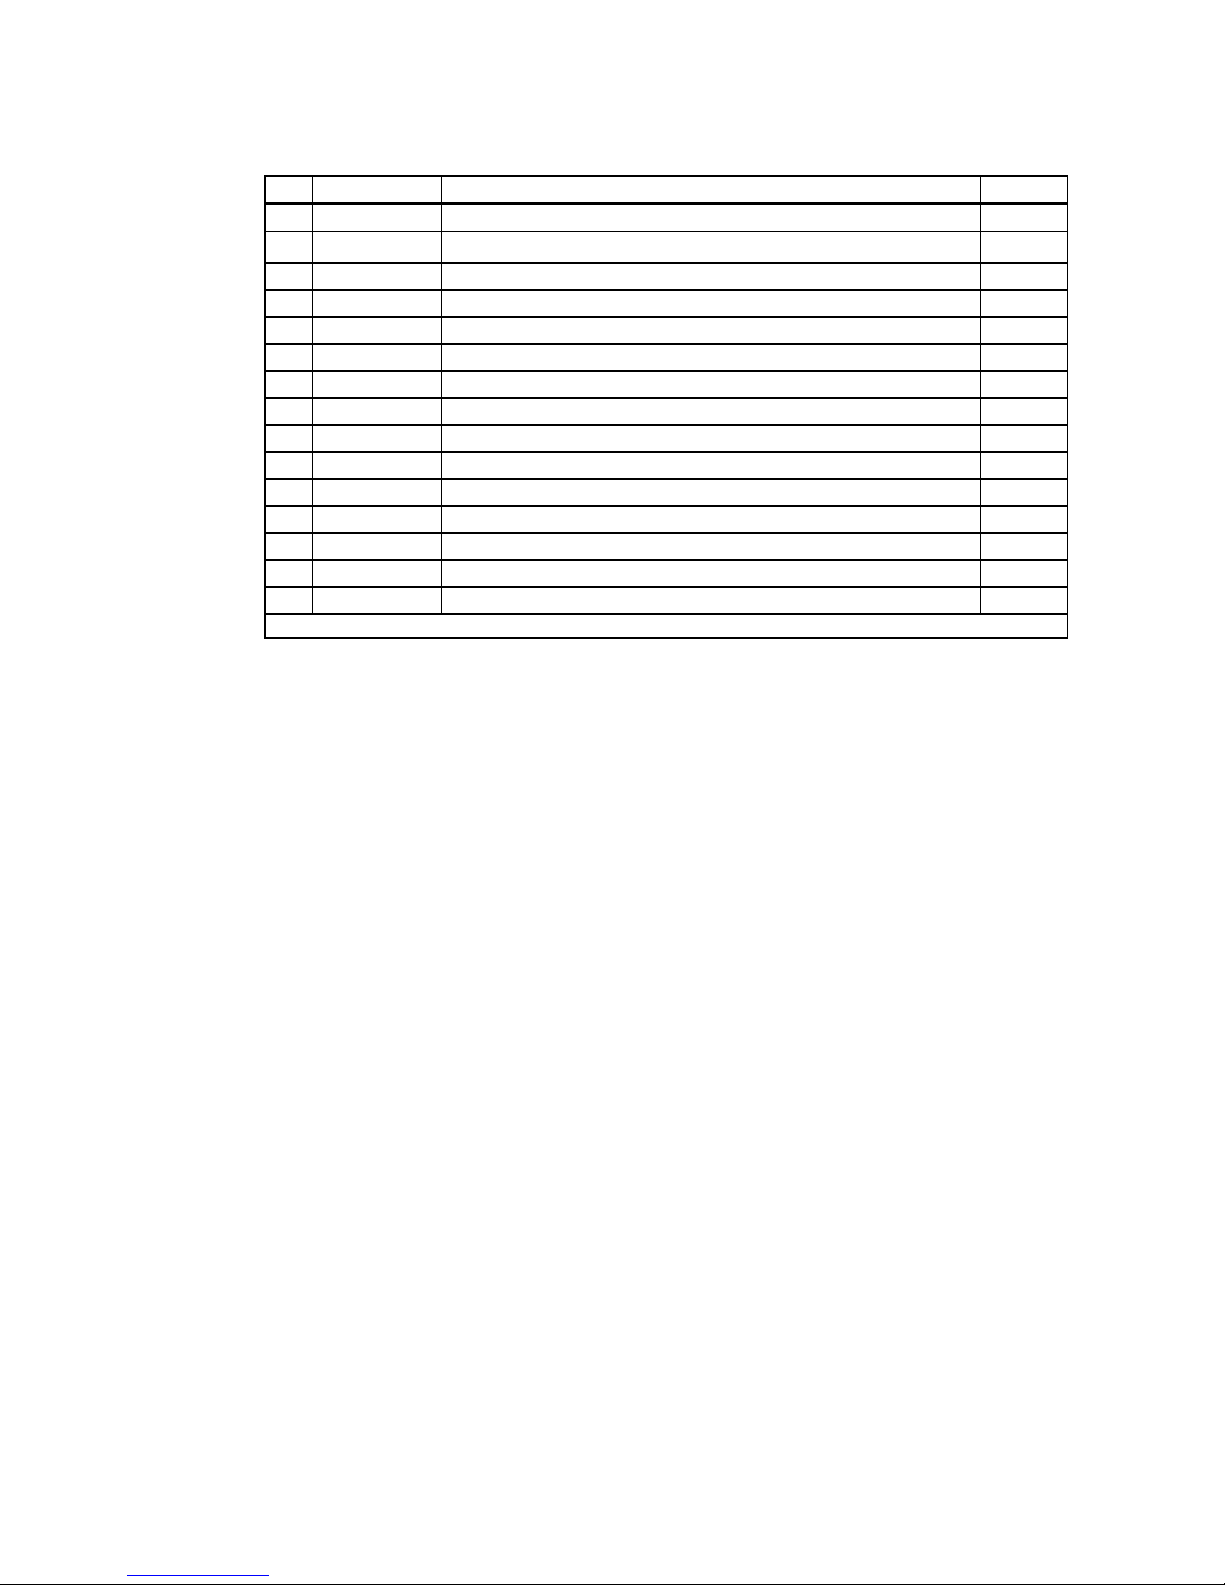
Table 4: RO-U Spare Parts List
Item Part Number Description Quantity
005 2594388 SP, RO membrane (x2) 100 gal (XPROMEMBR-100) 1
010 — n ROmembrane external cover —
015 2594396 SP, Non Return Valve 1/4" - Flow restrictor (WKLEPNONRETURN) 1
020 2594394 SP, Shut Off Valve (WKLEPSHUTOFF) 1
025 2594395 SP. Assembly, Booster pump, 24 VDC 1
030 2594393 SP, Assembly, Permeate pump 1
035 2594386 SP, ROFilter Parts, US Humidifier 1
040 2594392 SP, Assembly, Filter Holder 1
050 2594390 SP, Assembly, Water Safe Guard 1
060 2586532 F lowThru Tank, 2 gal w accessories 1
N/S 2594398 SP, Accessories for FlowThru Tank 1
065 2594387 SP, RO Unit with Transformer, US Humidifier 1
070 2594391 SP, Transformer 120 V to 24 V/ 40 VA 1
080 2594397 SP, Assembly, RO Holder 1
N/S 2594389 SP, AssemblyShut off valve, 24 VDC 1
N/S = item not shown
RO-U 2594385_A_EN_1811_RO_IOM Spare Parts List: Reverse Osmosis System
|
43
Page 44

11 Commissioning
11.1 General
The Reverse Osmosis System must be commissioned and operated only by personnel who are
adequately qualified and familiar with the Reverse Osmosis System. It is the customer's responsibility to
verify the qualifications of personnel.
11.2 First-time Commissioning
The unit must always be commissioned for the first time by a service technician from your Condair representative, or by personnel who are well trained and authorized by the customer. For this reason, this
manual only provides an outline, and not the details of the commissioning protocol.
The steps are in the following order:
1. Inspect the mounting of the unit.
2. Inspect the mist, water, and drain line installation.
3. Inspect the electrical installation.
4. Configure the Reverse Osmosis System through the humidifier controls.
5. Conduct performance tests, including controls.
6. Fill out the commissioning protocol documents.
Commissioning|44
2594385_A_EN_1811_RO_IOM
RO-U
Page 45

12 Decommissioning
12.1 General
If the Reverse Osmosis System needs to be replaced or removed from service for disposal, strictly follow the instructions in this section.
Personnel Qualifications
All decommissioning work must be performed only by a qualified service technician authorized by the
customer. It is the customer’s responsibility to verify proper qualifications of the personnel.
Safety
Refer to "For Your Safety" on page8.
12.2 Removing Unit from Service
Remove the from service for disposal, or long-term storage, as follows:
1. Disconnect the humidifier from the power source.
2. Disconnect the control signal inputs (including any power and security loop connections) from
the terminal strips in the humidifier.
3. Remove the Reverse Osmosis System from its mounting surface.
4. If the unit is to be put in long-term storage, store the unit in its original packaging inside a protected area. Ensure that the RO membrane is stored in a 0.01% hydrogen peroxide solution,
and is kept in a dark and cold (avoid freezing) location. Refer to "Receiving and Storage" on
page6.
5. If the unit is to be disposed, refer to "Disposing or Recycling the Unit" below.
12.3 Disposing or Recycling the Unit
The and its components must NOT be disposed in domestic waste, and should only be disposed in
accordance with local regulations at authorized collection facilities.
If you have any questions, please contact the appropriate local authorities, or your local Condair representative.
RO-U
2594385_A_EN_1811_RO_IOM
Decommissioning|45
Page 46

APPENDIX
Appendix
RO-U
Page 47

A Appendix:
Installation Checklist
Mounting
□
Unit installed in a suitable location? Refer to "Location Requirements" on page23.
□
Unit installed with suitable clearances? Refer to "Clearance Requirements" on page23.
□
Mounting surface is stable and capable of supporting the full operating weight of the unit? Refer
to "Weights" on page19.
□
Unit is level?
□
Unit is fastened securely?
Water Supply Connection
□
Is the minimum inside diameter of the water supply line constant throughout the entire length?
□
Water supply temperature 1-15 °C (41-59 °F)?
□
Water supply surge-free and pressure regulated to 207-550kPa (30-80psig)?
□
Are all components and tubes and hoses secured and are all threaded connections securely
tightened?
□
Leak-free water supply line?
□
Water supply line flushed?
Drain Line Connection
□
Are all components and pipes secured and are all threaded connections securely tightened?
□
Leak-free drain line?
□
Air gap funnel has a minimum diameter of 64mm (2-1/2in)?
□
Each drain line must lead to its own separate air gap funnel with trap, before connecting to the
drain?
□
Open end of each drain does NOT touch the funnel? The minimum air gap allowed is 20mm
(0.79in).
□
Drain line has a constant minimum decline of (1.2°) to funnel ?
□
Drain lines flushed?
□
Drain piping suitable for RO water (piping is not copper)
Electrical Connection
□
Power supply meet the voltage and current requirements shown on the specification label?
Refer to "Model Designation" on page15.
□
All cables fastened securely?
□
All cables free of tension and pass through any applicable cable glands or grommets?
□
Electrical installation meet the applicable national and local codes?
RO-U
2594385_A_EN_1811_RO_IOM
Installation Checklist|47
Page 48

Notes:
Page 49

Warranty
Condair Inc. and/or Condair Ltd. (hereinafter collectively referred to as THE COMPANY), warrant for a
period of two years after installation or 30 months from manufacturer’s ship date, whichever date is
earlier, that THE COMPANY’s manufactured and assembled products, not otherwise expressly warranted, are free from defects in material and workmanship. No warranty is made against corrosion,
deterioration, or suitability of substituted materials used as a result of compliance with government regulations.
THE COMPANY’s obligations and liabilities under this warranty are limited to furnishing replacement
parts to the customer, F.O.B. THE COMPANY’s factory, providing the defective part(s) is returned freight
prepaid by the customer. Parts used for repairs are warranted for the balance of the term of the warranty
on the original humidifier or 90 days, whichever is longer.
The warranties set forth herein are in lieu of all other warranties expressed or implied by law. No liability
whatsoever shall be attached to THE COMPANY until said products have been paid for in full and then
said liability shall be limited to the original purchase price for the product. Any further warranty must be
in writing, signed by an officer of THE COMPANY.
THE COMPANY’s parts or materials that are considered consumables, including but not limited to: cylinders, filters, nozzles, membranes, media, gaskets, O-rings, etc. are NOT covered by the warranty.
THE COMPANY makes no warranty and assumes no liability unless the equipment is installed in strict
accordance with a copy of the catalog and installation manual in effect at the date of purchase and by a
contractor approved by THE COMPANY to install such equipment.
THE COMPANY makes no warranty and assumes no liability whatsoever for consequential damage or
damage resulting directly from misapplication, incorrect sizing or lack of proper maintenance of the
equipment.
THE COMPANY makes no warranty and assumes no liability whatsoever for damage resulting from
freezing of the humidifier, supply lines, drain lines, or quality of the water used.
THE COMPANY retains the right to change the design, specification and performance criteria of its
products without notice or obligation.
THE COMPANY’s limited warranty on accessories, not of the companies manufacture, such as controls,
humidistats, pumps, etc. is limited to the warranty of the original equipment manufacturer from date of
original shipment of humidifier.
Extended Warranty
Extended warranties are available to purchase under the conditions listed above.
Page 50

CONSULTING, SALES, AND SERVICE:
CANADA
2740 Fenton Road
Ottawa, ON, K1T 3T7
Tel: 1.866.667.8321
Fax: 613.822.7964
Email: [email protected]
Website: www.condair.com
 Loading...