

Page 1

Ventilationsgerät
Fan unit
Appareil de ventilation
2539916 DE/EN/FR 1112
FAN3
MONTAGE- UND BETRIEBSANLEITUNG
INSTALLATION AND OPERATING INSTRUCTIONS
INSTRUCTIONS D’INSTALLATION ET D’EXPLOITATION
Page 2

Page 3

3
Inhaltsverzeichnis
1 Einleitung 4
1.1 Ganz zu Beginn 4
1.2 Hinweise zur
Montage- und Betriebsanleitung 4
2 Zu Ihrer Sicherheit 6
3 Produktübersicht 8
3.1 Typenübersicht 8
3.2 Optionen 9
3.3 Aufbau FAN3 9
3.4 Einsatzzweck 9
4 Installation 10
4.1 Dampf-Luftbefeuchter
vorbereiten 10
4.2 Plazierungshinweise 12
4.3 Montage 13
4.4 Elektroinstallation 15
5 Inbetriebnahme/Betrieb 16
6 Wartung 16
7 Störungsbehebung 16
8 Ausserbetriebsetzung/
Entsorgung 17
8.1 Ausserbetriebsetzung 17
8.2 Entsorgung/Recycling 17
9 Produktspezikationen 18
9.1 Technische Daten 18
9.2 Abmessungen/Gewichte 19
9.3 Lieferumfang 22
Contents
1 Introduction 4
1.1 To the very beginning 4
1.2 Notes on the installation and
operating instructions 4
2 For your safety 6
3 Unit overview 8
3.1 Type overview 8
3.2 Options 9
3.3 Construction of the FAN3 9
3.4 Application 9
4 Installation 10
4.1 Preparing the
steam air humidier 10
4.2 Equipment location 12
4.3 Mounting 13
4.4 Electrical installation 15
5 Commissioning/Operation 16
6 Maintenance 16
7 Fault elimination 16
8 Taking out of service/
Disposal 17
8.1 Taking out of service 17
8.2 Disposal/Recycling 17
9 Productspecications 18
9.1 Technical data 18
9.2 Dimensions/Weights 19
9.3 Delivery 22
Table des matières
1 Introduction 4
1.1 Premiers propos! 4
1.2 Remarques concernant la instruc-
tions d’installation et d’exploitation 4
2 Concernant votre sécurité 6
3 Vue d’ensemble de produit 8
3.1 Vue d’ensemble des types 8
3.2 Options 9
3.3 Structure FAN3 9
3.4 But d’utilisation 9
4 Installation 10
4.1 Préparation de
l’humidicateur à vapeur 10
4.2 Indications de l’emplacement 12
4.3 Montage 13
4.4 Installation électrique 15
5 Mise en service/exploitation 16
6 Maintenance 16
7 Dépannage 16
8 Mise hors service/
évacuation 17
8.1 Mise hors service 17
8.2 Evacuation/récupération 17
9 Spécicationsdesproduits 18
9.1 Caractéristiques techniques 18
9.2 Dimensions/Poids 19
9.3 Livraison 22
Page 4

4
1 Einleitung
1.1 Ganz zu Beginn
Wir danken Ihnen, dass Sie sich für ein Ven-
tilationsgerät FAN3 entschieden haben.
Die Ventilationsgeräte FAN3 sind nach
dem heutigen Stand der Technik und den
anerkann ten sicherheitstechnischen Regeln gebaut. Dennoch können bei unsachgemässer Verwendung des Ventilationsge-
rätes FAN3, Gefahren für den Anwender
und/oder Dritte entstehen und/oder Sachwerte beschädigt werden.
Um einen sicheren, sachgerechten und
wirtschaftlichen Betrieb des Ventilations-
gerätes FAN3 zu gewährleisten, beachten
und befolgen Sie sämtliche Angaben und
Sicher heitshinweise in dieser Montage- und
Betriebsanleitung.
Wenn Sie Fragen haben, die in dieser Dokumentation nicht oder nicht aus reichend
beantwortet werden, nehmen Sie bitte mit
Ihrem Lieferanten Kontakt auf. Man wird
Ihnen gerne weiterhelfen.
1.2 Hinweise zur Montage- und
Betriebsanleitung
Abgrenzungen
Gegenstand dieser Montage- und Betriebsanleitung ist das Ventilationsgerät
FAN3 in seinen verschiedenen Ausführungen.
Die Ausführungen in dieser Montage- und
Betriebsanleitung be schrän ken sich auf
die Installation, die Inbetriebnahme, den
Betrieb, die Wartung und die Störungsbehebung des Ventilationsgerätes FAN3
und richtet sich an entsprechend ausgebildetes und für die jeweilige Arbeit aus-
reichendqualiziertesFachpersonal.
Diese Montage- und Betriebsanleitung wird
ergänzt durch verschiedene separate Dokumentationen (Montage- und Betriebsan-
leitungen zu den Dampf-Luftbefeuchtern,
Ersatzteilliste, etc.). Wo nötig nden sich
in dieser Montage- und Betriebsanleitung
entsprechende Querverweise auf diese
Publikationen.
1 Introduction
1.1 To the very beginning
We thank you for having purchased the
fan unit FAN3.
The fan unit FAN3 incorporates the latest
technical ad van ces and meets all recognized safety standards. Nevertheless, improper use of the fan unit FAN3 may result
in danger to the user or third parties and/or
impairment of material assets.
To ensure a safe, proper, and economical
operation of the fan unit FAN3, please
observe and comply with all information
and safety instructions contained in the
present installation and operating instruc-
tions as well as the instructions given in
the manuals for the components used in
the humidication system.
If you have questions, which are not or
insufciently answered in this documentation, please contact your supplier. They will
be glad to assist you.
1.2 Notes on the installation
and operating instructions
Limitation
The subject of these installation and
operating instructions are the fan unit
FAN3 in its different versions.
These installation and operating instructions are restricted to the installation,
commissioning, operation, servicing
and trouble shooting of the fan unit FAN3
and is meant for well trained personnel
beingsufcientlyqualiedfortheirrespective work.
These installation and operating instructions are supplemented by various sepa-
rate items of documentation (installation
and operating instructionss of the steam
humidiers, spare parts list, manuals for
accessories, etc.). Where necessary, appropriate cross-references are made to
these publications in the present installation
and operating instructions.
1 Introduction
1.1 Premiers propos!
Nous vous remercions d’avoir opté pour
l’appareil de ventilation FAN3.
Les appareils de ventilation FAN3 sont
construites selon les techniques récentes et
les règles de sécurité en vigueur. Toutefois,
l’emploi inadéquat des appareils de ventilation FAN3 peut exposer l’utilisateur et/ou
des tierces personnes à des dangers et/ou
provoquer des dommages matériels.
An d’assurer une exploitation sûre, professionnelle et productive de l’appareil
de ventilation FAN3, veuillez observer et
respecter entièrement les indications et
les consignes de sécurité des présentes
instructions d’installation et d’exploitation.
Pour toute question non exposée exhausti-
vement ou ne gurant pas dans la présente
documentation, veuillez prendre contact
avec votre fournisseur, lequel vous assis-
tera volontiers.
1.2 Remarques concernant les
instructions d’installation et
d’exploitation
Restrictions
Les présentes instructions d’installation
et d’exploitation concernent l’appareil de
ventilation FAN3 dans ses différentes
versions.
Les descriptions des présentes instructions
d’installation et d’exploitation se limitent à
l’installation, la mise en service, l’exploi-
tation, la maintenance et le dépannage
de l’appareil de ventilation FAN3 et concernent le personnel professionnel ayant
subi une formation correspondante et
sufsamment qualié pour le travail
concerné.
Diverses documentations séparées complètent les présentes instructions d’installa-
tion et d’exploitation ( instructions d’installation et d’exploitation aux humidicateurs à
vapeur, liste des pièces de rechange, etc.).
Les présentes instructions d’installation et
d’exploitation font référence, le cas échéant,
à ces publications séparées.
Page 5

5
Symbols used in this manual
CAUTION!
The catchword “CAUTION” designates
notes in this documentation that, if neglected, may cause damage and/or
malfunction of the unit or other material assets.
WARNING!
The catchword “WARNING” used in conjunction with the general caution symbol
designates safety and danger notes in
this documentation that, if neglected, may
cause to injury to persons.
DANGER!
The catchword “DANGER” used in conjunction with the general caution symbol
designates safety and danger notes in
this documentation that, if neglected,
may lead to severe injury or even death
of persons.
Safekeeping
Please safeguard these installation and
operating instructions in a safe place, where
it can be immediately accessed. If the equipment changes hands, the documentation
should be passed on to the new operator.
If the documentation gets mislaid, please
contact your supplier.
Language versions
These installation and operating instructions
are available in various languages. Please
contact your supplier for information.
Copyright protection
The present installation and operating in-
structions are protected under the Copyright
Act. Passing-on and reproduction of the
manual (or part thereof) as well as exploitation and communication of the contents are
prohibited without written permission by the
manufacturer. Violation of copyright terms
is subject to legal prosecution and arises
liability for indemnication.
The manufacturer reserves the right to fully
exploit commercial patent rights.
Symboles utilisés
ATTENTION!
L’expression “ATTENTION” gurant dans
le présente documentation signale des
indications dont la non-observation peut
conduire à une détérioration ou un
disfonctionnement de l’appareil ou
d’autre matériel.
AVERTISSEMENT!
L’expression “AVERTISSEMENT”, associée aux symboles généraux de danger,
gurant dans le présente documentation,
signale des indications de sécurité ou
de danger dont la non-observation peut
conduire à des blessures de personnes.
DANGER!
L’expression “DANGER”, associée aux
symboles généraux de danger, gurant
dans le présente documentation, signale
des indications de sécurité ou de danger
dont la non-observation peut conduire à
des blessures graves, voire à la mort
de personnes.
Sauvegarde
Veuillez conserver les présentes instruc-
tions d’installation et d’exploitation en un
endroit sûr, à portée de main. Remettre
cette documentation à un éventuel nouveau
détenteur.
En cas de perte de la documentation,
veuillez contacter votre fournisseur.
Langues
Les présentes instructions d’installation et
d’exploitation sont disponibles en plusieurs
langues. A ce propos, veuillez contacter
votre fournisseur.
Protection d’auteur
Les présentes instructions d’installation
et d’exploitation sont protégées selon la
loi des droits d’auteur. La polycopie et la
diffusion (même partielles) des présentes
instructions, ainsi que l’utilisation et la
communication du contenu sont prohibées
sans autorisation écrite du fabricant. Les
enfreintes sont punissables et astreignent
à des dédommagements.
Le fabricant se réserve tous les droits
d’appliquer les droits de protection industrielle.
Verwendete Symbole
VORSICHT!
Das Signalwort “VORSICHT” kennzeichnet Hinweise in dieser Dokumentation,
deren Miss achtung eine Beschädigung
und/oder eine Fehlfunktion des Gerätes oder anderer Sachwerte zur Folge
haben können.
WARNUNG!
Das Signalwort “WARNUNG” zusammen
mit dem allgemeinen Gefahrensymbol
kennzeichnet Sicherheits - und Gefahrenhinweise in dieser Dokumentation,
deren Miss achtung Verletzungen von
Personen zur Folge haben können.
GEFAHR!
Das Signalwort “GEFAHR” zusammen
mit dem allgemeinen Gefahrensymbol
kennzeichnet Sicherheits - und Gefahrenhinweise in dieser Dokumentation, deren
Miss achtung schwere Verletzungen
einschliesslich den Tod von Personen
zur Folge haben können.
Aufbewahrung
Die Montage- und Betriebsanleitung an
einem siche ren Ort aufbewahren, wo sie
jederzeit zur Hand ist. Bei einer Handänderung des Produktes ist die Montage- und
Betriebsanleitung dem neuen Betreiber zu
übergeben.
Bei Verlust der Dokumentation wenden Sie
sich bitte an Ihren Lieferanten.
Sprachversionen
Diese Montage- und Betriebsanleitung
ist in verschiedenen Sprachen erhältlich.
Nehmen Sie diesbezüglich bitte mit Ihrem
Lieferanten Kon takt auf.
Urheberschutz
Diese Montage- und Betriebsanleitung ist
im Sinne des Urheberrechtsgesetzes geschützt. Die Weitergabe und Vervielfältigung
der Anleitung (auch auszugsweise) sowie
die Verwertung und Mitteilung ihres Inhaltes
sind ohne schriftliche Genehmigung des
Herstellers nicht gestattet. Zuwiderhand-
lungen sind strafbar und verpichten zu
Schadenersatz.
Alle Rechte der Ausübung von gewerblichen
Schutzrechten behalten wir uns vor.
Page 6

6
2 For your safety
General
Every person working with the fan unit
FAN3 must have read and understood the
present installation and operating instructions before carrying out any work.
Knowing and understanding the contents
of the present installation and operating
instructions is a basic requirement for pro-
tecting the personnel against any kind of
danger, to prevent faulty operation, and to
operate the unit safely and correctly.
All ideograms, signs and markings applied
to the unit must be observed and kept in
readable state.
Qualicationofpersonnel
All actions described in the present Instal-
lation and operating instructions (installa-
tion, operation, maintenance, etc.) must be
carried out only by well trained and suf-
cientlyqualiedpersonnelauthorised
by the owner.
For safety and warranty reasons any action
beyond the scope of this manuals must
be carried out only by qualied personnel
authorised by the manufacturer.
It is assumed that all persons working with
the fan unit FAN3 are familiar and comply
with the appropriate regulations on work
safety and the prevention of accidents.
Intended use
The fan unit FAN3 is intended exclusively
for the steam distribution in association
withthesteamhumidierCondairCP3
and Defensor Mk5 within the speci-
edoperatingconditions (see chapter 9
“Product specications”). Any other type
of application without the express written
consent of the manufacturer is considered
as not conforming with the intended purpose
and may lead to the fan unit FAN3 becoming dangerous.
Operation of the equipment in the intended
manner requires that all the information
in these instructions as well as in the
corresponding installation and operat-
ing instructionsofthesteamhumidier
is observed (in particular the safety
instructions).
2 Concernant votre sécurité
Généralités
Il est indispensable que le personnel affecté
aux travaux sur l’appareil de ventilation
FAN3 ait lu et assimilé les présentes instruc-
tions d’installation et d’exploitation avant
d’effectuer des travaux à l’appareil.
La connaissance du contenu des présentes
instructions d’installation et d’exploitation
est la condition sine qua non pour protéger
le personnel contre les risques et pour
éviter des erreurs de manipulation et, ainsi,
pour effectuer l’exploitation compétente de
l’appareil.
Tenir en état bien lisible et observer tous
les pictogrammes, plaquettes et inscriptions
apposées à l’appareil.
Qualicationdupersonnel
Seullepersonnelinstruit,sufsamment
qualié et le personnel professionnel
autorisé par l’exploitant sont habilités
à effectuer chaque action décrite dans
les présentes instructions d’installation
et d’exploitation (installation, exploitation,
maintenance, etc.),
Seul le personnel autorisé est habilité à
effectuer des interventions qui dépassent
le cadre des travaux mentionnés dans la
présente documentation.
Il est supposé que chaque personne qui ef-
fectue des travaux à l’appareil de ventilation
FAN3 connaît et respecte les prescriptions
concernant la sécurité du travail et la prévention des accidents.
Utilisation conforme aux consignes
L’appareil de ventilation FAN3, raccordé
aux humidicateurs à vapeur Condair
CP3 ou au Defensor Mk5, est destiné uni-
quement à la répartition de vapeur dans
les limites des conditions d’exploi tation
spéciées (voir chapitre 9 “Caractéristi-
ques spéciques des produits”). Toute autre
utilisation sans autorisation écrite du fabricant est considérée comme non conforme
aux consignes et peut rendre l’appareil de
ventilation FAN3 dangereux.
L’utilisation conforme implique également
l’observation de toutes les informations
gurant dans les présentes instructions
d’installation et d’exploitation et dans les
instructions d’installation et d’exploitation
de l’humidicateur à vapeur correspondante
(en particulier, des consignes de sécurité
et d’indications de danger).
2 Zu Ihrer Sicherheit
Allgemeines
Jede Person, die mit Arbeiten am Ven-
tilationsgerät FAN3 beauftragt ist, muss
die Montage- und Betriebsanleitung vor
Beginn der Arbeiten am Gerät gelesen und
verstanden haben.
Die Kenntnisse des Inhalts der Montage-
und Betriebsanleitung ist eine Grundvo-
raussetzung, das Personal vor Gefahren
zu schützen, fehlerhafte Bedienung zu
vermeiden und somit das Gerät sicher und
sachgerecht zu betreiben.
Alle am Gerät angebrachten Piktogramme,
Schilder und Beschriftungen sind zu beachten und in gut lesbarem Zustand zu
halten.
Personalqualikation
Sämtliche in dieser Montage- und Be-
triebsanleitung beschriebenen Handlungen
(Installation, Betrieb, Wartung, etc.) dürfen
nur durch ausgebildetes und ausrei-
chendqualiziertessowievomBetreiber
autorisiertes Fachpersonal durchgeführt
werden.
Eingriffe darüber hinaus dürfen aus Sicherheits- und Gewährleistungsgründen nur
durch vom Hersteller autorisiertes Fachpersonal durchgeführt werden.
Es wird vorausgesetzt, dass alle Personen
die mit Arbeiten am Ventilationsgerät FAN3
betraut sind, die Vorschriften über Arbeitssicherheit und Unfallverhütung kennen und
einhalten.
Bestimmungsgemässe Verwendung
Die Ventilationsgeräte FAN3 sind ausschliesslich zur Dampfverteilung in Ver-
bindungmitdenDampuftbefeuchtern
Cond air CP3 oder Defensor Mk5 innerhalb
derspeziziertenBetriebsbedingungen
(siehe Kapitel 9 “Produktspezikatio
nen”) bestimmt. Jeder andere Einsatz
ohne schriftliche Genehmigung des Herstellers gilt als nicht bestimmungsgemäss
und kann dazu führen, dass das Ventilati-
onsgerät FAN3 gefahrbringend wird.
Zur bestimmungsgemässen Verwendung gehören auch die Beachtung aller Informationen in dieser Montage- und
Betriebsanleitung und der Montage- und
Betriebsanleitung zum entsprechenden
Dampf-Luftbefeuchter (insbesondere aller
Sicherheits - und Gefahrenhinweise).
Page 7

7
Gefahren, die vom Ventilationsgerät ausgehen können:
GEFAHR!
Das Ventilationsgerät FAN3 arbeitet
mit Netzspannung. Bei geöffnetem Ge-
rät können stromführende Teile berührt
werden. Die Berührung stromführender
Teile kann zu schweren Verletzungen
oder zum Tod führen.
Daher: Vor Beginn von Arbeiten am
Ven ti lationsgerät FAN3, den Dampf-Luftbefeuchter sowie das Ventilationsgerät
ausser Betrieb setzen, vom Stromnetz
trennen und gegen unbeabsichtigte In-
betriebnahme sichern.
WARNUNG!
Durch die Austrittsöffnung wird im
Betrieb Dampf ausgeblasen. Bei Berüh-
rung des austretenden Dampfes besteht
Verbrennungsgefahr.
Daher: Ventilationsgerät so platzieren,
dass keine Personen durch den heissen
Dampfstrom verletzt werden können.
Verhalten im Gefahrenfall
Wenn anzunehmen ist, dass ein gefahrloser Betrieb nicht mehr mög lich ist, so ist
der Dampf-Luftbefeuchter und das Ventilationsgerät FAN3 umgehend ausser Betrieb
zu setzen und gegen unbeabsichtigtes
Einschalten zu si chern. Dies kann unter
folgenden Umständen der Fall sein:
– wenn das Ventilationsgerät FAN3 be-
schädigt ist
– wenn das Ventilationsgerät FAN3 nicht
mehr korrekt arbeitet
– wenn Anschlüsse oder Leitungen un-
dicht sind
Alle mit Arbeiten am Ventilationsgerät
FAN3 betrauten Personen sind verpich-
tet, Veränderungen am Gerät, welche die
Sicherheit beeinträchtigen, umgehend der
verantwortlichen Stelle des Betreibers zu
melden.
UnzulässigeGerätemodikationen
Ohne schriftliche Genehmigung des
Herstellers dürfen am Ventilationsgerät
FAN3 keine An- oder Umbauten vorge-
nommen werden.
Für den Austausch defekter Gerätekomponenten ausschliesslich Original Zu-
behör- und Ersatz teile vom Hersteller
verwenden.
Danger that may arise from the fan
unit:
DANGER!
The fan unit FAN3 is mains pow er ed.
One may get in touch with live parts when
the unit is open. Touching live parts may
cause severe injury or danger to life.
Prevention: Before carrying out any
work on the fan unit FAN3 set the steam
humidier as well as the fan unit out
of operation, disconnect the units from
the mains and secure the units against
inadvertent power-up.
WARNING!
During operation steam is blown out
via the outlet opening. There is danger
of burning when touching the steam
ow.
Prevention: Locate the fan unit in such
a way, that no persons can be hurt by
the steam ow.
Behaviour in case of danger
If it is suspected that safe operation is no
longer possible, then the steam humidier
and the fan unit FAN3 should immediately
be shut down and secured against accidental power-up. This can be the case
under the following circumstances:
– if the fan unit FAN3 or its mains cable
is damaged
– if the fan unit FAN3 is no longer operat-
ing correctly
– if connections and/or piping are not
sealed
All persons working with the fan unit FAN3
must report any alterations to the unit that
may affect safety to the owner without
delay.
Prohibitedmodicationstotheunit
No modications must be undertaken
on the fan unit FAN3 without the express
written consent of the manufacturer.
For the replacement of defective components use exclusively original acces-
sories and spare parts available from
your supplier.
Risques que peuvent présenter l’appareil de ventilation:
DANGER!
L’appareil de ventilation FAN3 est
branché sur le réseau électrique. Lors-
que l’appareil est ouvert, il y a risque de
toucher des éléments sous tension électrique. Le contact avec les parties sous
tension électrique peut conduire à des
blessures graves ou à l’électrocution.
Par conséquent: avant d’effectuer tout
travail à l’appareil de ventilation FAN3,
mettre l’humidicateur à vapeur et l’ap-
pareil de ventilation FAN3 hors service,
les débrancher du réseau électrique et
l’assurer contre toute mise en service
intempestive.
AVERTISSEMENT!
L’ouverture d’échappement éjecte de
la vapeur. Le contact avec la va peur peut
provoquer des brûlures.
Par conséquent: placer l’appareil de
ventilation de sorte à éviter des blessures aux personnes ensuite d’éjection
de vapeur.
Comportement en cas de danger
Si l’on doit admettre que l’exploitation
sans danger n’est plus possi ble, mettre
immédiatement hors service l’humidi-
cateur à vapeur et l’appareil de ventilation
FAN3 et les assurer contre tout enclenchement intempestif. Cette situa tion peut
se présenter:
– à l’endommagement de l’appareil de
ventilation FAN3,
– au fonctionnement incorrect de l’appa-
reil de ventilation FAN3,
– si des raccords ou conduites sont iné-
tanches.
Toute personne affectée aux travaux à
l’appareil de ventilation FAN3 est astreinte
à annoncer au responsable de l’exploitation
chaque modication de l’appareil susceptible de porter atteinte à la sécurité.
Modicationsd’appareilinadmissibles
Aucunemodication ni amendement à
l’appareil de ventilation FAN3 ne sont permis sans l’autorisation écrite du fabricant.
Le remplacement de composants défectueux doit s’effectuer uniquement avec
des pièces de rechange et des accessoires d’origine livrés par votre fournisseur.
Page 8
8
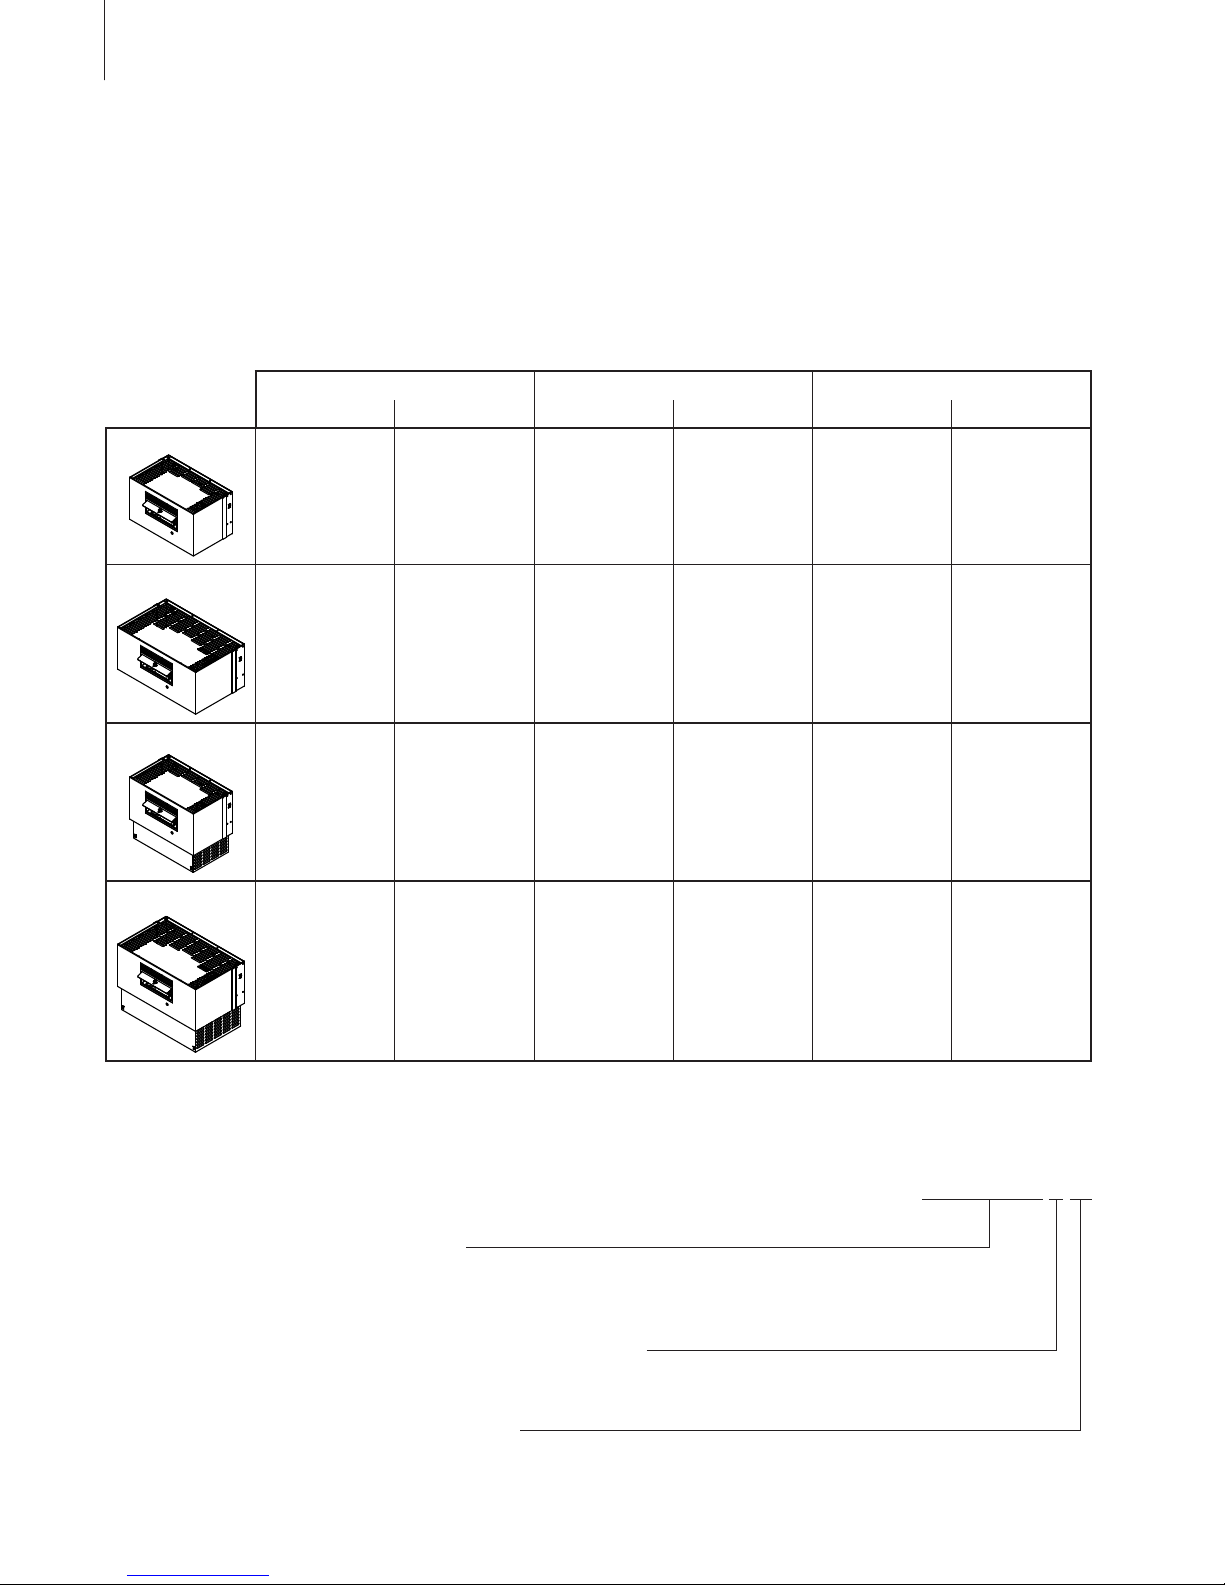
3 Produktübersicht
3.1 Typenübersicht
Die Ventilationsgeräte FAN3 sind in zwei
Grössen (“FAN3 ... M ...” und “FAN3 ... L ...”)
in unterschiedlichen Ausführungsvarianten
erhältlich, abgestimmt auf die verschiedenen Versionen der Dampf-Luftbefeuchter
Condair CP3 und Defensor Mk5.
Condair CP3 Basic Condair CP3 Pro Defensor Mk5 Visual / Process
5...15 kg/h 16...45 kg/h 5...15 kg/h 16...45 kg/h 5...16 kg/h 20...40 kg/h
FAN3 ... M ... BC
FAN3 CP Basic M BC –––– FAN3 CP Pro M BC –––– FAN3 Mk M BC ––––
FAN3 ... L ... BC
–––– FAN3 CP Basic L BC –––– FAN3 CP Pro L BC –––– FAN3 Mk L BC
FAN3 ... M ... FC
FAN3 CP Basic M FC –––– FAN3 CP Pro M FC –––– –––– ––––
FAN3 ... L ... FC
–––– FAN3 CP Basic L FC –––– FAN3 CP Pro L FC –––– ––––
Schlüssel Modellbezeichnung
Beispiel / Example / Exemple:
FAN3 CP Basic M BC
Geräteversion/Unit version/Version d’appareil:
FAN3 CP Basic
FAN3 CP Pro
FAN3 Mk
Grösse (Dampeistung)/Size (steam capacity)/Taille (débit de vapeur):
M (5...16 kg/h)
L (16...45 kg/h)
Ausführung Blende/Cover version/Version couvercle:
BC (Bodenblende/Base cover/Couvercle de base)
FC (Frontblende/Front cover/Couvercle frontal)
3 Unit overview
3.1 Type overview
The fan units FAN3 are available in two
sizes (“FAN3... M... “ and ” FAN3... L...”),
and different variants, adapted to the dif-
ferent versions of the steam air humidiers
Condair CP3 and Defensor Mk5.
3 Vue d’ensemble de produit
3.1 Vue d’ensemble des types
Les appareils de ventilation FAN3 sont
livrables en deux tailles (“FAN3 ... M ...”
et “FAN3 ... L ...”), dont leurs variantes
peuvent se distinguer entre elles, chacune d’elles étant adaptée aux diverses
versions de l’humidicateur Condair CP3
et Defensor Mk5.
Key model designation Code de la désignation de modèle
Page 9

9
1 Dampfanschluss
2 Kondensatanschluss
3 Dampfverteiler
4 Ablenkblech
5 Filterbox (Option)
6 Kabeldurchführung
7 Typenschild mit Modellbezeichnung
8 Gebläseschalter
9 Anschlussklemme
10 Bodenblende
(nur FAN3 ... BC)
11 Frontblende
(nur FAN3 ... FC)
3.4 Einsatzzweck
Die Ventilationsgeräte FAN3 dienen in
Ver bindung mit den Dampuftbefeuchtern Cond air CP3 und Defensor Mk5 zur
direkten Raumluftbefeuchtung. Das Ventilationsgerät wird vorzugsweise einge setzt,
wenn nur ein Raum zu befeuchten ist,
wenn keine Lüftungs- oder Klimaanlage
vorhanden ist, wenn der Befeuchter nachträglich eingebaut wird oder für spezielle
Befeuchtungsprobleme.
3
4
5
5
10
6
9
8
11
12
7
3.2 Optionen
FAN3 ... M ... FAN3 ... L ...
Filterboxen/Filter boxes/Boîtes à ltre FB-M (2538730) FB-L (2538731)
Hinweis: Die Filterboxen können auch nachträglich
eingebaut werden.
3.3 Aufbau FAN3
3.2 Options 3.2 Options
Remarque: les boîtes à ltre peuvent aussi être
montées ultérieurement.
3.3 Structure FAN3
Note: The lter boxes can also be installed later.
3.3 Construction of the FAN3
1 Steam connector
2 Condensate connector
3 Steam distributor
4 Deection sheet
5 Filter box (option)
6 Cable entry
7 Type plate with model designation
8 Fan switch
9 Connecting terminal
10 Base cover
(FAN3 ... BC only)
11 Front cover
(FAN3 ... FC only)
3.4 Application
The FAN3 fan units are used in association
with the Condair CP3 and Defensor Mk5
steam air humidiers for direct room air
humidication. The fan unit is chiey used
when only one room is to be humidied,
when there is no ventilation or air-condition-
ing plant installed, when the humidier has
been subsequently installed, or in the case
of special humidity problems.
1 Raccordement de vapeur
2 Raccordement de condensat
3 Rampe de diffusion de vapeur
4 Déecteur
5 Boîte à ltre (en option)
6 Passe-câble
7 Plaquette signalétique avec désigna-
tion de modèle
8 Commutateur de ventilateur
9 Borne de raccordement
10 Couvercle de base
(uniquement FAN3 ... BC)
11 Couvercle frontal
(uniquement FAN3 ... FC)
3.4 But d’utilisation
Combinés avec les humidicateurs à vapeur
Condair CP3 et Defensor Mk5, les appa-
reils de ventilation FAN 3 sont destinées à
l’humidi cation directe de locaux. Ces appa-
reils de ventilation s’utilisent de préfé ren ce
lorsqu’il s’agit d’humidier un seul local, en
l’absence d’installation de ventilation ou
de climatisation, lorsque l’humidicateur
est installé ultérieurement ou en cas de
problèmes d’humidi cation particuliers.
Page 10
10
4 Installation
4.1 Dampf-Luftbefeuchter
vorbereiten
Defensor Mk5
Beim Defensor Mk5 sind keine Vorbereitungsarbeiten notwendig.
Condair CP3 Basic/CP3 Pro
Beim Condair CP3 Basic und CP3 Pro sind
die mit dem FAN3 mitgelieferten Komponenten gemäss den nachfolgenden Abbildungen einzubauen. Beachten Sie dazu
auch die nachfolgenden Umbauhinweise
sowie die Angaben zum Ein- und Ausbau
des Dampfzylinders in der Montage- und
Betriebsanleitung zum Condair CP3.
ø45 mm
Cyl. A3../D3..
CP3 Basic 5..8 CP3 Basic 9...15 CP3 Basic 16...45
Cyl. A4../D4..
Cyl. A4..
Cyl. A3..
Cyl. D3..
Cyl. D4..
Cyl. A6..
Cyl. D6..
ø45 mm
ø30 mm
ø22 mm
ø30 mm
ø22 mm
ø30 mm
ø22 mm
ø30 mm
ø30 mm
ø45 mm
ø45 mm
A
B
C
D
E
F
A
B
C
D
E
F
A
B
C
D
E
F
Cyl. A6../D6..
4 Installation
4.1 Preparing the steam air
humidier
Defensor Mk5
With the Defensor Mk5 no preparatory work
is necessary.
Condair CP3 Basic/CP3 Pro
With the Condair CP3 Basic and CP3 Pro the
components provided with the FAN3 must
be installed in accordance with the following
gures. Please observe also the following
modication notes as well as the information
for installation and removal of the steam
cylinder in the installation and operating
instructions to the Condair CP3.
4 Installation
4.1 Préparation de
l’humidicateuràvapeur
Defensor Mk5
Le Defensor Mk5 ne nécessite aucune
préparation.
Condair CP3 Basic/CP3 Pro
Concernant le Condair CP3 Basic et le
Condair CP3 Pro, Il s’agit de monter les
composants livrés avec le FAN3 selon les
illustrations suivantes. Ce faisant, observez
les indications d’agencement suivantes et
les indications pour la pose et la dépose du
cylindre dans les instructions d’installation
et d’exploitation du Condair CP3.
Page 11
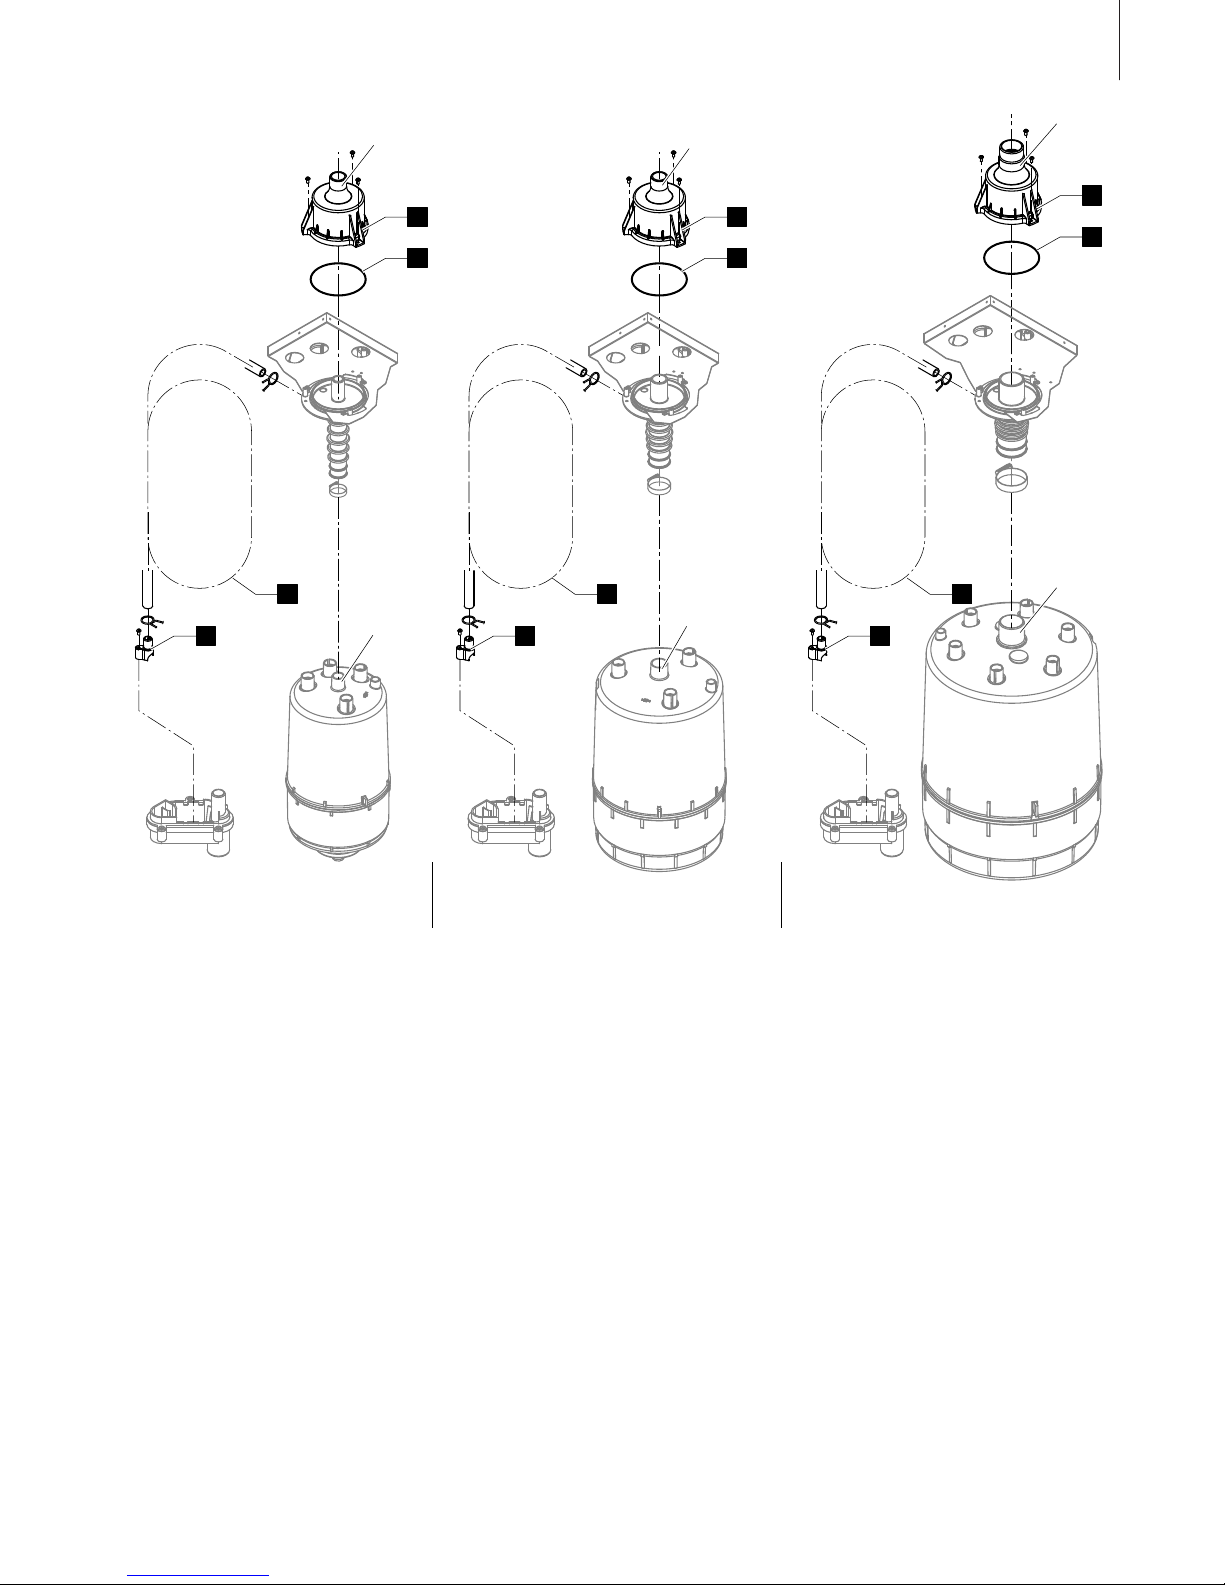
11
ø45 mm
A3.../D3...
CP3 Pro 5..8 CP3 Pro 9...15 CP3 Pro 16...45
A4.../D4...
A6.../D6...
ø30 mm
ø22 mm
ø30 mm
ø30 mm
ø45 mm
E
F
A
B
E
F
A
B
E
F
A
B
Umbauhinweise
– Der Kondensatschlauch “E” ist in einem
grossen Bogen hinter dem Dampfzylinder nach unten zu führen und mit dem
Ablaufstutzen “F” am Ablaufbecher zu
befestigen.
– Der Dampfanschluss “C” ist abhängig
vom verwendeten Zylinder (Cyl. A.. oder
Cyl. B..) über die langen oder die kurzen
Gewindebüchsen im Gehäusedeckel zu
befestigen.
– Der Ausblasstutzen “D” und der Kon-
densatschlauch “E” sind mit den ent-
sprechenden Schlauchklemmen an den
Anschlüssen zu befestigen.
– Beim Einbau der Kondensatfalle “A”
darauf achten, dass der O-Ring “B”
korrekt in der Zentrierung des Dampfanschlusses “C” eingelegt ist und nicht
beschädigt wird.
Indication concernant l’agencement
– Conduire le tuyau de condensat “E” vers
le bas en formant une grande boucle
derrière le cylindre à vapeur et le xer
au godet d’écoulement par le raccord
“F”.
– Fixer le raccord à vapeur “C” au moyen
des raccords letés longs ou courts,
selon le cylindre utilisé (Cyl. A.. ou
Cyl. B..).
– Fixer l’adaptateur sortie de vapeur “D”
et le tuyau de condensat “E” aux raccords au moyen des colliers de tuyaux
correspondants.
– Au montage du piège à condensat “A”,
veiller à poser correctement le joint tori-
que “B” dans le centrage du raccord de
vapeur “C” sans endommager le joint.
Modication notes
– The condensate hose “E” is to be led in
a large curve behind the steam cylinder
downwards and be fastened with the
socket “F” to the drain cup.
– The steam connector “C” is to be xed
to the housing via the long or the short
threaded bushes, depending on the
cylinder in use (Cyl. A.. or Cyl. B..).
– The outlet adapter “D” and the con-
densate hose “E” are to be fastened
with the appropriate hose clips to the
corresponding connectors.
– When mounting the condensate trap
“A” make sure the O-ring “B” is correctly
inserted in the centring of the steam
connector and is not damaged.
Page 12

12
4.2 Plazierungshinweise
Die Ventilationsgeräte FAN3 werden separat über dem/den Befeuchtern an die Wand
montiert. Bei der Platzierung des Ventilationsgerätes ist darauf zu achten, dass die
Vorschriften zur Dampf schlauchführung
(max. Länge 2 m, min. Schlauchradius
300 mm, min. Steigung 20 %) und zur
Kondensatschlauchführung (min. Gefälle
20 %, Siphon mit minimalen Durchmesser
von 100 mm) eingehalten werden (siehe
auch Montage- und Betriebsanleitung zum
Dampf-Luftbefeuchter).
Damit sich der Dampf strom des Ventilationsgerätes ungehindert ausbreiten kann
und nicht an Hin dernissen kondensiert
(Decken, Unterzüge, Pfeiler, etc.), sind
bei der Plazierung des Ventilationsgerätes
folgende Mindestabstände einzuhalten.
Hinweis: Die Mindestabstände in der Tabelle
gelten für einen Raumluftzustand von 15 °C
und ma x. 60 %rF. Bei tieferen Temperaturen
und/oder höherer Luftfeuchtigkeit sind die
Werte entsprechend zu erhöhen.
A
C
B
D
D
E
FAN3 ...-M ... FAN3 ...-L ...
m
D
max. 8 kg/h 15/16 kg/h 30 kg/h 40/45 kg/h
A min. 2.0 m 6.0 m 8.0 m 10.0 m
B min. 0.5 m 0.7 m 1.0 m 1.5 m
C min. 2.2 m 2.2 m 2.2 m 2.2 m
D ca. 0.5 m ca. 0.7 m ca. 1.0 m ca. 1.5 m
E min. siehe Massabbildungen in Kapitel 4.3
see dimension drawings in chapter 4.3
voir schémas de dimension dans le chapitre 4.3
E max.
VORSICHT!
Um Schäden zu vermeiden, sollten
unterhalb des Ventilationsgerätes und
im Bereich des Dampfstromes keine
korrosions-/wasserempndlichen Komponenten ge la gert werden.
4.2 Equipment location
The fan units are mounted separately on the
wall, above the humidier/s. When positioning the fan units, care should be taken that
the regulations relating to the installation of
steam hosing (max. length 2 m, min. hose
radius 300 mm, min. inclination 20%) and
condensate hosing (min. decline 20%,
Siphon with a minimum diameter of 100
mm) can be maintained (see also installation and operating instructions on steam
air humidiers).
In order that the fan unit steam ow can
expand unhindered and does not condense
on objects (such as ceilings, girders, pillars,
etc.), the following minimum separation
distances must be complied with.
Note: The minimum separations in the table
apply to an ambient room air condition of
15 °C and max. 60 %rh. At lower temperatures and/or greater air humidity, the values
should be increas ed appropriately.
4.2 Indications de l’emplacement
Les appareils de ventilation FAN3 se
montent séparé ment, au-dessus de/des
humi di cateur(s), à la paroi. A la mise en
place, veiller à respecter les prescrip tions
concernant le cheminement du tuyau de
vapeur (longueur max. 2 m, rayon min.
du tuyau 300 mm, inclinaison max. 20 %)
et le cheminement du tuyau de condensat (inclinaison maximale 20 %, siphon
à diamètre minimal de 100 mm) (voir
également les instructions d’installation et
d’exploitation concernant l’humidicateur
d’air à vapeur).
Au positionnement de l’appareil de ventilation, respecter les distances minima les
suivantes, de sorte que le ux de va peur
puisse se diffuser librement et pour éviter
qu’il ne se condense à des obstacles (plafonds, sommiers, piliers, etc.).
Nota: les distances minimales gurant dans
la table ont pour référence une température
ambian te de 15 °C et une humidité de max.
60 %hr. A tempé ratures plus basses et/ou
hygrométrie plus élevée, il s’agit d’augmenter les valeurs en conséquence.
CAUTION!
In order to avoid deterioration of components, no corrosion/water-sensitive
components should be stored below
the fan units and in the vicinity of the
ow of steam.
ATTENTION!
Ne pas entreposer des produits sensi-
bles à la corrosion ou à l’humidité sous
le ventilateur ni dans le ux de vapeur,
an d’éviter des dommages.
Hinweis: Masse gelten für den Betrieb des Ventilationsgerätes mit normaler Leistung
(Gebläseschalter auf Position 2)
Note: Measures apply to operation of the fan unit at normal performance
(fan switch on position 2)
Note: Les dimensions sont valables pour l’exploitation de l’appareil de ventilation à
performance normale (commutateur de ventilateur sur position 2)
Page 13

13
4.3 Montage
Verwenden Sie für die Montage des Gerätes
aus schliesslich das im Lieferumfang enthaltene Befesti gungs material. Ist in Ihrem
speziellen Fall die Befestigung mit dem mitgelieferten Material nicht möglich, wählen
Sie eine ähnlich stabile Befestigungsart.
1. Schraube der Geräteabdeckung lösen
und Geräteabdeckung entfernen.
2. Bei Geräten mit Bodenblende (FAN3 ...
BC): Die 4 Schrauben der Bodenblende
lösen und Bodenblende ausbauen.
3. Nur bei Geräten mit Frontblende (FAN3
CP ... FC): Dampfschlauch auf die benötigte Länge zuschneiden (FAN CP ...
L ...FC: 105 mm, FAN CP ... M ...FC:
78 mm) und Dampfschlauch am Dampfanschluss des Ventilationsgerätes mit
einer Schlauchklemme befestigen.
4. Befestigungspunkte “A” und “B” bzw.
“C” gemäss der entsprechenden Massabbildung und mit Hilfe einer Wasserwaage am vorgesehenen Stand ort
anzeichnen. Löcher ø10 mm bohren
und die mitgelieferten Dübel einsetzen.
Hinweis: Zum Anzeichnen der Befestigungspunkte für die Geräte mit Frontblende (FAN3 CP ... FC) die Bohrscha-
blone in der Verpackung verwenden.
min. 350 (183**)
max. 2000
(135..1952)
162
370
46049
A A
B
36048
min. 350 (157**)
max. 2000
162
B
A
320
A
(109..1952)
FAN3 CP ... L ...FAN3 CP ... M ...
** Minimalabstände in Klammern nur
möglich bei Ventilationsgeräten mit
Frontblende (FAN3 CP ... FC). Zum
Anzeichnen der Befestigungspunkte
Bohrschablone in der Verpackung verwenden.
4.3 Mounting
When installing the units, use exclusively
the xing materials contained in the delivery
package. If xing using the materials supplied is not possible in your specic instal-
lation, choose a similarly stable method
of x ing.
1. Undo the screw of the unit cover and
remove the unit cover.
2. Units with base cover only (FAN3 ...
BC): Undo the 4 screws of the base
cover and remove the base cover.
3. Units with front cover only (FAN3 CP
... FC): Cut steam hose to the desired
length (FAN CP ... L ...FC: 105 mm,
FAN CP ... M ...FC: 78 mm), then x
the steam hose to the steam connector
on the fan unit using a hose clamp.
4. Mark the xing points “A” and “B” or
“C” respectively at the desired location
in accordance with the corresponding
dimension drawing an the help of a spirit
level. Drill ø10 mm holes and insert the
dowels provided.
Note: To mark the xing points for the
units with front cover (FAN3 CP... FC)
use the drilling template in the packing.
** Minimum clearances in parentheses are
only possible with fan units with front
cover (FAN3 CP ... FC). To mark the
xing points use the drilling template
in the packing.
4.3 Montage
Pour le montage des appareils, utili sez uni-
que ment le matériel de xation inclus dans
la livraison. Si, dans votre cas particulier,
la xation ne peut pas être effectuée avec
le matériel de xation livré, choisissez un
mode de xation dont la stabilité est équi-
valente.
1. Desserrer la vis du couvercle d’appareil,
puis éloigner le couvercle.
2. Uniquement appareils avec couvercle
de base (FAN3 ... BC): dévisser les 4
vis du couvercle de base et déposer ce
dernier.
3. Uniquement appareils avec couvercle
frontal (FAN3 CP ... FC): couper à la
longueur requise le tuyau à vapeur (FAN
CP ... L ...FC: 105 mm, FAN CP ... L
...FC: 78 mm) et xer le tuyau à vapeur
au raccord de l’appareil de ventilation
au moyen d’un collier de tuyau.
4. Marquer aux endroits adéquats les
points de xation “A” et “B” resp. “C”
selon le dessin coté correspondant,
à l’aide d’un niveau. Percer les trous
de ø10 mm et introduire les chevilles
livrées.
Remarque: effectuer le marquage des
appareils avec couvercle frontal (FAN3
CP ... FC) à l’aide du gabarit de perçage
se trouvant dans l’emballage.
** Les cotes minimales entre parenthèses
ne sont possibles qu’aux appareils de
ventilation avec couvercle frontal (FAN3
CP ... FC). Effectuer le marquage des
points de xation à l’aide du gabarit
de perçage se trouvant dans l’embal-
lage.
Page 14

14
min. 548
max. 2000
162
46 370
460
(500..1952)
min. 340
max. 2000
175
495
22
(300..1960)
A
C
C
C
A
B
FAN3 Mk5 M BC FAN3 Mk5 L BC
C
B
A
A
5. Nur bei “FAN3 Mk M BC”: Mitgelieferte
Wandkonsole mit den Schrauben “C” an
der Wand befestigen. Vor dem Festziehen der Schrauben, horizontale Ausrichtung der Konsole kontrollieren.
6. Schrau ben “A” bis auf einen Abstand
von 2 mm zwischen Wand/Konsole
und Schrau benkopf eindrehen und das
Ventilationsgerät in die Schrauben “A”
einhängen.
Hinweis: Bei Geräten mit Frontblende
(FAN3 CP ... FC) beim Einhängen
des Gerätes gleichzeitig den Dampfschlauch mit der Schlauchklemme auf
den Anschluss am Dampf-Luftbefeuchter aufstecken.
7. Ventilationsgerät horizontal ausrichten
und mit der Schraube “B” befestigen.
8. Nur bei Geräten mit Bodenblende (FAN3
... BC): Bodenblende wieder einbauen
und mit den 4 Schrauben befestigen.
9. Nur bei Geräten mit Bodenblende (FAN3
... BC): Dampfschlauch auf die entsprechende Länge zuschneiden und mit den
Schlauchklemmen am Dampfanschluss
des Dampf-Luftbefeuchters und des
Ventilationsgerätes befestigen.
10. Kondensatschlauch auf den Anschluss
am Ventilationsgerät ausstecken und
mit einem Schlauchbogen (Siphon min.
Durchmesser 100 mm) nach unten führen und auf den Kondensatanschluss
im Dampf-Luftbefeuchter aufstecken.
Schlauchbogen mit einem Kabelbinder
am Gehäuse des Ventilationsgerätes
befestigen.
5. “FAN3 Mk M BC” only: Fix wall support
provided to the wall with the screws
“C”. Before fastening the screws check
horizontal alignment.
6. Tighten the screws “A” until there is a
separation of 2 mm between the wall/
support and the screw heads, then suspend the fan unit on the screws “A”.
Note: when suspending the unit with
front cover (FAN3 CP ... FC) attach
the steam hose with the hose clamp
to the steam connector on the steam
humidier at the same time.
7. Horizontally align the fan unit and x
the unit with the screw “B”.
8. Units with base cover only (FAN3 ...
BC): remount base cover with the four
screws.
9. Units with base cover only (FAN3 ...
BC): Cut the steam hose to the desired
length, then connect the steam hose to
the steam connectors on the fan unit
and the steam humidier using hose
clamps.
10. Connect the condensate hose to the
connector of the fan unit, then lead the
condensate hose downwards forming
a curve (siphon min. diameter 100
mm) and connect it to the condensate
connector of the steam humidier. Fix
the hose curve to the fan unit housing
using a cable strap.
5. “FAN3 Mk M BC” uniquement: xer à la
paroi les consoles livrées au moyen des
vis “C”. Contrôler l’alignement horizontal
des consoles avant de serrer les vis à
fond.
6. Visser les vis “A” en gardant un espace
de 2 mm entre la paroi/console et la
tête de vis, puis suspendre l’appareil
de ventilation aux vis “A”.
Remarque: en suspendant les appareils
avec couvercle frontal (FAN3 CP ... FC),
raccorder également le tuyau à vapeur
au raccord de l’humidicateur au moyen
du collier de tuyau.
7. Aligner horizontalement l’appareil de
ventilation et le xer au moyen de la
vis “B”.
8. Uniquement appareils avec couvercle
de base (FAN3 ... BC): reposer le cou-
vercle de base et le xer au moyen des
4 vis.
9. Uniquement appareils avec couvercle
de base (FAN3 ... BC): couper le tuyau
à vapeur à la longueur adéquate et le
raccorder aux raccords de l’humidi-
cateur et de l’appareil de ventilation au
moyen des colliers de tuyau.
10. Raccorder le tuyau de condensat au
raccord de l’appareil de ventilation,
le conduire vers le bas en formant
une boucle (siphon, diamètre minimal
100 mm) et le raccorder au raccord de
l’humidicateur. Fixer la boucle de tuyau
au boîtier de l’appareil de ventilation à
l’aide d’une ligature de câble.
Page 15

15
11. Nur bei Geräten mit Frontblende (FAN3
CP ... FC): Seitenbleche im Gehäu-
se des Ventilationsgerätes einhängen
und mit den Schrauben befestigen.
Anschliessend Frontblech in die Sietenbleche einhängen.
12. Geräteabdeckung des Ventilationsgerätes anbringen und mit der Schraube
befestigen.
4.4 Elektroinstallation
Die Spannungsversorgung erfolgt gemäss
dem nachfolgenden Schema über die Sicherung der Befeuchter-Steuer spannung.
Hinweis: Eine separate Spannungsversorgung ist nicht zulässig.
GEFAHR!
Die Spannungsversorgung erst nach
Fertigstellung der Installation ans
Stromnetz anschliessen.
1. Schraube des Gehäusedeckels lösen
und Deckel entfernen.
2. Anschlusskabel von unten durch die
Kabeldurchführung ins Geräteinnere
ziehen und gemäss dem Schema anschliessen.
3. Gehäusedeckel wieder anbringen und
mit den Schrauben befestigen.
L1 N SC1
MAIN SUPPLY
X1
SC2
Q4
F4
L1 N PE
X1
L1 N SK1SK1
200-240V / 50...60Hz
L1N
Q4
F4
L1 N PE
200-240V / 50...60Hz
L1N
Driver board module A
Supply module
FAN3CP3Mk5 FAN3
11. Uniquement appareils avec couvercle
frontal (FAN3 CP ... FC): accrocher les
tôles latérales dans le boîtier de l’ap-
pareil de ventilation et xer au moyen
des vis. Ensuite, accrocher le couvercle
frontal dans les tôles latérales.
12. Mettre en place le couvercle de l’appareil
de ventilation et le xer au moyen de la
vis.
4.4 Installation électrique
L’alimentation électrique s’effectue par le
biais du fusible de la tension de com-
mande de l’humi dicateur à vapeur, selon
le schéma suivant.
Note: Une alimentation électrique séparée
est inadmissible.
DANGER!
Ne pas effec tuer le raccordement au
réseau électrique avant l’achèvement
de l’installation électrique.
1. Desserrer les vis du couvercle du boî tier
et ôter le couvercle.
2. Depuis le bas, conduire le câble de
raccordement à l’intérieur de l’appareil
à travers le passe-câble et le raccorder
selon le schéma suivant.
3. Placer le couvercle de boîtier et le xer
au moyen des vis.
11. Units with front cover only (FAN3 CP
... FC): connect the side panels to the
housing of the fan unit and x it with the
screws. Then hook in the front panel
into the side panels.
12. Mount unit cover to the fan unit and x
it with the screw.
4.4 Electrical installation
The power supply is connected via the
humidi er control voltage fuse in ac-
cordance with the following schematic.
Note: A separate control voltage is not
permitted.
DANGER!
Connect voltage supply line to the
mains only after completion of the
installation work.
1. Loosen and remove the housing cover
screws and remove the cover.
2. Insert the connecting cable into the
unit from underneath, through the cable entry. Pull the cable into the unit
and connect it in accordance with the
schematic.
3. Replace the housing cover and x it
with the screws.
Page 16

16
5 Inbetriebnahme/
Betrieb
Mit dem Gebläseschalter auf der rechten
Seite des Ventilationsgerätes die Ventilatorleistung festlegen:
Pos. 1: reduzierte Leistung
FAN3 ... M:
unter 8 kg/h Dampeistung
FAN3 ... L:
unter 30 kg/h Dampeistung
Pos. 2: normale Leistung
Sobald der Befeuchter Dampf erzeugt
schalten sich die Ventilatoren (mit einer
kleinen Verzögerung) automatisch ein. Wird
kein Dampf mehr produziert schalten die
Ventilatoren nach einer gewissen Nachlaufzeit automatisch aus.
6 Wartung
Das Ventilationsgerät FAN3.. benötigt
grundsätzlich keine Wartung. Sollte das
Gerät und/oder die darin eingebauten Filter
(Option) einmal verschmutzt sein, gehen
Sie wie folgt vor:
1. Dampf-Luftbefeuchter/Ventilationsgerät ausser Betrieb nehmen und vom
Stromnetz trennen.
2. Schraube des Gehäusedeckels lösen
und Deckel entfernen.
3. Geräteinnenraum mit Nylonbürste reinigen und/oder Filter ersetzen.
4. Gehäusedeckel wieder anbringen und
mit den Schrauben befestigen.
7 Störungsbehebung
Folgende Störungen können im Betrieb
auftreten.
Störung: Ventilatoren schalten nicht ein,
obwohl der Dampf-Luftbefeuchter Dampf
produziert.
Ursache: Temperaturschalter im Dampfverteiler nicht angeschlossen oder defekt
oder Ventilatoren nicht angeschlossen oder
defekt.
Abhilfe: Temperaturschalter anschliessen
oder ersetzen. Ventilatoren anschliessen
oder ersetzen.
Störung: Beim Betätigen des Gebläseschalters ist keine Leistungsreduktion/erhöhung feststellbar.
Ursache: Ventilatoren oder Gebläseschalter nicht angeschlossen oder defekt.
Abhilfe: Ventilatoren/Gebläseschalter anschliessen oder ersetzen.
5 Commissioning/
Operation
Set the ventilator performance with the fan
switch on the right side of the fan unit:
Pos. 1: Reduced performance
FAN3 ... M:
with steam output below 8 kg/h
FAN3 ... L:
with steam output below 30 kg/h
Pos. 2: Normal performance
As soon as the humidier generates steam,
the ventilators switch on automatically (with
a slight delay). When steam is no longer
being produced, the ventilators switch off
automatically after a nominal overrun period.
6 Maintenance
Basically the fan unit FAN3.. does not require any maintenance. If the unit and/or
the built in lters (option), should once be
dirty, proceed as follows:
1. Take the steam humidier/fan unit out
of operation and disconnect the units
from the mains.
2. Undo the screw of the unit cover and
remove the cover.
3. Clean the interior of the unit with a nylon
brush and/or replace the lters.
4. Remount housing cover and x it with
the screw.
7 Fault elimination
The following malfunctions can occur during operation.
Malfunction: the fans do not switch on,
although the steam humidier produces
steam.
Cause: temperature switch in the steam
distributor not connected or defective or
fans not connected or defective.
Remedy: Connect and/or replace temperature switch. Connect and/or replace fans.
Malfunction: when actuating the fan switch
no performance reduction/increase can be
recognized.
Cause: ventilators or fan switch not connected or defective.
Remedy: Connect and/or replace ventilator/fan switch.
5 Mise en service/
exploitation
Détermination de la performance de ven-
tilateur à l’aide du commutateur de ventila-
teur au côté gauche de l’appareil de ventilation:
Pos. 1: performance réduite
FAN3 ... M:
débit de vapeur inférieur à 8 kg/h
FAN3 ... L:
débit de vapeur inférieur à 30 kg/h
Pos. 2: performance normale
Dès que l’humidicateur est en marche,
les ventilateurs tournent automatiquement
(avec temporisation). Si la production de vapeur cesse, les ventilateurs s’arrêtent automatiquement (avec un certain retard).
6 Maintenance
En principe, l’appareil de ventilation FAN3..
ne nécessite pas de maintenance. Si l’ap-
pareil et/ou le ltre intégré devait être
encrassé, procédez comme suit:
1. Mettre l’humidicateur à vapeur/l’appa-
reil de ventilation hors service et les
débrancher du réseau électrique.
2. Dévisser la vis du couvercle de boîtier
et ôter le couvercle.
3. Nettoyer l’intérieur de l’appareil à l’aide
d’une brosse de nylon et/ou remplacer
le ltre.
4. Remettre le couvercle d’appareil et le
xer au moyen des vis.
7 Dépannage
En cours d’exploitation, les perturbations
suivantes peuvent survenir.
Perturbation: les ventilateurs ne démarrent
pas, bien que l’humidicateur à vapeur
produit de la vapeur.
Cause: interrupteur thermostatique du
distributeur de vapeur non branchés ou
défectueux, ventilateurs non branchés ou
défectueux.
Remède: Brancher l’interrupteur thermostatique ou le remplacer. Brancher les
ventilateurs ou les remplacer.
Perturbation: En actionnant du com mu tateur de ventilateur, aucune augmenta tion/
réduction de la performance n’est décelab les.
Cause: ventilateurs ou commutateur de
ventilateur non branchés ou défectueux.
Remède: Brancher ventilateurs/commutateur de ventilateur ou les remplacer.
Page 17

17
8 Ausserbetriebsetzung/
Entsorgung
8.1 Ausserbetriebsetzung
Muss das Ventilationsgerät FAN3 ersetzt
werden oder wird das Befeuchtersystem
nicht mehr benötigt, gehen Sie wie folgt
vor:
1. Dampf-Luftbefeuchter/Ventilationsgerät
ausschalten und vom Stromnetz tren-
nen.
2. Ventilationsgerät (und falls erforderlich
weitere Systemkomponenten) durch
einen Fachmann ausbauen lassen.
8.2 Entsorgung/Recycling
Deinstallierte Komponenten sind entsprechend den lokalen Vorschriften zu entsorgen bzw. der Recyclierung zuzuführen.
Im Zweifelsfalle nehmen Sie mit Ihrem
Lieferanten Kontakt auf.
8 Mise hors service/
évacuation
8.1 Mise hors service
Si l’appareil de ventilation FAN3 doit être
remplacée ou si le système d’humidication
n’est plus utilisé, procédez comme suit
1. Mettre l’humidicateur à vapeur et l’appareil de ventilation hors service et les
débrancher du réseau électrique.
2. Faire déposer l’appareil de ventilation (si nécessaire, également tous
les composants du système) par un
professionnel.
8.2 Evacuation/récupération
Les composants déposés sont à évacuer
resp. récupérer selon les prescriptions locales. En cas de doute, veuillez contacter
votre fournisseur.
8 Taking out of service/
Disposal
8.1 Taking out of service
If the fan unit FAN3 must be replaced or
if the humidication system is not needed
any more, proceed as follows:
1. Take the steam humidier and the fan
unit out of operation and disconnect the
units from the mains.
2. Have the fan unit (and all other system
components, if necessary) unmounted
by a qualied service technician.
8.2 Disposal/Recycling
Dismantled components must be disposed
of and/or recycled according to the local
regulations. In case of doubt please contact
your supplier.
Page 18

18
9 Produktspezikationen
9.1 Technische Daten
Ventilationsgerät / Fan unit / Appareil de ventilation
FAN3 ... M .. FAN3 ... L ..
Für max. Dampfabgabe
For max. Steam output
Pour débit de vapeur max.
16 kg/h 45 kg/h
Elektrische Anschluss
Power supply
Alimentation électrique
220...240 V / 1N~ / 50...60 Hz
Schalterstellung
Switch position
Position de sélecteur
1 2 1 2
Leistungsaufnahme
Power consumption
Puissance
22 W 44 W 20 W 40 W
Luftfördermenge ohne Filter
Air delivery without lter
Débit d’air sans ltre
100 m
3
/h 180 m3/h 140 m3/h 250 m3/h
Luftfördermenge mit Filter 20 PPI
Air delivery with 20 PPI lter
Débit d’air avec ltre 20 PPI
85 m
3
/h * 155 m3/h * 120 m3/h * 210 m3/h *
Schalldruckpegel (gemäss DIN 45635, Teil 2)
Sound pressure level (according to DIN 45635, Part 2)
Niveau de pression sonore (selon DIN 45635, Partie 2)
44 dBA 52 dBA 44 dBA 49 dBA
* mit Filter im Neuzustand
9 Productspecications
9.1 Technical data
9 Spécicationsdesproduits
9.1 Caractéristiques techniques
* with new lter * équipé de ltre à l’état neuf
Page 19

19
9.2 Abmessungen/Gewichte
FAN3 CP Basic M BC
FAN3 CP Pro M BC
Masse in [mm] / Dimensions in [mm] / Dimensions en [mm]
Gewicht / Weight / Poids: 10.2 kg
FAN3 CP Basic L BC
FAN3 CP Pro L BC
FAN3 Mk L BC
Masse in [mm] / Dimensions in [mm] / Dimensions en [mm]
Gewicht / Weight / Poids: 11.7 kg
558
225
277
349
380
257
175
67
265
46049 49
45
ø10
ø42
514
13
6.5
162
90
211
456
257
149
194
ø10
ø30
174
225
406
56
279
310
36049 49
45
162
40
211
13
6.5
9.2 Dimensions/Poids9.2 Dimensions/Weights
Page 20

20
FAN3 CP Basic M FC
FAN3 CP Pro M FC
Masse in [mm] / Dimensions in [mm] / Dimensions en [mm]
Gewicht / Weight / Poids: 10.2 kg
FAN3 CP Basic L FC
FAN3 CP Pro L FC
Masse in [mm] / Dimensions in [mm] / Dimensions en [mm]
Gewicht / Weight / Poids: 11.7 kg
456
257
149
194
ø10
ø30
174
225
406
56
279
310
36049 49
162 45
250
14
15
42218
18
116
40
211
13
6.5
558349
380
257
175
67
265
52218
18
46049 49
13
6.5
45
141
320
13
15
ø10
ø42
225
277
514
162
90
211
Page 21

21
FAN3 Mk M BC
Masse in [mm] / Dimensions in [mm] / Dimensions en [mm]
Gewicht / Weight / Poids: 10.2 kg (12.0 kg **)
** mit Konsole / with support / avec support
456
104
194
ø10
ø42
174
225
406
56
279
310
258
107
17542
515
495
Page 22

22
9.3 Lieferumfang
FAN3 CP Basic M BC
FAN3 CP Basic M FC
Set Schlauchklemmen
Schraubenset
Dampfschlauch ø30 mm, 0.5 m
Kondensatschlauch ø12 mm, 2 m
Kondensatfalle ø30 mm
O-Ring
Dampfanschluss ø22 mm
Dampfanschluss ø30 mm
Ausblasstutzen ø22 mm
Ausblasstutzen ø30 mm
Kondensatschlauch ø15 mm, 2 m
Ablaufstutzen
Set with hose clips
Set with screws
Steam hose ø30 mm, 0.5 m
Condensate hose ø12 mm, 2 m
Condensate trap ø30 mm
O-ring / Joint torique
Steam connector ø22 mm
Steam connector ø30 mm
Outlet adapter ø22 mm
Outlet adapter ø30 mm
Kondensatschlauch ø15 mm, 2 m
Ablaufstutzen
Set avec colliers de tuyaux
Set avec vis
Tuyau de vapeur ø30 mm, 0.5 m
Tuyau de condensat ø12 mm, 2 m
Piège de condensat ø30 mm
Joint torique
Raccord d’échappement de vapeur ø22 mm
Raccord d’échappement de vapeur ø30 mm
Adaptateur de sortie ø22 mm
Adaptateur de sortie ø30 mm
Tuyau de condensat ø15 mm, 2 m
Raccord d’écoulement
FAN3 CP Basic L BC
FAN3 CP Basic L FC
Set Schlauchklemmen
Schraubenset
Dampfschlauch ø45 mm, 0.5 m
Kondensatschlauch ø12 mm, 2 m
Kondensatfalle ø45 mm
O-Ring
Dampfanschluss ø45 mm
Ausblasstutzen: ø45 mm
Kondensatschlauch ø15 mm, 2 m
Ablaufstutzen
Set with hose clips
Set with screws
Steam hose ø45 mm, 0.5 m
Condensate hose ø12 mm, 2 m
Condensate trap ø45 mm
O-ring
Steam connector ø45 mm
Outlet adapter ø45 mm
Condensate hose ø15 mm, 2 m
Drain socket
Set avec colliers de tuyaux
Set avec vis
Tuyau de vapeur ø45 mm, 0.5 m
Tuyau de condensat ø12 mm, 2 m
Piège de condensat ø45 mm
Joint torique
Raccord d’échappement de vapeur ø45 mm
Adaptateur de sortie ø45 mm
Tuyau de condensat: ø15 mm, 2 m
Raccord d’écoulement
FAN3 CP Pro M BC
FAN3 CP Pro M FC
Set Schlauchklemmen
Schraubenset
Dampfschlauch ø30 mm, 0.5 m
Kondensatschlauch ø12 mm, 2 m
Kondensatfalle ø30 mm
O-Ring
Kondensatschlauch ø15 mm, 2 m
Ablaufstutzen
Set with hose clips
Set with screws
Steam hose ø30 mm, 0.5 m
Condensate hose ø12 mm, 2 m
Condensate trap ø30 mm
O-ring
Condensate hose ø15 mm, 2 m
Drain socket
Set avec colliers de tuyaux
Set avec vis
Tuyau de vapeur ø30 mm, 0.5 m
Tuyau de condensat ø12 mm, 2 m
Piège de condensat ø30 mm
Joint torique
Tuyau de condensat ø15 mm, 2 m
Raccord d’écoulement
FAN3 CP Pro L BC
FAN3 CP Pro L FC
Set Schlauchklemmen
Schraubenset
Dampfschlauch ø45 mm, 0.5 m
Kondensatschlauch ø12 mm, 2 m
Kondensatfalle ø45 mm
O-Ring
Kondensatschlauch ø15 mm, 2 m
Ablaufstutzen
Set with hose clips
Set with screws
Steam hose ø45 mm, 0.5 m
Condensate hose ø12 mm, 2 m
Condensate trap ø45 mm
O-ring
Condensate hose ø15 mm, 2 m
Drain socket
Set avec colliers de tuyaux
Set avec vis
Tuyau de vapeur ø45 mm, 0.5 m
Tuyau de condensat ø12 mm, 2 m
Piège de condensat ø45 mm
Joint torique
Tuyau de condensat ø15 mm, 2 m
Raccord d’écoulement
FAN3 CP Mk M BC
FAN3 CP Mk L BC
Set Schlauchklemmen
Schraubenset
Dampfschlauch ø45 mm, 0.5 m
Kondensatschlauch ø12 mm, 2 m
Set with hose clips
Set with screws
Steam hose ø45 mm, 0.5 m
Condensate hose ø12 mm, 2 m
Set avec colliers de tuyaux
Set avec vis
Tuyau de vapeur ø45 mm, 0.5 m
Tuyau de condensat ø12 mm, 2 m
9.3 Delivery 9.3 Livraison
verpackt in Kartonschachtel:
FAN3...M..: 530 mm x 360 mm x 470 mm
FAN3...L..: 640 mm x 430 mm x 470 mm
packaged in cardboard box:
FAN3...M..: 530 mm x 360 mm x 470 mm
FAN3...L..: 640 mm x 430 mm x 470 mm
en emballage de carton:
FAN3...M..: 530 mm x 360 mm x 470 mm
FAN3...L..: 640 mm x 430 mm x 470 mm
Page 23

© Condair Ltd., Printed in Switzerland
Technische Änderungen vorbehalten
Technical data subject to modification
Sous réserve de modifications techniques
Page 24

CONSULTING, SALES AND SERVICE:
Manufacturer:
Condair Ltd.
Member of the Walter Meier Group
Talstrasse 35-37, 8808 Pfäffikon, Switzerland
Ph. +41 55 416 61 11, Fax +41 55 416 62 62
info@condair.com, www.condair.com
Reg.No. 40002-2
 Loading...