

Page 1

Concept Z Performance 350Z & G35 Engine Oil Cooler Kit Installation Guide
Thank you for your purchase of the CZP oil cooler kit. Please make sure your kit came with all of the necessary
components listed below:
1x Setrab Oil Cooler Core (19, 25 or 34 row core)
2x Setrab -10 AN to 22mm Port adapter fittings (for cooler core to AN lines)
1x Mocal Sandwich Plate (thermostatic or non-thermostatic)
2x Mocal -10AN to 1/2in BSP adapter fittings (for the sandwich plate to AN lines)
2x Dowty Seal 1/2in BSP (for Mocal sandwich plate fittings)
1x CZP Universal Oil Cooler Lower Bracket
1x CZP Z33/V35 Oil Cooler Upper Brackets (long and short)
1x CZP -10 AN SS Oil Cooler Line Long
1x CZP -10 AN SS Oil Cooler Line Short
9x M6x1.0x16mm Serrated-Flange Hex Head Bolts
7x M6x1.0 Nylon-Insert Flange Locknuts
6x M6 Weather-Resistant EPDM Rubber Washers
3x M6x1.0 Plastic/Fiberglass Rivet Nuts
1x M6x1.0 Rivet Nut tool
1
Page 2
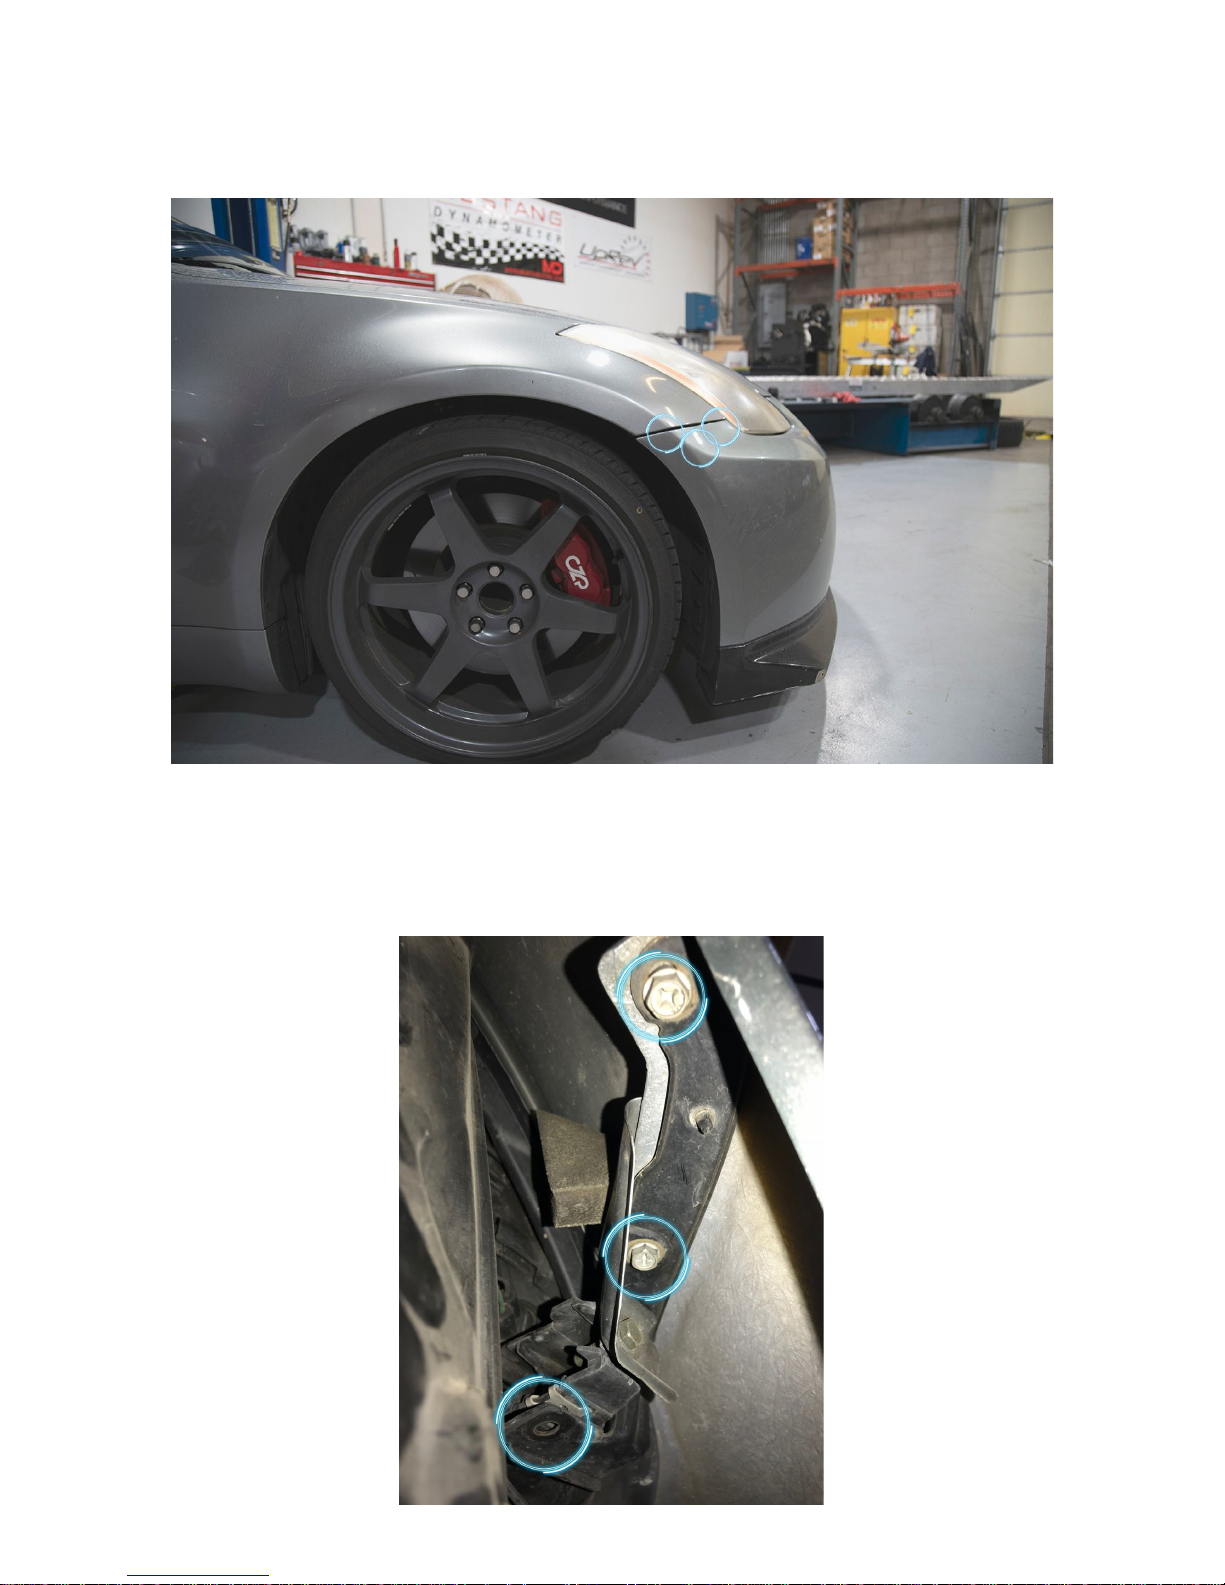
1. Remove the front bumper cover to fender mounting bolts (upper circles) as well as the bolt that holds the
L-shaped bumper cover bracket to the headlight (lower circle). There are three total bolts holding each of the
corners of the bumper cover where it meets with the fender.
With the wheel turned inwards slightly, you can push the fender liner out of the way slightly and gain access to
the two bolts going up into the fender and the one bolt going upward, mounting the bumper bracket to the headlight. All
three are 10mm and may require the use of an extension.
2
Page 3
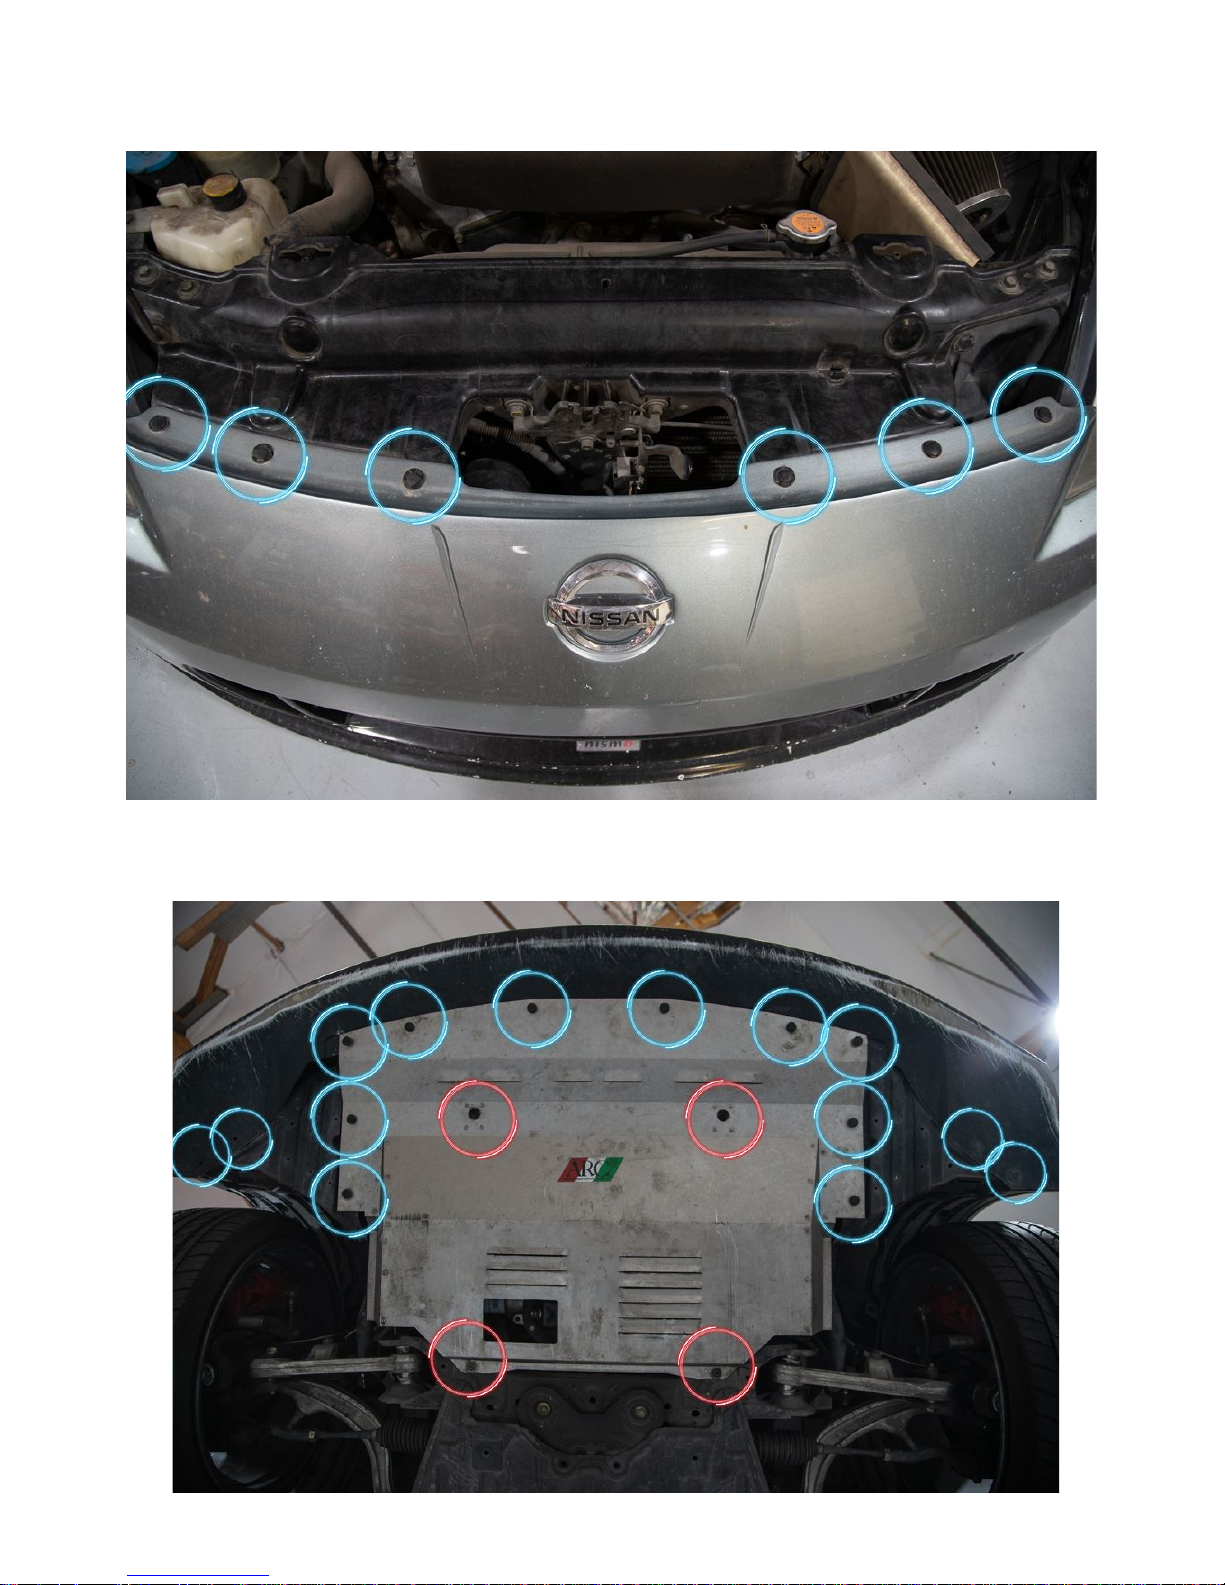
2. Open the hood and remove the six plastic pop-clips holding the bumper cover to the front core support with a
prying tool.
3. Lift the car and remove the 10mm bolts and plastic pop-in clips along the bottom of the bumper cover and fender
splash shields that hold the under tray in place.
3
Page 4

4. Carefully remove the bumper cover. With two people, gently pull the bumper cover forward and away from the
body of the car.
5. Drain the engine oil and remove the engine oil filter.
6. Enlarge the holes (blue circles) at the bottom of the radiator core support with a 5/16” drill bit. You are only
drilling through a thin layer of FRP so you don't need to press hard or drill far at all. In fact if you go 2 or 3 inches
too far you can hit the radiator end tank which is not good so be carefull.
4
Page 5
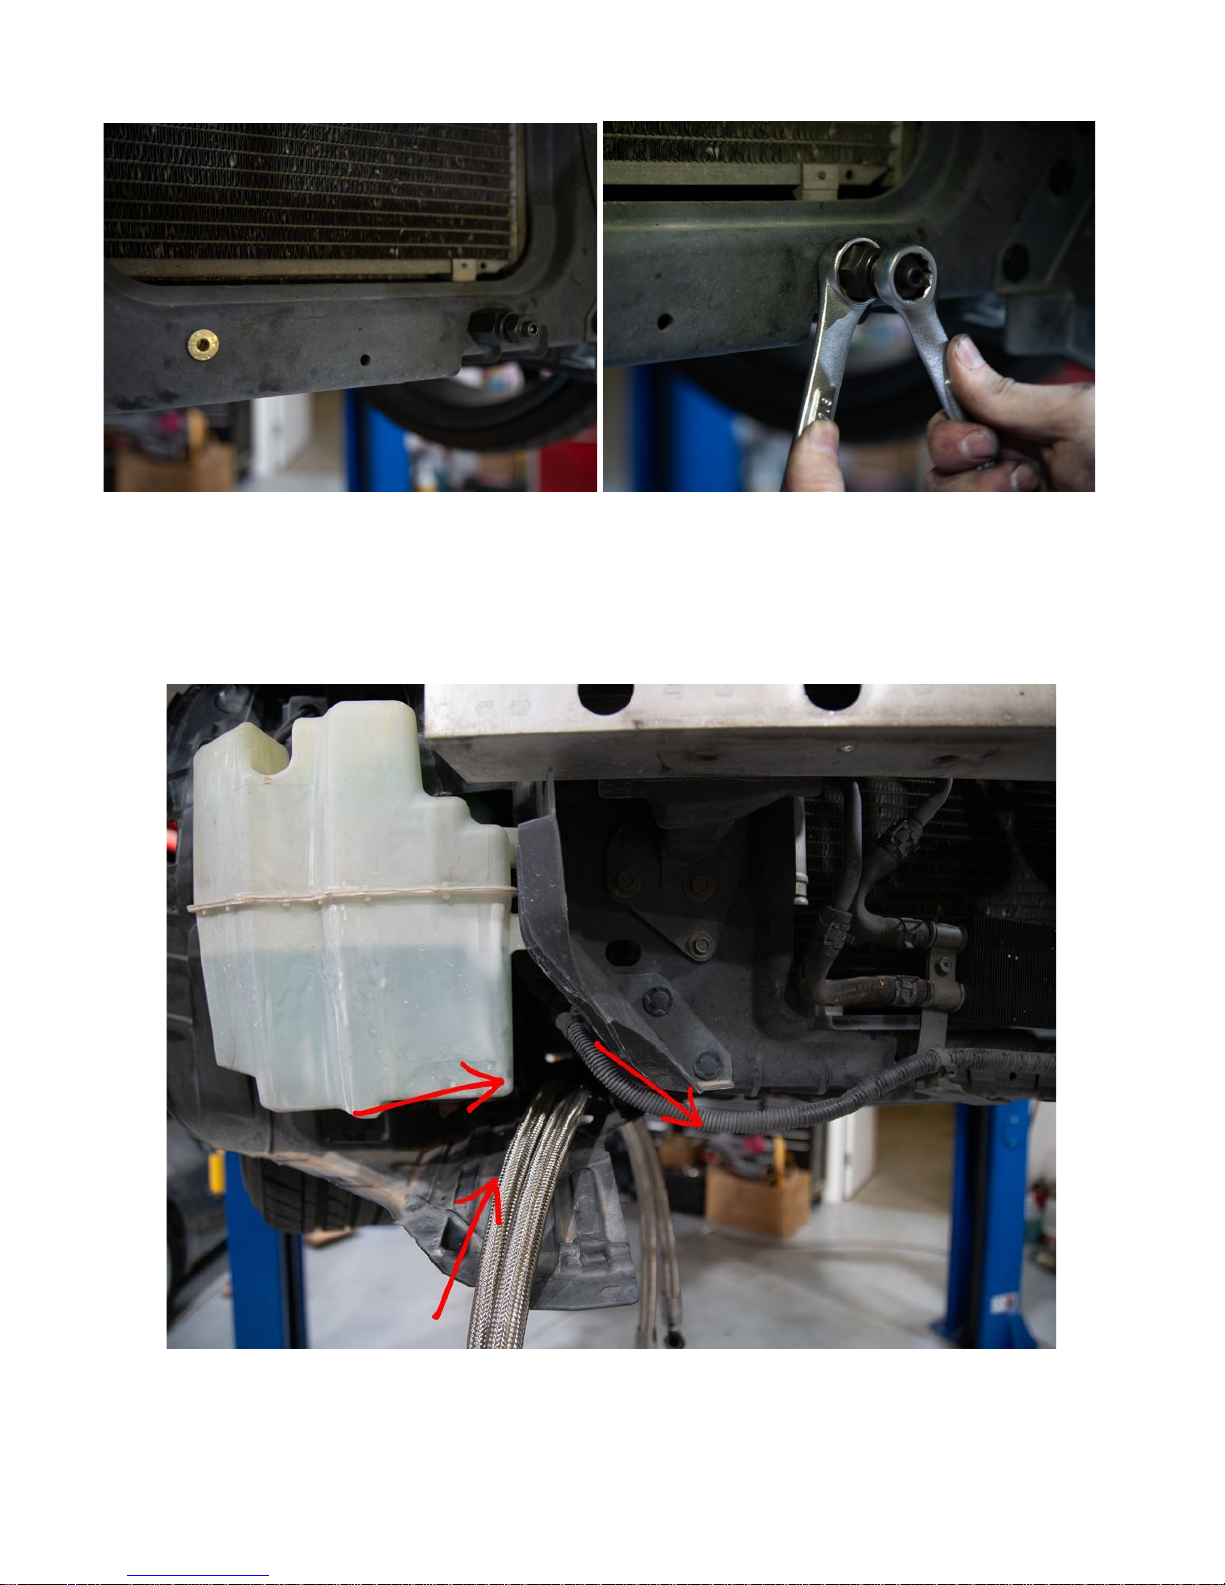
7. Insert the M6 rivnuts and tool and tighten the tool down to crush the rivnut and secure the threads.
8. With the two 120 degree fittings on the -10 AN oil lines matched up, feed the lines into the gap between the
windshield washer reservoir and the front core support, between the two black plastic splash shields, towards
the lower oil pan.
5
Page 6
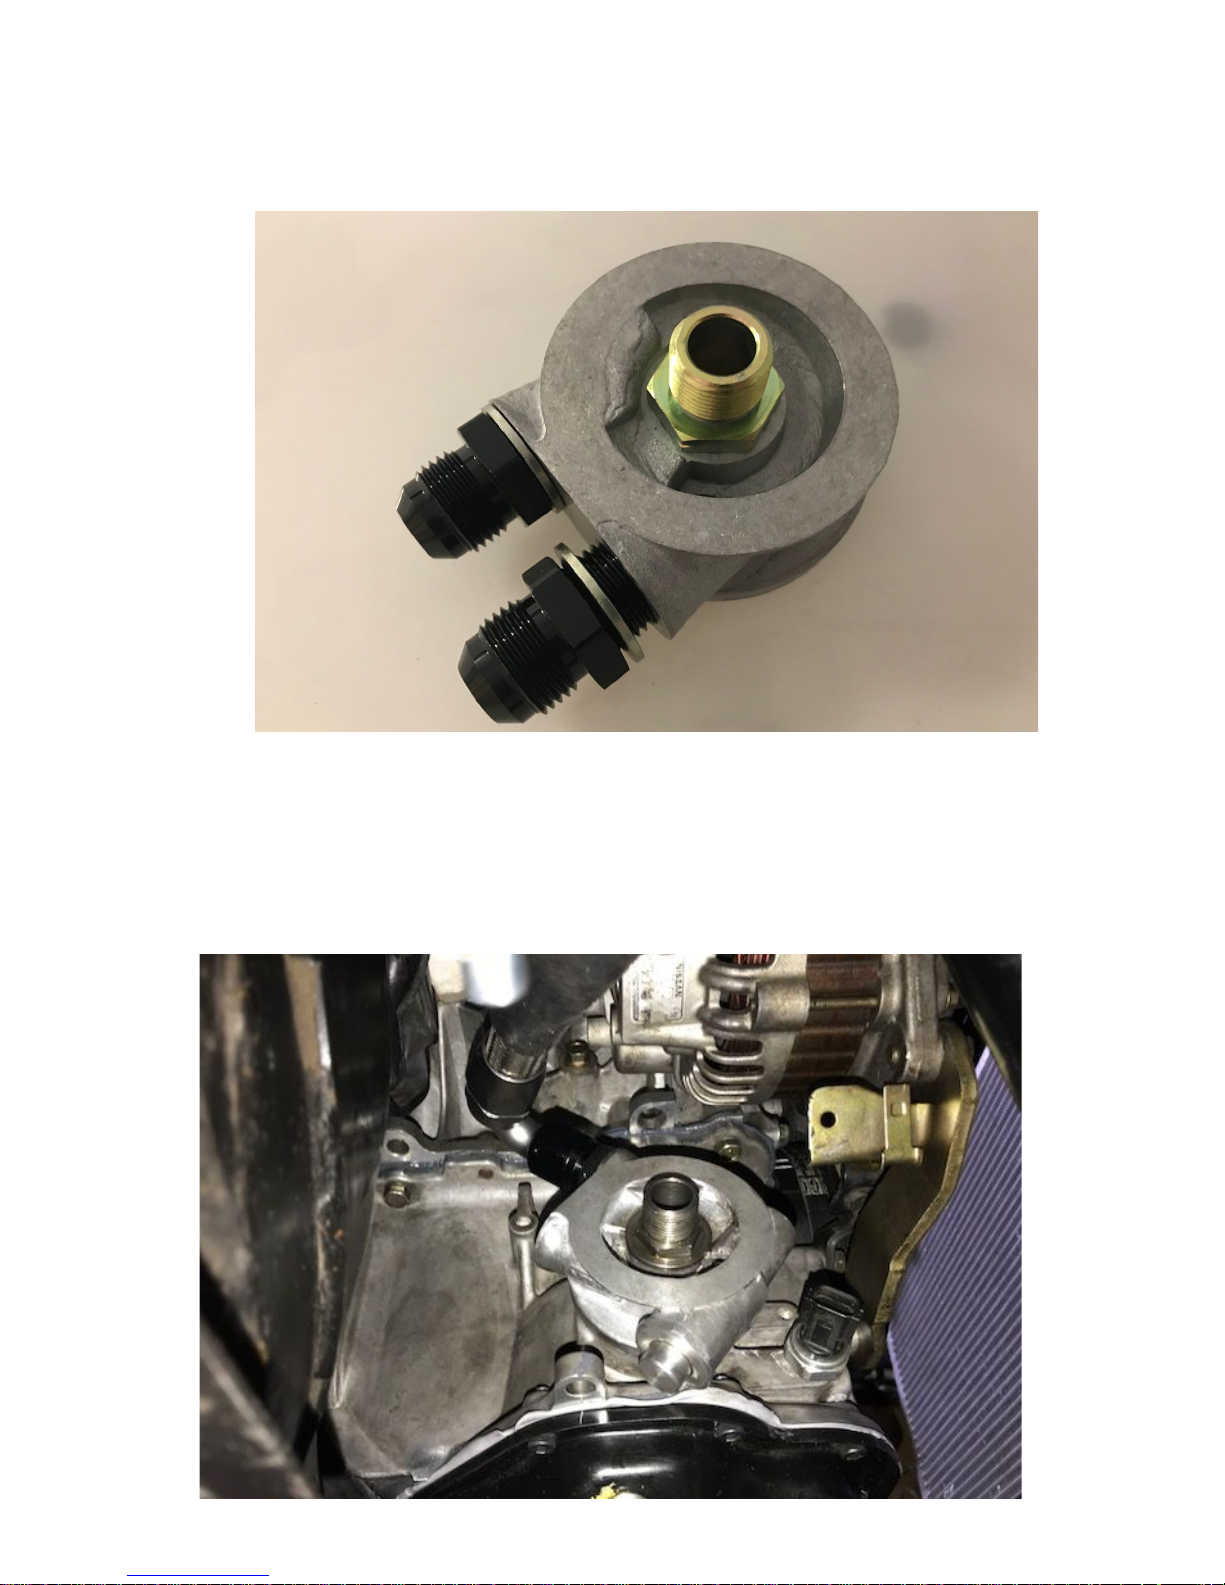
9. Attach the -10AN to 1/2in BSP adapter fittings to the Mocal sandwich plate making sure to use the 1/2in BSP
dowty seals in between the fitting and sandwich plate (see picture below) and snug them down with a 1 inch
socket or wrench.
10. Apply a small amount of oil to the o-ring on the back side of the sandwich plate. For those who want to
remove the stock water-to-oil cooler attach the oil sandwich plate to the upper oil pan where the stock engine
oil cooler was, and position the fittings so the are at about the 11 o'clock position as pictured below. Tighten it
down with the stock male-to-male hollow stud which is a 22 mm and will require a deep well socket (see picture
below).
6
Page 7
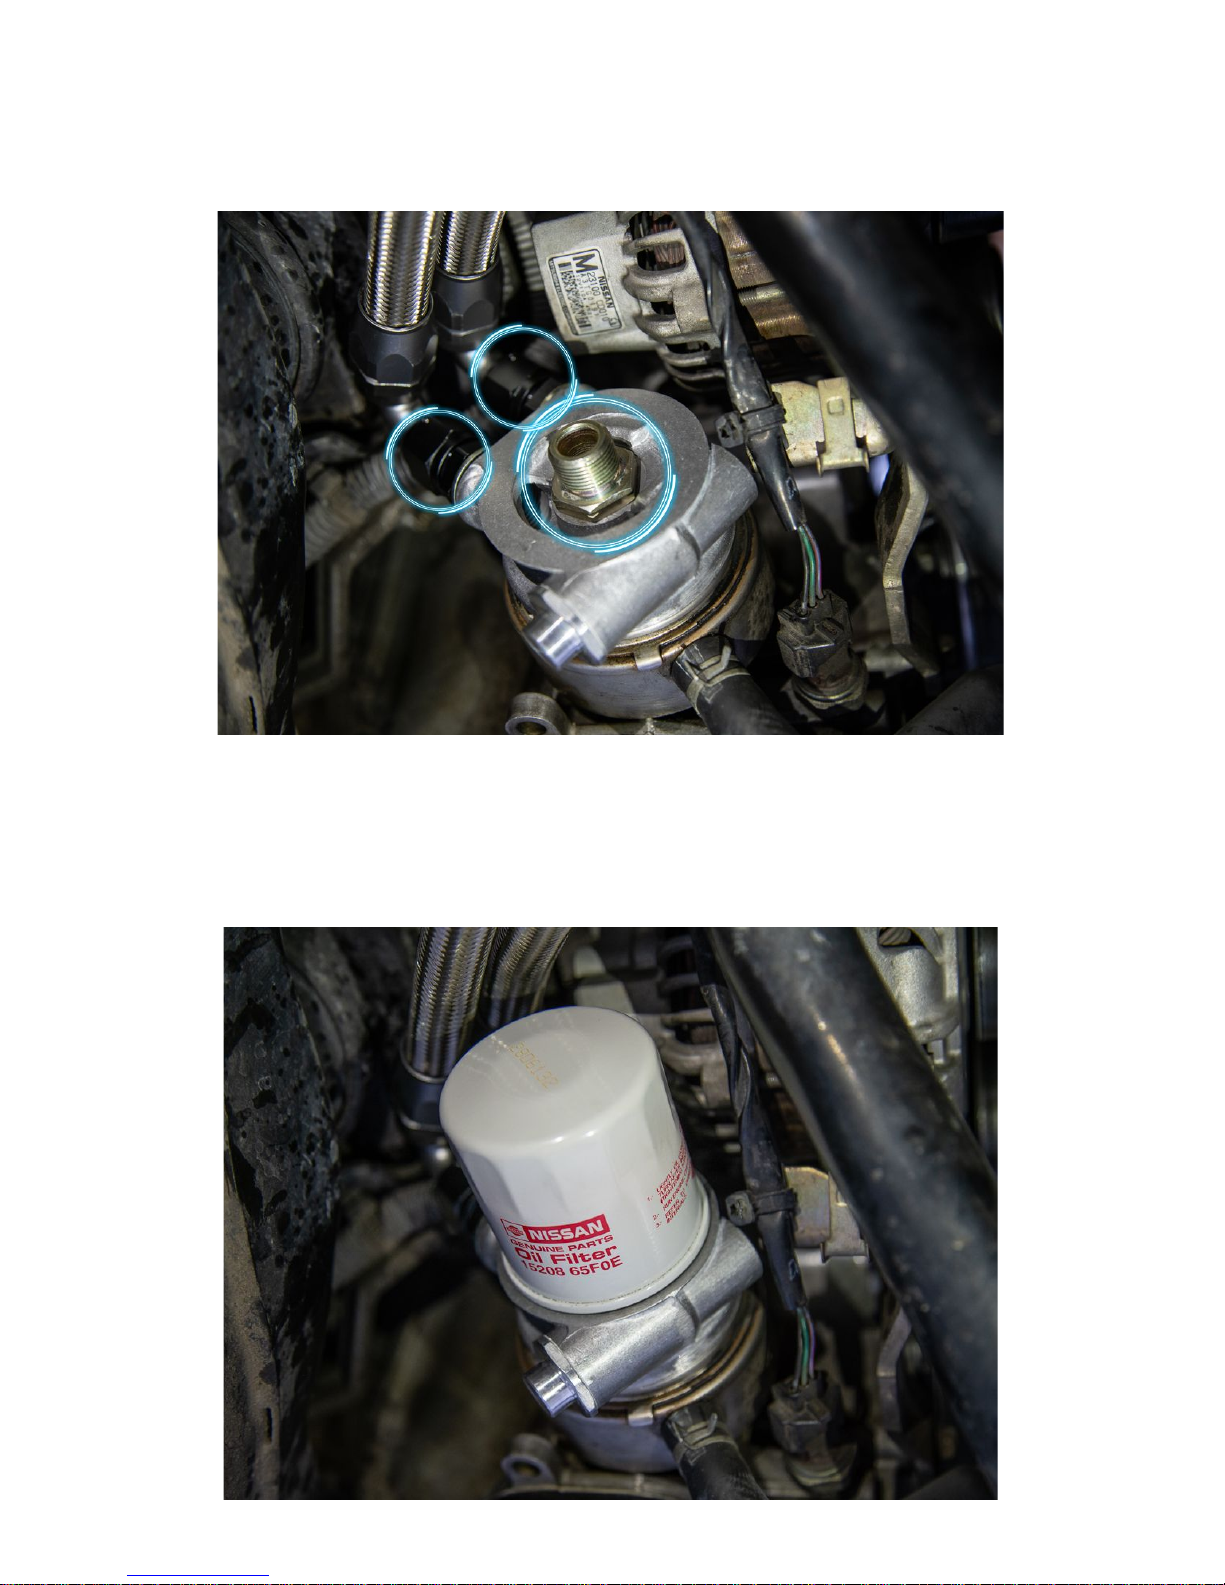
For those who want to keep the stock water-to-oil cooler you must clock the sandwich plate so the fittings
are at about 10 o'clock position, pointing back and up towards the motor mount, making sure to not let the lines
make contact with the mount or alternator. Then tighten it down with the provided female to male stud which is a
1 inch (see picture below).
11. Now attach one of the lines to the upper fitting on the new Mocal sandwich plate and tighten it down, then do the
same with the other line. (it doesn't matter which line is which, the cooler will work in either flow direction).
12. Make sure the oil sandwich plate and both of the fittings and lines going to it are tight then go ahead and install
your new oil filter. Reinstall your oil drain plug at this time if you haven't already.
7
Page 8
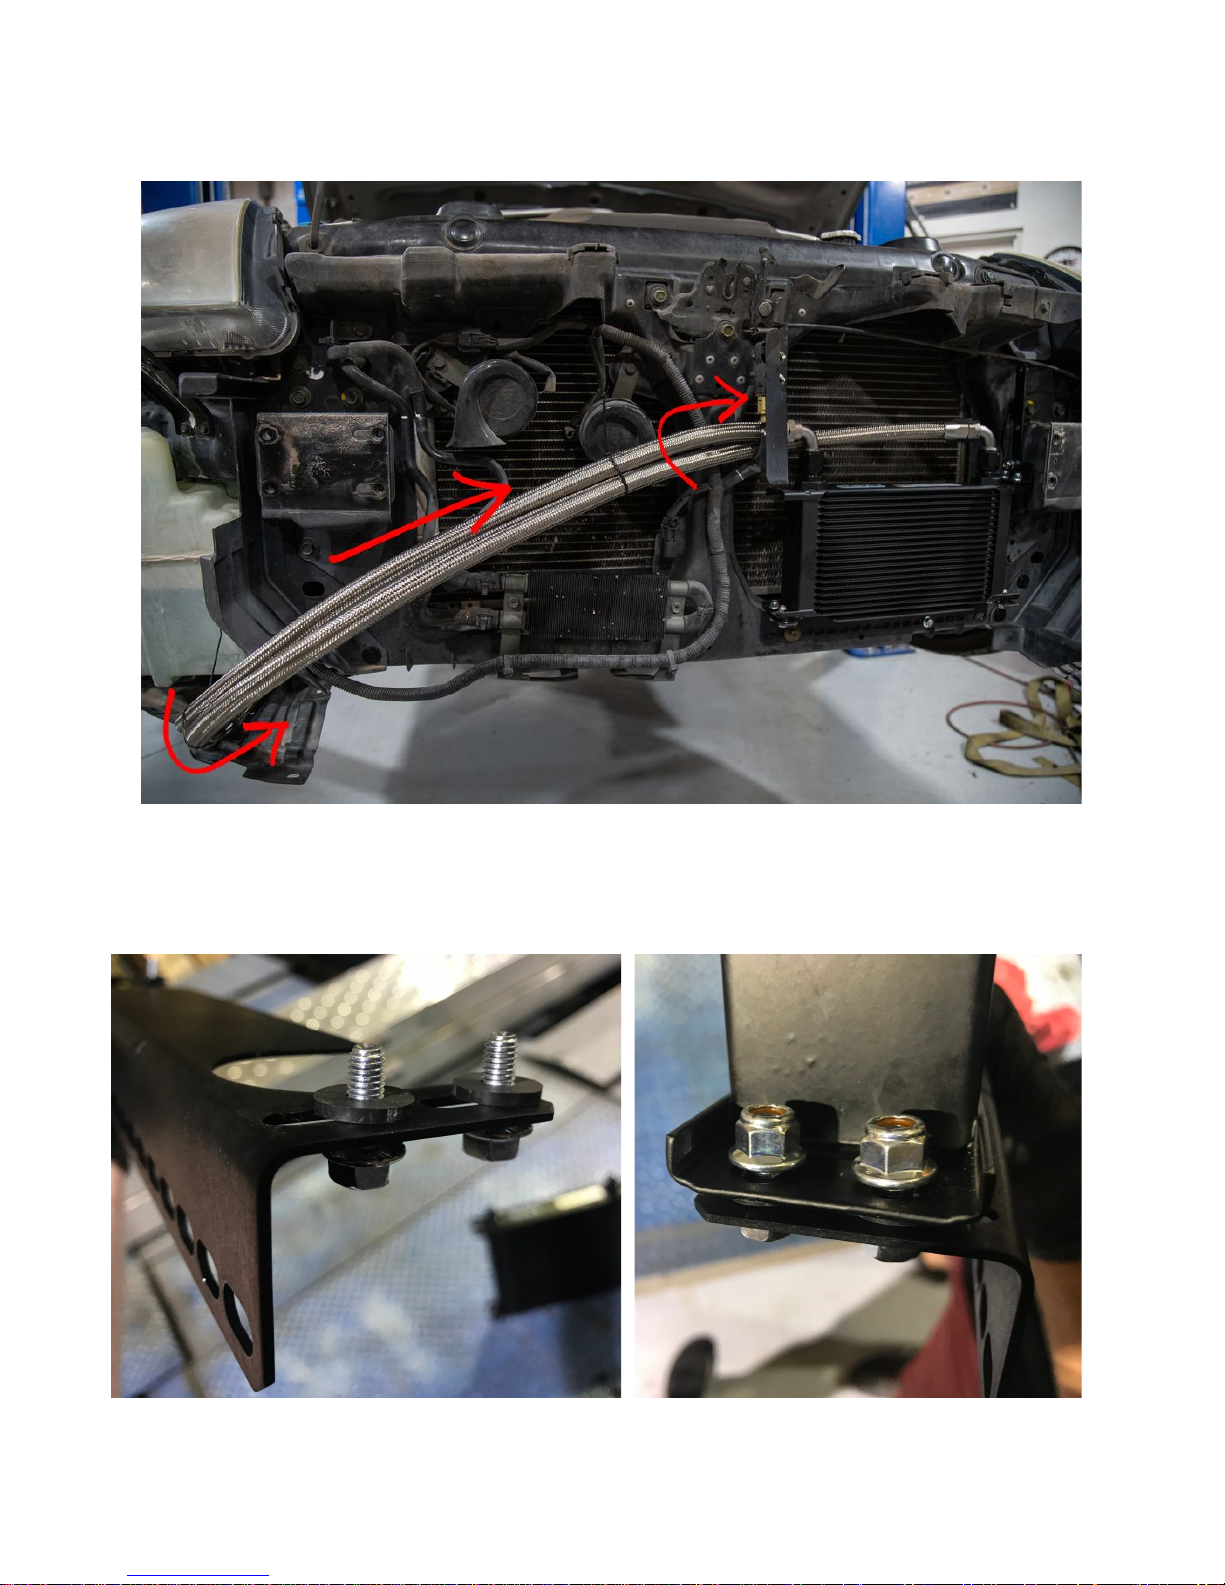
13. With one side of the lines hooked up, take the other side of the lines and route them along the front of the front
core support behind the front impact bar and just in front of vertical center brace for the front core support.
14. Attach the lower mounting bracket to the cooler core with the four of the supplied 10mm bolts, rubber washers
and lock nuts. Use the 4 rubber washers in between the bracket and the cooler core to insulate the assembly.
8
Page 9
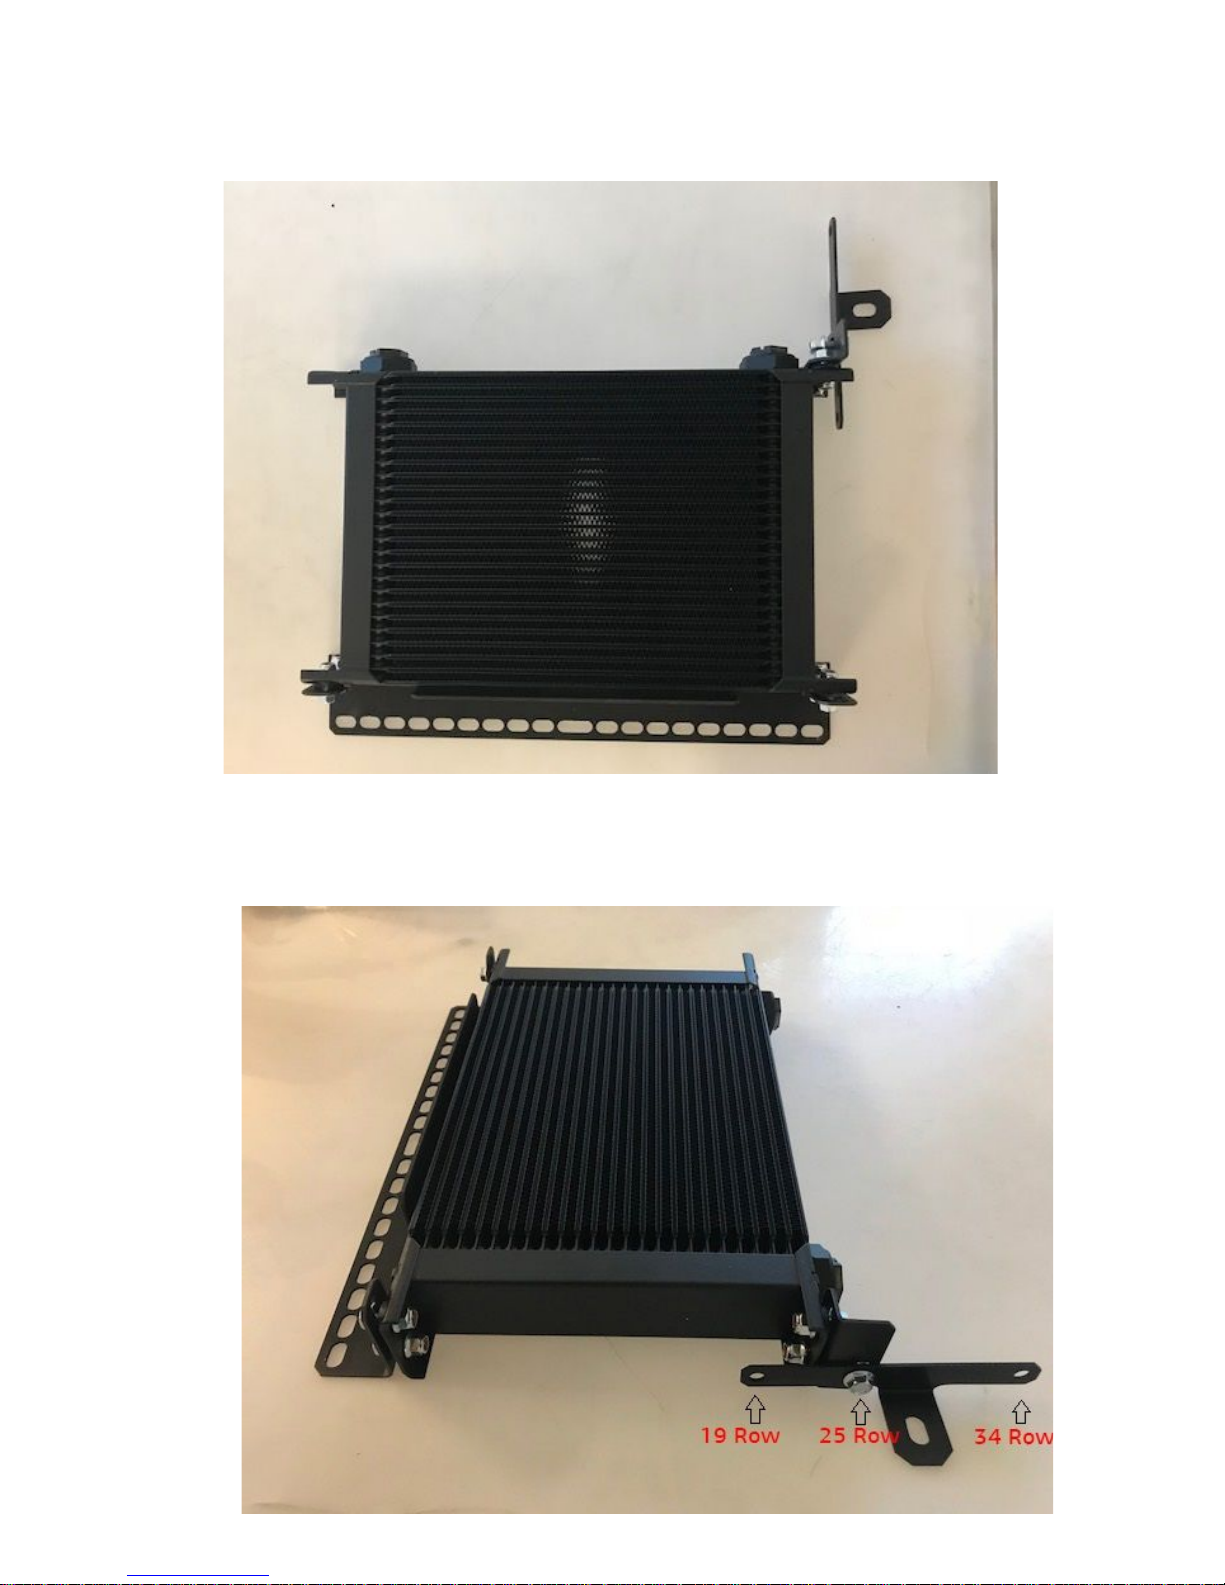
15. Attach the short upper bracket to the cooler core with the two of the supplied 10mm bolts, rubber washers and
lock nuts. When all of the brackets have been installed, your core should look something like this:
16. The mounting hole you use to secure these brackets together corresponds to the core size you’re installing:
9
Page 10
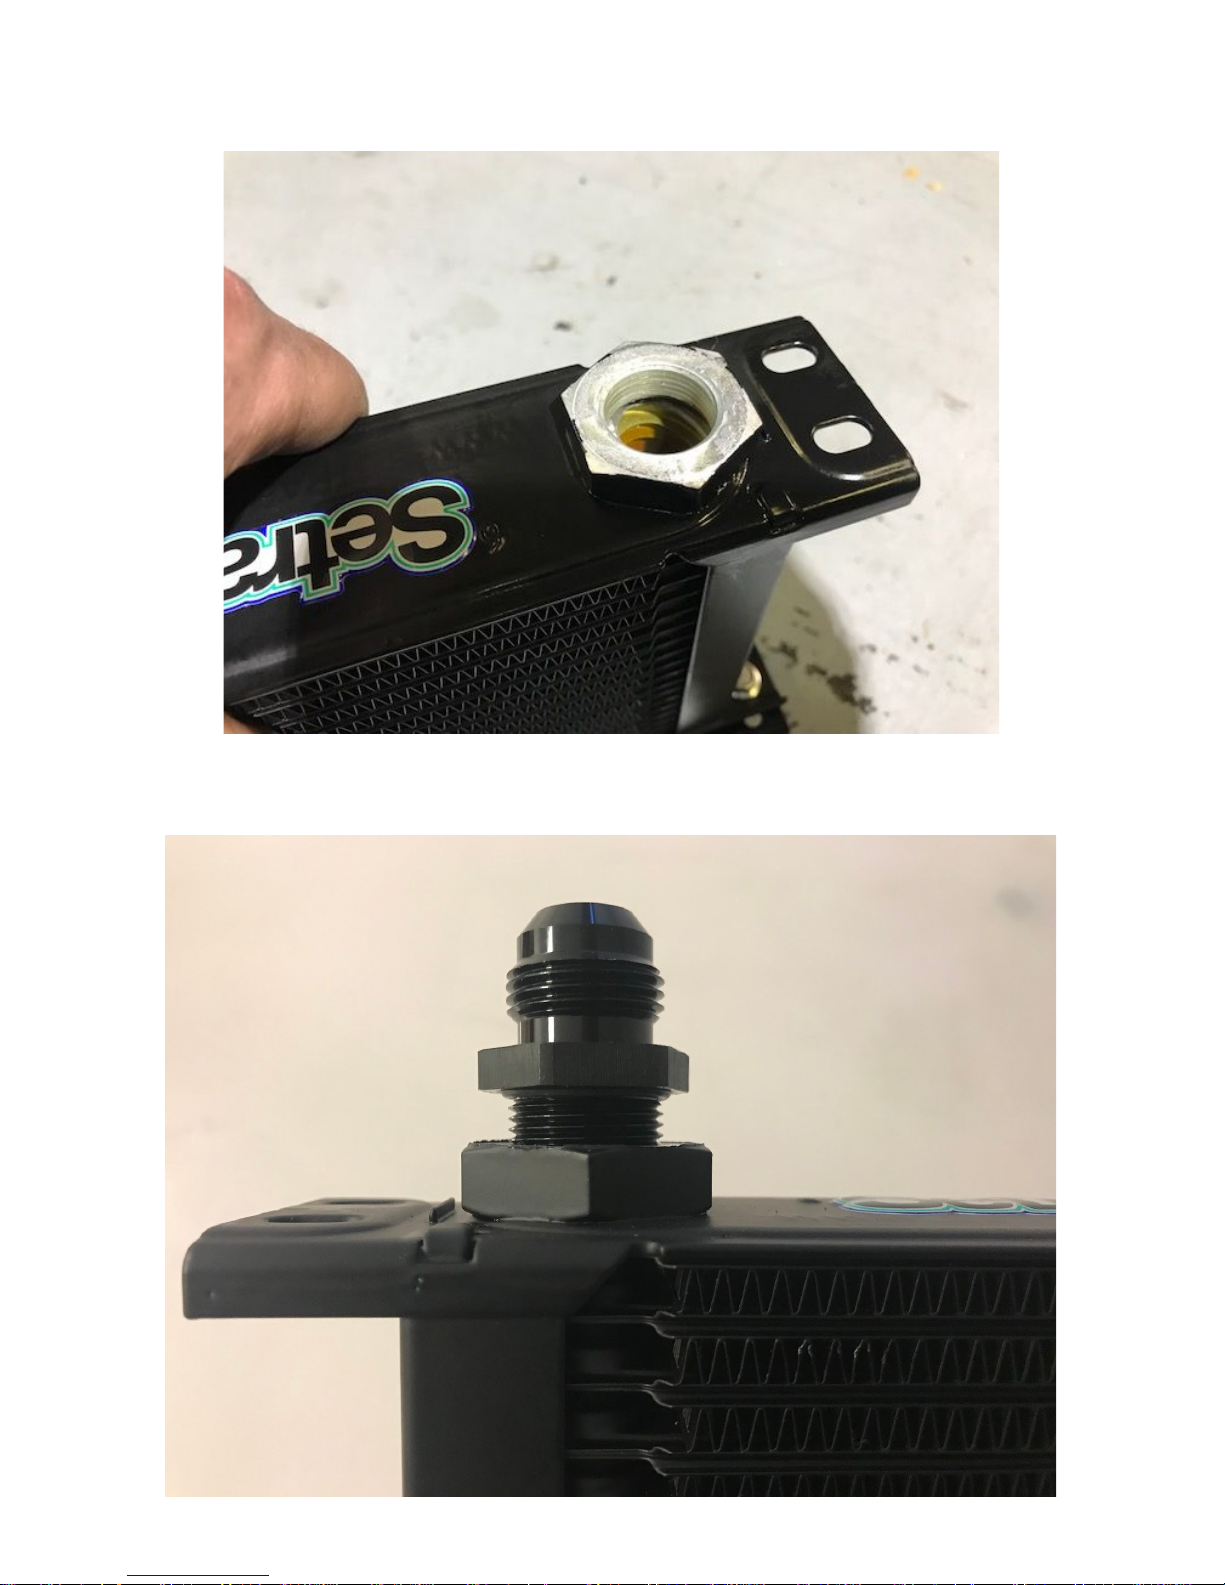
17. Fill up the cooler core all the way with fresh oil to avoid a dry start situation and to help purge all of the the air in
the lines and cooler faster.
18. Apply a dab of fresh oil to the o-ring seal and thread the -10 AN to 22mm adapter fittings to the top of the cooler
core and tighten them down.
10
Page 11
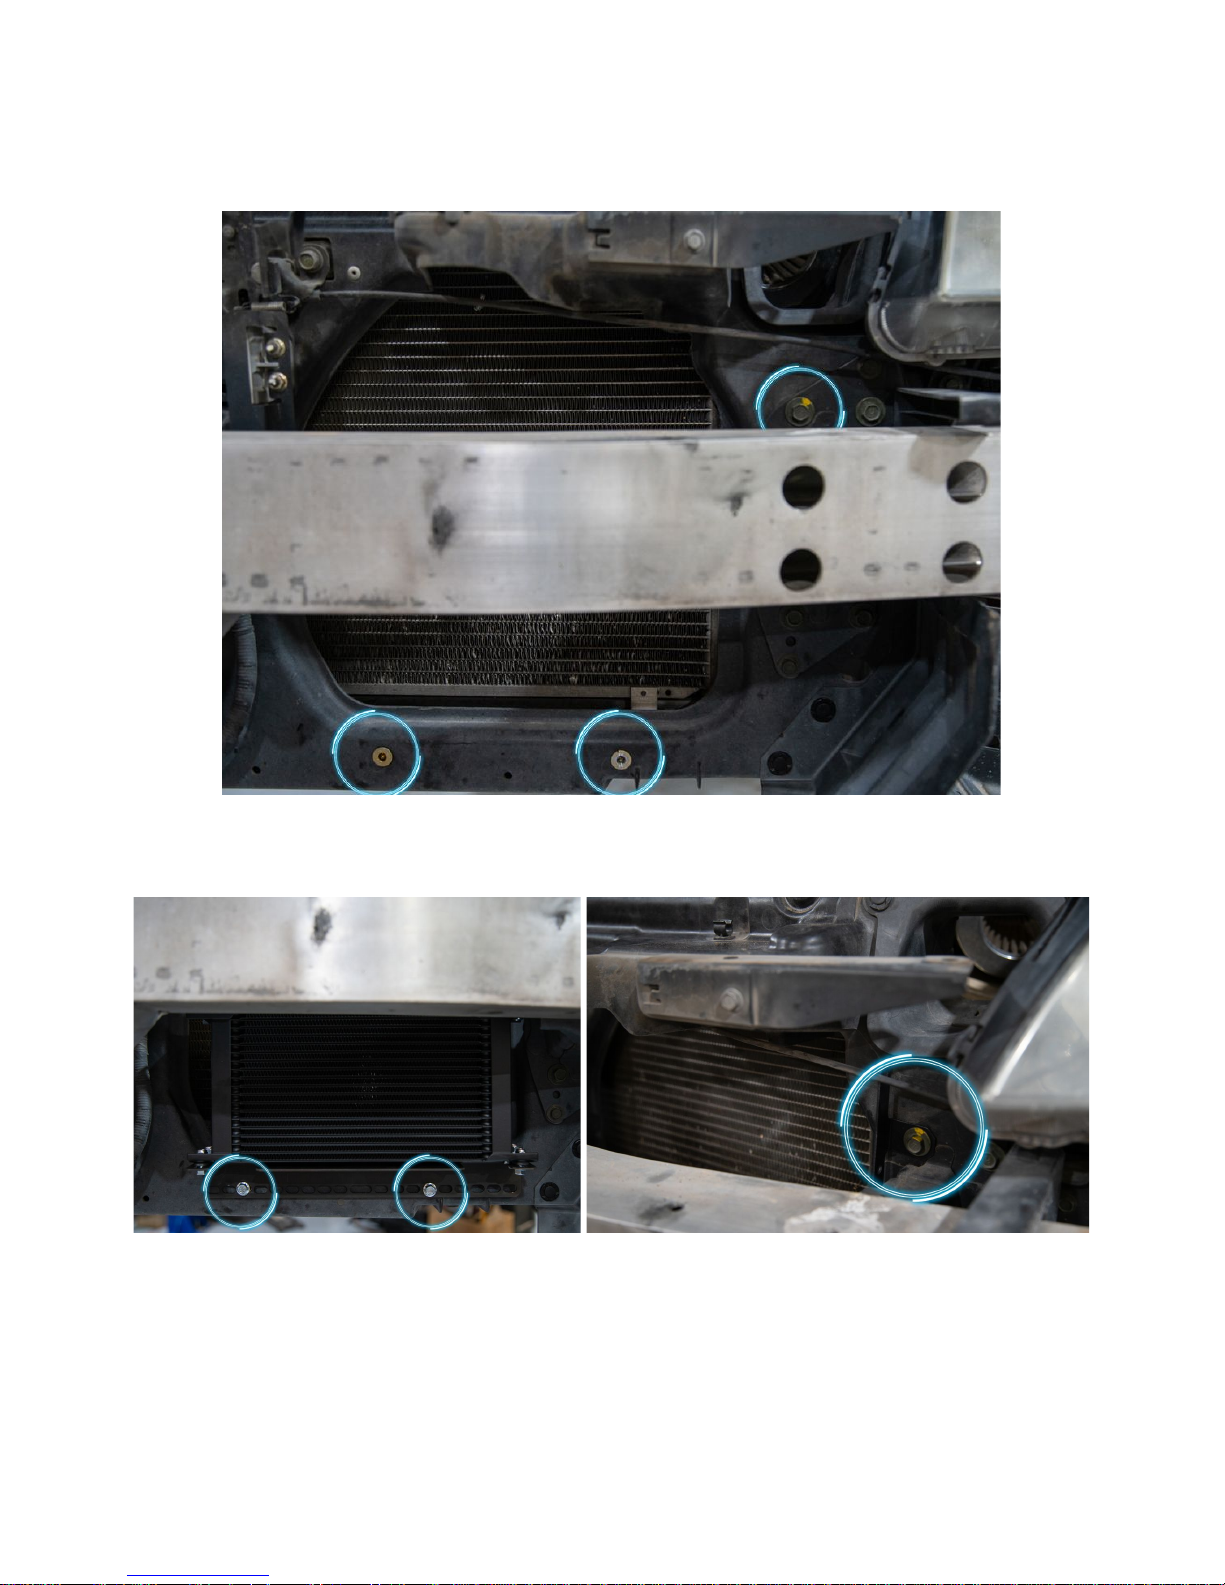
19. Remove the upper left mounting bolt for the drivers side crash support leg (top circle). This is where the long
upper oil cooler bracket will mount to. Removing the aluminum crash bar is not necessary but does free up
space and makes the install easier. The lower bracket will mount using the 2 rivnuts (bottom circles) installed in
step #7.
20. Now move the cooler into position and screw the two 10mm bottom mounting bolts into the rivnuts installed in
step #7, as well as the 12mm upper bolt that holds the upper brackets.
21. Attach the 90 degree lines to the -10 AN fittings on the cooler core and tighten them down.
22. Now that the oil cooler kit is fully installed, fill the car up with the manufacturer recommended amount of oil. We
recommend filling the car with an extra half quart of engine oil since the lines and cooler most likely still have
some air trapped inside them.
23. Start the car and check for oil leaks from the lines or cooler. If any leaks are found, shut the car off immediately
and tighten the loose fitting. Repeat step #23 until no oil leaks are present.
11
Page 12
24. Let the car sit for a minute or two, check the engine oil level and top it off as necessary.
25. Remount the front impact bar if removed in step #19.
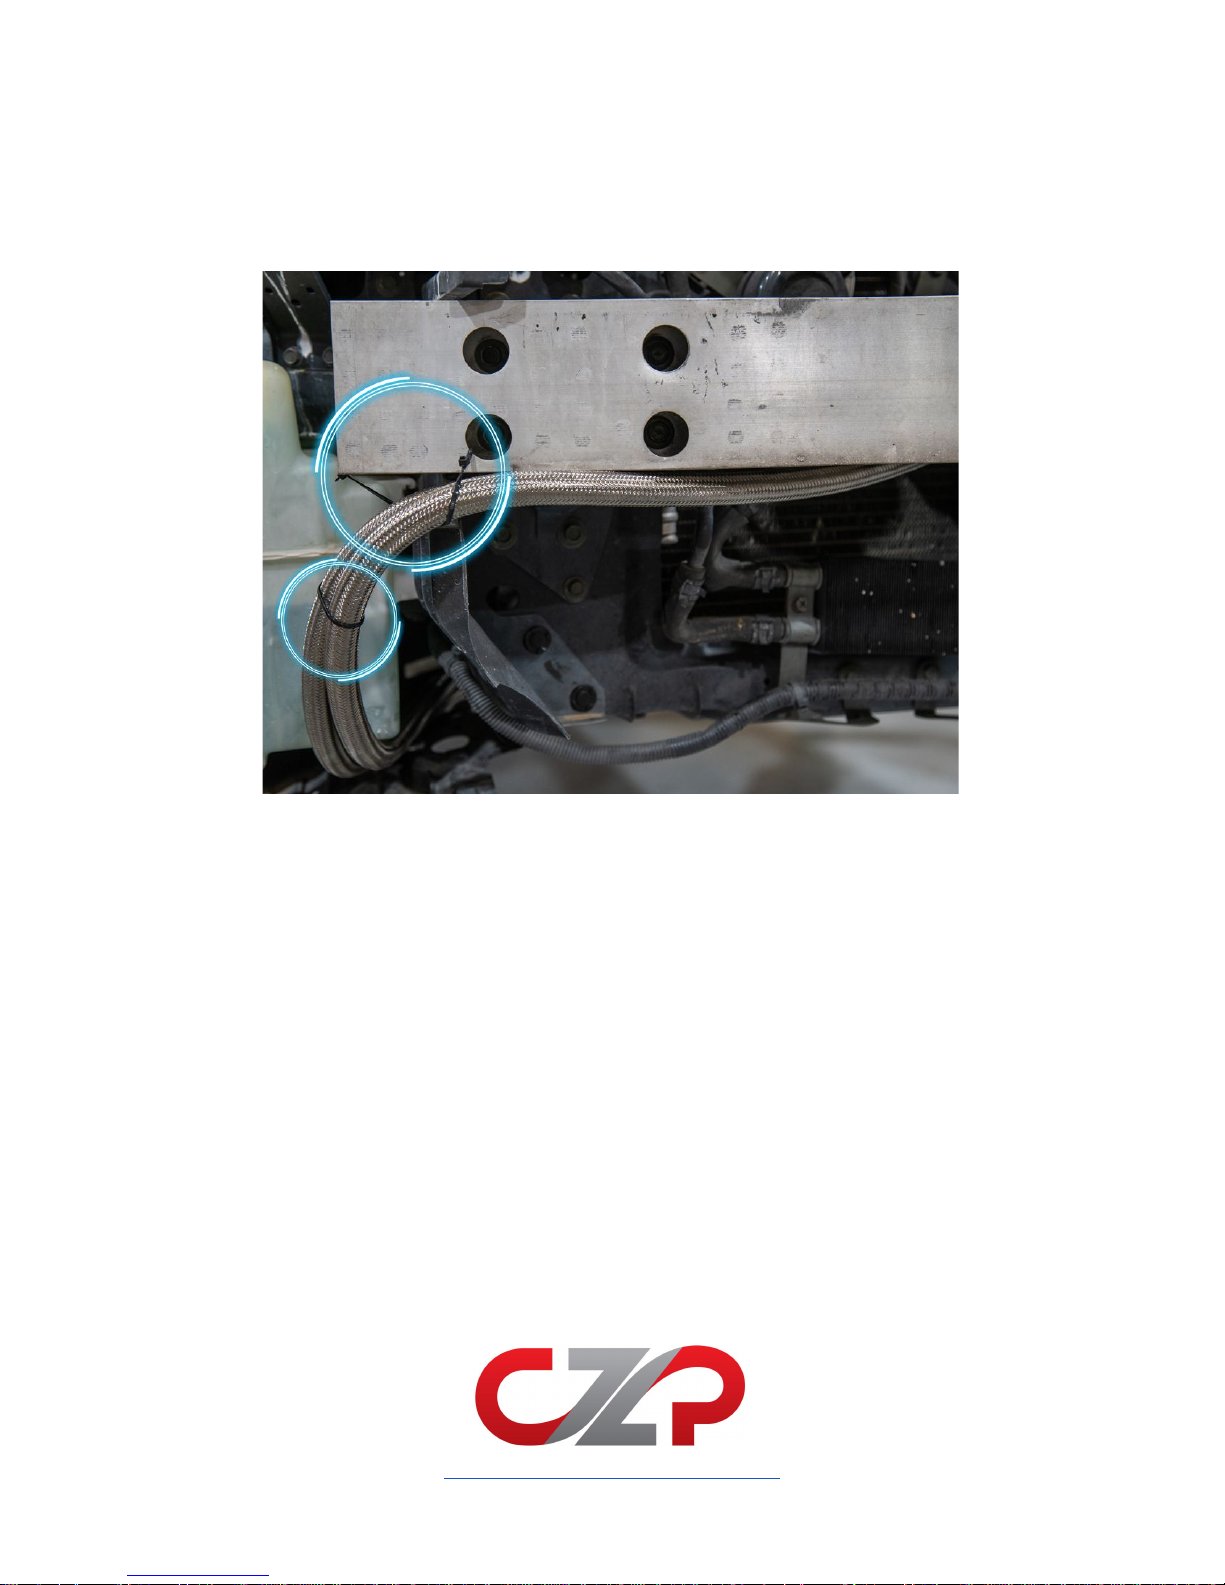
26. Secure the oil cooler lines up and out of the way with some zipties or other fasteners of your choice.
27. Reinstall the front bumper cover and splash-shield/under-tray with the 10mm bolts and plastic pop clips from
earlier.
Now you're ready to push your car to its limits without fear of overheating your engine oil!
www.conceptzperformance.com
12
 Loading...