

Page 1

Multi Language Quick Guide
CCTV Surveillance Kit
v1.0
Page 2
English
Conceptronic Surveillance Kit
1. Package contents
The following items are present in the package of the Conceptronic CCTV
Surveillance Kit:
• DVR x 1
• USB Mouse x 1
• Camera x 4
• 18.3m BNC Cables x 4
• Power Splitter Cable x 1
• Power Adaptor x 1
• Multi language quick installation guide x 1
• Software CD x 1
2. Installation & usage
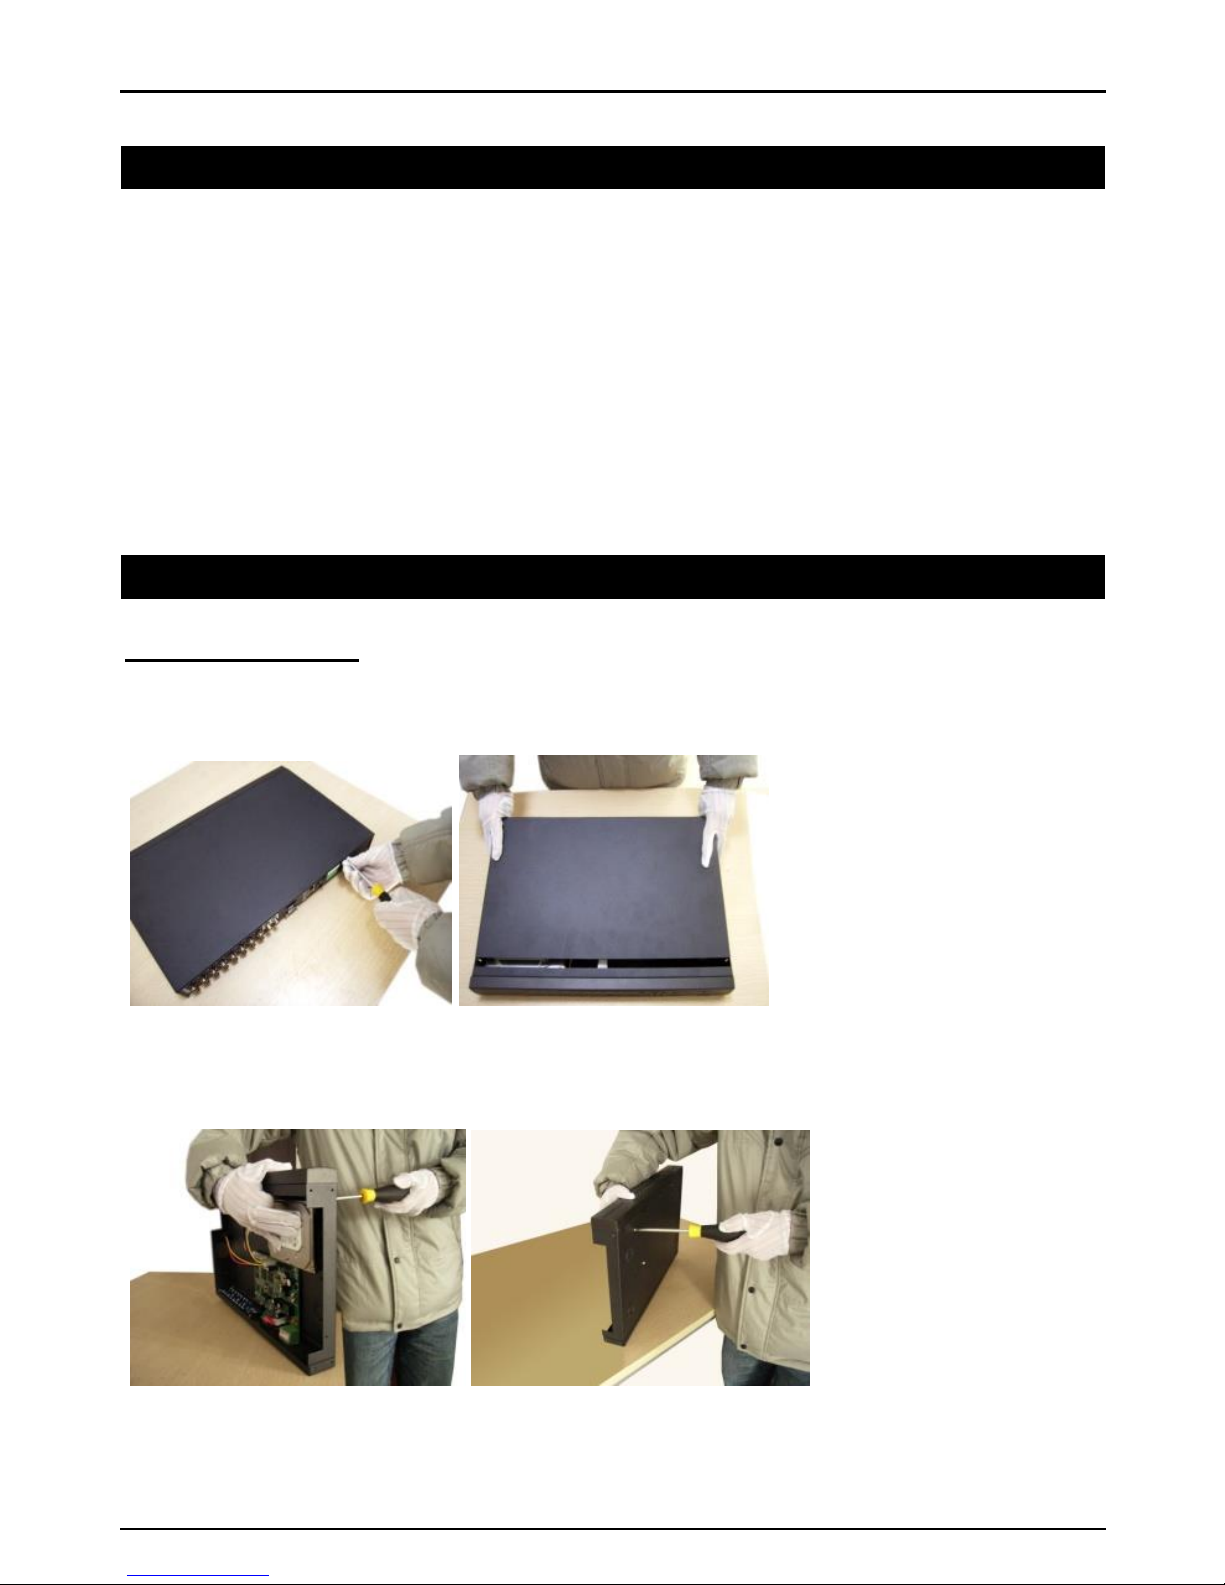
HDD Installation
Remove the screws from the upper cover of the DVR and remove the cover.
Align the HDD in the case and fasten the screws from the bottom of the DVR.
Page 3

English
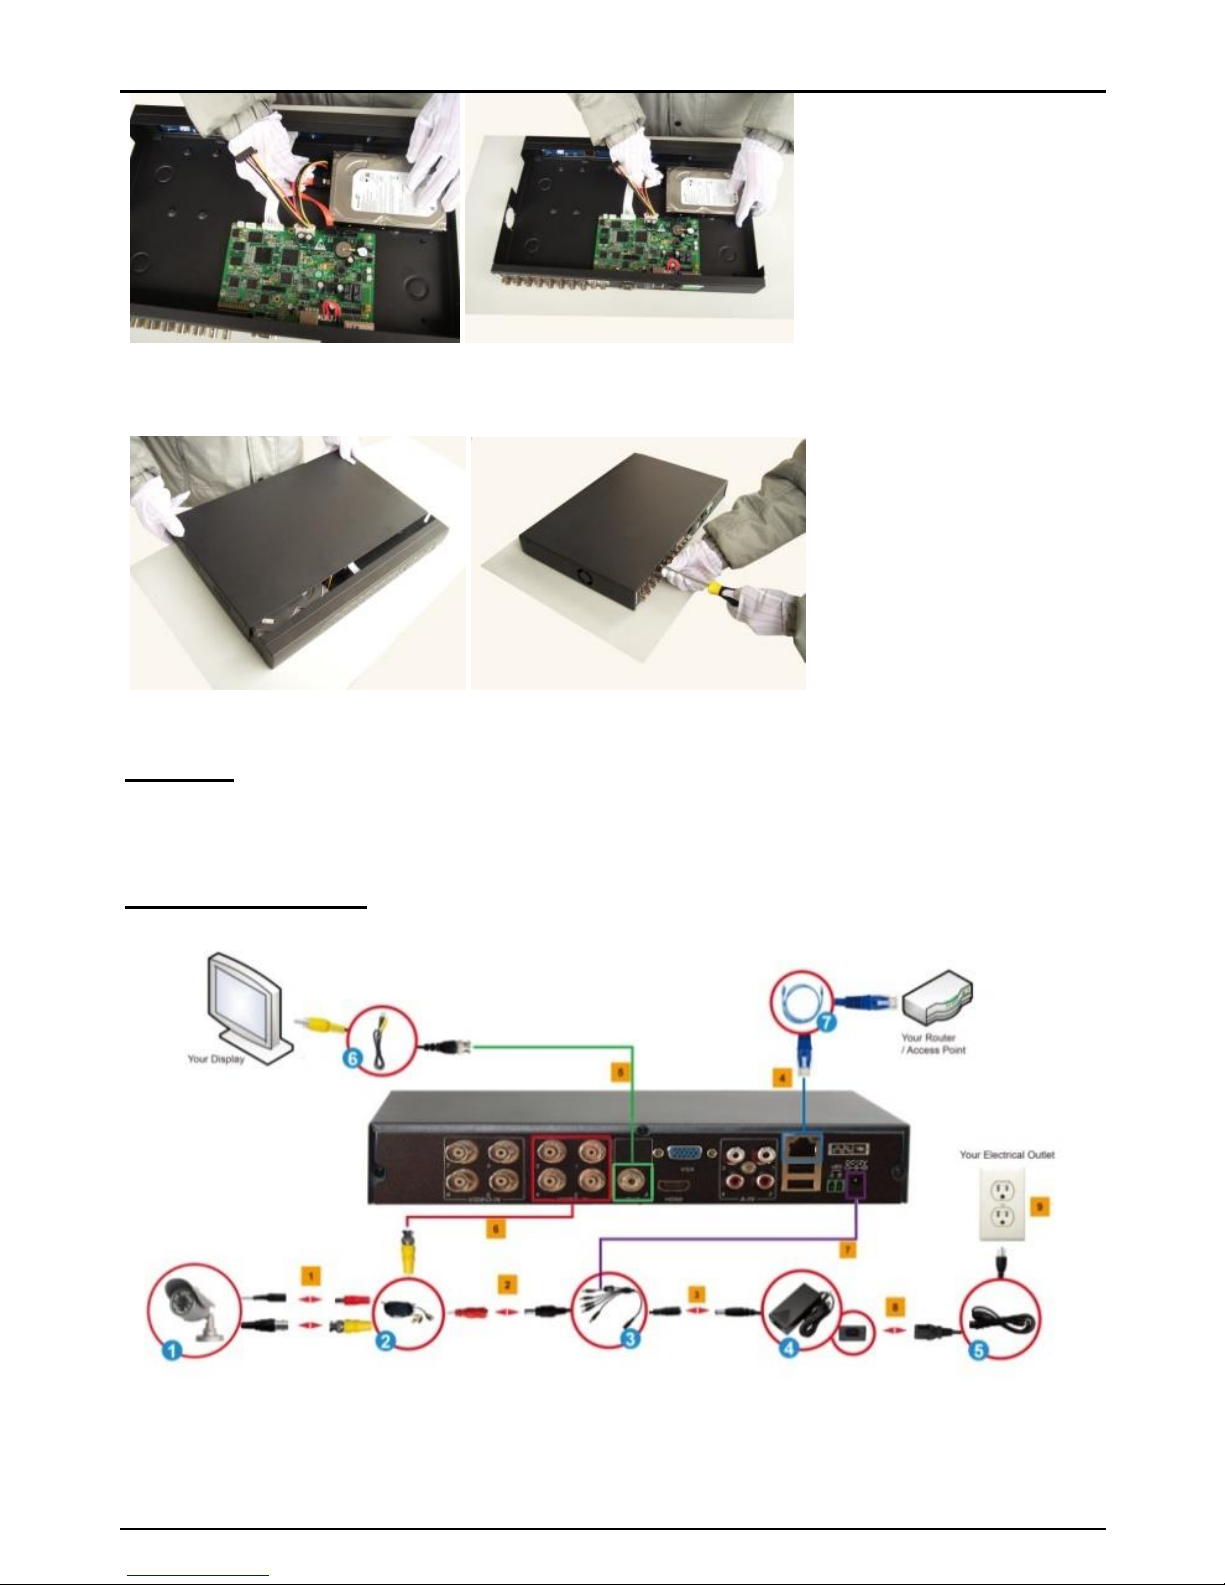
Install data and power cable for the hard disk.
Close the top cover and fasten screws.
Note: SATA hard disk inside the DVR does not support hot plugging. Please
properly connect wires in the hard disk prior to booting.
Cable Installation
1. Connect the BNC Connector and the Power Connector of the CCTV Cameras(1)
with Camera Cables(2).
2. Using the 9 way Splitter Cable(3), connect the male end of the Power
Page 4

English
Connector to the Camera Cable’s Female End of the Power
Connector(indicated in RED)(2).
3. Connect the single end of the 9 Way Splitter Cable(3) to the Power
Connector of the Adapter(4).
4. Connect one end of a Ethernet Cable(7) to the DVR and the other end to you
router/access point.
5. Connect one end of the BNC to RCA Cable(6) to your display and the other
end to the DVR. Alternatively, you can also use VGA output (VGA cable not
included).
6. Given that one end of the Camera Cable(2) is already connected to the CCTV
Camera, take the unconnected end of the BNC connector and connect it to
the respective BNC Input connectors.
7. Connect the Male End of the 9 Way Splitter Cable(3) to the DVR’ DC Power
Input Jack.
8. Connect the Power Cable(5) to the Power Adapter(4).
9. Plug the Power Cable(5) into an Electrical Outlet.
System Login: When the system is locked, click right button→"Main Menu", or
the shortcut icon on the preview screen. An user login interface
will appear. Fill user name and password in the login window
(default name is admin, no password). A successful login can be
conducted when a user inputs a correct user name and password
and presses OK for confirmation. The user then can operate the
system.
Enjoy the use of your Conceptronic CCTV Surveillance Kit!
Page 5

Deutsch
Conceptronic Surveillance Kit
1. Packungsinhalt
Folgende Teile befinden sich in der Verpackung von Conceptronic CCTV Surveillance
Kit:
• DVR x 1
• USB Mouse x 1
• Camera x 4
• 18.3m BNC Cables x 4
• Splitter Cable x 1
• Power Adaptor x 1
• Multi language quick installation guide x 1
• Software CD x 1
2. Installation & Verwendung
Festplatteninstallation
Entfernen Sie die Schrauben von der oberen Abdeckung des DVR, nehmen Sie
die Abdeckung ab.
Richten Sie die Festplatte im Gehäuse aus, ziehen Sie die Schrauben von der
Unterseite des DVR fest.
Page 6
Deutsch
Installieren Sie Daten- und Netzkabel der Festplatte.
Schließen Sie die obere Abdeckung, ziehen Sie die Schrauben fest.
Hinweis: Die SATA-Festplatte im DVR unterstützt kein Hot-Plugging. Bitte
schließen Sie die Kabel vor dem Einschalten richtig an der Festplatte
an.
Kabelinstallation
1. Verbinden Sie BNC- und Netzanschluss der CCTV-Kameras (1) mit den
Kamerakabeln (2).
Page 7

Deutsch
2. Verbinden Sie über das 9-Wege-Splitter-Kabel (3) das Steckerende des
Netzanschlusses mit dem Buchsenende des Netzanschlusses am Kamerakabel
(rot angezeigt) (2).
3. Verbinden Sie das einzelne Ende des 9-Wege-Splitter-Kabels (3) mit dem
Netzanschluss des Adapters (4).
4. Verbinden Sie ein Ende eines Netzwerkkabels (7) mit dem DVR und das
andere Ende mit Ihrem Router/Zugangspunkt.
5. Verbinden Sie ein Ende des BNC-zu-Cinch-Kabels (6) mit Ihrem Display und
das andere Ende mit dem DVR. Alternativ können Sie auch den VGA-Ausgang
nutzen (VGA-Kabel nicht enthalten).
6. Falls ein Ende des Kamerakabels (2) bereits mit der CCTV-Kamera verbunden
ist, nehmen Sie das nicht angeschlossene Ende des BNC-Anschlusses und
verbinden er mit den entsprechenden BNC-Eingängen.
7. Verbinden Sie das Steckerende des 9-Wege-Splitter-Kabels (3) mit dem
Netzeingang des DVR.
8. Schließen Sie das Netzkabel (5) am Netzteil (4) an.
9. Verbinden Sie das Netzkabel (5) mit einer Steckdose.
Systemanmeldung: Wenn das System gesperrt ist, klicken Sie mit der rechten
Maustaste → „Hauptmenü“ oder auf das
Verknüpfungssymbol im Vorschaufenster. Eine
Anmeldungsschnittstelle erscheint. Geben Sie
Benutzernamen und Kennwort im Anmeldefenster ein
(Standardname lautet admin, kein Kennwort). Eine
erfolgreiche Anmeldung kann durchgeführt werden, wenn
ein Nutzer einen richtigen Benutzernamen und ein
Kennwort eingibt; drücken Sie zum Bestätigen OK. Der
Nutzer kann das System dann bedienen.
Viel Spaß mit Ihrem Conceptronic CCTV Surveillance Kit!
Page 8

Deutsch
Page 9

FRANCAIS
Conceptronic Surveillance Kit
1. Contenu du Coffret
Les éléments suivants se trouvent dans l'emballage de votre CCTV Surveillance Kit:
• DVR x 1
• USB Mouse x 1
• Camera x 4
• 18.3m BNC Cables x 4
• Power Splitter Cable x 1
• Power Adaptor x 1
• Multi language quick installation guide x 1
• Software CD x 1
2. Installation & Utilisation
Installation du HDD
Dévissez les vis du couvercle supérieur de l’enregistreur DVR et retirez le
couvercle.
Alignez le HDD dans le boîtier et vissez-le en place depuis le bas du DVR.
Page 10

FRANCAIS
Installez le câble de données et le câble d’alimentation pour le disque dur.
Remettez le couvercle supérieur en place et revissez-le.
Remarque : le disque dur SATA à l’intérieur du DVR n’est pas compatible avec
l’enfichage à chaud. Veillez à effectuer le branchement correct des
fils du disque dur avant de démarrer le système.
Installation du câblage
1. Reliez le connecteur BNC et le connecteur d’alimentation de la caméra CCTV
(1) et les câbles de la caméra (2).
Page 11

FRANCAIS
2. À l’aide du répartiteur à 9 voies (3), branchez l’extrémité mâle du
connecteur d’alimentation sur le connecteur d’alimentation femelle de la
caméra (représenté en rouge) (2).
3. Branchez l’extrémité simple du répartiteur à 9 voies (3), sur le connecteur
d’alimentation de l’adaptateur (4).
4. Branchez une extrémité d’un câble Ethernet (7) sur le DVR et branchez
l’autre extrémité sur votre routeur / point d’accès.
5. Branchez une extrémité du câble BNC vers RCA (6) sur votre affichage et
branchez l’autre extrémité sur le DVR. Vous pouvez également utiliser la
sortie VGA (câble VGA non fourni).
6. Etant donné que l’extrémité du câble de la caméra (2) est déjà relié à la
caméra CCTV, munissez-vous de l’extrémité libre du connecteur BNC et
branchez-la sur les connecteurs d’entrée BNC correspondants.
7. Branchez l’extrémité mâle du répartiteur à 9 voies (3), sur le connecteur
d’entrée d’alimentation CC du DVR.
8. Branchez le câble d’alimentation (5) sur l’adaptateur d’alimentation (4).
9. Branchez le câble d’alimentation (5) sur une prise secteur.
Connexion au système : Lorsque le système est verrouillé, faites un clic droit
sur → « Menu principal », ou sur l’icône de raccourci
figurant sur l’écran de prévisualisation. Une interface
de connexion utilisateur s’affiche. Saisissez le nom
d’utilisateur et le mot de passe dans les champs de la
fenêtre de connexion (nom par défaut : admin ; pas
de mot de passe). La connexion est établie en
saisissant un nom d’utilisateur et un mot de passe
corrects et en appuyant sur OK pour confirmer.
L’utilisateur peut ensuite accéder au système et
l’utiliser.
Profitez de votre Conceptronic CCTV Surveillance Kit !
Page 12

ESPANOL
Conceptronic Surveillance Kit
1. Contenido del paquete
El paquete contiene los siguientes artículos de Conceptronic Surveillance Kit:
• DVR x 1
• USB Mouse x 1
• Camera x 4
• 18.3m BNC Cables x 4
• Power Splitter Cable x 1
• Power Adaptor x 1
• Multi language quick installation guide x 1
• Software CD x 1
2. Instalación & Utilización
Instalación de la unidad HDD
Quite los tornillos de la tapa superior de la DVR y retire la tapa.
Alinee la unidad HDD en la carcasa y apriete los tornillos de la parte inferior
de la DVR.
Page 13

ESPANOL
Instale los cables de datos y de alimentación para el disco duro.
Cierre la tapa superior y apriete los tornillos.
Nota: el disco duro SATA dentro de la DVR no admite la conexión en caliente.
Conecte correctamente los cables en el disco duro antes de iniciar.
Instalación de los cables
1. Conecte el conector BNC y el conector de alimentación de las cámaras CCTV
Page 14

ESPANOL
(1) a los cables de la cámara (2).
2. Mediante el cable divisor de 9 tomas (3), conecte el extremo macho del
conector de alimentación al extremo hembra del cable de la cámara del
conector de alimentación (marcado en rojo) (2).
3. Conecte el extremo único del cable divisor de 9 tomas (3) al conector de
alimentación del adaptador (4).
4. Conecte un extremo de un cable Ethernet (7) a la DVR y el otro extremo al
punto del enrutador/acceso.
5. Conecte un extremo del conector BNC al cable RCA (6) a la pantalla y el otro
extremo a la DVR. Como alternativa, también puede utilizar la salida VGA
(cable VGA no incluido).
6. Dado que uno de los extremos del cable de la cámara (2) ya está conectado
a la cámara CCTV, tome el extremo no conectado del conector BNC y
conéctelo a los conectores de entrada BNC correspondientes.
7. Conecte el extremo macho del cable divisor de 9 tomas (3) a la clavija de
entrada de corriente continua (CC) de la DVR.
8. Conecte el cable de alimentación (5) al adaptador de alimentación (4).
9. Enchufe el cable de alimentación (5) a una toma eléctrica.
Inicio de sesión del sistema: cuando el sistema esté bloqueado, haga clic con
el botón derecho del ratón→"Menú principal", o
bien en el icono de acceso directo de la pantalla
de vista previa. Aparecerá una interfaz de inicio
de sesión de usuario. Introduzca el nombre de
usuario y la contraseña en la ventana de inicio de
sesión (el nombre predeterminado es admin, sin
contraseña). El inicio de sesión se realizará
correctamente cuando el usuario escriba un
nombre de usuario y una contraseña correctos, y
presione Aceptar para confirmar. El usuario ya
puede utilizar el sistema.
Disfrute del uso de su Conceptronic CCTV Surveillance Kit.
Page 15

NEDERLANDS
Conceptronic Surveillance Kit
1. Inhoud verpakking
De volgende items zijn aanwezig in het pakket van de Conceptronic CCTV
Surveillance Kit:
• DVR x 1
• USB Mouse x 1
• Camera x 4
• 18.3m BNC Cables x 4
• Power Splitter Cable x 1
• Power Adaptor x 1
• Multi language quick installation guide x 1
• Software CD x 1
2. Installatie & Gebruik
Installatie harde schijf
Draai de schroeven uit de bovenkap van de DVR en verwijder de kap.
Lijn de harde schijf uit in de kast en draai de schroeven in vanaf de onderkant
van de DVR.
Page 16

NEDERLANDS
Installeer de data- en voedingskabel voor de harde schijf.
Sluit de bovenkap en plaats de schroeven terug.
NB: De SATA-harde schijf in de DVR ondersteunt hot plugging niet. Sluit de
draden goed aan op de harde schijf voordat u opstart.
Installatie kabels
1. Sluit de BNC-connector en de voedingsconnector van de CCTV-camera's (1)
Page 17

NEDERLANDS
aan met camerakabels (2).
2. Gebruik de 9-wegs splitskabel (3) om het male-einde van de
voedingsconnector aan te sluiten op het female-einden van de camerakabel
van de voedingsaansluiting (ROOD gemarkeerd) (2).
3. Sluit het enkele einde van de 9-wegs splitskabel (3) aan op de
voedingsconnector van de adapter (4).
4. Sluit één einde van een Ethernetkabel (7) aan op de DVR en het andere
einde op uw router/access point.
5. Sluit één einde van de BNC-naar-RCA-kabel (6) aan op het scherm en het
andere einde op de DVR. U kunt ook de VGA-uitgang gebruiken (VGA-kabel
niet meegeleverd).
6. Omdat één eind van de camerakabel (2) al is aangesloten op de CCTV-
camera, steekt u het niet-aangesloten einde van de BNC-connector en
verbind u deze met de betreffende BNC-ingangen.
7. Sluit het male-einde van de 9-wegsplitskabel (3) aan op de voedingsingang
van de DVR.
8. Sluit het netsnoer (5) aan op de voedingsadapter (4).
9. Steek het netsnoer (5) in een stopcontact.
Aanmelden bij systeem: Als het systeem vergrendeld is, rechtsklikt
u→"Hoofdmenu", of op het pictogram op het
voorbeeldscherm. Een aanmeldvenster verschijnt. Typ
de gebruikersnaam en het wachtwoord in het
aanmeldvenster (standaardnaam admin, geen
wachtwoord). Aanmelden is geslaagd als de gebruiker
een juiste gebruikersnaam en wachtwoord typt en op
OK drukt ter bevestiging. Daarna kan de gebruiker het
systeem bedienen.
Veel plezier met uw Conceptronic CCTV Surveillance Kit!
Page 18

ITALIANO
Conceptronic Surveillance Kit
1. Pakkens indhold
La confezione di Conceptronic CCTV Surveillance Kit contiene gli elementi che
seguono:
• DVR x 1
• USB Mouse x 1
• Camera x 4
• 18.3m BNC Cables x 4
• Power Splitter Cable x 1
• Power Adaptor x 1
• Multi language quick installation guide x 1
• Software CD x 1
2. Installazione & Uso
Installazione HDD
Rimuovere le viti dal coperchio superiore del DVR e rimuovere il coperchio.
Allineare l’unità HDD al case e serrare le viti dal fondo del DVR.
Page 19

ITALIANO
Installare il cavo dati e d’alimentazione per il disco rigido.
Chiudere il coperchio e stringere le viti.
Nota: Il disco rigido SATA all'interno del DVR non supporta il collegamento a
caldo. Collegare i cavi in modo appropriato del disco rigido prima di
avviarlo.
Installazione dei cavi
1. Collegare il connettore BNC e il connettore d’alimentazione delle
Page 20

ITALIANO
telecamere a circuito chiuso (1) con i cavi telecamera (2).
2. Utilizzando il cavo splitter a 9 vie (3), collegare l’estremità maschio del
connettore d’alimentazione all’estremità femmina del cavo d’alimentazione
della telecamera (indicata in ROSSO) (2).
3. Collegare l'estremità singola del cavo splitter a 9 vie (3) al connettore
d’alimentazione della scheda (4).
4. Collegare l’estremità di un cavo Ethernet (7) al DVR e l'altra estremità al
router/punto d’accesso.
5. Collegare un'estremità del cavo BNC a RCA (6) allo schermo e l'altra
estremità al DVR. In alternativa, è possibile utilizzare anche l'uscita VGA
(cavo VGA non incluso).
6. Dato che una delle estremità del cavo della telecamera (2) è già collegato
alla telecamera a circuito chiuso, prendere l'estremità libera del connettore
BNC e collegarla ai rispettivi connettori d’ingresso BNC.
7. Collegare l’estremità maschio del cavo splitter a 9 vie (3) al connettore
ingresso DC del DVR.
8. Collegare il cavo d’alimentazione (5) all'adattatore di corrente (4).
9. Inserire il cavo di alimentazione (5) in una presa elettrica.
Accesso al sistema: Quando il sistema è bloccato, fare clic sul tasto a destra →
"Menu principale", oppure sull'icona di collegamento nella
schermata d’anteprima. Apparirà una interfaccia d’accesso
utente Inserire il nome utente e la password nella finestra
d’accesso (il nome predefinito è admin, senza password).
L’accesso corretto si esegue inserendo i dati appropriati
per nome utente e password corretta e premendo OK per
la conferma. L'utente può quindi usare il sistema.
Godetevi l'uso di Conceptronic CCTV Surveillance Kit!
Page 21

ΕΛΛΗΝΙΚΆ
Conceptronic Surveillance Kit
1. Περιεχόμενα συσκευασίας
Τα ακόλουθα στοιχεία υπάρχουν στη συσκευασία του Conceptronic CCTV
Surveillance Kit:
• DVR x 1
• USB Mouse x 1
• Camera x 4
• 18.3m BNC Cables x 4
• Power Splitter Cable x 1
• Power Adaptor x 1
• Multi language quick installation guide x 1
• Software CD x 1
2. Εγκατάσταση & χρήση
Εγκατάσταση HDD
Αφαιρέστε τις βίδες από το επάνω κάλυμμα του DVR και αφαιρέστε το κάλυμμα.
Ευθυγραμμίστε το HDD στη θήκη και συνδέστε τις βίδες από το κάτω μέρος του
DVR.
Page 22

ΕΛΛΗΝΙΚΆ
Εγκαταστήστε δεδομένα και το καλώδιο τροφοδοσίας για τον σκληρό δίσκο.
Κλείστε το επάνω κάλυμμα και προσαρτήστε τις βίδες.
Σημείωση: Ο σκληρός δίσκος SATA μέσα στο DVR δεν υποστηρίζει ταχεία
σύνδεση. Συνδέστε σωστά τα καλώδια στον σκληρό δίσκο πριν την
εκκίνηση.
Εγκατάσταση Καλωδίου
Page 23

ΕΛΛΗΝΙΚΆ
1. Συνδέστε τον Σύνδεσμο BNC και τον Σύνδεσμο ρεύματος των Φωτογραφικών
μηχανών CCTV (1) με τα Καλώδια της φωτογραφικής μηχανής (2).
2. Χρησιμοποιώντας το Καλώδιο διαχωριστή 9οδών (3), συνδέστε το αρσενικό
άκρο του Συνδέσμου ρεύματος στο Θηλυκό άκρο του Συνδέσμου ρεύματος
του καλωδίου της φωτογραφικής μηχανής (υποδεικνύεται σε ΚΟΚΚΙΝΟ) (2).
3. Συνδέστε το μεμονωμένο άκρο του 9οδου Καλωδίου διαχωριστή (3) στον
Σύνδεσμο ρεύματος του τροφοδοτικού (4).
4. Συνδέστε ένα άκρο ενός καλωδίου Ethernet (7) στο DVR και το άλλο άκρο
στον διακομιστή/σημείο πρόσβασης.
5. Συνδέστε το ένα άκρο του καλωδίου BNC προς RCA (6) στην οθόνη σας και το
άλλο άκρο στο DVR. Εναλλακτικά, μπορείτε επίσης να χρησιμοποιήσετε την
έξοδο VGA (το καλώδιο VGA δεν περιλαμβάνεται).
6. Δεδομένου ότι το ένα άκρο του Καλωδίου της Φωτογραφικής μηχανής (2)
συνδέεται ήδη στην Φωτογραφική μηχανή CCTV, πάρτε το μη συνδεδεμένο
άκρο του συνδέσμου BNC και συνδέστε το στους αντίστοιχους συνδέσμους
Εισόδου BNC.
7. Συνδέστε το Αρσενικό άκρο του 9-οδου Καλωδίου Διαχωριστή (3) στην
Υποδοχή εισόδου ρεύματος DC του DVR.
8. Συνδέστε το Καλώδιο Ρεύματος (5) στο Τροφοδοτικό ρεύματος (4).
9. Εισάγετε το Καλώδιο Ρεύματος (5) σε μία Ηλεκτρική πρίζα.
Σύνδεση συστήματος: Όταν κλειδώσει το σύστημα, κάντε κλικ στο δεξί κουμπί
→"Κύριο Μενού", ή στο εικονίδιο συντόμευσης στην
οθόνη προεπισκόπησης. Θα εμφανιστεί μία διεπαφή
σύνδεσης χρήστη. Συμπληρώστε το όνομα χρήστη στο
παράθυρο σύνδεσης (το προεπιλεγμένο όνομα είναι
admin, χωρίς κωδικό πρόσβασης). Μία επιτυχής
σύνδεση μπορεί να διεξαχθεί όταν ένας χρήστης εισάγει
ένα σωστό όνομα χρήστη και ένα κωδικό πρόσβασης και
πατήσει ΟΚ για επιβεβαίωση. Τότε ο χρήστης μπορεί να
λειτουργήσει το σύστημα.
Απολαύστε τη χρήση του
Conceptronic CCTV Surveillance Kit σας!
Page 24

PORTUGUÊS
Conceptronic Surveillance Kit
1. Conteúdo da embalagem
A embalagem do Conceptronic CCTV Surveillance Kit contém os seguintes itens:
• DVR x 1
• USB Mouse x 1
• Camera x 4
• 18.3m BNC Cables x 4
• Power Splitter Cable x 1
• Power Adaptor x 1
• Multi language quick installation guide x 1
• Software CD x 1
2. Instalação & Utilização
Instalação do HDD
Desaperte os parafusos da tampa superior do DVR e retire a tampa.
Alinhe o HDD na caixa e aperte os parafusos na parte inferior do DVR.
Page 25

PORTUGUÊS
Instale o cabo de dados e de alimentação para o disco rígido.
Volte a colocar a tampa superior e aperte os parafusos.
Nota: O disco rígido SATA no interior do DVR não suporta hot plugging. Ligue
correctamente os cabos ao disco rígido antes do arranque.
Instalação dos cabos
1. Ligue o conector BNC e o conector de alimentação das câmaras do circuito
fechado de televisão (1) aos cabos das câmaras (2).
2. Utilizando o cabo divisor com 9 saídas (3) ligue a extremidade macho do
Page 26

PORTUGUÊS
conector de alimentação à extremidade fêmea do cabo da câmara do
conector de alimentação (indicado a VERMELHO) (2).
3. Ligue a extremidade simples do cabo divisor com 9 saídas (3) ao conector de
alimentação do adaptador (4).
4. Ligue uma extremidade de um cabo Ethernet (7) ao DVR e a outra
extremidade ao seu router/ponto de acesso.
5. Ligue uma extremidade do cabo RCA (6) ao monitor e a outra extremidade
ao DVR. Em alternativa, pode igualmente utilizar a saída VGA (cabo VGA não
incluído).
6. Visto que uma extremidade do cabo das câmaras (2) já se encontra ligado à
câmara do circuito fechado de televisão, ligue a extremidade não ligada do
conector BNC aos respectivos conectores de entrada BNC.
7. Ligue a extremidade macho do cabo divisor com 9 saídas (3) à ficha de
entrada de energia CC do DVR.
8. Ligue o cabo de alimentação (5) ao transformador (4).
9. Ligue o cabo de alimentação (5) a uma tomada eléctrica.
Início de sessão no sistema: Quando o sistema está bloqueado, clique no
botão direito→"Menu principal", ou clique no
ícone do atalho no ecrã de pré-visualização. Será
apresentada uma interface de início de sessão do
utilizador. Introduza o nome de utilizador e a
respectiva palavra-passe na janela de início de
sessão (o nome predefinido é admin, sem
palavra-passe). Ao introduzir correctamente um
nome de utilizador e respectiva palavra-passe,
confirmando de seguida ao premir o botão OK, a
sessão será iniciada com êxito. O utilizador pode,
então, navegar pelo sistema.
Desfrute do seu Conceptronic CCTV Surveillance Kit!
Page 27

PУССКИЙ
Conceptronic Surveillance Kit
1. Комплект поставки
В комплекте Conceptronic Surveillance Kit имеются следующие предметы:
• DVR x 1
• USB Mouse x 1
• Camera x 4
• 18.3m BNC Cables x 4
• Power Splitter Cable x 1
• Power Adaptor x 1
• Multi language quick installation guide x 1
• Software CD x 1
2. Установка & использование
Установка жесткого диска
Извлеките винты из верхней крышки цифрового видеорегистратора (DVR) и
снимите крышку.
Выровняйте жесткий диск в корпусе и закрепите винтами внизу цифрового
видеорегистратора (DVR).
Page 28

PУССКИЙ
Подключите кабель передачи данных и питания для жесткого диска.
Закройте верхнюю крышку и затяните винты.
Примечание: Жесткий диск SATA внутри цифрового
видеорегистратора (DVR) не поддерживает функцию
«горячего подключения». Перед загрузкой правильно
подключите провода к жесткому диску.
Установка кабеля
1. Подключите BNC-соединитель и разъем питания камер видеонаблюдения
Page 29

PУССКИЙ
(1) с помощью камерного кабеля (2).
2. Используя 9-сторонний разветвитель (3), подключите вставной конец
разъема питания к гнезду камерного кабеля в разъеме питания (показано
КРАСНЫМ)(2).
3. Подключите один конец 9-стороннего разветвителя (3) к разъему питания
адаптера (4).
4. Подключите один конец кабеля Ethernet (7) к цифровому
видеорегистратору (DVR), а другой конец к маршрутизатору/точке
доступа.
5. Подключите один конец кабеля «BNC to RCA» (6) к дисплею, а другой
конец к цифровому видеорегистратору (DVR). Кроме того, можно
использовать выход VGA (VGA кабель не входит в комплект поставки).
6. При условии, что один конец камерного кабеля (2) уже подключен к
камере видеонаблюдения, возьмите неподключенный конец BNC-
соединителя и подключите его к соответствующим входным BNC-
соединителям.
7. Подключите вставной конец 9-стороннего разветвителя (3) к входному
разъему питания постоянного тока цифрового видеорегистратора (DVR).
8. Подключите кабель питания (5) к адаптеру питания (4).
9. Включите кабель питания (5) в электрическую розетку.
Вход в систему: В том случае, если система заблокирована, щелкните
правой кнопкой мыши→«Главное меню» или ярлык на
экране предварительного просмотра. На экран выводится
пользовательский интерфейс входа в систему. Введите
имя пользователя и пароль в окне входа (имя по
умолчанию: admin, пароля нет). Вход в систему
выполняется успешно, если пользователь правильно ввел
имя пользователя и пароль, и нажал на кнопку ОК для
подтверждения. Затем пользователь сможет управлять
системой.
Желаем вам приятного использования
Conceptronic CCTV Surveillance Kit!
Page 30

POLSKI
Conceptronic Surveillance Kit
1. Zawartość opakowania
Na opakowaniu Conceptronic CCTV Surveillance Kit znajdują się następujące
elementy.
• DVR x 1
• USB Mouse x 1
• Camera x 4
• 18.3m BNC Cables x 4
• Power Splitter Cable x 1
• Power Adaptor x 1
• Multi language quick installation guide x 1
• Software CD x 1
2. Instalacji & stosowanie
Instalacja dysku twardego
Odkręć śruby od pokrywy górnej DVR i zdejmij pokrywę.
Dopasuj dysk twardy do obudowy i dokręć śruby od spodu DVR.
Page 31

POLSKI
Zainstaluj kabel danych i zasilania dysku twardego.
Zamknij pokrywę górną i dokręć śruby.
Uwaga: Dysk twardy SATA wewnątrz DVR nie obsługuje funkcji podłączania bez
wyłączania. Przed uruchomieniem należy prawidłowo podłączyć
przewody.
Instalacja okablowania
Page 32

POLSKI
1. Połącz złącze BNC i złącze zasilania kamer CCTV (1) z kablami kamery (2).
2. Używając 9 kierunkowego kabla rozdzielającego (3), połącz męski koniec
złącza zasilania żeńskiego kabla kamery (oznaczony kolorem czerwonym) (2).
3. Podłącz pojedyncze złącze 9 kierunkowego kabla rozdzielającego (3) do
złącza zasilania adaptera (4).
4. Podłącz jeden koniec kabla Ethernet (7) do DVR, a drugi koniec do
routera/punktu dostępowego.
5. Podłącz jeden koniec kabla BNC do RCA (6) do wyświetlacza, a drugi koniec
do DVR. Alternatywnie, można także użyć wyjścia VGA (kabel VGA
niedostarczony).
6. Przy założeniu, że jeden koniec kabla kamery (2) jest już podłączony do
kamery CCTV, podłącz niepodłączony koniec złącza BNC do odpowiedniego
złącza wejścia BNC.
7. Podłącz męski koniec 9 kierunkowego rozdzielacza (3) do gniazda wejścia
prądu stałego DVR.
8. Podłącz kabel zasilający (5) do adaptera zasilania (4).
9. Podłącz kabel zasilający (5) do gniazdka elektrycznego.
Logowanie do systemu: Po zablokowaniu sytemu, kliknij prawym przyciskiem
przycisk →"Menu główne", lub ikonę skrótu na ekranie
podglądu. Pojawi się interfejs logowania. Wprowadź
nazwę użytkownika i hasło w oknie logowania
(domyślna nazwa to admin, brak hasła). Pomyślne
logowanie można wykonać po wprowadzeniu przez
użytkownika prawidłowej nazwy użytkownika i hasła
oraz naciśnięciu OK w celu potwierdzenia. Następnie
użytkownik może rozpocząć korzystanie z systemu.
Rozpocznij korzystanie z
Conceptronic CCTV Surveillance Kit!
 Loading...