

Page 1
CM3G(P)(P) Remote Control
41
1
2
3
4
5
6
40
38
36
39
37
8
10
17
19
20
7
9
11
12
13
14
15
16
18
35
33
31
29
28
27
26
25
23
34
32
30
24
22
21
Page 2

NEDERLANDS
Conceptronic Media Giant
Gebruiksaanwijzing
Gefeliciteerd met uw nieuwe
In deze gebruiksaanwijzing vindt u stap-voor-stap instructies voor installatie en gebruik van de
Conceptronic mediarecorder en -speler.
Bij problemen kunt u het beste naar onze support-site gaan (www.conceptronic.net
Daar vindt u een database met veel gestelde vragen (FAQ).
Als u een vraag over dit product heeft die niet op onze website wordt beantwoord, kunt u ons e-mailen op
support@conceptronic.net
Ga voor meer informatie over Conceptronic producten naar de Conceptronic website:
www.conceptronic.net
Tip: De firmware van de Conceptronic Media Giant kan worden bijgewerkt. Om uw apparaat bij te werken
met de nieuwste firmware-versie gaat u naar de Conceptronic website, of gebruikt u de firmware
upgrade optie van de Media Giant.
Tip: Ga naar www.conceptronic.net voor de nieuwste lijst met codecs voor de ondersteunde
bestandsindelingen.
U vindt de volgende items in de verpakking van de Conceptronic mediarecorder en -speler:
• Conceptronic Media Giant (in deze gebruiksaanwijzing aangeduid als "de speler" of "Media Giant"). **
De verpakking bevat een van de volgende drie modellen:
CM3G [C08-130]:
CM3GP [C08-131]:
CM3GPP [C08-132]:
• Netsnoer.
• Afstandsbediening met batterij (batterijtype CR2025).
• Antennekabel.
• Composiet videokabel (met drie tulpstekkers: rood, wit en geel).
• S-videokabel.
• Component videokabel (met drie tulpstekkers: rood, groen en blauw).
• Coaxiale digitale audiokabel (zwarte tulpstekkers).
• Scartadapter voor composiet videokabel/s-videokabel.
• HDMI A/V kabel (HDMI 1.3).
• Netwerk kabel.
• Usb-kabel.
• Deze gebruiksaanwijzing.
Conceptronic mediarecorder en -speler
- klik op Support).
1. Inhoud van de verpakking
Media Giant zonder tuner (alleen AV-ingang).
Media Giant met analoge tuner.
Media Giant met analoge tuner en Powerline adapter.
BELANGRIJK:
Bepaalde mogelijkheden die in deze gebruiksaanwijzing worden besproken zijn alleen van toepassing
voor de CM3GP (met analoge tuner) en/of de CM3GPP (met analoge tuner en Powerline adapter). Deze
mogelijkheden worden aangegeven door **.
1
Page 3

NEDERLANDS
2. Mogelijkheden
• Ingebouwde Powerline netwerkadapter. **
• Ingebouwde tv-tuner met automatische zenderzoeker. **
• Opname tv-signaal. **
• Opname AV-signaal van bijvoorbeeld een videorecorder, dvd-speler of videocamera.
• Dv-ingang voor weergave/opname van een dv-videocamera.
• Opname op interne harde schijf.
• Uitgangsresolutie tot 1080i.
• Weergaveresolutie tot 1080i.
• Neemt bestanden in dvd-kwaliteit op (MPEG2-formaat, kan worden weergegeven op pc's en andere
mediaspelers).
• Opnamemogelijkheden: directe eentoetsopname, geprogrammeerde opname, timeshift (pauze
tijdens tv-uitzending).
• Weergave van MPEG1/2/4, MP3, WMA, JPG bestanden die op de interne harde schijf of op een usb-
apparaat staan.
• Kopiëren van bestanden van een usb-apparaat of netwerklocatie naar de interne harde schijf.
• Automatische omschakeling tussen mediaspeler en usb-opslagapparaat voor pc:
Wanneer de speler via usb met een pc verbonden is, gedraagt hij zich als usb-opslagapparaat.
Wanneer hij niet via usb met een pc verbonden is, gedraagt hij zich als mediaspeler.
3. Opmerkingen en voorzorgen
• Probeer de speler niet uit elkaar te halen. Dit kan leiden tot verwondingen door elektriciteit met een
hoge spanning.
• Houd de speler uit de buurt van te vochtige situaties.
• Stel de speler niet bloot aan vloeistoffen en voorkom dat hij wordt ondergedompeld.
• Haal de stekker uit het stopcontact als u de speler langere tijd niet wilt gebruiken.
• Zorg ervoor dat het stopcontact waarop de Media Giant is aangesloten makkelijk bereikbaar is.
• Gebruik de speler niet in de buurt van brandbare stoffen.
• Vervang de batterij van de afstandsbediening door hetzelfde type wanneer hij leeg is. Lever oude
batterijen in voor hergebruik. Om corrosie te voorkomen, moet u de batterij verwijderen als de
afstandsbediening langere tijd niet gebruikt zal worden.
• Controleer of de batterijen juist geplaatst zijn in de afstandsbediening om schade te voorkomen.
• Houd de afstandsbediening uit de buurt van te vochtige omstandigheden en laat hem niet vallen.
• Gebruik de afstandsbediening niet in fel zonlicht.
• Zorg dat de speler NOOIT valt of wordt gestoten of geschud.
• Om oververhitting te voorkomen, mag u de speler niet afdekken.
BELANGRIJK:
Formatteer de harde schijf NIET met uw computer! De speler raakt dan al zijn
systeemgegevens kwijt en zal opnieuw moeten worden geïnitialiseerd. Als u de harde
schijf van de speler wilt formatteren, moet u het ingebouwde formatteerprogramma uit
het instellingenmenu van de speler gebruiken.
2
Page 4
NEDERLANDS
7 8
23
19 18 17 16
12 13
Voorkant
1 3
4. Plaats van de onderdelen
2 4
Achterkant
9
10 11
15 21 22
14 20
5 6
Betekenis van de nummers:
1. Statuslampje: aan/uit, REC (opname), ACT, LAN) 13. Hoofdschakelaar
2. Navigatietoetsen 14. LAN (RJ45) aansluiting
3. Weergavetoetsen 15. HDMI-uitgang
4. Infraroodsensor 16. AV1-ingang (composiet video/audio)
5. Mini-usb-connector (naar pc) 17. AV2 component video-ingang
6. Usb-hostpoort 18. AV2 audio-ingang (L/R)
7. Dv-ingang 19. AV audio-uitgang (L/R)
8. Open toets frontpaneel 20. AV component video-uitgang (Y/Pb/Pr)
9. Tv-tuner uitgang** 21. S-video uitgang
10. Tv-tuner ingang** 22. SPDIF digitale optische uitgang
11. AV composiet video-uitgang 23. Lichtnetaansluiting (110~240 V)
12. SPDIF digitale optische uitgang
De toetsen op de speler bieden basisfuncties die ook op de afstandsbediening beschikbaar zijn.
NB:
3
Page 5
NEDERLANDS
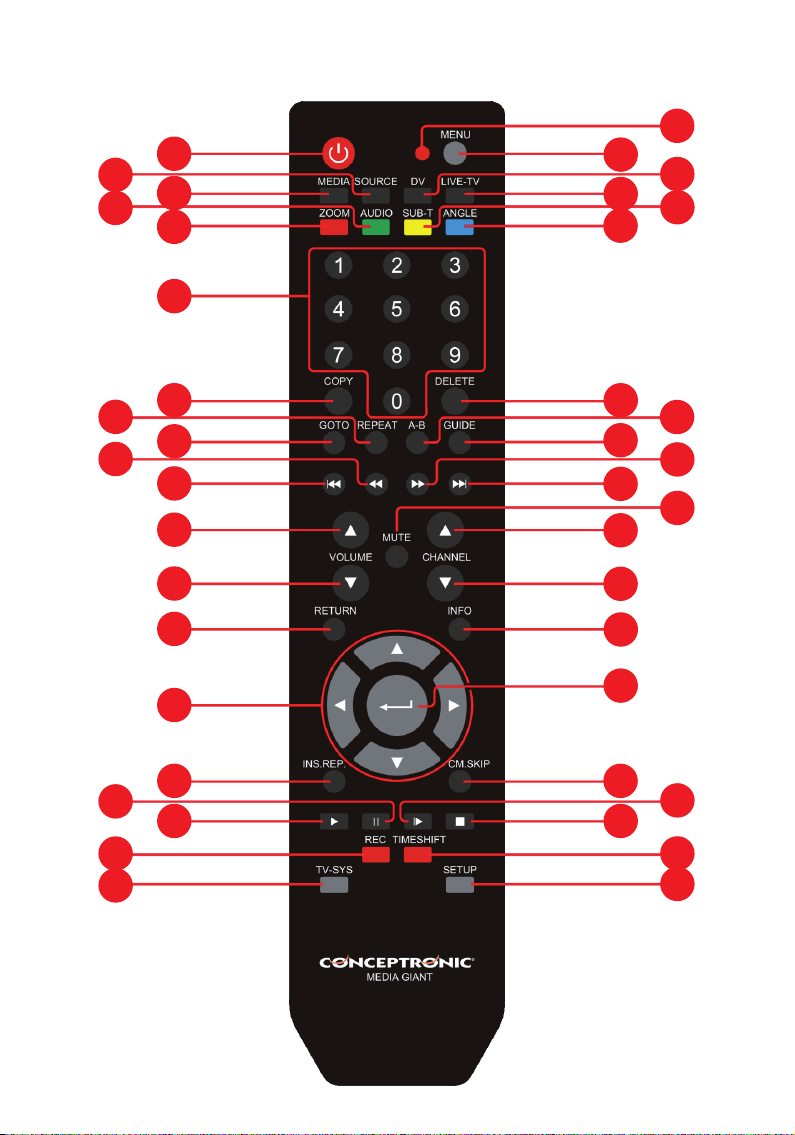
5. Toetsen afstandsbediening
De speler kan worden bediend met de afstandsbediening. Op de binnenflap van deze gebruiksaanwijzing
vindt u een afbeelding van de afstandsbediening. De nummering van de toetsen verwijst naar de
onderstaande tabel, waarin de betreffende functies worden uitgelegd.
Nr. Toets Beschrijving
1. AAN/UIT ( ) De speler inschakelen of op standby zetten
2. SOURCE (bron) Omschakelen tussen tuner, AV-ingang en weergave
3. MEDIA Directe knop naar de Media Browser
4. AUDIO Dvd-geluidsspoor/taal wijzigen (indien beschikbaar in uw dvd-bestanden)
5. ZOOM In/uitzoomen
6. 0 – 9 Cijfertoetsen
7. COPY (kopiëren) Het kopieermenu tonen
8. REPEAT (herhalen) Herhaalstand instellen
9. GOTO Ga naar een bepaald tijdstip in het bestand
10. TERUGSPOELEN (
11. VORIGE (
12. VOLUME + Verhoog het volume
13. VOLUME - Verlaag het volume
14. RETURN (terug) Terug naar het vorige menu/kanaal
15.
, , , Navigatietoetsen: door de menu's navigeren
16. INS.REP. 10 seconden teruggaan tijdens weergave
17. PAUSE Pauzeren tijdens weergave of timeshift
18. PLAY (weergeven) Weergave starten
19. REC (opnemen) Opname starten
20. TV SYS Uitgangsresolutie van de speler aanpassen
21. SETUP Directe knop naar het Setup Menu
22. TIMESHIFT Timeshift inschakelen
23. STOP (
) Weergave stoppen/opname stoppen/timeshift uitzetten
24. SLOW (langzaam) Vertraagde weergave
25. CM.SKIP (overslaan) 30 seconden overslaan tijdens timeshift of weergave
26. ENTER Selectie bevestigen
27. INFO Informatie over kanaal/zender/bestand tonen
28. CHANNEL - Vorige kanaal
29. CHANNEL + Volgende kanaal
30. MUTE (dempen) Geluid uitschakelen
31. VOLGENDE (
32. VOORUITSPOELEN (
33. GUIDE Het menu voor uitgestelde opnamen openen
34. A-B A-B herhaling instellen
35. DEL (wissen) Ingave wissen/selectie verwijderen
36. ANGLE (hoek) Dvd-camerahoek wijzigen (indien beschikbaar in uw dvd-bestanden)
37. SUB-T Ondertitels wijzigen (indien beschikbaar in uw video/dvd-bestanden)
38. LIVE-TV Toets om direct naar live-tv te gaan
39. DV Naar dv-opname/weergave
40. MENU Hoofdmenu tonen
41. LED Geeft activiteit van de afstandsbediening aan
) Versneld achteruit
) Vorig(e) bestand/nummer/hoofdstuk/afbeelding
) Volgend(e) bestand/nummer/hoofdstuk/afbeelding
) Vooruitspoelen met beeld
4
Page 6
NEDERLANDS
23
19 18 17 16
12 13
6. Uw Media Giant aansluiten
In dit hoofdstuk leest u hoe u de Media Giant aansluit op uw tv, home cinema, netwerk, etc.
9
10 11
Antennekabel(s) aansluiten
NB:
De tuner van de speler geeft het tv-ingangssignaal ongewijzigd door aan de tv-uitgang van de
tuner.
• Haal de antennekabel uit uw tv en doe hem in de tuneringang [10] van de speler.
• Sluit de meegeleverde antennekabel aan op de tuneruitgang [9] van de speler en op de antenne-ingang
van uw tv.
Videokabel(s) aansluiten
U kunt de speler op vier manieren op uw tv aansluiten:
- HDMI
- Composiet
- SCART (met behulp van de composietkabel en de scartadapter)
- S-video *
- Component *
* Bij gebruik van s-video of component gaat alleen het beeld naar uw tv.
Voor het geluid moet u in dat geval gebruik maken van de tulpaansluitingen van de composietkabel
(rood en wit) of de digitale audio-uitgang (optisch of coaxiaal) van de Media Giant.
HDMI:
• Doe de hdmi-kabel in de hdmi-uitgang [15] van de speler.
• Doe de andere kant van de hdmi-kabel in de hdmi-ingang van uw tv.
Composiet:
• Doe de connectors van de composietkabel (geel, rood en wit) in de bijbehorende AV OUT uitgangen [11,
• Doe de andere kant van de composietkabel (gele, rode en witte tulpstekker) in uw tv.
19] van de speler.
15 21 22
14 20
**
5
Page 7

NEDERLANDS
SCART:
• Doe de connectors van de composietkabel (geel, rood en wit) in de bijbehorende AV OUT uitgangen [11,
19] van de speler.
• Doe de andere kant van de composietkabel (gele, rode en witte tulpstekker) in de connectors van de
scartadapter.
• Doe de scartadapter in de scartaansluiting van uw tv.
S-video:
• Doe de s-videokabel in de s-video-uitgang [21] van de speler.
• Doe de andere kant van de s-videokabel in de s-video-ingang van uw tv.
Component:
• Doe de connectors van de componentkabel (rood, groen en blauw) in de componentaansluitingen [20]
• Doe de andere kant van de componentkabel in de componentingang van uw tv.
Audiokabel(s) aansluiten
U kunt de speler op drie manieren op uw tv en/of home cinemasysteem aansluiten:
Analoog:
• Doe de audio-connectors van de composietkabel (rood en wit) in de Audio tulpaansluitingen [19] van de
• Doe de andere kant van de composietkabel in de tulp-geluidsingangen van uw tv of
Digitaal coaxiaal:
• Doe de digitale coaxiale kabel in de digitale coaxiale uitgang [12] van de speler.
• Doe de andere kant van de digitale coaxiale kabel in de digitale coaxiale ingang van uw
Digitaal optisch:
• Doe de digitale optische kabel in de digitale optische uitgang [22] van de speler.
• Doe de andere kant van de digitale optische kabel in de digitale optische ingang van uw
Andere audio/videoapparaten aansluiten
U kunt een audio/videobron, zoals een videorecorder, dvd-speler of set-top box op de speler aansluiten om
van deze bron op te nemen.
De Media Giant ondersteunt apparaten met een composiet- of een component-uitgang.
Composiet:
• Doe de bij uw andere audio/videoapparaat geleverde audio/videokabel in de AV OUT uitgangconnectors
• Doe de andere kant van de composietkabel (gele, rode en witte tulpstekker) in de AV1 IN ingangen [16]
Component:
• Doe de bij uw andere audio/videoapparaat geleverde component videokabel in de bijpassende
• Doe de andere kant van de componentkabel (rode, groene en blauwe tulpstekker) in de AV2 IN ingangen
van de speler.
- analoog, via de Audio tulpaansluitingen van de A/V-uitgang.
- digitaal, via de coaxiale digitale SPDIF-uitgang.
- digitaal, via de optische digitale SPDIF-uitgang.
AV OUT uitgang.
ontvanger/versterker.
ontvanger/versterker.
ontvanger/versterker.
van het audio/videoapparaat.
van de speler.
componentuitgangen van het audio/videoapparaat.
[17] van de speler.
6
Page 8

NEDERLANDS
NB:
Component-videokabels brengen alleen beeld over, geen geluid. Voor het geluid moet u ook een
audiokabel aansluiten tussen het audio/videoapparaat en de AV2 IN audio-ingangen [18] van de
speler.
Netsnoer aansluiten
Nadat u de speler heeft aangesloten op uw externe audio/videoapparatuur, kunt u hem op het lichtnet
aansluiten.
• Sluit het meegeleverde netsnoer aan op de speler [23] en doe de stekker in een stopcontact.
• Zet de hoofdschakelaar [12] aan de achterkant van de speler op I om de speler aan te zetten.
De speler gaat aan.
Afstandsbediening voorbereiden
• Verwijder het batterijklepje van de achterkant van de afstandsbediening.
• Doe de meegeleverde AAA-batterijen in de afstandsbediening.
• Zet het batterijklepje terug op de achterkant van de afstandsbediening.
NB:
- De afstandsbediening werkt het best op een afstand tot ongeveer 5 meter.
- Richt de afstandsbediening op de infraroodsensor op het frontpaneel van de speler.
- De ontvangsthoek van de sensor is ±30 graden.
- Vervang de batterijen als ze zwak worden of leeg zijn.
7
Page 9

NEDERLANDS
7. In gebruik nemen en configureren
De mediaspeler moet worden geconfigureerd wanneer u hem voor het eerst aanzet.
• Kies op de tv de ingang waarop de speler is aangesloten (hdmi, composiet, scart, s-video of component).
NB:
In de rest van deze gebruiksaanwijzing wordt ervanuit gegaan dat uw tv staat ingesteld op de
ingang waarop de speler is aangesloten. Alle beschreven stappen hebben betrekking op de
bediening van de speler.
• Kijk of de hoofdschakelaar aan de achterkant van de speler op I (aan) staat.
• Zet de speler aan met de aan/uitknop aan de voorkant van de speler, of met de Power (1
afstandsbediening.
• Controleer het aan/uitlampje aan de voorkant van de Media Giant. Wanneer het lampje oranje is, staat
het apparaat in de standby-stand. Wanneer het lampje blauw is, is de speler klaar voor gebruik.
NB:
De speler moet zichzelf initialiseren nadat hij is aangezet. Dit kan enige tijd duren. Tijdens deze
initialisatie verschijnt het startscherm van de Media Giant.
) toets van de
[ Startscherm ] [ Setup Wizard]
Nadat de Media Giant is geïnitialiseerd, moet hij voor het eerste gebruik worden geconfigureerd. Om u te
helpen bij deze eenmalige configuratie toont de Media Giant de Wizard instellingen op uw scherm, die u
door de benodigde configuratiestappen zal leiden.
De Setup Wizard toont de volgende configuratiestappen:
- Menutalen
- Tv-invoer **
- Kanalen scannen **
- Netwerkinstellingen
- Tijd instellen
Met de navigatietoetsen en de Enter (26) toets van de afstandsbediening kunt u uw Media Giant instellen.
Als u een instelling heeft gekozen maar deze wilt veranderen, drukt u op de Return (14
) toets van de
afstandsbediening.
Menutaal
Selecteer de taal die u wilt gebruiken om de Media Giant te bedienen.
Tv-invoer
**
Selecteer uw land in de landenlijst. Als uw land er niet bij staat, selecteert u Don’t Care (Geen voorkeur)
in de lijst.
8
Page 10

NEDERLANDS
Kanalen scannen
• Kies OK om de analoge tuner van de Media Giant naar analoge tv-zenders te laten zoeken. Automatisch
zenderzoeken kan enige tijd in beslag nemen; hierbij worden alle gevonden zenders automatisch
vastgelegd in het geheugen van de Media Giant.
• Kies na afloop van het zenderzoeken OK om verder te gaan met de Setup Wizard.
Wanneer u het zenderzoeken wilt overslaan (als u bijvoorbeeld alleen gebruik maakt van een set-top box
en geen analoge tv-signalen ontvangt) selecteert u Annuleren om meteen door te gaan met de Setup
Wizard.
Netwerkinstellingen
In de netwerkinstellingen kunt u het IP-adres van de Media Giant aangeven. In de meeste gevallen wordt de
Media Giant verbonden met een netwerk met een DHCP-server (meestal een router).
• Als uw netwerk een DHCP-server bevat, selecteert u de keuze DHCP IP.
• De Setup Wizard vraagt u de keuze te bevestigen. Selecteer OK om door te gaan.
**
• Als u het IP-adres handmatig wilt instellen, selecteert u VAST IP.
• De Setup Wizard toont nu de velden waarin u het statische IP-adres kunt invullen. Geef met behulp van
de navigatietoetsen (15
server in.
• Wanneer u de juiste waarden heeft ingegeven, drukt u op de Enter toets (26) van de afstandsbediening.
• De Setup Wizard vraagt u de keuze te bevestigen. Selecteer OK om door te gaan.
Als uw Media Giant niet met een netwerk verbonden is, selecteert u Annuleren om deze stap over te slaan
en verder te gaan met de Setup Wizard.
Tijd instellen
Met de optie Tijd instellen kunt u de Media Giant op de juiste tijd en datum zetten.
• Als u de tijd en de datum zelf wilt ingeven, selecteert u Handmatig.
• Geef met behulp van de navigatietoetsen (15) en de cijfertoetsen 0-9 (6) jaar, maand, dag, uren,
• De Setup Wizard vraagt u de keuze te bevestigen. Selecteer OK om door te gaan.
• Als de Media Giant op een netwerk met een actieve internetverbinding aangesloten wordt, kunt u Auto
• De Setup Wizard toont nu de velden waarin u de automatische tijdinstellingen kunt invullen. U kunt de
• Selecteer een tijdzone die overeenkomt met die van het land waar u zich bevindt.
• Zet de Aanpassing zomertijd instelling Aan als u in een land bent dat gebruik maakt van zomertijd.
• De Setup Wizard vraagt u de keuze te bevestigen. Selecteer OK om door te gaan.
De Setup Wizard is nu gereed en de basisconfiguratie van de Media Giant is voltooid.
NB:
NB:
NB:
minuten en seconden in. Wanneer u klaar bent, drukt u op de Enter toets (26
afstandsbediening.
(via netwerk) selecteren.
standaard NTP-server laten staan, of desgewenst in het veld NTP-server op de Enter toets (26
om het internetadres van een andere NTP-server in te vullen.
Wanneer u de juiste waarden heeft ingegeven, drukt u op de Enter toets (26
Meer instellingen vindt u in de keuze Instellingen van het hoofdmenu. Het instellingenmenu wordt
beschreven in hoofdstuk 13.
Als u de Setup Wizard later opnieuw wilt uitvoeren, selecteert u Instellingen in het hoofdmenu
gevolgd door de keuze Standaard herstellen. De Media Giant maakt dan alle gewijzigde
instellingen ongedaan en de Setup Wizard wordt opnieuw gestart.
Als u een Media Giant met ongeformatteerde harde schijf heeft gekocht, verschijnt de Wizard
Formatteren na afloop van de Setup Wizard. De Wizard Formatteren wordt beschreven in
hoofdstuk 15 van deze gebruiksaanwijzing.
) en de cijfertoetsen 0-9 (6) IP-adres, subnetmasker, standaardgateway en DNS-
) van de
) drukken
) van de afstandsbediening.
9
Page 11
NEDERLANDS
8. Hoofdmenu
In het hoofdmenu kunt u verschillende functies van de Media Giant kiezen.
NB:
Wanneer het hoofdmenu niet op het scherm staat, kun u met de Menu toets (40) van de
afstandsbediening naar het hoofdmenu gaan.
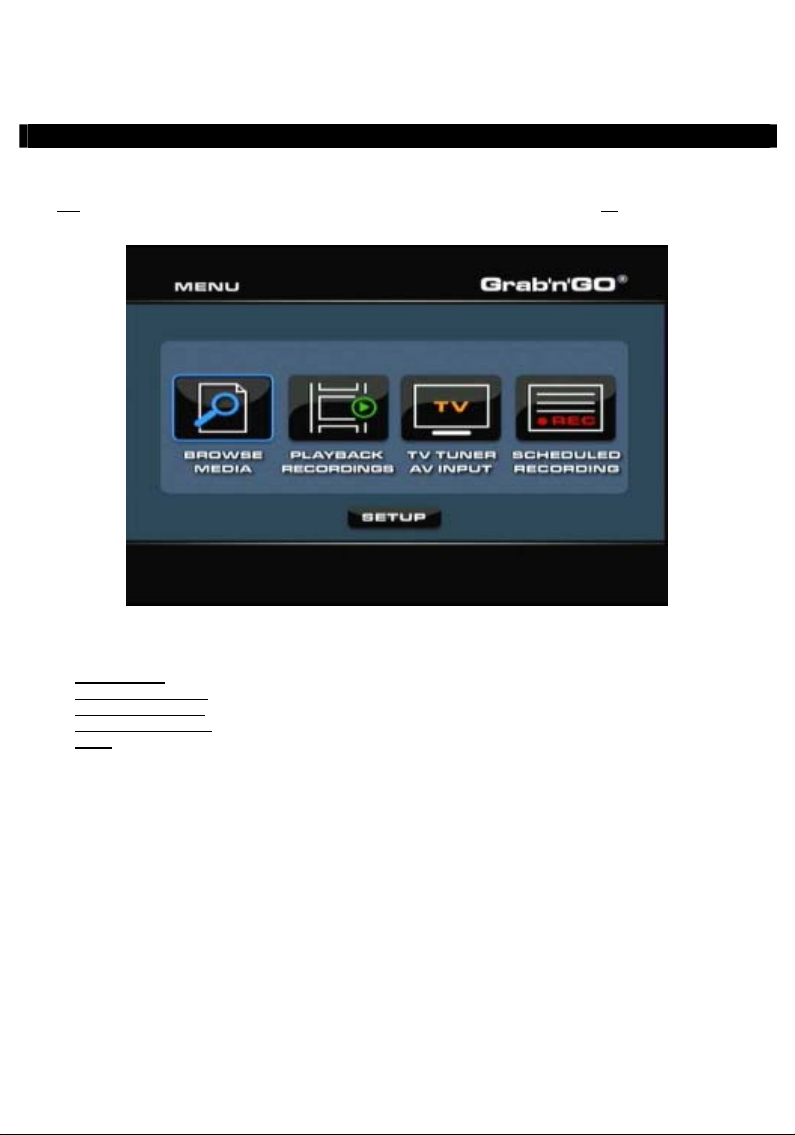
Het hoofdmenu bevat de volgende keuzes:
Browse Media
Playback Recordings
TV Tuner / AV Input
Scheduled Recording
Setup
De bovenstaande keuzes worden beschreven in de nu volgende hoofdstukken van deze gebruiksaanwijzing.
(Medialijst) Opgeslagen mediabestanden afspelen.
(Opnamen weergeven) Uw opnamen afspelen en bewerken.
(TV-tuner/AV-ingang) Tv-uitzending/materiaal via AV.
(Opnamen programmeren) Lijst met geplande opnamen bewerken.
(Instellingen) De Media Giant configureren.
[ Hoofdmenu ]
10
Page 12
NEDERLANDS
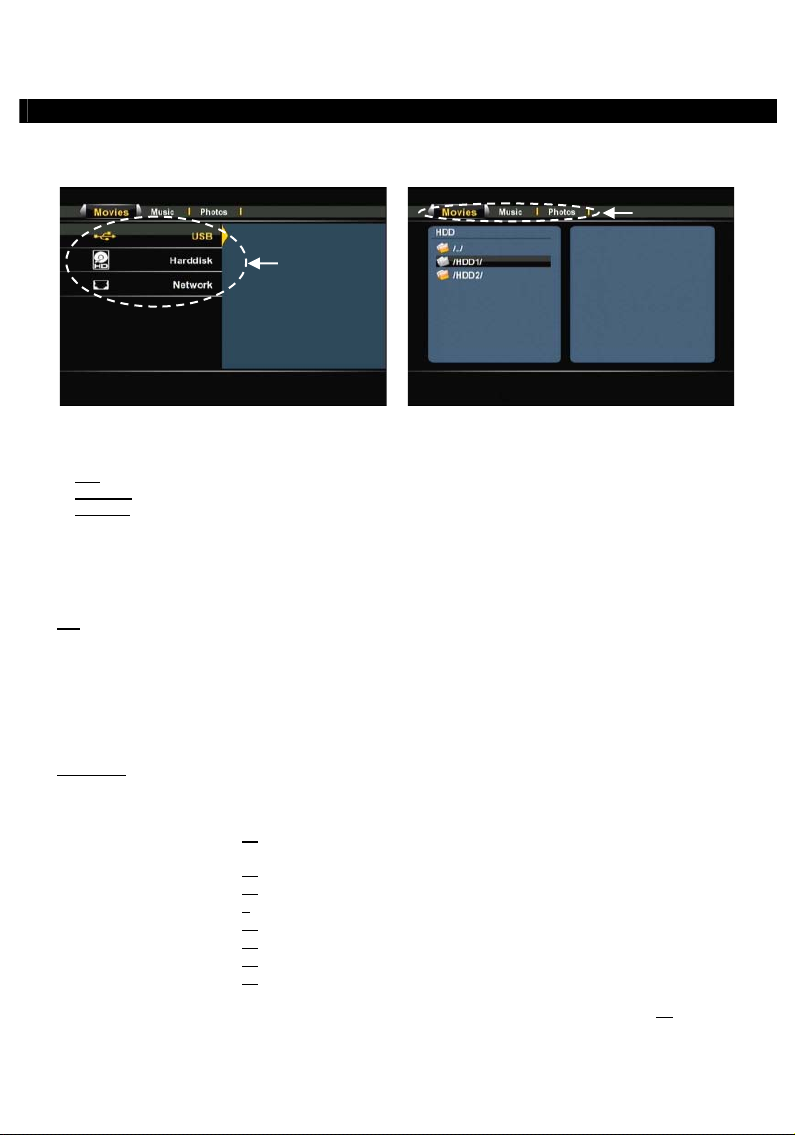
9. Browse Media (Medialijst)
Wanneer u in het hoofdmenu voor ‘Browse Media’ kiest, verschijnt de mediabrowser van de Media Giant
op uw scherm:
[ Opslaglocatie selecteren ] [ Mediatype kiezen: film, muziek, foto's ]
In de Mediabrowser kunt u het opslagapparaat kiezen waar de mediabestanden staan die u wilt afspelen:
USB
Media afspelen van een aangesloten usb-opslagapparaat (via de usb-hostpoort).
Harddisk
Media afspelen van de interne harde schijf van de Media Giant.
Media afspelen vanuit Samba/netwerkshares in uw netwerkomgeving.
Netwerk
Om door de bestanden op uw usb-apparaat of de ingebouwde harde schijf te bladeren, kiest u in de lijst
met opslaglocaties voor USB of Harddisk.
Om door de bestanden op uw gedeelde netwerklocaties te bladeren, kiest u in de lijst met opslaglocaties
voor Netwerk.
NB:
Als u door netwerkshares wilt bladeren, moet u ervoor zorgen dat u deze locaties op correcte
wijze heeft gedeeld. Zie voor meer informatie over het delen van en bladeren door
netwerklocaties hoofdstuk 17.
Nadat u een opslaglocatie heeft geselecteerd, kunt u omschakelen tussen Films, Muziek en Foto's met de
linker en rechter navigatietoetsen van de afstandsbediening.
Wanneer u een van de drie opties kiest, filtert de Media Giant de inhoud van de gekozen opslaglocatie
automatisch zodat alleen bestanden met het gekozen type worden getoond.
Voorbeeld:
In het menu Mediabrowser kunt u gebruik maken van de volgende bladerfuncties op de afstandsbediening:
Als u Films selecteert, staan er alleen films op het scherm.
- Navigatietoetsen (15) Door de bestanden en mappen navigeren, of andere weergavemodus
- Enter (26) Het geselecteerde bestand afspelen of de geselecteerde map openen.
kiezen.
- Return (14) Naar vorige map.
- Copy (kopiëren) (7) Naar kopieermenu (zie de betreffende paragraaf in dit hoofdstuk)
- Afspelen/pauzeren (18) Geselecteerd bestand afspelen.
- Volgende (31) Naar de volgende pagina met bestanden.
- Vorige (11) Naar de vorige pagina met bestanden.
- Menu (40) Terug naar hoofdmenu.
Als u vanuit het Mediabrowsermenu terug wilt naar het hoofdmenu, drukt u op de Menu toets (40
afstandsbediening.
) van de
11
Page 13
NEDERLANDS
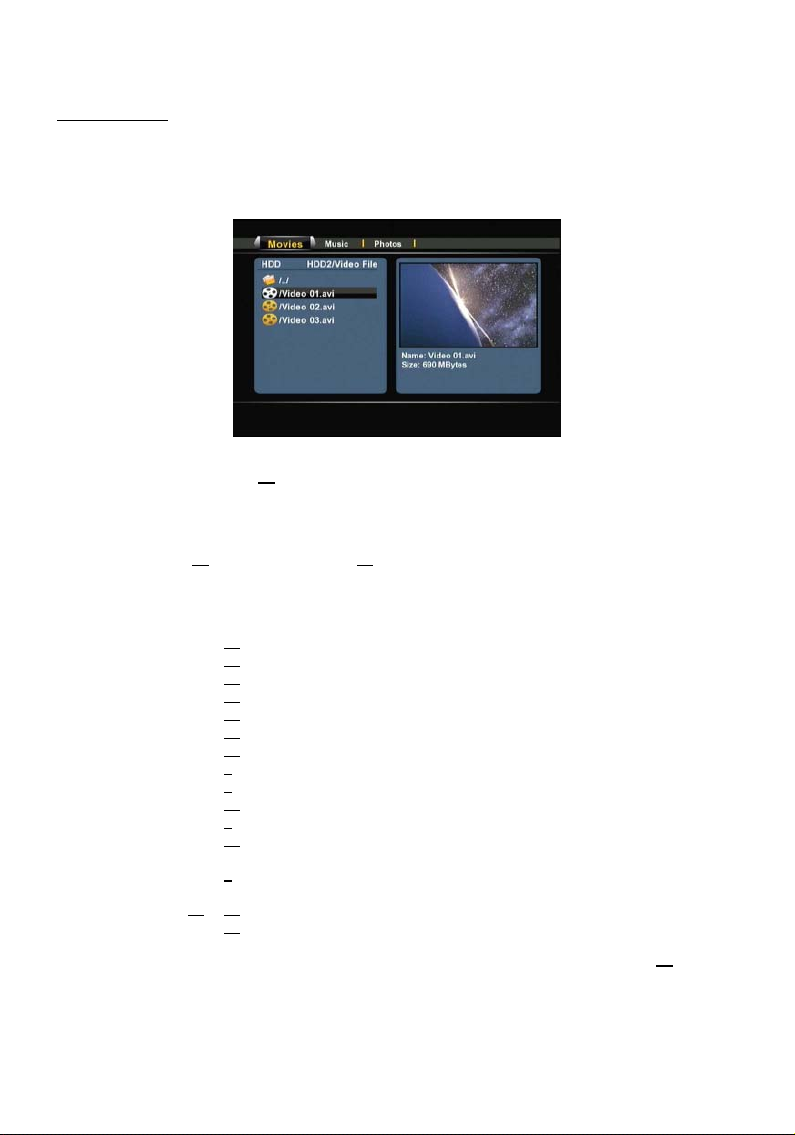
Uw films afspelen
U kunt films op uw tv afspelen vanaf de interne harde schijf, een usb-opslagapparaat of een netwerklocatie
met behulp van het filter Films van de Media Giant.
Als het filter Films is gekozen, toont de Media Giant alleen filmbestanden op uw scherm. Alle andere
bestanden zijn niet zichtbaar.
• Ga met de navigatietoetsen (15
Als u een filmbestand heeft geselecteerd, toont de Mediabrowser rechts op het scherm een voorbeeld met
de bestandsnaam en -grootte.
• Druk op de Enter (26
bestand te starten.
Tijdens het afspelen kunt u met de afstandsbediening de volgende weergavefuncties gebruiken:
) toets of de Afspelen (18) toets van de afstandsbediening om het geselecteerde
) van de afstandsbediening naar het bestand dat u wilt afspelen.
[ Filmmodus ]
- Pause (17) Weergave pauzeren of hervatten.
- Slow (langzaam) (24) Vertraagde weergave.
- Stop (23) De weergave stoppen.
- Terugspoelen (10) Versnelde weergave achteruit.
- Vooruitspoelen (32) Versnelde weergave.
- Ins. Rep. (16) 10 seconden teruggaan tijdens weergave
- CM. Skip (25) 30 seconden verdergaan tijdens weergave.
- Goto (ga naar) (9) Ga naar een bepaald tijdstip in de film.
- Repeat (herhalen) (8) De herhaalmethode voor het huidige bestand instellen.
- Info (27) Bestandsinfo tonen tijdens weergave.
- Zoom (5) Inzoomen/uitzoomen
- Sub-t (37) Andere ondertitels kiezen (indien beschikbaar in het weergegeven
- Audio (4) Ander geluidsspoor/taal kiezen (indien beschikbaar in het weergegeven
bestand).
- Volume (12), (13) Geluidsvolume instellen.
bestand).
- Mute (dempen) (30) Geluid uitschakelen.
Als u vanuit het Mediabrowsermenu terug wilt naar het hoofdmenu, drukt u op de Menu toets (40
afstandsbediening.
) van de
12
Page 14
NEDERLANDS
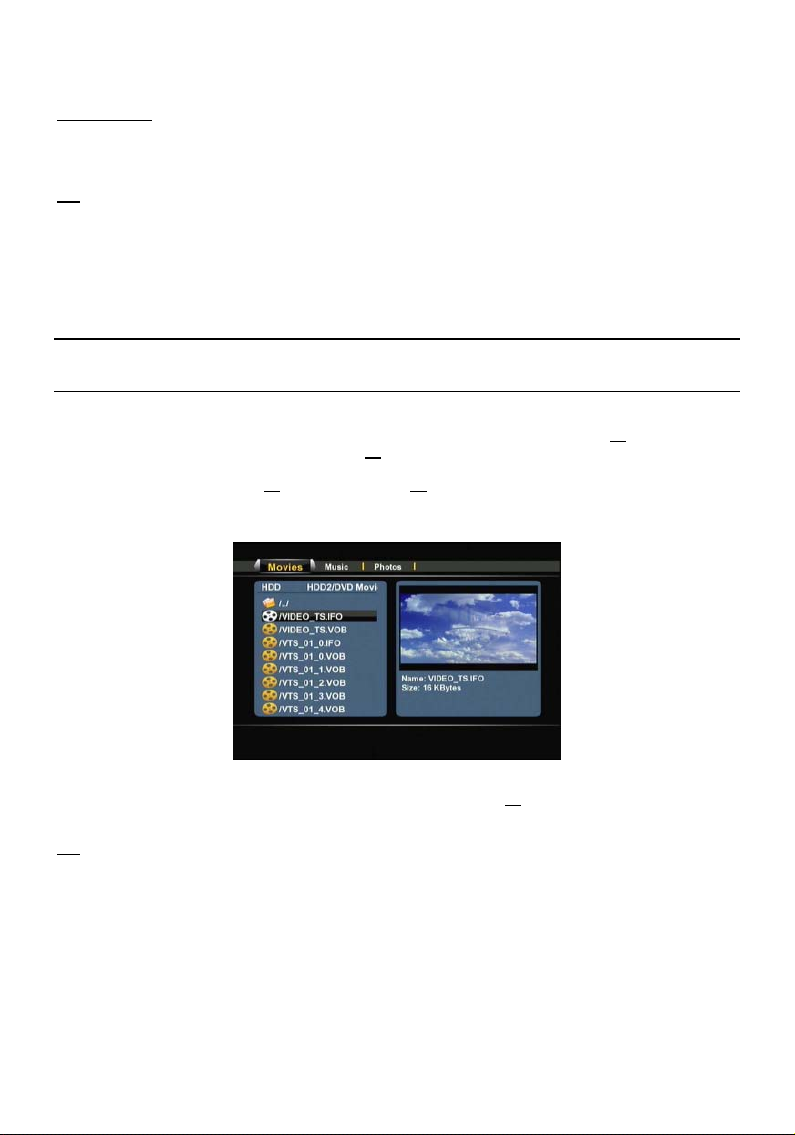
Dvd weergeven
Wanneer de Media Giant dvd-bestanden van de harde schijf afspeelt, werkt hij hetzelfde als een dvdspeler. U kunt door het dvd-menu navigeren, ondertitels kiezen en geluidssporen instellen.
NB:
De Media Giant ondersteunt uitsluitend de weergave van niet beveiligde dvd-bestanden. CSS
• Sluit de Media Giant op uw computer aan (zie hoofdstuk 13).
• Maak een map met de naam van uw dvd op de harde schijf van de Media Giant (voorbeeld: Film1).
• Kopieer de bestanden uit de map VIDEO_TS van uw dvd naar de zojuist gemaakte map (voorbeeld:
Film1) op de Media Giant.
Na het kopiëren moet de mapstructuur er als volgt uitzien:
- [Harde schijf van de Media Giant]
|-> Film1 (met alle dvd-bestanden de hierin staan)
• Verbreek de usb-verbinding tussen de Media Giant en uw computer en sluit de speler op uw tv aan.
• Selecteer het pictogram Mediabrowser in het hoofdmenu met de Navigatietoetsen (15
afstandsbediening en druk op de Enter toets (26
openen.
• Ga met de Navigatietoetsen (15
interne harde schijf waar uw dvd-bestanden zijn opgeslagen.
• Open de dvd-map die u op de harde schijf heeft gemaakt.
beveiliging wordt niet ondersteund.
) van de
) van de afstandsbediening om de Mediabrowser te
) en de Enter toets (26) van de afstandsbediening naar de map op de
[ Filmmodus ]
• Selecteer het bestand VIDEO_TS.IFO en druk op de toets Afspelen (18
) van de afstandsbediening om de
geselecteerde dvd te starten.
NB:
De Media Giant kan ook ISO-bestanden rechtstreeks afspelen wanneer deze in een NTSF-partitie
staan. Bij het afspelen van een ISO-bestand van een dvd beschikt u over dezelfde
weergavemogelijkheden als bij weergave van het IFO-bestand van deze dvd.
13
Page 15

NEDERLANDS
Tijdens dvd-weergave kunt u met de afstandsbediening de volgende weergavefuncties gebruiken:
- Pause (17) Weergave pauzeren of hervatten.
- Slow (langzaam) (24) Vertraagde weergave.
- Stop (23) De weergave stoppen.
- Navigatietoetsen (15) Door het dvd-menu navigeren.
- Enter (26) Keuze bevestigen in dvd-menu.
- Terugspoelen (10) Terugspoelen met beeld.
- Vooruitspoelen (32) Vooruitspoelen met beeld.
- Vorige (11) Vorig hoofdstuk.
- Volgende (31) Volgend hoofdstuk.
- Ins. Rep. (16) 10 seconden teruggaan tijdens weergave.
- CM. Skip (25) 30 seconden verdergaan tijdens weergave.
- Goto (ga naar) (7) Ga naar een bepaald tijdstip in de film.
- Repeat (herhalen) (8) De herhaalmethode voor het huidige bestand instellen.
- Info (27) Bestandsinfo tonen tijdens weergave.
- Zoom (5) Inzoomen/uitzoomen.
- Angle (hoek) (36) Camerahoek van de dvd wijzigen (als de dvd meer camerastandpunten
- Volume (12), (13) Geluidsvolume instellen.
bevat).
- Mute (dempen) (30) Geluid uitschakelen.
- Sub-t (37) Ondertitels van de dvd uitzetten of andere ondertitels kiezen.
- Audio (4) Geluidsspoor van de dvd wijzigen (als de dvd meer geluidssporen/talen
Als u vanuit het Mediabrowsermenu terug wilt naar het hoofdmenu, drukt u op de Menu toets (40
afstandsbediening.
Ondertitels weergeven
De Media Giant kan tijdens het weergeven van AVI-bestanden ook ondertitels tonen.
Om ondertitels te kunnen weergeven bij een AVI-bestand moet u het ondertitelbestand dezelfde naam
geven als het AVI-bestand; bijvoorbeeld:
Naam film: Mijn_film_met_ondertitels.AVI
Naam ondertitelbestand: Mijn_film_met_ondertitels.SRT
• Ga met de navigatietoetsen van de afstandsbediening naar het bestand dat u wilt afspelen.
• Druk op de Enter (26
bestand te starten.
De weergave van het AVI-bestand wordt gestart nadat het bijbehorende ondertitelbestand s geladen.
Om de ondertitels tijdens het afspelen aan of uit te zetten, drukt u op de Sub-t toets (37
afstandsbediening.
Als u vanuit het Mediabrowsermenu terug wilt naar het hoofdmenu, drukt u op de Menu toets (40
afstandsbediening.
) toets of de Afspelen (18) toets van de afstandsbediening om het geselecteerde
bevat).
) van de
) van de
) van de
14
Page 16
NEDERLANDS
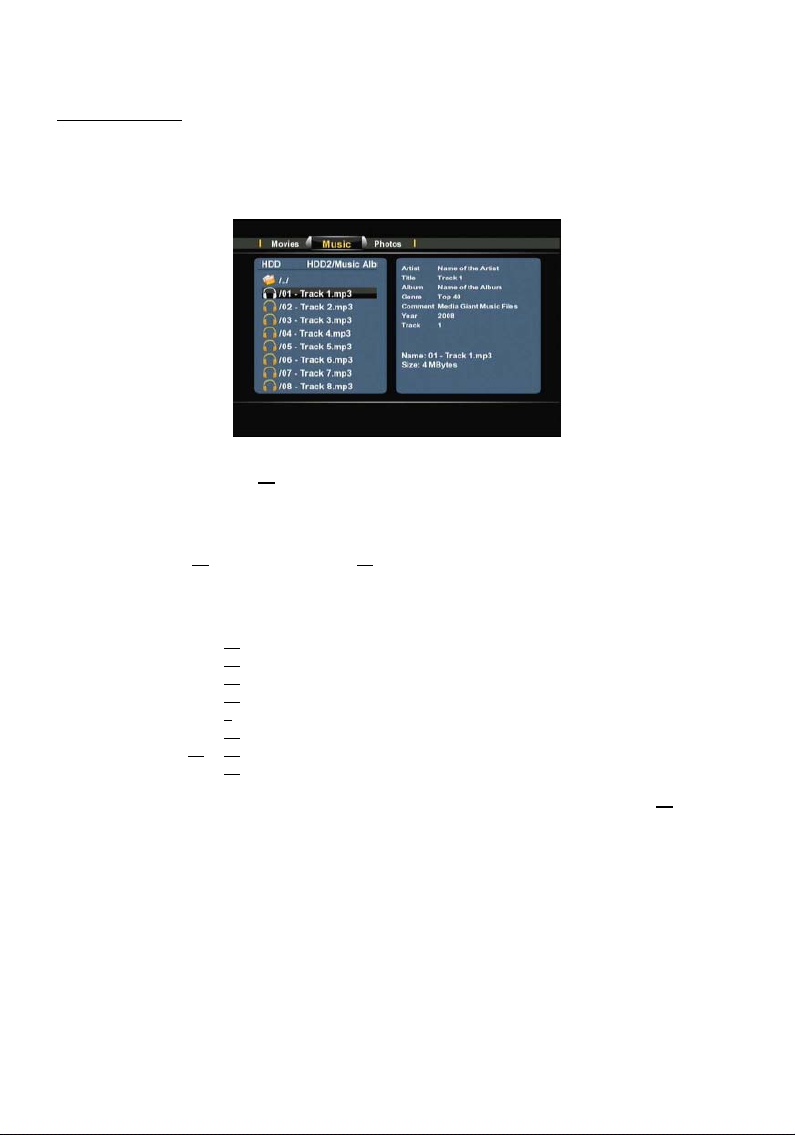
Uw muziek afspelen
U kunt muziekbestanden afspelen vanaf de interne harde schijf, een usb-opslagapparaat of een
netwerklocatie met behulp van het filter Muziek van de Media Giant.
Als het filter Muziek is gekozen, toont de Media Giant alleen muziekbestanden op uw scherm. Alle andere
bestanden zijn niet zichtbaar.
• Ga met de navigatietoetsen (15
Als u een muziekbestand heeft geselecteerd, toont de Mediabrowser rechts op het scherm de ID3-tag
informatie (indien beschikbaar) met de bestandsnaam en -grootte.
• Druk op de Enter (26
bestand te starten.
Tijdens het afspelen kunt u met de afstandsbediening de volgende weergavefuncties gebruiken:
) toets of de Afspelen (18) toets van de afstandsbediening om het geselecteerde
) van de afstandsbediening naar het bestand dat u wilt afspelen.
[ Muziekmodus ]
- Pause (17) Weergave pauzeren of hervatten.
- Stop (23) De weergave stoppen.
- Terugspoelen (10) Versnelde weergave achteruit.
- Vooruitspoelen (32) Versnelde weergave.
- Repeat (herhalen) (8) De herhaalmethode voor het huidige bestand of de huidige map instellen.
- Info (27) Weergavedetails tonen.
- Volume (12), (13) Geluidsvolume instellen.
- Mute (dempen) (30) Geluid uitschakelen.
Als u vanuit het Mediabrowsermenu terug wilt naar het hoofdmenu, drukt u op de Menu toets (40
afstandsbediening.
) van de
15
Page 17
NEDERLANDS
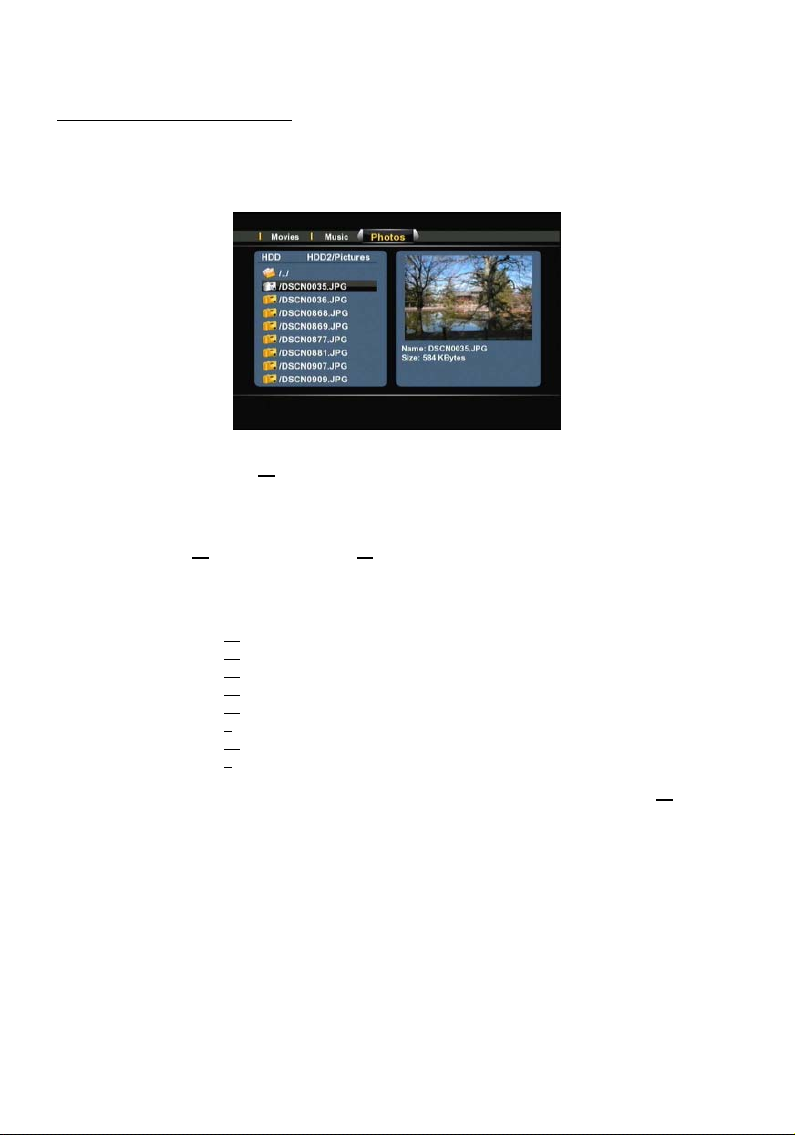
Uw foto's en afbeeldingen weergeven
U kunt foto- en afbeeldingbestanden afspelen vanaf de interne harde schijf, een usb-opslagapparaat of een
netwerklocatie met behulp van het filter Foto's van de Media Giant.
Als het filter Foto's is gekozen, toont de Media Giant alleen foto- en afbeeldingbestanden op uw scherm.
Alle andere bestanden zijn niet zichtbaar.
• Ga met de navigatietoetsen (15
Als u een fotobestand heeft geselecteerd, toont de Mediabrowser rechts op het scherm een klein voorbeeld
met de bestandsnaam en -grootte.
• Druk op de Enter (26
bestand te starten.
Tijdens het afspelen kunt u met de afstandsbediening de volgende weergavefuncties gebruiken:
) toets of de Afspelen (18) toets van de afstandsbediening om het geselecteerde
) van de afstandsbediening naar het bestand dat u wilt afspelen.
[ Fotomodus ]
- Pause (17) Weergave pauzeren of hervatten.
- Stop (23) De diashow stoppen.
- Navigatietoetsen (15) De getoonde foto draaien.
- Vorige (11) Het voorgaande bestand in de huidige map starten.
- Volgende (31) Het volgende bestand in de huidige map starten.
- Repeat (herhalen) (8) De herhaalmethode voor het huidige bestand of de huidige map instellen.
- Info (27) Bestandsinfo tonen tijdens de diashow.
- Zoom (5) Inzoomen/uitzoomen.
Als u vanuit het Mediabrowsermenu terug wilt naar het hoofdmenu, drukt u op de Menu toets (40
afstandsbediening.
) van de
16
Page 18
NEDERLANDS
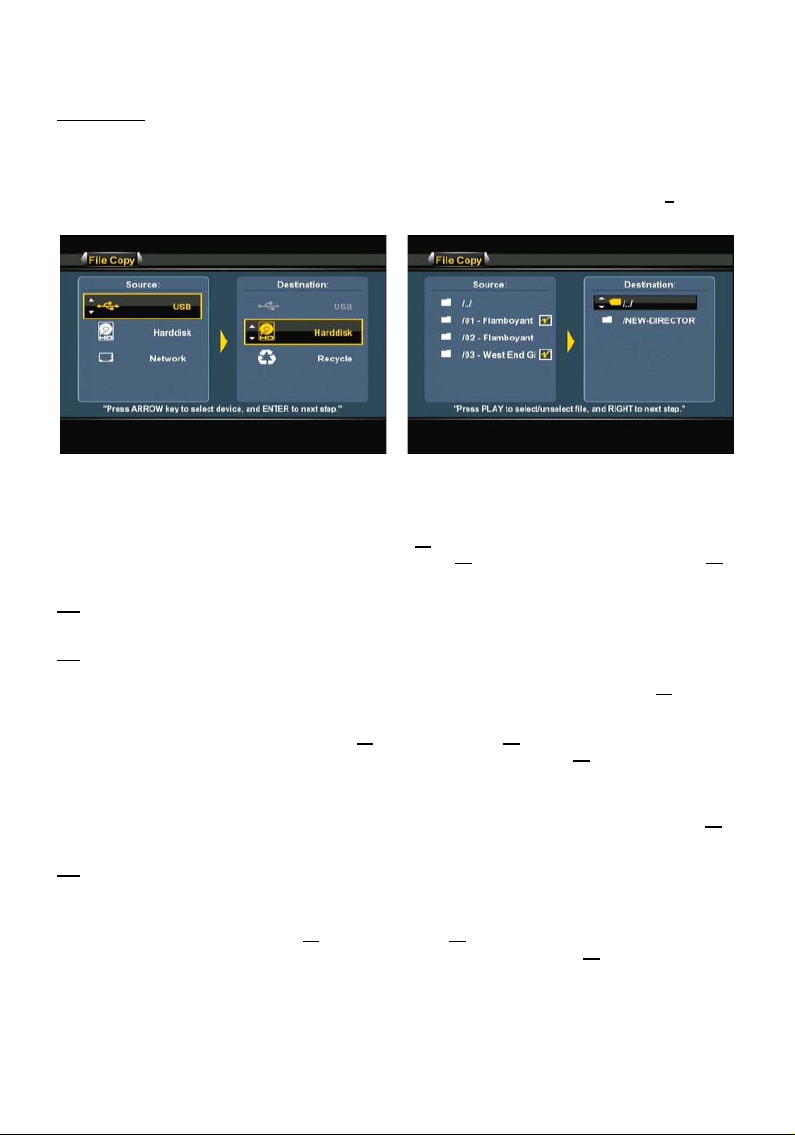
Kopieermodus
Als u bestanden van de ene locatie naar de andere wilt kopiëren (bijvoorbeeld van een usb-apparaat naar
de interne harde schijf) kunt u de kopieermodus van de Media Giant gebruiken.
Om naar de kopieermodus te gaan, drukt u terwijl u in de Mediabrowser bent op de Copy toets (7
afstandsbediening. Het kopieermenu wordt op uw scherm weergegeven:
) van uw
U kunt voor de bron van uw kopie kiezen tussen USB, Harddisk en Netwerk. De beschikbare doellocaties
zijn USB, Harddisk en Recycle (bestanden verwijderen).
Selecteer eerst de bronlocatie met de navigatietoetsen (15
bron heeft geselecteerd, drukt u op de rechter navigatietoets (15
omhoog of omlaag naar de gewenste doellocatie.
NB:
Aan de oplichtende rand ziet u of het brongedeelte of het doelgedeelte van het kopieermenu
NB:
U kunt niet kopiëren van USB naar USB of van Harddisk naar Harddisk.
• Wanneer u de juiste bronlocatie en doellocatie heeft ingegeven, drukt u op de Enter toets (26
afstandsbediening om door te gaan met de kopieerwizard.
• Navigeer nu in uw bronlocatie naar de bestanden of de mappen die u wilt kopiëren. U kunt door de
mappen navigeren met de navigatietoetsen (15
• Markeer de bestanden of mappen die uw wilt kopiëren met de toets Afspelen (18
afstandsbediening. De gemarkeerde bestanden of mappen zijn te herkennen aan een pictogram achter
de naam.
• Wanneer u de juiste bestanden of mappen heeft gemarkeerd, drukt u op de rechter navigatietoets (15
van de afstandsbediening om naar het doelgedeelte te gaan.
NB:
Het is niet mogelijk om een NTFS-mediapartitie op de Media Giant als doellocatie te kiezen, omdat
• Navigeer nu in uw doellocatie naar de map waar u naartoe wilt kopiëren. U kunt door de mappen
navigeren met de navigatietoetsen (15
• Wanneer u de juiste locatie heeft bereikt, drukt u op de rechter navigatietoets (15
afstandsbediening om het kopieerproces te starten.
[ Kopieermenu ] [ Kopieermenu – Wizard kopiëren]
actief is.
de Media Giant niet zelf (zonder computer) gegevens naar een NTFS-partitie kan wegschrijven.
) en de Enter toets (26) van de afstandsbediening.
) van de afstandsbediening. Nadat u de juiste
) en gaat u met de navigatietoetsen (15)
) van de
) en de Enter toets (26) van de afstandsbediening.
) van de
) van de
)
17
Page 19
NEDERLANDS
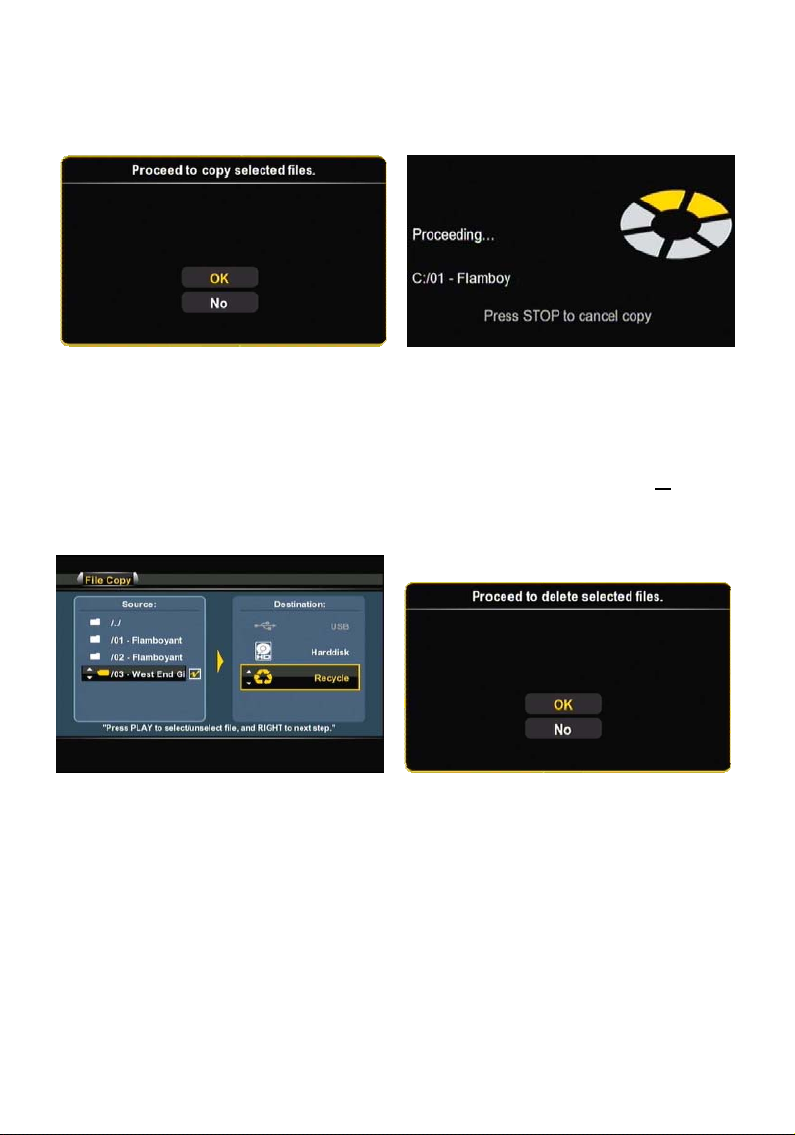
• De kopieerwizard vraagt u het kopiëren te bevestigen. Selecteer OK om door te gaan met het
kopieerproces.
Na afloop van het kopiëren krijgt u een melding op het scherm.
U kunt in het kopieermenu ook bestanden verwijderen.
Als u bestanden wilt verwijderen, kiest u bij de bronlocatie voor Recycle.
Markeer de bestanden of mappen die u wilt verwijderen en druk op de rechter navigatietoets (15
afstandsbediening; u krijgt nu een venster waarin u het verwijderen van de geselecteerde bestanden of
mappen kunt bevestigen.
Selecteer OK om de geselecteerde bestanden of mappen te verwijderen.
[ Kopieerbevestiging ] [ Bezig met kopiëren... ]
[ Kopieermenu – verwijderwizard ] [ Verwijderen bevestigen ]
) van de
18
Page 20

NEDERLANDS
10. Playback Recordings (Opnamen weergeven)
Wanneer u in het hoofdmenu voor ‘Playback Recordings’ heeft gekozen, toont de Media Giant de lijst met
al uw opgenomen bestanden op uw scherm:
In deze lijst ziet u alle opnamen die u handmatig heeft gestart of die met de programmatimer zijn
gemaakt. Bij iedere video ziet u een miniatuur voorbeeldweergave (eerste beeld van de opname), naam,
tijd, datum en opnamekwaliteit. Een gele ster achter een opname betekent dat de opname nieuw is en nog
nooit is afgespeeld. Wanneer u een opname bekeken heeft, verdwijnt de gele ster.
U kunt met de navigatietoetsen (15
navigeren en de geselecteerde opname afspelen met de toets Enter (26
afstandsbediening.
Tijdens het afspelen kunt u met de afstandsbediening de volgende weergavefuncties gebruiken:
[ Lijst met opnamen ]
) van de afstandsbediening omhoog en omlaag door uw opnamen
) of Afspelen (18) van de
- Pause (17) Weergave pauzeren of hervatten.
- Slow (langzaam) (24) Vertraagde weergave.
- Stop (23) De weergave stoppen.
- Terugspoelen (10) Versnelde weergave achteruit.
- Vooruitspoelen (32) Versnelde weergave.
- Ins. Rep. (16) 10 seconden teruggaan tijdens weergave.
- CM. Skip (25) 30 seconden verdergaan tijdens weergave.
- Vorige (11) Het voorgaande hoofdstuk of de voorgaande opname afspelen.
- Volgende (31) Het volgende hoofdstuk of de volgende opname afspelen.
- Repeat (herhalen) (8) De herhaalmethode voor het huidige bestand instellen.
- Info (27) Bestandsinfo tonen tijdens weergave.
- Goto (ga naar) (9) Ga naar een bepaald tijdstip in de film.
- Zoom (5) Inzoomen/uitzoomen.
- Audio (4) Ander geluidsspoor/taal kiezen (indien beschikbaar in het weergegeven
- Volume (12), (13) Geluidsvolume instellen.
bestand).
- Mute (dempen) (30) Geluid uitschakelen.
Met de linker en rechter navigatietoetsen (15
topmenu van de lijst met opnamen navigeren om verschillende mogelijkheden te selecteren:
Afspelen
Uw opnamen afspelen.
Verwijderen
Hernoemen
Sorteren
Bewerken
Uw opnamen verwijderen.
Uw opnamen een andere naam geven.
De volgorde van uw opnamen veranderen.
Uw opnamen bewerken (zie volgende paragraaf).
) van de afstandsbediening kunt u door de opties van het
19
Page 21
NEDERLANDS
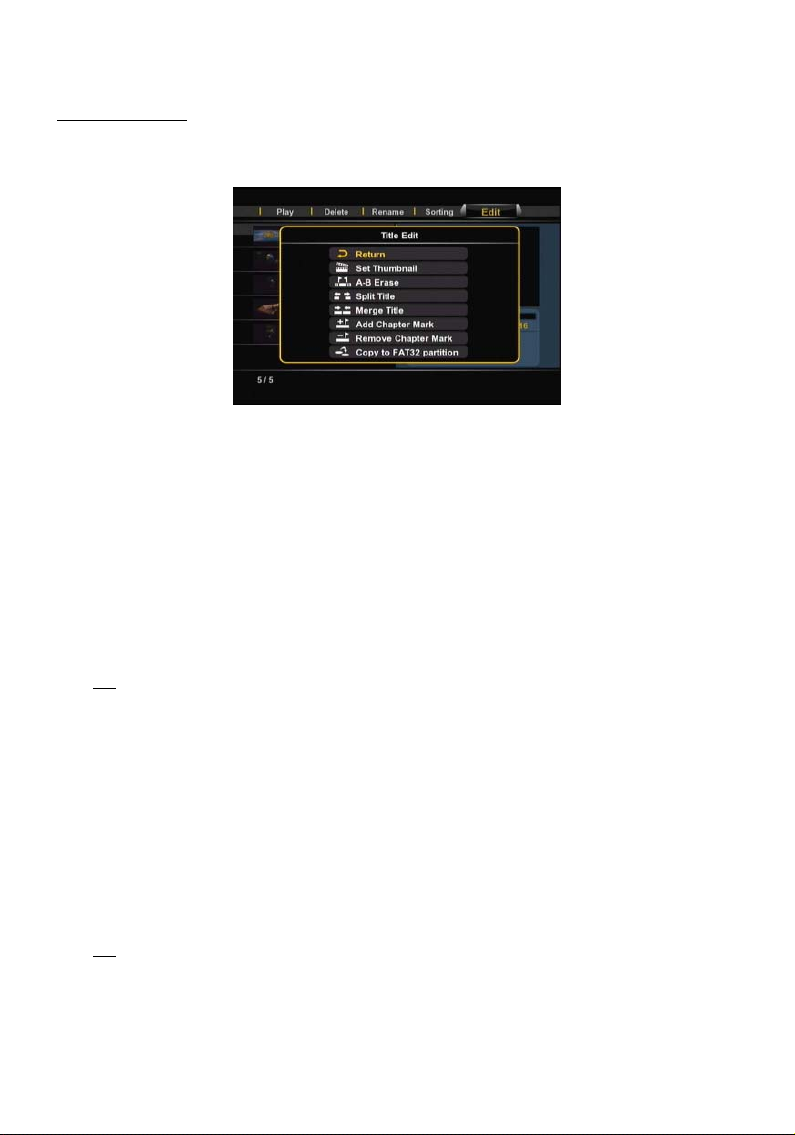
Het menu Bewerken
Het menu Bewerken heeft verschillende keuzes voor het aanpassen van uw opnamen; deze worden
hieronder uitgelegd:
[ Opnamen – menu Bewerken]
- Afbeelding instellen Met de keuze Afbeelding instellen kunt u uw film afspelen en uw
- A-B wissen Met de keuze A-B wissen kunt u een gedeelte van uw film markeren
- Titel splitsen Met de keuze Titel splitsen kunt u een opname in twee afzonderlijke
- Titel samenvoegen Met de keuze Titel samenvoegen kunt u twee opnamen achter elkaar
- Hfdstkmark. toevoegen Met de keuze Hfdstkmark. toevoegen kunt u uw opname in
NB:
U kunt ook de keuze Autom.hfdst. van het instellingenmenu aanzetten om tijdens het
opnemen automatisch hoofdstukmarkeringen aan uw opname toe te voegen.
favoriete afbeelding als miniatuurvoorbeeld voor de film instellen.
(bijvoorbeeld reclame) en uit uw opname verwijderen.
bestanden delen (bijvoorbeeld: als u twee tv-programma's heeft
opgenomen tijdens één opname met de programmatimer).
zetten om er één opname van te maken.
hoofdstukken verdelen. U kunt dan makkelijk naar verschillende plaatsen
in de opname "springen".
- Hfdstkmark. wissen Met de keuze Hfdstmark. wissen kunt u hoofdstukmarkeringen
verwijderen uit uw opname. Dit kan handig zijn als u de Media
Giant automatisch hoofdstukmarkeringen heeft laten toevoegen
- Kopieer naar FAT32 partitie Met de keuze Kopieer naar FAT32 partitie kunt u uw opname van
Wanneer de opname naar de FAT32 partitie is gekopieerd, kunt u
NB:
Zie voor meer informatie over de UPnP A/V server van de Media Giant hoofdstuk 16.
maar deze later weer wilt verwijderen.
de opnamepartitie naar de map REC in de mediapartitie van de
Media Giant kopiëren.
hem met uw computer afspelen, kopiëren en bewerken wanneer de
Media Giant via usb met de computer is verbonden, en kunt u de
opname via het netwerk naar een UPnP A/V-client (zoals de
Conceptronic C54WMP of de Conceptronic CFULLHDMA) streamen.
20
Page 22

NEDERLANDS
11. TV Tuner / AV Input (TV-tuner / AV-ingang)
Met de optie ‘TV Tuner/AV Input’ van het hoofdmenu kunt u kiezen of u van de tv-tuner opneemt of van
een op een AV-ingang van de Media Giant aangesloten apparaat.
Tip:
U kunt vanuit ieder menu van de Media Giant rechtstreeks naar het live tv-scherm gaan door op de
toets Live-TV (38
Wanneer u voor ‘TV Tuner/AV Input’ kiest, toont de Media Giant het programma waarop de tv-tuner is
afgestemd. Terwijl u naar live-tv kijkt, kunt u van zender wisselen met de toetsen Channel + (29
Channel - (28
Met de Source toets (2
en component-ingang. De bron wordt kort aangegeven in de rechter bovenhoek van het scherm.
Timeshifting (tv-uitzending pauzeren)
De Media Giant ondersteunt timeshifting. Met timeshift pauzeert u een tv-uitzending of andere
beeld/geluidsbron; het materiaal van de huidige opnamebron (zender/AV-ingang) wordt opgenomen vanaf
het moment dat de functie wordt geactiveerd.
Druk op de Timeshift toets (22
Wanneer timeshift actief is, wordt de uitzending of het AV-materiaal gepauzeerd terwijl de speler op de
achtergrond het materiaal opneemt.
) van de afstandsbediening.
) van uw afstandsbediening te drukken.
) en
) van de afstandsbediening kunt u schakelen tussen de tv-tuner, composiet-ingang
) van de afstandsbediening om timeshift te activeren.
NB:
Wanneer timeshift actief is, geeft een voortgangsbalk op het scherm de maximale buffergrootte
Meer informatie over formatteren vindt u in hoofdstuk 15.
Tijdens timeshift kunt u de volgende toetsen van de afstandsbediening gebruiken:
[ Timeshift: activeren ] [ Timeshift: actief ]
aan. Als u deze buffer wilt veranderen (groter of kleiner), moet u de harde schijf van de Media
Giant opnieuw formatteren om de grootte van de timeshift bufferpartitie aan te passen.
- Afspelen/pauzeren ( 18) Inhoud timeshiftbuffer afspelen.
- Pause (17) Weergave pauzeren of hervatten.
- Slow (langzaam) (24) Vertraagde weergave.
- Stop (23) De weergave stoppen.
- Terugspoelen (10) Versnelde weergave achteruit.
- Vooruitspoelen (32) Versnelde weergave.
- Ins. Rep. (16) 10 seconden teruggaan tijdens weergave
- CM. Skip (25) 30 seconden verdergaan tijdens weergave.
- Info (27) Informatie over timeshiftbuffer tonen of verbergen.
- Volume (12), (13) Geluidsvolume instellen.
- Mute (dempen) (30) Geluid uitschakelen.
21
Page 23
NEDERLANDS
Permanente timeshift
In het instellingenmenu van de Media Giant kunt u de Permanente timeshift aanzetten. Wanneer deze
functie aan staat, is de timeshift altijd actief en kunt u de weergave onmiddellijk pauzeren en met de
bovengenoemde toetsen door de timeshiftbuffer "springen".
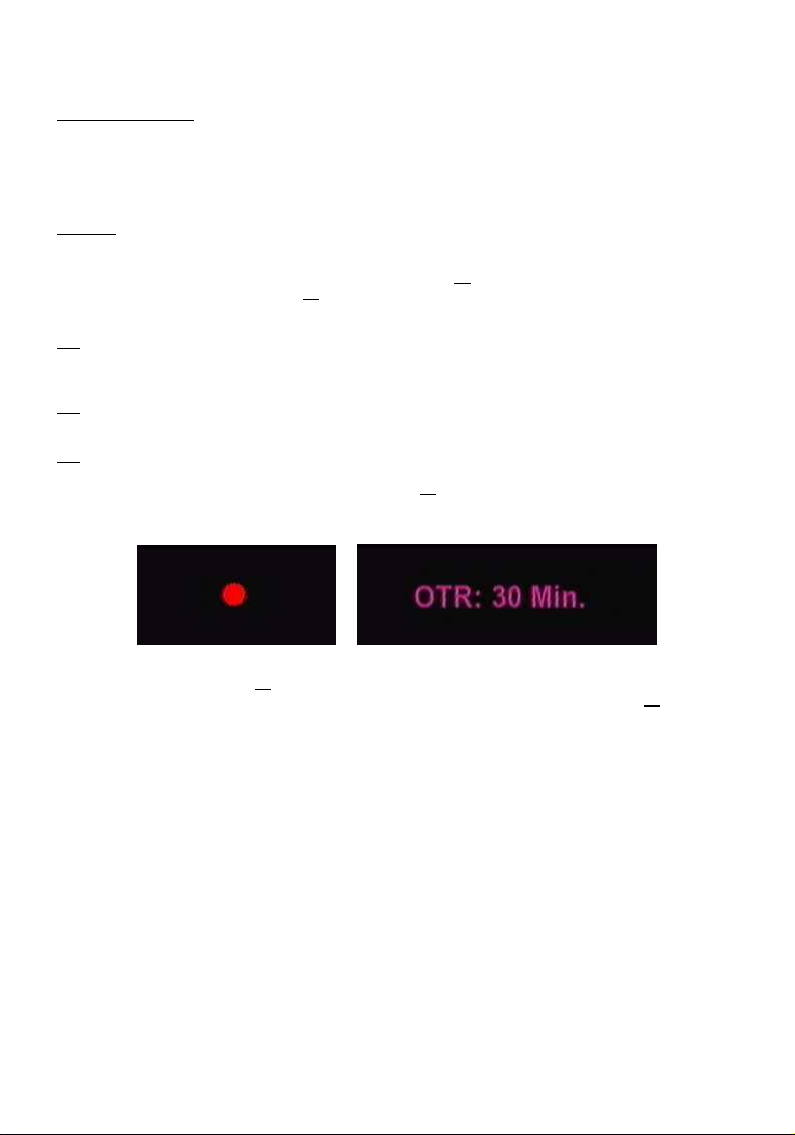
Opnemen
Wanneer u via de speler naar een live tv-uitzending of materiaal van de AV-ingang kijkt, kunt u het
materiaal waar u naar kijkt direct opnemen met de Rec toets (19
blijft opnemen tot u op de Stop toets (23
Tijdens de opname brandt de REC LED op het frontpaneel.
NB:
De speler herkent een eventuele kopieerbescherming op een aangesloten bron, zoals MacroVision
op dvd's. Wanneer een aangesloten bron tegen kopiëren is beveiligd, neemt de speler niet op en
verschijnt een waarschuwing wanneer de opnametoets wordt ingedrukt.
NB:
De Media Giant neemt standaard op in HQ (hoge kwaliteit). U kunt de opnamekwaliteit aanpassen
in het instellingenmenu.
NB:
U kunt tijdens een opname niet naar een andere zender gaan.
Wanneer u tijdens een lopende opname op de Rec toets (19
minuten vanaf het moment waarop u op de Rec toets drukt.
De melding OTR: 30 min. verschijnt op uw scherm.
) van de afstandsbediening. De speler
) van de afstandsbediening drukt.
) drukt, wordt de opnameduur ingesteld op 30
[ Normale opname ] [ Met opnametimer ]
Druk opnieuw op de Rec toets (19
minuten. De speler blijft opnemen tot de ingestelde tijd is verstreken of u op de Stop toets (23
afstandsbediening drukt.
) om de opnameduur met 30 minuten te verlengen tot maximaal 240
22
) van de
Page 24
NEDERLANDS
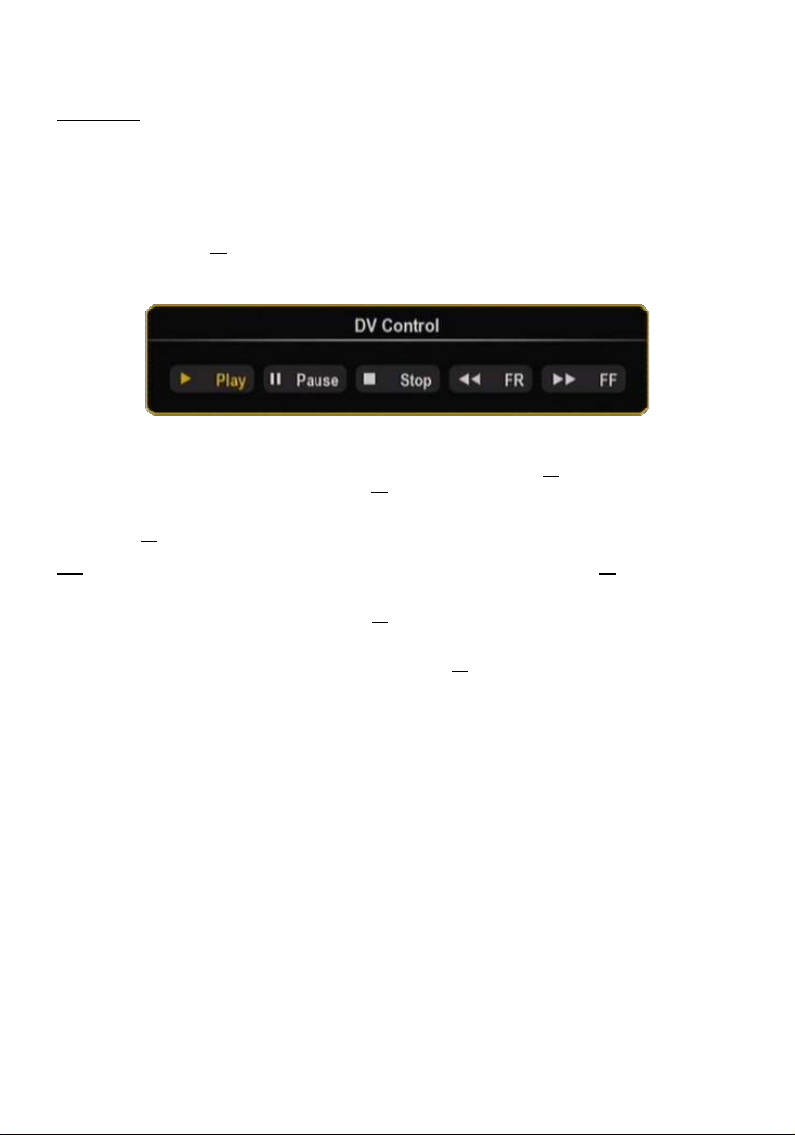
DV-bediening
Via de mini FireWire aansluiting achter het frontpaneel van de Media Giant kunt u uw dv-camera
rechtstreeks op de Media Giant aansluiten en uw opnamen bekijken of vastleggen op de interne harde
schijf van de Media Giant.
• Sluit uw dv-camera aan op de mini Firewire aansluiting [7] aan de voorkant van de Media Giant.
• Schakel uw dv-camera in en zet hem op Afspelen (Play).
• Druk op de DV toets (39
De Media Giant toont nu de dv-bediening op uw scherm:
) van uw afstandsbediening om naar DV bediening te gaan.
U kunt de knoppen van de dv-bediening selecteren met de navigatietoetsen (15
U bevestigt de gekozen knop met de Enter toets (26
Wanneer u in het dv-bedieningsscherm voor Afspelen heeft gekozen en uw video wordt weergegeven, kunt
u op de Rec (19
Tip:
U kunt het dv-bedieningsscherm tijdens de opname verbergen met de DV toets (39) van uw
afstandsbediening. Het bedieningsscherm verschijnt opnieuw als u nogmaals op de DV toets drukt.
U kunt de opname beëindigen met de Stop toets (23
De opgenomen video's verschijnen in de lijst met opnamen, zoals beschreven in hoofdstuk 10.
Om de dv-bediening af te sluiten, drukt u op de Return toets (14
) toets van de afstandsbediening drukken om uw dv-video op de harde schijf op te nemen.
[ DV bediening ]
) van de afstandsbediening.
) van de afstandsbediening.
) van de afstandsbediening.
) van de afstandsbediening.
23
Page 25
NEDERLANDS
12. Opnemen met programmatimer
U kunt de speler programmeren voor de opname van bepaalde zenders op bepaalde tijdstippen. De speler
heeft plaats voor maximaal 8 geprogrammeerde opnamen.
• Selecteer de keuze ‘Scheduled Recording’ in het hoofdmenu.
Het scherm Geplande opname verschijnt op uw tv.
Het menu Geplande opname heeft vijf keuzes, waaruit u kunt kiezen met de navigatietoetsen naar links en
rechts (15
Een programma toevoegen of bewerken
Als u de menuoptie Toevoegen of Bewerken kiest en op de Enter toets (26
drukt, kunt u een nieuw programma toevoegen of een bestaand programma wijzigen.
Standaard is het veld Bron actief.
Nadat u de juiste bron heeft geselecteerd, drukt u op de rechter navigatietoets (15
navigatietoetsen (15
• Selecteer de juiste bron voor uw opname. U kunt kiezen voor een tv-zender, de composiet video-ingang
• Stel de juiste datum voor uw opname in.
• Stel de juiste starttijd voor uw opname in.
• Stel de juiste lengte voor uw opname in.
• Stel de herhaalmethode voor uw opname in. U kunt uit de volgende mogelijkheden kiezen:
U kunt het veld Device/Apparaat overslaan, omdat u alleen op de interne harde schijf kunt opnemen.
[ Menu Geplande opname ] [ Programma toevoegen]
) van de afstandsbediening:
Toevoegen
Bewerken
Verwijderen
Status
Geschiedenis
of de component video-ingang.
Eenmaal, Elke dag, Ma-vr, Ma-za, Zo, Ma, Di, Wo, Do, Vr of Za.
Een nieuw programma toevoegen.
Een bestaand programma bewerken.
Een bestaand programma verwijderen.
De status van de lijst met timeropnamen wijzigen.
De geschiedenis van de timeropnamen tonen.
) omhoog of omlaag naar de gewenste doellocatie.
) van de afstandsbediening
) en gaat u met de
24
Page 26

NEDERLANDS
• Stel de opnamekwaliteit in. U kunt kiezen uit HQ, SP, LP, EP en SLP.
NB:
Als u het veld Kwaliteit verandert, heeft dit invloed op de kwaliteit van uw opname en de
hoeveelheid ruimte die deze op de harde schijf inneemt. De beschikbare opnametijd voor de
• Zet de keuze Nicam op aan of uit.
• Wanneer u alle opties voor uw opname heeft ingesteld, drukt u op de Enter toets (26
• Nu verschijnt een bevestigingsvenster op uw scherm. Selecteer Bevestigen en druk op de Enter toets
De opname is nu geprogrammeerd en de speler start de opname op het ingestelde kanaal wanneer het
ingestelde tijdstip is aangebroken, ook als de speler op dat moment op standby staat.
NB:
verschillende kwaliteitsinstellingen staat linksboven in het timerscherm.
Nicam moet aan staan als de bron die u wilt opnemen een tv-uitzending met twee verschillende
audiotalen is (bijvoorbeeld Eurosport).
afstandsbediening om het timerprogramma op te slaan.
) van de afstandsbediening om het timerprogramma op te slaan.
(26
U kunt tijdens een opname niet naar een andere zender gaan.
) van de
25
Page 27
NEDERLANDS
13. Instellingen
Wanneer u in het hoofdmenu voor ‘Setup’ kiest, verschijnt het instellingenmenu op uw scherm. Hieronder
vindt u alle beschikbare instellingen met de bijbehorende beschrijving.
U kunt met de navigatietoetsen van de afstandsbediening tussen de verschillende opties van het
instellingenmenu wisselen.
[ Instellingenmenu – Video ] [ Instellingenmenu – Opnemen]
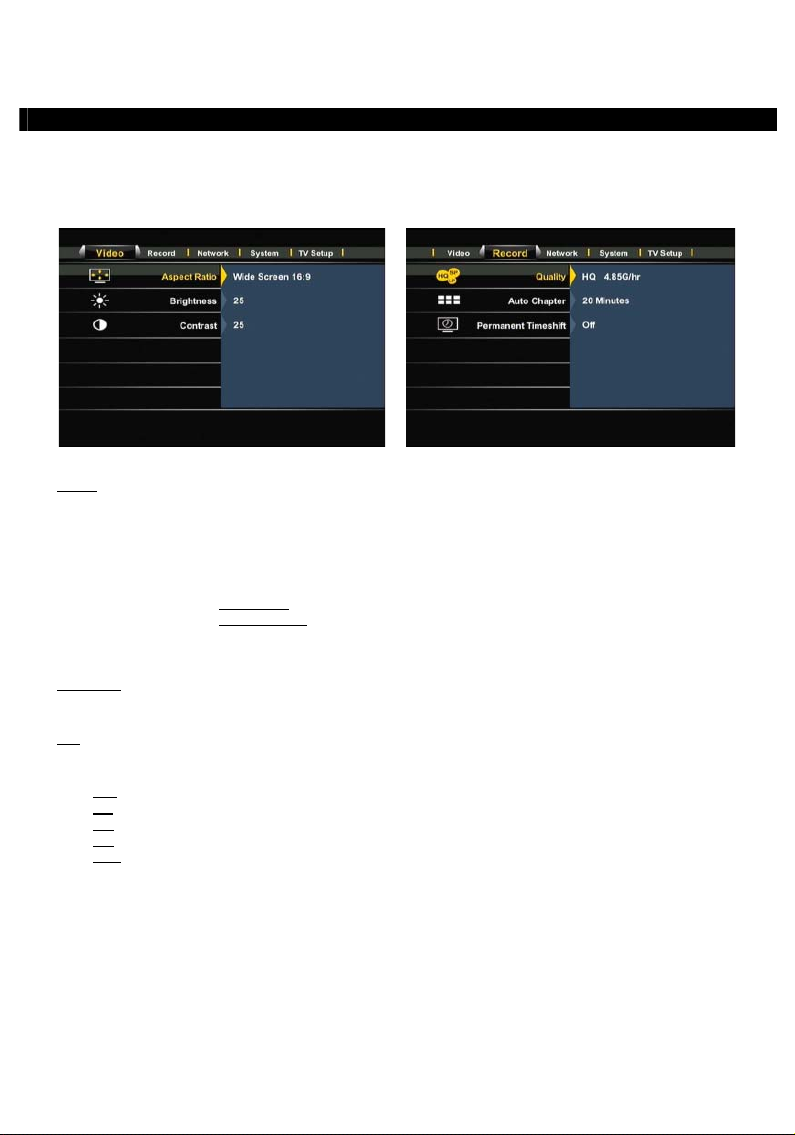
Video:
Beeldverhouding De beeldverhouding van het uitvoersignaal van de Media Giant aanpassen.
(Letterbox 4:3, Pan-Scan 4:3, Breedbeeld 16:9)
Helderheid De helderheid van het uitgangsignaal van de Media Giant wijzigen.
Contrast Het contrast van het uitgangsignaal van de Media Giant wijzigen.
Audio Setup Wijzig de geluidsinstellingen van de Media Giant.
Night Mode
Digital Output
Schakel ‘Night Mode’ aan of uit. (Uit, Aan, Comfort).
Selecteer de digitale uitgang. (HDMI-LPCM, HDMI-RAW, SPDIF-
LPCM, SPDIF-RAW)
Opnemen:
Kwaliteit De opnamekwaliteit aanpassen (HQ, SP, LP, EP, SLP).
NB: Als u het veld Kwaliteit verandert, heeft dit invloed op de kwaliteit van uw opname en de
hoeveelheid ruimte die deze op de harde schijf inneemt. De verschillende kwaliteitsinstellingen
vereisen per uur video de volgende vrije ruimte:
HQ: 4,85 GB (4850 MB)
2,42 GB (2420 MB)
SP:
LP:
1,62 GB (1620 MB)
1,21 GB (1210 MB)
EP:
SLP:
0,80 GB (800 MB)
Automatische Instellingen voor automatische hoofdstuknummering aanpassen. De functie Auto
hoofdstukken hoofdstuk voegt tijdens het opnemen automatisch hoofdstukmarkeringen aan uw
opname toe, waarmee u makkelijk naar verschillende plaatsen in de opname kunt
Permanente timeshift Permanente timeshift aan- of uitzetten. Wanneer deze functie aan staat, is de
"springen".
timeshift altijd actief en kunt u de weergave onmiddellijk pauzeren en met de
toetsen van de afstandsbediening door de timeshiftbuffer "springen".
26
Page 28
NEDERLANDS
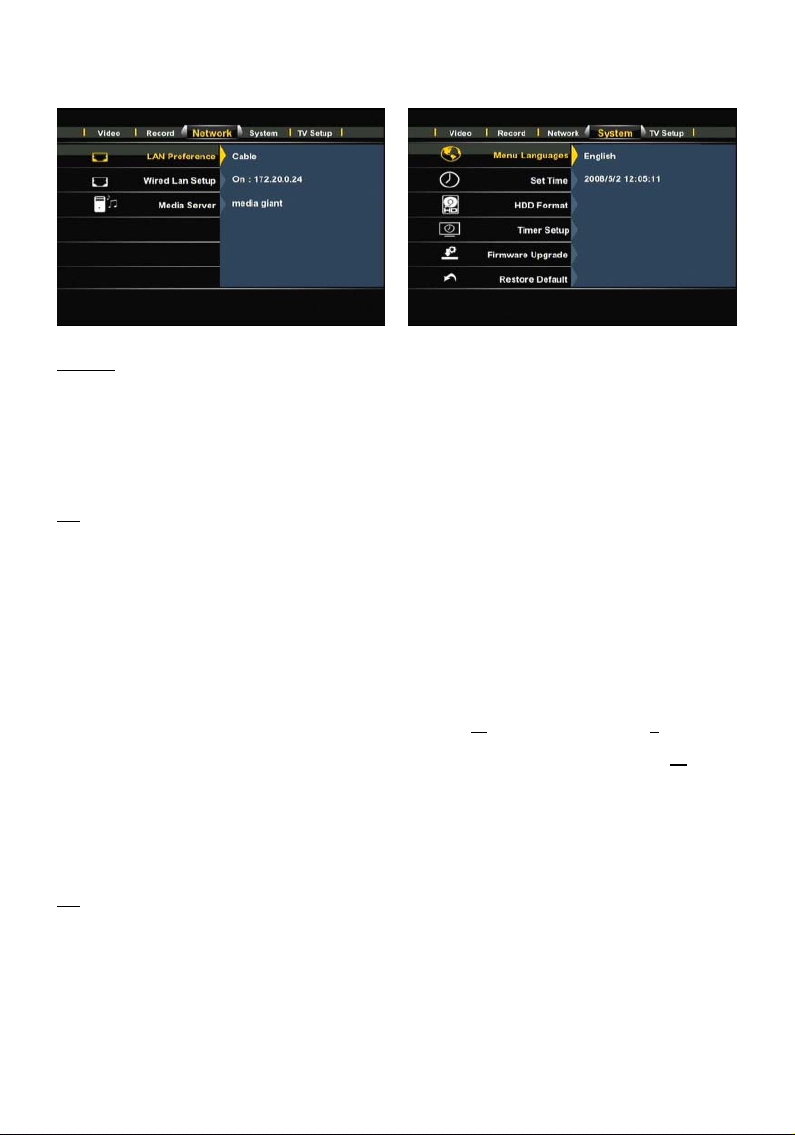
[ Instellingenmenu – Netwerk] [ Instellingenmenu – Systeem ]
Netwerk:
LAN Voorkeuze ** De voorkeur voor de netwerkverbinding instellen: Kabel of Auto (via Powerline).
Wanneer voor Kabel is gekozen, gebruikt de Media Giant altijd de LAN-aansluiting
voor de netwerkverbinding.
Als voor Auto (via Powerline) is gekozen, gebruikt de Media Giant Powerline als er
een Powerline netwerk beschikbaar is. Als er geen Powerline netwerk beschikbaar
is, wordt de LAN-aansluiting gebruikt.
NB: Wanneer de Media Giant zowel op Powerline als op een LAN-kabel is aangesloten, is Powerline het
standaardnetwerk. Wanneer in dat geval de snelheid van het Powerline netwerk terugloopt tot
minder dan 1 Mbps, schakelt de Media Giant automatisch over op Kabel.
Terwijl van de netwerkkabel gebruik wordt gemaakt, blijft de Media Giant de snelheid van het
Powerline netwerk controleren. Zodra de snelheid van het Powerline netwerk oploopt tot meer dan
1 Mbps, schakelt de Media Giant automatisch over op Powerline.
Bekabeld netwerk Bij Bekabeld netwerk inst. kunt u het IP-adres van de Media Giant configureren.
inst. U kunt hier kiezen tussen Annuleren, DHCP IP (Auto) en IP handmatig.
Als uw netwerk een DHCP-server bevat, selecteert u de keuze DHCP IP.
Als u het IP-adres handmatig wilt instellen, selecteert u IP handmatig.
De Setup Wizard toont nu de velden waarin u het statische IP-adres kunt invullen.
Geef met behulp van de navigatietoetsen (15
subnetmasker, standaardgateway en DNS-server in.
) en de cijfertoetsen 0-9 (6) IP-adres,
Wanneer u de juiste waarden heeft ingegeven, drukt u op de Enter toets (26) van
de afstandsbediening.
Media Server De naam van de Media Server wijzigen. Dit is de naam van de UPnP A/V-server van
de Media Giant, waarvan UPnP A/V-clients (zoals de Conceptronic C54WMP of de
Conceptronic CFULLHDMA) gebruik kunnen maken om via het netwerk
mediabestanden te streamen vanaf de harde schijf van de Media Giant.
NB: Meer informatie over de UPnP A/V-server van de Media Giant vindt u in hoofdstuk 16.
27
Page 29

NEDERLANDS
Systeem:
Menutaal Selecteer de taal die u wilt gebruiken om de Media Giant te bedienen.
Tijd instellen Tijd en datum aanpassen.
HDD formatteren Interne harde schijf formatteren.
Timer inst. Timer diashow:
Timer screensaver:
Firmware Upgrade Werk de firmware van de Media Giant bij.
De firmware kan worden bijgewerkt via internet of via een USB opslagapparaat.
De ‘Firmware Upgrade’ optie kan op ‘Automatisch’ of ‘Handmatig’ gezet worden.
Wanneer voor ‘Automatisch’ is gekozen (standaard), zal de Media Giant op
wisselende tijden controleren of er nieuwe firmware beschikbaar is en deze
automatisch bijwerken als het apparaat niet bezig is met een opname of afspelen.
Wanneer voor ‘Handmatig’ is gekozen kunt u zelf zoeken naar nieuwe firmware.
NB: Om uw huidige firmware-versie te bekijken, gaat u naar het hoofdmenu en drukt u op de Info toets
) van de afstandsbediening. De firmware-versie wordt op uw scherm weergegeven.
(27
Standaard herstellen De standaardinstellingen van de Media Giant terugzetten en de Setup Wizard starten
om de speler opnieuw te configureren.
Wachttijd per foto instellen voor diashow.
Hier kunt u de wachttijd voor de screensaver instellen.
[ Instellingenmenu – Tv-instellingen] [ Programma bewerken ]
Tv-instellingen: **
Tv-invoer Selecteer uw land in de landenlijst. Als uw land er niet bij staat, selecteert u Don’t
Kanalen scannen Automatisch alle kanalen doorzoeken. Automatisch zenderzoeken kan enige tijd in
care (Geen voorkeur) in de lijst.
beslag nemen; hierbij worden alle gevonden zenders automatisch vastgelegd in het
Handmatig
geheugen van de Media Giant.
afstemmen Onder Handmatig afstemmen kunt u nieuwe zenders aan uw bestaande zenderlijst
toevoegen (met de keuze Toevoegen), zenders verwijderen (met de keuze
Verwijderen) en namen invullen voor de gevonden zenders (met de keuze
Kanaalverwijzingen Met de optie Kanaalverwijzingen kunt u de volgorde van de kanalen aanpassen.
Bewerken).
Gebruik de navigatietoetsen van de afstandsbediening om de zender die u wilt
verplaatsen te selecteren en druk vervolgens op de Enter toets.
Het zenderblok wordt geel. Gebruik de navigatietoetsen van de afstandsbediening
om de nieuwe plaats van de zender te selecteren en druk vervolgens op de Enter
toets.
De twee zenders worden nu omgewisseld.
28
Page 30
NEDERLANDS
14. Op computer aansluiten via USB
De speler kan op uw computer worden aangesloten om gegevens van en naar de interne harde schijf van de
speler te kopiëren (films, muziek, foto's, documenten, etc.).
NB:
In het onderstaande voorbeeld wordt uitgegaan van een computer met Windows XP, maar de
speler kan worden verbonden met alle computers met usb-aansluiting die apparaten met het
FAT32 bestandssysteem kunnen lezen en schrijven.
Sluit de speler op uw computer aan
• Sluit de meegeleverde USB naar Mini-USB kabel aan op de Mini-USB poort aan de voorkant van de speler
en op een vrije USB poort van uw computer.
• Zet de speler aan met de hoofdschakelaar aan de achterkant van de speler. De speler wordt automatisch
herkend en geïnstalleerd, waarna hij als een verwisselbare harde schijf wordt aangegeven op de
computer.
NB:
Wanneer de harde schijf maar één (FAT32) mediapartitie heeft, is er maar één stationsletter
zichtbaar. Wanneer de harde schijf twee mediapartities heeft (FAT32 en NTFS), toont de Media
Giant twee stationsletters.
Opnamen afspelen op uw computer
Voordat u uw opnamen op een computer kunt afspelen, moet u ze eerst van de opnamepartitie naar de
mediapartitie van de Media Giant kopiëren. U kunt hiervoor de keuze Kopieer naar FAT32 partitie
gebruiken; u vindt deze keuze in het menu Opnamen afspelen zoals beschreven in hoofdstuk 10.
Nadat uw opnamen naar de FAT32-partitie zijn gekopieerd, kunt u ze op uw computer afspelen wanneer de
speler met de computer is verbonden.
Koppel de speler los van uw computer
• Klik op het pictogram Veilig verwijderen in de systeembalk.
• Selecteer USB massaopslagapparaat veilig verwijderen in de lijst die wordt getoond.
• Wacht op de melding U kunt de hardware nu veilig verwijderen.
• Verwijder de USB kabel.
29
Page 31

NEDERLANDS
15. Partitie-informatie en formatteerwizard
In de meeste gevallen wordt de Media Giant geleverd met een harde schijf die al is geformatteerd. De
harde schijf wordt geformatteerd volgens de standaardconfiguratie van de Media Giant, met de volgende
partities:
Bufferpartitie voor timeshift: Ca. 4,85 GB
Opnamepartie: 50% van de harde schijf.
FAT32 mediapartitie: 25% van de harde schijf.
NTFS mediapartitie: 25% van de harde schijf.
Voorbeeld met: 500 GB 750 GB 1000 GB
Bufferpartitie voor timeshift: ~ 4,85 GB ~ 4,85 GB ~ 4,85 GB
Opnamepartitie: ~ 250 GB ~ 375 GB ~ 500 GB
FAT32 mediapartitie: ~ 125 GB ~ 187 GB ~ 250 GB
NTFS mediapartitie: ~ 125 GB ~ 187 GB ~ 250 GB
U kunt afwijken van de standaardconfiguratie voor de harde schijf van de Media Giant door de schijf
opnieuw te formatteren.
NB:
Als u de harde schijf van de Media Giant formatteert, worden alle bestanden verwijderd die op de
harde schijf zijn opgeslagen of opgenomen!
Om de harde schijf van de Media Giant te formatteren, gaat u naar het instellingenmenu en selecteert u de
keuze HDD formatteren op de Systeem pagina. Selecteer ter bevestiging nogmaals HDD formatteren.
De wizard HDD formatteren verschijnt op uw scherm, met als eerste een waarschuwing:
[ Wizard formatteren – Waarschuwing] [ Wizard formatteren – Timeshiftbuffer ]
• Selecteer OK om door te gaan naar de volgende stap.
Pas de grootte van de timeshiftbuffer aan met de navigatietoetsen omhoog en omlaag (15
) van de
afstandsbediening.
U kunt de timeshiftbuffer op 1, 2, 3 of 4 uur zetten.
• Selecteer Volgende om door te gaan naar de volgende stap.
30
Page 32

NEDERLANDS
[ Wizard formatteren – Opnamepartitie ] [ Wizard formatteren – FAT32/NTFS partitie ]
• Pas de grootte van de opnamepartitie aan met de navigatietoetsen omhoog en omlaag (15
) van de
afstandsbediening.
De resterende ruimte wordt gebruikt voor de mediapartitie(s) van de Media Giant.
• Selecteer Volgende om door te gaan naar de volgende stap.
[ Wizard formatteren – Start formatteren ] [ Wizard formatteren – Formatteren... ]
• Selecteer Formatteren om te beginnen met het formatteren van de harde schijf van de Media Giant.
Tijdens het formatteren geeft de formatteerwizard de tekst Bezig... aan.
NB:
Het formatteren kan enige tijd duren (bijvoorbeeld ca. 5 minuten). Wacht tot de
formatteerprocedure voltooid is.
[ Wizard formatteren – Voltooid ]
• Kies na afloop van het formatteren OK om de formatteerwizard te sluiten. De Media Giant wordt nu
automatisch opnieuw gestart.
31
Page 33

NEDERLANDS
16. UPnP A/V-server (Twonky mediaserver)
Een van de mogelijkheden van de Media Giant is de UPnP A/V-server.
Hiermee wordt de Media Giant met al zijn media-inhoud beschikbaar gesteld aan de UPnP A/V-clients in uw
netwerk (bijvoorbeeld de Conceptronic CFULLHDMA of de Conceptronic C54WMP).
Als UPnP A/V-server beschikt de Media Giant over de Twonky mediaserver.
De Twonky mediaserver indexeert automatisch alle mediabestanden in de FAT32 en NTFS mediapartities.
Zodra er nieuwe inhoud aan deze partities wordt toegevoegd, is deze automatisch beschikbaar voor de
UPnP A/V-clients in uw netwerk.
U kunt de naam van uw UPnP A/V-server wijzigen in het instellingenmenu van de Media Giant, bij Netwerk.
NB:
De naam van de UPnP A/V-server staat standaard op media giant.
Als u bekend bent met de Twonky mediaserver software, kunt u de geavanceerde instellingen van de
Twonky server via uw computer aanpassen.
Voor de configuratiepagina's van de Twonky mediaserver software geeft u in de adresbalk van uw
internetbrowser het IP-adres van de Media Giant in, gevolgd door een dubbele punt en het poortnummer
9000.
Voorbeeld:
HTTP://192.168.0.100:9000/ (ervan uitgaande dat 192.168.0.100 het IP-adres van uw
Media Giant is).
De Twonky mediaserver heeft een ingebouwde Troubleshooting gids voor het oplossen van problemen; u
vindt deze in de linker navigatiebalk van het Twonky Media Server configuratievenster. Deze gids assisteert
u bij het configureren van de Twonky mediaserver.
Ga voor meer informatie over de Twonky mediaserver naar de Twonky website:
http://www.twonkymedia.com/
32
Page 34

NEDERLANDS
17. Door gedeelde netwerklocaties bladeren
De Media Giant kan door uw netwerkshares bladeren en de daar gevonden mediabestanden rechtstreeks
afspelen. Voordat u van deze mogelijkheid gebruik kunt maken, moet u binnen uw netwerk een of meer
mediamappen delen, zodat de Media Giant ze kan vinden en openen.
In dit hoofdstuk wordt uitgelegd hoe u bestanden kunt delen onder Windows XP of Windows Vista.
NB:
In dit hoofdstuk wordt uitsluitend uitgelegd hoe u bestanden kunt delen onder Windows XP of
Windows Vista.
Zie de gebruiksaanwijzing van het besturingssysteem van uw computer(s) of
netwerkopslagapparaten voor informatie over het delen van mappen met mediabestanden.
Bestanden delen onder Windows XP
• Open Deze computer vanuit het Windows Startmenu en ga naar de map met de mediabestanden die u
wilt delen.
• Klik eenmaal op de map met mediabestanden en selecteer in de menubalk links in het venster de keuze
Deze map delen.
De eigenschappen van de map worden getoond en het tabblad Delen wordt geactiveerd.
Bij Delen en beveiliging kunt u aangeven dat u de map wilt delen.
Als u nog niet eerder mappen heeft gedeeld, moet u de wizard Netwerkinstellingen uitvoeren door in het
venster op de regel Wizard netwerkinstellingen te klikken.
[ Deze computer – Map delen ]
33
Page 35

NEDERLANDS
• Wanneer de wizard Netwerkinstellingen al eens is uitgevoerd, kunt u uw map delen door op Deze map
delen te klikken.
• Geef in het tekstveld een naam in voor de gedeelde locatie en klik op Toepassen.
• Klik op OK om het venster te sluiten.
Het pictogram van de map bevat nu een hand om aan te geven dat het om een gedeelde map gaat.
[ Eigenschappen – tabblad Delen ] [ Eigenschappen – tabblad Delen ]
[ Gedeelde map ]
34
Page 36

NEDERLANDS
Bestanden delen onder Windows Vista
• Open Deze computer vanuit het Windows Startmenu en ga naar de map met de mediabestanden die u
wilt delen.
• Klik eenmaal op de map met mediabestanden en selecteer in de werkbalk bovenin het venster de keuze
Delen.
[ Computer – Map delen ]
Standaard staat uw eigen gebruikersaccount als eigenaar van de map ingevuld in de sharelijst.
[ Eigenschappen delen ]
• U kunt meer gebruikers aan de sharelijst toevoegen door ze te selecteren in het afrolmenu en op de
knop Toevoegen te klikken.
• Wanneer u alle gebruikers heeft ingevuld, klikt u op de knop Delen om de map te delen.
Het pictogram van de map toont nu twee personen om aan te geven dat het om een gedeelde map gaat.
[ Gedeelde map ]
35
Page 37

NEDERLANDS
Door gedeelde mappen bladeren vanuit de Media Giant
Wanneer u mediabestanden heeft gedeeld in uw netwerk kunt u met de keuze Mediabrowser van het
hoofdmenu door uw netwerklocaties bladeren.
[ Opslaglocatie selecteren ] [ Netwerkshare – Gebruiker aanmelden ]
Ga met de navigatietoetsen (15
Netwerk en navigeer binnen het netwerk naar uw computer of netwerkopslagapparaat met de gedeelde
mappen.
Wanneer een gedeelde map beveiligd is met een gebruikersnaam en een wachtwoord (bijvoorbeeld
standaard gedeelde locatie in Windows XP of Windows Vista), toont de Media Giant het venster Gebruiker
aanmelden waarin u een gebruikersnaam en een wachtwoord moet invullen.
NB:
U kunt de gegevens van uw normale Windows XP of Windows Vista gebruikersaccount gebruiken om
in te loggen op de gedeelde map.
Selecteer met de navigatietoetsen (15
wachtwoord en druk op de Enter toets (26
de gevraagde gegevens kunt ingeven.
Nadat u de gebruikersnaam en het wachtwoord correct heeft ingegeven, selecteert u de knop OK of de
knop OK & Opslaan in Mijn Snelkoppelingen om de gedeelde netwerklocatie te openen.
U kunt nu door de gedeelde map navigeren, zoals beschreven in hoofdstuk 9.
[ Virtueel toetsenbord ] [ Netwerkshare – Gebruiker aanmelden ]
) van de afstandsbediening in de lijst met opslaglocaties naar de keuze
) van de afstandsbediening het veld voor de gebruikersnaam of het
:
), waarna het virtuele toetsenbord op het scherm verschijnt en u
36
Page 38

ENGLISH
Conceptronic Media Giant
User Manual
Congratulations on the purchase of your
This User Manual gives you a step-by-step explanation how to install and use the Conceptronic Media
Recorder & Player.
When problems occur, we advise you to go to our support-site (go to www.conceptronic.net
‘Support’. Here you will find the Frequently Asked Questions Database.
When you have other questions about your product and you cannot find it at our website, contact us by email: support@conceptronic.net
For more information about Conceptronic products, please visit the Conceptronic Web Site:
www.conceptronic.net
Tip : The Conceptronic Media Giant is firmware upgradable. To upgrade your unit with the latest
firmware version, you can visit the Conceptronic Web Site, or use the firmware upgrade feature of
the Media Giant.
Tip :
Please check www.conceptronic.net for the latest codec list of supported files.
The following items should be present in the package of the Conceptronic Media Recorder & Player:
• Conceptronic Media Giant (described as ‘unit’ or ‘Media Giant’ in the manual). **
The device in the package is 1 of the 3 models listed below:
CM3G [C08-130]:
CM3GP [C08-131]:
CM3GPP [C08-132]:
• Power cord.
• Remote Control with battery. (Battery type: CR2025)
• RF Antenna Cable.
• Composite Video Cable (Red, White, Yellow RCA Jacks).
• S-Video Cable.
• Component Video Cable (Red, Green, Blue RCA Jacks).
• Coaxial Digital Audio Cable (Black RCA Jacks).
• SCART Adapter for Composite Video Cable / S-Video Cable.
• HDMI A/V cable (HDMI 1.3).
• Network Cable.
• USB Cable.
• This User Manual.
Conceptronic Media Recorder & Player.
and click
1. Package Contents
Media Giant without tuner (AV-in only).
Media Giant with analog tuner.
Media Giant with analog tuner and Powerline Adapter.
IMPORTANT:
In this manual, some features are explained which are only valid for the CM3GP (with analog tuner)
and the CM3GPP (with analog tuner and Powerline Adapter).
These features are marked with **.
37
Page 39

ENGLISH
2. Product Features
• Built-in Powerline network adapter. **
• Built-in TV Tuner with TV channel auto-search. **
• TV signal recording. **
• AV signal recording from e.g. a VCR, DVD or Video Camera.
• DV input for playback / recording from a DV Video Camera.
• Record to internal HDD.
• Up to 1080i output resolution.
• Up to 1080i playback resolution.
• DVD quality of recorded files in MPEG2 format (can be played on PC or other media player).
• Record Options: One-key instant record, Scheduled record, Time-shift.
• Playback of MPEG1/2/4, MP3, WMA, JPG files stored in internal HDD or USB Device.
• Files copy from USB Device or network location to internal HDD.
• Auto switch between USB-PC and Player Mode:
When connected by USB to the PC, the unit acts as an USB Storage Device.
When not connected by USB to the PC, the unit acts as a Media Recorder & Player.
3. Notes & Cautions
• Do not attempt to disassemble the unit. This may cause high-voltage injuries.
• Keep the unit away from excessive moisture.
• Do not immerse or expose the unit to liquids.
• Disconnect the power cable if you do not intend to use the unit for an extended period of time.
• Make sure the power socket where the Media Giant is connected to is easily accessible.
• Avoid using the unit in a location near combustibles.
• Change the battery of the remote control with the same kind when it is weak or dead. Recycle old
batteries where possible. To avoid corrosion, remove the battery when the remote will not be used
for a long time.
• Make sure the batteries are placed correctly in the remote control to prevent damage.
• Keep the remote away from excessive moisture; do not drop it.
• Do not operate the remote under intense sunlight.
• NEVER drop, shake or bump the unit.
• To prevent overheating, do not cover the unit.
IMPORTANT:
Do NOT format the harddisk on your computer! This will cause the unit to loose all system
data and will require a re-initialisation. When you want to format the harddisk of the unit,
use the built-in format tool in the Setup menu of the unit.
38
Page 40

ENGLISH
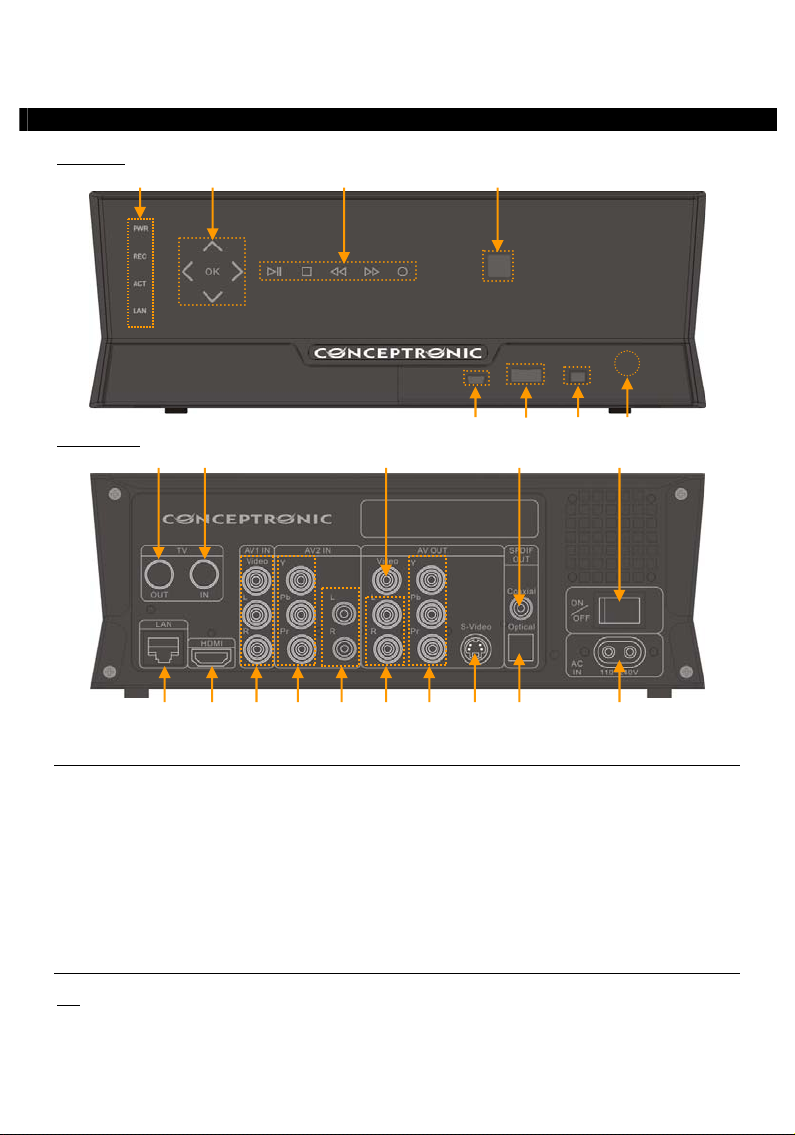
7 8
23
19 18 17 16
12 13
Front View
4. Product Overview
1 3
2 4
Rear view
9
10 11
15 21 22
14 20
5 6
Description of the numbers:
1. Status LED’s (Power, REC, ACT, LAN) 13. Main power switch
2. Navigation touch buttons 14. LAN (RJ45) connection
3. Playback touch buttons 15. HDMI ouput
4. Infrared receiver 16. AV1 input (Composite Video/Audio)
5. Mini-USB Jack (To PC) 17. AV2 Component video input
6. USB Host Port 18. AV2 audio input (L/R)
7. DV input 19. AV audio output (L/R)
8. Frontpanel ‘Open’ button 20. AV Component video output (Y/Pb/Pr)
9. TV-Tuner output ** 21. S-Video output
10. TV-Tuner input ** 22. SPDIF digital optical output
11. AV Composite video output 23. AC input (110 ~240v)
12. SPDIF digital coaxial output
The touch buttons have the same functions as the basic remote control functions.
Note:
39
Page 41

ENGLISH
5. Remote Control Explanation
The remote control is used to control the unit. On the inside cover of this manual you will find a picture of
the remote control. The numbers of the buttons correspond with the table below, to explain each function
of the remote control.
Nr Button Description
1. POWER ( ) Turn the unit on or to standby mode
2. SOURCE Switch between Tuner, AV & Playback
3. MEDIA Direct button to the Media Browser
4. AUDIO Change the DVD Audio track (when available on your DVD files)
5. ZOOM Zoom in / zoom out
6. 0 – 9 Numeric buttons
7. COPY Display the Copy menu
8. REPEAT Set Repeat mode
9. GOTO Goto a specific point in the playback
10. FAST REWIND (
11. PREVIOUS (
12. VOLUME + Increase the Volume
13. VOLUME - Decrease the Volume
14. RETURN Return to the previous screen / channel
15.
, , , Navigation Keys: Navigate through the menu’s
16. INS.REP. Jump back 10 seconds during timeshift or playback
17. PAUSE Pause the (timeshift) playback
18. PLAY Start Playback
19. REC Start recording
20. TV SYS Change the output resolution of the unit
21. SETUP Direct button to the Setup menu
22. TIMESHIFT Activate the timeshift feature
23. STOP (
24. SLOW Slowmotion playback
25. CM.SKIP Jump forward 30 seconds during timeshift or playback
26. ENTER Confirm selection
27. INFO Display Channel information / File information
28. CHANNEL - Channel Down
29. CHANNEL + Channel Up
30. MUTE Mute the sound
31. NEXT (
32. FAST FORWARD (
33. GUIDE Open the Scheduled Recording menu
34. A-B Initialize A-B repeat loop
35. DELETE Clear the input / Delete the selection
36. ANGLE Change the DVD angle (when available on your DVD files)
37. SUB-T Change the subtitle (when available on your video/DVD files)
38. LIVE-TV Direct button to Live-TV
39. DV Switch to DV Playback & Record mode
40. MENU Display the Main menu
41. LED Indicates the operation of the remote control
) Fast Rewind playback
) Previous File / Track / Chapter / Picture
) Stop Playback / Stop Recording / Disable Timeshift
) Next File / Track / Chapter / Picture
) Fast Forward playback
40
Page 42

ENGLISH
23
19 18 17 16
12 13
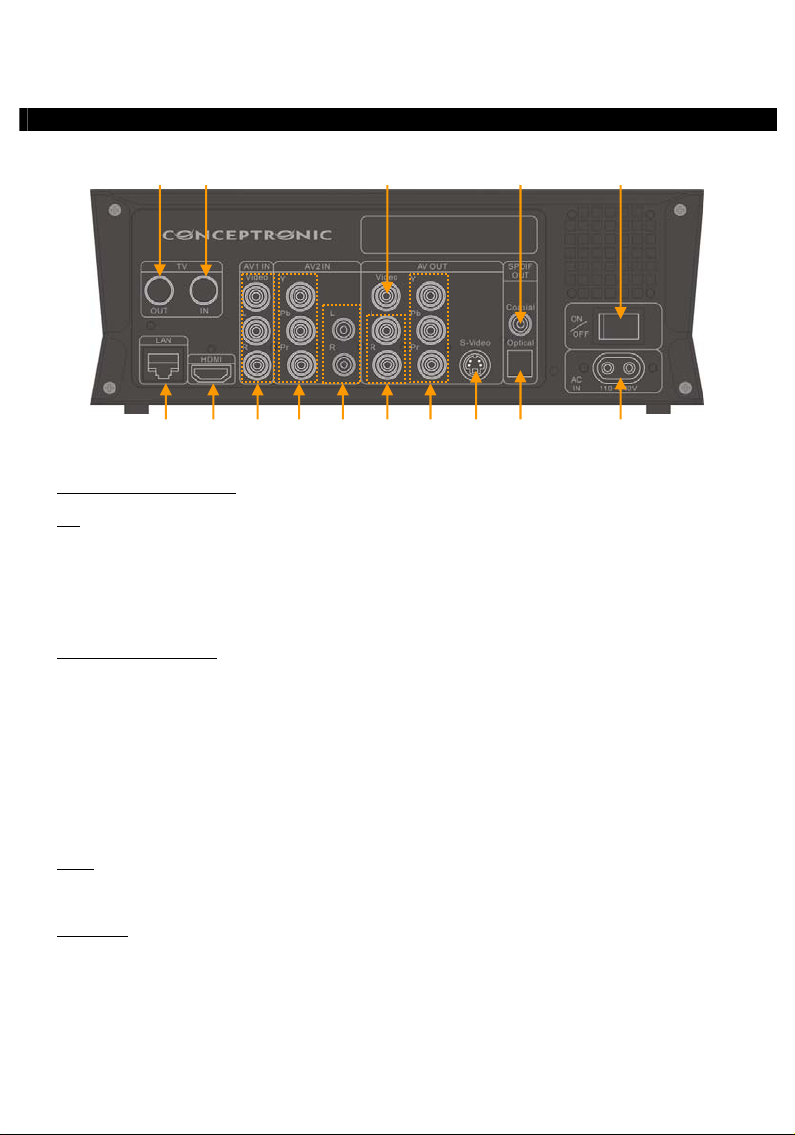
6. Connecting your Media Giant
This chapter will explain how you can connect the Media Giant to your TV, home cinema system, network,
etc.
9
10 11
Connecting the antenna cable(s)
Note:
The Tuner of the unit supports Signal Pass-through, to redirect the TV signal from the Tuner input
to the Tuner output.
• Disconnect the main antenna cable from your TV, and connect it to the Tuner input [10] of the unit.
• Connect the supplied antenna cable to the Tuner output [9] of the unit and to the Tuner input of your
TV.
Connecting the Video Cable(s)
You can connect the unit in 4 different ways to your TV:
- HDMI
- Composite
- SCART (by using the Composite cable & Scart Adapter)
- S-Video *
- Component *
* When using S-Video or Component, only the video signal is send to your TV.
For the audio signal, use the Audio RCA Jacks on the Composite cable (Red, White), or the digital
audio output (optical or coaxial) of the media giant.
HDMI:
• Connect the HDMI cable to the HDMI output [15] of the unit.
• Connect the other end of the HDMI cable to a free HDMI input on your TV.
Composite:
• Connect the Composite cable (Yellow, Red, and White) to the corresponding AV OUT jacks [11, 19] on
• Connect the other side of the Composite cable (Yellow, Red, and White) to your TV.
the unit.
15 21 22
14 20
**
41
Page 43

ENGLISH
SCART:
• Connect the Composite cable (Yellow, Red, and White) to the corresponding AV OUT jacks [11, 19] on
the unit.
• Connect the other side of the Composite cable (Yellow, Red, and White) to the jacks on the SCART
Adapter.
• Connect the SCART Adapter to the SCART Input of your TV.
S-Video:
• Connect the S-Video cable to the S-Video output [21] of the unit.
• Connect the other end of the S-Video cable to the S-Video Input on your TV.
Component:
• Connect the Component Cable (Red, Green, and Blue) to the Component Jacks [20] on the unit.
• Connect the other end of the Component cable to the Component Jacks on your TV.
Connecting the Audio Cable(s)
You can connect the unit to your TV and/or your home cinema system in 3 different ways:
Analog:
• Connect the Audio Jacks (Red, White) of the Composite cable to the RCA Audio Jacks [19] of the AV
• Connect the other end of the Composite cable to the RCA Audio Jacks of your TV or Receiver.
Digital Coaxial:
• Connect the Digital Coaxial cable to the Digital Coaxial output [12] of the unit.
• Connect the other end of the Digital Coaxial cable to the Digital Coaxial Input of your Receiver.
Digital Optical:
• Connect the Digital optical cable to the Digital optical output [22] of the unit.
• Connect the other end of the Digital Optical cable to the Digital Optical Input of your Receiver.
Connecting other Audio/Video Equipment
You can connect an Audio/Video source, like a VCR, DVD Player or Set-Top Box to the unit so you can
record from the Audio/Video source.
The Media Giant supports devices with Composite or Component output.
Composite:
• Connect the Audio/Video cable delivered with your Audio/Video device to the corresponding AV Output
• Connect the other side of the Composite cable (Yellow, Red, and White) to the AV1 IN jacks [16] of the
Component:
• Connect the Component Video cable delivered with your Audio/Video device to the corresponding
• Connect the other side of the Component Video cable (Red, Green, and Blue) to the AV2 IN jacks [17] of
- Analog, through the RCA Audio Jacks of the A/V Output
- Digital, Through the Coaxial Digital SPDIF Output
- Digital, Through the Optical Digital SPDIF Output
OUT.
jacks on the Audio/Video device.
unit.
Component output on the Audio/Video device.
the unit.
42
Page 44

ENGLISH
Note:
The Component video cables only transfer video, no sound. To transfer sound, you also need to
connect audio cables from the Audio/Video device to the AV2 IN audio jacks [18] of the unit.
Connecting the Power Cable
When the unit is connected to your Audio/Video equipment, you can connect the power supply to the unit.
• Connect the included power cable to the unit [23] and to a free wall socket.
• Set the main power switch [12] on the back of the unit to ‘I’ to power the unit.
The unit will now turn on.
Preparing the Remote Control
• Remove the battery cap from the back of the remote control
• Insert the included AAA batteries in the remote control.
• Replace the battery cap on the back of the remote control.
Notes:
- The best operational range of the remote control is about 5 meters.
- Point the remote control to the IR receiver which is embedded in the front panel of the unit.
- The receiving angle of the IR receiver is ±30 degrees.
- Change the batteries when they are weak or empty.
43
Page 45

ENGLISH
7. First-Time Configuration
The unit needs to be configured when you turn it on the first time.
• Select the correct input channel on your TV where the unit is connected to. (HDMI, Composite, SCART,
S-Video or Component).
Note:
From this point, the manual is based on the fact that your TV is set to the input channel of the
unit. All steps described are related to the operation of the unit.
• Check if the main power switch on the back of the unit is set to ‘I’ (On).
• Turn on the unit with the power button on the front of the unit, or with the ‘Power’ button (1
remote control.
• Check the Power LED on the front of the Media Giant. When the LED is Orange, the device is in
‘Standby’ mode. When the LED is Blue, the device is operational.
Note:
The unit needs to be initialized when it is turned on. This can take a little while. During
initializing, the Media Giant startup screen is shown.
) on the
[ Startup Screen ] [ Setup Wizard ]
When the Media Giant is initialized, it needs to be configured for first time usage. To assist you with the
first time configuration, the Media Giant will display the ‘Setup Wizard’ on your screen with the required
configuration steps for first time usage.
The Setup Wizard will display the following configuration steps:
- Menu Language
- TV Signal **
- Channel Scan **
- Network Setup
- Set Time
Use the navigation keys and the ‘Enter’ button (26) on the remote control to setup your Media Giant.
If you made a setting and you want to revise it, press the ‘Return’ button (14
) on the remote control.
Menu Language
Select the language you want to use when operating the Media Giant.
TV Input
**
Select your country from the country-list. If your country is not listed, select ‘Don’t Care’ from the list.
44
Page 46

ENGLISH
Channel Scan
• Select ‘OK’ to start the automatic channel scan of analog channels through the analog tuner of the
Media Giant. The automatic channel scan of the Media Giant can take a while, but will search & store
automatically all found channels in the memory of your Media Giant.
• When the Channel Scan is finished, select ‘OK’ to continue with the Setup Wizard.
If you want to skip the Channel Scan (for example when you are using a set-top box and do not have an
analog TV signal), you can select ‘Cancel’ to skip the Channel Scan and continue with the Setup Wizard.
Network Setup
The Network Setup is to set your IP Address for the Media Giant. In most situations, the Media Giant is
connected to a network which has a DHCP server (mostly a router).
• When you have a DHCP server in your network, select the option ‘DHCP IP’.
• The Setup Wizard will ask you to confirm the selection. Select ‘OK’ to continue.
**
• When you want to use a static IP address, select ‘FIX IP’.
• The Setup Wizard will show you the fields to enter a static IP address. Use the navigation buttons (15)
and the numeric buttons 0-9 (6
• When the entered values are correct, press the ‘Enter’ button (26) on the remote control.
• The Setup Wizard will ask you to confirm the selection. Select ‘OK’ to continue.
If your Media Giant is not connected to a network, select ‘Cancel’ to skip this step and continue with the
Setup Wizard.
Set Time
The ‘Set Time’ option allows you to set the correct time and date in the configuration of the Media Giant.
• To setup the time and date manually, select ‘Manual’.
• Use the navigation buttons (15) and the numeric buttons 0-9 (6) to enter the Year, Month, Day, Hour,
Minutes and Seconds. When you are finished, press the ‘Enter’ button (26
• The Setup Wizard will ask you to confirm the selection. Select ‘OK’ to continue.
• When you have an active internet connection, and the Media Giant is connected to your network, you
can select ‘Auto (Via Network)’.
• The Setup Wizard will show you the fields to configure the Automatic time configuration. You can keep
the default NTP server, but it you want to use another NTP server, press the ‘Enter’ button (26
NTP server field to adjust the value.
• Change the Time Zone to the correct timezone of your country.
• Set the ‘Daylight Savings Correction’ to ‘Disable’ or ‘Enable’, depending if your country uses daylight
saving time. When the entered values are correct, press the ‘Enter’ (26
• The Setup Wizard will ask you to confirm the selection. Select ‘OK’ to continue.
The Setup Wizard is now complete and the basic configuration of the Media Giant is finished.
Note:
For more configuration settings, use the ‘Setup’ option in the Main menu. The Setup menu is
explained in chapter 13.
Note:
If you want to run the Setup Wizard again after it is completed, select ‘Setup’ in the Main menu
and select the option ‘Restore Default’. The Media Giant will reset the made settings and run the
Setup Wizard again.
Note:
If you bought a Media Giant without a preformatted harddisk, the Media Giant will show the
‘Format Wizard’ after the ‘Setup Wizard’ is completed. This ‘Format Wizard’ is explained in
chapter 15 of this manual.
) to enter the IP address, Subnet mask, Default gateway and DNS server.
) on the remote control.
) on the
) button on the remote control.
45
Page 47

ENGLISH
8. Main menu
The Main menu allows you to select several functions of the Media Giant.
Note:
When the Main menu is not displayed, you can press the ‘Menu’ button (40) on the remote control
to show the Main menu on your screen.
The following options are available in the Main menu:
Browse Media
Playback Recordings
TV Tuner/AV Input
Scheduled Recording
Setup
The above options are described in the following chapters of this manual.
Playback of stored media files.
Playback & edit of your recordings.
View Live-TV & Live-AV.
Configure scheduled records.
Configuration of the Media Giant.
[ Main menu ]
46
Page 48

ENGLISH
9. Browse Media
When you have selected the ‘Browse Media’ option in the Main menu, the Media Giant will display the
Media browser on your screen:
[ Storage Location Selection ] [ Mode Selection: Movies, Music, Photos ]
The Media browser allows you to select the storage device where you want to play your media files from:
USB
Play Media from a connected USB device (through the USB Host Port).
Harddisk
Play Media from the internal harddisk of the Media Giant.
Play Media from Samba / Network shares in your network environment.
Network
To browse through your USB device or the internal harddisk, select the ‘USB’ or ‘Harddisk’ from the
storage location list.
To browse through your network to play media from network shares, select the ‘Network’ option from the
storage location list.
Note:
To browse through your network shares, make sure that you have setup your network shares
correctly. For more information about making network shares and browsing through network
shares, see chapter 17.
When a storage location is selected, you can switch between ‘Movies’, ‘Music’ and ‘Photos’ mode with the
left and right navigation buttons on the remote control.
When selecting 1 of the 3 options, the Media Giant will automatically filter the content on the storage
location so only corresponding files are shown.
For example:
In the Media browser menu, you can use the following browser options on the remote control:
If you select ‘Movies’, only movie files will be shown on your screen.
- Navigation keys (15) Navigate through the files & folders or change playback mode.
- Enter (26) Play the selected file or open the selected folder.
- Return (14) Go to the previous folder.
- Copy (7) Open the Copy menu. (explained in a subchapter of this chapter)
- Play (18) Play the selected file.
- Next (31) Go to the next page with files.
- Previous (11) Go to the previous page with files.
- Menu (40) Return to the Main menu.
You can return from the Media Browser menu to the Main menu by pressing the ‘Menu’ button (40
remote control.
) on the
47
Page 49

ENGLISH
Playback of your movies
You can play movies, stored on the HDD of the unit, a USB storage device or a network location, on your TV
through the ‘Movies’ filter of the Media Giant.
When the ‘Movies’ filter is selected, the Media Giant will display only movie files on your screen. All other
files will not be visible.
• Select the file you would like to play with the navigation buttons (15
If you have selected a movie file, the Media browser will display a preview with the filename and filesize in
the right part of the screen.
• Press the ‘Enter’ button (26
the selected file.
During playback, you can use the following playback options on the remote control:
) or the ‘Play’ button (18) on the remote control to start the playback of
[ Movie Mode ]
) on the remote control.
- Pause (17) Pause or resume the playback.
- Slow (24) Slowmotion playback.
- Stop (23) Stop the playback.
- Rewind (10) Rewind the playback.
- Fast Forward (32) Fast Forward the playback.
- Ins. Rep. (16) Jump back 10 seconds in the playback.
- CM. Skip (25) Jump forward 30 seconds in the playback.
- Goto (9) Go to a specific point (time) in the movie.
- Repeat (8) Change the Repeat option of the current playback.
- Info (27) Display the playback details.
- Zoom (5) Zoom in / zoom out
- Sub-t (37) Change the subtitle (if available for your playback).
- Audio (4) Change the audio track (if available for your playback).
- Volume (12), (13) Adjust the volume level.
- Mute (30) Mute the sound.
You can return from the Media browser menu to the Main menu by pressing the ‘Menu’ button (40
remote control.
) on the
48
Page 50

ENGLISH
DVD Playback functionality
The Media Giant plays DVD’s from the hard disk as if they are a normal DVD. You can navigate through the
DVD menu, choose subtitles or change audio languages.
Note:
The Media Giant supports the playback of unprotected DVD copies only. CSS protection is not
supported.
• Connect the Media Giant to your computer (See chapter 13).
• Create a folder on the Media Giant hard disk with the name of your DVD movie (for example: 'Movie1').
• Copy the files from the 'VIDEO_TS' folder to the created folder (for example: ‘Movie1’) on the Media
Giant.
After copying, the folder structure should look like below:
- [HDD of Media Giant]
|-> Movie1 (with all the DVD files inside)
• Disconnect the Media Giant from your computer and connect it to your TV.
• Select the ‘Browse Media’ icon in the Main menu with the ‘Navigation’ buttons (15
control, and press the ‘Enter’ button (26
• Use the ‘Navigation’ buttons (15
folder on the internal hard disk where your DVD is stored.
• Open the DVD folder which you have created on the harddisk.
) on the remote
) on the remote control to open the Media browser.
) and the ‘Enter’ button (26) on the remote control to navigate to the
[ Movie Mode ]
• Select the ‘VIDEO_TS.IFO’ file and press the ‘Play’ button (18
) on the remote control to start the
playback of the selected DVD.
Note:
It is also possible to play ISO files directly on the Media Giant, when they are stored on the NTFS
media partition. When playing an ISO file of a DVD, the same playback features will apply as when
playing the IFO file of a DVD.
49
Page 51

ENGLISH
During DVD playback, you can use the following playback options on the remote control:
- Pause (17) Pause or resume the playback.
- Slow (24) Slowmotion playback.
- Stop (23) Stop the playback.
- Navigation keys (15) Navigate through the DVD menu.
- Enter (26) Confirm DVD menu selection(s).
- Rewind (10) Fast Rewind.
- Fast Forward (32) Fast Forward.
- Previous (11) Previous Chapter.
- Next (31) Next Chapter.
- Ins. Rep. (16) Jump back 10 seconds in the playback.
- CM. Skip (25) Jump forward 30 seconds in the playback.
- Goto (7) Go to a specific point (time) in the movie.
- Repeat (8) Change the Repeat option of the current playback.
- Info (27) Display the playback details.
- Zoom (5) Zoom in / zoom out
- Angle (36) Change the DVD angle (when the DVD contains multiple angles).
- Volume (12), (13) Adjust the volume level.
- Mute (30) Mute the sound.
- Sub-t (37) Change or turn off the subtitle of the DVD.
- Audio (4) Change the audio track of the DVD (when the DVD contains multiple
You can return from the Media Browser menu to the Main menu by pressing the ‘Menu’ button (40
remote control.
Playback of subtitles
The Media Giant can play subtitle files when playing AVI videofiles.
To play AVI files with subtitles, you need to assign the same name to the subtitle file as the AVI file, for
example:
Movie name: My_Movie_With_Sub.AVI
Subtitle name: My_Movie_With_Sub.SRT
• Select the file you would like to play with the navigation buttons on the remote control.
• Press the ‘Enter’ button (26
the selected file.
The AVI file will start playing with the corresponding subtitle file loaded.
To disable/enable subtitles during playback, press the ‘Sub-t’ button (37
You can return from the Media Browser menu to the Main menu by pressing the ‘Menu’ button (40
remote control.
audio tracks).
) on the
) or the ‘Play’ button (18) on the remote control to start the playback of
) on the remote control.
) on the
50
Page 52

ENGLISH
Playback of your Music
You can play music files, which can be stored on the HDD of the unit, a USB storage device or a network
location, on your TV through the ‘Music’ filter of the Media Giant.
When the ‘Music’ filter is selected, the Media Giant will display only music files on your screen. All other
files will not be visible.
• Select the file you would like to play with the navigation buttons (15
If you have selected a music file, the Media browser will display the ID3 tag information (when available)
with the filename and filesize in the right part of the screen.
• Press the ‘Enter’ button (26
the selected file.
During playback, you can use the following playback options on the remote control:
) or the ‘Play’ button (18) on the remote control to start the playback of
[ Music Mode ]
) on the remote control.
- Pause (17) Pause or resume the playback.
- Stop (23) Stop the playback.
- Rewind (10) Rewind the playback.
- Fast Forward (32) Fast Forward the playback.
- Repeat (8) Change the Repeat option of the current file/folder.
- Info (27) Display the playback details.
- Volume (12), (13) Adjust the volume level.
- Mute (30) Mute the sound.
You can return from the Media Browser menu to the Main menu by pressing the ‘Menu’ button (40
remote control.
) on the
51
Page 53

ENGLISH
Playback of your Photos & Pictures
You can view your photos and pictures, which can be stored on the HDD of the unit, a USB storage device
or a network location, on your TV through the ‘Photos’ filter of the Media Giant.
When the ‘Photos’ filter is selected, the Media Giant will display only photo and picture files on your
screen. All other files will not be visible.
• Select the file you would like to play with the navigation buttons (15
If you have selected a photo file, the Media Browser will display a small preview with the filename and
filesize in the right part of the screen.
• Press the ‘Enter’ button (26
the selected file.
During playback, you can use the following playback options on the remote control:
) or the ‘Play’ button (18) on the remote control to start the playback of
[ Photos Mode ]
) on the remote control.
- Pause (17) Pause or resume the slideshow.
- Stop (23) Stop the slideshow.
- Navigation keys (15) Rotate the shown photo.
- Previous (11) Play the previous file in the current folder.
- Next (31) Play the next file in the current folder.
- Repeat (8) Change the Repeat option of the current file/folder.
- Info (27) Display the slideshow details.
- Zoom (5) Zoom in / zoom out
You can return from the Media Browser menu to the Main menu by pressing the ‘Menu’ button (40
remote control.
) on the
52
Page 54

ENGLISH
Copy mode
If you want to copy data from 1 location to another location (for example: from a USB device to the
internal harddisk), you can use the Copy mode of the Media Giant.
To access the Copy mode, press the ‘Copy’ button (7
browser. The Copy menu will be shown on your screen:
) on your remote control when you are in the media
You can select between ‘USB’, ‘Harddisk’ or ‘Network’ as source for your copy. The available desinations
are ‘USB’, ‘Harddisk’ and ‘Recycle’ (delete files).
First select the source by pressing the up and down navigation buttons (15
the correct source is selected, press the right navigation button (15
buttons (15
Note:
You can see by the highlighted border if the Source or Destination section of the Copy menu is
Note:
It is not possible to copy from ‘USB’ to ‘USB’, or from ‘Harddisk’ to ‘Harddisk’.
• When the source and destination location are correct, press the ‘Enter’ button (26
control to proceed with the Copy Wizard.
• Navigate through your source until you have found the files or folders you want to copy. You can
navigate through the folders with the navigation buttons (15
control.
• Mark the files or folders you want to copy with the ‘Play’ button (18
marked files or folders will show a marked icon behind the name.
• When the source files or folders are marked, press the right navigation button (15
control to switch to the destination section.
Note:
It is not possible to select the NTFS media partition of the Media Giant as destination, since it is
• Navigate through your destination until you have found the correct copy location. You can navigate
through the folders with the navigation buttons (15
• When the correct location is found, press the the right navigation button (15
start the copy process.
[ Copy menu ] [ Copy menu – Copy Wizard ]
) to select the destination.
active.
not possible to write on the NTFS media partition.
) on the remote control. When
) and use the up and down navigation
) on the remote
) and the ‘Enter’ button (26) on the remote
) on the remote control. The
) on the remote
) and the ‘Enter’ button (26) on the remote control.
) on the remote control to
53
Page 55

ENGLISH
• The copy wizard will ask your confirmation for the copy process. Select ‘OK’ to proceed with the copy
process.
When the copy process is complete, you will be notified with a message on your screen.
It is also possible to delete files through the Copy menu.
When you want to delete files, select ‘Recycle’ as your destination.
Mark the files or folders which you want to delete and press the right navigation button (15
control, you will see a confirmation window for deleting the selected files or folders.
Select ‘OK’ to delete the selected files or folders.
[ Copy Confirmation ] [ Copy in progress ]
[ Copy menu – Delete Wizard ] [ Delete Confirmation ]
) on the remote
54
Page 56

ENGLISH
10. Playback Recordings
When you have selected the ‘Playback Recordings’ option in the Main menu, the Media Giant will display
the recordings-list on your screen with all your recordings:
The recordings-list will show all your recordings which are made by manual record or scheduled recording.
Each video is indicated with a thumbnail image (first frame of the recording), name, time and date and
recording quality.
A yellow star behind your recording means that the recording is new and not been watched yet. When you
have watched the recording, the yellow star will disappear.
You can navigate through your recordings with the up and down navigation buttons (15
control and play the recordings by pressing the ‘Enter’ button (26
control when a recording is selected.
During playback, you can use the following playback options on the remote control:
[ Recordings-list ]
) or the ‘Play’ button (18) on the remote
) on the remote
- Pause (17) Pause or resume the playback.
- Slow (24) Slowmotion playback.
- Stop (23) Stop the playback.
- Rewind (10) Rewind the playback.
- Fast Forward (32) Fast Forward the playback.
- Ins. Rep. (16) Jump back 10 seconds in the playback.
- CM. Skip (25) Jump forward 30 seconds in the playback.
- Previous (11) Play the previous chapter or the previous recording.
- Next (31) Play the next chapter or the next recording.
- Repeat (8) Change the Repeat option of the current playback.
- Info (27) Display the playback details.
- Goto (9) Go to a specific point (time) in the movie.
- Zoom (5) Zoom in / zoom out
- Audio (4) Change the audio track (if available for your playback).
- Volume (12), (13) Adjust the volume level.
- Mute (30) Mute the sound.
With the left and right navigation buttons (15
on the top menu of the recordings-list, to select several features:
Play
Play your recordings.
Delete
Delete your recordings.
Rename your recordings.
Rename
Sorting
Change the sorting of your recordings.
Edit your recordings (explained in the next sub-chapter).
Edit
) on the remote control, you can navigate through the options
55
Page 57

ENGLISH
The ‘Edit’ menu explained
The ‘Edit’ menu has multiple options to modify your recordings, which are explained below:
[ Recordings – Edit menu]
- Set Thumbnail With the ‘Set Thumbnail’ option, you can play your movie and select
- A-B Erase With the ‘A-B Erase’ option, you can mark a part of your movie (for
- Split Title With the ‘Split Title’ option, you can split a recording in 2 pieces (for
- Merge Title With the ‘Merge Title’ option, you can merge 2 recordings into 1
- Add Chapter Mark With the ‘Add Chapter Mark’ option, you can add chapter marks to your
Note:
You can also enable the ‘Auto Chapter’ option in the Setup menu to automatically add
chapter marks on your recording.
your favourite frame as thumbnail for your recording.
example: a commercial) and delete it from your recording.
example: when you recorded 2 programs in 1 scheduled recording).
recording.
recording. This will allow you to easily jump to a specific part in the
recording.
- Remove Chapter Mark With the ‘Remove Chapter Mark’ option, you can remove chapter marks
from your recording. This option can be usefull when you configured the
Media Giant to automatically make chapter marks, but you want to
- Copy to FAT32 partition With the ‘Copy to FAT32 Partition’ option, you can copy your recording
When the recording is copied to the FAT32 partition, you are able to
Note:
For more information about the UPnP A/V Server feature of the Media Giant, see chapter
16.
remove them from the recording.
from the recording partition to the ‘REC’ folder on the media partition of
the Media Giant.
play, copy or edit it on your computer when the Media Giant is
connected through USB, or you can stream it to a UPnP A/V client (like
the Conceptronic C54WMP or the Conceptronic CFULLHDMA) through the
network.
56
Page 58

ENGLISH
11. TV Tuner / AV Input
Through the ‘TV Tuner / AV Input’ option in the main menu, you can view and record from the TV tuner or
the AV Input sources of the Media Giant.
Tip:
You can easily access the Live-TV screen from any menu in the Media Giant by pressing the ‘Live-TV’
button (38
When you select the option ‘TV Tuner / AV Input’, the Media Giant will show the Live-TV image from the
TV tuner. While watching live TV, you can change the channels by pressing the ‘Channel +’ (29
‘Channel -’ (28
With the ‘Source’ button (2
input and Component input. The source will be shown shortly in the upper right corner of the screen.
Timeshifting
The Media Giant supports timeshifting. The timeshift feature ‘pauses’ Live TV or Live Audio/Video by
recording the current channel/input when timeshift is activated.
Press the ‘Timeshift’ button (22
When the timeshift feature is initialized, the Live TV or Live A/V will be ‘paused’ and the unit will record
the channel on the background.
) on your remote control.
) or
) button on the remote control.
) on the remote control, you can switch between the TV-Tuner, Composite
) on the remote control to initialize the timeshift feature.
Note:
When the timeshift feature is activated, the onscreen progress bar shows the maximum timeshift
More information about formatting can be found in chapter 15.
During the timeshift, you can use the following buttons on the remote control:
[ Timeshift : Initializing ] [ Timeshift : Active ]
buffer time. If you want to adjust this buffer (smaller or larger), you need to re-format the
harddisk of the Media Giant in order to adjust the size of the timeshift buffer partition.
- Play (18) Play the timeshift buffer.
- Pause (17) Pause or resume the playback.
- Slow (24) Slowmotion playback.
- Stop (23) Stop the playback.
- Rewind (10) Rewind the playback.
- Fast Forward (32) Fast Forward the playback.
- Ins. Rep. (16) Jump back 10 seconds in the playback.
- CM. Skip (25) Jump forward 30 seconds in the playback.
- Info (27) Show or hide the timeshift buffer information.
- Volume (12), (13) Adjust the volume level.
- Mute (30) Mute the sound.
57
Page 59

ENGLISH
Permanent Timeshifting
In the Setup menu of the Media Giant, you can enable ‘Permanent Timeshifting’. When this feature is
enabled, the timeshift feature will be active at all times and allows you to instantly pause the playback or
use the above buttons on the remote control to ‘jump’ in your timeshift buffer.
Recording
While watching Live TV or Live A/V through the unit, you can start a record of the current channel by
pressing the ‘Rec’ button (19
button (23
During recording, the ‘REC’ LED on the frontpanel will light up.
Note:
Note:
Note:
When you press the ‘Rec’ button (19
at the time you pressed the ‘Record’ Button.
The message ‘OTR: 30 min.’ will be shown on your screen.
) on the remote control.
The unit detects copy protection on the connected source, for example MacroVision protection on
DVD discs. When a connected source is copy-protected, the unit will prevent recording and shows
a warning message when the record button is pressed.
The Media Giant records in HQ (High Quality) by default. You can change the recording quality in
the Setup menu.
During recording, you cannot change the current channel.
) on the remote control. The unit starts recording, until you press the ‘Stop’
) during a record, the record time will be set to 30 minutes, starting
[ Normal Record ] [ Record Timer activated ]
Press the ‘Rec’ button (19
minutes. The unit keeps recording until the record time is elapsed, or until you press the ‘Stop’ button
(23
) on the remote control.
) again to increase the time with another 30 minutes, up to a maximum of 240
58
Page 60

ENGLISH
DV Control
The mini FireWire connection behind the frontpanel of the Media Giant allows you to connect your DV
camera directly to the Media Giant and view or record your home videos on the internal harddisk.
• Connect your DV camera to the mini Firewire connection [7] on the front of the Media Giant.
• Turn on your DV camera and set it to ‘Playback’ mode.
• Press the ‘DV’ button (39
The Media Giant will display the DV Controls on your screen:
) on your remote control to initialize the ‘DV Control’ mode.
You can select the buttons of the DV Control panel with the navigation buttons (15
You can confirm your selection with the ‘Enter’ button (26
When you have selected ‘Play’ in the DV Control window and your movie is playing, you can press the ‘Rec’
(19
) button on the remote control to start recording your DV movie to the harddisk.
Tip:
When you are recording, you can hide the DV Control panel by pressing the ‘DV’ button (39) on your
remote control. The panel will be shown again after pressing the ‘DV’ button a second time.
You can stop this recording by pressing the ‘Stop’ button (23
The recorded movies will be listed in the recordings-list, as described in chapter 10.
To exit the DV Control mode, press the ‘Return’ button (14
[ DV Control Panel ]
) on the remote control.
) on the remote control.
) on the remote control.
) on the remote control.
59
Page 61

ENGLISH
12. Scheduled Recording
You can program the unit to record channels on specific times. You can program up to 8 scheduled
recordings in the unit.
• Select the option ‘Scheduled Recording’ in the Main menu.
The Scheduled Recording screen will be shown on your TV.
The Scheduled Recording menu shows 5 options, which can be selected with the left and right navigation
buttons (15
Add or Edit a schedule
When you select the ‘Add’ or ‘Edit’ option in the menu and you press the ‘Enter’ button (26
remote control, you can add a new schedule or edit an existing schedule.
By default, the ‘Source’ field is selected.
All options can be changed with the up and down navigation buttons (15
with the left and right navigation buttons (15
• Select the correct source for your recording. This can be TV channel, the Composite video input or the
• Set the correct date for your recording.
• Set the correct start time for your recording.
• Set the length of your recording.
• Set the repeat option for your recording. You can select the following options:
You can Skip the ‘Device’ field, since you can only record on the internal harddisk.
[ Scheduled Recording menu ] [ Add a scheduled recording ]
) of the remote control:
Add
Add a new scheduled recording
Edit an existing scheduled recording
Edit
Delete a scheduled recording
Delete
Status
Change the status of the scheduled recording list
Display the scheduled recording history list
History
Component video input.
‘Once’, ‘Everyday’, ‘Mon-Fri’, ‘Mon-Sat’, ‘Sun’, ‘Mon’, ‘Tue’, ‘Wed’, ‘Thu’, ‘Fri’ or ‘Sat’.
) on the
), and you can select another field
).
60
Page 62

ENGLISH
• Set the recording quality. You can choose between ‘HQ’, ‘SP’, ‘LP’, ‘EP’ and ‘SLP’.
Note:
Changing the ‘Quality’ field influences the quality of your record and the amount of space
needed for the record. The available recording time for each quality setting is shown in the
• Set the ‘Nicam’ option to ‘on’ or ‘off’.
• When all the options are set for your recording, press the ‘Enter’ button (26
• A confirmation popup will be shown on your screen. Select ‘Confirm’ and press the ‘Enter’ button (26
The recording is now programmed as a scheduled recording and the unit will start recording on the
programmed time and channel, even when the device is set to ‘Standby’.
Note:
upper left part of the scheduling window.
The Nicam option should be set to ‘on’ if the source you want to record a broadcast with 2 different
audio languages (for example: Eurosport).
) on the remote control to
save the schedule.
on the remote control to save the schedule.
During recording, you cannot change the current channel.
)
61
Page 63

ENGLISH
13. Setup
When you select the ‘Setup’ option in the Main menu, the Setup menu will be shown on your screen. The
explanation below shows all available settings with the including description.
You can switch between the various options of the Setup menu with the navigation buttons of the remote
control.
Video:
[ Setup menu – Video ] [ Setup menu – Record ]
Aspect Ratio Change the aspect ratio of the Media Giant outputsignal.
(‘Letterbox 4:3’, ‘Pan-Scan 4:3’, ‘Widescreen 16:9’)
Brightness Change the brightness of the Media Giant output signal.
Contrast Change the contrast of the Media Giant output signal.
Audio Setup Change the audio setup of the Media Giant.
Night Mode
Digital Output
Enable or disable Night Mode audio. (Off, On, Comfort).
Set the digital audio output. (HDMI-LPCM, HDMI-RAW, SPDIF-
LPCM, SPDIF-RAW)
Record:
Quality Change the default record quality. (‘HQ’, ‘SP’, ‘LP’, ‘EP’, ‘SLP’)
Note:
Changing the ‘Quality’ field influences the quality of your record and the amount of space needed
for the record. The different quality settings will require the following space for 1 hour of video:
HQ: 4.85 GB (4850 MB)
SP:
2.42 GB (2420 MB)
1.62 GB (1620 MB)
LP:
EP:
1.21 GB (1210 MB)
0.80 GB (800 MB)
SLP:
Auto Chapter Change the Auto Chapter setting. The Auto Chapter function will automatically
add chapter marks to your recording, to easier jump trough your recordings
Permanent Timeshift Enable or disable the permanent timeshift feature. When this feature is enabled,
during playback.
the timeshift feature will be active at all times and allows you to instantly pause
the playback or the buttons on the remote control to ‘jump’ in your timeshift
buffer.
62
Page 64

ENGLISH
Network:
[ Setup menu – Network ] [ Setup menu – System ]
LAN Preference ** Change the preferred LAN connection: Cable or Auto (Via Powerline)
When ‘Cable’ is chosen, the Media Giant will always use the LAN port as network
connection.
When ‘Auto (Via Powerline)’ is chosen, the Media Giant will use the Powerline
feature if a Powerline network is available. If there is no Powerline network
available, the LAN port will be used.
Note: When the Media Giant is connected to both Powerline and LAN Cable , the default network will be
the Powerline network. When the performance of the Powerline network will decrease to below
1Mbps, the Media Giant automatically switches to Cable mode. During Cable mode, the Media
Giant will keep checking the Powerline network performance. When the performance increases to
above 1Mbps, the Media Giant will switch from Cable mode to Powerline mode.
Wired Lan Setup In the ‘Wired Lan Setup’, you can configure the IP address of the Media Giant.
When selected, you can choose between ‘Cancel’, ‘DHCP IP (Auto)’ or
‘Fix IP (Manual)’.
When you have a DHCP server in your network, select the option ‘DHCP IP’.
When you want to use a static IP address, select ‘FIX IP’.
The Setup Wizard will show you the fields to enter a static IP address. Use the
navigation buttons (15
Subnet mask, Default gateway and DNS server.
) and the numeric buttons 0-9 (6) to enter the IP address,
When the entered values are correct, press the ‘Enter’ button (26) on the remote
control.
Media Server Change the Media Server name. This name is the name of the Media Giant UPnP A/V
Server, which allows UPnP A/V clients (like the Conceptronic C54WMP or the
Conceptronic CFULLHDMA) to stream media files through the network from the
Media Giant harddisk.
Note: More information about the UPnP A/V Server functionality of the Media
Giant can be found in chapter 16.
63
Page 65

ENGLISH
System:
menu Language Select the language you want to use when operating the Media Giant..
Set Time Change the time and date.
HDD Format Format the internal harddisk.
Timer Setup Slideshow Timer:
Screen Saver Timer:
Firmware Upgrade Upgrade the firmware of the Media Giant.
Change the slideshow interval during a picture slideshow.
Change the inactivity time to activate the screensaver.
A firmware upgrade can be done through the internet or through a USB storage
device. The firmware Upgrade option can be set to ‘Auto’ or to ‘Manual’.
When ‘Auto’ is selected (default), the Media Giant will check on random times for
new firmware online and upgrades the firmware automatically when no recording /
playback is running on the Media Giant.
When ‘Manual’ is selected, you can manually check for new firmware.
Note: To check your current firmware version, press the ‘Info’ button (27) on the
remote control when you are in the Main menu. The firmware version will
Restore Default Restore the Media Giant to the default settings and initialize the Setup Wizard to
be shown on your screen.
reconfigure the unit.
[ Setup menu – TV Setup ] [ Programme Edit ]
TV Setup: **
TV Input Select your country from the country-list. If your country is not listed, select ‘Don’t
Channel Scan Start an automatic channel scan. The automatic channel scan of the Media Giant can
Care’ from the list.
take a while, but will search and store automatically all found channels in the
Manual Tune With the Manual Tune feature, you can add new channels to your existing channel
memory of your Media Giant.
list (with the ‘Add’ option) , remove channels from your channel list (with the
Channel Mapping With the Channel Mapping feature, you can change the order of the channels.
‘Remove’ option), or assign names to the found channels (with the ‘Edit’ option).
To move a channel to another location, select the channel with the navigation
buttons on the remote control and press the ‘Enter’ button.
The channel block will become yellow. Select the new location for the channel with
the navigation buttons on the remote control and press the ‘Enter’ button.
The 2 channels are now swapped from location.
64
Page 66

ENGLISH
14. Computer USB Connectivity
The unit can be connected to your computer to copy data (movies, music, pictures, records, etc.) from and
to the internal HDD.
Note:
In our example below, we are using a computer running Windows XP, but the unit can be used on
computers with USB support and the capability of reading & writing FAT32 & NTFS file systems.
Connect the unit to your computer
• Connect the delivered USB to Mini-USB cable to the Mini-USB port on the frontside of the unit and to a
free USB port on your computer.
• Turn the unit on with the main power switch on the backside of the unit. The unit will be recognized
and installed automatically and will be shown as extra drives on your computer.
Note:
When the harddisk is partitioned with 1 media partition (FAT32 only), there will be only 1 drive
letter visible. When the harddisk is partitioned with 2 media partitions (FAT32 and NTFS), the
Media Giant will show 2 drive letters.
Recording playback on your computer
To play your recordings on your computer, you first need to copy the recordings from the record partition
to the media partition. You can do this with the ‘Copy to FAT32 Partition’ command, which can be found
in the ‘Playback Recordings’ menu, explained in chapter 10.
When your recordings are copied to the FAT32 partition, you can play the recorded programs on your
computer, when the unit is connected to the computer.
Disconnect the unit from your computer
• Single-click the “Safe Removal” icon on the system tray.
• Select “Stop USB Mass Storage Device” when prompted.
• Wait for the message “Safe to remove Hardware”.
• Disconnect the USB cable.
65
Page 67

ENGLISH
15. Partition Information & Format Wizard
The Media Giant will be delivered with a preformatted harddisk in most situations. The harddisk is
formatted with the default configuration of the Media Giant, and will partition the harddisk as following:
Timeshift buffer partition: ~ 4.85 GB
Recording partition: 50% of the harddisk space.
FAT32 media partition: 25% of the harddisk space.
NTFS media partition : 25% of the harddisk space.
Example with: 500GB 750 GB 1000GB
Timeshift buffer partition: ~ 4.85 GB ~ 4.85 GB ~ 4.85 GB
Recording artition: ~ 250 GB ~ 375 GB ~ 500 GB
FAT32 media partition: ~ 125 GB ~ 187 GB ~ 250 GB
NTFS media partition: ~ 125 GB ~ 187 GB ~ 250 GB
You can change the default harddisk configuration by reformatting the harddisk of the Media Giant.
Note:
If you reformat the harddisk of the Media Giant, all stored and recorded content on the harddisk
will be deleted!
To format the harddisk of the Media Giant, go to the Setup menu and select the option ‘HDD Format’ on
the ‘System’ page. Select again ‘HDD format’ as confirmation.
The HDD Format Wizard will now be shown on your screen, starting with a warning message:
[ Format Wizard – Warning ] [ Format Wizard – Timeshift Buffer ]
• Select ‘OK’ to continue to the next step.
Change the Timeshift Buffer size with the up and down navigation buttons (15
You can set the Timeshift Buffer to 1, 2, 3 or 4 hours.
• Select ‘Next’ to continue to the next step.
66
) on the remote control.
Page 68

ENGLISH
[ Format Wizard - Recording Partition ] [ Format Wizard – FAT32 / NTFS Partition ]
• Change the Recording Partition size with the up and down navigation buttons (15
) on the remote
control.
The remaining space will be used for the media partition(s) of the Media Giant.
• Select ‘Next’ to continue to the next step.
[ Format Wizard – Start Format ] [ Format Wizard – Formatting ]
• Select ‘Format’ to start with formatting the harddisk of the Media Giant.
During format, the Format Wizard will show ‘Proceeding’.
Note:
The format procedure can take a while (~ 5 minutes). Please wait until the format procedure is
finished.
[ Format Wizard – Completed ]
• When the Format process is finished, select ‘OK’ to close the Format Wizard. The Media Giant will
reboot automatically.
67
Page 69

ENGLISH
16. UPnP A/V Server (Twonky Mediaserver)
One of the features of the Media Giant is the UPnP A/V Server.
This makes the Media Giant and all its media content available for UPnP A/V clients in your network (for
example: the Conceptronic CFULLHDMA or the Conceptronic C54WMP).
The used UPnP A/V Server in the Media Giant is ‘Twonky Mediaserver’.
The Twonky Mediaserver automatically indexes all the media on the FAT32 and NTFS media partition. When
new data is added to one of these partitions, it will become automatically available for UPnP A/V clients in
your network.
The name of your UPnP A/V Server can be set in the Setup menu of the Media Giant, at the ‘Network’
section.
Note:
The default name of the UPnP A/V Server is ‘media giant’.
If you are familiar with the Twonky Mediaserver software, you can change the advanced Twonky
Mediaserver settings through your computer.
To access the configuration pages of the Twonky Mediaserver software, enter the IP address of the Media
Giant in your browser window, followed by the portnumber 9000.
For example:
HTTP://192.168.0.100:9000/ (assuming that 192.168.0.100 is the IP address of your
Media Giant).
The Twonky Media Server has a built-in ‘Troubleshooting’ guide, which can be found in the left navigation
bar of the Twonky Media Server configuration window. This guide will help you with the configuration of
the Twonky Media Server.
For more information of the Twonky Media Server, visit the Twonky website at:
http://www.twonkymedia.com/
68
Page 70

ENGLISH
17. Browsing Network Shares
The Media Giant can browse your network shares and play media files directly from a network share. In
order to use this feature, you need to share your media folders in your network, so the Media Giant can
find and access them.
This chapter will explain how you can enable file sharing in Windows XP and Windows Vista.
Note:
This manual only describes file and folder sharing in Windows XP and Windows Vista.
Please check the manual of your operating system or network storage device how you can share a
folder with media files.
File sharing in Windows XP
• Open ‘My Computer’ with the shortcut in the start menu and navigate to the folder with media files you
want to share.
• Single click on the folder with media files and select the option ‘Share this folder’ in the left menu bar.
The properties of the folder are shown, with the ‘Sharing’ page displayed.
The section ‘Network sharing and security’ can be used to share the folder.
If you did not share any folders previously, you need to run the Network Setup Wizard by clicking the
‘Network Setup Wizard’ line in the window.
[ My Computer – Share Folder ]
69
Page 71

ENGLISH
• When the Network Setup Wizard is already finished previously, you can share your folder by clicking
‘Share this folder on the network’.
• Enter a name for the share in the textfield and click ‘Apply’.
• Click ‘OK’ to close the window.
The folder is now listed with a hand beneath the folder icon, indicating that the folder is shared on your
computer.
[ Properties – Sharing Page ] [ Properties – Sharing Page ]
[ Shared Folder ]
70
Page 72

ENGLISH
File sharing in Windows Vista
• Open ‘Computer’ with the shortcut in the Start menu and navigate to the folder with media files you
want to share.
• Single click on the folder with media files and select the option ‘Share’ in the top menu bar of the
window.
[ Computer – Share Folder ]
By default, your own user is in the share list as owner of the folder.
[ Sharing Properties ]
• You can add more users to the sharing list by selecting them from the drop-down list and press the ‘Add’
button.
• When the list with users is complete, click the ‘Share’ button to share the folder.
The folder is now listed with a small icon displaying 2 people, indicating that the folder is shared on your
computer.
[ Shared Folder ]
71
Page 73

ENGLISH
Browse shared folders on the Media Giant
When your media files are shared, you can use the ‘Browse Media’ option in the Main menu to browse your
network locations.
Use the navigation buttons (15
location list, and navigate through the network to your computer or network storage device with the
shared folders.
When a shared folder is protected with a username and password (for example
XP and Windows Vista), the Media Giant will show a ‘User Login’ popup, to enter the username and
password.
Note:
Use the navigation buttons (15
the ‘Enter’ button (26
When the username and password are correctly entered, select the ‘OK’ or the ‘OK & Save to
MyShortcuts’ button to enter the network share.
You are now able to navigate through the shared folder like described in chapter 9.
[ Storage Location Selection ] [ Network Share – User Login ]
) on the remote control to select the option ‘Network’ in the storage
You can use your normal user account for Windows XP or Windows Vista to login to your shared
folder.
) on the remote control to select the User ID or the Password field and press
) to show the onscreen keyboard for entering the value.
[ Onscreen Keyboard ] [ Network Share – User Login ]
: default sharing in Windows
72
Page 74

ESPAÑOL
Media Giant de Conceptronic
Manual del usuario
Felicidades por la compra de su
Este manual de usuario le ofrece una descripción paso a paso acerca de cómo instalar y utilizar el
reproductor grabador multimedia de Conceptronic.
En caso de surgir cualquier problema, visite nuestra página web de asistencia técnica (haga clic en el
apartado “Soporte” de www.conceptronic.net
Preguntas Frecuentes (F.A.Q.).
Si tiene otras preguntas sobre su producto y no las encuentra en nuestro sitio web, póngase en contacto
con nosotros por correo electrónico: apoyo@conceptronic.net
Si desea información adicional sobre los productos de Conceptronic, visite nuestro sitio web:
www.conceptronic.net
Consejo: El Media Giant de Conceptronic puede actualizarse mediante firmware. Para actualizar la
Consejo:
El paquete del Reproductor grabador multimedia de Conceptronic debe incluir los siguientes artículos:
• Media Giant de Conceptronic (descrito como “unidad” o “Media Giant” en el manual). **
El modelo que contiene el paquete será uno de los tres modelos listados abajo:
CM3G [C08-130]:
CM3GP [C08-131]:
CM3GPP [C08-132]:
• Cable de alimentación.
• Mando a distancia con pilas (tipo CR2025).
• Cable de antena RF.
• Cable de Vídeo Composite (conectores RCA rojo, blanco y amarillo).
• Cable S-Vídeo.
• Cable de vídeo Component (conectores RCA rojo, verde y azul).
• Cable de audio digital coaxial (conectores RCA negros).
• Adaptador SCART de cable de vídeo Composite / cable S-Vídeo.
• Cable HDMI A/V (HDMI 1.3).
• Cable de red.
• Cable USB.
• Este manual de usuario.
reproductor grabador multimedia de Conceptronic.
). En esa sección podrá consultar la base de datos de
unidad a la última versión de firmware, visite el sitio web de Conceptronic o utilice la
característica de actualización de firmware del Media Giant.
Compruebe en www.conceptronic.net la lista de los últimos códecs de los archivos compatibles.
1. Contenido del paquete
Media Giant sin sintonizador (sólo entrada de A/V).
Media Giant con sintonizador analógico.
Media Giant con sintonizador analógico y adaptador para red Powerline.
IMPORTANTE:
En este manual se explican características sólo válidas para el CM3GP (con sintonizador digital)
o para el CM3GPP (con sintonizador digital y adaptador Powerline).
Estas características se indican con **.
73
Page 75

ESPAÑOL
2. Características del producto
• Adaptador de red Powerline incorporado. **
• Sintonizador de TV incorporado con búsqueda automática de canales. **
• Grabación de señal de TV. **
• Grabación de señal A/V procedente, por ejemplo, de un aparato de vídeo, un DVD o una
videocámara.
• Entrada DV para la reproducción o grabación de la señal de una videocámara DV.
• Grabación al disco duro interno.
• Resolución de salida de hasta 1080i.
• Resolución de reproducción de hasta 1080i.
• Archivos grabados en formato MPEG2 con calidad DVD (pueden reproducirse en un PC o en otros
reproductores multimedia).
• Opciones de grabación: grabación instantánea, grabación programada y grabación con TimeShift.
• Reproducción de archivos MPEG1/2/4, MP3, WMA o JPG almacenados en el disco duro interno o en el
dispositivo USB.
• Copiado de archivos desde un dispositivo USB o una ubicación en la red hacia el disco duro interno.
• Cambio automático de modo USB-PC a modo reproductor y viceversa:
Cuando está conectado al ordenador mediante conexión USB, actúa como dispositivo de
almacenamiento USB.
Cuando no está conectada al ordenador mediante conexión USB, la unidad actúa como
reproductor grabador multimedia.
3. Notas y avisos
• No intente desmontar la unidad. El alto voltaje puede causar lesiones.
• Mantenga el dispositivo apartado de ambientes excesivamente húmedos.
• No moje o sumerja la unidad en líquidos.
• Desconecte el cable de corriente si no va a utilizar el dispositivo durante un largo período de tiempo.
• Asegúrese que el cable de alimentación está conectado al Media Giant y es fácilmente accesible.
• Evite utilizar el dispositivo en lugares cercanos a sustancias combustibles.
• Cambie las pilas del mando a distancia por unas del mismo tipo cuando empiecen a agotarse o se
hayan agotado completamente. Recicle las pilas agotadas siempre que sea posible. Para evitar la
corrosión, retire las pilas del mando a distancia si no va a utilizarlo durante un largo período de
tiempo.
• Asegúrese que ha reemplazado correctamente las baterías del mando a distancia para prevenir
riesgos.
• Mantenga el mando a distancia apartado de ambientes excesivamente húmedos; no lo deje caer al
suelo.
• No utilice ni exponga el mando a distancia a luz del sol intensa.
• Evite SIEMPRE que la unidad se caiga o sufra sacudidas o golpes.
• Para evitar su calentamiento, no cubra el dispositivo.
IMPORTANTE:
¡NO formatee el disco duro de la unidad desde un ordenador! Eso haría que se perdieran
todos los datos de sistema y haría necesaria una reinicialización. Cuando desee formatear
el disco duro de la unidad, utilice la utilidad de formato incorporada que encontrará en el
menú Configuración de la unidad.
74
Page 76

ESPAÑOL
7 8
23
19 18 17 16
12 13
Vista frontal
1 3
4. Descripción del producto
2 4
Vista posterior
9
10 11
15 21 22
14 20
5 6
Descripción de los números:
1. LED de estado (encendido, grabación, ACT, LAN) 13. Interruptor de alimentación
2. Botones táctiles de navegación 14. Conexión LAN (RJ45)
3. Botones táctiles de reproducción 15. Salida HDMI
4. Receptor de infrarrojos 16. Entrada AV1 (Vídeo/Audio Composite)
5. Conector Mini-USB (a PC) 17. Entrada AV2 (Vídeo Component)
6. Puerto USB Host 18. Entrada AV2 (audio I/D)
7. Entrada DV 19. Salida AV de audio (I/D)
8. Botón “Open” del panel frontal 20. Salida AV de vídeo (Y/Pb/Pr)
9. Salida del sintonizador de TV ** 21. Salida S-Vídeo
10. Entrada del sintonizador de TV ** 22. Salida óptica digital SPDIF
11. Salida AV de vídeo Composite 23. Toma de corriente alterna (110 ~240V)
12. Salida coaxial digital SPDIF
Los botones táctiles tienen las mismas funciones que las funciones básicas del mando a distancia.
Nota:
75
Page 77

ESPAÑOL
5. Descripción del mando a distancia
El mando a distancia se utiliza para manejar la unidad. Encontrará una representación del mando a
distancia detrás de la portada de este manual. Los números de los botones corresponden a los de la tabla
de abajo, en la cual se explica cada función del mando a distancia.
Nº Botón Descripción
1. POWER ( ) Enciende la unidad o la sitúa en modo “standby”
2. SOURCE Cambia entre sintonizador, AV y reproducción
3. MEDIA Botón de acceso directo al buscador de archivos multimedia
4. AUDIO Cambia la pista de audio del DVD (si está disponible con los archivos del
DVD)
5. ZOOM Acerca o aleja la imagen
6. 0 – 9 Botones numéricos
7. COPY Muestra el menú de copiado
8. REPEAT Habilita el Modo de Repetición
9. GOTO Va a un punto específico de la reproducción
10. FAST REWIND (
11. PREVIOUS (
12. VOLUME + Subir el volumen
13. VOLUME - Bajar el volumen
14. RETURN Vuelve a la pantalla o canal anterior
15.
, , , Teclas de navegación: navegar en los menús
16. INS.REP. Salto de 10 segundos hacia atrás durante la reproducción o la función
TimeShift
17. PAUSE Pausa la reproducción o el TimeShift
18. PLAY Inicia la reproducción
19. REC Inicia la grabación
20. TV SYS Cambia la resolución de salida de la unidad
21. SETUP Botón de acceso directo al menú de configuración
22. TIMESHIFT Activa la función TimeShift
23. STOP (
24. SLOW Reproducción lenta
25. CM.SKIP Salto de 30 segundos hacia adelante durante la reproducción o la función
TimeShift
26. ENTER Confirma la selección
27. INFO Muestra la información del canal o del archivo
28. CHANNEL - Bajar un canal
29. CHANNEL + Subir un canal
30. MUTE Silencia el sonido
31. NEXT (
32. FAST FORWARD (
33. GUIDE Abre el menú de grabación programada
34. A-B Inicializa la repetición de intervalo A-B
35. DEL Desactiva la entrada / Borra la selección
36. ANGLE Cambia el ángulo de visión del DVD (si está disponible con los archivos
del DVD)
37. SUB-T Cambia el idioma de los subtítulos (si está disponible con los archivos del
DVD)
38. LIVE-TV Botón de acceso rápido a la señal de TV en directo
39. DV Cambia a modo de reproducción y de grabación DV
30. MENU Muestra el menú principal
41. LED Indica que el mando a distancia está funcionando.
) Rebobinado rápido
) Va al archivo, pista, capítulo o imagen anterior
) Detiene la reproducción / detiene la grabación / desactiva el TimeShift
) Va al archivo, pista, capítulo o imagen siguiente
) Avance rápido
76
Page 78

ESPAÑOL
23
19 18 17 16
12 13
6. Conexiones del Media Giant
En este capítulo se explica cómo conectar el Media Giant a su TV, su sistema de “home cinema”, su red,
etc.
9
10 11
Conectar el cable o cables de antena
Nota:
El sintonizador de la unidad es del tipo “Signal Pass-through”, lo que significa que redirecciona la
señal de TV de la entrada a la salida del sintonizador.
• Desconecte el cable principal de antena de su televisor y conéctelo a la entrada del sintonizador (10) de
la unidad.
• Conecte el cable de antena suministrado a la salida del sintonizador (9) de la unidad y a la entrada de
antena de su televisor.
Conectar el cable o cables de vídeo
Puede conectar la unidad a su televisor de 4 formas distintas:
- HDMI
- Composite
- SCART (utilizando el adaptador de cable Composite a Scart)
- S-Vídeo *
- Component *
* Cuando utilice S-Vídeo o Component, a su televisor sólo se enviará la señal de vídeo.
Para la señal de audio, use los conectores RCA de audio del cable Composite (rojo y blanco), o la
salida de audio digital (óptica o coaxial) del Media Giant.
HDMI:
• Conecte el cable HDMI a la salida HDMI (15) de la unidad.
• Conecte el otro extremo del cable HDMI a una entrada HDMI libre de su televisor.
Composite:
• Conecte el cable Composite (amarillo, rojo y blanco) a los correspondientes conectores de salida de AV
• Conecte el otro extremo del cable Composite (amarillo, rojo y blanco) a su televisor.
(11, 19) de la unidad.
15 21 22
14 20
**
77
Page 79

ESPAÑOL
SCART:
• Conecte el cable Composite (amarillo, rojo y blanco) a los correspondientes conectores de salida de AV
(11, 19) de la unidad.
• Conecte el otro extremo del cable Composite (amarillo, rojo y blanco) a los conectores del adaptador
SCART.
• Conecte el adaptador SCART a la entrada SCART de su televisor.
S-Vídeo:
• Conecte el cable S-Vídeo a la salida S-Vídeo (21) de la unidad.
• Conecte el otro extremo del cable S-Vídeo a la entrada S-Vídeo de su televisor.
Component:
• Conecte el cable Component (rojo, verde y azul) a los conectores Component (20) de la unidad.
• Conecte el otro extremo del cable Component a los conectores Component de su televisor.
Conectar el cable o cables de audio
Analógica:
• Conecte los conectores de audio (rojo y blanco) del cable Composite a los conectores RCA de audio (19)
• Conecte el otro extremo del cable Composite a los conectores RCA de audio de su televisor o receptor.
Digital Coaxial:
• Conecte el cable coaxial digital a la salida coaxial digital (12) de la unidad.
• Conecte el otro extremo del cable coaxial digital a la entrada coaxial digital de su receptor.
Digital óptica:
• Conecte el cable óptico digital a la salida óptica digital (22) de la unidad.
• Conecte el otro extremo del cable óptica digital a la entrada óptica digital de su receptor.
Conectar otros equipos de audio o vídeo
Puede conectar otras fuentes de audio o vídeo a la unidad, como por ejemplo un aparato de vídeo o DVD o
un sintonizador digital terrestre, y grabar su señal.
Puede conectar al Media Giant dispositivos con salida Composite o Component.
Composite:
• Conecte el cable de audio o vídeo suministrado con su dispositivo de A/V a la salida correspondiente de
• Conecte el otro extremo del cable Composite (amarillo, rojo y blanco) a los conectores de entrada AV1
Component:
• Conecte el cable de vídeo Component suministrado con su dispositivo de audio/vídeo a la salida
• Conecte el otro extremo del cable de vídeo Component (rojo, verde y azul) a los conectores de entrada
Puede conectar la unidad a su televisor o a su sistema de “home cinema” de 3 formas distintas:
- Analógica, mediante los conectores de audio RCA de la salida de A/V
- Digital, mediante la salida SPDIF digital coaxial
- Digital, mediante la salida SPDIF digital óptica
de la salida AV.
A/V del dispositivo.
(16) de la unidad.
correspondiente de A/V del dispositivo.
AV2 (17) de la unidad.
78
Page 80

ESPAÑOL
Nota:
Los cables de vídeo Component sólo transmiten vídeo, no sonido. Para transmitir el audio, deberá
conectar también cables de audio desde el dispositivo de audio/vídeo a los conectores de entrada
de audio AV2 (18) de la unidad.
Conectar el cable de alimentación
Cuando la unidad esté conectada a su equipo de audio o vídeo, puede conectar la fuente de alimentación a
la unidad.
• Conecte el cable de alimentación suministrado a la unidad (23) y a una toma de corriente disponible.
• Sitúe el interruptor de alimentación (12) de la parte trasera de la unidad a la posición “I” para
alimentar la unidad.
La unidad se encenderá.
Preparar el mando a distancia
• Quite la cubierta del compartimento de las pilas de la parte trasera del mando a distancia.
• Introduzca en el mando a distancia las pilas AAA incluidas.
• Vuelva a colocar la cubierta del compartimento de las pilas del mando a distancia.
- El alcance operacional óptimo del mando llega hasta unos 5 metros.
Notas:
- Apunte el mando hacia el receptor de infrarrojos situado en el panel frontal de la unidad.
- El ángulo de recepción del receptor infrarrojo es de ±30 grados.
- Cambie las pilas cuando estén parcial o totalmente agotadas.
79
Page 81

ESPAÑOL
7. Configuración inicial
Hay que configurar la unidad al encenderla por primera vez.
• Seleccione el canal correcto de entrada del televisor donde esté conectada la unidad (HDMI, Composite,
SCART, S-Vídeo o Component).
Nota:
A partir de este punto, en el manual se asume que en su televisor tiene seleccionado el canal de
entrada de señal de la unidad. Todos los pasos que se describen se refieren al funcionamiento de
la unidad.
• Compruebe que el interruptor de alimentación de la parte trasera de la unidad está en posición ‘I’
(encendido).
• Encienda la unidad con el botón de encendido de la parte frontal de la unidad, o con el botón ‘Power’
(1) del mando a distancia.
• Compruebe el indicador LED de corriente situado en el frontal del Media Giant. Cuando el LED está
naranja, el dispositivo se encuentra en modo “Standby”. Cuando el LED está azul, el dispositivo se
encuentra operativo.
Nota:
Cuando se enciende, la unidad tiene que inicializarse. Esto puede tomar un poco de tiempo.
Durante la inicialización, se muestra la pantalla de inicio del Media Giant.
[Pantalla de inicio] [Asistente de configuración]
Cuando el Media Giant se ha inicializado, hay que configurarlo antes de utilizarlo por primera vez. Para
ayudarlo con la configuración inicial, el Media Giant mostrará el “Asistente de configuración” en su
pantalla y le mostrará los pasos a seguir para realizar la configuración previa al primer uso.
El Asistente de configuración mostrará los siguientes pasos:
- Idioma del menú
- Señal de TV **
- Búsqueda de canales **
- Configuración de red
- Fecha y hora
Utilice las teclas de navegación y el botón Enter (26) del mando a distancia para configurar su Media
Giant. Si configuró un parámetro y luego desea revisarlo, pulse el botón Return (“volver”) (14)
del mando
a distancia.
Idioma del menú
Seleccione el idioma que desee para la utilización del Media Giant.
Entrada de TV
**
Seleccione su país de la lista de países. Si su país no aparece en la lista, seleccione “Don’t Care”
(“indistinto”).
80
Page 82

ESPAÑOL
Búsqueda de canales
• Seleccione “OK” para iniciar automáticamente la búsqueda de canales analógicos con el sintonizador
analógico del Media Giant. La búsqueda automática de canales del Media Giant puede tomar un poco de
tiempo; el Media Giant buscará y almacenará automáticamente en su memoria todos los canales
encontrados.
• Cuando la búsqueda de canales haya finalizado, seleccione “OK” para continuar con el Asistente de
configuración.
Si desea omitir la búsqueda de canales (por ejemplo, si está utilizando un sintonizador de TDT y no dispone
de señal analógica), puede seleccionar “Cancel” para omitir este paso y continuar con el Asistente de
configuración.
Configuración de red
La configuración de red sirve para adjudicar una dirección de IP al Media Giant. La mayoría de veces el
Media Giant estará conectado a una red que dispondrá de un servidor DHCP (generalmente un router).
• Cuando en su red haya un servidor HDCP, seleccione la opción “DHCP IP”.
• El Asistente de configuración le pedirá que confirme la selección. Seleccione “OK” para continuar.
• Cuando desee utilizar una IP estática, seleccione “FIX IP”.
• El Asistente de configuración le mostrará los campos para introducir una IP estática. Utilice los botones
de navegación (15)
la puerta de acceso predeterminada y el servidor DNS.
• Cuando haya introducido los valores correspondientes, pulse el botón “Enter” (26) del mando a
distancia.
• El Asistente de configuración le pedirá que confirme la selección. Seleccione “OK” para continuar.
Si su Media Giant no está conectado a ninguna red, seleccione “Cancel” para omitir este paso y continuar
con el Asistente de configuración.
Fecha y hora
La opción “Fecha y hora” le permite ajustar la fecha y hora correctas en la configuración del Media Giant.
• Para ajustar manualmente la fecha y hora, seleccione “Manual”.
• Utilice los botones de navegación (15) y los botones numéricos 0-9 (6) para introducir el año, el mes, el
día, la hora, los minutos y los segundos. Cuando haya terminado, pulse el botón “Enter” (26)
a distancia
• El Asistente de configuración le pedirá que confirme la selección. Seleccione “OK” para continuar.
• Si dispone de una conexión a Internet activa y el Media Giant está conectado a su red, puede seleccionar
"Auto (Via Network)”.
• El Asistente de configuración le mostrará los campos para configurar la fecha y hora automáticas. Puede
utilizar el servidor NTP predeterminado, pero si desea utilizar un servidor NTP distinto, pulse el botón
“Enter” (26)
• Introduzca la zona horaria que se corresponda con la de su país.
• Escoja “Desactivar” o “Activar” para desactivar o activar, respectivamente, la actualización automática
a horario de verano, dependiendo de si su país utiliza esta medida. Cuando haya introducido los valores
correspondientes, pulse el botón “Enter” (26)
• El Asistente de configuración le pedirá que confirme la selección. Pulse “OK” para continuar.
Se ha completado la configuración con el Asistente y ya está lista la configuración básica del Meda Giant.
Nota:
Para realizar otras configuraciones, utilice la opción “Configuración” del menú principal. El menú
de configuración se explica en el apartado 13.
Nota:
Si desea volver a utilizar el Asistente de configuración después de haberlo utilizado, seleccione
“Configuración” en el menú principal y seleccione la opción “Restaurar valores
predeterminados”. El Media Giant borrará la configuración realizada y volverá a ejecutar el
Asistente de configuración.
Nota:
Si compró el Media Giant sin el disco duro formateado, la unidad mostrará el Asistente de formato
una vez finalizado el Asistente de configuración. El Asistente de formato se explica en el apartado
15 de este manual.
**
y los botones numéricos 0-9 (6) para introducir la dirección IP, la máscara de subred,
del mando
en el campo del servidor FTP para ajustar el valor.
del mando a distancia.
81
Page 83

ESPAÑOL
8. Menú principal
Desde el menú principal podrá acceder a varias funciones del Media Giant.
Nota:
Si no está en la pantalla del menú principal, puede pulsar el botón "Menú" (40) del mando a
distancia para que aparezca el menú principal en la pantalla.
En el menú principal encontrará las siguientes opciones:
Examinar dispositivos
Reproducción de grabaciones
Sintonizador de TV / Entrada AV
Grabación programada
Configuración
Estas opciones se describen en los siguientes apartados de este manual.
Reproducir archivos multimedia almacenados.
Reproducir y editar sus grabaciones.
Ver la televisión o la señal de la entrada AV.
Establecer grabaciones programadas.
Configuración del Media Giant.
[Menú principal ]
82
Page 84

ESPAÑOL
9. Examinar dispositivos
Si ha seleccionado la opción “Examinar dispositivos” en el menú principal, el Media Giant mostrará el
buscador de dispositivos en su pantalla:
[Selección de dispositivos de almacenamiento] [Selección de modo: Películas, Música, Fotos]
El buscador de dispositivos le permite seleccionar el dispositivo de almacenamiento desde el que desea
reproducir sus archivos multimedia:
USB Reproduce los archivos multimedia del dispositivo USB conectado (a través del puerto
USB).
Disco duro
Red
Para buscar en el dispositivo USB o en el disco duro interno, seleccione “USB” o “Disco duro” en la lista de
Reproduce los archivos multimedia del disco duro interno del Media Giant.
Reproduce los archivos multimedia de los recursos compartidos o Samba de su entorno de
red.
dispositivos de almacenamiento.
Para buscar en los recursos compartidos de su red para reproducir desde éstos, seleccione la opción “Red”
en la lista de dispositivos de almacenamiento.
Nota: Para buscar en los recursos compartidos de su red, asegúrese de haber configurado estos recursos
compartidos correctamente. Para más información acerca de los recursos compartidos en red y
cómo buscar en ellos, véase el apartado 17.
Una vez seleccionado un dispositivo de almacenamiento, puede escoger entre los modos Películas, Música
y Fotos con los botones de navegación (“izquierda” y “derecha”) del mando a distancia.
Cuando haya seleccionado una de esas tres opciones, el Media Giant filtrará automáticamente el contenido
del dispositivo de almacenamiento de forma que sólo verá los archivos del tipo seleccionado.
Por ejemplo: Si selecciona “Películas”, en la pantalla sólo se mostrarán los archivos de películas.
En el menú del buscador de dispositivos, puede utilizar las siguientes opciones del buscador del mando a
distancia:
- Botones de naveg. (15) Examinar las carpetas y archivos o cambiar el modo de reproducción.
- Enter (26) Reproducir el archivo seleccionado o abrir la carpeta seleccionada.
- Atrás (14) Ir a la carpeta anterior.
- Copiar (7) Muestra el menú de copiado. (Se explica en un subapartado de este
- Reproducción (18) Reproducir el archivo seleccionado.
mismo apartado).
- Siguiente (31) Ir a la página con archivos siguiente.
- Anterior (11) Ir a la página con archivos anterior.
- Menú (40) Vuelve al menú principal.
Puede volver del menú del buscador de dispositivos al menú principal pulsando el botón “Menú” (40) del
mando a distancia.
83
Page 85

ESPAÑOL
Reproducción de películas
Puede reproducir películas almacenadas en el disco duro de la unidad, en un dispositivo USB o en una
ubicación de la red y verlas en su TV mediante el filtro “Películas” del Media Giant.
Si ha seleccionado el filtro “Películas”, el Media Giant sólo mostrará en la pantalla los archivos de
películas. No se mostrarán los otros archivos.
• Con los botones de navegación (15)
Si ha seleccionado un archivo de película, el buscador de dispositivos mostrará una vista preliminar con el
nombre y el tamaño del archivo en la derecha de la pantalla.
• Pulse el botón "Enter” (26
archivo seleccionado.
Durante la reproducción, puede utilizar las siguientes opciones de reproducción del mando a distancia:
) o el botón “Play” (18) del mando a distancia para iniciar la reproducción del
[Modo Películas]
del mando a distancia, seleccione el archivo que desee reproducir.
- Pause (17) Pausar o reanudar la reproducción.
- Slow (24) Reproducción lenta.
- Stop (23) Detener la reproducción.
- Rewind (10) Rebobinar.
- Fast Forward (32) Avance rápido.
- Ins. Rep. (16) Salto de 10 segundos hacia atrás en la reproducción.
- CM. Skip (25) Salto de 30 segundos hacia adelante en la reproducción.
- Goto (8) Ir a un punto (momento) específico de la película.
- Repeat (9) Cambiar la opción de repetición de la presente reproducción.
- Info (27) Mostrar la información de reproducción.
- Zoom (5) Acercar o alejar la imagen
- Sub-t (37) Cambiar el idioma de los subtítulos (si está disponible para esta
- Audio (4) Cambiar la pista de audio (si está disponible para esta reproducción).
reproducción).
- Volume (12), (13) Ajustar el volumen.
- Mute (30) Silenciar el sonido.
Puede volver del menú del buscador de dispositivos al menú principal pulsando el botón “Menú” (40
mando a distancia.
) del
84
Page 86

ESPAÑOL
Funcionalidad de reproducción de DVD
El Media Giant reproduce DVD del disco duro como si fueran DVD normales. Podrá navegar por el menú del
DVD, elegir subtítulos y cambiar el idioma de audio.
Nota:
El Media Giant sólo puede reproducir las copias de DVD que no estén protegidos. No es compatible
con la protección CSS.
• Conecte el Media Giant a su ordenador (véase el apartado 13).
• Cree una carpeta en el disco duro del Media Giant con el nombre de la película del DVD (por ejemplo:
“Película1”).
• Copie los archivos de la carpeta “VIDEO_TS” a la carpeta creada (en este ejemplo: “Película1”) en el
Media Giant.
Una vez realizada la copia, la estructura de carpetas debería verse así:
- [Disco duro del Media Giant]
|-> Película1 (con todos los archivos del DVD dentro)
• Desconecte el Media Giant de su ordenador y conéctelo a su televisor.
• Con los botones de navegación (15
del menú principal y pulse el botón “Enter” (26
dispositivos.
• Utilice los botones de navegación (15) y el botón “Enter” (26
del disco duro interno en la que se encuentra el DVD.
• Abra la carpeta del DVD que ha creado en el disco duro.
) del mando a distancia, seleccione el icono “Examinar dispositivos”
) del mando a distancia para abrir el buscador de
) del mando a distancia para ir a la carpeta
[Modo Películas]
• Seleccione el archivo VIDEO_TS.IFO y pulse el botón "Play” (18
) del mando a distancia para iniciar la
reproducción del DVD seleccionado.
Nota:
También es posible reproducir archivos ISO directamente desde el Media Giant si están
almacenados en la partición NTFS. Al reproducir un archivo ISO de un DVD, se podrán utilizar las
mismas funciones de reproducción que cuando se reproduce un archivo IFO de un DVD.
85
Page 87

ESPAÑOL
Durante la reproducción del DVD, puede utilizar las siguientes opciones de reproducción del mando a
distancia:
- Pause (27) Pausar o reanudar la reproducción.
- Slow (24) Reproducción lenta.
- Stop (23) Detener la reproducción.
- Navigation keys (15) Navegar en el menú del DVD.
- Enter (26) Confirmar el elemento o elementos seleccionados en el menú del DVD.
- Rewind (10) Rebobinado rápido.
- Fast Forward (32) Avance rápido.
- Previous (11) Capítulo anterior.
- Next (31) Capítulo siguiente.
- Ins. Rep. (16) Salto de 10 segundos hacia atrás en la reproducción.
- CM. Skip (25) Salto de 30 segundos hacia adelante en la reproducción.
- Goto (7) Ir a un punto (momento) específico de la película.
- Repeat (8) Cambiar la opción de repetición de la presente reproducción.
- Info (27) Mostrar la información de reproducción.
- Zoom (5) Acercar o alejar la imagen
- Angle (36) Cambiar el ángulo de visión del DVD (si el DVD contiene múltiples
- Volume (12), (13) Ajustar el volumen.
ángulos).
- Mute (30) Silenciar el sonido.
- Sub-t (37) Cambiar el idioma de los subtítulos del DVD o desactivarlos.
- Audio (4) Cambiar la pista de audio del DVD (si el DVD contiene múltiples pistas de
Puede volver del menú del buscador de dispositivos al menú principal pulsando el botón “Menú” (40
mando a distancia.
Reproducción de subtítulos
El Media Giant puede reproducir archivos de subtítulos cuando se reproducen archivos de vídeo AVI.
Para reproducir archivos AVI con subtítulos, debe asignar el mismo nombre al archivo AVI y al archivo de
subtítulos. Por ejemplo:
Nombre de la película: My_Movie_With_Sub.AVI
Nombre del archivo de subtítulos: My_Movie_With_Sub.SRT
• Con los botones de navegación del mando a distancia, seleccione el archivo que desee reproducir.
• Pulse el botón "Enter” (26
archivo seleccionado.
Se empezará a reproducir el archivo AVI con el archivo de subtítulos correspondiente cargado.
Para activar o desactivar los subtítulos durante la reproducción, pulse el botón “Sub-t” (37
distancia.
Puede volver del menú del buscador de dispositivos al menú principal pulsando el botón “Menú” (40
mando a distancia.
audio).
) del
) o el botón “Play” (18) del mando a distancia para iniciar la reproducción del
) del mando a
) del
86
Page 88

ESPAÑOL
Reproducción de música
Puede reproducir archivos de música almacenados en el disco duro de la unidad, en un dispositivo USB o en
una ubicación de la red y escucharlos en su TV mediante el filtro “Música” del Media Giant.
Si ha seleccionado el filtro “Música”, el Media Giant sólo mostrará archivos de música en la pantalla. No se
mostrarán los otros archivos.
• Con los botones de navegación (15
Si ha seleccionado un archivo de música, el buscador de dispositivos mostrará la información de la etiqueta
ID3 (cuando esté disponible) con el nombre y el tamaño del archivo a la derecha de la pantalla.
• Pulse el botón "Enter” (26
archivo seleccionado.
Durante la reproducción, puede utilizar las siguientes opciones de reproducción del mando a distancia:
) del mando a distancia, seleccione el archivo que desee reproducir.
) o el botón “Play” (18) del mando a distancia para iniciar la reproducción del
[Modo Música]
- Pause (17) Pausar o reanudar la reproducción.
- Stop (23) Detener la reproducción.
- Rewind (10) Rebobinar.
- Fast Forward (32) Avance rápido.
- Repeat (8) Cambiar la opción de repetición del presente archivo o carpeta.
- Info (27) Mostrar la información de reproducción.
- Volume (12), (13) Ajustar el volumen.
- Mute (30) Silenciar el sonido.
Puede volver del menú del buscador de dispositivos al menú principal pulsando el botón “Menú” (40
mando a distancia.
) del
87
Page 89

ESPAÑOL
Reproducción de fotos e imágenes
Puede visualizar sus fotos o imágenes almacenadas en el disco duro de la unidad, en un dispositivo USB o en
una ubicación de la red y verlas en su TV mediante el filtro “Fotos” del Media Giant.
Si ha seleccionado el filtro “Fotos”, el Media Giant sólo mostrará archivos de imagen en la pantalla. No se
mostrarán los otros archivos.
• Con los botones de navegación (15
Si ha seleccionado un archivo de imagen, el buscador de dispositivos mostrará una vista preliminar con el
nombre y el tamaño del archivo a la derecha de la pantalla.
• Pulse el botón "Enter” (26) o el botón “Play” (18
archivo seleccionado.
Durante la presentación, puede utilizar las siguientes opciones de presentación del mando a distancia:
) del mando a distancia, seleccione el archivo que desee reproducir.
[Modo Fotos]
) del mando a distancia para iniciar la reproducción del
- Pause (17) Pausar o reanudar la presentación.
- Stop (23) Detener la presentación.
- Navigation keys (15) Girar la foto mostrada.
- Previous (11) Reproducir el archivo anterior de la presente carpeta.
- Next (31) Reproducir el archivo siguiente de la presente carpeta.
- Repeat (8) Cambiar la opción de repetición del presente archivo o carpeta.
- Info (27) Mostrar la información de la presentación.
- Zoom (5) Acercar o alejar la imagen
Puede volver del menú del buscador de dispositivos al menú principal pulsando el botón “Menú” (40
mando a distancia.
) del
88
Page 90

ESPAÑOL
Modo Copiado
Si desea copiar datos de una ubicación a otra (por ejemplo, de un dispositivo USB al disco duro interno),
puede utilizar el modo Copiado del Media Giant.
Para acceder al modo Copiado, pulse el botón “Copy” (7
buscador de dispositivos. El menú de copiado se mostrará en su pantalla:
) del mando a distancia cuando esté en el
Puede seleccionar “USB”, “Disco duro” o “Red” como origen de copiado. Los destinos posibles son: “USB”,
“Disco duro” y “Papelera de reciclaje” (borrar archivos).
En primer lugar, seleccione el origen de copiado con los botones de navegación “arriba” y “abajo” (15
mando a distancia. Cuando haya seleccionado el origen de copiado, pulse el botón de navegación
“derecha” (15
destino de copiado.
Nota:
Nota:
• Cuando haya introducido la ubicación de origen y la de destino, pulse el botón “Enter” (26
• Examine la ubicación de origen para localizar los archivos o carpetas que desee copiar. Puede examinar
• Marque los archivos o carpetas que desee copiar con el botón "Play" (18
• Cuando haya marcado los archivos o carpetas que desee copiar, pulse el botón de navegación “derecha”
Nota:
• Examine la zona de destino hasta localizar la ubicación donde quiere realizar la copia. Puede examinar
• Cuando haya localizado la ubicación deseada, pulse el botón de navegación “derecha” (15) del mando a
[Menú de copiado] [Menú de copiado – Asistente de copiado]
) y luego utilice los botones de navegación “arriba” y “abajo” (15) para seleccionar el
Podrá ver si está activa la sección de Origen o la de Destino del menú de copiado por el borde
iluminado.
No es posible copiar de “USB” a “USB” o de “Disco duro” a “Disco duro”.
distancia para proceder con el Asistente de copiado.
las carpetas con los botones de navegación (15
archivos o carpetas marcados mostrarán un icono de marcado después del nombre.
(15
) del mando a distancia para ir a la sección de destino.
No es posible seleccionar la partición NTFS del Media Giant como destino, ya que no es posible
escribir en ella.
las carpetas con los botones de navegación (15) y el botón “Enter” (26) del mando a distancia.
distancia para iniciar el proceso de copiado.
) del
) del mando a
) y el botón “Enter” (26) del mando a distancia.
) del mando a distancia. Los
89
Page 91

ESPAÑOL
• El Asistente de copiado le pedirá la confirmación del proceso de copiado. Seleccione “OK” para
proceder con el proceso de copiado.
Cuando se haya completado el proceso de copiado, aparecerá un mensaje de notificación en la pantalla.
También es posible eliminar archivos con el menú de copiado.
Si desea eliminar archivos, seleccione “Papelera de reciclaje” como destino.
Marque los archivos o carpetas que desee eliminar y pulse el botón de navegación “derecha” (15
mando a distancia. Aparecerá una ventana de confirmación de borrado de los archivos o carpetas
seleccionados.
Seleccione “OK” para borrar los archivos o carpetas seleccionados.
[Confirmación de copiado] [Copiado en curso]
[Menú de copiado – Asistente de borrado] [Confirmación de borrado]
) del
90
Page 92

ESPAÑOL
10. Reproducción de grabaciones
Si ha seleccionado la opción “Reproducción de grabaciones” en el menú principal, el Media Giant
mostrará una lista con todas sus grabaciones en la pantalla:
La lista de grabaciones mostrará todas sus grabaciones, hechas de forma manual o programada.
Cada vídeo se indica con una vista en miniatura (primer fotograma de la grabación), el nombre, la fecha y
hora y la calidad de grabación.
Una estrella amarilla al lado de la grabación indicará que ésta es nueva y que todavía no se ha visualizado.
Cuando haya visualizado la grabación, la estrella amarilla desaparecerá.
Puede navegar por las carpetas o archivos de grabaciones con los botones de navegación “arriba” y “abajo”
(15
) del mando a distancia, e iniciar la reproducción de un archivo seleccionado pulsando el botón “Enter”
) o el botón “Play” (18) del mando a distancia.
(26
Durante la reproducción, puede utilizar las siguientes opciones de reproducción del mando a distancia:
[Lista de grabaciones]
- Pause (17) Pausar o reanudar la reproducción.
- Slow (24) Reproducción lenta.
- Stop (23) Detener la reproducción.
- Rewind (10) Rebobinar.
- Fast Forward (32) Avance rápido.
- Ins. Rep. (16) Salto de 10 segundos hacia atrás en la reproducción.
- CM. Skip (25) Salto de 30 segundos hacia adelante en la reproducción.
- Previous (11) Reproducir el capítulo o la grabación anterior.
- Next (31) Reproducir el capítulo o la grabación siguiente.
- Repeat (8) Cambiar la opción de repetición de la presente reproducción.
- Info (27) Mostrar la información de reproducción.
- Goto (9) Ir a un punto (momento) específico de la película.
- Zoom (5) Acercar o alejar la imagen
- Audio (4) Cambiar la pista de audio (si está disponible para esta reproducción).
- Volume (12), (13) Ajustar el volumen.
- Mute (30) Silenciar el sonido.
Con los botones de navegación “izquierda” y “derecha” (15
opciones del menú superior de la lista de grabaciones y seleccionar varias funciones:
Reproducir
Eliminar
Cambiar nombre
Clasificación
Edición
Reproducir sus grabaciones.
Eliminar sus grabaciones.
Cambiar el nombre de sus grabaciones.
Cambiar el sistema de clasificación de sus grabaciones.
Editar sus grabaciones (explicado en el próximo subapartado).
) del mando a distancia podrá navegar por las
91
Page 93

ESPAÑOL
Descripción del menú “Edición”
El menú “Edición” dispone de varias opciones para modificar sus grabaciones, explicadas a continuación:
[Grabaciones – Menú Edición]
- Imagen en miniatura Con la opción “Imagen en miniatura”, podrá reproducir la grabación y
seleccionar su fotograma favorito para convertirlo en la imagen en
- Borrar A-B Con la opción “Borrar A-B”, podrá marcar un fragmento de la grabación
- Dividir grabación Con la opción “Dividir grabación”, podrá dividir una grabación en 2
miniatura de la grabación.
(por ejemplo, un anuncio) y borrarlo.
partes (por ejemplo, cuando ha grabado 2 programas en una misma
- Unir grabaciones Con la opción “Unir grabaciones”, podrá unir 2 grabaciones y
- Añadir marcador de capítulo
grabación programada).
convertirlas en una.
Con la opción “Añadir marcador de capítulo”, podrá añadir marcadores
de capítulo a su grabación. Esto le permitirá ir fácilmente a una parte
específica de la grabación.
Nota:
También puede activar la opción "Capítulos automáticos" del menú de configuración para
añadir automáticamente capítulos a su grabación.
- Quitar marcador de capítulo Con la opción “Quitar marcador de capítulo”, podrá quitar marcadores
de capítulo de su grabación. Esta opción puede ser útil si configuró el
Media Giant para que añadiera automáticamente marcas de capítulo y
- Copiar a partición FAT32 Con la opción “Copiar a partición FAT32”, podrá copiar su grabación
Cuando la grabación se haya copiado a la partición FAT32, podrá
Nota:
Para más información sobre la función de servidor UPnP A/V del Media Giant, véase el
capítulo 16.
posteriormente desea borrarlas de la grabación.
desde la partición de grabación hacia la carpeta “REC” de la partición
multimedia del Media Giant.
reproducirla, copiarla o editarla en su ordenador si el Media Giant está
conectado a éste por USB, o puede enviarla y reproducirla en un cliente
UPnP A/V (como el C54WMP o el CFULLHDMA de Conceptronic) a través
de la red.
92
Page 94

ESPAÑOL
11. Entrada AV y sintonizador de TV
Con la opción “Entrada AV y sintonizador de TV” del menú principal, podrá visualizar y grabar la señal
procedente de estas dos entradas del Media Giant.
Consejo: Puede acceder fácilmente desde cualquier menú del Media Giant a la pantalla de TV en directo
Cuando seleccione la opción “Entrada AV y sintonizador de TV”, el Media Giant mostrará la imagen de TV
en directo desde el sintonizador de TV. Mientras esté viendo la señal de TV, puede cambiar de canal
pulsando los botones “Channel +” (29
Con el botón “Source” (2) del mando a distancia, podrá seleccionar el sintonizador de TV, la entrada
Composite o la entrada Component. La fuente escogida se mostrará brevemente en el rincón superior
derecho de la pantalla.
Opción TimeShift
El Media Giant incorpora la función TimeShift. Esta función “pausa” la recepción de televisión o de la
entrada A/V y graba la emisión del canal o entrada que esté viendo mientras TimeShift está activado.
Pulse el botón “TimeShift” (22) del mando a distancia para inicializar la función TimeShift.
Cuando se haya inicializado la función, se “pausará” la recepción de televisión o de la entrada A/V y la
unidad empezará a grabar la señal internamente.
pulsando el botón “Live-TV” (38
) o “Channel -“ (28) del mando a distancia.
) del mando a distancia.
Nota:
Cuando la característica TimeShift está activada, la barra de progresión muestra el tiempo máximo
[TimeShift: iniciándose] [TimeShift: activo ]
de almacenamiento del búfer del TimeShift. Si desea ajustar la capacidad de almacenamiento del
búfer (mayor o menor), deberá volver a formatear el disco duro del Media Giant para reajustar el
tamaño de la partición del búfer del TimeShift.
Encontrará más información sobre cómo formatear el disco duro en el apartado 15.
Durante el TimeShift, puede utilizar las siguientes opciones del mando a distancia:
- Play (18) Reproducir el contenido del búfer del TimeShift.
- Pause (17) Pausar o reanudar la reproducción.
- Slow (24) Reproducción lenta.
- Stop (23) Detener la reproducción.
- Rewind (10) Rebobinar.
- Fast Forward (32) Avance rápido.
- Ins. Rep. (16) Salto de 10 segundos hacia atrás en la reproducción.
- CM. Skip (25) Salto de 30 segundos hacia adelante en la reproducción.
- Info (27) Mostrar u ocultar la información del búfer del TimeShift.
- Volume (12), (13) Ajustar el volumen.
- Mute (30) Silenciar el sonido.
93
Page 95

ESPAÑOL
TimeShift permanente
En el menú de configuración del Media Giant puede habilitar el “TimeShift permanente”. Cuando esta
característica esté activada, el TimeShift estará siempre activo y le permitirá pausar instantáneamente la
reproducción o utilizar los botones superiores del mando a distancia para “saltar” en el búfer del
TimeShift.
Grabación
Cuando esté viendo la televisión o la señal de entrada de A/V a través de la unidad, puede empezar a
grabar instantáneamente la señal pulsando el botón “Rec” (19
a grabar y lo hará hasta que pulse el botón “Stop” (23
Durante la grabación, se encenderá el LED de grabación del panel frontal.
Nota:
Nota:
Nota:
Si pulsa el botón “Rec” (19
contados a partir de la primera vez que pulsó el botón “Rec” (para iniciar la grabación).
En la pantalla se mostrará el mensaje “OTR: 30 min.”
La unidad detecta si la señal de la fuente de entrada tiene protección anti-copia, como por
ejemplo la protección MacroVision en los discos de DVD. Cuando la fuente conectada esté
protegida anti-copia, la unidad no permitirá la grabación y mostrará un mensaje de alerta cuando
se pulse el botón de copiado.
El Media Giant graba en HQ (alta calidad) de forma predeterminada. Puede cambiar la calidad de
grabación en el menú de configuración.
Durante la grabación no podrá cambiar el canal seleccionado.
) del mando a distancia. La unidad empezará
) del mando a distancia.
) durante una grabación, el tiempo de grabación se establecerá en 30 minutos
[Grabación normal] [Temporizador de grabación activado]
Para incrementar este tiempo de grabación en 30 minutos más, pulse de nuevo el botón “Rec” (19
hasta un máximo de 240 minutos. La unidad continuará grabando hasta que haya finalizado el tiempo de
grabación o hasta que pulse el botón “Stop” (23
), y así
) del mando a distancia.
94
Page 96

ESPAÑOL
Control DV
La conexión mini Firewire situada detrás del panel frontal del Media Giant le permitirá conectar
directamente su cámara DV al Media Giant y grabar sus vídeos domésticos en el disco duro interno.
• Conecte su cámara DV al conector mini Firewire (7
• Encienda su cámara DV y póngala en modo Reproducción.
• Pulse el botón “DV” (39
El Media Giant mostrará los controles de DV en la pantalla:
) situado en el frontal del Media Giant.
) del mando a distancia para inicializar la función “Control DV”.
Puede seleccionar los botones del panel de control de DV con los botones de navegación (15
distancia. Confirme su selección con el botón “Enter” (26
Cuando haya seleccionado “Play” en la ventana de control de DV y se esté reproduciendo la grabación,
puede pulsar el botón “Rec” (19
duro.
Consejo:
Cuando esté grabando, puede ocultar el panel de control de DV pulsando el botón “DV” (39) del
Puede detener esta grabación pulsando el botón “Stop” (23
Los vídeos grabados aparecerán en la lista de grabaciones, tal como se describe en el apartado 10.
Para salir del modo Control DV, pulse la tecla “Return” (14
mando a distancia. El panel se volverá a mostrar si pulsa de nuevo el botón “DV”.
) del mando a distancia para iniciar la grabación del vídeo DV al disco
[Panel de control de DV]
) del mando a distancia.
) del mando a distancia.
) del mando a distancia.
) del mando a
95
Page 97

ESPAÑOL
12. Grabación programada
Puede programar la unidad para que empiece a grabar a una hora determinada. Puede establecer hasta 8
grabaciones programadas.
• Seleccione la opción “Grabación programada” del menú principal.
La pantalla de grabación programada se mostrará en su televisor.
El menú de la grabación programada muestra 5 opciones, que usted puede seleccionar con los botones de
navegación “izquierda” y “derecha” (15
Añadir o editar una grabación programada
Para añadir o editar una grabación programada, seleccione la opción “Añadir” o “Editar” del menú y pulse
el botón “Enter” (26
De forma predeterminada estará seleccionado el campo "Fuente".
Puede modificar todas las opciones con los botones de navegación “arriba” y “abajo” (15
otro campo con los botones de navegación “izquierda” y “derecha” (15
• Seleccione la fuente de la grabación. Puede escoger entre un canal de TV, la entrada de vídeo
• Seleccione la fecha de la grabación.
• Seleccione la hora de inicio de la grabación.
• Establezca la duración de la grabación.
• Seleccione la opción de repetición de la grabación. Puede seleccionar las siguientes opciones:
Puede omitir el campo “Dispositivo”, ya que sólo se puede grabar al disco duro interno.
[Menú de grabación programada] [Añadir una grabación programada]
) del mando a distancia:
Añadir
Añadir una nueva grabación programada
Editar una grabación programada existente
Editar
Eliminar una grabación programada
Eliminar
Estado
Cambiar el estado de la lista de grabaciones programadas
Muestra el historial de grabaciones programadas
Historial
) del mando a distancia.
Composite o la entrada de vídeo Component.
“Una vez”, “Cada día”, “Lun-vié.”, “Lun-sáb.”, “Domingo”, “Lunes”, “Martes”, “Miércoles”,
“Jueves”, “Viernes” y “Sábado”.
) y seleccionar
).
96
Page 98

ESPAÑOL
• Establezca la calidad de grabación. Puede escoger entre: “HQ”, “SP”, “LP”, “EP" y “SLP”.
Nota:
Cambiar el campo “Calidad” influirá en la calidad de la grabación y en el espacio necesario
para dicha grabación. El tiempo de grabación disponible para cada tipo de calidad se mostrará
• Active o desactive la opción “Nicam”.
• Cuando haya configurado todas las opciones, pulse el botón “Enter” (26
• Aparecerá una ventana emergente de confirmación en su pantalla. Seleccione “Confirmar” y pulse el
La grabación se encuentra ya programada y la unidad empezará a grabar el canal seleccionado en la fecha
y hora determinadas, incluso si el dispositivo se encuentra en modo “Standby”.
Nota:
en la parte superior izquierda de la ventana de programación de grabación.
La opción Nicam debería estar activada si la fuente de la que desea grabar emite con dos tipos de audio
(idiomas) diferentes (por ejemplo, Eurosport).
guardar la grabación programada.
botón “Enter” (26
Durante la grabación no podrá cambiar el canal seleccionado.
) del mando a distancia para guardar la grabación programada.
) del mando a distancia para
97
Page 99

ESPAÑOL
13. Configuración
Al seleccionar la opción “Configuración” del menú principal, se mostrará el menú de configuración en la
pantalla. Abajo se muestran todos los parámetros configurables y su descripción correspondiente.
Puede ir a las diferentes opciones del menú de configuración con los botones de navegación del mando a
distancia.
[Menú de configuración - Vídeo] [Menú de configuración - Grabación]
Vídeo:
Relación de pantalla Cambiar la relación de pantalla de la señal de salida del Media Giant.
(“Letterbox 4:3”, “Pan-Scan 4:3”, “Panorámica 16:9”)
Brillo Cambiar el brillo de la señal de salida del Media Giant.
Contraste Cambiar el contraste de la señal de salida del Media Giant.
Configuración de audio Cambiar la configuración de audio del Media Giant.
Modo nocturno Activar o desactivar el modo nocturno del audio (Off, On,
Confort).
Salida digital Configurar la salida de audio. (HDMI-LPCM, HDMI-RAW, SPDIF-
LPCM, SPDIF-RAW)
Grabación:
Calidad Cambiar la calidad de grabación predeterminada. (“HQ”, “SP”, “LP”, “EP" y
Nota: Cambiar el campo “Calidad” influirá en la calidad de la grabación y en el espacio necesario para
“SLP”)
dicha grabación. 1 hora de vídeo con los diferentes tipos de calidad requerirán el siguiente
espacio:
HQ: 4,85 GB (4,850 MB)
SP:
2,42 GB (2,420 MB)
1,62 GB (1,620 MB)
LP:
EP:
1,21 GB (1,210 MB)
SLP:
Capítulos automáticos Activar o desactivar los capítulos automáticos. La función de Capítulos
0,80 GB (800 MB)
automáticos añadirá automáticamente marcadores de capítulo a sus grabaciones
TimeShift permanente Activar o desactivar la característica de TimeShift permanente. Cuando esta
para poder ir fácilmente a distintos puntos durante la reproducción.
característica esté activada, el TimeShift estará siempre activo y le permitirá
pausar instantáneamente la reproducción o utilizar los botones superiores del
mando a distancia para “saltar” en el búfer del TimeShift.
98
Page 100

ESPAÑOL
[Menú de configuración - Red] [Menú de configuración - Sistema]
Red:
Preferencia de LAN ** Cambiar la conexión de LAN preferida: Cable o Auto (vía Powerline)
Si se escoge “Cable”, el Media Giant siempre utilizará el puerto LAN como conexión
de red.
Si se ha escogido “Auto (Via Powerline)”, el Media Giant utilizará la característica
Powerline si existe una red de este tipo disponible. Si no hay ninguna red Powerline
disponible, se utilizará el puerto LAN.
Nota: Si el Media Giant está conectado tanto a Powerline como a cable LAN, la red por defecto será la
red Powerline. Cuando el rendimiento de la red Powerline baje por debajo de 1Mbps, el Media
Giant cambiará automáticamente a modo cable. Mientras esté en modo cable, el Media Giant
continuará comprobando el rendimiento de la red Powerline. Cuando su rendimiento suba por
encima de 1Mbps, el Media Giant volverá a cambiar a modo Powerline.
Configuración de LAN En “Configuración de LAN", podrá configurar la dirección IP del Media Giant.
Podrá escoger entre “Cancel”, “DHCP IP (Auto)” o “Fix IP (Manual)”.
Cuando en su red haya un servidor HDCP, seleccione la opción “DHCP IP”
Cuando desee utilizar una IP estática, seleccione “FIX IP”.
El Asistente de configuración le mostrará los campos para introducir una IP estática.
Utilice los botones de navegación (15
) y los botones numéricos 0-9 (6) para
introducir la dirección IP, la máscara de subred, la puerta de acceso predeterminada
y el servidor DNS.
Cuando haya introducido los valores correspondientes, pulse el botón “Enter” (26
)
del mando a distancia.
Servidor multimedia Cambiar el nombre del servidor multimedia. Es el nombre del servidor UPnP A/V del
Media Giant, que permite a los clientes del UPnP A/V (como el C54WMP o el
CFULLHDMA de Conceptronic) transmitir archivos multimedia a través de la red
desde el disco duro del Media Giant.
Nota: Podrá encontrar más información sobre la función de servidor UPnP A/V del Media Giant en el
apartado 16.
99
 Loading...