

Page 1

Multi Language Quick Guide
Wireless Bluetooth Speaker
DARIO 01
V1.0
Page 2

English
Conceptronic DARIO 01
1. Package contents
• Wireless Bluetooth Speaker
• 3.5mm audio jack cable
• Power Adapter
• Remote control
• Microphone
• Multi language quick installation guide
2. Specifications
Input Power : DC 12V
Output Power : 10W*2+5W*2
3. Product overview
Page 3

English
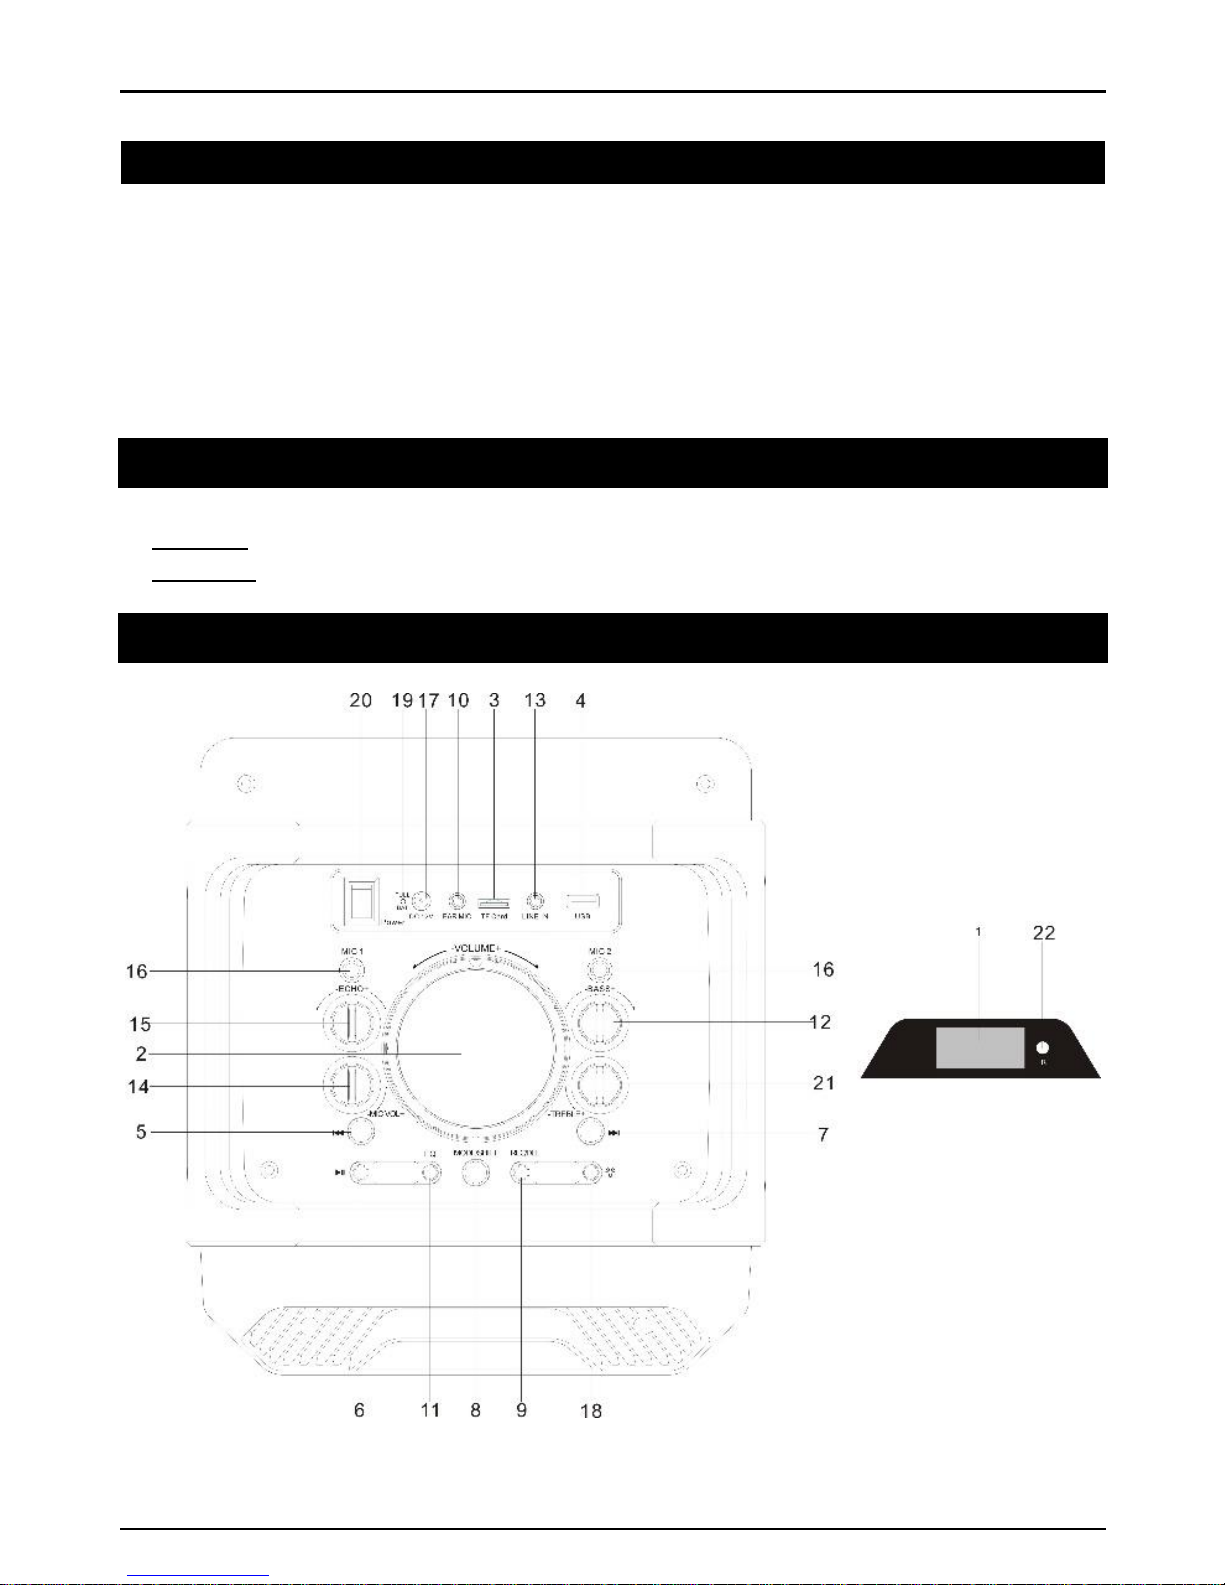
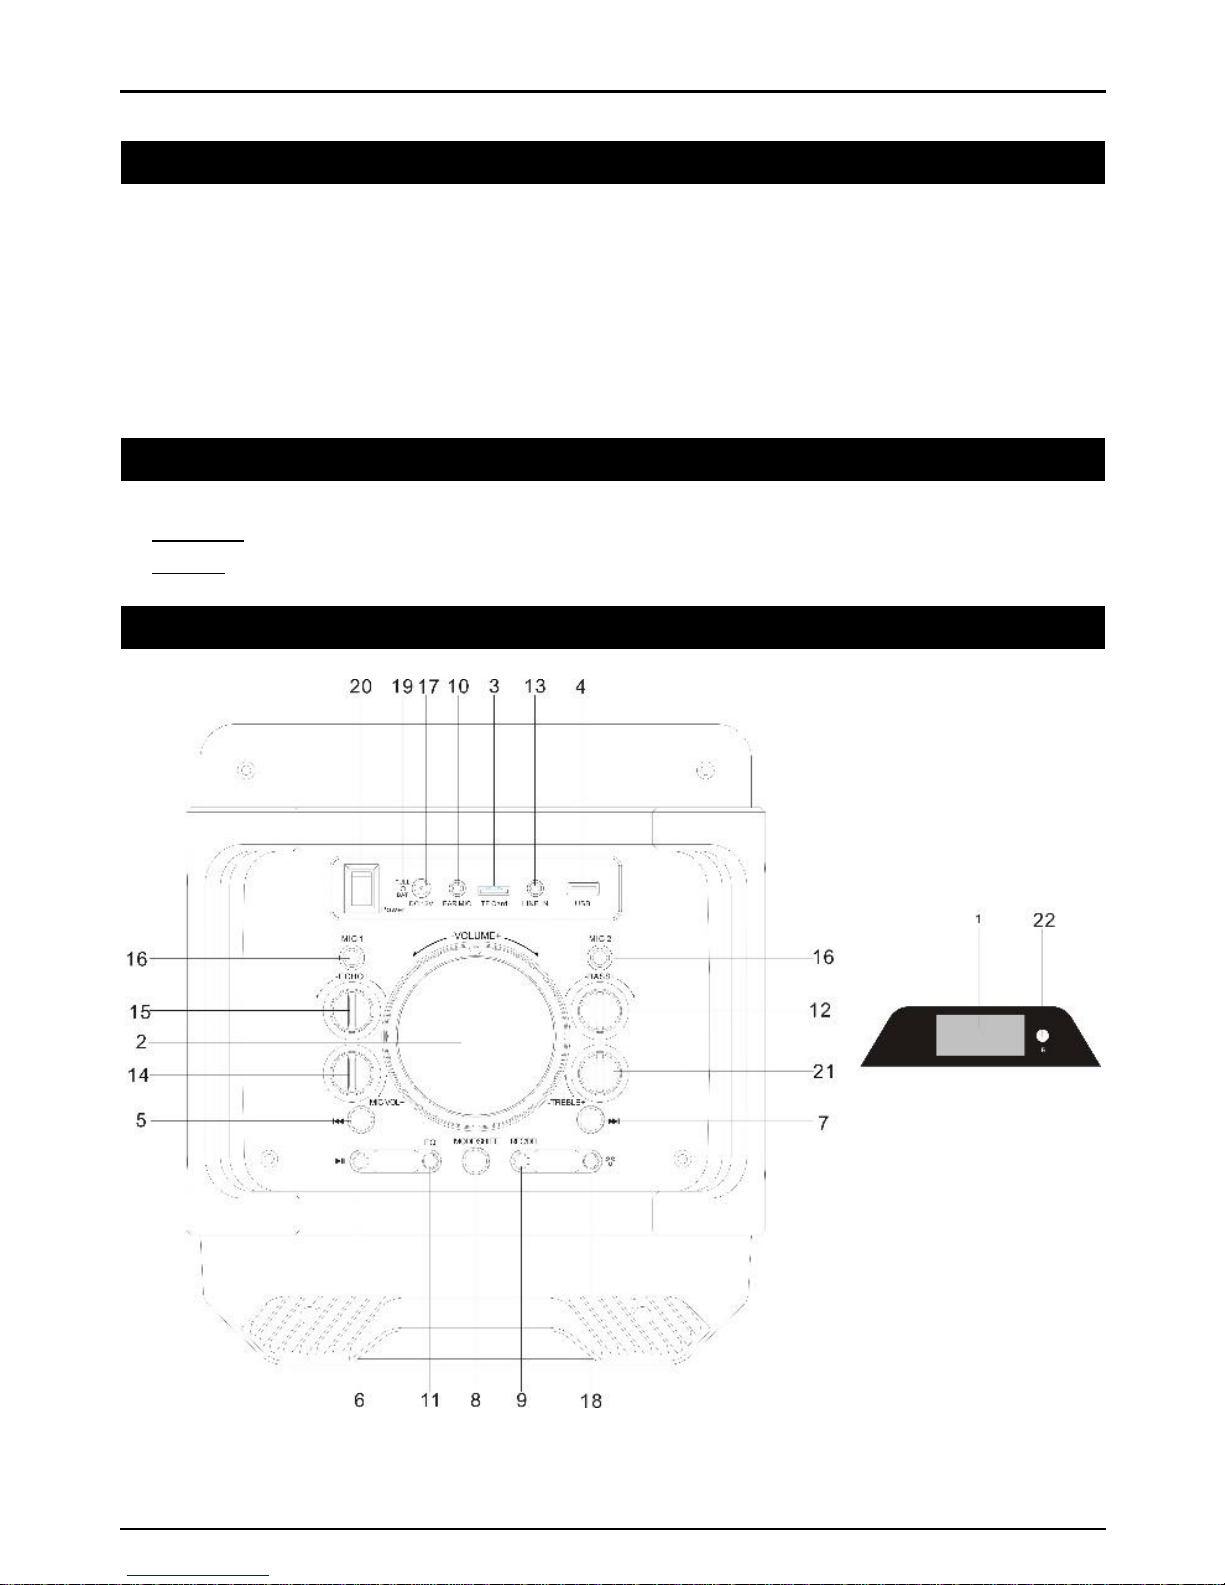
1. LED Screen.
2. Master Volume
3. TF Port: Play MP3 music from TF card (up to 32GB).
4. USB Port: Play MP3 music from USB storage device (up to 32GB).
5. Previous
6. Play/Pause: In USB/TF card reading status, short press it to play/pause, or long
press it to select one of four playback sequencing modes (All - play all tracks in
sequence; ONE - repeat one track). In AUX input / FM radio status, short press it to
toggle between mute and normal volume.
7. Next
8. Mode/SHIFT: Short press it to toggle between USB/TF and FM receiving modes,
long press it to toggle between recording folder and MP3 folder.
9. Recording/DEL: Short press it to enable recording (USB/TF storage device need
be connected first). During recording, reverberation should be tuned to the
minimum. Long press it to delete a recording file. Recording in AUX or FM mode is
available.
10. EAR MIC: headphone/MIC Port.
11. EQ: Environment Switching: In USB/TF reading status, short press it to select
an environment mode (Square, Meeting, Home, Hall and Personal) / to control the
flash light switch.
12. BASS: The control knob of bass
13. LINE IN: AUX input
14. Microphone volume regulating knob.
15. Microphone reverberation regulating knob.
16. Microphone input jack
17. DC 12V recharging port
18. : to control the flash light switch.
19. Recharging indicator light: When recharger is connected, the red light turns on.
When the device is fully recharged, the blue light turns on.
20. Power switch
21. TREBLE: The control knob of treble
22. Remote Control Receiver
Page 4
English
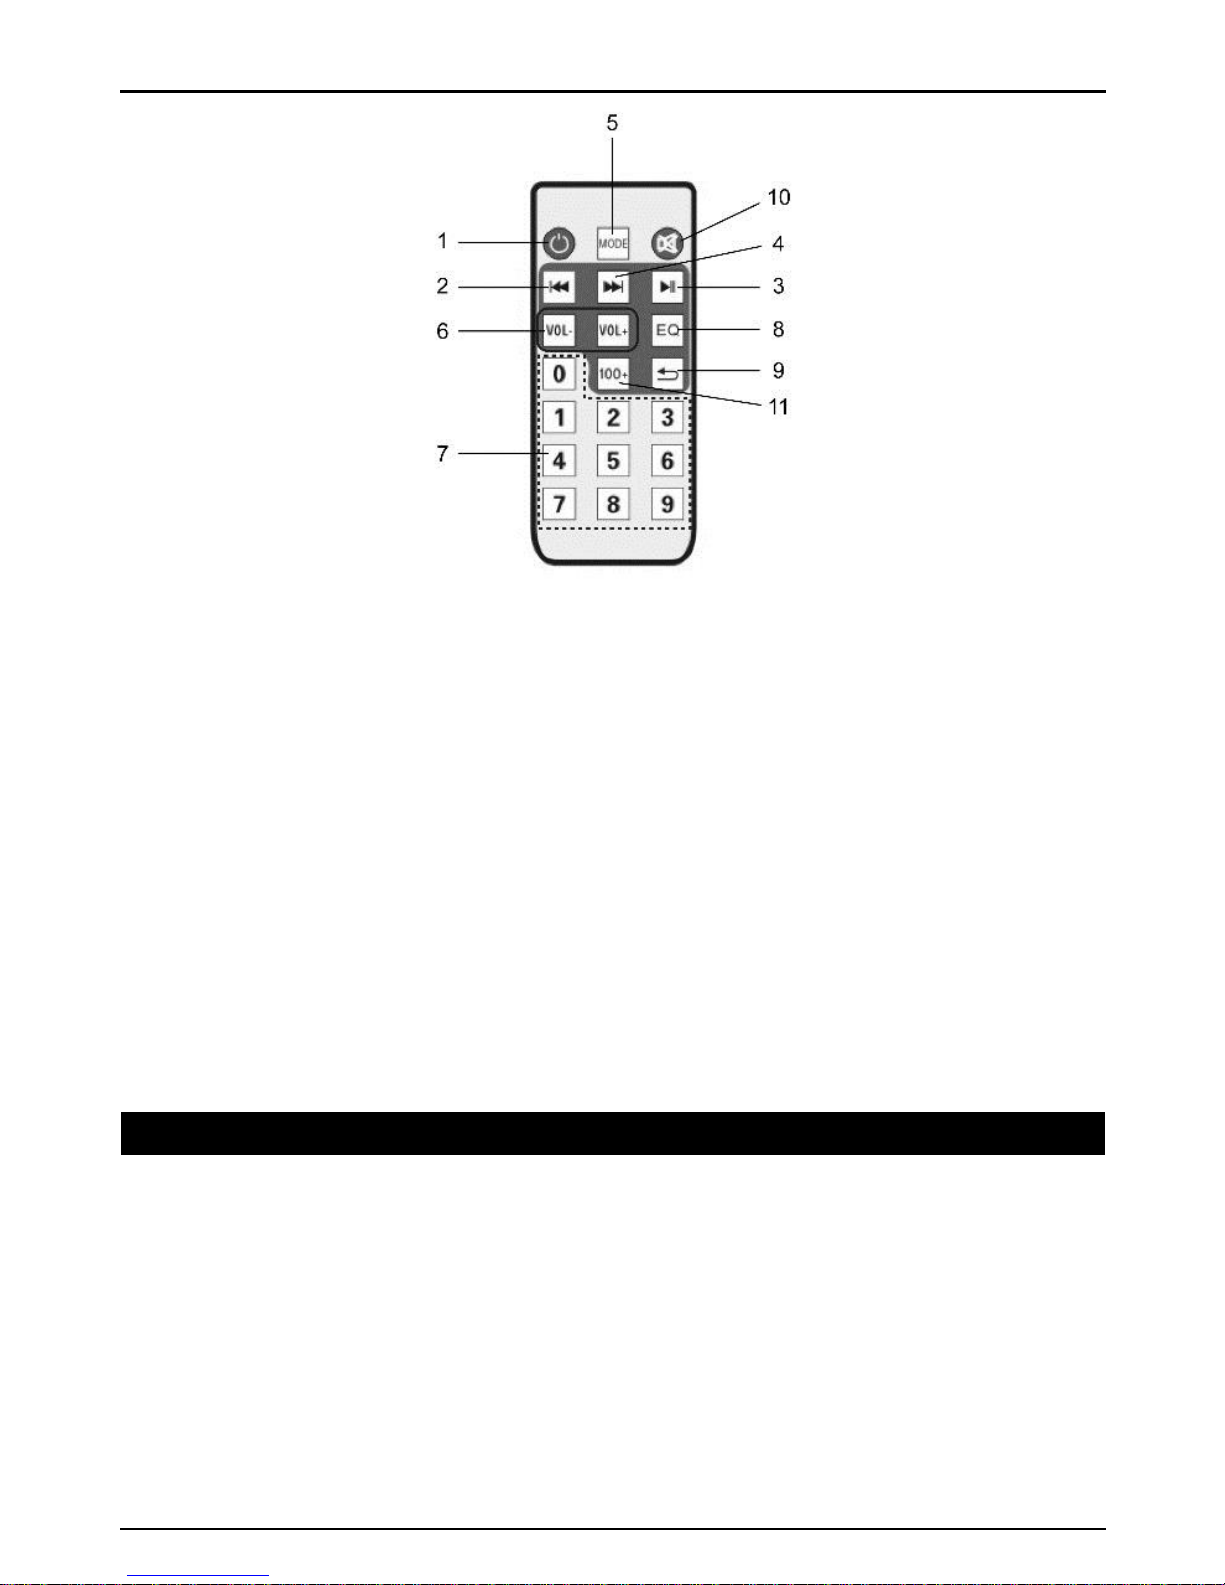
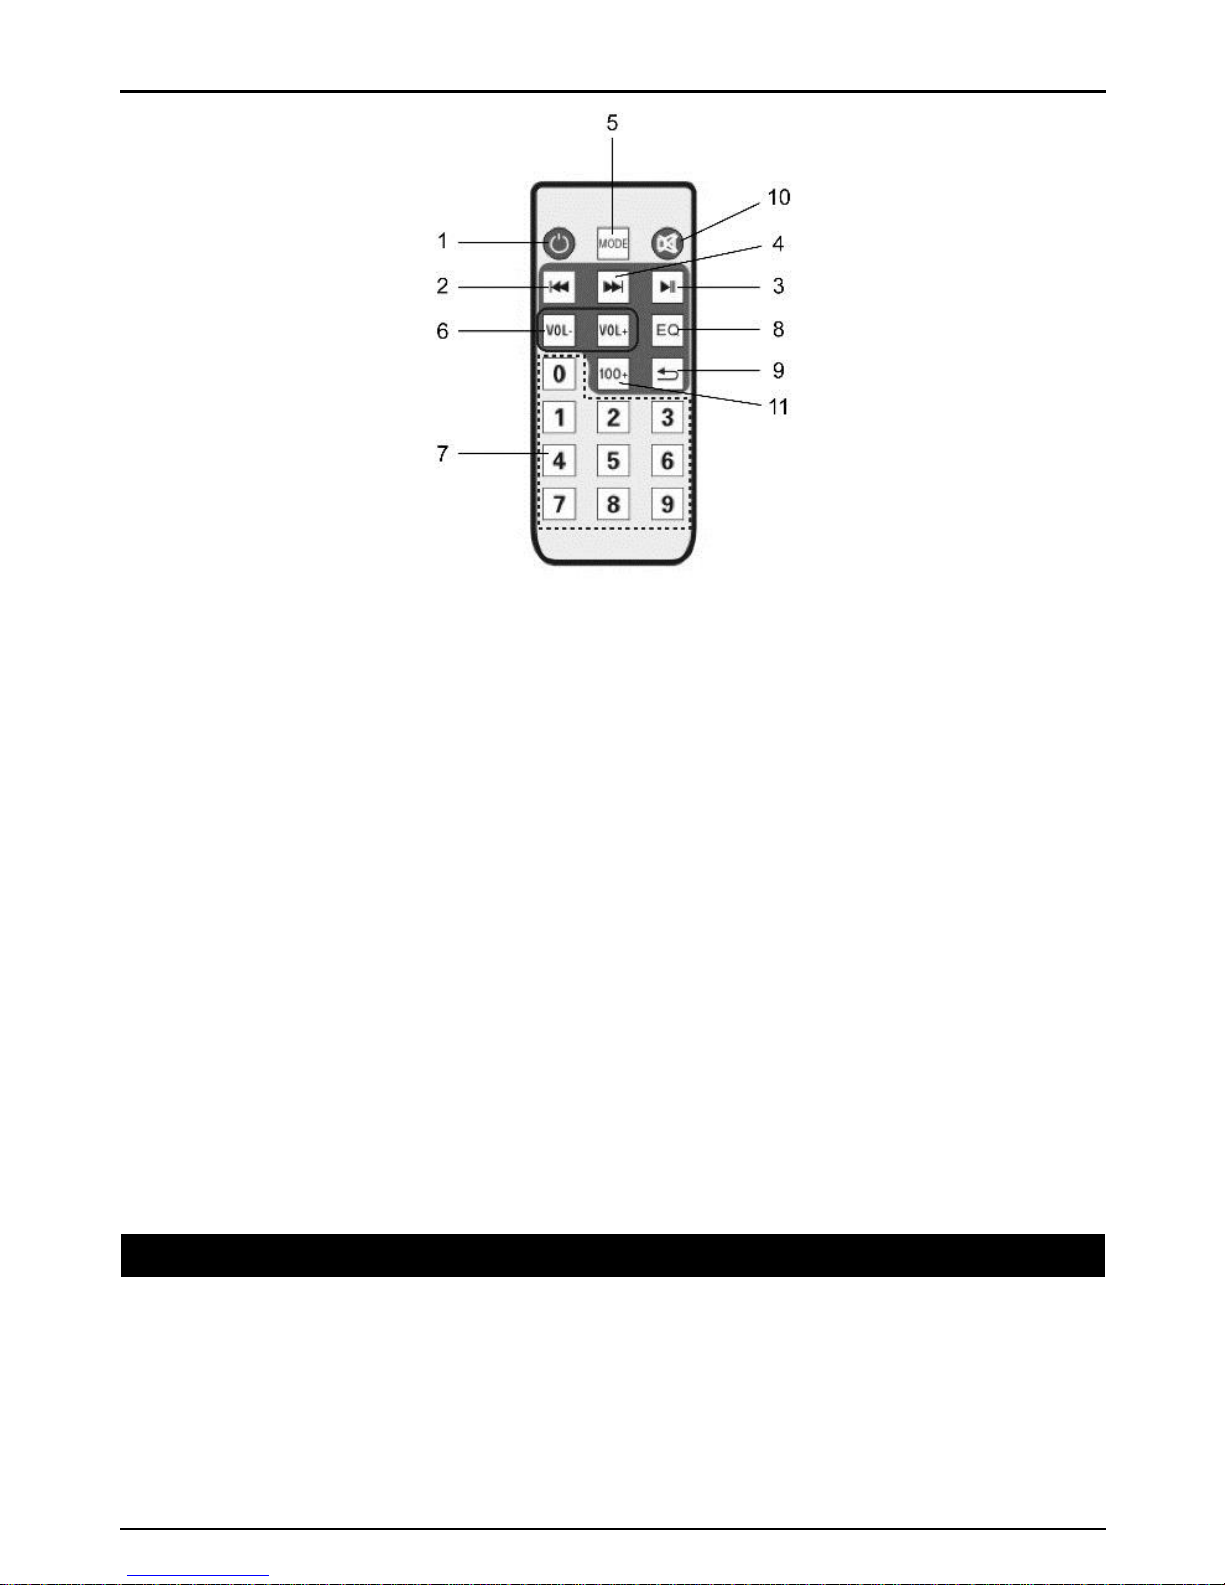
1. Power Button: Short press it to enter standby mode; short press it again to
resume. If no device is connected, the system goes to "-NO-".
2. Previous
3. Play/Pause
4. Next
5. Mode
6. Vol+ / Vol-
7. Number Selector: In FM status, to listen to channel 107.5MHZ, just input "1075".
8. Environment Switching: In USB/TF reading status, short press it to select an
environment mode (Square, Meeting, Home, Hall and Personal).
9. Sequencing: In USB/TF card reading status, short press it to toggle among four
playback sequencing modes (All - play all tracks in sequence; RAND - play in
random; ONE - repeat one track; FOL - repeat all tracks in a folder).
10. Mute
11. 100+: in MP3 mode, short press it to add "100" to current track number.
4. Installation & usage
Bluetooth Mode:
Turn the Power button to “ON”.
Press the Mode button to enter Bluetooth mode, the display screen will show
“BLUE”.
Turn on your iPad, tablet or PC and go to the Bluetooth setting window.
The Bluetooth device will be showing on the iPad, tablet or PC. Select “DARIO
01”.
Pair your device with the unit. If password is needed, type in“0000”. After the
unit is paired with your device, connect it to your device.
Page 5

English
Previous: to change “Previous music”
Next: to change “Next music”
MP3 Mode (TF / USB / AUX):
Turn the Power button to “ON”, and insert TF card or USB flash disk into slot or
connect MP3 or PC to speaker, audio files play automatically.
FM Radio Mode:
Turn the power button to “ON” without TF or USB inserted.
Press the Mode button to enter “FM” mode, long press “ ” button to auto
search. (it is recommended to execute at least one full search before using radio
receiving function. All founded stations will be saved even in power-off)
Previous: to change “Previous frequency”
Next: to change “Next frequency”
Recording:
In FM / Music Mode: Connect a storage device (USB/TF card) and press Mode
button to enter FM or AUX mode. Press Record button to start recording. The length
of recording time is limited by the storage capacity.
Via External Microphone: Connect a storage device (USB/TF card). Press Record
button to start recording. The length of recording time is limited by the storage
capacity. During recording, turn the “-ECHO+” knob to the minimum. The microphone
should be located a proper distance away from the speaker to prevent any howlround
or noise.
Enjoy the use of your Conceptronic Wireless Bluetooth Speaker!
Page 6
Deutsch
Conceptronic DARIO 01
1. Packungsinhalt
• Wireless Bluetooth Speaker
• 3.5mm audio jack cable
• Power Adapter
• Remote control
• Microphone
• Multi language quick installation guide
2. Technische Daten
Eingang : DC 12V
Ausgang : 10W*2+5W*2
3. Gerätekomponenten
Page 7

Deutsch
1. LED-Bildschirm
2. Master-Volume
3. TF-Port: MP3-Musik von einer TF-Karte wiedergeben (bis zu 32 GB).
4. USB-Port: MP3-Musik von einem USB-Speichergerät wiedergeben (bis zu 32
GB).
5. Vorheriges
6. Wiedergabe/Pause: Im USB-/TF-Kartenlesemodus zum Wiedergeben/Anhalten
kurz drücken bzw. zum Umschalten zwischen den vier Wiedergabesequenzmodi
(Alle – alle Titel der Reihe nach wiedergeben; Einer – einen Titel wiedergeben)
lange drücken. Im AUX-Eingangs-/UKW-Radiomodus zum Umschalten zwischen
Stummschaltung und normaler Lautstärke kurz drücken.
7. Nächstes
8. Modus/Wechsel: Zum Umschalten zwischen USB-/TF- und UKWEmpfangsmodus kurz drücken, zum Umschalten zwischen Aufnahme- und MP3Ordner lange drücken.
9. Aufnahme/Löschen: Zum Aktivieren der Aufnahme kurz drücken (zunächst
müssen Sie ein USB-/TF-Speichergerät anschließen). Zum Löschen einer
Aufnahmedatei lange drücken.
10. Kopfhörer/Mikrofon: Kopfhörer-/Mikrofonanschluss
11. EQ: Umgebungswechsel: Im USB-/TF-Lesemodus zum Auswählen eines
Umgebungsmodus (Platz, Konferenz, Zuhause, Halle und Benutzer) kurz drücken /
Taschenlampenschalter.
12. Bass: Der Bassregler
13. Line-Eingang: AUX-Eingang
14. Mikrofonlautstärkeregler.
15. Mikrofonnachhallregler.
16. Mikrofoneingang
17. Ladeanschluss (12 V Gleichspannung)
18. : Taschenlampenschalter.
19. Ladeanzeige: Wenn das Ladegerät angeschlossen ist, leuchtet die rote LED.
Wenn das Gerät vollständig aufgeladen ist, leuchtet die blaue LED.
20. Ein-/Ausschalter
21. Höhen: Der Höhenregler
22. Fernbedienungsempfänger
Page 8
Deutsch
1. Ein-/Austaste: Zum Umschalten in den Bereitschaftsmodus kurz drücken; zum
Fortsetzen des Betriebsmodus noch einmal kurz drücken. Falls kein Gerät
verbunden ist, wechselt das System zu „-Nein-“.
2. Vorheriges
3. Wiedergabe/Pause
4. Nächstes
5. Modus
6. Vol+ / Vol-
7. Zifferntasten: Im UKW-Modus geben Sie zum Anhören von Kanal 107,5 MHz
einfach „1075“ ein.
8. Umgebungswechsel: Im USB-/TF-Lesemodus zum Auswählen eines
Umgebungsmodus (Platz, Konferenz, Zuhause, Halle und Benutzer) kurz drücken.
9. Sequenz: Im USB-/TF-Kartenlesemodus zum Umschalten zwischen vier
Wiedergabesequenzmodi (Alle – alle Titel der Reihe nach wiedergeben; Zufall –
zufällige Wiedergabe; Einer – einen Titel wiederholen; Ordner – alle Titel in einem
Ordner wiederholen).
10. Stumm
11. 100+: Im MP3-Modus zum Hinzufügen von „100“ zur aktuellen Titelnummer
kurz drücken.
4. Installation & Verwendung
Bluetooth-Modus:
Schalten Sie das Gerät über die “On (Ein-/Austaste)” ein.
Drücken Sie zum Aufrufen des Bluetooth-Modus die Modustaste, der Bildschirm
zeigt „Blue“.
Schalten Sie Ihr(en) iPad/Tablet/PC ein, rufen Sie das Bluetooth-
Einstellungsfenster auf.
Page 9

Deutsch
Das Bluetooth-Gerät wird am iPad/Tablet/PC angezeigt. Wählen Sie “DARIO
01”.
Falls Sie zur Eingabe eines Kennwortes aufgefordert werden, geben Sie
„0000“ ein und tippen Sie auf „OK“
PREV (Vorheriges): Zum Aufrufen des “vorherigen Titels”
NEXT (Nächstes): Zum Aufrufen des “nächsten Titels”
Musikmodus (TF / USB / AUX):
Schalten Sie das Gerät über die “On (Ein-/Austaste)” ein, installieren Sie eine
TF -Karte oder einen USB-Flash-Datenträger im Steckplatz bzw. schließen ein
MP3 -Gerät oder einen PC am Lautsprecher an; die Audiodateien werden
automatisch wiedergegeben.
UKW-Radiomodus:
Schalten Sie das Gerät über die “On (Ein-/Austaste)” ein, ohne dass eine TF-
Karte bzw. ein USB-Gerät eingesteckt ist.
Drücken Sie zum Umschalten in den „UKW“-Modus die Modustaste, drücken
Sie zur automatischen Suche lange die „ “-Taste. (Sie sollten mindestens
eine komplette Suche durchführen, bevor Sie die Radioempfangsfunktion
nutzen. Alle gefundenen Sender bleiben auch nach einer Abschaltung
gespeichert.)
PREV (Vorheriges): Zum Aufrufen der “vorherigen Frequenz”
NEXT (Nächstes): Zum Aufrufen der “nächsten Frequenz”
Aufnahme:
Im UKW-/Musikmodus: Schließen Sie ein Speichergerät (USB/TF-Karte) an und
drücken Sie zum Aufrufen des UKW- oder AUX-Modus die Modustaste. Drücken Sie
zum Starten der Aufnahme die Aufnahmetaste. Die Aufnahmedauer wird durch die
Speicherkapazität beschränkt.
Über externes Mikrofon: Schließen Sie ein Speichergerät (USB/TF-Karte) an.
Drücken Sie zum Starten der Aufnahme die Aufnahmetaste. Die Aufnahmedauer
wird durch die Speicherkapazität beschränkt. Stellen Sie während der Aufnahme den
„-Echo+“-Knopf auf das Minimum ein. Das Mikrofon sollte sich zur Vermeidung von
Rückkopplung und Rauschen in einer angemessenen Entfernung zum Lautsprecher
befinden.
Viel Spaß mit Ihrem Conceptronic Wireless Bluetooth Speaker!
Page 10

FRANCAIS
Conceptronic DARIO 01
1. Contenu du Coffret
• Wireless Bluetooth Speaker
• 3.5mm audio jack cable
• Power Adapter
• Remote control
• Microphone
• Multi language quick installation guide
2. Spécifications
Entrée : DC 12V
Sortie : 10W*2+5W*2
3. Aperçu du produit
Page 11

FRANCAIS
1. Écran à LED.
2. Volume principal
3. Port TF : Lecture de musique MP3 à partir d'une carte TF (jusqu'à 32 Go).
4. Port USB : Lecture de musique MP3 à partir d'un périphérique de stockage USB
(jusqu'à 32 Go).
5. Précédent
6. Lecture / Pause : Pendant la lecture USB / carte TF, appuyez brièvement pour
lire / mettre en pause, ou appuyez longuement pour sélectionner l'un des quatre
modes de séquençage de la lecture (Tout - Lecture de tous les morceaux dans
l'ordre; UN - Répétition d'un morceau). Pendant la lecture depuis l'entrée AUX / de
la radio FM, appuyez brièvement pour basculer entre le volume coupé et normal.
7. Suivant
8. Mode / MAJ : Appuyez brièvement pour basculer entre les modes USB / TF et
réception FM, appuyez longuement pour basculer entre le dossier d'enregistrement
et le dossier MP3.
9. Enregistrement / SUPPR : Appuyez brièvement pour activer l'enregistrement (le
périphérique de stockage USB / TF doit être connecté d'abord). Appuyez
longuement pour supprimer un fichier d'enregistrement.
10. CASQUE MICRO : Port casque / MICRO
11. EQ: Commutation de l'environnement : Lors de la lecture USB / TF, appuyez
brièvement pour sélectionner un mode d'environnement (Square, Réunion,
Domicile, Hall et Personnalisé) / Commutateur de lumière clignotante.
12. GRAVES : Le bouton de commande des graves
13. ENTRÉE LIGNE : Entrée AUX
14. Bouton de réglage du volume du micro.
15. Bouton de réglage de la réverbération du micro.
16. Prise d'entrée microphone
17. Port de recharge CC 12V
18. : Commutateur de lumière clignotante.
19. Voyant de recharge : Lorsque le chargeur est branché, le voyant rouge
s'illumine. Lorsque l'appareil est complètement rechargé, le voyant bleu s'illumine.
20. Interrupteur d'alimentation
21. AIGUS : Le bouton de commande des aigus
22. Récepteur de la télécommande
Page 12

FRANCAIS
1. Bouton d'alimentation : Appuyez brièvement pour passer en mode veille;
appuyez de nouveau brièvement pour reprendre. Si aucun périphérique n'est
connecté, le système passe sur "-NO-".
2. Précédent
3. Lecture / Pause
4. Suivant
5. Mode
6. Vol+ / Vol-
7. Sélecteur numérique : En mode FM, pour écouter la fréquence 107.5MHZ, il
suffit de saisir "1075".
8. Commutation de l'environnement: Lors de la lecture USB / TF, appuyez
brièvement pour sélectionner un mode d'environnement (Square, Réunion,
Domicile, Hall et Personnalisé).
9. Séquençage : En mode de lecture USB / TF, appuyez brièvement pour basculer
entre les quatre modes de séquençage de la lecture (Tout - Lecture de tous les
morceaux dans l'ordre; ALÉ AT - Lecture de façon aléatoire; UN - Répétition d'un
morceau; DOS - Répétition de tous les morceaux d'un dossier).
10. Muet
11. 100+ : en mode MP3, appuyez brièvement pour ajouter "100" au numéro de
piste actuel.
4. Installation & Utilisation
Mode Bluetooth :
Mettez sur “ON” le bouton de mise sous tension.
Appuyez sur le bouton Mode pour entrer en mode Bluetooth, l'écran d'affichage
indique "BLUE".
Page 13

FRANCAIS
Allumez votre iPad, tablette ou PC et accédez à la fenêtre de configuration
Bluetooth.
L'appareil Bluetooth s'affiche sur votre iPad, tablette ou PC. Sélectionnez
“DARIO 01”.
Entrez ”0000” et cliquez sur OK si un message vous demande de saisir un mot
de passe.
PREV (PRÉCÉDENT) : pour passer au "Morceau musical précédent"
NEXT (SUIVANT) : pour passer au "Morceau musical suivant"
Mode Musique (TF / USB / AUX) :
Mettez sur “ON” le bouton de mise sous tension, puis insérez une carte TF ou
une clé USB dans l'emplacement ou connectez un lecteur MP3 ou un PC au
haut-parleur, les fichiers audio seront lus automatiquement.
Mode Radio FM :
Mettez sur “ON” le bouton de mise sous tension sans insérer de carte TF ni de
clé USB.
Appuyez sur le bouton Mode pour entrer dans le mode "FM", appuyez
longuement sur le bouton " " pour la recherche automatique. (il est
recommandé d'exécuter au moins une recherche complète avant d'utiliser la
fonction de réception radio. Toutes les stations détectées sont sauvegardées
même une fois éteint)
PREV (PRÉCÉDENT) : pour passer à la "Fréquence précédente"
NEXT (SUIVANT) : pour passer à la "Fréquence suivante"
Enregistrement :
En mode FM / Musique : Connectez un périphérique de stockage (USB / carte TF)
et appuyez sur le bouton Mode pour entrer en mode FM ou AUX. Appuyez sur le
bouton Enregistrer pour commencer l'enregistrement. La durée possible
d'enregistrement est limitée par la capacité de stockage.
Via microphone externe : Connectez un périphérique de stockage (USB / carte TF).
Appuyez sur le bouton Enregistrer pour commencer l'enregistrement. La durée
possible d'enregistrement est limitée par la capacité de stockage. Pendant
l'enregistrement, tournez le bouton "-ÉCHO+" sur le minimum. Le microphone doit
être situé à une distance appropriée de l'enceinte pour éviter tout larsen ou autre
bruit.
Profitez de votre Conceptronic Wireless Bluetooth Speaker!
Page 14
ESPANOL
Conceptronic DARIO 01
1. Contenido del paquete
• Wireless Bluetooth Speaker
• 3.5mm audio jack cable
• Power Adapter
• Remote control
• Microphone
• Multi language quick installation guide
2. Especificaciones
Entrada : DC 12V
Salida : 10W*2+5W*2
3. Descripción del producto
Page 15

ESPANOL
1. Pantalla de LED.
2. Volumen maestro
3. Puerto TF: reproduzca música MP3 de la tarjeta TF (hasta 32 GB).
4. Puerto USB: reproduzca música MP3 del dispositivo de almacenamiento USB
(hasta 32 GB).
5. Anterior
6. Reproducir/Pausar: durante el estado de lectura de la tarjeta USB/TF,
presiónelo brevemente para reproducir o pausar; presiónelo prolongadamente
para seleccionar uno de los cuatro modos de secuencia de reproducción (Todo:
reproducir todas las pistas en secuencia; UNA: repetir una pista). En el estado de
entrada AUX o radio de FM, presiónelo brevemente para alternar entre silencio y
volumen normal.
7. Siguiente
8. Modo/CAMBIAR: Presiónelo brevemente para cambiar entre los modos de
recepción USB/TF y FM. Presiónelo prolongadamente para alternar entre la
carpeta de grabación y la carpeta MP3.
9. Grabación/ELIMINAR: presiónelo brevemente para habilitar la grabación (es
necesario conectar primero el dispositivo de almacenamiento USB/TF). Presiónelo
prolongadamente para eliminar un archivo de grabación.
10. MICRÓ FONO PARA OREJA: puerto para auriculares y micrófono
11. EQ: Cambio de entorno: en el estado de lectura USB/TF, presiónelo
brevemente para seleccionar un modo de entorno (Plaza, Reunión, Casa, Hall y
Personal) / cambio de luz de flash.
12. GRAVES: mando de control de graves.
13. ENTRADA DE LÍNEA: entrada AUXILIAR
14. Mando de ajuste del volumen del micrófono.
15. Mando de ajuste de la resonancia del micrófono.
16. Conector de entrada del micrófono
17. Puerto de recarga de 12V CC
18. : 0 / cambio de luz de flash.
19. Indicador luminoso de recarga: cuando el cargador se conecta, la luz roja se
enciende. Cuando el dispositivo está completamente recargado, la luz azul se
enciende.
20. Interruptor de alimentación
21. AGUDOS: mando de control de agudos.
22. receptor del mando a distancia
Page 16

ESPANOL
1. Botón de encendido: presiónelo brevemente para entrar en el modo de espera;
presiónelo brevemente de nuevo para reanudar. Si no hay ningún dispositivo
conectado, el sistema va a "-NO-".
2. Anterior
3. Reproducir/Pausar
4. Siguiente
5. Modo
6. Vol+ / Vol-
7. Selector numérico: en el estado de FM, para escuchar el canal 107.5 MHZ,
simplemente introduzca "1075".
8. Cambio de entorno: Cambio de entorno: en el estado de lectura USB/TF,
presiónelo brevemente para seleccionar un modo de entorno (Plaza, Reunión,
Casa, Hall y Personal).
9. Secuencia: en el estado de lectura de tarjeta USB/TF, presiónelo brevemente
para alternar entre cuatro modos de secuencia de reproducción (Todo: reproducir
todas las pistas en secuencia; ALEATORIO: reproducir aleatoriamente; UNA:
reproducir una pista; CARPETA: repetir todas las pistas de una carpeta).
10. Silencio
11. 100+: en modo MP3, presiónelo brevemente para agregar "100" al número de
pista actual.
4. Instalación & Utilización
Modo Bluetooth:
Coloque el botón de alimentación en la posición de encendido “ON”.
Presione el botón Modo para entrar en el modo Bluetooth. La pantalla mostrará
“BLUE”.
Page 17

ESPANOL
Encienda su iPad, tableta o PC y vaya a la ventana de configuración Bluetooth.
El dispositivo Bluetooth se mostrará en su iPad, tableta o PC. Seleccione
“DARIO 01”.
Introduzca ”0000” y haga clic en Aceptar si aparece un mensaje solicitándole
que introduzca una contraseña.
PREV (ANTERIOR): permite cambiar a “Música anterior”
NEXT (SIGUIENTE): permite cambiar a “Música siguiente”
Modo Música (TF, USB y AUX):
Coloque el botón de alimentación en la posición de encendido “ON” e inserte
una tarjeta TF o disco flash USB en la ranura, o conecte su MP3 o PC al
altavoz. Los archivos de audio se reproducirán automáticamente.
Modo Radio FM:
Coloque el botón de alimentación en la posición de encendido “ON” sin haber
insertado una tarjeta TF o un dispositivo USB.
Presione el botón Modo para entrar en el modo “FM”. Presione
prolongadamente el botón “ ” para realizar una búsqueda automática. (Es
recomendable ejecutar al menos una búsqueda completa antes de utilizar la
función de recepción de radio. Todas las emisoras encontradas se guardarán
aunque la alimentación no esté conectada)
PREV (ANTERIOR): permite cambiar a “Frecuencia anterior”.
NEXT (SIGUIENTE): permite cambiar a “Frecuencia siguiente”.
Grabación:
En modo FM/Música: conecte un dispositivo de almacenamiento (tarjeta USB/TF)
y presione el botón Modo para entrar en el modo FM o AUXILIAR. Presione el botón
Grabar para iniciar la grabación. La longitud del tiempo de grabación está limitada
por la capacidad de almacenamiento.
A través de micrófono externo: Conecte un dispositivo de almacenamiento (tarjeta
USB/TF). Presione el botón Grabar para iniciar la grabación. La longitud del tiempo
de grabación está limitada por la capacidad de almacenamiento. Durante la
grabación, gire el mando “-ECO+” hasta el mínimo. El micrófono se debe ubicar a
una distancia adecuada del altavoz para evitar pitidos o ruido.
¡Disfrute del uso de su Conceptronic Wireless
Bluetooth Speaker!
Page 18

ITALIANO
Conceptronic DARIO 01
1. Contenuto del pacco
• Wireless Bluetooth Speaker
• 3.5mm audio jack cable
• Power Adapter
• Remote control
• Microphone
• Multi language quick installation guide
2. Specifiche
Entrata : DC 12V
Uscita : 10W*2+5W*2
3. Descrizione del prodotto
Page 19

ITALIANO
1. Schermo a LED.
2. Volume master
3. Porta TF: Riprodurre musica MP3 da scheda TF (fino a 32 GB).
4. Porta USB: Riprodurre musica MP3 dal dispositivo di archiviazione USB (fino a
32 GB).
5. Precedente
6. Riproduzione/Pausa: Nello stato di lettura della scheda USB/TF, premerlo
brevemente per riprodurre/interrompere o premerlo a lungo per selezionare una
delle quattro modalità della sequenza di riproduzione (Tutto - riprodurre tutti i brani
in sequenza; UNO - ripetere un brano). Nello stato di ingresso AUX / radio FM,
premerlo brevemente per passare tra la disattivazione dell'audio e il volume
normale.
7. Avanti
8. Modalità/SHIFT: Premerlo brevemente per passare tra le modalità di ricezione
USB/TF e FM , premerlo a lungo per passare tra la cartella di registrazione e la
cartella MP3.
9. Registrazione/DEL: Premerlo brevemente per abilitare la registrazione (prima è
necessario collegare il dispositivo di archiviazione USB/TF). Premere a lungo per
eliminare un file di registrazione.
10. MIC AUR: Porta cuffie/MIC
11. EQ: Cambio di ambiente: In stato di lettura USB/TF, premere brevemente per
selezionare una modalità dell'ambiente (Piazza, Sala riunioni, Casa, Sala e
Personale) / Interruttore luce intermittente.
12. BASSI: Manopola di controllo dei bassi
13. INGRESSO LINEA: Ingresso AUX
14. Manopola di regolazione volume microfono.
15. Manopola di regolazione riverbero microfono.
16. Jack di ingresso microfono
17. Porta di ricarica 12 V CC
18. : 0 / Interruttore luce intermittente
19. Spia di ricarica: Quando il caricatore è collegato, la spia rossa si accende.
Quando il dispositivo è completamente carico, la spia blu si accende.
20. Interruttore di alimentazione
21. ALTI: Manopola di controllo degli alti
22. Ricevitore telecomando
Page 20

ITALIANO
1. Tasto di alimentazione: Premere brevemente per accedere alla modalità
standby; premere di nuovo brevemente per riprendere. Se nessun dispositivo è
collegato, il sistema entra in "-NO-".
2. Precedente
3. Riproduzione/Pausa
4. Avanti
5. Modalità
6. Vol+ / Vol-
7. Selettore numero: In stato FM, per ascoltare il canale 107,5 MHZ, immettere
"1075".
8. Cambio di ambiente: In stato di lettura USB/TF, premere brevemente per
selezionare una modalità dell'ambiente (Piazza, Sala riunioni, Casa, Sala e
Personale).
9. Sequenza: In stato di lettura scheda USB/TF, premere brevemente per passare
tra le quattro modalità di sequenza (Tutto - riprodurre tutti i brani in sequenza;
RAND - riprodurre casualmente; UNO - ripetere un brano; FOL - ripetere tutti i
brani di una cartella).
10. Disattivazione audio
11. 100+: in modalità MP3, premerlo brevemente per aggiungere "100" al numero
di brano attuale.
4. Installazione & Uso
Modalità Bluetooth:
Girare il tasto d’alimentazione sulla posizione "ON".
Premere il tasto Modalità per accedere alla modalità Bluetooth; sul display viene
visualizzato “BLUE”.
Page 21

ITALIANO
Accendere l'iPad, il tablet o il PC e selezionare la finestra per le impostazioni
Bluetooth.
Il dispositivo Bluetooth viene visualizzato sull'iPad, sul tablet o sul PC.
Selezionare “DARIO 01”.
Inserire "0000" e fare clic su OK se è richiesto di inserire una password.
PREV (Precedente): per passare alla “musica precedente”
NEXT (Avanti): per passare alla “musica successiva”
Modalità musica (TF / USB / AUX):
Girare il tasto d’alimentazione sulla posizione "ON", inserire una scheda TF o
una chiavetta USB nell’alloggio, oppure collegare MP3 o PC agli altoparlanti; i
file audio sono riprodotti automaticamente.
Modalità Radio FM:
Girare il tasto d’alimentazione sulla posizione "ON" senza scheda TF o chiavetta
USB inserita.
Premere il tasto Modalità per accedere alla modalità “FM”, premere a lungo il
tasto “ ” per la ricerca automatica. (Si consiglia di eseguire almeno una
ricerca completa prima di utilizzare la funzione di ricezione audio. Tutte le
stazioni rilevate vengono salvate anche in caso di spegnimento)
PREV (Precedente): per passare alla “frequenza precedente”
NEXTI (Avanti): per passare alla “frequenza successiva”
Registrazione:
In modalità FM / Musica: Collegare un dispositivo di archiviazione (scheda USB/TF)
e premere il tasto Modalità per accedere alla modalità FM o AUX. Premere il tasto
Registra per avviare la registrazione. La durata della registrazione è limitata dalla
capacità di archiviazione.
Tramite microfono esterno: Collegare un dispositivo di archiviazione (scheda
USB/TF). Premere il tasto Registra per avviare la registrazione. La durata della
registrazione è limitata dalla capacità di archiviazione. Durante la registrazione,
portare la manopola “-ECHO+” al minimo. Il microfono deve essere posizionato ad
una distanza adeguata dall'altoparlante per evitare ogni feedback acustico o rumore.
Godetevi l’uso di Conceptronic Wireless Bluetooth Speaker!
Page 22

PORTUGUÊS
Conceptronic DARIO 01
1. Conteúdo da embalagem
• Wireless Bluetooth Speaker
• 3.5mm audio jack cable
• Power Adapter
• Remote control
• Microphone
• Multi language quick installation guide
2. Especificações
Entrada : DC 12V
Saída : 10W*2+5W*2
3. Resumo do produto
Page 23

PORTUGUÊS
1. Ecrã LED.
2. Volume principal
3. Porta TF: Reproduza música MP3 a partir de um cartão TF (até 32 GB).
4. Porta USB: Reproduza música MP3 a partir de um dispositivo de
armazenamento USB (até 32 GB).
5. Anterior
6. Reproduzir/Pausa: No modo de leitura USB/cartão TF, prima brevemente este
botão para reproduzir/pausar, ou mantenha-o premido para selecionar um de
quatro modos de sequência de reprodução (Tudo - Reproduz todas as faixas em
sequência; UMA - repete uma faixa). Em modo de entrada AUX / rádio FM, prima
este botão brevemente para alternar entre som interrompida e volume normal.
7. Seguinte
8. Modo/SHIFT: Prima brevemente este botão para alternar entre os modos
USB/TF e receção FM, e mantenha-o premido para alternar entre a pasta de
gravação e a pasta de MP3.
9. Gravação/DEL: Prima brevemente este botão para ativar a gravação (é
necessário ligar primeiro o dispositivo de armazenamento USB/TF). Mantenha-o
premido para eliminar um ficheiro de gravação.
10. AUSC MIC: Porta de auscultadores/microfone
11. EQ: Mudança de ambiente: Em modo de leitura USB/TF, prima brevemente
para selecionar um modo de ambiente (Praça, Reunião, Casa, Auditório e
Pessoal) / Mudança da luz do flash.
12. Graves: Botão de controlo dos graves
13. Entrada de linha: Entrada AUX
14. Botão de regulação do volume do microfone.
15. Botão de regulação da reverberação do microfone.
16. Ficha de entrada do microfone
17. Porta de carregamento DC de 12V
18. : 0/ Mudança da luz do flash
19. Luz indicadora de carregamento: Quando o carregador é ligado, a luz
vermelha acende. Quando o dispositivo estiver totalmente carregado, a luz azul
acende.
20. Interruptor de energia
21. Agudos: Botão de controlo dos agudos
22. Recetor do controlo remoto
Page 24

PORTUGUÊS
1. Botão de energia: Prima brevemente este botão para entrar em modo de
suspensão; volte a premir brevemente para retomar. Se não estiver ligado nenhum
dispositivo, o sistema entra em modo "-NO-".
2. Anterior
3. Reproduzir/Pausa
4. Seguinte
5. Modo
6. Vol+ / Vol-
7. Seletor de número: Em modo FM, para escutar o canal 107.5MHZ, introduza
simplesmente "1075".
8. Mudança de ambiente: Em modo de leitura USB/TF, prima brevemente para
selecionar um modo de ambiente (Praça, Reunião, Casa, Auditório e Pessoal).
9. Sequência: No modo de leitura USB/cartão TF, prima brevemente este botão
para alternar entre quatro modos de sequência de reprodução (Tudo - reproduz
todas as faixas em sequência; ALEA - reproduz em modo aleatório; UMA - repete
uma faixa; PAST - repete todas as faixas numa pasta).
10. Sem som
11. 100+: em modo MP3, prima brevemente para adicionar "100" ao número da
faixa atual.
4. Instalação & Utilização
Modo Bluetooth:
Coloque o botão de energia na posição “ON (Ligado)”.
Prima o botão de Modo para entrar em modo Bluetooth e o ecrã irá exibir
“BLUE”.
Ligue o seu iPad, tablet ou PC e aceda à janela de definições do Bluetooth.
Page 25

PORTUGUÊS
O dispositivo Bluetooth será detectado no iPad, tablet ou PC. Seleccione
“DARIO 01”.
Introduza ”0000” e clique em OK caso lhe seja solicitado que introduza uma
palavra-passe.
PREV (ANTERIOR): para mudar para a “Música anterior”
NEXT (SEGUINTE): para mudar para a “Música seguinte”
Modo de Música (TF/USB/AUX):
Coloque o botão de energia na posição “ON (Ligado)” e insira um cartão TF ou
disco flash USB na ranhura ou ligue um leitor de MP3 ou um PC ao altifalante.
Os ficheiros de áudio serão automaticamente reproduzidos.
Modo de Rádio FM:
Coloque o botão de energia na posição “ON (Ligado)” sem o cartão TF ou o
disco USB inserido.
Prima o botão de Modo para entrar em modo “FM” e mantenha premido o botão
“ ” para procurar automaticamente. (recomendamos que execute pelo
menos uma procura completa antes de usar a função de receção de rádio.
Todas as estações encontradas serão guardadas mesmo quando o dispositivo
for desligado)
PREV (ANTERIOR): para mudar para a “Frequência anterior”
NEXT (SEGUINTE): para mudar para a “Frequência seguinte”
Gravação:
Em modo FM / Música: Ligue um dispositivo de armazenamento (USB/cartão TF)
e prima o botão de Modo para entrar em modo FM ou AUX. Prima o botão de
Gravação para começar a gravar. A duração da gravação é limitada pela capacidade
de armazenamento.
Através de microfone externo: Ligue um dispositivo de armazenamento
(USB/cartão TF). Prima o botão de Gravação para começar a gravar. A duração da
gravação é limitada pela capacidade de armazenamento. Durante a gravação, rode
o botão “-ECHO+” para o mínimo. O microfone dever ficar localizado a uma distância
adequada do orador para evitar qualquer ruído ou feedback.
Desfrute do seu Conceptronic Wireless Bluetooth Speaker!
 Loading...