

Page 1

Multi Language Quick Guide
Wireless Cloud IP Camera
DARAY
Download and install the desktop application
from www.conceptronic.net
Page 2
ENGLISH
Installation & usage
LED Status
Camera Status
Red light on
Camera is powered on
Red and blue light alternately
flashing
Waiting to connect now
Blue light flashing
Camera is connecting Wi-Fi
Blue light solid
Succeeded to connect Wi-Fi
Red light quickly flashing
1. Reset camera to factory
setting
2. Camera is upgrading firmware
Get ready for camera
Connect the power adapter into your camera.
Note: Please use the power adapter attached with
camera, in order to avoid damage the camera.
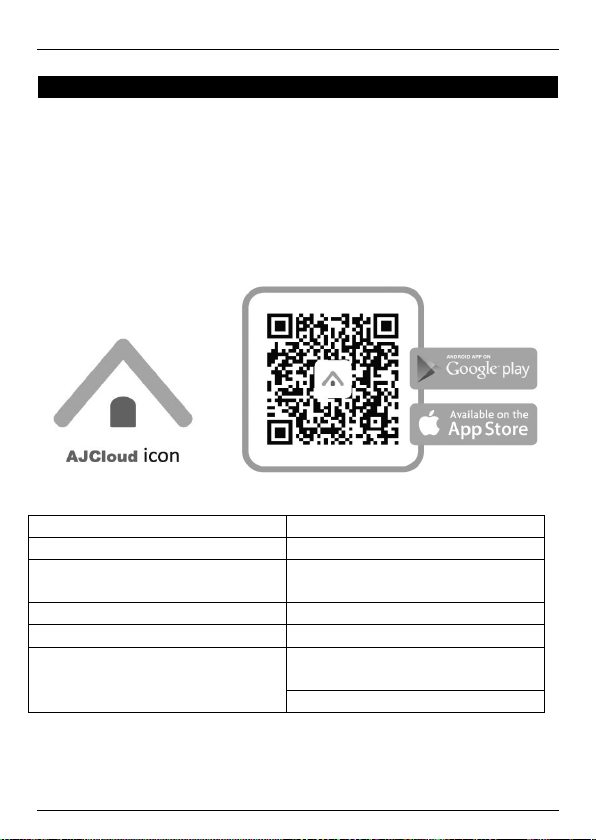
Android / iOS Phone Application
Search and download “AJCloud” from Google Play or APP
Store.
Camera Status Indicator Light
Note: Please make sure your router is connected to the Internet.
Wireless Setup
Page 3

ENGLISH
1. Connect your phone to 2.4G Wi-Fi
(5G is not supported).
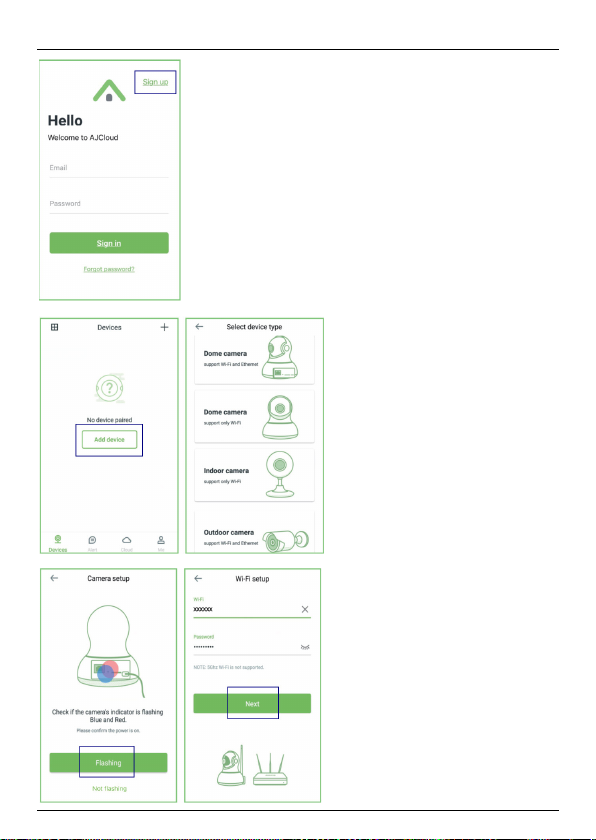
2. Open AJCloud app and register an
account with your email.
3. Check the email and verify your
account.
4. Please tap “Add
device”, and choose
your camera model.
5. If you see the flashing
blue and red light,
please tap “Flashing”.
6. You will see your WiFi name, inputting the
correct Wi-Fi password
and tap “Next”.
Page 4
ENGLISH
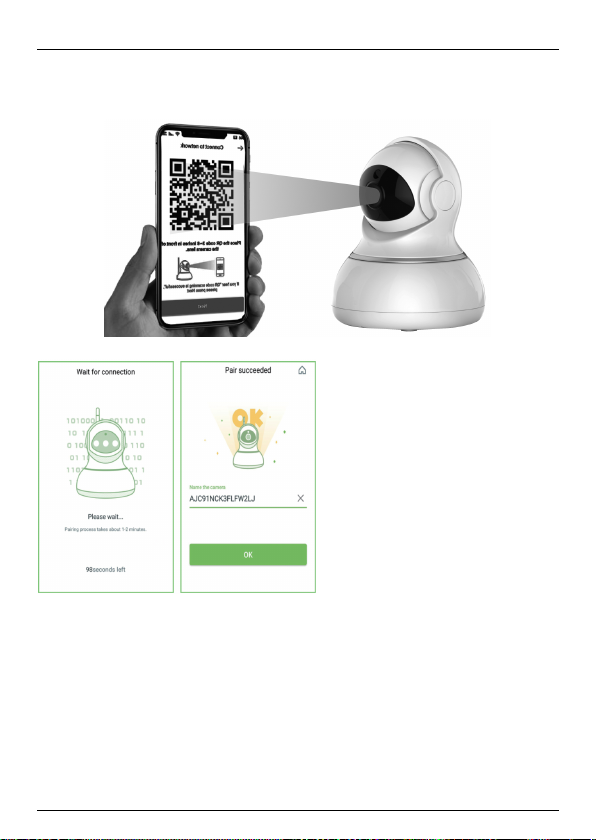
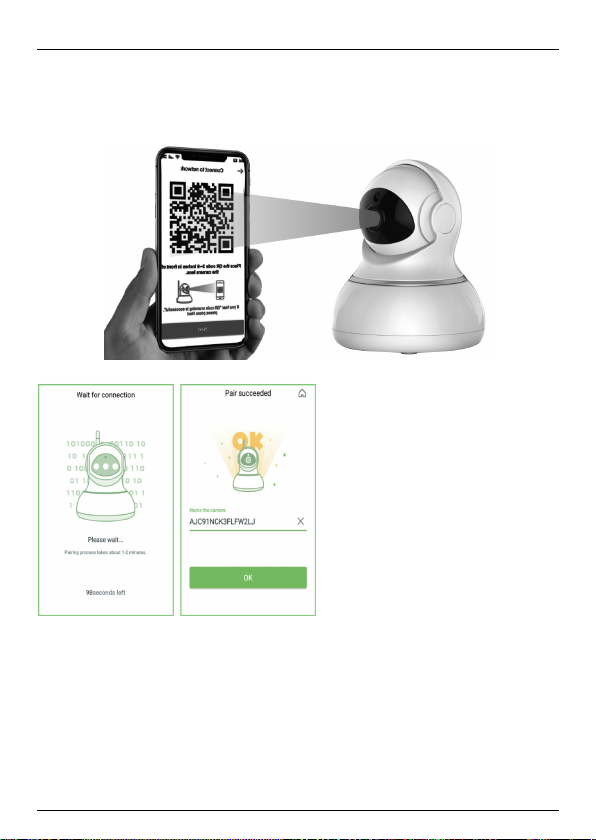
7. The app will show a QR code, please put the phone in
front of camera (3-8 inches), then please tap “Next” if you
hear “QR code scanning is successful”.
8. During connecting, the
blue light will flash
quickly. Once it’s
connected, camera will
say “Wi-Fi is connected”
and the blue light will
flash slowly. When the
blue light is steady, the
app will switch to a page
that you can change
camera name.
9. You can view the video after successful adding camera.
Note: Please reset the camera if fails to connect. (Hold
the Reset button for 15 seconds)
Page 5

Deutsch
Installation & Verwendung
LED-Status
Kamerastatus
Rotes Licht ein
Kamera ist eingeschaltet
Rotes und blaues Licht
blinken abwechselnd
Warte aktuell auf Verbindung
Blaues Licht blinkt
Kamera stellt WLAN-Verbindung her
Blaues Licht leuchtet
Erfolgreich mit WLAN verbunden
Rotes Licht blinkt schnell
1. Kamera auf Werkseinstellungen
zurücksetzen
2. Kamera aktualisiert die Firmware
Vorbereiten der Kamera
Das Netzteil mit Ihrer Kamera verbinden.
Hinweis: Bitte nutzen Sie zur Vermeidung von
Kameraschäden das mit der Kamera verbundene Netzteil.
Android- / iOS-Phone-Applikation
“ AJCloud” im Google Play Store oder Apple App Store
suchen und herunterladen.
Kamerastatus-Anzeigelicht
Hinweis: Bitte sicherstellen, dass Ihr Router mit dem Internet verbunden
ist.
WLAN-Einrichtung
Page 6
Deutsch
1. Verbinden Sie Ihr Telefon mit 2,4GHz-WLAN (5 GHz wird nicht
unterstützt).
2. Öffnen Sie die App AJCloud und
registrieren Sie ein Konto mit Ihrer EMail.
3. Prüfen Sie die E-Mail und verifizieren
Sie Ihr Konto.
4. Bitte tippen Sie auf
„Gerät zufügen“ und
wählen Sie Ihr
Kameramodell.
5. Wenn Sie ein blaues
und rotes blinkendes
Licht sehen, tippen Sie
bitte auf „Blinken“.
6. Sie sehen Ihren
WLAN-Name. Geben
sie Ihr WLAN-Kennwort
ein und tippen Sie auf
„Weiter“.
Page 7
Deutsch
7.Die App zeigt einen QR-Code. Bitte platzieren Sie das
Telefon vor der Kamera (7,6 bis 20,3 cm), tippen Sie dann
auf „Weiter“, wenn Sie „QR-Code erfolgreich
gescannt“ hören.
8. Während der
Verbindung blinkt das
blaue Licht schnell.
Sobald die Verbindung
hergestellt ist, sagt die
Kamera „WLAN
verbunden“ und das
blaue Licht blinkt
langsam. Wenn das
blaue Licht leuchtet,
wechselt die App zu
einer Seite, auf der Sie den Kameranamen ändern
können.
9. Sie können das Video ansehen, nachdem Sie die
Kamera erfolgreich hinzugefügt haben.
Hinweis: Bitte setzen Sie die Kamera zurück, falls die
Verbindung fehlschlägt. (Halten Sie 15 Sekunden lang die
Reset-Taste gedrückt.)
Page 8

FRANCAIS
Installation & Utilisation
État de la LED
État de la caméra
Voyant rouge allumé
La caméra est allumée
Les voyants rouge et bleue
clignotent en alternance
En attente de connexion pour
l’instant
Voyant bleu clignotant
La caméra se connecte au Wifi
Voyant bleu fixe
Connexion au Wifi réussie
Voyant rouge clignotant
rapidement
1. Réinitialiser la caméra aux
réglages d'usine
2. Le firmware de la caméra se
met à jour
Préparez la caméra
Branchez l'adaptateur secteur sur votre caméra.
Remarque : Veuillez utiliser l'adaptateur secteur fourni
avec la caméra afin d'éviter de l'endommager.
Application pour téléphone Android / iOS
Recherchez et téléchargez “AJCloud” sur Google Play ou
sur App Store.
Voyant d'état de la caméra
Remarque : Veuillez vous assurer que votre routeur est connecté à
Internet.
Paramétrage de la fonction sans fil
Page 9

FRANCAIS
1. Connectez votre téléphone au Wifi
2,4G Wi-Fi (5G non pris en charge).
2. Ouvrez l’appli AJCloud et créez un
compte avec votre e-mail.
3. Consultez vos e-mails et vérifiez votre
compte.
4. Appuyez sur
« Ajouter appareil », et
choisissez le modèle de
votre caméra.
5. Vous voyez le nom de
votre Wifi, saisissez le
bon mot de passe du
Wifi et appuyez sur
« Suivant ».
6. Vous voyez le nom de
votre Wifi, saisissez le
bon mot de passe du
Wifi et appuyez sur
« Suivant ».
Page 10

FRANCAIS
7. L'appli affiche un code QR. Mettez le téléphone devant
la caméra (3-8 pouces), puis appuyez sur « Suivant » si
vous entendez « La numérisation du code QR a réussi ».
8. Pendant la connexion,
le voyant bleu clignote
rapidement. Une fois
connectée, la caméra
indique « Le Wifi est
connecté » et le voyant
bleu clignote lentement.
Lorsque le voyant bleu
est fixe, l'appli bascule
sur une page sur laquelle
vous pouvez modifier le
nom de la caméra.
9. Vous pouvez visualiser la vidéo après avoir ajouté avec
succès une caméra.
Remarque: Réinitialiser la caméra si la connexion échoue.
(Maintenez le bouton Réinitialisation enfoncé 15
secondes.)
Page 11

ESPANOL
Instalación & Utilización
Estado del LED
Estado de la cámara
Luz roja encendida
La cámara está encendida
Luz roja y azul intermitentes
alternativamente
Esperando para conectar
Luz azul intermitente
La cámara se está conectando a
Wi-Fi
Luz azul permanente
Conexión correcta con Wi-Fi
Luz roja intermitente de forma
rápida
1. Restablezca la configuración
de fábrica de la cámara
2. La cámara está actualizando
el firmware
Prepare la cámara
Conecte el adaptador de alimentación a la cámara.
Nota: Para evitar daños en la cámara, utilice el adaptador
de alimentación conectado a dicha cámara.
Aplicación para teléfonos Android e iOS
Busque y descargue “AJCloud” desde Google Play o APP
Store.
Luz de indicación del estado de la cámara
Nota: Asegúrese de que el enrutador está conectado a Internet.
Page 12

ESPANOL
Configuración inalámbrica
1. Conecte el teléfono a Wi-Fi de 2,4G
(5G no se admite).
2. Abra la aplicación AJCloud y registre
una cuenta con el correo electrónico.
3. Compruebe el correo electrónico
y verifique su cuenta.
4. Pulse “Agregar
dispositivo” y elija el
modelo de cámara.
5. Si la luz azul y roja
parpadean, pulse
“Parpadeo”
6. Verá el nombre de la
conexión Wi-Fi. Escriba
la contraseña Wi-Fi
correcta y pulse
“Siguiente”.
Page 13

ESPANOL
7. La aplicación mostrará el código QR. Coloque el
teléfono delante de la cámara (entre 7,6 y 20,3 cm) y, a
continuación, pulse “Siguiente” si escucha “El código QR
es correcto”.
8. Durante la conexión,
la luz azul parpadeará
rápidamente. Una vez
conectada, en la cámara
pondrá “Wi-Fi conectado”
y la luz azul parpadeará
lentamente. Cuando la
luz azul sea permanente,
la aplicación cambiará a
una página donde podrá
cambiar el nombre de la
cámara.
9. Puede ver el vídeo después de agregar correctamente
la cámara.
Nota: Reinicie la cámara si no puede conectarse.
(Mantenga presionado el botón Restablecer 15
segundos.)
Page 14

ITALIANO
Installazione & Uso
Stato LED
Stato telecamera
Spia rossa accesa
Telecamera accesa
Spie rossa e blu lampeggianti
alternativamente
In attesa di connessione
Spia blu lampeggiante
Telecamera in fase di
connessione Wi-Fi
Spia blu fissa
Connessione Wi-Fi riuscita
Spia rossa lampeggiante
rapidamente
1. Ripristinare le impostazioni
predefinite della telecamera
2. Telecamera in fase di
aggiornamento firmware
Preparare videocamera
Collegare l'adattatore di alimentazione alla
videocamera.
Nota: Utilizzare l'adattatore di alimentazione collegato alla
videocamera per evitare danni alla videocamera.
Applicazione per telefono Android / iOS Phone
Cercare e scaricare “AJCloud” da Google Play o APP
Store.
Spia di stato telecamera
Nota: Assicurarsi che il router sia connesso a Internet.
Page 15

ITALIANO
Impostazione wireless
1. Connnettere lo smartphone alla rete
Wi-Fi 2,4 G (5 G non supportato).
2. Aprire l'app AJCloud e registrare
un account con la propria e-mail.
3. Controllare l'e-mail e verificare
l'account.
4. Toccare “Aggiungi
dispositivo” e
selezionare il modello di
telecamera.
5. Se appaiono le spie
blu e rossa
lampeggianti, toccare
“Lampeggiante”.
6. Quando appare il
nome Wi-Fi, immettere
la password Wi-Fi
corretta e toccare
“Avanti”.
Page 16

ITALIANO
7. L'app mostra un codice QR. Collocare lo smartphone
davanti alla telecamera (3-8"), quindi toccare “Avanti” se
si sente “Scansione codice QR riuscita”.
8.Durante la
connessione, la spia blu
lampeggia rapidamente.
Una volta effettuata la
connessione, la
telecamera indica “Wi-Fi
connesso” e la spia blu
lampeggia rapidamente.
Quando la spia blu è
fissa, l'app passa ad una
pagina in cui si può
modificare il nome della telecamera.
9. È possibile visualizzare il video dopo la corretta
aggiunta della telecamera.
Nota: Ripristina la fotocamera, se non si riesce a
connettersi. (Tenere premuto il tasto Ripristino per 15
secondi.)
Page 17

PORTUGUÊS
Instalação & Utilização
Estado do LED
Estado da câmara
Luz vermelha acesa
A câmara está ligada
Luz vermelha e azul a piscar
alternadamente
A aguardar ligação
Luz azul intermitente
A câmara está a ligar à rede Wi-
Fi
Luz azul estática
Ligado com êxito à rede Wi-Fi
Luz vermelha a piscar
rapidamente
1. Reposição da configuração de
fábrica da câmara
2. A câmara está a atualizar o
firmware
Prepare a câmara
Ligue o transformador à câmara.
Nota: Utilize o transformador incluído com a câmara para
evitar causar danos à mesma.
Aplicação para telemóveis Android / iOS
Procure e transfira a aplicação “AJCloud” no Google Play
ou na APP Store.
Luz indicadora do estado da câmara
Nota: Certifique-se que o seu router está ligado à Internet.
Page 18

PORTUGUÊS
Configuração sem fios
1. Ligue o seu telefone a uma rede WiFi 2,4G (5G não é suportado).
2. Abra a aplicação AJCloud e registe
uma conta com o seu e-mail.
3. Consulte o e-mail e verifique a sua
conta.
4. Toque em “Adicionar
dispositivo” e escolha o
modelo da sua câmara.
5. Se a luz estiver
intermitente em azul e
vermelho, toque em
“Intermitente”.
6. Será apresentado o
nome da sua rede Wi-Fi,
introduza a palavrapasse correta da rede
Page 19

PORTUGUÊS
Wi-Fi e toque em “Seguinte”.
7. A aplicação apresentará um código QR, coloque o
telefone à frente da câmara (7-20 cm) e, em seguida,
toque em “Seguinte” se ouvir “Código QR lido com êxito”.
8. Durante a ligação, a
luz azul piscará
rapidamente. Quando a
ligação for estabelecida,
a câmara dirá “Wi-Fi
ligado” e a luz azul
piscará lentamente.
Quando a luz azul estiver
estática, a aplicação
mudará para a página
onde poderá mudar o
nome da câmara.
9. Poderá ver as imagens de vídeo depois de adicionar a
câmara com êxito.
Nota: Reinicie a câmera se a ligação falhar. (Mantenha
premido o botão de reposição 15 segundos.)
Page 20

POLSKI
Instalacji & stosowanie
Stan diody LED
Stan kamery
Świeci czerwone światło
Włączone zasilanie kamery
Migające na przemian czerwone
i niebieskie światło
Oczekiwanie na połączenie
Migające niebieskie światło
Kamera nawiązuje połączenie
Wi-Fi
Stałe niebieskie światło
Pomyślne nawiązanie połączenia
Wi-Fi
Szybko migające czerwone
światło
1. Resetowanie kamery do
ustawień fabrycznych
2. Kamera wykonuje aktualizację
firmware
Przygotuj kamerę
Podłącz do kamery zasilacz.
Uwaga: Aby uniknąć uszkodzenia kamery, należy użyć
zasilacz dostarczony z kamerą.
Android / iOS Phone Application
Wyszukaj i pobierz “AJCloud” z Google Play lub z APP
Store.
Światło wskaźnika stanu kamery
Uwaga: Upewnij się, że posiadany router jest połączony z Internetem.
Page 21

POLSKI
Konfiguracja połączenia
bezprzewodowego
1. Połącz telefon z Wi-Fi 2,4G (5G nie
jest obsługiwane).
2. Otwórz aplikację AJCloud i zarejestruj
konto przez swój e-mail.
3. Sprawdź e-mail i zweryfikuj swoje
konto
4. Stuknij “Dodaj
urządzenie” i wybierz
swój model kamery.
5. Jeśli widoczne jest
migające, niebieskie i
czerwone światło,
stuknij “Miganie”.
6. Pojawi się nazwa WiFi, wprowadź
prawidłowe hasło Wi-Fi i
stuknij “Dalej”.
Page 22

POLSKI
7. Aplikacja pokaże kod QR, umieść telefon z przodu
kamery (3-8 cali), a następnie stuknij “Dalej”, usłyszenie
“oznacza pomyślne zeskanowanie kodu QR”.
8. W czasie łączenia,
szybko miga niebieskie
światło. Po połączeniu,
kamer wypowie “Wi-Fi is
connected (Nawiązano
połączenie Wi-Fi) ” i
zacznie powoli migać
niebieskie światło. Gdy
zacznie świecić stałe
niebieskie światło,
aplikacja przełączy na
stronę, na której będzie można zmienić nazwę kamery.
9. Po pomyślnym dodaniu kamery będzie można oglądać
obraz wideo.
Uwaga: Jeśli połączenie nie powiedzie się należy
zresetować kamerę. (Przytrzymaj przycisk Reset przez 15
sekund)
 Loading...