

Page 1
CZ
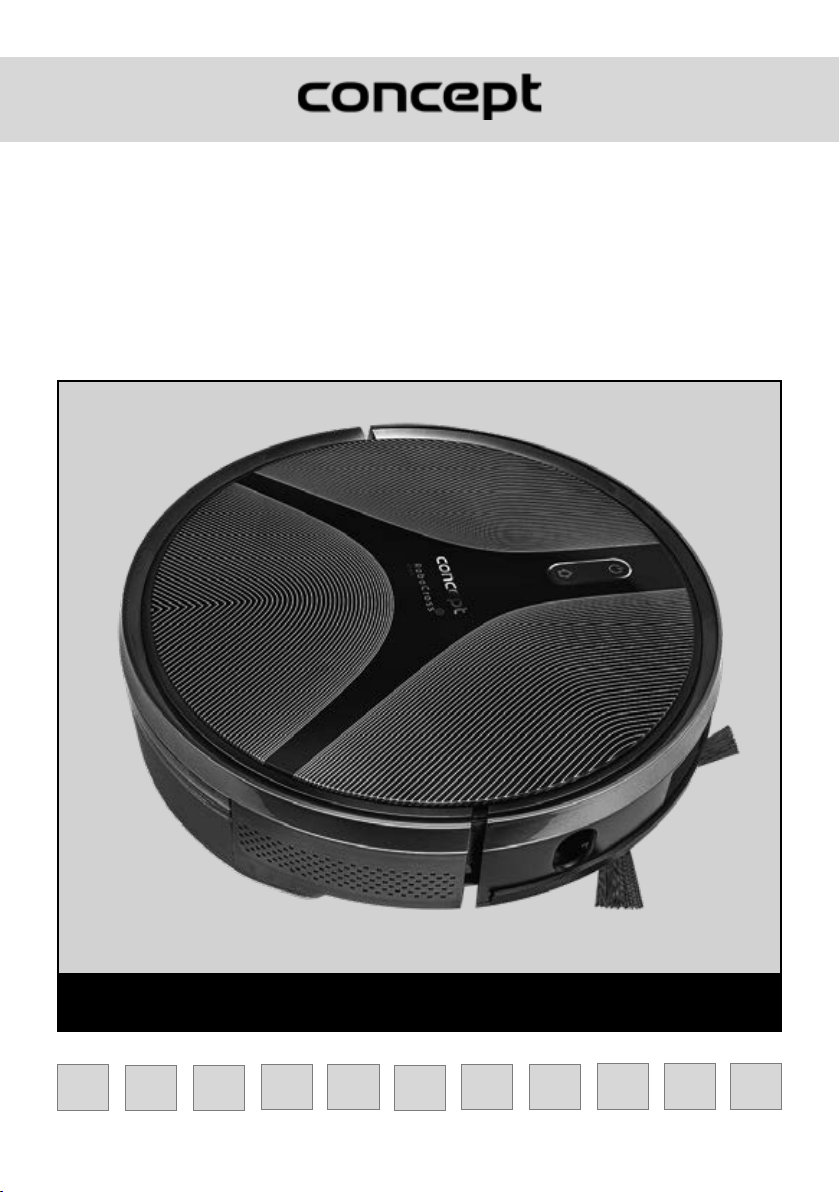
Robotický vysavač
Robotický vysávač
Odkurzacz automatyczny
Robotporszívó
Robots putekļsūcējs
Robotic Vacuum Cleaner
Staubsauger-Roboter
Aspirateur robot
Robot aspirapolvere
Aspiradora robótica
Aspirator robot
CZ
VR2110, VR2100
VR2110 | VR2100
HU LV DE FR
ENSK PL
IT ES
RO
1
Page 2
CZCZ
PODĚKOVÁNÍ
Děkujeme Vám, že jste si zakoupili výrobek značky Concept a přejeme Vám, abyste byli s naším výrobkem spokojeni po
celou dobu jeho používání.
Před prvním použitím prostudujte pozorně celý návod k obsluze a potom si jej uschovejte. Zajistěte, aby i ostatní osoby,
které budou s výrobkem manipulovat, byly seznámeny s tímto návodem.
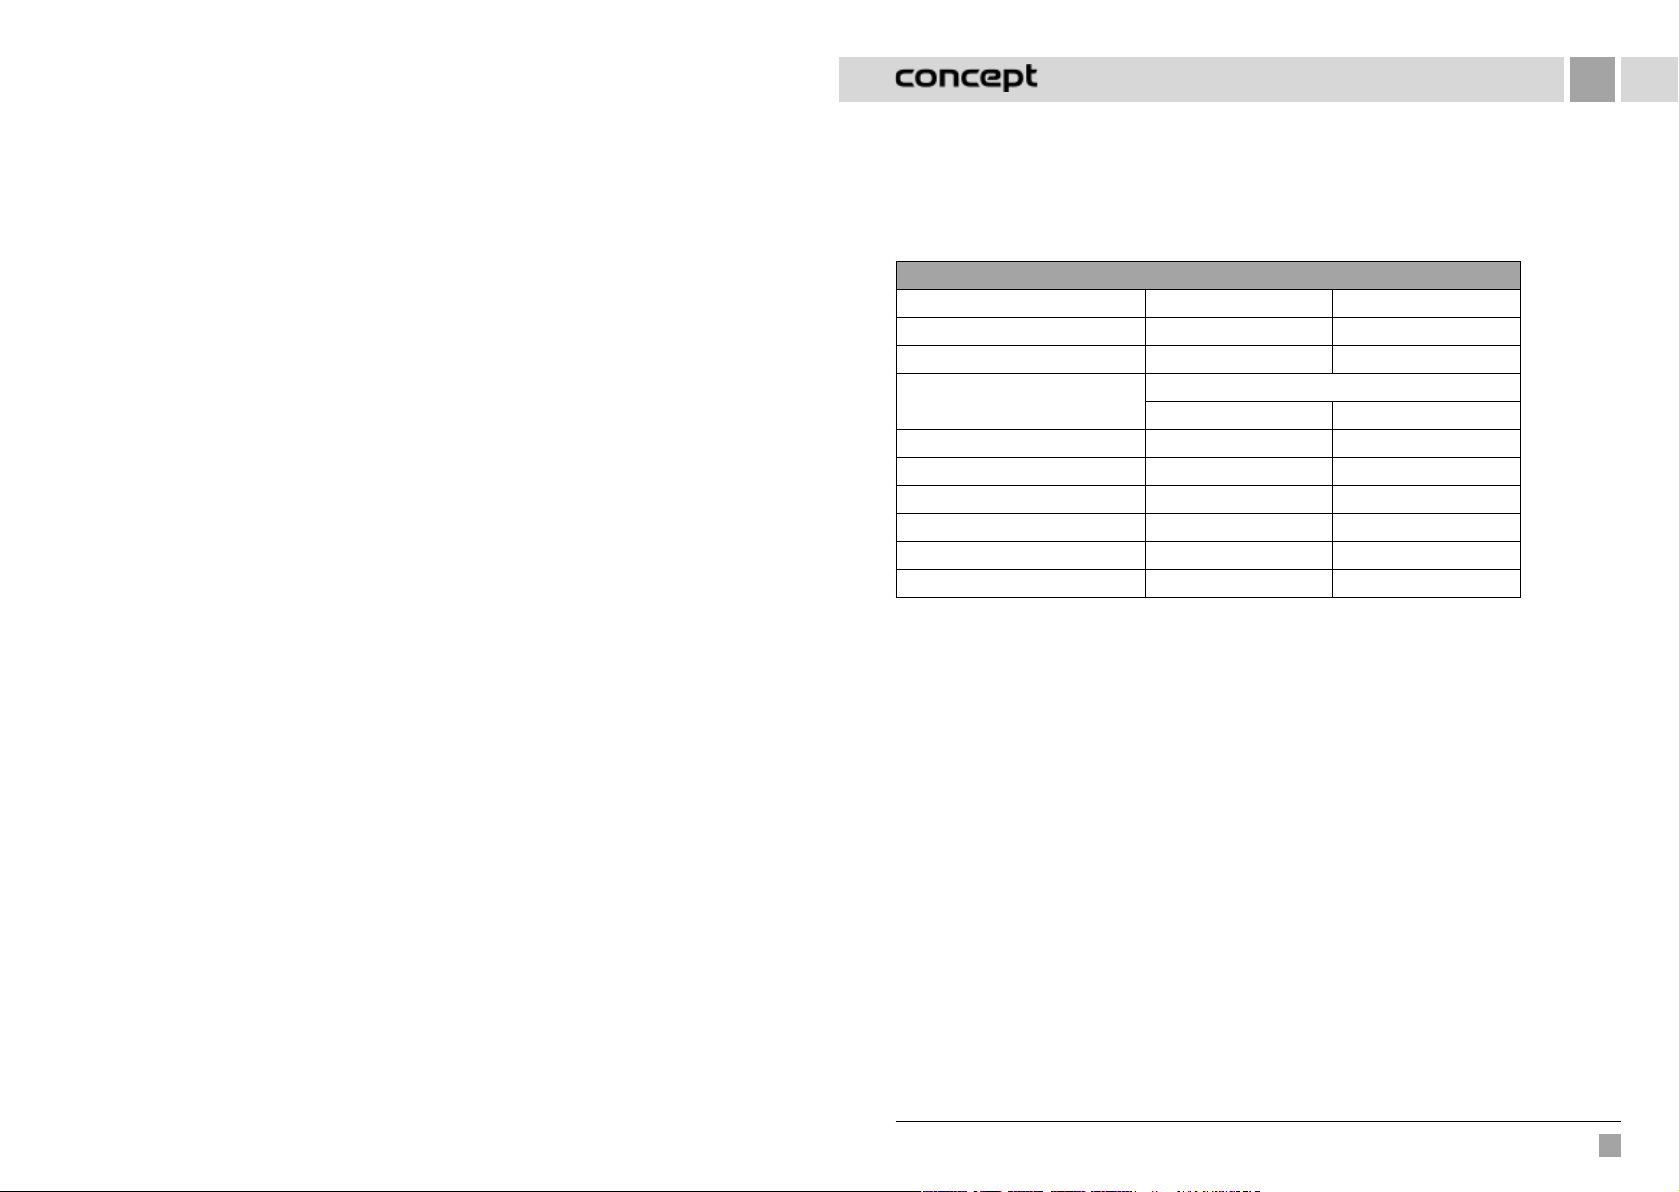
Technické parametry
VR2110 VR2100
Příkon 25 W 25 W
Napětí akumulátoru 14,8 V 14,4 V
Napětí nabíjecího adaptéru
Hlučnost 55-65 dB 55-65 dB
Baterie 3200 mAh, Li-Ion 2600 mAh, Li-Ion
Doba provozu 180 minut 150 minut
Doba úplného nabití 5 hodin 4-5 hodin
Frekvenční rozsah 2,4-2,4835 GHz 2,4-2,4835 GHz
Výkon vysílače (max.) 18 dBm 18 dBm
DŮLEŽITÉ
Před připojením do elektrické sítě zajistěte vizuální kontrolou, zda je jednotka neporušená a během přepravy
nedošlo k žádnému poškození.
AC 220-240 V - 50/60 Hz
DC 24 V DC 24 V
DŮLEŽITÁ BEZPEČNOSTNÍ UPOZORNĚNÍ
• Nepoužívejte spotřebič jinak, než je popsáno v tomto návodu.
• Před prvním použitím odstraňte ze spotřebiče všechny obaly amarketingové materiály.
• Před použitím odstraňte z podlahy všechny věci, které by mohli narušit efektivní
abezproblémový úklid (kabely, papíry, oblečení, ubrusy a záclony dotýkající se země).
• Pokud se v prostoru úklidu nacházejí schody, umístěte magnetický pásek (virtuální zeď)
v minimální vzdálenosti 15 cm od kraje vrchního schodu. Tato vzdálenost by měla zajistit
nejvyšší ochranu proti případnému pádu ze schodů.
• Používejte pouze originální příslušenství a náhradní díly, určené ktomuto modelu.
• Nesedejte si na vysavač, ani na něj nepokládejte jiné předměty.
• Spotřebič by měl být používán pouze v domácnostech při teplotách od 0 °C do 40 °C.
• Před použitím se ujistěte, že prachový zásobník a mopovací tkanina jsou správně nasazeny.
• Nevkládejte vlasy, oblečení, prsty nebo jiné části těla do blízkosti hlavního kartáče. Hlavní
kartáč a sací část vysavače udržujte včistotě, odstraňujte vlasy a prach, které mohou snížit
sací vlastnosti vysavače a kvalitu úklidu.
2 3
VR2110, VR2100 VR2110, VR2100
Page 3
CZCZ
• Nepoužívejte přístroj na mokré nebo vlhké podlaze.
• Nevysávejte tekutiny, hořící cigarety, střepy a ostré předměty, zápalky a jiné hořlavé látky,
větší kusy papíru, plastové sáčky nebo jiné předměty, které mohou vysavač poškodit.
• Při vysávání nenechávejte vysavač přejíždět přes volně položené kabely.
• Při údržbě a čištění spotřebiče přepněte vypínač do pozice vypnuto.
• Přímé sluneční světlo může způsobit sníženou citlivost infračervených snímačů vysavače,
zabraňte prosím jeho přímému svitu.
• Koberec je potřeba při vytírání zajistit tak, aby na něj robot během úklidu nenajel. Pokud
je na vysavači nainstalována mopovací tkanina se zásobníkem na vodu, mohlo by dojít
kpřerušení úklidu, případně nežádoucímu promočení koberce.
• Nepokládejte spotřebič na místa, ze kterých by mohl snadno spadnout na zem (stůl, židle).
• Před nabíjením spotřebiče se ujistěte, že je správně zapojena nabíjecí stanice.
• Při extrémních teplotních podmínek nebo nevhodným užíváním může dojít k úniku
tekutiny z baterie. Pokud se dostane tekutina na kůži, neprodleně umyjte pod tekoucí
vodou. V případě zasažení očí okamžitě vypláchněte pod tekoucí vodou minimálně po
dobu 10 minut. Vyhledejte lékařskou pomoc.
• V případě, že budete chtít výrobek zlikvidovat, nejprve odpojte baterii od spotřebiče.
• V případě, že spotřebič převážíte nebo jej dlouho nebudete používat, přepněte vypínač
do pozice vypnuto. Prodloužíte tak životnost baterie.
• Ověřte, zda připojované napětí odpovídá hodnotám na typovém štítku výrobku. Nezapojujte
spotřebič do rozbočovacích zásuvek aprodlužovacích přívodů.
• Při vypojování spotřebiče ze zásuvky elektrického napětí nikdy netahejte za přívodní
kabel, ale uchopte zástrčku a tahem ji vypojte.
• Nedovolte, aby byl spotřebič používán jako hračka.
• K čištění spotřebiče nepoužívejte hrubé a chemicky agresivní látky.
• Spotřebič je vhodný pouze pro použití v domácnosti, není určen pro komerční použití.
• Neponořujte přívodní kabel, zástrčku nebo spotřebič do vody ani do jiné kapaliny.
• Neopravujte spotřebič sami. Obraťte se na autorizovaný servis apředcházejte zranění při
neodborné manipulaci.
• Tento spotřebič mohou používat děti ve věku 8 let a starší a osoby se sníženými fyzickými či
mentálními schopnostmi nebo nedostatkem zkušeností a znalostí, pokud jsou pod dozorem
nebo byly poučeny o používání spotřebiče bezpečným způsobem a rozumí případným
nebezpečím. Čištění a údržbu prováděnou uživatelem nesmějí provádět děti, pokud nejsou
starší 8 let a pod dozorem. Děti mladší 8 let se musí držet mimo dosah spotřebiče a jeho
přívodu. Děti si se spotřebičem nesmějí hrát.
• Dětem mladším 3 let se musí zabránit v přístupu ke spotřebiči, pokud nejsou trvale pod
dozorem.
• Výrobce a dovozce do Evropské Unie neodpovídá za škody způsobené provozem přístroje
jako např. poranění, opaření, požár, zranění, znehodnocení dalších věcí apod.
• Pokud je přívodní kabel poškozen, jeho výměnu svěřte odbornému servisnímu středisku,
aby se zabránilo vzniku nebezpečné situace. Spotřebič s poškozeným přívodním kabelem
je zakázáno používat.
• Robotický vysavač se musí používat pouze s originálním síťovým adaptérem, který je
sním dodáván. Abyste se vyvarovali vzniku nebezpečné situace, nikdy nepoužívejte jiný
typ adaptéru.
Nedodržíte-li pokyny výrobce, nemůže být případná oprava uznána jako záruční.
Zkontrolujte pečlivě, že jste vybalili všechno dodávané příslušenství, doporučujeme vám ponechat si během
záruční doby originální papírovou krabici, uživatelský manuál a balicí materiál
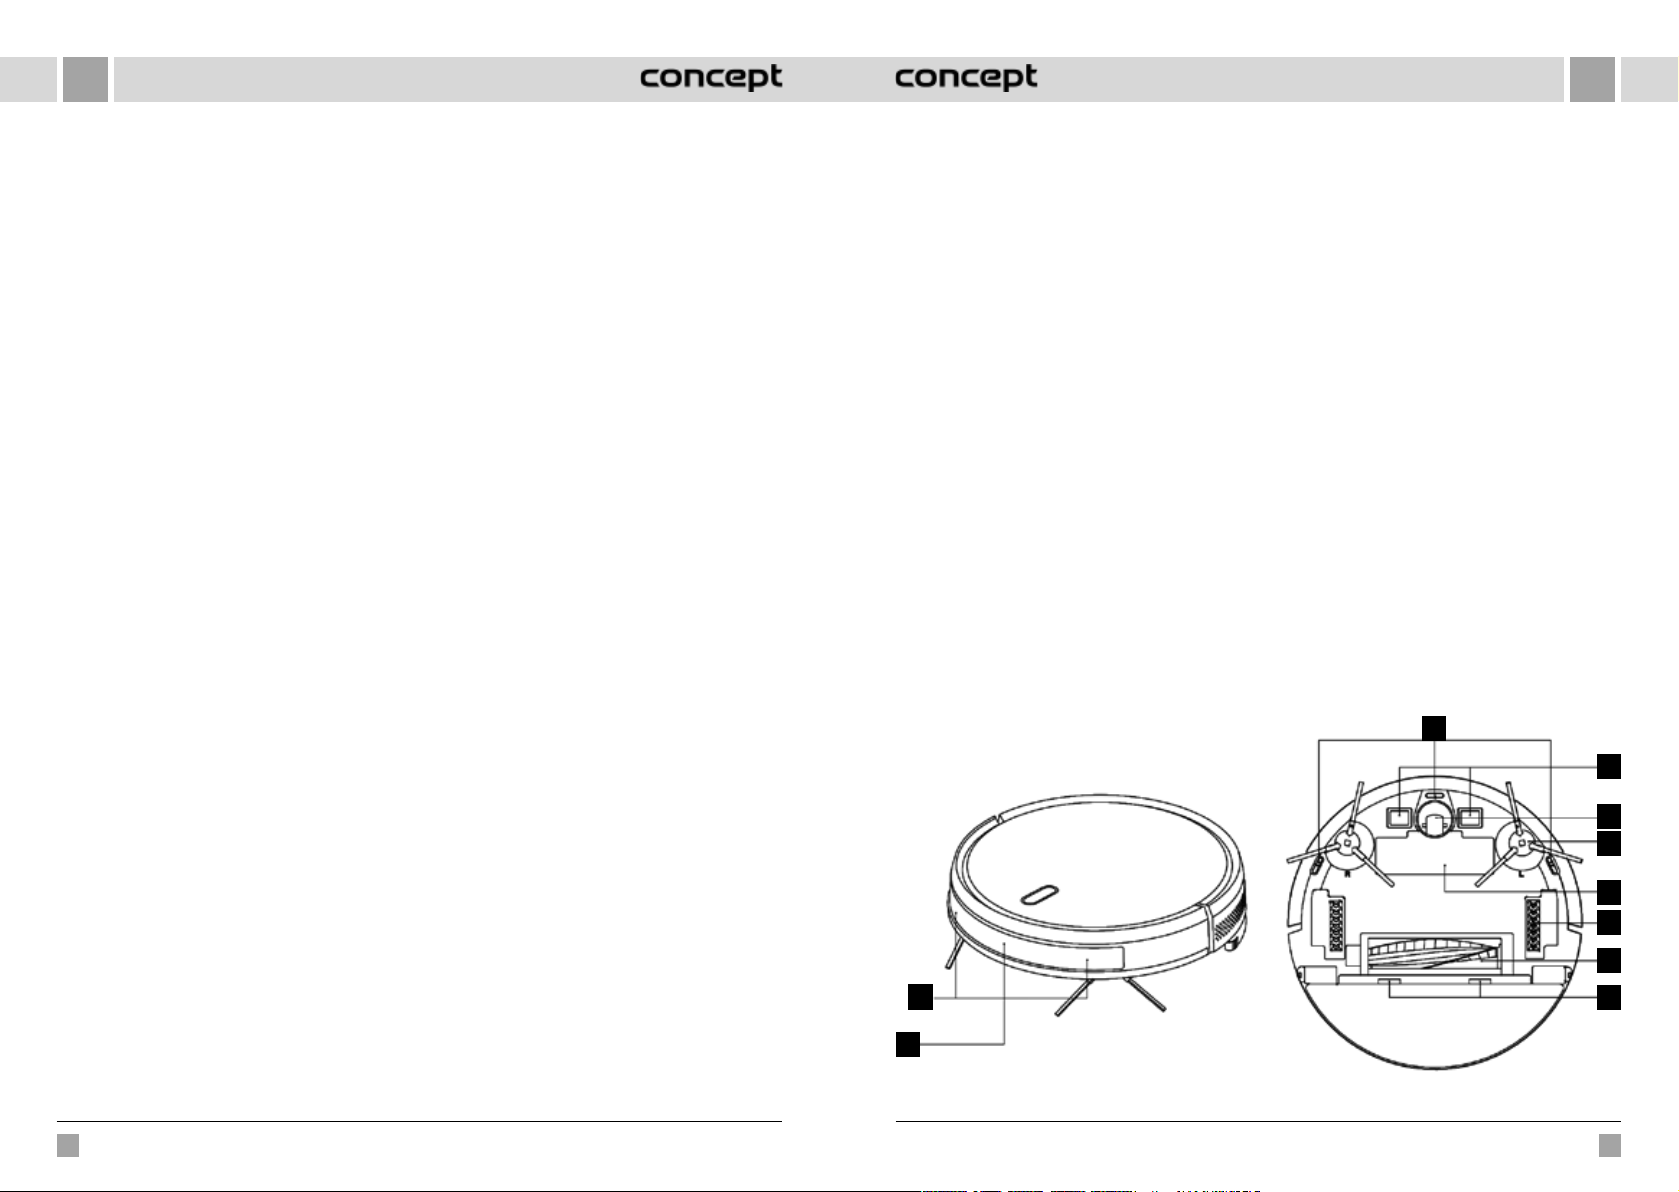
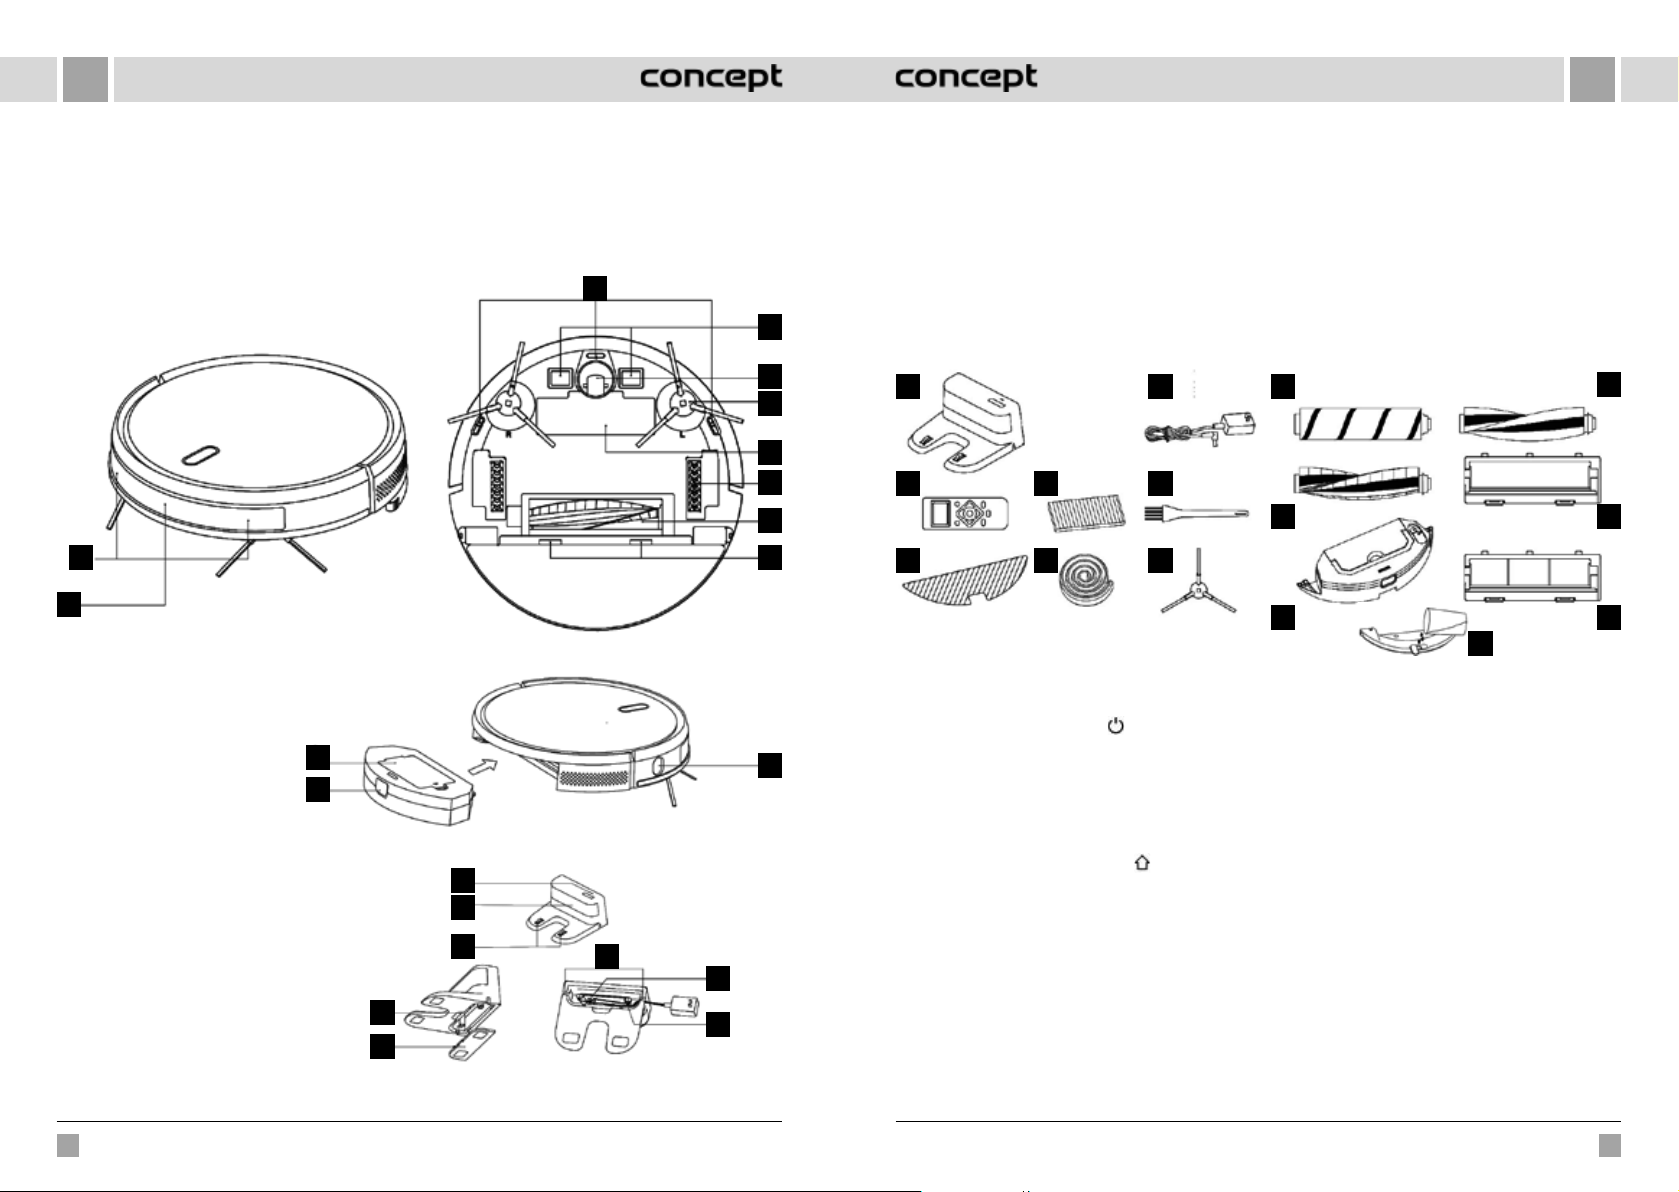
POPIS VÝROBKU
1 Antikolizní senzor
2 Infračervený senzor dobíjení
3 Senzor proti pádu
4 Nabíjecí kontakt
5 Univerzální kolečko
1
2
6 Boční kartáček
7 Kryt akumulátoru
8 Hnací kolečko
9 Hlavní kartáč
10 Západka krytu hlavního kartáče
3
4
5
6
7
8
9
10
4 5
VR2110, VR2100 VR2110, VR2100
Page 4
CZCZ
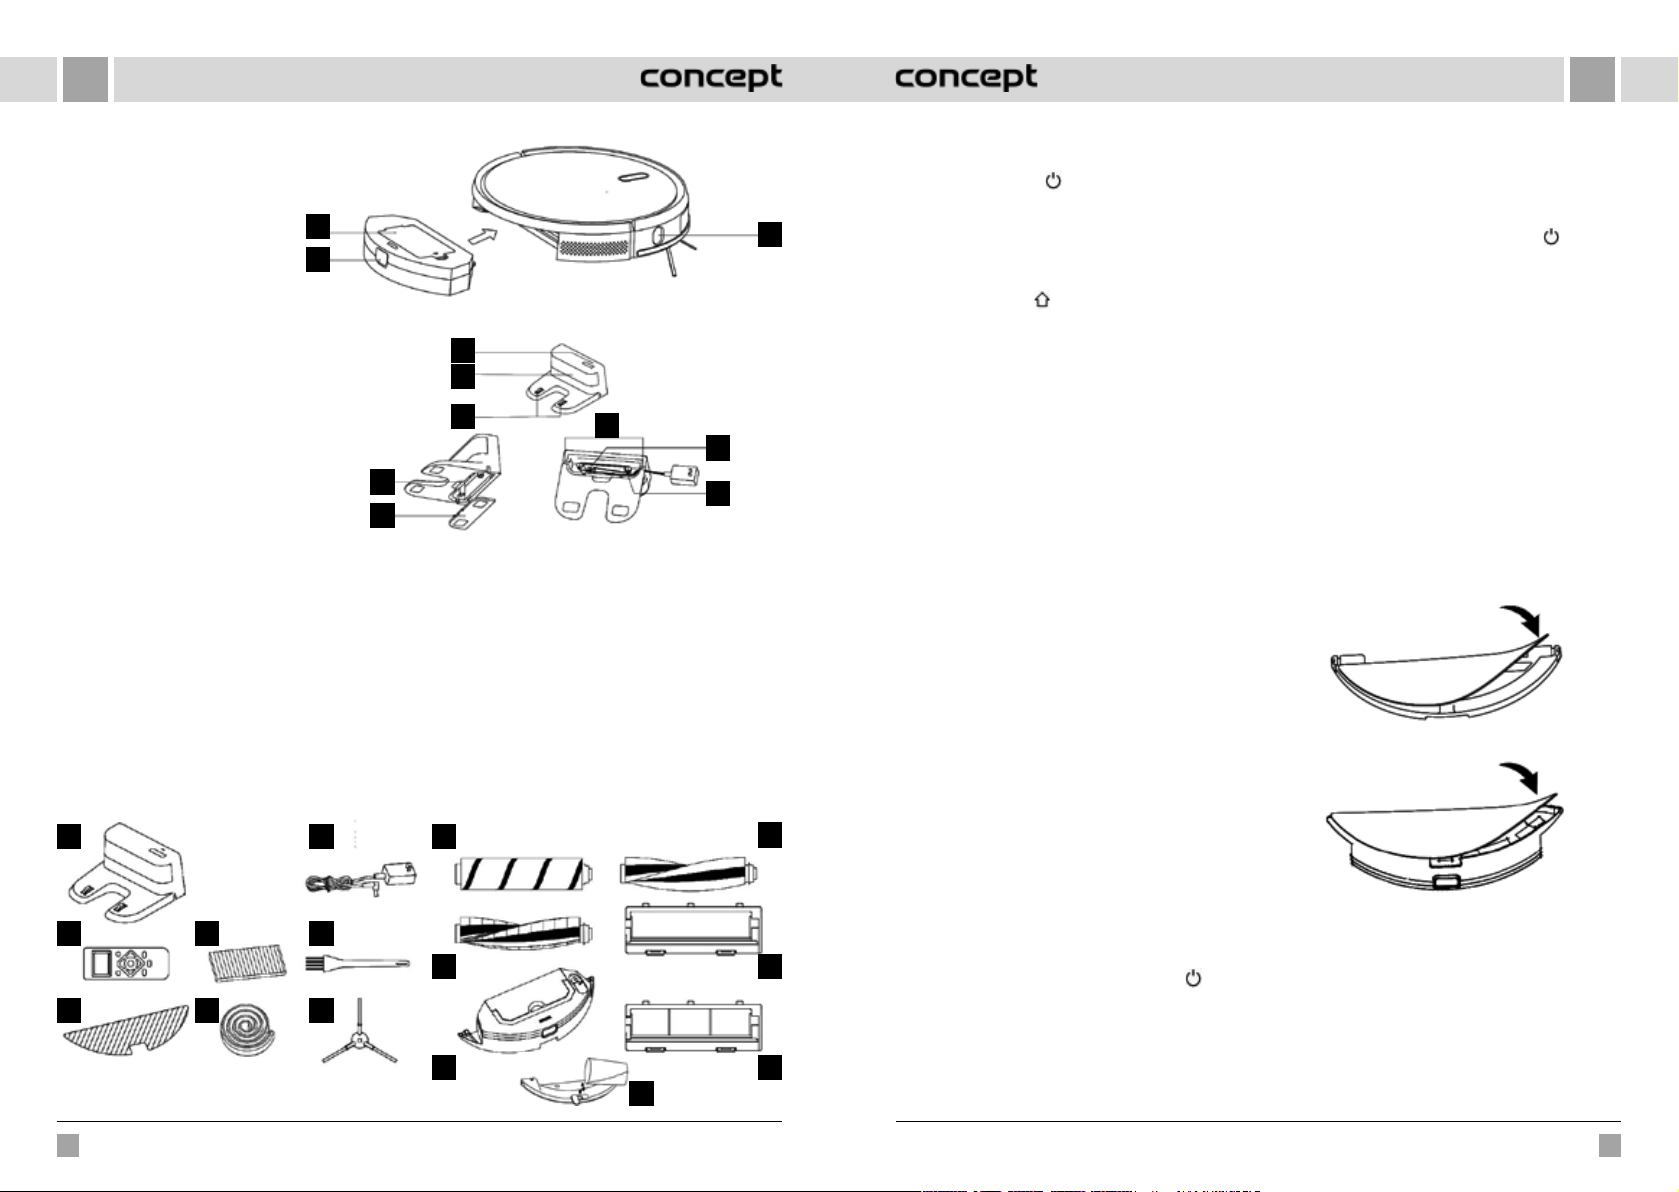
1 Kryt sítka filtru
2 Tlačítko nádobky na prach
3 Stěnový senzor
Dokovací stanice
1 Kontrolka napájení
2 Oblast vysílání signálu
3 Nabíjecí kontakty základny
4 Záchytná drážka
5 Krycí deska
6 Průchod pro kabel
7 Zásuvka napájecího adaptéru
8 Navíjecí kolík
Seznam součásti
1 Dokovací stanice 1x
2 Dálkové ovládání 1x
3 Textilie na vytírání 2x
4 HEPA filtr + pěnový filtr 3x (u VR2100 2x)
5 Magnetický pásek 1x
6 Adaptér 1x
7 Čisticí kartáček 1x
8 Levý a pravý kartáček 2x
1
2
3
4
5
KLÍČOVÉ FUNKCE
Úklid / zapnutí a vypnutí
• Krátkým stisknutím spustíte nebo pozastavíte úklid.
1
3
2
1
2
3
6
7
4
8
5
9 HARDFLOOR kartáč 1x (pouze u modelu VR2110)
UPOZORNĚNÍ! nelze použít na koberce, může dojít
kpřerušení úklidu.
10 CARPET kartáč 1x
11 Elektricky ovládaný zásobník na vodu 1x (pouze
umodelu VR2110)
12 PET kartáč 1x (pouze u modelu VR2110)
13 Kryt hlavního kartáče 1x (pouze u modelu VR2110)
vhodný pro HARDFLOOR a PET kartáč
14 Kryt hlavního kartáče s ocelovým drátem 1x (vhodný
pro CARPET kartáč)
15 Závěsný zásobník na vodu 1x (pouze umodelu
VR2100)
6
9
12
7
10
13
8
11
14
15
• Dlouhým stisknutím na dobu 3 s přístroj zapnete či
vypnete.
• Dlouhým stisknutím na dobu 15 s přistroj nuceně
vypnete za neobvyklých okolností.
Dobíjení / lokální úklid
• Krátkým stisknutím zahájíte dobíjení či pozastavení.
• Dlouhým stisknutím zahájíte lokální úklid.
Kontrolka
• Oranžová: Normální provoz nebo nabíjení.
• Červená: Abnormální stav nebo vybitý akumulátor.
• Červeno-oranžová: Přístroj není připojen k síti.
Reset WiFi
• Stiskněte současně obě tlačítka na 3 s.
INSTALACE
1. Připojte napájecí kabel a přebytečnou délku
kabelu uložte do prostoru pro kabel.
2. Položte dokovací stanici ke stěně a zapojte
napájení.
Poznámka:
• Zajistěte prostor o velikosti min. 0,5 m po obou
stranách dokovací stanice a min. 1,5 m před stanicí.
• Pokud je napájecí kabel napnutý svisle k zemi, může
dojít k tomu, že jej přístroj vytáhne a v důsledku toho
může být dokovací stanice vypnuta.
• Kontrolka nabíjení je v normálním stavu při zapnutí
rozsvícena a při nabití zhasnuta.
3. Dokovací stanici libovolně neposouvejte
anevystavujte ji přímému slunečnímu záření.
Poznámka: Přímé sluneční světlo bude rušit signál
dokovací stanice, a proto se přístroj nemusí do dokovací
stanice správně vrátit.
4. Instalace bočního kartáčku
Ujistěte se, že označení levého bočního kartáčku (L)
a pravého bočního kartáčku (R) odpovídá označení
La R na spodním krytu. Zatlačte boční kartáčky L a R,
dokud neuslyšíte zvuk „zaklapnutí“.
5. Uvedení do provozu a nabíjení
Robota zapnete dlouhým stisknutím tlačítka
je kontrolka napájení normálně zapnutá, nabijte
robota v dokovací stanici.
Poznámka: Pokud nelze přístroj spustit z důvodu slabého
akumulátoru, nabijte jej v dokovací stanici a přístroj se
spustí automaticky. Přístroj může normálně pracovat
pouze pokud je úroveň akumulátoru ≥20 %.
. Pokud
6. Připojení mobilní aplikace (tento krok můžete
přeskočit)
Přečtěte si pokyny k připojení Wi-Fi a připojte mobilní
aplikaci.
7. Zahájení úklidu
Po zapnutí robota krátce stiskněte tlačítko
nebo zahajte úklid pomocí mobilní aplikace (během
používání můžete přístroj pozastavit stisknutím
libovolného tlačítka).
Poznámka:
• Robota určeného k zametání nelze použít k odstranění
tekutin.
• Pokud je úroveň nabití akumulátoru nižší než 20%,
nemůže přístroj pracovat. V takovém případě jej
dobijte.
• Pokud je úroveň nabití akumulátoru nižší než 20 %,
přístroj se automaticky vrátí do dokovací stanice.
• Před použitím odstraňte různé vodiče (včetně
napájecího kabelu dokovací stanice) z podlahy, abyste
předešli výpadkům a poškození předmětů nebo
vodičů, když tyto vodiče přístroj zachytí.
8. Instalace modulu pro vytírání
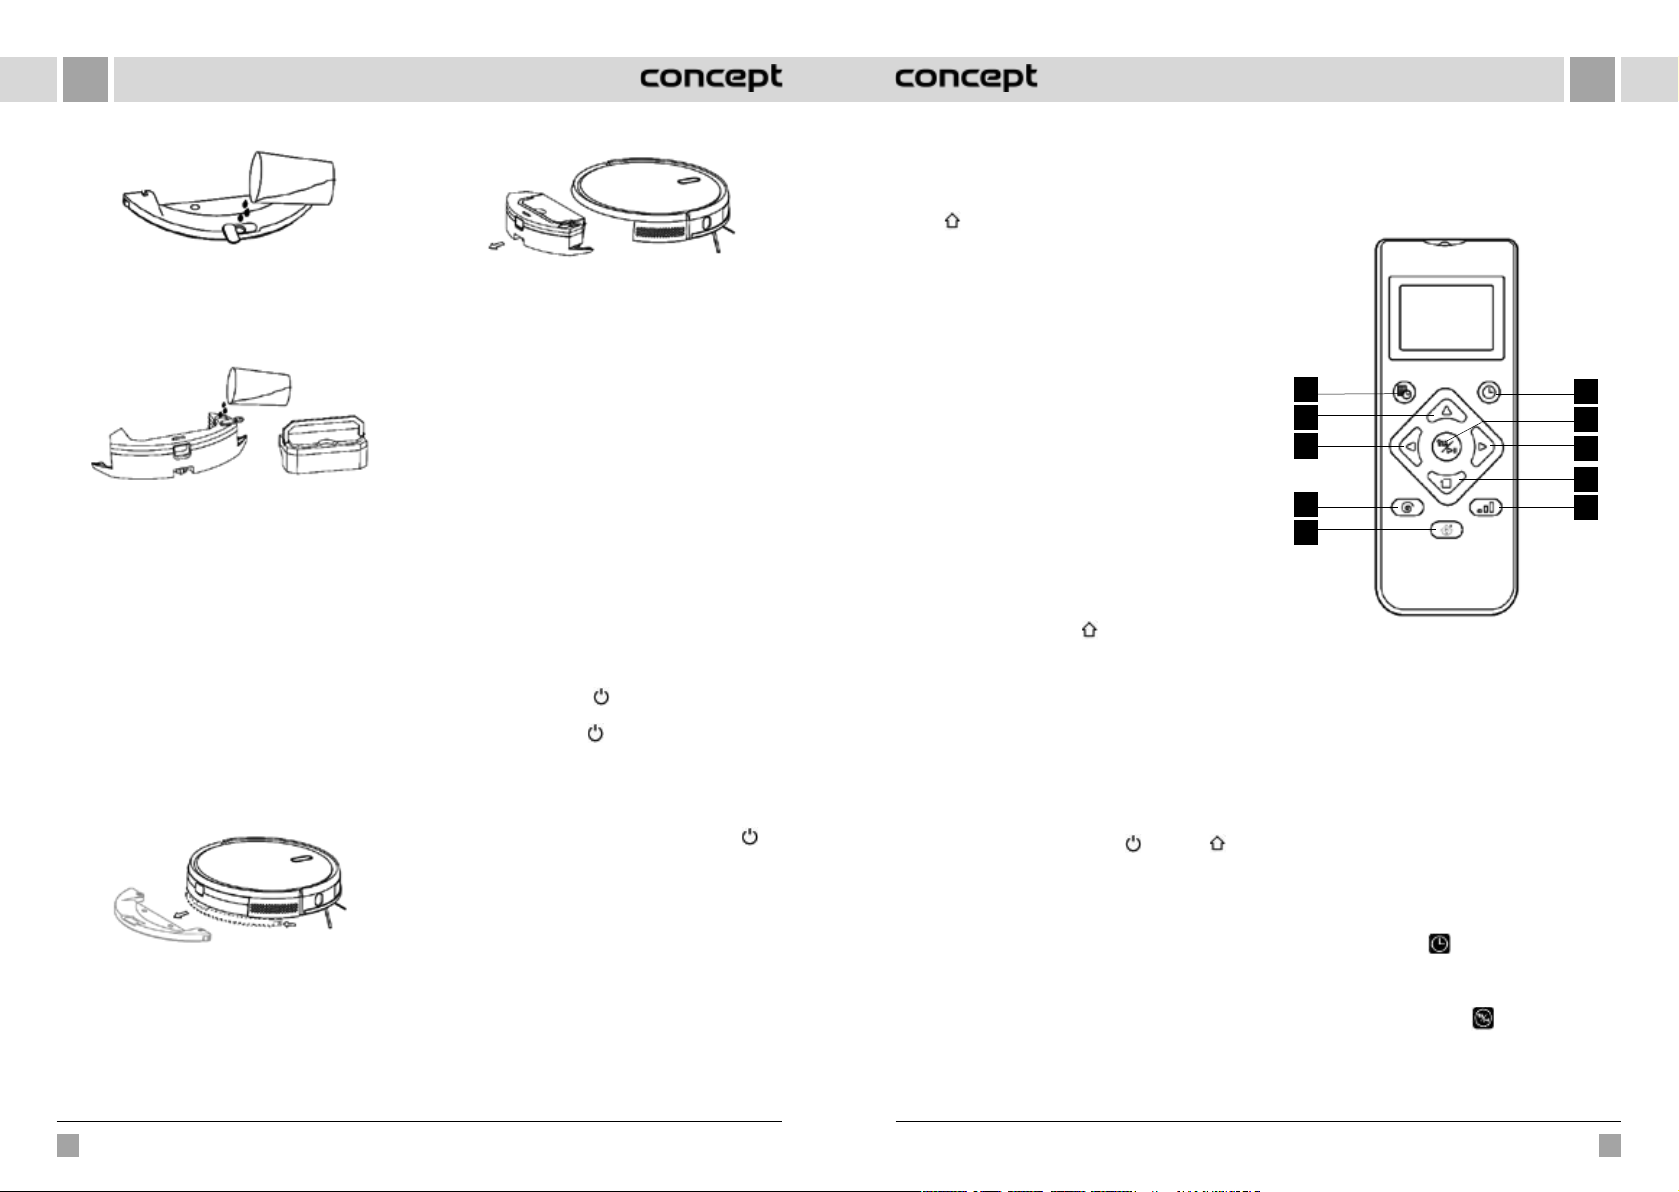
a) Instalace textilie na vytírání: textilii na vytírání
přilepte rovně ke dnu zásobníku na vodu.
Model VR2100 - Závěsný zásobník na vodu
Model VR2110 - Elektricky ovládaný zásobník na vodu
Poznámka: Textilii na vytírání po použití vyčistěte, abyste
jej udrželi v dobrém stavu.
b) Naplňte zásobník na vodu: kryt otevřete anaplňte
vodou.
na robotu
6 7
VR2110, VR2100 VR2110, VR2100
Page 5
CZCZ
Model VR2100 - Závěsný zásobník na vodu
Před naplněním vodou vyjměte nádobku na prach
pomocí rukojeti (VR2110).
Model VR2110 - Elektricky ovládaný zásobník na vodu
c) Nainstalujte modul:
Model VR2100: zatlačte modul vodorovně podél
zadní části robota. Modul je nainstalován na místě,
jakmile uslyšíte zvuk „zaklapnutí“.
Model VR2110: vložte do zásobníku na vodu
nádobku na prach adržadlo vložte do štěrbiny. Poté
stiskněte a podržte tlačítko uprostřed zásobníku
a vodorovně ho zasuňte podél zadní části robota.
Modul je nainstalován na místě, jakmile uslyšíte zvuk
„zaklapnutí“.
9. Vyjmutí modulu pro vytírání
Model VR2100: Jakmile robot dokončí svou práci,
stiskněte západky na obou stranách, vyjměte modul
pro vytírání směrem dozadu, vyprázdněte vodu
zezásobníku na vodu avyčistěte textilii (během čištění
robotem nepohybujte ani jej nepřevracejte).
Model VR2100 - Závěsný zásobník na vodu
Model VR2110: Jakmile robot dokončí svou práci,
stiskněte tlačítko uprostřed zásobníku na vodu, vyjměte
modul pro vytírání směrem dozadu, vyprázdněte vodu
ze zásobníku na vodu a vyčistěte textilii (během čištění
robotem nepohybujte ani jej nepřevracejte).
Model VR2110 - Elektricky ovládaný zásobník na vodu
10. Pokyny pro použití modulu pro vytírání
• Modul pro vytírání nepoužívejte, pokud ho nemáte
pod dohledem.
• Z důvodu bezpečnosti se ujistěte, že je modul pro
vytírání vyjmut při nabíjení nebo když jej nepoužíváte.
• Nepokoušejte se vytírat koberec.
• Pro dosažení lepšího účinku vytírání by měl být modul
pro vytírání použit po trojím zametení či vysátí podlahy.
• Chcete-li doplnit vodu nebo vyčistit textilii při činnosti
přístroje, pozastavte jej, vyjměte a znovu vložte
modul pro vytírání podle kroků 8 a 9. Nepřesunujte
ani nepřevracejte přístroj, aby nedošlo k chybě při
určování polohy a ke ztrátě mapy.
• Funkce vytírání je u přístroje určena k setření
a napomáhá hloubkovému čištění. Nemůže však
účinně odstranit pevně ulpělé nečistoty a nahradit tak
lidskou sílu.
POUŽITÍ
ZAPNUTÍ/VYPNUTÍ
Dlouze stiskněte tlačítko na dobu 3 s, kontrolka se
rozsvítí a přístroj se spustí.
Dlouze stiskněte tlačítko na dobu 3 s, když je přístroj
v pohotovostním režimu, kontrolka zhasne a přístroj se
vypne.
POZNÁMKA: Přístroj nelze vypnout, když je právě nabíjen.
ÚKLID/POZASTAVENÍ
Po spuštění přístroje krátce stiskněte tlačítko
přístroji nebo přístroj spusťte pomocí mobilní aplikace
(stisknutím kteréhokoli tlačítka jej můžete pozastavit).
Poznámka:
• Robotický vysavač nelze použít k odstranění tekutin.
• Pokud je úroveň nabití akumulátoru nižší než 20%,
nemůže přístroj pracovat. V takovém případě jej
dobijte.
• Pokud je úroveň nabití akumulátoru nižší než 20 %,
přístroj se automaticky vrátí do dokovací stanice.
• Před použitím odstraňte různé vodiče (včetně
napájecího kabelu dokovací stanice) z podlahy, abyste
předešli výpadkům a poškození předmětů nebo
vodičů, když tyto vodiče robot zachytí.
na
NABÍJENÍ
Automatický režim: Po práci se přístroj automaticky vrátí
do dokovací stanice.
Ruční režim: V pozastaveném stavu krátkým stisknutím
tlačítka zahájíte nabíjení nebo můžete přístroj nabíjet
ovládáním pomocí mobilní aplikace. Kontrolka bliká,
jakmile je přístroj nabitý.
Poznámka: Pokud přístroj nenajde dokovací stanici,
automaticky se vrátí do původní polohy. V takovém
případě vložte přístroj zpět do dokovací stanice ručně.
MAGNETICKÝ PÁSEK
Magnetické pásky lze nastavit tak, aby oddělovaly oblasti,
které nemají být uklizeny (například koupelny, kuchyně
atd.).
Poznámka: připevněte magnetický pásek k podlaze tak,
aby se nemohl posunout. V opačném případě to bude mít
vliv na jeho účinnost.
REŽIM ÚKLIDU
Po spuštění se bude stroj pohybovat podle úklidového
programu v obloucích, aby uklidil celou plchu podlahy
a dokončil úklid všech místností jedné po druhé
pravidelným, efektivním způsobem s plným pokrytím. Po
dokončení úklidu se přístroj vrátí zpět do dokovací stanice
aautomaticky se nabije.
LOKÁLNÍ ÚKLID
Dlouhým stisknutím tlačítka
robot lokalizuje, vyčistí kruhovou oblast o průměru 1,5 m
apo dokončení čištění se automaticky vrátí do výchozího
umístění a automaticky přestane pracovat.
PLÁNOVÁNÍ ÚKLIDU
Pevně danou dobu úklidu lze nastavit pomocí mobilní
aplikace. Přístroj začne automaticky uklízet ve stanovenou
dobu a po dokončení se vrátí do dokovací stanice.
RESET WIFI
Pokud se nelze mobilním telefonem k přístroji připojit
zdůvodu změny konfigurace routeru a hesla nebo z jiných
důvodů, stiskněte současně tlačítko
dobu 3 s, dokud se neozve hlasová výzva „WiFi has been
reset“ (WiFi byla resetována) a kontrolka se nerozsvítí
modrofialovou barvou a nebude pomalu blikat.
TICHÝ REŽIM
Hlasová hlášení robota můžete zapnout nebo vypnout
pomocí mobilní aplikace.
NASTAVENÍ SACÍHO VÝKONU
Sací výkon můžete nastavit na tichou, standardní nebo
vysokou úroveň pomocí mobilní aplikace.
Při detekci koberce dojde k automatickému nárůstu sací
síly na nejvyšší stupeň. UPOZORNĚNÍ - koberec je správně
detekován pouze sCarpet kartáčem.
NASTAVENÍ PRŮTOKU VODY (pouze pro elektricky
po dobu 3 sekund se
a tlačítko na
ovládaný zásobník na vodu u modelu VR2110)
Průtok vody můžete nastavit na nízkou, standardní nebo
vysokou úroveň pomocí mobilní aplikace.
POUŽITÍ DÁLKOVÉHO OVLÁDÁNÍ
1
2
3
6
7
8
9
4
10
5
1. Plánování úklidu
2. Pohyb vpřed
3. Otočení vlevo
4. Lokální TURBO úklid
5. Zahájení/pozastavení nabíjení
6. Automatický úklid/pauza
7. Úklid/pauza
8. Otočení vpravo
9. Obvodový úklid
10. Nastavení sacího výkonu / průtoku vody
Poznámka: Chcete-li zajistit, aby byla všechna správná
nastavení účinná, musíte dálkové ovládání nasměrovat
na přední část robotického vysavače, a to z dostatečné
blízkosti.
Nastavení času
1. Stisknutím tlačítka
vstoupíte do nastavení času, na LCD displeji bliká
symbol pro neděli.
2. Stisknutím levého a pravého tlačítka vyberte den
vtýdnu a stisknutím tlačítka jej potvrďte, pak se
LCD displej automaticky přepne na nastavení hodin.
3. Stisknutím tlačítek nahoru a dolů nastavte hodinu
a stisknutím tlačítek vlevo a vpravo přejděte na
nastavení minut.
na dálkovém ovladači
8 9
VR2110, VR2100 VR2110, VR2100
Page 6
CZCZ
4. Poté, co nastavíte aktuální čas, nasměrujte dálkový
ovladač na přední část robotického vysavače a stiskněte
tlačítko pro potvrzení všech nastavení času. Pokud
tak neučiníte, bude vaše nastavení neplatné.
5. Tím dokončíte nastavení času pro dálkové ovládání
irobotický vysavač.
Plán úklidu
1. Stisknutím tlačítka
na dálkovém ovladači
vstoupíte do funkce nastavení plánu, na LCD displeji
bude blikat symbol pro neděli.
2. Stisknutím levého a pravého tlačítka vyberte den
vtýdnu a stisknutím tlačítka jej potvrďte, pak se
LCD displej automaticky přepne na nastavení hodin.
3. Stisknutím tlačítek nahoru a dolů nastavte hodinu
a stisknutím tlačítek vlevo a vpravo přejděte na
nastavení minut. Poté nasměrujte dálkový ovladač na
přední část vysavače robota a stisknutím tlačítka
potvrďte toto nastavení plánu pro robotický vysavač.
4. Po dokončení jednoho nastavení plánu přejde dálkový
ovladač automaticky na další nastavení plánu. Pokud
nechcete pokračovat v nastavování, stiskněte tlačítko
pro ukončení nebo počkejte 10 s, než se nastavení
ukončí automaticky.
5. Tím dokončíte nastavení času pro dálkové ovládání
irobotický vysavač.
Zrušení plánu úklidu
1. Stiskněte tlačítko
na dálkovém ovladači, na LCD
displeji bude blikat symbol pro neděli a zobrazí se
symboly pro dny v týdnu, které jste naplánovali.
2. Stisknutím levého a pravého tlačítka vyberte den
vtýdnu, který jste naplánovali, a dlouhým stisknutím
tlačítka na 3 s tento plán zrušte. Můžete také
vybrat další naplánovaný den, který chcete zrušit, nebo
stiskněte tlačítko pro ukončení nebo počkejte 10 s,
než se nastavení ukončí automaticky.
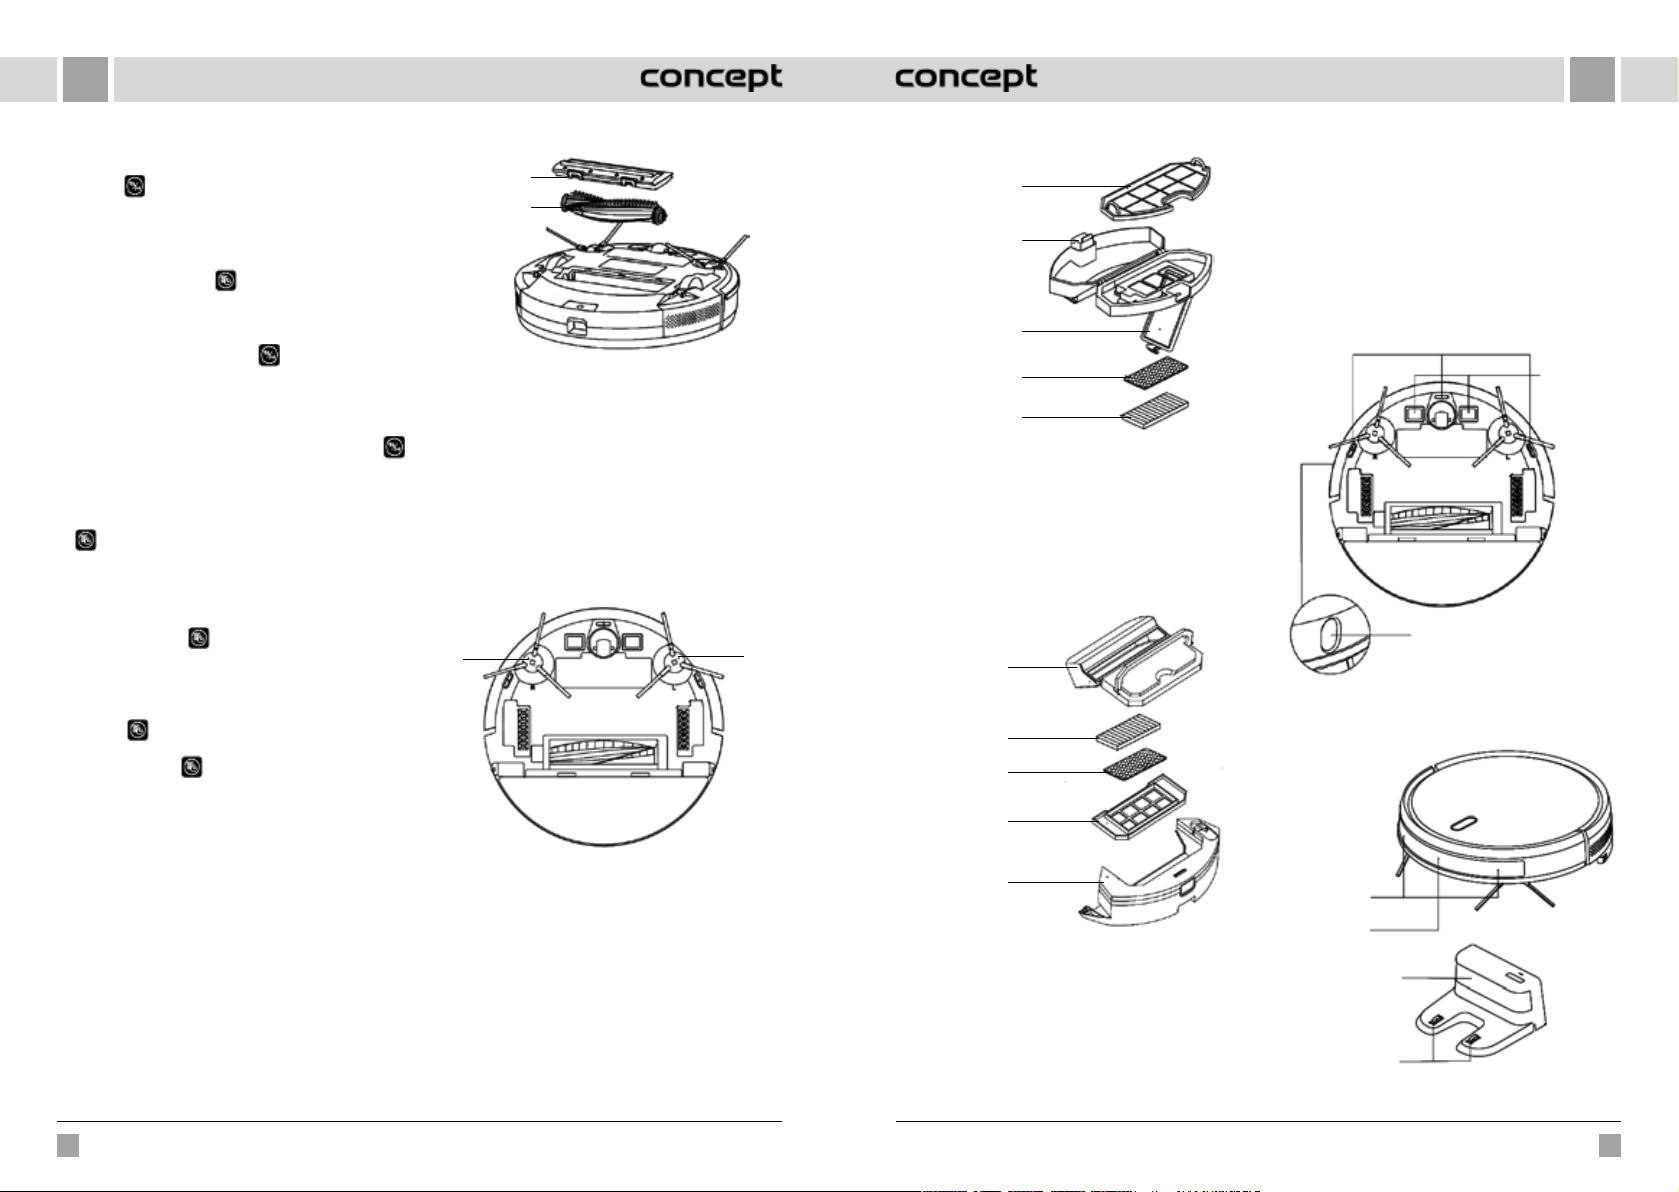
KAŽDODENNÍ ÚDRŽBA
Hlavní kartáč (pravidelně čistěte)
1. Otočte přístroj a stiskněte západku na krytu hlavního
kartáče, abyste jej mohli vytáhnout.
2. Odstraňte prach z vnitřního prostoru a z vnitřku
hlavního kartáče pomocí malého kartáčku a hlavní
kartáč očistěte.
3. Znovu sestavte hlavní kartáč a pevně zatlačte na kryt,
aby západka zaklapla na místo.
Západka
Hlavní
kartáč
Boční kartáček (pravidelně čistěte)
1. Otočte přístroj a vytáhněte boční kartáček směrem
nahoru.
2. Odstraňte vlasy a nečistoty a boční kartáček
namontujte zpět.
3. Ujistěte se, že levý boční kartáček (L) a pravý boční
kartáček (R) odpovídají symbolům L a R na spodním
krytu. Zatlačením na boční kartáčky L a R je znovu
nainstalujte.
Poznámka: Boční kartáčky vyměňte každých 3 až
6měsíců, abyste zajistili jejich čisticí účinek.
R - pravý boční
kartáček
L - levý bo ční
kartáček
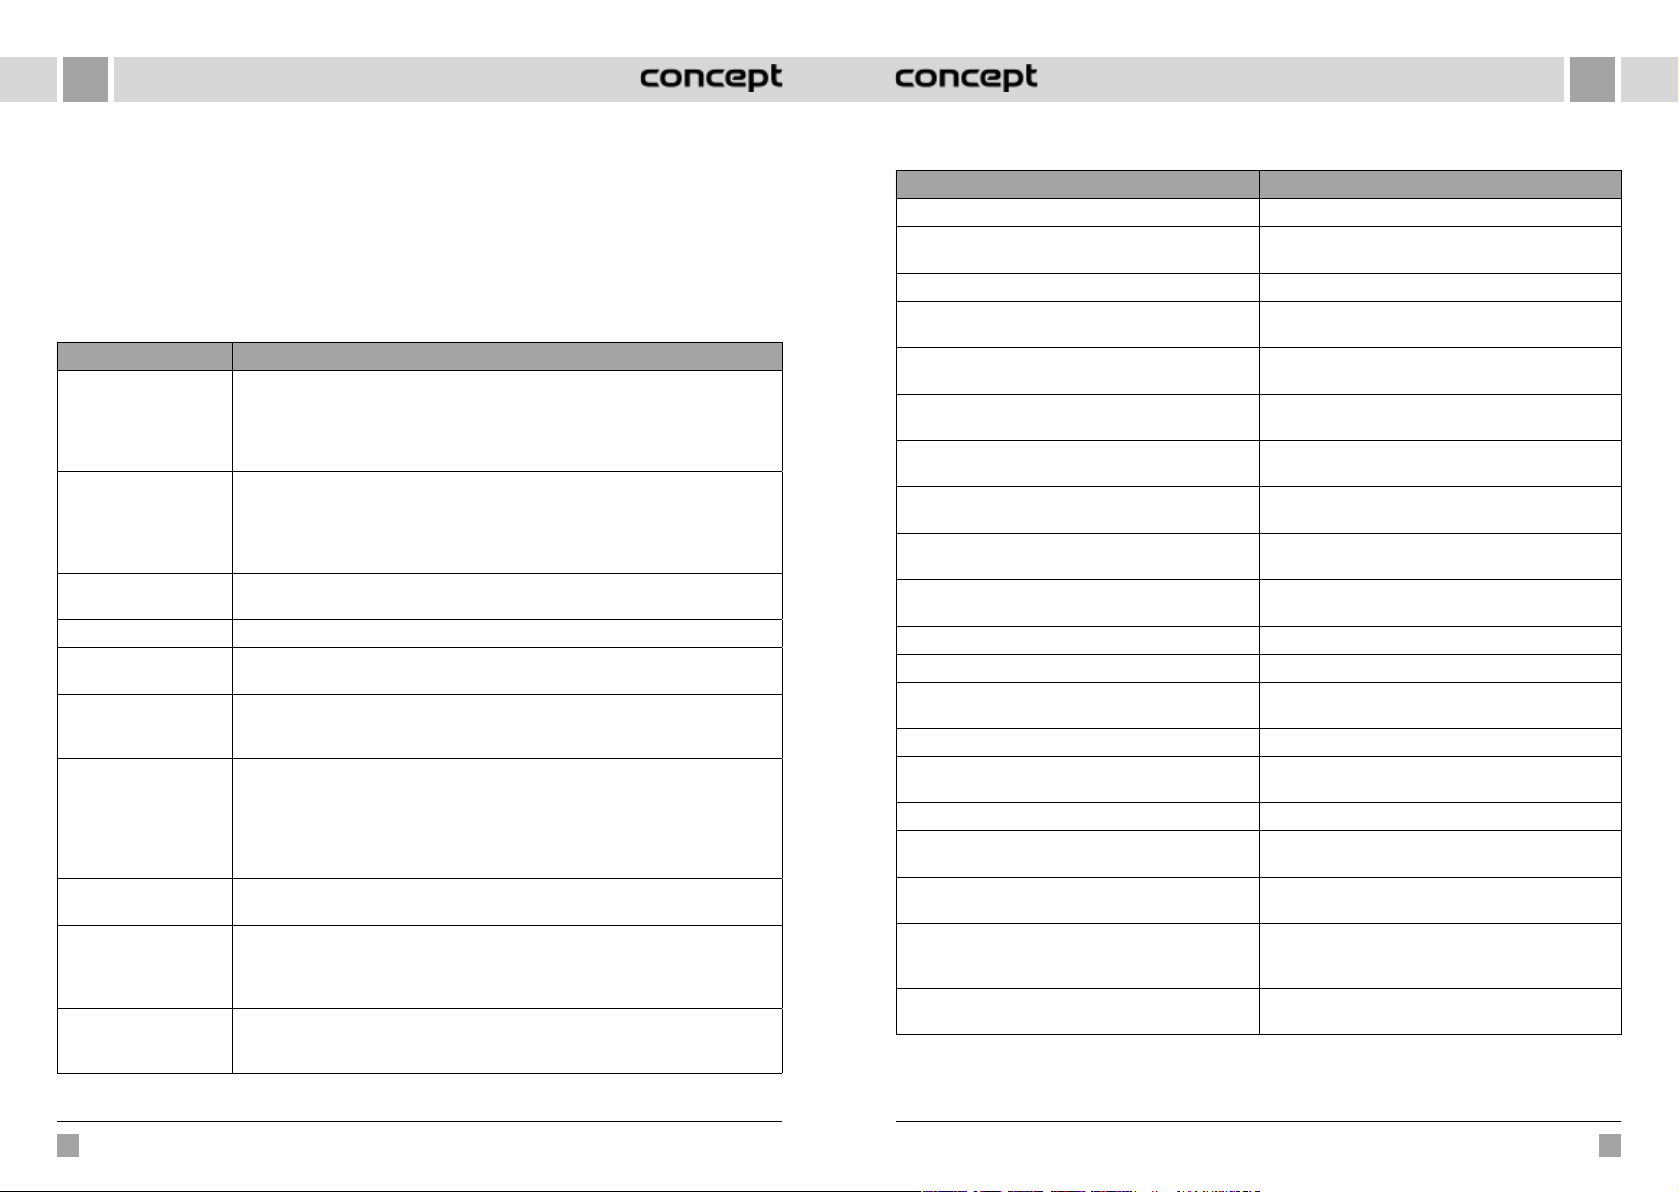
Nádobka na prach a mřížka filtru (pravidelně čistěte)
1. Stiskněte tlačítko a nádobku na prach vytáhněte
směrem dozadu.
2. Nádobku na prach otevřete a vyčistěte.
Čištění mřížky filtru (pravidelně čistěte)
1. Po dlouhodobém používání vyjměte mřížku filtru,
pěnový filtr a HEPA filtr.
2. Vyčistěte vyjmutou mřížku filtru. Pěnový filtr a HEPA
filtr opláchněte pod vodou.
3. Jednotlivé díly utřete a nechte volně uschnout.
4. Po oschnutí je postupně nainstalujte ve správném
pořadí mřížka - pěnový filtr - HEPA filtr.
Filtrační mřížka
(hrubý filtr)
Tlačítko
Kry t filtru
Pěnový
filtr
HEPA filtr
Poznámka:
• Mřížku filtru opláchněte čistou vodou a nepřidávejte
žádný čisticí prostředek.
• Nečistěte mřížku filtru štětcem či prsty.
• Mřížku filtru nechte oschnout na vzduchu po dobu
nejméně 24 hodin.
• Mřížku filtru vyměňte každých 3 až 6 měsíců.
Čištění filtru (pravidelně čistěte)
Nádobka
na prach
HEPA filtr
Pěnový
filtr
Filtrační mřížka
(hrubý filtr)
Nádobka
na vodu
Elektricky ovládaný zásobník na vodu
Modul pro vytírání (čistěte po každém použití)
1. Odstraňte textilii, vylijte vodu ze zásobníku na vodu.
2. Vyčistěte textilii, vysušte zásobník na vodu i textilii.
U modelu VR2110 nejprve vytáhněte nádobku na
prach a poté ze zásobníku na vodu vylijte vodu.
Senzory (pravidelně čistěte)
Senzory vyčistěte měkkou textilií následujícím způsobem:
1. Očistěte senzory podél stěny vpravo.
2. Tři senzory proti pádu ve spodní části přístroje.
3. Infračervené antikolizní čidlo v přední části přístroje.
4. Chránič před úrazem elektrickým proudem a kontakty
pro dokovací stanici ve spodní části přístroje (během
čištění přístroj vypněte).
5. Oblast pro přenos signálu dokovací stanice.
Senzor proti pádu
Nabíjecí
kontakt
TOF senzor
Senzory (čistěte každý měsíc)
Antikolizní
senzor
Infračer vený
senzor dobíjení
Oblast vysílání
signálu
Nabíjec í kontakty
základny
10 11
VR2110, VR2100 VR2110, VR2100
Page 7
CZCZ
Akumulátor
• Přístroj je vybaven vysoce výkonnými lithium-
iontovými akumulátory. Chcete-li zachovat výkon
akumulátoru, udržujte při každodenním používání
přístroj nabitý.
• Pokud je přístroj dlouhou dobu nepoužívaný, vypněte
jej a řádně uložte. Nabijte jej alespoň každé 3 měsíce,
abyste předešli poškození akumulátorů v důsledku
nadměrného vybití.
Aktualizace firmwaru
Firmware aktualizujte pomocí mobilní aplikace. Pokud je
zjištěn nový firmware, proveďte aktualizaci podle výzvy.
Při aktualizaci firmwaru by měla být úroveň akumulátoru
≥50 %, proto by měl být přístroj umístěn v dokovací
stanici.
BĚŽNÉ PROBLÉMY
Problém Řešení
Robota nelze spustit • V případě nízkého stavu akumulátoru umístěte robota do dokovací stanice
Robota není možné nabít • Přesuňte robota mimo stanici, zkontrolujte, zda se rozsvítí kontrolka dokovací stanice
Robota není možné dobít Robot je příliš daleko od dokovací stanice, umístěte jej do blízkosti dokovací stanice
Abnormální chování Vypněte robota a restartujte jej.
Při použití se ozývá
neobvyklý hluk
Snižuje se schopnost
čištění nebo z přístroje
vypadává prach
WiFi nelze připojit • Je špatný signál WiFi. Zkontrolujte, zda je k dispozici správné pokrytí signálem WiFi.
Plánovaný úklid
neproběhl
Spotřebovává robot
energii, pokud je vždy
umístěn na dokovací
stanici?
Je třeba robota napoprvé
nabíjet třikrát po dobu
16 ho din?
avyrovnejte podle kontaktů desky, přístroj se automaticky spustí (pokud je robot
zcela vypnutý, může se po chvíli nabíjení automaticky spustit).
• Nepoužívejte přístroj, pokud je teplota prostředí nižší než 0 °C nebo vyšší než 50 °C.
Používejte jej při teplotě 0-40 °C.
a zkontrolujte, zda jsou oba konce napájecího adaptéru dokovací stanice správně
připojeny.
• V případě špatného kontaktu vyčistěte kontaktní plošky dokovací stanice a nabíjecí
kontakty na robotu nebo otočte boční kartáček na stranu.
azkuste to znovu.
Hlavní kartáč, boční kartáček nebo kolečko mohou být obaleny cizími předměty,
vypněte robota a cizí předměty odstraňte.
• Nádobka na prach je plná. Vyčistěte ji.
• Mřížka filtru je zanesená. Vyčistěte ji nebo vyměňte.
• Hlavní kartáč je obalen cizími předměty, vyčistěte jej.
• WiFi je připojeno neobvyklým způsobem. Resetujte WiFi, stáhněte si nejnovější
aplikaci a zkuste se znovu připojit.
• Heslo je zadáno nesprávně.
• Je k dispozici router pro frekvenční pásmo 5G, robotický vysavač je vybaven pouze
pro frekvenční pásmo 2,4G.
V případě nízké úrovně nabití akumulátoru lze plánovaný úklid zahájit pouze tehdy,
je-li úroveň nabití akumulátoru nejméně 30 %.
Robot spotře bovává malé množstv í energie, pokud je tr vale umístěn v dokovací stanici,
a to umožňuje nejlepší výkon akumulátoru.
Lithiový akumulátor lze použít ihned po nabití a nemá paměťový efekt.
ŘEŠENÍ PROBLÉMŮ
Zvukové hlášení Řešení
Error 1: Oh dear! I cannot find the dust collector Úklid byl spuštěn po vyjmutí nádobky na prach.
Error 2: Please ch eck if the radar on top has bee n covered
or blocked
Error 3: Please place me in a new location and try again Seberte robota nebo jej zvedněte do vzduchu.
Error 4: Please scrub the cliff sensor, and restart me from
a new location
Error 5: Please scrub the front sensor, and restart me
from a new location
Error 6: Please scrub the right-hand sensor, and restart
me from a new location
Error 7: Please scrub the radar housing on top, and
restart me from a new location
Error 8: Please check if the bumper has been blocked in
some way
Error 9: Master, please clean the dust container and filter Nádobka na prach je plná nebo je potřeba vyměnit
Error 10: Dust container has been removed, please clean
the container and filter
Error 11: I'm stuck, please help me! Robot se někde zasekl.
Error 12: Please place me correctly! Robot je nakloněn.
Error 13: Please check if my wheels have become blocked
somewhere
Error 14: Please check if the main brush has become stuck Hlavní kartáč je zamotaný nebo zaseknutý.
Error 15: Please check if the side brushes have become
stuck
Error 16: What's going on? Where is the docking station? Dokovací stanice nebyla nalezena nebo není zapojena.
Error 17: Oh dear! Program error, please restart me Abnormální stav způsobený neznámým selháním,
Error 18: Error encountered initiating shutdown Robot upozorní uživatele a automaticky se vypne nebo
Error 19: Low battery, please recharge Když je úroveň nabití akumulátoru příliš nízká, robot
Error 20: To shut me down, please place me away from
the docking station
Horní senzor je zakrytý nebo je umístěn v otevřeném
prostoru (v oblasti 6x6 m2 není žádná překážka).
Senzor proti pádu je zakr ytý nebo je umístěn ve v ýšce.
Infračervený antikolizní senzor je znečištěný nebo
zakrytý.
Senzor stěny je znečištěný nebo zakry tý.
Radarový antikolizní senzor je znečištěný nebo zakrytý.
Senzor hran nebo antikolizní senzor je zaseknutý.
mřížku filtru.
Po signalizaci poruchy 9 uživatel vyjmul nádobku na
prach a tím se spustí porucha 10.
Hnací kolečko je zaseknuté nebo zamotané.
Boční kartáček je zamotaný nebo zaseknutý.
restartujte robota.
se dobije.
není na dokovací stanici a spustí se úklid (úroveň nabití
akumulátoru je nižší než 10 %).
Při nabíjení na dokovací stanici byl robot vypnut.
12 13
VR2110, VR2100 VR2110, VR2100
Page 8
CZCZ
BEZDRÁTOVÉ SPOJENÍ A KOMPATIBILITA
• Společnost Jindřich Valenta - CONCEPT nemůže být žádným způsobem zodpovědná za jakékoliv náhodné, nepřímé
nebo následné škody, ani za ztráty dat či ztráty způsobené únikem informací během komunikace prostřednictvím
bezdrátových technologií.
• Úspěšnou bezdrátovou komunikaci nelze 100% zaručit u všech Smart zařízení a Wifi sítí (routerů). Vzhledem
k rozmanitosti přístrojů na trhu mohou nastat případy, kdy charakter či specifikace daného Smart zařízení či Wifi
sítě (routeru) znemožňuje připojení, případně je nějakým způsobem narušeno. Úspěšnost bezdrátové komunikace
prostřednictvím Wifi sítě dále také ovlivňuje řada faktorů včetně hardwarové asoftwarové konfigurace. Spojení
mezi robotem a vaší Wifi sítí může být také negativně ovlivněno okolními Wifi sítěmi, které mohou být naladěny na
stejný kanál a tím narušovat spojení (např. na sídlištích, v bytových domech atp.). Tyto skutečnosti nejsou důvodem
kreklamaci spotřebiče.
• Aplikace je vlastněna a provozována třetím subjektem (dále jen „Subjekt") odlišným od společnosti Jindřich Valenta
- CONCEPT (dále jen „Prodejce"). Subjektu nejsou ze strany Prodejce předávány žádné osobní údaje. Při registraci do
aplikace předává zákazník osobní údaje přímo Subjektu, který se stává správcem osobních údajů. Aplikace a s tím
spojena ochrana osobních údajů se řídí pravidly Subjektu.
Kompatibilita:
Operační systém smart zařízení - Android 5.0 a vyšší
- IOS 9.0 a vyšší
Wifi síť - 2,4 GHz
- zabezpečení WPA1 a WPA2 (doporučeno WPA2)
UPOZORNĚNÍ: Zařízení nelze provozovat na Wifi sítích zabezpečených protokolem IEEE 802.1X (zpravidla firemní Wifi sítě).
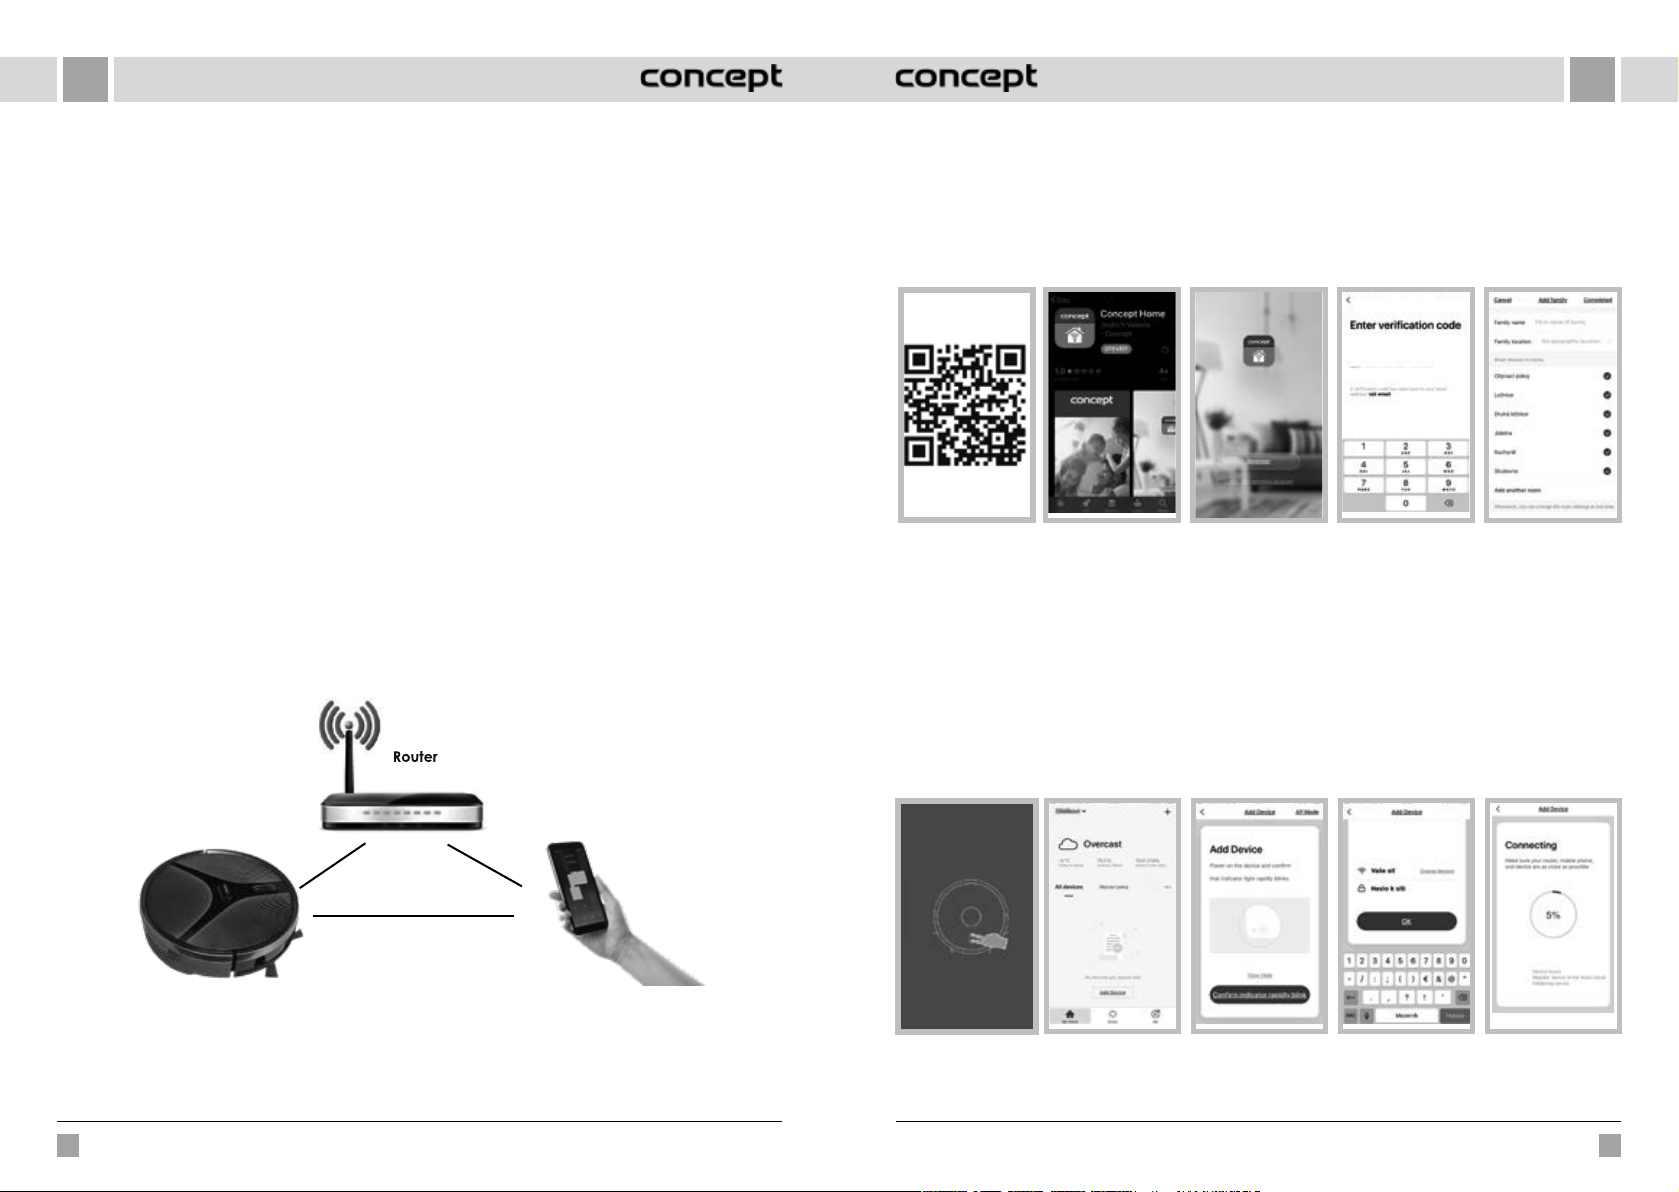
OVLÁDÁNÍ POMOCÍ APLIKACE
Dříve než bude možné ovládat zařízení přes aplikaci, je nutné spojit ho s vašim telefonem a umožnit mu přístup do vaši
WiFi sítě.
Stažení a instalace aplikace
1. Naskenuj te QR kód níže (obr. 1) nebo vyh ledejte aplikaci „Concept Ho me“ na Google Play nebo App Sto re a stáhněte
si ji do mobilního telefonu (obr. 2).
2. Pokud již máte Concept Home, otevřete aplikaci, přihlaste se a pokračujte na pokyny pro spárování.
3. Pokud jste nový uživatel, začněte registrací (obr. 3). Pokračujte podle instrukcí až k zadání ověřovacího kódu
adokončete registraci (obr. 4).
4. Postupujte dále podle instrukcí a vytvořte si rodinu (obr. 5).
obr. 1
Pokyny pro spárování zařízení
1. Na začátku párování je potřeba, abyste byli připojeni k vaší WiFi síti.
2. Před zahájením připojení se ujistěte, že je zařízení v pohotovostním režimu. Po dobu nejméně 3 sekund současně
stiskněte obě tlačítka (obr. 6), dokud robot nezačne blikat a nezazní zvuková hláška „WiFi lost, please follow the App
instruction for reconnection“. Zkontrolujte, zda je telefon připojen ke stejné síti WiFi, ke které chcete připojit robota.
3. Pak v aplikaci stiskněte + nebo „Add device“ (obr. 7) pro přidání nového zařízení.
4. Potvrďte „Confirm indicator rapidly blink“ (obr. 8).
5. Vyberte vaši WiFi síť, ke které se má zařízení připojit, a zadejte její heslo (obr. 9).
6. Zahájí se proces nastavení, který může nějakou dobu trvat (obr. 10).
7. Váš telefon se pokusí spojit se zařízením a připojí ho do vaší WiFi sítě.
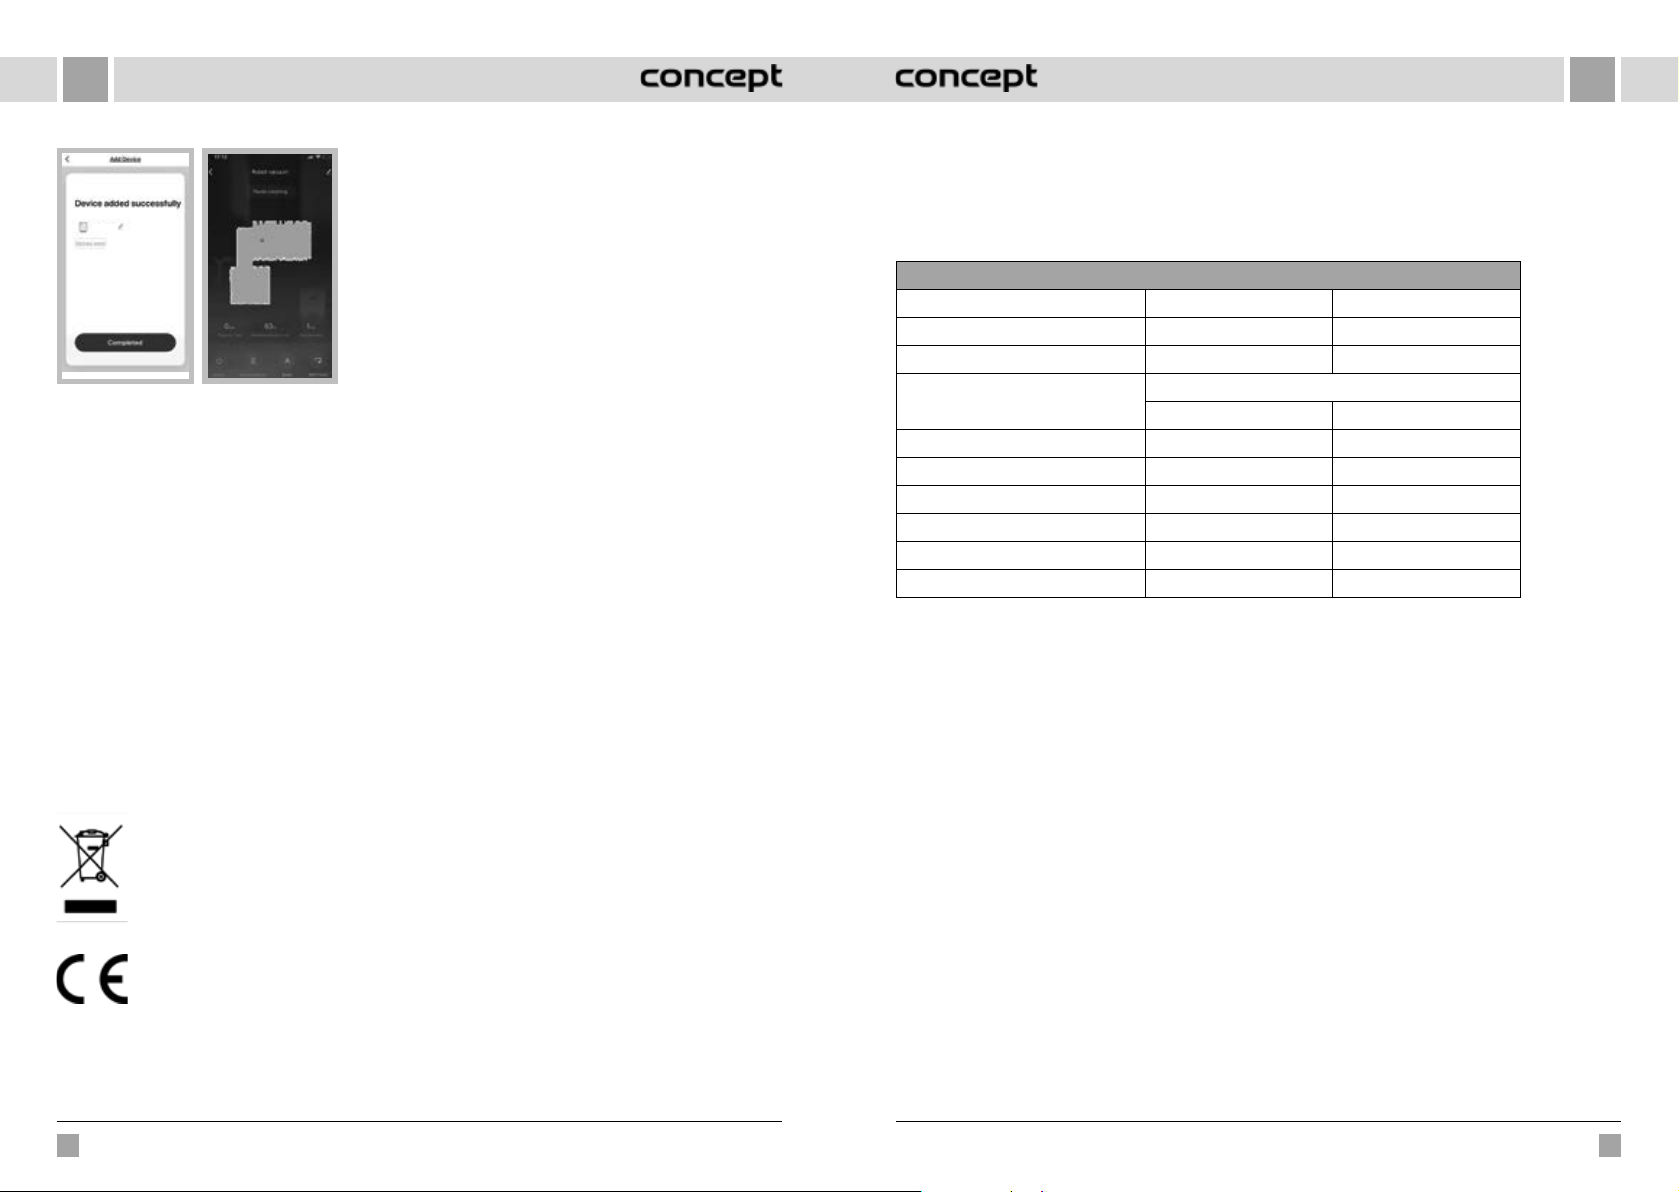
8. Po úspěšném nastavení (obr. 11) stiskněte „Completed“ a vstoupíte do rozhraní pro ovládání zařízení (obr. 12).
obr. 2 obr. 3 obr. 5obr. 4
Doporučená vzdálenost při nastavení: měně než 4 metry
Ujistěte se, že robotický vysavač, router a váš mobilní telefon jsou blízko sebe, tak aby mohlo proběhnout bezproblémové
spárování.
14 15
VR2110, VR2100 VR2110, VR2100
obr. 6 obr. 7 obr. 8 obr. 9 obr. 10
Page 9
CZ
SK
Upozornění při potížích s párováním
• Ověřte správnost zadaného hesla vaší WiFi sítě.
• Zařízení podporuje pouze WiFi sítě 2,4 GHz.
• Router je zahlcen připojením mnoha jiných zařízení.
Concept
obr. 11
Režimy aplikace
Můžete vybrat mezi úklidovými režimy AUTO (Automatický/ZIGZAG), Lokální (Kruhový), Obvodový (EDGE) a DOCK
(vyhledání dokovací stanice).
obr. 12
• Během pokusu o spojení se zařízením (obr. 10) se zkuste
ručně připojit na jeho WiFi síť.
SERVIS
Údržbu rozsáhlejšího charakteru nebo opravu, která vyžaduje zásah do vnitřních částí výrobku, musí provést kvalifikovaný
odborník nebo servis.
OCHRANA ŽIVOTNÍHO PROSTŘEDÍ
• Preferujte recyklaci obalových materiálů a starých spotřebičů.
• Krabice od spotřebiče může být dána do sběru tříděného odpadu.
• Plastové sáčky z polyetylénu (PE) odevzdejte do sběrného materiálu k recyklaci.
Recyklace spotřebiče na konci jeho životnosti:
Tento spotřebič je označen v souladu s Evropskou směrnicí 2012/19/EU o elektrickém odpadu
aelektrických zařízeních (WEEE). Symbol na výrobku nebo jeho balení udává, že tento výrobek nepatří
do domácího odpadu. Je nutné odvést ho do sběrného místa pro recyklaci elektrického aelektronického
zařízení. Zajištěním správné likvidace tohoto výrobku pomůžete zabránit negativním důsledkům pro
životní prostředí a lidské zdraví, které by jinak byly způsobeny nevhodnou likvidací tohoto výrobku.
Likvidace musí být provedena v souladu s předpisy pro nakládání s odpady. Podrobnější informace
o recyklaci tohoto výrobku zjistíte u příslušného místního úřadu, služby pro likvidaci domovního
odpadu nebo v obchodě, kde jste výrobek zakoupili.
Tento výrobek splňuje veškeré základní požadavky směrnic EU, které se na něj vztahují.
Změny v textu, designu a technických specifikací se mohou měnit bez předchozího upozornění avyhrazujeme si právo
na jejich změnu.
POĎAKOVANIE
Ďakujeme vám, že ste sa rozhodli kúpiť si výrobok značky Concept a prajeme vám, aby ste boli s naším výrobkom
spokojní po celý čas jeho používania.
Pred prvým použitím si prosím pozorne preštudujte celý návod naobsluhu a dobre ho odložte. Zabezpečte, aby všetci,
ktorí budú tento výrobok používať, boli oboznámení stýmto návodom.
Technické parametre
VR2110 VR2100
Príkon 25 W 25 W
Napätie akumulátora 14,8 V 14,4 V
Napätie nabíjacieho adaptéra
Hlučnosť 55-65 dB 55-65 dB
Batéria 3200 mAh, Li-Ion 2600 mAh, Li-Ion
Doba používania 180 minút 150 minút
Doba úplného nabitia 5 hodín 4-5 hodín
Frekvenčný rozsah 2,4-2,4835 GHz 2,4-2,4835 GHz
Výkon vysielača (max.) 18 dBm 18 dBm
DÔLEŽITÉ
Pred pripojením do elektrickej siete zaistite vizuálnou kontrolou, či je jednotka neporušená a či počas prepravy
nedošlo k žiadnemu poškodeniu.
AC 220-240 V - 50/60 Hz
DC 24 V DC 24 V
DÔLEŽITÉ BEZPEČNOSTNÉ UPOZORNENIA
• Nepoužívajte spotrebič inak, než je uvedené vtomto návode.
• Pred prvým použitím odstráňte zo spotrebiča všetky obaly a marketingové materiály.
• Pred použitím odstráňte z podlahy všetky veci, ktoré by mohli narušiť účinné abezproblémové
vysávanie (káble, papiere, oblečenie, obrusy a záclony dotýkajúce sa podlahy).
• Ak sa v čistiacom priestore nachádzajú schody, magnetický pásik (virtuálnu stenu)
umiestnite v minimálnej vzdialenosti 15 cm od okraja horného schodu. Táto vzdialenosť
by mala zaistiť najvyššiu ochranu pred prípadným pádom zo schodov.
• Používajte iba originálne príslušenstvo a náhradné diely, určené pre tento model.
• Nesadajte si na vysávač, ani naň nepokladajte predmety.
• Spotrebič by sa mal používať iba v domácnosti pri teplote od 0 °C do 40 °C.
• Pred použitím sa ubezpečte, že prachový zásobník a mopovacia tkanina sú správne nasadené.
• Do blízkosti hlavnej kefy nevkladajte vlasy, oblečenie, prsty ani iné časti tela. Hlavnú kefu
a saciu časť vysávača udržujte v čistote, odstraňujte vlasy a prach, ktoré môžu znížiť sacie
vlastnosti vysávača a kvalitu vysávania.
16
VR2110, VR2100
VR2110, VR2100
17
Page 10
SKSK
• Prístroj nepoužívajte na mokrej ani vlhkej podlahe.
• Nevysávajte tekutiny, horiace cigarety, črepy a ostré predmety, zápalky a iné horľavé látky,
väčšie kusy papiera, plastové vrecúška ani iné predmety, ktoré by mohli poškodiť vysávač.
• Pri vysávaní nedovoľte vysávaču prejsť cez voľne položené káble.
• Pri údržbe a čistení spotrebiča prepnite vypínač do pozície vypnuté.
• Priame slnečné svetlo môže spôsobiť zníženú citlivosť infračervených snímačov vysávača,
zabráňte prosím priamemu slnečnému svitu.
• Koberec treba pri vytieraní zaistiť tak, aby naň robot pri vysávaní nezašiel. Ak je na vysávači
inštalovaná mopovacia tkanina so zásobníkom na vodu, mohlo by dôjsť k prerušeniu
vysávania, prípadne nežiaducemu premočeniu koberca.
• Spotrebič nepokladajte na miesta, z ktorých by mohol ľahko spadnúť na zem (stôl, stolička).
• Pred nabíjaním spotrebiča sa ubezpečte, že je správne zapojená nabíjacia stanica.
• Pri extrémnych teplotných podmienkach a nevhodnom používaní môže dôjsť k úniku
tekutiny z batérie. Ak sa tekutina dostane na pokožku, ihneď ju zmyte tečúcou vodou.
V prípade zasiahnutia očí ich okamžite aspoň 10 minút vyplachujte tečúcou vodou.
Vyhľadajte lekársku pomoc.
• Keď budete chcieť výrobok zlikvidovať, najprv odpojte batériu od spotrebiča.
• Ak spotrebič prepravujete alebo ho nebudete používať dlhý čas, vypínač prepnite do
pozície vypnuté. Predĺžite tak životnosť batérie.
• Overte, či pripájané napätie zodpovedá hodnotám na typovom štítku prístroja. Spotrebič
nezapájajte do rozbočovacích zásuviek a predlžovacích prívodov.
• Pri odpájaní prístroja zo zásuvky elektrického napätia nikdy neťahajte za prívodný kábel,
ale uchopte zástrčku a ťahom prístroj odpojte.
• Nedovoľte, aby sa prístroj používal ako hračka.
• Na čistenie prístroja nepoužívajte hrubé ani agresívne chemické látky.
• Spotrebič sa odporúča len na použitie v domácnosti, nie je určený na komerčné použitie.
• Prívodný kábel ani zástrčku neponárajte do vody ani do inej kvapaliny.
• Spotrebič neopravujte sami. Obráťte sa na autorizovaný servis a predchádzajte zraneniam
pri neodbornej manipulácii.
• Tento spotrebič môžu používať deti od 8 rokov veku a osoby so zníženými fyzickými či
mentálnymi schopnosťami alebo nedostatkom skúseností a znalostí, ak majú nad sebou
dozor alebo boli poučené o používaní spotrebiča bezpečným spôsobom a rozumejú
prípadnému nebezpečenstvu. Domáce čistenie a údržbu nesmú robiť deti, ak nedosiahli
8 rokov a nemajú nad sebou dozor. Deti do 8 rokov veku sa nesmú zdržiavať v dosahu
spotrebiča ani jeho prívodu. Deti sa so spotrebičom nesmú hrať.
• Deťom do 3 rokov sa musí zabrániť v prístupe k spotrebiču, ak nie sú trvale pod dozorom.
• Výrobca a dovozca do Európskej únie nezodpovedá za škody spôsobené používaním
prístroja, napr. za poranenia, oparenia, požiare, zranenia, znehodnotenie ďalších vecí a pod.
• Ak je prívodný kábel poškodený, jeho výmenu zverte odbornému servisnému stredisku,
aby sa zabránilo vzniku nebezpečnej situácie. Spotrebič s poškodeným prívodným káblom
je zakázané používať.
• Robotický vysávač sa musí používať iba s originálnym sieťovým adaptérom, ktorý sa
sdodáva spolu s ním. Aby ste sa vyvarovali vzniku nebezpečnej situácie, nikdy nepoužívajte
iný typ adaptéra.
Ak nedodržíte pokyny výrobcu, prípadná oprava sa neuzná ako záručná.
Pozorne skontrolujte, či ste vybalili všetko dodávané príslušenstvo, odporúčame vám nechať si počas záručnej
lehoty originálnu papierovú škatuľu, užívateľský manuál a baliaci materiál
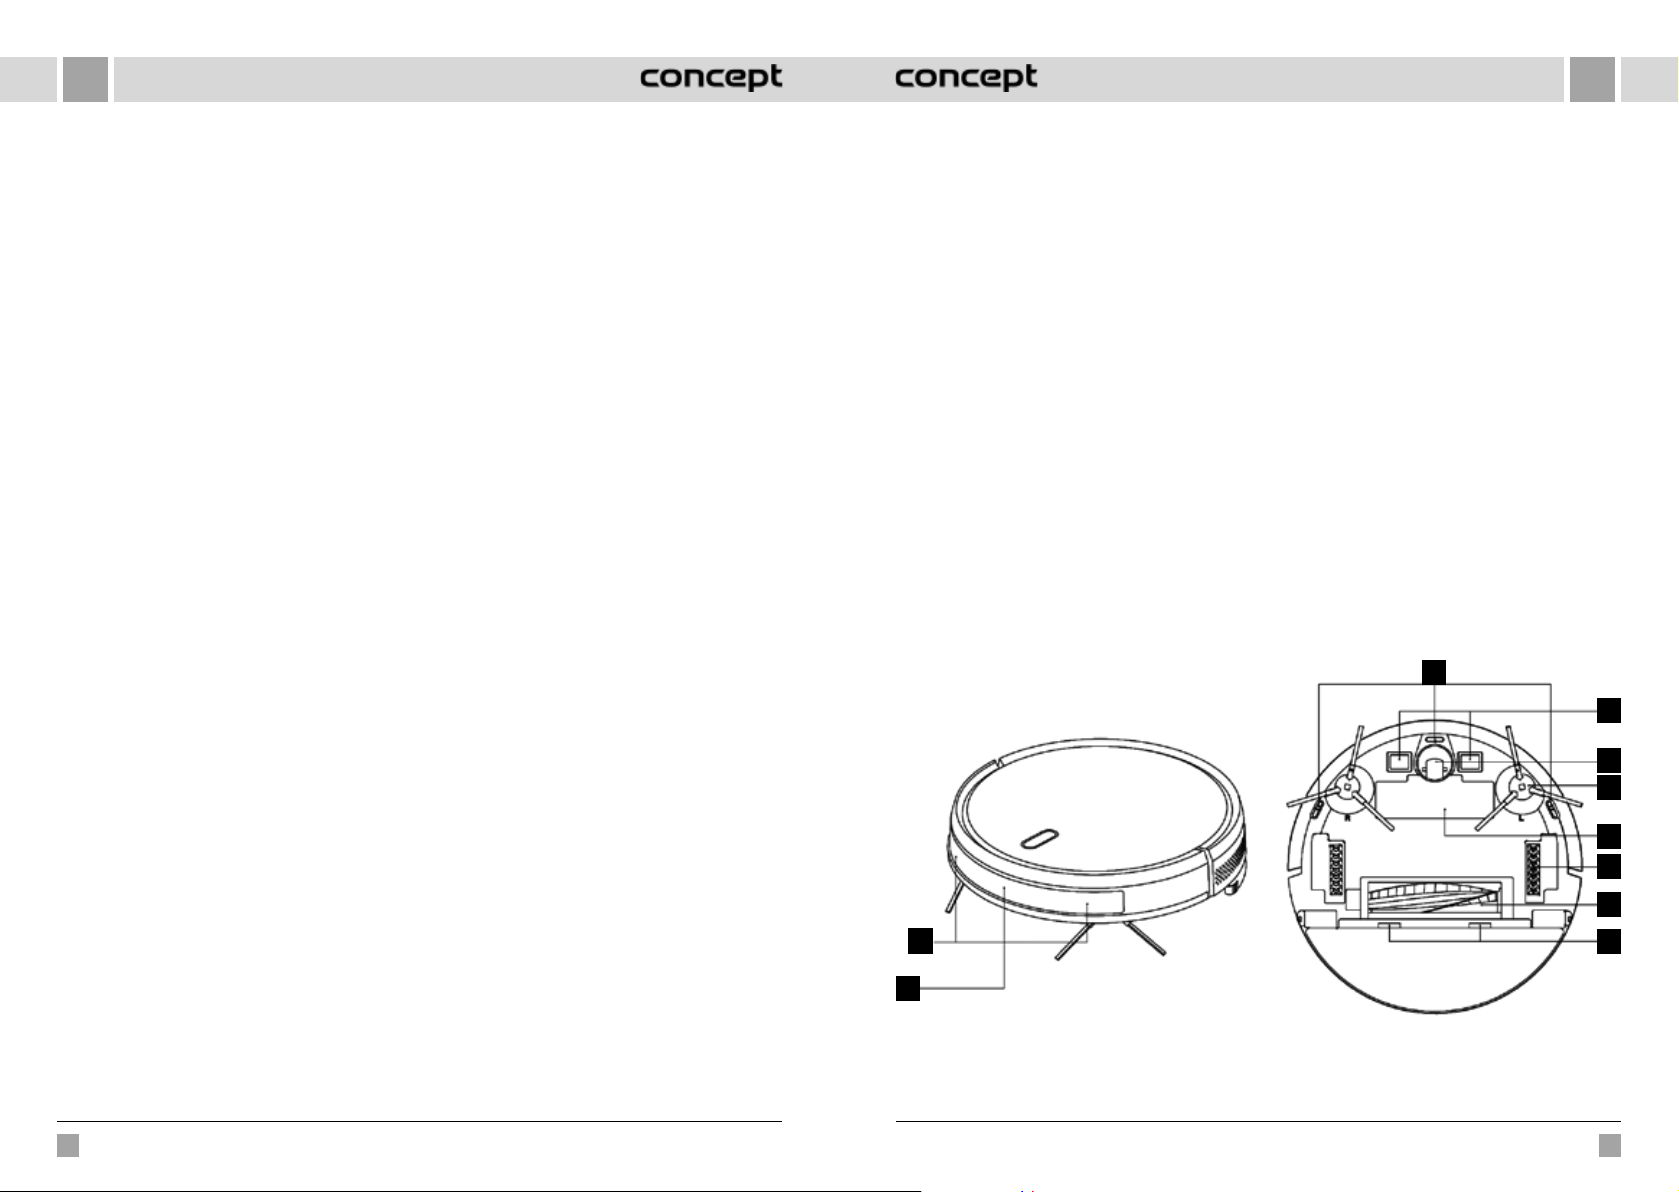
POPIS VÝROBKU
1 Antikolízny senzor
2 Infračervený senzor dobíjania
3 Senzor proti pádu
4 Nabíjací kontakt
5 Univerzálne koliesko
1
2
6 Bočná kefka
7 Kryt akumulátora
8 Hnacie koliesko
9 Hlavná kefa
10 Západka krytu hlavnej kefy
3
4
5
6
7
8
9
10
18 19
VR2110, VR2100 VR2110, VR2100
Page 11
SKSK
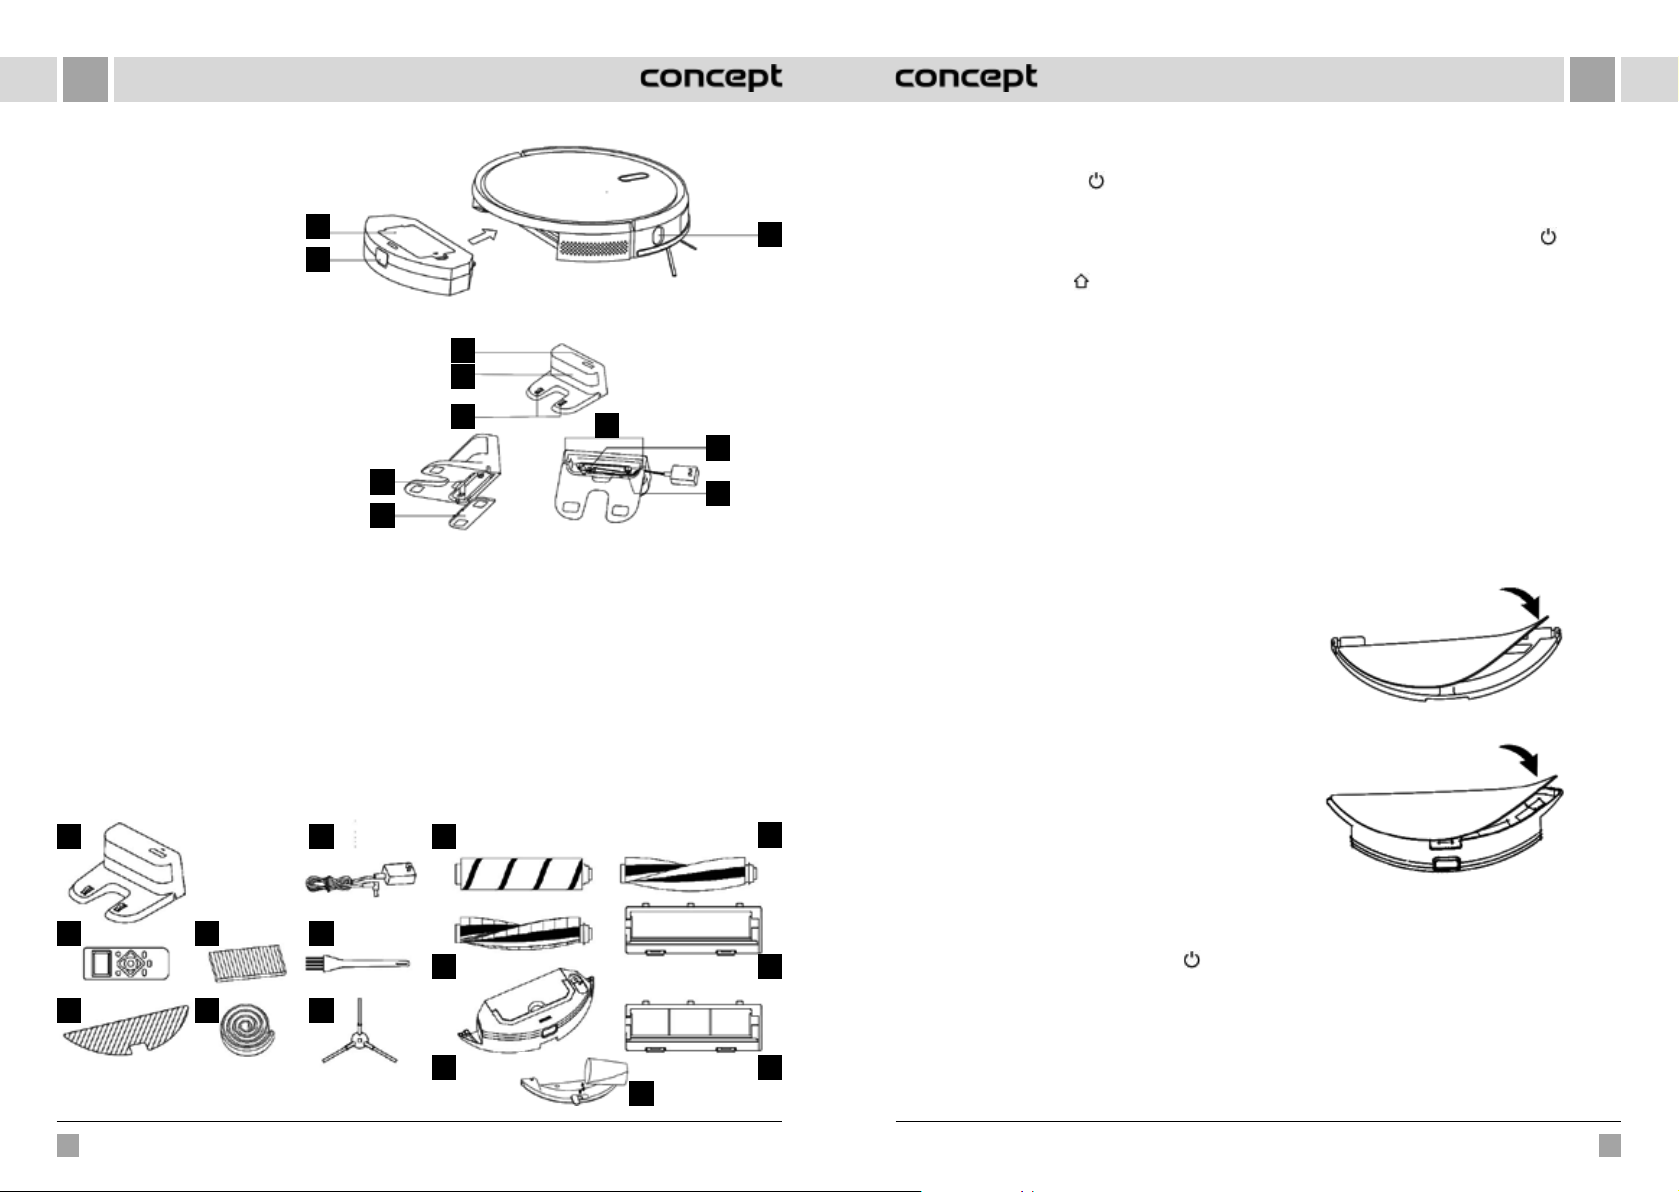
1 Kryt sitka filtra
2 Tlačidlo nádoby na prach
3 Senzor stien
1
2
Dokovacia stanica
1 Kontrolka napájania
2 Oblasť vysielania signálu
3 Nabíjacie kontakty základne
4 Záchytná drážka
5 Krycia doska
6 Priechod pre kábel
7 Zásuvka napájacieho adaptéra
8 Navíjací kolík
Zoznam súčastí
1 Dokovacia stanica 1x
2 Diaľkové ovládanie 1x
3 Textília na vytieranie 2x
4 HEPA filter + penový filter 3x (pri VR2100 2x)
5 Magnetický pásik 1x
6 Adaptér 1x
7 Čistiaca kefka 1x
8 Ľavá a pravá kefka 2x
1
2
3
4
5
6
7
8
1
2
3
6
4
5
9 HARDFLOOR kefa 1x (iba pri modeli VR2110)
UPOZORNENIE! nemožno použiť na koberce, môže
dôjsť kprerušeniu vysávania.
10 CARPET kefa 1x
11 Elektricky ovládaný zásobník na vodu 1x (iba pri
modeli VR2110)
12 PET kefa 1x (iba pri modeli VR2110)
13 Kryt hlavnej kefy 1x (iba pri modeli VR2110)
vhodný pre HARDFLOOR a PET kefu
14 Kryt hlavnej kefy s oceľovým drôtom 1x (vhodný pre
CARPET kefu)
15 Závesný zásobník na vodu 1x (iba pri modeli VR2110)
9
10
11
15
KĽÚČOVÉ FUNKCIE
Vysávanie / zapnutie a vypnutie
• Krátkym stlačením vysávanie spustíte alebo zastavíte.
3
7
8
12
13
14
• Dlhým stlačením na 3 s prístroj zapnete alebo vypnete.
• Dlhým stlačením na 15 s pristroj nútene vypnete za
neobvyklých okolností.
Dobíjanie / lokálne vysávanie
• Krátkym stlačením spustíte nabíjanie alebo zastavenie.
• Dlhým stlačením spustíte lokálne vysávanie.
Kontrolka
• Oranžová: Normálna prevádzka alebo nabíjanie.
• Červená: Abnormálny stav alebo vybitý akumulátor.
• Červeno-oranžová: Prístroj nie je pripojený k sieti.
Reset WiFi
• Stlačte zároveň obe tlačidlá na 3 s.
INŠTALÁCIA
1. Pripojte napájací kábel a prebytočnú dĺžku kábla
uložte do priestoru pre kábel.
2. Dokovaciu stanicu položte k stene a zapojte
napájanie.
Poznámka:
• Zaistite priestor veľkosti min. 0,5 m po oboch stranách
dokovacej stanice a min. 1,5 m pred stanicou.
• Ak je napájací kábel napnutý zvislo k zemi, môže dôjsť
k tomu, že prístroj ho vytiahne, v dôsledku čoho sa
môže vypnúť dokovacia stanica.
• Kontrolka nabíjania je v normálnom stave pri zapnutí
rozsvietená a pri nabití zhasnutá.
3. Dokovaciu stanicu ľubovoľne neposúvajte
anevystavujte ju priamemu slnečnému žiareniu.
Poznámka: Priame slnečné svetlo bude rušiť signál
dokovacej stanice, preto sa prístroj nemusí do dokovacej
stanice správne vrátiť.
4. Inštalácia bočnej kefky
Ubezpečte sa, že označenie ľavej bočnej kefky (L)
apravej bočnej kefky (R) zodpovedá označeniu L a Rna
spodnom kryte Zatlačte bočné kefky L a R, dokým sa
nezve zvuk „zaklapnutia“.
5. Uvedenie do činnosti a nabíjanie
Robot zapnete dlhým stlačením tlačidla
kontrolka napájania normálne zapnutá, robot nabite
vdokovacej stanici.
Poznámka: Ak prístroj nejde spustiť z dôvodu slabého
akumulátora, nabite ho v dokovacej stanici a prístroj sa
spustí automaticky. Prístroj môže normálne pracovať, iba
ak je úroveň akumulátora ≥ 20 %.
. Ak je
6. Pripojenie mobilnej aplikácie (tento krok môžete
preskočiť)
Prečítajte si pokyny na pripojenie Wi-Fi a pripojte
mobilnú aplikáciu.
7. Spustenie vysávania
Po zapnutí robota krátko stlačte tlačidlo
alebo vysávanie spustite pomocou mobilnej aplikácie
(pri používaní môžete prístroj zastaviť stlačením
ľubovoľného tlačidla).
Poznámka:
• Robot určený na zametanie nemožno použiť na
odstránenie tekutín.
• Ak je úroveň nabitia akumulátora nižšia ako 20 %,
prístroj nemôže pracovať. V takom prípade ho nabite.
• Ak je úroveň nabitia akumulátora nižšia ako 20 %,
prístroj sa automaticky vráti do dokovacej stanice.
• Pred použitím odstráňte rôzne vodiče (vrátane
napájacieho kábla dokovacej stanice) z podlahy,
aby ste predišli výpadkom a poškodeniu predmetov
avodičov, ak tieto vodiče prístroj zachytí.
8. Inštalácia modulu na vytieranie
a) Inštalácia textílie na vytieranie: textíliu na vytieranie
prilepte rovno ku dnu zásobníka na vodu.
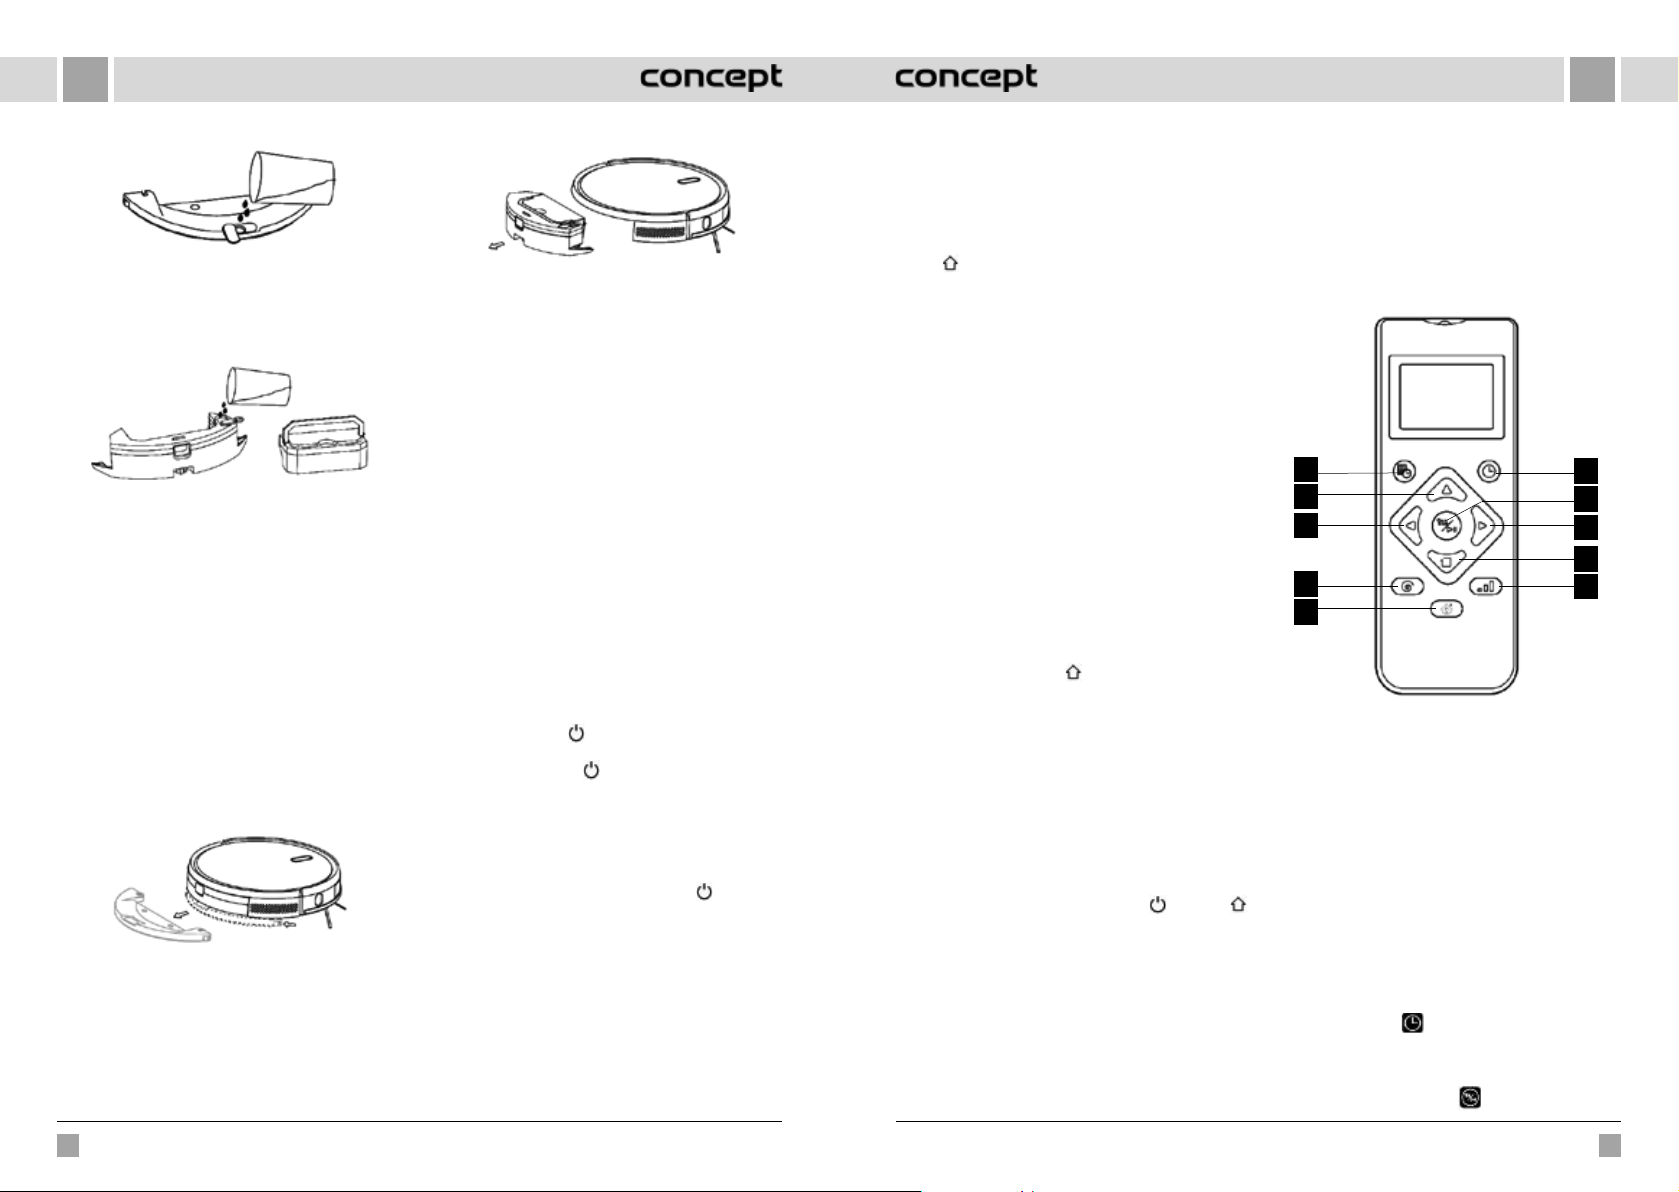
Model VR2100 - Závesný zásobník na vodu
Model VR2110 - Elektricky ovládaný zásobník na vodu
Poznámka: Textíliu na vytieranie po použití vyčistite, aby
ste ju udržali v dobrom stave.
b) Naplňte zásobník na vodu: kryt otvorte a naplňte
vodou.
na robote
20 21
VR2110, VR2100 VR2110, VR2100
Page 12
SKSK
Model VR2100 - Závesný zásobník na vodu
Pred naplnením vodou vyberte nádobu na prach
pomocou rukoväte (VR2110).
Model VR2110 - Elektricky ovládaný zásobník na vodu
c) Nainštalujte modul:
Model VR2100: modul zatlačte vodorovne pozdĺž
zadnej časti robota. Modul je nainštalovaný na
mieste, keď sa ozve zvuk „zaklapnutia“.
Model VR2110: vložte do zásobníka na vodu nádobu
na prach adržadlo vložte do štrbiny. Potom stlačte
a podržte tlačidlo uprostred zásobníka avodorovne
ho zasuňte pozdĺž zadnej časti robota. Modul
je nainštalovaný na mieste, keď sa ozve zvuk
„zaklapnutia“.
9. Vybratie modulu na vytieranie
Model VR2100: Keď robot dokončí svoju prácu,
stlačte západky na oboch stranách, vyberte modul
na vytieranie smerom dozadu, vyprázdnite vodu
zo zásobníka na vodu a vyčistite textíliu (pri čistení
robotom nepohybujte ani ho neprevracajte).
Model VR2100 - Závesný zásobník na vodu
Model VR2110: Keď robot dokončí svoju prácu, stlačte
tlačidlo uprostred zásobníka na vodu, vyberte modul
na vytieranie smerom dozadu, vyprázdnite vodu
zo zásobníka na vodu a vyčistite textíliu (pri čistení
robotom nepohybujte ani ho neprevracajte).
Model VR2110 - Elektricky ovládaný zásobník na vodu
10. Pokyny pri použití modulu na vytieranie
• Modul na vytieranie nepoužívajte, ak ho nemáte pod
dohľadom.
• Z dôvodu bezpečnosti sa ubezpečte, že modul
na vytieranie je vybratý pri nabíjaní a tiež, keď ho
nepoužívate.
• Nepokúšajte sa vytierať koberec.
• Pre dosiahnutie lepšieho účinku vytierania by mal
modul na vytieranie použiť až po trojitom zametaní
alebo po vysávaní podlahy.
• Ak chcete doplniť vodu alebo vyčistiť textíliu pri
činnosti prístroja, zastavte ho, vyberte a znova vložte
modul na vytieranie podľa krokov 8 a 9. Nepresúvajte
ani neprevracajte prístroj, aby nedošlo k chybe pri
určovaní polohy alebo strate mapy.
• Funkcia vytierania je u prístroja určená na zotretie
apomáha hĺbkovému čisteniu. Nedokáže však účinne
odstrániť pevne prichytené nečistoty a nahradiť tak
ľudskú silu.
POUŽITIE
ZAPNUTIE/VYPNUTIE
Dlho stlačte tlačidlo na 3 s, kontrolka sa rozsvieti
aprístroj sa spustí.
Dlho stlačte tlačidlo na 3 s, keď je prístroj
vpohotovostnom režime, kontrolka zhasne a prístroj sa
vypne.
POZNÁMKA: Prístroj nemožno vypnúť, keď sa práve
nabíja.
VYSÁVANIE/ZASTAVENIE
Po spustení prístroja krátko stlačte tlačidlo
alebo prístroj spusťte pomocou mobilnej aplikácie
(stlačením ktoréhokoľvek tlačidla ho môžete zastaviť).
Poznámka:
• Robotický vysávač nemožno použiť na odstránenie
tekutín.
• Ak je úroveň nabitia akumulátora nižšia ako 20 %,
prístroj nemôže pracovať. V takom prípade ho nabite.
• Ak je úroveň nabitia akumulátora nižšia ako 20 %,
prístroj sa automaticky vráti do dokovacej stanice.
• Pred použitím odstráňte z podlahy rôzne vodiče
(vrátane napájacieho kábla dokovacej stanice), aby ste
na prístroji
predišli výpadkom a poškodeniu predmetov a vodičov,
ak tieto vodiče robot zachytí.
NABÍJANIE
Automatický režim: Po práci sa prístroj automaticky vráti
do dokovacej stanice.
Ručný režim: V zastavenom stave krátkym stlačením
tlačidla
ovládaním pomocou mobilnej aplikácie. Kontrolka bliká,
ak je prístroj nabitý.
Poznámka: Ak prístroj nenájde dokovaciu stanicu,
automaticky sa vráti do pôvodnej polohy. V takom prípade
vložte prístroj späť do dokovacej stanice ručne.
MAGNETICKÝ PÁSIK
Magnetické pásiky možno nastaviť tak, aby oddeľovali
oblasti, ktoré sa nemajú vysávať (napríklad kúpeľne,
kuchyne atď.).
Poznámka: magnetický pásik pripevnite k podlahe tak,
aby sa nemohol posunúť. V opačnom prípade to bude
mať vplyv na jeho účinnosť.
REŽIM VYSÁVANIA
Po spustení sa bude stroj pohybovať podľa čistiaceho
programu v oblúkoch, aby vyčistil celú plochu podlahy
a dokončil čistenie všetkých miestností jednej po druhej
pravidelným, efektívnym spôsobom s plným pokrytím. Po
dokončení vysávania sa prístroj vráti späť do dokovacej
stanice aautomaticky sa nabije.
LOKÁLNE VYSÁVANIE
Dlhým stlačením tlačidla
lokalizuje, vyčistí kruhovú oblasť s priemerom 1,5 m apo
dokončení čistenia sa automaticky vráti do základného
umiestnenia a automaticky prestane pracovať.
PLÁNOVANIE VYSÁVANIA
Pevne daný čas vysávania možno nastaviť pomocou
mobilnej aplikácie. Prístroj začne automaticky vysávať
vstanovenom čase a po dokončení sa vráti do dokovacej
stanice.
RESET WIFI
Ak sa mobilným telefónom k prístroju nemožno pripojiť
z dôvodu zmeny konfigurácie routera a hesla alebo
ziných dôvodov, stlačte zároveň tlačidlo
na 3 s, dokým sa neozve hlasová výzva „WiFi has been
reset“ (WiFi bola resetovaná) a kontrolka sa rozsvieti
modrofialovo a bude pomaly blikať.
TICHÝ REŽIM
Hlasové hlásenia robota môžete zapnúť alebo vypnúť
pomocou mobilnej aplikácie.
NASTAVENIE SACIEHO VÝKONU
Sací výkon môžete nastaviť na tichú, štandardnú alebo
vysokú úroveň pomocou mobilnej aplikácie.
Pri detekcii koberca dôjde k automatickému nárastu
spustíte nabíjanie alebo môžete prístroj nabíjať
na 3 sekundy sa robot
a tlačidlo
sacej sily na najvyšší stupeň. UPOZORNENIE - koberec je
správne detegovaný iba sCarpet kefkou.
NASTAVENIE PRIETOKU VODY (iba pre elektricky
ovládaný zásobník na vodu pri modeli VR2110)
Prietok vody môžete nastaviť na nízku, štandardnú alebo
vysokú úroveň pomocou mobilnej aplikácie.
POUŽITIE DIAĽKOVÉHO OVLÁDANIA
1
2
3
6
7
8
9
4
10
5
1. Plánovanie vysávania
2. Pohyb vpred
3. Otočenie vľavo
4. Lokálne TURBO vysávanie
5. Spustenie/zastavenie nabíjania
6. Automatické vysávanie/pauza
7. Vysávanie/pauza
8. Otočenie vpravo
9. Obvodové vysávanie
10. Nastavenie sacieho výkonu / prietoku vody
Poznámka: Ak chcete zaistiť, aby všetky správne
nastavenia boli účinné, diaľkové ovládanie musíte
nasmerovať na prednú časť robotického vysávača, a to
zdostatočnej blízkosti.
Nastavenie času
1. Stlačením tlačidla
do nastavenia času, na LCD displeji bliká symbol pre
nedeľu.
2. Stlačením ľavého a pravého tlačidla vyberte deň
vtýždni a stlačením tlačidla ho potvrďte, potom sa
na diaľkovom ovládači vstúpite
22 23
VR2110, VR2100 VR2110, VR2100
Page 13
SKSK
LCD displej automaticky prepne na nastavenie hodín.
3. Stlačením tlačidiel hore a dole nastavte hodinu
a stlačením tlačidiel vľavo a vpravo prejdete na
nastavenie minút.
4. Po nastavení aktuálneho času nasmerujte diaľkový
ovládač na prednú časť robotického vysávača a stlačte
tlačidlo pre potvrdenie všetkých nastavení času.
Ak tak neurobíte, vaše nastavenie bude neplatné.
5. Takto dokončíte nastavenie času pre diaľkové
ovládanie ajrobotický vysávač.
Plán vysávania
1. Stlačením tlačidla
na diaľkovom ov ládači vstúpite
do nastavenia plánu, na LCD displeji bude blikať
symbol pre nedeľu.
2. Stlačením ľavého a pravého tlačidla vyberte deň
vtýždni a stlačením tlačidla
ho potvrďte, potom sa
LCD displej automaticky prepne na nastavenie hodín.
3. Stlačením tlačidiel hore a dole nastavte hodinu
a stlačením tlačidiel vľavo a vpravo prejdete na
nastavenie minút. Potom nasmerujte diaľkový ovládač
na prednú časť vysávača robota a stlačením tlačidla
potvrďte toto nastavenie plánu pre robotický
vysávač.
4. Po dokončení jedného nastavenia plánu prejde
diaľkový ovládač automaticky na ďalšie nastavenie
plánu. Ak nechcete pokračovať v nastavovaní, stlačte
tlačidlo pre ukončenie alebo 10 s počkajte, než sa
nastavenie ukončí automaticky.
5. Takto dokončíte nastavenie času pre diaľkové
ovládanie ajrobotický vysávač.
Zrušenie plánu vysávania
1. Stlačte tlačidlo
na diaľkovom ovládači, na LCD
displeji bude blikať symbol pre nedeľu a zobrazia sa
symboly pre dni v týždni, ktoré ste naplánovali.
2. Stlačením ľavého a pravého tlačidla vyberte deň
v týždni, ktorý ste naplánovali, a dlhým stlačením
tlačidla na 3 s tento plán zrušte. Môžete vybrať
aj ďalší naplánovaný deň, ktorý chcete zrušiť, alebo
stlačte tlačidlo pre ukončenie, alebo počkajte 10s,
než sa nastavenie ukončí automaticky.
KAŽDODENNÁ ÚDRŽBA
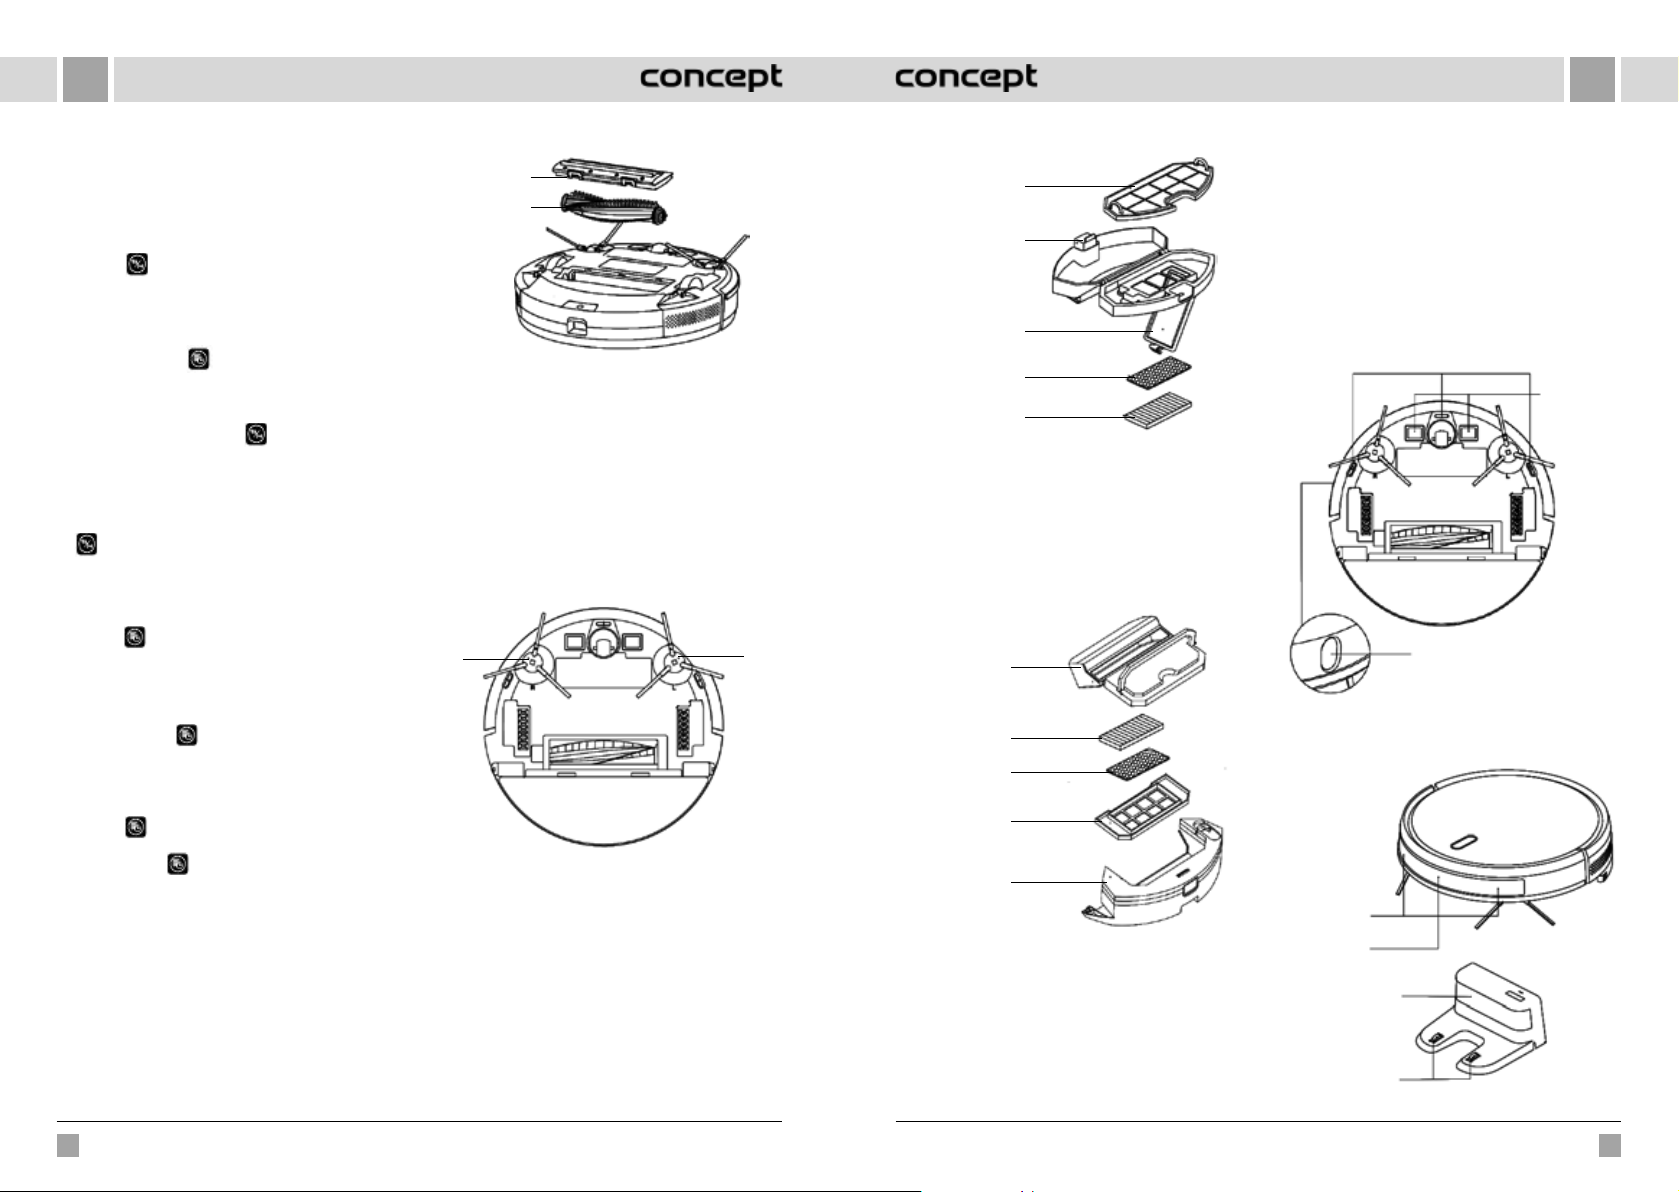
Hlavná kefa (pravidelne čistite)
1. Prístroj otočte a stlačte západku na kry te hlavnej kefy,
aby ste kefu mohli vytiahnuť.
2. Odstráňte prach z vnútorného priestoru a zvnútra
hlavnej kefy pomocou malej kefky a očistite hlavnú
kefu.
3. Znova zložte hlavnú kefu a pevne zatlačte na kryt, aby
západka zaklapla na miesto.
Západka
Hlavná
kefa
Bočnú kefku (pravidelne čistite)
1. Prístroj otočte a bočnú kefku vytiahnite smerom
nahor.
2. Odstráňte vlasy a nečistoty a bočnú kefku namontujte
späť.
3. Ubezpečte sa, že ľavá bočná kefka (L) a pravá bočná
kefka (R) zodpovedajú symbolom L a R na spodnom
kryte. Zatlačením na bočné kefky L a R ich znova
nainštalujte.
Poznámka: Bočné kefky meňte každých 3 až
6mesiacov, aby sa zaistil ich čistiaci účinok.
R - pravá bočná
kefka
L - ľavá bočná
kefka
Nádobu na prach a mriežku filtra (pravidelne čistite)
1. Stlačte tlačidlo a nádobu na prach vytiahnite smerom
dozadu.
2. Nádobu na prach otvorte a vyčistite.
Čistenie mriežky filtra (pravidelne čistite)
1. Po dlhodobom používaní vyberte mriežku filtra,
penový filter a HEPA filter.
2. Vyčistite vybratú mriežku filtra. Penový filter a HEPA
filter opláchnite pod vodou.
3. Jednotlivé diely utrite a nechajte voľne uschnúť.
4. Po oschnutí ich postupne nainštalujte v správnom
poradí: mriežka - penový filter - HEPA filter.
Filtračná mriežka
(hrubý filter)
Tlačidlo
Kryt filtra
Penový
filter
HEPA filter
Poznámka:
• Mriežku filtra opláchnite čistou vodou, nepridávajte
žiadny čistiaci prostriedok.
• Mriežku filtra nečistite štetcom ani prstami.
• Mriežku filtra nechajte oschnúť na vzduchu aspoň
24hodín.
• Mriežku filtra meňte každých 3 až 6 mesiacov.
Čistenie filtra (pravidelne čistite)
Nádoba na
prach
HEPA filter
Penový
filter
Filtračná mriežka
(hrubý filter)
Nádoba na
vodu
Elektricky ovládaný zásobník na vodu
Modul na vytieranie (čistite po každom použití)
1. Odstráňte textíliu, vylejte vodu zo zásobníka na vodu.
2. Vyčistite textiliu, vysušte zásobník na vodu aj textíliu.
Primodeli VR2110 najprv vytiahnite nádobu na prach
a potom zo zásobníku na vodu vylejte vodu.
Senzory (pravidelne čistite)
Senzory čistite mäkkou textíliou nasledujúcim spôsobom:
1. Vyčistite senzory pozdĺž steny vpravo.
2. Tri senzory proti pádu v spodnej časti prístroja.
3. Infračervený antikolízny senzor v prednej časti
prístroja.
4. Chránič pred úrazom elektrickým prúdom a kontakty
pre dokovaciu stanicu v spodnej časti prístroja (pri
čistení prístroj vypnite).
5. Oblasť na prenos signálu dokovacej stanice.
Senzor proti pádu
Nabíjací
kontakt
TOF senzor
Senzory (čistite každý mesiac)
Antikolízny
senzor
Infračervený
senzor dobíjania
Oblasť vysielania
signálu
Nabíjacie kontakty
základne
24 25
VR2110, VR2100 VR2110, VR2100
Page 14
SKSK
Akumulátor
• Prístroj je vybavený vysokovýkonnými lítiovo-iónovými
akumulátormi. Ak chcete zachovať výkon akumulátora,
pri každodennom používaní udržujte prístroj nabitý.
• Ak sa prístroj dlhší čas nepoužíva, vypnite ho
a riadne uložte. Nabite ho aspoň každé 3 mesiace,
aby ste predišli poškodeniu akumulátora v dôsledku
nadmerného vybitia.
Aktualizácia firmware
Firmware aktualizujte pomocou mobilnej aplikácie. Ak
sa zistí nový firmware, urobte aktualizáciu podľa výzvy.
Pri aktualizácii firmware by mala byť úroveň akumulátora
≥50 %, preto by mal byť prístroj umiestnený v dokovacej
stanici.
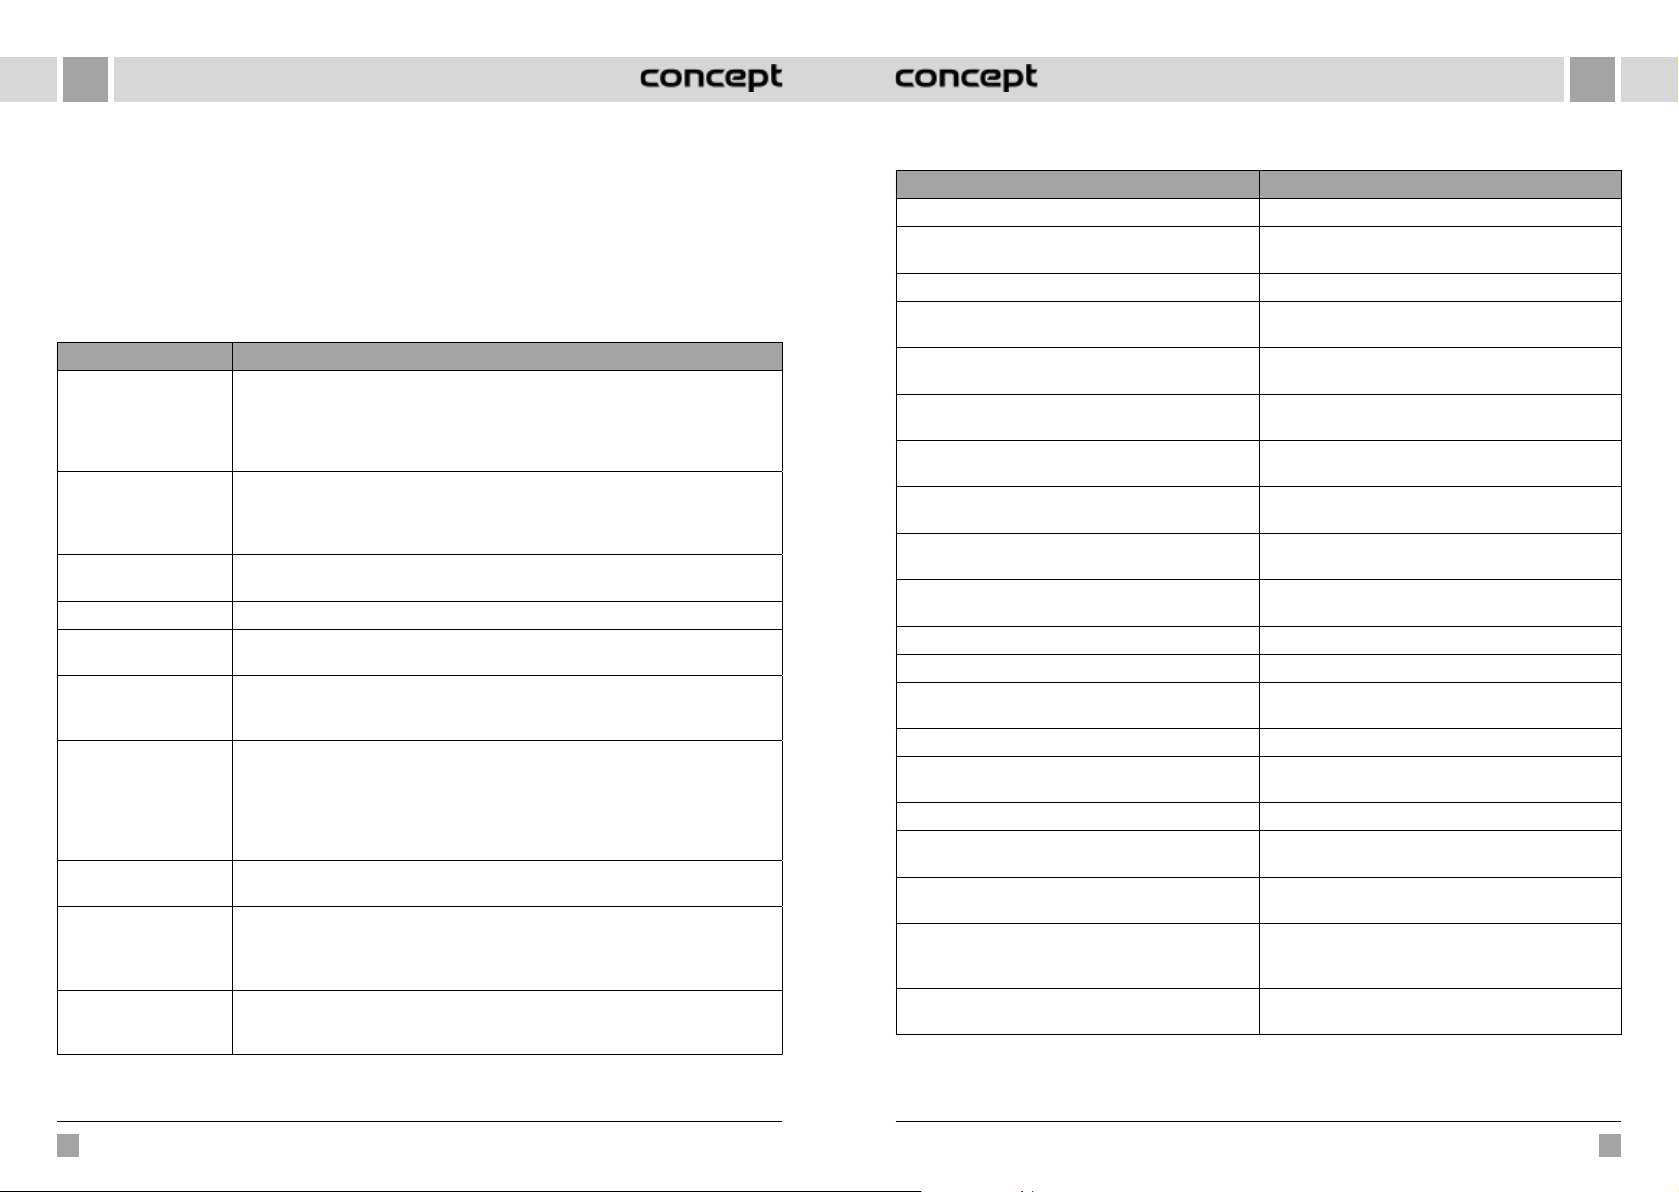
BEŽNÉ PROBLÉMY
Problém Riešenie
Robot nejde spustiť • V prípade nízkeho stavu akumulátora umiestnite robot do dokovacej stanice
Robot nejde nabiť • Robot presuňte mimo stanicu, skontrolujte, či sa rozsvieti kontrolka dokovacej stanice
Robot nie je možné dobiť Robot je príliš ďaleko od dokovacej stanice, umiestnite ho do blízkosti dokovacej stanice
Abnormálne správanie Robot vypnite a reštartujte.
Pri použití sa ozýva
neobvyklý hluk
Znižuje sa schopnosť
čistenia, alebo z prístroja
vypadáva prach
WiFi nemožno pripojiť • Je zlý signál WiFi. Skontrolujte, či je k dispozícii dobré pokrytie signálom WiFi.
Plánované vysávanie
neprebehlo
Spotrebováva robot
energiu, ak je vždy
umiestnený v dokovacej
stanici?
Treba robot na prvýkrát
nabíjať trikrát po dobu
16hodín?
avyrovnajte podľa kontaktov dosky, prístroj sa automaticky spustí (ak je robot úplne
vypnutý, môže sa po chvíli nabíjania automaticky spustiť).
• Nepoužívajte prístroj, ak je teplota prostredia nižšia ako 0 °C alebo vyššia ako 50 °C.
Používajte ho pri teplote 0 až 40 °C.
a či sú oba konce napájacieho adaptéra dokovacej stanice správne pripojené.
• V prípade zlého kontaktu vyčistite kontaktné plôšky dokovacej stanice a nabíjacie
kontakty na robote alebo otočte bočnú kefku nabok.
askúste to znova.
Hlavná kefa, bočná kefka alebo koliesko môžu byť obalené cudzími predmetmi, robot
vypnite a cudzie predmety odstráňte.
• Nádoba na prach je plná. Vyčistite ju.
• Mriežka filtra je zanesená. Vyčistite ju alebo vymeňte.
• Hlavná kefa je obalená cudzími predmetmi, vyčistite ju.
• WiFi je pripojené neobvyklým spôsobom. Resetujte WiFi, stiahnite si najnovšiu
aplikáciu a skúste sa znova pripojiť.
• Heslo je zadané nesprávne.
• Je k dispozícii router pre frekvenčné pásmo 5G, robotický vysávač je vybavený iba pre
frekvenčné pásmo 2,4G.
V prípade nízkej úrovne nabitia akumulátora možno plánované vysávanie začať iba
vtedy, ak je úroveň nabitia akumulátora aspoň 30 %.
Robot spotrebováva malé množstvo energie, ak je trvale umiestnený v dokovacej stanici,
čo umožňuje najlepší výkon akumulátora.
Lítiový akumulátor možno použiť hneď po nabití a nemá pamäťový efekt.
RIEŠENIE PROBLÉMOV
Zvukové hlásenie Riešenie
Error 1: Oh dear! I cannot find the dust collector Vysávanie bolo spustené po vybratí nádoby na prach.
Error 2: Please check if the radar on top has been covered
or blocked
Error 3: Please place me in a new location and try again Robot zoberte alebo ho zdvihnite do vzduchu.
Error 4: Please scrub the cliff sensor, and restart me from
a new location
Error 5: Please scrub the front sensor, and restart me from
a new location
Error 6: Please scrub the right-hand sensor, and restart
me from a new location
Error 7: Please scrub the radar housing on top, and restart
me from a new location
Error 8: Please check if the bumper has been blocked in
some way
Error 9: Master, please clean the dust container and filter Nádoba na prach je plná alebo treba vymeniť mriežku
Error 10: Dust container has been removed, please clean
the container and filter
Error 11: I'm stuck, please help me! Robot sa niekde zasekol.
Error 12: Please place me correctly! Robot je naklonený.
Error 13: Please check if my wheels have become blocked
somewhere
Error 14: Please check if the main brush has become stuck Hlavná kefa je zamotaná alebo zaseknutá.
Error 15: Please check if the side brushes have become
stuck
Error 16: What's going on? Where is the docking station? Dokovacia stanica sa nenašla alebo nie je zapojená.
Error 17: Oh dear! Program error, please restart me Abnormálny stav spôsobený neznámym zlyhaním, robot
Error 18: Error encountered initiating shutdown Robot upozorní užívateľa a automaticky sa vypne alebo
Error 19: Low battery, please recharge Ak je úroveň nabitia akumulátora príliš nízka, robot nie je
Error 20: To shut me down, please place me away from
the docking station
Horný senzor je zakrytý alebo je umiestnený v otvorenom
priestore (v oblasti 6x6 m2 nie je žiadna prekážka).
Senzor proti pádu je zakrytý alebo je umiestnený vo
výške.
Infračervený antikolízny senzor je znečistený alebo
zakrytý.
Senzor stien je znečistený alebo zakrytý.
Radarový antikolízny senzor je znečistený alebo zakrytý.
Senzor hrán alebo antikolízny senzor je zaseknutý.
filtra.
Po signalizácii poruchy 9 užívateľ vybral nádobu na
prach, čím sa spustí porucha 10.
Hnacie koliesko je zaseknuté alebo zamotané.
Bočná kefka je zamotaná alebo zaseknutá.
reštartujte.
sa dobije.
v dokovacej stanici a spustí sa vysávanie (úroveň nabitia
akumulátora je nižšia ako 10 %).
Pri nabíjaní v dokovacej stanici bol robot vypnutý.
26 27
VR2110, VR2100 VR2110, VR2100
Page 15
SKSK
BEZDRÔTOVÉ SPOJENIE A KOMPATIBILITA
• Spoločnosť Jindřich Valenta - CONCEPT nemôže byť žiadnym spôsobom zodpovedná za žiadne náhodné, nepriame
alebo následné škody, ani za straty údajov alebo straty spôsobené únikom informácií pri komunikácii prostredníctvom
bezdrôtových technológií.
• Úspešnú bezdrôtovú komunikáciu nemožno 100% zaručiť u všetkých Smart zariadení a Wifi sietí (routerov). Vzhľadom
na rozmanitosť prístrojov na trhu môžu nastať prípady, keď charakter alebo špecifikácia daného Smart zariadenia
alebo Wifi siete (routera) znemožňuje pripojenie, prípadne je nejakým spôsobom narušené. Úspešnosť bezdrôtovej
komunikácie prostredníctvom Wifi siete ďalej ovplyvňujú aj mnohé faktory vrátane hardvérovej a softvérovej
konfigurácie. Spojenie medzi robotom a vašou Wifi sieťou môže byť negatívne ovplyvnené aj okolitými Wifi sieťami,
ktoré môžu byť naladené na rovnaký kanál a tak narúšať spojenie (napr. na sídliskách, v bytových domoch a pod.).
Tieto skutočnosti nie sú dôvodom nareklamáciu spotrebiča.
• Aplikáciu vlastní a prevádzkuje tretí subjekt (ďalej iba „Subjekt") odlišný od spoločnosti Jindřich Valenta - CONCEPT
(ďalej iba „Predajca"). Subjektu nie sú zo strany Predajcu odovzdávané žiadne osobné údaje. Pri registrácii do aplikácie
zákazník odovzdá osobné údaje priamo Subjektu, ktorý sa stáva správcom osobných údajov. Aplikácia a s tým spojená
ochrana osobných údajov sa riadia pravidlami Subjektu.
Kompatibilita:
Operačný systém smart zariadení - Android 5.0 a vyšší
- IOS 9.0 a vyšší
Wifi sieť - 2,4 GHz
- zabezpečenie WPA1 a WPA2 (odporúčané WPA2)
UPOZORNENIE: Zariadenie nemožno prevádzkovať na Wifi sieťach zabezpečených protokolom IEEE 802.1X (spravidla
firemné Wifi siete).
OVLÁDANIE POMOCOU APLIKÁCIE
Prv než bude možné ovládať zariadenie prostredníctvom aplikácie, treba ho spojiť s vaším telefónom a umožniť mu
prístup do vašej WiFi siete.
Stiahnutie a inštalácia aplikácie
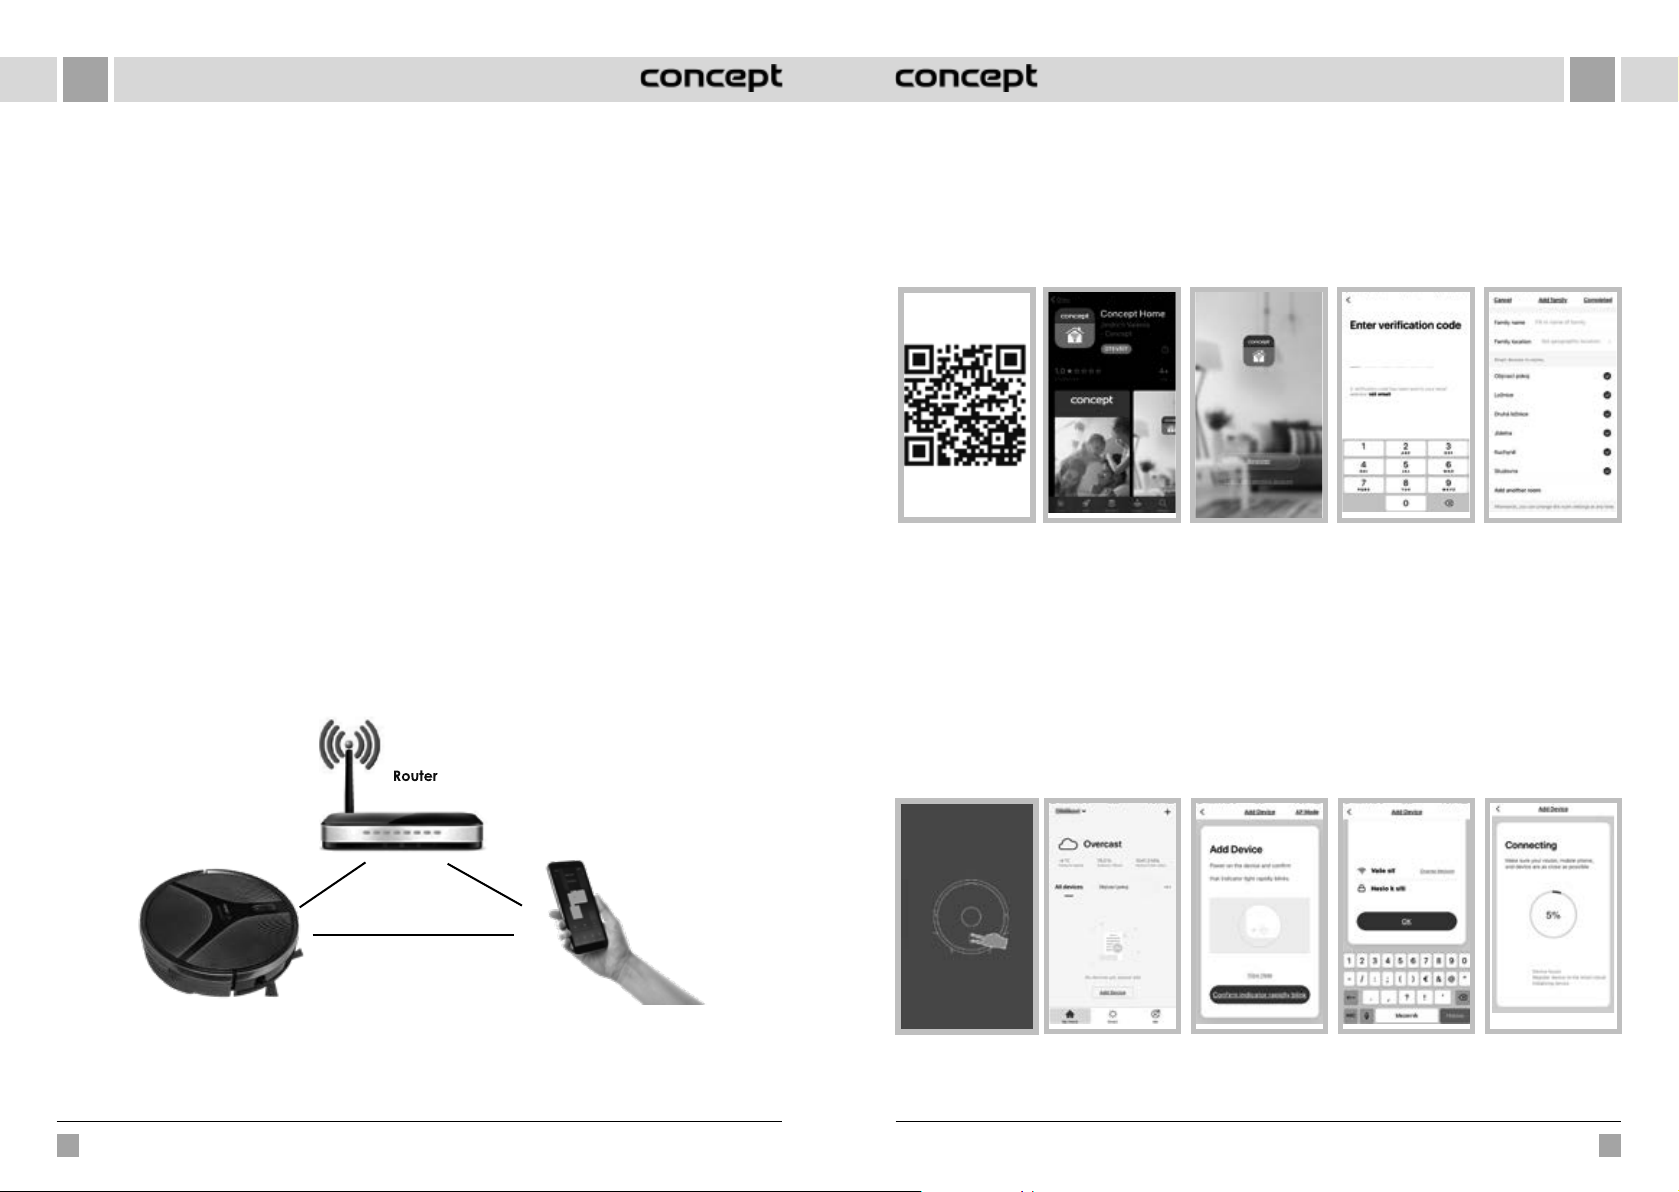
1. Naskenujte QR kód nižšie (obr. 1) alebo vyhľadajte aplikáciu „Concept Home“ na Google Play alebo App Store
astiahnite si ju do mobilného telefónu (obr. 2)
2. Ak už máte Concept Home, otvorte aplikáciu, prihláste sa a pokračujte na pokyny pre párovanie.
3. Ak ste nový užívateľ, začnite registráciu (obr. 3). Pokračujte podľa inštrukcií až k zadaniu overovacieho kódu
adokončite registráciu (obr. 4).
4. Postupujte ďalej podľa inštrukcií a vytvorte si rodinu (obr. 5).
obr. 1
Pokyny pre spárovanie zariadenia
1. Na začiatku párovania treba, aby ste boli pripojení k vašej WiFi sieti.
2. Pred pripojením sa ubezpečte, že zariadenie je v pohotovostnom režime. Po dobu najmenej 3 sekúnd súčasne
stlačte obe tlačidlá (obr. 6), dokým robot nezačne blikať a nezaznie zvukové hlásenie „WiFi lost, please follow the App
instruction for reconnection“. Skontrolujte, či telefón je pripojený k rovnakej sieti WiFi, ku ktorej chcete pripojiť robot.
3. Potom v aplikácii stlačte + alebo „Add device“ (obr. 7) pre pridanie nového zariadenia.
4. Potvrďte „Confirm indicator rapidly blink“ (obr. 8)
5. Vyberte vašu WiFi sieť, ku ktorej sa má zariadenie pripojiť a zadajte jej heslo (obr. 9).
6. Začne sa proces nastavenia, ktorý môže nejaký čas trvať (obr. 10).
7. Váš telefón sa pokúsi spojiť so zariadením a pripojí ho do vašej WiFi siete.
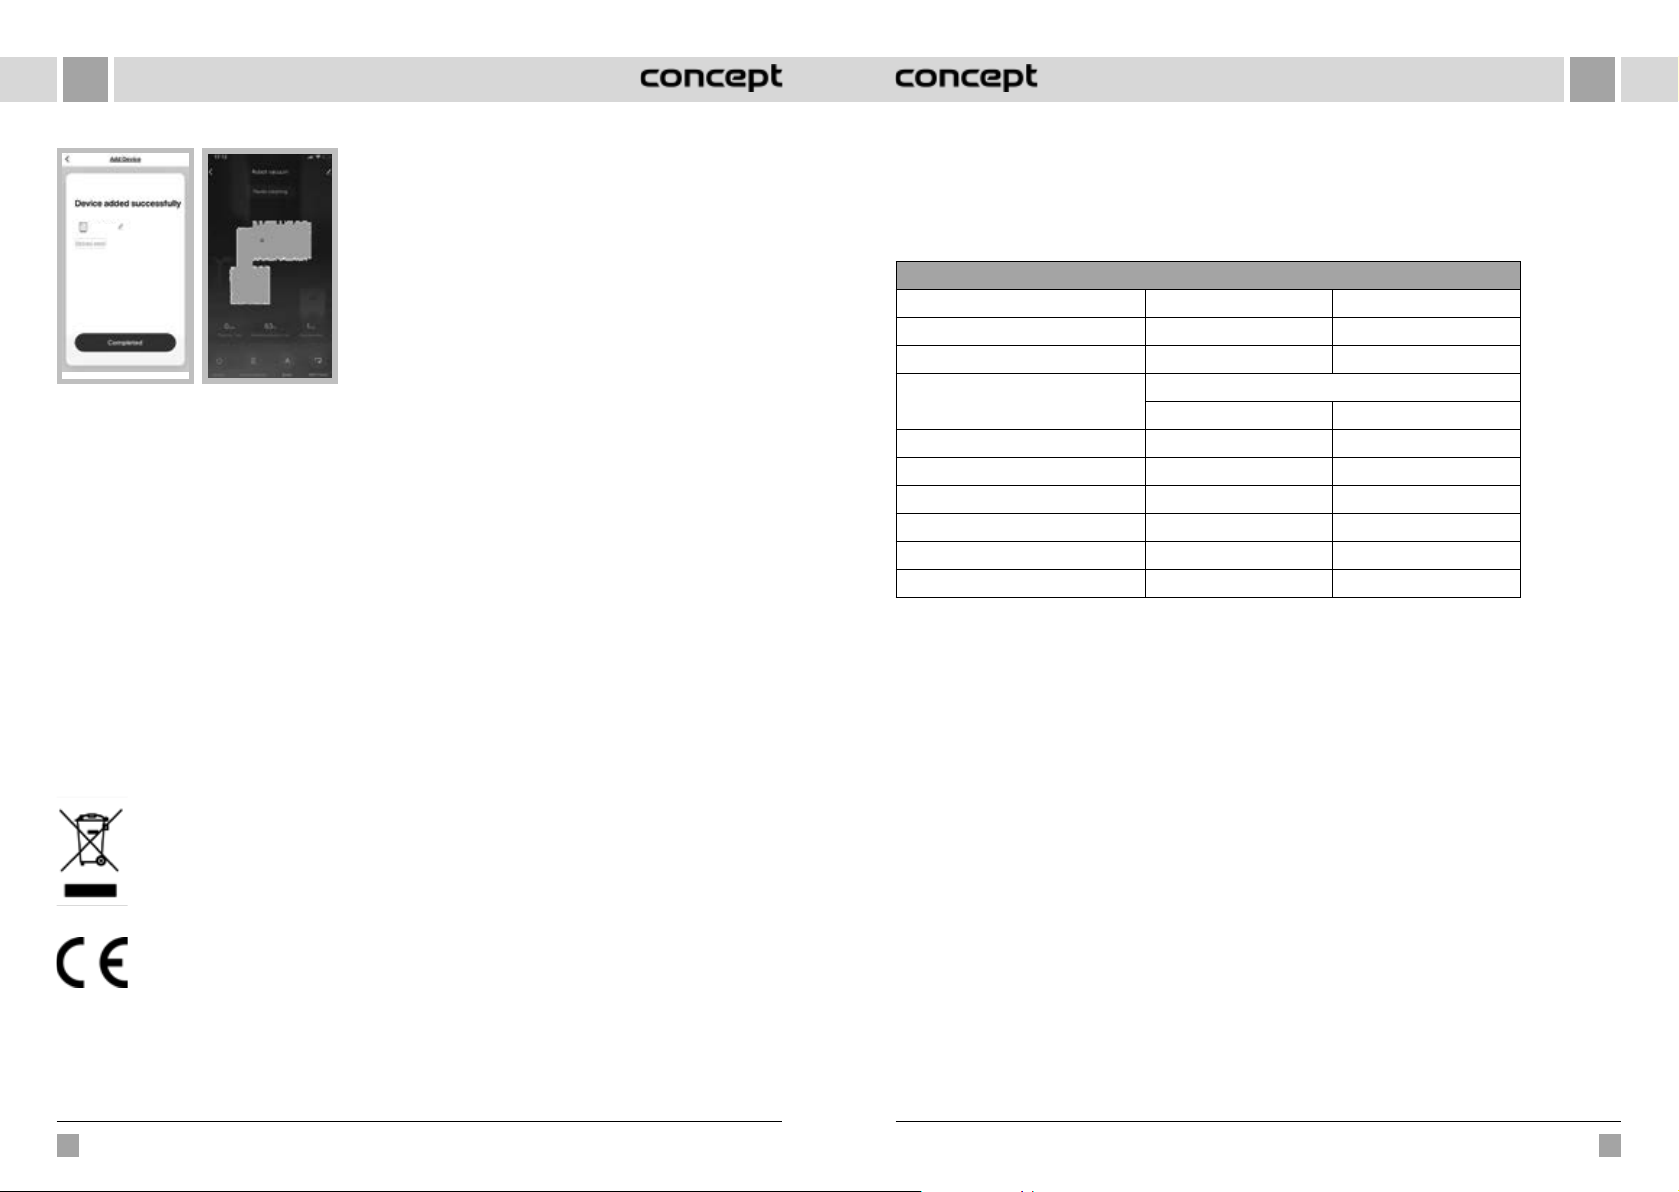
8. Po úspešnom nastavení (obr. 11) stlačte „Completed“ a vstúpite do rozhrania na ovládanie zariadenia (obr. 12).
obr. 2 obr. 3 obr. 5obr. 4
Odporúčaná vzdialenosť pri nastavení: menej ako 4 metre
Ubezpečte sa, že robotický vysávač, router a váš mobilný telefón sú blízko seba, aby mohlo prebehnúť bezproblémové
párovanie.
28 29
VR2110, VR2100 VR2110, VR2100
obr. 6 obr. 7 obr. 8 obr. 9 obr. 10
Page 16
SK
PL
Upozornenie pri problémoch s párovaním
• Overte správnosť zadaného hesla vašej WiFi siete.
• Zariadenie podporuje iba WiFi siete 2,4 GHz.
• Router je zahltený pripojením mnohých iných zariadení.
Concept
obr. 11
Režimy aplikácie
Môžete vyberať medzi čistiacimi režimami AUTO (Automatický/ZIGZAG), Lokálny (Kruhový), Obvodový (EDGE) a DOCK
(vyhľadanie dokovacej stanice).
obr. 12
• Pri pokuse o spojenie so zariadením (obr. 10) sa skúste
ručne pripojiť na jeho WiFi sieť.
SERVIS
Údržbu rozsiahlejšieho charakteru alebo opravu, ktorá vyžaduje zásah do vnútorných častí prístroja, môže vykonať len
kvalifikovaný odborník alebo servis.
OCHRANA ŽIVOTNÉHO PROSTREDIA
• Preferujte recykláciu obalových materiálov a starých prístrojov.
• Škatuľu od prístroja môžete dať do zberu triedeného odpadu.
• Plastové vrecúška zpolyetylénu (PE) odovzdajte ako zberný odpad narecykláciu.
Recyklácia prístroja na konci jeho životnosti:
Tento spotrebič je označený podľaeurópskej smernice 2012/19/EÚ o elektrickom odpade a elektrických
zariadeniach (WEEE). Symbol na výrobku alebo jeho obale udáva, že tento výrobok nepatrí do
domáceho odpadu Treba ho odovzdať na zberné miesto na recykláciu elektrických a elektronických
zariadení. Zaistením správnej likvidácie tohto výrobku zabránite negatívnym dôsledkom na životné
prostredie a ľudské zdravie. Likvidácia musí byť vykonaná vsúlade s predpismi na likvidáciuodpadu.
Podrobnejšie informácie o recyklácii tohto výrobku zistíte na príslušnom miestnom úrade, u služby na
likvidáciu domového odpadu alebo vobchode, kde ste výrobok kúpili.
Tento výrobok spĺňa všetky základné požiadavky smerníc EÚ, ktoré sa naň vzťahujú.
Zmeny v texte, vzhľade a technických špecifikáciách môžu nastať bez predošlého upozornenia a na tieto zmeny si
vyhradzujeme právo.
PODZIĘKOWANIE
Dziękujemy za zakup produktu marki Concept i życzymy Państwu zadowolenia z naszego produktu przez cały czas jego
użytkowania.
Przed pierwszym użyciem prosimy o uważne przeczytanie całej instrukcji obsługi oraz zachowanie jej na przyszłość.
Należy zadbać o to, aby także inne osoby, które będą obchodziły się z produktem, zapoznały się z niniejszą instrukcją.
Parametry techniczne
VR2110 VR2100
Pobór mocy 25 W 25 W
Napięcie akumulatora 14,8 V 14,4 V
Napięcie adaptera do ładowania
Poziom hałasu 55-65 dB 55-65 dB
Bateria 3200 mAh, Li-Ion 2600 mAh, Li-Ion
Czas pracy 180 minut 150 minut
Czas do całkowitego naładowania 5 godzin 4-5 godzin
Zakres częstotliwości 2,4-2,4835 GHz 2,4-2,4835 GHz
Moc nadajnika (maks.) 18 dBm 18 dBm
WAŻNE
Przed podłączeniem jednostki do sieci elektrycznej należy sprawdzić wzrokowo, czy jest ona nienaruszona oraz
czy nie została uszkodzona podczas transportu.
AC 220-240 V - 50/60 Hz
DC 24 V DC 24 V
WAŻNE PRZESTROGI DOTYCZĄCE BEZPIECZEŃSTWA
• Nie wolno korzystać z urządzenia w sposób inny niż opisany w niniejszej instrukcji.
• Przed pierwszym użyciem należy usunąć z urządzenia wszystkie materiały opakowaniowe
i marketingowe.
• Przed użyciem należy usunąć z podłogi wszystkie przedmioty, które mogłyby przeszkadzać
w efektywnym i bezproblemowym sprzątaniu (kable, papiery, ubrania, obrusy i firanki
dotykające podłogi).
• Jeżeli w strefie sprzątania znajdują się schody, należy umieścić taśmę magnetyczną
(wirtualną ścianę) w odległości co najmniej 15 cm od krawędzi górnego stopnia. Taka
odległość powinna zapewnić maksymalne zabezpieczenie przed ewentualnym upadkiem
ze schodów.
• Należy używać tylko oryginalnych akcesoriów i części zamiennych przeznaczonych dla
danego modelu.
• Nie wolno siadać na odkurzaczu automatycznym, czy też odkładać na nim jakiekolwiek
przedmioty.
30
VR2110, VR2100
VR2110, VR2100
31
Page 17
PLPL
• Urządzenie winno być używane tylko w domu, w temperaturze od 0°C do 40°C.
• Przed użyciem należy upewnić się, że pojemnik na kurz i tkanina mopa są prawidłowo
zamocowane.
• Włosy, ubrania, palce czy też inne części ciała należy trzymać z dala od szczotki głównej.
Szczotkę główną oraz część ssącą odkurzacza należy utrzymywać w czystości, należy usuwać
włosy i kurz, które mogą pogorszyć właściwości ssące odkurzacza oraz jakość sprzątania.
• Nie wolno używać urządzenia na podłodze mokrej lub wilgotnej.
• Nie wolno odkurzać cieczy, palących się papierosów, okruchów szkła i innych ostrych
przedmiotów, zapałek i innych materiałów palnych, większych kawałków papieru,
plastikowych torebek czy też innych przedmiotów mogących uszkodzić odkurzacz.
• Podczas odkurzania należy zapobiec przejeżdżaniu odkurzacza przez ułożone luzem
przewody.
• Przed konserwacją i czyszczeniem urządzenia należy przestawić przełącznik do pozycji
wyłączonej.
• Bezpośrednie oddziaływanie promieni słonecznych może spowodować zmniejszenie
wrażliwości czujników podczerwieni odkurzacza, dlatego prosimy, aby zapobiec takiemu
oddziaływaniu.
• Dywan podczas mycia należy zabezpieczyć w taki sposób, aby odkurzacz nie wjechał
na niego podczas sprzątania. Gdy na odkurzaczu jest zainstalowana tkanina mopa
zpojemnikiem na wodę, mogłoby to skutkować przerwaniem sprzątania, ewentualnie
niechcianym przemoczeniem dywanu.
• Nie wolno kłaść urządzenia w miejscach, z których mogłoby łatwo spaść na ziemię (stół,
krzesło).
• Przed ładowaniem urządzenia należy upewnić się, że stacja ładująca jest prawidłowo
połączona.
• Warunki ekstremalnej temperatury czy też nieprawidłowe używanie może spowodować
wyciek płynu z baterii. Jeżeli płyn zetknie się ze skórą, należy niezwłocznie omyć skórę
strumieniem wody. W przypadku kontaktu z oczami należy natychmiast przepłukiwać
oczy strumieniem wody przez co najmniej 10 minut. Należy zasięgnąć porady lekarza.
• Przed zamierzonym oddaniem produktu w celu jego utylizacji, należy najpierw odłączyć
baterię od urządzenia.
• W przypadku przemieszczania urządzenia lub jego przechowywania przez dłuższy czas,
należy przestawić przełącznik do pozycji wyłączonej. Przedłuży to żywotność baterii.
• Należy upewnić się, że podłączane napięcie zgadza się z wartościami podanymi na tabliczce
znamionowej produktu. Nie wolno podłączać urządzenia do rozgałęziaczy i przedłużaczy.
• Podczas odłączania urządzenia od gniazda elektrycznego, nigdy nie wolno wyrywać wtyczki
poprzez ciąganie przewodu zasilającego, natomiast należy chwycić wtyczkę iodłączyć ją
poprzez wyjęcie.
• Nie wolno używać urządzenia jako zabawki.
• Urządzenia nie wolno czyścić szorstkimi materiałami ani agresywnymi substancjami
chemicznymi.
• Urządzenie jest przeznaczone tylko do użytku domowego, a nie nadaje się do użytku
komercyjnego.
• Nie wolno zanurzać przewodu zasilającego, wtyczki ani urządzenia w wodzie lub innej cieczy.
• Nie wolno naprawiać urządzenia we własnym zakresie. Należy skontaktować się
zautoryzowanym centrum serwisowym i zapobiec obrażeniom w następstwie niefachowej
obsługi urządzenia.
• Z urządzenia mogą korzystać dzieci w wieku 8 lat lub więcej oraz osoby o ograniczonej
sprawności ruchowej lub umysłowej, lub bez odpowiedniego doświadczenia i wiedzy,
tylko gdy są one nadzorowane, albo gdy zapoznały się z instrukcją bezpiecznej obsługi
urządzenia, i rozumieją ewentualne zagrożenia. Przeprowadzane przez użytkownika
czynności w ramach czyszczenia i konserwacji nie mogą być wykonywane przez dzieci,
chyba że ukończyły one 8 lat i są pod nadzorem. Dzieci poniżej 8 lat należy trzymać z dala
od urządzenia i jego przewodu zasilającego. Dzieciom nie wolno bawić się z urządzeniem.
• Dzieciom w wieku poniżej 3 lat należy uniemożliwić dostęp do urządzenia, chyba że są
one stale nadzorowane.
• Producent i importer do Unii Europejskiej nie ponosi odpowiedzialności za szkody
spowodowane pracą urządzenia, takie jak poranienia, oparzenia, pożar, obrażenia,
zniszczenie rzeczy itp.
• W przypadku uszkodzenia przewodu zasilającego, należy zlecić jego naprawę
wykwalifikowanemu specjaliście, co zapobiegnie powstaniu niebezpiecznej sytuacji.
Zabronione jest używanie urządzenia z uszkodzonym przewodem zasilającym.
• Odkurzacza automatycznego należy używać wyłącznie z oryginalnym adapterem sieciowym
dostarczanym wraz z nim. Nigdy nie wolno używać adaptera innego typu, aby uniknąć
powstania niebezpiecznej sytuacji.
Nieprzestrzeganie wskazówek producenta może prowadzić do nieobjęcia gwarancją ewentualnej naprawy.
Należy starannie sprawdzić, czy rozpakowane zostały wszystkie dostarczone akcesoria; zalecamy zatrzymanie
na okres trwania gwarancji oryginalnego kartonu, podręcznika użytkownika i materiałów opakowaniowych.
32 33
VR2110, VR2100 VR2110, VR2100
Page 18
PLPL
OPIS PRODUKTU
1 Czujnik antykolizyjny
2 Czujnik podczerwieni doładowywania
3 Czujnik przeciwko upadkowi
4 Styk ładowania
5 Uniwersalne kółko
1
2
1 Pokrywka siatki filtra
2 Przycisk pojemnika na kurz
3 Czujnik ściany
Stacja dokująca
1 Wskaźnik zasilania
2 Strefa nadawania sygnału
3 Styki ładowania bazy
4 Rowek do zaczepienia
5 Płyta pokrywki
6 Przepust kablowy
7 Gniazdo adaptera zasilania
8 Trzpień do nawijania
6 Mała szczotka boczna
7 Pokrywka akumulatora
8 Kółko napędowe
9 Szczotka główna
10 Zatrzask pokrywy szczotki głównej
3
Lista części składowych
1 Stacja dokująca 1 szt.
2 Pilot zdalnego sterowania 1 szt.
3 Włóknina do mycia podłóg 2 szt.
4 Filtr HEPA + filtr piankowy 3 szt. (VR2100 - 2 szt.)
5 Taśma magnetyczna 1 szt.
6 Adapter 1 szt.
7 Szczotka czyszcząca 1 szt.
8 Mała szczotka lewa i prawa 2 szt.
4
5
1
6
9 Szczotka HARDFLOOR 1 szt. (tylko model VR2110)
UWAGA! Nie można użyć do dywanów, może
spowodować przerwanie sprzątania.
10 Szczotka CARPET 1 szt.
11 Pojemnik na wodę sterowany elektrycznie 1 szt.
(tylko model VR2110)
12 Szczotka PET 1 szt. (tylko model VR2110)
13 Pokrywa szczotki głównej 1 szt. (tylko model VR2110)
przeznaczona dla szczotek HARDFLOOR i PET
14 Pokrywa szczotki głównej z drutem stalowym 1 szt.
(przeznaczona dla szczotki CARPET)
15 Zawieszany pojemnik na wodę (tylko model VR2100)
9
12
6
7
8
9
10
2
3
4
5
7
10
13
8
11
14
15
KLUCZOWE FUNKCJE
Sprzątanie / włączenie i wyłączenie
1
3
2
1
2
3
6
7
4
8
5
• Krótkim naciśnięciem uruchamia się lub wstrzymuje
sprzątanie.
• Naciśnięciem i przytrzymaniem przez 3 s włącza się lub
wyłącza urządzenie.
• Długie naciśnięcie przez 15 s spowoduje wyłączenie
urządzenia w przypadku wyjątkowych okoliczności.
Doładowywanie / sprzątanie miejscowe
• Po krótkim naciśnięciu następuje rozpoczęcie
doładowywania lub wstrzymanie.
• Po długim naciśnięciu następuje sprzątanie miejscowe.
Wskaźnik
• Pomarańczowy: Normalna praca lub ładowanie.
• Czerwony: Stan nienormalny albo rozładowany
akumulator.
• Czerwono-pomarańczowy: Urządzenie nie jest
połączone zsiecią.
Reset WiFi
• Naciśnij oba przyciski jednocześnie i przytrzymaj przez
3 s.
INSTALACJA
1. Podłącz przewód zasilający, a nadmiar długości
przewodu schowaj w schowku na przewód.
2. Połóż stację dokującą przy ścianie i podłącz zasilanie.
Pamiętaj:
• Należy zapewnić miejsce o wielkości min. 0,5 m po obu
stronach stacji dokującej oraz min. 1,5 m przed stacją.
• Przewód zasilający w pozycji napiętej prostopadle
do ziemi może spowodować jego wyciągnięcie przez
urządzenie, co może prowadzić do odłączenia stacji
dokującej.
• Wskaźnik ładowania świeci się w normalnym stanie
włączenia, a gaśnie po naładowaniu.
3. Nie wolno przesuwać dowolnie stacji dokującej, jak
również wystawiać jej na bezpośrednie działanie
promieni słonecznych.
Pamiętaj: Bezpośrednie działanie promieni słonecznych
zakłóca sygnał stacji dokującej, a urządzenie wtedy nie
musi powrócić dokładnie do stacji dokującej.
34 35
VR2110, VR2100 VR2110, VR2100
Page 19
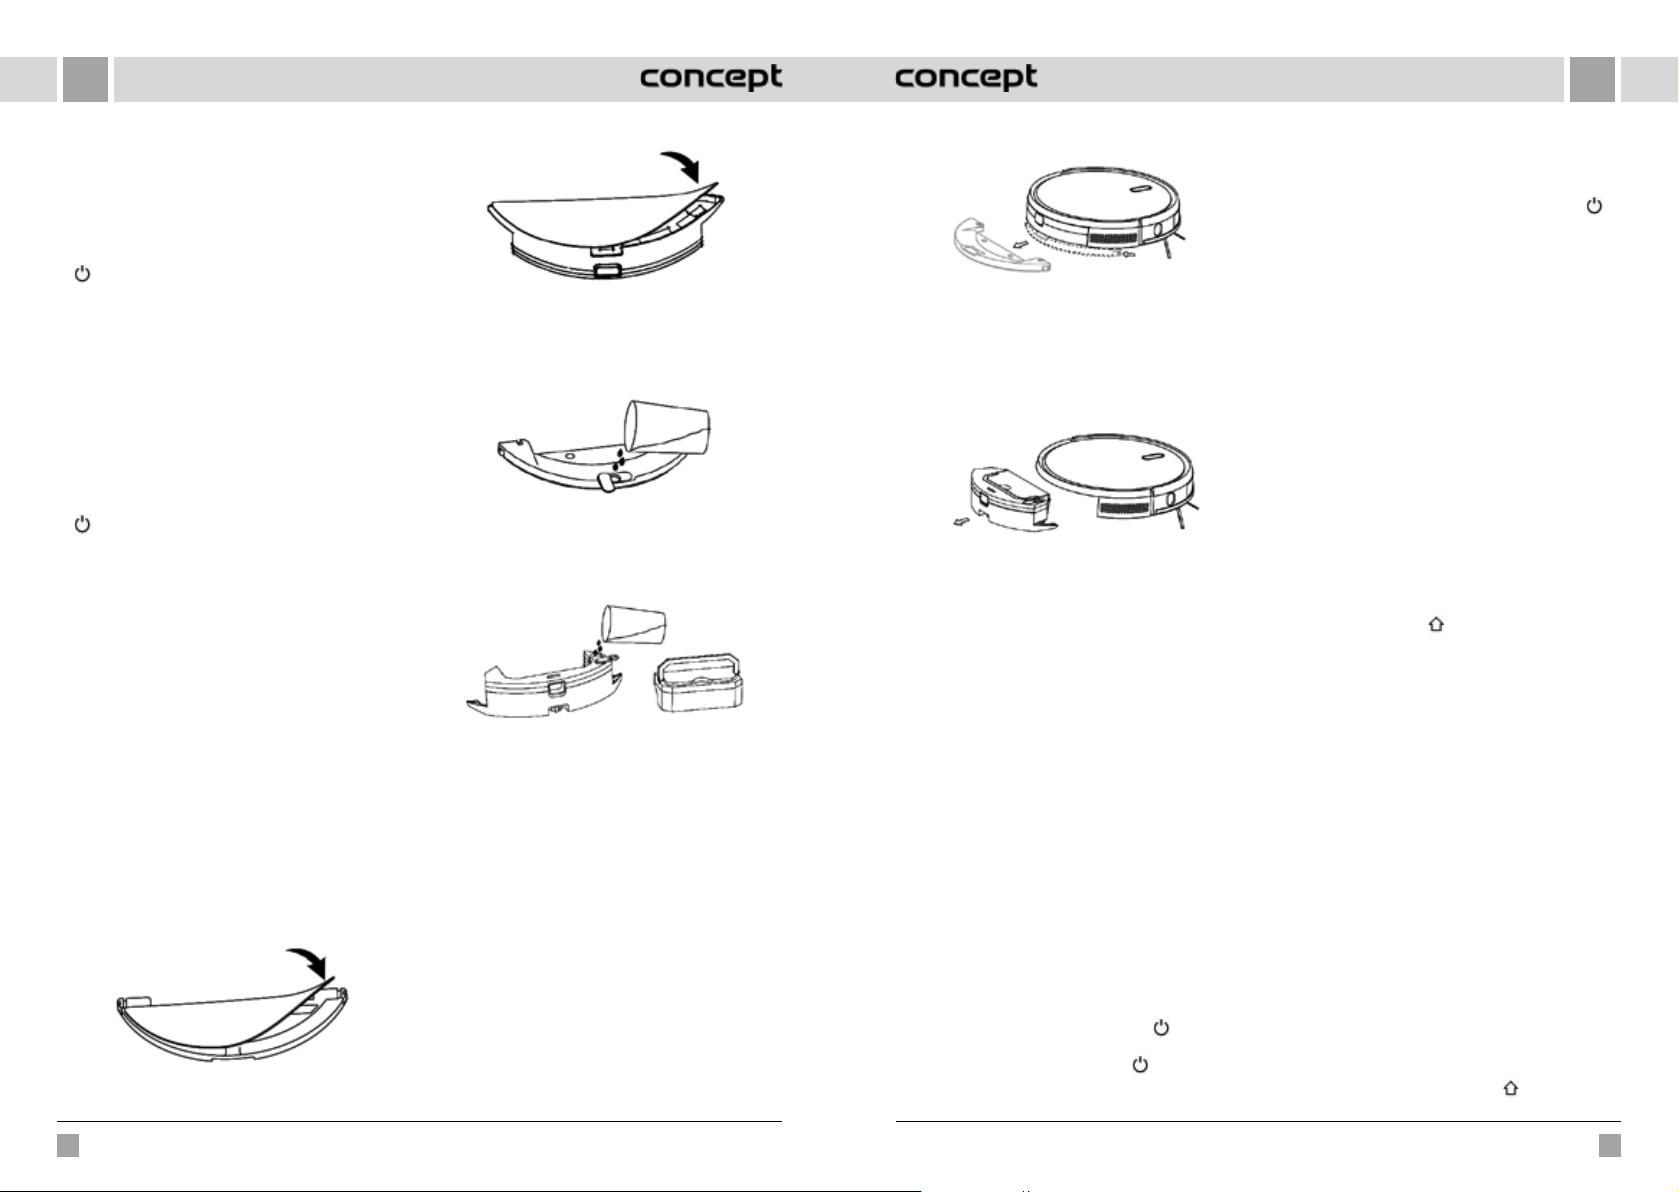
PLPL
4. Instalacja małej szczotki bocznej
Przekonaj się, że oznaczenie małej szczotki bocznej
lewej (L) i prawej (R) jest zgodne z oznaczeniami
LiRna pokrywie dolnej. Dociskaj szczotki boczne L i R,
aż usłyszysz „zatrzaśnięcie”.
5. Uruchomienie i ładowanie
Odkurzacz włącza się długim naciśnięciem przycisku
. Jeśli wskaźnik zasilania świeci się normalnie,
naładuj odkurzacz w stacji dokującej.
Pamiętaj: Jeśli nie można włączyć urządzenia z powodu
słabego akumulatora, naładuj go w stacji dokującej,
a urządzenie włączy się automatycznie. Urządzenie
może rozpocząć normalną pracę tylko w przypadku, gdy
poziom naładowania akumulatora wynosi ≥20%.
6. Połączenie z aplikacją mobilną (ten krok można
ominąć)
Przeczytaj instrukcje dotyczące połączenia z WiFi,
apołącz się z aplikacją mobilną.
7. Rozpoczęcie sprzątania
Po włączeniu odkurzacza, naciśnij krótko przycisk
na odkurzaczu, albo rozpocznij sprzątanie za
pomocą aplikacji mobilnej (w czasie używania można
wstrzymać pracę urządzenia naciśnięciem dowolnego
przycisku).
Pamiętaj:
• Urządzenia przeznaczonego do odkurzania nie można
użyć do usuwania cieczy.
• Urządzenie nie może pracować, gdy poziom
naładowania akumulatora spadnie poniżej 20%.
Wtakim przypadku należy go naładować.
• W przypadku, gdy poziom naładowania akumulatora
spadnie poniżej 20%, urządzenie automatycznie
powraca do stacji dokującej.
• Przed użyciem należy usunąć z podłogi wszystkie
przewody (wraz z przewodem zasilającym stacji
dokującej), aby zapobiec usterkom oraz uszkodzeniu
przedmiotów lub przewodów zaczepionych przez
urządzenie.
8. Instalacja modułu do mycia podłóg
a) Założenie włókniny do mycia podłóg: włókninę
do mycia podłóg należy przykleić prosto na dno
pojemnika na wodę.
Model VR2100 - Zawieszany pojemnik na wodę
Model VR2110 - Pojemnik na wodę sterowany elektrycznie
Pamiętaj: Włókninę do mycia podłóg należy oczyścić po
użyciu, aby utrzymać ją w dobrym stanie.
b) Napełnij pojemnik na wodę: otwórz pokrywę i wlej
wodę do pojemnika.
Model VR2100 - Zawieszany pojemnik na wodę
Przed wlaniem wody wyjmij pojemnik na kurz za
pomocą uchwytu (VR2110).
Model VR2110 - Pojemnik na wodę sterowany elektrycznie
c) Zainstaluj moduł:
Model VR2100: dociśnij moduł poziomo wzdłuż
tylnej części odkurzacza. Moduł jest prawidłowo
zainstalowany w momencie, gdy usłyszysz
„zatrzaśnięcie”.
Model VR2110: włóż pojemnik na kurz do pojemnika
na wodę, a uchwyt włóż w szczelinę. Następnie
naciśnij i przytrzymaj przycisk w środku pojemnika,
a wsuń pojemnik poziomo wzdłuż tylnej części
odkurzacza. Moduł jest prawidłowo zainstalowany
w momencie, gdy usłyszysz „zatrzaśnięcie”.
9. Wyjęcie modułu do mycia podłóg
Model VR2100: Gdy tylko odkurzacz zakończy swoją
pracę, naciśnij zatrzaski po obu stronach, wyjmij moduł
do mycia podłóg w kierunku do tyłu, wylej wodę
z pojemnika i oczyść włókninę (w czasie czyszczenia
nie ruszaj odkurzacza ani też nie odwracaj go).
Model VR2100 - Zawieszany pojemnik na wodę
Model VR2110: Gdy tylko odkurzacz zakończy swoją
pracę, naciśnij przycisk w środku pojemnika na wodę,
wyjmij moduł do mycia podłóg w kierunku do tyłu,
wylej wodę z pojemnika i oczyść włókninę (w czasie
czyszczenia nie ruszaj odkurzacza ani też nie odwracaj
go).
Model VR2110 - Pojemnik na wodę sterowany elektrycznie
10. Instrukcja używania modułu do mycia podłóg
• Nie używaj modułu do mycia podłóg, jeśli nie możesz
go obserwować.
• Ze względów bezpieczeństwa przekonaj się, że moduł
do mycia podłóg jest wyjęty w czasie ładowania, albo
gdy nie używasz go.
• Nie próbuj myć dywanu.
• Aby osiągnąć lepszy efekt mycia, modułu do mycia
podłóg powinno się użyć po potrójnym zamieceniu
lub odkurzeniu podłóg.
• Jeśli chcesz dolać wody albo oczyścić włókninę
w czasie pracy urządzenia, wstrzymaj go, a wyjmij
i załóż ponownie moduł do mycia podłóg tak, jak
jest opisane w krokach 8 i 9. Nie przemieszczaj ani
nie odwracaj urządzenia, aby nie doprowadzić do
błędnego ustalania pozycji i utraty mapy.
• Funkcja mycia podłóg urządzenia jest przeznaczona do
ścierania i wspomaga dogłębne czyszczenie. Nie może
jednak skutecznie usunąć przywartych zanieczyszczeń
stałych, tak jak może tego dokonać tylko siła człowieka.
SPOSÓB UŻYCIA
WŁĄCZENIE/WYŁĄCZENIE
Naciśnij i przytrzymaj przez 3 s przycisk - zapala się
wskaźnik i urządzenie włącza się.
Naciśnij i przytrzymaj przez 3 s prz ycisk , gdy urządzenie
jest w trybie czuwania – wskaźnik gaśnie i urządzenie
wyłącza się.
PAMIĘTAJ: Nie można wyłączyć urządzenia, gdy trwa jego
ładowanie.
SPRZĄTANIE/WSTRZYMANIE
Aby uruchomić urządzenie, naciśnij krótko przycisk
urządzeniu, albo uruchom urządzenie za pomocą aplikacji
mobilnej (naciśnięciem dowolnego przycisku można
wstrzymać jego pracę).
Pamiętaj:
• Odkurzacza automatycznego nie można używać do
usuwania cieczy.
• Urządzenie nie może pracować, gdy poziom
naładowania akumulatora spadnie poniżej 20%.
Wtakim przypadku należy go naładować.
• W przypadku, gdy poziom naładowania akumulatora
spadnie poniżej 20%, urządzenie automatycznie
powraca do stacji dokującej.
• Przed użyciem należy usunąć z podłogi wszystkie
przewody (wraz z przewodem zasilającym stacji
dokującej), aby zapobiec usterkom oraz uszkodzeniu
przedmiotów lub przewodów zaczepionych przez
urządzenie.
ŁADOWANIE
Tryb automatyczny: Po pracy urządzenie automatycznie
powraca do stacji dokującej.
Tryb manualny: W stanie wstrzymania, krótkim
naciśnięciem przycisku
albo można ładować urządzenie obsługując go z aplikacji
mobilnej. Wskaźnik miga, gdy tylko urządzenie jest
wpełni naładowane.
Pamiętaj: Jeśli urządzenie nie znajdzie stacji dokującej,
powraca automatycznie do swojej pierwotnej pozycji.
Wtakim przypadku należy włożyć urządzenie ręcznie do
stacji dokującej.
TAŚMA MAGNETYCZNA
Taśmy magnetyczne można tak poukładać, aby oddzielały
obszary, które nie mają być sprzątane (na przykład
łazienki, kuchnie itd.).
Uwaga: zamocuj taśmę magnetyczną do podłogi tak, aby
nie mogła przesuwać się. W przeciwnym razie taśma nie
musi być skuteczna.
TRYB SPRZĄTANIA
Po uruchomieniu urządzenie będzie poruszało się
zgodnie z programem sprzątania w trasach o kształcie
łuków tak, aby posprzątało całą powierzchnię podłóg we
wszystkich pomieszczeniach po kolei, kończąc sprzątanie
w regularny i efektywny sposób przy pełnym pokryciu.
Po zakończeniu sprzątania urządzenie powraca do stacji
dokującej i rozpoczyna automatyczne ładowanie.
SPRZĄTANIE MIEJSCOWE
Naciśnięcie i przytrzymanie przycisku
rozpoczynamy ładowanie,
przez 3 sekundy
na
36 37
VR2110, VR2100 VR2110, VR2100
Page 20
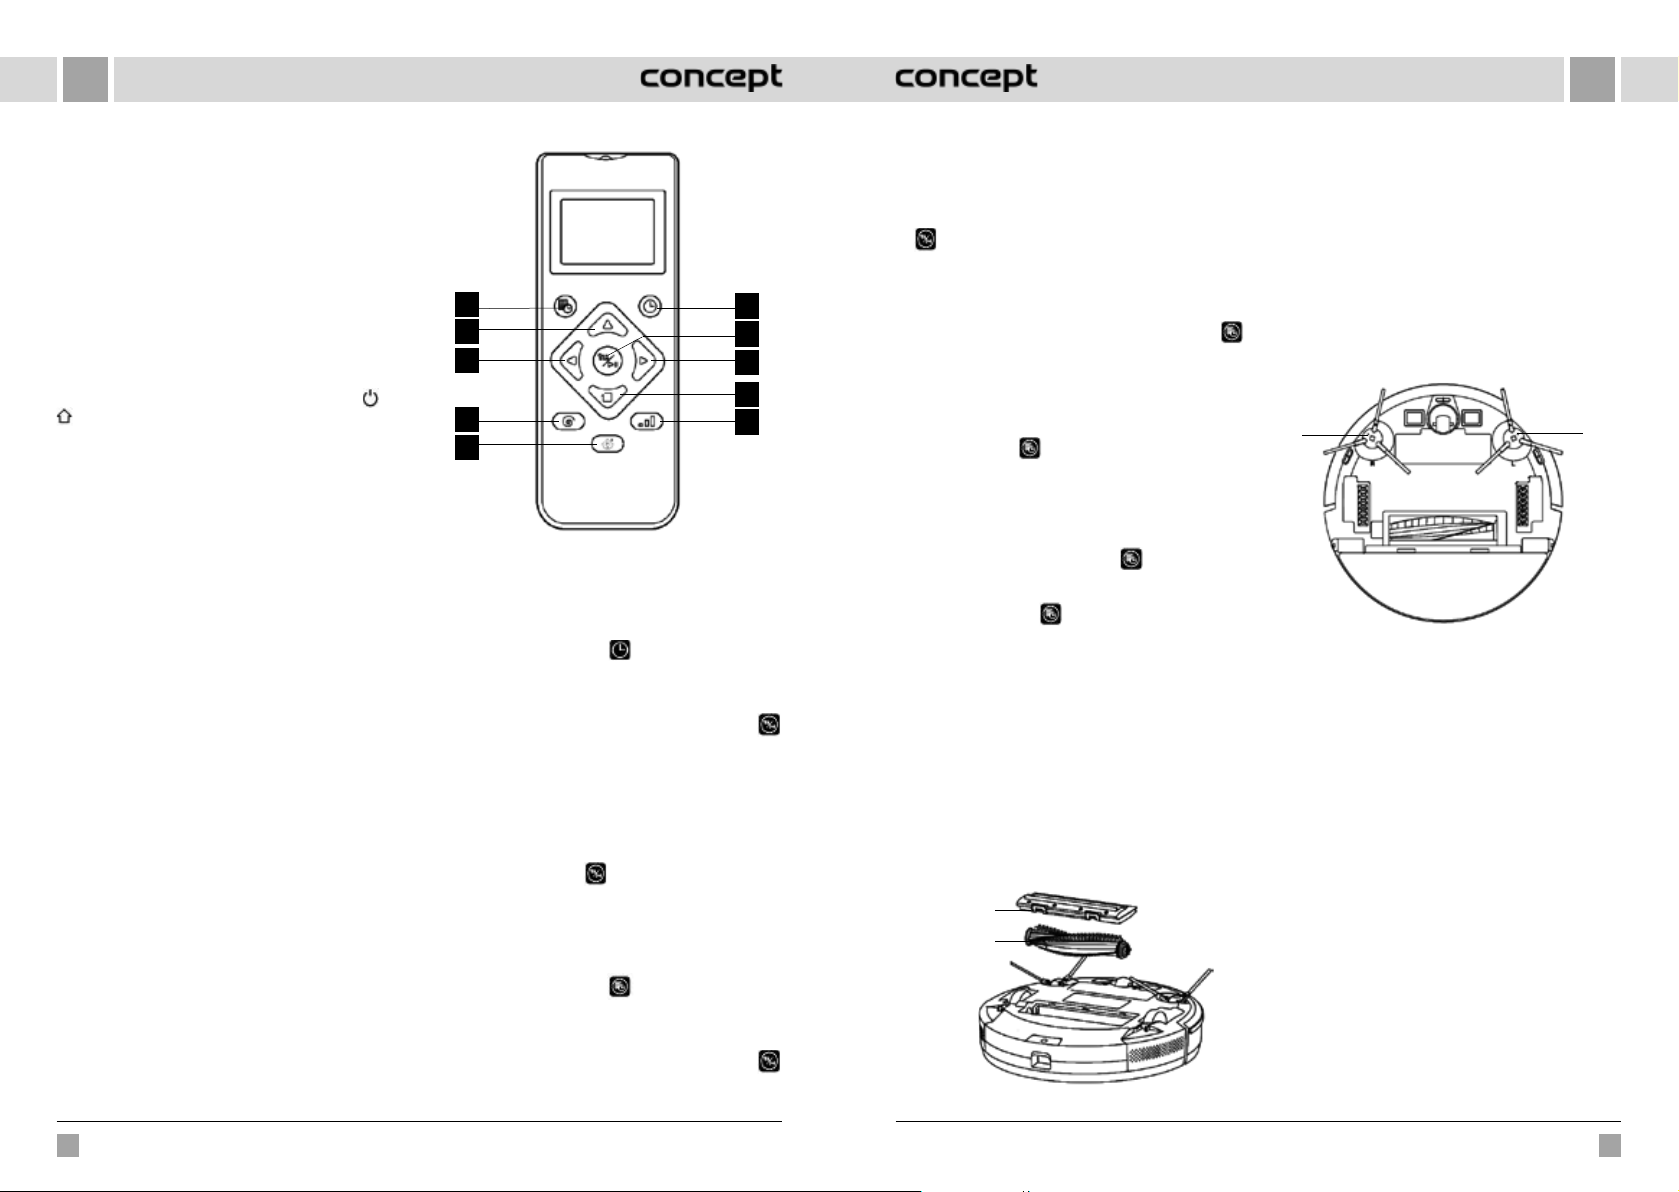
PLPL
spowoduje zlokalizowanie się odkurzacza, który wtedy
oczyszcza obszar w kształcie kręgu o średnicy 1,5 m,
a po zakończeniu czyszczenia powraca automatycznie
do swojego wyjściowego położenia, przestając
automatycznie pracować.
ZAPLANOWANIE SPRZĄTANIA
Określony niezmienny czas sprzątania można ustawić za
pomocą aplikacji mobilnej. Urządzenie automatycznie
rozpoczyna sprzątanie w wyznaczonym czasie, a po
zakończeniu powraca do stacji dokującej.
RESET WIFI
Jeśli nie można połączyć telefonu z urządzeniem
z powodu zmiany konfiguracji routera i hasła czy też
zinnych powodów, naciśnij jednocześnie przyciski
i przytrzymaj przez 3 s, aż zabrzmi komunikat głosowy
„WiFi has been reset” (Zresetowano WiFi), azaświeci się
wskaźnik w kolorze niebiesko-fioletowym, który będzie
powoli migał.
TRYB WYCISZONY
Komunikaty głosowe odkurzacza można włączyć albo
wyłączyć za pomocą aplikacji mobilnej.
USTAWIENIE MOCY SSANIA
Moc ssania można ustawić na poziomie cichym,
standardowym albo wysokim, za pomocą aplikacji
mobilnej.
W przypadku wykrycia dywanu nastąpi automatyczne
zwiększenie mocy ssania do najwyższego stopnia.
UWAGA - prawidłowe wykrycie dywanu jest możliwe
tylko przy użyciu szczotkiCarpet.
USTAWIENIE PRZEPŁYWU WODY (dotyczy tylko
sterowanego elektrycznie pojemnika na wodę w modelu
VR2110)
Przepływ wody można ustawić na poziomie niskim,
standardowym albo wysokim, za pomocą aplikacji
mobilnej.
SPOSÓB UŻYCIA PILOTA ZDALNEGO STEROWANIA
1. Zaplanowanie sprzątania
2. Poruszanie się do przodu
3. Skręcenie w lewo
4. Sprzątanie miejscowe TURBO
5. Rozpoczęcie/wstrzymanie ładowania
6. Sprzątanie automatyczne/pauza
7. Sprzątanie/pauza
8. Skręcenie w prawo
9. Sprzątanie wzdłuż ścian
10. Ustawienie mocy ssania / przepływu wody
oraz
1
2
3
6
7
8
9
4
10
5
Pamiętaj: Chcąc zapewnić skuteczność prawidłowego
dokonania wszystkich ustawień, należy skierować pilota
w przednią część odkurzacza automatycznego, znajdując
się wystarczająco w jego pobliżu.
Ustawienie czasu
1. Naciśnięciem przycisku na pilocie otwieramy
ustawienia czasu - na wyświetlaczu LCD miga symbol
niedzieli.
2. Naciskaniem lewego i prawego przycisku wybieramy
dzień tygodnia, a naciśnięciem przycisku
potwierdzamy go - wyświetlacz LCD wtedy przełącza
się automatycznie do ustawień zegara.
3. Naciskaniem przycisków w górę i w dół ustawiamy
godzinę, a naciskaniem przycisków w lewo i w prawo
przechodzimy do ustawienia minut.
4. Po ustawieniu aktualnego czasu skierujemy pilota
w przednią część odkurzacza automatycznego
i naciskamy przycisk , aby potwierdzić wszystkie
ustawienia czasu. Jeśli tego nie zrobimy, nasze
ustawienia będą nieważne.
5. W ten sposób kończymy ustawianie czasu zarówno dla
pilota, jak też dla odkurzacza automatycznego.
Harmonogram sprzątania
1. Naciśnięciem przycisku
funkcję ustawienia harmonogramu - na wyświetlaczu
LCD będzie migał symbol niedzieli.
2. Naciskaniem lewego i prawego przycisku wybieramy
dzień tygodnia, a naciśnięciem przycisku
potwierdzamy go - wyświetlacz LCD wtedy przełącza
się automatycznie do ustawień zegara.
na pilocie otwieramy
3. Naciskaniem przycisków w górę i w dół ustawiamy
godzinę, a naciskaniem przycisków w lewo
i w prawo przechodzimy do ustawienia minut.
Następnie skierujemy pilota w przednią część
odkurzacza automatycznego i naciśnięciem przycisku
potwierdzamy wprowadzone ustawienia
harmonogramu dla odkurzacza automatycznego.
4. Po zakończeniu ustawiania jednego harmonogramu,
pilot przechodzi automatycznie do ustawiania
następnego harmonogramu.
wprowadzać kolejnych ustawień, naciśnij przycisk ,
aby zakończyć, albo zaczekaj przez 10 s, aż ustawienia
zostaną zakończone automatycznie.
5. W ten sposób kończymy ustawianie czasu zarówno dla
pilota, jak też dla odkurzacza automatycznego.
Anulowanie harmonogramu sprzątania
1. Naciśnij przycisk
będzie migał symbol niedzieli, a wyświetlone zostaną
symbole dni tygodnia, jakie zostały przez Ciebie
zaplanowane.
2. Naciskaniem lewego i prawego przycisku wybierz
zaplanowany przez Ciebie dzień w tygodniu,
adługim naciśnięciem przycisku przez 3 sanuluj
ten harmonogram. Możesz wybrać także kolejny
zaplanowany dzień, który chcesz anulować, albo
nacisnąć przycisk , aby zakończyć, albo też
zaczekać przez 10 s, aż ustawianie zostanie zakończone
automatycznie.
na pilocie - na wyświetlaczu LCD
Jeśli nie chcesz
CODZIENNA KONSERWACJA
Szczotka główna (należy regularnie czyścić)
1. Odwróć urządzenie, a ściśnij zatrzask na pokrywie
szczotki głównej, aby można było ją wyjąć.
2. Usuń kurz z wnętrza oraz ze schowka szczotki głównej
za pomocą małej szczoteczki, a oczyść szczotkę
główną.
3. Załóż szczotkę główną z powrotem i mocno dociśnij
pokrywę tak, aby zatrzask zatrzasnął w swoim miejscu.
Zatrzask
Szczotka
główna
Mała szczotka boczna (należy regularnie czyścić)
1. Odwróć urządzenie, a wyjmij małą szczotkę boczną
wkierunku do góry.
2. Usuń włosy i zanieczyszczenia, a zamontuj małą
szczotkę boczną z powrotem.
3. Przekonaj się, że mała szczotka boczna lewa (L) i prawa
(R) odpowiadają symbolom L i R na pokrywie dolnej.
Zainstaluj małe szczotki boczne L i R poprzez ich
dociśnięcie.
Pamiętaj: Małe szczotki boczne należy wymieniać
co 3 do 6 miesięcy, aby zapewnić skuteczność ich
czyszczenia.
R - mała
szczotka boczna
prawa
Pojemnik na kurz i kratka filtra (należy regularnie
czyścić)
1. Naciśnij przycisk, a wyjmij pojemnik na kurz
wkierunku do tyłu.
2. Otwórz i oczyść pojemnik na kurz.
Czyszczenie kratki filtra (należy regularnie czyścić)
1. Po długim okresie używania, wyjmij kratkę filtra, filtr
piankowy oraz filtr HEPA.
2. Oczyść wyjętą kratkę filtra. Filtr piankowy oraz
filtrHEPA opłucz pod wodą.
3. Wytrzyj poszczególne elementy i pozostaw do
osuszenia.
4. Po osuszeniu zainstaluj je po kolei w prawidłowej
kolejności: kratka - filtr piankowy - filtr HEPA.
L - mała
szczotka boczna
lewa
38 39
VR2110, VR2100 VR2110, VR2100
Page 21
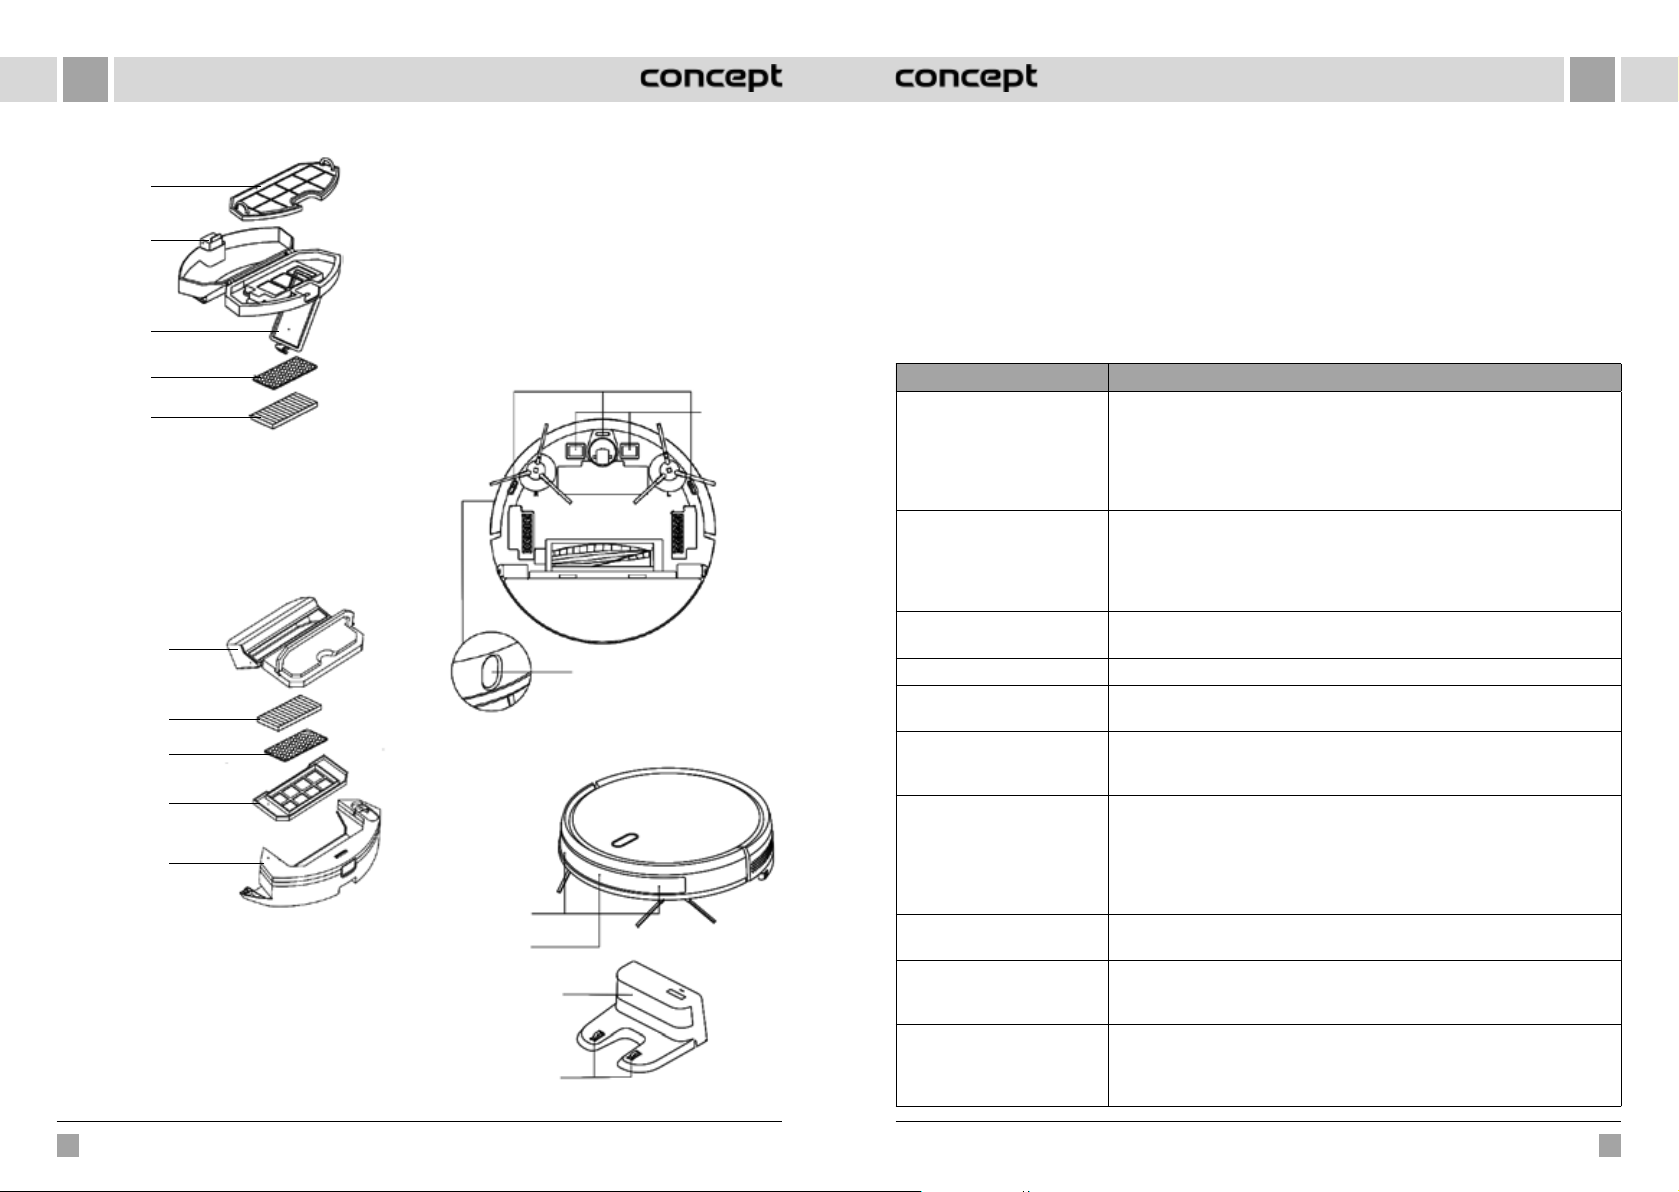
PLPL
Kratka filtrująca
(filtr zgrubny)
Przycisk
Pokrywka
filtra
Filtr
piankowy
Filtr HEPA
Pamiętaj:
• Kratkę filtra opłucz pod czystą wodą bez dodawania
jakiegokolwiek środka czyszczącego.
• Nie czyść kratki filtra pędzlem ani palcami.
• Pozostaw kratkę filtra do osuszenia na wolnym
powietrzu przez co najmniej 24 godziny.
• Wymieniaj kratkę filtra co 3 do 6 miesięcy.
Czyszczenie filtra (należy regularnie czyścić)
Pojemnik
na kurz
Filtr HEPA
Filtr
piankowy
Kratka filtrująca
(filtr zgrubny)
Pojemnik
na wodę
Pojemnik na wodę sterowany elektrycznie
Moduł do mycia podłóg (należy czyścić po każdym
użyciu)
1. Usuń włókninę, wylej wodę z pojemnika.
2. Oczyść włókninę, osusz pojemnik na wodę i włókninę.
W przypadku modelu VR2110 najpierw wyjmij
pojemnik na kurz i następnie wylej wodę z pojemnika
na wodę.
Czujniki (należy regularnie czyścić)
Oczyść czujniki miękką włókniną w następujący sposób:
1. Ocz yść czujniki wzdłuż ściany po prawej stronie.
2. Trzy czujniki przeciwko upadkowi w dolnej części
urządzenia.
3. Czujnik podczerwieni antykolizyjny z przodu
urządzenia.
4. Ochronę przed porażeniem prądem elektrycznym oraz
styki dla stacji dokującej w dolnej części urządzenia
(wczasie czyszczenia wyłącz urządzenie).
5. Strefa transmisji sygnału stacji dokującej.
Czujnik przeciwko upadkowi
Styk
ładowania
Czujnik ToF
Czujniki (należy czyścić co miesiąc)
Czujnik
antykolizyjny
Czujnik
podczerwieni
doładowywania
Strefa nadawania
sygnału
Styki ładowania
bazy
Akumulator
• Urządzenie posiada akumulator litowo-jonowy
o wysokiej pojemności. Aby zachować pojemność
akumulatora, należy w codziennym użyciu utrzymywać
urządzenie naładowane.
• Jeśli nie używasz urządzenia przez dłuższy czas, wyłącz
go i zapewnij należyte przechowywanie. Naładuj go co
najmniej raz na 3 miesiące, aby zapobiec uszkodzeniu
Aktualizacja oprogramowania sprzętowego
Aktualizacji oprogramowania sprzętowego dokonuje
się za pomocą aplikacji mobilnej. W przypadku wykrycia
nowego oprogramowania sprzętowego, dokonaj
aktualizacji po otrzymaniu komunikatu. Poziom
naładowania akumulatora przed uruchomieniem
aktualizacji powinien wynosić ≥50%, z tego względu
urządzenie winno być umieszczone w stacji dokującej.
akumulatora w następstwie nadmiernego rozładowania.
BIEŻĄCE PROBLEMY
Problem Rozwiązanie
Nie można uruchomić odkurzacza • W przypadku niskiego stanu naładowania akumulatora, umieść odkurzacz w stacji
Nie można naładować odkurzacza
Nie można doładować odkurzacza Odkurzacz jest za daleko od stacji dokującej, przemieść go bliżej stacji dokującej
Nienormalne zachowanie Wyłącz odkurzacz i zrestartuj go.
W czasie pracy odzywa się
niezwykły odgłos
Zmniejsza się zdolność
czyszczenia, albo z urządzenia
odpada kurz
Nie można połączyć się z WiFi
Zaplanowane sprzątanie nie
odbyło się
Czy odkurzacz zużywa energię,
jeśli jest cały czas umieszczony
wstacji dokującej?
Czy za pierwszym razem
potrzebne jest ładowanie
odkurzacza trzy razy pod rząd
przez 16 godzin?
dokującej tak, aby styki odkurzacza i płyty stacji kontaktowały się - urządzenie
uruchamia się automatycznie (jeśli odkurzacz jest całkowicie wyłączony, może
uruchomić się automatycznie po chwili ładowania).
• Nie używaj urządzenia, jeśli temperatura w otoczeniu jest niższa niż 0°C, albo wyższa
niż 50°C. Używaj go w temperaturze 0-40°C.
• Przemieść odkurzacz poza stację, sprawdź, czy zapala się lampka kontrolna stacji
dokującej, oraz sprawdź, czy obie końcówki adaptera zasilającego stacji dokującej
są podłączone prawidłowo.
• W przypadku złego kontaktu oczyść powierzchnie stykowe stacji dokującej oraz styki
ładowania na odkurzaczu, albo obróć na bok małą szczotkę boczną.
ispróbuj ponownie.
Do szczotki głównej, małej szczotki bocznej albo kółka mogą przywierać ciała obce wyłącz odkurzacz i usuń ciała obce.
• Pojemnik na kurz jest pełny. Oczyść go.
• Kratka filtra jest zatkana. Oczyść ją albo wymień.
• Do szczotki głównej przywierają ciała obce, oczyść ją.
• Zły sygnał WiFi. Sprawdź, czy jest do dyspozycji właściwe pokrycie sygnałem WiFi.
• Połączenie z WiFi odbywa się w niezwykły sposób. Zresetuj WiFi, pobierz najnowszą
aplikację, i spróbuj połączyć się ponownie.
• Nieprawidłowo wprowadzone hasło.
• Do dyspozycji jest router wykorzystujący pasmo częstotliwości 5G, odkurzacz
automatyczny może łączyć się tylko w paśmie 2,4G.
Niski stan naładowania akumulatora - zaplanowane sprzątanie może rozpocząć się tylko
wtedy, gdy poziom naładowania akumulatora wynosi co najmniej 30%.
Odkurzacz zużywa małą ilość energii, gdy jest trwale umieszczony w stacji dokującej, co
pozwala na osiągnięcie najlepszej mocy akumulatora.
Akumulator litowy nadaje się do użycia natychmiast po naładowaniu, i nie posiada
efektu pamięci ogniw.
40 41
VR2110, VR2100 VR2110, VR2100
Page 22
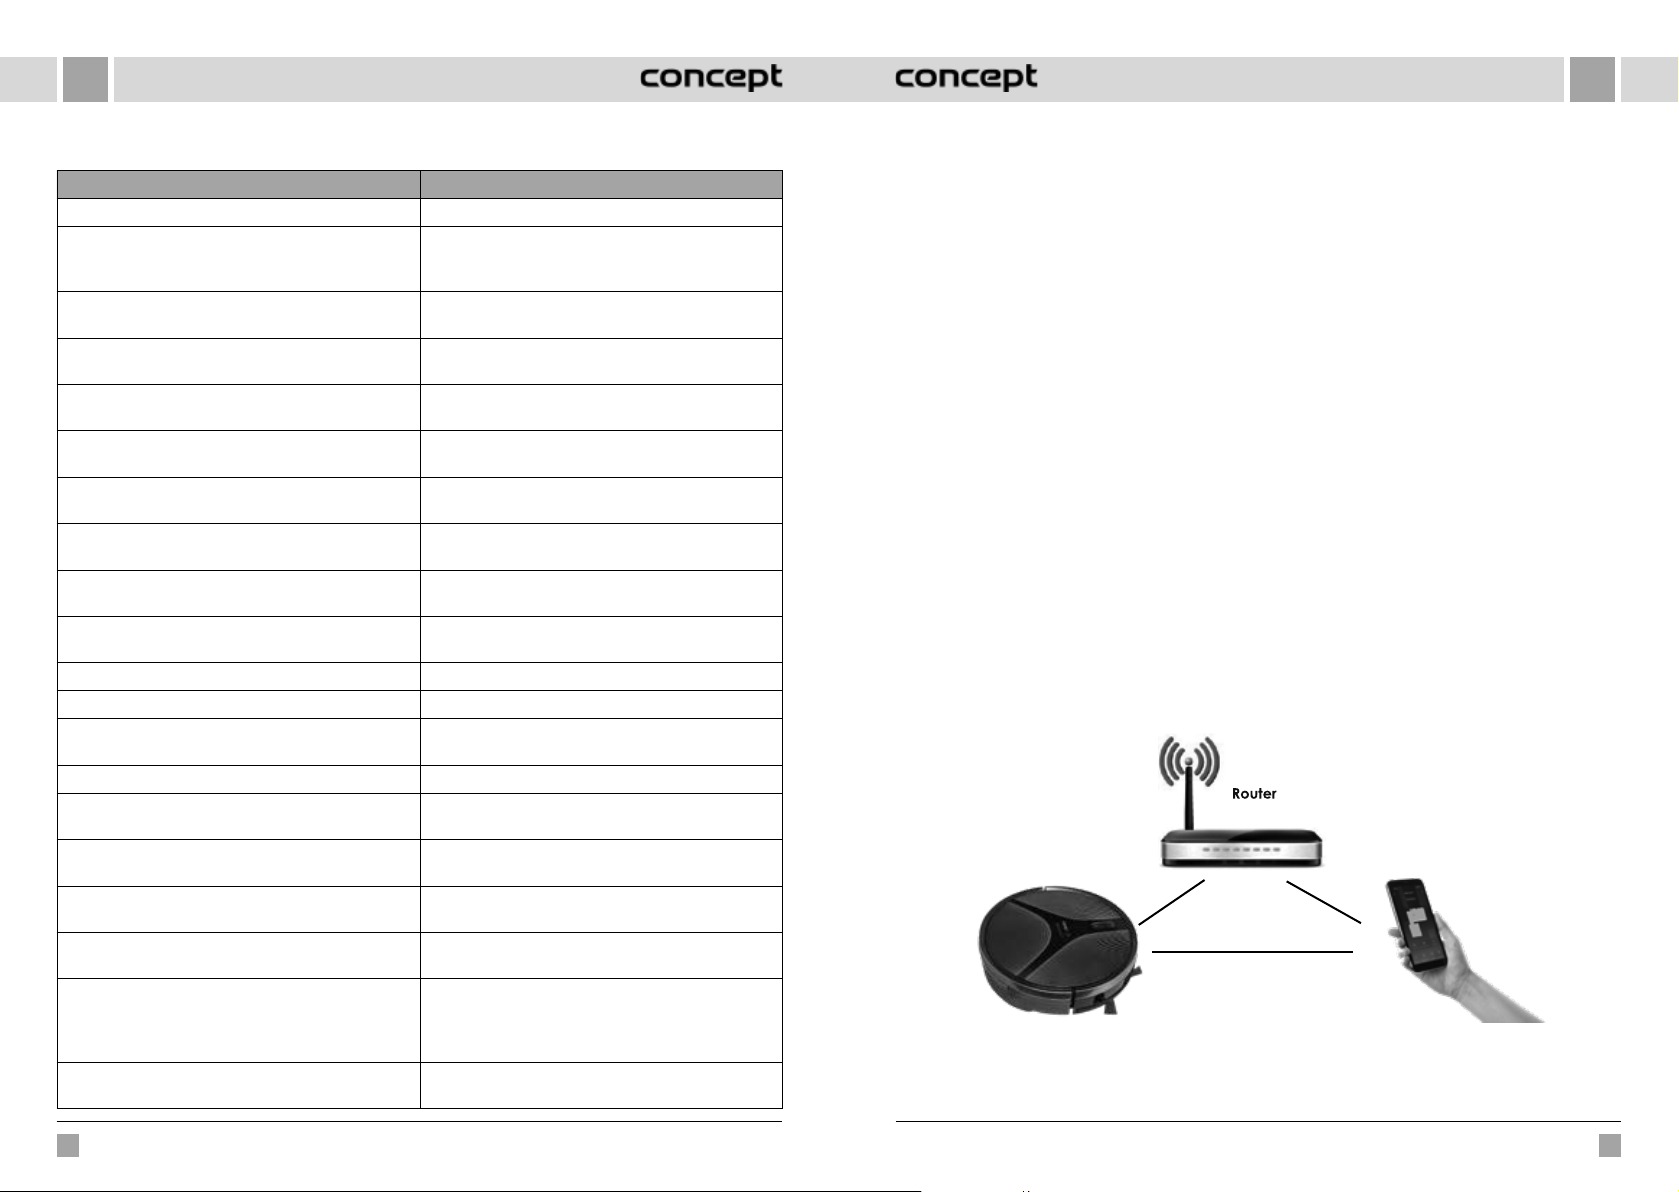
PLPL
ROZWIĄZYWANIE PROBLEMÓW
Komunikat głosowy Rozwiązanie
Error 1: Oh dear! I cannot find the dust collector Uruchomiono sprzątanie po wyjęciu pojemnika na kurz.
Error 2: Please check if the radar on top has been covered
or blocked
Error 3: Please place me in a new location and try again Podnieś odkurzacz i zatrzymaj go przez chwilę
Error 4: Please scrub the cliff sensor, and restart me from
a new location
Error 5: Please scrub the front sensor, and restart me from
a new location
Error 6: Please scrub the right-hand sensor, and restart
me from a new location
Error 7: Please scrub the radar housing on top, and restart
me from a new location
Error 8: Please check if the bumper has been blocked in
some way
Error 9: Master, please clean the dust container and filter Pojemnik na kurz jest pełny albo trzeba wymienić kratkę
Error 10: Dust container has been removed, please clean
the container and filter
Error 11: I'm stuck, please help me! Odkurzacz gdzieś utknął.
Error 12: Please place me correctly! Odkurzacz jest nachylony.
Error 13: Please check if my wheels have become blocked
somewhere
Error 14: Please check if the main brush has become stuck Szczotka główna zacięła się albo jest zablokowana.
Error 15: Please check if the side brushes have become
stuck
Error 16: What's going on? Where is the docking station? Nie znaleziono stacji dokującej, albo stacja nie jest
Error 17: Oh dear! Program error, please restart me Nienormalny stan spowodowany nieznanym błędem,
Error 18: Error encountered initiating shutdown Odkurzacz ostrzega użytkownika i automatycznie
Error 19: Low battery, please recharge W przypadku zbyt niskiego poziomu naładowania
Error 20: To shut me down, please place me away from
the docking station
Górny czujnik jest zasłonięty albo znajduje się wotwartej
przestrzeni (na obszarze 6x6 m2 nie ma żadnej
przeszkody).
wpowietrzu.
Czujnik przeciwko upadkowi jest zasłonięty albo znajduje
się w wysokości.
Czujnik podczerwieni antykolizyjny jest zanieczyszczony
albo zasłonięty.
Czujnik ściany jest zanieczyszczony albo zasłonięty.
Czujnik radaru antykolizyjnego jest zanieczyszczony albo
zasłonięty.
Czujnik krawędzi bądź czujnik antykolizyjny jest
zawieszony.
filtra.
Po zasygnalizowaniu usterki 9 użytkownik wyjął pojemnik
na kurz, co spowodowało uruchomienie usterki 10.
Kółko napędowe zacięło się albo jest zablokowane.
Mała szczotka boczna zacięła się albo jest zablokowana.
podłączona.
zrestartuj odkurzacz.
wyłącza się albo rozpoczyna ładowanie.
akumulatora, odkurzacz nie znajduje się w stacji
dokującej, a uruchamia się sprzątanie (poziom
naładowania akumulatora spadł poniżej 10%).
Podczas ładowania w stacji dokującej wyłączono
odkurzacz.
ŁĄCZNOŚĆ BEZPRZEWODOWA I KOMPATYBILNOŚĆ
• Spółka Jindřich Valenta - CONCEPT nie może w żaden sposób ponosić odpowiedzialności za jakiekolwiek
przypadkowe szkody, pośrednie lub następcze, jak również za utratę danych czy też straty spowodowane wyciekiem
danych wramach komunikacji odbywającej się za pośrednictwem technologii bezprzewodowych.
• Nie można w 100% zapewnić pomyślnej komunikacji bezprzewodowej wszystkich urządzeń typu Smart oraz sieci
WiFi (routerów). Ze względu na różnorodność urządzeń obecnych na rynku, mogą wystąpić przypadki, kiedy charakter
lub specyfikacja danego urządzenia typu Smart czy też sieci WiFi (routera) uniemożliwia łączność, ewentualnie jej
zakłócenia. Na pomyślne nawiązanie komunikacji bezprzewodowej za pośrednictwem sieci WiFi wpływa ponadto
szereg innych czynników, takich jak konfiguracja sprzętu i oprogramowania. Na łączność pomiędzy odkurzaczem,
aTwoją siecią WiFi mogą wpływać niekorzystnie także sieci WiFi w otoczeniu, które mogą działać na tym samym
kanale, a przez to zakłócać łączność (np. na osiedlach, w domach wielorodzinnych itp.). Opisane powyżej fakty nie
stanowią powodu do reklamacji urządzenia.
• Właścicielem i operatorem aplikacji jest podmiot trzeci (dalej „Podmiot”), będący podmiotem różnym od spółki
Jindřich Valenta - CONCEPT (dalej tylko „Sprzedawca”). Sprzedawca nie udostępnia Podmiotowi żadnych danych
osobowych. Klient, dokonując rejestracji w aplikacji, udostępnia swoje dane bezpośrednio Podmiotowi, który staje
się administratorem danych osobowych. Działanie aplikacji i związana z tym ochrona danych osobowych kierują się
zasadami opracowanymi przez Podmiot.
Kompatybilność:
System operacyjny urządzenia typu Smart - Android 5.0 lub wyższy
- IOS 9.0 lub wyższy
Sieć WiFi - 2,4 GHz
- zabezpieczenie WPA1 i WPA2 (zalecane WPA2)
UWAGA: Urządzenie nie może pracować w sieciach WiFi zabezpieczonych za pomocą protokołu IEEE 802.1X (najczęściej
firmowe sieci WiFi).
OBSŁUGA ZA POMOCĄ APLIKACJI
Aby umożliwić obsługę urządzenia za pomocą aplikacji, należy połączyć go z Twoim telefonem oraz zezwolić mu na
dostęp do Twojej sieci WiFi.
Zalecana odległość podczas ustawiania: do 4 metrów
Przekonaj się, że odkurzacz automatyczny, router i Twój telefon znajdują się blisko siebie tak, aby mogło odbyć się
bezproblemowe sparowanie.
42 43
VR2110, VR2100 VR2110, VR2100
Page 23
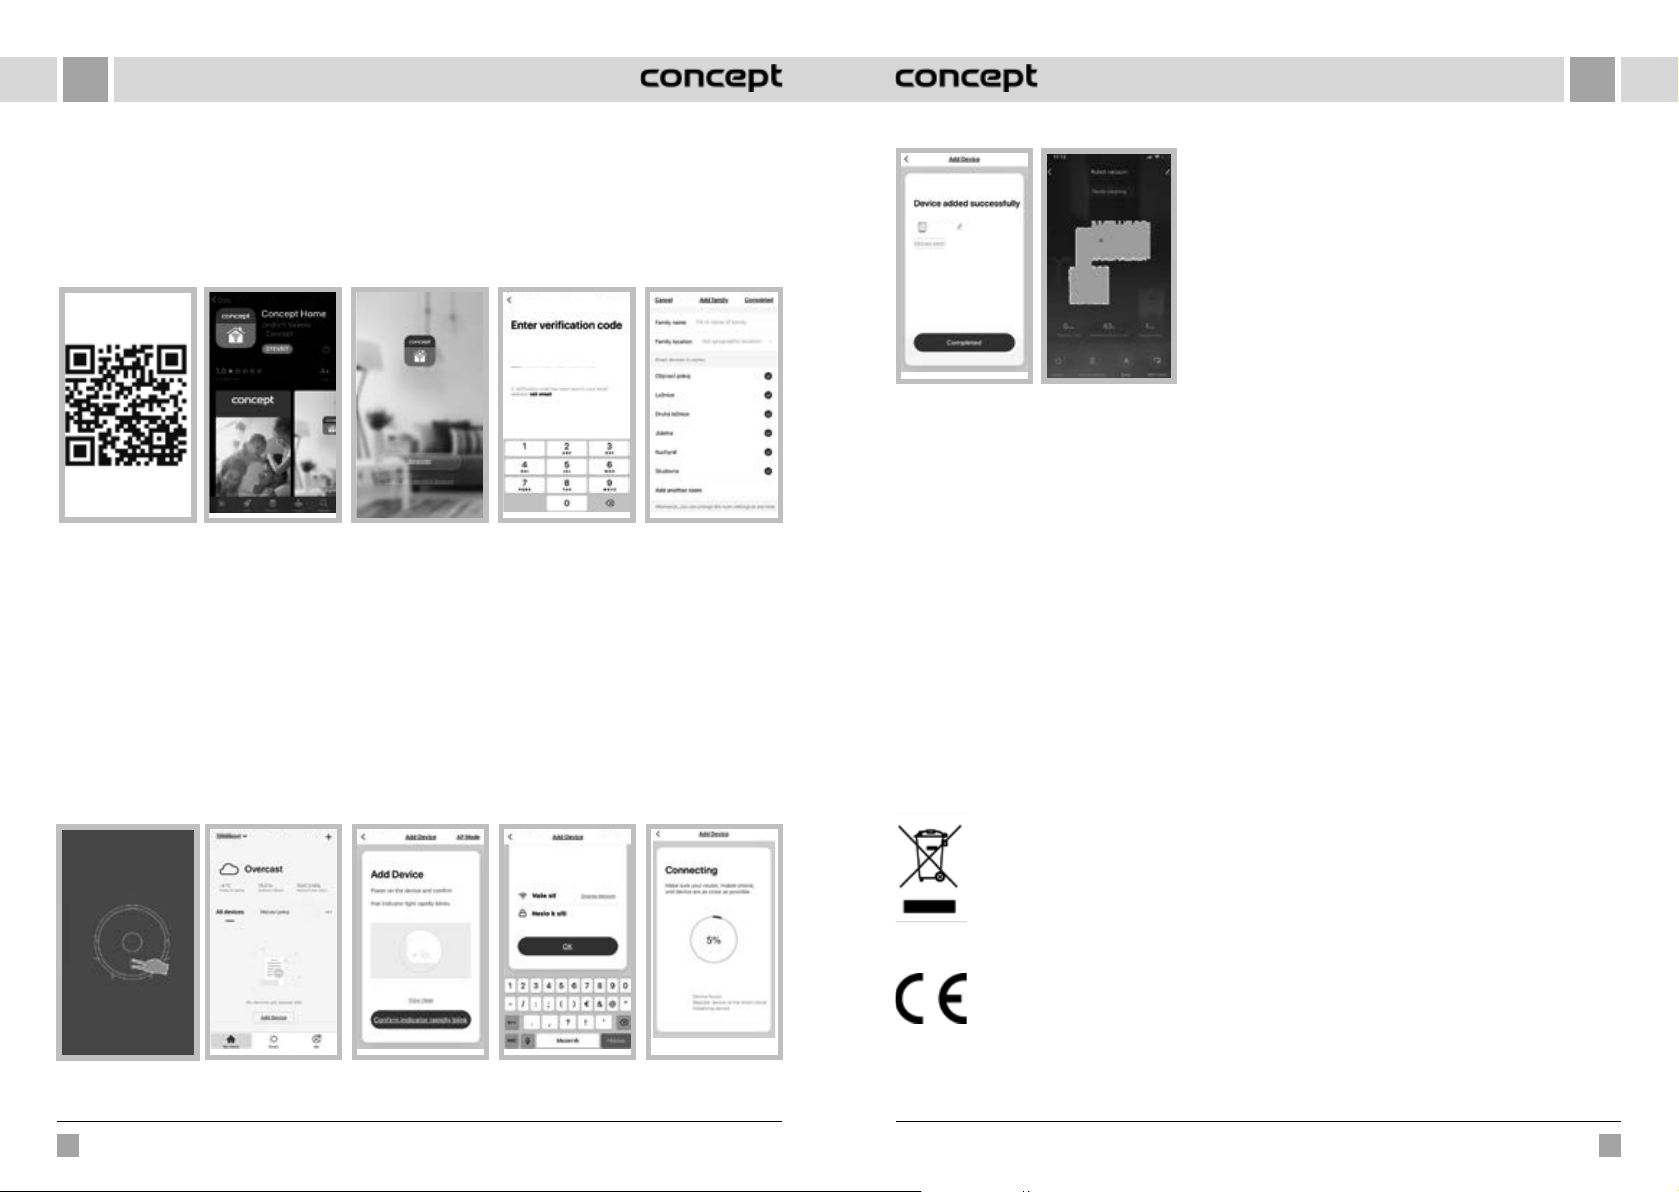
PLPL
Pobranie i zainstalowanie aplikacji
1. Wczytaj kod QR poniżej (rys. 1), albo wyszukaj aplikację „Concept Home” w Google Play lub App Store, i pobierz ją
do swojego telefonu (rys. 2).
2. Jeśli już masz „Concept Home”, otwórz aplikację, zaloguj się, i dalej kieruj się wskazówkami dotyczącymi sparowania.
3. Jeśli jesteś nowym użytkownikiem, to najpierw zarejestruj się (rys. 3). Kieruj się instrukcjami aż do punktu
wprowadzenia kodu weryfikacyjnego, i zakończ rejestrację (rys. 4).
4. Dalej kieruj się instrukcjami i utwórz rodzinę (rys. 5).
rys. 1
Instrukcja parowania urządzeń
1. Na początku sparowania potrzebna jest łączność z Twoją siecią WiFi.
2. Przed nawiązaniem łączności przekonaj się, że urządzenie jest w trybie czuwania. Naciśnij i przytrzymaj przez co
najmniej 3 sekundy jednocześnie oba przyciski (rys. 6), aż odkurzacz będzie migał, a zabrzmi komunikat głosowy
„WiFi lost, please follow the App instruction for reconnection”. Sprawdź, czy telefon jest połączony z tą samą siecią
WiFi, do której chcesz przyłączyć odkurzacz.
3. Następnie naciśnij w aplikacji + albo „Add device” (rys. 7), aby dodać nowe urządzenie.
4. Potwierdź: „Confirm indicator rapidly blink” (rys. 8).
5. Wybierz Twoją sieć WiFi, do której urządzenie ma się przyłączyć, a wpisz jej hasło (rys. 9).
6. Rozpoczyna się proces ustawień, który może zająć jakiś czas (rys. 10).
7. Twój telefon spróbuje połączyć się z urządzeniem oraz przyłączyć go do Twojej sieci WiFi.
8. Po pomyślnym zakończeniu ustawiania (rys. 11), naciśnij „Completed”, a przejdź do ekranu obsługi urządzenia (rys.
12).
rys. 2 rys. 3 rys. 5rys. 4
Co robić w razie problemów z parowaniem
• Sprawdź, czy hasło Twojej sieci WiFi jest wpisane
poprawnie.
• Urządzenie współpracuje tylko z sieciami WiFi 2,4 GHz.
Concept
rys. 11
Tryby aplikacji
Można wybierać spośród trybów sprzątania: AUTO (Automatyczny/ZYGZAK), Miejscowy (Krąg), Wzdłuż Ścian (EDGE) oraz
DOCK (wyszukanie stacji dokującej).
rys. 12
• Router jest przeciążony wieloma innymi urządzeniami.
• W trakcie próby nawiązania łączności z urządzeniem (rys.
10), spróbuj połączyć się ręcznie z jego siecią WiFi.
SERWIS
Bardziej kompleksową konserwację lub naprawy wymagające ingerencji w wewnętrzne elementy produktu powinien
wykonywać wykwalifikowany specjalista lub serwis.
OCHRONA ŚRODOWISKA
• Preferujemy recykling materiałów opakowaniowych oraz starych urządzeń elektrycznych.
• Karton od urządzenia można oddać w punkcie zbiórki odpadów sortowanych.
• Plastikowe worki z polietylenu (PE) należy oddać w punkcie zbiórki materiałów do recyklingu.
Recykling urządzenia po zakończeniu użytkowania:
Urządzenie jest oznakowane zgodnie z dyrektywą europejską 2012/19/UE w sprawie zużytego sprzętu
elektrycznego i elektronicznego (WEEE). Symbol na produkcie lub jego opakowaniu oznacza, że takiego
produktu nie wolno traktować jako odpadu komunalnego. Należy przekazać go do punktu zbiórki
irecyklingu urządzeń elektrycznych i elektronicznych. Zapewnienie prawidłowej utylizacji produktu
zapobiega negatywnemu oddziaływaniu na środowisko oraz zdrowie ludzi, jakie mogłoby wynikać
z niewłaściwej utylizacji produktu. Utylizację należy wykonać zgodnie z przepisami dotyczącymi
postępowania z odpadami. W celu uzyskania szczegółowych informacji na temat recyklingu produktu
należy zwrócić się do lokalnego urzędu, firmy zajmującej się utylizacją odpadów z gospodarstw
domowych lub sklepu, w którym zakupiono produkt.
Produkt spełnia wszystkie stosowne wymagania podstawowe, nakładane na niego przez dyrektywy UE.
rys. 6 rys. 7 rys. 8 rys. 9 rys. 10
44 45
VR2110, VR2100 VR2110, VR2100
Tekst, wygląd i specyfikacja techniczna mogą ulec zmianie bez uprzedniego powiadomienia, do czego zastrzegamy
sobie prawo.
Page 24
HU
KÖSZÖNETNYILVÁNÍTÁS
Köszönjük, hogy megvásárolta ezt a Concept márkájú készüléket, és kívánjuk, hogy használata során végig elégedett
legyen termékünkkel.
Az első használat előtt figyelmesen tanulmányozza át az egész használati útmutatót, és őrizze meg. Gondoskodjon róla,
hogy a terméket kezelő valamennyi személy megismerje az útmutató tartalmát.
Műszaki adatok
VR2110 VR2100
Teljesítményfelvétel 25 W 25 W
Az akkumulátor feszültsége 14,8 V 14,4 V
A tápadapter feszültsége
Zajszint 55-65 dB 55-65 dB
Akkumulátor 3200 mAh, Li-Ion 2600 mAh, Li-Ion
Működési idő 180 perc 150 perc
A teljes feltöltés időtartama 5 óra 4-5 óra
Frekvenciatartomány 2,4-2,4835 GHz 2,4-2,4835 GHz
Az adó teljesítménye (max.) 18 dBm 18 dBm
FONTOS
Az elektromos hálózathoz való csatlakoztatás előtt szemrevételezéssel ellenőrizze, hogy az egység nem sérült,
és a szállítás során sem károsodott.
AC 220-240 V - 50/60 Hz
DC 24 V DC 24 V
FONTOS BIZTONSÁGI FIGYELMEZTETÉSEK
• Ne használja a terméket az ebben az útmutatóban leírtaktól eltérően.
• Az első használat előtt távolítson el a készülékről minden csomagoló- és marketinganyagot.
• Használat előtt távolítson el a padlóról mindent, ami zavarhatja a hatékony és problémamentes
takarítást (kábelt, papírt, ruhát, földig érő asztalterítőt és függönyt).
• Ha a takarítandó területen lépcső van, helyezze a mágnesszalagot (virtuális falat) legalább
15 cm-re a legfelső lépcsőfok szélétől. Ez a távolság a legnagyobb védelmet biztosítja az
esetleges leesés ellen.
• Csak ehhez a modellhez való eredeti tartozékokat és pótalkatrészeket használjon.
• Ne üljön a porszívóra, és ne tegyen rá más tárgyakat.
• A készüléket csak háztartásban, 0 °C és 40 °C közti hőmérsékleten használja.
• Használat előtt bizonyosodjon meg róla, hogy a portartály és a mop megfelelően fel van téve.
• Haját, ruháját, ujjait vagy más testrészeit ne tegye a főkefe közelébe. A főkefét és a porszívó
szívó részét tartsa tisztán, távolítsa el belőle a hajat és a port, mert ezek gyengíthetik
aszívási tulajdonságokat és a takarítás minőségét.
VR2110, VR2100
47
Page 25
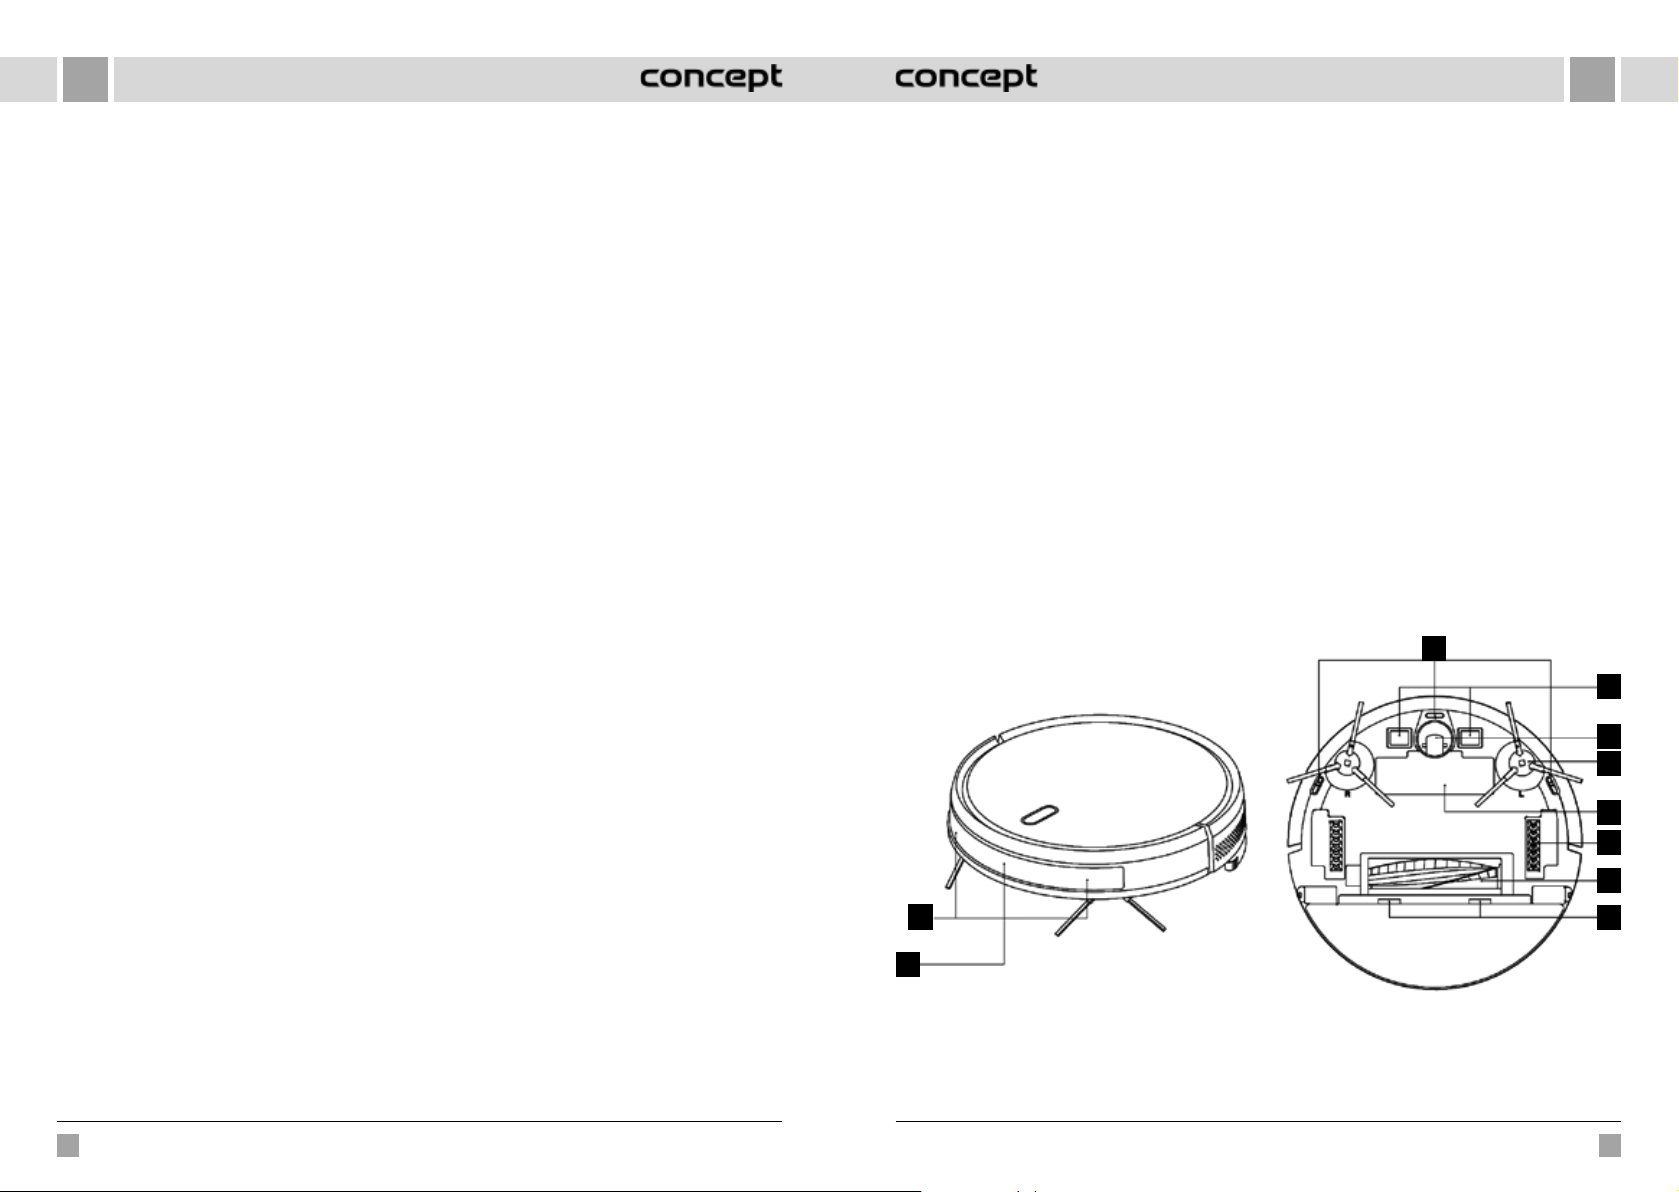
HUHU
• Ne használja a készüléket nedves vagy vizes padlón.
• Ne porszívózzon folyadékot, égő cigarettát, szilánkokat és éles tárgyakat, gyufát és más
gyúlékony anyagot, nagyobb darab papírokat, műanyagzacskót vagy más tárgyakat,
amelyek meghibásodást okozhatnak a porszívóban.
• Porszívózás közben ne hagyja, hogy a porszívó átmenjen a szabadon lévő kábeleken.
• A készülék karbantartásakor és tisztításakor a kapcsolót állítsa kikapcsolt állásba.
• A közvetlen napfény korlátozhatja a porszívó infravörös érzékelőjének érzékenységét,
ezért óvja a közvetlen fénytől.
• Gondoskodni kell róla, hogy felmosáskor a robot ne menjen rá a szőnyegre. Ha a porszívóra
fel van téve a mop a víztartállyal, a takarítás elakadhat, vagy a szőnyeg nedves lehet.
• Ne tegye a készüléket olyan helyre, ahonnan könnyen leeshet (asztal, szék).
• A készülék töltése előtt győződjön meg róla, hogy megfelelően csatlakoztatva van
atöltőállomás.
• Szélsőséges hőmérsékleti feltételek vagy nem megfelelő használat esetén folyadék
szökhet az akkumulátorból. Ha a folyadék a bőréhez ér, azonnal mossa le folyó víz alatt.
Ha a szemébe kerül, azonnal öblögesse legalább 10 percig folyó vízzel. Forduljon orvoshoz.
• Ha a terméket meg akarja semmisíteni, először válassza le az akkumulátort a készülékről.
• Amennyiben a készüléket szállítja, vagy sokáig nem használja, állítsa a kapcsolót kikapcsolt
állásba. Ezzel meghosszabbítja az akkumulátor élettartamát.
• Ellenőrizze, hogy a csatlakoztatott feszültség megfelel-e a típuscímkén megadott értékeknek.
Ne csatlakoztassa a készüléket elosztóhoz vagy hosszabbítóhoz.
• A készüléket soha ne a kábelnél fogva húzza ki az aljzatból, hanem fogja meg a csatlakozót,
és úgy húzza ki.
• Ne engedje, hogy a készüléket játékra használják.
• A készülék tisztításához ne használjon durva és kémiailag agresszív anyagokat.
• A készülék csak háztartási használatra alkalmas, kereskedelmi használatra nem való.
• Se a tápkábelt, se a csatlakozót, se a készüléket ne merítse vízbe vagy más folyadékba.
• Ne javítsa maga a készüléket. Forduljon szakszervizhez, és előzze meg a szakszerűtlenségből
eredő sérülést.
• Ezt a készüléket csak 8 évnél idősebb gyerekek használhatják, és olyan csökkent fizikai
vagy mentális képességű személyek, akik felügyelet alatt vannak, vagy ismertették velük
a készülék biztonságos használati módját és tisztában vannak az esetleges veszélyekkel.
Afelhasználói karbantartást és tisztítást gyerekek nem végezhetik, ha nem idősebbek 8évnél,
és nincsenek felügyelet alatt. A 8 évnél fiatalabb gyerekeket tartsa távol akészüléktől és
a vezetékektől. A gyerekeknek tilos a készülékkel játszani.
• A 3 évnél fiatalabb gyermekeket meg kell akadályozni benne, hogy hozzáférjenek
akészülékhez, ha nincsenek folyamatos ellenőrzés alatt.
• A gyártó és az EU-beli forgalmazó nem felelős a készülék üzemeltetése által okozott
károkért pl. sérülés, égés, tűz, más tárgyak értékvesztése stb.
• A tápkábel sérülése esetén annak cseréjét bízza szakszervizre, hogy elkerülje veszélyes
helyzetek kialakulását. Sérült hálózati kábellel a készüléket tilos használni.
• A robotporszívót csak az eredeti, hozzá mellékelt tápadapterrel szabad használni. Veszélyes
helyzetek kialakulásának elkerülése érdekében soha ne használjon más típusú adaptert.
Ha nem tartja be a gyártó utasításait, az esetleges javításra nem vonatkozik a jótállás.
Gondosan ellenőrizze, hogy kicsomagolta-e az összes tartozékot, javasoljuk, hogy a jótállási idő lejártáig őrizze
meg az eredeti papírdobozt, a felhasználói kézikönyvet és a csomagolóanyagot
A TERMÉK LEÍRÁSA
1 Ütközésgátló érzékelő
2 Infravörös töltésérzékelő
3 Esés elleni érzékelő
4 Töltőérintkező
5 Univerzális kerék
1
2
6 Oldalkefe
7 Az akkumulátor borítása
8 Hajtókerék
9 Főkefe
10 A főkefe borításának retesze
3
4
5
6
7
8
9
10
48 49
VR2110, VR2100 VR2110, VR2100
Page 26
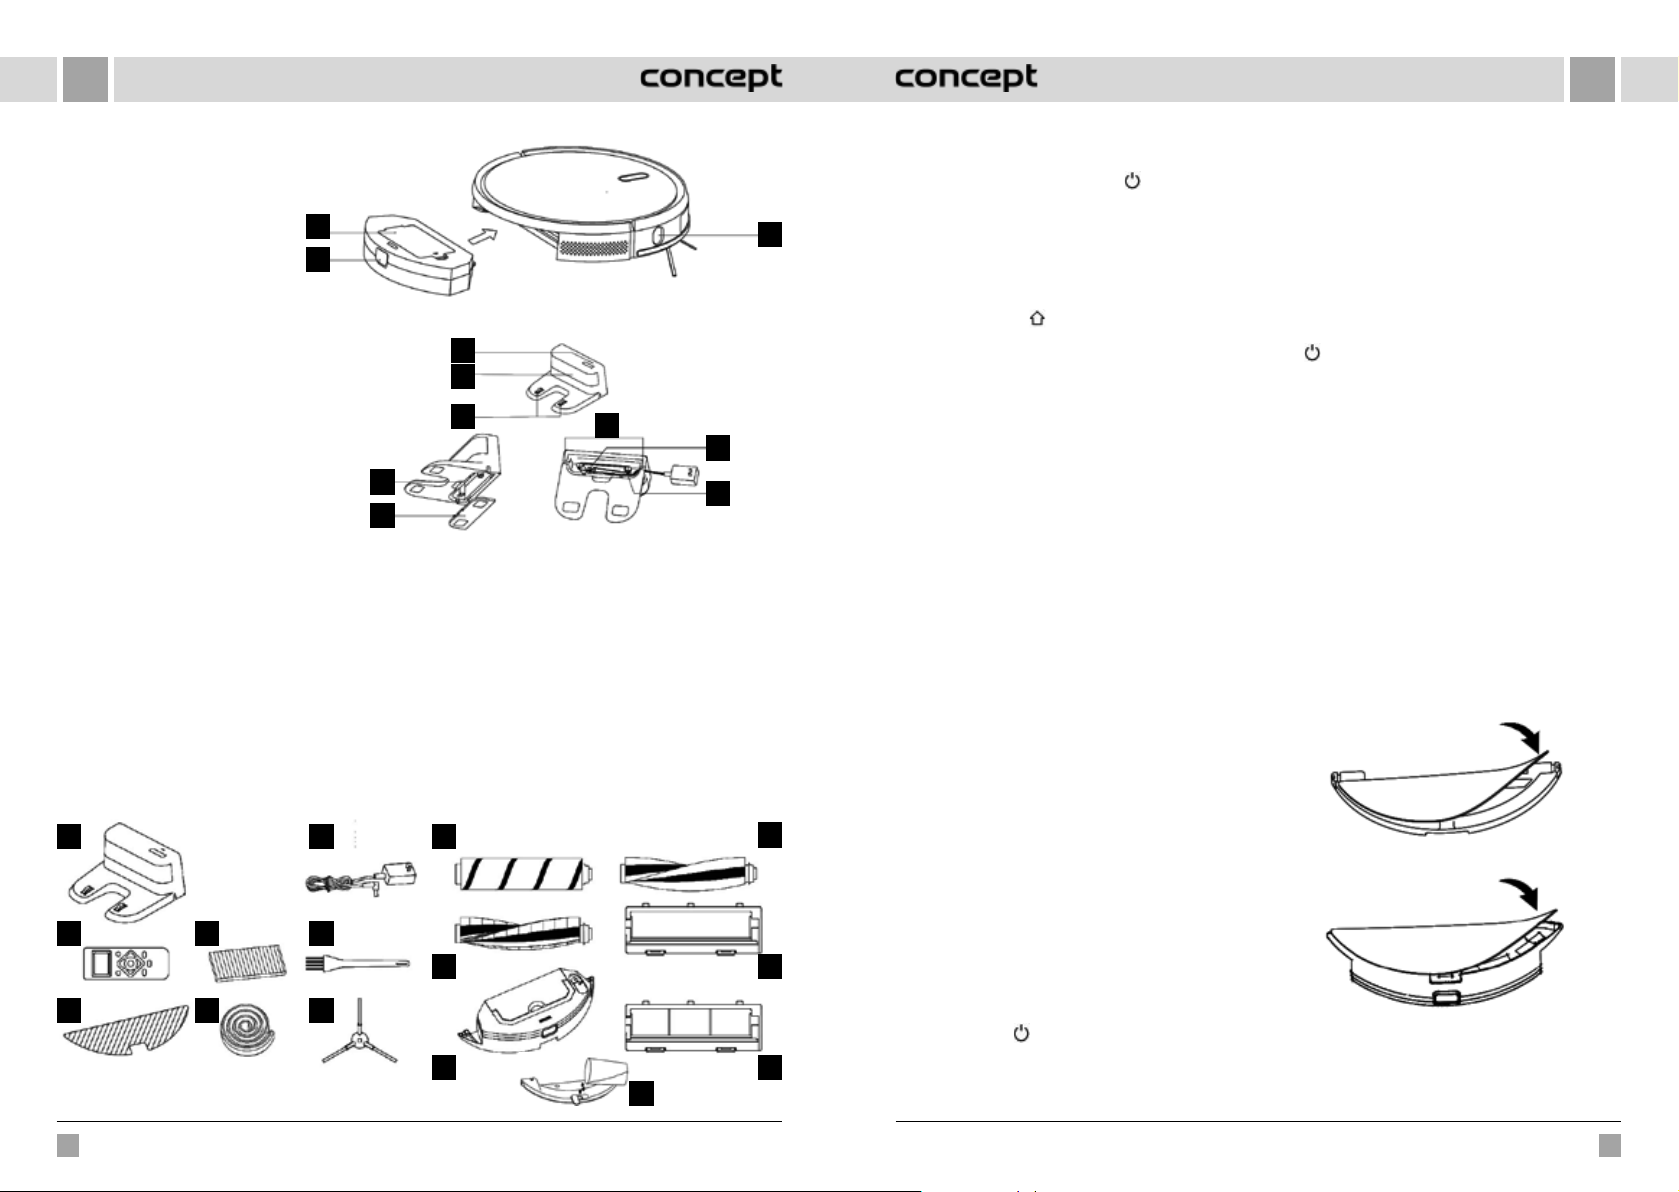
HUHU
1 A szűrő fedele
2 A portartály gombja
3 Falérzékelő
1
2
Dokkoló állomás
1 Töltéskijelző
2 A jel sugárzási területe
3 Az alapzat töltőérintkezői
4 Rögzítő vájat
5 Fedőlap
6 Kábelnyílás
7 A töltőadapter csatlakozója
8 Feltekerő pecek
Az alkatrészek jegyzéke
1 Dokkoló állomás 1x
2 Távirányító 1x
3 Felmosórongy 2x
4 HEPA-szűrő + habszűrő 3x (a VR2100-nál 2x)
5 Mágnesszalag 1x
6 Adapter 1x
7 Tisztítókefe 1x
8 Bal és jobb kefe 2x
1
2
3
4
5
6
7
8
1
2
3
6
4
5
9 HARDFLOOR kefe 1x (csak VR2110 modell esetén)
FIGYELMEZTETÉS! nem használható szőnyegekhez,
megszakíthatja a takarítást.
10 CARPET kefe 1x
11 Elektromosan vezérelt víztartály 1x (csak VR2110
modell esetén)
12 PET kefe 1x (csak VR2110 esetén)
13 Főkefe borítása 1x (csak VR2110 esetén), HARDFLOOR
és PET keféhez
14 Acéldrótos főkefe borítása 1x (CARPET keféhez)
15 Felakasztható víztartály 1x (csak VR2100 modell
esetén)
9
10
11
15
ALAPFUNKCIÓK
Takarítás / bekapcsolás és kikapcsolás
• Rövid megnyomással elindítja vagy megállítja
3
7
8
atakarítást.
• 3 másodperces nyomva tartással a készüléket be- vagy
kikapcsolja.
• 15 másodperces nyomva tartással rendkívüli
helyzetben a készüléket kikapcsolásra kényszerítheti.
Töltés / helyi takarítás
• Rövid megnyomással elindítja vagy megállítja a töltést.
• Hosszú megnyomással elkezdi a helyi takarítást.
Kontroll-lámpa
• Narancssárga: Normál működés vagy töltés.
• Piros: Abnormális állapot vagy lemerült akkumulátor.
• Pirosas-narancssárga: A készülék nincs csatlakoztatva
a hálózathoz.
WiFi reset
• Tartsa nyomva egyszerre mindkét gombot
3másodpercig.
TELEPÍTÉS
1. Csatlakoztassa a tápkábelt, a kábel felesleges
részét tegye a kábeltartó rekeszbe.
2. Tegye a dokkoló állomást a falhoz, és
csatlakoztassa a tápellátást.
Megjegyzés:
• Biztosítson legalább 0,5 m helyet a dokkoló állomás
két oldalán, és legalább 1,5 m-t előtte.
• Ha a tápkábel függőlegesen feszül, előfordulhat,
hogy a készülék kihúzza, és emiatt a dokkoló állomás
kikapcsol.
• A töltés kontroll-lámpája normál állapotban
bekapcsoláskor kigyullad, feltöltéskor kialszik.
12
13
14
3. A dokkoló állomást ne tologassa, és ne tegye ki
közvetlen napfénynek.
Megjegyzés: A közvetlen napfény megzavarja a dokkoló
állomás jelét, és ezért elképzelhető, hogy a készülék nem
tud rá megfelelően visszatérni.
4. Az oldalkefe felhelyezése
Győződjön meg róla, hogy a bal oldalkefe (L) és ajobb
oldal kefe (R) jelzése megfelel az alsó burkolaton
feltüntetett L és R megjelölésnek. Nyomja meg a L és
R oldalkefét, amíg egy kattanást nem hall.
5. Üzembe helyezés és töltés
A robotot a
kapcsolhatja be. Ha a tápellátás kontroll-lámpája
normálisan be van kapcsolva, töltse fel a robotot
adokkoló állomáson.
gomb hosszú megnyomásával
Megjegyzés: Ha a készüléket nem lehet elindítani, mert
gyenge az akkumulátor, töltse fel a dokkoló állomáson, és
ezután a készülék magától beindul. A készülék csak akkor
tud megfelelően működni, ha az akkumulátor töltöttségi
szintje 20 % felett van.
6. A mobilalkalmazás csatlakoztatása (ezt a lépést
átugorhatja)
Olvassa el a WiFi-csatlakozásra vonatkozó utasításokat,
és csatlakoztassa a mobilalkalmazást.
7. A takarítás megkezdése
A robot bekapcsolása után nyomja meg röviden
gombot a roboton, vagy a mobilalkalmazás
a
segítségével kezdje meg a takarítást (menet közben
akészülék munkáját bármelyik gomb megnyomásával
felfüggesztheti).
Megjegyzés:
• A söprésre szolgáló robot nem használható folyadék
eltávolítására.
• Ha az akkumulátor töltöttségi szintje 20% alatt van,
akészülék nem tud működni. Ilyen esetben a töltse fel.
• Ha az akkumulátor töltöttségi szintje 20 % alá
süllyed, akészülék automatikusan visszatér a dokkoló
állomásra.
• Használat előtt távolítsa el a vezetékeket (a dokkoló
állomás tápkábelét is) a földről, nehogy áramszünetet
okozzon, tárgyak vagy vezetékek sérüljenek, amikor
akészülék becsípi őket.
8. A felmosó modul felszerelése
a) A felmosórongy felszerelése: a felmosórongyot
rögzítse simán a víztartály fenekéhez.
VR2100 modell - Felakasztható víztartály
VR2110 modell - Elektromosan vezérelt víztartály
Megjegyzés: A felmosórongyot használat után tisztítsa
meg, hogy jó állapotban maradjon.
b) Töltse fel a víztartályt: nyissa fel a fedelet, és töltse
50 51
VR2110, VR2100 VR2110, VR2100
Page 27
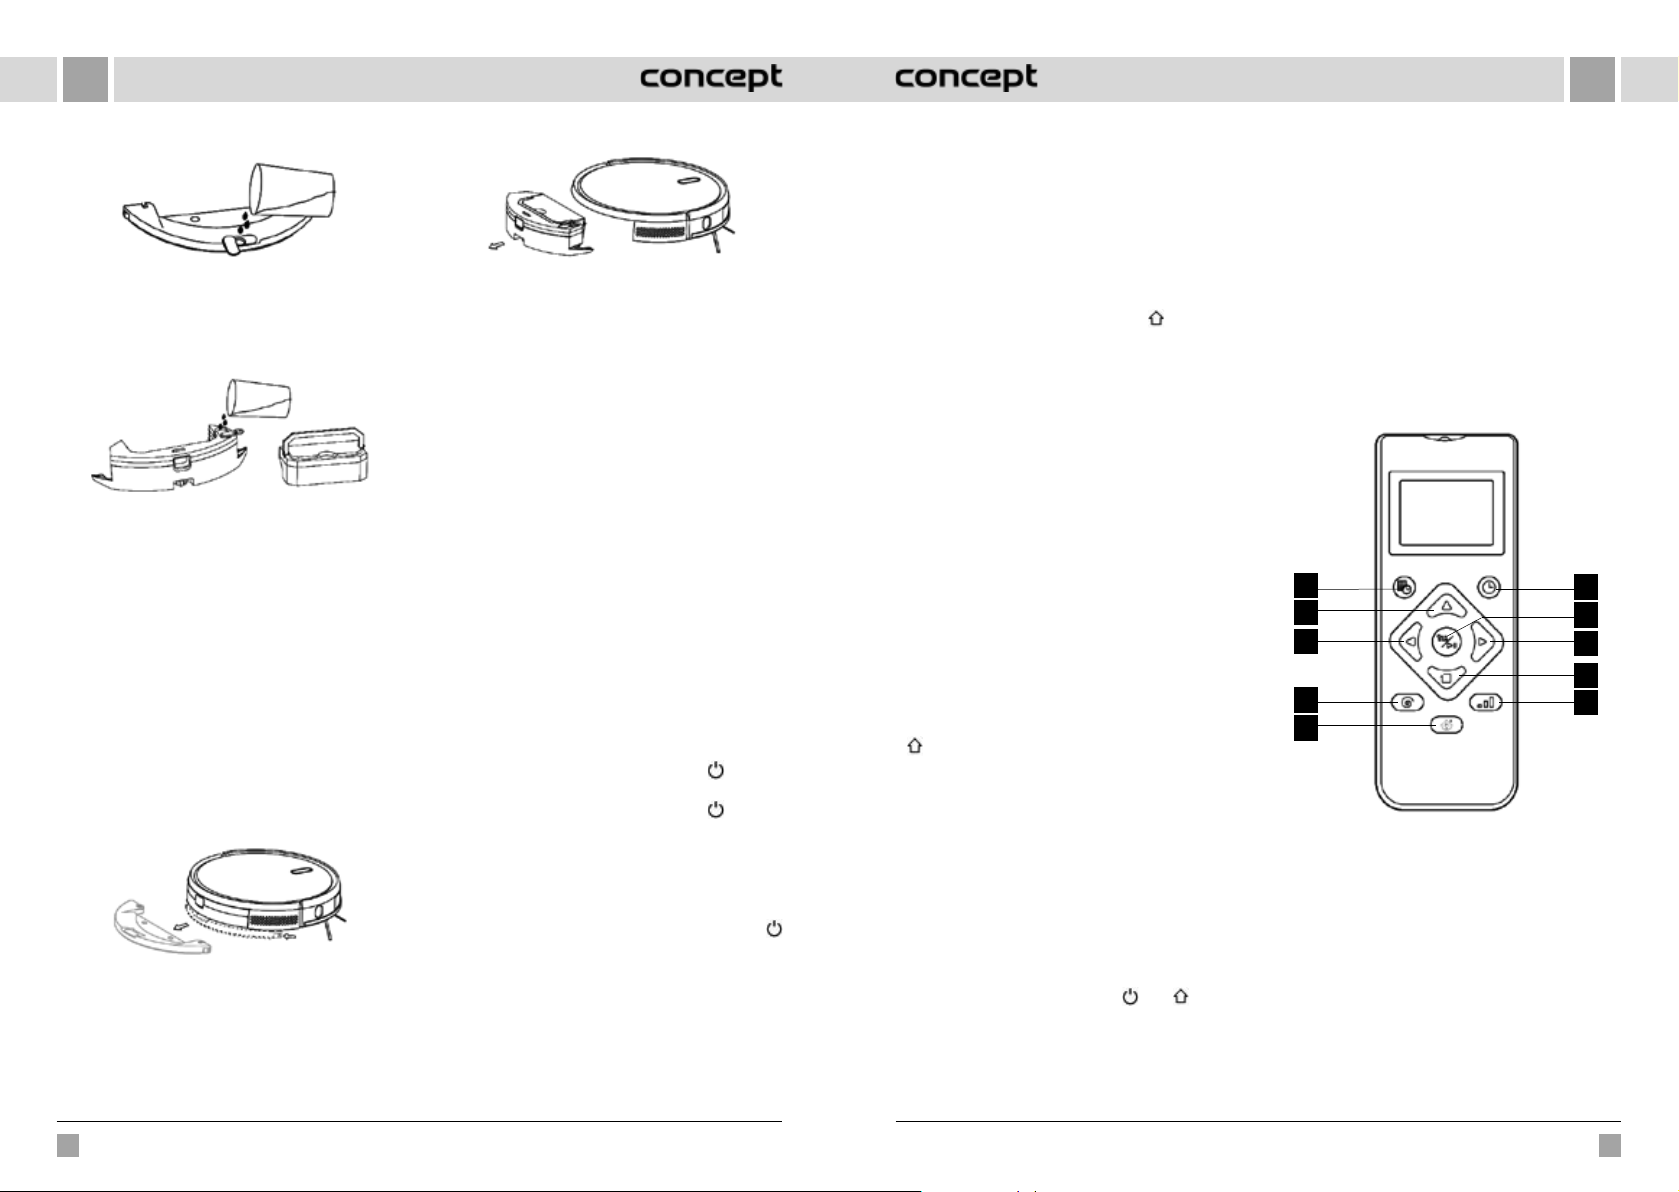
HUHU
meg vízzel.
VR2100 modell - Felakasztható víztartály
Mielőtt feltölti vízzel, vegye ki a porgyűjtő edényt
afogantyú segítségével (VR2110).
VR2110 modell - Elektromosan vezérelt víztartály
c) Szerelje fel a modult:
VR2100 modell: nyomja be a modult vízszintesen
a robot hátsó része mentén. A modul akkor kerül
ahelyére, amikor egy kattanást hall.
VR2110 modell: tegye be a víztartályba a porgyűjtő
edényt, és a fogantyút dugja be a nyílásba. Ezután
tartsa lenyomva a tartály közepén lévő gombot,
és vízszintesen csúsztassa el a robot hátsó része
mentén. A modul akkor kerül a helyére, amikor egy
kattanást hall.
9. A felmosó modul eltávolítása
VR2100 modell: Amikor a robot befejezi a munkát,
nyomja meg a reteszt mindkét oldalon, hátrafelé vegye
ki a felmosómodult, öntse ki a vizet a víztartályból, és
tisztítsa meg a rongyot (takarítás közben a robotot ne
mozgassa és ne fordítsa fel).
VR2100 modell - Felakasztható víztartály
VR2110 modell: Amikor a robot befejezi a munkát,
nyomja meg a víztartály közepén lévő gombot,
hátrafelé vegye ki a felmosómodult, öntse ki a vizet
a víztartályból, és tisztítsa meg a rongyot (takarítás
közben a robotot ne mozgassa és ne fordítsa fel).
VR2110 modell - Elektromosan vezérelt víztartály
10. A felmosómodul használatára vonatkozó
utasítások
• A felmosómodult csak akkor használja, ha szemmel
tudja tartani.
• Biztonsági okokból gondoskodjon róla, hogy
a felmosómodul ne legyen a készülékben töltéskor,
vagy ha nem használja.
• Ne próbáljon szőnyeget felmosni.
• A legjobb hatás elérése érdekében a felmosómodult
csak a padló háromszoros felseprése vagy
felporszívózása után használja.
• Ha vizet akar hozzáönteni vagy meg akarja tisztítani
a rongyot, miközben a készülék működik, állítsa
meg, és a 8. és 9. lépés alapján vegye ki, majd tegye
vissza a felmosómodult. Ne tolja el és ne fordítsa fel
akészüléket, nehogy hibás legyen a helymeghatározás
vagy elvesszen a térkép.
• A készülék felmosás funkciójának célja a takarékosság,
és hozzájárul a mélytakarításhoz is. Nem tudja azonban
eltávolítani az erősen megtapadt szennyeződéseket, és
ezzel helyettesíteni az emberi erőt.
HASZNÁLAT
BEKAPCSOLÁS/KIKAPCSOLÁS
Hosszan, 3 másodpercig tartsa lenyomva a gombot,
akontroll-lámpa kigyullad és a készülék bekapcsol.
Hosszan, 3 másodpercig tartsa lenyomva a gombot,
amikor a készülék készenléti üzemmódban van, a kontrolllámpa kialszik, és a készülék kikapcsol.
MEGJEGYZÉS: A készüléket nem lehet kikapcsolni, amikor
éppen tölt.
TAKARÍTÁS/SZÜNETELTETÉS
A készülék bekapcsolása után röviden nyomja meg a
gombot, vagy indítsa el a készüléket a mobilalkalmazás
segítségével (a működést bármelyik gomb
megnyomásával szüneteltetheti).
Megjegyzés:
• A robotporszívó nem használható folyadékok
eltávolítására.
• Ha az akkumulátor töltöttségi szintje 20% alatt van,
akészülék nem tud működni. Ilyen esetben a töltse fel.
• Ha az akkumulátor töltöttségi szintje 20 % alá
süllyed, akészülék automatikusan visszatér a dokkoló
állomásra.
• Használat előtt távolítsa el a vezetékeket (a dokkoló
állomás tápkábelét is) a földről, nehogy áramszünetet
okozzon, tárgyak vagy vezetékek sérüljenek, amikor
arobot becsípi őket.
TÖLTÉS
Automatikus üzemmód: A munka után a készülék
automatikusan visszatér a dokkoló állomásra.
Kézi üzemmód: Szünetelő állásban a
megnyomásával elkezdheti a töltést, vagy a készüléket
a mobilalkalmazással vezérelve is feltöltheti. A kontrolllámpa villog, amikor a készülék fel van töltve.
Megjegyzés: Ha a készülék nem találja a dokkoló állomást,
automatikusan visszatér eredeti pozíciójába. Ilyen esetben
kézzel tegye vissza a készüléket a dokkoló állomásra.
MÁGNESSZALAG
A mágnesszalagokat be lehet állítani úgy, hogy leválasszák
azokat a területeket, amelyeket nem kell takarítani (pl.
fürdőszoba, konyha stb.).
Megjegyzés: úgy rögzítse a mágnesszalagot a padlóra,
hogy ne tudjon elcsúszni. Különben befolyásolni fogja
ahatékonyságot.
TAKARÍTÁSI ÜZEMMÓD
Elindítás után a gép a takarító programot követve ívben
mozog, hogy a padló teljes felületét feltakarítsa, és
rendszeres, hatékony módon egymás után kitakarítsa
a helyiségek teljes területét. A takarítás befejezését
követően a készülék visszatér a dokkoló állomásra, és
automatikusan feltölt.
HELYI TAKARÍTÁS
A
gomb 3 másodpercig tartó nyomva tartásával a robot
meghatározza a helyét, megtisztít egy 1,5 m átmérőjű kör
alakú területet, majd a takarítás végeztével automatikusan
visszatér kiinduló helyére és automatikusan leáll.
A TAKARÍTÁS MEGTERVEZÉSE
A rögzített takarítási időtartamot a mobilalkalmazás
segítségével lehet beállítani. A készülék automatikusan
takarítani kezd, és a megadott időtartam végeztével
visszatér a dokkoló állomásra.
WIFI RESET
Ha a router konfigurációjának vagy jelszavának
módosulása vagy egyéb ok miatt nem lehet
a mobiltelefonnal kapcsolódni a készülékhez, tartsa
nyomva 3 másodpercig egyszerre a
míg felhangzik a „WiFi has been reset“ (a WiFi visszatért
alapállapotba) hangüzenet, kigyullad és lassan villog
akékeslila kontroll-lámpa.
CSENDES ÜZEMMÓD
A robot hangjelzéseit a mobilalkalmazás segítségével
gomb rövid
és a gombot,
lehet be- vagy kikapcsolni.
A SZÍVÓTELJESÍTMÉNY BEÁLLÍTÁSA
A szívóteljesítményt a mobilalkalmazás segítségével
csendes, normál vagy magas szintre lehet állítani.
Szőnyeg érzékelése esetén a szívóteljesítmény
automatikusan a legmagasabb szintre emelkedik.
FIGYELMEZTETÉS - a szőnyeget csak a Carpet kefével lehet
megfelelően érzékelni.
A VÍZÁRAMLÁS BEÁLLÍTÁSA (csak a VR2110 modell
elektromosan vezérelt víztartálya esetén)
A vízáramlást a mobilalkalmazás segítségével alacsony,
normál vagy magas szintre lehet állítani.
A TÁVIRÁNYÍTÓ HASZNÁLATA
1
2
3
6
7
8
9
4
10
5
1. A takarítás megtervezése
2. Mozgás előre
3. Fordulás balra
4. Helyi TURBO takarítás
5. A töltés megkezdése/felfüggesztése
6. Automatikus takarítás/szünet
7. Takarítás/szünet
8. Fordulás jobbra
9. Peremek takarítása
10. A szívóteljesítmény / vízáramlás beállítása
Megjegyzés: Ahhoz, hogy minden megfelelő beállítás
hatékony legyen, a távirányítót a robotporszívó elülső
részére kell irányítani, mégpedig elég közelről.
52 53
VR2110, VR2100 VR2110, VR2100
Page 28
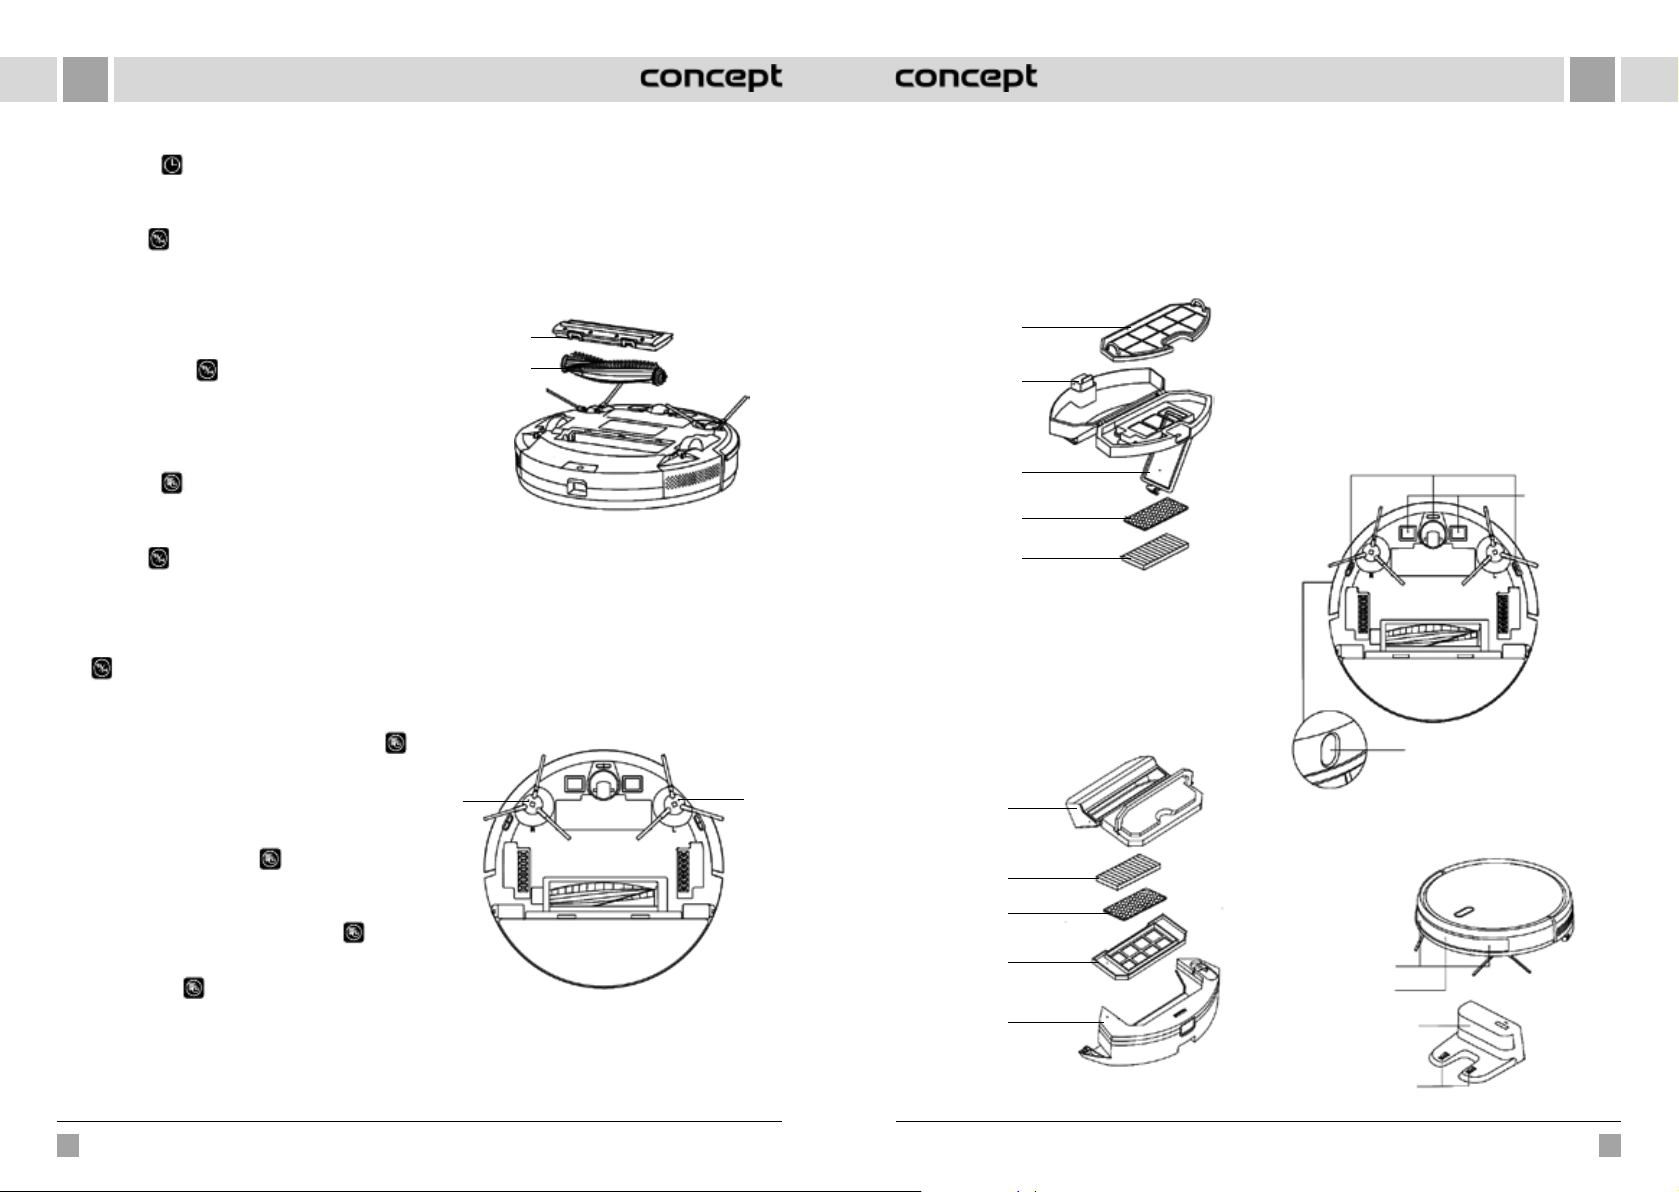
HUHU
Az idő beállítása
1. A távirányító gombjának megnyomásával belép
az időbeállításba, az LCD-kijelzőn villog a vasárnap
ikon.
2. A bal és a jobb gomb megnyomásával válassza ki a hét
napját és a gombbal hagyja jóvá, ezután az LCDkijelző automatikusan az órabeállításra vált.
3. A fel és le gomb megnyomásával állítsa be az órát,
majd a bal és jobb gomb megnyomásával lépjen át
apercek beállítására.
4. Miután beállította az aktuális időt, irányítsa
a távirányítót a robotporszívó elülső oldala felé,
és nyomja meg a gombot a teljes időbeállítás
jóváhagyásához. Ha ezt nem teszi meg, a beállításai
nem lépnek hatályba.
5. Ezzel befejezi az idő beállítását a távirányítón és
arobotporszívón.
Takarítási terv
1. A távirányító
gombjának megnyomásával belép
a tervbeállításba, az LCD-kijelzőn villog a vasárnap
ikon.
2. A bal és a jobb gomb megnyomásával válassza ki a hét
napját és a gombbal hagyja jóvá, ezután az LCDkijelző automatikusan az órabeállításra vált.
3. A fel és le gomb megnyomásával állítsa be az órát,
majd a bal és jobb gomb megnyomásával lépjen át
a percek beállítására. Ezután irányítsa a távirányítót
a robotporszívó elülső oldala felé, és nyomja meg
a gombot a robotporszívó takarítási tervének
jóváhagyásához.
4. A terv beállításának a befejezése után a távirányító
automatikusan átlép egy következő terv beállítására.
Ha nem akarja folytatni a beállítást, nyomja meg a
gombot a befejezéshez, vagy várjon 10 másodpercet,
amikor a beállítás automatikusan befejeződik.
5. Ezzel befejezi az idő beállítását a távirányítón és
arobotporszívón.
A takarítási terv törlése
1. Nyomja meg a távirányító
gombját, az LCDkijelzőn villogni kezd a vasárnap ikon, és megjelennek
a hét azon napjai, amelyeket megtervezett.
2. A bal és a jobb gomb megnyomásával válassza ki
azt a napot, amelyre tervet készített, és a gomb
3 másodperces nyomva tartásával ezt a tervet
törölheti. Választhat másik törlendő napot is, vagy
nyomja meg a gombot a befejezéshez vagy
várjon 10 másodpercig, és a beállítás automatikusan
befejeződik.
MINDENNAPOS KARBANTARTÁS
Főkefe (rendszeresen tisztítsa)
1. Fordítsa fel a készüléket, és nyomja meg a főkefe
borításán lévő reteszt, hogy ki tudja húzni.
2. Egy kis kefe segítségével távolítsa el a port a főkefe
belsejéből, és a főkefét tisztítsa meg.
3. Rakja össze újra a főkefét, és nyomja le a borítást, hogy
a retesz a helyére pattanjon.
Retesz
Főkefe
Oldalkefe (rendszeresen tisztítsa)
1. Fordítsa fel a készüléket, és felfelé húzza ki az oldalkefét.
2. Távolítsa el a hajat és a szennyeződéseket, majd
szerelje vissza az oldalkefét.
3. Győződjön meg róla, hogy a bal oldalkefe (L) és a jobb
oldalkefe (R) megfelel az alsó burkolaton feltüntetett
L és R jelnek. Az L és R oldalkefét lenyomással szerelje
vissza.
Megjegyzés: Az oldalkeféket tisztítóhatásuk biztosítása
érdekében 3-6 havonta cserélje.
R - jobb
oldalkefe
Portartály és szűrőrács (rendszeresen tisztítsa)
1. Nyomja meg a gombot, és a portartályt hátrafelé
húzza ki.
2. A portartályt nyissa ki és tisztítsa ki.
A szűrőrács tisztítása (rendszeresen tisztítsa)
L - bal oldalkefe
1. Hosszabb ideig történő használat után vegye ki
aszűrőrácsot, a habszűrőt és a HEPA-szűrőt.
2. Tisztítsa meg a kivett szűrőrácsot. A habszűrőt és
aHEPA-szűrőt víz alatt öblítse le.
3. Az egyes alkatrészeket törölje le, és hagyja szabadon
megszáradni.
4. Megszáradás után megfelelő sorrendben egymás után
szerelje vissza a rácsot - habszűrőt - HEPA-szűrőt.
Szűrőrács (durva
szűrő)
Gomb
A szűrő fedele
Habszűrő
HEPA-szűrő
Megjegyzés:
• A szűrőrácsot tiszta vízzel öblítse le, ne adjon hozzá
semmilyen tisztítószert.
• Ne tisztítsa a rácsot kefével vagy az ujjaival.
• A szűrőrácsot hagyja legalább 24 órán keresztül
alevegőn száradni.
• A szűrőrácsot 3-6 havonta cserélje.
A szűrő tisztítása (rendszeresen tisztítsa)
Portartály
HEPA-szűrő
Habszűrő
Szűrőrács
(durva szűrő)
Víztartály
Elektromosan vezérelt víztartály
Felmosó modul (minden használat után tisztítsa)
1. Távolítsa el a rongyot, öntse ki a vizet a víztartályból.
2. Tisztítsa meg a rongyot, szárítsa meg a víztartályt és
a rongyot. A VR2110 modell esetén először vegye ki
aportartályt, majd a víztartályból öntse ki a vizet.
Érzékelők (rendszeresen tisztítsa)
Az érzékelőket egy puha ronggyal az alábbi módon
tisztítsa meg:
1. Tisztítsa meg a fal mentén jobbra levő érzékelőket.
2. A három esés elleni érzékelőt a készülék alján.
3. Az infravörös ütközés elleni érzékelőt a készülék elején.
4. Az áramütés elleni védőt és a dokkoló állomáshoz
való érintkezőket a készülék alján (a tisztítás idejére
akészüléket kapcsolja ki).
5. A dokkoló állomás jelátvivőjének környékét.
Esés elleni érzékelő
Töltőérintkező
TOF érzékelő
Érzékelők (havonta tisztítsa)
Ütközésgátló
érzékelő
Infravörös
töltésérzékelő
A jel sugárzási
területe
Az alapzat
töltőérintkezői
54 55
VR2110, VR2100 VR2110, VR2100
Page 29
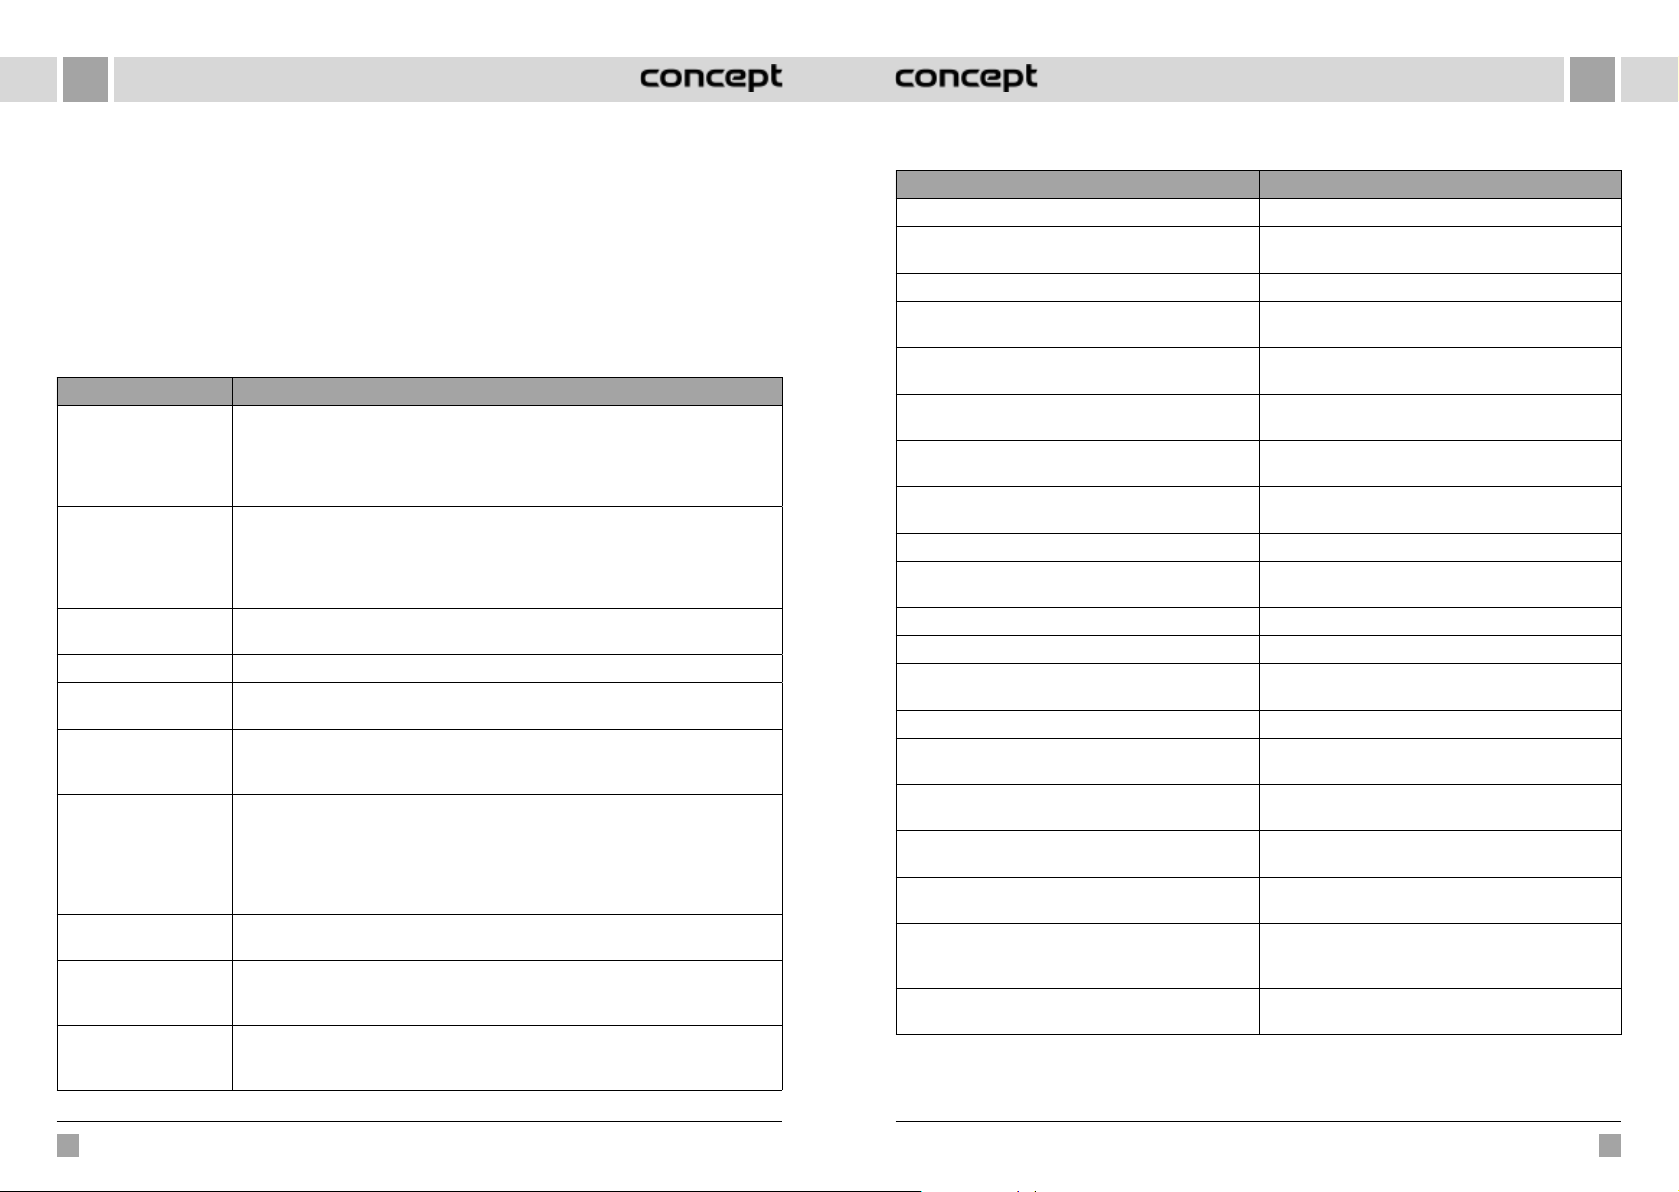
HUHU
Akkumulátor
• A készülék nagyon nagy teljesítményű lítium-ion
akkumulátorokkal rendelkezik. Ha meg akarja őrizni az
akkumulátor teljesítményét, a mindennapos használat
során tartsa a készüléket feltöltve.
• Ha a készüléket sokáig nem használja, kapcsolja ki
és tegye el. Töltse fel legalább háromhavonta, hogy
megelőzze az akkumulátor túlzott lemerülés miatti
meghibásodását.
Firmware frissítés
A firmware-t a mobilalkalmazás segítségével frissítheti.
Ha kiderül, hogy új firmware áll rendelkezésre,
afigyelmeztetés alapján végezze el a frissítést. A firmware
frissítésekor az akkumulátor töltöttségi szintjének
50%felett kell lennie, ezért lehetőleg a dokkoló állomáson
legyen.
A LEGGYAKORIBB PROBLÉMÁK
Hiba Megoldás
A robot nem indul be • Ha az akkumulátor töltöttsége alacsony, helyezze a robotot a dokkoló állomásra és
A robotot nem lehet
feltölteni
A robotot nem lehet
utántölteni
Abnormális viselkedés Kapcsolja ki, és indítsa újra a robotot.
Használat közben
szokatlan zaj hallatszik
Csökken a takarítási
képesség vagy
akészülékből por hull
Nem lehet csatlakozni
aWiFi-hez
A tervezett takarítás nem
történt meg
A robot energiát fogyaszt,
miközben folyamatosan
adokkoló állomáson van?
Szükséges a robotot
először háromszor
16órán keresztül tölteni?
illessze a lap érintkezőihez, a készülék automatikusan beindul (ha a robot teljesen ki
van kapcsolva, lehet, hogy egy rövid ideig tartó töltés után indul csak be).
• Ne használja a készüléket 0 °C-nál alacsonyabb vagy 50 °C-nál magasabb környezeti
hőmérséklet esetén. Csak 0-40 °C közötti hőmérsékleten használja.
• Tolja le a robotot az állomásról, ellenőrizze, kigyullad-e a dokkoló állomás kontroll-
lámpája, és ellenőrizze, hogy a dokkoló állomás tápadapterének mindkét vége
megfelelően csatlakoztatva van-e.
• Ha rossz az érintkezés, tisztítsa meg a dokkoló állomás érintkező felületeit és a robot
töltőérintkezőit, vagy fordítsa félre az oldalkefét.
A robot túl messze van a dokkoló állomástól, helyezze a dokkoló állomás közelébe és
próbálja újra.
Lehet, hogy a főkefét, az oldalkefét vagy a kereket egy idegen tárgy borítja, kapcsolja ki
a robotot és távolítsa el az idegen tárgyat.
• A portartály tele van. Tisztítsa ki.
• A szűrőrács szennyezett. Tisztítsa meg vagy cserélje ki.
• A főkefét idegen tárgyak borítják be, tisztítsa meg.
• Rossz a WiFi-jel. Ellenőrizze, megfelelő-e a WiFi lefedettség.
• A WiFi szokatlan módon csatlakozik. Resetelje a WiFi-t, töltse le a legújabb alkalmazást
és próbáljon újra csatlakozni.
• Rosszul adta meg a jelszót.
• 5G frekvenciasávú routere van, a porszívó pedig csak 2.4G frekvenciasávval
rendelkezik.
Ha az akkumulátor töltöttsége alacsony, a tervezett takarítást csak akkor lehet elkezdeni,
ha az akkumulátor töltöttsége legalább 30 %.
A robot akkor is használ egy kis mennyiségű energiát, ha folyamatosan a dokkoló
állomáson van, ez biztosítja az akkumulátor legjobb teljesítményét.
A lítiumakkumulátort közvetlenül feltöltés után használni lehet, és nem rendelkezik
memóriaeffektussal.
PROBLÉMAMEGOLDÁS
Hangjelzés Megoldás
Error 1: Oh dear! I cannot find the dust collector A takarítást úgy kezdte el, hogy ki volt véve a portartály.
Error 2: Please check if the radar on top has been covered
or blocked
Error 3: Please place me in a new location and try again Tegye át a robotot, vagy emelje a levegőbe.
Error 4: Please scrub the cliff sensor, and restart me from
a new location
Error 5: Please scrub the front sensor, and restart me from
a new location
Error 6: Please scrub the right-hand sensor, and restart
me from a new location
Error 7: Please scrub the radar housing on top, and restart
me from a new location
Error 8: Please check if the bumper has been blocked in
some way
Error 9: Master, please clean the dust container and filter A portartály tele van, vagy a szűrőrácsot ki kell cserélni.
Error 10: Dust container has been removed, please clean
the container and filter
Error 11: I'm stuck, please help me! A robot valahol elakadt.
Error 12: Please place me correctly! A robot megdőlt.
Error 13: Please check if my wheels have become blocked
somewhere
Error 14: Please check if the main brush has become stuck A főkefe belegabalyodott valamibe vagy elakadt.
Error 15: Please check if the side brushes have become
stuck
Error 16: What's going on? Where is the docking station? A dokkoló állomást nem sikerült megtalálni, vagy nincs
Error 17: Oh dear! Program error, please restart me Abnormális állapot azonosítatlan hiba miatt, indítsa újra
Error 18: Error encountered initiating shutdown A robot figyelmezteti a felhasználót, majd automatikusan
Error 19: Low battery, please recharge Ha az akkumulátor töltöttsége túl alacsony, a robot nem
Error 20: To shut me down, please place me away from
the docking station
A felső érzékelő le van takarva, vagy nyílt terepen van
(6x6 m2-es területen nincs akadály).
Az esés elleni érzékelő le van takarva, vagy magasban
van.
Az infravörös ütközésgátló érzékelő szennyezett vagy le
van takarva.
A falérzékelő szennyezett vagy le van takarva.
A radaros ütközésgátló érzékelő szennyezett vagy le van
takarva.
A perem- vagy ütközésgátló érzékelőt valami blokkolja.
A 9. zavar jelzése után a felhasználó kivette a portartályt,
és ezzel a 10. zavar alakult ki.
A hajtókerék elakadt vagy belegabalyodott valamibe.
Az oldalkefe belegabalyodott valamibe vagy elakadt.
csatlakoztatva.
a robotot.
kikapcsol vagy tölteni kezd.
a dokkoló állomáson van, és elkezdődik a takarítás (az
akkumulátor töltöttségi szintje 10 % alatt van).
A dokkoló állomáson történő töltés közben a robotot
kikapcsolták.
56 57
VR2110, VR2100 VR2110, VR2100
Page 30
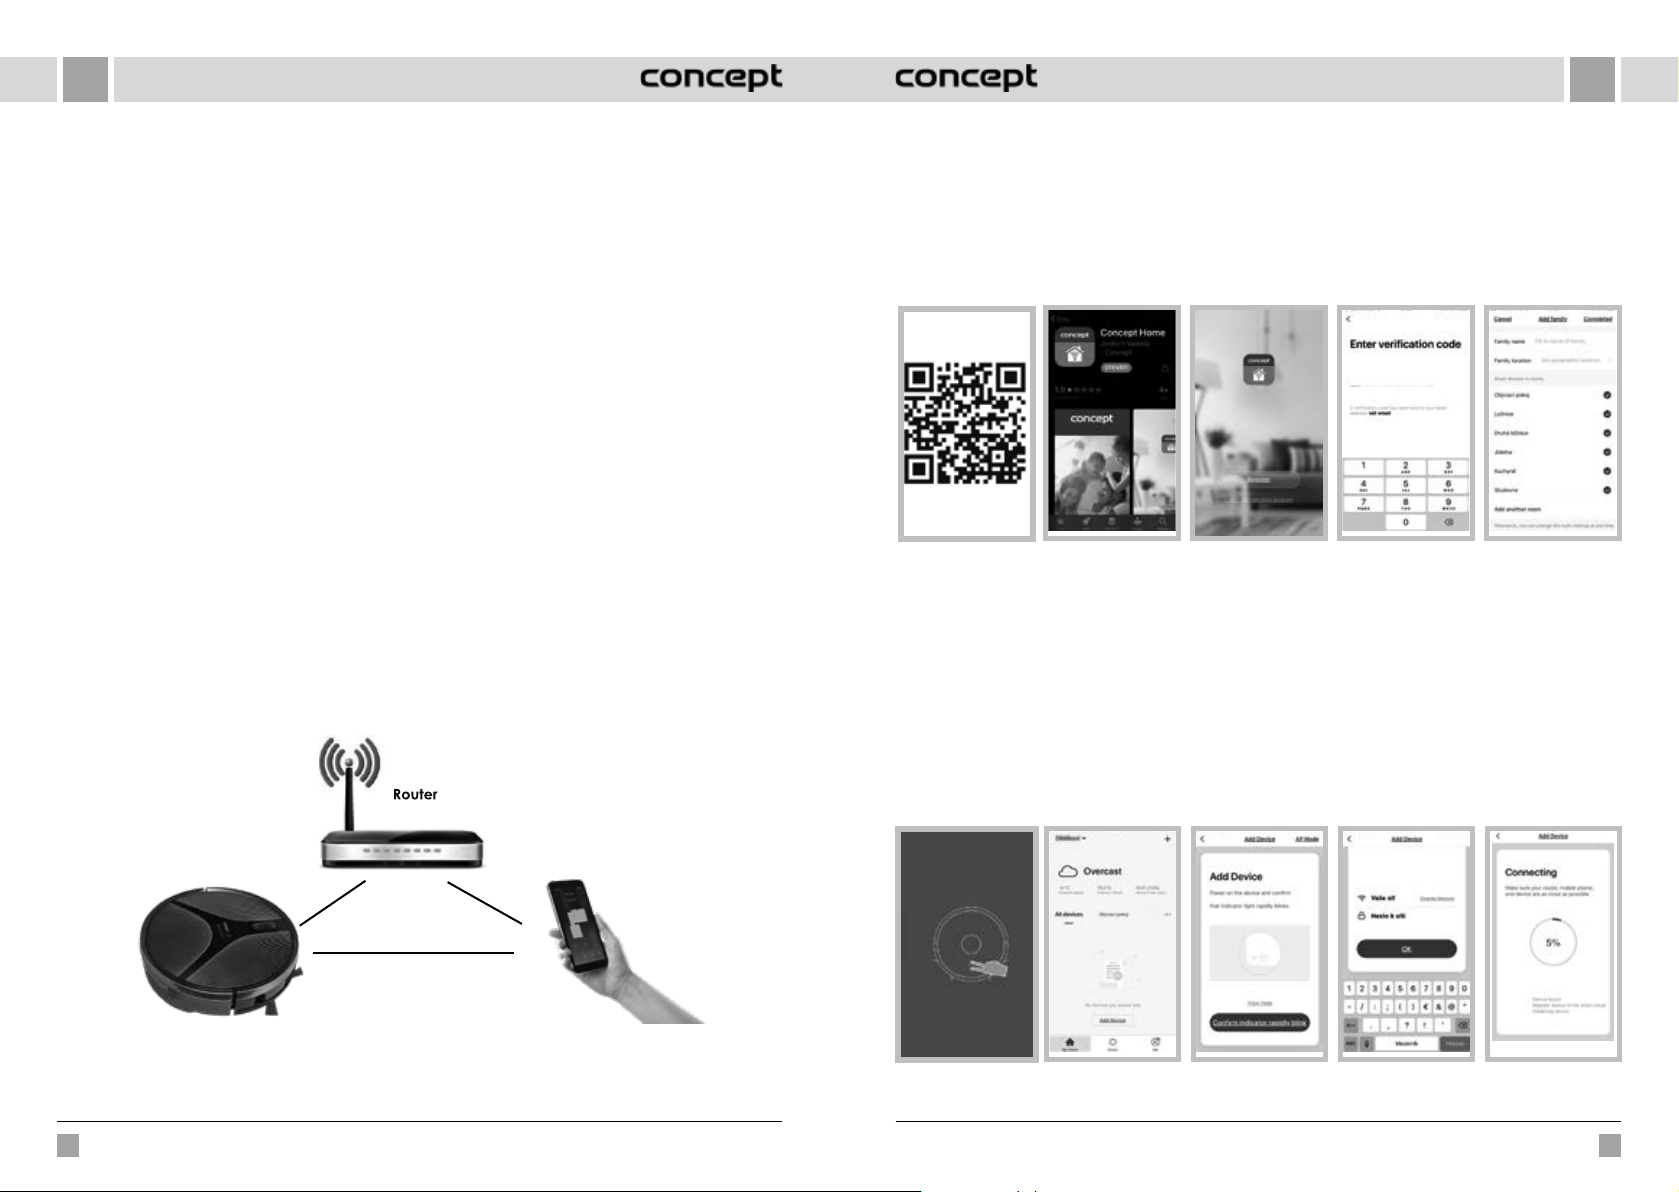
HUHU
VEZETÉK NÉLKÜLI CSATLAKOZÁS ÉS KOMPATIBILITÁS
• A Jindřich Valenta - CONCEPT vállalat semmilyen módon nem felelős semmilyen véletlen, közvetett vagy
következményes kárért, adatvesztésért vagy bármilyen olyan veszteségért, amely a vezeték nélküli technológián
alapuló kommunikáció során kiszivárgott információból ered.
• A sikeres vezeték nélküli kommunikáció nem garantálható 100%-ban minden Smart készülék és Wifi hálózat (router)
esetén. Tekintettel a piacon fellelhető készülékek változatosságára előfordulhat, hogy az adott Smart készülék vagy
Wifi hálózat (router) jellege vagy specifikációja lehetetlenné teszi vagy valamilyen módon zavarja a csatlakozást.
AWifi-hálózaton keresztüli vezeték nélküli kommunikáció sikerességét egy sor tényező, köztük a hardver és a szoftver
konfigurációja befolyásolja. A robot és a Wifi-hálózat közti kapcsolatot negatívan befolyásolhatják a környező
Wifi-hálózatok, amelyek esetleg ugyanarra a csatornára vannak behangolva, és ezzel zavarják a csatlakozást (pl.
lakótelepen, lakóházban stb.). Az ilyen esetek nem adnak alapot a készülékre vonatkozó reklamációra.
• Az alkalmazás tulajdonosa és üzemeltetője egy harmadik fél (a továbbiakban „Harmadik”), aki nem azonos a Jindřich
Valenta - CONCEPT vállalattal (a továbbiakban „Eladó”). Az Eladó semmilyen személyes adatot nem ad tovább
aHarmadik részére. Az alkalmazásba történő regisztráció során a megrendelő közvetlenül a Harmadiknak ad meg
személyes adatokat, aki maga az adatkezelő. Az alkalmazásra és a személyes adatok ezzel kapcsolatos védelmére
aHarmadik szabályai vonatkoznak.
Kompatibilitás:
Az okoskészülék operációs rendszere - Android 5.0 vagy magasabb
- IOS 9.0 és magasabb
Wifi-hálózat - 2,4 GHz
- WPA1 és WPA2 biztosítás (WPA2 javasolt)
FIGYELMEZTETÉS: A készülék nem üzemeltethető IEEE 802.1X biztonsági protokollal rendelkező Wifi-hálózaton
(rendszerint céges Wifi-hálózat).
VEZÉRLÉS AZ ALKALMAZÁSSAL
Mielőtt az alkalmazással vezérelni tudja a készüléket, össze kell kapcsolnia telefonjával és lehetővé kell tennie, hogy
elérje a WiFi hálózatot.
Az alkalmazás letöltése és telepítése
1. Szkennelje be az alábbi QR-kódot (1. ábra), keresse meg a „Concept Home” alkalmazást a Google Play-en vagy az
App Store-ban, és töltse le mobiltelefonjára (2. ábra).
2. Ha már rendelkezik a Concept Home-mal, nyissa meg az alkalmazást, jelentkezzen be, és kövesse a párosításra
vonatkozó utasításokat.
3. Ha új felhasználó, kezdje a regisztrációval (3. ábra). Folytassa az instrukciók szerint a hitelesítő kód megadásával, majd
fejezze be a regisztrációt (4. ábra).
4. Cselekedjen a továbbiakban az utasítások szerint, és hozzon létre családot (5. ábra).
1. ábra
A készülékek párosítására vonatkozó utasítások
1. A párosítás elején csatlakozva kell lennie a WiFi hálózathoz.
2. A csatlakozás megkezdése előtt győződjön meg róla, hogy a készülék készenléti üzemmódban van. Legalább
3másodpercig tartsa lenyomva egyszerre a két gombot (6. ábra), míg a robot villogni nem kezd, és fel nem hangzik
a„WiFi lost, please follow the App instruction for reconnection“ hangüzenet. Ellenőrizze, hogy a telefon ugyanahhoz
a WiFi hálózathoz csatlakozik-e, amelyikhez a robotot szeretné csatlakoztatni.
3. Majd az alkalmazásban nyomja meg a + vagy az „Add Device” (7. ábra) gombot új készülék hozzáadásához.
4. Hagyja jóvá a „Confirm indicator rapidly blink“ opcióra koppintva (8. ábra).
5. Válassza ki a WiFi-hálózatot, amelyhez a készüléknek csatlakoznia kell, és adja meg a jelszót (9. ábra).
6. Elindul a beállítási folyamat, ami egy ideig eltarthat (10. ábra).
7. Telefonja megpróbál összekapcsolódni a készülékkel, és csatlakoztatja WiFi-hálózatához.
8. A sikeres beállítást követően (11. ábra) koppintson a „Completed” gombra, és beléphet a készülék vezérlésére szolgáló
felületre (12. ábra).
2. ábra 3. ábra 5. ábra4. ábra
Javasolt távolság a beállításnál: 4 méteren belül
Bizonyosodjon meg róla, hogy a robotporszívó, a router és a mobiltelefonja közel vannak egymáshoz, hogy gond nélkül
párosítani lehessen.
58 59
VR2110, VR2100 VR2110, VR2100
6. ábra 7. ábra 8. ábra 9. ábra 10. ábra
Page 31
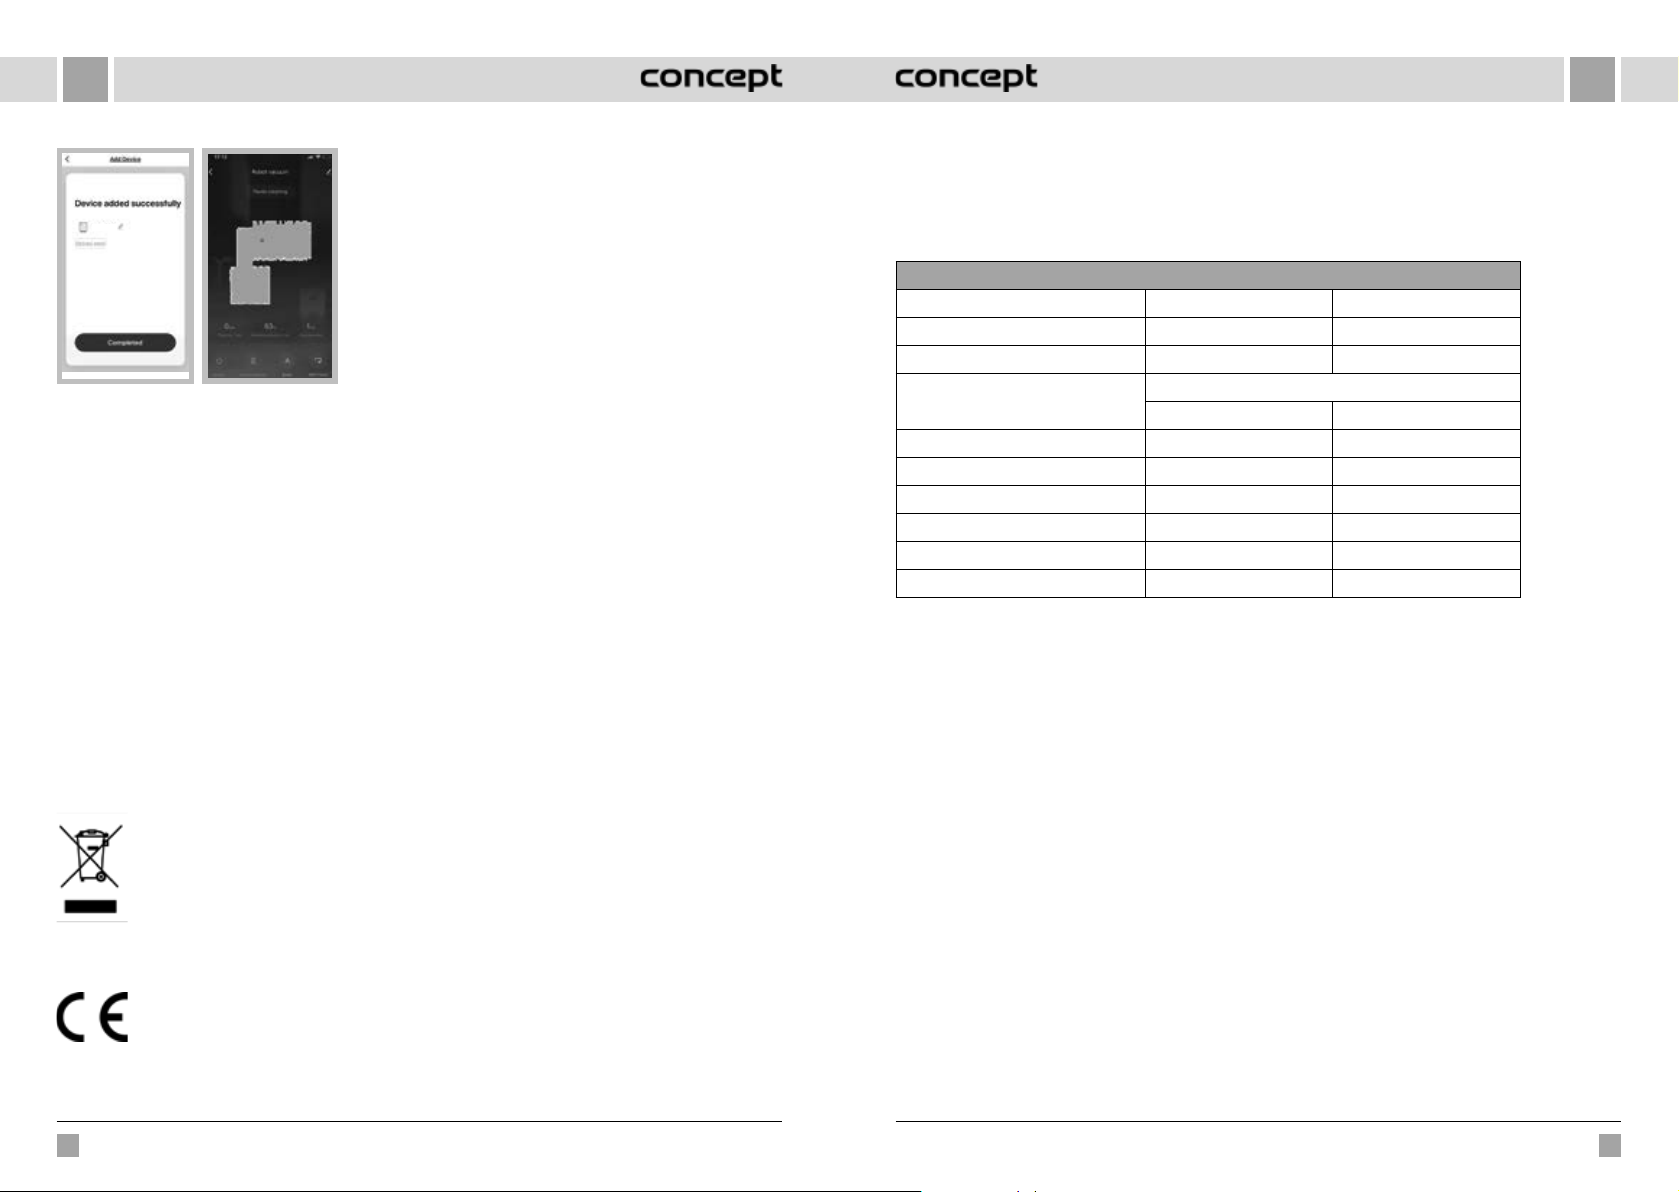
HU
LV
Figyelmeztetés párosítással kapcsolatos problémák
esetén
• Ellenőrizze, hogy a megadott WiFi-jelszó helyes-e.
• A készülék csak a 2,4 GHz-es WiFi-hálózatot támogatja.
Concept
11. ábra
Az alkalmazás üzemmódjai
A következő takarítási üzemmódok közül választhat: AUTO (Automatikus/ZIGZAG), Helyi (Körkörös), Sarkok (EDGE) és
DOCK (a dokkoló állomás megkeresése).
12. ábra
• Túl sok más készülék csatlakozik a routerhez.
• A készülékkel történő csatlakozási kísérlet közben
(10.ábra) próbáljon meg manuálisan csatlakozni a WiFihálózatára.
SZERVIZ
Nagyobb mértékű, vagy a termék belső részeire is vonatkozó karbantartást vagy javítást szakembernek vagy
szakszerviznek kell elvégeznie.
A KÖRNYEZET VÉDELME
• Lehetőleg gondoskodjon a csomagolóanyagok és a régi készülék újrahasznosításáról.
• A készülék dobozát a szelektív gyűjtőbe dobhatja.
• A polietilén (PE) műanyagzacskókat adja le újrahasznosítható anyagokat gyűjtő helyen.
A készülék újrahasznosítása élettartama végén:
Ez a készülék az európai Elektromos hulladékról és elektromos berendezésekről (WEEE) szóló 2012/19/
EU irányelvnek megfelelően van megjelölve. A terméken vagy a csomagolásán található szimbólum
jelzi, hogy a termék nem tartozik a vegyes háztartási hulladék közé. El kell vinni olyan helyre, ahol az
elektromos és elektronikus hulladékot gyűjtik újrahasznosítás céljából. A termék megfelelő módon
történő megsemmisítésének biztosításával megakadályozza a környezetet és az emberi egészséget
veszélyeztető negatív hatásokat, amelyeket a nem megfelelő hulladék-megsemmisítés okozhatna.
A megsemmisítést a hulladékgazdálkodási előírásoknak megfelelően kell végrehajtani. A termék
újrahasznosítására vonatkozó részletesebb információkért forduljon az illetékes helyi hivatalhoz,
aháztartási hulladék megsemmisítésével foglalkozó szolgáltatóhoz, vagy az üzlethez, ahol a terméket
vásárolta.
Ez a termék teljesíti minden rá vonatkozó EU-irányelv alapkövetelményeit.
A szövegben, a kivitelben és a műszaki jellemzőkben előzetes figyelmeztetés nélkül sor kerülhet változtatásokra,
minden módosításra vonatkozó jog fenntartva.
PATEICĪBA
Pateicamies par šīs “Concept” ierīces iegādi. Ceram, ka būsiet apmierināti ar šo izstrādājumu visu tā kalpošanas laiku.
Pirms lietošanas rūpīgi izlasiet šo lietošanas instrukciju un uzglabājiet to drošā vietā, lai nepieciešamības gadījumā
varētu pārlasīt. Nodrošiniet, lai arī citi cilvēki, kuri izmantos šo ierīci, pirms šīs ierīces lietošanas būtu iepazinušies ar
norādījumiem.
Tehniskie dati
VR2110 VR2100
Jauda 25W 25W
Akumulatora spriegums 14,8V 14,4V
Uzlādes adaptera spriegums
Trokšņa līmenis 55-65 dB 55-65 dB
Akumulators 3200mAh, litija jonu 2600mAh, litija jonu
Darbības laiks 180minūtes 150minūtes
Pilnas uzlādes laiks 5stundas 4–5stundas
Frekvenču diapazons 2,4-2,4835 GHz 2,4-2,4835 GHz
Raidītāja jauda (maks.) 18 dBm 18 dBm
SVARĪGA INFORMĀCIJA
Pirms pievienošanas elektrotīklam vizuāli pārbaudiet, vai ierīcei nav defektu un vai pārvadāšanas laikā tā nav
tikusi sabojāta.
AC220–240V – 50/60Hz
DC24V DC24V
SVARĪGI DROŠĪBAS NORĀDĪJUMI
• Lietojiet šo ierīci tikai tā, kā izklāstīts šajā lietošanas instrukcijā.
• Pirms ierīces pirmās izmantošanas noņemiet visu iepakojumu un reklāmas materiālus.
• Pirms ierīces izmantošanas paceliet no grīdas visus priekšmetus, kas varētu traucēt efektīvu
un drošu uzkopšanu (vadus, papīru, apģērbus, galdautus un aizkarus, kas pieskaras grīdai).
• Ja šajā telpā atrodas kāpnes, izvietojiet magnētisko lenti (virtuālo sienu) vismaz 15cm
attālumā no augšējā pakāpiena malas. Šim attālumam būtu jānodrošina vislabākā
aizsardzība no ierīces iespējamās nokrišanas pa kāpnēm.
• Izmantojiet tikai šim modelim izstrādātos oriģinālos piederumus un rezerves daļas.
• Nesēdiet uz putekļsūcēja vai nenovietojiet uz tā dažādus priekšmetus.
• Ierīci drīkst izmantot tikai mājsaimniecībā, temperatūrā no 0°C līdz 40°C.
• Pirms lietošanas pārliecinieties, ka putekļu nodalījums un tīrīšanas drāna ir pareizi ievietota.
• Nelieciet galvenās birstes tuvumā matus, apģērbu, pirkstus vai citas ķermeņa daļas.
Nodrošiniet galvenās birstes un putekļsūcēja sūkšanas daļas tīrību, noņemiet matus un
putekļus, kas var samazināt putekļsūcēja sūkšanas jaudu un uzkopšanas kvalitāti.
60
VR2110, VR2100
VR2110, VR2100
61
Page 32
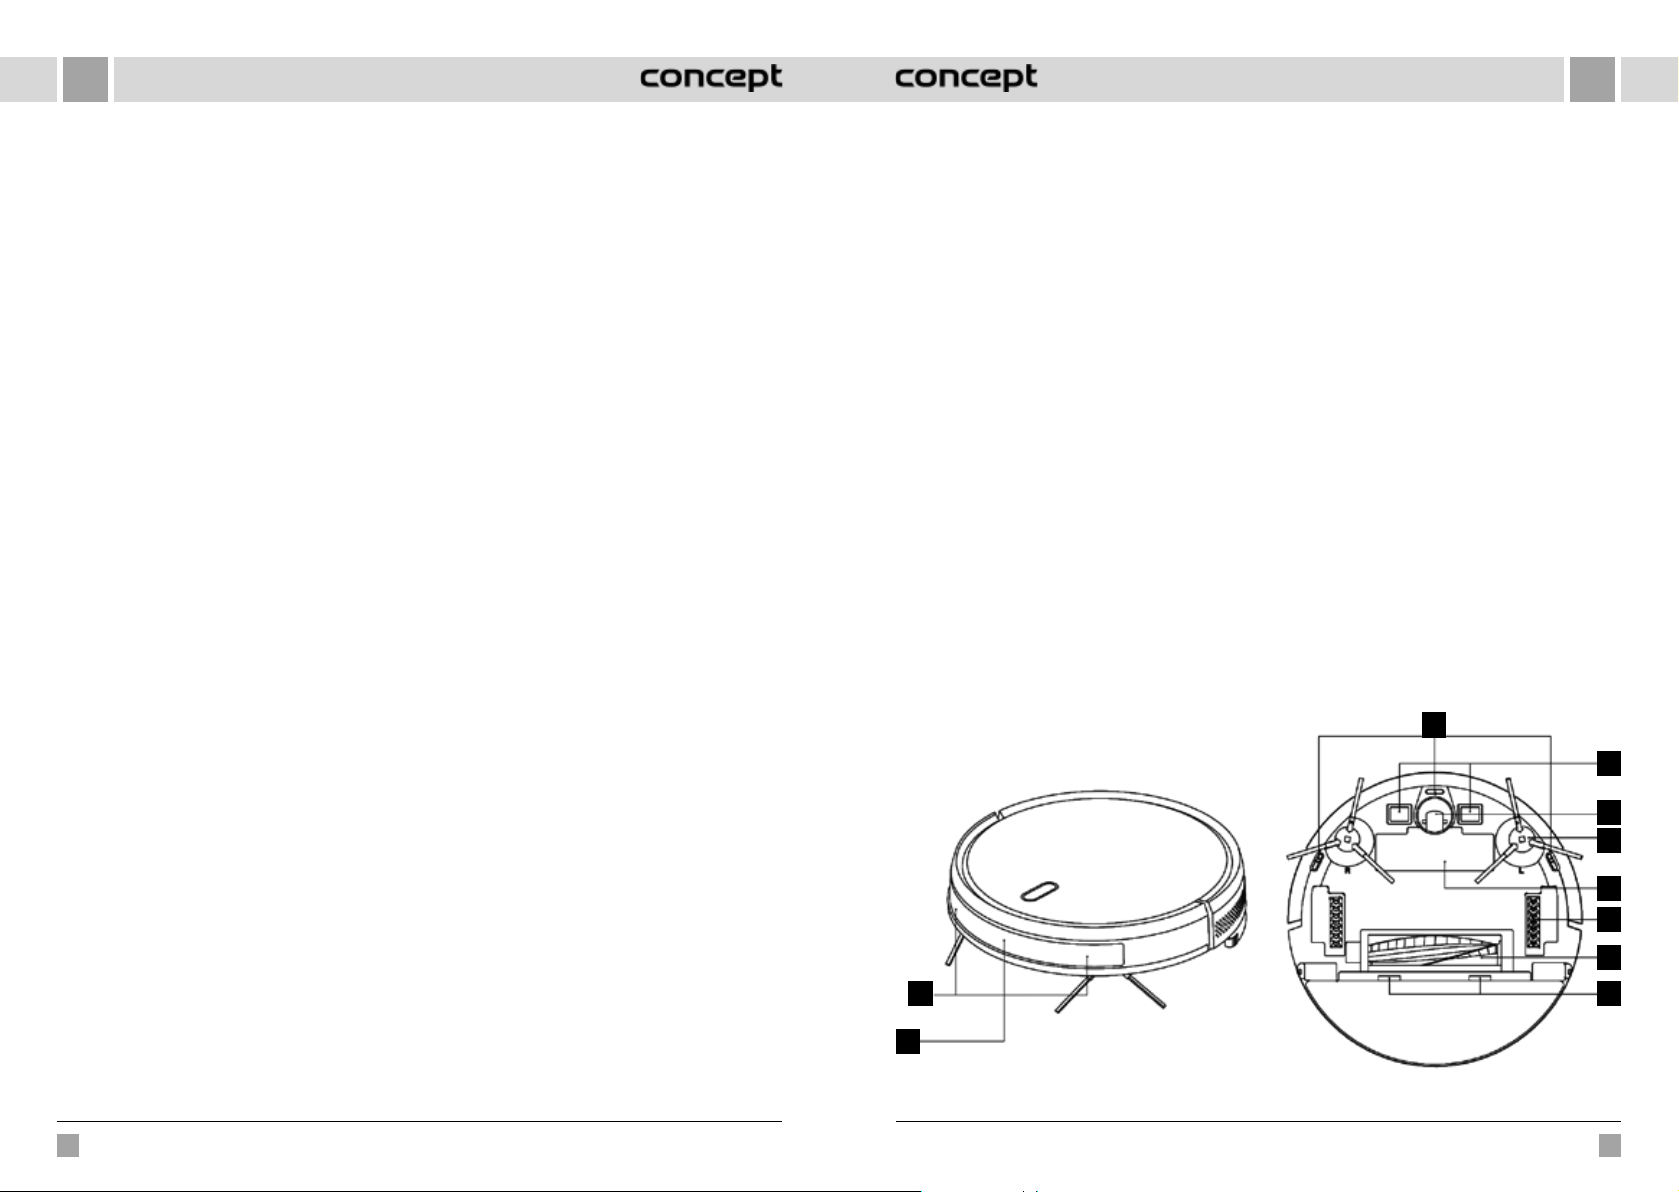
LVLV
• Nelietojiet ierīci uz mitras vai slapjas grīdas.
• Neizmantojiet ierīci, lai uzsūktu šķidrumu, degošas cigaretes, lauskas un asus priekšmetus,
sērkociņus un citas viegli uzliesmojošas vielas, lielus papīra gabalus, plastmasas maisiņus
vai citus priekšmetus, kas varētu sabojāt putekļsūcēju.
• Nepieļaujiet, ka sūkšanas laikā putekļsūcējs pārbrauc pāri brīvi novietotiem vadiem.
• Veicot ierīces apkopi un tīrīšanu, pārslēdziet strāvas padeves slēdzi pozīcijā “izslēgts”.
• Tieša saules gaisma var samazināt putekļsūcēja infrasarkanā starojuma sensoru jutību,
tādēļ nepakļaujiet ierīci tiešai saules staru iedarbībai.
• Uzkopšanas laikā paklājs jānovieto tā, lai tīrot robots tam neuzbrauktu. Ja putekļsūcējam ir
uzstādīta tīrīšanas drāna ar ūdens tvertni, tas varētu pārtraukt uzkopšanu vai nevajadzīgi
samitrināt paklāju.
• Nenovietojiet ierīci vietās, no kurām tā viegli varētu nokrist zemē (galds, krēsli).
• Pirms ierīces uzlādes pārliecinieties, ka uzlādes stacija ir pareizi pieslēgta.
• Ļoti augstas temperatūras gadījumā vai, nepareizi lietojot ierīci, var notikt akumulatora
šķidruma noplūde. Ja šis šķidrums nokļūst uz ādas, tas nekavējoties jānomazgā ar tekošu
ūdeni. Saskares ar acīm gadījumā nekavējoties skalojiet tās ar tekošu ūdeni vismaz
10minūtes. Vērsieties pēc medicīniskās palīdzības.
• Ja vēlēsieties šo izstrādājumu iznīcināt, vispirms atvienojiet akumulatoru no ierīces.
• Ja plānojat ierīci transportēt vai ja to ilgu laiku nelietosiet, pārslēdziet strāvas padeves
slēdzi pozīcijā “izslēgts”. Šādi tiks pagarināta akumulatora dzīvildze.
• Pārliecinieties, ka elektrotīkla spriegums atbilst tam spriegumam, kas ir minēts uz
izstrādājuma tehnisko pamatdatu plāksnītes. Nepievienojiet ierīci kontaktrozetes
sadalītājiem un pagarinātājiem.
• Atvienojot ierīci no elektrotīkla, nekad neraujiet strāvas vadu. Satveriet kontaktdakšu un
atvienojiet to, viegli pavelkot.
• Neļaujiet izmantot ierīci kā rotaļlietu.
• Ierīces tīrīšanai neizmantojiet abrazīvas vai ķīmiski agresīvas vielas.
• Ierīce ir paredzēta tikai mājsaimniecības vajadzībām. Tā nav paredzēta ekspluatācijai
komercnolūkos.
• Nepieļaujiet strāvas vada, kontaktdakšas vai ierīces nokļūšanu ūdenī vai citā šķidrumā.
• Ir aizliegts labot ierīci patstāvīgi. Sazinieties ar pilnvaroto servisa apkalpes centru un
izvairieties no traumām, kas varētu rasties nepareizas lietošanas dēļ.
• Bērni vecumā no 8gadiem un vecāki, kā arī personas ar fiziskiem, maņu vai garīgiem
traucējumiem vai ar nepietiekamu pieredzi un zināšanām drīkst izmantot šo ierīci, ja viņi
atrodas citu cilvēku uzraudzībā vai arī ir instruēti par ierīces izmantošanu drošā veidā, kā
arī izprot iespējamo bīstamību. Lietotāja veikto ierīces tīrīšanu un apkopi nedrīkst veikt
bērni, kas jaunāki par 8gadiem un neatrodas pieaugušo uzraudzībā. Bērni, kas ir jaunāki
par 8gadiem, nedrīkst atrasties ierīces un tās vada tuvumā. Neļaujiet bērniem rotaļāties
ar šo ierīci.
• Bērni līdz 3gadu vecumam drīkst piekļūt ierīcei, tikai atrodoties nepārtrauktā uzraudzībā.
• Ražotājs un importētājs Eiropas Savienībā nav atbildīgs par kaitējumu, ko var izraisīt ierīces
transportēšana: traumām, apdegumiem, ugunsgrēku, ievainojumiem, citu priekšmetu
bojājumiem u.tml.
• Ja strāvas vads ir bojāts, tā nomaiņa jāveic servisa tehniķiem, lai novērstu bīstamu situāciju
rašanos. Ir aizliegts izmantot ierīci ar bojātu strāvas vadu.
• Robotu putekļsūcēju drīkst lietot tikai ar oriģinālo tīkla adapteru, kas ir iekļauts
komplektācijā. Lai izvairītos no bīstamām situācijām, nekad neizmantojiet citu adapteru.
Ražotāja norādījumu neievērošanas dēļ var tikt atteikts garantijas remonts.
Rūpīgi pārbaudiet, vai esat izpakojis visus komplektā esošos piederumus. Iesakām saglabāt oriģinālo papīra
kasti, lietotāja rokasgrāmatu un iepakojuma materiālu visu garantijas periodu.
IERĪCES APRAKSTS
1 Pretsadursmes sensors
2 Infrasarkanais uzlādes sensors
3 Kritiena sensors
4 Uzlādes kontakts
5 Universālie ritenīši
1
2
6 Sānu birste
7 Akumulatora vāks
8 Piedziņas ritenis
9 Galvenā birste
10 Galvenās birstes vāka fiksators
3
4
5
6
7
8
9
10
62 63
VR2110, VR2100 VR2110, VR2100
Page 33
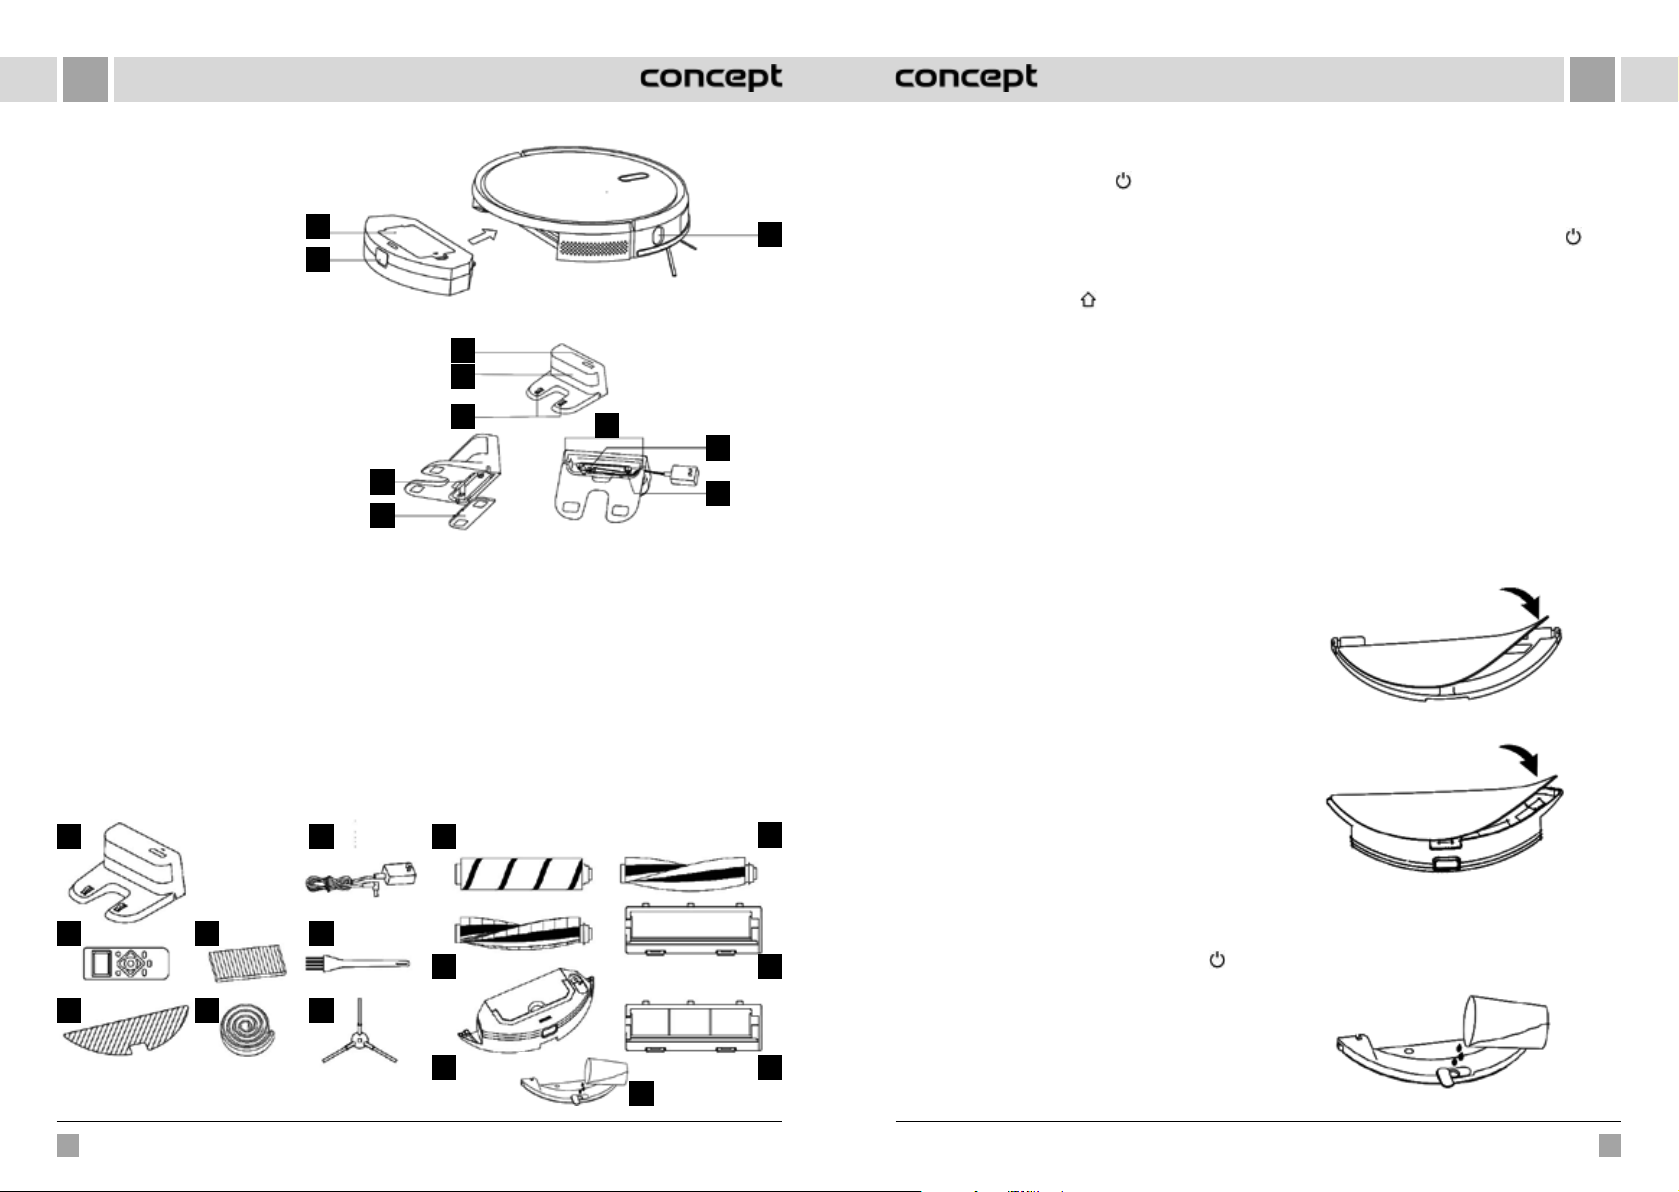
LVLV
1 Filtra sieta vāks
2 Putekļu tvertnes poga
3 Sienas sensors
1
2
Bāzes stacija
1 Barošanas kontrollampiņa
2 Signāla apraides zona
3 Pamatnes uzlādes kontakti
4 Nostiprināšanas rieva
5 Nosegpanelis
6 Vada vieta
7 Strāvas adaptera kontaktligzda
8 Uztīšanas tapa
Komponentu saraksts
1 Bāzes stacija 1x
2 Tālvadība 1x
3 Tīrīšanas drāna 2x
4 HEPA filtrs + putu filtrs 3x (VR2100 modelim 2x)
5 Magnētiskā lente 1x
6 Adapters 1x
7 Tīrīšanas birste 1x
8 Kreisās un labās puses birste 2x
1
2
3
4
5
6
7
8
1
2
3
6
4
5
9 HARD FLOO R birste 1x (tikai VR2110)
BRĪDINĀJUMS! nevar izmantot paklājiem, uzkopšana
var tikt pārtraukta.
10 PAKLĀJA birste 1x
11 Elektriski darbināma ūdens tvertne 1x (tikai modelim
VR2110)
12 PET birste 1x (tikai modelim VR2110)
13 Galvenās birste vāks 1x (tikai modelim VR2110)
piemērots HARDFLOOR un PET birstei
14 Galvenās birstes vāks ar tērauda stiepli 1x (piemērots
PAKLĀJA birstei)
15 Piekarama ūdens tvertne 1x (tikai modelim VR2100)
9
10
11
15
GALVENĀS IEZĪMES
Uzkopšana/ieslēgšana un izslēgšana
• Īslaicīgi nospiediet, lai sāktu vai apturētu uzkopšanu.
3
7
• Turiet nospiestu 3 sekundes, lai ierīci ieslēgtu vai
izslēgtu.
• Turiet nospiestu 15 sekundes, lai izslēgtu ierīci
neparastos apstākļos.
Uzlādēšana/vietējā uzkopšana
• Īslaicīgi nospiediet, lai sāktu uzlādi vai uz brīdi apturētu.
• Nospiediet ilgi, lai uzsāktu vietējo uzkopšanu.
Signāllampiņa
• Oranža: Normāla darbība vai uzlāde.
• Sarkana: Neparasts stāvoklis vai izlādējies akumulators.
• Sarkani-oranža: Ierīce nav savienota ar elektrotīklu.
WiFi atiestatīšana
• 3sekundes nospiediet abas pogas vienlaikus.
8
UZSTĀDĪŠANA
1. Pievienojiet strāvas vadu, savukārt lieko vada
garumu novietojiet vada nodalījumā.
2. Novietojiet bāzes staciju pret sienu un ieslēdziet
strāvas padevi.
Piezīme:
• Atbrīvojiet vismaz 0,5m abās bāzes stacijas pusēs un
vismaz 1,5m stacijas priekšā.
• Ja strāvas vads ir piestiprināts vertikāli uz zemes, ierīce
to var izvilkt, kā rezultātā var tikt izslēgta bāzes stacija.
• Uzlādes signāllampiņa ir ieslēgta parastajā režīmā:
ieslēgšanas gadījumā deg, uzlādes gadījumā –
nodziest.
3. Nepārvietojiet bāzes staciju citur un nepakļaujiet to
tiešai saules staru iedarbībai.
Piezīme: Tieši saules stari apgrūtinās bāzes stacijā signālu,
12
13
14
tāpēc ierīce varētu neatgriezties bāzes stacijā pareizi.
4. Sānu birstes uzstādīšana
Pārliecinieties, ka kreisās puses birstes (L) un labās
puses birstes (R) apzīmējums atbilst “L” un “R”
marķējumam uz apakšējā vāka. Nospiediet sānu
birstes “L” un “R”, līdz atskanēs klikšķis.
5. Palaišana ekspluatācijā un uzlāde
Lai ieslēgtu robotu, ilgi turiet nospiestu pogu
strāvas signāllampiņa ir ieslēgta, uzlādējiet robotu
bāzes stacijā.
Piezīme: Ja ierīci nevar palaist nepietiekami uzlādēta
akumulatora dēļ, uzlādējiet ierīci bāzes stacijā, un tā sāks
darboties automātiski. Ierīce darbojas normāli tikai tad, ja
akumulatora uzlādes līmenis ir ≥20%.
6. Mobilās lietotnes savienošana (šo darbību varat
izlaist)
Izlasiet WiFi savienojuma instrukcijas un savienojiet
mobilo lietotni.
7. Uzkopšanas uzsākšana
Pēc robota ieslēgšanas īslaicīgi nospiediet
uz robota vai sāciet uzkopšanu, izmantojot mobilo
lietotni (izmantošanas laikā ierīci var apturēt, nospiežot
jebkuru taustiņu).
Piezīme:
• Slaucīšanai paredzēto robotu nevar izmantot, lai
uzsūktu šķidrumus.
• Ja akumulatora uzlādes līmenis ir mazāks par 20 %,
ierīce nedarbojas. Uzlādējiet to.
• Ja akumulatora uzlādes līmenis ir mazāks par 20%,
ierīce automātiski atgriezīsies bāzes stacijā.
• Pirms lietošanas noņemiet dažādus vadus (ieskaitot
bāzes stacijas elektrības vadu) no grīdas, lai novērstu
darbības atteici un priekšmetu vai vadu bojājumus, ja
ierīce šos vadus aizķers.
8. Tīrīšanas moduļa uzstādīšana
a) Tīrīšanas drānas uzlīmēšana: pielīmējiet tīrīšanas
drānu ūdens tvertnes apakšdaļai.
VR2100 modelis – piekarama ūdens tvertne
VR2110 modelis – elektriski darbināma ūdens tvertne
Piezīme: Pēc lietošanas notīriet tīrīšanas drānu, lai
saglabātu to labā stāvoklī.
. Ja
b) Piepildiet ūdens tvertni: atveriet vāku un piepildiet
to ar ūdeni.
VR2100 modelis – piekarama ūdens tvertne
pogu
64 65
VR2110, VR2100 VR2110, VR2100
Page 34
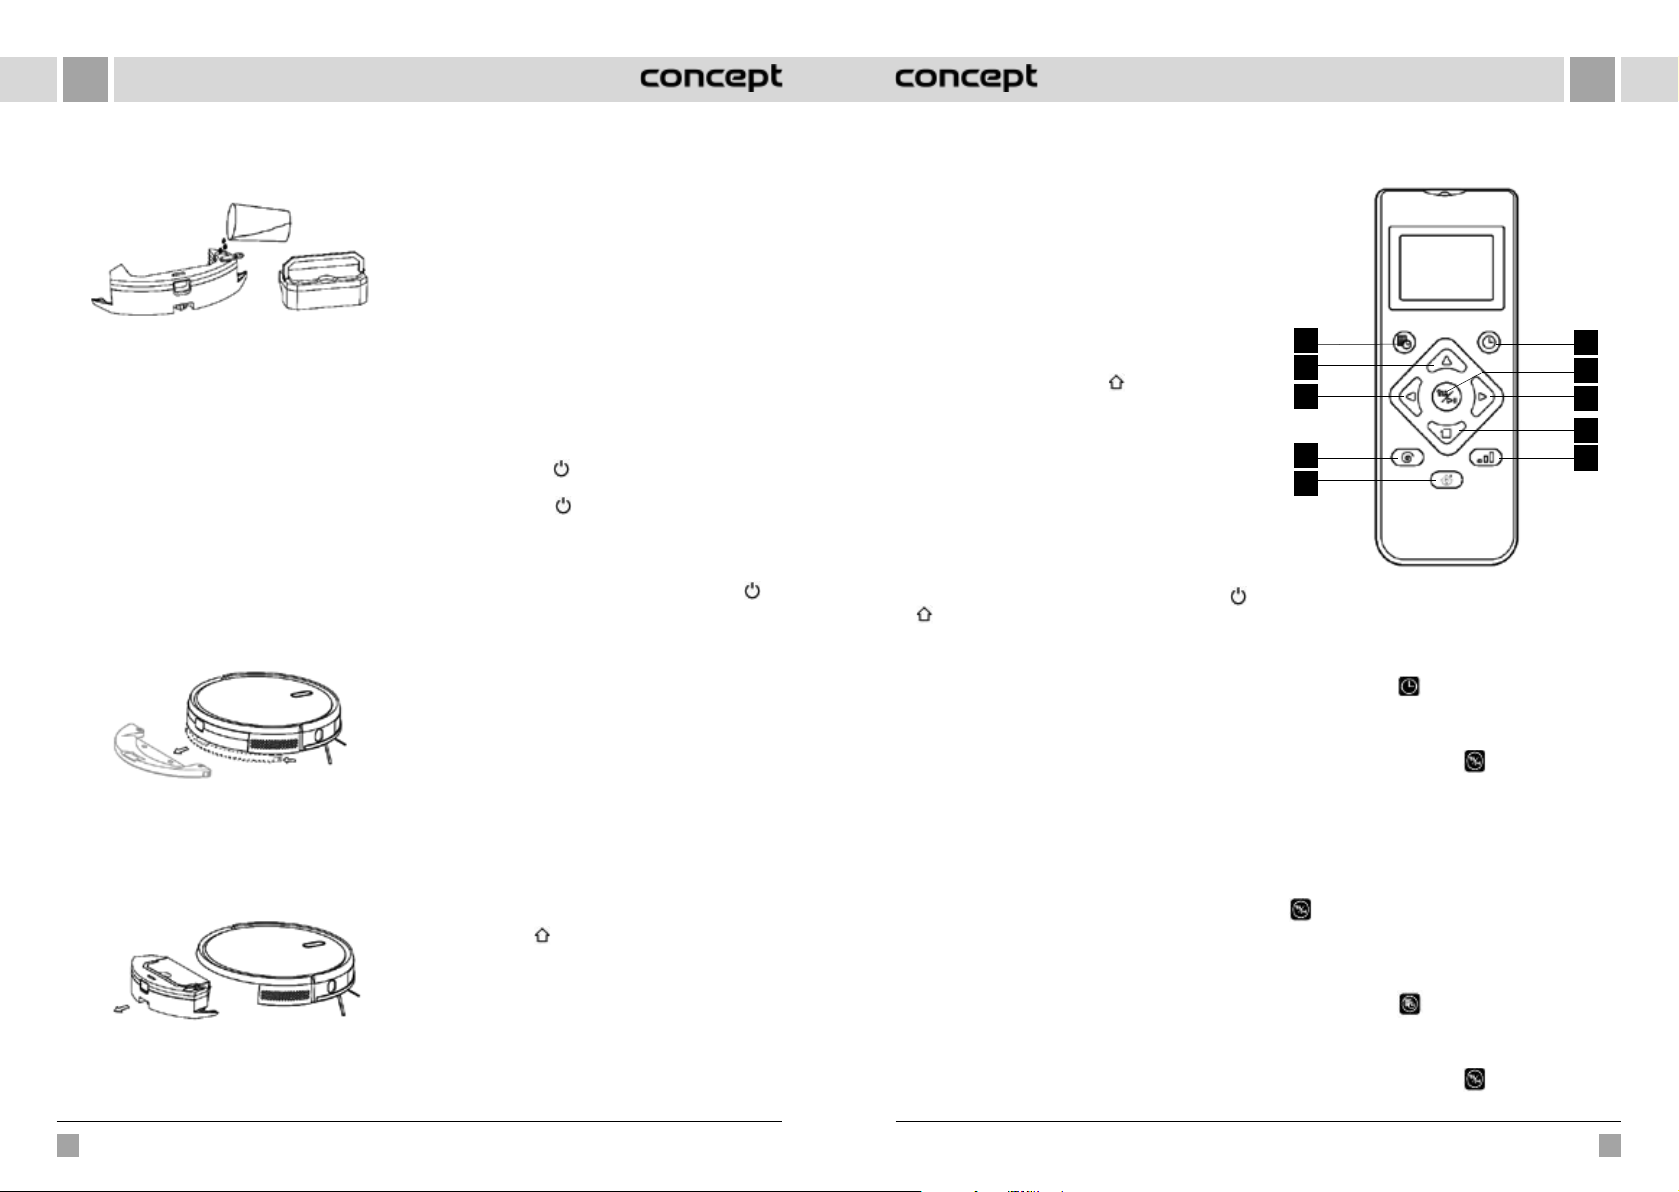
LVLV
Pirms piepildīšanas ar ūdeni noņemiet putekļu
tvertni, izmantojot rokturi (VR2110).
VR2110 modelis – elektriski darbināma ūdens tvertne
c) Uzstādiet moduli:
VR2100 modelis: piespiediet moduli horizontāli gar
robota aizmugurējo daļu. Modulis ir uzstādīts tam
paredzētajā vietā, tiklīdz atskanēs klikšķis.
VR2110 modelis: ievietojiet putekļu tvertni ūdens
tvertnē un ievietojiet rokturi atverē. Pēc tam
nospiediet un turiet nospiestu pogu tvertnes vidū
un bīdiet to horizontāli gar robota aizmugurējo daļu.
Modulis ir uzstādīts tam paredzētajā vietā, tiklīdz
atskanēs klikšķis.
9. Tīrīšanas moduļa izņemšana
VR2100 modelis: Kad robots ir pabeidzis darbu,
nospiediet fiksatorus abās pusēs, izņemiet tīrīšanas
moduli virzienā atpakaļ, iztukšojiet ūdeni no ūdens
tvertnes un notīriet drānu (nepārvietojiet un
neapgrieziet to tīrīšanas laikā).
VR2100 modelis – piekarama ūdens tvertne
VR2110 modelis: Kad robots ir pabeidzis darbu,
nospiediet pogu ūdens tvertnes vidū, izņemiet
tīrīšanas moduli virzienā atpakaļ, iztukšojiet ūdeni no
ūdens tvertnes un notīriet drānu (nepārvietojiet un
neapgrieziet to tīrīšanas laikā).
VR2110 modelis – elektriski darbināma ūdens tvertne
10. Tīrīšanas moduļa izmantošanas norādījumi
• Tīrīšanas moduli, ja vien nav iespējas to uzraudzīt.
• Drošības apsvērumu dēļ pārliecinieties, ka tīrīšanas
modulis tiek izņemts, uzlādējot vai neizmantojot ierīci.
• Nemēģiniet tīrīt paklāju.
• Lai panāktu labāku tīrīšanas efektu, tīrīšanas modulis
jāizmanto pēc trīs slaucīšanas reizēm vai putekļu
izsūkšanas.
• Lai uzpildītu ūdeni vai notīrītu tīrīšanas drānu
ierīces darbības laikā, apturiet, izņemiet un no jauna
ievietojiet tīrīšanas moduli saskaņā ar 8. un 9.darbību.
Nepārvietojiet vai neapgrieziet ierīci, lai izvairītos no
pozicionēšanas kļūdas un kartes pazaudēšanas.
• Tīrīšanas funkcija ir paredzēta, lai saudzīgi veiktu dziļo
tīrīšanu. Tomēr tā nevar efektīvi noņemt cieši pielipušus
netīrumus un pilnībā aizstāt cilvēku.
IZMANTOŠANA
IESLĒGŠANA/IZSLĒGŠANA
Ilgi nospiediet pogu 3sekundes. Iedegas signāllampiņa,
un ierīce sāk darboties.
Ilgi nospiediet pogu 3sekundes, kad ierīce ir gaidstāves
režīmā. Nodzisīs signāllampiņa, un ierīce izslēgsies.
PIEZĪME: Ierīci nevar izslēgt, kad tā tiek uzlādēta.
UZKOPŠANA/APTURĒŠANA
Pēc ierīces palaišanas īslaicīgi nospiediet pogu
ierīces vai ieslēdziet ierīci, izmantojot mobilo lietotni
(nospiediet jebkuru pogu, lai to apturētu).
Piezīme:
• Robotu putekļsūcēju nevar izmantot, lai uzsūktu
šķidrumus.
• Ja akumulatora uzlādes līmenis ir mazāks par 20 %,
ierīce nedarbojas. Uzlādējiet to.
• Ja akumulatora uzlādes līmenis ir mazāks par 20%,
ierīce automātiski atgriezīsies bāzes stacijā.
• Pirms lietošanas noņemiet no grīdas dažādus vadus
(ieskaitot bāzes stacijas elektrības vadu), lai novērstu
darbības atteici un priekšmetu vai vadu bojājumus, ja
robots šos vadus aizķers.
LĀDĒŠANA
Automātiskais režīms: Pēc darba ierīce automātiski
atgriežas bāzes stacijā.
Manuālais režīms: Kad ierīces darbība ir apturēta, īslaicīgi
nospiediet pogu
ierīci, izmantojot mobilo lietotni. Signāllampiņa mirgo,
tiklīdz ierīce ir uzlādēta.
Piezīme: Ja ierīce neatrod bāzes staciju, tā automātiski
atgriežas sākotnējā pozīcijā. Šādā gadījumā ievietojiet
ierīci atpakaļ bāzes stacijā manuāli.
MAGNĒTISKĀ LENTE
Magnētiskās lentes var regulēt tā, lai tās atdalītu
atsevišķas zonas, kas nav jātīra (piemēram, vannasistaba,
, lai uzsāktu uzlādi, vai arī varat uzlādēt
uz
virtuve utt.).
Piezīme: piestipriniet magnētisko lenti grīdai tā, lai to
nevarētu pārvietot. Pretējā gadījumā tiks ietekmēta
ierīces efektivitāte.
UZKOPŠANAS REŽĪMS
Pēc palaišanas ierīces pārvietosies atbilstoši uzkopšanas
programmai apļveida kustībā, lai notīrītu visu grīdas
virsmu un pabeigtu uzkopšanu visās telpās citu aiz citas
regulārā un efektīvā veidā ar pilnu pārklājumu. Kad
uzkopšana ir pabeigta, ierīce atgriežas bāzes stacijā un
automātiski uzlādējas.
VIETĒJĀ UZKOPŠANA
Ilgi 3 sekundes nospiediet pogu
attīrītu apļveida zonu ar diametru 1,5 m un pēc tam
automātiski atgrieztos sākotnējā atrašanās vietā un
automātiski izslēgtos.
UZKOPŠANAS PLĀNOŠANA
Var iestatīt fiksētu uzkopšanas laiku, izmantojot mobilo
lietotni. Ierīce sāks tīrīšanu automātiski noteiktā laikā un
pēc pabeigšanas atgriezīsies bāzes stacijā.
WiFi ATIESTATĪŠANA
Ja mobilais tālrunis nevar izveidot savienojumu ar ierīci,
jo ir mainīta maršrutētāja un paroles konfigurācija vai
citu iemeslu dēļ, 3 sekundes vienlaikus nospiediet
un pogu, līdz atskanēs balss uzvedne “WiFi has been
reset” (WiFi tika atiestatīts) un signāllampiņa iedegsies
zilganvioletā krāsā un lēni mirgos.
KLUSAIS REŽĪMS
Varat ieslēgt vai izslēgt robota balss ziņas, izmantojot
mobilo lietotni.
SŪKŠANAS JAUDAS IESTATĪŠANA
Sūkšanas jaudu var iestatīt klusā, standarta vai augstā
līmenī, izmantojot mobilo lietotni.
Kad ierīce atradīs paklāju, sūkšanas jauda automātiski
palielināsies līdz augstākajai pakāpei. BRĪDINĀJUMS –
paklājs var tikt pareizi atrasts tikai ar paklāja birsti.
ŪDENS PLŪSMAS IESTATĪJUMI (tikai elektriski
darbināmas ūdens tvertnes gadījumā VR2110modelim)
Izmantojot mobilo lietotni, ūdens plūsmas ātrumu var
iestatīt zemā, standarta vai augstā līmenī.
TĀLVADĪBAS PULTS IZMANTOŠANA
1. Uzkopšanas plānošana
2. Kustība uz priekšu
3. Pagrieziens pa kreisi
4. Vietējā TURBO uzkopšana
5. Uzlādes sākšana/apturēšana
6. Automātiska uzkopšana/pauze
7. Uzkopšana/pauze
8. Pagrieziens pa labi
, lai robots atrastu,
9. Perimetra uzkopšana
10. Sūkšanas jaudas/ūdens plūsmas iestatīšana
1
2
3
6
7
8
9
4
10
5
Piezīme: Lai nodrošinātu, ka visi pareizie uzstādījumi ir
efektīvi, tālvadības pults jāvirza uz robota putekļsūcēja
priekšpusi pietiekamā attālumā.
Laika iestatīšana
1. Nospiediet pogu uz tālvadības pults, lai ievadītu
laika iestatījumu: LCD displejā mirgo svētdienas
simbols.
2. Nospiediet kreiso un labo pogu, lai izvēlētos nedēļas
dienu, un nospiediet pogu , lai apstiprinātu; pēc
tam LCD displejs automātiski pārslēdzas uz stundu
iestatījumu.
3. Nospiediet augšup un lejup taustiņus, lai iestatītu
stundu un nospiediet kreiso un labo pogu, lai pārietu
uz minūšu iestatījumu.
4. Kad ir iestatīts aktuālais laiks, virziet tālvadības pulti
uz robota putekļsūcēja priekšpusi un nospiediet pogu
, lai apstiprinātu visus laika iestatījumus. Ja to
neizdarīsiet, iestatījumi būs nederīgi.
5. Tas ļaus pabeigt laika iestatījumu gan tālvadības pultij,
gan robotam putekļsūcējam.
Uzkopšanas plāns
1. Nospiediet pogu
plānošanas funkciju: LCD displejā mirgo svētdienas
simbols.
2. Nospiediet kreiso un labo pogu, lai izvēlētos nedēļas
dienu, un nospiediet pogu , lai apstiprinātu; pēc
tam LCD displejs automātiski pārslēdzas uz stundu
uz tālvadības pults, lai iestatītu
66 67
VR2110, VR2100 VR2110, VR2100
Page 35
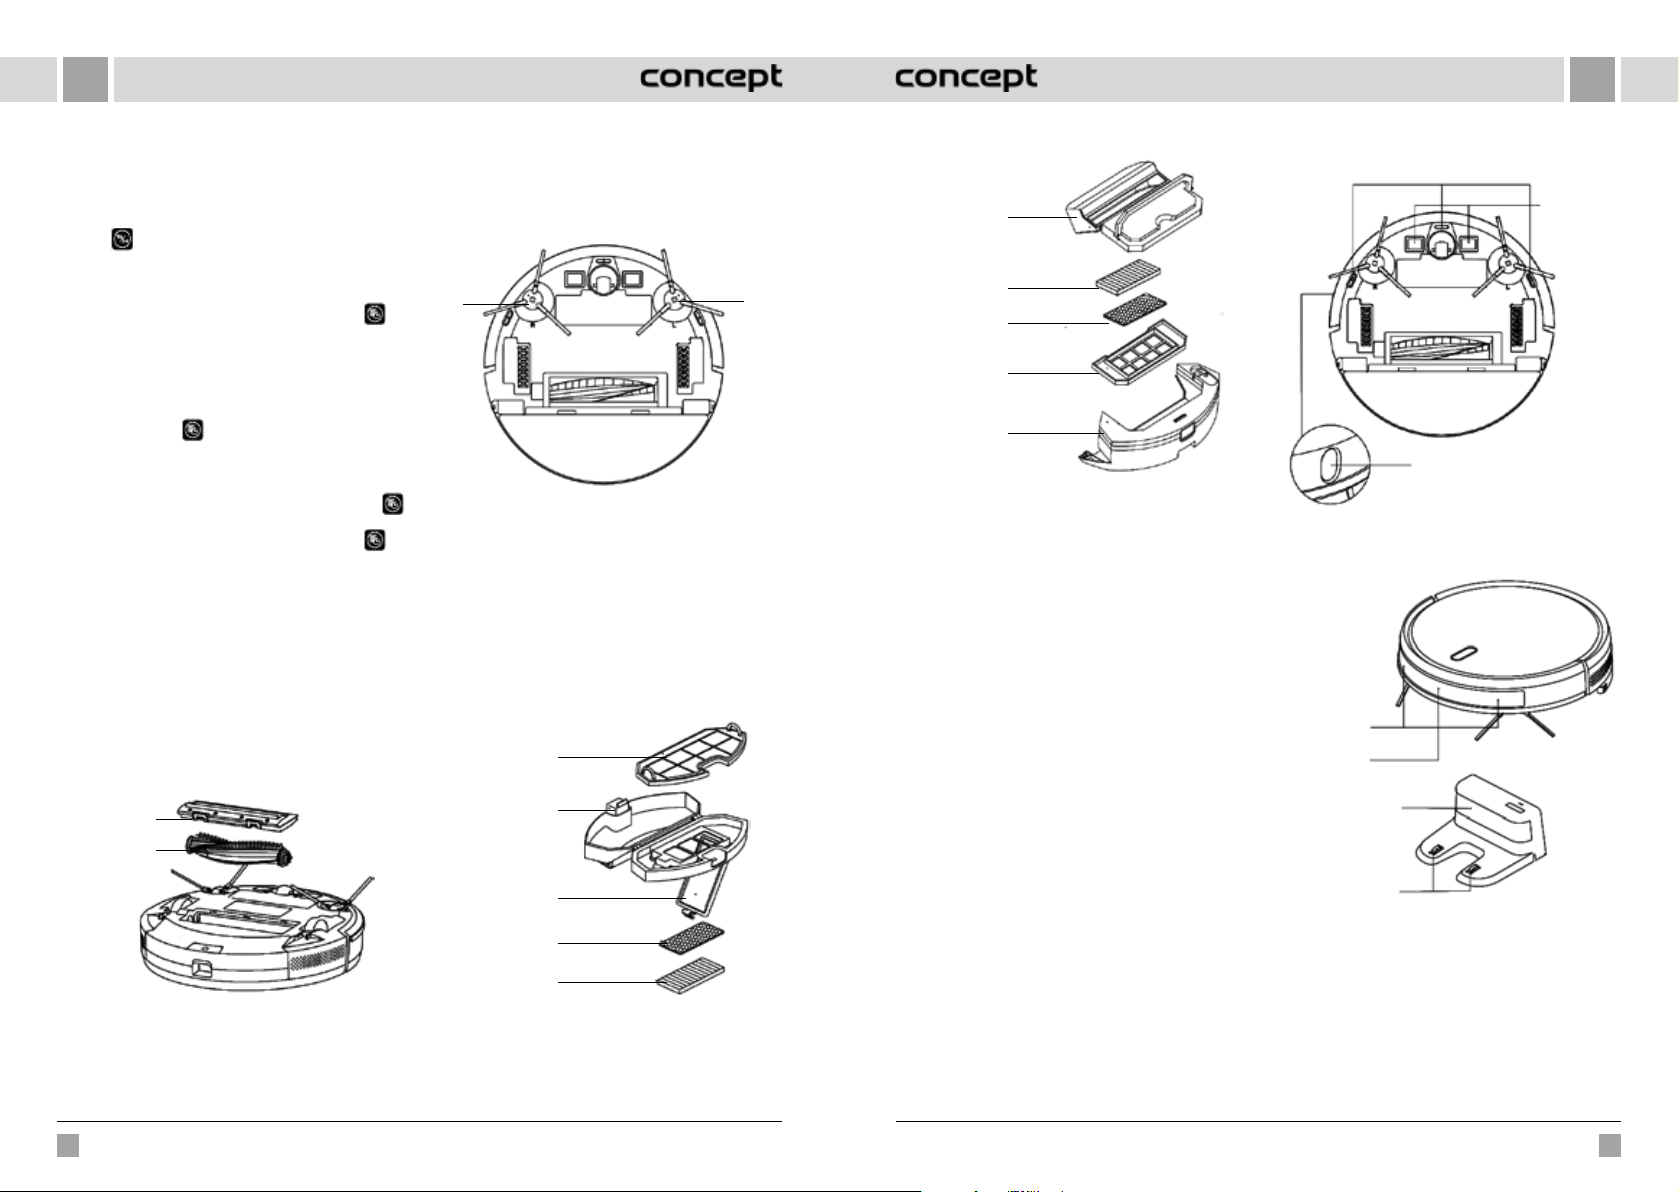
LVLV
iestatījumu.
3. Nospiediet augšup un lejup taustiņus, lai iestatītu
stundu un nospiediet kreiso un labo pogu, lai pārietu
uz minūšu iestatījumu. Pēc tam virziet tālvadības
pulti uz robota putekļsūcēja priekšpusi un nospiediet
pogu , apstipriniet šos plāna iestatījumus robotam
putekļsūcējam.
4. Kad viena plāna iestatīšana ir pabeigta, tālvadības pults
automātiski pāries uz nākamo plāna iestatījumu. Ja
nevēlaties turpināt iestatīšanu, nospiediet pogu , lai
pabeigtu, vai pagaidiet 10sekundes, iestatījumi aizvērsies
automātiski.
5. Tas ļaus pabeigt laika iestatījumu gan tālvadības pultij,
gan robotam putekļsūcējam.
Uzkopšanas plāna atcelšana
1. Nospiediet pogu
uz tālvadības pults: LCD displejā
mirgo svētdienas simbols, un tiks parādīti ieplānoto
nedēļas dienu simboli.
2. Nospiediet kreiso un labo pogu, lai izvēlētos ieplānoto
nedēļas dienu, un ilgi 3sekundes nospiediet pogu ,
lai šo plānu atceltu. Varat arī izvēlēties nākamo plānoto
dienu, kuru vēlaties atcelt, vai nospiediet pogu , lai
pabeigtu, vai pagaidiet 10 sekundes, līdz iestatījumi
aizvērsies automātiski.
IKDIENAS APKOPE
Galvenā birste (tīriet regulāri)
1. Pagrieziet ierīci un nospiediet fiksatoru uz galvenās
birstes vāka, lai to varētu izņemt.
2. Noņemiet putekļus no iekšpuses un galvenās birstes
iekšpuses ar nelielu suku un notīriet galveno birsti.
3. Salieciet galveno birsti un nospiediet stingri uz vāka, lai
fiksators ar klikšķi nofiksētos vietā.
Fiksators
Galvenā
birste
puses birstes (R) apzīmējums atbilst “L” un “R”
marķējumam uz apakšējā vāka. Nospiediet sānu
birstes “L” un “R”, lai pārinstalētu tās.
Piezīme: Nomainiet sānu birstes reizi 3–6mēnešos, lai
nodrošinātu to tīrīšanas efektu.
R – labās puses
sānu birste
L – kreisās puses
sānu birste
Putekļu tvertne un filtra režģis (tīriet regulāri)
1. Nospiediet pogu un velciet putekļu tvertni atpakaļ.
2. Atveriet putekļu tvertni un iztīriet to.
Filtra režģa tīrīšana (tīriet regulāri)
1. Pēc ilgstošas lietošanas noņemiet filtra režģi, putu
filtru un H E PA filtru.
2. Iztīriet noņemto filtra režģi. Noskalojiet putu filtru un
HEPA filtru zem ūdens.
3. Noslaukiet atsevišķas daļas un ļaujiet brīvi izžūt.
4. Pēc žāvēšanas pakāpeniski uzstādiet tos pareizā secībā:
režģis – putu filtrs – HEPA filtrs.
Filtra režģis
(lielais filtrs)
Poga
Filtra vāks
Filtra tīrīšana (tīriet regulāri)
Putekļu
tvertne
HEPA filtrs
Putu filtrs
Filtra režģis
(lielais filtrs)
Ūdens
tvertne
Elektriski darbināma ūdens tvertne
Tīrīšanas modulis (tīriet pēc katras lietošanas)
1. Noņemiet drānu, izlejiet ūdeni no ūdens tvertnes.
2. Iztīriet drānu, nosusiniet ūdens tvertni un drānu.
VR2110 modeļa gadījumā vispirms izņemiet putekļu
tvertni, tad izlejiet ūdeni no ūdens tvertnes.
Sensori (tīriet regulāri)
Notīriet sensorus ar mīkstu drānu šādi:
1. Notīriet sensorus gar sienu pa labi.
2. Trīs sensori aizsardzībai pret kritienu ierīces apakšdaļā.
3. Infrasarkano staru pretsadursmes sensoru ierīces
priekšpusē.
4. Elektriskās strāvas trieciena drošinātāji un bāzes
stacijas kontakti ierīces apakšdaļā (izslēdziet ierīci
tīrīšanas laikā).
5. Bāzes stacijas signāla pārraides zona.
Kritiena sensors
TOF sensors
Sensori (tīriet reizi mēnesī)
Pretsadursmes
sensors
Infrasarkanais
uzlādes sensors
Signāla apraides
Pamatnes uzlādes
zona
kontakti
Uzlādes
kontakts
Putu filtrs
HEPA filtrs
Sānu birste (tīriet regulāri)
1. Pagrieziet ierīci un pavelciet sānu birsti augšup.
2. Noņemiet matus un netīrumus un novietojiet sānu
birsti atpakaļ.
3. Pārliecinieties, ka kreisās puses birstes (L) un labās
68 69
Piezīme:
• Noskalojiet filtra režģi ar tīru ūdeni, nepievienojot
mazgāšanas līdzekli.
• Netīriet filtra režģi ar birsti vai pirkstiem.
• Ļaujiet filtra režģim nožūt gaisā vismaz 24stundas.
• Nomainiet filtra režģi reizi 3–6mēnešos.
VR2110, VR2100 VR2110, VR2100
Page 36
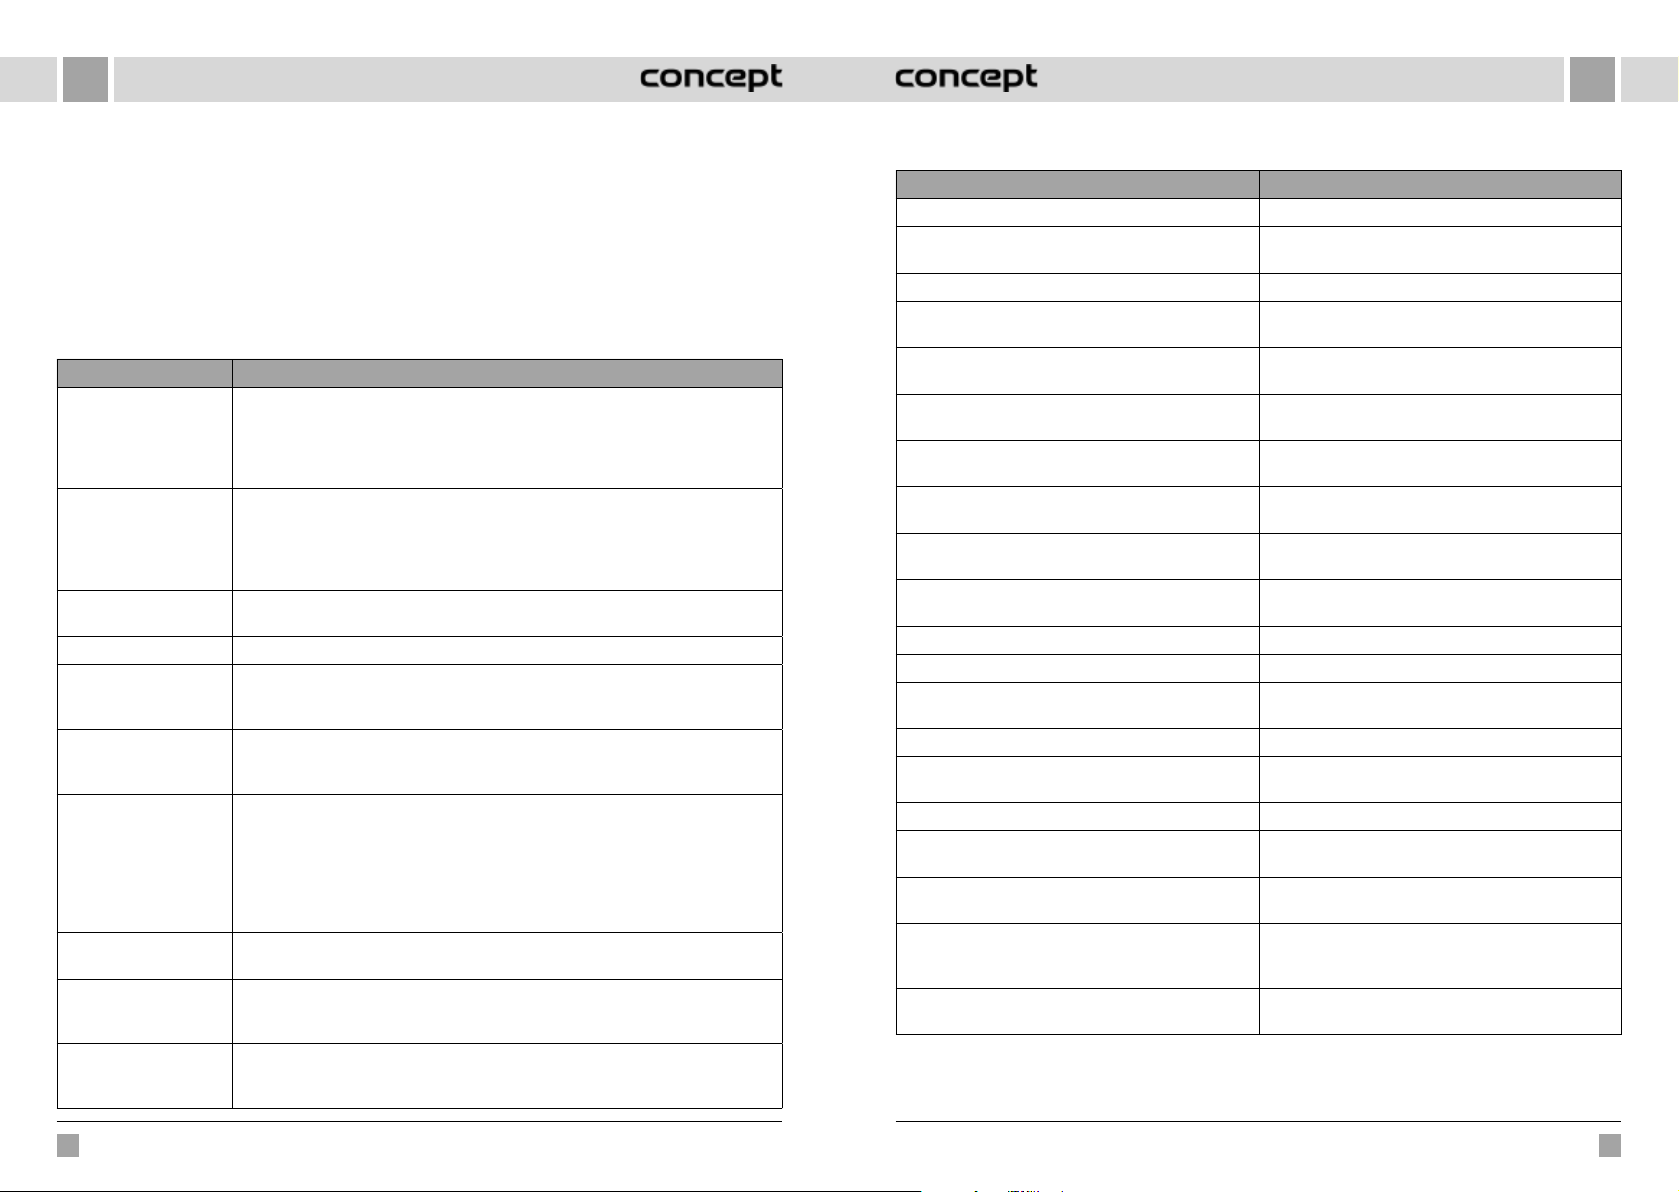
LVLV
Akumulators
• Ierīce ir aprīkota ar augstas veiktspējas litija jonu
akumulatoriem. Lai uzturētu akumulatora enerģiju,
nodrošiniet, ka ierīce ir uzlādēta ikdienas lietošanas
laikā.
• Ja ierīce ilgāku laiku netiek izmantota, izslēdziet
to un uzglabājiet pareizi. Uzlādējiet to vismaz reizi
3 mēnešos, lai nepieļautu akumulatoru bojājumus
pārmērīgas izlādes dēļ.
Programmaparatūras atjauninājums
Atjauniniet programmaparatūru, izmantojot mobilo
lietotni. Ja parādās jauna programmaparatūra, atjauniniet
to pēc uzaicinājuma. Atjauninot programmaparatūru,
akumulatora uzlādes līmenim jābūt ≥ 50%, tāpēc ierīcei
jāatrodas bāzes stacijā.
IZPLATĪTĀKĀS PROBLĒMAS
Problēma Risinājums
Robotu nevar palaist • Ja akumulatora uzlādes līmenis ir zems, novietojiet robotu bāzes stacijā un izlīdziniet
Robotu nevar uzlādēt • Pārvietojiet robotu ārpus stacijas, pārliecinieties, ka ir iedegta bāzes stacijas
Robotu nevar uzlādēt Robots atrodas pārāk tālu no bāzes stacijas, novietojiet to netālu no bāzes stacijas un
Neparasta uzvedība Izslēdziet robotu un restartējiet to.
Izmantošanas laikā ir
dzirdams neparasts
troksnis
Samazinās tīrīšanas jauda
vai no ierīces krīt putekļi
Nevar pieslēgt WiFi • Nepietiekams WiFi signāls. Pārliecinieties, vai ir pieejams pareizs WiFi signāla
Plānotā uzkopšana netika
veikta
Vai robots patērē
enerģiju, ja tas vienmēr
atrodas bāzes stacijā?
Vai robots pirmo reizi ir
jāuzlādē trīs reizes pa
16stundām?
atbilstoši pamatnes kontaktiem; ierīce sāks darbību automātiski (ja robots ir pilnībā
izslēgts, pēc kāda laika uzlāde var sākties automātiski).
• Neizmantojiet ierīci, ja apkārtējās vides temperatūra ir mazāka par 0°C vai augstāka
par 50°C. Izmantojiet to temperatūrā 0–40°C.
signāllampiņa, un pārliecinieties, ka abi bāzes stacijas strāvas adaptera gali ir pareizi
savienoti.
• Nepietiekama kontakta gadījumā iztīriet bāzes stacijas kontaktvirsmu un uzlādes
kontaktus robotā vai pagrieziet sānu birsti uz sāniem.
mēģiniet vēlreiz.
Galvenā birste, sānu birste vai ritenīši var būt aptinušies ar svešķermeņiem. Izslēdziet
robotu un noņemt svešķermeņus.
• Putekļu tvertne ir pilna. Iztīriet to.
• Filtra režģis ir aizsērējis. Iztīriet to vai nomainiet.
• Galvenā birste ir aptinusies ar svešķermeņiem; notīriet to.
pārklājums.
• Bezvadu internets ir savienots neparastā veidā. Atiestatiet WiFi, lejupielādējiet
jaunāko lietotni un mēģiniet vēlreiz izveidot savienojumu.
• Parole ir ievadīta nepareizi.
• Maršrutētājs ir paredzēts 5G frekvenču joslai, savukārt robots putekļsūcējs ir aprīkots
tikai 2,4G frekvenču joslu.
Zema akumulatora uzlādes līmeņa gadījumā plānotā uzkopšana var tikt sākta tikai tad,
ja akumulatora uzlādes līmenis ir vismaz 30%.
Robots patērē nelielu daudzumu enerģijas, nepārtraukti atrodoties bāzes stacijā, un tas
nodrošina vislabāko akumulatora veiktspēju.
Litija akumulatoru var izmantot uzreiz pēc uzlādes, un tam nav atmiņas efekta.
PROBLĒMU RISINĀŠANA
Audio paziņojums Risinājums
Error 1: Oh dear! I cannot find the dust collector Uzkopšana tika sākta pēc putekļu tvertnes izņemšanas.
Error 2: Please check if the radar on top has been covered
or blocked
Error 3: Please place me in a new location and try again Paņemiet robotu vai paceliet to gaisā.
Error 4: Please scrub the cliff sensor, and restart me from
a new location
Error 5: Please scrub the front sensor, and restart me from
a new location
Error 6: Please scrub the right-hand sensor, and restart
me from a new location
Error 7: Please scrub the radar housing on top, and restart
me from a new location
Error 8: Please check if the bumper has been blocked in
some way
Error 9: Master, please clean the dust container and filter Putekļu tvertne ir pilna vai arī ir nepieciešams nomainīt
Error 10: Dust container has been removed, please clean
the container and filter
Error 11: I'm stuck, please help me! Robots ir iestrēdzis.
Error 12: Please place me correctly! Robots ir sasvēries.
Error 13: Please check if my wheels have become blocked
somewhere
Error 14: Please check if the main brush has become stuck Galvenā birste ir aptinusies vai iesprūdusi.
Error 15: Lūdzu, pārbaudiet, vai sānu birstes nav
iesprūdušas.
Error 16: What's going on? Where is the docking station? Bāzes stacija nav atrasta vai nav pievienota.
Error 17: Oh dear! Program error, please restart me Neparasts stāvoklis, ko izraisījusi nezināma kļūme;
Error 18: Error encountered initiating shutdown Robots brīdina lietotāju un automātiski izslēdzas vai
Error 19: Low battery, please recharge Kad akumulatora uzlādes līmenis ir pārāk zems, robots
Error 20: To shut me down, please place me away from
the docking station
Augšējais sensors ir aizklāts vai atrodas atvērtā laukumā
(6x6m2 zonā nav šķēršļu).
Kritiena sensors ir aizklāts vai atrodas augstumā.
Infrasarkanais pretsadursmes sensors ir netīrs vai aizklāts.
Sienas sensors ir netīrs vai aizklāts.
Radara pretsadursmes sensors ir netīrs vai aizklāts.
Ir iestrēdzis malas vai pretsadursmes sensors.
filtra režģi.
Pēc 9. kļūmes signāla lietotājs izņēma putekļu tvertni,
tādējādi izraisot 10.kļūmi.
Piedziņas ritenis ir iestrēdzis vai aptinies.
Sānu birste ir aptinusies vai iesprūdusi.
restartējiet robotu.
uzlādējas.
neatrodas bāzes stacijā un tiek palaista uzkopšana
(akumulatora uzlādes līmenis ir mazāks par 10%).
Lādējot bāzes stacijā, robots tika izslēgts.
70 71
VR2110, VR2100 VR2110, VR2100
Page 37
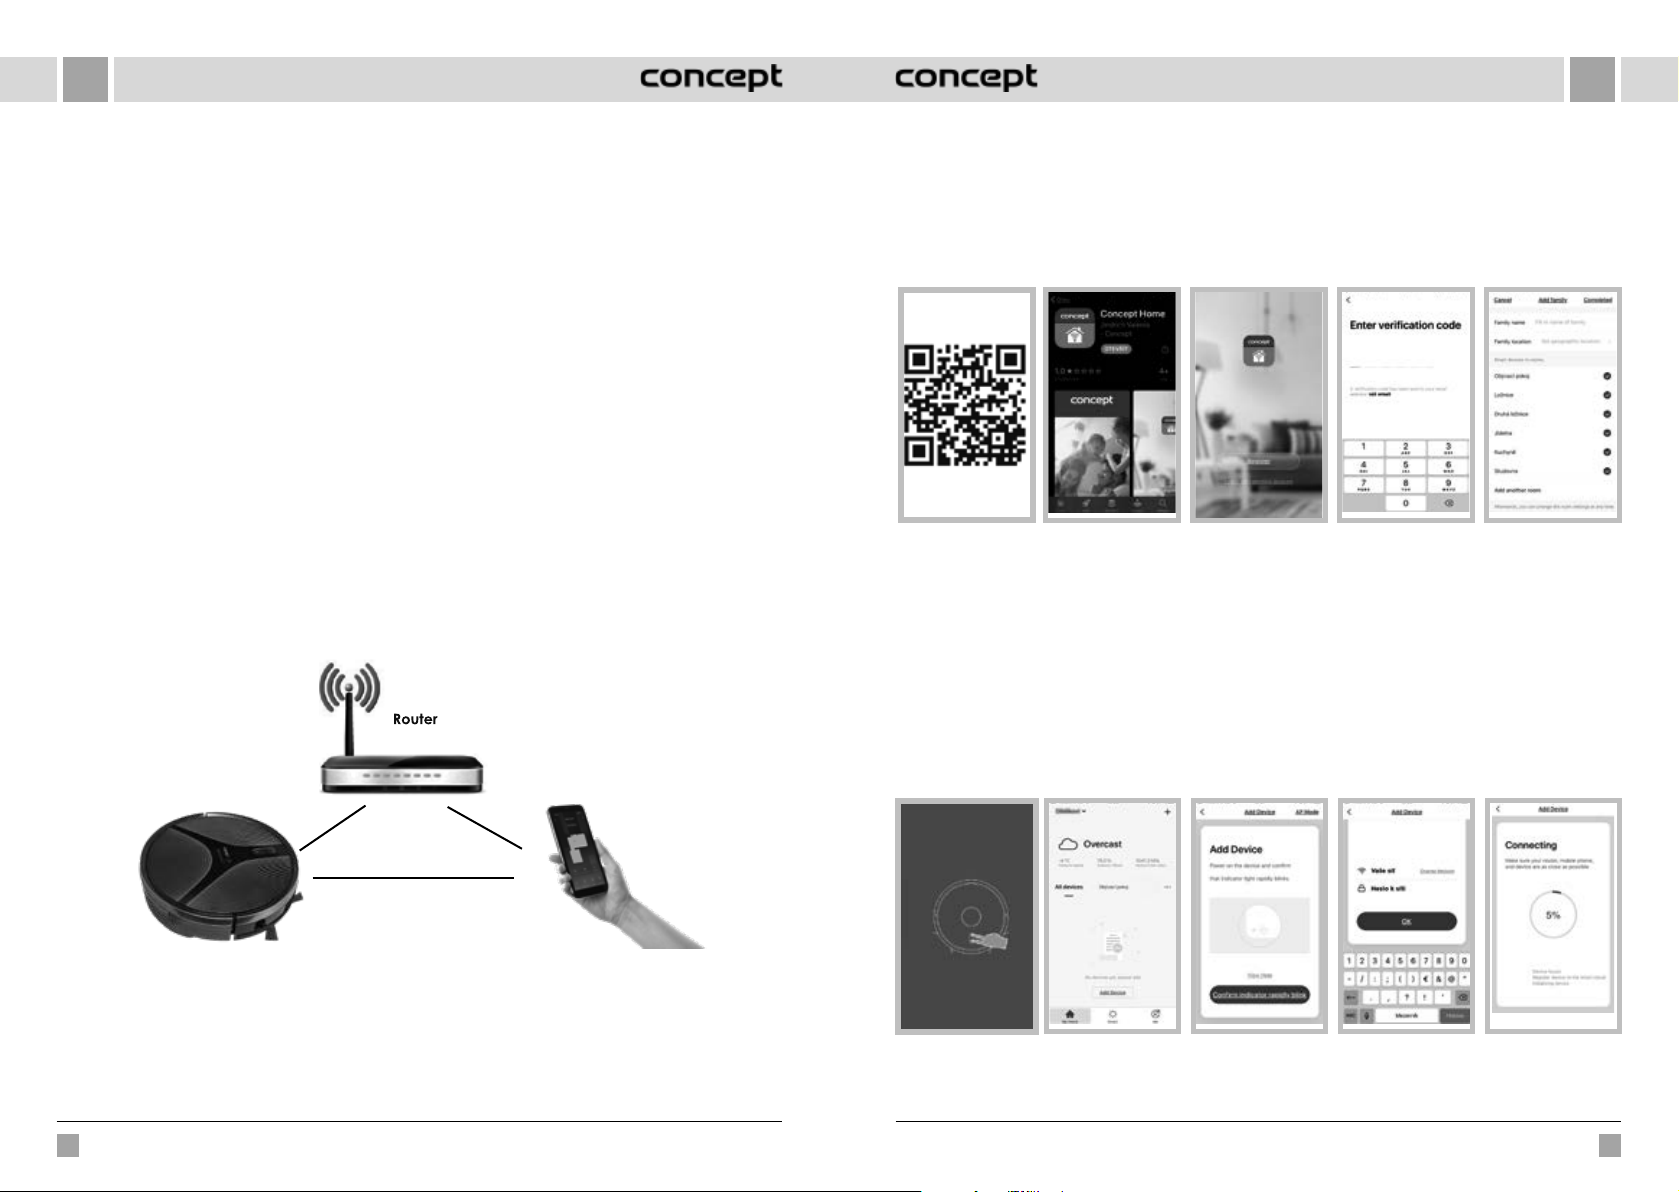
LVLV
BEZVADU SAVIENOJUMS UN SADERĪBA
• Uzņēmums “Jindřich Valenta – CONCEPT” nekādā veidā nevar būt atbildīgs par jebkādiem nejaušiem, netiešiem
vai izrietošiem zaudējumiem vai par datu zudumu, vai zaudējumiem, ko izraisa informācijas noplūde, izmantojot
bezvadu tehnoloģijas.
• Visām viedierīcēm un WiFi tīkliem (maršrutētājiem) nevar garantēt 100% sekmīgu bezvadu komunikāciju. Tā kā tirgū
ir dažādas ierīces, var būt gadījumi, kad noteiktas viedierīces vai WiFi tīkla (maršrutētāja) iezīmes vai specifikācija
neļauj tikt savienotas vai arī savienojums tiek traucēts. Bezvadu komunikācijas sekmīgumu WiFi tīklā ietekmē arī
vairāki faktori, tostarp aparatūras un programmatūras konfigurācija. Savienojumu starp robotu un Jūsu WiFi tīklu
var nelabvēlīgi ietekmēt arī apkārtējie WiFi tīkli, kas ir iestatīti tajā pašā kanālā un tādējādi traucēt savienojumu
(piemēram, mikrorajonos, daudzdzīvokļu ēkās u.tml.). Šie fakti nav iemesls, lai iesniegu pretenziju par ierīci.
• Lietotnes īpašnieks un uzturētājs ir trešā puse (turpmāk tekstā – “Subjekts”), kas atšķiras no uzņēmuma “Jindřich
Valenta – CONCEPT” (turpmāk tekstā – “Pārdevējs”). Pārdevējs nenodod Subjektam nekādus personas datus.
Reģistrējoties lietotnē, klients nodod personas datus Subjektam, kas kļūst par personas datu pārzini. Lietotni un ar to
saistīto personas datu aizsardzību regulē Subjekta noteikumi.
Savietojamība:
Viedierīces operētājsistēma - Android 5.0 un jaunākas versijas
- IOS 9.0 un jaunākas versijas
WiFi tīkls - 2,4GHz
- WPA1 un WPA2 drošība (ieteicams WPA2)
BRĪDINĀJUMS: Ierīci nevar darbināt WiFi tīklā ar IEEE 802.1X drošības protokolu (parasti – uzņēmuma bezvadu interneta tīklā).
IERĪCES VADĪBA, IZMANTOJOT LIETOTNI
Lai ierīci varētu vadīt ar lietotni, tā ir jāsavieno ar tālruni un jāļauj tai piekļūt WiFi tīklam.
Lietotnes lejupielāde un instalēšana
1. Noskenējiet turpmāk redzamo kvadrātkodu (1.att.) vai atrodiet “Concept Home” lietotni GooglePlay vai AppStore
un lejupielādējiet to savā mobilajā tālrunī (2.att.)
2. Ja Jums jau ir “Concept Home”, atveriet lietotni, pierakstieties un izpildiet savienošanas norādījumus.
3. Ja esat jauns lietotājs, sāciet ar reģistrēšanos (3.att.). Izpildiet norādījumus, lai ievadītu verifikācijas kodu un pabeigtu
reģistrāciju (4.att.).
4. Izpildiet norādījumus, lai izveidotu ģimeni (5.att.).
1.att.
Ierīces savienošanas norādījumi
1. Savienojuma izveides sākumā ir jāizveido savienojums ar WiFi tīklu.
2. Pirms savienojuma uzsākšanas pārliecinieties, ka ierīce ir gaidstāves režīmā. Vismaz 3sekundes vienlaikus nospiediet
abas pogas (6. att.), līdz robots sāk mirgot un atskan audioziņa “WiFi lost, please follow the App instruction for
reconnection”. Pārliecinieties, ka tālrunis ir savienots ar to pašu WiFi tīklu, kuram vēlaties pievienot robotu.
3. Pēc tam nospiediet taustiņu “+” vai “Add device” lietotnē (7.att.), lai pievienotu jaunu ierīci.
4. Apstipriniet “Confirm indicator rapidly blink” (8.att.)
5. Izvēlieties savu WiFi tīklu, kuram jāpievieno ierīce, un ievadiet tā paroli (9.att.).
6. Sākas uzstādīšanas process, kas var aizņemt kādu laiku (10.att.).
7. Tālrunis mēģinās izveidot savienojumu ar ierīci un savienosies ar Jūsu WiFi tīklu.
8. Pēc sekmīgas iestatīšanas (11.att.) nospiediet “Completed” un atveriet ierīces vadības saskarni (12.att.).
2.att. 3.att. 5.att.4.att.
Ieteicamais attālums iestatīšanas laikā: mazāk nekā 4metri.
Pārliecinieties, ka robots putekļsūcējs, maršrutētājs un Jūsu mobilais tālrunis atrodas tuvumā, lai savienošana noritētu
bez problēmām.
72 73
VR2110, VR2100 VR2110, VR2100
6.att. 7.att. 8.att. 9.att. 10.att.
Page 38
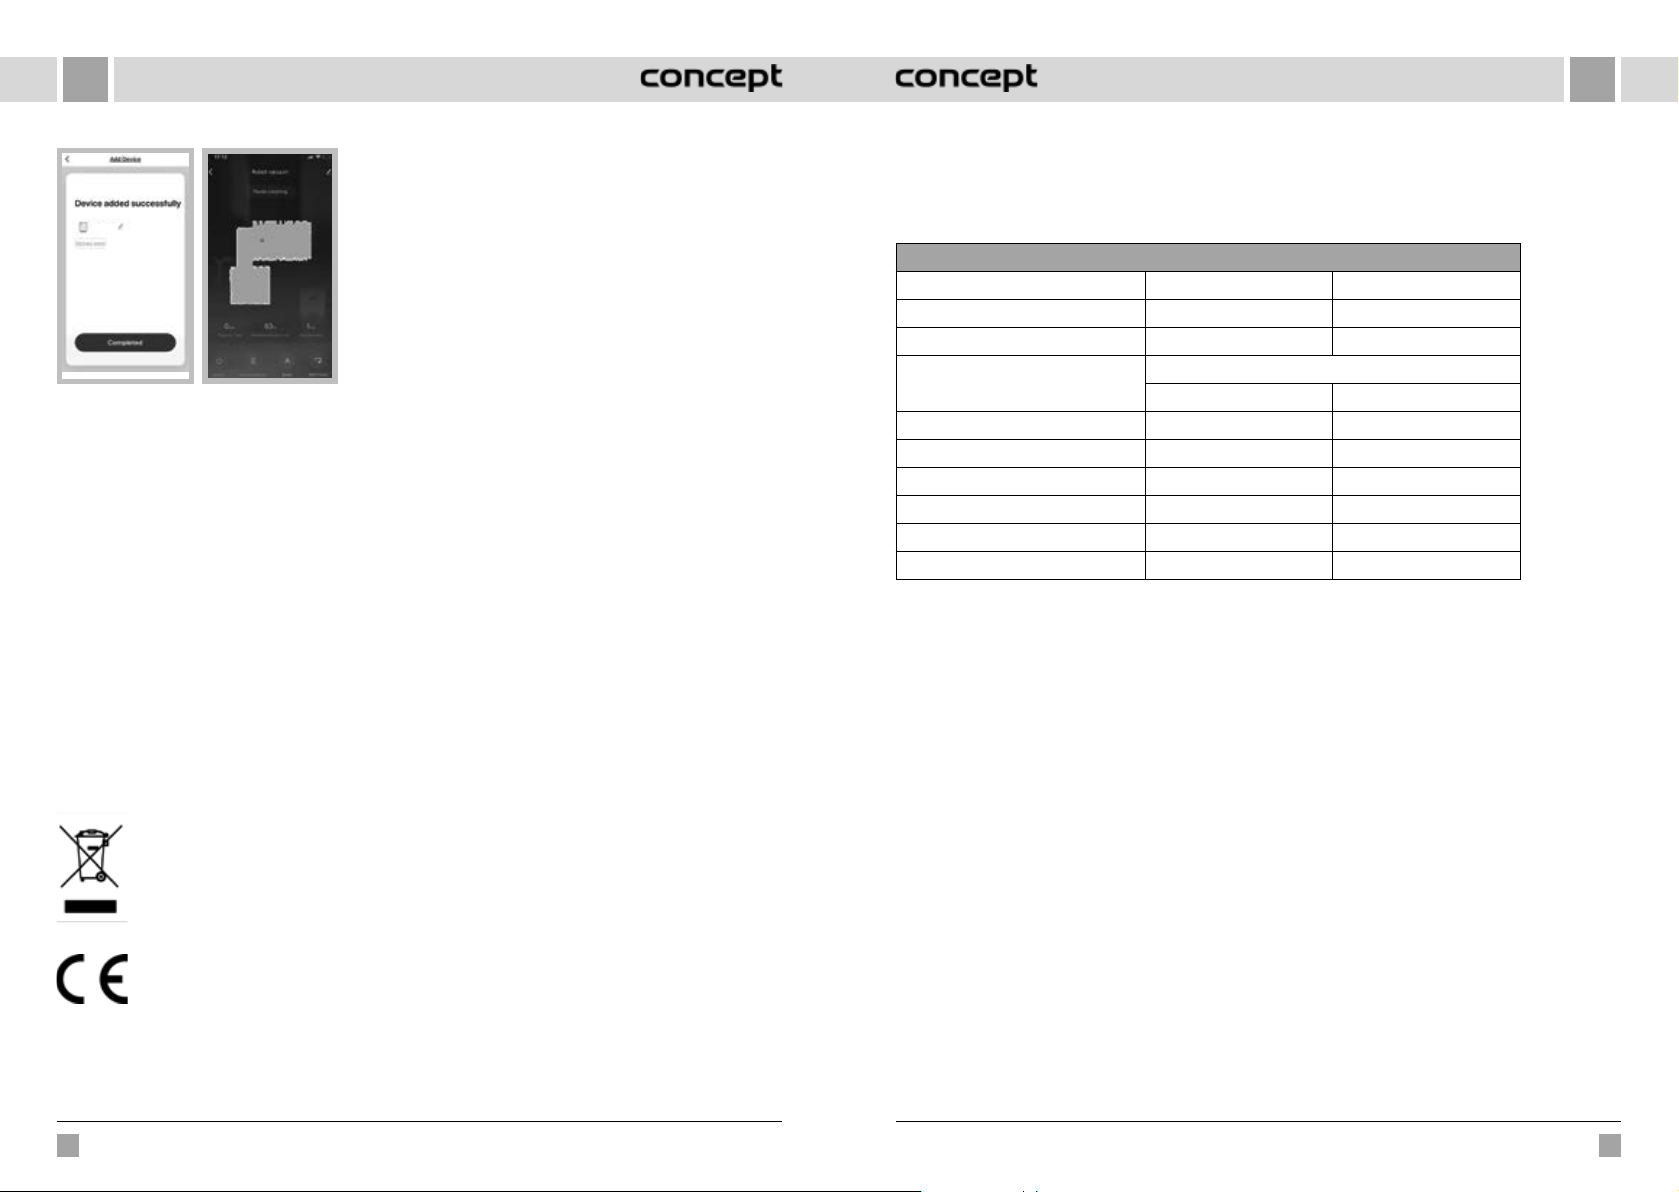
LV
EN
Brīdinājums par savienojuma izveides problēmām
• Pārbaudiet ievadīto WiFi tīkla paroles pareizību.
• Ierīce atbalsta tikai 2,4GHz WiFi tīklu.
• Maršrutētājs bieži ir aizņemts, savienojot daudzas citas
Concept
11.att.
Lietotnes režīmi
Jūs varat izvēlēties starp automātisko (Automātiskais/ZIGZAG), vietējo (Apļveida), perimetra (EDGE) uzkopšanas režīmu
un bāzes stacijas meklēšanu (DOCK).
12.att.
ierīces.
• Mēģinot izveidot savienojumu ar ierīci (10. att.),
centieties manuāli izveidot savienojumu ar tā WiFi tīklu.
TEHNISKĀ APKALPE
Plašāka mēroga apkopes un remontdarbi, kuriem ir nepieciešama iejaukšanās ierīces iekšpusē, jāveic kvalificētam
speciālistam vai servisa centram.
VIDES AIZSARDZĪBA
• Nododiet iepakojuma materiālu un vecās ierīces otrreizējai pārstrādei.
• Ierīču kastes var nodot atkritumu šķirošanas punktos.
• Polietilēna (PE) maisiņus nododiet otrreizējai pārstrādei paredzēto materiālu savākšanas punktā.
Ierīces otrreizējā pārstrāde tās kalpošanas laika beigās
Šī ierīce ir marķēta saskaņā ar Eiropas Parlamenta un Padomes Direktīvu 2012/19/ES par elektrisko
un elektronisko iekārtu atkritumiem (EEIA). Simbols uz izstrādājuma vai tā iepakojuma norāda, ka
šis izstrādājums nepieder sadzīves atkritumiem. Tas jānogādā elektrisko un elektronisko iekārtu
otrreizējās pārstrādes savākšanas punktā. Nodrošinot šā izstrādājuma pareizu iznīcināšanu, tiks
novērsta nelabvēlīga ietekme uz vidi un cilvēku veselību, ko var izraisīt nepareiza ierīces iznīcināšana.
Iznīcināšana jāveic saskaņā ar noteikumiem par atkritumu apstrādi. Lai iegūtu papildu informāciju par
šīs ierīces otrreizēju pārstrādi, lūdzu, sazinieties ar vietējās pašvaldības sadzīves atkritumu iznīcināšanas
dienestu vai veikalu, kurā iegādājāties izstrādājumu.
Šis izstrādājums atbilst visām piemērojamo ES direktīvu pamatprasībām.
Izmaiņas tekstā, konstrukcijā un tehniskajās specifikācijās var tikt veiktas bez iepriekšēja brīdinājuma, un mēs paturam
tiesības veikt šīs izmaiņas.
ACKNOWLEDGEMENTS
Thank you for purchasing a Concept product. We wish you much joy with your new appliance every day you use it.
Please read the instruction manual carefully before initial use. To refer to this manual any time you need to, we
recommend you to keep it in a safe place. And please pass it to any future owner of the appliance.
Technical specifications
VR2110 VR2100
Input 25 W 25 W
Battery voltage 14.8 V 14.4 V
Charger voltage
Sound level 55-65 dB 55-65 dB
Battery 3200 mAh, Li-Ion 2600 mAh, Li-Ion
Operation time 180 minutes 150 minutes
Full charge time 5 hours 4-5 hours
Frequency range 2.4-2.4835 GHz 2.4-2.4835 GHz
Transmitter power (max.) 18 dBm 18 dBm
IMPORTANT
Before connecting to the mains, make a visual check to ensure that the unit is intact and that no damage occurred
during transport.
AC 220-240 V - 50/60 Hz
DC 24 V DC 24 V
IMPORTANT SAFETY PRECAUTIONS
• Do not use the appliance in any other way than as described in this manual.
• Remove all the covering and marketing materials from the appliance before the first use.
• Remove all items from the floor from the floor that could disrupt the effective a trouble-
free cleaning (cables, papers, clothes, table cloths and curtains touching the ground).
• If there are stairs in the cleaning area, place a magnetic strip (virtual wall) at a minimum
distance of 15 cm from the top edge. This distance should ensure the highest protection
against falling from the stairs.
• Use only original accessories and spare parts for this model.
• Do not sit on the vacuum robot or place other objects on it.
• The appliance should only be used in households at temperatures between 0 °C and 40 °C.
• Make sure that the dust container and mopping cloth are properly attached before use.
• Do not put your hair, clothes, fingers or other body parts near the main brush. Keep the
main brush and the suction part of the vacuum robot clean, remove all hair and dust that
can lower the suction properties of the vacuum robot and the cleaning quality.
74
VR2110, VR2100
VR2110, VR2100
75
Page 39
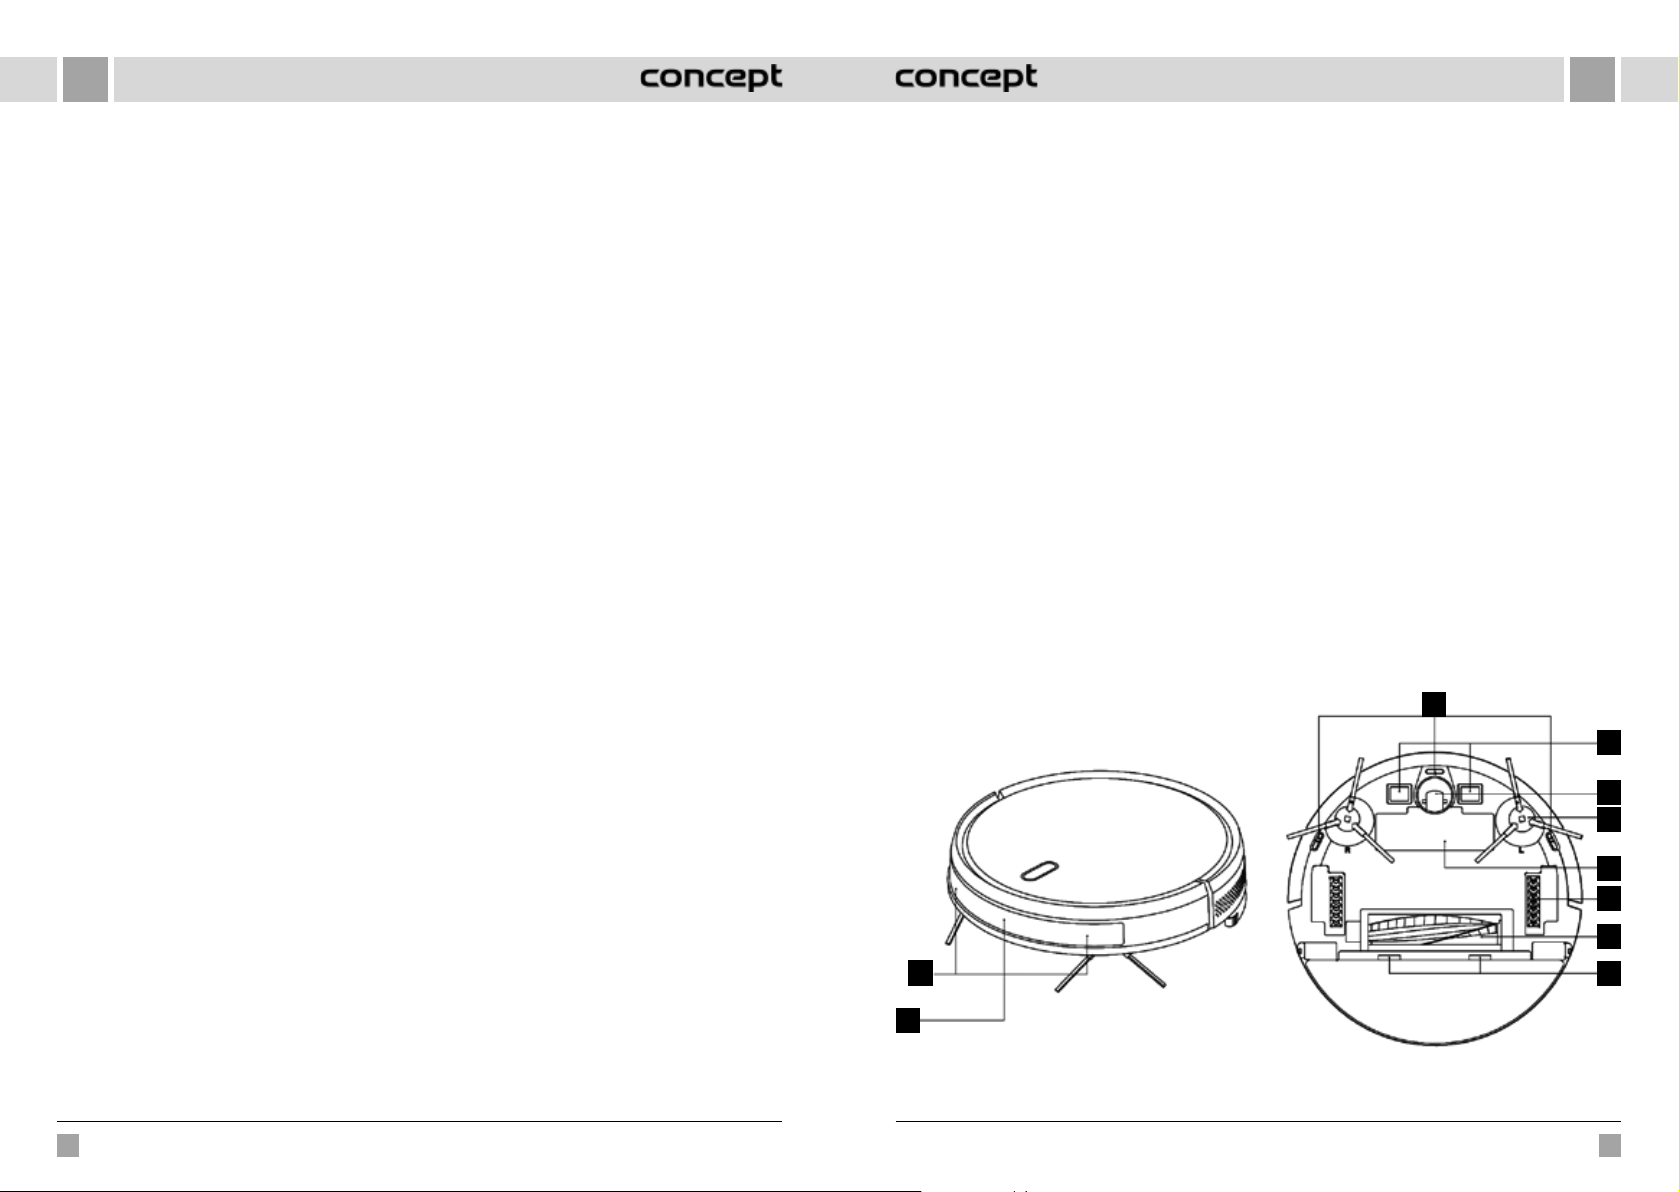
ENEN
• Do not use the appliance on wet or damp floors.
• Do not vacuum liquids, burning cigarettes, splinters and sharp objects, matches and other
flammable substances, larger pieces of paper, plastic bags or other items that can damage
the vacuum robot.
• Do not allow the vacuum robot to pass over loose cables when vacuuming.
• When servicing and cleaning the appliance, turn the power switch to the OFF position.
• Direct sunlight may cause a reduced sensitivity of the infra-red sensors of the vacuum
robot, please avoid direct sunlight.
• A carpet must be secured so that the robot does not enter on it during cleaning. If a mopping
cloth with a water tank is installed on the vacuum robot, cleaning can be interrupted or
unwanted soaking of the carpet can occur.
• Do not place the appliance in a place where it could easily fall on the floor (table, chairs).
• Before charging the appliance, make sure the charging station is properly connected.
• Extreme thermal conditions or inappropriate use may result in leakage of the battery. If
the fluid gets on your skin, wash immediately under running water. In case of contact with
eyes, rinse immediately under running water for at least 10 minutes. Get medical help.
• In case you want to dispose of the product, first disconnect the battery from the appliance.
• If the appliance is being transported or it is not used for a long time, switch it to the OFF
position. This extends the battery life.
• Make sure the mains voltage corresponds to the values on the rating plate of the product.
Do not connect the appliance to the distribution sockets and extension leads.
• When disconnecting the unit from the wall outlet, never pull the power cord, grasp the
plug end and disconnect it by removing it from the receptacle.
• Do not use the appliance as a toy.
• Do not use coarse and chemically aggressive substances to clean the appliance.
• The appliance is only suitable for home use and is not intended for commercial use.
• Do not immerse the power cord, plug or appliance in water or any other liquid.
• Do not repair the appliance yourself. Please contact an authorized service centre to prevent
injury from improper handling.
• This appliance can be used by children aged from 8 years and above and persons with
reduced physical, sensory or mental capabilities or lack of experience and knowledge if
they have been given supervision or instruction concerning the use of the appliance in
a safe way and understand the hazards involved. Cleaning and maintenance performed
by the user must not be carried out by children unless they are 8 years old and under
supervision. Children aged under 8 years of age must be kept away from the appliance
and its power cord. Do not let children play with the appliance.
• Children aged under 3 years of age must be prevented from accessing the appliance unless
they are permanently supervised.
• The manufacturer and importer to the European Union has no liability for damage caused
by the operation of the appliance, i.e. wounds, scalding, fire, injuries, damage to other
things, etc.
• If the power cord is damaged, have it replaced by a qualified service centre to avoid
adangerous situation. It is forbidden to use the appliance with a damaged power cord.
• The robotic vacuum cleaner must only be used with the original AC adapter supplied with
it. To avoid a dangerous situation, never use any other type of adapter.
Damages from failure to follow the manufacturer's instructions are not covered by the warranty.
Carefully check that you have unpacked all the accessories that are supplied. During the warranty period, we
recommend to keep the original paper box, user manual and the packaging material
PRODUCT DESCRIPTION
1 Anti-collision sensor
2 Infra-red charging sensor
3 Cliff sensor
4 Charging contact
5 Universal wheel
1
2
6 Side brush
7 Battery cover
8 Drive wheel
9 The main brush
10 Main brush cover latch
3
4
5
6
7
8
9
10
76 77
VR2110, VR2100 VR2110, VR2100
Page 40
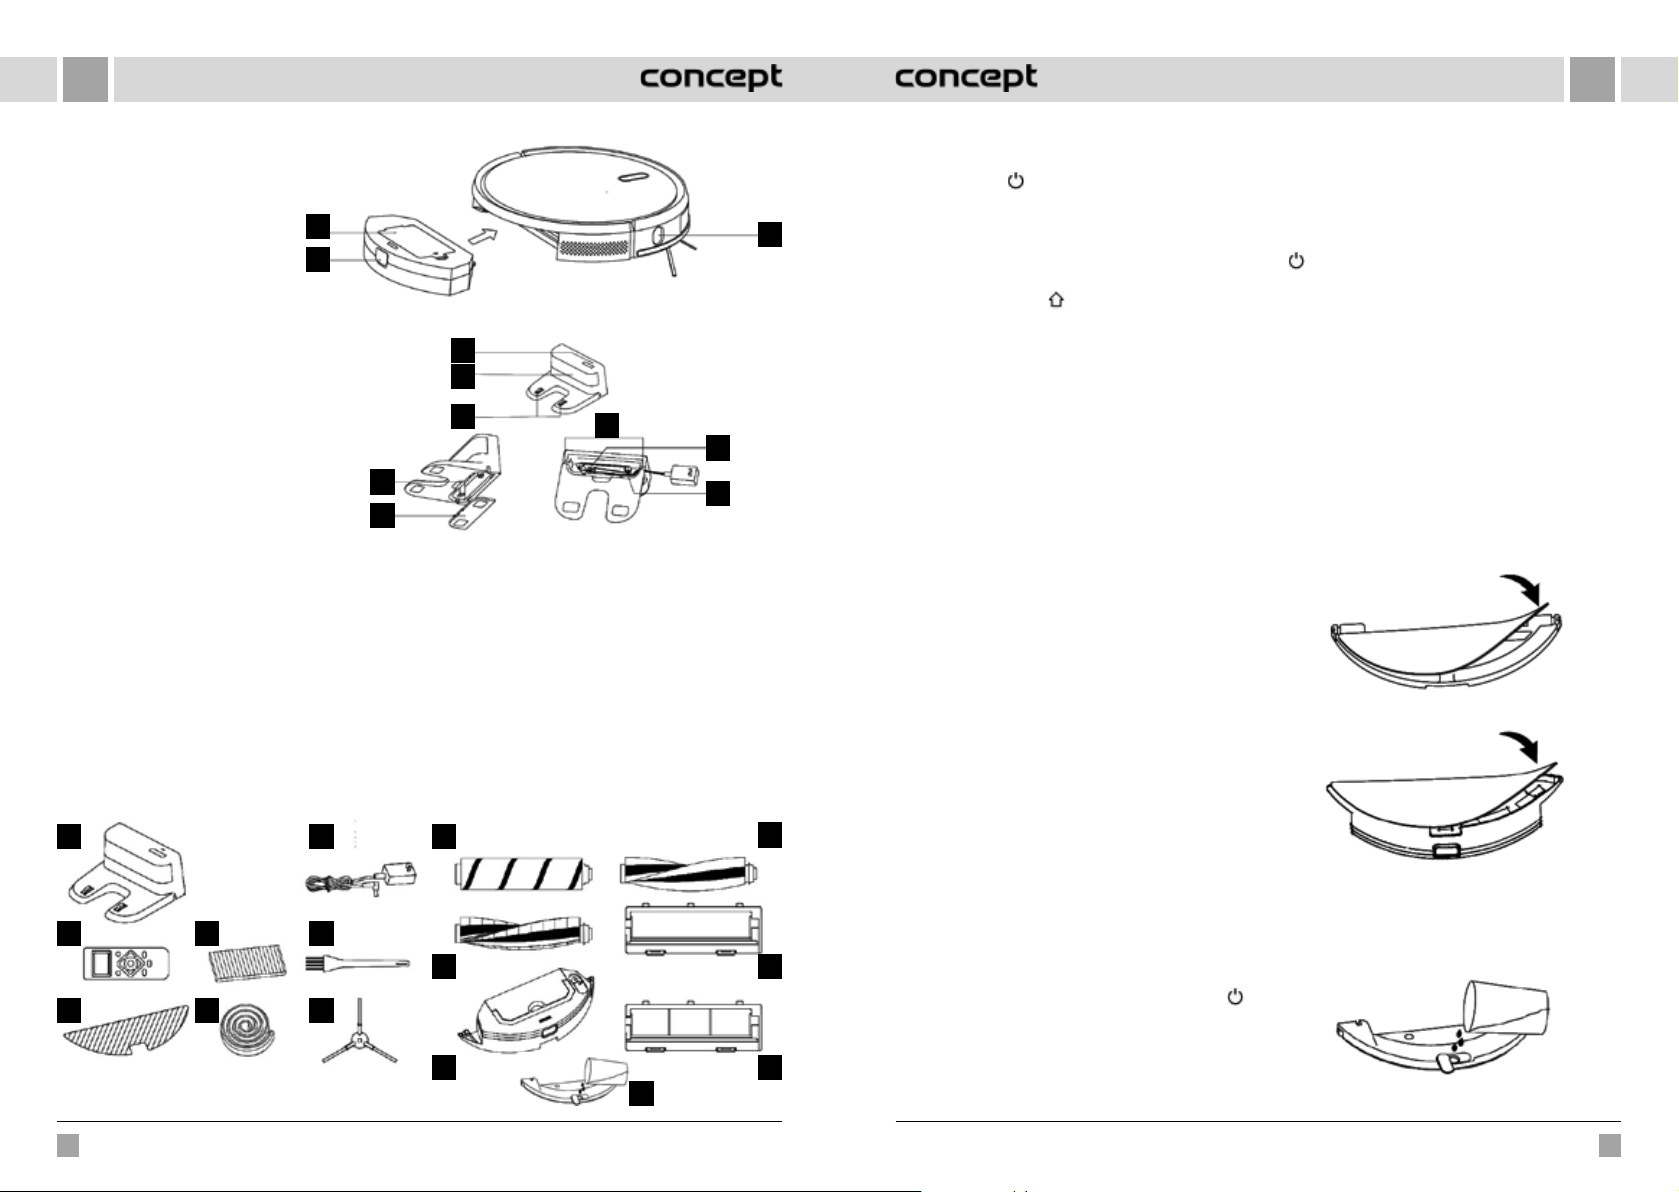
ENEN
1 Filter strainer cover
2 Dust container button
3 Wall sensor
1
2
Docking station
1 Power indicator light
2 Signal transmission area
3 Base charging contacts
4 Catch groove
5 Cover plate
6 Cable passage
7 AC adapter socket
8 Winding pin
List of parts
1 Docking station 1x
2 Remote control 1x
3 Wiping cloth 2x
4 HEPA filter + foam filter 3x (for VR2100 2x)
5 Magnetic strip 1x
6 Adapter 1x
7 Cleaning brush 1x
8 Left and right brush 2x
1
2
3
4
5
KEY FEATURES
Cleaning / ON/OFF
• Press briefly to start or pause cleaning.
3
1
2
3
6
7
4
8
• Press and hold for 3 seconds to switch the appliance
on or off.
• Long press for 15 seconds to force the appliance to
shut down under unusual circumstances.
Charging / Local cleaning
• Press briefly to start or pause charging.
• Long press to start local cleaning.
Indicator light
• Orange: Normal operation or charging.
• Red: Abnormal condition or low battery.
• Red-orange: The appliance is not connected to the
network.
Wi-Fi reset
• Press both buttons simultaneously for 3 seconds.
5
INSTALLATION
9 HARDFLOOR brush 1x (VR2110 only) CAUTION!
Cannot be used on carpets, cleaning may be
interrupted.
10 CARPET brush 1x
11 Electrically operated water tank 1x (VR2110 only)
12 PET brush 1x (VR2110 only)
13 Main brush cover 1x (VR2110 only)
suitable for HARDFLOOR and PET brushes
14 Main brush cover with steel wire 1x (suitable for
CARPET brush)
15 Hanging water tank 1x (VR2100 only)
6
9
12
7
10
13
8
11
14
15
1. Connect the power cord and store the excess
cable length in the cable compartment.
2. Place the docking station against the wall and
connect the power.
Note:
• Provide a space of min. 0.5 m on both sides of the
docking station and min. 1.5 m in front of the station.
• If the power cord is stretched vertically to the ground,
the appliance may pull it out and the docking station
may be switched off.
• In normal condition, the charging indicator light is on
when switched on, and off when charged.
3. Do not move the docking station or expose it to
direct sunlight.
Note: Direct sunlight will interfere with the docking
station signal and the appliance may not return to the
docking station properly.
4. Installing the side brush
Make sure the left side brush (L) and right side brush
(R) markings correspond to the L and R markings on
the bottom cover. Push the side brushes L and R until
you hear a “click” sound.
5. Putting the appliance into operation and charging
To switch the robot on, press and hold the button
If the power indicator light is normally on, charge the
robot in the docking station.
Note: If the appliance does not start due to a low
battery, charge it in the docking station and it will start
automatically. Normally, the appliance can only operate
when the battery level is ≥20 %.
6. Connecting a mobile app (you can skip this step)
Read the instructions for connecting Wi-Fi and connect
the mobile app.
7. Start of cleaning
After switching on the robot, briefly press the button
on the robot or start cleaning using the mobile app
(you can pause the appliance by pressing any button
during use).
Note:
• The sweeping robot cannot be used to remove fluids.
• If the battery charge level is less than 20 %, the
appliance cannot operate. In this case, recharge it.
• If the battery charge level is less than 20 %, the
appliance automatically returns to the docking station.
• Before use, remove various wires (including the
docking station power cord) from the floor to prevent
outages and damage to objects or wires when the
appliance catches these wires.
8. Installing the wiping module
a) Installing the wiping cloth: glue the wiping cloth
straight to the bottom of the water tank.
Model VR2100 - Hanging water tank
Model VR2110 - Electrically operated water tank
Note: Clean the wiping cloth after use to keep it in good
condition.
b) Fill the water tank: open the cover and fill the tank
with water.
.
Model VR2100 - Hanging water tank
78 79
VR2110, VR2100 VR2110, VR2100
Page 41
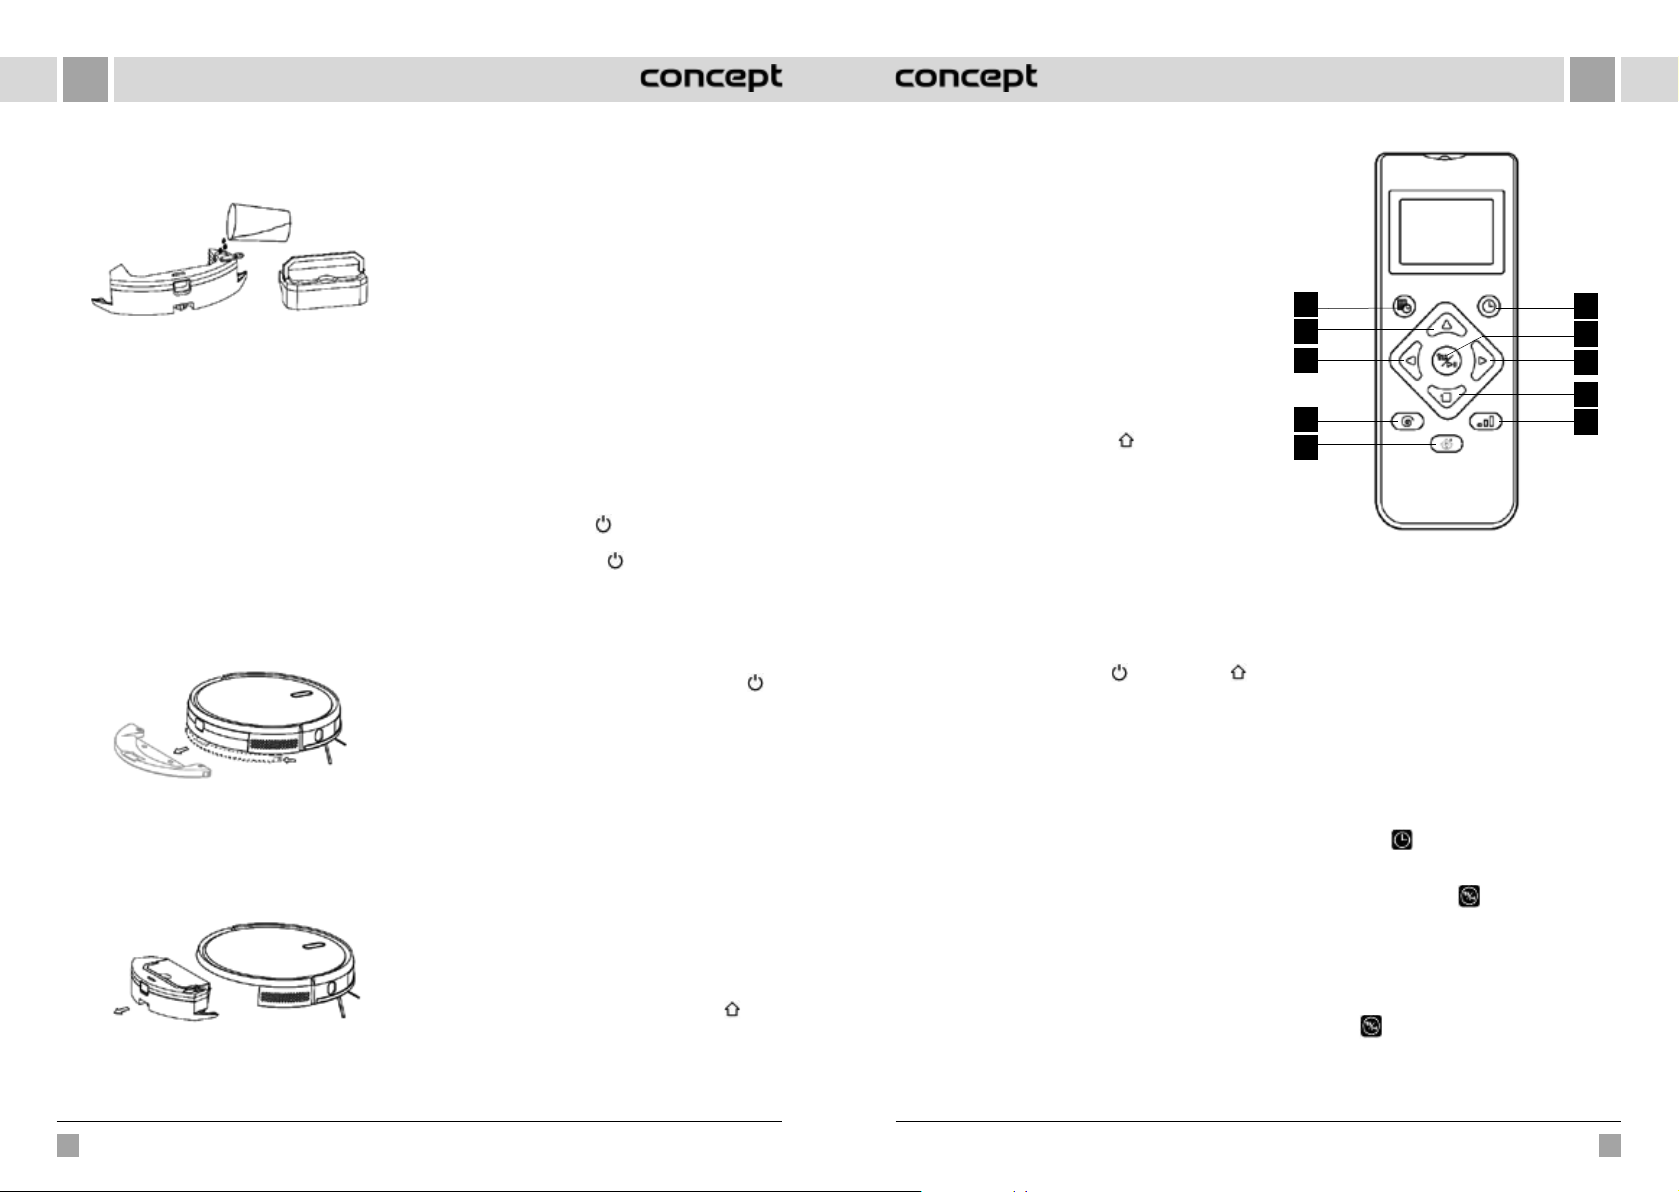
ENEN
Before filling with water, remove the dust container
using the handle (VR2110).
Model VR2110 - Electrically operated water tank
c) Install the module:
Model VR2100: push the module horizontally along
the back of the robot. The module is installed in
place when you hear a “click” sound.
Model VR2110: insert the dust container into the
water tank and insert the handle into the slot. Then
press and hold the button in the centre of the tank
and push it horizontally along the back of the robot.
The module is installed in place when you hear
a“click” sound.
9. Removing the wiping module
Model VR2100: Once the robot has completed its work,
press the latches on both sides, remove the wiping
module backwards, empty the water from the water
tank and clean the cloth (do not move or flip the robot
during cleaning).
Model VR2100 - Hanging water tank
Model VR2110: Once the robot has completed its
work, press the button in the middle of the water tank,
remove the wiping module backwards, empty the
water from the water tank and clean the cloth (do not
move or flip the robot during cleaning).
Model VR2110 - Electrically operated water tank
10. Instructions for using the wiping module
• Do not use the wiping module unless supervised.
• For safety, make sure the wiping module is removed
when charging or when not in use.
• Do not attempt to wipe the carpet.
• For a better wiping effect, the wiping module should
be used after sweeping or vacuuming the floor three
times.
• To refill water or clean the cloth while the appliance
is operating, pause it, remove and reinsert the wiping
module as described in steps 8 and 9. Do not move or
flip the appliance to avoid positioning errors and map
loss.
• The wiping function of the appliance is designed for
wiping and aids deep cleaning. However, it cannot
effectively remove stubborn dirt and thus replace
human power.
USE
ON/OFF
Press and hold the button for 3 seconds, the indicator
light comes on and the appliance starts.
Press and hold the button for 3 seconds while the
appliance is in standby mode, the indicator light goes out
and the appliance switches off.
NOTE: The appliance cannot be switched off while it is
being charged.
CLEANING/PAUSE
After starting the appliance, briefly press the button
the appliance or start the appliance using the mobile app
(press any button to pause the appliance).
Note:
• The robotic vacuum cleaner cannot be used to remove
fluids.
• If the battery charge level is less than 20 %, the
appliance cannot operate. In this case, recharge it.
• If the battery charge level is less than 20 %, the
appliance automatically returns to the docking station.
• Before use, remove various wires (including the
docking station power cord) from the floor to prevent
outages and damage to objects or wires when the
robot catches these wires.
CHARGING
Automatic mode: The appliance automatically returns to
the docking station after work.
Manual mode: When paused, press the button
to start charging or you can use your mobile app to
charge the appliance. The indicator light flashes when the
appliance is fully charged.
Note: If the appliance does not find the docking station,
on
briefly
it will automatically return to its original position. In this
case, place the device manually into the docking station.
MAGNETIC STRIP
Magnetic strips can be set to separate areas that should
not be cleaned (for example, bathrooms, kitchens, etc.).
Note: attach the magnetic strip to the floor so that it
cannot move. Otherwise, it will affect its effectiveness.
CLEANING MODE
Upon start-up, the appliance will move according to the
cleaning program in curves to clean up the entire floor
area and complete the cleaning of all rooms one by one
in a regular, efficient manner with full coverage. When
cleaning is complete, the appliance returns to the docking
station and recharges automatically.
LOCAL CLEANING
By pressing and holding the button
robot is localized, cleans a circular area of 1.5 m diameter,
and automatically returns to its default location and stops
when cleaning is complete.
CLEANING PLANNING
You can set a fixed cleaning time using the mobile app.
The appliance will automatically start cleaning at the
specified time and will return to the docking station when
completed.
WI-FI RESET
If the mobile phone cannot connect to the appliance
due to a change in router and password configuration
or other reasons, press the button
for 3 seconds at the same time until you hear the “Wi-Fi
has been reset” voice prompt and until the indicator light
turns on blue-violet and flashes slowly.
SILENT MODE
You can turn robot voice messages on or off using the
mobile app.
SETTING THE SUCTION POWER
You can set the suction power to a quiet, standard or high
level using the mobile app.
When the carpet is detected, the suction force
automatically increases to the highest level. WARNING
- the carpet is correctly detected only with the Carpet
brush.
SETTING THE WATER FLOW (only for electrically
operated water tank of model VR2110)
You can set the water flow to a low, standard or high level
using the mobile app.
USING THE REMOTE CONTROL
for 3 seconds, the
and the button
1
2
3
6
7
8
9
4
10
5
1. Cleaning planning
2. Moving forward
3. Turning left
4. Local TURBO cleaning
5. Start/pause charging
6. Automatic cleaning / pause
7. Cleaning/pause
8. Turning right
9. Peripheral cleaning
10. Setting suction power / water flow
Note: To ensure that all the correct settings are effective,
you must point the remote control at the front of the
robotic vacuum cleaner from close proximity.
TIME SETTING
1. Pres s the button on the remo te control to enter the
time setting, the Sunday symbol flashes on the LCD.
2. Press the left and right buttons to select the day of the
week and press the button to confirm it, then the
LCD will automatically switch to the clock setting.
3. Press the up and down buttons to set the hour and
press the left and right buttons to move to the minute
setting.
4. After setting the current time, point the remote control
at the front of the robotic vacuum cleaner and press
the button to confirm all time settings. Failure to
do so will invalidate your settings.
5. This completes the time setting for both the remote
control and the robotic vacuum cleaner.
Cleaning plan
80 81
VR2110, VR2100 VR2110, VR2100
Page 42
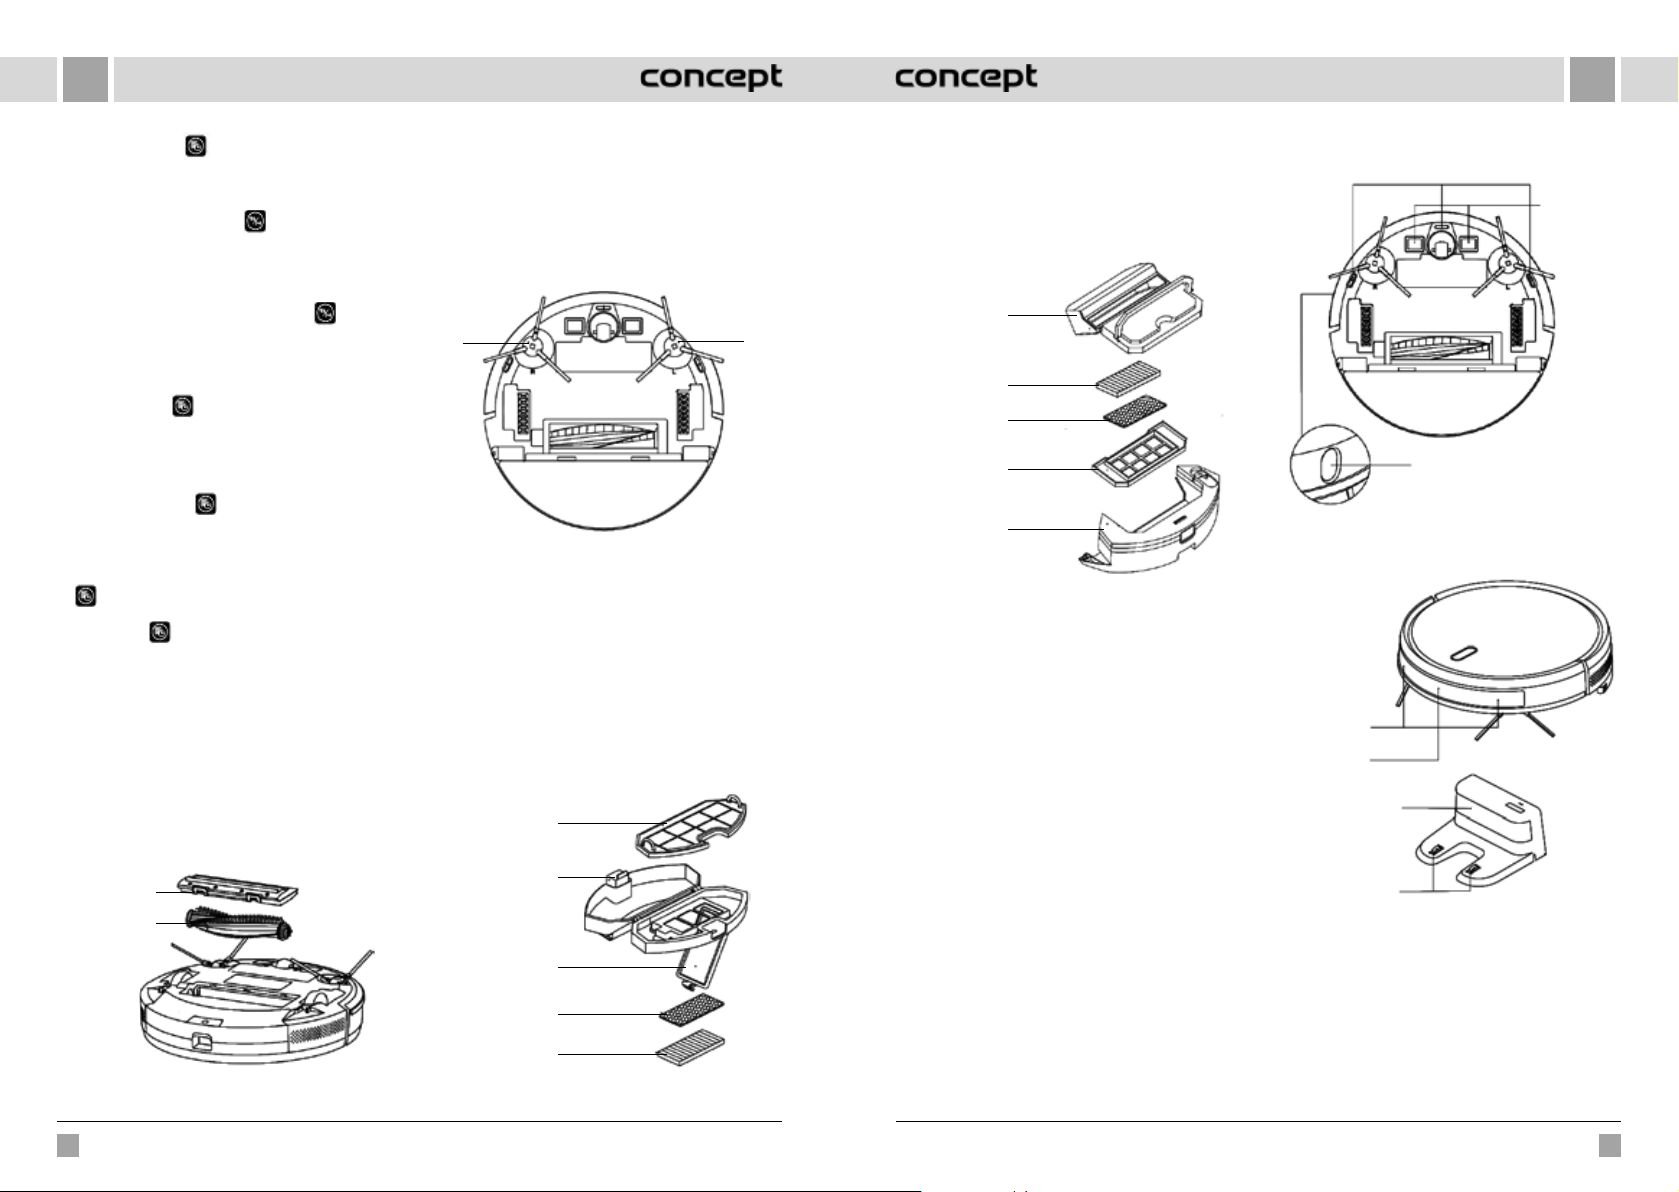
ENEN
1. Press the button on the remote control to enter
the plan setting function, the Sunday symbol flashes
on the LCD.
2. Press the left and right buttons to select the day of the
week and press the button to confirm it, then the
LCD will automatically switch to the clock setting.
3. Press the up and down buttons to set the hour and press
the left and right buttons to move to the minute setting.
Then point the remote control at the front of the robot
vacuum cleaner and press the button to confirm
this plan setting for the robotic vacuum cleaner.
4. When one plan setting is completed, the remote
control automatically moves to the next plan setting.
If you do not want to continue with the setting, press
the exit button or wait 10 seconds for the setting
to finish automatically.
5. This completes the time setting for both the remote
control and the robotic vacuum cleaner.
Cancelling the cleaning plan
1. Press the button
on the remote control, the
Sunday symbol flashes on the LCD and the symbols
for the days of the week you have planned appear.
2. Press the left and right buttons to select the day of the
week you have planned, and press and hold the button
for 3 seconds to cancel the plan. You can also select
the next planned day you want to cancel, or press the
exit button or wait 10 seconds for the setting to
finish automatically.
DAILY MAINTENANCE
Main brush (clean regularly)
1. Turn the appliance over and press the latch on the
main brush cover to pull it out.
2. Remove dust from inside and from inside the main
brush with a small brush and clean the main brush.
3. Reassemble the main brush and press firmly on the
cover until the latch clicks into place.
Latch
The main
brush
1. Turn the appliance over and pull the side brush up.
2. Remove hair and dirt and refit the side brush.
3. Make sure the left side brush (L) and right side brush
(R) correspond to the L and R symbols on the bottom
cover. Push the L and R side brushes to reinstall them.
Note: Replace the side brushes every 3 to 6 months to
ensure their cleaning effect.
R - right side
brush
L - left side
brush
Dust container and filter grid (clean regularly)
1. Press the button and pull the dust container
backwards.
2. Open and clean the dust container.
Cleaning the filter grid (clean regularly)
1. After prolonged use, remove the filter grid, foam filter
and HEPA filter.
2. Clean the removed filter grid. Rinse the foam filter and
HEPA filter under water.
3. Wipe the individual parts and let them dry freely.
4. After drying, gradually install them in the correct order:
grid - foam filter - HEPA filter.
Filter grid
(coarse filter)
Button
• Rinse the filter grid with clean water and do not add
any detergent.
• Do not clean the filter grid with a brush or fingers.
• Allow the filter grid to air dry for at least 24 hours.
• Replace the filter grid every 3 to 6 months.
Cleaning the filter (clean regularly)
Dust
container
HEPA filter
Foam filter
Filter grid
(coarse filter)
Water tank
Electrically operated water tank
Wiping module (clean after each use)
1. Remove the cloth, empty the water tank.
2. Clean the cloth, dry both the water tank and the cloth.
For model VR2110, first pull out the dust container and
then empty the water tank.
Sensors (clean regularly)
Clean the sensors with a soft cloth as follows:
1. Clean the sensors along the wall to the right.
2. Three cliff sensors at the bottom of the appliance.
3. Infra-red anti-collision sensor in front of the appliance.
4. Protection against electric shock and docking station
contacts at the bottom of the appliances (turn off the
appliance during cleaning).
5. Docking station signal transmission area.
Cliff sensor
TOF sensor
Sensors (clean every month)
Anti-collision
sensor
Infra-red
charging sensor
transmission area
Signal
Base charging
contacts
Charging
contact
Filter cover
Foam filter
HEPA filter
Side brush (clean regularly)
82 83
Note:
VR2110, VR2100 VR2110, VR2100
Page 43
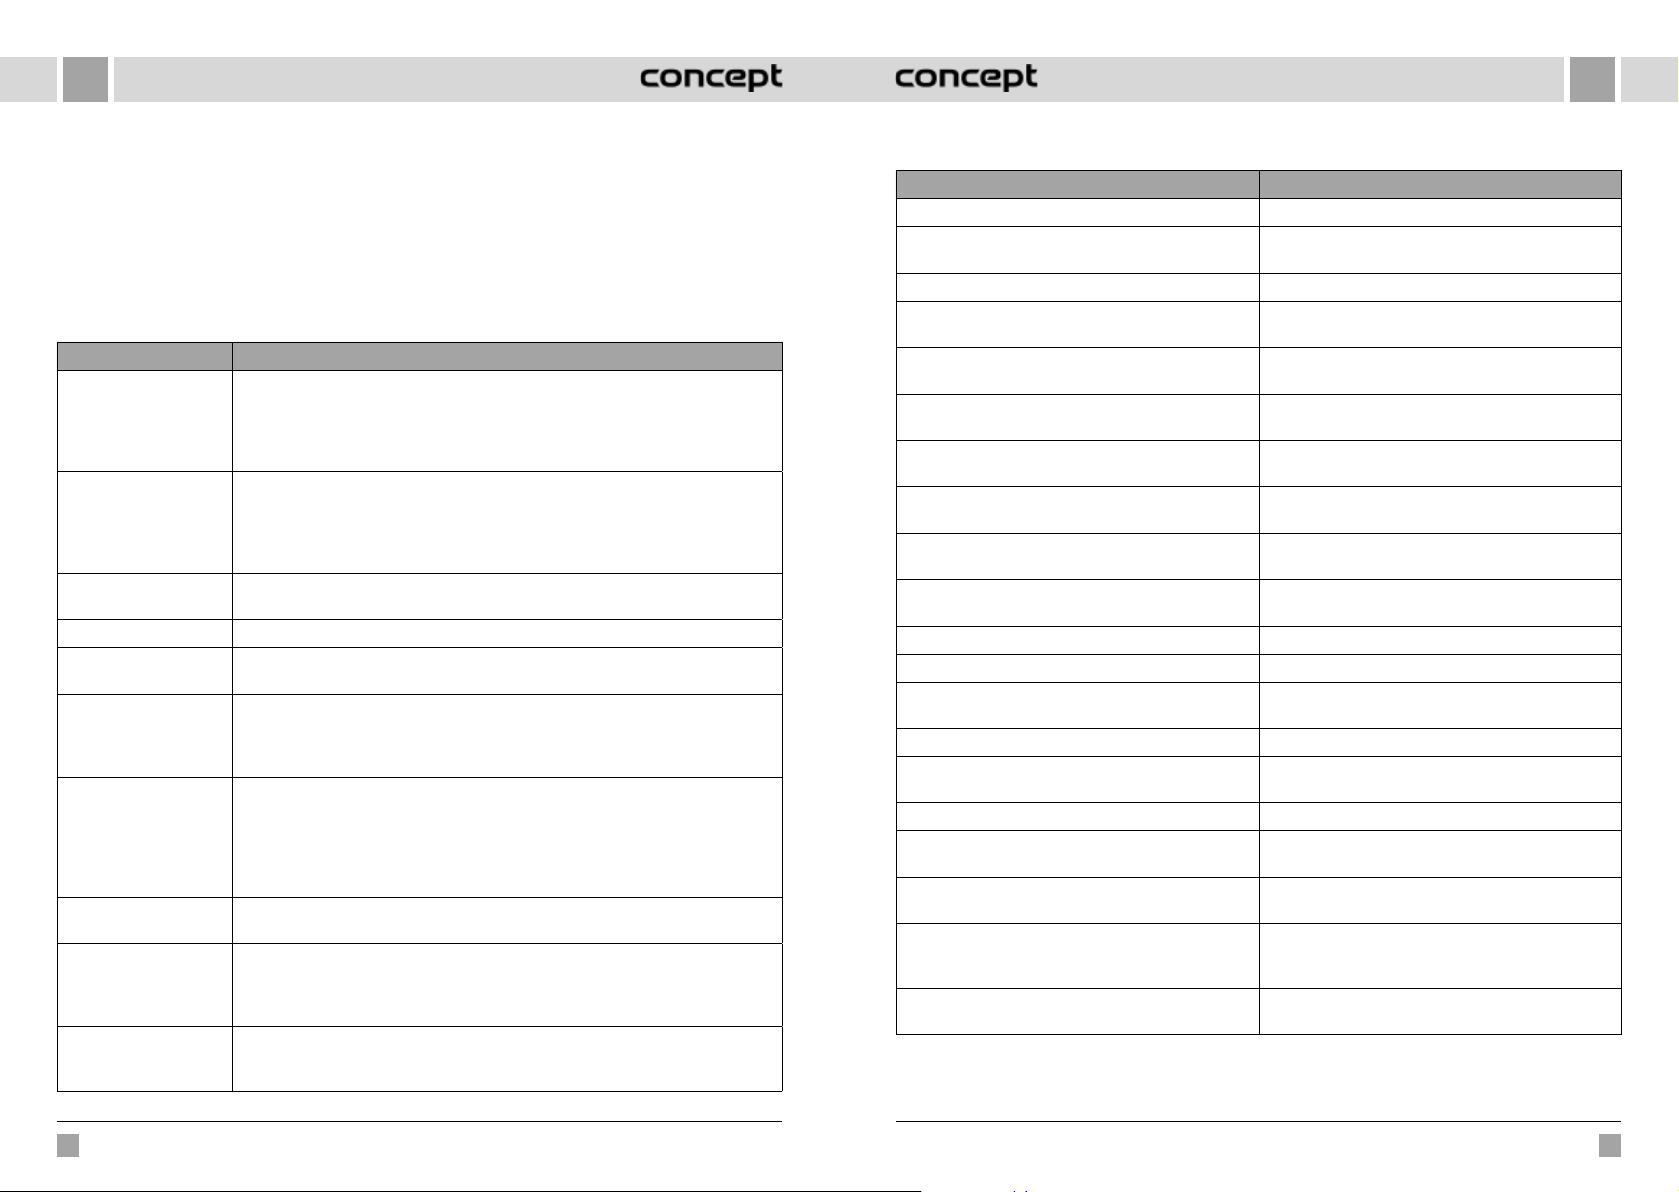
ENEN
Battery
• The appliance is equipped with high-performance
lithium-ion batteries. To maintain battery performance,
keep the appliance charged every day.
• If the appliance is not used for a long time, turn it off
and store it properly. Charge it at least every 3 months
to prevent damage to the batteries due to excessive
discharge.
COMMON PROBLEMS
Problem Remedy
The robot cannot be
started
The robot cannot be
charged
The robot cannot be
recharged
Abnormal behaviour Turn off the robot and restart it.
Unusual noise is heard
during use
Cleaning ability is
reduced or dust is
dropping from the
appliance
Wi-Fi cannot be
connected
The planned cleaning did
not take place
Does the robot consume
power when it is always
placed in the docking
station?
Do I need to charge the
robot three times for
16hours the first time?
• If the battery is low, place the robot in the docking station and align it with the board
contacts, the appliance will start automatically (if the robot is completely off, it can
start automatically after a while).
• Do not use the appliance if the ambient temperature is below 0 °C or above 50 °C.
Use at 0-40 °C.
• Move the robot off the station, make sure the docking station indicator light turns
on, and make sure both ends of the docking station power adapter are properly
connected.
• In case of poor contact, clean the docking station contact points and charging
contacts on the robot or turn the side brush to the side.
The robot is too far from the docking station, place it near the docking station and try
again.
The main brush, side brush or wheel may be wrapped with foreign objects, turn off the
robot and remove foreign objects.
• The dust container is full. Clean it.
• The filter grid is clogged. Clean or replace.
• The main brush is wrapped with foreign objects, clean it.
• The Wi-Fi signal is bad. Check that the correct Wi-Fi coverage is available.
• Wi-Fi is connected in an unusual way. Reset Wi-Fi, download the latest app, and try
connecting again.
• The password is entered incorrectly.
• There is a router for the 5G frequency band, the robotic vacuum cleaner is equipped
only for the 2.4G frequency band.
If the battery level is low, planned cleaning can only be started if the battery level is at
least 30 %.
The robot consumes a small amount of power when it is permanently placed in the
docking station, allowing the best battery performance.
The lithium battery can be used immediately after charging and has no memory effect.
Firmware update
Use the mobile app to update the firmware. If new
firmware is detected, update as prompted. When
updating the firmware, the battery level should be ≥50 %,
so the appliance should be placed in the docking station.
TROUBLE SHOOTING
Voice message Remedy
Error 1: Oh dear! I cannot find the dust container Cleaning was started after removing the dust container.
Error 2: Please check if the radar on top has been covered
or blocked
Error 3: Please place me in a new location and try again Pick up the robot or lift it into the air.
Error 4: Please scrub the cliff sensor, and restart me from
a new location
Error 5: Please scrub the front sensor, and restart me from
a new location
Error 6: Please scrub the right-hand sensor, and restart
me from a new location
Error 7: Please scrub the radar housing on top, and restart
me from a new location
Error 8: Please check if the bumper has been blocked in
some way
Error 9: Master, please clean the dust container and filter The dust container is full or the filter grid needs to be
Error 10: Dust container has been removed, please clean
the container and filter
Error 11: I'm stuck, please help me! The robot is stuck somewhere.
Error 12: Please place me correctly! The robot is tilted.
Error 13: Please check if my wheels have become blocked
somewhere
Error 14: Please check if the main brush has become stuck The main brush is tangled or stuck.
Error 15: Please check if the side brushes have become
stuck
Error 16: What's going on? Where is the docking station? Docking station not found or not connected.
Error 17: Oh dear! Program error, please restart me Abnormal condition due to unknown failure, restart the
Error 18: Error encountered initiating shut-down The robot alerts the user and automatically shuts down
Error 19: Low battery, please recharge When the battery charge level is too low, the robot is not
Error 20: To shut me down, please place me away from
the docking station
The top sensor is covered or placed in an open area (there
is no obstruction in the 6x6 m2 area).
The cliff sensor is covered or placed at a height.
The infra-red anti-collision sensor is dirty or covered.
The wall sensor is dirty or covered.
The anti-collision radar sensor is dirty or covered.
The edge sensor or anti-collision sensor is stuck.
replaced.
After error 9 has been signalled, the user has removed the
dust container and this triggers error 10.
The drive wheel is stuck or tangled.
The side brush is tangled or stuck.
robot.
or recharges.
in the docking station and cleaning starts (the battery
charge level is less than 10 %).
The robot was turned off while charging at the docking
station.
84 85
VR2110, VR2100 VR2110, VR2100
Page 44
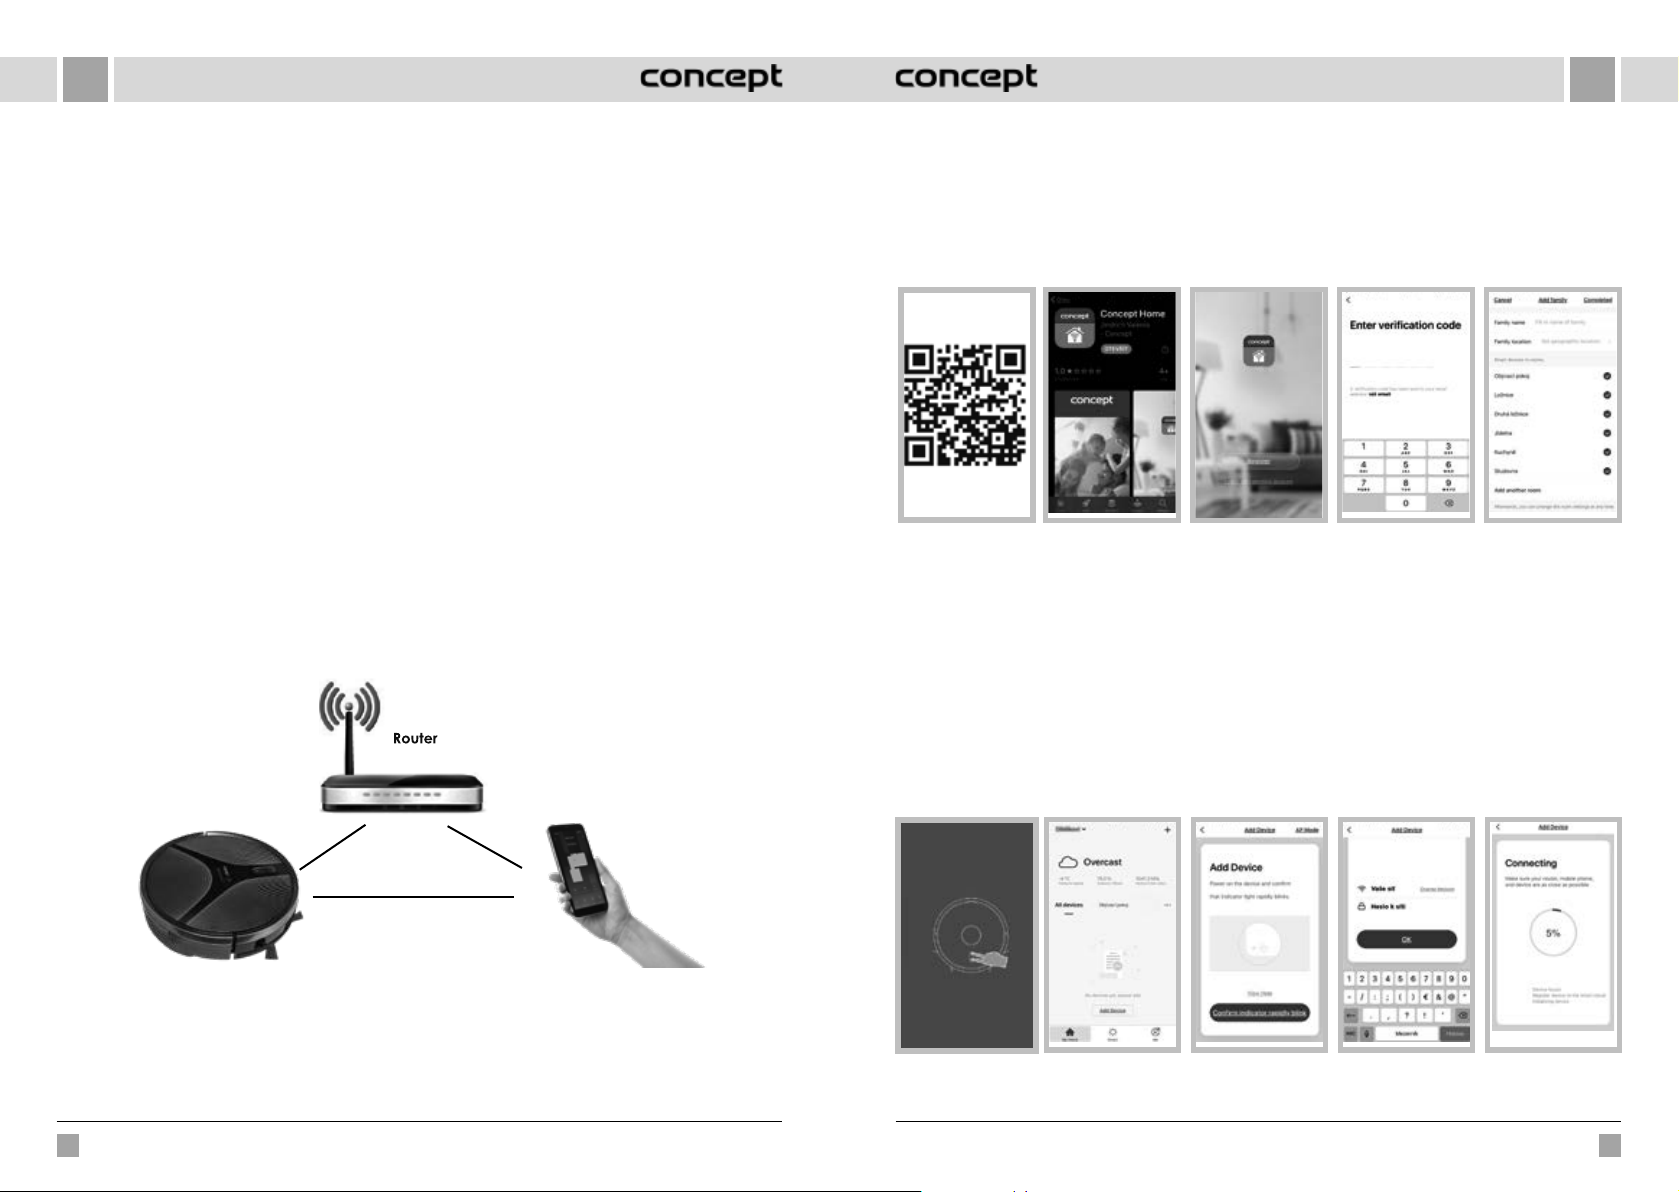
ENEN
WIRELESS CONNECTION AND COMPATIBILITY
• Jindřich Valenta - CONCEPT shall in no way be liable for any incidental, indirect or consequential damages, or for any
loss of data or loss due to information leakage during communication via wireless technology.
• Successful wireless communication cannot be 100% guaranteed on all Smart devices and Wi-Fi networks (routers).
Due to the variety of devices on the market, there may be cases where the character or specification of a given
Smart device or Wi-Fi network (router) makes connection impossible or is somehow disturbed. In addition, a number
of factors, including hardware and software configuration, also affect the success of wireless communication via
Wi-Fi network. The connection between the robot and your Wi-Fi network can also be adversely affected by the
surrounding Wi-Fi networks, which can be tuned to the same channel and thus interfere with the connection (e.g. in
housing estates, apartment buildings, etc.). These facts are not a reason to claim the appliance.
• The application is owned and operated by a third party (the “Entity”) different from Jindřich Valenta - CONCEPT (the
“Seller”). No personal data is transferred to the Entity by the Seller. When registering for the application, the customer
submits personal data directly to the Entity, who becomes the administrator of personal data. The application and the
associated protection of personal data are governed by the Entity’s rules.
Compatibility:
Smart device operating system - Android 5.0 and higher
- IOS 9.0 and higher
Wi-Fi network - 2.4 GHz
- WPA1 and WPA2 security (WPA2 recommended)
NOTICE: The appliance cannot be operated on IEEE 802.1X-protected Wi-Fi networks (usually corporate Wi-Fi networks).
OPERATING USING THE APP
Before you can control the device through the application, it is necessary to connect it to your phone and give it access
to your Wi-Fi network.
Download and installation of the app
1. Scan the QR code below (Fig. 1) or find and download the “Concept Home” application on Google Play or App Store
(Fig. 2).
2. If you already have Concept Home, open the app, sign in, and continue with the pairing instructions.
3. If you are a new user, start by registering (Fig. 3). Follow the instructions to enter the verification code and complete
the registration (Fig. 4).
4. Follow the instructions to create a family (Fig. 5).
Fig. 1
Instructions for pairing the device
1. At the beginning of pairing, you need to be connected to your Wi-Fi network.
2. Make sure that the appliance is in standby mode before starting the connection. Press both buttons (Fig. 6) at the
same time for at least 3 seconds until the robot starts flashing and you hear the “Wi-Fi lost, please follow the App
instruction for reconnection” voice message. Make sure your phone is connected to the same Wi-Fi network you want
to connect the robot to.
3. Then press + or “Add device” (Fig. 7) in the application to add a new device.
4. Confirm “Confirm indicator rapidly blink” (Fig. 8).
5. Select your Wi-Fi network to which the device needs to connect to and enter your password (Fig. 9).
6. This will start the set-up process, which may take some time (Fig. 10).
7. Your phone will try to connect to the device and it will connect it to your Wi-Fi network.
8. After successful set-up (Fig. 11), press “Completed” to enter the device control interface (Fig. 12).
Fig. 2 Fig. 3 Fig. 5Fig. 4
Recommended distance during set-up: less than 4 meters
Make sure your robotic vacuum cleaner, router, and your mobile phone are close together so that you can pair your phone
with the device with no problems.
86 87
VR2110, VR2100 VR2110, VR2100
Fig. 6 Fig. 7 Fig. 8 Fig. 9 Fig. 10
Page 45
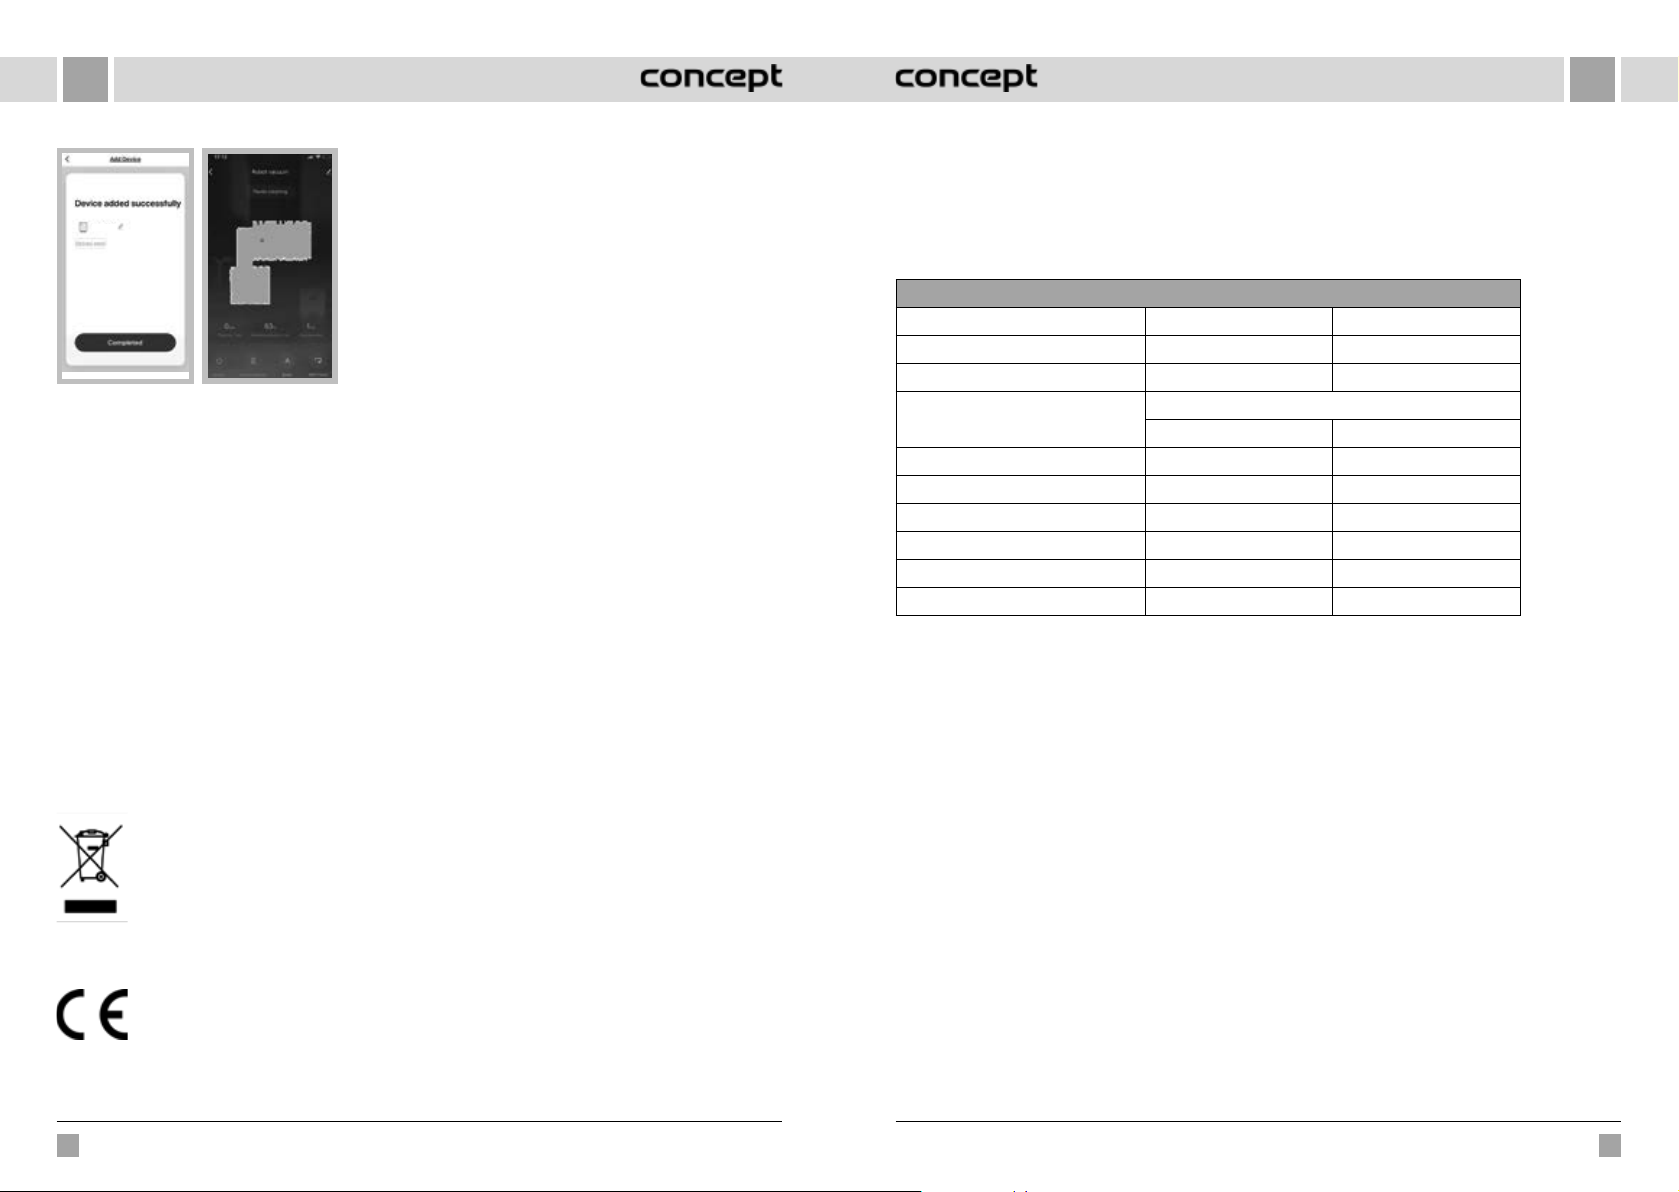
EN
DE
Pairing troubleshooting
• Verify that your Wi-Fi network password is correct.
• The device only supports 2.4 GHz Wi-Fi networks.
• The router is overloaded as many other devices are
Concept
Fig. 11
App modes
You can choose between the AUTO (Automatic/ZIGZAG), Local (Circular), Peripheral (EDGE) and DOCK (search for the
docking station).
Fig. 12
connected.
• When attempting to connect to the device (Fig. 10), try
to manually connect to its Wi-Fi network.
SERVICE CENTRE
Extensive maintenance or repair, which requires access to internal parts of the product, has to be performed by
aqualified specialist or the service centre.
ENVIRONMENTAL CONCERNS
• Packaging materials and old appliances should be recycled.
• Packaging materials may be disposed of as sorted waste.
• Dispose the plastic bags made of polyethylene (PE) of as sorted waste.
DANKSAGUNG
Vielen Dank, dass Sie ein Produkt der Marke Concept eingekauft haben. Wir wünschen Ihnen, dass Sie mit unserem
Produkt über seine gesamte Gebrauchsdauer zufrieden sein werden.
Lesen Sie sich vor dem ersten Gebrauch die ganze Bedienungsanleitung sorgfältig durch und bewahren Sie diese
dann auf. Stellen Sie sicher, dass auch andere Personen, die dieses Produkt behandeln werden, sich mit dieser
Gebrauchsanweisung vertraut machen.
Technische Parameter
VR2110 VR2100
Leistungsbedarf 25 W 25 W
Akkuspannung 14,8 V 14,4 V
Spannung des Ladeakkumulators
Lautstärke 55-65 dB 55-65 dB
Batterie 3200 mAh, Li-Ion 2600 mAh, Li-Ion
Betriebszeit 180 Minuten 150 Minuten
Dauer des vollen Aufladens 5 Stunden 4-5 Stunden
Frequenzbereich 2,4-2,4835 GHz 2,4-2,4835 GHz
Leistung des Senders (max.) 18 dBm 18 dBm
WICHTIG
Vor dem Anschluss an das Stromnetz sichern Sie durch eine Sichtkontrolle, ob die Einheit unversehrt ist und ob
es während des Transports zu irgendwelcher Beschädigung nicht gekommen ist.
AC 220-240 V - 50/60 Hz
DC 24 V DC 24 V
WICHTIGE SICHERHEITSHINWEISE
Recycling of the appliance at the end of its lifespan:
This appliance is labelled in accordance with European Directive 2012/19/EU concerning used
electrical and electronic appliances (waste electrical and electronic equipment - WEEE). The symbol
on the product or on its packaging indicates that this product may not be treated as household
waste. Instead it should be taken to the appropriate collection point for the recycling of electrical and
electronic equipment. By ensuring this product is disposed of correctly, you will help prevent potential
negative consequences for the environment and human health, which could otherwise be caused by
inappropriate waste handling of this product. The disposal of such material has to be done according
to the recycling regulations. For more detailed information about recycling of this appliance see the
authorized local office or service for household waste disposal or the shop, where you purchased the
appliance.
The product meets all the necessary requirements of the EU directives applicable to the specific product.
Changes in text, design, and technical specifications are subject to change without prior notice and we reserve the right
to change them.
88
VR2110, VR2100
• Benutzen Sie das Gerät nicht anders, als es in dieser Anleitung beschrieben ist.
• Vor dem ersten Einsatz entfernen Sie alle Verpackungen und Marketingunterlagen vom
Gerät.
• Vor der Nutzung beseitigen Sie vom Fußboden alle Sachen (Kabel, Papiere, Bekleidung,
Tischtücher und Gardinen, die den Fußboden berühren), welche die effektive und problemlose
Reinigung stören könnten.
• Wenn sich im Raum der Reinigung Treppen befinden, bringen Sie das magnetische Band
(virtuelle Wand) in dem Mindestabstand von 15 cm von dem Rand der oberen Treppe an.
Dieser Abstand sollte den höchsten Schutz gegen den eventuellen Sturz von der Treppe
absichern.
• Benutzen Sie nur das Originalzubehör und die Ersatzteile, die zu diesem Modell bestimmt
sind.
• Setzen Sie sich nicht auf den Staubsauger und legen Sie darauf auch keine Gegenstände.
VR2110, VR2100
89
Page 46
DEDE
• Das Elektrogerät sollte nur in den Haushalten bei den Temperaturen von 0 °C bis 40 °C
genutzt werden.
• Vergewissern Sie sich vor der Nutzung, dass der Staubbehälter und das Moppgewebe
richtig eingesetzt sind.
• Legen Sie keine Haare, Bekleidung, Finger oder andere Körperteile in die Nähe der
Hauptbürste ein. Halten Sie die Hauptbürste und den Ansaugteil des Staubsaugers sauber,
beseitigen Sie Haare und den Staub, welche die Staubeigenschaften des Staubsaugers
und die Qualität der Reinigung herabsetzen können.
• Benutzen Sie das Gerät auf dem nassen oder feuchten Fußboden nicht.
• Saugen Sie keine Flüssigkeiten, brennenden Zigaretten, Scherben und scharfen Gegenstände,
Streichhölzer und anderen brennbaren Stoffe, keine größeren Papierstücke, keine
Papiertüten oder anderen Gegenstände, die den Staubsauger beschädigen können.
• Beim Staubsaugen lassen Sie den Staubsauger über frei verlegte Kabel nicht überfahren.
• Bei der Instandhaltung und bei der Reinigung des Elektrogeräts schalten Sie den Ausschalter
in die Position Ausgeschaltet um.
• Das direkte Sonnenlicht kann die herabgesetzte Sensibilität der infraroten Sensoren des
Staubsaugers verursachen, verhindern Sie bitte seine direkte Strahlung.
• Der Teppich ist beim Abwischen so abzusichern, dass der Roboter darauf während des
Saubermachens nicht auffährt. Wenn auf dem Staubsauger das Moppgewebe mit dem
Wasserbehälter installiert ist, könnte es zur Unterbrechung der Reinigung, eventuell zum
unerwünschten Durchnässen des Teppichs kommen.
• Legen Sie das Gerät nicht auf die Plätze, von denen es auf den Boden leicht fallen kann
(Tisch, Stühle).
• Überzeugen Sie sich vor der Ladung des Geräts, dass die Ladestation richtig eingeschaltet ist.
• Bei den extremen Temperaturbedingungen oder bei der ungeeigneten Nutzung kann es
zur Freisetzung der Flüssigkeit aus der Batterie kommen. Wenn die Flüssigkeit die Haut
betrifft, waschen Sie sie unverzüglich unter dem fließenden Wasser. Im Falle des Kontakts
mit den Augen spülen Sie die Augen sofort unter dem fließenden Wasser mindestens für
die Dauer von 10 Minuten. Suchen Sie die ärztliche Hilfe aus.
• Im Falle, wenn Sie das Produkt entsorgen wollen, schalten Sie zuerst die Batterie vom
Elektrogerät ab.
• Im Falle, wenn Sie das Elektrogerät transportieren oder wenn Sie es lange nicht nutzen
werden, schalten Sie den Schalter in die Position Ausgeschaltet um. Sie verlängern so die
Lebensdauer der Batterie.
• Überprüfen Sie, ob die Anschlussspannung den Werten auf dem Typenschild des
Produkts entspricht. Schalten Sie das Elektrogerät in die Abzweigsteckdosen und
Verlängerungsleitungen nicht ein.
• Zum Trennen des Gerätes von der Steckdose ziehen Sie nie am Zuleitungskabel, sondern
greifen Sie den Stecker und trennen Sie diesen von der Steckdose durch das Ziehen.
• Erlauben Sie nicht, dass das Gerät als Spielzeug verwendet wird.
• Benutzen Sie keine groben und chemisch aggressiven Stoffe zur Reinigung des Geräts.
• Das Gerät ist nur für den Gebrauch im Haushalt geeignet, es ist nicht für kommerzielle
Zwecke bestimmt.
• Tauchen Sie das Zuleitungskabel, den Stecker oder das Gerät nicht in Wasser oder andere
Flüssigkeit.
• Reparieren Sie das Gerät nicht selbst. Wenden Sie sich an den autorisierten Service und
beugen Sie Verletzungen bei der unsachgemäßen Handhabung vor.
• Dieses Gerät können Kinder ab dem 8. Lebensjahr und Personen mit den erniedrigten
physischen oder mentalen Fähigkeiten oder mit den ungenügenden Erfahrungen und
Kenntnissen dann nutzen, wenn sie unter der Aufsicht stehen oder wenn sie über das Nutzen
des Geräts auf eine sichere Weise belehrt wurden und wenn sie die eventuellen Gefahren
verstehen. Die von dem Benutzer durchzuführende Reinigung und Wartung dürfen keine
Kinder durchführen, wenn sie nicht älter als 8 Jahre und unter keiner Aufsicht sind. Kinder
bis zum 8. Lebensjahr müssen außerhalb der Reichweite des Geräts und dessen Zuleitung
gehalten werden. Kinder dürfen mit dem Gerät nicht spielen.
• Die Kinder bis zum 3. Lebensjahr muss man am Zutritt zum Gerät hindern, wenn sie unter
der dauerhaften Aufsicht nicht stehen.
• Der Hersteller und Importeur in die Europäische Union haftet für die durch den Betrieb
des Elektrogeräts verursachen Schäden nicht, wie z.B. Verletzung, Verbrühung, Brand,
Verwundung, Entwertung anderer Sachen u. ä. sind.
• Das beschädigte Netzkabels lassen Sie bei einer Fachwerkstatt ersetzen, um Entstehung
einer gefährlichen Situation zu vermeiden. Es ist verboten, das Gerät mit beschädigtem
Netzkabel zu benutzen.
• Der Staubsauger-Roboter ist nur mit dem mitgelieferten originalen Netzadapter zu benutzen.
Benutzen Sie nie einen anderen Typ vom Adapter, um Entstehung einer gefährlichen
Situation zu vermeiden.
Bei der Nichteinhaltung der Anweisungen des Herstellers kann eine eventuelle Reparatur nicht als
Garantiereparatur anerkannt werden.
Überprüfen Sie sorgfältig, dass Sie das sämtliche gelieferte Zubehör ausgepackt haben. Wir empfehlen Ihnen, dass
Sie den Originalkarton, das Nutzerhandbuch und das Verpackungsmaterial während der Garantiefrist beibehalten.
90 91
VR2110, VR2100 VR2110, VR2100
Page 47
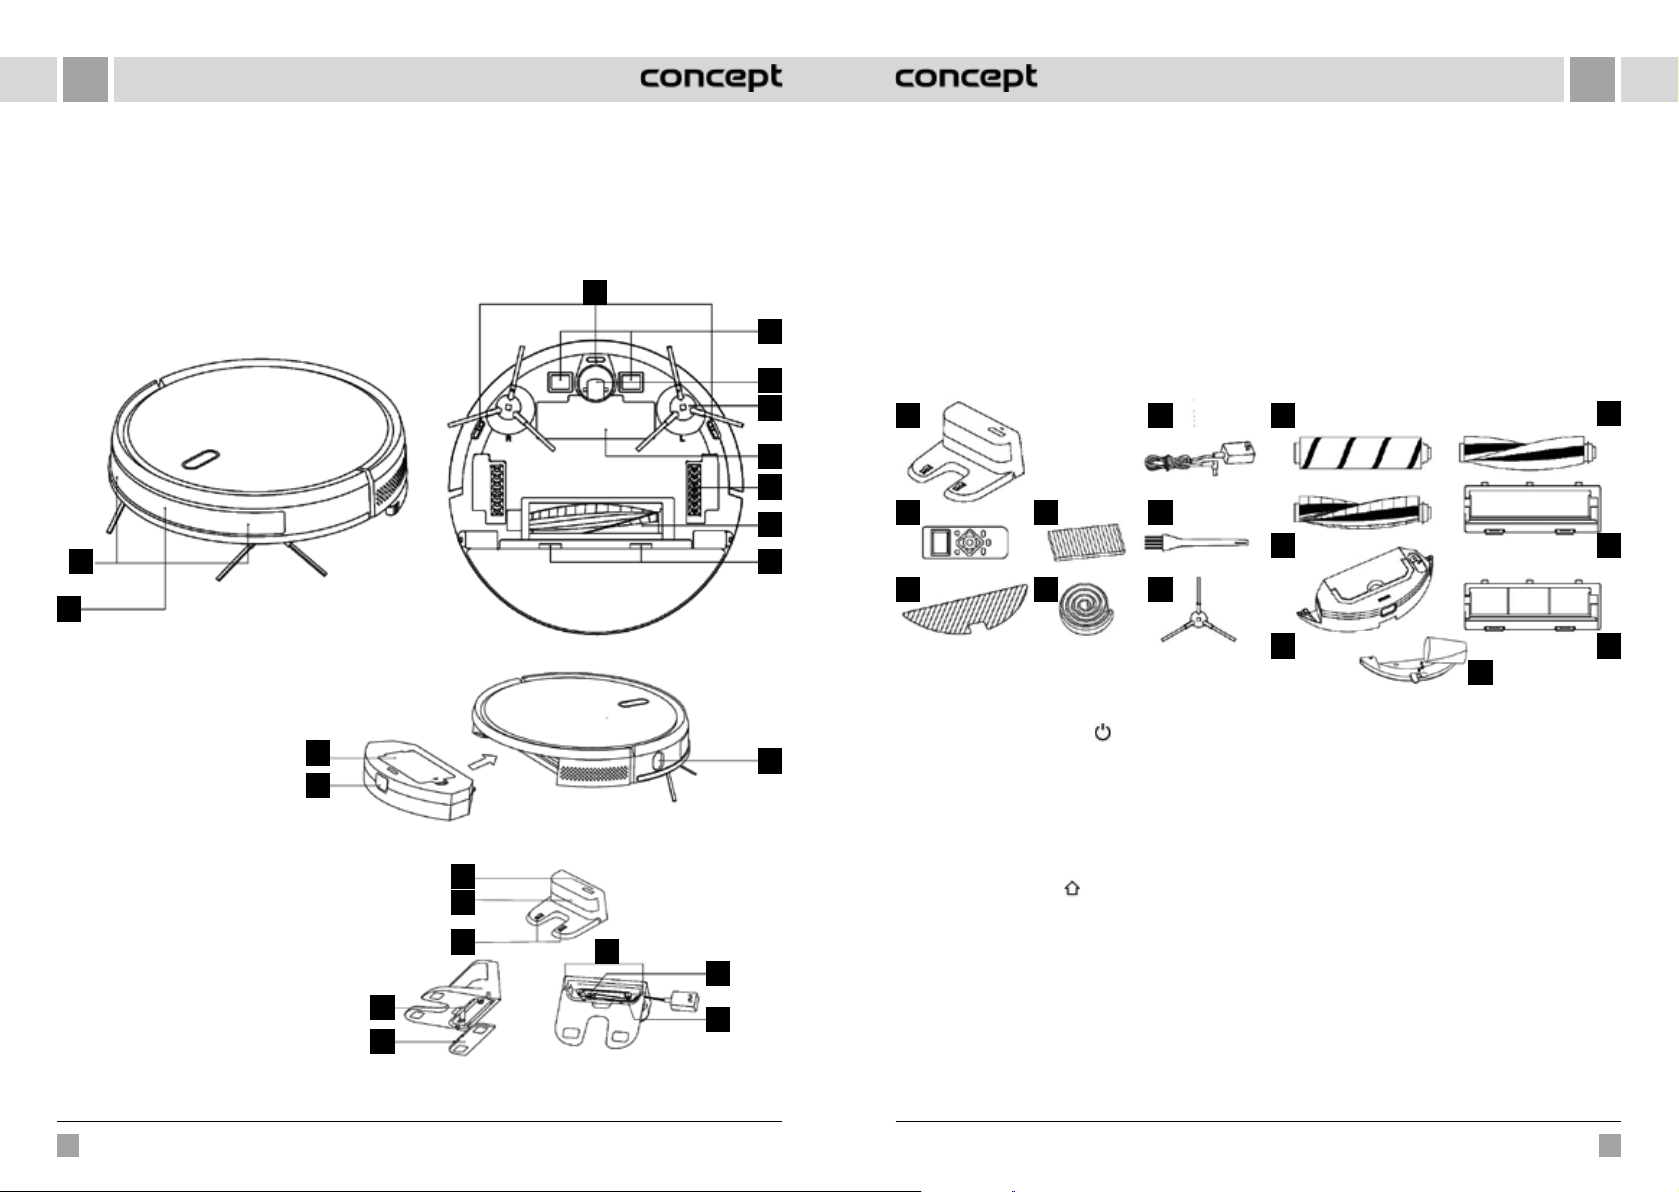
DEDE
PRODUKTBESCHREIBUNG
1 Antikollisionssensor
2 Infraroter Ladesensor
3 Sensor gegen den Sturz
4 Ladekontakt
5 Universalrad
1
2
1 Abdeckung des Filtersiebes
2 Taste des Staubbehälters
3 Wandsensor
Dockingstation
1 Kontrollleuchte des Aufladens
2 Signalsendungsbereich
3 Ladekontakte der Basis
4 Auffangrille
5 Abdeckplatte
6 Kabeldurchgang
7 Steckdose des Versorgungsadapters
8 Wickelstift
6 Seitenbürste
7 Abdeckung des Akkus
8 Antriebsrad
9 Hauptbürste
10 Klinke der Abdeckung der Hauptbürste
3
Komponentenliste
1 Ladestation 1x
2 Fernbedienung 1x
3 Gewebe zum Abwischen 2x
4 HEPA Filter + Schaumfilter 3x (bei VR2100 2x)
5 Magnetisches Band 1x
6 Adapter 1x
7 Reinigungsbürste 1x
8 Linke und rechte Bürste 2x
4
5
6
1
6
9 HARDFLOOR Bürste 1x (nur beim Modell VR2110)
HINWEIS! Darf nicht für Teppiche genutzt werden,
die Reinigung könnte unterbrochen werden.
10 CARPET Bürste 1x
11 Elektrisch gesteuerter Wasserbehälter 1x (nur beim
Modell VR2110)
12 PET Bürste 1x (nur beim Modell VR2110)
13 Abdeckung der Hauptbürste 1x (nur beim Modell
VR2110)
geeignet für HARDFLOOR und PET Bürste
14 Abdeckung der Hauptbürste mit Stahldraht 1x
(geeignet für CARPET Bürste)
15 Hängewasserbehälter 1x (nur beim Modell VR2100)
9
12
7
8
9
2
4
7
10
13
10
3
5
8
11
14
15
KERNFUNKTIONEN
Reinigung / Ein- und Ausschalten
1
3
2
1
2
3
6
7
4
8
5
• Durch kurzes Drücken wird die Reinigung gestartet
oder gestoppt.
• Durch langes Drücken über 3 s wird das Gerät ein-,
bzw. ausgeschaltet.
• Durch langes Drücken über 15 s erfolgt das NotAusschalten des Geräts unter außerordentlichen
Umständen.
Aufladen / lokale Reinigung
• Durch kurzes Drücken wird das Aufladen gestartet
oder gestoppt.
• Durch langes Drücken wird lokale Reinigung gestartet.
Kontrollleuchte
• Orange: Laufender Betrieb oder Aufladen.
• Rot: Außerordentlicher Zustand oder leerer Akku.
• Rot-Orange: Das Gerät ist nicht ans Netz angeschlossen.
WiFi Reset
• Drücken Sie beide Tasten gleichzeitig über 3 s.
INSTALLATION
1. Schließen Sie das Netzkabel an, und die
überflüssige Kabellänge lagern Sie im Kabelraum.
2. Stellen Sie die Dockingstation an die Wand und
schließen Sie die Versorgung an.
Anmerkung:
• Stellen Sie den Raum von min. 0,5 m auf beiden
Seiten der Dockingstation und min. 1,5 m vor der
Dockingstation sicher.
• Wenn das Netzkabel senkrecht zum Boden gespannt
ist, kann es dazu führen, dass es von dem Gerät
ausgezogen wird, infolge dessen die Dockingstation
abgeschaltet werden kann.
• In normalem Zustand leuchtet die Kontrollleuchte
beim Einschalten, und erlischt bei der Aufladung.
3. Verschieben Sie die Dockingstation nicht
willkürlich und setzen Sie diese keiner direkten
Sonneneinstrahlung aus.
Anmerkung: Direkte Sonneneinstrahlung stört das
Signal der Dockingstation, und deshalb kann es
passieren, dass das Gerät nicht ordnungsgemäß in die
Dockingstation zurückkommen kann.
92 93
VR2110, VR2100 VR2110, VR2100
Page 48
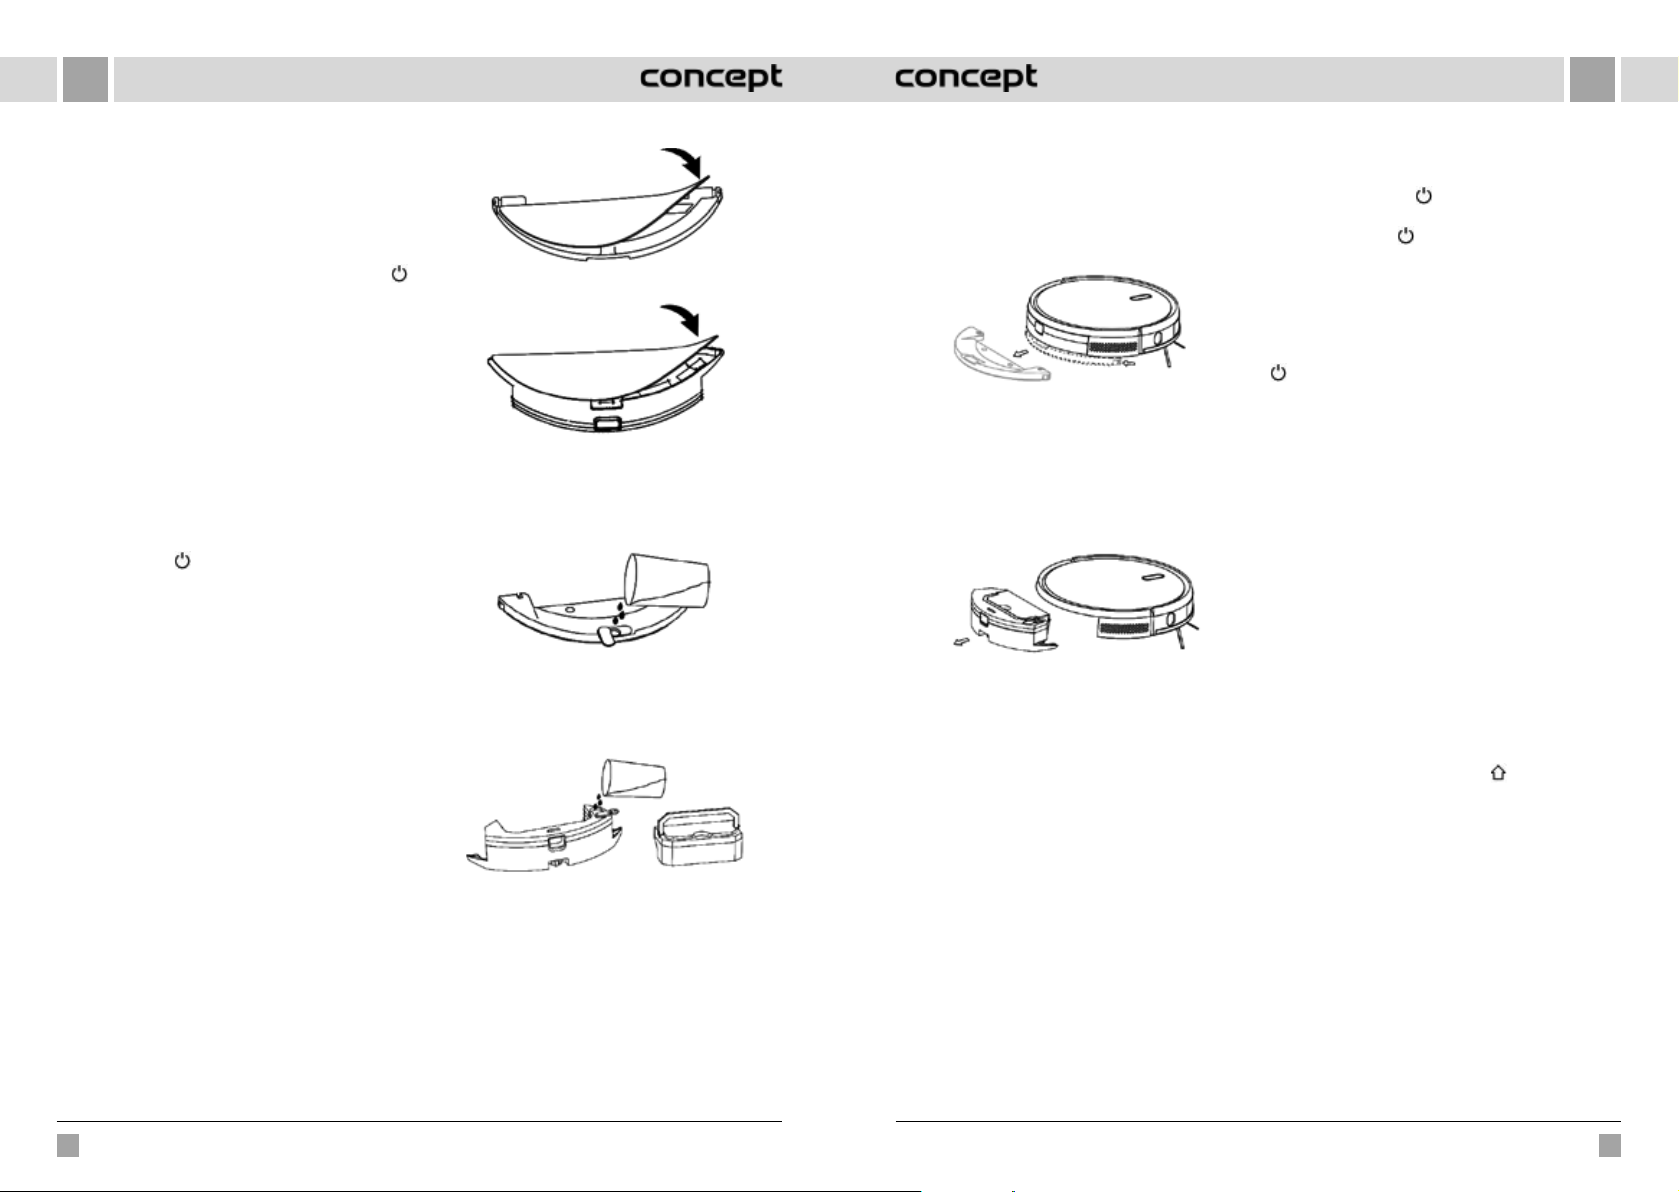
DEDE
4. Einbau der Seitenbürste
Überzeugen Sie sich, dass die Markierung der linken
Seitenbürste (L) und der rechten Seitenbürste (R) mit der
Markierung L und R am unteren Deckel übereinstimmt.
Drücken Sie auf die L und RSeitenbürsten, solange das
„Einrasten“ hörbar ist.
5. Inbetriebnahme und Aufladen
Der Roboter wird durch langes Drücken der Taste
eingeschaltet. Wenn die Kontrollleuchte des Aufladens
normal eingeschaltet ist, laden Sie den Roboter in der
Dockingstation auf.
Anmerkung: Wenn das Gerät aufgrund eines schwachen
Akkus nicht eingeschaltet werden kann, laden Sie es in der
Dockingstation auf, und das Gerät schaltet automatisch
ein. Das Gerät kann nur dann laufend arbeiten, wenn der
Zustand des Akkus ≥20 % ist.
6. Anschluss der Mobilapplikation (dieser Schritt
kann übersprungen werden)
Lesen Sie die Anweisungen für den WiFi-Anschluss
durch, und schließen Sie die Mobilapplikation an.
7. Einleitung der Reinigung
Nach dem Einschalten des Roboters drücken Sie
kurz die Taste
Reinigung mittels der Mobilapplikation ein (während
der Benutzung kann das Gerät durch Drücken einer
beliebigen Taste gestoppt werden).
Anmerkung:
• Zum Fegen bestimmter Roboter darf nicht zur
Entfernung von Flüssigkeiten genutzt werden.
• Wenn das Ladezustand des Akkus 20 % unterschreitet,
kann das Gerät nicht arbeiten. In diesem Fall ist es zu
laden.
• Wenn der Ladezustand des Akkus 20 % unterschreitet,
kehrt das Gerät automatisch in die Dockingstation
zurück.
• Entfernen Sie die verschiedenen Leiter (einschließlich
Netzkabels der Dockingstation) vor der Benutzung
vom Boden, um die Ausfälle und Beschädigungen der
Gegenstände oder Leiter für den Fall vorzubeugen,
dass diese Leiter vom Gerät aufgefangen werden.
8. Installation des Aufwischmoduls
a) Befestigung des Aufwischgewebes: kleben Sie
das Aufwischgewebe eben auf den Boden des
Wasserbehälters.
am Roboter oder leiten Sie die
Modell VR2100 - Hängewasserbehälter
Modell VR2110 - elektrisch gesteuerter Wasserbehälter
Anmerkung: Um das Aufwischgewebe in gutem Zustand
zu erhalten, ist dieses nach dem Einsatz zu reinigen.
b) Füllen Sie den Wasserbehälter: öffnen Sie den
Deckel und füllen Sie Wasser ein.
Modell VR2100 - Hängewasserbehälter
Vor dem Wassereinfüllen ist der Staubbehälter mit
dem Handgriff herauszunehmen (VR2110).
Modell VR2110 - elektrisch gesteuerter Wasserbehälter
c) Installation des Moduls:
Modell VR2100: Drücken Sie das Modul waagrecht
entlang des Hinterteils des Roboters. Das Modul ist
installiert, sobald das „Einrasten“ hörbar ist.
Modell VR2110: Legen Sie den Staubbehälter in den
Wasserbehälter hinein, und den Handgriff legen
Sie in die Spalte hinein. Anschließend drücken
und halten Sie die Taste in der Mitte des Behälters,
und stecken Sie diese entlang des Hinterteils des
Roboters ein. Das Modul ist installiert, sobald das
„Einrasten“ hörbar ist.
9. Herausnehmen des Aufwischmoduls
Modell VR2100: Sobald der Roboter mit seiner Arbeit
fertig ist, drücken Sie die Klinken auf beiden Seiten,
nehmen Sie den Aufwischmodul nach hinten heraus,
leeren Sie Wasser aus dem Wasserbehälter und
reinigen Sie das Gewebe (bewegen oder kippen Sie
den Roboter bei der Reinigung nicht um).
Modell VR2100 - Hängewasserbehälter
Modell VR2110: Sobald der Roboter mit seiner Arbeit
fertig ist, drücken Sie die Taste in der Mitte des
Wasserbehälters, nehmen Sie den Aufwischmodul
nach hinten heraus, leeren Sie Wasser aus dem
Wasserbehälter und reinigen Sie das Gewebe
(bewegen oder kippen Sie den Roboter bei der
Reinigung nicht um).
Modell VR2110 - elektrisch gesteuerter Wasserbehälter
10. Anweisungen zur Benutzung des Aufwischmoduls
• Benutzen Sie den Aufwischmodul nicht, wenn Sie
diesen nicht überwachen können.
• Überzeugen Sie sich sicherheitshalber, dass der
Aufwischmodul beim Aufladen oder wenn dieser nicht
• Versuchen Sie nicht Teppiche aufzuwischen.
• Um ein besseres Ergebnis des Aufwischens zu
erreichen, sollte der Aufwischmodul benutzt
werden, nachdem der Boden dreimal ausgefegt oder
staubgesaugt wurde.
• Wenn Sie möchten Wasser nachfüllen oder das
Gewebe reinigen, wenn das Gerät im Betrieb ist,
stellen sie dieses, nehmen Sie den Aufwischmodul
heraus und legen Sie diesen nach den Schritten 8 und
9 wieder hinein. Um Fehler bei der Positionsermittlung
und Kartenverlust zu vermeiden, sollte das Gerät nicht
verschoben oder umgekippt werden.
• Die Funktion des Aufwischens ist bei diesem Gerät
zum Wischen bestimmt, und sie unterstützt die
Tiefreinigung. Sie kann jedoch die fest angehafteten
Verschmutzungen wirksam entfernen und die
menschliche Kraft zu ersetzen.
BENUTZUNG
EIN-/AUSSCHALTEN
Drücken Sie die Taste 3 s lang, die Kontrollleuchte
erleuchtet und das Gerät wird eingeschaltet
rücken Sie die Taste 3 s lang, wenn sich das Gerät im
Standby Modus befindet, die Kontrollleuchte erlischt und
das Gerät wird ausgeschaltet.
ANMERKUNG: Das Gerät kann während des Ladens nicht
ausgeschaltet werden.
REINIGUNG/UNTERBRECHUNG
Nach dem Start des Geräts drücken Sie kurz die Taste
am Gerät, bzw. schalten Sie das Gerät mit der
Mobilapplikation ein (durch Drücken jeder beliebigen
Taste kann das Gerät gestoppt werden).
Anmerkung:
• Der Staubsauger-Roboter darf nicht zur Entfernung
von Flüssigkeiten genutzt werden.
• Wenn das Ladezustand des Akkus 20 % unterschreitet,
kann das Gerät nicht arbeiten. In diesem Fall ist es zu
laden.
• Wenn der Ladezustand des Akkus 20 % unterschreitet,
kehrt das Gerät automatisch in die Dockingstation
zurück.
• Entfernen Sie die verschiedenen Leiter (einschließlich
Netzkabels der Dockingstation) vor der Benutzung
vom Boden, um die Ausfälle und Beschädigungen der
Gegenstände oder Leiter für den Fall vorzubeugen,
dass diese Leiter vom Roboter aufgefangen werden.
AUFLADEN
Automatischer Modus: Nach der Arbeit kehrt das Gerät
automatisch in die Dockingstation zurück.
Manueller Modus: Im Standby-Modus wird das Aufladen
durch kurzes Drücken der Taste
Sie können das Gerät durch die Steuerung mittels der
Mobilapplikation aufladen. Sobald das Gerät aufgeladen
ist, beginnt die Kontrollleuchte zu blinken.
Anmerkung: Wenn das Gerät die Dockingstation nicht
findet, kehrt er automatisch in die Ausgangsposition
zurück. Legen Sie das Gerät in diesem Fall manuell in die
Dockingstation zurück.
MAGNETISCHES BAND
Magnetische Bänder können so eingestellt werden, um
die Bereiche zu trennen, die nicht zu reinigen sind (z.B.
Bäder, Küchen, usw.).
Hinweis: Befestigen Sie magnetisches Band zum Boden
so, damit es sich nicht verschieben kann. Anderenfalls
wird dadurch seine Wirksamkeit beeinflusst.
REINIGUNGSMODUS
Nach dem Einschalten bewegt sich das Gerät nach
dem Reinigungsprogramm in Kurven, um die gesamte
eingeleitet, oder
94 95
VR2110, VR2100 VR2110, VR2100
Page 49
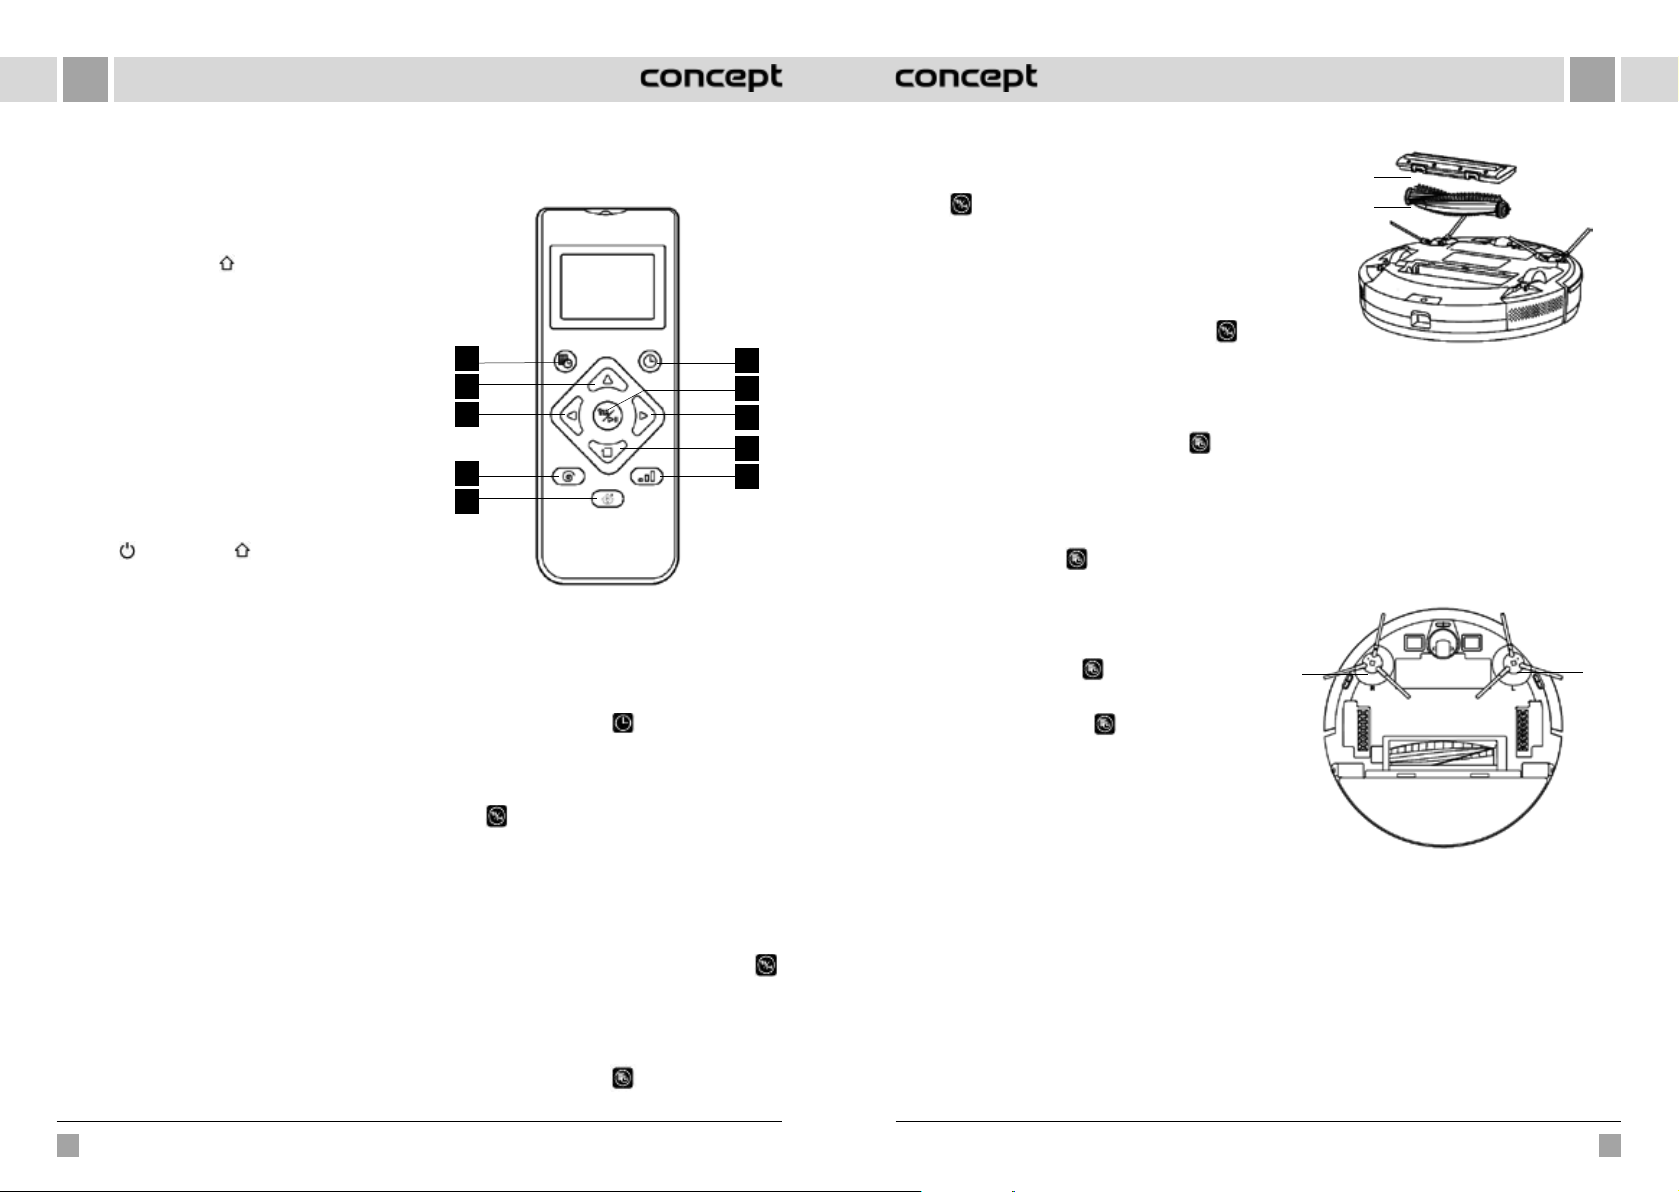
DEDE
Fußbodenfläche zu reinigen und die Reinigung von allen
Räumen nacheinander auf regelmäßiger, effizienter
Weise mit voller Abdeckung fertig zu stellen. Nach der
Fertigstellung der Reinigung kehrt das Gerät in die
Dockingstation zurück und wird automatisch aufgeladen.
LOKALE REINIGUNG
Durch Drücken der Taste
Roboter lokalisiert, er reinigt ein rundes Gebiet vom
Durchmesser 1,5 m, und nach der Fertigstellung der
Reinigung kehrt es automatisch in die Ausgangsposition
und hört automatisch auf zu arbeiten.
PLANUNG DER REINIGUNG
Die fix festgelegte Reinigungszeit kann mit der
Mobilapplikation eingestellt werden. Zum festgelegten
Zeitpunkt beginnt das Gerät automatisch zu reinigen,
und nach der Fertigstellung kehrt es in die Dockingstation
zurück.
WIFI RESET
Wenn sich das Mobiltelefon aufgrund einer Änderung
der Routerkonfiguration und des Passworts, bzw. aus
sonstigen Gründen nicht verbinden kann, drücken Sie
die Taste
die Anzeige „WiFi has been reset“ (WiFi Reset wurde
durchgeführt) ertönt, und die Kontrollleuchte blauviolett
erleuchtet und langsam zu blinken beginnt.
STILLER MODUS
Die gesprochenen Anzeigen des Roboters können mit der
Mobilapplikation ein- oder ausgeschaltet werden.
EINSTELLUNG DER SAUGLEISTUNG
Die Saugleistung kann mit der Mobilapplikation auf
leisen, Standard- oder hohen Grad eingestellt werden.
Bei der Identifizierung eines Teppichs wird die Saugkraft
automatisch auf den höchsten Grad erhöht. HINWEIS - der
Teppich wird nur mit der Carpet Bürste richtig identifiziert.
EINSTELLUNG DER WASSERDURCHFLUSSMENGE (nur
für den elektronisch gesteuerten Wasserbehälter des
Modells VR2110)
Die Wasserdurchflussmenge kann mit der
Mobilapplikation auf niedrigen, Standard- oder hohen
Grad eingestellt werden.
VERWENDUNG DER FERNBEDIENUNG
1. Planung der Reinigung
2. Fortbewegung
3. Umdrehung nach links
4. Lokale TURBO Reinigung
5. Einleitung/Unterbrechung des Aufladens
6. Automatische Reinigung/Pause
7. Reinigung/Pause
8. Umdrehung nach rechts
und die Taste gleichzeitig 3 s lang, bis
3 Sekunden lang wird der
9. Periphere Reinigung
10. Einstellung der Saugleistung / der
Wasserdurchflussmenge
1
2
3
6
7
8
9
4
10
5
Anmerkung: Zur Gewährleistung der Wirksamkeit aller
richtigen Einstellungen ist die Fernbedienung an den
Vorderteil des Staubsauger-Roboters zu richten, und dies
aus ausreichender Nähe.
Zeiteinstellung
1. Durch Drücken der Taste an der Fernbedienung
betreten Sie die Zeiteinstellung, das Symbol für
Sonntag blinkt auf dem LCD Display.
2. Durch Drücken der linken und der rechten Taste wird
der Tag in der Woche gewählt, und durch Drücken der
Taste wird er bestätigt, anschließend schaltet das
LCD Display automatisch in die Uhrzeiteinstellung um.
3. Durch Drücken der Tasten aufwärts und abwärts wird
die Stunde eingestellt, und durch Drücken der Tasten
nach links und nach rechts wird zur Minuteneinstellung
umgeschaltet.
4. Nachdem die aktuelle Zeit eingestellt wurde,
richten Sie die Fernbedienung an den Vorderteil des
Staubsauger-Roboters und drücken Sie die Taste ,
um alle Zeiteinstellungen zu bestätigen. Wenn Sie dies
nicht durchführen, sind Ihre Einstellungen ungültig.
5. Hiermit wird die Zeiteinstellung für die Fernbedienung,
sowie für den Staubsauger-Roboter abgeschlossen.
Reinigungsplan
1. Durch Drücken der Taste
betreten Sie die Funktion der Planeinstellung, das
an der Fernbedienung
Symbol für Sonntag blinkt auf dem LCD Display.
2. Durch Drücken der linken und der rechten Taste wird
der Tag in der Woche gewählt, und durch Drücken der
Taste
LCD Display automatisch in die Uhrzeiteinstellung um.
3. Durch Drücken der Tasten aufwärts und abwärts
wird die Stunde eingestellt, und durch Drücken
der Tasten nach links und nach rechts wird zur
Minuteneinstellung umgeschaltet. Anschließend
richten Sie die Fernbedienung an den Vorderteil des
Staubsauger-Roboters und drücken Sie die Taste ,
um diese Planeinstellung für den Staubsauger-Roboter
zu bestätigen.
4. Nach der Abschließung einer Planeinstellung geht
die Fernbedienung automatisch zur nächsten
Planeinstellung über. Wenn Sie die Einstellung nicht
fortsetzen wollen, drücken Sie die Taste zum
Abschluss oder warten Sie 10 s ab, bis die Einstellung
automatisch abgeschlossen wird.
5. Hiermit wird die Zeiteinstellung für die Fernbedienung,
sowie für den Staubsauger-Roboter abgeschlossen.
Aufhebung des Reinigungsplans
1. Drücken Sie die Taste
auf dem LCD Display blinkt das Symbol für Sonntag,
und es werden Symbole für die Tage in der Woche
angezeigt, die Sie eingeplant haben.
2. Wählen Sie durch Drücken der linken und der rechten
Taste den eingeplanten Tag in der Woche, und
durch Drücken der Taste 3 s lang wird dieser
Plan aufgehoben. Sie können auch einen anderen
eingeplanten Tag wählen, den Sie aufheben wollen,
oder drücken Sie die Taste für Abschluss, bzw.
warten Sie 10 s, bis die Einstellung automatisch
abgeschlossen wird.
wird er bestätigt, anschließend schaltet das
an der Fernbedienung,
ALLTÄGLICHE PFLEGE
Hauptbürste (ist regelmäßig zu reinigen)
1. Drehen Sie das Gerät um und drücken Sie die Klinke
am Deckel der Hauptbürste, um diese herausziehen
zu können.
2. Entfernen Sie Staub mit einer kleinen Bürste vom
Innenraum und vom Inneren der Hauptbürste, und
reinigen Sie die Hauptbürste.
3. Bauen Sie die Hauptbürste wieder zusammen, und
drücken Sie fest am Deckel, damit die Klinke an ihrer
Stelle einrastet.
Klinke
Hauptbürste
Seitenbürste (ist regelmäßig zu reinigen)
1. Drehen Sie das Gerät um und ziehen Sie die
Seitenbürste nach oben.
2. Entfernen Sie Haare und Verschmutzung und bauen
Sie die Seitenbürste wieder ein.
3. Überzeugen Sie sich, dass die linke Seitenbürste (L)
und die rechte Seitenbürste (R) mit den Symbolen
L und R am unteren Deckel übereinstimmen. Durch
Drücken auf die Seitenbürsten L und R werden diese
wieder eingebaut.
Anmerkung: Die Seitenbürsten sind jede 3 bis
6Monate zu ersetzen, um ihre Reinigungswirkung zu
gewährleisten.
R - rechte
Seitenbürste
Staubbehälter und Filtergitter (sind regelmäßig zu
reinigen)
1. Drücken Sie die Taste und ziehen Sie den
Staubbehälter nach hinten.
2. Öffnen Sie den Staubbehälter und reinigen Sie diesen.
Reinigung des Filtergitters (ist regelmäßig zu reinigen)
1. Nach einem langfristigen Einsatz sind das Filtergitter,
der Schaumfilte r und der HEPA Filter herauszu nehmen.
2. Reinigen Sie das herausgenommene Filtergitter.
Waschen sie den Schaumfilter und den HEPA Filter mit
Wasser ab.
3. Wischen Sie einzelne Teile ab und lassen Sie diese frei
abtrocknen.
L - linke
Seitenbürste
96 97
VR2110, VR2100 VR2110, VR2100
Page 50
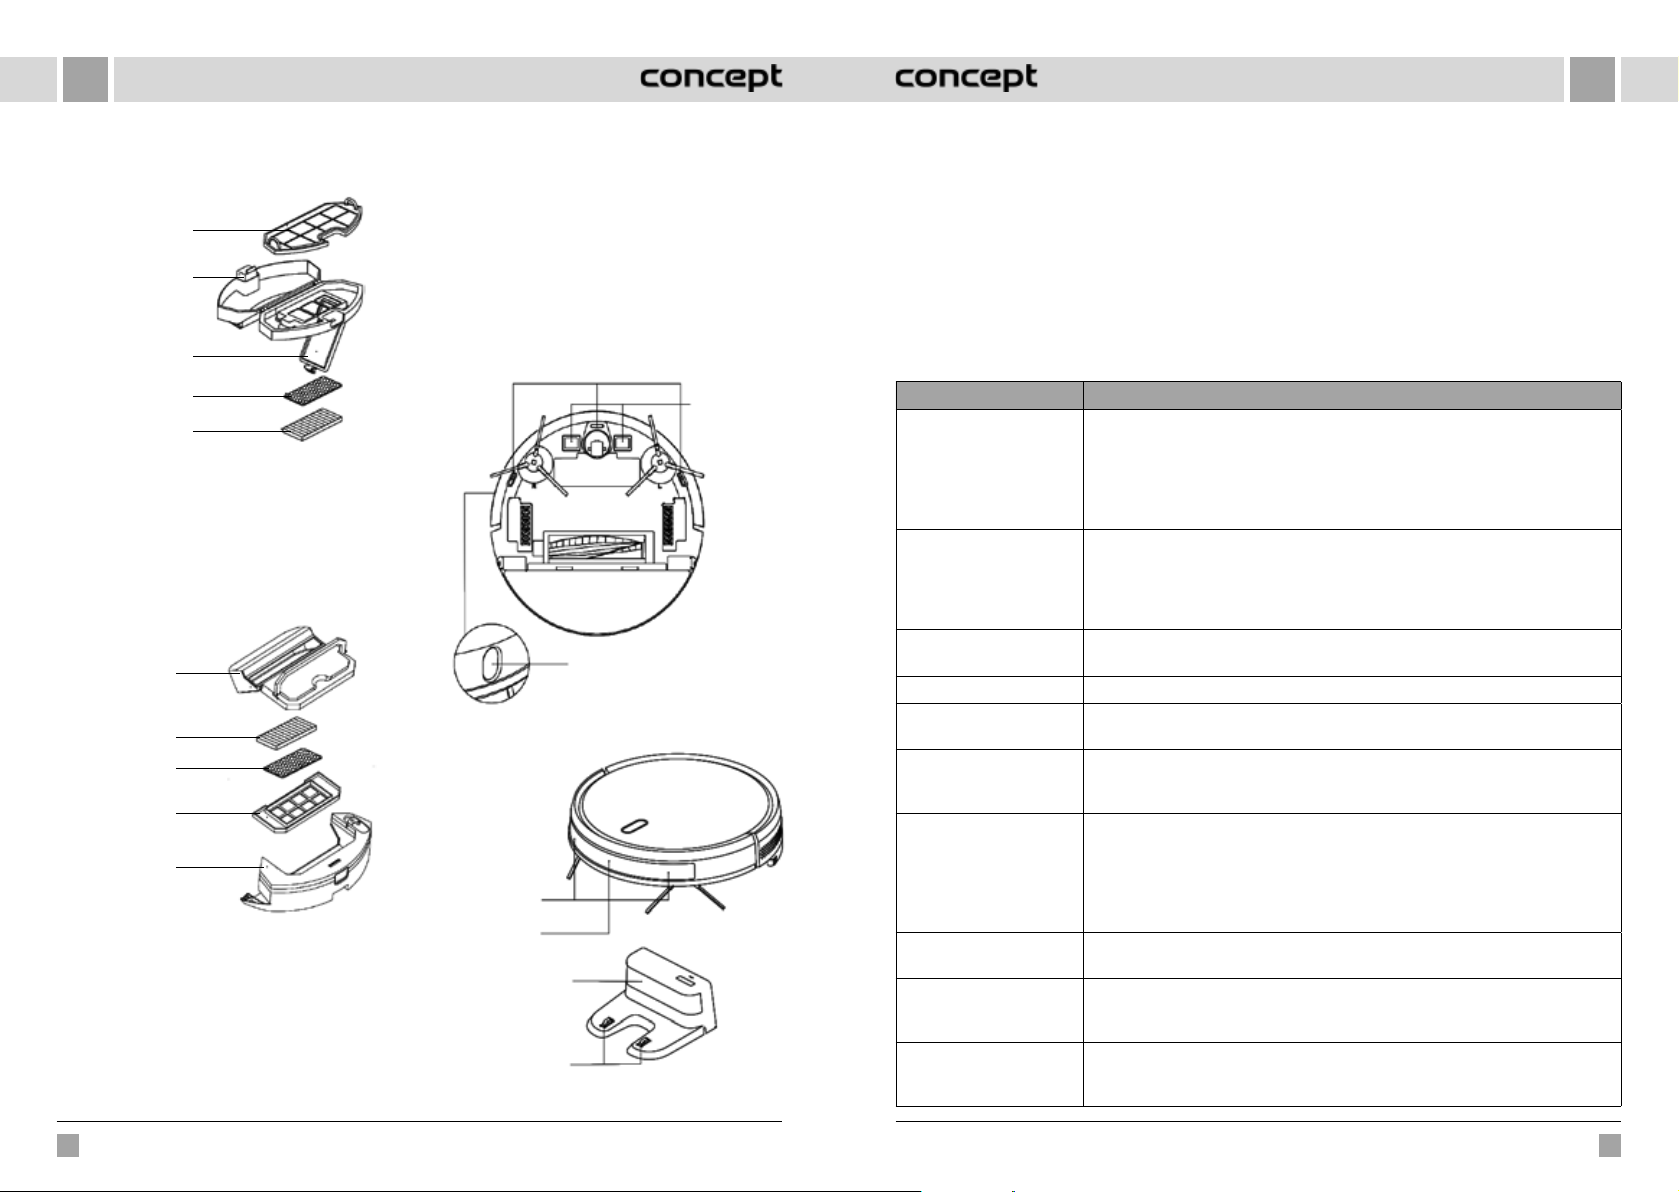
DEDE
4. Nach dem Abtrocknen bauen Sie diese in der richtigen
Reihenfolge Gitter - Schaumfilter - HEPA Filter
nacheinander wieder ein.
Filtergitter
(grober Filter)
Taste
Filterabdeckung
Schaumfilter
HEPA Filter
Anmerkung:
• Spülen Sie das Filtergitter mit Wasser ab, es wird kein
Reinigungsmittel beigemischt.
• Reinigen Sie das Filtergitter nicht mit Pinsel oder mit
den Fingern.
• Lassen Sie das Gitter mindestens über 24 Stunden an
der Luft austrocknen.
• Das Filtergitter ist jede 3 bis 6 Monate zu ersetzen.
Reinigung des Filters (ist regelmäßig zu reinigen)
Staubbehälter
HEPA Filter
Schaumfilter
Filtergitter
(grober Filter)
Wasserbehälter
Elektrisch gesteuerter Wasserbehälter
Aufwischmodul (ist nach jedem Einsatz zu reinigen)
1. Entfernen Sie das Gewebe und schütten Sie Wasser
aus dem Wasserbehälter aus.
2. Reinigen Sie das Gewebe und trocknen Sie den
Wasserbehälter, sowie das Gewebe aus. Beim Modell
VR2110 ist zuerst der Staubbehälter herauszunehmen,
und erst dann Wasser aus dem Wasserbehälter
auszuschütten.
Sensoren (sind regelmäßig zu reinigen)
Reinigen Sie die Sensoren mit einem weichen Gewebe,
wie folgt:
1. Reinigen Sie die Sensoren entlang der Wand rechts.
2. Drei Sensoren gegen den Sturz im unteren Teil des
Geräts.
3. Infraroter Antikollisionssensor im Vorderteil des Geräts.
4. Stromschlagschutz und Kontakte für die
Dockingstation im unteren Teil des Geräts (schalten Sie
das Gerät bei der Reinigung aus).
5. Signalübertragungsbereich der Dockingstation
Sensor gegen den Sturz
Ladekontakt
TOF Sensor
Sensoren (sind monatlich zu reinigen)
Antikollisionssensor
Infraroter
Ladesensor
Signalsendungsbereich
Ladekontakte der
Basis
Akku
• Das Gerät ist mit leistungsstarken Li-Ion-Akkus
ausgestattet. Wenn Sie die Leistung des Akkus erhalten
wollen, halten Sie das Gerät bei alltäglichem Einsatz
geladen.
• Wird das Gerät über einen längeren Zeitraum
nicht benutzt, schalten Sie es aus und lagern Sie
Aktualisierung der Firmware
Aktualisieren Sie die Firmware mit der Mobilapplikation.
Wenn eine neue Firmware festgestellt wird, führen Sie
die Aktualisierung nach der Aufforderung durch. Bei der
Aktualisierung der Firmware sollte der Mindestzustand
des Akkus von ≥50 % betragen, deshalb sollte das Gerät
in die Dockingstation untergebracht werden.
es ordnungsgemäß. Laden Sie es mindestens alle
3Monate auf, um die Beschädigung der Akkus durch
übermäßige Entladung vorzubeugen.
ÜBLICHE PROBLEME
Problem Lösung
Der Roboter kann nicht
gestartet werden
Der Roboter kann nicht
aufgeladen werden.
Der Roboter kann nicht
nachgeladen werden.
Außerordentliches Verhalten Schalten Sie den Roboter aus und starten Sie diesen neu.
Beim Einsatz ist ein
unübliches Geräusch hörbar
Die Reinigungsfähigkeit
vermindert sich, bzw. Staub
fällt aus dem Gerät aus
WiFi kann nicht
angeschlossen werden
Geplante Reinigung wurde
nicht durchgeführt.
Verbraucht der Roboter
Strom, wenn er jeweils in die
Dockingstation gestellt wird?
Ist er Roboter zum ersten Mal
dreimal über 16 Stunden zu
laden?
• Stellen Sie den Roboter beim niedrigen Zustand des Akkus in die Dockingstation und
richten Sie die Platten nach den Kontakten aus, das Gerät schaltet automatisch ein (wenn
der Roboter ganz ausgeschaltet ist, kann er nach einer Weile des Aufladens automatisch
gestartet werden).
• Benutzen Sie das Gerät nicht, wenn die Umgebungstemperatur 0 °C unterschreitet oder
50 °C überschreitet. Benutzen Sie diesen nur im Temperaturbereich von 0-40 °C.
• Verschieben Sie den Roboter außerhalb der Station, überprüfen Sie, ob die Kontrollleuchte
der Dockingstation erleuchtet, und überprüfen Sie, ob beide Enden des Speiseadapters
der Dockingstation richtig angeschlossen sind.
• Bei einem schlechten Kontakt sind die Kontaktflächen der Dockingstation und die
Ladekontakte am Roboter zu reinigen, oder drehen Sie die Seitenbürste zur Seite um.
Der Roboter befindet sich zu weit weg von der Dockingstation, legen sie diesen in die Nähe
der Dockingstation und versuchen Sie es erneut.
Die Hauptbürste, die Seitenbürste oder die Rolle können mit Fremdkörpern umwickelt sein,
schalten Sie den Roboter aus und entfernen Sie die Fremdkörper.
• Der Staubbehälter ist voll. Reinigen Sie diesen.
• Das Filtergitter ist verstopft. Es ist zu reinigen oder zu ersetzen.
• Die Hauptbürste ist durch Fremdkörper umwickelt, reinigen Sie diese.
• Mangelhaftes WiFi-Signal. Überprüfen Sie, ob es richtige WiFi-Signalabdeckung gibt.
• Unüblicher WiFi-Anschluss. Starten Sie WiFi neu, laden Sie die neueste Applikation
herunter und versuchen Sie, sich erneut anzuschließen.
• Falsch eingegebenes Passwort.
• Ein Router für 5G Frequenzbereich steht zu Verfügung, während der Staubsauger-
Roboter nur für 2,4G ausgestattet ist.
Beim niedrigen Ladezustand des Akkus kann die geplante Reinigung nur dann eingeleitet
werden, wenn der Ladezustand des Akkus mindestens 30 % beträgt.
Der Roboter verbraucht eine geringfügige Strommenge, wenn er sich dauerhaft in der
Dockingstation befindet, dies ermöglicht die beste Leistung des Akkus.
Der Lithium-Akkumulator kann sofort nach dem Aufladen benutzt werden, er weist keinen
Gedächtniseffekt auf.
98 99
VR2110, VR2100 VR2110, VR2100
Page 51
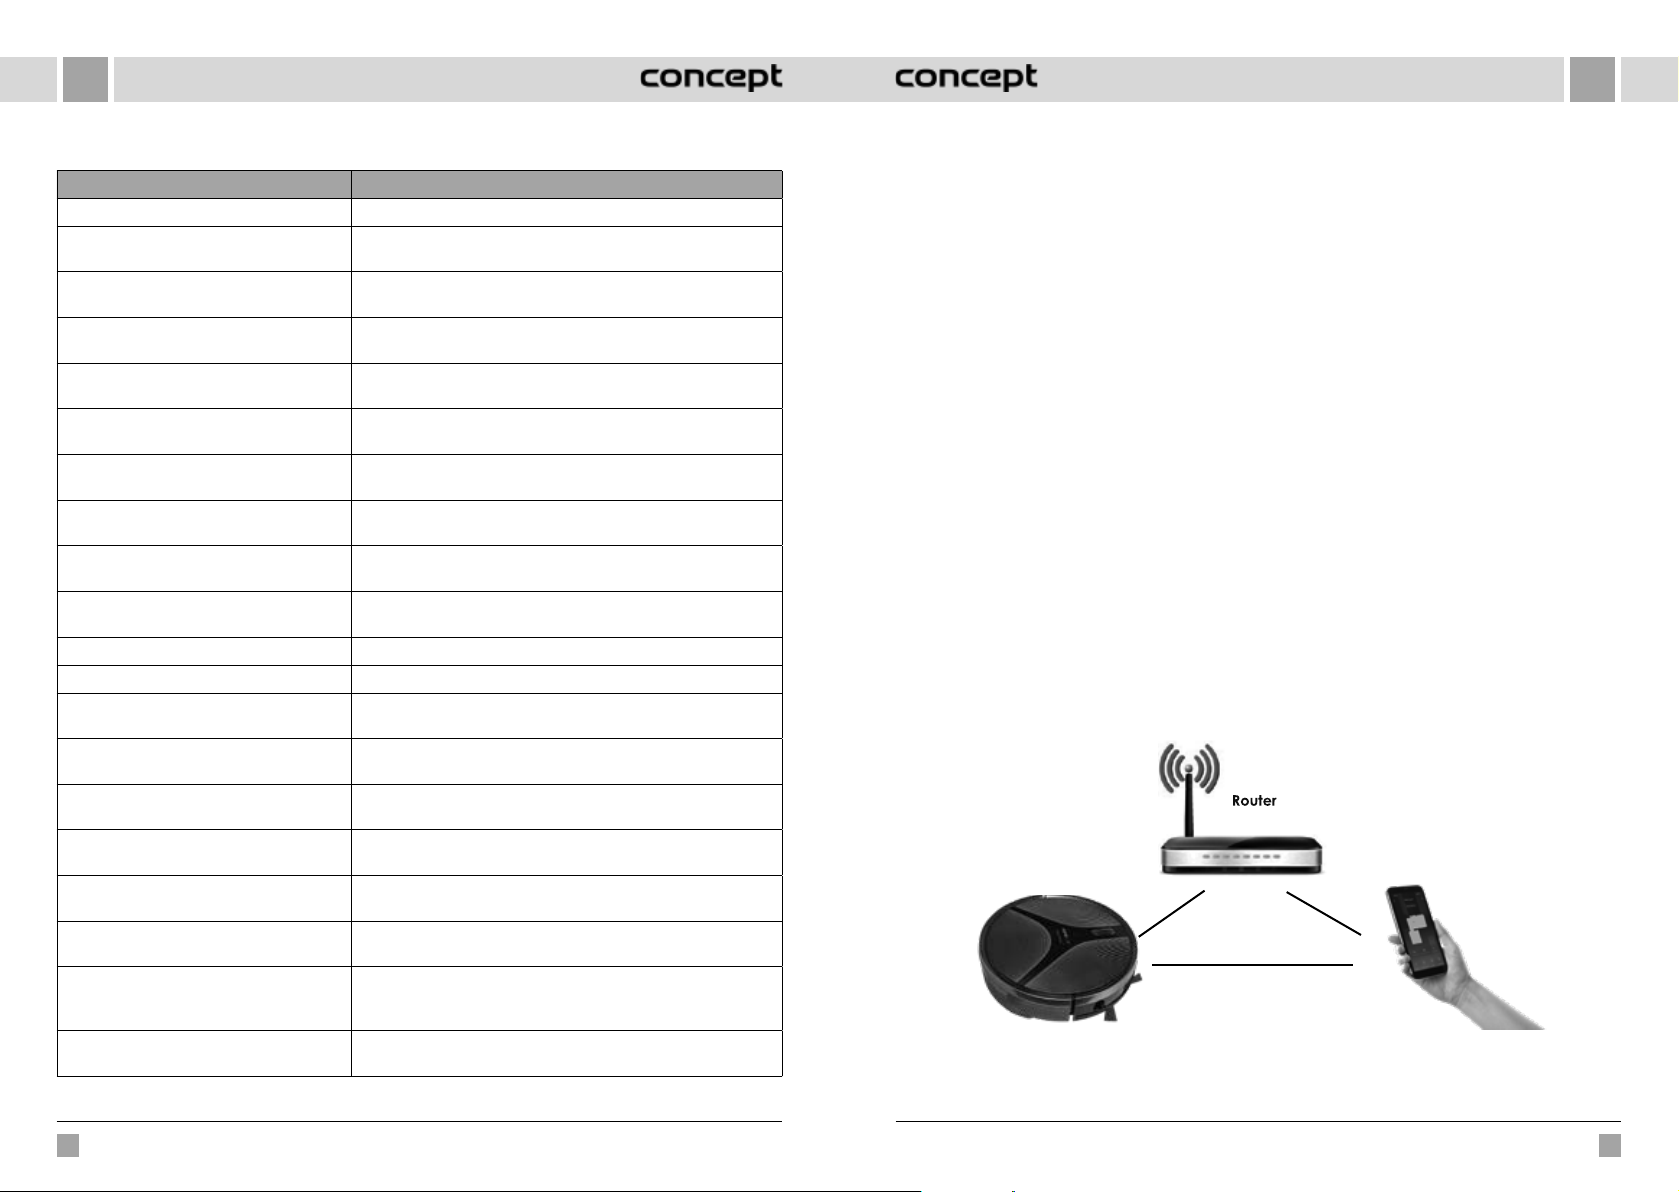
DEDE
PROBLEMLÖSUNG
Tonmeldung Lösung
Error 1: Oh dear! I cannot find the dust collector Nach Herausnehmen des Staubbehälters wurde die Reinigung gestartet.
Error 2: Please check if the radar on top has been
covered or blocked
Error 3: Please place me in a new location and
try again
Error 4: Please scrub the cliff sensor, and restart
me from a new location
Error 5: Please scrub the front sensor, and restart
me from a new location
Error 6: Please scrub the right-hand sensor, and
restart me from a new location
Error 7: Please scrub the radar housing on top,
and restart me from a new location
Error 8: Please check if the bumper has been
blocked in some way
Error 9: Master, please clean the dust container
and filter
Error 10: Dust container has been removed,
please clean the container and filter
Error 11: I'm stuck, please help me! Der Roboter ist irgendwo stehen geblieben.
Error 12: Please place me correctly! Der Roboter steht schief.
Error 13: Please check if my wheels have become
blocked somewhere
Error 14: Please check if the main brush has
become stuck
Error 15: Please check if the side brushes have
become stuck
Error 16: What's going on? Where is the docking
station?
Error 17: Oh dear! Program error, please restart
me
Error 18: Error encountered initiating shutdown Der Roboter weist den Benutzer hin und schaltet automatisch aus, bzw.
Error 19: Low battery, please recharge Wenn der Ladezustand des Akkus zu niedrig ist, der Roboter sich nicht
Error 20: To shut me down, please place me away
from the docking station
Der obere Sensor ist abgedeckt oder befindet sich im offenen Raum (im
Bereich von 6x6 m
Nehmen Sie den Roboter auf, bzw. heben Sie diesen in die Luft.
Der Sensor gegen den Sturz ist abgedeckt oder befindet sich in Höhe.
Der infrarote Antikollisionssensor ist verschmutzt oder abgedeckt.
Der Wandsensor ist verschmutzt oder abgedeckt.
Der Radar-Antikollisionssensor ist verschmutzt oder abgedeckt.
Der Kantensensor oder der Antikollisionssensor ist verklemmt.
Der Staubbehälter ist voll, bzw. das Filtergitter ist zu ersetzen.
Nach der Signalisierung der Störung 9 hat der Benutzer den Staubbehälter
herausgenommen, und dadurch wird die Störung 10 ausgelöst.
Das Antriebsrad ist verklemmt oder verwickelt.
Die Hauptbürste ist verwickelt oder verklemmt.
Die Seitenbürste ist verwickelt oder verklemmt.
Die Dockingstation wurde nicht gefunden, bzw. ist nicht angeschlossen.
Außerordentlicher Zustand durch unbekanntes Fehlschlagen, starten Sie
den Roboter neu.
ladet nach.
in der Dockingstation befindet und die Reinigung wird ausgelöst (der
Ladezustand des Akkus unterschreitet 10 %).
Beim Laden in der Dockingstation wurde der Roboter ausgeschaltet.
2
befindet sich kein Hindernis).
DRAHTLOSE VERBINDUNG UND KOMPATIBILITÄT
• Die Gesellschaft Jindřich Valenta - CONCEPT kann keinesfalls für eventuelle zufällige, indirekte oder Folgeschäden,
für Datenverluste oder Verluste durch Informationsleck bei der Kommunikation mittels der drahtlosen Technologien
verantwortlich sein.
• Erfolgreiche drahtlose Kommunikation kann nicht 100%ig bei allen Smart Einrichtungen und WiFi Netzen
(Routern) gewährleistet werden. In Anbetracht der Vielfalt der Einrichtungen auf dem Markt können solche Fälle
entstehen, wann der Anschluss aufgrund des Charakters oder der Spezifikation der jeweiligen Smart Einrichtung
oder des WiFi Netzes (Routers) nicht möglich ist, beziehungsweise irgendwie gestört wird. Der Erfolg der drahtlosen
Kommunikation mittels des WiFi Netzes wird ferner über eine Reihe von Faktoren einschließlich Hardware- und
Softwarekonfiguration beeinflusst. Die Verbindung zwischen dem Roboter und Ihrem WiFi Netz kann auch durch
andere WiFi Netze in der Umgebung negativ beeinflusst werden, die auf den gleichen Kanal eingestellt sind und
dadurch die Verbindung stören (z.B. In den Wohnsiedlungen, in Wohnungshäusern, usw.). Diese Ereignisse stellen
keinen Grund für die Beanstandung des Geräts dar.
• Die Applikation wird vom dritten Subjekt (nachfolgend nur „Subjekt“) besessen und betrieben, das sich von der Gesellschaft
Jindřich Valenta - CONCEPT (nachfolgend nur „Verkäufer") unterscheidet. Es werden keine personenbezogenen Daten
seitens des Verkäufers an das Subjekt übermittelt. Bei der Eintragung in die Applikation übermittelt der Kunde
seine personenbezogenen Daten direkt an das Subjekt, das zum Verwalter der personenbezogenen Daten wird. Die
Applikation und der damit verbundene Datenschutz richten sich nach den Regeln des Subjekts.
Kompatibilität:
Betriebssystem der Smart Einrichtung - Android 5.0 und höher
- IOS 9.0 und höher
WiFi Netz - 2,4 GHz
- Absicherung WPA1 und WPA2 (empfohlen WPA2)
HINWEIS: Das Gerät kann nicht an den WiFi Netzen betrieben werden, die mit dem Protokoll IEEE 802.1X abgesichert sind
(in der Regel Firmen-WiFi-Netze).
BEDIENUNG MIT HILFE DER APP
Bevor das Gerät über die App bedient werden kann, ist dieses mit Ihrem Telefon zu verknüpfen und ihm den Zutritt zu
Ihrem WiFi-Netz zu ermöglichen.
Empfohlener Abstand bei der Einstellung: weniger als 4 Meter
Überzeugen Sie sich, dass sich der Staubsauger-Roboter, der Router und Ihr Mobiltelefon in der gegenseitigen Nähe so
befinden, dass das problemlose Paaren erfolgen kann.
100 101
VR2110, VR2100 VR2110, VR2100
Page 52
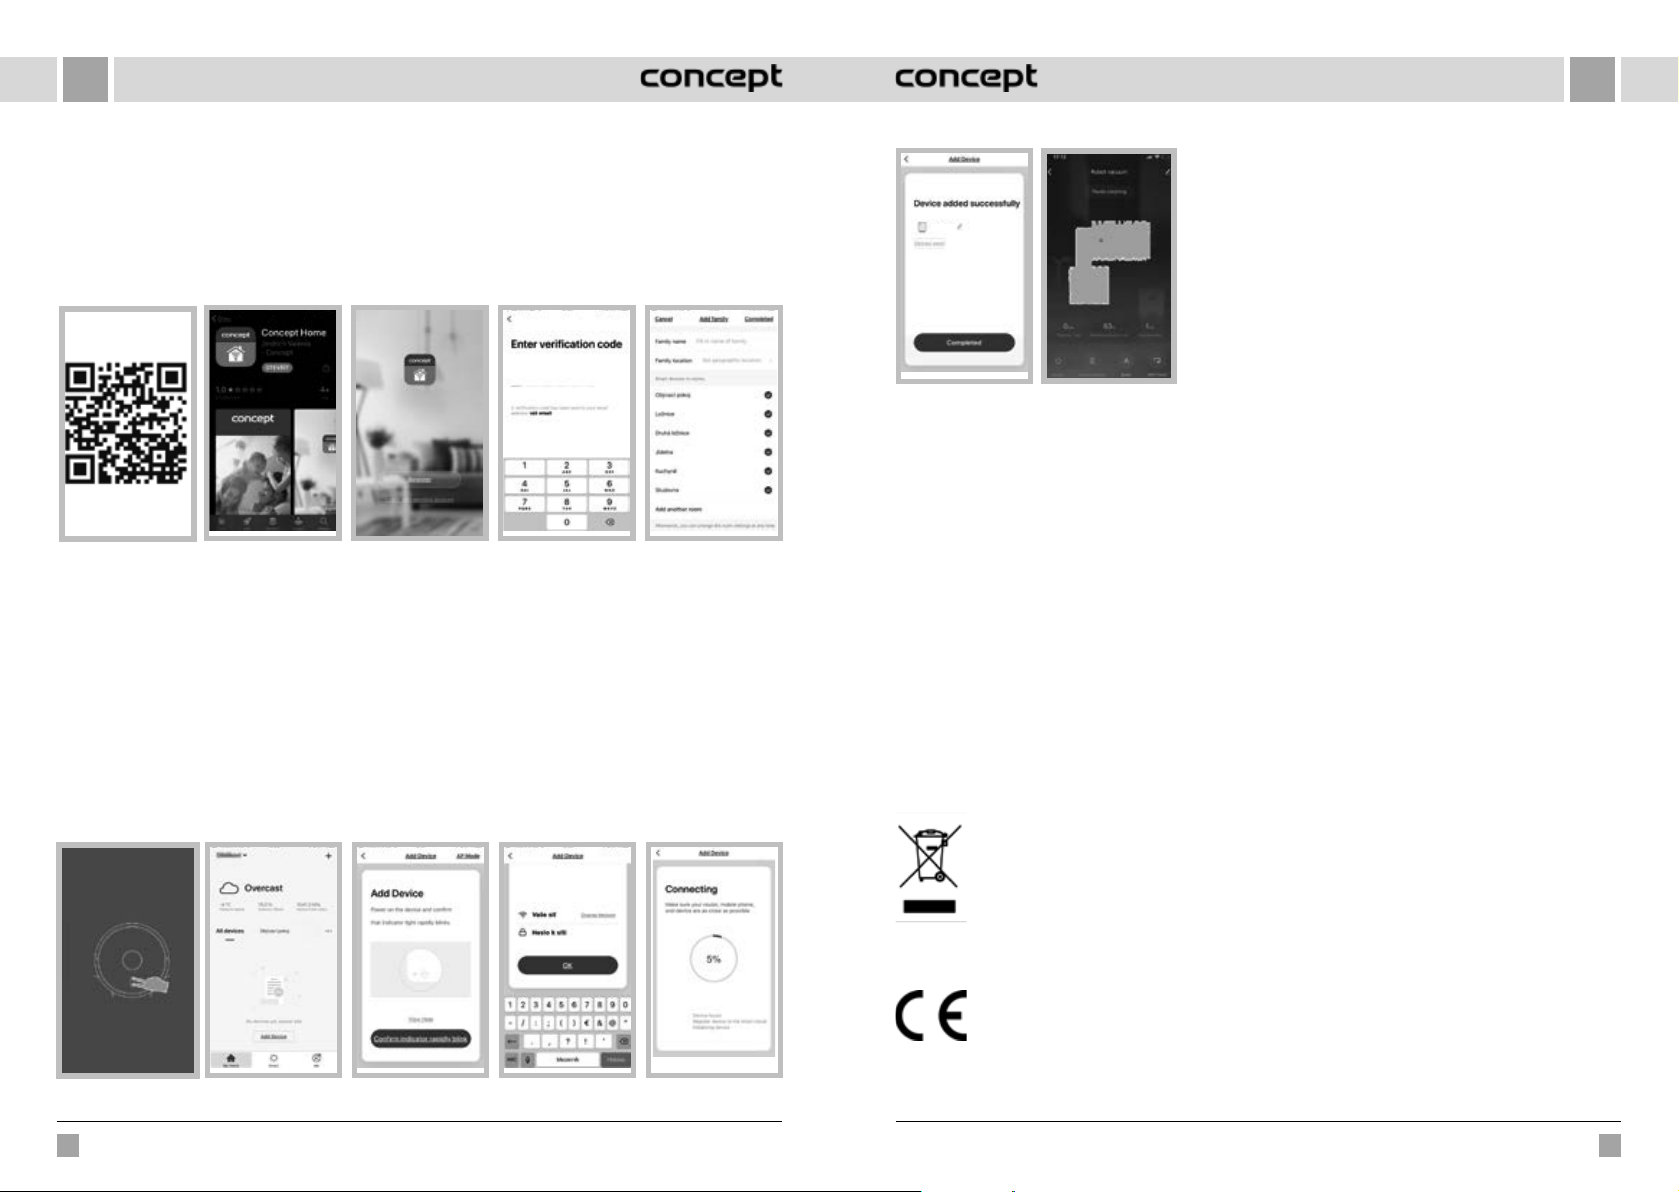
DEDE
Herunterladen und Installation der App
1. Scannen Sie den QR-Code unten (Abb. 1) oder suchen Sie die App „Concept Home“ auf Google Play oder App Store
und laden Sie sie in das Mobiltelefon (Abb. 2) herunter.
2. Wenn Sie schon über Concept Home verfügen, öffnen Sie die App, melden Sie sich an und verfolgen Sie die
Anweisungen zum Paaren.
3. Wenn Sie ein neuer Benutzer sind, beginnen Sie mit der Registrierung (Abb. 3). Setzen Sie nach den Anweisungen bis
zur Eingabe des Überprüfungscodes fort und stellen Sie die Registrierung fertig (Abb. 4).
4. Setzen Sie nach den Anweisungen weiter fort und bilden Sie eine Familie (Abb. 5).
Abb. 1
Anweisungen zum Paaren des Geräts
1. Zu Beginn des Paarens ist es nötig, dass Sie an Ihr WiFi-Netz angeschlossen sind.
2. Überzeugen Sie sich vor dem Anschlussbeginn, dass sich das Gerät in Standby-Modus befindet. Drücken Sie beide
Tasten (Abb. 6) gleichzeitig mindestens 3 Sekunden lang, bis der Roboter zu blinken beginnt und die Anzeige „WiFi
lost, please follow the App instruction for reconnection“ ertönt. Überprüfen Sie, ob das Telefon an gleiches WiFi Netz
angeschlossen ist, an welches sie den Roboter anschließen möchten.
3. Drücken Sie dann P + oder „Add device“ in der App (Abb. 7), um ein neues Gerät hinzuzufügen.
4. Bestätigen Sie es mit „Confirm indicator rapidly blink“ (Abb. 8).
5. Wählen Sie Ihr WiFi-Netz, an welches das Gerät anzuschließen ist, und geben Sie ihr Passwort ein (Abb. 9).
6. Dann beginnt der Einstellprozess, das über eine bestimmte Zeit dauern kann (Abb. 10).
7. Ihr Telefon versucht, sich mit dem Gerät zu verbinden, und es schließt dieses an Ihr WiFi-Netz an.
8. Nach erfolgreicher Einstellung (Abb. 11) drücken Sie „Completed“ , und Sie geraten in der Schnittstelle zur Bedienung
des Geräts (Abb. 12).
Abb. 2 Abb. 3 Abb. 5Abb. 4
Hinweis bei Problemen mit Paaren
• Prüfen Sie die Richtigkeit des eingegebenen Passworts
Ihres WiFi-Netzes.
• Das Gerät unterstützt nur die 2,4 Ghz WiFi-Netze.
Concept
Abb. 11
App-Modi
Sie können zwischen den Reinigungsmodi AUTO (Automatisch/ZIGZAG), Lokal (Kreisförmig), Umfang (EDGE) und DOCK
(Aussuchen der Dockingstation) wählen.
Abb. 12
• Der Router ist mit Anschlüssen von vielen anderen
Geräten überlastet.
• Während des Versuchs um Verbindung mit dem Gerät
(Abb. 10) versuchen Sie sich manuell an sein WiFi-Netz
anzuschließen.
SERVICE
Eine umfangreichere Wartung oder Reparatur, die einen Eingriff in die Innenteile des Geräts erfordert, ist durch einen
qualifizierten Fachmann oder Werkstatt durchzuführen.
UMWELTSCHUTZ
• Bevorzugen Sie das Recyceln von Verpackungen und Altgeräten.
• Der Gerätekarton kann als sortiertes Altmaterial entsorgt werden.
• Die Polyäthylen-Beutel (PE) geben Sie zum Recyceln des Sammelmaterials ab.
Recycling des Gerätes am Ende seiner Lebensdauer:
Dieses Gerät ist im Einklang mit der Europäischen Richtlinie 2012/19/EU über Elektro- und ElektronikAltgeräte (WEEE) gekennzeichnet. Das Symbol am Produkt oder an dessen Verpackung gibt an,
dass dieses Produkt nicht in den Haushaltsabfall gehört. Es ist auf eine Sammelstelle zum Recyceln
der elektrischen und elektronischen Anlagen zu bringen. Durch die Sicherstellung der korrekten
Entsorgung dieses Produktes helfen Sie, negative Konsequenzen für die Umwelt und die Gesundheit
der Menschen zu verhindern, die durch die unsachgemäße Entsorgung dieses Produktes verursacht
würden. Die Entsorgung muss im Einklang mit den Vorschriften für die Abfallbehandlung durchgeführt
werden. Ausführlichere Informationen zum Recycling dieses Produkts erhalten Sie bei der zuständigen
örtlichen Behörde, dem Dienstleister für Entsorgung von Haushaltsabfall oder in dem Geschäft, wo Sie
das Produkt gekauft haben.
Dieses Produkt erfüllt sämtliche Grundanforderungen der EU-Richtlinien, die sich darauf beziehen.
Abb. 6 Abb. 7 Abb. 8 Abb. 9 Abb. 10
102 103
VR2110, VR2100 VR2110, VR2100
Die Änderungen im Text, im Design und in den technischen Spezifizierungen können ohne vorherigen Hinweis geändert
werden, und wir behalten uns das Recht auf deren Änderungen vor.
Page 53
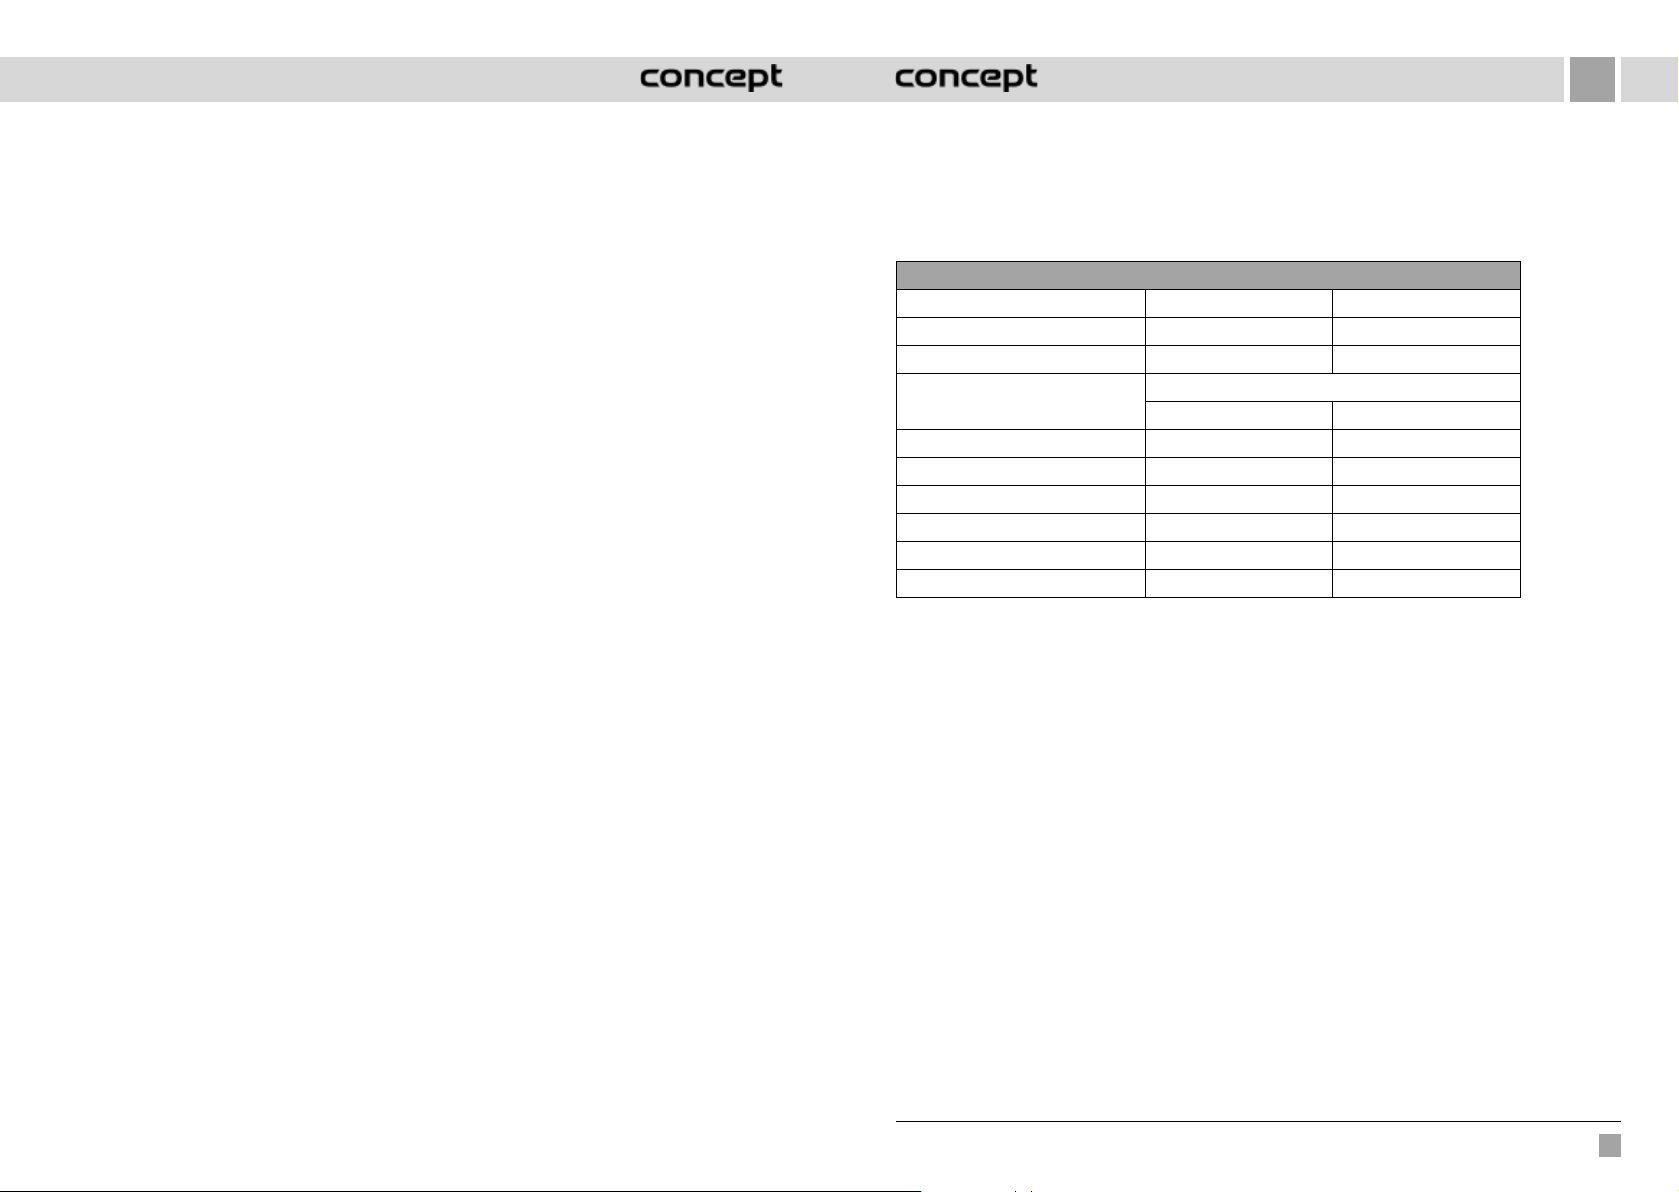
FR
MERCI
Nous vous remercions d’avoir acheté le produit de la marque Concept et nous espérons qu’il vous apportera votre
entière satisfaction pendant son utilisation.
Lire attentivement le manuel d’emploi avant la première utilisation et le conserver. Faire prendre connaissance du
manuel d’emploi par les autres personnes pouvant manipuler le produit.
Caractéristiques techniques
VR2110 VR2100
Puissance 25 W 25 W
Tension accumulateur 14,8 V 14,4 V
Tension de l´adaptateur de recharge
Niveau sonore 55-65 dB 55-65 dB
Piles 3200 mAh, Li-Ion 2600 mAh, Li-Ion
Temps de travail continu 180 minutes 150 minutes
Durée de chargement complet 5 heures 4-5 heures
Gamme de fréquence 2,4-2,4835 GHz 2,4-2,4835 GHz
Puissance d'émission (max) 18 dBm 18 dBm
IMPORTANT
Avant de brancher l’appareil, vérifier en effectuant un contrôle visuel, si l’unité ne présente pas de signes
d’endommagement et n’a pas subi d’endommagement pendant le transport.
AC 220-240 V - 50/60 Hz
DC 24 V DC 24 V
PRÉCAUTIONS PARTICULIÈRES DE SÉCURITÉ
• Ne jamais utiliser l’appareil autrement que prévu dans le manuel d’emploi.
• Enlever tous les emballages et autres éléments de marketing avant la première utilisation.
• Avant toute utilisation de l’appareil, enlever tous les objets du sol qui pourrait gêner lors
du nettoyage (câbles, papiers, vêtements, nappes et rideaux jusqu’au sol).
• Si dans la zone de nettoyage se trouve un escalier, placez une bande magnétique (un mur
virtuel) à une distance minimale de 15 cm du bord de la première marche. Cette distance
doit assurer la protection la plus élevée possible contre les chutes depuis les escaliers.
• Utiliser uniquement des accessoires et des pièces de rechange d’origine destinés à ce modèle.
• Ne pas s’assoir sur l’aspirateur et ne pas placer d’autres objets dessus.
• L’appareil ne doit être utilisé que pour un usage domestique et à une température comprise
entre 0 °C et 40 °C.
• Avant toute utilisation, s’assurer que le bac à poussière et le tissu de nettoyage sont
correctement installés.
• Attention à ne pas garder les cheveux, les vêtements, les doigts ou toute autre partie
VR2110, VR2100
105
Page 54
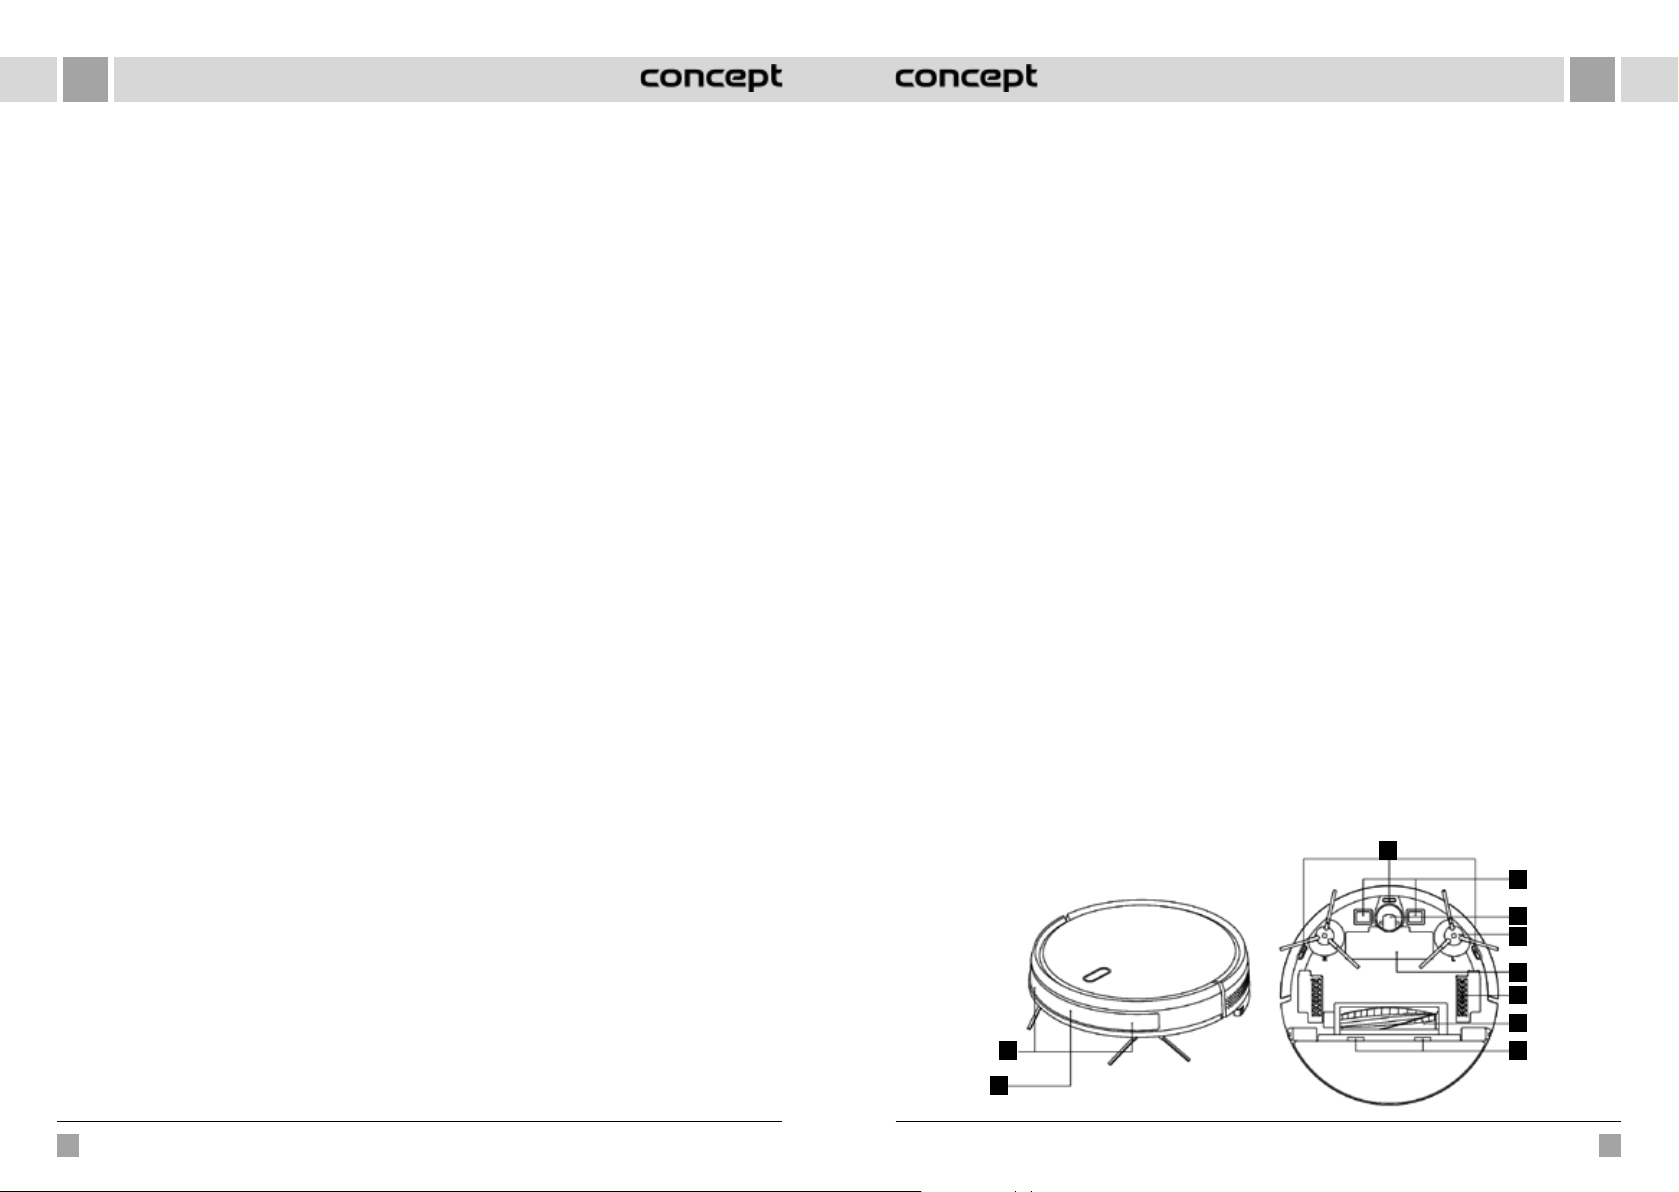
FRFR
du corps à proximité de la brosse principale. Maintenir la brosse principale et la partie
aspirante de l’aspirateur propres, supprimer les cheveux et la poussière qui peut réduire
les performances de l’aspirateur et la qualité du nettoyage.
• Ne pas utiliser l’appareil sur des sols mouillés ou humides.
• Ne pas aspirer de liquides, cigarettes allumées, éclats de verre, objets coupants, allumettes
et autres substances inflammables, gros morceaux de papier, sachets en plastique ou tout
autre objet susceptible d’endommager l’aspirateur.
• Lors de l’utilisation, ne pas laisser l’aspirateur passer sur les câbles librement posés.
• Pendant l’entretien et le nettoyage, l’appareil doit être en position d’arrêt.
• La lumière directe du soleil peut réduire la sensibilité des capteurs infrarouges de l’aspirateur.
Éviter la lumière directe du soleil.
• Lors du nettoyage humide, les tapis doivent être sécurisés devant le robot afin qu’il ne passe
pas sur ceux derniers. Si un tissu de nettoyage avec un réservoir d’eau sont présents sur
l’aspirateur, le nettoyage peut être arrêté ou le tapis pourrait être mouillé de façon involontaire.
• Ne pas placer l’appareil à un endroit depuis lequel il pourrait facilement tomber (table,
chaises).
• Avant de recharger l’appareil, s’assurer que le bloc d'alimentation est correctement branchée.
• Dans des conditions de température extrêmes ou en cas d’utilisation inappropriée, la
batterie risque de fuir. Si ce liquide entre en contact avec la peau, il est impératif de la rincer
immédiatement à l’eau courante. En cas de contact avec les yeux, les rincer immédiatement
à l’eau courante pendant au moins 10 minutes. Contactez un médecin.
• Si vous souhaitez vous débarrasser du produit, commencez par déconnecter la batterie
de l’appareil.
• Lors de transport de l’appareil ou si l’appareil n’est pas utilisé pendant une longue période,
mettre l’interrupteur en position d’arrêt. Cela prolonge la vie de la batterie.
• S’assurer que la tension de secteur correspond bien à celle marquée sur la plaque signalétique.
L’appareil ne doit pas être branché sur des multiprises ou à l’aide des rallonges.
• Ne pas tirer sur le cordon d’alimentation pour le débrancher, mais saisir la fiche et la tirer
délicatement.
• Ne pas permettre de laisser utiliser l’appareil comme un jouet.
• Ne jamais nettoyer l’appareil à l’aide des agents abrasifs ou des produits chimiques agressifs.
• L’appareil est exclusivement destiné à un usage domestique, il n’est pas prévu à des fins
commerciales.
• Ne jamais plonger le cordon d’alimentation, la fiche ou l’appareil dans de l’eau ou d’autres
liquides.
• Ne pas essayer de réparer l’appareil par ses propres soins. Contacter le centre agrée et
empêcher le risque de blessure lors d’une manipulation non professionnelle.
• Cet appareil peut être utilisé par des enfants âgés de 8 ans et plus et les personnes ayant des
capacités physiques ou mentales réduites ou le manque d’expérience et de connaissances,
si elles sont supervisées ou ont reçu des instructions pour utiliser l’appareil d’une manière
sûre et comprennent les dangers potentiels. Les enfants de moins de 8 ans ne sont autorisés
à réaliser les opérations de nettoyage ou d’entretien que sous la surveillance. Maintenir
l’appareil et le cordon d’alimentation hors de portée des enfants de moins de 8 ans. Ne
pas laisser les enfants jouer avec l’appareil.
• Permettre l’accès à l’appareil aux enfants de l’âge inférieur à 3 ans que sous la surveillance.
• Le fabricant et l’importateur dans l’Union européenne ne sont pas responsables des
dommages causés par le fonctionnement de l’appareil, tels que blessures, brûlures,
incendie, dommages causés sur les autres objets, etc.
• Si le cordon d'alimentation est endommagé, faites-le remplacer par un centre d'entretien
agréé pour éviter une situation dangereuse. Il est interdit d'utiliser l'appareil avec un
cordon d'alimentation endommagé.
• L'aspirateur robot doit uniquement être utilisé avec l'adaptateur secteur d'origine fourni.
Pour éviter une situation dangereuse, n'utilisez jamais un autre type d'adaptateur.
En cas de non-respect des recommandations du fabricant, la garantie concernant la réparation est annulée.
Vérifier soigneusement d’avoir bien déballé tous les accessoires. Nous vous recommandons de conserver la boîte
en papier d’origine, le manuel d’utilisation et le matériel d’emballage pendant toute la période de garantie.
DESCRIPTION DU PRODUIT
1 Capteur anti-collision
2 Capteur de charge infrarouge
3 Capteurs anti-chute
4 Broche de charge
5 Roulettes universelles
1
2
6 Brosse latérale
7 Capot de batterie
8 Roue motrice
9 Brosse principale
10 Verrou du capot de la brosse principale
3
4
5
6
7
8
9
10
106 107
VR2110, VR2100 VR2110, VR2100
Page 55
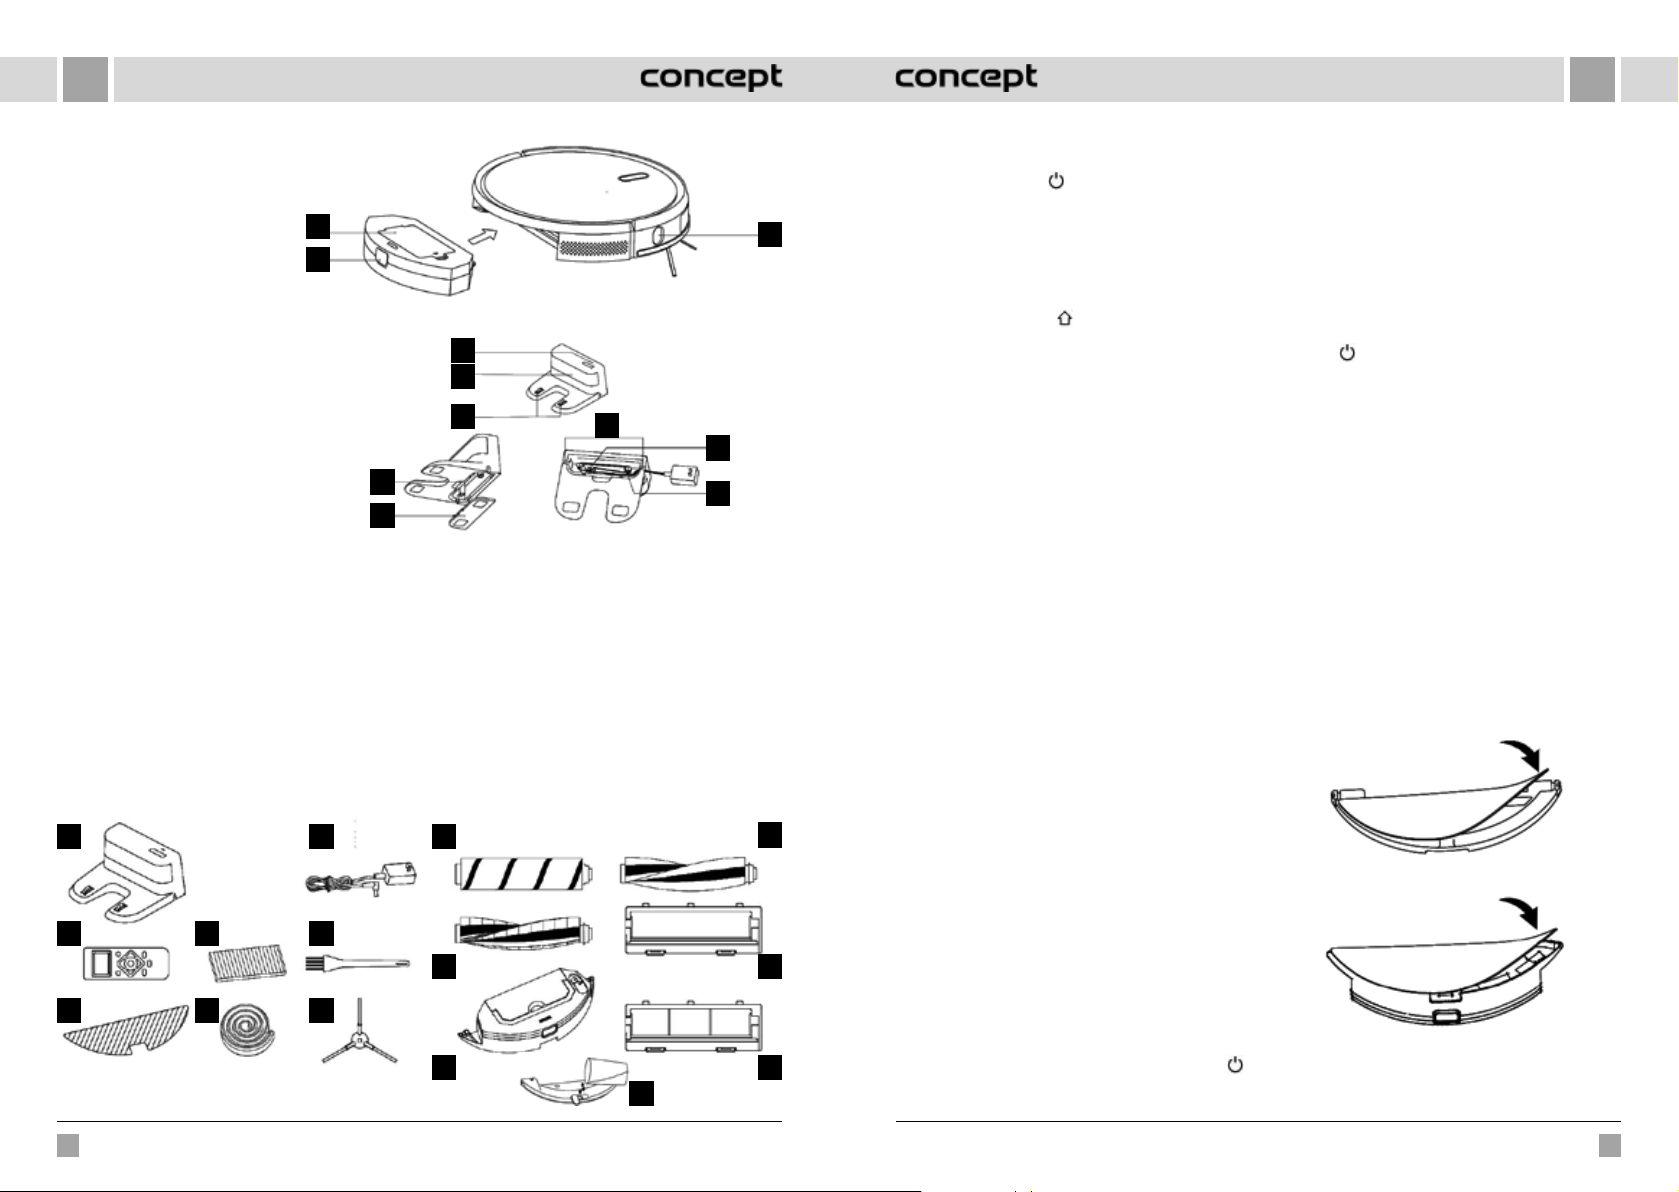
FRFR
1 Couvercle de crépine de filtre
2 Bouton du bac à poussière
3 Capteur mural
1
2
Bloc d'alimentation
1 Voyant de recharge
2 Zone de transmission du signal
3 Broche de charge du bloc
4 Rainure de prise
5 Capot
6 Passe-câble
7 Prise adaptateur secteur
8 Goupille de bobinage
Liste des composants
1 Bloc d'alimentation 1x
2 Télécommande 1x
3 Chiffon de lavage 2x
4 Filtre HEPA + filtre mousse 3x (pour VR2100 2x)
5 Bande magnétique 1x
6 Adaptateur 1x
7 Brossette de nettoyage 1x
8 Brosse gauche et droite 2x
1
2
3
4
5
6
7
8
1
2
3
6
4
5
9 Brosse HARDFLOOR 1x (VR2110 uniquement)
ATTENTION ! Ne pas utiliser sur les tapis, elle risque
d'arrêter le cycle de nettoyage.
10 Brosse CARPET 1x
11 Réservoir d'eau à commande électrique 1x (VR2110
uniquement)
12 Brosse PET 1x (VR2110 uniquement)
13 Couvercle de brosse principale 1x (VR2110
uniquement) convient aux brosses HARDFLOOR et PET
14 Couvercle de brosse métallique principale 1x (adapté
pour la brosse CARPET)
15 Réservoir d'eau suspendu 1x (VR2100 uniquement)
9
10
11
15
FONCTIONS CLÉES
Nettoyage marche / arrêt
• Appuyer court pour démarrer ou suspendre le
3
7
8
nettoyage.
• Appuyer et maintenir pendant 3 secondes pour
allumer ou éteindre l'appareil.
• Appuyer pendant 15 secondes pour forcer la mise en
arrêt de l'appareil dans des situations inhabituelles.
Recharge / nettoyage local
• Appuyer court pour démarrer la charge ou la pause.
• Appuyer court pour démarrer le nettoyage local.
Voyant
• Orange : Fonctionnement normal ou charge.
• Rouge : Etat anormal ou batterie faible.
• Rouge-orange : L'appareil n'est pas connecté au réseau.
Réinitialiser le WiFi
• Appuyer simultanément sur les deux boutons pendant
3 secondes.
INSTALLATION
1. Brancher le câble d'alimentation et garder
la longueur de câble excédentaire dans le
compartiment de câbles.
2. Placer le bloc d'alimentation contre le mur et
brancher.
Note:
• Prévoir une distance minimale de 0,5 m des deux
côtés du bloc d'alimentation et mini 1,5 m du bloc
d'alimentation.
• Si le cordon d'alimentation est tendu verticalement
vers le sol, l'appareil peut être retiré et le bloc
d'alimentation peut être mise hors tension.
• Le voyant de charge est allumé lorsque l´appareil est
12
13
14
en marche et est éteint lors de la charge.
3. Ne pas déplacer le bloc d'alimentation et ne pas
l'exposer à la lumière directe du soleil.
Note : La lumière directe du soleil interfère avec le
signal du bloc d'alimentation et l'appareil ne pas revenir
correctement dans le bloc d'alimentation.
4. Installation de la brosse latérale
Assurez-vous que les repères de la brosse latérale
gauche (L) et de la brosse latérale droite (R)
correspondent aux repères L et R sur le capot inférieur.
Appuyez sur les brosses latérales L et R jusqu'à ce que
vous entendiez un « clic ».
5. Mise en service et rechargement
Pour allumer le robot, maintenir appuyé le bouton .
Si le voyant d'alimentation est normalement allumé,
charger le robot dans le bloc d'alimentation.
Note : Si l'appareil ne démarre pas en raison d'une
batterie faible, le charger dans le bloc d'alimentation et
l'appareil démarrera automatiquement. Le robot ne peut
fonctionner normalement que lorsque le niveau de la
batterie est ≥ 20%.
6. Connexion à l'application mobile (ignorer cette
étape)
Lire les instructions de connexion Wi-Fi et connecter
l'application mobile.
7. Commencer le nettoyage
Après avoir allumé le robot, appuyer court sur le
bouton
utilisant l'application mobile (vous pouvez mettre
l'appareil en pause en appuyant sur n'importe quel
bouton pendant l'utilisation du robot).
Note:
• Le robot de balayage ne peut pas être utilisé pour
nettoyer les liquides.
• Si le niveau de charge de la batterie est inférieur à 20%,
l'appareil ne peut pas fonctionner. Dans un tel cas,
recharger le robot.
• Si le niveau de la batterie est inférieur à 20%, l'appareil
revient automatiquement à son bloc d'alimentation.
• Avant l'utilisation, éliminer tous fils électriques
(y compris le câble d'alimentation du bloc
d'alimentation) trainant sur le sol pour prévenir tout
court-circuit ou dommages des objets ou des fils
lorsque que l'appareil s'emmêle dans ces derniers.
8. Installation du module de lavage
a) Installation du chiffon d'essuyage : Collez le chiffon
Note : Nettoyer le chiffon de lavage après l´utilisation
pour le maintenir en bon état.
du robot ou commencer le nettoyage en
d'essuyage directement au fond du réservoir d'eau.
Modèle VR2100 - Réservoir d'eau suspendu
Modèle VR2110 - Réservoir d'eau à commande électrique
108 109
VR2110, VR2100 VR2110, VR2100
Page 56
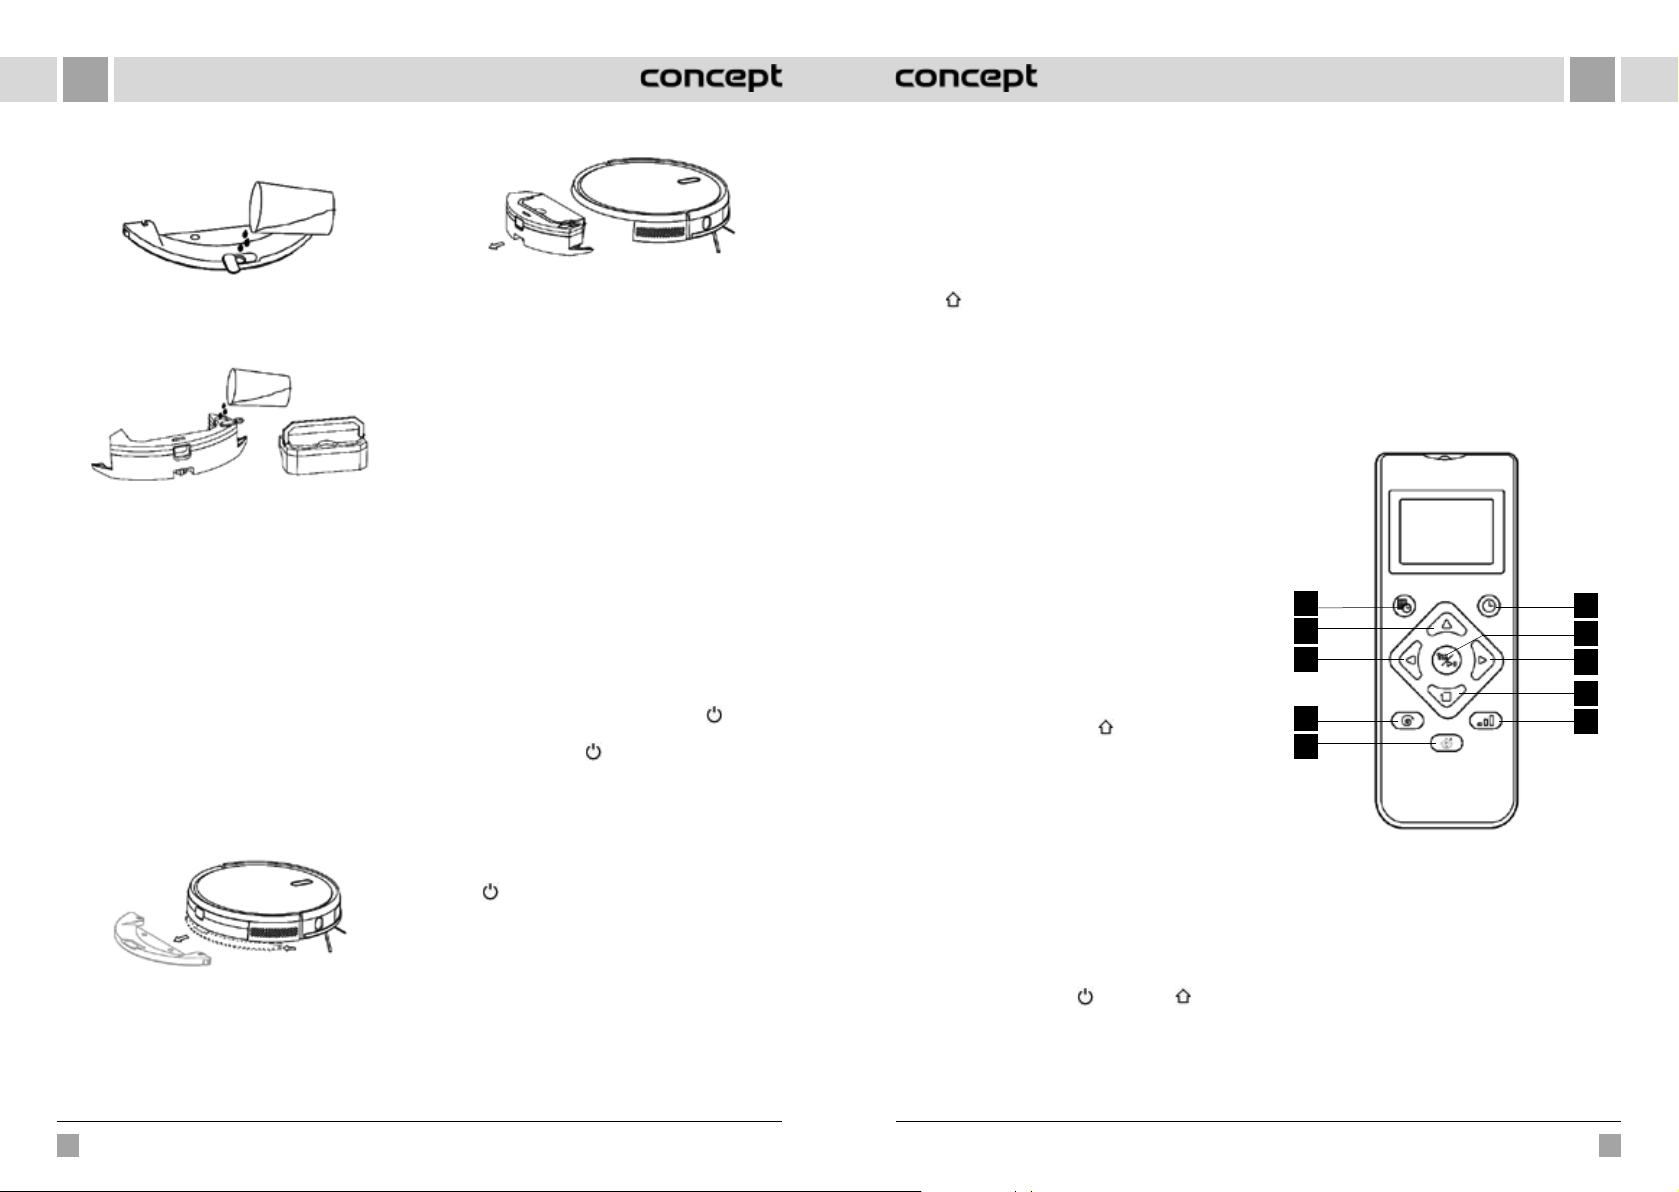
FRFR
b) Remplir le réservoir d'eau : ouvrir le couvercle et
remplir d'eau.
Modèle VR2100 - Réservoir d'eau suspendu
Avant de le remplir d'eau, retirer le bac à poussière
en utilisant la poignée (VR2110).
Modèle VR2110 - Réservoir d'eau à commande électrique
c) Installer le module :
Modèle VR2100 : pousser le module horizontalement
le long de la face arrière du robot. Le module est
correctement en place lorsque vous entendez un
«clic ».
Modèle VR2110 : installer le bac à poussière dans
le réservoir d'eau et insérer la poignée dans la
fente. Appuyer ensuite sur le bouton au centre du
réservoir et maintenir appuyé, puis le faire glisser
horizontalement le long de la face arrière du robot.
Le module est correctement en place lorsque vous
entendez un « clic ».
9. Retrait du module de lavage
Model VR2100 : Une fois le travail du robot terminé,
appuyer sur les verrous de deux côtés, retirer le module
de lavage, vider l'eau du réservoir et nettoyer le chiffon
(ne pas manipuler et ne pas retourner le robot pendant
le nettoyage).
Modèle VR2100 - Réservoir d'eau suspendu
Modèle VR2110 : Une fois le travail du robot terminé,
appuyer sur le bouton au centre du réservoir, retirer le
module de lavage, vider l'eau du réservoir et nettoyer
le chiffon (ne pas manipuler et ne pas retourner le
robot pendant le nettoyage).
Modèle VR2110 - Réservoir d'eau à commande électrique
10. Consignes d'utilisation du module de lavage
• Ne pas utiliser le module de lavage sans surveillance.
• Pour des mesures de sécurité, assurez-vous que le
module de lavage soit retiré lors de la recharge ou
lorsque le robot n'est pas utilisé.
• Ne pas tenter de laver un tapis.
• Pour un meilleur résultat, le module de lavage doit être
utilisé après avoir balayé ou aspiré le sol trois fois.
• Pour remplir le réservoir d'eau ou nettoyer le chiffon
pendant le fonctionnement du robot, arrêter, retirer et
mettre en place le module de lavage conformément
aux étapes 8 et 9. Ne pas manipuler et ne pas retourner
l'appareil pour éviter les erreurs de positionnement et
la perte de carte.
• La fonction de lavage du robot est conçue pour
le lavage et facilite le nettoyage en profondeur.
Cependant, il ne peut pas enlever les saletés tenaces et
remplacer ainsi le travail humain.
USAGE
MARCHE / ARRET
Appuyer et maintenir appuyé le bouton pendant
3secondes, le voyant s'allume et l'appareil démarre.
Appuyer long le bouton pendant 3 secondes lorsque
l'appareil est en mode veille, le voyant s'éteint et l'appareil
s'arrete.
NOTE : L'appareil ne peut pas être arreté pendant que le
rechargement est en cours.
NETTOYAGE / SUSPENSION
Après la mise en marche du robot appuyer court sur le
bouton
application mobile (appuyer sur n'importe quel bouton
pour suspendre le robot).
Note:
• L'aspirateur robot ne peut pas être utilisé pour retirer
• Si le niveau de charge de la batterie est inférieur à 20%,
• Si le niveau de la batterie est inférieur à 20%, l'appareil
• Avant l'utilisation, éliminer tous fils électriques
de l'appareil ou démarrer l'appareil via une
des liquides.
l'appareil ne peut pas fonctionner. Dans un tel cas,
recharger le robot.
revient automatiquement à son bloc d'alimentation.
(y compris le câble d'alimentation du bloc
d'alimentation) trainant sur le sol pour prévenir tout
court-circuit ou dommages des objets ou des fils
lorsque que l'appareil s'emmêle dans ces derniers.
RECHARGE
Mode automatique : Après le travail, l'appareil revient
automatiquement à son bloc d'alimentation.
Mode manuel : En état de pause, appuyer court sur le
bouton
l'appareil à l'aide de l'application mobile. Le voyant
clignote lorsque l'appareil est complètement chargé.
Note: Si l'appareil ne trouve pas son bloc d'alimentation,
il reviendra automatiquement à sa position d'origine.
Dans ce cas, remettre manuellement l'appareil à son bloc
d'alimentation.
BANDE MAGNÉTIQUE
Les bandes magnétiques peuvent être mises en place
pour séparer les zones à ne pas nettoyer (par exemple,
salles de bains, cuisines, etc.).
Remarque : fixer la bande magnétique au sol de manière
à ce qu'elle ne puisse pas bouger. Sinon, cela affectera
l'efficacité du robot.
MODES DE NETTOYAGE
Au démarrage, le robot utilise un mouvement en spirale
selon un programme de nettoyage pour nettoyer la zone
du sol et nettoie le périmètre complet de toutes pièces
de manière régulière et efficace. Une fois le nettoyage
terminé, l'appareil revient à son bloc d'alimentation et se
recharge automatiquement.
NETTOYAGE LOCALISÉ
En appuyant long sur le bouton
le robot localise, nettoie une zone circulaire de 1,5 m
de diamètre, et revient automatiquement à son
emplacement de départ, une fois le travail terminé et
s'arrête automatiquement.
NETTOYAGE PLANIFIÉ
Vous pouvez définir l´heure de nettoyage fixe à l'aide
de l'application mobile. Le robot fonctionnera toujours
àl'heure programmé et revient à son bloc d'alimentation
une fois le travail terminé.
REINITIALISER le WIFI
Si le téléphone mobile ne peut pas se connecter
à l'appareil en raison de la configuration du routeur
et du mot de passe, ou pour d'autres raisons, appuyer
simultanément sur le bouton
3 secondes jusqu'à ce que le message vocal « WiFi a été
réinitialisé » retentit et que le voyant bleu-violet s'allume
et se met ensuite à clignoter.
MODE SILENCIEUX
Vous pouvez activer ou désactiver les messages vocaux
pour démarrer la recharge ou pour contrôler
pendant 3 secondes,
et le bouton pendant
du robot à l'aide de l'application mobile.
RÉGLAGE DE LA PUISSANCE D'ASPIRATION
Vous pouvez régler la puissance d'aspiration à un niveau
silencieux, standard ou élevé à l'aide de l'application
mobile.
Lorsque le tapis est détecté, la force d'aspiration augmente
automatiquement au plus haut niveau. AVERTISSEMENT
- le tapis est correctement détecté uniquement avec la
brosse Carpet.
RÉGLAGE DU DÉBIT D'EAU (uniquement pour le
réservoir d'eau à commande électrique VR2110)
Vous pouvez régler le débit d'eau à un niveau bas,
standard ou élevé à l'aide de l'application mobile.
UTILISATION DE LA TÉLÉCOMMANDE
1
2
3
6
7
8
9
4
10
5
1. Nettoyage planifié
2. Avancer
3. Tourner à gauche
4. Nettoyage localisé TURBO
5. Démarrer / suspendre la charge
6. Nettoyage / pause automatique
7. Nettoyage / pause
8. Tourner à droite
9. Nettoyage du périmètre
10. Réglage de la puissance d'aspiration / du débit d'eau
Note : Pour vous assurer que tous les réglages sont
efficaces, vous devez pointer la télécommande vers
l'avant du robot aspirateur pas loin de celui-ci.
110 111
VR2110, VR2100 VR2110, VR2100
Page 57
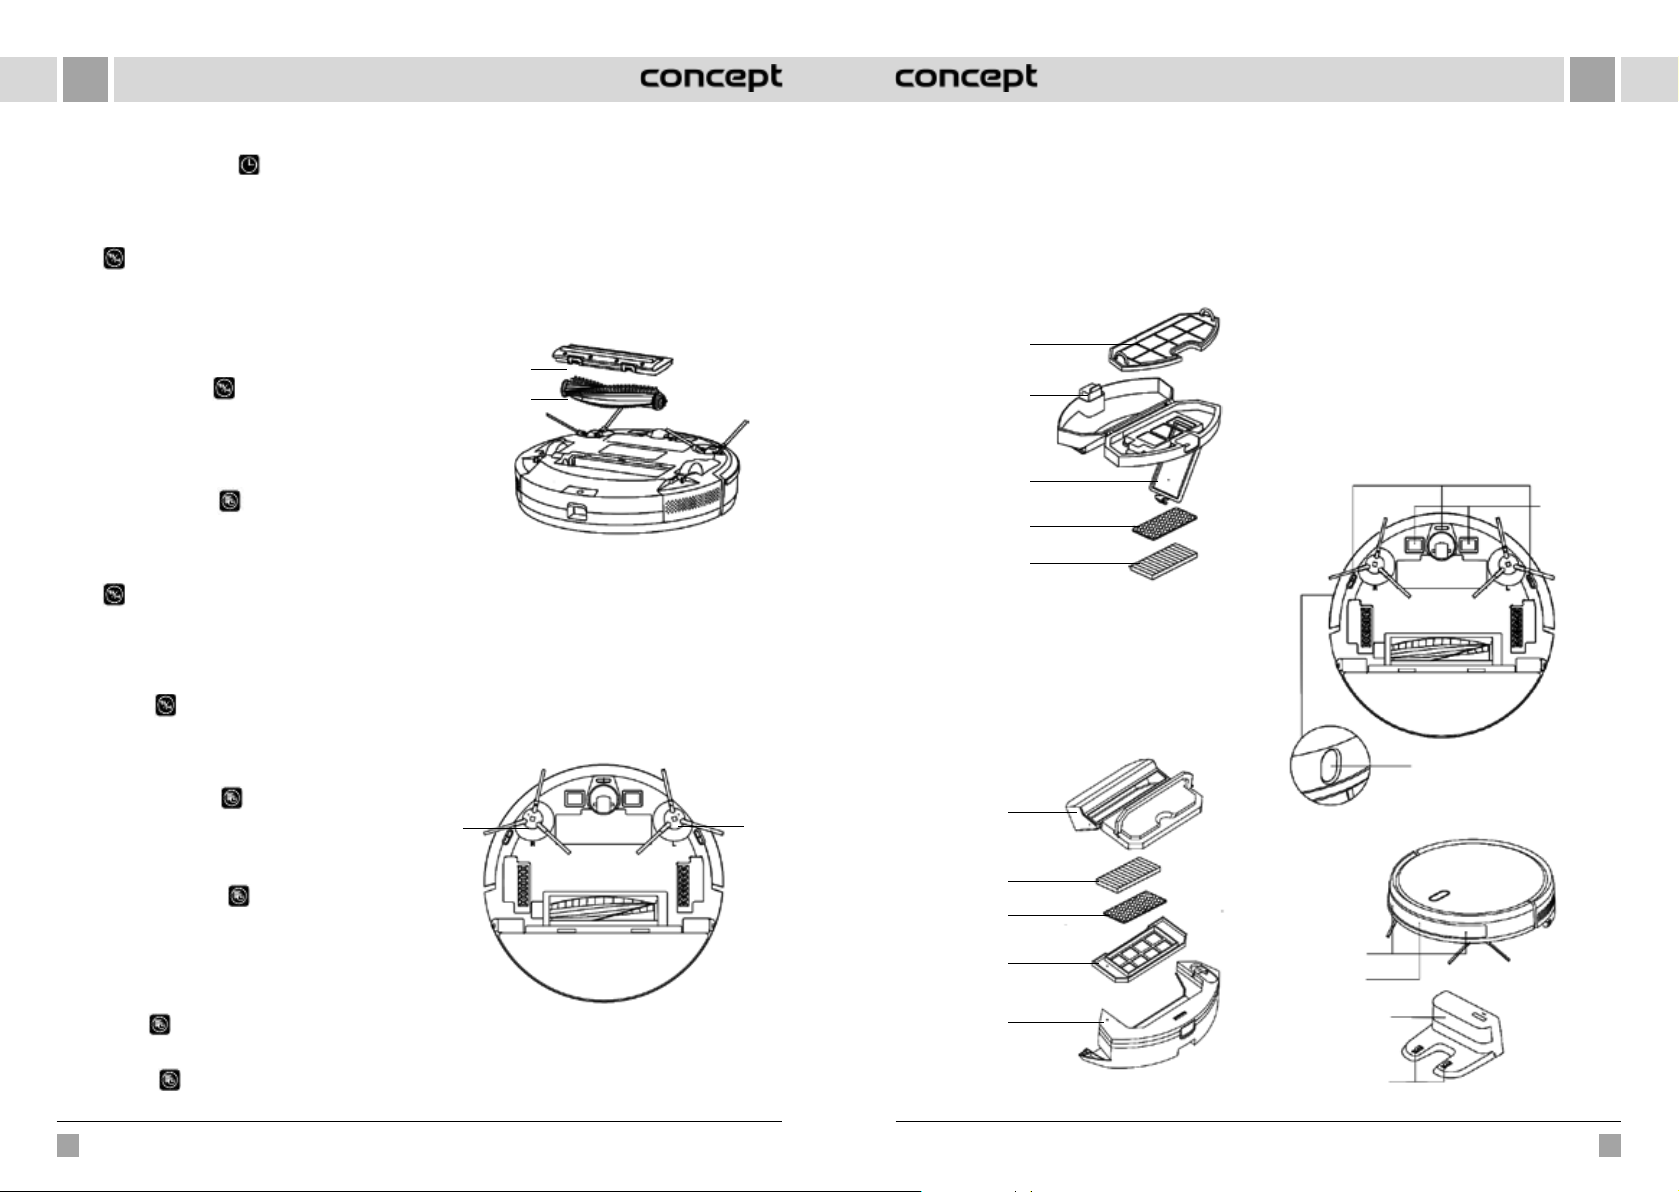
FRFR
Réglage de la durée
1. Appuyer sur le bouton de la télécommande
pour entrer le réglage de l'heure, un symbole pour
dimanche clignote sur l'écran LCD.
2. Appuyer sur les boutons gauche et droit pour
sélectionner le jour de la semaine et appuyer
sur pour confirmer, puis l'écran LCD passera
automatiquement au réglage de l'heure.
3. Appuyer sur les boutons haut et bas pour régler l'heure
et appuyer sur les boutons gauche et droit pour passer
au réglage des minutes.
4. Après avoir réglé l'heure actuelle, pointer la
télécommande vers l'avant du robot aspirateur et
appuyer sur le bouton pour confirmer les réglages
de l'heure. L'absence de confirmation invalidera vos
paramètres.
5. Cette opération termine le réglage de l'heure pour la
télécommande et l'aspirateur robot.
Plan de nettoyage
1. Appuyer sur le bouton
de la télécommande pour
entrer le réglage du plan, un symbole pour dimanche
clignote sur l'écran LCD.
2. Appuyer sur les boutons gauche et droit pour
sélectionner le jour de la semaine et appuyer
sur pour confirmer, puis l'écran LCD passera
automatiquement au réglage de l'heure.
3. Appuyer sur les boutons haut et bas pour régler
l'heure et appuyer sur les boutons gauche et droit
pour passer au réglage des minutes. Pointer ensuite
la télécommande vers l'avant du robot aspirateur et
appuyer sur pour confirmer votre sélection pour
le robot aspirateur.
4. Lorsqu'un mode est sélectionné, la télécommande passe
automatiquement au réglage d'un mode de sélection
suivant. Si vous ne souhaitez pas poursuivre la sélection,
appuyez sur la touche ou attendez 10 secondes
pour terminer automatiquement le réglage.
5. Cette opération termine le réglage de l'heure pour la
télécommande et l'aspirateur robot.
Annuler le plan de nettoyage
1. Appuyez sur le bouton
de la télécommande, le
symbole du dimanche clignote sur l'écran LCD et
les symboles des jours de la semaine que vous avez
programmés s'affichent.
2. Appuyez sur les boutons gauche et droit pour
sélectionner le jour de la semaine que vous avez
programmé et maintenir enfoncé pendant 3 secondes
le bouton pour annuler le programme. Vous
pouvez également sélectionner le prochain jour
programmé que vous souhaitez annuler, ou appuyer
sur la touche attendre 10 secondes pour terminer
automatiquement le réglage.
ENTRETIEN QUOTIDIEN
Brosse principale (à nettoyer régulièrement)
1. Reto urner le robot et app uyer sur le verrou du couverc le
de la brosse principale pour pouvoir le retirer.
2. Enlever la poussière de l'intérieur du robot et de
la brosse principale en utilisant une petite brosse,
nettoyer la brosse principale.
3. Remettre en place la brosse principale et appuyer
fermement sur le couvercle jusqu'à ce que le verrou
s'enclenche.
Verrou
Brosse
principale
Brossette latérale (à nettoyer régulièrement)
1. Retourner le robot et enlever la brosse latérale en
tirant vers le haut.
2. Enlever les cheveux et la saleté et remettre en place la
brosse latérale.
3. Assurez-vous que la brosse latérale gauche (L) et la
brosse latérale droite (R) correspondent aux repères
L et R sur le couvercle inférieur. Remettre en place les
brosses latérales L et R.
Note : Remplacer les brosses latérales tous les
3à6mois pour assurer leur effet nettoyant.
R - brosse
latérale droite
Bac à poussière et grille de filtre (à nettoyer
régulièrement)
1. Appuyer sur le bouton et tirer le bac à poussière
àl'arrière.
2. Ouvrir et nettoyer le bac à poussière.
L - brosse
latérale gauche
Nettoyage de la grille du filtre (à nettoyer
régulièrement)
1. Après une utilisation prolongée, retirer la grille du
filtre, le filtre mousse et le filtre HEPA.
2. Nettoyer la grille du filtre retirée. Rincer le filtre mousse
et le filtre HEPA.
3. Essuyer et laisser sécher les filtres et autres éléments.
4. Après séchage, remettre les filtres dans le bon ordre :
grille - filtre mousse - filtre HEPA.
Grille de filtre
(filtre grossier)
Bouton
Couvercle de filtre
Filtre
mousse
Filtre HEPA
Note:
• Rincer la grille du filtre à l'eau claire sans ajouter des
détergents.
• Ne pas nettoyer la grille du filtre avec une brosse ou
des doigts.
• Laisser le gril du filtre sécher à l'air pendant au moins
24 heures.
• Remplacer la grille du filtre tous les 3 à 6 mois.
Nettoyage du filtre (à nettoyer régulièrement)
Bac à
poussière
Filtre HEPA
Filtre
mousse
Grille de
filtration
(filtre grossier)
Bac à eau
Réservoir d'eau à commande électrique
Module de lavage (à nettoyer après chaque utilisation)
1. Retirer le chiffon, vider le réservoir d'eau.
2. Nettoyer le chiffon, faire sécher le réservoir d'eau
et le chiffon. Pour le VR2110, retirer d'abord le bac
àpoussière, puis vider le réservoir d'eau.
Capteurs (à nettoyer régulièrement)
Nettoyer les capteurs avec un chiffon doux comme suit :
1. Nettoyer le capteur de mur et le capteur de droite.
2. Trois capteurs anti-chute sur la face inférieure de
l'appareil.
3. Capteur anti-collision infrarouge sur le front de
l'appareil.
4. La protection contre les chocs électriques et les
broches de charge située sur la face inférieure de
l'appareil (arrêter l'appareil avant le nettoyage).
5. La zone de transmission du signal du bloc
d'alimentation.
Capteurs anti-chute
Broche de
charge
Capteur TOF
Capteurs (à nettoyer une fois par mois)
Capteur anti-
collision
Capteur
de charge
infrarouge
Zone de
transmission du
signal
Broche de charge
du bloc
112 113
VR2110, VR2100 VR2110, VR2100
Page 58
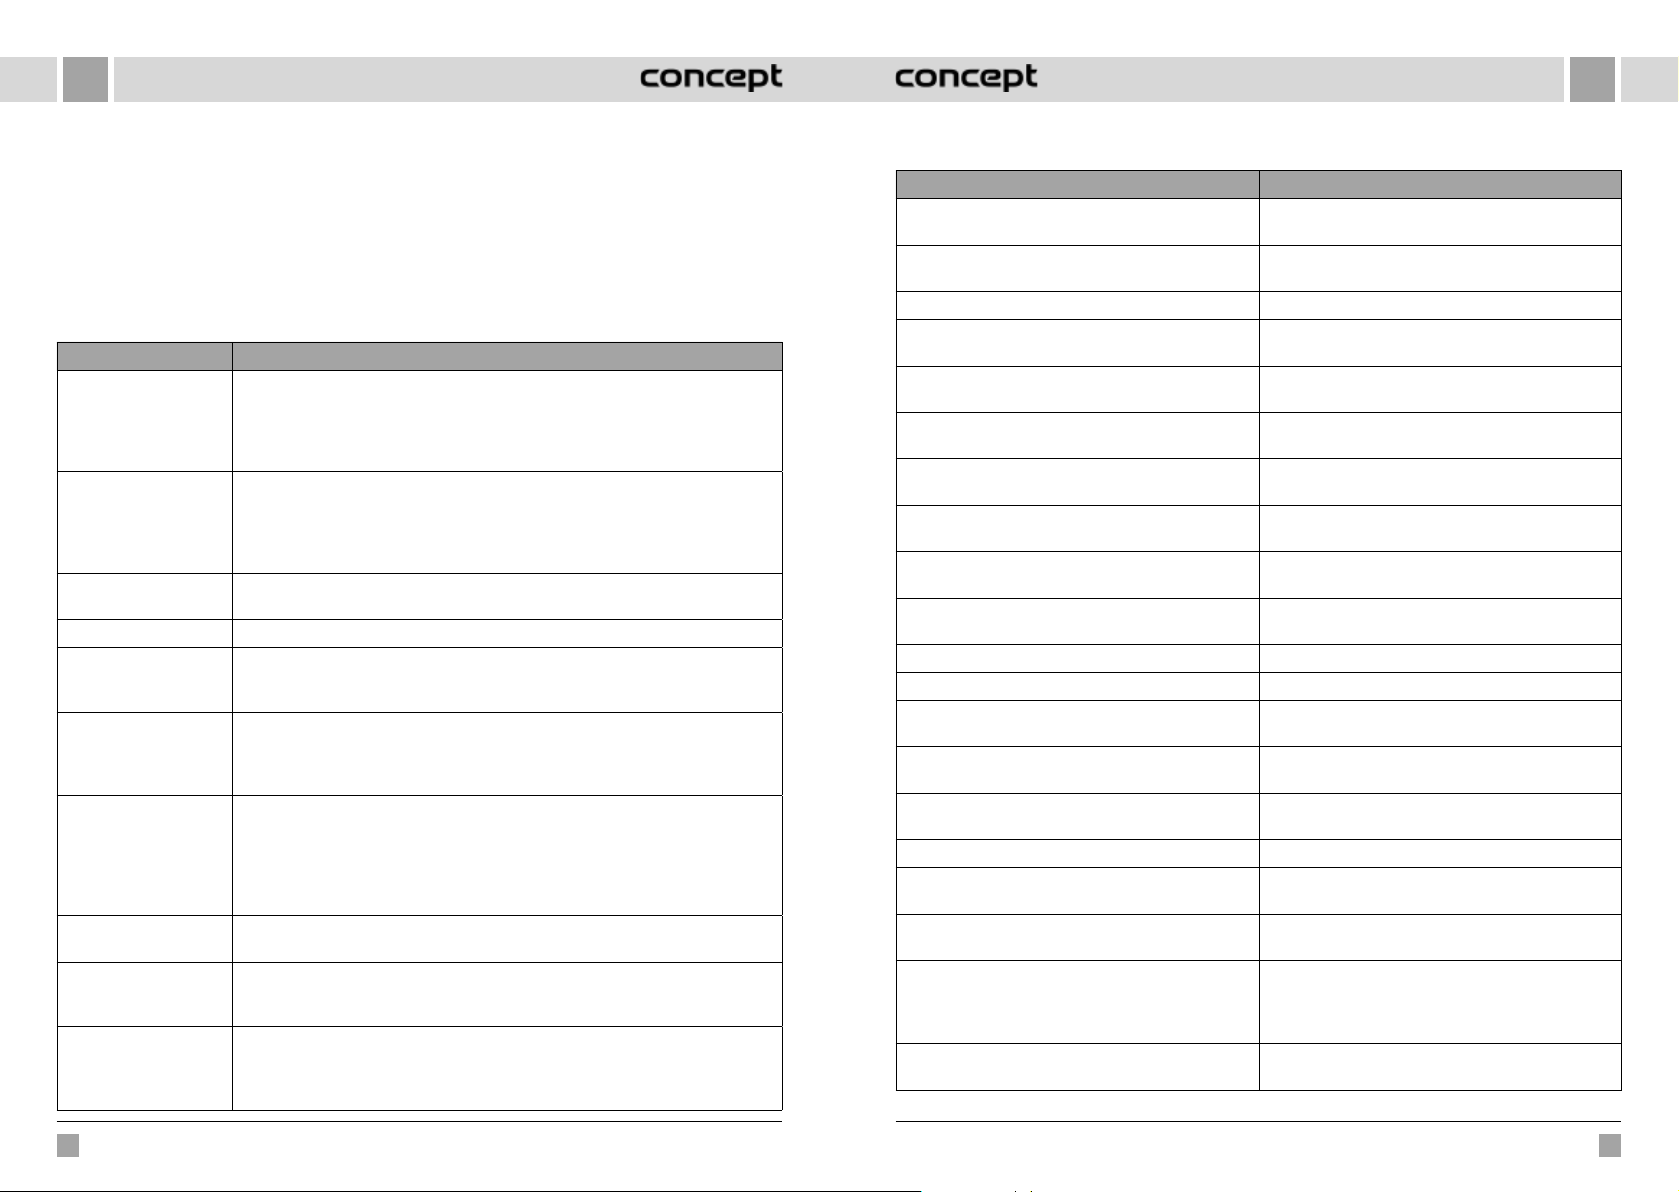
FRFR
Batterie
• L'appareil est équipé de batteries lithium-ion hautes
performances. Pour maintenir les performances de la
batterie, gardez l'appareil chargé tous les jours.
• Si l'appareil n'est pas utilisé pendant une longue
période, débrancher et ranger le robot. Charger
la batterie au moins tous les 3 mois pour éviter
l'endommagement en raison d'une décharge excessive.
PROBLÈMES COURANTS
Problème Solution
Impossible de mettre en
marche l'appareil
Impossible de recharger
l'appareil
Impossible de recharger
l'appareil
Comportement anormal Arrêter et réinitialiser le robot.
Le robot émet un bruit
anormal lorsqu'il est en
marche
La capacité de nettoyage
est réduite ou de la
poussière tombe de
l'appareil
Impossible de connecter
le WiFi
Le nettoyage prévu n'a
pas eu lieu
Le robot consomme de
l'énergie lorsqu'il est dans
son bloc d'alimentation ?
Dois-je charger le robot
trois fois pendant
16heures la première
fois ?
• Si la batterie est faible, mettre l'appareil dans son bloc d'alimentation et aligner les
broches, l'appareil démarrera automatiquement (si le robot est complètement éteint,
il peut redémarrer automatiquement après un certain temps).
• N'utilisez pas l'appareil si la température ambiante est inférieure à 0 ° C ou supérieure
à 50 ° C. Utiliser le robot de 0-40 ° C
• Déplacer le robot hors son bloc d'alimentation, assurez-vous que le voyant du bloc
d'alimentation soit allumé et que les deux extrémités de l'adaptateur d'alimentation
du bloc d'alimentation soient correctement connectées.
• En cas de mauvais contact, nettoyer les points de contact du bloc d'alimentation et
les broches de charge du robot ou tourner la brosse latérale.
Le robot est trop loin du bloc d'alimentation, le placer à proximité du bloc d'alimentation
et réessayer.
La brosse principale, la brosse latérale ou la roue peuvent être bloquées avec des objets
étrangers, arrêter le robot et enlever les corps étrangers.
• Le bac de poussière est trop plein. Videz-le.
• La grille du filtre est obstruée. Nettoyez ou remplacez.
• La brosse principale est enveloppée de corps étrangers, nettoyez-la.
• Un mauvais signal WiFi. Vérifiez que la couverture WiFi correcte est disponible.
• Le WiFi est connecté de manière inhabituelle. Réinitialisez le WiFi, téléchargez la
dernière application et essayez de vous reconnecter.
• Le mot de passe n'est pas entré correctement.
• Il y a un routeur pour la bande de fréquences 5G, le robot aspirateur est équipé
uniquement pour la bande de fréquences 2,4G.
Si le niveau de la batterie est faible, le nettoyage programmé ne peut être démarré que
si le niveau de la batterie est d'au moins 30%.
Le robot consomme une petite quantité d'énergie lorsqu'il est placé en permanence
dans son bloc d'alimentation, ce qui permet les meilleures performances de la batterie.
La batterie au lithium peut être utilisée immédiatement après la charge et n'a aucun
effet mémoire.
Mise à jour du firmware
Utiliser l'application mobile pour mettre à jour le firmware.
Si un nouveau firmware est détecté, procéder àla mise
à jour sur invite. Lors de la mise à jour du firmware, le
niveau de la batterie doit être ≥50%, donc l'appareil doit
se trouver dans son bloc d'alimentation.
DÉPANNAGE GÉNÉRAL
Message sonore Solution
Erreur 1 : Oh dear! I cannot find the dust collector Le nettoyage a commencé après avoir retiré le bac
Erreur 2 : Please check if the radar on top has been
covered or blocked
Erreur 3 : Please place me in a new location and try again Ramassez le robot ou soulevez-le en l'air.
Erreur 4 : Please scrub the cliff sensor, and restart me from
a new location
Erreur 5 : Please scrub the front sensor, and restart me
from a new location
Erreur 6 : Please scrub the right-hand sensor, and restart
me from a new location
Erreur 7 : Please scrub the radar housing on top, and
restart me from a new location
Erreur 8 : Please check if the bumper has been blocked
in some way
Erreur 9 : Master, please clean the dust container and filter Le bac à poussière est plein ou la grille du filtre doit être
Erreur 10 : Dust container has been removed, please
clean the container and filter
Erreur 11 : I'm stuck, please help me! Le robot est coincé quelque part.
Erreur 12 : Please place me correctly! Le robot est incliné.
Erreur 13 : Please check if my wheels have become
blocked somewhere
Erreur 14 : Please check if the main brush has become
stuck
Erreur 15 : Please check if the side brushes have become
stuck
Erreur 16 : What's going on? Where is the docking station? Le bloc d'alimentation introuvable ou non connecté.
Erreur 17 : Oh dear! Program error, please restart me Condition anormale due à une anomalie inconnue,
Erreur 18 : Error encountered initiating shutdown Le robot alerte l'utilisateur et s'arrête automatiquement
Erreur 19 : Low battery, please recharge Lorsque le niveau de charge de la batterie est trop faible,
Erreur 20 : To shut me down, please place me away from
the docking station
àpoussière.
Le capteur supérieur est couvert ou placé dans une zone
ouverte (dans la zone de 6x6 m
Le capteur anti-chute est couvert ou situé en hauteur.
Le capteur infrarouge anti-collision est sale ou couvert.
Le capteur mural est sale ou couvert.
Le capteur radar anti-collision est sale ou couvert.
Le capteur de bord ou le capteur anti-collision est coincé.
remplacée.
Une fois le défaut 9 signalé, l'utilisateur a retiré le bac
àpoussière ce qui a déclenché une erreur 10.
La roue motrice est coincée ou emmêlée.
La brosse principale est emmêlée ou coincée.
La brosse latérale est emmêlée ou coincée.
redémarrez le robot.
ou se recharge.
le robot n'est pas à son bloc d'alimentation et démarre le
nettoyage (le niveau de charge de la batterie est inférieur
à 10%).
Le robot a été éteint pendant la charge au bloc
d´alimentation.
2
pas d'obstacle).
114 115
VR2110, VR2100 VR2110, VR2100
Page 59
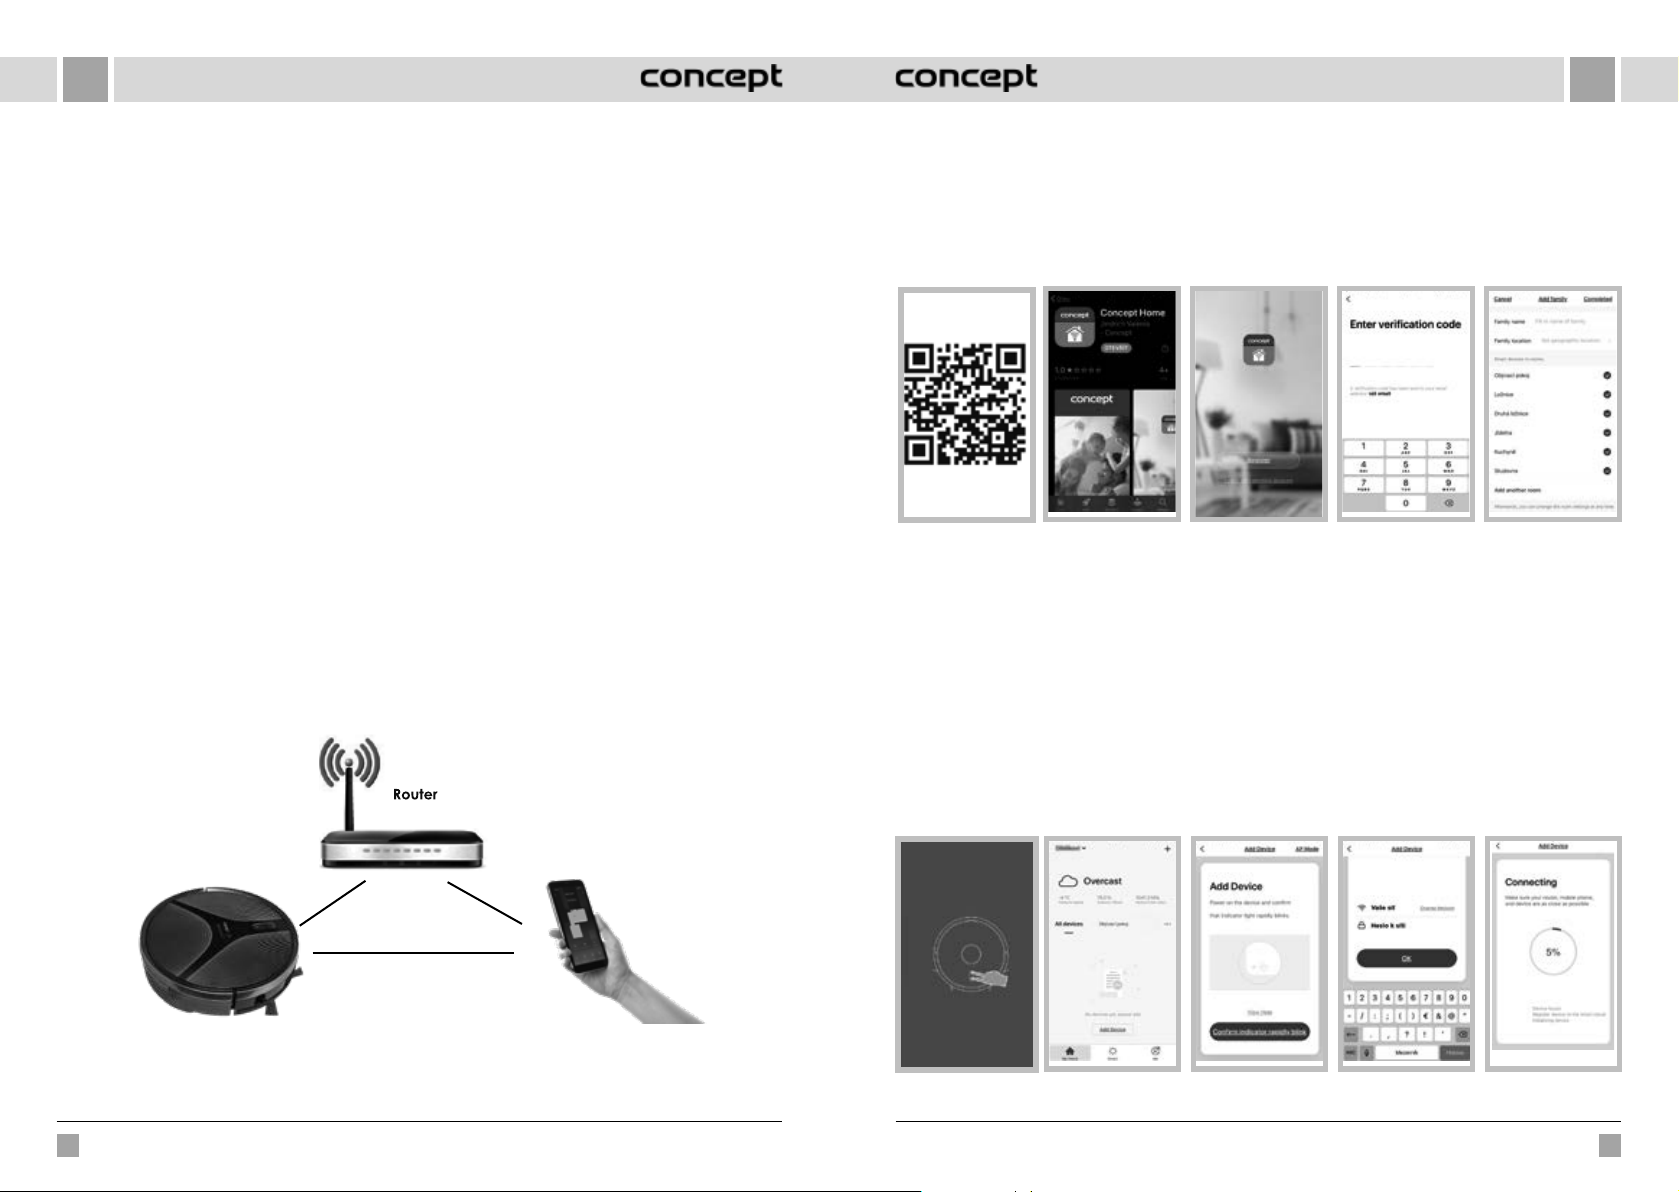
FRFR
CONNECTIVITÉ ET COMPATIBILITÉ SANS FIL
• La société Jindřich Valenta - CONCEPT ne sera en aucun cas responsable des dommages accessoires, indirects ou
consécutifs, ni de toute perte de données ou perte due à une fuite d'informations lors d'une communication sans fil.
• Une communication sans fil réussie ne peut pas être garantie à 100% sur tous les appareils intelligents et les
réseaux Wifi (routeurs). En raison de la variété d'appareils sur le marché, il peut y avoir des cas où le caractère ou la
spécification d'un appareil intelligent ou d'un réseau Wifi (routeur) donné rendent la connexion impossible ou est en
quelque sorte perturbé. En outre, un certain nombre de facteurs, notamment la configuration matérielle et logicielle,
affectent également le succès de la communication Wifi sans fil. La connexion entre le robot et votre réseau Wifi peut
également être affectée par les réseaux Wifi environnants, qui peuvent être réglés au même canal et donc interférer
avec la connexion (par exemple des banlieues, des immeuble d'habitation, etc.). Ces faits ne peuvent pas être un
motif de faire une réclamation de l'appareil.
• L'application est détenue et exploitée par un tiers (ci-après « le Sujet ») différent de Jindřich Valenta - CONCEPT (ci-
après « le Vendeur »). Aucune donnée personnelle n'est transférée au Sujet par le Vendeur. Lors de son inscription
àl'application, le client communique ses données personnelles directement au Sujet, qui devient l'administrateur de
ses données personnelles. L'application et la protection associée des données personnelles sont régies par les règles
applicables du Sujet.
Compatibilité :
Système d'exploitation pour appareil intelligent - Android 5.0 et supérieur
- IOS 9.0 et supérieur
Réseau Wifi - 2,4 GHz
- sécurité WPA1 et WPA2 (WPA2 recommandé)
MISE EN GARDE : L'appareil ne peut pas être utilisé sur des réseaux Wifi sécurisés IEEE 802.1X (généralement des réseaux
Wifi d'entreprise).
COMMANDE VIA L’APPLICATION
Avant de pouvoir contrôler l'appareil via l'application, il est nécessaire de le connecter à votre smartphone et de permettre
l´accès à votre réseau WiFi.
Téléchargement et installation de l’application
1. Scann er le code QR ci-dess ous (fig. 1) ou recherch er «Concept Home» sur Go ogle Play ou l'App Store et le télécharger
sur votre smartphone (fig.2)
2. Si vous avez déjà un Concept Home, ouvrez l'application, connectez-vous et continuez en suivant les instructions
pour appairer votre smartphone.
3. Si vous êtes un nouvel utilisateur, commencer par votre enregistrement (fig. 3). Suivre les instructions pour entrer le
code de vérification et terminer votre enregistrement (fig. 4).
4. Suivre les instructions pour créer une famille (fig. 5).
fig. 1
Instructions pour apparier les appareils
1. Avant d´apparier votre appareil, vous devez être connecté à votre réseau WiFi.
2. Assurez-vous que l'appareil est en mode veille avant de démarrer la connexion. Appuyez sur les deux boutons en
même temps pendant au moins 3 secondes (fig. 6) jusqu'à ce que le voyant du robot se met à clignoter et que
le message sonore „WiFi lost, please follow the App instruction for reconnection“ ("WiFi perdu, veuillez suivre les
instructions de l'application pour la reconnexion".). Assurez-vous que votre smartphone est connecté au même
réseau WiFi auquel vous souhaitez connecter le robot.
3. Appuyez ensuite sur + ou « Ajouter un appareil » dans l'application (fig. 7) pour ajouter un nouvel appareil.
4. Confirmer « L'indicateur de confirmation clignote rapidement » (fig. 8).
5. Sélectionnez votre réseau WiFi auquel il faut connecter votre appareil et entrez le mot de passe (fig. 9).
6. Le processus d'installation démarrera, ce qui peut prendre un certain temps (fig. 10).
7. Votre smartphone se connectera à l'appareil et le connectera à votre réseau WiFi.
8. Une fois la configuration achevée (fig. 11), appuyez sur « Terminé » pour accéder à l'interface de commande de
l'appareil (fig. 12).
fig. 2 fig. 3 fig. 5fig. 4
Distance recommandée : moins de 4 mètres
Assurez-vous que la distance entre le purificateur d'air, le routeur et votre smartphone soit suffisante pour permettre
de les appairer.
116 117
VR2110, VR2100 VR2110, VR2100
fig. 6 fig. 7 fig. 8 fig. 9 fig. 10
Page 60
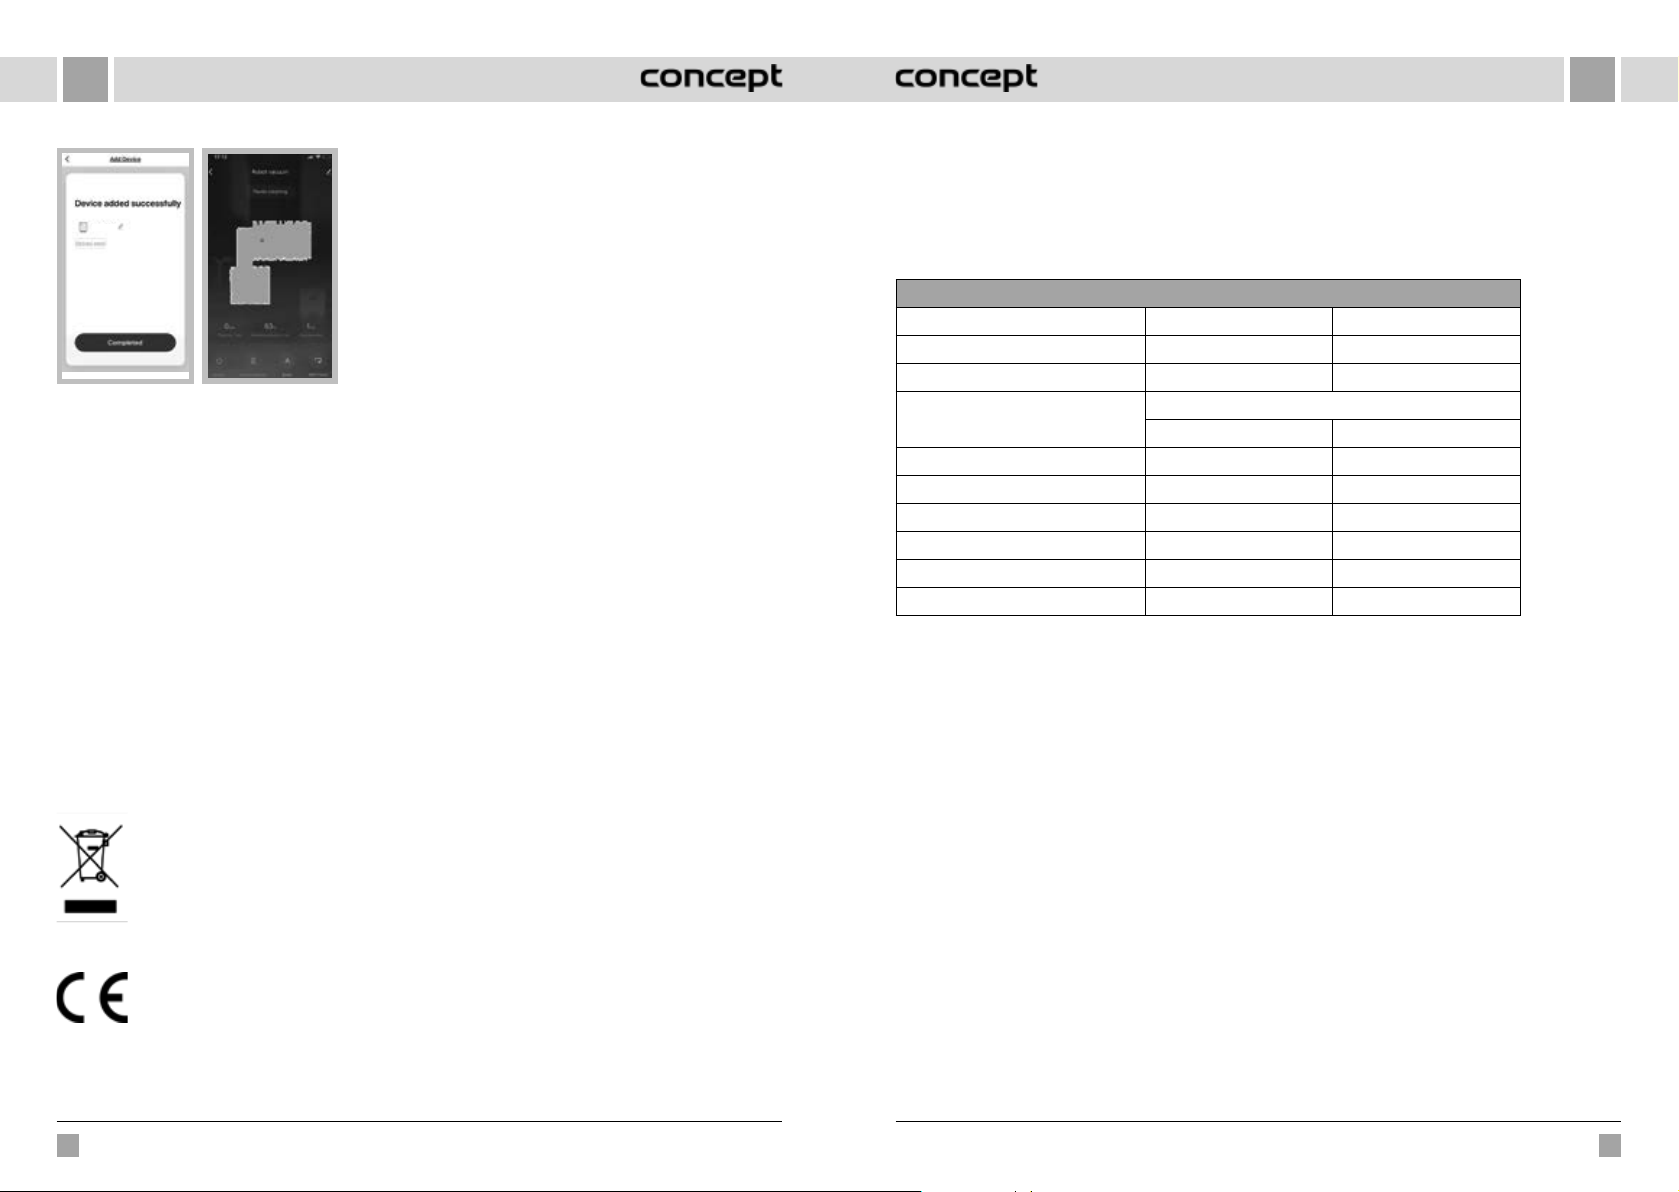
FR
IT
ATTENTION AUX PROBLÈMES D'APPARIEMENT
• Vérifiez que le mot de passe saisi de votre réseau WiFi est
correct
• L'appareil ne supporte que les réseaux WiFi 2,4 GHz.
Concept
fig. 11
Modes de l’application
Vous pouvez choisir entre les modes AUTO (Automatique / ZIGZAG), local (circulaire), perimetre (EDGE) et DOCK (recherche
du bloc d'alimentation).
fig. 12
• Le routeur est surchargé par la connexion des autres
appareils
• En essayant de vous connecter à l'appareil (fig. 10),
essayez de vous connecter manuellement à son réseau
WiFi
SERVICE
Les opérations de maintenance ou les réparations de plus grande étendue nécessitant une intervention sur les
composantes internes de l’appareil ne peuvent être effectuées que par un centre d’entretien agréé.
PROTECTION DE L’ENVIRONNEMENT
• Préférer le recyclage des emballages et des appareils à la fin de leur durée de vie.
• Le carton est à remettre dans le centre de collecte sélective.
• Les sachets en plastique (PE) sont à remettre dans le centre de collecte sélective pour recyclage.
RINGRAZIAMENTO
Grazie per aver acquisito il prodotto di marchio Concept e vi auguriamo che vi dia la massima soddisfazione per tutta la
durata della sua vita utile.
Si consiglia di leggere attentamente l’intero manuale d’uso prima di procedere al primo uso dell’apparecchio stesso.
Conservare bene il manuale d’uso. Provvedere che tutte le persone addette all’uso del prodotto facciano la conoscenza
del manuale d’uso.
Parametri tecnici
VR2110 VR2100
Potenza assorbita 25 W 25 W
Tensione dell’accumulatore 14,8 V 14,4 V
Tensione dell’adattatore di ricarica
Rumorosità 55-65 dB 55-65 dB
Batteria 3200 mAh, Li-Ion 2600 mAh, Li-Ion
Autonomia 180 minuti 150 minuti
Durata di ricarica completa 5 ore 4-5 ore
Gamma di frequenza 2,4-2,4835 GHz 2,4-2,4835 GHz
Potenza dell’emettitore (max.) 18 dBm 18 dBm
IMPORTANTE
Prima di collegare l’apparecchio alla rete assicurarsi visivamente che l’unita sia integra e non sia stata danneggiata
durante il trasporto.
AC 220-240 V - 50/60 Hz
DC 24 V DC 24 V
IMPORTANTI AVVERTIMENTI DI SICUREZZA
Recyclage de l’appareil à la fin de sa durée de vie:
La désignation du produit est conforme à la Directive européenne 2012/19/CE relative aux déchets
d'équipements électriques et électroniques (WEEE). Le symbole apposé sur le produit ou son emballage
indique que le produit ne doit pas être éliminé avec les déchets municipaux. Il est nécessaire de le
remettre dans un centre de collecte pour le recyclage des équipements électriques et électroniques.
En assurant une élimination conforme de ce produit, vous pouvez empêcher tout impact négatif sur
l’environnement et sur la santé humaine résultant de la liquidation non conforme de ce produit. Éliminer
le produit en conformité à la réglementation de traitement de déchets. De plus amples informations
concernant le recyclage peuvent être obtenues auprès de l’administration locale compétente, les
centres de tri de déchets ménagers ou dans le magasin où vous avez acheté votre produit.
Ce produit satisfait aux exigences élémentaires des directives CE applicables.
Le fabricant se réserve le droit d’effectuer les modifications du texte, design et spécifications techniques sans information
préalable.
118
VR2110, VR2100
• Non utilizzare il prodotto in modo diverso da quello descritto nel presente manuale d’uso.
• Eliminare completamente tutti gli imballi e materiali pubblicitari prima di utilizzare
l’apparecchio per la prima volta.
• Prima di procedere all’utilizzo dell’apparecchio eliminare dal pavimento tutti gli oggetti
che possano compromettere la pulizia regolare ed effettiva del pavimento stesso (cavi,
carta, vestiti, tovaglie e tende che toccano per terra).
• Se nel vano da pulire si trovano le scale, posizionare il nastro magnetico (parete virtuale)
a distanza minima di 15 cm dal bordo dello scalino superiore. La tale distanza dovrebbe
garantire la protezione massima contro la caduta dell’apparecchio dalle scale.
• Utilizzare solo ed esclusivamente gli accessori ed i pezzi di ricambio originali destinati
aquesto modello.
• Non sedersi sull’aspirapolvere né posarvi degli oggetti.
• L’apparecchio è destinato solo all’uso domestico alle temperatura da 0 °C a 40 °C.
VR2110, VR2100
119
Page 61
ITIT
• Prima di procedere all’uso dell’apparecchio controllare se il contenitore per la raccolta
della polvere e il tessuto del mop sono inseriti correttamente.
• Non porre i capelli, i vestiti, le dita o altre parti del corpo in vicinanza della spazzola
principale. Mantenere pulite la spazzola principale e le bocca di aspirazione, eliminare
i capelli e la polvere che potrebbero ridurre la capacità aspirante dell’apparecchio e la
qualità di pulizia.
• Non utilizzare l’apparecchio sul pavimento bagnato o umido.
• Non aspirare liquidi, mozziconi ardenti, frammenti di vetro e altri oggetti taglienti,
fiammiferi ed altre sostanze infiammabili, grossi pezzi di carta, sacchetti di plastica o altri
oggetti che potrebbero danneggiare l’aspirapolvere.
• Non far passare l’apparecchio a lavoro sopra i cavi posati per terra.
• Durante la manutenzione e la pulizia dell’apparecchio mettere l'interruttore generale
nella posizione OFF.
• I raggi diretti del sole possono provocare la ridotta sensibilità dei lettori infrarossi
dell’apparecchio, prevenire l’esposizione dell’apparecchio ai raggi diretti del sole.
• Durante la pulizia ad umido del pavimento il tappeto deve essere assicurato in modo che
l’apparecchio non vi entri sopra. Qualora sull’apparecchio sia montato il mop in tessuto
con il serbatoio d’acqua, il processo di pulizia potrebbe sospendersi o il tappetto potrebbe
rimanere bagnato.
• Non porre l’apparecchio sui posti in alto dai quali potrebbe cadere (tavolo, sedia).
• Prima di mettere l’apparecchio sotto la ricarica assicurarsi sul corretto collegamento della
stazione di ricarica.
• Alle temperature estreme o nel caso dell’uso improprio si corre il rischio di fuoriuscita
del liquido dalla batteria. Nel caso di contatto di tale liquido con la pelle sciacquare
immediatamente il punto di contatto con l’acqua corrente. Qualora il liquido entri negli
occhi sciacquarli immediatamente sotto l’acqua corrente per almeno 10 minuti. Rivolgersi
al medico.
• Prima di smaltire l’apparecchio alla fine della sua vita utile sconnette la batteria.
• Nel caso di trasloco del prodotto in un altro posto o nel caso dell’inattività prolungata mettere
l’interruttore generale nella posizione OFF. In tal modo si prolunga la vita della batteria.
• Verificare se la tensione della rete corrisponde ai valori riportati sull'etichetta del prodotto.
Non collegare l’apparecchio agli adattatori prese e/o alle prolunghe.
• Allo staccare dell’apparecchio dalla presa di corrente non tirare mai il cavo di alimentazione,
bensì prendere la spina in mano e staccarla estraendola.
• Non permettere che l ’apparecchio sia utilizzato come giocatolo.
• Per pulire l’apparecchio non adoperare gli agenti chimici aggressivi e abrasivi.
• L’apparecchio di vostro possesso è adatto solo per uso domestico, non per uso commerciale.
• Non immergere il cavo di alimentazione, la spina o l’apparecchio stesso nell’acqua o in
un altro liquido.
• Non procedere mai alla riparazione dell’apparecchio. Rivolgersi al centro di assistenza
autorizzato. Prevenire gli infortuni dovuti alla manipolazione inadeguata.
• L’apparecchio può essere utilizzato dai bambini d’età superiore a 8 anni. Le persone di
capacità fisiche e mentali ridotte e/o non pratiche possono utilizzare l’apparecchio solo
in presenza delle persone istruite e informate sugli eventuali rischi uniti all’uso. La pulizia
e la manutenzione dell’apparecchio non deve essere effettuata dai bambini se essi sono
d’età inferiore a 8 anni o se non presente una persona esperta. I bambini d’età inferiore
a8anni devono stare lontani dalla portata dell’apparecchio e dal suo cavo di alimentazione.
L’apparecchio non è un giocatolo e come tale deve essere utilizzato.
• Ai bambini d’età inferiore a 3 anni non può essere acconsentito l’accesso all’apparecchio
se non sorvegliati costantemente.
• Il produttore e l’importatore nell’Unione Europea non risponde dei danni causati dal
funzionamento dell’apparecchio quali, per esempio, infortuni, scottature dall’acqua calda,
incendi, danni sugli oggetti etc.
• Qualora il cavo di alimentazione risulti danneggiato, per la sua sostituzione rivolgersi ad
un centro di assistenza specializzato, per prevenire ogni possibile situazione pericolosa.
E’ severamente vietato utilizzare l’apparecchio con il cavo di alimentazione danneggiato.
• L’aspirapolvere robot può essere utilizzato solo con l'adattatore di rete originale fornito
in dotazione. Per prevenire le situazioni pericolose non utilizzare mai un altro tipo
dell'adattatore.
Un eventuale danno causato dal mancato rispetto delle indicazioni previste dal produttore non può essere
coperto dalla garanzia.
Controllare attentamente se sono stati disimballati tutti gli accessori, si consiglia di conservare, per il periodo
di garanzia, il box di cartone originale, il manuale d’uso e il materiale di confezionamento
120 121
VR2110, VR2100 VR2110, VR2100
Page 62
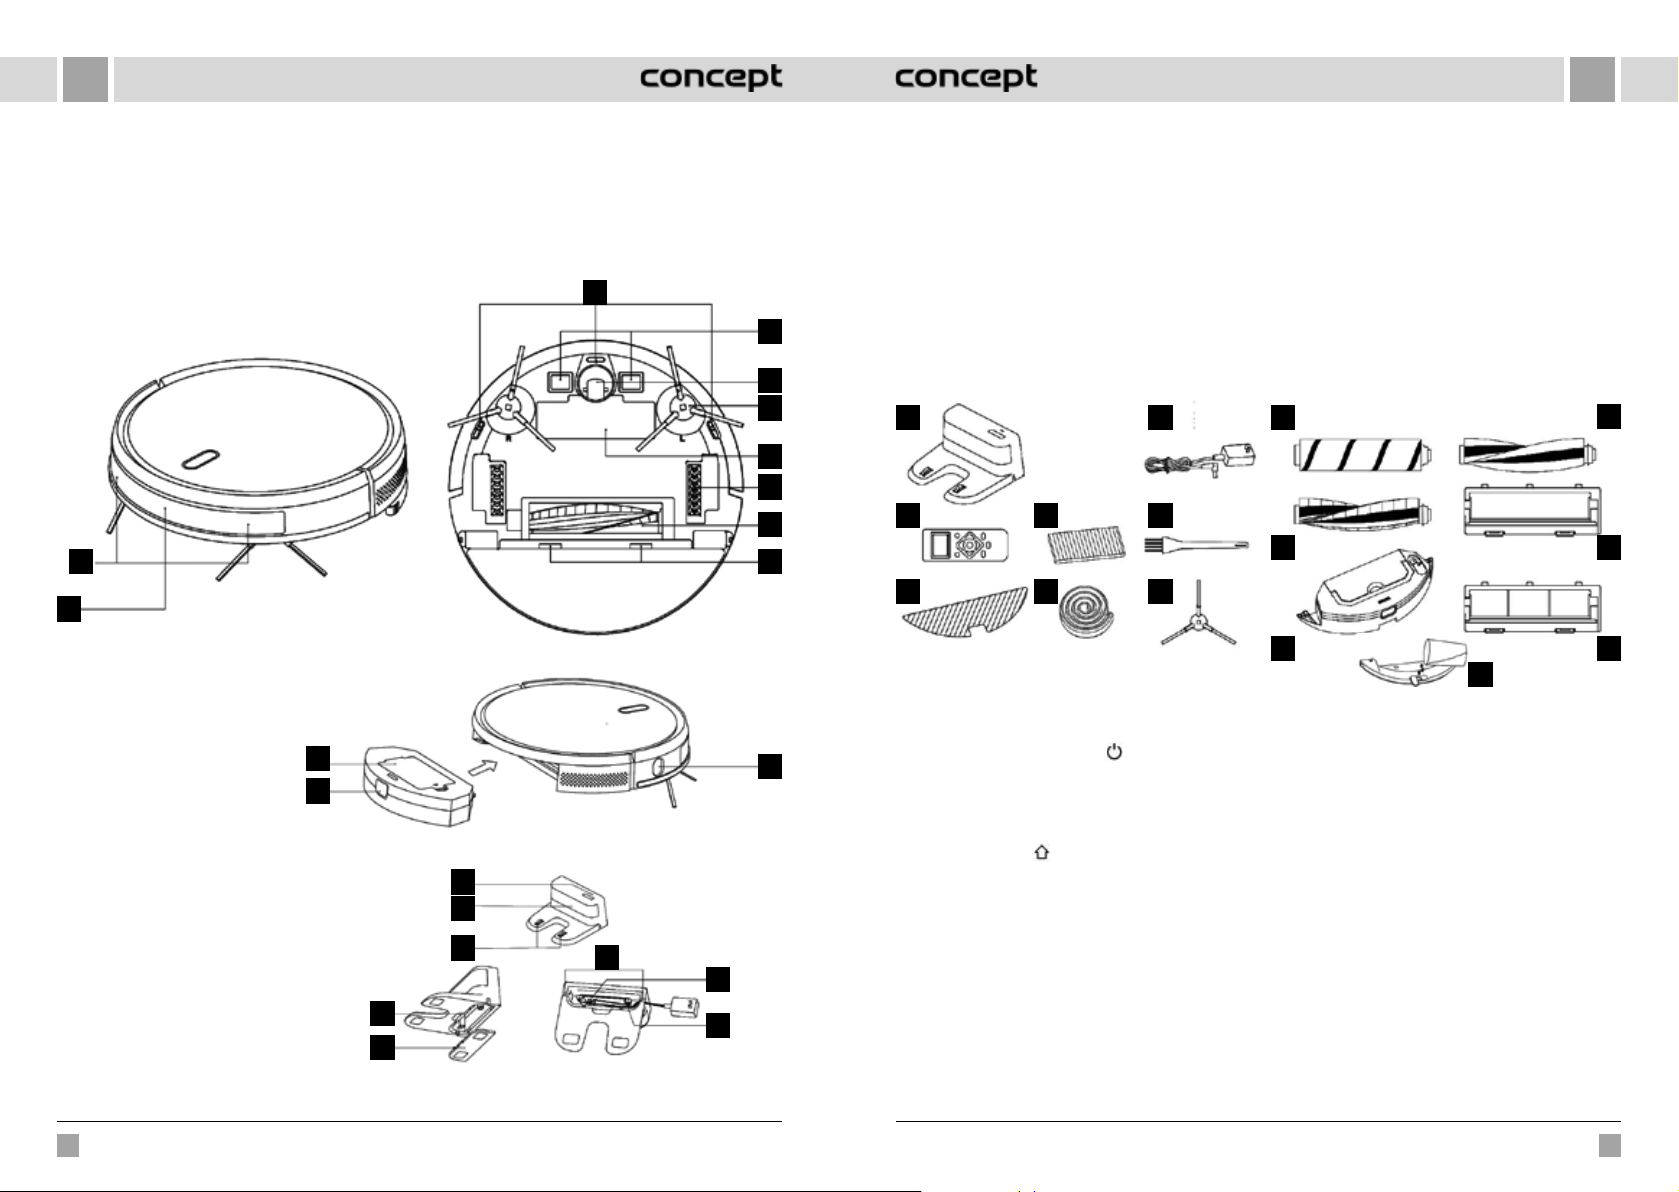
ITIT
DESCRIZIONE DEL PRODOTTO
1 Sensore anticollisione
2 Sensore di ricarica a infrarossi
3 Sensore anticaduta
4 Contatto di ricarica
5 Rotella universale
6 Spazzola laterale
7 Coperchio dell’accumulatore
8 Ruota motrice
9 Spazzola principale
10 Fermo del coperchio della spazzola principale
1
2
1 Coperchio della griglia del filtro
2 Pulsante del contenitore per la raccolta della polvere
3 Sensore parete
1
2
Stazione di ricarica
1 Spia di ricarica
2 Area di trasmissione del segnale
3 Contatti di ricarica della stazione di ricarica
4 Incastro di fermo
5 Lastra di copertura
6 Passaggio del cavo
7 Presa dell'adattatore di alimentazione
8 Perno di avvolgimento
4
5
Lista delle parti
1 N. 1 stazione di ricarica
2 N. 1 telecomando
3 N. 2 tessuti lavapavimenti
4 Filtro HEPA + n. 3 filtri in schiuma (per il modello
VR2100 ci sono 2 filtri in schiuma)
5 N. 1 nastro magnetico
6 N. 1 adattatore
3
7 N. 1 spazzola di pulizia
8 N. 2 spazzole desta e sinistra
4
5
6
1
6
9 N. 1 spazzola HARDFLOOR (solo per il modello
VR2110) AVVERTIMENTO! Non può essere utilizzato
per i tappeti, potrebbe verificarsi la sospensione
della pulizia.
10 N. 1 spazzola CARPET
11 N. 1 contenitore per l’acqua comandato
elettricamente (solo per il modello VR2110)
12 N. 1 spazzola PET (solo per il modello VR2110)
13 N. 1 coperchio della spazzola principale (solo per modello
VR2110) idoneo per le spazzole HARDFLOOR e PET
14 N. 1 coperchio della spazzola principale con filo in
acciaio (idoneo per la spazzola CARPET)
15 N. 1 Contenitore per l’acqua sospeso (solo per il
modello VR2100)
9
12
7
8
10
9
2
3
4
5
7
10
13
8
11
14
15
FUNZIONI CHIAVE
3
1
2
3
6
7
8
Pulizia / accensione e spegnimento
• Premendo brevemente si avvia o ferma la pulizia.
• Premendo per 3 s, l’apparecchio si accende o spegne.
• Premendo per 15 s, si forza lo spegnimento
dell’apparecchio in circostanze di emergenza.
Ricarica / pulizia locale
• Premendo brevemente si avvia la ricarica o si sospende
il funzionamento.
• Premendo a lungo si avvia la pulizia locale.
Spia
• Arancione: Funzionamento normale o ricarica.
• Rossa: Stato anomalo o accumulatore scarico.
• Rosso-arancio: L’apparecchio non è collegato alla rete.
Riavvio della WiFi
• Premere contemporaneamente entrambi pulsanti per
3 s.
INSTALLAZIONE
1. Collegare il cavo di alimentazione e riporre la
parte del cavo in eccedenza nell’apposito vano.
2. Mettere la stazione di ricarica vicino alla parete
ecollegarla.
Nota:
• Garantire lo spazio libero di almeno 0,5 m da entrambi
lati della stazione di ricarica e di almeno 1,5 m davanti
alla stazione di ricarica.
• Se il cavo di alimentazione risulta teso verticalmente
verso il pavimento, l’apparecchio potrebbe farlo uscire
dalla presa di rete e di conseguenza la stazione di
ricarica potrebbe essere spenta.
• In condizioni normali la spia di ricarica è accesa
all'accensione dell’apparecchio e spenta alla ricarica
dell’apparecchio completata.
3. Non spostare senza motivo la stazione di ricarica
enon esporla ai raggi diretti del sole.
Nota: I raggi diretti del sole disturbano il segnale della
stazione di ricarica e per questo motivo l’apparecchio
potrebbe non trovare la stazione di ricarica.
122 123
VR2110, VR2100 VR2110, VR2100
Page 63
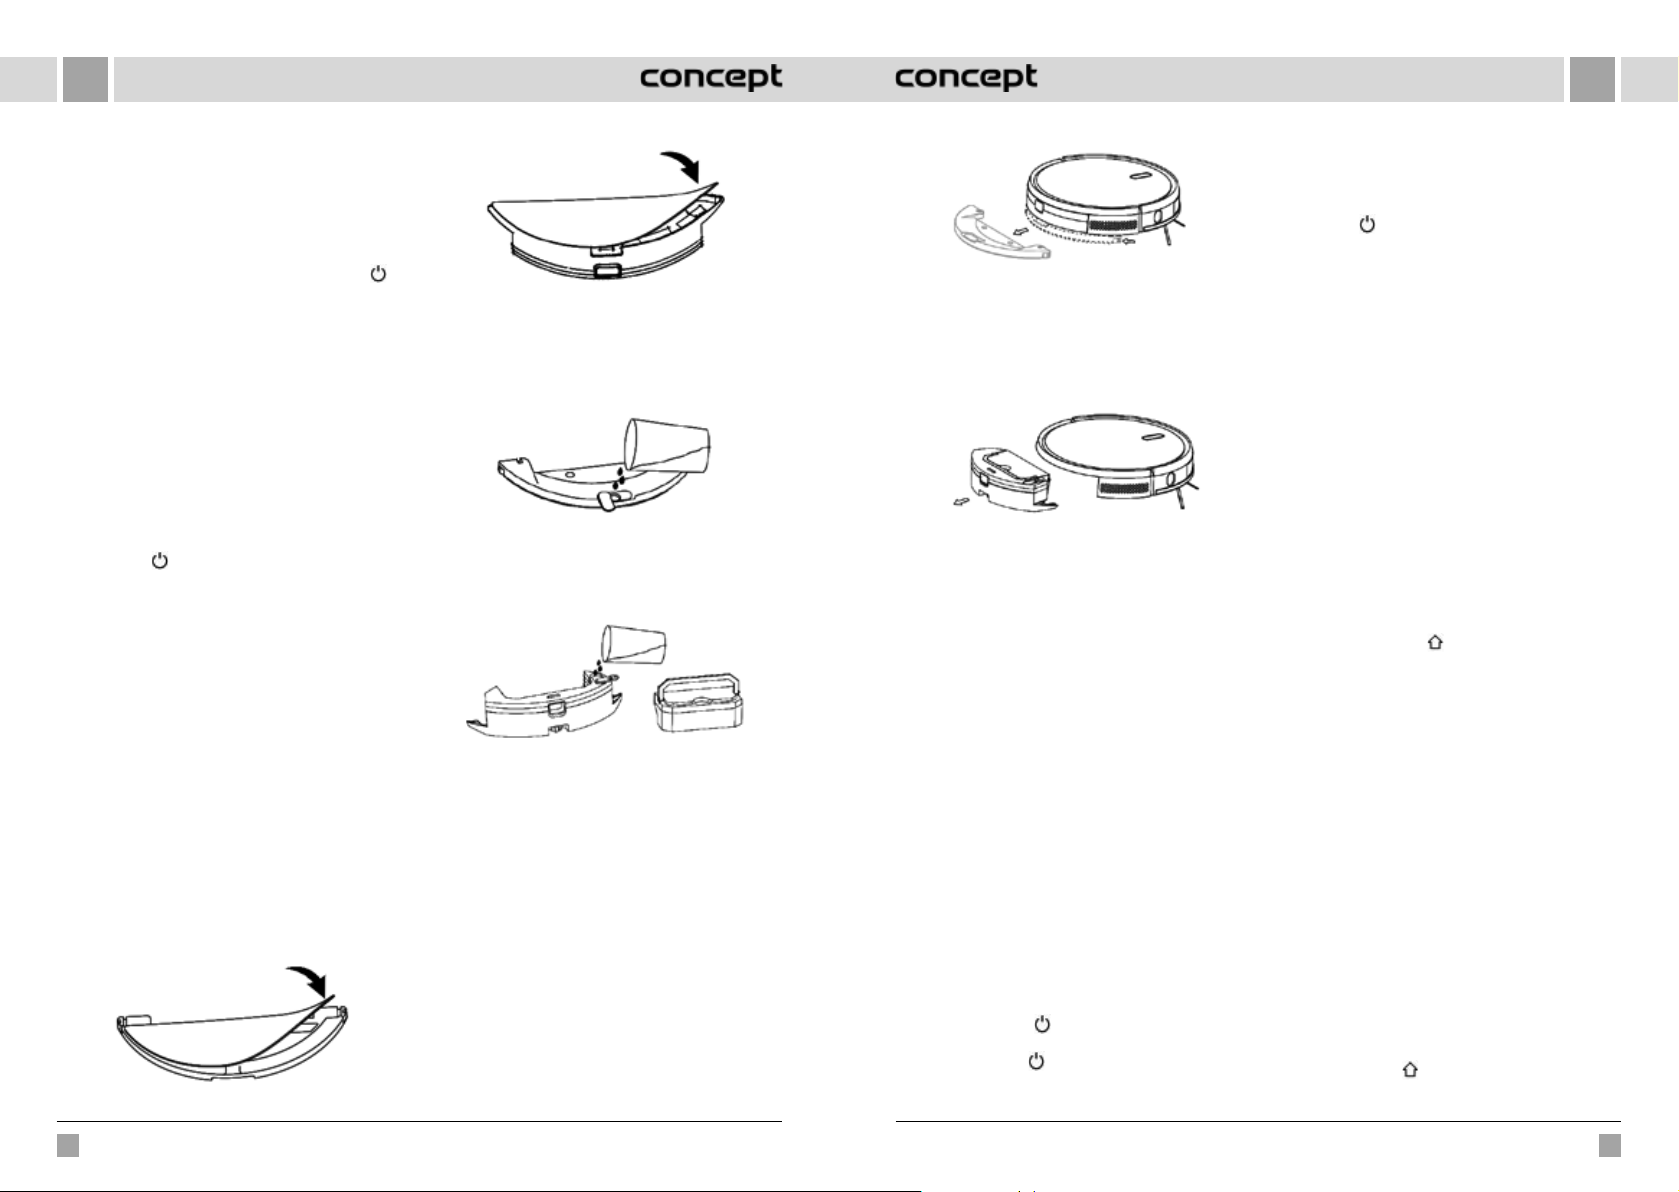
ITIT
4. Montaggio della spazzola laterale
Assicurarsi che l’identificazione della spazzola
laterale sinistra (L) e della spazzola laterale destra
(R) corrisponda all’identificazione L e R sul coperchio
inferiore. Premere le spazzole laterali L e R, sino a che
non si sente uno scatto.
5. Messa in funzione e ricarica
Il robot si accende premendo a lungo il pulsante . Se
la spia di ricarica risulta accesa normalmente, ricaricare
il robot nella stazione di ricarica.
Nota: Se non si riesce ad accendere l’apparecchio a causa
del livello basso di ricarica dell'accumulatone, ricaricare
l’accumulatore nella stazione di ricarica, l’apparecchio
si avvia automaticamente. L’apparecchio può lavorare
normalmente solo se il livello di ricarica dell’accumulatore
è ≥20 %.
6. Connessione dell’applicazione mobile (questo
passo può essere omesso)
Leggere le istruzioni per la connessione della rete Wi-Fi
e collegare l’applicazione mobile.
7. Avvio della pulizia
Una volta acceso il robot, premere brevemente
il pulsante
sul robot stesso oppure avviare la
pulizia tramite l’applicazione mobile (durante l’uso
dell’apparecchio il suo funzionamento può essere
sospeso premendo il pulsante qualsiasi).
Nota:
• Il robot destinato all’uso spazzola non può essere
utilizzato per l’eliminazione dei liquidi.
• Se il livello della ricarica dell’accumulatore è inferiore
al 20%, l’apparecchio non può lavorare. Procedere alla
ricarica dell’accumulatore.
• Qualora il livello di ricarica dell’accumulatore sia
inferiore al 20 %, l’apparecchio torna automaticamente
alla stazione di ricarica.
• Prima di usare l’apparecchio eliminare tutti gli oggetti
dal pavimento (compreso il cavo di alimentazione della
stazione di ricarica), per prevenire i buchi di corrente
edanneggiamenti degli oggetti/fili conduttori.
8. Montaggio del modulo lavapavimenti
a) Applicazione del tessuto lavapavimenti: incollare
il tessuto lavapavimenti dritto sul fondo del
contenitore per l’acqua.
Modello VR2100 - Contenitore per l’acqua sospeso
Modello VR2110 - Contenitore per l’acqua controllato
elettricamente
Nota: Finita la pulizia lavare bene il tessuto lavapavimenti
per mantenerlo in buone condizioni.
b) Caricare il contenitore per l’acqua: aprire il coperchio
e versare l’acqua.
Modello VR2100 - Contenitore per l’acqua sospeso
Prima di caricare l’acqua estrarre il contenitore per
la raccolta della polvere tirando l’apposita maniglia
(VR2110).
Modello VR2110 - Contenitore per l’acqua controllato
elettricamente
c) Montare il modulo:
Modello VR2100: spingere il modulo orizzontalmente
lungo la parte posteriore del robot. Il modulo risulta
montato, quando si sente lo scatto.
Modello VR2110: inserire nel contenitore per l’acqua
il contenitore per la raccolta della polvere e inserire
la maniglia nella fessura. Poi premere e tenere
premuto il pulsante al centro del contenitore ed
inserirlo orizzontalmente lungo la parte posteriore
del robot. Il modulo risulta montato, quando si sente
lo scatto.
9. Estrazione del modulo lavapavimenti
Modello VR2100: Non appena il robot termina il lavoro,
premere i fermi da entrambi lati, estrarre il modulo
lavapavimenti da dietro, svuotare il contenitore per
l’acqua e pulire il tessuto (non muovere né capovolgere
il robot durante la pulizia).
Modello VR2100 - Contenitore per l’acqua sospeso
Modello VR2110: Non appena il robot termina il
lavoro, premere il pulsante al centro del contenitore
per l’acqua, estrarre il modulo lavapavimenti da dietro,
svuotare il contenitore per l’acqua e pulire il tessuto
(non muovere né capovolgere il robot durante la
pulizia)
Modello VR2110 - Contenitore per l’acqua controllato
elettricamente
10. Istruzioni d’uso del modulo lavapavimenti
• Non utilizzare il modulo lavapavimenti se non si ha
sotto controllo.
• Assicurarsi, per motivi di sicurezza, che il modulo
lavapavimenti sia stato tolto se non usato o se
l’apparecchio si trova sotto la ricarica.
• Non tentare di lavare il tappeto.
• Per ottenere il migliore effetto di lavaggio pavimento
rimuovere prima le impurità dal pavimento con una
scopa o con un’aspirapolvere.
• Per integrare l’acqua o pulire il tessuto lavapavimenti
sospendere il funzionamento dell’apparecchio ed
estrarre e rimettere il modulo lavapavimenti seguendo
i passi 8 e 9. Non spostare né capovolgere l’apparecchio
per non causare la lettura errata della posizione o la
perdita della mappa.
• La funzione di lavapavimenti viene utilizzata per
la pulizia accurata della superficie. L’apparecchio
però non può eliminare in modo efficace le impurità
incollate. Esse devono essere rimosse manualmente.
UTILIZZO
ATTIVAZIONE/SPEGNIMENTO:
Premere il pulsante per 3 s, la spia si accende
el’apparecchio parte.
Premere il pulsante per 3 s, quando l’apparecchio
si trova nel regime di standby, la spia e l’apparecchio si
spengono.
NOTA: L’apparecchio non può essere spento se sotto la
ricarica.
PULIZIA/SOSPENSIONE TEMPORANEA
Una volta avviato l’apparecchio premere brevemente
il pulsante
sull’apparecchio stesso o avviare
l’apparecchio tramite l’applicazione mobile (premendo
un pulsante qualsiasi il funzionamento dell’apparecchio
può essere sospeso).
Nota:
• Il robot aspirapolvere non può essere utilizzato per
l’eliminazione dei liquidi.
• Se il livello della ricarica dell’accumulatore è inferiore
al 20%, l’apparecchio non può lavorare. Procedere alla
ricarica dell’accumulatore.
• Qualora il livello di ricarica dell’accumulatore sia
inferiore al 20 %, l’apparecchio torna automaticamente
alla stazione di ricarica.
• Prima di usare l’apparecchio eliminare tutti gli oggetti
dal pavimento (compreso il cavo di alimentazione della
stazione di ricarica), per prevenire i buchi di tensione
edanneggiamenti degli oggetti/fili conduttori.
RICARICA
Regime automatico: Terminato il lavoro, l’apparecchio
torna automaticamente alla stazione di ricarica.
Regime manuale: Quando l’apparecchio si trova nelle
condizioni di sospensione temporanea premendo
brevemente il pulsante
si avvia la ricarica oppure
l’apparecchio può essere ricaricato gestendolo tramite
l’applicazione mobile. Quando l’apparecchio è carico, la
spia comincia a lampeggiare.
Nota: Se l’apparecchio non trova la stazione di ricarica,
torna automaticamente in posizione di partenza. In
tal caso portare l’apparecchio alla stazione di ricarica
manualmente.
NASTRO MAGNETICO
I nastri magnetici possono essere posizionati in modo da
delimitare le zone che non vanno pulite (per esempio il
bagno, la cucina etc.).
Nota: fissare il nastro magnetico sul pavimento in modo
che non si muova. Nel caso contrario verrà compromessa
la sua efficacia.
REGIME DI PULIZIA
Una volta avviato l’apparecchio seguirà il programma di
pulizia impostato muovendosi in curve per pulire in modo
efficace tutta la superficie in tutte le stanze previste.
Terminata la pulizia l’apparecchio torna alla stazione di
ricarica e si ricarica automaticamente.
PULIZIA LOCALE
Premendo il pulsante
per 3 s il robot si localizza, pulisce
la zona in raggio d’azione 1,5 m e terminata la pulizia
124 125
VR2110, VR2100 VR2110, VR2100
Page 64
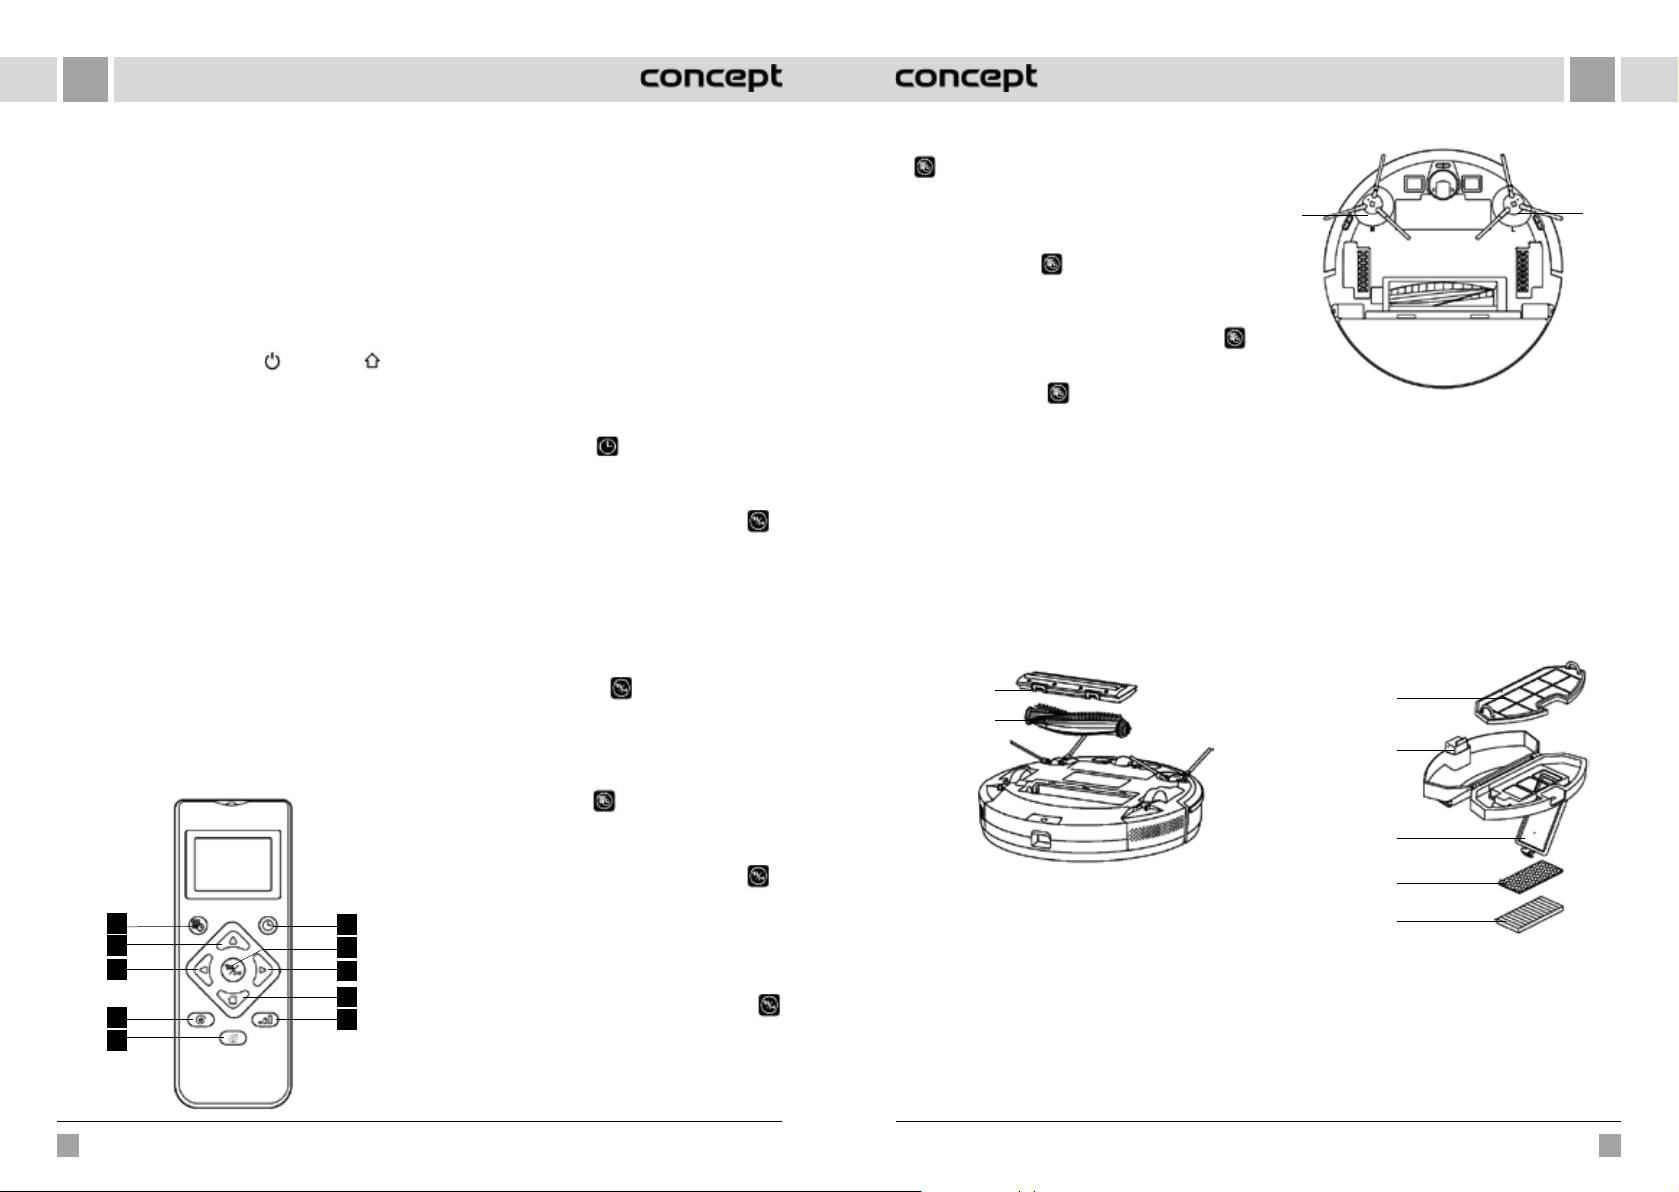
ITIT
torna automaticamente alla posizione di partenza e cessa
di lavorare.
PROGRAMMAZIONE DELLE PULIZIA
Il tempo fisso della pulizia può essere impostato tramite
l’applicazione mobile. L’apparecchio comincia a pulire
automaticamente all’ora impostata e terminato lavoro
torna alla stazione di ricarica.
RIAVVIO DELLA WIFI
Se non è possibile collegarsi all’apparecchio tramite
il cellulare per motivi di cambio della configurazione
del router e della password o per altri motivi, premere
contemporaneamente il pulsante
3 s, fino a che non si sente il messaggio vocale „WiFi has
been reset“ (WiFi è stata resettata) e la spia non si accende
di colore blu violaceo lampeggiando lentamente.
REGIME SILENZIOSO
I messaggi acustici del robot possono essere accesi
ospenti tramite l’applicazione mobile.
IMPOSTAZIONE DELLA POTENZA DI ASPIRAZIONE.
La potenza di aspirazione può essere impostata tramite
l’applicazione mobile a diversi livelli: silenzioso, standard
o alto.
Quando l’apparecchio rileva il tappeto automaticamente
aumenta la potenza di aspirazione al livello massimo.
AVVERTIMENTO - il tappeto viene rilevato correttamente
solo con la spazzola Carpet.
IMPOSTAZIONE DELLA PORTATA D’ACQUA (solo per
il contenitore per l’acqua comandato elettricamente,
modello VR2110)
La portata d’acqua può essere impostata tramite
l’applicazione mobile a diversi livelli: basso, standard
oalto.
UTILIZZO DEL TELECOMANDO
1
2
3
e il pulsante per
6
7
8
9
4
10
5
1. Programmazione della pulizia
2. Movimento avanti
3. Girata a sinistra
4. Pulizia locale TURBO
5. Avvio/sospensione della ricarica
6. Pulizia automatica/pausa
7. Pulizia/pausa
8. Girata a destra
9. Pulizia perimetrale
10. Impostazione della potenza di aspirazione / della
portata d’acqua
Nota:
Se si vuole garantire l’efficienza di tutte le
impostazioni, il telecomando deve essere vicino eorientato
verso la parte anteriore del robot aspirapolvere.
Impostazione dell’ora
1. Premendo il pulsante sul telecomando si entra
nell’impostazione dell’ora, sul display LCD lampeggia
il simbolo di domenica.
2. Premendo il pulsante sinistro o destro si sceglie il
giorno della settimana e premendo il pulsante il
giorno scelto viene confermato, poi il display LCD passa
automaticamente all’impostazione dell’ora.
3. Premendo i pulsanti indicanti la direzione su e giù
s’imposta l’ora e premendo i pulsanti indicanti la
direzione a sinistra e a destra si passa all’impostazione
dei minuti.
4. Una volta impostata l’ora attuale orientare il
telecomando verso la parte anteriore dell’apparecchio
e poi premere il pulsante per confermare tutte le
impostazioni del tempo effettuate. Nel caso contrario
l’impostazione rimane invalida.
5. In questo modo si completa l’impostazione dell’ora per
il telecomando e per il robot aspirapolvere.
Piano di pulizia
1. Premendo il pulsante
nella funzio ne della programmazione, sul display LCD
lampeggia il simbolo di domenica.
2. Premendo il pulsante sinistro o destro si sceglie il
giorno della settimana e premendo il pulsante il
giorno scelto viene confermato, poi il display LCD passa
automaticamente all’impostazione dell’ora.
3. Premendo i pulsanti indicanti la direzione su e giù
s’imposta l’ora e premendo i pulsanti indicanti la
direzione a sinistra e a destra si passa all’impostazione
dei minuti. Poi orientare il telecomando verso la parte
anteriore dell’apparecchio e premendo il pulsante
confermare l’impostazione del programma per il robot
aspirapolvere.
4. Terminata l’impostazione di un programma il
telecomando passa automaticamente alla successiva
impostazione del programma. Se non si vuole
sul telecomando si entra
continuare a fare l’impostazione, premere il pulsante
per terminare l’operazione o aspettare 10 s, poi il
regime d’impostazione termina automaticamente.
5. In questo modo si completa l’impostazione dell’ora per
il telecomando e per il robot aspirapolvere.
Cancellazione della programmazione della pulizia
1. Premere il pulsante
LCD lampeggia il sim bolo di domenica e si v isualizzano
i simboli per i giorni della settimana programmati.
2. Premendo il pulsante sinistro e destro si sceglie il
giorno della settimana e premendo il pulsante
per 3 s il programma si cancella. Si può scegliere un
altro giorno programmato da cancellare, oppure
premere il pulsante per terminare l’operazione
oaspettare 10 s, poi il regime d’impostazione termina
automaticamente.
sul telecomando, sul display
MANUTENZIONE GIORNALIERA
Spazzola principale (da pulire regolarmente)
1. Girare l’apparecchio e premere il fermo sul coperchio
della spazzola principale per poter estrarla.
2. Eliminare la polvere dal vano interno e dall’interno
della spazzola principale con un apposito spazzolino,
pulire la spazzola principale.
3. Ricomporre la spazzola principale e spingere il
coperchio fino a che il fermo entri nella propria sede.
Fermo
Spazzola
principale
La spazzola laterale (da pulire regolarmente)
1. Girare l’apparecchio e tirare la spazzola laterale verso
alto.
2. Eliminare dalla spazzola capelli ed altre impurità
erimetterla sul posto.
3. Assicurarsi che l’identificazione della spazzola laterale
sinistra (L) e della spazzola laterale (R) corrisponda
all’identificazione L e R sul coperchio inferiore.
Premendo sulle spazzole laterali L e R esse entrano
nella propria sede.
Nota: Cambiare le spazzole laterali ogni 3 - 6mesi, per
garantire la loro efficacia.
R - spazzola
laterale destra
Il contenitore per la raccolta della polvere e la griglie
del filtro (da pulire regolarmente)
1. Premere il pulsante e il contenitore per la raccolta
polvere estrarlo da dietro.
2. Aprire il contenitore per la raccolta polvere e pulirlo.
Pulizia della griglia del filtro (da pulire regolarmente)
1. Dopo l’uso prolungato estrarre la griglia del filtro, il
filtro in schiuma e il filtro HEPA.
2. Pulire la griglia del filtro. Sciacquare il filtro in schiuma
e il filtroHEPA sotto l’acqua corrente.
3. Strofinare i singoli pezzi e lasciarli asciugare per bene.
4. Una volta asciugati rimontarli in ordine corretto: griglia
- filtro in schiuma - filtro HEPA.
Griglia del filtro
(filtro grosso)
Pulsante
Coperchio
del filtro
Filtro
schiuma
Filtro HEPA
Nota:
• Sciacquare la griglia del filtro sotto l’acqua pulita senza
detergente.
• Non utilizzare né un pennello né le dita per pulire la
griglia del filtro.
• Lasciare la griglia del filtro asciugare all’aria per almeno
24 ore.
• Sostituire la griglia del filtro ogni 3 - 6 mesi.
L - spazzola
laterale sinistra
126 127
VR2110, VR2100 VR2110, VR2100
Page 65
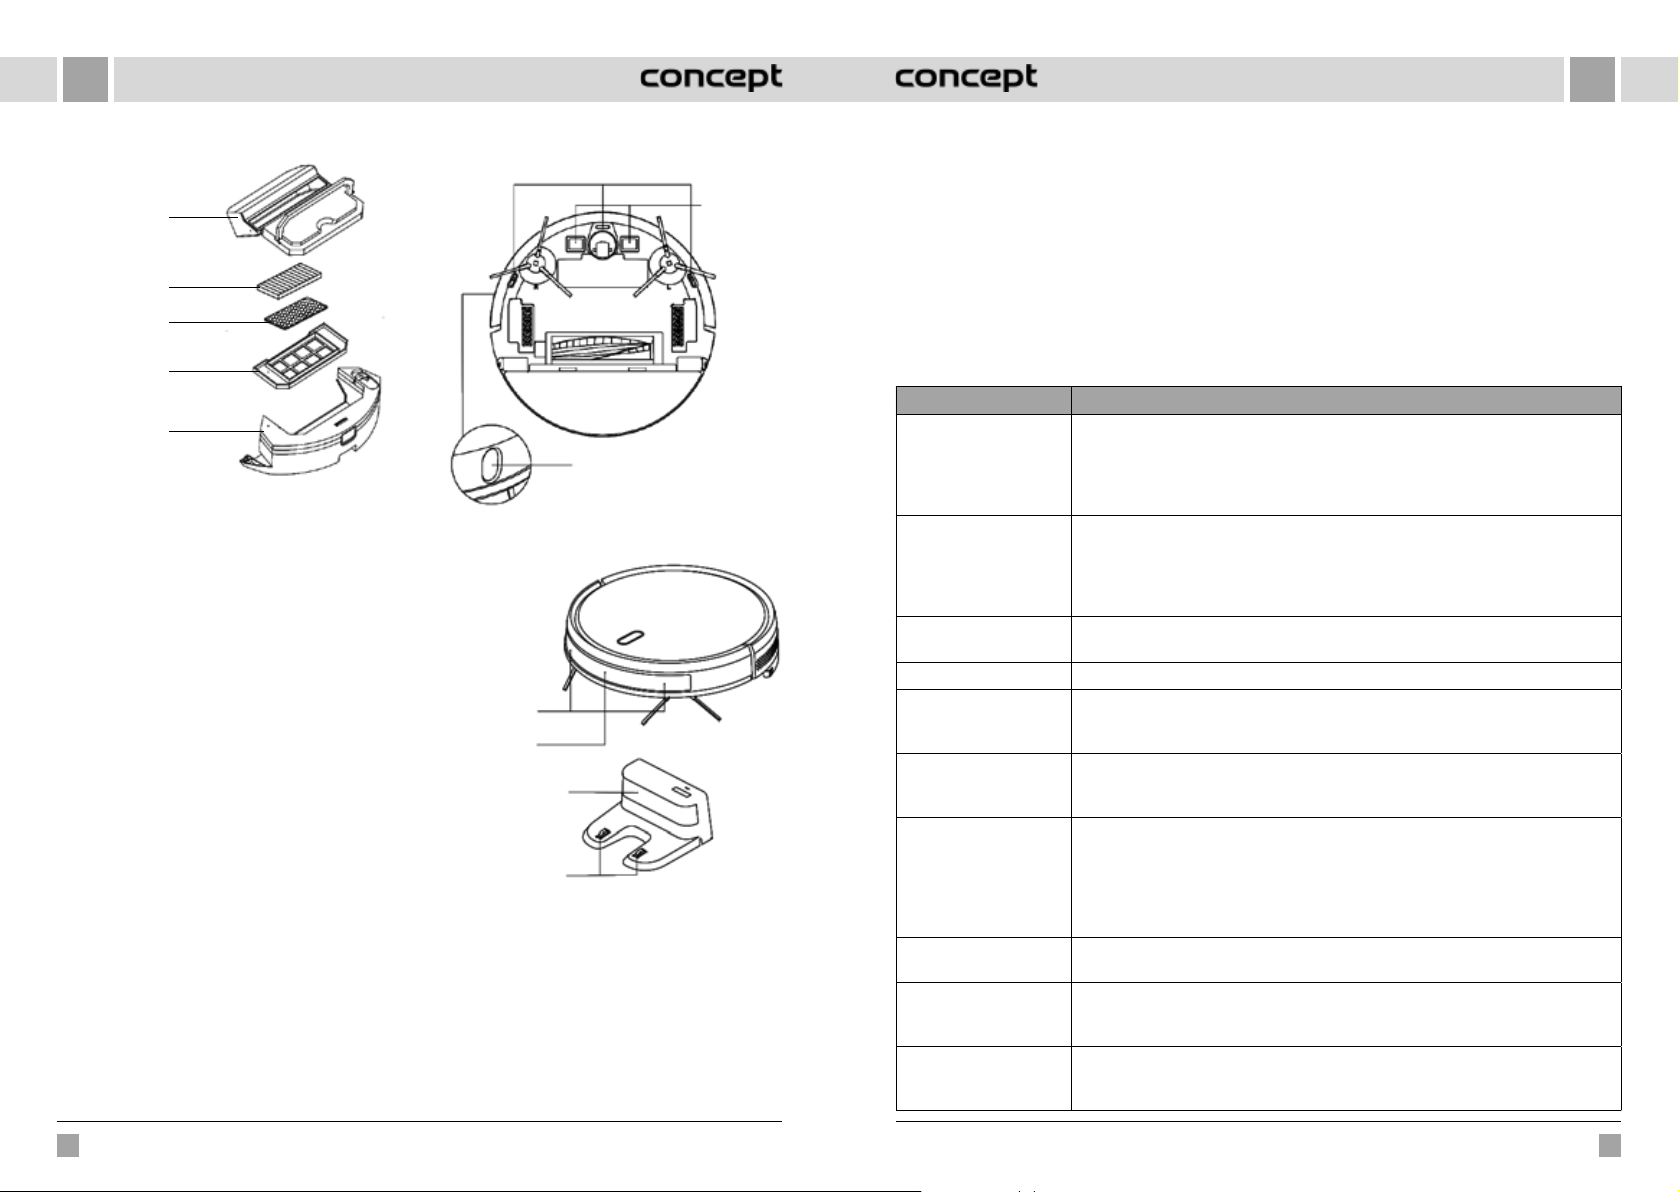
ITIT
Pulizia del filtro (da pulire regolarmente)
Contenitore
per la raccolta
della polvere
Filtro HEPA
Filtro
schiuma
Griglia filtrante
(filtro grosso)
Contenitore
per l’acqua
Contenitore per l’acqua comandato elettricamente
Modulo lavapavimenti (pulire dopo ogni uso)
1. Staccare il tessuto lavapavimenti, svuotare il
contenitore per l’acqua.
2. Pulire il tessuto lavapavimenti, asciugarlo insieme
con il contenitore per l’acqua. Per il modello VR2110
estrarre prima il contenitore per la raccolta polvere
epoi svuotare il contenitore per l’acqua.
Sensori (da pulire regolarmente)
Pulire i sensori con un panno morbido in modo seguente:
1. Pulire i sensori lungo il lato a destra.
2. Tre sensori anticaduta nella parte bassa
dell’apparecchio.
3. Sensore anticollisione a infrarossi nella parte anteriore
dell’apparecchio.
4. Dispositivo di protezione contro gli infortuni da
corrente elettrica e contatti per la stazione di ricarica
si trovano nella parte bassa dell’apparecchio (spegnere
l’apparecchio durante la pulizia).
5. Area di trasmissione del segnale della stazione di
ricarica.
Sensore anticaduta
Sensore TOF
Sensori (da pulire ogni mese)
Sensore
anticollisione
Sensore di ricarica
a infrarossi
Area di trasmissione
del segnale
Contatti di ricarica della
stazione di ricarica
Contatto di
ricarica
Accumulatore
• L’apparecchio è munito degli accumulatori agli ioni di
litio ad alta potenza. Se si vogliono mantenere le alte
prestazioni dell’accumulatore, utilizzare l’apparecchio
completamente carico.
• Qualora si preveda il fermo prolungato
dell’apparecchio, spegnerlo e immagazzinarlo in modo
sicuro. Ricaricare l’apparecchio fermo ogni tre mesi,
per prevenire il danneggiamento degli accumulatori in
seguito allo scarico eccessivo.
PROBLEMI COMUNI
Problema Soluzione
Non si riesce ad accendere
l’apparecchio
Non si riesce a ricaricare
il robot
Non si riesce a ricaricare
il robot
Comportamento anomalo Spegnere il robot e riavviarlo.
L'apparecchio emette il
suono strano durante il
funzionamento
La capacità di aspirazione
si riduce e dall’apparecchio
esce la polvere
Non si riesce a collegare la
rete WiFi
La pulizia programmata
non è stata fatta
Il robot consuma l’energia
se posizionato alla stazione
di ricarica?
Per le prime tre volte
il robot va caricato per
16ore?
• L’apparecchio potrebbe avere l’accumulatore quasi scarico, mettere il robot nella stazione di
ricarica ed allinearlo secondo i contatti della lastra, l’apparecchio si avvia automaticamente
(se il robot è spento completamente, si avvia solo dopo che sta per un po’ sotto la ricarica).
• Non utilizzare l’apparecchio se la temperatura dell’ambiente è inferiore allo 0 °C o superiore
ai 50 °C. Utilizzare l’apparecchio alla temperatura che rientra nei limiti 0-40 °C.
• Spostare il robot dalla stazione di ricarica, controllare se si accende la spia della stazione di
ricarica e controllare se entrambe le estremità dell’adattatore di ricarica della stazione di
ricarica sono collegati correttamente.
• Nel caso del mancato contatto pulire le superfici di contatto della stazione di ricarica
eicontatti di ricarica sul robot oppure girare la spazzola laterale da parte.
Il robot è troppo lontano dalla stazione di ricarica, posizionarlo nella vicinanza della stazione
di ricarica e riprovare.
Sulla spazzola principale, la spazzola laterale o sulla ruota possono essere avvolte delle
impurità, spegnere il robot ed eliminare le impurità.
• Il contenitore per la raccolta della polvere è pieno. Svuotarlo e pulirlo.
• La griglia del filtro è otturata. Pulirla o sostituirla.
• La spazzola principale è avvolta dalle impurità.
• Cattivo segnale della rete WiFi. Controllare se la copertura del segnale WiFi è sufficiente.
• La rete WiFi è collegata in modo inusuale. Operare il riavvio della rete WiFi, scaricare
l’applicazione più recente e provare a collegarsi di nuovo.
• La password non è stata inserita correttamente.
• E’ a disposizione il router per la gamma di frequenza 5G, il robot aspirapolvere è attrezzato
solo per la gamma di frequenza 2,4G.
La pulizia programmata può partire solo se il livello di ricarica dell'accumulatore è pari
osuperiore al 30 %.
Il robot consuma la piccola quantità dell’energia, se è posizionato permanentemente alla
stazione di ricarica e il ciò permette la massima prestazione dell’accumulatore.
L’accumulatore agli ioni di litio può essere utilizzato subito dopo la ricarica e non ha l’effetto
memoria.
Aggiornamento del firmware
Il firmware si aggiorna tramite l’applicazione mobile.
Effettuare l’aggiornamento ogniqualvolta si riceva
l’informazione su un firmware nuovo. All’aggiornamento
del firmware il livello di ricarica dell’accumulatore
dovrebbe essere ≥50 %, quindi l’apparecchio dovrebbe
trovarsi alla stazione di ricarica.
128 129
VR2110, VR2100 VR2110, VR2100
Page 66
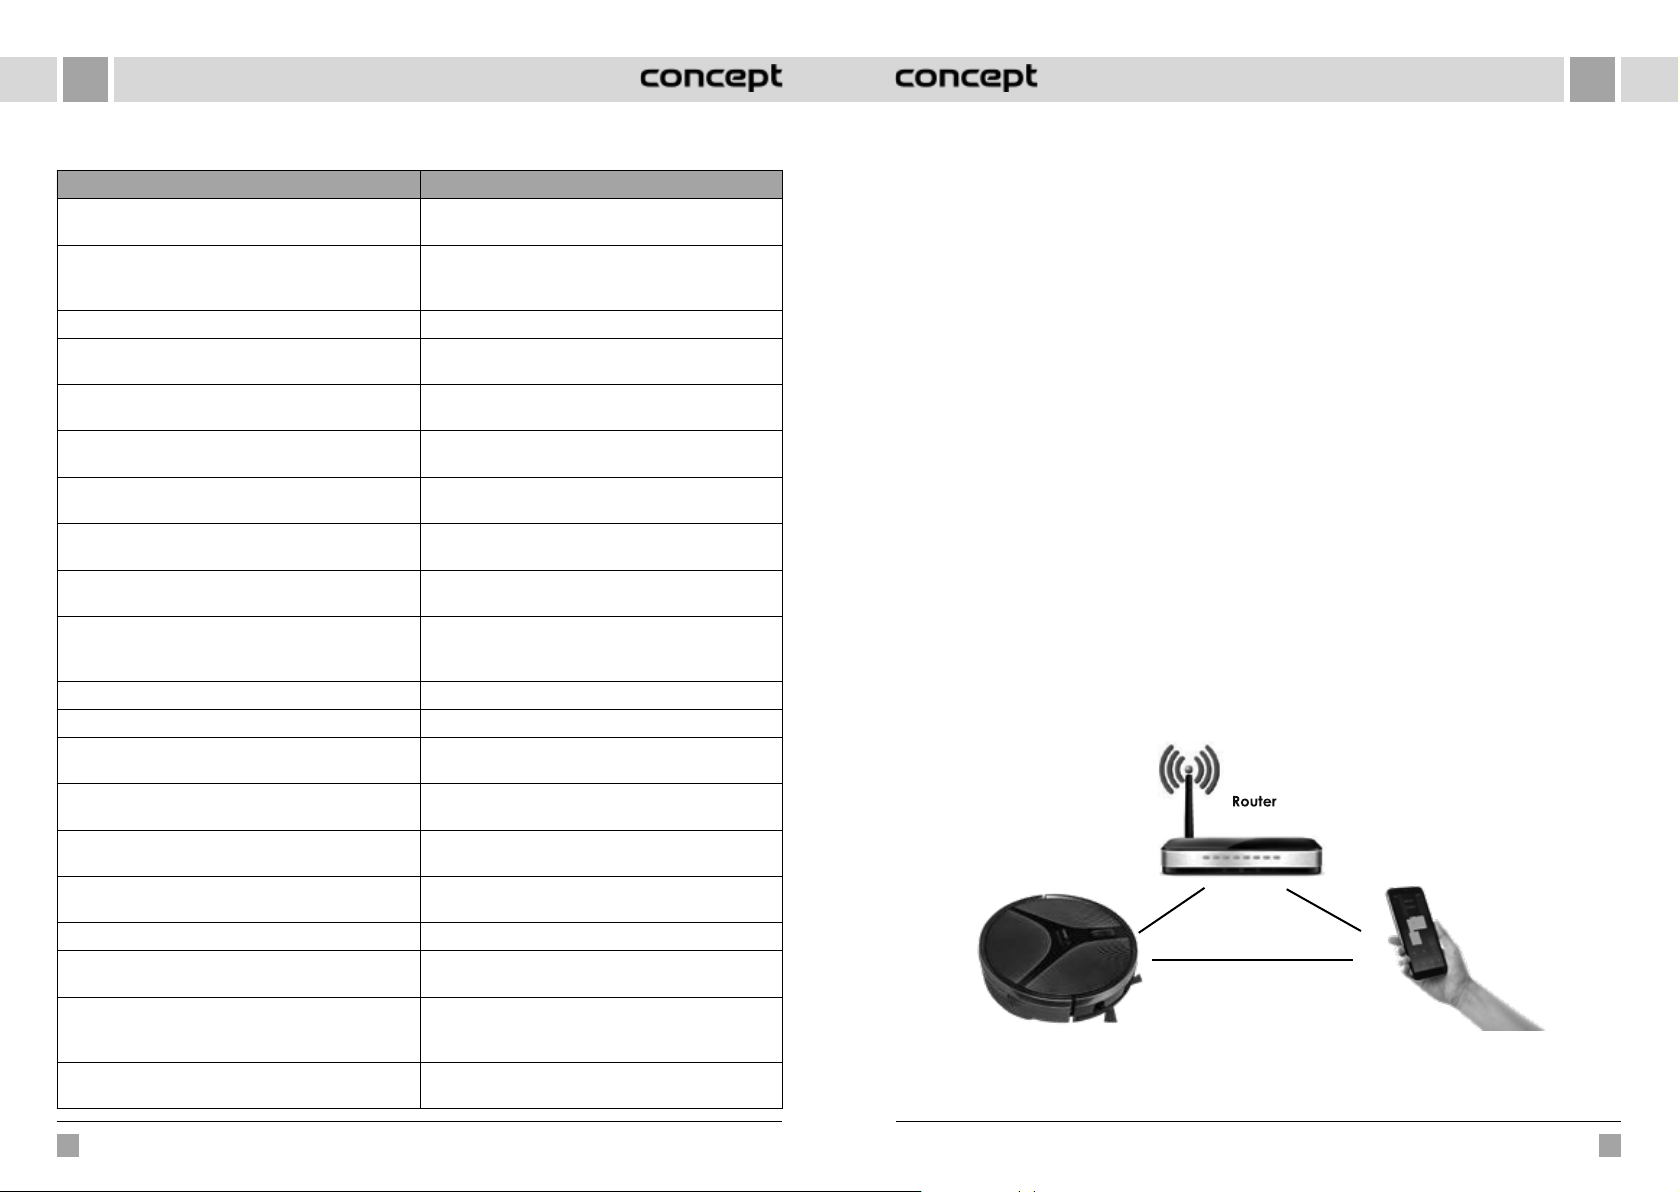
ITIT
SOLUZIONE DEI PROBLEMI
Messaggi acustici Soluzione
Errore 1: Oh dear! I cannot find the dust collector La pulizia è stata avviata con l’apparecchio senza il
Errore 2: Please check if the radar on top has been
covered or blocked
Errore 3: Please place me in a new location and try again Il robot va posizionato in una posizione nuova.
Errore 4: Please scrub the cliff sensor, and restart me from
a new location
Errore 5: Please scrub the front sensor, and restart me
from a new location
Errore 6: Please scrub the right-hand sensor, and restart
me from a new location
Errore 7: Please scrub the radar housing on top, and
restart me from a new location
Errore 8: Please check if the bumper has been blocked in
some way
Errore 9: Master, please clean the dust container and filter Il contenitore per la raccolta della polvere è pieno oppure
Errore 10: Dust container has been removed, please clean
the container and filter
Errore 11: I'm stuck, please help me! Il robot si è bloccato da qualche parte.
Errore 12: Please place me correctly! Il robot è inclinato, è da posizionare correttamente.
Errore 13: Please check if my wheels have become
blocked somewhere
Errore 14: Please check if the main brush has become
stuck
Errore 15: Please check if the side brushes have become
stuck
Errore 16: What's going on? Where is the docking station? La stazione di ricarica non è stata trovata o non ècollegata
Errore 17: Oh dear! Program error, please restart me Lo stato anomalo di causa sconosciuta, riavviare il robot.
Errore 18: Error encountered initiating shutdown Il robot avvisa l’utente e si spegne o ricarica
Errore 19: Low battery, please recharge Il livello dell’accumulatore è troppo basso, il robot non si
Errore 20: To shut me down, please place me away from
the docking station
contenitore per la polvere montato.
Il sensore superiore è coperto o è posizionato in un
ambiente aperto (nella zona di 6x6 m
ostacolo).
Il sensore anticaduta è coperto o posizionato in alto.
Il sensore anticollisione a infrarossi è sporco o coperto.
Il sensore della parete è sporco o coperto.
Il sensore anticollisione radar è sporco o coperto.
Il sensore dei bordi o anticollisione è bloccato.
occorre sostituire la griglia del filtro.
Segnalato l’errore 9 l’utente aveva estratto il contenitore
per la raccolta della polvere e di conseguenza scatta
l’errore 10.
La ruota motrice è bloccata o avvolta dalle impurità.
La spazzola principale è avvolta dalle impurità o bloccata.
La spazzola laterale è avvolta dalle impurità o bloccata.
alla rete.
automaticamente.
trova nella stazione (il livello di ricarica dell’accumulatore
è inferiore al 10 %).
Durante la ricarica nella stazione di ricarica il robot si
èspento.
2
non si trova alcun
COLLEGAMENTO SENZA FILI E COMPATIBILITÀ
• La società Jindřich Valenta - CONCEPT non può essere resa responsabile in alcun modo dei danni accidentali, indiretti
o consequenziali, né della perdita dei dati o dei danni causati dalla diffusione delle informazioni avvenuta in seguito
alla comunicazione tramite le tecnologie senza fili.
• La comunicazione senza fili funzionante in modo perfetto non può essere garantita al 100% per tutti i dispositivi
Smart e per tutte le reti Wifi (router). Considerata la varietà dei dispositivi sul mercato possono verificarsi i casi, in cui
la natura o la specifica del rispettivo dispositivo Smart o della rete Wifi (router) non permettono il collegamento, oil
collegamento è disturbato. L’efficienza della comunicazione senza fili è inoltre influenzata da una serie dei fattori,
compresa la configurazione hardware esoftware. La comunicazione tra il robot e la rete Wifi a cui si vuole fare il
collegamento, può essere compromessa da altre reti Wifi, che possono essere sintonizzate sullo stesso canale e di
conseguenza disturbare la comunicazione (per esempio nei quartieri con alta densità di popolazione, nei condomini
etc.). I tali fatti non possono essere considerati la causa della contestazione dell’apparecchio.
• L’applicazione è posseduta ed esercitata da un terzo soggetto (di cui in poi per brevità solo „Soggetto") diverso dalla
società Jindřich Valenta - CONCEPT (di cui in poi per brevità solo „Venditore"). Il Venditore non passa al soggetto alcuni
dati personali. Al momento della registrazione all’applicazione il cliente passa i dati direttamente al Soggetto che
diventa il Titolare del trattamento dati. L’applicazione e la relativa tutela dei dati personali sono soggette alle regole
del Soggetto.
Compatibilità:
Sistema operativo del dispositivo Smart - Android 5.0 e superiore
- IOS 9.0 e superiore
Rete Wifi - 2,4 GHz
- protezione WPA1 e WPA2 (consigliata WPA2)
AVVERTIMENTO: L’apparecchio non può essere utilizzato sulle reti Wifi protette dal protocollo IEEE 802.1X (solitamente le
reti Wifi aziendali).
CONTROLLO TRAMITE L’APPLICAZIONE
Prima di poter gestire l’apparecchio tramite l'applicazione, sarà necessario collegarlo con il Vostro cellulare e permettergli
accesso alla Vostra rete WiFi.
Distanza consigliata al momento di impostazione: meno di 4 metri
Assicurarsi che il robot aspirapolvere, router e il rispettivo cellulare siano vicini uno rispetto all’altro in modo che possa
avvenire l’accoppiamento.
130 131
VR2110, VR2100 VR2110, VR2100
Page 67
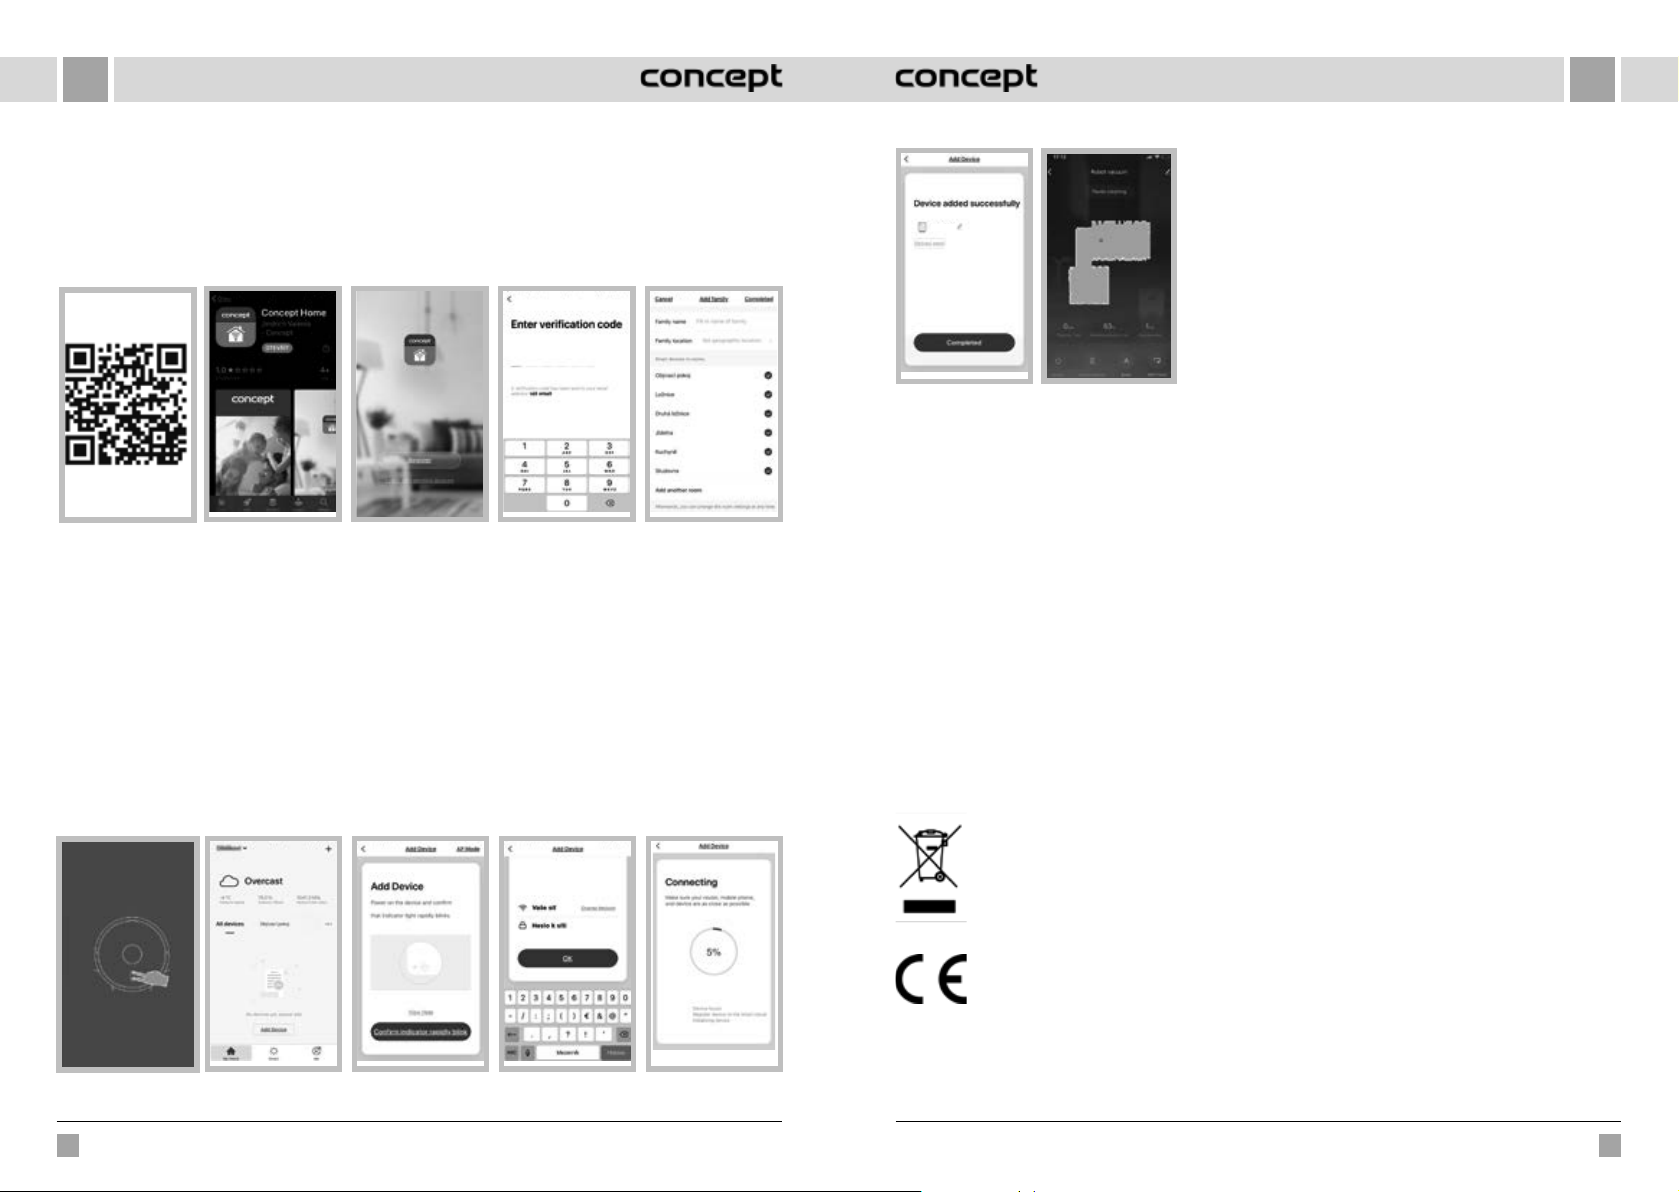
ITIT
Scarico e installazione dell’applicazione
1. Fare lo scan del codice QR di cui sot to (fig. 1) oppure cercare l’applicazione „Concept Home“ su Google Play oppure
nell’App Store e scaricarla nel proprio cellulare (fig. 2).
2. Se si ha già l’applicazione Concept Home, aprirla, effettuare login e seguire le istruzioni per l’accoppiamento.
3. Nel caso di utente nuovo effettuare prima la registrazione (fig. 3). Seguire le istruzioni fino all’inserimento del codice
di verifica e completare la registrazione (fig. 4).
4. Continuare a procedere secondo le istruzioni e creare una famiglia (fig. 5).
5.
fig. 1
Le istruzioni per l’accoppiamento
1. Prima di procedere all’accoppiamento controllare il collegamento con la rete WiFi.
2. Prima di procedere al collegamento assicurarsi che l’apparecchio si trovi nel regime di standby. Premere
contemporaneamente per almeno 3 secondi entrambi pulsanti (fig 6), fino a che il robot non comincia a lampeggiare
e non si sente il messaggio acustico „WiFi lost please follow the App instruction for reconnection“ (WiFi persa, seguire
le istruzioni per ripristinare la connessione). Controllare se il telefono è connesso alla stessa rete WiFi alla quale si
vuole connettere il robot.
3. Nell’applicazione premere il tasto “+” o „Add device“ (fig. 7) per aggiungere un nuovo dispositivo.
4. Confermare con „Confirm indicator rapidly blink“ (fig. 8).
5. Scegliere la rete WiFi alla quale l’apparecchio va connesso ed inserire la password (fig. 9).
6. Parte il processo di impostazione che può durare qualche minuto (fig. 10).
7. Il rispettivo cellulare proverà ad accoppiarsi con la rete WiFi scelta.
8. Una volta l’impostazione risulta riuscita (fig. 11) premere „Completed“ ed entrare nell’interfaccia per la gestione
dell’apparecchio (fig. 12).
fig. 2 fig. 3 fig. 5fig. 4
Problemi di accoppiamento
• Verificare la correttezza della password inserita della rete
WiFi utilizzata.
• L’apparecchio supporta solamente la rete WiFi 2,4 Ghz.
Concept
fig. 11
Regimi dell’applicazione
Si può scegliere tra i regimi di pulizia AUTO (Automatico/ZIGZAG), Locale (Circolare), Angolare (EDGE) e DOCK (ricerca
della stazione di ricarica).
fig. 12
• Il router è sovraccaricato per il collegamento di tanti altri
dispositivi.
• Provare a collegarsi manualmente alla rete WiFi (fig.10).
ASSISTENZA
La manutenzione più impegnativa e/o la riparazione che richiede l’intervento sulle parti interne dell’apparecchio devono
essere fatte esclusivamente dal centro di assistenza autorizzato o da una persona esperta e qualificata.
PROTEZIONE DELL’AMBIENTE
• Riciclare imballi e prodotti vecchi, alla fine di loro ciclo di vita.
• La scatola in cui si acquista il prodotto può essere recuperata come rifiuto differenziato.
• I sacchetti in polietilene (PE) possono essere recuperati come rifiuto differenziato.
Riciclaggio del prodotto alla fine della sua vita utile
L’apparecchio è identificato in conformità alla Direttiva 2012/19/EU del Parlamento europeo e del
Consiglio sui rifiuti di apparecchiature elettriche ed elettroniche (RAEE). Il simbolo riportato sul prodotto
indica che il prodotto stesso non può essere smaltito come rifiuto urbano. Va portato in un centro di
raccolta dei rifiuti elettrici ed elettronici. Provvedendo allo smaltimento corretto del prodotto si può
prevenire l’impatto negativo sull’ambiente e/o sulla salute umana nel caso di mancato riciclaggio.
Lo smaltimento deve essere effettuata in conformità alle norme regolanti la gestione dei rifiuti. Le
maggiori informazioni sulle modalità dello smaltimento del prodotto sono reperibili presso l’ufficio
locale di amministrazione pubblica oppure nel negozio dove il prodotto è stato acquistato.
Il presente prodotto rispetta tutti i requisiti elementari stabiliti dalle normative UE inerenti.
Il produttore si riserva di apportare le modifiche ai testi relativi al prodotto, al suo disegno e alle relative specifiche
tecniche senza preavviso.
fig. 6 fig. 7 fig. 8 fig. 9 fig. 10
132 133
VR2110, VR2100 VR2110, VR2100
Page 68
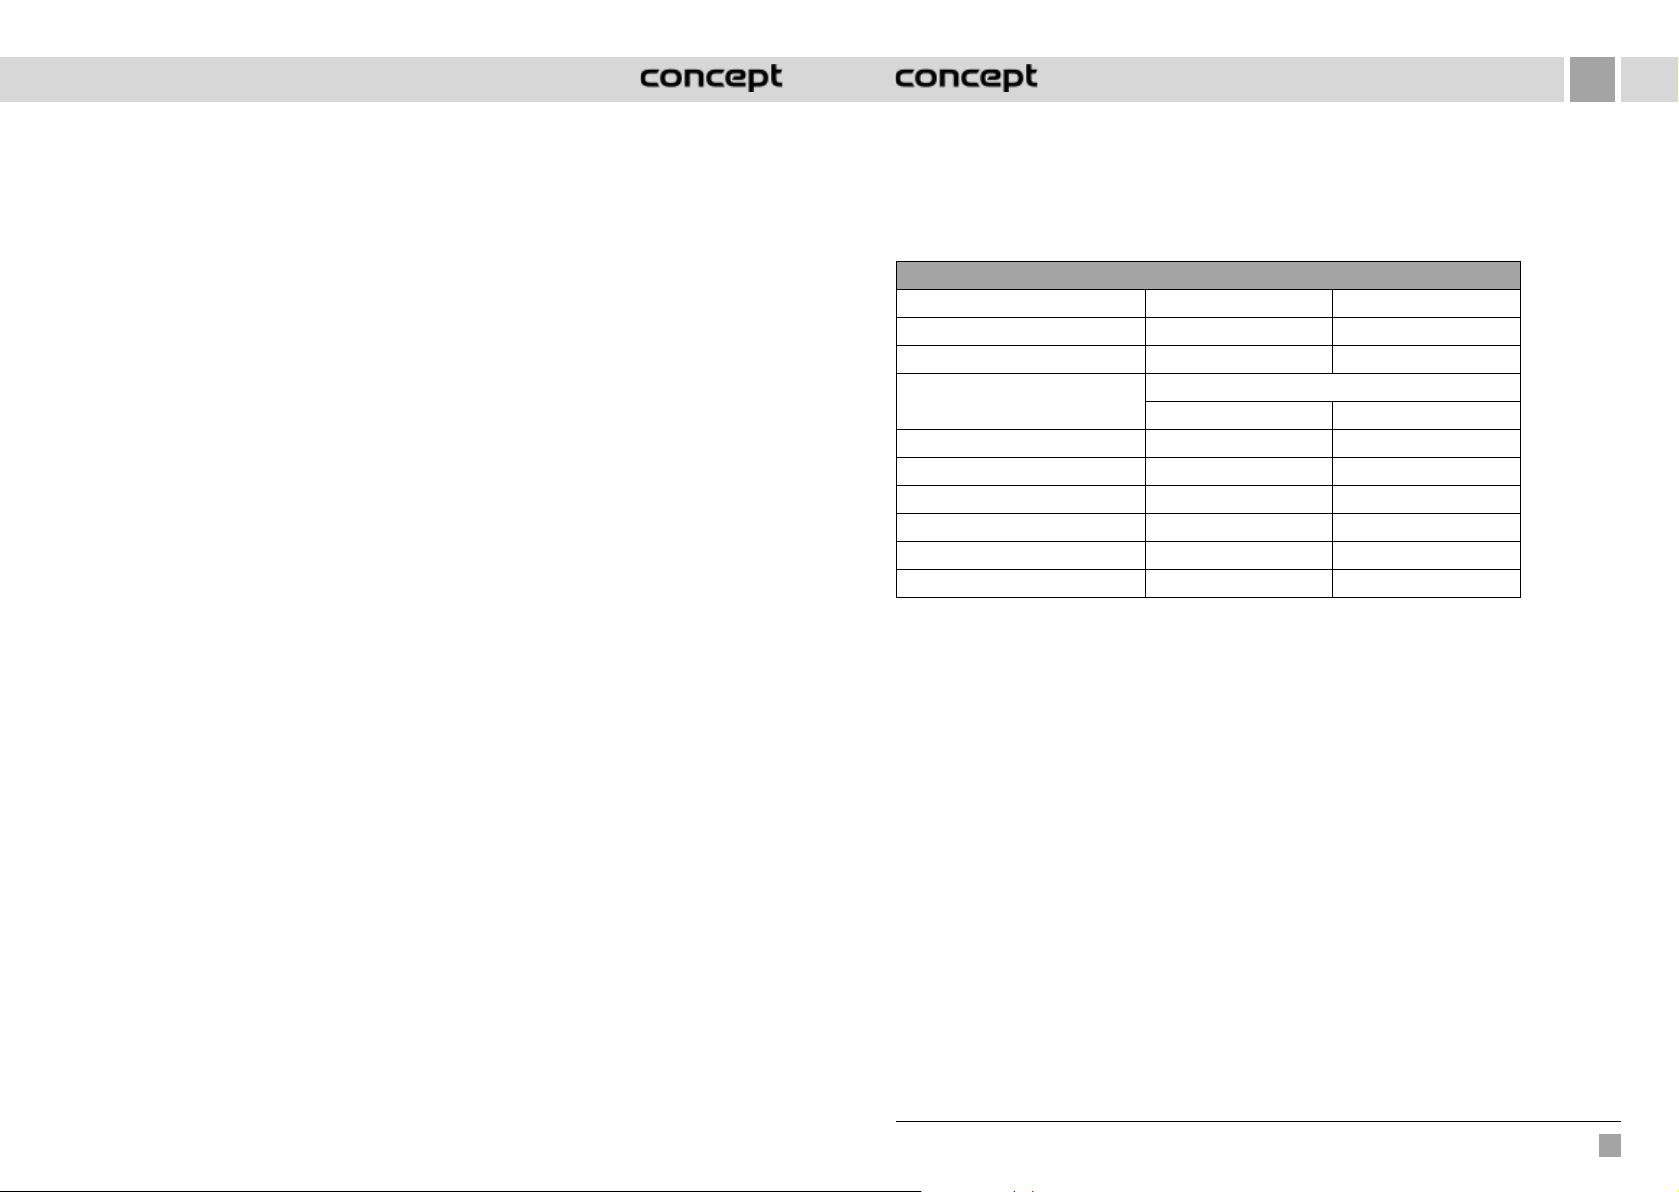
ES
AGRADECIMIENTO
Gracias por comprar este producto de la marca Concept y esperamos que quede satisfecho con él durante todo el
tiempo que lo use.
Antes de usar el producto, lea con cuidado todo el manual y luego guárdelo. Asegúrese de que las demás personas que
vayan a utilizar el producto se familiaricen con el presente manual.
Parámetros técnicos
VR2110 VR2100
Potencia de entrada 25 W 25 W
Voltaje de la batería 14,8 V 14,4 V
Voltaje del adaptador de carga
Nivel de ruido 55-65 dB 55-65 dB
Batería 3200 mAh, Li-Ion 2600 mAh, Li-Ion
Tiempo de funcionamiento 180 minutos 150 minutos
Tiempo de carga completo 5 horas 4-5 horas
Rango de frecuencia 2,4-2,4835 GHz 2,4-2,4835 GHz
Potencia de la antena (máx.) 18 dBm 18 dBm
IMPORTANTE
Antes de conectar al suministro eléctrico, haga un control visual para verificar que el artefacto esté intacto yque
no haya sufrido daños durante el transporte.
AC 220-240 V - 50/60 Hz
DC 24 V DC 24 V
ADVERTENCIAS IMPORTANTES DE SEGURIDAD
• No emplee el artefacto de una manera diferente a la descrita en el presente manual.
• Antes de utilizar por primera vez el artefacto, retire el embalaje y los materiales promocionales.
• Antes de usar, retire del piso todos los objetos que podrían obstaculizar la limpieza (cables,
papeles, ropa, manteles y cortinas que llegan al piso).
• Si en la zona a limpiar hay escaleras, coloque la cinta magnética (pared virtual) a al menos
15cm del primer escalón. Esta distancia garantiza la mejor protección contra posibles caídas.
• Use solamente accesorios y repuestos originales.
• No se siente ni coloque objetos sobre el artefacto.
• Use la aspiradora solamente en hogares y a temperaturas de entre 0 y 40°C.
• Antes de usar, asegúrese de que el colector de polvo y la tela de fregado estén bien colocados.
• No ponga pelo, dedos u otras partes del cuerpo cerca del cepillo principal. Mantenga
limpios el cepillo principal y la boca de la aspiradora, retire el pelo y el polvo que podrían
afectar la succión y la calidad de la limpieza.
• No use el artefacto en pisos mojados o húmedos.
VR2110, VR2100
135
Page 69
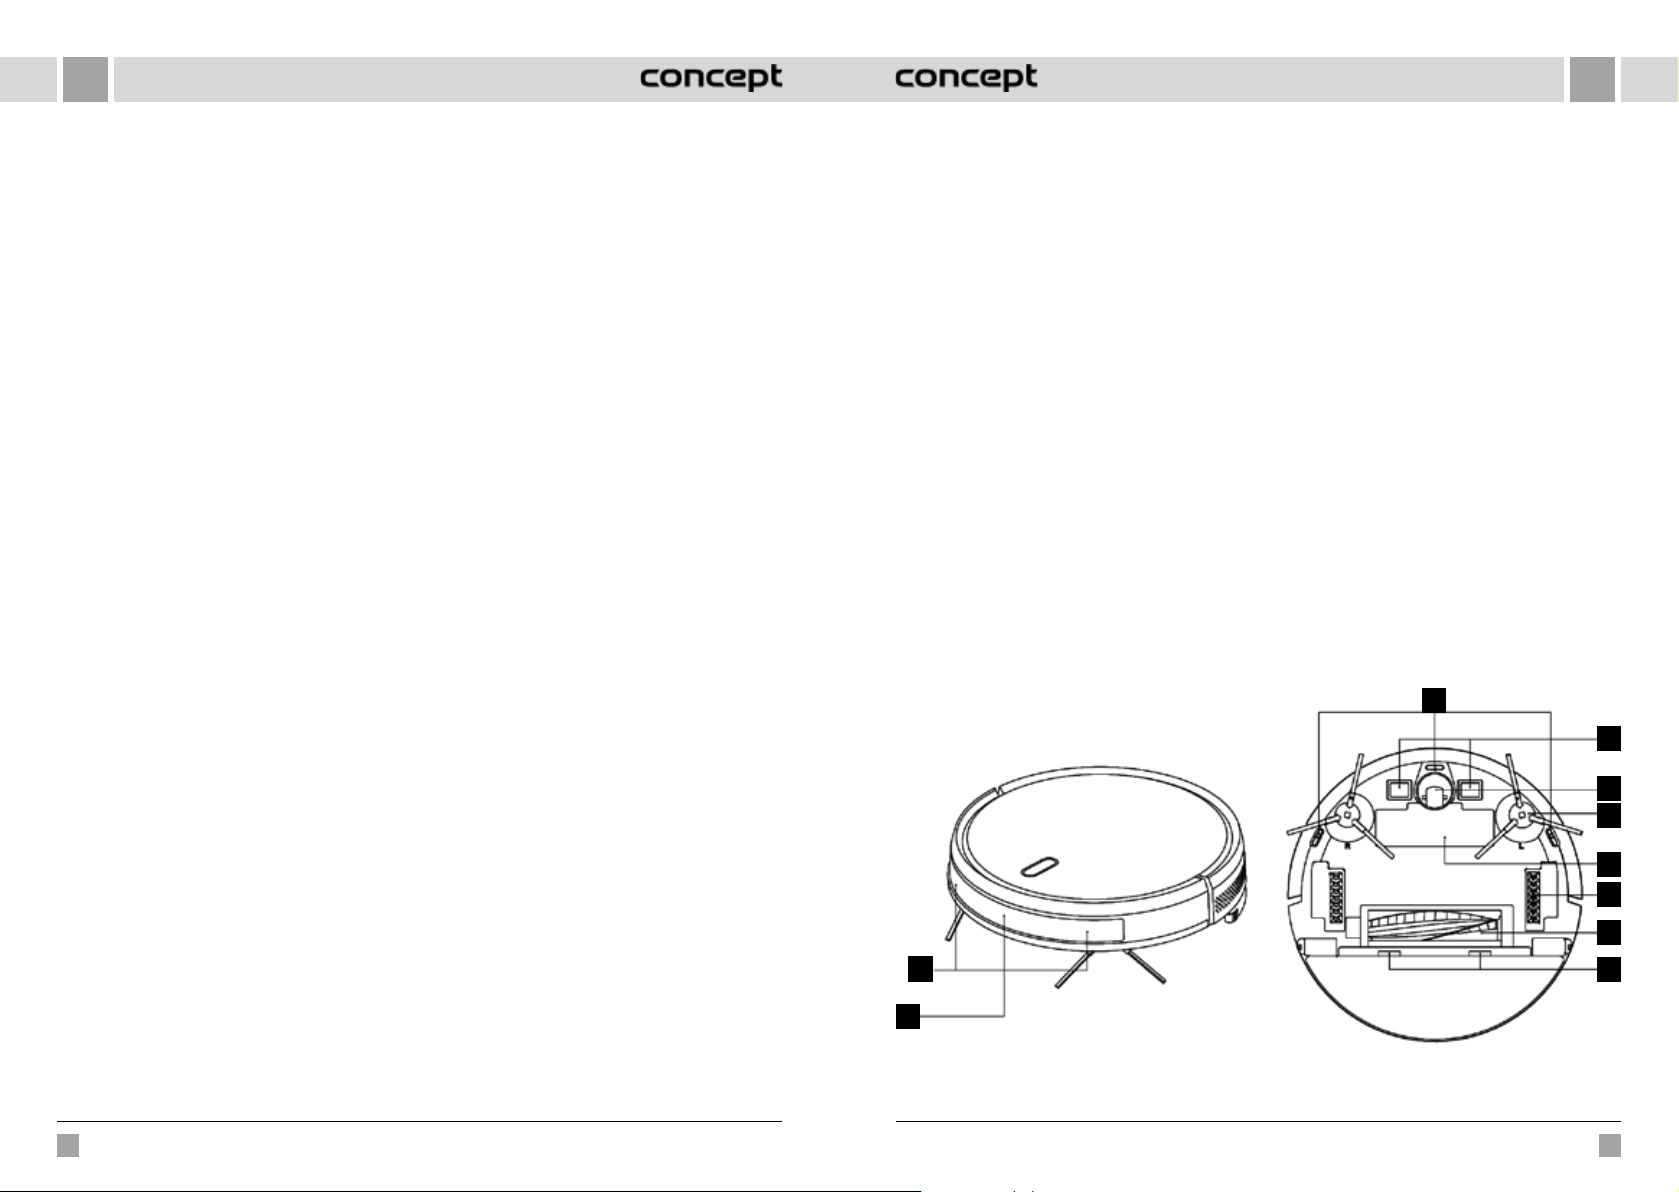
ESES
• No aspire líquidos, cigarrillos encendidos, astillas y objetos afilados, cerillas, sustancias
inflamables, pedazos grandes de papel, bolsas de plástico u otros objetos que puedan
dañar el artefacto.
• No deje que la aspiradora circule encime de cables sueltos.
• Apague el artefacto para su limpieza y mantenimiento.
• Evite la luz directa del sol ya que puede reducir la sensibilidad de los sensores infrarrojos.
• Al fregar, asegure la alfombra para evitar que el robot no pase por ella. Si la tela de fregar
y el tanque de agua están instalados, la limpieza podría interrumpirse si la alfombra se
moja por accidente.
• No coloque el artefacto en lugares desde donde podría caer fácilmente (mesas, sillas).
• Antes de poner a cargar el artefacto, asegúrese de que la base esté bien conectada.
• Las temperaturas extremas o el uso indebido podrían causar fugas de líquido de batería.
Si este entrase en contacto con la piel, lávelo de inmediato bajo agua corriente. En caso de
contacto con los ojos, enjuague de inmediato bajo agua corriente al menos diez minutos.
Procure asistencia médica.
• Si desea desechar el producto, primero retire la batería.
• Si va a transportar el artefacto, o no lo va a usar por largo tiempo, ponga el interruptor en
apagado. para prolongar la vida de la batería.
• Verifique que la tensión de red se corresponda a los valores indicados en la placa. No
enchufe el artefacto en regletas o extensiones de cable.
• Al desenchufar el artefacto, no tire del cable, sino del enchufe.
• No permita que el artefacto sea usado como juguete.
• No emplee sustancias agresivas o telas ásperas para limpiar el artefacto.
• El artefacto está destinado únicamente para uso hogareño; no está destinado para uso
comercial.
• No sumerja el cable, el enchufe o el artefacto en agua u otro líquido.
• No repare usted mismo el artefacto. diríjase a un servicio autorizado y evite lesiones por
manipulación indebida.
• Los niños mayores de 8 años y las personas mayores o con capacidades físicas o mentales
reducidas, o con insuficiente experiencia y conocimientos pueden utilizar el artefacto
únicamente bajo supervisión o si se les ha enseñado a utilizarlo de una manera segura
yson conscientes de los eventuales riesgos. El mantenimiento y limpieza realizados por
el usuario no pueden ser llevados a cabo por niños menores de 8 años y sin supervisión.
Los niños menores de 8 años deben mantenerse fuera del alcance del artefacto y su cable.
Los niños no deben jugar con el artefacto.
• Evite que los niños menores de 3 años accedan al artefacto a menos que estén bajo
supervisión permanente.
• El fabricante y el importador a la Unión Europea no asumen responsabilidad por daños
causados por el uso del artefacto, como lesiones, quemaduras, daños a otros objetos, etc.
• Si el cable de alimentación está dañado, hágalo reemplazar por un servicio especializado para
evitar situaciones peligrosas. Se prohíbe el uso del artefacto con el cable de alimentación
dañado.
• La aspiradora robótica debe usarse únicamente con el adaptador de red original incluido.
Evite situaciones peligrosas, no use otro tipo de adaptador.
En caso de incumplimiento de las instrucciones del fabricante, cualquier reparación no será reconocida por la
garantía.
Asegúrese de haber desempacado todos los accesorios incluidos. Se recomienda guardar la caja y el material de
embalaje original y el manual por la duración de la garantía.
DESCRIPCIÓN DEL PRODUCTO
1 Sensor anticolisión
2 Sensor infrarrojo de carga
3 Sensor contra caídas
4 Contacto de carga
5 Rueda universal
1
2
6 Cepillo lateral
7 Tapa de la batería
8 Rueda motriz
9 Cepillo principal
10 Pestillo de la tapa del cepillo principal
3
4
5
6
7
8
9
10
136 137
VR2110, VR2100 VR2110, VR2100
Page 70
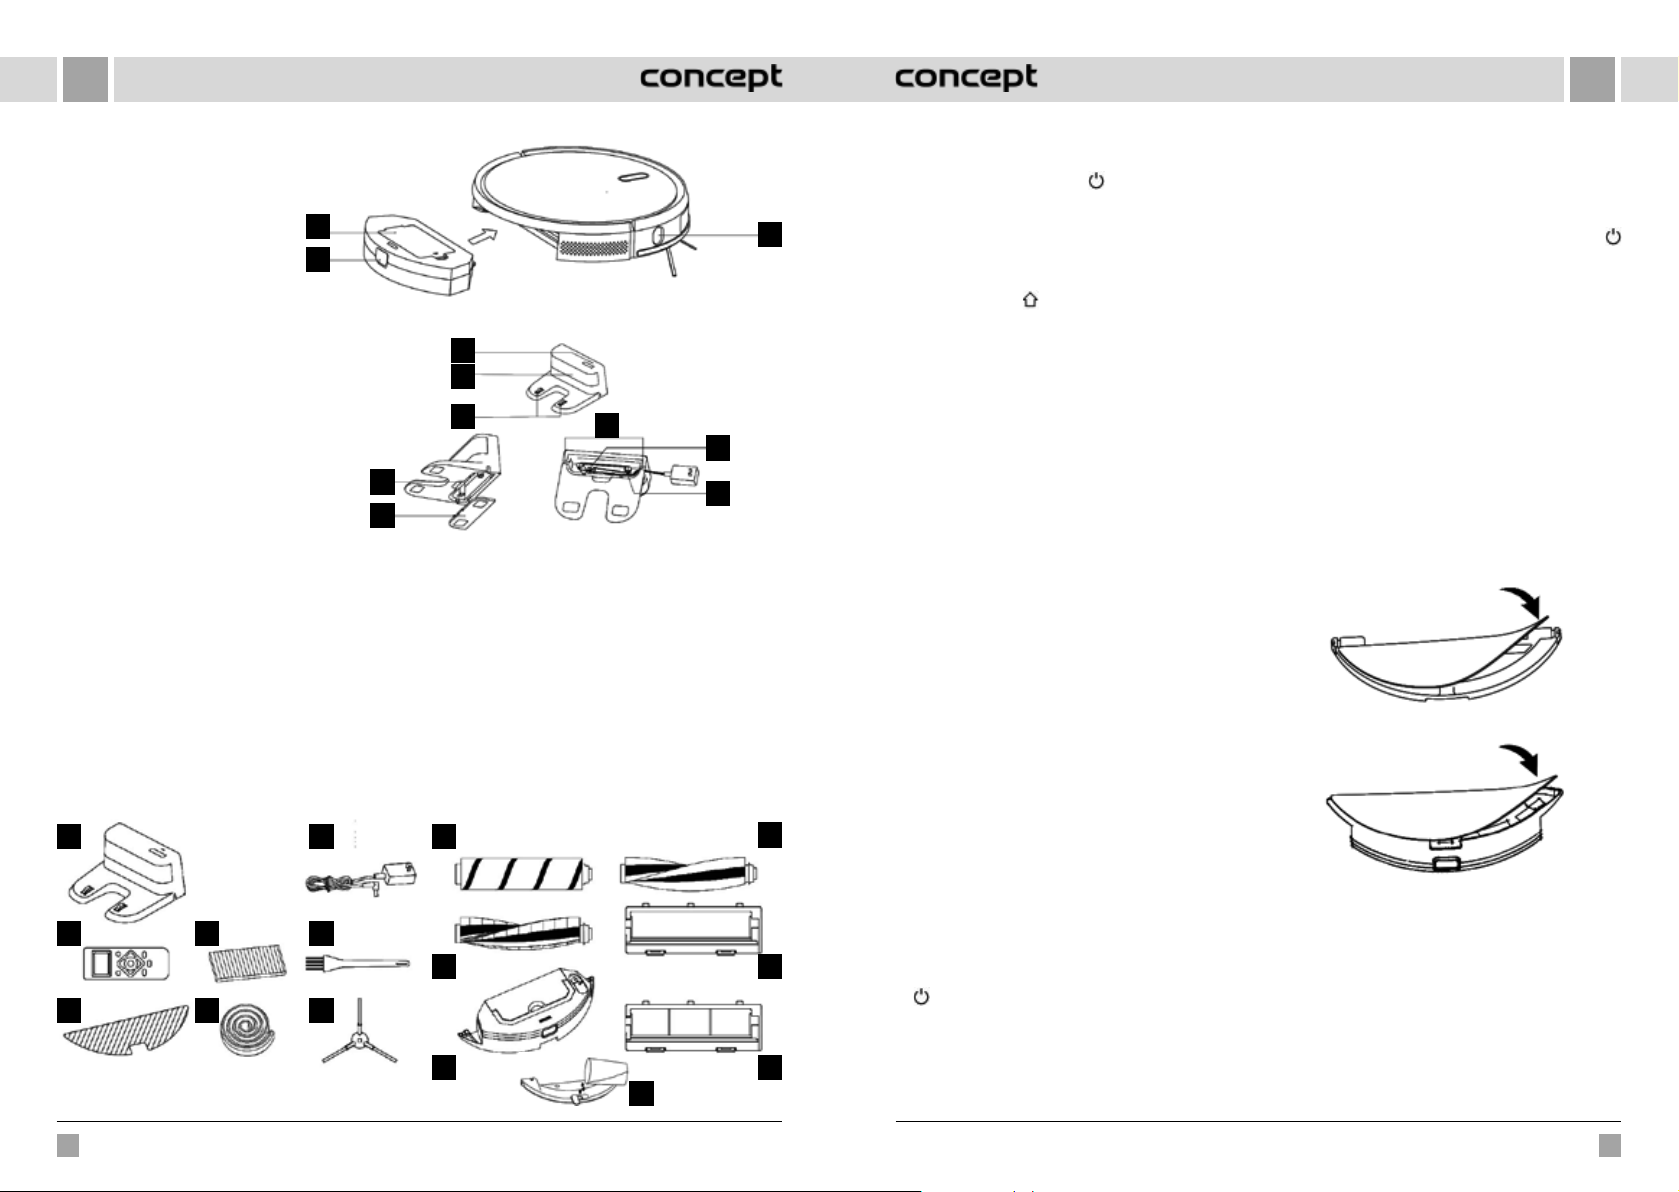
ESES
1 Tapa del filtro
2 Botón del colector de polvo
3 Sensor de pared
1
2
Estación base
1 Indicador de suministro eléctrico
2 Área de transmisión de señal
3 Contactos de carga de la base
4 Ranura de captura
5 Cubierta
6 Pasaje de cable
7 Adaptador de CA
8 Pasador de enrollamiento
Lista de componentes
1 Estación base: 1
2 Control remoto: 1
3 Paños de fregado: 2
4 Filtro HEPA y filtro de espuma: 3 (VR2100: 2)
5 Cinta magnética: 1
6 Adaptador: 1
7 Cepillo de limpieza: 1
8 Cepillos izquierdo y derecho: 2
1
2
3
4
5
6
7
8
1
2
3
6
4
5
9 Cepillo HARDFLOOR: 1 (solo con VR2110)
(ADVERTENCIA: no puede usarse en alfombras,
puede interrumpir la limpieza).
10 Cepillo CARPET: 1
11 Tanque de agua eléctrico: 1 (solo con VR2110)
12 Cepillo PET: 1 (solo con VR2110)
13 Tapa del cepillo principal: 1 (solo con VR2110), para
HARDFLOOR y PET
14 Tapa del cepillo principal con alambre de acero:
1(para CARPET)
15 Tanque de agua colgante: 1 (solo con VR2100)
9
10
11
15
FUNCIONES PRINCIPALES
Limpieza / encendido y apagado
• Presione brevemente para iniciar o detener la limpieza.
3
7
8
• Presione por 3 segundos para encender o apagar el
artefacto.
• Presione por 15 segundos para forzar el apagado del
artefacto en circunstancias inusuales.
Carga / limpieza local
• Presione brevemente para iniciar o detener la carga.
• Mantenga presionado para iniciar la limpieza local.
Indicador
• Naranja: Funcionamiento normal o carga.
• Rojo: Estado anormal o batería agotada.
• Rojo-naranja: Artefacto no conectado a la red.
Reset WiFi
• Presione ambos botones simultáneamente por
3segundos.
INSTALACIÓN
1. Conecte el cable de alimentación y guarde el
cable restante en la cámara.
2. Coloque la estación base contra la pared y conecte
la alimentación.
Nota:
• Mantenga un espacio de al menos 0,5 m a ambos lados
de la estación base y de 1,5 m frente a esta.
• Si el cable está tensado perpendicular al piso, el
artefacto podría arrancarlo, lo que apagaría la estación
base.
• En estado normal, el indicador de carga se enciende
cuando está activo y se apaga durante la carga.
3. No mueva la estación base ni la exponga a la luz
solar directa.
12
13
14
Nota: La luz solar directa puede interferir la señal de la
estación base lo que puede impedir que el artefacto
vuelva a esta.
4. Instalación del cepillo lateral
Verifique que la marca del cepillo izquierdo (L) y del
derecho (R) se correspondan con las marcas L y R de la
tapa inferior. Empuje los cepillos L y R hasta oír un clic.
5. Puesta en funcionamiento y carga
Para encender el robot, mantenga presionado el botón
. Si el indicador de carga se enciende normalmente,
cargue el robot en la estación base.
Nota: Si el artefacto no puede encenderse debido
a poca batería, cárguelo en la estación base y se
activará automáticamente. El artefacto puede funcionar
normalmente con un nivel de batería de ≥20 %.
6. Conexión de aplicación celular (este paso puede
saltearse)
Lea las instrucciones para conectarse al Wi-Fi y conecte
la aplicación.
7. Iniciar limpieza
Encienda el robot y presione brevemente el botón
o inicie la limpieza con la aplicación (el artefacto en
funcionamiento puede apagarse apretando cualquier
botón).
Nota:
• El robot destinado a barrer no puede usarse para
limpiar líquidos.
• El robot no puede funcionar si el nivel de batería es
menor a 20%. En tal caso, cárguelo.
• Cuando el nivel de la batería es menor a 20%, el
artefacto vuelve automáticamente a la estación base.
• Antes de usar, quite del piso todos los cables
(incluyendo el de la estación base) para evitar que el
artefacto los enganche y provoque apagones o daños
a objetos o cables.
8. Instalación del módulo de fregado
a) Instalación de los paños para fregar: adhiéralos
directamente al fondo del tanque de agua.
Modelo VR2100 – Tanque de agua colgante
Modelo VR2110 – Tanque de agua eléctrico
Nota: Luego del uso, limpie los paños para fregar para
mantenerlos en buen estado.
b) Abra la tapa del tanque de agua y llénelo.
138 139
VR2110, VR2100 VR2110, VR2100
Page 71
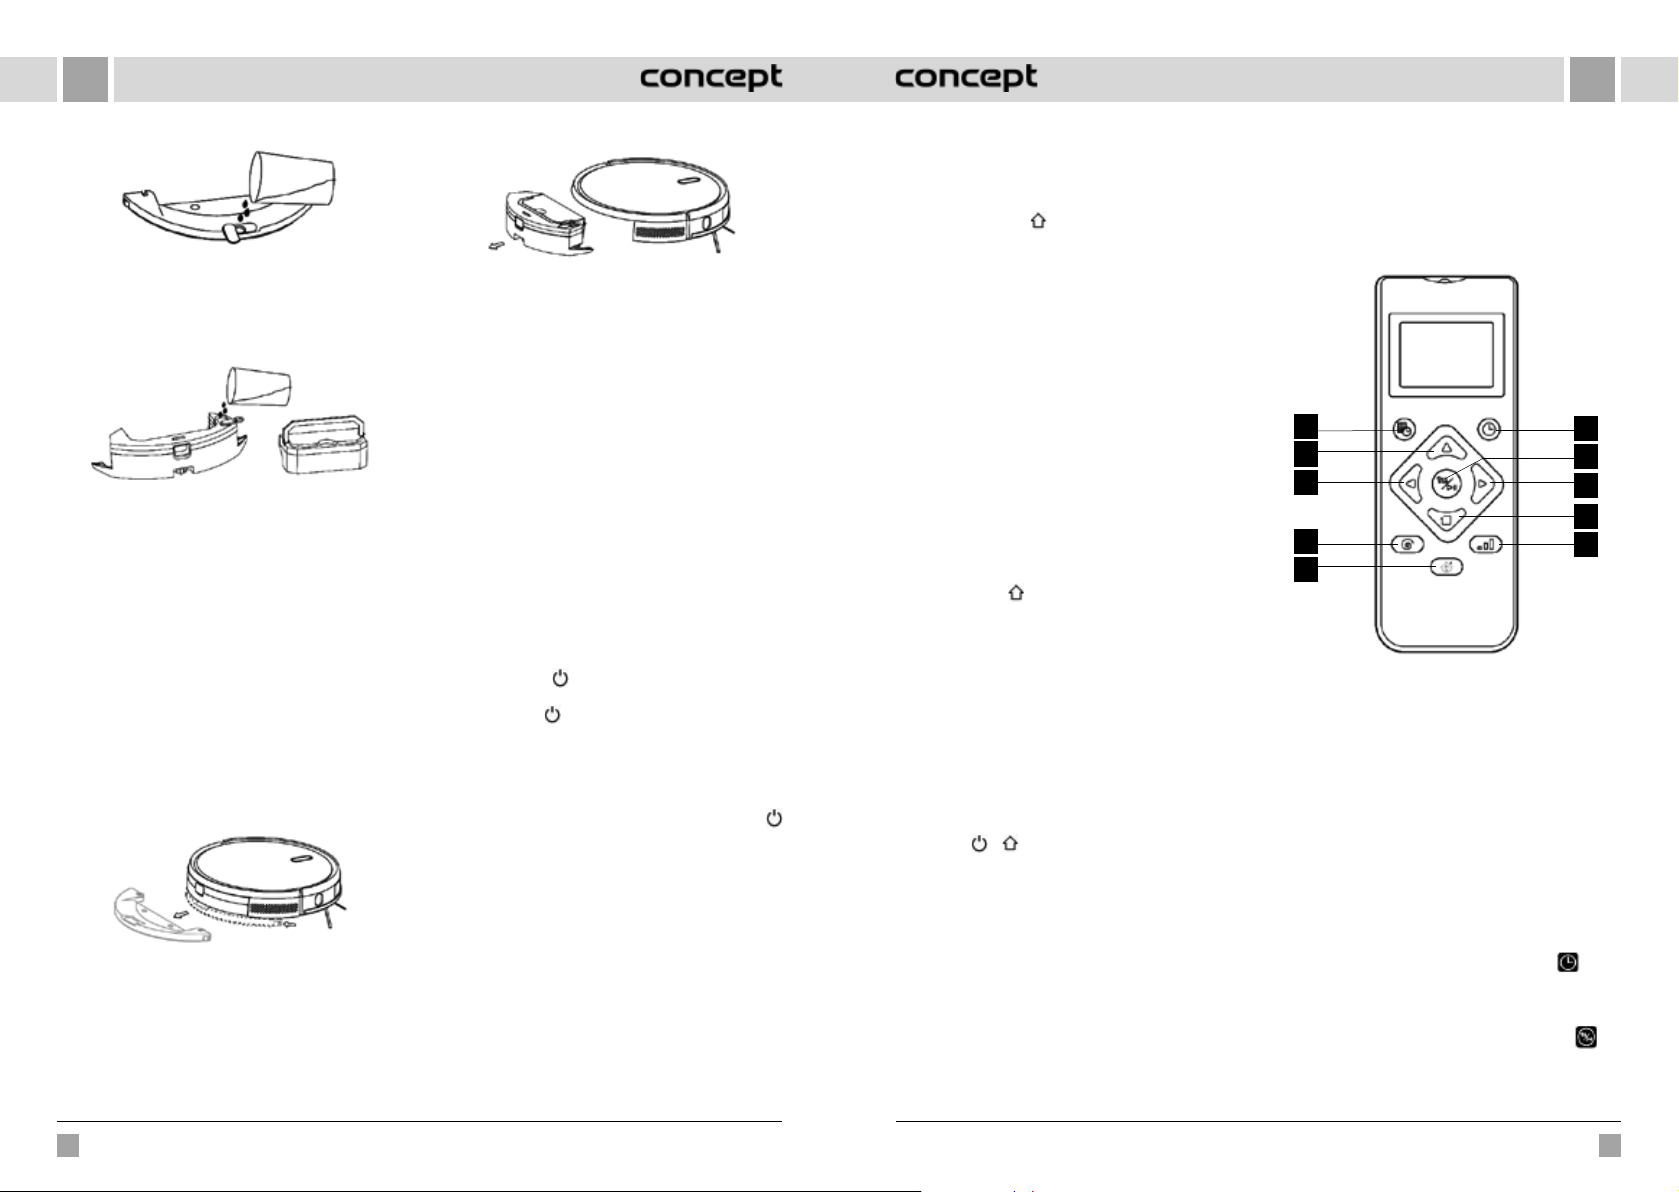
ESES
Modelo VR2100 – Tanque de agua colgante
Antes de llenar el tanque de agua, retire el colector
de polvo con el mango (VR2110).
Modelo VR2110 – Tanque de agua eléctrico
c) Instale el módulo:
Modelo VR2100: empuje el módulo en sentido
horizontal a la parte trasera del robot. El módulo está
instalado cuando se oye un clic.
Modelo VR2110: inserte el contenedor de polvo en
el tanque de agua e inserte la manija en la ranura.
Mantenga presionado el botón en el medio del
tanque y empújelo en sentido horizontal a la parte
trasera del robot. El módulo está instalado cuando
se oye un clic.
9. Desmontar el módulo de fregado
Modelo VR2100: Una vez que el robot haya terminado
su labor, presione los pestillos a ambos lados, extraiga
el módulo tirando hacia atrás, vacíe el tanque de agua
y limpie los paños (durante la limpieza no mueva ni
voltee el robot).
Modelo VR2100 – Tanque de agua colgante
Modelo VR2110: Una vez que el robot haya terminado
su labor, presione el botón en el medio del tanque de
agua, extraiga el módulo tirando hacia atrás vacíe el
tanque de agua y limpie los paños (durante la limpieza
no mueva ni voltee el robot).
Modelo VR2110 – Tanque de agua eléctrico
10. Instrucciones de uso del módulo de fregado
• No use el módulo de fregado sin supervisión.
• Por motivos de seguridad, asegúrese de que el módulo
esté desmontado para cargar o cuando no está en uso.
• No intente limpiar alfombras.
• Para mejores resultados, use el módulo de fregado
luego de barrer o aspirar el piso tres veces.
• Si desea cargar agua o limpiar telas con el artefacto
en funcionamiento, deténgalo, desmonte y vuelva
a montar el módulo de fregado siguiendo los pasos
8 y 9. No mueva ni voltee el artefacto para evitar
errores de posicionamiento y la pérdida del mapa.
• La función de fregado está diseñada para lograr una
limpieza profunda. No obstante, no puede reemplazar
la fuerza humana para limpiar suciedad fuertemente
adherida al piso.
USO
ENCENDIDO/APAGADO
Presione el botón por 3 segundos. El indicador se
enciende y el artefacto se activa.
Presione el botón por 3 segundos, si el artefacto está
en modo stand-by, el indicador y el artefacto se apagan.
NOTA: El artefacto no puede apagarse mientras se está
cargando.
LIMPIEZA/PARADA
Luego de activar el artefacto, presione el botón
oactive el artefacto con la aplicación (el artefacto puede
detenerse con cualquier botón).
Nota:
• La aspiradora robótica no puede usarse para líquidos.
• El robot no puede funcionar si el nivel de batería es
menor a 20%. En tal caso, cárguelo.
• Cuando el nivel de la batería es menor a 20%, el
artefacto vuelve automáticamente a la estación base.
• Antes de usar, quite del piso todos los cables
(incluyendo el de la estación base) para evitar que el
robot los enganche y provoque apagones o daños
aobjetos o cables.
CARGA
Modo automático: El artefacto vuelve automáticamente
a la estación base.
Modo manual: El artefacto puede cargarse presionando
brevemente el botón
parpadea cuando el artefacto está cargado.
Nota: Si el artefacto no encuentra la estación base,
vuelve automáticamente a la posición original. En la caso,
devuelva el artefacto a la estación base.
CINTA MAGNÉTICA
Las cintas magnéticas puede programarse para separar
áreas que no deben ser limpiadas (por ejemplo, la cocina,
el baño, etc.).
Nota: fije las cintas magnéticas al piso para evitar que se
muevan, de otro modo, no serán efectivas.
MODO LIMPIEZA
Luego de activarse, el artefacto se moverá según el
programa en círculos para limpiar toda la superficie del
piso y todas las habitaciones una por una, de manera
regular, efectiva y con plena cubertura. Luego de
completar la limpieza, el robot vuelve automáticamente
a la estación base y se carga.
LIMPIEZA LOCAL
Presione el botón
ylimpia un área circular de 1,5 metros de diámetros, luego
de lo cual vuelve automáticamente a la posición original
y se detiene.
LIMPIEZA PROGRAMADA
Se puede programar una hora fija de limpieza con
la aplicación celular. El robot empieza a limpiar
automáticamente a la hora programada y luego vuelve
ala estación de carga.
REINICIAR WIFI
Si el robot no puede conectarse con el teléfono celular
debido a un cambio en la configuración del enrutador o de
contraseña, o por otro motivo, presione simultáneamente
los botones
“WiFI has been reset” (Wi-Fi reiniciado) y que el indicador
parpadee en azul violeta.
MODO SILENCIOSO
Los anuncios de voz del robot pueden activarse
odesactivarse con la aplicación celular.
AJUSTE DE POTENCIA DE SUCCIÓN
La potencia de succión puede ajustarse en silenciosa,
estándar o alta con la aplicación celular.
Al detectarse una alfombra, la potencia de succión
aumenta automáticamente al nivel más alto.
ADVERTENCIA: las alfombras se detectan correctamente
solo con el cepillo Carpet.
o con la aplicación. El indicador
por 3 segundos, el robot se localiza
y por 3 segundos hasta oír el mensaje
AJUSTE DEL CAUDAL DE AGUA (solo para el tanque
eléctrico del modelo VR2110)
El caudal de agua ajustarse en bajo, estándar o alto con la
aplicación celular.
USO DEL CONTROL REMOTO
1
2
3
6
7
8
9
4
10
5
1. Programar limpieza
2. Mover hacia adelante
3. Girar hacia la izquierda
4. Limpieza local TURBO
5. Iniciar/detener carga
6. Limpieza automática/pausa
7. Limpieza/pausa
8. Girar hacia la derecha
9. Limpieza perimetral
10. Ajuste de potencia de succión / caudal de agua
Nota: Para que las configuraciones sean efectivas,
apunte el control remoto al frente de la aspiradora y lo
suficientemente cerca.
Ajustar la hora
1. Para ajustar la hora, presione el botón
control remoto. En la p antalla parpadea el símbo lo del
domingo.
2. Seleccione el día de la semana con los botones
izquierdo y derecho y confirme con el botón . La
pantalla pasa automáticamente a la configuración de
la hora.
3. Seleccione la hora con los botones arriba y abajo, y use
en el
140 141
VR2110, VR2100 VR2110, VR2100
Page 72
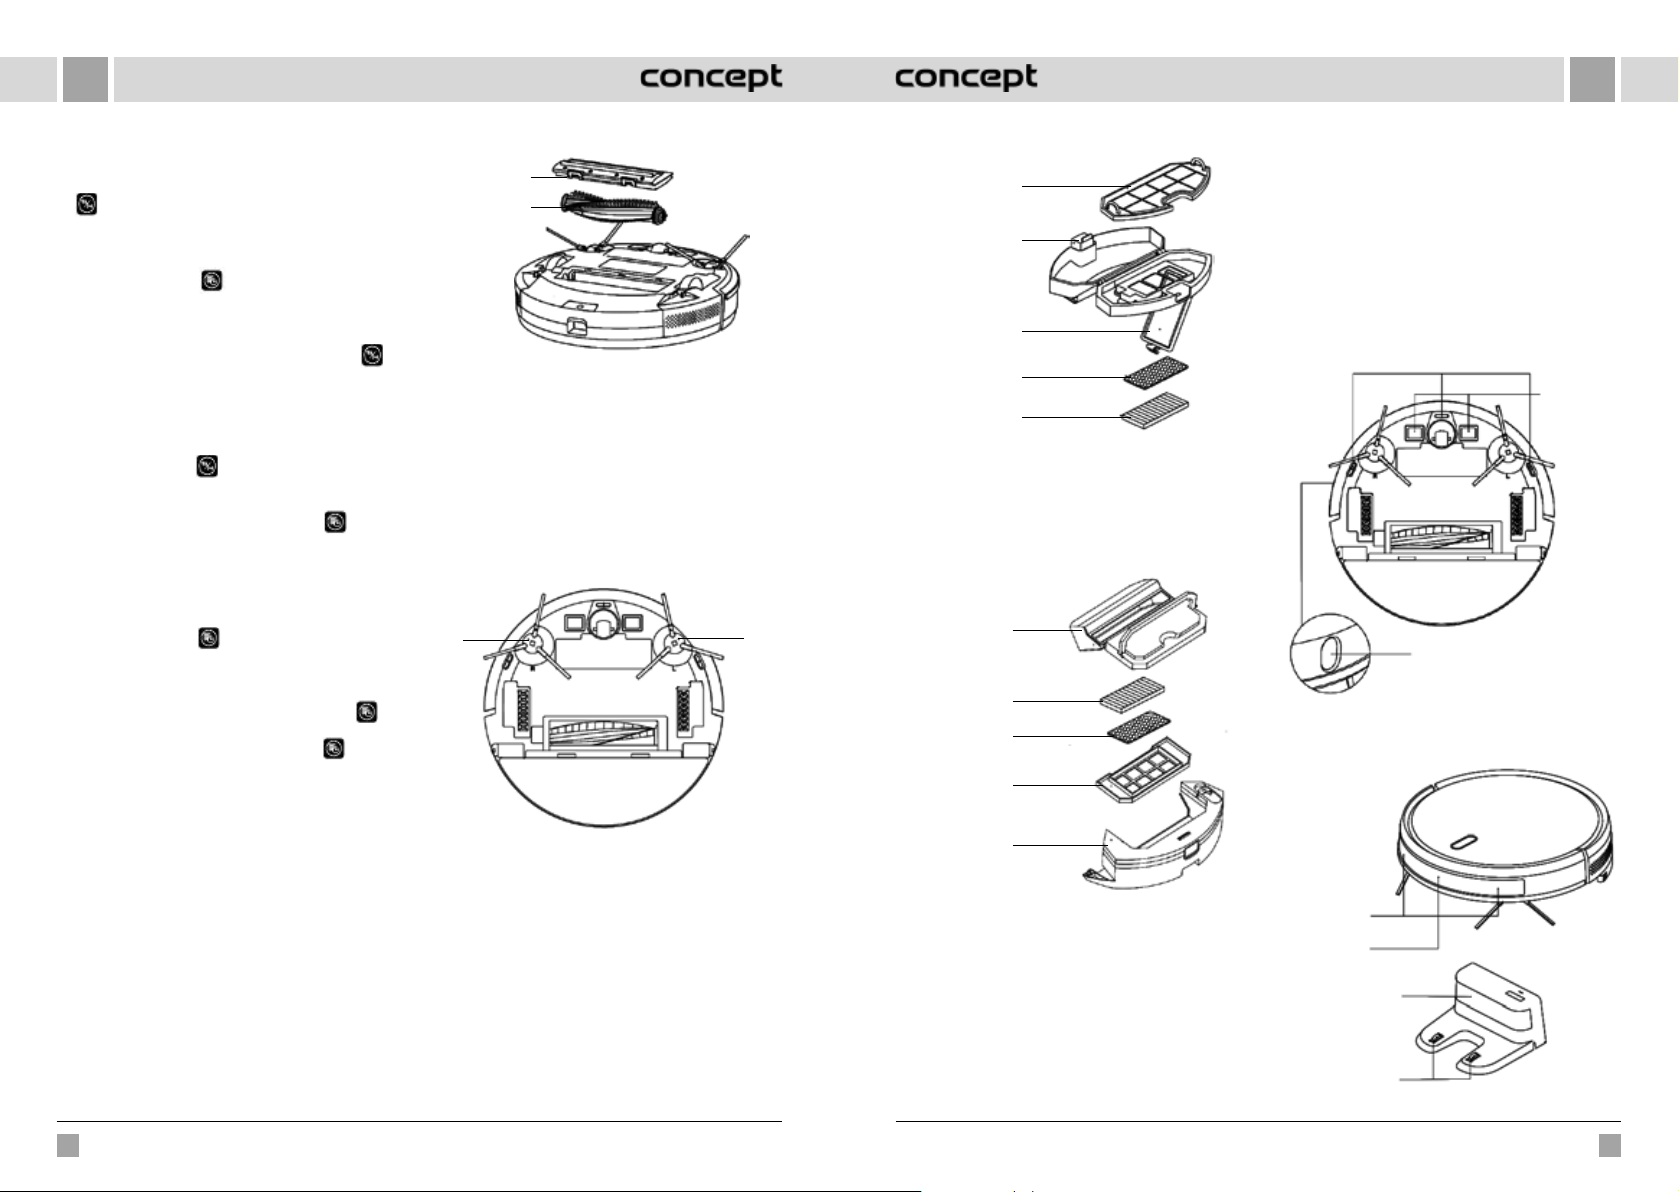
ESES
los botones izquierdo y derecho para los minutos.
4. Luego de ajustar la hora actual, apunte el control
remoto al frente de la aspiradora y presione el botón
para confirmar, de otro modo, no será válida.
5. Con esto se completa el ajuste de la hora para el control
remoto y la aspiradora.
Plan de limpieza
1. Presione el botón
en el control remoto para
ingresar a la función del plan de limpieza. En la
pantalla parpadea el símbolo del domingo.
2. Seleccione el día de la semana con los botones
izquierdo y derecho y confirme con el botón . La
pantalla pasa automáticamente a la configuración de
la hora.
3. Seleccione la hora con los botones arriba y abajo, yuse
los botones izquierdo y derecho para los minutos.
Apunte el control remoto al frente de la aspiradora
ypresione el botón para confirmar el programa.
4. Una vez programado el plan, el control remoto activa
automáticamente la programación de otro plan. Si
no desea continuar, presione el botón o espere
10 segundos hasta que la función se desactive
automáticamente.
5. Con esto se completa el ajuste de la hora para el control
remoto y la aspiradora.
Cancelar plan de limpieza
1. Presione el botón
en el control remoto. En la
pantalla parpadea el símbolo del domingo y se ven
los símbolos de los días programados.
2. Seleccione los días programados con los botones
derecho e izquierdo y presione el botón por
3 segundos para anular el programa. Puede elegir
otro día para anular, presionar el botón o esperar
10 segundos para que la función se desactive
automáticamente.
Pestillo
Cepillo
principal
Cepillo lateral (limpieza regular)
1. Gire el robot y tire del cepillo lateral hacia arriba.
2. Limpie los pelos y la suciedad y vuelva a montar el
cepillo.
3. Asegúrese de que el cepillo lateral izquierdo (L) y el
derecho (R) se correspondan con los símbolos L y R en
la tapa inferior. Empuje los cepillos L y R para volver
amontarlos.
Nota: Reemplace los cepillos laterales cada 3 a 6 meses
para mantener su efecto limpiador.
R - Cepillo
lateral derecho
L - Cepillo
lateral izquierdo
Rejilla del filtro
(filtro grueso)
Botón
Tapa del filtro
Filtro de
espuma
Filtro HEPA
Nota:
• Lave la rejilla con agua sin detergente.
• No use cepillos o los dedos.
• Deje secar la rejilla por al menos 24 horas.
• Reemplace la rejilla cada 3 a 6 meses.
Limpieza del filtro (limpieza regular)
Colector de
polvo
Filtro HEPA
Filtro de
espuma
Rejilla de filtrado
(filtro grueso)
Sensores (limpieza regular)
Limpie los sensores con un paño suave de la siguiente
manera:
1. Sensores en la pared derecha.
2. Tres sensores contra caídas en la parte inferior.
3. Sensor infrarrojo anticolisión en el frente.
4. Protector contra descargas eléctricas y contactos
para la estación base en la parte inferior (para limpiar
apague el artefacto).
5. Área de transmisión de señal de la estación base.
Sensor contra caídas
Contacto
de carga
Sensor TOF
Sensores (limpiar cada mes)
MANTENIMIENTO DIARIO
Cepillo principal (limpieza regular)
1. Gire el ro bot y presione el pestill o en la tapa del cepillo
principal para poder extraerlo.
2. Limpie el polvo del recinto y del interior del cepillo con
un cepillo pequeño y limpie el cepillo principal.
3. Vuelva a montar el cepillo principal y presione la tapa
para que encaje en su lugar.
Colector de polvo y rejilla del filtro (limpieza regular)
1. Presione el botón en el colector de polvo y tire hacia
atrás.
2. Abra y limpie el colector de polvo.
Rejilla del filtro (limpieza regular)
1. Luego de un uso prolongado, desmonte la rejilla del
filtro, el filtro de espuma y el filtro HEPA.
2. Limpie la rejilla. Lave el filtro HEPA y el de espuma con
agua.
3. Limpie cada pieza y déjelas secar.
Tanque de
agua
Tanque de agua eléctrico
Módulo de fregado (limpiar luego de cada uso)
1. Retire los paños y vacíe el tanque.
2. Lave los paños y déjelos secar junto con el tanque. En
el modelo VR2110, primero desmonte el colector de
polvo y luego vacíe el tanque de agua.
Sensor
anticolisión
Sensor infrarrojo
de carga
Área de transmisión
de señal
4. Vuelva a montarlas en el orden correcto: rejilla, filtro de
espuma, filtro HEPA.
142 143
VR2110, VR2100 VR2110, VR2100
Contactos de
carga de la base
Page 73
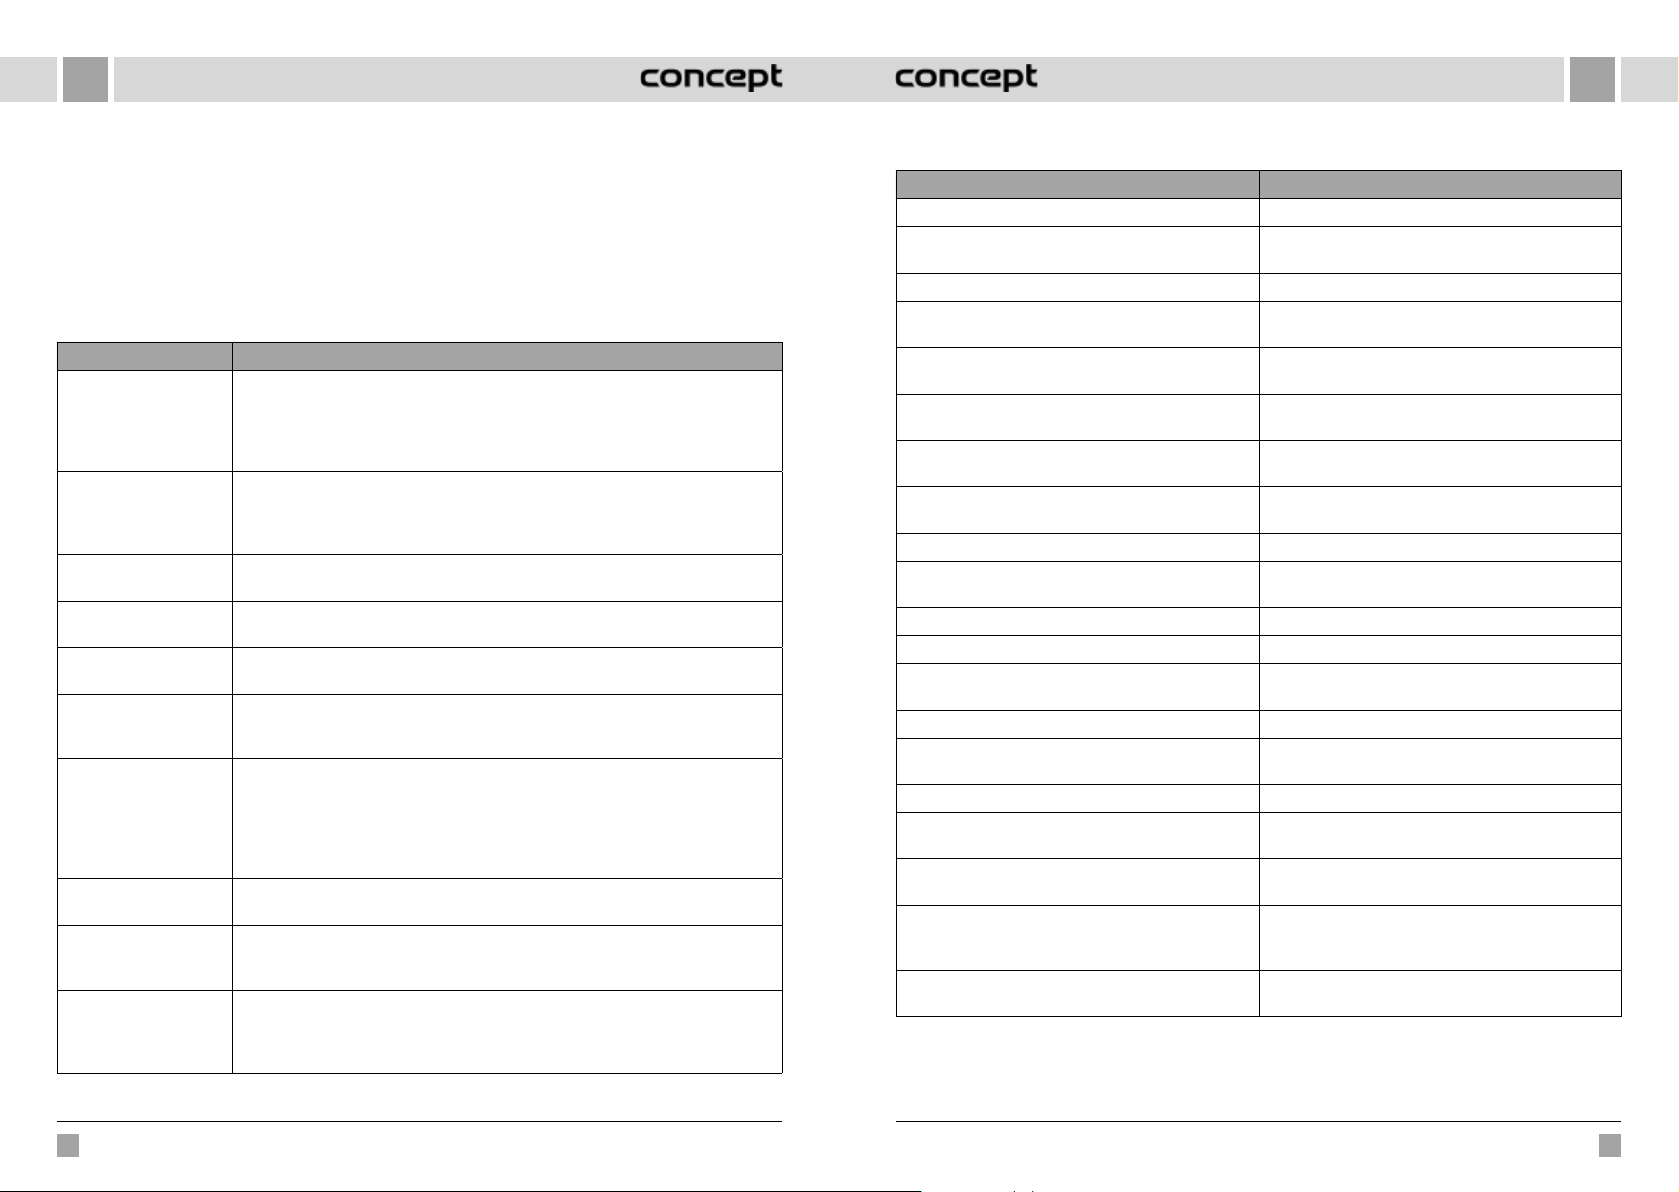
ESES
Batería
• El artefacto está equipado con baterías de iones de litio
de alto rendimiento. Para mantener el rendimiento de
la batería, mantenga el artefacto cargado todos los
días.
• Si el artefacto no se utiliza durante mucho tiempo,
apáguelo y guárdelo correctamente. Cárguelo al
menos cada 3 meses para evitar daños en la batería.
Actualización del firmware
El firmware se actualiza con la aplicación celular. Si se
detecta una nueva versión, actualice el firmware según se
solicite. Para la actualización, el nivel de la batería debería
ser ≥50 % y por este motivo el artefacto debe estar en la
estación base.
PROBLEMAS COMUNES
Problema Solución
El robot no arranca • Si la batería está baja, ponga el robot en la estación base y alinéelo con los contactos
El robot no se carga • Retire el robot de la base, verifique que el indicador de la base esté encendido y si
El robot no puede
recargarse
Comportamiento
anormal
Ruido inusual durante
el uso
Capacidad de limpieza
reducida o cae polvo del
robot
No se puede conectar
el Wi-Fi
La limpieza programada
no tuvo lugar
¿El robot consume
energía cuando está en la
estación base?
¿El robot tiene que
cargarse tres veces pro
16 horas antes del primer
uso?
de la placa. El robot se activa automáticamente (si está totalmente apagado, puede
activarse automáticamente luego de un rato).
• No utilice el artefacto si la temperatura ambiente es inferior a 0°C o superior a 50°C.
Úselo en temperaturas de 0 a 40°C.
ambos extremos del adaptador están bien conectados.
• En caso de mal contacto, limpie las placas de contacto de la estación base y los
contactos de carga del robot o gire el capillo lateral hacia un lado.
El robot está demasiado lejos de la estación base. Acérquelo a la estación base y vuelva
a intentar.
Apague el robot y reinícielo.
El cepillo principal o lateral, o la rueda pueden estar cubiertas con objetos extraños.
Apague el robot y retire los objetos.
• El colector de polvo está lleno. Vacíelo.
• La rejilla del filtro está obstruida. Límpiela o reemplácela.
• El cepillo principal esta cubierto con objetos extraños, límpielo.
• Mala señal de Wi-Fi. Controle la cobertura de la señal de Wi-Fi.
• El Wi-Fi está mal conectado. Reinicie el Wi-Fi, instale la última aplicación y vuelva
aintentar.
• Se ingresó una contraseña errónea.
• El enrutador tiene un rango de frecuencia 5G, la aspiradora está equipada para un
rango de frecuencia 2,4 G.
En caso de batería baja, la limpieza programada puede iniciarse solo si el nivel de la
batería es al menos 30%.
El robot consume poca energía cuando está en la estación base, lo que permite un mejor
rendimiento de la batería.
Las baterías de litio pueden usarse inmediatamente luego de cargarse y no tienen efecto
memoria.
SOLUCIÓN DE PROBLEMAS
Anuncios de voz Solución
Error 1: Oh dear! I cannot find the dust collector La limpieza se activó luego de quitar el colector de polvo.
Error 2: Please check if the radar on top has been covered
or blocked
Error 3: Please place me in a new location and try again Levante el robot.
Error 4: Please scrub the cliff sensor, and restart me from
a new location
Error 5: Please scrub the front sensor, and restart me from
a new location
Error 6: Please scrub the right-hand sensor, and restart
me from a new location
Error 7: Please scrub the radar housing on top, and restart
me from a new location
Error 8: Please check if the bumper has been blocked in
some way
Error 9: Master, please clean the dust container and filter El colector de polvo está lleno o hay que cambiar el filtro.
Error 10: Dust container has been removed, please clean
the container and filter
Error 11: I'm stuck, please help me! El robot está atascado.
Error 12: Please place me correctly! El robot está inclinado.
Error 13: Please check if my wheels have become blocked
somewhere
Error 14: Please check if the main brush has become stuck El cepillo principal está atascado o enredado.
Error 15: Please check if the side brushes have become
stuck
Error 16: What's going on? Where is the docking station? La estación base no se encontró o no está conectada.
Error 17: Oh dear! Program error, please restart me Estado anormal causado por una falla desconocida.
Error 18: Error encountered initiating shutdown El robot advierte al usuario y se apaga o recarga
Error 19: Low battery, please recharge Cuando la batería está demasiado baja, el robot no está
Error 20: To shut me down, please place me away from
the docking station
El sensor superior está cubierto o en un espacio abierto
(en un área de 6 m2 no hay ningún obstáculo).
El sensor contra caídas está cubierto o a una altura.
El sensor infrarrojo anticolisión está sucio o cubierto.
El sensor de pared está sucio o cubierto.
El radar anticolisión está sucio o cubierto.
El sensor de bordes o anticolisión está atascado.
Luego del error 9, el usuario retiró el colector de polvo,
activando el error 10.
La rueda motriz está atascada o enredada.
El cepillo lateral está atascado o enredado.
Reinicie el robot.
automáticamente.
en la base y se inicia la limpieza (el nivel de batería es
inferior a 10%).
El robot se apagó mientras se cargaba en la estación base.
144 145
VR2110, VR2100 VR2110, VR2100
Page 74
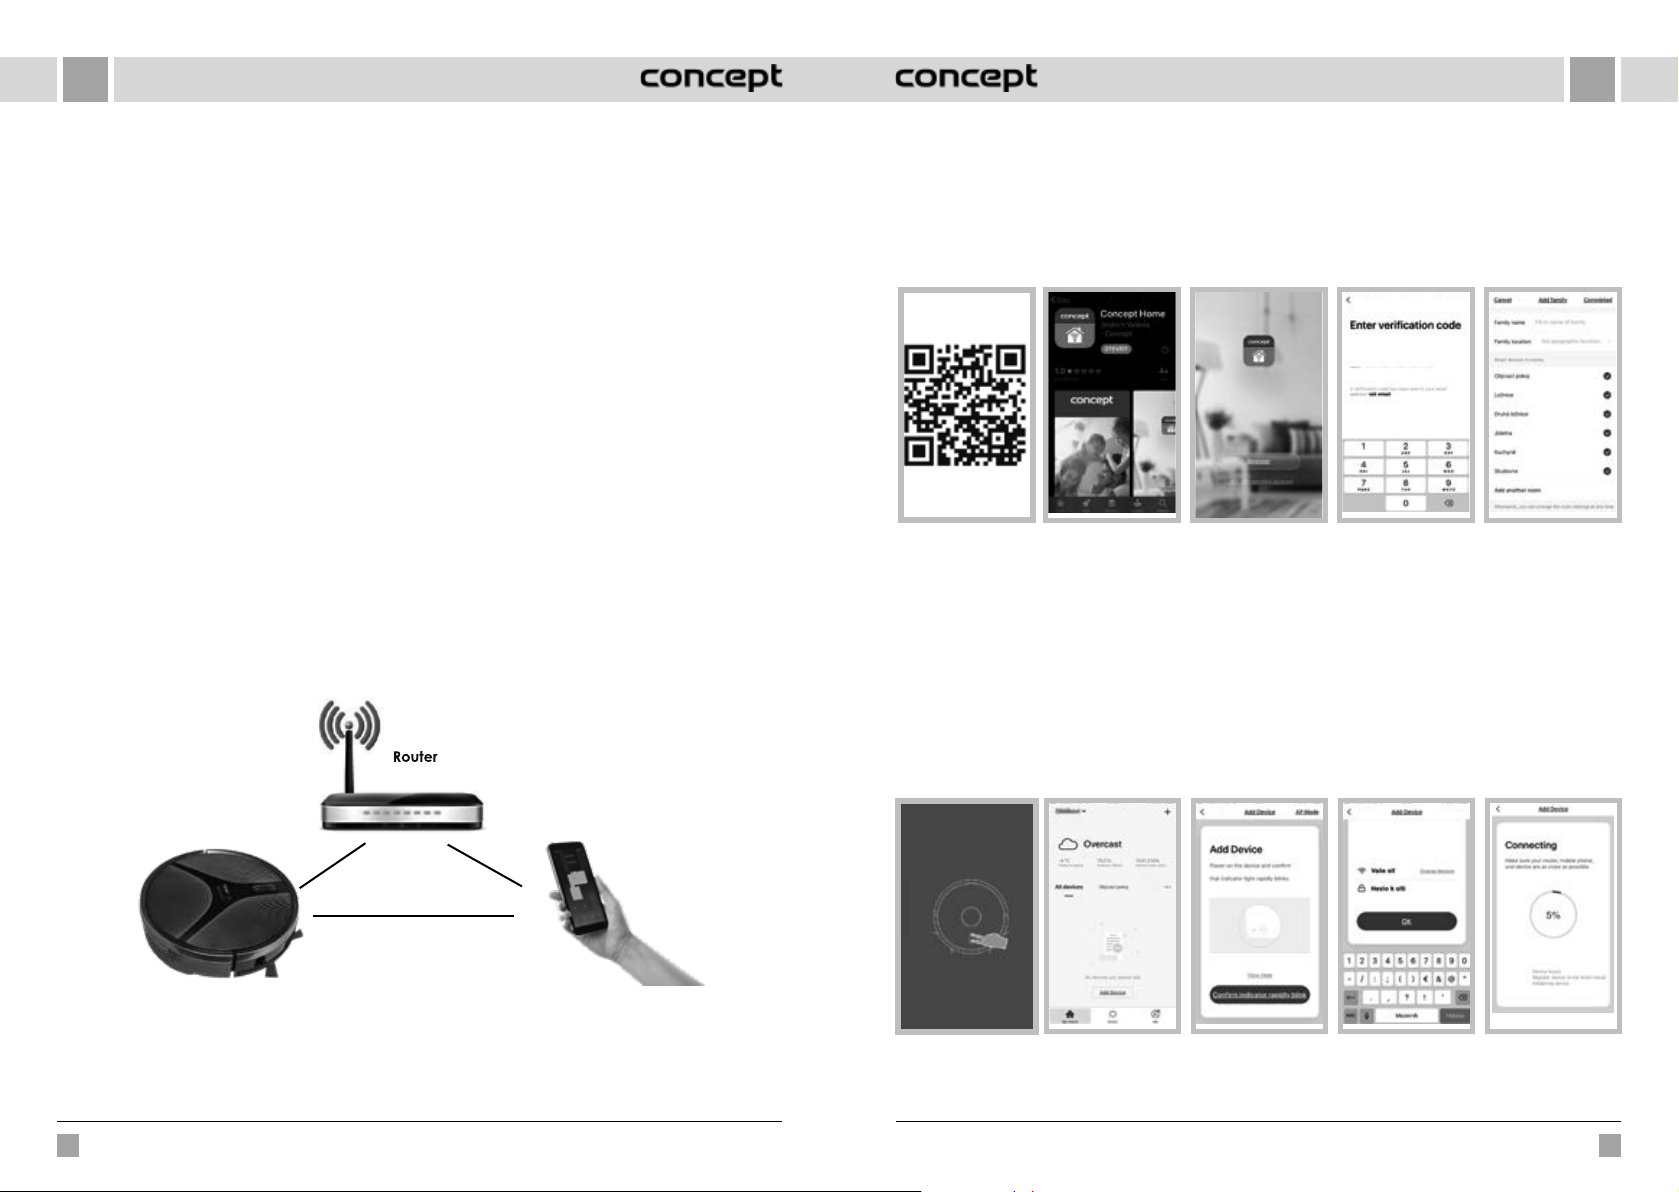
ESES
CONEXIÓN INALÁMBRICA Y COMPATIBILIDAD
• La empresa Jindřich Valenta - CONCEPT no asume responsabilidad alguna por daños accidentales, directos
oindirectos, ni por pérdida de datos, ni por pérdidas causadas por la fuga de información durante la comunicación
por medio de tecnologías inalámbricas.
• No es posible garantizar una comunicación inalámbrica 100% exitosa con todos los dispositivos inteligentes yredes
de Wi-Fi (enrutadores). Debido a la diversidad de los dispositivos en el mercado, puede ocurrir que el carácter
olas especificaciones de un dispositivo inteligente dado o de una red Wi-Fi (enrutador) no permitan la conexión
o la interfieran de algún modo. El éxito de la comunicación inalámbrica por medio de una red Wi-Fi también se ve
afectado por varios factores, que incluyen la configuración de software y hardware. La conexión entre el robot y su
red Wi-Fi también puede verse afectada por otras redes cercanas que pueden estar sintonizadas en el mismo canal
yde esta manera interferir con la conexión. Esto no será motivo de reclamo.
• La aplicación es propiedad y es operada por una entidad ajena (en adelante “Entidad”) a la empresa Jindřich Valenta
- CONCEPT (en adelante, el “Vendedor). El Vendedor no transfiere ningún dato personal a la Entidad. Al registrarse en
la aplicación, el cliente proporciona sus datos personales a la Entidad, que pasa a ser su administrador. La aplicación
y la protección de datos personales de esta derivada se rigen por las normas de la Entidad.
Compatibilidad:
Sistema operativo - Android 5.0 y superior
- IOS 9.0 y superior
Red Wi-Fi - 2,4 GHz
- Seguridad WPA1 y WPA2 (se recomienda WPA2)
ADVERTENCIA: El dispositivo no puede usarse en redes Wi-Fi con protocolo de seguridad IEEE 802.1X (por lo general, redes
corporativas).
CONTROL CON LA APLICACIÓN
Antes de poder controlar el artefacto con la aplicación, debe sincronizarlo con su teléfono y permitirle acceder a la red Wi-Fi.
Descargar e instalar la aplicación
1. Escanee el código QR (Fig. 1) o busque la aplicación “Concept Home” en Google Play o App Store y descárguela al
teléfono (Fig. 2).
2. Si ya tiene Concept Home, abra la aplicación, inicie sesión y sigas las instrucciones de sincronización.
3. Si es un usuario nuevo, registre su cuenta (Fig. 3). Proceda según las instrucciones hasta ingresar el código de
verificación y complete el registro (Fig. 4).
4. Siga procediendo según las instrucciones y cree una familia (Fig. 5).
Fig. 1
Instrucciones para sincronizar el artefacto
1. Para poder emparejar, tiene que estar conec tado a su red Wi-Fi.
2. Antes de iniciar la conexión, verifique que el dispositivo esté en modo stand-by. Presione ambos botones por
3 segundos (Fig. 6), hasta que el robot empiece a parpadear y oiga el mensaje “Wi-Fi lost, please follow the App
instruction for reconnection“. Compruebe que el teléfono esté conectado a la misma red Wi-Fi.
3. En la aplicación, pulse + o “Add device” (Fig. 7) para agregar el artefacto nuevo.
4. Confirme “Confirm indicator rapidly blink“ (Fig. 8).
5. Seleccione la red Wi-Fi a la que el artefacto se conectará e ingrese la contraseña (Fig. 9).
6. Se inicia el proceso de configuración, que puede tardar un poco (Fig. 10).
7. Su teléfono intentará conectarse con el artefacto y lo conectará a la red Wi-Fi.
8. Luego de completar la configuración (Fig. 11), pulse “Completed” y abra la interfaz para controlar el artefacto (Fig. 12).
Fig. 2 Fig. 3 Fig. 5Fig. 4
Distancia recomendada: menos de 4 metros
Asegúrese de que la aspiradora robótica, el router y su teléfono estén cerca para poder sincronizar sin problemas.
146 147
VR2110, VR2100 VR2110, VR2100
Fig. 6 Fig. 7 Fig. 8 Fig. 9 Fig. 10
Page 75
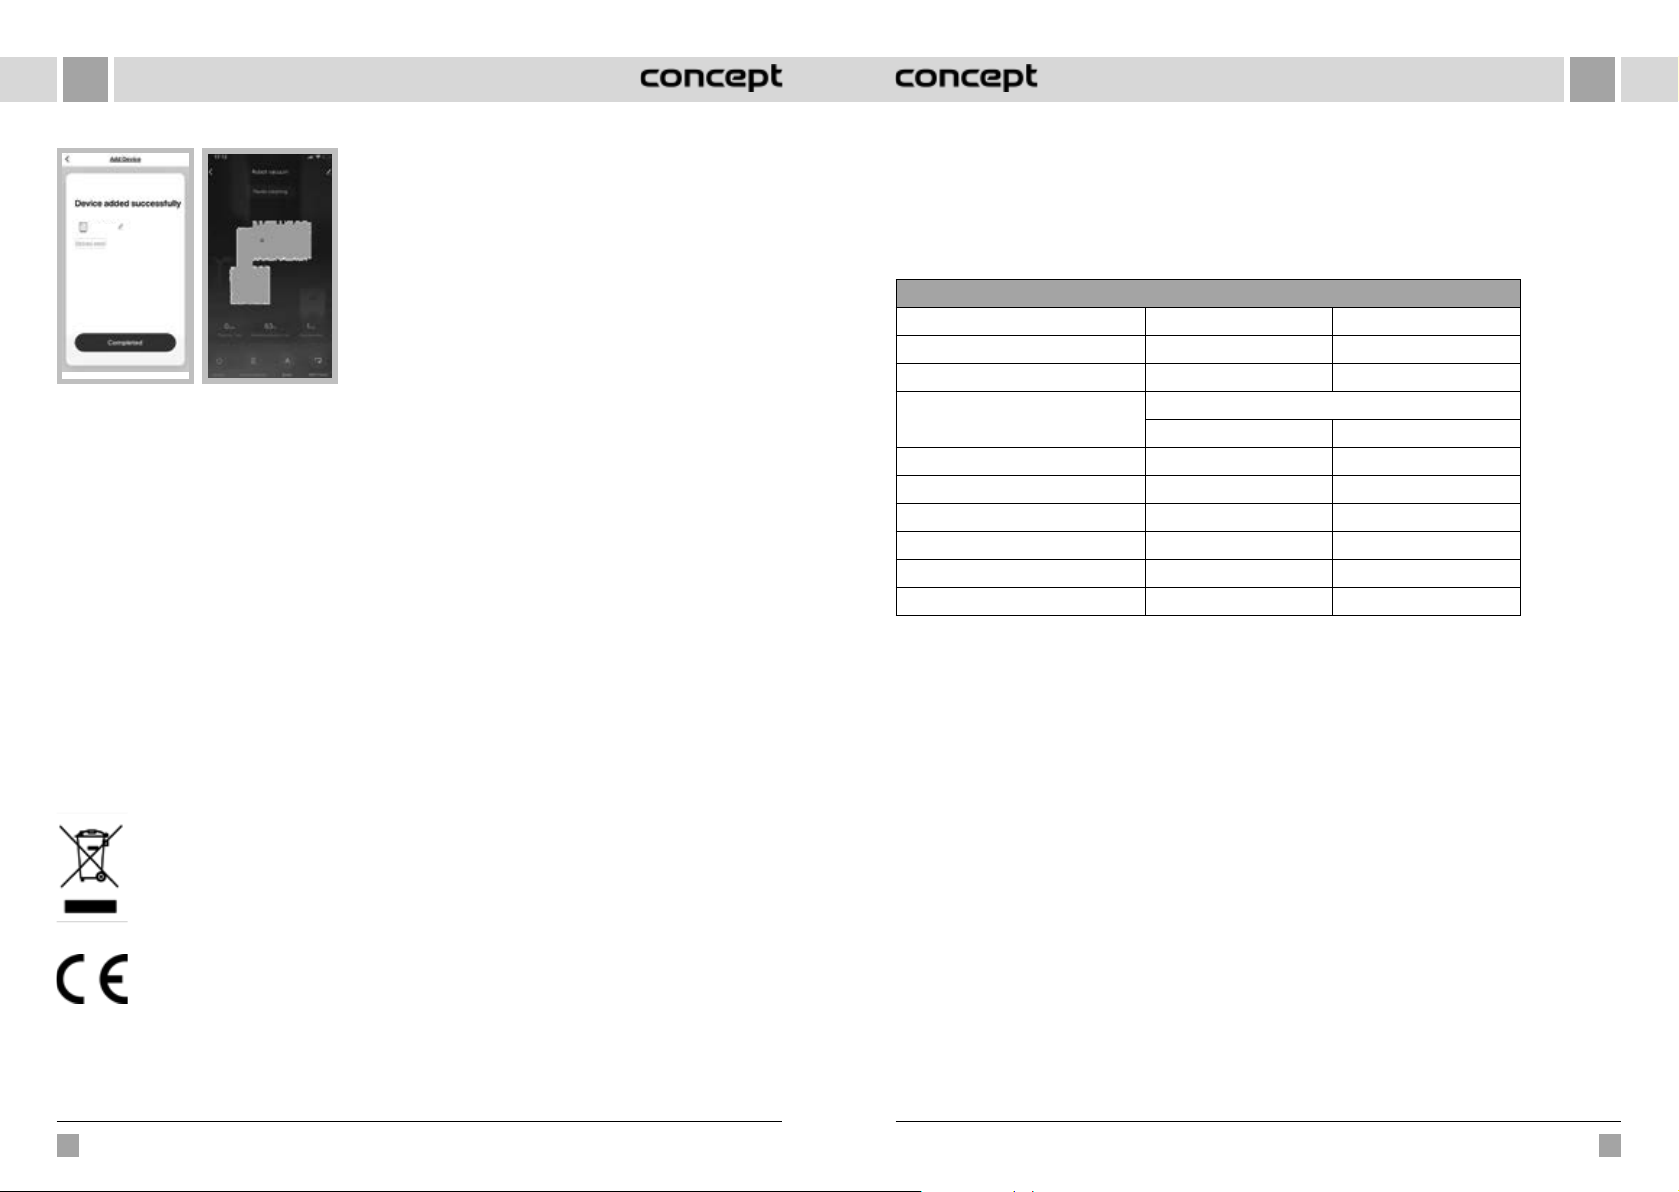
ES
RO
Dificultades al sincronizar
• Compruebe si ingresó la contraseña correcta de la red
Wi-Fi.
• El artefacto es compatible solo con redes Wi-Fi de
Concept
Fig. 11
Modos de la aplicación
Puede seleccionar los modos AUTO (automático/ZIGZAG), Local (circular), Perimetral (EDGE) y DOCK (buscar base).
Fig. 12
2,4GHz.
• Hay demasiados dispositivos conectados al enrutador.
• Cuando intenta conectarse con el artefacto (Fig. 10) trate
de conectarse manualmente a su red Wi-Fi.
SERVICIO
El mantenimiento de carácter más amplio o las reparaciones que requieran intervenir en las piezas internas del producto
deben ser realizados por un servicio profesional.
PROTECCIÓN AL MEDIO AMBIENTE
• Dé preferencia al reciclado de los materiales de embalaje y los artefactos viejos.
• La caja puede ser desechada con la recolección de residuos clasificados.
• Las bolsas de polietileno (PE) deben ser llevadas para su reciclaje.
Reciclaje del artefacto al final de su vida útil:
El artefacto está etiquetado de acuerdo con la Directiva Europea 2012/19/UE sobre Residuos de
Artefactos Eléctricos y Electrónicos (RAEE). El símbolo en el producto o su embalaje indica que este
no debe ser incluido entre los residuos domésticos. Debe ser llevado a un centro de recolección para
el reciclaje de dispositivos eléctricos o electrónicos. Procurar la correcta liquidación del producto
ayuda a prevenir efectos negativos en el medio ambiente y la salud humana que podrían ser resultar
de la liquidación incorrecta del producto. El artefacto debe ser desechado conforme las normas para
la gestión de residuos. Podrá obtener información más detallada sobre el reciclaje del producto en
la autoridad local, el servicio de tratamiento de residuos correspondiente o la tienda en donde fue
adquirido.
El producto cumple con todos los requisitos básicos de las directivas UE aplicables.
El fabricante se reserva el derecho de realizar cambios en el texto, el diseño y las especificaciones técnicas.
MULȚUMIRE
Vă mulțumim pentru cumpărarea produsului marca Concept și vă dorim să fiți mulțumiți de produsul nostru pe întreaga
durată de utilizare a acestuia.
Înainte de prima utilizare citiți cu atenție și în întregime manualul de utilizare și păstrați-l pentru o consultare ulterioară.
Asigurați-vă că și celelalte persoane care vor folosi produsul sunt familiarizate cu instrucțiunile prezentate în prezentul
manual.
Parametrii tehnici
VR2110 VR2100
Putere consumată 25 W 25 W
Tensiunea acumulatorului 14,8 V 14,4 V
Tensiunea adaptorului de încărcare
Nivel zgomot 55-65 dB 55-65 dB
Baterie 3200 mAh, Li-Ion 2600 mAh, Li-Ion
Durata de funcționare 180 minute 150 minute
Durata încărcării depline 5 ore 4-5 ore
Gama de frecvențe 2,4-2,4835 GHz 2,4-2,4835 GHz
Puterea emițătorului (max.) 18 dBm 18 dBm
IMPORTANT
Înaintea racordării la rețeaua electrică, efectuați un control vizual pentru a vă asigura că unitatea este intactă,
iar pe timpul transportului nu s-a ajuns la nicio deteriorare.
AC 220-240 V - 50/60 Hz
DC 24 V DC 24 V
INDICAȚII IMPORTANTE PRIVIND SECURITATEA
• Nu utilizați aparatul în alt mod decât cel descris în prezentul manual.
• Înainte de prima utilizare îndepărtați de pe aparat întregul material de ambalare și
materialele de marketing.
• Înainte de utilizare îndepărtați de pe podea toate obiectele care ar putea perturba
curățarea eficientă și fără probleme (cabluri, hârtii, îmbrăcăminte, fețe de masă și perdele
care ating podeaua).
• În cazul în care în zona de curățare se află scări, puneți banda magnetică (perete virtual)
la o distanță de cel puțin 15 cm față de marginea treptei superioare. Această distanță ar
trebui să asigure cea mai mare protecție împotriva căderii de pe scări.
• Folosiți doar accesorii și piese de schimb originale, destinate acestui scop.
• Nu vă așezați pe aspirator și nici nu puneți pe acesta alte obiecte.
• Aparatul ar trebui să fie utilizat doar în interior, la temperaturi cuprinse între 0 °C și 40 °C.
• Înainte de utilizare controlați dacă recipientul pentru praf și țesătura mopului sunt fixate bine.
148
VR2110, VR2100
VR2110, VR2100
149
Page 76
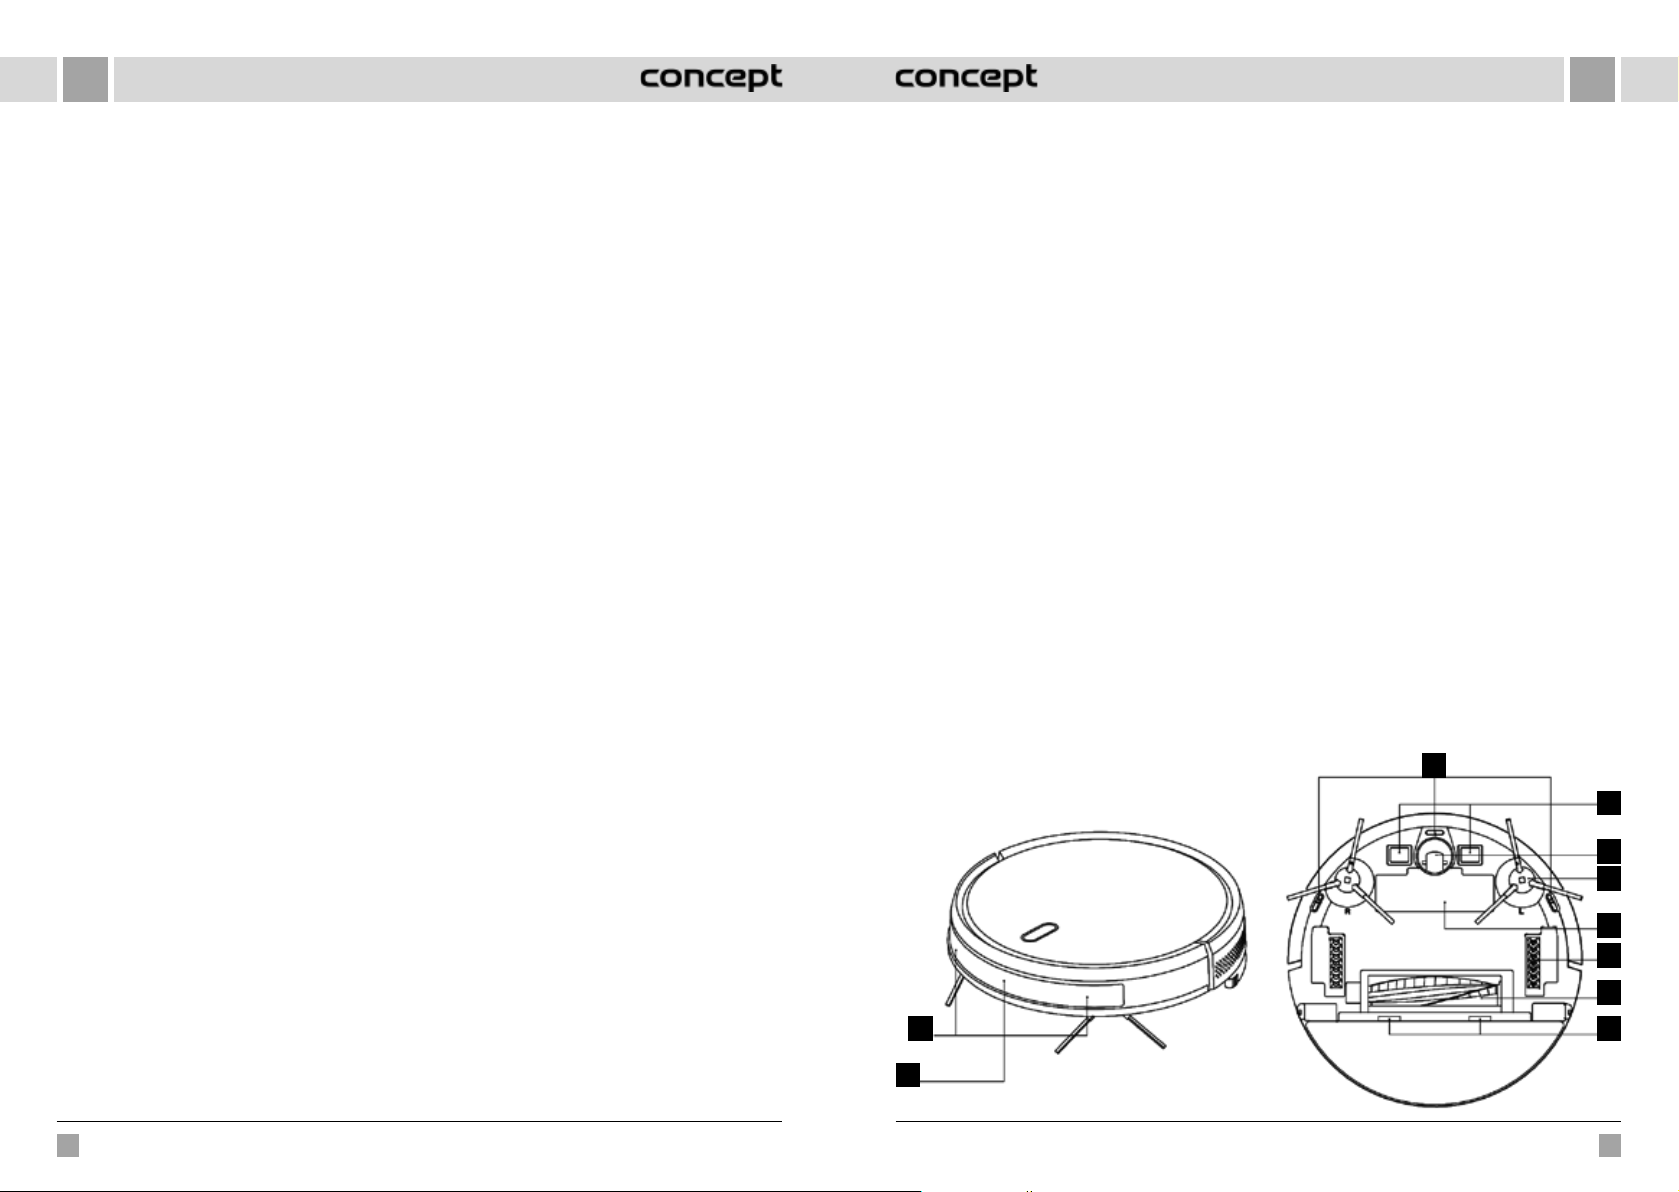
RORO
• Nu puneți părul, îmbrăcămintea, degetele sau alte părți ale corpului în apropierea periei
principale. Mențineți peria și partea de aspirare a aspiratorului curate, îndepărtați părul
și praful care ar putea să reducă proprietățile de aspirare și calitatea curățării.
• Nu utilizați aparatul pe podea udă sau umedă.
• Nu aspirați lichide, țigări aprinse, cioburi și obiecte ascuțite, chibrituri și alte substanțe
inflamabile, bucăți mai mari de hârtie, saci de plastic sau alte obiecte care ar putea să
deterioreze aspiratorul.
• La aspirare nu lăsați ca aspiratorul să treacă peste cabluri liber așezate.
• La întreținerea sau curățarea aparatului comutați întrerupătorul în poziția oprit.
• Lumina solară directă poate să reducă sensibilitatea senzorilor cu infraroșu, împiedicați
vă rugăm iluminarea directă a acestuia.
• La ștergere covorul trebuie asigurat în așa fel încât robotul să nu urce pe acesta. În cazul
în care este instalată pe aspirator țesătura de ștergere cu rezervorul de apă, s-ar putea
ajunge la întreruperea curățeniei, eventual la umezirea nedorită a covorului.
• Nu puneți aparatul în locurile de unde ar putea să cadă ușor pe podea (masă, scaune).
• Înaintea încărcării aparatului verificați dacă stația de încărcare este conectată corespunzător.
• În condiții termice extreme sau la o utilizare necorespunzătoare se poate ajunge la scăpări
de lichid din baterie. La contactul lichidului cu pielea, spălați imediat cu multă apă. La
contactul cu ochii limpeziți imediat cu o cantitate mare de apă timp de cel puțin 10 minute.
Apelați la medic.
• În cazul în care doriți să lichidați aparatul, mai întâi decuplați bateria de la aparat.
• În cazul în care transportați aparatul sau nu-l veți folosi timp mai îndelungat, comutați
întrerupătorul în poziția oprit. Astfel veți prelungi durabilitatea bateriei.
• Verificați dacă tensiunea rețelei de alimentare corespunde cu valoarea tensiunii înscrisă pe
placa cu date a aparatului. Nu conectați aparatul la prize ramificate sau la cabluri prelungitoare.
• Când scoateți aparatul din priză, nu trageți niciodată de cablu, ci prindeți de ștecăr și
scoateți-l prin tragere.
• A nu se permite folosirea aparatului drept jucărie.
• Nu folosiți substanțe abrazive sau chimic agresive pentru a curăța aparatul.
• Aparatul este potrivit doar pentru utilizare casnică, nu este destinat uzului comercial.
• Nu cufundați cablul de alimentare, ștecărul sau aparatul în apă și nici într-un alt lichid.
• Nu reparați aparatul prin forțe proprii. Apelați la un service autorizat și preveniți rănirile
la o manipulare neprofesională.
• Acest aparat poate fi utilizat de către copiii cu vârsta de 8 ani și peste și de către persoanele
cu dizabilități fizice sau capacitate mentală redusă sau experiență și cunoștințe insuficiente,
dacă sunt supravegheate sau au fost familiarizate cu folosirea aparatului în siguranță și
realizează eventualele pericole. Curățarea și întreținerea efectuată de către utilizator nu
poate fi exercitată de către copii care nu au vârsta de peste 8 ani și nu sunt supravegheați.
Copiii sub 8 ani trebuie să mențină distanța de siguranță față de aparat și cablu de alimentare.
Copiii nu au voie să se joace cu aparatul.
• Copiii cu vârsta sub 3 ani nu trebuie să aibă acces la aparat, dacă nu sunt supravegheați
permanent.
• Producătorul și importatorul în Uniunea Europeană nu este răspunzător pentru daunele
cauzate de aparat, ca de ex. rănire, opărire, incendiu, vătămare, degradare a altor obiecte etc.
• În cazul în care cablul de alimentare este deteriorat, asigurați ca înlocuirea să o facă un
service autorizat, pentru a se preveni apariția situațiilor periculoase. Este interzisă utilizarea
aparatului cu cablul de alimentare defect.
• Aspiratorul robot trebuie folosit doar cu adaptorul de rețea original, adaptorul fiind livrat cu
acesta. Pentru a evita apariția situațiilor periculoase, nu folosiți niciodată un alt tip de adaptor.
În cazul în care nu respectați instrucțiunile producătorului, o eventuală reparație nu poate fi considerată ca și
reparație de garanție.
Controlați cu atenție dacă ați scos toate accesoriile livrate, pe perioada garanției recomandăm să păstrați cutia
originală din hârtie, manualul de utilizare și materialul de ambalare
DESCRIEREA PRODUSULUI
1 Senzor anti coliziune
2 Senzor cu infraroșu pentru încărcare
3 Senzor împotriva căderii
4 Contact de încărcare
5 Rotiță universală
1
2
6 Periuța laterală
7 Carcasa acumulatorului
8 Roata de acționare
9 Peria principală
10 Clichetul carcasei periei principale
3
4
5
6
7
8
9
10
150 151
VR2110, VR2100 VR2110, VR2100
Page 77
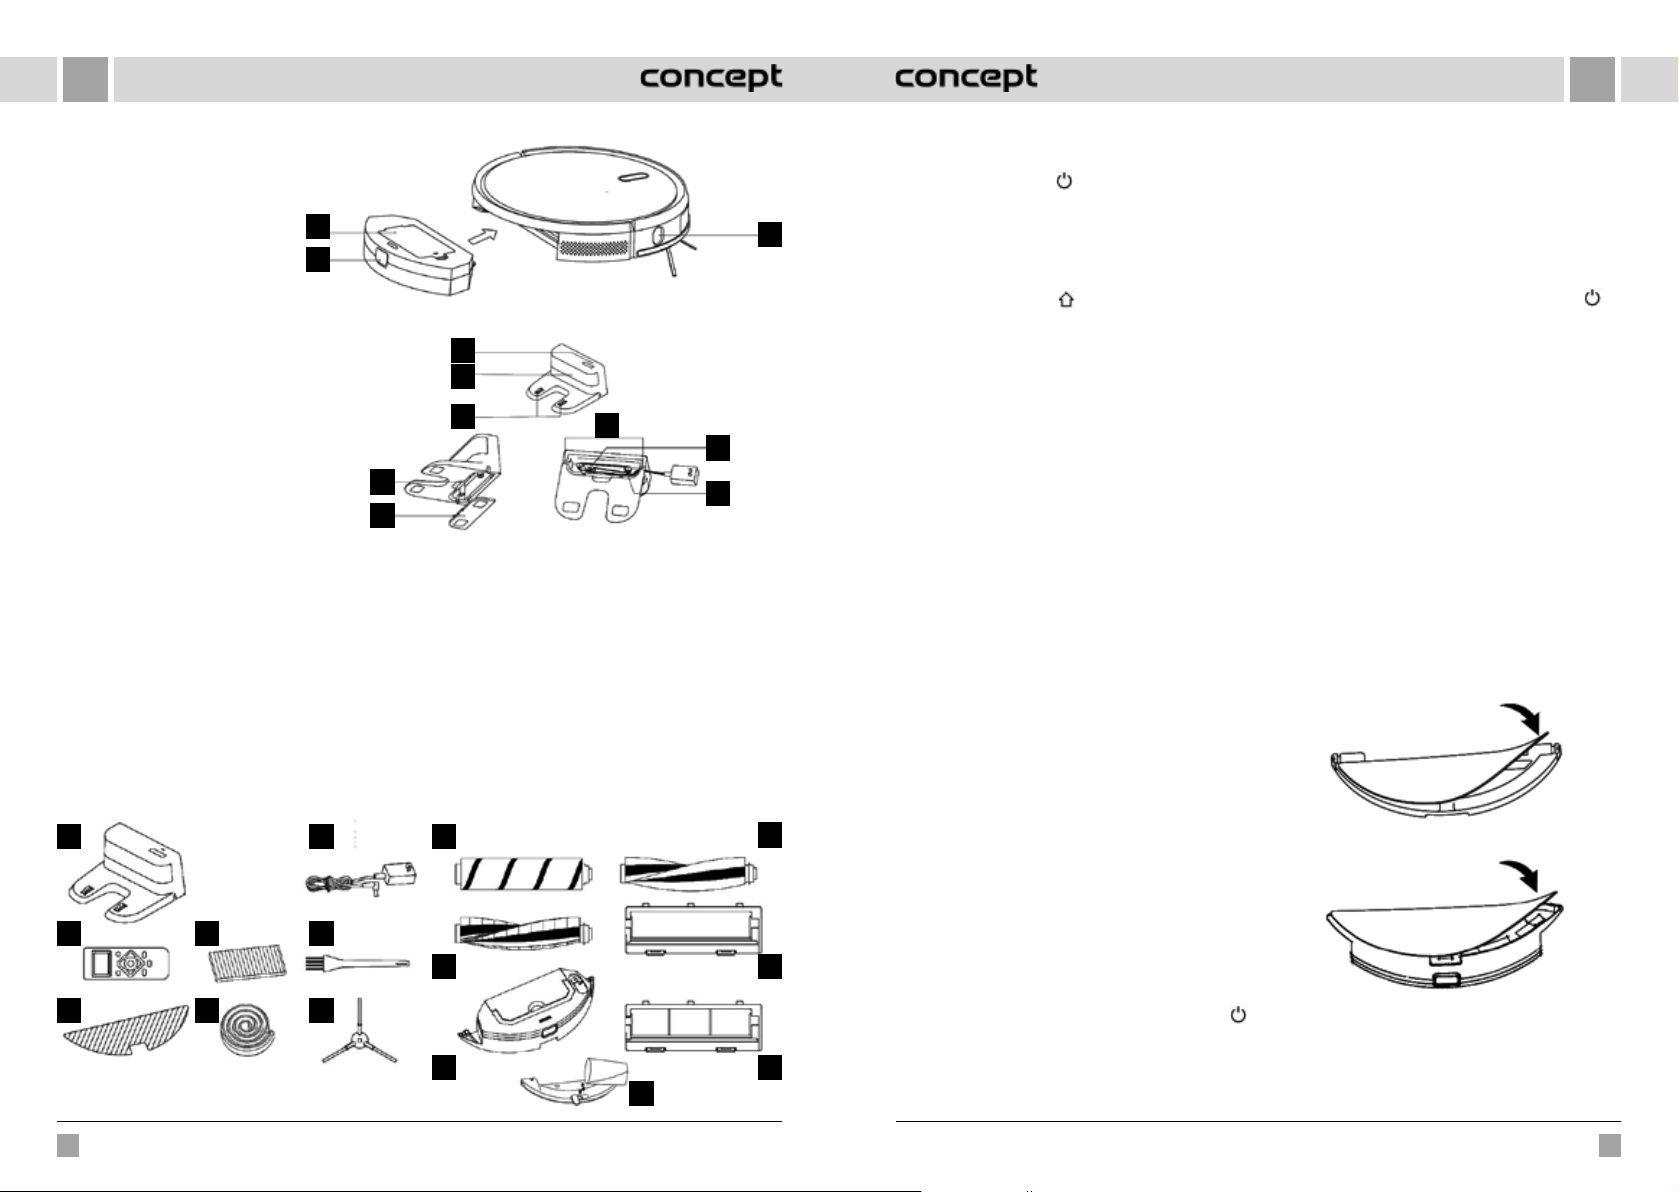
RORO
1 Capacul sitei filtrului
2 Butonul recipientului pentru praf
3 Senzor de perete
1
2
Stația de andocare
1 Indicator alimentare
2 Zona de emitere a semnalului
3 Contactele de încărcare ale bazei
4 Canal de prindere
5 Placă de acoperire
6 Trecere pentru cablu
7 Priza adaptorului de alimentare
8 Bolț de înfășurare
Lista de componente
1 Stația de andocare 1x
2 Telecomanda 1x
3 Textil pentru ștergere 2x
4 Filtru HEPA + filtru din spumă 3x (la VR2100 2x)
5 Bandă magnetică 1x
6 Adaptor 1x
7 Periuță de curățare 1x
8 Perie stânga și dreapta 2x
1
2
3
4
5
6
7
8
1
2
3
6
4
5
9 Perie HARDFLOOR 1x (doar la modelul VR2110)
ATENȚIONARE! nu se poate folosi la covoare, se
poate ajunge la întreruperea curățeniei.
10 Perie CARPET 1x
11 Rezervor de apă controlat electric 1x (doar la modelul
VR2110)
12 Perie PET 1x (doar la modelul VR2110)
13 Capacul periei principale 1x (doar la modelul VR2110)
potrivit pentru peria HARDFLOOR și PET
14 Capacul periei principale cu sârmă din oțel 1x
(potrivit pentru peria CARPET)
15 Rezervor de apă suspendabil 1x (doar la modelul
VR2100)
9
10
11
15
FUNCȚII CHEIE
Curățare / pornire și oprire
• Prin apăsare scurtă porniți sau opriți curățarea.
3
7
8
• Prin apăsare lungă timp de 3 s, porniți sau opriți
aparatul.
• Prin apăsare lungă timp de 15 s opriți aparatul forțat în
situații neobișnuite.
Încărcare / curățenia locală
• Prin apăsare scurtă activați sau întrerupeți încărcarea.
• Prin apăsare lungă activați curățenia locală.
Indicator
• Portocaliu: Exploatare sau încărcare normală.
• Roșu: Stare anormală sau acumulator descărcat.
• Roșu-portocaliu: Aparatul nu este neconectat la baza
rețea.
Resetare Wi-Fi
• Apăsați ambele butoane pentru 3 s.
INSTALARE
1. Racordați cablul de alimentare, iar surplusul
cablului puneți în spațiul pentru cablu.
2. Puneți stația de andocare lângă perete și porniți
alimentarea.
Notă:
• Asigurați o zonă de min. 0,5 m pe ambele părți ale
stației de andocare și de min. 1,5 m în fața stației.
• Dacă cablul de alimentare este întins perpendicular pe
podea, se poate ajunge la situația că aparatul îl scoate
și ca urmare stația de andocare poate fi oprită.
• Indicatorul de control a încărcării este în stare normală
la pornire aprins, iar la terminarea încărcării stins.
3. Nu mișcați stația de andocare arbitrar și nu
oexpuneți luminii solare directe.
12
13
14
Notă: Lumina solară directă va perturba semnalul stației
de andocare, de aceea aparatul nu trebuie să se întoarcă
corect în stația de andocare.
4. Instalarea periei laterale
Asigurați-vă că marcajul periei laterale stânga (L) și
a periei laterale dreapta (R) corespunde cu marcajul
Lși R de pe carcasa inferioară. Puneți periile laterale Lși
R prin apăsare, până ce veți auzi sunetul de „cădere la
loc“.
5. Punere în funcțiune și încercare
Robotul se pornește prin apăsare lungă a butonului
. Dacă indicatorul de alimentare este aprins normal,
încărcați robotul în stația de andocare.
Notă: Dacă aparatul nu poate fi pornit din cauza
acumulatorului slab, încărcați-l în stația de andocare,
iar aparatul va porni automat. Aparatul poate să lucreze
normal doar atunci când nivelul acumulatorului este
≥20%.
6. Conectarea aplicației mobile (acest pas poate fi
sărit)
Citiți instrucțiunile de conectare Wi-Fi și conectați
aplicația mobilă.
7. Începerea curățeniei
După pornirea robotului apăsați scurt butonul
pe robot sau începeți curățenia cu ajutorul aplicației
mobile (în timpul utilizării puteți întrerupe aparatul
prin apăsarea oricărui buton.).
Notă:
• Robotul destinat măturării nu poate fi folosit pentru
îndepărtarea lichidelor.
• Dacă nivelul de încărcare a acumulatorului este sub
20%, aparatul nu poate să lucreze. În acest caz trebuie
încărcat.
• Dacă nivelul de încărcare al acumulatorului este
sub 20%, aparatul se întoarce automat în stația de
andocare.
• Înaintea utilizării îndepărtați diferiți conductori
(inclusiv cablul de alimentare a stației de andocare)
de pe podea, pentru a preveni opririle și deteriorarea
obiectelor sau conductorilor în cazul în care aparatul
prinde acești conductori.
8. Instalarea modulului pentru ștergere
a) Instalarea textilului pentru ștergere: lipiți textilul
pentru ștergere drept de fundul rezervorului de apă.
Model VR2100 - Rezervor de apă suspendabil
Model VR2110 - Rezervor de apă controlat electric
Notă: După folosire curățați textilul pentru ștergere,
pentru a-l menține în stare bună.
b) Umpleți rezervorul de apă: deschideți capacul și
umpleți cu apă.
de
152 153
VR2110, VR2100 VR2110, VR2100
Page 78
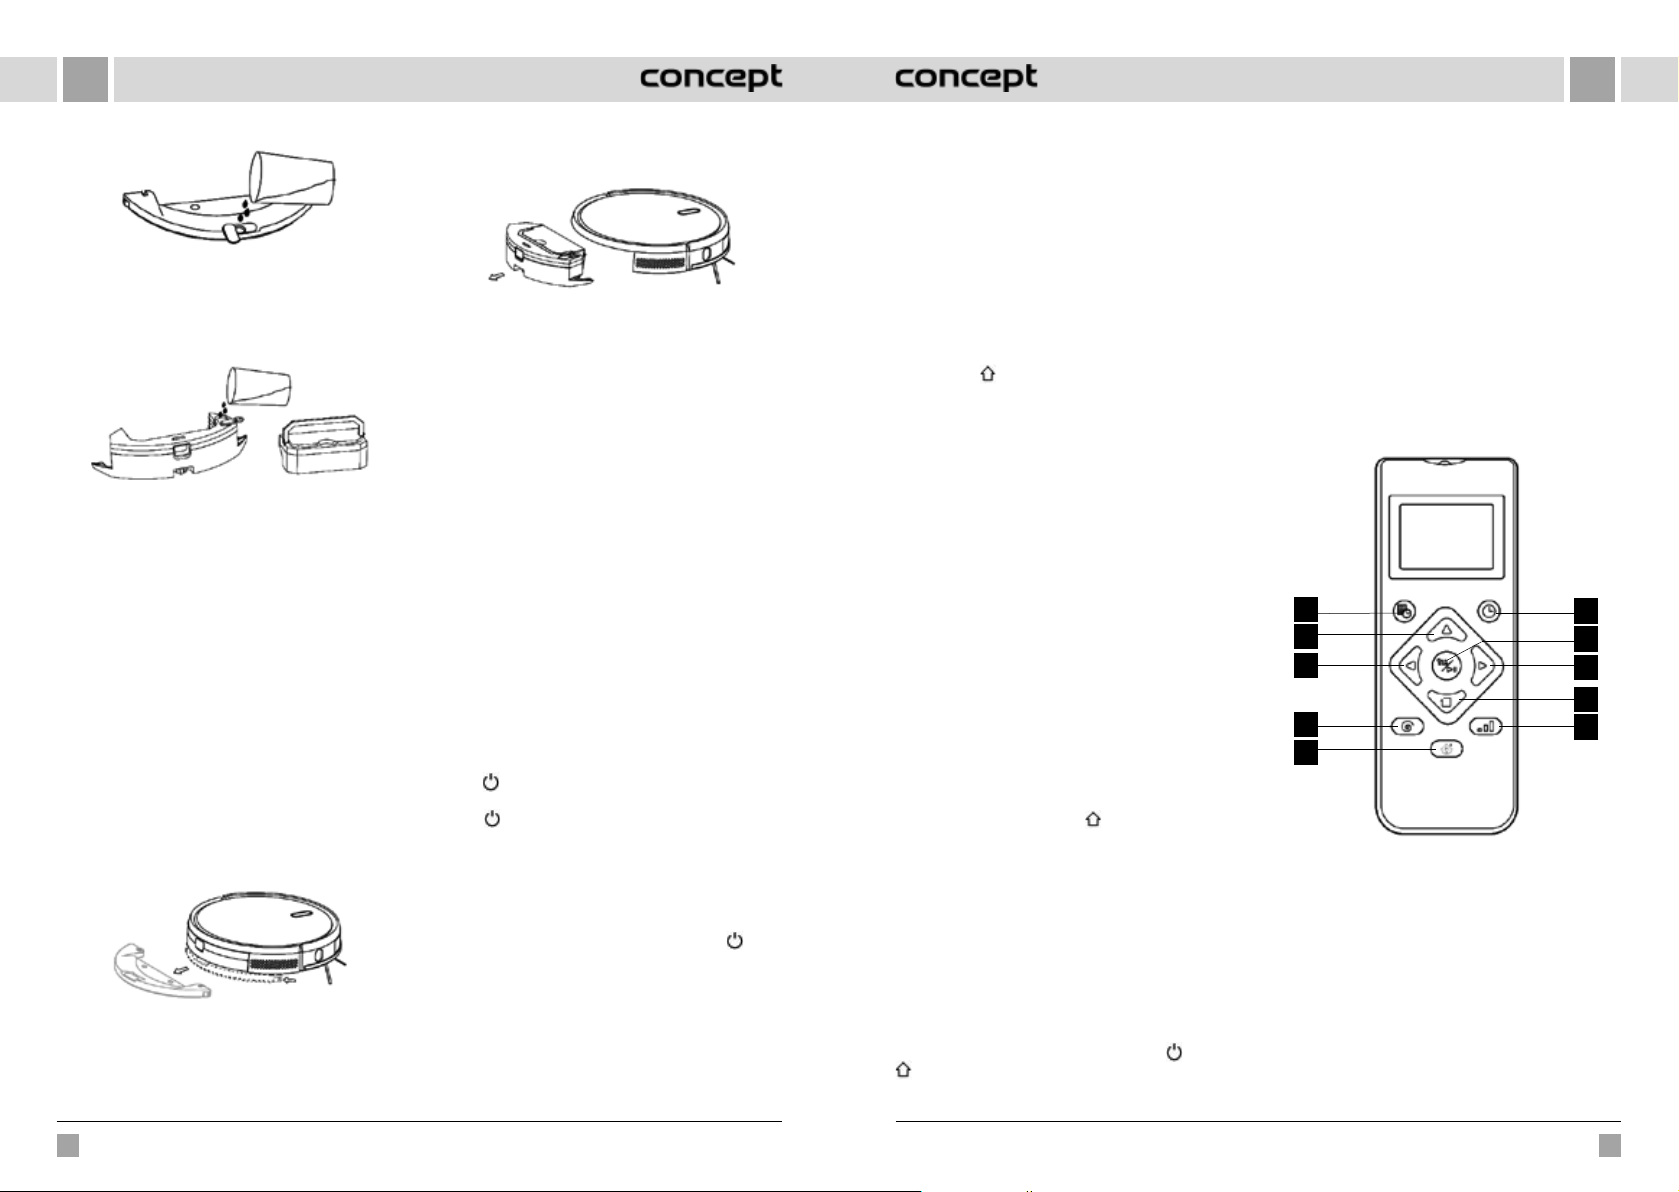
RORO
Model VR2100 - Rezervor de apă suspendabil
Înaintea umplerii cu apă scoateți recipientul pentru
praf cu ajutorul mânerului (VR2110).
Model VR2110 - Rezervor de apă controlat electric
c) Instalați modulul:
Model VR2100: apăsați modulul orizontal de-a
lungul părții posterioare a robotului. Modulul este
instalat la loc în momentul în care auziți sunetul de
„cădere la loc“.
Model VR2110: introduceți în rezervorul de apă
recipientul pentru praf și introduceți mânerul în
lăcaș. După aceea apăsați și țineți apăsat butonul de
la mijlocul rezervorului și introduceți-l orizontal de-a
lungul părții posterioare a robotului. Modulul este
instalat la loc în momentul în care auziți sunetul de
„cădere la loc“.
9. Scoaterea modulului pentru ștergere
Model VR2100: În momentul în care robotul termină
munca sa, apăsați clichetele de pe ambele părți,
scoateți modulul pentru ștergere în direcția în spate,
goliți apa din rezervorul de apă și curățați textilul
(pe timpul curățării nu mișcați cu robotul și nici nu-l
răsturnați).
Model VR2100 - Rezervor de apă suspendabil
Model VR2110: În momentul în care robotul termină
munca sa, apăsați butonul de pe mijlocul rezervorului
de apă, scoateți modulul pentru ștergere în direcția în
spate, goliți apa din rezervorul de apă și curățați textilul
(pe timpul curățării nu mișcați cu robotul și nici nu-l
răsturnați).
Model VR2110 - Rezervor de apă controlat electric
10. Instrucțiuni de folosire a modulului pentru
ștergere
• Nu folosii modulul pentru ștergere dacă nu-l aveți sub
supraveghere.
• Asigurați-vă, din motivul de siguranță, că modulul este
scos la încărcare sau atunci când nu este folosit.
• Nu încercați s ștergeți covoare.
• Pentru atingerea unei eficiențe mai bune a ștergerii,
modulul de ștergere ar trebui folosit după a treia
măturare sau aspirare a podelei.
• Dacă doriți să completați apă sau să curățați textilul în
timp ce aparatul funcționează, întrerupeți-l, scoateți și
repuneți modulul pentru ștergere potrivit pașilor 8 și
9. Nu mutați și nici nu răsturnați aparatul, pentru a nu
se ajunge la eroare la stabilirea poziției și la pierderea
hărții.
• Funcția de ștergere la aparat este destinată ștergerii
și ajută la o curățenie mai profundă. Nu poate însă să
îndepărteze impuritățile strâns lipite și să înlocuiască
forța umană.
UTILIZARE
PORNIRE/OPRIRE
Butonul apăsat lung, timp de 3 s, indicatorul se aprinde
iar aparatul este pornit.
Butonul apăsat lung, timp de 3 s atunci când aparatul
este în modul stand-by, indicatorul se stinge iar aparatul
este oprit.
MENȚIUNE: Aparatul nu poate fi oprit în momentul în care
se încarcă.
CURĂȚENIE/ÎNTRERUPERE
După pornirea aparatului apăsați scurt butonul
aparat sau porniți aparatul cu ajutorul aplicației mobile
(prin apăsarea oricărui buton puteți să-l întrerupeți).
Notă:
• Aspiratorul robot nu poate fi folosit pentru
îndepărtarea lichidelor.
• Dacă nivelul de încărcare a acumulatorului este sub
20%, aparatul nu poate să lucreze. În acest caz trebuie
încărcat.
de pe
• Dacă nivelul de încărcare al acumulatorului este
sub 20%, aparatul se întoarce automat în stația de
andocare.
• Înaintea utilizării îndepărtați diferiți conductori
(inclusiv cablul de alimentare a stației de andocare)
de pe podea, pentru a preveni opririle și deteriorarea
obiectelor sau conductorilor în cazul în care aparatul
prinde acești conductori.
ÎNCĂRCARE
Mod automat: După lucru aparatul se întoarce automat
în stația de andocare.
Mod manual: În starea întreruptă, la apăsare scurtă
a butonului
aparatul prin control de pe aplicația mobilă. În momentul
în care aparatul este încărcat, indicatorul luminează
intermitent.
Notă: În cazul în care aparatul nu găsește stația de
andocare, se întoarce automat în poziția inițială. În
acest caz introduceți manual aparatul înapoi în stația de
andocare.
BANDĂ MAGNETICĂ
Benzile magnetice pot fi puse în așa fel încât să despartă
zonele care nu trebuie curățate (de ex. baia, bucătăria
etc.).
Notă: fixați banda magnetică de podea în așa fel încât
să nu se poată deplasa. În cazul contrar va fi influențat
efectul acesteia.
MOD DE CURĂȚARE
După pornire aparatul se va mișca potrivit programului
de curățare în arcuri, pentru a curăța întreaga suprafață
a podelei din toate încăperile, una după alta, într-un mod
eficient de acoperire completă. După terminarea curățării
aparatul se întoarce înapoi în stația de andocare și se
încarcă automat.
CURĂȚENIA LOCALĂ
Prin apăsare lungă a butonului
se localizează, curăță o zonă circulară cu diametru de
1,5m iar după terminarea curățării se întoarce automat la
locul inițial și încetează automat să lucreze.
PLANIFICAREA CURĂȚENIEI
Timpul fix pentru curățenie poate fi setat cu ajutorul
aplicației mobile. Aparatul va începe să facă curățenia la
ora stabilită, iar după terminare se întoarce înapoi în stația
de andocare.
RESETARE Wi-Fi
În cazul în care nu vă puteți conecta la aparat cu telefon
din cauza modificării configurației router-ului și a parolei
sau din alt motive, apăsați simultan butonul
timp de 3 s, până ce nu se aude notificarea vocală „WiFi
has been reset“ (Wi-Fi a fost resetat) iar indicatorul se va
activați încărcarea sau puteți încărca
timp 3 secunde robotul
și butonul
aprinde în culoarea albastru-violetă și va licări încet.
MOD SILENȚIOS
Notificările vocale pot di activate sau dezactivate cu
ajutorul aplicației mobile.
SETAREA PUTERII DE ASPIRARE
Puterea de aspirare poate fi setată cu ajutorul aplicației
mobile la nivel silențios, standard sau înalt.
La detectarea covorului se ajunge la creșterea automată
a puterii de aspirare la cel mai înalt grad. ATENȚIONARE covorul este detectat corect doar cu peria Carpet.
SETAREA DEBITULUI DE APĂ (doar pentru rezervor de
apă cu control electric la modelul VR2110)
Debitul de apă poate fi setat cu ajutorul aplicației mobile
la nivel jos, standard sau înalt.
FOLOSIREA TELECOMENZII
1
2
3
6
7
8
9
4
10
5
1. Planificarea curățeniei
2. Mersul înainte
3. Rotire spre stânga
4. Curățenia locală TURBO
5. Începerea/întreruperea încărcării
6. Curățenie/pauză automată
7. Curățenie/pauză
8. Rotire spre dreapta
9. Curățenie periferică
10. Setarea puterii de aspirare / debitului de apă
Notă: Pentru a vă asigura că toate setările sunt eficiente,
trebuie să direcționați telecomanda spre partea frontală
aaspiratorului robot și din apropiere.
154 155
VR2110, VR2100 VR2110, VR2100
Page 79
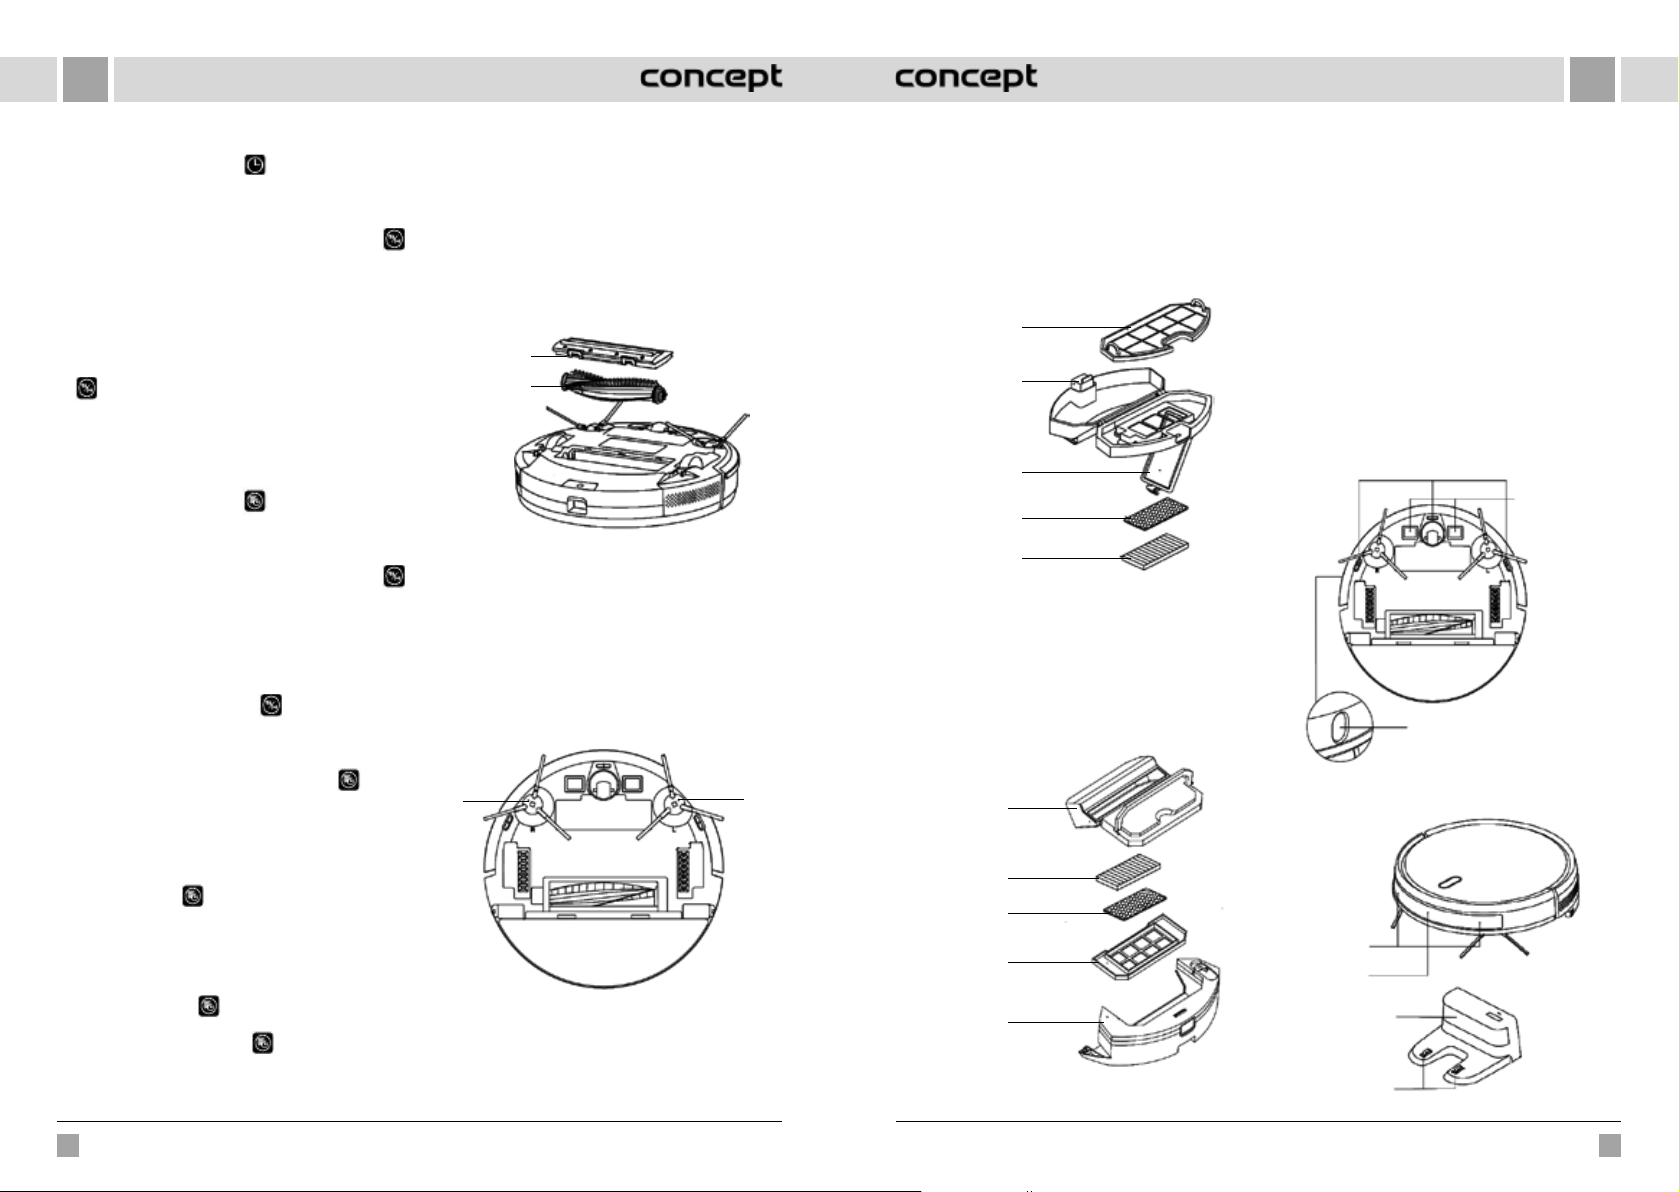
RORO
Setare oră
1. Prin apăsarea butonului de pe telecomandă
intrați în set area orei, pe display LCD apare intermi tent
simbolul pentru duminică.
2. Prin apăsarea butonului stâng și drept selectați
ziua săptămânii, iar prin apăsarea butonului
o confirmați, apoi displayul LCD trece automat pe
setarea orei.
3. Prin apăsarea butoanelor în sus și în jos setați ora, iar
prin apăsarea butoanelor în stânga și în dreapta treceți
pe setarea minutelor.
4. După ce setați ora actuală, direcționați telecomanda
spre partea frontală a aspirator robot și apăsați butonul
pentru confirmarea tuturor setărilor orei. Dacă
nu procedați așa, setările dumneavoastră nu vor fi
valabile.
5. Astfel terminați setarea orei pentru telecomanda și
aspiratorul robot.
Plan de curățenie
1. Prin apăsarea butonului
de pe telecomandă
intrați în funcția setarea planului, pe display LCD va
apărea intermitent simbolul pentru duminică.
2. Prin apăsarea butonului stâng și drept selectați
ziua săptămânii, iar prin apăsarea butonului
o confirmați, apoi displayul LCD trece automat pe
setarea orei.
3. Prin apăsarea butoanelor în sus și în jos setați ora,
iar prin apăsarea butoanelor în stânga și în dreapta
treceți pe setarea minutelor. După aceasta direcționați
telecomanda spre partea frontală a aspiratorului robot,
iar prin apăsarea butonului confirmați această
setare a planului pentru aspiratorul robot.
4. După terminarea setării unui plan telecomanda trece
automat la setarea următorului plan. Dacă nu doriți
să continuați cu setările, apăsați butonul pentru
terminare sau așteptați 10 s după care setarea este
terminată automat.
5. Astfel terminați setarea orei pentru telecomanda și
aspiratorul robot.
Anularea planului de curățenie
1. Apăsați butonul
de pe telecomandă, pe display
LCD va licări simbolul pentru duminică și vor fi afișate
simbolurile pentru zilele săptămânii pe care le-ați
planificat.
2. Prin apăsarea butonului stâng și drept selectați ziua
săptămânii pe care ați planificat-o, iar prin apăsare
lungă a butonului timp de 3 s anulați această
zi. Puteți selecta o altă zi planificată pe care doriți să
oanulați sau apăsați butonul pentru terminare, sau
așteptați 10 s până ce setarea este terminată automat.
ÎNTREȚINERE ZILNICĂ
Peria principală (curățați periodic)
1. Întoarceți aparatul și apăsați clichetul de pe carcasa
principală a periei, pentru a o putea scoate.
2. Îndepărtați praful din interior și din interiorul periei
principale cu ajutorul periuței mici și curățați peria
principală.
3. Puneți la loc peria principală prin apăsare, în așa fel
încât clichetul să cadă la loc.
Clichet
Peria
principală
Peria laterală (curățați periodic)
1. Întoarceți aparatul și scoateți peria laterală în sus.
2. Îndepărtați părul și impuritățile și montați înapoi peria
laterală.
3. Asigurați-vă că peria laterală stânga (L) și peria laterală
dreapta (R) corespund cu simbolurile L și R de pe carcasa
inferioară. Prin apăsare pe periuțele L și R le reinstalați.
Notă: Schimbați periuțele laterale la fiecare 3 până la
6 luni, pentru a asigura efectul de curățare al acestora.
R - periuța
laterală dreapta
Recipientul pentru praf și grila filtrului (curățați
periodic)
1. Apăsați pe buton și scoateți recipientul pentru praf în
spate.
2. Deschideți și curățați recipientul pentru praf.
L - periuța
laterală stânga
Curățarea grilei filtrului (curățați periodic)
1. După o utilizare lungă scoateți grila filtrului, filtrul din
spumă și filtrul HEPA.
2. Curățați grila filtrului scoasă. Limpeziți cu apă filtrul din
spumă și filtrul HEPA.
3. Ștergeți piesele în parte și lăsați-le să se usuce liber.
4. După uscare instalați-le pe rând în ordinea corectă:
grila - filtrul din spumă - filtrul HEPA.
Grilă de filtrare
(filtru brut)
Buton
Capacul
filtrului
Filtru din
spumă
Filtru HEPA
Notă:
• Limpeziți grila filtrului cu apă curată fără adăugarea
vreunui agent de curățare.
• Nu curățați grila filtrului cu pensulă sau degete.
• Grila filtrului lăsați să se usuce la aer timp de cel puțin
24 de ore.
• Schimbați grila filtrului la fiecare 3 până la 6 luni.
Curățarea filtrului (curățați periodic)
Recipient
pentru praf
Filtru HEPA
Filtru din
spumă
Grila de filtrare
(filtru brut)
Rezervor
de apă
Rezervor de apă controlat electric
Modulul pentru ștergere (curățați după fiecare folosire)
1. Îndepărtați textilul, goliți apa din rezervorul de apă.
2. Curățați textilul, uscați rezervorul de apă și textilul. La
modelul VR2110 scoateți mai întâi recipientul pentru
praf și după aceea goliți apa din rezervorul de apă.
Senzori (curățați periodic)
Curățați senzorii cu un textil moale, în modul următor:
1. Curățați senzorii de-a lungul peretelui în dreapta.
2. Trei senzori împotriva căderii în partea de jos aaparatului.
3. Senzorul anti coliziune cu infraroșu din partea frontală
a aparatului.
4. Protecția împotriva electrocutării și contactele pentru
stația de andocare din partea de jos a aparatului (opriți
aparatul la curățare).
5. Regiunea pentru transmiterea semnalului stației de
andocare.
Senzor împotriva căderii
Contact de
încărcare
Senzor TOF
Senzori (curățați în fiecare lună)
Senzor anti
coliziune
Senzor cu
infraroșu pentru
încărcare
Zona de emitere
a semnalului
Contactele de
încărcare ale bazei
156 157
VR2110, VR2100 VR2110, VR2100
Page 80
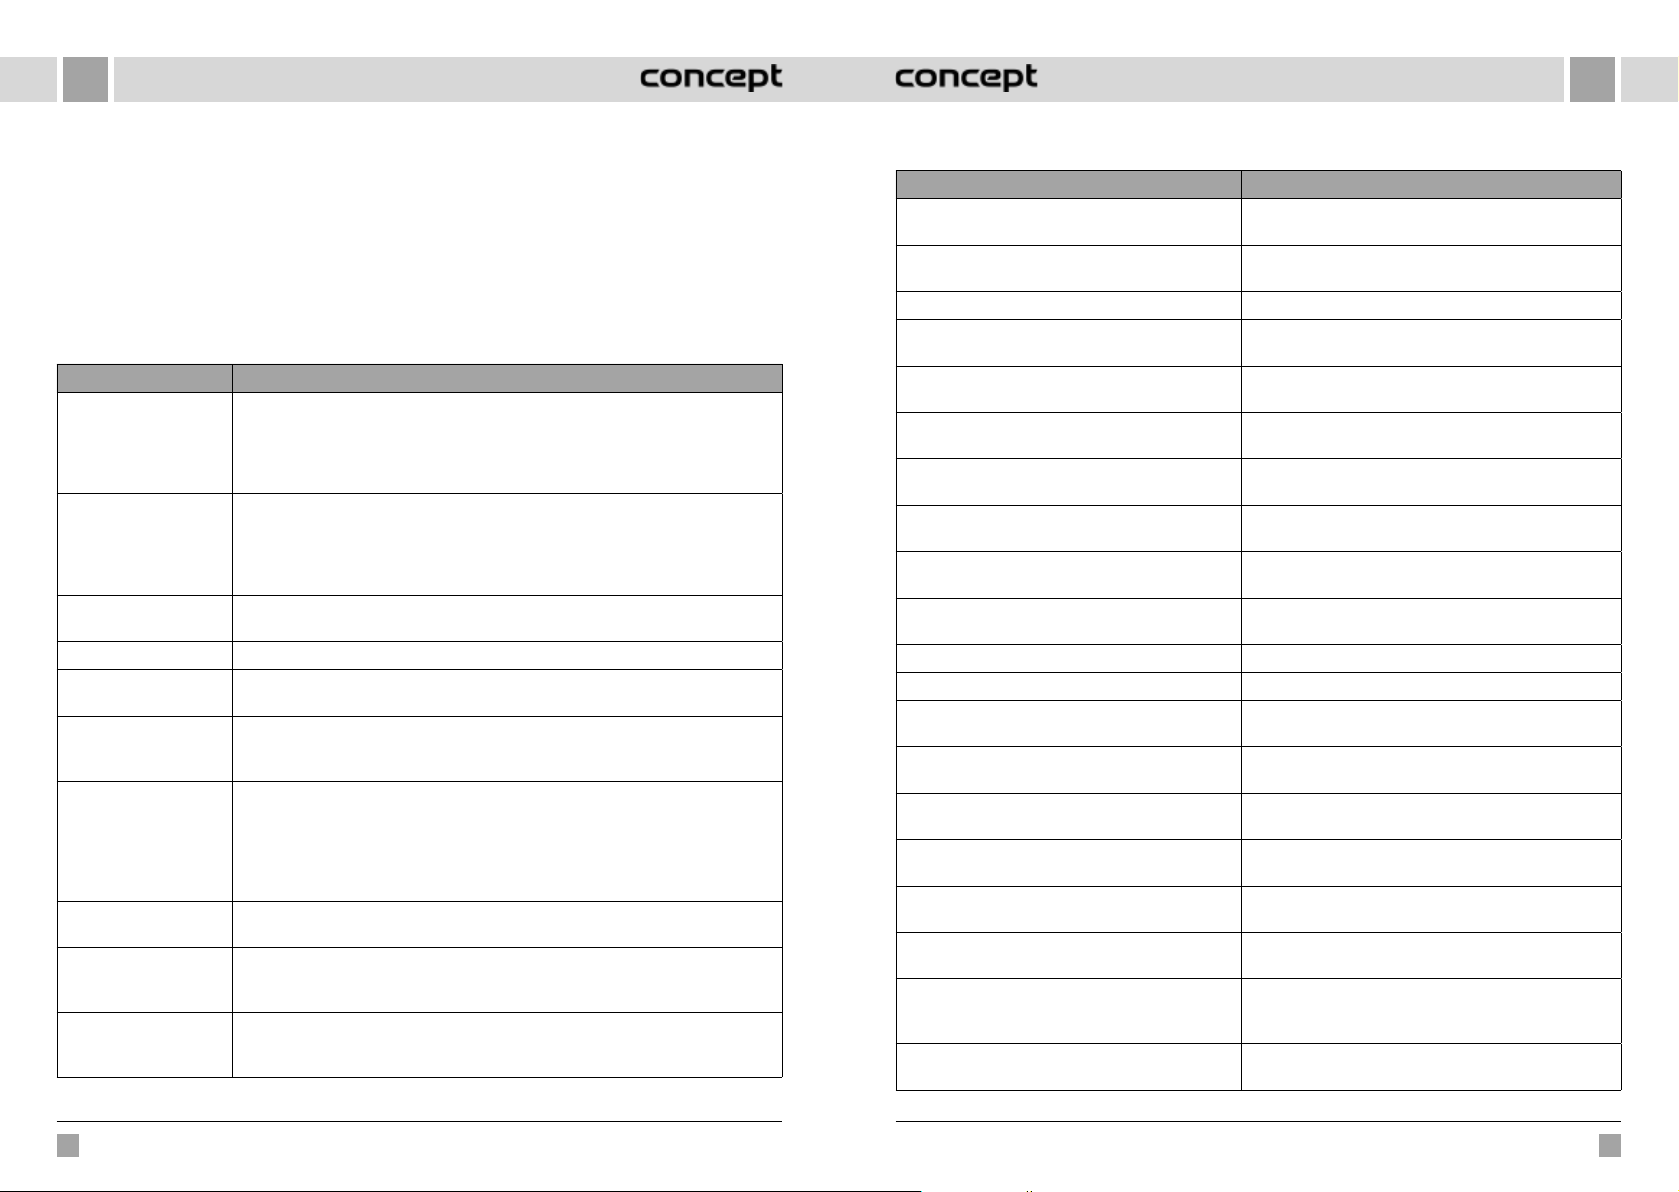
RORO
Acumulator
• Aparatul este prevăzut cu acumulatoare litiu-ion foarte
performante. Dacă doriți să păstrați performanța
acumulatorului, mențineți aparatul încărcat la utilizare
de fiecare zi.
• Dacă aparatul nu este utilizat timp îndelungat, opriți-l
și depozitați corespunzător. Încărcați-l cel puțin o dată
la 3 luni, pentru a preveni deteriorarea acumulatoarelor
în urma descărcării prea mari.
Actualizare firmware
Actualizați firmware cu ajutorul aplicației mobile. Dacă
este detectat un firmware nou, confirmați actualizarea
potrivit solicitării. La actualizarea firmware-ului nivelul de
încărcare a acumulatorului ar trebui să fie ≥50%, de aceea
aparatul ar trebui să se afle în stația de andocare.
PROBLEME OBIȘNUITE
Defecțiunea Soluția
Robotul nu poate fi pornit • În cazul nivelului scăzut al acumulatorului puneți robotul în stația de andocare și
Robotul nu poate fi
încărcat
Robotul nu poate fi
reîncărcat
Comportare anormală Opriți robotul și reporniți-l.
La utilizare se aude
zgomot neobișnuit
Se reduce capacitatea de
curățare sau din aparat
cade praf
Wi-Fi nu poate fi conectat • Semnal Wi-Fi slab. Verificați dacă este la dispoziție acoperire bună cu semnal Wi-Fi.
Curățenia planificată nu
a decurs
Consumă robotul energie
dacă se află în stația de
andocare?
Este nevoie ca robotul să
fie încărcat la început de
trei ori timp de 16 ore?
aliniați la contactele plăcii, aparatul va porni automat (dacă robotul este oprit total,
după o clipă de încărcare poate să se pornească).
• Nu folosiți aparatul dacă temperatura mediului este sub 0 °C sau peste 50 °C. Folosiți-l
ta temperaturi de 0-40 °C.
• Puneți robotul în afara stației, verificați dacă este aprinsă lampa de control de pe
stația de andocare și controlați dacă ambele capete ale adaptorului de alimentare
sunt conectate corect.
• Dacă contactul nu est bun, curățați suprafețele de contact ale stației de andocare și
contactele de încărcare de pe robot sau rotiți peria laterală într-o parte.
Robotul este prea departe de stația de andocare, puneți-l în apropierea stației de
andocare și încercați din nou.
Peria principală, periuța laterală sau rotița pot fi înfășurate cu corpuri străine, opriți
robotul și îndepărtați corpurile străine.
• Recipientul pentru praf este plin. Curățați-l.
• Grila filtrului este înfundată. Curățați-o sau schimbați-o.
• Peria principală este înfășurată cu corpuri străine, curățați-o.
• Wi-Fi este conectat într-un mod neobișnuit. Resetați Wi-Fi, descărcați cea mai recentă
aplicație și încercați să vă conectați din nou.
• Parola nu este introdusă corect.
• Este la dispoziție router cu banda de frecvență 5G, aspiratorul robot est dotat doar
pentru banda de frecvență de 2,4G.
În cazul nivelului redus de încărcare a bateriei, curățenia planificată poate fi începută
doar atunci când acumulatorul este încărcat cel puțin la 30%.
Robotul consumă o cantitate mică de energie dacă este pus permanent în stația de
andocare, acest fapt oferă cea mai bună performanță a acumulatorului.
Acumulatorul cu litiu poate fi folosit imediat după încărcare și nu are efect de memorie.
SOLUȚIONAREA PROBLEMELOR
Mesaje sonore Soluția
Error 1: Oh dear! I cannot find the dust collector Curățenia a fost activată după scoaterea recipientului
Error 2: Please check if the radar on top has been
covered or blocked
Error 3: Please place me in a new location and try again Luați robotul sau ridicați-l în aer.
Error 4: Please scrub the cliff sensor, and restart me
from a new location
Error 5: Please scrub the front sensor, and restart me
from a new location
Error 6: Please scrub the right-hand sensor, and restart
me from a new location
Error 7: Please scrub the radar housing on top, and
restart me from a new location
Error 8: Please check if the bumper has been blocked
in some way
Error 9: Master, please clean the dust container and
filter
Error 10: Dust container has been removed, please
clean the container and filter
Error 11: I'm stuck, please help me! Robotul s-a blocat undeva.
Error 12: Please place me correctly! Robotul este înclinat.
Error 13: Please check if my wheels have become
blocked somewhere
Error 14: Please check if the main brush has become
stuck
Error 15: Please check if the side brushes have become
stuck
Error 16: What's going on? Where is the docking
station?
Error 17: Oh dear! Program error, please restart me Stare anormală cauzată de o eșuare necunoscută, reporniți
Error 18: Error encountered initiating shutdown Robotul îl avertizează pe utilizator și se oprește sau se
Error 19: Low battery, please recharge Dacă nivelul de încărcare a acumulatorului este prea
Error 20: To shut me down, please place me away from
the docking station
pentru praf.
Senzorul superior este acoperit sau este amplasat în spațiu
deschis (în zona de 6x6 m
Senzorul împotriva căderii este acoperit sau este amplasat
la înălțime.
Senzorul anti coliziune cu infraroșu este impurificat sau
acoperit.
Senzorul de perete este impurificat sau acoperit.
Senzorul anti coliziune cu radar este impurificat sau acoperit.
Senzorul pentru muchii sau anti coliziune este blocat.
Recipientul pentru praf este plin sau trebuie schimbată grila
filtrului.
La semnalizarea erorii 9 utilizatorul a scos recipientul pentru
praf și prin aceasta este activată eroarea 10.
Rotița de acționare este blocată sau înfășurată.
Peria principală este înfășurată sau blocată.
Periuța laterală este înfășurată sau blocată.
Stația de andocare nu a fost găsită sau nu este conectată.
robotul.
încarcă automat.
scăzut, robotul nu este în stația de andocare și este pornită
curățenia (nivelul de încărcare a bateriei este sub 10%).
La încărcare pe stația de andocare robotul a fost oprit.
2
nu este nici un obstacol).
158 159
VR2110, VR2100 VR2110, VR2100
Page 81
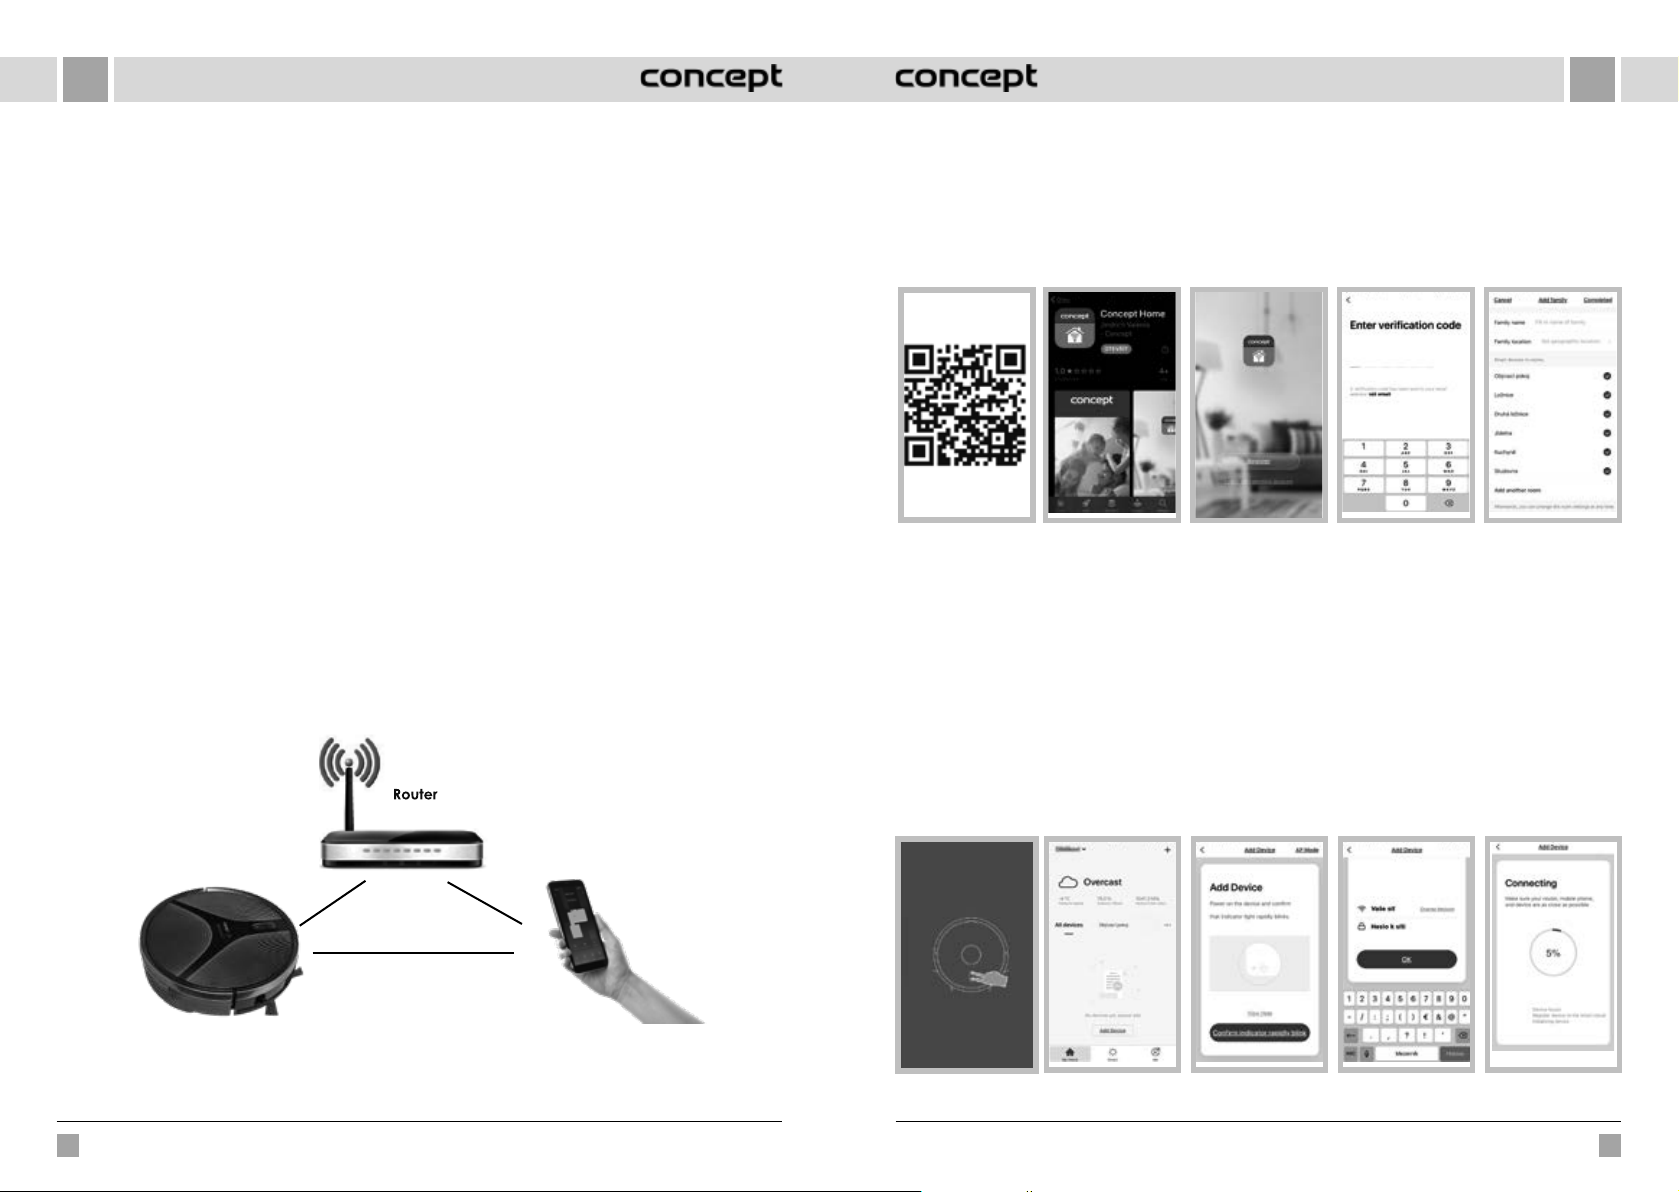
RORO
CONEXIUNE FĂRĂ FIR ȘI COMPATIBILITATE
• Compania Jindřich Valenta - CONCEPT nu poate fi răspunzătoare în nici un mod de orice daună accidentală, indirectă
sau ulterioară, nici de pierderea datelor sau pierderile cauzate de scurgeri de informații pe timpul comunicării prin
intermediul tehnologiilor fără fir.
• O comunicare fără fir cu succes nu poate fi asigurată 100% la toate dispozitivele Smart și rețele (router Wi-Fi). Având în
vedere diversitatea dispozitivelor pe piață, pot să apară cazuri în care caracterul sau specificarea dispozitivului Smart
sau a rețelei Wi-Fi (router) împiedică conectarea sau este în vreun fel perturbată. Succesul comunicării fără fir prin
rețea Wi-Fi est influențată în plus de serie de factori, inclusiv configurația hardware și software. Conexiunea dintre
robot și rețeaua dumneavoastră Wi-Fi poate fi influențată negativ de rețele Wi-Fi din jur care pot fi setate pe același
canal și prin aceasta să perturbe conexiunea (de ex. cartiere, blocuri ș.a.m.d.). Acest fapt nu prezintă un motiv pentru
reclamarea aparatului.
• Aplicația este în deținută și operată de o persoană terță (în continuare doar „Entitate”) diferită de compania
Jindřich Valenta - CONCEPT (în continuare doar „Vânzător”). Vânzătorul nu predă Entității nici un fel de date cu
caracter personal. La înregistrare în aplicație clientul predă datele cu caracter personal direct Entității, care devine
administratorul datelor cu caracter personal. Aplicația, și cu aceasta și protecția legată de datele cu caracter personal
sunt reglementate de regulile Entității.
Compatibilitate:
Sistemul de operare al dispozitivului smart - Android 5.0 și versiunile majore
- IOS 9.0 și versiunile majore
Rețea Wi-Fi - 2,4 GHz
- modul de securitate WPA1 și WPA2 (recomandat WPA2)
ATENȚIONARE: Aparatul nu poate fi exploatat pe rețele Wi-Fi cu protocolul de securitate IEEE 802.1X (de regulă rețele Wi-Fi
corporative).
CONTROL PRIN APLICAȚIE
Înainte ca aparatul să poată fi controlat prin aplicație, trebuie împerecheat cu telefonul dumneavoastră și trebuie să aibă
acces la rețeaua dumneavoastră Wi-Fi.
Descărcarea și instalarea aplicației
1. Scanaț i codul QR de mai jos (fig. 1) sau căutați aplic ația „Concept Home“ pe Goo gle Play sau App Store și descărc ați-o
în telefonul dumneavoastră (fig. 2).
2. Dacă aveți deja Concept Home, lansați aplicația, logați-vă și continuați la instrucțiunile pentru împerechere.
3. Dacă sunteți un utilizator nou, înregistrați-vă (fig. 3). Continuați potrivit instrucțiunilor până la introducerea codului
de verificare și terminați înregistrarea (fig. 4).
4. Continuați mai departe potrivit instrucțiunilor și creați o familie (fig. 5).
fig. 1
Instrucțiuni de împerechere a aparatului
1. La începutul împerecherii trebuie să fiți conectat la rețeaua dumneavoastră Wi-Fi.
2. Înaintea începerii conectării asigurați-vă că aparatul este în modul stand-by. Apăsați simultan timp de cel puțin
3secunde ambele butoane (fig. 6), până ce robotul nu va începe să lumineze intermitent și veți auzi mesajul „WiFi
lost, please follow the App instruction for reconnection“. Verificați dacă telefonul este conectat la aceeași rețea Wi-Fi
la care doriți să conectați robotul.
3. După aceea apăsați în aplicație pe + sau „Add device“ (fig. 7) pentru adăugarea unui aparat nou.
4. Confirmați „Confirm indicator rapidly blink“ (fig. 8).
5. Selectați rețeaua dumneavoastră Wi-Fi la care trebuie conectat aparatul dumneavoastră și introduceți parola acesteia
(fig. 9).
6. Va începe procesul de setare, care poate dura ceva timp (fig. 10).
7. Telefonul dumneavoastră va încerca să se conecteze la aparatul dumneavoastră și îl va conecta la rețeaua
dumneavoastră Wi-Fi.
8. După o setare cu succes (fig. 11) apăsați „Completed“ și intrați în interfața de control a aparatului (fig. 12).
fig. 2 fig. 3 fig. 5fig. 4
Distanța recomandată la setare: mai puțin de 4 metri
Asigurați-vă că aspiratorul robot, routerul și telefonul mobil al dumneavoastră sunt aproape unul de altul, în așa fel încât
împerecherea să poată să decurgă fără probleme.
160 161
VR2110, VR2100 VR2110, VR2100
fig. 6 fig. 7 fig. 8 fig. 9 fig. 10
Page 82
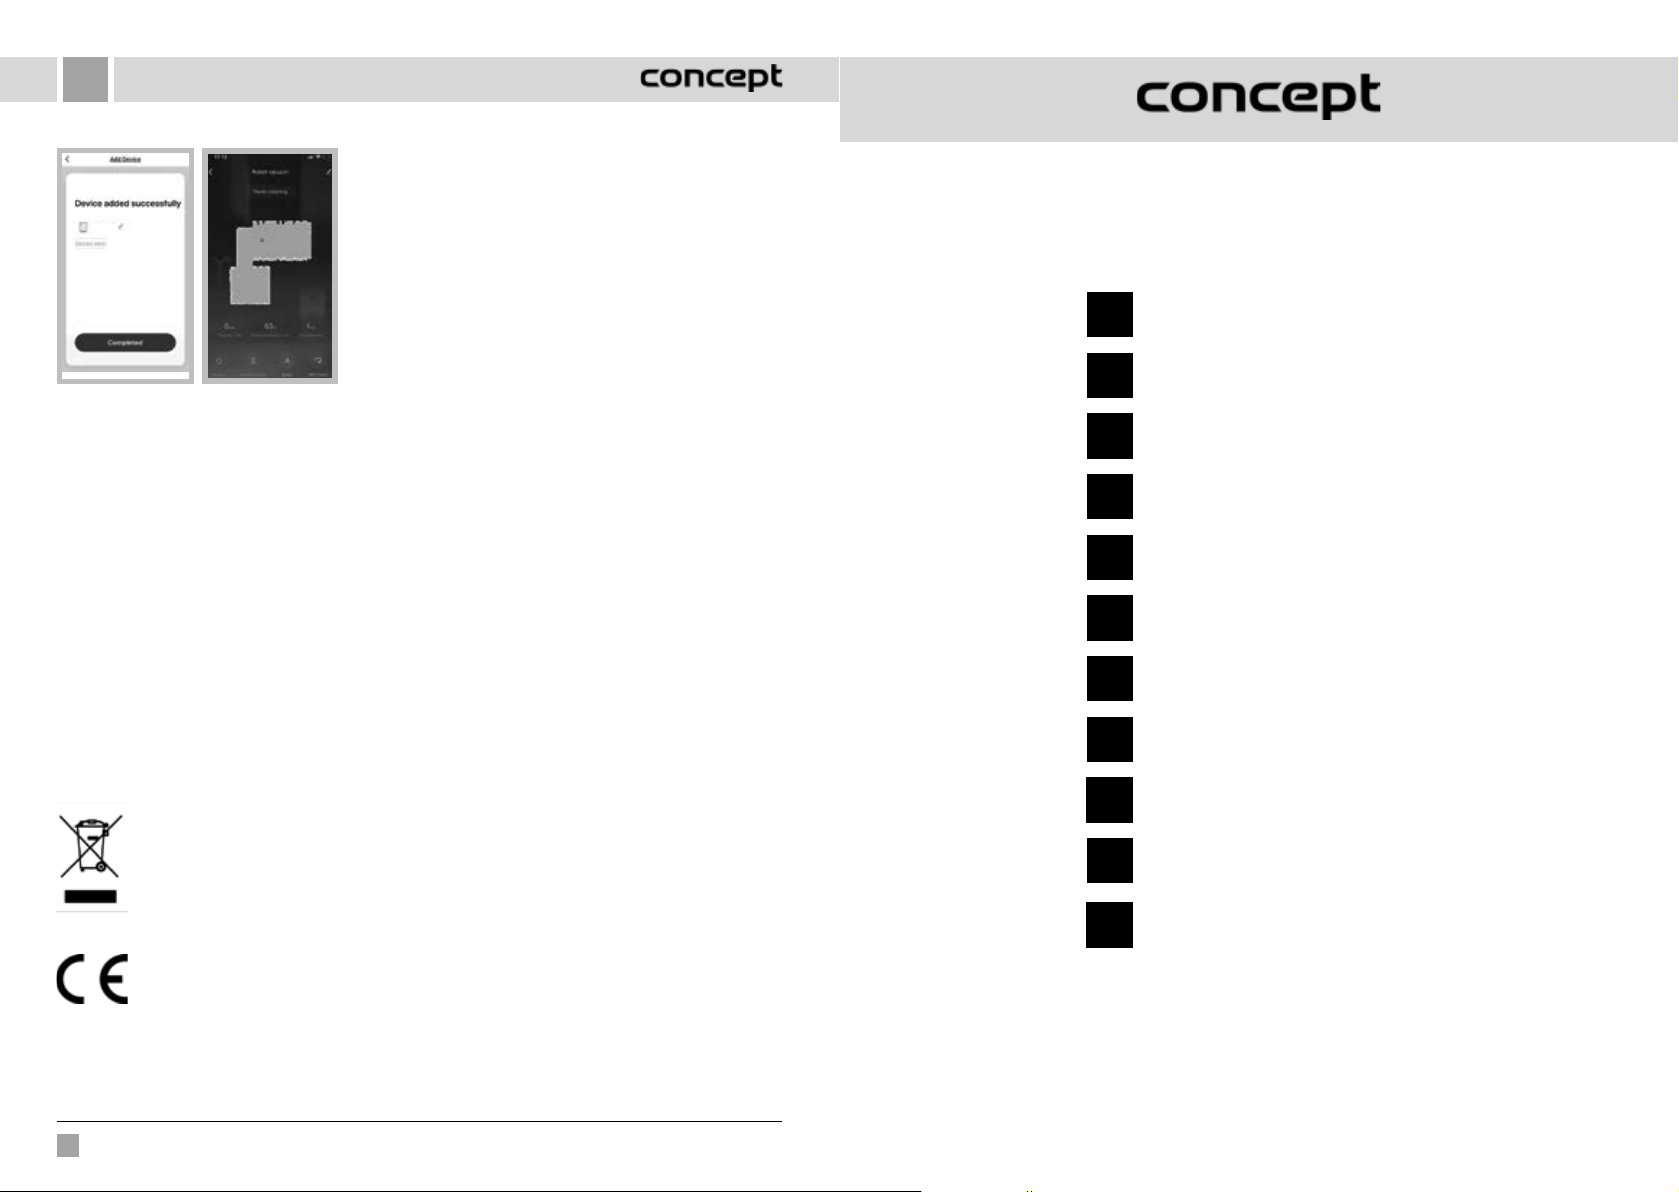
RO
Concept
Avertizare la probleme cu împerechere
• Verificați dacă parola introdusă la rețeaua dumneavoastră
Wi-Fi este corectă.
• Aparatul sprijină doar rețele Wi-Fi de 2,4 GHz.
• Routerul este suprasolicitat de conectarea multor alte
dispozitive.
• În timpul încercării de conectare la aparat (fig. 10)
încercați să vă conectați manual la rețeaua Wi-Fi
aacestuia.
CZ
Záruční podmínky
fig. 11
Modurile aplicației
Puteți selecta dintre modurile de curățare AUTO (Automati/ZIGZAG), Local (Circular), Periferic (EDGE) și DOCK (căutarea
stației de andocare).
SERVICE
Întreținerea cu caracter mai amplu sau reparația care necesită o intervenție la părțile interioare ale produsului, trebuie să
fie executate de către un specialist calificat sau de un service.
PROTECȚIA MEDIULUI
• Optați pentru reciclarea materialelor de ambalare și a aparatelor vechi.
• Cutia de la aparat poate fi predată la un centru de colectare a deșeurilor sortate.
• Predați pungile din polietilenă (PE) la un centru de colectare a materialelor în vederea reciclării.
Reciclarea aparatului la sfârșitul duratei de viață:
Acest aparat este însemnat în conformitate cu Directiva Europeană 2012/19/UE privind deșeurile de
echipamente electrice și electronice (DEEE). Simbolul de pe produs sau de pe ambalaj indică faptul că
acest produs nu aparține deșeurilor menajere. Trebuie dus la un centru de colectare pentru reciclarea
echipamentelor electrice și electronice. Prin asigurarea eliminării corecte a acestui produs veți contribui
la prevenirea impactului negativ asupra mediului și a sănătății umane, care ar fi cauzate prin eliminare
necorespunzătoare. Eliminarea trebuie efectuată în conformitate cu reglementările privind gestionarea
deșeurilor. Informații mai detaliate privind reciclarea acestui produs veți obține de la autoritățile locale
competente, serviciile de eliminare a deșeurilor menajere sau în magazinul unde ați cumpărat produsul.
fig. 12
SK
PL
HU
LV
EN
DE
FR
IT
ES
RO
Záručné podmienky
Karta gwarancyjna
Garanciális feltételek
Garantijas talons
Warranty Certificate
Garantiebedingungen
Conditions de garantie
Condizioni di garanzia
Condiciones de garantía
Condiții de garanție
Acest produs îndeplinește toate cerințele de bază relevante ale Directivei UE.
Modificările textului, a designului și a specificațiilor tehnice pot fi făcute fără o atenționare prealabilă. Ne rezervăm
dreptul la efectuarea acestor modificări.
162
VR2110, VR2100
Page 83
CZ
ZÁRUČNÍ PODMÍNKY
Záruka
Výrobce (příp. dovozce) odpovídá za to, že výrobek
vyhovuje požadavkům právních předpisů a vyhovuje
požadavkům stanovených příslušnými technickými
normami. Dále odpovídá za to, že výrobek má takové
vlastnosti, které výrobce popsal v dokumentech
vztahujících se ke zboží nebo které spotřebitel očekával
s ohledem na povahu zboží a na základě reklamy
výrobcem prováděné, jakož i odpovídá za to, že se výrobek
hodí k účelu, který pro jeho použití výrobce uvádí nebo ke
kterému se věc tohoto druhu obvykle používá.
Záruční doba za jakost výrobku trvá 24 měsíců od data
převzetí výrobku spotřebitelem.
Záruka se nevztahuje na opotřebení výrobku způsobené
jeho obvyklým užíváním. Právo z vadného plnění
spotřebiteli nenáleží, pokud před převzetím výrobku
věděl, že výrobek má vadu, anebo pokud vadu sám
způsobil.
Vadný akumulátor se z hlediska těchto záručních
podmínek považuje takový akumulátor, který je
elektronicky nefunkční (tzn. nekomunikuje se základní
jednotkou, jsou vadné nabíjecí či vybíjecí obvody, atd.)
nebo má vnitřní zkrat.
V žádném případě se za vadu z hlediska záruky nepovažují
závady, či změny parametrů způsobené běžným
používáním a opotřebením (například přirozený pokles
kapacity).
Na akumulátory je poskytována záruční služba po dobu
6 měsíců. Akumulátor má z hlediska těchto záručních
podmínek charakter spotřebního materiálu, podrobněji
viz. „Spotřební materiál“.
Spotřební materiál
U spotřebního materiálu (baterie, atp.) garantujeme
zachování technických parametrů po dobu 6 měsíců, a to
v případě, že nebyl poškozen neodborným používáním
anevypršela doba jeho životnosti.
Záruka se nevztahuje na případy, kdy (zejména):
• nebyly dodrženy podmínky pro instalaci, provoz
a obsluhu výrobku, které jsou uvedeny v návodu
kobsluze výrobku,
• k závadě došlo vlivem mechanického, tepelného nebo
chemického poškození, zkratem, přepětím vsíti nebo
nesprávnou instalací,
• k závadě došlo neodborným zásahem třetí osoby,
• k závadě došlo při živelné události,
• k závadě došlo nedostatečnou nebo nevhodnou
údržbou v rozporu s návodem k obsluze včetně závad
způsobených vodními a jinými usazeninami,
• ke změně barvy topných ploch nebo poškrábání ploch
došlo v souvislosti s jejich obvyklým používáním,
• se jedná o vzhledové a funkční změny způsobené
slunečním zářením, tepelným zářením nebo vodními
ajinými usazeninami,
• uplyne životnost některých součástí výrobku, např.
akumulátorů, žárovek atd.
Záruka se nevztahuje na plnění, která byla bezplatně
poskytnuta spolu s výrobkem (dárky, propagační
předměty, apod.).
Uplatnění reklamace
Reklamaci vady výrobku je třeba uplatnit bez zbytečného
odkladu po jejím zjištění, nejpozději však před uplynutím
záruční doby.
Reklamaci výrobku uplatňuje spotřebitel u prodejce,
u kterého výrobek zakoupil, případně u kteréhokoliv
z autorizovaných servisních středisek, jejichž seznam je
součástí balení výrobku, případně je uveden na internetu
na adrese www.my-concept.com.
Při reklamaci výrobku je nutno výrobek řádně očistit
a bezpečně zabalit tak, aby nedošlo k poškození při
jeho případné přepravě do autorizovaného servisního
střediska, není-li výrobek předáván osobně.
Spotřebitel je povinen prokázat uzavření kupní smlouvy
předložením dokladu o koupi výrobku.
Zároveň s reklamací spotřebitel sdělí popis vytýkané vady
a provede volbu reklamačního nároku.
Vyřízení reklamace
Jedná-li se o odstranitelnou vadu, má spotřebitel právo na
bezplatné, včasné a řádné odstranění vady.
Není-li to vzhledem k povaze vady neúměrné, může
spotřebitel požadovat dodání nového výrobku bez vad
(výměnu), nebo týká-li se vada jen součásti výrobku,
výměnu takové součásti. Je-li však požadavek na výměnu
výrobku nebo jeho součásti vzhledem k povaze vady
neúměrný, zejména lze-li vadu odstranit bez zbytečného
odkladu, má spotřebitel právo na bezplatné odstranění
vady.
Jedná-li se o neodstranitelnou vadu, případně vznikne-li
spotřebiteli nárok na výměnu výrobku nebo jeho součásti,
avšak tato výměna není možná, např. zdůvodu vyprodání
daného výrobku, má spotřebitel právo výrobek vrátit
(odstoupení od smlouvy).
Právo na dodání nového výrobku (výměnu), nebo
výměnu součásti výrobku má spotřebitel i v případě
odstranitelné vady, pokud nemůže věc řádně užívat pro
opakovaný výskyt vady po opravě nebo pro větší počet
vad. V takovém případě má spotřebitel i právo na vrácení
výrobku (odstoupení od smlouvy).
Nedojde-li k vrácení výrobku (odstoupení od smlouvy)
nebo neuplatní-li spotřebitel právo na dodání nového
výrobku bez vad (výměnu), na výměnu jeho součásti nebo
na opravu výrobku, může požadovat přiměřenou slevu.
Spotřebitel má právo na přiměřenou slevu iv případě, kdy
mu nemůže být dodán nový výrobek bez vad, vyměněna
součást výrobku nebo výrobek opraven, jakož i v případě,
nedojde-li ke zjednání nápravy vpřiměřené době nebo by
zjednání nápravy spotřebiteli působilo značné obtíže.
Prodávající, autorizované servisní středisko, či jimi
pověřený pracovník, rozhodne o reklamaci ihned, ve
složitých případech do tří pracovních dnů. Do této lhůty
se nezapočítává doba přiměřená podle druhu výrobku
potřebná k odbornému posouzení vady. Reklamace
včetně odstranění vady musí být vyřízena bez zbytečného
odkladu, nejpozději do 30 dnů ode dne uplatnění
reklamace, pokud se prodávající nebo autorizované
servisní středisko vyřizující reklamaci se spotřebitelem
nedohodne na delší lhůtě.
Při vrácení výrobku (odstoupení od smlouvy) je spotřebitel
povinen provést vrácení rovněž příslušenství výrobku
avšech dokumentů dodaných svýrobkem.
Spotřebitel nemá nárok na vydání vadných dílů asoučástí
výrobku, které byly vyměněny v rámci opravy výrobku.
Veškerá další práva spotřebitele, která se ke koupi výrobku
vážou, nejsou těmito záručními podmínkami dotčena.
Pozn.: Reklamace výrobku poškozeného při přepravě se
řídí reklamačním řádem přepravce.
Výrobce:
Jindřich Valenta – Concept
Vysokomýtská 1800, 565 01 Choceň
Česká republika
IČO 13216660
tel.: + 420 465 471 400, fax: +420 465 473 304,
email: [email protected]
www: www.my-concept.com
Podrobnosti o produktu
Model:
Výrobní číslo:
Datum prodeje: Razítko a podpis prodejce:
164 165
VR2110, VR2100 VR2110, VR2100
Page 84
SK
ZÁRUČNÉ PODMIENKY
Záruka
Výrobca (príp. dovozca) zodpovedá za to, že výrobok
vyhovuje požiadavkám právnych predpisov a vyhovuje
požiadavkám stanovených príslušnými technickými
normami. Ďalej zodpovedá za to, že výrobok má také
vlastnosti, ktoré výrobca popísal v dokumentoch
vzťahujúcich sa k tovaru alebo ktoré spotrebiteľ očakával
s ohľadom na povahu tovaru a na základe reklamy
výrobcom prevádzanej, ako odpovedá i za to, že sa
výrobok hodí k účelu, ktorý pre jeho použitie výrobca
uvádza alebo ku ktorému sa vec tohto druhu obvykle
používa.
Záručná doba za akosť výrobku trvá 24 mesiacov od
dátumu prevzatia výrobku spotrebiteľom.
Záruka sa nevzťahuje na opotrebenie výrobku spôsobené
jeho obvyklým používaním. Právo z vadného plnenia
spotrebiteľovi nenáleží, pokiaľ pred prevzatím výrobku
vedel, že výrobok má vadu, alebo pokiaľ vadu sám
spôsobil.
Za nefunkčný akumulátor sa z hľadiska týchto záručných
podmienok považuje taký akumulátor, ktorý je
elektronicky nefunkčný (tzn. nekomunikuje so základnou
jednotkou, nefungujú nabíjacie alebo vybíjacie obvody
atď.) alebo má vnútorný skrat.
V žiadnom prípade sa za poruchu z hľadiska záruky
nepovažujú poruchy alebo zmeny parametrov spôsobené
bežným používaním a opotrebením (napríklad prirodzený
pokles kapacity).
Na akumulátory sa poskytuje záručná služba po
dobu 6 mesiacov. Akumulátor má z hľadiska týchto
záručných podmienok charakter spotrebného materiálu,
podrobnejšie pozri. „Spotrebný materiál“.
chemického poškodenia, skratom, prepätím v sieti
alebo nesprávnou inštaláciou,
• k vade došlo neodborným zásahom tretej osoby,
• k vade došlo pri živelnej udalosti,
• k vade došlo nedostatočnou alebo nevhodnou
údržbou v rozpore s návodom k obsluhe vrátane závad
spôsobených vodnými a inými usadeninami,
• k zmene farby výhrevných plôch alebo poškriabaniu
plôch došlo v súvislosti s ich obvyklým používaním,
• sa jedná o vzhľadové a funkčné zmeny spôsobené
slnečným žiarením, tepelným žiarením alebo vodnými
a inými usadeninami,
• uplynie životnosť niektorých súčastí výrobku, napr.
akumulátorov, žiaroviek atď.
Záruka sa nevzťahuje na plnenia, ktoré boli bezplatne
poskytnuté spolu s výrobkom (darčeky, propagačné
predmety, apod.)
Uplatnenie reklamácie
Reklamáciu vady výrobku je potrebné uplatniť bez
zbytočného odkladu po jej zistení, najneskôr však pred
uplynutím záručnej doby.
Reklamáciu výrobku uplatňuje spotrebiteľ u predajcu,
u ktorého výrobok zakúpil, prípadne u ktoréhokoľvek
z autorizovaných servisných stredísk, ktorých zoznam
je súčasťou balenia výrobku, prípadne je uvedený na
internete na adrese www.my-concept.com.
Pri reklamácii výrobku je nutné výrobok poriadne očistiť
a bezpečne zabaliť tak, aby nedošlo k poškodeniu pri
jeho prípadnej preprave do autorizovaného servisného
strediska, ak nie je výrobok predávaný osobne.
Spotrebiteľ je povinný preukázať uzavretie kúpnej zmluvy
predložením dokladu o kúpe výrobku.
Zároveň s reklamáciou spotrebiteľ uvedie popis vytýkanej
vady a prevedie voľbu reklamačného nároku.
zbytočného odkladu, má spotrebiteľ právo na bezplatné
odstránenie závady.
Ak sa jedná o neodstrániteľnú vadu, prípadne ak vznikne
spotrebiteľovi nárok na výmenu výrobku alebo jeho
súčasti, avšak táto výmena nie je možná, napr. z dôvodu
vypredania daného výrobku, má spotrebiteľ právo
výrobok vrátiť (odstúpenie od zmluvy)
Právo na dodání nového výrobku (výměnu), nebo
výměnu součásti výrobku má spotřebitel i v případě
odstranitelné vady, pokud nemůže věc řádně užívat pro
opakovaný výskyt vady po opravě nebo pro větší počet
vad. V takovém případě má spotřebitel i právo na vrácení
výrobku (odstoupení od smlouvy).
Právo na dodanie nového výrobku (výmenu), alebo
výmenu súčasti výrobku má spotrebiteľ i v prípade
odstrániteľnej vady, ak nemôže vec poriadne používať pre
opakovaný výskyt vady po oprave alebo pre väčší počet
vád. V takom prípade má spotrebiteľ i právo na vrátenie
výrobku (odstúpenie od zmluvy).
Ak nedôjde k vráteniu výrobku (odstúpeniu od zmluvy)
alebo ak neuplatní spotrebiteľ právo na dodanie nového
výrobku bez vád (výmenu), na výmenu jeho súčasti alebo
na opravu výrobku, môže požadovať primeranú zľavu.
Spotrebiteľ má právo na primeranú zľavu ivprípade, keď
mu nemôže byť dodaný nový výrobok bez vád, vymenená
súčasť výrobku alebo výrobok opravený, ako i v prípade,
že nedôjde k zjednaniu nápravy v primeranej dobe alebo
by zjednanie nápravy spotrebiteľovi spôsobilo značné
problémy.
Predávajúci, autorizované servisné stredisko, či nimi
poverený pracovník, rozhodne o reklamácii ihneď,
vzložitých prípadoch do troch pracovných dní. Do tejto
lehoty sa nezapočítava doba primeraná podľa druhu
výrobku potrebná k odbornému posúdeniu vady.
Reklamácia vrátane odstránenia vady musí byť vybavená
bez zbytočného odkladu, najneskôr do 30 dní odo dňa
uplatnenia reklamácie, pokiaľ sa predávajúci alebo
autorizované servisné stredisko vybavujúce reklamáciu so
spotrebiteľom nedohodne na dlhšej lehote.
Pri vrátení výrobku (odstúpení od zmluvy) je spotrebiteľ
povinný vrátiť peniaze a tiež príslušenstvo výrobku
avšetkých dokumentov dodaných svýrobkom.
Spotrebiteľ nemá nárok na vydanie vadných dielov
a súčastí výrobku, ktoré boli vymenené v rámci opravy
výrobku.
Všetky ďalšie práva spotrebiteľa, ktoré sa ku kúpe výrobku
viažu, nie sú týmito záručnými podmienkami dotknuté.
Pozn.: Reklamácia výrobku poškodeného pri preprave sa
riadi reklamačným poriadkom prepravcu.
Výrobce:
Jindřich Valenta – Concept
Vysokomýtská 1800, 565 01 Choceň
Česká republika
IČO 13216660
tel.: + 420 465 471 400, fax: +420 465 473 304
email: [email protected]
www: www.my-concept.com
Distribútor:
ELKO Valenta - Slovakia, s. r. o.
Hurbanova 1563/23, 911 01 Trenčín
Slovenská republika
tel.: +421 326 583 465, fax: +421 326 583 466
email: [email protected]
www: www.my-concept.sk
Spotrebný materiál
U spotrebného materiálu (batérie a pod.) garantujeme
zachovanie technických parametrov po dobu 6 mesiacov,
a to v prípade, ak nebol poškodený neodborným
používaním a neuplynula doba jeho životnosti.
Záruka sa nevzťahuje na prípady, kedy (najmä):
• neboli dodržané podmienky pre inštaláciu, prevádzku
a obsluhu výrobku, ktoré sú uvedené v návode na
obsluhu výrobku,
• k vade došlo vplyvom mechanického, tepelného alebo
166 167
Vybavenie reklamácie
Ak sa jedná o odstrániteľnú vadu, má spotrebiteľ právo na
bezplatné, včasné a riadne odstránenie vady.
Ak to nie je vzhľadom k povahe vady neúmerné, môže
spotrebiteľ požadovať dodanie nového výrobku bez vád
(výmenu), alebo ak sa týka vada len súčasti výrobku,
výmenu takej súčasti. Ak je však požiadavka na výmenu
výrobku alebo jeho súčasti vzhľadom k povahe vady
neúmerná, najmä ak je možné vadu odstrániť bez
VR2110, VR2100 VR2110, VR2100
Podrobnosti o produktu
Model:
Výrobné číslo:
Dátum prodeja: Pečiatka a podpis prodejca:
Page 85
PL
GWARANCJA
Gwarancja
Producent (lub importer) zapewnia, że produkt jest
zgodny z wymogami prawnymi i spełnia odpowiednie
normy techniczne. Produkt posiada właściwości, zawarte
w dokumentacji produktowej, oczekiwane ze względu
na charakter towaru oraz wskazane w re- klamie
prowadzonej przez producenta. Producent zapewnia, że
produkt nadaje się do celów konsumpcyjnych, do których
ma zastosowanie lub do których stosuje się zwykle tego
rodzaju produkt.
Okres gwarancji wynosi 24 miesiące od daty otrzymania
produktu przez konsumenta.
Gwarancja nie obejmuje uszkodzeń mechanicznych
spowodowanych użytkowaniem.
Prawo gwarancji za wady rzeczy nie przysługuje, jeżeli
klient wiedział przed zakupem, że produkt ma wadę lub
usterkę lub sam ją spowodował.
Wadliwym akumulatorem w świetle powyższych
warunków gwarancji jest akumulator o niesprawnym
układzie elektronicznym (tzn. nie komunikuje z jednostką
bazową, obwody ładujące lub rozładowujące są
uszkodzone itd.), albo wykazujący zwarcie wewnętrzne.
Pod względem gwarancji nie można w żadnym wypadku
uważać za wadę takich usterek czy zmian parametrów,
jakie wynikają ze zwykłego używania i zużycia produktu
(na przykład naturalny spadek pojemności).
Na akumulatory udziela się gwarancji o długości
trwania 6 miesięcy. W świetle powyższych warunków
gwarancji akumulator swoim charakterem należy do
materiałów eksploatacyjnych, szczegóły zob. „Materiały
eksploatacyjne”.
Materiały eksploatacyjne
W przypadku materiałów eksploatacyjnych (akumulatory
itp.), gwarantujemy zachowanie ich parametrów
technicznych przez 6 miesięcy pod warunkiem, że
nie zostały one uszkodzone poprzez niewłaściwe
użytkowanie oraz nie upłynął okres ich żywotności.
Gwarancja nie ma zastosowania w przypadkach,
wktórych:
• nie zostały dotrzymane warunki w zakresie instalacji,
obsługi oraz konserwacji produktu, wymienione
winstrukcji obsługi produktu,
• awaria była spowodowana mechanicznie, termiczne
lub dotyczy chemicznych uszkodzeń, nastąpiła
w wyniku zwarcia, zmian napięcia sieci lub
nieprawidłowej instalacji,
• wada rzeczy wystąpiła w wyniku działań osób trzecich,
• wada rzeczy wystąpiła w wyniku klęski żywiołowej,
• wada rzeczy wystąpiła w wyniku nieodpowiedniej
lub niewłaściwej konserwacji, niezgodnej z instrukcją
obsługi, w tym wady spowodowane przez wodę iinne
osady,
• wystąpiły zmiany kolorystyki elementów grzewczych
oraz zarysowania powierzchni wynikające
zużytkowania,
• wystąpiły wizualne i funkcjonalne zmiany wywołane
przez światło słoneczne, promieniowanie ciepła lub
wodę i inne osady,
Gwarancja nie ma zastosowania do transakcji, wktórych
produkty zostały przekazane nieodpłatnie (prezenty,
artykuły promocyjne, itp.).
Zgłoszenie reklamacji
Reklamacja na wadę produktu musi zostać zgłoszona
natychmiast po wykryciu, bez zbędnej zwłoki, nie później
jednak niż przed upływem okresu gwarancyjnego.
Praw wynikających z gwarancji można dochodzić
udystrybutora, u którego produkt został zakupiony lub
w dowolnych autoryzowanych centrach serwisowych,
których lista znajduje się na opakowaniu produktu, bądź
jest umieszczona w Internecie pod adresem www.myconcept.com.
Produkt zgłaszany do reklamacji musi być odpowiednio
oczyszczony i bezpiecznie zapakowany, aby uniknąć
uszkodzenia w trakcie transportu do autoryzowanego
centrum serwisowego, chyba że produkt jest przekazany
osobiście.
Warunkiem ważności gwarancji jest udowodnienie
zawarcia umowy sprzedaży poprzez przedstawienie
dowodu zakupu.
Zgłoszenie reklamacyjne musi zawierać wskazanie
domniemanej wady oraz roszczenie reklamacyjne.
Rozpatrywanie reklamacji
W przypadku wystąpienia wady, którą można usunąć,
konsument ma prawo do bezpłatnego, terminowego
iwłaściwego usunięcia wady.
W przypadku wystąpienia istotnej wady dla
funkcjonowania produktu, konsument może żądać
dostarczenia nowego produktu bez wad (wymiana) lub
jeśli dotyczy to tylko elementu produktu, wymianę takiego
elementu. Jednakże, jeżeli możliwe jest usunięcie wady
bez zbędnej zwłoki, żądanie wymiany produktu lub jego
części z uwagi na charakter wady, nie ma zastosowania, a
konsument ma prawo do bezpłatnej naprawy.
W przypadku braku możliwości usunięcia wady,
konsument ma prawo do wymiany produktu lub jego
elementów, jak również do zwrotu produktu (odstąpienie
od umowy).
Prawo do otrzymania nowego produktu (wymiana) lub
jego elementów, ma konsument, który z powodu braku
możliwości usunięcia wady lub w wyniku powtarzającego
się występowania wady nie może prawidłowo korzystać
z produktu. W takim przypadku konsument również ma
prawo do zwrotu produktu (odstąpienia od umowy).
W przypadku wystąpienia wad, jeżeli nie ma
zastosowania: zwrot produktu (odstąpienie od umowy)
lub prawo otrzymania nowego produktu bez wad
(wymiana), wymiana części lub naprawa produktu, klient
może zażądać obniżenia ceny. Konsument ma prawo do
odpowiedniej obniżki ceny, wówczas gdy nie może być:
dostarczony nowy produkt bez wad, dostarczona część
produktu lub naprawiony produkt, a także wprzypadku
kiedy czynności mające na celu usunięcie wady nie
zostały wykonane w rozsądnym terminie, w celu
zadośćuczynienia za wynikłe trudności.
Sprzedawca, autoryzowane centrum serwisowe lub
inny upoważniony pracownik niezwłocznie informuje
osposobie rozpatrzenia reklamacji, w skomplikowanych
przypadkach w ciągu trzech dni roboczych. Okres ten
nie obejmuje czasu wymaganego do oceny właściwych
ekspertów. Usunięcie wad powinno odbyć się bez
zbędnej zwłoki, nie później niż 30 dni od daty zgłoszenia
roszczenia, chyba że sprzedawca lub autoryzowane
centrum serwisowe obsługi reklamacji wspólnie
zkonsumentem ustalą dłuższy okres czasu.
Podczas zwrotu produktu (odstąpienia od umowy) konsument jest zobowiązany do zwrotu wszystkich akcesorii
i dołączenie do produktu całej otrzymanej dokumentacji.
Konsument nie ma prawa do wydawania wadliwych
części i elementów produktu, które zostały wymienione
wramach naprawy.
Gwarancja nie wyłącza, nie ogranicza ani nie zawiesza
uprawnień kupującego wynikających z przepisów rękojmi
za wady rzeczy sprzedanej.
Wady produktów powstałe w czasie transportu podlegają
procedurą reklamacyjnym przewoźnika.
Niniejsza gwarancja ma zastosowanie w Unii Europejskiej
Producent:
Jindřich Valenta – Concept
Vysokomýtská 1800, 565 01 Choceň
Česká republika
IČO 13216660
tel.: + 420 465 471 400, fax: +420 465 473 304
email: [email protected]
www: www.my-concept.com
Importer:
CONCEPT POLSKA sp. z o.o.
ul Ostrowskiego 30, 53-238 Wrocław
tel.:+48 71 339 04 44, fax: 71 339 04 14
email: [email protected]
www: www.my-concept.pl
Dane produktu
Model:
Numer fabryczny:
Data sprzedaży: Pieczątka i podpis sprzedawcy:
168 169
VR2110, VR2100 VR2110, VR2100
Page 86
HU
A gyártó (ill. forgalmazó) a garanciális időszak alatt jótállást
vállal a terméknek a vonatkozó műszaki szabványokban és
feltételekben meghatározott tulajdonságaira. Ajótállási
idő a termék fogyasztó általi megvásárlásától számított
24 hónap.
A fogyasztó a jótállás keretében jogosult a hibák (ld. alább)
térítésmentes, időszerű és megfelelő elhárítására, illetve,
amennyiben az a hiba jellegéből adódóan nem adekvát,
jogosult a termék hibás részeinek cseréjére. Atermékre
vonatkozó cserejog vagy az elállás az adásvételi
szerződéstől csak a jogszabályi feltételek betartásával
és kizárólag akkor érvényesíthető, ha a termék nincs
túlságosan elhasználva vagy megsérülve.
Ezen jótállási feltételek szempontjából hibásnak minősül
az az akkumulátor, amely elektronikusan nem működik
(azaz nem kommunikál az alapegységgel, hibásak a töltő
vagy a kisülési áramkörök stb.) vagy zárlatos.
Semmiképpen nem minősülnek hibának a jótállás
szempontjából azok a meghibásodások, melyeknek
oka a paramétereknek a mindennapos használat és
elhasználódás miatti megváltozása (például a kapacitás
természetes csökkenése).
Az akkumulátorokra 6-havi garanciális szolgáltatást
nyújtunk. Ezen jótállási feltételek szempontjából az
akkumulátor kelléknek minősül, részletesen ld. „Kellékek”.
Kellékek
A kellékek (akkumulátor és hasonlók) esetében 6 hónapig
garantáljuk a műszaki paramétereket, amennyiben nem
sérült a nem szakszerű használat miatt, és nem telt le az
élettartama.
GARANCIÁLIS FELTÉTELEK
A garancia érvényesítésének feltételei:
• a termék használati utasításában található valamennyi
utasítás betartása,
• a termék vásárlását igazoló bizonylat bemutatása.
A fogyasztó a termék meghibásodása esetén annál
az eladónál érvényesítheti a garanciális jogait, akinél
aterméket vásárolta.
márkaszervizben érvényesíthető, amelyek listája atermék
csomagolásán vagy az interneten, a www.my-concept.
com címen található. Ha a fogyasztó nem a legközelebbi
márkaszervizt választja, akkor az emiatt keletkezett
magasabb költségeket ő viseli.
A fogyasztónak szóló figyelmeztetés
A fogyasztó köteles a termék kifizetését igazoló
bizonylatot megőrizni.
A termék reklamációjához a terméket gondosan meg
kell tisztítani, és biztonságosan be kell csomagolni,
nehogy megsérülhessen az esetleges márkaszervizbe
szállítás során. A szennyezett termék átvételét az eladó
elutasíthatja, illetve adott esetben kiszámlázhatja
afogyasztónak a termék tisztítási költségeit.
A gyártó (ill. forgalmazó) fenntartja a jogot arra, hogy
ajogosulatlan reklamációkkal kapcsolatos költségeket ne
térítse meg, valamint hogy a reklamálónak kiszámlázza
a reklamáció jogosultságának kivizsgálásával, valamint
megoldásával kapcsolatos elengedhetetlen költségeket.
A termék díjmentes javítására, ill. a termék visszaváltására
való jog nem érvényesíthető az alábbi esetekben:
• ha a termék használati utasításában feltüntetett
telepítési, üzemeltetési és kezelési feltételeket nem
tartották be,
• ha a meghibásodás mechanikai, hő- vagy vegyi sérülés
miatt, rövidzárlat, hálózati túlfeszültség vagy hibás
telepítés miatt következett be,
• ha a meghibásodás harmadik személy szakszerűtlen
beavatkozása miatt következett be,
• ha a meghibásodás vis major ok miatt következett be,
• ha a meghibásodás a nem megfelelő vagy szakszerűtlen
karbantartás miatt következett be, amely nem tesz
eleget a használati utasításban foglaltaknak, beleértve
a vízkő és egyéb üledékek miatti meghibásodást,
• ha a termék vagy annak részei a rendeltetésszerű
használat során elhasználódtak,
• ha a rendeltetésszerű használat során a fűtőfelületek
elszíneződtek, vagy az egyéb felületek megkarcolódtak,
• ha a napsugárzás, hősugárzás, vízkő vagy egyéb
üledékek miatt optikai vagy funkcionális változásokra
került sor,
• ha letelt a termék valamely alkatrészének, pl.
akkumulátor, izzó stb. élettartama
A keletkezett hiba jellegének megállapítására kizárólag
a gyártó, forgalmazó, márkaszerviz, ill. adott esetben
bírósági szakértő jogosult, nem pedig az eladó vagy
afogyasztó.
A garanciális javítás keretében kicserélt hibás
pótalkatrészekre a fogyasztó nem tarthat igényt.
Amennyiben a fogyasztó eláll az adásvételi szerződéstől,
úgy köteles visszaszolgáltatni a komplett terméket
beleértve annak tartozékait, valamint a termékkel
leszállított dokumentumokat is.
A termékkel együtt adott ajándékokra, amelyek nem
kerültek kiszámlázásra a fogyasztónak, semmilyen jótállás
nem vonatkozik.
Megjegyzés: A szállítás során megsérült termék
reklamációjára a szállítmányozó reklamációs szabályzata
vonatkozik.
Gyártó
Jindřich Valenta – Concept
Vysokomýtská 1800, 565 01 Choceň
Cseh Köztársaság
tel: +420465471400
fax: +420 465 473 304
email: [email protected]
www: www.my-concept.com
170 171
VR2110, VR2100 VR2110, VR2100
Page 87
LV
Pārdevēja pienākums ir iepazīstināt patērētāju ar
izstrādājuma parametriem un darbību, kā arī pilnībā
un salasāmi aizpildīt garantijas talonu izstrādājuma
pārdošanas dienā.
Ja nav pareizi aizpildīta vai nepareizi norādīta
nepieciešamā informācija par izstrādājumu,
garantijas talons ir nederīgs!
Ražotājs (vai piegādātājs) garantijas laika periodā ir
atbildīgs par izstrādājuma tehniskajām īpašībām un
tā darbību, ko paredz attiecīgās tehniskās normas un
nosacījumi.
Garantijas laiks ilgst 24 mēnešus, sākot no pārdošanas
datuma, ja ražotājs (vai piegādātājs) nav noteicis citādi.
Patērētājam garantijas ietvaros ir tiesības uz bezmaksas,
savlaicīgu un pilnīgu izstrādājuma bojājumu novēršanu
(skat. tālāk) vai, ja tas nav neadekvāti attiecībā pret
bojājuma raksturu, tiesības uz izstrādājuma bojāto detaļu
maiņu. Tiesības uz izstrādājuma maiņu vai pirkšanas
līguma nosacījumu neievērošanu var izmantot tikai tad, ja
ir izpildīti visi likumīgie nosacījumi, un tikai gadījumā, ja
izstrādājums nav ticis pārmērīgi nolietots vai bojāts.
Garantija ir spēkā, ja ir izpildīti šādi nosacījumi:
• ievēroti izstrādājuma apkalpes instrukcijas norādījumi,
• uzrādīti visi pirkumu apliecinošie dokumenti un spēkā
Ar pretenzijām par bojājumiem patērētājam jāgriežas
tirdzniecības vietā, kur izstrādājums tika iegādāts.
Bojājumu labošanu var pieteikt tajā pašā tirdzniecības
vietā, kur tika iegādāts izstrādājums, vai arī kādā no
autorizētajiem servisa centriem, kuru saraksts ir norādīts
iepakojuma sastāvā, vai arī varat to atrast tīmekļa vietnē:
www.my-concept.com.
Par bojātu akumulatoru šo garantijas noteikumu izpratnē
uzskata akumulatoru, kas elektroniski nedarbojas (t. i.,
nesazinās ar bāzes bloku, tam ir bojātas uzlādes vai izlādes
ķēdes utt.) vai kam ir iekšējs īssavienojums.
Šo garantijas noteikumu izpratnē par defektu neuzskata
bojājumu vai parametru izmaiņas, ko izraisījusi normāla
darbība vai nolietojums (piemēram, dabisks veiktspējas
samazinājums).
Uz akumulatoriem attiecas garantijas pakalpojumu
GARANTIJAS TALONS
esoša garantijas apliecība.
termiņš 6 mēneši. Šo garantijas noteikumu izpratnē
akumulatoram ir palīgmateriālu pazīmes, skat. sadaļu
“Palīgmateriāli”.
Palīgmateriāli
Palīgmateriāliem (baterijām, akumulatoriem utt.)
garantējam tehnisko parametru saglabāšanu 6mēnešus,
ja tie nav bojāti nepareizas lietošanas dēļ un nav beidzies
to kalpošanas laiks.
Brīdinājums patērētājam
Patērētāja pienākums ir saglabāt garantijas talonu un
pirkuma apliecinošu dokumentu (kases čeku, pavadzīmi
u.c.), kas apliecina produkta iegādi. Sūdzību gadījumā
izstrādājums rūpīgi jāiztīra un jāiesaiņo tā, lai, to
transportējot uz autorizēto servisa centru, tas netiktu
bojāts.
Ražotājam (vai piegādātājam) ir tiesības nesegt
izdevumus, kas ir saistīti ar nepamatotu sūdzību, un
pieprasīt no sūdzības iesniedzēja nepieciešamo atlīdzību
par izdevumiem, kas ir radušies, noskaidrojot sūdzības
pamatojumu.
Tiesības uz izstrādājuma bezmaksas labošanu, respektīvi,
izstrādājuma atdošanu, nav iespējams izmantot šādos
gadījumos:
• ja nav tikuši ievēroti instalācijas, ekspluatācijas vai
apkalpes nosacījumi, kas ir norādīti izstrādājuma
lietošanas instrukcijā;
• ja bojājums ir radies mehāniskas, termiskas vai
ķīmiskas iedarbības, īssavienojuma vai elektrotīkla
pārsprieguma rezultātā;
• ja bojājums ir radies trešās personas neprofesionālas
rīcības rezultātā;
• ja bojājums ir radies dabas katastrofas rezultātā;
• ja bojājums ir radies nepietiekošas vai nepiemērotas
aprūpes dēļ, kas ir pretrunā ar lietošanas instrukciju,
tostarp bojājumi, ko ir izraisījušas ūdens vai citas
nogulsnes;
• ja izstrādājuma vai tā daļas nolietojums ir radies
parastas lietošanas rezultātā;
• ja apsildes laukumu krāsas maiņu vai virsmu
skrāpējumu ir izraisījusi parasta lietošana;
• ja izskata vai funkcijas maiņu ir izraisījis saules
starojums, siltums, ūdens vai citas nogulsnes;
• ja atsevišķām izstrādājuma daļām, piem.,
akumulatoram, spuldzēm utt., ir beidzies kalpošanas
laiks.
To, kāda ir attiecīgā bojājuma izcelsme, ir tiesīgs novērtēt
vienīgi ražotājs, piegādātājs, autorizētais servisa centrs vai
tiesu eksperts nevis pārdevējs vai patērētājs.
Patērētājam nav tiesību uz bojātajām rezerves daļām, kas
ir apmainītas garantijas remonta gaitā.
Ja patērētājs neievēro pirkšanas līguma nosacījumus,
tā pienākums ir atdot izstrādājumu visā pilnībā, tostarp
aprīkojumu un dokumentus, kas tikuši piegādāti kopā ar
izstrādājumu.
Uz dāvanām, kuras var tikt pievienotas izstrādājumam
pārdošanas laikā un kuru cena no patērētāja nav iekasēta,
garantija neattiecas.
Patērētājam ir tikai tās tiesības, ko nosaka likums.
Piez.: Uz sūdzībām par bojājumiem, kas ir radušies
izstrādājuma transportēšanas laikā, attiecas transportētāja
sūdzību iesniegšanas nolikumi.
Jindřich Valenta – Concept
Vysokomýtská 1800, 565 01 Choceň
Česká republika
IČO 13216660
tel.: + 420 465 471 400, fax: +420 465 473 304
email: [email protected]
www: www.my-concept.com
Piegādātājs:
Verners VT Ltd.
Piedrujas iela 5a, Rīga LV-1073
Latvija
tālr.: +371 67 021 021
fakss: +371 67 021 000
e-pasts: [email protected]
www: www.verners.lv
Ražotājs:
Izstrādājuma raksturojums:
Modelis:
Izstrādājuma numurs:
Pārdošanas datums: Pārdevēja paraksts un zīmogs:
172 173
VR2110, VR2100 VR2110, VR2100
Page 88
EN
WARRANTY TERMS
Warranty
The manufacturer (or importer) is responsible for ensuring
the product complies with the requirements of applicable
legal regulations as well as those of the relevant technical
standards. Moreover, they are responsible for ensuring
the product has the properties the manufacturer
described in documents related to the goods or those
reasonably expected by the customer with regard to the
nature of the goods or based on advertising produced by
the manufacturer, and further they are responsible for
ensuring the product is fit for the purpose proposed by
the manufacturer or that aproduct of the same type is
normally used for.
The quality warranty term is 24 months from product
takeover by the customer.
The warranty does not apply to wear and tear caused
by regular use. The customer shall not be entitled to any
warranty claims if, prior to taking the product over, they
knew the product contained a defect or if the defect is
attributable to the customer.
In terms of these warranty conditions, a defective battery
is considered a battery that is electronically inoperative
(i.e., does not communicate with the base unit, the
charging or discharging circuits are defective, etc.) or has
an internal short circuit.
Defects or changes in parameters caused by normal use
and wear (e.g. natural capacity decrease) are in no way
considered a defect in terms of warranty.
The battery is provided warranty service for a period of
6 months. In terms of these warranty conditions, the
battery has the nature of a consumable, for more details
see „Consumables“.
Consumables
For consumables (batteries, etc.) we guarantee the
preservation of technical parameters for 6 months, in case
it was not damaged by improper use and its lifetime has
not expired.
The warranty specifically does not apply:
• if the product installation, operation and service
conditions stipulated in the product operating manual
have not been adhered to,
• to malfunctions caused due to mechanical, heat
or chemical damage, short circuit, over voltage or
incorrect installation,
• to malfunctions caused by an inexpert third-party
intervention,
• to malfunctions caused by natural disaster,
• to malfunctions caused by insufficient or inappropriate
maintenance in violation of the operating manual,
including malfunctions caused by water and other
sediments,
• to changes in colour of the heating surface or to
scratching of the surface caused as a result of using the
products in an unusual manner,
• to appearance and functional changes caused by
exposure to sunlight, thermal radiation of water and
other sediments,
• if the service life of certain product parts expires, e.g.
for accumulators, bulbs, etc.
The warranty does not apply to any products and services
provided along with the product (gifts, promotional
articles, etc.).
Filing a complaint
A complaint against a product defect must be filed as
soon as identified, yet no later than before the end of the
warranty term.
The customer must file a product complaint with the
dealer from which they have purchased the product,
or with any authorised service centre, a list of which is
included in the product package, or available at www.myconcept.com.
While filing a product complaint, the product must be
duly cleaned and securely packed so as to prevent any
damage during its transport to an authorised service
centre, where relevant, unless the product is delivered in
person.
The customer must submit proof of having concluded
a purchase contract for the product by producing the
receipt.
Complaints processing
As long as the noted defect may be removed, the user has
the right to have the defect duly removed free of charge
on a timely basis.
If the noted defect is not removable, or if the customer
becomes entitled to replacement of the product or a part
thereof, yet the replacement is not possible, for example
due to the product having been sold out, the customer
has the right to return the product (withdrawal from the
contract).
The customer shall have the right to a new product
(replacement) or to replacement of a part of the product
even if the defect can be removed, provided they cannot
properly use the product due to repeated occurrence of
the defect or due to a high number of such defects. In
such a case, the customer also has the right to return the
product (by withdrawing from the contract).
If the product is not returned (the customer does
not withdraw from the contract), or if the customer
does not apply the right to a new defect-free product
(replacement), to replacement of a part thereof or to
repair of the product, they may request a reasonable
discount. The customer also has a right to a reasonable
discount if anew defect-free product cannot be supplied
to them, or if aproduct part cannot be replaced or the
product repaired unless the situation is remedied within
a reasonable time limit, or if remedying the situation
would create major discomfort on the part of the
customer.
The seller, authorised service centre or a staff member
authorised by them must decide about each complaint
immediately or within three business days in complicated
cases. This term does not include a reasonable period
of time, depending on the type of product concerned,
required for the defect to be assessed by an expert.
A complaint, including defect removal, must be dealt
with without any undue delay, yet no later than within
30 calendar days of the complaint filing date, unless the
seller and the customer agree on a later deadline.
On returning the product (withdrawing from the contract)
the customer must return any accessories and documents
supplied along with the product.
The customer does not have the right to keep the
defective parts and components of the product replaced
as part of a repair of the product.
This shall be without prejudice to any other rights the
customer may have in relation to the purchase of the
product.
Remark: Complaints against products damaged in
transport are governed by the carrier’s complaints
procedure.
Manufacturer
Jindřich Valenta - Concept
Vysokomýtská 1800, 565 01 Choceň
Czech Republic
tel.: +420 465 471 400
fax +420 465 473 304
Company ID No. 13216660
email: [email protected]
www: www.my-concept.com
Product data
Model:
Production number:
Date of purchase: Seal and signature of vendor:
While filing their complaint, the customer must indicate
the noted defect and identify the preferred complaint
application method.
174 175
VR2110, VR2100 VR2110, VR2100
Page 89
DE
GARANTIEBEDINGUNGEN
Garantie
Der Hersteller (bzw. Importeur) garantiert, dass das
Produkt den Anforderungen der Rechtsvorschriften und
den durch die entsprechenden technischen Normen
bestimmten Anforderungen entspricht. Weiterhin, dass
das Produkt über solche Eigenschaften verfügt, die der
Hersteller in den zum Produkt gehörigen Dokumenten
beschrieben hat oder welche der Verbraucher in Bezug
auf den Charakter der Ware und auf der Grundlage der
vom Hersteller durchgeführten Werbung erwartet. Der
Hersteller garantiert, dass das Produkt für die von ihm
angeführten Zwecke geeignet ist.
Die Garantielaufzeit beträgt 24 Monate und beginnt mit
der Produktübernahme durch den Verbraucher zu laufen.
Die Garantie bezieht sich nicht auf Mängel durch
Verschleiß. Der Garantieanspruch gilt nicht, wenn dem
Verbraucher vor der Produktübernahme Mängel bekannt
waren oder er diese selbst verursacht hat.
Als ein mangelhafter Akku aus der Sicht dieser
Garantiebedingungen wird solcher Akku verstanden,
der elektronisch nicht funktionsfähig ist (d.h. der Akku
kommuniziert mit der Grundeinheit nicht, die Lade- oder
Entladekreise sind mangelhaft, usw.) oder der einen
Innenkurzschluss hat.
Aus dem Gesichtspunkt der Garantie gelten die durch
laufende Benutzung und Abnutzung verursachten
Mängel oder Parameteränderungen keinesfalls als
Mängel (zum Beispiel natürliche Kapazitätssenkung).
Für die Akkus wird 6monatige Garantie gewährt. Aus dem
Gesichtspunkt dieser Garantiebedingungen hat der Akku
den Charakter des Verbrauchsmaterials, Einzelheiten
siehe „Verbrauchsmaterial“.
Verbrauchsmaterial
Beim Verbrauchsmaterial (Batterien, usw.) garantieren wir
die Erhaltung technischer Parameter über 6 Monate, und
dies im Falle, dass es durch nicht sachgemäße Benutzung
nicht beschädigt wurde und die Lebensdauer nicht
abgelaufen ist.
Ausgenommen von der Garantie sind (insbesondere):
• Nichteinhaltung von Bedingungen für Installation,
Betrieb und Bedienung gemäß Bedienungsanleitung,
• Mängel durch mechanische, chemische Schäden,
Kurzschluss, Netzüberspannung oder falsche
Installation,
• Mängel durch unsachgemäße Eingriffe durch nicht
autorisierte Personen,
• Mängel aufgrund höherer Gewalt,
• Mängel durch unsachgemäße Wartung im Widerspruch
mit der Bedienungsanleitung, einschließlich Schäden
durch Wasserablagerungen,
• Farbveränderungen von Heizflächen oder Verkratzen
durch üblichen Gebrauch,
• Optische und funktionale Veränderungen, verursacht
durch Sonnen- und Wärmeeinstrahlung oder
Wasserablagerungen und andere Ablagerungen,
• Einige Zubehörteile des Produkts wegen ihrer kürzeren
Lebensdauer, z.B. Akkus, Glühbirnen usw.
Die Garantie gilt nicht für Leistungen, die mit dem Produkt
kostenlos zur Verfügung gestellt wurden (Geschenke,
Werbeartikel usw.).
Geltendmachung der Reklamation
Produktmängel sollten unmittelbar nach deren
Feststellung reklamiert werden, spätestens jedoch vor
Ablauf der Garantiezeit.
Die Reklamation ist beim Verkäufer des Produkts geltend
zu machen oder bei einer autorisierten Servicestelle. Die
Liste der Servicestellen ist im Lieferumfang enthalten
oder unter www.my- concept.com.
Das reklamierte Produkt ist gereinigt und ordnungsgemäß
verpackt an die Servicestelle zu versenden, um eventuelle
Transportschäden zu vermeiden, falls es nicht persönlich
übergeben wird.
Der Verbraucher ist verpflichtet einen Beleg über den
Vertragsabschluss und Produktkauf vorzulegen.
Der Verbraucher ist verpflichtet den Mangel genau zu
beschreiben, einschließlich des Reklamationsanspruches.
Reklamationsverfahren
Kann der reklamierte Mangel beseitigt werden, hat der
Verbraucher das Recht auf eine kostenlose, zeit- und
ordnungsgemäße Beseitigung des Mangels.
nicht unangemessen ist, kann der Verbraucher die
Lieferung einer neuen mangelfreien Sache oder die
Lieferung der fehlenden Sache fordern (Austausch).
Kann der Mangel jedoch ohne unnötige Verzögerung
beseitigt werden, hat der Verbraucher das Recht auf eine
kostenlose Beseitigung solches Mangels.
Handelt es sich um einen irreparablen Mangel und der
Verbraucher hat das Recht auf einen Austausch des
Produkts oder deren Teile, und dies z.B. aufgrund der
Nichtverfügbarkeit des Produkts nicht möglich ist, ist der
Verbraucher berechtigt das Produkt zurückzugeben (vom
Vertrag zurückzutreten).
Das Recht auf die Lieferung eines neuen Produkts
(Austausch) oder deren Teile hat der Verbraucher auch
bei reparablen Mängeln, falls diese wiederholt auftreten.
In solchem Fall ist der Verbraucher auch berechtigt das
Produkt zurückzugeben (vom Vertrag zurückzutreten).
Erfolgt keine Rückgabe (Vertragsrücktritt) oder kein
Anspruch auf die Lieferung eines neuen Produkts oder
deren Teile (Austausch), oder auf eine Reparatur, kann der
Verbraucher einen angemessenen Nachlass fordern. Dies
gilt auch im Falle, wenn kein neues Produkt oder deren
Teile geliefert werden können, das Produkt nicht repariert
wird, und auch dann, wenn dafür keine Ersatztermine
vereinbart werden.
Verkäufer, autorisierte Servicestelle oder beauftragte
Personen haben über die Reklamation unverzüglich zu
entscheiden, bei schwierigen Fällen innerhalb von drei
Werktagen. Diese Frist umfasst nicht den erforderlichen
Zeitraum zur fachlichen Bewertung des Mangels. Der
Verkäufer oder die Servicestelle ist verpflichtet die
Reklamation innerhalb von 30 Tagen ab dem Tag der
Geltendmachung der Reklamation zu erledigen, falls
keine längere Frist vereinbart wird.
Bei Rückgabe des Produkts (Vertragsrücktritt) ist der
Verbraucher verpflichtet auch jegliches Zubehör und
sämtliche Dokumente zum Produkt zurückzugeben.
Der Verbraucher hat kein Recht auf die Rückgabe der
mangelhaften Teile des Produkts, die im Rahmen der
Reklamation ausgetauscht wurden.
Sämtliche weitere Rechte des Verbrauchers, verbunden
mit dem Kauf des Produkts, bleiben durch diese
Garantiebedingungen unberührt.
Anm.: Für Reklamationen von Produkten, die
während des Transports beschädigt werden, gilt die
Reklamationsordnung des Transportunternehmens.
Hersteller:
Jindřich Valenta – Concept
Vysokomýtská 1800, 565 01 Choceň
Tschechische Republik
Ident.-Nr.: 13216660
Tel.: + 420 465 471 400, Fax: +420 465 473 304,
E-Mail: [email protected]
www: www.my-concept.com
Produktdetails
Modell:
Herstellernummer:
Verkaufsdatum: Stempel und Unterschrift des Verkäufers:
Sofern dies im Hinblick auf den Charakter des Mangels
176 177
VR2110, VR2100 VR2110, VR2100
Page 90
FR
CONDITIONS DE GARANTIE
Garantie
Le fabricant (l´importateur, le cas échéant) est tenu
responsable de la conformité du produit aux exigences
réglementaires et normatives applicables. Il est aussi tenu
responsable du fait que le produit présente les qualités
définies dans les documents relatifs au produit ou ceux
attendus par le consommateur en tenant compte de la
nature et des caractéristiques du produit et sur la base de
publicité du fabricant, il est également tenu responsable
du fait que le produit est propre aux usages auxquels
servent habituellement les biens du même type.
La durée de garantie en terme de qualité du produit est de
24 mois à partir de la date de l´acquisition du produit par
le consommateur.
La garantie ne s´applique pas à l´usure du produit
résultant de son usage habituel. La garantie ne s´applique
pas si le consommateur a été conscient des vices du
produit ou si le consommateur lui même acausé ces vices.
La batterie est considérée défectueuse de point de vue
de garantie si elle présente d´anomalies électroniques
fonctionnelles (à savoir elle ne communique pas
avec l´unité de base, les circuits de chargement ou
déchargement sont défectueux etc.) ou il y a un courtcircuit intérieur.
Les défauts ou les changements de paramètres dus
à l´usage standard ou à l´usure (exemple la capacité
naturellement faible) ne sont pas considérés comme
défauts couverts par la garantie.
La durée de garantie des batteries est de 6 mois. Dans
le cadre de ces conditions de garantie la batterie est
considérée comme une matière consommable, pour plus
de détails voir «Matières consommables».
Matières consommables
Pour les matières consommables (batterie, etc.) nous
garantissons le respect des paramètres techniques
pendant 6 mois sous condition que ces derniers n’ont pas
été endommagés suite à l’utilisation autre que prévue et
qu’elles ne sont pas en fin de vie.
La garantie est exclue si (notamment) :
• les conditions de l´installation, d´utilisation ou
d´entretien du produit indiquées dans le manuel
d´emploi n´ont pas été respectées,
• les dommages sont dus à un endommagement d´ordre
mécanique, thermique ou chimique, à un court-circuit,
surcharge de réseau ou installation autre que prévue,
• les dommages sont dus à une intervention par un tiers
• les dommages sont dus à un sinistre,
• les dommages résultent du non-respect des
instructions prévues dans le manuel d´emploi
y compris les anomalies dues à un dépôt d´eau ou
autres,
• les changements de couleur des surfaces de chauffe
ou grattage de surfaces sont dues à un usage habituel,
• s´agit des changements d´aspect ou de fonctions
provoqués par le rayonnement solaire, thermique ou
par le dépôt d´eau ou autres,
• certains éléments du produit sont à la fin de vie,
exemple : accumulateurs, ampoules etc.
La garantie ne s´applique pas aux éléments fournis
àtitre gratuit avec le produit (cadeaux, objets àcaractère
publicitaire etc.).
Demande en garantie
Toute demande en garantie est à notifier sans délai après
son identification, avant la fin de la période de garantie
au plus tard.
La demande en garantie est à signaler à votre revendeur,
le cas échéant au centre d´assistance autorisé dont la liste
fait partie de l´emballage du produit, ou elle est indiquée
sur l´adresse www.my-concept.com.
Pour envoyer le produit, objet de la réclamation, il faut
le nettoyer et sécuriser pour le transport dans le centre
d´assistance autorisé afin d´éviter tout endommagement,
si le produit n´est pas remis personnellement.
L´utilisateur est tenu de prouver l´existence du contrat
d´achat en présentant son bon d´achat.
L´utilisateur est tenu d´indiquer l´anomalie objet de
réclamation et il fait choix de sa revendication découlant
de sa demande en réclamation.
Liquidation de réclamation
S´il s´agit d´un défaut réparable, le consommateur ale
droit de bénéficier de la réparation à titre gratuit et dans
un délai prévu.
Si cela n´est pas disproportionné en tenant compte
la nature du défaut, le consommateur a le droit de
demander une livraison d´un nouveau produit sans vice
(remplacement), ou si le défaut ne concerne qu´une
partie du produit, demander le changement de cette
dernière. Si la demande du remplacement du produit et
de sa partie est disproportionnée en tenant compte la
nature du défaut, notamment si le défaut est réparable,
le consommateur a le droit de demander une réparation
à titre gratuit.
S´il s´agit d ´un défaut irréparable ou si le consommateur
a le droit de demander un remplacement du produit ou de
sa partie, mais le remplacement n´est pas réalisable, par
exemple due à l´épuisement des stocks, le consommateur
a le droit de retourner le produit (d´annuler le contrat de
vente).
Le consommateur a le droit de demander une
livraison d´un nouveau produit (remplacement) ou le
remplacement d´une partie du produit en cas d´un
défaut réparable si le produit ne peut pas être utilisé
pour l´existence répétitive du défaut après la réparation
ou pour le nombre de défauts importants. Dans un tel
cas le consommateur a le droit de retourner le produit
(d´annuler le contrat de vente).
Si le produit n´est pas retourné (le contrat de vente
annulé) ou si le consommateur n´appliquer pas son droit
de demander une livraison d´un nouveau produit sans
défauts (remplacement), de demander un remplacement
d´un partie ou de sa réparation, il peut demander le
remboursement approprié. Le consommateur a le droit
de demander le remboursement également dans le cas
ou il s´avère impossible de livrer un nouveau produit sans
défauts, de remplacer une partie du produit ou de réparer
le produit, ou si la réparation n´est pas réalisée dans un
délai prévu ou si la remise à l´état est trop compliquée
pour le consommateur.
Le revendeur, le service d´assistance autorisé ou
autre personne désignée décide sur la réclamation
immédiatement, dans les cas compliqués en trois jours
ouvriers.
Le délai ci-dessus ne comprend pas le temps nécessaire
pour évaluation expert du défaut en prenant compte de
la nature du produit.
Toute demande en garantie doit être traitée sans délai,
dans le délai de 30 jours a partir de la date de demande en
garantie, s´il n´est pas prévu autrement entre le revendeur
ou le service d´assistance autorisé et le consommateur.
En cas de retour du produit (annulation du contrat de
vente) le consommateur est tenu de retourner tous
éléments auxiliaires du produit y compris tous documents
livrés avec le produit.
Le consommateur n´a pas le droit de demander le retour
des pièces ou de parties du produit remplacées dans le
cadre de la réparation.
Tout droit du consommateur liés à l´achat du produit
n´est pas touché par les présentes conditions de garantie.
Note : La réclamation du produit endommagé pendant
le transport est régie par le Code de réclamation du
transporteur.
Fabricant:
Jindřich Valenta – Concept
Vysokomýtská 1800, 565 01 Choceň
République tchèque
TVA n° 13216660
tél.: + 420 465 471 400, fax: +420 465 473 304,
email: [email protected]
www: www.my-concept.co
Détails du produit
Modèle :
Numéro de série :
Date de l´achat : Cachet et signature du vendeur :
178 179
VR2110, VR2100 VR2110, VR2100
Page 91
CONDIZIONI DI GARANZIA
IT
Garanzia
Il produttore (eventualmente l’importatore) risponde
della conformità del prodotto ai requisiti normativi
previsti dalle rispettive norme tecniche. Il produttore
garantisce inoltre che il prodotto ha le qualità riportate
nei documenti che si riferiscono alla merce o che l’utente
si aspetta di ricevere al riguardo della natura della merce,
e che il prodotto stesso è adatto al fine indicato dal
produttore.
Il periodo di garanzia si stabilisce a 24 mesi dalla data di
accettazione del prodotto da parte dell’utente.
La garanzia non si riferisce all’usura del prodotto
provocata dall’uso normale del prodotto stesso. Il diritto
di sostituzione della merce per difetto sul prodotto non
spetta all’utente se quest’ultimo era al corrente del
rispettivo difetto prima di accettare la merce o se il difetto
lo aveva causato lui stesso.
Per fini della presente garanzia l’accumulatore difettoso
è quello con la funzionalità elettronica compromessa
(ovvero mancante comunicazione con unità principale,
circuiti di carica e/o di discarica difettosi etc.), oppure il
cortocircuito presente all’interno.
Non si considerano difetti, ai fini della garanzia concessa,
le alterazioni o le modifiche dei parametri causate dall’uso
e/o dal consumo normale (per esempio calo naturale
della capacità).
Per gli accumulatori si concede la garanzia di 6 mesi.
Per fini della garanzia concessa l’accumulatore viene
considerato il materiale di consumo, per maggiori
informazioni si veda „Materiale di consumo“.
Materiale di consumo
Per il materiale di consumo (batteria e simile) si garantisce
il mantenimento dei parametri tecnici per il periodo
di 6 mesi, e comunque solo qualora le sue prestazioni
non siano state compromesse dall’uso improprio e/o il
materiale non sia giunto alla fine la sua vita utile.
La garanzia non si riferisce ai seguenti casi, quando (in
particolare):
• non sono state rispettate le condizioni di installazione,
funzionamento ed uso corretto del prodotto riportate
nel manuale d’uso del prodotto stesso;
• il danneggiamento è di natura meccanica termica,
chimica o elettrica, tipo cortocircuito, oppure è stato
causato dalla sovratensione nella rete;
• il difetto è stato causato da un intervento inopportuno
da parte di un terzo;
• il difetto è stato causato dalla furia degli elementi;
• il difetto è stato provocato dalla manutenzione
insufficiente e/o impropria, eseguita in contrasto
con quanto riportato nel manuale d’uso, ivi compresi
idifetti causati dal calcare o da altri sedimenti;
• il cambio di colore e/o i graffi sulle superfici di
riscaldamento sono la conseguenza di uso normale;
• le alterazioni visive e funzionali dovute ai raggi di sole,
alla radiazione termica e/o ai sedimenti;
• decorsa la vita utile di alcuni elementi del prodotto, per
esempio degli accumulatori, delle lampadine etc.
La garanzia non si riferisce agli adempimenti concessi
gratuitamente insieme con il prodotto (omaggi, materiale
pubblicitario etc.).
Procedura di reclamo
Il reclamo del prodotto deve essere fatto senza rinvii una
volta accertato il difetto, comunque entro e non oltre la
scadenza del periodo di garanzia.
Il reclamo del prodotto va presentato presso il venditore
del prodotto stesso, ovvero presso un centro autorizzato
qualsiasi. La lista dei centri assistenza autorizzati fa parte
della confezione del prodotto oè reperibile sul sito www.
my-concept.com.
Prima di presentare il prodotto al reclamo, esso deve
essere dovutamente pulito e pure imballato, qualora
va spedito in un centro autorizzato onde evitare il suo
danneggiamento.
L’utente finale è tenuto a presentare il documento
attestante l’acquisto del prodotto.
Al prodotto deve essere allegata la lettera con la
descrizione del difetto contestato e l’opzione per la
gestione del reclamo.
Gestione del reclamo
Qualora si tratti di un difetto riparabile, l’utente ha diritto
alla riparazione gratuita e tempestiva del prodotto.
Se, considerata la natura del difetto, non si tratta di una
pretesa inadeguata, l’utente può richiedere la fornitura di
un prodotto privo dei difetti (la sostituzione), oppure se il
difetto interessa solo un elemento concreto del prodotto,
la sostituzione di tale elemento. Se però, considerata
la natura del difetto, la pretesa della sostituzione risulta
inadeguata in particolare se il difetto può essere eliminato
in tempi previsti, l’utente ha diritto alla riparazione
gratuita del prodotto.
Qualora però si tratti di un difetto irreparabile eall’utente
nasce il diritto alla sostituzione del prodotto o di una sua
parte e la sostituzione non è praticabile, per esempio
per motivi di vendita completa del rispettivo prodotto,
l’utente ha diritto di restituire il prodotto (recedere dal
contratto).
Il diritto alla fornitura del prodotto nuovo (alla
sostituzione), oppure al cambio di un elemento del
prodotto ha l’utente anche nel caso di un difetto
riparabile, se limitato nell’uso normale del prodotto per la
presenza ripetuta del danno o per il numero maggiore dei
danni. In tal caso l’utente ha diritto alla restituzione del
prodotto (recesso dal contratto).
Se non viene effettuata la restituzione del prodotto
(recessione dal contratto) oppure se l’utente non rivendica
il diritto alla fornitura del prodotto nuovo (sostituzione),
alla sostituzione di un elemento del prodotto oppure
alla riparazione del prodotto stesso, può richiedere
uno sconto adeguato. L’utente ha diritto ad uno sconto
adeguato anche qualora non gli possa essere fornito un
prodotto nuovo, privo dei difetti, sostituito un elemento
del prodotto oppure effettuata la riparazione del prodotto
stesso, nonché qualora non possa essere posto il rimedio
entro un periodo adeguato oppure il provvedimento al
rimedio comporti dei grossi problemi all’utente stesso.
Il venditore, il centro di assistenza autorizzato oppure
un operatore incaricato da questi decidono sulla
contestazione immediatamente, nei casi complicati entro
tre giorni lavorativi. In quel tempo non viene calcolato
il periodo necessario per una valutazione peritale del
difetto.
La contestazione del difetto e l’eliminazione dello stesso
devono essere risolti senza rinvii, entro 30giorni dal giorno
di presentazione del reclamo, salve le pattuizioni diverse
fatte tra il centro di assistenza autorizzato el’utente.
Alla restituzione del prodotto (recessione dal contratto)
l’utente è tenuto a restituire pure tutti gli accessori e tutti
i documenti forniti insieme con il prodotto.
L’utente non ha diritto a ricevere indietro i pezzi e gli
elementi difettosi del prodotto sostituiti nell’ambito della
riparazione.
Ogni altro diritto dell’utente relativo all’acquisto del
prodotto non viene meno con l’applicazione delle
condizioni di garanzia.
Nota: La contestazione del prodotto danneggiato durante
il trasporto è regolata dall’ordinamento contestazioni del
trasportatore.
Produttore:
Jindřich Valenta – Concept
Vysokomýtská 1800, 565 01 Choceň
Repubblica Ceca
C.F. 13216660
tel.: + 420.465.471.400, fax: +420.465.473.304.
email: [email protected]
www: www.my-concept.com
Dettagli sul prodotto
Modello:
Numero di matricola:
Data di vendita: Timbro e firma del produttore:
180 181
VR2110, VR2100 VR2110, VR2100
Page 92
ES
CONDICIONES DE GARANTÍA
Garantía
Es responsabilidad del fabricante (o importador) que el
producto cumpla con los requisitos legales ylo dispuesto
por las normas técnicas aplicables. Es también su
responsabilidad que el producto tenga las propiedades
descritas en la documentación vinculada al mismo o las
que el consumidor pudiese esperar dada la naturaleza del
producto y la publicidad llevada a cabo por el fabricante,
y es también su responsabilidad que el producto sea
adecuado para el propósito indicado o para su uso
habitual.
La garantía por la calidad del producto es válida por
24meses a partir de su entrega al consumidor.
La garantía no cubre el desgaste resultante del uso
habitual. El derecho a reclamación no será aplicable si,
antes de haber recibido el producto, el consumidor sabía
que este era defectuoso o si él hubiese causado el defecto.
Bajo las presentes condiciones de garantía, se considera
como batería defectuosa a aquella que no funcione
electrónicamente (no se comunica con la base, los
circuitos de carga y descarga están defectuosos, etc.)
oque tenga un cortocircuito interno.
Los defectos o cambios en los parámetros resultantes del
uso habitual o el desgaste (por ejemplo, caída natural de
capacidad) no serán considerados como defectos bajo la
garantía.
Las baterías tienen una garantía de 6 meses. Bajo estas
condiciones de garantía, la batería tiene el carácter de
material consumible. Para más detalles, ver. “Materiales
consumibles”.
Materiales consumibles
Los materiales consumibles (baterías, etc.) tienen una
garantía de 6 meses para sus parámetros técnicos, en
tanto no hayan sido dañados por uso indebido o no haya
concluido su vida útil.
La garantía no es válida en caso de que (en particular):
• que no se hubiesen cumplido las condiciones para la
instalación, funcionamiento y operación del producto
descritas en el manual,
• que el defecto hubiese resultado de daños mecánicos,
térmicos o químicos, cortocircuitos, sobretensión en la
red o de una instalación incorrecta,
• que el defecto hubiese sido causado por la intervención
indebida de terceros,
• que el defecto hubiese sido causado por un desastre
natural,
• el defecto hubiese sido causado por un mantenimiento
insuficiente o incorrecto, incluyendo aquellos causados
por sedimentos de agua u otro tipo,
• cambios en el color de la superficie de calentamiento
orayaduras sean el resultado del uso habitual,
• tratarse de cambios de apariencia o funcionales
causados por la radiación solar o térmica o por
sedimentos de agua u otro tipo,
• haber concluido la vida útil de alguno de los
componentes del producto (acumuladores, bombillas,
etc.)
La garantía no cubre los objetos proporcionados
gratuitamente junto con el producto (regalos, materiales
promocionales, etc.).
Reclamaciones
Las reclamaciones por defectos deben ser realizadas
sin demora innecesaria y antes del vencimiento de la
garantía.
El consumidor presentará su reclamación en el
establecimiento en donde adquirió el producto o en
cualquiera de los servicios autorizados incluidos en la lista
que forma parte del embalaje del producto, que también
puede encontrarse en internet, en la dirección www.myconcept.com.
Para presentar la reclamación, el producto debe ser
adecuadamente limpiado y puesto en un embalaje
seguro para evitar daños durante un eventual transporte
al servicio autorizado, en caso de que no sea entregado
en persona.
El consumidor tiene la obligación de demostrar la
celebración de un contrato de compraventa mediante la
presentación de un comprobante de compra.
Junto con la reclamación, el consumidor describirá el
supuesto defecto y seleccionará la reclamación.
Resolución de reclamaciones
Si se tratase de un defecto corregible, el consumidor
tendrá derecho a que el defecto sea corregido sin cargo
yde manera oportuna y apropiada.
De no ser desproporcionado a la naturaleza del defecto, el
consumidor podrá exigir la entrega de un nuevo producto
sin defectos (reemplazo) o, si el defecto se relacionase
aun componente del producto, podrá exigir el reemplazo
de dicho componente. Sin embargo, si el reemplazo del
producto o su componente fuese desproporcionado a la
naturaleza del defecto, en especial si el defecto pudiese
ser corregido sin demora, el consumidor tendrá derecho
aque el defecto sea corregido sin cargo.
Si se tratase de un defecto no corregible, o si el
consumidor tuviese derecho al reemplazo del producto
osu componente, pero dicho reemplazo no fuese posible,
por ej. debido a que el producto estuviese agotado,
el consumidor tendrá derecho a devolver el producto
(rescindir el contrato).
El consumidor tiene derecho a recibir un nuevo producto
(reemplazo) o partes del mismo, incluso en caso de
defectos que sean reparables si no fuese posible utilizar
el objeto apropiadamente debido a un defecto recurrente
luego de su reparación o a un número mayor de defectos.
En tal caso, el consumidor también tendrá derecho
adevolver el producto (rescindir el contrato).
Si el consumidor no devolviese el producto (rescisión de
contrato) o no ejerciese su derecho a recibir un nuevo
producto sin defectos (reemplazo) o un reemplazo de un
componente del mismo, o a que el producto sea reparado,
podrá exigir un descuento razonable. El consumidor
tendrá derecho a un descuento razonable también en
caso de que no sea posible: entregarle un nuevo producto
sin defectos, el reemplazo de un componente del
producto, la reparación del producto o que la situación no
pueda ser remediada en un plazo razonable o que esto
le haya causado al consumidor dificultades considerables.
El vendedor, el servicio autorizado o un empleado por
estos designado decidirá sobre el reclamo de inmediato
o dentro de los tres días hábiles en casos complicados.
Este plazo no incluirá el periodo razonable necesario
según el tipo de producto para la evaluación profesional
del defecto.
La reclamación, incluyendo la corrección de los defectos
deberá ser resuelta sin demora innecesaria, a más tardar
a los 30 días a partir de la presentación de la reclamación,
a menos que el vendedor o el servicio autorizado que
resuelva el reclamo acuerde una extensión del plazo con
el consumidor.
Al devolver el producto (renunciar al contrato), el
consumidor está obligado a devolver también los
accesorios y todos la documentación entregada con el
mismo.
El consumidor no tiene derecho a recibir los componentes
o las piezas defectuosas que hubiesen sido reemplazados
al reparar el producto.
Todos los demás derechos del consumidor vinculados
a la compra del producto no se verán afectados por las
presentes condiciones de garantía.
Nota: La reclamaciones por daños al producto durante su
transporte se rigen por el reglamento de reclamaciones
del transportista.
Fabricante
Jindřich Valenta - Concept
Vysokomýtská 1800, 565 01 Choceň,
República Checa
CIF 13216660
tel.: + 420 465 471 400, fax: +420 465 473 304,
email: [email protected]
www: www.my-concept.com
Detalles del producto
Modelo:
Número de serie:
Fecha de venta: Sello y firma del vendedor:
182 183
VR2110, VR2100 VR2110, VR2100
Page 93
RO
CONDIȚII DE GARANȚIE
Garanție
Producătorul (eventual importatorul) răspunde de
faptul că produsul este în conformitate cu legislația și
îndeplinește cerințele stabilite de normele tehnice
aferente. De asemenea răspunde pentru faptul că produsul
are caracteristicile pe care producătorul le-a descris în
documentele legate de produs sau pe care consumatorul
le-a presupus, ținând cont de natura produsului și pe baza
reclamei producătorului, fiind responsabil și pentru faptul
că produsul se potrivește scopului pe care producătorul
l-a menționat sau pentru care se folosește un astfel de
produs.
Termenul de garanție pentru calitatea produsului este de
24 luni de la preluarea produsului de către consumator.
Garanția nu include uzura produsului cauzată de utilizarea
normală a acestuia. Consumatorul nu beneficiază de
dreptul de garanție dacă înaintea preluării produsului
a știut că produsul are defecțiuni sau dacă a cauzat el
însăși defectul.
Un acumulator defect, din punctul de vedere al acestor
condiții de garanție, se consideră acel acumulator care
nu este funcțional electronic (adică nu comunică cu
unitatea de bază, sunt defecte circuitele de încărcare sau
descărcare etc.) sau are un scurtcircuit intern.
În nici un caz nu se consideră ca fiind un defect, din punctul
de vedere al garanției, defecțiunile sau modificările de
parametri cauzate de utilizare curentă și uzură (de e.
scăderea naturală a capacității).
Pentru acumulatoare este oferit serviciul de garanție
pe o perioadă de 6 luni. Din punctul de vedere al
acestor condiții de garanție, acumulatorul are caracterul
materialului consumabil, pentru detalii vezi „Material
consumabil“.
Material consumabil
La materialele consumabile (baterii ș.a.m.d.) garantăm
păstrarea parametrilor tehnici pe o durată de 6 luni,
aceasta în cazul în care nu a fost deteriorat prin utilizare
necorespunzătoare și nu a expirat durata sa de viață.
Garanția este exclusă în cazurile în care (în special):
• nu au fost respectate condițiile de instalare, exploatare
și deservire a produsului, care sunt menționate în
manualul de utilizare,
• defecțiunea a apărut din cauza deteriorării mecanice,
termice sau chimice, prin scurtcircuitare, supratensiune
în rețea sau instalare incorectă,
• defecțiunea a apărut prin intervenirea neautorizată
aunei persoane terțe,
• defecțiunea a apărut la o calamitate naturală,
• defecțiunea a apărut ca urmare a unei întrețineri
insuficiente sau necorespunzătoare, în contradicție cu
manualul de utilizare, inclusiv defecțiunile cauzate de
depunerile de apă și altele,
• a apărut modificarea culorii suprafețelor de încălzire
sau zgârierea suprafețelor prin folosirea obișnuită,
• este vorba de modificările de aspect și funcționalitate
cauzate de radiații solare, radiații termice sau de
depunerile de apă sau altele,
• expiră durata de viață a unor părți ale produsului, de ex.
a acumulatorului, becurilor etc.
Garanția nu include obiectele care au fost oferite gratuit
împreună cu produsul (cadouri, obiecte de promovare,
etc.).
Valorificarea reclamației
Reclamarea defecțiunii produsului trebuie valorificată fără
o întârziere inutilă după depistarea acesteia, cel târziu însă
înainte de expirare a perioadei de garanție.
Reclamarea produsului se valorifică de către consumator
la vânzătorul la care a achiziționat produsul, eventual la
oricare dintre service-uri autorizate a căror listă face parte
din livrarea produsului, eventual care este menționat pe
internet la adresa www.my-concept.com.
În cazul unei reclamații a produsului, acesta trebuie
curățat în mod corespunzător și ambalat în siguranță,
pentru a se evita deteriorarea la transportul acestuia
în service-ul autorizat, în cazul în care produsul nu este
predat personal.
Consumatorul are obligația de a dovedi încheierea
contractului de vânzare-cumpărare prin prezentarea unui
document de achiziționare a acestuia.
În același timp, la reclamația produsului consumatorul
descrie defecțiunile reclamate și efectuează opțiunea
dreptului la reclamare.
Soluționarea reclamației
În cazul în care este vorba de o defecțiune care poate
fi eliminată, consumatorul are dreptul la eliminarea
gratuită, la timp și reglementară a defecțiunii.
Dacă acest lucru nu este posibil, ținând cont de natura
defecțiunii, consumatorul poate solicita livrarea unui
produs nou fără defecțiuni (schimb), sau dacă defecțiunea
este legată doar de o piesă a produsului, schimbul unei
astfel de piese. Dacă însă, având în vedere natura
defecțiunii, mai ales când defecțiunea poate fi eliminată
fără întârziere, cerința de schimbare a produsului sau
acomponentei acestuia este neadecvată, consumatorul
are dreptul la eliminarea gratuită a defecțiunii.
In cazul în care este vorba de o defecțiune care nu poate
fi eliminată, eventual în cazul în care consumatorul
are dreptul la schimbul produsului sau a componentei
acestuia însă acest schimb nu este posibil, de ex. din
motivul neexistenței acestui produs, consumatorul este
îndreptățit să returneze produsul (reziliere la contract).
Consumatorul are dreptul la livrarea unui produs nou
(schimb) sau la înlocuirea componentei produsului și în
cazul în care defecțiunea poate fi eliminată, însă produsul
nu poate fi folosit reglementar din cauza defecțiunilor
repetate ale defecțiunii reparate sau în cazul unui număr
mai mare de defecțiuni. În aceste cazuri consumatorul are
dreptul la returnarea produsului (rezilierea la contract).
Dacă nu se ajunge la returnarea produsului (rezilierea la
contract) sau dacă consumatorul nu valorifică dreptul de
livrare a unui produs fără defecțiuni (schimb), la înlocuirea
componentelor acestuia sau la repararea produsului,
poate solicita o reducere adecvată. Consumatorul are
dreptul la o reducere adecvată și în cazul în care nu-i
poate fi livrat un produs nou fără defecțiuni, nu poate
fi înlocuită componenta sau produsul reparat, precum
și în cazul în care nu se ajunge la remediere într-un
timp adecvat sau remedierea ar cauza consumatorului
probleme semnificative.
Vânzătorul, service-ul autorizat sau muncitorul desemnat
de acesta va hotărî despre reclamație imediat, în cazurile
complicate în termen de trei zile lucrătoare. Această
perioadă nu include perioada adecvată, în funcție de tipul
produsului, necesară evaluării profesionale adefecțiunii.
Reclamația, inclusiv eliminarea defecțiunii, trebuie
soluționată fără amânare inutilă, cel târziu în 30 de zile de
la valorificarea reclamației, dacă vânzătorul sau service-ul
autorizat care soluționează reclamația nu au convenit cu
consumatorul asupra unei perioade mai lungi.
La returnarea produsului (rezilierea la contract)
consumatorul trebuie să returneze de asemenea
accesoriile produsului și toate documentele livrate
împreună cu produs.
Consumatorul nu are dreptul la livrarea pieselor și
acomponentelor defecte, care au fost înlocuite în cadrul
reparației produsului.
Celelalte drepturi ale consumatorului, legate de
achiziționarea produsului, nu sunt afectate de aceste
condiții de garanție.
Notă: Reclamațiile produsului deteriorat în timpul
transportului sunt reglementate de regulamentul de
reclamații al transportatorului.
Producător
Jindřich Valenta - Concept
Vysokomýtská 1800, 565 01 Choceň,
Republica Cehă
CUI 13216660
tel.: + 420 465 471 400, fax: +420 465 473 304,
email: [email protected]
www: www.my-concept.com
Date despre produs
Model:
Numărul de fabricație:
Data vânzării: Ștampila și semnătura unității de vânzare:
184 185
VR2110, VR2100 VR2110, VR2100
Page 94
CZ
SK
PL
HU
HR
Seznam servisních míst
Zoznam servisných stredisiek
Wykaz punktów servisovych
Szolgáltatók listáját
Popis uslužnih mjesta
Česká republika
Název Ulice PSČ Město Telefon/Fax E-mail
Jindřich Valenta
CONCEPT
Vysokomýtská 1800 56501 Choceň 465 471 400
465 473 304
Slovenská republika
Názov Ulica PSČ Mesto Telefón/Fax E-mail
HOSPOL
elektro spol. s r.o
VILLA MARKET
s.r.o.
ELSPO BB s.r.o. Internátna 2318/24 974 01 Banská
Odborárov 49 05201 Spišská
Nová Ves
Bystrica
053/4421857 [email protected]
048/4135535 objednavky@
elektroobchod-elspo.sk
Polska
Nazwa Ulica Kod Miasto Telefon E-mail
CONCEPT
POLSKA sp. z o.o.
Ostrowskiego 30 53-238 WROCŁAW 071/339-04-44
w. 27
Magyarország
Név Utca ZIP Város Telefon E-E-mail
ASPICO KFT Hűtőház u. 25.
H–9027
Győr
+36 96 511 291
Hrvatska
Ime Ulica
Horvat
elektronika d.o.o.
Dravska 8 HR-
Poštanski
40305
Grad Telefon E-E-mail
Pušćine
+385 040 895
500
servis@horvat-elektronika.
hr
Page 95
CZ
Jindřich Valenta – Concept
Vysokomýtská 1800, 565 01 Choceň
Tel.: +420 465 471 400, Fax: +420 465 473 304
www.my-concept.cz
SK
PL
HU
LV
HR
ELKO Valenta – Slovakia, s.r.o.
Hurbanova 1563/23, 911 01 Trenčín
Tel.: +421 326 583 465, Fax: +421 326 583 466
www.my-concept.sk
CONCEPT POLSKA sp. z o.o.
Ostrowskiego 30, 53-238 Wroclaw
Tel.: +48 713 390 444, Fax: 713 390 414
ASPICO KFT
H - 9027 Győr, Hűtőház u. 25.
Tel.: +36 96 511 291, Fax: +36 96 511 293
[email protected]
Verners VT Ltd.
Piedrujas iela 5a, Riga, Latvia
Tel. + 371 67021021, fakss + 371 67021000
e-pasts: [email protected], www.verners.lv
Horvat elektronika d.o.o.
Dravska 8, HR-40305 Pušćine
[email protected]
Hotline: +385 040 895 500
 Loading...