

Page 1
Page 2

Page 3

Table of Contents
SAFETY.............................................................3
INTRODUCTION ................................................4
FORCE MONITOR USE......................................5
Basic Operation ........................................ 6
Advanced Operation .................................7
Recall Mode .............................................. 7
Second Function of Buttons .....................8
GETTING STARTED...........................................9
TRAINING
Dampers, Speed, Force & Training .......... 12
“Lift” Variations.......................................14
Logging Your Results .............................. 15
CARE & MAINTENANCE .................................18
WARRANTY ....................................................18
DYNO
QUICK REFERENCE GUIDE ...................19
SAFETY
caution
• Be sure to do at least five minutes of cardiovascular exercise and some stretching as a warmup before lifting. Rowing makes a great warm-up because it uses the same muscle groups as
the
DYNO
• Keep children, pets, and bystanders away from the
the moving carriage could pinch fingers.
.
DYNO
while you are using it. In particular,
warning
• IMPORTANT: Do not attempt to lift a free weight of the same amount that you can push on
DYNO
the
DYNO
. The
DYNO
force reading may be greater than the amount of free weight you can lift.
lift is not limited by your “weak point” of the motion. Therefore, the
3
Page 4
INTRODUCTION
DYNO
- short for Dynamometer, a device which measures force.
Dynamic Strength Training
The Concept2
is a direct response to your effort. The more force you are capable of applying to the
more you “lift.” A measurement of your effort for each repetition will be displayed.
Think about traditional weight lifting. The amount of weight you can lift is limited by your weakest
point in the lift. Your stronger parts of the lift may not be challenged. Dynamic Strength Training
enables your muscles to be fully challenged throughout the movement, because the resistance is
created in dynamic response to your effort. At the points in the “lift” where you are able to push
harder, the resistance will be greater.
DYNO
is based on the concept of dynamic strength training. The resistance you feel
DYNO
, the
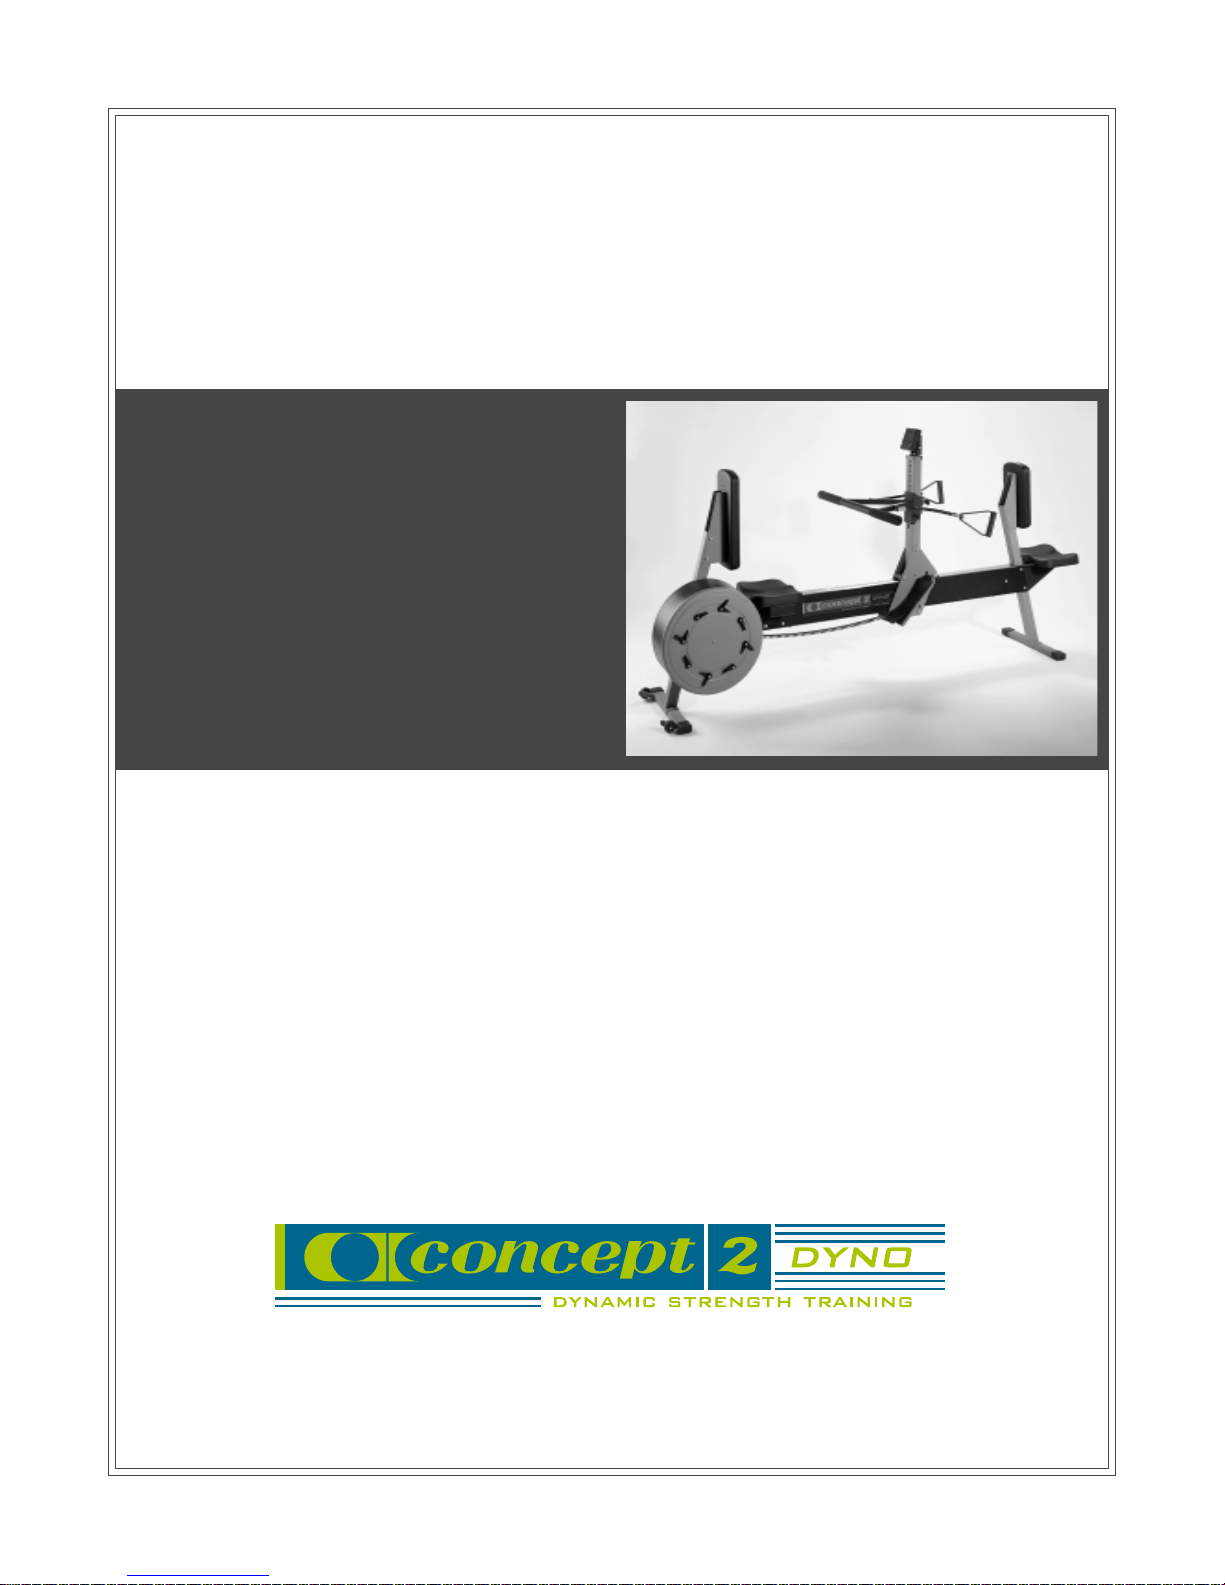
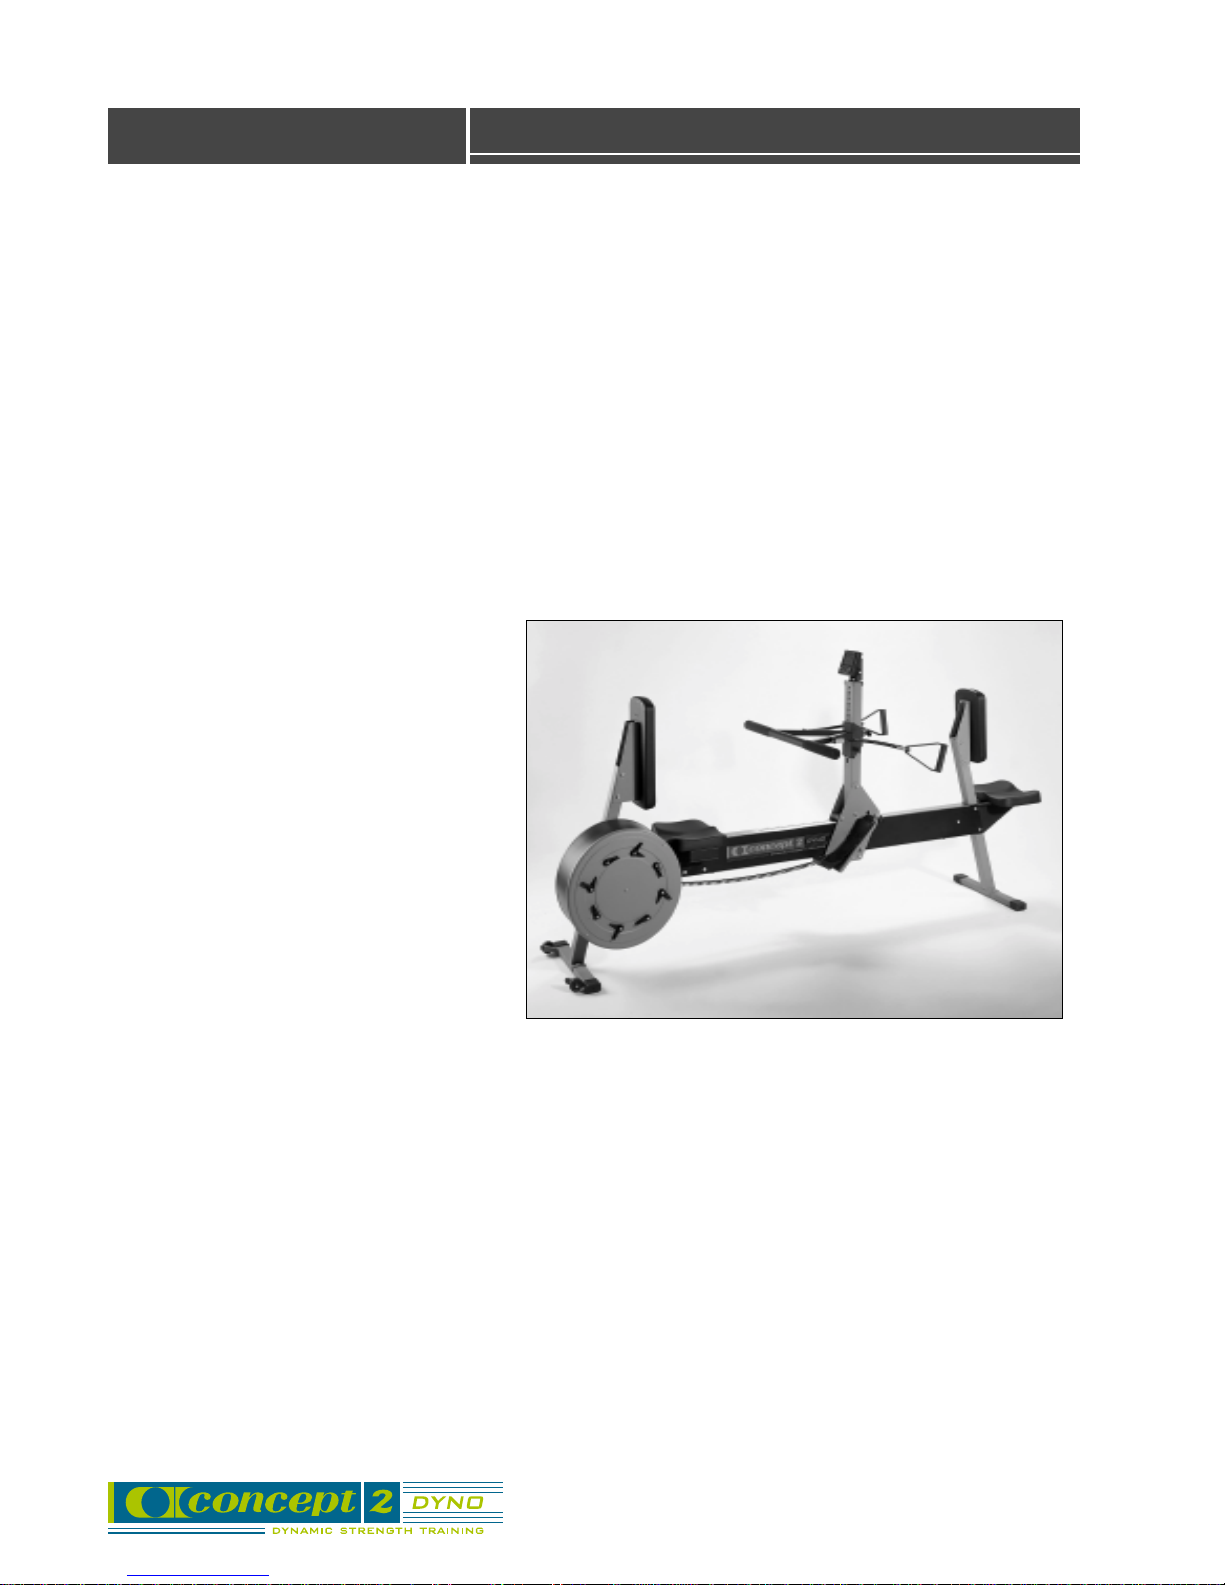
Description of the Machine
The heart of the
suitable for strength training. The amount of air reaching the flywheel is controlled by eight damper
levers on the flywheel housing. These dampers affect the load that you have on the wheel. The
more dampers that are open, the harder the
The
DYNO
movements provide a basic strength foundation for many sports and activities. The “lifts” are done
by pushing or pulling a carriage which rides on a monorail. The
basic “lifts” by making a number of variations, which exercise slightly different muscle groups.
The Force Monitor gives you accurate and immediate feedback on your effort. It also displays your
maximum effort and calculates an average at the end of the set.
DYNO
has three basic positions: leg press, seated bench press, and bench pull. These three
is a flywheel, specially designed to produce a range of resistance levels
DYNO
will feel at a given speed of movement.
DYNO
4
also allows you to build on the
Page 5
TIMER
ON/OFF DISPLAY
DOWN UP
CLEAR
CLOSE
SETS
REPS
RECALL
MAX
WATTS
WORK
VEL
LOAD
HR
OK
FORCE MONITOR Use
• Rep - short for repetition. Each press or pull that you do is one rep.
• Set - a group of reps is called a set.
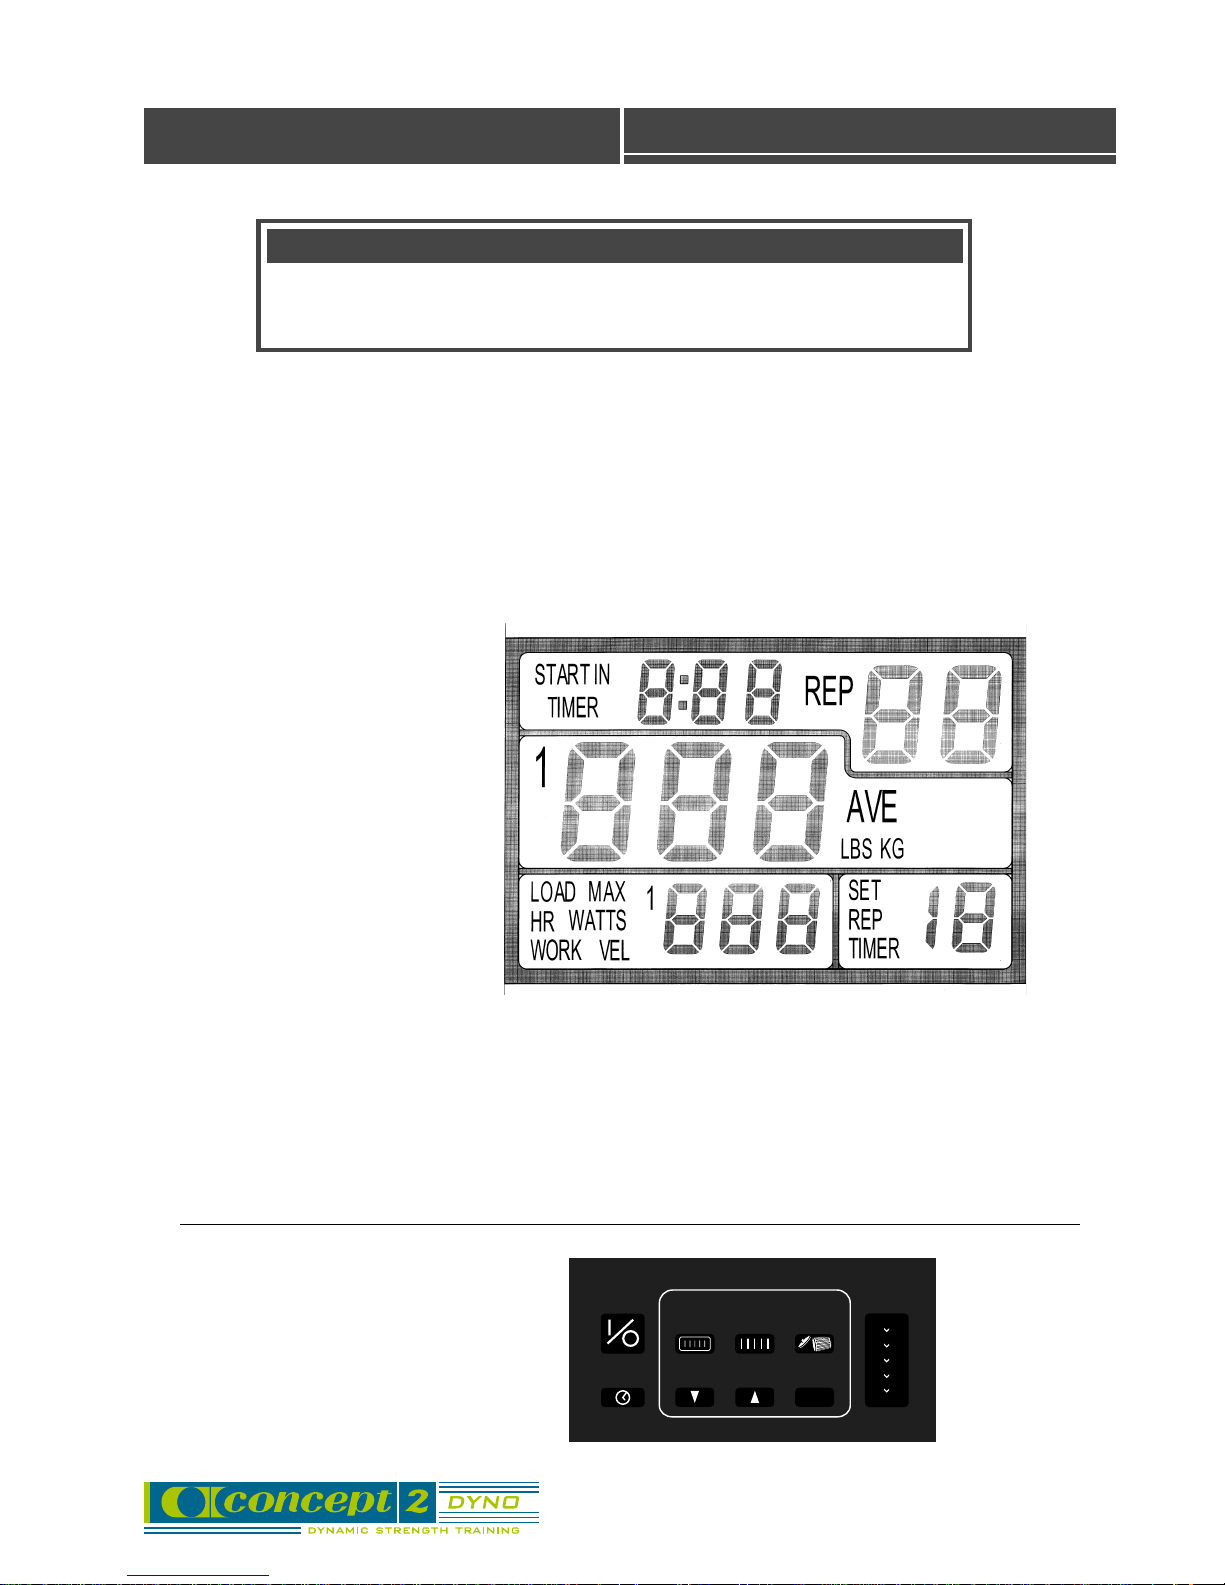
Description of Display
Terminology
Top left:
This display counts down the warm-up reps. When you start,
you will see: START IN 3 REP. If the set/rest time is turned on
by pressing the TIMER button, this display will show the
elapsed time for the set, then the elapsed time for the rest.
Center:
• During each set: This display shows
the force exerted on the rep just
completed. 140 LBS means you have
generated an average force of 140 lbs
over the entire range of the “lift” just
▲
completed. You may choose between
units of LBS or KG.
• After each set: Ten seconds after the
last rep is completed, this display will
change to show the average of all the
reps in the set.
Lower left:
This display shows your maximum force for the
set. You may choose between units of LBS or KG.
You may also choose to view other data in this
display, including power (watts), heart rate, work
(newton-meters), load, and velocity (mm/sec).
▲
▲
Top right:
After the warm-up, this display shows
how many reps you have done. For
example, it will show REP 5 when you
have completed your fifth rep.
▲
▲
Lower right:
• During each set, this display shows
the REP TIMER, which counts the
elapsed time since the completion of
the last rep.
• After each set: This display shows the
number of completed sets.
View of Force Monitor
Button Panel
5
Page 6
Basic Operation
Power-Up: The Force Monitor has been designed to start automatically when you begin lifting.
No button pushing is required.
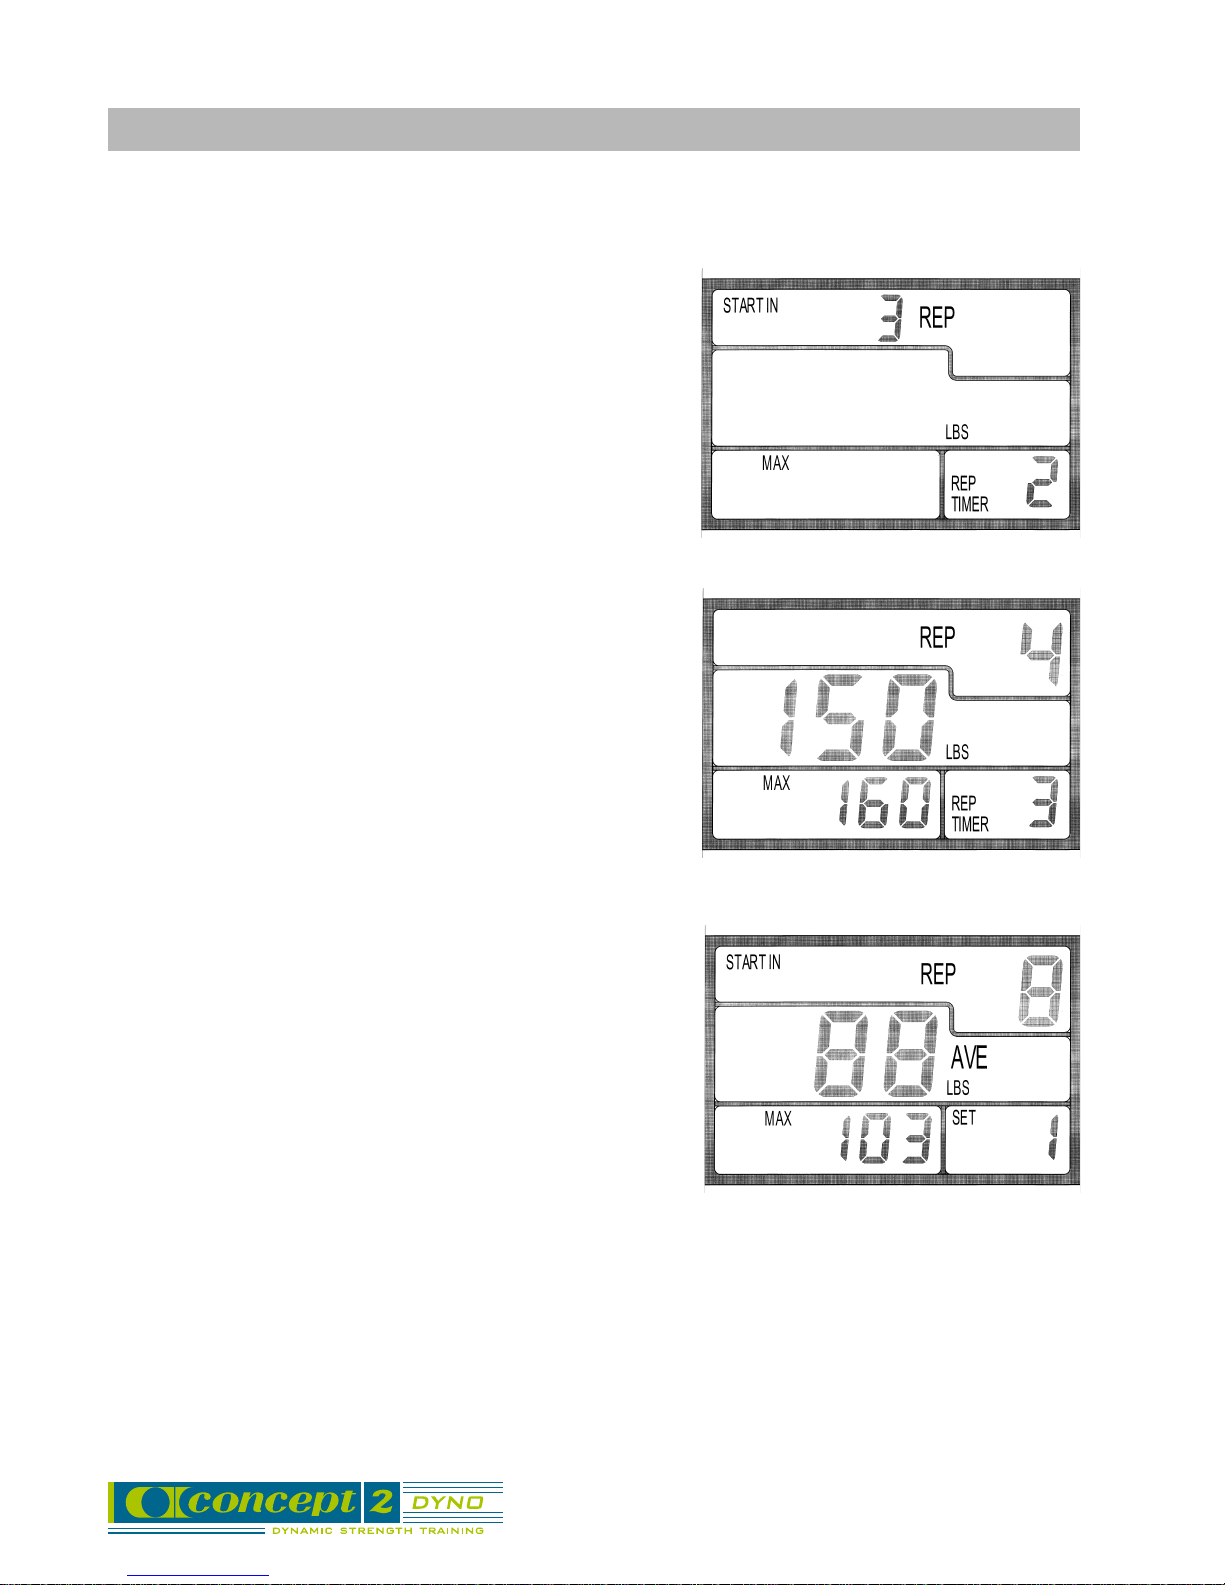
Start in 3 Reps: The Force Monitor will count down the
first three reps as warm-up reps, during which no force
data will be displayed. This allows you to start every set
with three easy warm-up reps.
Workout Data: After the warm-up, the Force Monitor
will automatically display your workout data as follows:
• Center display - your force reading for each rep, and the
average of all your reps at the end of the set
• Bottom left - your maximum force reading for the set.
• Top right - the number of reps completed.
• Bottom right - the elapsed time since your last rep, and
the number of sets completed at the end of the set.
End of Set: The monitor determines that your set is
finished if ten seconds elapses since the beginning of the
last rep without another rep occurring. You can watch the
rep timer in the lower right display to be sure you start your
next rep within ten seconds, unless you are done with your
set. Your set summary data will automatically be displayed
ten seconds after completion of your last rep.
Pounds or Kilograms: To cycle the units between pounds and kilograms in the central display,
press OK and the UP arrow. After powering down, the monitor will come back up in the units you
last used.
Automatic Power Down: The monitor will power down automatically after ten minutes of no
activity. It can also be turned off using the I/O button.
6
Page 7
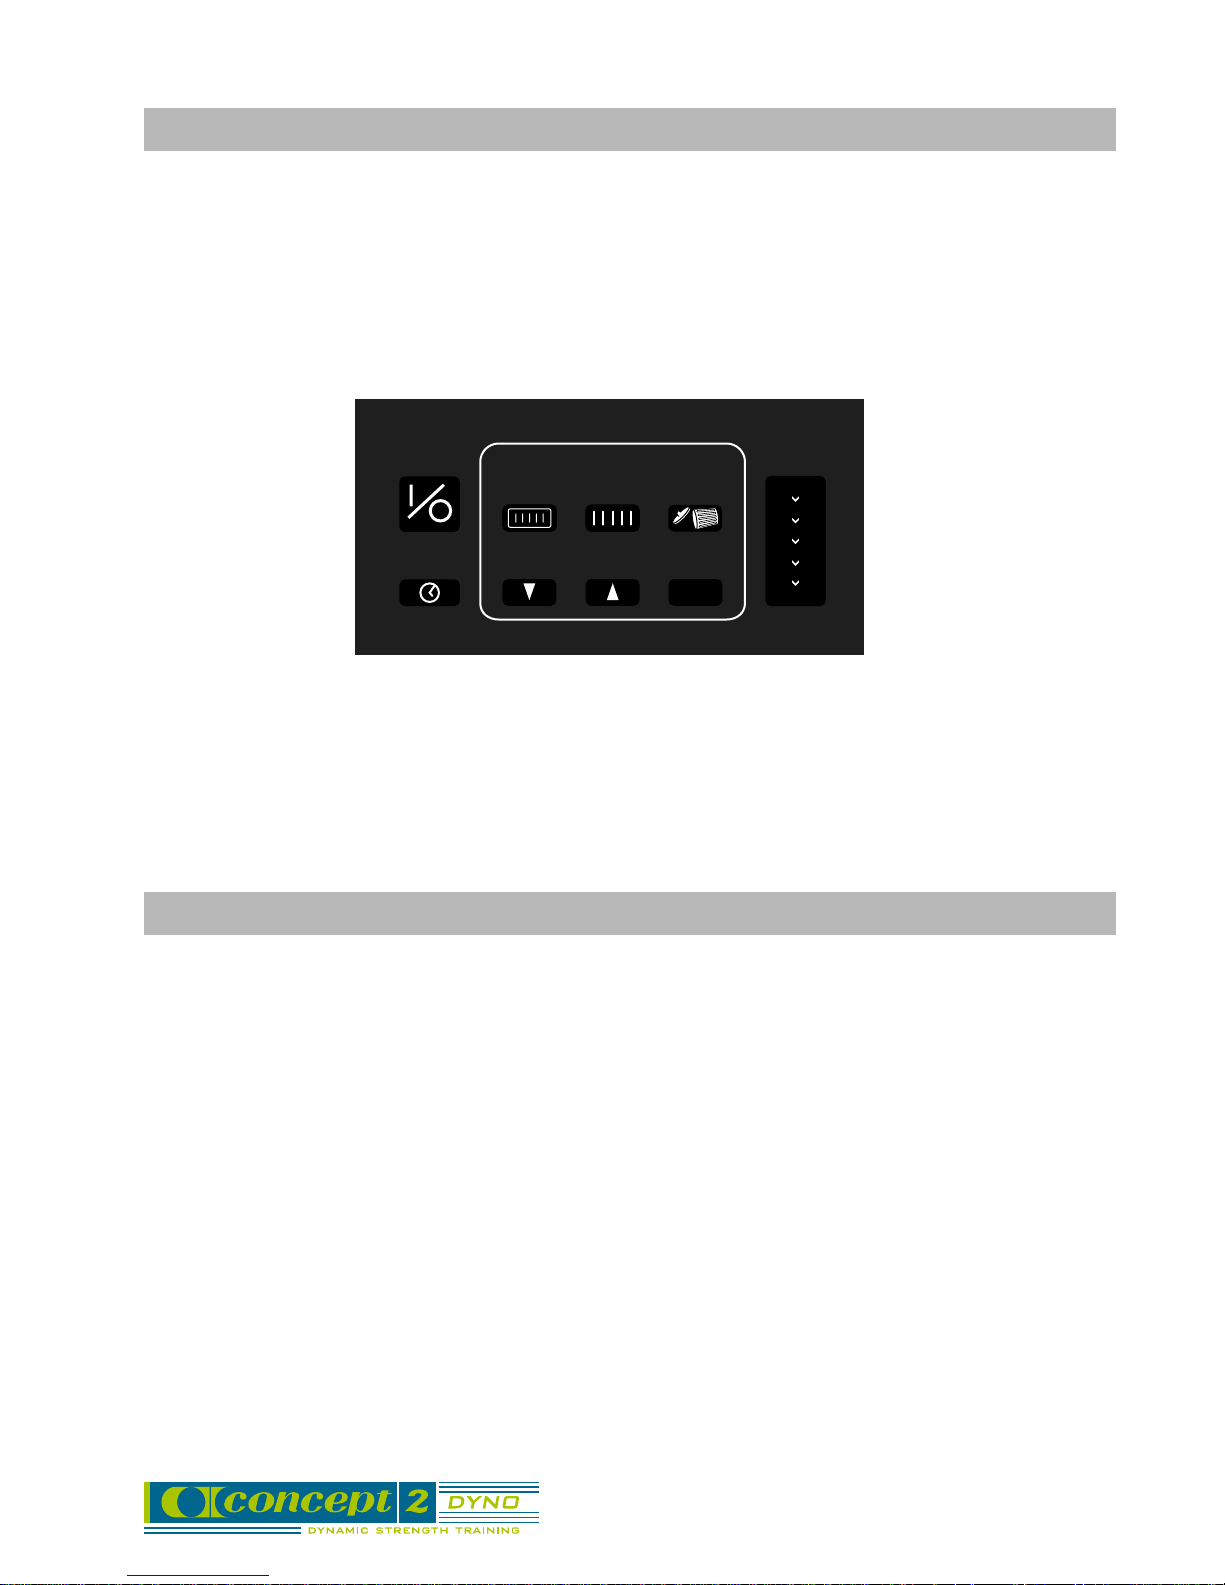
Advanced Operation
Button Functions
ON/ OFF - turns Force
Monitor on or off; resets
monitor after using
recall or other second
level functions.
TIMER - turns on and
off the set/rest timer,
in the top left display.
SETS - puts the
monitor into recall
mode and displays
the set summary
data for the last set
done.
ON/OFF DISPLAY
▲▲
TIMER
DOWN - moves
backward
through reps or
sets when in
recall mode.
REPS - puts
the monitor
into recall
mode and
displays the
data for the last
rep of the last
set done.
RECALL
SETS
DOWN UP
REPS
CLEAR
CLOSE
OK
▲▲
UP - moves
forward
through reps
or sets when
in recall
mode.
▲
OK - allows you to
get out of
memory mode
without clearing
data. Also used in
button second
functions.
CLEAR removes all data
from memory if
pressed while in
Recall mode,
and returns the
monitor to a
reset/on state.
▲▲▲
MAX
WATTS
WORK
VEL
LOAD
HR
DISPLAY - changes the
information in the lower left
▲
display. You can choose
between watts, work, load,
velocity, and heart rate for
the units to be displayed for
the current rep (not the max
rep).
When you are in recall
mode, the DISPLAY button
will allow you to review a
past workout in all the
available display options (for
the set summary screens
only). No secondary
outputs will be saved for the
individual rep recall.
Recall Mode
Features
• RECALL enables you to save up to 19 set summary screens and over 300 rep screens.
• When either limit is reached, the oldest data will be dropped first.
• Workout data is stored as reps within sets. Example: set 1 (rep 1, rep 2,...) set 2 (rep 1,
rep 2,...)
• After the CLEAR button is pressed, the first set completed will be set 1.
• The memory will save all sets and reps during power down, but will be automatically
cleared before rep 1 of the first set after a full power-down. (A full power-down occurs
when the dash in lower right hand display completely disappears).
• The first set to be recalled will be the most recently completed set.
NOTE: If a new user starts to work out, their sets will just be added to memory. i.e. their first set
may be set 17 if they have not cleared memory.
7
Page 8

Using the memory buttons:
• Upon completion of the last rep, the “results screen” will be displayed. At this point the monitor is not in the memory mode.
• If the user presses the SETS or the REPS button while in the “results screen” (or in an “ON”
state activated by pressing the ON button) the monitor goes into recall mode.
• If the recall mode is entered by pressing SETS, the first screen is the set summary screen for
the most recent set. This set summary screen is similar to the result screen except the rest
time is replaced by the set time and the DOWN/UP (▼ / ▲) buttons will scroll you through the
set numbers.
• If the recall mode is entered by pressing REPS, the rep recall screen for the last rep of the last
set will show. The rep enunciator should flash to show that you have selected reps and the
DOWN/UP (▼ / ▲) buttons will move through the reps. The rep recall screen shows the rep #,
the force, and the set #.
• At any time during review of reps, if the SETS button is pressed, the set summary screen will
appear for the current set being viewed and the DOWN/UP (▼ / ▲) buttons will move through
the set summary screens.
• At any time during the review of the set summary screens if the REPS button is pressed, the
rep recall screen for the last rep of that set will show. The rep enunciator should flash to show
that you have selected reps and the DOWN/UP (▼ / ▲) buttons will move through the reps.
Getting out of memory mode
• Pressing CLEAR will remove all data from memory and return the monitor to a reset / on state.
• If the user wants to get out of memory without clearing the data, press the OK (close) button.
Remember that if the monitor powers down, it will automatically clear memory before rep 1 of
the first set after power-up.
Second Function of Buttons
OK + UP - toggles between LBS and KG for the units in the central display. It can be done at any
time, i.e. in the middle of a set or while recalling from memory. The monitor should power up in the
units that were last selected.
OK + REPS - Lets you view the resettable rep counter. Pressing CLEAR while viewing resettable
reps will zero the counter.
OK + SETS - Lets you view your total work in thousands of newton-meters. Pressing CLEAR while
viewing resettable total work will reset work to zero.
OK + DOWN - lets you view the non-resettable rep counter displayed in thousands of reps.
8
Page 9
GETTING STARTED
Your first workout should focus on getting accustomed to the motions of the three basic “lifts.”
learning about the operation of the Force Monitor as described on pages 4-7, and determining the
settings that are most comfortable for you. If you have been doing regular weight training workouts,
you may feel comfortable pushing harder during your first
doing any weight training, start easily and give yourself a few workouts to build up to full effort.
Terminology
• Rep - short for repetition. Each press or pull that you
do is one rep.
• Set - a group of reps is called a set.
• Compression - the amount of bend in your knees when
you start the leg press. The lower the number on the
compression scale the greater your leg compression.
“Lift” Positions and Recommended Settings:
We recommend that you start with the following settings:
DYNO
workout. If you have not been
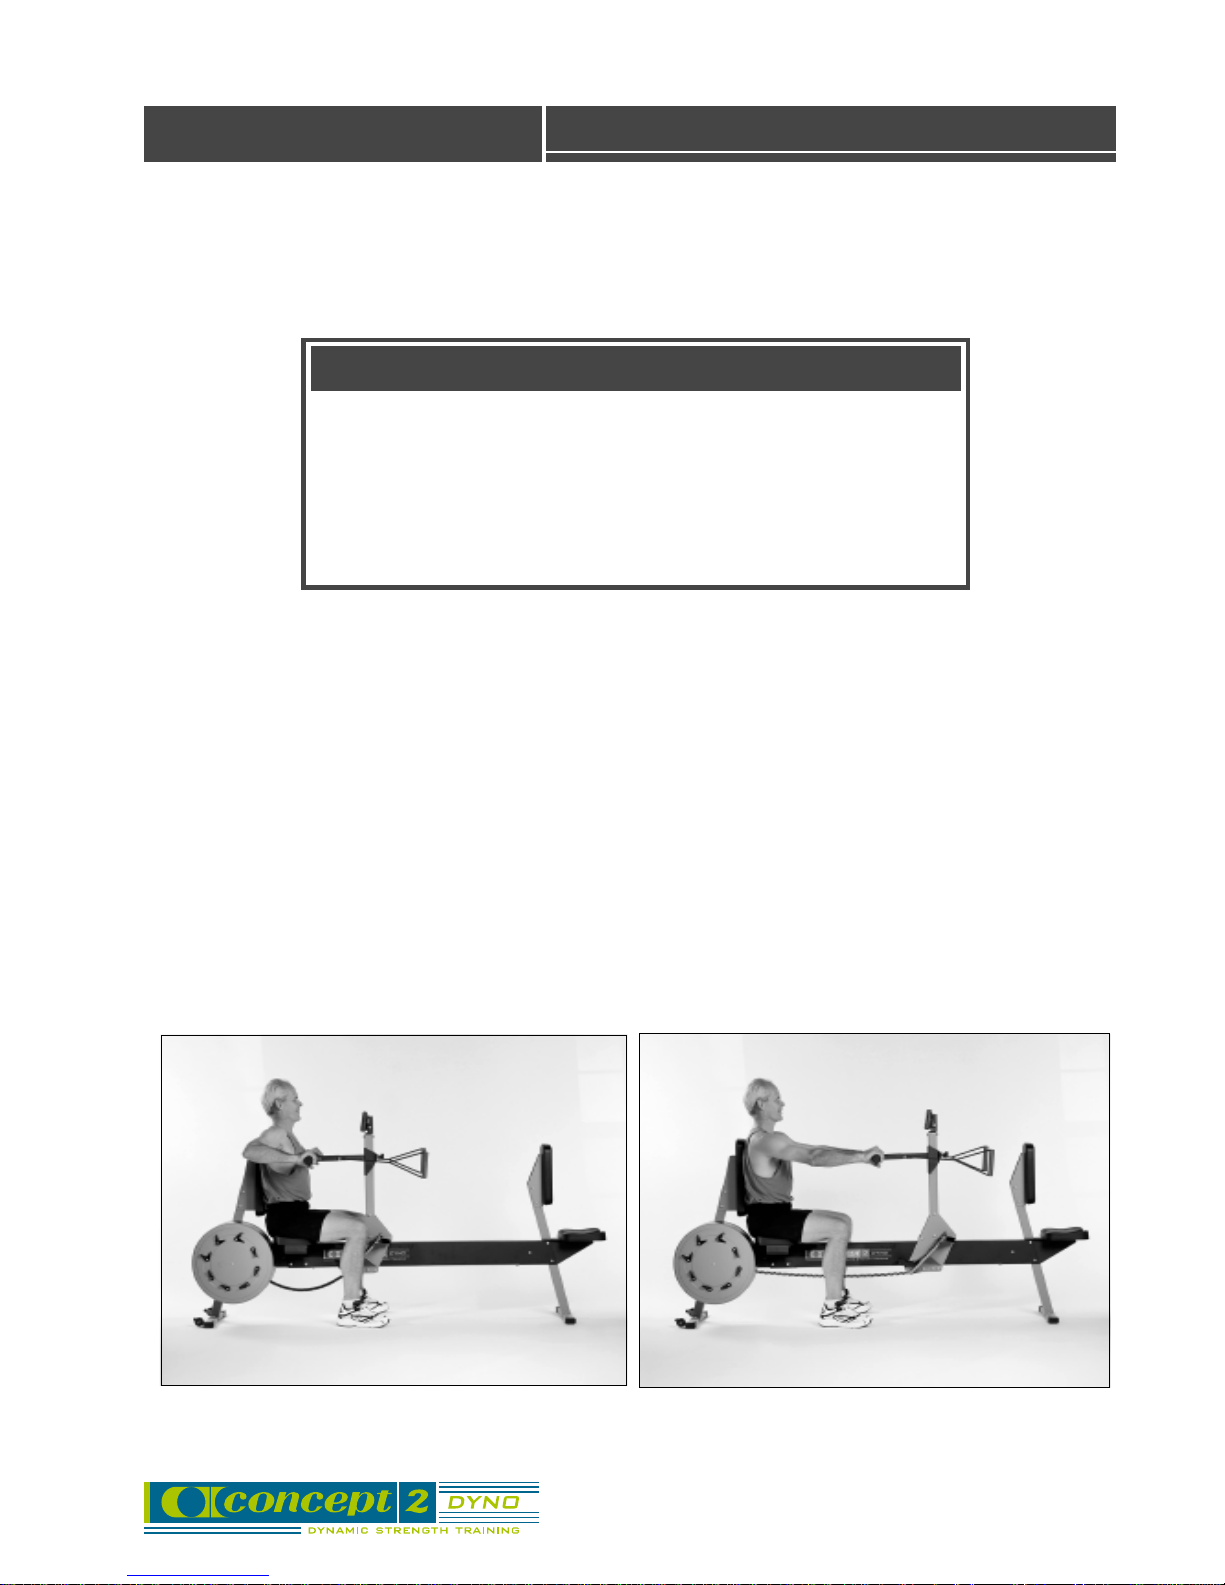
1) Seated Bench Press
a) Handle height: Loosen the knob that holds the handles on the vertical post. Set the bar
height so that the handles are about three inches below your shoulders. Tighten the knob.
b) Damper levers: Start in the range of 1-2 dampers open.
c) Compression: Let the bar return until it just touches your chest.
d) Start position: Start with the handles close to your body and press them straight away from
your chest until your arms are straight.
Start Finish
9
Page 10
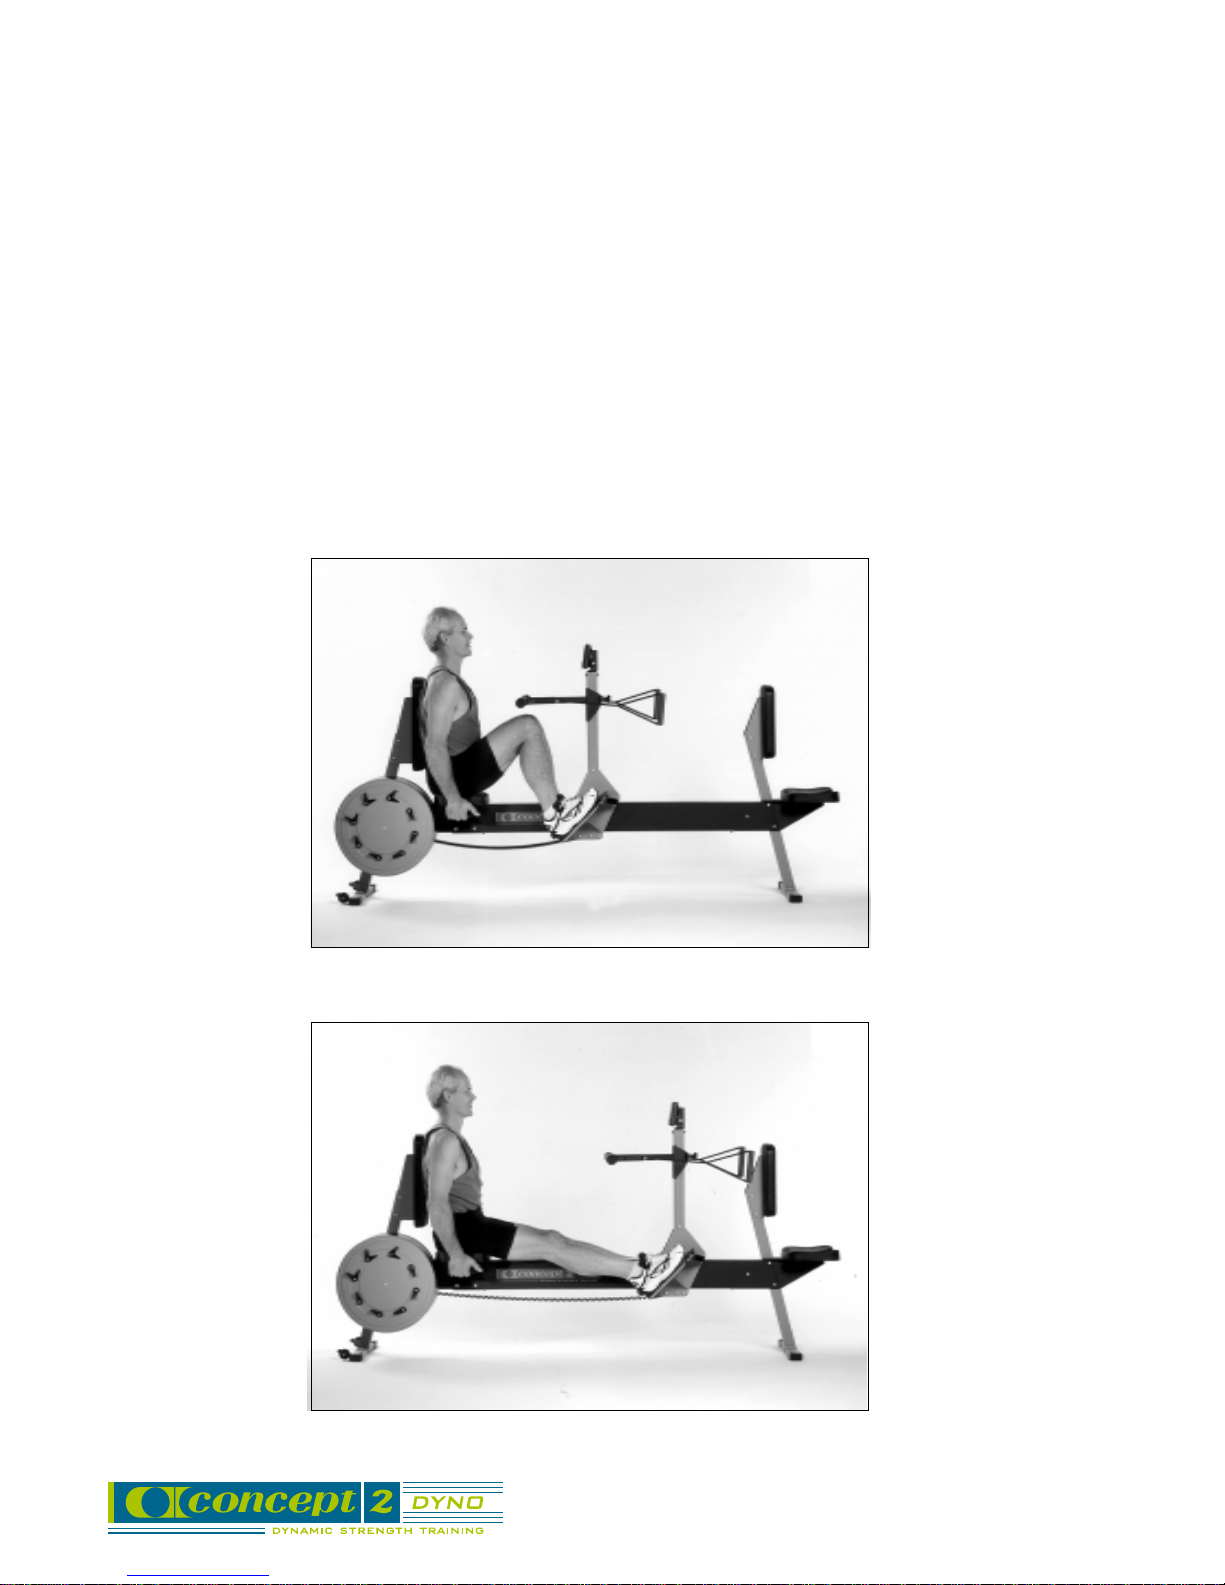
2) Leg Press
a) Set the handle high enough to be out of the way of your knees.
b) Foot height: Adjust the Flexfoot so that the ball of your foot rests on the flat stationary
section of the Flexfoot.
c) Damper levers: Start in the range of 2-4 dampers open.
d) There is a pair of handles under the seat to hold on to during the leg press.
e) Watch to see what compression reading you naturally achieve. Most people should aim for a
compression of between 6 and 12. Those with shorter legs should aim for smaller compression numbers; those with longer legs should aim for larger numbers. Your force reading will
vary greatly at different compression starting points. This is because more compression
puts your body into a “weaker” position. The smaller force applied at this weaker position
will be averaged into the reading for that rep, thus giving a lower value.
f) Start position: Start the press with your legs comfortably compressed and extend them until
they are just straight, but not hyper-extended.
Start
Finish
10
Page 11
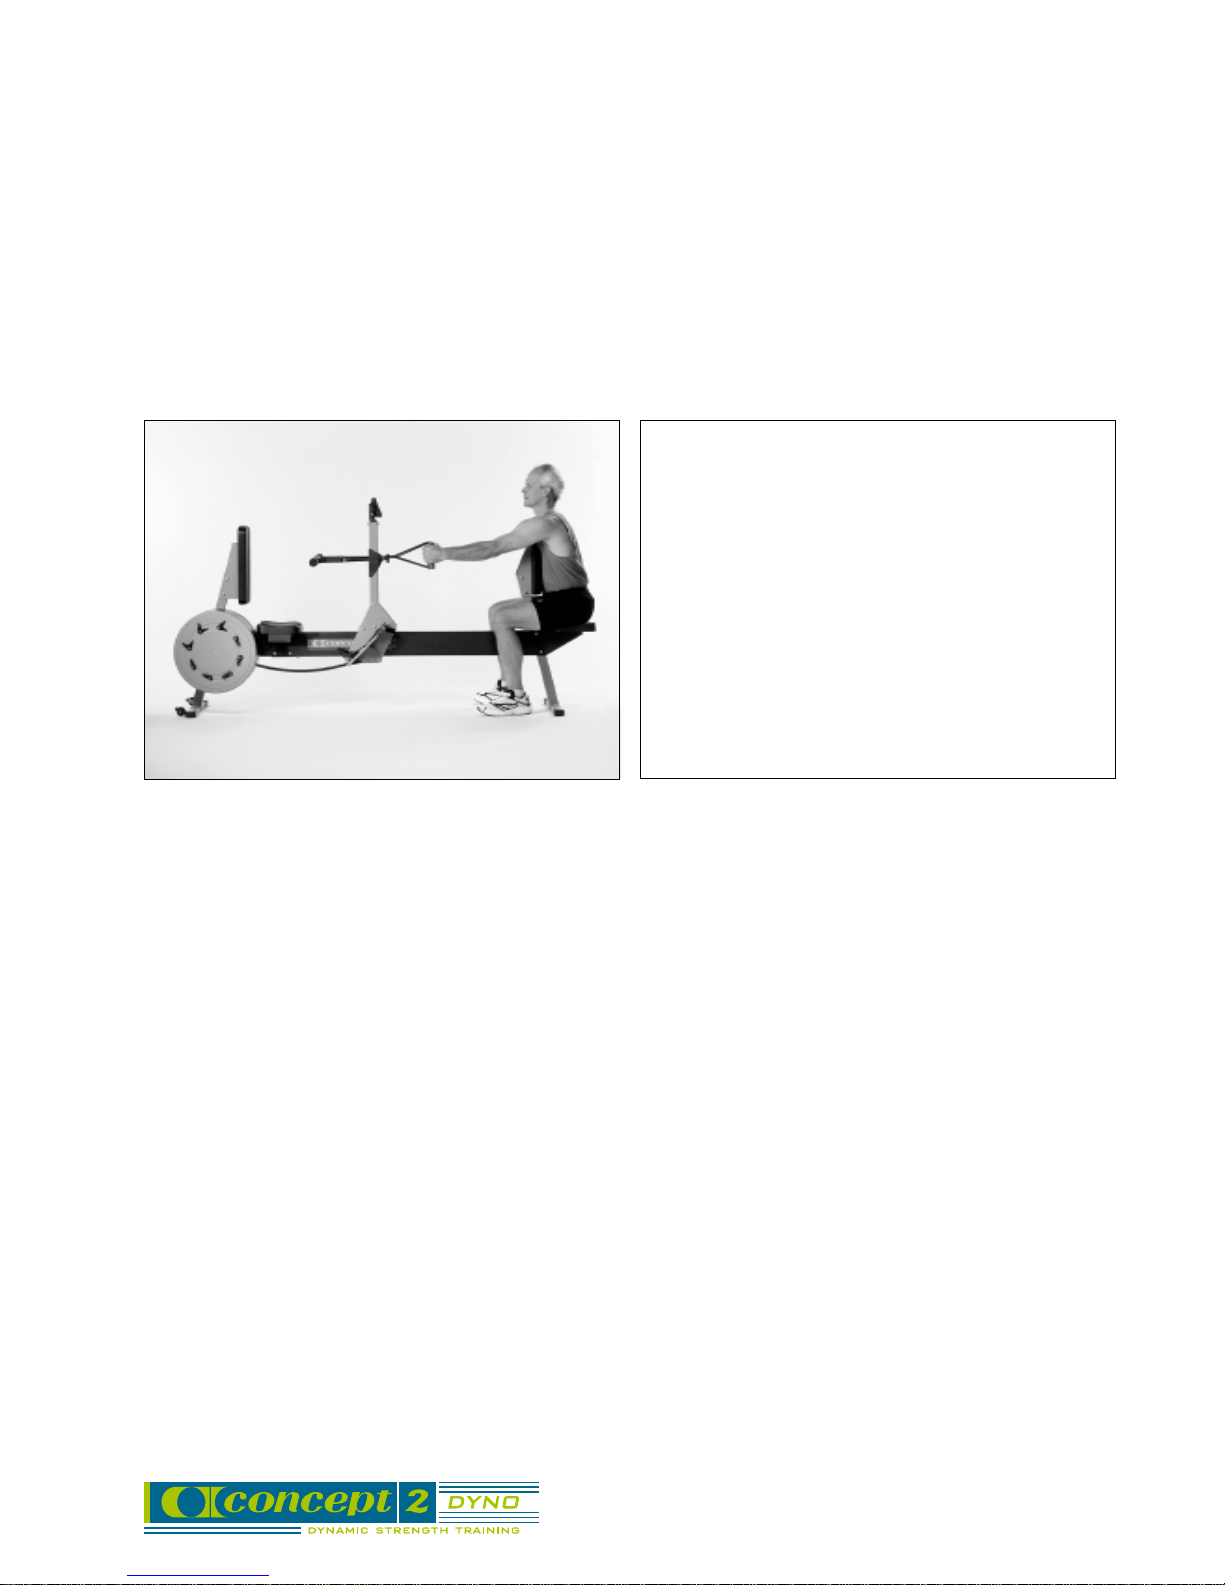
3) Seated Bench Pull
a) Handle height: Loosen the knob that holds the handles on the vertical post. Set the bar
height so that the handles are about five inches below your bench press setting. Tighten
the knob.
b) Damper levers: Start in the range of 1-2 dampers open.
c) Sit with your knees far enough apart to allow the carriage to travel all the way to the chest
support.
d) Start position: Start the pull with arms fully extended.
e) Finish position: The pull is complete when you have pulled the handles all the way to your
body or just past the seat back.
Start
Finish
Your First Session:
• Be sure to do 5-10 minutes of cardiovascular activity as a warm-up.
• Stretch.
• Order of “Lifts”: Start with one of the upper body “lifts” (Seated Bench Press or Seated Bench
Pull), then do the Leg Press, and finish with the remaining upper body lift.
• Protocol: A typical protocol for general strength improvement is three sets of eight reps. (In
other words: 8 reps, rest, 8 reps, rest, 8 reps.) If this feels like too much, just do one or two
sets. If you are accustomed to another protocol from standard weight lifting, you may wish to
apply it to the
DYNO
as well.
• Work gently at first, applying only as much pressure as is comfortable. Remember, the harder
you push, the harder it will feel. Watch the monitor and get used to how it feels at different
force numbers.
• Watch your compression on the Leg Press to see what amount of compression is natural and
comfortable for you. Record this in your log.
• Use your first session to get comfortable. If you feel that a “lift” would be more comfortable if
you adjusted your settings, go ahead and change them. When you are comfortable, record all
settings so you can duplicate them for your next
DYNO
session.
By the end of the first workout, you should have established your settings and compression targets. For subsequent workouts, it will be important to keep these variables consistent in order to
be able to accurately monitor your progress. You will also have an idea of how much force you can
apply and what the set average means.
11
Page 12
TRAINING Dampers, Speed, Force & Training
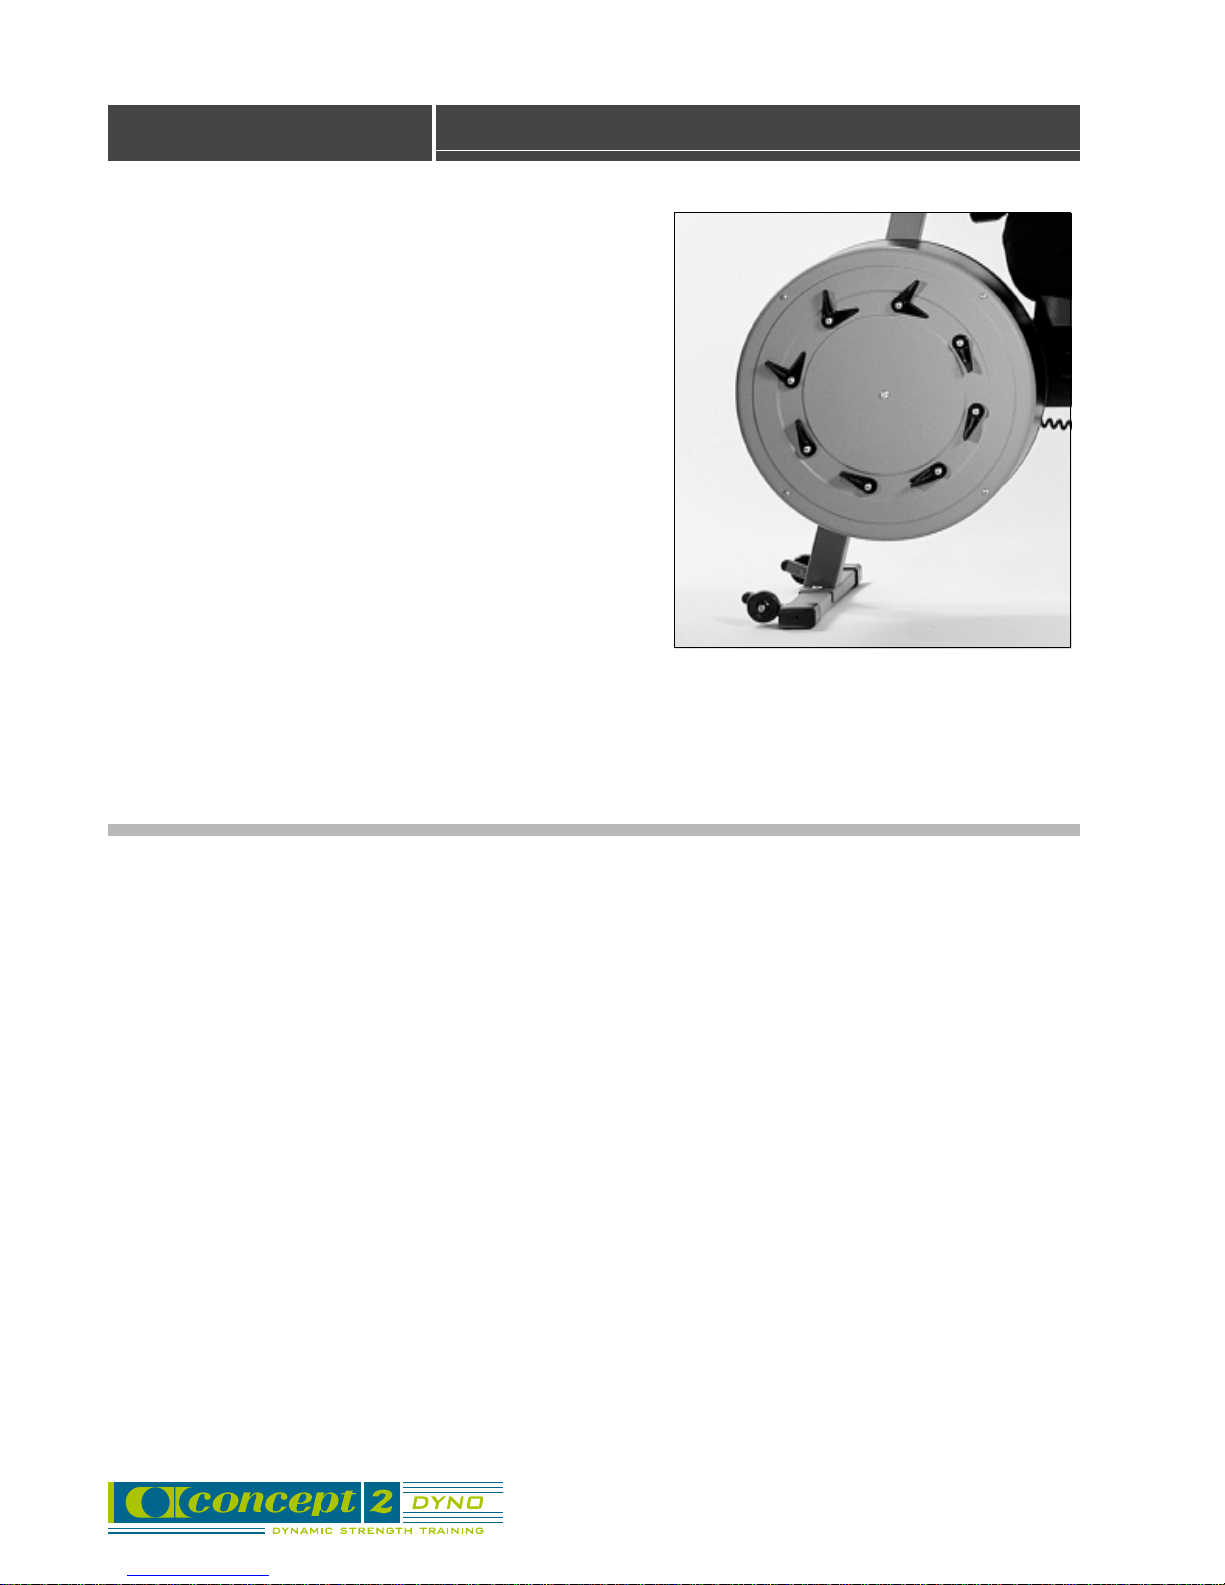
The damper levers affect the air flow to the fan, which
in turn determines how fast the
move when a given force is applied.
• When more dampers are open, you will tend to
achieve a higher force but at a slower speed of
movement.
• When fewer dampers are open, you will tend to
achieve a lower force but at a faster speed of
movement.
There is a relationship between the speed of an
athlete’s movement and their ability to generate force
through muscular function. The slower the speed of
movement, the greater the force that can be generated
(up to a point). Generally, to improve strength, you need
to train at a slower speed than you would normally use
in your sport so that you can apply a higher force to
challenge your muscles and cause an improvement in your strength.
DYNO
carriage will
Three dampers open.
Based on this premise, we have listed
some possible training strategies below:
Strategy #1: Building Maximum Strength
The goal of this strategy is to exert the maximum force you can each repetition for a small number
of repetitions. You are continually trying to achieve a new personal record (PR). Experiment with the
dampers so that you are working with the smallest number of open dampers that still allows you to
achieve your maximum force reading. This keeps you from straining at too slow a speed of movement, while still enabling you to work at maximum force.
# of open dampers: minimum that lets you achieve maximum force.
# of reps: 8 or fewer.
Go for max force each rep.
Do 2 - 3 sets of the number of reps chosen.
Strategy #2: Improving Ability to Apply High Force at Faster Speed
After you have achieved adequate maximum strength (or concurrently if you wish) you can work
toward improving your ability to deliver your force at faster speeds of movement. Decrease the
number of open dampers by 2 or more, and work on building your ability to achieve high force
readings despite the faster speed.
# of open dampers: 2 or more fewer than in Strategy #1.
# of reps: 12 or fewer.
Go for max force each rep.
Do 2 - 3 sets of the number of reps chosen.
12
Page 13

Strategy #3: Improving Muscular Endurance
The goal here is to improve your ability to do many reps of an exercise, still at a higher force and
slower speed than would normally be used in your sport.
# of open dampers: the same or fewer than in Strategy #2.
# of reps: 20 or more.
Go for best average force.
Suggested Workout Frequency: One to three times per week. If you are lifting three
times per week and you find that you are reaching a plateau in your progress, try dropping one
session. If you are lifting just once per week and are not seeing progress, try adding a second
session.
Note on Making Damper Changes: The Force Monitor is self-calibrating so that it is
accurate regardless of damper settings. The built-in warm-up reps allow the monitor to adjust for
any damper changes before the set begins. For this reason, it is important that damper
changes be made before the warm-up cycle of a set.
Strategy #4: Improving Anaerobic Threshold
Both aerobic and anaerobic capacities begin to decline as early as age 30 and VO2 max decreases
about 1% per year after the age of 50. Anaerobic capacity deteriorates three times as fast. To
stimulate the anearobic energy systems, try to perform the following workouts once or twice a
week.
#1 DYNO Leg Press: Press as many reps with as high a power output as possible in 30
seconds followed by a two-minute recovery period.
#2 DYNO Arm Pull and Push: Same as above.
Note: Because the anaerobic energy systems are maximized at 40-60 seconds and because you
need sufficient time to clear and metabolize the lactate produced, all of these workouts will offer an
effective challenge to the anaerobic energy system.
13
Page 14

“Lift” Variations
Leg Press variations:
• You can set the height of your feet.
• You can increase or decrease the amount of leg compression.
• You can change the number of open dampers to alter the speed at which your force
is applied.
Seated Bench Press variations:
• You can set the height of the bar.
• You can use a wide hand grip, or grip the bar with hands closer together.
• You can grasp the bar with palms down or palms up.
• You can change the number of open dampers to alter the speed at which your force
is applied.
Seated Bench Pull variations:
• You can set the height of the handles.
• You can rotate the handles to allow you to pull palms facing down, up, or inward.
• You can change the number of open dampers to alter the speed at which your force
is applied.
IMPORTANT: Because of the many variations possible, it is extremely important that you main-
tain consistency in your settings if you wish to monitor your results. For example, a decrease in leg
compression on the Leg Press will always result in higher scores. Therefore, if you want to be able
to measure true improvement in your leg strength, you need to maintain the same degree of
compression every time you do the Leg Press. (Compression refers to the amount of bend in your
knees when you start the press. The lower the number on the compression scale the greater your
leg compression.)
It is also important to keep consistency in your lifting protocol. For optimal comparability, you
should choose a protocol and stick with it, until you consciously decide to make a change. For
example, a common protocol for strength improvement is three sets of eight repetitions.
Log pages are provided on pages 16 and 17 in this manual which will prompt you to record the
important variables to ensure that you are being consistent with your lifts.
14
Page 15

Logging Your Results
Starting with your second
you to monitor your progress over time. Log sheets are provided in this booklet. You may make as
many copies as wish.
DYNO
workout, you should log all your workout results. This will enable
Workout Logging:
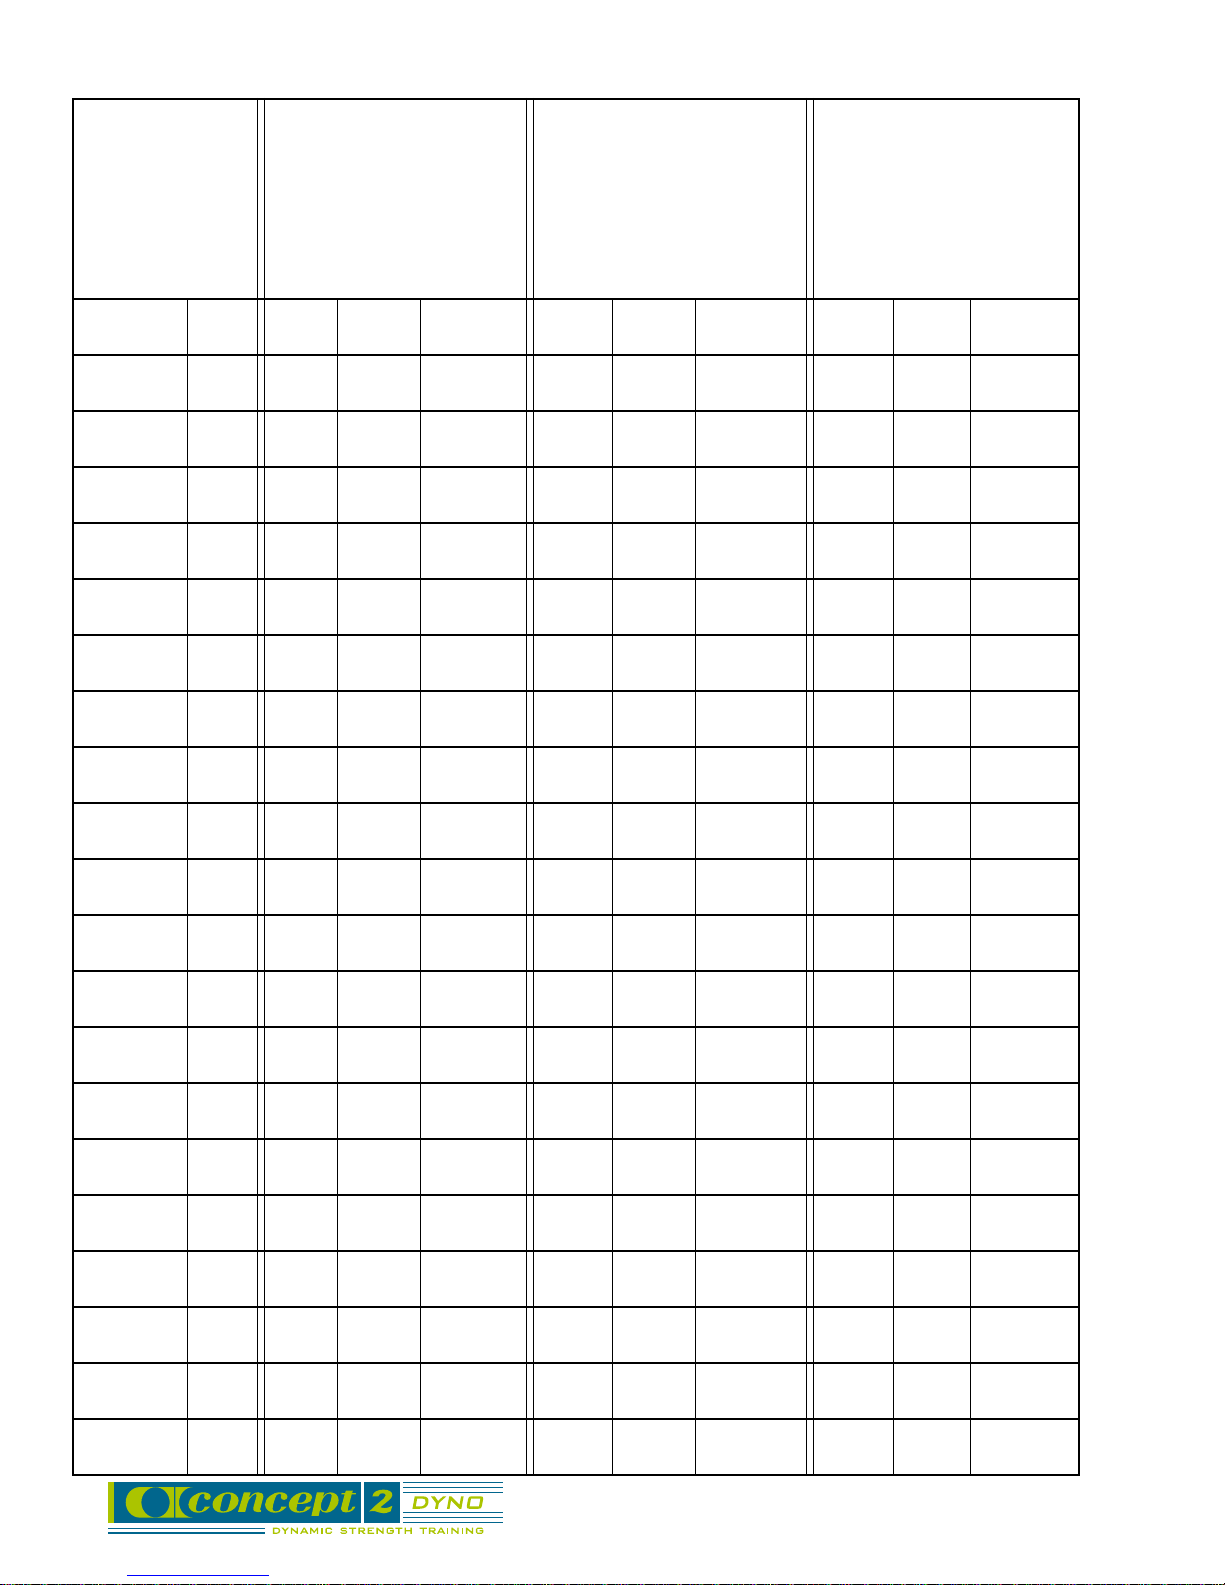
The log sheets are designed to help you maintain consistency in your
sample log sheets on pages 16 and 17 of this manual. Specifically, you should record and keep
consistent the following variables:
• Number of open dampers.
• Height setting of the handle bar.
• Degree of compression.
• Orientation of hand grip (up, down, wide, narrow).
• Number of reps per set.
• Number of sets per session.
In order to be able to compare your results from one workout to the next, you must keep all these
variables the same.
If you decide to increase the number of open dampers as your strength increases, be sure to
record it, and be aware that your results will not be directly comparable to those at the lower
number of open dampers.
DYNO
variables. See the
If you do variations of a basic movement, you should record these results as separate “lifts.”
For example: If you do bench press both with a wide grip and a narrow grip, these would be recorded separately as you will get two different sets of results.
Longitudinal Analysis:
We have also provided you with a graphing log sheet
format for logging your progress over time. See page 17.
1. Use one sheet for each “lift.”
2. Take your best set for each day and write the
max and average values at the bottom of the
chart as shown on sample graph at right.
3. Plot your first points about one-third of the way
up the graph as shown on this sample graph.
4. Once you plot your first points, you can write in
the scale along the vertical axis, using each
square to represent five pounds.
5. If you improve so much that you move off the
chart, start again on another sheet.
160 lbs.
150 lbs.
140 lbs.
Date
Max
Ave
—
✳
—
✳
—
✳
7/12
152
143
Sample
—
✳
7/15
156
147 148
7/20
157
15
Page 16
NAME: Leg Press Specs Arm Press Specs Arm Pull Specs
reps per set_____________ reps per set _____________ reps per set ____________
_________________ # of open dampers_________ # of open dampers _________ # of open dampers ________
_________________ compress to rail #__________ vertical height setting_______ vertical height setting______
other: other: other:
DATE SET# MAX AVE COMMENTS MAX AVE COMMENTS MAX AVE COMMENTS
16
Page 17

:
Lift
Longitudinal Analysis Graph
200 lbs.
X
A
M
&
A
V
E
R
A
17
G
E
–
150 lbs.
✱
Key: – MAX ✱ Avg Note: each square equals 5 lbs.
Date
Max
Ave
I
L
F
T
Page 18
CARE & MAINTENANCE
The
DYNO
procedures be performed regularly to prolong the life of the machine.
requires minimal care and maintenance, but we do recommend that the following
• Clean the monorail at least weekly - use a cloth or paper towel with water or a
household spray cleaner to wipe sweat and dirt off the rail.
• Oil chain several times per year or more frequently as needed. Use the chain oil
provided. Apply oil to a paper towel and run it over the chain as someone gently
uses the machine to move the chain for you.
• Oil the threads of the handle tightening knob when you oil the chain, or more fre-
quently as needed.
• Check all nuts and bolts for tightness monthly.
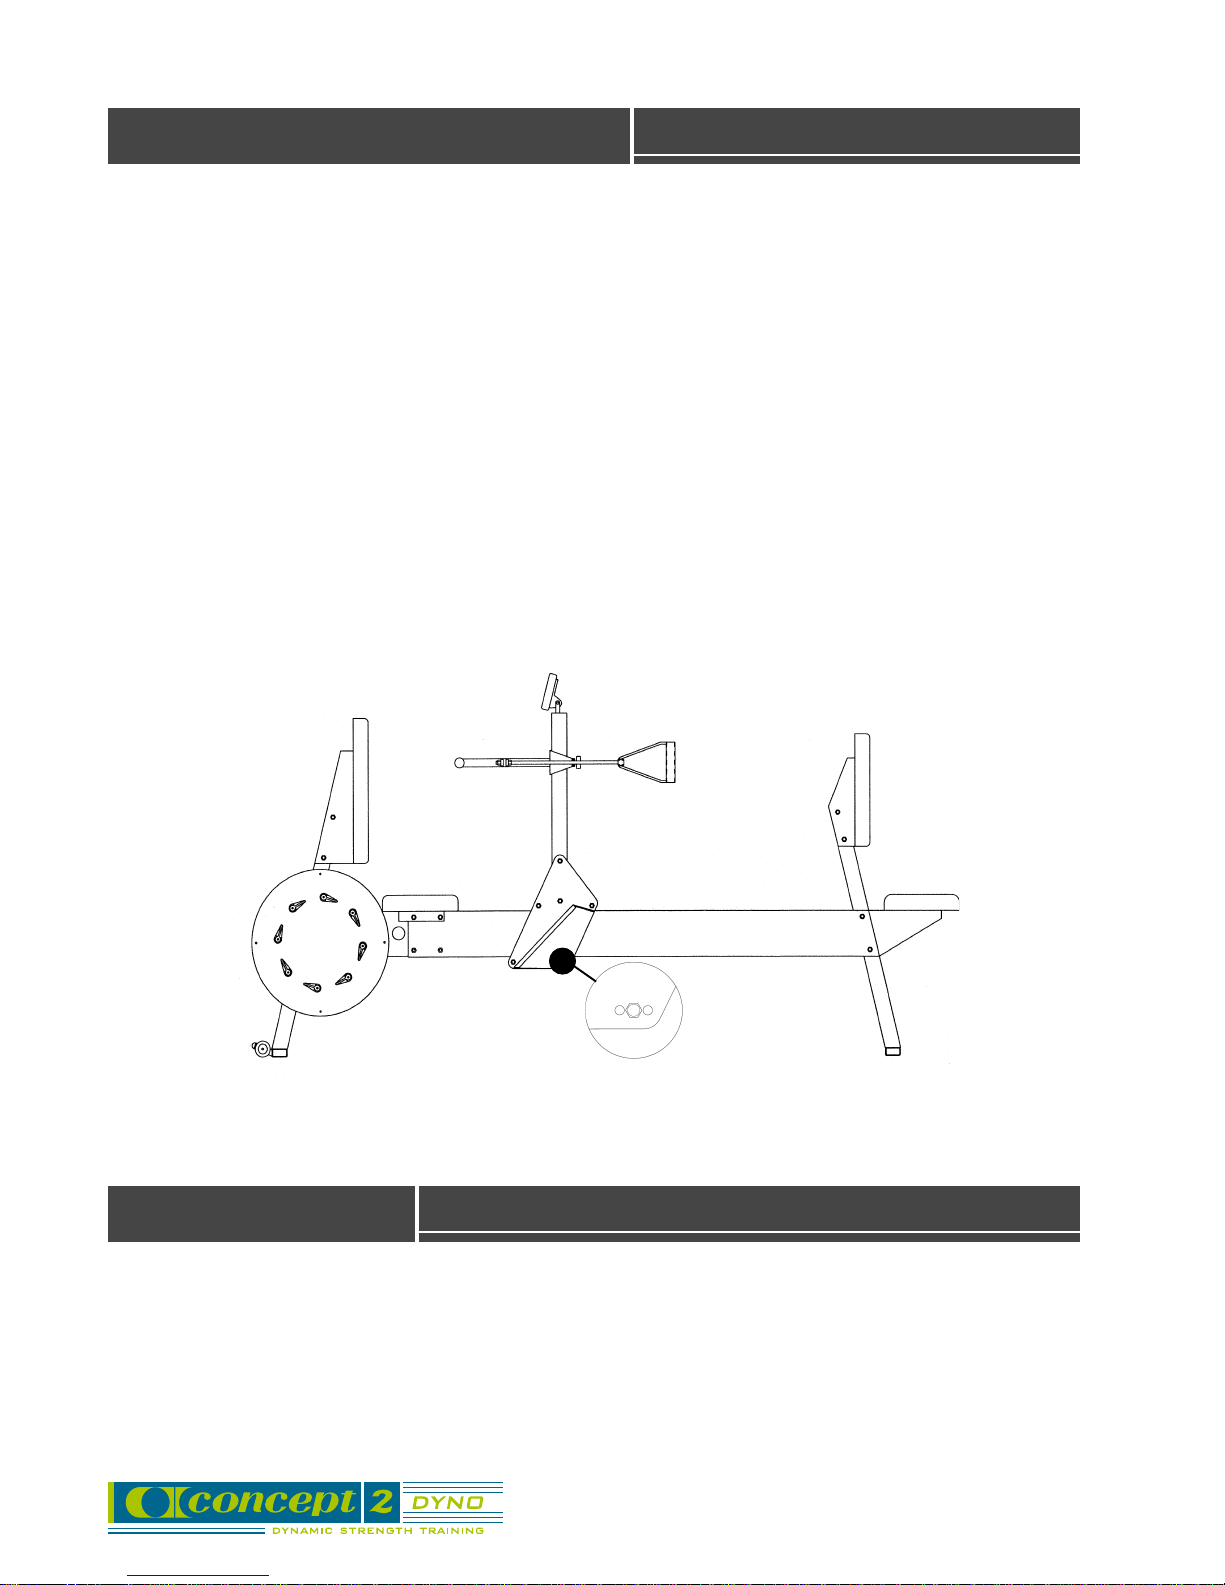
• Damper lever tension can be adjusted by tightening or loosening the screw at the
pivot point of the lever. A fraction of a turn on the screw will make a significant
change in tension.
WARRANTY
Five years on metal frame parts, and two years on all other parts.
Loosen
Adjust tightness of the rolling
carriage by moving this roller.
18
➛
➛
Tighten
Page 19

DYNO Quick Reference Guide
• Warm up with at least five minutes of continuous exercise before performing high force
repetitions.
caution
caution
• Monitor will automatically begin a new set when the carriage is activated. The first three
reps are not recorded and serve as extra warm-up and allow the monitor to adjust for any
damper changes.
• Eight damper levers control the load that you feel at a given speed of movement. NOTE:
Damper levers should not be changed once a set has been started.
• The set will end automatically if ten seconds has passed since the beginning of the last
rep.
• When a set has ended, the set summary data will be displayed.
• Set summary data and individual rep data may be recalled using the RECALL buttons.
The memory can be emptied with the CLEAR button. The OK button exits recall mode
without clearing memory. The memory will also clear automatically just before the first
rep of the first set after a power down.
• Keep feet apart for seated bench press and seated bench pull so carriage
does not hit your legs.
• Keep other people away from moving carriage when in use.
• In order to be able to compare your results from one workout to the next, you should
record and keep consistent the following variables: number of open dampers, height
setting of the handle bar, degree of compression, orientation of hand grip (up, down,
wide, narrow), number of reps per set, and number of sets per session. The set max and
average are only comparable if the variables are held constant.
• The TIMER button turns on or off the SET/REST button in the upper left display.
• The DISPLAY button cycles between five options for the data shown in the bottom left
display.
warning
• IMPORTANT SAFETY NOTE: Do not attempt to lift a free weight
of the same amount that you can push on the
limited by your “weak point” of the motion. Therefore, the
reading may be greater than the amount of free weight you can lift.
19
DYNO
. The
DYNO
DYNO
lift is not
force
Page 20

MORRISVILLE, VERMONT USA 05661 EMAIL:[email protected] WEB:WWW.CONCEPT2.COM
 Loading...