

Page 1
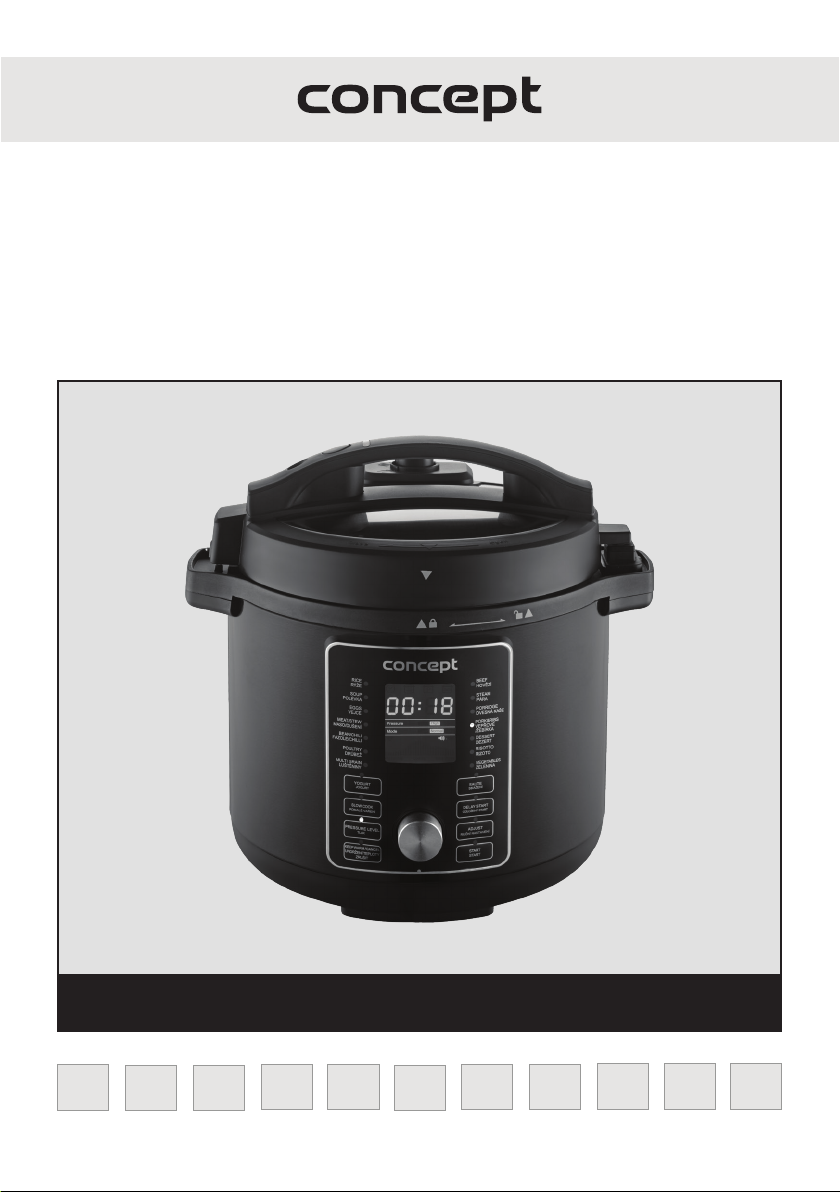
Multifunkční tlakový hrnec 2v1 s Air fry poklicí
Multifunkčný tlakový hrniec s pokrievkou Air fry
Wielofunkcyjny szybkowar z pokrywą Air fry
Multifunkcionális nyomástartó edény Air fry fedővel
Daudzfunkcionāls spiediena katls ar Air fry vāku
Multifunction pressure cooker with Air fry lid
Multifunktionaler Druckkochtopf mit Airfry-Deckel
Cuiseur à pression multifonctionnel avec cou-
vercle Air fry
Pentola a pressione multifunzionale con coper-
chio Air fry
Olla a presión multifuncional con tapa Air fry
Oală sub presiune multifuncțională cu capac
Air fry
CZ
CK8000
HU LV DE FR
ENSK PL
IT ES
RO
Page 2
CZ
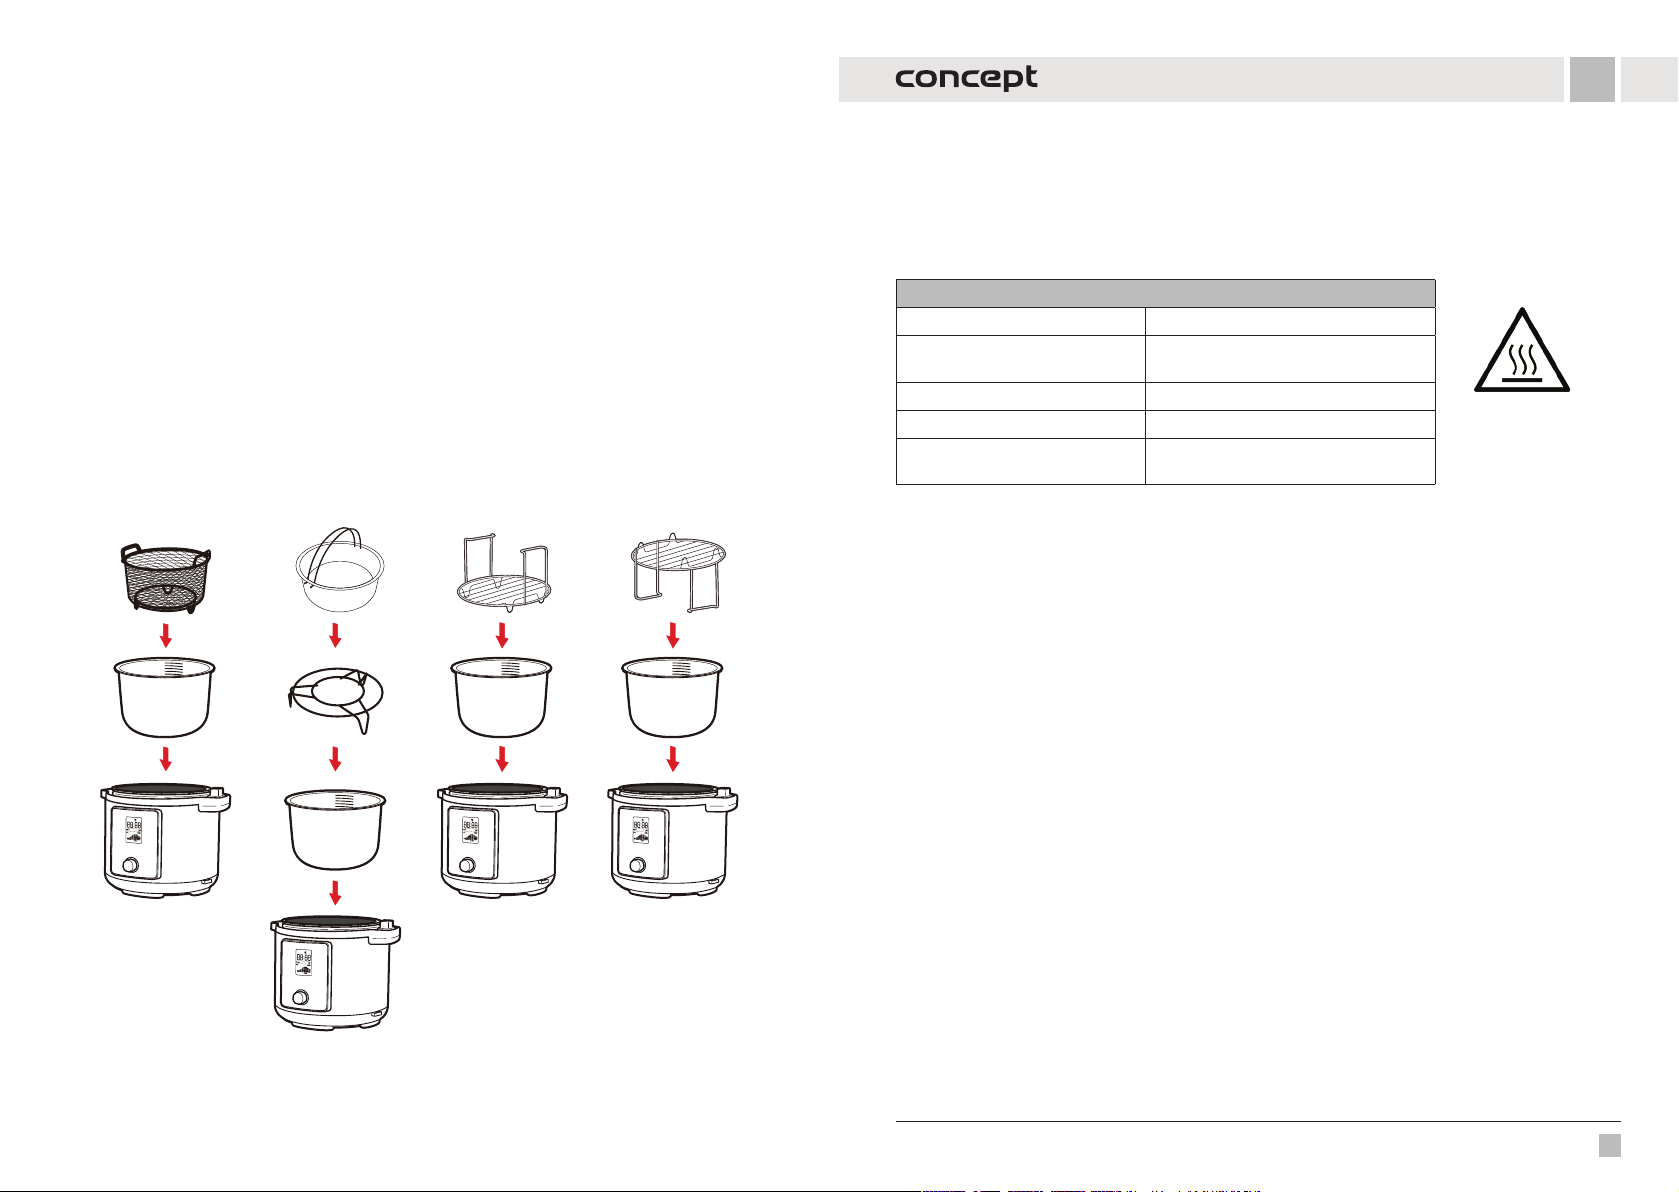
SESTAVENÍ PRODUKTU S PŘÍSLUŠENSTVÍM
MONTÁŽ PRODUKTU S PRÍSLUŠENSTVOM
MONTAŻ PRODUKTU Z AKCESORIAMI
TERMÉK ÖSSZESZERELÉSE TARTOZÉKOKKAL
PRODUKTA MONTĀŽA AR PIEDERUMIEM
PRODUCT ASSEMBLY WITH ACCESSORIES
PRODUKTMONTAGE MIT ZUBEHÖR
ASSEMBLAGE DU PRODUIT AVEC LES ACCESSOIRES
ASSEMBLAGGIO DEL PRODOTTO CON ACCESSORI
MONTAJE DEL PRODUCTO CON ACCESORIOS
ASAMBLAREA PRODUSULUI CU ACCESORII
PODĚKOVÁNÍ
Děkujeme Vám, že jste si zakoupili výrobek značky Concept a přejeme Vám, abyste byli s naším výrobkem spokojeni
po celou dobu jeho používání.
Před prvním použitím prostudujte pozorně celý návod k obsluze a potom si jej uschovejte. Zajistěte, aby i ostatní
osoby, které budou s výrobkem manipulovat, byly seznámeny s tímto návodem.
Technické parametry
Napětí 220-240 V~50-60 Hz
Příkon
Kapacita nádoby 5,6 l
Nastavitelná teplota fritéza: vaření 80-200 °C, sušení 40-90 °C
Časovač
DŮLEŽITÉ
Před připojením do elektrické sítě zajistěte vizuální kontrolu, zda je jednotka neporušená a během přepravy nedošlo
kžádnému poškození.
1000 W multifunkční hrnec
1500 W horkovzdušná fritéza
Pozor!
Horký povrch
hrnec: 1 min - 24 hod
fritéza: vaření 1 - 60 min, sušení 1 - 12 hod
DŮLEŽITÁ BEZPEČNOSTNÍ UPOZORNĚNÍ
• Nepoužívejte spotřebič jinak, než je popsáno v tomto návodu.
• Před prvním použitím odstraňte ze spotřebiče všechny obaly
amarketingové materiály.
• Ověřte, zda připojované napětí odpovídá hodnotám na typovém štítku
výrobku.
• Spotřebič umístěte pouze na stabilní povrch stranou od jiných zdrojů
tepla.
• Při vypojování spotřebiče ze zásuvky elektrického napětí nikdy netahejte
za přívodní kabel, ale uchopte zástrčku a tahem ji vypojte.
• Nedovolte dětem a nesvéprávným osobám se spotřebičem manipulovat,
používejte ho mimo jejich dosahu.
• Osoby se sníženou pohybovou schopností, se sníženým smyslovým
vnímáním, s nedostatečnou duševní způsobilostí nebo osoby
neseznámené s obsluhou musí používat spotřebič jen pod dozorem
zodpovědné seznámené osoby.
• Dbejte zvýšené opatrnosti, pokud je spotřebič používán v blízkosti dětí.
• Nedovolte, aby byl spotřebič používán jako hračka.
• Nezakrývejte spotřebič.
3
Page 3
CZCZ
• Před montáží nebo demontáží spotřebiče vypojte přívodní kabel
ze zásuvky elektrického napětí.
• Před čištěním a po použití spotřebič vypněte a vypojte ze zásuvky
elektrického napětí.
• Udržujte spotřebič v čistotě, nedovolte, aby cizí tělesa pronikla do otvorů
mřížek. Mohla by způsobit vážné zranění, zkrat, poškodit spotřebič nebo
způsobit požár.
• Nepoužívejte spotřebič s poškozeným přívodním kabelem či zástrčkou,
nechte závadu neprodleně odstranit autorizovaným servisním střediskem.
• Nepoužívejte spotřebič, pokud nepracuje správně, byl-li upuštěn,
poškozen nebo namočen do kapaliny. Dejte ho přezkoušet a opravit
autorizovaným servisním střediskem.
• Spotřebič je vhodný pouze pro použití v domácnosti, není určen pro
komerční použití.
• Nepoužívejte spotřebič venku.
• Použití prodlužovacího kabelu se nedoporučuje, protože by se mohl
přehřát a způsobit nebezpečí vzniku požáru. Pokud je nezbytné
prodlužovací kabel použít, ujistěte se, že je elektrický výkon kompatibilní
se spotřebičem a zásuvka je uzemněna.
• Během provozu spotřebičem nehýbejte ani s ním netřeste.
• Do spotřebiče nevkládejte hořlavé materiály (papír, plast).
• Nesahejte na spotřebič vlhkýma nebo mokrýma rukama.
• Neponořujte přívodní kabel, zástrčku nebo spotřebič do vody
ani do jiné kapaliny. Nelijte vodu ani jiné kapaliny na elektrické
součásti a konektory.
• Neopravujte spotřebič sami. Obraťte se na autorizovaný servis.
• Tento spotřebič mohou používat děti ve věku 8 let a starší a osoby se
sníženými fyzickými či mentálními schopnostmi nebo nedostatkem
zkušeností a znalostí, pokud jsou pod dozorem nebo byly poučeny
o používání spotřebiče bezpečným způsobem a rozumí případným
nebezpečím. Čištění a údržbu prováděnou uživatelem nesmějí provádět
děti, pokud nejsou starší 8 let a pod dozorem. Děti mladší 8 let se musí
držet mimo dosah spotřebiče a jeho přívodu. Děti si se spotřebičem
nesmějí hrát.
• Nedotýkejte se horkých povrchů.
• Nenechávejte přívodní kabel volně viset přes hranu stolu nebo kuchyňskou
linku. Nenechávejte přívodní kabel dotýkat se horkých povrchů.
• Neumisťujte spotřebič do blízkosti plynového nebo elektrického hořáku.
Spotřebič neumisťujte na varnou desku. Ujistěte se, že je spotřebič
umístěn na dobře větraném místě mimo horké povrchy, hořlavé materiály
(záclony, ubrusy) a vlhké prostředí.
• UPOZORNĚNÍ: Povrchy spotřebiče mohou být velice horké. Uchopujte
spotřebič pouze za držadlo a používejte ochranné pomůcky jako je např.
kuchyňská rukavice.
• Věnujte zvýšenou pozornost, aby se do spotřebiče nedostala voda ani
jiná tekutina. Mohlo by dojít k úrazu elektrickým proudem.
• Potraviny vkládejte vždy do koše spotřebiče, aby se zabránilo jejich styku
s topným tělesem.
• Nikdy se během provozu nebo hned po vypnutí nedotýkejte vnitřních
ploch spotřebiče. Nechte spotřebič dostatečně vychladnout.
• Nezapojujte a neovládejte spotřebič s mokrýma rukama.
• Air fry poklice: Během vaření se uvolňuje horká pára přes výstupní
otvory vzduchu, udržujte vaše ruce a obličej v bezpečné vzdálenosti od
vzduchových výstupních otvorů.
• Tlaková poklice: Pozor na horkou páru a vzduch unikající z tlakového
ventilu. Nad výpusť tlakové poklice nedávejte ruce, obličej ani žádné
předměty.
• Spotřebič nepoužívejte pokud máte kardiostimulátor, naslouchátko
apod. Před použitím spotřebiče se poraďte se svým odborným lékařem.
• Nepoužívejte jiné příslušenství, než je doporučeno výrobcem.
• Nepřipojujte spotřebič k externímu časovému spínači.
• Ochrana proti přehřátí: Pokud zareagovala tepelná pojistka, spotřebič
nebude fungovat. Spotřebič vypojte ze zásuvky a před opětovným
spuštěním vyčkejte, až zcela vychladne.
• Pokud během provozu uvidíte tmavý kouř vystupující ze spotřebiče,
okamžitě jej vypněte a kontaktujte autorizovaný servis.
• Před čištěním nechte spotřebič alespoň 30 minut vychladnout.
Nedodržíte-li pokyny výrobce viz bezpečnostní upozornění, nemůže
být případná oprava uznána jako záruční.
4 5
Page 4
CZCZ
c
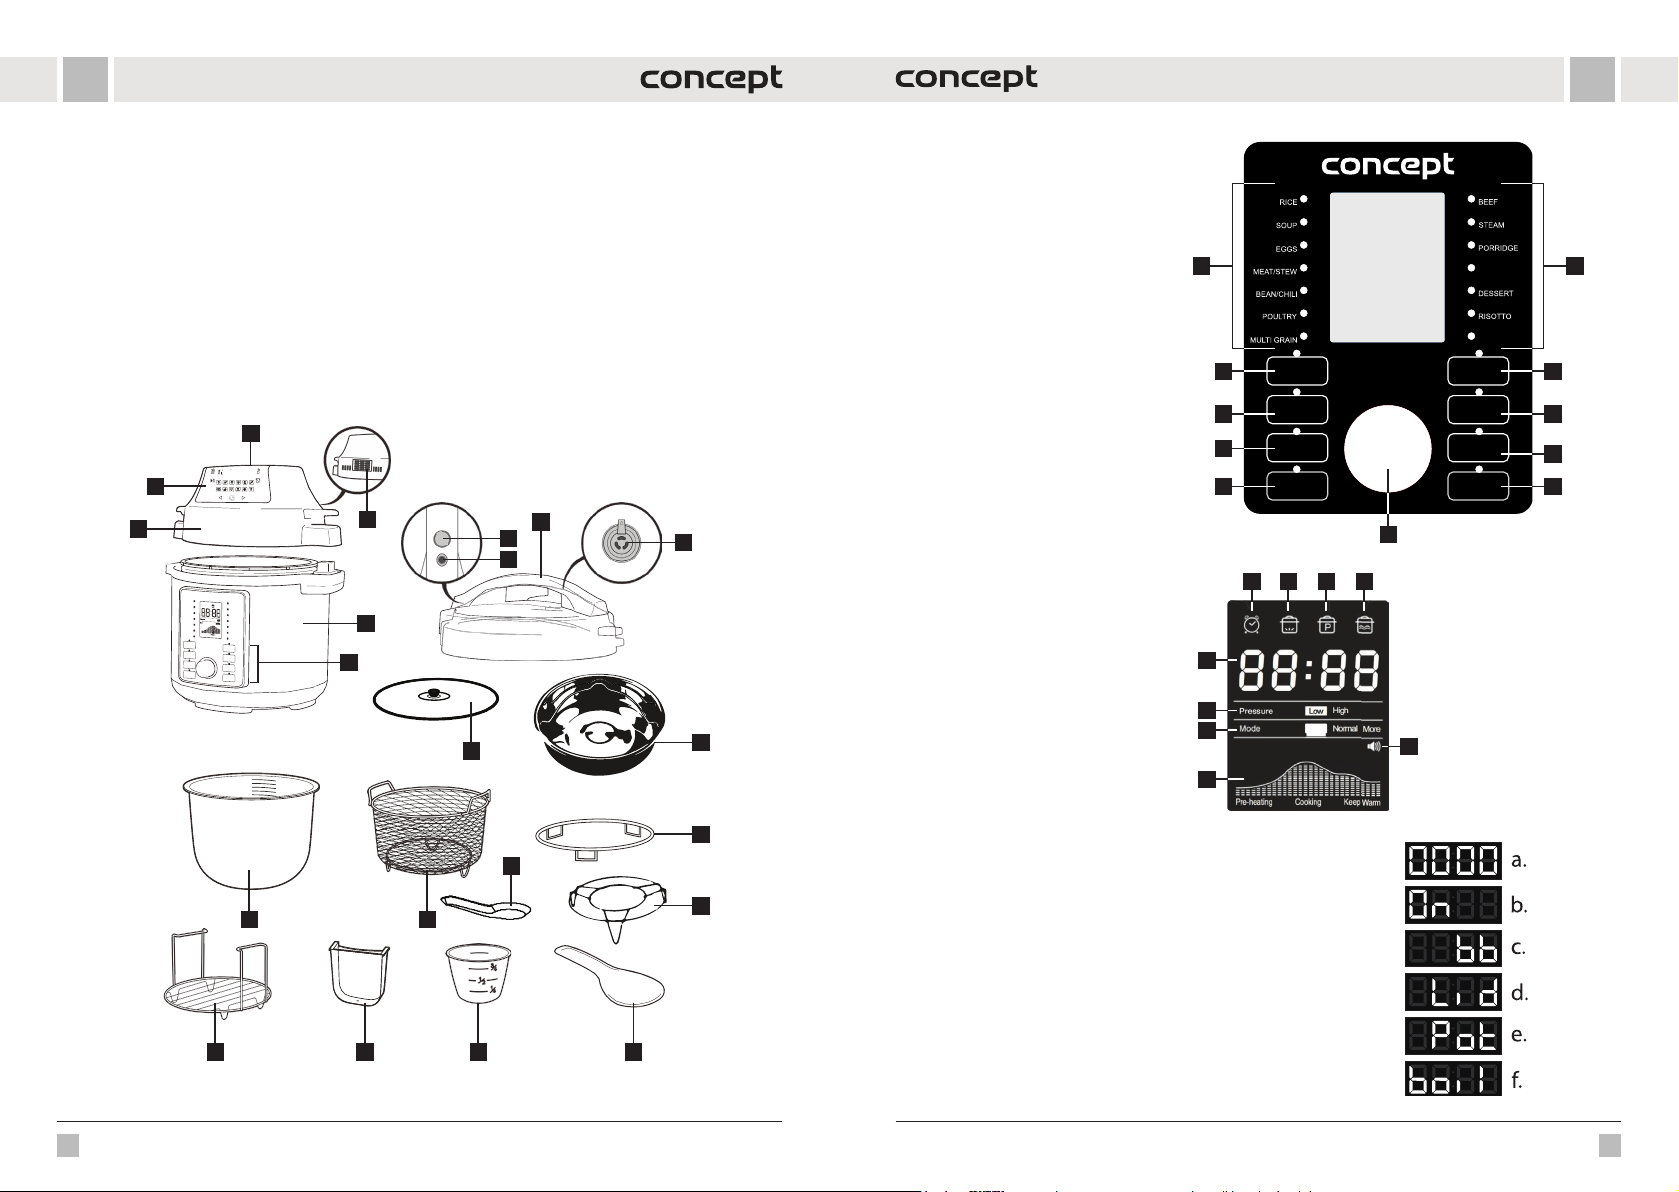
POPIS VÝROBKU
1 Přívod vzduchu
2 Vývod vzduchu
3 Horkovzdušná poklice
4 Displej horkovzdušné poklice
5 Tělo spotřebiče
6 Ovládací panel multifunkčního hrnce
7 Tlaková poklice
8 Tlačítko pro uvolnění poklice
9 Bezpečnostní ventil
10 Tlakový ventil
11 Skleněná poklice
1
4
3
POPIS OVLÁDACÍHO PANELU
12 Vnitřní nádoba
13 Fritovací koš
14 Stojan na poklice
15 Stojan s úchyty
16 Kondenzační nádobka na přebytečnou vodu
17 Odměrka
18 Lžíce mělká
19 Lžíce hluboká (naběračka)
20 Napařovací hrnec
21 Stojan na vaření v páře
2
7
8
9
10
MULTIFUNKČNÍHO HRNCE
1 Přednastavené programy
2 Program jogurt
3 Pomalé vaření
4 Nastavení nízkého/vysokého tlaku
5 Udržení teploty/Zrušit
6 Smažení
7 Odložený start
8 Ruční nastavení
9 Start
10 Ovládací knoflík
RÝŽE
POLÉVKA
VEJCE
MASO / DUŠENÍ
FAZOLE / CHILLI
DRŮBEŽ
LUŠTĚNINY
2 6
POMALÉ VAŘENÍ
SLOW COOK
3
4
UDRŽENÍ TEPLOTY
5
KEEP WARM/CANCEL
JOGURT
YOGURT
TLAK
PRESSURE
LEVEL
/ ZRUŠIT
Pressure
Mode
Pre-heating
High
Low
Less Normal More
Cooking Keep Warm
HOVĚZÍ
PÁRA
OVESNÁ KAŠE
VEPŘOVÉ /
ŽEBÍRKA
PORK&RIBS
DEZERT
RIZOTO
ZELENINA
VEGETABLES
SMAŽENÍ
SAUTE
ODLOŽENÝ START
DELAY START
RUČNÍ NASTAVENÍ
ADJUST
START
10
A B C D
11
7
8
9
POPIS DISPLEJE
5
6
11
20
A Indikátor odloženého startu
B Indikátor předehřívání
C Indikátor natlakování
D Indikátor udržování teploty
E Indikátor zapnutého/vypnutého zvuku
F Indikátor průběhu
G Indikátor režimu
H Indikátor úrovně tlaku
I Zobrazení času a upozornění
I
H
G
E
F
14
19
12 13
21
Na LED displeji se mohou zobrazovat následující upozornění:
a. Hrnec je připraven k použití, ale nebyl zvolen program
b. Hrnec se nahřívá na požadovanou teplotu
c. „Keep warm“ funkce – hrnec udržuje teplotu
d. Poklice je ve špatné pozici nebo chybí
e. V hrnci chybí vnitřní nádoba
f boiL (vaření) zobrazí se při režimu More (více) u programu Jogurt
15
16 17 18
6 7
Page 5
CZCZ
PŘED PRVNÍM POUŽITÍM
• Odstraňte ze spotřebiče veškeré obalové materiály.
• Odstraňte ze spotřebiče všechny štítk y a nálepky.
• Vnitřní nádobu (12) umyjte horkou vodou.
• Důkladně vytřete hadříkem spotřebič zvenčí i zevnitř.
• Příslušenství omyjte horkou vodou s mýdlem a neabrazivní houbou.
Poznámka: Spotřebič předehřívejte 10 minut bez jakýchkoli potravin. Ze spotřebiče může unikat neškodný kouř a
mírný zápach.
• Během provozu nechte kolem spotřebiče min. 13 cm volného prostoru.
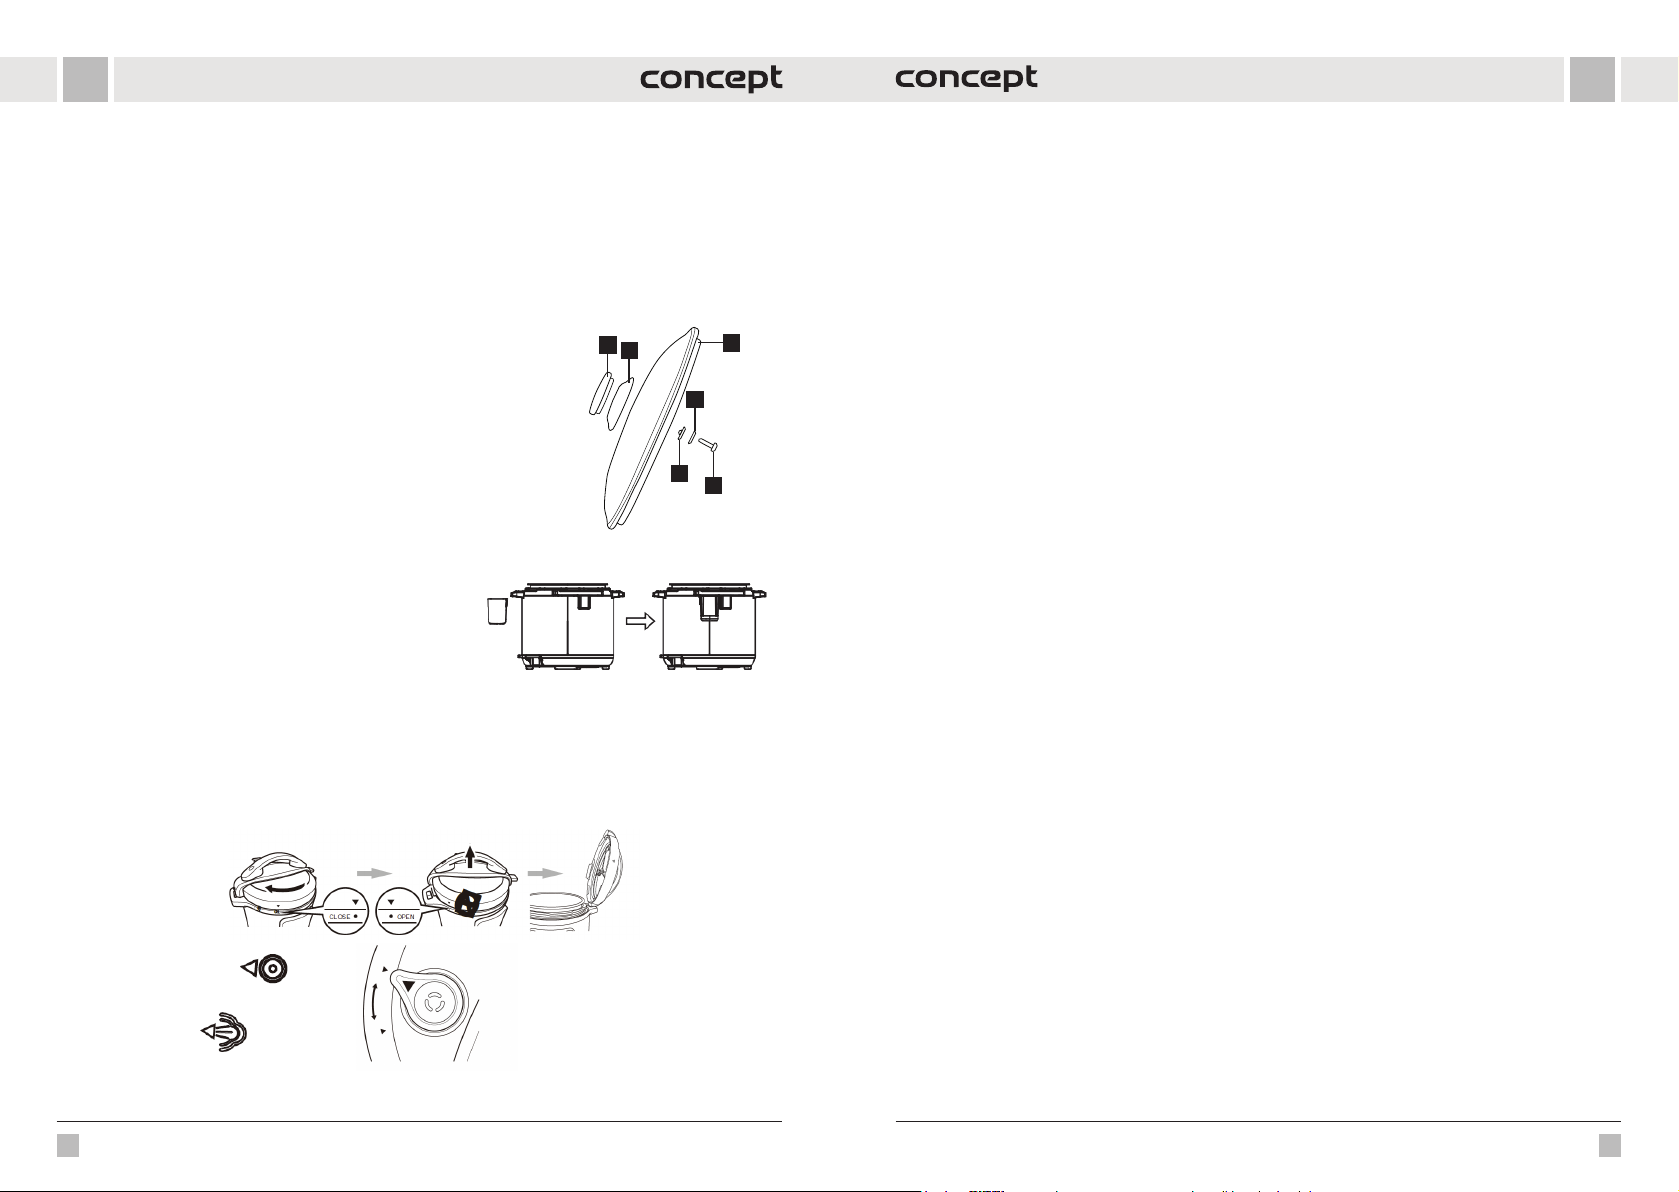
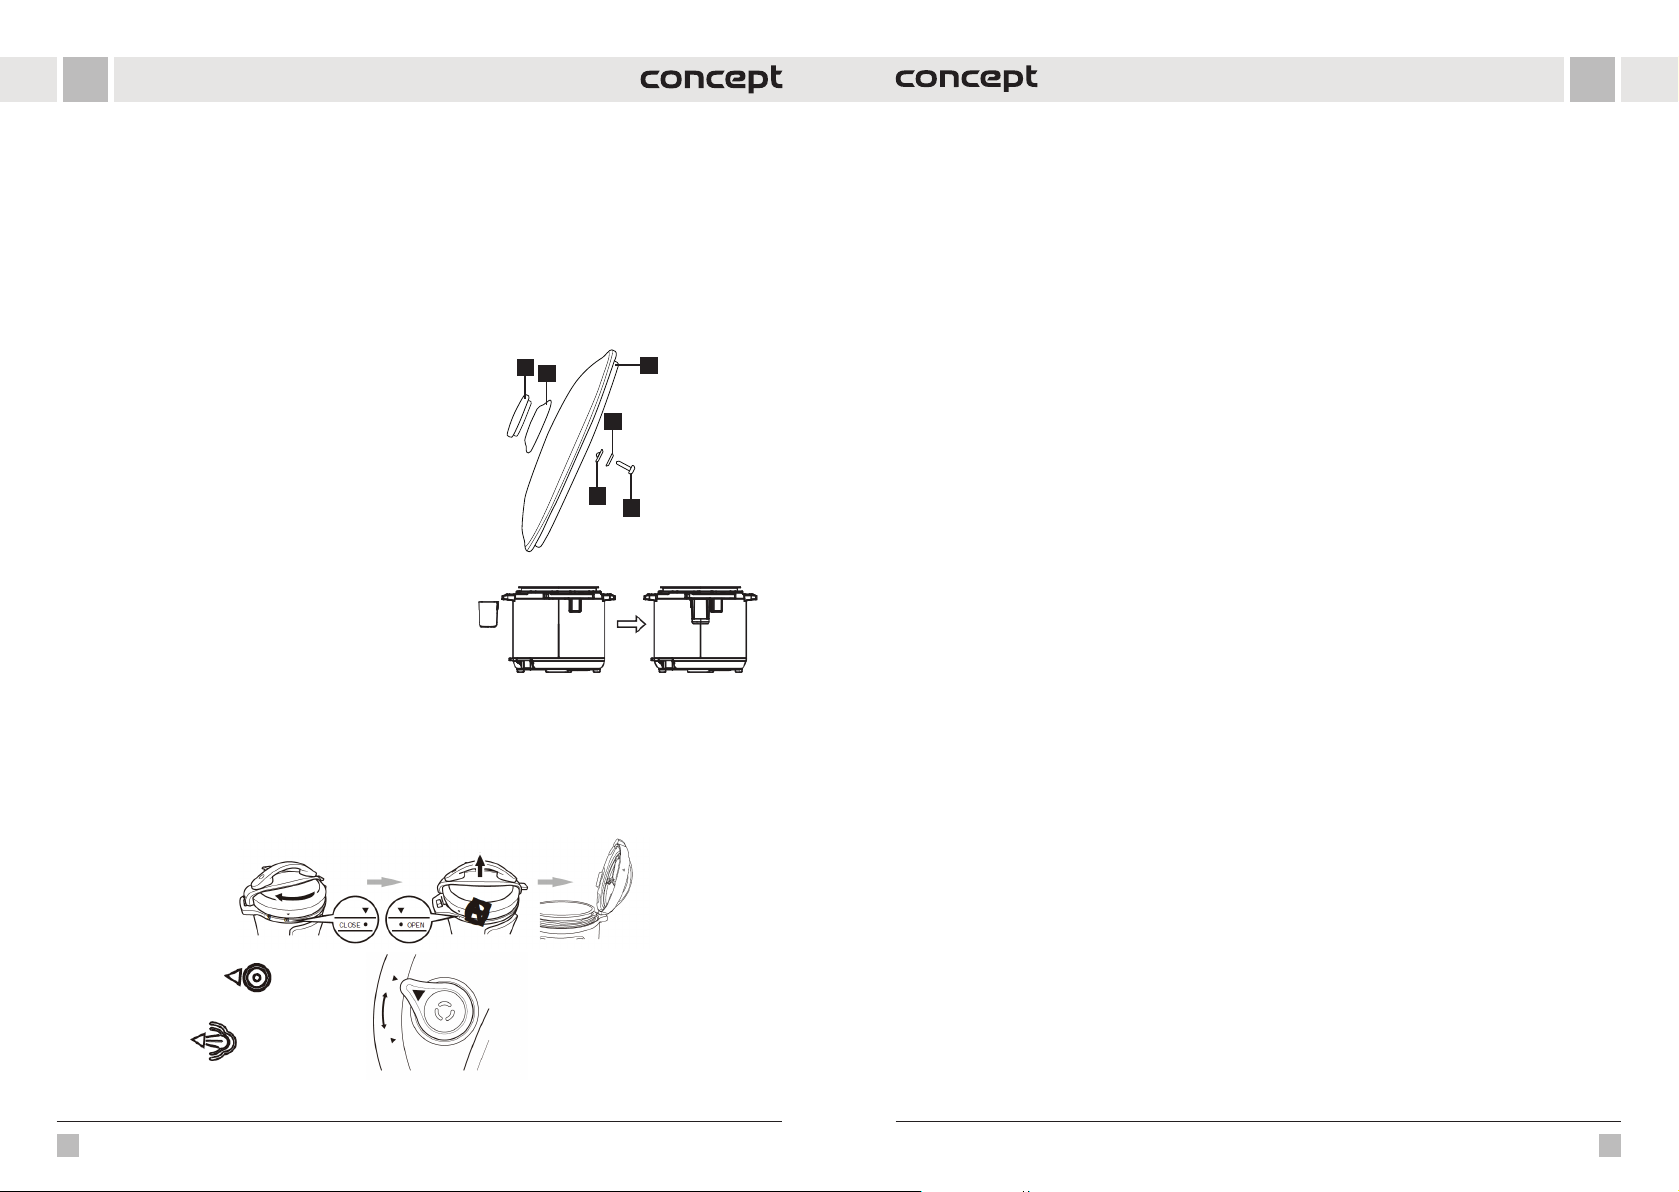
Sestavení skleněné poklice
Skleněnou poklici můžete použít s funkcemi Pomalé vaření a Udržování teploty.
Montáž držadla je znázorněna na obrázku.
1. Rukojeť
2. Základna rukojeti
3. Tělo skleněné poklice
4. Těsnění
5. Podložka
6. Šroub
1
2
3
5
4
6
NÁVOD K OBSLUZE
POUŽITÍ HRNCE S TLAKOVOU POKLICÍ (7)
1. Spotřebič postavte na suché a rovné místo.
2. Na zadní část spotřebiče umístěte kondenzační nádobku na
přebytečnou vodu (16) viz obr. 1.
3. Připravte tlakovou poklici (7), viz obr. 2.
• Zatáhnutím za kovový výčnělek na spodní straně poklice oddělíte ochranný kryt, na kterém je nasazené těsnění.
Těsnění lze sejmout a vyčistit. Ujistěte se, že těsnění není nikde poškozeno či natrženo. V případě poškození je
nutná výměna. Ujistěte se, že je plovákový ventil čistý a může se volně pohybovat.
Poznámka: Pokud byla tlaková poklice na spotřebiči již nasazena, pro přípravu ji sejměte stisknutím červeného
tlačítka a otočením madla proti směru hodinov ých ručiček a zvednutím nahoru.
Utěsněno
obr. 2
Vypouštění páry
obr. 1
4. Vyjměte vnitřní nádobu (12). Celkový objem potravin a vody by neměl přesáhnout 2/3 objemu vnitřní nádoby.
Pokud budete v ařit potraviny, které během v aření zvětší svůj ob jem (např. rýže), nenaplňujte nádobu v íce než z 1/2.
Upozornění: Některé potraviny, jako je jablečné pyré, brusinky, ovesné vločky, nudle, rebarbora nebo špagety
mohou pěnit a praskat, a tak ucpávat tlakový ventil (výpusť). Tyto potraviny by neměly být v tlakovém hrnci
vařeny. Pozor: Nepoužívejte tlakový hrnec ke smažení s olejem.
5. Ujistěte se, že vnitřní povrch těla spotřebiče (5) je suchý a umístěte vnitřní nádobu (12) do těla spotřebiče (5).
6. Nasaďte tlakovou poklici (7) a otočte po směru hodinových ručiček. Až uslyšíte zacvaknutí, poklice je správně
usazena. Řádné uzavření poklice znázorňují zarovnané šipky na okraji poklice a okraji spotřebiče.
7. Upozorňujeme, že pro správné fungování hrnce musí být tlakový ventil (10) volně pohyblivý.
8. Tlakový ventil nastavte do pozice „Utěsněno“, tím je hrnec připraven k použití.
9. Zapojte pří vodní kabel do zástrčk y spotřebiče a poté do zásuv ky elektrického n apětí. Na displeji se zobra zí "00 00".
10. Otočením ovládacího knoflíku procházíte přednastavené programy (1) (další programy stiskem příslušného
tlačítka programu) nebo upravujete dobu vaření. Zvolený program (svítí indikátor) potvrďte tlačítkem
Start. Pro úpravu přednastaveného času programu stiskněte knoflík a otáčením zvolte požadovaný
čas a potvrďte stiskem tlačítka Start. Poznámka: Stiskem tlačítka Nastavení tlaku přepínáte mezi nízkým
a vysokým tlakem. Výchozí nastavení je vysoký tlak (High Pressure). Nastavení tlaku upravujte po volbě
programu a doby vaření, nastavení potvrďte tlačítkem Start. Stiskem tlačítka Ručního nastavení zvolíte
množství potravin, přepínáte mezi režimem Less (méně), Normal a More (více). Výchozí nastavení je Normal.
Poznámka: Doba vaření by měla být upravena podle množství potravin.
11. Hrnec se začne nahřívat na požadovanou teplotu (na displeji je zobrazeno "On", svítí ikona předehřívání)
a plovákový ventil stoupá. Jakmile dosáhne požadované teploty, začne odpočet nastaveného času. V tuto chvíli
již vaříte pod tlakem (svítí ikona natlakování), víko je uzamčeno a hrnec nelze otevřít. NIKDY SE NEPOKOUŠEJTE
OTEVŘÍT HRNEC SILOU!
12. Po ukončení vaření se ozve zvukový signál, hrnec se automaticky přepne do režimu „Keep warm“ a bude udržovat
potraviny teplé. Na displeji je zobrazeno "bb" a svítí ikona Udržení teploty.
13. Nastavení hrnce můžete kdykoli zrušit stiskem tlačítka Udržení teploty/Zrušit (5).
14. Vypnutí/zapnutí zvuku: pro změnu režimu zvuku podržte 3 sekundy stisknuté tlačítko Udržení teploty/Zrušit,
dokud se ikona zvuku na displeji nezmění. Bezpečnostní upozornění jsou vždy zapnuta.
Po ukončení vaření lze uvolnit tlak dvěma způsoby:
1. Po skončení vaření za čne tlak postupně kles at. V závislosti na množst ví tekutiny to může trvat 15-30 min. Plovákov ý
ventil postupně klesne, poklice se odemkne a lze snadno otevřít. Pokud nejde otevřít, vyčkejte delší čas. NIKDY
NEOTVÍREJTE HRNEC SILOU!
2. Otevření tlakové poklice: Uchopte rukojeť a stiskněte červené tlačítko pro uvolnění poklice, otočte poklicí proti
směru hodinových ručiček, dokud se neuvolní a tahem nahoru zvedněte. Poklici můžete odložit na stojan na
pokl ice (14).
3. Po skončení vaření stiskněte tlačítko Udržení teploty/Zrušit (5), pomocí chňapky otočte plovákový ventil do pozice
„Vypouštění pár y“, plovákový ventil klesn e, poklice s e odemkne a lze snadno otevří t. DBEJTE ZVÝŠEN É OPATRNOSTI
A POUŽIJTE OCHRANNÉ PRACOVNÍ POMŮCKY, NEBEZPEČÍ OPAŘENÍ PÁROU!
Funkce odložený star t/ Delay Start:
1. S využitím funkce Delay Start lze posunout začátek vaření až o 24 hod.
2. Postupujte podle Návodu k obsluze, otočením knoflíku zvolte požadovaný program, poté stiskněte tlačítko
Odložený start a opakovaným stiskem tlačítka nastavte, o jaký čas chcete posunout začátek vaření. Výchozí
nastavení odloženého startu je 30 min.
3. Poté stiskněte tlačítko Start. Během odloženého startu na displeji svítí ikona odloženého startu a je zobrazen
zbývající čas. Po uplynutí nastaveného času začne probíhat zvolený program.
Tipy
1. Při zvolení programu Pomalé vaření, Jogurt nebo Smažení lze použít hrnec s tlakovou poklicí, skleněnou poklicí
nebo bez poklice. Při použití bez tlakové poklice z displeje zmizí indikátor úrovně tlaku.
2. Funkci „Keep warm“ doporučujeme v yužívat maximálně 1 hod, poté ztrácí jídlo na kvalitě.
3. Programy jsou připravené pro přípravu jídla s váhou menší než 1200 g, pokud připravujete větší porce, využijte
vlastního nastavení.
8 9
Page 6
CZCZ
4. Funkci Delay Start využívejte jen pro potraviny, které se nemůžou během této doby zkazit
5. Potraviny do vnitřní nádoby vkládejte a vyjímejte pomocí dřevěného nebo plastového náčiní, nikdy nepožívejte
ostré nebo kovové, aby se nenarušil povrch nádoby.
6. Použití příslušenství:
• Při volbě programu Pára vlož te do vnitřní nádoby (12) stojan na vaření v páře (21) a poté vložte napařovací hrnec
(20).
• Při volbě programu Smažení vložte do vnitřní nádoby (12) Stojan s úchyty (15).
• Při volbě programu Pomalé vaření, Jogurt nebo Smažení lze použít skleněnou poklici (11).
• Při volbě programu pro fritování (při použití horkovzdušné poklice), do vnitřní nádoby (12) umístěte fritovací
koš (13).
• Stojan na poklice (14) využijte pro odkládání poklic.
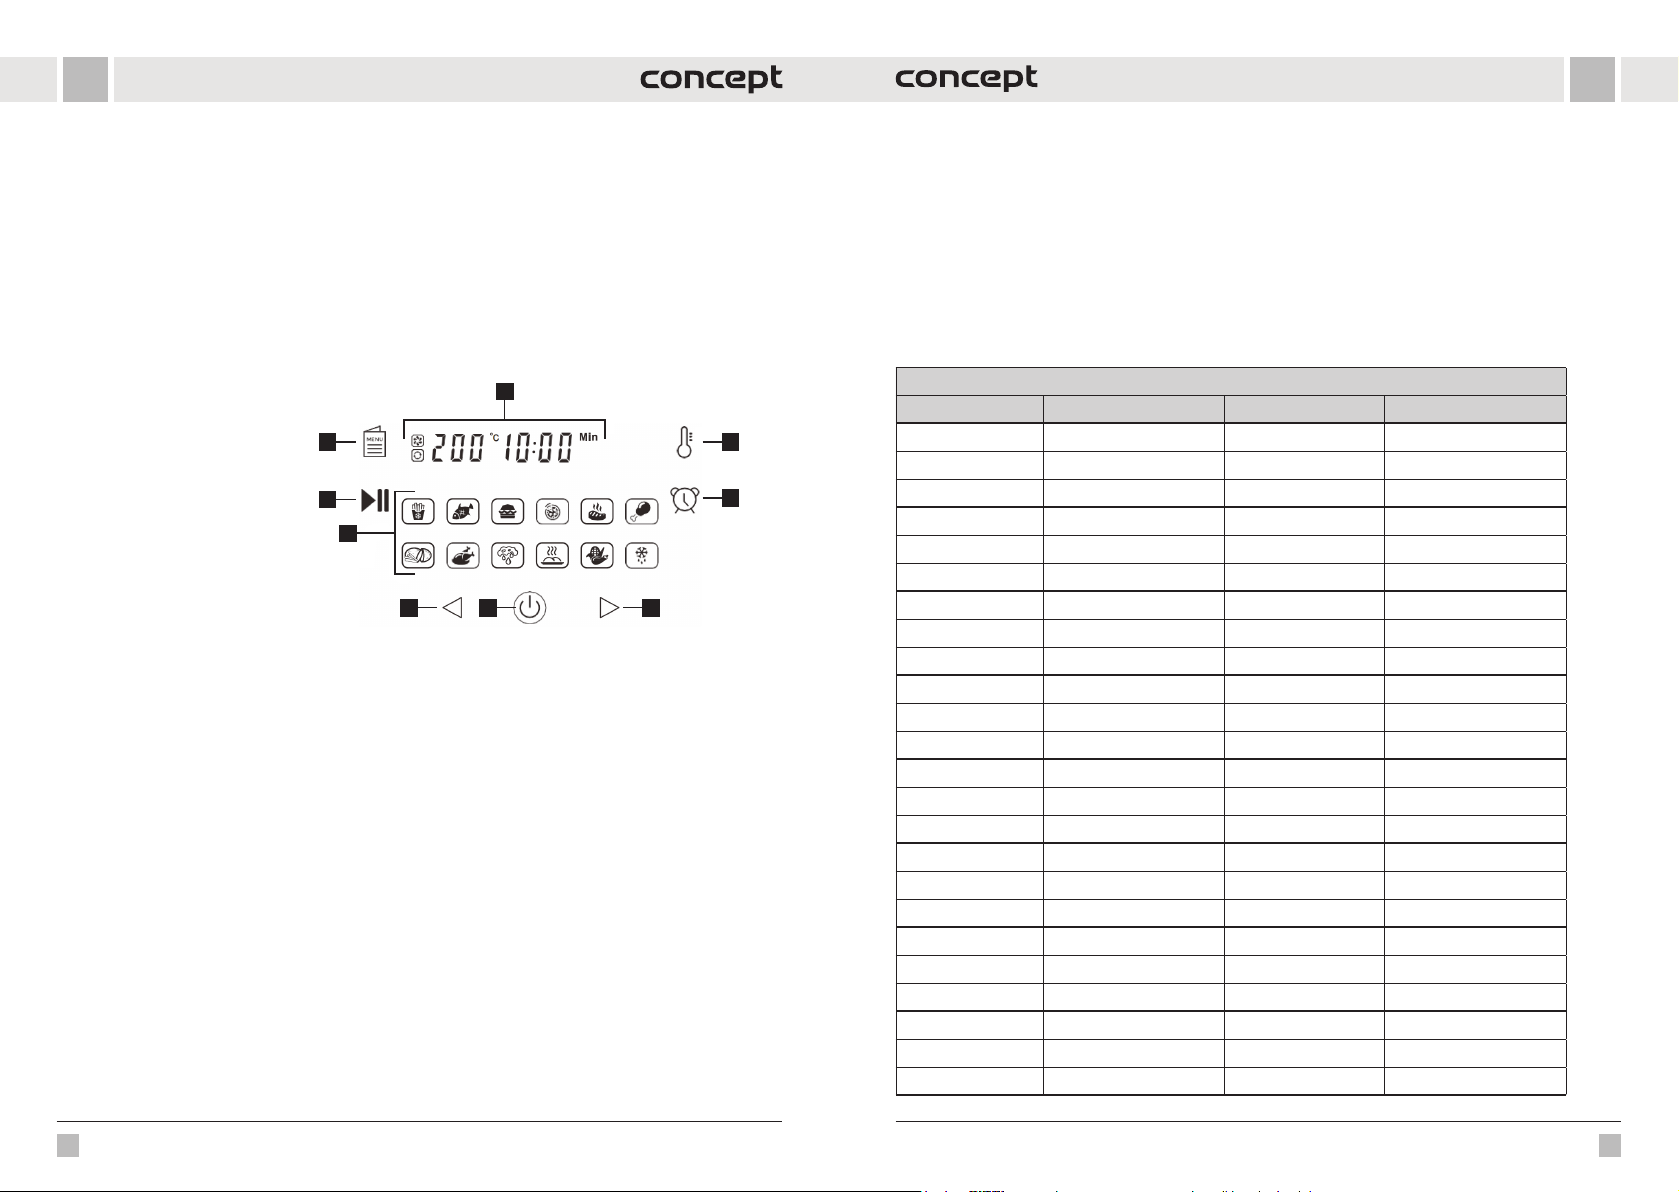
POPIS OVLÁDACÍHO PANELU HORKOVZDUŠNÉ POKLICE
1. Digitální displej
2. Nastavení teploty
3. Nastavení časovače
4. Zvýšení teploty/časovače
5. On/Off
6. Snížení teploty/časovače
7. Programy
8. Start/pauz a
9. Výběr přednastavených programů
POUŽITÍ HRNCE S HORKOVZDUŠNOU POKLICÍ (3)
Hrnec s horkov zdušnou poklicí pracuje pomocí horkého vzduchu, nikdy neplňte nádobu olejem či jiným prostředkem
na smažení.
1. Spotřebič postavte na suché a rovné místo.
2. Zapojte přívodní kabel do zásuvky elektrického napětí.
3. Ujistěte se, že vnitřní povrch těla spotřebiče (5) je suchý a umístěte vnitřní nádobu (12) do těla spotřebiče (5).
4. Vložte potraviny do vnitřní nádoby (12). Poznámka: Pokud chcete použít program pro fritování, do vnitřní nádoby
umístěte fritovací koš (13) a do koše vložte potraviny. Nepřeplňujte fritovací koš (13) ani vnitřní nádobu (12).
5. Umístěte horkovzdušnou poklici (3) pro použití spotřebiče jako horkovzdušné trouby.
6. Stiskněte tlačítko On/Off (5) pro zapnutí. Rozsvítí se ikony a na displeji se zobrazí výchozí nastavení 180 °C
a 15 minut.
7. Stiskněte tl ačítko výběr pře dnastavených programů (9) pro přep ínání předvoleb vaření. I kona zvoleného pro gramu
bliká a na displeji je zobrazena přednastavená teplota a čas programu. Opakovaným stiskem tlačítka (9) přepnete
na další progra m. Pro změnu nastavení tepl oty nejprve stis kněte tlačítko nastavení te ploty (2)/pro změnu nastavení
času stiskněte tlačítko nastavení časovače (3) a poté stiskem nebo podržením tlačítek 4 a 6 lze upravit teplotu
v intervalech po 5 °C a čas v intervalech po 1 minutě (pouze u programu sušení po 30 minutách).
8. Výběr potvrďte tlačítkem Start/Pauza (8). Poznámka: Pokud začínáte vařit, když je spotřebič ještě studený,
prodluž te dobu přípravy o cca 2 min uty. Během předehřívání j e na displeji zobrazeno "PR EHEATING", po předehřátí
z displeje zmizí a zobrazuje se pouze "HEATING" při spínání topného tělesa. Poznámka: Během spuštěného
programu v levém horním rohu svítí ikona ventilátoru. Ikona zhasne, jakmile ventilátor přestane pracovat.
9. Během vaření můžete program kdykoliv pozastavit stiskem tlačítka Start/pauza (8) a opakovaným stiskem tlačítka
znovu pokračovat v procesu vaření.
10. Během vaření můžete horkovzdušnou poklici (3) kdykoliv sejmout a pokrm zkontrolovat/přidat nebo vyjmout
8
7
6
1
29
3
5
4
potraviny. Dojde k přerušení zvoleného programu. Po opětovném umístění poklice, začne program dále pracovat
tam, kde byl přerušen.
11. Po uplynutí programu budete upozorněni zvukovým signálem a na displeji bude zobrazeno pouze "FINISHED"
a bude problikávat tlačítko On/Off (5).
12. Po ukončení vaření spotřebič odpojte od elektrické sítě.
Upozornění: Při vyjímání horkého fritovacího koše/vnitřní nádoby používejte kuchyňské rukavice.
Tipy
Během vaření doporučujeme potraviny obrátit pro rovnoměrné propečení, nebo promíchat.
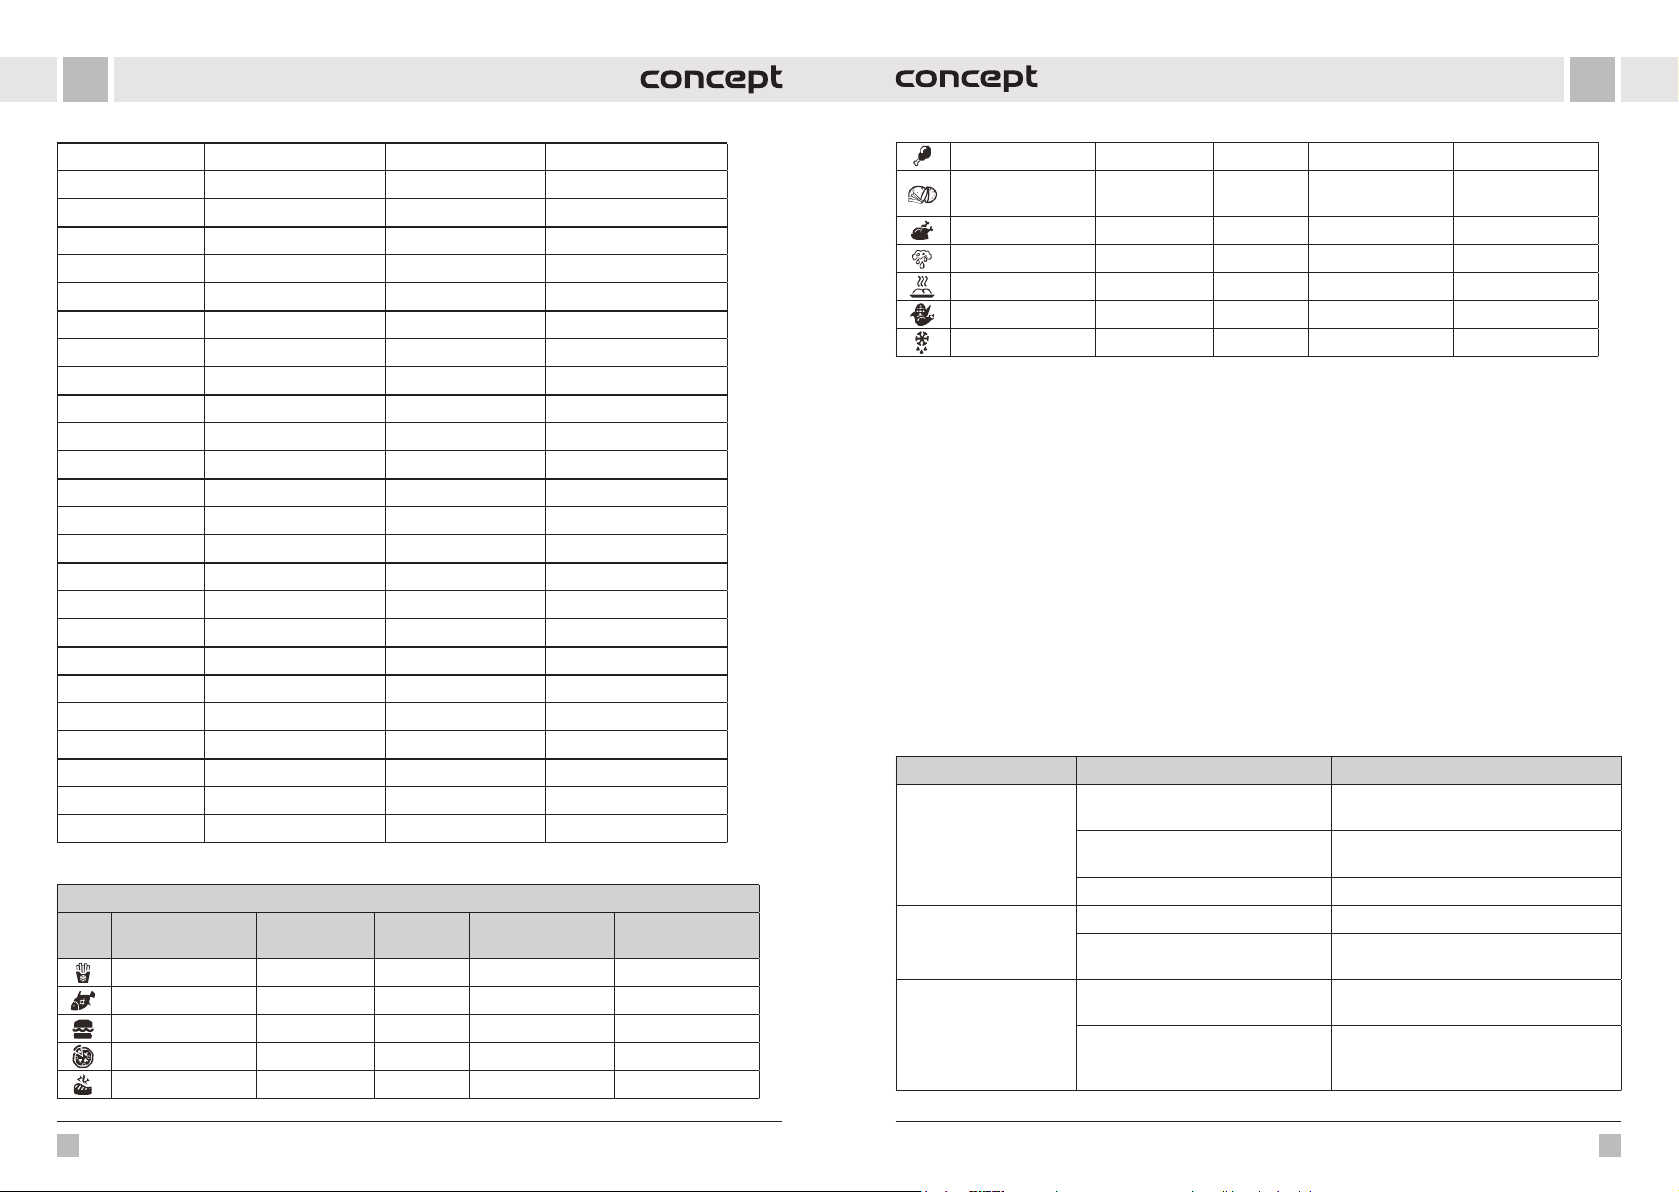
PŘEDNASTAVENÉ PROGRAMY
Programy na vaření s tlakovou poklicí
Programy Množství (přizpůsobit) Čas vaření (min) Možné časové rozpětí
Rýže Méně 8 1-99 min
Normální 12
Více 15
Polévka Méně 12 1-99 min
Normální 15
Více 20
Vejce Méně 4 1-99 min
Normální 5
Více 6
Maso/Dušení Méně 20 1-99 min
Normální 35
Více 45
Fazole/Chilli Méně 25 1-99 min
Normální 30
Více 40
Drůbež Méně 10 1-99 min
Normální 15
Více 25
Luštěniny Méně 20 1-99 min
Normální 40
Více 45
Hovězí Méně 30 1-99 min
Normální 35
Více 40
10 11
Page 7
CZCZ
Pára Méně 12 1-99 min
Normální 15
Více 20
Ovesná kaše Méně 12 1-99 min
Normální 15
Více 20
Vepřové/žebírka Méně 13 1-99 min
Normální 18
Více 25
Dezert Méně 25 1-99 min
Normální 40
Více 50
Rizoto Méně 20 1-99 min
Normální 35
Více 45
Zelenina Méně 10 1-99 min
Normální 15
Více 20
Smažení Normální 30 30 min
Pomalé vaření Méně 30 30 min - 9 h 30 min
Normální 6 h
Více 9 h 30 min
Jogurt Méně 24 h 6 h - 24 h
Normální 8 h
Více "boiL"
Programy na vaření s horkovzdušnou poklicí
Programy Teplota (°C) Čas
Zmražené hranolky 200 15 min 80-200 1-60 min
Ryby 160 15 min 80-200 1-60 min
Hamburger 185 13 min 80-200 1-60 min
Pizza 185 15 min 80-200 1-60 min
Hovězí steak 175 25 min 80-200 1-60 min
Nastavitelná
teplota (°C)
Možné časové
rozpětí
Kuřecí stehna 200 22 min 80-200 1-60 min
Hranolky ze syro-
vých brambor
Celé kuře 180 40 min 80-200 1-60 min
Sušení 80 2 hod 40-90 1-12 hod
Grilování 160 10 min 160 1-30 min
Zelenina 180 15 min 80-200 1-60 min
Rozmrazování 50 5 min 50 1-60 min
Poznámka: Tato nastavení jsou pouze orientační. Pokud začínáte vařit, když je spotřebič ještě studený, prodlužte
dobu přípravy o cca 2 minuty.
160 30 min 80-200 1-60 min
ČIŠTĚNÍ A ÚDRŽBA
Čistěte spotřebič po každém použití.
Nepoužívejte drsné a agresivní prostředky jako jsou: ostré předměty, škrabky, chemická rozpouštědla,
ředidla apod.
• Před čištěním vždy odpojte přívodní kabel ze zásuvky elektrického napětí. Nikdy neponořujte přívodní kabel,
zástrčku, spotřebič nebo horkovzdušnou poklici do vody nebo jiné kapaliny!
• Před čištěním nechte spotřebič zcela vychladnout.
• Vnější povrch spotřebiče otřete vlhk ým hadříkem.
• Vnitřní nádobu naplňte horkou vodou a nechte chvíli odležet. Poté lze měkkým hadříkem umýt ve vodě spřidáním
saponátu nebo v myčce nádobí.
• Další části spotřebiče lze umýt ve vodě s přidáním saponátu.
• Pouze příslušenství a vnitřní nádobu lze mýt v myčce nádobí.
• Po úplném vysušení dílů spotřebič sestavte a uskladněte na chladném a suchém místě.
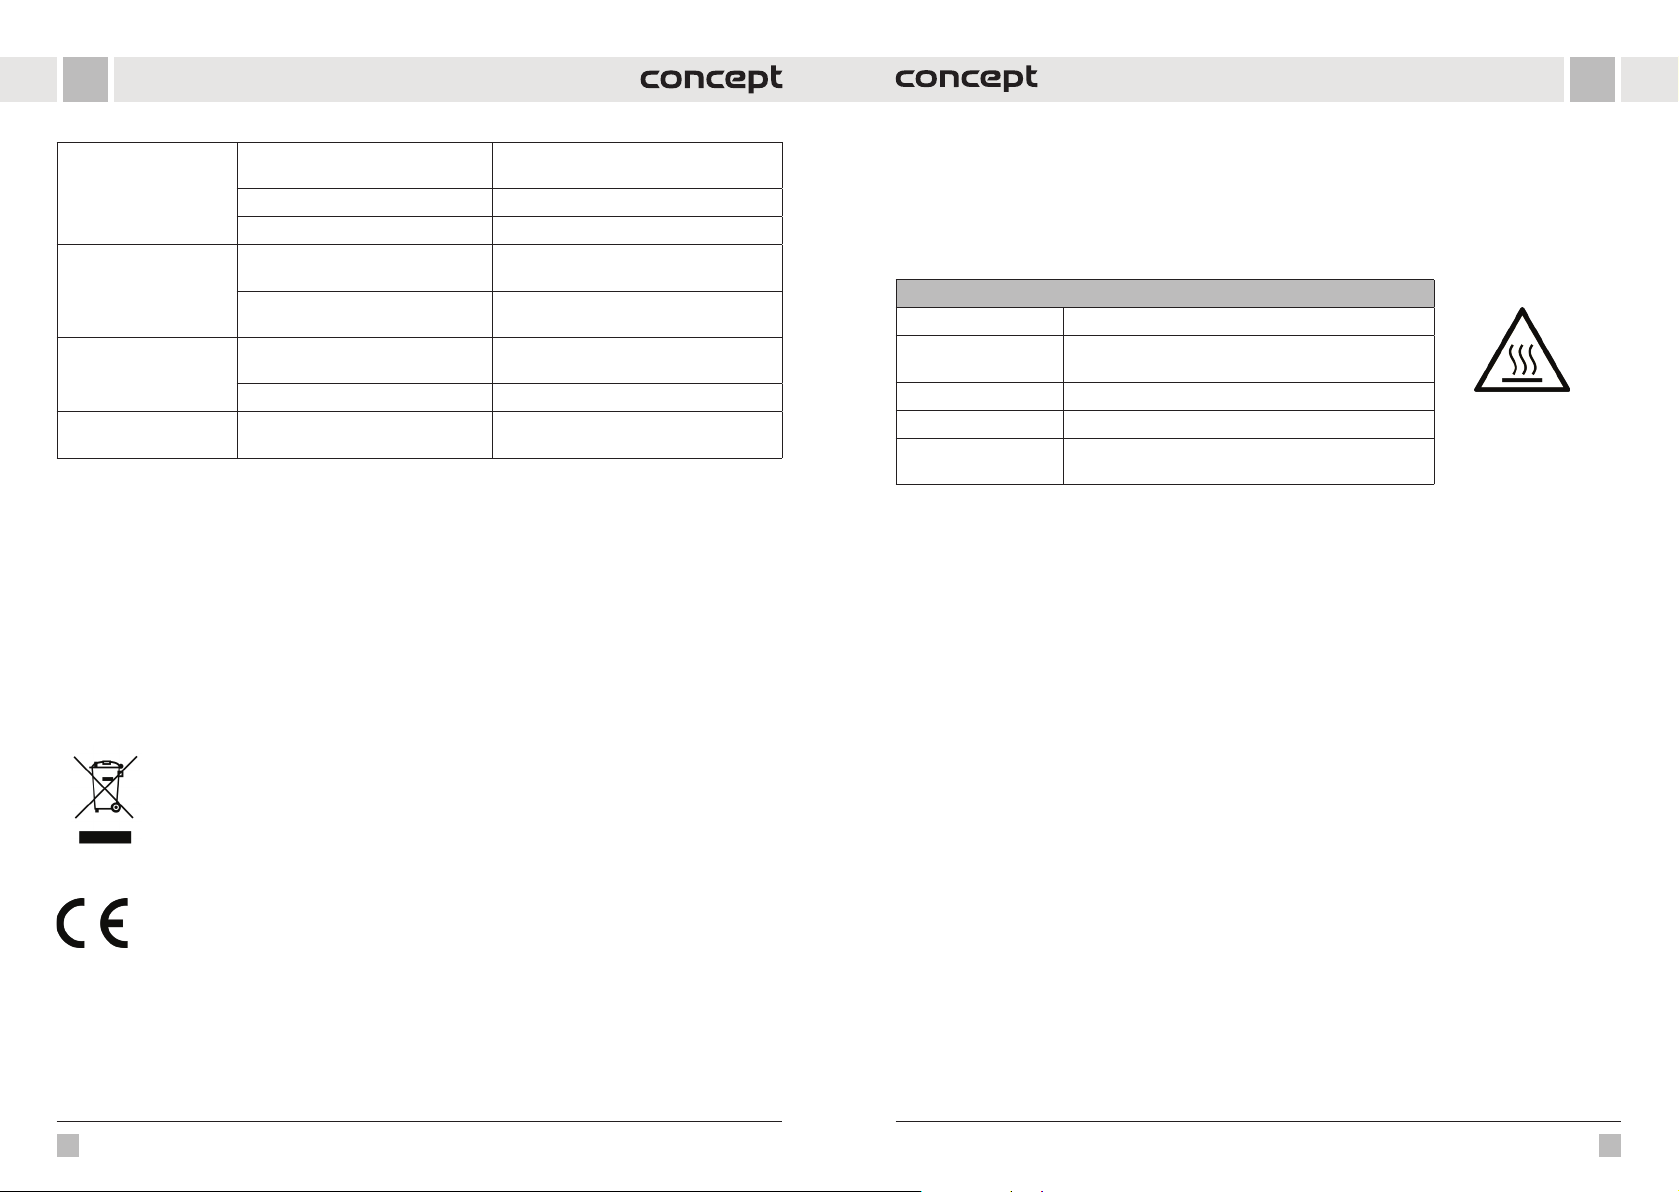
ŘEŠENÍ PROBLÉMŮ
Problém Příčina Řešení
Spotřebič zapojte do zásuvky
s uzemněním.
Nastavte požadovaný program
nebo časovač.
Prodlužte dobu vaření, zvyšte teplotu.
Vyjměte některé potraviny nebo je
protřepejte/otočte v polovině vaření.
Ujistěte se, že používáte čerstvé
potraviny a připravte je správně
na smažení (pokapejte pár kapkami oleje).
Spotřebič nefunguje.
Smažené potraviny nejsou
hotové.
Potraviny jsou usmaženy
nerovnoměrně.
Spotřebič není správně zapojen.
Program nebo časovač není nastaven.
Víko není správně usazeno. Zkontrolujte usazení víka.
Příliš mnoho potravin. Do nádoby/ koše vkládejte menší dávky.
Nastavená doba vaření je příliš krátká,
teplota příliš nízká.
Příliš velká dávka potravin, potraviny
leží na sobě.
Potraviny nejsou čerstvé nebo nejsou
připraveny správně.
12 13
Page 8
CZ
SK
Smažené jídlo není
křupavé.
Ze spotřebiče vychází bílý
kouř.
Unikající pára kolem víka
tlakové poklice.
Unikající pára z tlakového
ventilu.
Některé potraviny jsou lepší pro použití v horkovzdušné fritéze.
Je potřeba trochu oleje. Potraviny lehce pokapejte olejem.
Potraviny jsou vlhké. Před vařením potraviny vysušte.
Jídlo ve fritéze je tučné.
Nádoba/koš stále obsahuje zbytky
mastnoty z předchozího použití.
Těsnění není spravně usazeno.
Tlakový ventil (výpusť) je ucpán. Vyčistěte ventil.
Tlakový ventil (výpusť) není řádně
utěsněn.
Použijte čerstvé potraviny
nebo polotovary.
Nejedná se o závadu. Osušte potraviny
od přebytečného oleje.
Nádobu/koš řádně vyčistěte.
Přerušte vaření, odejměte víko a zkontrolujte
usazení těsnění.
Ventil opatrně uzavřete.
SERVIS
Údržbu roz sáhlejšího charakteru nebo opravu, která v yžaduje zásah do vnitřních čás tí výrobku, musí provést odborný
servis.
OCHRANA ŽIVOTNÍHO PROSTŘEDÍ
• Preferujte recyklaci obalových materiálů a starých spotřebičů.
• Krabice od spotřebiče může být dána do sběru tříděného odpadu.
• Plastové sáčky z polyetylénu (PE) odevzdejte do sběru materiálu k recyklaci.
Recyk lace spotřebiče na konci jeho životnosti
Tento spotřebič je označen v souladu s Evropskou směrnicí 2012/19/EU o elektrickém odpadu
a elektrických zařízeních (WEEE). Symbol na výrobku nebo jeho balení udává, že tento výrobek
nepatří do domácího odpadu. Je nutné odvézt ho do sběrného místa pro recyklaci elektrického
a elektronického zařízení. Zajištěním správné likvidace tohoto výrobku pomůžete zabránit
negativním d ůsledkům pro životní pros tředí a lidské zdraví, kter é by jinak byly způsobeny nevh odnou
likvidací tohoto výrobku. Likvidace musí bý t provedena v souladu s předpisy pro nakládání s odpady.
Podrobnější informace orecyklaci tohoto výrobku zjistíte u příslušného místního úřadu, služby pro
likvidaci domovního odpadu nebo v obchodě, kde jste výrobek zakoupili.
Tento výrobek splňuje veškeré základní požadavky směrnic EU, které se na něj vztahují.
Změny v textu, designu a technických specifikací se mohou měnit bez předchozího upozornění a vyhrazujeme si
právo na jejich změnu.
POĎAKOVANIE
Ďakujeme vám, že ste sa rozhodli kúpiť si výrobok značky Concept, a prajeme vám, aby ste boli s naším výrobkom
spokojní po celý čas jeho používania.
Pred prv ým použitím si prosí m pozorne preštudujte cel ý návod naobsluhu a dob re ho odložte. Zabezp ečte, aby všetci,
ktorí budú tento výrobok používať, boli oboznámení stýmto návodom.
Technické parametre
Napätie 220-240 V~50-60 Hz
Príkon
Kapacita nádoby 5,6 l
Nastaviteľná teplota fritéza: varenie 80-200 °C, sušenie 40-90 °C
Časovač
1000 W multifunkčný hrniec
1500 W horúcovzdušná fritéza
Pozor!
Horúci povrch
hrniec: 1 min - 24 hod
fritéza: varenie 1 - 60 min, sušenie 1 - 12 hod
DÔLEŽITÉ
Pred pripojením do elektrickej siete vizuálne skontrolujte, či je jednotka neporušená a či počas prepravy nedošlo
kžiadnemu poškodeniu.
DÔLEŽITÉ BEZPEČNOSTNÉ UPOZORNENIA
• Nepoužívajte spotrebič inak, než je uvedené vtomto návode.
• Pred prvým použitím odstráňte zo spotrebiča všetky obaly a marketingové
materiály.
• Overte, či pripájané napätie zodpovedá hodnotám na typovom štítku
prístroja.
• Spotrebič umiestnite zásadne na stabilný povrch bokom od iných zdrojov
tepla.
• Pri odpájaní prístroja zo zásuvky elektrického napätia nikdy neťahajte za
prívodný kábel, ale uchopte zástrčku a ťahom prístroj odpojte.
• Nedovoľte deťom a nesvojprávnym osobám manipulovať so spotrebičom
a používajte ho iba mimo ich dosahu.
• Osoby so zníženými pohybovými schopnosťami, zníženým zmyslovým
vnímaním, nedostatočne duševne spôsobilí a osoby neoboznámené
sobsluhou môžu spotrebič používať len za dozoru zodpovednej osoby
oboznámenej s jeho obsluhou.
• Dbajte na zvýšenú opatrnosť, ak sa spotrebič používa vblízkosti detí.
• Nedovoľte, aby sa spotrebič používal ako hračka.
• Nezakrývajte spotrebič.
14
15
Page 9
SKSK
• Pred montážou a demontážou spotrebiča odpojte prívodný kábel
zo zásuvky elektrického napätia.
• Pred čistením a po použití spotrebič vypnite a vypojte zo zásuvky
elektrického napätia.
• Spotrebič udržujte v čistote, nedovoľte, aby cudzie telesá vnikli do otvorov
mriežok. Mohli by spôsobiť vážne zranenie, skrat, poškodiť spotrebič
alebo spôsobiť požiar.
• Nepoužívajte spotrebič, ak má poškodený prívodný kábel alebo ak je
poškodená zástrčka, poruchu dajte ihneď odstrániť autorizovanému
servisu.
• Spotrebič nepoužívajte, ak nepracuje správne, ak spadol na zem, je
poškodený alebo bol namočený do kvapaliny. Dajte ho preskúšať
aopraviť do autorizovaného servisu.
• Spotrebič sa odporúča len na použitie v domácnosti, nie je určený na
komerčné použitie.
• Spotrebič nepoužívajte vo vonkajšom prostredí. Používanie
predlžovacieho kábla sa neodporúča, pretože sa môže prehriať a spôsobiť
nebezpečenstvo požiaru. Ak je potrebné použiť predlžovací kábel, uistite
sa, že elektrické napájanie je kompatibilné so spotrebičom a zásuvka je
uzemnená.
• Počas prevádzky spotrebičom nehýbte ani ním netraste.
• Do spotrebiča nevkladajte horľavé materiály (papier, plast).
• Na spotrebič nesiahajte vlhkými alebo mokrými rukami.
• Prívodný kábel ani zástrčku neponárajte do vody ani do inej
kvapaliny. Na elektrické komponenty a konektory nelejte vodu
ani iné kvapaliny.
• Spotrebič neopravujte sami. Obráťte sa na autorizovaný servis.
• Tento spotrebič môžu používať deti od 8 rokov veku a osoby so
zníženými fyzickými či mentálnymi schopnosťami alebo nedostatkom
skúseností a znalostí, ak majú nad sebou dozor alebo boli poučené
opoužívaní spotrebiča bezpečným spôsobom a rozumejú prípadnému
nebezpečenstvu. Domáce čistenie a údržbu nesmú robiť deti, ak
nedosiahli 8 rokov a nemajú nad sebou dozor. Deti do 8 rokov veku
sa nesmú zdržiavať v dosahu spotrebiča ani jeho prívodu. Deti sa so
spotrebičom nesmú hrať.
• Nedotýkajte sa horúceho povrchu.
• Prívodný kábel nenechávajte voľne visieť cez hranu stola alebo kuchynskú
linku. Prívodný kábel nenechávajte dotýkať sa horúceho povrchu.
• Spotrebič neumiestňujte do blízkosti plynového alebo elektrického
horáka. Neumiestňujte spotrebič na varnú dosku. Uistite sa, že spotrebič
je umiestnený na dobre vetranom mieste mimo horúcich povrchov,
horľavých materiálov (záclony, obrusy) a vlhkého prostredia.
• UPOZORNENIE: Povrch spotrebiča môže byť veľmi horúci. Spotrebič
držte iba za držadlo a používajte ochranné pomôcky, napr. kuchynské
rukavice.
• Venujte zvýšenú pozornosť, aby sa do spotrebiča nedostala voda alebo
iná tekutina. Mohlo by dôjsť k úrazu elektrickým prúdom.
• Potraviny vkladajte vždy do koša spotrebiča, aby sa zabránilo ich kontaktu
s výhrevným telesom.
• Nikdy sa počas činnosti alebo hneď po vypnutí nedotýkajte vnútorných
plôch spotrebiča. Spotrebič nechajte dostatočne vychladnúť.
• Spotrebič nezapájajte a neovládajte mokrými rukami.
• Air fry veko: počas varenia sa cez vzduchové otvory uvoľňuje horúca
para, ruky a tvár držte v bezpečnej vzdialenosti od vzduchových otvorov.
• Pokrievka tlakového hrnca: Dávajte pozor na horúcu paru a vzduch
unikajúci z tlakového ventilu. Neumiestňujte ruky, tvár ani žiadne
predmety nad vývod tlakového krytu.
• Spotrebič nepoužívajte, ak máte kardiostimulátor, načúvací prístroj
a pod. Pred použitím spotrebiča sa poraďte so svojím lekárom.
• Nepoužívajte iné príslušenstvo ako to, ktoré odporúča výrobca.
• Spotrebič nepripájajte k externému časovaču.
• Ochrana proti prehriatiu: ak tepelná poistka zareagovala, spotrebič
nebude fungovať. Pred opätovným spustením spotrebiča ho odpojte zo
zásuvky a počkajte, kým úplne vychladne.
• Ak počas činnosti uvidíte tmavý dym vystupujúci zo spotrebiča, spotrebič
okamžite vypnite a kontaktujte autorizovaný servis.
• Pred čistením nechajte spotrebič aspoň 30 minút vychladnúť.
Ak nedodržíte pokyny výrobcu, pozri bezpečnostné upozornenie,
prípadná oprava nemôže byť uznaná ako záručná.
16 17
Page 10
SKSK
c
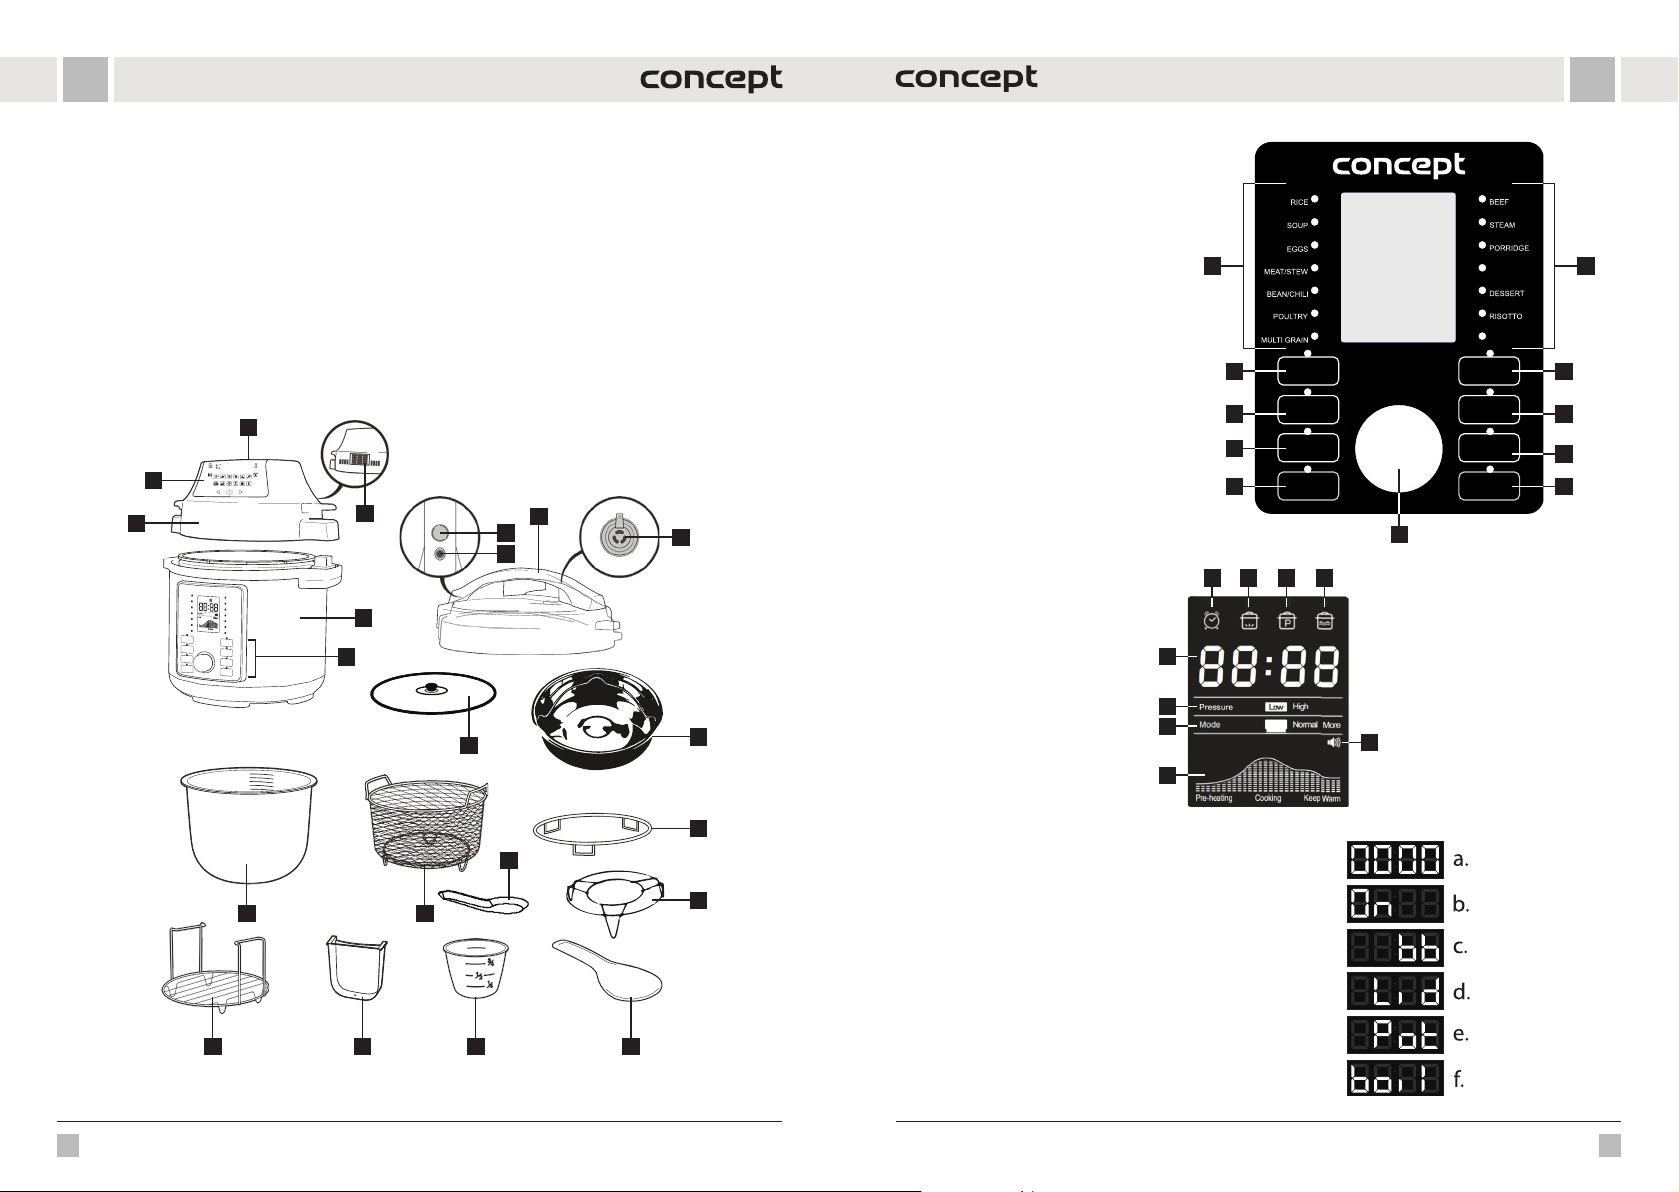
POPIS VÝROBKU
1 Prívod vzduchu
2 Výstup vzduchu
3 Pokrievka horúceho vzduchu
4 Displej pokrievky horúceho vzduchu
5 Teleso spotrebiča
6 Ovládací panel multifunkčného hrnca
7 Pokrievka tlakového hrnca
8 Tlačidlo uvoľnenia veka
9 Bezpečnostný ventil
10 Tlakový ventil
11 Sklenené veko
1
4
3
12 Vnútorná nádoba
13 Fritovací kôš
14 Stojan na pokrievky
15 Stojan s držadlami
16 Kondenzačná nádoba na prebytočnú vodu
17 Odmerka
18 Plytká lyžica
19 Hlboká lyžica (naberačka)
20 Nádoba na varenie v pare
21 Stojan na varenie v pare
2
7
8
9
5
6
11
POPIS OVLÁDACIEHO PANELA
MULTIFUNKČNÉHO HRNCA
1 Prednastavené programy
2 Program na prípravu jogurtu
3 Pomalé varenie
4 Nastavenie nízkeho/vysokého tlaku
5 Udržiavanie teploty/Zrušenie
6 Smaženie
7 Odložený štart
8 Manuálne nastavenie
9 Spustenie
10 Ovládací gombík
10
POPIS DISPLEJA
A B C D
RÝŽE
POLÉVKA
VEJCE
MASO / DUŠENÍ
FAZOLE / CHILLI
DRŮBEŽ
LUŠTĚNINY
2 6
POMALÉ VAŘENÍ
SLOW COOK
3
4
UDRŽENÍ TEPLOTY
5
KEEP WARM/CANCEL
JOGURT
YOGURT
TLAK
PRESSURE
LEVEL
/ ZRUŠIT
Pressure
Mode
Pre-heating
High
Low
Less Normal More
Cooking Keep Warm
10
A Indikátor odloženého štartu
B Indikátor predhriatia
C Indikátor tlaku
I
D Indikátor udržiavania teploty
E Indikátor zapnutia/vypnutia zvuku
F Indikátor priebehu
20
G Indikátor režimu
H Indikátor úrovne tlaku
I Ukazovateľ času a výstrahy
H
G
E
F
HOVĚZÍ
PÁRA
OVESNÁ KAŠE
VEPŘOVÉ /
ŽEBÍRKA
PORK&RIBS
DEZERT
RIZOTO
ZELENINA
VEGETABLES
SMAŽENÍ
SAUTE
ODLOŽENÝ START
DELAY START
RUČNÍ NASTAVENÍ
ADJUST
START
11
7
8
9
14
19
12 13
21
Na LED displeji sa môžu zobraziť nasledujúce oznámenia:
a. Hrniec je pripravený na použitie, ale program nebol zvolený.
b. Hrniec sa zahrieva na požadovanú teplotu
c. Funkcia "Keep warm" - hrniec udržiava teplotu
d. Pokrievka je v nesprávnej polohe alebo chýba
e. Hrncu chýba vnútorná nádoba
f. boiL (varenie) sa zobrazí v režime More pre program Jogurt
15
16 17 18
18 19
Page 11
SKSK
PRED PRVÝM POUŽITÍM
• Zo spotrebiča odstráňte všetky obalové materiály.
• Zo spotrebiča odstráňte všetky štítk y a nálepky.
• Vnútornú nádobu (12) umyte horúcou vodou.
• Spotrebič dôkladne utrite handričkou zvnútra aj zvonka.
• Príslušenstvo umyte horúcou vodou s mydlom a neabrazívnou hubkou.
Poznámka: Spotrebič predhrievajte 10 minút bez akéhokoľvek jedla. Zo spotrebiča môže vychádzať neškodný dym
a mierny zápach.
• Počas prevádzk y nechajte okolo spotrebiča voľný priestor minimálne 13 cm.
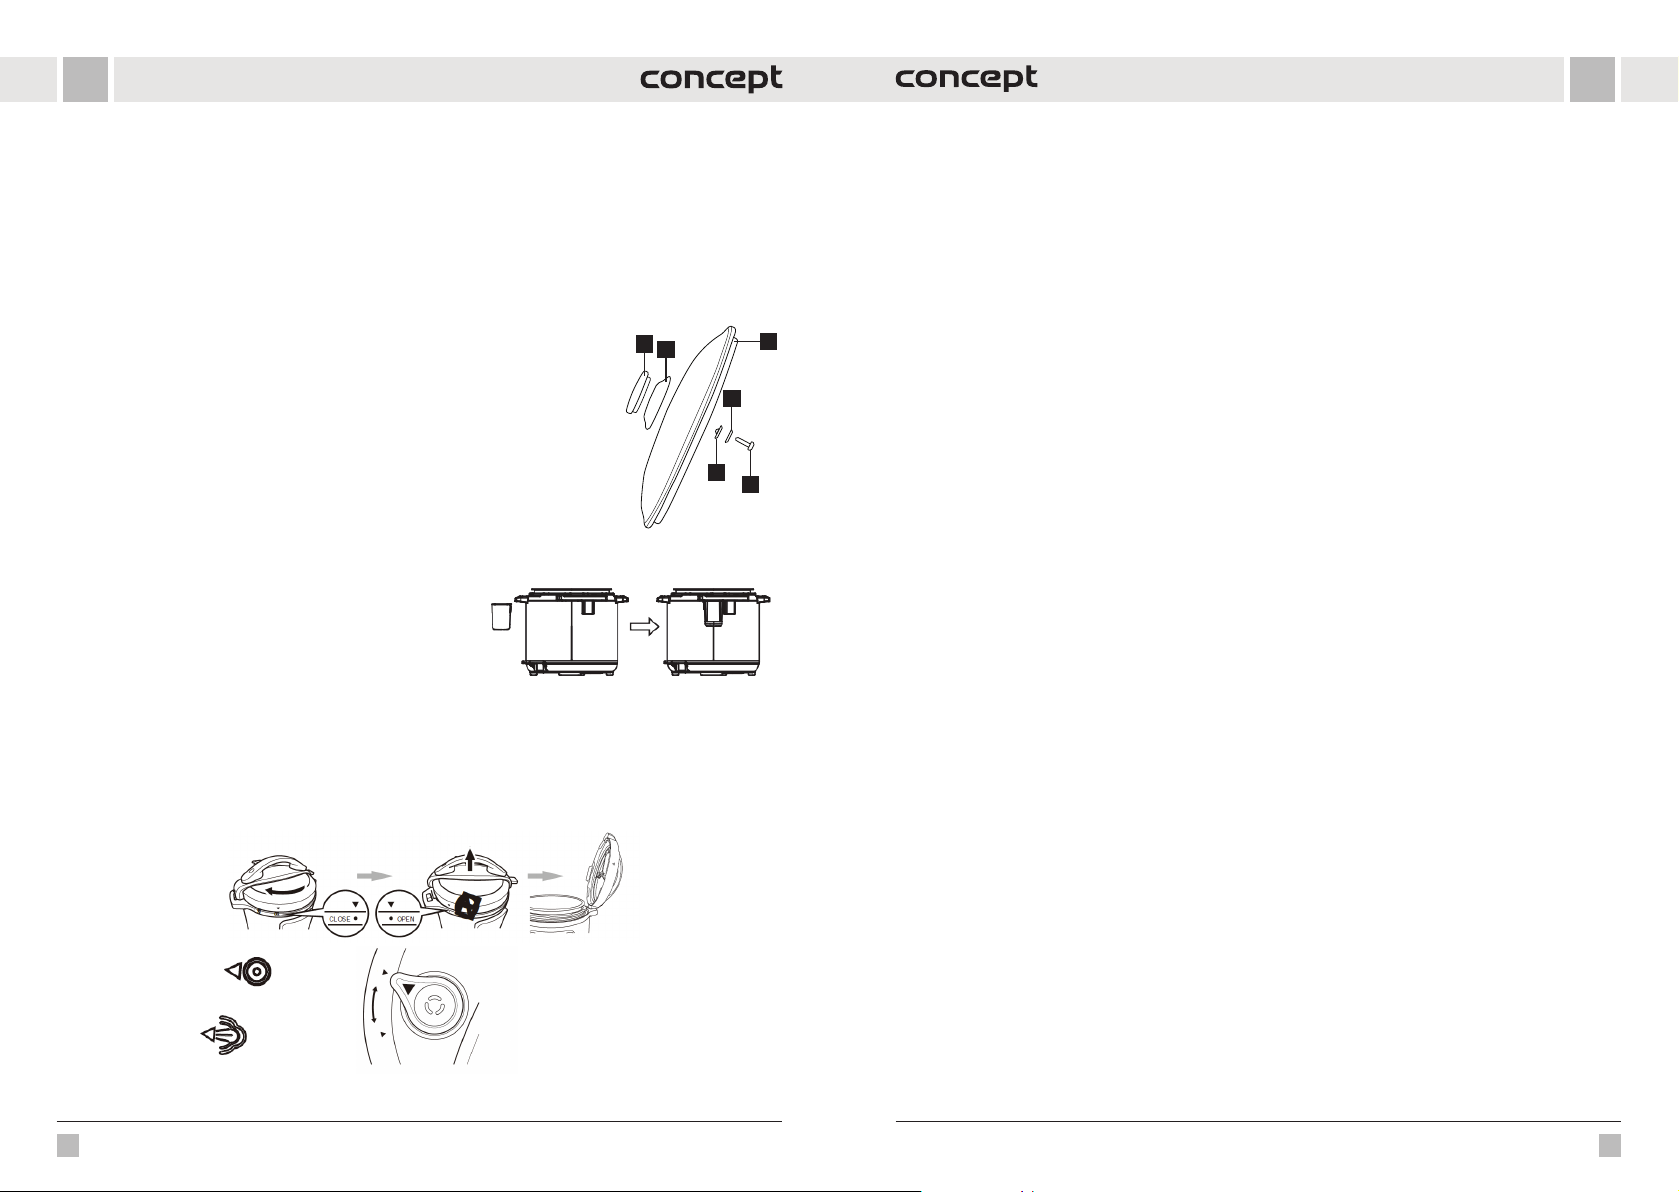
Montáž skleneného veka
Sklenenú pokrievku možno používať s funkciami pomalého varenia a udržiavania teploty.
Inštalácia rukoväte je znázornená na obrázku.
1. Rukoväť
2. Základňa rukoväte
3. Sklenené telo veka
4. Tesnenie
5. Podložka
6. Skrutka
1
2
3
5
4
6
NÁVOD NA OBSLUHU
POUŽITIE HRNCA S TLAKOVOU POKRIEVKOU (7)
1. Spotrebič umiestnite na suché a rovné miesto.
2. Na zadnú stranu spotrebiča umiestnite kondenzačnú nádobu
na prebytočnú vodu (16),viz obr. 1.
3. Pripravte tlakový kryt (7), viz obr. 2.
• Potiah nutím za kovový výs tupok na spodnej stra ne veka odstráňte ochra nný kryt, na kto rom je nasadené tesnenie.
Tesnenie je možné vybrať a vyčistiť. Uistite sa, že tesnenie nie je nikde poškodené alebo roztrhnuté. V prípade
poškodenia je potrebná výmena. Skontrolujte, či je plavákový ventil čistý a či sa môže voľne pohybovať.
Poznámka: Ak už bol na spotrebič namontovaný tlakový kryt, odstráňte ho na prípravu stlačením červeného tlačidla,
otočením rukoväte proti smeru hodinových ručičiek a zdvihnutím.
Zapečatené
obr. 2
Vypúšťanie pary
obr. 1
4. V yberte vnútornú ná dobu (12). Celkový objem potraví n a vody by nemal presiahnuť 2/ 3 objemu vnútornej nádoby.
Ak budete vari ť potraviny, ktoré počas vareni a zväčšia svoj objem (napr. ry ža), nenapĺňajte nádobu viac ako do 1/2.
Poznámka: Niektoré potraviny, ako napr. jablkové pyré, brusnice, ovsené vločky, rezance, rebarbora alebo
špagety, môžu speniť a popraskať, čím sa upchá tlakový ventil (výpust). Tieto potraviny by sa v tlakovom hrnci
nemali variť. Upozornenie: Tlakový hrniec nepoužívajte na vyprážanie na oleji.
5. Uistite sa, že vnútorný povrch telesa spotrebiča (5) je suchý a vložte vnútornú nádobu (12) do telesa spotrebiča (5).
6. Nasaďte tlakový kr yt (7) a otočte v smere hodinových ručičiek. Keď počujete cvaknutie, veko je správne nasadené.
Správne utesnenie veka indikujú zarovnané šípky na okraji veka a okraji spotrebiča.
7. Upozorňujeme, že tlakový ventil (10) musí byť voľne pohybliv ý, aby hrniec správne fungoval.
8. Nastavte tlakový ventil do polohy "Utesnené", tým je hrniec pripravený na použitie.
9. Zapojte napájací kábel do zástrčky spotrebiča a potom do elektrickej zásuvky. Na displeji sa zobrazí "00 00".
10. Otáčaním ovládacieho gombíka môžete prechádzať medzi prednastavenými programami (1) (ďalšie programy
stlačením príslušného tlačidla programu) alebo nastaviť čas varenia. Zvolený program potvrďte (indikátor sa
rozsviet i) tlačidlom Štar t. Ak chcete nas taviť čas pre dnastavenéh o programu, s tlačením a otočením g ombíka v yber te
požadovaný čas a potvrďte stlačením tlačidla Štart. Poznámka: Stlačením tlačidla nastavenia tlaku môžete prepínať
medzi nízk ym a v ysok ým tlakom . Predvole né nastaveni e je vys oký tla k. Nast avenie tlaku up ravte po v ýbe re progr amu
a času varenia, na stavenie pot vrďte tlačid lom Štart. Stlače ním tlačidla Manuál ne nastavenie v yberte mn ožstvo je dla,
pričom môžete pr epínať medzi možnos ťami Menej, Normálne a V iac. Predvolené nast avenie je Normal (Normálne).
Poznámka: Čas varenia by sa mal upraviť podľa množst va potravín.
11. Hrniec sa začne zohrievať na požadovanú teplotu (na displeji sa zobrazí "On", ikona predhrievania svieti).
a plavákový ventil sa zdvihne. Po dosiahnutí požadovanej teploty sa začne odpočítavať nastavený čas. V tomto
okamihu už varíte pod tlakom (svieti ikona tlaku), pokrievka je uzamknutá a hrniec sa nedá otvoriť. NIKDY SA
NEPOKÚŠAJTE HRNIEC OTVORIŤ NÁSILÍM!
12. Po dokončení varenia zaznie zvukový signál a hrniec sa automaticky prepne do režimu "Keep warm" (Udržiavať
teplé), aby sa jedlo udržalo teplé. Na displeji sa zobrazí "bb" a svieti ikona Keep Warm (Udržiavanie tepla).
13. Nastavenie hrnca môžete kedykoľvek zrušiť stlačením tlačidla Keep Warm/Cancel (5).
14. Vypnutie/zapnutie zvuku: Ak chcete zmeniť režim zvuku, podržte stlačené tlačidlo Keep Temperature/Cancel po
dobu 3 sekúnd, kým sa nezmení ikona zvuku na displeji. Bezpečnostné upozornenia sú vždy zapnuté.
Po ukončení varenia možno uvoľniť tlak dvoma spôsobmi:
1. Po skončení varenia sa tlak postupne zníži. V závislosti od množstva tekutiny to môže trvať 15-30 minút. Plavákový
ventil postupne klesá, veko sa odomkne a dá sa ľahko otvoriť. Ak sa nedá otvoriť, počkajte dlhší čas. HRNIEC NIKDY
NEOTVÁRAJTE NÁSILÍM!
2. Otvorenie veka tlakového hrnca: uchopte rukoväť a stlačte červené tlačidlo na uvoľnenie veka, otáčajte vekom
proti smeru hodinových ručičiek, kým sa neuvoľní, a zdvihnite ho ťahom nahor. Veko môžete položiť na stojan na
veko (14).
3. Po skončení varenia stlačte tlačidlo Udržiavanie teploty/Zrušenie (5), pomocou držiaka hrnca otočte plavákový
ventil do polohy " Uvoľnenie pary", plavákov ý ventil klesne, pokri evka sa odomkne a možn o ju ľahko otvoriť. DBAJ TE
NA ZVÝŠENÚ OPATRNOSŤ A POUŽÍVAJTE OCHRANNÉ PRACOVNÉ POMÔCKY, HROZÍ NEBEZPEČENSTVO OBARENIA
PAROU!
Funkcia odloženého štartu Delay Start:
1. Pomocou funkcie odloženého štartu môžete odložiť začiatok varenia až o 24 hodín.
2. Postupujte podľa návodu na použitie, otáčaním gombíka vyberte požadovaný program, potom stlačte tlačidlo
Odložený štart a opätovným stlačením tlačidla nastavte čas, o ktorý chcete odložiť začiatok varenia. Predvolené
nastavenie odloženého štartu je 30 min.
3. Potom stlačte tlačidlo Štart. Počas odloženého štartu sa na displeji rozsvieti ikona odloženého štartu a zobrazí sa
zostávajúci čas. Po uplynutí nastaveného času sa spustí zvolený program.
Tipy
1. Ak vyberiete možnosť Pomalý hrniec, Jogurt alebo Fritovanie, môžete použiť tlakový hrnie c s pokrievkou, sklenenú
pokriev ku alebo bez pokri evky. Pri použití tlakového hr nca bez pokrievk y zmizne z displeja uka zovateľ úrovne tlaku.
2. Funkciu „Keep warm“ odporúčame používať maximálne 1 hod, potom jedlo stráca na kvalite.
3. Programy sú pripravené na prípravu jedla s hmotnosťou menšou ako 1200 g. Ak pripravujete väčšie porcie, použite
20 21
Page 12
SKSK
vlastné nastavenie.
4. Funkciu Delay Start používajte iba pre potraviny, ktoré sa nemôžu za tento čas skaziť.
5. Potraviny do vnútornej nádoby vkladajte a vyberajte pomocou dreveného alebo plastového náčinia, nikdy
nepoužívajte ostré alebo kovové náčinie, aby ste nepoškodili povrch nádoby.
6. Používanie príslušenstva:
• Pri výbere programu Para vložte do vnútornej nádoby (12) stojan na varenie v pare (21) a potom vložte nádobu
na varenie v pare (20).
• Pri výbere programu Smaženie vložte do vnútornej nádoby (12) naparovací stojan s držadlami (15).
• Pri výbere programu Pomalé varenie, Jogurt alebo Fritovanie môžete použiť sklenenú pokrievku (11).
• Pri výbere programu Fritovanie (pri použití teplovzdušného veka) vložte do vnútornej nádoby (12) fritovací kôš
(13)
• Na uloženie vrchnákov použite stojan na vrchnák y (14).
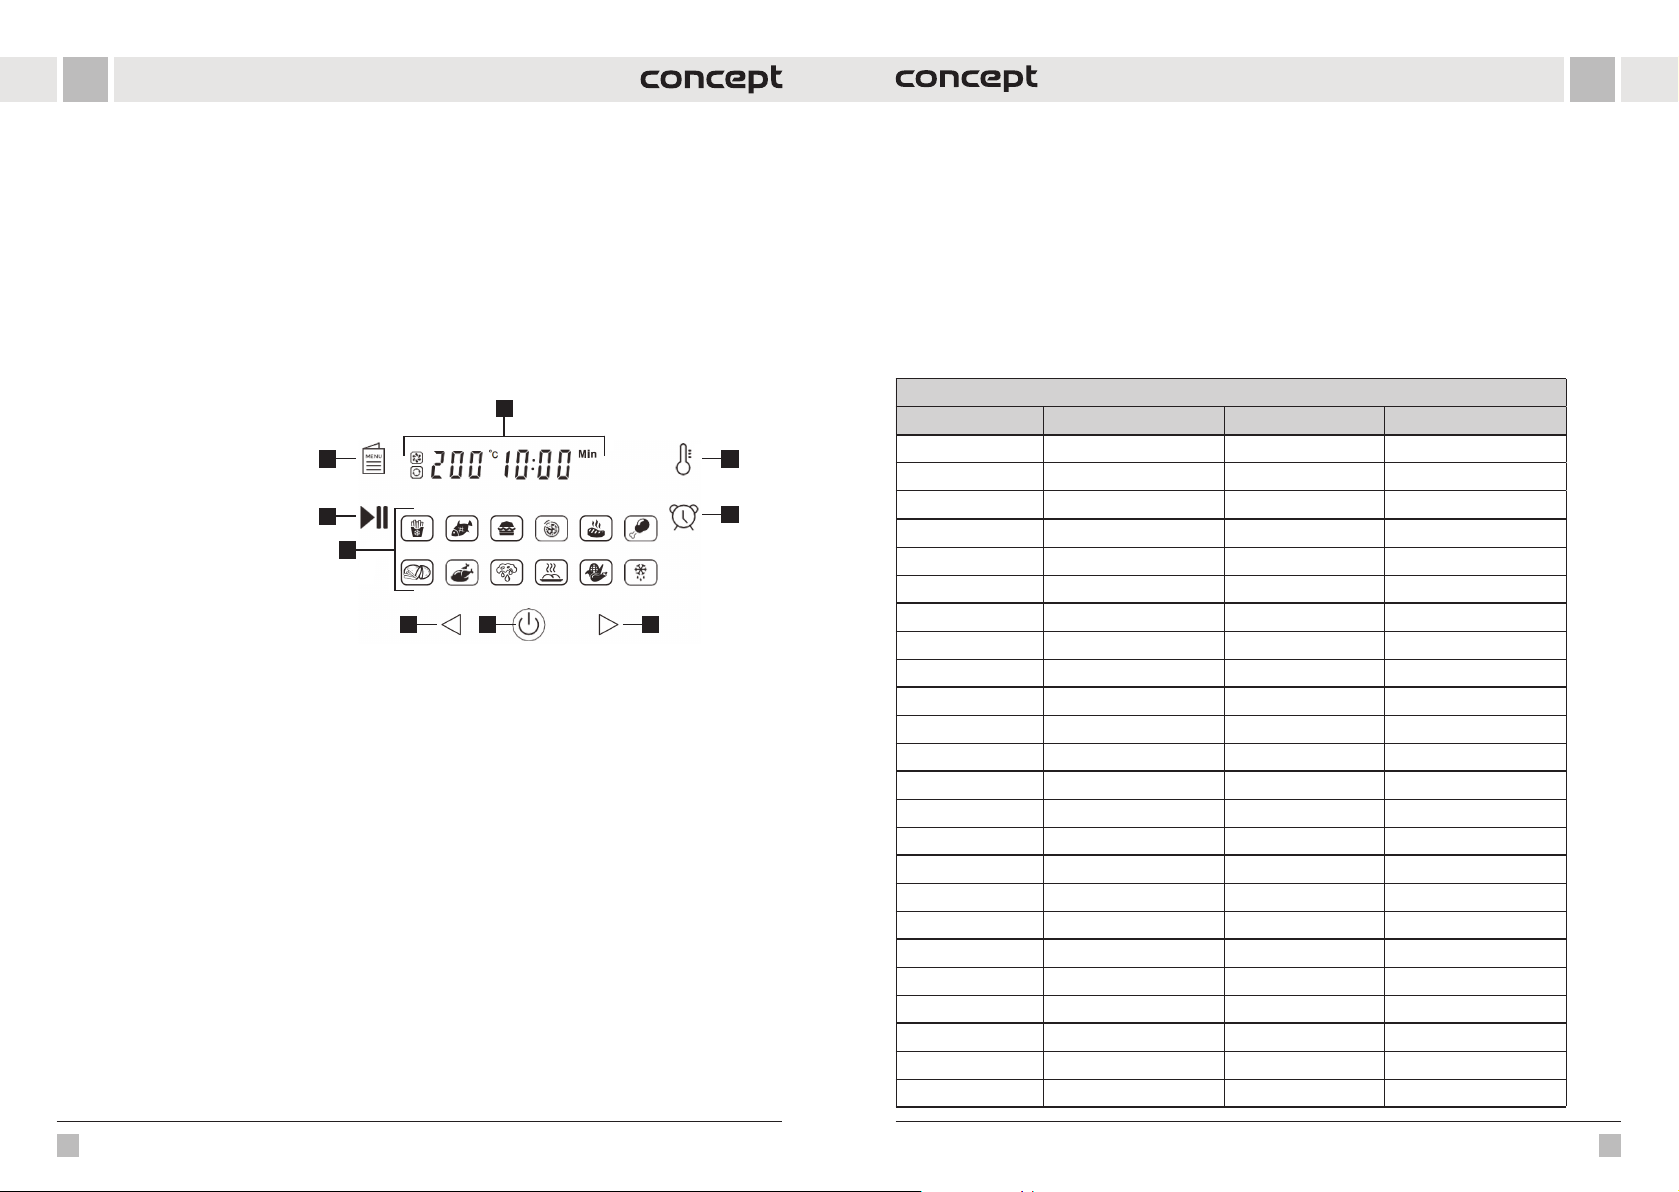
POPIS OVLÁDACIEHO PANELA TEPLOVZDUŠNÉHO ODSÁVAČA PÁR
1. Digitálny displej
2. Nastavenie teploty
3. Nastavenie časovača
4. Zvýšenie teploty/časovača
5. Zapnutie/vypnutie
6. Zníženie teploty/časovača
7. Programy
8. Spustenie/pozastavenie
9. Výber prednastavených programov
POUŽÍVANIE HRNCA S HORÚCOVZDUŠNOU POKRIEVKOU (3)
Hrniec s teplovzdušnou pokrievkou pracuje s horúcim vzduchom; nikdy nenapĺňajte hrniec olejom alebo iným
fritovacím médiom.
1. Spotrebič umiestnite na suché a rovné miesto.
2. Zapojte napájací kábel do elektrickej zásuvky.
3. Uistite sa, že vnútorný povrch telesa spotrebiča (5) je suchý a vložte vnútornú nádobu (12) do telesa spotrebiča (5).
4. Vložte potraviny do vnútornej nádoby (12). Poznámka: Ak chcete použiť program fritovania, vložte do vnútornej
nádoby fritovací kôš (13) a vložte do neho potraviny. Fritovací kôš (13) ani vnútornú nádobu (12) nepreplňujte.
5. Ak chcete spotrebič používať ako teplovzdušnú rúru, nasaďte teplovzdušné veko (3).
6. Stlačte tlačidlo zapnutia/vypnutia (5), aby ste sa zapli. Ikony sa rozsvietia a na displeji sa zobrazí predvolené
nastavenie 180 °C a 15 minút.
7. Stlačením tlačidla voľby prednastaveného programu (9) prepnete predvoľby varenia. Ikona zvoleného programu
bliká a na disple ji sa zobrazuje prednas tavená teplota a čas progr amu. Opakovaným stláčaním t lačidla (9) prepnete
na ďalší progra m. Ak chcete zmeniť nas tavenie teplot y, najprv stlač te tlačidlo nastave nia teploty (2)/ak chcete zmeni ť
nastavenie času , stlačte tlačid lo nastavenia času (3) a potom st lačte alebo po držte tlači dlá 4 a 6 na nastavenie tepl oty.
v intervaloch po 5 °C a čas v inter valoch po 1 minúte (len pre 30-minútový program sušenia).
8. Výber potvrďte tlačidlom Štart/Pauza (8). Poznámka: Ak začnete variť, keď je spotrebič ešte studený, predĺžte
čas varenia približne o 2 minúty. Počas predhrievania sa na displeji zobrazuje "PREHEATING" (predhrievanie), po
skončení predhrievania z displeja zmizne a po zapnutí ohrevného telesa sa zobrazí len "HEATING" (ohrievanie).
Poznámka: Ikona ventilátora v ľavom hornom rohu svieti počas spusteného programu. Ikona zhasne, keď
ventilátor prestane pracovať.
9. Program môžete kedykoľvek počas varenia pozastaviť stlačením tlačidla Štart/Pauza (8) a opätovným stlačením
tlačidla pokračovať vo varení.
8
7
6
1
29
3
5
4
10. Horúcovzdušnú pokrievku (3) môžete kedykoľvek počas varenia odstrániť, aby ste skontrolovali/priložili alebo
odobrali jedlo. Zvolený program sa preruší. Po opätovnom vložení veka bude program pokračovať v mieste, kde
bol prerušený.
11. Na ukončenie programu vás upozorní zvukový signál a na displeji sa zobrazí len "FINISHED". a tlačidlo zapnutia/
vypnutia (5) bude blikať.
12. Po skončení varenia odpojte spotrebič od elektrickej siete.
Upozornenie: Pri vyberaní horúceho fritovacieho koša/vnútornej nádoby používajte kuchynské rukavice.
Tipy
Počas varenia odporúčame jedlo otáčať, aby sa rovnomerne opieklo alebo premiešalo.
PREDNASTAVENÉ PROGRAMY
Programy na varenie s vekom tlakového hrnca
Programy Množstvo (prispôsobiť) Čas varenia (min) Možné časové rozpätie
Ryža Menej 8 1-99 min
Normálne 12
Viac 15
Polievka Menej 12 1-99 min
Normálne 15
Viac 20
Vajcia Menej 4 1-99 min
Normálne 5
Viac 6
Mäso/Dusenie Menej 20 1-99 min
Normálne 35
Viac 45
Fazuľa/chilli Menej 25 1-99 min
Normálne 30
Viac 40
Hydina Menej 10 1-99 min
Normálne 15
Viac 25
Strukoviny Menej 20 1-99 min
Normálne 40
Viac 45
Hovädzie mäso Menej 30 1-99 min
Normálne 35
Viac 40
22 23
Page 13
SKSK
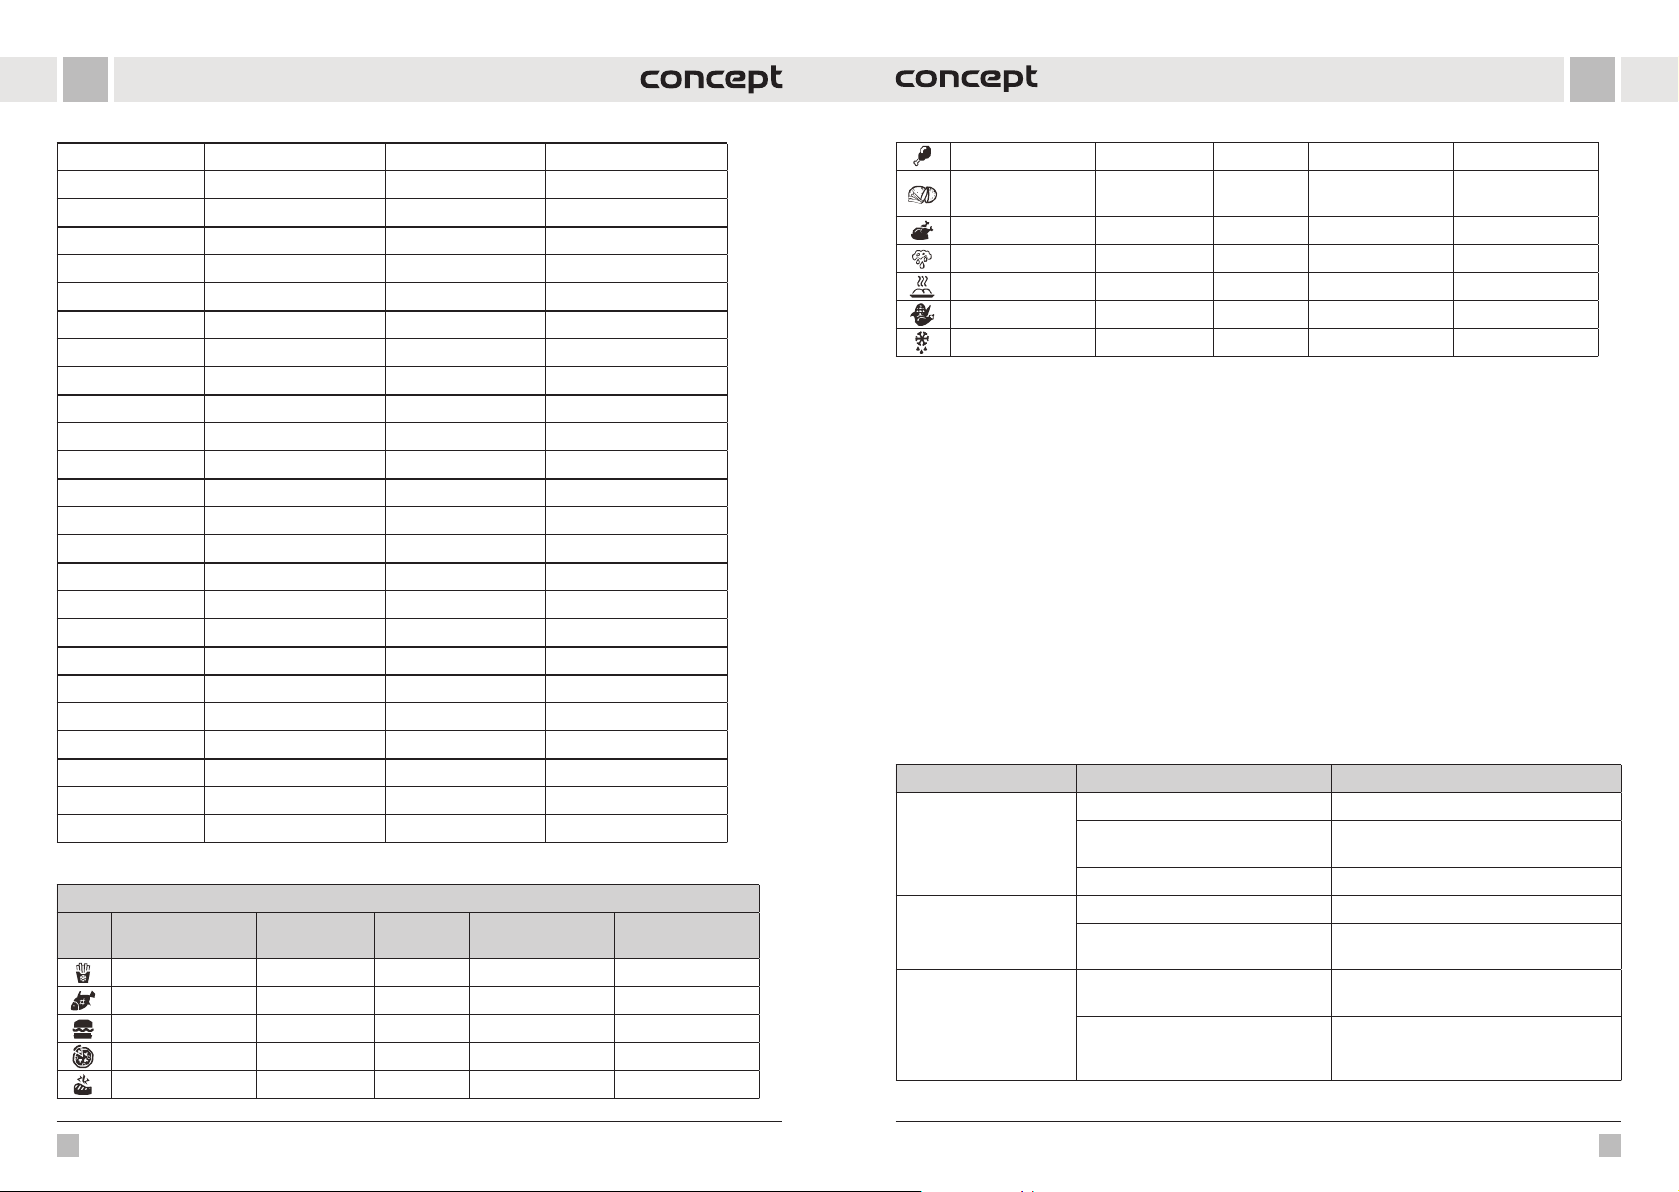
Para Menej 12 1-99 min
Normálne 15
Viac 20
Ovsená kaša Menej 12 1-99 min
Normálne 15
Viac 20
Bravčové mäso/rebrá Menej 13 1-99 min
Normálne 18
Viac 25
Dezert Menej 25 1-99 min
Normálne 40
Viac 50
Rizoto Menej 20 1-99 min
Normálne 35
Viac 45
Zelenina Menej 10 1-99 min
Normálne 15
Viac 20
Smaženie Normálne 30 30 min
Pomalé varenie Menej 30 30 min - 9 h 30 min
Normálne 6 h
Viac 9 h 30 min
Jogurt Menej 24 h 6 h - 24 h
Normálne 8 h
Viac "boiL"
Programy na varenie s teplovzdušnou pokrievkou
Programy Teplota (°C) Čas
Mrazené hranolky 200 15 min 80-200 1-60 min
Ryby 160 15 min 80-200 1-60 min
Hamburger 185 13 min 80-200 1-60 min
Pizza 185 15 min 80-200 1-60 min
Hovädzí steak 175 25 min 80-200 1-60 min
Nastaviteľna
teplota (°C)
Možné časové
rozpätie
Kuracie stehná 200 22 min 80-200 1-60 min
Hranolky zo suro-
vých zemiakov
Celé kurča 180 40 min 80-200 1-60 min
Sušenie 80 2 hod 40-90 1-12 hod
Grilovanie 160 10 min 160 1-30 min
Zelenina 180 15 min 80-200 1-60 min
Rozmrazovanie 50 5 min 50 1-60 min
Poznámka: Tieto nastavenia sú len orientačné. Ak začnete variť, keď je spotrebič ešte studený, predĺžte čas varenia
približne o 2 minúty.
160 30 min 80-200 1-60 min
ČISTENIE A ÚDRŽBA
Spotrebič čistite po každom použití.
Nepoužívajte drsné a agresívne prostriedky, ako sú ostré predmety, škrabky, chemické rozpúšťadlá, riedidlá
a pod.
• Pred čistením spotrebiča odpojte prívodný kábel zo zásuvky elektrického napätia. Nikdy neponárajte napájací
kábel, zástrčku, spotrebič alebo teplovzdušnú krytku do vody alebo inej tekutiny!
• Pred čistením nechajte spotrebič úplne vychladnúť.
• Vonkajší povrch spotrebiča otrite vlhkou handričkou.
• Vnútornú nádobu naplňte horúcou vodou a nechajte chvíľu pôsobiť. Potom možno mäkkou handričkou umyť vo
vode sprídavkom saponátu alebo v umývačke riadu.
• Ďalšie časti spotrebiča možno umyť vo vode s prídavkom saponátu.
• Iba príslušenstvo a vnútornú nádobu je možné umývať v umývačke riadu.
• Po úplnom vysušení dielov spotrebič zostavte a uložte na chladnom a suchom mieste.
RIEŠENIE PROBLÉMOV
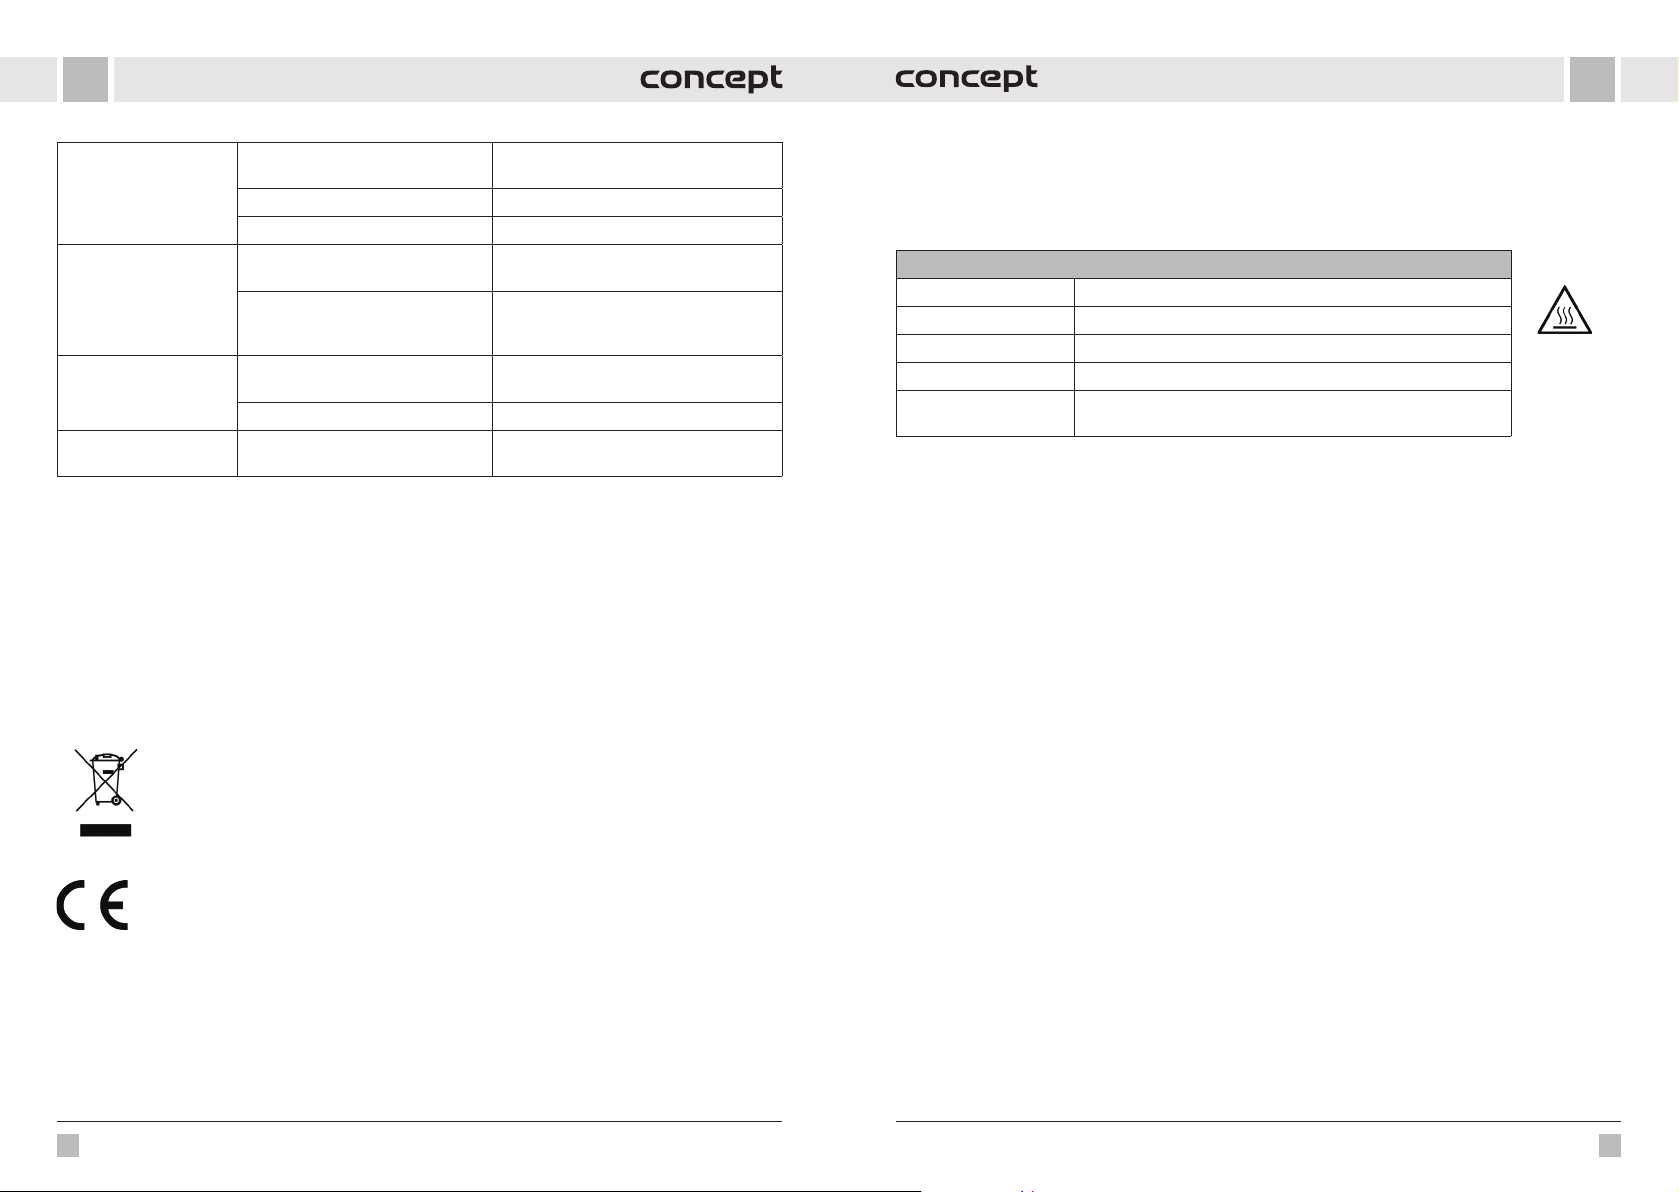
Problém Príčina Riešenie
Spotrebič nie je správne pripojený. Spotrebič zapojte do uzemnenej zásuvky.
Spotrebič nefunguje.
Smažené jedlo nie je
hotové.
Jedlo je usmažené
nerovnomerne.
Nie je nastavený program alebo
časovač.
Veko nie je správne nasadené. Skontrolujte, či je veko nasadené.
Príliš veľa potravín. Vložte do nádoby/koša menšie dávky.
Príliš krátky nastavený čas varenia,
príliš nízka teplota.
Príliš veľká dávka potravín, potraviny
ležiace na sebe.
Potraviny nie sú čerstvé alebo nie sú
správne pripravené.
Nastavte požadovaný program alebo
časovač.
Predĺžte čas varenia, zvýšte teplotu.
Vyberte si niektoré potraviny alebo ich pripravte v polovici varenia pretrepať/obrátiť.
Uistite sa, že používate čerstvé potraviny
a správne ich pripravte na smaženie
(pokvapkajte niekoľkými kvapkami oleja).
24 25
Page 14
SK
PL
Smažené jedlo nie je
chrumkavé.
Zo spotrebiča vychádza
biely dym.
Okolo veka tlakové
pokrievky uniká para.
Z tlakového ventilu uniká
para.
Niektoré potraviny sú vhodnejšie na
použitie v teplovzdušnej fritéze.
Je potrebné malé množstvo oleja. Potraviny zľahka pokvapkajte olejom.
Potraviny sú vlhké. Pred varením potraviny osušte.
Potraviny vo fritéze sú tučné.
Nádoba/kôš ešte obsahuje zvyšky mastnoty z predchádzajúceho
použitia.
Tesnenie nie je správne usadené.
Tlakový ventil (výstup) je zablokovaný. Vyčistite ventil.
Tlakový ventil (výstup) nie je správne
utesnený.
Používajte čerstvé potraviny alebo polotovar y.
Toto nie je vada. Potraviny osušte od prebytočného oleja.
Nádobu/kôš riadne vyčistite.
Prestaňte variť, odstráňte veko a skontrolujte, či je tesnenie usadené.
Opatrne zatvorte ventil.
SERVIS
Údržbu rozsiahlejšieho charakteru alebo opravu, ktorá si vyžaduje zásah do vnútorných častí výrobku, musí urobiť
odborný servis.
OCHRANA ŽIVOTNÉHO PROSTREDIA
• Preferujte recykláciu obalových materiálov a starých spotrebičov.
• Škatuľu od spotrebiča môžete dať do zberu triedeného odpadu.
• Plastové vrecúška z polyetylénu (PE) odovzdajte do zberu materiálu na recykláciu.
Recyk lácia prístroja na konci jeho životnosti
Tento spotrebič je označený v súlade s európskou smernicou 2012/19/EU o elektrickom odpade
a elektrických zariadeniach (WEEE). Symbol na výrobku alebo jeho obale udáva, že tento výrobok
nepatrí do domáceho odpadu Treba ho odovzdať na zberné miesto na recykláciu elektrických
a elektronických zariadení. Zaistením správnej likvidácie tohto výrobku zabránite negatívnym
dôsledkom na životné prostredie a ľudské zdravie. Likvidácia musí byť vykonaná vsúlade s predpismi
na likvidáciu odpadu. Podrobnejšie informácie o recyklácii tohto výrobku zistíte na príslušnom
miestnom úrade, u služby na likvidáciu domového odpadu alebo vobchode, kde ste výrobok kúpili.
Tento výrobok spĺňa všetky základné požiadavky smerníc EU, ktoré pre neho platia.
Zmeny v texte, vzhľade a technických špecifikáciách môžu nastať bez predošlého upozornenia a na tieto zmeny si
vyhradzujeme právo .
PODZIĘKOWANIE
Dziękujemy za zakup produktu marki Concept i życzymy Państwu zadowolenia z naszego produktu przez cały czas
jego uży tkowania. Przed pier wszym użyci em prosimy o uważne przec zytanie cał ej instrukcji obsługi ora z zachowanie
jej na przyszłość. Należy zadbać o to, aby także inne osoby, które będą obchodziły się z produktem, zapoznały się z
niniejszą instrukcją.
Parametry techniczne
Napięcie 220-240 V~50-60 Hz
Pobór mocy 1000 W garnek wielofunkcyjny, 1500 W frytkownica beztłuszczowa
Pojemność pojemnika 5,6 l
Regulowana temperatura fr ytkownica: gotowanie 80-200 °C, suszenie 40-90 °C
Regulator czasowy
Frytkownica: gotowanie 1 - 60 min, suszenie 1 - 12 godz.
Garnek: 1 min - 24 godz.
Uwaga!
Gorąca
powierzchnia
WAŻNE
Przed podłączeniem jednostki do sieci elektrycznej należy sprawdzić wzrokowo, czy jest ona nienaruszona oraz czy nie
została uszkodzona podczas transportu.
WAŻNE PRZESTROGI DOTYCZĄCE BEZPIECZEŃSTWA
• Nie wolno korzystać z urządzenia w sposób inny niż opisany w niniejszej
instrukcji.
• Przed pierwszym użyciem należy usunąć z urządzenia wszystkie materiały
opakowaniowe i marketingowe.
• Należy upewnić się, że podłączane napięcie zgadza się z wartościami
podanymi na tabliczce znamionowej produktu.
• Urządzenie należy umieścić tylko na stabilnej powierzchni, z dala od
innych źródeł ciepła.
• Podczas odłączania urządzenia od gniazda elektrycznego, nigdy nie
wolno wyrywać wtyczki poprzez ciąganie kabla zasilającego, natomiast
należy chwycić wtyczkę i odłączyć ją poprzez wyjęcie.
• Nie wolno dopuszczać dzieci ani osób ubezwłasnowolnionych do obsługi
urządzenia. Urządzenia należy używać poza ich zasięgiem.
• Osoby o ograniczonej zdolności ruchowej, zmniejszonym postrzeganiu
zmysłowym, niewystarczającej zdolności umysłowej lub osoby, które
nie zapoznały się z obsługą, mogą korzystać z urządzenia tylko pod
nadzorem osoby odpowiedzialnej i zapoznanej z obsługą.
• W przypadku używania urządzenia w pobliżu dzieci należy zachować
szczególną ostrożność. Nie wolno używać urządzenia jako zabawki.
• Nie wolno zasłaniać urządzenia.
• Przed przystąpieniem do montażu lub demontażu urządzenia
należy odłączyć kabel zasilający od gniazda elektrycznego.
26
27
Page 15
PLPL
• Przed czyszczeniem i po użyciu należy wyłączyć urządzenie oraz
odłączyć go od gniazda elektrycznego.
• Należy utrzymywać urządzenie w czystości; trzeba unikać przedostawania
się ciał obcych do kratek. Mogą one spowodować poważne obrażenia,
zwarcie, uszkodzenie urządzenia albo pożar.
• Nie wolno używać urządzenia, gdy kabel lub wtyczka są uszkodzone.
Usterkę należy natychmiast usunąć, zwracając się do autoryzowanego
centrum serwisowego.
• Nie wolno używać urządzenia, gdy nie pracuje ono prawidłowo, zostało
upuszczone, uszkodzone lub zanurzone w cieczy. Należy przekazać go do
autoryzowanego centrum serwisowego w celu przebadania i naprawy.
• Urządzenie jest przeznaczone tylko do użytku domowego, a nie nadaje
się do użytku komercyjnego.
• Nie używaj urządzenia na zewnątrz.
• Nie zaleca się używania przedłużacza, ponieważ może się on
przegrzać i spowodować zagrożenie pożarem. Jeśli konieczne jest
użycie przedłużacza, należy upewnić się, że zasilanie elektryczne jest
kompatybilne z urządzeniem, a gniazdko jest uziemione.
• Podczas pracy urządzenia nie należy nim poruszać ani nim potrząsać.
• Nie wkładać do urządzenia materiałów łatwopalnych (papier, plastik).
• Nie wolno dotykać urządzenia wilgotnymi lub mokrymi rękami.
• Nie wolno zanurzać kabla zasilającego, wtyczki ani urządzenia
wwodzie lub innej cieczy. Nie wylewać wody ani innych płynów na
elementy elektryczne i złącza.
• Nie wolno naprawiać urządzenia we własnym zakresie. Należy zwrócić
się do autoryzowanego serwisu.
• Dzieci w wieku 8 lat lub więcej oraz osoby o ograniczonej sprawności
ruchowej lub umysłowej, lub bez odpowiedniego doświadczenia
i wiedzy, mogą korzystać z urządzenia tylko pod warunkiem, że są
one nadzorowane, albo zapoznały się z instrukcją bezpiecznej obsługi
urządzenia, i rozumieją ewentualne zagrożenia. Przeprowadzane przez
użytkownika czynności w ramach czyszczenia i konserwacji nie mogą
być wykonywane przez dzieci, chyba że ukończyły one 8 lat i są pod
nadzorem. Dzieci poniżej 8 lat należy trzymać z dala od urządzenia i jego
kabla zasilającego. Dzieciom nie wolno bawić się z urządzeniem.
• Nie wolno dotykać gorących powierzchni.
• Nie wolno zostawiać kabla zasilającego zwisającego poza krawędź stołu
lub blatu kuchennego. Kabel zasilający nie może dotykać gorących
powierzchni.
• Nie wolno umieszczać urządzenia w pobliżu palnika gazowego lub
elektrycznego. Nie należy umieszczać urządzenia na płycie grzewczej.
Upewnij się, że urządzenie jest umieszczone w dobrze wentylowanym
miejscu, z dala od gorących powierzchni, łatwopalnych materiałów
(zasłony, obrusy) i wilgotnego otoczenia.
• UWAGA: Powierzchnie urządzenia mogą być bardzo gorące. Urządzenie
należy trzymać wyłącznie za uchwyt i używać sprzętu ochronnego,
takiego jak rękawice kuchenne.
• Należy zadbać szczególnie o to, aby do urządzenia nie przedostała
się woda lub inna ciecz. Mogłoby to spowodować porażenie prądem
elektrycznym.
• Żywność należy zawsze umieszczać w koszu urządzenia, aby zapobiec jej
kontaktowi z elementem grzejnym.
• W czasie pracy lub zaraz po wyłączeniu urządzenia nigdy nie dotykaj
jego powierzchni wewnętrznych. Zaczekaj, aż urządzenie wystarczająco
ostygnie.
• Nie podłączaj i nie obsługuj urządzenia mokrymi rękami.
• Pokrywa do smażenia na powietrzu: podczas gotowania gorąca para jest
uwalniana przez wylot.
• Należy trzymać ręce i twarz w bezpiecznej odległości od wylotów
powietrza.
• Pokrywa szybkowaru: należy uważać na gorącą parę i powietrze
wydostające się z zaworu ciśnieniowego. Nie umieszczać rąk, twarzy ani
żadnych przedmiotów nad wylotem pokrywy szybkowaru.
• Nie używaj urządzenia, jeśli masz rozrusznik serca, aparat słuchowy itp.
Przed użyciem urządzenia należy skonsultować się z lekarzem
• Nie używaj akcesoriów innych niż zalecane przez producenta.
• Nie podłączać urządzenia do zewnętrznego wyłącznika czasowego
• Zabezpieczenie przed przegrzaniem: jeśli bezpiecznik termiczny zadziała,
urządzenie nie będzie działać. Przed ponownym uruchomieniem należy
odłączyć urządzenie od zasilania i poczekać, aż całkowicie ostygnie.
• Jeśli w trakcie pracy zauważysz ciemny dym uchodzący z urządzenia,
wyłącz go natychmiast i skontaktuj się z autoryzowanym centrum
serwisowym. Przed czyszczeniem pozostaw urządzenie do ostygnięcia
przez co najmniej 30 minut.
28 29
Page 16
PLPL
c
Nieprzestrzeganie wskazówek producenta, patrz przestrogi
dotyczące bezpieczeństwa, może prowadzić do nieobjęcia gwarancją
ewentualnej naprawy.
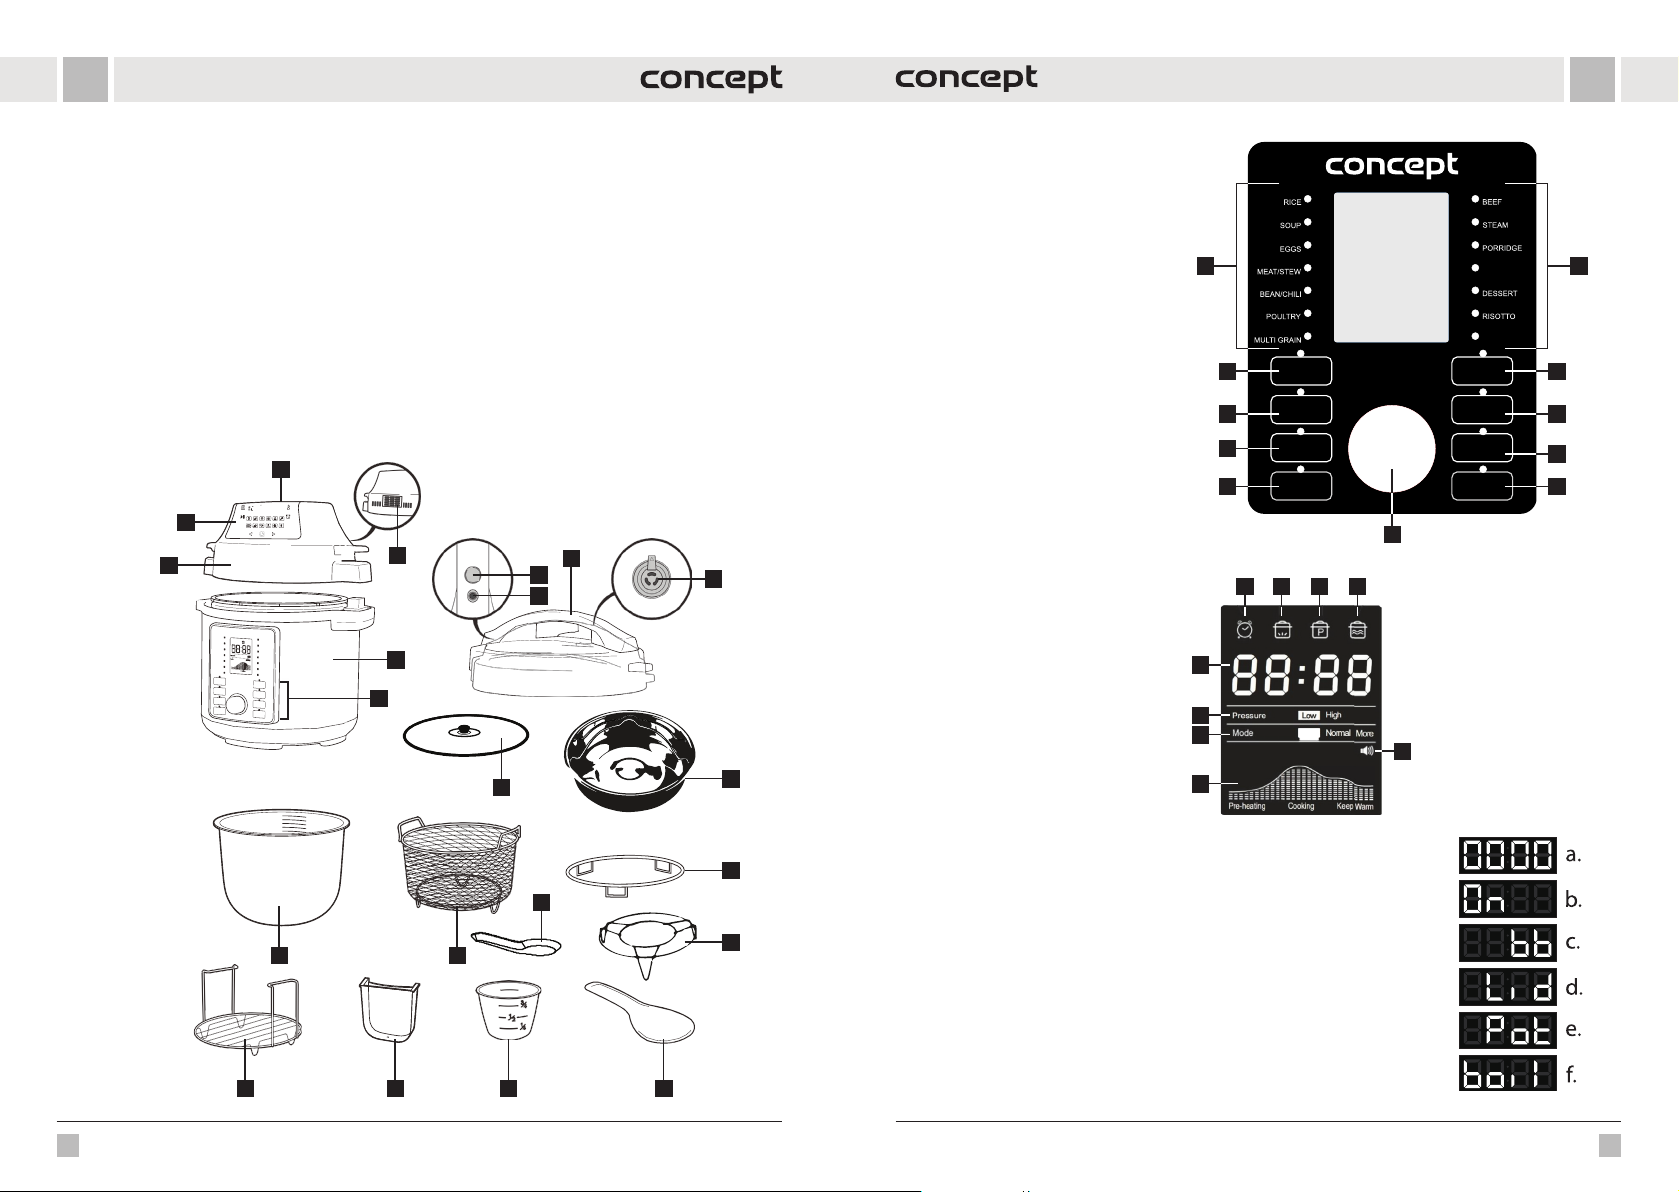
OPIS PRODUKTU
1 Dopływ powietrza
2 Wylot powietrza
3 Pokrywa gorącego powietrza
4 Wyświetlacz pokrywy gorącego powietrza
5 Korpus urządzenia
6 Panel sterowania garnka wielofunkcyjnego
7 Pokrywa szybkowaru
8 Przycisk zwalniający pokrywę
9 Zawór bezpieczeństwa
10 Zawór ciśnieniowy
11 Szklana pokrywat
1
4
3
2
5
6
12 Pojemnik wewnętrzny
13 Kosz do smażenia
14 Stojak na pokrywę
15 Stojak z uchwytami
16 Pojemnik kondensacyjny na nadmiar wody
17 Kubek pomiarowy
18 Płytka łyżka
19 Głęboka łyżka (chochla)
20 Garnek do gotowania na parze
21 Stojak do gotowania na parze
7
8
10
9
11
20
OPIS PANELU STEROWANIA
GARNKA WIELOFUNKCYJNEGO
1 Zaprogramowane programy
2 Program jogurtowy
3 Wolne gotowanie
4 Ustawienie niskiego/wysokiego ciśnienia
5 Utrzymywanie temperatury/Anuluj
6 Smażenie
7 Opóźniony start
8 Ustawienie ręczne
9 Start
10 Pokrętło sterowania
OPIS WYŚWIETLACZA
A Wskaźnik opóźnionego startu
B Wskaźnik podgrzewania
C Wskaźnik ciśnienia
D Wskaźnik utrzymania temperatury
E Wskaźnik włączenia/wyłączenia dźwięku
F Wskaźnik postępu
G Wskaźnik trybu
H Wskaźnik poziomu ciśnienia
I Wyświetlacz czasu i ostrzeżeń
RÝŽE
POLÉVKA
VEJCE
MASO / DUŠENÍ
FAZOLE / CHILLI
DRŮBEŽ
LUŠTĚNINY
2 6
POMALÉ VAŘENÍ
SLOW COOK
3
4
UDRŽENÍ TEPLOTY
5
KEEP WARM/CANCEL
JOGURT
YOGURT
TLAK
PRESSURE
LEVEL
/ ZRUŠIT
Pressure
Mode
Pre-heating
High
Low
Less Normal More
Cooking Keep Warm
HOVĚZÍ
PÁRA
OVESNÁ KAŠE
VEPŘOVÉ /
ŽEBÍRKA
PORK&RIBS
DEZERT
RIZOTO
ZELENINA
VEGETABLES
SMAŽENÍ
SAUTE
ODLOŽENÝ START
DELAY START
RUČNÍ NASTAVENÍ
ADJUST
START
10
A B C D
I
H
G
E
F
11
7
8
9
14
19
Na wyświetlaczu LED mogą wyświetlać się następujące komunikaty:
a. Garnek jest gotowy do użycia, ale program nie został wybrany.
b. Garnek nagrzewa się do wymaganej temperatury
12 13
21
c. Funkcja „Keep warm” – podtrzymywanie temperatury w garnku
d. Pokrywka znajduje się w niewłaściwym położeniu lub jej brakuje
e. Brak naczynia wewnętrznego w garnku
f. boiL (gotowanie) pojawia się w trybie More (Więcej) dla programu Yoghurt (Jogurt).
15
16 17 18
30 31
Page 17
PLPL
PRZED PIERWSZYM WŁĄCZENIEM
• Usuń wszystkie materiał y opakowaniowe z urządzenia.
• Usuń wszystkie etykiety i naklejki z urządzenia.
• Umyć pojemnik wewnętrzny (12) gorącą wodą.
• Dokładnie wytrzeć urządzenie szmatką wewnątrz i na zewnątrz.
• Umyj akcesoria gorącą wodą z mydłem i nieścierną gąbką.
Uwaga: Rozgrzewaj urządzenie przez 10 minut bez jedzenia. Urządzenie może wydzielać nieszkodliwy dym
i delikatny zapach.
• Podczas pracy urządzenia należy pozostawić co najmniej 13 cm wolnej przestrzeni wokół urządzenia.
Montaż szklanej pokrywy
Szklanej pokrywy można używać z funkcjami Wolnego gotowania i
Utrzymywania temperatury.
Sposób montażu uchwytu pokazano na ilustracji.
1. Uchwyt
2. Podstawa uchwytu
3. Korpus szklanej pokrywy
4. Uszczelka
5. Podkładka
6. Śruba
1
2
3
5
4
6
INSTRUKCJA OBSŁUGI
UŻYCIE GARNKA W TRYBIE SZYBKOWARU (7)
1. Umieść urządzenie w suchym i równym miejscu.
2. Umieść pojemnik na nadmiar wody (16) z tyłu urządzenia,
patrz rys. 1.
3. Przygotuj pokrywkę szybkowaru (7), zob. rys. 2.
• Pociągnąć za metalowy występ na spodzie pokrywy, aby zdjąć pokrywę ochronną, na której zamontowana jest
uszczelka. Uszczelkę można wyjąć i wyczyścić. Upewnij się, że uszczelka nie jest nigdzie uszkodzona ani rozdarta.
W przypadku uszkodzenia konieczna jest wymiana. Upewnij się, że zawór pływakowy jest czysty i może się
swobodnie poruszać.
Uwaga: Jeśli pokrywa szybkowaru została już zamontowana na urządzeniu, należy ją zdjąć w celu przygotowania,
naciskając czerwony przycisk i obracając uchwyt w kierunku przeciwnym do ruchu wskazówek zegara, a następnie
podnosząc go do góry.
Uszczelnione
Rys. 2
Wyładowanie pary
Rys. 1
4. Wyjmij pojemnik wewnętrzny (12). Całkowita objętość żywności i wody nie powinna przekraczać 2/3
objętości pojemnika wewnętrznego. Jeśli gotowana będzie żywność, której objętość zwiększy się
podczas gotowania (np. ryż), nie należy napełniać pojemnika więcej niż do połowy jego pojemności.
Uwaga: Niektóre potrawy, takie jak mus jabłkowy, żurawina, płatki owsiane, makaron, rabarbar lub spaghetti
mogą się pieni ć i pękać, zaty kając zawór ciśnieniow y (wylot). Potraw y te nie powinny być gotowane w sz ybkowarze.
Uwaga: nie używaj szybkowaru do smażenia na oleju.
5. Upewnij się, że wewnętrzna powierzchnia korpusu urządzenia (5) jest sucha i umieść wewnętrzny pojemnik (12)
w korpusie urządzenia (5).
6. Załóż pokrywę dociskową (7) i przekręć ją zgodnie z ruchem wskazówek zegara. Po usłyszeniu kliknięcia pokry wa
jest prawidłowo osadzona. Prawidłowe uszczelnienie pokrywy jest wskazywane przez wyrównane strzałki na
krawędzi pokrywy i krawędzi urządzenia.
7. Należy pamiętać, że zawór ciśnieniowy (10) musi być swobodnie ruchomy, aby garnek działał prawidłowo.
8. Ustaw zawór ciśnieniowy w poz ycji "Sealed", co sprawi, że garnek będzie gotowy do użycia.
9. Podłącz przewód zasilający do wtyczki urządzenia, a następnie do gniazdka elektrycznego. Na wyświetlaczu
pojawi się "00 00".
10. Obracaj pok rętłem sterowania, aby przewijać zaprogramowane programy (1) (dodatkowe programy po naciśnięciu
odpowied niego prz ycisku pro gramu) lub ustawić c zas gotowan ia. Potwier dzić wyb rany program (wsk aźnik zaś wieci
się) za pomocą przycisku Start. Aby ustawić zaprogramowany czas trwania programu, naciśnij pokrętło i obróć je,
aby wybr ać żądany cza s, a następnie pot wierdź w ybór, naciskając pr zycisk Star t. Uwaga: Naciśnij p rzycisk us tawiania
ciśnienia, aby przełączać między niskim i wysokim ciśnieniem. i wysokim ciśnieniem. Domyślnym ustawieniem jest
wysokie ciśnienie. Dostosuj ustawienie ciśnienia po wybraniu programu i czasu gotowania, potwierdź ustawienie
przyciskiem Start. Naciśnij przycisk Manual Settings (Ustawienia ręczne), aby wybrać ilość jedzenia, przełączając
między opcjami Less (Mniej), Normal (Normalnie) i More (Więcej). Ustawieniem domyślnym jest Normal.
Uwaga: Czas gotowania należy dostosować do ilości jedzenia.
11. Garnek zac zyna się nagr zewać do żądanej te mperatury (w yświetlac z pokazuje "O n", świeci się ikona podgr zewania).
a zawór pływakowy podnosi się. Po osiągnięciu żądanej temperatury rozpoczyna się odliczanie ustawionego
czasu. W tym momencie gotowanie odbywa się już pod ciśnieniem (świeci się ikona ciśnienia), pokrywa jest
zablokowana, a garnka nie można otworzyć. NIGDY NIE PRÓBUJ OTWIERAĆ GARNKA NA SIŁĘ!
12. Po zakończeniu gotowania rozlegnie się sygnał dźwiękowy, a kuchenka automatycznie przełączy się w tryb
utrzymywania ciepła. Na w yświetlaczu pojawi się "bb" i zaświeci się ikona utrz ymywania ciepła.
13. Ustawienie garnka można anulować w dowolnym momencie, naciskając przycisk Keep Warm/Cancel (5).
14. Dźwięk wyłączony/włączony: aby zmienić tryb dźwięku, przytrzymaj przycisk utrzymywania temperatury/
anulowania pr zez 3 sekundy, aż ikona dźwi ęku na wyświetlac zu zmieni się. Ostrze żenia dotyczące be zpieczeństw a
są zawsze włączone.
Po zakończeniu się gotowania można zwolnić ciśnienie na dwa sposoby:
1. Po zakończeniu się gotowania ciśnienie stopniowo spada. Zależnie od ilości płynu może to zająć od 15 do 30min.
Zawór pływakowy stopniowo opada, następnie pokrywka odblokowuje się i garnek można bez problemu
otworzyć. Jeśli nie da się otworzyć, zaczekaj trochę dłużej. NIGDY NIE OTWIERAJ GARNKA NA SIŁĘ!
2. Otwieranie pokrywy szybkowaru: chwycić za uchwyt i nacisnąć czerwony przycisk, aby zwolnić pokrywę, obrócić
pokrywę w kierunku przeciwnym do ruchu wskazówek zegara, aż zostanie zwolniona i podnieść, pociągając do
góry. Pokrywę można umieścić na stojaku pokrywy (14).
3. Po za kończeniu gotowania naciśnij pr zycisk utrzy mywania temperatur y/anulowania (5), i za pomo cą łapki przekrę ć
zawór pł ywakowy do pozycji „Wypuszc zanie pary” – zawór p ływakowy opada, pokryw ka odblokowuje się i garnek
można łatwo otworzyć. ZACHOWAJ ZWIĘKSZONĄ OSTROŻNOŚĆ I UŻYWAJ ŚRODKÓW OCHRONY OSOBISTEJ –
RYZYKO OPARZENIA PARĄ!
Funkcja opóźnionego star tu Delay Start:
1. Za pomocą funkcji Delay Start można opóźnić początek gotowania aż o 24 godz.
2. Postępuj zgodnie z instrukcją obsługi, obróć pokrętło, aby wybrać żądany program, a następnie naciśnij przycisk
opóźnienia startu i naciśnij go ponownie, aby ustawić czas opóźnienia rozpoczęcia gotowania. Domyślna wartość
opóźnionego startu to 30 min.
3. Następnie naciśnij przycisk Start. Podczas opóźnionego startu na wyświetlaczu świeci się ikona opóźnionego
startu i w yświetlany jest pozostały czas. Po upł ywie ustawionego czasu rozpoczyna się wybrany program.
32 33
Page 18
PLPL
Wskazówki
1. Po wybraniu opcji Wolne gotowanie, Jogurt lub Smażenie można używać szybkowaru z pokrywką ciśnieniową,
szklaną pokrywką lub bez pokrywki. W przypadku korzystania z szybkowaru bez pokrywy wskaźnik poziomu
ciśnienia znika z wyświetlacza.
2. Zalecamy korzystanie z funkcji „Keep warm” maksymalnie przez 1 godz., później jedzenie traci na jakości.
3. Programy są opracowane do przyrządzania jedzenia o wadze maksymalnie 1200 g. Jeżeli przyrządzasz więcej
pokarmów, skorzystaj z własnych ustawień.
4. Z funkcji Delay Start korzystaj tylko dla żywności, która nie może się zepsuć w ustawionym czasie.
5. Wkładaj i wyjmuj żywność do pojemnika wewnętrznego za pomocą drewnianych lub plastikowych przyborów,
nigdy nie używaj ostrych lub metalowych przyborów, aby uniknąć uszkodzenia powierzchni pojemnika.
6. Korzystanie z akcesoriów:
• Wybierając program gotowania na parze, włóż stojak do gotowania na parze (21) do pojemnika wewnętrznego
(12), a następnie włóż garnek do gotowania na parze (20).
• Wybieraj ąc program Smażenie, włóż s tojak do gotowania na parze z uc hwytami (15) do pojemnika wewnęt rznego
(12).
• W przypadku wybrania programu Wolne gotowanie, Jogurt lub Smażenie można użyć szklanej pokrywy (11).
• W przypadku wybrania programu frytowania (gdy używana jest pokrywa z gorącym powietrzem), umieść kosz
do frytowania (13) w pojemniku wewnętrznym (12).
• Użyj stojaka na pokrywki (14) do przechowywania pokr ywek.
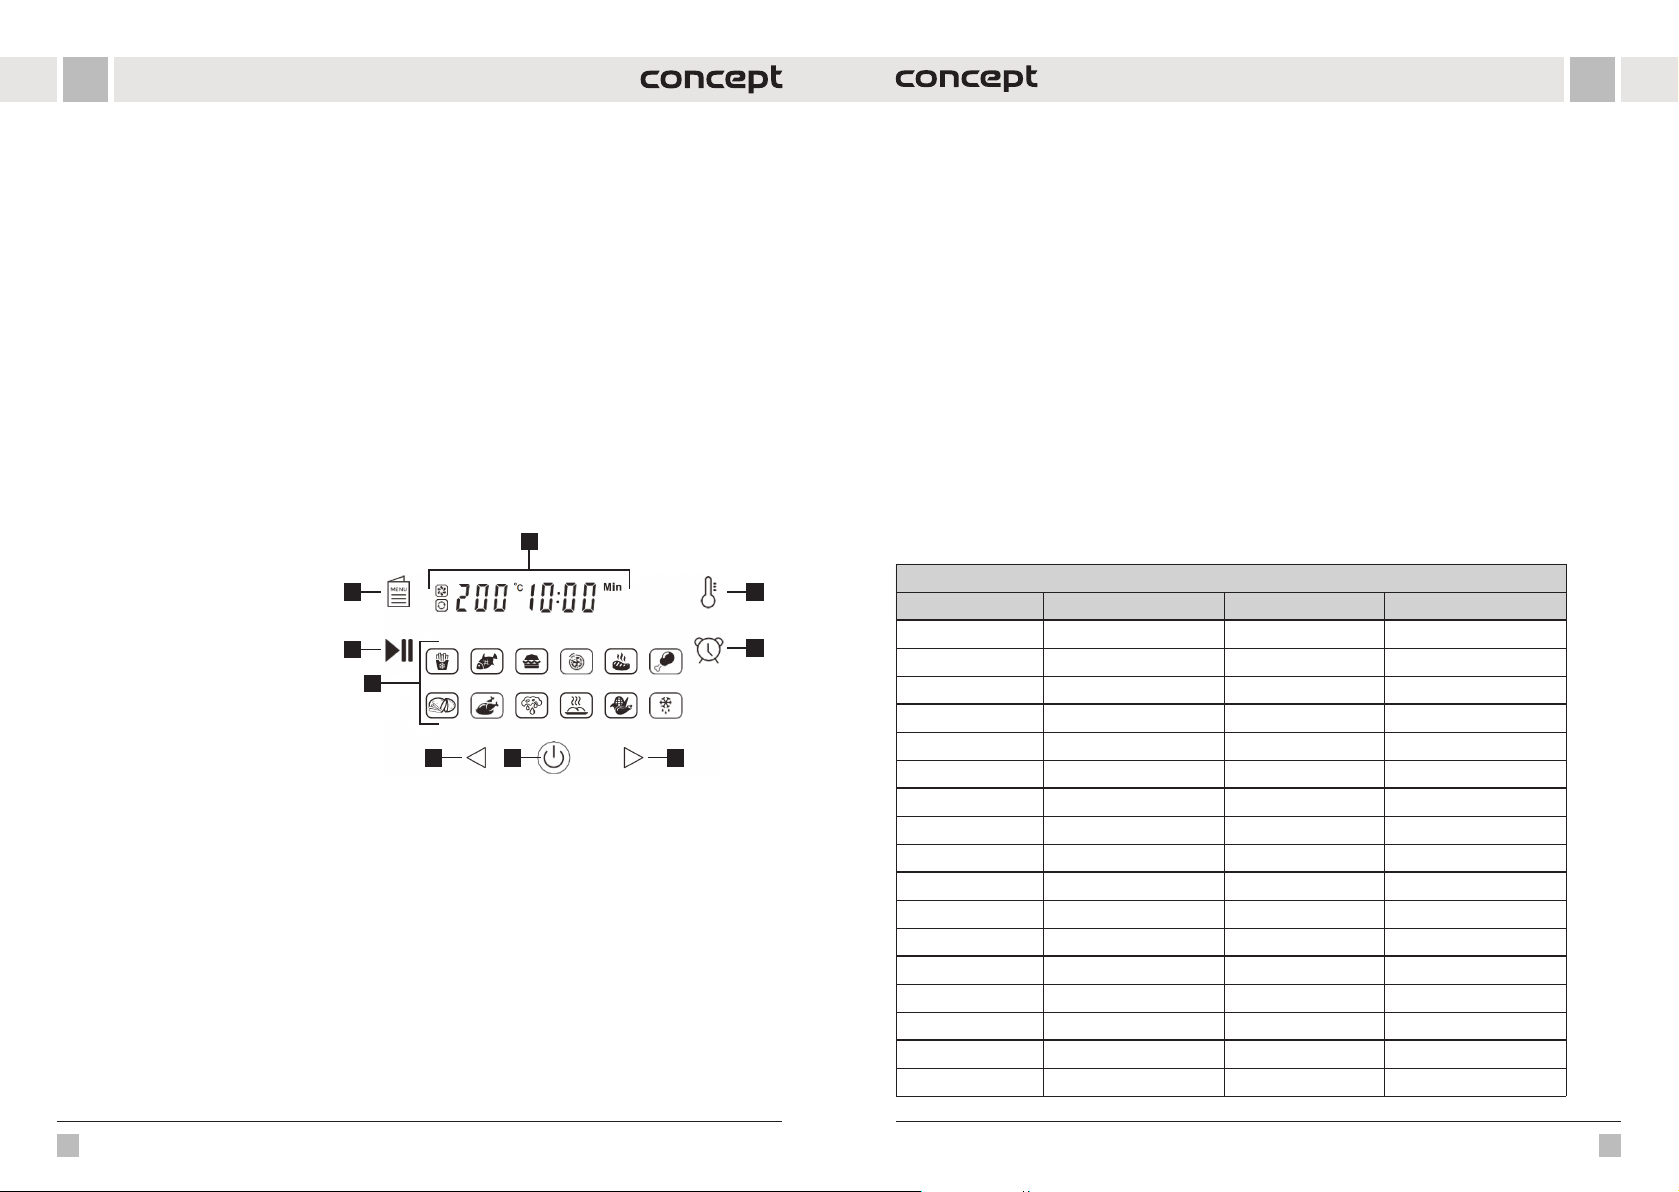
OPIS PANELU STEROWANIA DLA POKRYW Z GORĄCYM POWIETRZEM
1. Wyświetlacz cyfrowy
2. Ustawienie temperatury
3. Ustawienie timera
4. Zwiększenie temperatury/timera
5. Wł/Wył
6. Zmniejszanie temperatury/czasu
7. Programy
8. Start/pauz a
9. Wybór zaprogramowanego programu
UŻYCIE GARNK A W TRYBIE FRYTKOWNICY (3)
Garnek z pokrywką na gorące powietrze działa w oparciu o gorące powietrze; nigdy nie napełniaj garnka olejem lub
innym medium do smażenia.
1. Umieść urządzenie w suchym i równym miejscu.
2. Podłącz przewód zasilający do gniazdka elek trycznego.
3. Upewnij się, że wewnętrzna powierzchnia korpusu urządzenia (5) jest sucha i umieść wewnętrzny pojemnik (12)
w korpusie urządzenia (5).
4. Umieść żywność w pojemniku wewnętrznym (12). Uwaga: Jeśli chcesz użyć programu smażenia, umieść kosz do
smażenia (13) w pojemniku wewnętrznym i umieść w nim żywność. Nie przepełniaj kosza do smażenia (13) ani
pojemnika wewnętrznego (12).
5. Umieść pokrywę z gorącym powietrzem (3), aby używać urządzenia jako piekarnika z gorącym powietrzem.
6. Naciśnij przycisk włączania/wyłączania (5), aby włączyć urządzenie. Ikony zaświecą się, a na wyświetlaczu pojawi
się domyślne ustawienie 180 °C i 15 minut.
7. Naciśnij przycisk wyboru zaprogramowanego programu (9), aby przełączać zaprogramowane programy
gotowania. Ikona wybranego programu miga, a wyświetlacz pokazuje ustawioną temperaturę i czas programu.
Naciśnij kilkakrotnie przycisk (9), aby przejść do następnego programu. Aby zmienić ustawienie temperatury,
należy najpierw nacisnąć przycisk ustawiania temperatury (2)/ aby zmienić ustawienie czasu, należy nacisnąć
8
7
6
1
29
3
5
4
przycisk ustawiania timera (3), a następnie nacisnąć lub przytrzymać przyciski 4 i 6, aby ustawić temperaturę w
odstępach co 5° C i czas w odstępach co 5°C . w odstępach co 5°C i czas w od stępach co 1 minutę (tylko w prz ypadku
30-minutowego programu suszenia).
8. Potwierdź w ybór za pomocą przycisku Star t/Pauza (8). Uwaga: Jeśli rozpoczniesz gotowanie, gdy urządzenie jest
jeszcze zimne, wydłuż czas gotowania o około 2 minuty. Podczas podgrzewania na wyświetlaczu widoczny jest
komunikat "PREHEATING" (podgrzewanie), po zakończeniu podgrzewania komunikat ten znika z wyświetlacza,
a po włączeniu elementu grzejnego wyświetlany jest tylko komunikat "HEATING" (podgrzewanie). Uwaga:
Ikona wentylatora w lewym górnym rogu świeci się podczas działania programu. Ikona zgaśnie, gdy wentylator
przestanie działać.
9. Program można wstrzymać w dowolnym momencie gotowania, naciskając przycisk Start/Pauza (8), a następnie
naciskając go ponownie w celu wznowienia procesu gotowania.
10. Pokrywę z gorącym powietrzem (3) można zdjąć w dowolnym momencie gotowania, aby sprawdzić/dodać lub
wyjąć potrawę. Wybrany program zostanie przerwany. Po ponownym założeniu pokrywy program zostanie
wznowiony od miejsca, w którym został przerwany.
11. Po zakończeniu programu rozlegnie się sygnał dźwiękowy, a na wyświetlaczu pojawi się komunikat "FINISHED"
(Zakończono). a przycisk włączania/wyłączania (5) będzie migać.
12. Po zakończeniu gotowania odłącz urządzenie od zasilania.
Uwaga: Podczas wyjmowania gorącego kosza/pojemnika wewnętrznego należy nosić rękawice kuchenne.
Wskazówki
Zalecamy obracanie żywności podczas gotowania w celu równomiernego przyrumienienia lub mieszania.
WSTĘPNIE USTAWIONE PROGRAMY
Programy do gotowania w trybie szybkowaru
Programy Ilość (dostosuj) Czas gotowania (min) Możliwy okres czasu
Ryż Mniej 8 1-99 min
Normalny 12
Więcej 15
Zupa Mniej 12 1-99 min
Normalny 15
Więcej 20
Jajka Mniej 4 1-99 min
Normalny 5
Więcej 6
Mięso/Duszenie Mniej 20 1-99 min
Normalny 35
Więcej 45
Fasola/Chilli Mniej 25 1-99 min
Normalny 30
Więcej 40
Drób Mniej 10 1-99 min
Normalny 15
34 35
Page 19
PLPL
Więcej 25
Rośliny strączkowe Mniej 20 1-99 min
Normalny 40
Więcej 45
Wołowina Mniej 30 1-99 min
Normalny 35
Więcej 40
Para Mniej 12 1-99 min
Normalny 15
Więcej 20
Kasza owsiana Mniej 12 1-99 min
Normalny 15
Więcej 20
Wieprzowina/żeberka
Deser Mniej 25 1-99 min
Risotto Mniej 20 1-99 min
Warz ywa Mniej 10 1-99 min
Smażenie Normalny 30 30 min
Powolne gotowanie Mniej 30 30 min - 9 godz. 30 min
Jogurt Mniej 24 godz. 6 - 24 godz.
Mniej 13 1-99 min
Normalny 18
Więcej 25
Normalny 40
Więcej 50
Normalny 35
Więcej 45
Normalny 15
Więcej 20
Normalny 6 godz.
Więcej 9 godz. 30 min
Normalny 8 godz.
Więcej "boiL"
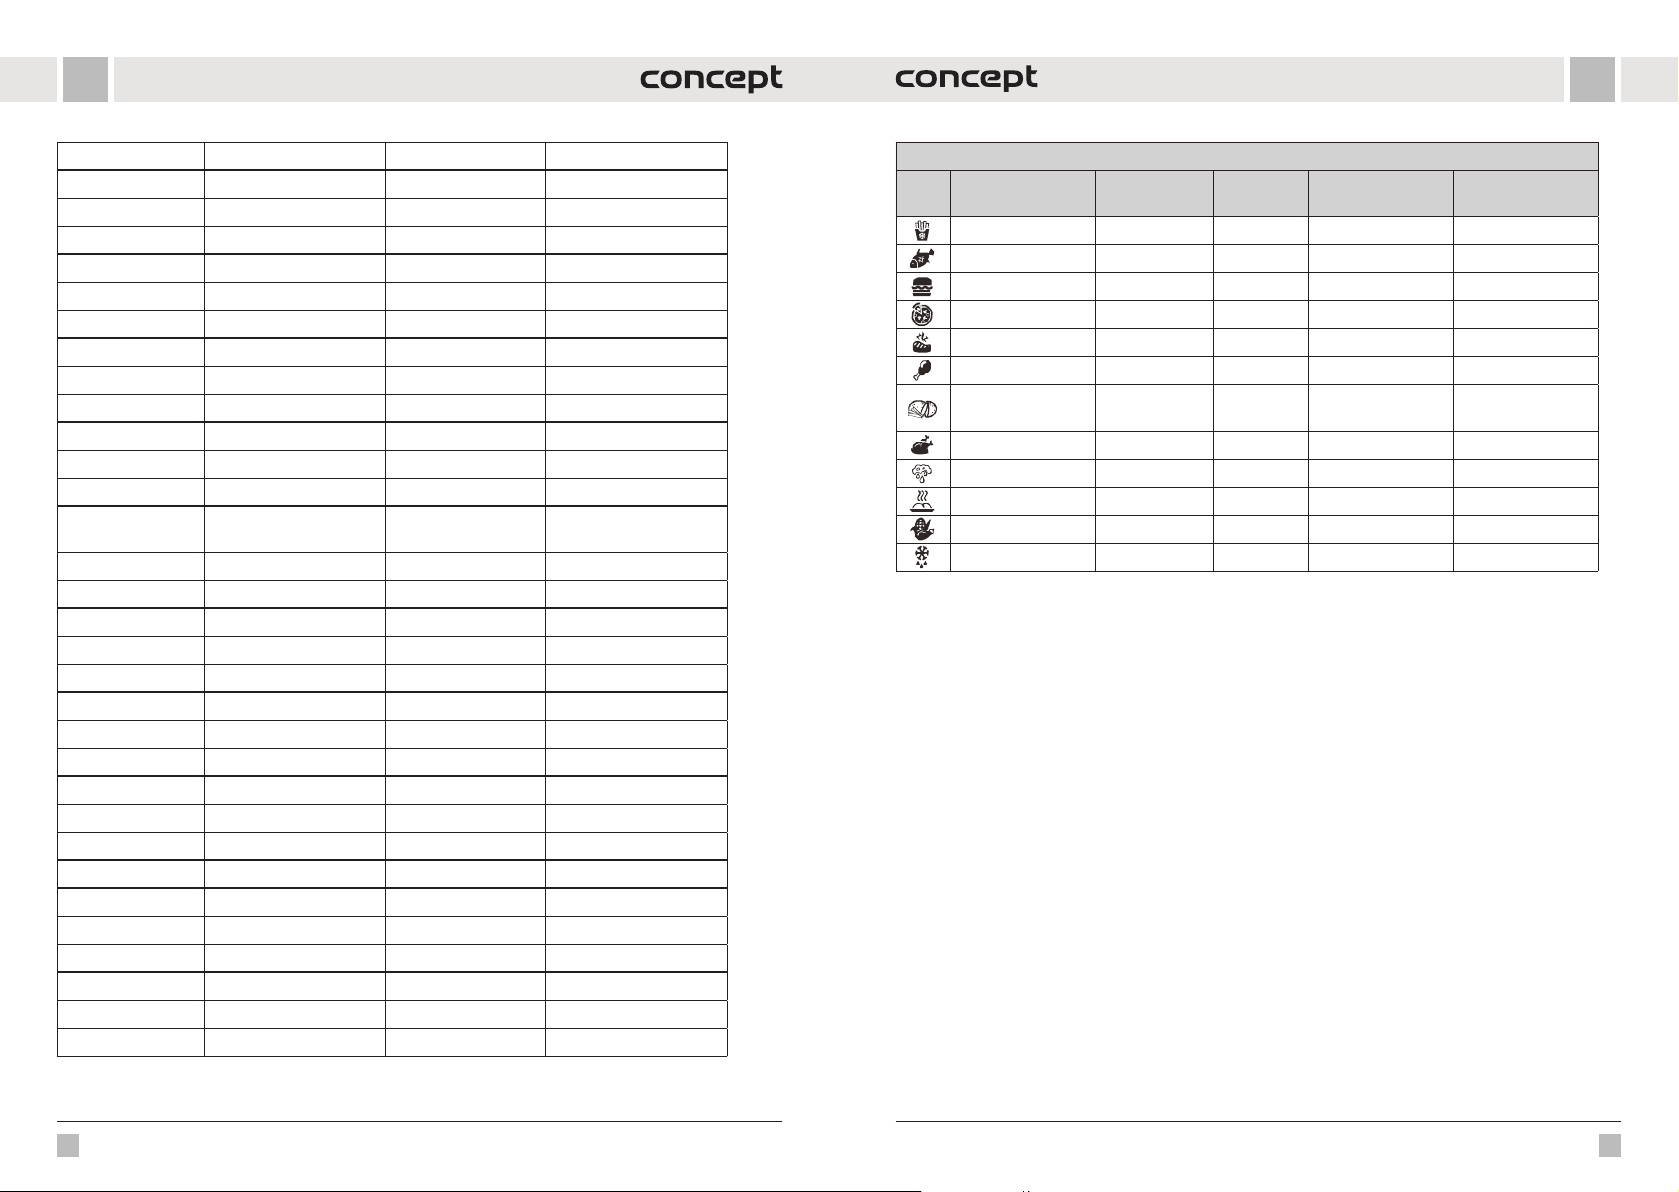
Programy do gotowania z pokrywą na gorące powietrze
Programy
Mrożone frytki 200 15 min 80-200 1-60 min
Ryba 160 15 min 80-200 1-60 min
Hamburger 185 13 min 80-200 1-60 min
Pizza 185 15 min 80-200 1-60 min
Stek wołowy 175 25 min 80-200 1-60 min
Udka z kurczaka 200 22 min 80-200 1-60 min
Frytki z surowych
ziemniaków
Kurczak w całości 180 40 min 80-200 1-60 min
Suszenie 80 2 godz. 40-90 1-12 godzin
Grillowanie 160 10 min 160 1-30 min
Warz ywa 180 15 min 80-200 1-60 min
Rozmrażanie 50 5 min 50 1-60 min
Uwaga: Ustawienia te mają jedynie charak ter orientacyjny. W przypadku rozpoczęcia gotowania, gdy ur ządzenie jest
jeszcze zimne, należy wydłużyć czas gotowania o około 2 minuty.
Temperatura
(°C)
160 30 min 80-200 1-60 min
Czas
Temperatura
regulowana (°C)
Możliwy okres
czasu
CZYSZCZENIE I KONSERWACJA
Oczyść urządzenie po każdym użyciu.
Nie używaj do czyszczenia szorstkich i agresywnych środków, takich jak: ostre przedmioty, skrobaczki,
rozpuszczalniki chemiczne, rozcieńczalniki, itp.
• Przed czyszczeniem zawsze odłącz kabel zasilający od gniazda elektrycznego. Nigdy nie zanurzaj przewodu
zasilającego, w tyczki, urządzenia lub pokryw y gorącego powietrza w wodzie lub innym płynie!
• Przed czyszczeniem zaczekaj, aż urządzenie całkowicie ostygnie.
• Zewnętrzną powierzchnię urządzenia przetrzyj wilgotną ściereczką.
• Napełnij naczynie wewnętrzne gorącą wodą i pozostaw na chwilę do odmoczenia. Następnie można go umyć
miękką ściereczką w wodzie z dodatkiem detergentu, albo w zmywarce.
• Pozostałe części urządzenia można umyć w wodzie z dodatkiem detergentu.
• Tylko akcesoria i pojemnik wewnętrzny można myć w zmywarce.
• Po całkowitym wyschnięciu części zmontuj urządzenie i przechowuj je w chłodnym, suchym miejscu.
36 37
Page 20
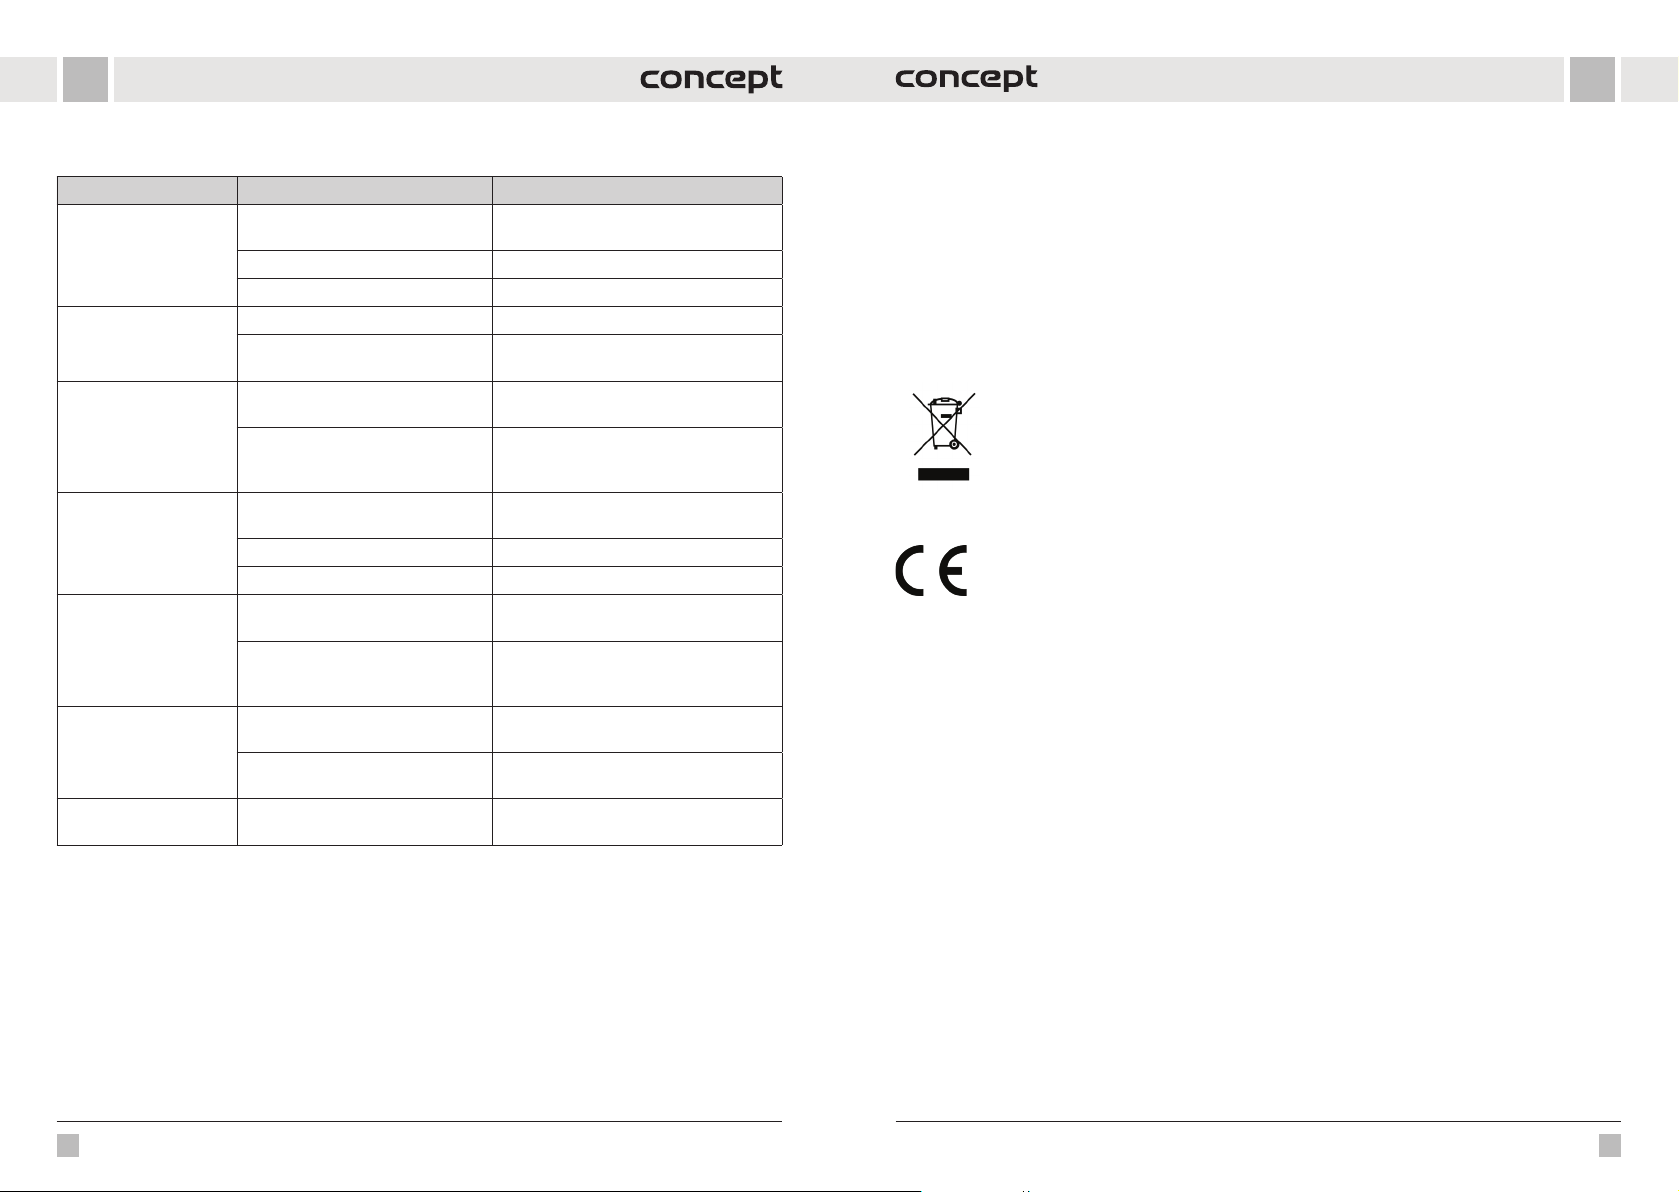
PLPL
ROZWIĄZYWANIE PROBLEMÓW
Problem Przyczyna Rozwiązanie
Urządzenie nie jest prawidłowo
Urządzenie nie działa.
Smażone jedzenie nie jest
gotowe.
Jedzenie jest smażone
nierównomiernie.
Smażone jedzenie nie jest
chrupiące.
Biały dym wydobywający
się z urządzenia.
Para wydobywająca się
z pokrywy szybkowaru.
Para wydobywająca się
z zaworu ciśnieniowego.
podłączone.
Program lub timer nie jest ustawiony. Ustaw żądany program lub timer.
Za dużo jedzenia. Umieść mniejsze partie w pojemniku/ koszu.
Za dużo jedzenia. Umieść mniejsze partie w pojemniku/ koszu.
Zbyt krótki czas gotowania, zbyt niska
temperatura.
Zbyt duża porcja żywności, żywność
leżąca jedna na drugiej.
Nieświeża lub nieprawidłowo przygotowana żywność.
Niektóre potrawy są lepsze do użycia
we frytownicy na gorące powietrze.
Potrzebna jest niewielka ilość oleju. Lekko skrop żywność olejem.
Żywność jest wilgotna. Wysusz żywność przed gotowaniem.
Żywność we frytkownicy jest tłusta.
Pojemnik/koszyk nadal zawiera
pozostałości tłuszczu z poprzedniego
użycia.
Uszczelka nie jest prawidłowo
osadzona.
Zawór ciśnieniowy (wylotowy) jest
zablokowany.
Zawór ciśnieniowy (wylotowy) nie jest
prawidłowo uszczelniony.
Podłącz urządzenie do uziemionego
gniazdka.
Wydłużyć czas gotowania, zwiększyć
temperaturę.
Usuń niektóre potrawy lub wstrząśnij/obróć
je w połowie gotowania.
Upewnij się, że używasz świeżej żywności
i odpowiednio przygotuj ją do smażenia
(skrop kilkoma kroplami oleju).
Używaj świeżej lub częściowo
przygotowanej żywności.
Nie jest to wada. Osusz żywność z nadmiaru
oleju.
Prawidłowo wyczyść pojemnik/kosz.
Przerwać gotowanie, zdjąć pokrywę i sprawdzić, czy uszczelka jest dobrze osadzona.
Wyczyść zawór.
Ostrożnie zamknij zawór.
SERWIS
Bardziej kompleksowe konserwacje lub naprawy wymagające ingerencji w wewnętrzne elementy produktu mogą
być wykonywane wyłącznie przez wykwalifikowany serwis.
OCHRONA ŚRODOWISKA
• Preferujemy rec ykling materiałów opakowaniowych oraz starych urządzeń elektrycznych.
• Karton od urządzenia można oddać w punkcie zbiórki odpadów sortowanych.
• Plastikowe worki z polietylenu (PE) oddajemy w punkcie zbiórki materiałów do recyklingu.
Recykling urządzenia po zakończeniu użytkowania
Urządzenie jest oznakowane zgodnie z dyrektywą europejską 2012/19/EU w sprawie zużytego
sprzętu elektrycznego i elektronicznego (WEEE). Symbol na produkcie lub je go opakowaniu oznacza,
że takiego produktu nie wolno traktować jako odpadu komunalnego. Należy przekazać go do
punktu zbiórki i recyklingu urządzeń elektrycznych i elektronicznych. Zapewnienie prawidłowej
utylizacji produktu zapobiega negatywnemu oddziaływaniu na środowisko i zdrowie ludzi, jakie
mogłoby w ynikać z niewłaściw ej utylizacji produ ktu. Utylizacj ę należy wykonać zgo dnie z przepisami
dotyczącymi postępowania z odpadami. W celu uzyskania szczegółowych informacji na temat
recyk lingu produktu należ y zwrócić się do loka lnego urzędu, firmy zajmującej się utylizacją odpadów
z gospodarstw domowych lub sklepu, w któr ym zakupiono produkt.
Produkt spełnia wszystkie stosowne wymagania podstawowe, nakładane na niego przez dyrektyw y EU.
Tekst, wygląd i specyfikacja techniczna mogą ulec zmianie bez uprzedniego powiadomienia, do czego zastrzegamy
sobie prawo.
38 39
Page 21
HUHU
KÖSZÖNETNYILVÁNÍTÁS
Köszönjük, hogy megvásárolta ezt a Concept márkájú készüléket, és kívánjuk, hogy használata során végig elégedett
legyen termékünkkel.
Az első használat előtt figyelmesen tanulmányozza át az egész használati útmutatót, és őrizze meg. Gondoskodjon
róla, hogy a terméket kezelő valamennyi személy megismerje az útmutató tartalmát.
Műszaki adatok
Feszültség 220-240 V~50-60 Hz
Teljesítményfelvétel 1000 W multifunkciós edény, 1500 W forrólevegős fritőz
Az edény kapacitása 5,6 l
Beállítható hőmérséklet fritőz: főzés 80-200 °C, szárítás 40-90 °C
Időzítő
FONTOS
Az elektromos hálózathoz való csatlakoztatás előtt szemrevételezéssel ellenőrizze, hogy az egység nem sérült, és
aszállítás során sem károsodott.
Edény: 1 perc - 24 óra
fritőz: főzés 1 - 60 perc, szárítás 1 - 12 óra
Vigyázat!
Forró felület
FONTOS BIZTONSÁGI FIGYELMEZTETÉSEK
• Ne használja a terméket az ebben az útmutatóban leírtaktól eltérően.
• Az első használat előtt távolítson el a készülékről minden csomagoló- és
marketinganyagot.
• Ellenőrizze, hogy a csatlakoztatott feszültség megfelel-e a típuscímkén
megadott értékeknek.
• A készüléket csak stabil felületre tegye, más hőforrásoktól távol.
• A készüléket soha ne a kábelnél fogva húzza ki az aljzatból, hanem fogja
meg a csatlakozót, és úgy húzza ki.
• Ne engedje, hogy gyermekek vagy cselekvőképtelen személyek
hozzáférjenek a készülékhez.
• Csökkent mozgásképességgel, csökkent érzékszervi képességekkel
vagy nem megfelelő szellemi alkalmassággal bíró, valamint a használati
útmutatót nem ismerő személyek csak felelős, az útmutatót ismerő
személy felügyelete alatt használhatják a készüléket.
• Legyen különösen óvatos, ha a készüléket gyermekek közelében
használja.
• Ne engedje, hogy a készüléket játékra használják.
• Ne takarja le a készüléket.
• A készülék össze- vagy szétszerelése előtt húzza ki a tápkábelt az
aljzatból.
• Tisztítás előtt és használat után kapcsolja ki a készüléket, és húzza
ki a hálózati aljzatból.
• Tartsa tisztán a készüléket, vigyázzon, nehogy idegen tárgy kerüljön
a rácsok nyílásaiba. Súlyos sérülést, rövidzárlatot vagy tüzet okozhat,
vagy kárt tehet a készülékben.
• Ne hasz nálja a készüléket sérült káb ellel vagy cs atlakozóval, haladékt alanul
javíttassa meg a hibát szakszervizben.
• Ne használja a készüléket, ha nem működik megfelelően, ha leesett,
megsérült vagy nedves lett. Megvizsgálás és javítás céljából vigye
szakszervizbe.
• A készülék csak háztartási használatra alkalmas, kereskedelmi használatra
nem való.
• Ne használja a készüléket szabad téren.
• Hosszabbító kábel használata nem javasolt, mert túlmelegedhet és
tűzveszélyt okozhat. Ha hosszabbító kábelt kell használni, győződjön
meg arról, hogy az elektromos áram kompatibilis a készülékkel, és a
konnektor földelve van.
• Működés közben ne mozgassa vagy rázza a készüléket.
• Ne tegyen gyúlékony anyagokat (papír, műanyag) a készülékbe.
• Ne nyúljon a készülékhez nedves vagy vizes kézzel.
• Se a tápkábelt, se a csatlakozót, se a készüléket ne merítse vízbe
vagy más folyadékba. Ne öntsön vizet vagy más folyadékot az
elektromos alkatrészekre és csatlakozókra.
• Ne javítsa maga a készüléket. Forduljon szakszervizhez.
• Ezt a készüléket csak 8 évnél idősebb gyerekek használhatják, és olyan
csökkent fizikai vagy mentális képességű személyek, akik felügyelet
alatt vannak, vagy ismertették velük a készülék biztonságos használati
módját és tisztában vannak az esetleges veszélyekkel. A felhasználói
karbantartást és tisztítást gyerekek nem végezhetik, ha nem idősebbek
8évnél, és nincsenek felügyelet alatt. A 8 évnél fiatalabb gyerekeket tartsa
távol a készüléktől és a vezetékektől. Gyermekeknek tilos a készülékkel
játszani.
• Ne érjen hozzá a forró felületekhez.
• Ne engedje a kábelt szabadon lelógni az asztal vagy a konyhapult szélén.
Ne engedje, hogy a kábel forró felülettel érintkezzen.
• Ne tegye a készüléket gáz- vagy villanytűzhely közelébe. Ne helyezze a
készüléket a főzőlapra. Ügyeljen arra, hogy a készüléket jól szellőző helyen
40 41
Page 22
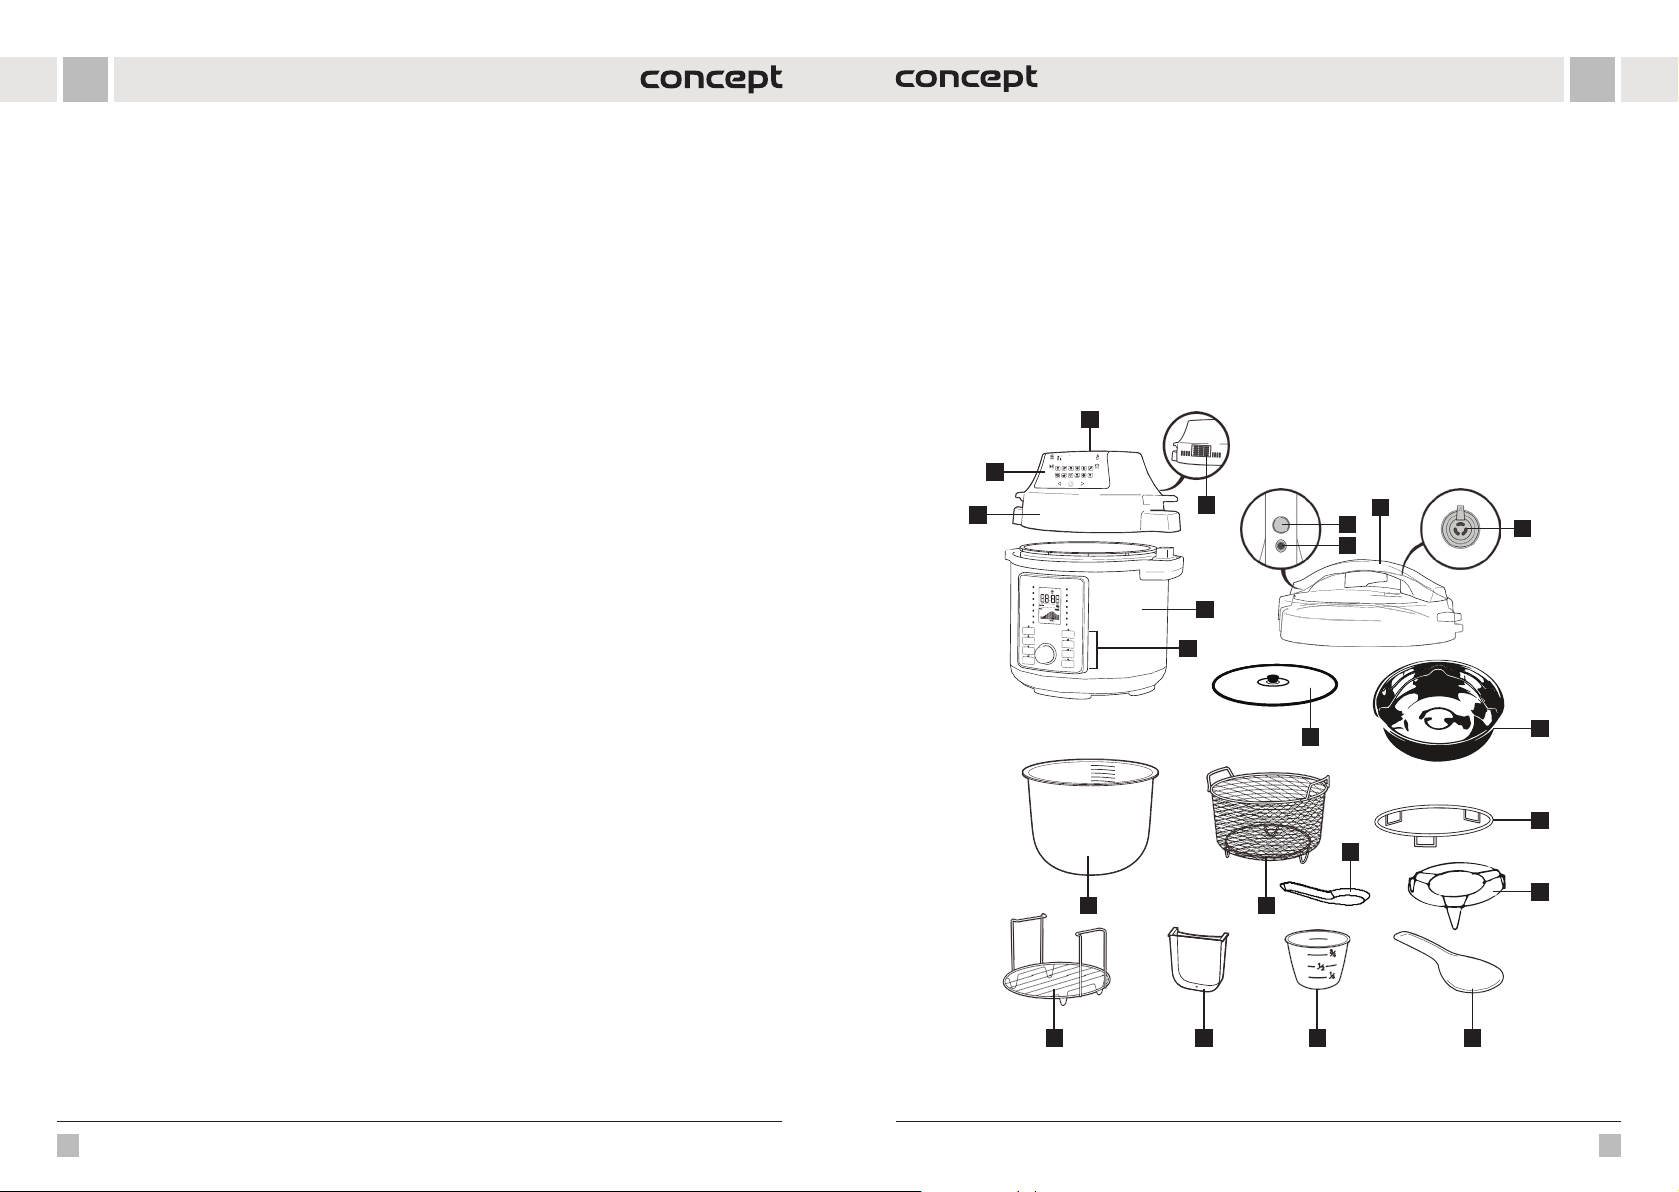
HUHU
c
helyezze el, távol forró felületektől, gyúlékony anyagoktól (függönyök,
terítők) és nedves környezettől.
• FIGYELMEZTETÉS: A készülék felületei nagyon forrók lehetnek.
A készüléket csak a fogantyúnál fogja meg, és használjon védőfelszerelést,
pl.
• konyhai kesztyűt.
• Különösen ügyeljen rá, hogy a készülékbe ne kerüljön víz vagy más
folyadék. Ez áramütést okozhat.
• Mindig tegyen élelmiszert a készülék kosarába, hogy megakadályozza
• a fűtőelemmel való érintkezést.
• Működés közben vagy közvetlenül kikapcsolás után ne érjen hozzá
akészülék belső felületéhez. Várja meg, míg a készülék eléggé kihűl.
• Ne csatlakoztassa és ne kezelje a készüléket nedves kézzel.
• Air fry fedő: Sütés közben forró gőz szabadul fel a levegőkimeneteken
• keresztül, tartsa távol kezét és arcát a levegőkimenetektől.
• Nyomástartó fedő: Ügyeljen arra, hogy a nyomásszelepből forró gőz
és levegő távozik. Ne tegye a kezét, arcát vagy valamilyen tárgyat
a nyomástartó fedő kimenetére.
• Ne használja a készüléket, ha pacemakere, hallókészüléke stb. van.
A készülék használata előtt konzultáljon szakorvosával.
• Ne használjon a gyártó által ajánlottaktól eltérő tartozékokat.
• Ne csatlakoztassa a készüléket külső időzítő kapcsolóhoz.
• Túlmelegedés elleni védelem: Ha a hőbiztosíték kioldódott, a készülék
nem fog működni. Húzza ki a készüléket a konnektorból, és várja meg,
amíg teljesen kihűl, mielőtt újra bekapcsolná.
• Ha működés közben sötét füstöt lát távozni a készülékből, azonnal
kapcsolja ki, és vegye fel a kapcsolatot a szakszervizzel.
• Tisztítás előtt legalább 30 percig hagyja a készüléket hűlni.
Ha nem tartja be a gyártó utasításait, ld. biztonsági utasítások, az
esetleges javításra nem vonatkozik a jótállás.
A TERMÉK LEÍRÁSA
1 Levegő bevezetés
2 Levegő kivezetés
3 Forrólevegős fedő
4 A forrólevegős fedő kijelzője
5 A készülék teste
6 A többfunkciós edény vezérlő panele
7 Nyomástartó fedő
8 Fedő kioldó gomb
9 Biztonsági szelep
10 Nyomástartó szelep
11 Üveg fedő
1
4
3
12 13
12 Belső edény
13 Fritőz kosár
14 Állvány a fedőhöz
15 Állvány fogantyúkkal
16 Kondenzvíz tartály a felesleges víz számára
17 Mérőedény
18 Sekély kanál
19 Mély kanál (merőkanál)
20 Gőzölő edény
21 Állvány gőzöléshez
2
5
6
11
7
8
9
19
10
20
14
21
15
42 43
16 17 18
Page 23
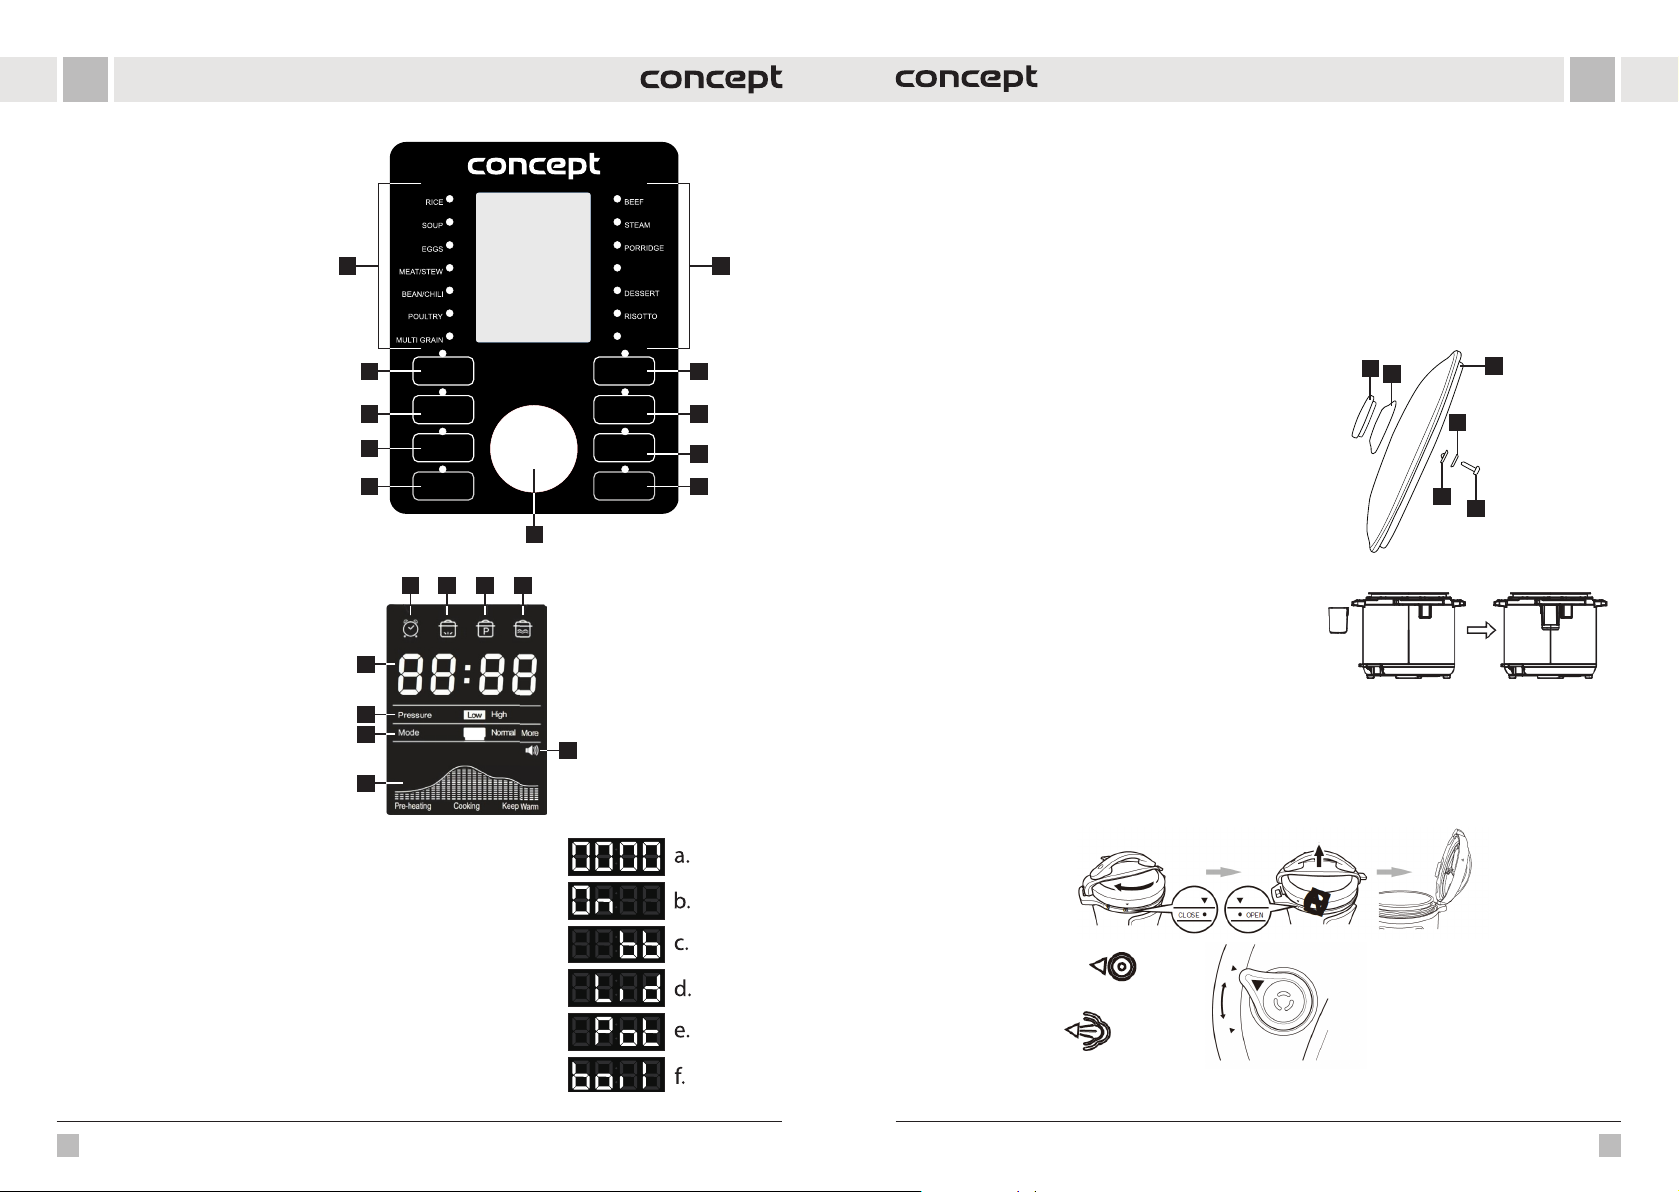
HUHU
A MULTIFUNKCIÓS EDÉNY
KEZELŐPANELÉNEK LEÍRÁSA
1 Előre beállított programok
2 Joghurt program
3 Lassú főzés
4 Alacsony/magas nyomás beállítása
5 Hőmérséklet tartása/Törlése
6 Sütés
7 Késleltetett indítás
8 Kézi beállítás
9 Start
10 Vezérlő gomb
A KIJELZŐ LEÍRÁSA
A A késleltetett indítás indikátora
B A túlmelegedés indikátora
C A nyomás indikátora
D A hőmérséklet tartás indikátora
E A bekapcsolt/kikapcsolt hang indikátora
F Haladás indikátor
G Üzemmód indikátor
H A nyomásszint indikátora
I I Idő és figyelmeztetések megjelenítése
RÝŽE
POLÉVKA
VEJCE
MASO / DUŠENÍ
FAZOLE / CHILLI
DRŮBEŽ
LUŠTĚNINY
2 6
POMALÉ VAŘENÍ
SLOW COOK
3
4
UDRŽENÍ TEPLOTY
5
KEEP WARM/CANCEL
JOGURT
YOGURT
TLAK
PRESSURE
LEVEL
/ ZRUŠIT
Pressure
Mode
Pre-heating
High
Low
Less Normal More
Cooking Keep Warm
HOVĚZÍ
PÁRA
OVESNÁ KAŠE
VEPŘOVÉ /
ŽEBÍRKA
PORK&RIBS
DEZERT
RIZOTO
ZELENINA
VEGETABLES
SMAŽENÍ
SAUTE
ODLOŽENÝ START
DELAY START
RUČNÍ NASTAVENÍ
ADJUST
START
10
A B C D
I
H
G
E
F
AZ ELSŐ HASZNÁLAT ELŐTT
• Távolítson el minden csomagolóanyagot a készülékről.
• Távolítson el minden címkét és matricát a készülékről.
• Mossa ki a belső tartályt (12) forró vízzel.
• Alaposan törölje át a készüléket kívül és belül egy ronggyal.
11
• A tartozékokat forró vízzel, szappannal és nem súroló szivaccsal mossa ki.
Megjegyzés: Melegítse elő a ké szüléket 10 percig étel nélkül . A készülék ártalmatla n füstöt és enyhe szagot b ocsáthat
ki.
• Működés közben hagyjon legalább 13 cm távolságot a készülék körül.
Az üveg fedő összeszerelése
Az üveg fedőt a Lassú főzés és Melegen tartás funkciókkal használhatja.
1
2
3
A fogantyú beszerelése a képen látható.
7
8
9
1. Fogantyú
2. A fogantyú alapja
3. Az üveg fedő teste
4. Tömítés
5. Alapzat
6. Csavar
5
4
6
HASZNÁLATI ÚTMUTATÓ
AZ EDÉNY HASZNÁLATA NYOMÁSSZABÁLYOZÓ FEDŐVEL (7)
1. Helyezze a készüléket száraz és vízszintes helyre.
2. Helyezze a készülék hátuljára a felesleges víz számára
fenntartott kondenzációs tartályt (16), ld. az 1. ábrát.
3. Készítse elő a nyomásszabályozó fedőt (7), ld. 2. ábra
• Húzza meg a fedél alján lévő fémnyúlványt, hogy eltávolítsa a védőburkolatot, amelyre a tömítés van felszerelve.
A tömítés eltávolí tható és tisztítható. Győződjön m eg róla, hogy a tömítés seh ol sem sérült vagy sza kadt el. Sérülés
esetén cserére van szükség. Győződjön meg arról, hogy az úszószelep tiszta és szabadon mozog.
Megjegyzés: Ha a gyorsfőző fedele már fel van szerelve a készülékre, az előkészítéshez vegye le azt a piros gomb
megnyomásával, majd a fogantyút az óramutató járásával ellentétes irányban elfordítva emelje fel.
Ábra. 1
A LED-kijelzőn a következő figyelmeztetések jelenhetnek meg:
a. Az edény használatra kész, de nincs kiválasztva program
b. Az edény elkezdett a kívánt hőmérsékletre melegedni
c. „Keep warm” funkció – az edény tartja a hőmérsékletet
d. A fedő helytelen pozícióban van vagy hiányzik
Tömített
Ábra. 2
e. A kuktából hiányzik a belső edény
f boiL (főzés) jelenik meg More (több) üzemmódban a Joghurt programnál
Gőzelvezetés
44 45
Page 24
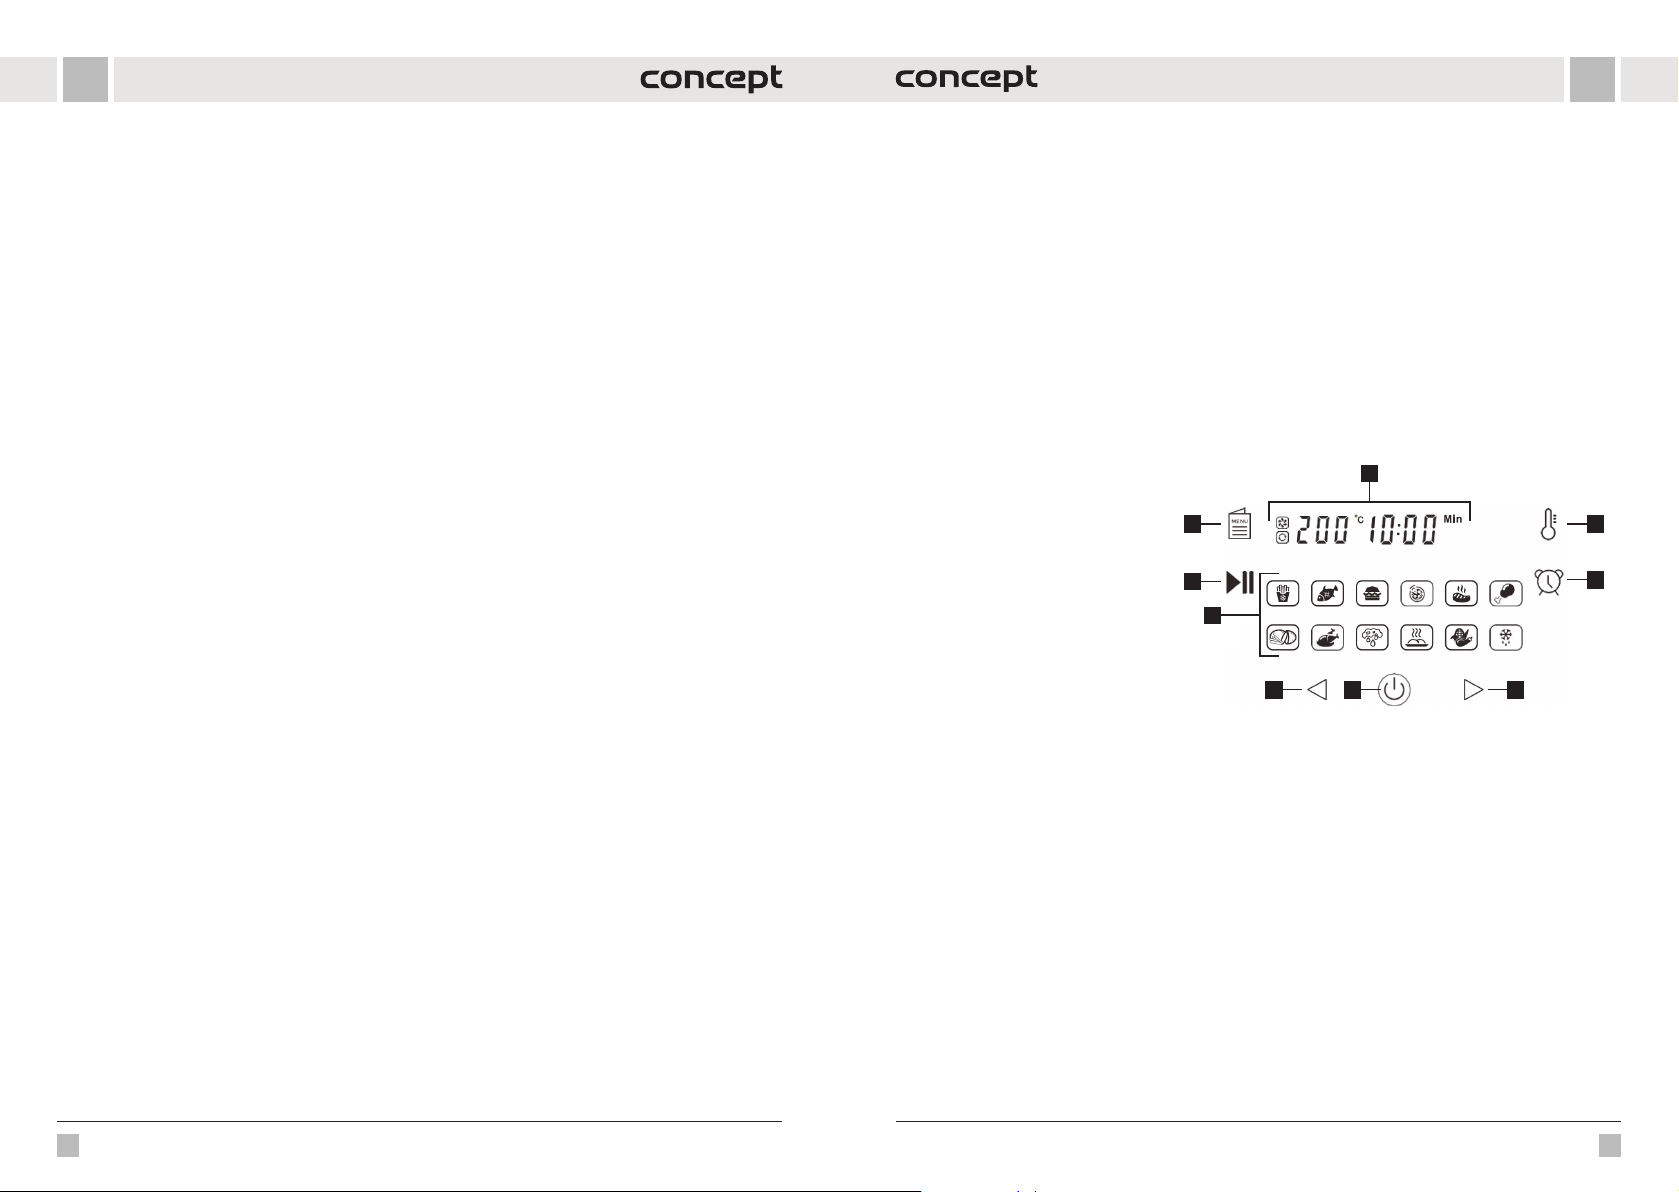
HUHU
4. Veg ye ki a belső tart ályt (12). Az étel és a víz telj es térfogata nem ha ladhatja meg a belső tar tály térfogat ának 2/3-át.
Ha olyan ételt fog főzni, amelynek térfogata a főzés során megnő (pl. rizs), ne töltse meg a tartályt 1/2-nél jobban.
Megjegyzés: Egyes élelmiszerek, mint például az almaszósz, az áfonya, a zabpehely, a tészta, a rebarbara vagy a
spagetti habosodhatnak és repedezhetnek, eltömítve a nyomásszelepet (kivezetőnyílás). Ezeket az ételeket nem
szabad a gyorsfőzőben főzni. Vigyázat: Ne használja a gyorsfőzőt olajjal való sütéshez.
5. Győződjön meg arról, h ogy a készüléktes t (5) belső felülete szára z, és helyezze a bels ő tartályt (12) a készüléktes tbe
(5).
6. Szerelje fel a nyomófedelet (7), és fordítsa el az óramutató járásával megegyező irányba. Amikor egy kattanást
hall, a fedél megfelelően illeszkedik. A fedél megfelelő tömítettségét a fedél szélén és a készülék peremén lévő,
egymáshoz igazított nyilak jelzik.
7. Kérjük, vegye figyelembe, hogy a nyomásszelepnek (10) szabadon mozgathatónak kell lennie ahhoz, hogy az
edény megfelelően működjön.
8. Állítsa a nyomásszelepet "Sealed" állásba, ezzel a fazék használatra készen áll.
9. Csatlakoztassa a tápkábelt a készülék dugaszába, majd egy konnektorba. A kijelzőn "00 00" jelenik meg.
10. Forgassa el a vezérlőgombot az előre beállított programok (1) (további programok a megfelelő
programgomb megnyomásával) vagy a főzési idő beállításához. Erősítse meg a kiválasztott programot
(a kijelző világít) a Start gombbal. Az előre beállított programidő beállításához nyomja meg
a gombot és forgassa el a kívánt idő kiválasztásához, majd erősítse meg a Start gomb megnyomásával.
Megjegyzés: A nyomásbeállító gomb megnyomásával válthat az alacsony nyomásfokozatú és a magas nyomás
között. Az alapértelmezett beállítás a magas nyomás. A program és a főzési idő kiválasztása után állítsa be a
nyomásbeállítást, majd erősítse meg a beállítást a Start gombbal. Nyomja meg a Kézi beállítás gombot az étel
mennyiségé nek kiválasztás ához, váltva a Keveseb b, Normál és Több között. Az a lapértelmezet t beállítás a Normál.
Megjegyzés: A főzési időt az étel mennyiségének megfelelően kell beállítani.
11. Az edény elkezd felmelegedni a kívánt hőmérsékletre (a kijelzőn "On" (bekapcsolva) látható, az előmelegítés
ikonja világít) és az úszószelep felemelkedik. Amint eléri a kívánt hőmérsékletet, a beállított idő visszaszámlálása
megkezdődik. Ekkor már nyomás alatt főz (a nyomás ikon világít), a fedél zárva van, és az edény nem nyitható ki.
SOHA NE PRÓBÁLJA MEG ERŐSZAKKAL KINYITNI AZ EDÉNY T!
12. Amikor a főzés befejeződik, hangjelzés hallható, és a tűzhely automatikusan átvált "Melegen tartás" üzemmódba,
hogy az ételt melegen tartsa. A kijelzőn "bb" jelenik meg, és a Melegen tar tás ikon világít.
13. Az edénybeállítás bármikor megszüntethető a Melegen tartás/megszüntetés gomb (5) megnyomásával.
14. Hang ki/be: a hang üzemmód megváltoztatásához tartsa lenyomva a Melegen tartás/leállítás gombot 3
másodpercig, amíg a kijelzőn a hang ikonja meg nem változik. A biztonsági figyelmeztetések mindig be vannak
kapcsolva.
A főzés befejezése után kétféle módon engedheti ki a gőzt:
1. A főzés után a nyomás elkezd fokozatosan csökkenni. A folyadék mennyiségétől függően ez 15-30 percig tarthat.
Az úszószelep fokozatos an lesüllyed, a fedő kiold, és könnyen ki lehet nyitni. Ha nem lehet kinyitni, várjon még e gy
kicsit. SOHA NE NYISSA KI A FEDŐT ERŐVEL!
2. A nyomástartó fedő kinyitása: Fogja meg a fogantyút, és nyomja meg a piros gombot a fedő elengedéséhez,
forgassa el a fedőt az óramutató járásával ellentétes irányba, amíg szabaddá nem válik, majd húzza felfelé az
emeléshez. A fedőt ráhelyezheti a fedő állványára (14).
3. Főzés után nyomja meg a Melegen tartás/Törlés gombot (5), egy konyhai kesztyű segítségével fordítsa az
úszószelepet „Gőzkieresztés” állásba, az úszószelep lesüllyed, a fedél kiold, és könnyen ki lehet nyitni. LEGYEN
RENDKÍVÜL ÓVATOS ÉS HASZNÁLJON VÉDŐFELSZERELÉST, A GŐZZEL MEGÉGETHETI MAGÁT!
A Delay Star t késleltetett indítás funkció:
1. A Delay Start funkció használatával akár 24 órával is késleltetni lehet a főzés megkezdését.
2. Kövesse a Felhasználói kézikönyvet, válassza ki a kívánt programot a gomb elforgatásával, majd nyomja meg
a Késleltetett indítás gombot, és ismételten nyomja meg a gombot, hogy beállítsa a főzés megkezdésének
késleltetését. Akésleltetett indítás alapértelmezett beállítása 30 perc.
3. Ezután nyomja meg a Start gomb ot. A késleltetett indítás ideje alatt a késleltetett indítás ikonja v ilágít a kijelzőn, és
megjelenik a hátralévő idő. A beállított idő eltelte után elindul a kiválasztott program.
Tippek
1. Ha a Lassú főzés, a Joghurt vagy a Sütés opciót választja, használhatja a gyorsfőzőt nyomástartó fedővel, üveg
fedővel vagy fedő nélkül. A nyomástartó fedő nélküli használat esetén a nyomásszint indikátor eltűnik a kijelzőről.
2. A „Keep warm” funkciót legfeljebb 1 óráig javasoljuk használni, később már romolhat az étel minősége.
3. A programok legfeljebb 1200 g súlyú ételmennyiséghez készültek, ha nagyobb adagokat készít, használjon saját
beállításokat.
4. A Delay Start funkciót csak olyan élelmiszerekkel használja, amelyek ez alatt az idő alatt nem romlanak meg.
5. Az ételt fából vagy műanyagból készült eszközökkel helyezze be és vegye ki a belső tartályból, soha ne használjon
éles vagy fém eszközöket, hogy elkerülje a tartály felületének sérülését.
6. Tartozékok használata:
• Ha a Gőzölés program van kiválasztva, helyezze be a gőzölő állványt (21) a belső tartályba (12), majd helyezze
be a gőzölő edényt (20).
• A Sütés program kiválasz tásakor helyezze be a fogantyús állványt (15) a belső tartályba (12).
• Az üveg fedővel (11) kiválasztható a Lassú főzés, a Joghurt vagy a Sütés.
• A sütési program kiválasztásakor (a forrólevegős fedő használata esetén) helyezze a sütőkosarat (13) a belső
tartályba (12).
• Használja a fedőtartót (14) a fedők tárolására.
A FORRÓLEVEGŐS FEDŐ KEZELŐPANELÉNEK LEÍRÁSA
1. Digitális kijelző
2. Hőmérséklet beállítások
3. Időzítő beállításai
4. Hőmérséklet emelés/időzítők
5. Be/Ki
6. Hőmérséklet csökkentés/időzítők
7. Programok
8. Start/szünet
9. Előre beállított programok kiválasztása
AZ EDÉNY HASZNÁLATA FORRÓLEVEGŐS FEDŐVEL (3)
A forró levegős fedővel ellátott edény forró levegővel működik; soha ne töltse meg az edényt olajjal vagy más
sütőközeggel.
1. Helyezze a készüléket száraz és vízszintes helyre.
2. Csatlakoztassa a tápkábelt egy konnektorba.
3. Győződjön meg a rról, hogy a készülék test (5) belső felülete sz áraz, és helyezze a b első tartály t (12) a készüléktestbe
(5).
4. Helyezz e az ételt a belső tar tályba (12). Megjeg yzés: Ha a sütési progr amot kívánja használ ni, helyezze a sütőkos arat
(13) a belső tartályba, és helyezze az ételt a kosárba. Ne töltse túl a sütőkosarat (13) vagy a belső tartályt (12).
5. Helyez ze fel a forrólevegős fed elet (3), ha a készüléke t forrólevegős sütőként sze retné használni. A bekap csoláshoz
nyomja meg a Be/Ki gombot (5). Az ikonok felgyulladnak, és a kijelzőn az alapértelmezett 180 °C-os beállítás
jelenik meg. és 15 perc.
6. Nyomja meg az előre beállított programválasztó gombot (9) a főzési beállítások közötti váltáshoz. A kiválasztott
program ikonja villog, és a kijelzőn megjelenik az előre beállított hőmérséklet és a programidő. A következő
programra való átváltáshoz nyomja meg ismételten a gombot (9). A hőmérséklet-beállítás megváltoztatásához
először nyomja meg a hőmérséklet-beállító gombot (2)/ az időbeállítás megváltoztatásához nyomja meg az
időbeállító g ombot (3), majd nyomja meg vagy tart sa lenyomva a 4. és 6. gombot a hő mérséklet beállí tásához. 5 °Cos intervallumokban és az időt 1 perces intervallumokban állítsa be (csak a 30 perces szárítási program esetében).
7. Erősítse meg a kiválasztást a Start/Pause gombbal (8).
8
7
6
1
29
3
5
4
46 47
Page 25
HUHU
Megjegyzés: Ha a főzést akkor kez di el, amikor a készülék mé g hideg, akkor a főzési idő t kb. 2 perccel meghoss zabbítja.
Az előmelegítés alatt a kijelzőn az "PREHEATING" (ELŐFŰTÉS) felirat jelenik meg, az előmelegítés után ez eltűnik
a kijelzőről, és csak a "HEATING" (FŰTÉS) felirat jelenik meg, amikor a fűtőelem bekapcsol.
Megjegyzés: A bal felső sarokban lévő ventilátor ikon a program futása közben világít. Az ikon kialszik, amikor
a ventilátor leáll.
8. A főzés közben bár mikor megállíthatja a prog ramot a Start/Pause g omb (8) megnyomásával, majd a gomb ismé telt
megnyomásával folytathatja a főzési folyamatot.
9. A forrólevegős fedelet (3) a főzés során bármikor leveheti, hogy ellenőrizze/ hozzáadja vagy eltávolítsa az ételt.
10. A kiválasztott program megszakad. A fedél visszahelyezésekor a program ott folytatódik, ahol megszakadt.
11. Ha a program befejeződött, hangjelzés figyelmezteti Önt, és a kijelzőn csak a "FINISHED" felirat jelenik meg.
és a be/kikapcsoló gomb (5) villogni fog. Ha befejezte a főzést, válassza le a készüléket a hálózatról.
Megjegyzés: A forró sütőkosár/belső tartály eltávolításakor viseljen sütőkesztyűt.
Tippek
Javasoljuk, hogy a főzés során forgassa meg az ételt az egyenletes barnulás vagy keverés érdekében.
ELŐRE BEÁLLÍTOTT PROGRAMOK
Programok nyomásszabályozó fedővel
Programok Mennyiség (testreszabható) Főzési idő (perc) Lehetséges időtartam
Rizs Kevesebb 8 1-99 perc
Normális 12
Több 15
Leves Kevesebb 12 1-99 perc
Normális 15
Több 20
Tojás Kevesebb 4 1-99 perc
Normális 5
Több 6
Hús/Párolás Kevesebb 20 1-99 perc
Normális 35
Több 45
Bab/Chili Kevesebb 25 1-99 perc
Normális 30
Több 40
Baromfi Kevesebb 10 1-99 perc
Normális 15
Több 25
Hüvelyesek Kevesebb 20 1-99 perc
Normális 40
Több 45
Marhahús Kevesebb 30 1-99 perc
Normális 35
Több 40
Gőzölés Kevesebb 12 1-99 perc
Normális 15
Több 20
Zabkása Kevesebb 12 1-99 perc
Normális 15
Több 20
Sertéshús/oldalasok Kevesebb 13 1-99 perc
Normális 18
Több 25
Desszert Kevesebb 25 1-99 perc
Normális 40
Több 50
Rizottó Kevesebb 20 1-99 perc
Normális 35
Több 45
Zöldség Kevesebb 10 1-99 perc
Normális 15
Több 20
Sütés Normális 30 30 perc
Lassú főzés Kevesebb 30 30 perc - 9 óra 30 perc
Normális 6 óra
Több 9 óra 30 perc
Joghurt Kevesebb 24 óra 6 - 24 óra
Normális 8 óra
Több "boiL"
48 49
Page 26
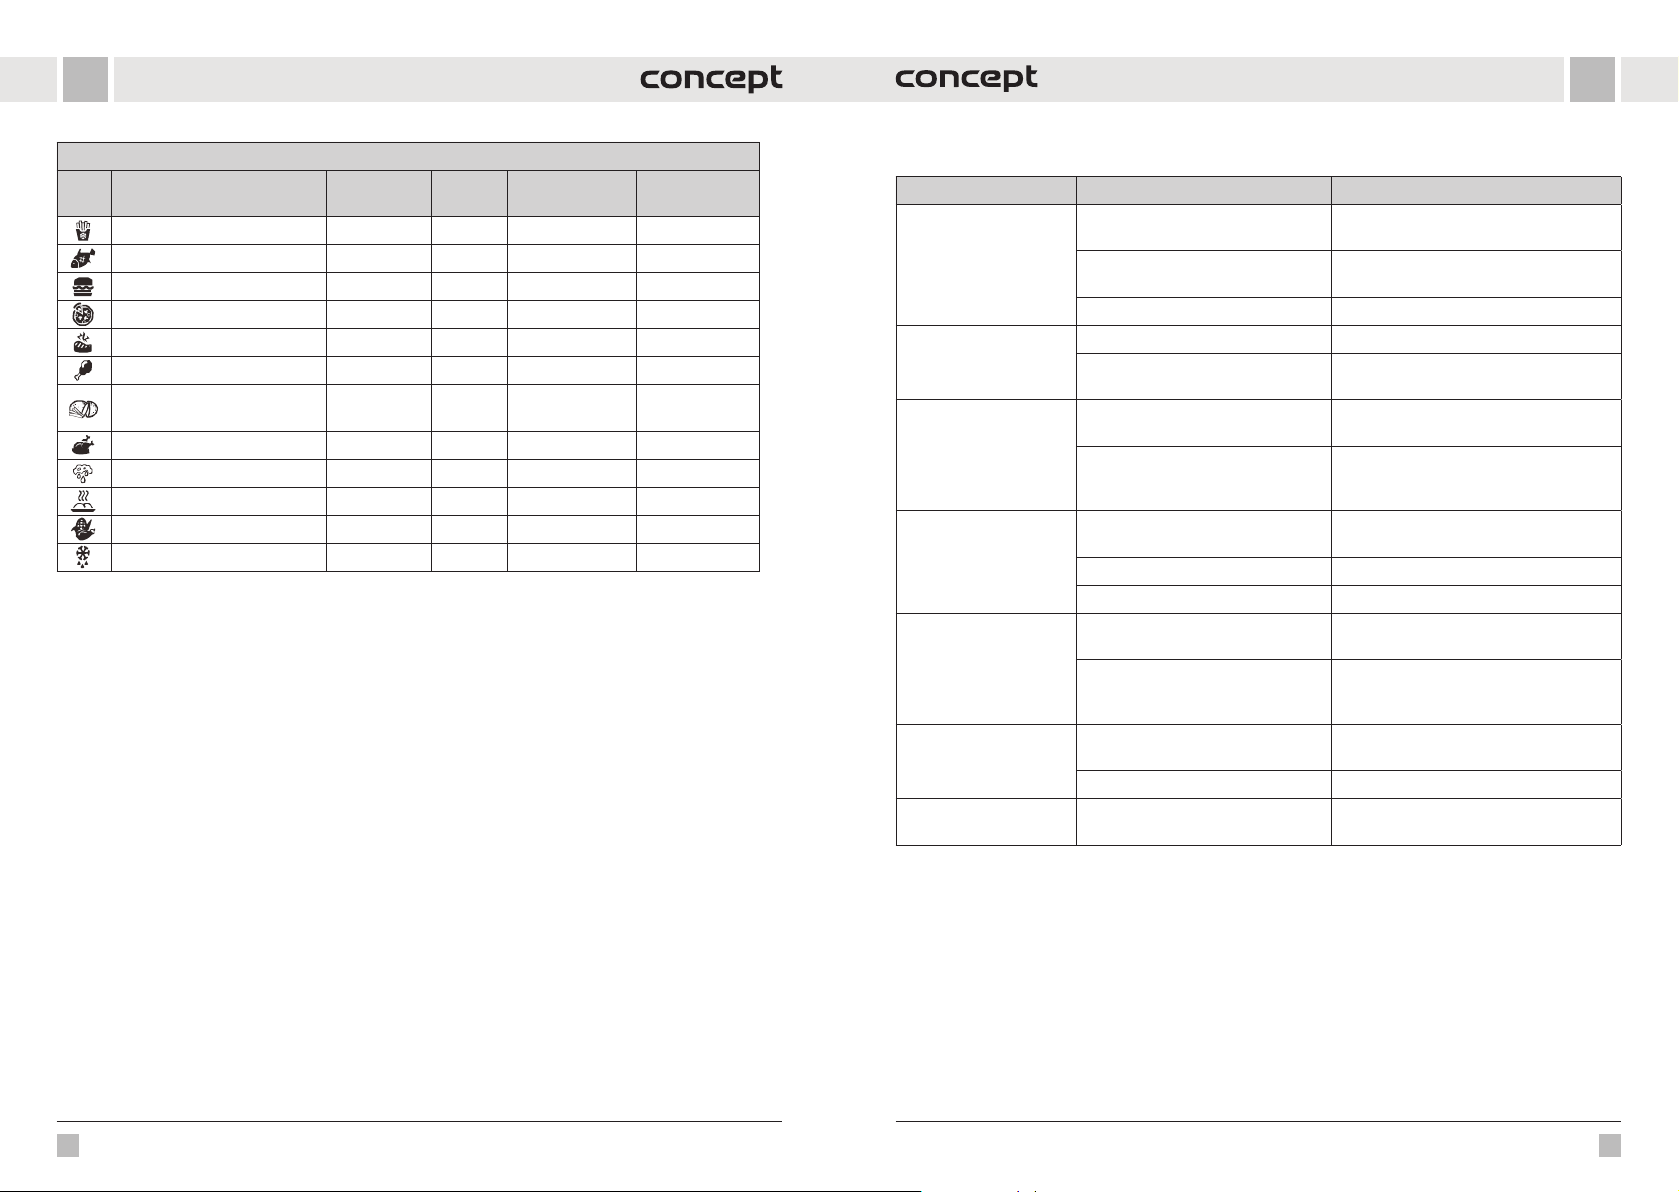
HUHU
Programok forrólevegős fedővel történő főzéshez
Programok
Mélyhűtött hasábburgonya 200 15 min 80-200 1-60 min
Hal 160 15 min 80-200 1-60 min
Hamburger 185 13 min 80-200 1-60 min
Pizza 185 15 min 80-200 1-60 min
Marhahús steak 175 25 min 80-200 1-60 min
Csirkecomb 200 22 min 80-200 1-60 min
Hasábburgonya nyers
burgonyából
Egész csirke 180 40 min 80-200 1-60 min
Szárítás 80 2 óra 40-90 1-12 óra
Grillezés 160 10 min 160 1-30 min
Zöldség 180 15 min 80-200 1-60 min
Kiolvasztás 50 5 min 50 1-60 min
Megjegyzés: Ezek a beállítások csak tájékoztató jellegűek. Ha akkor kezdi el a főzést, amikor a készülék még hideg,
hosszabbítsa meg a főzési időt kb. 2 perccel.
Hőmérséklet
(°C)
160 30 min 80-200 1-60 min
Idő
Beállítható
hőmérséklet (°C)
Lehetséges
időtartam
TISZTÍTÁS ÉS KARBANTARTÁS
Minden használat után tisztítsa meg a készüléket.
Ne használjon agresszív és dörzsölő hatású eszközöket, mit pl. éles tárgyat, kaparót, kémiai oldószereket,
hígítót stb.
• Tisztítás előtt húzza ki a tápkábelt az elektromos hálózatból. Soha ne merítse a tápkábelt, a dugót, a készüléket
vagy a forrólevegős fedőt vízbe vagy más folyadékba!
• Tisztítás előtt várja meg, míg a készülék teljesen kihűl.
• A készülék külső felületét nedves ronggyal törölje le.
• A belső edény t töltse meg forró víz zel és hagyja egy kis ideig állni. Azut án mosogatószeres víz zel és puha ronggyal,
vagy mosogatógépben elmoshatja.
• A készülék többi alkatrészét mosogatószeres vízzel és puha ronggyal moshatja el.
• Csak a tartozékok és a belső tartály mosható mosogatógépben.
• Ha az alkatrészek teljesen megszáradtak, szerelje össze a készüléket, és tárolja hűvös, száraz helyen.
PROBLÉMAMEGOLDÁS
Probléma Ok Megoldás
A készülék nem működik.
A sült ételek nem
készülnek el.
Az ételek egyenetlenül
vannak megsütve.
A sült ételek nem
ropogósak.
A készülékből fehér füst
jön ki.
Gőz szivárog
a nyomástartó fedő körül.
Gőz szivárog
a nyomásszelepből.
A készülék nincs megfelelően
csatlakoztatva.
A program vagy az időzítő nincs
beállítva.
A fedél nem ül megfelelően a helyén. Ellenőrizze a fedél illeszkedését.
Túl sok az étel. Tegyen kisebb adagokat a tartályba/kosárba.
Túl rövidre állított sütési idő, túl alacsony hőmérséklet.
Túl nagy adag étel, egymáson fekvő
ételek.
Az ételek nem frissek vagy nem
megfelelően vannak elkészítve.
Egyes élelmiszerek jobban alkalmasak
forrólevegős sütőhöz.
Szükség van egy kis olajra. Enyhén csepegtesse meg az ételt olajjal.
Az ételek nedvesek. Főzés előtt szárítsa meg az élelmiszereket.
A fritőzben az étel zsíros.
A tartály/kosár még tartalmaz az
előző használatból származó zsíros
maradványokat.
A tömítés nem ül megfelelően
a helyén.
A nyomásszelep (kimenet) elzáródott. Tisztítsa meg a szelepet.
A nyomásszelep (kimenet) nincs
megfelelően tömítve.
Csatlakoztassa a készüléket földelt
konnektorba.
Állítsa be a kívánt programot vagy időzítőt.
Hosszabbítsa meg a főzési időt, növelje
a hőmérsékletet.
Távolítson el valamennyi ételt, vagy a főzés
felénél rázza fel/forgassa meg őket.
Ügyeljen arra, hogy friss élelmiszert használjon, és megfelelően készítse elő a sütéshez
(adjon hozzá néhány csepp olajat).
Használjon friss élelmiszereket vagy félkész
termékeket.
Ez nem hiba. Szárítsa meg az ételt
a felesleges olajtól.
Tisztítsa meg megfelelően a tartályt/kosarat.
Állítsa le a főzési folyamatot, vegye le
a fedőt, és ellenőrizze a tömítéseket.
A szelepet óvatosan zárja el.
50 51
Page 27
HU
LV
SZERVIZ
Nagyobb mértékű, vagy a termék belső részeire is vonatkozó karbantartást vagy javítást szakszervizben kell
elvégeztetni.
A KÖRNYEZET VÉDELME
• Lehetőleg gondoskodjon a csomagolóanyagok és a régi készülék újrahasznosításáról.
• A készülék dobozát a szelektív gyűjtőbe dobhatja.
• A polietilén (PE) műanyagzacskókat adja le újrahasznosítható anyagokat gyűjtő udvarban.
A készülék újrahasznosítása élettartama végén
Ez az elektromos roller az európai Elektromos hulladékról és elektromos berendezésekről (WEEE)
szóló 2012/19/EU irányelvnek megfelelően van megjelölve. A terméken vagy a csomagolásán
található szimbólum jelzi, hogy a termék nem tartozik a vegyes háztartási hulladék közé. El kell vinni
olyan hely re, ahol az elektromos és elektro nikus hulladékot gyűjtik újrahasznosít ás céljából. Atermék
megfelelő módon történő megsemmisítésének biztosításával megakadályozza a környezetet és
az emberi egészséget veszélyeztető negatív hatásokat, amelyeket a nem megfelelő hulladékmegsemmisítés okozhatna. A megsemmisítést a hulladékgazdálkodási előírásoknak megfelelően
kell végrehajtani. A termék újrahasznosítására vonatkozó részletesebb információkért forduljon az
illetékes helyi hivatalhoz, a háztartási hulladék megsemmisítésével foglalkozó szolgáltatóhoz, vagy
az üzlethez, ahol a terméket vásárolta.
Ez a termék teljesíti minden rá vonatkozó EU-irányelv alapkövetelményeit.
Változtatások a szövegben, a kivitelben és a műszaki jellemzőkben előzetes figyelmeztetés nélkül történhetnek,
amódosításra vonatkozó jog fenntartva.
PATEICĪBA
Pateicamies par šīs “Concept” ierīces iegādi. Ceram, ka būsiet apmierināti ar šo izstrādājumu visu tā kalpošanas laiku.
Pirms lietošanas rūpīgi izlasiet šo lietošanas instrukciju un uzglabājiet to drošā vietā, lai nepieciešamības gadījumā
varētu pārlasīt. Nodrošiniet, lai arī citi cilvēki, kuri izmantos šo ierīci, pirms tās lietošanas būtu iepazinušies ar
norādījumiem.
Tehniskie dati
Spriegums 220–240V~50–60Hz
Jauda
Tvertņu ietilpība 5,6l
Regulējamā temperatūra fritēze: gatavošana 80-200 °C, žāvēšana 40-90 °C.
Taimeris
fritētājs: gatavošana 1 - 60 min, žāvēšana 1 - 12 stundas
1000W daudzfunkcionālais katls
1500W karstā gaisa friteris
Uzmanību!
Karsta virsma
Katls: 1 min - 24 stundas
SVARĪGA INFORMĀCIJA
Pirms pievienošanas elektrotīklam vizuāli pārbaudiet, vai ierīcei nav defektu un vai pārvadāšanas laikā tā nav tikusi
sabojāta.
SVARĪGI DROŠĪBAS NORĀDĪJUMI
• Lietojiet šo ierīci tikai tā, kā izklāstīts šajā lietošanas instrukcijā.
• Pirms ierīces pirmās izmantošanas noņemiet visu iepakojumu un reklāmas
materiālus.
• Pārliecinieties, ka elektrotīkla spriegums atbilst tam spriegumam, kas ir
minēts uz izstrādājuma tehnisko pamatdatu plāksnītes.
• Novietojiet ierīci tikai uz stabilas virsmas drošā attālumā no citiem siltuma
avotiem.
• Atvienojot ierīci no elektrotīkla, nekad neraujiet elektrības vadu. Satveriet
kontaktdakšu un atvienojiet to, viegli pavelkot.
• Neļaujiet ar ierīci darboties bērniem vai personām bez attiecīgām
iemaņām. Izmantojiet to bērniem nepieejamā vietā.
• Personām ar ierobežotām kustību spējām, ierobežotu maņu uztveri,
nepietiekamām gara spējām vai cilvēkiem, kas nepārzina pareizu tās
izmantošanu, šī ierīce jāizmanto tikai atbildīgas, zinošas personas
uzraudzībā.
• Ja ierīces izmantošanas laikā tuvumā ir bērni, ievērojiet papildu
piesardzību.
• Neļaujiet izmantot ierīci kā rotaļlietu.
52
53
Page 28
LVLV
• Neapsedziet ierīci.
• Pirms ierīces uzstādīšanas vai demontāžas atvienojiet strāvas
vadu no elektrotīkla.
• Pirms tīrīšanas un pēc izmantošanas izslēdziet ierīci un atvienojiet
strāvas vadu no elektrotīkla.
• Uzturiet ierīci tīru, nepieļaujiet svešķermeņu nokļūšanu režģa spraugās.
Tas varētu izraisīt nopietnus savainojumus, īssavienojumu, sabojāt ierīci
vai izraisīt ugunsgrēku.
• Neizmantojiet ierīci ar bojātu elektrības vadu vai kontaktdakšu. Lai veiktu
bojātu detaļu labošanu vai maiņu, nekavējoties sazinieties ar pilnvaroto
servisa apkalpes centru.
• Nelietojiet ierīci, ja tā nedarbojas pareizi vai ja tā ir nomesta, bojāta
vai pakļauta šķidrumu iedarbībai. Nogādājiet ierīci pārbaudīšanai un
labošanai pilnvarotā servisa apkalpes centrā.
• Ierīce ir paredzēta tikai mājsaimniecības vajadzībām. Tā nav paredzēta
ekspluatācijai komercnolūkos.
• Nelietojiet ierīci ārpus telpām.
• Nav ieteicams izmantot pagarinātāju, jo tas var pārkarst un izraisīt
ugunsbīstamību. Ja nepieciešams izmantot pagarinātāju, pārliecinieties,
ka elektrības padeve ir saderīga ar ierīci un kontaktligzda ir iezemēta.
• Ekspluatācijas laikā ierīci nepārvietojiet un nesakratiet.
• Neievietojiet ierīcē uzliesmojošus materiālus (papīru, plastmasu).
• Nepieskarieties ierīcei ar mitrām vai slapjām rokām.
• Nepieļaujiet elektrības vada, kontaktdakšas vai ierīces nokļūšanu
ūdenī vai citā šķidrumā. Nelejiet ūdeni vai citus šķidrumus uz
elektriskajiem komponentiem un savienotājiem.
• Ir aizliegts labot ierīci patstāvīgi. Sazinieties ar pilnvaroto servisa centru.
• Bērni vecumā no 8gadiem un vecāki, kā arī personas ar fiziskiem, maņu
vai garīgiem traucējumiem vai ar nepietiekamu pieredzi un zināšanām
drīkst izmantot šo ierīci, ja viņi atrodas citu cilvēku uzraudzībā vai arī ir
instruēti par ierīces izmantošanu drošā veidā, kā arī izprot iespējamo
bīstamību. Lietotāja veikto ierīces tīrīšanu un apkopi nedrīkst veikt bērni,
kas jaunāki par 8gadiem un neatrodas pieaugušo uzraudzībā. Bērni, kas
ir jaunāki par 8gadiem, nedrīkst atrasties ierīces un tās vada tuvumā.
Neļaujiet bērniem rotaļāties ar šo ierīci.
• Nepieskarieties karstajām virsmām.
• Neļaujiet strāvas vadam brīvi pārkarāties galda vai virtuves iekārtas malai.
Neļaujiet strāvas vadam pieskarties karstām virsmām.
• Nenovietojiet ierīci gāzes vai elektriskā degļa tuvumā. Nenovietojiet ierīci
uz plīts. Pārliecinieties, ka ierīce ir novietota labi vēdināmā vietā, prom no
karstām virsmām, uzliesmojošiem materiāliem (aizkariem, galdautiem)
un mitras vides.
• BRĪDINĀJUMS: Ierīces virsmas var būt ļoti karstas. Lerīci turiet tikai par
rokturi un izmantojiet aizsardzības līdzekļus, piemēram, virtuves cimdus.
• Pievērsiet īpašu uzmanību tam, lai ierīcē neiekļūtu ūdens vai cits šķidrums.
Pastāv elektriskās strāvas trieciena risks.
• Vienmēr ievietojiet ēdienu ierīces grozā, lai novērstu tā saskari ar
sildelementu.
• Ierīces darbības laikā vai uzreiz pēc tās izslēgšanas nekad nepieskarieties
tās iekšējām virsmām. Ļaujiet iekārtai pietiekami atdzist.
• Nepievienojiet vai neregulējiet ierīci ar mitrām rokām.
• Air fry vāki: gatavošanas laikā caur gaisa atverēm izdalās karsti tvaiki,
tāpēc rokas un seju turiet drošā attālumā no gaisa atverēm.
• Spiediena vāks: jāuzmanās no karsta tvaika un gaisa, kas izplūst no
spiediena vārsta. Nenovietojiet rokas, seju vai jebkādus priekšmetus virs
spiediena vāka izejas atveres.
• Nelietojiet ierīci, ja jums ir elektrokardiostimulators, dzirdes aparāts utt.
Pirms ierīces lietošanas konsultējieties ar ārstu.
• Neizmantojiet citus piederumus, izņemot ražotāja ieteiktos.
• Nevienu ierīci nedrīkst pieslēgt ārējam taimerim.
• Aizsardzība pret pārkaršanu: ja termiskais drošinātājs ir reaģējis, ierīce
nedarbosies. Atvienojiet ierīci no tīkla un pirms atkārtotas palaišanas
pagaidiet, līdz tā ir pilnībā atdzisusi.
• Ja ierīces darbības laikā redzat tumšus dūmus, nekavējoties izslēdziet to
un sazinieties ar pilnvaroto servisa centru.
• Pirms tīrīšanas ļaujiet ierīcei vismaz 30minūtes atdzist.
Ražotāja norādījumu (skat. drošības norādījumus) neievērošanas
dēļ var tikt atteikts garantijas remonts.
54 55
Page 29
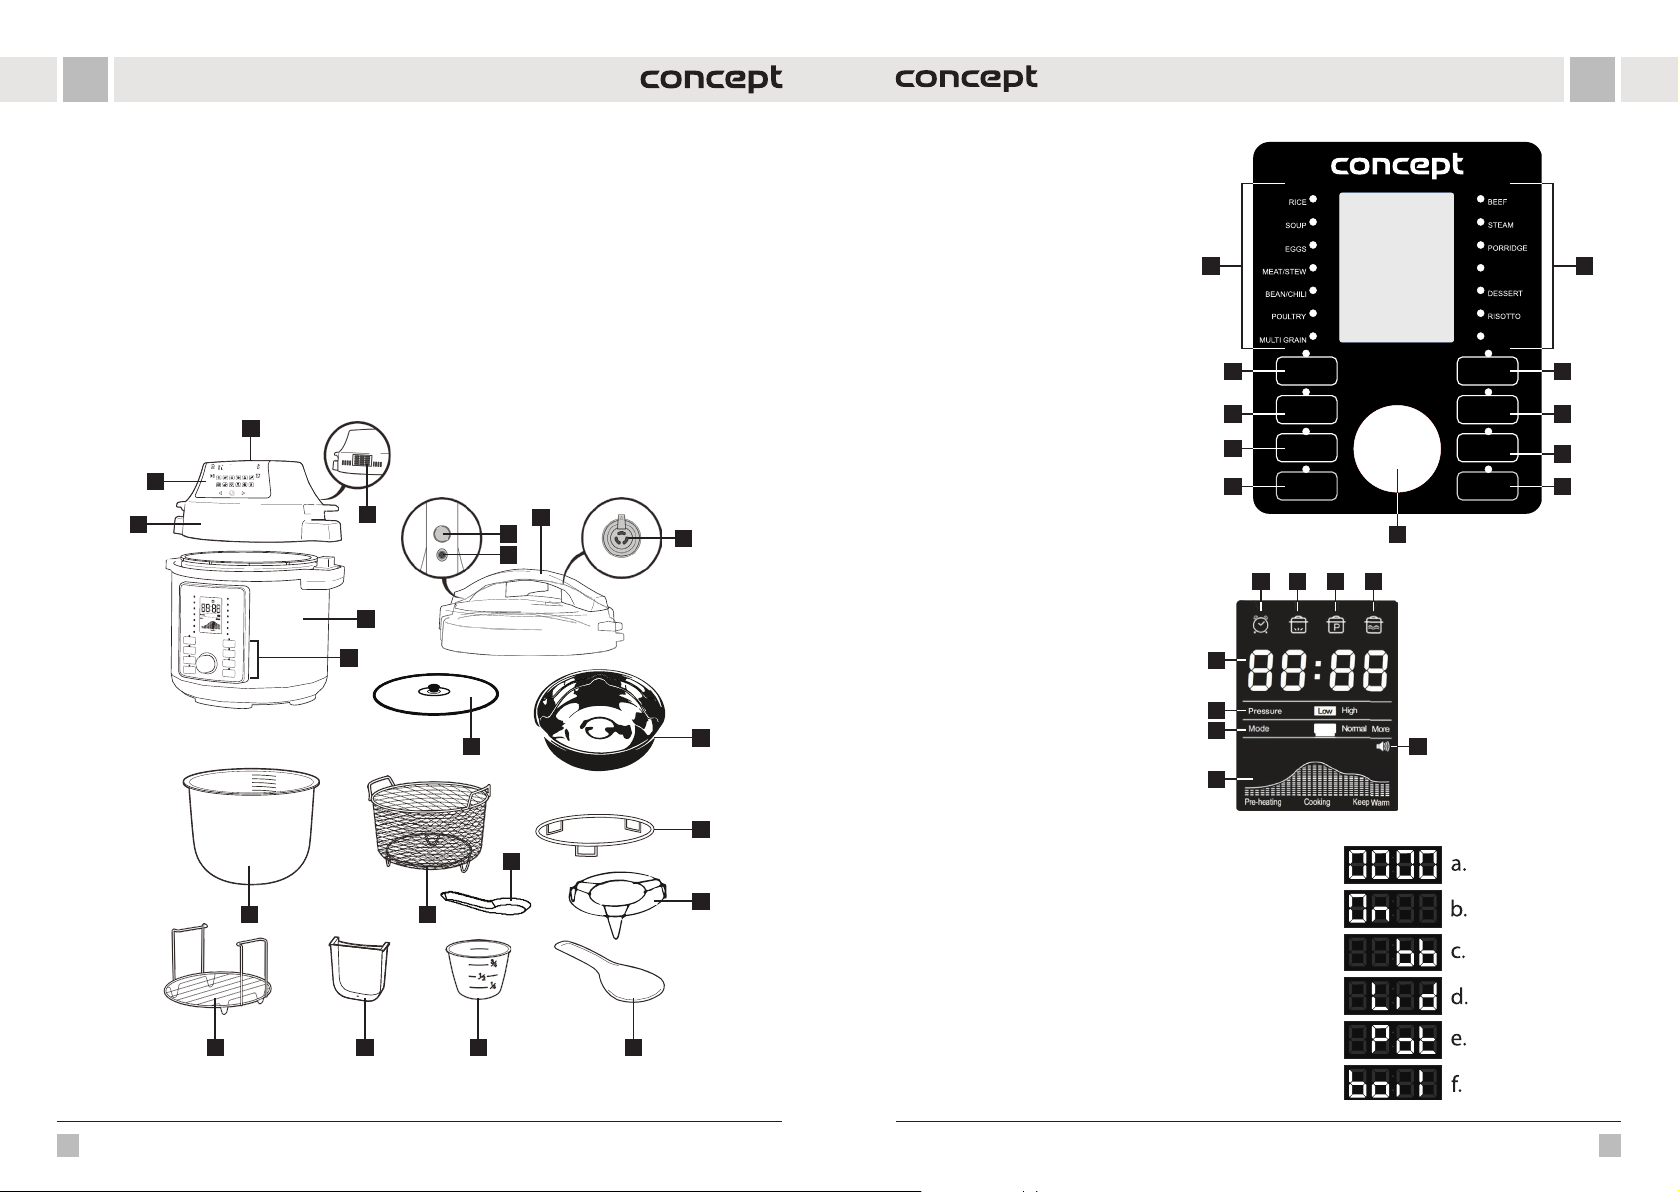
LVLV
c
IERĪCES APRAKSTS
1 Gaisa padeve
2 Gaisa izplūdes atvere
3 Karstā gaisa vāks
4 Karstā gaisa vāka displejs
5 Lerīces korpuss
6 Daudzfunkcionālā poda vadības panelis
7 Spiediena vāks
8 Vāka atbrīvošanas poga
9 Drošības vārsts
10 Spiediena vārsts
11 Stikla vāks
1
4
3
12 Iekšējā tvertnē
13 Fritēšanas grozs
14 Vāka statīvs
15 Statīvs ar rokturiem
16 Kondensācijas tvertne liekajam ūdenim
17 Mērglāze
18 Sekla karote
19 Dziļa karote (karote)
20 Tvaicēšanas trauks
21 Tvaicēšanas plaukts
2
7
8
9
5
6
11
DAUDZFUNKCIONĀLĀ KATLA
VADĪBAS PANEĻA APRAKSTS
1 Lepriekš iestatītās programmas
2 Jogurta programma
3 Lēna gatavošana
4 Zema/augsta spiediena iestatījums
5 Temperatūras uzturēšana/atcelšana
6 Cepšana
7 Aizkavēta palaišana
8 Manuāls iestatījums
9 Palaišana
10 Vadības poga
10
DISPLEJA APRAKSTS
RÝŽE
POLÉVKA
VEJCE
MASO / DUŠENÍ
FAZOLE / CHILLI
DRŮBEŽ
LUŠTĚNINY
2 6
POMALÉ VAŘENÍ
3
4
UDRŽENÍ TEPLOTY
5
KEEP WARM/CANCEL
JOGURT
YOGURT
SLOW COOK
TLAK
PRESSURE
LEVEL
/ ZRUŠIT
Pressure
Mode
Pre-heating
High
Low
Less Normal More
Cooking Keep Warm
10
A B C D
A Aizkavētas palaišanas indikators
B Uzkarsēšanas indikators
C Spiediena indikators
D Temperatūras uzturēšanas indikators
I
E Skaņas ieslēgšanas/izslēgšanas indikators
F Progresa indikators
20
G Režīma indikators
H Spiediena līmeņa indikators
I Laika un brīdinājuma indikators
H
G
E
F
HOVĚZÍ
PÁRA
OVESNÁ KAŠE
VEPŘOVÉ /
ŽEBÍRKA
PORK&RIBS
DEZERT
RIZOTO
ZELENINA
VEGETABLES
SMAŽENÍ
SAUTE
ODLOŽENÝ START
DELAY START
RUČNÍ NASTAVENÍ
ADJUST
START
11
7
8
9
14
19
12 13
21
LED displejā var parādīties šādi brīdinājumi:
a. Katls ir gatavs lietošanai, bet programma nav izvēlēta
b. Katls uzkarst līdz vēlamajai temperatūrai
c. Funkcija “Keep warm” – katls uztur temperatūru
d. Vāks ir nepareizā pozīcijā vai tā nav
e. Katlā trūkst iekšējās tvertnes
f. boiL (gatavošana) parādās Jogurta programmas Vairāk režīmā
15
16 17 18
56 57
Page 30
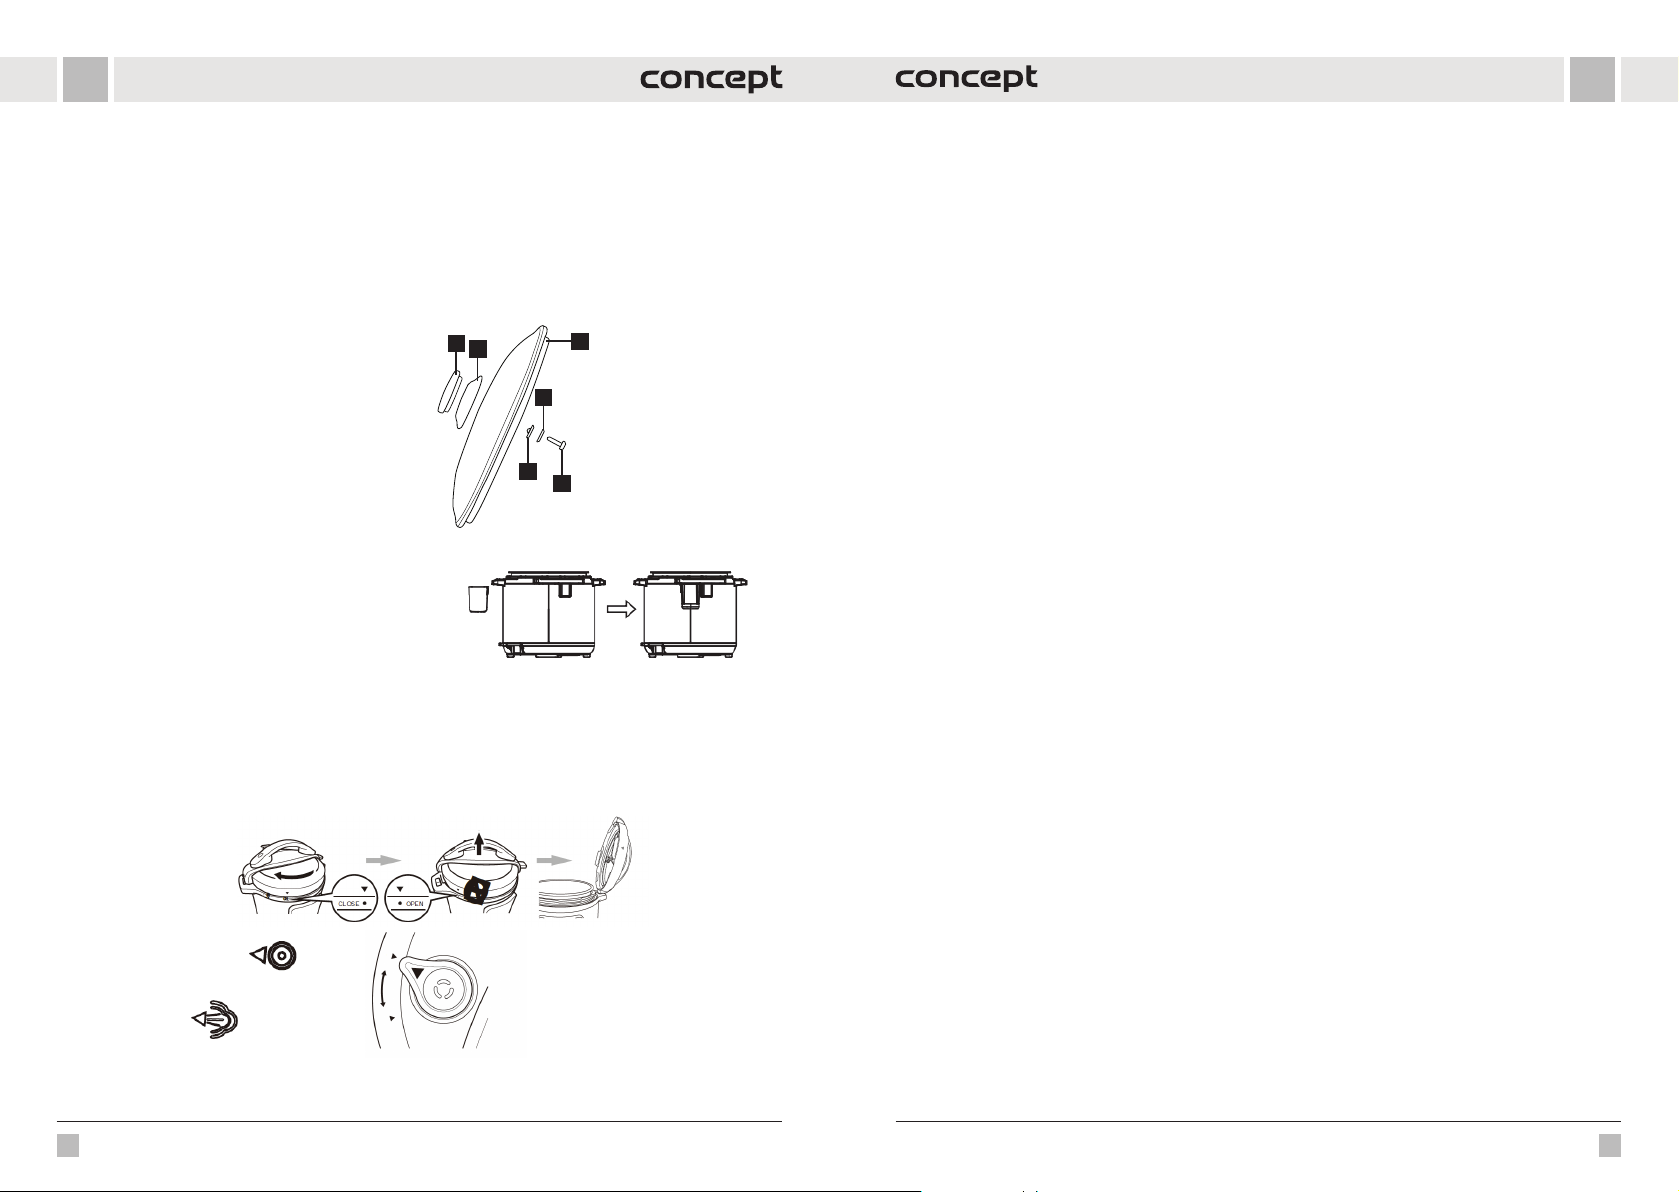
LVLV
PIRMS PIRMĀS IZMANTOŠANAS
• Noņemiet no ierīces visus iepakojuma materiālus.
• Noņemiet no ierīces visas uzlīmes.
• Nomazgājiet iekšējo tvertni (12) ar karstu ūdeni.
• Rūpīgi noslaukiet ierīci ārpusē un iekšpusē ar drāniņu.
• Mazgājiet piederumus ar karstu ūdeni, ziepēm un neabrazīvu sūkli.
Piezīme: Uzkarsējiet ierīci 10 minūtes bez ēdiena. No ierīces var izdalīties nekaitīgi dūmi un neliela smaka.
• Darbības laikā ap ierīci atstājiet vismaz 13 cm brīvu vietu.
Stikla vāka montāža
Stikla vāku var izmantot ar funkcijām Lēna gatavošana
un Temperatūras uzturēšana. Roktura montāža ir parādīta
attēlā.
1. Rokturis
2. Roktura pamatne
3. Stikla vāka korpuss
4. Blīvslēgi
5. Mazgātājs
6. Skrūve
1
2
3
5
4
6
LIETOŠANAS INSTRUKCIJA
KATLA AR SPIEDIENA VĀKU(7) LIETOŠANA
1. Novietojiet ierīci sausā un līdzenā vietā.
2. Uz ierīces aizmugures novietojiet kondensācijas tvertni
liekajam ūdenim (16), skatīt 1. attēlu.
3. Sagatavojiet spiediena vāku (7), skat. 2.attēlu.
• Izvelciet metāla izvirzījumu vāka apakšējā daļā, lai noņemtu aizsargvāciņu, uz kura ir uzlikts blīvējums. Blīvējumu
var noņemt un iztīrīt. Pārliecinieties, ka blīvējums nav bojāts vai saplēsts. Bojājumu gadījumā ir nepieciešama
nomaiņa. Pārliecinieties, ka pludiņvārsts ir tīrs un var brīvi kustēties.
Piezīme: Ja spiediena katla vāks jau ir piestiprināts ierīcei, noņemiet to sagatavošanai, nospiežot sarkano pogu,
pagriežot rokturi pretēji pulksteņrādītāja virzienam un paceļot uz augšu.
Noslēgts
Tvaika novadīšana
1. att.
2. att.
4. I zņemiet iek šējo tver tni (12). Kopējais pārtikas un ūd ens tilpums ned rīkst p ārsniegt 2 /3 no iekš ējā konteinera tilp uma.
Ja gatavosiet ēdienu, kura tilpums gatavošanas laikā palielināsies (piemēram, rīsus), nepiepildiet trauku vairāk par 1/2.
Piezīme: Daži pārtika s produkti, p iemēram, ābo lu mērce, dzērve nes, auzu pārs las, nūdeles, r abarberi vai s pageti, var
putot un plaisāt, n ospro stojo t spie diena v ārs tu (izp lūdes a tve ri). Šādus p ār tika s prod uk tus ne drī ks t gatavot āt r vārī tavā.
Uzmanību: Neizmantojiet spiediena katlu cepšanai ar eļļu.
5. Pārliecinieties, ka ierīces korpusa (5) iekšējā virsma ir sausa, un ievietojiet iekšējo tvertni (12) ierīces korpusā (5).
6. Uzlieciet spiediena vāciņu (7) un pagrieziet pulksteņrādītāja virzienā. Kad atskan klikšķis, vāks ir pareizi ievietots.
Par pareizu vāka blīvējumu liecina izlīdzinātās bultiņas uz vāka malas un ierīces malas.
7. Lūdzu, ņemiet vērā, ka spiediena vārstam (10) jābūt brīvi kustīgam, lai katls darbotos pareizi.
8. Iestatiet spiediena vārstu pozīcijā "hermētisk s", lai katls būtu gatavs lietošanai.
9. Iespraudiet strāvas vadu ierīces kontaktdakšas kontaktā un pēc tam - strāvas kontaktligzdā. Displejā parādīsies
"00 00".
10. Pagri eziet vadības po gu, lai pārslēgtu iep riekš iestatī tās programmas (1) (papildu program mas, nospiežot attie cīgo
programmas pogu) vai lai pielāgotu gatavošanas laiku. Apstipriniet izvēlēto programmu (indikators iedegas),
nospiežot po gu Start. Lai piel āgotu iepriekš ie statīto programma s laiku, nospiediet un p agrieziet pogu, l ai izvēlētos
vēlamo laiku, un ap stipriniet, nospiež ot pogu Start. Piezīme: N ospiediet spiediena ie statīšanas pogu, lai pār slēgtos
starp zema un a ugstu spiedienu. No klusējuma iestatī jums ir Augsts spiedi ens. Pielāgojiet spie diena iestatījumu p ēc
programmas un gatavošanas laika izvēles, apstipriniet iestatījumu ar pogu Start. Nospiediet Manuālo iestatījumu
pogu, lai iz vēlētos ēdiena da udzumu, pārsl ēdzot starp Ma zāk, Normā li un Vairāk. Noklu sējuma iestatī jums ir Normal.
Piezīme: Gatavošanas laiks jāpielāgo atkarībā no ēdiena daudzuma.
11. Katls sāk sildīties līdz vēlamajai temperatūrai (displejā tiek rādīts "Ieslēgts", deg iepriekšējas uzsildīšanas ikona).
un pludiņvārsts paceļas. Kad tas sasniedz vēlamo temperatūru, iestatītais laiks sāk skaitīt uz leju. Šajā brīdī
gatavošana jau notiek zem spiediena (iedegas spiediena ikona), vāks ir aizslēgts, un katlu nevar atvērt. NEKAD
NEMĒĢINIET ATVĒRT KATLU AR SPĒKU!
12. Kad gatavošana ir pabeigta, atskanēs skaņas signāls, un plīts automātiski pārslēgsies režīmā "Uzglabāt siltu", lai
ēdiens būtu silts. Displejā tiek parādīts "bb" un iedegas ikona Keep Warm.
13. Katla iestatījumu jebkurā laikā var atcelt, nospiežot Keep Warm/Cancel (5) pogu.
14. Skaņas izslēgšana/ieslēgšana: lai mainītu skaņas režīmu, turiet nospiestu "Keep Temperature/Cancel" (Uzturēt
siltu/atcelt) pogu 3 sekundes, līdz displejā mainās skaņas ikona. Drošības brīdinājumi vienmēr ir ieslēgti.
Pēc gatavošanas spiedienu var atbrīvot divos veidos:
1. Pēc gatavošanas spiediens sāk pakāpeniski samazināties. Atkarībā no šķidruma daudzuma tas var aizņemt 15līdz
30minūtēm. Pludiņa vārsts pakāpeniski slīd lejup, vāks ir atbloķēts, un to var viegli atvērt. Ja to nevar atvērt,
uzgaidiet ilgāk. NEKAD NEATVERIET KATLU AR SPĒKU!
2. Lai atvērtu spiedtvaika katla vāku: satveriet rokturi un nospiediet sarkano pogu, lai atvērtu vāku, pagrieziet vāku
pretēji pulksteņrādītāja rādītāja virzienam, līdz tas atbrīvojas, un paceliet to uz augšu, pavelkot uz augšu. Vāku var
novietot uz vāka statīva (14).
3. Ka d gatavošana ir pabeigta, n ospiediet Temperatūras uz turēšanas/atcelšanas pogu (5), izmantojot v irtuves cimdus,
pagrieziet pludiņa vārstu pozīcijā “Tvaika izplūde”, pludiņa vārsts nokrīt, vāks ir atbloķēts, un to var viegli atvērt.
ESIET ĪPAŠI PIESARDZĪGI UN IZMANTOJIET AIZSARGLĪDZEKĻUS, JO PASTĀV TVAIKA APPLAUCĒŠANAS RISKS!
Atliktā sākuma funkcija “Delay Start ”:
1. Ar “Delay Start” funkciju varat atlikt gatavošanas sākumu līdz pat 24stundām.
2. Levērojiet lietošanas pamācību, pagrieziet pogu, lai izvēlētos vēlamo programmu, pēc tam nospiediet pogu
Aizkavēt palaišanu un vēlreiz nospiediet pogu, lai iestatītu laiku, par kādu vēlaties aizkavēt gatavošanas sākumu.
Atliktā sākuma noklusējuma iestatījums ir 30minūtes.
3. Pēc tam nospiediet Start pogu. Aizkavētas palaišanas laikā displejā iedegas aizkavētas palaišanas ikona un tiek
parādīts atlikušais laiks. Pēc iestatītā laika beigām sāks darboties izvēlētā programma.
Padomi
1. Ja esat izvēlējies lēnā gatavošanas, jogurta vai cepšanas režīmu, varat izmantot spiediena katlu ar vāku, stikla vāku
vai bez vāka. Ja spiedtvairi izmantojat bez vāka, spiediena līmeņa indikators pazūd no displeja.
2. Iesakām izmantot funkciju “Keep warm” ne ilgāk kā 1stundu, jo pēc tam pārtikas produktu kvalitāte samazināt.
58 59
Page 31
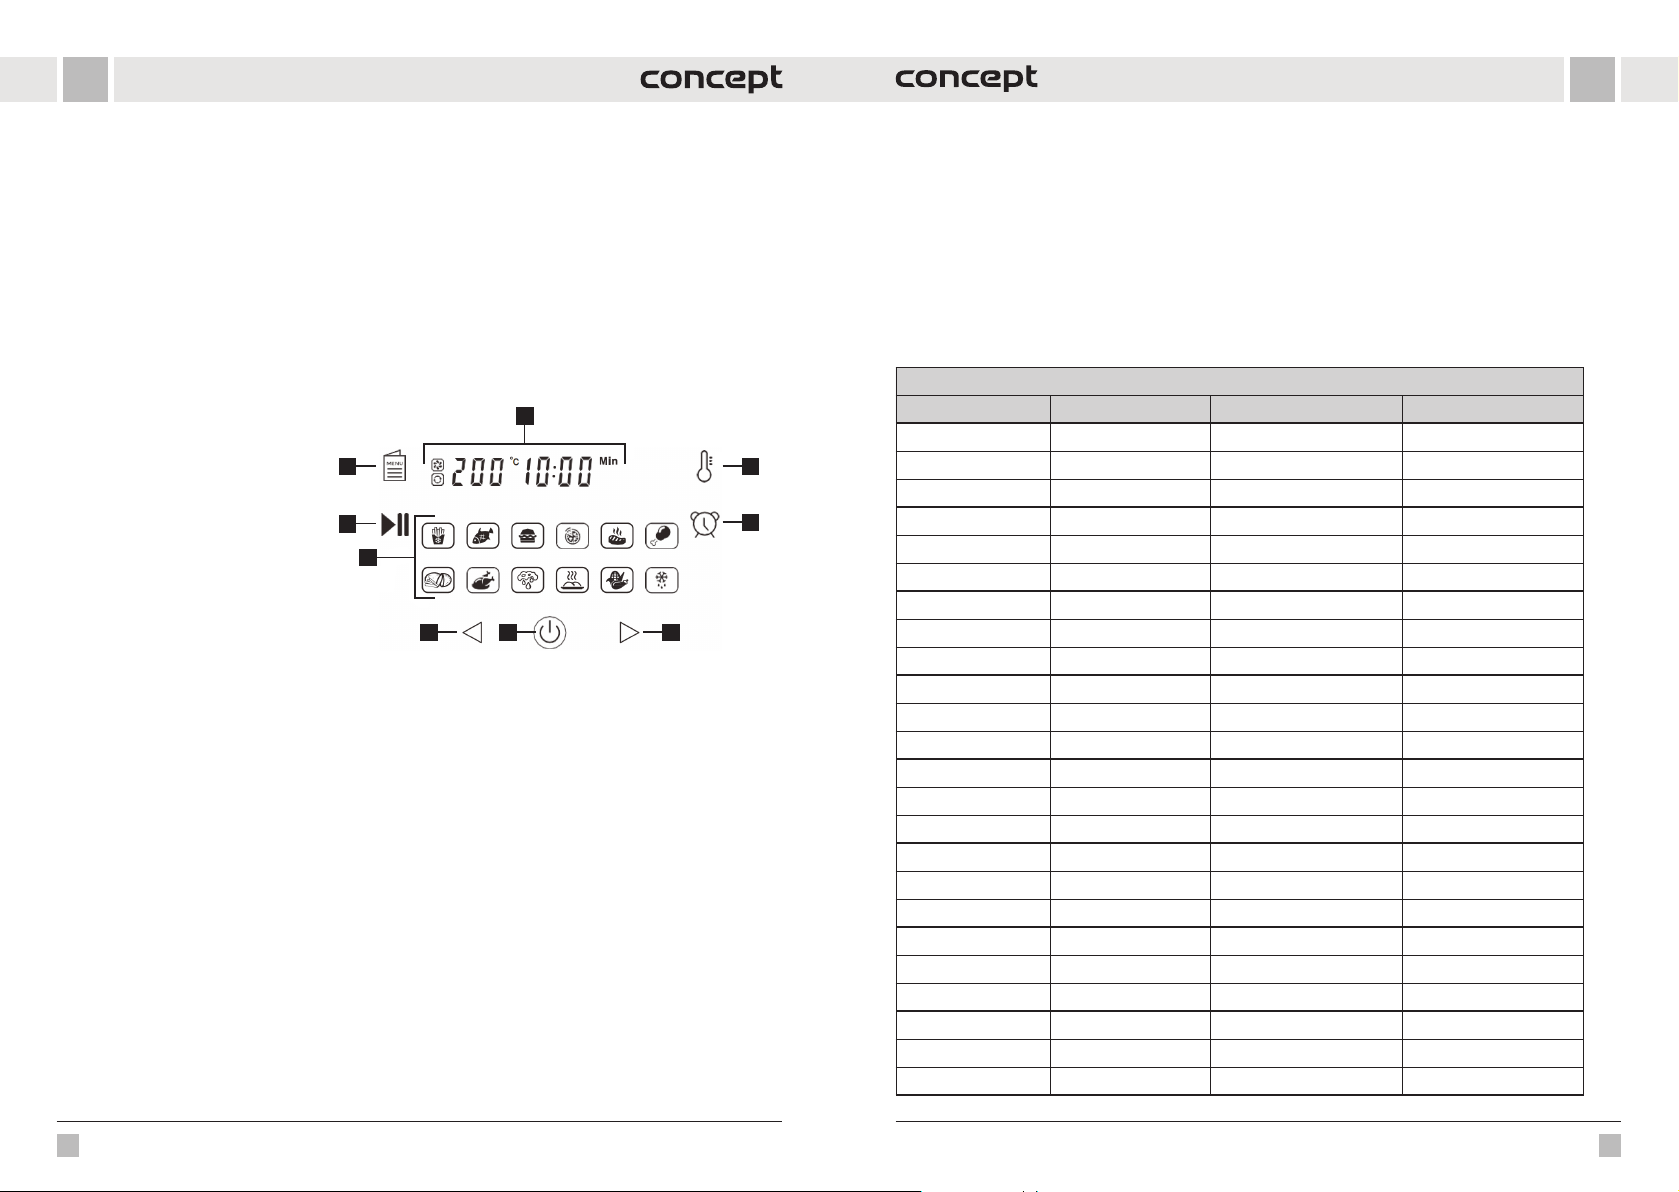
LVLV
3. Programmas ir izstrādātas tāda ēdiena pagatavošanai, kas sver mazāk nekā 1200g. Gatavojot lielākas porcijas,
izmantojiet individuālus iestatījumus.
4. Izmantojiet funkciju “Delay Start” tikai tiem pārtikas produktiem, kas šajā laikā nevar sabojāties.
5. Levietojiet un izņemiet ēdienu iekšējā tvertnē, izmantojot koka vai plastmasas piederumus, nekad nelietojiet asus
vai metāla piederumus, lai nesabojātu t vertnes virsmu.
6. Palīgierīču lietošana:
• Izvēloties tvaicēšanas programmu, ievietojiet tvaicēšanas plauktu (21) iekšējā tvertnē (12) un pēc tam ievietojiet
tvaicēšanas trauku (20). 6.
• Izvēloties Cepšanas programmu, ievietojiet iekšējo tvertnē (12) statīvs ar rokturiem (15).
• Izvēloties lēnās gatavošanas, jogurta vai cepšanas programmu, var izmantot stikla vāku (11).
• Izvēloties cepšanas programmu (ja tiek izmantots karstā gaisa vāks), ievietojiet iekšējā tvertnē (12) fritēšanas
grozu (13).
• Izmantojiet vāku statīvu (14), lai uzglabātu vākus.
KARSTĀ GAISA VĀKS VADĪBAS PANEĻA APRAKSTS
1. Digitālais displejs
2. Temperatūras iestatīšana
3. Taimera iestatījums
4. Temperatūras paaugstināšana / taimera
iestatīšana
5. Ieslēgšana/Izslēgšana
6. Temperatūras samazināšana / taimeris
7. Programmas
8. Palaišana/Pauzē
9. Iepriekš iestatītas programmas izvēle
KATLA AR KARSTĀ GAISA VĀKU(3) LIETOŠANA
Katls ar karstā gaisa vāku darbojas ar karstu gaisu; nekad nepiepildiet katlu ar eļļu vai citu cepšanas līdzekli.
1. Novietojiet ierīci sausā un līdzenā vietā.
2. Iespraudiet strāvas vadu elektrības kontaktligzdā.
3. Pārliecinieties, ka ierīces korpusa (5) iekšējā virsma ir sausa, un ievietojiet iekšējo tvertni (12) ierīces korpusā (5).
4. Ievietojiet ēdienu iekšējā traukā (12). Piezīme: Ja vēlaties izmantot cepšanas programmu, ievietojiet cepšanas
grozu (13) iekšējā traukā un ievietojiet tajā ēdienu. Nepārpildiet fritēšanas grozu (13) vai iekšējo trauku (12).
5. Uzlieciet karstā gaisa vāku (3), lai ierīci izmantotu kā karstā gaisa krāsni.
6. Nospiediet ieslēgšanas/izslēgšanas pogu (5), lai ieslēgtu. Ikonas iedegsies, un displejā būs redzams noklusējuma
iestatījums 180 °C un 15 minūtes.
7. Nospiediet iepriekš iestatītās programmas izvēles pogu (9), lai pārslēgtu gatavošanas iestatījumus. Izvēlētās
programmas ikona mirgo, un displejā tiek parādīta iepriekš iestatītā temperatūra un programmas laiks. Lai
pārslēgtos uz nākamo programmu, atkārtoti nospiediet pogu (9). Lai mainītu temperatūras iestatījumu,
vispirms nospiediet temperatūras iestatīšanas pogu (2)/ Lai mainītu laika iestatījumu, nospiediet taimera
iestatīšanas pogu (3) un pēc tam nospiediet vai turiet nospiestu pogas 4 un 6, lai iestatītu temperatūru.
5 °C intervālos un laiku 1 minūtes intervālos (tikai 30 minūšu žāvēšanas programmai).
8. Apstipriniet izvēli ar sākuma/pauzes pogu (8).
Piezīme: Ja sākat gatavošanu, kad ierīce vēl ir auksta, pagariniet gatavošanas laiku par aptuveni 2 minūtēm.
Priekšsil dīšanas laikā uz displeja ti ek rādīts "PREHEATING", pēc priek šsildīšanas tas pazūd n o displeja, un, kad ir ieslēg ts
sildelements, tiek rādīts tikai "HEATING".
Piezīme: Programmas darbības laikā programmas augšējā kreisajā stūrī iedegas ventilatora ikona. Ikona izslēgsies,
kad ventilators pārtrauks darboties.
9. Jebkurā gatavošanas laikā programmu var apturēt, nospiežot starta/pauzes pogu (8) un pēc tam vēlreiz nospiežot
pogu, lai atsāktu gatavošanas procesu.
8
7
6
1
29
3
5
4
10. Gatavošanas laikā jebkurā laikā var noņemt karstā gaisa vāku (3), lai pārbaudītu/pievienotu vai izņemtu ēdienu.
Izvēlētā programma tiks pārtraukta. Kad vāks ir atkal ievietots, programma atsāksies tur, kur tā tika pārtraukta.
11. Kad programma būs pabeigta, jūs tiksiet brīdināti ar skaņas signālu, bet displejā būs redzams tikai "FINISHED".
un ieslēgšanas/izslēgšanas poga (5) mirgo.
12. Kad gatavošana ir pabeigta, atvienojiet ierīci no elektrotīkla.
Paziņojums: Izņemot karsto cepšanas grozu/iekšējo trauku, valkājiet cimdus.
Padomi
Ēdienu gatavošanas laikā ieteicams to pagriezt, lai tas vienmērīgi apbrūnētu, vai samaisīt.
IEPRIEKŠ IESTATĪTAS PROGRAMMAS
Programmas gatavošanai ar spiediena vāku
Programmas Daudzums (pielāgot) Gatavošanas ilgums (min) Iespējamais laika posms
Rīsi Mazāk 8 1-99 min
Normāli 12
Vairāk 15
Zupa Mazāk 12 1-99 min
Normāli 15
Vairāk 20
Olas Mazāk 4 1-99 min
Normāli 5
Vairāk 6
Gaļa/Gaļas sautējums Mazāk 20 1-99 min
Normāli 35
Vairāk 45
Pupiņas/Chilli Mazāk 25 1-99 min
Normāli 30
Vairāk 40
Mājputnu gaļa Mazāk 10 1-99 min
Normāli 15
Vairāk 25
Pākšaugi Mazāk 20 1-99 min
Normāli 40
Vairāk 45
Liellopu gaļa Mazāk 30 1-99 min
Normāli 35
Vairāk 40
60 61
Page 32
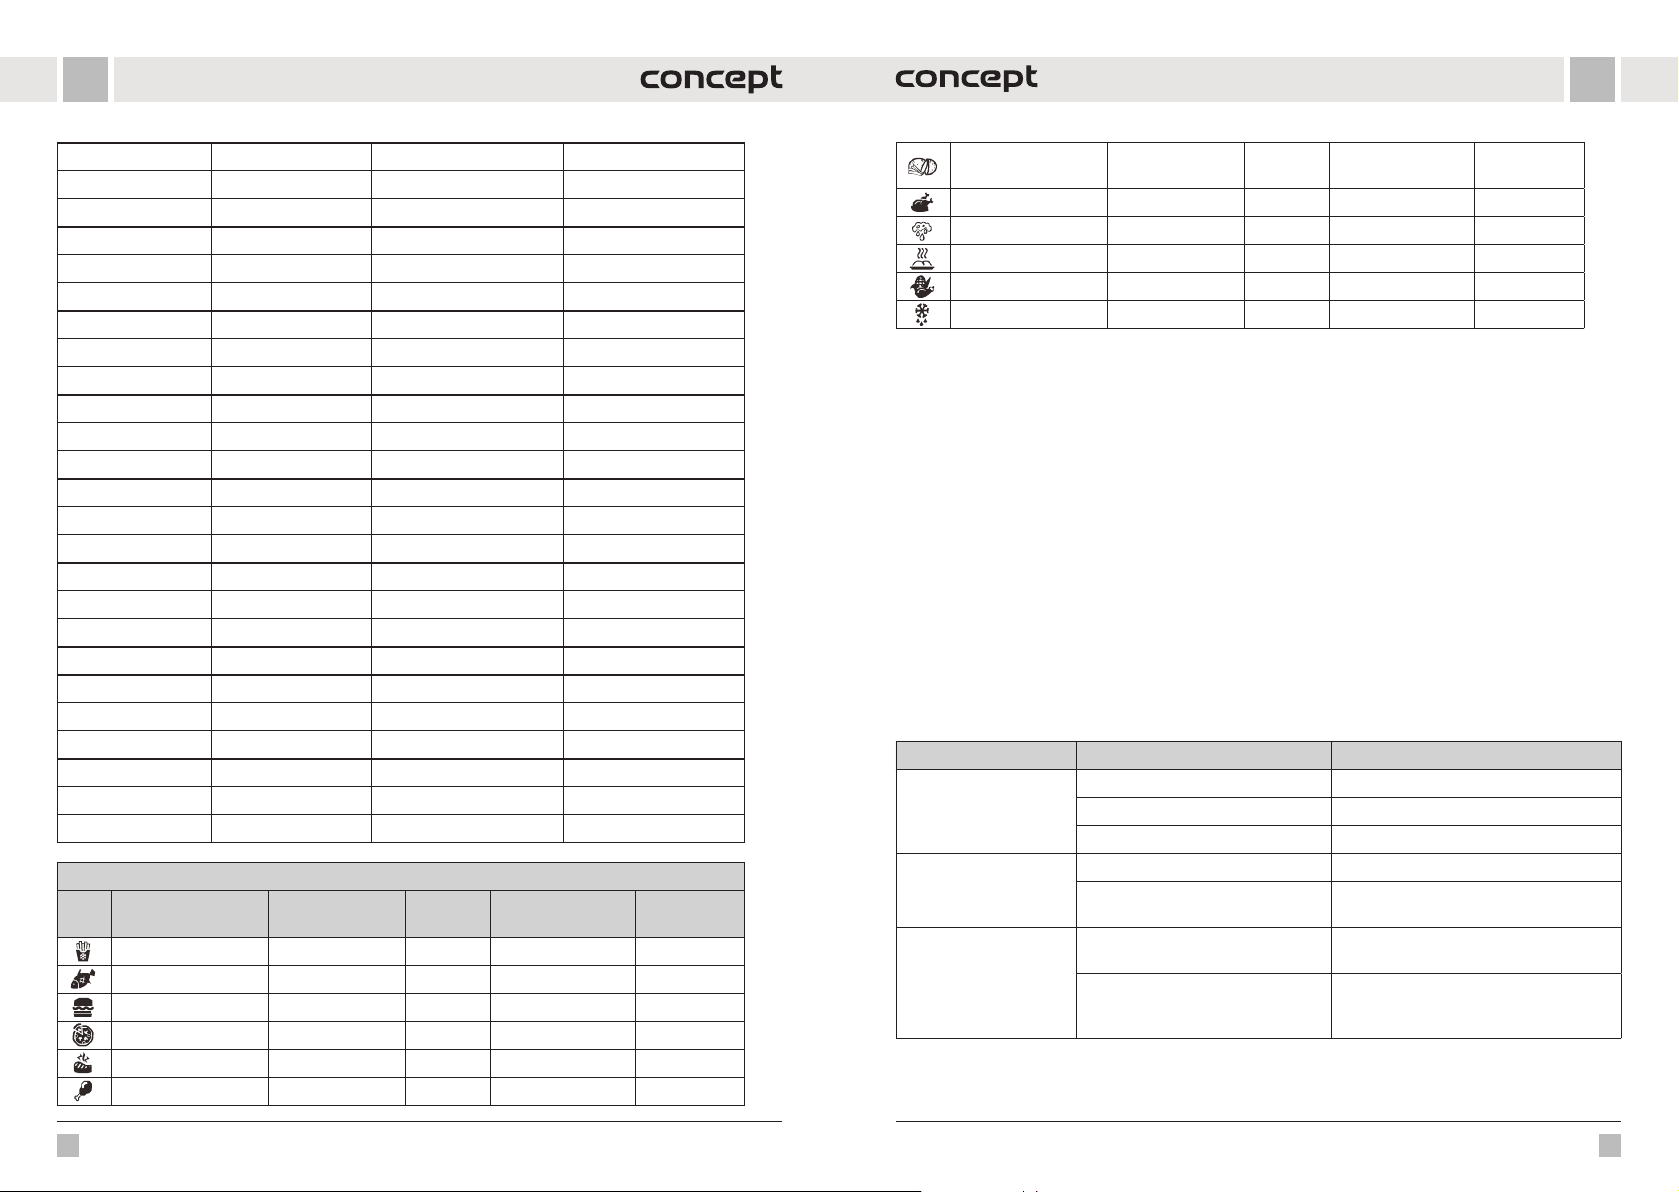
LVLV
Tvaika Mazāk 12 1-99 min
Normāli 15
Vairāk 20
Auzu pārslu putra Mazāk 12 1-99 min
Normāli 15
Vairāk 20
Cūkgaļa/ribiņas Mazāk 13 1-99 min
Normāli 18
Vairāk 25
Deserts Mazāk 25 1-99 min
Normāli 40
Vairāk 50
Risotto Mazāk 20 1-99 min
Normāli 35
Vairāk 45
Dārzeņi Mazāk 10 1-99 min
Normāli 15
Vairāk 20
Cepšana Normāli 30 30 min
Lēna gatavošana Mazāk 30 30 min - 9 stundas 30 min
Normāli 6 stundas
Vairāk 9 stundas 30 minūtes
Jogurts Mazāk 24 stundas 6 - 24 stundas
Normāli 8 stundas
Vairāk "boiL"
Programmas ēdiena gatavošanai ar karstā gaisa vāku
Programmas Temperatūra (°C) Ilgums
Saldēti čipsi 200 15 min 80-200 1-60 min
Zivis 160 15 min 80-200 1-60 min
Hamburgeri 185 13 min 80-200 1-60 min
Picas 185 15 min 80-200 1-60 min
Liellopa gaļas steiks 175 25 min 80-200 1-60 min
Vistas kājas 200 22 min 80-200 1-60 min
Regulējamā tem-
peratūra (°C)
Iespējamais
laika posms
Neapstrādāti kartupeļu frī kartupeļi
Visa vistas gaļa 180 40 min 80-200 1-60 min
Žāvēšana 80 2 stundas 40-90 1-12 stundas
Grilēšana 160 10 min 160 1-30 min
Dārzeņi 180 15 min 80-200 1-60 min
Atkausēšana 50 5 min 50 1-60 min
Piezīme: Šie iestatījumi ir tikai orientējoši. Ja sākat gatavošanu, kad ierīce vēl ir auksta, pagariniet gatavošanas laiku
par aptuveni 2 minūtēm.
160 30 min 80-200 1-60 min
TĪRĪŠANA UN APKOPE
Iztīriet ierīci pēc katras lietošanas.
Neizmantojiet agresīvus līdzekļus, piemēram, asus priekšmetus, skrāpjus, ķīmiskos šķīdinātājus, citus
šķīdinātājus utt.
• Pirms ierīces uzstādīšanas atvienojiet strāvas vadu no elektrotīkla. Nekad neiegremdējiet strāvas vadu,
kontaktdakšu, ierīci vai karstā gaisa vāku ūdenī vai citā šķidrumā!
• Pirms tīrīšanas ļaujiet ierīcei pilnībā atdzist.
• Notīriet ierīces ārējo virsmu ar mitru, mīkstu drāniņu.
• Piepildiet iekšējo tvertni ar karstu ūdeni un atstājiet uz brīdi. Pēc tam to var nomazgāt ar mīkstu drāniņu ūdenī ar
pievienotu mazgāšanas līdzekli vai trauku mazgājamajā mašīnā.
• Citas ierīces daļas var mazgāt ūdenī, pievienojot mazgāšanas līdzekli.
• Trauku mazgājamajā mašīnā var mazgāt tikai piederumus un iekšējo tvertni.
• Kad detaļas ir pilnīgi sausas, samontējiet ierīci un uzglabājiet to vēsā, sausā vietā.
PROBLĒMU RISINĀŠANA
Problēmas Cēlonis Risinājums
Ierīce nav pareizi savienota. Iespraudiet ierīci iezemētā kontaktligzdā.
Ierīce nedarbojas.
Cepamais ēdiens nav
gatavs.
Ēdiens tiek cepts
nevienmērīgi.
Nav iestatīta programma vai taimeris. Iestatiet vēlamo programmu vai taimeri.
Nav pareizi ievietots vāks. Pārbaudiet, vai vāks ir ievietots.
Pārāk daudz ēdiena. Ievietojiet mazākas partijas tvertnē/grozā.
Uzstādīts pārāk īss gatavošanas laiks,
temperatūra ir pārāk zema.
Pārāk liela pārtikas produktu partija,
pārtikas produkti atrodas viens uz otra.
Pārtika nav svaiga vai nav pareizi
sagatavota.
Pagariniet gatavošanas laiku, palieliniet
temperatūru.
Izņemiet dažus pārtikas produktus vai
sakratiet/apgrieziet tos gatavošanas pusceļā.
Pārliecinieties, ka izmantojat svaigus
pārtikas produktus un pienācīgi sagatavojat
tos cepšanai (iepiliniet dažus pilienus eļļas).
62 63
Page 33
LV
EN
Ceptais ēdiens nav
kraukšķīgs.
No ierīces nāk balti dūmi.
Ap spiediena katla vāku
noplūst tvaiks.
Tvaika noplūde no spiediena vārsta.
Dažus pārtikas produktus labāk izmantot karstā gaisa fritē.
Nepieciešams neliels eļļas daudzums. Pārtiku viegli aplejiet ar eļļu.
Pārtika ir mitra. Pirms gatavošanas ēdienu nosusiniet.
Fritētavā esošais ēdiens ir taukains.
Tvertnē / grozā joprojām ir iepriekšējās
lietošanas laikā radušies tauku
atlikumi.
Blīvējums nav pareizi ievietots.
Spiediena vārsts (izvads) ir bloķēts. Notīriet vārstu.
Spiediena vārsts (izvads) nav pareizi
noslēgts.
Izmantojiet svaigus vai daļēji sagatavotus
pārtikas produktus.
Tas nav defekts. Izžāvējiet pārtiku no eļļas
pārpalikuma.
Pareizi iztīriet tvertni/ grozu.
Pārtrauciet gatavošanu, noņemiet vāku un
pārbaudiet, vai blīvējums ir ievietots.
Uzmanīgi aizveriet vārstu.
TEHNISKĀ APKALPE
Plašāka mēroga apkopes un remontdarbi, kuriem ir nepieciešama iejaukšanās ierīces iekšpusē, jāveic kvalificētam
speciālistam vai servisa centram.
VIDES AIZSARDZĪBA
• Nododiet iepakojuma materiālu un vecās ierīces otrreizējai pārstrādei.
• Ierīču kastes var nodot atkritumu šķirošanas punktos.
• Polietilēna (PE) maisiņus nododiet otrreizējai pārstrādei paredzēto materiālu savākšanas punktā.
Ierīces otrreizējā pārstrāde tās kalpošanas laika beigās
Šī ierīce ir marķēta saskaņā ar Eiropas Parlamenta un Padomes Direktīvu 2012/19/EU par elektrisko
un elektronisko iekārtu atkritumiem (WEEE). Simbols uz izstrādājuma vai tā iepakojuma norāda,
ka šis izstrādājums nepieder sadzīves atkritumiem. Tas jānogādā elektrisko un elektronisko iekārtu
otrreizējās pārstrādes savākšanas punktā. Nodrošinot šā izstrādājuma pareizu iznīcināšanu, tiks
novērsta nelabvēlīga ietekme uz vidi un cilvēku veselību, ko var izraisīt nepareiz a ierīces iznīcināšana.
Iznīcināšana jāveic saskaņā ar noteikumiem par atkritumu apstrādi. Lai iegūtu papildu informāciju
par šīs ierīces otrreizēju pārstrādi, lūdzu, sazinieties ar vietējās pašvaldības sadzīves atkritumu
iznīcināšanas dienestu vai veikalu, kurā iegādājāties izstrādājumu.
Šis izstrādājums atbilst visām piemērojamo EU direktīvu pamatprasībām.
Izmaiņas tekstā, konstrukcijā un tehniskajās specifikācijās var tikt veiktas bez iepriek šēja brīdinājuma, un mēs paturam
tiesības veikt šīs izmaiņas.
ACKNOWLEDGMENT
Thank you for purchasing a Concept product. We wish you much joy with your new appliance every day you use it.
Please read the instruction manual carefully before initial use. To refer to this manual any time you need to, we
recommend you to keep it in a safe place. And please pass it to any future owner of the appliance.
Technical specifications
Voltage 220-240 V~50-60 Hz
Input
Container capacity 5,6 l
Adjustable temperature fryer: cooking 80 -200 °C, drying 40-90 °C
Timer
1000 W multifunction cooker
1500 W air fryer
Caution!
Hot surface
Pot: 1 min - 24 h
fryer: cooking 1 - 60 min, drying 1 - 12 h
IMPORTANT
Before connecting to the mains, make a visual check to ensure that the unit is intact and that no damage occurred
during transport.
IMPORTANT SAFETY PRECAUTIONS
• Do not use the appliance in any other way than as described in this
manual.
• Remove all the covering and marketing materials from the appliance
before the first use.
• Make sure the mains voltage corresponds to the values on the rating
plate of the product.
• Place the appliance on a stable, flat surface away from other heat sources.
• When disconnecting the appliance from the wall outlet, never pull the
power cord, grasp the plug end and disconnect it by removing it from
the receptacle.
• Do not allow children or unauthorized people to handle the appliance,
use it out of their reach.
• Persons with reduced mobility, reduced sensory perception, mental
disadvantage or persons not familiar with the operation must use the
appliance only under the supervision of responsible person, who is
familiar with the instructions.
• Pay extra attention if the appliance is used near children.
• Do not use the appliance as a toy.
• Do not cover the appliance.
64
65
Page 34
ENEN
• Before assembly and disassembly, disconnect the power cord from
the wall outlet.
• Before cleaning and af ter use of the appliance, switch the appliance
off and disconnect it from the mains.
• Keep the appliance clean, do not allow foreign objects to into the grid
openings. It could cause serious injury, short circuit, damage to the
appliance or cause fire.
• Do not use the appliance with a damaged cord or plug and have it
repaired immediately by an authorized service centre.
• Do not use the appliance if it is not working properly, has been dropped,
damaged or immersed in liquid. Have it checked and repaired by an
authorized service centre.
• The appliance is only suitable for home use and is not intended for
commercial use.
• Do not use the appliance outdoors.
• Use of an extension cord is not recommended as it may overheat and
cause a fire hazard. If it is necessary to use an extension cord, make sure
the electrical power is compatible with the appliance and the outlet is
grounded.
• Do not move or shake the appliance during operation.
• Do not insert flammable materials (paper, plastic) into the appliance.
• Do not touch the appliance with wet hands.
• Do not immerse the power cord, plug or appliance in water or
any other liquid. Do not pour water or other liquids on electrical
components and connectors.
• Do not repair the appliance yourself. Contact an authorized service centre.
• This appliance can be used by children aged from 8 years and above
and persons with reduced physical, sensory or mental capabilities or
lack of experience and knowledge if they have been given supervision
or instruction concerning the use of the appliance in a safe way and
understand the hazards involved. Cleaning and maintenance performed
by the user must not be carried out by children unless they are at least
8 years old and under supervision. Children aged under 8 years of age
must be kept away from the appliance and its power cord. Do not let
children play with the appliance.
• Do not touch hot surfaces.
• Do not let the power cord hang freely over the edge of a table or kitchen
unit. Do not let the power cord touch hot surfaces.
• Do not place the appliance near a gas or electric burner. Do not place the
appliance on the hob. Make sure that the appliance is placed in a wellventilated area away from hot surfaces, flammable materials (curtains,
tablecloths) and damp environments.
• NOTICE: The surfaces of the appliance may be very hot. Hold the appliance
only by the handle and use protective equipment such as kitchen gloves.
• Pay special attention to prevent water or other liquid from entering the
appliance. This could cause an electric shock.
• Always place food in the basket of the appliance to prevent it coming
into contact with the heating element.
• Never touch the inner surfaces of the appliance during operation or
immediately after switching off. Allow the appliance to cool down
sufficiently.
• Do not plug in or operate the appliance with wet hands.
• Air fry lids: hot steam is released through the air outlets during cooking,
keep your hands and face at a safe distance from the air outlets.
• Pressure cooker lid: Beware of hot steam and air escaping from the
pressure valve. Do not place your hands, face or any objects over the
pressure hood outlet.
• Do not use the appliance if you have a pacemaker, hearing aid, etc.
Consult your medical professional before using the appliance.
• Do not use accessories other than those recommended by the
manufacturer.
• Do not connect the appliance to an external timer.
• Overheat protection: if the thermal fuse has reacted, the appliance will
not operate. Unplug the appliance and wait until it has cooled completely
before restarting.
• If you see dark smoke coming out of the appliance during operation,
switch it off immediately and contact an authorized service centre.
• Before cleaning the appliance allow it to cool down for at least 30 minutes.
Damages from failure to follow the manufacturer's instructions (see
safety precautions) are not covered by the warranty.
66 67
Page 35
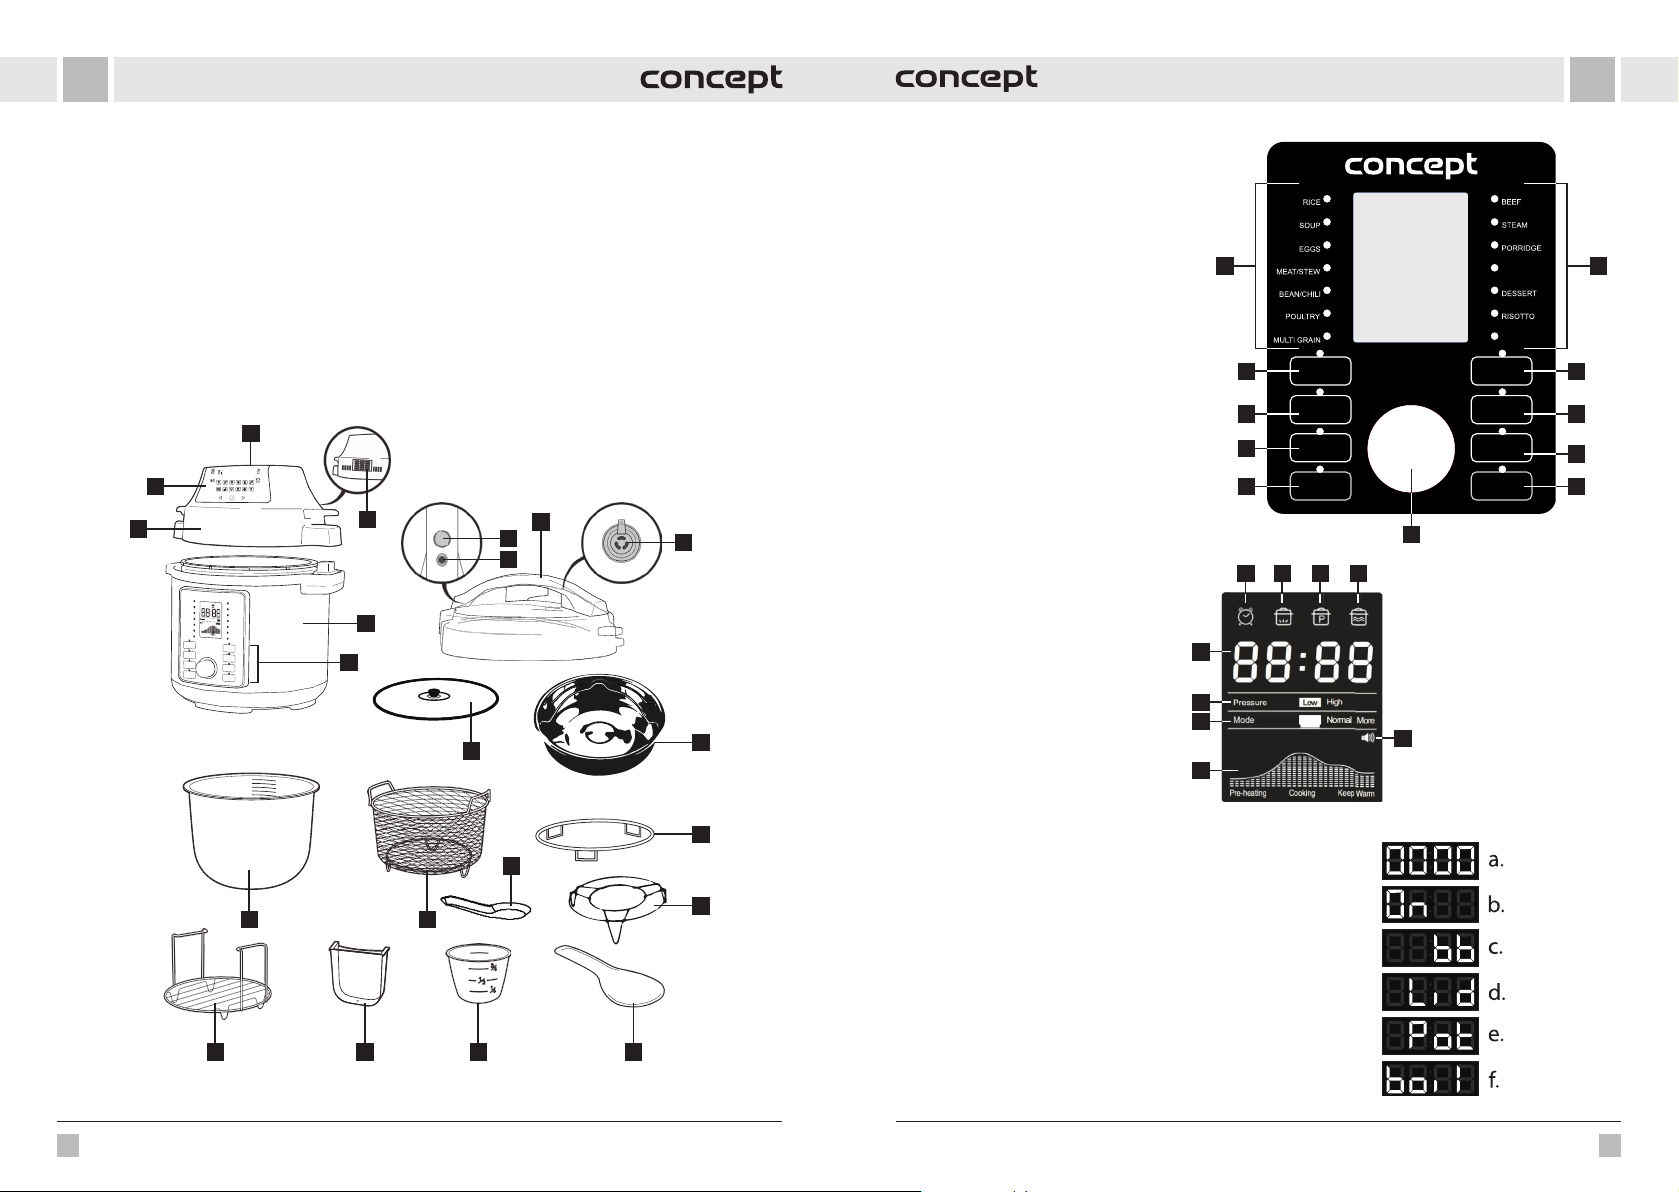
ENEN
c
PRODUCT DESCRIPTION
1 Air supply
2 Air outlet
3 Hot air lid
4 Hot air lid display
5 Appliance body
6 Control panel of the multifunction pot
7 Pressure cooker lid
8 Lid release button
9 Safety valve
10 Pressure valve
11 Glass lid
1
4
3
12 Inner container
13 Frying basket
14 Lid rack
15 Stand with handles
16 Condensation container for excess water
17 Measuring cup
18 Shallow spoon
19 Deep spoon (ladle)
20 Steaming pot
21 Steaming rack
2
7
8
9
5
6
11
DESCRIPTION OF THE CONTROL
PANEL OF THE MULTIFUNCTIONAL
POT
1 Preset programs
2 Yoghurt programme
3 Slow cooking
4 Low/high pressure setting
5 Temperature Hold/Cancel
6 Frying
7 Delayed start
8 Manual setting
9 Start
10 Control knob
10
DISPLAY DESCRIPTION
A B C D
RÝŽE
POLÉVKA
VEJCE
MASO / DUŠENÍ
FAZOLE / CHILLI
DRŮBEŽ
LUŠTĚNINY
2 6
POMALÉ VAŘENÍ
SLOW COOK
3
4
UDRŽENÍ TEPLOTY
5
KEEP WARM/CANCEL
JOGURT
YOGURT
TLAK
PRESSURE
LEVEL
/ ZRUŠIT
Pressure
Mode
Pre-heating
High
Low
Less Normal More
Cooking Keep Warm
10
A Delayed start indicator
B Preheat indicator
C Pressure indicator
I
D Temperature hold indicator
E Sound on/off indicator
F Progress indicator
G Mode indicator
20
H Pressure level indicator
I Time and warning display
H
G
E
F
HOVĚZÍ
PÁRA
OVESNÁ KAŠE
VEPŘOVÉ /
ŽEBÍRKA
PORK&RIBS
DEZERT
RIZOTO
ZELENINA
VEGETABLES
SMAŽENÍ
SAUTE
ODLOŽENÝ START
DELAY START
RUČNÍ NASTAVENÍ
ADJUST
START
11
7
8
9
14
19
12 13
21
The following notifications may appear on the LED display:
a. The pot is ready to use, but the program has not been selected
b. The cooker is heating to the required temperature
c. The „Keep Warm“ function – the cooker maintains the temperature
d. Lid is in the wrong position or missing
e. There is not an inner container in the cooker
f. boiL (cooking) appears in More mode for the Yoghurt programme
15
16 17 18
68 69
Page 36
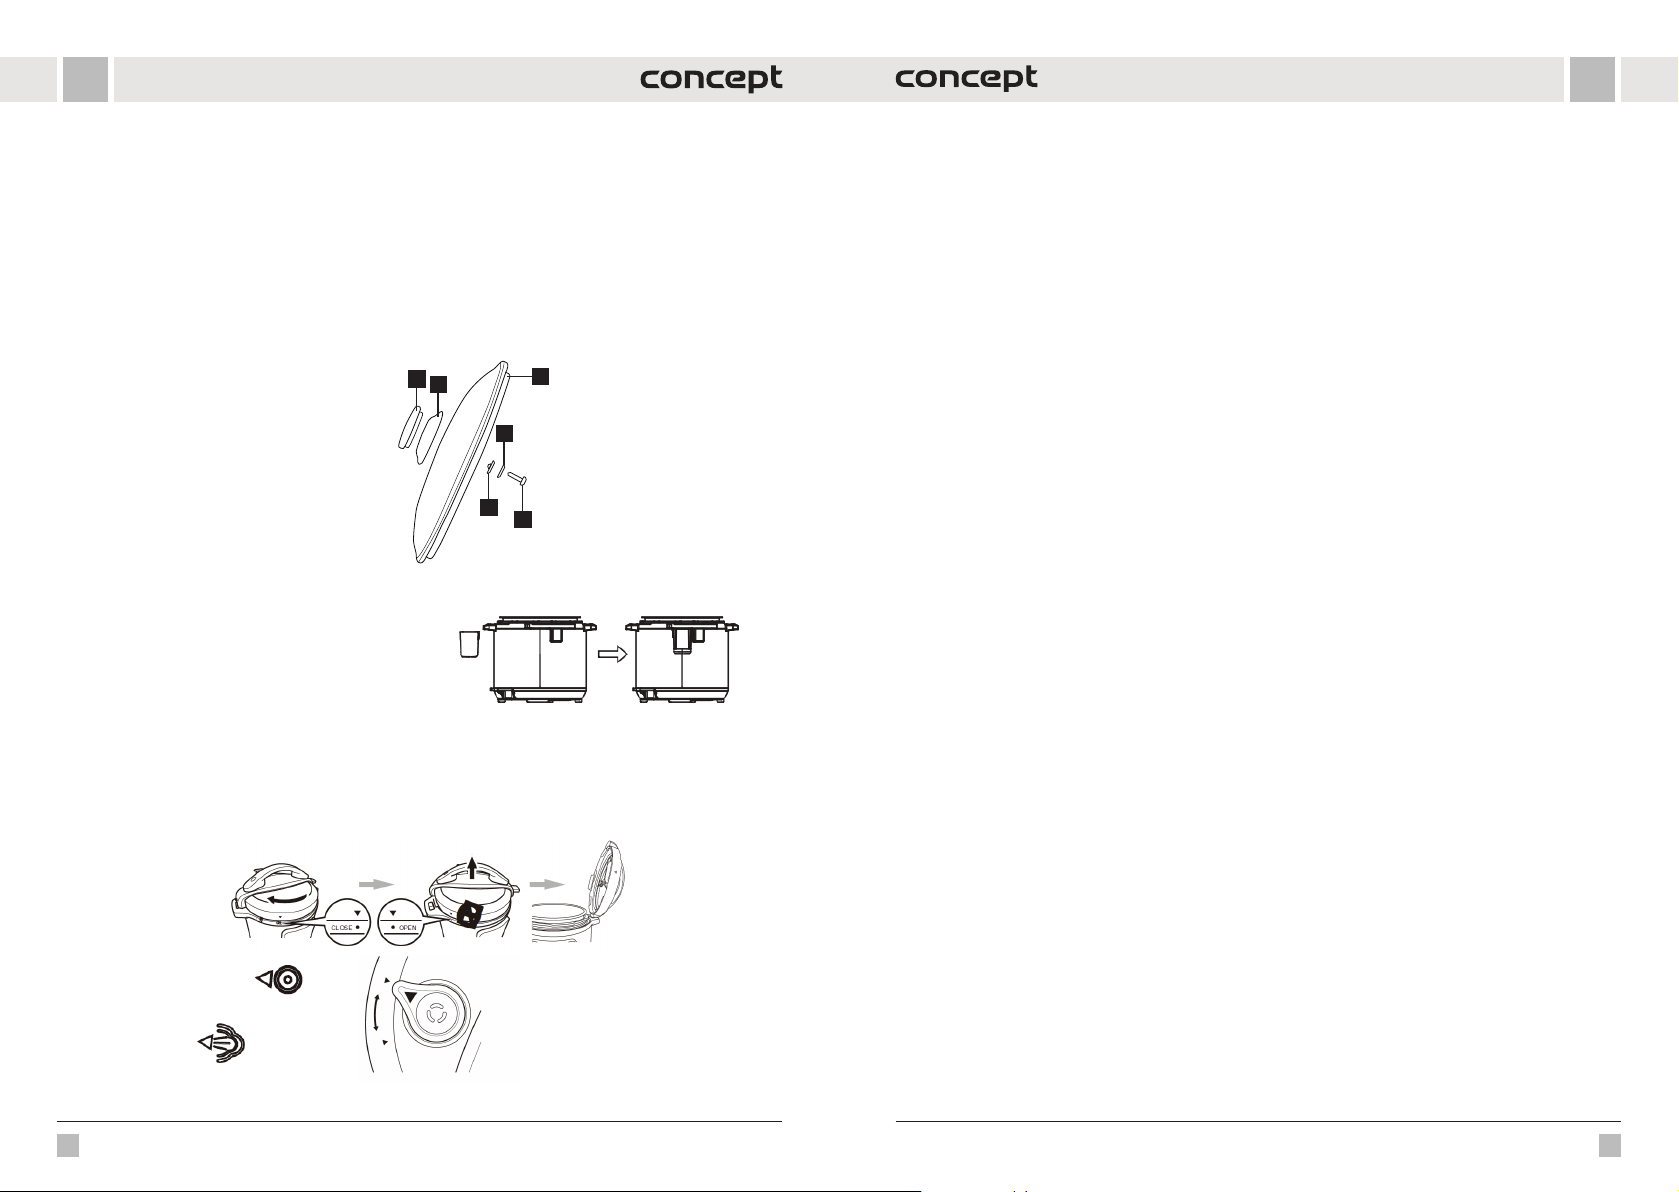
ENEN
BEFORE FIRST USE
• Remove all packaging materials from the appliance.
• Remove all labels and stickers from the appliance.
• Wash the inner container (12) with hot water.
• Wipe the appliance thoroughly from the inside and outside with a cloth.
• Wash the accessories with hot water and soap and a non-abrasive sponge.
Note: Preheat the appliance for 10 minutes without any food. Harmless smoke and a slight odour may escape from
the appliance.
• Leave a minimum of 13 cm clearance around the appliance during operation.
Assembling the glass lid
You can use the glass lid with the Slow Cook and
Maintain Temperature functions. The assembly of the
handle is shown in the picture.
1. Handle
2. Handle base
3. Glass lid body
4. Seal
5. Washer
6. Screw
1
2
3
5
4
6
OPERATING INSTRUCTIONS
USING THE COOKER WITH PRESSURE LID (7)
1. Place the appliance in a dry and level place.
2. Place the condensation container for excess water (16)
on the back of the appliance, see Fig. 1.
3. Prepare the pressure lid (7) as shown in the Fig. 2.
• Pull the metal protrusion on the underside of the lid to remove the protective cover on which the seal is fitted.
The gasket can be removed and cleaned. Make sure that the seal is not damaged or torn anywhere. In case of
damage, replacement is necessary. Make sure the float valve is clean and can move freely.
Note: If the pressure cooker lid has already been fitted to the appliance, remove it for preparation by pressing the red
button and turning the handle anti-clockwise and lifting up.
Sealed
Steam discharge
Fig. 1
Fig. 2
4. R emove the inner contai ner (12). The total volume of f ood and water shoul d not exceed 2/3 of t he volume of the inner
container. If you will b e cooking food that will in crease in volume during cook ing (e.g. rice), do not fill the container
more than 1/2 full. Caution: Some foods such as applesauce, cranberries, oatmeal, noodles, rhubarb or spaghetti
can foam and cr ack, clogging the pressu re valve (outlet). These foods sho uld not be cooked in the pressur e cooker.
Caution: do not use the pressure cooker for frying with oil.
5. Make sure the inner surface of the appliance body (5) is dry and place the inner container (12) into the appliance
body (5).
6. Fit the pressure cove r (7) and turn clockwise. When you hear a click , the lid is properly seated. Proper sealing of the
lid is indicated by the aligned arrows on the edge of the lid and the edge of the appliance.
7. Please note that the pressure valve (10) must be freely movable for the pot to function properly.
8. Set the pressure valve to the "Sealed" position, this makes the pot ready for use.
9. Plug the power cord into the appliance plug and then into a power outlet. The display will show "00 00".
10. Turn the control knob to scroll through the preset programmes (1) (additional programmes by pressing the
corresponding programme button) or to adjust the cooking time. Confirm the selected programme (indicator
lights up) with the Start button. To adjust the preset programme time, press the knob and turn to select the
desired time and confirm by pressing the Start button.
Note: Press the Pres sure setting button to s witch between low and hig h pressure. The default set ting is High Pressure.
Adjust the pressure setting after selecting the program and cooking time, confirm the setting with the Start button.
Press the Manual Settings button to select the quantity of food, switching between Less, Normal and More. The
default setting is Normal.
Note: The cooking time should be adjusted according to the amount of food.
11. The pot starts to heat up to the desired temperature (the display shows "On", the preheat icon is lit) and the float
valve rises. Once it reaches the desired temperature, the set time starts counting down. At this point, you are
already cooking under pressure (the pressure icon is lit), the lid is locked and the pot cannot be opened. NEVER
TRY TO OPEN THE POT BY FORCE!
12. When cooking is complete, an audible signal will sound and the cooker will automatically switch to "Keep warm"
mode to keep the food warm. The display shows "bb" and the Keep Warm icon lights up.
13. You can cancel the pot setting at any time by pressing the Keep Warm/Cancel button (5).
14. Sound off/on: to change the sound mode, hold down the Keep Temperature/Cancel but ton for 3 seconds until the
sound icon on the display changes. Safety warnings are always on.
When cooking is complete, the pressure can be released in two ways:
1. When cooking is complete, the pressure will gradually decrease. Depending on the amount of liquid, this may take
15-30 minutes. The float valve gradually drops, the lid unlocks and can be opened easily. If it cannot be opened,
wait for a bit longer. NEVER OPEN THE COOKER BY FORCE!
2. To open the pressure cooker lid: grasp the handle and press the red button to release the lid, turn the lid
counterclockwise until it releases and lift up with an upward pull. The lid can be placed on the lid rack (14).
3. When the cooking is finished, press the Hold Temperature/Cancel button (5), wear a pot holder and turn the float
valve to the “Steam release” position, the float valve will drop, the lid will unlock and can be opened easily. BE VERY
CAREFUL AND USE PROTECTIVE EQUIPMENT, RISK OF STEAM SCALDING!
Delay Start function:
1. Using the Delay Start function, you can delay the start of cooking by up to 24 hours.
2. Follow the Instructions for use, turn the knob to select the desired program, then press the Delay Start button and
press the button again to set the time you want to delay the start of cooking. The default setting for delayed start
is 30 minutes.
3. Then press the Star t button. During delayed start, the delayed st art icon lights up on the display and the remaining
time is shown. After the set time has elapsed, the selected program starts.
Tips
1. If you select Slow cooking, Yoghurt or Frying, you can use a pressure cooker with a lid, a glass lid or no lid. When
used without a pressure cooker lid, the pressure level indicator disappears from the display.
2. We recommend using the “Keep Warm” function for a maximum of 1 hour, after that the food will start to lose its
quality.
70 71
Page 37
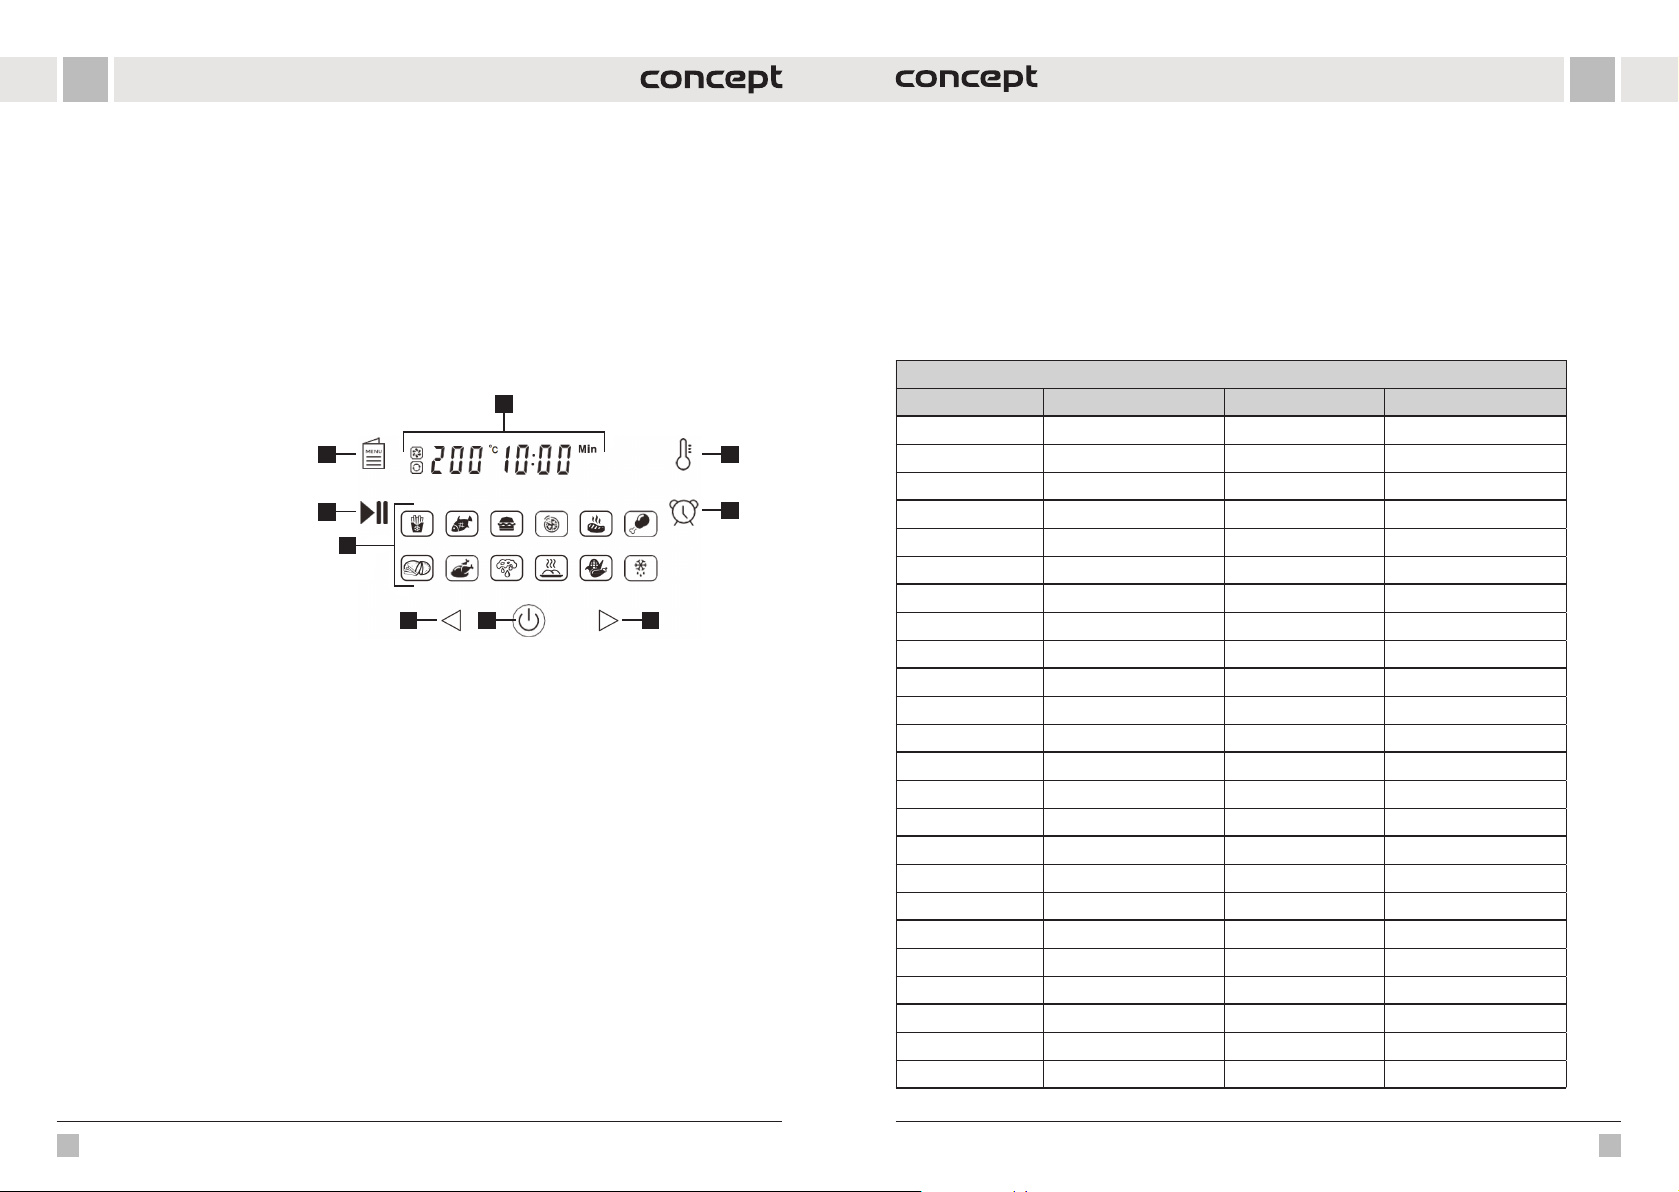
ENEN
3. The programs are pre-set to prepare food weighing less than 1200 g. If you want to prepare larger portions, use
your own custom setting.
4. Use the Delay Start function only for foods that cannot spoil during this time.
5. Insert and remove food into the inner container using wooden or plastic utensils, never use sharp or metal utensils
to avoid damaging the surface of the container.
6. Use of accessories:
• When selecting the Steam programme, insert the steaming rack (21) into the inner container (12) and then inser t
the steaming pot (20).
• When selecting the Fry programme, insert the steaming rack with handles (15) into the inner container (12).
• When selecting the Slow cooking, Yoghurt or Frying programme, the glass lid (11) can be used.
• When selecting the frying programme (when using the hot air lid), place the frying basket (13) in the inner
cont ain er (12).
• Use the lid rack (14) to store the lids.
DESCRIPTION OF THE CONTROL PANEL OF THE HOT AIR LID
1. Digital display
2. Temperature setting
3. Timer setting
4. Increase temperature/timer
5. On/Off
6. Decrease temperature/timer
7. Programs
8. Start/pause
9. Preset program selection
USING THE COOKER WITH THE HOT-AIR LID (3)
The cooker with a hot-air lid uses hot air, never fill the cooker with oil or other fr ying medium.
1. Place the appliance in a dry and level place.
2. Plug the power cord into an electrical outlet.
3. Make sure the inner surface of the appliance body (5) is dry and place the inner container (12) into the appliance
body (5).
4. Place the food in the inner container (12). Note: If you want to use the frying programme, place the frying basket
(13) in the inner container and place the food in the basket. Do not overfill the frying basket (13) or the inner
container (12).
5. Place the hot air lid (3) to use the appliance as a hot air oven.
6. Press the On/Off button (5) to switch on. The icons will light up and the display will show the default setting of 180
°C and 15 minutes.
7. Press the preset programme selection button (9) to switch cooking presets. The selected program icon flashes
and the display shows the preset temperature and program time. Press the button (9) repeatedly to switch to the
next programme. To change the temperature setting, first press the temperature setting but ton (2)/to change the
time setting, press the timer setting button (3) and then press or hold buttons 4 and 6 to adjust the temperature
in 5 °C intervals and the time in 1 minute intervals (only for the 30 minute dr ying programme).
8. Confirm the selection with the Start/Pause button (8).
Note: If you start cooking when the appliance is still cold, extend the cooking time by about 2 minutes. During
preheating, the display shows "PREHEATING", after preheating it disappears from the display and only "HEATING" is
shown when the heating element is switched on.
Note: The fan icon in the top left corner lights up while the program is running. The icon will turn off when the fan
stops working.
9. You can pause the program at any time during cooking by pressing the Start/Pause button (8) and then pressing
the button again to resume the cooking process.
8
7
6
1
29
3
5
4
10. At any time during cooking, you can remove the hot air lid (3) to check/add or remove food. The selected
programme will be interrupted. When the lid is reinserted, the programme will resume where it was interrupted.
11. You will be alerted by an audible signal when the program is over and the display will only show "FINISHED"
and the On/Off button (5) will flash.
12. When you have finished cooking, disconnect the appliance from the mains.
Notice: Wear oven gloves when removing the hot fr ying basket/internal container.
Tips
We recommend turning the food during cooking for even browning or stirring.
PRESET PROGRAMS
Programmes for cooking using the pressure lid
Programs Quantity (adjust) Cooking time (min) Possible time range
Rice Less 8 1-99 min
Normal 12
More 15
Soup Less 12 1-99 min
Normal 15
More 20
Eggs Less 4 1-99 min
Normal 5
More 6
Meat/Stewing Less 20 1-99 min
Normal 35
More 45
Beans/Chilli Less 25 1-99 min
Normal 30
More 40
Poultry Less 10 1-99 min
Normal 15
More 25
Legumes Less 20 1-99 min
Normal 40
More 45
Beef Less 30 1-99 min
Normal 35
More 40
72 73
Page 38
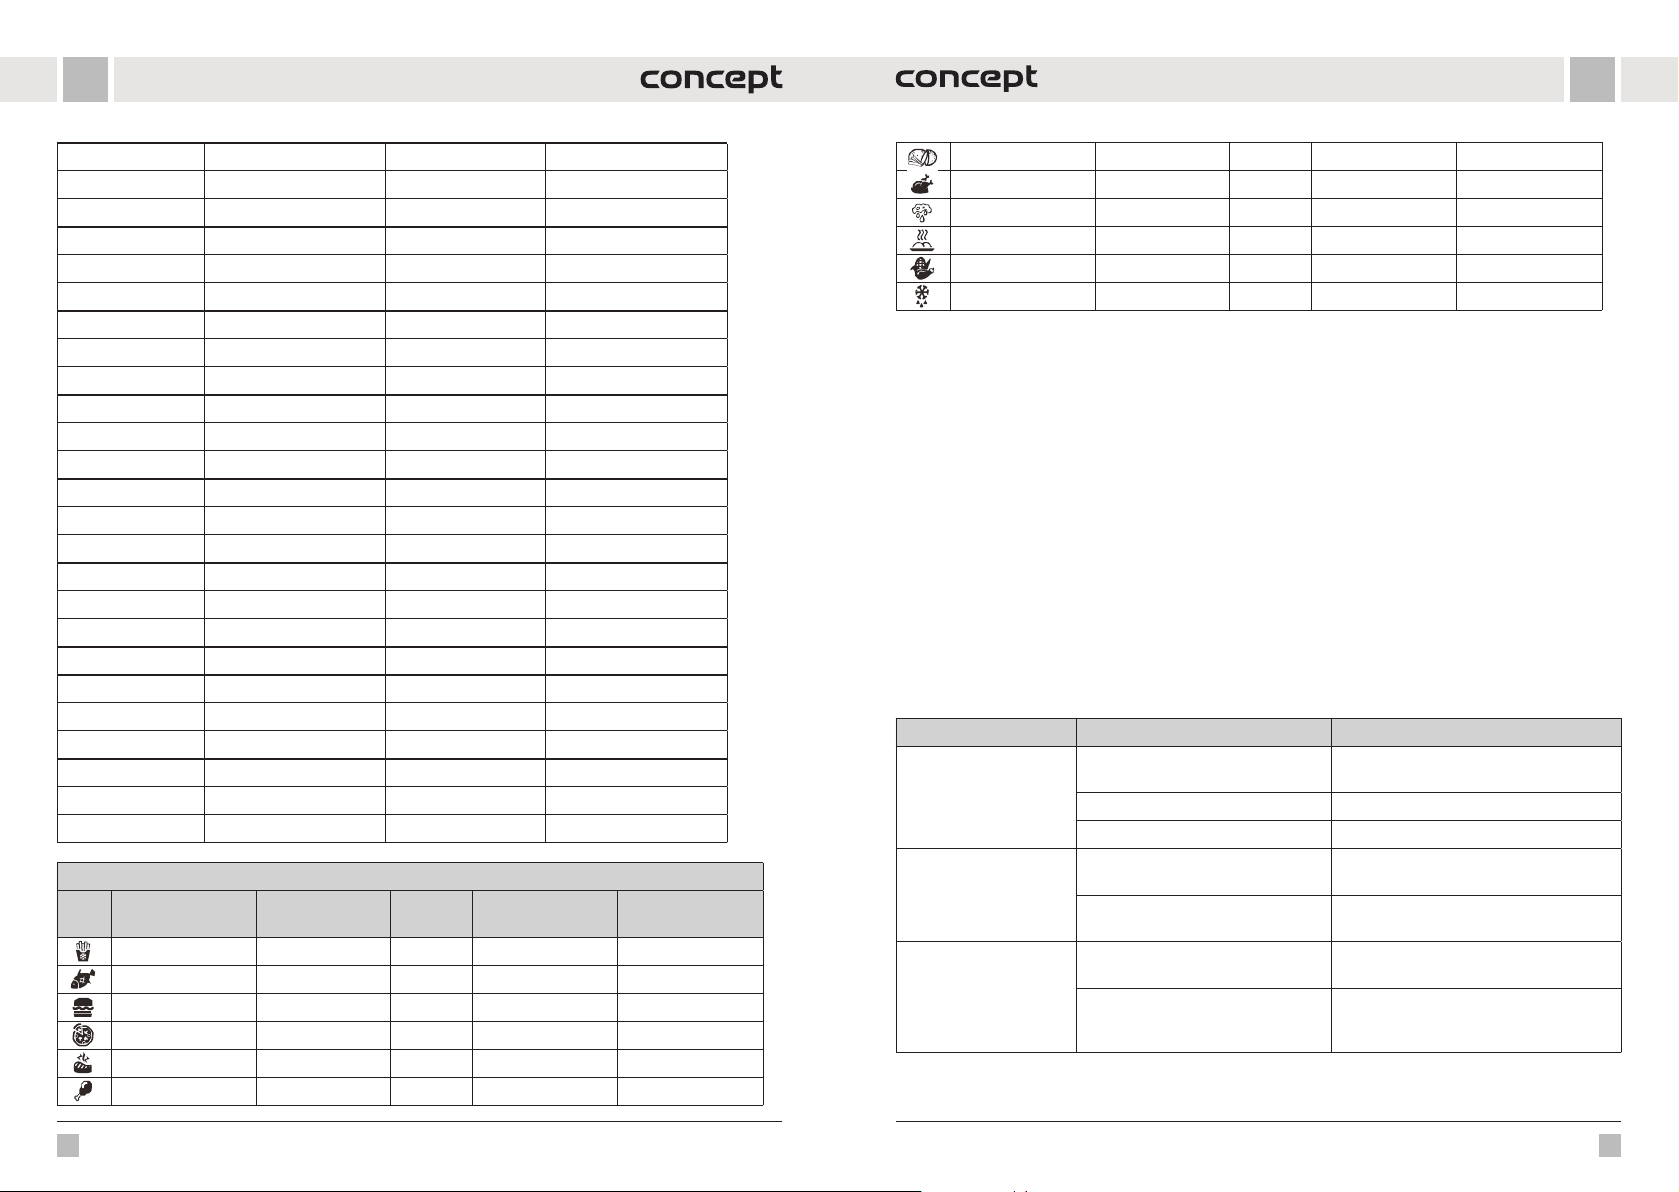
ENEN
Steam Less 12 1-99 min
Normal 15
More 20
Oatmeal porridge Less 12 1-99 min
Normal 15
More 20
Pork/ribs Less 13 1-99 min
Normal 18
More 25
Dessert Less 25 1-99 min
Normal 40
More 50
Risotto Less 20 1-99 min
Normal 35
More 45
Vegetables Less 10 1-99 min
Normal 15
More 20
Frying Normal 30 30 min
Slow cooking Less 30 30 min - 9 h 30 min
Normal 6 h
More 9 h 30 min
Yoghurt Less 24 h 6 h - 24 h
Normal 8 h
More "boiL"
Programmes for cooking with a hot-air lid
Programs Temperature (°C) Time
Frozen chips 200 15 min 80-200 1-60 min
Fish 160 15 min 80-200 1-60 min
Hamburger 185 13 min 80-200 1-60 min
Pizza 185 15 min 80-200 1-60 min
Beef steak 175 25 min 80-200 1-60 min
Chicken legs 200 22 min 80-200 1-60 min
Adjustable
temperature (°C)
Possible time
range
Raw potato fries 160 30 min 80-200 1-60 min
Whole chicken 180 40 min 80-200 1-60 min
Drying 80 2 hours 40-90 1-12 hours
Grilling 160 10 min 160 1-30 min
Vegetables 180 15 min 80-200 1-60 min
Defrosting 50 5 min 50 1-60 min
Note: These settings are for guidance only. If you start cooking when the appliance is still cold, extend the cooking
time by approx. 2 minutes.
CLEANING AND MAINTENANCE
Clean the appliance after each use.
Do not use coarse and chemically aggressive substances such as: sharp objects, scrapers, c hemical solvents,
thinners, etc.
• Before cleaning always disconnect the appliance from the mains. Never immerse the power cord, plug, appliance
or hot air lid in water or other liquid!
• Before cleaning the appliance allow it to cool down.
• Wipe the outside of the appliance with a damp cloth.
• Fill t he inner container with hot w ater and leave to stand for a while. Th en it can be washed with a so ft cloth in water
with a detergent or in a dishwasher.
• Other parts of the appliance can be washed in water with a detergent.
• Only the accessories and the inner container are dishwasher safe.
• Once the parts are completely dry, assemble the appliance and store in a cool, dry place.
PROBLEM SOLVING
Problem Cause Solution
The appliance is not
working.
The fried food is not ready.
Food is fried unevenly.
The appliance is not connected
correctly.
Program or timer is not set. Set the desired programme or timer.
Lid not seated correctly. Check that the lid is seated.
Too much food.
Cooking time set too short, temperature too low.
Too large a batch of food, food lying on
top of each other.
Food not fresh or not prepared
correctly.
Plug the appliance into a grounded socket.
Place smaller batches in the container/
basket.
Extend cooking time, increase temperature.
Remove some foods or shake/turn them in
the middle of cooking.
Make sure you use fresh food and prepare it
properly for frying (drizzle a few drops
of oil).
74 75
Page 39
EN
DE
Fried food is not crispy.
White smoke coming from
the appliance.
Steam leaking around the
pressure cooker lid.
Steam leaking from the
pressure valve.
Some foods are better for use in a hot
air fryer.
A little oil is needed. Lightly drizzle the food with oil.
Food is moist. Dry the food before cooking.
Food in the fryer is greasy.
The container/basket still contains
grease residue from previous use.
The seal is not seated properly.
The pressure valve (outlet) is blocked. Clean the valve.
The pressure valve (outlet) is not
properly sealed.
Use fresh food or semi-prepared foods.
This is not a defect. Dry the food of excess
oil.
Clean the container/basket properly.
Stop cooking, remove the lid and check the
seal for seating.
Carefully close the valve.
SERVICE
Extensive maintenance or repair, which requires access to internal parts of the product, has to be performed by
aqualified service centre.
ENVIRONMENTAL CONCERNS
• Packaging materials and old appliances should be recycled.
• Packaging materials may be disposed of as sorted waste.
• Dispose the plastic bags made of polyethylene (PE) of as sorted waste.
Recycling of the appliance at the end of its lifespan
This appliance is labelled in accordance with European Directive 2012/19/EU concerning used
electrical and electronic appliances (Waste Electrical and Electronic Equipment - WEEE). The symbol
on the product or on its packaging indicates that this product may not be treated as household
waste. Instead, it should be taken to the appropriate collection point for the recycling of electrical
and electronic equipment. By ensuring this product is disposed of correctly, you will help prevent
potential negative consequences for the environment and human health, which could otherwise
be caused by inappropriate waste handling of this product. The disposal of such material has to be
done according to the recycling regulations. For more detailed information about recycling of this
appliance see the authorized local office or service for household waste disposal or the shop, where
you purchased the appliance.
The product meets all the necessary requirements of the EU directives applicable to the specific
product.
Changes in text, design, and technical specifications are subject to change without notice and we reserve the right to
change them.
DANKSAGUNG
Vielen Dank, dass Sie ein Produkt der Marke Concept eingekauft haben. Wir wünschen Ihnen, dass Sie mit unserem
Produkt über seine gesamte Gebrauchsdauer zufrieden sein werden.
Lesen Sie sich vor dem ersten Gebrauch die ganze Bedienungsanleitung sorgfältig durch und bewahren Sie diese
dann auf. Stellen Sie sicher, dass auch andere Personen, die dieses Produkt behandeln werden, sich mit dieser
Gebrauchsanweisung vertraut machen.
Technische Parameter
Spannung 220-240 V~50-60 Hz
Leistungsbedarf
Fassungsvermögen des Behälters 5,6 l
Einstellbarer Temperaturbereich Fritteuse: Kochen 80-200 °C, Trocknen 40-90 °C
Zeitschalter
Fritteuse: Kochen 1 - 60 min, Trocknen 1 - 12 Stunden
1000 W Multifunktions-Kochtopf
1500 W Heißluft-Frit teuse
Vorsicht!
Heiße Oberfläche
Topf: 1 min - 24 Stunden
WICHTIG
Vor dem Anschluss an das Stromnetz sichern Sie durch eine Sichtkontrolle, ob die Einheit unversehrt ist und ob es
während des Transports zu irgendwelcher Beschädigung nicht gekommen ist.
WICHTIGE SICHERHEITSHINWEISE
• Benutzen Sie das Gerät nicht anders, als es in dieser Anleitung beschrieben
ist.
• Vor dem ersten Einsatz entfernen Sie alle Verpackungen und
Marketingunterlagen vom Gerät.
• Überprüfen Sie, ob die Anschlussspannung den Werten auf dem
Typenschild des Produkts entspricht.
• Stellen Sie das Gerät nur auf eine stabile und hitzebeständige Oberfläche,
und halten Sie es von anderen Wärmequellen fern.
• Zum Trennen des Gerätes von der Steckdose ziehen Sie nie am
Zuleitungskabel, sondern greifen Sie den Stecker und trennen Sie diesen
von der Steckdose durch das Ziehen.
• Gestatten Sie den Kindern und Unmündigen nicht, mit dem Gerät zu
manipulieren, nutzen Sie es außerhalb ihrer Reichweite.
• Personen mit der erniedrigen Bewegungsfähigkeit, mit der erniedrigen
Sinneswahrnehmung, mit der ungenügenden psychischen Fähigkeit
oder Personen, die mit der Bedienung nicht anvertraut sind, müssen das
Gerät nur unter der Aufsicht einer verantwortlichen anvertrauten Person
nutzen.
76
77
Page 40
DEDE
• Verwenden Sie das Gerät nur mit großer Vorsicht in der Nähe von Kindern.
• Erlauben Sie nicht, dass das Gerät als Spielzeug verwendet wird.
• Decken Sie das Gerät nicht ab.
• Vor der Montage oder Demontage des Geräts ist das Zuleitungskabel
von der Steckdose zu trennen.
• Vor der Reinigung und nach dem Gebrauch ist das Gerät
auszuschalten und von der Steckdose zu trennen.
• Halten Sie das Gerät sauber und gestatten Sie nicht, dass fremde
Gegenstände in die Gitteröffnungen eindringen. Diese könnten eine
schwere Verletzung, den Kurzschluss verursachen, das Gerät beschädigen
oder den Brand verursachen.
• Nutzen Sie das Gerät mit dem beschädigten Zuleitungskabel oder
Stecker nicht. Lassen Sie den Mangel von einer autorisierten Werkstatt
unverzüglich beheben.
• Benutzen Sie das Gerät nicht, wenn es nicht richtig arbeitet, nach einem
Sturz, oder wenn es in eine Flüssigkeit eingetaucht wurde. Lassen Sie es
von einer autorisierten Werkstatt überprüfen und reparieren.
• Das Gerät ist nur für den Gebrauch im Haushalt geeignet, es ist nicht für
kommerzielle Zwecke bestimmt.
• Verwenden Sie das Gerät nicht im Freien.
• Die Verwendung eines Verlängerungskabels wird nicht empfohlen,
da es überhitzen und eine Brandgefahr darstellen kann. Wenn Sie ein
Verlängerungskabel verwenden müssen, vergewissern Sie sich, dass
die Stromversorgung mit dem Gerät kompatibel ist und die Steckdose
geerdet ist.
• Bewegen oder schütteln Sie das Gerät während des Betriebs nicht.
• Legen Sie keine brennbaren Materialien (Papier, Plastik) in das Gerät.
• Berühren Sie das Gerät mit feuchten oder nassen Händen nicht.
• Tauchen Sie das Zuleitungskabel, den Stecker oder das Gerät nicht
ins Wasser oder in eine andere Flüssigkeit. Gießen Sie kein Wasser
oder andere Flüssigkeiten auf elektrische Bauteile und Anschlüsse.
• Reparieren Sie das Gerät nicht selbst. Wenden Sie sich an eine autorisierte
Werkstatt.
• Dieses Gerät können Kinder ab dem 8. Lebensjahr und Personen mit
den erniedrigten physischen oder mentalen Fähigkeiten oder mit den
ungenügenden Erfahrungen und Kenntnissen dann nutzen, wenn sie
unter der Aufsicht stehen oder wenn sie über das Nutzen des Geräts
auf eine sichere Weise belehrt wurden und wenn sie die eventuellen
Gefahren verstehen. Die von dem Benutzer durchzuführende Reinigung
und Wartung dürfen keine Kinder durchführen, wenn sie nicht älter als
8 Jahre und unter keiner Aufsicht sind. Kinder bis zum 8. Lebensjahr
müssen außerhalb der Reichweite des Geräts und dessen Zuleitung
gehalten werden. Kinder dürfen mit dem Gerät nicht spielen.
• Berühren Sie heiße Oberflächen nicht.
• Lassen Sie das Anschlusskabel nicht über die Tischkante oder die
Küchenzeile frei hängen. Lassen Sie das Netzkabel nicht heiße Oberflächen
berühren.
• Stellen Sie das Gerät nicht in die Nähe eines Gasbrenners oder eines
elektrischen Brenners. Stellen Sie das Gerät nicht auf das Kochfeld. Achten
Sie darauf, dass das Gerät in einem gut belüfteten Bereich aufgestellt
wird, der von heißen Oberflächen, brennbaren Materialien (Vorhänge,
Tischdecken) und feuchten Umgebungen entfernt ist.
• HINWEIS: Die Oberflächen des Geräts können sehr heiß sein. Fassen
Sie das Gerät nur am Griff an und verwenden Sie Schutzausrüstung wie
Küchenhandschuhe.
• Achten Sie besonders darauf, dass kein Wasser oder sonstige Flüssigkeiten
ins Gerät eindringen. Dies könnte zu einem Stromschlag führen.
• Legen Sie Lebensmittel immer in den Korb des Geräts, damit sie nicht mit
dem Heizelement in Berührung kommen.
• Berühren Sie die Innenflächen des Geräts niemals beim Betrieb oder
unverzüglich nach der Ausschaltung. Lassen Sie das Gerät genügend
abkühlen.
• Schalten Sie das Gerät nicht ein und bedienen Sie das Gerät nicht mit
nassen Händen.
• Airfry-Deckel: Während des Kochens wird heißer Dampf durch die
Luftauslässe freigesetzt; halten Sie Ihre Hände und Ihr Gesicht in einem
sicheren Abstand zu den Luftauslässen.
• Druckdeckel: Achten Sie auf den heißen Dampf und die Luft, die aus dem
Druckventil entweichen. Halten Sie Ihre Hände, Ihr Gesicht oder andere
Gegenstände nicht über den Auslass der Druckhaube.
• Verwenden Sie das Gerät nicht, wenn Sie einen Herzschrittmacher, ein
Hörgerät usw. tragen. Konsultieren Sie Ihren Arzt, bevor Sie das Gerät
benutzen.
• Verwenden Sie kein anderes als das vom Hersteller empfohlene Zubehör.
78 79
Page 41
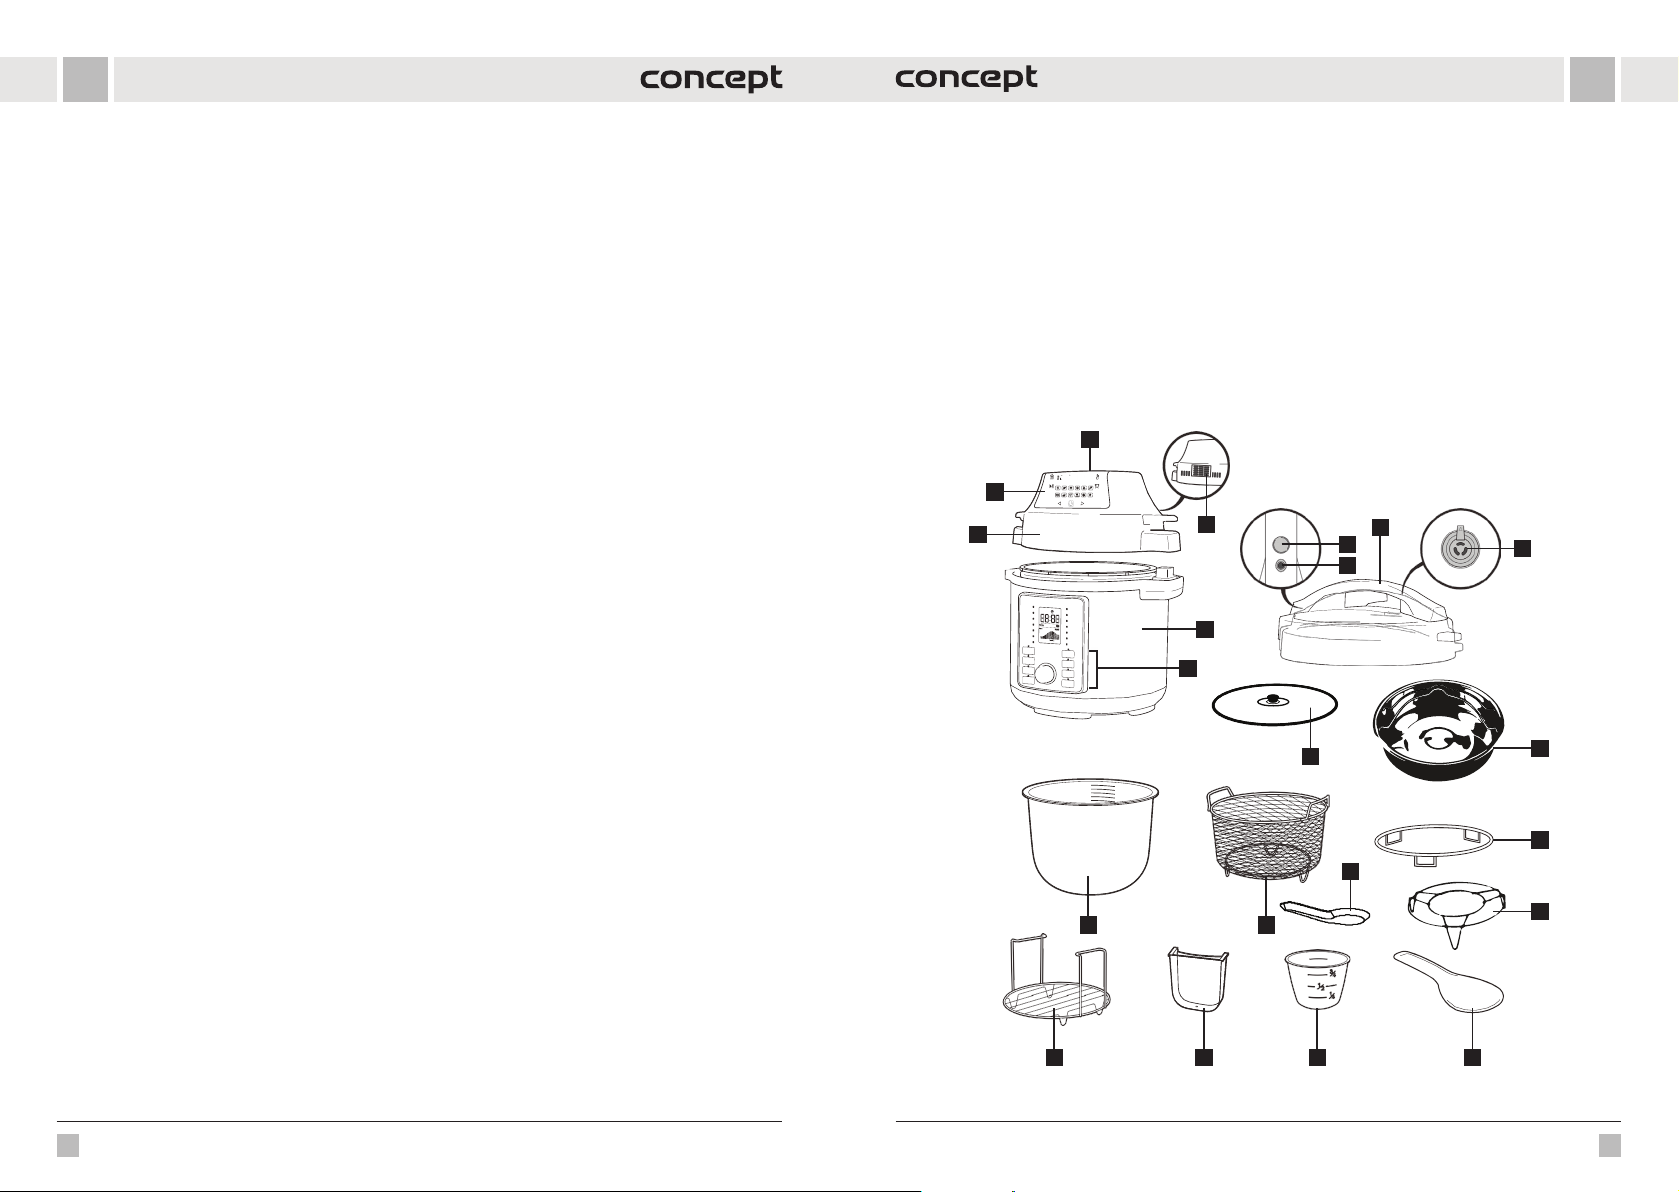
DEDE
c
• Schließen Sie das Gerät nicht an eine externe Zeitschaltuhr an.
• Überhitzungsschutz: Wenn die Thermosicherung ausgelöst hat,
funktioniert das Gerät nicht. Ziehen Sie den Netzstecker und warten Sie,
bis das Gerät vollständig abgekühlt ist, bevor Sie es wieder einschalten.
• Wenn sich ein dunkler Rauch beim Betrieb aus dem Gerät entwickelt,
schalten Sie dieses sofort ab und setzen Sie sich mit der autorisierten
Werkstatt in Verbindung.
• Vor der Reinigung lassen Sie das Gerät mindestens 30 Minuten abkühlen.
Bei der Nichteinhaltung der Anweisungen des Herstellers (siehe
Sicherheitshinweise) kann eine eventuelle Reparatur nicht als
Garantiereparatur anerkannt werden.
PRODUKTBESCHREIBUNG
1 Luftzufuhr
2 Luftaustritt
3 Heißluftdeckel
4 Display der Heißluftdeckel
5 Gerätekörper
6 Bedienfeld des Multifunktionstopfes
7 Druckdeckel
8 Deckelentriegelungstaste
9 Sicherheitsventil
10 Druckventil
11 Glasdeckel
1
4
3
12 Innenbehälter
13 Frittierkorb
14 Deckelständer
15 Ständer mit Griffen
16 Kondenswasserbehälter für überschüssiges Wasser
17 Messbecher
18 Flacher Löffel
19 Tiefer Löffel (Schöpfkelle)
20 Dampftopf
21 Dämpfeinsatz
2
5
6
7
8
9
10
11
19
12 13
15
80 81
16 17 18
20
14
21
Page 42
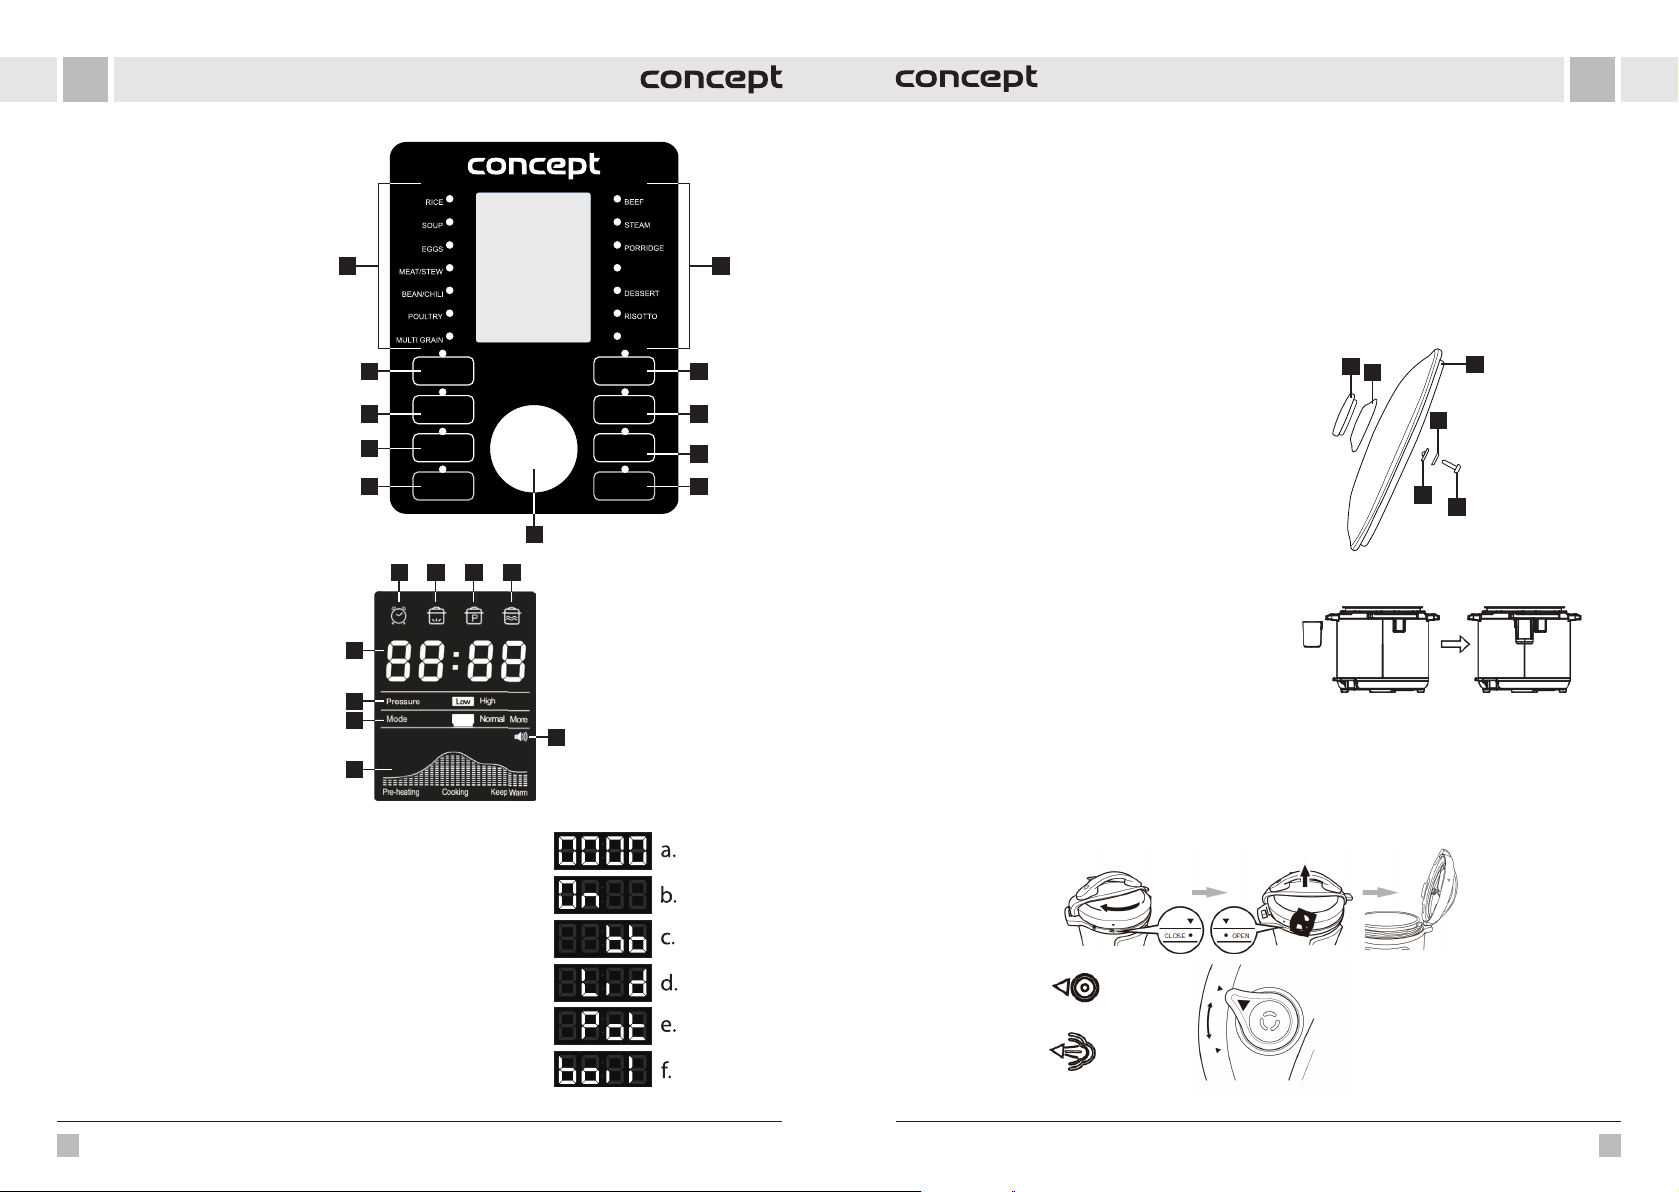
DEDE
BESCHREIBUNG DES
BEDIENFELDES DES
MULTIFUNKTIONSTOPFES
1 Voreingestellte Programme
2 Joghurt-Programm
3 Langsames Kochen
4 Nieder-/Hochdruckeinstellung
5 Temperatur halten/Abbrechen
6 Frittieren
7 Startverzögerung
8 Manuelle Einstellung
9 Start
10 Bedienknopf
BESCHREIBUNG DER ANZEIGE
A Anzeige für verzögerten Start
B Vorheizen-Anzeige
C Druckanzeige
D Temperatur-Halte-Anzeige
E Anzeige für Ton ein/aus
F Fortschrittsanzeige
G Modus-Anzeige
H Druckstufenanzeige
I Zeit- und Warnanzeige
RÝŽE
POLÉVKA
VEJCE
MASO / DUŠENÍ
FAZOLE / CHILLI
DRŮBEŽ
LUŠTĚNINY
2 6
POMALÉ VAŘENÍ
SLOW COOK
3
4
UDRŽENÍ TEPLOTY
5
KEEP WARM/CANCEL
JOGURT
YOGURT
TLAK
PRESSURE
LEVEL
/ ZRUŠIT
Pressure
Mode
Pre-heating
High
Low
Less Normal More
Cooking Keep Warm
HOVĚZÍ
PÁRA
OVESNÁ KAŠE
VEPŘOVÉ /
ŽEBÍRKA
PORK&RIBS
DEZERT
RIZOTO
ZELENINA
VEGETABLES
SMAŽENÍ
SAUTE
ODLOŽENÝ START
DELAY START
RUČNÍ NASTAVENÍ
ADJUST
START
10
A B C D
I
H
G
E
F
VOR DEM ERSTEN EINSATZ
• Entfernen Sie sämtliche Verpackungsmaterialien vom Gerät.
• Entfernen Sie sämtliche Schilder und Etiketten vom Gerät.
• Waschen Sie den Innenbehälter (12) mit heißem Wasser.
• Wischen Sie den Innenraum, sowie die Außenflächen des Geräts gründlich aus.
11
• Waschen Sie das Zubehör mit heißem Wasser und Seife und einem nicht scheuernden Schwamm.
Hinweis: Heizen Sie das Gerät 10 Minuten lang ohne Lebensmittel vor. Aus dem Gerät können harmloser Rauch und
ein leichter Geruch austreten.
• Lassen Sie während des Betriebs mindestens 13 cm Freiraum um das Gerät herum.
Zusammenbau des Glasdeckels
Sie können den Glasdeckel mit den Funktionen Langsames Kochen
und Temperatur beibehalten.
7
8
9
Die Montage des Griffs ist in der Abbildung dargestellt.
1. Griff
2. Basis des Griffs
3. Glasdeckelkörper
4. Dichtung
5. Unterlegscheibe
1
2
6. Schraube
3
5
4
6
BEDIENUNGSANLEITUNG
BENUTZUNG DES KOCHTOPFS MIT DEM DRUCKDECKEL
(7)
1. Stellen Sie das Gerät an einem trockenen und ebenen
Ort auf.
2. Ste llen Sie den Kondensatb ehälter für über schüssiges
Wasser (16) auf die Rückseite des Geräts, sie he Abb. 1.
3. Bereiten Sie den Druckdeckel (7) vor, siehe Abb. 2.
• Ziehen Sie an dem Metallvorsprung an der Unterseite des Deckels, um die Schutzabdeckung zu entfernen, auf
der die Dichtung angebracht ist. Die Dichtung kann entfernt und gereinigt werden. Achten Sie darauf, dass die
Dichtung nirgends beschädigt oder eingerissen ist. Sollte sie beschädigt sein, muss sie ersetzt werden. Stellen Sie
sicher, dass das Schwimmerventil sauber ist und sich frei bewegen kann.
Anmerkung: Wenn der Deckel des Schnellkochtopfes bereits auf dem Gerät angebracht ist, nehmen Sie ihn zur
Vorbereitung ab, indem Sie den roten Knopf drücken und den Griff gegen den Uhrzeigersinn drehen und anheben.
Abb. 1
Folgende Hinweise können auf dem LED Display angezeigt werden:
a. Der Topf ist einsatzbereit, aber das Programm wurde nicht ausgewählt
b. Vorwärmung des Kochtopfs wird auf gewünschte Temperatur
c. „Keep warm“- Funktion - der Kochtopf hält die Temperatur
d. Der Deckel ist in der falschen Position oder fehlt
e. Kein Innenbehälter im Kochtopf
f boiL (Kochen) erscheint im Modus Mehr für das Programm Joghurt
Abgedichtet
Abb. 2
Dampfauslass
82 83
Page 43
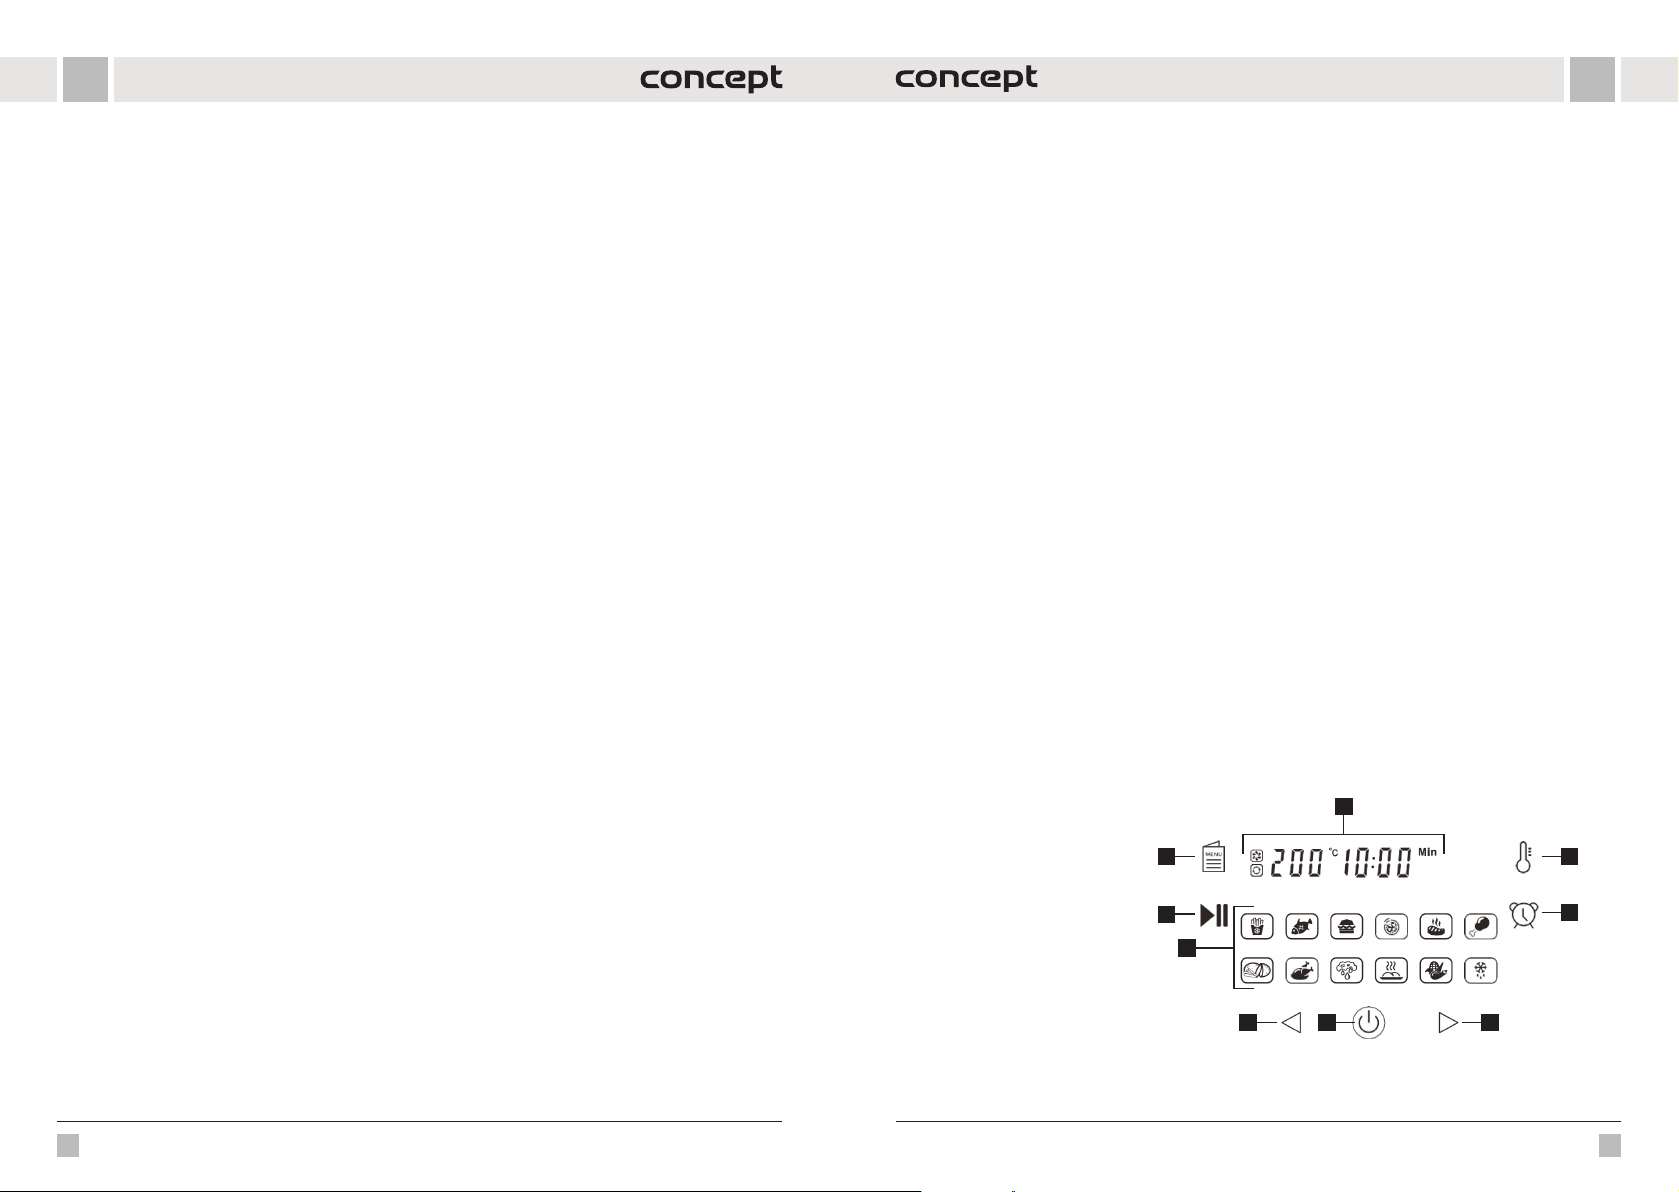
DEDE
4. Nehmen Sie den Innenbehälter (12) heraus. Das Gesamtvolumen von Lebensmitteln und Wasser sollte 2/3 des
Volumens des Innenbehälters nicht überschreiten. Wenn Sie Lebensmittel garen, deren Volumen während des
Garens zunimmt (z. B. Reis), füllen Sie den Behälter nicht mehr als 1/2 voll.
Hinweis: Einige Lebensmittel wie Apfelmus, Cranberries, Haferflocken, Nudeln, Rhabarber oder Spaghetti können
schäumen und platzen, wodurch das Druckventil (Auslass) verstopft wird. Diese Lebensmittel sollten nicht im
Schnellkochtopf gegart werden. Achtung: Verwenden Sie den Schnellkochtopf nicht zum Braten mit Öl.
5. Vergewissern Sie sich, dass die Innenfläche des Gerätegehäuses (5) trocken ist und setzen Sie den Innenbehälter
(12) in das Gerätegehäuse (5) ein.
6. S etzen Sie den Druckdecke l (7) auf und drehen Sie ihn im Uhrzeigersinn. Wenn Sie ein Klicken hör en, ist der Deckel
richtig aufgesetzt. Die korrek te Abdichtung des Deckels w ird durch die ausgerichteten P feile am Rand des Deckels
und am Rand des Geräts angezeigt.
7. Bitte beachten Sie, dass das Druck ventil (10) frei beweglich sein muss, damit der Topf richtig funktioniert.
8. Stellen Sie das Druckventil auf die Position "Sealed", damit ist der Topf einsatzbereit.
9. Stecken Sie das Netzkabel in den Gerätestecker und dann in eine Steckdose. Auf dem Display wird "00 00"
angezeigt.
10. Drehen Sie den Bedienknopf, um durch die voreingestellten Programme (1) zu blättern (weitere Programme
durch Drücken der entsprechenden Programmtaste) oder um die Garzeit einzustellen. Bestätigen Sie das
gewählte Programm (Anzeige leuchtet) mit der Start-Taste. Um die voreingestellte Programmzeit einzustellen,
den Drehknopf drücken und drehen, um die gewünschte Zeit auszuwählen und durch Drücken der Start-Taste zu
bestätigen.
Anmerkung: Drücken Sie die Taste Druckeinstellung, um zwischen niedrigem und hohem Druck zu wechseln. Die
Standardeins tellung ist hoher Druc k. Stellen Sie den Druck ein , nachdem Sie das Programm un d die Garzeit ausgewäh lt
haben, und bestätigen Sie die Einstellung mit der Taste Start. Drücken Sie die Taste Manuelle Einstellungen, um die
Menge der Speisen auszuwählen und zwischen Weniger, Normal und Mehr umzuschalten. Die Standardeinstellung
ist Normal.
Anmerkung: Die Garzeit sollte je nach Menge der Lebensmittel angepasst werden.
11. Der Topf beginnt, sich auf die gewünschte Temperatur zu erhitzen (auf dem Display erscheint "On", das
Vorheizsymbol leuchtet) und das Schwimmerventil hebt sich. Sobald er die gewünschte Temperatur erreicht
hat, beginnt die eingestellte Zeit herunterzuzählen. Zu diesem Zeitpunkt kochen Sie bereits unter Druck (das
Drucksymbol leuchtet), der Deckel ist verriegelt und der Topf kann nicht geöffnet werden. VERSUCHEN SIE
NIEMALS, DEN TOPF GEWALTSAM ZU ÖFFNEN!
12. Nach Beendigung des Garvorgangs ertönt ein akustisches Signal und der Herd schaltet automatisch in den
Warmhaltemodus, um die Speisen warm zu halten. Auf dem Display wird "bb" angezeigt und das Symbol
"Warmhalten" leuchtet auf.
13. Sie können die Topfeinstellung jederzeit durch Drücken der Taste Temperatur halten/Abbrechen (5) abbrechen.
14. Um den Tonmodus zu ändern, halten Sie die Taste Temperatur halten/Abbrechen 3 Sekunden lang gedrückt, bis
sich das Tonsymbol auf dem Display ändert. Die Sicherheitswarnungen sind immer eingeschaltet.
Nach Ende des Kochvorgangs gibt es zwei Möglichkeiten zur Druckentlastung:
1. Nach Ende des Kochvorgangs beginnt der Druck allmählich zu senken. Je nach der Flüssigkeitsmenge kann dies
15-30 Minuten dauern. Das Schwimmerventil senkt allmählich, der Deckel wird entsperrt und kann leicht geöffnet
werden. Wenn es nicht geöffnet werden kann, warten Sie noch eine gewisse Zeit. ÖFFNEN SIE NIEMALS DEN
KOCHTOPF MIT KRAFT!
2. Öffnen des Druckdeckels: den Griff fassen und den roten Knopf drücken, um den Deckel zu entriegeln, den Deckel
gegen den Uhr zeigersinn drehen, bis er sich löst, und mit einem Ruck nach oben anheben. Der Deckel kann auf die
Deckelablage (14) gelegt werden.
3. Drücken Sie nach Beendigung des Kochens die Taste Temperatur halten/Abbrechen (5) Taste, drehen Sie das
Schwimmerventil mit dem Topflappen in die Position „Dampfauslass“ um, das Schwimmerventil sinkt, der Deckel
wird entsperrt und kann leicht geöffnet werden. ACHTEN SIE AUF ERHÖHTE VORSICHTIGKEIT UND BENUTZEN SIE
DIE ARBEITSSCHUTZMIT TEL, VERBRÜHUNGSGEFAHR!
Funktion des aufgeschobenen Starts (Delay Star t):
1. Wenn Sie Slow Cooker, Joghur t oder Braten wählen, könn en Sie einen Schnellkochtopf m it Deckel, einen Glasde ckel
oder ohne Deckel verwenden. Wenn Sie einen Schnellkochtopf ohne Deckel verwenden, verschwindet die
Druckstufenanzeige aus dem Display.
2. Befolgen Sie die Gebrauchsanweisung, drehen Sie den Drehknopf, um das gewünschte Programm auszuwählen,
drücken Sie dann die Taste Startverzögerung und drücken Sie die Taste erneut, um die Zeit einzustellen, um die
Sie den Start des Garvorgangs verzögern möchten.Die Ausgangseinstellung des aufgeschobenen Starts sind 30
Minuten.
3. Drücken Sie dann die Start-Taste. Während des verzögerten Starts leuchtet das Symbol für den verzögerten Start
auf dem Display auf und die verbleibende Zeit wird angezeigt. Nach Ablauf der eingestellten Zeit beginnt das
gewählte Programm zu laufen.
Tipps
1. Wenn Sie Langsames Kochen, Joghurt oder Frittieren wählen, können Sie einen Topf mit einem Druckdeckel, einem
Glasdeckel oder ohne Deckel verwenden. Wenn Sie einen Topf ohne Druckdeckel verwenden, verschwindet die
Druckstufenanzeige aus dem Display.
2. Es wird empfohlen, die „Keep warm“ Funktion maximal 1 Stunde lang zu benutzen, dann verliert das Gericht an
der Qualität.
3. Die Programme wurden zur Zubereitung von Gerichten entwickelt, deren Gewicht 1200 g unterschreitet, zur
Zubereitung von größeren Portionen benutzen Sie Ihre eigene Einstellung.
4. Die Delay Star Funktion ist nur für solche Lebensmittel auszunutzen, die während dieser Zeit nicht verderben
können.
5. Verwenden Sie zum Einlegen und Entnehmen von Lebensmitteln in den Innenbehälter Holz- oder
Kunststoffutensilien; verwenden Sie niemals scharfe oder metallene Utensilien, um die Oberfläche des Behälters
nicht zu beschädigen.
6. Verwendung des Zubehörs:
• Wenn Sie das Programm Dämpfen wählen, setzen Sie den Dämpfeinsatz (21) in den Innenbehälter (12) ein und
setzen Sie dann den Dämpftopf (20) ein.
• Wenn Sie das Programm Frittieren wählen, setzen Sie den Ständer mit Griffen (15) in den Innenbehälter (12) ein.
• Wenn Sie das Programm Langsames Kochen, Joghurt oder Frittieren wählen, können Sie den Glasdeckel (11)
verwenden.
• Wenn Sie das Programm Langsames Kochen, Joghurt oder Frittieren wählen, können Sie den Glasdeckel (11)
verwenden.
• Wenn Sie das Programm Frittieren wählen (bei Verwendung des Heißluftdeckels), setzen Sie den Frittierkorb (13)
in den Innenbehälter (12).
• Verwenden Sie die Deckelständer (14) zur Aufbewahrung der Deckel.
BESCHREIBUNG DES BEDIENFELDES DER HEISSLUFTDECKELS
1. Digitale Anzeige
2. Temperatureinstellung
3. Timer-Einstellung
4. Temperatur/Timer erhöhen
5. Ein /Aus
6. Temperatur/Timer absenken
7. Programme
8. Start/Pause
9. Voreingestellte Programmwahl
8
7
6
1
29
3
5
4
84 85
Page 44
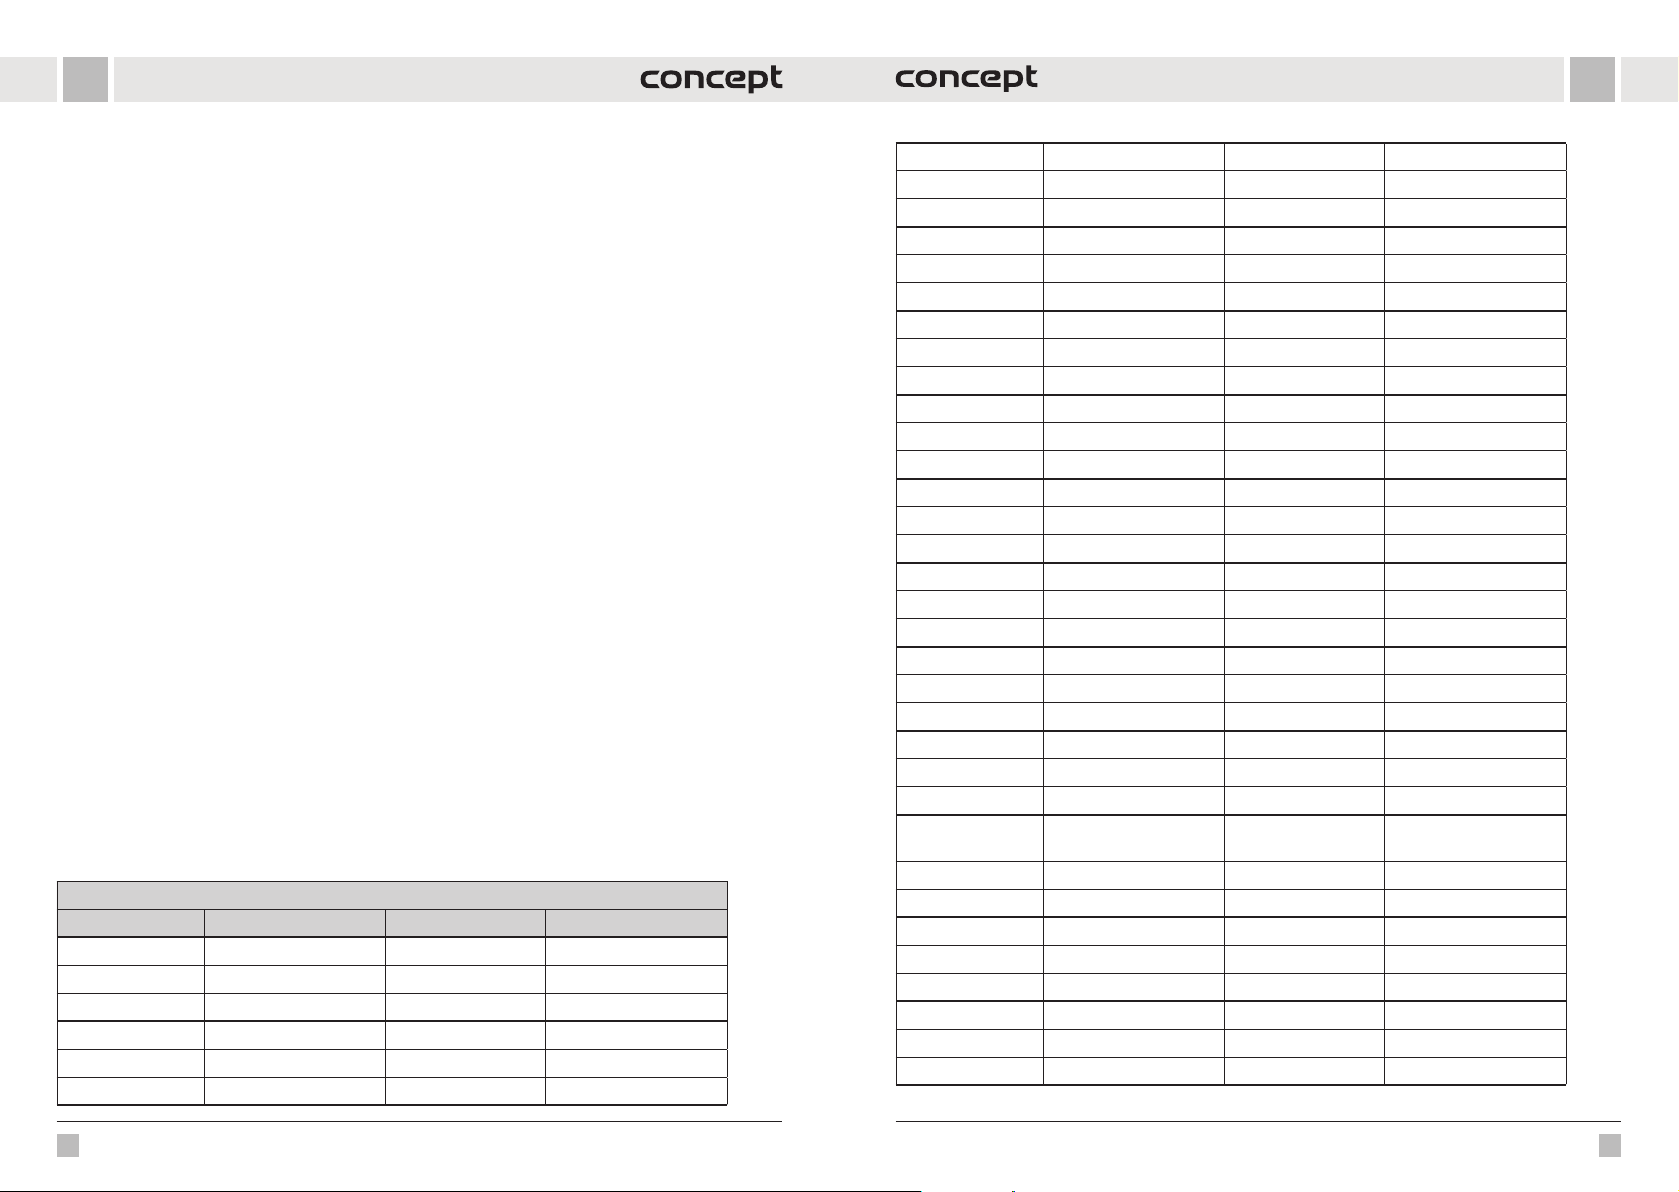
DEDE
BENUTZUNG DES KOCHTOPFS MIT DEM HEISSLUFTDECKEL (3)
Ein Topf mit Heißluf tdeckel arbeitet mit h eißer Luft; fü llen Sie den Topf niemals mit Öl ode r einem anderen Brat medium.
1. Stellen Sie das Gerät an einem trockenen und ebenen Ort auf.
2. Stecken Sie das Netzkabel in eine Steckdose.
3. Vergewissern Sie sich, dass die Innenfläche des Gerätegehäuses (5) trocken ist und setzen Sie den Innenbehälter
(12) in das Gerätegehäuse (5) ein.
4. Geben Sie die Lebensmittel in den Innenbehälter (12). Hinweis: Wenn Sie das Frittierprogramm verwenden
möchten, stellen Sie den Frittierkorb (13) in den Innenbehälter und geben Sie die Lebensmittel in den Korb. Füllen
Sie den Frittierkorb (13) oder den Innenbehälter (12) nicht zu voll.
5. Setzen Sie den Heißluftdeckel (3) auf, um das Gerät als Heißluftofen zu verwenden.
6. Drücken Sie die Taste Ein/Aus (5), um das Gerät einzuschalten. Die Symbole leuchten auf und das Display zeigt die
Standardeinstellung von 180 °C und 15 Minuten.
7. Drücken Sie die Wahltaste für das voreingestellte Programm (9), um das Garprogramm zu wechseln. Das
Symbol des gewählten Programms blinkt und auf dem Display werden die voreingestellte Temperatur und die
Programmzeit angezeigt. Drücken Sie die Taste (9) wiederholt, um zum nächsten Programm zu wechseln. Um
die Temperatureinstellung zu ändern, drücken Sie zuerst die Taste für die Temperatureinstellung (2)/um die
Zeiteinstellung zu ändern, drücken Sie die Taste für die Zeiteinstellung (3) und drücken oder halten dann die
Tasten 4 und 6, um die Temperatur in 5 °C-Schritten und die Zeit in 1-Minuten-Schritten einzustellen (nur für das
30-Minuten-Trockenprogramm).
8. Bestätigen Sie die Auswahl mit der Taste Start/Pause (8). Anmerkung: Wenn Sie mit dem Kochen beginnen, wenn
das Gerät noch kalt ist, verlängern Sie die Kochzeit um etwa 2 Minuten. Während des Vorheizens erscheint im
Display die Anzeige "VORHEIZEN", nach dem Vorheizen verschwindet sie aus dem Display und es wird nur noch
"HEIZEN" angezeigt, wenn das Heizelement eingeschaltet is t. Anmerkung: Das Lüftersymbol in der oberen linken
Ecke leuchtet auf, während das Programm läuft. Das Symbol erlischt, wenn der Lüfter nicht mehr funktioniert.
9. Sie können das Programm jederzeit während des Garvorgangs unterbrechen, indem Sie auf die Taste Start/Pause
(8) drücken und dann erneut auf die Taste drücken, um den Garvorgang fortzusetzen.
10. Sie können den Heißluftdeckel (3) während des Garvorgangs jederzeit abnehmen, um die Speisen zu überprüfen/
hinzugeben oder zu entfernen. Das gewählte Programm wird dann unterbrochen. Wenn der
11. Deckel wieder aufgesetzt wird, wird das Programm an der Stelle fortgesetzt, an der es unterbrochen wurde.
Wenn das Programm b een det is t, e r tönt ein a kus tisch es Sign al und au f dem D isplay e rsc hein t nur die A nzei ge "FIN ISHED".
und die Taste On/Off (5) blinkt.
12. Trennen Sie das Gerät nach Beendigung des Garvorgangs vom Stromnetz.
Hinweis: Tragen Sie Küchenhandschuhe, wenn Sie den heißen Frittierkorb/Innenbehälter herausnehmen.
Tipps
Wir empfehlen, das Gargut während des Garvorgangs zu wenden, um eine gleichmäßige Bräunung zu erreichen, oder
es umzurühren.
VOREINGESTELLTE PROGRAMME
Programme fürs Kochen mit Druckdeckel
Programme Menge (anpassen) Kochzeit (min) Mögliche Zeitspanne
Reis Weniger 8 1-99 min
Normal 12
Mehr 15
Suppe Weniger 12 1-99 min
Normal 15
Mehr 20
Eier Weniger 4 1-99 min
Normal 5
Mehr 6
Fleisch/ Schmoren Weniger 20 1-99 min
Normal 35
Mehr 45
Bohnen/Chili Weniger 25 1-99 min
Normal 30
Mehr 40
Geflügel Weniger 10 1-99 min
Normal 15
Mehr 25
Hülsenfrüchte Weniger 20 1-99 min
Normal 40
Mehr 45
Rindfleisch Weniger 30 1-99 min
Normal 35
Mehr 40
Dampf Weniger 12 1-99 min
Normal 15
Mehr 20
Haferflockenbrei Weniger 12 1-99 min
Normal 15
Mehr 20
Schweinefleisch/
Rippchen
Nachspeise Weniger 25 1-99 min
Risotto Weniger 20 1-99 min
Weniger 13 1-99 min
Normal 18
Mehr 25
Normal 40
Mehr 50
Normal 35
Mehr 45
86 87
Page 45
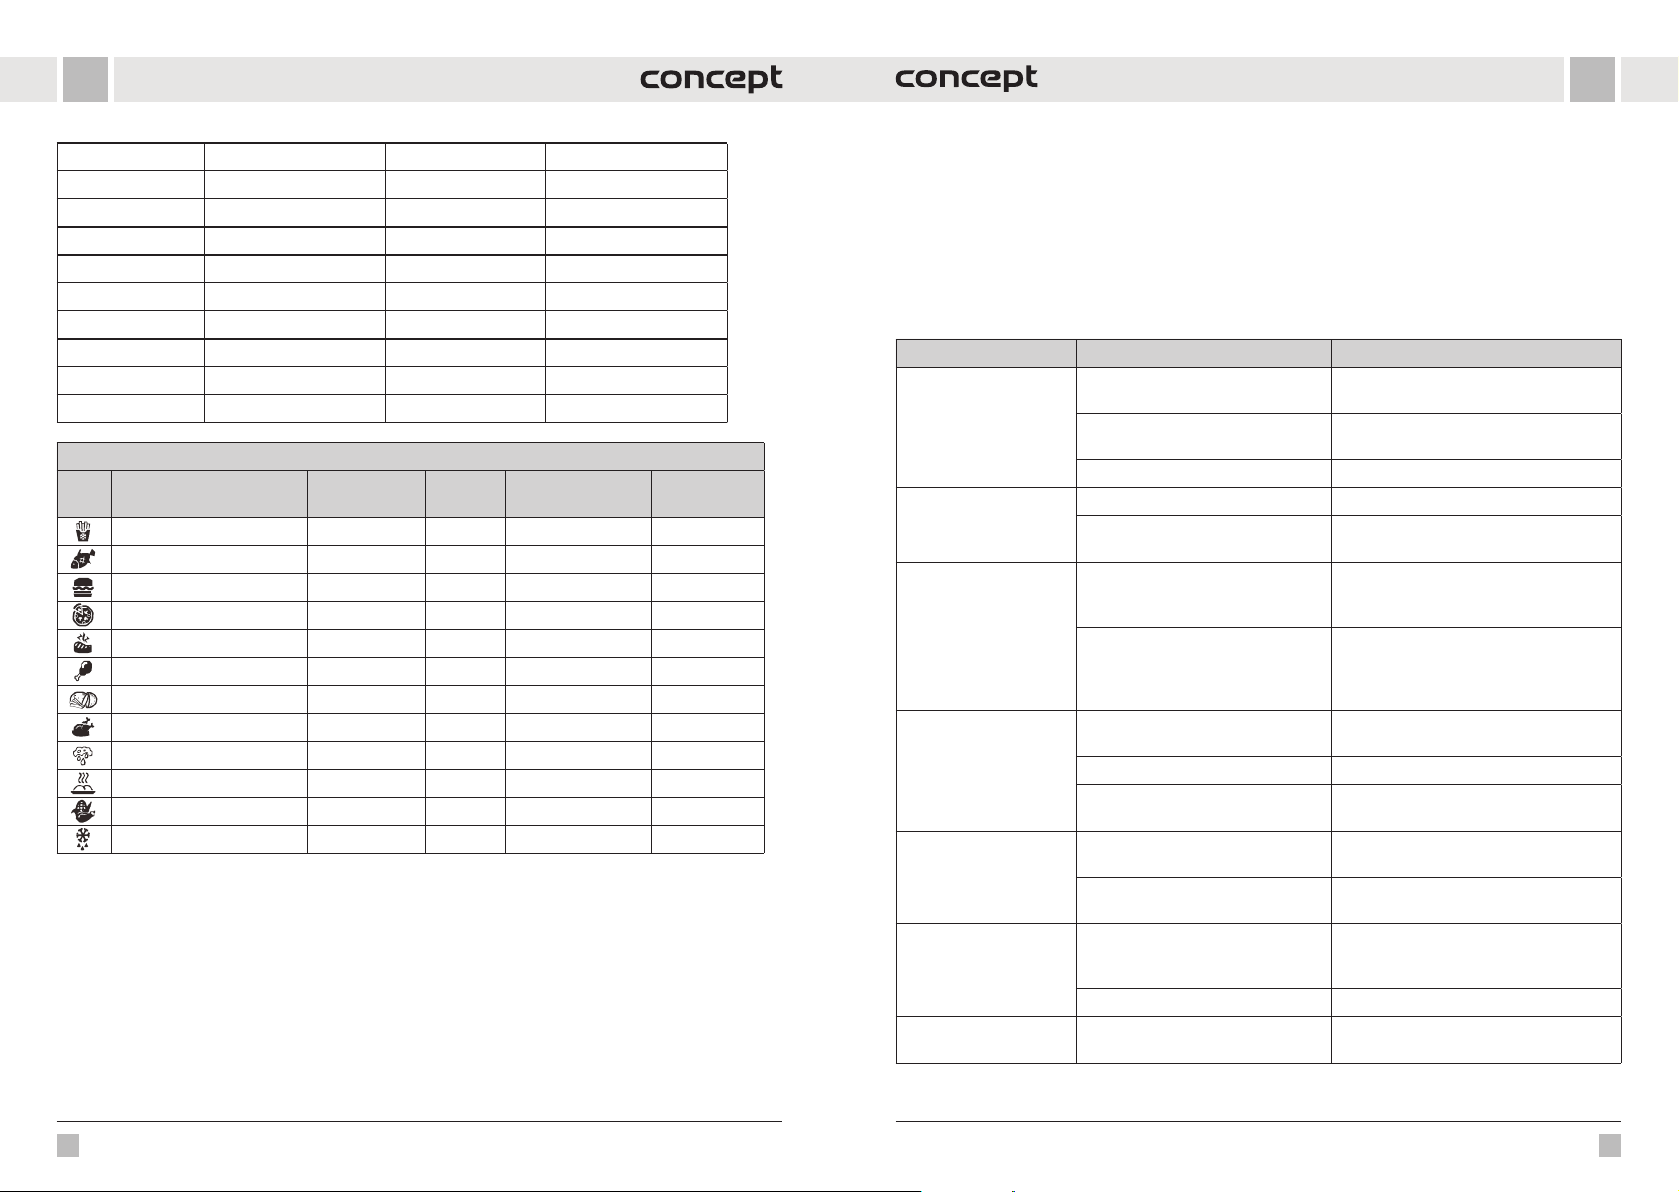
DEDE
Gemüse Weniger 10 1-99 min
Normal 15
Mehr 20
Frittieren Normal 30 30 min
Langsam kochen Weniger 30 30 min - 9 Stunden 30 min
Normal 6 Stunden
Mehr 9 Stunden 30 min
Joghurt Weniger 24 Stunden 6 - 24 Stunden
Normal 8 Stunden
Mehr "boiL"
Programme für das Garen mit einem Heißluftdeckel
Programme
Gefrorene Pommes frites 200 15 min 80-200 1-60 min
Fisch 160 15 min 80-200 1-60 min
Hamburger 185 13 min 80-200 1-60 min
Pizza 185 15 min 80-200 1-60 min
Rindersteak 175 25 min 80-200 1-60 min
Hähnchenschenkel 200 22 min 80-200 1-60 min
Rohe Kartoffelpommes 160 30 min 80-200 1-60 min
Ganzes Hähnchen 180 40 min 80-200 1-60 min
Trocknen 80 2 Std. 40-90 1-12 Std.
Grillen 160 10 min 160 1-30 min
Gemüse 180 15 min 80-200 1-60 min
Auftauen 50 5 min 50 1-60 min
Hinweis: Diese Einstellungen dienen nur zur Orientierung. Wenn Sie mit dem Garen beginnen, wenn das Gerät noch
kalt ist, verlängern Sie die Garzeit um ca. 2 Minuten.
Temperatur
(°C)
Zeit
Einstellbare
Temperatur (°C)
Mögliche
Zeitspanne
REINIGUNG UND WARTUNG
Das Gerät ist nach jeder Nutzung zu reinigen.
Benutz en Sie keine rauen u nd aggressive n Mittel, wie sc harfe Gege nstände, Scha ber, chemische Lö semittel,
Verdünnungsmittel u. ä. sind.
• Vor der Reinigung trennen Sie immer das Anschlusskabel von der Netzspannung ab. Tauchen Sie niemals das
Netzkabel, den Stecker, das Gerät oder den Heißluftdeckel in Wasser oder andere Flüssigkeiten!
• Vor der Reinigung lassen Sie das Gerät vollständig abkühlen.
• Wischen Sie die Außenoberfläche des Geräts mit einem feuchten Tuch ab.
• Füllen Sie den Innenbehälter mit heißem Wasser auf und lassen Sie es einen Moment ablagern. Danach kann es
mit einem weichen Tuch im Wasser mit der Zugabe eines Reinigungsmittels, bzw. in einer Geschirrspülmaschine
gewaschen werden.
• Sonstige Teile des Geräts können im Wasser mit der Zugabe eines Reinigungsmittels gewaschen werden.
• Nur das Zubehör und der Innenbehälter können in der Spülmaschine gereinigt werden.
• Sobald die Teile vollständig getrocknet sind, setzen Sie das Gerät zusammen und lagern es an einem kühlen,
trockenen Ort.
PROBLEMBEHEBUNG
Problem Ursache Lösung
Das Gerät funktioniert
nicht.
Das Frittiergut ist nicht
fertig.
Das Bratgut ist
ungleichmäßig gebraten.
Das Frittiergut ist nicht
knusprig.
Weißer Rauch kommt aus
dem Gerät.
Dampf tritt um den Deckel
des Druckkochtopfes
herum aus.
Dampf entweicht aus dem
Druckventil.
Das Gerät ist nicht richtig
angeschlossen.
Programm oder Timer ist nicht
eingestellt.
Der Deckel sitzt nicht richtig. Prüfen Sie, ob der Deckel fest sitzt.
Zu viel Gargut. Kleinere Chargen in den Behälter geben.
Garzeit zu kurz eingestellt, Temperatur
zu niedrig.
Zu große Menge an Speisen, Speisen
liegen übereinander.
Lebensmittel nicht frisch oder nicht
richtig zubereitet.
Einige Lebensmittel eignen sich besser
für eine Heißluftfritteuse.
Es wird wenig Öl benötigt. Beträufeln Sie die Lebensmittel leicht mit Öl.
Die Lebensmittel sind feucht.
Die Lebensmittel in der Fritteuse sind
fettig.
Der Behälter/Korb enthält noch
Fettreste vom vorherigen Gebrauch.
Die Dichtung sitzt nicht richtig.
Das Druckventil (Auslass) ist blockiert. Reinigen Sie das Ventil.
Das Druckventil (Auslass) ist nicht
richtig abgedichtet.
Schließen Sie das Gerät an eine geerdete
Steckdose an.
Stellen Sie das gewünschte Programm oder
den Timer ein.
Verlängern Sie die Garzeit, erhöhen Sie die
Temperatur.
Nehmen Sie einige Lebensmittel heraus
oder schütteln/wenden Sie sie nach der
Hälfte der Garzeit.
Vergewissern Sie sich, dass Sie frische
Lebensmittel verwenden und sie richtig
zum Braten vorbereiten (ein paar Tropfen Öl
aufträufeln).
Verwenden Sie frische Lebensmittel oder
halbfertige Lebensmittel.
Trocknen Sie die Lebensmittel vor dem
Garen ab.
Dies ist kein Fehler. Trocknen Sie die
Lebensmittel von überschüssigem Öl.
Reinigen Sie den Behälter bzw. den Korb
ordnungsgemäß.
Beenden Sie den Garvorgang, nehmen Sie
den Deckel ab und prüfen Sie den Sitz der
Dichtung.
Schließen Sie das Ventil vorsichtig.
88 89
Page 46
DE
FR
INSTANDHALTUNG
Eine umfangreiche Wartung oder Reparatur, die einen Eingriff in die inneren Teile des Gerätes erfordert, ist durch eine
spezialisierte Reparaturwerkstatt durchzuführen.
UMWELTSCHUTZ
• Bevorzugen Sie das Recyceln von Verpackungen und Altgeräten.
• Der Gerätekarton kann als sortiertes Altmaterial entsorgt werden.
• Die Polyäthylentüten (PE) geben Sie zur Sammlung des Materials zum Recyceln ab.
Recycling des Gerätes am Ende seiner Lebensdauer
Dieses Gerät ist im Einklang mit der Europäischen Richtlinie 2012/19/EU über Elektro- und
Elektronik-Altgeräte (WEEE) gekennzeichnet. Das Symbol am Produkt oder an dessen Verpackung
gibt an, dass dieses Produkt nicht in den Haushaltsabfall gehört. Es ist auf eine Sammelstelle zum
Recyceln der elektrischen und elektronischen Anlagen zu bringen. Durch die Sicherstellung der
korrekten Entsorgung dieses Produktes helfen Sie, negative Konsequenzen für die Umwelt und die
Gesundheit der Menschen zu verhindern, die durch die unsachgemäße Entsorgung dieses Produktes
verursacht würden. Die Entsorgung muss im Einklang mit den Vorschriften für die Abfallbehandlung
durchgeführt werden. Ausführlichere Informationen zum Recycling dieses Produkts erhalten Sie bei
der zuständigen örtlichen Behörde, dem Dienstleister für Entsorgung von Haushaltsabfall oder in
dem Geschäf t, wo Sie das Produkt gekauf t haben.
Dieses Produkt erfüllt sämtliche Grundanforderungen der EU-Richtlinien, die sich darauf beziehen.
Die Änderungen im Text, im Design und in den technischen Spezifizierungen können ohne vorherigen Hinweis
geändert werden, und wir behalten uns das Recht auf deren Änderungen vor.
MERCI
Nous vous remercions d’avoir acheté le produit de la marque Concept et nous espérons qu’il vous apportera votre
entière satisfaction pendant son utilisation.
Lire attentivement le manuel d’emploi avant la première utilisation et le conserver. Faire prendre connaissance du
manuel d’emploi par les autres personnes pouvant manipuler le produit.
Caractéristiques techniques
Tension 220-240 V~50-60 Hz
Puissance
Capacité du récipient 5,6 l
Température réglable friteuse : cuisson 80-200 °C, séchage 40-90 °C
Minuterie
Cuiseur multifonction 1000 W
Friteuse à air chaud 1500 W
Attention !
Surface chaude
marmite : 1 min - 24 h
friteuse : cuisson 1 - 60 min, séchage 1 - 12 h
IMPORTANT
Avant de brancher l’appareil, vérifier en effectuant un contrôle visuel, si l’unité ne présente pas de signes
d’endommagement et n’a pas subi d’endommagement pendant le transport.
PRÉCAUTIONS PARTICULIÈRES DE SÉCURITÉ
• Ne jamais utiliser l’appareil autrement que prévu dans le manuel d’emploi.
• Enlever tous les emballages et autres éléments de marketing avant la
première utilisation.
• S’assurer que la tension de secteur correspond bien à celle marquée sur
la plaque signalétique.
• Assurez-vous que la surface soit stable et insensible à la chaleur, éloignée
de toutes sources de chaleur.
• Ne pas tirer sur le cordon d’alimentation pour le débrancher, mais saisir la
fiche et la tirer délicatement.
• Ne pas permettre aux enfants ou aux personnes de capacités mentales
réduites de manipuler l’appareil ou le mettre hors leur portée.
• Des personnes dont les capacités physiques, sensorielles ou mentales sont
réduites, ou des personnes dénuées d’expérience ou de connaissance du
mode d’emploi ne doivent manipuler l’appareil que sous la surveillance
d’une personne responsable informée de l’utilisation de l’appareil.
• Redoubler de vigilance lorsque cet appareil est employé à proximité
d’enfants.
• Ne pas permettre de laisser utiliser l’appareil comme un jouet.
90
91
Page 47
FRFR
• Ne pas couvrir l´appareil.
• Débrancher le cordon d´alimentation avant tout montage ou
démontage de l´appareil.
• Les opérations d'entretien et de nettoyage doivent toujours être
faites sur appareil débranché et refroidi.
• Maintenir l’appareil propre, ne pas laisser pénétrer les corps étrangers
dans les grilles. Cela pourrait causer un court-circuit électrique, des
dommages ou un incendie.
• Ne jamais utiliser l’appareil si le cordon d’alimentation ou la prise est
abîmé, laisser le réparer immédiatement dans un centre d’entretien
agréé.
• Ne pas utiliser l’appareil s’il ne fonctionne pas correctement, s’il est
tombé par terre, s’il a été endommagé ou plongé dans un liquide. Laisser
le vérifier et réparer dans un centre d’entretien agréé.
• L’appareil est exclusivement destiné à un usage domestique, il n’est pas
prévu à des fins commerciales.
• Ne pas utiliser l'appareil à l'extérieur.
• L'utilisation d'une rallonge n'est pas recommandée car elle peut
surchauffer et provoquer un risque d'incendie. S'il est nécessaire d'utiliser
une rallonge, assurez-vous que la puissance électrique est compatible
avec l'appareil et que la prise est mise à la terre.
• Ne déplacez pas et ne secouez pas l'appareil pendant son fonctionnement.
• N'insérez pas de matériaux inflammables (papier, plastique) dans
l'appareil.
• Ne pas toucher l’appareil avec les mains humides.
• Ne jamais plonger le cordon d’alimentation, la fiche ou l’appareil
dans de l’eau ou d’autres liquides. Ne pas verser d'eau ou d'autres
liquides sur les composants électriques et les connecteurs.
• Ne pas essayer de réparer l’appareil par ses propres soins. Contacter un
centre d’entretien agréé.
• Cet appareil peut être utilisé par des enfants âgés de 8 ans et plus et
les personnes ayant des capacités physiques ou mentales réduites ou le
manque d’expérience et de connaissances, si elles sont supervisées ou
ont reçu des instructions pour utiliser l’appareil d’une manière sûre et
comprennent les dangers potentiels. Les enfants de moins de 8 ans ne
sont autorisés à réaliser les opérations de nettoyage ou d’entretien que
sous la surveillance. Maintenir l’appareil et le cordon d’alimentation hors
de portée des enfants de moins de 8 ans. Ne pas laisser les enfants jouer
avec l’appareil.
• Ne pas toucher les surfaces chaudes.
• Ne pas laisser le cordon d'alimentation pendre librement sur le bord
d'une table ou d'un élément de cuisine. Éviter que le câble d’alimentation
entre en contact avec les surfaces chaudes.
• Ne pas placer l'appareil près d'un brûleur à gaz ou électrique. Ne placez
pas l'appareil sur la table de cuisson. Veillez à ce que l'appareil soit placé
dans un endroit bien ventilé, à l'écart des surfaces chaudes, des matériaux
inflammables (rideaux, nappes) et des environnements humides.
• MISE EN GARDE : Les surfaces de l'appareil peuvent être très chaudes.
Tenez l'appareil uniquement par la poignée et utilisez des équipements
de protection tels que des gants de cuisine.
• Redoubler de vigilance pour empêcher l'eau ou tout autre liquide de
pénétrer dans l'appareil. Cela pourrait provoquer un choc électrique.
• Placez toujours les aliments dans le panier de l'appareil pour éviter qu'ils
n'entrent en contact avec l'élément chauffant.
• Ne jamais toucher les surfaces intérieures de l'appareil en cours de
fonctionnement ou immédiatement après l'arrêt. Laisser refroidir votre
appareil.
• Ne pas brancher et ne pas utiliser l'appareil avec les mains humides.
• Couvercle Air fry : de la vapeur chaude s'échappe par les sorties d'air
pendant la cuisson ; gardez vos mains et votre visage à une distance sûre
des sorties d'air.
• Couvercle de cuiseur à pression : attention à la vapeur chaude et à l'air qui
s'échappent de la soupape de pression. Ne placez pas vos mains, votre
visage ou tout autre objet au-dessus de la sortie de la hotte à pression.
• N'utilisez pas l'appareil si vous portez un stimulateur cardiaque, un
appareil auditif, etc. Consultez votre médecin avant d'utiliser l'appareil.
• N'utilisez pas d'accessoires autres que ceux recommandés par le fabricant.
• Ne pas connecter l'appareil à une minuterie externe.
• Protection contre la surchauffe : si le fusible thermique a réagi, l'appareil ne
fonctionne pas. Débranchez l'appareil et attendez qu'il ait complètement
refroidi avant de le remettre en marche.
• Si vous détectez de la fumée noire s'échapper de l'appareil en cours de
fonctionnement, arrêter l'appareil immédiatement et contacter un centre
de service agréé.
92 93
Page 48
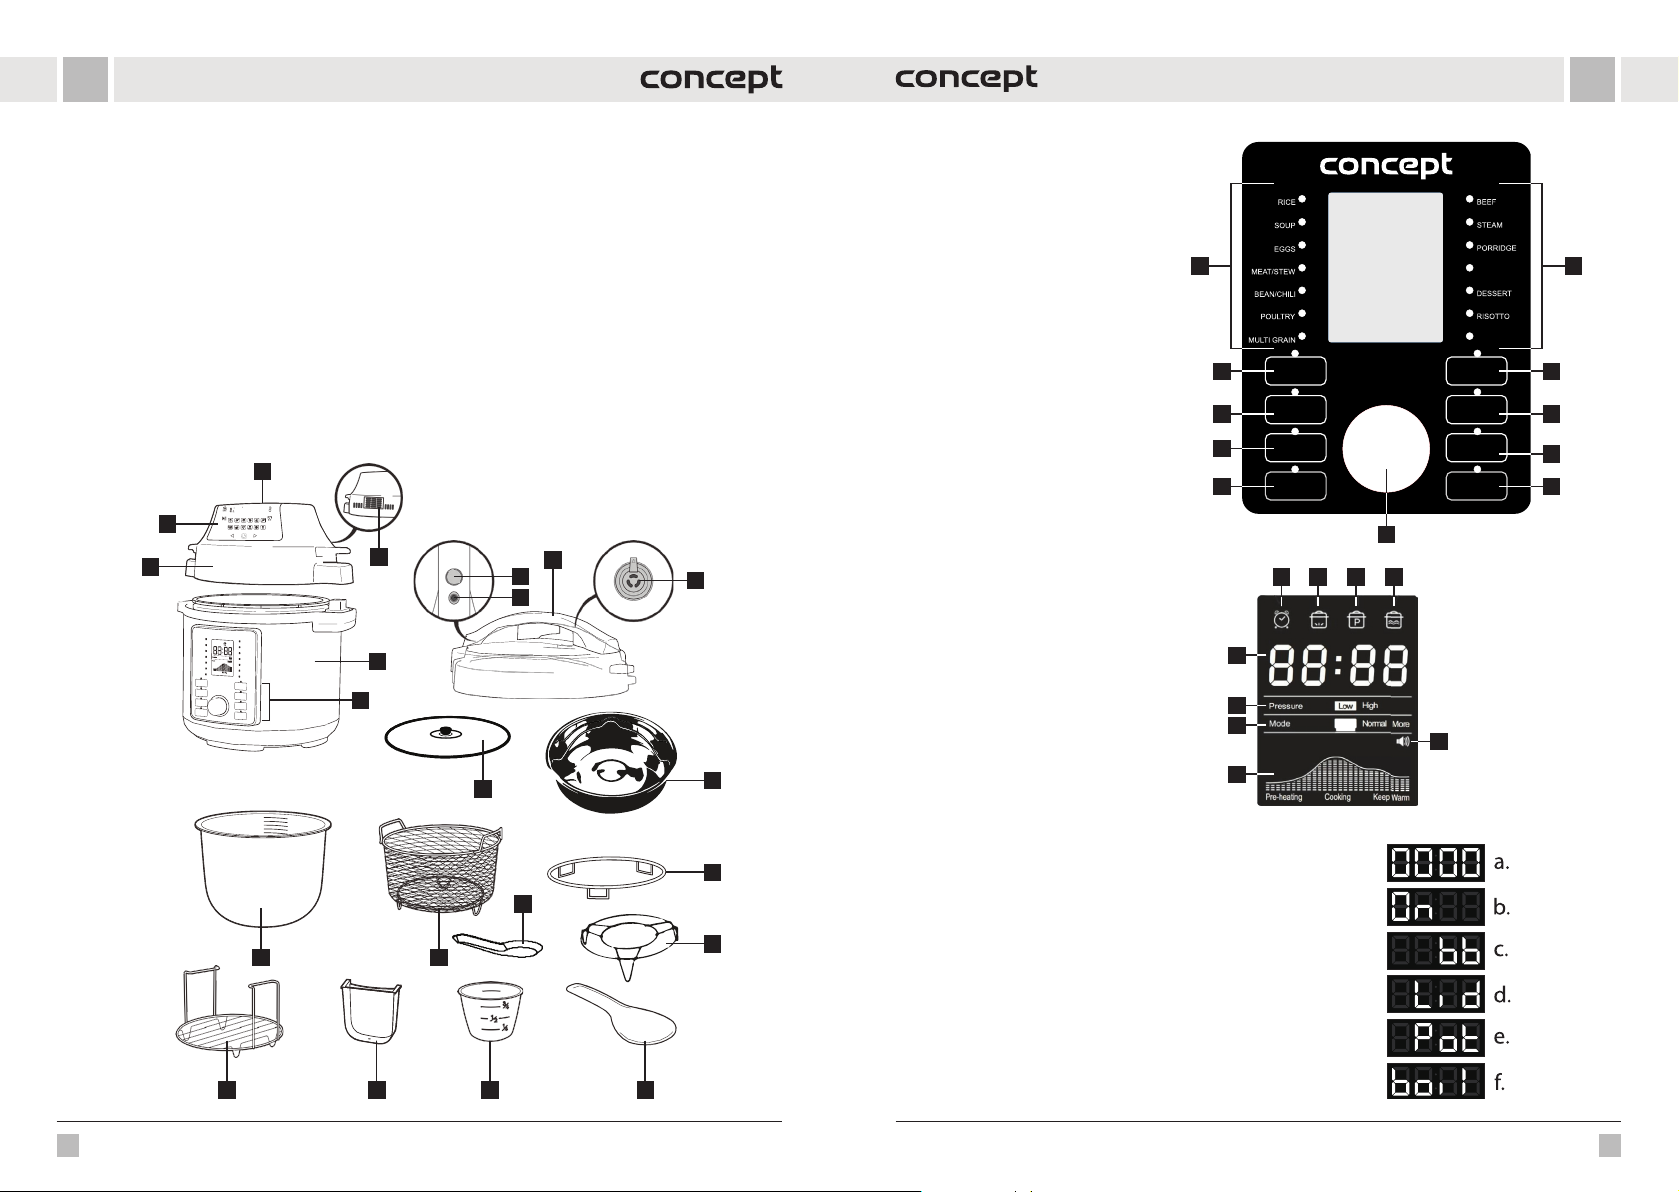
FRFR
c
• Ensuite, laisser l'appareil refroidir pendant au moins 30 minutes.
En cas de non-respect des recommandations de sécurité du fabricant,
la garantie concernant la réparation est annulée.
DESCRIPTION DU PRODUIT
1 Alimentation en air
2 Sortie d'air
3 Couvercle à air chaud
4 Affichage du couvercle à air chaud
5 Corps de l'appareil
6 Panneau de commande de la marmite multifonction
7 Couvercle de pression
8 Bouton d'ouverture du couvercle
9 Soupape de sécurité
10 Soupape de pression
11 Couvercle en verre
1
4
3
6
12 Récipient intérieur
13 Panier de friture
14 Porte-couvercle
15 Support avec poignées
16 Récipient à condensation pour l'eau excédentaire
17 Gobelet de mesure
18 Cuillère peu profonde
19 Cuillère profonde (louche)
20 Pot à vapeur
21 Support de cuisson à la vapeur
2
7
8
9
5
11
10
20
DESCRIPTION DU PANNEAU
DE COMMANDE DU POT
MULTIFONCTIONS
1 Programmes prédéfinis
2 Programme yaourt
3 Cuisson lente
4 Réglage de la pression basse/haute
5 Maintien de la température/Annulation
6 Friture
7 Démarrage différé
8 Réglage manuel
9 Démarrage
10 Bouton de commande
DESCRIPTION DE L'AFFICHAGE
A Indicateur de démarrage différé
B Indicateur de préchauffage
C Indicateur de pression
D Indicateur de maintien de la température
E Indicateur d'activation/désactivation du son
F Indicateur de progression
G Indicateur de mode
H Indicateur de niveau de pression
I Affichage de l'heure et des avertissements
RÝŽE
POLÉVKA
VEJCE
MASO / DUŠENÍ
FAZOLE / CHILLI
DRŮBEŽ
LUŠTĚNINY
2 6
POMALÉ VAŘENÍ
SLOW COOK
3
4
UDRŽENÍ TEPLOTY
5
KEEP WARM/CANCEL
JOGURT
YOGURT
TLAK
PRESSURE
LEVEL
/ ZRUŠIT
Pressure
Mode
Pre-heating
High
Low
Less Normal More
Cooking Keep Warm
HOVĚZÍ
PÁRA
OVESNÁ KAŠE
VEPŘOVÉ /
ŽEBÍRKA
PORK&RIBS
DEZERT
RIZOTO
ZELENINA
VEGETABLES
SMAŽENÍ
SAUTE
ODLOŽENÝ START
DELAY START
RUČNÍ NASTAVENÍ
ADJUST
START
10
A B C D
I
H
G
E
F
11
7
8
9
14
19
12 13
21
Les notifications suivantes peuvent apparaître sur l'écran LED:
a. Le pot est prêt à l'emploi, mais le programme n'a pas été sélectionné.
b. Le cuiseur est chauffé à la température souhaitée
c. Fonction «Maintien au chaud» - le cuiseur maintient la température
d. Le couvercle est mal positionné ou manquant
e. Le cuiseur n'a pas de récipient intérieur
f. boiL (cuisson) apparaît en mode More pour le programme Yoghourt
15
16 17 18
94 95
Page 49
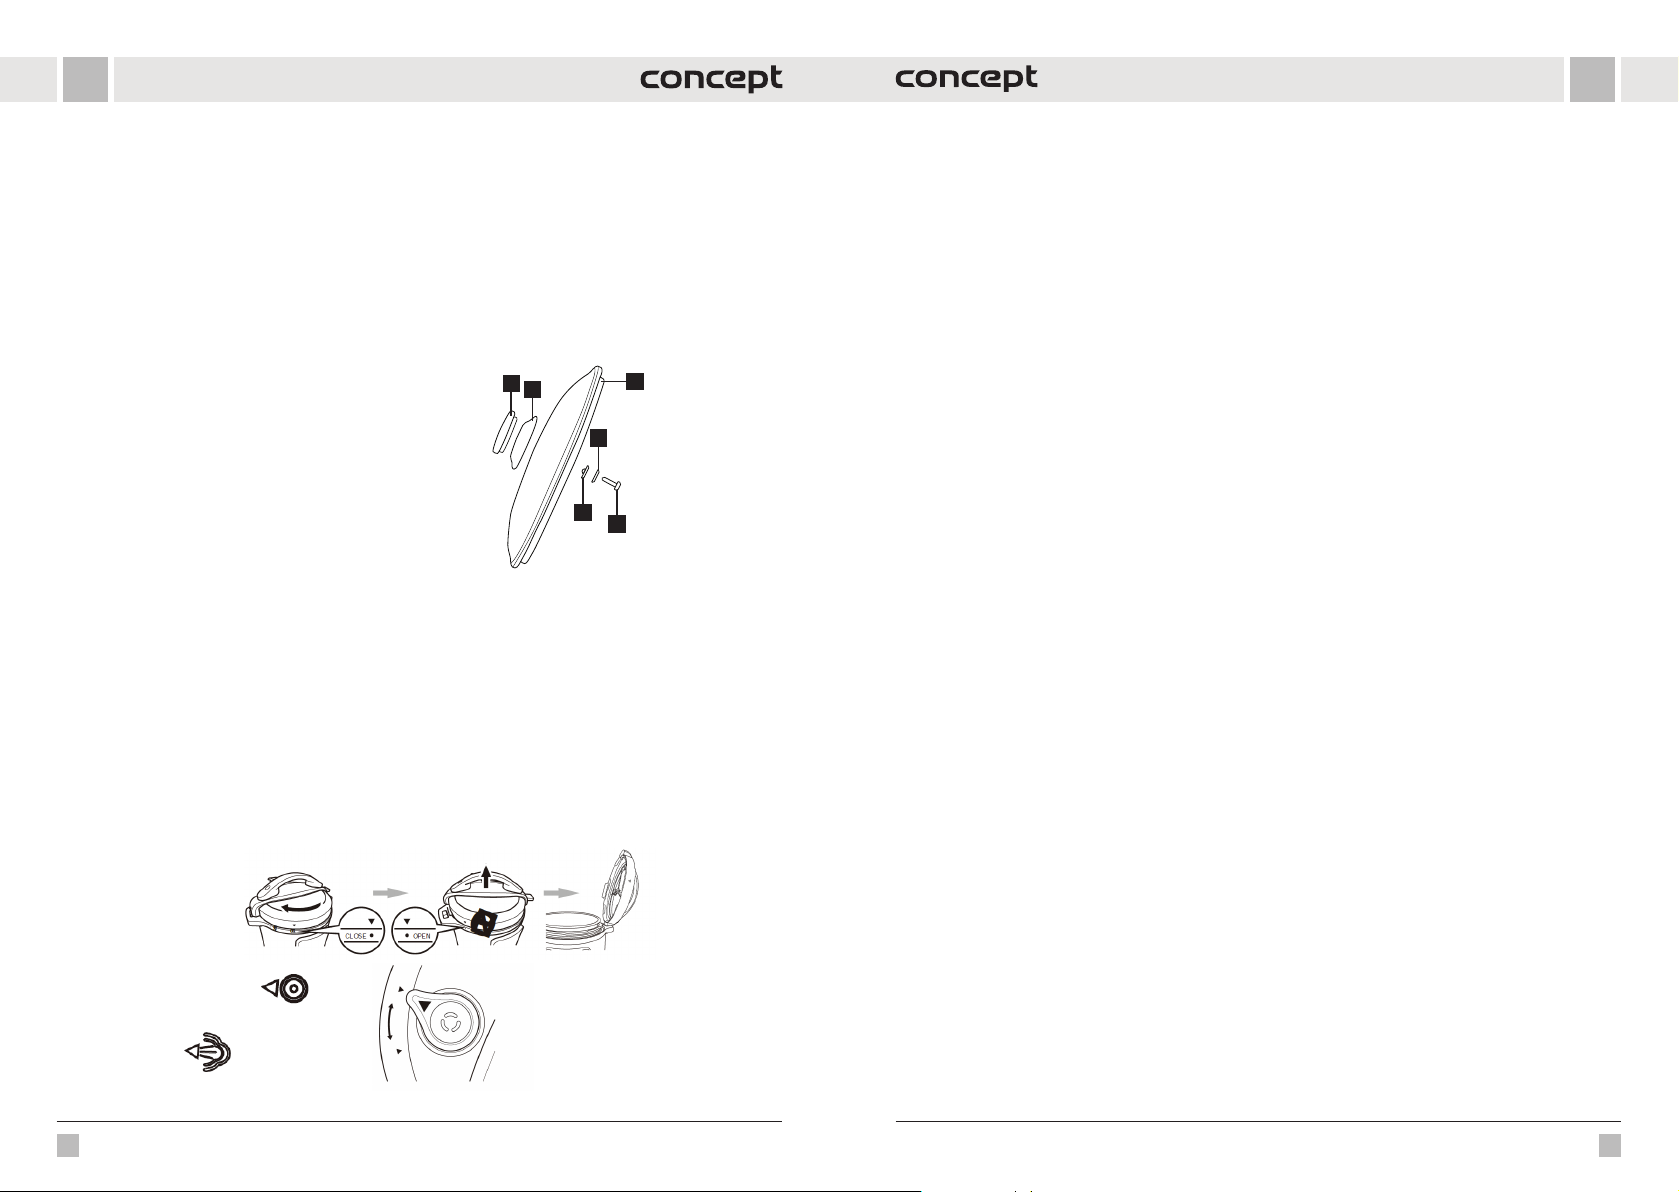
FRFR
AVANT LA PREMIÈRE UTILISATION
• Retirer tous les matériaux d'emballage de l'appareil.
• Enlever de l’appareil tous les emballages et les étiquettes.
• Laver le récipient intérieur (12) à l'eau chaude.
• Essuyer soigneusement l'intérieur et de l'extérieur de l'appareil avec un chiffon.
• Lavez les accessoires avec de l'eau chaude et du savon et une éponge non abrasive.
Remarque: Préchauffez l'appareil pendant 10 minutes sans aliments. Une fumée inoffensive et une légère odeur
peuvent s'échapper de l'appareil.
• Laissez un espace libre d'au moins 13 cm autour de l'appareil pendant son fonctionnement.
Assemblage du couvercle en verre
Vous pouvez utiliser le couvercle en verre avec les fonctions Cuisson
lente et Maintien de la température. L'assemblage de la poignée est
illustré sur la photo.
1. Poignée
2. Base de la poignée
3. Corps du couvercle en verre
4. Joint d'étanchéité
5. Rondelle
6. Vis
1
2
3
5
4
6
MODE D’EMPLOI
UTILISATION D'UN AUTOCUISEUR (7)
1. Placez l'appareil dans un endroit sec et plat.
2. Placez le récipient de condensation pour l'eau excédentaire
(16) à l'arrière de l'appareil, voir Fig. 1.
3. Préparer le couvercle de pression (7), voir Fig. 2.
• Tirez sur la protubérance métallique située sous le couvercle pour retirer le couvercle de protection sur lequel
est fixé le joint d'étanchéité. Le joint peut être retiré et nettoyé. Veillez à ce que le joint ne soit ni endommagé ni
déchiré. S'il est endommagé, il doit être remplacé. Assurez-vous que le robinet à flotteur est propre et qu'il peut
se déplacer librement.
Note: Si le couvercle de l'autocuiseur a déjà été monté sur l'appareil, retirez-le pour la préparation en appuyant sur le
bouton rouge, en tournant la poignée dans le sens inverse des aiguilles d'une montre et en la soulevant.
Éntache
Fig. 2
Décharge de vapeur
4. Retirer le récipient intérieur (12). Le volume total des aliments et de l'eau ne doit pas dépasser les 2/3 du volume
du récipient intérieur. Si vous cuisinez des aliments qui augmentent de volume pendant la cuisson (par exemple
du riz), ne remplissez pas le récipient à plus de la moitié de son volume.
Note: Certains aliments tels que la compote de pommes, les canneberges, les flocons d'avoine, les nouilles, la
rhubarbe ou l es spaghettis peuvent m ousser et se fissurer, obstruant ains i la soupape de pression (sor tie). Ces aliments
ne doivent pas être cuits dans l'autocuiseur. Attention: N'utilisez pas l'autocuiseur pour frire avec de l'huile.
5. Assurez-vous que la surface intérieure du corps de l'appareil (5) est sèche et placez le récipient intérieur (12) dans
le corps de l'appareil (5).
6. Mettez en place le couvercle à pression (7) et tournez-le dans le sens des aiguilles d'une montre. Lorsque vous
entendez un déclic, le couvercle est correctement mis en place. L'étanchéité du couvercle est indiquée par les
flèches alignées sur le bord du couvercle et le bord de l'appareil.
7. Veuillez noter que la soupape de pression (10) doit pouvoir se déplacer librement pour que la marmite fonctionne
correctement.
8. Placez la soupape de pression en position "scellée", ce qui rend le pot prêt à l'emploi.
9. Branchez le cordon d'alimentation dans la prise de l'appareil, puis dans une prise de courant. L'écran affiche "00
00 ".
10. Tournez le bouton de commande pour faire défiler les programmes préréglés (1) (programmes supplémentaires
en appuyant sur la touche de programme correspondante) ou pour régler le temps de cuisson. Confirmez le
programme sélectionné (l'indicateur s'allume) à l'aide de la touche Start. Pour régler la durée du programme
préréglé, appuyez sur le bouton et tournez-le pour sélectionner la durée souhaitée et confirmez en appuyant sur
le bouton Start
Note: appuyez sur la touche de réglage de la pression pour passer de la basse pression à la haute pression et haute
pression. Le réglage par défaut est Haute pression. Réglez la pression après avoir sélectionné le programme et le
temps de cuisson, puis confirmez le réglage en appuyant sur la touche Start. Appuyez sur la touche Réglages manuels
pour sélectionner la quantité d'aliments, en basculant entre Moins, Normal et Plus. Le réglage par défaut est Normal.
Note: Le temps de cuisson doit être ajusté en fonction de la quantité d'aliments.
11. La casserole commence à chauffer jusqu'à la température souhaitée (l'écran affiche "On", l'icône de préchauffage
s'allume) et le robinet à flotteur monte. Lorsqu'elle atteint la température souhaitée, le décompte du temps
programmé commence. À ce stade, vous cuisinez déjà sous pression (l'icône de pression est allumée), le couvercle
est verrouillé et la casserole ne peut pas être ouverte. N'ESSAYEZ JAMAIS D'OUVRIR LA COCOTTE PAR LA FORCE !
12. Lorsqu e la cuisson est terminée, un sign al sonore retentit et l'appareil p asse automatiquement en mode "Maintien
au chaud" pour garder les aliments au chaud. L'écran affiche "bb" et l'icône de maintien au chaud s'allume.
13. Vous pouvez annuler le réglage de la cocotte à tout moment en appuyant sur la touche Maintien au chaud/
Annulation (5).
14. S on désactivé/acti vé : pour modifier le mod e sonore, maintenez la touche M aintien au chaud/Annulation enfoncé e
pendant 3 secondes jusqu'à ce que l'icône du son change sur l'écran. Les avertissements de sécurité sont toujours
allumés.
Une fois la cuisson terminée, la pression peut être relâchée de deux manières :
1. Lorsque la cuisson est terminée, la pression diminue progressivement. Cela peut prendre 15 à 30 minutes en
fonction de quantité de liquide. La soupape à flotteur descend progressivement, le couvercle se déverrouille et
peut être ouvert facilement. S'il ne s'ouvre pas, patienter encore. NE JAMAIS OUVRIR LE CUISEUR EN FORCE !
2. Pour ou vrir le couvercle de pre ssion : saisir la poignée e t appuyer sur le bouton ro uge pour déverrouill er le couvercle,
tourner le couvercle dans le sens inverse des aiguilles d'une montre jusqu'à ce qu'il se déverrouille et le soulever en
tirant vers le haut. Le couvercle peut être placé sur le support de couvercle (14).
3. Lorsque la cuisson est terminée, appuyez sur la touche Maintien de la température/Annulation (5), utiliser la manique
pour tourne r la soupape à flotteur sur la p osition «Steam release», la soupape descend, le co uvercle se déverrouille et
peut être ouvert facilement. FAIRE TRÈS ATTENTION ET UTILISER DES MOYENS DE PROTECTION, RISQUE DE BRULURES
PAR LA VAPEUR !
Fonction départ différé Delay Start :
1. Si vous sélectionnez Mijoter, Yaourter ou Frire, vous pouvez utiliser un autocuiseur avec un couvercle, un couvercle
en verre ou sans couvercle. Lorsque l'autocuiseur est utilisé sans couvercle, l'indicateur de niveau de pression
disparaît de l'écran.
96 97
Page 50
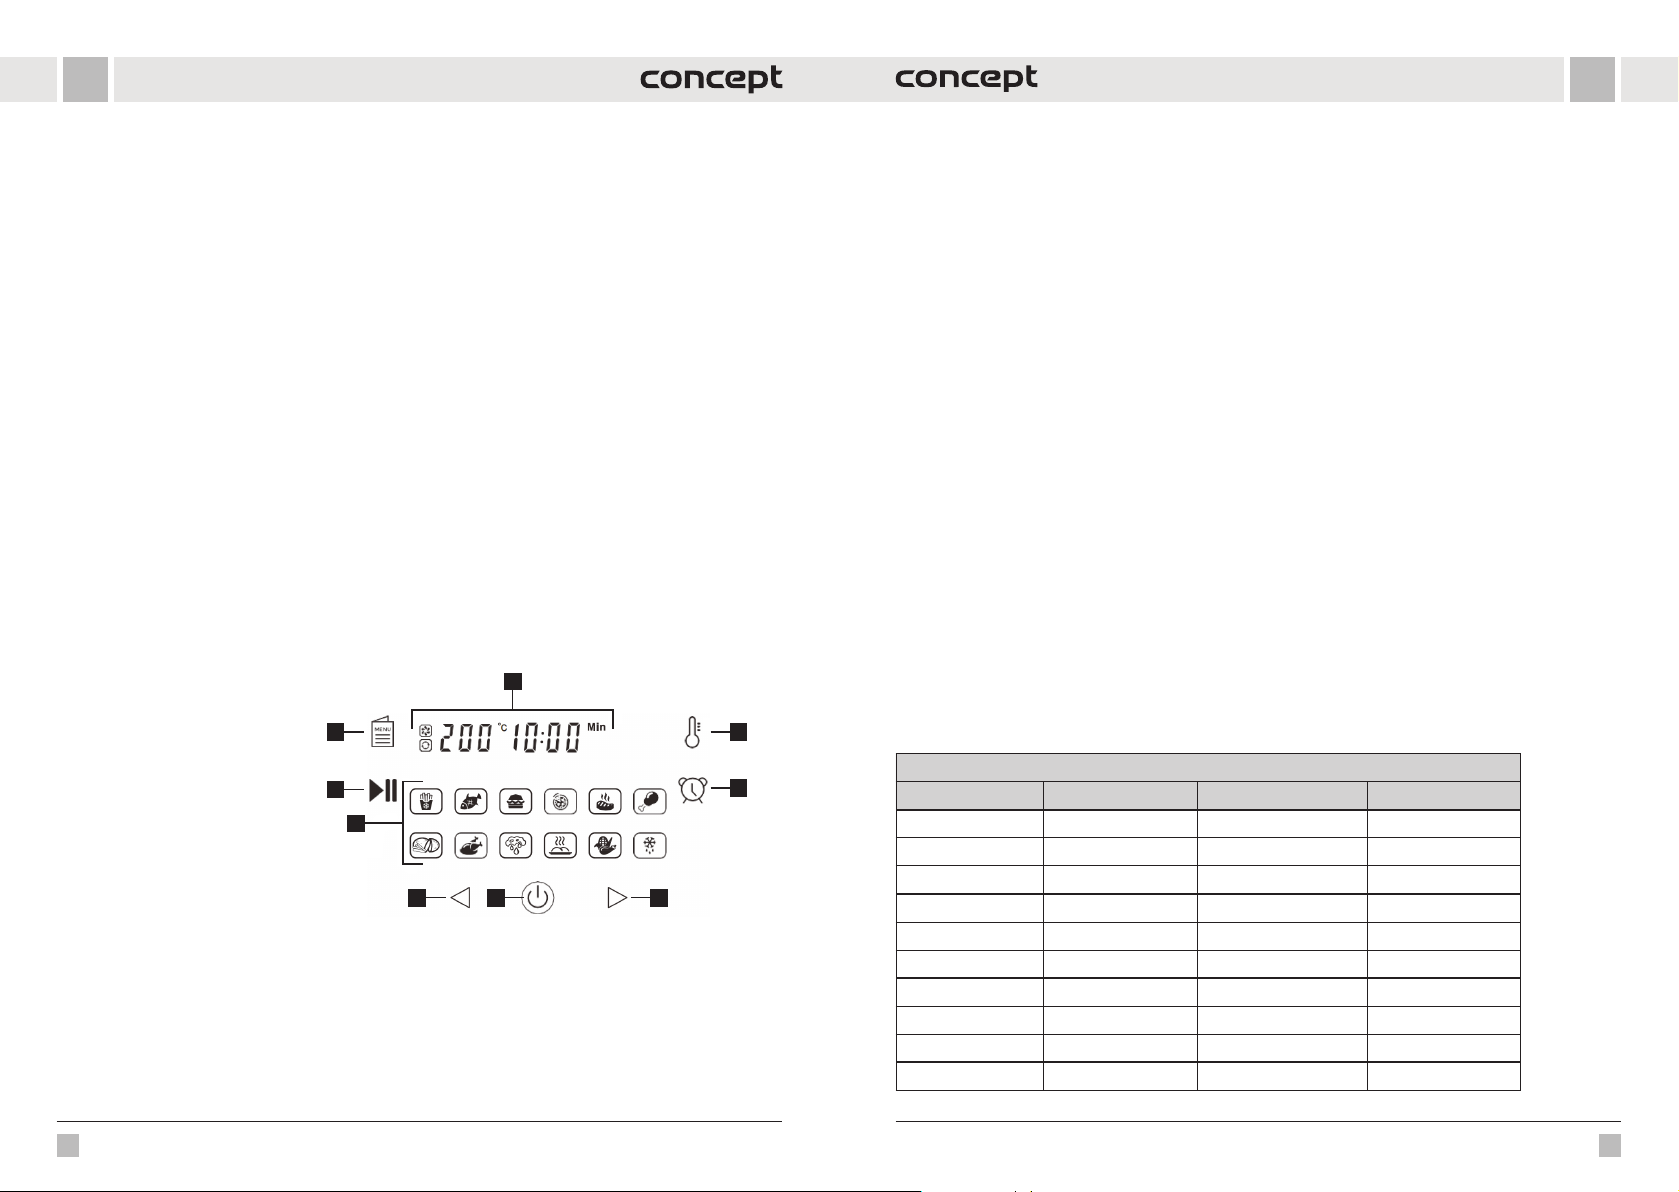
FRFR
2. Suivez le mode d'emploi, tournez le bouton pour sélectionner le programme souhaité, puis appuyez sur la touche
Démarrage différé et appu yez à nouveau sur la touche pour ré gler le temps pendant lequel vo us souhaitez retarder
le début de la cuisson. Le réglage par défaut du démarrage différé est de 30 minutes.
3. Appuyez ensuite sur le bouton Démarrage (Start). Pendant le démarrage différé, l'icône de démarrage différé
s'allume sur l'écran et le temps restant s'affiche. Après l'écoulement de la durée programmée, le programme
sélectionné démarre.
Astuces
1. Si vous sélectionnez Cuisson lente, Yaourt ou Friture, vous pouvez utiliser un autocuiseur avec couvercle de
pression, un couvercle en verre ou sans couvercle. Lorsque l'autocuiseur est utilisé sans couvercle, l'indicateur de
niveau de pression disparaît de l'écran.
2. L'utilisation de la fonction «Keep warm» est recommandée pour une durée maximale d'une heure, après quoi les
aliments perdent leur qualité.
3. Les p rogrammes sont conçus pour l a préparation d'aliments de mo ins de 1200 g. Si vous préparez des por tions plus
importantes, utilisez le réglage personnalisé.
4. Utilis er la fonction Dépar t différé uniquement pour l es aliments qui ne peuvent pas s e gâter pendant cette pério de.
5. Ins érez et retirez les aliment s dans le récipient intérieu r à l'aide d'ustensil es en bois ou en plastique. N'u tilisez jamais
d'ustensiles pointus ou métalliques pour éviter d'endommager la surface du récipient.
6. Utilisation des accessoires:
• Lorsque vous sélectionnez le programme Vapeur, insérez le support de cuisson à la vapeur (21) dans le récipient
intérieur (12), puis insérez la marmite à vapeur (20).
• Lorsque vous sélectionnez le programme Friture, insérez le support avec les poignées (15) dans le récipient
intérieur (12).
• Le couvercle en verre (11) peut être utilisé lors de la sélection des programmes de cuisson lente, de yaourt ou
de friture.
• Lorsque vou s sélectionnez le p rogramme de friture (en utilis ant le couvercle à air chaud), place z le panier à friture
(13) dans le récipient intérieur (12).
• Utilisez le support de couvercle (14) pour ranger les couvercles.
DESCRIPTION DU PANNEAU DE COMMANDE
DE LA COUVERCLE A AIR CHAUD
1. Affichage numérique
2. Réglage de la température
3. Réglage de la minuterie
4. Augmentation de la température/de
la minuterie
5. Marche/Arrêt
6. Diminution de la température/de la
minuterie
7. Programmes
8. Démarrage/pause
9. Sélection du programme prédéfini
UTILISATION D'UN CUISEUR AVEC COUVERCLE D'AIR CHAUD (3)
Le cuiseur avec un couvercle a air chaud fonctionne avec de l'air chaud; ne jamais remplir le cuiseur avec de l'huile ou
un autre produit de friture.
1. Placer l'appareil dans un endroit sec et plat.
2. Brancher l’appareil dans une prise électrique.
3. Assurez-vo us que la surface intérieur e du corps de l'appareil (5) est sèche p our placer le récipient inté rieur (12) dans
le corps de l'appareil (5).
4. Placez les aliments dans le récipient intérieur (12).
8
7
6
1
29
3
5
4
Remarque: Si vous souhaitez utiliser le programme de friture, placez le panier à friture (13) dans le récipient intérieur
et mettez les aliments dans le panier. Ne remplissez pas trop le panier à friture (13) ou le récipient intérieur (12).
5. Placez le couvercle à air chaud (3) pour utiliser l'appareil comme un four à air chaud.
6. Appuyez sur le bouton On/Off (5) pour allumer l'appareil. Les icônes s'allument et l'écran affiche le réglage par
défaut de 180 °C et 15 minutes.
7. Appuyez sur la touche de sélection du programme préréglé (9) pour passer d'un programme de cuisson à l'autre.
L'icône du programme sélectionné clignote et l'écran affiche la température préréglée et la durée du programme.
Appuyez plusieurs fois sur la touche (9) pour passer au programme suivant. Pour modifier le réglage de la
température, appuyez d'abord sur la touche de réglage de la température (2)/pour modifier le réglage de la durée,
appuyez sur la touche de réglage de la durée (3), puis appuyez sur les touches 4 et 6 ou maintenez-les enfoncées
pour régler la température par intervalles de 5 °C et la durée par intervalles de 5 °C et la durée par intervalles de 1
minute (uniquement pour le programme de séchage de 30 minutes).
8. Confirmez la sélection à l'aide de la touche Start/Pause (8).
Note: Si vous commencez à cuisiner alors que l'appareil est encore froid, prolongez le temps de cuisson d'environ 2
minutes. Pendant le préchauffage, l'écran affiche "PREHEATING", après le préchauffage, il disparaît de l'écran et seul
"HEATING" s'affiche lorsque l'élément chauffant est allumé.
Note: L'icône du ventilateur dans le coin supérieur gauche s'allume lorsque le programme est en cours d'exécution.
L'icône s'éteint lorsque le ventilateur cesse de fonctionner.
9. Vous pouvez interrompre le programme à tout moment pendant la cuisson en appuyant sur la touche Start/Pause
(8), puis en appuyant à nouveau sur la touche pour reprendre le processus de cuisson.
10. Vous pouvez retirer le couvercle à air chaud (3) à tout moment pendant la cuisson pourvérifier, ajouter ou retirer
des aliments. Le programme sélectionné est interrompu. Lorsque le couvercle est remis en place, le programme
reprend là où il a été interrompu.
11. Lorsque le programme est terminé, vous êtes averti par un signal sonore et l'écran n'affiche plus que "FINIS"
et la touche Marche/Arrêt (5) clignote.
12. Une fois la cuisson terminée, débranchez l'appareil.
Remarque: Portez des gants de cuisine lorsque vous retirez le panier de friture/récipient interne chaud.
Astuces
Il est recommandé de retourner la préparation pendant la cuisson.
PROGRAMMES PRÉRÉGLÉS
Programmes pour la cuisson a l'autocuiseur
Programmes Quantité (à adapter) Temps de cuisson (min) Durée possible
Riz Moins 8 1-99 min
Normal 12
Plus 15
Soupe Moins 12 1-99 min
Normal 15
Plus 20
Œufs Moins 4 1-99 min
Normal 5
Plus 6
Viande/À l'étouffée Moins 20 1-99 min
98 99
Page 51
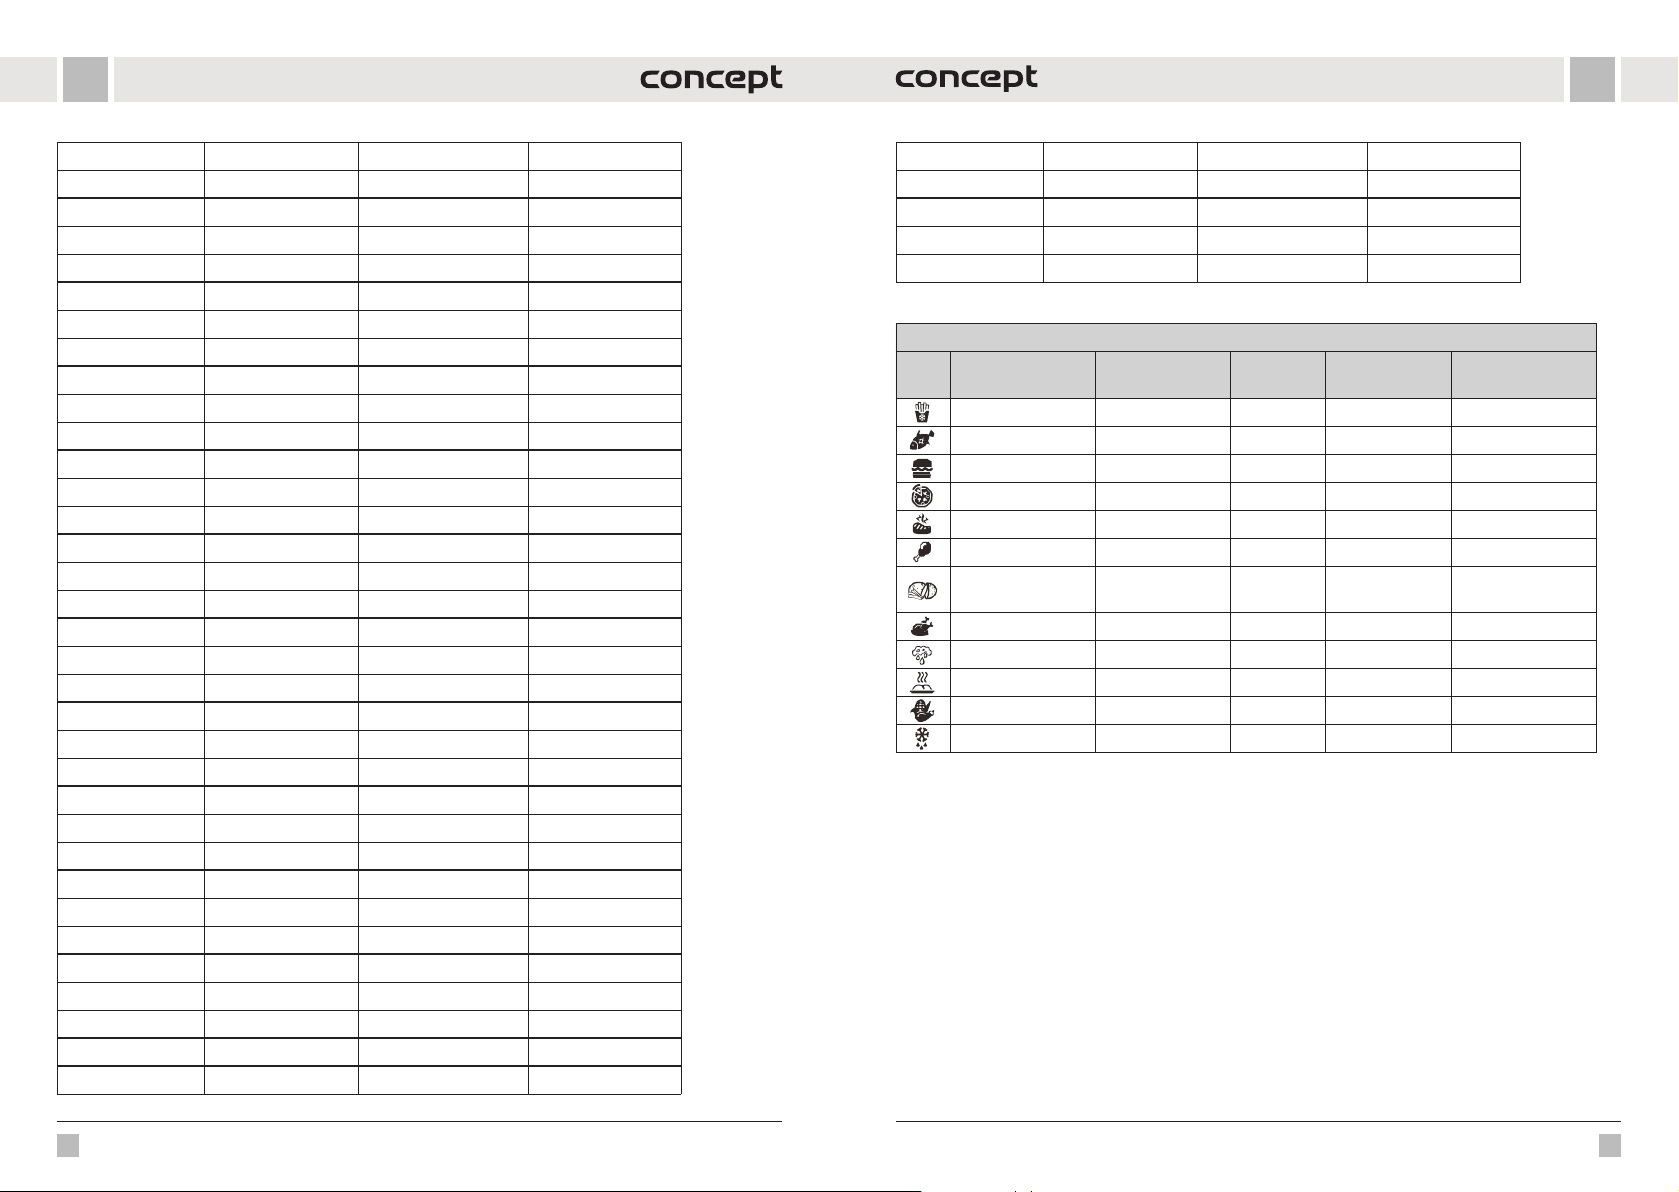
FRFR
Normal 35
Plus 45
Haricots/Chili Moins 25 1-99 min
Normal 30
Plus 40
Volaille Moins 10 1-99 min
Normal 15
Plus 25
Légumineuses Moins 20 1-99 min
Normal 40
Plus 45
Bœuf Moins 30 1-99 min
Normal 35
Plus 40
Vapeur Moins 12 1-99 min
Normal 15
Plus 20
Porridge à l'avoine Moins 12 1-99 min
Normal 15
Plus 20
Porc/côtes de porc Moins 13 1-99 min
Normal 18
Plus 25
Dessert Moins 25 1-99 min
Normal 40
Plus 50
Risotto Moins 20 1-99 min
Normal 35
Plus 45
Légumes Moins 10 1-99 min
Normal 15
Plus 20
Friture Normal 30 30 min
Cuisson lente Moins 30 30 min - 9 h 30 min
Normal 6 h
Plus 9 h 30 min
Yaourt Moins 24 h 6 h - 24 h
Normal 8 h
Plus "boiL"
Programmes de cuisson avec couvercles à air chaud
Programmes Température (°C) Temps
Frites surgelées 200 15 min 80-200 1-60 min
Poisson 160 15 min 80-200 1-60 min
Hamburger 185 13 min 80-200 1-60 min
Pizza 185 15 min 80-200 1-60 min
Steak de bœuf 175 25 min 80-200 1-60 min
Cuisses de poulet 200 22 min 80-200 1-60 min
Frites de pommes
de terre crues
Poulet entier 180 40 min 80-200 1-60 min
Séchage 80 2 heures 40-90 1-12 heures
Griller 160 10 min 160 1-30 min
Légumes 180 15 min 80-200 1-60 min
Décongélation 50 5 min 50 1-60 min
Remarque: ces réglages sont donnés à titre indicatif. Si vous commencez à cuisiner alors que l'appareil est encore
froid, prolongez le temps de cuisson d'environ 2 minutes.
160 30 min 80-200 1-60 min
Température
réglable (°C)
Durée possible
NETTOYAGE ET ENTRETIEN
Nettoyer l´appareil à chaque utilisation.
Pour nettoyer, n’utilisez jamais des produits abrasifs ou agressifs tels que : objets coupant, gratte, solvants
chimiques, diluants, etc.
• Avant le n ettoyage débrancher l´appareil du secteur. Ne plon gez jamais le cordon d'alimentatio n, la fiche, l'appareil
ou le couvercle à air chaud dans l'eau ou dans un autre liquide !
• Laisser refroidir complètement l´appareil avant le nettoyage.
• Nettoyer la surface extérieure de l’appareil avec un chiffon humide.
• L aisser tremper le bol inte rne à l’eau chaude. Ensuite, il peut être l avé avec un chiffon doux dans de l'eau savonn euse
ou dans le lave-vaisselle.
• Les autres parties de l'appareil peuvent être lavées dans de l'eau savonneuse.
• Seuls les accessoires et le récipient intérieur peuvent être lavés au lave-vaisselle.
• Une fois les pièces complètement sèches, remontez l'appareil et rangez-le dans un endroit frais et sec.
100 101
Page 52
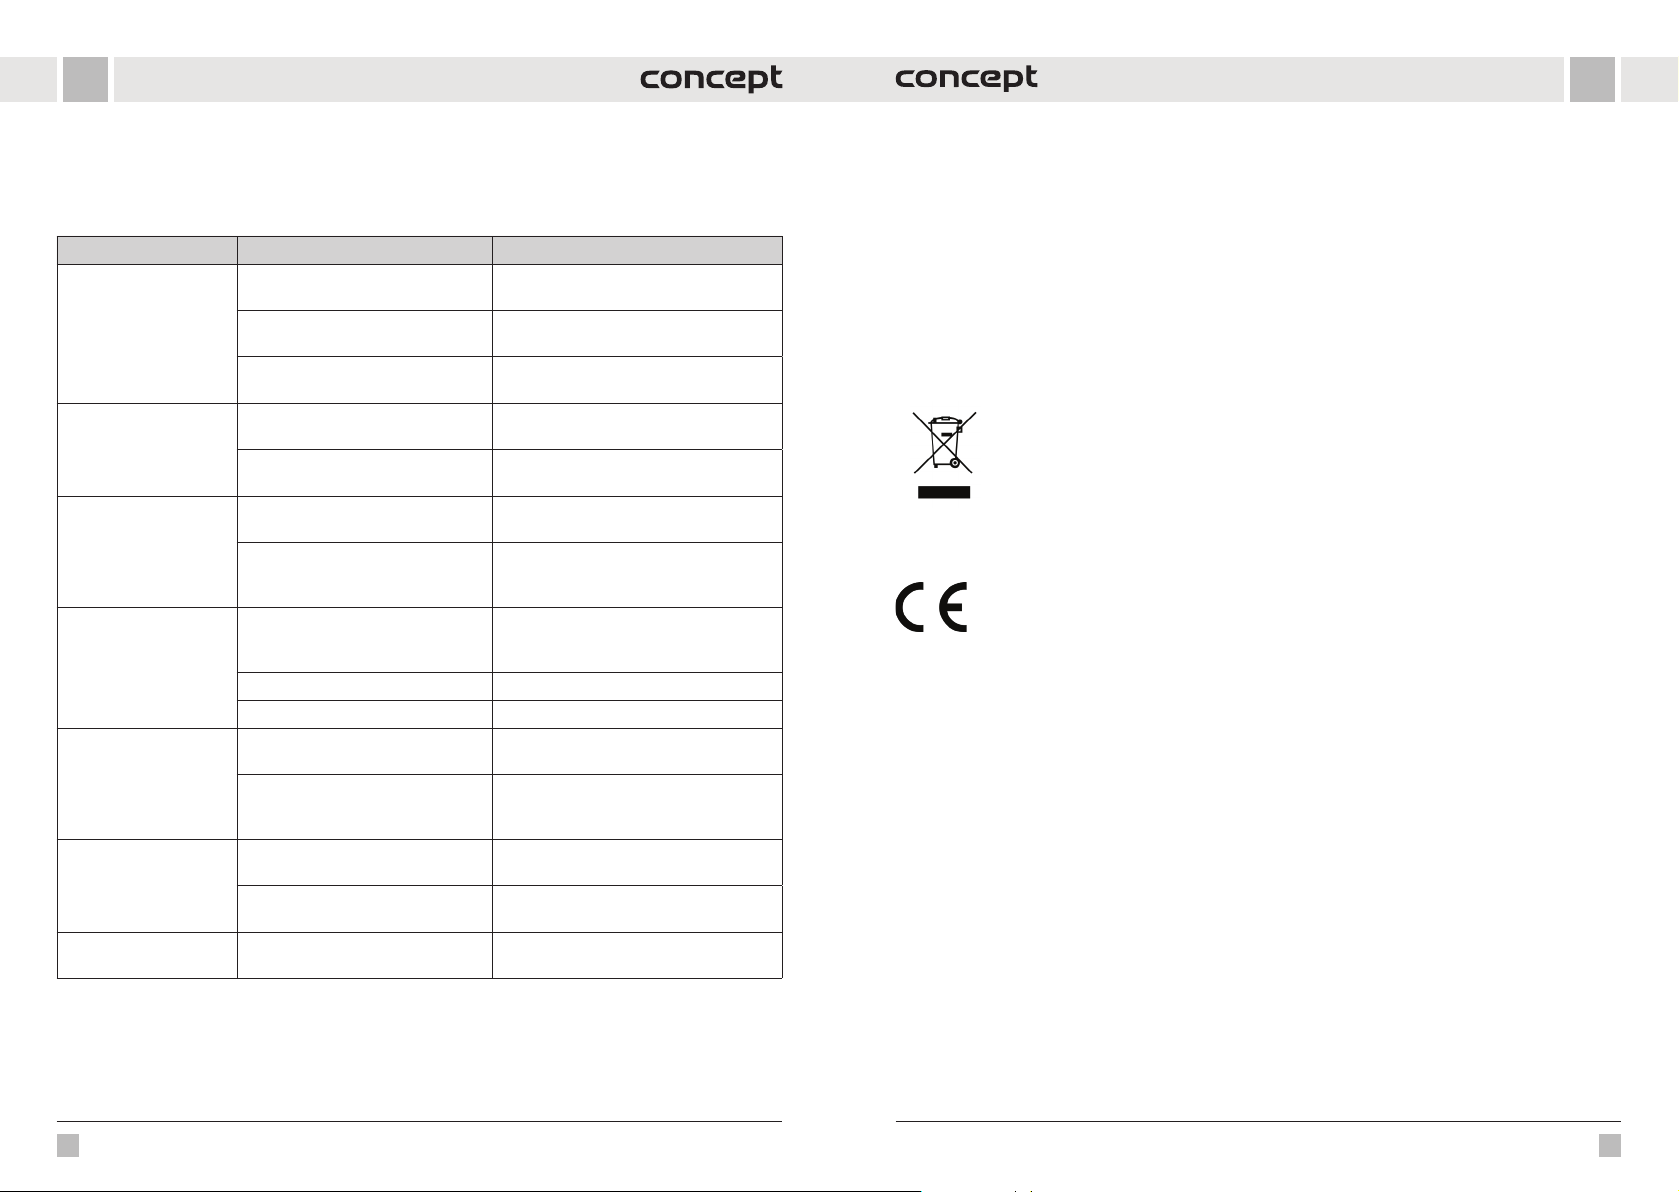
RÉSOLUTION DE PROBLÈMES
FRFR
ENTRETIEN
Les opérations de maintenance ou les réparations de plus grande étendue nécessitant une intervention sur les
composantes internes de l’appareil ne peuvent être effectuées que par un centre d’entretien agréé.
Problème Cause Solution
L'appareil ne fonctionne
pas.
Les aliments frits ne sont
pas prêts.
Les aliments sont frits de
façon irrégulière.
Les aliments frits ne sont
pas croustillants.
De la fumée blanche
s'échappe de l'appareil.
Fuite de vapeur autour du
couvercle de pression.
Fuite de vapeur au niveau
de la soupape de pression.
L'appareil n'est pas raccordé correctement.
Le programme ou la minuterie n'est
pas réglé.
Le couvercle n'est pas correctement
placé.
Trop d'aliments.
Temps de cuisson trop court,
température trop basse.
Trop grande quantité d'aliments,
aliments superposés.
Les aliments ne sont pas frais ou n'ont
pas été préparés correctement.
Certains aliments se prêtent mieux
à une utilisation dans une friteuse à
air chaud.
Un peu d'huile est nécessaire. Arrosez légèrement les aliments d'huile.
Les aliments sont humides. Séchez les aliments avant la cuisson.
Les aliments dans la friteuse sont gras.
Le récipient/panier contient encore
des résidus de graisse provenant d'une
utilisation précédente.
Le joint n'est pas correctement placé.
La soupape de pression (sortie) est
bloquée.
La soupape de pression (sortie) n'est
pas correctement fermée.
Branchez l'appareil sur une prise de courant
reliée à la terre.
Réglez le programme ou la minuterie
souhaités.
Vérifier que le couvercle est bien en place.
Placez les petites quantités dans le récipient/
le panier.
Prolonger le temps de cuisson, augmenter la
température.
Retirez certains aliments ou secouez/
retournez-les à mi-cuisson.
Veillez à utiliser des aliments frais et à les
préparer correctement pour la friture
(quelques gouttes d'huile).
Utilisez des aliments frais ou semi-préparés.
Il ne s'agit pas d'un défaut. Séchez les
aliments de l'excès d'huile.
Nettoyez correctement le récipient/le panier.
Arrêtez la cuisson, retirez le couvercle
et vérifiez que le joint est bien en place.
Nettoyez la soupape.
Fermez la soupape avec précaution.
PROTECTION DE L’ENVIRONNEMENT
• Préférer le recyclage des emballages et des appareils à la fin de leur durée de vie.
• Le carton est à remettre dans le centre de collecte sélective.
• Les sachets en plastique (PE) sont à remettre dans le centre de collecte sélective pour recyclage.
Recyclage de l’appareil à la fin de sa durée de vie :
La désignation du produit est conforme à la Directive européenne 2012/19/EU relative aux
déchets d'équipements électriques et électroniques (WEEE). Le symbole apposé sur le produit ou
son emballage indique que le produit ne doit pas être éliminé avec les déchets municipaux. Il est
nécessaire de le remettre dans un centre de collecte pour le recyclage des équipements électriques
et électroniques. En assurant une élimination conforme de ce produit, vous pouvez empêcher tout
impact négatif sur l’environnement et sur la santé humaine résultant de la liquidation non conforme
de ce produit. Éliminer le produit en conformité à la réglementation de traitement de déchets. De
plus amples informations concernant le recyclage peuvent être obtenues auprès de l’administration
locale compétente, les centres de tri de déchets ménagers ou dans le magasin où vous avez acheté
votre produit.
Ce produit satisfait aux exigences élémentaires des directives EU applicables.
Le fabricant se réserve le droit d’effectuer les modifications du texte, design et spécifications techniques sans
informations au préalable.
102 103
Page 53
ITIT
RINGRAZIAMENTO
Grazie per aver acquisito il prodotto di marchio Concept e vi auguriamo che vi dia la massima soddisfazione per tutta
la durata della sua vita utile.
Si consiglia di leggere attentamente l’intero manuale d’uso prima di procedere al primo uso dell’apparecchio stesso.
Conserva re bene il manuale d’uso. Prov vedere che tutte le per sone addette all ’uso del prod otto facciano la conosce nza
del manuale d’uso.
Parametri tecnici
Tensione 220-240 V~50-60 Hz
Potenza assorbita
Capacità del contenitore 5,6 lt
Temperatura preimpostabile friggitrice: cottura 80-200 °C, asciugatura 40-90 °C
Timer
IMPORTANTE
Prima di collegare l’apparecchio alla rete assicurarsi visivamente che l’unità sia integra e non abbia subito dei
danneggiamenti durante il trasporto.
friggitrice: cottura 1 - 60 min, asciugatura 1 - 12 ore
1000 W pentola polifunzionale
1500 W friggitrice ad aria
Attenzione!
Superficie calda
pentola: 1 min - 24 ore
IMPORTANTI AVVERTIMENTI DI SICUREZZA
• Non utilizzare il prodotto in modo diverso da quello descritto nel presente
manuale d’uso.
• Eliminare completamente tutti gli imballi e materiali pubblicitari prima di
utilizzare l’apparecchio per la prima volta.
• Verificare se la tensione della rete corrisponde ai valori riportati
sull'etichetta del prodotto.
• Posizionare l’apparecchio su una superficie stabile lontano dalle altre
fonti di calore.
• Allo staccare dell’apparecchio dalla presa di corrente non tirare mai il cavo
di alimentazione, bensì prendere la spina in mano e staccarla estraendola.
• Non permettere ai bambini, né alle persone incapaci di volere e di
intendere, di manipolare con l’apparecchio, utilizzarlo fuori dalla loro
portata.
• Le persone con la mobilità e/o la percezione ridotte, mentalmente
inadatte oppure le persone non istruite in merito all’uso devono utilizzare
l’apparecchio solo in presenza di una persona responsabile e istruita in
merito.
• Prestare la maggiore attenzione se l’apparecchio è utilizzato in presenza
dei bambini.
• Non permettere che l’apparecchio sia utilizzato come giocatolo.
• Non coprire l’apparecchio.
• Prima di montare o smontare l’apparecchio staccare il cavo di
alimentazione dalla presa di corrente.
• Prima di procedere alla pulizia dell’apparecchio staccare il cavo di
alimentazione dalla rete.
• Mantenere l’apparecchio pulito, non permettere che gli oggetti estranei
entrino nelle aperture della griglia. Tali oggetti potrebbero causare
idanni alle persone e/o alle cose (il cortocircuito o l’incendio).
• Non utilizzare l’apparecchio se il cavo di alimentazione o la spina risultano
danneggiati, il tale difetto deve essere riparato da un’officina autorizzata.
• Non utilizzare l’apparecchio se non funziona correttamente se caduto
per terra o se è stato immerso nell'acqua o in un altro liquido. In tal caso
bisogna far esaminare l’apparecchio ed eventualmente farlo riparare da
un‘officina autorizzata.
• L’apparecchio di vostro possesso è adatto solo per uso domestico, non
per uso commerciale.
• Non utilizzare l'apparecchio all'aperto.
• L'uso di una prolunga è sconsigliato perché potrebbe surriscaldarsi
e causare un rischio di incendio. Se è necessario utilizzare una prolunga,
accertarsi che l'alimentazione elettrica sia compatibile con l'apparecchio
e che la presa sia dotata di messa a terra.
• Non spostare o scuotere l'apparecchio durante il funzionamento.
• Non inserire nell'apparecchio materiali infiammabili (carta, plastica).
• Non utilizzare l’apparecchio se si hanno le mani bagnate.
• Non immergere il cavo di alimentazione, la spina o l’apparecchio
stesso nell’acqua o in un altro liquido. Non versare acqua o altri
liquidi sui componenti elettrici e sui connettori.
• Non procedere mai alla riparazione dell’apparecchio. Rivolgersi sempre
ad un’officina autorizzata.
• L’apparecchio può essere utilizzato dai bambini d’età superiore a8anni.
Le persone di capacità fisiche e mentali ridotte e/o non pratiche
possono utilizzare l’apparecchio solo in presenza delle persone istruite
einformate sugli eventuali rischi uniti all’uso. La pulizia e la manutenzione
dell’apparecchio non deve essere effettuata dai bambini se essi sono d’età
inferiore a 8 anni o se non presente una persona esperta. I bambini d’età
inferiore a 8 anni devono stare lontani dalla portata dell’apparecchio
edal suo cavo di alimentazione. L’apparecchio non è un giocatolo e come
104 105
Page 54
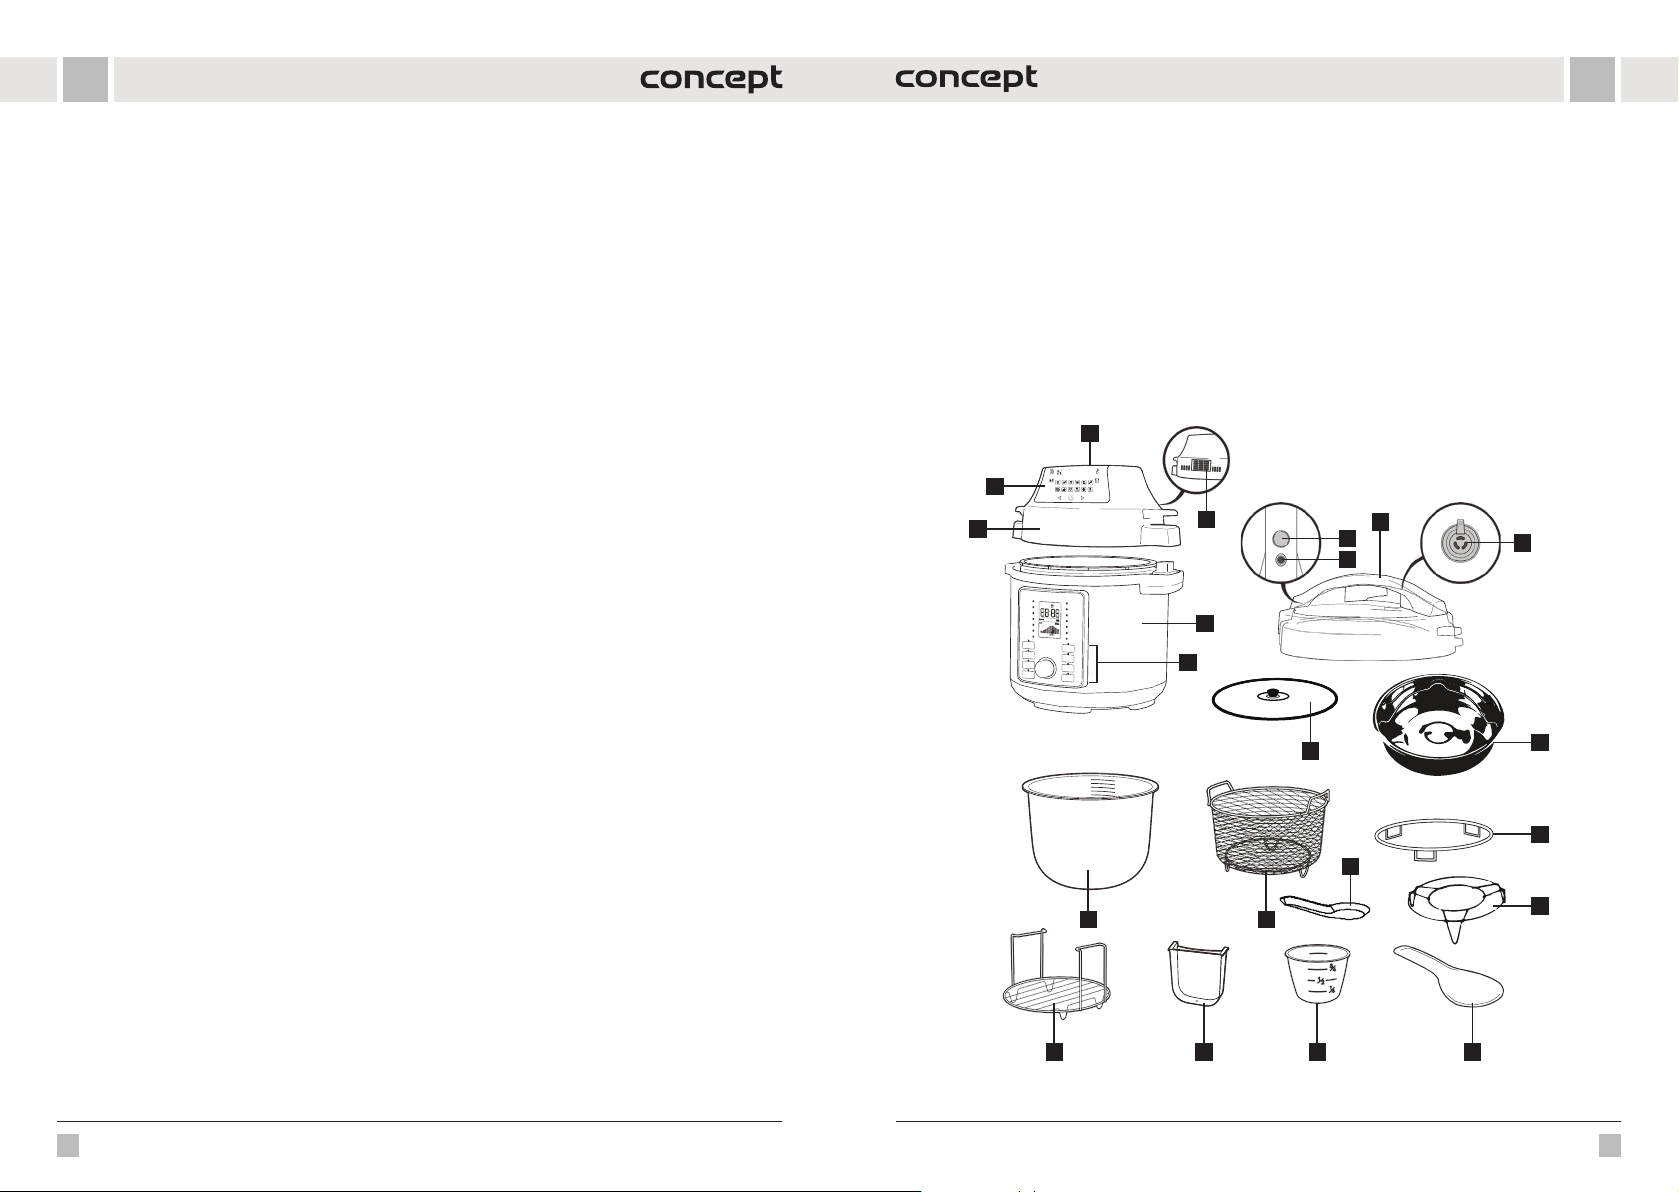
ITIT
c
tale deve essere utilizzato.
• Non toccare le superfici calde.
• Non lasciare pendere liberamente il cavo di alimentazione oltre il bordo
della tavola o del banco da cucina. Avere cura che il cavo di alimentazione
non tocchi le superfici caldi.
• Non posizionare l’apparecchio vicino al bruciatore a gas o elettrico.
• Non collocare l'apparecchio sul piano di cottura. Assicurarsi che
l'apparecchio sia collocato in un'area ben ventilata, lontano da superfici
calde, materiali infiammabili (tende, tovaglie) e ambienti umidi.
• AVVERTIMENTO: La superfici dell'apparecchio potrebbero essere molto
calde. Tenere l'apparecchio solo per l'impugnatura e utilizzare dispositivi
di protezione come guanti da cucina.
• Dedicare la maggiore attenzione a non far entrare l’acqua o altro liquido
nell’apparecchio. Si corre il rischio d’infortunio da corrente elettrica.
• Collocare sempre gli alimenti nel cestello dell'apparecchio per evitare
che entrino in contatto con l'elemento riscaldante.
• Non toccare mai le superfici interne dell’apparecchio se esso è acceso
oappena spento. Lasciare raffreddare l’apparecchio.
• Non collegare o comandare l’apparecchio con le mani umide.
• Coperchi Air fry: durante la cottura il vapore caldo fuoriesce dalle uscite
dell'aria, tenere mani e viso a distanza di sicurezza dalle uscite dell'aria.
• Coperchio della pentola a pressione: fare attenzione al vapore caldo e
all'aria che fuoriescono dalla valvola a pressione. Non mettere le mani, il
viso o altri oggetti sopra l'uscita della cappa a pressione.
• Non utilizzare l'apparecchio se si è portatori di pacemaker, apparecchi
acustici, ecc. Consultare il medico prima di utilizzare l'apparecchio.
• Non utilizzare accessori diversi da quelli raccomandati dal produttore.
• Non collegare l'apparecchio a un timer esterno.
• Protezione contro il surriscaldamento: se il fusibile termico ha reagito,
l'apparecchio non funziona. Scollegare l'apparecchio e attendere che si
raffreddi completamente prima di riavviarlo.
• Se durante il funzionamento si nota la presenza del fumo scuro che esce
dall’apparecchio, spegnere l’apparecchio immediatamente e rivolgersi
all’assistenza autorizzata.
• Prima di pulire l’apparecchio lasciarlo raffreddare per almeno 30 minuti.
Un eventuale danno causato dal mancato rispetto delle indicazioni
previste dal produttore non può essere coperto dalla garanzia.
DESCRIZIONE DEL PRODOTTO
1 Alimentazione dell'aria
2 Uscita dell'aria
3 Coperchio ad aria calda
4 Display del coperchio dell'aria calda
5 Corpo dell'apparecchio
6 Pannello di controllo della pentola multifunzione
7 Coperchio a pressione
8 Pulsante di sblocco del coperchio
9 Valvola di sicurezza
10 Valvola di pressione
11 Coperchio in vetro
1
4
3
12 13
15
2
5
6
16 17 18
12 Contenitore interno
13 Cestello per friggere
14 Portacoperchio
15 Supporto con maniglie
16 Contenitore per la condensa per l'acqua in eccesso
17 Bicchiere di misurazione
18 Cucchiaio basso
19 Cucchiaio profondo (mestolo)
20 Pentola per la cottura a vapore
21 Rastrelliera per la cottura a vapore
7
8
9
11
19
10
20
14
21
106 107
Page 55
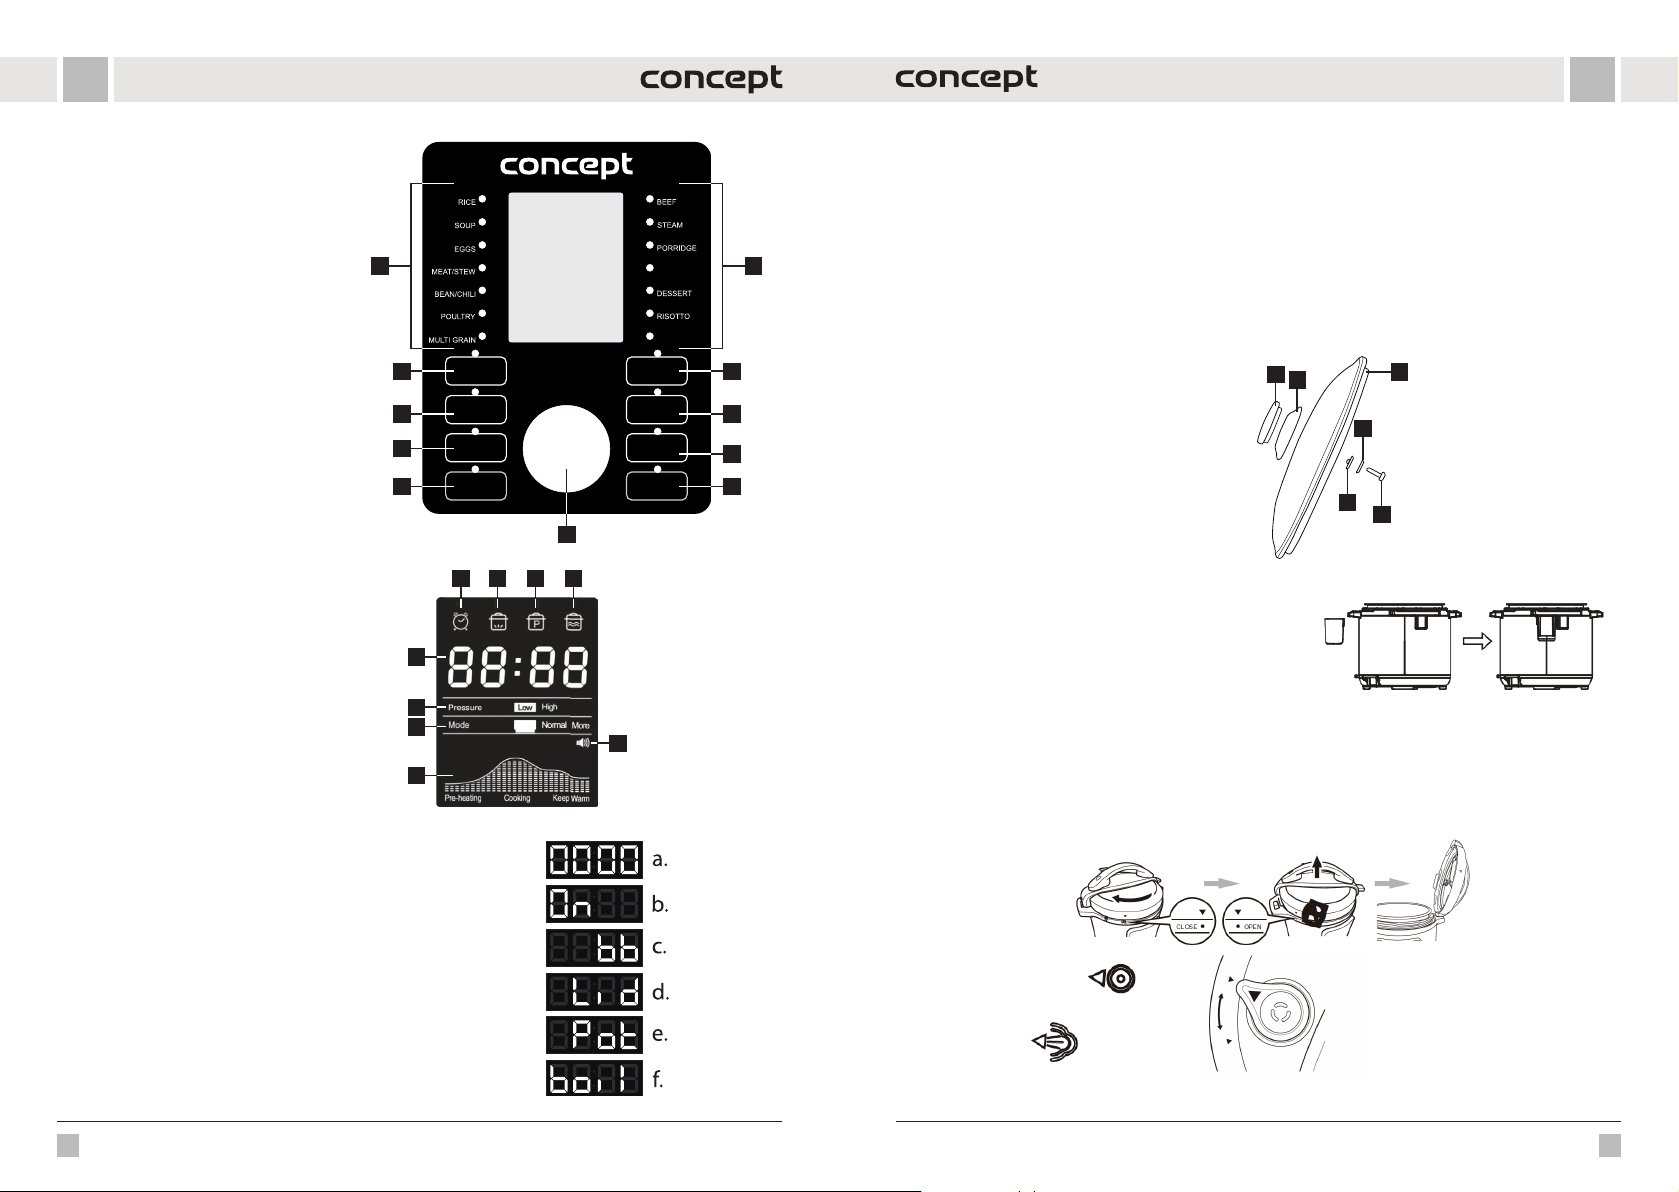
ITIT
DESCRIZIONE DEL PANNELLO DI
CONTROLLO DELLA PENTOLA
MULTIFUNZIONE
1 Programmi preimpostati
2 Programma yogurt
3 Cottura lenta
4 Impostazione bassa/alta pressione
5 Mantenimento della temperatura/Annullamento
6 Frittura
7 Avvio ritardato
8 Impostazione manuale
9 Avvio
10 Manopola di controllo
DESCRIZIONE DEL DISPLAY
A Indicatore di avvio ritardato
B Indicatore di preriscaldamento
C Indicatore di pressione
D Indicatore di mantenimento della temperatura
E Indicatore di accensione/spegnimento del suono
F Indicatore di avanzamento
G Indicatore di modalità
H Indicatore del livello di pressione
I Visualizzazione dell'ora e degli avvisi
RÝŽE
POLÉVKA
VEJCE
MASO / DUŠENÍ
FAZOLE / CHILLI
DRŮBEŽ
LUŠTĚNINY
2 6
POMALÉ VAŘENÍ
3
4
UDRŽENÍ TEPLOTY
5
KEEP WARM/CANCEL
JOGURT
YOGURT
SLOW COOK
TLAK
PRESSURE
LEVEL
/ ZRUŠIT
Pressure
Mode
Pre-heating
High
Low
Less Normal More
Cooking Keep Warm
HOVĚZÍ
PÁRA
OVESNÁ KAŠE
VEPŘOVÉ /
ŽEBÍRKA
PORK&RIBS
DEZERT
RIZOTO
ZELENINA
VEGETABLES
SMAŽENÍ
SAUTE
ODLOŽENÝ START
DELAY START
RUČNÍ NASTAVENÍ
ADJUST
START
10
A B C D
I
H
G
E
F
COME PROCEDERE PRIMA DEL PRIMO USO
• Disimballare completamente l’apparecchio.
• Eliminare completamente tutte le etichette.
• Lavare il recipiente interno (12) con l’acqua calda.
• Pulire per bene l’apparecchio all’interno ed all’esterno con un panno.
11
• Lavare gli accessori con acqua calda, sapone e una spugna non abrasiva.
Nota: preriscaldare l'apparecchio per 10 minuti senza alimenti. Dall'apparecchio possono fuoriuscire fumo innocuo e
un leggero odore.
• Lasciare uno spazio minimo di 13 cm intorno all'apparecchio durante il funzionamento.
Montaggio del coperchio di vetro
È possibile utilizzare il coperchio in vetro con le funzioni
Cottura lenta e Mantenimento della temperatura. Il
7
montaggio dell'impugnatura è illustrato nella figura.
1
2
1. Maniglia
8
9
2. Base della maniglia
3. Corpo del coperchio in vetro
4. Guarnizione
5. Rondella
6. Vite
3
5
4
6
MANUALE D’USO
UTILIZZO DELLA PENTOLA CON COPERCHIO A PRESSIONE
(7)
1. Collocare l'apparecchio in un luogo asciut to e in piano.
2. Collocare il contenitore di condensa per l'acqua in eccesso
(16) sul retro dell'apparecchio, vedi fig. 1.
3. Predisporre il coperchio a pressione (7), si veda la fig. 2.
• Ti rare la sporgenza meta llica sul lato inferiore del cope rchio per rimuovere il coperchi o protettivo su cui è montata
la guarnizione. La guarnizione può essere rimossa e pulita. Assicurarsi che la guarnizione non sia danneggiata
o strappata in alcun punto. In caso di danni, è necessario sostituirla. Assicurarsi che la valvola a galleggiante sia
pulita e possa muoversi liberamente.
Nota: Se il coperchio della pentola a pressione è già stato montato sull'apparecchio, rimuoverlo per la preparazione
premendo il pulsante rosso, ruotando il manico in senso antiorario e sollevandolo.
fig. 1
Sul display LED possono essere visualizzati i seguenti messaggi:
a. La pentola è pronta per l'uso, ma il programma non è stato selezionato.
b. La pentola si riscalda alla temperatura desiderata
c. Funzione „Keep warm“ – la pentola mantiene la temperatura
d. Il coperchio è nella posizione sbagliata o manca
Guarnito
fig. 2
e. Nella pentola manca il recipiente interno
f boiL (cottura) appare in modalità Altro per il programma Yogurt
Scarico del vapore
108 109
Page 56
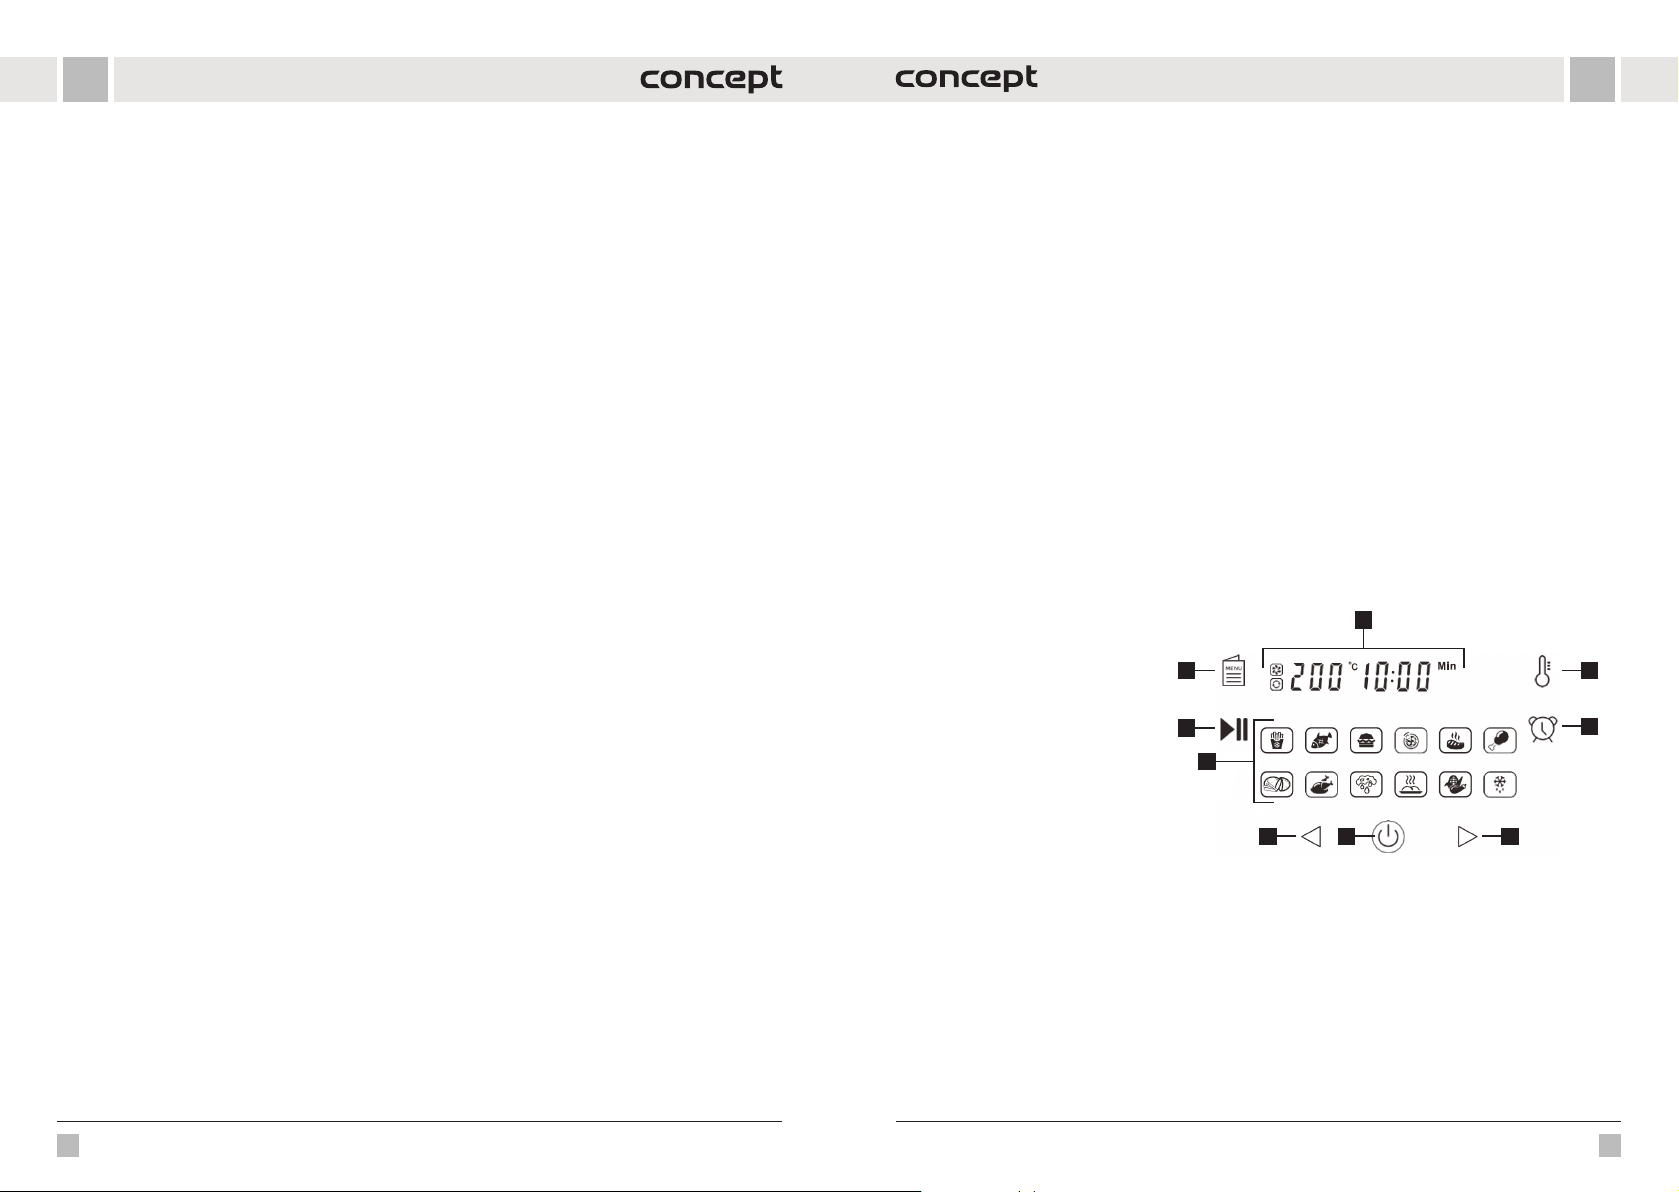
ITIT
4. Rimuovere il contenitore interno (12). Il volume totale di cibo e acqua non deve superare i 2/3 del volume del
contenitore interno. Se si cucinano alimenti che aumentano di volume durante la cottura (ad esempio il riso), non
riempire il contenitore oltre la metà.
Avviso: Alcuni alimenti come la salsa di mele, i mirtilli rossi, la farina d'avena, le tagliatelle, il rabarbaro o gli spaghetti
possono formare schiuma e rompersi, ostruendo la valvola a pressione (uscita). Questi alimenti non devono essere
cucinati nella pentola a pressione. Attenzione: non utilizzare la pentola a pressione per friggere con l'olio.
5. Assicurarsi che la superficie interna del corpo dell'apparecchio (5) sia asciutta e inserire il contenitore interno (12)
nel corpo dell'apparecchio (5).
6. Inserire il coperchio a pressione (7) e ruotarlo in senso orario. Quando si sente uno scatto, il coperchio è
correttamente inserito. La corretta tenuta del coperchio è indicata dalle frecce allineate sul bordo del coperchio e
sul bordo dell'apparecchio.
7. Per il corretto funzionamento della pentola, la valvola di pressione (10) deve essere libera di muoversi.
8. Posizionare la valvola a pressione sulla posizione "Sealed" (sigillato), in modo che la pentola sia pronta per l'uso.
9. Collegare il cavo di alimentazione alla spina dell'apparecchio e quindi alla presa di corrente. Il display visualizza
“00 00”.
10. Ruotare la manopola per scorrere i programmi preimpostati (1) (programmi aggiuntivi premendo il tasto del
programma corrispondente) o per regolare il tempo di cottura. Confermare il programma s elezionato (l'indicatore
si accende) con il tasto Start. Per regolare la durata del programma preimpostato, premere la manopola e ruotarla
per selezionare l'ora desiderata e confermare premendo il tasto Avvio.
Nota: Premere il pulsante di impostazione della pressione per passare da bassa ad alta pressione. L'impostazione
predefinita è Alta pressione. Regolare l'impostazione della pressione dopo aver selezionato il programma e il tempo
di cottura; confermare l'impostazione con il pulsante Avvio. Premere il pulsante Impostazioni manuali per selezionare
la quantità di cibo, passando da Meno, Normale e Più. L'impostazione predefinita è Normale.
Nota: Il tempo di cottura deve essere regolato in base alla quantità di cibo.
11. La pentola inizi a a riscaldarsi fino all a temperatura desid erata (il display visualiz za "On", l'icona del prerisc aldamento
è accesa) e la valvola a galleggiante si alza. Una volta raggiunta la temperatura desiderata, inizia il conto alla
rovescia del tempo impostato. A questo punto la cottura è già sotto pressione (l'icona della pressione è accesa),
il coperchio è bloccato e la pentola non può essere aperta. NON CERCARE MAI DI APRIRE LA PENTOLA CON LA
FORZA!
12. Al termine della cottura, viene emesso un segnale acustico e la pentola passa automaticamente alla modalità
"Mantenimento in c aldo" per ma ntenere il c ibo cal do. Il display v isualiz za "b b" e l'icona Manteni mento in cal do è accesa .
È possibile annullare l'impostazione della pentola in qualsiasi momento premendo il pulsante Mantenimento in
caldo/Annullamento (5).
13. Suono disattivato/attivato: per cambiare la modalità di suono, tenere premuto il pulsante Mantieni temperatura
14. An nulla per 3 secondi fino a quand o l'icona del suono sul display camb ia. Gli avvisi di sicurez za sono sempre accesi.
Finita la cottura la pressione può essere scaricata in due modi:
1. Finita la cottura la pressione comincia a calare gradualmente. In funzione della quantità del liquido la calata di
pressione può durare da 15 a 30 min. La valvola galleggiante scende gradualmente, il coperchio si sblocca epuò
essere aperto facilmente. Se non si sblocca, attendere ancora un po’. NON FORZARE MAI L’APERTURA DELLA
PENTOLA!
2. Per aprire il coperchio della pentola a pressione: afferrare il manico e premere il pulsante rosso per sbloccare il
coperchio, ruotare il coperchio in senso antiorario finché non si sblocca e sollevarlo tirandolo verso l'alto. Il
coperchio può essere appoggiato sulla rastrelliera (14).
3. Al termine della cottura, premere il pulsante Mantenimento della temperatura/Annullamento (5), utilizzando la
presina e girare la valvola galle ggiante nella posizione „S carico vapore“, la valvola galleggiante scende, il coperchio
si sblocca e si apre facilmente. PRESTARE LA DOVUTA ATTENZIONE ALLA MANIPOLAZIONE CON LA PENTOLA,
UTILIZZARE I MEZZI DI PROTEZIONE, SI CORRE IL RISCHIO DI USTIONE DA VAPORE!
Funzione di avvio rinviato Delay Start:
1. Se si seleziona Cottura lenta, Yogurt o Frittura, è possibile utilizzare una pentola a pressione con coperchio, un
coperchio di vetro o senza coperchio. Quando si utilizza una pentola a pressione senza coperchio, l'indicatore del
livello di pressione scompare dal display.
2. Seguire le istruzioni per l'uso, ruotare la manopola per selezionare il programma desiderato, quindi premere il
pulsante Avvio ritardato e premere nuovamente il pulsante per impostare il tempo che si desidera ritardare l'inizio
della cottura. Dalla fabbrica è impostato il rinvio di avvio di durata di 30 minuti.
3. Quindi premere il pulsante Avvio. Durante l'avvio ritardato, sul display si accende l'icona dell'avvio ritardato e viene
visualizzato il tempo rimanente. Decorso il tempo impostato parte il programma scelto.
Consigli utili
1. Se si seleziona Cottura lenta, Yogurt o Frittura, è possibile utilizzare una pentola con coperchio a pressione, con
coperchio in vetro o senza coperchio. Quando si utilizza una pentola a pressione senza coperchio, l'indicatore del
livello di pressione scompare dal display.
2. S consig lia di utilizzare la f unzione „Keep warm“ p er un’ora al massimo, poi la qualità de l cibo comincia a deteriora re.
3. I pro grammi sono impostati p er cuocere il cibo di peso infe riore a 1200 gr, se il peso del ci bo da cuocere è superiore,
procedere all’impostazione individuale.
4. Utilizzare la funzione Delay Start solo per gli alimenti che non possono deteriorare in attesa di avvio della cottura.
5. Ins erire e rimuovere gli alimenti nel contenitore interno utilizz ando utensili di legno o di plas tica; non utilizzare mai
utensili affilati o metallici per evitare di danneggiare la superficie del contenitore.
6. Utilizzo degli accessori:
• Quando si seleziona il programma Vapore, inserire il cestello per la cottura a vapore (21) nel contenitore interno
(12) e quindi inserire la pentola per la cottura a vapore (20).
• Quando si seleziona il programma Frittura, inserire il cestello con le maniglie (15) nel contenitore interno (12).
• Quando si seleziona il programma Cottura lenta, Yogurt o Frittura, si può utilizzare il coperchio di vetro (11).
• Quando si seleziona il programma di Friggere (se si utilizza il coperchio ad aria calda), inserire il cestello per
friggere (13) nel contenitore interno (12).
• Per riporre i coperchi, utilizzare il portacoperchi (14).
DESCRIZIONE DEL PANNELLO DI CONTROLLO PER COPERCHIO AD ARIA CALDA
1. Display digitale
2. Impostazione della temperatura
3. Impostazione del timer
4. Aumento della temperatura/del timer
5. Accensione/Spegnimento
6. Riduzione della temperatura/del timer
7. Programmi
8. Avvio/pausa
9. Selezione del programma preimpostato
UTILIZZO DELLA PENTOLA CON COPERCHIO AD ARIA (3)
Una pentola con coperchio ad aria calda funziona con aria calda; non riempire mai la pentola con olio o altro mezzo
di frittura.
1. Collocare l'apparecchio in un luogo asciutto e in piano.
2. Collegare il cavo di alimentazione a una presa di corrente.
3. Assicurarsi che la superficie interna del corpo dell'apparecchio (5) sia asciutta e inserire il contenitore interno (12)
nel corpo dell'apparecchio (5).
4. Collocare il cibo nel contenitore interno (12). Nota: se si desidera utilizzare il programma di frittura, collocare il
cestello di frittura (13) nel contenitore interno e inserire gli alimenti nel cestello. Non riempire eccessivamente il
cestello di frittura (13) o il contenitore interno (12).
5. Posizionare il coperchio dell'aria calda (3) per utilizzare l'apparecchio come forno ad aria calda.
6. Premere il pulsante On/Off (5) per accendere l'apparecchio. Le icone si accendono e il display visualizza
l'impostazione predefinita di 180 °C e 15 minuti e 15 minuti.
8
7
6
1
29
3
5
4
110 111
Page 57
ITIT
7. Premere il pulsante di selezione del programma di preselezione (9) per cambiare le preselezioni di cottura.
L'icona del programma selezionato lampeggia e il display visualizza la temperatura preimpostata e la durata
del programma. Premere ripetutamente il pulsante (9) per passare al programma successivo. Per modificare
l'imposta zione della temperatura, p remere prima il pulsante di imp ostazione della temper atura (2)/per modific are
l'impostazione dell'ora, premere il pulsante di impostazione del timer (3) e quindi premere o tenere premuti i
pulsanti 4 e 6 per regolare la temperatura a inter valli di 5 °C e l'ora a intervalli di 5 °C a intervalli di 5 °C e il tempo a
intervalli di 1 minuto (solo per il programma di asciugatura di 30 minuti).
8. Confermare la selezione con il tasto Avvio/Pausa (8).
Nota: Se si inizia a cucinare quando l'apparecchio è ancora freddo, si prolunga il tempo di cottura di circa 2 minuti.
Durante il preriscaldamento, il display visualiz za "PREHEATING", al termine del preriscaldamento scompare dal display
e viene visualizzato solo "HEATING" quando si accende l'elemento riscaldante.
Nota: L'icona della ventola nell'angolo in alto a sinistra si accende mentre il programma è in esecuzione. L'icona si
spegne quando la ventola smette di funzionare.
9. È possibile mettere in pausa il programma in qualsiasi momento durante la cottura premendo il pulsante Avvio/
Pausa (8) e premendo nuovamente il pulsante per riprendere il processo di cottura.
10. In qualsiasi momento durante la cottura, è possibile rimuovere il coperchio dell'aria calda (3) per controllare/
aggiungere o rimuovere gli alimenti. Il programma selezionato viene interrotto. Quando si reinserisce il coperchio,
il programma riprende dal punto in cui era stato interrotto.
11. Quando il pr ogramma è terminato, l'utente v iene avvisato da un se gnale acustico e il displ ay visualizza sol o "FINITO".
e il pulsante On/Off (5) lampeggerà.
12. Al termine della cottura, scollegare l'apparecchio dalla rete elettrica.
Avviso: Indossare guanti da forno quando si rimuove il cestello di frittura caldo/il contenitore interno.
Consigli utili
Si consiglia di girare gli alimenti durante la cottura per ottenere una doratura uniforme o di mescolarli.
PROGRAMMI PREIMPOSTATI
Programmi per la cottura con il coperchio a pressione
Programmi Quantità (regolabile) Tempo di cottura (min) Possibile arco di tempo
Riso Meno 8 1-99 min
Normale 12
Di più 15
Zuppa Meno 12 1-99 min
Normale 15
Di più 20
Uova Meno 4 1-99 min
Normale 5
Di più 6
Carne/Stufato Meno 20 1-99 min
Normale 35
Di più 45
Fagioli/Chili Meno 25 1-99 min
Normale 30
Di più 40
Pollame Meno 10 1-99 min
Normale 15
Di più 25
Legumi Meno 20 1-99 min
Normale 40
Di più 45
Manzo Meno 30 1-99 min
Normale 35
Di più 40
Vapore Meno 12 1-99 min
Normale 15
Di più 20
Porridge di farina
d'avena
Carne di maiale/
stinchi
Dessert Meno 25 1-99 min
Risotto Meno 20 1-99 min
Verdure Meno 10 1-99 min
Frittura Normale 30 30 min
Meno 12 1-99 min
Normale 15
Di più 20
Meno 13 1-99 min
Normale 18
Di più 25
Normale 40
Di più 50
Normale 35
Di più 45
Normale 15
Di più 20
112 113
Page 58
ITIT
Cottura lenta Meno 30 30 min - 9 ore 30 min
Normale 6 ore
Di più 9 ore 30 min
Yogurt Meno 24 ore 6 - 24 ore
Normale 8 ore
Di più "boiL"
Programmi per la cottura con il coperchio ad aria
Programmi Temperatura (°C) Tempo
Patatine fritte
surgelate
Pesce 160 15 min 80-200 1-60 min
Hamburger 185 13 min 80-200 1-60 min
Pizza 185 15 min 80-200 1-60 min
Bistecca di manzo 175 25 min 80-200 1-60 min
Cosce di pollo 200 22 min 80-200 1-60 min
Patate fritte crude 160 30 min 80-200 1-60 min
Pollo intero 180 40 min 80-200 1-60 min
Asciugatura 80 2 hod 40-90 1-12 hod
Grigliate 160 10 min 160 1-30 min
Verdure 180 15 min 80-200 1-60 min
Scongelamento 50 5 min 50 1-60 min
Nota: Queste impostazioni sono solo indicative. Se si inizia a cucinare quando l'apparecchio è ancora freddo,
prolungare il tempo di cottura di circa 2 minuti.
200 15 min 80-200 1-60 min
Temperatura rego-
labile (°C)
Possibile arco di
tempo
PULIZIA E MANUTENZIONE
Pulire l’apparecchio dopo ogni uso.
Per pulire l’apparecchio non utilizzare gli oggetti e gli agenti che potrebbero danneggiare la superficie,
quali: oggetti appuntiti, raschietti, diluenti chimici, solventi etc.
• Prima di procedere alla pulizia sconnettere il cavo di alimenta zione. Non immergere mai il cavo di alimentazione, la
spina, l'apparecchio o il coperchio dell'aria calda in acqua o altri liquidi!
• Prima di procedere alla pulizia dell’apparecchio, lasciarlo raffreddare completamente.
• La superficie esterna dell’apparecchio è da pulire con un panno umido.
• Riempire il recipiente interno con l’acqua calda e lasciarlo riposare. Poi, aggiungendo il sapone lavapiatti è possibile
lavare il recipiente interno nell’acqua saponata o nel lavastoviglie.
• Anche le altre parti dell’apparecchio possono essere lavate nell’acqua saponata.
• Solo gli accessori e il contenitore interno possono essere lavati in lavastoviglie.
• Una volta che le parti sono completamente asciutte, montare l'apparecchio e conservarlo in un luogo fresco e
asciutto.
RISOLUZIONE DEI PROBLEMI
Problema Causa Soluzione
L'apparecchio non
funziona.
Il cibo fritto non è pronto.
Il cibo è fritto in modo non
uniforme.
l cibo fritto non è croccante.
Fumo bianco proveniente
dall'apparecchio.
Fuoriuscita di vapore
intorno al coperchio a
pressione.
Fuoriuscita di vapore dalla
valvola a pressione.
L'apparecchio non è collegato
correttamente.
Il programma o il timer non sono
impostati.
Il coperchio non è inserito
correttamente.
Troppo cibo.
Tempo di cottura troppo breve, temperatura troppo bassa.
Quantità di cibo troppo grande,
alimenti sovrapposti.
Alimenti non freschi o non preparati
correttamente.
Alcuni alimenti sono più adatti alla
friggitrice ad aria calda.
È necessario un po' di olio. Irrorare leggermente gli alimenti con l'olio.
Gli alimenti sono umidi. Asciugare gli alimenti prima della cottura.
Gli alimenti nella friggitrice sono unti.
Il contenitore/cestello contiene
ancora residui di grasso dovuti all'uso
precedente.
La guarnizione non è inserita
correttamente.
La valvola di pressione (uscita) è
bloccata.
La valvola di pressione (uscita) non è
sigillata correttamente.
Collegare l'apparecchio a una presa
di corrente con messa a terra.
Impostare il programma o il timer
desiderato.
Controllare che il coperchio sia inserito.
Mettere i lotti più piccoli nel
contenitore/ cestello.
Prolungare il tempo di cottura, aumentare la
temperatura.
Togliere alcuni alimenti o scuoterli o girarli
a metà cottura.
Assicurarsi di utilizzare alimenti freschi
e di prepararli correttamente per la frittura
(versare qualche goccia d'olio).
Utilizzare alimenti freschi o semipreparati.
Questo non è un difetto. Asciugare gli
alimenti dall'olio in eccesso.
Pulire correttamente il contenitore/cestello.
Interrompere la cottura, rimuovere
il coperchio e controllare la tenuta.
Pulire la valvola.
Chiudere con cautela la valvola.
114 115
Page 59
IT
ES
ASSISTENZA
La manutenzione più impegnativa e/o la riparazione che richiede l’intervento sulle parti interne dell’apparecchio
devono essere fatte esclusivamente dal centro di assistenza autorizzato.
PROTEZIONE DELL’AMBIENTE
• Riciclare imballi e prodotti vecchi, alla fine di loro ciclo di vita.
• La scatola in cui si acquista il prodotto può essere recuperata come rifiuto differenziato.
• Sacchetti in polietilene (PE) possono essere recuperati come rifiuto differenziato.
Riciclaggio del prodotto alla fine della sua vita utile
L’apparecchio è identificato in conformità alla Direttiva 2012/19/EU del Parlamento europeo e del
Consiglio sui rifiuti di apparecchiature elettriche ed elettroniche (WEEE). Il simbolo riportato sul
prodotto indica che il prodotto stesso non può essere smaltito come rifiuto urbano. Va portato in
un centro di raccolta dei rifiuti elettrici ed elettronici. Provvedendo allo smaltimento corretto del
prodotto s i può prevenire l’impat to negativo sull’ambiente e/o sulla salute u mana nel caso di mancato
riciclaggio. Lo smaltimento deve essere effettuata in conformità alle norme regolanti la gestione dei
rifiuti. Le maggiori informazioni sulle modalità dello smaltimento del prodotto sono reperibili presso
l’ufficio locale di amministrazione pubblica oppure nel negozio dove il prodotto è stato acquistato.
Il presente prodotto rispetta tutti i requisiti elementari stabiliti dalle normative EU inerenti.
Il produttore si riserva il diritto di modificare senza preavviso il testo del manuale d’uso, il design del prodotto e/o i
suoi parametri tecnici.
AGRADECIMIENTO
Gracias por comprar este producto de la marca Concept y esperamos que quede satisfecho con él durante todo el
tiempo que lo use.
Antes de usar el pro ducto, lea con cuidado tod o el manual y luego guárdelo. A segúrese de que las demás pe rsonas que
vayan a utilizar el producto se familiaricen con el presente manual.
Parámetros técnicos
Tensión 220-240 V~50-60 Hz
Potencia de entrada
Capacidad del recipiente 5,6 l
Temperaturas freidora: cocción 80-200 °C, secado 40-90 °C
Temporizador
1000 W olla multifunción
1500 W freidora de aire
¡Atención!
Superficie caliente
olla: 1 min - 24 h
freidora: cocción 1 - 60 min, secado 1 - 12 h
IMPORTANTE
Antes de conectar al suministro eléctrico, haga un control visual para verificar que el artefacto esté intacto y que no haya
sufrido daños durante el transporte.
ADVERTENCIAS IMPORTANTES DE SEGURIDAD
• No emplee el artefacto de una manera diferente a la descrita en el
presente manual.
• Antes de utilizar por primera vez el artefacto, retire el embalaje y los
materiales promocionales.
• Verifique que la tensión de red se corresponda a los valores indicados en
la placa.
• Coloque el artefacto únicamente en una superficie estable y apartado de
otras fuentes de calor.
• Al desenchufar el artefacto, no tire del cable, sino del enchufe.
• No permita que el artefacto sea manipulado por niños o personas no
capacitadas y utilícelo fuera de su alcance.
• Las personas con capacidad de movimiento o percepción sensorial
reducidas, o con insuficiente capacidad mental, o personas no
familiarizadas con su manejo deben utilizar el artefacto únicamente bajo
la supervisión de una persona responsable, familiarizada con su uso.
• Tenga especial cuidado si emplea el artefacto en las cercanías de niños.
• No permita que el artefacto sea usado como juguete.
• No cubra el artefacto.
116
117
Page 60
ESES
• Desenchufe el artefacto antes de armarlo de desarmarlo.
• Antes de limpiar el artefacto, y luego de su uso, apáguelo
ydesenchúfelo.
• Mantenga limpio el artefacto y evite el ingreso de cuerpos extraños por
los orificios de la rejilla. Podrían causar lesiones graves, cortocircuitos,
dañar el artefacto o causar un incendio.
• No emplee el artefacto si el cable o el enchufe estuviesen dañados. Haga
reparar la avería de inmediato por un servicio autorizado.
• No emplee el artefacto si no funcionase correctamente, hubiese caído,
estuviese dañado o hubiese sumergido en un líquido. Hágalo probar
yreparar por un servicio autorizado.
• El artefacto está destinado únicamente para uso hogareño; no está
destinado para uso comercial.
• No utilice el aparato al aire libre.
• No se recomienda el uso de un cable alargador, ya que podría
sobrecalentarse y provocar un riesgo de incendio. Si es necesario utilizar
un cable alargador, asegúrese de que la corriente eléctrica es compatible
con el aparato y de que la toma de corriente tiene conexión a tierra.
• No mueva ni agite el aparato durante su funcionamiento.
• No introduzca materiales inflamables (papel, plástico) en el aparato.
• No toque el artefacto con las manos mojadas o húmedas.
• No sumerja el cable, el enchufe o el artefacto en agua u otro líquido.
No vierta agua ni otros líquidos sobre los componentes eléctricos
y los conectores.
• No repare usted mismo el artefacto. Diríjase a un servicio autorizado.
• Los niños mayores de 8 años y las personas mayores o con capacidades
físicas o mentales reducidas, o con insuficiente experiencia
yconocimientos pueden utilizar el artefacto únicamente bajo supervisión
o si se les ha enseñado a utilizarlo de una manera segura y son conscientes
de los eventuales riesgos. El mantenimiento y limpieza realizados por el
usuario no pueden ser llevados a cabo por niños menores de 8 años y sin
supervisión. Los niños menores de 8 años deben mantenerse fuera del
alcance del artefacto y su cable. Los niños no deben jugar con el artefacto.
• Evite tocar las partes calientes.
• No permita que el cable cuelgue del borde de la mesa o el mostrador de
la cocina. Evite que el cable entre en contacto con superficies calientes.
• No coloque el artefacto cerca de quemadores de gas o eléctricos.
No coloque el aparato sobre la placa de cocción. Asegúrese de colocar
el aparato en un lugar bien ventilado y alejado de superficies calientes,
materiales inflamables (cortinas, manteles) y ambientes húmedos.
• ADVERTENCIA: Las superficies del artefacto pueden estar muy calientes.
Sujete el aparato sólo por el asa y utilice equipos de protección como
guantes de cocina.
• Tenga especial cuidado de evitar el ingreso al artefacto de agua u otros
líquidos. ¡Peligro de descarga eléctrica!
• Coloque siempre los alimentos en la cesta del aparato para evitar que
entren en contacto con la resistencia.
• No toque las superficies internas con el artefacto en funcionamiento
orecién apagado. Deje que el artefacto se enfríe lo suficiente.
• No conecte ni maneje el artefacto con las manos mojadas.
• Tapa Air fry: el vapor caliente sale por las salidas de aire durante la cocción,
mantenga las manos y la cara a una distancia segura de las salidas de aire.
• Tapa de la olla a presión: tenga cuidado con el vapor caliente y el aire que
sale por la válvula de presión. No coloque las manos, la cara ni ningún
objeto sobre la salida de aire de la tapa de presión.
• No utilice el aparato si lleva marcapasos, audífono, etc. Consulte a su
médico antes de utilizar el aparato.
• No utilice accesorios distintos de los recomendados por el fabricante.
• No conecte el aparato a un temporizador externo.
• Protección contra sobrecalentamiento: si el fusible térmico ha reaccionado,
el aparato no funcionará. Desenchufe el aparato y espere a que se enfríe
por completo antes de volver a ponerlo en marcha.
• Si nota humo oscuro saliendo del artefacto, apáguelo de inmediato
ycontacte a un servicio autorizado.
• Deje que el artefacto se enfríe 30 minutos antes de limpiarlo.
En caso de incumplimiento de las instrucciones del fabricante,
cualquier reparación no será reconocida por la garantía.
118 119
Page 61
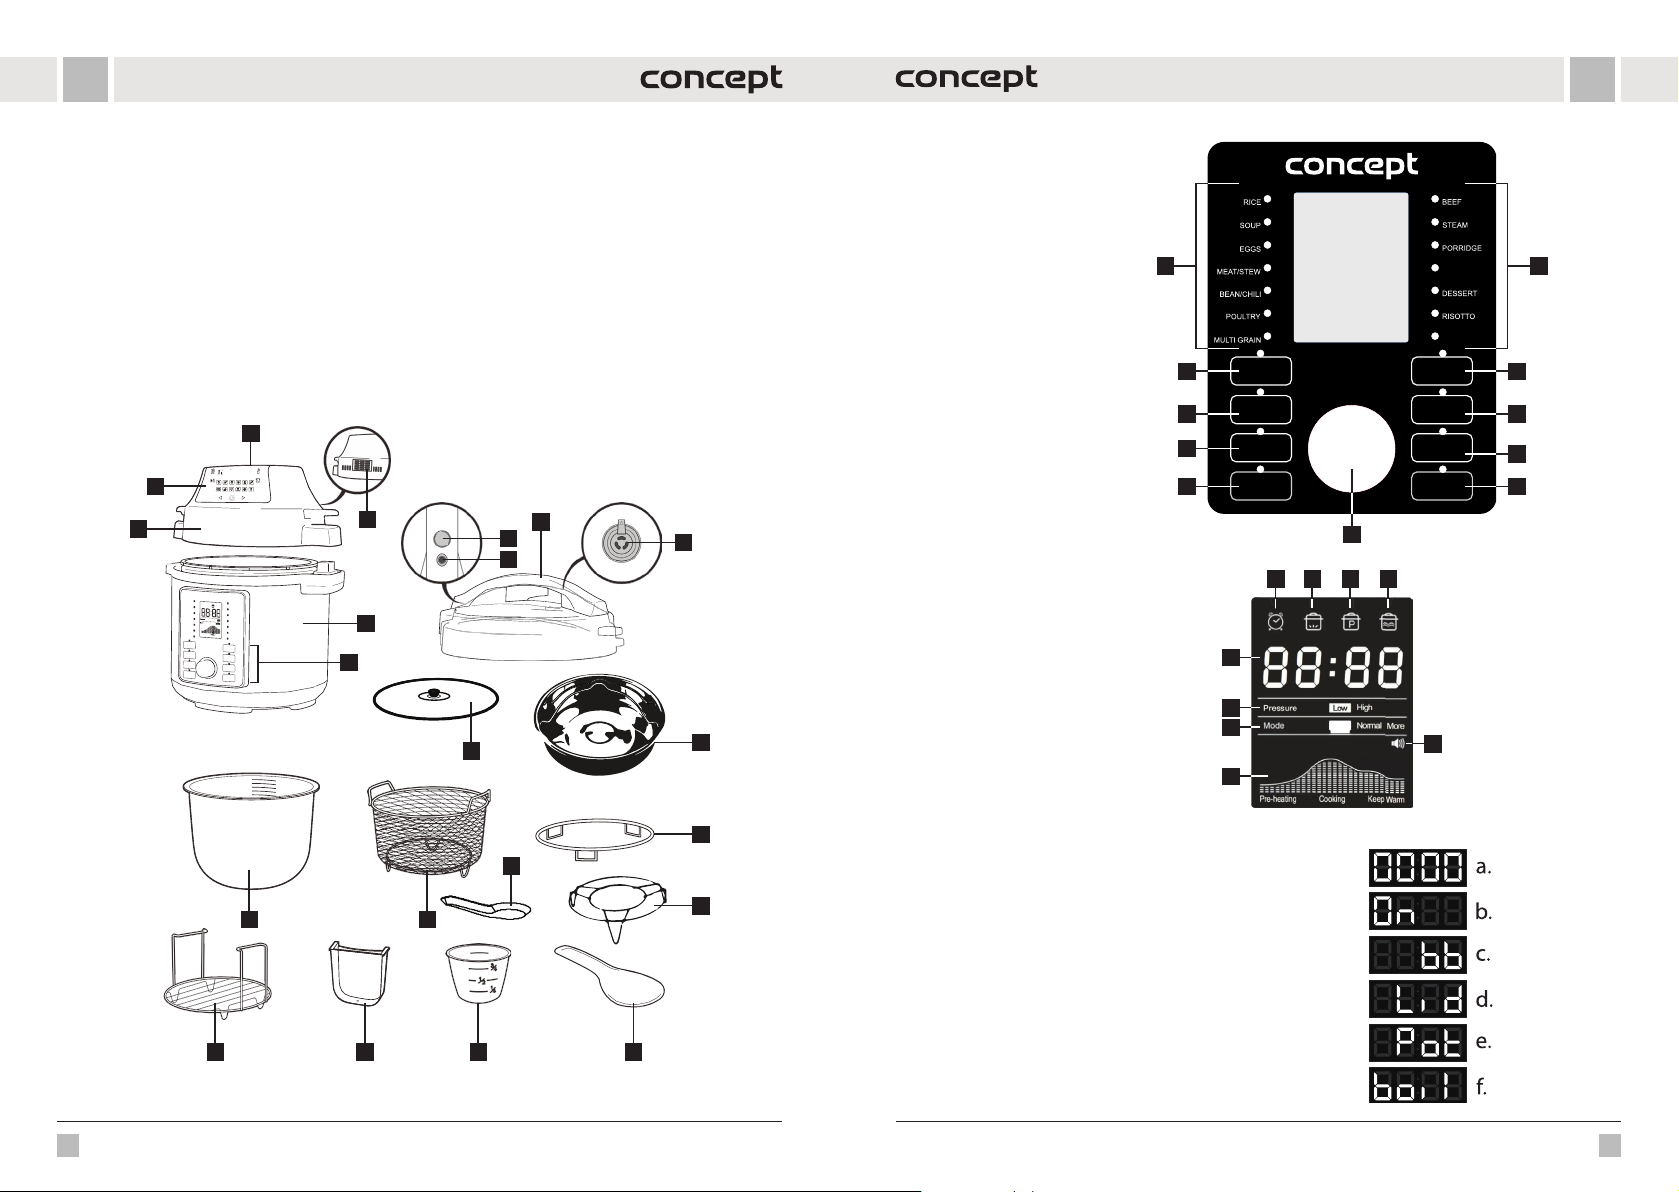
ESES
c
DESCRIPCIÓN DEL PRODUCTO
1 Alimentación de aire
2 Salida de aire
3 Tapa de aire caliente
4 Pantalla de la tapa de aire caliente
5 Cuerpo del aparato
6 Panel de mandos de la olla multifunción
7 Tapa de presión
8 Botón de apertura de la tapa
9 Válvula de seguridad
10 Válvula de presión
11 Tapa de vidrio
1
4
3
12 Recipiente interior
13 Cesta para freír
14 Rejilla para la tapa
15 Soporte con asas
16 Recipiente de condensación para el agua sobrante
17 Vaso medidor
18 Cuchara poco profunda
19 Cuchara honda (cucharón)
20 Olla para cocer al vapor
21 Rejilla para cocer al vapor
2
7
8
9
5
6
11
DESCRIPCIÓN DEL PANEL
DE CONTROL DE LA OLLA
MULTIFUNCIÓN
1 Programas preestablecidos
2 Programa de yogur
3 Cocción lenta
4 Ajuste de presión baja/alta
5 Mantener temperatura/Cancelar
6 Freír
7 Arranque diferido
8 Ajuste manual
9 Arranque
10 Mando de control
10
DESCRIPCIÓN DE LA PANTALLA
RÝŽE
POLÉVKA
VEJCE
MASO / DUŠENÍ
FAZOLE / CHILLI
DRŮBEŽ
LUŠTĚNINY
2 6
POMALÉ VAŘENÍ
SLOW COOK
3
4
UDRŽENÍ TEPLOTY
5
KEEP WARM/CANCEL
JOGURT
YOGURT
TLAK
PRESSURE
LEVEL
/ ZRUŠIT
Pressure
Mode
Pre-heating
High
Low
Less Normal More
Cooking Keep Warm
10
A B C D
A Indicador de arranque diferido
B Indicador de precalentamiento
C Indicador de presión
D Indicador de mantenimiento de temperatura
I
E Indicador de encendido/apagado del sonido
F Indicador de progreso
G Indicador de modo
20
I Indicador de tiempo y aviso
H
G
F
HOVĚZÍ
PÁRA
OVESNÁ KAŠE
VEPŘOVÉ /
ŽEBÍRKA
PORK&RIBS
DEZERT
RIZOTO
ZELENINA
VEGETABLES
SMAŽENÍ
SAUTE
ODLOŽENÝ START
DELAY START
RUČNÍ NASTAVENÍ
ADJUST
START
E
11
7
8
9
14
19
12 13
21
Las siguientes notificaciones pueden aparecer en la pantalla LED:
a. La olla está lista para usar, pero no se ha seleccionado el programa
b. La olla se está calentando a la temperatura deseada
c. Función “Keep warm” - la olla mantiene la temperatura
d. La tapa está en posición incorrecta o falta
e. Falta el recipiente interno
f. aparece boiL (cocción) en el modo Más para el programa Yogur
15
16 17 18
120 121
Page 62
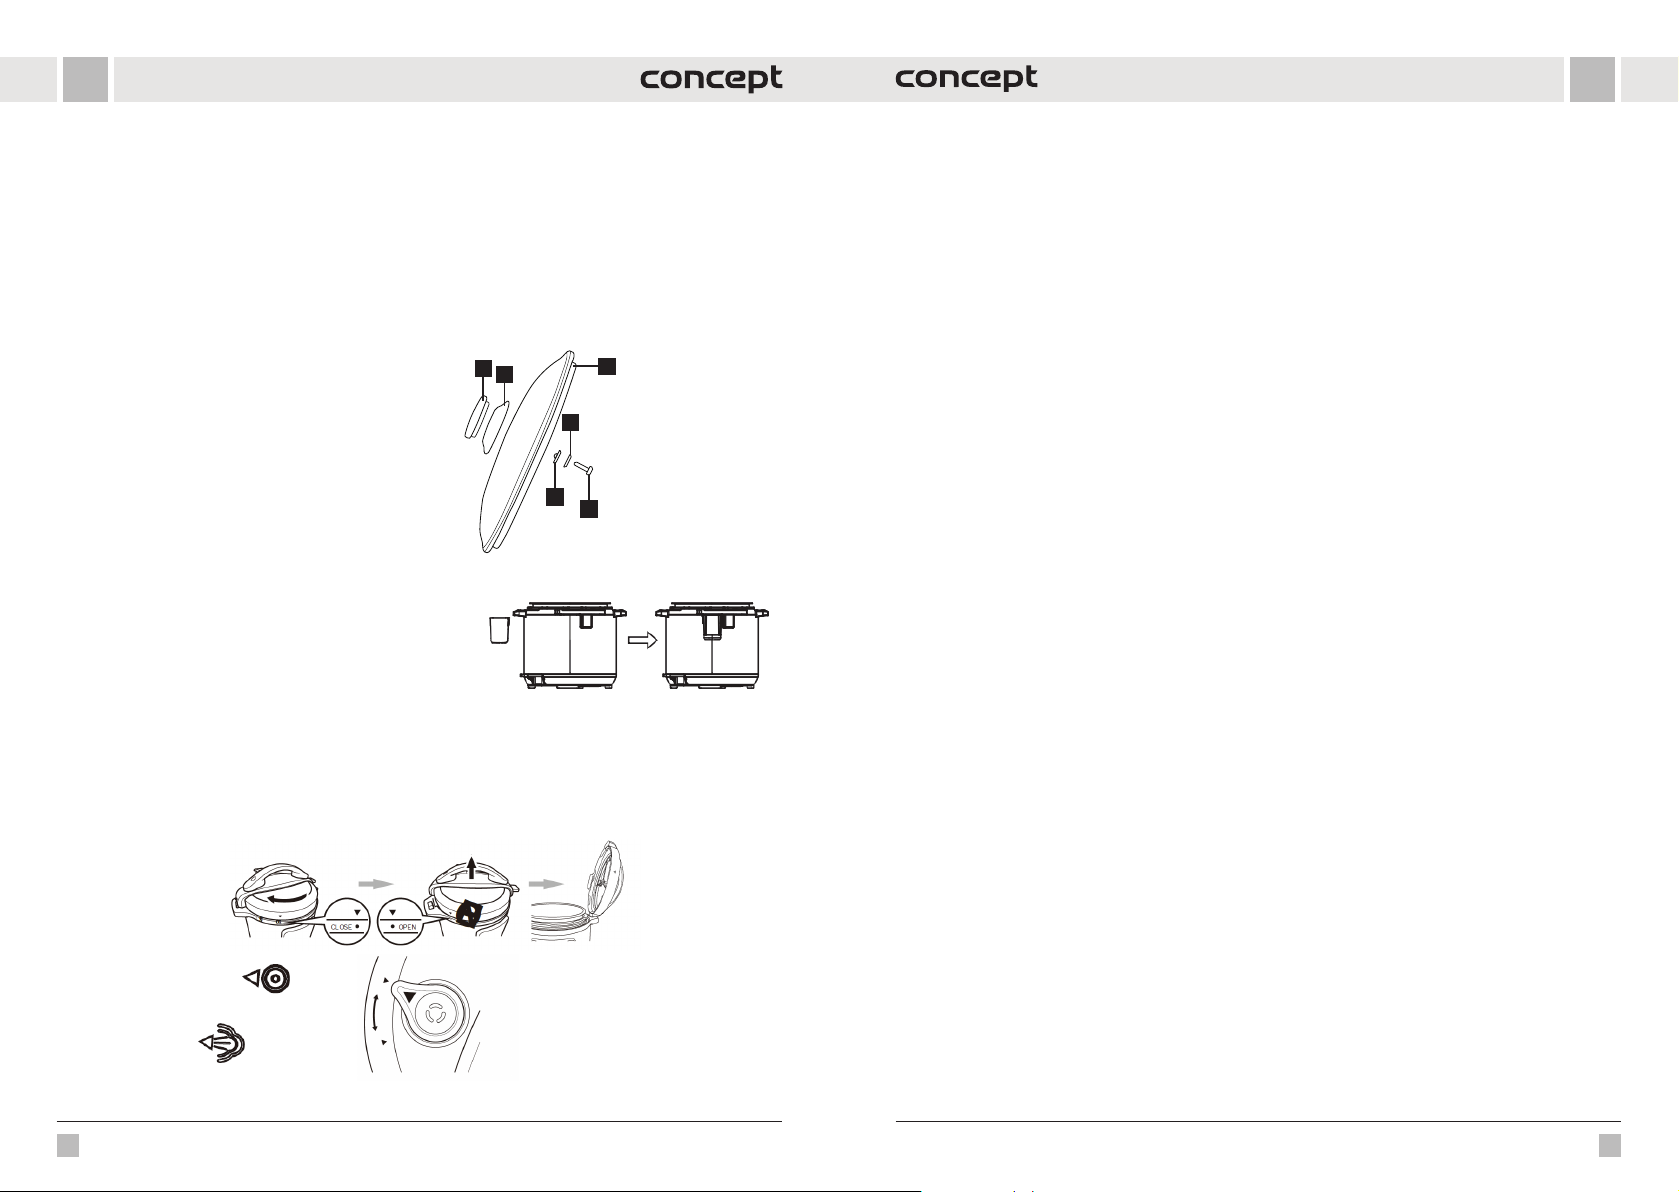
ESES
ANTES DEL PRIMER USO
• Retire todo el material de embalaje.
• Retire todas las etiquetas y pegatinas.
• Lave el recipiente interno (12) con agua caliente.
• Limpie bien el artefacto por dentro y por fuera con un paño.
• Lave los accesorios con agua caliente y jabón y una esponja no abrasiva.
Nota: Precaliente el aparato durante 10 minutos sin ningún alimento. Puede salir humo inofensivo y un ligero olor
del aparato.
• Deje un espacio libre mínimo de 13 cm alrededor del aparato durante el funcionamiento.
Montaje de la tapa de vidrio
Puede utilizar la tapa de vidrio con las funciones Cocción Lenta
y Mantener temperatura. El montaje del asa se muestra en la
imagen.
1. Asa
2. Base del asa
3. Cuerpo de la tapa de vidrio
4. Junta
5. Arandela
6. Tornillo
1
2
3
5
4
6
MANUAL DE USO
USO DE UNA OLLA A PRESIÓN (7)
1. Coloque el aparato en un lugar seco y nivelado.
2. Coloque el recipiente de condensación para el exceso de agua
(16) en la parte trasera del aparato, véase la fig. 1.
3. Prepare la tapa a presión (7), Fig. 2.
• Tire del saliente metálico situado en la parte inferior de la tapa para retirar la cubierta protectora en la que está
instalada la junta. La junta puede retirarse y limpiarse. Asegúrese de que la junta no esté dañada ni rasgada en
ninguna parte. En caso de daños, es necesario sustituirla. Asegúrese de que la válvula del flotador está limpia y
puede moverse libremente.
Nota: Si la tapa de la olla a presión ya está colocada en el aparato, retírela para la preparación pulsando el botón rojo
y girando el asa en el sentido contrario a las agujas del reloj y levantándola.
Sellado
fig. 2
Vertido de vapor
Fig. 1
4. Retire el recipiente interior (12). El volumen total de alimentos y agua no debe superar los 2/3 del volumen del
recipiente interior. Si va a cocinar alimentos cuyo volumen aumentará durante la cocción (por ejemplo, arroz), no
llene el recipiente más de 1/2 de su capacidad.
Aviso: Algunos alimentos como la compota de manzana, los arándanos, la avena, los fideos, el ruibarbo o los
espaguetis pueden formar espuma y agrietarse, obstruyendo la válvula de presión (salida). Estos alimentos no deben
cocinarse en la olla a presión. Atención: no utilice la olla a presión para freír con aceite.
5. Asegúrese de que la superficie interior del cuerpo del aparato (5) esté seca y coloque el recipiente interior (12) en
el cuerpo del aparato (5).
6. Coloque la tapa de presión (7) y gírela en el sentido de las agujas del reloj. Cuando oiga un clic, la tapa está bien
colocada. El sellado correcto de la tapa se indica mediante las flechas alineadas en el borde de la tapa y el borde
del aparato.
7. Tenga en cuenta que la válvula de presión (10) debe poder moverse libremente para que la olla funcione
correctamente.
8. Coloque la válvula de presión en la posición "Sellada", esto hace que la olla esté lista para su uso.
9. Conecte el cable de alimentación al enchufe del aparato y, a continuación, a una toma de corriente. La pantalla
mostrará "00 00".
10. Gire el mando de control para desplazarse por los programas preajustados (1) (programas adicionales pulsando el
botón del programa correspondiente) o para ajustar el tiempo de cocción. Confirme el programa seleccionado (el
indicador se ilumina) con el botón Inicio. Para ajustar el tiempo del programa preajustado, pulse el mando y gírelo
para seleccionar el tiempo deseado y confirme pulsando el botón Inicio.
Nota: Pulse el botón de ajuste de presión para cambiar entre baja y alta presión. El ajuste por defecto es Alta Presión.
Ajuste la presión después de seleccionar el programa y el tiempo de cocción, confirme el ajuste con el botón Inicio.
Pulse el botón Ajuste manual para seleccionar la cantidad de alimentos, cambiando entre Menos, Normal y Más. El
ajuste por defecto es Normal.
Nota: El tiempo de cocción debe ajustarse en función de la cantidad de alimentos.
11. La olla empieza a calentarse a la temperatura deseada (la pantalla muestra "On", el icono de precalentamiento se
enciende) y la válvula de flotador sube. Una vez alcanzada la temperatura deseada, comienza la cuenta atrás del
tiempo programado. En este momento, ya está cocinando bajo presión (el icono de presión está encendido), la
tapa está bloqueada y la olla no se puede abrir. ¡NUNCA INTENTE ABRIR LA OLLA POR LA FUERZA!
12. Cuando finalice la cocción, sonará una señal acústica y la olla pasará automáticamente al modo "Mantener
caliente" para mantener la comida caliente. La pantalla muestra "bb" y el icono de Mantener caliente se ilumina.
13. Puede cancelar el ajuste de la olla en cualquier momento pulsando el botón Mantener caliente/Cancelar (5).
Sonido apagado/encendido: para cambiar el modo de sonido, mantenga pulsado el botón Mantener temperatura
14. Cancelar durante 3 segundos hasta que cambie el icono de sonido de la pantalla. Las advertencias de seguridad
están siempre encendidas.
Una vez terminada la cocción, la presión puede liberarse de dos maneras:
1. Cuando la cocción termina, la presión empieza a bajar gradualmente. Según la cantidad de líquido, esto puede
tardar 15 a 30 minutos. La válvula de flotador baja, la tapa se desbloquea y se puede abrir fácilmente. Si no puede
abrirla, espere un poco más. ¡NO ABRA LA OLLA A LA FUERZA!
2. Para ab rir la tapa de presión: agarr e el asa y pulse el botón rojo para s oltar la tapa, gire la tap a en el sentido contrario
a las agujas del reloj hasta que se suelte y levántela tirando hacia arriba. La tapa puede colocarse en la rejilla para
tapas (14).
3. Una vez finalizada la cocción, pulse el botón Mantener Temperatura/Cancelar (5), gire la válvula de flotador a
la posición de "Liberación de vapor" con una agarradera, la válvula baja, la tapa se desbloquea y puede abrirse
fácilmente. EXTREME LAS PRECAUCIONES Y UTILICE EL EQUIPO DE PROTECCIÓN, ¡RIESGO DE QUEMADURAS POR
VAPOR!
Función de arranque diferido Delay Start:
1. La función Delay Start permite programar el inicio de la cocción en hasta 24 horas.
2. Siga las i nstrucciones de uso, gire e l mando para selecciona r el programa deseado, de spués pulse el botón Arran que
diferido y vuelva a pulsar el botón para ajustar el tiempo que desea retrasar el inicio de la cocción.. El ajuste por
defecto es 30 minutos.
122 123
Page 63
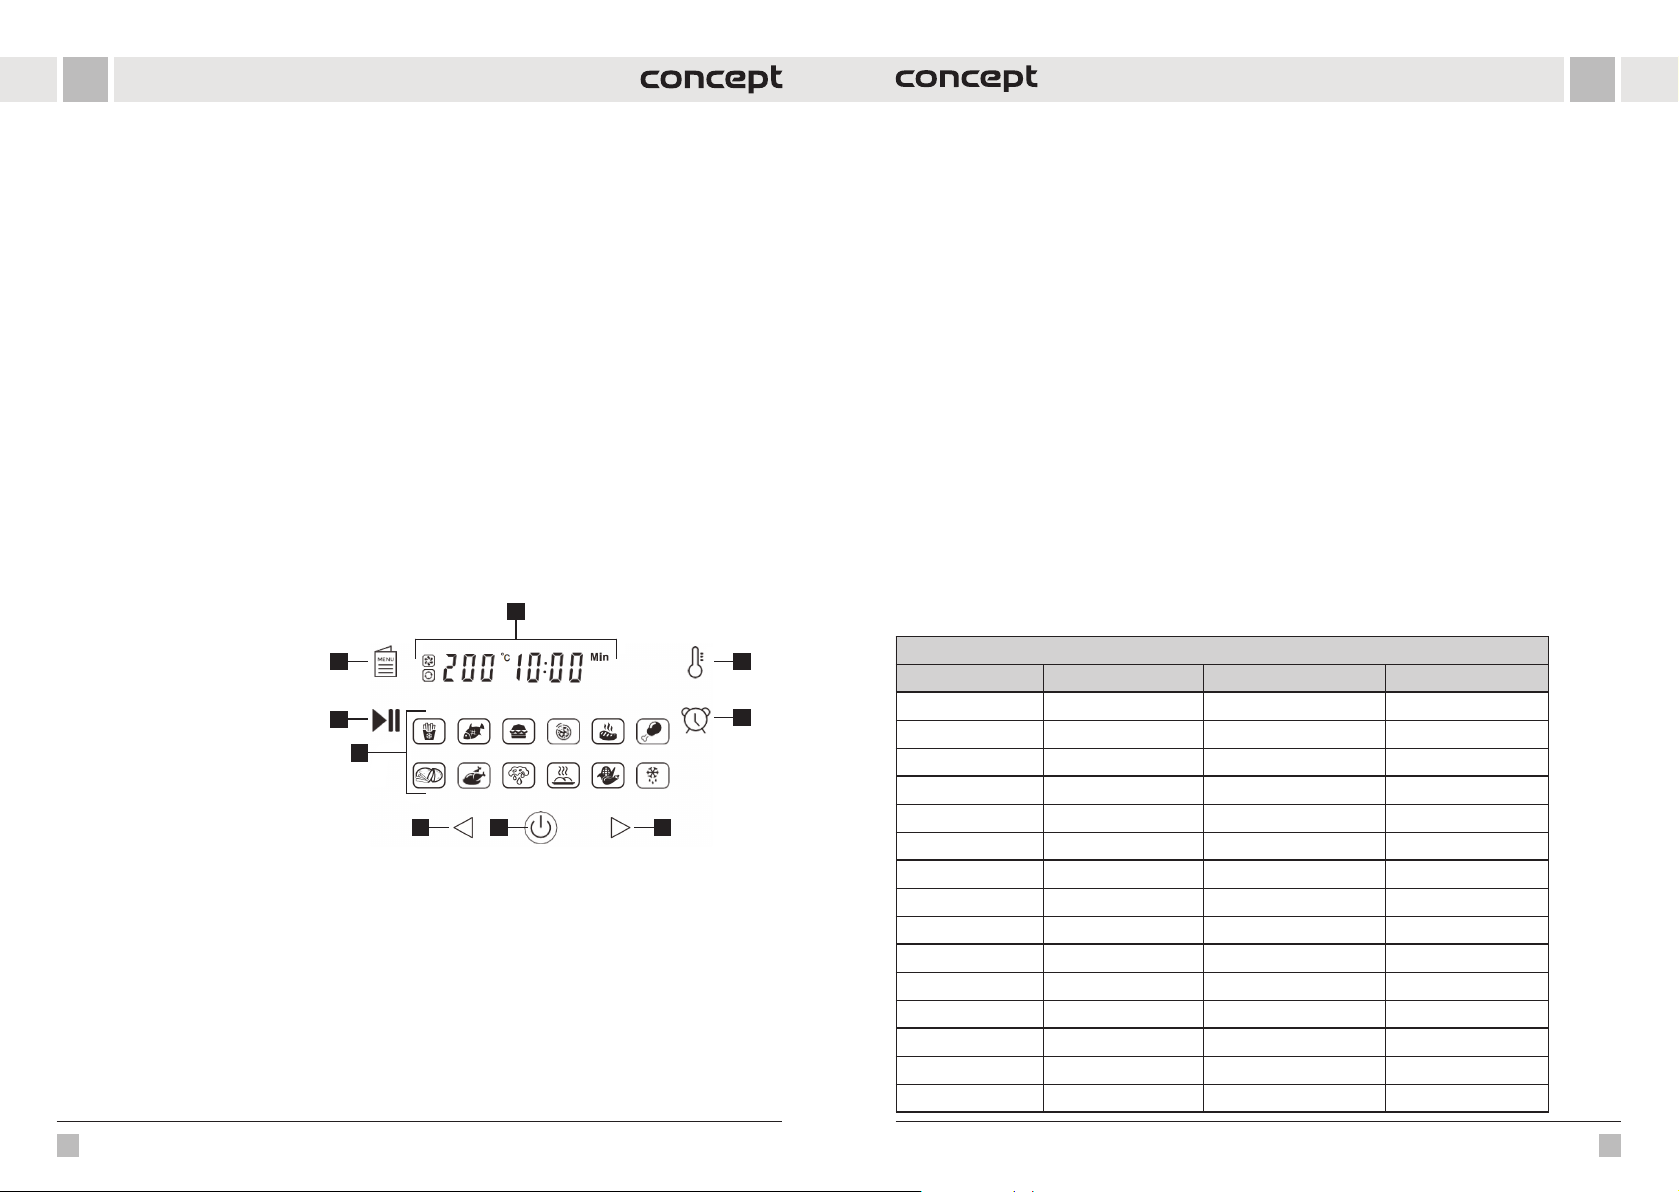
ESES
3. A continuación, pulse el botón Arranque. Durante el arranque diferido, el icono de arranque diferido se ilumina
en la pantalla y se muestra el tiempo restante. Una vez transcurrido el tiempo programado, se inicia el programa
seleccionado.
Consejos
1. Si selecciona la opción Cocción l enta, Yogur o Fritura, p uede utilizar una olla con tapa de presión, con tapa de vidrio
o sin tapa. Cuando se utiliza sin tapa la olla a presión, el indicador de nivel de presión desaparece de la pantalla.
2. Se recomienda usar la función “Keep warm” por una hora como máximo porque después la comida pierde su
calidad.
3. Los programas están diseñados para preparar alimentos que pesen menos de 1200 g, si va a preparar porciones
más grandes, utilice los ajustes personalizados.
4. Use la función Delay Star t solo con alimentos que pudrirse durante ese tiempo.
5. Introduzca y saque los alimentos en el recipiente interior utilizando utensilios de madera o plástico, nunca utilice
utensilios afilados o metálicos para evitar dañar la superficie del recipiente.
6. Uso de accesorios:
• Cuando seleccione el programa Vapor, inserte la rejilla para cocinar al vapor (21) en el recipiente interior (12) y, a
continuación, inserte la olla para cocinar al vapor (20).
• Al seleccio nar el programa Freír, introduzca la rej illa de cocción al vapor con asas (15) en el recipiente inte rior (12).
• Al seleccionar el programa Cocción lenta, Yogur o Freír, puede utilizarse la tapa de vidrio (11).
• Al seleccionar el programa de fritura (cuando utilice la tapa de aire caliente), coloque la cesta de fritura (13) en el
recipiente interior (12).
• Utilice la rejilla para tapas (14) para guardar las tapas.
DESCRIPCIÓN DEL PANEL DE CONTROL DE LA TAPA DE AIRE CALIENTE
1. Pantalla digital
2. Ajuste de la temperatura
3. Ajuste del temporizador
4. Aumentar temperatura/temporizador
5. Encendido/Apagado
6. Disminuir temperatura/temporizador
7. Programas
8. Arranque/pausa
9. Selección de programa predefinido
USO DE LA OLLA CON TAPA DE AIRE CALIENTE (3)
Una olla con tapa de aire caliente funciona con aire caliente; nunca llene la olla con aceite u otro medio para freír.
1. Coloque el aparato en un lugar seco y nivelado.
2. Enchufa el cable de alimentación a una toma de corriente.
3. Asegúrese de que la superficie interior del cuerpo del aparato (5) esté seca y coloque el recipiente interior (12) en
el cuerpo del aparato (5).
4. Coloque los alimentos en el recipiente interior (12). Nota: Si desea utilizar el programa de fritura, coloque la cesta
de fritura (13) en el recipiente interior e introduzca los alimentos en la cesta. No llene en exceso la cesta de fritura
(13) ni el recipiente interior (12).
5. Coloque la tapa de aire caliente (3) para utilizar el aparato como horno de aire caliente.
6. Pulse el botón de en cendido/apagado (5) para encender el a parato. Los iconos se iluminarán y la p antalla mostrará
el ajuste por defecto de 180 °C y 15 minutos.
8
7
6
1
29
3
5
4
7. Pulse el botón de selección de programas preestablecidos (9) para cambiar de programa de cocción. El icono del
programa seleccionado parpadea y la pantalla muestra la temperatura preajustada y el tiempo del programa.
Pulse repetidamente el botón (9) para pasar al siguiente programa. Para cambiar el ajuste de temperatura, pulse
primero el botón de ajuste de temperatura (2)/para cambiar el ajuste de tiempo, pulse el botón de ajuste del
temporizador (3) y, a continuación, pulse o mantenga pulsados los botones 4 y 6 para ajustar la temperatura en
intervalos de 5 °C y el tiempo en intervalos de 1 minuto (sólo para el programa de secado de 30 minutos).
8. Confirme la selección con el botón Inicio/Pausa (8).
Nota: Si empieza a coc inar cuando el aparato aún est á frío, prolongue el tiemp o de cocción unos 2 minutos. Dur ante el
precalentamiento, la pantalla muestra "PREHEATING", después del precalentamiento desaparece de la pantalla y sólo
se muestra "HEATING" cuando se enciende la resistencia.
Nota: El icono del ventilador situado en la e squina superior izquierda se ilumina mientras el programa está en marcha.
El icono se apagará cuando el ventilador deje de funcionar.
9. Pued e pausar el programa en cu alquier momento durante la co cción pulsando el botón In icio/Pausa (8) y volviendo
a pulsar el botón para reanudar el proceso de cocción.
10. Puede retirar la tapa de aire caliente (3) en cualquier momento durante la cocción para comprobar/añadir o retirar
alimentos. El programa seleccionado se interrumpirá. Al volver a colocar la tapa, el programa se reanudará en el
punto en el que se interrumpió.
11. Cuando el programa haya finalizado, se le avisará mediante una señal acústica y en la pantalla sólo aparecerá
"FINALIZADO" y el botón de encendido/apagado (5) parpadeará.
12. Cuando haya terminado de cocinar, desconecte el aparato de la red eléctrica.
Aviso: Utilice guantes de cocina para retirar la cesta de fritura caliente/el recipiente interior.
Consejos
Recomendamos girar los alimentos durante la cocción para que se doren uniformemente o removerlos.
FUNCIONES PROGRAMADAS
Programas para la olla a presión
Programas Cantidad (a medida) Tiempo de cocción (min) Plazo posible
Arroz Menos 8 1-99 min
Normal 12
Más 15
Sopa Menos 12 1-99 min
Normal 15
Más 20
Huevos Menos 4 1-99 min
Normal 5
Más 6
Carne/Estofado Menos 20 1-99 min
Normal 35
Más 45
Judías/chile Menos 25 1-99 min
Normal 30
Más 40
124 125
Page 64
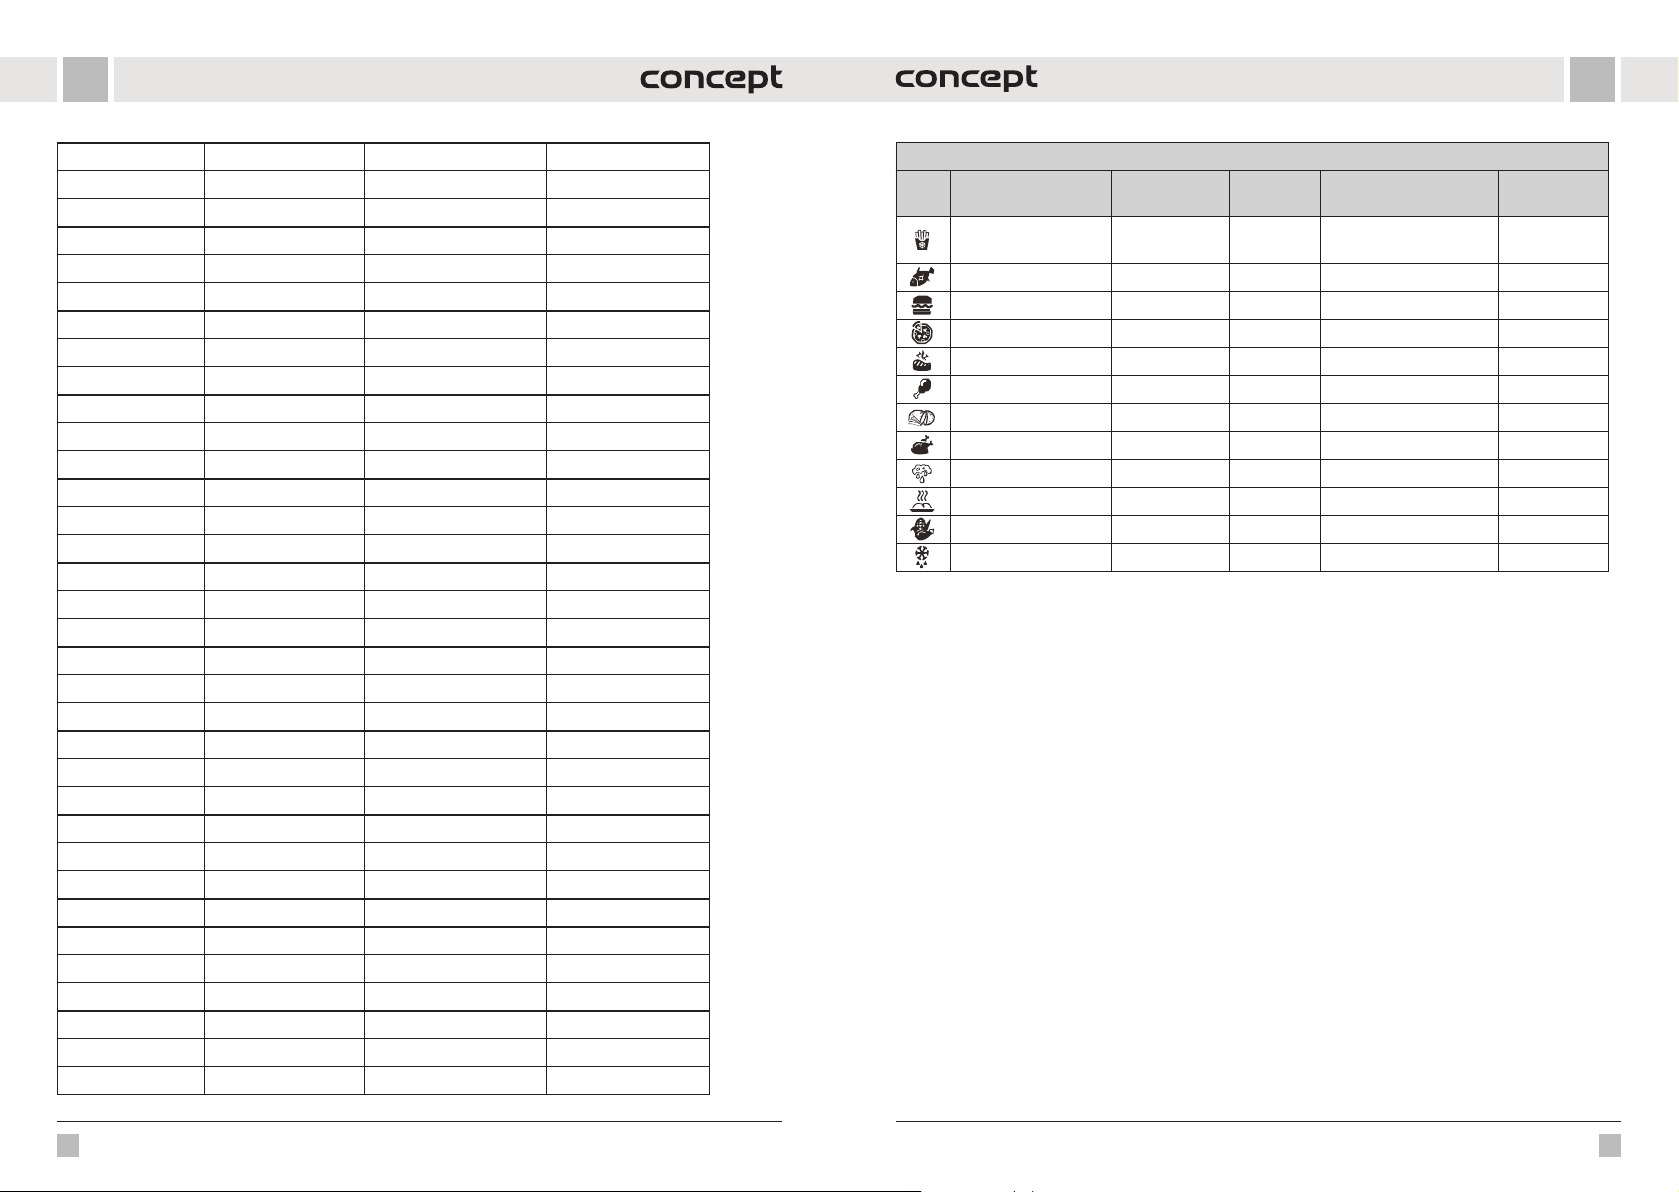
ESES
Aves Menos 10 1-99 min
Normal 15
Más 25
Legumbres Menos 20 1-99 min
Normal 40
Más 45
Vacuno Menos 30 1-99 min
Normal 35
Más 40
Vapor Menos 12 1-99 min
Normal 15
Más 20
Gachas de avena Menos 12 1-99 min
Normal 15
Más 20
Cerdo/costillas Menos 13 1-99 min
Normal 18
Más 25
Postre Menos 25 1-99 min
Normal 40
Más 50
Risotto Menos 20 1-99 min
Normal 35
Más 45
Verduras Menos 10 1-99 min
Normal 15
Más 20
Freír Normal 30 30 min
Cocción lenta Menos 30 30 min - 9 h 30 min
Normal 6 h
Más 9 h 30 min
Yogur Menos 24 h 6 h - 24 h
Normal 8 h
Más "boiL"
Programas de cocción con tapas de aire caliente
Programas
Patatas fritas congeladas
Pescado 160 15 min 80-200 1-60 min
Hamburguesa 185 13 min 80-200 1-60 min
Pizza 185 15 min 80-200 1-60 min
Filete de ternera 175 25 min 80-200 1-60 min
Muslos de pollo 200 22 min 80-200 1-60 min
Patatas fritas crudas 160 30 min 80-200 1-60 min
Pollo entero 180 40 min 80-200 1-60 min
Secado 80 2 horas 40-90 1-12 horas
Parrilla 160 10 min 160 1-30 min
Verduras 180 15 min 80-200 1-60 min
Descongelar 50 5 min 50 1-60 min
Nota: Estos ajustes son orientativos. Si empieza a cocinar cuando el aparato aún está frío, prolongue el tiempo de
cocción unos 2 minutos.
Temperatura
(°C)
200 15 min 80-200 1-60 min
Tiempo
Temperatura regulable
(°C)
Plazo posible
LIMPIEZA Y MANTENIMIENTO
Limpie el artefacto luego de cada uso.
Evite medios agresivos como objetos afilados, raspadores, disolventes, etc.
• Antes de limpiarlo, desenchufe el artefacto. No sumerja nunca el cable de alimentación, el enchufe, el aparato o la
tapa de aire caliente en agua u otro líquido.
• Deje que el artefacto se enfríe antes de limpiarlo.
• Limpie la superficie externa del artefacto con un trapo húmedo.
• Llene el recipiente interno con agua caliente y déjelo reposar un momento. Luego, se puede lavar con un trapo
suave en agua con detergente o en lavavajillas.
• Las otras partes pueden lavarse con agua con detergente.
• Sólo los accesorios y el recipiente interior pueden lavarse en el lavavajillas.
• Una vez que las piezas estén completamente secas, monte el aparato y guárdelo en un lugar fresco y seco.
126 127
Page 65
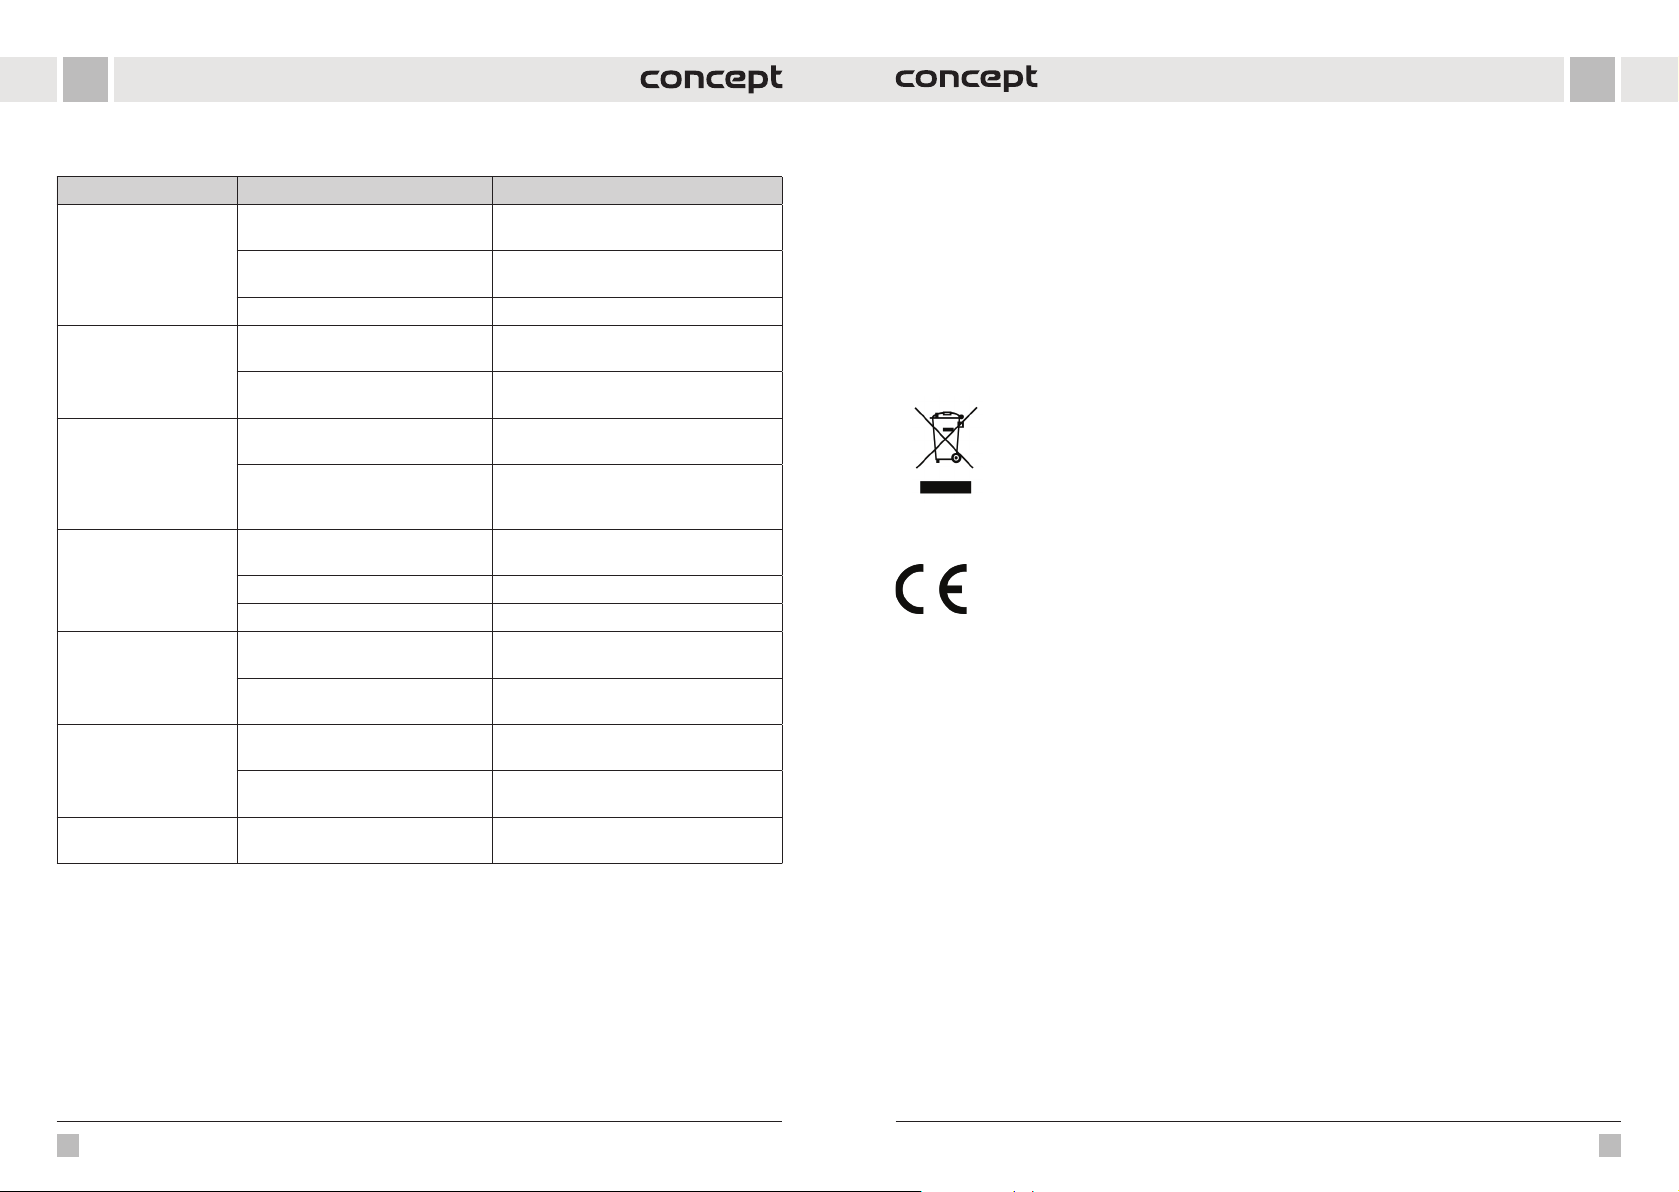
ESES
RESOLUCIÓN DE PROBLEMAS
Problema Causa Solución
El aparato no funciona.
Los alimentos fritos no
están listos.
Los alimentos se fríen de
forma desigual.
Los alimentos fritos no
están crujientes.
Sale humo blanco del
aparato.
Fuga de vapor alrededor
de la tapa de presión.
Fugas de vapor por la
válvula de presión.
El aparato no está conectado
correctamente.
El programa o el temporizador no
están ajustados.
La tapa no está bien colocada. Compruebe que la tapa está asentada.
Demasiada comida.
Tiempo de cocción demasiado corto,
temperatura demasiado baja.
Demasiada cantidad de alimentos, los
alimentos están unos encima de otros.
Los alimentos no son frescos o no se
han preparado correctamente.
Algunos alimentos son mejores para su
uso en una freidora de aire caliente.
Se necesita poco aceite. Rocíe ligeramente los alimentos con aceite.
Los alimentos están húmedos. Seque los alimentos antes de cocinarlos.
Los alimentos de la freidora están
grasientos.
El recipiente/cesta todavía contiene
restos de grasa de un uso anterior.
La junta no está bien asentada.
La válvula de presión (salida) está
bloqueada.
La válvula de presión (salida) no está
bien sellada.
Enchufe el aparato a una toma de corriente
con toma de tierra.
Ajuste el programa o temporizador deseado.
Coloque los lotes más pequeños en el recipiente o la cesta.
Prolongue el tiempo de cocción, aumente la
temperatura.
Retire algunos alimentos o agítelos/gírelos
a mitad de cocción.
Asegúrese de utilizar alimentos frescos y de
prepararlos adecuadamente para la fritura
(rocíe unas gotas de aceite).
Utilice alimentos frescos o semipreparados.
Esto no es un defecto. Seque los alimentos
del exceso de aceite.
Limpie correctamente el recipiente/cesta.
Detenga la cocción, retire la tapa
y compruebe el asiento de la junta.
Limpie la válvula.
Cierre la válvula con cuidado.
SERVICIO
El mantenimiento de carácter más amplio o las reparaciones que requieran intervenir en las piezas internas del
producto deben ser realizados por un servicio profesional.
PROTECCIÓN AL MEDIO AMBIENTE
• Dé preferencia al reciclado de los materiales de embalaje y los artefactos viejos.
• La caja puede ser desechada con la recolección de residuos clasificados.
• Las bolsas de polietileno (PE) deben ser llevadas para su reciclaje.
Reciclaje del ar tefacto al final de su vida útil
El artefacto está etiquetado de acuerdo con la Directiva Europea 2012/19/EU sobre Residuos de
Artefactos Eléctricos y Electrónicos (WEEE). El símbolo en el producto o su embalaje indica que este
no debe ser incluido entre los residuos domésticos. Debe ser llevado a un centro de recolección para
el reciclaje de a rtefactos eléc tricos o electrónico s. Procurar la correct a liquidación del produc to ayuda
a prevenir efectos negativos en el medio ambiente y la salud humana que podrían ser resultar de
la liquidación incorrecta del producto. El artefacto debe ser desechado conforme las normas para
la gestión de residuos. Podrá obtener información más detallada sobre el reciclaje del producto en
la autoridad local, el servicio de tratamiento de residuos correspondiente o la tienda en donde fue
adquirido.
El producto cumple con todos los requisitos básicos de las directivas EU aplicables.
El fabricante se reserva el derecho de realizar cambios en el texto, el diseño y las especificaciones técnicas.
128 129
Page 66
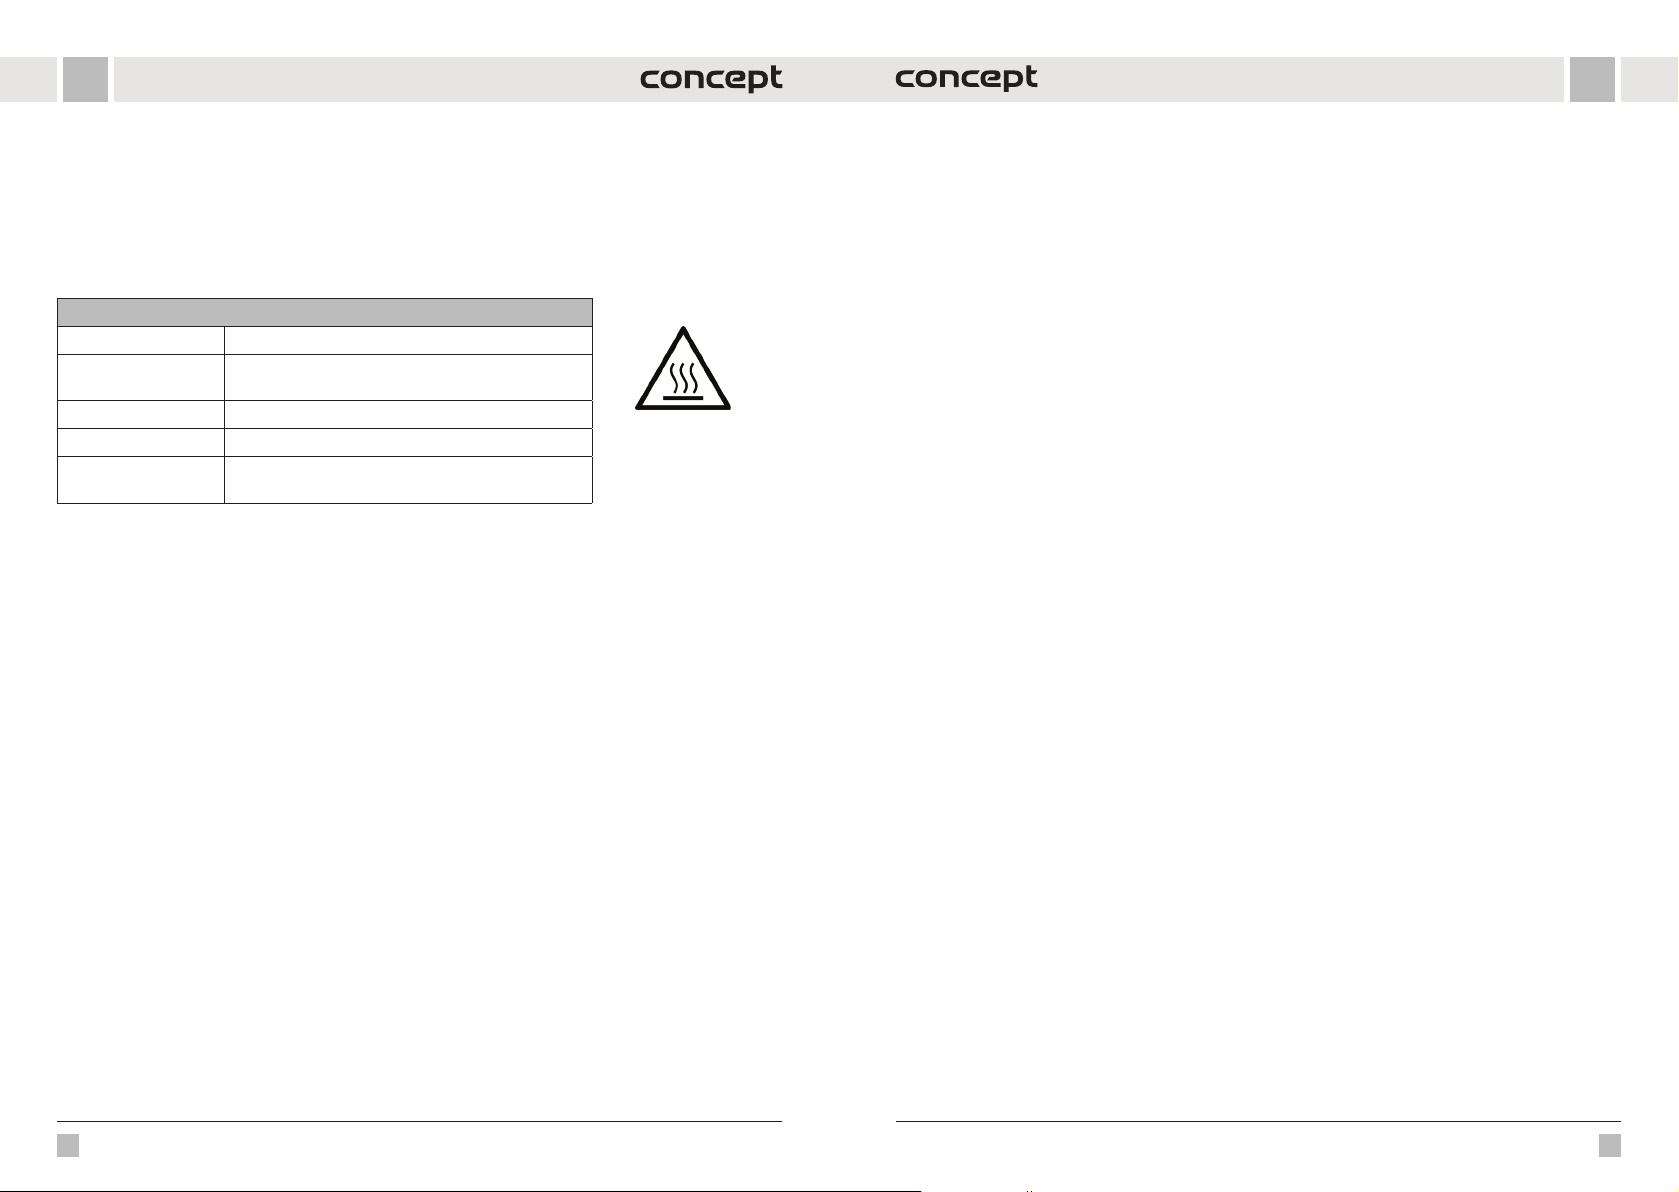
RORO
MULUMIRE
Vă mulțumim pentru cumpărarea produsului marca Concept și vă dorim să fiți mulțumiți de produsul nostru pe
întreaga durată de utilizare a acestuia.
Înainte de prima utilizare citiți cu atenție și în întregime manualul de utilizare și păstrați-l pentru o consultare
ulterioară. Asigurați-vă că și celelalte persoane care vor folosi produsul sunt familiarizate cu instrucțiunile prezentate
în prezentul manual.
Parametri tehnici
Tensi une 220-240 V~50-60 Hz
Consum de putere
Capacitatea vasului 5,6 l
Reglarea temperaturii friteuză: gătire 80-200 °C, uscare 40-90 °C
Temporizator
IMPORTANT
Înaintea racordării la rețeaua electrică, efectuați un control vizual pentru a vă asigura că unitatea este intactă și că nu
afost deteriorată în timpul transportului.
1000 W oală multifuncțională
1500 W friteuză cu aer cald
Atenție!
Suprafață fierbinte
oală: 1 min - 24 ore
friteuză: gătire 1 - 60 min, uscare 1 - 12 ore
INDICAII IMPORTANTE PRIVIND SECURITATEA
• Nu utilizați aparatul în alt mod decât cel descris în prezentul manual.
• Înainte de prima utilizare îndepărtați de pe aparat întregul material de
ambalare și materialele de marketing.
• Verificați dacă tensiunea rețelei de alimentare corespunde cu valorile de
pe plăcuța de identificare a aparatului.
• Așezați aparatul numai pe o suprafață stabilă, departe de alte surse de
căldură.
• La scoaterea aparatului din priza de curent electric nu trageți niciodată
de cablu, prindeți de ștecăr și scoateți-l prin tragere.
• Nu permiteți copiilor sau persoanelor cu dizabilități să manipuleze cu
aparatul, folosiți-l în afara accesului acestora.
• Persoanele cu capacitatea motrică redusă, cu percepția simțului redusă,
cu capacitatea intelectuală insuficientă sau persoanele nefamiliarizate cu
deservire, trebuie să folosească aparatul doar sub supravegherea unei
persoane responsabile și familiarizate cu deservirea.
• Acordați atenție sporită la folosirea aparatului în apropierea copiilor.
• Nu permiteți folosirea aparatului drept jucărie.
• Nu acoperiți aparatul.
• Înaintea montării sau demontării aparatului, deconectai cablul
de alimentare din priza de curent electric.
• Înainte de curăare și după utilizare, oprii aparatul și deconectai-l
de la priza de curent electric.
• Păstrați aparatul curat, nu lăsați să pătrundă vreun obiect prin orificiile
grilei. Acestea ar putea cauza accidente grave, scurtcircuitarea,
deteriorarea aparatului sau incendiul.
• Nu folosiți niciodată aparatul care are cablul de alimentare sau ștecărul
deteriorate, asigurați neîntârziat eliminarea defectului de către un service
autorizat.
• Nu utilizați aparatul dacă nu funcționează corect, dacă a căzut, este
deteriorat sau a fost expus vreunui lichid. Predați-l pentru testare și
reparare la un service autorizat.
• Aparatul este destinat doar utilizării casnice, nu este destinat uzului
comercial.
• Nu utilizați aparatul în aer liber.
• Nu se recomandă utilizarea unui prelungitor, deoarece se poate
supraîncălzi și poate provoca un pericol de incendiu. Dacă este necesar
să folosiți un prelungitor, asigurați-vă că alimentarea electrică este
compatibilă cu aparatul și că priza este legată la pământ.
• Nu mișcați și nu scuturați aparatul în timpul funcționării.
• Nu introduceți materiale inflamabile (hârtie, plastic) în aparat
• Nu atingeți aparatul cu mâinile ude sau umede.
• Nu cufundai cablul de alimentare, ștecărul sau aparatul în apă sau
într-un alt lichid. Nu turnai apă sau alte lichide pe componentele
electrice și pe conectori.
• Nu reparați aparatul prin forțe proprii. Apelați la un service autorizat.
• Acest aparat poate fi utilizat de către copiii cu vârsta de 8 ani și peste și
de către persoanele cu dizabilități fizice sau capacitate mentală redusă
sau experiență și cunoștințe insuficiente doar dacă sunt supravegheate
sau au fost familiarizate cu utilizarea în siguranță a aparatului și pricep
eventualele pericole. Curățarea și întreținerea efectuată de către utilizator
nu poate fi exercitată de către copii care nu au vârsta de peste 8 ani și
nu sunt supravegheați. Copiii sub 8 ani trebuie să păstreze distanța de
siguranță față de aparat și cablu de alimentare. Copiii nu au voie să se
joace cu aparatul.
• Nu atingeți suprafețele fierbinți.
130 131
Page 67
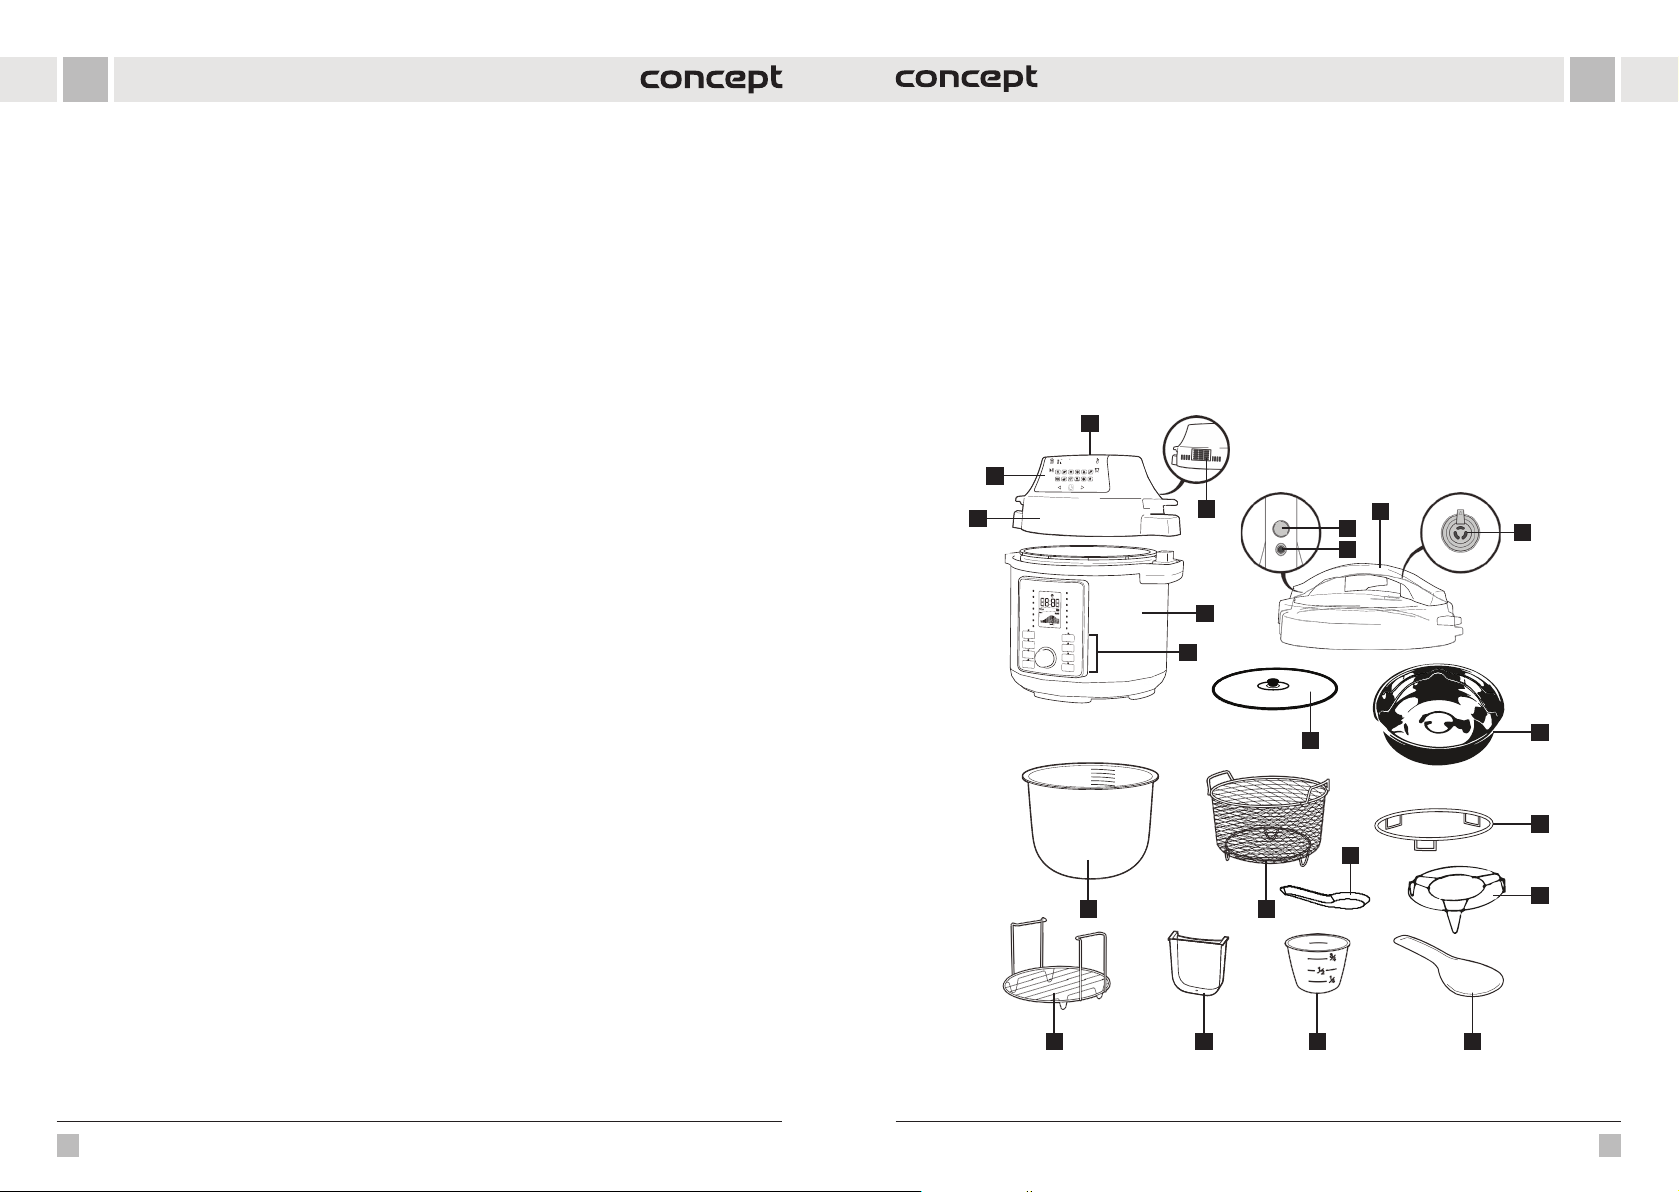
RORO
c
• Nu lăsați cablul de alimentare să atârne liber peste muchia mesei sau
ablatului de bucătărie. Nu lăsați cablul de alimentare să intre în contact
cu suprafețele fierbinți.
• Nu amplasați aparatul în apropierea arzătorului de gaz sau electric. Nu
așezați aparatul pe plita de gătit. Asigurați-vă că aparatul este amplasat
într-o zonă bine ventilată, departe de suprafețe fierbinți, materiale
inflamabile (perdele, fețe de masă) și medii umede.
• AVERTIZARE: Suprafețele aparatului pot fi foarte fierbinți. Țineți aparatul
numai de mâner și folosiți echipament de protecție, cum ar fi mănuși de
bucătărie.
• Acordați atenție sporită, pentru a împiedica intrarea apei sau a altui lichid
în aparat. S-ar putea ajunge la electrocutare.
• Așezați întotdeauna alimentele în coșul aparatului pentru a evita ca
acestea să intre în contact cu elementul de încălzire.
• Nu atingeți niciodată suprafețele interioare ale aparatului în timpul
funcționării sau imediat după oprire. Lăsați aparatul să se răcească
suficient.
• Nu conectați și nici nu folosiți cu aparatul cu mâinile umede.
• Capac Air fry: aburul fierbinte este eliberat prin orificiile de aerisire în
timpul gătitului, păstrați-vă mâinile și fața la o distanță sigură de orificiile
de aerisire.
• Capac de presiune: Atenție la aburul fierbinte și la aerul care iese din
supapa de presiune. Nu vă așezați mâinile, fața sau orice obiect deasupra
orificiului de ieșire al capacului de presiune.
• Nu utilizați aparatul dacă aveți un stimulator cardiac, un aparat auditiv
etc. Consultați medicul înainte de a utiliza aparatul.
• Nu utilizați alte accesorii decât cele recomandate de producător.
• Nu conectați aparatul la un cronometru extern.
• Protecție împotriva supraîncălzirii: dacă siguranța termică a reacționat,
aparatul nu va funcționa. Scoateți aparatul din priză și așteptați până
când acesta se răcește complet înainte de a-l reporni.
• Dacă în timpul funcționării vedeți fum negru ieșind din aparat, opriți-l
imediat și apelați la un service autorizat.
• Înainte de curățare, lăsați aparatul să se răcească cel puțin 30 de minute.
La nerespectarea instruciunilor producătorului, a se vedea
instruciunile de securitate, eventuala reparaie nu poate fi
recunoscută drept reparaie de garanie.
DESCRIEREA PRODUSULUI
1 Alimentarea cu aer
2 Leșire de aer
3 Capac de aer cald
4 Afișajul capacului de aer cald
5 Corpul aparatului
6 Panoul de comandă al vasului multifuncțional
7 Capac de presiune
8 Butonul de eliberare a capacului
9 Supapa de siguranță
10 Supapa de presiune
11 Capac de sticlă
1
4
3
6
12 13
15
12 Vasul interior
13 Coș friteuză
14 Suport pentru capac
15 Suport cu mânere
16 Recipient de condensare pentru excesul de apă
17 Cupa de măsurare
18 Lingură puțin adâncă
19 Lingură adâncă (lingură)
20 Oală pentru abur
21 Suport pentru aburire
2
5
11
16 17 18
7
8
9
19
10
20
14
21
132 133
Page 68
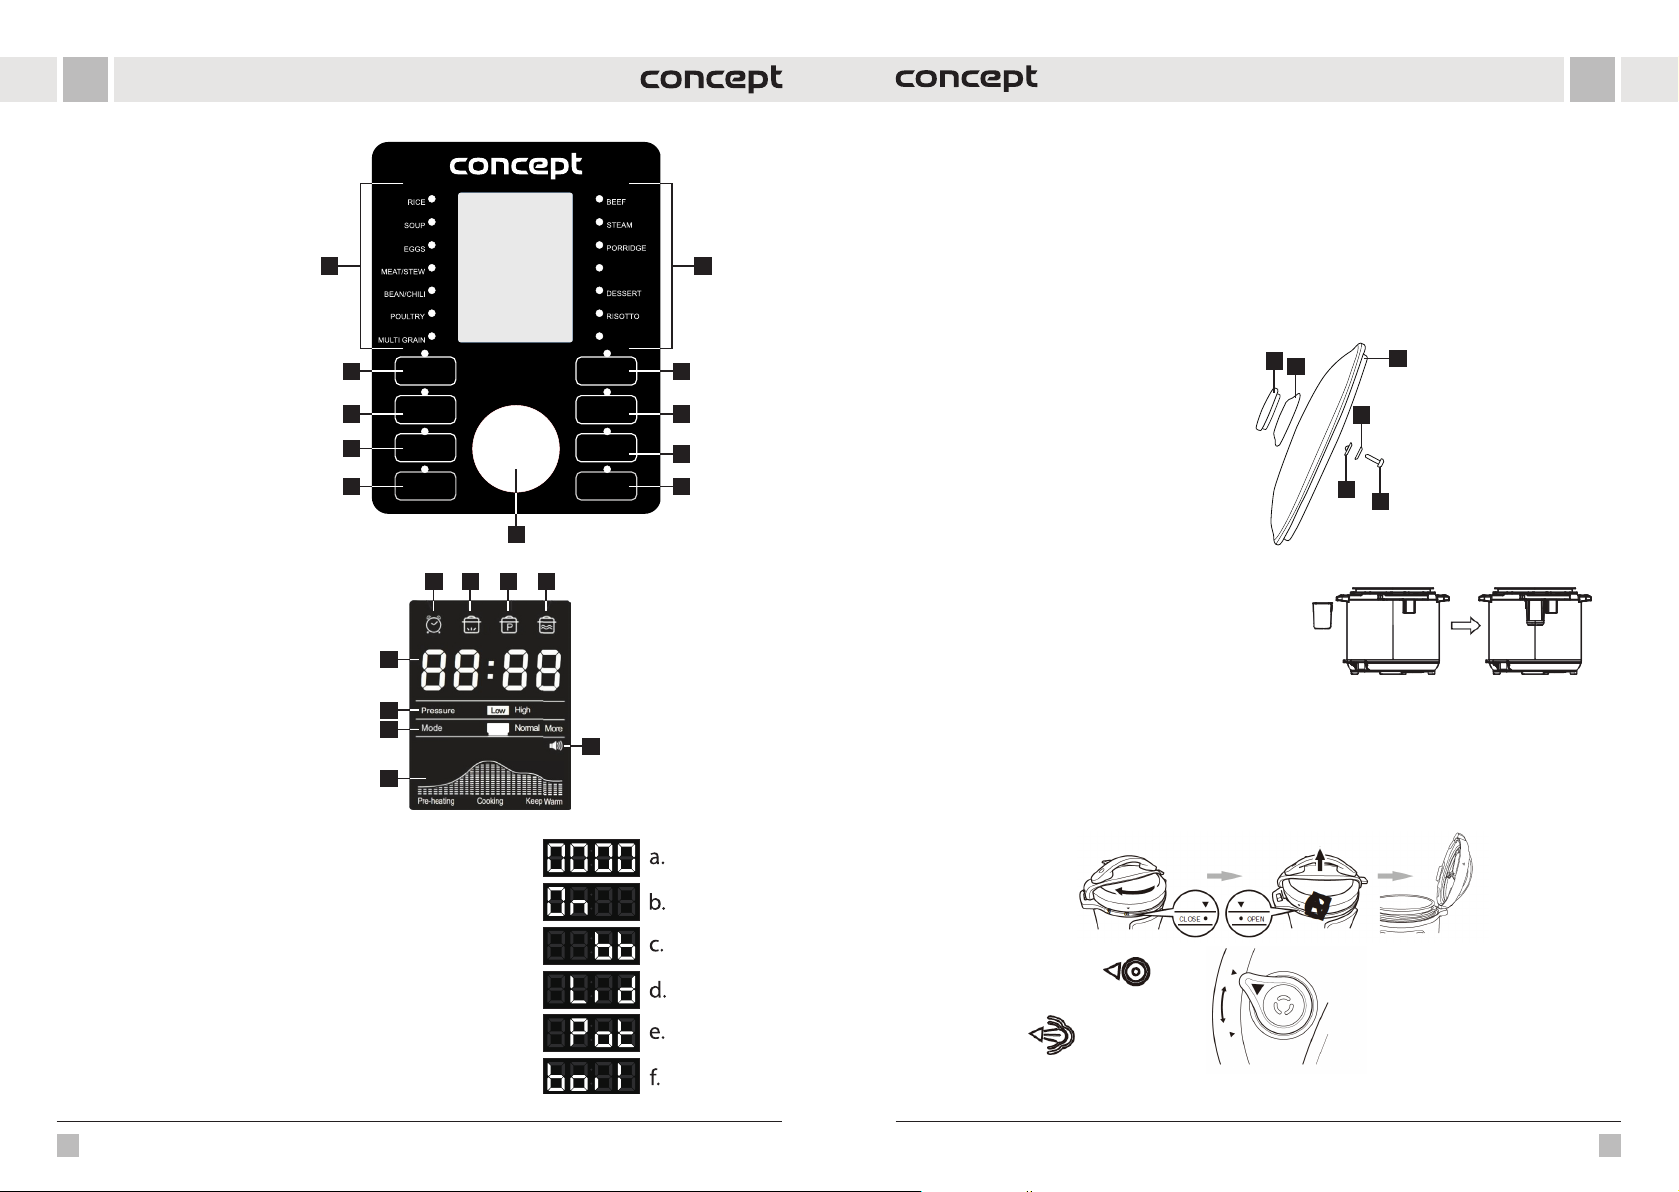
RORO
DESCRIEREA PANOULUI
DE CONTROL AL OALEI
MULTIFUNCIONALE
1 Programe presetate
2 Program pentru iaurt
3 Gătire lentă
4 Setarea presiunii scăzute/înalte
5 Menținerea temperaturii/Anulare
6 Prăjire
7 Pornire întârziată
8 Setare manuală
9 Pornire
10 Buton de control
DESCRIEREA AFIȘAJULUI
A Indicator de pornire întârziată
B Indicator de preîncălzire
C Indicator de presiune
D Indicator de menținere a temperaturii
E Indicator de activare/dezactivare a sunetului
F Indicator de progres
G Indicator de mod
H Indicator de nivel de presiune
I Afișaj de timp și avertizare
RÝŽE
POLÉVKA
VEJCE
MASO / DUŠENÍ
FAZOLE / CHILLI
DRŮBEŽ
LUŠTĚNINY
2 6
POMALÉ VAŘENÍ
SLOW COOK
3
4
UDRŽENÍ TEPLOTY
5
KEEP WARM/CANCEL
JOGURT
YOGURT
TLAK
PRESSURE
LEVEL
/ ZRUŠIT
Pressure
Mode
Pre-heating
High
Low
Less Normal More
Cooking Keep Warm
HOVĚZÍ
PÁRA
OVESNÁ KAŠE
VEPŘOVÉ /
ŽEBÍRKA
PORK&RIBS
DEZERT
RIZOTO
ZELENINA
VEGETABLES
SMAŽENÍ
SAUTE
ODLOŽENÝ START
DELAY START
RUČNÍ NASTAVENÍ
ADJUST
START
10
A B C D
I
H
G
E
F
ÎNAINTE DE PRIMA UTILIZARE
• Îndepărtați toate materialele de ambalare de pe aparat.
• Îndepărtați toate etichetele și autocolantele de pe aparat.
• Spălați vasul interior (12) cu apă caldă.
• Ștergeți temeinic aparatul în interior și în exterior cu o cârpă.
11
• Spălați accesoriile cu apă caldă și săpun și un burete neabraziv.
Notă: Preîncălziți aparatul timp de 10 minute fără alimente. Este posibil să iasă fum inofensiv și un miros ușor din
aparat.
• Lăsați un spațiu liber de cel puțin 13 cm în jurul aparatului în timpul funcționării.
Asamblarea capacului de sticlă
Puteți utiliza capacul de sticlă cu funcțiile Gătire lentă
1
2
3
și Menținerea temperaturii. Asamblarea mânerului este
7
8
9
prezentată în imagine.
1. Mâner
2. Baza mânerului
3. Corpul capacului de sticlă
4. Sigiliu
5. Șaibă
6. Șurub
5
4
6
INSTRUCIUNI DE UTILIZARE
UTILIZAREA OALEI SUB PRESIUNE CU CAPACUL DE
PRESIUNE (7)
1. Așezați aparatul într-un loc uscat și nivelat.
2. Așezați recipientul de condensare pentru excesul de apă
(16) pe partea din spate a aparatului, a se vedea Fig. 1.
3. Pregătiți capacul de presiune (7), a se vedea Fig. 2.
• Trageți de protuberanța metalică de pe partea inferioară a capacului pentru a îndepărta capacul de protecție
pe care este montată garnitura. Garnitura poate fi îndepărtată și curățată. Asigurați-vă că garnitura nu este
deteriorată sau ruptă nicăieri. În caz de deteriorare, este necesară înlocuirea. Asigurați-vă că supapa de flotor este
curată și se poate mișca liber.
Notă: În cazul în care capacul oalei sub presiune a fost deja montat pe aparat, scoateți-l pentru pregătire apăsând
butonul roșu, rotiți mânerul în sens antiorar și ridicați-l.
fig. 1
Pe afișajul LED pot apărea următoarele notificări:
a. Oala este gata de utilizare, dar programul nu a fost selectat
b. Oala se încălzește la temperatura dorită
c. Funcția „Keep warm” - oala menține temperatura
d. Capacul este în poziție greșită sau lipsește
e. În oală lipsește vasul interior
f. boiL (gătire) apare în modul More (Mai multe) pentru programul Yogurț
Evacuarea aburului
Etanșat
fig. 2
134 135
Page 69
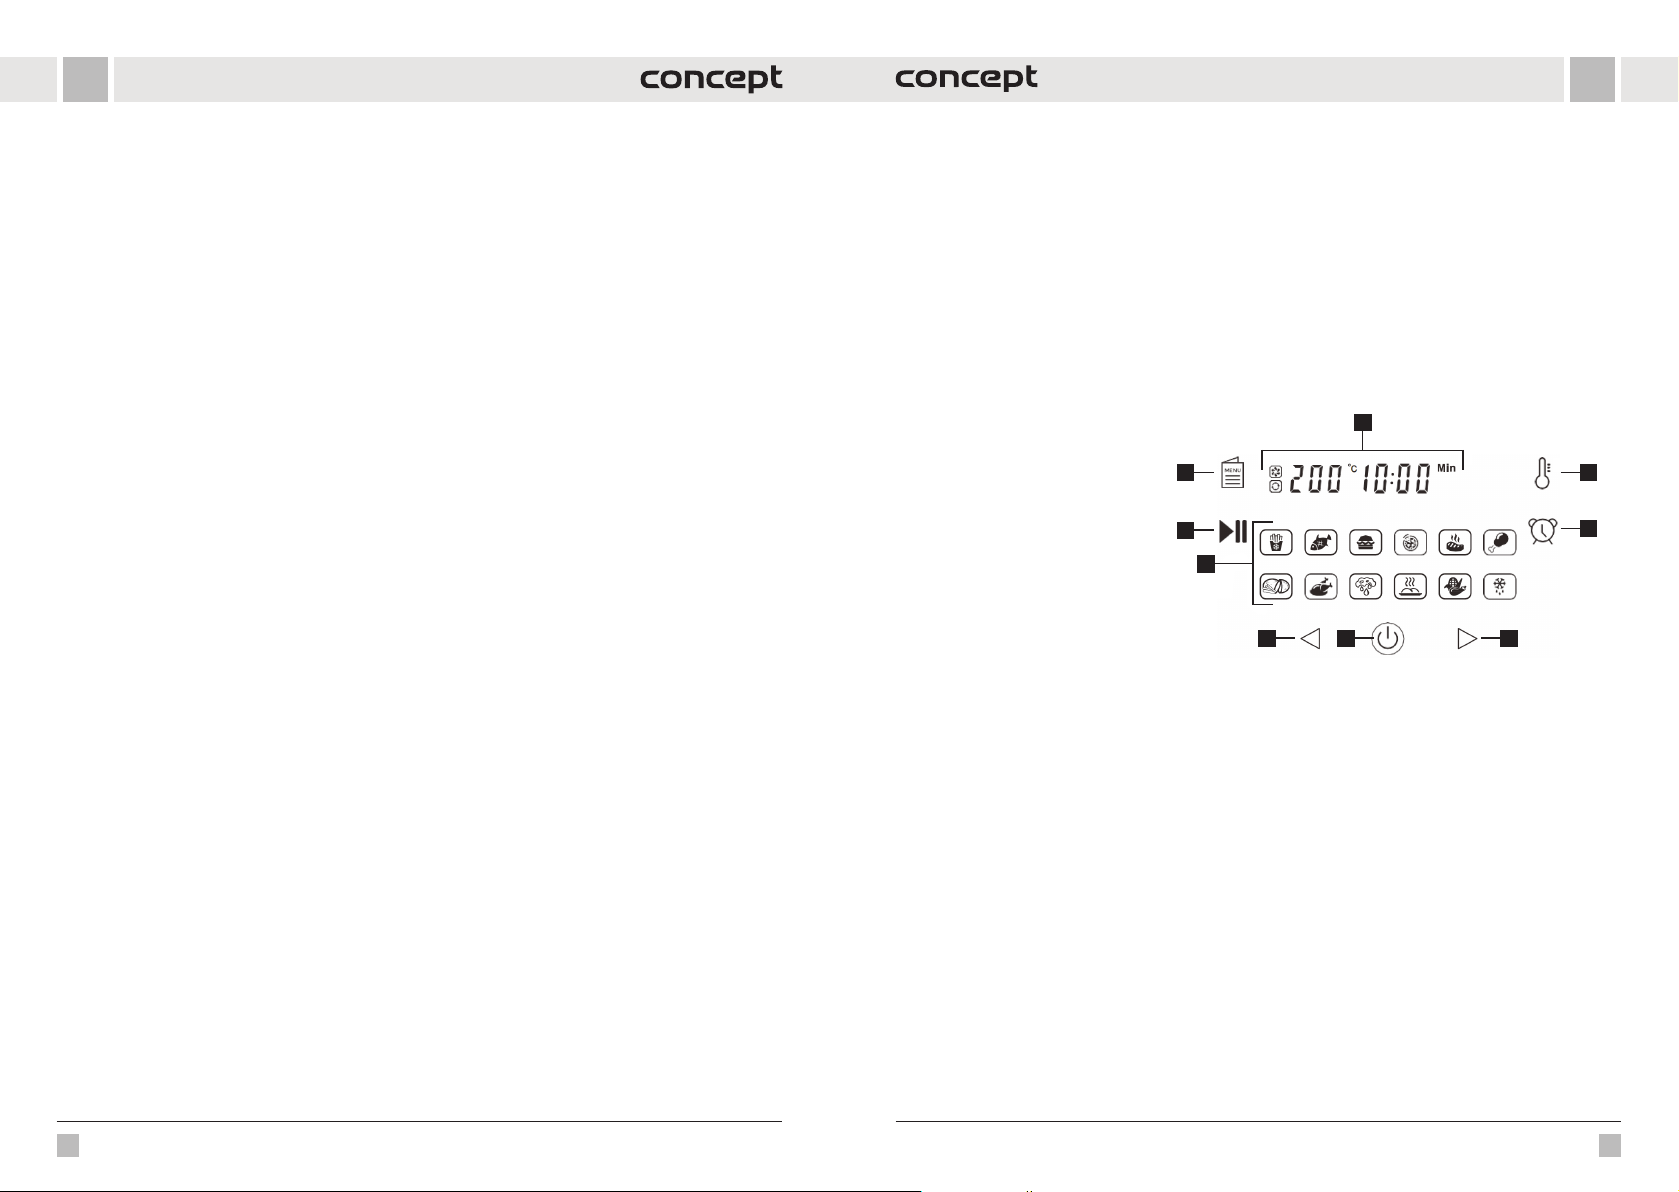
RORO
4. Îndepărtați recipientul interior (12). Volumul total de alimente și apă nu trebuie să depășească 2/3 din volumul
recipientului interior. Dacă veți găti alimente al căror volum va crește în timpul gătirii (de exemplu, orez), nu
umpleți recipientul mai mult de 1/2 plin.
Aviz: Unele alimente, cum ar fi compotul de mere, afinele, fulgii de ovăz, tăițeii, rubarba sau spaghetele pot face
spumă și se pot crăpa, înfundând supapa de presiune (ieșirea). Aceste alimente nu trebuie gătite în oala sub presiune.
Atenție: nu folosiți oala sub presiune pentru prăjirea cu ulei.
5. Asigurați-vă că suprafața interioară a corpului aparatului (5) este uscată și așezați recipientul interior (12) în corpul
aparatului (5).
6. Montați capacul de presiune (7) și rotiți-l în sensul acelor de ceasornic. Când auziți un clic, capacul este așezat
corect. Et anșarea corectă a capac ului este indicată de săgeț ile aliniate de pe marginea capacului și de pe marginea
aparatului.
7. Vă rugăm să reține ți că supapa de presiune (10) trebuie să fie li ber deplasabilă pentr u ca oala să funcțio neze corect.
8. Reglați supapa de presiune în poziția "Sealed" (Sigilat), astfel oala este gata de utilizare.
9. Conectați cablul de alimentare la fișa aparatului și apoi la o priză de curent. Afișajul va arăta "00 00".
10. Rotiți butonul de comandă pentru a parcurge programele presetate (1) (programe suplimentare prin apăsarea
butonului de program corespunzător) sau pentru a regla timpul de gătire. Confirmați programul selectat
(indicatorul se aprinde) cu ajutorul butonului Start. Pentru a regla timpul programului presetat, apăsați butonul
de comandă și rotiți-l pentru a selecta timpul dorit și confirmați cu butonul Start.
Notă: Apăsați butonul de setare a presiunii pentru a comuta între presiunea scăzută și cea ridicată. Setarea implicită
este Presiune înaltă. Reglați setarea presiunii după selectarea programului și a timpului de gătire, confirmați setarea
cu butonul Start. Apăsați butonul de setare manuală pentru a selecta cantitatea de alimente, comutând între Less,
Normal și More. Setarea implicită este Normal.
Notă: Timpul de gătire trebuie ajustat în funcție de cantitatea de alimente.
11. Oala începe să se în călzească până la te mperatura dori tă (afișajul arată "On", pictogr ama de preîncălzi re este aprinsă)
și supapa plutitoare se ridică. Odată ce a atins temperatura dorită, timpul setat începe numărătoarea inversă. În
acest moment, gătiți deja sub presiune (pictograma de presiune este aprinsă), capacul este blocat și oala nu poate
fi deschisă. NU ÎNCERCAȚI NICIODATĂ SĂ DESCHIDEȚI OALA CU FORȚA!
12. Când gătitul este finalizat, se va auzi un semnal sonor, iar aragazul va trece automat la modul "Păstrare la cald"
pentru a menține mâncarea caldă. Afișajul afișează "bb", iar pictograma Keep Warm (Păstrare la cald) se aprinde.
13. Puteți anula în orice moment setarea vasului apăsând butonul Menținere temperatură/anulare (5).
14. Pentru a schimba modul de sunet, țineți apăsat butonul Menține temperatura/anulare timp de 3 secunde, până
când pictograma sunetului de pe afișaj se schimbă. Avertismentele de siguranță sunt întotdeauna aprinse.
După terminarea gătitului, presiunea poate fi eliberată în două moduri:
1. La terminarea gătitului, presiunea va începe să scadă treptat. În funcție de cantitatea de lichid, acest lucru poate
dura 15-30 min. Supapa flotantă coboară treptat, capacul se deblochează și poate fi deschis cu ușurință. Dacă nu
poate fi deschis, așteptați mai mult timp. NU DESCHIDEȚI NICIODATĂ OALA CU FORȚA!
2. Pentru a deschide capacul oalei sub presiune: prindeți mânerul și apăsați butonul roșu pentru a elibera capacul,
rotiți capacul în sens invers acelor de ceasornic până când se eliberează și ridicați-l cu o tragere în sus. Capacul
poate fi așezat pe suportul pentru capac (14).
3. Când se termină gătitul, apăsați butonul Menținerea temperaturii/Anulare (5), cu ajutorul mănușii termoizolante
rotiți supapa flotantă în poziția „Eliberare abur”, supapa flotantă va coborî, capacul se va debloca și poate fi deschis
cu ușurință. ACORDAȚI O ATENȚIE SPORITĂ ȘI FOLOSIȚI ECHIPAMENT DE PROTECȚIE, RISC DE OPĂRIRE CU ABUR!
Funcia de pornire amânată Delay Start:
1. Cu ajutorul funcției Delay Start, puteți amâna începerea gătitului cu până la 24 de ore.
2. Urmați instrucțiunile de utilizare, rotiți butonul pentru a selecta programul dorit, apoi apăsați butonul Pornire
întârziată și apăsați din nou butonul pentru a seta timpul în care doriți să întârziați începerea gătitului. Setarea
implicită pentru pornirea întârziată este de 30 de minute.
3. Apoi apăsați butonul Start/Cancel. După scurgerea timpului setat, începe să funcționeze programul selectat.
Sugestii
1. Apoi apăsați butonul Pornire. În timpul pornirii întârziate, pictograma de pornire întârziată se aprinde pe afișaj și
se afișează timpul rămas.
2. Vă recomandăm să folosiți funcția „Keep warm” timp de maxim 1 oră, după care alimentele își pierd calitatea.
3. Programele sunt concepute pentru prepararea alimentelor cu o greutate mai mică de 1200 g, dacă pregătiți porții
mai mari, folosiți setările personalizate.
4. Folosiți funcția Delay Start numai pentru alimentele care nu se pot altera în acest interval de timp.
5. Introduceți și scoateți alimentele în vasul interior folosind ustensile din lemn sau plastic, nu folosiți niciodată
ustensile ascuțite sau metalice pentru a evita deteriorarea suprafeței vasului.
6. Utilizarea accesoriilor:
• Când selectați programul Aburire, introduceți suportul pentru abur (21) în vasul interior (12) și apoi introduceți
oala pentru abur (20).
• Când selectați programul Prăjire, introduceți suportul pentru abur cu mânere (15) în vasul interior (12).
• Atunci când selectați programul Gătire lentă, Iaurt sau Prăjire, se poate utiliza capacul de sticlă (11).
• Atunci când selectați programul Prăjire (atunci când utilizați capacul cu aer cald), introduceți coșul pentru prăjire
(13) în recipientul interior (12).
• Utilizați suportul pentru capace (14) pentru a depozita capacele.
DESCRIEREA PANOULUI DE COMANDĂ AL CAPACUL DE AER CALD
1. Afișaj digital
2. Setarea temperaturii
3. Setarea temporizatorului
4. Creșterea temperaturii/timerului
5. Pornit/oprit
6. Scăderea temperaturii/timerului
7. Programe
8. Pornire/pauză
9. Selectarea programului presetat
UTILIZAREA OALEI CU CAPAC CU AER CALD (3)
O oală cu un capac cu aer cald funcționează cu aer cald; nu umpleți niciodată oala cu ulei sau alt mediu de prăjire.
1. Așezați aparatul într-un loc uscat și nivelat.
2. Conectați cablul de alimentare la o priză electrică.
3. Asigurați-vă că suprafața interioară a corpului aparatului (5) este uscată și puneți recipientul interior (12) în corpul
aparatului (5).
4. Așezați alimentele în recipientul interior (12). Notă: Dacă doriți să utilizați programul de prăjire, așezați coșul
de prăjire (13) în recipientul interior și puneți alimentele în coș. Nu umpleți prea mult coșul de prăjire (13) sau
recipientul interior (12).
5. Așezați capacul pentru aer cald (3) pentru a utiliza aparatul ca un cuptor cu aer cald.
6. Apăsați butonul Pornit/Oprit (5) pentru a porni. Pictogramele se vor aprinde, iar pe afișaj va apărea setarea
implicită de 180 °C și 15 minute.
7. Apăsați butonul de selectare a programului presetat (9) pentru a schimba presetările de gătit. Pictograma
programului selectat clipește, iar pe afișaj apar temperatura presetată și durata programului. Apăsați butonul (9) în
mod repet at pentru a trece la următorul p rogram. Pentru a modifi ca setarea temperatur ii, apăsați mai întâi butonul
de setare a temperaturii (2)/pentru a modifica setarea timpului, apăsați butonul de setare a temporizatorului (3)
și apoi apăsați sau mențineți apăsate butoanele 4 și 6 pentru a regla temperatura în intervale de 5 °C și timpul în
intervale de 1 minut (numai pentru programul de uscare de 30 de minute).
8. Confirmați selecția cu ajutorul butonului Start/Pauză (8).
Notă: Dacă începeți să gătiți când aparatul este încă rece, prelungiți timpul de gătire cu aproximativ 2 minute. În timpul
preîncălzirii, pe afișaj apare "PREÎNCĂLZIRE", după preîncălzire dispare de pe afișaj și se afișează doar "ÎNCĂLZIRE"
atunci când elementul de încălzire este pornit.
Notă: Pictograma ventilatorului din colțul din stânga sus se aprinde în timpul funcționării programului. Pictograma se
va stinge atunci când ventilatorul nu mai funcționează.
8
7
6
1
29
3
5
4
136 137
Page 70
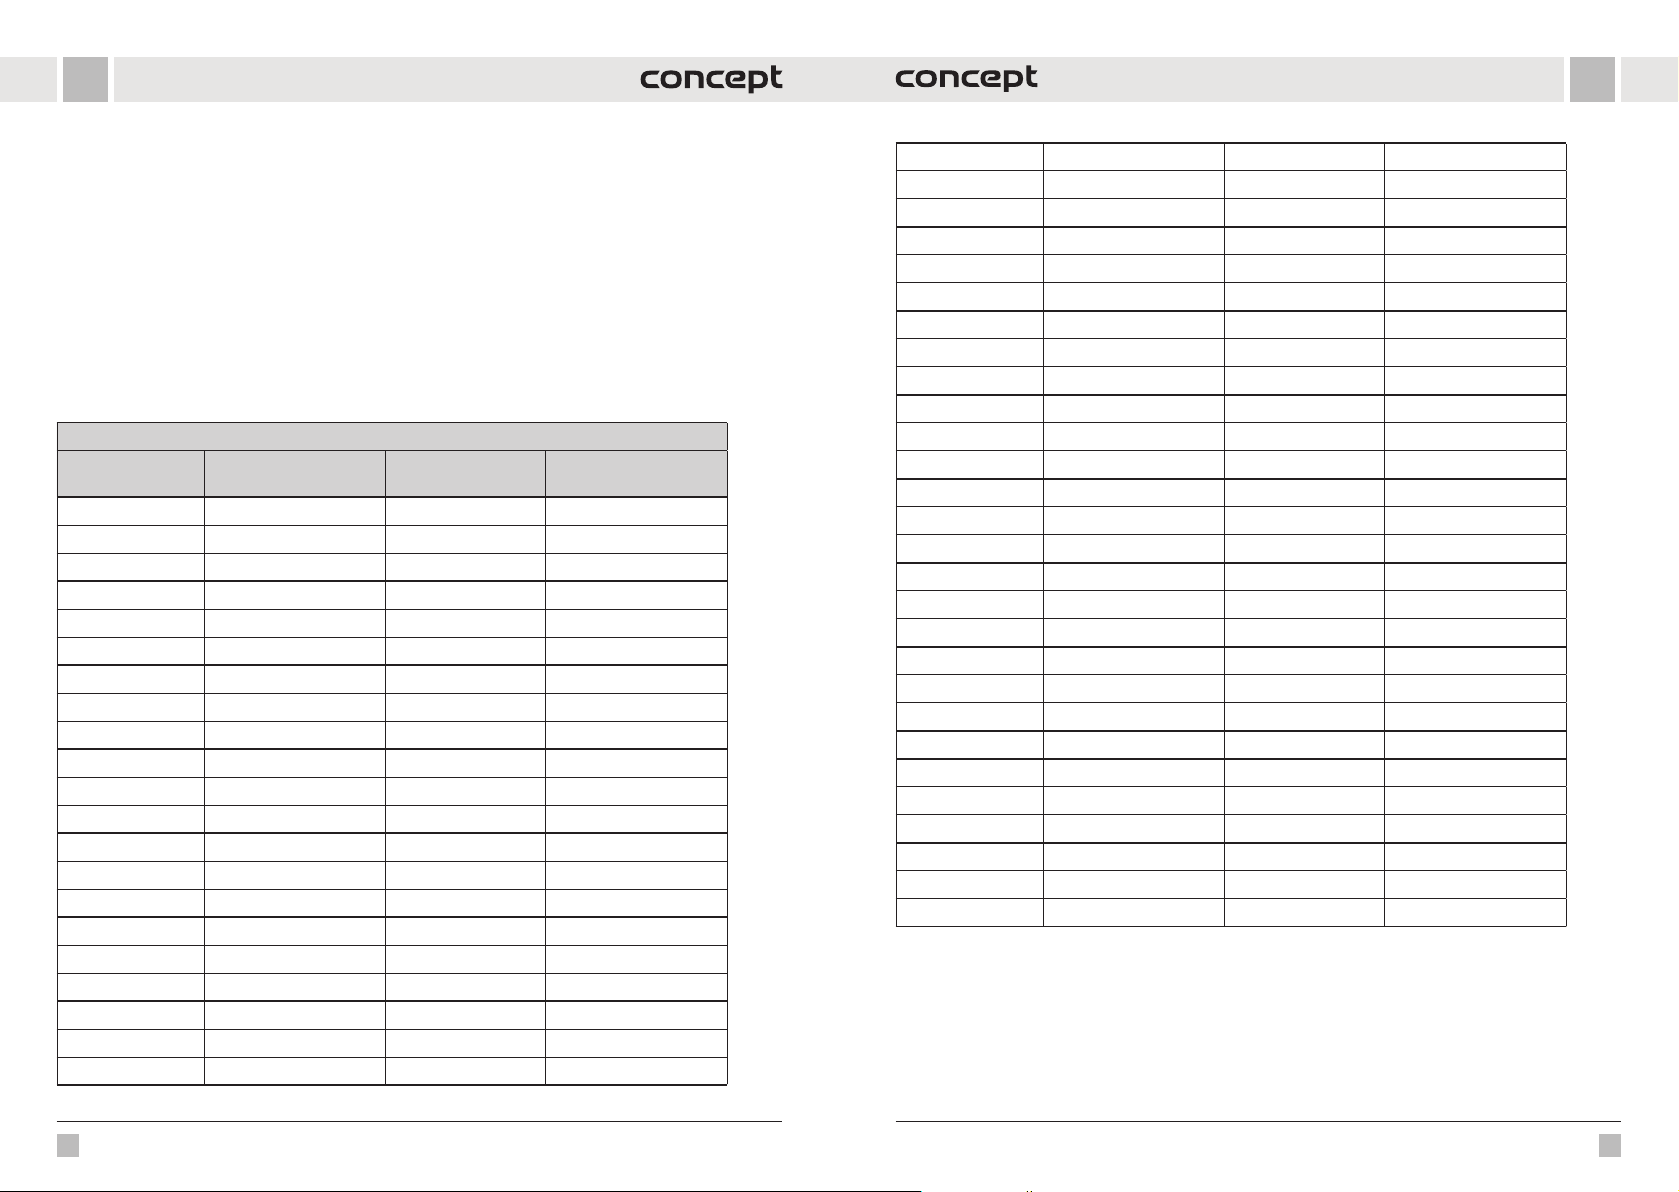
RORO
9. Puteți întrerupe programul în orice moment în timpul gătitului, apăsând butonul Start/Pauză (8) și apoi apăsând
din nou butonul pentru a relua procesul de gătit.
10. Puteți îndepărta capacul cu aer cald (3) în orice moment în timpul gătitului pentru a verifica/adăuga sau îndepăr ta
alimente. Programul selectat va fi întrerupt. Când capacul este reintrodus, programul va fi reluat de unde a fost
întrerupt.
11. Veți fi avertiz at printr-un semnal son or când programul s e termină, iar pe afișaj va a părea doar "FINISHED" ( Terminat)
iar butonul de pornire/oprire (5) va clipi.
12. Când ați terminat de gătit, deconectați aparatul de la rețeaua electrică.
Aviz: Purtați mănuși de cuptor atunci când scoateți coșul de prăjire/ recipientul intern fierbinte.
Sugestii
Vă recomandăm să întoarceți mâncarea în timpul gătitului pentru o rumenire uniformă sau să amestecați mâncarea.
PROGRAME PRESETATE
Programe pentru gătit cu capacul de presiune
Programe Cantitate
(poate fi ajustată)
Orez Mai puțin 8 1-99 min
Normal 12
Mai mult 15
Supă Mai puțin 12 1-99 min
Normal 15
Mai mult 20
Ouă Mai puțin 4 1-99 min
Normal 5
Mai mult 6
Carne/Tocană Mai puțin 20 1-99 min
Normal 35
Mai mult 45
Fasole/Chilli Mai puțin 25 1-99 min
Normal 30
Mai mult 40
Păsări de curte Mai puțin 10 1-99 min
Normal 15
Mai mult 25
Leguminoase Mai puțin 20 1-99 min
Normal 40
Mai mult 45
Timp de gătire (min) Interval de timp posibil
Vită Mai puțin 30 1-99 min
Normal 35
Mai mult 40
Abur Mai puțin 12 1-99 min
Normal 15
Mai mult 20
Terci de ovăz Mai puțin 12 1-99 min
Normal 15
Mai mult 20
Carne de porc/coaste Mai puțin 13 1-99 min
Normal 18
Mai mult 25
Desert Mai puțin 25 1-99 min
Normal 40
Mai mult 50
Risotto Mai puțin 20 1-99 min
Normal 35
Mai mult 45
Legume Mai puțin 10 1-99 min
Normal 15
Mai mult 20
Prăjire Normal 30 30 min
Gătire lentă Mai puțin 30 30 min - 9 ore 30 min
Normal 6 ore
Mai mult 9 ore 30 min
Jogurt Mai puțin 24 ore 6 - 24 ore
Normal 8 ore
Mai mult "boiL"
138 139
Page 71
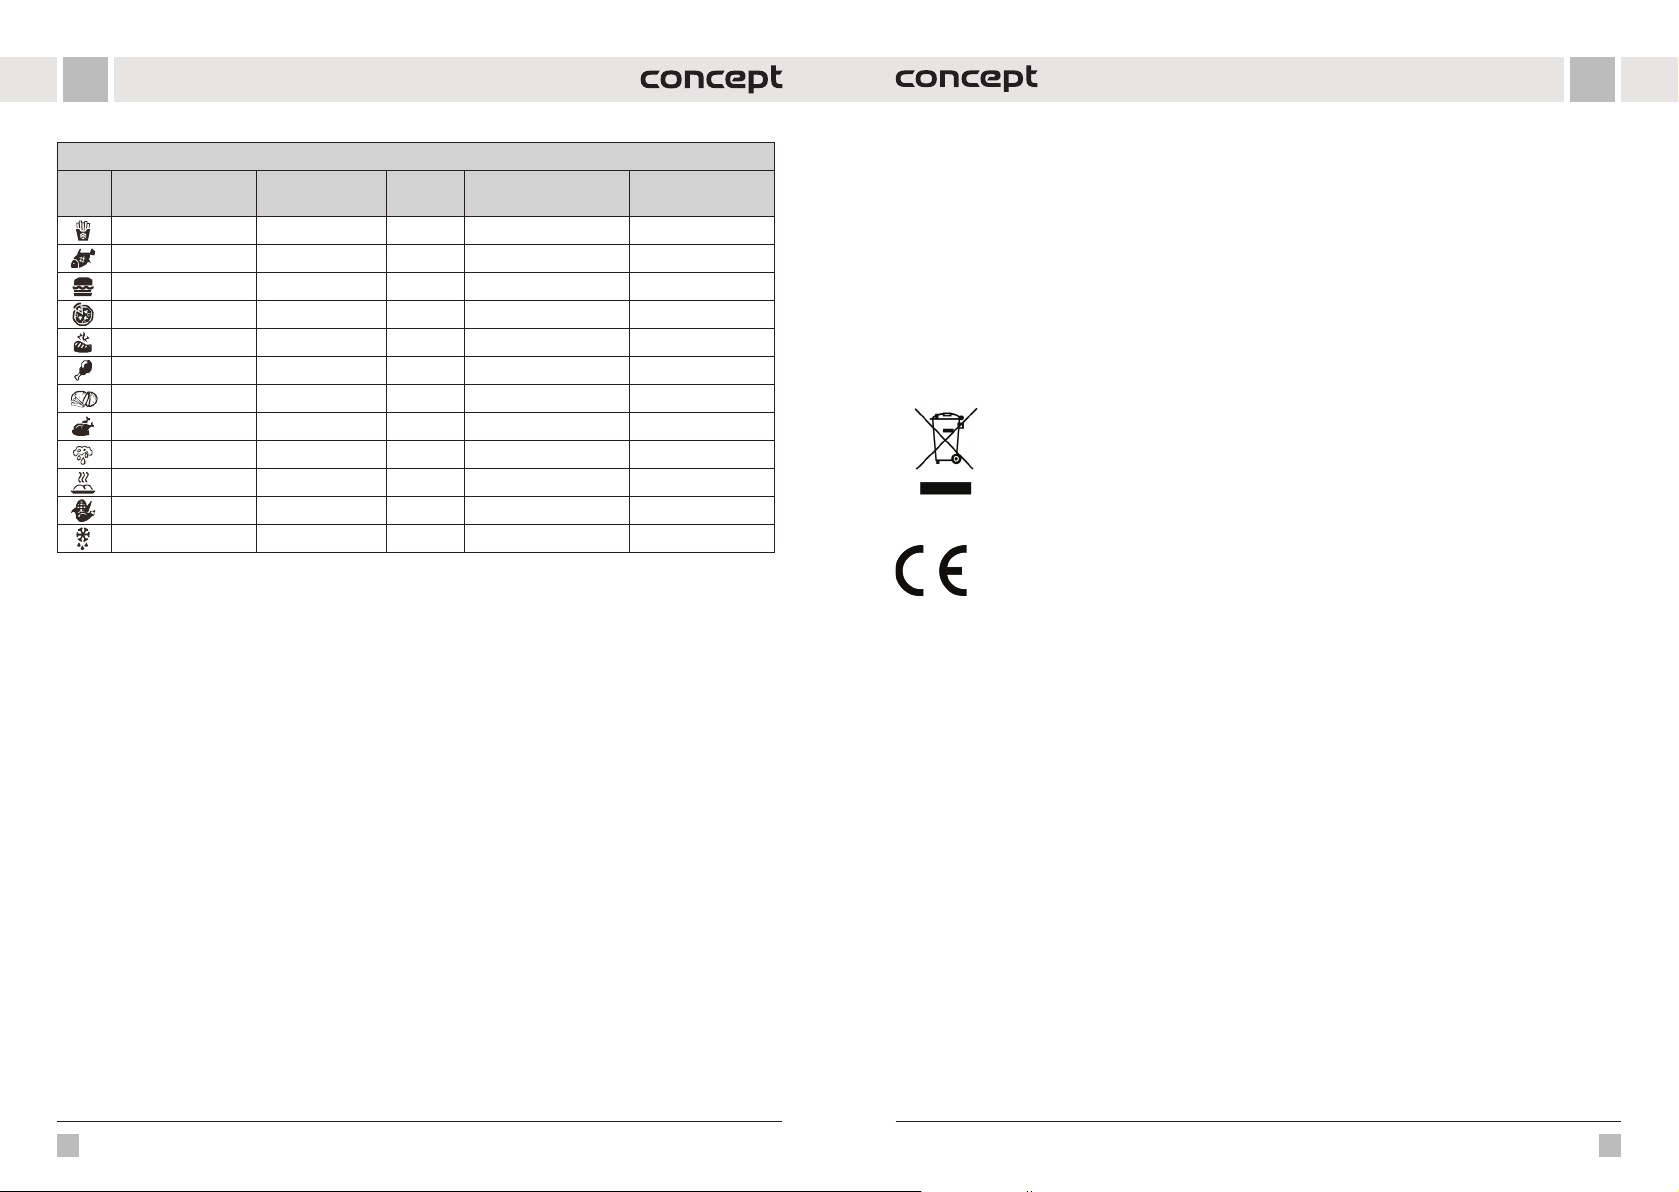
RORO
Programe pentru gătit cu capacul cu aer cald
Programe Temperatura (°C) Timp
Chipsuri congelate 200 15 min 80-200 1-60 min
Pește 160 15 min 80-200 1-60 min
Hamburger 185 13 min 80-200 1-60 min
Pizza 185 15 min 80-200 1-60 min
Friptură de vită 175 25 min 80-200 1-60 min
Picioare de pui 200 22 min 80-200 1-60 min
Cartofi prăjii cruzi 160 30 min 80-200 1-60 min
Pui întreg 180 40 min 80-200 1-60 min
Uscare 80 2 ore 40-90 1-12 ore
Grătar 160 10 min 160 1-30 min
Legume 180 15 min 80-200 1-60 min
Dezgheare 50 5 min 50 1-60 min
Notă: Aceste setări sunt doar orientative. Dacă începeți să gătiți când aparatul este încă rece, prelungiți timpul de
gătire cu aproximativ 2 minute.
Temperatura reglabilă
(°C)
Interval de timp
posibil
CURĂARE ȘI ÎNTREINERE
Curăai aparatul după fiecare utilizare.
Nu utilizai mijloace dure și agresive, cum ar fi: obiecte ascuite, răzuitoare, solveni chimici, diluani etc.
• Deconectați întotdeauna cablul de alimentare de la priză înainte de curățare. Nu scufundați niciodată cablul de
alimentare, ștecherul, aparatul sau capacul de aer cald în apă sau alt lichid!
• Lăsați aparatul să se răcească complet înainte de a-l curăța.
• Ștergeți suprafața exterioară a aparatului cu o cârpă umedă.
• Umpleți vasul interior cu apă fierbinte și lăsați să stea o clipă. După aceasta, poate fi spălată cu o cârpă moale în apă
cu adaos de detergent sau în mașina de spălat vase.
• Celelalte părți ale aparatului pot fi spălate în apă cu adaos de detergent.
• Numai accesoriile și vasul interior pot fi spălate în mașina de spălat vase.
• După ce piesele sunt complet uscate, asamblați aparatul și depozitați-l într-un loc răcoros și uscat.
SERVICE
Întreținerea cu caracter mai amplu sau reparația care necesită intervenție la părțile interioare ale produsului, trebuie
făcute de un ser vice de specialitate.
PROTECIA MEDIULUI
• Optați pentru reciclarea materialelor de ambalare și a aparatelor vechi.
• Cutia de la aparat poate fi predată la un centru de colectare a deșeurilor sortate.
• Pungile din polietilenă (PE) a se preda la un centru de colectare a materialelor în vederea reciclării.
Reciclarea aparatului la sfârșitul duratei de viaă
Acest aparat este însemnat în conformitate cu Directiva Europeană 2012/19/EU privind deșeurile
de echipamente electrice și electronice (WEEE). Simbolul de pe produs sau de pe ambalaj indică
faptul că acest produs nu aparține deșeurilor menajere. Trebuie dus la un centru de colectare pentru
reciclarea echipamentelor electrice și electronice. Prin asigurarea eliminării corecte a acestui produs
veți contribui la prevenirea impactului negativ asupra mediului și a sănătății umane, care ar fi cauzate
prin eliminare necorespunzătoare. Eliminarea trebuie efectuată în conformitate cu reglementările
privind gestionarea deșeurilor. Informații mai detaliate privind reciclarea acestui produs veți obține
de la autoritățile locale competente, serviciile de eliminare a deșeurilor menajere sau în magazinul
unde ați cumpărat produsul.
Acest produs respectă toate cerințele de bază ale Directivei EU relevante.
Modificările textului, a designului și a specificațiilor tehnice pot fi efectuate fără o atenționare prealabilă. Ne rezervăm
dreptul la modificarea acestora.
140 141
 Loading...