

Page 1
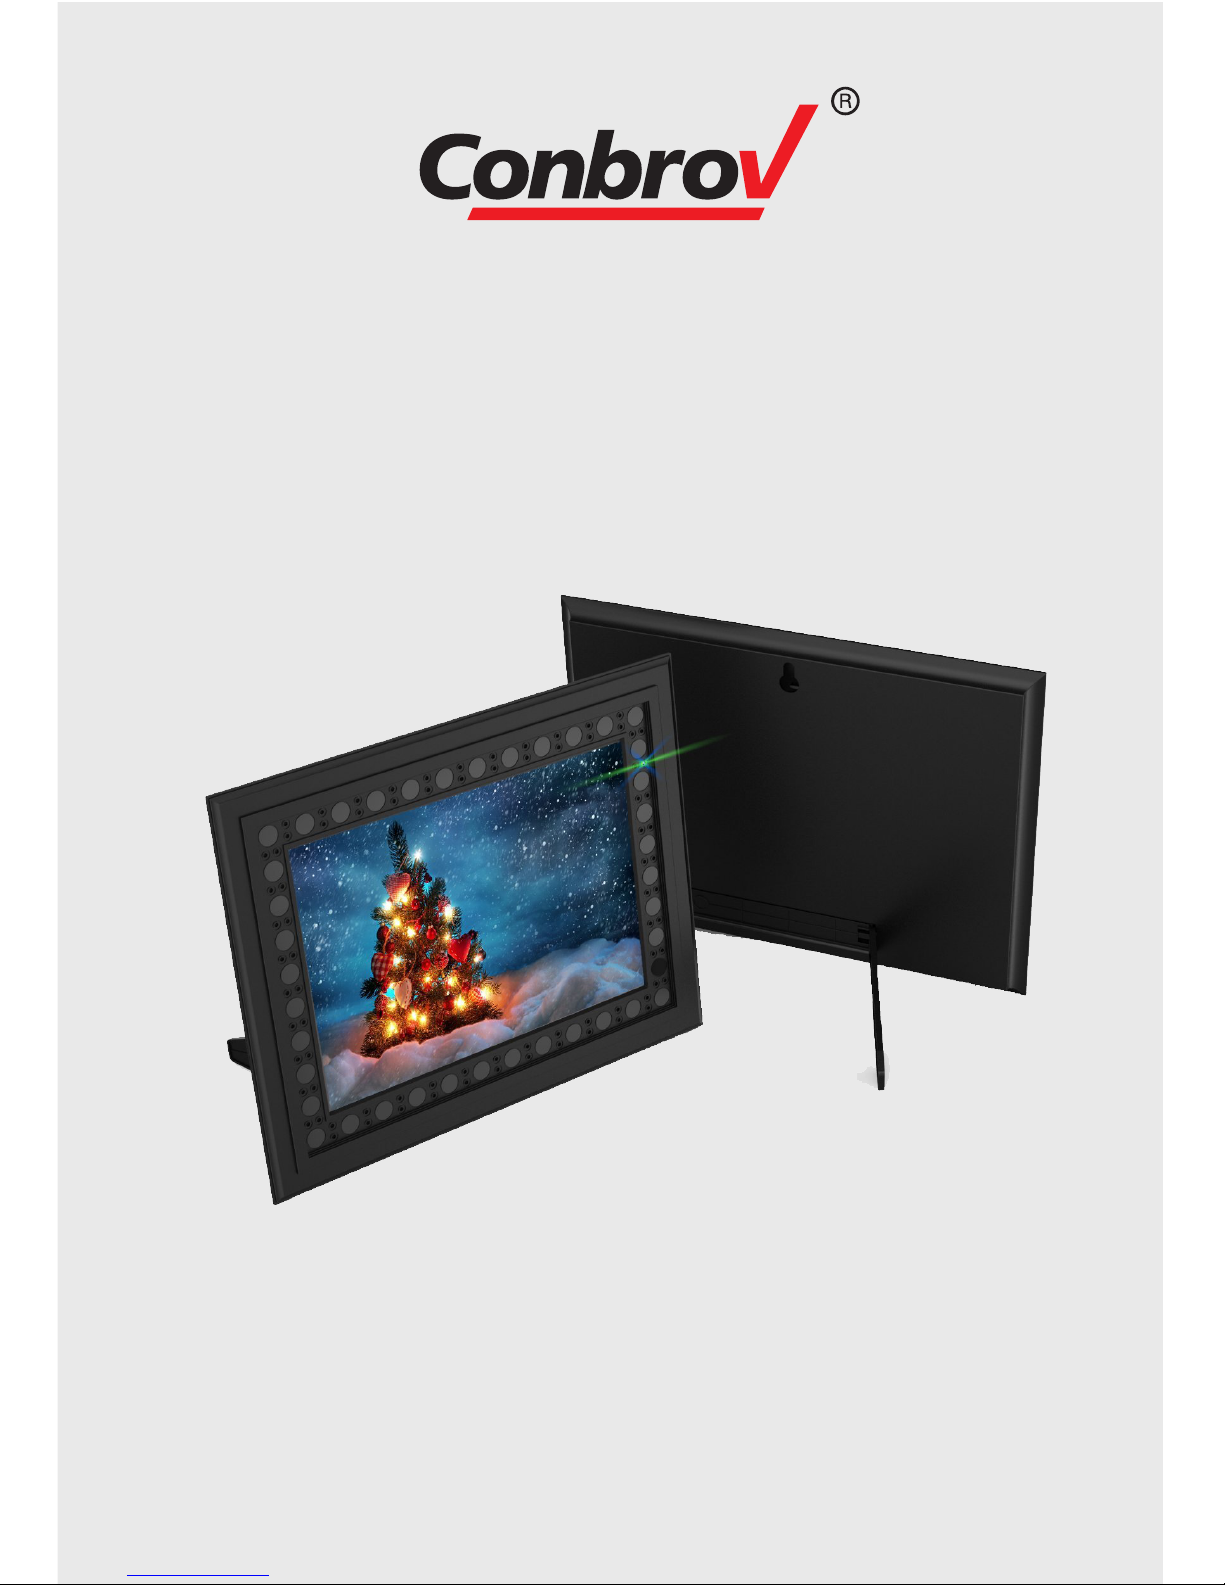
T10 Photo Frame Camera-Black
User Manual
Model No.: T10
Page 2

Table of Contents
Part 1 Before First Use.........................................1-2
Part 2 Quick Guide..................................................3
Part 3 Detailed User Manual............................... 4-20
Part 3 Detailed User Manual
Safety Precautions...................................................4
Warning on Invasion of Privacy..................................5
What's Included....................................................... 6
T10 Diagram............................................................7
Before Using Your T10 Camera............................. 8-11
1. Charging the Camera.......................................... 8
2. Installing the micro SD Card..............................8-9
3. Setting the Date and Time..............................10-11
How to Use Your Conbrov T10 camera................. 12-14
1. Turning the Camera On/Off................................ 12
2. How to Record A Video..................................12-13
3. How to Record with Sound..................................14
4. How to Switch Into Night Vision...........................14
5. How to Play A Video...........................................14
Other tips.............................................................. 15
1. How to Reset the Camera...................................15
2. How to set up the Camera...................................15
LED Status.......................................................... 16
Technical Specifications................................... .... 17
FAQs................................................................18-19
Warranty................................................................20
Disposal................................................................ 20
Declaration of Conformity........................................20
Page 3
Part 1 Before First Use
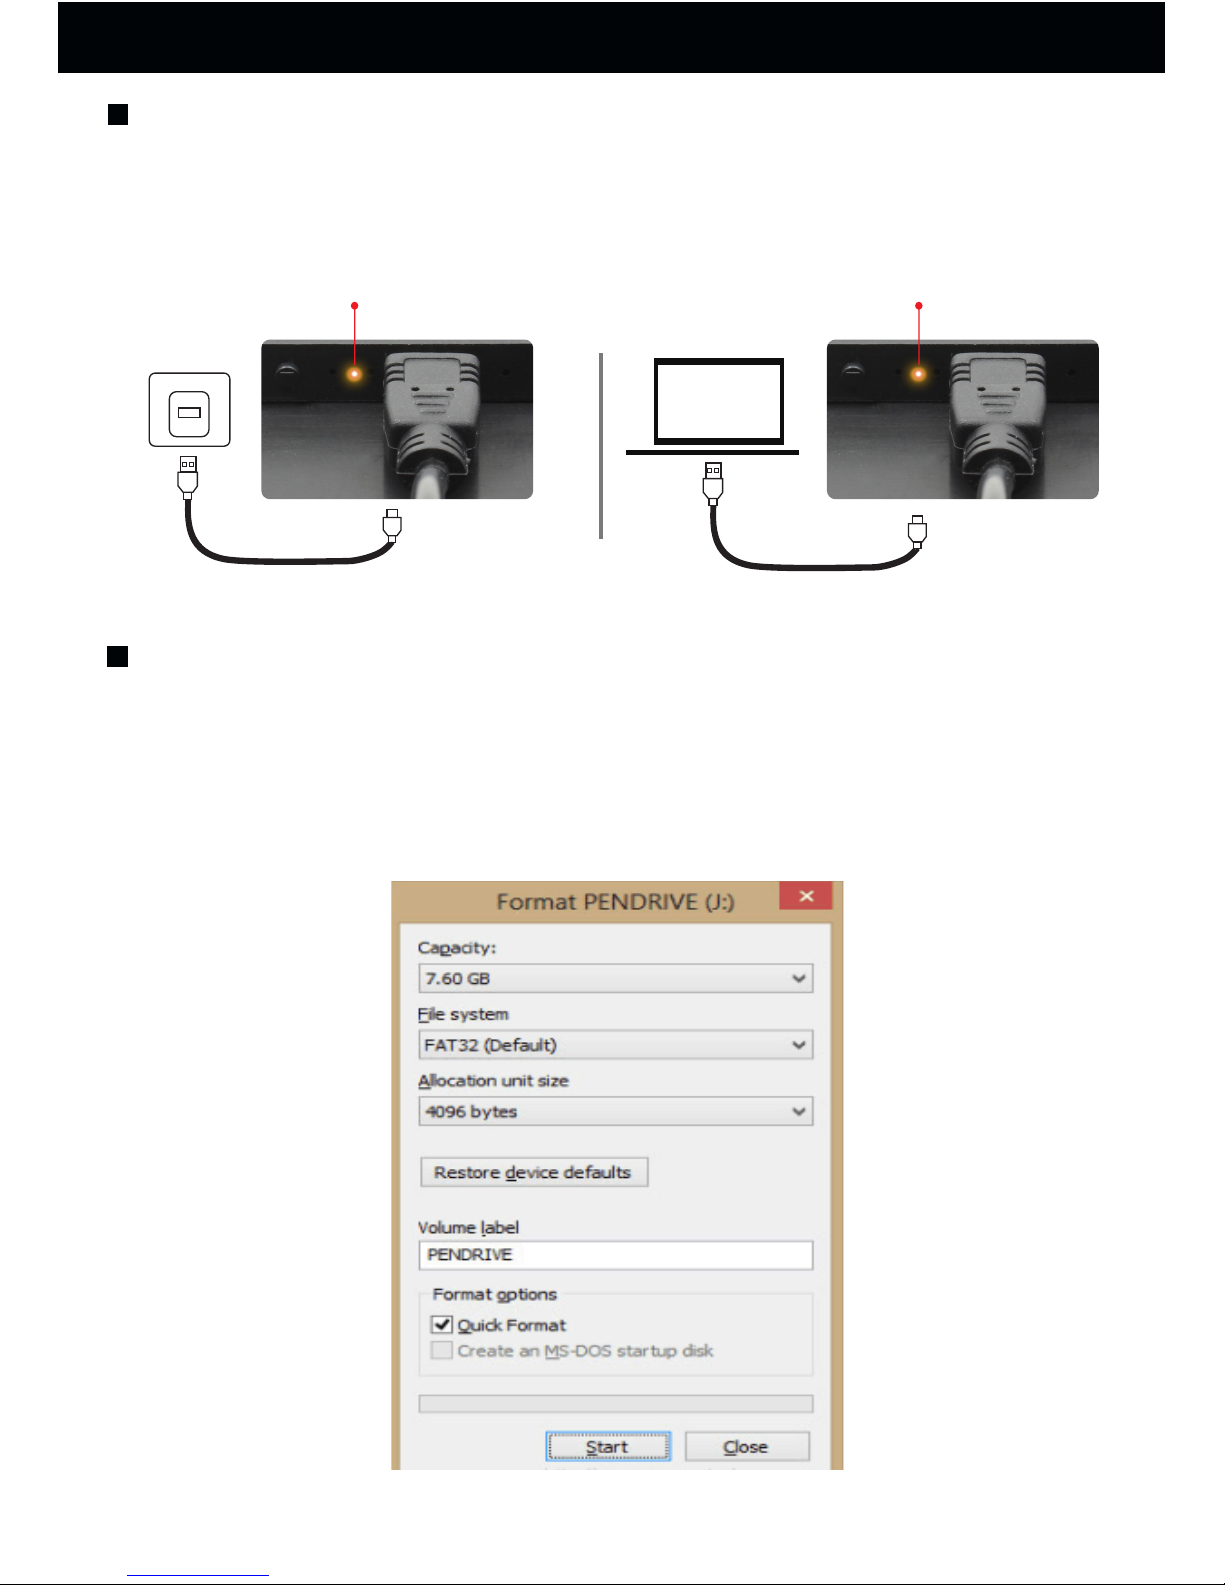
Charging the Camera
Before the first use, charge the camera via your PC or
USB charger ( The fully charging time is 20 hours)
Yellow indicator Yellow indicator
Formatting the microSD Card
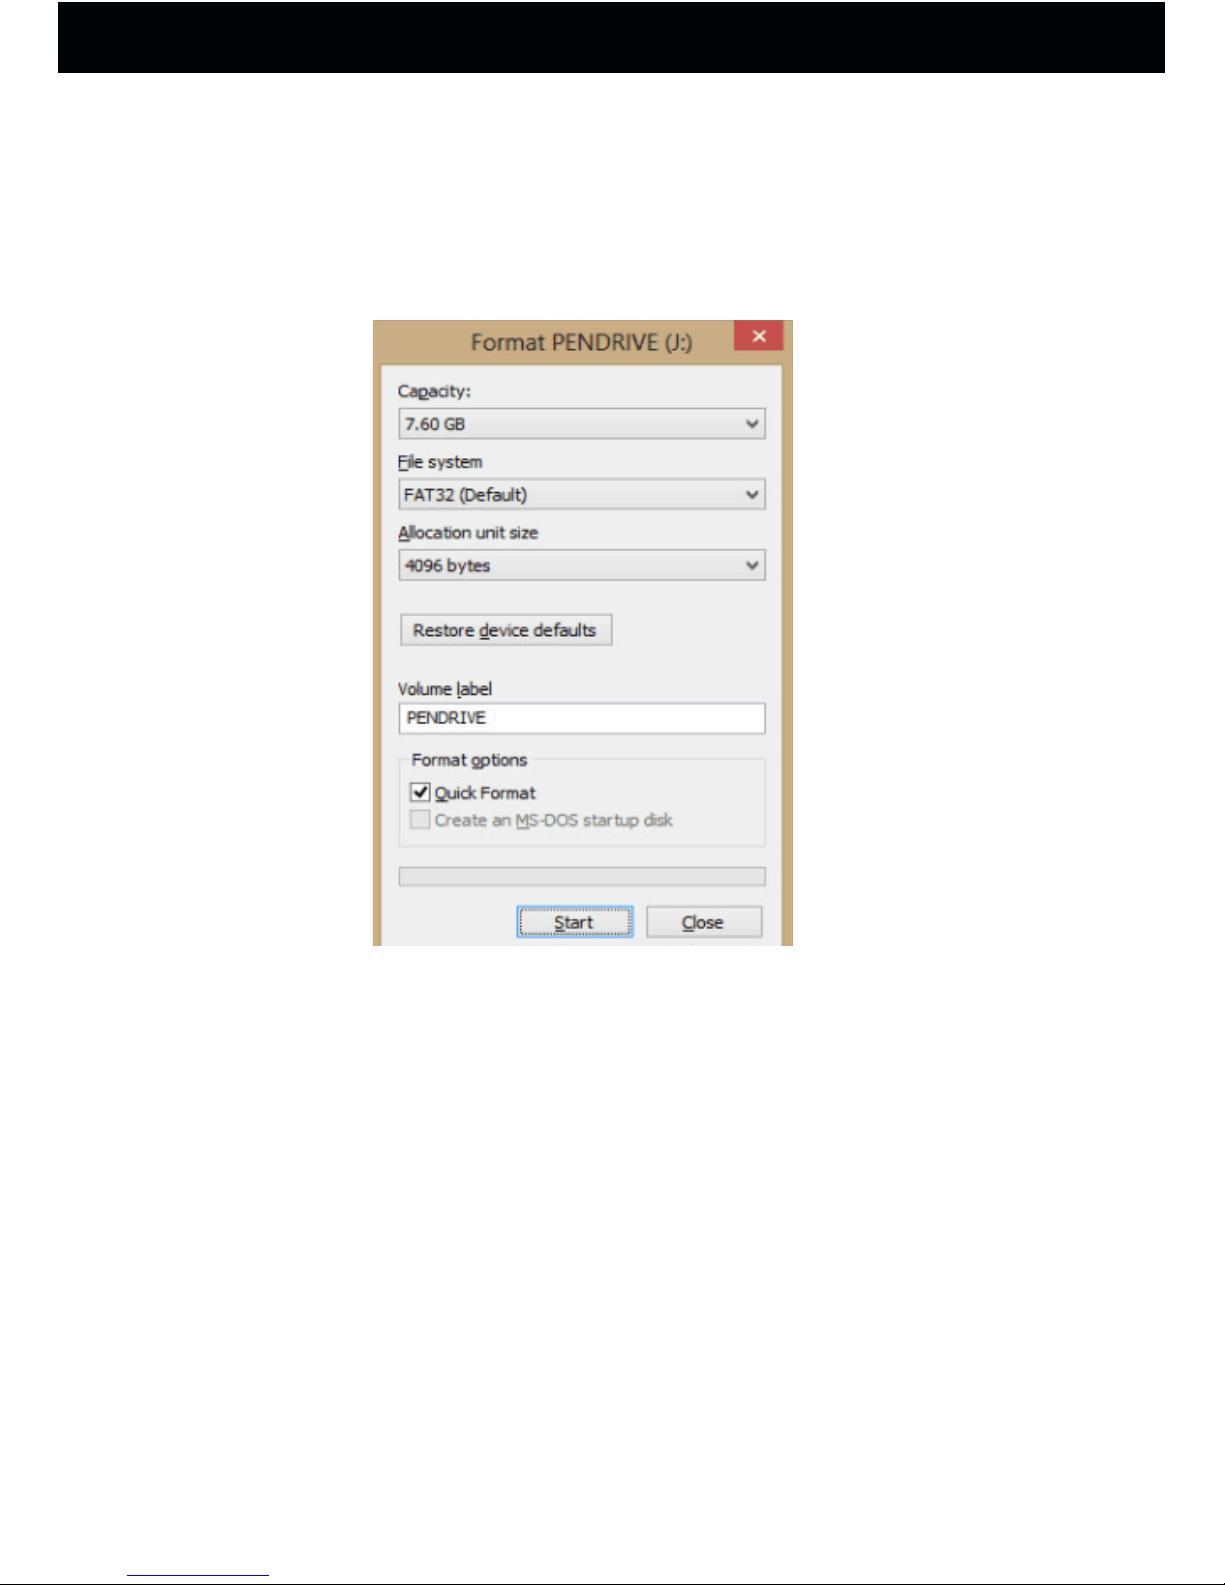
Before the first use, format the microSD card to FAT32
format (applicable to Windows system ONLY). The
camera only supports class 10 microSD cards with at
least an 8GB capacity. It supports cards up to 32 GB.
1
Page 4
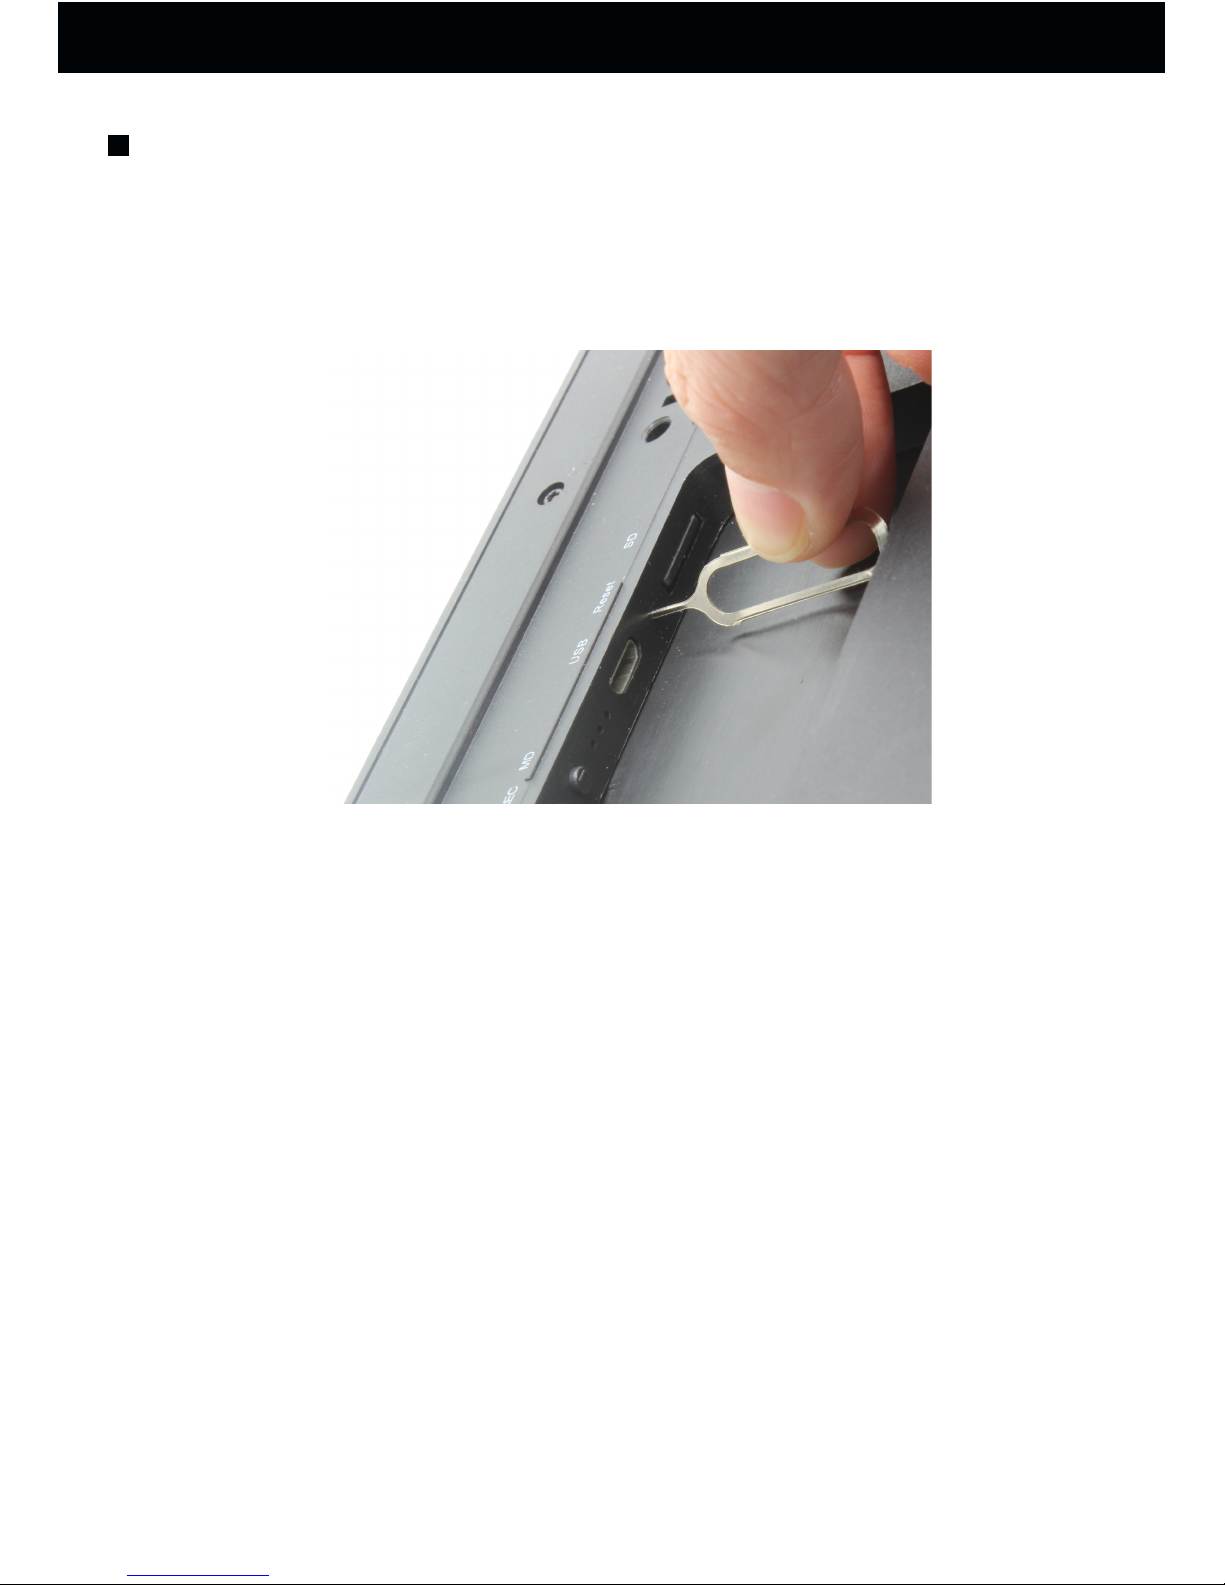
Resetting the camera
If the camera malfunctions for any reason, reset it with
the included pin. A small paperclip can also be used.
Part 1 Before First Use
2
Page 5
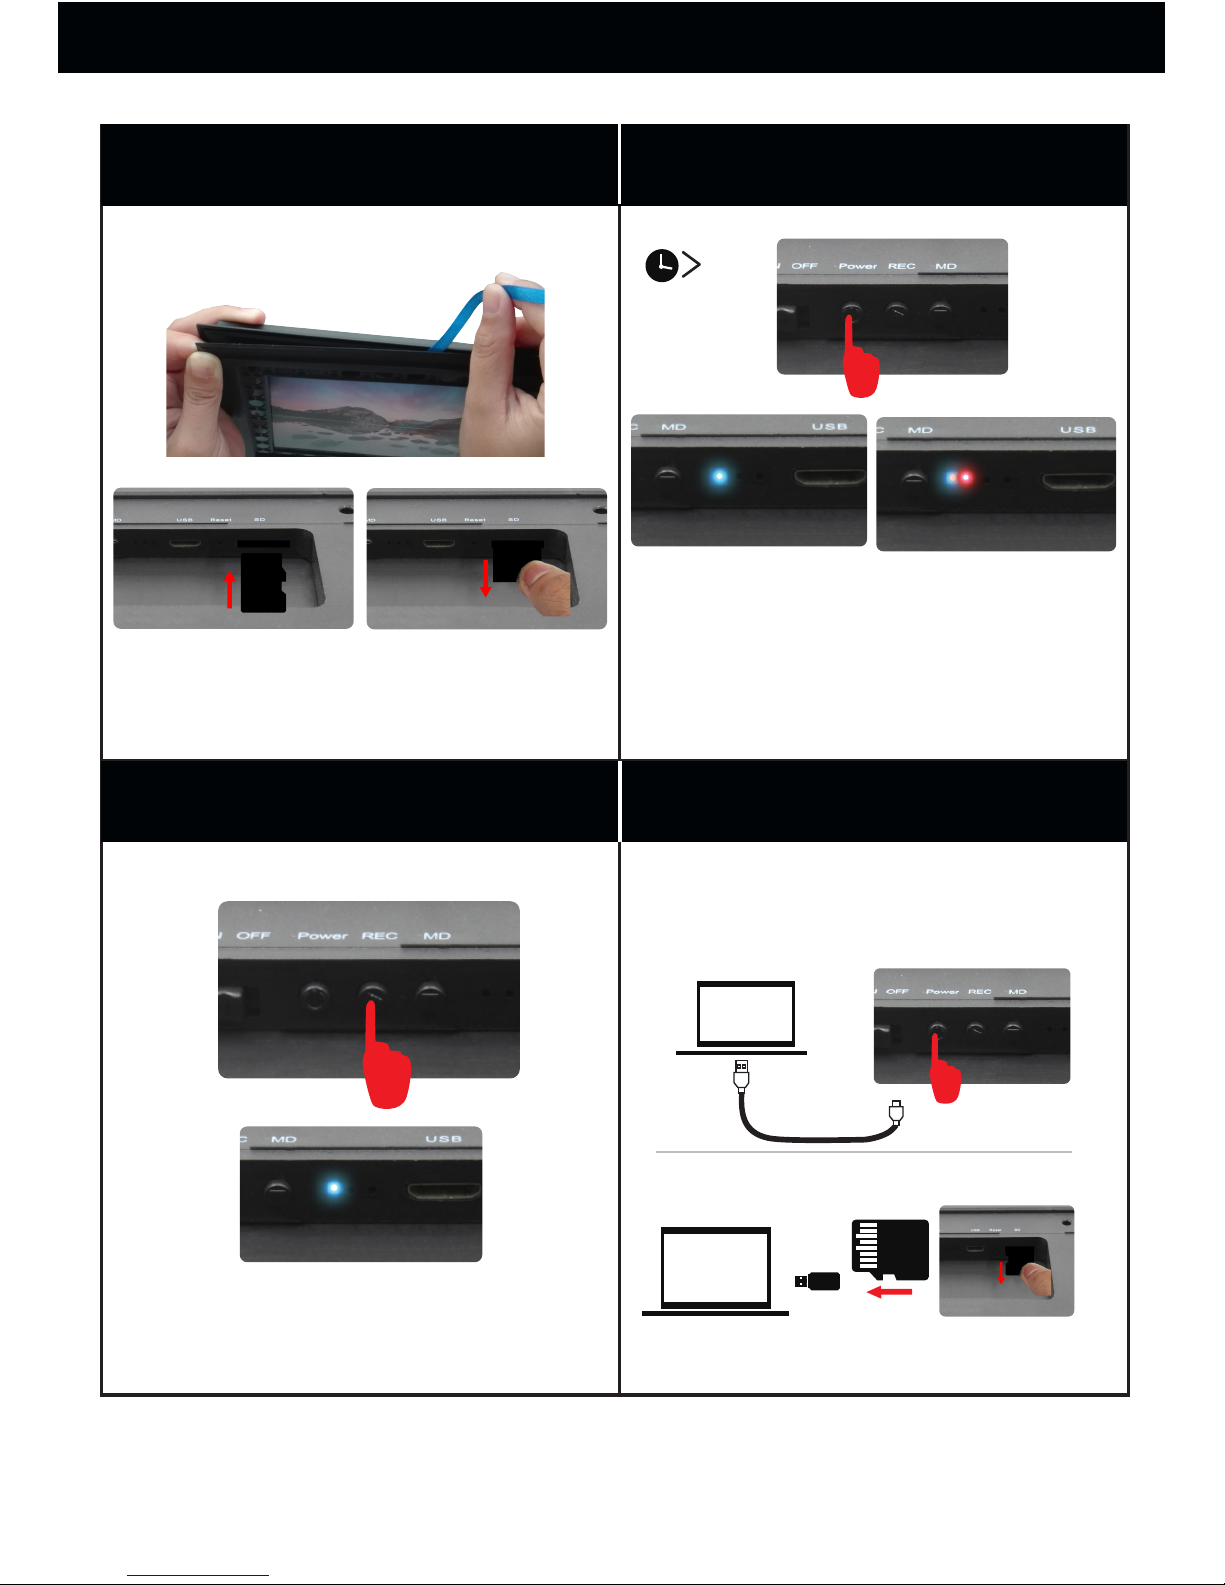
A.Take off the frame front cover
and install The micro SD Card
ON lights up
blue and the
camera is in
standby mode
OFF flashes
alternating red
and blue and
then turns off
Record a Video
flash 3 times blue
C.Record A Video
B.Turn On/Off
D.Play The Video
Power On
1
2
USB2 .0
For more detailed information, see Part 3: Detailed User
Manual.
2S
Part 2 Quick Guide
3
Page 6

Safety precautions
Read this instruction manual carefully before using the
camera. It contains important information for your safety
as well as operating and maintenance instructions.
Follow all safety precautions in order to prevent damage
due to improper use of the camera.
Keep this user manual carefully for future use. Should
this camera be passed along to a third party, this user
manual must be handed on as well.
Use the camera only for its intended purpose.
In the event of improper use or erroneous handling, no
liability can be assumed for any possible damage which
may occur.
Never try to repair the camera yourself. Only allow
qualified personnel to repair the camera in the event
of malfunctions.
Warning! The camera is not waterproof. Never immerse
the camera in water or other liquids while cleaning or
operating it.
Do not open the housing under any circumstances.
Do not introduce any metal objects into the interior of
the housing.
Never use accessories which are not recommended by
the manufacturer.
Keep the camera away from all hot surfaces and naked
flames. Protect the camera from extreme heat and cold,
dust, direct sunlight, humidity and drops or jets of water.
Do not place any heavy objects on the camera.
The manufacturer is not responsible for any missing video
data due to maloperation, microSD card malfunctions,
camera angle limitation, etc.
Part 3: Detailed User Manual
4
Page 7

The camera should be used for legal purpose only.
Follow the laws of your country.Recording and circulating
an image of an individual may constitute an infringement
of their privacy for which you could be liable. Ask for
authorization before filming individuals, particularly if you
want to keep your recordings and/or circulate images on
the Internet or any other medium. Do not circulate a
degrading image or one which could undermine the
reputation or dignity of an individual.
Warning on invasion of privacy
5
Page 8
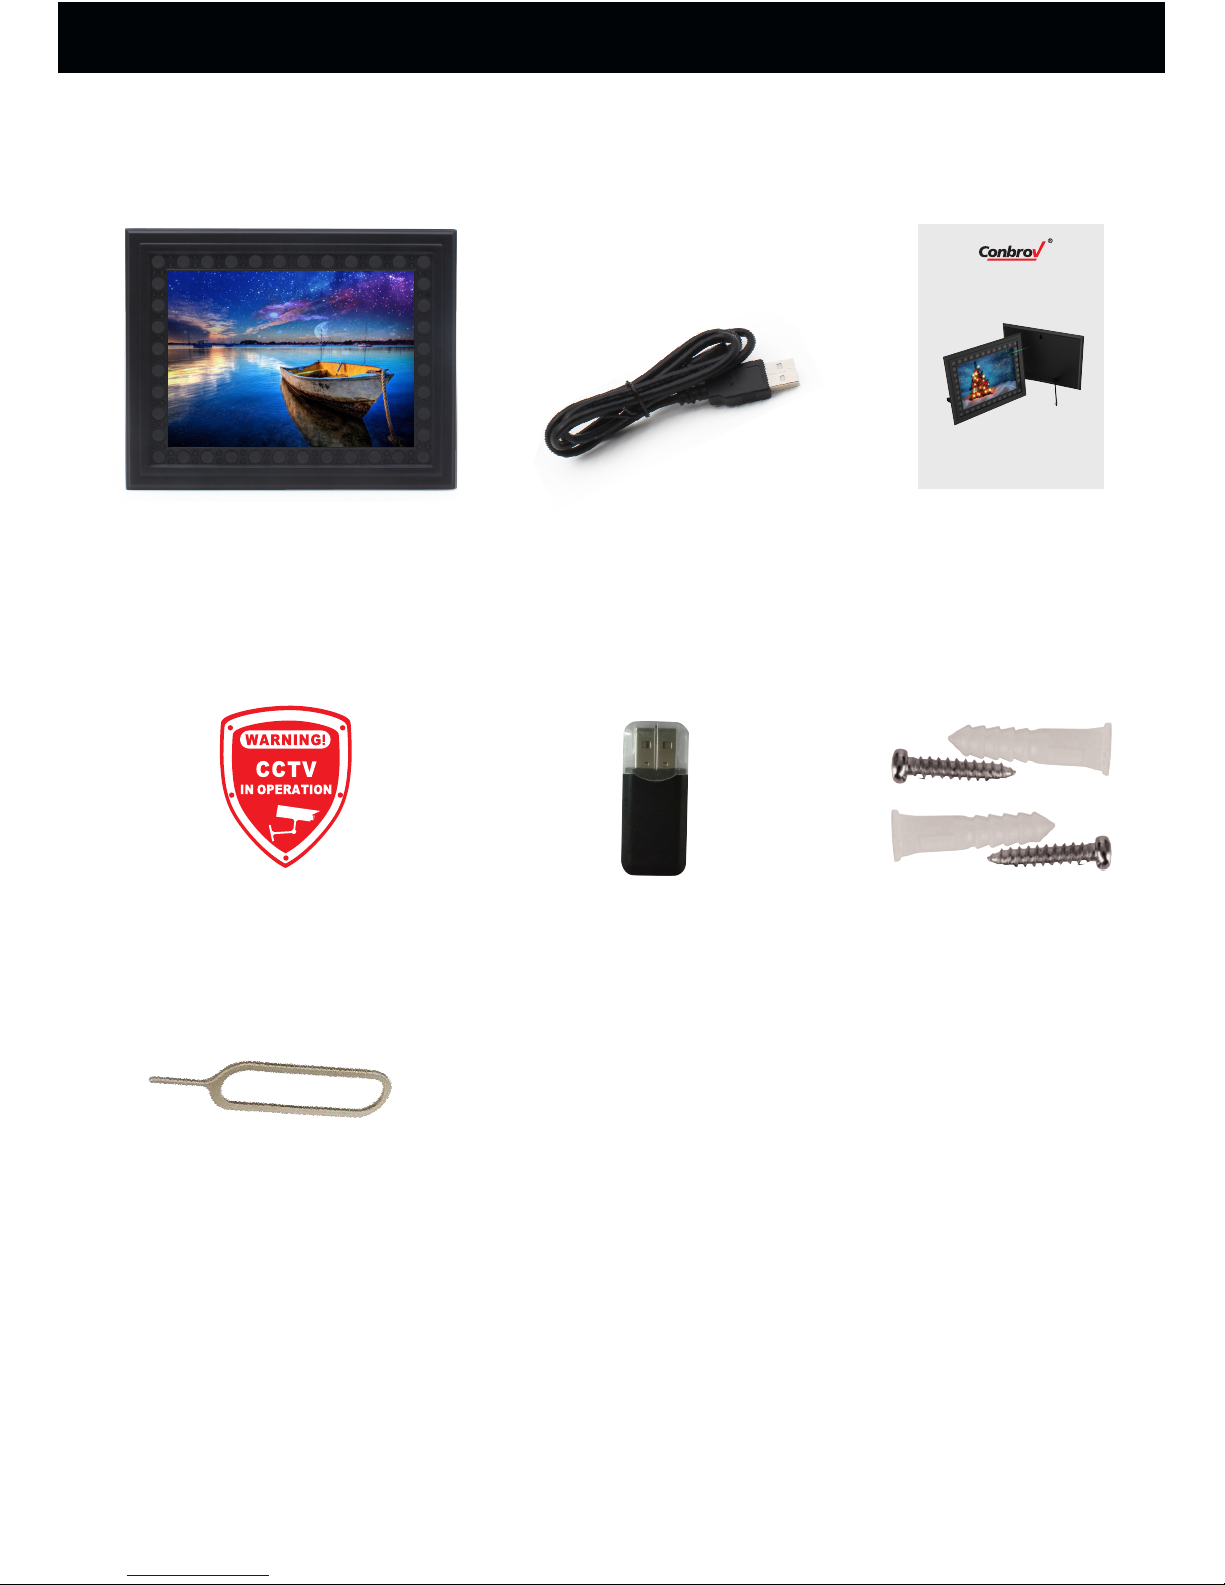
T10 P hoto Fr ame Cam era-B lack
Use r Manua l
Mod el No.: T1 0
Camera
Manual
USB cable
Warning sticker
Card reader Screws
What's included
6
Pin
Page 9
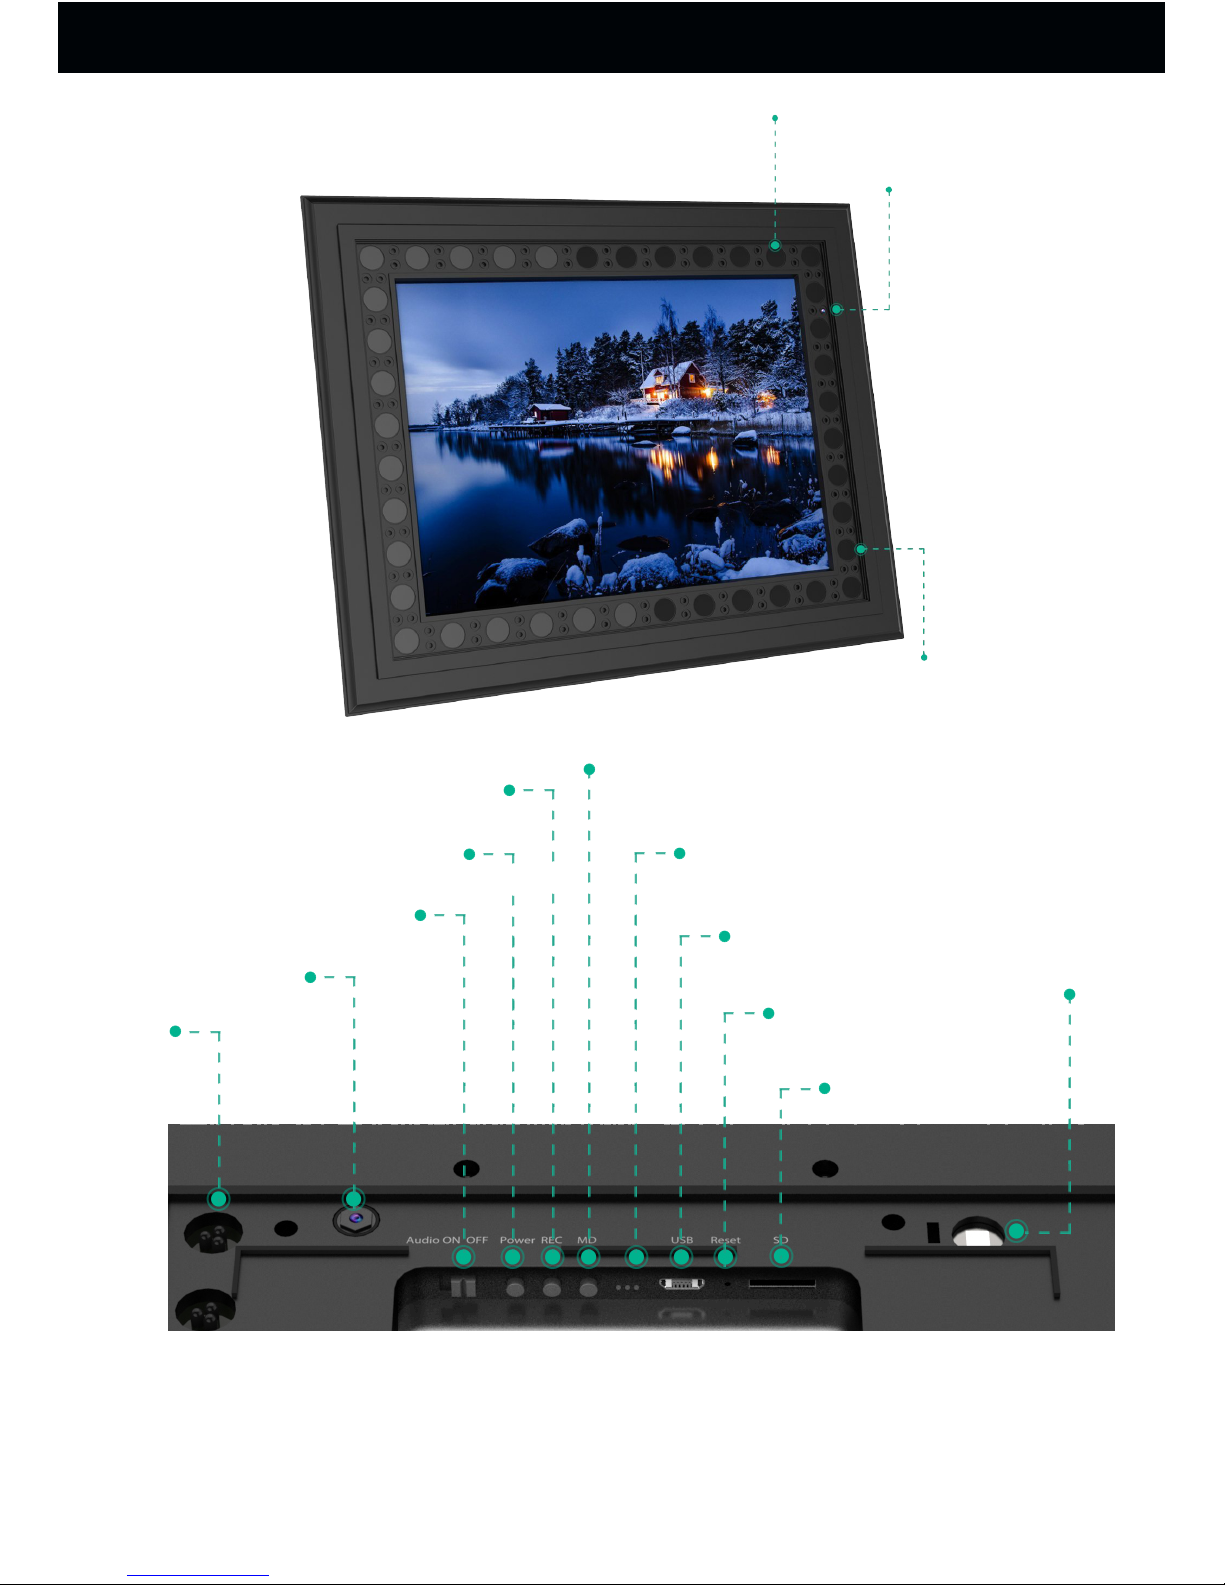
invisibie LED
Camera Lens
PIR
LED
Camera lens
Audio(on/off)
Power
REC
MD
lndicator
USB
Reset
Micro-SD
PIR
T10 Diagram
7
Page 10
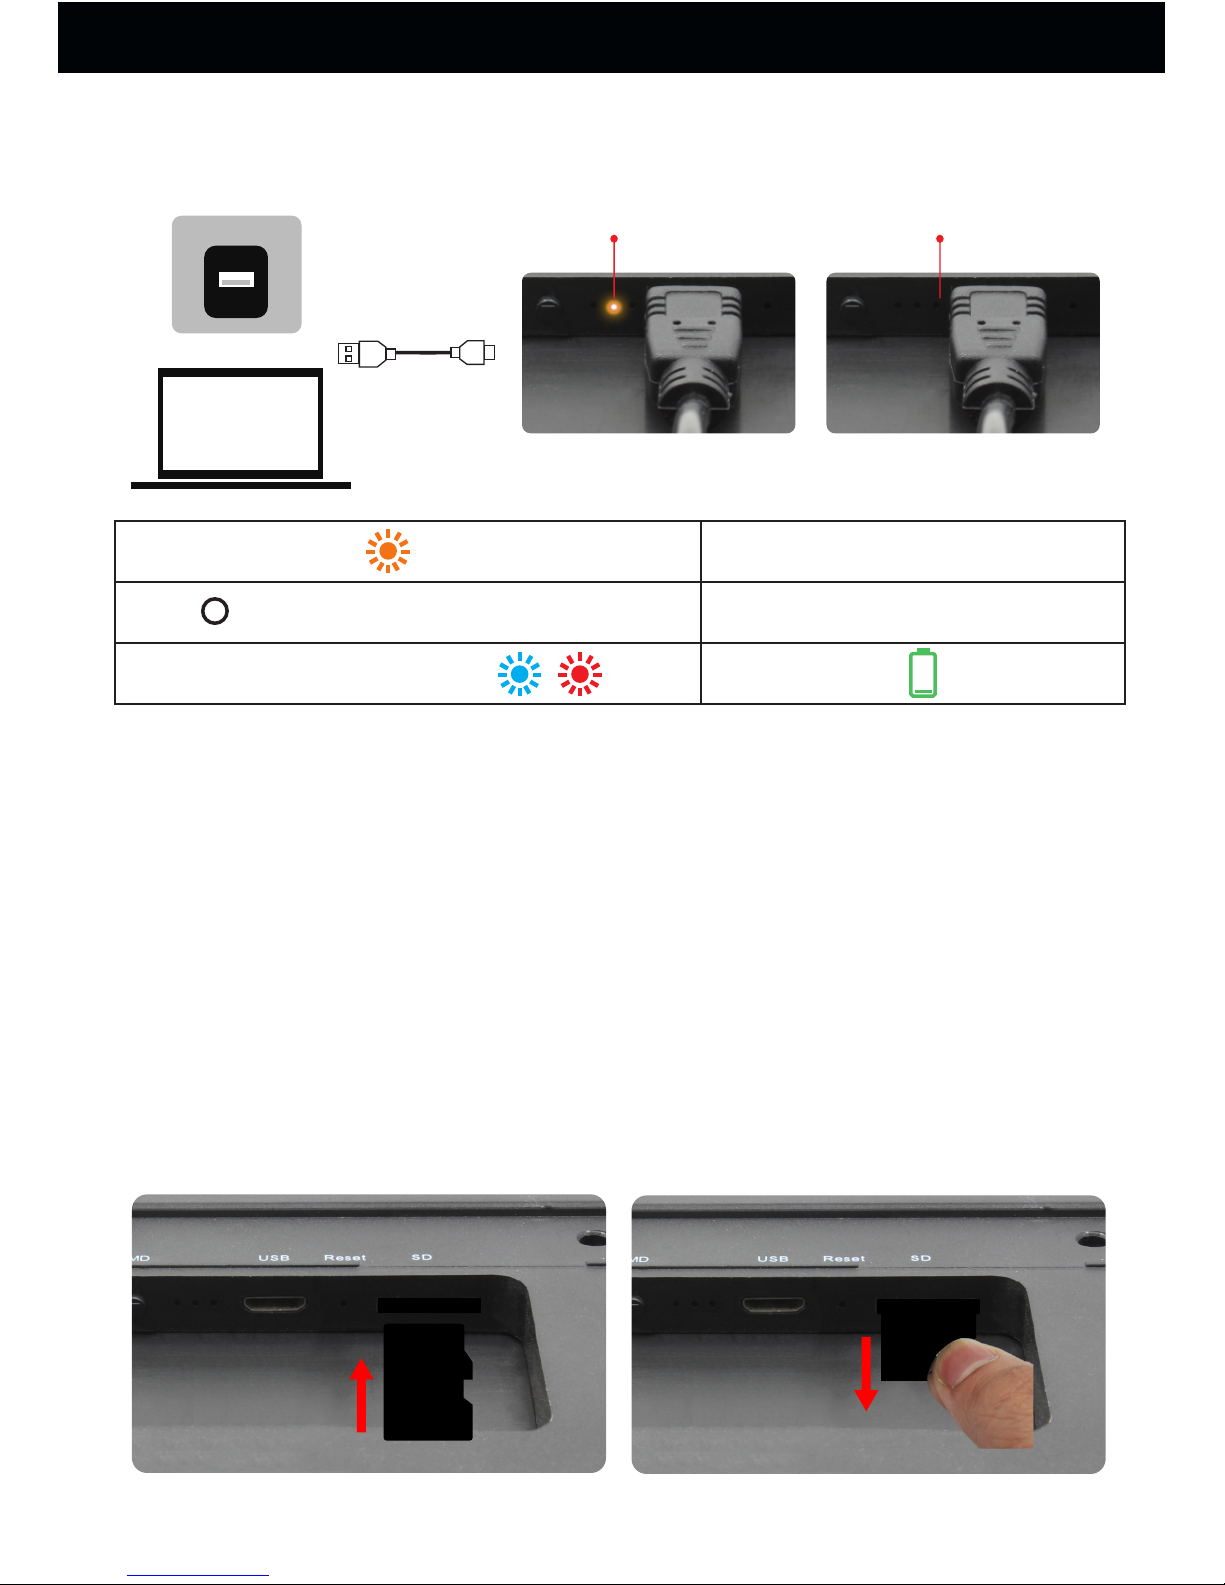
1.Charging your camera
Off
Yellow indicator
Steady yellow
Off
Flashing blue and red
Charging
Fully charged
Low power
(1)It is suggested to turn off your camera during charging.
(2)Connect the supplied USB cable to the Micro USB port
and a suitable USB port on your PC or a USB charger
(separate charger not included). The yellow LED is on
while charging. The charge time is about 20 hours.
(3)The yellow LED turns off when the camera is fully
charged.
2. Installing the microSD card
Before Using Your Conbrov T10 Camera
8
Page 11
Before Using Your Conbrov T10 Camera
Caution! Format the microSD before use. Doing this,
however, will remove all data from the card. Make sure
to back up any data before formatting (applicable to
Windows system ONLY)
(1)
capacity for recording.
(2) Do not remove the microSD card during operation. It
will damage both the memory card and camera.
(3)Push the microSD card into the memory card slot
gently until it clicks into place. The card only fits one
way, so do not force the card into the port.
(4)To remove the microSD card, make sure the camera is
OFF. Press down on the microSD and it will pop up,
you can then pull it out easily.
Only supports a Class 10 microSD with at least 8GB
9
Page 12
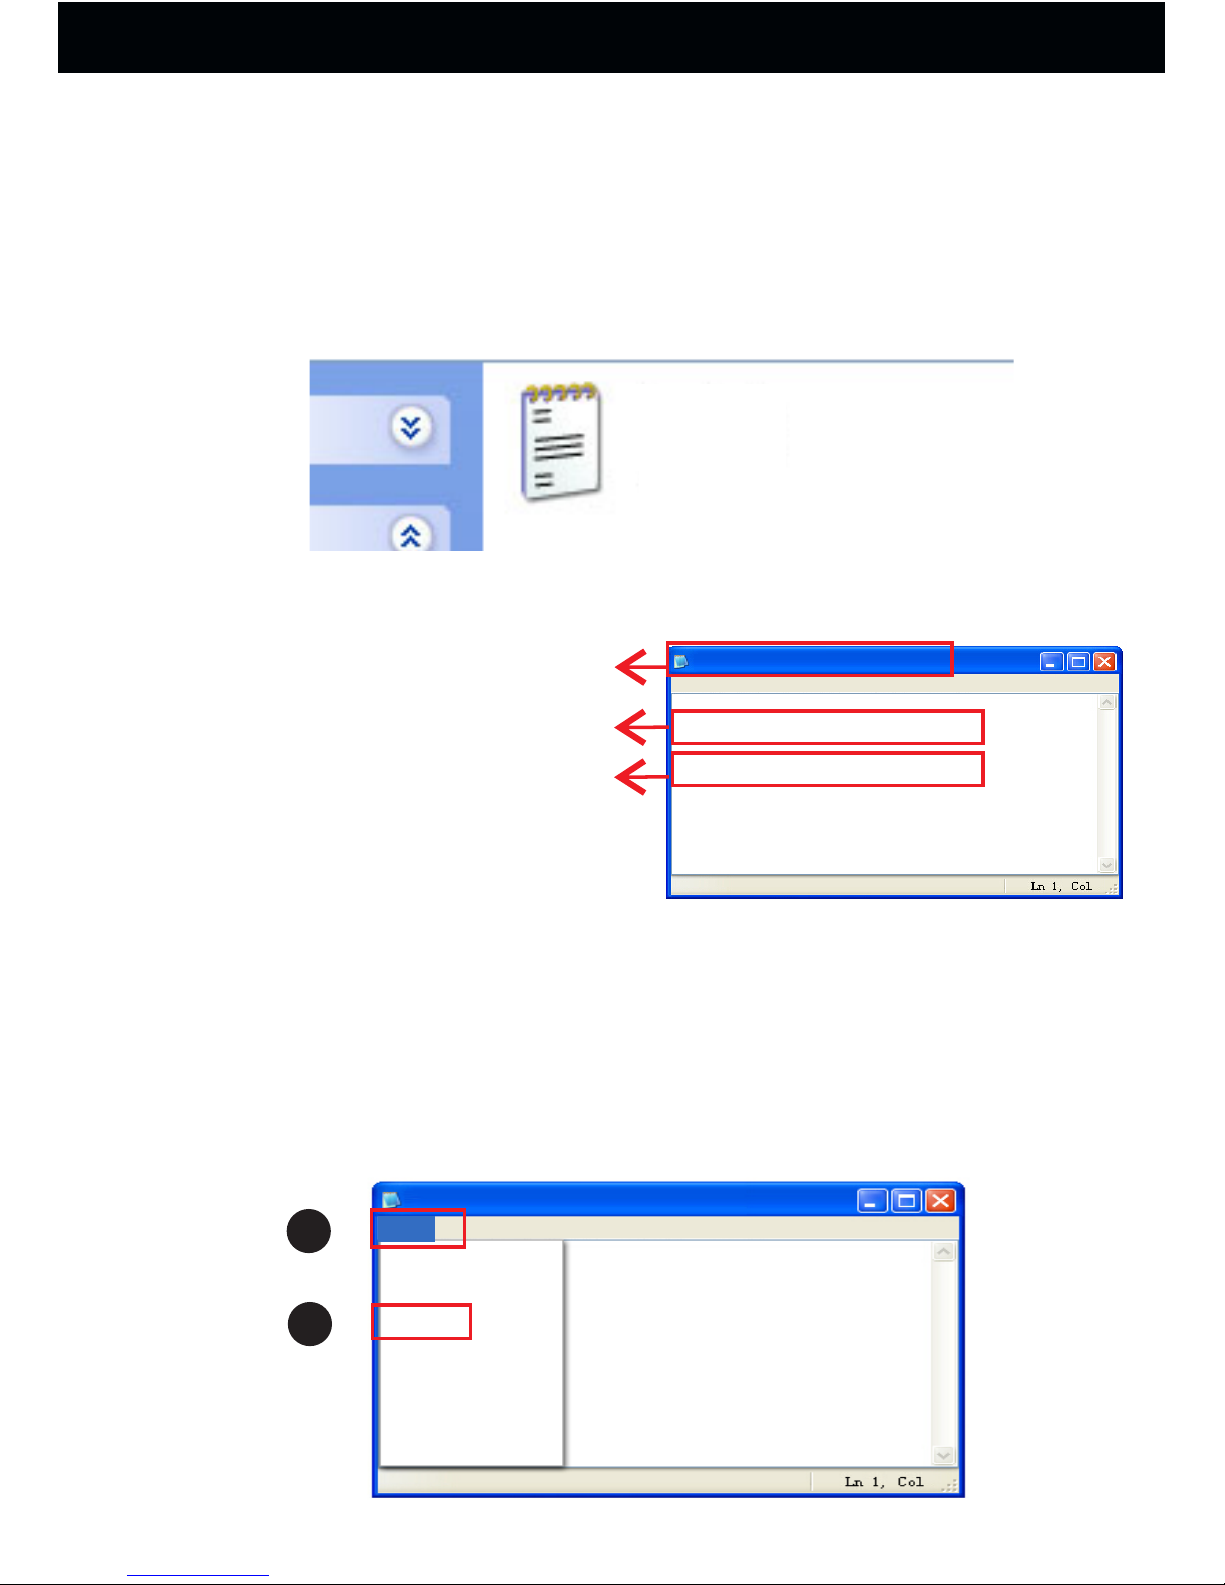
Insert the microSD card into the card reader and connect
the card reader to your PC. After a few seconds the
microSD card will be shown as a removable disk. Open
the SETTIME.TXT file.
SETTIME
The following menu will be displayed:
SETTIME.TXT
file Edit Format View Help
2016-07-15, 23:59:59
yes
yyyy-mm-dd, hh:mm:ss
yes: loop recording on microSD
no: no loop recording
Time format:
File name
Modify date and time on the computer.
After setting date and time, click on “File” and then on
“Save”.
Please do not add any blank or characters to change the
existing format.
New
Open
Save
Save as
Page settings
Print
Exit
File
Edit Format View Help
SETTIME.TXT
1
2
3. Setting the Date and Time.
Before Using Your Conbrov T10 Camera
10
Page 13

Note: If you cannot find the file SETTIME.TXT after
opening the microSD on the computer, please record a
video clip to activate the card and set the date and time
again. The date and time will remain accurate unless the
battery has been depleted for long time.
Before Using Your Conbrov T10 Camera
11
Page 14
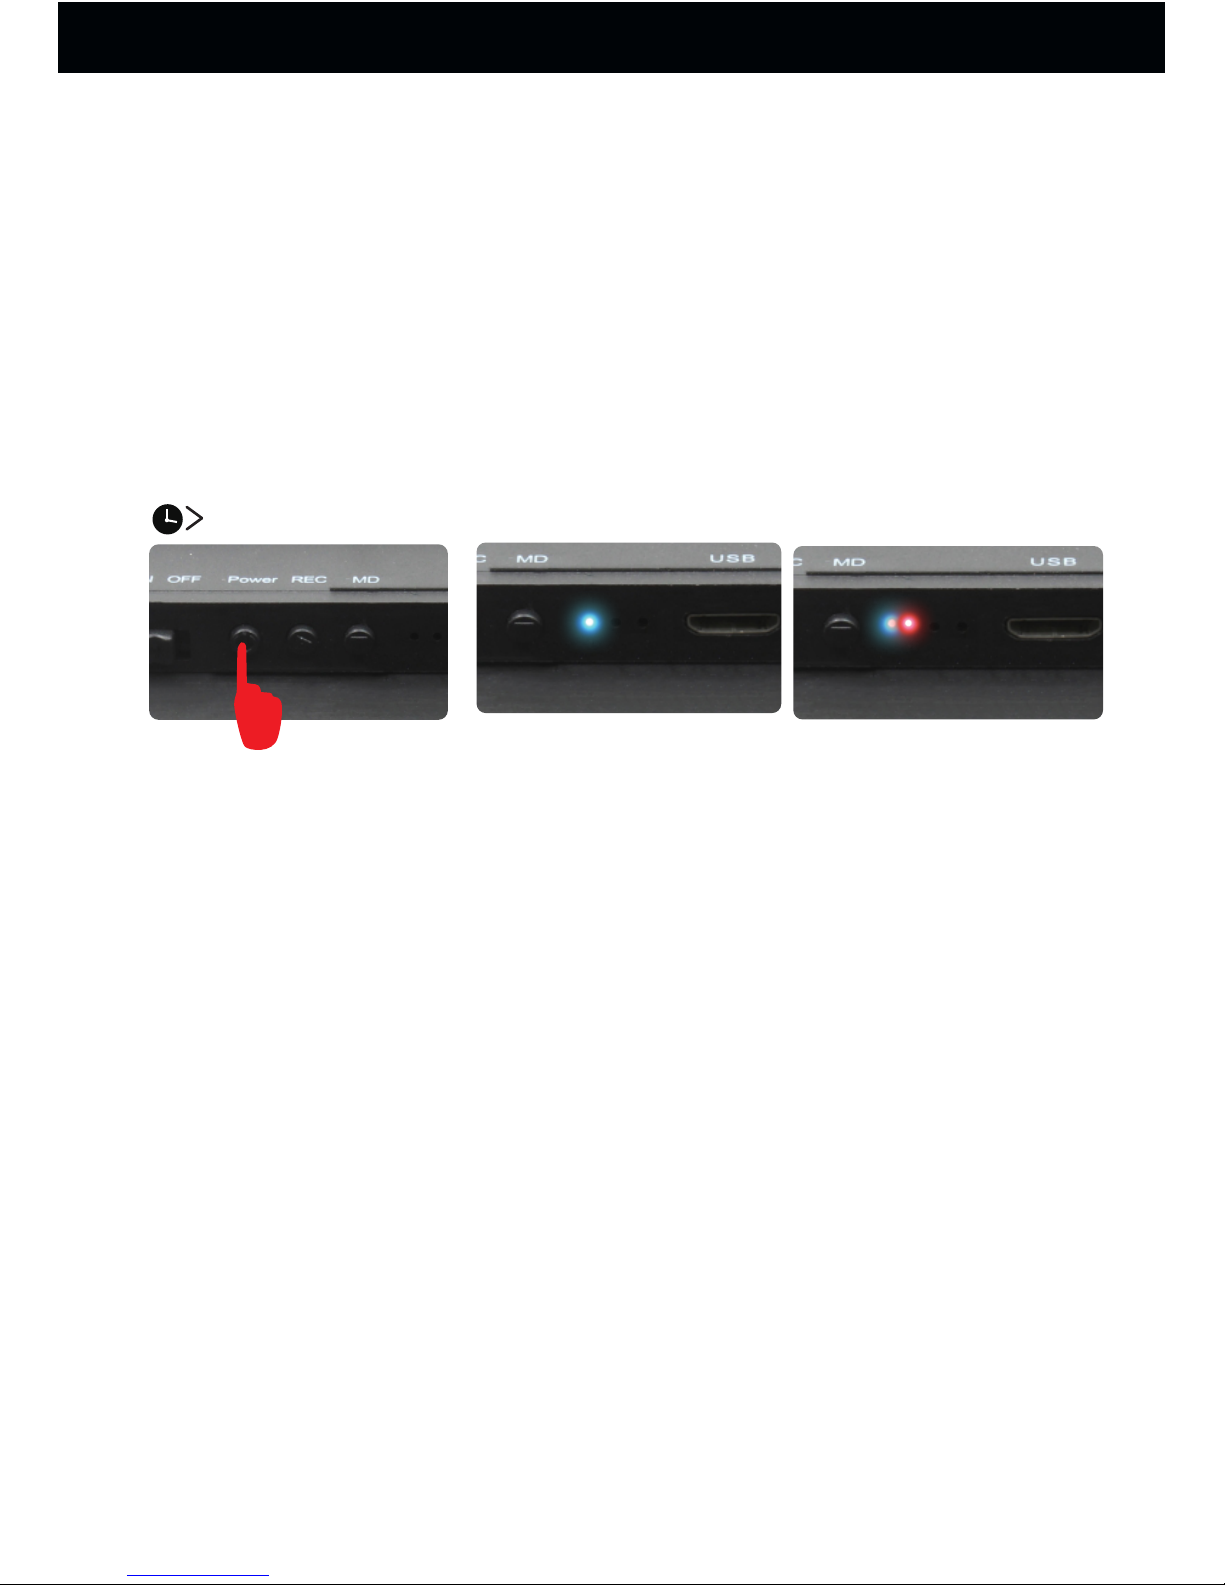
1. Turning the Camera On/Off
Using the ribbon to take off the frame front cover first.
(1) Press and hold the power to switch the camera on.
The LED will light up blue, which indicates that it is in
standby mode.
(2) Press and hold the power to switch the camera off.
The LED will flash alternating red and blue and then
turn off.
ON lights up blue and
the camera is in standby
mode
OFF flashes alternating
red and blue and then t
urns off
Note: If the camera switches off automatically, there
are two reasons:
1. The battery power is too low and the camera must be
charged.
2. The camera has been in standby mode without any
operation for longer than 1 minute. In this case, the
camera switches off to save battery power.
2. How to Record A Video
(1) PIR motion detection video record
Press MD button to enter 1 minute test recording. The
Blue and Red LED indicator will flash and then go off,
The Red LED indicator stays on .
2S
How to Use Your Conbrov T10 camera
12
Page 15
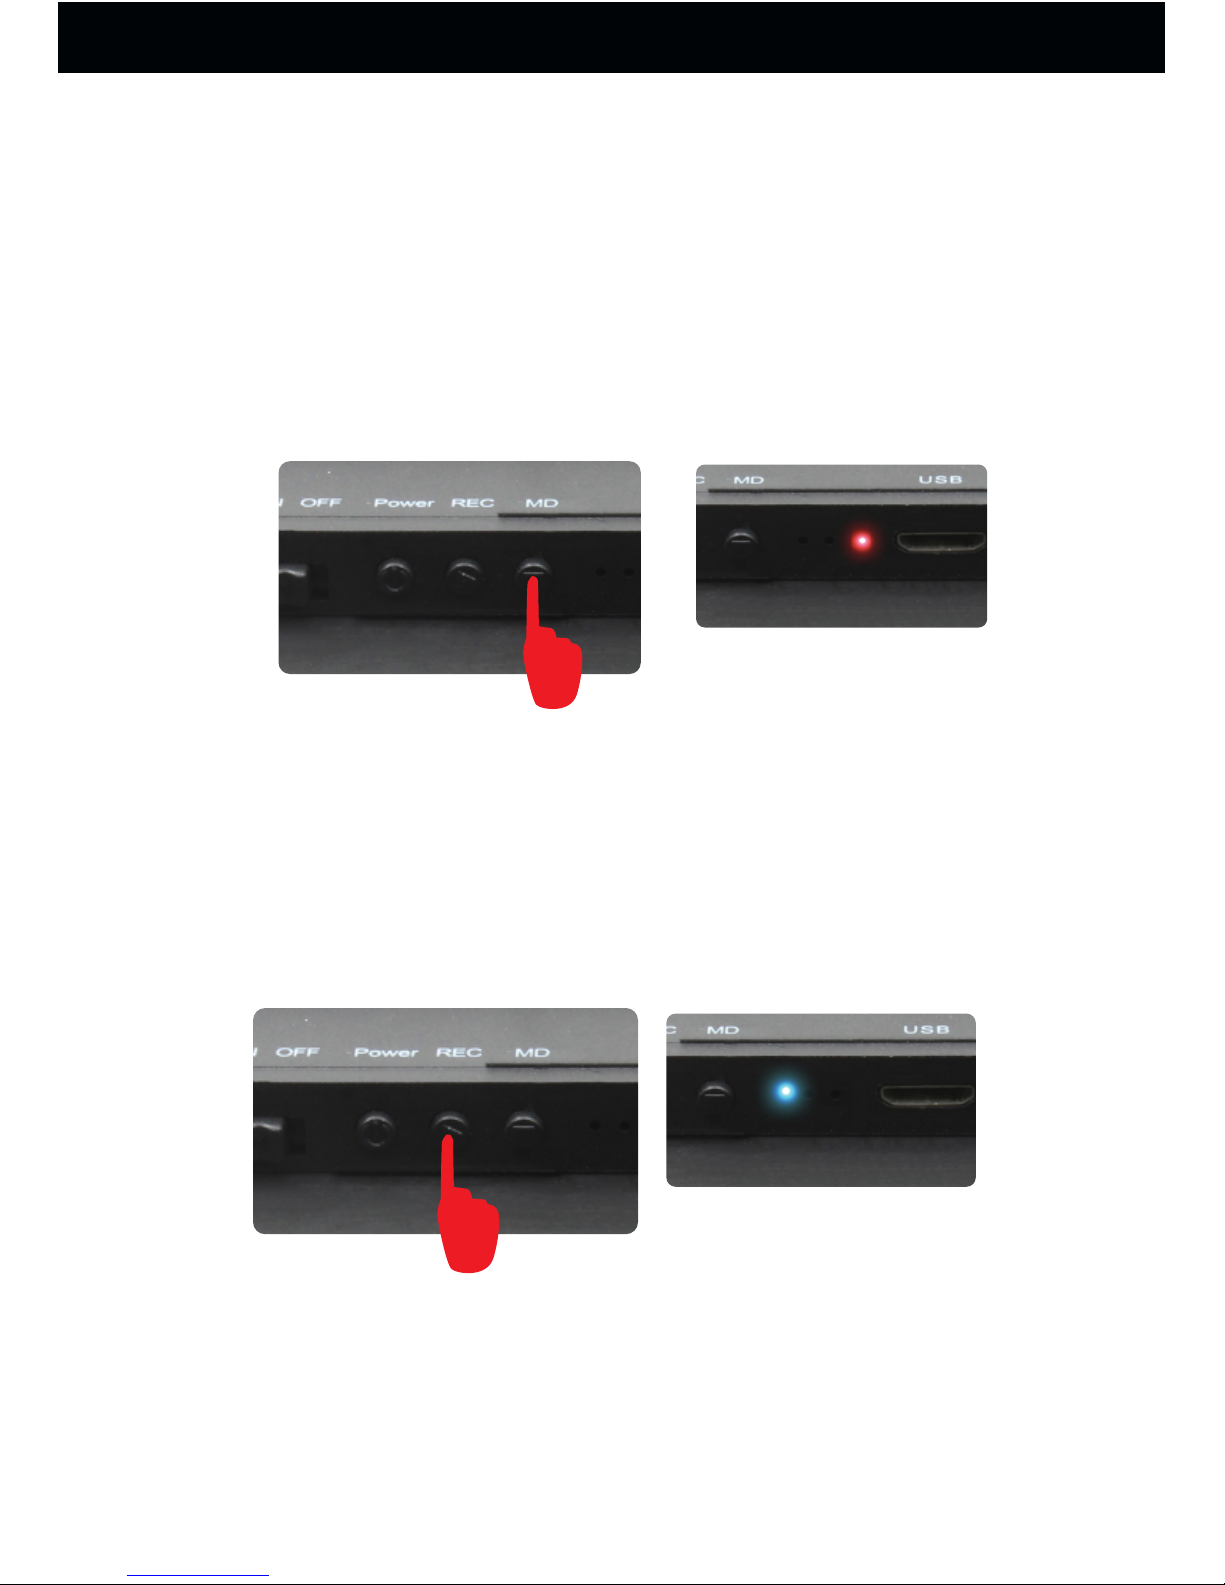
After test recording, the PIR motion sensor is triggered
while detecting a motion and the camera enters motion
detection recording mode, The Blue and Red LED
indicator flash 3 times. The Red LED indicator is always
on.Press MD button again to stop recording, The Blue and
Red LED indicator will flash and then go off, The Red
LED indicator goes off. The device will powered off.
(2)Record continuously
Turn the camera on, then press REC button to record
continuously, and the LED flashing blue 3 times then
goes off. Press REC button again to stop recording
and the blue light will stay on. The device will be in
standby mode.
Record a Video
flash 3 times blue
Note: If no microSD is inserted, the blue LED will flash
blue for 3 seconds then turns off.
How to Use Your Conbrov T10 camera
13
Page 16
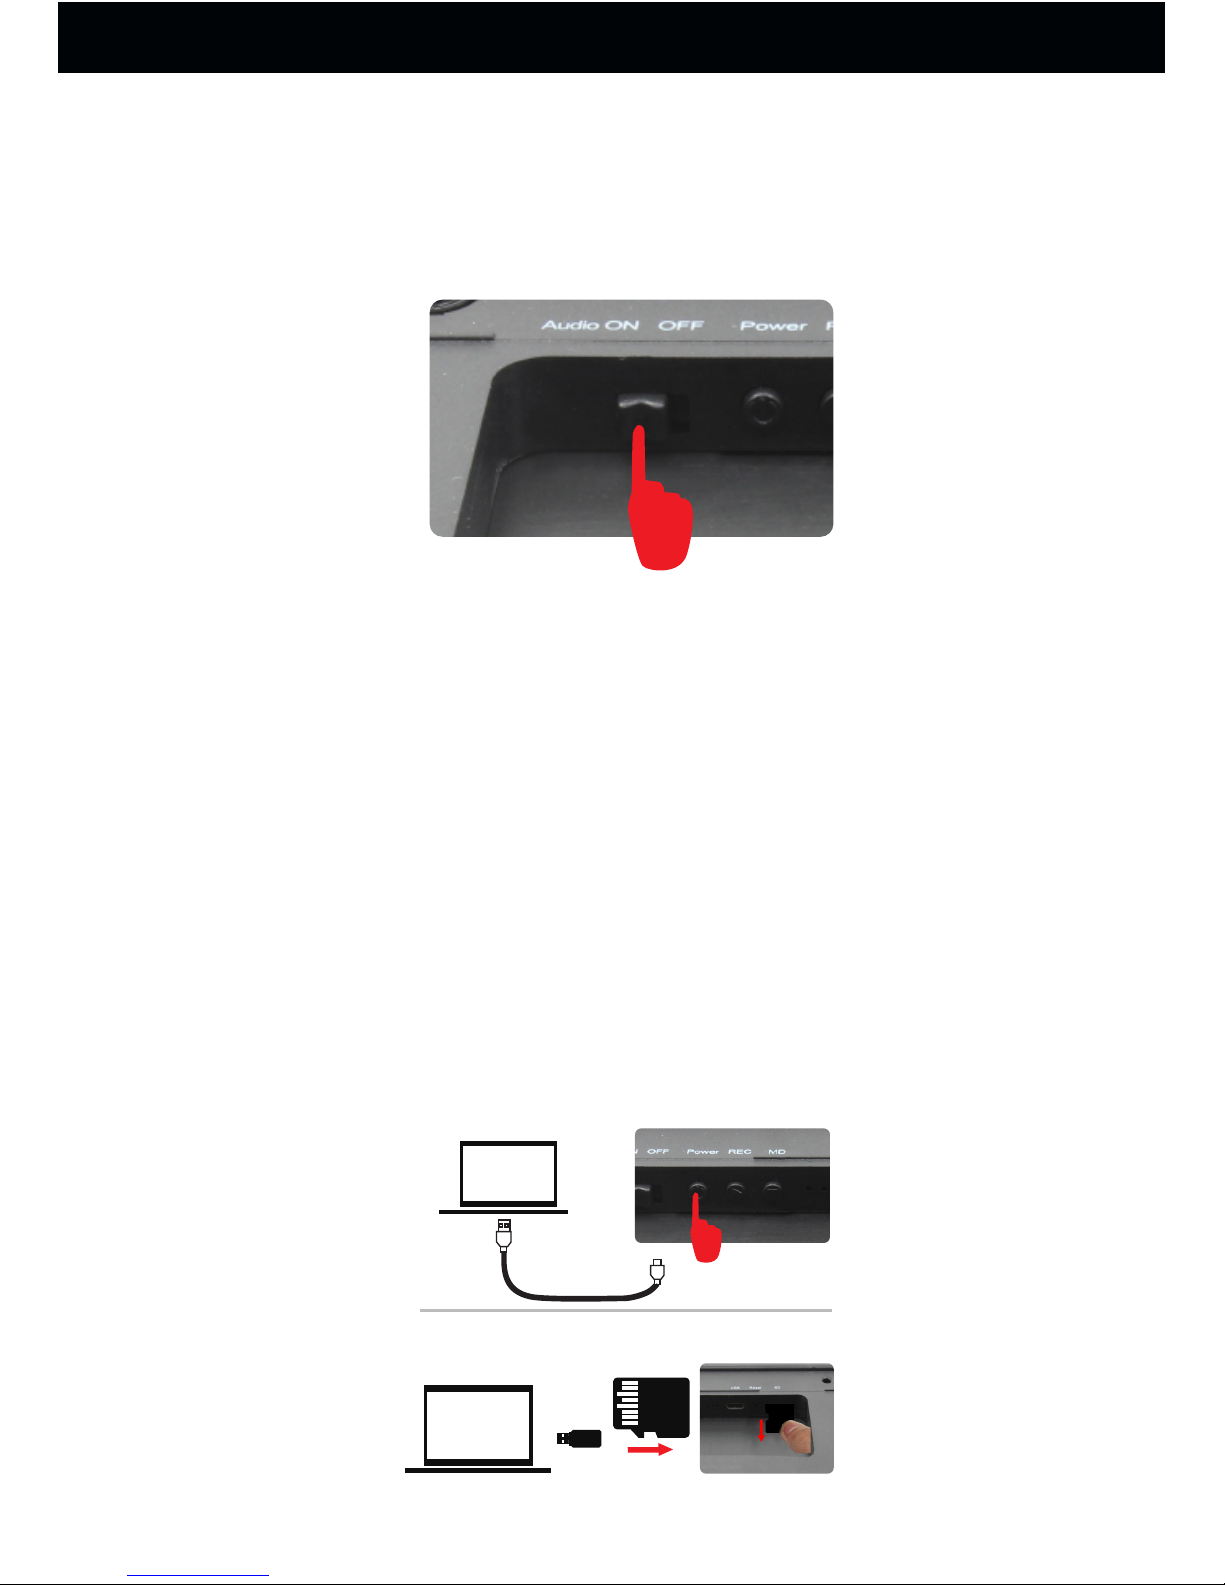
3. How to Record with Sound
Only switch the Audio on button to record with sound
in any condition, switch to off button to record without
sound.
4. How to enter into Night Vision
Whether under PIR motion detection video recording or
recording continuously, when ambient light brightness
is lower than 20LUX, the camera will automatically
switch into night vision and the video is black and white.
5. How to Play a Video
Turn on the camera first, and then connect the T10 camera to
computer via USB cable. Or take out the microSD, insert it into
the card reader (included), then connect the card reader to
computer.After a few seconds, there will be a removable disk
shown on computer. Open it, and then you'll see the Video file.
Open it to play the videos.
1
2
USB2 .0
Power On
How to Use Your Conbrov T10 camera
14
Page 17
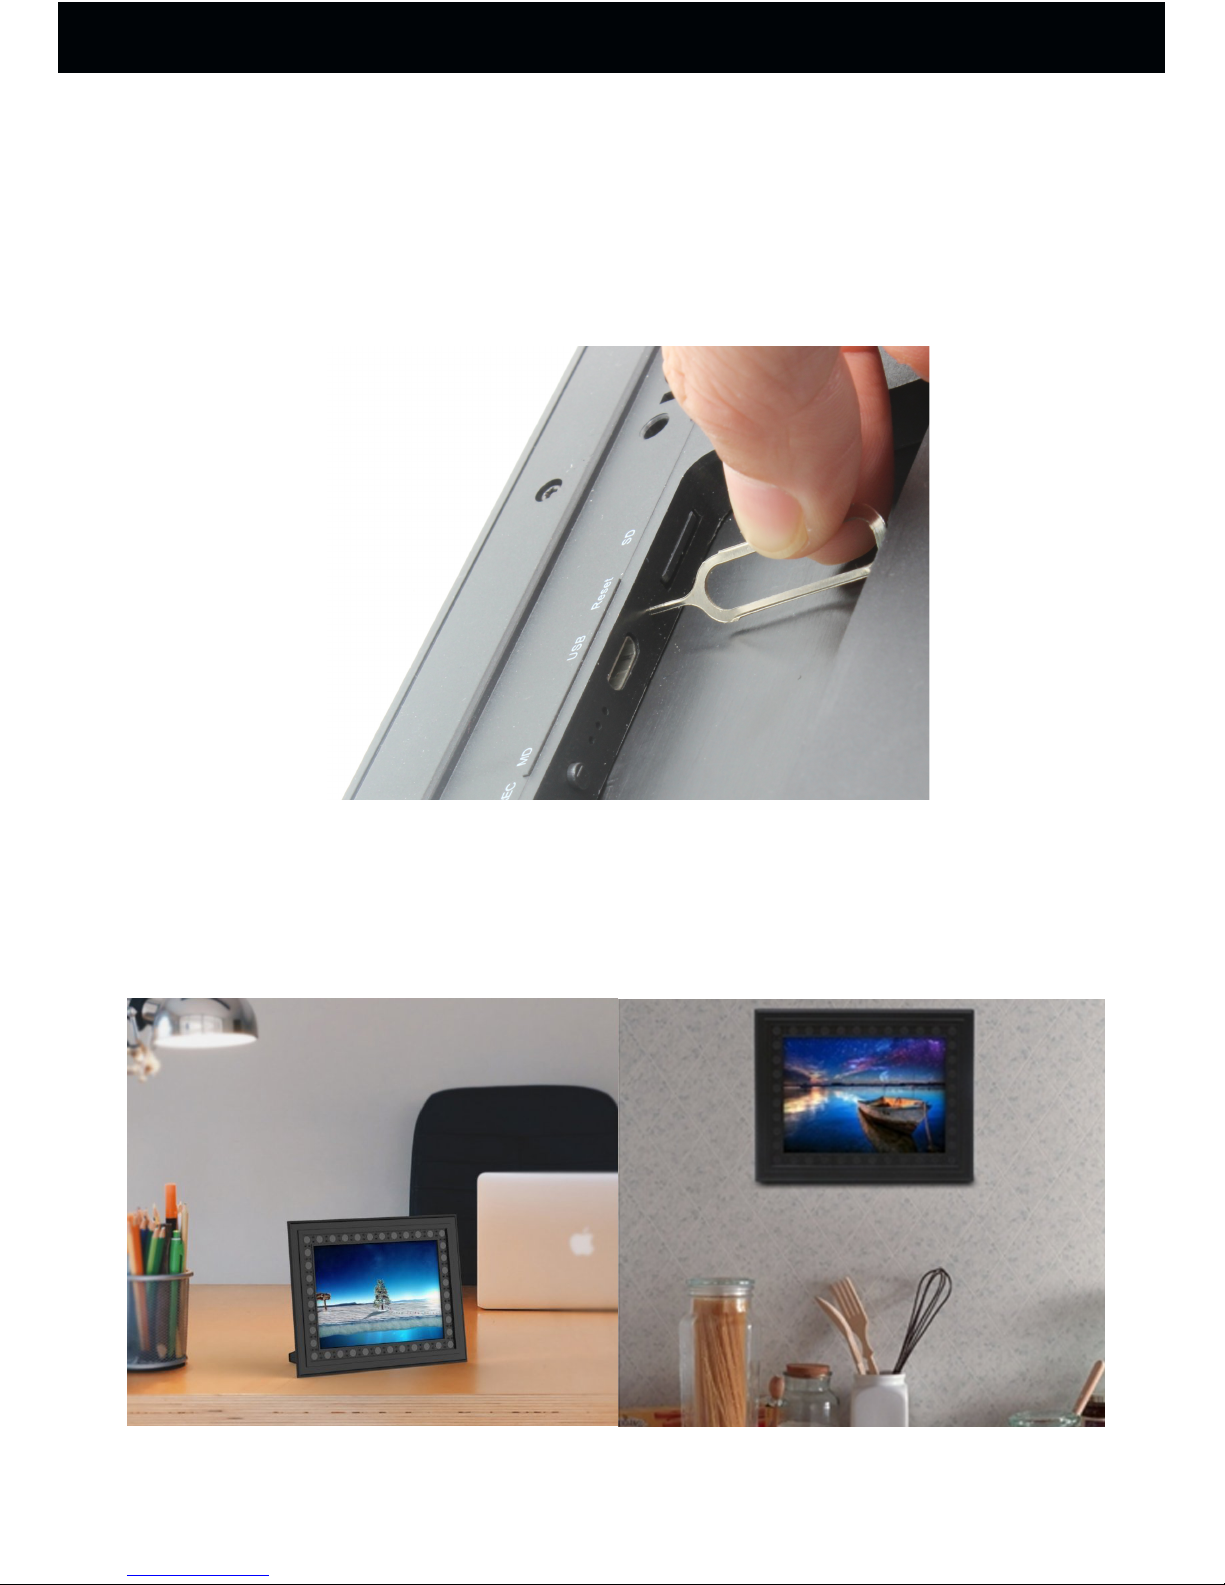
1.How to Reset the Camera
Use the supplied pin or similar tool (like a paperclip)
to reset your camera in case of a malfunction. Press
the Reset Button to reset the camera to standard
factory settings.
2. How to set up the Camera
You can put it on your desk or hang it from the wall by
the hole.
Other Tips
15
Page 18

LED status
Starting up with SD card
LED stays on blue
Starting up without SD card
LED flashes blue 10
seconds and goes off
Power on
LED stays on blue
Record continuously
LED flashes blue 3 times
and then goes off
PIR motion detection video
record
LED lights up blue then
off, and the red light stays
on
Low battery
LED flashes alternately
Red and Blue
PC charging
LED stays on Yellow
USB charging
LED stays on Yellow
Fully charged
LED Yellow lights off
Power off
LED lights up blue and red
then goes off
16
Page 19

Technical specifications
Item
Parameter
Battery
Lip
Video compression
M-JPEG
PIR detection angle
0
60
PIR detection distance
5-8 meters (15-25 feet)
Camera angle
0
75
Focal distance
2.8mm
Memory extension supported
Up to 32G
Max PIR standby time
About 2 years
Day time recording power
consumption
220mA
Max day time recording time
30 hours
Night vision recording power
consumption
840mA
Max night vision continuously
recording time
About 10 hours
Fully charging time
About 20 hours by USB
power adapter, 30 hours
by PC
Dimensions
245*195*14mm
Size of photo
180*130 mm
Resolution
720P
FPS
FPS30FPS
10000mAhBattery size
PIR MD video record
About 1 minute per file
Record continuously
About 10 minutes per file
Loop recording
optional
17
Page 20

FAQs
1.Q: What kind of microSD card does it support?
A: It only supports a Class 10 microSD with at least 8 GB
capacity for recording and supports cards up to 32 GB.
2.Q: How to format the microSD and what format does it
support?
A: Please format the microSD to FAT32 on Windows system.
3.Q: How long does the camera recording to a 32 GB SD
card?
A: In generally, it takes about 4.5 hours to fill the 32GB SD
card.
4.Q: How will the night vision mode work? Is there a night
vision mode that you have to set or does it just sense
that it's dark? Does the camera record in color?
A: It will sense the darkness automatically and switch it self to
night vision when the light is less than 20 LUX.It records in
black and white for night vision, but in color for day time.
5.Q: How long it will last to record when charged fully?
A: The camera can record 30 hours for day time, 10 hours for
night vision when charged fully. You can record during
charging, too. (Please note it will stop recording when SD
card filled without loop record)
6.Q: The LED turns on unexpectedly, button operation not
possible?
A: Reset the camera as described in Chapter “Resetting the
camera”.
7.Q: Why my camera cannot be recognized on the
computer?
A: Please turn the camera on first, and then connect the
camera to the computer via USB cable.
8.Q: How to set the date and time?
A: The camera has the date and time stamp, you can fix the
date and time on computer and don't forget to save the
fixed date and time at the end. For more details, see the
“Setting the date and time” part in user manual.
18
Page 21

FAQs
9.Q: Is the camera always recording in loop mode? How
can I turn off the mode?
A: Yes, it's defaulted to loop recording, and you can set
“no” for loop recording in the SETTIME.TXT file to turn
off the mode.
10.Q: Why I can't playback the video on the computer?
A: If you use Mac, please try VLC player. If you use
windows computer, please try KM player. Sometimes,
it is the problem of the media player.
11.Q: Why my video has no audio?
A: Please check that the audio on button is turn on or not
when you recording. If yes and still no audio, please
change the media play and try it again.
12.Q: Why the battery cannot last so long as said 2 years
standby time?
A: standby time means there is no motion to be recorded;
it can last 2 years when you fully charged the camera.
13.Q: How to install or remove the SD card?
A: Push the card that clip down into the slot until you hear a
click to install. Then Use your finger nail or the pin
(included) to push the card a little bit under the surface,
the card will pop itself out
19
Page 22
Warranty
All products sold by the Conbrov Group are covered by a
12-month full replacement warranty.
Happy with it? Share your experience with an Amazon review.
Or any questions?
Our friendly customer services team are ready to
help: [email protected]
Contacting us via the above email address is the quickest way
to reach our support team.
For the electronic user manual and more information,
please visit:
Disposal
Electrical products should not be discarded with
household waste. According to the European
Directive 2012/19/EC on waste electrical and
electronic equipment and its implementation into
national law, electrical products used must be
collected separately and disposed of at collection
points provided for this purpose. Talk with your local
authorities or dealer for advice on recycling.
Declaration of conformity
Conbrov Electron Co., Ltd., Room 908 Huiyicaifu Center, c/o
Queshan and Longhua Roads, Shenzhen, China, declares
under our sole responsibility that the product Starlight Mini
Camera T16, to which this declaration relates, meets all
relevant European standards and directives. For the complete
declaration of conformity visit our website www.conbrov.com.
Page 23

Trademarks
All trademarks or registered trademarks are the property
of their respective owners.
Manufacturer
Conbrov Electron Co., Ltd.
Room 908 Huiyicaifu Center,
c/o Queshan and Longhua Roads
Shenzhen, People's Republic of China
About Us
Conbrov Electron Co., Ltd. founded in 2003 is an innovative
technology research company specialized in personal
surveillance cameras and on-dash cameras. Conbrov products
and technology are patent protected by PCT or U.S. Patent
Office. Based on years of professional experience and
knowledge, we are able to provide the best and most efficient
products and customer service.
 Loading...