

Page 1
MINI PIR SECURITY CAMERA
MODEL NO: DV089
USER MANUAL
-
Please ensure that you read the complete user manual
carefully before using any part of the product.
- Keep this copy safe for future reference in case of
operational difficulties.
Page 2

General overview
This manual is specifically meant for this product
and covers tutorials for the Mini High-Performance
Security Camera that comes alongside with this
manual. The camera has High Definition (HD)
sensor with PIR feature for accurate motion
detection and video recording ability. Additionally, it
has a maximum of 1 week battery stand-by when
fully charged. This gives the ability to capture long
hours of any motion accurately round the clock.
Connecting it to an external separate power bank
enables it to record for months without going off.
The small size of the camera enables the user to
place it in any favorable locations and positions as it
is not limited to specified places.
Main features
- Has the ability to record people movement
perfectly without distractions
- It is small in size providing flexibility when in use
- It has easy to use features. Use single press to
access the Motion Detection Mode and record
instant accurate videos
- It has a maximum stand-by time of about 7 days
when fully charged.
2
Page 3

Safety Instructions
Please read the following instructions before using
the camera:
- Ensure that the camera is tested for the first time
use and confirm that it suits the intended purpose.
- We are not responsible for any missing video
information due to wrong operation,Micro-SD
malfunctioning or camera angle limit etc.
- The camera should be used for legal purpose only.
Check and follow the laws provided in your country
regarding the use of camera and other video
recording devices.
By following the above safety instructions, we hope
that it will be enjoyable to own and use this product!
3
Page 4
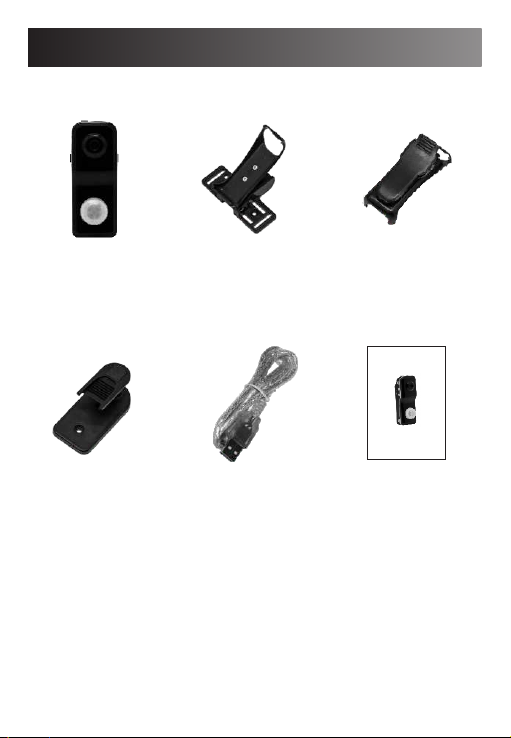
Product accessories
Camera
bracket 3
bracket 1
USB cable
bracket 2
MINI PI R CAMER A
MODEL NO: DV 089
User Ma nual
-Please rea d the use r manua l caref ully be fore
using the pro duct.
-Please kee p the use r manua l well for f uture
checking.
Manual
It is important to note that:
If there is anything missing in your product
package and it is not included in the above list
of accessories, contact us as soon as possible
4
Page 5
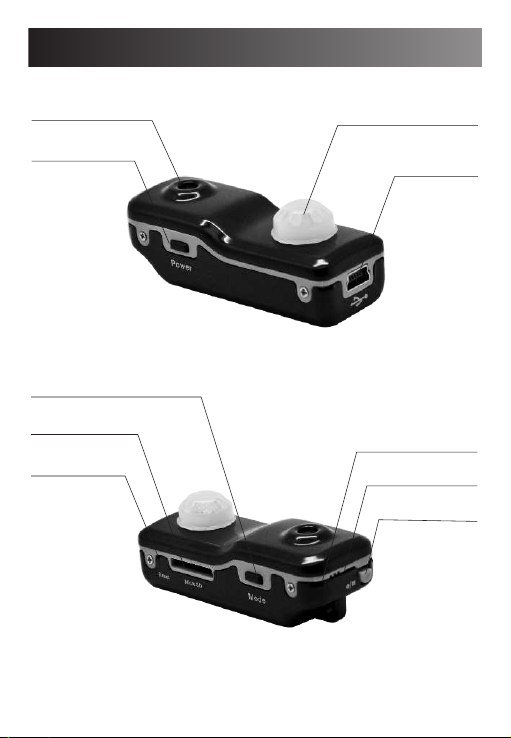
Product structure
Lens
Power on button
Mode button (switch
motion detection on/off)
Micro-SD slot
Reset
PIR motion sensor
USB Port
Micro phone
Status indicator
Record/Stop
5
Page 6
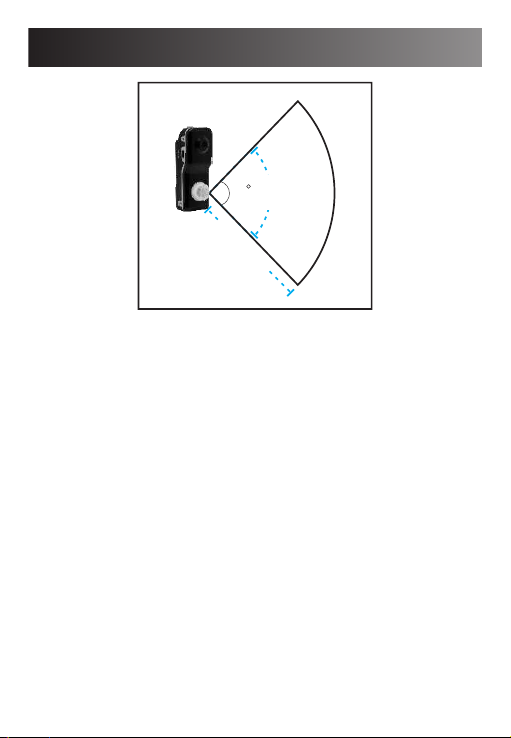
Detection ability
ers
met
8
Detection
90
angle
Det
distance
ec
t
ion
Motion detectin angle: 90 degrees
Favorable detection distance: within 8 meters / 24 feet
Important Notice:
- While using the camera, it should be placed in a
perpendicular direction to those objective people
passing by
- Avoid using the camera in hot or extreme
temperatures that will interfere with the
motion-accuracy detection
- Once the camera is set to motion-detection mode,
it takes about 1 minute to switch to surveillance
function.
6
Page 7
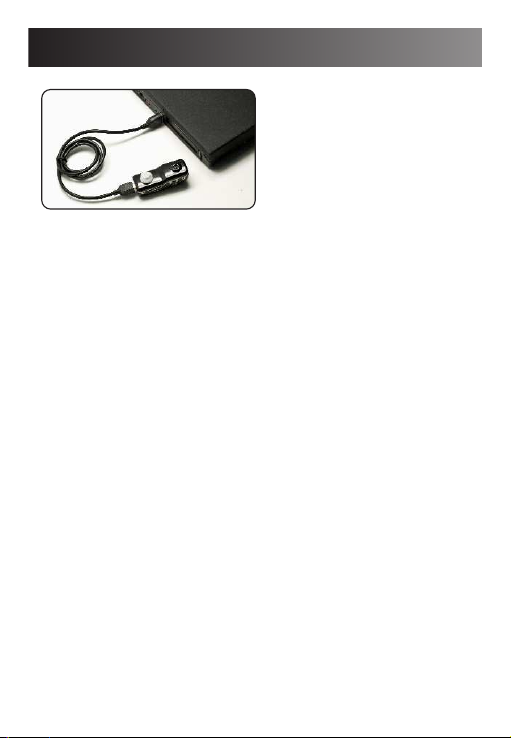
Charging information
The camera is chargeable by the use of provided USB
-
cable.
- During charging, both Red and Blue light indicators
are ON. The Red light goes OFF once fully charged.
- It's usually take 5 hours for a fully charge. (5v 1A)
Important notice:
- Ensure that the camera is switched OFF during
charging.
- Before using the camera for the fist time, it is
recommended to fully charge it using a computer.
7
Page 8
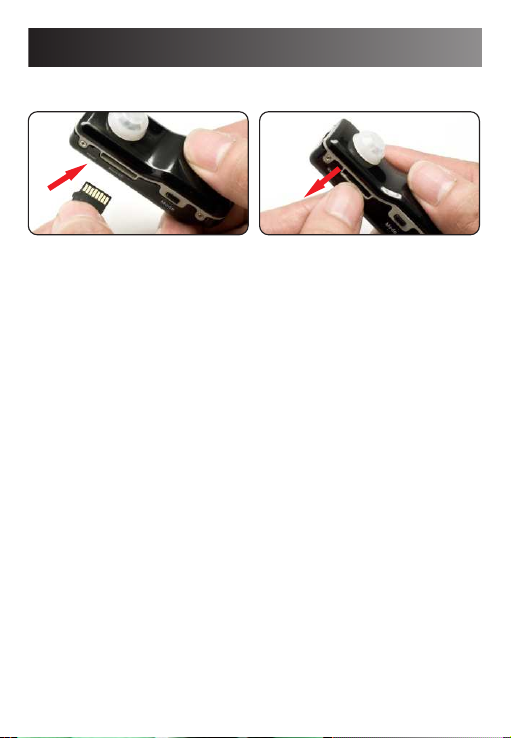
How to insert and take out Micro-SD card
Take Micro-SD outInsert Micro-SD card
Important notice:
- The camera has the ability to record video only when
Micro-SD is inserted.
- Please avoid by all means to insert or remove
Micro-SD when the camera is either powered ON or
connected to the computer. This can possibly cause
damage to Micro-SD or the entire camera.
- Please ensure that minimal effort is applied to the
Micro-SD when inserting it in or out of the camera.
Use of force can easily damage the Micro-SD or the
product parts.
- Before using the product for the first time, ensure
that the Micro-SD is formatted. Please check for any
saved data in the Micro-SD to avoid unexpected loss.
We are not liable or responsible for malfunctions that
result from failure to follow the above guidelines.
8
Page 9
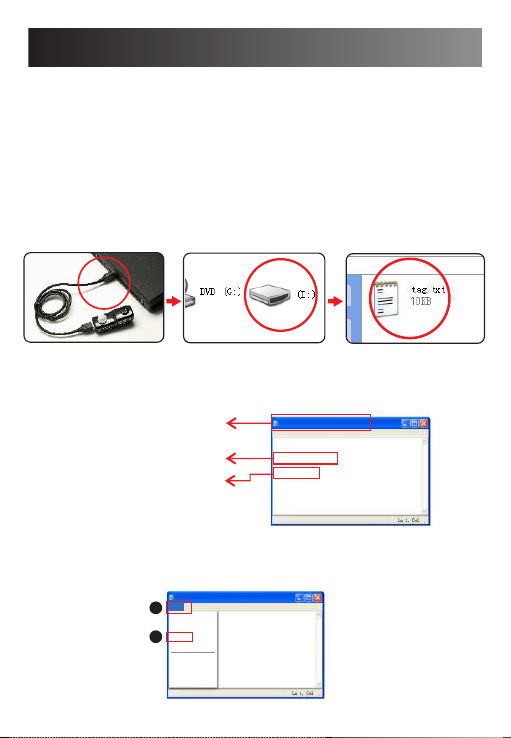
Time and date setting
It is not compulsory to set time or date unless when
necessary for personal purposes. The user can
choose to set or ignore depending on their target of
product use.
How to set time and date
Step 1: Use the provided USB cable to connect the
camera to the computer and open the camera control
panel available from the computer options. The new
window will show a tag.txt file.
Step 2: Open the tag.txt file and only change the date
and time figures without altering any other data. Save
the file and close it.
File name
Year/Month/Day
Hour/Minute/Second
Step 3: Disconnect the camera from the computer and
power it on. It should be ready to function normally with
an updated time and date details.
1
2
file
New
Open
Save
Save as
Page se tting s
Print
Exit
TAG. TXT
Edit Fo rmat Vi ew Help
TAG. TXT
file Ed it Form at View H elp
[da te]
201 5/03/ 23
23: 15:12
9
Page 10
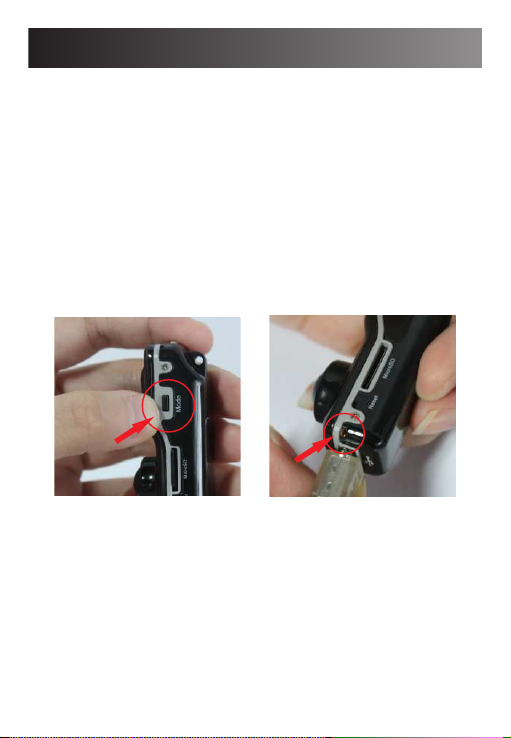
Operating the motion detection record feature
1. Motion detection procedure:
- The camera should be fully charged and Micro-SD
inserted.
- Press on Mode button and the camera will
automatically switch to Motion Detection Mode.
This enables the camera to record any motion
detected within its environment as specified above
- While in Motion Detection Mode, there is a yellow
indicator at the bottom that will remain ON to show
record duration.
Mode button
Yellow indicator
2. Video recording procedure:
- Press the power function button to switch ON.
- Hold the Record button for 3 seconds to enable
video record feature.
- Press the record button again will stop the camera
from recording and automatically savethe already
recorded video.
10
Page 11
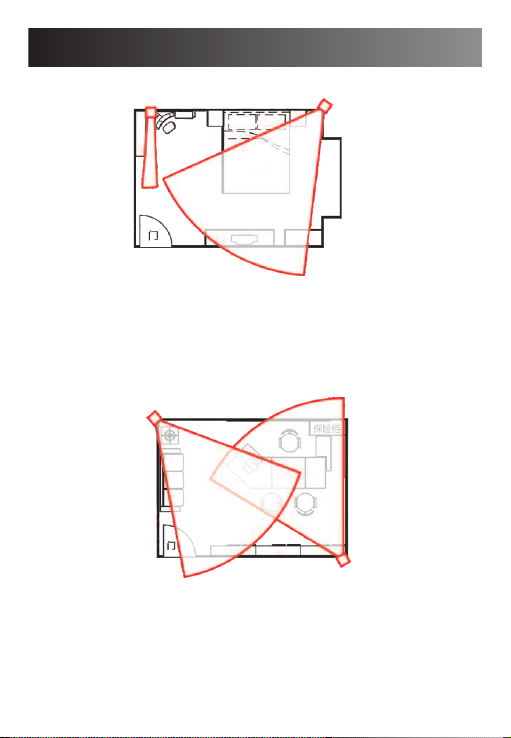
Installation position and camera angle settings
Point A
Point B
From the diagram, it is clear that point A is not
favorable as the camera's angle is limited and the
position is directly straight to the door. Point B
happens to be the best position.
Point A
Point B
However, it would be an advantage when using two
or more motion cameras to cover the entire room and
avoid possible limitations that may occur due to
distance and angle covered by a single camera.
11
Page 12
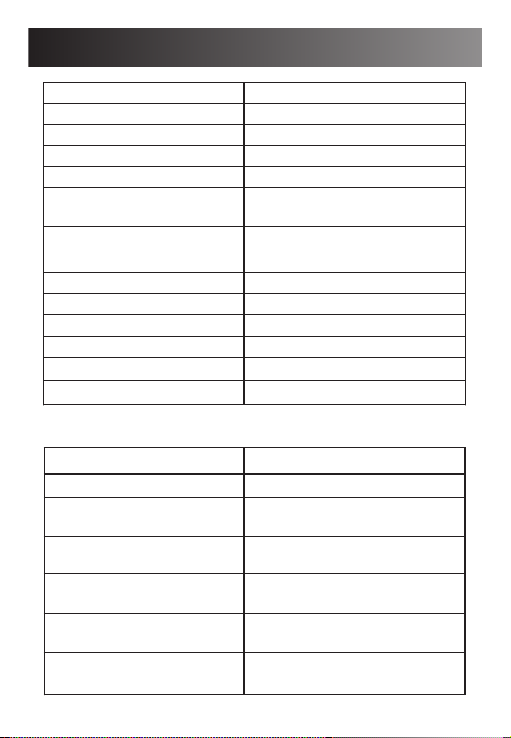
Detailed parameters
Item
Camera size
Video file format
Video file code
Camera resolution
Video player supported
Computer Operating
Systems supported
USB type
Camera memory storage
Battery type
Camera PIR angle
Supported PIR distance
Camera view angle
Indicator Status and their meanings
Stand-by
Save file
Charging
Fully charged
Motion detection ON
No Micro-SD inserted
Record mode
22mm x 16mm x 57mm
AVI
M-JPEG
720x480
Windows Media Player or
other available alternatives
Windows
Mini 5 Pin
Micro-SD
High capacity Li-battery
90 degrees
8 meters / 24 feet
72 degrees
Blue indicator is ON
Blue indicator is ON
Both Red and Blue indicators
are ON
Red indicator goes OFF,Red
indicator is ON
Yellow indicator is ON at the
bottom
Blue indicator flashesand
goes OFF
Blue indicator flashes for 3
times and goes OFF
12
Parameter
Page 13

 Loading...