

Page 1
DC80 Mini WiFi Dash Cam
User Manual
Model No.: DC80
Page 2
Table of Contents
Part 1:Before First Use...............................................1-2
Part 2: Detailed User Manual.....................................4-24
Part 2:Detailed User Manual
What's Included.............................................................
4
5
Before Using Your DC80 Dash Cam...............................
6-7
1. Charging the Camera..................................................
6
2. Installing the Micro SD Card......................................
6-7
Button Specification for Function Operation.....................
8
How to Use Your Conbrov DC80 Dash Cam..................
9-11
1. Turn on/off the Camera...............................................
9
2. How to Record A Video................................................
9
3. How to Take Photos...................................................
10
4. How to Playback the Videos/Pictures.............................
10
5. How to Use SOS........................................................
11
6. How to Play Videos on Computer.................................
11
How to Set Your Conbrov DC80 Dash Cam..................
12-15
1. About G-sensor........................................................
12
2. About Parking Monitoring..........................................
13
3. About GPS.........................................................
14-15
How to Remote Control Your Conbrov DC80 Dash Cam..
16-17
1. Download the App “RoadCam”..................................
16
2. Connect DC80 Dash Cam to Your Phone...............
16-17
LED Status...................................................................
18
Technical Specifications...............................................
19
FAQs..........................................................................
20
Warranty......................................................................
21
Disposal.......................................................................
21
Declaration of Conformity..............................................
21
Page 3
1
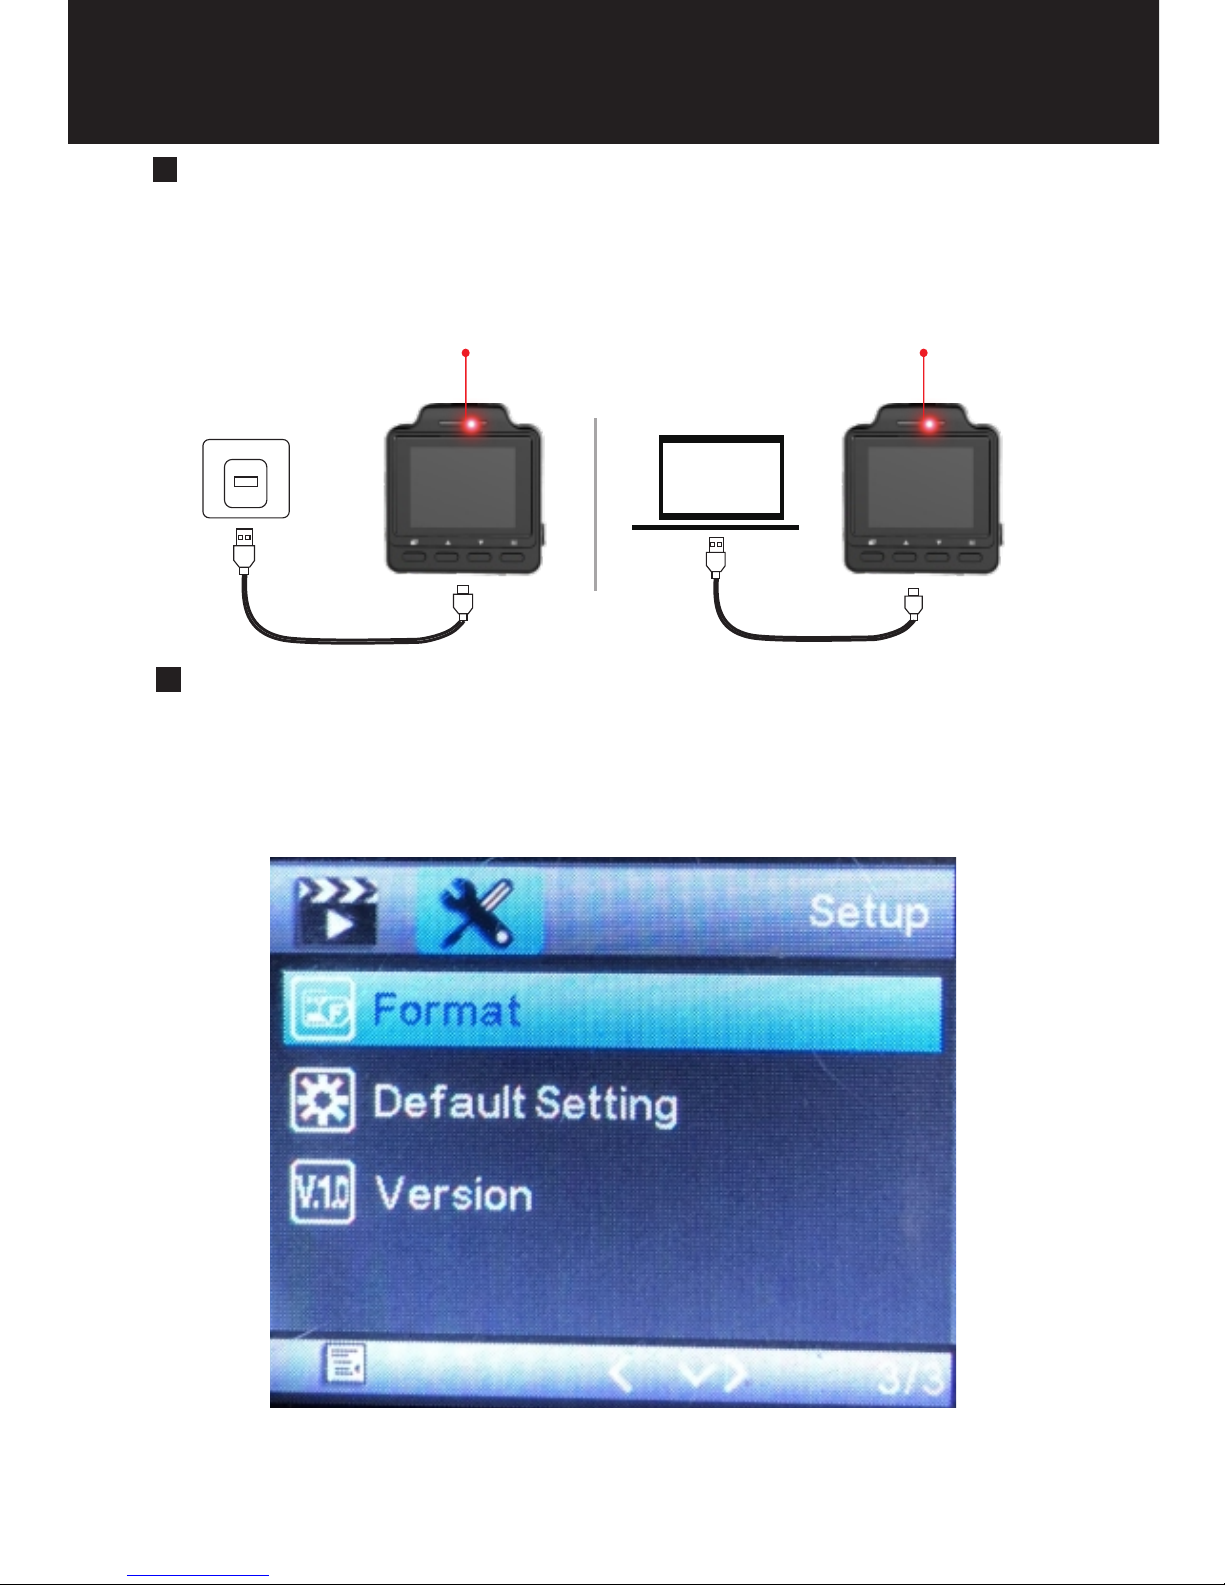
Charging the Camera
Formatting the Micro SD Card
Before the first use, charge the camera via USB
charger. The dash cam will turn on automatically when
charging.
Before the first use, format the Micro SD card to FAT32
format. The camera only supports class 10 micro SD
cards with at least a 8GB capacity.
Part1: Before First Use
Red indicator Red indicator
Page 4
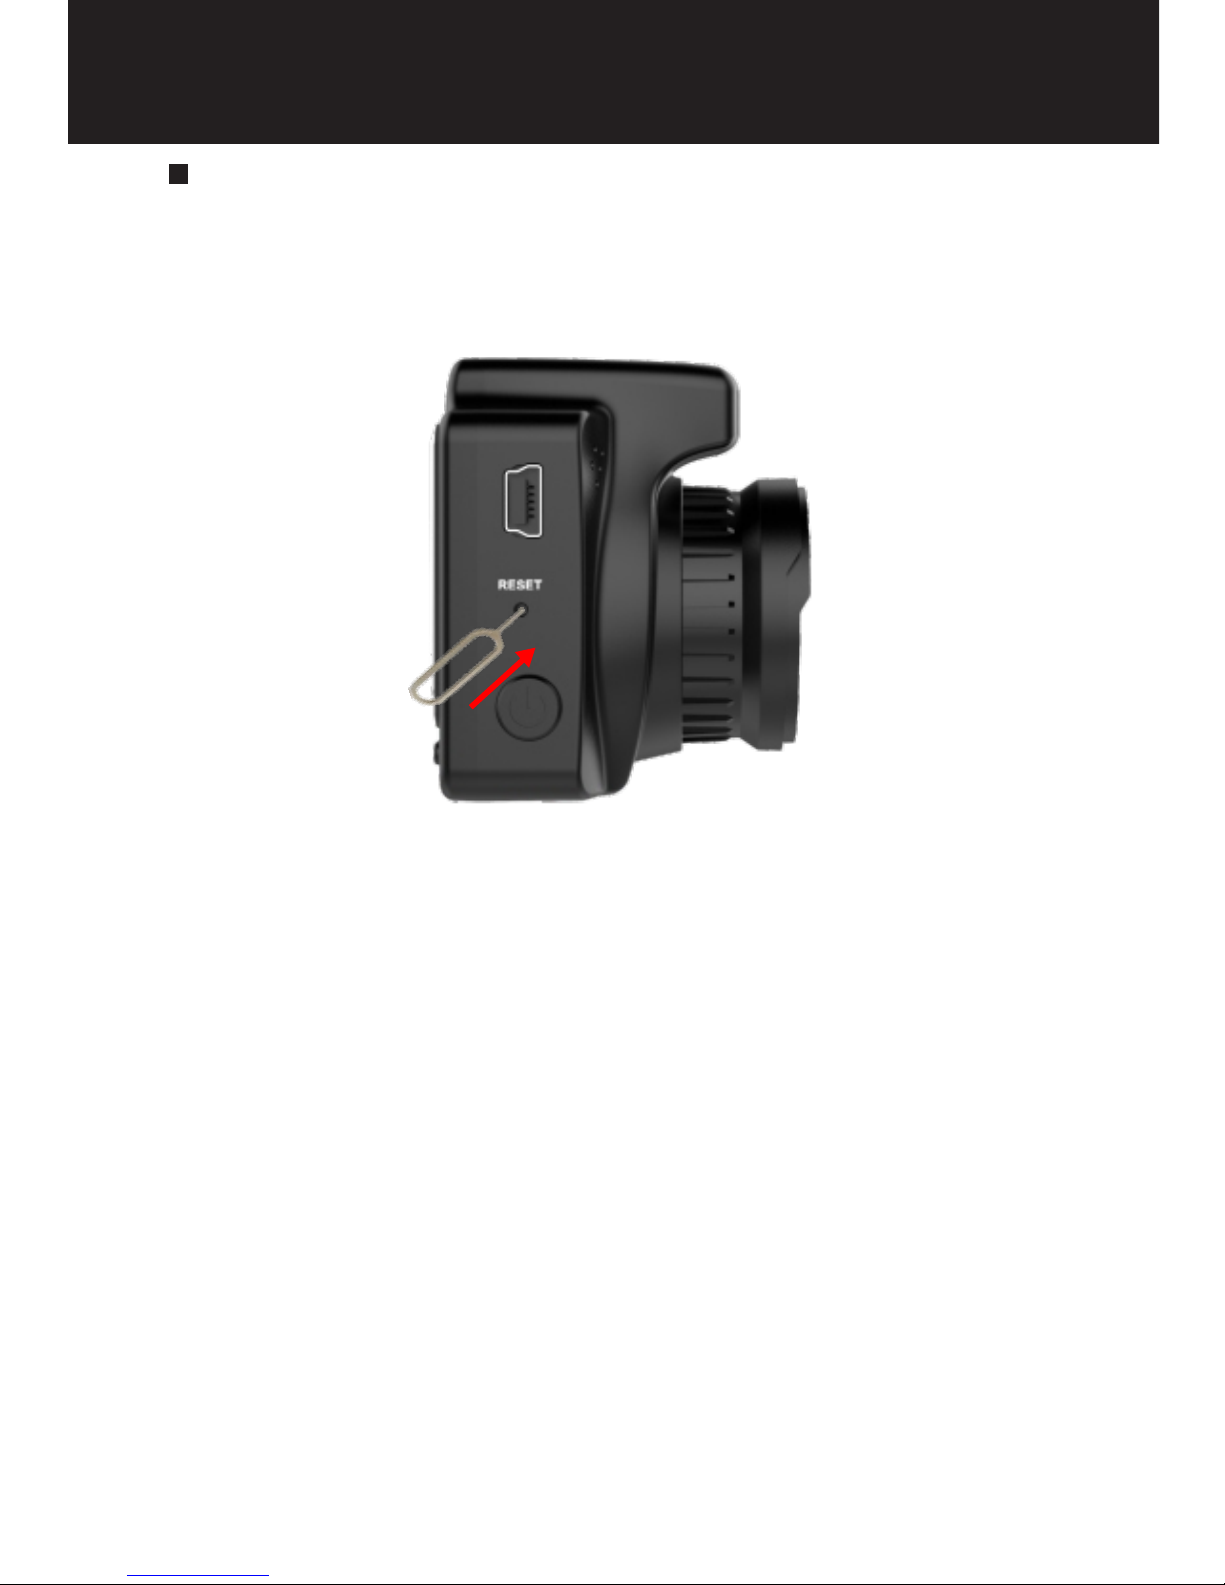
Resetting the Camera
If the cam malfunctions for any reason, reset it with
the included pin or small paperclip.
Part1: Before First Use
2
Page 5

•Read this instruction manual carefully before using the
camera. It contains important information for your safety
as well as operating and maintenance instructions.
•Follow all safety precautions in order to prevent damage
due to improper use of the camera.
•Keep this user manual for future use. Should this camera
be passed along to a third party, this user manual should
be handed on as well.
•Use the camera only for its intended purpose.
•In the event of improper use or erroneous handling, no
liability can be assumed for any possible damage which
may occur.
•Never try to repair the camera yourself. Only allow
qualified personnel to repair the camera in the event of
malfunctions.
•Warning! Never immerse the camera in water or other
liquids while cleaning or operating it. Never hold the
product under running water.
•Do not open the housing under any circumstances. Do
not introduce any metal objects into the interior of the
housing.
•Never use accessories which are not recommended by
the manufacturer.
•Keep the camera away from all hot surfaces and flames.
Protect the camera from extreme heat and cold, dust,
direct sunlight, humidity , and water.
•Do not place heavy objects on the camera.The
manufacturer is not responsible for any missing video
data due to maloperation, microSD card malfunctions,
camera angle limitation, etc.
Safety precautions
3
Page 6
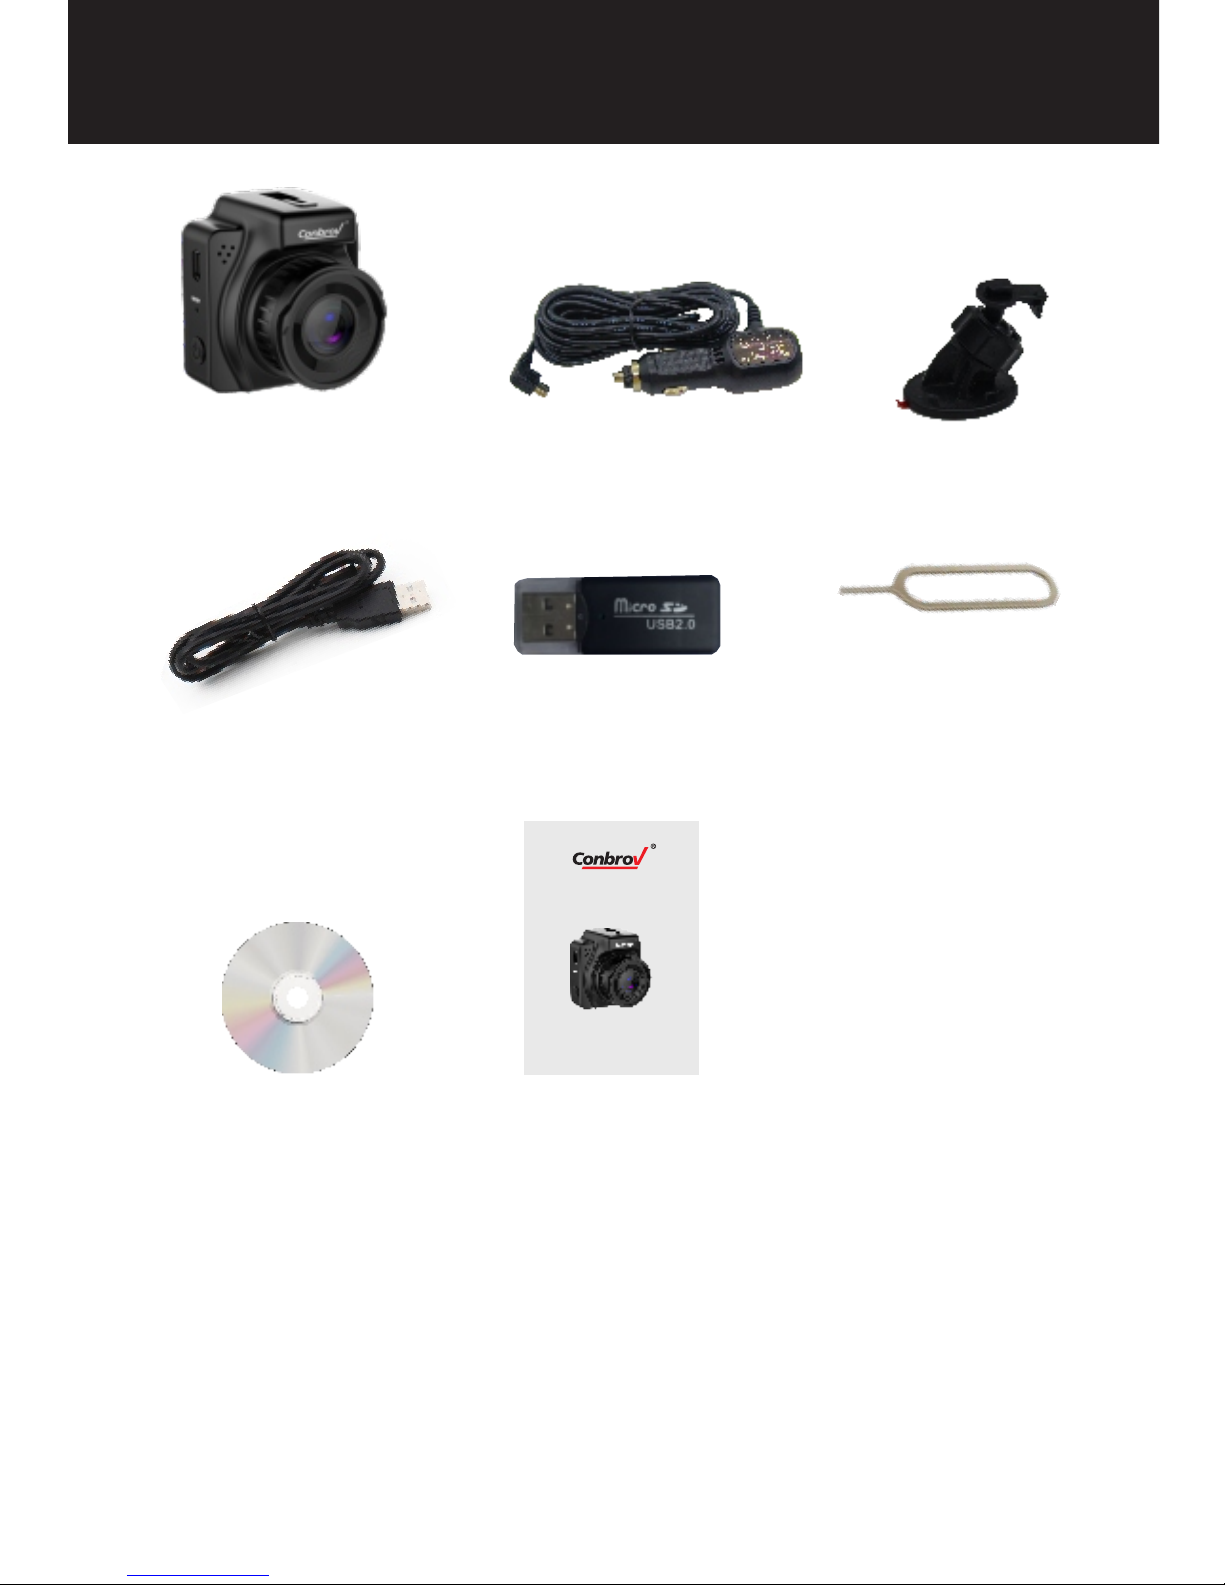
Conbrov DC80
Car Dash Cam
Car Bracket
Car Charger
USB Cable Card Reader Pin
CD
What's included?
4
DC8 0 Mini Wi Fi Dash C am
Use r Manua l
Mode l No.: DC 80
User Manual
DC8 0 Mini Wi Fi Dash C am
Use r Manua l
Mode l No.: DC 80
Page 7
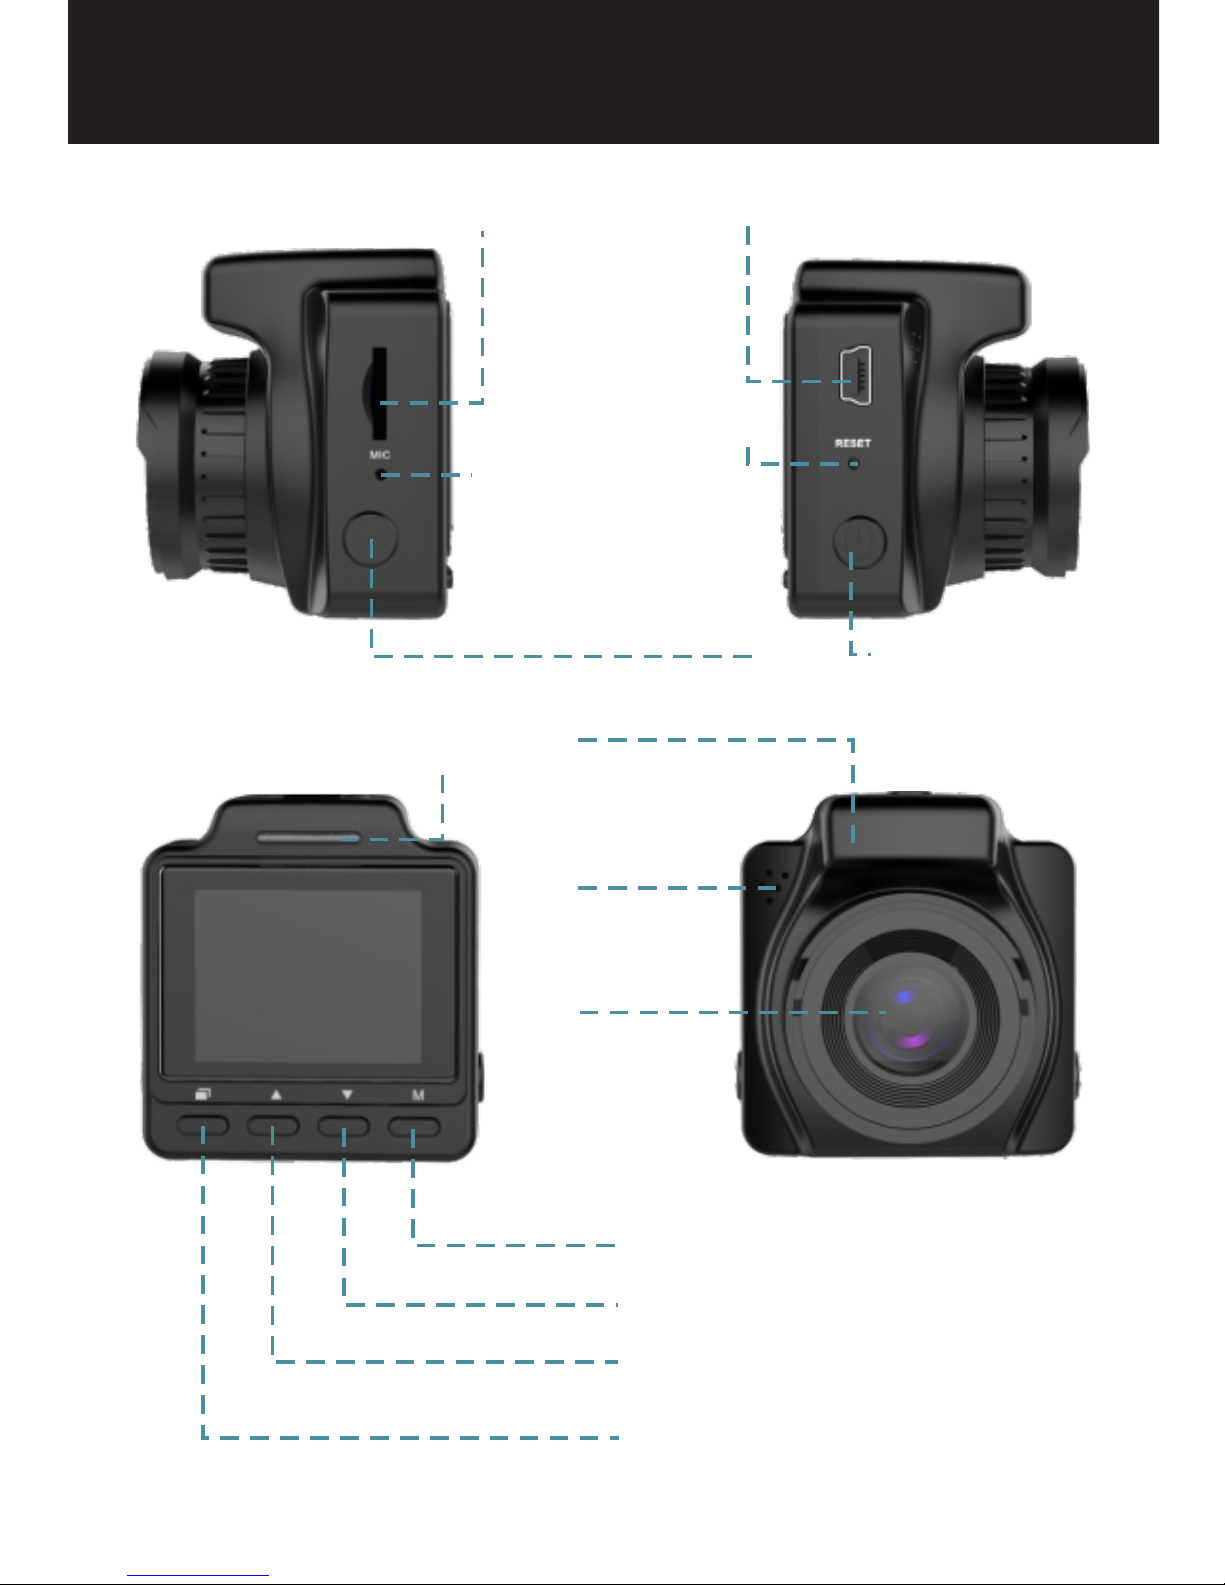
DC80 Diagram
LED indicator
Menu
Up
Down
Mode
SD card port
MIC
Record/Confirm
USB port
Reset
Power
Lens
Speaker
GPS
5
Page 8
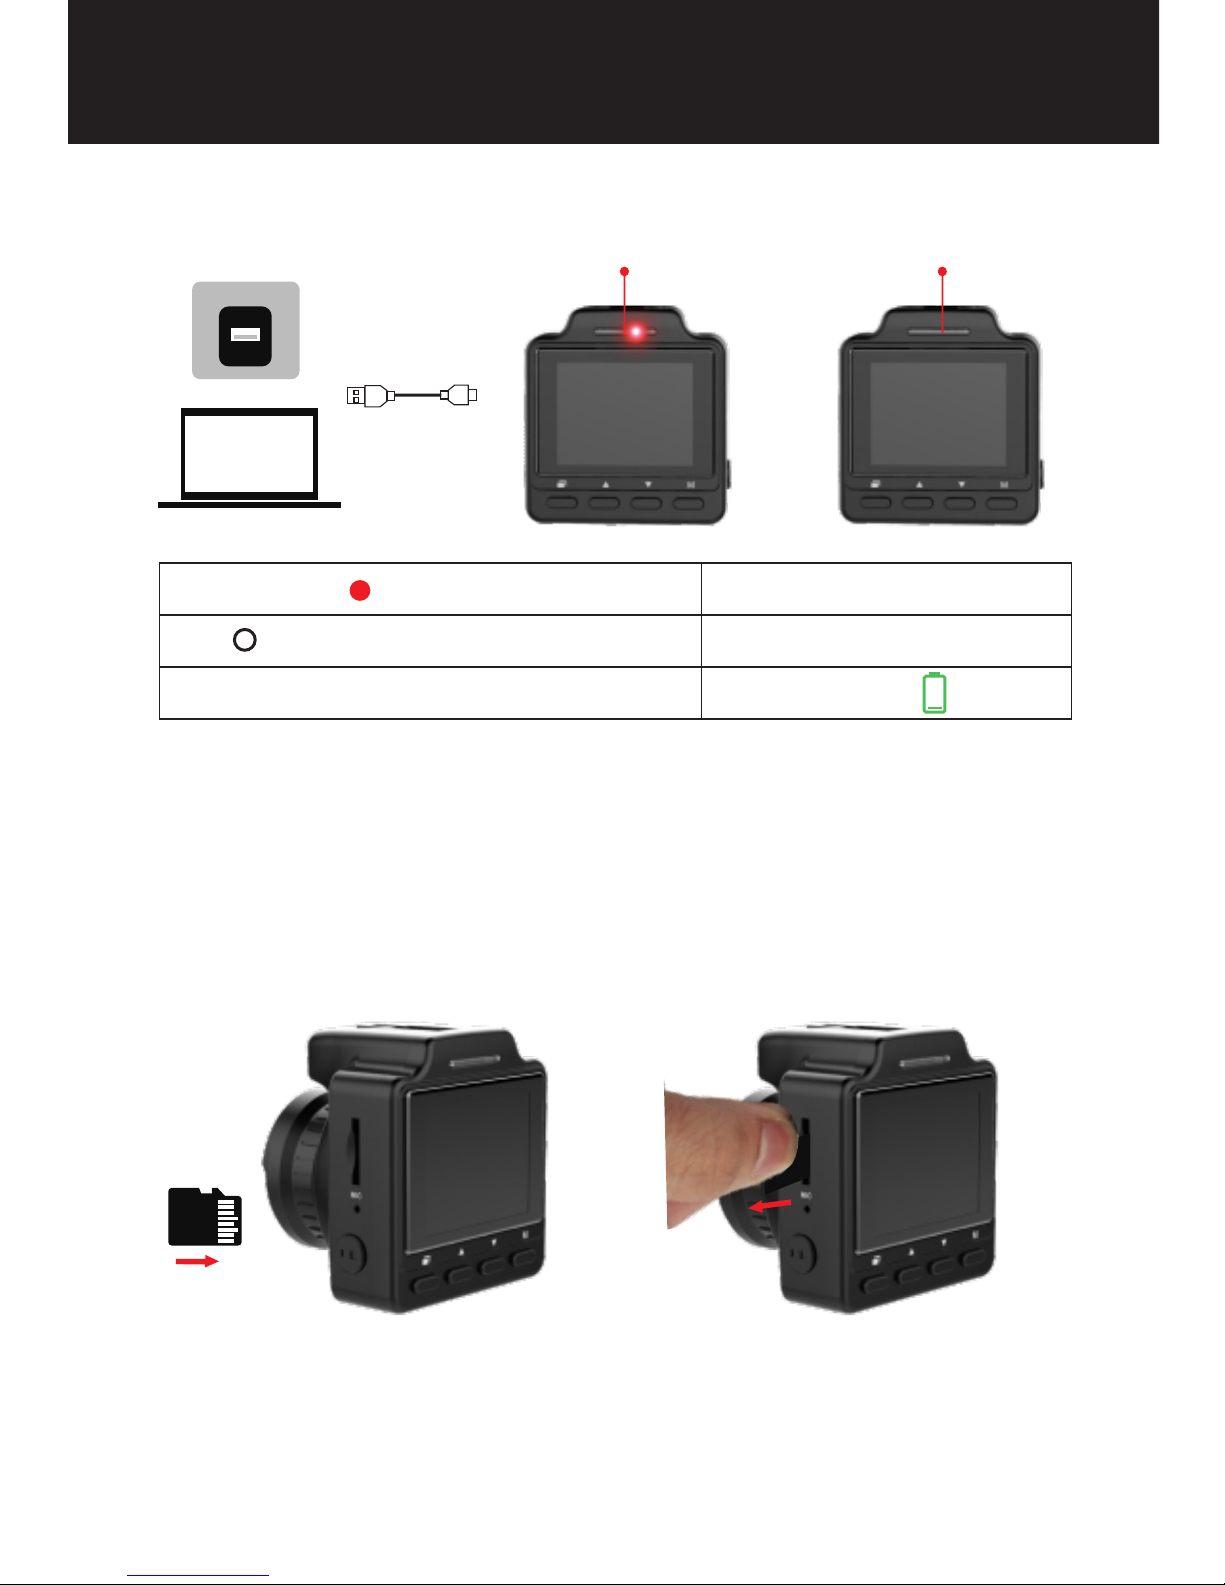
1.Charging Your Camera
.
Installing the microSD
Removing the microSD
2.Installing SD Card
Before Using Your Conbrov DC80 dash cam
(1)You cannot turn off the camera while charging.
(2)It will record automatically when start the engine.
(3)The red LED turns off when the camera is fully
charged.
Before Using Your Conbrov DC80 dash camBefore Using Your Conbrov DC80 dash cam
Red indicator
Off
Steady red
Off
The screen showing"Low Battery"
Charging
Fully charged
Low power
6
Page 9

Before Using Your Conbrov DC80 dash camBefore Using Your Conbrov DC80 dash camBefore Using Your Conbrov DC80 dash cam
Caution! Format the Micro SD before first use. Doing this,
however, will remove all data from the card. Make sure
to back up any data before formatting.
(1) Only supports a Class 10 Micro SD with at least 8GB
capacity for recording.
(2) Do not remove the Micro SD card during operation. It
will damage both the memory card and camera.
(3)Push the Micro SD card into the memory card slot gently
until it clicks into place. The card only fits one way, so do
not force the card into the port.
(4)To remove the Micro SD card, make sure the camera is
OFF. Press down on the Micro SD and it will pop up, you
can then pull it out easily.
7
Page 10
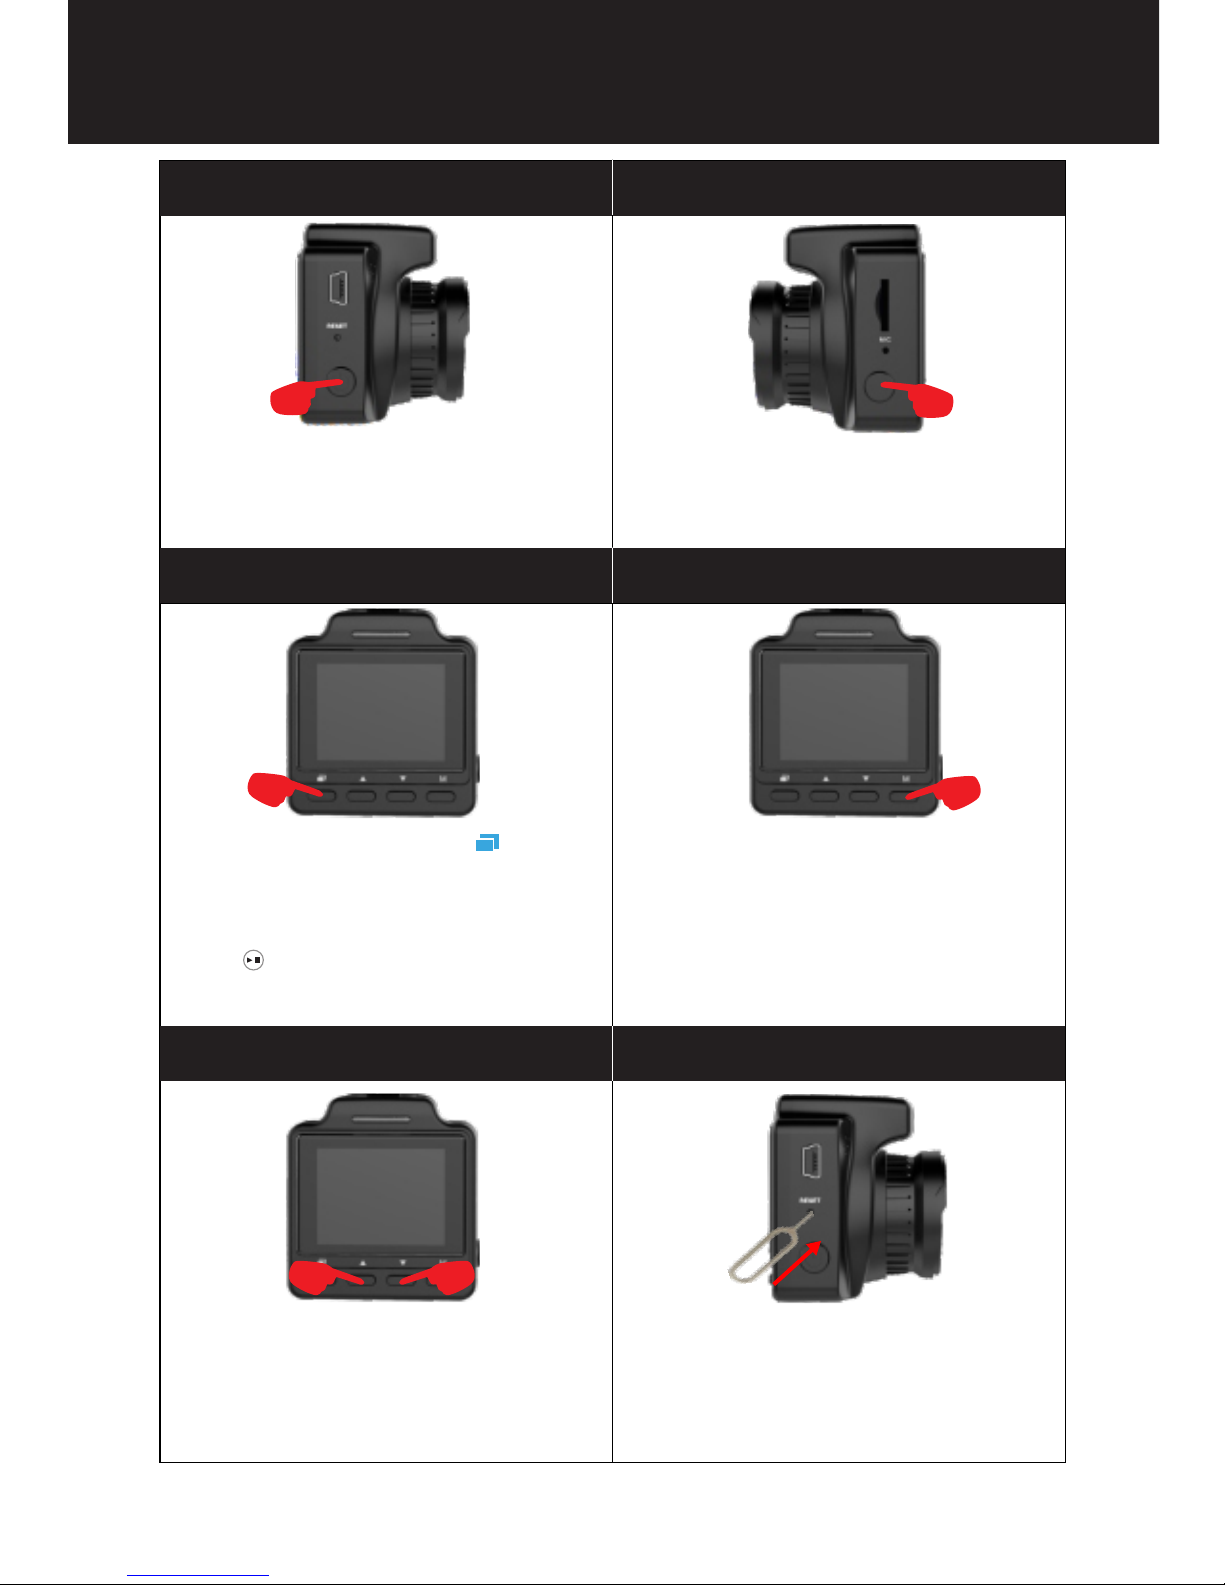
Button specification
A: Power
B: Record/confirm
E: Select up/down
F:Reset
C:Menu
D:Mode
Press the power button to turn on
the dash cam, the camera make a
sound and the LCD screen lights
up.
Press the button to start recording
or taking photo after the camera
powers on.
In standby mode, press“ ”button
to enter into menu option, you can
set parameter information and
preview it; when in menu mode,
press ,then you can set
parameter information and save it.
In standby mode, short press
modes button, then you can
switch between photo and
recording mode.
In menu/mode mode, press
“up/down” button, then you can
choose the menu items.
If the camera malfunctions for
any reason, You can click the
reset button to reset. When
resetting is successful,restart
the camera to use.
8
Page 11
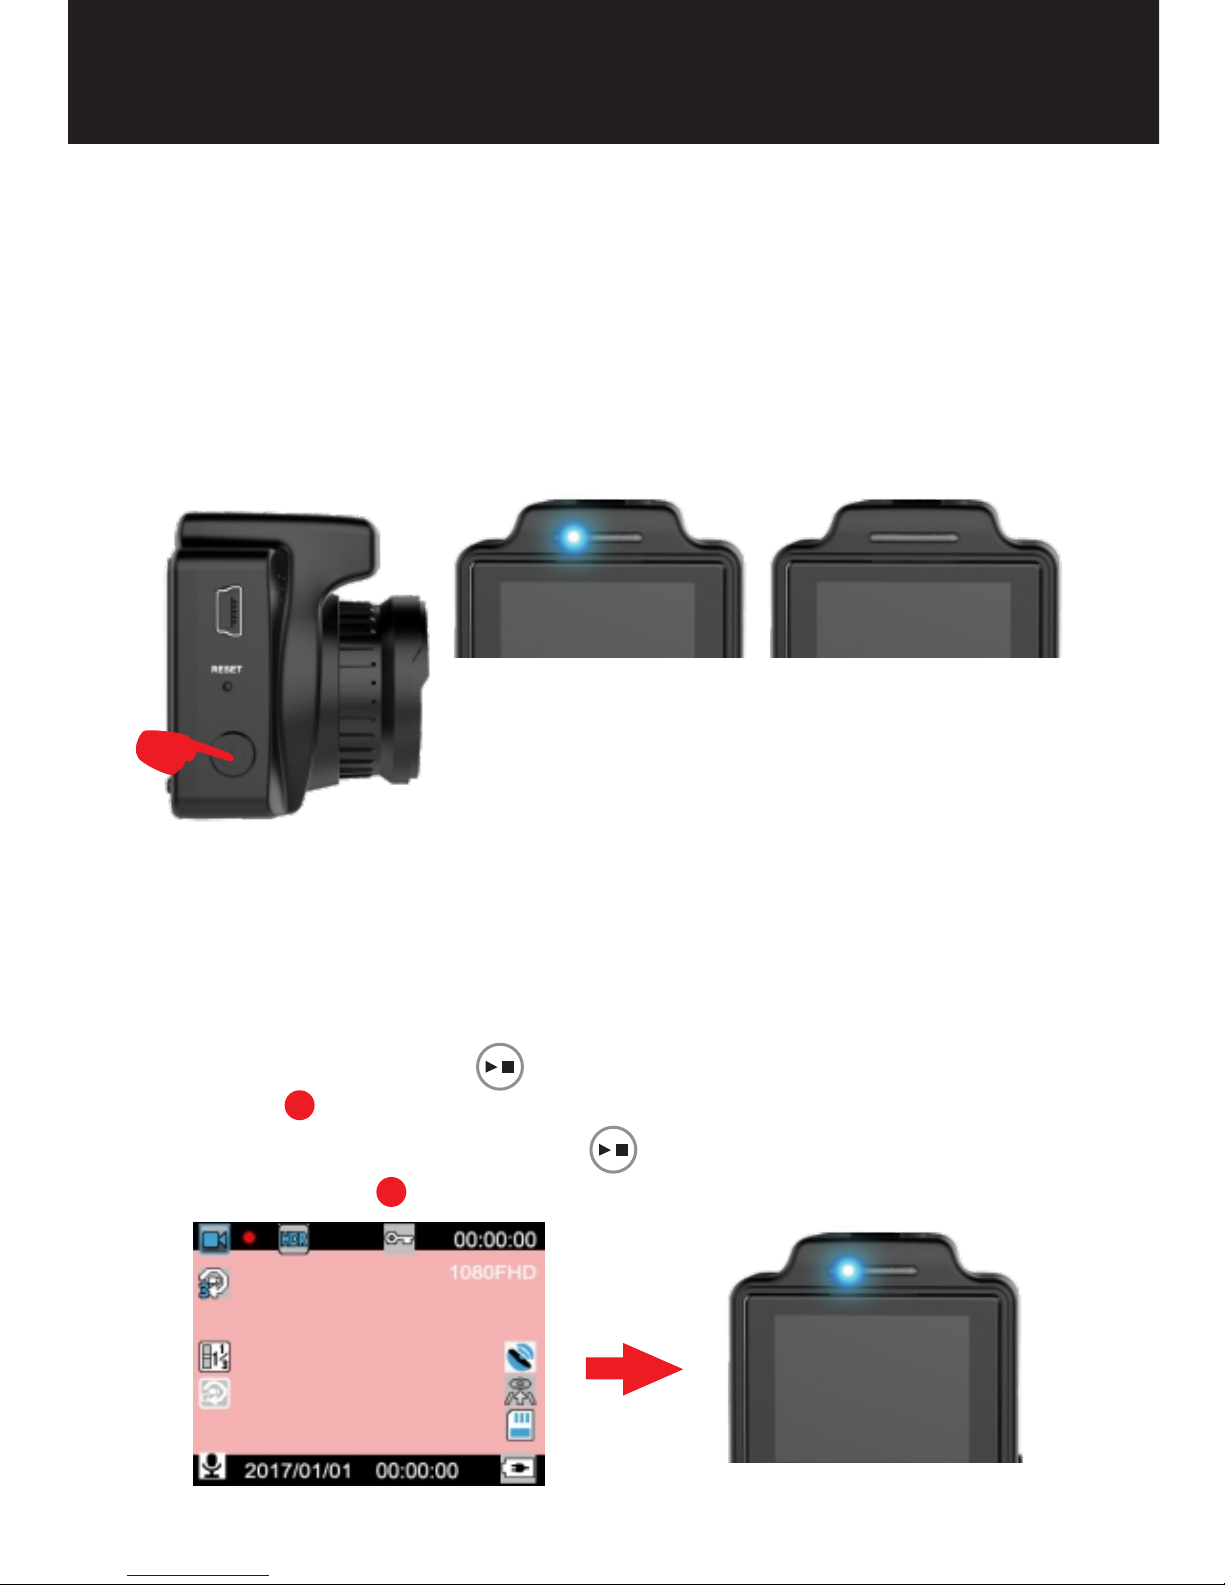
1.Turn on/off the Camera
The camera will turn on automatically when charging or
starting the engine and turn off when stop charging or the
engine.
(1) Press power button to switch the camera on. The led will
light up blue on the left, which indicates that it is in standby
mode.
(2) Press the power button again to switch the camera off.
The led blue will turn off.
How to Use Your DC80 Dash Cam
ON lights up blue and
the camera is in standby
mode
OFF
turn off.
the led blue will
Note:
1.Stop recording first before turning off the dash cam.
2.The battery power is too low and the camera must be charged.
2.How to Record Manually
Power on the camera, press M button to switch to recording
mode, then press the button to start recording videos, the
red icon flashes on the screen and the Led flashes blue.
In recording mode, press the button again to stop
recording, the disappears and LED stays blue.
9
Page 12
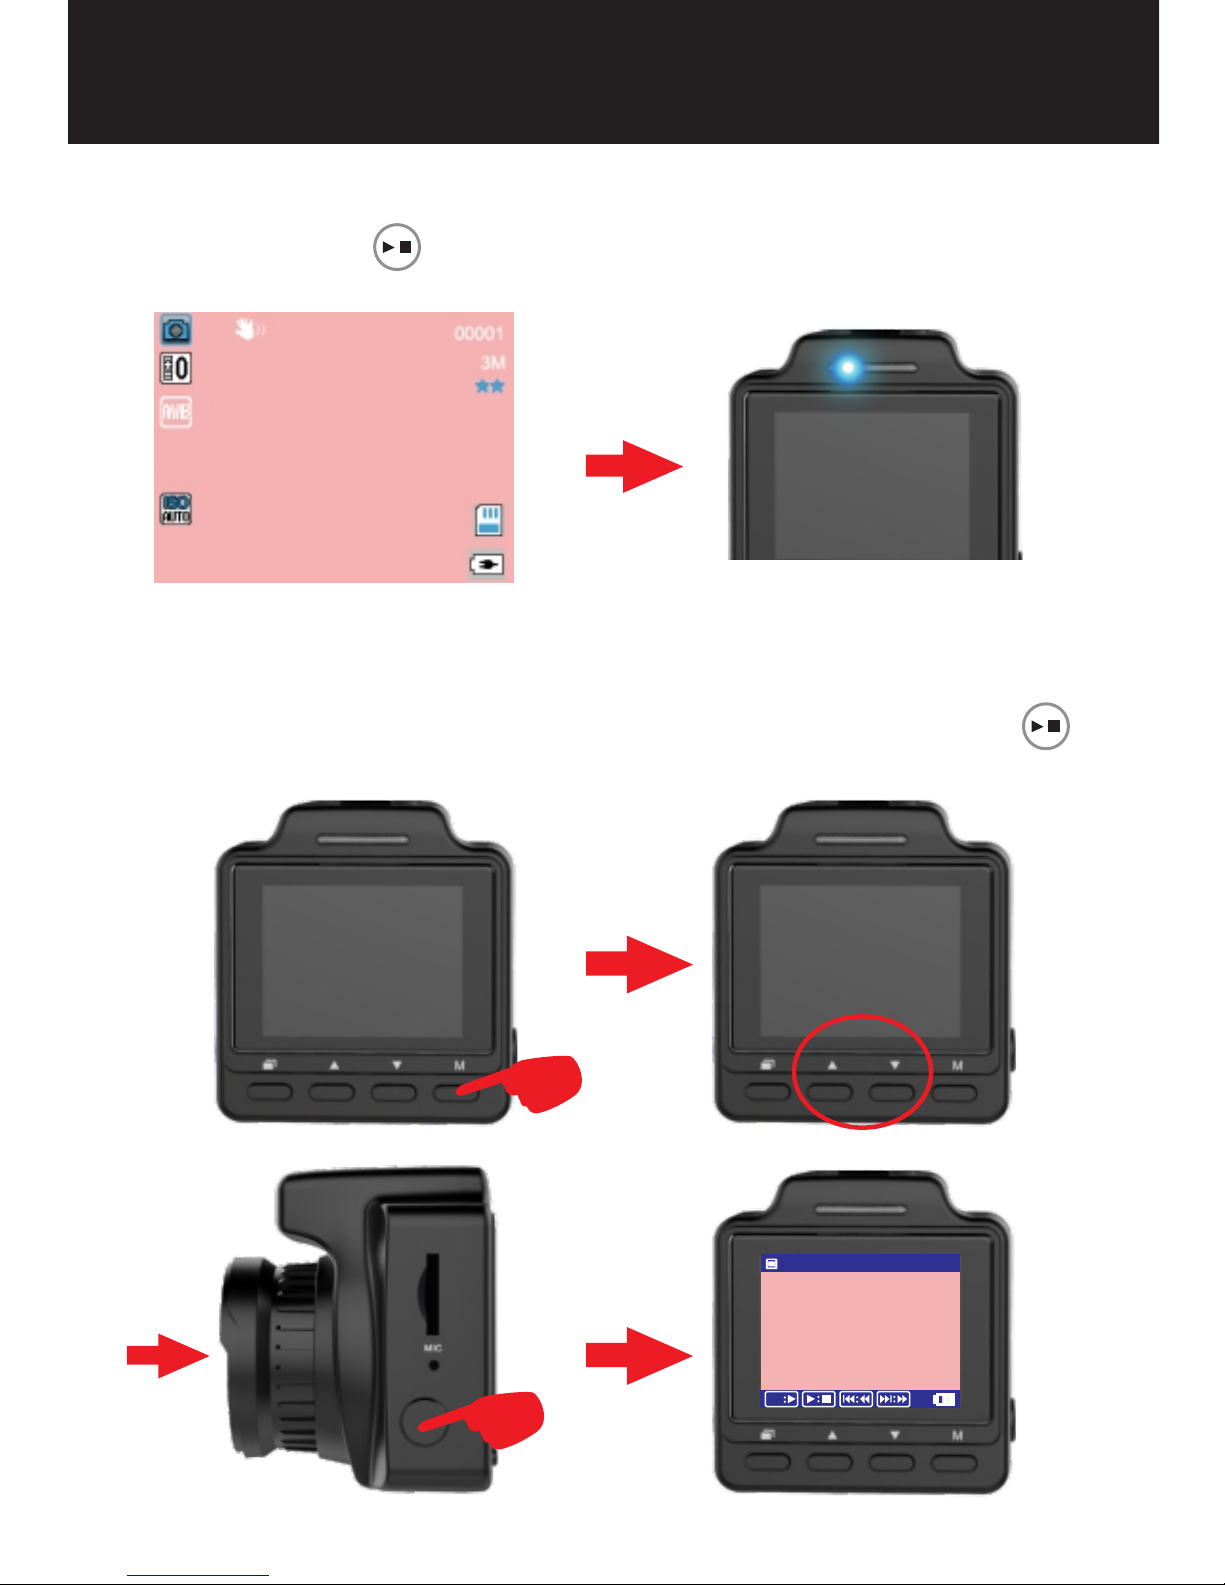
3.How to Take Photos
Power on the camera, press M button to switch to photo mode,
then press the button to take a photo, the Led stays blue.
The photo will save automatically to the SD card.
How to Use Your DC80 Dash Cam
4.How to Playback the Video/Photo
In photo mode, press the M button to enter the playback mode,
then press up/down to choose the video/ picture file, press
button to play the video.
201 8-0112 -16 3118-0 06
00: 00:20
18/ 01/12
16: 34
OK
10
Page 13
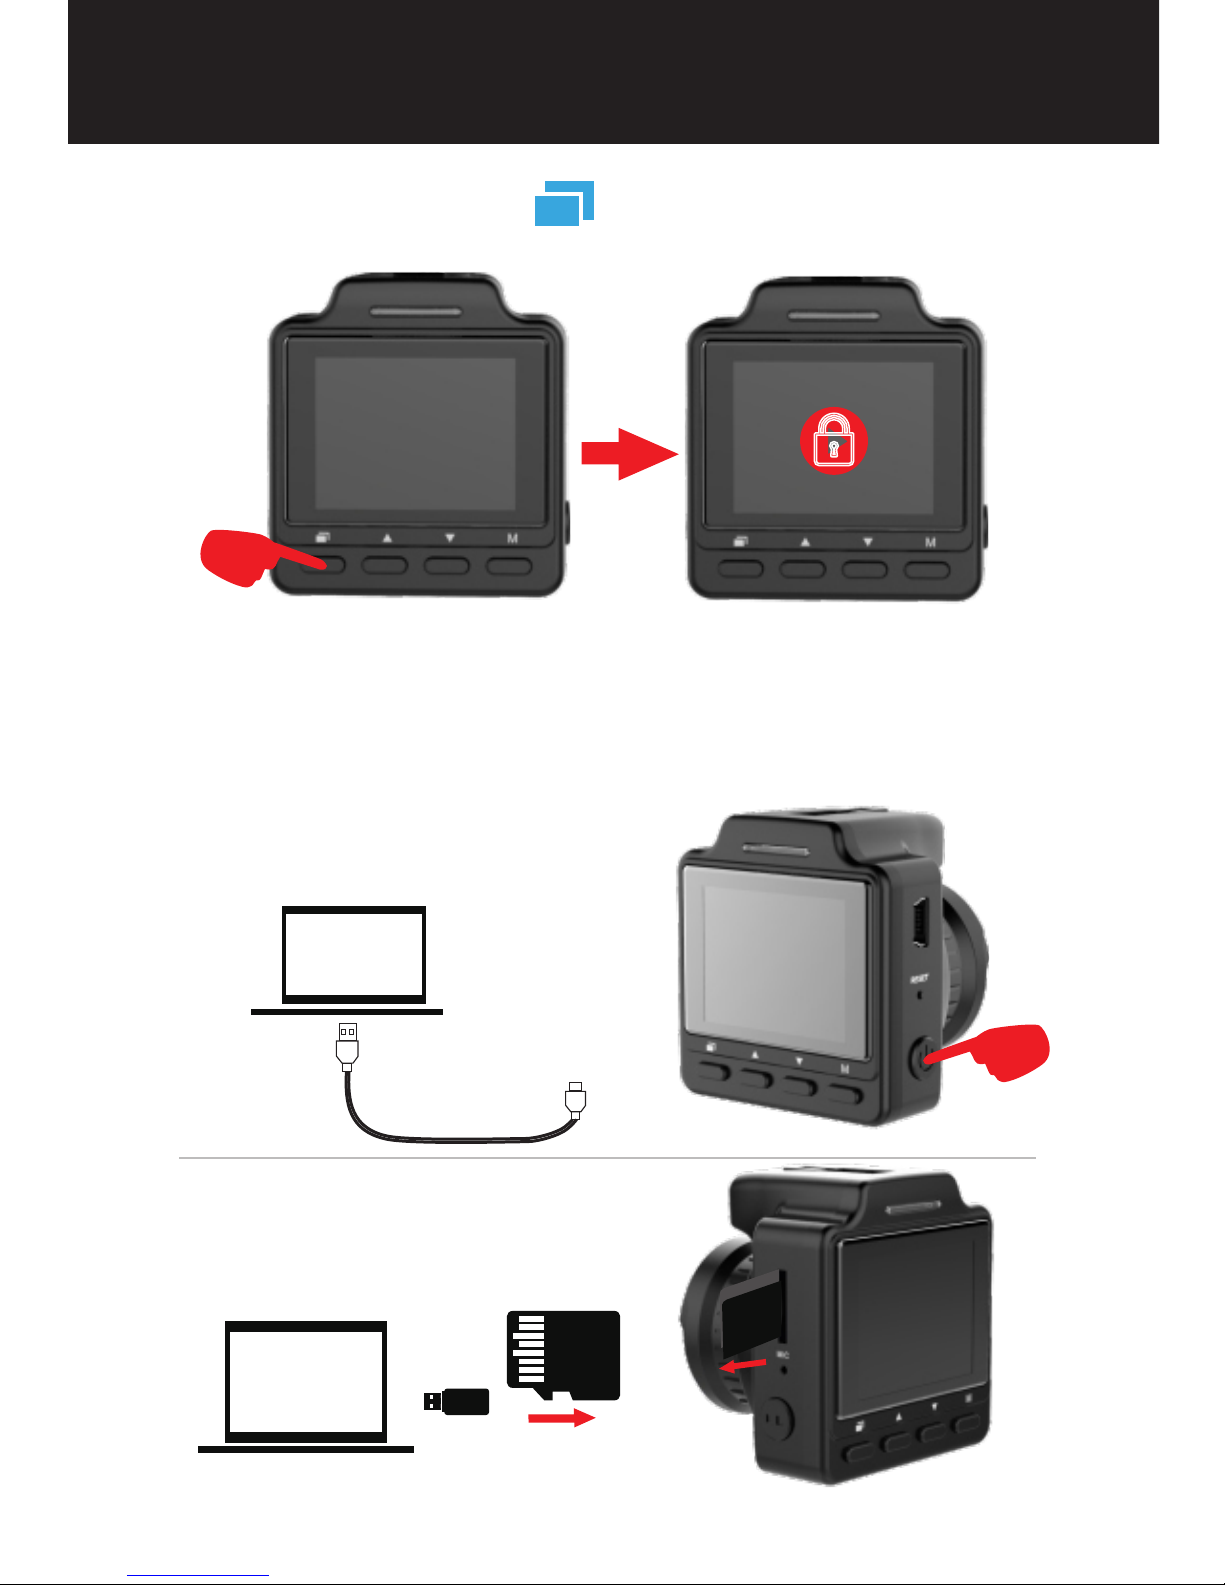
5.How to Use SOS
In recording mode, press button to lock the video files and
cannot be recovered.
How to Use Your DC80 Dash Cam
6.How to Play Video on Computer
Connect the dash cam to computer via USB cable, power on
the dash cam and will show a folder on you computer, you can
play the video/picture or save them as you want.
1
2
USB 2.0
Power On
11
Page 14
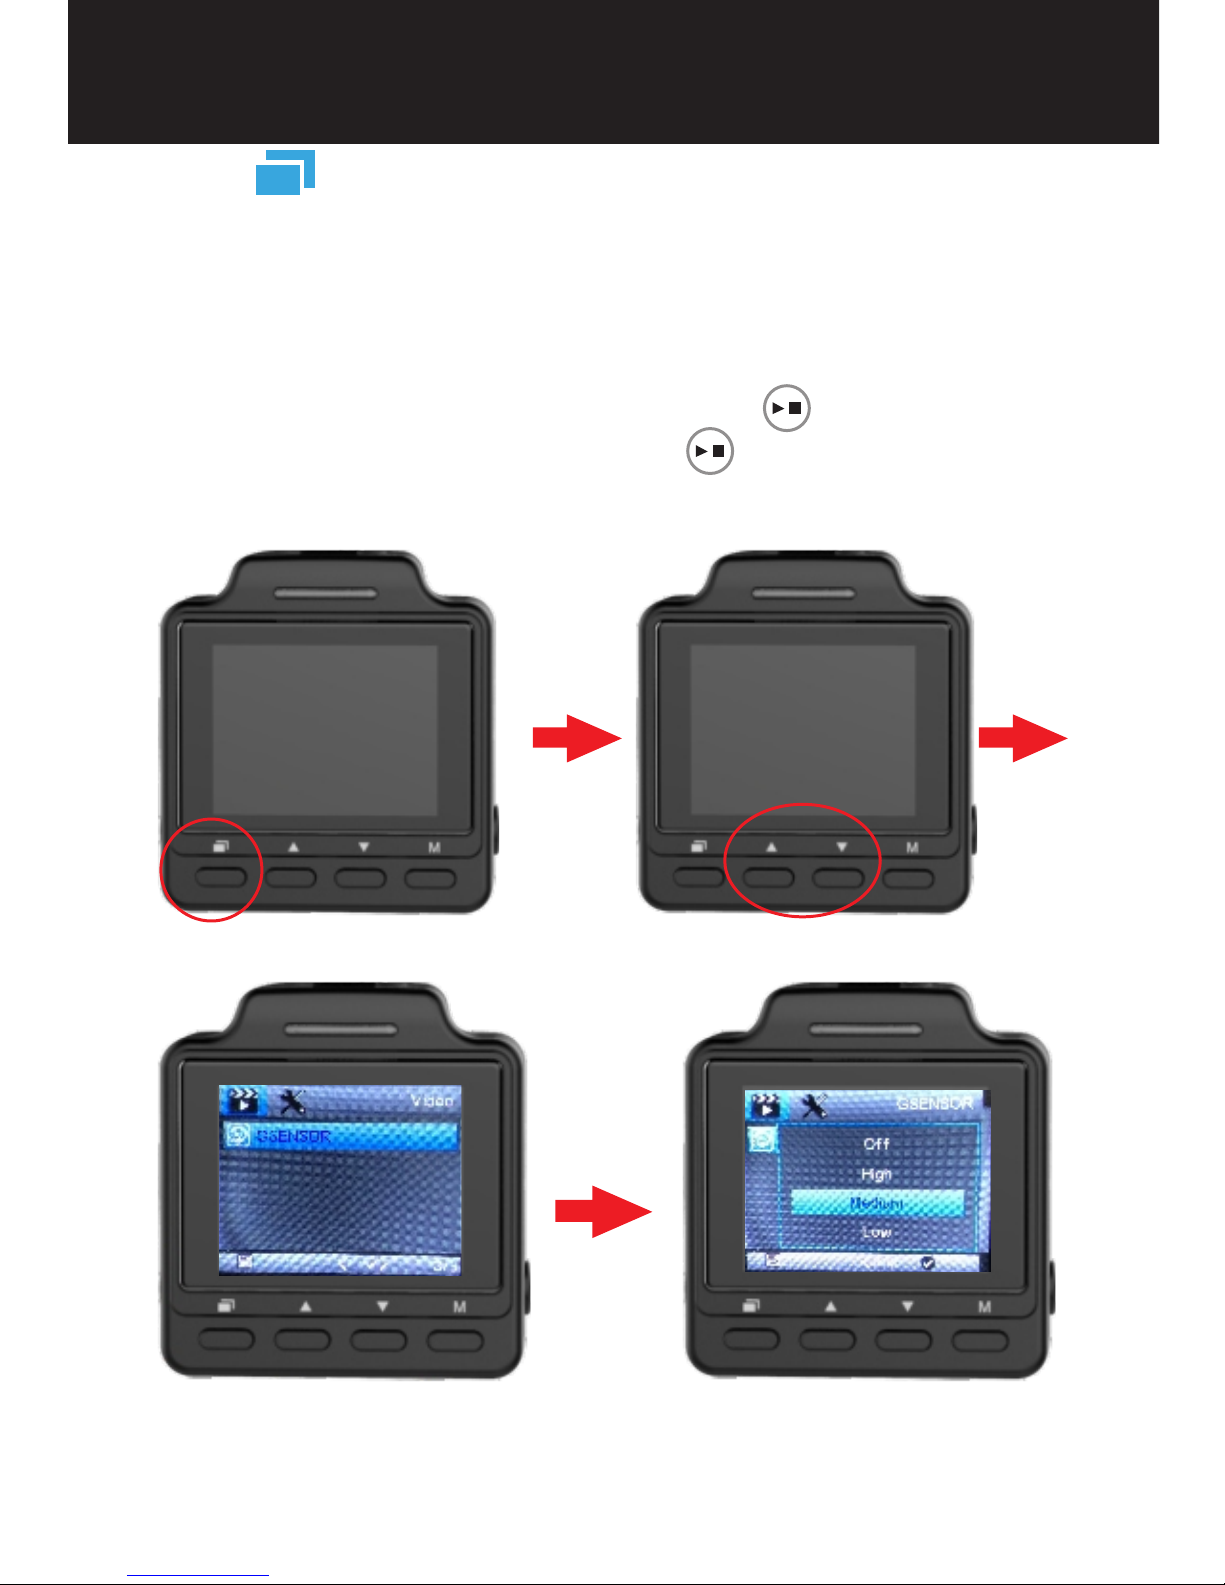
Press button to format the sd card and set the date,
parking monitoring, motion detection, record audio, frequency,
loop recording ect:
How to Set Your DC80 Dash Cam
1. About G-sensor
The dash camera will automatically lock videos of unexpected
incidents, the sensitivity is optional, In the menu, press up/down
button to find the “GSENSOR” then press button to choose
“off”, “low”, ”medium” ,” high” , press button again to save
the option. The sensitivity is default to "medium".
12
Page 15
How to Set Your DC80 Dash Cam
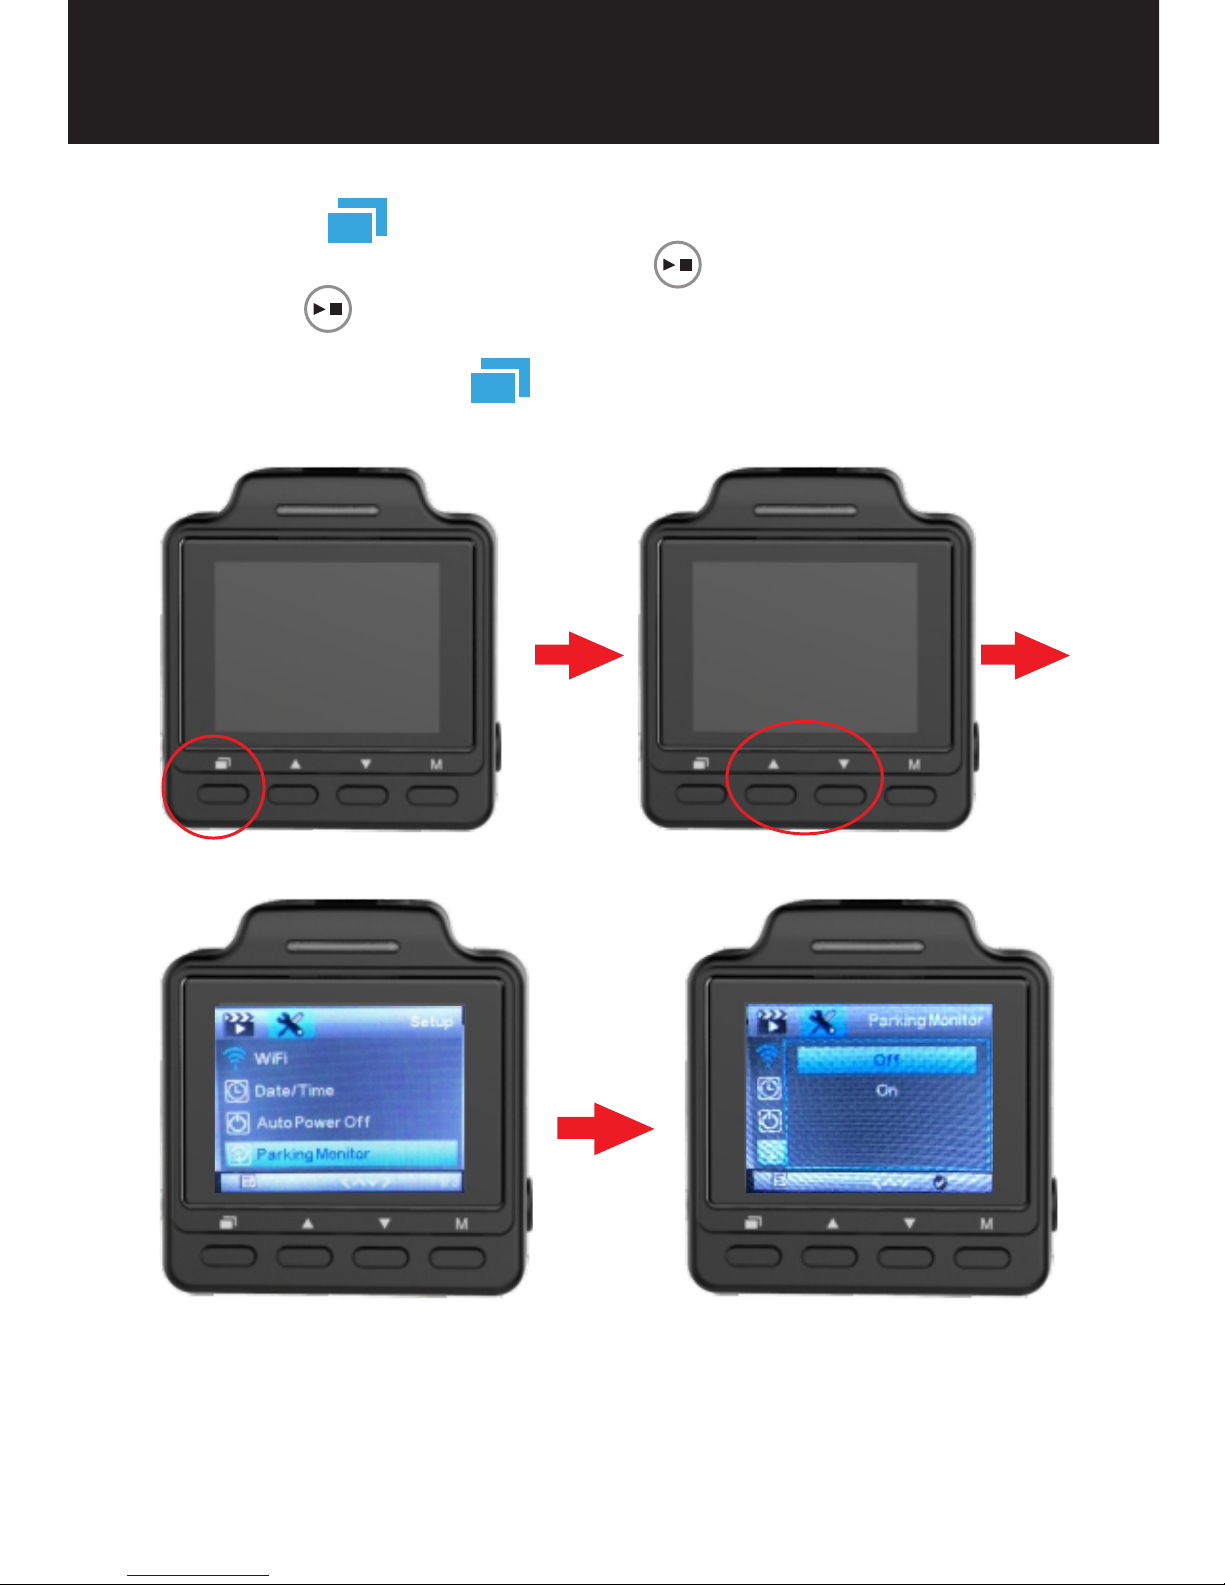
2. About Parking monitoring
Short press button twice, then press down button to choose
“parking monitor”, and then press button to choose on or
off. Press button again to save the option.
In menu mode, Press button again to end menu settings.
13
Page 16
How to Set Your DC80 Dash Cam
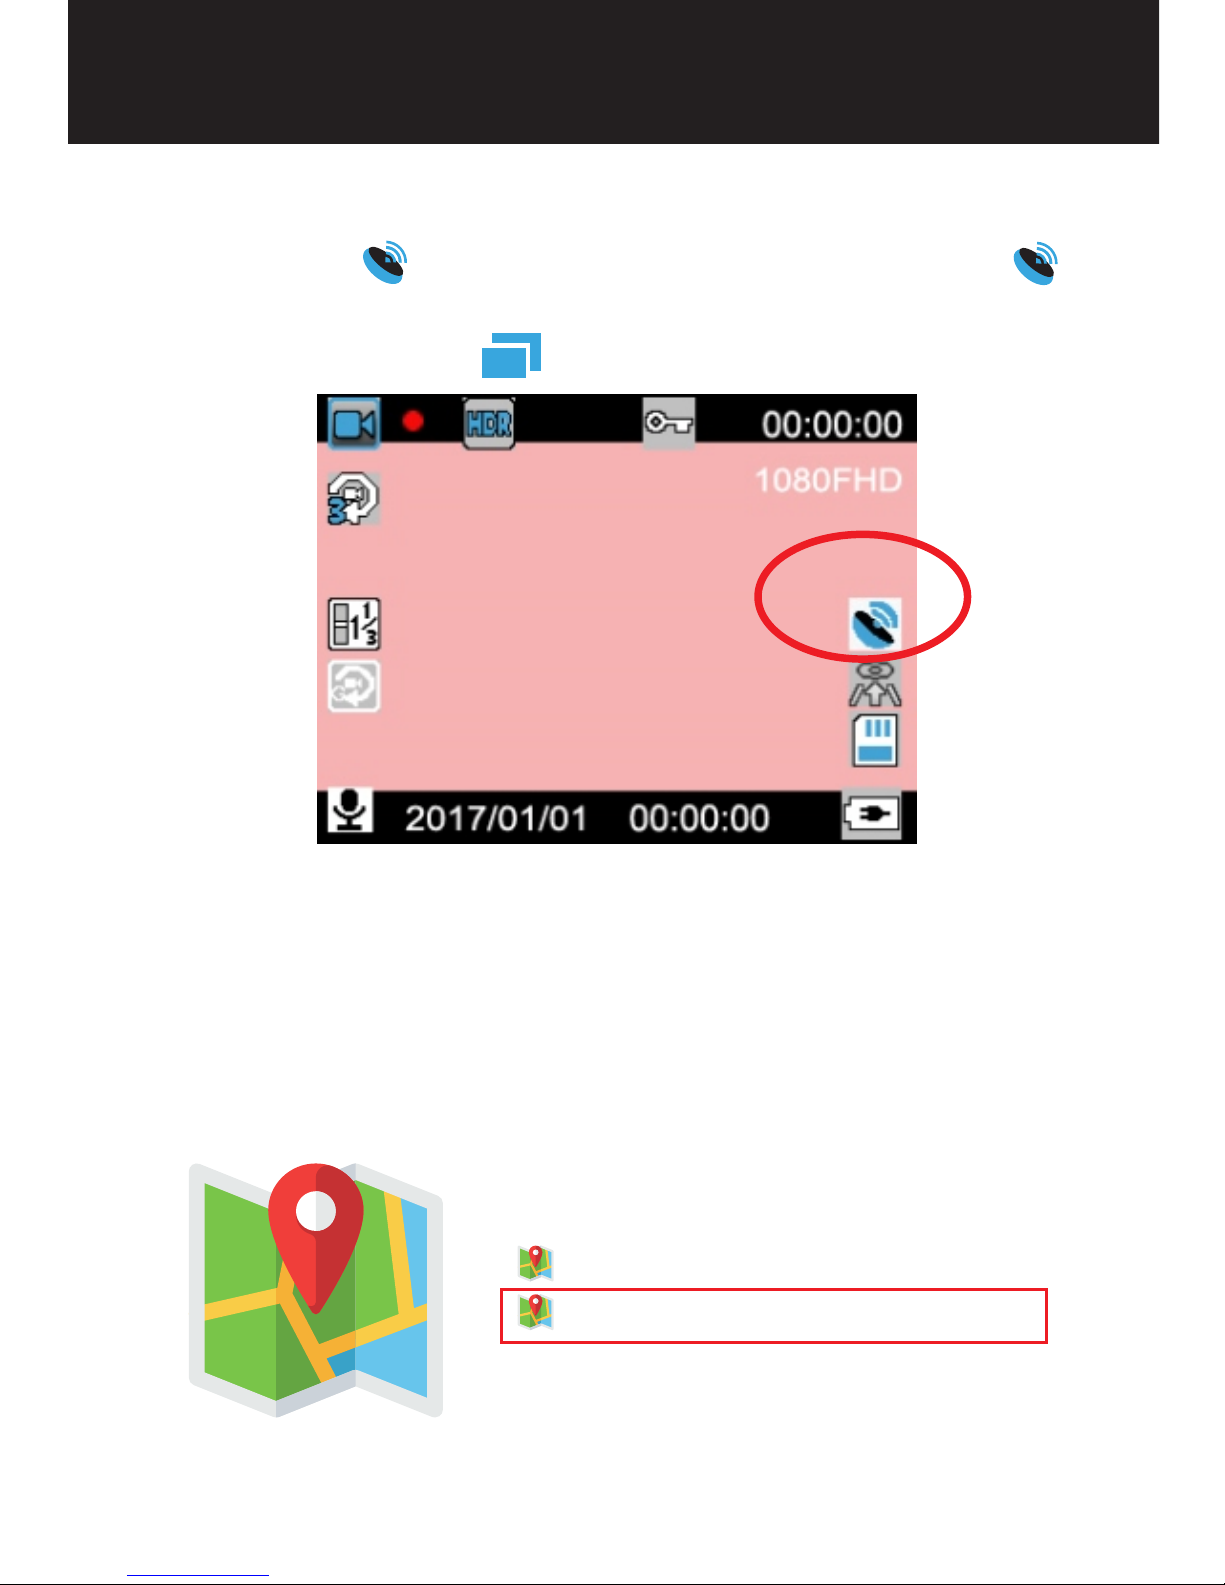
3. About GPS
1.The dash cam will search GPS signal once powered on, the
screen shows flashing meaning in searching GPS, the
stays on meaning GPS is working.
14
2. How to play GPS information
If the GPS working when recording, you can play the videos
with GPS on the player that included in the package:
1.Please play the CD in the package to download the "Driving
Recorder Player" to computer.please choose the Google
Driver.
In menu mode, Press button again to end menu settings.
PlayerSetup-Baidu-DrivingRecorder...
PlayerSetup-Google-DrivingRecorder...
Page 17
How to Set Your DC80 Dash Cam
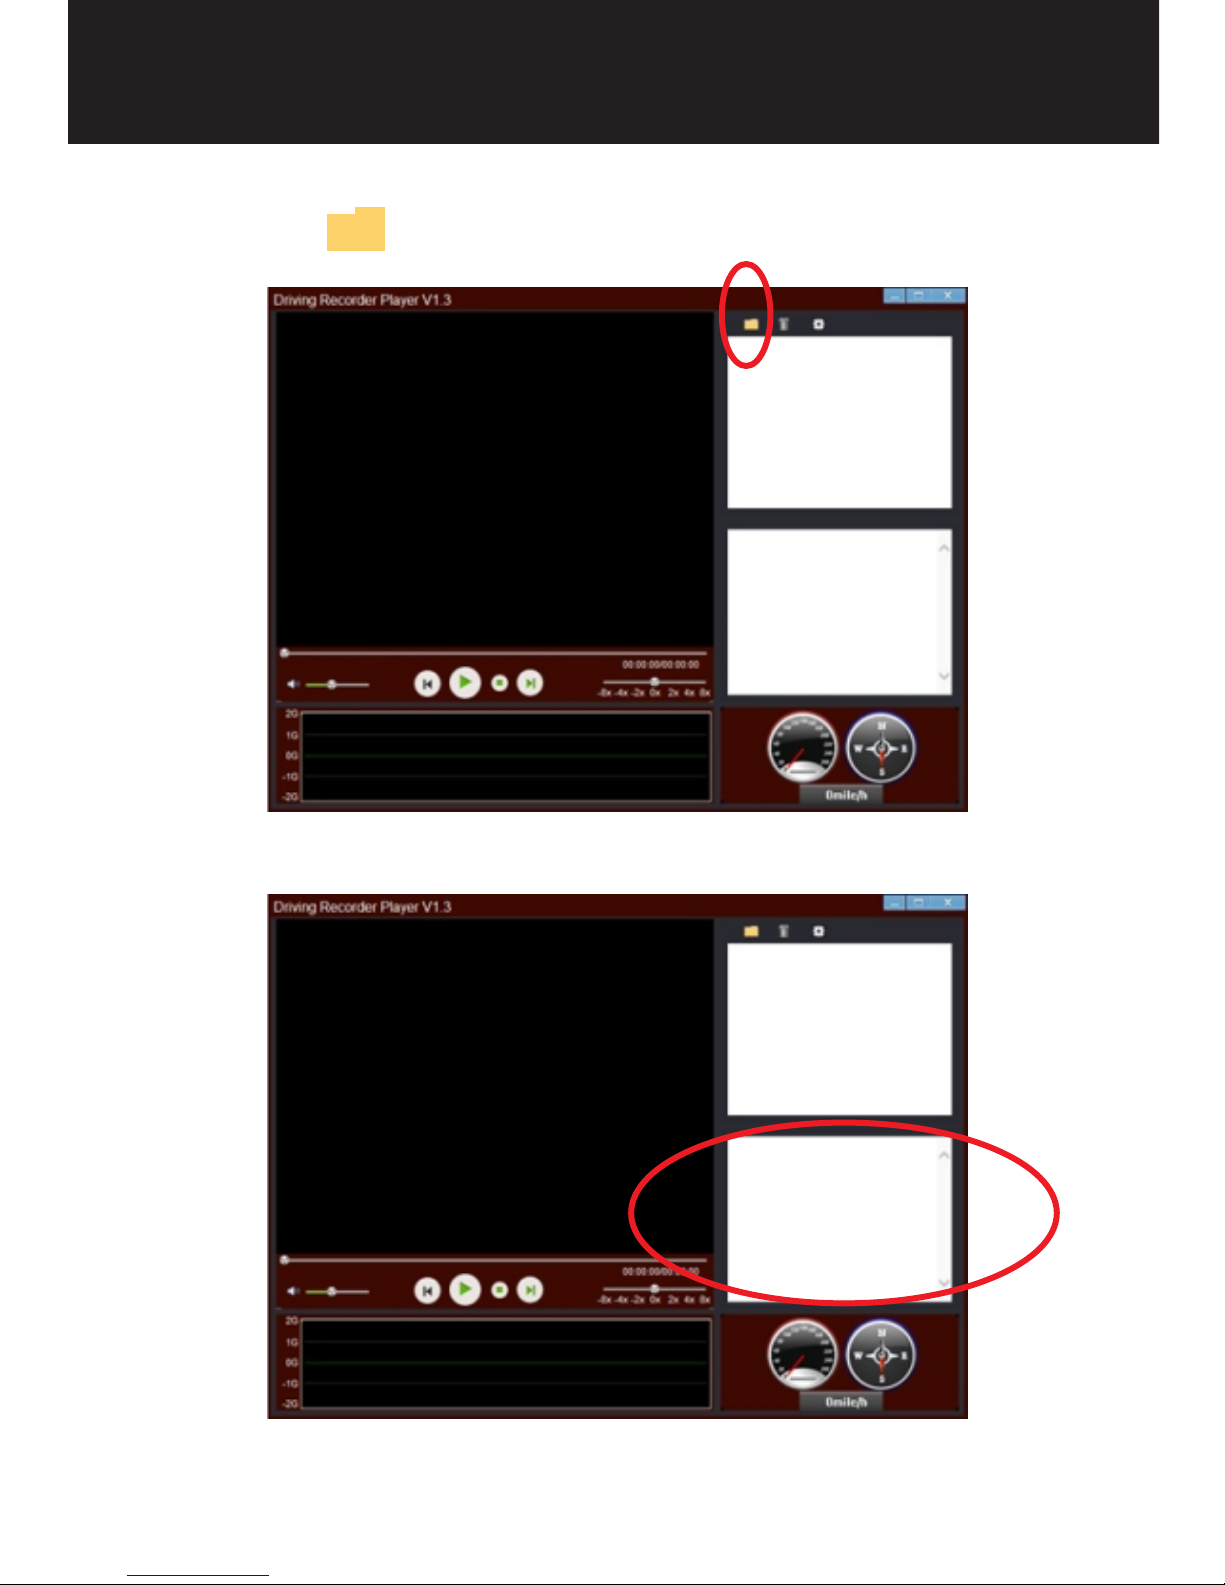
2.Install the player on computer and open the player.
3.Click the on the right to choose the video that you want.
15
4.You can check the location on the player now.
Page 18
How to Remote Control Your DC80 Dash Cam
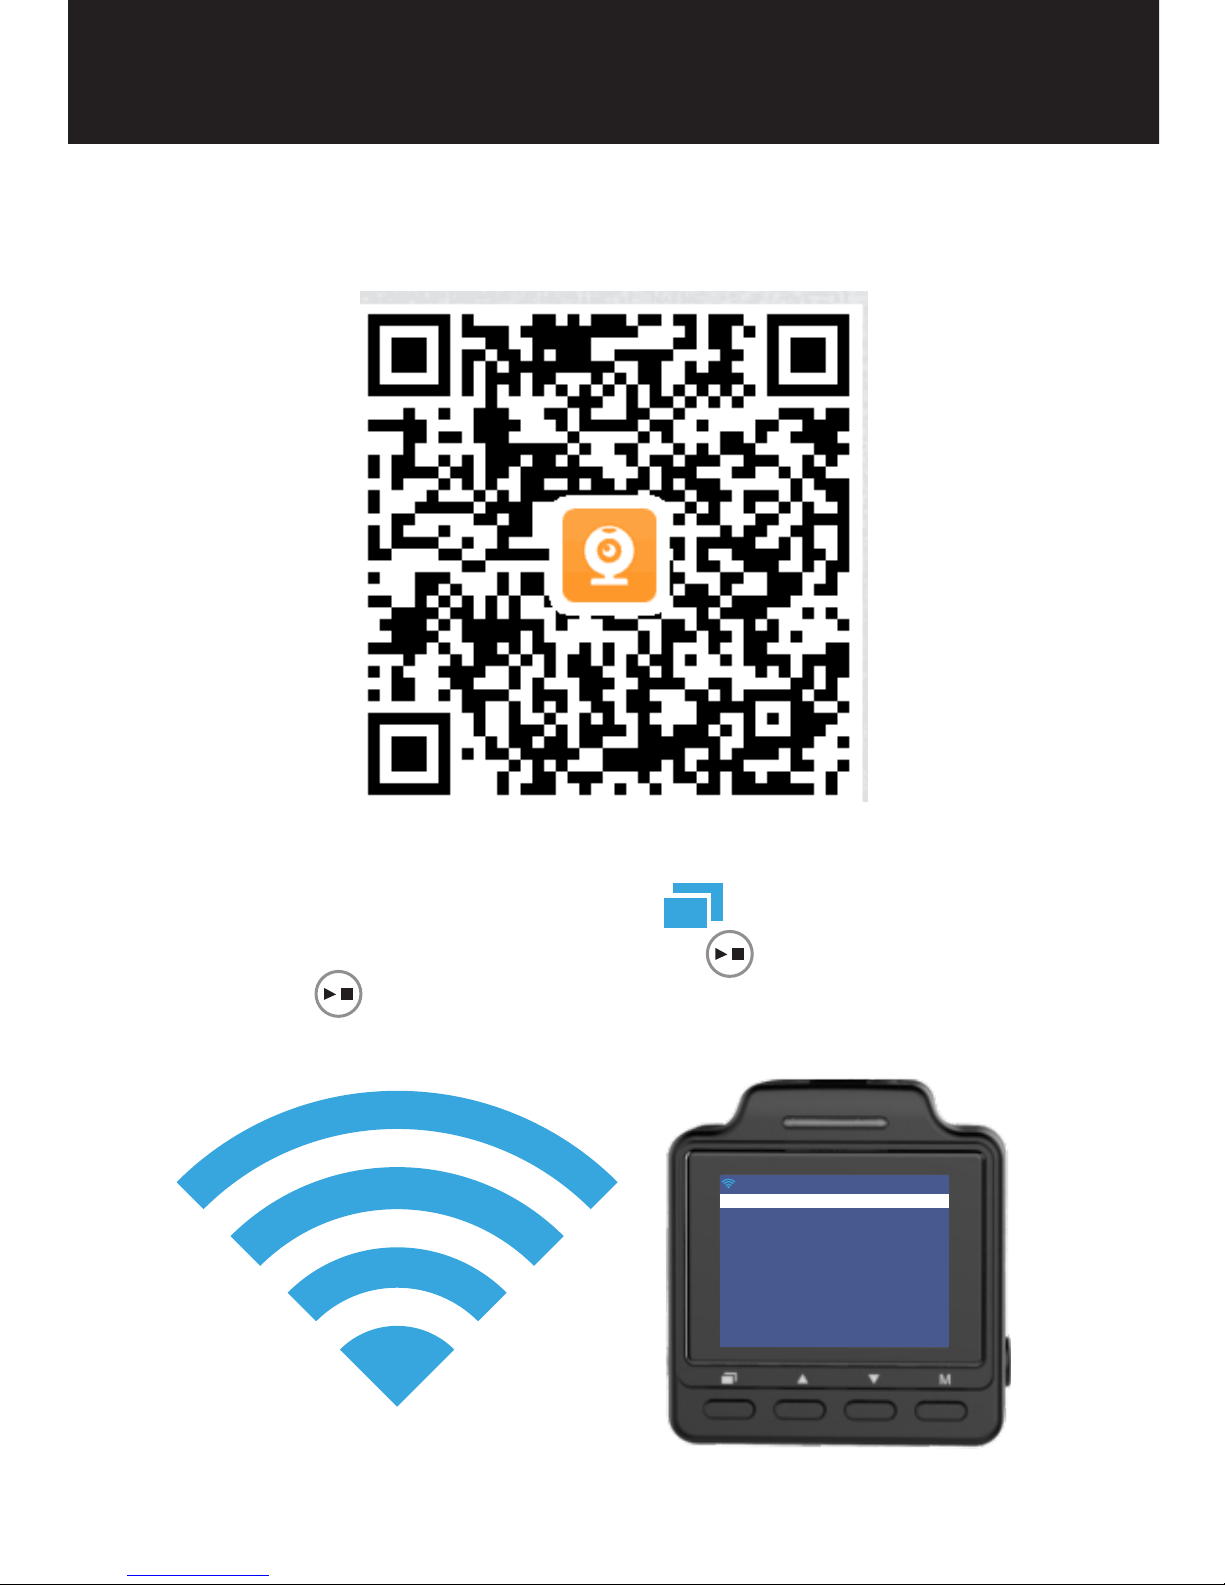
1.Download the APP “RoadCam”
Scan the code to download the APP RoadCam, or search the
RoadCam on App Store or Google play to download it.
2.Connect DC80 Dash Cam to Your Phone
Power on the dash cam, press the button twice, press
button to choose the wifi, press button to turn on wifi
and press button again to enter into wifi mode, the screen
will show the wifi SSID and PWD.
down
AP Mo de
SSI D:DV0 00B6A 12F60 5
PWD :1234 5678
Ref resh wiF i-OFF
16
Page 19
How to Remote Control Your DC80 Dash Cam
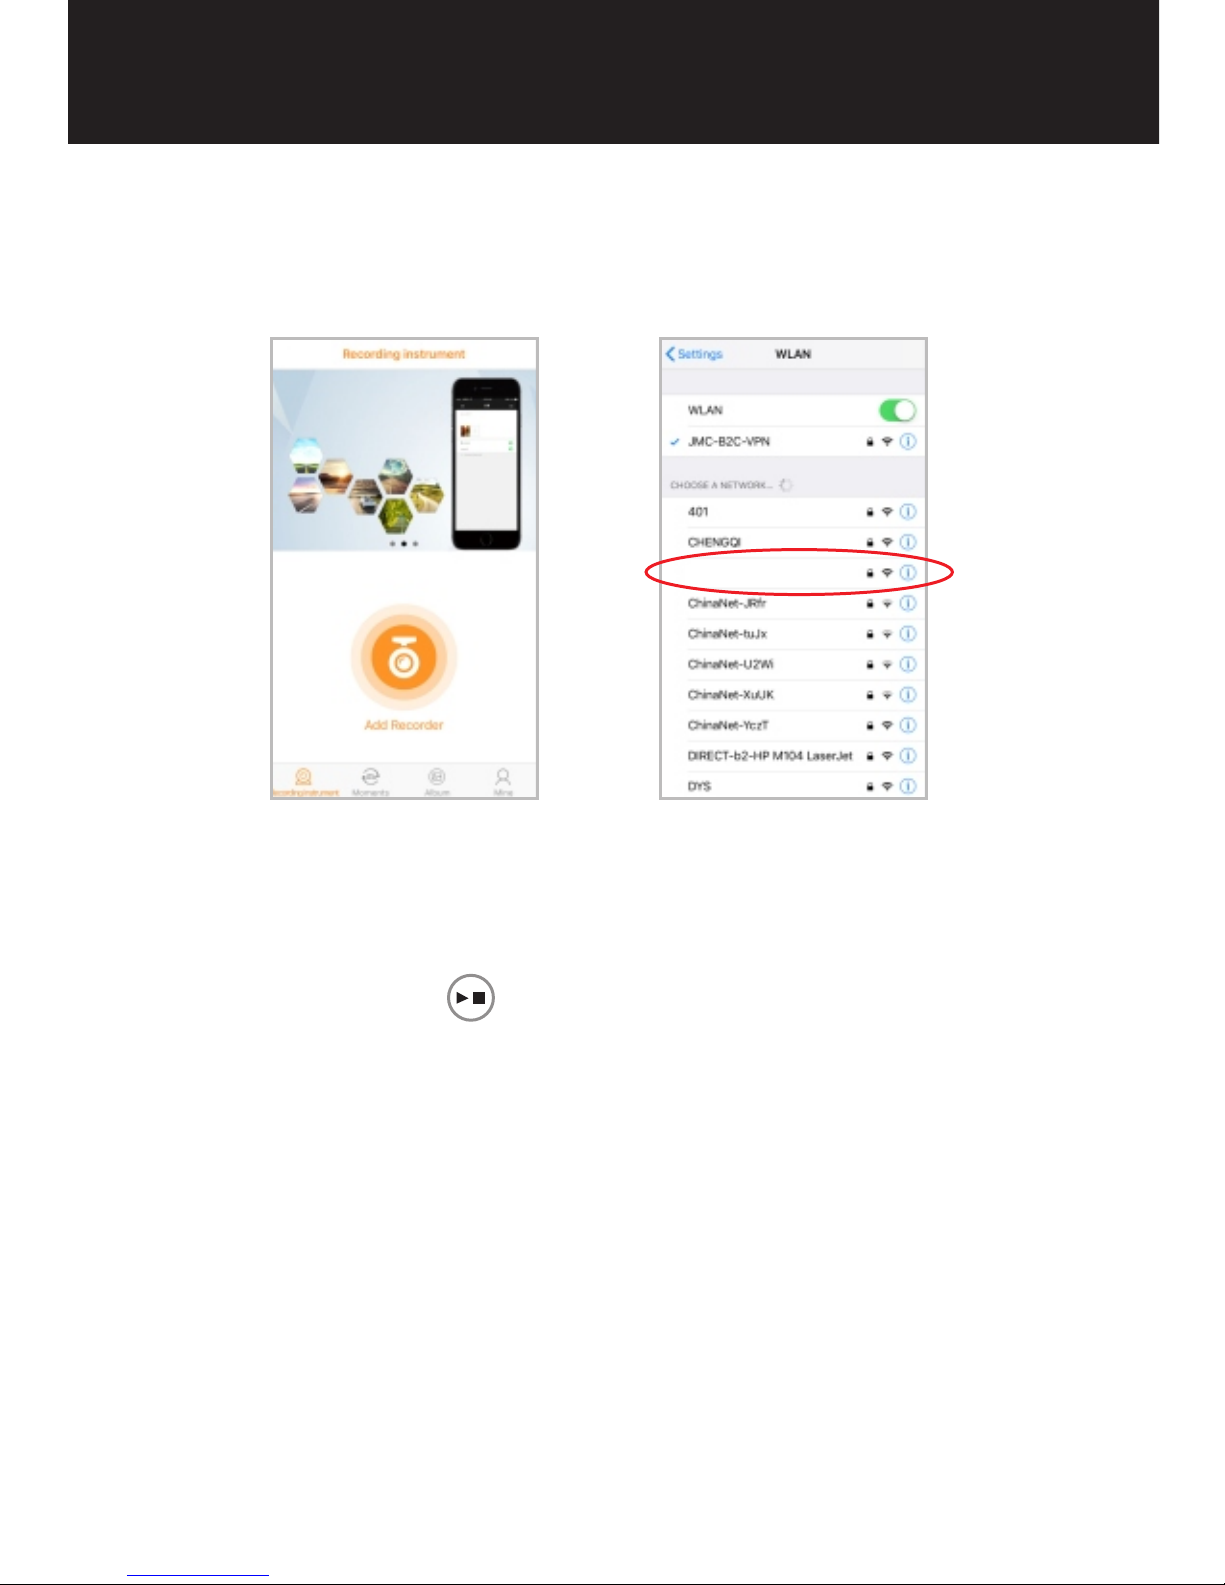
3.Enter into the RoadCam app, click “Add Recorder” to enter
your wifi connecting mode, find out the same SSID on the dash
cam, and enter into the password as you see on the dash cam.
Please note: one dash have only one SSID.
4.Now you have connected the dash cam to your phone
successfully.In wifi mode, press down button to choose
“wifi off” then press button to disconnect wifi.
Please Note: 1. In standby mode, press and hold Power
button more than 5 seconds to enter wifi mode.
In wifi mode, press and hold Power button more than 5
seconds to turn off wifi.
DV0 00B6A 12F60 5
17
Page 20
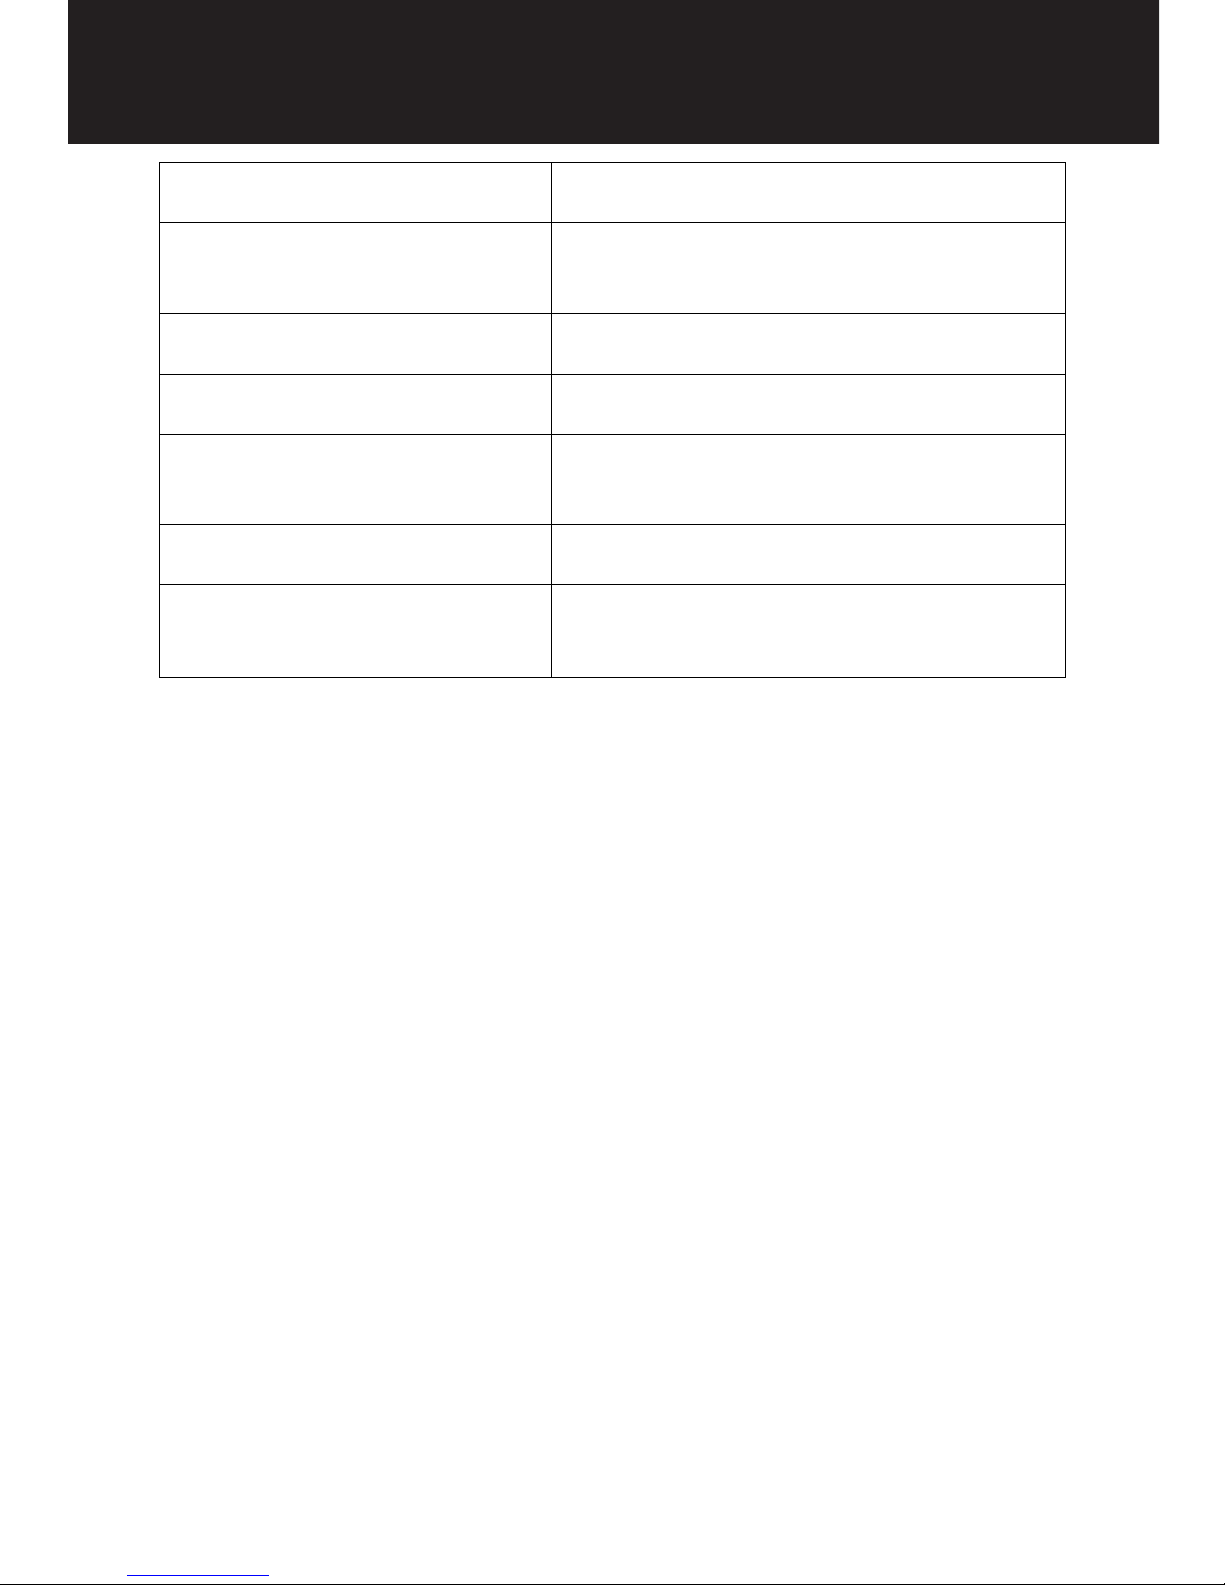
Led stays blue
Led stays on blue
Led stays on red on the right
Led red turns off
Led flashes blue
Led blue turns off
Led stays on blue
LED status
Power on
Standby mode
Charging
Fully charged
Recording
Power off
Taking photos
18
Page 21
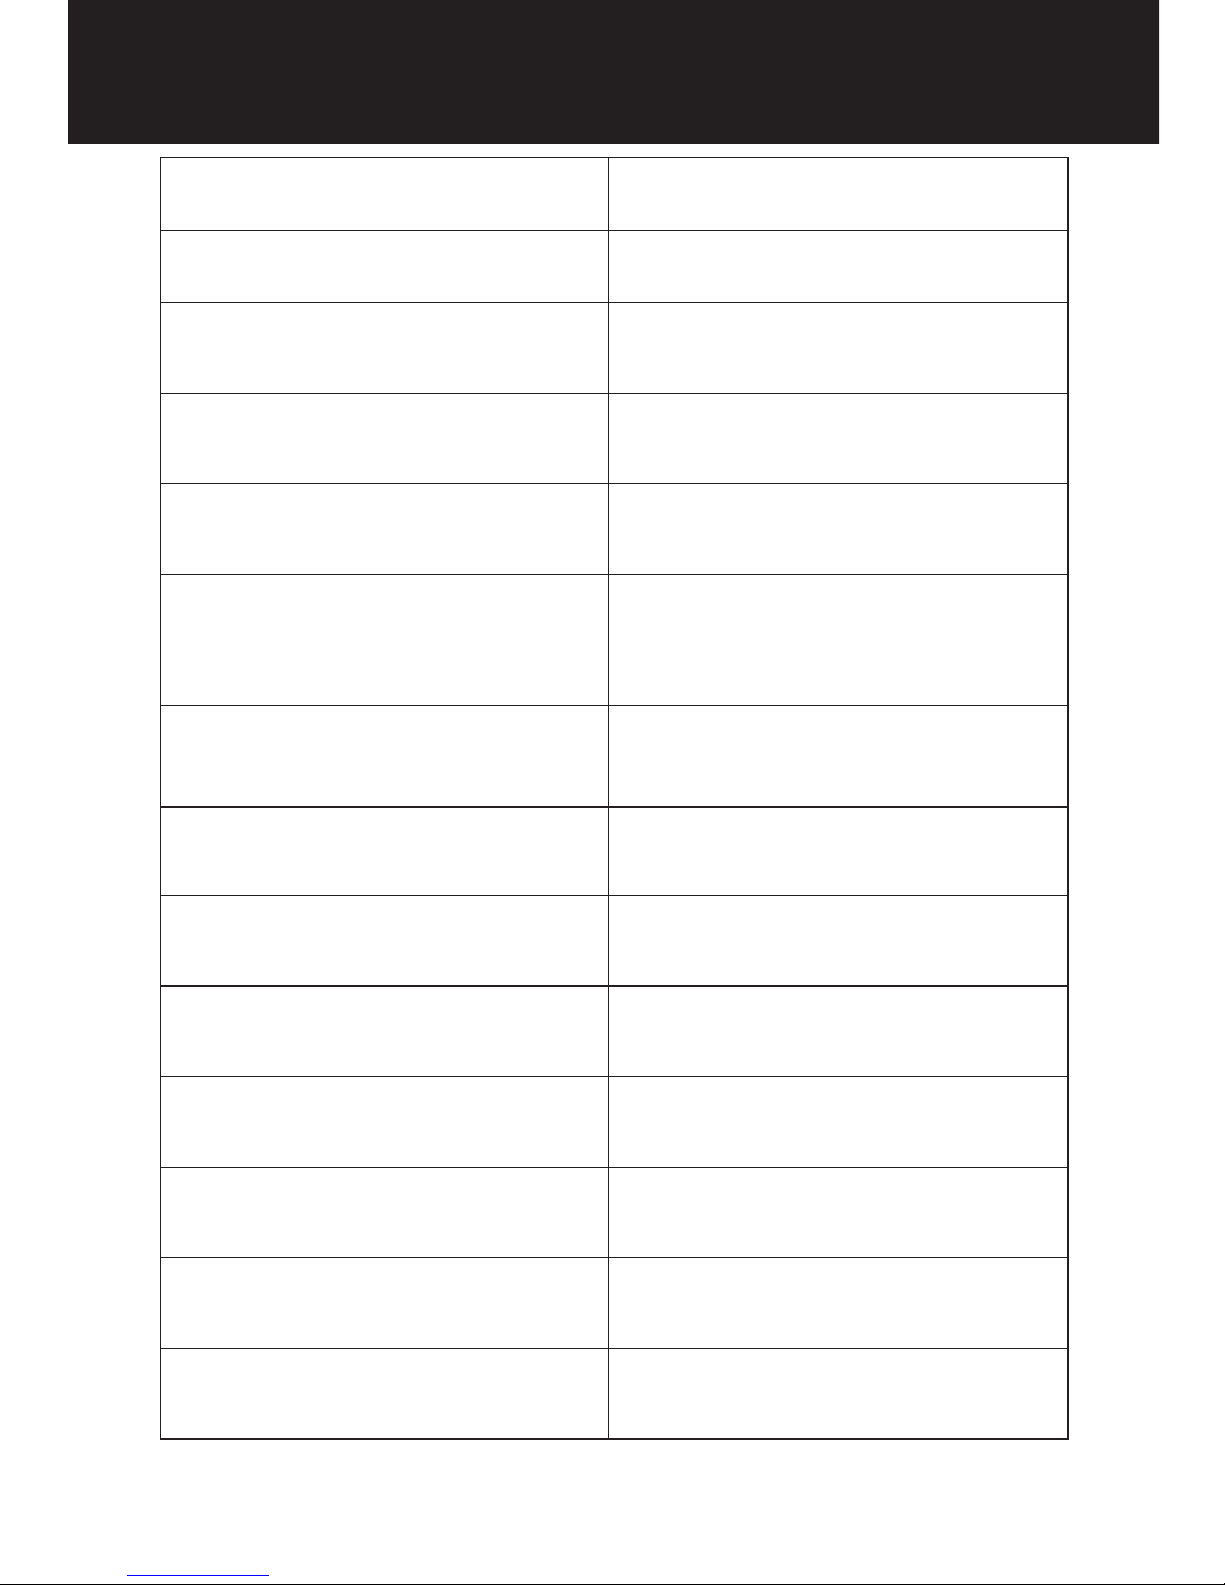
Item
LCD size
Power Supply
Battery Capacity
Video Format
Parameter
1.5 inch
Car Charger;
Output: 5V,1A
170mAh
H.264 , Audio: AAC
Resolution
720P 1280×720,
1080FHD 1920×1080
1296P 1728×1296
Technical specifications
SD Card Capacity
Supported Range
Automatically power on/off
Picture Format
Frequency
File Format
MAX 64GB
Recording when start
the engine
JPEG
50HZ/60HZ
MOV
Wifi
Optional
GPS
Support
Loop recording
Optional
19
Page 22

1. Q: What should I do when all the operations malfunction?
A: Please try to reset the camera, there is a pin included in the
package, and you can use it to press the reset button to reset
the camera.
2. Q: The dash cam cannot record video or take photos?
A: Please check the capacity of SD card, and if it is locked.
3.Q: What should I do when I can't play the video on
computer or there is only sound without frame?
A: We recommend replacing a VCL player on the market and
restart the computer.
4.Q: What should I do when the Micro SD card can't save
the video?
A: Please try to format the micro SD card to FAT32, or you can
change a new micro SD card. We recommend using class 10
card with 16GB capacity.
5.Q: What should I do if the G-sensor is very sensitive to
trigger?
A: Please set the G sensor to low or mid sensitivity.
6.Q:Why the video file is disrupted by horizontal stripes?
A: Choose the right frequency according local frequency.
FAQS
20
Page 23
All products sold by the Conbrov Group are covered by a
12-month full replacement warranty.
Happy with it? Share your experience with an Amazon
review.
Or any questions?
Our friendly customer service team is ready to
help: [email protected]
Contacting us via the above email address,which is the
quickest way to reach our support team.
For the electronic user manual and more information,
please visit:
Disposal
Electrical products should not be discarded with
household waste. According to the European
Directive 2012/19/EC on waste electrical and
electronic equipment and its implementation into
national law, electrical products used must be
collected separately and disposed of at collection
points provided for this purpose. Talk with your
local authorities or dealer for advice on recycling.
Declaration of conformity
Conbrov Electron Co., Ltd., Room 908 Huiyicaifu Center, c/o
Queshan and Longhua Roads, Shenzhen, China, declares
under our sole responsibility that the product Starlight Mini
Camera T19, to which this declaration relates, meets all
relevant European standards and directives. For the complete
declaration of conformity visit our website www.conbrov.com.
Warranty
21
Page 24

23
Trademarks
All trademarks or registered trademarks are the property
of their respective owners.
Manufacturer
Conbrov Electron Co., Ltd.
4th Floor, Building D of Baifuli,
Yuan Ye Industrial park
Shenzhen, People's Republic of China
About Us
Conbrov Electron Co., Ltd. founded in 2003 is an innovative
technology research company specialized in personal
surveillance cameras and on-dash cameras. Conbrov products
and technology are patent protected by PCT or U.S. Patent
Office. Based on years of professional experience and
knowledge, we are able to provide the best and most efficient
products and customer service.
Become a member of Conbrov,
Claim your FREE GIFT today!
http://vip.conbrov.com/
https://www.facebook.com/groups/ConbrovVIP/
 Loading...