

Page 1
Carousel Plus Dryer
W Series Models 600 through 5000 with DC-1 Controls
Corporate Office: 724.584.5500 l Instant Access 24/7 (Parts and Service): 800.458.1960 l Parts and Service: 814.437.6861
U S E R G U I D E
UGD035-1216
www.conairgroup.com
Page 2

Please record your equipment’s
model and serial number(s) and
the date you received it in the
spaces provided.
It’s a good idea to record the model and serial number(s) of your equipment and
the date you received it in the User Guide. Our service department uses this information, along with the manual number, to provide help for the specific equipment
you installed.
Please keep this User Guide and all manuals, engineering prints and parts lists
together for documentation of your equipment.
Date:
Manual Number: UGD035-1216
Serial Number(s):
Model Number(s):
See Screens 3 and 4 for Software Version
*Display Firmware Version:
*Control Firmware Version:
* NOTE: Displayed upon initialization, during power up, or on a data tag
inside the door.
DISCLAIMER: Conair shall not be liable for errors contained in this User Guide or for incidental,
consequential damages in connection with the furnishing, performance or use of this information.
Conair makes no warranty of any kind with regard to this information, including, but not limited
to the implied warranties of merchantability and fitness for a particular purpose.
Co p yr ig ht 2 01 6 l Co na ir l A ll r ig ht s re se rv ed
✐
Page 3

Table of Contents
1-1 I ntr odu cti on
Purpose of the user guide . . . . . . . . . . . . . . . . . . . . . . . . . . . . . . . . 1-2
How the guide is organized . . . . . . . . . . . . . . . . . . . . . . . . . . . . . . 1-2
Using the Carousel Plus W Series as a central dryer . . . . . . . . . . . . 1-3
Your responsibilities as a user . . . . . . . . . . . . . . . . . . . . . . . . . . . . . 1-3
ATTENTION: Read this so no one gets hurt . . . . . . . . . . . . . . . . . . . 1-4
How to use the lockout device . . . . . . . . . . . . . . . . . . . . . . . . . . . . 1-6
2-1 D esc rip tio n
What is the Carousel Plus W Series Dryer? . . . . . . . . . . . . . . . . . . .2-2
Typical applications . . . . . . . . . . . . . . . . . . . . . . . . . . . . . . . . . . . . .2-2
How it works . . . . . . . . . . . . . . . . . . . . . . . . . . . . . . . . . . . . . . . . . .2-4
Specifications: Carousel Plus W Series Dehumidifying Dryer . . . . . . 2-7
Carousel Plus W Series Dehumidifying Dryer options . . . . . . . . . . . 2-8
3-1 I nst all ati on
Unpacking the boxes . . . . . . . . . . . . . . . . . . . . . . . . . . . . . . . . . . . 3-2
Preparing for installation . . . . . . . . . . . . . . . . . . . . . . . . . . . . . . . . . 3-3
Positioning the dryer on the floor . . . . . . . . . . . . . . . . . . . . . . . . . . 3-4
Removing the cable tie from the desiccant wheel (W600-1000) . . . 3-4
Installing the regeneration exhaust cover . . . . . . . . . . . . . . . . . . . . 3-4
Installing the return air adapter . . . . . . . . . . . . . . . . . . . . . . . . . . . . 3-5
Installing the return air inlet and air outlet
adapters (W1600-5000) . . . . . . . . . . . . . . . . . . . . . . . . . . . . 3-6
Installing the overhead process air duct (W3200-5000) . . . . . . . . . 3-7
Connecting the main power . . . . . . . . . . . . . . . . . . . . . . . . . . . . . . 3-8
Ta bl e of C on te nt s l i
Page 4

Checking for proper air flow . . . . . . . . . . . . . . . . . . . . . . . . . . . . . . 3-9
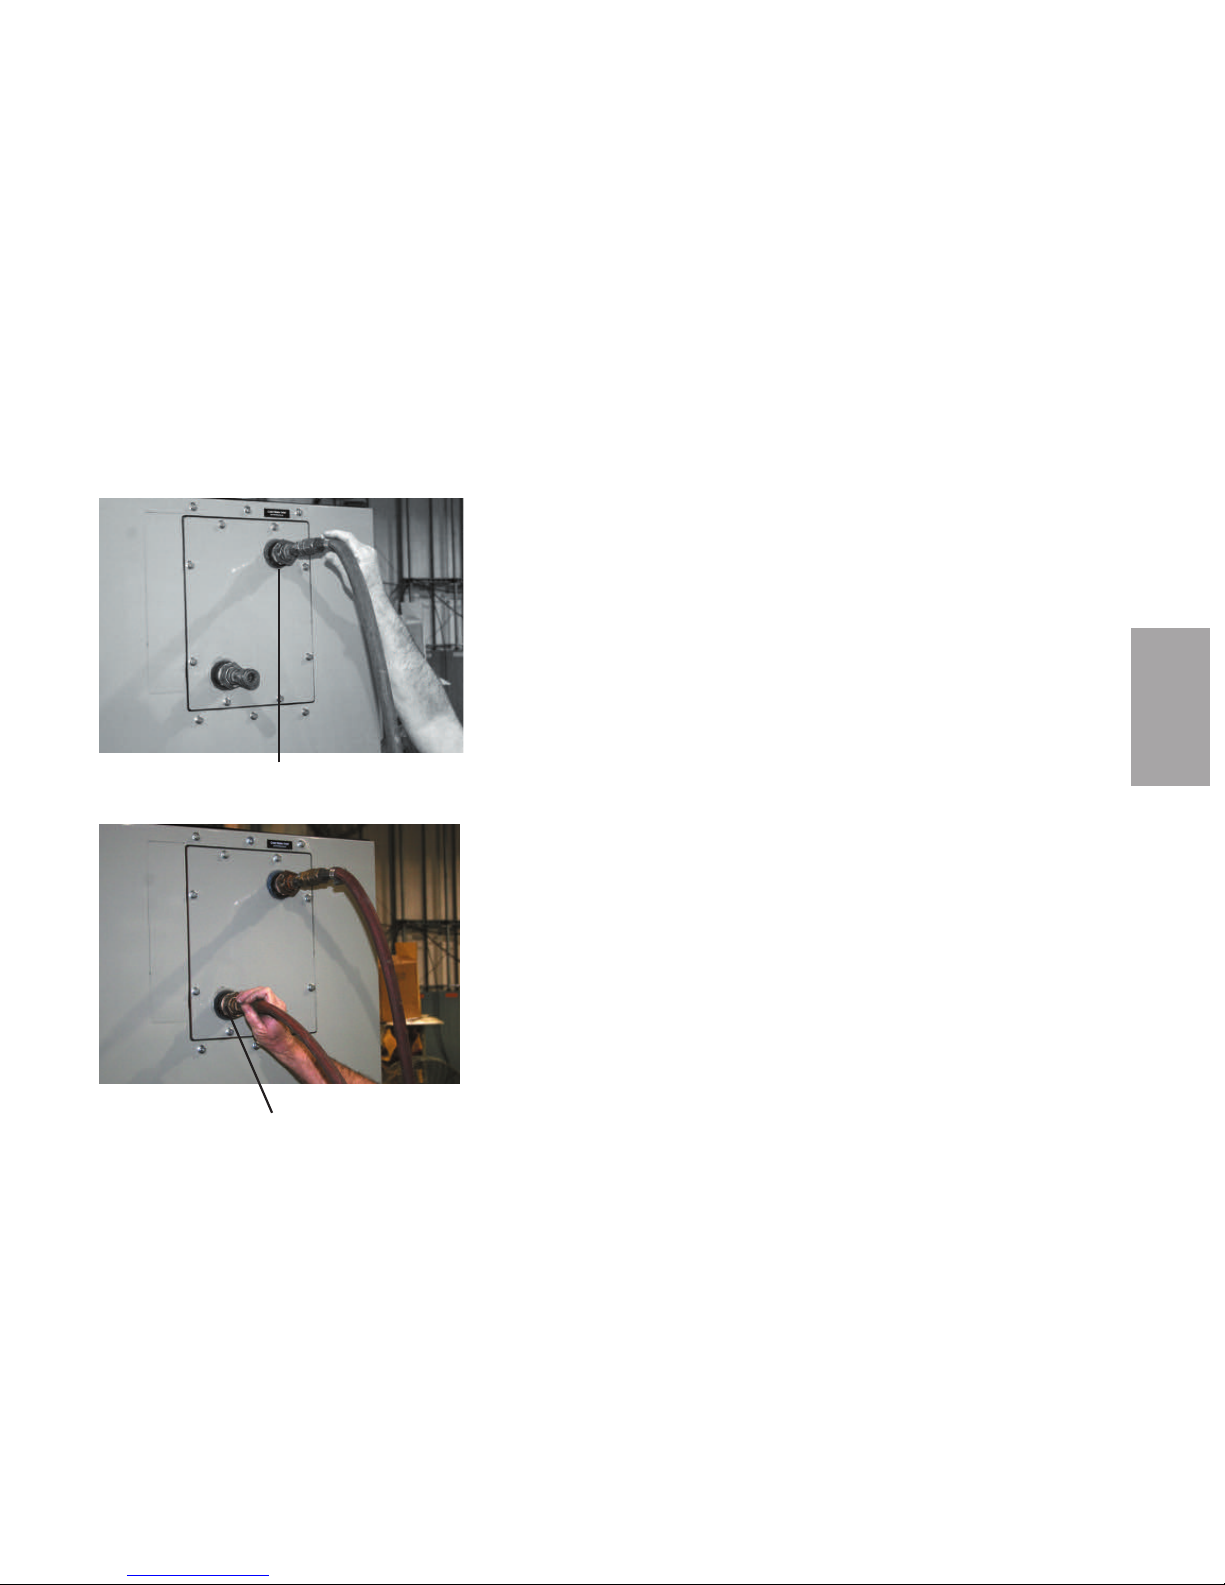
Connecting the air hoses to a single hopper (W600-1000) . . . . . . 3-12
Connecting the air hoses to a single hopper (W1600-5000) . . . . . 3-13
Connecting the air hoses to a ResinWorks. . . . . . . . . . . . . . . . . . . 3-14
Connecting the dryer to the hopper . . . . . . . . . . . . . . . . . . . . . . . 3-15
Connecting the dryer to ResinWorks . . . . . . . . . . . . . . . . . . . . . . . 3-15
Connecting air hose adapters . . . . . . . . . . . . . . . . . . . . . . . . . . . . 3-16
Connecting the aftercooler and optional precooler (W600-1000). . 3-17
Connecting the intercooler and optional precooler (W1600-5000) . 3-18
Mounting a loader on the hopper . . . . . . . . . . . . . . . . . . . . . . . . . 3-19
Testing the installation . . . . . . . . . . . . . . . . . . . . . . . . . . . . . . . . . 3-19
4-1 O per ati on
Carousel Plus W Series Dryer: control panel DC-1. . . . . . . . . . . . . . 4-2
Carousel Plus W Series Dryer DC-1 control functions . . . . . . . . . . . 4-3
Control function flow chart . . . . . . . . . . . . . . . . . . . . . . . . . . . . . . . 4-3
Control function descriptions. . . . . . . . . . . . . . . . . . . . . . . . . . . . . . 4-5
To start drying. . . . . . . . . . . . . . . . . . . . . . . . . . . . . . . . . . . . . . . . 4-15
To stop drying . . . . . . . . . . . . . . . . . . . . . . . . . . . . . . . . . . . . . . . . 4-16
Using the auto start countdown function. . . . . . . . . . . . . . . . . . . . 4-17
How to disable the auto start on the DC-1 control. . . . . . . . . . . . . 4-17
Using the dewpoint monitor and dewpoint control. . . . . . . . . . . . . 4-18
5-1 M ain ten anc e
Preventative maintenance checklist . . . . . . . . . . . . . . . . . . . . . . . . 5-2
Checking the dewpoint . . . . . . . . . . . . . . . . . . . . . . . . . . . . . . . . . . 5-3
Cleaning the hopper . . . . . . . . . . . . . . . . . . . . . . . . . . . . . . . . . . . . 5-5
Cleaning the process filter. . . . . . . . . . . . . . . . . . . . . . . . . . . . . . . . 5-6
ii l Tab l e of Co nt en t s
Page 5

Cleaning the regeneration filter . . . . . . . . . . . . . . . . . . . . . . . . . . . . 5-8
Cleaning the aftercooler/intercooler coils . . . . . . . . . . . . . . . . . . . . 5-9
Cleaning the precooler coils . . . . . . . . . . . . . . . . . . . . . . . . . . . . . 5-11
Cleaning the volatile trap on the demister . . . . . . . . . . . . . . . . . . . 5-11
Inspecting hoses and gaskets . . . . . . . . . . . . . . . . . . . . . . . . . . . . 5-11
6-1 Troubleshoo tin g
Before beginning. . . . . . . . . . . . . . . . . . . . . . . . . . . . . . . . . . . . . . . 6-2
A few words of caution . . . . . . . . . . . . . . . . . . . . . . . . . . . . . . . . . 6-3
DIAGNOSTICS
How to identify the cause of a problem . . . . . . . . . . . . . . . . . . . . . 6-4
Alarms . . . . . . . . . . . . . . . . . . . . . . . . . . . . . . . . . . . . . . . . . . . . . 6-5
Dewpoint troubleshooting . . . . . . . . . . . . . . . . . . . . . . . . . . . . . . . 6-17
Poor material drying troubleshooting. . . . . . . . . . . . . . . . . . . . . . . 6-18
REPAIR
Replacing fuses. . . . . . . . . . . . . . . . . . . . . . . . . . . . . . . . . . . . . . . 6-23
Checking heater solid state relays. . . . . . . . . . . . . . . . . . . . . . . . . 6-24
Checking or replacing temperature sensors . . . . . . . . . . . . . . . . . 6-25
Replacing the regeneration heater (W600-1000). . . . . . . . . . . . . . 6-26
Replacing the regeneration heater (W1600-2400). . . . . . . . . . . . . 6-28
Replacing the regeneration heater (W3200-5000). . . . . . . . . . . . . 6-30
Replacing the desiccant wheel assembly (W600-1000). . . . . . . . . 6-32
Replacing the desiccant wheel motor (W600-1000) . . . . . . . . . . . 6-34
Replacing the desiccant wheel motor (W1600-5000) . . . . . . . . . . 6-35
Ta bl e of C on te nt s l i ii
Page 6

iv l Tab l e of Co nt en t s
A App endix
We’re here to help . . . . . . . . . . . . . . . . . . . . . . . . . . . . . . . . . . . . . A-1
How to contact customer service . . . . . . . . . . . . . . . . . . . . . . . . . . A-1
Before you call... . . . . . . . . . . . . . . . . . . . . . . . . . . . . . . . . . . . . . . A-1
Equipment guarantee . . . . . . . . . . . . . . . . . . . . . . . . . . . . . . . . . . A-2
Performance warranty . . . . . . . . . . . . . . . . . . . . . . . . . . . . . . . . . . A-2
Warranty limitations . . . . . . . . . . . . . . . . . . . . . . . . . . . . . . . . . . . . A-2
B Appendix
Cleaning the precooler coils . . . . . . . . . . . . . . . . . . . . . . . . . . . . . . B-1
C A p pen dix
Cleaning the volatile trap on the demister (W600-1000) . . . . . . . . C-1
Cleaning the volatile trap on the demister (W1600-3200) . . . . . . . C-2
Page 7

Introduction
Purp o se o f t he u ser guid e . . . . . . . . . . . . . . 1-2
How the gu i de i s o rgani z ed . . . . . . . . . . . . . 1-2
Usin g th e C a rouse l P l us W Serie s
as a c entra l d r yer . . . . . . . . . . . . . . . . 1-3
Yo ur r espo n s ibil i ties as a u ser. . . . . . . . . . . 1 -3
ATTE N T ION:
Read th i s s o n o on e g e ts h urt . . . . . . . . 1-4
How to use th e lo c kout dev i ce . . . . . . . . . . . 1- 6
S E C T I O N
1
In t ro du ct io n l 1 -1
1
In t r odu c t ion
Page 8

✐
Purpose of the User Guide
This User Guide describes the Conair Carousel Plus W Series Dryer and
explains step-by-step how to install, operate, maintain, and repair this
equipment.
Before installing this product, please take a few moments to read the User
Guide and review the diagrams and safety information in the instruction
packet. You also should review manuals covering associated equipment
in your system. This review won’t take long, and it could save you valuable installation and operating time later.
How the Guide is Organized
Symbols have been used to help organize the User Guide and call your
attention to important information regarding safe installation and operation.
Symbols within triangles warn of conditions that could be hazardous to users or
could damage equipment. Read and take precautions before proceeding.
Numbers indicate tasks or steps to be performed by the user.
A diamond indicates the equipment’s response to an action performed by the user.
An open box marks items in a checklist.
A circle marks items in a list.
Indicates a tip. A tip is used to provide you with a suggestion that will help you with
the maintenance and the operation of this equipment.
Indicates a note. A note is used to provide additional information about the steps
you are following throughout the manual.
1
◆
❒
•
✒
1- 2 l I n tr od uc ti o n
Page 9

In t ro du ct io n l 1 -3
Using the Carousel Plus W Seri es
as a Central Dr yer
The Conair Carousel Plus W600-5000 Series Dryers are factory configured to
be used as central dryers only. Therefore, this manual incorporates the information necessary to use these dryers for central drying applications.
Your Responsibility a s a User
You must be familiar with all safety procedures concerning installation, operation and maintenance of this equipment. Responsible safety procedures include:
• Thorough review of this User Guide, paying particular attention
to hazard warnings, appendices and related diagrams.
• Thorough review of the equipment itself, with careful attention
to voltage sources, intended use and warning labels.
• Thorough review of instruction manuals for associated equipment.
• Step-by-step adherence to instructions outlined in this User Guide.
1
In t r odu c t ion
Page 10

ATTENTION:
Read this so no one gets hurt
We design equipment with the user’s safety in mind. You can avoid the potential
hazards identified on this machine by following the procedures outlined below and
elsewhere in the User Guide.
WA RNING : Impr o per inst a llati o n, oper ation , or
ser v icing ma y re sult in equi p ment dam a ge o r
perso n al injur y.
This equipment should be installed, adjusted, and serviced by qualified
technical personnel who are familiar with the construction, operation,
and potential hazards of this type of machine.
All wiring, disconnects, and fuses should be installed by qualified electrical technicians in accordance with electrical codes in your region.
Always maintain a safe ground. Do not operate the equipment at power
levels other than what is specified on the machine serial tag and data
plate.
WA RNING : Vo ltage ha z ard
This equipment is powered by three-phase alternating current,
as specified on the machine serial tag and data plate.
A properly sized conductive ground wire from the incoming power
supply must be connected to the chassis ground terminal inside the
electrical enclosure. Improper grounding can result in severe personal
injury and erratic machine operation.
Always disconnect and lock out the incoming main power source before
opening the electrical enclosure or performing non-standard operating
procedures, such as routine maintenance. Only qualified personnel
should perform troubleshooting procedures that require access to the
electrical enclosure while power is on.
1- 4 l I n tr od uc ti o n
(continued)
Page 11

1
In t r odu c t ion
In t ro du ct io n l 1 -5
ATTENTION:
Read this so no one gets hurt
(c on ti nue d)
We design equipment with the user’s safety in mind. You can avoid the potential
hazards identified on this machine by following the procedures outlined below and
elsewhere in the User Guide.
CA UTION : Hot Sur fa c es.
Always protect yourself from hot surfaces inside the dryer and hopper.
Also exercise caution around exterior surfaces that may become hot
during use. These include the hopper door frame, the exterior of an
uninsulated hopper, the return air hose and the dryer’s process filter
housing and moisture exhaust outlet.
WA RNING : Do not plac e a e rosol , compr e ssed
gas or flamm able mate r ials on or near th i s
equip m ent.
The hot temperatures associated with the drying process may cause
aerosols or other flammable materials placed on the dryer or hopper to
explode.
Page 12

1- 6 l I n tr od uc ti o n
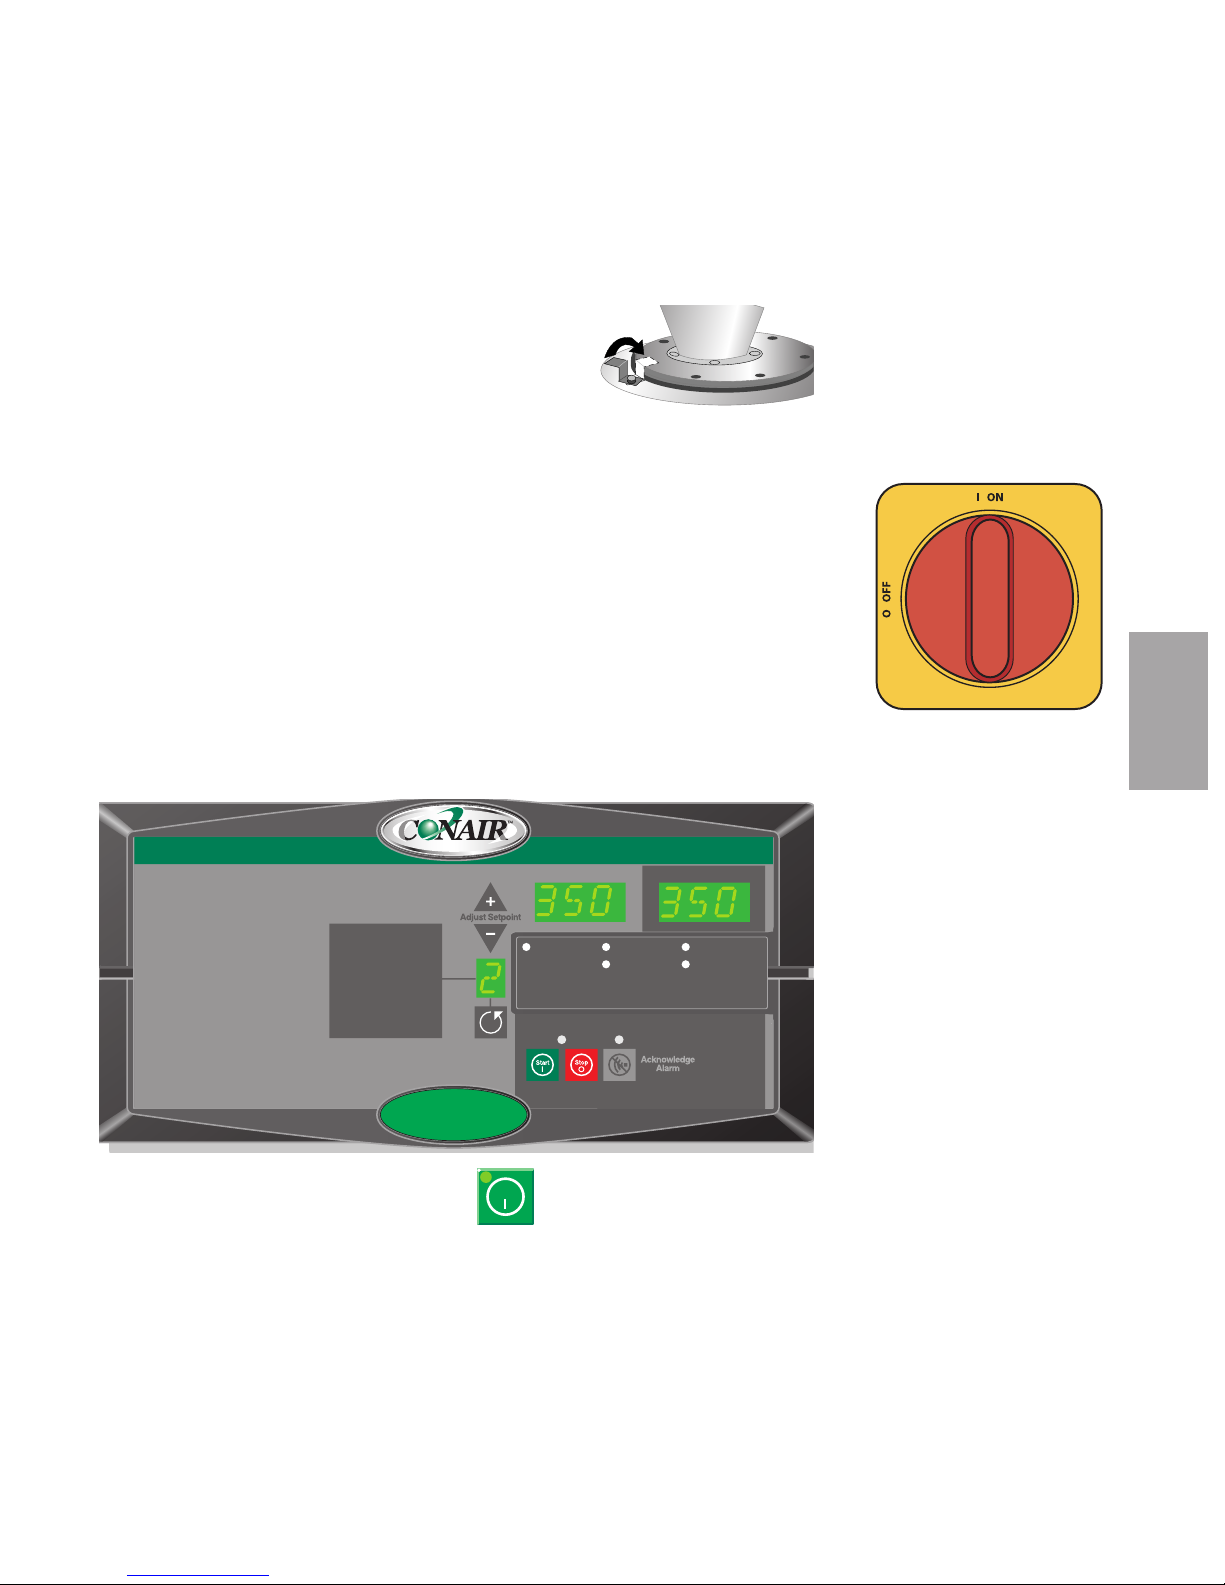
How to Use the Lockout Device
CAUTION: Before performing maintenance or repairs on this product, you should
disconnect and lockout electrical power sources to prevent injury from unexpected
energization or start-up. A lockable device has been provided to isolate this product from potentially hazardous electricity.
Lockout is the preferred method of isolating machines or equipment from energy
sources. Your Conair product is equipped with the lockout device pictured below.
To use the lockout device:
1
Stop or turn off the equipment.
2
Isolate the equipment from the electric power. Turn the rotary
disconnect switch to the OFF, or “O” position.
3
Secure the device with an assigned lock or tag. Insert a lock or tag
in the holes to prevent movement.
4
The equipment is now locked out.
WARNING: Before removing lockout devices and returning switches to the ON
position, make sure that all personnel are clear of the machine, tools have been
removed, and all safety guards reinstalled.
To restore power to the dryer, turn the rotary disconnect back to the ON position:
1
Remove the lock or tag.
2
Turn the rotary disconnect switch to the ON or “I” position.
Page 13

De s cr ip ti on l 2- 1
Description
Wha t is th e C a r ouse l Pl u s W S erie s D r yer ? . . 2-2
Typi c a l a ppli c ati o n s . . . . . . . . . . . . . . . . . . 2- 2
How it wor k s . . . . . . . . . . . . . . . . . . . . . . 2-4
Spec i fica t ions: C arous e l P l us W Seri e s
Dehu m idify i ng Dry e r. . . . . . . . . . . . . . . 2- 7
Caro u sel Plus W Se r ies Dehu m idify i ng
Dr y er o ptio n s . . . . . . . . . . . . . . . . . . . 2-8
S E C T I O N
2
2
De s c rip t i on
Page 14

What is the Carousel Plus W Series
Dryer?
The Carousel Plus W Series dehumidifying dryer produces low-dewpoint air that
removes moisture from hygroscopic plastics. The dryer pulls moist air from a
drying hopper and circulates it through a dehumidifying desiccant wheel. The
dryer then circulates the air through the material in the hopper.
The dryer’s closed-loop design ensures a continuous supply of dehumidified air
while preventing contamination from moisture in the plant.
Typical Applications
1 Dryer on the floor, single hopper (with HTC Hopper Temperature Control
package) on a floor stand.
2 Dryer on the floor, multiple hoppers in central configuration (ResinWorks) with
separate heat source for each hopper.
The Carousel Plus W Series Dryer can be used successfully in applications that
require:
• A contamination-free drying environment.
• A constant flow of dehumidified air.
2- 2 l D e sc ri pt io n
NOTE: The W600 - 5000 pro-
vides no heat to the process
air. A separate heat source is
required at the hopper(s) inlet
to heat the air to the desired
drying temperature.
✐
(continued)
Page 15

De s cr ip ti on l 2- 3
2
De s c rip t i on
Typical Applications ( co nt inu ed )
Model Drying Temperature Range
Low temperature (with precooler)* 100° - 150°F {38° - 66°C}
Standard 150° - 240°F {66° - 116°C}
High heat (with aftercooler/intercooler)* 150° - 375°F {66° - 191°C}
Low-high (with aftercooler/intercooler & precooler)* 100° - 375°F {38° - 191°C}
* See page 3-17, 3-18 and Appendix B
• Throughput rates of 600 to 5000 lbs {271 to 454 kg} per hour (some
materials can be ran at a higher rate).
• Dewpoints of -40°F {-40°C}.
Use the aftercooler/intercooler when:
• You are drying at temperatures over 240°F {116°C}.
• Throughput rates are less than 50% of the dryer’s rated capacity.
• You are pre-drying material at temperatures over 150°F {66°C}
• The return air is 120°F {49°C} or above.
Dryer Options
• Dewpoint monitor/dewpoint control
• Audible and visual alarm
NOTE: Temperature setback is only available in conjunction with the Hopper Temperature
Controller (HTC) or ResinWorks systems.
✐
NOTE: The aftercooler/intercooler reduces the temperature of air returning from the drying hopper, improving the efficiency of the desiccant.
✐
NOTE: Carousel Plus W Series 600-1000 Dryers use an aftercooler located before the the process
blower. Carousel Plus W Series 1600-5000 uses an intercooler located after the process blower.
✐
Page 16

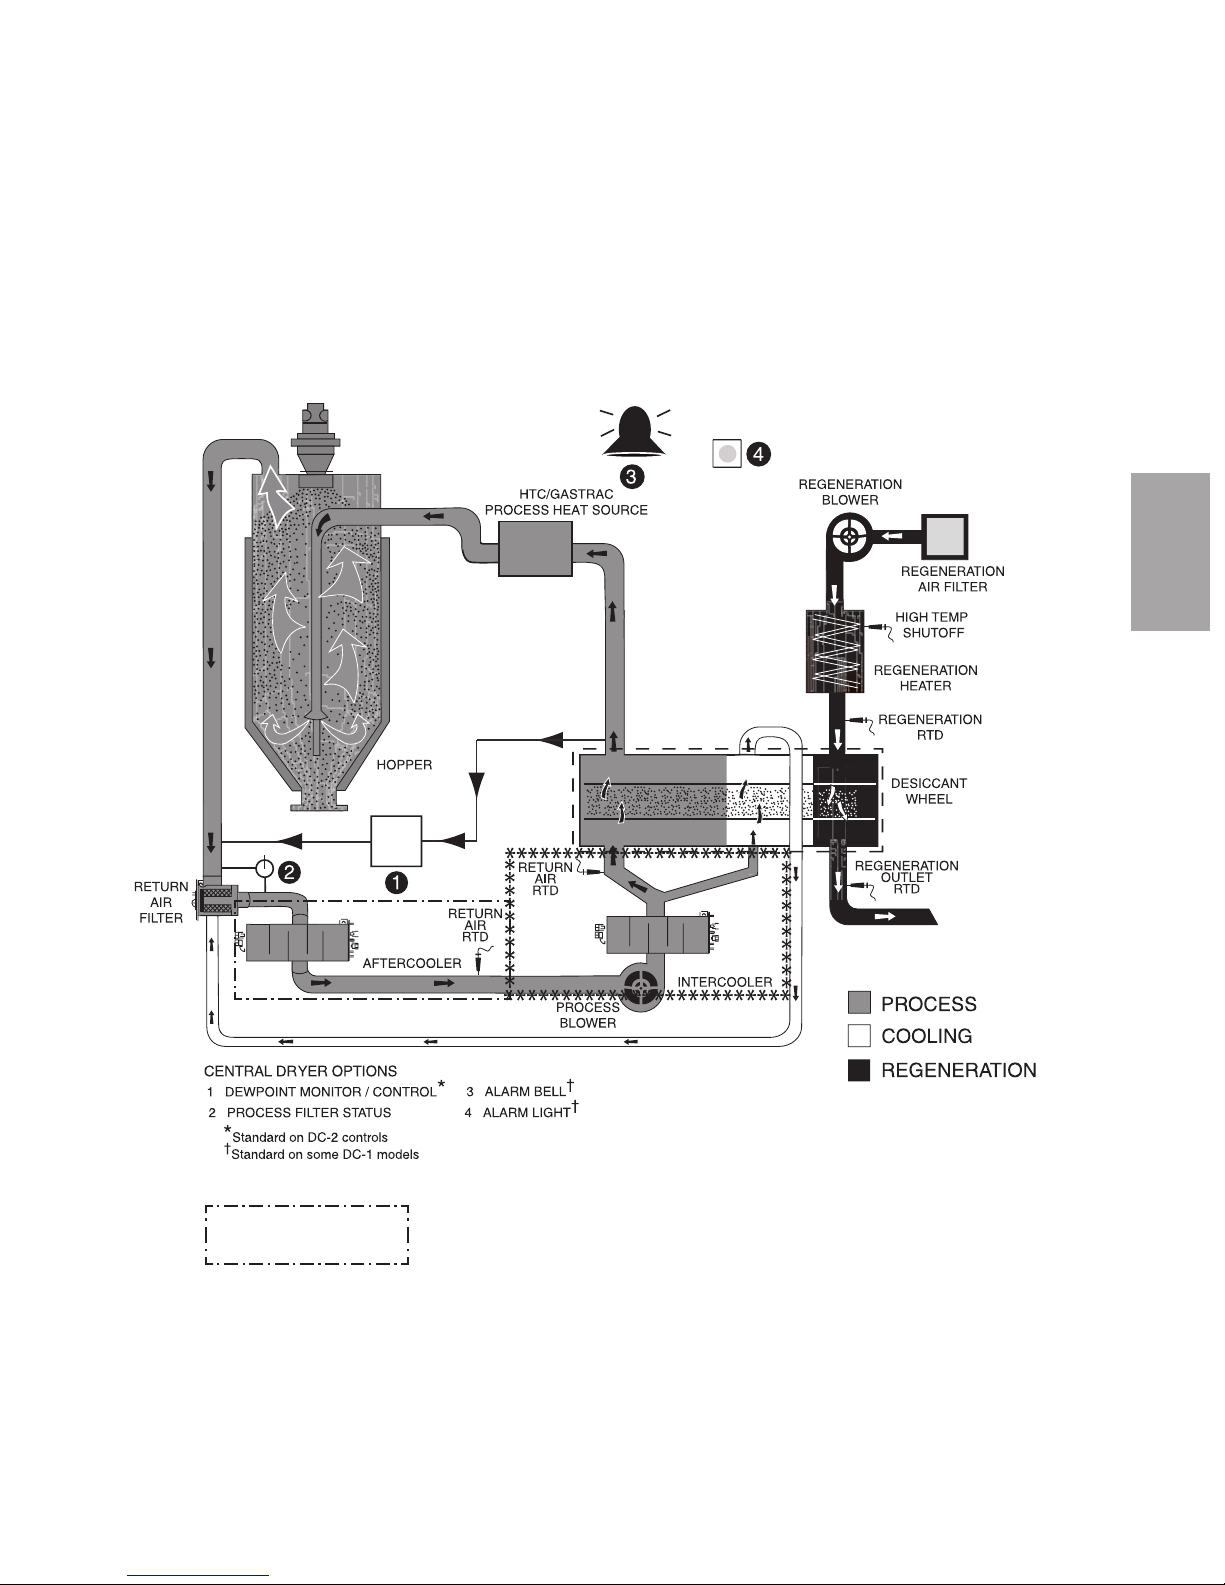
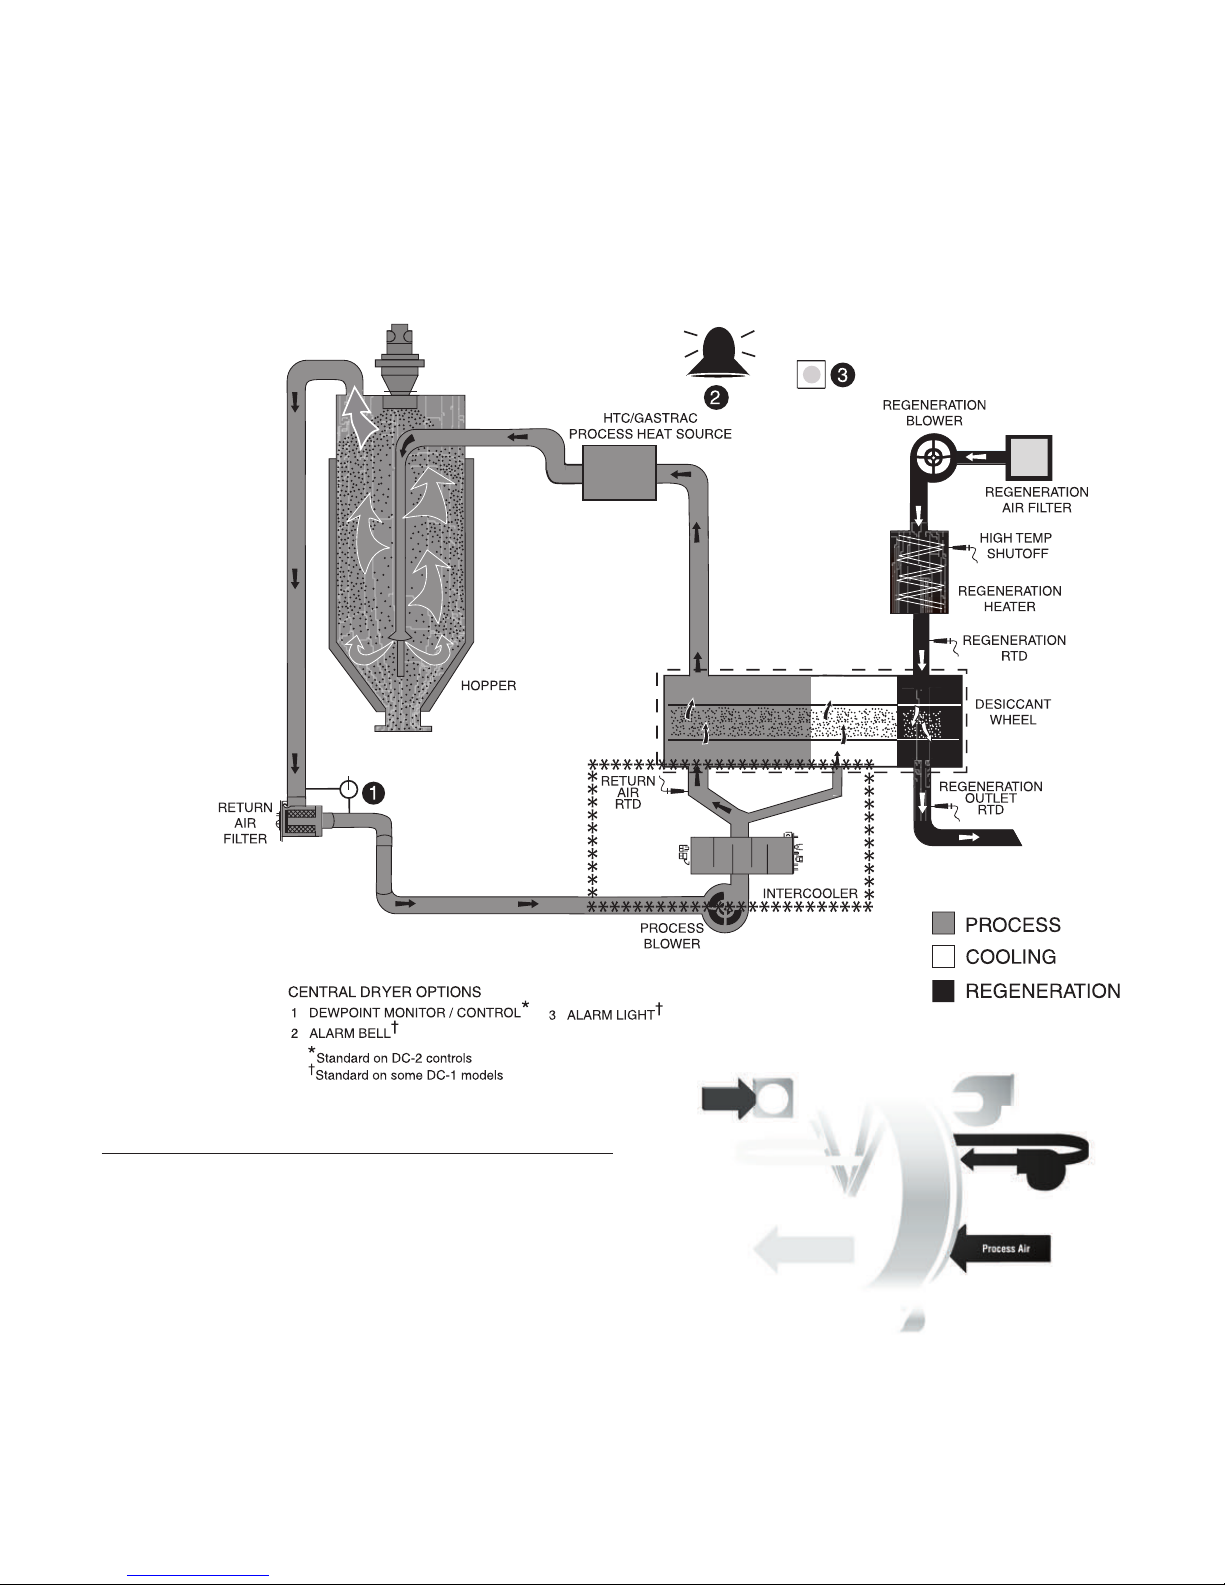
How It Works
2- 4 l D e sc ri pt io n
The Process (Drying) Cycle (W1600 - 5000)
Process air from the hopper is pulled into the dryer, through the process filter and
then into the process blower inlet. Air exits the process blower and then enters the
intercooler, then passes through the desiccant wheel, where moisture is removed.
The air exits the dryer and passes through the precooler (if installed), then into the
process heat source (HTC or CGT Gas Unit). After the air exits the process heat
source it then goes into the hopper inlet through internal piping, then to the spreader cone, which evenly distributes the air through the material.
The Cooling Cycle (All models except W2400 and 5000)
Regenerated desiccant must be cooled before it rotates back into the process cycle.
The process blower pushes the process air through the desiccant wheel. A small
amount of the process air is diverted through a small section of the desiccant wheel
to cool the air. The cooling air then returns back to the process air stream at the
start of the process cycle.
The Regeneration Cycle
The regeneration blower pulls air through the regeneration filter into the dryer’s
regeneration heater. The air is heated to 350°F {177°C} before it is pushed into the
“wet” section of the desiccant wheel. The hot air purges moisture from the
desiccant. The moist air is blown out the moisture exhaust at the top of the dryer.
The Process (Drying) Cycle (W600 - 1000)
Process air from the hopper is pulled into the dryer, through the process filter and
then into the process blower inlet. Air exits the process blower and then enters the
aftercooler, then passes through the desiccant wheel, where moisture is removed.
The air exits the dryer and passes through the precooler (if installed), then into the
process heat source (HTC or CGT Gas Unit). After the air exits the process heat
source it then goes into the hopper inlet, then to the spreader cone, which evenly
distributes the air through the material.
Page 17
2
De s c rip t i on
How It Works (c on tin ued )
(W600 - 1 6 0 0 and 3 2 0 0 )
De s cr ip ti on l 2- 5
W-series 1600-5000
intercooler location only.
W-series 600-1000
aftercooler location.
NOTE: Earlier W1600-5000 dryers will have their intercoolers in the W6001000 location.
✐
NOTE: Carousel Plus W Series 600-1000 Dryers use an aftercooler located
before the the process blower. Carousel Plus W Series 1600-5000 dryers
use an intercooler located after the process blower.
✐
**********************
**********************
******
******
Page 18
2- 6 l D e sc ri pt io n
How It Works (c on tin ued )
(W2400 and 5 0 0 0 )
Protected under
United States Patent
No. 7,101,414 and
other US and Foreign
Patents Pending.
.
NOTE: Carousel Plus W Series 600-1000 Dryers use an
aftercooler located before the the process blower. Carousel
Plus W Series 1600-5000 dryers use an intercooler located
after the process blower.
✐
Power Purge
W 2400 and 5000 models have a Power Purge (cooling fan)
feature integral to the desiccant wheel assembly.
Page 19
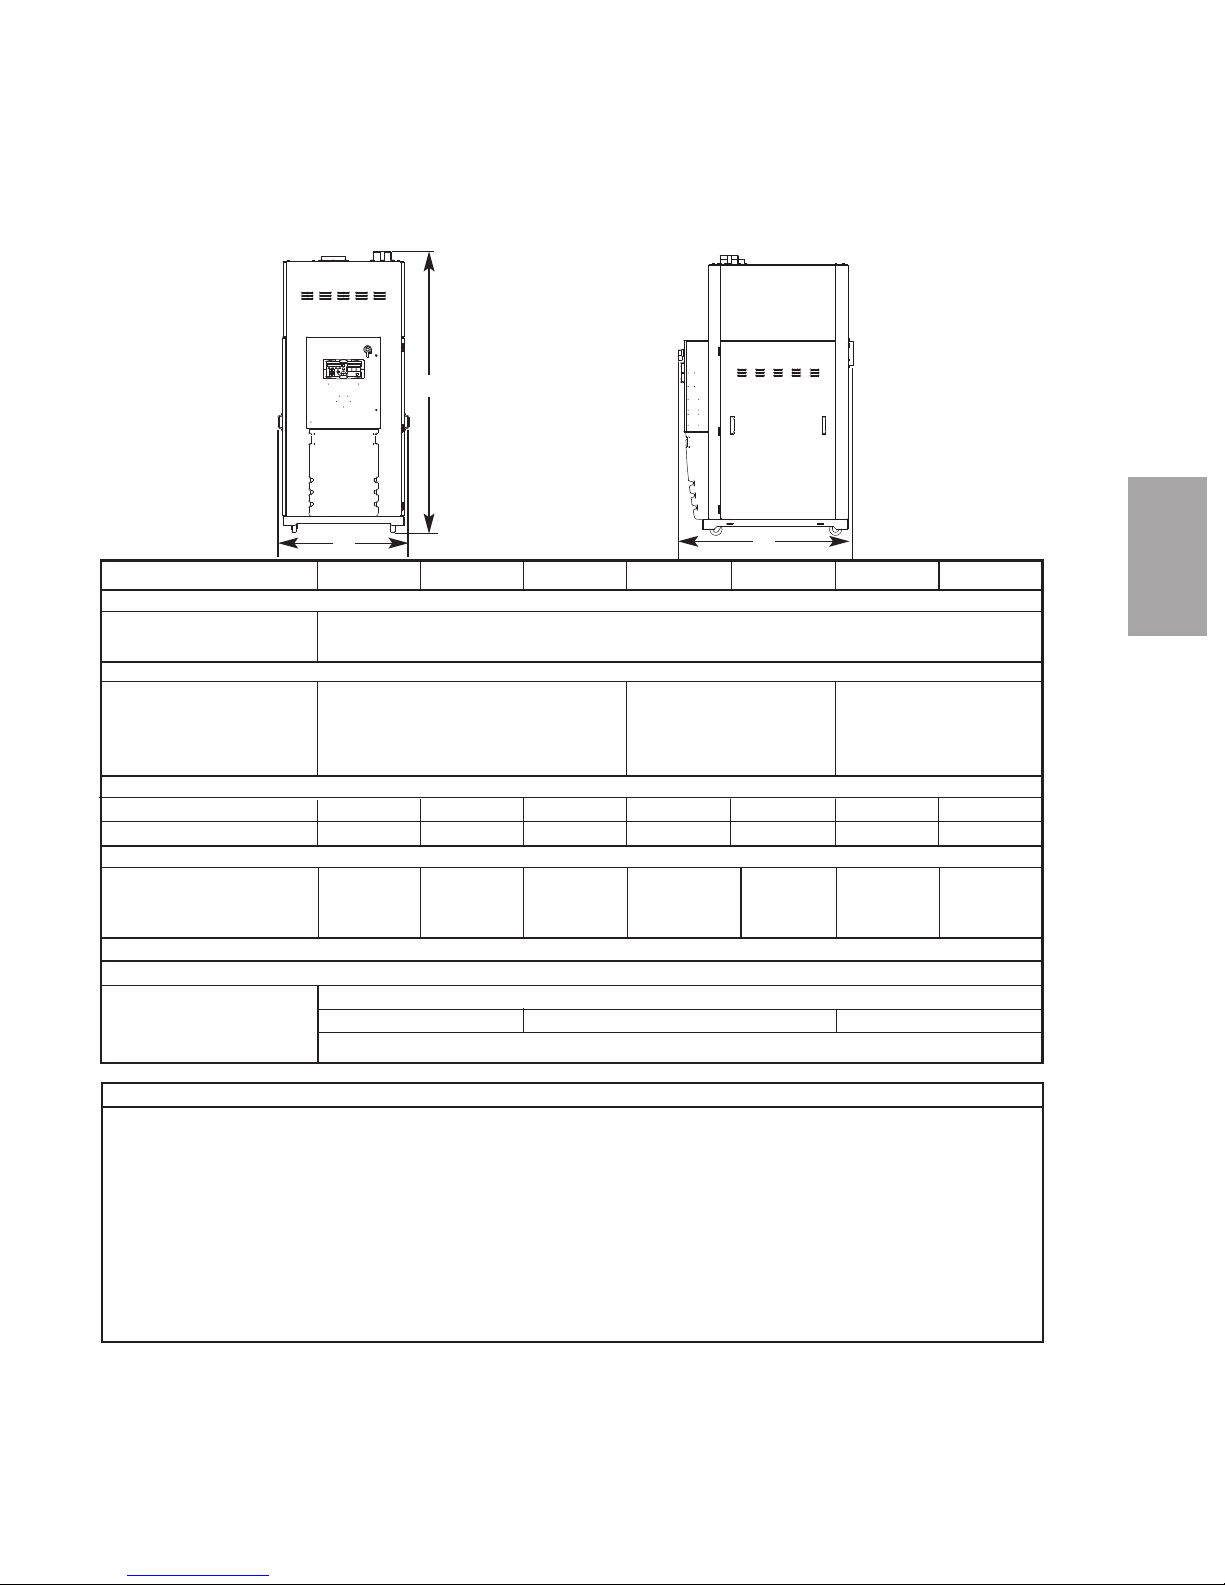
Specifications: Carousel Plus W
Series Dehumidifying Dryers
C
A
B
De s cr ip ti on l 2- 7
2
De s c rip t i on
TPDS019-0311-REV
MODELS W600* W800* W1000
*
W1600
*††
W2400
*††
W3200
*††
W5000
*
††
Performance characteristics (with full hopper)
Drying temperature All models 100 - 375°F {38 - 191°C} with options
Dewpoint All models -40°F {-40°C}
Dimensions inches {cm}
A - Height 92.6 {235.2} 95.5 {242.6} 102.8 {261.1}
B - Width 43.3 {109.9} 48.3 {122.7} 48.9 {124.2}
C - Depth 57.6 {146.3} 86.2 {218.9} 112.0 {284.5}
Outlet/inlet hose diameter 8 {20.3} 12 {30.5} 12 {30.5}
Approximate weight lbs {kg}
Installed 1300 {590} 1300 {590} 1400 {636} 1600 {726} 1600 {726} 2000 {907} 2000 {907}
Shipping 1495 {678} 1515 {687} 1515 {687} 2100 {953} 2620 {1188} 3385 {1535} 3385 {1535}
Voltage - Full load amps
400 V/3 phase/50 Hz† 37.2 37.2 37.5 64.7 73.7 122.3 128.0
460 V/3 phase/60 Hz 32.0 32.0 32.2 56.3 63.1 106.6 111.0
575 V/3 phase/60 Hz 25.6 25.6 25.7 45.0 50.5 85.3 89.1
Water requirements {for aftercooler/intercooler or optional precooler}
§
Recommended temperature
**
45°- 85°F {7- 29}
Water flow gal./min. {liters/min.} 6-25 {22.7-94.6} 12-40 {45.4-151.4} 15-50 {56.8-189.3}
Water connections NPT 1 1/2 in. NPT
SPECIFICATION NOTES:
* Dryers W600-W5000 are central dryers and do not have process heaters. Hopper Temperature Controllers (HTC’s) or ResinWorks systems are used at the
hopper for heating the process air. See the Hopper Temperature Controller (HTC) specification sheet for additional information.
†
Dryers running at 50 Hz will have 17% less airflow, and a 17% reduction in material throughput.
‡ Total kW listed at a regeneration temperature of 350°F {177°C}.
§ When drying below 150 °F {66°C} a precooler is required. When drying above 180°F {82°C} an aftercooler/intercooler and insulated drying hose is
required.
** Temperatures above or below the recommended levels may affect dryer performance. Tower, chiller or municipal water sources can be used.
††
Models W1600-5000 do not have casters.
Specifications may change without notice. Consult a Conair representative for the most current information
.
Page 20

2- 8 l D e sc ri pt io n
Carousel Plus W Series
Dehumidifying Dr yer Options
• Volatile trap (only in conjunction with aftercooler/intercooler) - The volatile
trap is recommended if drying materials that produce volitales that condense
into a waxy or oily residue and/or if the material contains excessive fines.
• Precooler - The precooler reduces the temperature of air after the desiccant
wheel and before the process heater, which enables the dryer to control
temperatures at low setpoints, (100º - 150ºF {38º - 66ºC})
• Filter check - The filter check sensor will activate a passive alarm when the
process filter is clogged or needs to be replaced.
NOTE: Temperature setback is only available in conjunction with the Hopper Temperature
Controller (HTC) or the ResinWorks system.
✐
Page 21

In s ta ll at io n l 3 -1
Installation
Unpa c king the box e s . . . . . . . . . . . . . . . . . 3-2
Prep a ring for ins t alla t ion . . . . . . . . . . . . . . 3-3
Po siti o n ing the dr y er on the floo r . . . . . . . . . 3-4
Remo v ing the cabl e t i e f r om the
desi c cant whe e l ( W 600- 1 0 00) . . . . . . . . 3-4
Inst a lling th e re g enera tion exh a ust cove r . . . 3 -4
Inst a lling th e re t urn air ada p ter . . . . . . . . . . 3-5
Inst a lling th e re t urn air inl e t a n d a ir o utle t
ada p ters (W1 6 00-50 0 0) . . . . . . . . . . . . 3-6
Inst a lling th e Ov e rhead Pr o cess A i r D u ct
(W32 0 0-500 0 ) . . . . . . . . . . . . . . . . . . . 3-7
Conn e cting th e ma i n p ower . . . . . . . . . . . . . 3-8
Chec k ing for prop e r a ir f low . . . . . . . . . . . . 3 -9
Conn e cting th e ai r h o ses to a s i ngle
hopp e r ( W 600- 1 000) . . . . . . . . . . . . . . 3-12
Conn e cting th e ai r h o ses to a s i ngle
hopp e r ( W 1600 - 5000) . . . . . . . . . . . . . 3-13
Conn e cting th e ai r h o ses to a
Resi n Wo r ks . . . . . . . . . . . . . . . . . . . . 3-14
Conn e cting th e dr yer to the hop p er . . . . . . 3 -15
Conn e cting th e dr yer to Resi n Wo rks . . . . . . 3-15
Conn e cting ai r ho s e a dapt e rs . . . . . . . . . . 3 -16
Conn e cting th e af t erco o l er and opti o nal
prec o oler (W6 0 0-100 0 ) . . . . . . . . . . . . 3 - 17
Conn e cting th e in t erco o l er and opti o nal
prec o oler (W1 6 00-50 0 0) . . . . . . . . . . . 3 - 1 8
Moun t ing a l oader on th e ho p per . . . . . . . . 3- 1 9
Te sting th e in s tall a tion . . . . . . . . . . . . . . . 3- 1 9
S E C T I O N
3
3
In s t all a t i on
Page 22

3- 2 l I n st al la ti on
Unpacking the Boxes
The Carousel Plus W Series Dryer comes in one to four boxes, depending on the
model and options ordered. The box(es) could include (depending on the options
selected):
• Carousel Plus W Series Dryer
• Delivery air hose
• Return air hose
• User Guide
1 Carefully remove the dryer and components from their shipping
container(s). Note that the dryer is secured to its shipping container with metal
bands that pass through the bottom of the dryer frame.
2 Unbolt any additional items secured to the shipping pallet, such as the
regeneration exhaust cover and return air adapter. (Carousel Plus W Series
1600-2400 Dryers will have a dry air delivery adapter. Carousel Plus W Series
3200-5000 Dryers will have a dry air delivery adapter and an overhead process
air duct.)
3 Remove all packing material, protective paper, tape, and plastic.
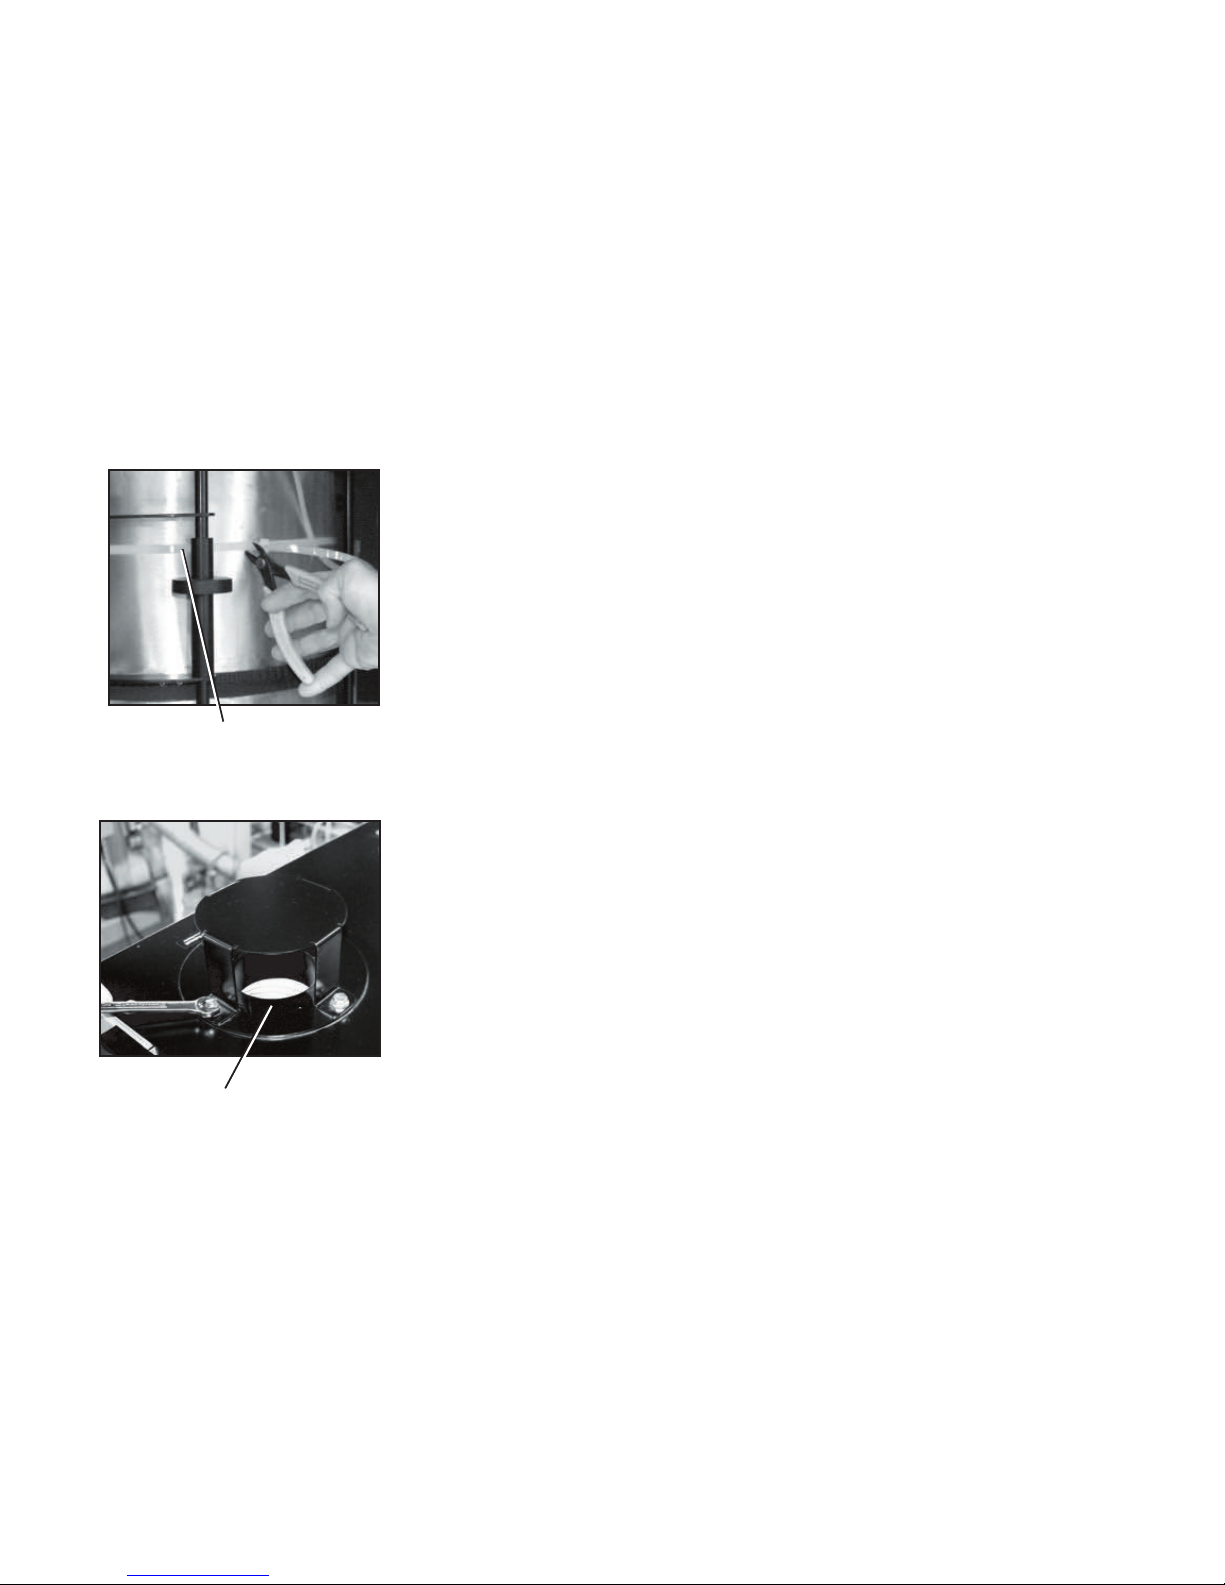
4 Cut and remove the desiccant wheel tie securing the wheel assembly.
(W600-1000)✎
5 Carefully inspect all components to make sure no damage occurred during
shipping, and that you have all the necessary hardware.
Page 23

In s ta ll at io n l 3 -3
Unpacking the Boxes ( co nti nue d)
6 Take a moment to record serial numbers and electrical power specifications
in the blanks provided on the back of the User Guide’s title page. The
information will be helpful if you ever need service or parts.
7 You are now ready to begin installation.
Follow the preparation steps on the next page, then choose one of the two
mounting options:
• Dryer on the floor, single hopper (with HTC Hopper Temperature Control
package) on a floor stand.
• Dryer on the floor, multiple hoppers in central configuration (ResinWorks)
with separate heat source for each hopper.
3
In s t all a t i on
NOTE: The W600 - 5000 provides no heat to the process air. A separate heat source is
required at the hopper(s) inlet to heat the air to the desired drying temperature.
✐
Preparing for Instal lation
The Carousel Plus W Series Dryer is easy to install if you plan the location and
prepare the mounting area properly.
1 Make sure the mounting area provides:
❒
A grounded power source supplying the voltage and correct current
for your dryer model. Check the dryer’s serial tag (on the control box) for
the correct amps, voltage, phase, and cycles. Field wiring should be completed by a qualified personnel to the planned location for the dryer. All
electrical wiring should comply with your region’s electrical codes.
❒
A source of water, when using the aftercooler/intercooler and/or pre-
cooler. The W Dryer’s aftercooler/intercooler and precooler require
tower, city, or chiller water at temperatures of 45° to 85°F {7° to 29°C}.
Refer to the Specifications Sheet (page 2-7) for flow rate for your unit.
Piping should be ran to the planned dryer location. Use flexible hose to
connect the water pipes to the aftercooler/intercooler and/or optional precooler.
❒
Minimum clearance for safe operation and maintenance. You should
maintain 24 in. {61 cm} clearance on all sides of the dryer.
Material and conveying lines
installed. If you plan to use
vacuum or compressed air
loaders to fill the hopper,
install conveying lines to the
drying hopper location.
✒
NOTE: The aftercooler/intercooler reduces the temperature
of air returning from the drying
hopper, improving the efficiency of the desiccant.
✐
Page 24
3- 4 l I n st al la ti on
Posit ioning the Dr yer on the Floor
1 Lift the dryer from the shipping container using a fork truck.
2 Position the dryer on the floor near the hopper or ResinWorks sled. Make
sure the location allows for the connection of all hoses, keeping hose lengths as
short as possible.
Removing the Cable Tie from the
Desiccant Wheel (W600-1000)
1 Open the dryer side panels and remove the cable tie securing the desiccant
wheel, if it was not done while unpacking the dryer.
Installing the Regen eration
Exhaust Cover
The Carousel Plus W Series Dryer’s regeneration exhaust cover must be installed.
To install the regeneration exhaust cover:
1 Remove the exhaust cover that is attached to the dryer’s shipping pallet.
2 Locate the bolt pattern at the top of the dryer, on top of the regeneration
exhaust outlet.
3 Position the regeneration exhaust cover on top of the regeneration exhaust
outlet, aligning both bolt patterns.
4 Secure the regeneration exhaust cover with supplied hardware, using an
appropriately sized wrench.
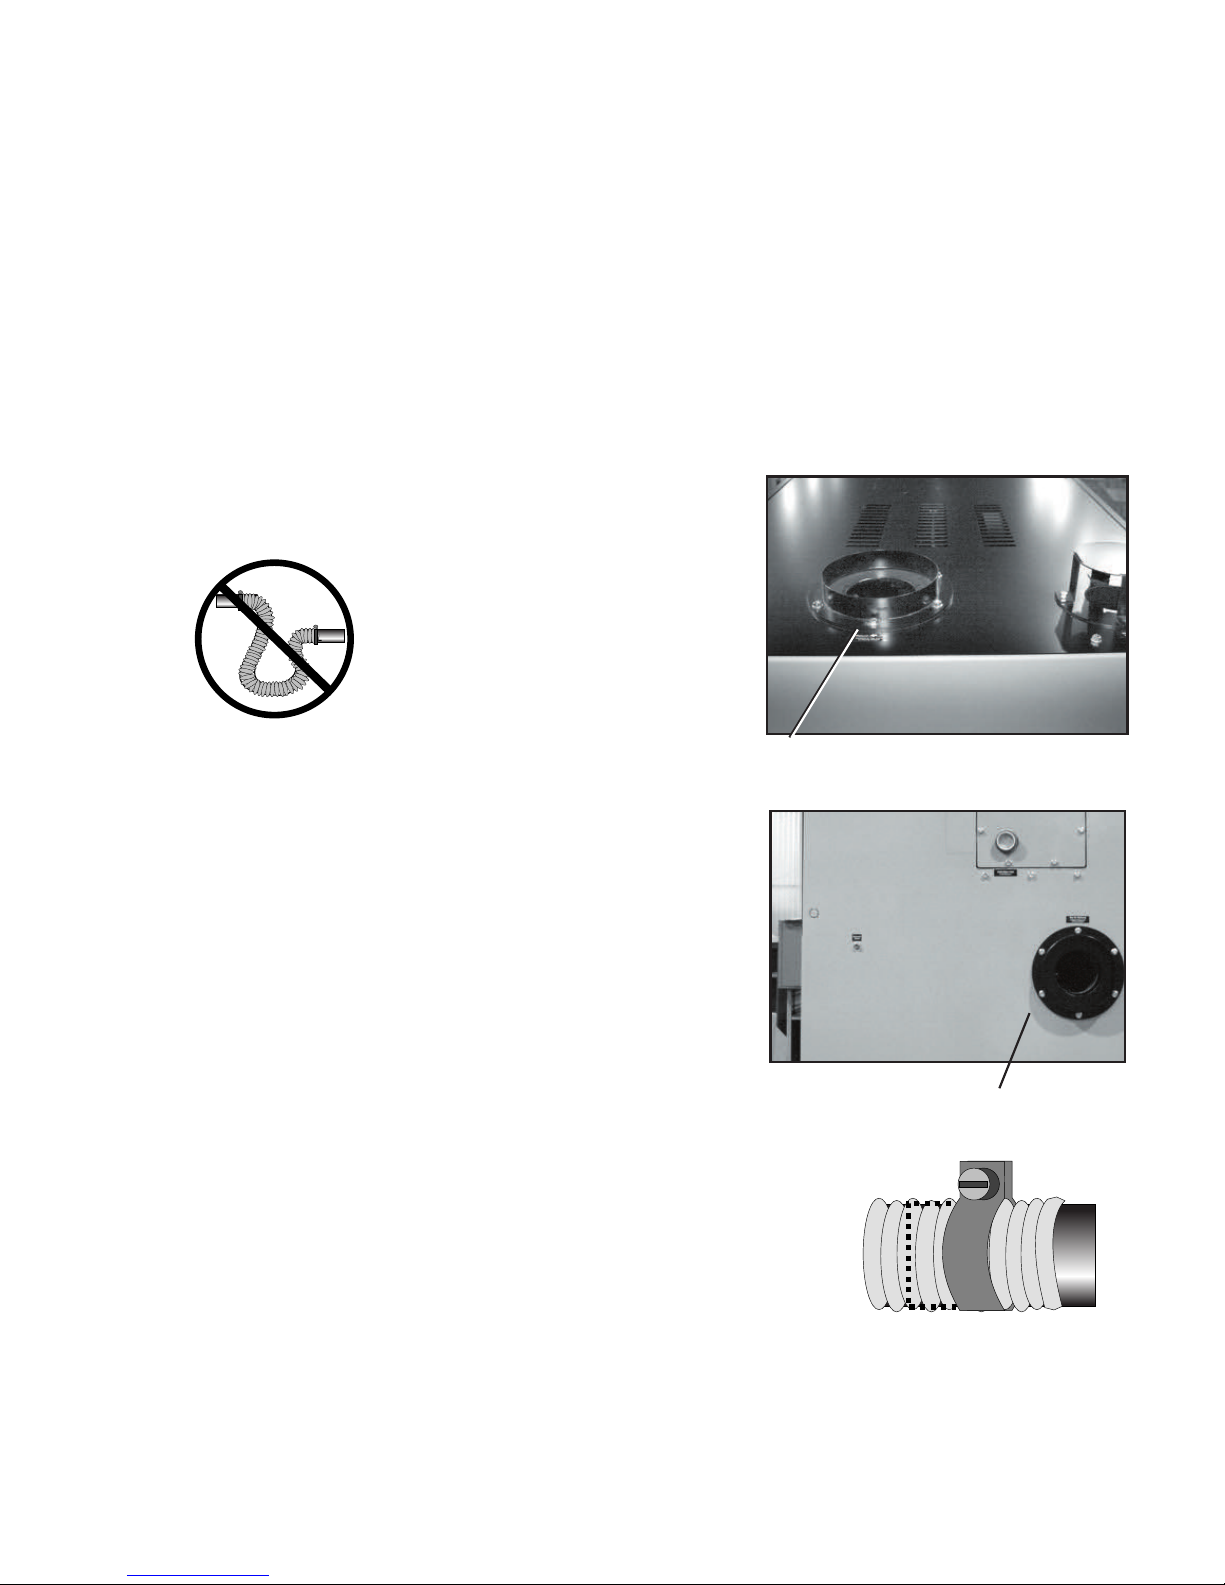
Desiccant Cable Tie
Regeneration
Exhaust Cover
Page 25

3
In s t all a t i on
In s ta ll at io n l 3 -5
Installing the Retur n Air Adapter
(W600 - 1 0 0 0 )
The Carousel Plus W Series Dryer’s return air adapter must be installed.
To install the return air adapter:
1 Remove the return air adapter that is attached to the dryer’s shipping
pallet.
2 Locate the bolt pattern on the top of the dryer, on top of the return air inlet.
3 Position the return air adapter on top of the return air inlet, aligning both
bolt patterns.
4 Secure the return air adapter with supplied hardware, using an appropriate-
ly sized wrench.
Return Air
Inlet Adapter
Page 26
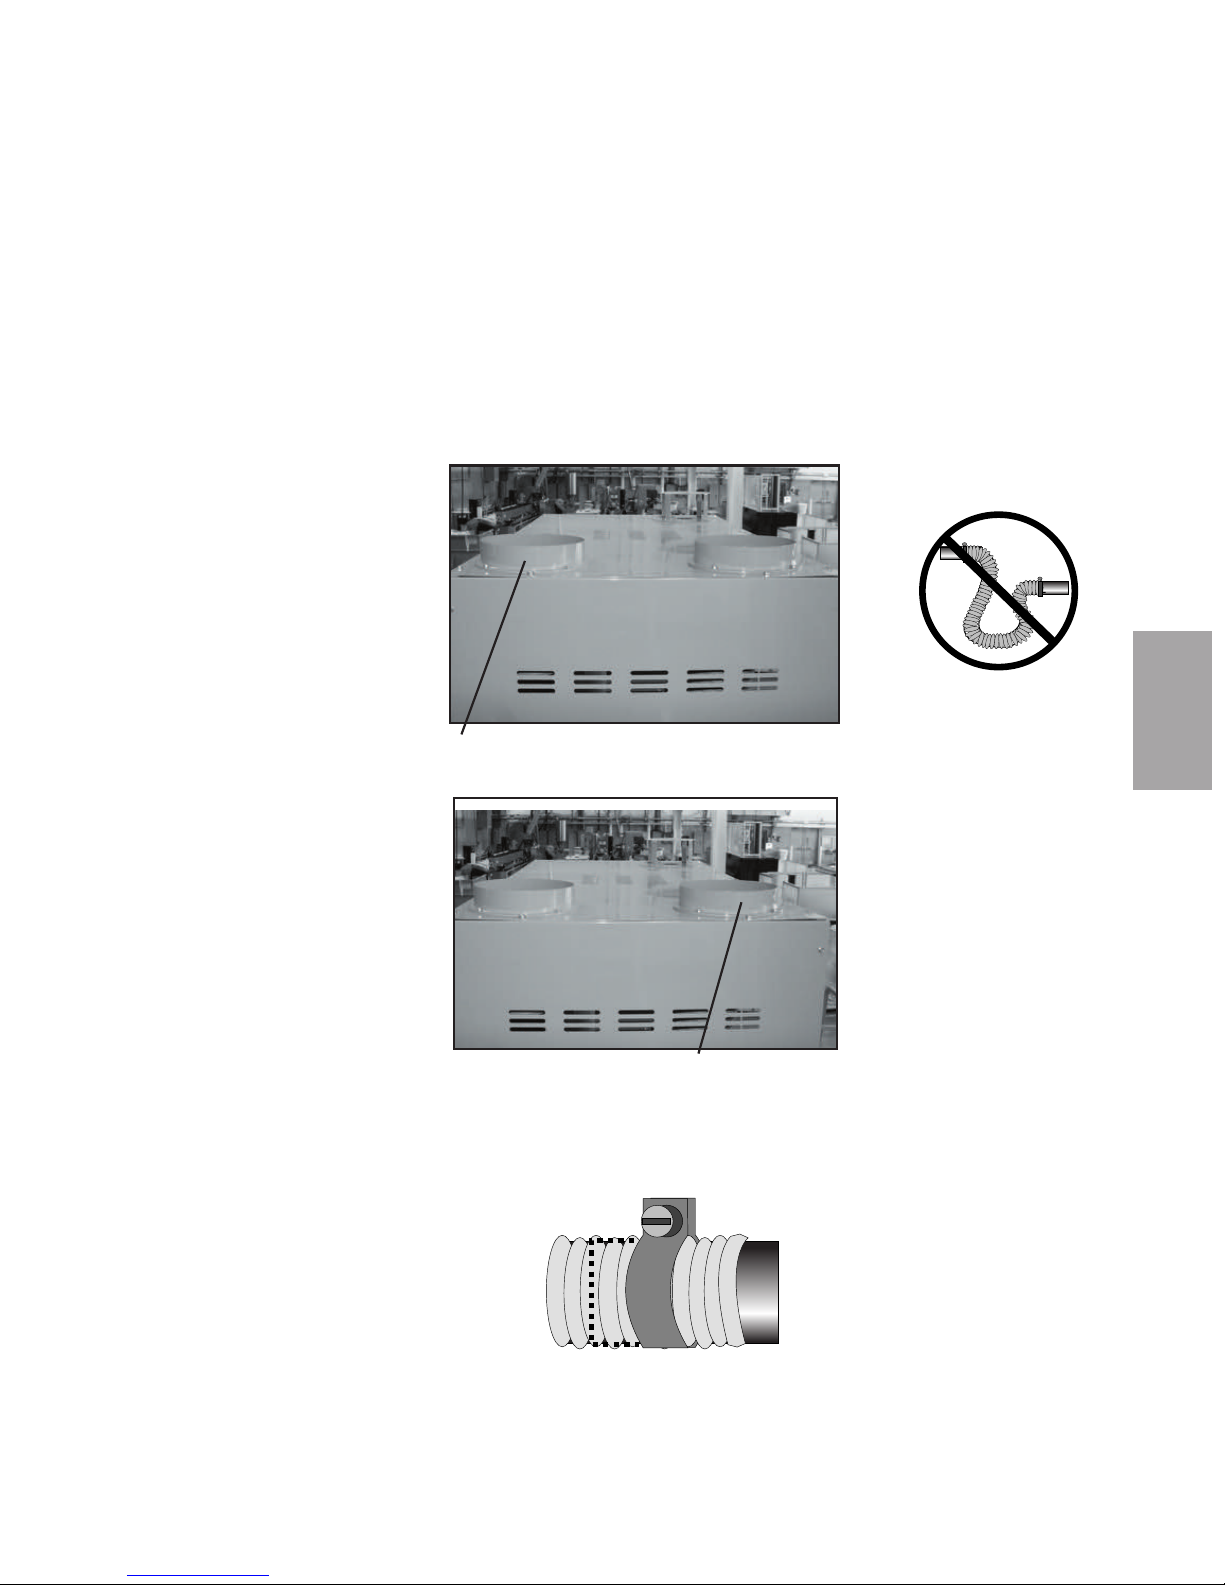
Installing the Retur n Air Inlet and
Air Outlet Adapters (W1600 - 5000)
The Carousel Plus W Series Dryer’s return air inlet and air outlet adapters will be
removed when the dryer is shipped
To install the return air inlet and air outlet adapters:
1 Remove the return air inlet and air outlet adapters that are attached to the
dryer’s shipping pallet.
2 Locate the bolt patterns on the top of the dryer, on top of the return air inlet
and air out outlet.
3 Position the return air adapter on top of the return air inlet, aligning both
bolt patterns.
4 Secure the return air adapter with supplied hardware, using an appropriate-
ly sized wrench.
5 Position the air inlet adapter on top of the inlet air inlet, aligning both bolt
patterns.
6 Secure the air inlet adapter with supplied hardware, using an appropriately
sized wrench.
3- 6 l I n st al la ti on
Dry Air
Outlet
Adapter
Return Air
Inlet Adapter
Page 27
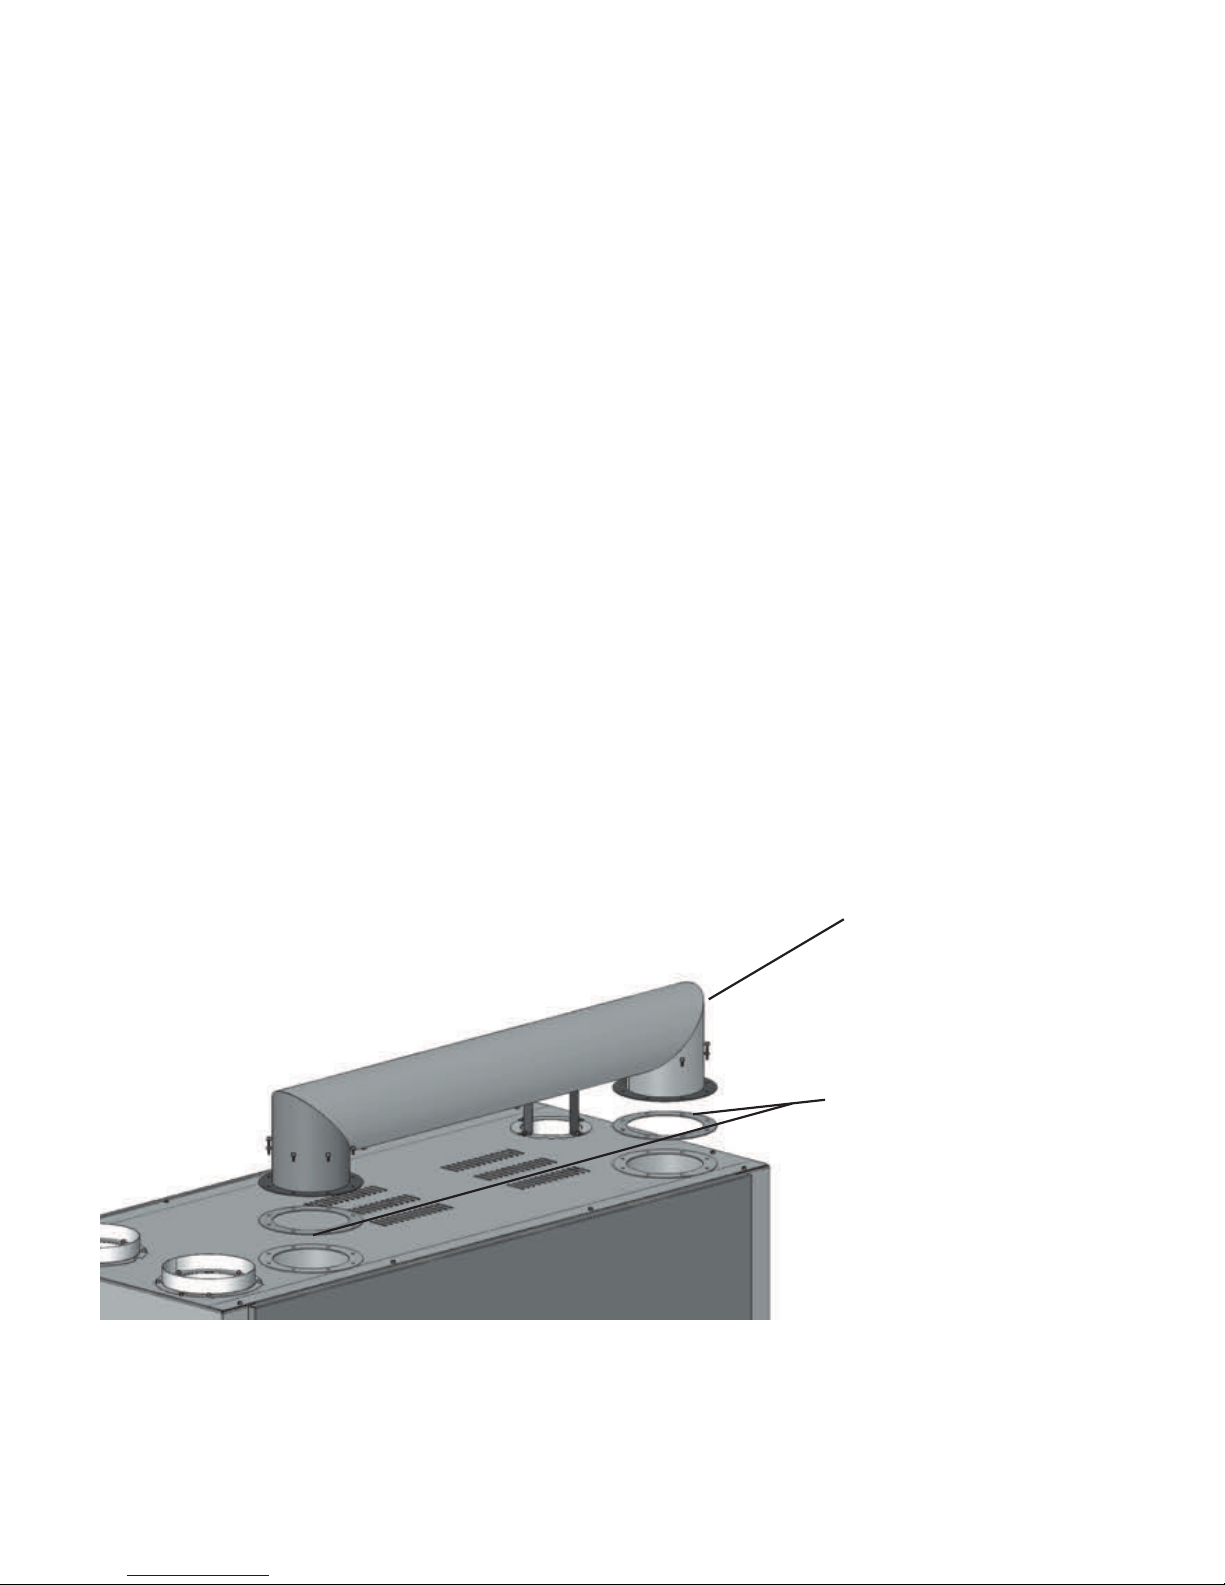
Installing the Overh ead Process Air
Duct (W3200 - 5000)
The Carousel Plus W Series Dryer’s overhead process air duct will be removed
when the dryer is shipped.
To install the overhead process air duct:
1 Remove the overhead process air duct that is attached to the dryer’s ship-
ping pallet. The piping will be shipped as one unit with included gaskets (2).
2 Locate the bolt patterns on the top of the dryer, over top of the overhead
process air duct inlet and outlet.
3 Position the overhead process air duct on top of the overhead process air
duct inlet and outlet making sure to place supplied gaskets between the
overhead process air duct and the inlet and outlet of the dryer, align all bolt
patterns.
4 Secure the piping with supplied hardware, using an appropriately sized
wrench.
In s ta ll at io n l 3 -7
Overhead Process Air
Duct
Gaskets (2)
Page 28

Connecting the Main Power
CAUTION: Always disconnect and lock out the main power sources before mak-
ing electrical connections. Electrical connections should be made only by qualified
personnel.
1 Open the dryer’s electrical enclosure. Turn
the disconnect dial on the dryer door to the Off
or “O” position. Lock out the main power (see
Page 1-6 for complete lock out information).
Turn the captive screw, and swing the door
open.
2
Insert the main power
wire through the knock-
out in the side of the enclosure or the rear of the dryer. (the dryer’s electrical
wire connection location was a factory option and may be connected through
the front or the rear of the dryer.) Secure the wire with an appropriate compression fitting or strain relief.
3- 8 l I n st al la ti on
IMPORTANT: Always refer to the
wiring diagrams that came with
your dryer before making electrical
connections.
3
Connect the power wires
to the three terminals at the top of the power
disconnect holder.
4 Connect the ground wire to the ground lug as shown in the photo.
Page 29

Auto Start
Dryer Status
Process Blower Regen. Blower
Regen. Heater
Set Point Actual
1 Process Temp.
2 Regen. Temp.
3 Return Air Temp.
4 Auto Start
5 Load Time (MDC)
6 Activate Setback Temp.
7 Setback Temp.(Process)
8 Dewpoint
Shutdown Alarms
A1 Process High Temp
A2 Process Loop Break
A3 Process Heater High Temp
A4 Regen Heater High Temp
A7 Return Air High Temp
A49 Process Protection High Temp
A53 Process Blower Overload
A55 Wheel Rotation Failure
Passive Alarms
P1 Process Temp Deviation
P3 Regen Temp Deviation
P5 Return Air Mid High Temp
P17 MDC Conveying Demand
1000
Opening the Dryer Doors
(W1600 - 5 0 0 0 )
Carousel Plus W Series 1600-5000 Dryers designed after August 2007 will
have locking side panel door bolts.
To unlock the side panel door bolts:
1 Rotate the two (2) locking door bolts on the dryer door counterclockwise
with a regular screw driver.
2 Close the dryer doors and rotate the two (2) locking door bolts clockwise
to resecure the dryer doors.
Checking for Proper Air Flow
This procedure is needed on W600-5000 models if the phase detection option
was not ordered with the dryer.
CAUTION: If the air flow direction is incorrect due to improper phase connection, material from the hopper can be pulled back into the dryer, causing permanent damage to this equipment.
1 Turn on the main power to the dryer. Make sure the dryer’s discon-
nect dial is in the ON position. This powers up the control and the display
lights will illuminate.
2 Press the START button then the STOP button.
(continued)
Start and Stop Buttons
Stop
Start
In s ta ll at io n l 3 -9
3
In s t all a t i on
IMPORTANT: This procedure must be performed before the dryer’s air hoses are
connected to the hopper or before loading material into the hopper.
Dryer Door
Locking Bolts (2)
(W1600-5000)
Page 30
3- 1 0 l I ns ta ll at io n
Checking for Proper Air Flow ( co nti nue d)
3 Visually verify the blower motor is
moving in the correct direction indicated by the arrow on the blower
housing. The W series 600-5000 dryers
are equipped with centrifugal process
blowers.
Dry Delivery
Air
Direction
Indication
Arrow
✐
NOTE: Models W600-1000
dryer aftercooler and dry
air delivery configuration
shown. Location on larger
models are different.
Refer to the labeling on
your dryer. See
Installation section entitled, Installing the
Return/Delivery Air
Adapters, for proper air
line connections.
Page 31

In s ta ll at io n l 3 -1 1
3
In s t all a t i on
Checking for Proper Air Flow ( co nti nue d)
4 If air flow is incorrect disconnect power, follow proper lockout procedures and
swap any 2 of the 3 main power wires.
If the air flow is reversed, the process blower is turning in the wrong
direction. Turn off and lock out the main power source. Open the electrical
enclosure and reverse any two leads connecting the main power supply to
the dryer.
WARNING: All wiring, disconnects, and fuses should be installed by qualified electrical technicians in accordance with electrical codes in your
region. Always maintain a safe ground. Do not operate the equipment at
power levels other than what is specified on the the machine serial tag
and data plate.
LEADS
WARNING: All wiring, disconnects, and fuses should be installed by
qualified electrical technicians in accordance with electrical codes in your
region. Always maintain a safe ground. Do not operate the equipment at
power levels other than what is specified on the the machine serial tag
and data plate.
Page 32
3- 1 2 l I ns ta ll at io n
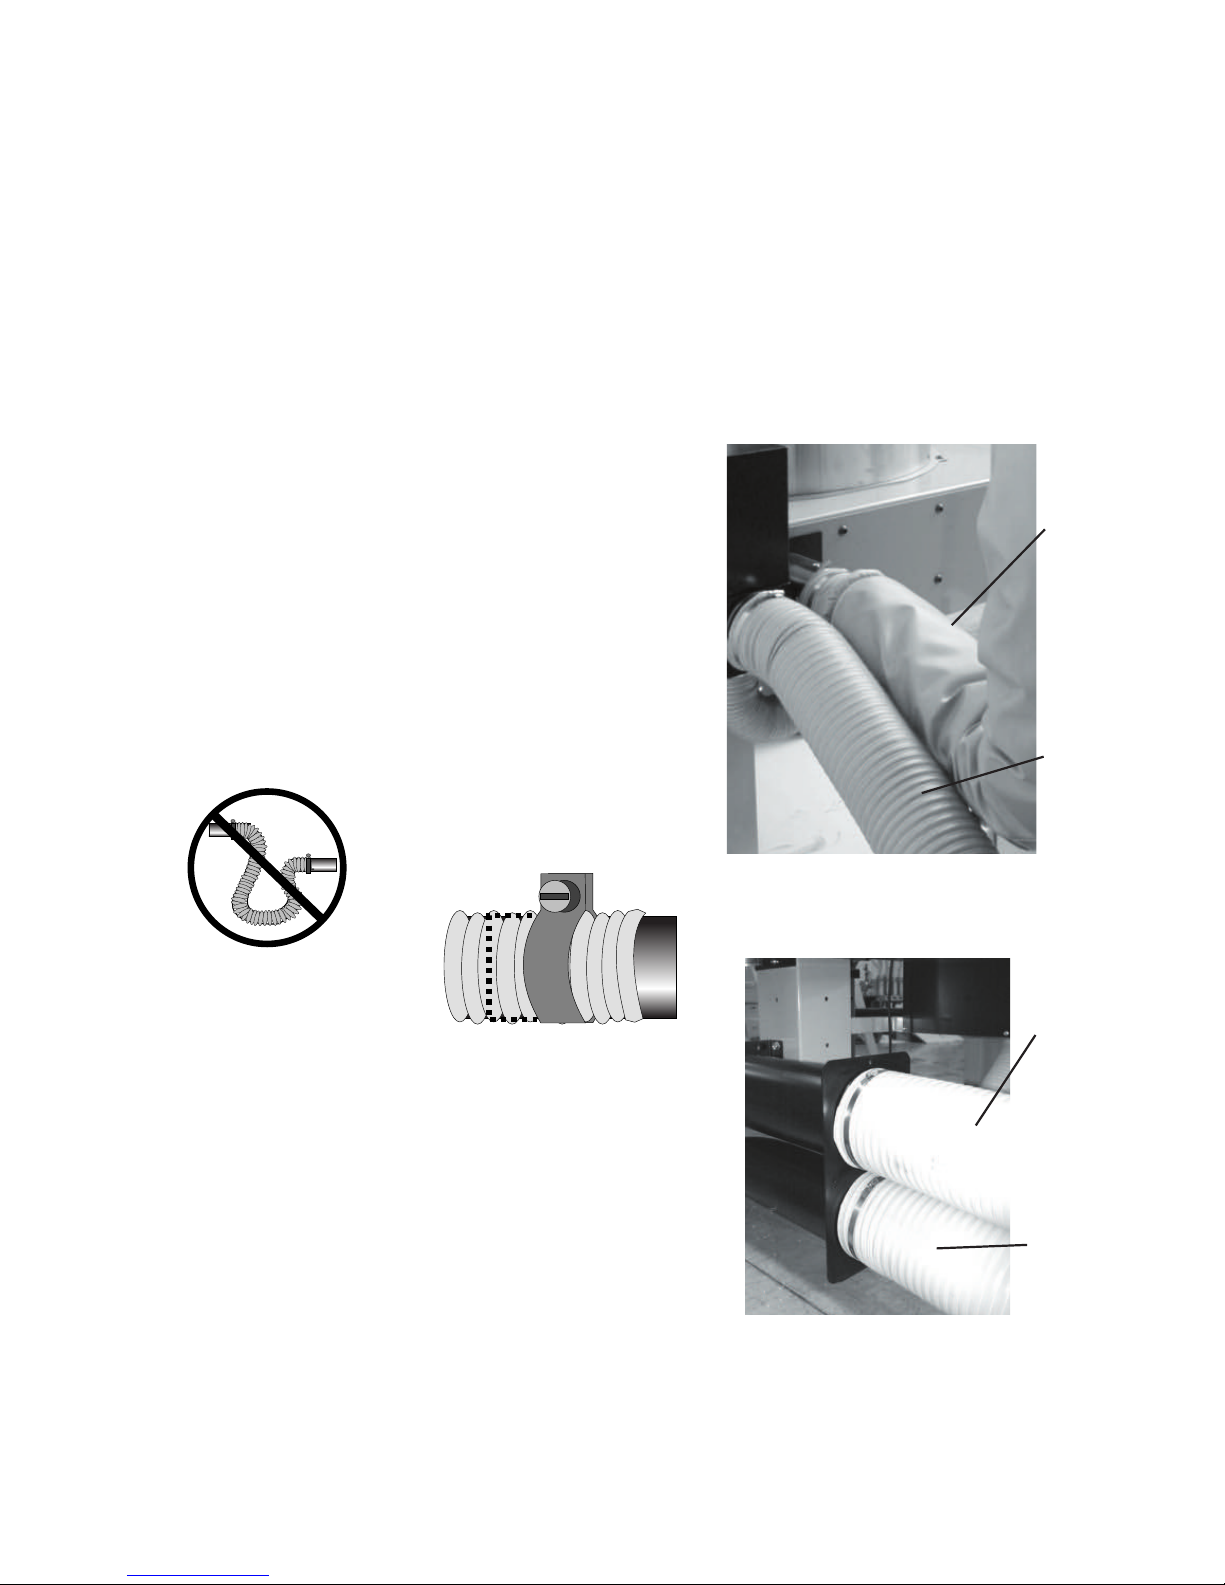
Connecting the Air Hoses to a
Single Hopper ( W 6 0 0 - 1 0 0 0 )
Using the two flexible hoses provided, connect the inlet of the HTC and outlet
of the drying hopper to the dryer. Make sure the dryer is located as close as
possible to the hopper (10 ft {3.05 m} of hose supplied).
1 Attach one hose from the return
air inlet, located on top of the
dryer, to the outlet of the hopper.
2 Attach one hose from the delivery
air outlet to the inlet of the HTC.
3 Secure hoses with clamps. The hose clamp
should be secured at least 1/4 in. {0.64 cm}
from the end of the inlet or outlet tube.
NOTE: Do not allow the
flexible hoses to kink or
crimp.
✐
Return
Air Inlet
Dry Delivery Air
✐
NOTE: Models W600-1000
dryer aftercooler and dry
air delivery configuration
shown. Location on larger
models are different.
Refer to the labeling on
your dryer.
✐
NOTE: All air hose connections will be appropriately
labeled.
Page 33
In s ta ll at io n l 3 -1 3
3
In s t all a t i on
Connecting the Air Hoses to a
Single Hopper ( W 1 6 0 0 - 5 0 0 0 )
Using the two flexible hoses provided, connect the inlet of the HTC and outlet
of the drying hopper to the dryer. Make sure the dryer is located as close as
possible to the hopper (10 ft {3.05 m} of hose supplied).
1 Attach one hose from the return
air inlet, located on top of the
dryer, to the outlet of the hopper.
2 Attach one hose from the delivery
air outlet, located on top of the
dryer, to the inlet of the HTC.
3 Secure hoses with clamps. The hose clamp should be secured
at least 1/4 in. {0.64 cm} from the end of the inlet or outlet tube.
NOTE: Do not allow the
flexible hoses to kink or
crimp.
✐
Return Air
Inlet
Delivery Air
Outlet
Page 34
3- 1 4 l I ns ta ll at io n
NOTE: Do not allow the
flexible hoses to kink or
crimp.
✐
Connecting the Air Hoses to a
ResinWork s
Using the two flexible hoses provided, connect the delivery air and return air
manifolds of the ResinWorks to the dryer. Make sure the dryer is located as
close as possible to the sleds (10 ft {3.05 m} of hose supplied).
1 Attach one hose from the
return air inlet of the dryer to
the return air manifold of the
ResinWorks.
2 Attach one hose from the
delivery air outlet of the dryer
to the delivery air manifold of
the ResinWorks.
3 Secure hoses with clamps. The
hose clamp should be secured at
least 1/4 in. {0.64 cm} from the
end of the inlet or outlet tube.
Insulated hose shown not standard.
Return
Air
Dry
Delivery
Air
Return
Air
Dry
Delivery
Air
Page 35

3
In s t all a t i on
In s ta ll at io n l 3 -1 5
Connecting the Dryer to the Hopper
If your dryer hose connection and your hopper HTC hose connection are not the
same size, you will need a hose adapter. Contact Conair Parts 1 800-458-1960.
Connecting the Dryer to
ResinWork s
If your dryer hose connection and the connection on your ResinWorks sled are not
the same size, you will need to use a hose adapter. Contact Conair Parts
1 800-458-1960.
NOTE: Because the W600 - 5000 models require a separate heat source for the
delivery air, all references to this heat source will be identified as “HTC” (Hopper
Temperature Controller). When using this dryer with a HTC, reference the User
Guide supplied with the HTC for installation instructions.
✐
NOTE: Because the W600 - 5000 models require a separate heat source for the
delivery air, all references to this heat source will be identified as ResinWorks.
When using this dryer with a ResinWorks sled reference the User Guide supplied
with the ResinWorks sled for installation instructions.
✐
Page 36
3- 1 6 l I ns ta ll at io n
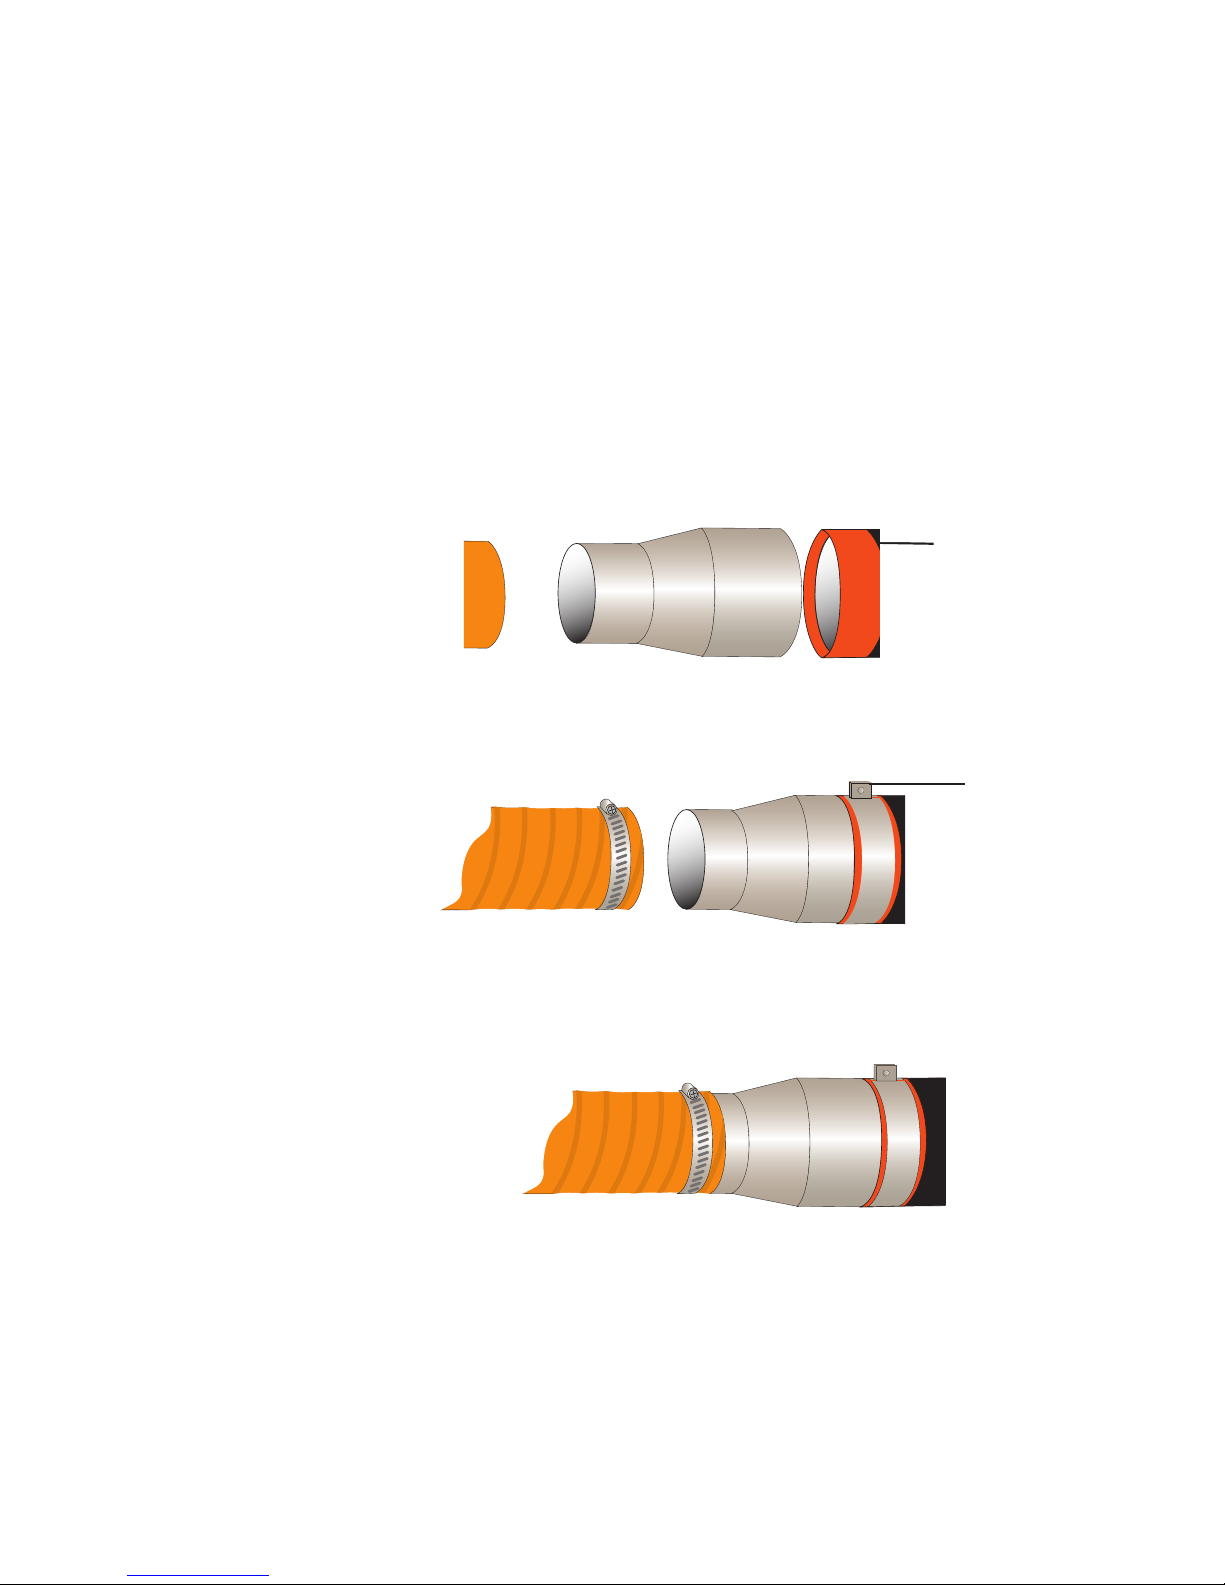
Connecting Air Hose Adapters
Depending on the hopper you purchased you may need to install an air hose
adapter to connect the hopper to your dryer.
To connect the air hose adapter:
1 Place high temperature gasket half way down over the dry air delivery
outlet.
2 Place hose adapter inside high temperature gasket flush to the dryer outlet,
secure with pressure clamp.
3 Attach the hopper inlet hose over the adapter, secure with clamp.
Dryer
Inlet/Outlet
Connection
Pressure Clamp
Page 37
In s ta ll at io n l 3 -1 7
3
In s t all a t i on
Connecting the After cooler and
Optional Precooler (W600 - 1000)
The aftercooler and/or optional precooler require a source of city, tower, or chiller
water and a discharge or return line. You can use water at temperatures of 45 to
85°F {7 to 29°C}. But the water flow should be at least 3 gal/min {11.4
liters/min}.
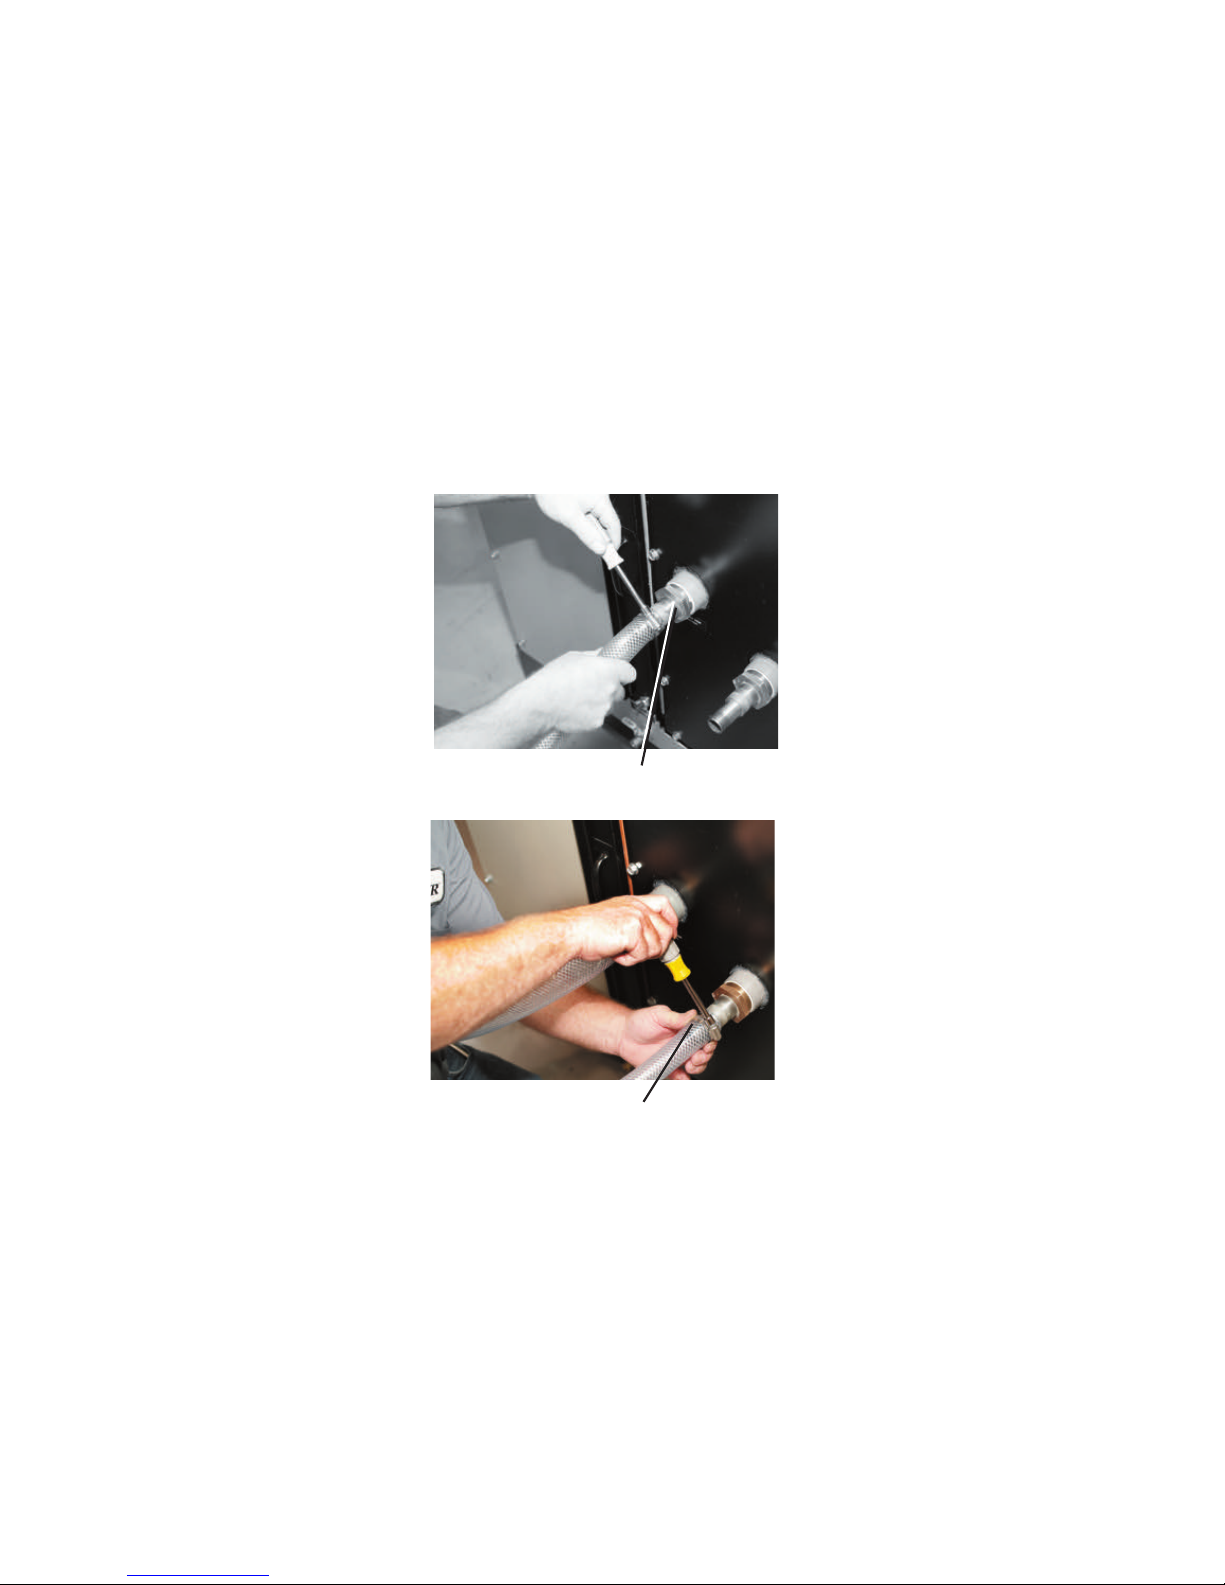
1 Connect the water supply line to
the aftercooler or precooler inlet.
If a manual shut off valve is used,
it should be mounted on the inlet
line.
2 Connect the water discharge or
return line with the pressure
relief valve to the aftercooler or
precooler outlet. Use the bracket
supplied to secure the pressure
relief valve to the back of the
dryer.
IMPORTANT: Turn the water off when the dryer is not in use to prevent
condensation.
Aftercooler Inlet
Aftercooler Outlet
✒
TIP: Make the water supply and dis-
charge / return connections with
flexible hoses at least 24 in.
(61 cm) long. This allows you to
easily remove the aftercooler
assembly for cleaning.
✒
TIP: If an optional flow control is
also being installed with the after cooler, the manual shut off valve
should be installed on the inlet line
for the flow control.
NOTE: Models W600-1000
dryer aftercooler and dry air
delivery configuration shown.
Location on larger models
are different. Refer to the
labeling on your dryer.
✐
Page 38
3- 1 8 l I ns ta ll at io n
Connecting the Inter cooler and
Optional Precooler
(W1600 - 5 0 0 0 )
The intercooler and/or optional precooler require a source of city, tower, or chiller
water and a discharge or return line. You can use water at temperatures of 45 to
85°F {7 to 29°C}. But the water flow should be at least 3 gal/min {11.4
liters/min}.
1 Connect the water supply line to
the intercooler or precooler inlet.
If a manual shut off valve is used,
it should be mounted on the inlet
line.
2 Connect the water discharge or
return line with the pressure
relief valve to the intercooler
or precooler outlet. Use the
bracket supplied to secure the
pressure relief valve to the back of
the dryer.
IMPORTANT: Turn the water off when the dryer is not in use to prevent
condensation.
Intercooler Inlet
Intercooler Outlet
✒
TIP: Make the water supply and dis-
charge / return connections with
flexible hoses at least 24 in.
(61 cm) long. This allows you to
easily remove the intercooler
assembly for cleaning.
✒
TIP: If an optional flow control is
also being installed with the inter cooler, the manual shut off valve
should be installed on the inlet line
for the flow control.
Page 39
Mounting a Loader on the Hoppe r
If you have a Conair loader or vacuum receiver, you can
use the flange and mounting clips provided on the top of
the hopper. Refer to the manual that came with your
receiver or loader for detailed installation instructions.
Testing the I nstallation
You have completed the installation. Now it’s time to make sure everything works.
1 Make sure there is no material in the hopper. If you have mounted a loader
or vacuum receiver on the hopper, disconnect the material inlet hose at the
source.
2 Turn on the main power to the dryer. Make sure the dryer’s disconnect dial is
in the ON position. This powers up the control and the display lights will illuminate.
3 Press the START button.
If everything is installed correctly:
• The green light on the start button will illuminate.
• The regeneration and process blowers and LEDs will turn on.
• The regeneration heater and LED will turn on.
• The LEDs will illuminate.
• The desiccant wheel starts turning.
(continued)
Auto Start
Dryer Status
Process Blower Regen. Blower
Regen. Heater
Set Point Actual
1 Process Temp.
2 Regen. Temp.
3 Return Air Temp.
4 Auto Start
5 Load Time (MDC)
6 Activate Setback Temp.
7 Setback Temp.(Process)
8 Dewpoint
Shutdown Alarms
A1 Process High Temp
A2 Process Loop Break
A3 Process Heater High Temp
A4 Regen Heater High Temp
A7 Return Air High Temp
A49 Process Protection High Temp
A53 Process Blower Overload
A55 Wheel Rotation Failure
Passiv e Alarms
P1 Process Temp Deviation
P3 Regen Temp Deviation
P5 Return Air Mid High Temp
P17 MDC Conveying Demand
1000
Start
IMPORTANT: Be sure the cable tie
has been removed from the desiccant wheel. (W600-1000 models)
In s ta ll at io n l 3 -1 9
3
In s t all a t i on
Page 40

3- 2 0 l I ns ta ll at io n
Testing the I nstallation (c ont inu ed )
4 Press the STOP button.
If everything is installed correctly:
• The blowers will continue running as needed to cool the heaters.
(until regeneration heaters are less than 150°F {66°C})
5 The test is over. If the dryer performed the normal operating sequences as
outlined, you can load the hopper and begin operation. If it did not, refer to
the Troubleshooting section of the User Guide.
Stop
Page 41

S E C T I O N
4
4
Op e r a tio n
Operation
Caro u sel Plus W Se r ies Dr y e r:
cont r ol p anel DC- 1 . . . . . . . . . . . . . . . . 4-2
Caro u sel Plus W Se r ies Dr y e r D C-1
cont r ol f unct i ons . . . . . . . . . . . . . . . . . 4-3
Cont r ol f unct i o n f low cha r t . . . . . . . . . . . . . 4-3
Cont r ol f unct i o n d escri p tion s . . . . . . . . . . . 4 -5
To s t a rt dry i ng . . . . . . . . . . . . . . . . . . . . 4-15
To s t o p d ryi n g . . . . . . . . . . . . . . . . . . . . . 4-1 6
Usin g th e a u to s tart co u n tdo w n f u ncti o n . . . 4 - 17
How to dis a ble the auto st a rt o n t he
DC-1 co n t rol . . . . . . . . . . . . . . . . . . . 4-17
Usin g de w poin t co n trol . . . . . . . . . . . . . . . 4-1 8
Op e ra ti on l 4-1
Page 42

4- 2 l Op er at io n
Auto Start
Dryer Status
Process Blower Regen. Blower
Regen. Heater
Set Point Actual
1 Process Temp.
2 Regen. Temp.
3 Return Air Temp.
4 Auto Start
5 Load Time (MDC)
6 Activate Setback Temp.
7 Setback Temp.(Process)
8 Dewpoint
Shutdown Alarms
A1 Process High Temp
A2 Process Loop Break
A3 Process Heater High Temp
A4 Regen Heater High Temp
A7 Return Air High Temp
A49 Process Protection High Temp
A53 Process Blower Overload
A55 Wheel Rotation Failure
Passiv e Alarms
P1 Process Temp Deviation
P3 Regen Temp Deviation
P5 Return Air Mid High Temp
P17 MDC Conveying Demand
1000
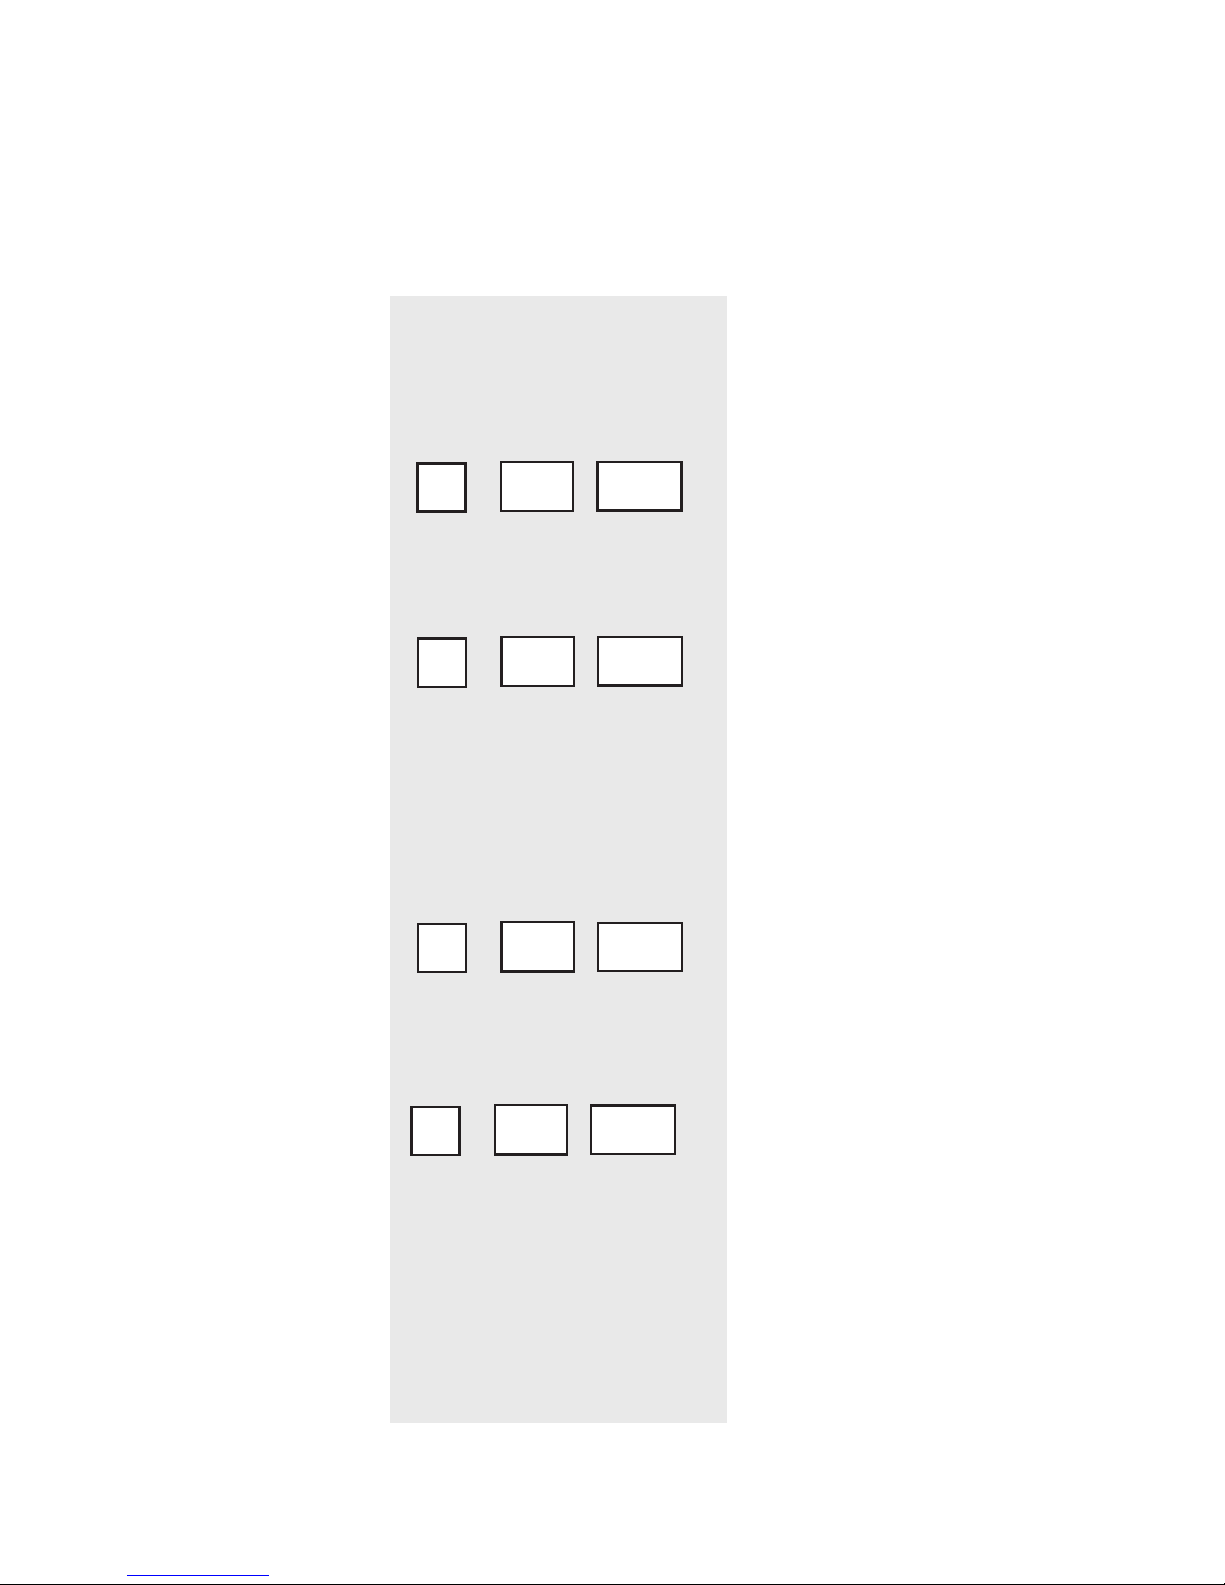
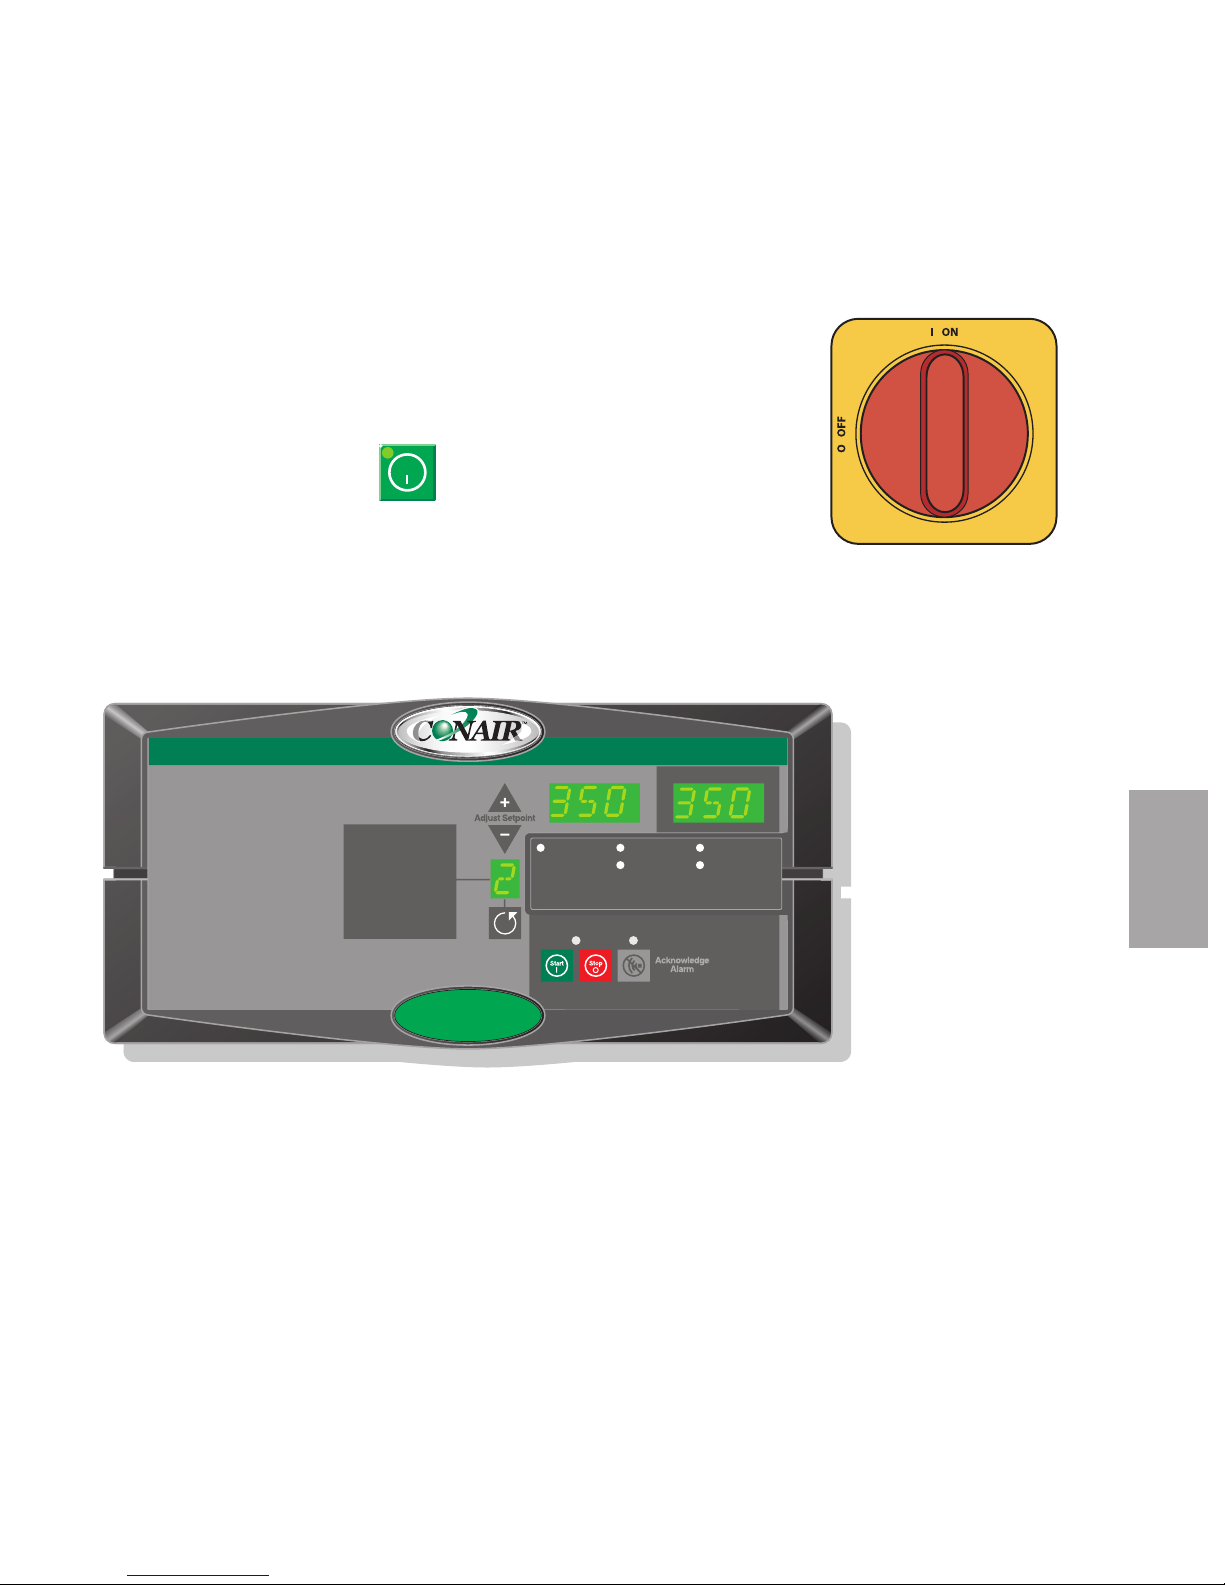
Carousel Plus W Series Dr yer: Control Panel DC-1
Se tp oi nt
Di sp la y
Shows the setpoint
value.
Me nu Li st
Numbers 2, 3, and 4 are standard items that will
always be present. Number 8 is a screen associated with options. If the option is not installed, the
screens will not be displayed.
NOTE: #1 Process is not displayed when
the unit is configured as a central dryer.
Ac kn ow led ge
Al ar m But to n
Press once to
silence the optional audible alarm
and display alarm
messages. Press
again to clear the
alarm. If pushed
when no active
alarm is present,
the most recent
alarm will be
displayed.
St ar t and St op
Bu tt on s
Press “Start” to start the dryer.
Press “Stop” to stop the dryer.
In cr em ent /De cr em ent
Bu tt on s
Used to increase and/or decrease the setpoint of a control function.
Ac tu al
Di sp la y
Shows the actual
temperature value.
Me nu
Nu mb er
Di sp la y
Displays the
menu number
corresponding to what
is shown in
the setpoint
and actual
displays.
Can also display letters
for alarms
and setup.
Sc ro ll
Bu tt on
Press to
scroll
through the
closed loop
menu list.
Pressing the
Scroll button
moves you
down the list.
Al ar m Cod es
See Troubleshooting section for a
more complete listing of alarms.
NOTE:
Process related
alarms are not
applicable
when the unit
is configured
as a central
dryer.
✐
✐
Page 43

Carousel Plus W Series Dr yer DC-1
Control Functions
Dryer functions are values that you can set or monitor. Press the Scroll button to
access the function within a Menu list until the function you want to set or monitor
appears in the LED display.
NOTE: Grey shaded screens denote optional functions. If the options were not
purchased with the dryer, those screens will not appear.
Control Function Flo w Chart
The following flow chart provides a quick summary of the control functions. For
an explanation of each control function, see Control Function Descriptions (page
4-5).
The Main Menu functions can be accessed by pressing the Scroll button when on
Screen 5. To access the Setup, Test Mode, and Alarm History Menus, the appropriate access code must be entered. Refer to the instructions for Screen 14
(page 4-7).
Op e ra ti on l 4-3
4
Op e r a tio n
✐
Page 44

POWER ON
s
creen #
1
Pr up
5 sec
2
CP 600
5 sec - Model Disignator
3
C v2.0 3.00
1 sec - Control Software Version
4
dv2.0 3.00
1 sec - Display Software Version
5
1
CNT DRY
Configured as a Central Dryer
6
2350350
Regen Temp
7
3100100
Return Air Temp
8
416On
Auto Start
13
9-30-40
Dewpoint Monitor or Dewpoint Control
14
00
Password Screen
754 755
756
28
Hoff 1
44
A1P3
44
A2A1
30
Hoff 3
44
A3A5
18
C350C04
31
Hoff 4
44
A4A4
19
CoffC05
32
Hoff 5
44
A5P1
33
Hoff 6
44
A6P5
21
C20C07
34
Hoff 7
44
A7A1
35
Hoff 8
44
A8A7
24
CoffC10
44
A9A2
37
Hoff 10
44
A10A6
38
Hoff 11
40
Hoff 13
41
Hoff 14
42
Hoff 15
43
Hoff 16
Setup Menu
Access Code
Te st Mode Menu
Access Code
Alarm History Menu
Access Code
47
CFC15
MAIN MENU
22
C200C08
4- 4 l Op er at io n
NOTE: In the event new control boards are installed, screens showing Process and MDC may be present. The boards
will need to be configured for a central dryer. If this is not done, alarms will occur.
✐
Display Menu
Number
Setpoint
Display
Actual
Display
NOTE: Screens 1-4 are only
displayed during initialization.
✐
Page 45

4
Op e r a tio n
Op e ra ti on l 4-5
Once power is turned on, this screen is displayed for 5 seconds while the control
goes through self-checking.
Once power is turned on and screen 1 is
displayed for 5 seconds, this screen is displayed for another 3 seconds. It shows the
dryer model number for which the control
is configured.
After the model number is displayed, this
screen flashes for 1 second and displays
the control board software version.
After the control version is shown, the
screen flashes again for 1 second and displays the display board software version.
Indicates configuration as a central dryer.
Shows the regeneration air setpoint and
actual temperature. The setpoint can not be
changed from this screen; it is shown only
as a reference.
Screen
SCREEN 1
SCREEN 2
SCREEN 3
SCREEN 4
SCREEN 5 (Default Screen)
SCREEN 6
Pr
Function
Control Function Des criptions
up
CP
600
v2.0
3.00
C
v2.0
3.00
d
350
350
2
CNT
DRY
1
Page 46

4- 6 l Op er at io n
Screen
SCREEN 7
SCREEN 8
100
Function
Control Function Des criptions
(c on ti nue d)
This screen shows the actual return air
temperature measured at the inlet to the
process blower. (The return air temperature
on W1600-5000 dryers is measured at the
inlet to the desiccant wheel. W1600-5000
dryers designed prior to August 2007, the
return air temperature is measured at the
inlet to the process blower.) If the optional
aftercooler/intercooler flow control is
installed, a setpoint will be displayed on
this screen as well. The (+) or (-) buttons
can be used to change the set point.
Holding the (+) or (-) buttons in will allow
the number to ramp up faster the longer
the button is held.
This screen is used to set the dryer to auto
start. The dryer must be on but not running to set auto start. The value shown is
the countdown time setpoint. It is
adjustable from 0.1 hours to 150 hours.
Once the countdown time is set, press the
“START” button. The display will show
ON to tell the operator that the auto start is
ON and counting. The auto start LED on
the display also flashes green when the
auto start is armed and counting down.
The LED will turn solid green when the
dryer starts. The dryer will begin operating when the control has finished counting
down.
100
3
16
On
4
Page 47

Op e ra ti on l 4-7
Screen
SCREEN 13 (Dewpoint Monitor/
Dewpoint Control Option)
SCREEN 14
Function
Control Function Des criptions
(c on ti nue d)
If the dryer has the dewpoint monitor
option installed, this screen will show the
actual dewpoint of the process delivery air.
With the dewpoint monitor option
installed, there will only be an actual display (no setpoint value). Although the
dryer is capable of producing dewpoints
much lower than -40°F {-40°C}, the minimum sensor range is -40°F {-40°C}.
Dewpoint control will automatically adjust
the regeneration temperature to maintain
dewpoint setpoint. Dewpoint control is not
active with -40°F {-40°C} setpoint.
This is the password entry screen that
gives the user access to the Set Up, Test
Mode, and Alarm History screens. The
user can get to the password protected control functions through this screen by pressing the Scroll button and the adjust setpoint button (-) at the same time. This
works only if you are on menu #1 (Screen
5). The access codes are as follows:
Set Up Screens 754
Test Mode Screens 755
Alarm History Screens 756
To exit the password section, enter 500
and press scroll or cycle the power.
(continued)
-30
-40
8
0
0
4
Op e r a tio n
Page 48

Screen
Screens 18-24 require access
code 754.
SCREEN 18 (Set up Screen)
SCREEN 19 (Set up Screen)
SCREEN 21 (Set up Screen)
Regeneration Differential
Temperature
Function
Control Function Des criptions
(c on ti nue d)
This is the regeneration setpoint screen.
NOTE: There is normally no need to change
this temperature. Consult Conair prior to
changing this setting.
This is the regeneration heater autotune
screen. The autotune function can be
turned on by pressing the (+) key. Once
the (+) key is pressed, the screen will show
“On” and then start the autotune process.
This may take a minute or so to complete.
When finished the display will read "don".
The new PID values are automatically
saved. An autotune should be performed
on a cold dryer. It will autotune to the
setpoint value entered on Screen 18.
This screen shows the minimum differential temperature between the regeneration
inlet and the outlet at the desiccant wheel.
If the actual temperature differential is
under the set value, the dryer will alarm
(P31), but will still run. The temperature
range is 5 to 100°F {-15 to 38°C}. The
default temperature is 20°F {-7°C}.
350
C04
C
off
C05
C
✐
✐
4- 8 l Op er at io n
20
C07
C
Page 49

4
Op e r a tio n
Op e ra ti on l 4-9
Screen
Screens 18-24 require access
code 754.
SCREEN 22 (Set up Screen)
Regeneration Air Temperature
SCREEN 24 Aftercooler/
Intercooler Flow Control Enable
(Option)
Screen 28-43 require access
code 755.
SCREEN 28 (Test Mode Screen)
Function
Control Function Des criptions
(c on ti nue d)
This screen shows the actual temperature
of the regeneration air at the outlet of the
desiccant wheel.
This screen is the Aftercooler/Intercooler
Flow Control Enable screen. By pressing
the (+) or (-) keys, this function can be
turned on or off. When off, the dryer will
not open the optional flow control valve to
control the return air temperature. There
will also be no setpoint value on Menu #3,
Screen 7. This screen is not visible if the
aftercooler/intercooler flow control option
is not installed on the dryer.
This is the Test Mode screen for the
process blower. By pressing the (+) or (-)
keys, the setting can be changed. When
set to "On", the process blower output will
be turned on for 3 seconds and then shut
off automatically.
(continued)
✐
off
C10
C
off
1
H
200
C08
C
✐
Page 50
4- 1 0 l Ope r at io n
Control Function Des criptions (con tin ue d)
Screen
Screen 28-43 require access
code 755.
SCREEN 30 (Test Mode Screen)
SCREEN 31 (Test Mode Screen)
SCREEN 32 (Test Mode Screen)
SCREEN 33 (Test Mode Screen)
Function
This is the Test Mode screen for the regeneration blower. By pressing the (+) or (-)
keys, the setting can be changed. When
set to "On", the regeneration blower output
will be turned on for 3 seconds and then
shut off automatically.
This is the Test Mode screen for the regeneration heater. By pressing the (+) or (-)
keys, the setting can be changed. When
set to "On", the regeneration heater output
will be turned on for 3 seconds and then
shut off automatically.
NOTE: The isolation contactor will not be
engaged so no electricity will go the heater.
The solid state relay contacts should close.
This is the Test Mode screen for the wheel
motor. By pressing the (+) or (-) keys, the
setting can be changed. When set to "On",
the wheel motor output will be turned on
for 3 seconds and then shut off automatically.
This Test Mode screen is not used in the
current program.
off
3
H
off
5
H
off
4
H
✐
off
6
H
✐
Page 51

4
Op e r a tio n
Op e ra ti on l 4-1 1
Screen
Screen 28-43 require access
code 755.
SCREEN 34 (Test Mode Screen)
SCREEN 35 (Test Mode Screen)
SCREEN 37 (Test Mode Screen)
SCREEN 38 (Test Mode Screen)
Function
Control Function Des criptions
(c on ti nue d)
This is the Test Mode screen for the isolation contactor. By pressing the (+) or (-)
keys, the setting can be changed. When
set to "On", the isolation contactor output
will be turned on for 3 seconds and then
shut off automatically.
This is the Test Mode screen for the alarm
output (horn and/or red light). By pressing
the (+) or (-) keys, the setting can be
changed. When set to "On", the alarm output will be turned on for 3 seconds and
then shut off automatically.
NOTE: The alarm light on the membrane
switch will not come on. If the optional
alarm horn or red light is not installed nothing will happen.
This is the Test Mode screen for the aftercooler/intercooler flow control valve. By
pressing the (+) or (-) keys, the setting can
be changed. When set to "On", the aftercooler/intercooler flow control valve output will be turned on for
3 seconds and then shut off automatically.
NOTE: If the optional aftercooler/intercooler
flow control valve is not installed nothing will happen.
This screen is not used in the current
program.
off
8
H
off
7
H
off
10
H
✐
✐
off
11
H
✐
Page 52
4- 1 2 l Ope r at io n
Screen
Screen 28-43 require access
code 755.
SCREEN 40 (Test Mode Screen)
SCREEN 41 (Test Mode Screen)
SCREEN 42 (Test Mode Screen)
SCREEN 43 (Test Mode Screen)
Function
Control Function Des criptions
(c on ti nue d)
This screen is not used in the current
program.
This screen is not used in the current
program.
This is the Test Mode screen for the alarm
output (yellow light). By pressing the (+)
or (-) keys, the setting can be changed.
When set to "On", the alarm output will be
turned on for 3 seconds and then shut off
automatically.
NOTE: If the optional tricolor light is not
installed nothing will happen.
This is the Test Mode screen for the alarm
output (green light). By pressing the (+)
or (-) keys, the setting can be changed.
When set to "On", the alarm output will be
turned on for 3 seconds and then shut off
automatically.
NOTE: If the optional tricolor light is not
installed nothing will happen.
off
13
H
off
15
H
off
14
H
off
16
H
✐
✐
✐
Page 53

4
Op e r a tio n
Op e ra ti on l 4-1 3
Screen
Access code 756 required.
SCREEN 44 (Alarm Screen)
Function
Control Function Des criptions (con tin ue d)
1
P3
A
This is the first Alarm History screen. In
this section, the last 10 alarms that have
occurred are saved, starting with the
most recent alarm. The number in the
setpoint screen shows the list of alarms
1-10. The alarm code shows up in the
actual screen. Some of the alarm codes
are shown on the display label. Please
refer to the alarm section of this manual
for all alarm code definitions.
These are the additional alarm screens.
See the explanation above.
2
A1
A
3
A5
A
4
A4
A
5
P1
A
6
P5
A
7
A7
A
8
A2
A
9
A6
A
10
P2
A
✐
Page 54

4- 1 4 l Ope r at io n
Screen
Screen 47 require access
code 754.
SCREEN 47 (Degree F/Degree C)
Function
Control Function Des criptions
(c on ti nue d)
This is the temperature units screen. It is
used to change the temperature display
from °F to °C or °C to °F. Use the (+) or
(-) keys to toggle between °C and °F.
F
C15
C
✐
Page 55
Op e ra ti on l 4-1 5
To Start Dr ying
1 Make sure there is material in the hopper.
2 Turn on the main power to the dryer. Make sure the dryer’s disconnect dial
is in the ON position. This powers up the control and the display lights will
illuminate.
3 Press the START button.
If everything is installed correctly:
• The green light on the start button will illuminate.
• The process and regeneration blowers turn on and the LEDs will
illuminate.
• The regeneration heater turns on and the LED will illuminate.
• The desiccant wheel starts turning.
Auto Start
Dryer Status
Process Blower Regen. Blower
Regen. Heater
Set Point Actual
1 Process Temp.
2 Regen. Temp.
3 Return Air Temp.
4 Auto Start
5 Load Time (MDC)
6 Activate Setback Temp.
7 Setback Temp.(Process)
8 Dewpoint
Shutdown Alarms
A1 Process High Temp
A2 Process Loop Break
A3 Process Heater High Temp
A4 Regen Heater High Temp
A7 Return Air High Temp
A49 Process Protection High Temp
A53 Process Blower Overload
A55 Wheel Rotation Failure
Passiv e Alarms
P1 Process Temp Deviation
P3 Regen Temp Deviation
P5 Return Air Mid High Temp
P17 MDC Conveying Demand
1000
NOTE: Once the dryer has been started, go to the ResinWorks or HTC and set the setpoint, then turn on the unit.
✐
Start
4
Op e r a tio n
Page 56

4- 1 6 l Ope r at io n
To Stop Drying
1 Press the STOP button. The Stop LED blinks red.
• The blowers continue running for a few minutes
to cool the heaters.
2 Be sure to disconnect and lockout the main power if you have stopped the
dryer to perform maintenance or repair.
IMPORTANT: Do not use the main power switch to stop the dryer. Turning off power to the
control and dryer during normal operation prevents the necessary cool-down period, and
can trigger the shutdown/high temperature alarm during your next drying cycle.
CAUTION: Improper shut down can cause damage to your dryer.
NOTE: Turn off the ResinWorks or HTC and allow the heaters to cool (3 to 5 minutes)
before turning off the dryer.
✐
Stop
Page 57

Using the Auto Start Countdown
Function
The countdown function allows the user to set the Carousel Plus W Series
Dryer to automatically start at a predetermined time. The countdown time can
be set from 0.1 to 150.0 hours.
To set the countdown time:
1 Use the Scroll button to access the function (Menu 4, Screen 8).
Auto Start
2 Use the Setpoint Adjust keys to set the desired countdown time in hours.
3 Press the Start button. The Auto Start LED will blink to indicate that Auto Start
is armed.
How to Disable the Auto Start on
the DC-1 Control
To disable auto start once armed cycle the power off and on.
16
ON
4
Op e ra ti on l 4-1 7
4
Op e r a tio n
Page 58

4- 1 8 l Ope r at io n
NOTE: For more information concerning specific dewpoint control screens, see Control
Function Descriptions, page 4-5.
✐
Using Dewpoint Contr ol
Dewpoint control is a feature that can help you to reduce energy consumption. It
does this by varying the temperature of the regeneration air from its default setpoint of 350° F {177° C}, to maintain a setpoint that you have entered on the
process dewpoint screen (Screen 11).
Example:
If your material is not difficult to dry, it may dry adequately with -20° F
{-29° C} dewpoint air. When -20° F {-29° C} is entered as the setpoint (Screen
11), the dryer will gradually lower the regeneration air temperature to a point
where the dryer’s delivery air is controlled at -20° F {-29° C} dewpoint.
The dewpoint control is active with setpoint values of -39° F {-39.4° C} and
higher. When the setpoint is -40° F {-40° C} or lower, the regeneration tempera-
ture will be maintained at the default temperature of 350° F {177° C} and the
dewpoint control is inactive.
Page 59

Maintenance
Prev e ntat i ve m aint e nance ch e c klis t . . . . . . . 5 - 2
Chec k ing the dewp o int . . . . . . . . . . . . . . . . 5-3
Clea n ing the hopp e r. . . . . . . . . . . . . . . . . . 5- 5
Clea n ing the proc e ss filte r . . . . . . . . . . . . . 5-6
Clea n ing the rege n erat i on filte r . . . . . . . . . . 5- 8
Clea n ing the afte r coole r /int e r cool e r c o ils . . . 5-9
Clea n ing the prec o oler coi l s . . . . . . . . . . . 5- 1 1
Clea n ing the vola tile tra p o n t h e d emist e r . . 5-11
Insp e cting ho s e s a nd gaske t s . . . . . . . . . . 5-11
S E C T I O N
5
Ma i n ten a n ce
5
Ma i nt en an ce l 5- 1
Page 60

5- 2 l M a in te na nc e
Preventative Maintenance
Checklist
Routine maintenance will ensure optimum operation and performance of the
W Series Carousel Plus Dryer. We recommend the following maintenance
schedule and tasks.
• Whenever you change materials
❒ Drain and clean the hopper.
• Wee k ly, or as ofte n a s ne eded
❒Clean or replace the process and regeneration filters.
You may need to clean filters more often than weekly. Frequency
depends on how much material you process and how dusty or full of fines it is.
❒Inspect hoses and hose connections.
Check for damage, kinks, or loose hose clamps. Replace any hoses that
show signs of damage or wear. Reposition and tighten loose hose clamps.
• M o nthly
❒
Clean the aftercooler/intercooler and optional precooler coils.
You may need to clean the coils more often than monthly. Frequency will
depend on the type and volume of material you process.
• E v ery six mo n ths
❒Inspect gaskets for damage or wear.
Damaged gaskets can allow moisture to seep into the closed-loop drying
system. Replace any gasket that is torn or cracked.
❒Inspect the overhead process air duct connections.
(W3200-5000) Ensure that all connections are tighten properly and have .
no air leaks.
❒Verify dewpoint readout and performance with calibrated portable
instrument.
❒Measure current draw on all 3 legs of heater wires. This is to ensure
that the heater is working properly.
Page 61

5
Ma i n ten a n ce
Ma i nt en an ce l 5- 3
✐
NOTE: Portable dewpoint monitors purchased from Conair are
provided with a male connector
that plugs into the dewpoint
check port. If you purchased
your portable instrument elsewhere, the male connector is
available through the Conair
parts department.
NOTE: The dewpoint check port
was not included on early
dryers. It can be added easily.
Contact the Conair parts
department or follow the
alternate procedure.
✐
Replacement dewpoint
monitors, male connectors
and dewpoint check ports
are available from Conair.
Contact Conair Parts
(800) 458 1960
From outside of the
United States, call:
(814) 437 6861
Checking the Dewpoin t
It is a good idea to monitor the dewpoint performance of your dryer periodically
with a calibrated portable dewpoint monitor, to ensure it is performing at
maximum capacity. Even if your dryer has a dewpoint readout, comparing it
to a portable instrument periodically will confirm that the dewpoint sensor and
readout is performing properly.
To check dewpoint:
1 Connect your portable dewpoint meter to the
dewpoint check port of the dryer.
2 Turn on the portable instrument, and ensure
there is positive airflow through the sensor.
3 Monitor the readout and allow ample time for it to stabilize before discon-
necting the portable dewpoint monitor. Some dewpoint monitors require a
substantial amount of time for residual moisture to be purged from the sensor.
4 In the event the dewpoint in not satisfactory, refer to the Troubleshooting
section of the manual, under A28 and P9 alarm for DC1.
Alternate Procedure: (for dryers with no dewpoint check port)
1 Stop dryer and allow it to cool.
2 Swing open or remove the left side panel. See Installation section entitled,
Opening the dryer doors (W1600-5000).
3 Remove the 1/8 inch NPT pipe plug at the process air outlet on the bottom
manifold of the desiccant wheel assembly.
4 Connect a portable dewpoint meter to the hole from which the plug was just
removed.
Page 62
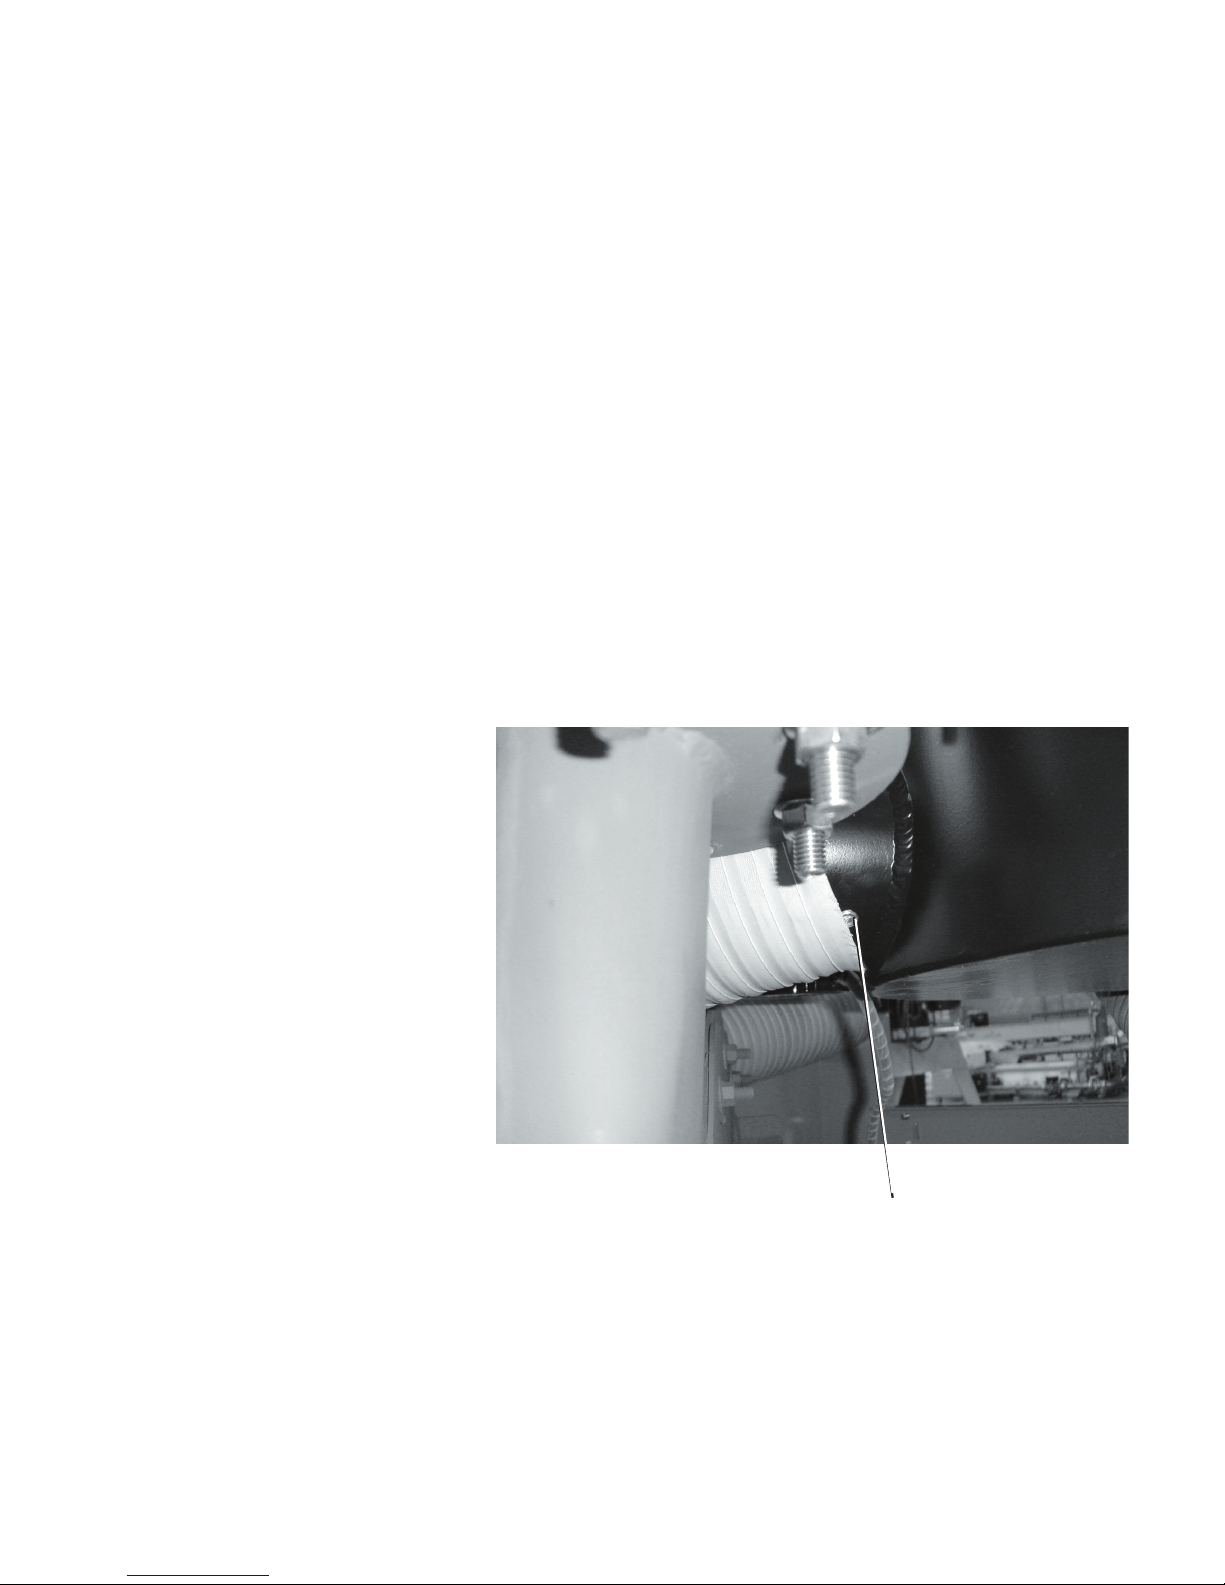
Checking the Dewpoin t ( co nti nue d)
5 Turn on the portable instrument, and ensure there is positive airflow through
the sensor.
6 Monitor the readout and allow ample time for it to stabilize before
disconnecting the portable instrument. Some dewpoint monitors require a
substantial amount of time for residual moisture to be purged from the sensor.
7 In the event the dewpoint is not satisfactory, refer to the Troubleshooting
section of the manual, under A28 and P9 alarms for DC1.
8 Stop the dryer, and allow it to cool down. Then disconnect your portable
instrument and replace any pipe plugs that may have been removed.
9 Close or replace the side panel.
5- 4 l M a in te na nc e
1/8 inch NPT Hole Plug
Page 63

5
Ma i n ten a n ce
Ma i nt en an ce l 5- 5
Cleaning the Hopper
CAUTION: Hot surfaces. Always protect yourself from hot surfaces inside and
outside the dryer and drying hopper.
The hopper, spreader cone, and discharge assembly should be cleaned thoroughly
between material changes to prevent resin contamination.
1 Close the hopper slide gate.
2 Place a container beneath the hopper’s drain port to catch the material.
3 Open the drain port and allow the material to drain.
4 Open the hopper door and wipe out the inside of the hopper.
5 Clean the return air screen at the return air outlet of the hopper.
6
Remove the container from beneath the hopper and replace the drain
port cover before filling the hopper with material.
CAUTION: Wear eye protection. If you use compressed air to clean the equipment, you must wear eye protection and observe all OSHA and other safety
regulations pertaining to the use of compressed air.
Page 64
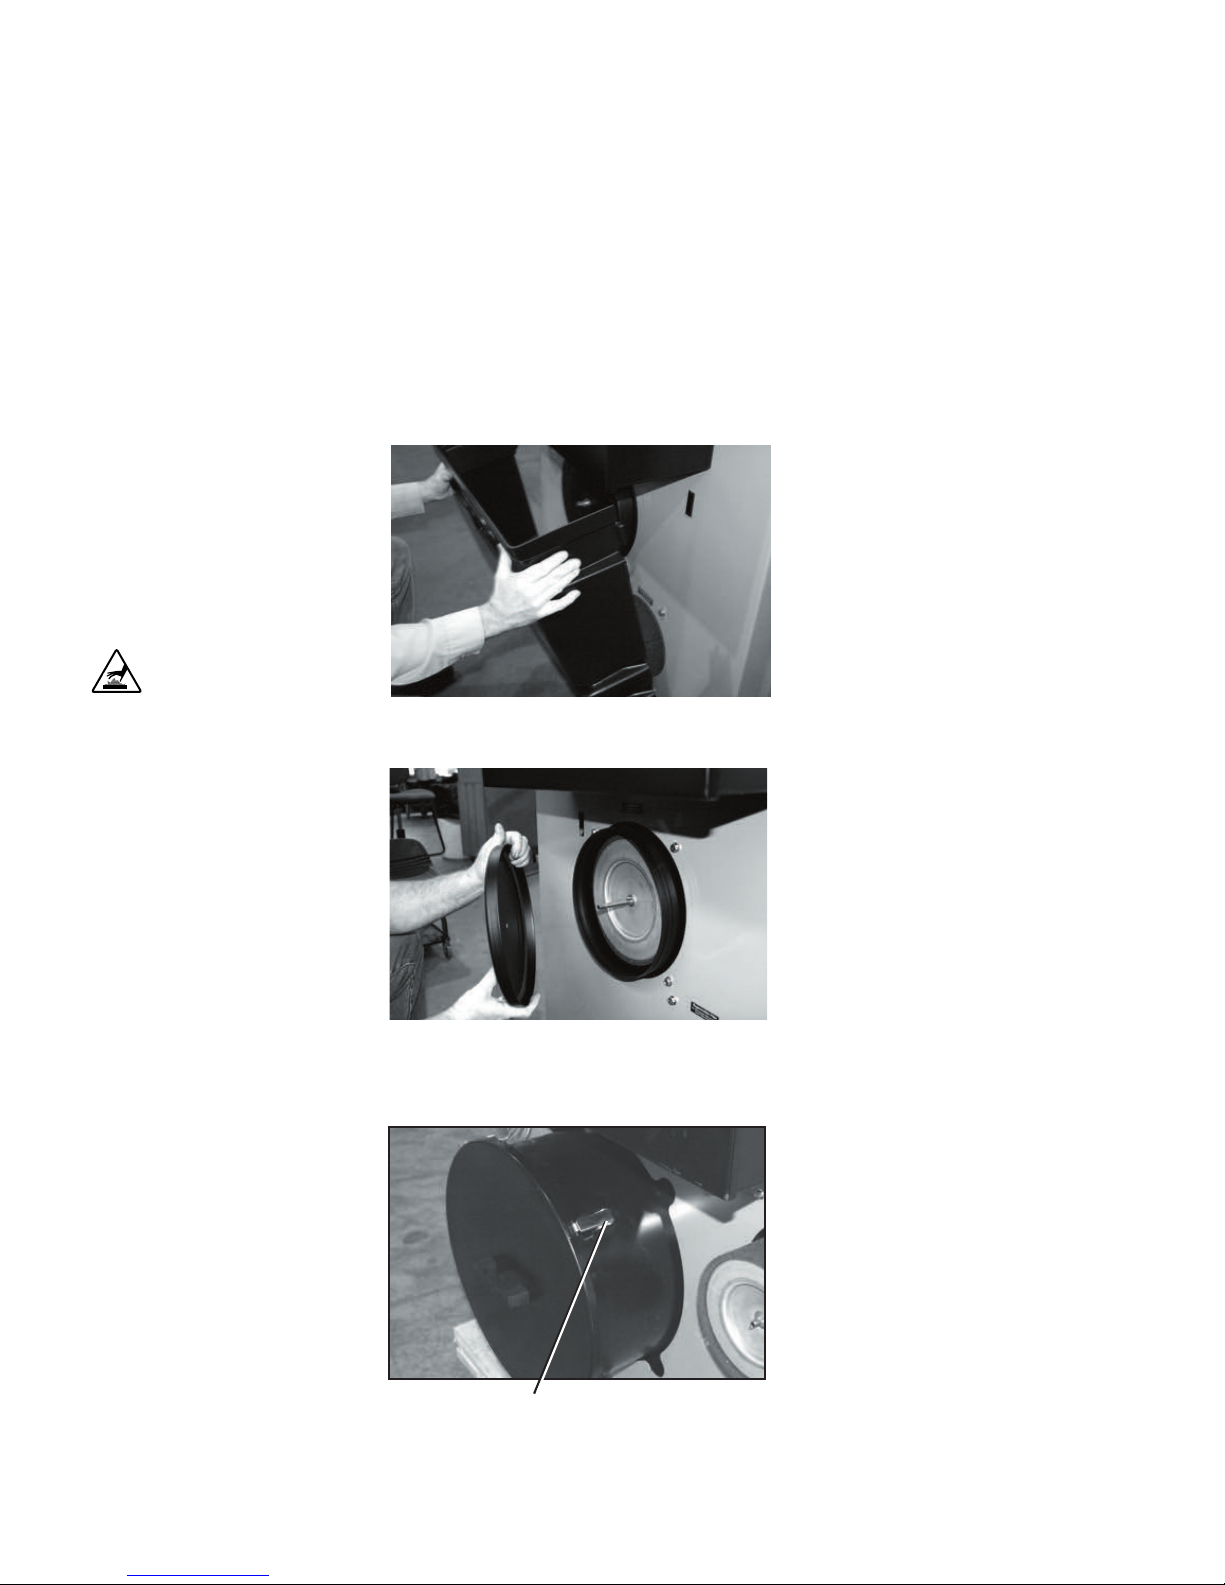
5- 6 l M a in te na nc e
Cleaning the Process Filter
Clogged filters reduce air flow and dryer efficiency. Cleaning frequency depends
on how much material you process and how dusty or full of fines it is.
1 Push in on the sides to release the
tabs on the front cover. Remove
the cover.
NOTE: Larger dryer models
(W1600 - 5000) do not have
covers.
2 Remove the cover wing nut, then
pull the filter cap off.
2a Remove the four (4) filter cap cover
latches, then pull the filter cap off.
CAUTION: Hot surfaces.
Always protect yourself
from hot surfaces inside
and outside the dryer and
drying hopper.
✐
Process Fitter Cap Latch (4)
Carousel Plus W-series Dryers 6 0 0 - 1 0 0 0
Carousel Plus W-series Dryers 1 6 0 0 - 5 0 0 0
Page 65
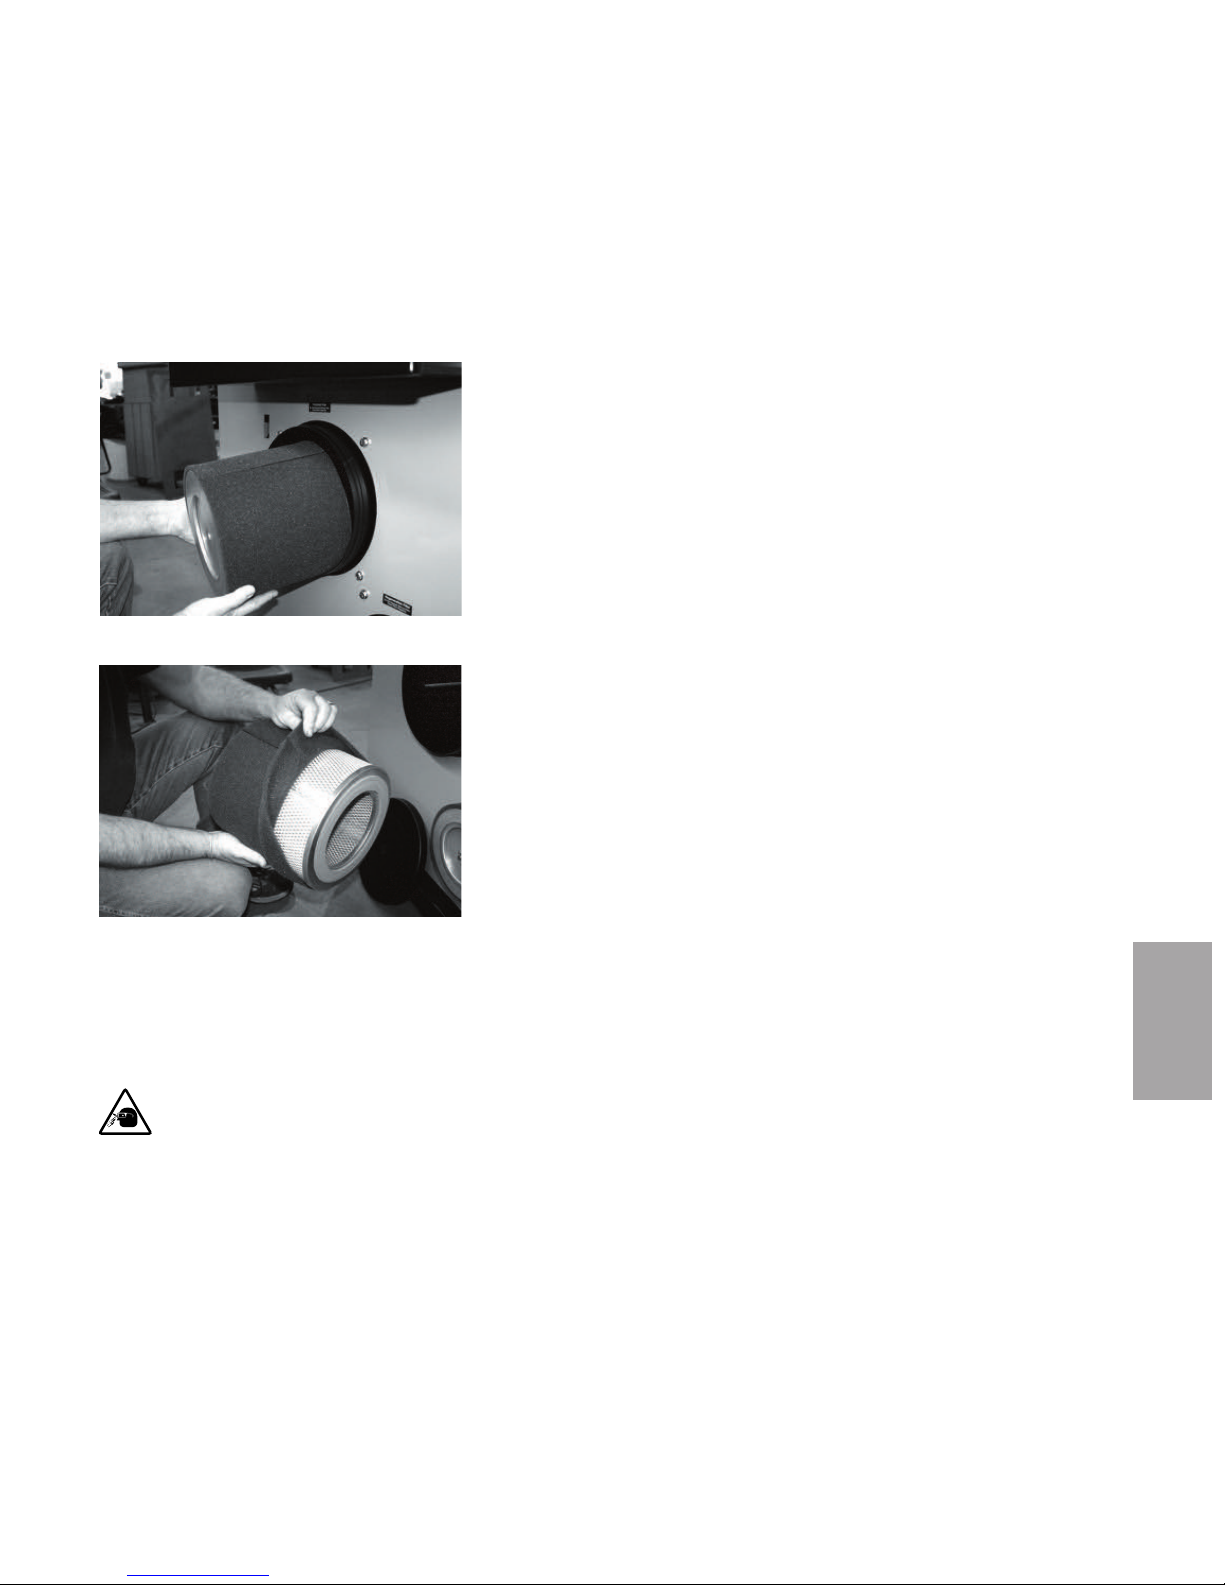
Ma i nt en an ce l 5- 7
5
Ma i n ten a n ce
Cleaning the Process Filter (c ont in ue d)
3 Remove the filter wing nut, then
remove the filter.
4 Remove outer filter and clean it with soapy
water. Let air dry.
5 Clean the filter by laying it on its side and gently tapping it on the floor. Replace
damaged, worn, or clogged filters.
6 Reverse the procedure to reinstall the process filter. Ensure that the gasket on filter cap is
in place and in good condition.
CAUTION: Wear eye protection. If you use compressed air to clean the equipment, you must
wear eye protection and observe all OSHA and other safety regulations pertaining to the use of
compressed air.
TIP: If gasket on the process filter cap becomes loose or detached from the filter cap, resecure with high
temperature silicone adhesive.
✒
Carousel Plus W-series Dryers 6 0 0 - 5 0 0 0
NOTE: On models W1600-5000 the process filter
will not have an outer filter.
✐
Page 66
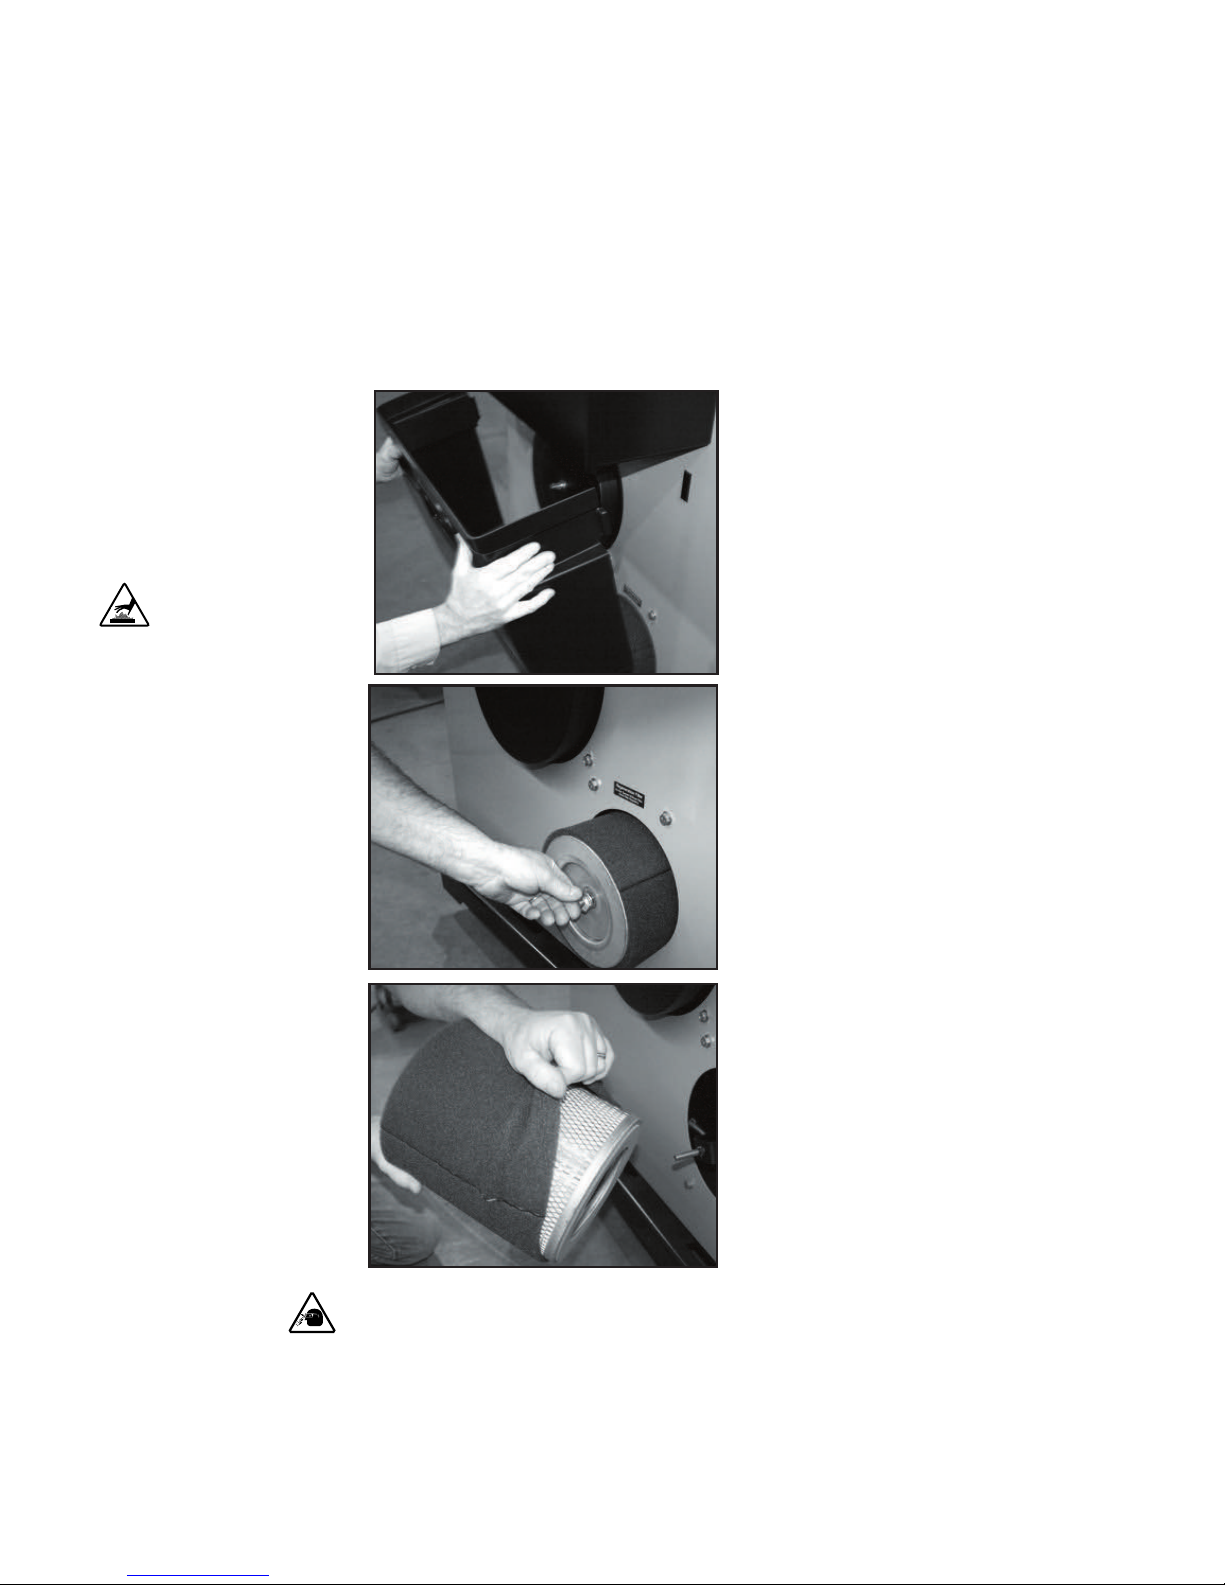
5- 8 l M a in te na nc e
Cleaning the Regener ation Filter
Clogged filters reduce air flow and dryer efficiency. Cleaning frequency depends
on the condition of your dryer’s ambient air.
1 Push in on the sides to release the tabs on
the front cover. Remove the cover.
NOTE: Larger dryer models (W1600 - 5000)
do not have covers.
2 Remove the filter wing nut, then remove
the filter.
3 Remove outer filter and clean it with soapy
water. Let air dry.
4 Clean the filter by laying it on its side
and gently tapping it on the floor.
Replace damaged, worn or clogged
filters.
5 Reverse the procedure to reinstall the
regeneration filter.
CAUTION: Wear eye protection. If you use compressed air to clean the equipment, you must
wear eye protection and observe all OSHA and other safety regulations pertaining to the use of
compressed air.
✐
CAUTION: Hot surfaces. Always protect
yourself from hot surfaces inside and outside the dryer and drying hopper.
NOTE: Dirty or clogged
regeneration filters are
the leading contributor
of dryers not reaching
desired dewpoints.
✐
Page 67
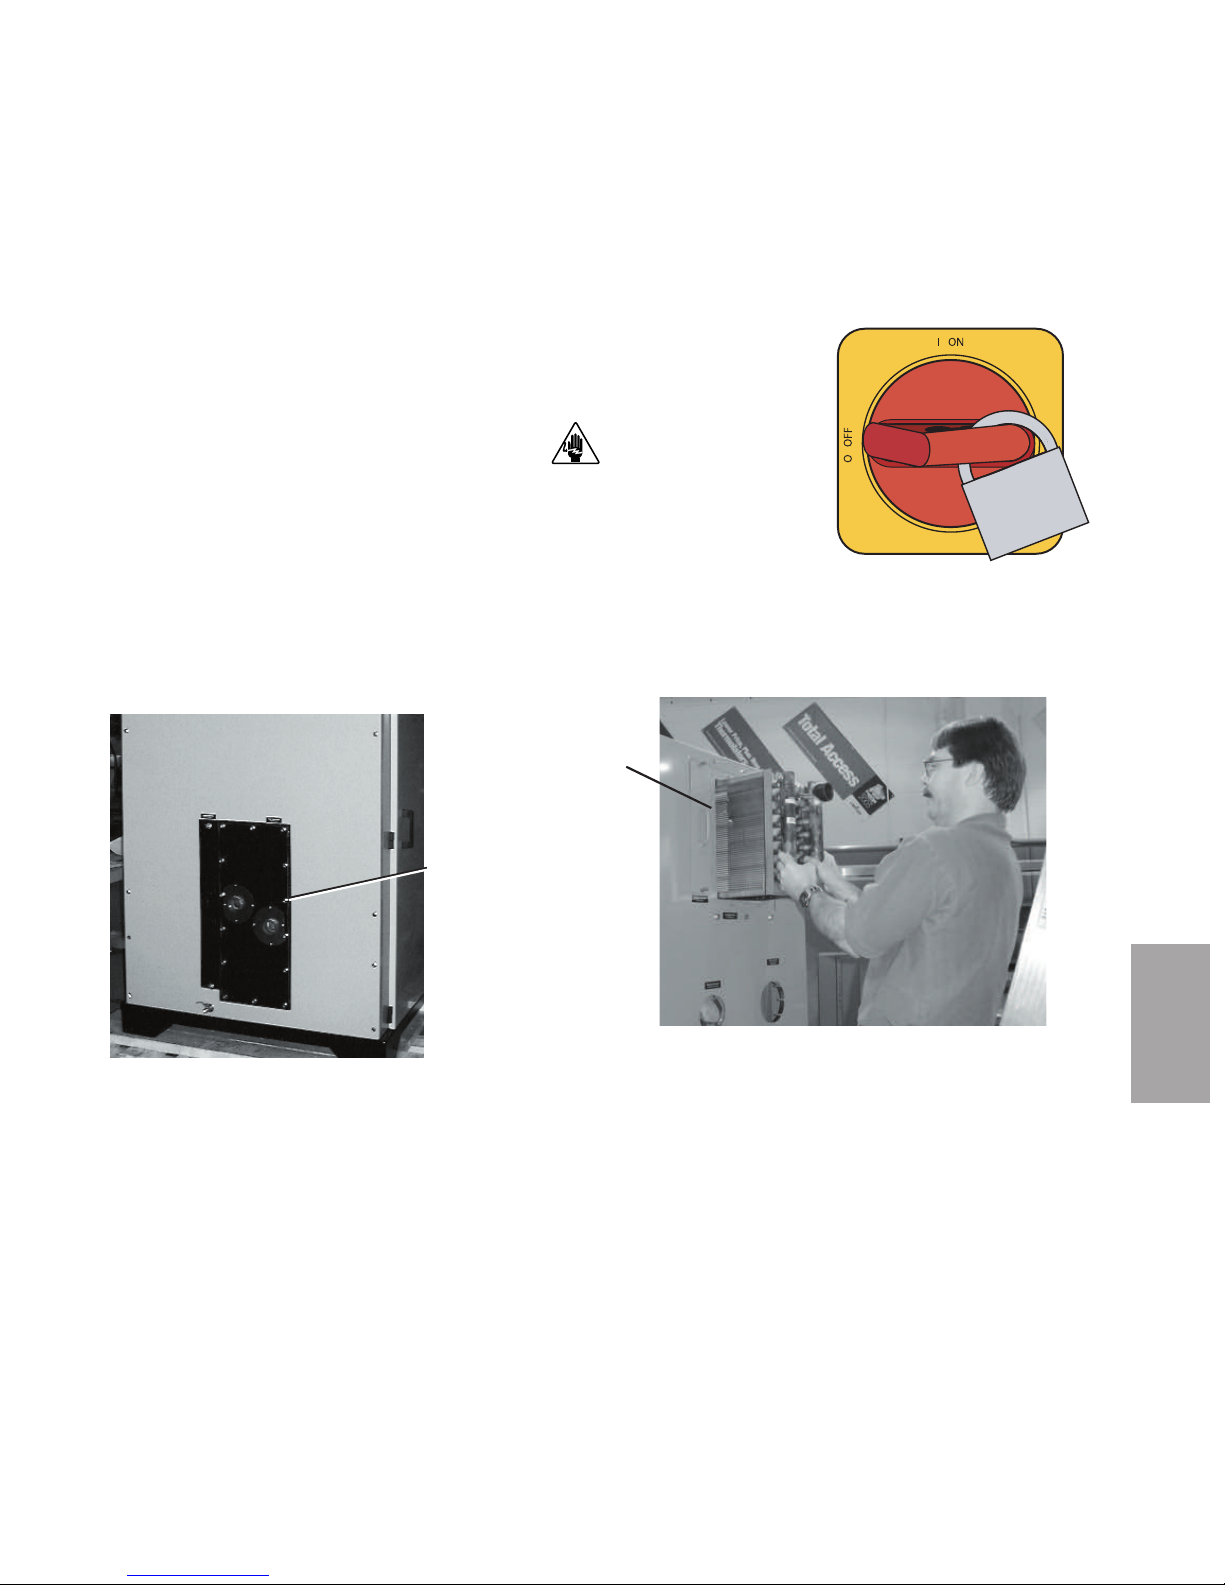
Ma i nt en an ce l 5- 9
5
Ma i n ten a n ce
Cleaning the Afterco oler/
Intercooler Coils
You need to clean the aftercooler/intercooler coils to keep them working efficiently. Cleaning frequency depends on the type and amount of material you process.
1 Stop the dryer and lockout the main power.
2 Turn off the water flow to the water supply line. Disconnect
supply and return lines.
3 Remove the bolts securing the aftercooler/intercooler cover. Remove the
cover.
4 Remove the aftercooler/intercooler by pulling it out of the aftercooler/inter-
cooler housing.
W600 - 1000
Models
W1600 - 5000
Models
NOTE: If an optional flow control was added with the aftercooler/intercooler, remove the
compression fitting from the aftercooler/intercooler inlet. Loosen the fitting on the flow
control, then swing the copper water supply tube out and away from the
aftercooler/intercooler inlet.
✐
(continued)
Page 68

Cleaning the Afterco oler/
Intercooler Coils
(c on ti nue d)
5 Clean the assembly using a mild soap and water. Let the assembly
dry thoroughly before installation.
NOTE: In cases of heavy volatiles, steam cleaning or the use of solvents, such
as acetone, may be necessary. Be sure to test a small area with the solvent
you have selected to be sure there is no adverse reaction.
6 Inspect the condition of the gasket. If it is damaged, replace the
gasket.
7 Reassemble by repeating the steps in reverse order.
8 Connect the water supply line to the inlet. If a manual shut off
valve is used, it should be mounted on the inlet line as well.
9 Connect the outlet of the aftercooler/intercooler to the inlet of the
flow control valve using the pre-shaped copper tubing and compression fittings provided.
✐
5- 1 0 l M ai nt en an c e
Page 69

Cleaning the Precool er Coils
You need to clean the precooler cooling coils to keep them working efficiently. See
Appendix B for details.
Cleaning the Volatile Trap on
the Demister
If you have the optional volatile trap, you need to clean the trap to keep it working
efficiently. See Appendix C for details.
Inspecting Hoses and Gaskets
Loose or damaged hoses and gaskets can allow moisture to seep into the
closed-loop drying system.
1 Follow the hose routing of all the hoses within the dryer and inspect all
hoses, clamps, fittings, and gaskets.
2 Tighten any loose hose clamps or fittings.
3 Replace worn or damaged hoses and gaskets.
5
Ma i n ten a n ce
Ma i nt en an ce l 5- 11
Page 70

5- 1 2 l M ai nt en an c e
Page 71

Troubleshooting
Befo r e b e ginn i n g . . . . . . . . . . . . . . . . . . . . 6-2
A f ew w ords of cau t ion . . . . . . . . . . . . . . 6 - 3
DIAG N O STIC S
How to ide n tify the cau s e o f a pr o blem . . . . 6 -4
Alar m s . . . . . . . . . . . . . . . . . . . . . . . . . 6 -5
Dewp o i nt trou b l esho o t ing . . . . . . . . . . . . . 6-17
Po or m ate r ial dr y i ng troub l esho o t ing . . . . . 6-18
REPA IR
Repl a c ing fus e s . . . . . . . . . . . . . . . . . . . . 6- 23
Chec k i ng hea t e r s olid sta te r elay s . . . . . . . 6-24
Chec k i ng or repla c ing temp e ratu r e s e nsor s . 6-25
Repl a c ing the reg e nera t ion hea t er
(W60 0 - 100 0 ) . . . . . . . . . . . . . . . . . . 6-2 6
Repl a c ing the reg e nera t ion hea t er
(W16 0 0 - 24 0 0) . . . . . . . . . . . . . . . . . 6- 2 8
Repl a c ing the reg e nera t ion hea t er
(W32 0 0 - 50 0 0) . . . . . . . . . . . . . . . . . 6- 3 0
Repl a c ing the des i ccant wh e el a ssem b l y
(W60 0 - 100 0 ) . . . . . . . . . . . . . . . . . . 6-3 2
Repl a c ing the des i ccant wh e el m otor
(W60 0 - 100 0 ) . . . . . . . . . . . . . . . . . . 6-3 4
Repl a c ing the des i ccant wh e el m otor
(W16 0 0 - 50 0 0) . . . . . . . . . . . . . . . . . 6- 3 5
S E C T I O N
6
6
Troubleshooting
Tr ou b le sh oo ti n g l 6- 1
Page 72
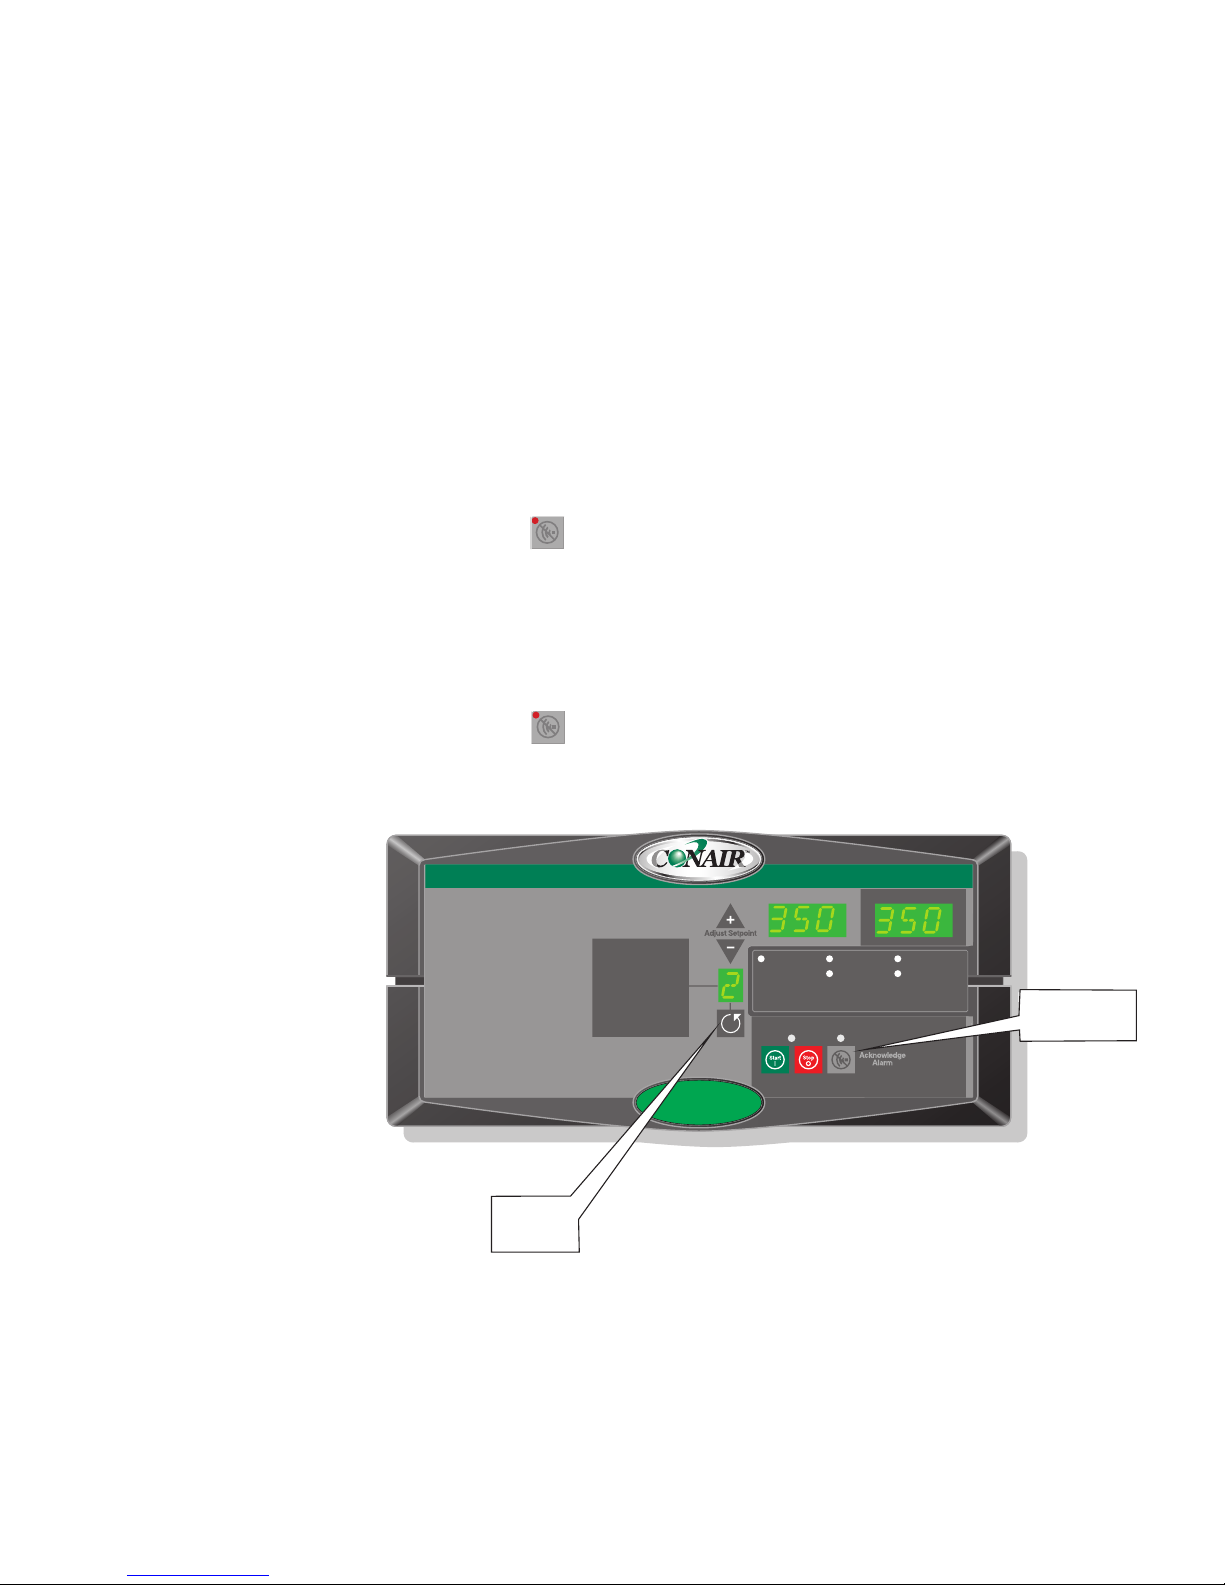
Before Beginning
You can avoid most problems by following the recommended installation and
maintenance procedures outlined in this User Guide. If you do have a problem,
this section will help you determine what caused it and how to fix it.
Before you open the side panels of the dryer be sure to:
❏ Diagnose causes from the control panel.
1 Press once to silence the optional audible alarm and display the
alarm message.
2 Address the alarm message and fix the problem. (Refer to the alarm
descriptions later in this section.)
3 Press again to clear the alarm. If the alarm reappears the problem
was not fixed.
Auto Start
Dryer Status
Process Blower Regen. Blower
Regen. Heater
Set Point Actual
1 Process Temp.
2 Regen. Temp.
3 Return Air Temp.
4 Auto Start
5 Load Time (MDC)
6 Activate Setback Temp.
7 Setback Temp.(Process)
8 Dewpoint
Shutdown Alarms
A1 Process High Temp
A2 Process Loop Break
A3 Process Heater High Temp
A4 Regen Heater High Temp
A7 Return Air High Temp
A49 Process Protection High Temp
A53 Process Blower Overload
A55 Wheel Rotation Failure
Passive Alarms
P1 Process Temp Deviation
P3 Regen Temp Deviation
P5 Return Air Mid High Temp
P17 MDC Conveying Demand
1000
Acknowledge
Alarm Button
Scroll
Button
6- 2 l Tr o ub le sh oo t in g
Page 73
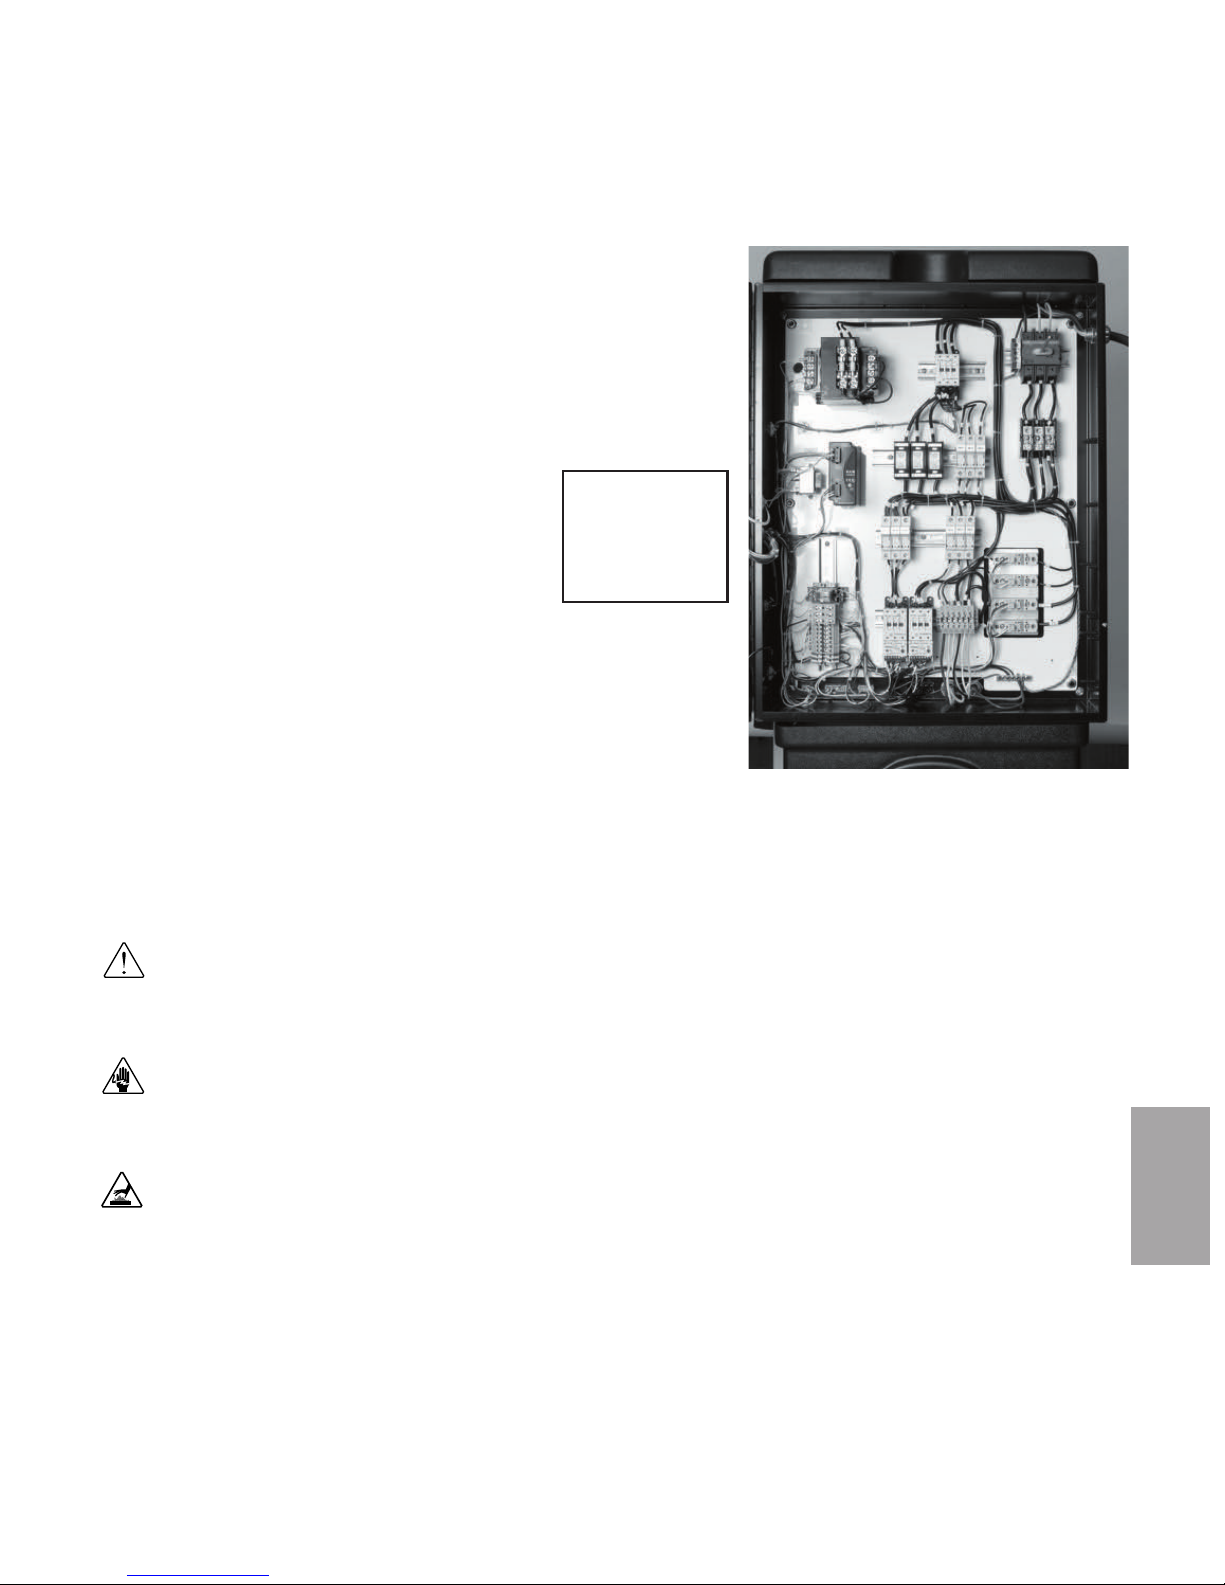
Before Beginning (c on tin ued )
❏ Find the wiring and equipment diagrams that were shipped
with your dryer. These diagrams are the best reference for cor-
recting a problem. The diagrams also will note any custom features, such as special wiring or alarm capabilities, not covered in
this User Guide.
6
Troubleshooting
A Few Words of Caution
The Carousel Plus W Series Dryer is equipped with numerous safety devices.
Do not remove or disable them. Improper corrective action can lead to hazardous conditions and should never be attempted to sustain production.
WARNING: Only qualified service personnel should examine and correct
problems that require opening the dryer’s electrical enclosure or using
electrical wires to diagnose the cause.
WARNING: High voltage. Always stop the Carousel Plus dryer,
disconnect and lock out the main power source before troubleshooting
or performing repairs.
CAUTION: Hot surfaces. Always protect yourself from hot surfaces inside
and outside of the dryer and hopper.
See warnings
below. Open the
electrical enclosure
to check fuses and
heater contactors.
Tr ou b le sh oo ti n g l 6- 3
Page 74

How to Identify the Cause of a
Problem
Dryer alarms are indicated by an illuminated Acknowledge Alarm light on the W
Series Dryer control panel. Shutdown alarms will energize optional audible and
visual alarm indicators.
A problem can trigger two types of alarms:
• Shutdown: The dryer has automatically shut down because it has detected a
serious problem that could damage your material or dryer.
• Passive: The dryer continues to operate, but warns of a problem that could
prevent correct drying of your material. If ignored, this problem could lead to a
condition that will shut down the dryer.
When the alarm light is displayed:
1 Press the Acknowledge Alarm button once to silence the optional audible
alarm and display the alarm message. Pressing the Acknowledge Alarm button once also changes the alarm LED from blinking to solid.
2 Find the error message in the diagnostics table of this Troubleshooting
section. Use information provided to diagnose and resolve the cause of the
alarm.
3 Note that, after correcting the problem, pressing the Acknowledge Alarm
button a second time will clear the alarm. If the alarm reappears,
the cause has not been resolved.
NOTE: When the dryer detects abnormally high temperature in the process heater, the
dryer immediately shuts down and an error message appears in the display window.
6- 4 l Tr o ub le sh oo t in g
Auto Start
Dryer Status
Process Blower Regen. Blower
Regen. Heater
Set Point Actual
1 Process Temp.
2 Regen. Temp.
3 Return Air Temp.
4 Auto Start
5 Load Time (MDC)
6 Activate Setback Temp.
7 Setback Temp.(Process)
8 Dewpoint
Shutdown Alarms
A1 Process High Temp
A2 Process Loop Break
A3 Process Heater High Temp
A4 Regen Heater High Temp
A7 Return Air High Temp
A49 Process Protection High Temp
A53 Process Blower Overload
A55 Wheel Rotation Failure
Passive Alarms
P1 Process Temp Deviation
P3 Regen Temp Deviation
P5 Return Air Mid High Temp
P17 MDC Conveying Demand
1000
Acknowledge
Alarm LED and
Button
✐
NOTE: Pushing the
Acknowledge Alarm button when there is no
active alarm will display
the most recent alarm
code.
✐
NOTE: The dryer cannot
be started if a passive
alarm is present on
power-up.
✐
Page 75

6
Troubleshooting
Tr ou b le sh oo ti n g l 6- 5
Alarms
A problem can trigger two types of alarms:
• Shutdown (A#): If the red Acknowledge Alarm LED is blinking, the alarm is a
shutdown alarm. The dryer has automatically shut down because it has detected a
serious problem that could damage your material or dryer. Note that once the
Acknowledge Alarm button is pressed once, the blinking red LED becomes solid.
• Passive (P#): If the amber Acknowledge Alarm LED is blinking, the alarm is a
passive alarm. The dryer continues to operate, but warns of a problem that could
prevent correct drying of your material. If ignored, this problem could lead to a
condition that will shut down the dryer. Note that once the Acknowledge Alarm
button is pressed once, the blinking amber LED becomes solid.
Problem
A4 - Regeneration Heater
High Temperature – The
snap switch in the regeneration
heater tube activated due to
excessive temperature.
Possible cause
The regeneration exhaust is blocked or the
air hoses are loose.
The regeneration blower is not running or
running in the wrong direction.
The isolation contactor failed in the
closed position.
The heater solid state relays (SSRs) failed.
The regeneration heater output on the
board has failed.
Solution
Locate and remove any airflow restrictions.
Tighten any loose hoses.
Correct the cause of the non-running
blower or reverse the rotation of the
blower.
Replace the isolation contactor.
Replace the failed heater solid state
relays (SSRs).
Replace the board.
NOTE: Shutdown alarms
will cause the dryer to go
through the normal shut
down procedure to cool
the heaters, then it will
stop running.
✐
Page 76

6- 6 l Tr o ub le sh oo t in g
Alarms
• Shutdown (A#): The dryer has automatically shut down because it has detect-
ed a serious problem that could damage your material or dryer.
• Passive (P#): The dryer continues to operate, but warns of a problem that could
prevent correct drying of your material. If ignored, this problem could lead to a
condition that will shut down the dryer.
Problem
A7 - Return Air High
Temperature – If the return
air temperature at the inlet to
the blower is greater than
180°F {82°C}, it shuts down
the dryer. (The return air temperature on W1600-5000 dryers is measured at the inlet to
the desiccant wheel. W1600-
5000 dryers designed prior to
August 2007, the return air
temperature is measured at
the inlet to the process blower.)
A23 & P3 - Regeneration
Temperature Deviation – The
regeneration temperature
exceeds the deviation band for
the specified time. Default
values are 10°F {6°C} for 5
seconds.
Possible cause
The hopper does not contain enough
material.
You are drying at a high drying temperature above 120°F {49°C} or you are
running at low throughputs.
The aftercooler/intercooler does not
have enough water.
The aftercooler/intercooler coils are
dirty.
One of the solid state relays (SSRs) failed
in the closed position.
The heater has become defective.
The regeneration RTD is loose or has
fallen out.
The air hose connections are loose.
The output on the board has failed.
Solution
Make sure your material supply system
is working properly.
Ensure water flow to the aftercooler/
intercooler.
Turn on the water supply, or fix any
leaks or blockages.
Clean the aftercooler coils. See
Maintenance section entitled, Cleaning
the aftercooler/intercooler coils.
Replace the failed solid state relays
(SSRs).
Check the heater fuses and resistance
across each leg of the regeneration
heater
Check the regeneration RTD and tighten
if needed.
Tighten all air hose connections.
Replace the board.
Page 77

6
Troubleshooting
Tr ou b le sh oo ti n g l 6- 7
Alarms
• Shutdown (A#): The dryer has automatically shut down because it has detect-
ed a serious problem that could damage your material or dryer.
• Passive (P#): The dryer continues to operate, but warns of a problem that could
prevent correct drying of your material. If ignored, this problem could lead to a
condition that will shut down the dryer.
Problem
A25 & P5 - Return Air MidHigh Temperature – If the
return air temperature is
between 150 and 180°F
{66 and 82°C}. (The return
air temperature on W16005000 dryers is measured at
the inlet to the desiccant
wheel. W1600-5000 dryers
designed prior to August
2007, the return air tempera-
ture is measured at the inlet
to the process blower.)
A26 & P6 - Regeneration
High Temperature – If the
regeneration temperature
exceeds the high temperature
limit for the specified time.
Default values are 400°F
{204°C} for 20 seconds
A27 & P7 - Regeneration
Low Temperature – The
regeneration temperature is
less than the low temperature
for the specified time (200°F
{93°C} for 20 seconds).
Possible cause
The hopper does not contain enough
material.
You are drying at a high drying temperature above 120°F {49°C} or running at
low throughputs.
The aftercooler/intercooler does not have
enough water.
The aftercooler/intercooler coils are
dirty.
One of the solid state relays (SSRs)
failed in the closed position.
The output on the board has failed.
The regeneration heater has failed.
The output on the control board has
failed or the fuse has blown.
The regeneration RTD is loose or has
fallen out.
Solution
Make sure your material supply system
is working properly.
Ensure water flow to the aftercooler/
intercooler.
Turn on the water supply, or fix any
leaks or blockages.
Clean the aftercooler/intercooler coils.
See Maintenance section entitled,
Cleaning the aftercooler/intercooler
coils.
Replace the failed solid state relays
(SSRs).
Replace the board.
Check the heater fuses, and resistance
across each leg of the regeneration
heater.
Replace the control board or the fuse.
Check the regeneration RTD and tighten
if needed.
Page 78

6- 8 l Tr o ub le sh oo t in g
Alarms
• Shutdown (A#): The dryer has automatically shut down because it has detect-
ed a serious problem that could damage your material or dryer.
• Passive (P#): The dryer continues to operate, but warns of a problem that could
prevent correct drying of your material. If ignored, this problem could lead to a
condition that will shut down the dryer.
Problem
A28 & P9 - Process
Dewpoint – The dewpoint has
not fallen below the setpoint.
If the dewpoint goes below
the setpoint for 180 seconds
the alarm should go away.
NOTE: The alarm is not
active for the first 5
minutes.
A29 & P10 - Process Filter
Clogged (Option) – The
process filter differential pressure switch is tripped.
A33 & P26 - Regeneration
RTD Integrity – If the regen-
eration RTD is faulty, it shuts
down the dryer.
Possible cause
Defective sensor.
The hose or wiring connections to the
sensor block are loose or have fallen off.
Poor regeneration air flow.
Desiccant wheel not turning.
The desiccant wheel may be contaminated.
Leaks in the process air stream.
Power Purge blower not running.
(Models 2400 and 5000)
The process air filter is clogged.
There is a loose connection in the
wiring leading to the RTD.
The connection of the RTD plug on the
control board is loose.
The regeneration RTD has failed.
The control board has failed.
Solution
Replace the sensor.
Check wiring and hose connections to
the sensor, resecure if needed.
Remove the air flow restrictions, dirty
filters, etc.
See A55 & P31
Check the desiccant for contamination,
replace if needed.
See Troubleshooting
section, entitled Replacing the desiccant
wheel assembly.
Install plasticizer/volatile trap for severe
situations.
Check for worn or loose hoses.
Check fuse, wiring or replace blower.
Remove and clean or replace the process
air filter.
Check the RTD plug connections,
make necessary repairs.
Check the plug connection and tighten
if needed.
Replace the regeneration RTD.
Replace the control board.
✐
Page 79

Tr ou b le sh oo ti n g l 6- 9
6
Troubleshooting
Alarms
• Shutdown (A#): The dryer has automatically shut down because it has detect-
ed a serious problem that could damage your material or dryer.
• Passive (P#): The dryer continues to operate, but warns of a problem that could
prevent correct drying of your material. If ignored, this problem could lead to a
condition that will shut down the dryer.
Problem
A34 & P28 - Return Air
Temperature RTD Integrity
– The dryer continues to run
with a passive alarm. (The
return air temperature on
W1600-5000 dryers is measured at the inlet to the desiccant wheel. W1600-5000 dry-
ers designed prior to August
2007, the return air tempera-
ture is measured at the inlet
to the process blower.)
A35 & P8 - Regeneration
Temperature Loop Break –
The regeneration temperature
is outside of the operator
entered deviation alarm band
(see Regeneration
Temperature Deviation passive alarm) and the regeneration temperature is not moving
towards the setpoint at a rate
greater than specified. Default
values are 2°F {1°C} over 40
seconds.
A36 - Control
Communications Watchdog
- The display board has lost
communications with the
control board.
Possible cause
There is a loose connection in the
wiring leading to the RTD.
The connection of the RTD plug on the
control board is loose.
The return air RTD has failed.
The control board has failed.
The regeneration heater has failed.
The regeneration RTD is loose or has
fallen out.
The regeneration blower is not running.
The output on the control board has
failed or the fuse is blown.
Plugs on wire harness between the
display and control boards are loose or
not wired correctly.
Display board or communications
boards have failed.
Solution
Check the RTD plug connections,
make necessary repairs.
Check the plug connection and tighten if
needed.
Replace the return air RTD.
Replace the control board.
Check the heater fuses, and resistance
across each leg of the process heater.
Check the regeneration RTD and tighten
if needed.
Correct the cause of the non-functioning
blower.
Replace the control board or fuse.
Make sure plugs are tight on board
connections and match the wiring diagram.
Replace the defective boards.
Page 80

6- 1 0 l Tr ou bl es ho o ti ng
Alarms
• Shutdown (A#): The dryer has automatically shut down because it has detect-
ed a serious problem that could damage your material or dryer.
• Passive (P#): The dryer continues to operate, but warns of a problem that could
prevent correct drying of your material. If ignored, this problem could lead to a
condition that will shut down the dryer.
Problem
A38 - Phase Error (Option
al) - One of the three power
wires is connected wrong.
A39 - EEProm Write Error
A48 & P22 Aftercooler/Intercooler Loop
Break (Optional) - Indicates
return air temperature is not
moving towards the setpoint
when flow control option is
installed.
Possible cause
One of the three power wires are out of
phase.
A fuse has blown.
Phase detection board has failed.
There is loose wiring between the phase
board and the control board.
Internal control board problem.
No water to aftercooler/intercooler.
Solution
Switch the position of two of the incoming lead power wires at the dryer.
Check and replace the fuse.
Replace the phase detection board.
Make sure wires are correct and secure.
Replace the control board.
Turn on water supply.
Ensure flow control valve is functioning properly.
Page 81

6
Troubleshooting
Tr ou b le sh oo ti n g l 6- 11
Alarms
• Shutdown (A#): The dryer has automatically shut down because it has detect-
ed a serious problem that could damage your material or dryer.
• Passive (P#): The dryer continues to operate, but warns of a problem that could
prevent correct drying of your material. If ignored, this problem could lead to a
condition that will shut down the dryer.
Problem
A53 - Process Blower
Overload - If the process
blower exceeds its full load
amp rating or the overload
has tripped due to a mechanical or electrical problem the
dryer will shut down.
Possible cause
The process blower current draw has
exceeded the full load amps rating of
the motor.
The process blower has mechanically
failed or is unable to rotate freely.
The process blower has failed electrically.
Loss of phase of power to the motor
starter.
The overload is set incorrectly.
Overload is defective.
Solution
Press alarm acknowledge and allow
overload to automatically reset, then
try to restart the dry. If the alarm condition occurs again have a qualified
electrician check the current draw to
the motor.
Disconnect and lock out main power.
Check the process blower for mechanical failure and free rotation. Replace if
necessary. Allow overload to automatically reset, then try to restart the dryer.
Disconnect and lock out main power.
Check the process blower for electrical
shorts or open circuits. Replace if necessary. Allow overload to automatically reset, then try to restart the dryer.
Check for a blown fuse in the dryer or
main power supply. Allow overload to
automatically reset, then try to restart
the dryer.
Disconnect and lock out main power.
Check the overload settings and confirm that the settings match the full
load amps listed on the process blower
motor. Allow overload to automatically reset, then try to restart the dryer.
Replace the overload.
NOTE: Once the overload
has tripped you must wait
2 - 15 minutes with
power on for it to reset
automatically.
✐
Page 82

6- 1 2 l Tr ou bl es ho o ti ng
Alarms
• Shutdown (A#): The dryer has automatically shut down because it has detect-
ed a serious problem that could damage your material or dryer.
• Passive (P#): The dryer continues to operate, but warns of a problem that could
prevent correct drying of your material. If ignored, this problem could lead to a
condition that will shut down the dryer.
Problem
A55 & P31 - Wheel Rotation
Failure - The regeneration
temperature differential has
been reached.
A56 & P32 - Regeneration
Outlet RTD Integrity - The
control can not sense the
regeneration outlet RTD.
Possible cause
The wheel motor is not turning.
The belt tensioner is loose or the belt is
slipping.
The regeneration heater is not working.
There is a loose connection in the
wiring leading to the RTD.
The connection of the RTD plug on the
control board is loose.
The regeneration outlet RTD has
failed.
The control board has failed.
Solution
Check the motor, plugs, and fuses.
Change or adjust the tensioner spring or
replace the belt.
Check the heater fuses and heater.
Check the RTD plug connections,
make necessary repairs.
Check the plug connection and tighten
if needed.
Replace the regeneration outlet RTD.
Replace the control board.
Page 83

Tr ou b le sh oo ti n g l 6- 13
6
Troubleshooting
Alarms
• Shutdown (A#): The dryer has automatically shut down because it has detect-
ed a serious problem that could damage your material or dryer.
• Passive (P#): The dryer continues to operate, but warns of a problem that could
prevent correct drying of your material. If ignored, this problem could lead to a
condition that will shut down the dryer.
Problem
A57 - Regeneration Blower
Overload - If the regenera-
tion blower exceeds its full
load amp rating or the overload has tripped due to a
mechanical or electrical problem the dryer will shut down.
Possible cause
The regeneration blower current draw
has exceeded the full load amps rating
of the motor.
The regeneration blower has mechanically failed or is unable to rotate freely.
The regeneration blower has failed
electrically.
Loss of phase of power to the motor
starter.
The overload is set incorrectly.
Overload is defective.
Solution
Press alarm acknowledge and allow
overload to reset automatically, then try
to restart the dryer. If the alarm condition occurs again have a qualified electrician check the current draw to the
motor.
Disconnect and lock out main power.
Check the regeneration blower for
mechanical failure and free rotation.
Replace if necessary. Allow overload
to reset automatically, then try to
restart the dryer.
Disconnect and lock out main power.
Check the regeneration blower for
electrical shorts or open circuits.
Replace if necessary. Allow overload
to reset automatically, then try to
restart the dryer.
Check for a blown fuse in the dryer or
main power supply.
Disconnect and lock out main power.
Check the overload settings and confirm that the settings match the full
load amps listed on the process blower
motor. Allow overload to reset automatically, then try to restart the dryer
Replace the overload.
NOTE: Once the overload
has tripped you must wait
2 - 15 minutes with
power on for it to reset
automatically.
✐
Page 84

6- 1 4 l Tr ou bl es ho o ti ng
Alarms
• Shutdown (A#): The dryer has automatically shut down because it has detect-
ed a serious problem that could damage your material or dryer.
• Passive (P#): The dryer continues to operate, but warns of a problem that could
prevent correct drying of your material. If ignored, this problem could lead to a
condition that will shut down the dryer.
Problem
A58 & P34 - Dewpoint
Deviation High (Option) -
Displayed when the actual
dewpoint goes above the setpoint by a specified amount of
time and degrees. Defaults are
set for 5°F {3°C} for 30
seconds.
A 59 & P35 - Dewpoint
Deviation Low (Option) -
Displayed when the actual
dewpoint goes below the setpoint by a specified amount of
time and degrees. Defaults are
set for 5°F {3°C} for 30
seconds.
Possible cause
Desiccant wheel not turning.
The hose or wiring connections to the
sensor block are loose or have fallen off.
Poor regeneration air flow.
The desiccant wheel may be contaminated.
Leaks in the process air stream.
The dewpoint can not control to the
desired setpoint.
The dewpoint sensor has failed.
Solution
See A55 & P31
Check wiring and hose connections to
the sensor, resecure if needed.
Remove the air flow restrictions, dirty
filters, etc.
Install plasticizer/volatile trap for severe
situations.
Replace the desiccant wheel.
See
Troubleshooting section, entitled
Replacing the desiccant wheel assembly.
Check for worn or loose hoses.
Material and/or ambient condition may
be too dry to increase the actual dewpoint. Please wait several hours to
determine if the setpoint can be reached.
Increase the dewpoint low deviation
value.
Replace the dewpoint sensor.
Page 85

Tr ou b le sh oo ti n g l 6- 15
Additional Alarms
Along with the alarm indicators, you may encounter additional messages that indicate a problem within the control.
Problem
CoS Er.4 or Co5 Er. 4 Displayed when the “Start”
button is pushed during any
active alarm. (Passive or
Shutdown)
CoS Er.0 or Co5 Er.0 Indicates there is a problem in
the communication between
the control board and the
display board.
Err 004 - Indicates a mismatch of software between the
display board and the control
board.
Er. L - There is a problem in
the sensor connection (RTD,
dewpoint sensor, etc.) for the
effected function.
Possible cause
The dryer will continue to run if there is
a passive alarm, however it will not start
if there is a active alarm.
Loose or improperly connected wire.
Improper dip switch setup on control
board.
Defective display board or control
board.
The software revision of the display
board and control board are not compatible.
Problem in the analog input section of
the control.
Defect in the main control board.
Solution
Push the alarm acknowledgement button
to identify the alarm, and address it as
necessary.
Check wiring between control board and
display board.
Check dip switch setup on control board.
Replace boards in sets to maintain
software compatibility.
In most cases, both display and control
boards will need to be replace as a set.
Check that all jumpers are in their
proper place.
Check to see if the dewpoint sensor is
connected properly.
Disconnect the ribbon cable connecting
any analog option boards to the main
control board. If the display returns to
normal for all values except those that
are generated through the analog options
boards, replace the option board.
Replace main control board.
6
Troubleshooting
Page 86

Additional Alarms
Along with the alarm indicators, you may encounter additional messages that indicate a problem within the control.
Problem
Er. H - There is a problem in
the analog input section of the
control.
Possible cause
RTD is not connected properly or is
defective.
Connector to all RTDs is removed.
The ribbon cable between an analog
option board and the main control
board is not connected properly.
Problem in the analog input section of
the control.
Defect in the main control board.
Solution
Check RTD connections, replace
defective RTD
Check connections between analog
option board and the main control
board.
Disconnect the ribbon cable connecting any analog option boards to the
main control board. If the display
returns to normal for all values
except those that are generated
through the analog options boards,
replace the option board.
Replace main control board.
6- 1 6 l Tr ou bl es ho o ti ng
Page 87

Dewpoint Troubleshooting
Under normal operating conditions, the dryer will produce dewpoints in the range
of -40 to -20° F {-40 to -29° C}. However, you may experience situations that produce undesirable results.
Problem
Dryer not producing desired
dewpoint.
Possible cause
Low regeneration air flow.
Return air temperature exceeds 125°F
{52°C}. (The return air temperature on
W1600-5000 dryers is measured at the
inlet to the desiccant wheel. On W16005000 dryers designed prior to August
2007, the return air temperature will be
measured at the inlet to the process
blower.)
Regeneration temperature is below normal setting.
Leaks in process lines.
Contaminated desiccant due to offgassing, too long of a residence time or
drying temperature is too high for the
grade of material being processed.
Analog option board/sensor malfunction
Solution
Check regeneration filter and clean
and/or replace as necessary.
Reduce the temperature of the cooling
water or increase the flow.
Connect water to the aftercooler/intercooler if not already connected.
Check for adequate water temperature.
Water temperature should be approximately 85°F {29°C}.
Check amperage of regeneration heaters.
Replace heaters if necessary.
Check all hoses, gaskets, doors, loaders
or other potential areas where leakage
may occur. Replace any defective hoses
or gaskets.
Verify proper drying temperatures and
residence times. If off-gassing is a condition of the material being processed,
contact Conair Parts at (800) 458 1960
for the addition of a volatile trap.
Verify dryer dewpoint readings with a
calibrated portable dewpoint meter.
Replace analog option board or sensor.
WARNING: Any electrical
checks should be performed by
a qualified electrician.
Tr ou b le sh oo ti n g l 6- 17
6
Troubleshooting
Page 88

Poor Material Dr ying
Troubleshooting
Occasionally, processing problems that are suspected of being caused by poor drying are eventually determined to be the result of other issues in the process setup.
The information can assist you in determining if your drying system is performing
properly. However, the only way to know definitely if your material is properly
dried is to perform moisture analysis of small samples as it leaves the bottom of
the hopper or just as it enters the process. Conair does not sell moisture-analyzing
equipment, but there are many brands of this equipment available on the market.
You should also be aware that some processing problems may actually be the
result of over-drying material. Most materials will degrade to some extent if they
are exposed to their specified drying temperature for a time significantly longer
than the residence time specified by the supplier. If you want to maintain its dryness, it is recommended that you reduce the process air temperature. If your Conair
dryer is equipped with the Setback feature, you should familiarize yourself with it,
and make use of it. If not, you may want to contact Conair to determine if it can be
added to your dryer.
A majority of customer questions to Conair are related to dewpoint. It is important
to realize that dewpoint is one of four requirements that need to be satisfied.
There are four requirements, listed in order of importance, necessary to
properly dry hygroscopic plastic resins:
1 Drying temperature of the air entering the hopper must be at the proper
drying temperature for your material, as specified by your material supplier.
2 Residence time is the time, determined by your material supplier, that the
material in use must be heated to achieve proper drying temperature.
3 Airflow during the process drying circuit must be adequate to carry and
distribute the heat throughout the entire bed of material inside the hopper.
4 Dewpoint of the process air must be low so it can efficiently collect the
moisture as it is released from the heated material and carry it to the dryer to
be removed in the desiccant.
6- 1 8 l Tr ou bl es ho o ti ng
NOTE: Concerns with drying
temperature may require
review of HTC or
ResinWorks controls.
✐
Page 89

Poor Material Dr ying
Troubleshooting ( con tin ue d)
Once it is determined which of the four requirements that is not being satisfied,
refer to the following list of possible causes and solutions.
Temperature - The temperature of the air entering the hopper must be at the proper drying temperature for your material, as specified by your supplier.
Problem
The temperature of the air
entering the hopper is not at
proper drying temperature.
Possible cause
Incorrect setpoint
Not able to achieve setpoint.
Inaccurate process temperature readout.
Solution
Refer to the drying specifications for
your material and adjust the setpoint to
the recommended setpoint.
If your dryer has the Setback option,
make sure it is not active unless you
have specifically activated it. If necessary, refer to the Operation section of
this manual for assistance in using the
Setback function.
Replace any defective process heater,
contactors, fuses, etc.
Ensure the selected drying temperature
is within the design specifications of
your dryer.
Ensure the Process RTD is properly
positioned in the air stream.
Determine if there is a problem in the
temperature control circuit and repair or
replace any defective components such
as RTD, temperature control, circuit
boards, etc.
Tr ou b le sh oo ti n g l 6- 19
6
Troubleshooting
NOTE: Concerns
with drying temperature may
require review
of HTC or ResinWorks controls.
✐
Page 90

Poor Material Dr ying
Troubleshooting ( con tin ue d)
Residence Time - The time your material supplier has determined that the material
in use must be heated to its drying temperature to achieve proper drying.
Problem
Material residence time is
too long or short.
Possible cause
Material level in hopper is too low.
Material throughput is too high.
Solution
Make sure there is an adequate supply of
material to feed the loader on top of the
drying hopper.
Correct any problems with the conveying system that may be preventing your
loader from filling the hopper.
If your hopper has a level sensor for
maintaining a material level less than
completely full, be sure this sensor is
adjusted properly.
Take any necessary steps, such as slowing down the process, to ensure the
material usage is within design specifications of the dryer and hopper.
6- 2 0 l Tr ou bl es ho o ti ng
Page 91

Poor Material Dr ying
Troubleshooting ( con tin ue d)
Airflow - The airflow in the process drying circuit must be adequate to carry and
distribute the heat throughout the entire bed of material inside the hopper. If the
airflow is too low, the material in the center of the hopper may get heated fully to
the drying temperature, but the material against the sidewalls will not. In most
cases, the material 2/3 to 3/4 of the way toward the top of the hopper should be
heated to the proper drying temperature.
Problem
Too much or too little airflow.
Possible cause
Dirty process air filter.
Collapsed hoses or holes/leaks in the
hoses and hose connection.
Airflow restrictions.
Process blower running backwards or
performing poorly.
Material level in the hopper too low.
Solution
Clean or replace the process filter.
Replace any worn or damaged hoses.
Tighten all hose clamps to eliminate
leaks.
Remove any obstructions in the process
air circuit.
Verify the process blower is running in
the correct direction. If backwards,
reverse direction by switching any 2 legs
of high voltage to the motor.
Repair or replace motor.
Other than running out of material to
complete a job, the material level inside
the hopper must be a minimum of 50%
full. If the hopper is not at least half full,
the material in the cone section will not
get adequate airflow to dry properly.
NOTE: If there is too
much airflow, the material
may fluidize inside the
hopper, resulting in inconsistent material flow
through the hopper, which
can negatively impact
residence time.
✐
WARNING: Any electrical
checks should be performed
by a qualified electrician.
Tr ou b le sh oo ti n g l 6- 21
6
Troubleshooting
Page 92

6- 2 2 l Tr ou bl es ho o ti ng
Poor Material Dr ying
Troubleshooting ( con tin ue d)
Dewpoint - The process air must be at a low dewpoint so it can efficiently collect
the moisture as it is released from the heated material and carry it to the dryer to be
removed in the desiccant. In most cases, the dryer will dry your material satisfactory if the dewpoint of the air is -20 to -40° F {-29 to -40° C}. If your dryer does not
have a dewpoint readout, you can check the dewpoint with a portable dewpoint
instrument. Conair sells a variety of portable dewpoint meters. Contact Conair
Parts.
Problem
Dryer dewpoint is not
reaching proper setpoint.
Possible cause
Low regeneration temperature.
Poor regeneration airflow.
High dewpoint, ambient air leaking into
the closed loop drying circuit.
Return air temperature to the dryer is too
high. (The return air temperature on
W1600-5000 dryers is measured at the
inlet to the desiccant wheel. W1600-
5000 dryers designed prior to August
2007, the return air temperature is
measured at the inlet to the process
blower.)
Poor desiccant performance.
Solution
Replace or check defective heaters, fuses
etc.
Clean or replace the regeneration filter.
Ensure the regeneration blower is operating properly and rotating in the correct
direction.
See Installation section enti-
tled, Checking for proper airflow.
Remove obstructions in the air stream,
such as crimped hoses, etc.
Replace damaged hoses and seal any
leaks in the process air circuit.
If using a vacuum loader on the hopper,
ensure that the loader shroud is installed
in the hopper and that the hopper is
completely filled with material.
If partially filling your hopper, ensure
that the hopper loader is sealed against
ambient air.
Install a gasket between the loader and
the top of the hopper.
Clean the aftercooler/intercooler coils.
See Maintenance section entitled,
Cleaning the aftercooler/intercooler
coils.
See Troubleshooting section entitled,
Replacing the desiccant wheel assembly.
Replacement dewpoint
monitors are available
from Conair.
Contact Conair Parts
(800) 458 1960
From outside of the
United States, call:
(814) 437 6861
Page 93

6
Troubleshooting
Replacing Fuses
1 Disconnect and lockout the main power supply.
2 Open the electrical enclosure door.
3 Check the fuse with an ohmmeter. If necessary, pull the fuse out and replace
it with a fuse of the same type and rating.
Fuse Blocks
To locate the appropriate fuse
and replacement part, refer to
the wiring diagrams that
came with your dryer.
IMPORTANT: Always refer
to the wiring diagrams that
came with your dryer to
locate specific electrical
components. Illustrations in
the User Guide are intended
to be representative only.
Tr ou b le sh oo ti n g l 6- 23
Page 94
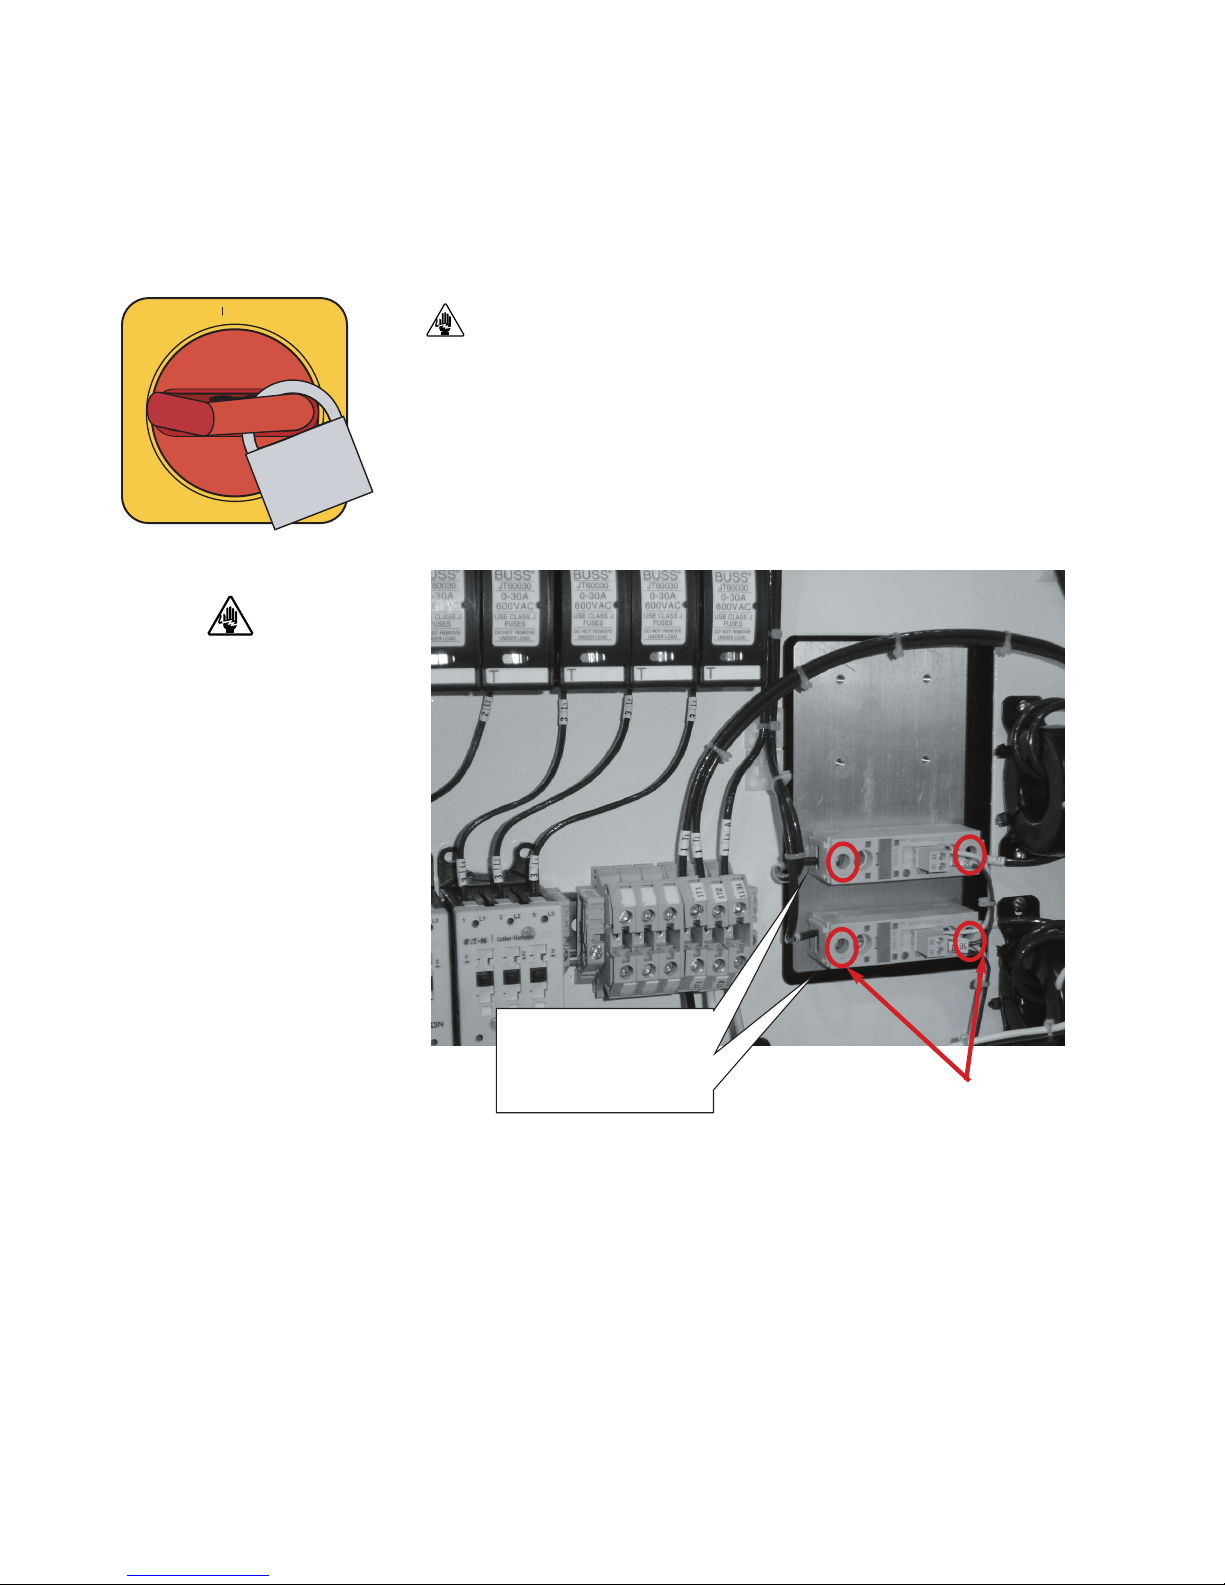
6- 2 4 l Tr ou bl es ho o ti ng
IMPORTANT: Always refer
to the wiring diagrams that
came with your dryer to
locate specific electrical
components. Illustrations in
the User Guide are intended
to be representative only.
ON
O OFF
Checking Heater Soli d State Relays
1
Disconnect and lockout the main power supply.
2 Open the electrical enclosure.
3 Locate the regeneration solid state relays. Refer to the wiring diagrams that
came with your dryer.
4 Turn power on to the machine.
5 Start the dryer.
6 Measure voltage across the high voltage connections using a voltmeter.
When relay is energized, as indicated by the LED (green) voltage should be
read 0 (zero). When relay is de-energized, LED off, full voltage should be
measured across the relay. When relay is off, if voltage reads zero, relay is
bad and needs replaced. Repeat this procedure for each relay.
Regeneration heater
solid state relays
CAUTION: Always disconnect and lock out the main power sources before
making electrical connections. Electrical connections should be made only by
qualified personnel.
✐
NOTE: Measure voltage using a
voltmeter across the two high
voltage connections of each
relay. (Shown here circled in
red.)
Page 95

6
Troubleshooting
Tr ou b le sh oo ti n g l 6- 25
Checking or Replacin g Temperature
Sensors
The Carousel Plus W Series Dryer uses RTD sensors to monitor the temperatures
of the return air, air into the desiccant, the regeneration outlet, and the regeneration
inlet.
To check or replace an RTD sensors:
1 Disconnect and lockout the main power supply.
2 Remove dryer panels, as necessary. See Installation section entitled, Opening
the dryer doors (W1600-5000).
3 Locate the RTD sensors.
4 Check the sensor positions and conditions. Temperature readings will be
incorrect, if the sensors are touching the wall of an air hose or pipe or if the
sensor or wiring is damaged. The tip of the sensor should be centered within the
air hose or pipe. Sensor wires should be attached to the appropriate connection
points on the dryer’s electrical enclosure or microprocessor board.
5 To check with ohm meter, measure the resistance across the RTDs. The
resistance should be approximately 110 ohm at room temperature.
6 Replace the sensor, if necessary.
IMPORTANT
: Always refer
to the wiring diagrams
that came with your dryer
to locate specific electrical components.
Illustrations in the User
Guide are intended to be
representative only.
Page 96
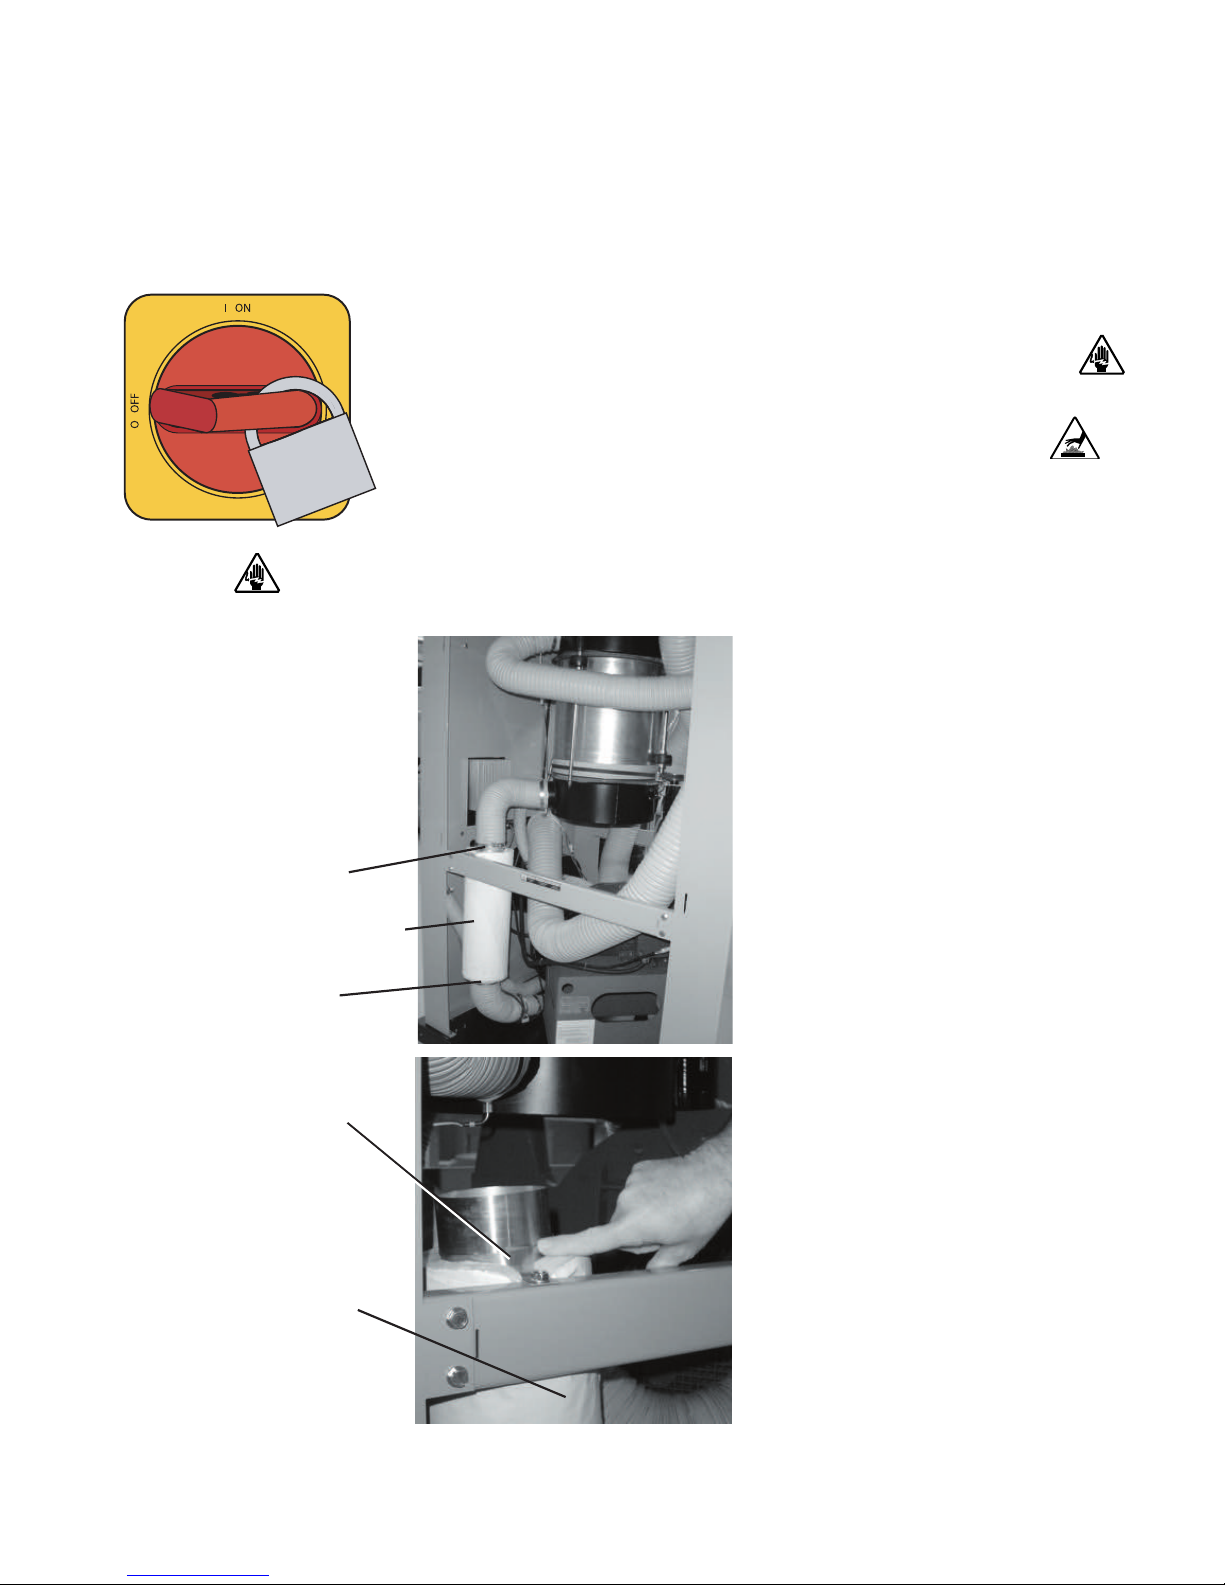
Replacing the Regene ration Heater
(W600 - 1 0 0 0 )
1 Stop the dryer, disconnect the power, and follow proper lockout
procedures.
2 Remove the right side panel of the dryer, as viewed from the
front of the dryer, to gain access to the regeneration heater.
3 Disconnect the regeneration heater power wires from the terminal
block in the control cabinet. Feed the regeneration power cable out of the
control cabinet.
4 Unplug the quick disconnect for the
high temperature switch cable at the
switch.
5 Loosen the hose clamps then remove
the hoses from the top and bottom of
the regeneration heater tube. Remove
and check the bottom heater hose for
loose debris or fragments, these frag ments can damage the newly installed
heater if not removed.
6 While supporting the heater tube,
loosen the hose clamp supporting the
regeneration tube to the mounting
bracket, then remove the heater tube
from the dryer.
7 Slide the insulation off the heater
tube, or make a cut the entire length of
the insulation sleeve to aid removal.
6- 2 6 l Tr ou bl es ho o ti ng
IMPORTANT
: Always refer
to the wiring diagrams
that came with your dryer
to locate specific electrical components.
Illustrations in the User
Guide are intended to be
representative only.
Regeneration
Heater
Insulation
Clamp
Clamp
Clamp
Page 97

Replacing the Regene ration Heater
(W600 - 1 0 0 0 ) (co nti nu ed )
8 Compare the markings on the outside of the regeneration heater tube to
ensure the new one has the same voltage and kW ratings as the original heater
tube. This information is on the end nearest the wires.
9 Slide the original insulation over the new heater or, if the insulation was
cut for removal, wrap the cut insulation sleeve around the new heater tube and
secure it with duct tape.
10 Make sure the cable end of the heater tube is to the bottom then secure
the new heater tube to the mounting bracket with a hose clamp.
11 Connect the hoses to the top and bottom of the heater tube and secure
them with hose clamps.
12 Connect the high temperature switch wires to the quick disconnects near
the heater tube.
13 Route the heater power cable into the control cabinet and connect the
leads to the original locations on the terminal block. Refer to the wiring
diagram for specific connection information.
14 Replace the side panel of the dryer.
15 Measure the resistance from each leg of the heater tube to the others and
from each leg to ground. There should be +/- 5% resistance variation
between all 3 legs, and high resistance from each leg to ground.
16 Connect the dryer to power and turn it on. Verify that the regeneration
temperature achieves the setpoint.
Tr ou b le sh oo ti n g l 6- 27
6
Troubleshooting
Page 98
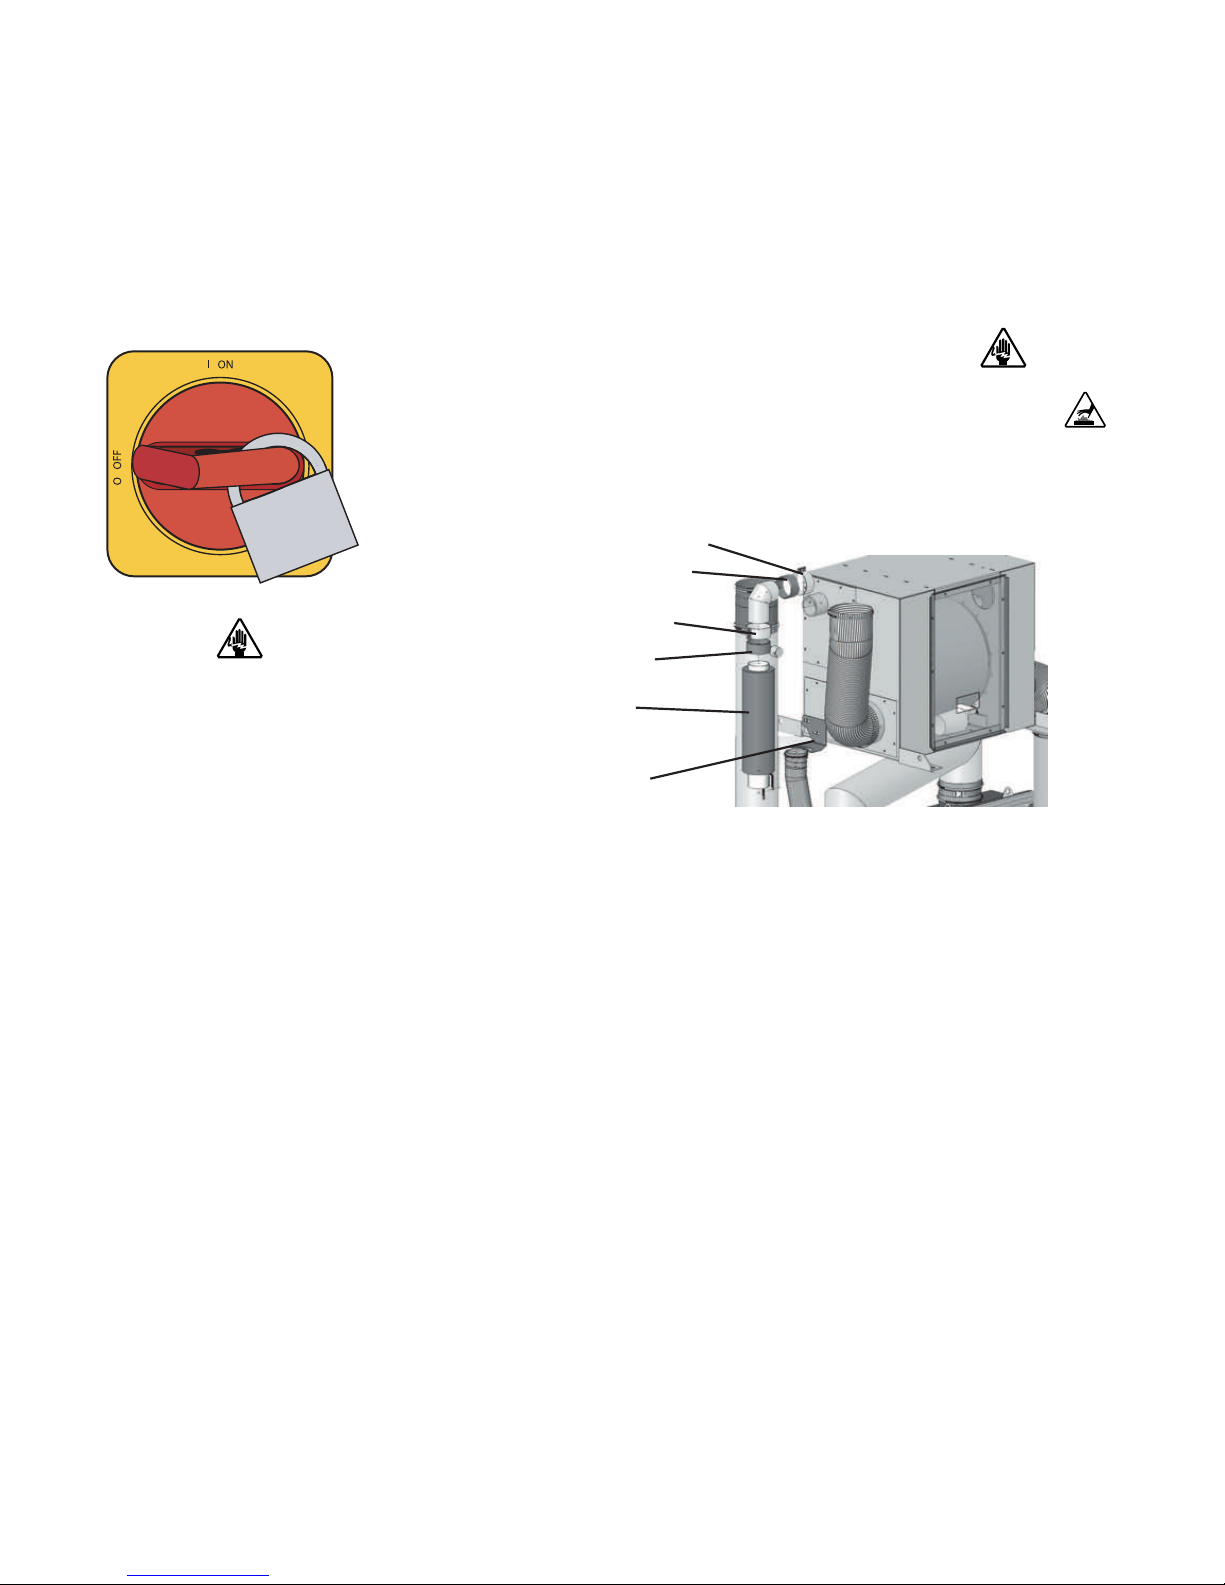
Replacing the Regene ration Heater
(W1600 - 2 4 0 0 )
1 Stop the dryer, disconnect and lockout the main power.
2 Locate the heater. Open the side panels of the dryer locating the
heater which is secured to the inlet of the desiccant wheel assembly by
hard piping, brackets and clamps. See Installation section entitled, Opening
the dryer doors (W1600-5000).
3 Disconnect the main power leads at the junction box inside the frame
of the dryer.
4 Disconnect the high temperature switch cable at the quick disconnect.
5 To remove the defective regeneration heater tube, loosen the pressure
clamps at the top and bottom of the heater tube connection and slide the
clamp and its silicon gasket back away from the heater tube. W16002400 model dryers lower clamp is attached to a bracket that is mounted
to the desiccant wheel assembly, loosen clamp to remove it from the
bracket. Remove and check the bottom heater hose for loose debris or frag-
ments, these fragments can damage the newly installed heater if not removed.
6 Slide the insulation off the heater tube, or make a cut down the entire
length of the insulation sleeve to aid removal.
7 Compare the markings on the outside of the regeneration heater tube to
ensure the new one has the same voltage and kW ratings as the original
heater tube. This information is on the end nearest the wires.
(continued)
6- 2 8 l Tr ou bl es ho o ti ng
IMPORTANT
: Always refer
to the wiring diagrams
that came with your dryer
to locate specific electrical components.
Illustrations in the User
Guide are intended to be
representative only.
Heater
Tube
Bracket
Gasket
Clamp
Gasket
Clamp
Page 99

6
Troubleshooting
Tr ou b le sh oo ti n g l 6- 29
Replacing the Regene ration Heater
(W1600 - 2 4 0 0 ) ( co nti nue d)
8 Slide the original insulation over the new heater, or if the insulation was cut
for removal, wrap the cut insulation sleeve around the new heater tube and
secure it with heat tape.
9 Make sure the cable end of the new heater tube is to the bottom, then
connect the hoses to the top and bottom of the heater tube and resecure
with pressure clamps and the lower heater tube bracket that was removed in
Step 5.
10 Connect the high temperature switch cable to the quick disconnect.
11 Route the heater power wires into the junction box, and connect them to
the supply leads from the control box. Refer to the wiring diagram for specific connection information.
12 To ensure all connections are correct, measure the resistance as in Step 3.
You should measure the readings as noted for a good heater.
13 Close the side panel of the dryer.
14 Connect the dryer to power and turn it on. Verify the regeneration temper-
ature achieves the setpoint.
Page 100
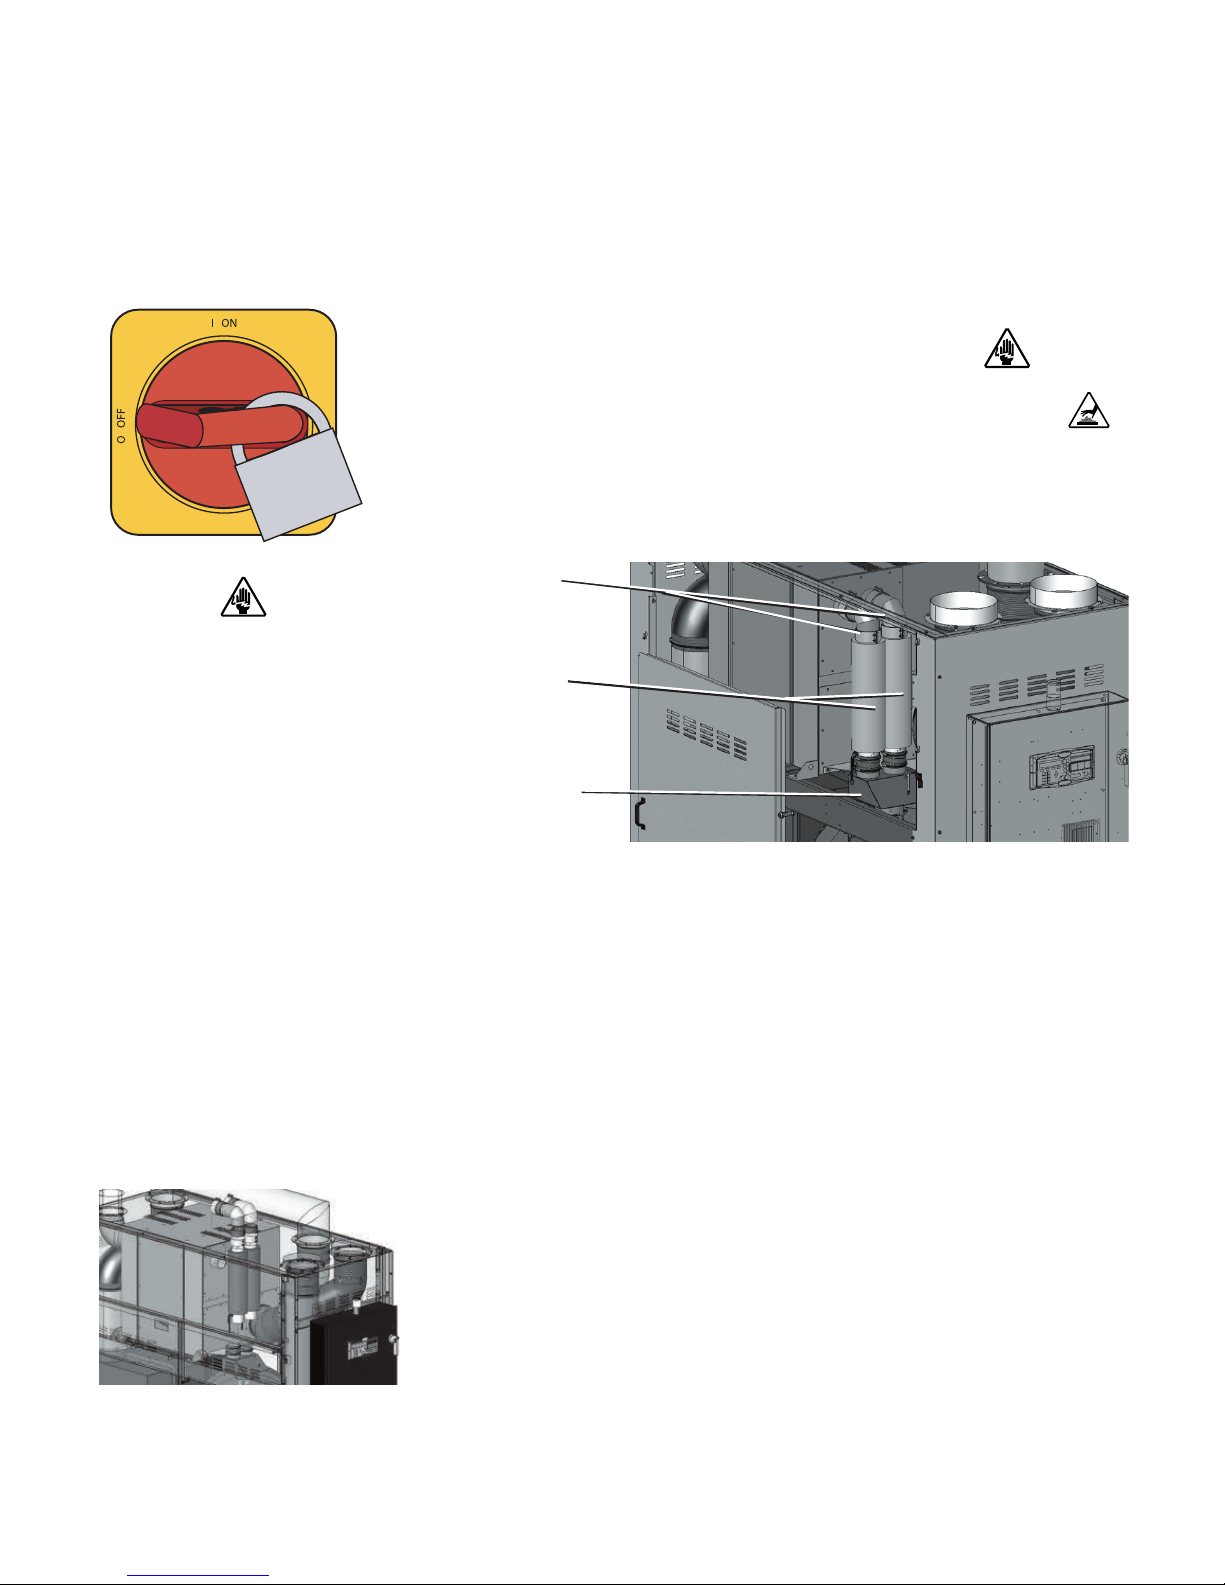
Replacing the Regene ration Heater
(W3200 - 5 0 0 0 )
1 Stop the dryer, disconnect and lockout the main power.
2 Locate the heater(s). Open the side panels of the dryer locating
the heaters which are secured to the inlet of the desiccant wheel assembly
by hard piping, a heater tube manifold, brackets and clamps. See
Installation section entitled, Opening the dryer doors (W1600-5000).
3 Disconnect the main power leads at the junction box inside the frame
of the dryer. In units with two heaters (W3200 and W5000), it may be
necessary to measure resistance across the power leads of each heater tube
to determine which heater needs to be replaced. In a good element, the
resistance across all three legs should be +/- 5% resistance variation when
measured leg-to-leg, and high resistance from each leg to ground. Readings
other than this indicate a defective heater.
4 Disconnect the high temperature switch cables at the quick
disconnects.
5 Loosen the pressure clamps at the top and bottom of the heater tube con-
nection and slide the clamp and its silicon gasket back and away from
the heater tube to remove the defective regeneration heater tube(s).
W3200-5000 model dryers lower heater clamp(s) are attached to a manifold that is secured to the desiccant wheel assembly with a bracket,
loosen the clamp that secures the heater tube to the manifold to remove
it from the dryer.
(continued)
IMPORTANT
: Always refer
to the wiring diagrams
that came with your dryer
to locate specific electrical components.
Illustrations in the User
Guide are intended to be
representative only.
6- 3 0 l Tr ou bl es ho o ti ng
Heater
Tubes
Manifold
Clamps and
Gaskets
 Loading...